step-by-step self-injection instructions self-injection instructions ... which can speed the process...
TRANSCRIPT

STEP-BY-STEP SELF-INJECTION INSTRUCTIONS
H.P. Acthar® Gel (repository corticotropin injection) is indicated for the reduction of proteinuria in people with nephrotic syndrome of the idiopathic type (unknown origin) without uremia (accumulation of urea in the blood due to malfunctioning kidneys) or that due to lupus erythematosus (lupus).
Please see Important Safety Information on pages 32–33, and the accompanying full Prescribing Information.


3
Table of contents
INJECTION PREPARATION
Getting started with Acthar 4
Preparing to inject 6
A few things to remember before injecting 10
SUBCUTANEOUS INJECTION
INSTRUCTIONS
Injecting the upper thigh 12
Injecting the abdomen 13
Injecting the upper arm 14
How to inject 17
How to dispose of used syringes, needles, and vials 20
INTRAMUSCULAR INJECTION
INSTRUCTIONS
Injecting the upper-outer thigh muscle 21
Injecting the upper-arm muscle 22
How to inject 24
How to dispose of used syringes, needles, and vials 27
ADDITIONAL INFORMATION
Questions 28
When to call your doctor 29
Home Injection Training Services 30
Resources 30
IMPORTANT SAFETY
INFORMATION
Important Safety Information 32
IndicationH.P. Acthar® Gel (repository corticotropin injection) is indicated for the reduction of proteinuria in people with nephrotic syndrome of the idiopathic type (unknown origin) without uremia (accumulation of urea in the blood due to malfunctioning kidneys) or that due to lupus erythematosus (lupus).
Table of Contents

The following sections provide step-by-step instructions on how to inject Acthar. The guide reviews all the items you will need when injecting,
how to find areas on the body where Acthar can be injected, how to complete the injection itself, how to store Acthar, and how to throw it away.
Getting started with ActharThe steps included in this guide are intended only to supplement the detailed instructions and training provided to you in person by your doctor or nurse.
You are also eligible to have a licensed nurse visit you in the privacy of your home to provide Home Injection Training Services to help you or your care partner learn how to inject Acthar. If you are interested in these services, more information is available under Home Injection Training Services on page 30.
Once you receive Acthar:1. Check the vial to make sure that it’s Acthar
2. Check the expiration date on the Acthar vial to make sure you are using it before the date listed
3. Prior to each use, check for any signs of contamination (cloudiness, small flecks, etc)
Do not use if: the vial is expired any signs of contamination are seen
If you have any questions, contact your doctor

5Please see Important Safety Information on pages 32–33, and the accompanying full Prescribing Information.
4. Refrigerate Acthar as soon as you receive it and check that your refrigerator is set between 36°–46°F or 2°–8°C
5. Read this entire instruction guide before your first injection
Tell your healthcare provider about any other health problems you may have or medicines you are taking, including prescription and non-prescription medicines, vitamins, and herbal supplements
Items you will need when injecting Acthar: Vial of Acthar
A 23g or 25g needle
– Some packages may include a 20g needle (not for injection), which can speed the process of drawing Acthar into the syringe
Syringe
Alcohol swabs
Gauze pad
Adhesive bandage
Puncture-resistant container to safely dispose of syringe and needles after use
Injection Preparation
A 23g or 25g needle can be used to draw Acthar into the syringe and it should be used
to inject Acthar. If your kit includes a 20g needle, this should be used only to draw up
Acthar into the syringe, not to inject

Preparing to inject1. Gather all your needed supplies in one place that will be easy to access when injecting
2. Take the vial of Acthar out of the refrigerator. Recheck the expiration date to make sure the vial has not expired. Warm the vial to room temperature by rolling it between the palms of your hands or by holding it under your arm for a few minutes
Do not inject Acthar directly after removing it from the refrigerator. Make sure to refrigerate the vial after the injection is performed

7Please see Important Safety Information on pages 32–33, and the accompanying full Prescribing Information.
3. Wash your hands with soap and warm water for at least 15 seconds
4. Remove the cap of the vial and use an alcohol swab to wipe the rubber stopper on top of the vial
5. Attach either the wider (20g) or the thinner (23g or 25g) needle to the syringe. Before removing the cap of the needle, draw air into the syringe by pulling the syringe plunger to the exact amount your doctor has prescribed
Barrel
Needle hub
Needle
Plunger
6. Remove the needle cap. Insert the needle through the rubber stopper and inject air into the upright vial by pushing down on the plunger until it cannot be pushed farther

7. While the syringe is still in the vial, turn the vial and syringe upside down
8. While keeping the needle tip in the gel (medication), slowly pull back the plunger to the exact amount your doctor prescribed
Keep needle tip in gel (medication)
at all times

9Please see Important Safety Information on pages 32–33, and the accompanying full Prescribing Information.
9. With the tip of the syringe upright and the needle still in the vial, tap the syringe with your finger until any air bubbles rise to the top
If bubbles are present, very slowly press the plunger until only the bubbles are pressed out of the syringe and a droplet starts to form at the needle tip. Check that you still have the amount your doctor prescribed in the syringe. If not, place the needle tip in the gel (medication) and draw in the amount you need and remove bubbles again
10. If using the wider (20g) needle to draw Acthar into the syringe, replace the needle cap, detach the needle, and attach the thinner (23g or 25g) needle; continue to the following sections to find an injection site and learn how to inject Acthar. But remember, the 20g needle is not for injecting
If using the thinner (23g or 25g) needle to draw Acthar into the syringe, continue to the following sections to find an injection site and learn how to inject Acthar
Before injecting, ensure that the needle remains sterile (ie, do not place on an unclean surface)

A few things to remember before injecting Ask your doctor or nurse which injection areas may be best for you. Common areas include the upper arm or thigh
You may inject into the same area more than once a week, but rotate the injection sites in that area each time, keeping 1 inch between sites
Do not inject into: Vein
Same site (small area of the muscle) more than once a week
An area that has skin irritation, including red, swollen, or painful areas
An area that has hardened or is sensitive to touch
Tattoos, warts, scars, or birthmarks
Belly button
Knee or groin area
Contact your doctor if you notice any injection site reactions, including redness, pain, or swelling.
If you are injecting subcutaneously, continue to page 12.
If you are injecting intramuscularly, skip to page 21.

11Please see Important Safety Information on pages 32–33, and the accompanying full Prescribing Information.
Here is some Important Safety Information you should know about ActharActhar can cause side effects similar to those with steroid treatments. While taking Acthar, tell your doctor right away if you have any of the symptoms listed here. Not all of these side effects have occurred with Acthar; however, you should know about them in case they occur:
Increased risk of infections. You may be more likely to get new infections. Also, old infections may become active. Before and during treatment, tell your doctor if you see any signs of an infection. Contact your doctor at the first sign of an infection or fever. Signs of infection are fever, cough, vomiting, or diarrhea. Other signs may be flu or any open cuts or sores
Adrenal gland changes. When taking Acthar long term, your adrenal gland may produce too much of a hormone called cortisol, which may cause symptoms of Cushing’s syndrome, such as upper body fat, rounded “moon” face, bruising easily, or muscle weakness
Sometimes when you stop taking Acthar long term, your body may not produce enough cortisol on its own. This is called “adrenal insufficiency.” Your doctor may prescribe a steroid medicine to protect you until the adrenal gland recovers

SUBCUTANEOUS INJECTION ONLY
Injecting the upper thighThe following instructions are for self-injections.
You may inject into the same area more than once in a week,
but rotate the injection sites in that area each time, keeping
1 inch between sites
1. Sit comfortably on a firm chair to keep the thigh area relaxed
2. To locate the correct area, place one hand on your knee and one hand on your upper thigh near your hip. Draw an imaginary line down the center front of your thigh from hip to knee. The area between your hands and from the center of your thigh to the outer side of the leg is the area that should be injected
3. See “How to inject” on page 17 for additional instructions

13Please see Important Safety Information on pages 32–33, and the accompanying full Prescribing Information.
SUBCUTANEOUS INJECTION ONLY
Subcutaneous Injection Instructions
Injecting the abdomenThe following instructions are for self-injections.
1. Sit comfortably on a firm chair
2. To locate the area, place your hands on your lower ribs. Injections should be done below where your hands are in any area that has enough tissue to pinch. However, it is important to not inject the belly button or the 1-inch area around it
3. See “How to inject” on page 17 for additional instructions
SUBCUTANEOUS INJECTION ONLY
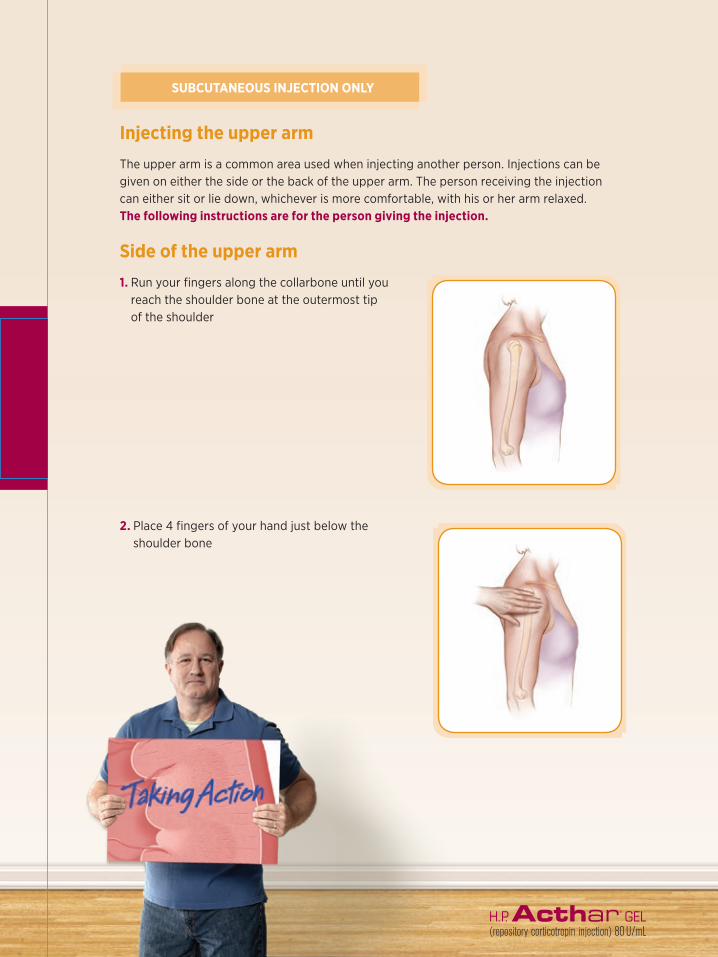
Injecting the upper armThe upper arm is a common area used when injecting another person. Injections can be given on either the side or the back of the upper arm. The person receiving the injection can either sit or lie down, whichever is more comfortable, with his or her arm relaxed. The following instructions are for the person giving the injection.
Side of the upper arm1. Run your fingers along the collarbone until you
reach the shoulder bone at the outermost tip of the shoulder
2. Place 4 fingers of your hand just below the shoulder bone

15Please see Important Safety Information on pages 32–33, and the accompanying full Prescribing Information.
SUBCUTANEOUS INJECTION ONLY
3. Now place 4 fingers of your other hand on the elbow. Draw an imaginary line down the center front and down the outer side of the upper arm from shoulder to elbow. Injections can be given between these imaginary lines and your hands if there is enough tissue to pinch
4. See “How to inject” on page 17 for additional instructions
Back of the arm1. Run your fingers along the collarbone until you reach the shoulder bone

SUBCUTANEOUS INJECTION ONLY
2. Place 4 fingers of your hand behind the arm just below the shoulder bone
3. Now place 4 fingers of your other hand on the back side of the elbow. Draw an imaginary line down the center back and down the outer side of the back upper arm from shoulder to elbow. Injections can be given between these imaginary lines and your hands if there is enough tissue to pinch
4. See “How to inject” on page 17 for additional instructions

17Please see Important Safety Information on pages 32–33, and the accompanying full Prescribing Information.
SUBCUTANEOUS INJECTION ONLY
How to injectThe steps are the same whether you are injecting yourself or someone else. The steps below should be done after the person receiving the injection has removed clothing around the area to be injected, an injection site has been found, and the person receiving the injection is ready for the injection (see previous instructions for more information).
1. Clean the area to be injected with an alcohol swab. Let the alcohol dry before injecting
2. Press the plunger until a droplet forms at the tip of the needle
3. Pinch the skin around the injection site between the thumb and fingers of the hand that is not holding the syringe

4. Hold the syringe like a pencil or dart with your right hand if you are right-handed and your left if you are left-handed. Using a quick motion, insert the needle at a 90° angle through the skin
Skin
Muscle
90° angle
Layer of tissue
5. Once the needle is fully in, draw back on the plunger to check for blood. It is important to make sure you are not injecting into a vein, and checking for blood will determine this
If no blood enters the syringe, slowly push the plunger in until the syringe is empty
If blood enters the syringe, withdraw the needle and, using a gauze pad, place pressure on the injection site. Start over with a new syringe and a new site for injection
Please note that this step may not be necessary for all injections. Ask your doctor or nurse if or when you should check for blood
SUBCUTANEOUS INJECTION ONLY

19Please see Important Safety Information on pages 32–33, and the accompanying full Prescribing Information.
SUBCUTANEOUS INJECTION ONLY
6. Once the syringe is empty, pull the needle straight out. It may be helpful to hold a gauze pad over the injection site and use it to apply pressure once the needle has been removed. Use an ice cube if you feel pain at the injection site
7. If there is any blood, wipe it off and, if necessary, apply an adhesive bandage
8. Dispose of the used syringe, needle, and needle cap in a puncture-resistant container. Do not replace the needle cap prior to disposal
See the following section for more information about proper disposal of syringes, needles, and vials
9. Wash your hands with soap and warm water

How to dispose of used syringes, needles, and vialsIt is important to follow state and local laws regarding proper disposal of used syringes, needles, and vials. Your doctor, nurse, or pharmacist will provide instructions to you.
You should: Place used supplies in a heavy plastic or metal container with a tight-fitting lid that is puncture resistant and leakproof; you can ask your pharmacist for a sharps container or you can use a laundry detergent bottle
Mark “Not For Recycling” on the container
Reinforce the lid with heavy-duty tape
Store the container in a secure place out of the reach of children or pets
You should not: Reuse syringes and needles
Throw the syringes, needles, and vials in household trash
Recycle syringes, needles, and vials (once empty)
Use a clear plastic or glass container
How to store Acthar: Acthar should be kept refrigerated (36°–46°F; 2°–8°C) between uses

21Please see Important Safety Information on pages 32–33, and the accompanying full Prescribing Information.
INTRAMUSCULAR INJECTION ONLY
Injecting the upper-outer thigh muscleThe following instructions are for self-injections.
1. Sit comfortably on a firm chair to keep the muscle relaxed
2. To locate the correct muscle, place your fingertips on the middle of the thigh and gently press down to locate the thigh bone. The muscle that runs along the upper-outer edge of the thigh bone is the muscle that should be injected
3. It is best to inject into the middle third of that muscle. To find the middle third, place the fingertips of one hand on your knee and rest the palm of that hand on your thigh. Place the fingertips of your other hand behind the first hand. The outer area under your second hand is the area to inject
4. See “How to Inject” on page 24 for additional instructions
You may inject into the same muscle more than once in a week, but rotate the injection sites in that muscle each
time, keeping 1 inch between sites
Intramuscular
Injection Instructions

INTRAMUSCULAR INJECTION ONLY
Injecting the upper-arm muscleIn some patients, the muscle may not be well developed and would not be a suitable area for injections. Consult your doctor or nurse for further guidance. The person receiving the injection can either sit or lie down, whichever is more comfortable, with his or her arm relaxed. The following instructions are for the person giving the injection.
1. Run your fingers along the collarbone until you reach the shoulder bone at the outermost tip of the shoulder

23Please see Important Safety Information on pages 32–33, and the accompanying full Prescribing Information.
INTRAMUSCULAR INJECTION ONLY
2. Inject in the area 3 fingertip widths directly below the shoulder bone
3. See “How to inject” on page 24 for additional instructions

INTRAMUSCULAR INJECTION ONLY
How to injectThe steps are the same whether you are injecting yourself or someone else. The steps below should be done after the person receiving the injection has removed clothing around the area to be injected, an injection site has been found, and the person receiving the injection is ready for the injection (see previous instructions for more information).
1. Clean the area to be injected with an alcohol swab; let the alcohol dry before injecting
2. Press the plunger until a droplet forms at the tip of the needle
3. Stretch and hold the skin around the injection site between the thumb and fingers of the hand that is not holding the syringe. Steady the muscle by grasping it on each side

25Please see Important Safety Information on pages 32–33, and the accompanying full Prescribing Information.
INTRAMUSCULAR INJECTION ONLY
4. Hold the syringe like a pencil or dart with your right hand if you are right-handed and your left if you are left-handed. Using a quick motion, insert the needle at a 90° angle through the skin
Skin
Muscle
90° angle
Layer of tissue
5. Once the needle is fully in (about 1/8" of the needle should still be visible above the skin), draw back on the plunger to check for blood. It is important to make sure you are not injecting into a vein, and checking for blood will determine this
If no blood enters the syringe, slowly push the plunger in until the syringe is empty
If blood enters the syringe, withdraw the needle and, using a gauze pad, place pressure on the injection site. Start over with a new syringe and a new site for injection
Please note that this step may not be necessary for all injections. Ask your doctor or nurse if or when you should check for blood

INTRAMUSCULAR INJECTION ONLY
6. Once the syringe is empty, pull the needle straight out. It may be helpful to hold a gauze pad over the injection site and use it to apply pressure once the needle has been removed. Use an ice cube if you feel pain at the injection site
7. If there is any blood, wipe it off and, if necessary, apply an adhesive bandage
8. Dispose of the used syringe, needle, and needle cap in a puncture-resistant container. Do not replace the needle cap prior to disposal
See the following section for more information about proper disposal of syringes, needles, and vials
9. Wash your hands with soap and warm water

27Please see Important Safety Information on pages 32–33, and the accompanying full Prescribing Information.
How to dispose of used syringes, needles, and vialsIt is important to follow state and local laws regarding proper disposal of used syringes, needles, and vials. Your doctor, nurse, or pharmacist will provide instructions to you.
You should: Place used supplies in a heavy plastic or metal container with a tight-fitting lid that is
puncture resistant and leakproof; you can ask your pharmacist for a sharps container or you can use a laundry detergent bottle
Mark “Not For Recycling” on the container
Reinforce the lid with heavy-duty tape
Store the container in a secure place out of the reach of children or pets
You should not: Reuse syringes and needles
Throw the syringes, needles, and vials in household trash
Recycle syringes, needles, and vials (once empty)
Use a clear plastic or glass container
How to store Acthar: Acthar should be kept refrigerated (36°–46°F; 2°–8°C) between uses

QuestionsIf you have a question that is not answered in this brochure, please ask your doctor or nurse. Feel free to use the space below to write down any questions or notes you’d like to remember.
Questcor Pharmaceuticals, Inc. intends this document to be informative, but you should remember the contents are general in nature and not meant to substitute for specific advice from professionals that may be necessary based on your individual questions and needs. We have made reasonable efforts to provide helpful and accurate information; however, we make no guarantees and you should not solely rely on the information included in this document.
ADDITIONAL INFORMATION

29Please see Important Safety Information on pages 32–33, and the accompanying full Prescribing Information.
ADDITIONAL INFORMATION
When to call your doctorYou should call your doctor right away if you have any of the following:
Problems that keep you from giving yourself the injection
Needle that breaks off in the injection site
Medication injected into the wrong area
Bleeding at the injection site that doesn’t stop
Rash, redness, or swelling at the injection site
A lot of pain
Shortness of breath
Fever or chills
Allergic reaction
Any other severe side effect or concern
Additional Inform
ation

H.I.T.S.A C T H A R
Home Injection Training ServicesYou can have a healthcare professional visit you at your home to provide Home Injection Training Services (HITS). This service is provided at no cost and is made available by support from the maker of Acthar.
To find out more about these free Home Injection Training Services, you or your care partner can call the Acthar Support & Access Program (A.S.A.P.) at 1-888-435-2284.
ResourcesYou can find helpful information on acthar.com. There are also a number of organizations that can provide you with education and resources, including:
American Society of Nephrology asn-online.org
National Kidney Center nationalkidneycenter.org
National Kidney Foundation kidney.org
This brochure may identify third-party organizations and provide links to third-party websites or other third-party information (“Third-Party Content”). The Third-Party Content is meant for informational purposes only, is not endorsed by or under the control of Questcor, and is not meant to replace a physician’s medical advice. Questcor has no responsibility or liability for and makes no representations whatsoever about any Third-Party Content.

31Please see Important Safety Information on pages 32–33, and the accompanying full Prescribing Information.
Notes from your office visit

Important Safety InformationActhar is injected beneath the skin or into the muscle.
Who should NOT take Acthar?You should not take Acthar if you have:
A skin condition called scleroderma Bone density loss or osteoporosis Any infections, including fungal, bacterial, or viral
Eye problems, such as ocular herpes simplex Had recent surgery Stomach ulcers or a history of ulcers Heart problems High blood pressure
Allergies to pig-derived proteins Been recently given a vaccine or are about to take one
Suspected congenital infections (in children under 2 years of age)
A condition where your adrenal glands produce either too much of certain hormones (as with Cushing’s syndrome), or not enough (adrenal insufficiency)
Tell your doctor if you have any of these conditions or any other health problems. Also, share with your doctor what medicines you are taking. Don’t forget to mention nonprescription medicines, vitamins, and herbal supplements.
What is the most important information I should know about Acthar? Never inject Acthar directly into a vein, always take Acthar as prescribed by your doctor Never stop treatment suddenly unless your doctor tells you to Try not to miss any scheduled doctor’s appointments, as it is important for the doctor to monitor you while taking Acthar
Acthar can cause side effects similar to those with steroid treatments. While taking Acthar, tell your doctor right away if you have any of the symptoms listed here:
Increased risk of infections. You may be more likely to get new infections. Also, old infections may become active. Before and during treatment, tell your doctor if you see any signs of an infection. Contact your doctor at the first sign of an infection or fever. Signs of infection are fever, cough, vomiting, or diarrhea. Other signs may be flu or any open cuts or sores
Adrenal gland changes. When taking Acthar long term, your adrenal gland may produce too much of a hormone called cortisol, which may cause symptoms of Cushing’s syndrome, such as upper body fat, rounded “moon” face, bruising easily, or muscle weakness

Please see the accompanying full Prescribing Information. 33
Important Safety Inform
ation
Sometimes when you stop taking Acthar long term, your body may not produce enough cortisol on its own. This is called “adrenal insufficiency.” Your doctor may prescribe a steroid medicine to protect you until the adrenal gland recovers.
Increased blood pressure, body salt, and fluid levels. Your doctor may check your blood pressure while you are being treated with Acthar. He or she may recommend some changes to your diet, such as eating less salt and taking certain supplements
Unpredictable response to vaccines. Talk to your doctor about which vaccines are safe to use when you are taking Acthar
Masking other conditions. Acthar may hide symptoms of other diseases. This can make it more difficult for your doctor to make a diagnosis if something else is going on
Stomach or intestinal problems. Acthar may put you at increased risk for bleeding from the stomach, or getting stomach ulcers. Tell your doctor if you have stomach pains, bloody vomit, bloody or black stools, excessive tiredness, increased thirst, difficulty breathing, or increased heart rate
Changes in mood or behavior. Taking Acthar can make you feel irritable or depressed. You may also have mood swings or trouble sleeping
Worsening of other medical conditions. If you have other conditions, such as diabetes or muscle weakness, you may find they get worse
Eye problems. It’s possible that you may develop certain eye conditions, such as cataracts, glaucoma, or optic nerve damage
Allergic reactions. Your body may develop antibodies or become sensitive when Acthar is used long term. Signs of allergic reaction in children are: – Skin rash– Swelling of the face, tongue, lips, or throat– Trouble breathing
Problems with growth and physical development. Using Acthar long term can affect growth and physical development in children. This can be reversed when Acthar is no longer needed
Bone density loss. Acthar may cause osteoporosis at any age Potential harm to unborn baby. Tell your doctor if you are pregnant or plan on becoming pregnant
What are the most common side effects of Acthar?
The most common side effects of Acthar are similar to those of steroids. They include:
Fluid retention Behavior and mood changes Changes in blood sugar Changes in appetite and weight Increased blood pressure
Specific side effects in children under 2 years of age include:
Increased risk of infections Symptoms of Cushing’s syndrome Increased blood pressure Cardiac hypertrophy (thickening of the heart muscle) Irritability Weight gain
The above side effects may also be seen in adults and children over 2 years of age.
These are not all the possible side effects of Acthar.
Tell your doctor about any side effect that bothers you, or that does not go away. Call your doctor or pharmacist for medical advice about side effects. You may report side effects to the FDA. Call 1-800-FDA-1088 or visit www.fda.gov/medwatch. You may also report side effects by calling 1-800-465-9217.
This brochure provides step-by-step instructions on how to inject Acthar. The guide reviews
all the items you will need when injecting, how to find areas on the body where Acthar can be injected,
how to complete the injection itself, how to store Acthar, and how to throw it away.
H.P. Acthar® Gel and Questcor® are registered trademarks of Questcor Pharmaceuticals, Inc., a Mallinckrodt company.© 2014 Mallinckrodt, PM-01-03-1290 10/14 Printed in USA.
Impo
rtan
t Saf
ety
In
form
atio
n