stingray music & music videos tv app - att.com music & music videos ... appears to the right...
TRANSCRIPT

STINGRAY MUSIC & MUSIC VIDEOS TV APP
USER GUIDE FOR AT&T
VERSION 1.0

MUSIC MENU
INITIAL LAUNCH
When it is launched, the app opens on the Music menu.
The Top Channels category is in view; the Hit List channel is highlighted.
Music will not stream until a channel is selected.
The categories and music genres channels (each represented by a distinct icon) are arranged
along a horizontal carousel. Navigate the channels, left or right, by using the remote’s
Directional-Pad (D-pad).
The three (3) specialty categories (My Channels / My Channel History / Top Channels) are
located to the left of the carrousel. The music genres are located to the right of the carousel in
order of popularity.
How to know which genre or category is in view
The icon representing the genre or category is in the center of the carousel.
The icon is slightly larger than the others.
The icon is centered between outward-pointing chevron arrows.
A list of associated channels appears underneath the genre or category. The first channel in
the list is highlighted.

Streaming a channel
When browsing channels, a large Play icon appears next to the highlighted channel. The Play icon indicates that the channel can be selected for streaming by clicking the
OK/Select button at the center of the remote’s D-pad. A list of featured artists appears underneath the name of the highlighted channel.
Highlighted channel with the large Play icon to the left.
Cover view
Select a channel by clicking OK/Select on the D-pad. You will be taken to that channel’s cover view.
Channel cover view
The album cover of the song that is streaming currently appears in the center of the screen.
Four lines of information are placed above the album cover:

1: Name of the channel 2: Title of the current track 3: Name of the current artist 4: Progress bar of the current track (with the total running time to the right).
Information about the previous track appears to the left of the album cover. It includes:
Title of the previous track Name of the previous artist
To return to the Music menu from the cover view: use the remote’s OK/Select button to click
the on-screen button (chevron arrow pointing left).
If the cover view is idle for more than five (5) seconds, the screen will be simplified by removing the following: previous info, back button, the current track’s total running time as well as the highlight on any on-screen element.
Simplified cover view.
Bring back the previous info, back button and the current track’s total running time, by clicking any of the D-pad’s directional buttons.

Other functions while in cover view:
The channel name, and sometimes the current track’s title, can be selected. To access a channel’s context menu, highlight the channel name and then click OK/Select.
The menu includes two (2) options:
Channel’s context menu, accessed by clicking a channel name while in cover view.
View Channel Info: a subsection that includes additional information about the channel that is currently streaming (more about this in the “Accessing Channel Info” section).
Add to My Channels: selecting this option adds the current channel to a list of favourites called My Channels. You can access My Channels from the Music menu.
If a video icon ( ) appears to the right of a track title, it means a music video is available for the track. Click the track title to view an available option:
Available option when a video icon appears next to a track title. (More about this in the “Video Playlist > Adding Videos” section)
If there is no video icon next to a track title, a different, non-clickable, message appears:
Message after clicking a track title without a video icon.

Going back to the Music menu while a channel is streaming
Look of the Music menu while a channel is streaming.
When a channel has been selected for streaming, you are taken to its cover view. You can return to the Music menu by clicking the back button (top left). The following elements will appear on the screen.
Player activity box (grey horizontal banner at the bottom the screen): it includes the current
track’s progress bar, track title and artist name (note that none of the elements can be
selected).
When a channel is streaming, the Play icon is replaced by the cover view icon (four corner
arrows).
To return to the cover view from the Music menu, highlight and click the channel that is
currently streaming.
Cover view icon of a channel that is currently streaming.

NOTE
A video cannot be added to a playlist from the Music menu, this can only be done from the cover view.
Therefore, if you are streaming a channel while browsing the Music menu, and see in the
player activity box that the current track has a video icon , you will need to return to the cover view to click the track title.
(More details on adding to a Video Playlist while in full-screen view in the “Video Playlist > Adding Videos” section.)
Relaunching the app
Every time the app is launched or triggered, you are taken to the cover view of the channel
that was last streamed (provided that a channel was playing when you quit the app.) The
broadcast of the channel resumes.
The Back button is highlighted to facilitate the navigation back to Music menu.
When the app is relaunched, you are taken to the cover view of the last channel to be streamed.

Channel Info
When in cover view, click the current channel’s name to access its Channel Info. Channel Info is divided into five (5) subsections: Description
Recently Played
Top 10 Tracks
Artists
Music Programmer
Navigate these subsections by clicking right or left on the remote’s D-pad.
Use the back button to return to the previous page.
Description
Channel description in Channel Info.
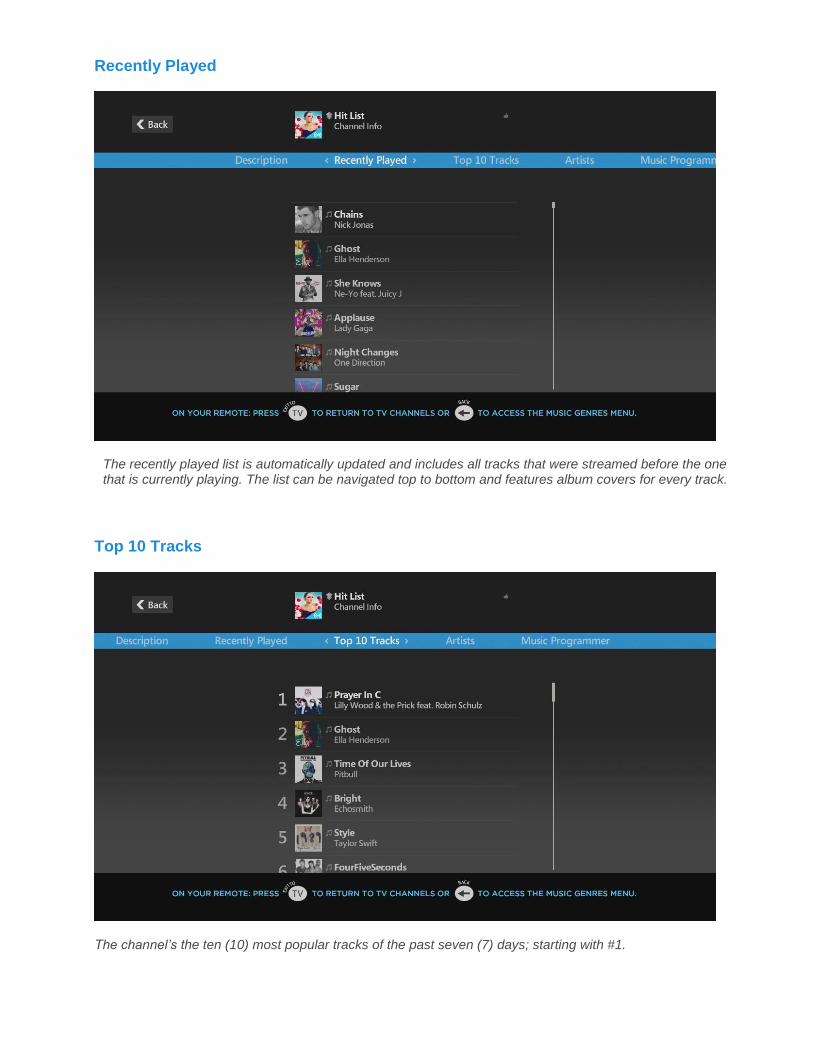
Recently Played
The recently played list is automatically updated and includes all tracks that were streamed before the one that is currently playing. The list can be navigated top to bottom and features album covers for every track.
Top 10 Tracks
The channel’s the ten (10) most popular tracks of the past seven (7) days; starting with #1.

Artists
List of artists usually featured in the channel. This list can be sorted alphabetically or by popularity (by changing the filter just below the “Artists” header)
Music Programmer
Biography a channel’s music programmer. Each channel is curated by a programmer with expertise in the genre.

Other functions within Channel Info
A channel can be saved as a favourite and added to My Channels (or removed, if it was already added) by highlighting then clicking its name at the top of the screen
To return to the channel’s cover view, highlight and then click the Back button.
My Channels
Adding a channel to My Channels / Removing a channel from My Channels
As previously mentioned in the “Other functions while in Cover View” and “Other functions while in Channel Info” sections, a channel can be saved as a favorite from: Cover view Channel Info
If a channel has not yet been saved as a favourite, the “Add to My Channels” option appears when clicking its name.
Option in Channel Info when a channel has not yet been saved as a favourite.
Once a channel has been saved as a favourite, a thumbs-up icon appears to the right of its name.
Channels that are saved as favourites have a thumbs-up icon to the right of their names.
Once a channel has been saved as a favourite; a confirmation message is displayed in a green banner at the bottom if the screen.

Confirmation message when a channel has been saved as a favourite.
To remove a channel from My Channels, click its name while in cover view or from the Channel Info section. The “Remove from My Channels” option will appear.
Only available option for a channel that has been saved as a favourite.
The thumbs-up icon disappears once you click “Remove from My Channels”. A confirmation message is displayed in a green banner at the bottom of the screen.
Confirmation message when a channel has been removed from favourites.
Where to view the list of favourite channels (My Channels):
The list of all channels that were saved as favourites can be viewed in the My Channels section (located to the left of the carrousel in the Music menu).

Channels that were saved as favourites are listed in the My Channels section.
When the My Channels list is empty, the following message is displayed instead of a list of favourite channels:
Message when My Channels is empty.

My Channel History
A list of all channels that were streamed is available in My Channel History (located 2nd to the left of the carrousel in the Music menu).
All previously streamed channels are listed in My Channel History, with the most recent at the top of the list.

VIDEO MENU Videos are accessible from the Videos menu:
Start from the Music menu. With the D-pad, move up to highlight the main navigation bar Highlight Videos by navigating to the right.
By default, the Videos menu opens on the “New” category.
To navigate the Videos menu:
Move down from the main menu bar to highlight “New”. “New” and the other categories are
arranged on a secondary menu bar.
Navigate the Videos categories, left or right, by using the remote’s D-pad.
Two user-generated categories (My Video History / My Video Playlists) are located to the left
of the secondary menu bar. Videos genres and other specialty categories (such as Most
Popular and Hit List) are located to the right.
In the screenshot above, a music channel is streaming while the Videos menu is open (the
player activity box appears at the bottom of the screen.)
The channel will continue to stream until a video is selected.

Within specialty Videos categories (New, Most Popular, Hit List, etc.):
Video Mixes marked with a icon are located to the left.
Single videos marked with a icon are located to the right.
Within user-generated categories (My Video History, My Video Playlists):
In My Video History, videos are arranged in viewing order.
My Video playlists only includes playlists you have created.
How to play a video (or a video mix)
Option 1: immediate playback
Highlight the thumbnail of a video or video mix. A Play icon will appear on the thumbnail.
Click OK/Select on the remote’s D-pad.
Highlighted video thumbnail with Play icon.
Option 2: playing from the title of a video or video mix.
Instead of highlighting the thumbnail, highlight and click the video (or video mix) title.
Select Play Video from the list of options in the context menu.

Option 2 to play a video by clicking the title.
Option 3: from artist videos list
Highlight and click the artist name underneath the thumbnail of the chosen video.
Click the “View Artist Videos” option.
Click any of the artist’s videos for “Play Video” or “Add to Video Playlist” options.
Click an artist’s name to view a list of all of their available videos.

During Video Playback – The Control Panel:
Note: The control panel during video playback will disappear after the app is left idle for a few seconds. To bring it back, click the remote’s D-pad..

Control panel legend:
1. Click the Back button while playing a video to return to the Videos menu. The video will continue playing as Full Motion Video (FMV) in a thumbnail at the top of the screen.
2. Click the Name of the Video Playlist or Video Mix for additional information (e.g. “View Video Mix Info”). Extra options are available for playlists you have created (Rename or Delete the playlist).
3. Click the Title of the Video to be given the option to add the video to a playlist.
4. Click the Artist Name to access the list of other available videos by the artist.
5. Replay / Skip Back:
For single videos:
Click once to restart the video.
For playlists:
Click once to restart the video.
Click twice in rapid succession to return to the previous video.
6. Click to Pause the video. Click again to resume playback.
7. The Skip Forward button is only available for video mixes or video playlists. It allows you to skip to the next video. The skip forward button is disabled on the last video of the mix or playlist.
8. The Shuffle button is only available for video mixes or playlists. Use it to change the order of a Video Mix or Video Playlist. The button changes colour when turned ON. When it is turned OFF, the list reverts to its original sequence.
9. Progress bar of current video. The total running time is displayed to the right.
10. Next video information is only available when playing a Video Mix or Video Playlist.
Search Videos
Instead of browsing the Videos menu, you can search for a particular video or artist in the Search Videos section:
Highlight the main navigation bar using the D-pad.
Highlight Search Videos.

Using Search Videos
Search suggestions appear on the right as soon as three characters of a keyword are entered.
Searching for an artist or title of a video:
Example: searching for Lady Gaga.
Start typing “gag”. (The search is case-insensitive.) Search suggestions start appearing to the right as soon as three characters of a keyword are
entered: videos are at the top of the list and artist info (relating to videos) at the bottom. If the search returns too many results to list in Search Suggestions, “View more results”
appears at the bottom of the list. Or
You can go directly to all results by clicking the magnifying glass (a.k.a. Search) button of the on-screen keypad.
You can play a video directly from the Search Suggestions column or the Search Results screen.
The process is the same when searching for a video title as for an artist name.
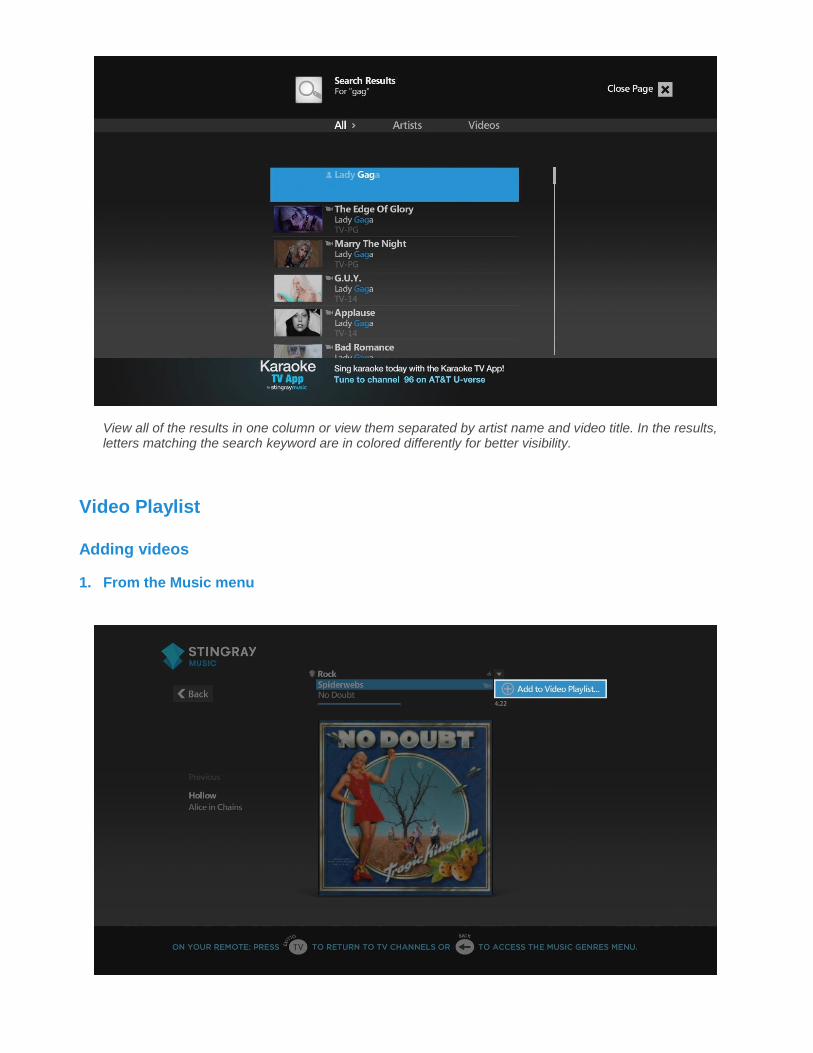
View all of the results in one column or view them separated by artist name and video title. In the results, letters matching the search keyword are in colored differently for better visibility.
Video Playlist
Adding videos
1. From the Music menu

You are listening to a channel in cover view, and the current track has the icon next to it.
Click the track title and then select “Add to Video Playlist” by clicking OK/Select on the D-pad.
You may add the selected video to an existing playlist (they will be listed) or create a new one
(by selecting “New Playlist”).
NOTE:
Videos are not accessible from the Music menu. The icons only indicate that a related video exists in the Videos menu. From the Music menu, you can only add videos to playlists for later viewing.
Once a video is added to a playlist; a confirmation message is displayed in a green banner at
the bottom of the screen.
Once a video is added to a Video Playlist; you may watch it by going to the Videos menu and then to My Video Playlists.

2. During full-screen video streaming
In the Videos menu, start a video by either clicking its thumbnail or from the context menu
(accessed by clicking the title). The video will play in full-screen.
Click the title (at the top of the control panel) and then on the “Add to Video Playlist…”
option.
You may add the video to an existing playlist (they will be listed) or create a new one (by
selecting “New Playlist”).
Once a video is added to a playlist; a confirmation message is displayed in a green
banner at the bottom of the screen while the video continues playing.

3. From Artist Videos list while watching a Video
While watching a video, highlight and click the artist name at the top of the control panel.
Note: If a video features multiple artists, a context menu appears from which you can select which you want to look up.
Video that features multiple artists. Select which one you want to look up.
Option to “View Artist Videos” appears. Click it to view a list of available videos featuring the
artist. The current video continues playing in the background.

You can view a list of videos featuring the artist and add them to a playlist while the current video continues to play in the background.
You may add any video from this list to an existing or new playlist.
Once you have finished adding videos, highlight and click (top right of the screen)
4. From the Videos menu
4.1 Click the video title
A video can be added to a playlist without needing to be played.
In any category of the Video menu, click the title of a video underneath its thumbnail (see screenshot above).
Click the “Add to Video Playlist…” option.

Add the video to an existing or new playlist.
4.2 Click the artist name
View a list of all available videos by an artist by clicking his or her name.
In any category of the Videos menu, click an artist’s name underneath the video thumbnail (see screenshot above) and then “View Artist Videos” to view a list of all available videos.
You may add any video to an existing or new playlist.
Click (top right corner) to return to the Videos menu.
Note: If a video features multiple artists, a context menu with the artists’ names will appear before the “View Artist Videos” option.

4.3 From “View All…” lists in every category or genre of the Videos menu
The “View All…” option is available for every category in the Videos menu, underneath the category thumbnail.
The “View All” option is available for every category of the Videos menu. It enables you to view the content of the category in a vertical list instead of a horizontal carousel.
The screenshot above shows the “View All” option for the “New” category.
The content is divided into three (3) columns within “View All” [category name]:
Column 1: single videos and video mixes sorted by date added (can also be sorted alphabetically).
Column 2: single videos sorted by date added (can also be sorted alphabetically). Column 3: video mixes sorted by date added ((can also be sorted alphabetically).
Any single video can be added to an existing or new playlist.

4.4 From a Video Mix
You can click the title of a Video Mix in any category/genre of the Videos menu to view its content (“View Video Mix Info”).
Click the title of a Video Mix, underneath its thumbnail.
In the context menu, select “View Video Mix Info”. Click any video within a video mix to add it to an existing or a new playlist.
Any video from a Video Mix can be added to a playlist while it is being watched.
Play a Video. The video will play in full-screen. Use the remote’s D-pad to highlight the title of the Video Mix
and then click it with the OK/Select button:
Click the Video Mix title to view its Video Mix Info
The “Video Mix Info” appears on-screen while the videos continue playing in the background. Any videos listed in the “Video Mix Info” list can be added to an existing or new playlist.
Click the button (top-right of the “Video Mix Info”) to return to the current video that was playing in the background.
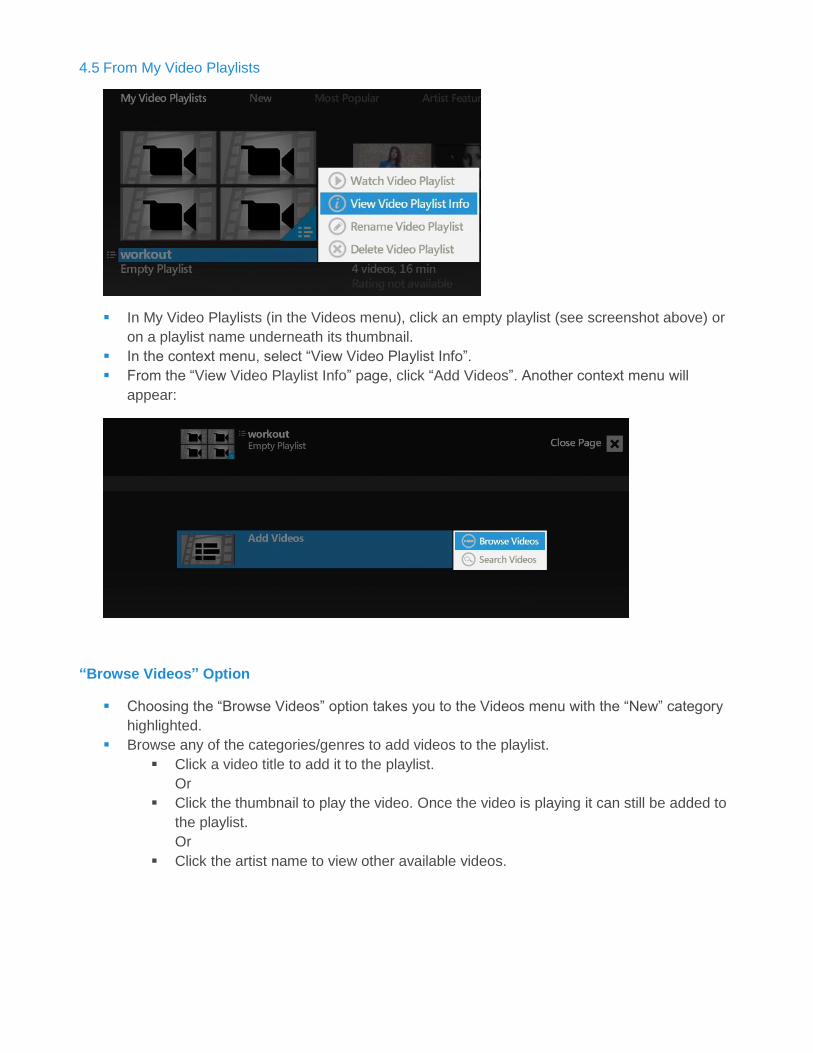
4.5 From My Video Playlists
In My Video Playlists (in the Videos menu), click an empty playlist (see screenshot above) or
on a playlist name underneath its thumbnail.
In the context menu, select “View Video Playlist Info”.
From the “View Video Playlist Info” page, click “Add Videos”. Another context menu will
appear:
“Browse Videos” Option
Choosing the “Browse Videos” option takes you to the Videos menu with the “New” category
highlighted.
Browse any of the categories/genres to add videos to the playlist.
Click a video title to add it to the playlist.
Or
Click the thumbnail to play the video. Once the video is playing it can still be added to
the playlist.
Or
Click the artist name to view other available videos.
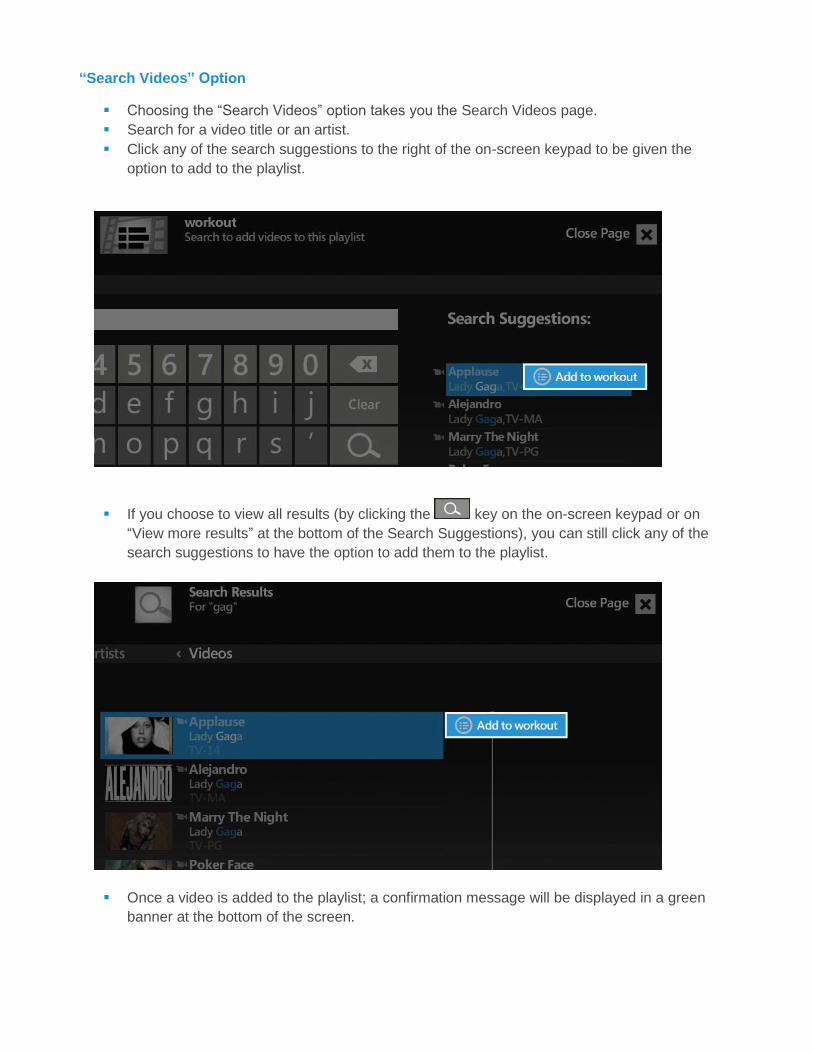
“Search Videos” Option
Choosing the “Search Videos” option takes you the Search Videos page.
Search for a video title or an artist.
Click any of the search suggestions to the right of the on-screen keypad to be given the
option to add to the playlist.
If you choose to view all results (by clicking the key on the on-screen keypad or on
“View more results” at the bottom of the Search Suggestions), you can still click any of the
search suggestions to have the option to add them to the playlist.
Once a video is added to the playlist; a confirmation message will be displayed in a green
banner at the bottom of the screen.

You may continue to search for more videos or return to the playlist by clicking the
button (top left corner).
Click (top right of the page) to return to the Videos menu.
Modifying items in a Video Playlist
1. From My Video Playlists
Create a video playlist.
Navigate to “My Video Playlists” in the Videos menu.
Click the playlist name underneath its thumbnail and select “View Playlist Info”.
Click any item in “Video Playlist Info” and select “Remove from Playlist” in the context menu.
You can also click “Add to Video Playlist” to add the video to a different playlist.
Click “Add Videos” above the listed items to add more videos to the playlist.

2. While watching a video playlist
View Video Playlist Info can also be accessed from the control panel while that playlist is being watched.
Click the playlist name at the top of the control panel to view “View Playlist Info” while watching a video playlist.
Once in “Video Playlist Info”, click any item to remove it from the playlist or to add it to a different playlist.
Use the “Add Videos” button at the top of each “Video Playlist Info” page to add more videos to a playlist while the current video continues to play in the background.
3. From My Video History
Any playlist that was watched is listed in My Video History (accessible from the Videos menu).
Click a playlist name, either in the horizontal carousel in “My Video History’ or in the vertical
list in “View All My Video History’.
Select “View Video Playlist Info” in the context menu.
Click an item to remove it from the playlist or add it to a different playlist.

Use the “Add Videos” button at the top of each “Video Playlist Info” page to add more videos
to a playlist.
Creating a playlist to add videos at a later time
You can create a playlist and add videos to it later.
Navigate to the “My Video Playlists” category in the Videos menu,
Click “View All My Video Playlists” at the bottom of the screen.
In “All My Video Playlists’, click “Create Video Playlist” at the top of the list.
Use the on-screen keypad to name the new playlist.
Use the remote’s D-pad to navigate and select the keys of the on-screen keypad.
When the playlist is named, save and close the page by clicking the OK/Select button of the on-screen keypad or selecting the text field and clicking the OK/Select button on the remote.
A confirmation message will be displayed in a green banner at the bottom of the screen.
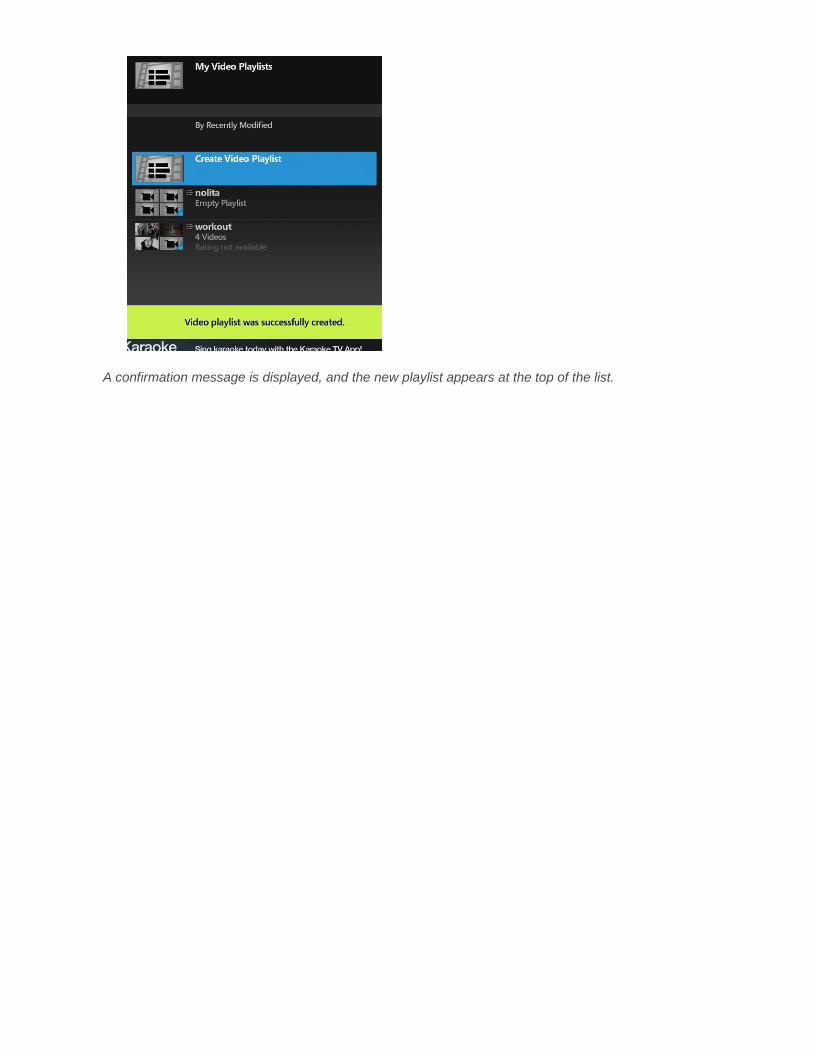
A confirmation message is displayed, and the new playlist appears at the top of the list.

Modifying a video playlist
Renaming a video playlist
From the horizontal carousel in My Video Playlists
Navigate to the My Video Playlists category in the Videos menu.
Click a video playlist’s name underneath its thumbnail.
In the context menu, click “Rename Video Playlist”.
Use the on-screen keypad to rename the video playlist.
When the playlist is renamed, save and close the page by clicking the OK/Select button of the
on-screen keypad or selecting the text field and clicking the OK/Select button on the remote.
A confirmation message will be displayed in a green banner at the bottom of the screen. The
playlist will appear with its new name in the “My Video Playlists” category.

1. From a “View All’ list in My Video Playlists
Navigate to the My Video Playlists category in the Videos menu.
Highlight and click “View All My Video Playlists”.
Click any video playlist.
In the context menu click “Rename Video Playlist”.
Use the on-screen keypad to rename the video playlist.
When the playlist is renamed, save and close the page by clicking the OK/Select button of the
on-screen keypad or selecting the text field and clicking the OK/Select button on the remote.
A confirmation message will be displayed in a green banner at the bottom of the screen. The
playlist will appear with its new name in the “My Video Playlists” category.

From within “Video Playlist Info” in My Video Playlists
Access a “Video Playlist Info”, either from the horizontal carousel in My Video Playlists or from
“View All My Video Playlists’.
Click any video playlist name.
In the context menu, click “View Playlist Info’.
Within “View Playlist Info’, click the video playlist name at the top of the page.
In the context menu, click “Rename Video Playlist”.
Use the on-screen keypad to rename the video playlist.
When the playlist is renamed, save and close the page by clicking the OK/Select button of the
on-screen keypad or selecting the text field and clicking the OK/Select button on the remote.
A confirmation message will be displayed in a green banner at the bottom of the screen. The
playlist will appear with its new name in the “My Video Playlists” category.

2. While watching a Video Playlist
Click the playlist name at the top of the control panel to access “View Playlist Info” while
watching a video playlist.
Video Playlists can be renamed while being watched.
Click Rename Video Playlist. Use the on-screen keypad to rename the playlist.
When the playlist is renamed, save and close the page by clicking the OK/Select button of the
on-screen keypad or selecting the text field and clicking the OK/Select button on the remote.
Continue watching the video playlist.
After the video playlist is renamed, you can continue watching it.

Deleting a Video Playlist
You can delete a video playlist by clicking its name and selecting “Delete Video Playlist”.
.
Before a playlist is deleted, a message will appear on-screen requesting confirmation.
Confirmation screen to prevent accidentally deleting a video playlist.
Once the deletion of confirmed, a confirmation message will be displayed in a green banner at the bottom of the screen.

NOTE: Once a playlist is deleted; the operation cannot be undone.
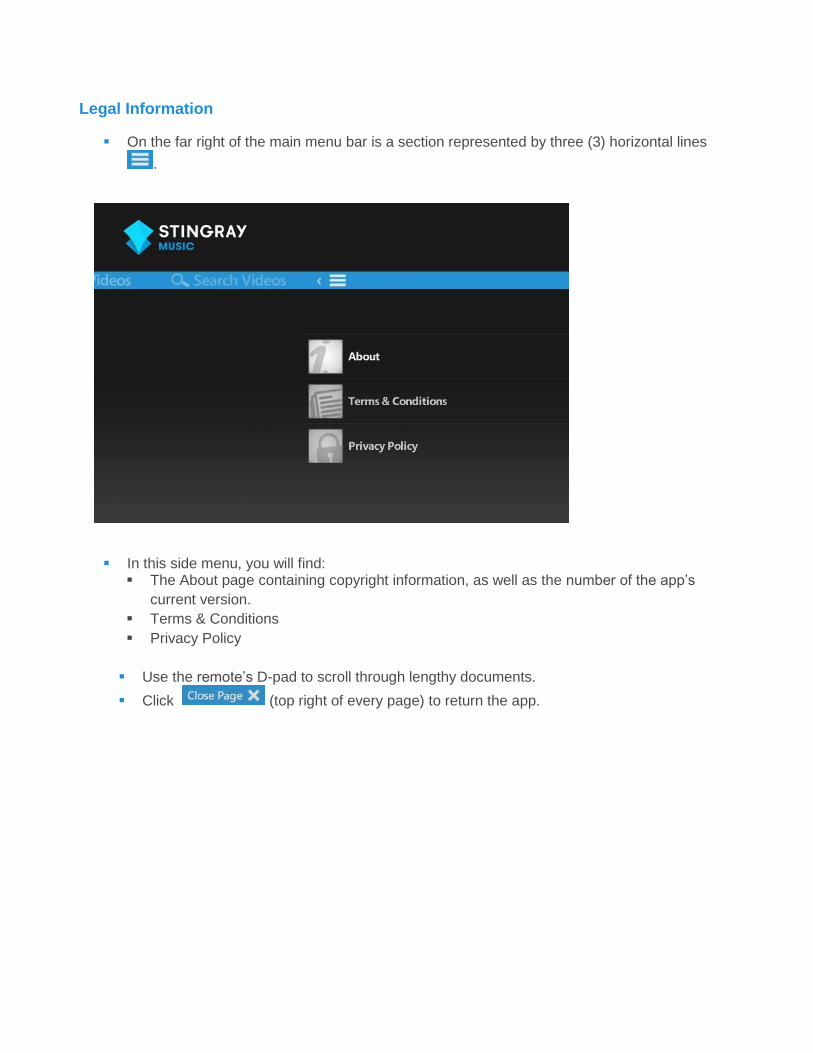
Legal Information
On the far right of the main menu bar is a section represented by three (3) horizontal lines
.
In this side menu, you will find: The About page containing copyright information, as well as the number of the app’s
current version.
Terms & Conditions
Privacy Policy
Use the remote’s D-pad to scroll through lengthy documents.
Click (top right of every page) to return the app.