storguard 13 ft x 27 ft - king canopy · the king canopy storguard™ garages are designed to be...
TRANSCRIPT

StorGuard™ 13 ft x 27 ft 13 ft 7 in Wide (Bottom) 11 ft 5 in Wide (Top) x 27 ft Length
6 ft 7 in Side Height / 8 ft 9 in Center Height / 6 ft 10 in Door Height
King Canopy Item # SG1327SWith 10 Legs, Cover with Side Walls, 2 End Walls,
Rafter Braces, Elastic Ball Straps, Foot Pads and Anchors.
WARNING:Keep all flame and heat
sources away from this tent fabric. The fabric will burn
if left in continuous contact with any flame source.
Distributed by:PIC America, LTD.8009 Purfoy Road • Fuquay-Varina, NC 275261-800-800-6296 • www.kingcanopy.com
These Tools Are Recommended:
PLEASE READ THE INSTRUCTIONS BEFORE PROCEEDING TO ASSEMBLE THIS CANOPY
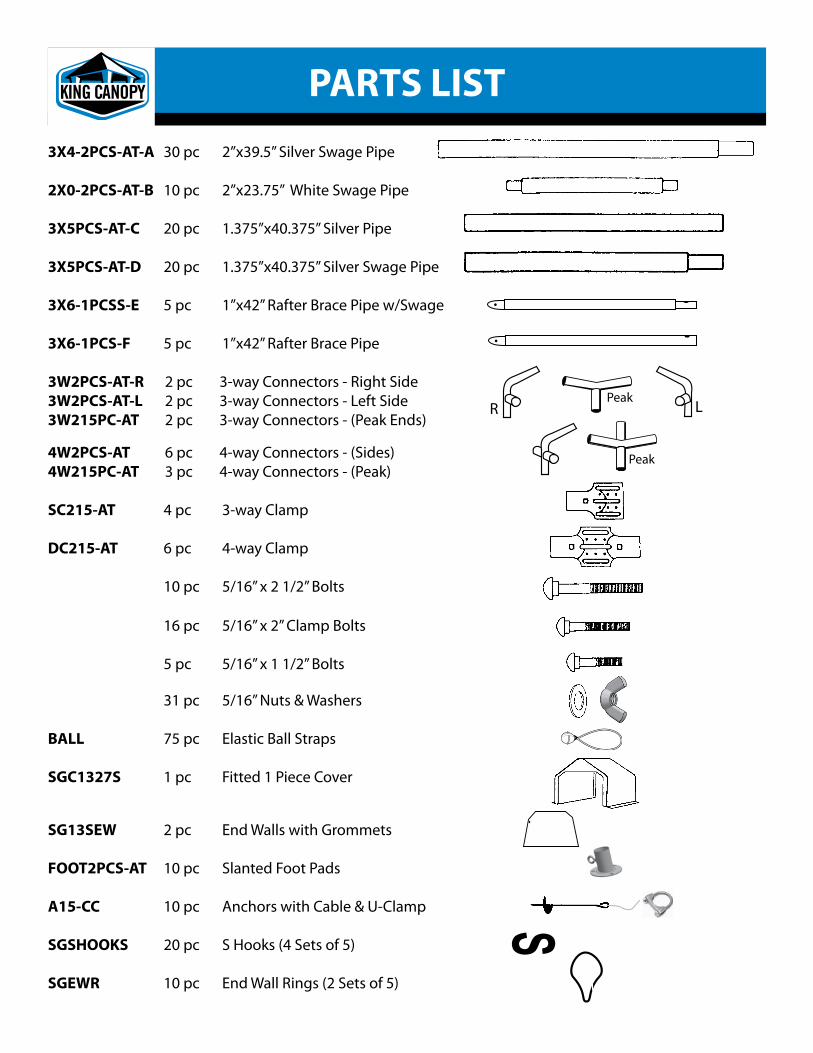
PARTS LIST3X4-2PCS-AT-A 30 pc 2”x39.5” Silver Swage Pipe
2X0-2PCS-AT-B 10 pc 2”x23.75” White Swage Pipe
3X5PCS-AT-C 20 pc 1.375”x40.375” Silver Pipe
3X5PCS-AT-D 20 pc 1.375”x40.375” Silver Swage Pipe
3X6-1PCSS-E 5 pc 1”x42” Rafter Brace Pipe w/Swage
3X6-1PCS-F 5 pc 1”x42” Rafter Brace Pipe
3W2PCS-AT-R 2 pc 3-way Connectors - Right Side3W2PCS-AT-L 2 pc 3-way Connectors - Left Side3W215PC-AT 2 pc 3-way Connectors - (Peak Ends)
4W2PCS-AT 6 pc 4-way Connectors - (Sides)4W215PC-AT 3 pc 4-way Connectors - (Peak)
SC215-AT 4 pc 3-way Clamp
DC215-AT 6 pc 4-way Clamp
10 pc 5/16” x 2 1/2” Bolts
16 pc 5/16” x 2” Clamp Bolts 5 pc 5/16” x 1 1/2” Bolts
31 pc 5/16” Nuts & Washers
BALL 75 pc Elastic Ball Straps
SGC1327S 1 pc Fitted 1 Piece Cover
SG13SEW 2 pc End Walls with Grommets
FOOT2PCS-AT 10 pc Slanted Foot Pads
A15-CC 10 pc Anchors with Cable & U-Clamp
SGSHOOKS 20 pc S Hooks (4 Sets of 5)
SGEWR 10 pc End Wall Rings (2 Sets of 5)
R LPeak
Peak
S

PARTS LIST
13’7
”
27’
8’9”
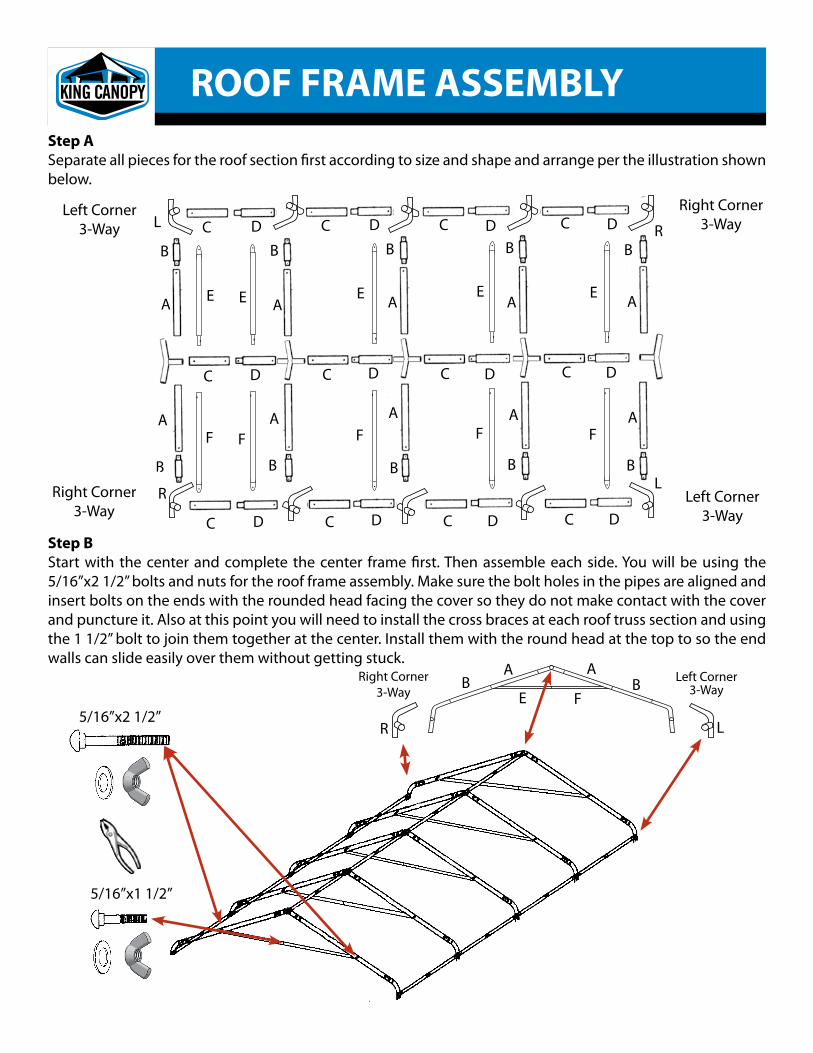
Step ASeparate all pieces for the roof section first according to size and shape and arrange per the illustration shown below.
Step BStart with the center and complete the center frame first. Then assemble each side. You will be using the 5/16”x2 1/2” bolts and nuts for the roof frame assembly. Make sure the bolt holes in the pipes are aligned and insert bolts on the ends with the rounded head facing the cover so they do not make contact with the cover and puncture it. Also at this point you will need to install the cross braces at each roof truss section and using the 1 1/2” bolt to join them together at the center. Install them with the round head at the top to so the end walls can slide easily over them without getting stuck.
ROOF FRAME ASSEMBLY
C
C
C
C
C
C
C
C
C
D
D
D
D
D
D
D
D
D
B
B
B
B
B
B
B
B
A
A
A
A
A
A
A
A
5/16”x2 1/2”
C
C
C
D
D
D
B
B
A
A
Right Corner3-Way
Left Corner3-Way
Left Corner3-Way
Right Corner3-Way
Right Corner3-Way
Left Corner3-Way
R
RL
L
LR
E
F
E
F
E
F
E
F
E
F
F
AB
AB
E
5/16”x1 1/2”

Inside View Outside View
COVER ASSEMBLY
Drape the cover over the the roof frame with the grommets on the bottom facing the roof frame and attach with ball bungees at each end. You may want to fold the sidewall section back onto the roof frame to keep it out of your way off the ground until you attach the legs. The sidewalls are long enough to be buried in the ground to prevent water from running inside.
Insert Second
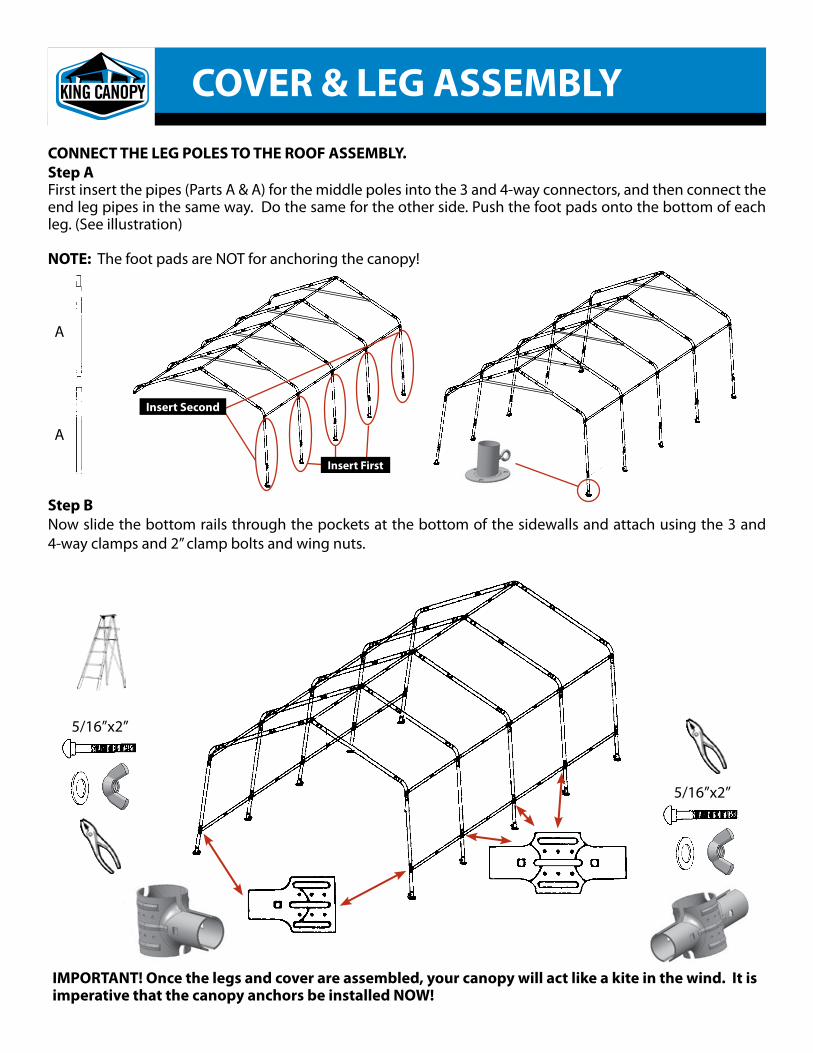
CONNECT THE LEG POLES TO THE ROOF ASSEMBLY.Step AFirst insert the pipes (Parts A & A) for the middle poles into the 3 and 4-way connectors, and then connect the end leg pipes in the same way. Do the same for the other side. Push the foot pads onto the bottom of each leg. (See illustration)
NOTE: The foot pads are NOT for anchoring the canopy!
COVER & LEG ASSEMBLY
Step BNow slide the bottom rails through the pockets at the bottom of the sidewalls and attach using the 3 and 4-way clamps and 2” clamp bolts and wing nuts.
IMPORTANT! Once the legs and cover are assembled, your canopy will act like a kite in the wind. It is imperative that the canopy anchors be installed NOW!
A
A
5/16”x2”
5/16”x2”
Insert First

ATTACH END WALLS TO ROOF BRACE BARS.Step ALoosen 1 end of the brace support bar and slide 4 rings onto the bar.
Step BHook the endwall onto each ring through the grommets on the top edge of the end wall.
Step CAttach an S-hook to the cover and with some pliers you maysqueeze the end of the S-hook tight to prevent it from coming loose.
Step D Loop a ball bungee strap through the grommet on the side walland pull it over the side and hook it into the S-hook to secure theend wall in a closed position.
Step ETo open the end, unhook all the ball bungees from one side andslide the wall open.
END WALL ASSEMBLY

ANCHORING YOUR UNIT
This canopy is designed for use as a temporary structure. After assembly, the canopy MUST BE securely anchored to the ground to prevent damage from winds. Your canopy will act like a kite in the wind if not properly and securely anchored to the ground. Severe winds will cause the frame to twist and unanchored legs will fall, thereby collapsing the canopy. If severe winds are expected, you must remove the cover from the frame to prevent damage.
We recommend anchoring your canopy at each corner foot and center foot on each side. Screw anchor into ground next to canopy foot using a large screw driver (1). Looping the cable through the anchor eye will keep it out of the way while turning. Tilting the anchor slightly will help the anchor to cut into the ground. Apply downward pressure while turning the anchor into the ground. Leave approximately three inches of anchor out of the ground.
Unloop the cable from the anchor eye and slide the clamp onto cable (2). Run cable around the pipe, and then back through the clamp. Pull the cable as tight as possible through the clamp. Hold the cable and tighten clamp with an adjustable wrench.
When you have tightened the clamp and satisfied that the cable will not slip, you may tighten the cable more by turning the anchor further in the ground as seen in Diagram (1).
(1)
(2)

IMPORTANT NOTICE: PLEASE READ CAREFULLY
We are confident that you will be completely satisfied with your King Canopy unit. Please take a moment to read the very important information below, and call us with any questions you may have.
King Canopy/PIC America, LTD. has no control over wind, snow, ice, rain or any other weather condition and we are in no way responsible for any damage caused by the canopy or to the canopy. We suggest you contact your insurance carrier just as you would for any other outside structure.
OTHER PRECAUTIONS WHICH MUST BE FOLLOWED:
Keep all flame and heat sources away from this tent fabric. The tent fabric will burn if left in continuous contact with any flame source.
DO NOT cook underneath or near canopy.
DO NOT store or use flammable liquids underneath or near canopy.
DO NOT ignite or store fireworks underneath or near canopy.
DO NOT use bleach to clean cover.
DO NOT dry clean cover.
DO NOT wash cover in washing machine or dry in dryer. Hand wash with mild soap and water only.
DO NOT allow rain water, snow or ice to accumulate on top of cover.
DO NOT hang or suspend anything from the frame, grommets, truss system or ball straps of the unit.
REMOVE canopy cover before a storm, or disassemble entire canopy unit if possible.
REMOVE rain water, snow and ice from canopy cover.
This is a temporary structure and is not recommended for use as a permanent structure.
The King Canopy StorGuard™ Garages are designed to be one of the strongest and most well designed garages in production today. This innovative product offers numerous features and benefits for the end use consumer. Key features include a commercial grade PE fabric skylight that allows sunlight to enter and “Pass-Thru” front and rear doors that make storing automobiles, boats, ATVs or personal watercraft a breeze! The Roof Truss System is included for increased stability and durability in extreme weather conditions and able to withstand significantly heavier loads than frame systems that do not include this outstanding feature. Easy to assemble and engineered for maximum protection. Includes one year limited warranty. (Please see enclosed instruction sheet for details.)
***The Roof Truss System will not guarantee that your King Canopy Garage/Carport will hold heavy loads (snow specifically) indefinitely. Any significant snow accumulation must be removed frequently to avoid the possibility of PE fabric failure and steel frame collapse.***

PRODUCT INFORMATION
Missing/Defective PartsWe try our best to eliminate any defective parts that are shipped with our products. Carefully inspect all packages upon arrival and report any missing or defective items upon receipt. Any discrepancies must be reported to King Canopy within 30 days of purchase. Please be sure to take a few minutes to match all items in the box to the items on the product manual. If there should be any missing or defective items, we will ship them free of charge. You will need to fill out a warranty claim form and e-mail, fax, or mail it in along with a proof of purchase showing date of purchase. Your replacement will be shipped free of charge by ground shipping. Next day or express shipping will require freight collect and paid for by you. Damages from improper anchoring, strong winds, snow, ice or rain are not considered defects.1 Year Limited WarrantyAll of our canopy components feature a 1-year limited warranty (90 day-limited on Value King Brand items) and are warranted to be free from defects in material and workmanship during this time frame. You must fill out our warranty claim form and provide your proof of purchase receipt. This does not pertain to any missing or defective parts in the 30 day inspection period.Defective ReturnsIf you receive a product that is defective and wish to return it, please contact our customer service department to receive a return authorization number. All items will be passed through quality control before issuing a credit. You will be contacted upon receipt of your returned merchandise and notified whether your return is accepted or not. If not, you will have the option to receive the product back at your expense.Improper Anchoring, Strong Winds, Rain, Snow, or IceKing Canopy/ PIC America, LTD. does not guarantee these canopies under strong weather conditions (including snow and ice) under any circumstances. These canopies are designed to protect against damages cause by sun, light rain, tree sap, birds, etc. They are not designed to hold roof loads that accompany snow, ice, or heavy rains. If your canopy is not anchored securely, strong winds can lift it and cause damage if it is blown over and/or away. Canopies make excellent kites. If your canopy is anchored incorrectly and is blown away, we will not send any free replacement parts for damages. If you know strong weather is predicted, remove the cover or take down the unit completely. The cover is designed to be quickly and easily removed.Non-Warranty Replacement PartsIf your warranty expires and you need replacement parts and they cannot be found on www.kingcanopy.com, please contact us at 1-800-800-6296. We stock replacement parts for most of our products. Our customer service department will be pleased to assist you in any way possible.Certain regions of the country are extremely harsh on canopy covers. Normal wear and tear is not covered under warranty, and should be expected.In order to receive a discounted or free replacement part, you may be asked to return the part, freight prepaid, to our warehouse for inspection before we will send a replacement. You must, in all cases, provide a copy of your receipt showing the date of purchase, model number and price.Customer Service:8:00 AM – 5:00 PM EST, Monday - Friday1-919-552-2977 • Toll Free: 1-800-800-6296 • Fax: 1-919-552-5069Download Warranty Claim Form from our website.Return PolicyAll returns will require a return authorization number (RA). To obtain an RA, please contact our customer service department at (800) 800-6296. All returns must be submitted within 30 days of purchase date, located on receipt. Any returns summited after 30 days without an RA number will not be accepted. Credit will be issued upon receipt of product and inspected for damages or excessive wear and tear. The full amount of the product will be credited in the form of original payment minus a 15% restocking fee and shipping and handling.*Please allow time to inspect and issue the appropriate refund.*Customer Service:8:00 AM – 5:00 PM EST, Monday - Friday1-919-552-2977 • Toll Free: 1-800-800-6296 • Fax: [email protected]