storport miniport driver -...
TRANSCRIPT

Storport Miniport DriverVersion 2.10
for Windows Server 2003
Windows Server 2008
Server Core Installation Option of Windows 2008
User Manual
P003638-01 A Rev. A Critical Connectivity Solutions™
Copyright © 2008 Emulex. All rights reserved worldwide. No part of this document may be reproduced by any means or translated to any electronic medium without the prior written consent of Emulex.
Information furnished by Emulex is believed to be accurate and reliable. However, no responsibility is assumed by Emulex for its use; or for any infringements of patents or other rights of third parties which may result from its use. No license is granted by implication or otherwise under any patent, copyright or related rights of Emulex.
Emulex, AutoPilot Installer, BlockGuard, cLAN, FabricStream, FibreSpy, Giganet, HBAnyware, InSpeed, IntraLink, LightPulse, MultiPulse, SAN Insite, SBOD and Vixel are registered trademarks, and AutoPilot Manager, Critical Connectivity Solutions, EZPilot, SLI and VMPilot are trademarks of Emulex. All other brand or product names referenced herein are trademarks or registered trademarks of their respective companies or organizations.
Emulex provides this manual “as is” without any warranty of any kind, either expressed or implied, including but not limited to the implied warranties of merchantability or fitness for a particular purpose. Emulex may make improvements and changes to the product described in this manual at any time and without any notice. Emulex assumes no responsibility for its use, nor for any infringements of patents or other rights of third parties that may result. Periodic changes are made to information contained herein; although these changes will be incorporated into new editions of this manual, Emulex disclaims any undertaking to give notice of such changes.
DH-CHAP Notice.License: Copyright (c) 1998-2006 The OpenSSL Project. All rights reserved. This product includes software developed by the OpenSSL Project for use in the OpenSSL Toolkit. (http://www.openssl.org/) SSLeay License: Copyright (C) 1995-1998 Eric Young ([email protected]) All rights reserved. This product includes cryptographic software written by Eric Young ([email protected]). This product includes software written by Tim Hudson ([email protected]).
Windows DH-CHAP Notice.Derived from the RSA Data Security, Inc. MD5 Message-Digest Algorithm.Copyright (C) 1991-2, RSA Data Security, Inc. Created 1991. All rights reserved.
Emulex, 3333 Susan StreetCosta Mesa, CA 92626
Storport Miniport Driver User Manual Page ii

Table of Contents
Installation ..................................................................................................................... 1
Introduction.............................................................................................................. 1Important Considerations......................................................................................... 2
New in This Release ......................................................................................... 2Changing Driver Types ...................................................................................... 2Minimum Software Requirements...................................................................... 2Known Issues .................................................................................................... 2
Storport Miniport Driver Information ......................................................................... 3Driver Kit Installer Overview .................................................................................... 4
Files Installed by the Driver Kit Installer............................................................. 4AutoPilot Installer Overview..................................................................................... 5
AutoPilot Installer Features ............................................................................... 5Text-Only Installation ......................................................................................... 5
Installing the Driver Kit............................................................................................. 6Starting Installers from a Command Prompt or Script .............................................. 6Running a Software Installation Interactively ........................................................... 6
Hardware-First Installation or Driver and Utility Update ..................................... 8Software-First Installation ................................................................................ 10Utility-Only Update .......................................................................................... 10Diagnostics...................................................................................................... 12
Performing an Unattended Installation................................................................... 13Driver Kit Installer Command Line Parameters ...................................................... 14Configuring an AutoPilot Installer Kit ..................................................................... 15
AutoPilot Installer Command Line Parameters ................................................ 16Command Line Parameter Settings .......................................................... 16Configuration File Location ....................................................................... 17Software Configuration Parameters .......................................................... 17
AutoPilot Configuration File ............................................................................. 20Configuration Identification [AUTOPILOT.ID]............................................. 21Software Configuration [AUTOPILOT.CONFIG] ........................................ 21Configuration Prompts/Vendor-Specific Questions [STORPORT.CONFIGURATION] .............................................................. 21QFE Checks [STORPORT.QFES] ............................................................. 23Setting Up Driver Parameters [STORPORT.PARAMS].............................. 23Setting Up System Parameters [SYSTEM.PARAMS] ................................ 23
AutoPilot Installer Exit Codes .......................................................................... 24AutoPilot Installer Installation Reports....................................................... 25Command Script Example......................................................................... 25
Manual Installation and Updating Procedures ....................................................... 27Manually Installing or Updating the Storport Miniport Driver ............................ 27
Manually Installing the Emulex PLUS (ElxPlus) Driver for the First Time ............................................................................................ 27Manually Updating the Emulex PLUS (ElxPlus) Driver.............................. 28Manually Installing or Updating the Fibre Channel Storport Miniport Driver ............................................................................. 28
Manually Installing the Driver Utilities .............................................................. 29HBAnyware Security Configurator ......................................................................... 30
Installing the HBAnyware Security Configurator .............................................. 30
Storport Miniport Driver User Manual Page iii

Table of Contents
HBAnyware Utility Web Launch Procedures .......................................................... 30Installing the HBAnyware Utility Web Launch Feature..................................... 30Updating the HBAnyware Utility Web Launch URL.......................................... 31
Uninstallation ............................................................................................................... 32
Uninstalling HBAnyware Web Launch ............................................................. 32Uninstalling Programs ..................................................................................... 32Uninstalling the Emulex Drivers....................................................................... 34
Configuration ............................................................................................................... 35
Introduction............................................................................................................ 35Server Performance .............................................................................................. 35
I/O Coalescing................................................................................................. 35Performance Testing ....................................................................................... 36
Troubleshooting ........................................................................................................... 37
Introduction............................................................................................................ 37Event Tracing (Windows Server 2003, SP1 and later only) ............................. 37Event Trace Messages.................................................................................... 38
ELS Log Messages (0100 - 0130)............................................................. 38Discovery Log Messages (0202 - 0262) .................................................... 40Mailbox Log Messages (0310 - 0326) ....................................................... 42INIT Log Messages (0400 - 0463)............................................................. 42FCP Log Messages (0701 - 0749) ............................................................ 44Link Log Messages (1302 - 1306) ............................................................. 46Tag Messages (1400 - 1401)..................................................................... 47NPIV Messages (1800 - 1899) .................................................................. 47ELS Messages (1900 - 1999).................................................................... 48
Error Log ......................................................................................................... 48Viewing the Error Log................................................................................ 48Severity Scheme ....................................................................................... 49Related Driver Parameter: LogError.......................................................... 49Format of an Error Log Entry .................................................................... 49Error Codes Tables ................................................................................... 50
Storport Miniport Driver User Manual Page iv

Installation
IntroductionAutoPilot Installer® for Emulex® Storport Miniport drivers provides installation options that include simple installations with a few mouse clicks, custom unattended installations that use predefined script files and text-only installations. AutoPilot Installer is included with Emulex drivers and utilities in Windows executable files (driver kit installers) that you can download from the Emulex Web site.
There are two types of driver kits that can install the Emulex Storport Miniport driver and utilities:
• Full Installation Driver kit (full driver kit) - Includes the Emulex Storport Miniport driver and the complete HBAnyware® utility set, including a Graphical User Interface (GUI) and a Command Line Interface (CLI). The full driver kit also provides an option to create AutoPilot Installer kits that you can customize and distribute on your network. Although the full driver kit will not install on the Server Core installation option of Windows Server 2008 (Server Core), it can be used to create kits for those platforms.
• Core Installation Driver kit (core driver kit) - Includes the Emulex Storport Miniport driver and the HBAnyware utility CLI, but not the HBAnyware utility GUI. The core driver kit is required for use with Server Core platforms. You can only customize the core driver kit on the system where it is installed. It cannot be used to create AutoPilot Installer Kits for other platforms.
Run one of the driver kit installers to extract all of the software needed for an installation, then complete the installation using AutoPilot Installer. You can install a driver by any of the following methods:
Hardware-first installation. At least one Emulex adapter is installed before you install the Emulex drivers and utilities.
Software-first installation. You can install drivers and utilities using AutoPilot Installer prior to the installation of any adapters. You do not need to specify the model of any adapters to be installed later. The appropriate drivers and utilities automatically load when you install the adapters.
Utility Only update. If the Storport Miniport driver in the driver kit is the same version as what is already installed on the system, you can reinstall or update the previously installed utility without reinstalling the Storport Miniport driver.
Text-Only installation. Text-based installation mode is used automatically when AutoPilot Installer is run on a Server Core system.
Network installation. You can place the driver kit installers on a shared network drive and install them across your local area network (LAN). You can use the full driver kit to create your own AutoPilot Installer kits for network-based installation. Network-based installation is often used in conjunction with unattended installation and scripting. This allows you to configure and install the same driver and utility versions on all the hosts in a SAN.
Unattended installation. You can run the driver kit installers and AutoPilot Installer with no user interaction from a command line or script. Unattended installation works for both hardware-first and software-first installations and with both the full driver kit and the core driver kit. An unattended installation operates in silent mode (sometimes referred to as quiet mode) and creates an extensive report file with installation status.
Note: These installation methods are not mutually exclusive.
Storport Miniport Driver User Manual Page 1

Important Considerations
New in This Release• Support for converged network adapters.• Utility-only update (see “Utility-Only Update” on page 10.)• Command line parameters for silent installation.• Support for the Server Core installation option of Windows Server 2008. A text-only mode has
been added to AutoPilot Installer for Server Core systems.• Support to change the management port number.• Support for Windows Server 2008 Hyper-V.• Support to run the HBAnyware utility in read-only mode.
Changing Driver Types
If you currently use a SCSIport Miniport or FC Port driver, the driver will be replaced when you install Storport Miniport driver version 2.10. Storport Miniport driver version 2.10 will be installed for all HBAs on the server. You will also lose your customized driver parameters, persistent bindings, LUN masking and LUN mapping. The default parameters set with AutoPilot Installer will usually be the best options. However, you may want to note your current settings before you install Storport Miniport driver version 2.10. After the installation, you can then update your customized driver parameters.
Minimum Software Requirements
AutoPilot Installer will not let you perform an installation if the minimum Windows service pack or Microsoft Storport driver update is not installed.
Known Issues
The following issues have been reported at the time of publication. These issues may not yet have been verified or confirmed and may apply to another product, such as hardware.
• Do not perform software-first installations on Windows Server 2008 or Vista systems. The procedure documented in “Software-First Installation” on page 10 might not have the expected effect. No error will be reported, but Windows might continue using the version of the driver distributed with the operating system rather than the new driver when an adapter is installed. The problem occurs because Microsoft-distributed drivers are versioned differently than Emulex-distributed drivers.
• To revert to older drivers after installing one of the 2.10 driver kits, you must uninstall all Emulex software and drivers before installing the older driver kit. Failure to do so could leave your system in an unsupported state. See“Uninstallation” on page 32 for all the procedures you must follow.
Note: This update process can leave files associated with old driver kits on your system. After running AutoPilot Installer and restarting your system, you may be required to uninstall old driver or utility program entries. Follow the procedures in the "Uninstalling Programs" section in the Storport Miniport driver User Manual. Ensure you delete only previous driver and utility versions.
Storport Miniport Driver User Manual Page 2

Storport Miniport Driver InformationPrerequisites
• One of the following operating systems:• Windows Server 2003 SP2 running on an x86, x64 or Itanium server.• Windows Server 2008 running on an x86, x64 or Itanium server.• Server Core installation option of Windows Server 2008 running on an x86 or x64 server.• Windows Vista SP1 running on an x86 or x64 platform.
• Minimum 512 MB memory. • See the Emulex Web site for required updates to the Microsoft Storport driver.
Compatibility
• The Emulex Storport Miniport driver is compatible with the following Emulex adapters:• LP21002 and LP21000 converged network adapters (CNAs) (minimum firmware version
1.00a4)
• LPe12002, LPe12000 and LPe1250 adapters (minimum firmware version 1.00a9)• LPe11004, LPe11002, LPe11000 and LPe1150 adapters (minimum firmware version 2.72a2)• LP11002, LP11000 and LP1150 adapters (minimum firmware version 2.72a2)• LP10000DC, LP10000, LP1050DC and LP1050 adapters (minimum firmware version
1.91a5)• LP10000ExDC and LP1050Ex adapters (minimum firmware 1.91a5)• LP9802DC, LP9802 and LP982 adapters (minimum firmware version 1.91a5)• LP9402DC, LP9002DC, LP9002L, LP9000 & LP952L adapters (minimum firmware version
3.93a0)• x86 BootBIOS - LP21002 and LP21000, minimum version 2.02a1; LPe12002 LPe12000 and
LPe1250, minimum version 2.01a2; all other adapter models, minimum version 1.71a0.• EFIBoot - (LP21002 and LP21000 are not supported) LPe12002, LPe12000 and LPe1250,
minimum version 4.00a1; all other adapter models, minimum 3.11a5.• This version of the driver is compatible with version 4.0 of the HBAnyware utility. This is the
version of HBAnyware that is included in the driver kit. Version 4.0 of the HBAnyware utility is not compatible with earlier versions of the Emulex Storport Miniport driver on the same server.
Note: The LP21002 and LP21000 CNAs do not support Windows Server 2003/2008 on Itanium servers
Storport Miniport Driver User Manual Page 3

Driver Kit Installer OverviewThe driver kit installer is an executable file that self-extracts and copies the following software onto your system:
• AutoPilot Installer - Installs drivers and runs the HBAnyware utilities installer.• Storport Miniport driver - Manages communication and data transfer between applications and
I/O devices, using Emulex adapters as agents. There are separate drivers for Emulex host bus adapters (HBAs) and converged network adapters (CNAs).
• ElxPlus driver - Supports the HBAnyware utility, persistent binding and LUN mapping and masking.
• HBAnyware utility installer- Installs HBAnyware utilities and services. These monitor and perform configuration tasks on remote and local adapters.
• HBAnyware Security Configurator - Controls which HBAnyware systems can remotely access and manage adapters on other systems in a Storage Area Network (SAN).
After the driver kit is installed, you have three options:
• Automatically run AutoPilot Installer immediately. This is the default option. See page 6 for more information.
• Explicitly run AutoPilot Installer later on your system. See page 7 for more information.• Create an AutoPilot Installer kit that can be customized and used to run AutoPilot Installer on
your system or another system. See page 7 for more information.
Files Installed by the Driver Kit Installer
The driver kit installer copies the AutoPilot Installer Files to your system. By default, the files necessary to run AutoPilot Installer are copied to:
c:\Program Files\Emulex\AutoPilot Installer.
When you select the Create AutoPilot Installer Kits option, the files are copied by default to an Emulex folder in your Documents folder.
Note: The third option is only available when installing the full driver kit. While the full driver kit cannot be installed on Server Core systems, it can be used to create AutoPilot Installer Kits for those systems.
Table 1: AutoPilot Installer Program Files
Folder Description
AutoPilot Installer This folder contains files necessary to run the AutoPilot Installer, including:• APInstall.exe - Executable file for the AutoPilot Installer.• APInstall.cfg - Default configuration file for the AutoPilot Installer.
Drivers\Storport This folder contains the files necessary to install the drivers.
Utilities This folder contains files necessary to install the HBAnyware utilities.
reports AutoPilot Installer reports are placed here by default. Reports can be placed in a different location using the ReportLocation parameter.
Storport Miniport Driver User Manual Page 4

AutoPilot Installer OverviewAutoPilot Installer runs after the driver kit is installed. It can be run by:
• Continuing the installation process after the driver kit installation completes.• Interactive installation at a later time.• Unattended installation.
AutoPilot Installer Features• Command line functionality - Initiates an installation from a command prompt or script.
Configuration settings can be specified on the command line.• Compatibility - Verifies that the driver to be installed is compatible with the operating system and
platform.• Driver and utility updates - Installs and updates drivers and utilities.• Multiple adapter installation capability - Installs drivers on multiple adapters, alleviating the need
to manually install the same driver on all adapters in the system.• Driver diagnostics - Determines whether the driver is operating properly.• Silent installation mode - Suppresses all screen output (necessary for unattended installation).• Utility-only installation - AutoPilot Installer can skip driver installation if the driver on the system
is the same as the driver AutoPilot Installer is about to install. This functionality is available for attended and unattended installations.
• Management Mode Setup - Parameters in the AutoPilot Installer configuration file or on the command line determine if you can manage adapters locally and remotely, and if the user can change the remote management options once the utility is installed.
Text-Only Installation
Text-based installation mode is used automatically when AutoPilot Installer runs on a server with the Server Core installation option of Windows Server 2008. During text-based installations, AutoPilot Installer interacts through a command prompt window. AutoPilot Installer notifies you when the driver is installed and also gives you a chance to abort the installation.
Whether it is launched from the command line or started programmatically, Windows always starts AutoPilot Installer as a separate stand-alone task. This means that AutoPilot Installer will have its own command prompt window and cannot access others.
Note: See “Software Configuration Parameters” on page 17 in the Unattended Installation topic for more information. Management mode parameters govern both attended and unattended installations.
Table 2: Supported Installation Modes
Installation Kit Full Windows System Server Core System
Full Driver Kit GUI InstallSilent Install
Not Allowed
Core Driver Kit GUI InstallSilent Install
Text-based InstallSilent Install
Storport Miniport Driver User Manual Page 5

Installing the Driver KitTo install either the full driver kit or the core driver kit:
1. Download the driver kit installer from the Emulex Web site to your system. There is one driver kit installer for the full driver kit and one driver kit installer for the core driver kit. Only one driver kit may be installed on any system. The driver kit installer is an executable file with a name similar to storportminiportkit_2-10a7-1c.exe for the full driver kit, or storportminiportcorekit_2-10a7-1c.exe for the core driver kit.
2. Once you download the driver kit installer, you have several options:• For an automatic interactive installation without customization, see “Option 1: Automatically
Run AutoPilot Installer” on page 6.• For control of all interactive installation settings, see “Option 2: Run AutoPilot Installer
Separately” on page 7.• To create your own AutoPilot Installer kits and deploy them, see “Option 3: Create an
AutoPilot Installer Kit” on page 7.• For an unattended installation with AutoPilot Installer, see “Performing an Unattended
Installation” on page 13.
Starting Installers from a Command Prompt or ScriptWhen a driver kit installer or AutoPilot Installer is run from a command prompt or command script (batch file), the Windows command processor does not wait for the installer to run to completion. Thus you cannot check the exit code of the installer before the next command is executed. Emulex recommends that command line invocation always use the “start” command with the “/wait” option. This will cause the command processor to wait for the installer to complete before it continues. The preferred method for launching the driver kit Installer from a command prompt or a command script is:
start /wait storportminiportkit_2-10a7-1c
Running a Software Installation InteractivelyThere are three options when performing an installation interactively. These options assume you have already downloaded the driver kit installer from the Emulex web site.
Option 1: Automatically Run AutoPilot Installer
Use this option unless you have specific configuration needs. This option allows you to complete a driver kit installation and AutoPilot installation with a few simple mouse clicks.
1. Double-click the driver kit installer or run it from a command line. See “Driver Kit Installer Command Line Parameters” on page 14 for information on the command line options. One command line parameter, APargs, lets you specify arguments that will automatically be passed to the AutoPilot Installer command. A Welcome page is displayed with driver kit version information and Emulex contact information.
2. Click Next to proceed to the Installation Options page.
For each installation option, the default installation location for that option is displayed. Browse to a different location, if desired. • For the core driver kit, there is only one installation option: Perform AutoPilot Installation. • For the full driver kit, you have an additional option to Create AutoPilot Installer Kits. The
default option is Perform AutoPilot Installation only.
Note: The name of the driver kit installer depends on the current version identifier.
Storport Miniport Driver User Manual Page 6

3. Click Install to continue the installation.
The Progress dialog box is displayed. After all tasks complete, a Finish page is displayed. The Start AutoPilot Installer box is automatically selected.
4. Click Finish. AutoPilot Installer is run automatically.
Option 2: Run AutoPilot Installer Separately
This option is recommended to:
• Change installation settings, such as the HBAnyware management mode, for a limited number of systems.
• Familiarize yourself with AutoPilot Installer configuration options.
• Test a configuration file that you created as part of Option 3 (see below).
To access these features, you run AutoPilot Installer after driver kit installation is done. This allows you to change the configuration options supplied to AutoPilot Installer (see below).
1. Perform steps 1 through 3 for Option 1.2. Clear the Run AutoPilot Installer check box on the Finish page.3. Click Finish. The driver kit installer exits.
After the driver kit installation is finished, change the configuration in one of two ways:
• Change the configuration file. See “Software Configuration Parameters” on page 17 for details. • Supply parameters on the command line. See “Command Line Parameter Settings” on page 16
for details.
Once you have finished this step, you can run AutoPilot Installer at a later time, using either of the following methods: (If you are supplying options via the command line, you must use the second option.)
• Select Programs>Emulex>AutoPilot Installer in the Start menu. • Run AutoPilot Installer from a command line by running
"C:\Program Files\Emulex\AutoPilot Installer\APInstall.exe""
Option 3: Create an AutoPilot Installer Kit
This option is recommended to install the same customized configuration on multiple systems in your SAN.
1. Run the driver kit installer. The Installation options page is displayed.2. Select the Create AutoPilot Installer Kits option. 3. Clear the Perform AutoPilot Installation option unless you also want to run AutoPilot Installer
using Option 1 or Option 2 as previously described. The Create AutoPilot Installer Kits option will not install any additional programs on your system. Instead, files will be copied to a Documents folder. The files can be used to create AutoPilot Installer Kits. An AutoPilot Installer Kit is a folder containing APInstall.exe and other files. You run this copy of APInstall.exe from the command line.
After the driver kit installer is finished, you'll typically find APInstall.cfg in:
Documents\Emulex\AutoPilot Installer Kit version\Installers
Note: The location of APInstaller.exe may differ on your system, depending on your system's Program Files location. You may also specify a different location when you install the driver package.
Storport Miniport Driver User Manual Page 7

where Documents is your Documents folder (named “My Documents” in Windows Server 2003 or “username\Documents” in Windows Server 2008/Vista) and version is the driver package version identifier. You can specify a different AutoPilot Installer kits folder when you select the Create AutoPilot Installer Kits option.
See “Configuring an AutoPilot Installer Kit” on page 15 for more information on creating a custom kit.
Hardware-First Installation or Driver and Utility Update
The driver kit installer must be downloaded from the Emulex Web site and installed. Either the full or the core package may be installed; only one can be installed on a system.
To perform a hardware-first installation:
1. Install a new Emulex adapter and power-on the system. If the Windows Found New Hardware wizard is displayed, click Cancel to exit. AutoPilot Installer performs this function.
2. Run AutoPilot Installer using any of the options listed in the “Running a Software Installation Interactively” on page 6.
3. When the AutoPilot Installer Welcome page appears, select an adapter in the list and click Next. Installation continues. Specific considerations:• If you are replacing a SCSIport Miniport or FC Port driver, an Available Drivers list will be
displayed for your review. Click OK on this window.• If you are updating the driver and the utility, your existing management modes and port
settings will be used, unless otherwise specified in the configuration file. These settings will be pre-selected but can be changed. Set or change settings, then click Next.
• If you are initially installing a vendor-specific version of the Emulex driver installation program, a Driver Configuration page may be displayed. This page includes one or more windows with questions that you must answer before continuing the installation process. In this case, answer each question and click Next on each window to continue.
4. If the Utilities Installation page appears (as seen in Figure 1), select how adapters (local and remote) are managed by the HBAnyware utility.
The following configurations can be selected:• Strictly Local Management - The HBAnyware utility only manages the adapters on this host
and no remote management of adapters is allowed.• Local Management Plus - The HBAnyware utility only manages the adapters on this host.
Management of adapters on this host from other hosts is allowed.• Full Management - The HBAnyware utility manages the adapters on this host and other
hosts that allow it. Management of adapters on this host from other hosts is also allowed.• Read Only Management - If you select this check box, the HBAnyware utility cannot perform
configuration tasks, such as changing driver parameter values or updating firmware. • This option cannot be checked if Strictly Local Management is selected.
Note: To update the Storport Miniport driver, begin the following procedure at step 2.
Note: If there are multiple adapters in the system, the Windows Found New Hardware wizard appears multiple times. Click Cancel to exit the wizard each time it appears.
Note: The display of the Utilities Installation page is optional and based on settings on the AutoPilot Installer command line or in the AutoPilot Configuration file. See “Software Configuration Parameters” on page 17 for more information.
Storport Miniport Driver User Manual Page 8

• If Local Management Plus is selected, the HBAnyware utility can view information about the adapters on this host but cannot change the information.
• If Full Management is selected, the HBAnyware utility can view information about the adapters on this host and other hosts that allow it, but cannot change the information.
In both cases, other hosts can view and manage the local host’s adapters.• To prevent the management mode from being changed after installation, clear the Allow
users to change the management mode after installing the utility check box.
Figure 1: Utilities Installation Management Mode Setup
5. Click Next. Installation automatically continues to completion. A dialog box will be displayed if Windows requires a reboot. View the progress of the installation. Once the installation is successful, a Finish page appears.
6. View or print a report, if desired.• View Installation Report - The installation report is a text file with current Emulex adapter
inventory, configuration information and task results. • Print Installation Report - The Windows print dialog is displayed to select options for printing
the installation report.7. Click Finish to exit AutoPilot Installer. If your system requires a reboot as indicated in step 5, you
must do so before using the drivers or utilities.
Storport Miniport Driver User Manual Page 9

Software-First Installation
The driver kit installer must be downloaded from the Emulex Web site and installed on your system. Either the full or core driver package may be installed.
To perform a software-first installation:
1. Run AutoPilot Installer using any of the options listed in the “Running a Software Installation Interactively” on page 6. The following message appears:
Figure 2: AutoPilot Installer Warning (Software-First Installation)
2. Click OK. A Welcome page appears. 3. Click Next. Installation automatically completes.
View the progress of the installation. Once the installation is successful, a Finish Page appears.4. View or print a report, if desired.
• View Installation Report. The installation report is a text file with current Emulex adapter inventory, configuration information and task results.
• Print Installation Report - The Windows print dialog is displayed to select options for printing the installation report.
5. Click Finish to exit AutoPilot Installer.
Utility-Only Update
You can reinstall or update a utility without reinstalling the Storport Miniport driver. This option is only available if the Storport Miniport driver in the driver kit installer is the same version as the driver that is already installed on the system.
For unattended installations, the ForceDriverUpdate setting must be set to false. (See “Software Configuration Parameters” on page 17.)
For attended hardware-first utility updates:
1. Run AutoPilot Installer using any of the options listed in the “Running a Software Installation Interactively” on page 6.
Storport Miniport Driver User Manual Page 10

2. When the AutoPilot Installer Welcome page appears, click Next.The Driver Installation Issue page is displayed.
Figure 3: Driver Installation Issue
3. Select the Skip the driver installation and install the utilities check box and click Next. To stop installation, click Cancel.
4. View or print a report, if desired.• View Installation Report. The installation report is a text file with current Emulex adapter
inventory, configuration information and task results.• Print Installation Report - The Windows print dialog is displayed to select options for printing
the installation report.5. Click Finish to exit AutoPilot Installer. If the system needs to reboot, you are prompted to do so
after you click Finish.
For software-first utility updates:
1. Run AutoPilot Installer. A dialog appears asking if you want to perform a software-first installation of the drivers and utilities, or just an installation of utilities.
2. Select Utilities Only. Installation proceeds. View the progress of the utility installation. Once the utility installation is successful, a congratulations window appears.
3. View or print a report, if desired (see details in step 4 of the previous procedure)4. Click Finish to exit AutoPilot Installer.
Storport Miniport Driver User Manual Page 11

Diagnostics
Once the AutoPilot Installer finishes, the Diagnostics window is displayed. Figure 4 shows a successful installation.
Figure 4: AutoPilot Installer Diagnostics.
If the installation fails, the Diagnostics window shows that the adapter failed. If the adapter fails:
1. Select the adapter to view the reason an adapter failed. The reason and suggested corrective action are displayed.
2. Perform the suggested corrective action and run AutoPilot Installer again.
Note: AutoPilot Installer can be run again from the Start menu (Programs>Emulex>AutoPilot Installer) or APInstall.exe can be run from a command prompt.
Storport Miniport Driver User Manual Page 12

Performing an Unattended InstallationAn unattended installation, sometimes referred to as a quiet or silent installation, requires no user input. This is useful for performing an installation remotely from a command script, or when you want to make sure a custom configuration will not be changed by a user during installation.There are several ways to perform an unattended installation. These correspond to the options for running the software installation interactively.
Option 1: Automatically Run AutoPilot Installer
Run the driver kit installer from a command prompt or script. Specify the “/q” (quiet) command line option. For example:
storportminiportkit_2-10a7-1c.exe /q
Option 2: Run AutoPilot Installer Separately
• Run the driver kit installer, but defer running AutoPilot Installer. Then choose one of the following options:• Run AutoPilot Installer from a command prompt or script with the silent option:
APInstall.exe /silent
• Edit the AutoPilot Installer configuration file before running AutoPilot Installer. The configuration file is typically in:C:\Program Files\Emulex\AutoPilot Installer\APInstall.cfg
Uncomment the line that sets SilentInstallEnable to “True”. There are other settings in the same section of the configuration file related to unattended installations that you may also want to edit. See “Software Configuration Parameters” on page 17 for more information. After editing the file, you can run AutoPilot Installer from the Start menu, a command prompt or a script.
Option 3: Create an AutoPilot Installer Kit
• Run the full driver package installer and choose the Create AutoPilot Installer Kits option. Then do one of the following:• Create AutoPilot Installer kits using the makekit.cmd script (makekit script), as described in
the “Configuring an AutoPilot Installer Kit” on page 15. Run APInstall.exe in the kit folder you create, specifying the “/silent” switch.
• For customized settings, edit the AutoPilot Installer configuration file as previously described, except edit the file Documents\Emulex\AutoPilot Installer Kit version\Installers\APInstall.cfg instead of the one in Program Files. Create AutoPilot Installer kits using the makekit script, as described in “Configuring an AutoPilot Installer Kit” on page 15. Run APInstall.exe in the kit folder you create.
See “Starting Installers from a Command Prompt or Script” on page 6 for important information on running the installer from a command prompt or script.
Note: The name of the driver kit installer depends on whether you are installing the full or core package and the current version identifier. For other command line options, see “Driver Kit Installer Command Line Parameters” on page 14.
Storport Miniport Driver User Manual Page 13

When in unattended installation mode, AutoPilot Installer does the following:
1. Reads the configuration file.2. Reads any options that may be specified on the command line, overriding the configuration file
settings as appropriate. 3. Opens the installation report file.4. Validates the operating system.5. Discovers adapters and records the adapter inventory in the report file.6. Verifies mandatory configuration file parameters.7. Searches for drivers to be installed based on the LocalDriverLocation setting in the configuration
file.8. If appropriate, verifies that the selected driver is a different type than the currently installed
driver, or more recent version of the currently installed driver.9. Copies the driver parameters from the configuration file into the registry for the driver's
coinstaller.10. Installs/updates the driver.11. Rediscovers adapters and records the updated adapter inventory in the report file.12. Records the final results and closes the report file.
Driver Kit Installer Command Line ParametersYou can pass command line parameters to AutoPilot Installer, yet still have it run automatically by the driver kit, if you run the driver kit installer from a command prompt or script.
If you specify the “/q” switch with the driver installer command, the driver installer will run in unattended mode and it will automatically invoke APInstall.exe with its “/silent” switch. See the “Performing an Unattended Installation” on page 13 for more information.
If you specify a value for the “APargs” driver kit parameter, this value will be appended to the APInstall.exe command line. See “Command Line Parameter Settings” on page 16 for more information on the AutoPilot Installer settings that may be specified in the APargs value.
For example, assume the driver kit file you downloaded from the Emulex web site is named storportportminiportkit_2-10a7-1c.exe. If you execute this installer file as:
storportminiportkit_2-10a7-1c.exe /q APargs=ManagementMode=Full
then after installing AutoPilot Installer, the driver kit will automatically execute it as:
APInstall.exe /silent ManagementMode=Full
To specify more than one AutoPilot Installer parameter, separate the settings by one or more spaces and put quotes around the entire APargs expression. For example, the command line (all on one line)
storportminiportkit_2-10a7-1c.exe "APargs=ManagementMode=ReadOnly ManagementModeChangeable=FALSE"
results in AutoPilot Installer being run as:
APInstall.exe ManagementMode=ReadOnly ManagementModeChangeable=FALSE
AutoPilot Installer parameter values that contain spaces, such as path names, must be enclosed in quotes. To add such a setting to APargs, you must insert backslashes before the quotes around the value, and then add quotes around the entire APargs expression. For example, the command line (all on one line)
Storport Miniport Driver User Manual Page 14

storportminiportkit_2-10a7-1c.exe "APargs=ReportLocation=\"C:\Documents and Settings\Administrator\My Documents\reports\""
results in AutoPilot Installer being run as:
APInstall.exe ReportLocation="C:\Documents and Settings\Administrator\My Documents\reports"
If you have many parameters to pass to AutoPilot Installer, or if you want to do so repeatedly, then it may be less error prone to run the driver kit installer interactively, delay AutoPilot Installer execution, and then run the AutoPilot Installer command yourself. The procedure for doing so is described in the “Option 2: Run AutoPilot Installer Separately” on page 7 and “Performing an Unattended Installation” on page 13.
Configuring an AutoPilot Installer KitTo configure an AutoPilot Installer kit:
1. Create an AutoPilot Installer Kits folder by using the Create AutoPilot Installer Kits option of the full driver kit. See “Option 3: Create an AutoPilot Installer Kit” on page 13. By default, the driver kit will create a folder namedDocuments\Emulex\AutoPilot Installer Kit version\Installers
where Documents is your Documents folder (named “My Documents” in Windows Server 2003) and version is the driver package version identifier. However, you may specify a different loca-tion for the folder.
2. Open a command prompt window and cd to the folder created by the driver kit.3. If desired, customize the APInstall.cfg file. It is located in the Installers folder within the folder
created by the driver kit. See “AutoPilot Configuration File” on page 20 for more information.4. Decide whether you want AutoPilot Installer to install the full utilities kit (including the
HBAnyware GUI and CLI) or just the core utilities kit (no GUI).
5. Decide which CPU architectures on which you'll install the kits: x86, x64, or IA64.6. Run the makekit command script in the folder created by the driver kit:
makekit
The makekit script will prompt you for the CPU architecture and utilities set.
If you prefer, you may run makekit non-interactively, from a command prompt or a command script. To see all the makekit options, type:
makekit ?
For example, to create a kit folder for x86 machines that installs the full utility set, you can type:
makekit x86 full
Unless you specify a different path on the makekit command, makekit will create a folder in the current folder by concatenating the architecture and utilities options chosen. For example:
x86_full_kit
Note: The GUI cannot be installed on Server Core systems.
Note: Since makekit is a command script, you must precede it with the Windows call command to call it from another command script. Otherwise, the parent script will not continue after the makekit script exits. For example:REM Create kit for Windows Server 2008 x64 Core installations.call makekit x64 core \\server\share\Emulex_x64_core_kitif errorlevel 1 echo Creation of Emulex_x64_core_kit failed
Storport Miniport Driver User Manual Page 15
AutoPilot Installer Command Line Parameters
The syntax used to run AutoPilot Installer silently from a command line or script is:
APInstall [/silent] [parameter setting][parameter setting...]
The “silent” switch and parameter settings can occur in any order. One or more spaces must separate the switch and each parameter setting.
Command Line Parameter Settings
The syntax of a parameter setting is
parameter_name =["]value["]
Double quotes are required only around values that contain spaces. Spaces may separate parameters, equal signs and values. Parameter names and values are not case-sensitive.
The APInstall command may contain the settings listed below. Each setting, except ConfigFileLocation, may also be specified in the AutoPilot Configuration file. For descriptions of each parameter, see “Software Configuration Parameters” on page 17.
Settings specified in the APInstall command override those specified in the configuration file.
ConfigFileLocation = path-specifier
NoSoftwareFirstInstalls = { TRUE | FALSE }SilentRebootEnable = { TRUE | FALSE }ForceDriverUpdate = { TRUE | FALSE }ForceDriverTypeChange = { TRUE | FALSE }SkipUtilityInstall = { TRUE | FALSE }SkipDriverInstall = { TRUE | FALSE }InstallWithoutQFE = { TRUE | FALSE }ForceRegUpdate = { TRUE | FALSE }LocalDriverLocation = path-specifier
UtilitiesLocation = path-specifier
ReportLocation = path-specifier
ManagementMode = { LocalOnly | LocalPlus | LocalReadOnlyPlus | ReadOnly | Full }HideManagementModeGUI = { TRUE | FALSE }ManagementModeChangeable = { TRUE | FALSE }
Path Specifiers
Paths may be specified as
• an explicit path:
ReportLocation="C:\Program Files\Emulex\AutoPilot Installer\Reports"
• a relative path:LocalDriverLocation="Drivers\Storport Miniport\"
(assuming installation into “C:\Program Files\Emulex\AutoPilot Installer\”, this path would logi-cally become “C:\Program Files\Emulex\AutoPilot Installer\Drivers\Storport Miniport\”)
Note: The double quotes are required for values that contain spaces, such as the value above.
Storport Miniport Driver User Manual Page 16

• with the %ProgramFiles% environment variable:UtilitiesLocation = "%ProgramFiles%\Emulex\AutoPilot Installer\Utilities"
Configuration File Location
The optional setting ConfigFileLocation contains the path to the configuration file that should be used. If this parameter is not specified, AutoPilot Installer will use the file named APInstall.cfg in the same folder as APInstall.exe.
The format is the same as that of the other path settings.
Example
APInstall /silent SkipDriverInstall=True ManagementModeChangeable="True" configFileLocation=MyConfiguration.cfg
Software Configuration Parameters
DiagEnable (Running Diagnostics)
Default: True
By default, AutoPilot Installer will run its diagnostics after all driver installation tasks have been completed. To disable this function, set this parameter to false.
ForceDriverTypeChange (Forcing a Driver Type Change)
Default: False
When installing a driver, set this parameter to true to cause silent mode installations to update/install the Storport Miniport driver on each adapter in the system, without regard for the currently installed driver type (replacing any installation of the SCSIport Miniport or FC Port driver).
ForceDriverUpdate (Forcing a Driver Version Update)
Default: False
By default, if the same version of the driver is already installed, an unattended installation will proceed with installing only the utilities.To force a driver update even if the same version of the driver is installed, set this parameter to true.
ForceRegUpdate (Forcing Updates of an Existing Driver Parameter Value)
Default: False
The ForceRegUpdate driver parameter setting determines if existing driver parameters are retained or changed when you update the driver. By default, all existing driver parameter settings are retained. The ForceRegUpdate parameter does not affect any existing persistent bindings. To set up an installation to remove the existing driver parameters from the registry and replace them with parameters specified in the AutoPilot Configuration file, set this parameter to true.
Note: The DiagEnable parameter cannot be specified on the command line.
Note: ForceDriverUpdate applies to unattended installations only; in interactive installations this parameter is ignored. Instead you are asked if the driver should be updated.
Note: You can also use this setting for attended installations with the AutoPilot Installer wizard if you modify the AutoPilot Configuration file in an AutoPilot Installer Kit.
Storport Miniport Driver User Manual Page 17

SkipUtilityInstall (Installing Driver Without Utilities)
Default: False
You can set up an unattended installation to install the driver without installing the utilities package. By default, the utilities are automatically installed with an unattended installation. To set up an installation without utilities, set this parameter to true.
LocalDriverLocation (Specifying Location to Search for Drivers)
Default: Drivers (The default “Drivers” folder is located in the same folder as AutoPilot Installer.)
You can specify a local location that is to be searched for drivers during unattended installations. The location may be a local hard drive or a network share. Removable media are not searched. Example: localDriverLocation = "d:\drivers\new\Storport"
NoSoftwareFirstInstalls (Prohibiting Software First Installations)
Default: False
When this parameter is set to true, AutoPilot Installer prevents unattended installations from performing software-first installations. This way, you can execute an automated installation on multiple machines in your network, but only machines with Emulex adapters will actually have Emulex drivers updated or installed.
ManagementMode (Managing Emulex Adapters)
Default: LocalPlus
This parameter controls how the HBAnyware utility manages local and remote adapters. The ManagementMode parameter works with the ManagementModeChangable and HideManagementModeGUI parameters.
• LocalOnly - The utility only manages the adapter on this host and no remote management of adapters is allowed.
• LocalPlus - The utility only manages the adapters on this host. Management of adapters on this host from other hosts is allowed.
• Full - The utility manages the adapters on this host and other hosts that allow it. Management of adapters on this host from other hosts is also allowed.
• LocalReadOnlyPlus - The utility has read-only access to the adapters on this host.Remote hosts must be used to fully manage the adapters on this host.
• ReadOnlyPlus -The utility has read-only access to the adapters on this host and other hosts that allow it. Remote hosts must be used to fully the manage adapters on this host.
To set this parameter, set the parameter value to one of the names listed above.
Example: ManagementMode = "LocalOnly"
Note: On x64 and 32-bit systems, the path specified by 'LocalDriverLocation' must contain at least one instance of both an ElxCna (for CNAs) and ElxStor (for HBAs and CNAs) driver. AutoPilot Installer will automatically select the most recent revisions that it finds.
For IA64 systems, only ElxStor drivers are supported.
Note: If this setting is not specified and a utility upgrade is being performed, the existing value of this setting will be retained.
Storport Miniport Driver User Manual Page 18

ManagementModeChangable (Changing Management Mode)
Default: True
By default, you can change the management mode after the HBAnyware utility is installed, by selecting the Management Mode parameter in the HBAnyware utility’s File menu. If the ManagementMode parameter is disabled and the ManagementModeChangable parameter is set to false, you must reinstall the HBAnyware utility to change the management mode.
HideManagementModeGUI (Hiding the Management Mode Configuration)
Default: True
The Utilities Installation page can be displayed by Autopilot Installer. (See Figure 1 on page 9.) The page is displayed only if this parameter is set to false. AutoPilot Installer then reads the configuration file parameters and uses those settings to pre-select the appropriate options in the page.
If this parameter is omitted from the configuration file or explicitly set to true, the page is not displayed. AutoPilot Installer will use configuration file parameters to determine the appropriate management mode.
ManagementPort (Specifying the Port Number)
Default: 23333 (assigned to Emulex by the Internet Assigned Numbers Authority [IANA])
A numeric value indicating the port number at which Emulex utilities should operate. If changed, this setting must be propagated throughout any other machines on the SAN.
ReportLocation (Setting Up an Installation Report Title and Location)
The automatically generated file name for reports is
"report_mm-dd-yy.txt"
where ‘mm’ is the month number, ‘dd’ is the day, and ‘yy’ indicates the year.
You can only change the installation report folder; the file name is auto-generated. In the following example x could be any available drive:
ReportLocation = "x:\autopilot\reports\installs\"
SilentInstallEnable (Enabling Unattended Installation)
Default: False
Setting this parameter to true causes AutoPilot Installer to operate with no user interaction.
Note: If this setting is not specified in the configuration file and a utility upgrade is being performed, the existing value of this setting will be retained.
Note: The ManagementPort parameter cannot be specified on the command line.
Note: Setting the SilentInstallEnable parameter to true in the configuration file is functionally equivalent to supplying the “/silent” switch on the command-line. You cannot specify the SilentInstallEnable parameter on the command line.
Storport Miniport Driver User Manual Page 19

SilentRebootEnable (Enabling Silent Reboot)
Default: False
If Windows must be restarted after a driver is installed, AutoPilot Installer's default behavior in unattended installations is not to restart the system. AutoPilot Installer continues with the installation and you must restart at a later time. Restarts often require you to login as part of the Windows start up process and without logging in, the installation process would hang if it restarted the system. However, Windows can be configured to start up without requiring you to login. You must make sure it is safe to restart the system during unattended installations if you are going to set this parameter to true.
InstallWithoutQFE (Enabling Installation if a QFE Check Fails)
Default: False
AutoPilot Installer checks for Microsoft’s Quick Fix Engineering updates (QFEs), also known as KB (Knowledge Base) updates, based upon the checks you have specified in the [STORPORT.QFES] section. By default, the installation will terminate if the QFE check should fail. To enable a driver installation to proceed even if a check for QFEs should fail, set this parameter to true.
AutoPilot Configuration File
The AutoPilot Configuration file is organized into sections, grouped according to related commands. There are six main sections. Each section begins with a heading. The heading is required even if there are no settings in the section. The only section not required is the Installation Prompts section, which has the heading [STORPORT.CONFIGURATION]. That section cannot exist if AutoPilot Installer will be run in silent mode. You must delete or comment-out that entire section for unattended installation. The sections and their headings are:
• Configuration Identification [AUTOPILOT.ID] - This section appears at the beginning of every AutoPilot Configuration file. This section contains revision and label information. The revision entry identifies the file's version number and the date on which it was produced. The label entry is used to identify the configuration that the file supports. This section can appear only once in the AutoPilot Configuration file.
• Software Configuration [AUTOPILOT.CONFIG] -This section can contain settings that control and configure AutoPilot Installer and the HBAnyware utility operation. This section can appear only once in the AutoPilot Configuration file.
• Installation Prompts [STORPORT.CONFIGURATION] - This section can contain questions that must be answered during the initial installation process. This section applies to attended installations only, this section must not be present in configuration files to be used with unattended installations.
• Driver Parameters [STORPORT.PARAMS] - This section can specify driver parameters. Parameters are read exactly as they are entered and are written to the registry.
• System Parameters [SYSTEM.PARAMS] - This section can adjust the operating system’s global disk timeout. The timeout is stored in the registry under the key HKML\CurrentControlSet\Services\disk and specified with the following string:TimeOutValue = 0x3C (where the number is the timeout value in seconds.)
• Additional Quick Fix Engineering (QFE) Checks [STORPORT.QFES] - This section can specify additional QFE check, also known as KB (Knowledge Base) updates, during installation. This section can appear anywhere within the file as long as it is not contained within another section.
Lines that begin with a semicolon are comments. Some of the comments are sample settings. To use the setting, remove the semicolon.
Storport Miniport Driver User Manual Page 20

Using the Windows Environment Variable (%ProgramFiles%)
You can use the Windows ProgramFiles environment variable in the LocalDriverLocation, UtilitiesLocation and ReportLocation strings within the configuration file. This allows you to specify strings in a driver independent manner, allowing the same configuration file to be used on different systems where Windows may have been installed on different drives. To use this option, “%ProgramFiles%” must be the first component specified in the string. The portion of the string that follows will be appended to the contents of the ProgramFiles environment variable.
UtilitiesLocation = "%ProgramFiles%\my company\our utilities"
Configuration Identification [AUTOPILOT.ID]
This section contains revision and label information. The revision entry identifies the file's version number and the date on which it was produced. The label entry is used to identify the configuration that the file supports. This section may appear only once in the APInstall.cfg file.
Software Configuration [AUTOPILOT.CONFIG]
The settings in this section affect the operation of AutoPilot Installer during installation. They also affect the operation of the HBAnyware utilities after they are installed. See “Software Configuration Parameters” on page 17 for information about settings that may be specified in this section.
Configuration Prompts/Vendor-Specific Questions [STORPORT.CONFIGURATION]
A [STORPORT.CONFIGURATION] section may exist in the AutoPilot Configuration file.The first items in this section are the driver parameters to be used regardless of how the questions are answered. This is followed by a subsection that contains questions (these may be vendor-specific questions). A line containing '[QUESTIONS]' marks the start of the subsection, and the end of it is marked by a line containing '[ENDQUESTIONS]'. Within the question subsection there can be as many questions as needed. Each question uses the format:
question= "question?", "explanation", "answer0", "answer1", "answer2",.... ,
"answern"
Where:
“question?” contains the text of the question to be asked.
“explanation” contains brief text to help explain the question. The explanation will appear below the question in a smaller font. If there is no explanatory text, empty quotes must be used in its place.
“answer0” contains the 1st answer to be displayed in the drop down list.
“answer1” contains the 2nd answer to be displayed in the drop down list.
“answern” contains the nth answer to be displayed in the drop down list.
Note: The contents of the ProgramFiles environment variable is not terminated with a slash, so one must be provided in the string. Windows environment variables are not case-sensitive.
Note: You must remove or comment out the entire [STORPORT.CONFIGURATION] section for an unattended installation.
Storport Miniport Driver User Manual Page 21

For each question there can be as many answers as needed. For each answer there must be a corresponding "answer =" section with its corresponding driver parameters listed beneath it. The answer uses the format:
answer = 0
DriverParameter="Param1=value; Param2=value;"
answer = 1
DriverParameter="Param1=value; Param2=value;"
....
answer = n
DriverParameter="Param1=value; Param2=value;"
Example of [STORPORT.CONFIGURATION] section:
[STORPORT.CONFIGURATION]
;The first section contains the driver parameters common to all
configurations, no matter what answers are given.
DriverParameter="EmulexOption=0;"
[QUESTIONS]
question = "What is your link speed?", "Note: select 'Auto-detect' if you
are unsure about the answer.", "4GB", "2GB", "1GB", "Auto-detect"
ANSWER = 0
DriverParameter = "LinkSpeed=4;" ;4 GB
ANSWER = 1
DriverParameter = "LinkSpeed=2;" ;2 GB
ANSWER = 2
DriverParameter = "LinkSpeed=1;" ;1 GB
ANSWER = 3
DriverParameter = "LinkSpeed=0;" ;Auto-detect
question = "Describe the topology of your storage network.", "Note:
Select 'Arbitrated Loop' when directly connected to the array (no fibre
switch). Select 'Point-to-Point' when connected to a SAN (fibre switch).",
"Arbitrated Loop", "Point-to-Point"
ANSWER = 0
DriverParameter = "Topology=2;"
ANSWER = 1
DriverParameter = "Topology=3;"
[ENDQUESTIONS]
[END.STORPORT.CONFIGURATION]
Storport Miniport Driver User Manual Page 22

QFE Checks [STORPORT.QFES]
To add a Windows Quick-Fix Engineering (QFE) check to the configuration file, edit the [STORPORT.QFES] section in the AutoPilot Configuration file. You may place this section anywhere within the file as long as it is not contained within another section. This section contains a single line for each QFE that is to be checked. Up to 10 lines will be checked, more than that may exist but they will be ignored. All parameters in each line must be specified. These lines have the format
qfe = "qfe name", "path and file name", "file version", "applicable OS"
qfe name - The name of the item being checked. For example, QFE 838896. The name should facilitate searching Microsoft's Web site for any required code updates.
path and file name - This string identifies the file to be checked and its location relative to the Windows home folder. In most cases, the file to check will be the Microsoft Storport driver, for example, “\system32\drivers\storport.sys”. This string is also used in dialogs and log file messages.
file version - This is the minimum version that the file to be checked must have for the QFE to be considered installed. It is specified as a text string using the same format as is used when displaying the files property sheet. For example, “5.2.1390.176”.
applicable OS - This is used to determine if the QFE applies to the operating system platform present. The acceptable values are “Win2003”, “Win2008” and “WinVista”.
Example
[STORPORT.QFES]
qfe = "QFE 83896", "\system32\drivers\storport.sys", "5.2.1390.176","Win2003"
Setting Up Driver Parameters [STORPORT.PARAMS]
To change driver parameters, modify this section of the AutoPilot Configuration file. Locate the [STORPORT.PARAMS] section in the AutoPilot Configuration file. This section follows Optional Configuration File Changes. Under the [STORPORT.PARAMS] heading, list the driver parameters and new values for the driver to use.
For example:
Driver Parameter = "LinkTimeout = 45"
See the HBAnyware Utility User Manual for a listing of driver parameters, defaults and valid values.
Setting Up System Parameters [SYSTEM.PARAMS]
To change the system parameters, create a [SYSTEM.PARAMS] section in the APInstall.cfg file. Create this section in the Optional Configuration File Changes heading in the [AUTOPILOT.CONFIG] section of the AutoPilot Configuration file.
Storport Miniport Driver User Manual Page 23
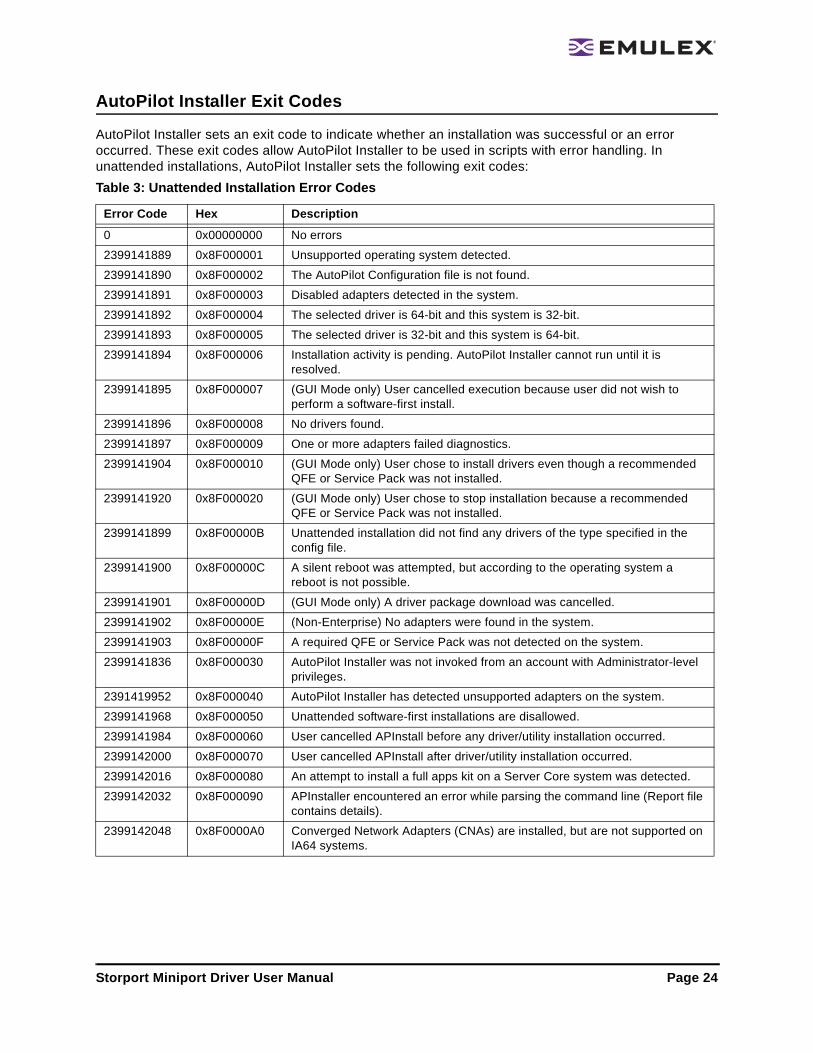
AutoPilot Installer Exit Codes
AutoPilot Installer sets an exit code to indicate whether an installation was successful or an error occurred. These exit codes allow AutoPilot Installer to be used in scripts with error handling. In unattended installations, AutoPilot Installer sets the following exit codes:Table 3: Unattended Installation Error Codes
Error Code Hex Description
0 0x00000000 No errors
2399141889 0x8F000001 Unsupported operating system detected.
2399141890 0x8F000002 The AutoPilot Configuration file is not found.
2399141891 0x8F000003 Disabled adapters detected in the system.
2399141892 0x8F000004 The selected driver is 64-bit and this system is 32-bit.
2399141893 0x8F000005 The selected driver is 32-bit and this system is 64-bit.
2399141894 0x8F000006 Installation activity is pending. AutoPilot Installer cannot run until it is resolved.
2399141895 0x8F000007 (GUI Mode only) User cancelled execution because user did not wish to perform a software-first install.
2399141896 0x8F000008 No drivers found.
2399141897 0x8F000009 One or more adapters failed diagnostics.
2399141904 0x8F000010 (GUI Mode only) User chose to install drivers even though a recommended QFE or Service Pack was not installed.
2399141920 0x8F000020 (GUI Mode only) User chose to stop installation because a recommended QFE or Service Pack was not installed.
2399141899 0x8F00000B Unattended installation did not find any drivers of the type specified in the config file.
2399141900 0x8F00000C A silent reboot was attempted, but according to the operating system a reboot is not possible.
2399141901 0x8F00000D (GUI Mode only) A driver package download was cancelled.
2399141902 0x8F00000E (Non-Enterprise) No adapters were found in the system.
2399141903 0x8F00000F A required QFE or Service Pack was not detected on the system.
2399141836 0x8F000030 AutoPilot Installer was not invoked from an account with Administrator-level privileges.
2391419952 0x8F000040 AutoPilot Installer has detected unsupported adapters on the system.
2399141968 0x8F000050 Unattended software-first installations are disallowed.
2399141984 0x8F000060 User cancelled APInstall before any driver/utility installation occurred.
2399142000 0x8F000070 User cancelled APInstall after driver/utility installation occurred.
2399142016 0x8F000080 An attempt to install a full apps kit on a Server Core system was detected.
2399142032 0x8F000090 APInstaller encountered an error while parsing the command line (Report file contains details).
2399142048 0x8F0000A0 Converged Network Adapters (CNAs) are installed, but are not supported on IA64 systems.
Storport Miniport Driver User Manual Page 24

AutoPilot Installer Installation Reports
During each installation, AutoPilot Installer produces a report describing events that occurred during the installation. This report has several sections.
The first section provides basic information including the time and date of the installation, the name of the machine that the installation was performed on, the version number of AutoPilot Installer, and the identification of the configuration file that was used.
The second section provides an inventory of the Emulex adapters as they were before AutoPilot Installer performed any actions.
The third section lists the tasks that AutoPilot will perform in the order they will be done.
The fourth section records the results of each task. When all driver installation tasks are completed, an updated adapter inventory is recorded.
Command Script Example
Modifying the configuration file enables you to script the installation of a system's driver. The following example command script (batch file) assumes that you have made mandatory changes to the AutoPilot Configuration file, as well as any desired optional changes.
If your systems were set up with a service that supports remote execution, then you can create a command script to remotely update drivers for all of the systems on the storage net. If Microsoft's RCMD service was installed, for example, a script similar to the following would run remote execution:
rcmd \\server1 g:\autopilot\x86_full_kit\apinstall
if errorlevel 1 goto server1ok
echo AutoPilot reported an error upgrading Server 1.
if not errorlevel 2147483650 goto unsupported
echo Configuration file missing.
goto server1ok
:unsupported
if not errorlevel 2147483649 goto older
echo Unsupported operating system detected.
:older
if not errorlevel 2001 goto none
echo The driver found is the same or older than the existing driver.
goto server1ok
:none
if not errorlevel 1248 goto noreport
echo No Emulex adapter found.
goto server1ok
:noreport
if not errorlevel 110 goto nocfg
echo Could not open installation report file.
goto server1ok
:nocfg
if not errorlevel 87 goto badcfg
Note: If you cancel AutoPilot Installer, that information is recorded along with when you cancelled the installation. The contents of any error dialogs that are displayed are also recorded.
Storport Miniport Driver User Manual Page 25

echo Invalid configuration file parameters.
goto server1ok
:badcfg
if not errorlevel 2 goto server1ok
echo No appropriate driver found.
server1ok
rcmd \\server2 g:\autopilot\ApInstall
ConfigFileLocation=g:\autopilot\mysetup\apinstall.cfg
if errorlevel 1 goto server2ok
echo AutoPilot reported an error upgrading Server 2.
if not errorlevel 2147483650 goto unsupported
echo Configuration file missing.
goto server2ok
:unsupported
if not errorlevel 2147483649 goto older
echo Unsupported operating system detected.
:older2
if not errorlevel 2001 goto none2
echo The driver found is the same or older than the existing driver.
goto server2ok
:none2
if not errorlevel 1248 goto noreport2
echo No adapter found.
goto server2ok
:noreport
if not errorlevel 110 goto nocfg2
echo Could not open installation report file.
goto server2ok
:nocfg2
if not errorlevel 87 goto badcfg2
echo Invalid configuration file parameters.
goto server2ok
:badcfg2
if not errorlevel 2 goto server2ok
echo No appropriate driver found.
server2ok
Storport Miniport Driver User Manual Page 26
Manual Installation and Updating Procedures
Manually Installing or Updating the Storport Miniport Driver
Overview
You can install or update the Storport Miniport driver and utilities manually without using AutoPilot Installer.
The Emulex PLUS (ElxPlus) driver supports the HBAnyware utility, persistent binding and LUN mapping and masking. The ElxPlus driver must be installed before you install the Storport Miniport driver.
Removing the Adjunct Driver Registry Key
The ElxPlus driver replaces the adjunct driver that was used with Storport Miniport 1.11a3 or earlier. If currently installed, the adjunct driver registry key must be removed using the deladjct.reg file before you install the ElxPlus driver. The deladjct.reg file was extracted when you installed the old driver.
Manually Installing the Emulex PLUS (ElxPlus) Driver for the First Time
To install the ElxPlus driver from the desktop:
1. Run the driver kit installer, but do not run AutoPilot Installer. See “Running a Software Installation Interactively” on page 6 for instructions on how to do this.
2. Select Start>Control Panel>Add Hardware. The Add Hardware Wizard window appears. Click Next.
3. Select Yes, I have already connected the hardware and click Next.4. Select, Add a new hardware device and click Next.5. Select Install the hardware that I manually select from a list (Advanced) and click Next.6. Select Show All Devices and click Next.7. Click Have Disk.... Direct the Device Wizard to the location of elxplus.inf. If you have installed
the driver installer kit in the default folder and C:\ is your Windows system drive, the path is:• C:\Program Files\Emulex\AutoPilot Installer\Drivers\Storport\x86\HBA for the 32-bit driver
version
or• C:\Program Files\Emulex\AutoPilot Installer\Drivers\Storport\x64\HBA for the x64 driver
version
or• C:\Program Files\Emulex\AutoPilot Installer\Drivers\Storport\IA64\HBA for the Itanium driver
version8. Click OK.9. Select Emulex PLUS. Click Next and click Next again to install the driver.10. Click Finish. The initial ElxPlus driver installation is complete. Continue with manual installation
of the Storport Miniport Driver. See page 28 for this procedure.
Note: Only one instance of the Emulex PLUS driver should be installed, even if you have multiple adapter ports installed in your system.
Storport Miniport Driver User Manual Page 27

Manually Updating the Emulex PLUS (ElxPlus) Driver
To update an existing ElxPlus driver from the desktop:
1. Run the driver kit installer, but do not run AutoPilot Installer. See “Running a Software Installation Interactively” on page 6 for instructions on how to do this.
2. Select Start>Administrative Tools>Computer Management.3. Click Device Manager (left pane).4. Click the plus sign (+) next to the Emulex PLUS class (right pane) to show the ElxPlus driver
entry.5. Right-click the ElxPlus driver entry and select Update Driver... from the menu.6. Select No, not this time. Click Next on the Welcome to the Hardware Update Wizard window.
Click Next. 7. Select Install from a list or specific location (Advanced) and click Next. 8. Select Don’t Search. I will choose the driver to install.9. Click Have Disk.... Direct the Device Wizard to the location of driver’s distribution kit. If you have
installed the driver installer kit in the default folder, the path is:• C:\Program Files\Emulex\AutoPilot Installer\Drivers\Storport\x86 for the 32-bit driver version
or• C:\Program Files\Emulex\AutoPilot Installer\Drivers\Storport\x64 for the x64 driver version
or• C:\Program Files\Emulex\AutoPilot Installer\Drivers\Storport\IA64 for the Itanium driver
version10. Click OK. Select Emulex PLUS. 11. Click Next to install the driver.12. Click Finish. The ElxPlus driver update is complete. Continue with manual installation of the
Storport Miniport Driver.
Manually Installing or Updating the Fibre Channel Storport Miniport Driver
To update or install the Storport Miniport driver from the desktop:
1. Select Start>Control Panel>System.2. Select the Hardware tab.3. Click Device Manager.4. Open the “SCSI and RAID Controllers” item.5. Double-click the desired Emulex adapter.
6. Select the Driver tab. 7. Click Update Driver. The Update Driver wizard starts. 8. Select No, not this time. Click Next on the Welcome to the Hardware Update Wizard window.
Note: Only one instance of the Emulex PLUS driver should be installed, even if you have multiple adapter ports installed in your system.
Note: The driver will affect only the selected adapter. If there are other adapters in the system, you must repeat this process for each adapter. All DC adapter models will be displayed in Device Manager as two adapters, therefore each adapter must be updated.
Storport Miniport Driver User Manual Page 28

9. Select Install from a list or specific location (Advanced) and click Next. 10. Select Don't search. I will choose the driver to install and click Next.
11. Click Have Disk.... Direct the Device Wizard to the location of oemsetup.inf. If you have installed the driver installer kit to the default folder, the path is:• C:\Program Files\Emulex\AutoPilot Installer\Drivers\Storport\x86\HBA for the 32-bit driver
version
or• C:\Program Files\Emulex\AutoPilot Installer\Drivers\Storport\x64\HBA for the x64 driver
version
or• C:\Program Files\Emulex\AutoPilot Installer\Drivers\Storport\IA64\HBA for the Itanium driver
version12. Click OK. Select Emulex LightPulse LPX000, PCI Slot X, Storport Miniport Driver (your
adapter model will be displayed here).13. Click Next.14. Click Finish.
The driver installation is complete. The driver should start automatically. If the adapter is connected to a SAN or data storage device, a blinking yellow light on the back of the HBA will indicate a link up condition.
Manually Installing the Driver Utilities
Run the full driver kit installer. Select the Create AutoPilot Installer Kit option, clear the Perform AutoPilot Installation option and click Next. After the files have been copied to your system, the Finish page will show where the files have been placed. Click Finish. A Utilities folder will exist in the folder created by the installer.
To install the full utility set (including the HBAnyware utility GUI):
1. Run SetupCommon.exe 2. Run Setup.exe.
3. Follow the instructions on the setup windows.4. Click Finish in the Finish page to exit setup. The utility installation has completed. The
HBAnyware utility automatically starts running.
To install the core utility set:
1. cd to the Core folder in the Utilities folder.2. Run setupCLI.exe.3. Click Finish in the Finish page to exit setup. The core installation has completed.
Note: Using the OEMSETUP.INF file to update Emulex's Storport Miniport driver overwrites customized driver settings. If you are upgrading from a previous installation, write down the settings. Following installation, use the HBAnyware utility to restore the pre-upgrade settings.
Caution: Run Setup.exe only after running SetupCommon.exe.
Storport Miniport Driver User Manual Page 29

HBAnyware Security Configurator
Installing the HBAnyware Security Configurator
After the HBAnyware utility and remote server are installed on a group of systems, the utility can remotely access and manage the Emulex adapters on any systems in the group. This may not be desirable because any system with remote access can perform actions such as resetting boards or downloading firmware. The HBAnyware Security Configurator controls which HBAnyware systems can remotely access and manage adapters on other systems in a Storage Area Network (SAN). HBAnyware security is system-based, not user-based. As a result, anyone who can access a system with HBAnyware client access to remote adapters can manage those adapters.
The Emulex driver and the HBAnyware utilities must be installed before you can install the HBAnyware Security Configurator.
To install the HBAnyware Security Configurator:
1. Locate the SSCsetup.exe file. The default path for this file is: C:\Program Files\Util\HBAnyware
2. Double-click the SSCsetup.exe file. A welcome page appears. 3. Click Next. The Setup Status window is displayed. After setup completes, the Emulex
HBAnyware Security Setup Completed window appears.4. Click Finish.
HBAnyware Utility Web Launch Procedures
Installing the HBAnyware Utility Web Launch Feature
In addition to the driver and HBAnyware utilities, the following software must be installed before you can install the Web Launch feature:
• Microsoft Internet Information Services (IIS) Server. See the Microsoft Web site for information on downloads and installation.
• Java Runtime Environment (JRE). See the http://java.com Web site for information on downloads and installation.
To install the HBAnyware Utility Web launch feature:
1. Click Programs>Emulex >HBAnyware WebLaunch Install. Web Launch installation begins.2. Type the URL address that you want HBAnyware Web Launch to use.
HBAnyware Web Launch, Update URL screen
Storport Miniport Driver User Manual Page 30

Updating the HBAnyware Utility Web Launch URL
The driver, HBAnyware utilities and HBAnyware Web Launch must be installed before you can update the URL.
To change the IP address for HBAnyware Web Launch:
1. Copy Web Launch-related files to a sub-folder called WebLaunch in the HBAnyware installation folder.
2. Click on Programs>Emulex>HBAnyware WebLaunch Update URL.
Storport Miniport Driver User Manual Page 31
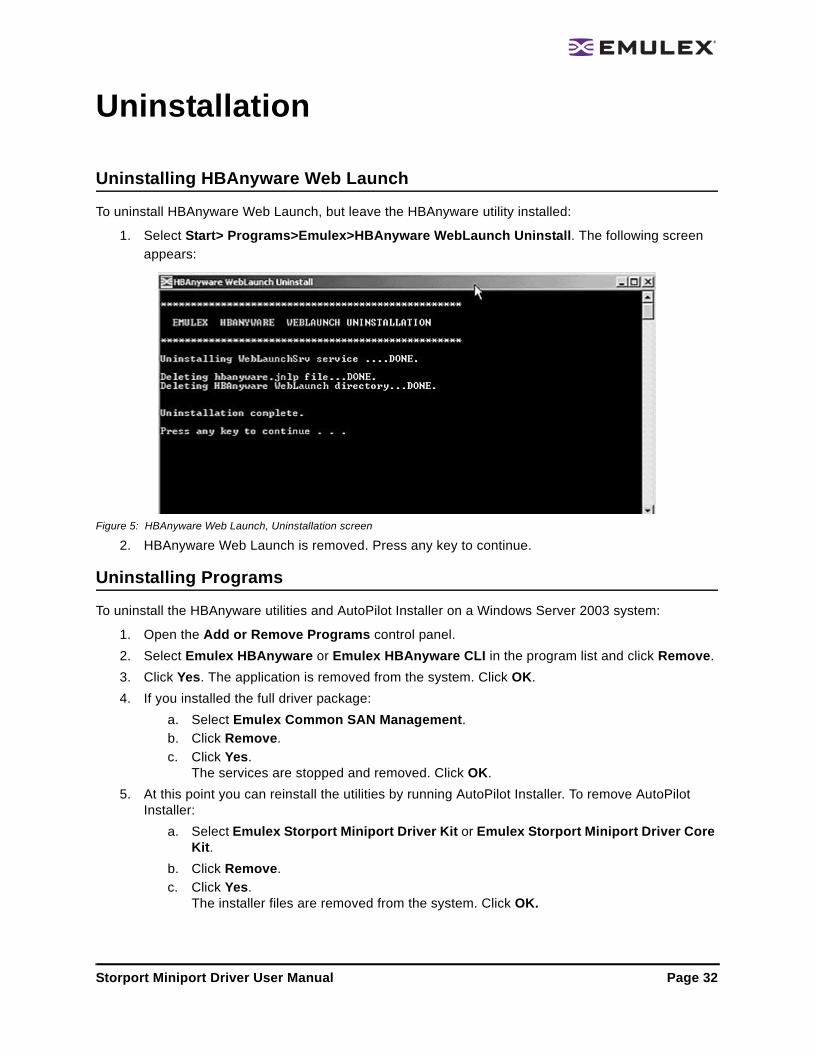
Uninstallation
Uninstalling HBAnyware Web Launch
To uninstall HBAnyware Web Launch, but leave the HBAnyware utility installed:
1. Select Start> Programs>Emulex>HBAnyware WebLaunch Uninstall. The following screen appears:
Figure 5: HBAnyware Web Launch, Uninstallation screen
2. HBAnyware Web Launch is removed. Press any key to continue.
Uninstalling Programs
To uninstall the HBAnyware utilities and AutoPilot Installer on a Windows Server 2003 system:
1. Open the Add or Remove Programs control panel.2. Select Emulex HBAnyware or Emulex HBAnyware CLI in the program list and click Remove. 3. Click Yes. The application is removed from the system. Click OK.4. If you installed the full driver package:
a. Select Emulex Common SAN Management.b. Click Remove.c. Click Yes.
The services are stopped and removed. Click OK.5. At this point you can reinstall the utilities by running AutoPilot Installer. To remove AutoPilot
Installer:a. Select Emulex Storport Miniport Driver Kit or Emulex Storport Miniport Driver Core
Kit.b. Click Remove. c. Click Yes.
The installer files are removed from the system. Click OK.
Storport Miniport Driver User Manual Page 32

To uninstall the HBAnyware utilities and AutoPilot Installer on a Vista or Windows Server 2008 system:
1. Open the Programs and Features control panel.2. Select Emulex HBAnyware or Emulex HBAnyware CLI in the program list and click the
Uninstall icon in the tool bar above the program list. If you have User Access Control enabled, click Continue when asked for permission.
3. Click Yes. The application is removed from the system. Click OK.4. If you installed the full driver package:
a. Select Emulex Common SAN Management.b. Click the Uninstall icon. If you have User Access Control enabled, click Continue when
asked for permission. c. Click Yes.
The services are stopped and removed. Click OK.
5. At this point you can reinstall the utilities by running AutoPilot Installer. To remove AutoPilot Installer:
a. Select Emulex Storport Miniport Driver Kit or Emulex Storport Miniport Driver Core Kit.
b. Click the Uninstall icon. If you have User Access Control enabled, click Continue when asked for permission.
c. Click Yes. The installer files are removed from the system. Click OK.
To uninstall the HBAnyware utilities and AutoPilot Installer on a Server Core system:
1. cd to the “Program Files” folder on an x86 system or the “Program Files (x86)” folder on a 64-bit system.
2. cd to “Emulex\Util\Uninstall”.3. Run “uninstall_HBAnyware_CLI.bat”.
You may now delete the “Emulex\Util” folder. You may also delete the Emulex folder if it is now empty.
4. To remove AutoPilot Installer, continue with the following steps.a. cd to the “Program Files” folder (on both x86 systems and 64-bit systems).b. cd to “Emulex\AutoPilot Installer”.c. Run “uninstall_elx_core_kit.bat”. The installer files are removed from the system.
On all platforms, the reports folder in the “Emulex\AutoPilot Installer” folder is not removed, so you can still view installation history and see which drivers have been installed on the system. You may delete the reports folder at any time if you want.
Note: If you do not want to use the Control Panel, you can execute a batch file to perform the uninstallation. The batch file is typically in “C:\Program Files\Emulex\Util\Uninstall”.For HBAnyware, it is uninstall_HBAnyware.bat.For HBAnyware CLI, it is uninstall_HBAnyware_CLI.bat.For Emulex Common SAN Management, it is uninstall_CommonSAN.bat.
Storport Miniport Driver User Manual Page 33

Uninstalling the Emulex Drivers
The Emulex Storport Miniport and PLUS (ElxPlus) drivers are uninstalled using the Device Manager.
To uninstall the Emulex Storport Miniport driver:
1. Select Start>All Programs>Administrative Tools>Computer Management.2. Click Device Manager.3. Double-click the adapter from which you want to remove the Storport Miniport driver. A device-
specific console window is displayed. Select the Driver tab.4. Click Uninstall and click OK to uninstall.
To uninstall the ElxPlus driver (uninstall the ElxPlus driver only if all adapters and installations of Emulex miniport drivers are uninstalled):
After running Device Manager (steps 1 and 2 above):
1. Click the plus sign (+) next to the Emulex PLUS driver class.2. Right-click the Emulex driver and click Uninstall.3. Click OK in the Confirm Device Removal window.
To uninstall or update an earlier version of the Storport Miniport driver (prior to version 1.20), you must remove the registry settings for the adjunct driver prior to manually installing a new driver.
To remove the adjunct driver registry settings:
1. Browse to the Storport Miniport driver version 1.20 (or later) driver kit that you downloaded and extracted.
2. Double-click on the deladjct.reg file. A Registry Editor window appears to confirm that you want to execute deladjct.reg.
3. Click Yes. The elxadjct key is removed from the registry.
Storport Miniport Driver User Manual Page 34
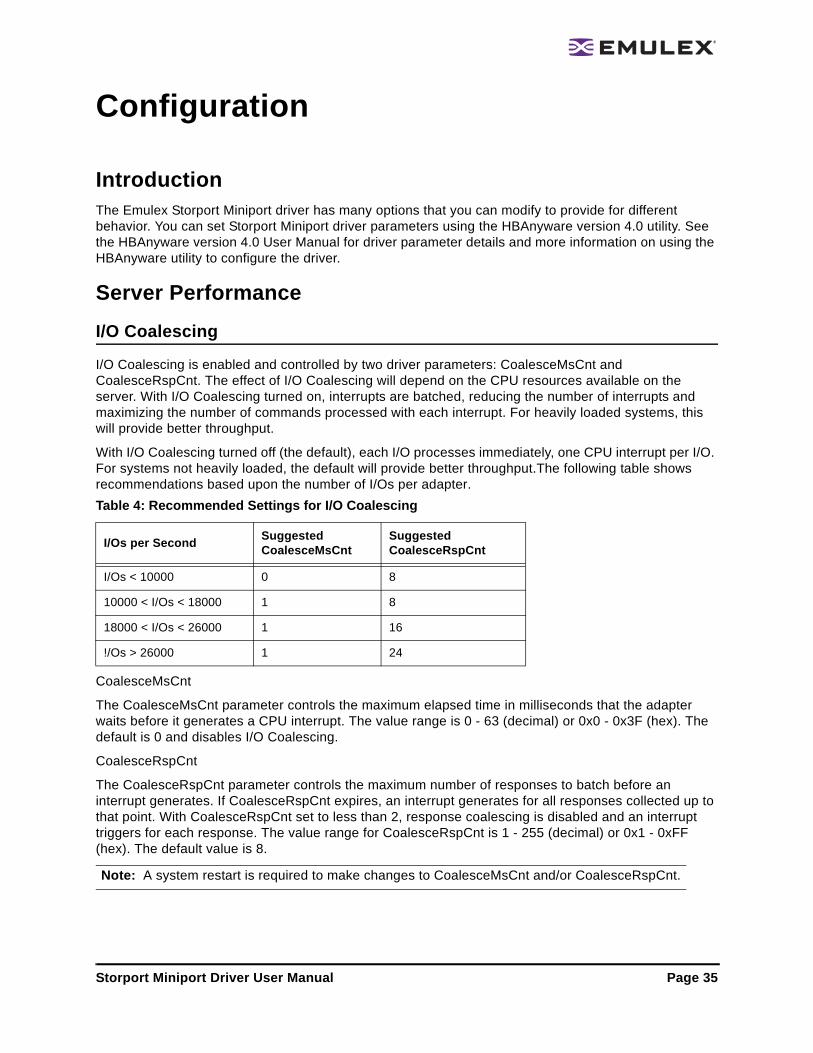
Configuration
IntroductionThe Emulex Storport Miniport driver has many options that you can modify to provide for different behavior. You can set Storport Miniport driver parameters using the HBAnyware version 4.0 utility. See the HBAnyware version 4.0 User Manual for driver parameter details and more information on using the HBAnyware utility to configure the driver.
Server Performance
I/O Coalescing
I/O Coalescing is enabled and controlled by two driver parameters: CoalesceMsCnt and CoalesceRspCnt. The effect of I/O Coalescing will depend on the CPU resources available on the server. With I/O Coalescing turned on, interrupts are batched, reducing the number of interrupts and maximizing the number of commands processed with each interrupt. For heavily loaded systems, this will provide better throughput.
With I/O Coalescing turned off (the default), each I/O processes immediately, one CPU interrupt per I/O. For systems not heavily loaded, the default will provide better throughput.The following table shows recommendations based upon the number of I/Os per adapter.
CoalesceMsCnt
The CoalesceMsCnt parameter controls the maximum elapsed time in milliseconds that the adapter waits before it generates a CPU interrupt. The value range is 0 - 63 (decimal) or 0x0 - 0x3F (hex). The default is 0 and disables I/O Coalescing.
CoalesceRspCnt
The CoalesceRspCnt parameter controls the maximum number of responses to batch before an interrupt generates. If CoalesceRspCnt expires, an interrupt generates for all responses collected up to that point. With CoalesceRspCnt set to less than 2, response coalescing is disabled and an interrupt triggers for each response. The value range for CoalesceRspCnt is 1 - 255 (decimal) or 0x1 - 0xFF (hex). The default value is 8.
Table 4: Recommended Settings for I/O Coalescing
I/Os per Second Suggested CoalesceMsCnt
SuggestedCoalesceRspCnt
I/Os < 10000 0 8
10000 < I/Os < 18000 1 8
18000 < I/Os < 26000 1 16
!/Os > 26000 1 24
Note: A system restart is required to make changes to CoalesceMsCnt and/or CoalesceRspCnt.
Storport Miniport Driver User Manual Page 35

Performance Testing
There are four driver parameters that need to be considered (and perhaps changed from the default) for better performance testing: QueueDepth, NumFcpContext, CoalesceMsCnt and CoalesceRspCnt.
QueueDepth
If the number of outstanding I/Os per device is expected to exceed 32, increase this parameter to a value greater than the number of expected I/Os per device, up to a maximum of 254.The QueueDepth parameter defaults to 32. If 32 is set and not a high enough value, performance degradation may occur due to Storport throttling its device queue.
NumFcpContext
If the number of outstanding I/Os per adapter is expected to exceed 512, increase this parameter to a value greater than the number of expected I/Os per adapter. Increase this value in stages: from 128 to 256 to 512 to 1024 to a maximum of 2048. NumFcpContext limits the number of outstanding I/Os per adapter, regardless of how QueueDepth is set. The NumFcpContext defaults to 512. If NumFcpContext is too small relative to the total number of outstanding I/Os on all devices combined, performance degradation may occur due to I/O stream throttling.
CoalesceMsCnt
CoalesceMsCnt defaults to zero. If you are using a performance evaluation tool such as IOMETER and if you expect the I/O activity will be greater than 8000 I/Os per second, set CoalesceMsCnt to 1 and reinitialized with an adapter reset or system reboot.
CoalesceRspCnt
CoalesceRspCnt defaults to 8. For all other values up to the maximum of 63, the adapter will not interrupt the host with a completion until either CoalesceMsCnt milliseconds has elapsed or CoalesceRspCnt responses are pending. The value of these two driver parameters reduces the number of interrupts per second which improves overall CPU utilization. However, there is a point where the number of I/Os per second is small relative to CoalesceMsCnt and this will slow down the completion process, causing performance degradation.
Performance Testing Examples
Test Scenario One
You execute IOMETER with an I/O depth of 1 I/O per device in a small-scale configuration (16 devices). In this case, the test does not exceed the adapter 's performance limits and the number of I/Os per second are in the low thousands.
Recommendation: set CoalesceMsCnt to 0 (or leave the default value).
Test Scenario Two
You execute IOMETER with an I/O depth of 48 I/Os per device in a small-scale configuration (16 devices).
Recommendation: set QueueDepth to be greater than 48 (e.g. 64) and NumFcpContext to be greater than 512 (e.g. 1024).
Note: Parameter values recommended in this topic are for performance testing only and not for general operation.
Storport Miniport Driver User Manual Page 36

Troubleshooting
IntroductionThere are several circumstances in which your system may operate in an unexpected manner. The Troubleshooting section contains reference tables on event codes and error messages and provides information regarding unusual situations.
Event Tracing (Windows Server 2003, SP1 and later only)
Trace messages are part of the Emulex lpfc log messages.
Storage Event Tracing supports two types of events:
• FFInit (0x00000001) - events that occurred at HwFindAdapter and HwInitialize.• FFIo (0x00000002) - events that occurred during I/O.
Storage Event Tracing supports four levels of events:
• DbgLvlErr (0x00000001) - error level• DbGLvlWrn (0x00000002) - warning level• DbgLvlInfo (0x00000004) - Information level• DbgLvlInfo (0x00000008) - excessive information level
Note: To view trace messages, you must enable Event Tracing in the operating system. See your Microsoft operating system documentation for more information.
Table 5: Event Tracing Summary Table
LOG MessageDefinition From To Reserved
Through Verbose Description
ELS 0100 0130 0199 ELS events
Discovery 0202 0262 0299 Link discovery events
Mailbox 0310 0326 0399 Mailbox events
INIT 0400 0463 0499 Initialization events
FCP 0701 0749 0799 FCP traffic history events
Link 1300 1306 1399 Link events
Tag 1400 1401 1499
NPIV 1800 1804 1800 N_Port_ID virtualization events
Storport Miniport Driver User Manual Page 37

Event Trace Messages
ELS Log Messages (0100 - 0130)
lpfc_mes0100: 0100: FLOGI failure - ulpStatus: x%x, ulpWord[4]:x%x
DESCRIPTION: An ELS FLOGI command that was sent to the fabric failed.SEVERITY: ErrorLOG: LOG_ELS verboseACTION: Check fabric connection.SEE ALSO: lpfc_mes0110.
lpfc_mes0101: 0101: FLOGI completes successfully - NPortId: x%x, RaTov: x%x, EdTov: x%x
DESCRIPTION: An ELS FLOGI command that was sent to the fabric succeeded.SEVERITY: InformationLOG: LOG_ELS verboseACTION: No action needed, informational.
lpfc_mes0102: 0102: PLOGI completes to NPortId: x%x
DESCRIPTION: The adapter performed a PLOGI into a remote NPort.SEVERITY: InformationLOG: LOG_ELS verboseACTION: No action needed, informational.
lpfc_mes0103: 0103:PRLI completes to NPortId: x%x, TypeMask: x%x, Fcp2Recovery: x%x
DESCRIPTION: The adapter performed a PRLI into a remote NPort. SEVERITY: InformationLOG: LOG_ELS verboseACTION: No action needed, informational.
lpfc_mes0104: 0104: ADISC completes to NPortId x%x
DESCRIPTION: The adapter performed an ADISC into a remote NPort.SEVERITY: InformationLOG: LOG_ELS verboseACTION: No action needed, informational.
lpfc_mes0105: 0105: LOGO completes to NPortId: x%x
DESCRIPTION: The adapter performed a LOGO into a remote NPort.SEVERITY: InformationLOG: LOG_ELS verboseACTION: No action needed, informational.
lpfc_mes0112: 0112: ELS command: x%x, received from NPortId: x%x
DESCRIPTION: Received the specific ELS command from a remote NPort.SEVERITY: InformationLOG: LOG_ELS verboseACTION: No action needed, informational.REMARKS: lpfc_mes0114 and lpfc_mes0115 are also recorded for more details if the corresponding SEVERITY level is set. You can use the XRI to match the messages.
Storport Miniport Driver User Manual Page 38

lpfc_mes0114: 0114: PLOGI chkparm OK
DESCRIPTION: Received a PLOGI from a remote NPORT and its FC service parameters match this adapter. Request can be accepted.SEVERITY: InformationLOG: LOG_ELS verboseACTION: No action needed, informational.SEE ALSO: lpfc_mes0112.
lpfc_mes0115: 0115: Unknown ELS command: x%x, received from NPortId: x%x\n
DESCRIPTION: Received an unsupported ELS command from a remote NPORT.SEVERITY: ErrorLOG: LOG_ELS verboseACTION: Check remote NPORT for potential problem.SEE ALSO: lpfc_mes0112.
lpfc_mes0128: 0128: Accepted ELS command: OpCode: x%x
DESCRIPTION: Accepted ELS command from a remote NPORT.SEVERITY: InformationLOG: LOG_ELS verboseACTION: No action needed, informational.
lpfc_mes0129: 0129: Rejected ELS command: OpCode: x%x
DESCRIPTION: Rejected ELS command from a remote NPORT.SEVERITY: InformationLOG: LOG_ELS verboseACTION: No action needed, informational.
lpfc_mes0130: 0130: ELS command error: ulpStatus: x%x, ulpWord[4]: x%x
DESCRIPTION: ELS command failureSEVERITY: ErrorLOG: LOG_ELS verboseACTION: Check remote NPORT for potential problem.
Storport Miniport Driver User Manual Page 39
Discovery Log Messages (0202 - 0262)
lpfc_mes0202: 0202: Start Discovery: Link Down Timeout: x%x, initial PLOGICount:%d
DESCRIPTION: Device discovery/rediscovery after FLOGI, FAN or RSCN has started. TMO is the current value of the soft link time. It is used for link discovery against the LinkDownTime set in parameters. DISC CNT is number of nodes being discovered for link discovery. RSCN CNT is number of nodes being discovered for RSCN discovery. There will be value in either DISC CNT or RSCN CNT depending which discovery is being performed.SEVERITY: InformationLOG: LOG_DISCOVERY verboseACTION: No action needed, informational.
lpfc_mes0204: 0204: Discovered SCSI Target: WWN word 0: x%x, WWN word 1: x%x, DID: x%x:, RPI: x%x
DESCRIPTION: Device discovery found SCSI target.SEVERITY: InformationLOG: LOG_DISCOVERY verboseACTION: No action needed, informational.
lpfc_mes0214: 0214: RSCN received: Word count:%d
DESCRIPTION: Received RSCN from fabric.SEVERITY: InformationLOG: LOG_DISCOVERY verboseACTION: No action needed, informational.
lpfc_mes0215: 0215: RSCN processed: DID: x%x
DESCRIPTION: Processed RSCN from fabric.SEVERITY: InformationLOG: LOG_DISCOVERY verboseACTION: No action needed, informational.
lpfc_mes0225: 0225: Device Discovery completes
DESCRIPTION: This indicates successful completion of device (re)discovery after a link up. SEVERITY: InformationLOG: LOG_DISCOVERY verboseACTION: No action needed, informational.
lpfc_mes0229: 0229: Assign SCSIId x%x to WWN word 0: x%x, WWN word 1: x%x, NPortId x%x
DESCRIPTION: The driver assigned a SCSI ID to a discovered mapped FCP target. BindType - 0: DID 1:WWNN 2:WWPNSEVERITY: InformationLOG: LOG_DISCOVERY verboseACTION: No action needed, informational.
Storport Miniport Driver User Manual Page 40

lpfc_mes0230: 0230: Cannot assign SCSIId to WWN word 0: x%x, WWN word 1: x%x, NPortId x%x
DESCRIPTION: SCSI ID assignment failed for discovered target.SEVERITY: WarningLOG: LOG_ELS verboseACTION: Review system configuration.
lpfc_mes0232: 0232: Continue discovery at sequence number%d, PLOGIs remaining:%d
DESCRIPTION: NPort discovery sequence continuation.SEVERITY: InformationLOG: LOG_ELS verboseACTION: No action needed, informational.
lpfc_mes0235: 0235: New RSCN being deferred due to RSCN in process
DESCRIPTION: An RSCN was received while processing a previous RSCN.SEVERITY: InformationLOG: LOG_ELS verboseACTION: No action needed, informational.
lpfc_mes0236: 0236: Issuing command to name server” type: x%x
DESCRIPTION: The driver is issuing a nameserver request to the fabric. Also recorded if a GID_FT is sent.SEVERITY: InformationLOG: LOG_DISCOVERY verboseACTION: No action needed, informational.SEE ALSO: lpfc_mes0239 or lpfc_mes0240.
lpfc_mes0238: 0238: NameServer response DID count:%d
DESCRIPTION: Received a response from fabric name server with N DIDs.SEVERITY: InformationLOG: LOG_ELS verboseACTION: No action needed, informational.
lpfc_mes0239: 0239: NameServer Response: next DID value: x%x
DESCRIPTION: The driver received a nameserver response. And, this message is recorded for each DID included in the response data.SEVERITY: InformationLOG: LOG_DISCOVERY verboseACTION: No action needed, informational.
SEE ALSO: lpfc_mes0236.
lpfc_mes0240: 0240: NameServer Response Error - CmdRsp:x%x, ReasonCode: x%x, Expla-nation x%x
DESCRIPTION: The driver received a nameserver response containing a status error.SEVERITY: ErrorLOG: LOG_DISCOVERY verboseACTION: Check Fabric configuration. The driver recovers from this and continues with device discovery.SEE ALSO: lpfc_mes0236.
Storport Miniport Driver User Manual Page 41

lpfc_mes0256: 0256: Start node timer on NPortId: x%x, timeout value:%d
DESCRIPTION: Starting timer for disconnected target with NPort ID and timeout value.SEVERITY: InformationLOG: LOG_ELS verboseACTION: No action needed, informational.
lpfc_mes0260: 0260: Stop node timer on NPortId: x%x, SCSIId: x%x
DESCRIPTION: Discontinuing timer for reconnected target with NPort ID and SCSI ID.SEVERITY: InformationLOG: LOG_ELS verboseACTION: No action needed, informational.
lpfc_mes0262: 0262: Node timeout on NPortId: x%x, SCSIId: x%x
DESCRIPTION: Disconnected NPort ID, SCSI ID has failed to reconnect within timeout limit.SEVERITY: ErrorLOG: LOG_ELS verboseACTION: Review system configuration.
Mailbox Log Messages (0310 - 0326)
lpfc_mes0310: 0310: Mailbox command timeout - HBA unresponsive
DESCRIPTION: A Mailbox command was posted to the adapter and did not complete within 30 seconds. sync - 0: asynchronous mailbox command is issued 1: synchronous mailbox command is issued.SEVERITY: ErrorLOG: LOG_MBOX verboseACTION: This error could indicate a software driver or firmware problem. If no I/O is going through the adapter, reboot the system. If these problems persist, report these errors to Technical Support.
lpfc_mes0326: 0326: Reset HBA - HostStatus: x%x
DESCRIPTION: The adapter has been reset.SEVERITY: InformationLOG: LOG_MBOX verboseACTION: No action needed, informational.
INIT Log Messages (0400 - 0463)
lpfc_mes0400: 0400 Initializing discovery module: OptionFlags: x%x
DESCRIPTION: Driver discovery process is being initialized with internal flags as shown.SEVERITY: InformationLOG: LOG_ELS verboseACTION: No action needed, informational.
lpfc_mes0401: 0401: Initializing SLI module: DeviceId: x%x, NumMSI:%d
DESCRIPTION: PCI function with device id and MSI count as shown is being initialized for service level interface.SEVERITY: InformationLOG: LOG_ELS verboseACTION: No action needed, informational.
Storport Miniport Driver User Manual Page 42

lpfc_mes0405: Service Level Interface (SLI) 2 selected\n");
DESCRIPTION: Service Level Interface level 2 is selected.SEVERITY: InformationLOG: LOG_ELS verboseACTION: No action needed, informational.
lpfc_mes0406: 0406: Service Level Interface (SLI) 3 selected\n");
DESCRIPTION: Service Level Interface level 3 is selected.SEVERITY: InformationLOG: LOG_ELS verboseACTION: No action needed, informational.
lpfc_mes0436: Adapter not ready: hostStatus: x%x
DESCRIPTION: The adapter failed during powerup diagnostics after it was reset.SEVERITY: ErrorLOG: LOG_INIT verboseACTION: This error could indicate a hardware or firmware problem. If problems persist report these errors to Technical Support.
lpfc_mes0442: 0442: Adapter failed to init, CONFIG_PORT, mbxStatus x%x
DESCRIPTION: Adapter initialization failed when issuing CONFIG_PORT mailbox command.SEVERITY: ErrorLOG: LOG_INIT verboseACTION: This error could indicate a hardware or firmware problem. If problems persist report these errors to Technical Support.
lpfc_mes0446: 0446: Adapter failed to init, CONFIG_RING, mbxStatus x%x
DESCRIPTION: Adapter initialization failed when issuing CFG_RING mailbox command.SEVERITY: LOG: LOG_INIT verboseACTION: This error could indicate a hardware or firmware problem. If problems persist report these errors to Technical Support.
lpfc_mes0454: 0454: Adapter failed to init, INIT_LINK, mbxStatus x%x
DESCRIPTION: Adapter initialization failed when issuing INIT_LINK mailbox command.SEVERITY: ErrorLOG: LOG_INIT verboseACTION: This error could indicate a hardware or firmware problem. If problems persist report these errors to Technical Support.
lpfc_mes0458: 0458: Bring Adapter online
DESCRIPTION: The FC driver has received a request to bring the adapter online. This may occur when running HBAnyware.SEVERITY: WarningLOG: LOG_INIT verboseACTION: None required.
Storport Miniport Driver User Manual Page 43

lpfc_mes0460: 0460: Bring Adapter offline
DESCRIPTION: The FC driver has received a request to bring the adapter offline. This may occur when running HBAnyware.SEVERITY: WarningLOG: LOG_INIT verboseACTION: None required.
lpfc_mes0463: 0463: Adapter firmware error: hostStatus: x%x, Info1(0xA8): x%x, Info2 (0xAC): x%x
DESCRIPTION: The firmware has interrupted the host with a firmware trap error.SEVERITY: ErrorLOG: LOG_INIT verboseACTION: Review HBAnyware diagnostic dump information.
FCP Log Messages (0701 - 0749)
lpfc_mes0701: 0701: Issue Abort Task Set to PathId: x%x, TargetId: x%x, Lun: x%x
DESCRIPTION: The driver has issued a task management command for the indicated SCSI device address.SEVERITY: WarningLOG: LOG_INIT verboseACTION: Review system configuration.
lpfc_mes0703: 0703: Issue LUN reset to PathId: x%x, TargetId: x%x, Lun: x%x, Did: x%x
DESCRIPTION: Storport is requesting a reset of the indicated LUN.SEVERITY: WarningLOG: LOG_INIT verboseACTION: Review system configuration. Possible side-effect of cluster operations.
lpfc_mes0713: 0713: Issued Target Reset to PathId:%d, TargetId:%d, Did: x%x
DESCRIPTION: Storport detected that it needs to abort all I/O to a specific target. This results in login reset to the target in question.SEVERITY: WarningLOG: LOG_FCP verboseACTION: Review system configuration. Possible side-effect of cluster operations.SEE ALSO: lpfc_mes0714.
lpfc_mes0714: 0714: Issued Bus Reset for PathId:%d
DESCRIPTION: Storport is requesting the driver to reset all targets on this adapter.SEVERITY: WarningLOG: LOG_FCP verboseACTION: Review system configuration. Possible side-effect of cluster operations.SEE ALSO: lpfc_mes0713.
Storport Miniport Driver User Manual Page 44
lpfc_mes0716: 0716: FCP Read Underrun, expected%d, residual%d
DESCRIPTION: FCP device provided less data than was requested.SEVERITY: Supplement InformationLOG: LOG_FCP verboseACTION: No action needed, informational.SEE ALSO: lpfc_mes0730.
lpfc_mes0729: 0729: FCP command error: ulpStatus: x%x, ulpWord[4]: x%x, XRI: x%x, ulpWord[7]: x%x
DESCRIPTION: The specified device failed an I/O FCP command. SEVERITY: WarningLOG: LOG_FCP verboseACTION: Check the state of the target in question.REMARKS: lpfc_mes0730 is also recorded if it is a FCP Rsp error.
lpfc_mes0730: 0730: FCP response error: Flags: x%x, SCSI status: x%x, Residual:%d
DESCRIPTION: The FCP command failed with a response error.SEVERITY: WarningLOG: LOG_FCP verboseACTION: Check the state of the target in question.remark: lpfc_mes0716, lpfc_mes0734, lpfc_mes0736 or lpfc_mes0737 is also recorded for more details if the corresponding SEVERITY level is set. SEE ALSO: lpfc_mes0729.
lpfc_mes0734: 0734: Read Check: fcp_parm: x%x, Residual x%x
DESCRIPTION: The issued FCP command returned a Read Check Error.SEVERITY: WarningLOG: LOG_FCP verboseACTION: Check the state of the target in question.SEE ALSO: lpfc_mes0730.
lpfc_mes0737: 0737: SCSI check condition, SenseKey x%x, ASC x%x, ASCQ x%x, SrbStatus: x%x
DESCRIPTION: The issued FCP command resulted in a Check Condition.SEVERITY: WarningLOG: LOG_FCP verboseACTION: Review SCSI error code values.SEE ALSO: lpfc_mes0730.
0747: Target reset complete: PathId: x%x, TargetId: x%x, Did: x%x
DESCRIPTION: A target reset operation has completed.SEVERITY: WarningLOG: LOG_FCP verboseACTION: Review system configuration. Possible side-effect of cluster operations.REMARK: See also Message 0713.
Storport Miniport Driver User Manual Page 45

0748: Lun reset complete: PathId: x%x, TargetId: x%x, Lun: x%x
DESCRIPTION: A LUN reset operation has completed.SEVERITY: WarningLOG: LOG_FCP verboseACTION: Review system configuration. Possible side-effect of cluster operations.REMARK: See also Message 0703.
0749: Abort task set complete: Did: x%x, SCSIId: x%x
DESCRIPTION: A task management has completed.SEVERITY: WarningLOG: LOG_FCP verboseACTION: Review system configuration. Possible side-effect of cluster operations.REMARK: See also Message 0701.
Link Log Messages (1302 - 1306)
lpfc_mes1302: 1302: Invalid speed for this board:%d, forced link speed to auto
DESCRIPTION: The driver is re-initializing the link speed to auto-detect.SEVERITY: WarningLOG: LOG_LINK_EVENT verboseACTION: None required.
lpfc_mes1303: 1303: Link Up event: tag: x%x, link speed:%dG, topology (0 = Pt2Pt, 1 = AL):%d
DESCRIPTION: A link up event was received. It is also possible for multiple link events to be received together. SEVERITY: ErrorLOG: LOG_LINK_EVENT verboseACTION: If numerous link events are occurring, check physical connections to the FC network.REMARKS: lpfc_mes1304 is recorded if Map Entries > 0 and the corresponding mode and SEVERITY level is set.
lpfc_mes1305:1305: Link down even: tag x%x
DESCRIPTION: A link down event was received.SEVERITY: ErrorLOG: LOG_LINK_EVENT verboseACTION: If numerous link events are occurring, check physical connections to the FC network.
lpfc_mes1306: 1306: Link Down timeout
DESCRIPTION: The link was down for greater than the configuration parameter (HLinkTimeOut) seconds. All I/O associated with the devices on this link will be failed. SEVERITY: WarningLOG: LOG_LINK_EVENT verboseACTION: Check adapter cable/connection to SAN.
Storport Miniport Driver User Manual Page 46

Tag Messages (1400 - 1401)
lpfc_mes1400 1400: Tag out of range: ContextIndex: x%x, MaxIndex: x%x, ulpCommand: x%x
DESCRIPTION: Firmware has generated an invalid response.SEVERITY: ErrorLOG: LOG_LINK_EVENT verboseACTION: Review hardware configuration. Contact Emulex Technical Support.
lpfc_mes1401 1401: Invalid tag: ContextIndex: x%x, ulpCommand: x%x
DESCRIPTION: Firmware has generated an invalid response.SEVERITY: ErrorLOG: LOG_LINK_EVENT verboseACTION: Review hardware configuration. Contact Emulex Technical Support.
NPIV Messages (1800 - 1899)
lpfc_mes1800 1800: NPIV FDISC failure VPI: x%x Error x%x Reason x%x
DESCRIPTION: Virtual Port fails on a FDISC to the switch with the error and reason listed.SEVERITY: ErrorLOG: LOG_NPIV verboseACTION: Check to ensure the switch supports NPIV.
lpfc_mes1801 1801: Memory allocation failure for NPIV port: x%x
DESCRIPTION: Fails to allocated the block of memory for the Virtual Port.SEVERITY: ErrorLOG: LOG_NPIV verboseACTION: Check to ensure system has sufficient kernel memory.
lpfc_mes1802 1802: Exceeded the MAX NPIV port: x%x
DESCRIPTION: Exceeded the number of Virtual Port allows on the HBA.SEVERITY: ErrorLOG: LOG_NPIV verboseACTION: Reduce the number of Virtual Ports.
lpfc_mes1803 1803: Virtual Port: x%x VPI:x%x successfully created.
DESCRIPTION: Virtual Port ID is successfully created.SEVERITY: InformationLOG: LOG_NPIV verboseACTION: No action needed, informational.
lpfc_mes1804 1804: Removing Virtual Port: x%x VPI:x%x
DESCRIPTION: Removing Virtual Port ID.SEVERITY: InformationLOG: LOG_NPIV verboseACTION: No action needed, informational.
Storport Miniport Driver User Manual Page 47
ELS Messages (1900 - 1999)
1900: x%x sends ELS_AUTH_CMD x%x with TID x%x
DESCRIPTION: An ELS_AUTH_CMD is sent.SEVERITY: InformationLOG: LOG_FCSP verboseACTION: No action needed, informational.
1901: x%x sends ELS_AUTH_REJECT x%x x%x to x%x
DESCRIPTION: An ELS_AUTH_REJECT is sent.SEVERITY: InformationLOG: LOG_FCSP verboseACTION: No action needed, informational.
1902: Receives x%x from x%x in state x%x
DESCRIPTION: Receives an ELS_AUTH_CMD.SEVERITY: InformationLOG: LOG_FCSP verboseACTION: No action needed, informational.
1903: Receives ELS_AUTH_RJT x%x x%x
DESCRIPTION: Receives an ELS_AUTH_REJECT.SEVERITY: InformationLOG: LOG_FCSP verboseACTION: No action needed, informational.
1904: Authentication ends for x%x with status x%x (%d %d)
DESCRIPTION: Authentication is done.SEVERITY: InformationLOG: LOG_FCSP verboseACTION: No action needed, informational.
1905: Authentication policy change for local x%08x x%08x remote x%08x%08x
DESCRIPTION: Authentication policy has been changed.SEVERITY: InformationLOG: LOG_FCSP verboseACTION: No action needed, informational.
Error Log
Viewing the Error Log
The system event log is a standard feature of Windows Server 2003.
To view the error LOG:
1. Open the Event Viewer window:• Click Start>Programs>Administrative Tools>Event Viewer
or • Right-click on My Computer, Manage and Event Viewer in Computer Management.
Storport Miniport Driver User Manual Page 48

The Event Viewer window is displayed.2. Double-click any event with the source name ELXSTOR.
3. Examine the entry at offset 0x10 and Event ID 11.
Severity Scheme
When the Event Viewer is launched, there are three branches: Application, Security and System. All ELXSTOR error log entries are found under the System branch and all ELXSTOR error log entries have the Event Viewer severity level of “error”.
• A severe error code indicates that the driver, firmware or adapter is behaving abnormally and your intervention is required to correct the problem.
• A malfunction error code indicates that there is a problem with the system, but your intervention is not required.
• A command error code indicates that an event has transpired, but does not require your intervention. An event may be problem-oriented, such as an invalid fabric command sub-type. An event may not be problem-oriented, such as exhausted retries on PLOGI or PDISC.
Related Driver Parameter: LogError
The LogError driver parameter determines the minimum severity level to enable entry of a logged error into the system.
• If set to 0 = all errors regardless of severity are logged.• If set to 1 = severe, malfunction and command level errors are logged.• If set to 2 = both severe and malfunction errors are logged.• If set to 3 = only severe errors are logged.
Format of an Error Log Entry
An error log entry will take the form of an event.This event is described by:
• Date (date entry was logged)• Source (elxstor)• Time (time entry was logged)• Category (none)• Type (error)• Event id (0)• User (N/A)• Computer (name of computer)
The relevant word from the elxstor point of view is at offset 0x10. Bits 0 - 7 of the word at offset 0x10 are the error code.
Note: See the Configuration Section for instructions on how to set driver parameters.
Storport Miniport Driver User Manual Page 49

Error Codes TablesTable 6: Severe Errors
Bits 0 -7 Interpretation
0x00 Failed to allocate PCB
0x01 Failed to allocate command ring
0x02 Failed to allocate response ring
0x03 Failed to allocate mailbox context
0x04 Read revision failed
0x05 Invalid adapter type
0x06 Invalid adapter type
0x07 Write of non-volatile parameters failed
0x08 Invalid link speed selection
0x09 Read configuration failed
0x0A Set variable failed
0x0B Configure port failed
0x0D Configure ring 0 failed
0x0E Configure ring 1 failed
0x0F Configure ring 2 failed
0x10 Configure ring 3 failed
0x11 Initialize link failed
0x12 Port ready failed
0x13 Read revision failed
0x14 Invalid adapter type
0x15 Invalid adapter type
0x17 Set variable command failed
0x18 Configure port failed
0x19 Configure ring 0 failed
0x1A Configure ring 1 failed
0x1B Configure ring 2 failed
0x1C Configure ring 3 failed
0x1E Context pool initialization failure
0x1F Context pool initialization failure
0x20 Context pool initialization failure
0x24 Firmware trap: fatal adapter error
0x25 Non-specific fatal adapter error (bits 8-31 will indicate type)
0x27 FCoE chip is running Golden firmware
0x28 FCoE chip is running Diagnostic firmware
0x29 Recoverable adapter error: device has been auto-restarted
0x2A Mailbox command time-out
0x2B Invalid FRU data found on adapter
Storport Miniport Driver User Manual Page 50

0x2D Invalid-Illegal response IOCB
0x2E Invalid-response IOCB
0X2F Invalid-response IOCB
0x30 Mailbox context allocation failure
0x34 Mailbox context allocation failure
0x35 Mailbox context allocation failure
0x37 Mailbox context allocation failure
0x3D Mailbox context allocation failure
0x41 Mailbox context allocation failure
0x42 Mailbox context allocation failure
0x44 ELS FLOGI command context allocation failure
0x47 Mailbox context allocation failure
0x4D Mailbox context allocation failure
0x51 Request to ADISC a non-existent node
0x52 ELS ADISC command context allocation failure
0x56 Mailbox context allocation failure
0x57 Mailbox context allocation failure
0x58 ELS LOGO command context allocation failure
0x5C ELS PRLI command context allocation failure
0x5E ELS RLIR command context allocation failure
0x64 Create XRI command context allocation failure
0x67 Name server command context allocation failure
0x6E Close XRI command context allocation failure
0x6F State change registration failure
0x70 ELS receive context allocation failure
0x72 ELS receive PLOGI context allocation failure
0x74 Mailbox context allocation failure
0x77 Mailbox context allocation failure
0x7A ELS receive LOGO context allocation failure
0x7D Mailbox context allocation failure
0x7E Mailbox context allocation failure
0x7F Mailbox context allocation failure
0x80 Mailbox context allocation failure
0x81 Mailbox context allocation failure
0x84 ELS FDISC context allocation failure
0x85 Mailbox context allocation failure
0x88 ELS PLOGI command context allocation failure
0x89 ELS RSCN registration command context allocation failure
Table 6: Severe Errors (Continued)
Bits 0 -7 Interpretation
Storport Miniport Driver User Manual Page 51

0xA0 Port object construction failed
0xA4 Unsupported command type (command type in bits 8 - 31)
0xC0 Failed to allocate un-cached extension
0xC1 Port initialization failure
0xC2 Utility mailbox command timeout
0xC3 Fatal over-temperature condition
0xC4 Over-temperature warning condition
0xC5 Over-temperature warning condition alleviated
0xC6 Invalid response IOCB
0xC7 Initialization failed due to exceeding max driver instances (256)
0xC8 Initialization failed due to STORPORT.SYS revision level too low
0xEC Failed to allocate authentication context
Table 7: Malfunction Errors
Bits 0 - 7 Interpretation0x0C Set variable failed
0x26 Spurious mailbox attention
0x31 Unrecognized mailbox completion command code
0x33 Invalid link state
0x36 Initialization command failed (status in bits 8 -31)
0x3B Discovery error due to lack of resources (insufficient RPIs)
0x3E Unable to create discovered node object
0x3F Failed to issue ELS process login (PRLI) command
0x45 Retries exhausted to ELS FLOGI
0x47 Failed to issue UNREG_VPI
0x48 No exchange available for extended link service request (ELS) command
0x4C Exhausted retries on ELS PLOGI
0x53 WWPN mismatch on ADISC response
0x54 WWNN mismatch on ADISC response
0x55 Exhausted retries on ELS ADISC
0X59 Exhausted retries on ELS LOGO
0X5B Attempted ELS PRLI non-existent node
0x5D Exhausted retries on ELS PRLI
0x63 Attempt to issue command to fabric without a valid fabric login
0x65 Error issuing fabric command (status in bits 8 - 31)
0x66 Invalid fabric command type
0x6A Invalid fabric command sub-type
0x6C Name server response error (status in bits 8 - 31)
0x6D Name server response error (status in bits 8 - 31)
Table 6: Severe Errors (Continued)
Bits 0 -7 Interpretation
Storport Miniport Driver User Manual Page 52

0x6F SCN registration failed
0x71 Received unsupported ELS command (type in bits 8 - 31)
0x76 Invalid format for received PRLI
0x83 Node object-allocation failure
0x9A SCSI command error (SCSI status in bits 8 - 31)
0xA2 Generalized command context allocation failure
0xA8 Read check error (parameter in bits 8 -31)
0xAA Node time-out (DID in bits 8 -31)
0xF0 Spurious link attention
0xF1 Spurious link attention with previous state change
Table 8: Command Errors
Bits 0 - 7 Interpretation0x32 Insufficient context for attention handling
0x49 ELS command error (status in bits 8 - 31)
0x4A ELS command failure
0x90 ELS FDISC completed (NPort ID in bits 24 -31)
0x91 ELS LOGO completed (NPort ID in bits 8 - 31)
0x92 ELS LOGO received from fabric
0x93 ELS FLOGI completed (NPort ID in bits 8 -31)
0x94 ELS PLOGI completed (NPort ID in bits 8 -31)
0x95 Discovered SCSI target (NPort ID in bits 8 -31)
0x96 ELS RSCN received (count in bits 8 -15, vpi in bits 24 - 31)
0x97 Assigned SCSI address to discovered target (address in bits 8 - 31)
0x98 Name server response (count in bits 8 - 31)
0x9B SCSI check condition (sense codes in bits 8 - 31)
0xA3 Local error on FCP command completion (status in bits 8 - 31)
0xA6 Data over-run
0xA7 Non-specific FCP error (info in bits 8 - 31)
0xA9 Local error (status in bits 8 - 31)
0xAB Pass-through command error (status in bits 8 - 31)
0xAC Local error on report LUN completion (status in bits 8 -31)
Table 9: Event Indications
Bits 0 - 7 Interpretation0x21 Port re-initialization complete: now off-line
0x22 Port shutdown complete
0x23 Port re-initialization complete: now on-line
0xA5 Data under-run (residual in bits 8 - 31)
0xD0 NPIV Virtual Port creation success (Virtual Port Did in bits 8 - 31)
Table 7: Malfunction Errors (Continued)
Bits 0 - 7 Interpretation
Storport Miniport Driver User Manual Page 53

0xD1 NPIV Virtual Port creation failed (Virtual Port Index in bits 8 - 31)
0xD2 NPIV Virtual Port FDISC failed (Virtual Port index in bits 8 - 31)
0xD3 NPIV Virtual Port memory allocation failed (Virtual Port index in bits 8 - 31)
0xD4 Exceeded maximum Virtual Port supported (Virtual Port index in bits 8 - 31)
0xD5 NPIV Virtual Port removal (Virtual Port Did in bits 8 - 31)
0xE0 Authenticated successfully (remote Did in bits 8 - 31)
0xE1 Failed to authenticate (remote Did in bits 8 - 31)
0xE2 Authentication not supported (remote Did in bits 8 - 31)
0xE3 Authenticated ELS command timeout (remote Did in bits 8 - 31)
0xE4 Authentication transaction timeout (remote Did in bits 8 -31)
0xE5 LS_RJT other than Logical Busy received for Authentication transaction (remote Did in bits 8 - 31)
0xE6 LS_RJT Logical Busy received for Authentication transaction (remote Did in bits 8 - 31)
0xE7 Received Authentication Reject other than Restart (remote Did in bits 8 -31)
0xE8 Received Authentication Reject Restart (remote Did in bits 8 -31)
0xE9 Received Authentication Negotiate (remote Did in bits 8 -31)
0xEA Authenticating spurious traffic (remote Did in bits 8 -31)
0xEB Authentication policy has been changed (remote Did in bits 8 -31)
Table 9: Event Indications
Storport Miniport Driver User Manual Page 54