student information systems elementary grading
TRANSCRIPT

SCHOOLMASTER®
Student Information Systems
Elementary Grading Revised - August 2005
Schoolmaster is SIF Certified
Schoolmaster uses ctree Plus® from FairCom®

2005 Printed Documentation Revised August 2005
© 2005 All Rights Reserved
Published by Olympia Computing Company No part of this publication may be produced, transmitted, transcribed, stored in a retrieval system, translated into any language or computer language, in any form or by any means, without the prior written permission of Olympia Computing Company, Incorporated. Olympia Computing Company, Inc. makes no representations or warranties, real or implied, to the contents hereof and specifically disclaims any warranties, real or implied, of merchantability or fitness for any particular purpose. Olympia Computing Company, Inc. reserves the right to revise the contents of this publication without prior notification to the user. All names used in this publication are fictitious. Any similarities between persons living or dead is purely coincidental.
SCHOOLMASTER® is the registered trademark of
Olympia Computing Company, Inc 7249 Capitol Boulevard South Tumwater, WA 98501-5519
(360) 352-0922
All other product names, trade names, or trademarks are the property of their respective owners.

Information in this printed documentation is supplemental and is not intended to replace Schoolmaster online Help.
Table of Contents - Elementary Grading i
Table Of Contents Elementary Grading ............................................................................................................................. 1
Chapter 1 - Introduction ................................................................................................................... 3 Terminology in Elementary Grading................................................................................................ 3 Work Activity Guide ......................................................................................................................... 5
Getting Started............................................................................................................................. 5 Ongoing Activities ........................................................................................................................ 6 End of Year Procedures .............................................................................................................. 6
Chapter 2 - Elementary Grading Setup........................................................................................... 7 Mark Positions................................................................................................................................. 7
Accessing Mark Positions............................................................................................................ 7 Changing a Mark Position............................................................................................................ 7
Mark Tables..................................................................................................................................... 8 Numeric or Alpha Grading ........................................................................................................... 8 Multiple Mark Tables.................................................................................................................... 8 Accessing Mark Tables................................................................................................................ 8 Working with Mark Tables ........................................................................................................... 9
Adding a Mark Table ................................................................................................................ 9 Deleting a Mark Table .............................................................................................................. 9 Editing a Mark Table .............................................................................................................. 10 Adding an Alpha Mark............................................................................................................ 10 Deleting an Alpha Mark.......................................................................................................... 11 Editing an Alpha Mark ............................................................................................................ 11 Printing Elementary Mark Tables........................................................................................... 12
Report Card Comments ................................................................................................................ 12 Accessing Report Card Comments ........................................................................................... 13 Working with Report Card Comments ....................................................................................... 13
Adding a Comment ................................................................................................................ 13 Changing a Comment ............................................................................................................ 14 Deleting a Comment .............................................................................................................. 14 Printing Comments................................................................................................................. 15
Report Card Layouts ..................................................................................................................... 15 Prerequisites for Report Card Layouts ...................................................................................... 16 Accessing Report Card Layouts ................................................................................................ 16 Report Card Layout Views......................................................................................................... 16 Reading the Subject List View................................................................................................... 16 Working with Report Card Layouts ............................................................................................ 17
Using Save As in Elementary Report Card Layouts .............................................................. 17 Adding a Report Card Layout ................................................................................................ 17 Deleting a Report Card Layout .............................................................................................. 17 Editing a Report Card Layout................................................................................................. 18 Adding a Subject/Skill ............................................................................................................ 18 Deleting a Subject/Skill .......................................................................................................... 20 Editing a Subject/Skill............................................................................................................. 20 Moving a Subject/Skill ............................................................................................................ 20 Editing Scan Form Headings ................................................................................................. 21

Information in this printed documentation is supplemental and is not intended to replace Schoolmaster online Help.
ii Table of Contents - Elementary Grading
Printing Report Card Layouts ................................................................................................ 21 Current Mark Position ................................................................................................................... 21
Selecting the Current Mark Position.......................................................................................... 21
Chapter 3 - Mark Entry ....................................................................................................................23 Prerequisites for Mark Collection.................................................................................................. 23 Teacher Mark Entry by Class ....................................................................................................... 24
Prerequisites for Teacher Entry by Class.................................................................................. 24 Accessing Teacher Entry by Class ........................................................................................... 24 Reading Teacher Entry by Class (Roster) ................................................................................ 25 Reading Teacher Entry by Class (Subject) ............................................................................... 26 Working with the Teacher: Mark Entry View ............................................................................. 27
Using Teacher Entry by Class Features................................................................................ 27 Entering Marks in Teacher: Mark Entry ................................................................................. 28
Post Teacher Marks to Office ....................................................................................................... 29 Prerequisites for Post Teacher Marks to Office ........................................................................ 29 Posting Teacher Marks to Office............................................................................................... 29
Office Entry by Class .................................................................................................................... 30 Accessing Office Entry by Class ............................................................................................... 31 Reading the Class: Mark Entry View......................................................................................... 31 Working with the Class: Mark Entry View ................................................................................. 32
Selecting Another Class ........................................................................................................ 32 Using Teacher Entry by Class Features................................................................................ 32 Locating a Student................................................................................................................. 33 Entering Marks in Class: Mark Entry ..................................................................................... 33 Showing and Hiding a Mark Table......................................................................................... 34
Office Entry by Scanner ................................................................................................................ 34 Prerequisites for Office Entry by Scanner ................................................................................. 34 General Procedures for Office Entry by Scanner...................................................................... 34 Accessing Office Entry by Scanner........................................................................................... 35 Reading the Class: Scan Marks View....................................................................................... 35 Working with Office Entry by Scanner....................................................................................... 36
Preparing Forms to Scan Elementary Marks ........................................................................ 36 Using the Class: Scan Marks View........................................................................................ 36 Working with a Scanner......................................................................................................... 37
Scanner Settings................................................................................................................ 37 Using Scanner Diagnostics................................................................................................ 38 Reading the Diagnostics Display ....................................................................................... 38 Scanning Errors ................................................................................................................. 39
Office Entry by Student ................................................................................................................. 40 Accessing Office Entry by Student............................................................................................ 40 Reading the Student: Elementary Marks View ......................................................................... 40 Working with the Student: Elementary Marks View .................................................................. 41
Using Teacher Entry by Class Features................................................................................ 41 Locating a Student in the Student: Elementary Marks View ................................................. 43 Entering Marks in the Student: Elementary Marks ................................................................ 43
Chapter 4 - Elementary Mark History ............................................................................................45 Prerequisites for Elementary Mark History ................................................................................... 45 Accessing the Elementary Mark History View .............................................................................. 45 Reading the Elementary Mark History View ................................................................................. 45
Information in this printed documentation is supplemental and is not intended to replace Schoolmaster online Help.
Table of Contents - Elementary Grading iii
Working with Posting Office Marks to Mark History ...................................................................... 47 When to Post ............................................................................................................................. 47 What to Post .............................................................................................................................. 47 Posting Office Marks to Elementary Mark History..................................................................... 48
Working with Elementary Mark History ......................................................................................... 48 Sorting the Subjects................................................................................................................... 48 Adding an Elementary Mark History Record ............................................................................. 49 Deleting an Elementary Mark History Record ........................................................................... 50
Chapter 5 - Reports......................................................................................................................... 51 Elementary Mark Collection Forms - 84931L - plain paper........................................................... 51
Prerequisites for Elementary Mark Collection Forms ................................................................ 51 Accessing Elementary Mark Collection Forms.......................................................................... 51 Printing Mark Collection Forms.................................................................................................. 51 Scannable Forms....................................................................................................................... 52
Reading the Scannable Form ................................................................................................ 52 Marking the Scannable Form................................................................................................. 54
Plain Paper Forms ..................................................................................................................... 54 Reading the Plain Paper Form............................................................................................... 54 Marking the Plain Paper Form ............................................................................................... 55
Teacher Mark Verification Reports................................................................................................ 55 Prerequisites for Teacher Mark Verification .............................................................................. 56 Printing the Teacher Mark Verification Report........................................................................... 56
Report Card Mark Verification ....................................................................................................... 57 Prerequisites for Report Card Mark Verification ........................................................................ 58 Printing the Report Card Mark Verification Report .................................................................... 58
Selected Mark Report.................................................................................................................... 60 Prerequisites for Selected Marks Report................................................................................... 60 Reading the Selected Marks Report.......................................................................................... 60 Printing Selected Marks Reports ............................................................................................... 61
Elementary Report Cards.............................................................................................................. 63 Prerequisites for Elementary Report Cards............................................................................... 63 Reading Elementary Report Cards............................................................................................ 63 Printing Elementary Report Cards............................................................................................. 65 Adding/Editing Elementary Report Card Variations .................................................................. 70 Deleting Elementary Report Cards............................................................................................ 71
Elementary Transcripts ................................................................................................................. 71 Prerequisites for Elementary Transcripts .................................................................................. 71 Reading Elementary Transcripts ............................................................................................... 71 Printing Elementary Transcripts................................................................................................. 73 Adding/Editing Elementary Transcript Variations ...................................................................... 77 Deleting Elementary Transcripts ............................................................................................... 78
Index .................................................................................................................................................... 79

Information in this printed documentation is supplemental and is not intended to replace Schoolmaster online Help.
iv Table of Contents - Elementary Grading

Information in this printed documentation is supplemental and is not intended to replace Schoolmaster online Help.
Elementary Grading 1
Elementary Grading This manual describes features and implementation activities of the Schoolmaster Elementary Grading module. This manual contains information of interest to school administrators and secretaries who use Schoolmaster's Student: Elementary Marks and Student: Elementary Mark History views and reports for mark management. It also contains setup information of interest to the System Manager. A student's report card and elementary transcript are displayed in the Student File on the Student: Elementary Marks and Student: Elementary Mark History views, respectively. By following the procedures described in this manual, you can create mark tables, construct report card layouts, collect marks, and print mark verification reports. You can print transcripts and report cards on the following Schoolmaster forms available from Olympia Computing Company: Academic Achievement Forms 84980L and 84981L. Topics covered in this manual include: 1 - Introduction Introduces the Elementary Grading module and suggests a list of work activities. 2 - Grading Setup Identifies the various files and tables that need to be established in preparation for mark collection and reporting. 3 - Mark Entry Describes the different methods of entering student marks into the school's records, including copying from teacher entries. 4 - Elementary Mark History Describes the Student: Elementary Mark History view and how to enter information. 5 - Reports Describes report, form, and record printing options and formats.

Information in this printed documentation is supplemental and is not intended to replace Schoolmaster online Help.
2 Elementary Grading
Information in this printed documentation is supplemental and is not intended to replace Schoolmaster online Help.
Elementary Grading 3
Chapter 1 - Introduction
Terminology in Elementary Grading Attendance Monthly school attendance can be included on report cards. The information needed to print attendance information comes from the daily attendance profile. Rules for interpreting the attendance codes and converting period absences to daily absences come from the attendance settings described in the Attendance manual. Elementary Mark History File The Elementary Mark History File provides permanent storage for subjects and marks. Subject titles and marks from the report card, the posting date, and other information are posted to the Elementary Mark History File from the Office Marks File using the Post Office Marks to Mark History module. Subjects can be added to a student's Elementary Mark History directly using the Student: Elementary Mark History view. Marks (Grades) The Elementary Grading module supports a mixture of alpha and numeric marks -- alpha for one subject and numeric for another, or both alpha and numeric for a single subject. A variety of symbols are used to represent points on an ordinal scale ranging from poor to excellent. There are three popular scales. The most general of these features three points: below average, average, above average. These three points are expressed in a variety of ways, including the popular plus (+ for above average), check ( for average) and minus (- for below average). A 13-point scale, with marks ranging from F to A+, is very common, and the 100-point scale, with marks ranging from 0 to 100, is also widely used. Depending on the Schoolmaster form used, you can print six or eight marks per subject. The number of columns used (1-8) is established during setup operations. Four columns are used when report cards are issued quarterly; some teachers elect to use an additional column for the final mark. Besides the efficiency gained from automating the mark reporting process, you benefit by posting marks to the transcript, where they remain online for immediate reference. The transcript can be printed chronologically or by subject. Mark Entry Most of the work associated with report card processing involves getting the marks into the computer. Marks can be entered by keyboard, by optical mark reader (scanner) or, if your school is using the Classroom module, by importing marks from the Teacher Marks File. The most efficient method for collecting marks is by keyboard entry from classroom workstations. Teachers complete an electronic report card using the Teacher Mark Entry module. If classroom workstations are not available, Schoolmaster's data collection forms and a compatible scanner can be used to capture student marks. After the report card layouts have been entered and students have been assigned to homerooms, a data collection form can be printed for each homeroom member.
Information in this printed documentation is supplemental and is not intended to replace Schoolmaster online Help.
4 Elementary Grading
Like the report card, this form is comprised of lines and columns. The lines contain subjects and applicable topics. For example, under the subject Reading, the topic Comprehension might be listed. If the first subject on the report card is Reading, it will be the first subject on the data collection form. The data collection form has 11 columns; each column represents a different letter or number. The first column usually represents A, the second B, the third C, and so on for D, F, U, P, and I, with the ninth column representing plus (+), and so forth. Each column is labeled accordingly. Columns also represent numbers for numeric marks and comments. Teachers indicate marks and comments by darkening the applicable circles with a soft lead pencil. If a scanner is not available, the mark collection form is printed to plain paper and the teacher writes marks and comments in the spaces provided. Office Marks File The Office Marks File is a temporary repository for as many as eight marks per subject for each class member. After scanning, or after posting from the Teacher Marks File, file contents can be viewed and corrected in the Student: Elementary Marks view. Marks appear as numbers or letters, depending on the layout specification (numeric or alpha). Numeric marks can also be printed as letters, depending on mark table specifications. Marks can be printed to legal-sized Schoolmaster form 84980L or to letter-sized form 84981L, both of which are designed to fit in a #10 window envelope. After posting marks to the Elementary Mark History File at the end of the year, the Office Marks File should be purged. Relationship between Homerooms and Report Cards Having a homeroom assignment is a prerequisite to having a report card. Students who are not assigned to homerooms cannot have report cards. Even if a student once had a homeroom and was graded, those marks cannot be viewed if the homeroom assignment has been deleted. When report cards are printed, the program retrieves the student's homeroom assignment and its attached report card layout. After printing the homeroom layout, the program prints layouts, if any, attached to linked classes such as Music or Art. Report Card A report card is a table comprised of rows (subjects, topics, and comments) and columns (marks and comment numbers). Report cards, which are designed to fit in #10 window envelopes, can include mark descriptions, text messages, marks, comments, and monthly attendance information. Examples of report card subjects include Reading, Language, Spelling, Handwriting, Mathematics, Social Studies, Science, Social Development, Health, Physical Education, Music, and Art. Subjects such as these are usually posted to the Elementary Mark History File at the end of the year. Letter marks A-F or numbers 1-100 are normally used to denote achievement in subjects. Topic (skill) marks augment subject marks. The student's Reading mark, for example, is often supplemented with Vocabulary, Comprehension, and Word Attack marks. Topic or skill marks are typically plus or minus, and they are usually not posted to the Elementary Mark History File. Topics are often marked excellent (E), satisfactory (S), and so forth. Typical math topics include Numeration, Basic Facts, Whole Number Operations, Fractions, Decimals, Graphics, Measuring, and Problem Solving.
Information in this printed documentation is supplemental and is not intended to replace Schoolmaster online Help.
Elementary Grading 5
Social development and work habits topics include: Demonstrates Listening Skills, Follows Directions, Understands Directions, Organizes Work Activities, Works Efficiently, Works Neatly, Works Independently, Works Cooperatively, Works to Capacity, Completes Work on Time, and Participates in Classroom. When the students are graded, teachers can select from a list of user-defined comments to personalize and supplement the subject and topic evaluations. Placeholders for comments can be specified at any location within the list of subjects and topics. Any of the report card layout lines can be reserved for comments. Report Card Layout A specific layout is created for each type of report card (e.g., Kindergarten Report Card, Grades 1-3 Report Card, etc.). The report card layout specifies how a list of subjects, supporting topics, and comments are formatted to appear on the Student: Elementary Marks view and on the printed copy of the report card. The layout specifies the appropriate marks for each report card element and indicates which subjects are to be posted to the Elementary Mark History File for permanent storage. A report card layout is assigned to each homeroom and, optionally, to non-homeroom classes such as Art, Music, and Physical Education. Layouts can be unique for each homeroom or shared across homerooms and grade levels. Teacher Marks File Marks entered by teachers from classroom workstations using the Schoolmaster Classroom module are stored in the Teacher Marks File. After verification and at an appointed time, office personnel post (copy) the marks to the Office Marks File. At the end of the year, the Teacher Marks File is cleared with the Purge Marks utility.
Work Activity Guide
Getting Started 1. Use current report cards to determine how many report card layouts are needed and name each
layout. Decide if homeroom layouts will include non-homeroom subjects. Including them is simpler, but non-homeroom teachers won't be able to enter marks directly if they do not have their own layouts.
2. Decide which report card subjects will be posted.
3. Compile a list of all marks used.
4. Enter Mark Positions.
5. Enter Report Card Comments.
6. Add Report Card Layouts.
7. Establish or edit the Mark Table. One table should suffice.
8. Add homerooms and other classes as described in the Staff, Classes, and Programs manual.
9. Show teachers how to enter marks from their workstations or how to complete the mark collection form.
Information in this printed documentation is supplemental and is not intended to replace Schoolmaster online Help.
6 Elementary Grading
Ongoing Activities
1. Capture the marks as described in Mark Entry.
2. If marks were posted from teacher workstations, print the Teacher Mark Verification Report. Ask teachers to correct errors they find.
3. If marks are entered from teacher workstations, Post Teacher Marks to Office.
4. Print the Report Card Mark Verification Report and both the office and teachers give a final check.
5. Correct errors discovered by teachers. (Teachers do not have access to the Office Marks File.)
6. Print Elementary Report Cards.
7. At the end of the year, post marks to the Elementary Mark History File.
End of Year Procedures Warning! Do not purge the current year grading files until the end of the school year. It is needed for state reporting purposes. See the System Manager Yearly Activity Checklists to ensure the proper timing of this activity.
1. Print the Elementary Mark History (transcript) and file it in the cumulative folder.
2. Purge Marks from the Office Marks File and the Teacher Marks File.
3. Build academic histories for transfer students as time permits (print transcripts or export student data for other Schoolmaster schools).

Information in this printed documentation is supplemental and is not intended to replace Schoolmaster online Help.
Elementary Grading 7
Chapter 2 - Elementary Grading Setup
Mark Positions Schoolmaster forms for Academic Achievement (84980L and 84981L) can accommodate up to eight mark positions (columns). You select labels for these mark positions from a list when report cards are printed. A mark position label is, in effect, a grading period label. Typical elementary school grading period codes Q1, Q2, Q3, and Q4 represent Quarter 1, Quarter 2, Quarter 3, and Quarter 4, respectively. If a final mark is given, a fifth label, Final, is included in the list. Strive for clarity; these labels appear on report cards, elementary transcripts, elementary mark history views, and mark displays.
Accessing Mark Positions Choose Setup, Elementary Grading, Mark Positions from the menu bar to open the Elem. Mark Position window.
Initially, eight mark positions are listed for review. The position codes appear on the report card and on other mark reports. If only four marks are collected during the school year, erase the remaining position codes and titles. If more are required, type them in the next blank row.
Changing a Mark Position Changes to the Mark Positions File are reflected in the elementary report card and academic history mark positions. So, before changing a mark position, consider the effect on report card mark layouts and transcript printing. For example, if a code was changed from Qtr 1 to Q1, student report card marks previously labeled Qtr 1 would be changed to Q1. A Q1 label could be changed to read Q2 just as easily, which may be misleading on subsequent printings. 1. Choose Setup, Elementary Grading, Mark Positions from the menu bar.
2. Select the position code or title you want to change.
3. Type the new code or title.
Information in this printed documentation is supplemental and is not intended to replace Schoolmaster online Help.
8 Elementary Grading
Mark Tables Use this editor to add, delete, and edit mark tables. A mark table is a named list of alpha or numeric symbols used to express a student's achievement of subject/ skill objectives. Typical mark symbols include A, B, C, D, F, U, P, I, and the numbers 0-100. Schoolmaster comes with a default table containing these marks. Each subject/skill has a designated mark table, although the same table may be used for all. The designated table must contain all alpha marks applicable to the subject/skill. When a student's alpha mark for a particular subject/skill is entered manually, Schoolmaster looks for it in the designated mark table. If the mark is found, a reference to it is written to the Office Marks File or Teacher Marks File; otherwise, the attempt is ignored. The default table will meet the mark reporting requirements of most elementary schools without alteration. Additional tables will be needed where numeric-to-alpha conversions vary among report card layouts or subjects/skills.
Numeric or Alpha Grading Included for each mark in the table are Alpha Mark, Conversion Threshold, and Averaging Value. The Alpha Mark is the mark symbol -- A, B, C, etc. The Conversion Threshold enables the program to determine a mark's range of numeric equivalents (e.g., 85-93 = B) and from that range, express a numeric mark in alpha form (e.g., 88 = B). The Averaging Value enables the program to express an alpha mark as a number (e.g., B = 85). It will also enable future versions to use alpha marks in mathematical operations such as computing an average. If its Averaging Value field is blank, a mark will not be included in mark averaging computations.
Multiple Mark Tables Additional mark tables may be needed to accommodate grading practices that vary across grade levels or student groups. However, although each subject reported can have a different mark table, one table per report card layout should suffice. In some circumstances, two tables, one for subjects and another for skills, could be justified.
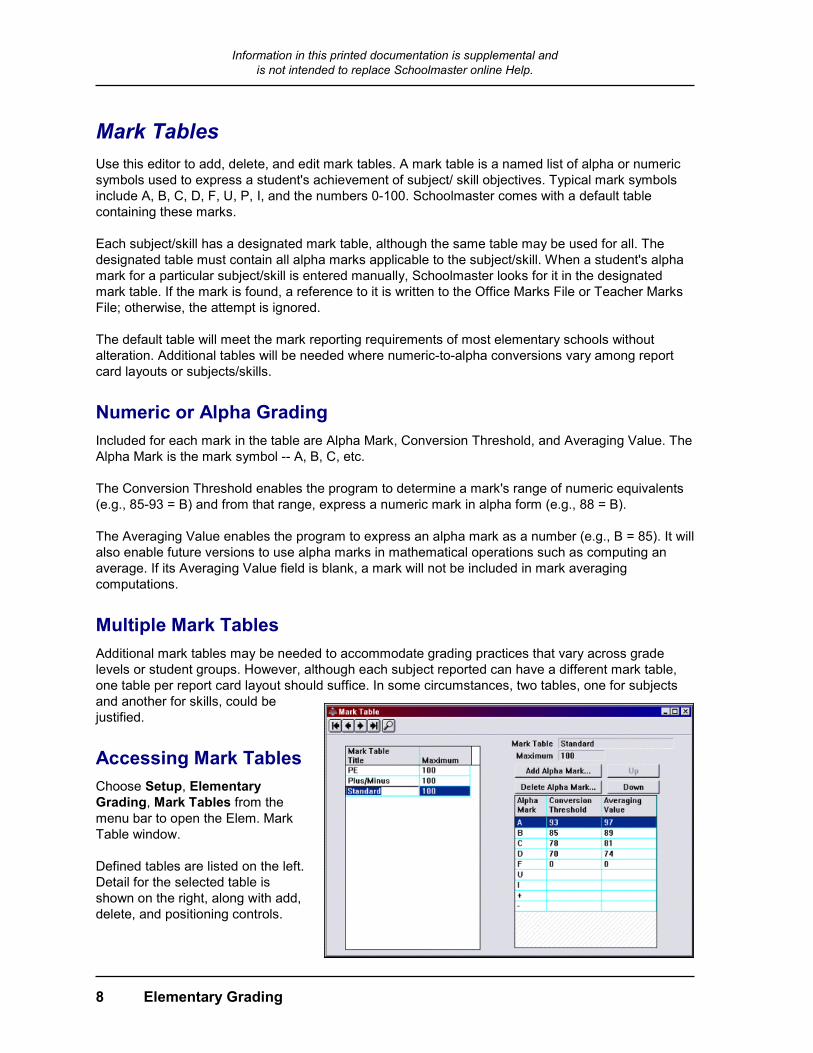
Accessing Mark Tables Choose Setup, Elementary Grading, Mark Tables from the menu bar to open the Elem. Mark Table window. Defined tables are listed on the left. Detail for the selected table is shown on the right, along with add, delete, and positioning controls.
Information in this printed documentation is supplemental and is not intended to replace Schoolmaster online Help.
Elementary Grading 9
Working with Mark Tables
Adding a Mark Table First, assign the new table a name and maximum value as instructed below; then add marks to it as instructed in Adding an Alpha Mark.
1. Choose Setup, Elementary Grading, Mark Tables from the menu bar.
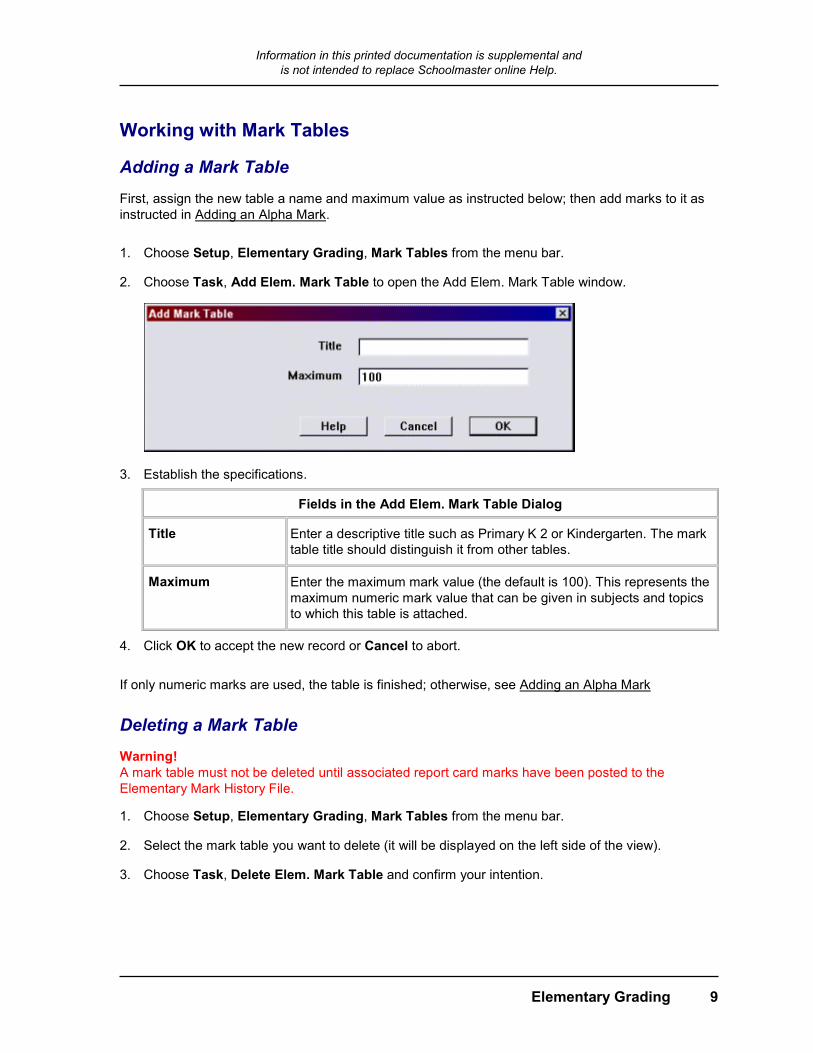
2. Choose Task, Add Elem. Mark Table to open the Add Elem. Mark Table window.
3. Establish the specifications.
Fields in the Add Elem. Mark Table Dialog
Title Enter a descriptive title such as Primary K 2 or Kindergarten. The mark table title should distinguish it from other tables.
Maximum Enter the maximum mark value (the default is 100). This represents the maximum numeric mark value that can be given in subjects and topics to which this table is attached.
4. Click OK to accept the new record or Cancel to abort.
If only numeric marks are used, the table is finished; otherwise, see Adding an Alpha Mark
Deleting a Mark Table Warning! A mark table must not be deleted until associated report card marks have been posted to the Elementary Mark History File.
1. Choose Setup, Elementary Grading, Mark Tables from the menu bar.
2. Select the mark table you want to delete (it will be displayed on the left side of the view).
3. Choose Task, Delete Elem. Mark Table and confirm your intention.
Information in this printed documentation is supplemental and is not intended to replace Schoolmaster online Help.
10 Elementary Grading
Editing a Mark Table
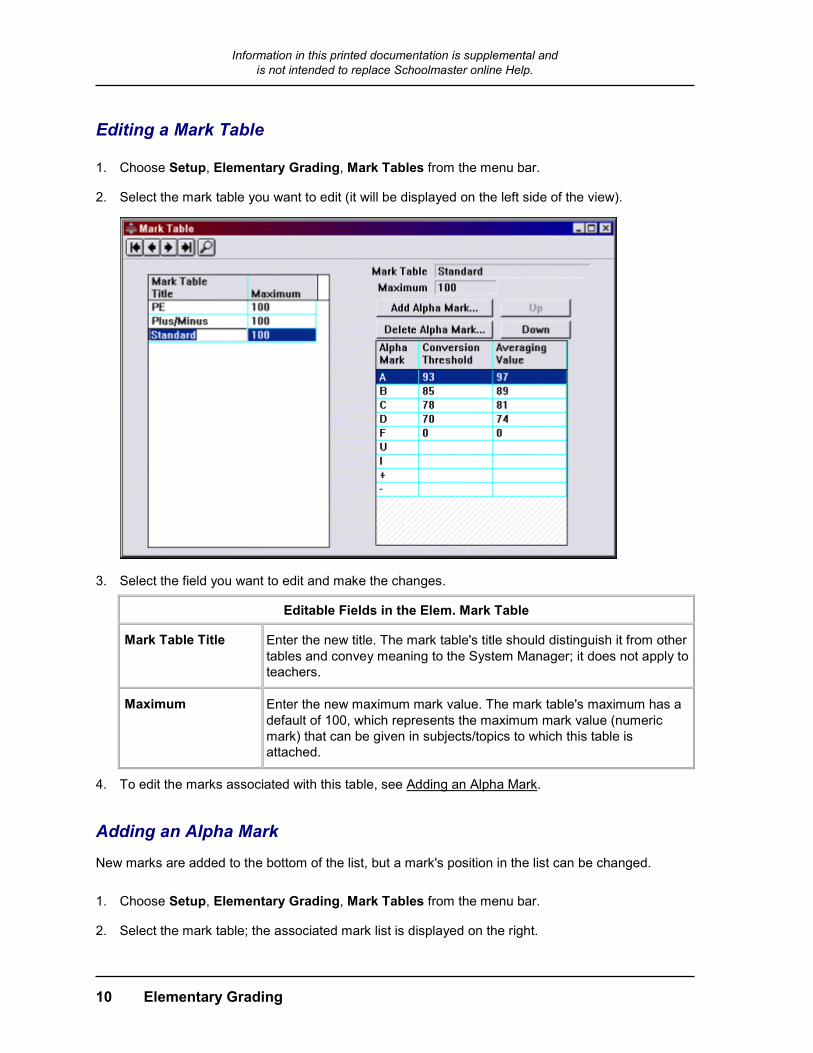
1. Choose Setup, Elementary Grading, Mark Tables from the menu bar.
2. Select the mark table you want to edit (it will be displayed on the left side of the view).
3. Select the field you want to edit and make the changes.
Editable Fields in the Elem. Mark Table
Mark Table Title Enter the new title. The mark table's title should distinguish it from other tables and convey meaning to the System Manager; it does not apply to teachers.
Maximum Enter the new maximum mark value. The mark table's maximum has a default of 100, which represents the maximum mark value (numeric mark) that can be given in subjects/topics to which this table is attached.
4. To edit the marks associated with this table, see Adding an Alpha Mark.
Adding an Alpha Mark New marks are added to the bottom of the list, but a mark's position in the list can be changed.
1. Choose Setup, Elementary Grading, Mark Tables from the menu bar.
2. Select the mark table; the associated mark list is displayed on the right.
Information in this printed documentation is supplemental and is not intended to replace Schoolmaster online Help.
Elementary Grading 11
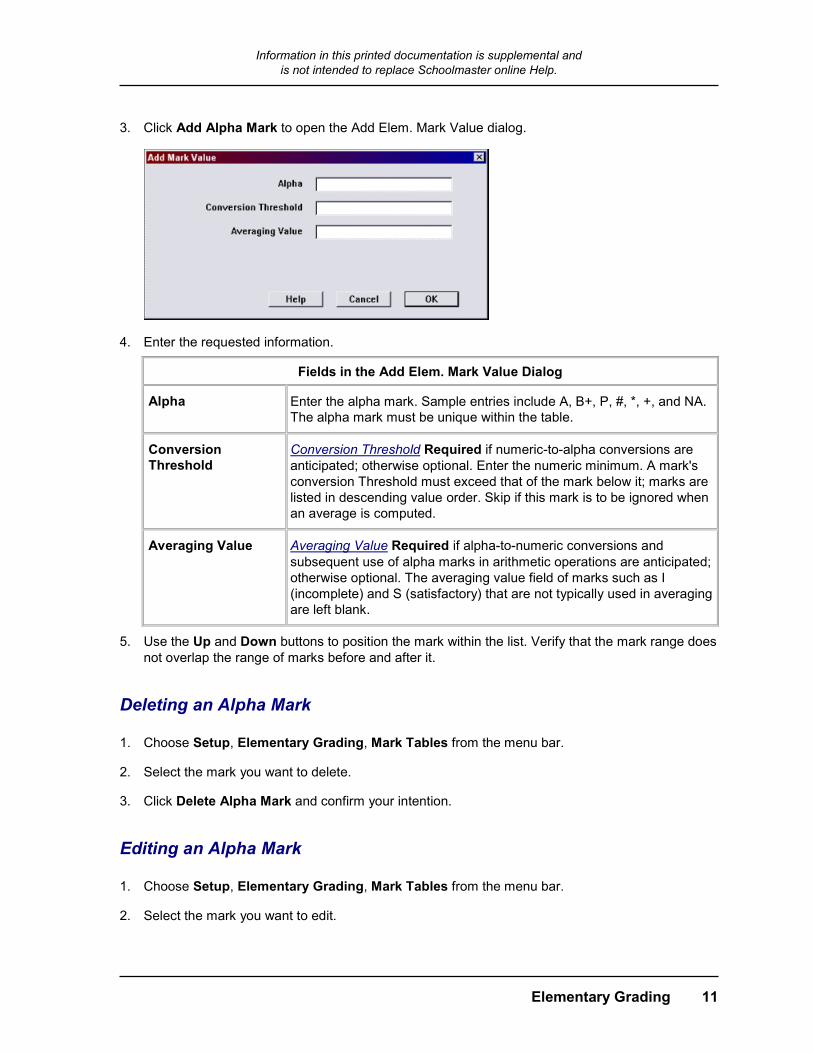
3. Click Add Alpha Mark to open the Add Elem. Mark Value dialog.
4. Enter the requested information.
Fields in the Add Elem. Mark Value Dialog
Alpha Enter the alpha mark. Sample entries include A, B+, P, #, *, +, and NA. The alpha mark must be unique within the table.
Conversion Threshold
Conversion Threshold Required if numeric-to-alpha conversions are anticipated; otherwise optional. Enter the numeric minimum. A mark's conversion Threshold must exceed that of the mark below it; marks are listed in descending value order. Skip if this mark is to be ignored when an average is computed.
Averaging Value Averaging Value Required if alpha-to-numeric conversions and subsequent use of alpha marks in arithmetic operations are anticipated; otherwise optional. The averaging value field of marks such as I (incomplete) and S (satisfactory) that are not typically used in averaging are left blank.
5. Use the Up and Down buttons to position the mark within the list. Verify that the mark range does not overlap the range of marks before and after it.
Deleting an Alpha Mark
1. Choose Setup, Elementary Grading, Mark Tables from the menu bar.
2. Select the mark you want to delete.
3. Click Delete Alpha Mark and confirm your intention.
Editing an Alpha Mark
1. Choose Setup, Elementary Grading, Mark Tables from the menu bar.
2. Select the mark you want to edit.
Information in this printed documentation is supplemental and is not intended to replace Schoolmaster online Help.
12 Elementary Grading
3. Select the appropriate field.
4. Enter the new information.
Printing Elementary Mark Tables To print one mark table exactly as it appears on the screen:
1. Choose Setup, Elementary Grading, Mark Tables from the menu bar.
2. Select the Mark Table Title to display the associated Mark Values.
3. Choose File, Print, and select Window to print the currently selected Mark Table and its Mark Values exactly as it appears in the window.
To print a list of Mark Tables available or a list of Mark Values formatted like a report:
1. Choose Setup, Elementary Grading, Mark Tables from the menu bar.
2. Choose File, Print, and select Table.
3. Select one of the following:
• Elementary Mark Tables to print a list of Mark Tables available.
• Elementary Mark Values to print the Mark Values for the currently selected Mark Table in a report format.
4. Click OK and make an output selection.
For complete details about the advantages/disadvantages when printing via Window/Table see Printing a View.
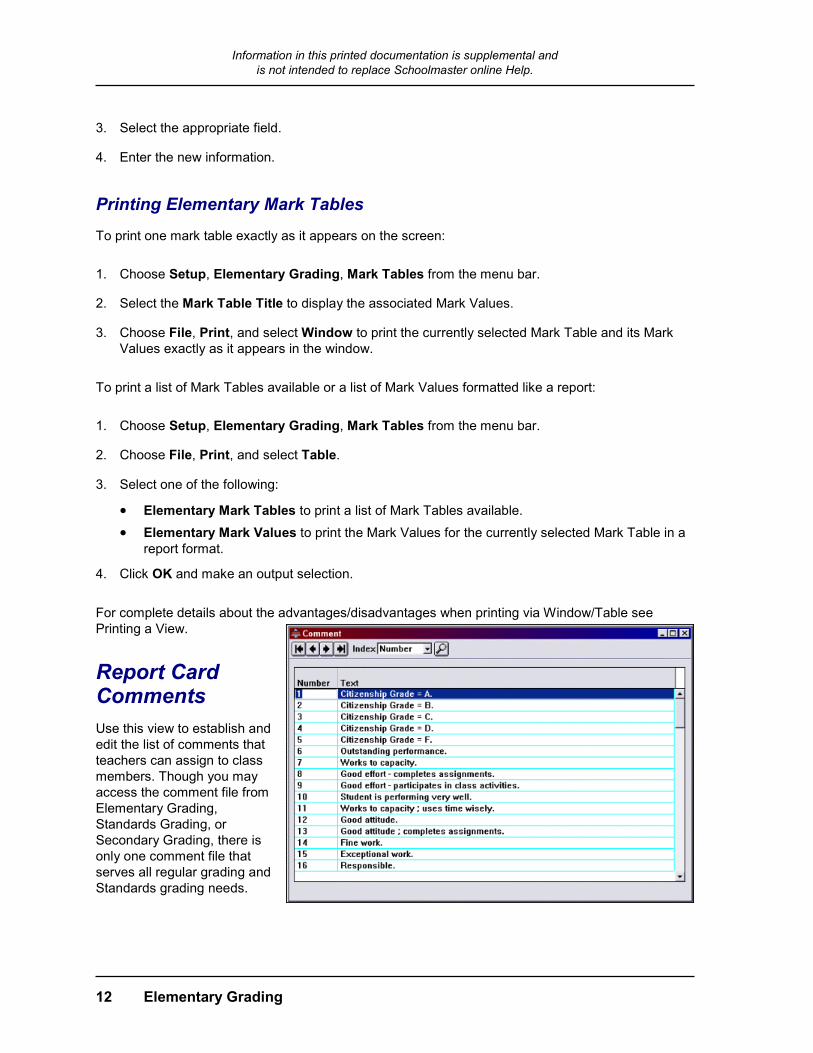
Report Card Comments Use this view to establish and edit the list of comments that teachers can assign to class members. Though you may access the comment file from Elementary Grading, Standards Grading, or Secondary Grading, there is only one comment file that serves all regular grading and Standards grading needs.
Information in this printed documentation is supplemental and is not intended to replace Schoolmaster online Help.
Elementary Grading 13
A maximum of three comments can be assigned to each class member in each class per Marking Period. Length of Comments -- Limit comments to about 75 upper/lower characters, including spaces. Comments will be truncated to approximately five inches in length when printed. Number of Comments -- If marks and comments are scanned, 999 comments are supported. When entered directly, 9,999 comments are supported.
Accessing Report Card Comments Choose Setup, Elementary Grading, Comments to open the Comment window.
Working with Report Card Comments
Adding a Comment
Though you may access the comment file from Standards Grading, Elementary Grading, or Secondary Grading, there is only one comment file that serves both regular grading and Standards grading needs.
The comment list can be printed or displayed in ascending order by number or alphabetically by text. References to comment text are stored by number in office/teacher mark records; the comment text itself is not stored in mark records. Some comments may apply to all subjects; others may apply to specific subjects; also, the comment file serves both regular and Standards grading. For convenience, organize the comments into subject-specific groups, departments, or Standards. You may accomplish this using the comment number or text. To organize by
► Comment Number -- Assign comment numbers 1-30 to Math, 31-60 to Standards Math, 61-90 to Science, 91-120 to Standards Science, and so on.
• Advantage -- The organizing scheme doesn't show if comments are printed on report cards.
• Disadvantages -- Teachers and staff adding comments must learn the numbering scheme. Also, comments are stored in records by number; if the text associated with a number is changed at a later date, the comments in student records reflect the new text.
► Comment Text -- Add a standards or department title to the text (e.g., "Math - Completes all homework problems" or "Math Standards - Mastered fractions quickly").
• Advantage -- Teachers and staff adding grades and comments will find it easier to locate appropriate comments without remembering numbering schemes.
• Disadvantage -- Comments printed on report cards include the organizing text as well.
1. Choose Setup, Elementary Grading, Comments.
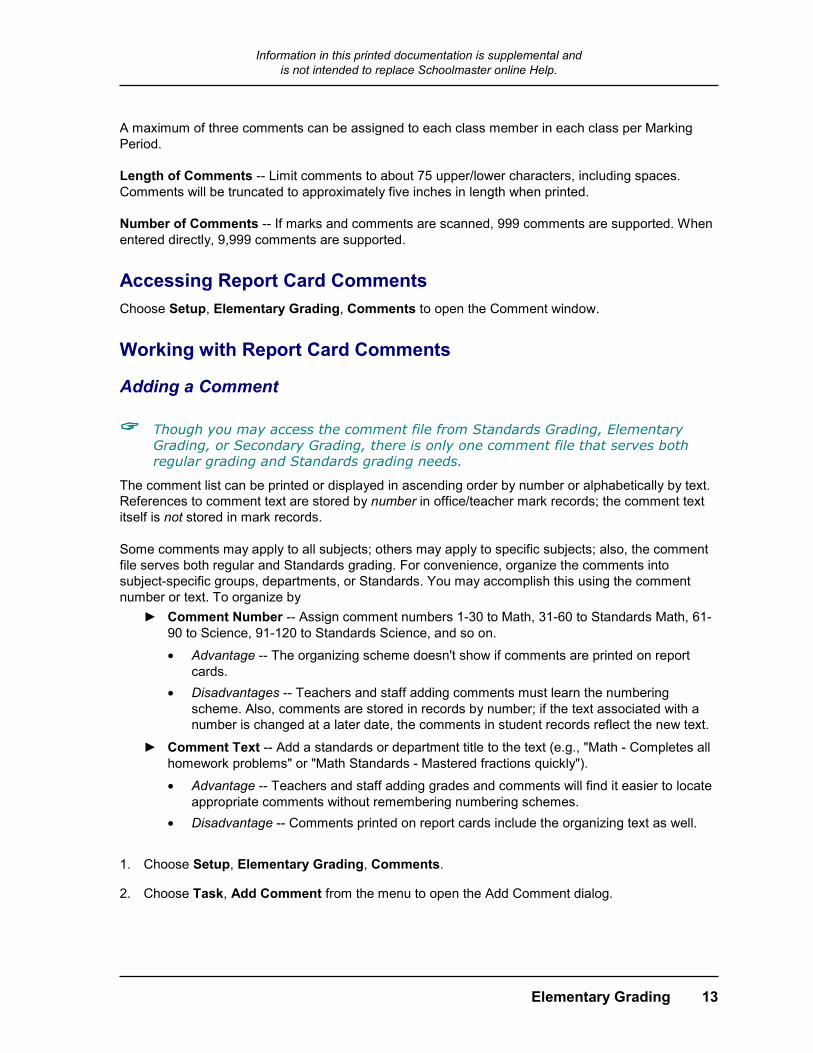
2. Choose Task, Add Comment from the menu to open the Add Comment dialog.
Information in this printed documentation is supplemental and is not intended to replace Schoolmaster online Help.
14 Elementary Grading
3. Enter the Number of the comment or accept the default number.
4. Enter the comment Text. Limit comments to about 75 upper/lower case characters.
5. Click OK. Your new comment appears on the Comment window.
Changing a Comment References to applicable comment records are stored in office/teacher mark records, not the comment text itself. Changes made to the text of a comment will be applied to the applicable students' report cards.
1. Choose Setup, Elementary Grading, Comments.
2. Select the record you want to change.
3. Select the field to change.
4. Type the new number or revised text.
Comment numbers must be unique.
There is no renumbering facility; if you want to change the numbering, you must edit each number manually.
Deleting a Comment Warning! Do not delete a comment until after report cards have been printed for the current grading period. Deleting a comment erases all references to it.
1. Choose Setup, Elementary Grading, Comments.
2. Select the comment.
3. Choose Task, Delete Comment and confirm your intention.

Information in this printed documentation is supplemental and is not intended to replace Schoolmaster online Help.
Elementary Grading 15
Printing Comments You can print a list of entries in the Comments File. This list reports the fields of the Comment view, in the order indicated in the Index (Number or Text).
1. Choose Setup, Elementary Grading, Comments.
2. Select the index to use when printing the list: Number or Text.
3. Choose File, Print from the menu bar. Schoolmaster will prompt you to print the window (exactly as you see it onscreen) or the table (complete contents).
4. Click Window to print the contents of the Comment view to the directly to the default printer or click Table to print the entire contents to the screen, printer, or file destination.
For complete details about the advantages/disadvantages when printing via Window/Table see Printing a View.
Report Card Layouts Use this view to create and edit report card layouts. At least one layout is required. As many as one report card layout per class or as few as one for the entire school can be used.
Information in this printed documentation is supplemental and is not intended to replace Schoolmaster online Help.
16 Elementary Grading
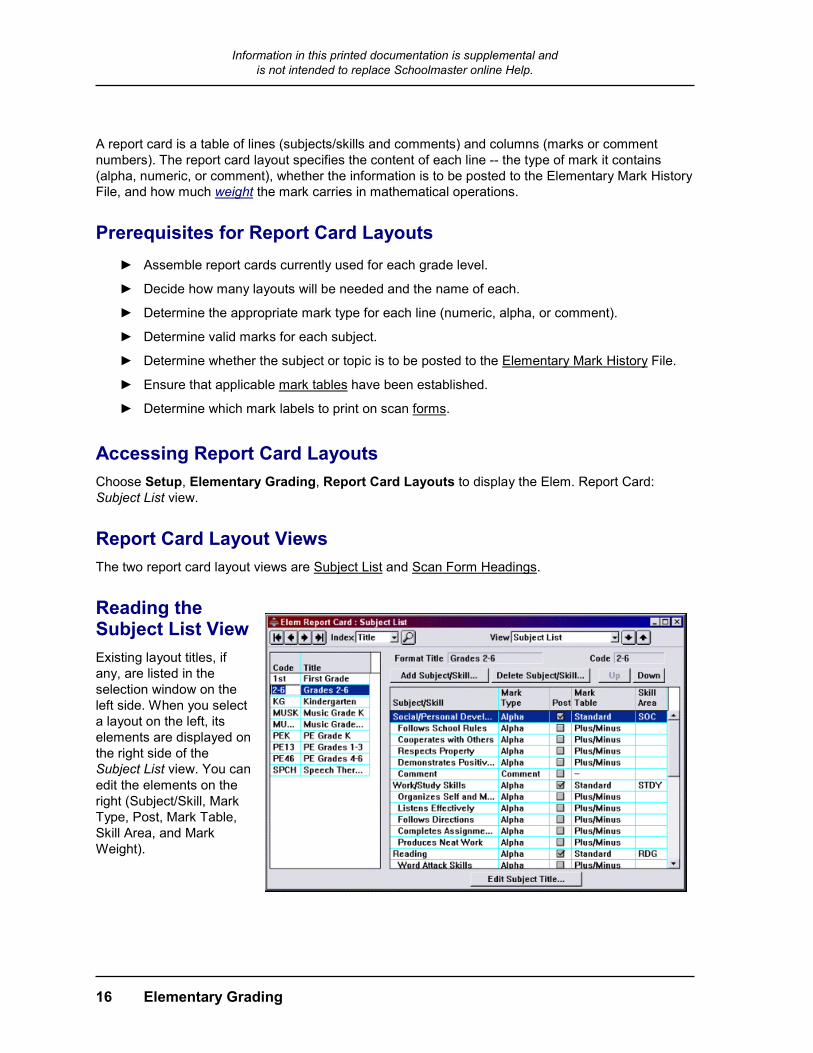
A report card is a table of lines (subjects/skills and comments) and columns (marks or comment numbers). The report card layout specifies the content of each line -- the type of mark it contains (alpha, numeric, or comment), whether the information is to be posted to the Elementary Mark History File, and how much weight the mark carries in mathematical operations.
Prerequisites for Report Card Layouts ► Assemble report cards currently used for each grade level.
► Decide how many layouts will be needed and the name of each.
► Determine the appropriate mark type for each line (numeric, alpha, or comment).
► Determine valid marks for each subject.
► Determine whether the subject or topic is to be posted to the Elementary Mark History File.
► Ensure that applicable mark tables have been established.
► Determine which mark labels to print on scan forms.
Accessing Report Card Layouts Choose Setup, Elementary Grading, Report Card Layouts to display the Elem. Report Card: Subject List view.
Report Card Layout Views The two report card layout views are Subject List and Scan Form Headings.
Reading the Subject List View Existing layout titles, if any, are listed in the selection window on the left side. When you select a layout on the left, its elements are displayed on the right side of the Subject List view. You can edit the elements on the right (Subject/Skill, Mark Type, Post, Mark Table, Skill Area, and Mark Weight).
Information in this printed documentation is supplemental and is not intended to replace Schoolmaster online Help.
Elementary Grading 17
Working with Report Card Layouts
Using Save As in Elementary Report Card Layouts
Because other classes may require a particular report card layout and multiple classes may use the same report card layout, it is safest to create a copy of an existing report card layout before making edits. And it is also more efficient to begin with a similar layout and make edits than it is to build from scratch.
Choose Task, Save As then type a name to create a new version before editing existing Report Card Layouts.
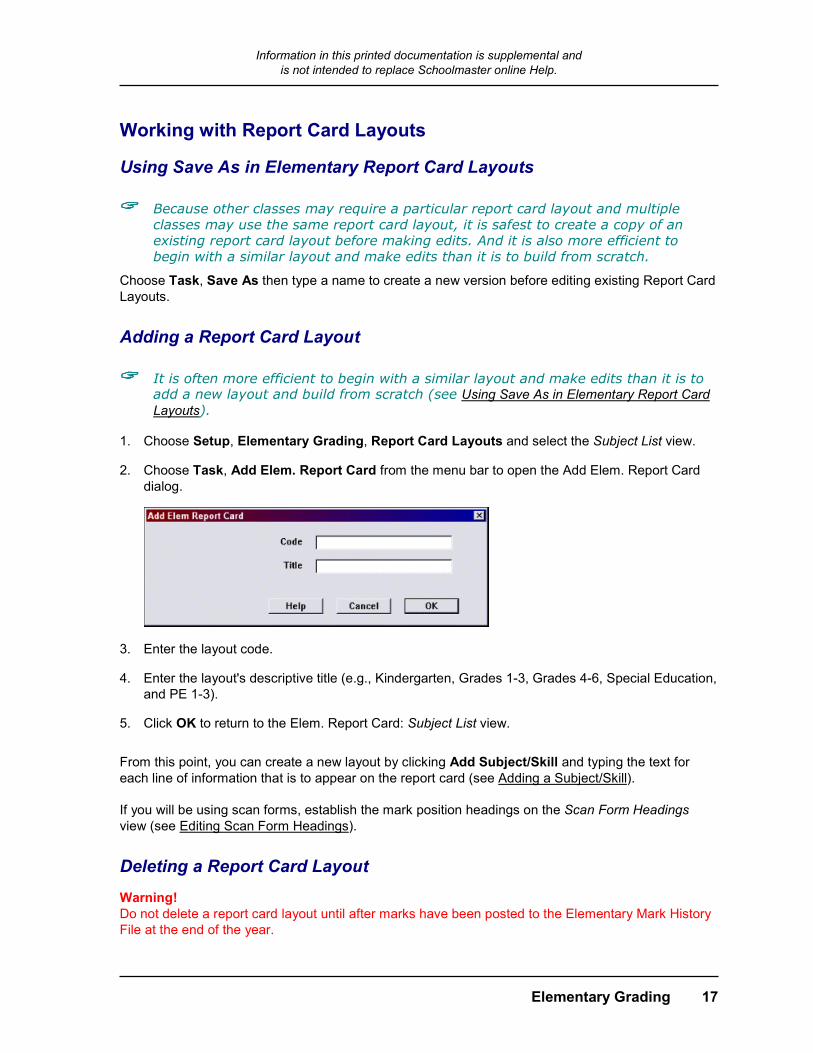
Adding a Report Card Layout
It is often more efficient to begin with a similar layout and make edits than it is to add a new layout and build from scratch (see Using Save As in Elementary Report Card Layouts).
1. Choose Setup, Elementary Grading, Report Card Layouts and select the Subject List view.
2. Choose Task, Add Elem. Report Card from the menu bar to open the Add Elem. Report Card dialog.
3. Enter the layout code.
4. Enter the layout's descriptive title (e.g., Kindergarten, Grades 1-3, Grades 4-6, Special Education, and PE 1-3).
5. Click OK to return to the Elem. Report Card: Subject List view.
From this point, you can create a new layout by clicking Add Subject/Skill and typing the text for each line of information that is to appear on the report card (see Adding a Subject/Skill). If you will be using scan forms, establish the mark position headings on the Scan Form Headings view (see Editing Scan Form Headings).
Deleting a Report Card Layout Warning! Do not delete a report card layout until after marks have been posted to the Elementary Mark History File at the end of the year.
Information in this printed documentation is supplemental and is not intended to replace Schoolmaster online Help.
18 Elementary Grading
1. Choose Setup, Elementary Grading, Report Card Layouts and select the Subject List view.
2. Select the report card layout you want to delete.
3. Choose Task, Delete Elem. Report Card and confirm your intention.
Editing a Report Card Layout When you change a layout's Title or Code, current year report card marks or mark histories are not affected.
1. Choose Setup, Elementary Grading, Report Card Layouts and select the Subject List view.
2. Select the layout you want to edit.
3. Select the field to edit (Title or Code).
4. Type the new information.
5. Change the subject/skill entries as needed (see Adding a Subject/Skill).
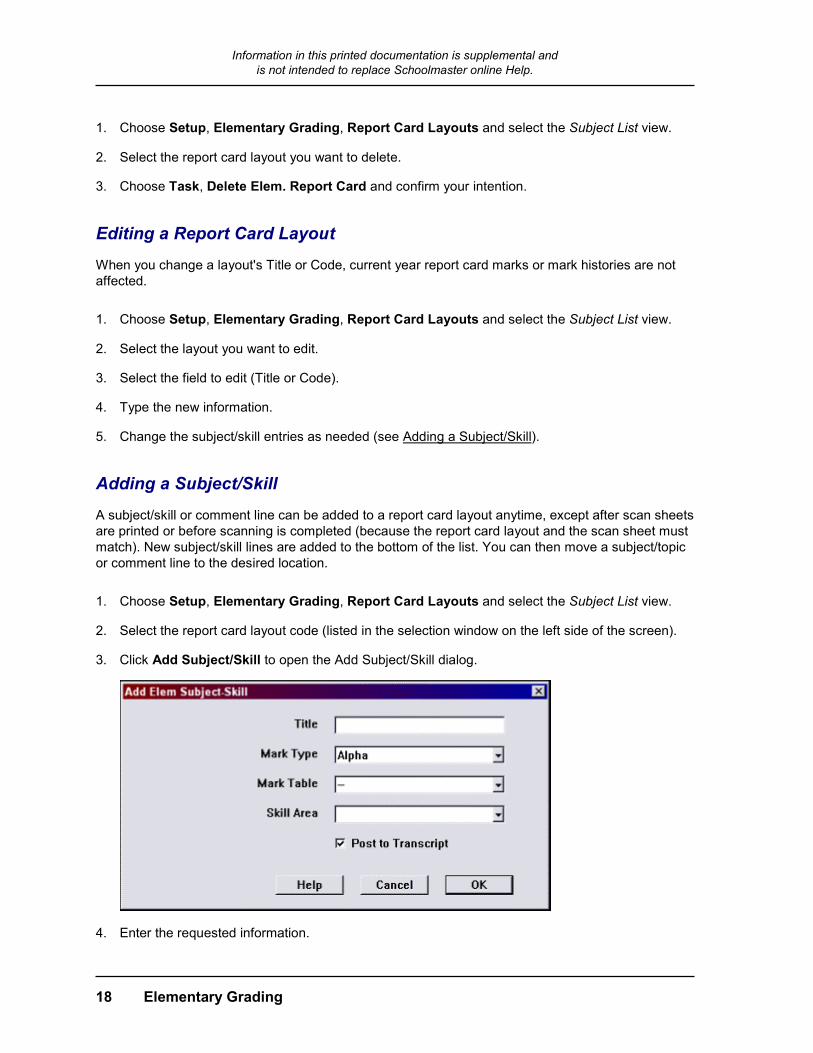
Adding a Subject/Skill A subject/skill or comment line can be added to a report card layout anytime, except after scan sheets are printed or before scanning is completed (because the report card layout and the scan sheet must match). New subject/skill lines are added to the bottom of the list. You can then move a subject/topic or comment line to the desired location.
1. Choose Setup, Elementary Grading, Report Card Layouts and select the Subject List view.
2. Select the report card layout code (listed in the selection window on the left side of the screen).
3. Click Add Subject/Skill to open the Add Subject/Skill dialog.
4. Enter the requested information.
Information in this printed documentation is supplemental and is not intended to replace Schoolmaster online Help.
Elementary Grading 19
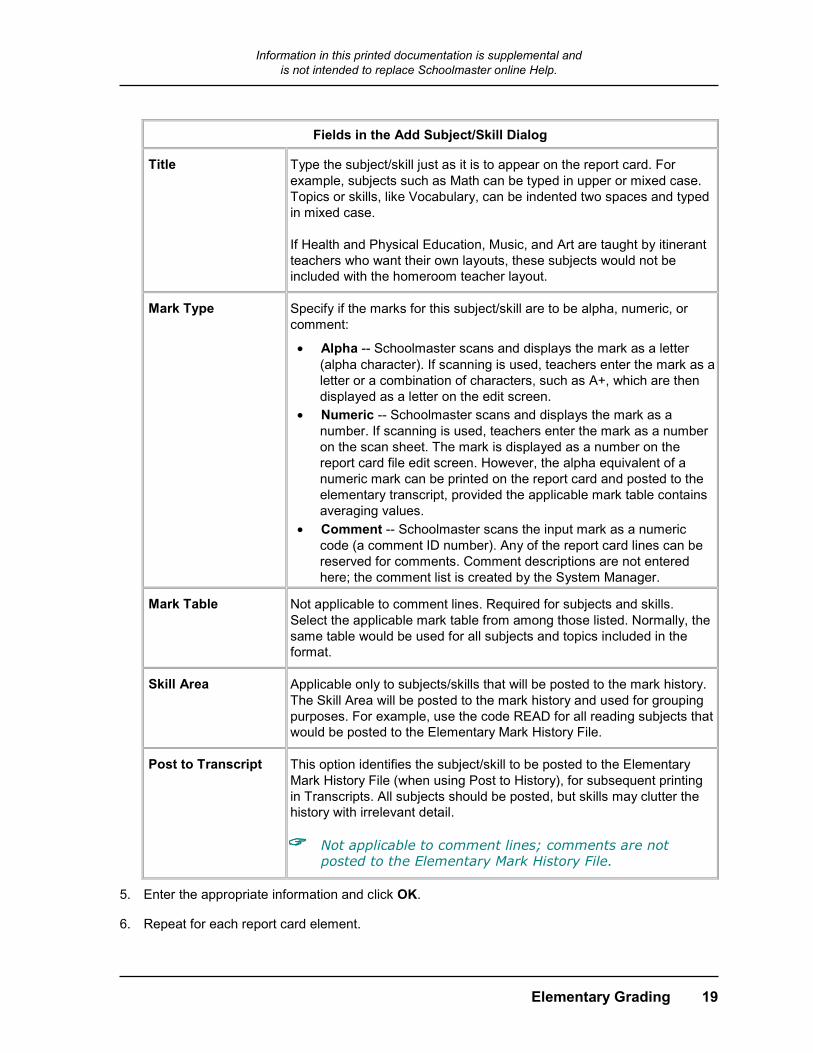
Fields in the Add Subject/Skill Dialog
Title Type the subject/skill just as it is to appear on the report card. For example, subjects such as Math can be typed in upper or mixed case. Topics or skills, like Vocabulary, can be indented two spaces and typed in mixed case. If Health and Physical Education, Music, and Art are taught by itinerant teachers who want their own layouts, these subjects would not be included with the homeroom teacher layout.
Mark Type Specify if the marks for this subject/skill are to be alpha, numeric, or comment:
• Alpha -- Schoolmaster scans and displays the mark as a letter (alpha character). If scanning is used, teachers enter the mark as a letter or a combination of characters, such as A+, which are then displayed as a letter on the edit screen.
• Numeric -- Schoolmaster scans and displays the mark as a number. If scanning is used, teachers enter the mark as a number on the scan sheet. The mark is displayed as a number on the report card file edit screen. However, the alpha equivalent of a numeric mark can be printed on the report card and posted to the elementary transcript, provided the applicable mark table contains averaging values.
• Comment -- Schoolmaster scans the input mark as a numeric code (a comment ID number). Any of the report card lines can be reserved for comments. Comment descriptions are not entered here; the comment list is created by the System Manager.
Mark Table Not applicable to comment lines. Required for subjects and skills. Select the applicable mark table from among those listed. Normally, the same table would be used for all subjects and topics included in the format.
Skill Area Applicable only to subjects/skills that will be posted to the mark history. The Skill Area will be posted to the mark history and used for grouping purposes. For example, use the code READ for all reading subjects that would be posted to the Elementary Mark History File.
Post to Transcript This option identifies the subject/skill to be posted to the Elementary Mark History File (when using Post to History), for subsequent printing in Transcripts. All subjects should be posted, but skills may clutter the history with irrelevant detail.
Not applicable to comment lines; comments are not posted to the Elementary Mark History File.
5. Enter the appropriate information and click OK.
6. Repeat for each report card element.

Information in this printed documentation is supplemental and is not intended to replace Schoolmaster online Help.
20 Elementary Grading
Deleting a Subject/Skill Warning! Do not delete a subject/ skill after student report card marks are entered. The deletion of a subject/skill or comment will result in its deletion from applicable current year report cards.
1. Choose Setup, Elementary Grading, Report Card Layouts and select the Subject List view.
2. Select the subject/skill line you want to delete.
3. Click Delete Subject/Skill and confirm your intention.
Editing a Subject/Skill
4. Choose Setup, Elementary Grading, Report Card Layouts and select the Subject List view.
5. Select the subject/skill line.
6. Select the field you want to edit.
7. Type or select the new information from the drop-down lists.
Moving a Subject/Skill Warning! Do not change a subject's position in the list by revising its title. Select and move the record instead.
1. Choose Setup, Elementary Grading, Report Card Layouts and select the Subject List view.
Information in this printed documentation is supplemental and is not intended to replace Schoolmaster online Help.
Elementary Grading 21
2. Select the Subject/Skill line you want to move.
3. Click the Up or Down buttons to relocate the selected subject/skill line.
Editing Scan Form Headings Up to 10 entries may be printed on a scan form, and 10 columns may have titles. Each report card layout can have a different set of column headings. To establish the correct headings to be used to identify the mark columns on the forms:
1. Choose Setup, Elementary Grading, Report Card Layouts and select the Scan Form Headings view.
2. Determine values for up to 10 columns (usually one or two characters).
3. Enter headings in Scan Column 1-10 fields. Entries such as + and - should appear near the end of the list to allow for combinations described in the note below.
Combinations can be created by marking more than one entry on the scan form. So, instead of having separate columns for A, A-, and A+, the columns can be identified as A, -, and +, which also allows for B, B-, and B+ by adding a B column.
Printing Report Card Layouts
1. Choose Report, General, Listing to open the Listings window.
2. Select Report Card Layouts -- Subject/Skills.
3. Click Print and choose the output destination.
Current Mark Position Only one mark position is accessible to teachers at any time when entering marks (Module, Elementary Grading, Teacher Entry by Class). Unless a mark position is selected, teachers will not be able to enter marks. The System Manager uses this feature to identify which mark position to enter.
Selecting the Current Mark Position
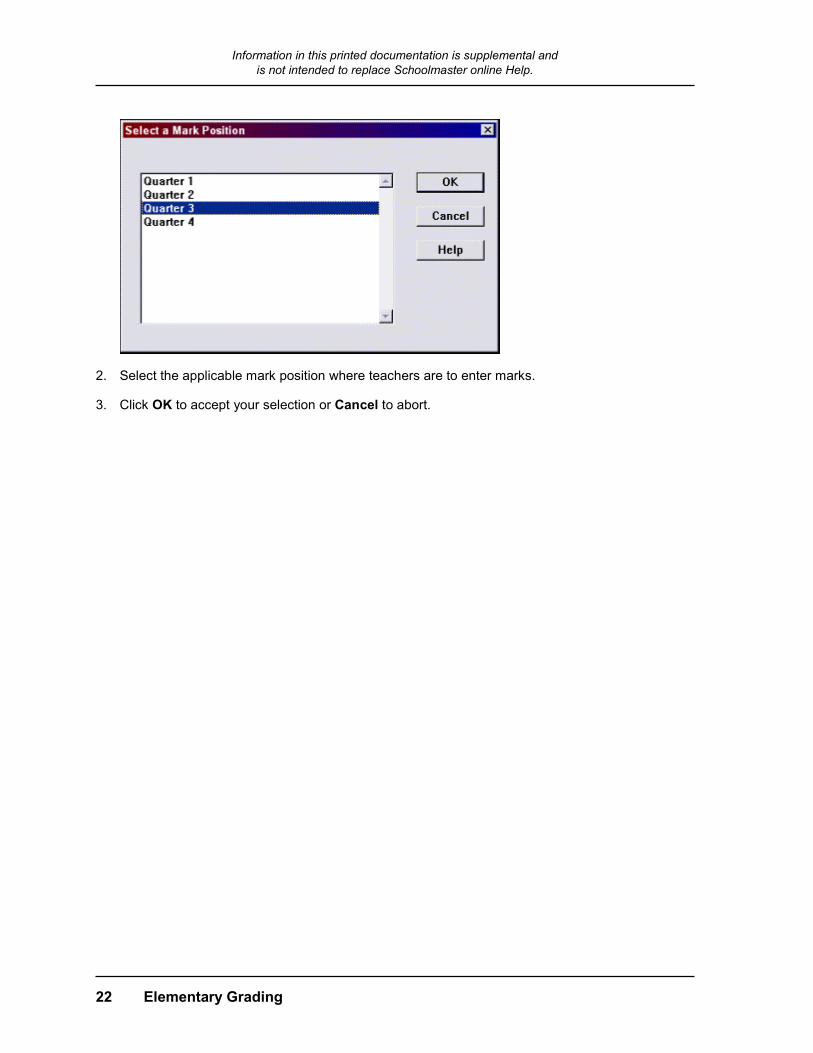
1. Choose Setup, Elementary Grading, Current Mark Position to open the Select a Mark Position dialog.
Information in this printed documentation is supplemental and is not intended to replace Schoolmaster online Help.
22 Elementary Grading
2. Select the applicable mark position where teachers are to enter marks.
3. Click OK to accept your selection or Cancel to abort.
Information in this printed documentation is supplemental and is not intended to replace Schoolmaster online Help.
Elementary Grading 23
Chapter 3 - Mark Entry Schoolmaster supports several mark entry methods. You can enter marks from:
• Classroom workstations, by teachers using the Classroom module, using Teacher Mark Entry view.
• Office staff or system managers with access to Teacher Entry by Class (making corrections to the Teacher Mark File).
• An office workstation using Office Entry by Class or Office Entry by Student.
• An office workstation using Office Entry by Scanner.
All marks entered by teachers are stored in the Teacher Marks File. Run the Teacher Mark Verification report to allow teachers to check the entries. After all marks have been entered and confirmed by the teachers, office personnel use the Post Teacher Marks to Office utility to copy marks from the Teacher Marks File to the Office Marks File. Schools using scanners (optical mark readers) submit Mark Collection forms to the office; marks are entered the forms using Office Entry by Scanner; they are stored in the Office Marks File. If teachers don't enter the marks or if an optical mark reader (scanner) is not available, marks may be collected on Mark Collection Forms and then entered from the office by hand using Office Entry by Class or Office Entry by Student. These marks and comments are stored in the Office Marks File. Marks in the Office Marks File are verified (see Chapter 5 - Report Card Mark Verification) printed to report cards and, at the year's end, posted to the students' Mark History (transcript) file (see Chapter 4 - Elementary Mark History).
Prerequisites for Mark Collection ► Add and edit the applicable Mark Tables.
► Establish the report card Mark Positions.
► Add comments to the Report Card Comment File.
► Add teachers to the Staff File.
► Add Classes and set the Collect Marks flag for appropriate grading periods.
► Create Report Card Layouts and assign one to each applicable class.
► Add students to Homeroom Rosters.
► If teachers are entering marks to the Classroom Module or Gradebook, provide a copy school grading policy.
► If teachers are not submitting marks to the office for entry, print mark entry forms, mark tables, and comments and distribute them to teachers (see also Obtaining Schoolmaster Forms).
Information in this printed documentation is supplemental and is not intended to replace Schoolmaster online Help.
24 Elementary Grading
Teacher Mark Entry by Class
Teachers who are using the Classroom module to enter marks for the current mark position; see Classroom Module: Teacher Mark Entry.
Teachers use the Classroom Module to enter marks for each student on the Teacher Mark Entry view, which shows that teacher's classes and all subjects/skills in the report card layout assigned to a class. When one student's marks are completely entered, the next student (in alphabetical order) is accessed and the process is repeated. Any student who is listed in the Class: Roster view appears on the Teacher Mark Entry view. If the teacher has more than one class, each is available. Office staff or system managers with access to the Teacher Entry by Class view are generally using this view to make corrections to the Teacher Marks File.
Prerequisites for Teacher Entry by Class ► Teachers must belong to a user group that has access rights to the elementary grading
module and they must be Classroom Users.
► All elementary grading setup activities must be completed.
► The Current Mark Position must be identified. It determines which marks and comments can be edited.
Accessing Teacher Entry by Class
If teachers find access to the Entry by Class (Roster) view is not available (choice is gray on the menu), check the User Group access rights for teachers. This view was added in Schoolmaster Version 5.22 and when new views are added, access rights to the new view must be granted.
Choose Module, Elementary Grading, Teacher Entry by Class (Subject) or (Roster) from the menu bar (or click Grading on the button bar).
• Use entry by section (Subject) to enter marks for all associated marks for one student at a time.
• Use entry by section (Roster) to enter marks for all student in a roster for one mark subject at a time.
If you are logged in as a teacher, your first assigned class should display automatically in the selected style.
Teachers -- The Grading button on the button bar will open the Grading module appropriate for you unless you are in a K-12 school. In K-12 schools, the Grading button opens Secondary Grading by default. To open Elementary Grading in a K-12 school, chose Module, Elementary Grading from the menu bar.
If you are not logged in as a teacher, but have access rights, select a teacher from the Staff Search dialog.
Information in this printed documentation is supplemental and is not intended to replace Schoolmaster online Help.
Elementary Grading 25
Reading Teacher Entry by Class (Roster)
If teachers find access to the Entry by Class (Roster) view is not available (choice is gray on the menu), check the User Group access rights for teachers. This view was added in Schoolmaster Version 5.22 and when new views are added, access rights to the new view must be granted.
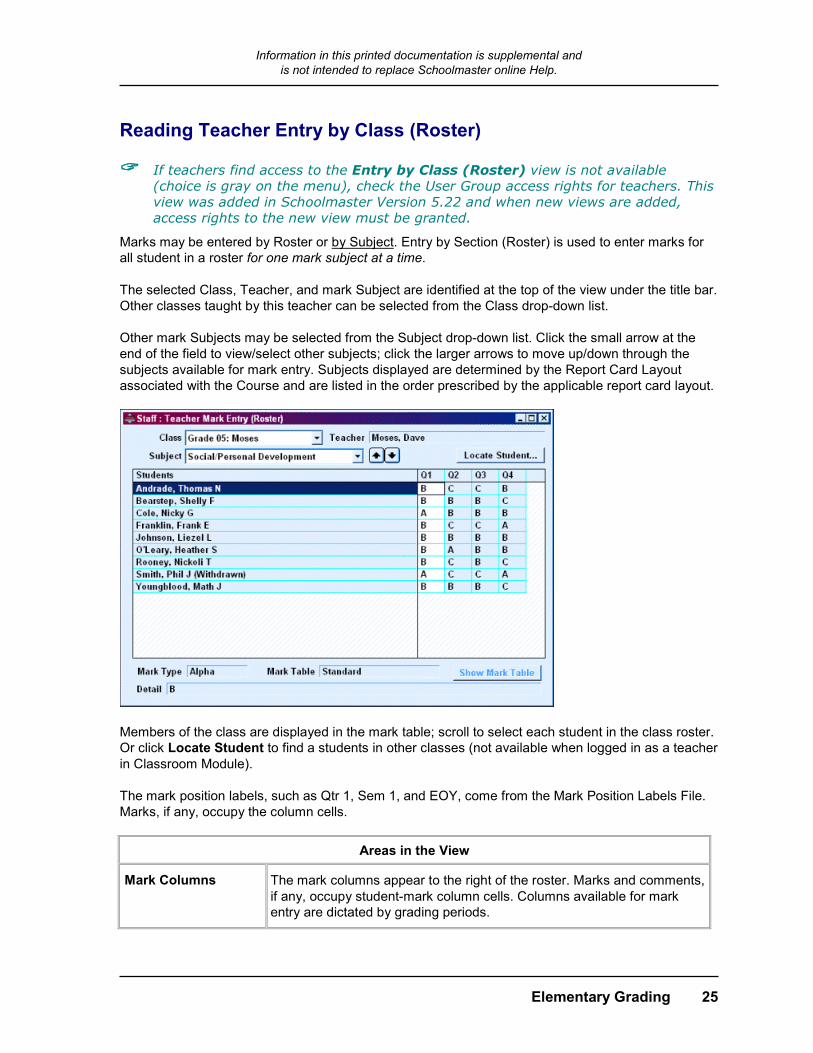
Marks may be entered by Roster or by Subject. Entry by Section (Roster) is used to enter marks for all student in a roster for one mark subject at a time. The selected Class, Teacher, and mark Subject are identified at the top of the view under the title bar. Other classes taught by this teacher can be selected from the Class drop-down list. Other mark Subjects may be selected from the Subject drop-down list. Click the small arrow at the end of the field to view/select other subjects; click the larger arrows to move up/down through the subjects available for mark entry. Subjects displayed are determined by the Report Card Layout associated with the Course and are listed in the order prescribed by the applicable report card layout.
Members of the class are displayed in the mark table; scroll to select each student in the class roster. Or click Locate Student to find a students in other classes (not available when logged in as a teacher in Classroom Module). The mark position labels, such as Qtr 1, Sem 1, and EOY, come from the Mark Position Labels File. Marks, if any, occupy the column cells.
Areas in the View
Mark Columns The mark columns appear to the right of the roster. Marks and comments, if any, occupy student-mark column cells. Columns available for mark entry are dictated by grading periods.
Information in this printed documentation is supplemental and is not intended to replace Schoolmaster online Help.
26 Elementary Grading
Areas in the View
Mark Type Indicates that the selected cell records an Alpha, Numeric, or Comment entry.
Mark Table Name of the Mark Table specified in the associated Report Card Layout.
Show/Hide Mark Table
Use this button to hide and show the list of marks or comments contained in the associated mark table. To remove the mark table selection box, click Hide Mark Table.
Detail Displays the as much of the full text of the selected cell as can be accommodated (display the mark table to view longer comments).
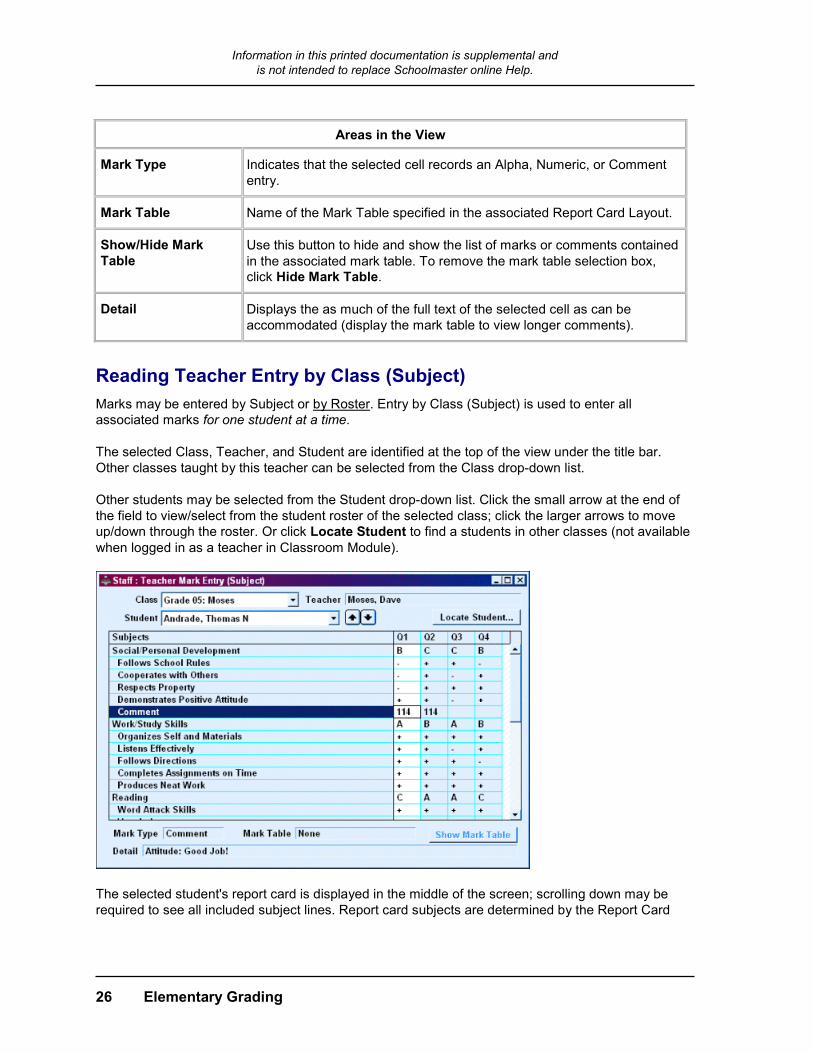
Reading Teacher Entry by Class (Subject) Marks may be entered by Subject or by Roster. Entry by Class (Subject) is used to enter all associated marks for one student at a time. The selected Class, Teacher, and Student are identified at the top of the view under the title bar. Other classes taught by this teacher can be selected from the Class drop-down list. Other students may be selected from the Student drop-down list. Click the small arrow at the end of the field to view/select from the student roster of the selected class; click the larger arrows to move up/down through the roster. Or click Locate Student to find a students in other classes (not available when logged in as a teacher in Classroom Module).
The selected student's report card is displayed in the middle of the screen; scrolling down may be required to see all included subject lines. Report card subjects are determined by the Report Card
Information in this printed documentation is supplemental and is not intended to replace Schoolmaster online Help.
Elementary Grading 27
Layout associated with the class and are listed on the left in the order prescribed by the applicable report card layout. The mark position labels, such as Qtr 1, Sem 1, etc., come from the Mark Position Labels File. Marks, if any, occupy the column cells. Marks, comments, and narrative entries from mark entry periods other than the Current Mark Position may be viewed but not edited.
Areas in the View
Mark Columns The mark columns appear to the right of the roster. Marks and comments, if any, occupy student-mark column cells. Columns available for mark entry are dictated by the current grading period.
Mark Type Indicates that the selected cell records an Alpha, Numeric, Comment, Description, or Narrative entry.
Mark Table Name of the Mark Table specified in the associated Report Card Layout.
Show/Hide Mark Table
Use this button to hide and show the list of marks or comments contained in the associated mark table. To remove the mark selection box, click Hide Mark Table.
Detail Displays the as much of the full text of the selected cell as can be accommodated (double-click a comment cell to see any text that doesn't fit).
Working with the Teacher: Mark Entry View
Using Teacher Entry by Class Features
In teacher mark entry views, only the Current Mark Position is active; others may display but are inactive. Teachers can only change/add marks located in the Current Mark Position. The System Manager sets the current mark position appropriate to the grading period (Setup, Elementary Grading, Current Mark Position).
Choose Module, Elementary Grading, Teacher Entry by Class from the menu bar Marks may be entered by Subject or by Roster. Select any mark entry cell to see the applicable Mark Type (alpha/numeric or comment) and the Mark Table displayed at the bottom of the screen. With a cell selected, the Detail line, also at the bottom of the view, displays the selected mark or comment text. Comment numbers, if any, occupy the comment-column cells. Click the cell containing a comment number to see the text of the comment in the Detail field. Click Show/Hide Mark Table to display the mark or comment table associated with the selected cell.
Information in this printed documentation is supplemental and is not intended to replace Schoolmaster online Help.
28 Elementary Grading
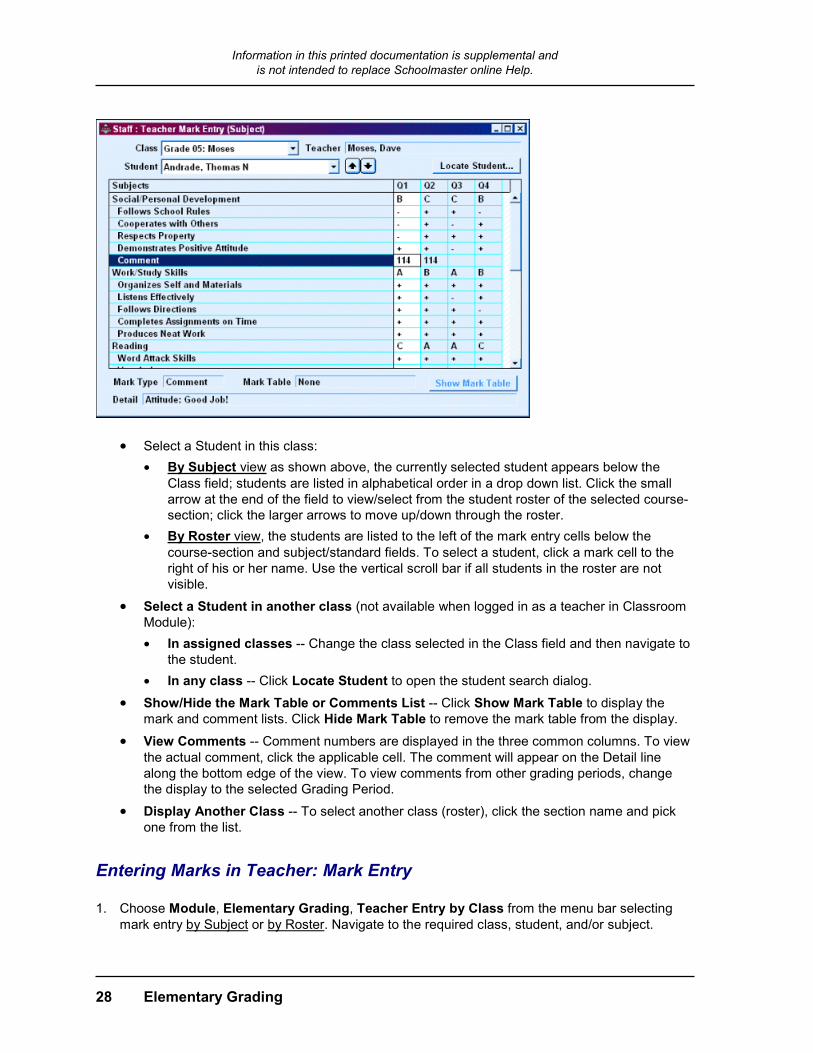
• Select a Student in this class: • By Subject view as shown above, the currently selected student appears below the
Class field; students are listed in alphabetical order in a drop down list. Click the small arrow at the end of the field to view/select from the student roster of the selected course-section; click the larger arrows to move up/down through the roster.
• By Roster view, the students are listed to the left of the mark entry cells below the course-section and subject/standard fields. To select a student, click a mark cell to the right of his or her name. Use the vertical scroll bar if all students in the roster are not visible.
• Select a Student in another class (not available when logged in as a teacher in Classroom Module): • In assigned classes -- Change the class selected in the Class field and then navigate to
the student. • In any class -- Click Locate Student to open the student search dialog.
• Show/Hide the Mark Table or Comments List -- Click Show Mark Table to display the mark and comment lists. Click Hide Mark Table to remove the mark table from the display.
• View Comments -- Comment numbers are displayed in the three common columns. To view the actual comment, click the applicable cell. The comment will appear on the Detail line along the bottom edge of the view. To view comments from other grading periods, change the display to the selected Grading Period.
• Display Another Class -- To select another class (roster), click the section name and pick one from the list.
Entering Marks in Teacher: Mark Entry
1. Choose Module, Elementary Grading, Teacher Entry by Class from the menu bar selecting mark entry by Subject or by Roster. Navigate to the required class, student, and/or subject.
Information in this printed documentation is supplemental and is not intended to replace Schoolmaster online Help.
Elementary Grading 29
2. Click the applicable student's mark entry cell. You may type valid marks or comment numbers and press enter to move to the next mark entry cell below. But selecting marks/comments from the applicable mark table is easier and less likely to result in invalid entries.
• Click Show Mark Table to display the mark or comment lists. The mark table changes according to the mark type of the selected mark entry cell, displaying either alpha/numeric marks or comments.
• Double-click the appropriate mark/comment in the mark table to enter a mark/comment in the currently selected mark entry cell and move to the next mark entry cell below.
The Mark Table replaces a portion of the report card display. Click Hide Mark Table to remove the mark table from the display. Use the scroll bar to display additional mark entry cells.
3. Review marks/comments, editing if desired. Repeat this procedure until all marks have been entered.
4. Select the next student, subject, or class (see Using Teacher Entry by Class Features).
5. Print the Teacher Mark Verification report to confirm that all entries are correctly recorded in the Teacher Marks File.
Post Teacher Marks to Office Use Post Teacher Marks to Office to copy report card marks that teachers have entered using Teacher Mark Entry and to update the Office Marks File before performing final edits. This is used only if teachers enter marks from workstations.
Prerequisites for Post Teacher Marks to Office ► Ensure that teachers have entered marks for all classes and students.
► Print the Teacher Mark Verification report to allow teachers to check the entries.
► Ask teachers to verify and correct marks.
► Or, office staff or system managers with access to Teacher Entry by Class may make corrections to the Teacher Mark File.
Posting Teacher Marks to Office Warning! Corrections made by office personnel to previously posted marks could be lost if mark columns are re-posted.
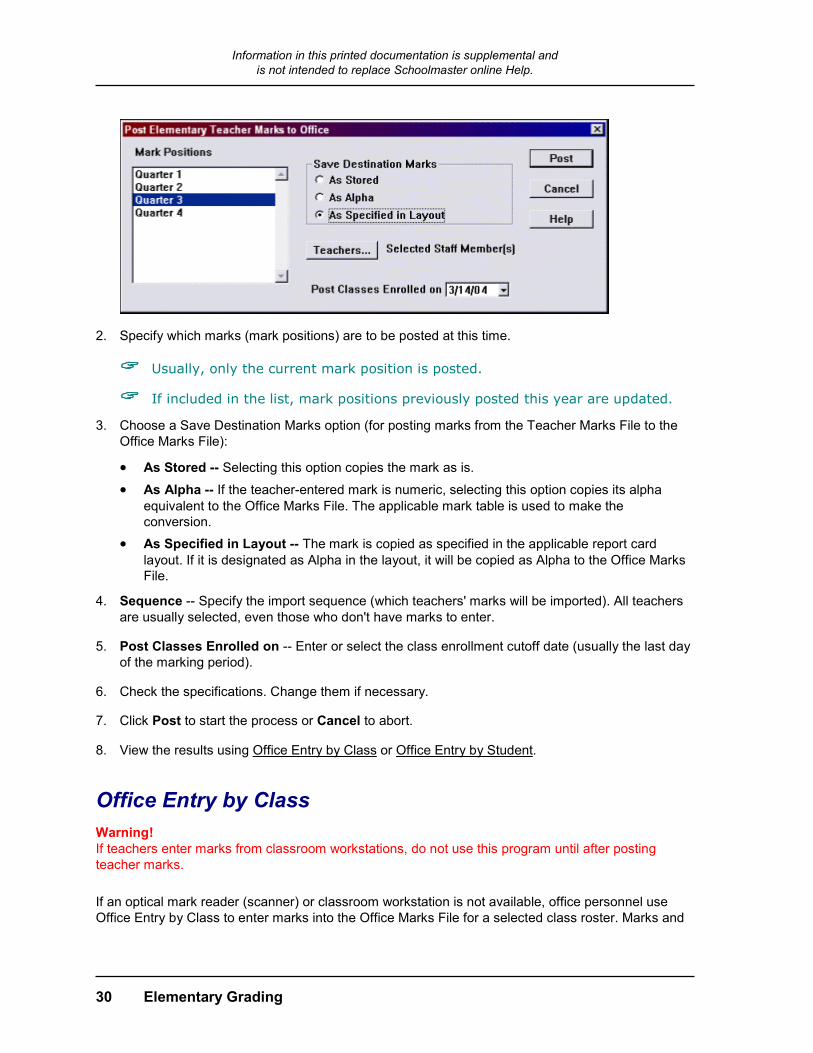
1. Choose Module, Elementary Grading, Post Teacher Marks to Office from the menu bar.
Information in this printed documentation is supplemental and is not intended to replace Schoolmaster online Help.
30 Elementary Grading
2. Specify which marks (mark positions) are to be posted at this time.
Usually, only the current mark position is posted.
If included in the list, mark positions previously posted this year are updated.
3. Choose a Save Destination Marks option (for posting marks from the Teacher Marks File to the Office Marks File):
• As Stored -- Selecting this option copies the mark as is.
• As Alpha -- If the teacher-entered mark is numeric, selecting this option copies its alpha equivalent to the Office Marks File. The applicable mark table is used to make the conversion.
• As Specified in Layout -- The mark is copied as specified in the applicable report card layout. If it is designated as Alpha in the layout, it will be copied as Alpha to the Office Marks File.
4. Sequence -- Specify the import sequence (which teachers' marks will be imported). All teachers are usually selected, even those who don't have marks to enter.
5. Post Classes Enrolled on -- Enter or select the class enrollment cutoff date (usually the last day of the marking period).
6. Check the specifications. Change them if necessary.
7. Click Post to start the process or Cancel to abort.
8. View the results using Office Entry by Class or Office Entry by Student.
Office Entry by Class Warning! If teachers enter marks from classroom workstations, do not use this program until after posting teacher marks. If an optical mark reader (scanner) or classroom workstation is not available, office personnel use Office Entry by Class to enter marks into the Office Marks File for a selected class roster. Marks and

Information in this printed documentation is supplemental and is not intended to replace Schoolmaster online Help.
Elementary Grading 31
comments entered with this module are written to the Office Marks File, from which they are printed to report cards and, at the end of the year, posted to the Elementary Mark History File.
Accessing Office Entry by Class Method 1 Choose Module, Elementary Grading, Office Entry by Class from
the menu bar to open the Class Search dialog. Select the class and click OK to display the Class: Mark Entry view.
Method 2 Choose File, Classes from the menu bar to open the Class Searchdialog. Select the class and click OK to display the Class: Primary Data view. Set the view to Mark Entry.
Reading the Class: Mark Entry View
The Mark Entry view resembles the student's report card. It is accessible as a Student: Elementary Marks view and as a Class: Mark Entry view.
The Class: Mark Entry view shows marks for the first student on the roster. You can search for another class, change the class index, move forward and backward through the list of classes, select a class member, move among the class members, and locate a student who is not a member of the selected class. The selected class and student are identified at the top of the screen.
Part of the selected student's report card is displayed in the middle of the screen. Report card subjects are listed on the left in the order prescribed by the applicable report card layout. The mark position labels, such as Q1, come from the Mark Positions File. Marks, if any, are in the subject-column cells. Comment numbers, if any, are in the comment-column cells.

Information in this printed documentation is supplemental and is not intended to replace Schoolmaster online Help.
32 Elementary Grading
The applicable Mark Type and Mark Table for the selected cell are displayed at the bottom of the screen. The Detail line displays the selected mark or comment.
Working with the Class: Mark Entry View
Selecting Another Class
To select another class (roster), click the search icon and select a class from the list.
Using Teacher Entry by Class Features
In teacher mark entry views, only the Current Mark Position is active; others may display but are inactive. Teachers can only change/add marks located in the Current Mark Position. The System Manager sets the current mark position appropriate to the grading period (Setup, Elementary Grading, Current Mark Position).
Choose Module, Elementary Grading, Teacher Entry by Class from the menu bar Marks may be entered by Subject or by Roster. Select any mark entry cell to see the applicable Mark Type (alpha/numeric or comment) and the Mark Table displayed at the bottom of the screen. With a cell selected, the Detail line, also at the bottom of the view, displays the selected mark or comment text. Comment numbers, if any, occupy the comment-column cells. Click the cell containing a comment number to see the text of the comment in the Detail field. Click Show/Hide Mark Table to display the mark or comment table associated with the selected cell.
• Select a Student in this class:
Information in this printed documentation is supplemental and is not intended to replace Schoolmaster online Help.
Elementary Grading 33
• By Subject view as shown above, the currently selected student appears below the Class field; students are listed in alphabetical order in a drop down list. Click the small arrow at the end of the field to view/select from the student roster of the selected course-section; click the larger arrows to move up/down through the roster.
• By Roster view, the students are listed to the left of the mark entry cells below the course-section and subject/standard fields. To select a student, click a mark cell to the right of his or her name. Use the vertical scroll bar if all students in the roster are not visible.
• Select a Student in another class (not available when logged in as a teacher in Classroom Module): • In assigned classes -- Change the class selected in the Class field and then navigate to
the student. • In any class -- Click Locate Student to open the student search dialog.
• Show/Hide the Mark Table or Comments List -- Click Show Mark Table to display the mark and comment lists. Click Hide Mark Table to remove the mark table from the display.
• View Comments -- Comment numbers are displayed in the three common columns. To view the actual comment, click the applicable cell. The comment will appear on the Detail line along the bottom edge of the view. To view comments from other grading periods, change the display to the selected Grading Period.
• Display Another Class -- To select another class (roster), click the section name and pick one from the list.
Locating a Student To display the marks of a student who is not a member of this class, click Locate Student. If the student has more than one class, select the one you wish to see.
Entering Marks in Class: Mark Entry
1. Choose Module, Elementary Grading, Office Entry by Class from the menu bar to open the Class Search dialog. Select the class and click OK to display the Class: Mark Entry view. and navigate to the required class/student.
2. Click the applicable subject/marking period cell.
3. Click Show Mark Table to display the mark and comment lists. A portion of the report card display will be replaced by the mark table display.
Additional report card columns can be displayed using the scroll bar.
The mark table will change, as necessary, according to the specifications for the current subject-column cell.
4. Click Hide Mark Table to remove the mark table from the display.
5. Enter or edit marks and comments. Although valid marks (those contained in the applicable mark table) can be typed directly into the subject-column cells, selecting them from the mark table is easier and less likely to result in invalid entries.
Information in this printed documentation is supplemental and is not intended to replace Schoolmaster online Help.
34 Elementary Grading
6. Double-click the applicable mark. The mark will appear in the selected cell and the cursor will advance to the next subject, skill, or comment line.
7. Repeat this procedure until all marks for the selected marking period have been entered. The mark list will be replaced by the comment list (arranged alphabetically) when a comment cell is selected.
Showing and Hiding a Mark Table Click Show Mark Table to display the mark and comment lists. Click Hide Mark Table to remove the mark table from the display. The mark table shown will be appropriate to the selected subject/skill.
Office Entry by Scanner Warning! If some teachers enter marks from classroom workstations, do not use this program until after posting teacher marks. Use Office Entry by Scanner and a 48-column optical mark reader (scanner) to scan mark and comment entries from Schoolmaster data collection rosters.
Scanners from Scanning Systems or NCS are compatible with Schoolmaster.
Marks and comments entered with this function are written to the Office Marks File, from which they are printed to report cards and posted to the Elementary Mark History (Transcript) File at the end of the year.
Prerequisites for Office Entry by Scanner ► Assign students to homerooms.
► Create and assign report cards layouts.
► If necessary print and distribute Mark Tables and Comments for teacher reference.
► Print scannable mark forms (84931L) and distribute them to teachers (see also Obtaining Schoolmaster Forms).
► Collect completed forms. Erase stray marks and darken light marks.
► Make sure the scanner is in serial communications with the workstation and its settings are correct (see equipment manual).
The program will read forms in any order, but arranging them in alphabetical order by teacher and by student is best.
General Procedures for Office Entry by Scanner After accessing the setup dialog, check the scanner settings and begin scanning forms. When a form is scanned, the student's name and marks for the applicable mark position are displayed for review.
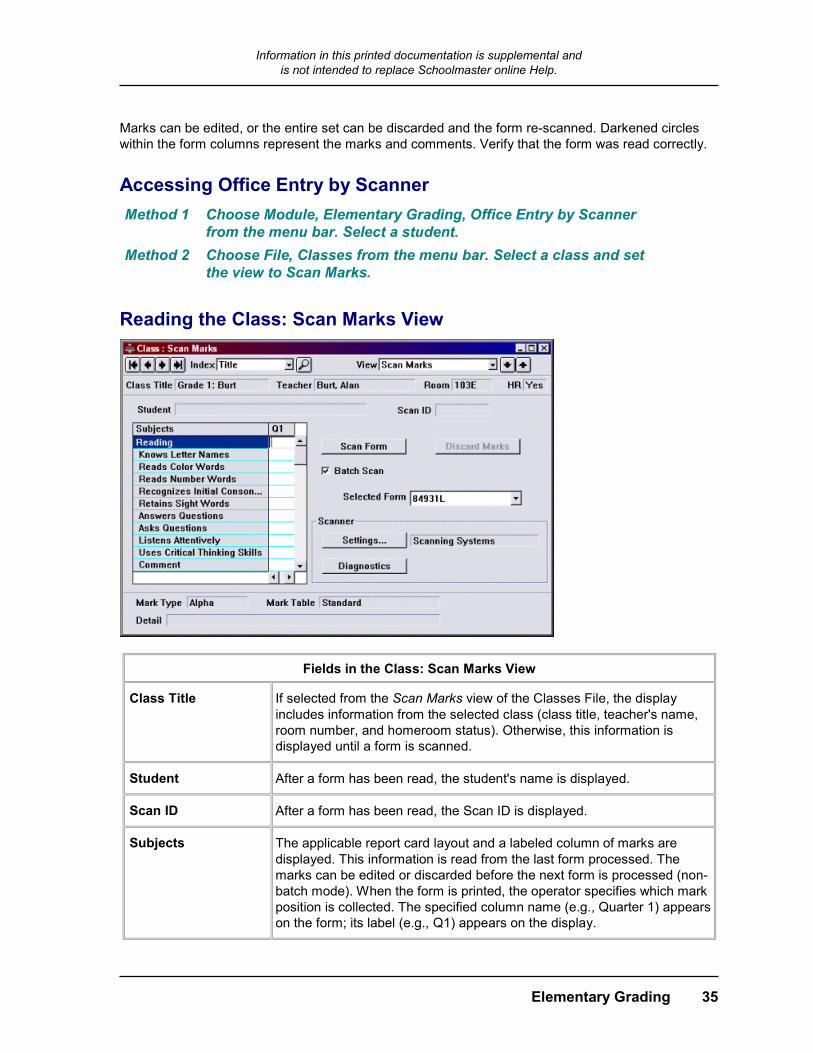
Information in this printed documentation is supplemental and is not intended to replace Schoolmaster online Help.
Elementary Grading 35
Marks can be edited, or the entire set can be discarded and the form re-scanned. Darkened circles within the form columns represent the marks and comments. Verify that the form was read correctly.
Accessing Office Entry by Scanner Method 1 Choose Module, Elementary Grading, Office Entry by Scanner
from the menu bar. Select a student. Method 2 Choose File, Classes from the menu bar. Select a class and set
the view to Scan Marks.
Reading the Class: Scan Marks View
Fields in the Class: Scan Marks View
Class Title If selected from the Scan Marks view of the Classes File, the display includes information from the selected class (class title, teacher's name, room number, and homeroom status). Otherwise, this information is displayed until a form is scanned.
Student After a form has been read, the student's name is displayed.
Scan ID After a form has been read, the Scan ID is displayed.
Subjects The applicable report card layout and a labeled column of marks are displayed. This information is read from the last form processed. The marks can be edited or discarded before the next form is processed (non-batch mode). When the form is printed, the operator specifies which mark position is collected. The specified column name (e.g., Quarter 1) appears on the form; its label (e.g., Q1) appears on the display.
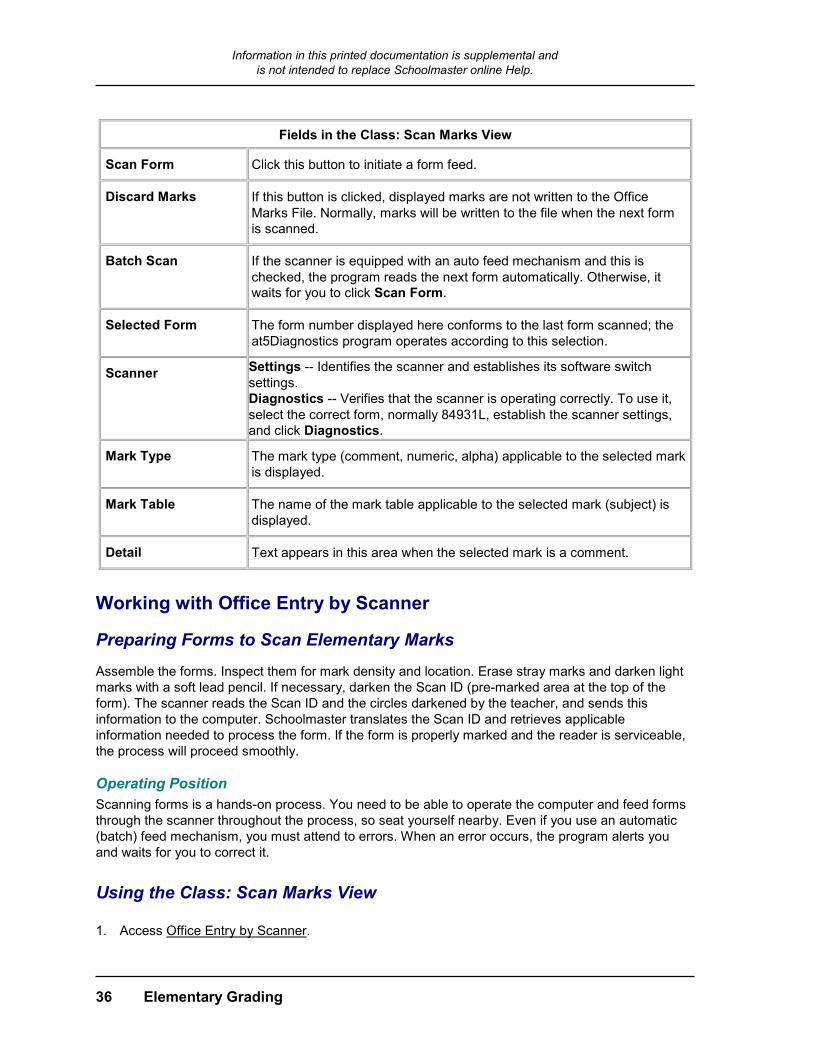
Information in this printed documentation is supplemental and is not intended to replace Schoolmaster online Help.
36 Elementary Grading
Fields in the Class: Scan Marks View
Scan Form Click this button to initiate a form feed.
Discard Marks If this button is clicked, displayed marks are not written to the Office Marks File. Normally, marks will be written to the file when the next form is scanned.
Batch Scan If the scanner is equipped with an auto feed mechanism and this is checked, the program reads the next form automatically. Otherwise, it waits for you to click Scan Form.
Selected Form The form number displayed here conforms to the last form scanned; the at5Diagnostics program operates according to this selection.
Scanner Settings -- Identifies the scanner and establishes its software switch settings. Diagnostics -- Verifies that the scanner is operating correctly. To use it, select the correct form, normally 84931L, establish the scanner settings, and click Diagnostics.
Mark Type The mark type (comment, numeric, alpha) applicable to the selected mark is displayed.
Mark Table The name of the mark table applicable to the selected mark (subject) is displayed.
Detail Text appears in this area when the selected mark is a comment.
Working with Office Entry by Scanner
Preparing Forms to Scan Elementary Marks Assemble the forms. Inspect them for mark density and location. Erase stray marks and darken light marks with a soft lead pencil. If necessary, darken the Scan ID (pre-marked area at the top of the form). The scanner reads the Scan ID and the circles darkened by the teacher, and sends this information to the computer. Schoolmaster translates the Scan ID and retrieves applicable information needed to process the form. If the form is properly marked and the reader is serviceable, the process will proceed smoothly. Operating Position Scanning forms is a hands-on process. You need to be able to operate the computer and feed forms through the scanner throughout the process, so seat yourself nearby. Even if you use an automatic (batch) feed mechanism, you must attend to errors. When an error occurs, the program alerts you and waits for you to correct it.
Using the Class: Scan Marks View
1. Access Office Entry by Scanner.
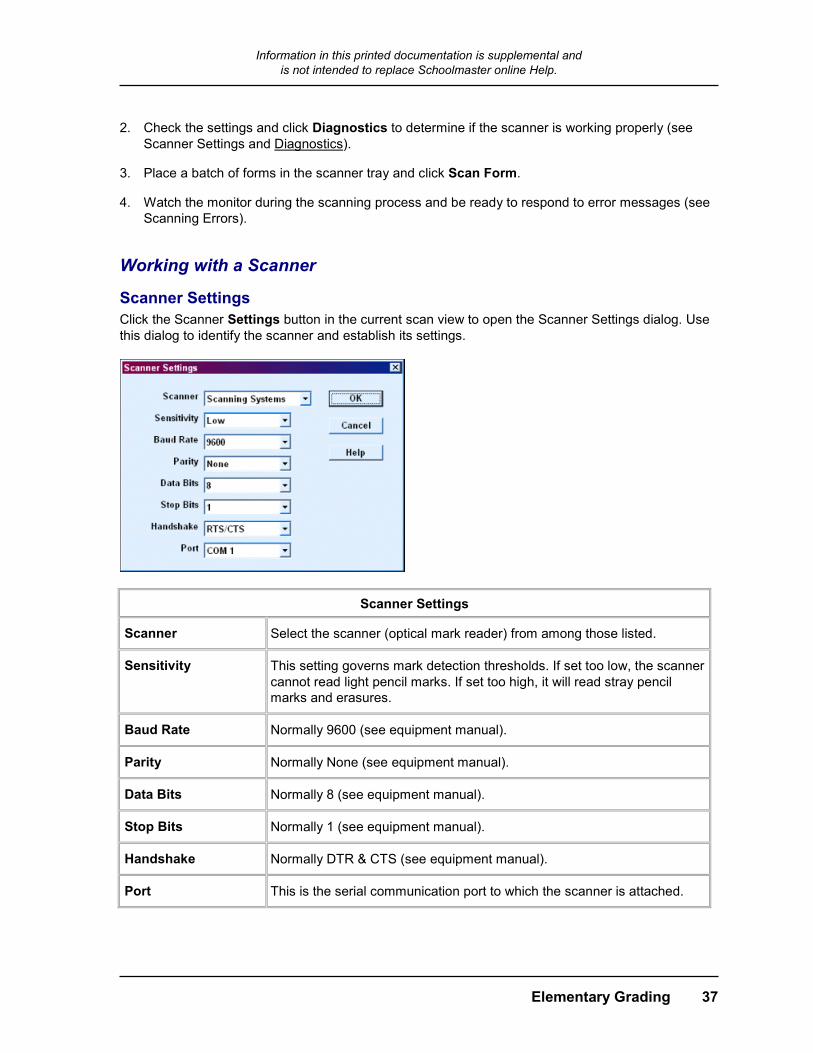
Information in this printed documentation is supplemental and is not intended to replace Schoolmaster online Help.
Elementary Grading 37
2. Check the settings and click Diagnostics to determine if the scanner is working properly (see Scanner Settings and Diagnostics).
3. Place a batch of forms in the scanner tray and click Scan Form.
4. Watch the monitor during the scanning process and be ready to respond to error messages (see Scanning Errors).
Working with a Scanner
Scanner Settings Click the Scanner Settings button in the current scan view to open the Scanner Settings dialog. Use this dialog to identify the scanner and establish its settings.
Scanner Settings
Scanner Select the scanner (optical mark reader) from among those listed.
Sensitivity This setting governs mark detection thresholds. If set too low, the scanner cannot read light pencil marks. If set too high, it will read stray pencil marks and erasures.
Baud Rate Normally 9600 (see equipment manual).
Parity Normally None (see equipment manual).
Data Bits Normally 8 (see equipment manual).
Stop Bits Normally 1 (see equipment manual).
Handshake Normally DTR & CTS (see equipment manual).
Port This is the serial communication port to which the scanner is attached.
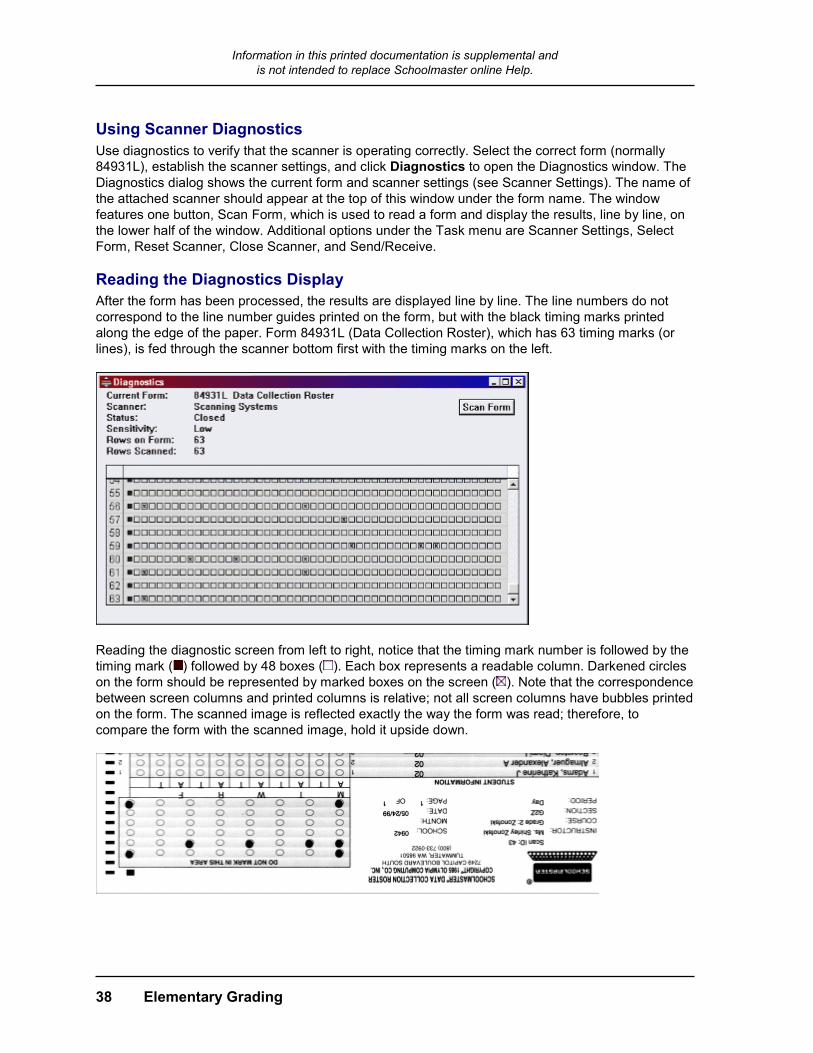
Information in this printed documentation is supplemental and is not intended to replace Schoolmaster online Help.
38 Elementary Grading
Using Scanner Diagnostics Use diagnostics to verify that the scanner is operating correctly. Select the correct form (normally 84931L), establish the scanner settings, and click Diagnostics to open the Diagnostics window. The Diagnostics dialog shows the current form and scanner settings (see Scanner Settings). The name of the attached scanner should appear at the top of this window under the form name. The window features one button, Scan Form, which is used to read a form and display the results, line by line, on the lower half of the window. Additional options under the Task menu are Scanner Settings, Select Form, Reset Scanner, Close Scanner, and Send/Receive. Reading the Diagnostics Display After the form has been processed, the results are displayed line by line. The line numbers do not correspond to the line number guides printed on the form, but with the black timing marks printed along the edge of the paper. Form 84931L (Data Collection Roster), which has 63 timing marks (or lines), is fed through the scanner bottom first with the timing marks on the left.
Reading the diagnostic screen from left to right, notice that the timing mark number is followed by the timing mark ( ) followed by 48 boxes ( ). Each box represents a readable column. Darkened circles on the form should be represented by marked boxes on the screen ( ). Note that the correspondence between screen columns and printed columns is relative; not all screen columns have bubbles printed on the form. The scanned image is reflected exactly the way the form was read; therefore, to compare the form with the scanned image, hold it upside down.
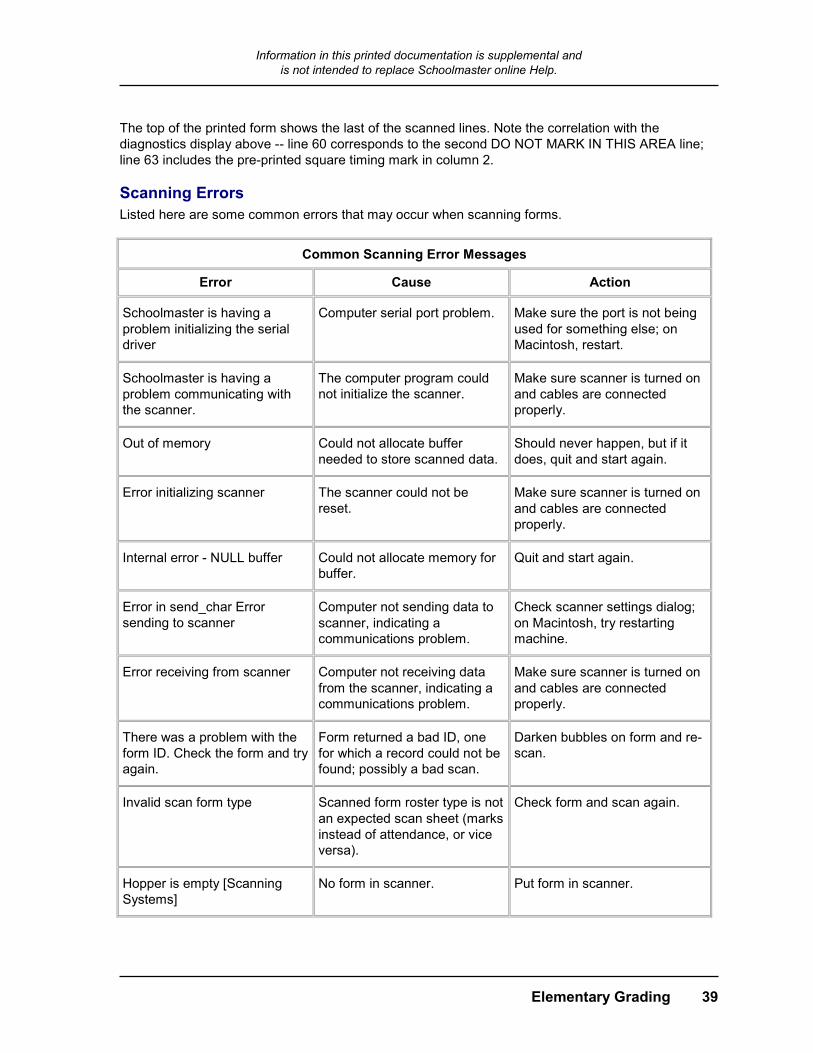
Information in this printed documentation is supplemental and is not intended to replace Schoolmaster online Help.
Elementary Grading 39
The top of the printed form shows the last of the scanned lines. Note the correlation with the diagnostics display above -- line 60 corresponds to the second DO NOT MARK IN THIS AREA line; line 63 includes the pre-printed square timing mark in column 2. Scanning Errors Listed here are some common errors that may occur when scanning forms.
Common Scanning Error Messages
Error Cause Action
Schoolmaster is having a problem initializing the serial driver
Computer serial port problem. Make sure the port is not being used for something else; on Macintosh, restart.
Schoolmaster is having a problem communicating with the scanner.
The computer program could not initialize the scanner.
Make sure scanner is turned on and cables are connected properly.
Out of memory Could not allocate buffer needed to store scanned data.
Should never happen, but if it does, quit and start again.
Error initializing scanner The scanner could not be reset.
Make sure scanner is turned on and cables are connected properly.
Internal error - NULL buffer Could not allocate memory for buffer.
Quit and start again.
Error in send_char Error sending to scanner
Computer not sending data to scanner, indicating a communications problem.
Check scanner settings dialog; on Macintosh, try restarting machine.
Error receiving from scanner Computer not receiving data from the scanner, indicating a communications problem.
Make sure scanner is turned on and cables are connected properly.
There was a problem with the form ID. Check the form and try again.
Form returned a bad ID, one for which a record could not be found; possibly a bad scan.
Darken bubbles on form and re-scan.
Invalid scan form type Scanned form roster type is not an expected scan sheet (marks instead of attendance, or vice versa).
Check form and scan again.
Hopper is empty [Scanning Systems]
No form in scanner. Put form in scanner.

Information in this printed documentation is supplemental and is not intended to replace Schoolmaster online Help.
40 Elementary Grading
Common Scanning Error Messages
A command other than a Control Command was set to the scanner
Unknown Should not occur during normal operation.
Jam error. Form has not read properly.
Form feed problem. Clear form and scan again.
One or more timing marks were not read correctly
Form feed problem, read head problem, or form problem.
Try scanning the form again.
Hopper release lever is not in "Feed" position
Release lever in wrong position.
Move lever to "Feed" position.
Expected xx lines -- received xx
Wrong form for menu choice. Select the applicable choice from the menu.
Office Entry by Student Warning! If teachers enter marks from classroom workstations, do not use this program until after posting teacher marks. Marks and comments entered in this manner are written to the Office Marks File, from which they are printed to report cards and, at the end of the year, posted to the Elementary Mark History File.
Accessing Office Entry by Student Method 1 Choose Module, Elementary Grading, Office Entry by Student
from the menu bar. Select a student. Method 2 Choose File, Students from the menu bar. Select a student and
set the view to Elementary Marks. After the student is selected, the mark entry screen is displayed, showing the selected student's homeroom marks. If one of the student views is already displayed, the selected student's homeroom marks can be displayed by setting the view to Elementary Marks. Using standard procedures, you can search for another student, change the student index, and move forward and backward through the list of students.
Reading the Student: Elementary Marks View The selected class and student are identified at the top of the screen under the title bar.

Information in this printed documentation is supplemental and is not intended to replace Schoolmaster online Help.
Elementary Grading 41
Part of the selected student's report card is displayed in the middle of the screen. Report card subjects are listed on the left in the order prescribed by the applicable report card layout. The order of the non-homeroom class marks is determined by the order of the classes in the Student: Classes view. The mark position labels, such as Qtr. 1, come from the Mark Positions File. Marks, if any, occupy the subject-column cells. Comment numbers, if any, occupy the comment-column cells. The applicable mark type and mark table for the selected cell are displayed at the bottom of the screen. The Detail line displays a selected mark or comment. The Show Mark Table button is used to display valid marks.
Working with the Student: Elementary Marks View
Using Teacher Entry by Class Features
In teacher mark entry views, only the Current Mark Position is active; others may display but are inactive. Teachers can only change/add marks located in the Current Mark Position. The System Manager sets the current mark position appropriate to the grading period (Setup, Elementary Grading, Current Mark Position).
Choose Module, Elementary Grading, Teacher Entry by Class from the menu bar Marks may be entered by Subject or by Roster. Select any mark entry cell to see the applicable Mark Type (alpha/numeric or comment) and the Mark Table displayed at the bottom of the screen. With a cell selected, the Detail line, also at the bottom of the view, displays the selected mark or comment text. Comment numbers, if any, occupy the comment-column cells. Click the cell containing a comment number to see the text of the comment in the Detail field.
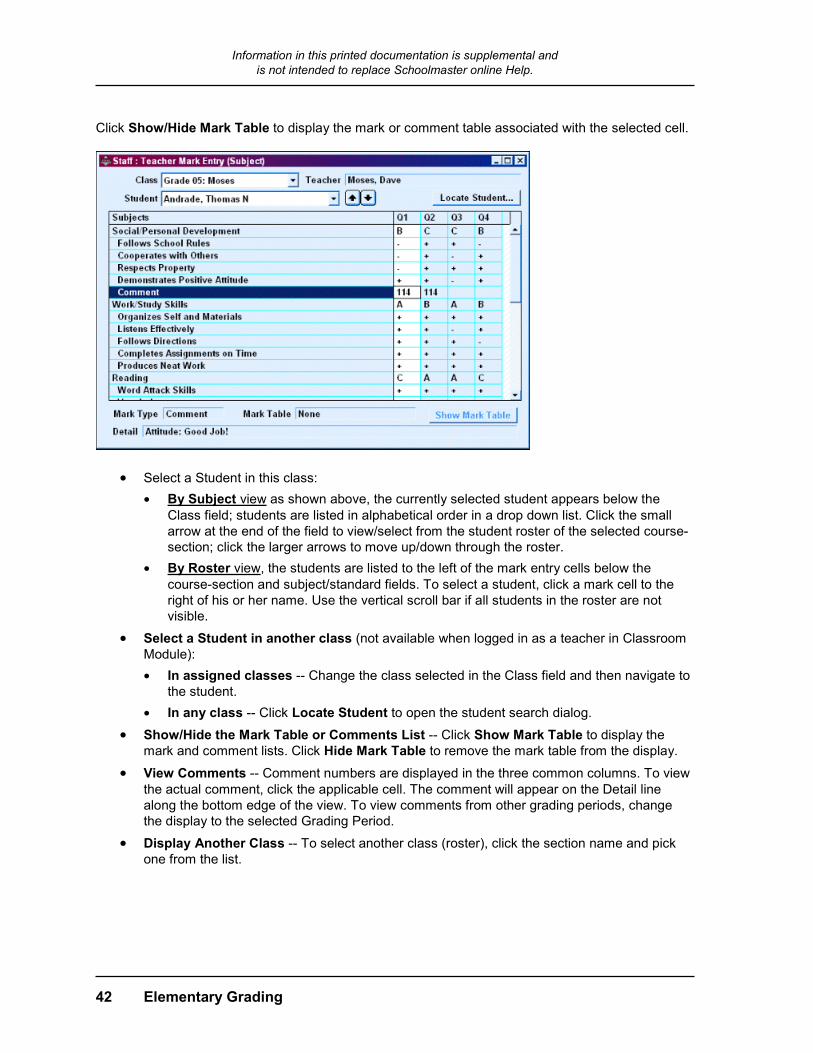
Information in this printed documentation is supplemental and is not intended to replace Schoolmaster online Help.
42 Elementary Grading
Click Show/Hide Mark Table to display the mark or comment table associated with the selected cell.
• Select a Student in this class: • By Subject view as shown above, the currently selected student appears below the
Class field; students are listed in alphabetical order in a drop down list. Click the small arrow at the end of the field to view/select from the student roster of the selected course-section; click the larger arrows to move up/down through the roster.
• By Roster view, the students are listed to the left of the mark entry cells below the course-section and subject/standard fields. To select a student, click a mark cell to the right of his or her name. Use the vertical scroll bar if all students in the roster are not visible.
• Select a Student in another class (not available when logged in as a teacher in Classroom Module): • In assigned classes -- Change the class selected in the Class field and then navigate to
the student. • In any class -- Click Locate Student to open the student search dialog.
• Show/Hide the Mark Table or Comments List -- Click Show Mark Table to display the mark and comment lists. Click Hide Mark Table to remove the mark table from the display.
• View Comments -- Comment numbers are displayed in the three common columns. To view the actual comment, click the applicable cell. The comment will appear on the Detail line along the bottom edge of the view. To view comments from other grading periods, change the display to the selected Grading Period.
• Display Another Class -- To select another class (roster), click the section name and pick one from the list.
Information in this printed documentation is supplemental and is not intended to replace Schoolmaster online Help.
Elementary Grading 43
Locating a Student in the Student: Elementary Marks View You can display the report card of a student who may not be a member of the selected class.
1. Choose Module, Elementary Grading, Office Entry by Student from the menu bar. Click the
search icon.
2. Type a few characters of the last name.
3. Select the student from the list. The student's report card and applicable class label will be displayed.
Entering Marks in the Student: Elementary Marks
1. Choose Module, Elementary Grading, Office Entry by Student from the menu bar and locate the required student.
2. Click the applicable subject-column period cell.
3. Click Show Mark Table to display the mark and comment lists.
4. Type valid marks (those contained in the applicable mark table) directly into the subject/marking period cells. However, when entering many alpha marks, it is easier to use the mark table.
5. Double-click the applicable mark. The mark appears in the selected subject/marking period cell and the cursor advances to the next subject. The program automatically selects the proper mark table for each subject or skill.
6. Repeat this procedure until all subjects for the selected marking period have been entered.
Mark tables may vary by subject as prescribed by the applicable report card layout.

Information in this printed documentation is supplemental and is not intended to replace Schoolmaster online Help.
44 Elementary Grading
Information in this printed documentation is supplemental and is not intended to replace Schoolmaster online Help.
Elementary Grading 45
Chapter 4 - Elementary Mark History Read this chapter to learn how selected report card marks are posted to the Elementary Mark History File, and how elementary mark history records are added and deleted. A student's cumulative academic record is stored in the Elementary Mark History File, where one record represents achievement for a particular school year in a particular subject. For example, if a student's curriculum included Reading every year for grade levels 1-6, the Elementary Mark History File would contain six Reading records showing marks received, teacher, school, posting date, and other useful information. Report card marks for selected subjects are posted to the Elementary Mark History File annually or at the end of each grading period for all students. Transcripts of subjects taken at other schools are entered manually. The academic histories of withdrawn students are printed and sent to their new schools.
Prerequisites for Elementary Mark History ► Add the applicable Mark Tables.
► Add the school of record to the School File.
Accessing the Elementary Mark History View Use this editor to view and edit the Elementary Mark History File by student. Method 1 Choose Module, Elementary Grading, Mark History from the
menu bar. Select a student and click OK. Method 2 Choose File, Students from the menu bar. Select a student and
set the view to Elementary Mark History.
Reading the Elementary Mark History View Subjects and marks are displayed in the middle of the screen. Additional information about the selected record is displayed at the bottom of the screen.
To sort the records in a particular column, click the column heading, which toggles between ascending and descending sorts.
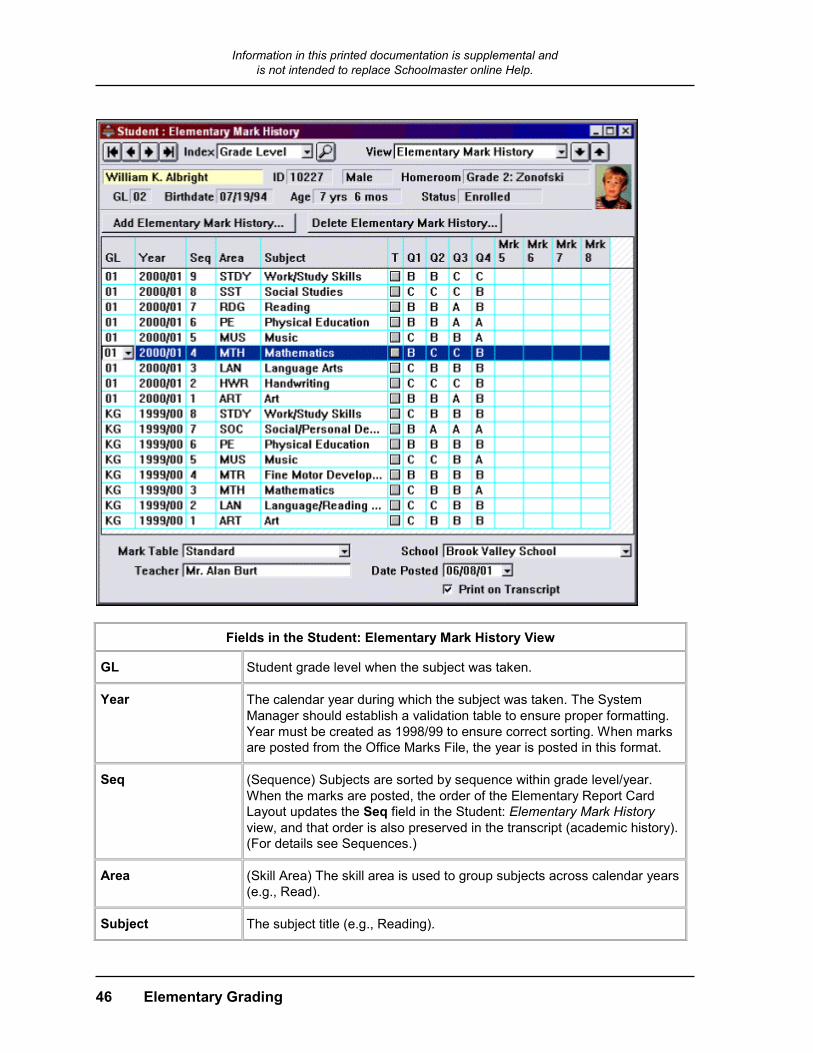
Information in this printed documentation is supplemental and is not intended to replace Schoolmaster online Help.
46 Elementary Grading
Fields in the Student: Elementary Mark History View
GL Student grade level when the subject was taken.
Year The calendar year during which the subject was taken. The System Manager should establish a validation table to ensure proper formatting. Year must be created as 1998/99 to ensure correct sorting. When marks are posted from the Office Marks File, the year is posted in this format.
Seq (Sequence) Subjects are sorted by sequence within grade level/year. When the marks are posted, the order of the Elementary Report Card Layout updates the Seq field in the Student: Elementary Mark History view, and that order is also preserved in the transcript (academic history). (For details see Sequences.)
Area (Skill Area) The skill area is used to group subjects across calendar years (e.g., Read).
Subject The subject title (e.g., Reading).
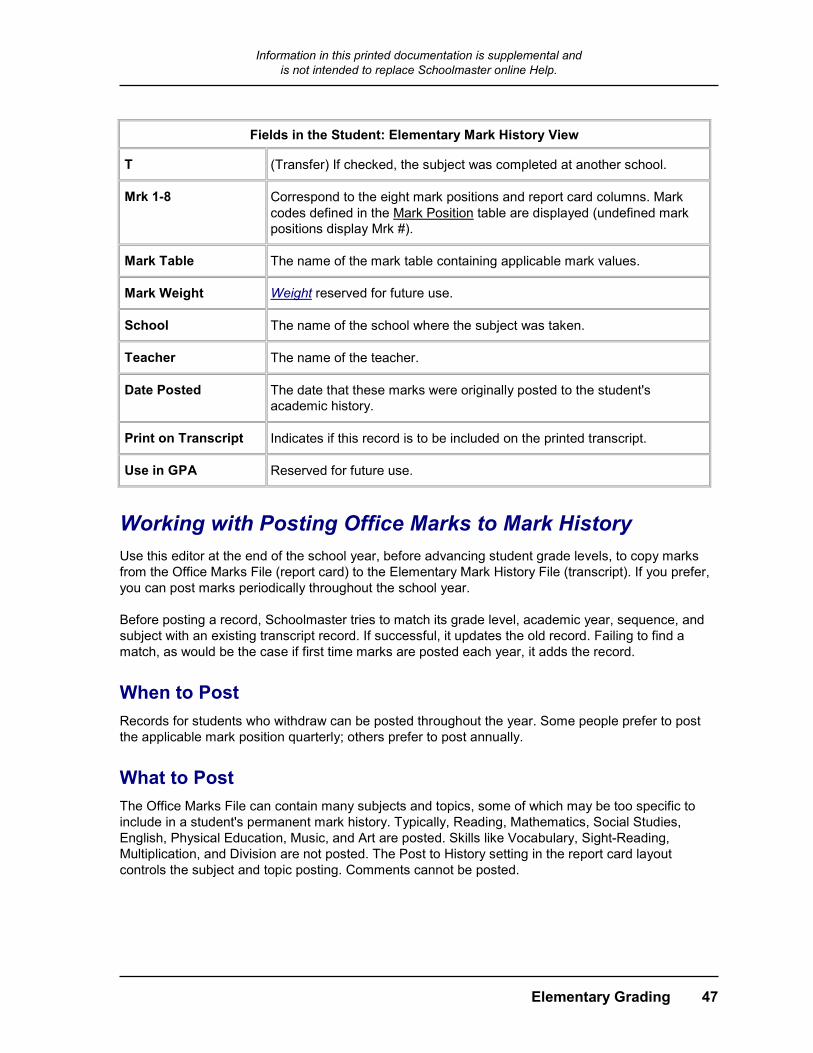
Information in this printed documentation is supplemental and is not intended to replace Schoolmaster online Help.
Elementary Grading 47
Fields in the Student: Elementary Mark History View
T (Transfer) If checked, the subject was completed at another school.
Mrk 1-8 Correspond to the eight mark positions and report card columns. Mark codes defined in the Mark Position table are displayed (undefined mark positions display Mrk #).
Mark Table The name of the mark table containing applicable mark values.
Mark Weight Weight reserved for future use.
School The name of the school where the subject was taken.
Teacher The name of the teacher.
Date Posted The date that these marks were originally posted to the student's academic history.
Print on Transcript Indicates if this record is to be included on the printed transcript.
Use in GPA Reserved for future use.
Working with Posting Office Marks to Mark History Use this editor at the end of the school year, before advancing student grade levels, to copy marks from the Office Marks File (report card) to the Elementary Mark History File (transcript). If you prefer, you can post marks periodically throughout the school year. Before posting a record, Schoolmaster tries to match its grade level, academic year, sequence, and subject with an existing transcript record. If successful, it updates the old record. Failing to find a match, as would be the case if first time marks are posted each year, it adds the record.
When to Post Records for students who withdraw can be posted throughout the year. Some people prefer to post the applicable mark position quarterly; others prefer to post annually.
What to Post The Office Marks File can contain many subjects and topics, some of which may be too specific to include in a student's permanent mark history. Typically, Reading, Mathematics, Social Studies, English, Physical Education, Music, and Art are posted. Skills like Vocabulary, Sight-Reading, Multiplication, and Division are not posted. The Post to History setting in the report card layout controls the subject and topic posting. Comments cannot be posted.
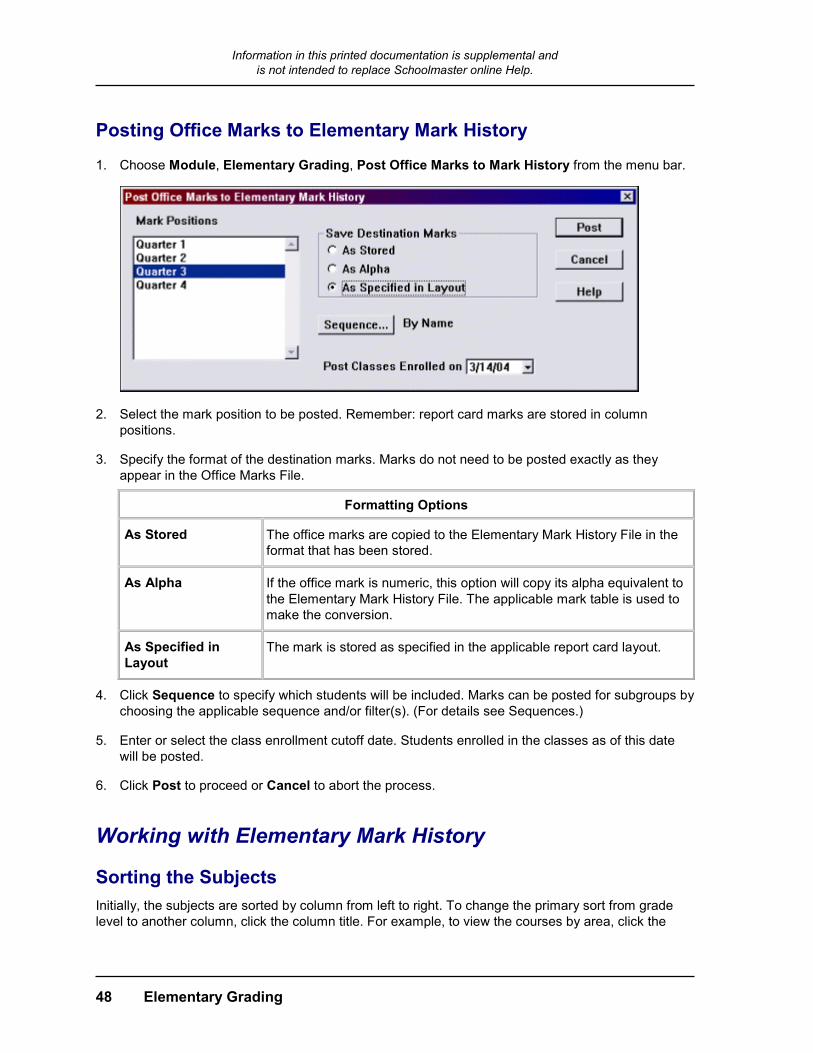
Information in this printed documentation is supplemental and is not intended to replace Schoolmaster online Help.
48 Elementary Grading
Posting Office Marks to Elementary Mark History
1. Choose Module, Elementary Grading, Post Office Marks to Mark History from the menu bar.
2. Select the mark position to be posted. Remember: report card marks are stored in column positions.
3. Specify the format of the destination marks. Marks do not need to be posted exactly as they appear in the Office Marks File.
Formatting Options
As Stored The office marks are copied to the Elementary Mark History File in the format that has been stored.
As Alpha If the office mark is numeric, this option will copy its alpha equivalent to the Elementary Mark History File. The applicable mark table is used to make the conversion.
As Specified in Layout
The mark is stored as specified in the applicable report card layout.
4. Click Sequence to specify which students will be included. Marks can be posted for subgroups by choosing the applicable sequence and/or filter(s). (For details see Sequences.)
5. Enter or select the class enrollment cutoff date. Students enrolled in the classes as of this date will be posted.
6. Click Post to proceed or Cancel to abort the process.
Working with Elementary Mark History
Sorting the Subjects Initially, the subjects are sorted by column from left to right. To change the primary sort from grade level to another column, click the column title. For example, to view the courses by area, click the
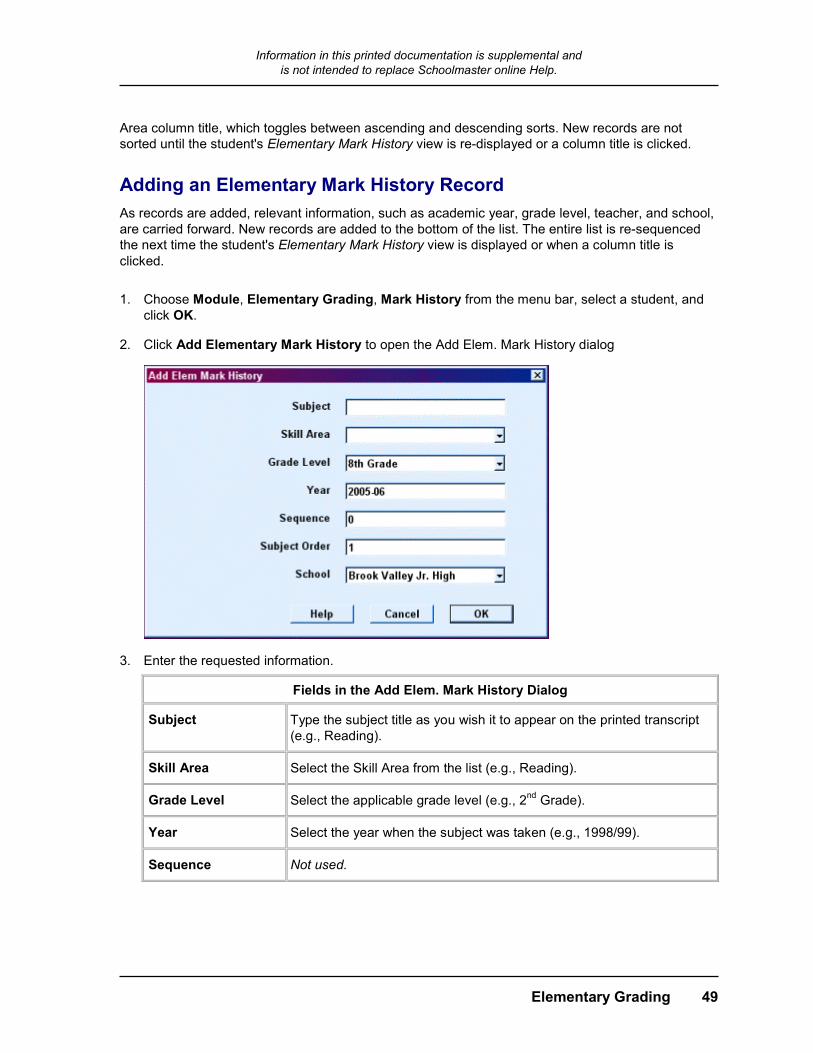
Information in this printed documentation is supplemental and is not intended to replace Schoolmaster online Help.
Elementary Grading 49
Area column title, which toggles between ascending and descending sorts. New records are not sorted until the student's Elementary Mark History view is re-displayed or a column title is clicked.
Adding an Elementary Mark History Record As records are added, relevant information, such as academic year, grade level, teacher, and school, are carried forward. New records are added to the bottom of the list. The entire list is re-sequenced the next time the student's Elementary Mark History view is displayed or when a column title is clicked.
1. Choose Module, Elementary Grading, Mark History from the menu bar, select a student, and click OK.
2. Click Add Elementary Mark History to open the Add Elem. Mark History dialog
3. Enter the requested information.
Fields in the Add Elem. Mark History Dialog
Subject Type the subject title as you wish it to appear on the printed transcript (e.g., Reading).
Skill Area Select the Skill Area from the list (e.g., Reading).
Grade Level Select the applicable grade level (e.g., 2nd Grade).
Year Select the year when the subject was taken (e.g., 1998/99).
Sequence Not used.
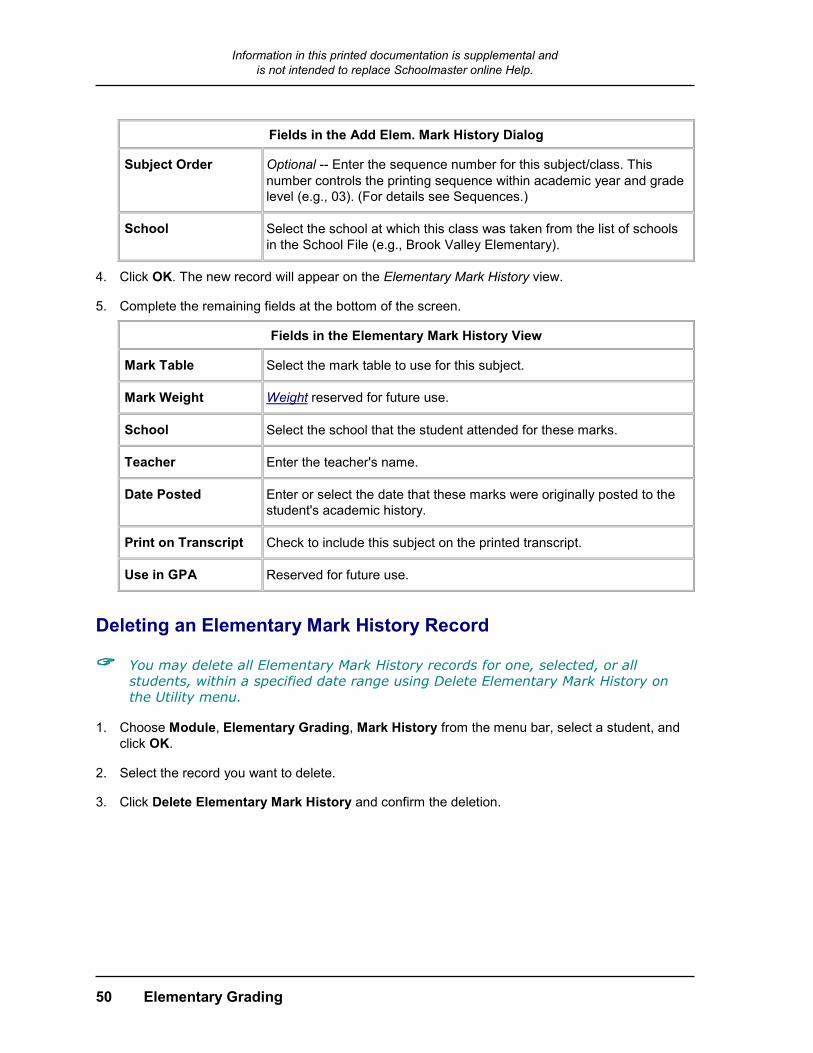
Information in this printed documentation is supplemental and is not intended to replace Schoolmaster online Help.
50 Elementary Grading
Fields in the Add Elem. Mark History Dialog
Subject Order Optional -- Enter the sequence number for this subject/class. This number controls the printing sequence within academic year and grade level (e.g., 03). (For details see Sequences.)
School Select the school at which this class was taken from the list of schools in the School File (e.g., Brook Valley Elementary).
4. Click OK. The new record will appear on the Elementary Mark History view.
5. Complete the remaining fields at the bottom of the screen.
Fields in the Elementary Mark History View
Mark Table Select the mark table to use for this subject.
Mark Weight Weight reserved for future use.
School Select the school that the student attended for these marks.
Teacher Enter the teacher's name.
Date Posted Enter or select the date that these marks were originally posted to the student's academic history.
Print on Transcript Check to include this subject on the printed transcript.
Use in GPA Reserved for future use.
Deleting an Elementary Mark History Record
You may delete all Elementary Mark History records for one, selected, or all students, within a specified date range using Delete Elementary Mark History on the Utility menu.
1. Choose Module, Elementary Grading, Mark History from the menu bar, select a student, and click OK.
2. Select the record you want to delete.
3. Click Delete Elementary Mark History and confirm the deletion.
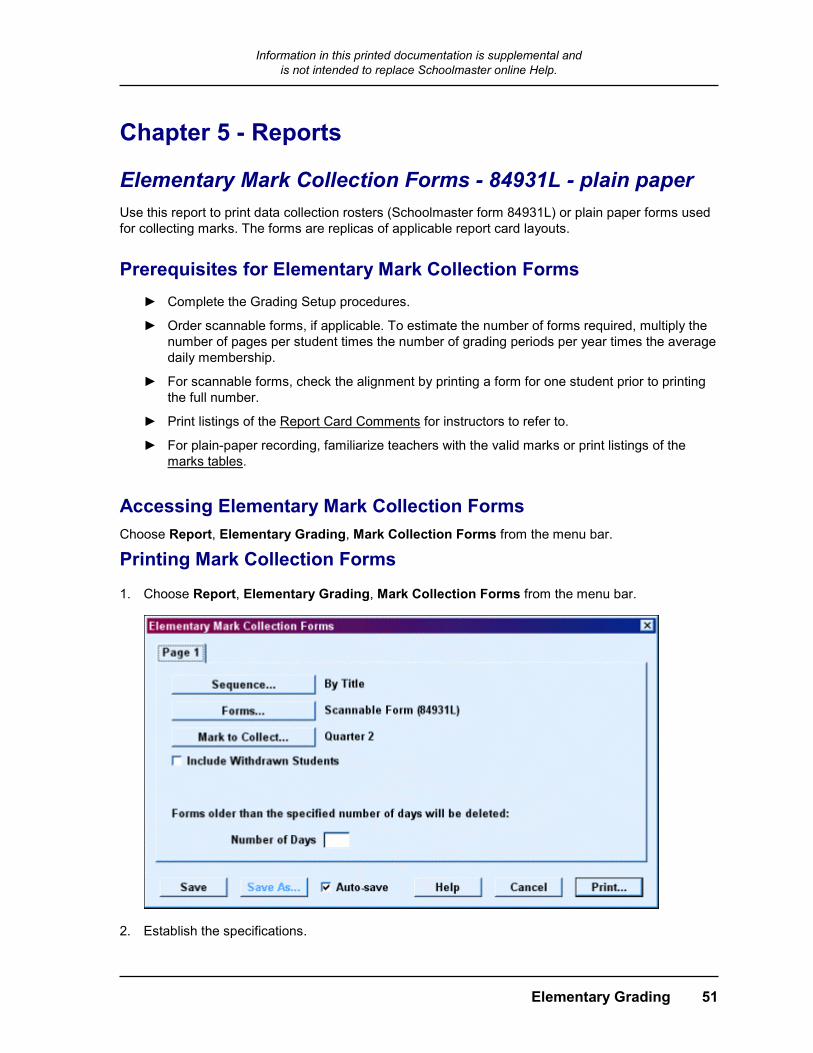
Information in this printed documentation is supplemental and is not intended to replace Schoolmaster online Help.
Elementary Grading 51
Chapter 5 - Reports
Elementary Mark Collection Forms - 84931L - plain paper Use this report to print data collection rosters (Schoolmaster form 84931L) or plain paper forms used for collecting marks. The forms are replicas of applicable report card layouts.
Prerequisites for Elementary Mark Collection Forms ► Complete the Grading Setup procedures.
► Order scannable forms, if applicable. To estimate the number of forms required, multiply the number of pages per student times the number of grading periods per year times the average daily membership.
► For scannable forms, check the alignment by printing a form for one student prior to printing the full number.
► Print listings of the Report Card Comments for instructors to refer to.
► For plain-paper recording, familiarize teachers with the valid marks or print listings of the marks tables.
Accessing Elementary Mark Collection Forms Choose Report, Elementary Grading, Mark Collection Forms from the menu bar.
Printing Mark Collection Forms
1. Choose Report, Elementary Grading, Mark Collection Forms from the menu bar.
2. Establish the specifications.
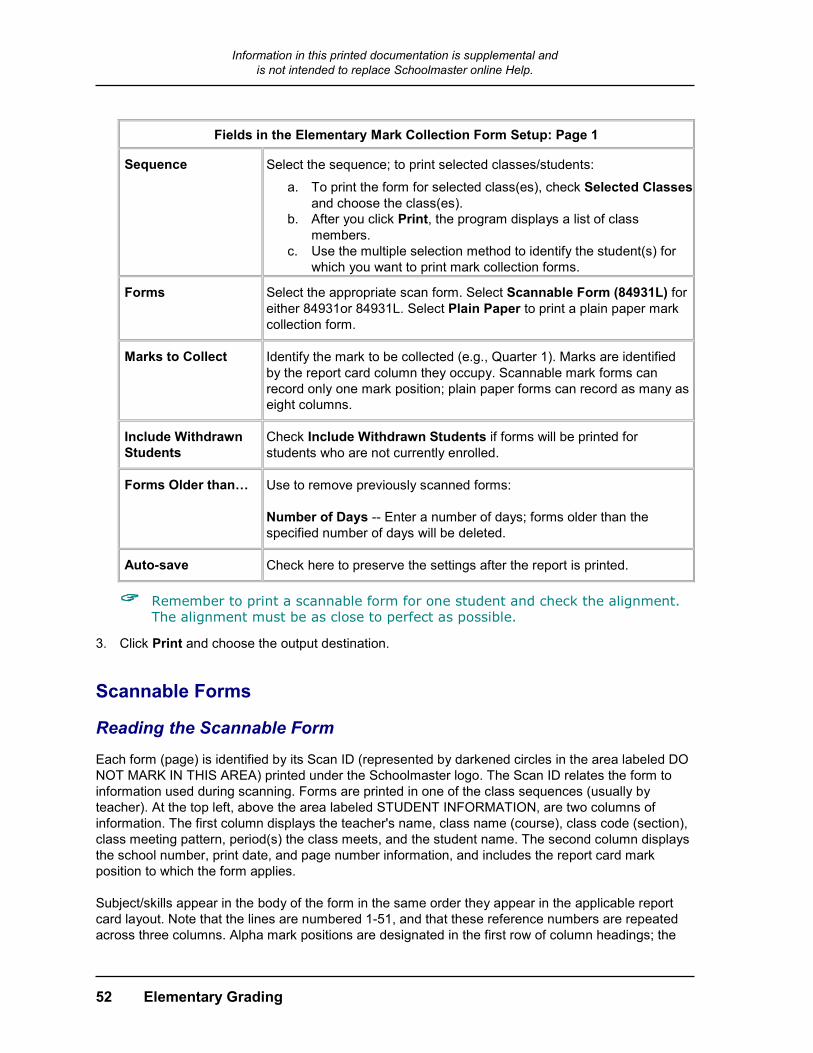
Information in this printed documentation is supplemental and is not intended to replace Schoolmaster online Help.
52 Elementary Grading
Fields in the Elementary Mark Collection Form Setup: Page 1
Sequence Select the sequence; to print selected classes/students:
a. To print the form for selected class(es), check Selected Classesand choose the class(es).
b. After you click Print, the program displays a list of class members.
c. Use the multiple selection method to identify the student(s) for which you want to print mark collection forms.
Forms Select the appropriate scan form. Select Scannable Form (84931L) for either 84931or 84931L. Select Plain Paper to print a plain paper mark collection form.
Marks to Collect Identify the mark to be collected (e.g., Quarter 1). Marks are identified by the report card column they occupy. Scannable mark forms can record only one mark position; plain paper forms can record as many as eight columns.
Include Withdrawn Students
Check Include Withdrawn Students if forms will be printed for students who are not currently enrolled.
Forms Older than… Use to remove previously scanned forms: Number of Days -- Enter a number of days; forms older than the specified number of days will be deleted.
Auto-save Check here to preserve the settings after the report is printed.
Remember to print a scannable form for one student and check the alignment. The alignment must be as close to perfect as possible.
3. Click Print and choose the output destination.
Scannable Forms
Reading the Scannable Form Each form (page) is identified by its Scan ID (represented by darkened circles in the area labeled DO NOT MARK IN THIS AREA) printed under the Schoolmaster logo. The Scan ID relates the form to information used during scanning. Forms are printed in one of the class sequences (usually by teacher). At the top left, above the area labeled STUDENT INFORMATION, are two columns of information. The first column displays the teacher's name, class name (course), class code (section), class meeting pattern, period(s) the class meets, and the student name. The second column displays the school number, print date, and page number information, and includes the report card mark position to which the form applies. Subject/skills appear in the body of the form in the same order they appear in the applicable report card layout. Note that the lines are numbered 1-51, and that these reference numbers are repeated across three columns. Alpha mark positions are designated in the first row of column headings; the
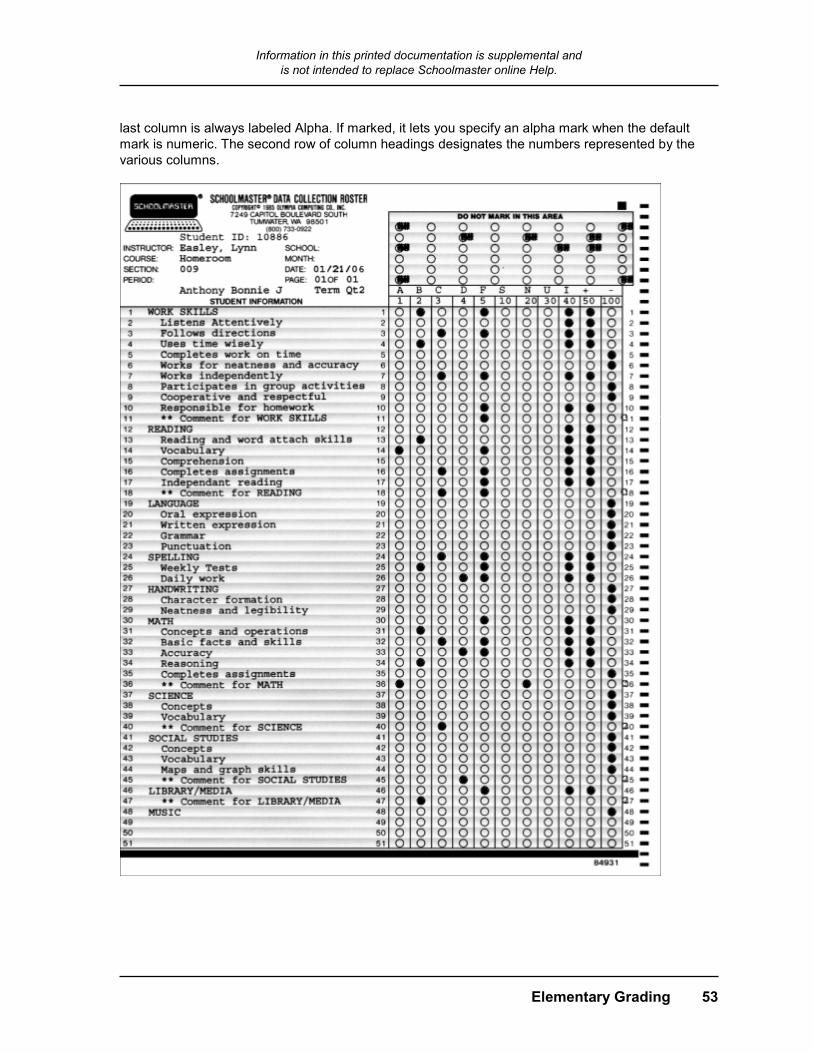
Information in this printed documentation is supplemental and is not intended to replace Schoolmaster online Help.
Elementary Grading 53
last column is always labeled Alpha. If marked, it lets you specify an alpha mark when the default mark is numeric. The second row of column headings designates the numbers represented by the various columns.
Information in this printed documentation is supplemental and is not intended to replace Schoolmaster online Help.
54 Elementary Grading
Marking the Scannable Form
Alpha Marks One row is reserved for each subject/skill marked with alpha marks. An alpha mark, such as A, is indicated by darkening the applicable circle within the one row reserved for the alpha-marked subject/skill. To enter an alpha mark for a numerically marked subject/skill, darken two circles in the 10s row reserved for the subject/skill. Darken one circle to represent the alpha mark, such as I, and also darken the circle in the Alpha column. Numeric Marks
Previous users of DOS Schoolmaster, the tens and units rows for mark values have been reversed. The tens are now the first row, and the units are the second row.
Two rows are reserved for each subject/skill marked with numeric marks. Numeric marks from 0-9 are indicated by darkening the zero column in the first row (representing 10s) and the applicable circle in the second row (representing 1s). To enter a mark of 05, mark 0 in the first row and 5 in the second. Numeric marks from 10-99 are indicated by darkening the applicable circles in both rows reserved for numerically marked subjects. For example:
• Enter a numeric mark of 97 by darkening the 9 circle in the first row and the 7 circle in the second row.
• Enter a numeric mark of 100 by marking the 100 column in the second row.
• Enter a numeric mark of 109 by marking 100 in the second row, 0 in the first row and 9 in the second row. Marking 0 in the first row is optional.
• Enter a numeric mark of 125 by marking 100 in the second row, 2 in the first row, and 5 in the second row.
The maximum value that can be coded for a numeric mark is 199. Comments The number of rows allocated to each comment depends on the total number of defined comments (Comment File). If the highest comment number is more than 299, three rows are allocated: 1s, 10s, and 100s as labeled. Note that the Alpha circle can be used as a value of 100 for comments only.
Plain Paper Forms
Reading the Plain Paper Form Each page of the form is identified at the top by the date it was printed (06/28/99), the school name, and the page number followed by the report title (Elementary Mark Collection Forms) and sequence (By Title). The homeroom entry (Class: Grade 1: Burt) and teacher (Teacher: Burt, Alan) are next, followed by the name and Schoolmaster ID (James A. Boatman; ID#13106) of the selected student. The marks to collect are identified by the mark position labels; only those selected to print will appear. More than one page may be printed for each student, depending on the number of subjects, skills, and comments specified on the report card.
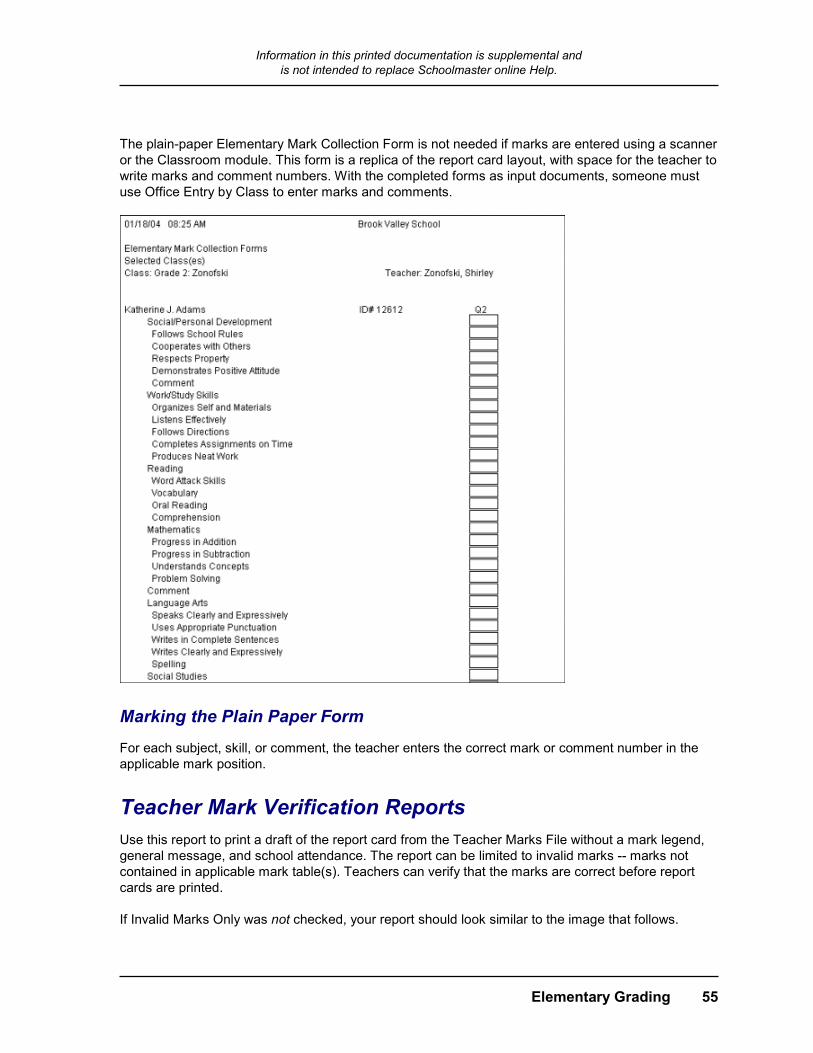
Information in this printed documentation is supplemental and is not intended to replace Schoolmaster online Help.
Elementary Grading 55
The plain-paper Elementary Mark Collection Form is not needed if marks are entered using a scanner or the Classroom module. This form is a replica of the report card layout, with space for the teacher to write marks and comment numbers. With the completed forms as input documents, someone must use Office Entry by Class to enter marks and comments.
Marking the Plain Paper Form For each subject, skill, or comment, the teacher enters the correct mark or comment number in the applicable mark position.
Teacher Mark Verification Reports Use this report to print a draft of the report card from the Teacher Marks File without a mark legend, general message, and school attendance. The report can be limited to invalid marks -- marks not contained in applicable mark table(s). Teachers can verify that the marks are correct before report cards are printed. If Invalid Marks Only was not checked, your report should look similar to the image that follows.
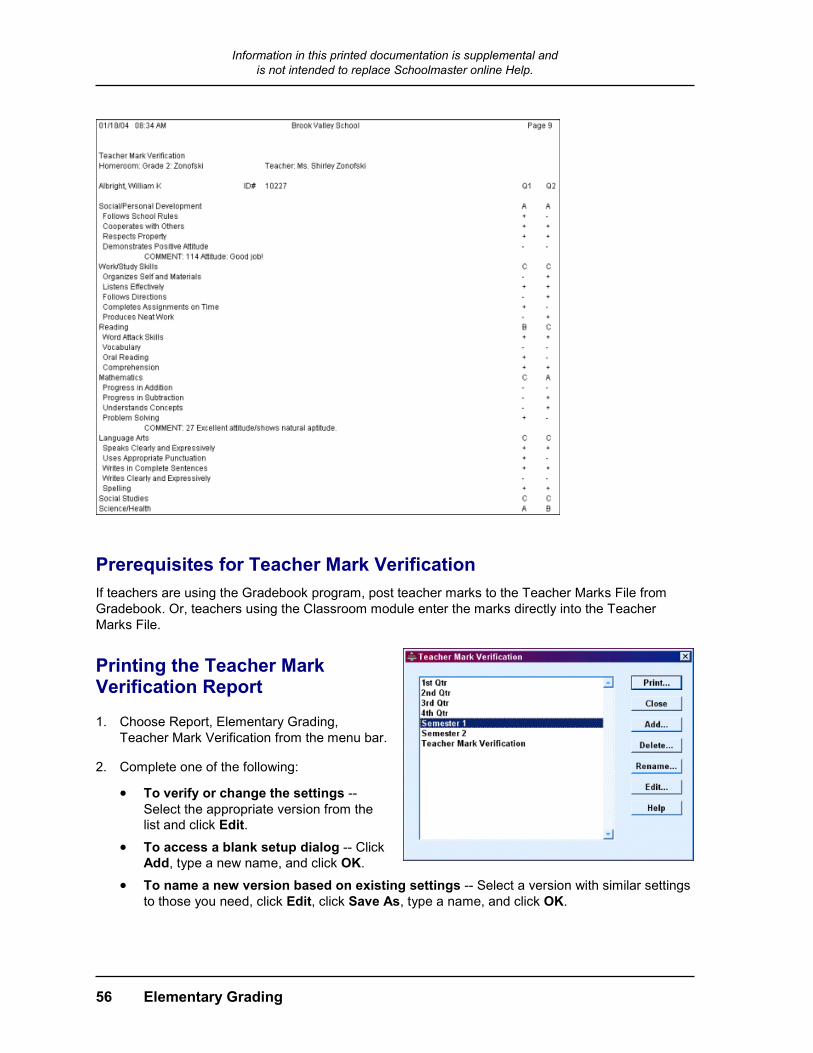
Information in this printed documentation is supplemental and is not intended to replace Schoolmaster online Help.
56 Elementary Grading
Prerequisites for Teacher Mark Verification If teachers are using the Gradebook program, post teacher marks to the Teacher Marks File from Gradebook. Or, teachers using the Classroom module enter the marks directly into the Teacher Marks File.
Printing the Teacher Mark Verification Report
1. Choose Report, Elementary Grading, Teacher Mark Verification from the menu bar.
2. Complete one of the following:
• To verify or change the settings -- Select the appropriate version from the list and click Edit.
• To access a blank setup dialog -- Click Add, type a new name, and click OK.
• To name a new version based on existing settings -- Select a version with similar settings to those you need, click Edit, click Save As, type a name, and click OK.
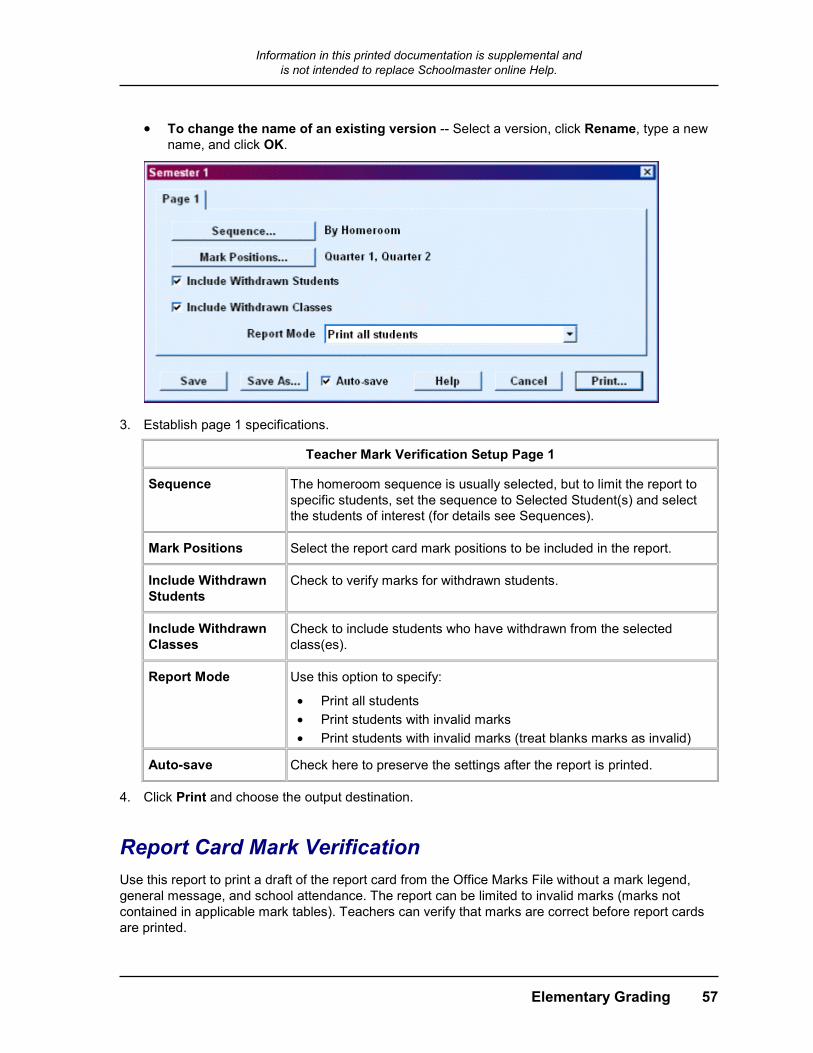
Information in this printed documentation is supplemental and is not intended to replace Schoolmaster online Help.
Elementary Grading 57
• To change the name of an existing version -- Select a version, click Rename, type a new name, and click OK.
3. Establish page 1 specifications.
Teacher Mark Verification Setup Page 1
Sequence The homeroom sequence is usually selected, but to limit the report to specific students, set the sequence to Selected Student(s) and select the students of interest (for details see Sequences).
Mark Positions Select the report card mark positions to be included in the report.
Include Withdrawn Students
Check to verify marks for withdrawn students.
Include Withdrawn Classes
Check to include students who have withdrawn from the selected class(es).
Report Mode Use this option to specify:
• Print all students • Print students with invalid marks • Print students with invalid marks (treat blanks marks as invalid)
Auto-save Check here to preserve the settings after the report is printed.
4. Click Print and choose the output destination.
Report Card Mark Verification Use this report to print a draft of the report card from the Office Marks File without a mark legend, general message, and school attendance. The report can be limited to invalid marks (marks not contained in applicable mark tables). Teachers can verify that marks are correct before report cards are printed.
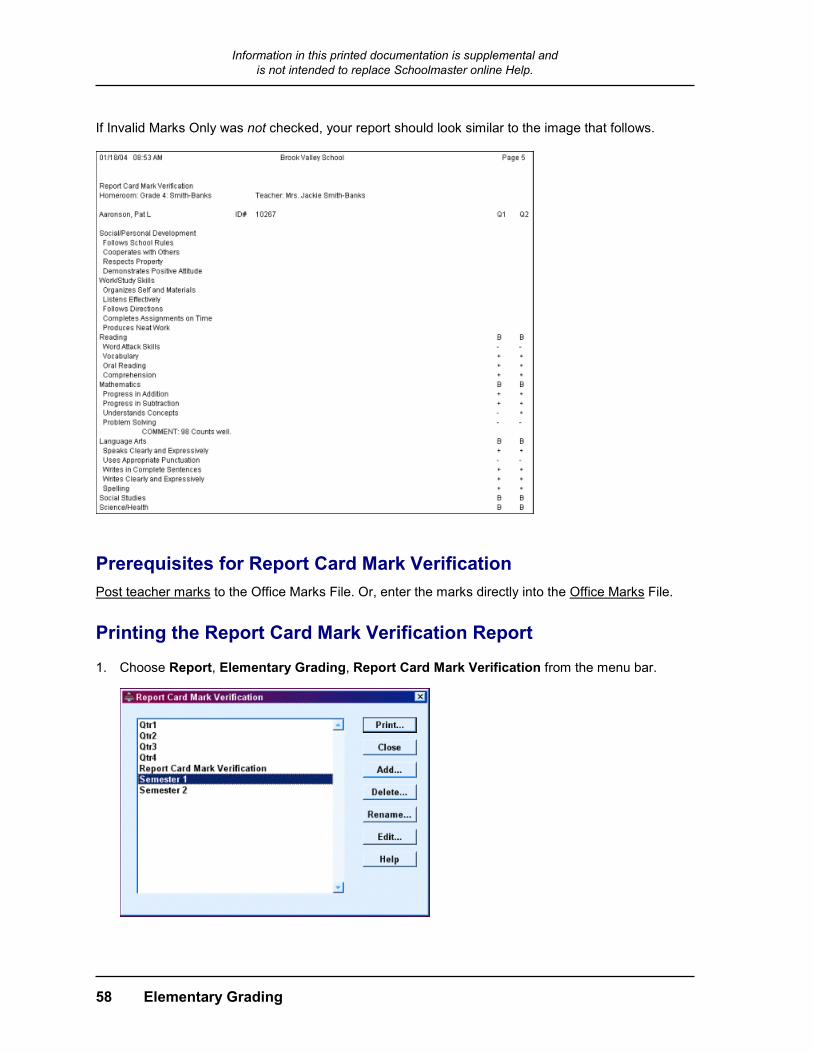
Information in this printed documentation is supplemental and is not intended to replace Schoolmaster online Help.
58 Elementary Grading
If Invalid Marks Only was not checked, your report should look similar to the image that follows.
Prerequisites for Report Card Mark Verification Post teacher marks to the Office Marks File. Or, enter the marks directly into the Office Marks File.
Printing the Report Card Mark Verification Report
1. Choose Report, Elementary Grading, Report Card Mark Verification from the menu bar.
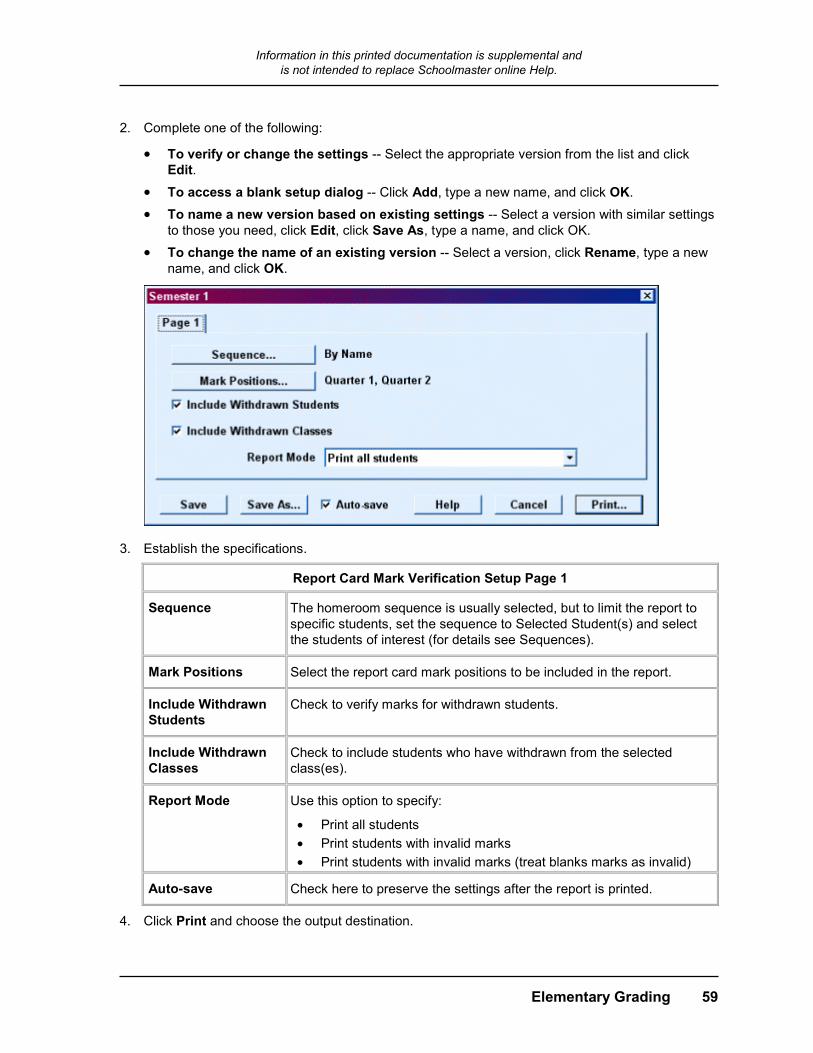
Information in this printed documentation is supplemental and is not intended to replace Schoolmaster online Help.
Elementary Grading 59
2. Complete one of the following:
• To verify or change the settings -- Select the appropriate version from the list and click Edit.
• To access a blank setup dialog -- Click Add, type a new name, and click OK.
• To name a new version based on existing settings -- Select a version with similar settings to those you need, click Edit, click Save As, type a name, and click OK.
• To change the name of an existing version -- Select a version, click Rename, type a new name, and click OK.
3. Establish the specifications.
Report Card Mark Verification Setup Page 1
Sequence The homeroom sequence is usually selected, but to limit the report to specific students, set the sequence to Selected Student(s) and select the students of interest (for details see Sequences).
Mark Positions Select the report card mark positions to be included in the report.
Include Withdrawn Students
Check to verify marks for withdrawn students.
Include Withdrawn Classes
Check to include students who have withdrawn from the selected class(es).
Report Mode Use this option to specify:
• Print all students • Print students with invalid marks • Print students with invalid marks (treat blanks marks as invalid)
Auto-save Check here to preserve the settings after the report is printed.
4. Click Print and choose the output destination.
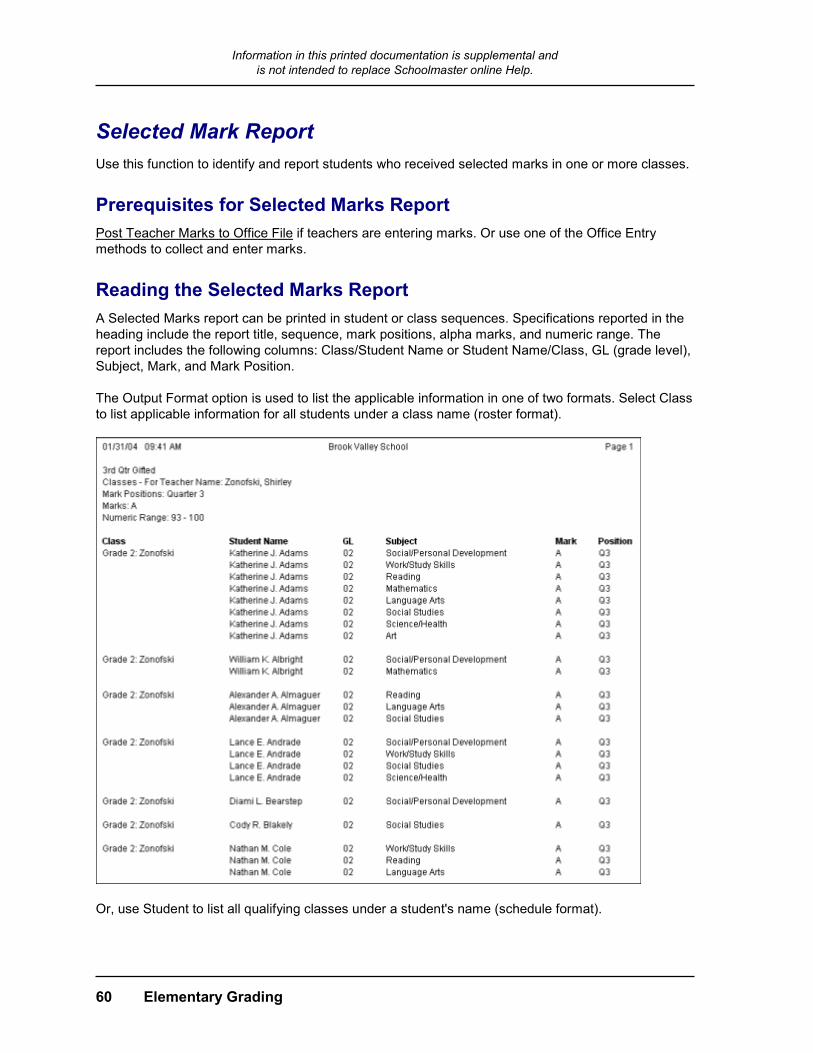
Information in this printed documentation is supplemental and is not intended to replace Schoolmaster online Help.
60 Elementary Grading
Selected Mark Report Use this function to identify and report students who received selected marks in one or more classes.
Prerequisites for Selected Marks Report Post Teacher Marks to Office File if teachers are entering marks. Or use one of the Office Entry methods to collect and enter marks.
Reading the Selected Marks Report A Selected Marks report can be printed in student or class sequences. Specifications reported in the heading include the report title, sequence, mark positions, alpha marks, and numeric range. The report includes the following columns: Class/Student Name or Student Name/Class, GL (grade level), Subject, Mark, and Mark Position. The Output Format option is used to list the applicable information in one of two formats. Select Class to list applicable information for all students under a class name (roster format).
Or, use Student to list all qualifying classes under a student's name (schedule format).

Information in this printed documentation is supplemental and is not intended to replace Schoolmaster online Help.
Elementary Grading 61
Printing Selected Marks Reports
1. Choose Report, Elementary Grading, Selected Marks from the menu bar.
2. Complete one of the following:

Information in this printed documentation is supplemental and is not intended to replace Schoolmaster online Help.
62 Elementary Grading
• To verify or change the settings -- Select the appropriate version from the list and click Edit.
• To access a blank setup dialog -- Click Add, type a new name, and click OK.
• To name a new version based on existing settings -- Select a version with similar settings to those you need, click Edit, click Save As, type a name, and click OK.
• To change the name of an existing version -- Select a version, click Rename, type a new name, and click OK.
3. Establish the specifications.
Selected Marks Setup
Output Format Use the Student option to list applicable information for all classes under a student's name (schedule format). Use the Class option to list applicable information for all students under a class name (roster format).
Sequence Select the sequence. The choices correspond to the selected output.
Include Withdrawn Students
Check to include students who have withdrawn from the selected class(es) but earned marks before withdrawing.
Alpha Marks Select the applicable alpha marks; if the report is to be based on numeric marks, select None (comments with numeric codes are not included).
Mark Positions Select the applicable mark positions.
Numeric Low Specify the lowest numeric value mark to be included on the report. If the report is based on alpha marks, leave blank.
Numeric High Specify the highest numeric value mark to be included on the report. If the report is based on alpha marks, leave blank.
Information in this printed documentation is supplemental and is not intended to replace Schoolmaster online Help.
Elementary Grading 63
Selected Marks Setup
Auto-save Check to save the settings established when the report is printed for the next time it is run.
4. Click Print and choose the output destination.
Elementary Report Cards Use this report to print elementary report cards to the following Schoolmaster forms available from Olympia Computing Company: Academic Achievement forms 84980L legal-sized and 84981L letter-sized. Report card subjects and marks come from the Office Marks File. To have a report card, a student must be currently enrolled in or have been enrolled in a homeroom class to which a report card layout has been attached. A student's report card represents the combined report card layouts of all applicable classes. The order of the non-homeroom classes in the Student: Classes and Programs view determines the order in which they appear on the report card.
Prerequisites for Elementary Report Cards ► Complete Setup procedures.
► Create Classes.
► Assign Report Card Layouts, teachers, and students to classes (see Scheduling and Course, Sections, and Schedules).
► Compile a comment listing and add it to the Report Card Comments File.
► Print Elementary Mark Collection Forms (Non-Classroom module schools).
► Enter Marks.
► Print the Report Card Mark Verification Report.
► Correct marks and comments.
► Stock a sufficient supply of report cards (84980L legal-sized or 84981L letter-sized). See Obtaining Schoolmaster Forms.
Reading Elementary Report Cards The school name and address come from the School File and pertain to the school name listed in the Licensed Name field in the Configuration File. The student's name, ID number, gender, and grade level come from the Student File. The Period Ending date, specified during the setup process, applies to computing monthly attendance. The homeroom teacher's name comes from the Staff File. The mark legend comes from one of the setup dialogs. The column headings come from the Mark Positions File. The subjects come from the applicable Report Card Layout File. The marks come from the Office Marks File.
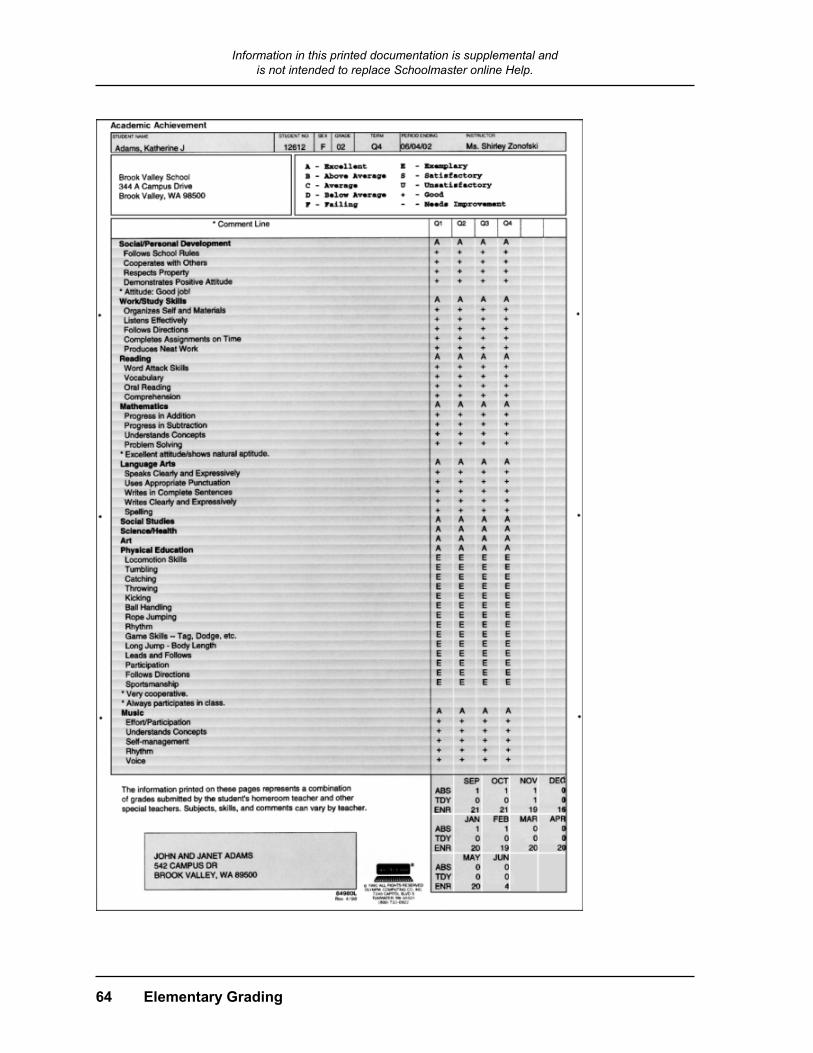
Information in this printed documentation is supplemental and is not intended to replace Schoolmaster online Help.
64 Elementary Grading
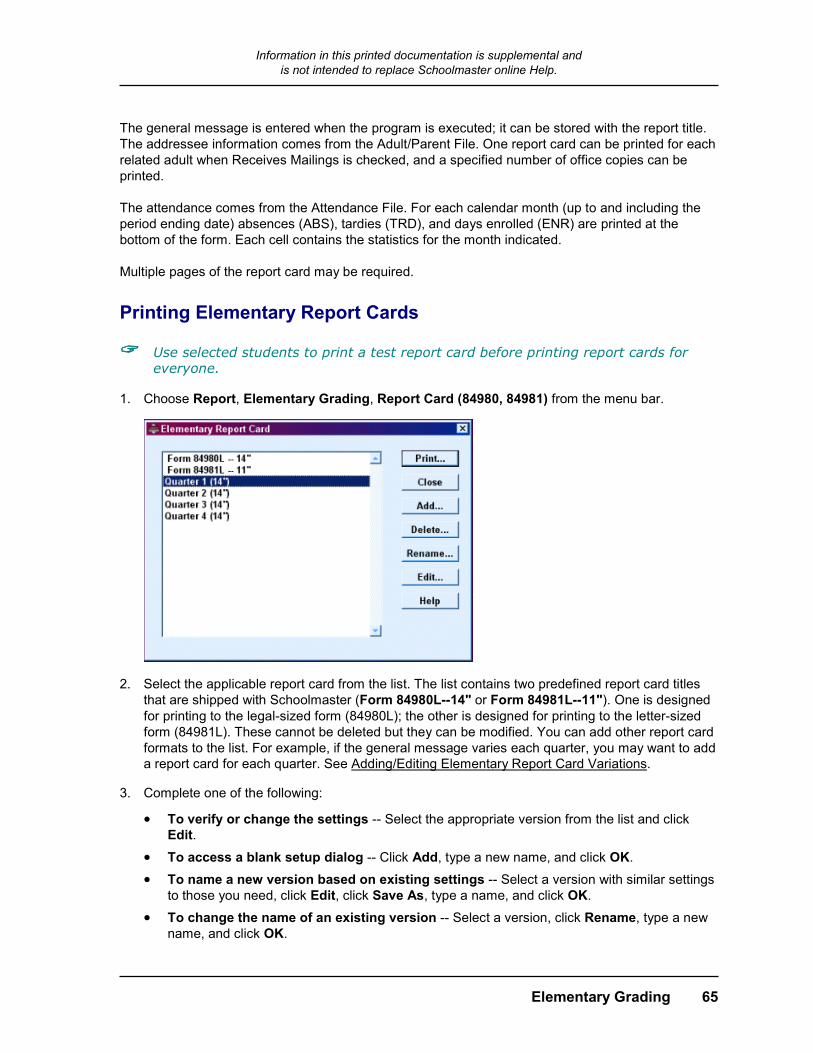
Information in this printed documentation is supplemental and is not intended to replace Schoolmaster online Help.
Elementary Grading 65
The general message is entered when the program is executed; it can be stored with the report title. The addressee information comes from the Adult/Parent File. One report card can be printed for each related adult when Receives Mailings is checked, and a specified number of office copies can be printed. The attendance comes from the Attendance File. For each calendar month (up to and including the period ending date) absences (ABS), tardies (TRD), and days enrolled (ENR) are printed at the bottom of the form. Each cell contains the statistics for the month indicated. Multiple pages of the report card may be required.
Printing Elementary Report Cards
Use selected students to print a test report card before printing report cards for everyone.
1. Choose Report, Elementary Grading, Report Card (84980, 84981) from the menu bar.
2. Select the applicable report card from the list. The list contains two predefined report card titles that are shipped with Schoolmaster (Form 84980L--14" or Form 84981L--11"). One is designed for printing to the legal-sized form (84980L); the other is designed for printing to the letter-sized form (84981L). These cannot be deleted but they can be modified. You can add other report card formats to the list. For example, if the general message varies each quarter, you may want to add a report card for each quarter. See Adding/Editing Elementary Report Card Variations.
3. Complete one of the following:
• To verify or change the settings -- Select the appropriate version from the list and click Edit.
• To access a blank setup dialog -- Click Add, type a new name, and click OK.
• To name a new version based on existing settings -- Select a version with similar settings to those you need, click Edit, click Save As, type a name, and click OK.
• To change the name of an existing version -- Select a version, click Rename, type a new name, and click OK.
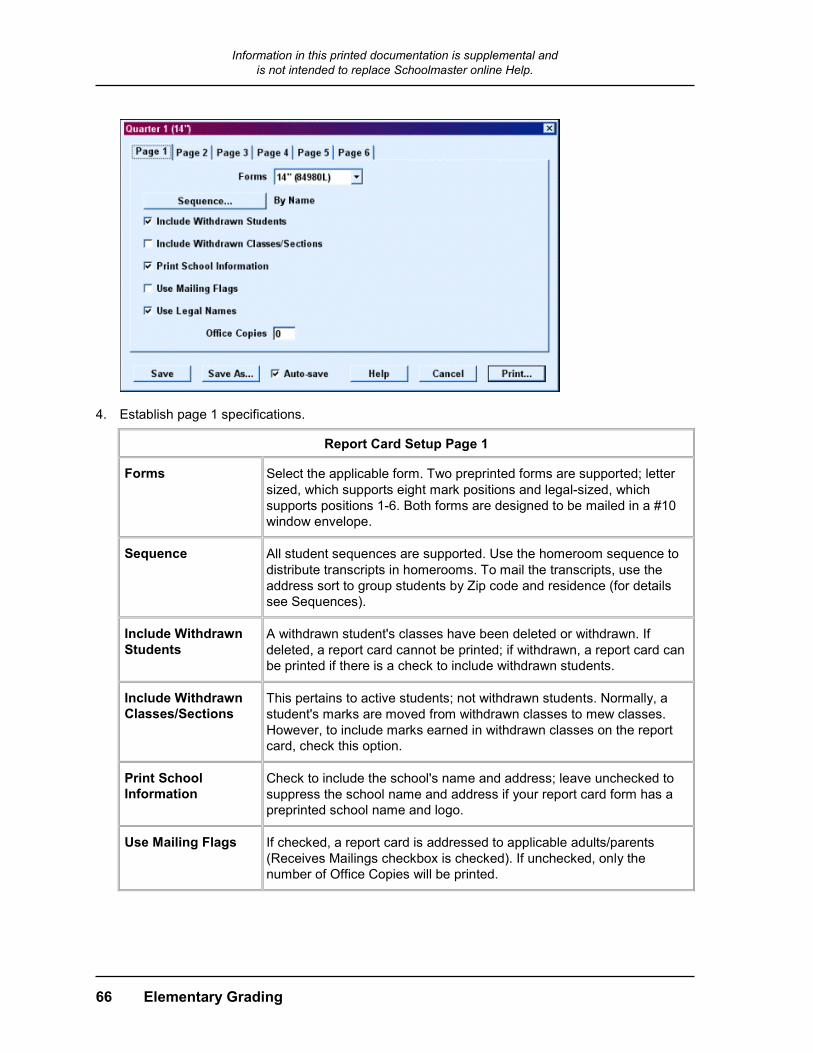
Information in this printed documentation is supplemental and is not intended to replace Schoolmaster online Help.
66 Elementary Grading
4. Establish page 1 specifications.
Report Card Setup Page 1
Forms Select the applicable form. Two preprinted forms are supported; letter sized, which supports eight mark positions and legal-sized, which supports positions 1-6. Both forms are designed to be mailed in a #10 window envelope.
Sequence All student sequences are supported. Use the homeroom sequence to distribute transcripts in homerooms. To mail the transcripts, use the address sort to group students by Zip code and residence (for details see Sequences).
Include Withdrawn Students
A withdrawn student's classes have been deleted or withdrawn. If deleted, a report card cannot be printed; if withdrawn, a report card can be printed if there is a check to include withdrawn students.
Include Withdrawn Classes/Sections
This pertains to active students; not withdrawn students. Normally, a student's marks are moved from withdrawn classes to mew classes. However, to include marks earned in withdrawn classes on the report card, check this option.
Print School Information
Check to include the school's name and address; leave unchecked to suppress the school name and address if your report card form has a preprinted school name and logo.
Use Mailing Flags If checked, a report card is addressed to applicable adults/parents (Receives Mailings checkbox is checked). If unchecked, only the number of Office Copies will be printed.
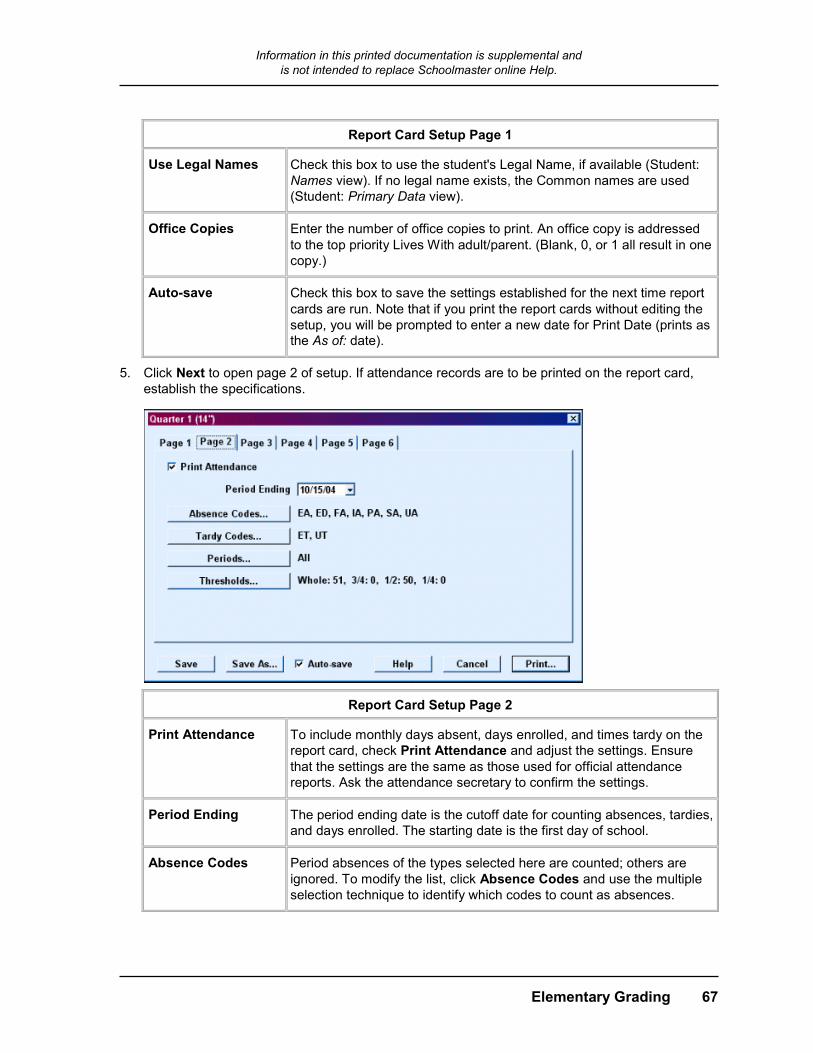
Information in this printed documentation is supplemental and is not intended to replace Schoolmaster online Help.
Elementary Grading 67
Report Card Setup Page 1
Use Legal Names Check this box to use the student's Legal Name, if available (Student: Names view). If no legal name exists, the Common names are used (Student: Primary Data view).
Office Copies Enter the number of office copies to print. An office copy is addressed to the top priority Lives With adult/parent. (Blank, 0, or 1 all result in one copy.)
Auto-save Check this box to save the settings established for the next time report cards are run. Note that if you print the report cards without editing the setup, you will be prompted to enter a new date for Print Date (prints as the As of: date).
5. Click Next to open page 2 of setup. If attendance records are to be printed on the report card, establish the specifications.
Report Card Setup Page 2
Print Attendance To include monthly days absent, days enrolled, and times tardy on the report card, check Print Attendance and adjust the settings. Ensure that the settings are the same as those used for official attendance reports. Ask the attendance secretary to confirm the settings.
Period Ending The period ending date is the cutoff date for counting absences, tardies, and days enrolled. The starting date is the first day of school.
Absence Codes Period absences of the types selected here are counted; others are ignored. To modify the list, click Absence Codes and use the multiple selection technique to identify which codes to count as absences.
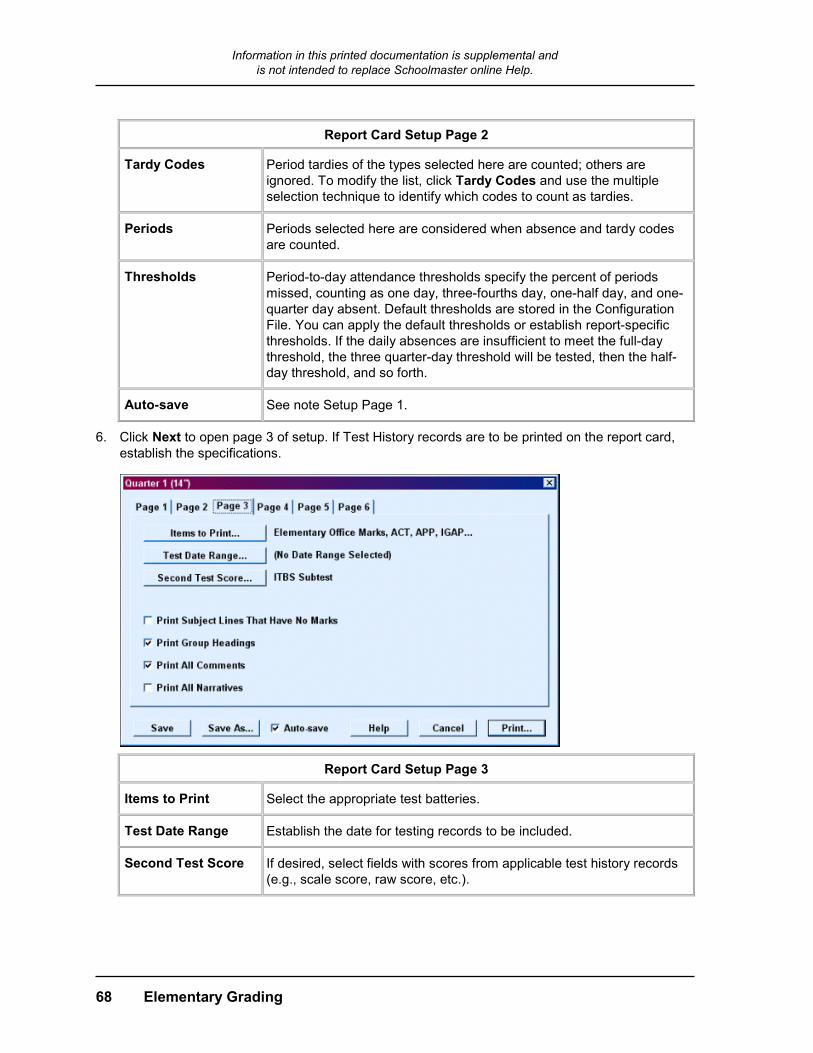
Information in this printed documentation is supplemental and is not intended to replace Schoolmaster online Help.
68 Elementary Grading
Report Card Setup Page 2
Tardy Codes Period tardies of the types selected here are counted; others are ignored. To modify the list, click Tardy Codes and use the multiple selection technique to identify which codes to count as tardies.
Periods Periods selected here are considered when absence and tardy codes are counted.
Thresholds Period-to-day attendance thresholds specify the percent of periods missed, counting as one day, three-fourths day, one-half day, and one-quarter day absent. Default thresholds are stored in the Configuration File. You can apply the default thresholds or establish report-specific thresholds. If the daily absences are insufficient to meet the full-day threshold, the three quarter-day threshold will be tested, then the half-day threshold, and so forth.
Auto-save See note Setup Page 1.
6. Click Next to open page 3 of setup. If Test History records are to be printed on the report card, establish the specifications.
Report Card Setup Page 3
Items to Print Select the appropriate test batteries.
Test Date Range Establish the date for testing records to be included.
Second Test Score If desired, select fields with scores from applicable test history records (e.g., scale score, raw score, etc.).
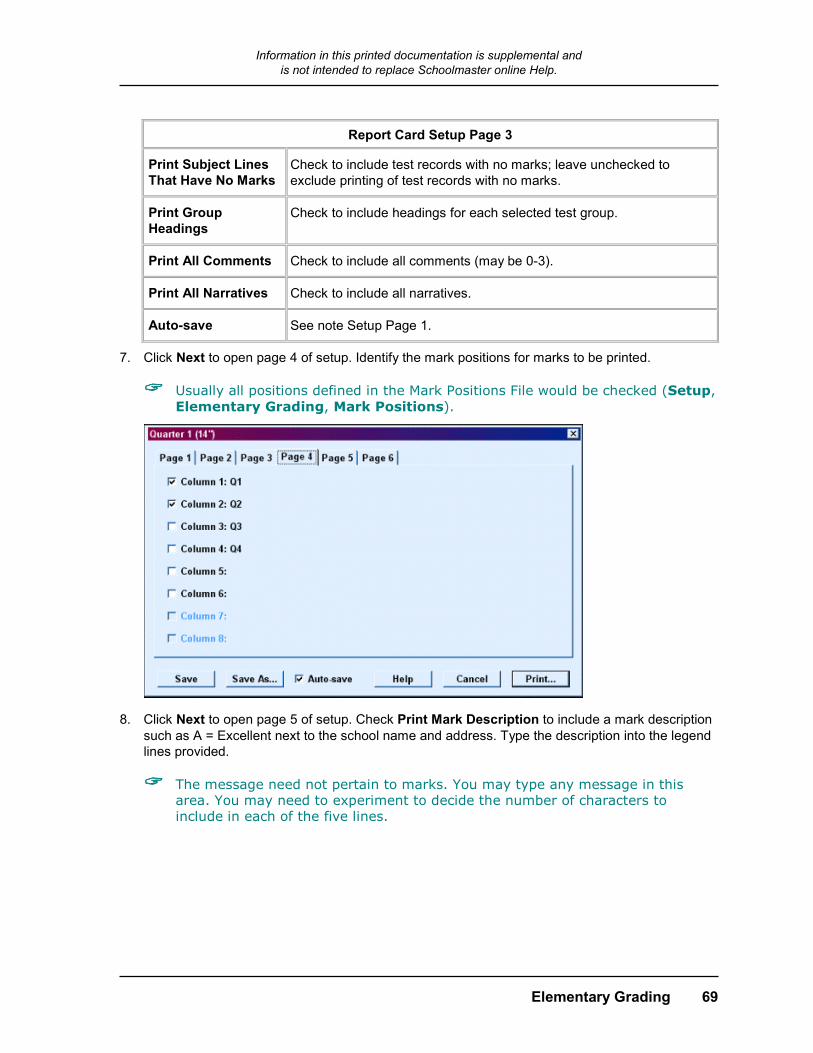
Information in this printed documentation is supplemental and is not intended to replace Schoolmaster online Help.
Elementary Grading 69
Report Card Setup Page 3
Print Subject Lines That Have No Marks
Check to include test records with no marks; leave unchecked to exclude printing of test records with no marks.
Print Group Headings
Check to include headings for each selected test group.
Print All Comments Check to include all comments (may be 0-3).
Print All Narratives Check to include all narratives.
Auto-save See note Setup Page 1.
7. Click Next to open page 4 of setup. Identify the mark positions for marks to be printed.
Usually all positions defined in the Mark Positions File would be checked (Setup, Elementary Grading, Mark Positions).
8. Click Next to open page 5 of setup. Check Print Mark Description to include a mark description such as A = Excellent next to the school name and address. Type the description into the legend lines provided.
The message need not pertain to marks. You may type any message in this area. You may need to experiment to decide the number of characters to include in each of the five lines.
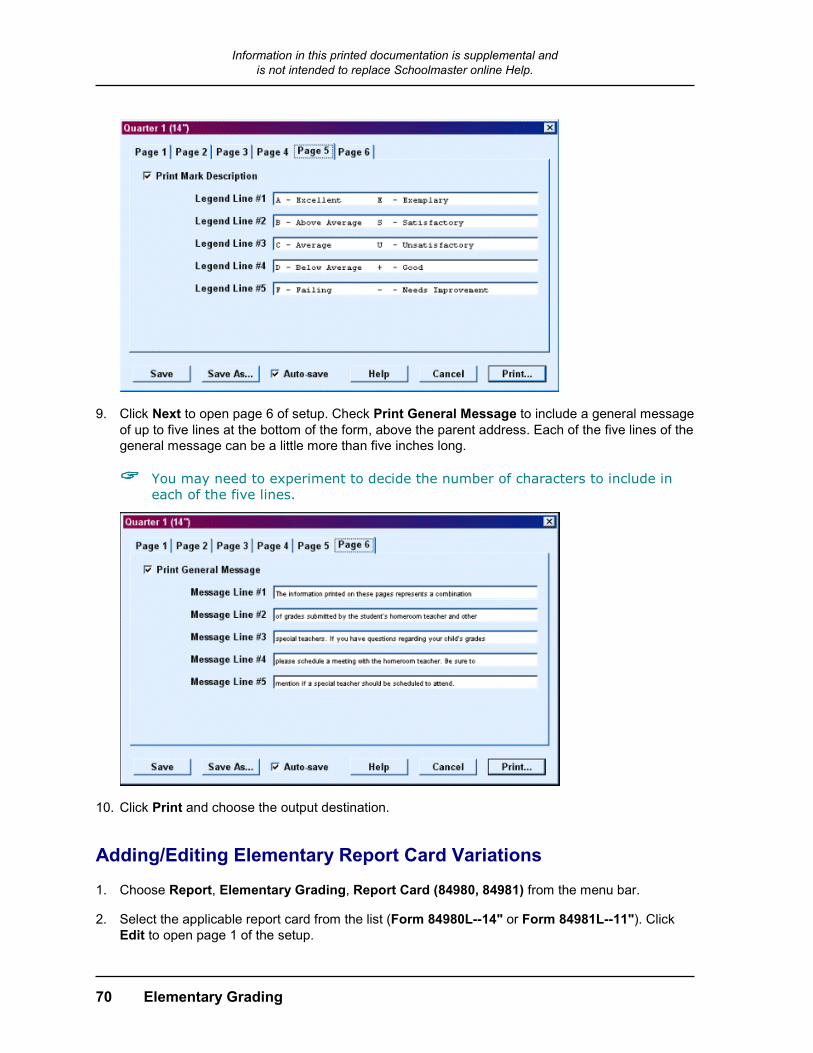
Information in this printed documentation is supplemental and is not intended to replace Schoolmaster online Help.
70 Elementary Grading
9. Click Next to open page 6 of setup. Check Print General Message to include a general message of up to five lines at the bottom of the form, above the parent address. Each of the five lines of the general message can be a little more than five inches long.
You may need to experiment to decide the number of characters to include in each of the five lines.
10. Click Print and choose the output destination.
Adding/Editing Elementary Report Card Variations
1. Choose Report, Elementary Grading, Report Card (84980, 84981) from the menu bar.
2. Select the applicable report card from the list (Form 84980L--14" or Form 84981L--11"). Click Edit to open page 1 of the setup.
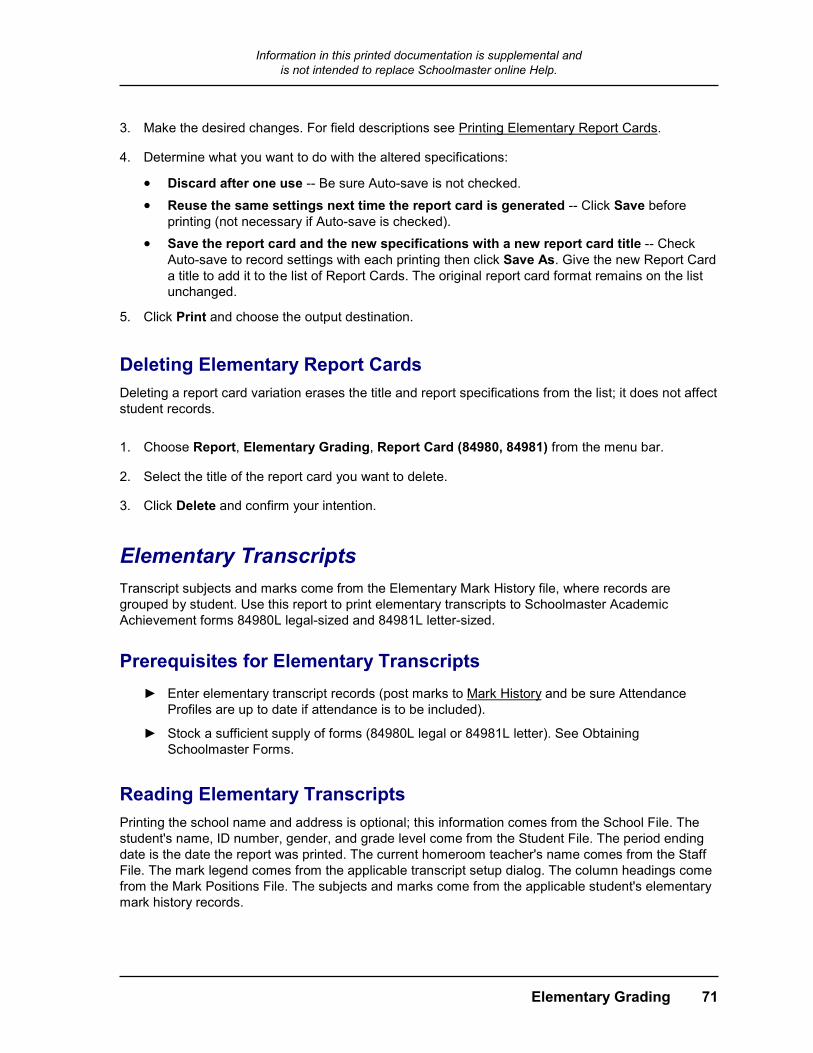
Information in this printed documentation is supplemental and is not intended to replace Schoolmaster online Help.
Elementary Grading 71
3. Make the desired changes. For field descriptions see Printing Elementary Report Cards.
4. Determine what you want to do with the altered specifications:
• Discard after one use -- Be sure Auto-save is not checked.
• Reuse the same settings next time the report card is generated -- Click Save before printing (not necessary if Auto-save is checked).
• Save the report card and the new specifications with a new report card title -- Check Auto-save to record settings with each printing then click Save As. Give the new Report Card a title to add it to the list of Report Cards. The original report card format remains on the list unchanged.
5. Click Print and choose the output destination.
Deleting Elementary Report Cards Deleting a report card variation erases the title and report specifications from the list; it does not affect student records.
1. Choose Report, Elementary Grading, Report Card (84980, 84981) from the menu bar.
2. Select the title of the report card you want to delete.
3. Click Delete and confirm your intention.
Elementary Transcripts Transcript subjects and marks come from the Elementary Mark History file, where records are grouped by student. Use this report to print elementary transcripts to Schoolmaster Academic Achievement forms 84980L legal-sized and 84981L letter-sized.
Prerequisites for Elementary Transcripts ► Enter elementary transcript records (post marks to Mark History and be sure Attendance
Profiles are up to date if attendance is to be included).
► Stock a sufficient supply of forms (84980L legal or 84981L letter). See Obtaining Schoolmaster Forms.
Reading Elementary Transcripts Printing the school name and address is optional; this information comes from the School File. The student's name, ID number, gender, and grade level come from the Student File. The period ending date is the date the report was printed. The current homeroom teacher's name comes from the Staff File. The mark legend comes from the applicable transcript setup dialog. The column headings come from the Mark Positions File. The subjects and marks come from the applicable student's elementary mark history records.
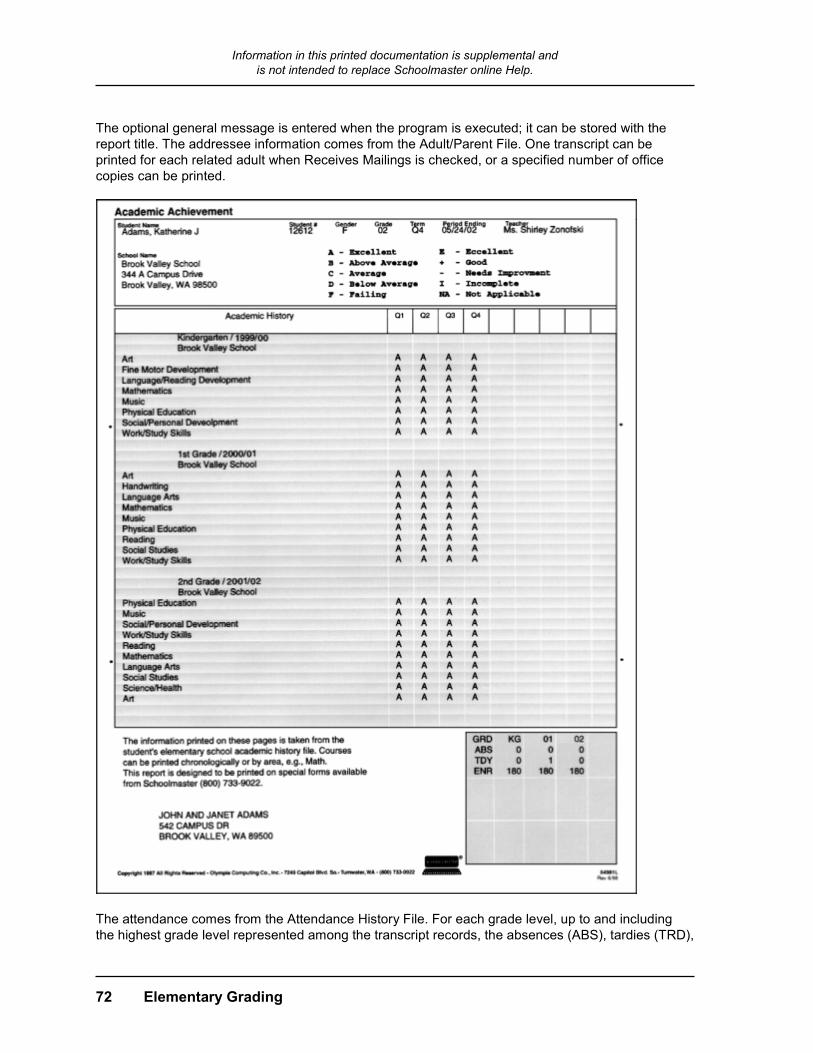
Information in this printed documentation is supplemental and is not intended to replace Schoolmaster online Help.
72 Elementary Grading
The optional general message is entered when the program is executed; it can be stored with the report title. The addressee information comes from the Adult/Parent File. One transcript can be printed for each related adult when Receives Mailings is checked, or a specified number of office copies can be printed.
The attendance comes from the Attendance History File. For each grade level, up to and including the highest grade level represented among the transcript records, the absences (ABS), tardies (TRD),
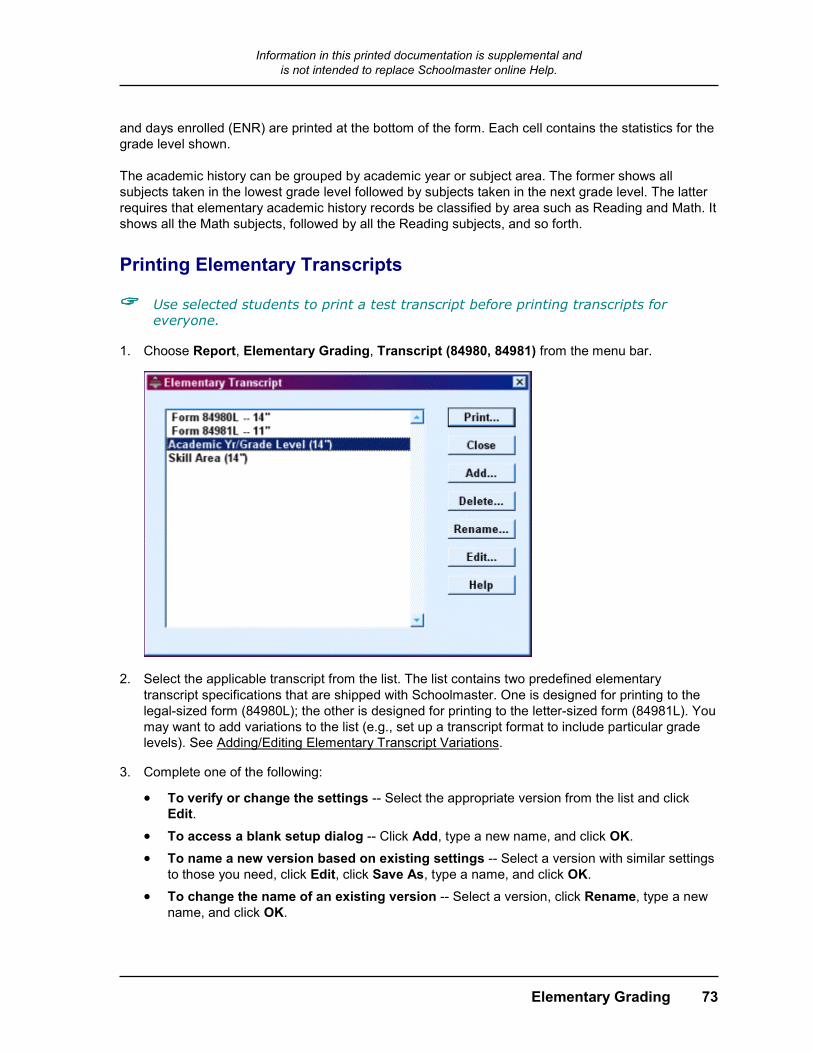
Information in this printed documentation is supplemental and is not intended to replace Schoolmaster online Help.
Elementary Grading 73
and days enrolled (ENR) are printed at the bottom of the form. Each cell contains the statistics for the grade level shown. The academic history can be grouped by academic year or subject area. The former shows all subjects taken in the lowest grade level followed by subjects taken in the next grade level. The latter requires that elementary academic history records be classified by area such as Reading and Math. It shows all the Math subjects, followed by all the Reading subjects, and so forth.
Printing Elementary Transcripts
Use selected students to print a test transcript before printing transcripts for everyone.
1. Choose Report, Elementary Grading, Transcript (84980, 84981) from the menu bar.
2. Select the applicable transcript from the list. The list contains two predefined elementary transcript specifications that are shipped with Schoolmaster. One is designed for printing to the legal-sized form (84980L); the other is designed for printing to the letter-sized form (84981L). You may want to add variations to the list (e.g., set up a transcript format to include particular grade levels). See Adding/Editing Elementary Transcript Variations.
3. Complete one of the following:
• To verify or change the settings -- Select the appropriate version from the list and click Edit.
• To access a blank setup dialog -- Click Add, type a new name, and click OK.
• To name a new version based on existing settings -- Select a version with similar settings to those you need, click Edit, click Save As, type a name, and click OK.
• To change the name of an existing version -- Select a version, click Rename, type a new name, and click OK.
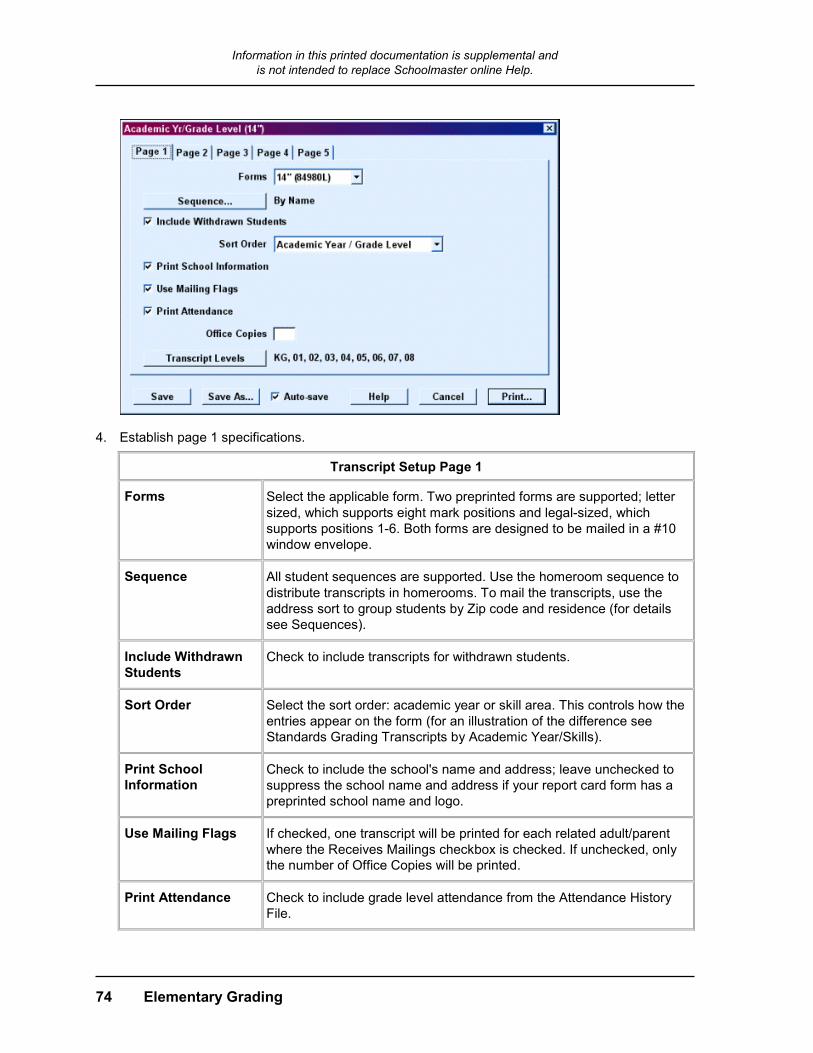
Information in this printed documentation is supplemental and is not intended to replace Schoolmaster online Help.
74 Elementary Grading
4. Establish page 1 specifications.
Transcript Setup Page 1
Forms Select the applicable form. Two preprinted forms are supported; letter sized, which supports eight mark positions and legal-sized, which supports positions 1-6. Both forms are designed to be mailed in a #10 window envelope.
Sequence All student sequences are supported. Use the homeroom sequence to distribute transcripts in homerooms. To mail the transcripts, use the address sort to group students by Zip code and residence (for details see Sequences).
Include Withdrawn Students
Check to include transcripts for withdrawn students.
Sort Order Select the sort order: academic year or skill area. This controls how the entries appear on the form (for an illustration of the difference see Standards Grading Transcripts by Academic Year/Skills).
Print School Information
Check to include the school's name and address; leave unchecked to suppress the school name and address if your report card form has a preprinted school name and logo.
Use Mailing Flags If checked, one transcript will be printed for each related adult/parent where the Receives Mailings checkbox is checked. If unchecked, only the number of Office Copies will be printed.
Print Attendance Check to include grade level attendance from the Attendance History File.
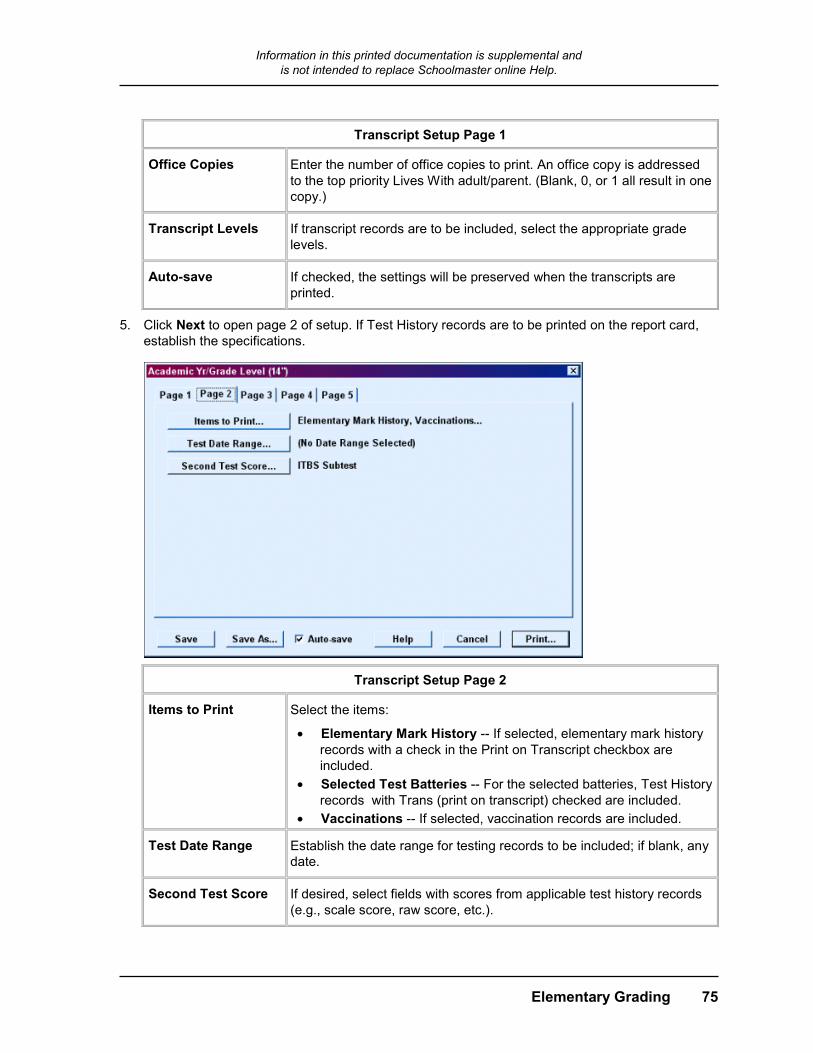
Information in this printed documentation is supplemental and is not intended to replace Schoolmaster online Help.
Elementary Grading 75
Transcript Setup Page 1
Office Copies Enter the number of office copies to print. An office copy is addressed to the top priority Lives With adult/parent. (Blank, 0, or 1 all result in one copy.)
Transcript Levels If transcript records are to be included, select the appropriate grade levels.
Auto-save If checked, the settings will be preserved when the transcripts are printed.
5. Click Next to open page 2 of setup. If Test History records are to be printed on the report card, establish the specifications.
Transcript Setup Page 2
Items to Print Select the items:
• Elementary Mark History -- If selected, elementary mark history records with a check in the Print on Transcript checkbox are included.
• Selected Test Batteries -- For the selected batteries, Test History records with Trans (print on transcript) checked are included.
• Vaccinations -- If selected, vaccination records are included.
Test Date Range Establish the date range for testing records to be included; if blank, any date.
Second Test Score If desired, select fields with scores from applicable test history records (e.g., scale score, raw score, etc.).

Information in this printed documentation is supplemental and is not intended to replace Schoolmaster online Help.
76 Elementary Grading
Transcript Setup Page 2
Auto-save If checked, the settings will be preserved when the transcripts are printed.
6. Click Next to open page 3 of setup. Identify the mark positions for marks to be printed.
• Usually labeled positions are included.
• Position labels come from the Mark Positions File.
7. Click Next to open page 4 of setup. Check Print Mark Description to include a mark description such as A = Excellent next to the school name and address. Type the description into the legend lines provided.
The message need not pertain to marks. You may type any message in this area. You may need to experiment to decide the number of characters to include in each of the five lines.
8. Click Next to open page 5 of setup. Check Print General Message to include a general message of up to five lines at the
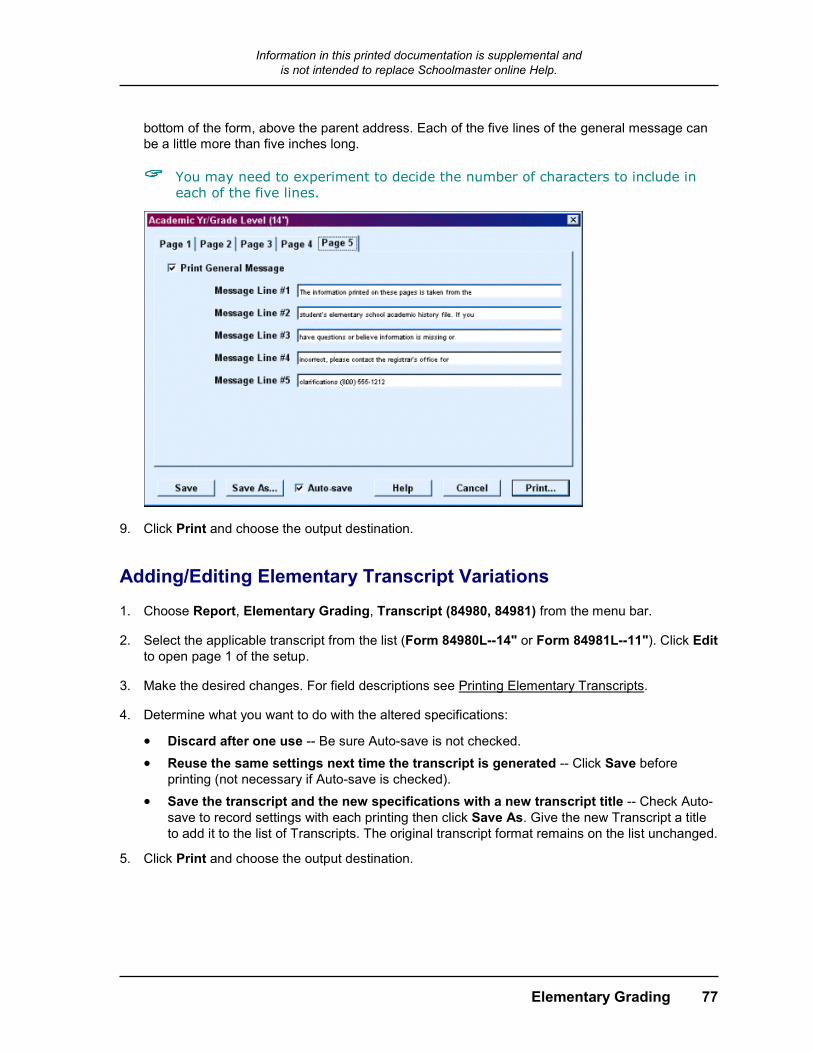
Information in this printed documentation is supplemental and is not intended to replace Schoolmaster online Help.
Elementary Grading 77
bottom of the form, above the parent address. Each of the five lines of the general message can be a little more than five inches long.
You may need to experiment to decide the number of characters to include in each of the five lines.
9. Click Print and choose the output destination.
Adding/Editing Elementary Transcript Variations
1. Choose Report, Elementary Grading, Transcript (84980, 84981) from the menu bar.
2. Select the applicable transcript from the list (Form 84980L--14" or Form 84981L--11"). Click Edit to open page 1 of the setup.
3. Make the desired changes. For field descriptions see Printing Elementary Transcripts.
4. Determine what you want to do with the altered specifications:
• Discard after one use -- Be sure Auto-save is not checked.
• Reuse the same settings next time the transcript is generated -- Click Save before printing (not necessary if Auto-save is checked).
• Save the transcript and the new specifications with a new transcript title -- Check Auto-save to record settings with each printing then click Save As. Give the new Transcript a title to add it to the list of Transcripts. The original transcript format remains on the list unchanged.
5. Click Print and choose the output destination.

Information in this printed documentation is supplemental and is not intended to replace Schoolmaster online Help.
78 Elementary Grading
Deleting Elementary Transcripts Deleting a transcript variation erases the title and report specifications from the list; it does not affect student records.
1. Choose Report, Elementary Grading, Transcript (84980, 84981) from the menu bar.
2. Select the title of the transcript you want to delete.
3. Click Delete and confirm your intention.

Information in this printed documentation is supplemental and is not intended to replace Schoolmaster online Help.
Elementary Grading 79
Index Absence Codes field............................................................................................................................. 65 Academic Achievement Forms......................................................................................................... 7, 71 Accessing
Current Mark Position ....................................................................................................................... 21 Elementary Grading ..........................................................................................1, 8, 24, 28, 31, 35, 40 Elementary Mark Collection Forms................................................................................................... 51 Elementary Mark History View.......................................................................................................... 45 Mark Collection Forms ...................................................................................................................... 51 Mark History ...................................................................................................................................... 45 Mark Position Labels........................................................................................................................... 7 Mark Positions..................................................................................................................................... 7 Mark Tables ........................................................................................................................................ 8 Office Entry by Class ........................................................................................................................ 31 Office Entry by Scanner .................................................................................................................... 35 Office Entry by Student ..................................................................................................................... 40 Post Office Marks to Mark History .................................................................................................... 48 Post Teacher Marks to Office ........................................................................................................... 29 Report Card Comments .................................................................................................................... 13 Report Card Layouts ......................................................................................................................... 16 Report Card Mark Verification Reports ............................................................................................. 58 Report Cards..................................................................................................................................... 70 Teacher Mark Entry by Class............................................................................................................ 24 Transcripts ........................................................................................................................................ 77
Adding Alpha Marks ...................................................................................................................................... 10 Comments......................................................................................................................................... 13 Elementary Mark History Record ...................................................................................................... 49 Elementary Report Card Variations .................................................................................................. 70 Elementary Transcript Variations...................................................................................................... 77 Mark History Record ......................................................................................................................... 49 Mark Tables ........................................................................................................................................ 9 Report Card Comments .................................................................................................................... 13 Report Card Layouts ......................................................................................................................... 17 Report Cards..................................................................................................................................... 70 Subject/Skill....................................................................................................................................... 18 Transcripts ........................................................................................................................................ 77
Alpha field ............................................................................................................................................. 10 Alpha Grading......................................................................................................................................... 8 Alpha Marks
Adding ............................................................................................................................................... 10 Deleting ............................................................................................................................................. 11 Editing ............................................................................................................................................... 11
Alpha Marks............................................................................................................................................ 8 Alpha Marks field .................................................................................................................................. 61 Area field............................................................................................................................................... 45 As Alpha field..................................................................................................................................29, 48 As Specified in Layout field ............................................................................................................29, 48 As Stored field ................................................................................................................................29, 48
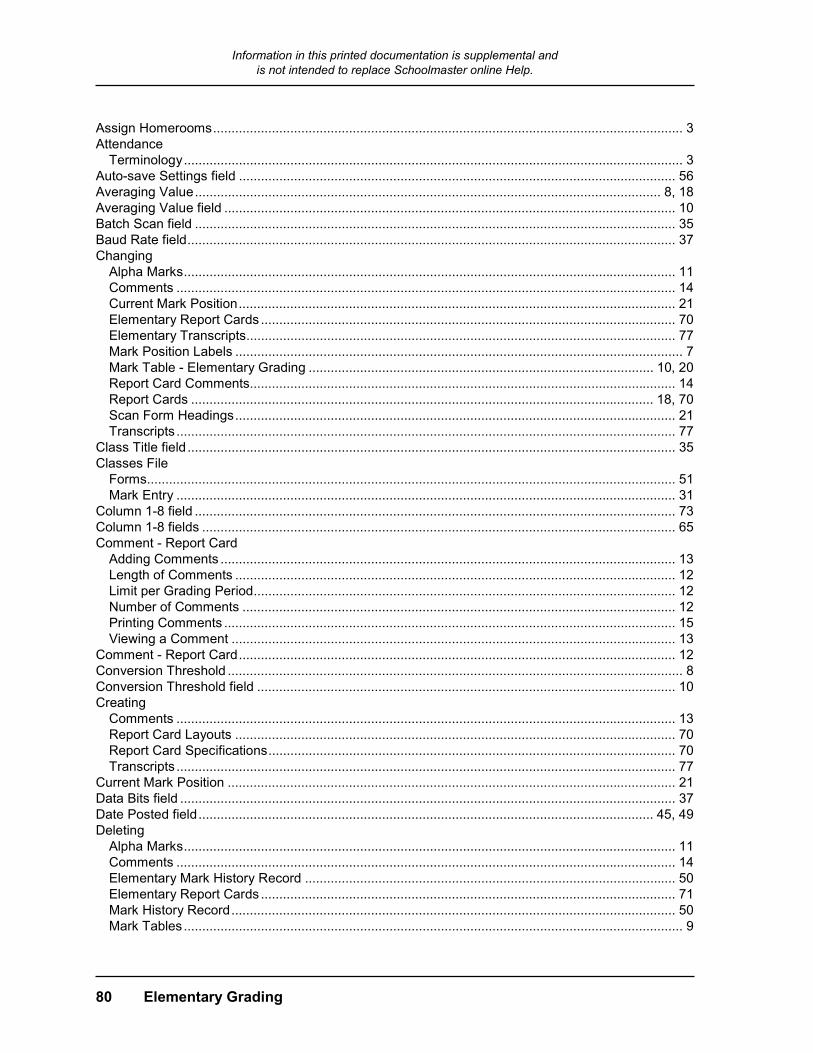
Information in this printed documentation is supplemental and is not intended to replace Schoolmaster online Help.
80 Elementary Grading
Assign Homerooms................................................................................................................................ 3 Attendance
Terminology........................................................................................................................................ 3 Auto-save Settings field ....................................................................................................................... 56 Averaging Value............................................................................................................................... 8, 18 Averaging Value field ........................................................................................................................... 10 Batch Scan field ................................................................................................................................... 35 Baud Rate field..................................................................................................................................... 37 Changing
Alpha Marks...................................................................................................................................... 11 Comments ........................................................................................................................................ 14 Current Mark Position....................................................................................................................... 21 Elementary Report Cards ................................................................................................................. 70 Elementary Transcripts..................................................................................................................... 77 Mark Position Labels .......................................................................................................................... 7 Mark Table - Elementary Grading .............................................................................................. 10, 20 Report Card Comments.................................................................................................................... 14 Report Cards .............................................................................................................................. 18, 70 Scan Form Headings........................................................................................................................ 21 Transcripts ........................................................................................................................................ 77
Class Title field..................................................................................................................................... 35 Classes File
Forms................................................................................................................................................ 51 Mark Entry ........................................................................................................................................ 31
Column 1-8 field ................................................................................................................................... 73 Column 1-8 fields ................................................................................................................................. 65 Comment - Report Card
Adding Comments ............................................................................................................................ 13 Length of Comments ........................................................................................................................ 12 Limit per Grading Period................................................................................................................... 12 Number of Comments ...................................................................................................................... 12 Printing Comments ........................................................................................................................... 15 Viewing a Comment ......................................................................................................................... 13
Comment - Report Card....................................................................................................................... 12 Conversion Threshold ............................................................................................................................ 8 Conversion Threshold field .................................................................................................................. 10 Creating
Comments ........................................................................................................................................ 13 Report Card Layouts ........................................................................................................................ 70 Report Card Specifications............................................................................................................... 70 Transcripts ........................................................................................................................................ 77
Current Mark Position .......................................................................................................................... 21 Data Bits field ....................................................................................................................................... 37 Date Posted field............................................................................................................................ 45, 49 Deleting
Alpha Marks...................................................................................................................................... 11 Comments ........................................................................................................................................ 14 Elementary Mark History Record ..................................................................................................... 50 Elementary Report Cards ................................................................................................................. 71 Mark History Record......................................................................................................................... 50 Mark Tables ........................................................................................................................................ 9
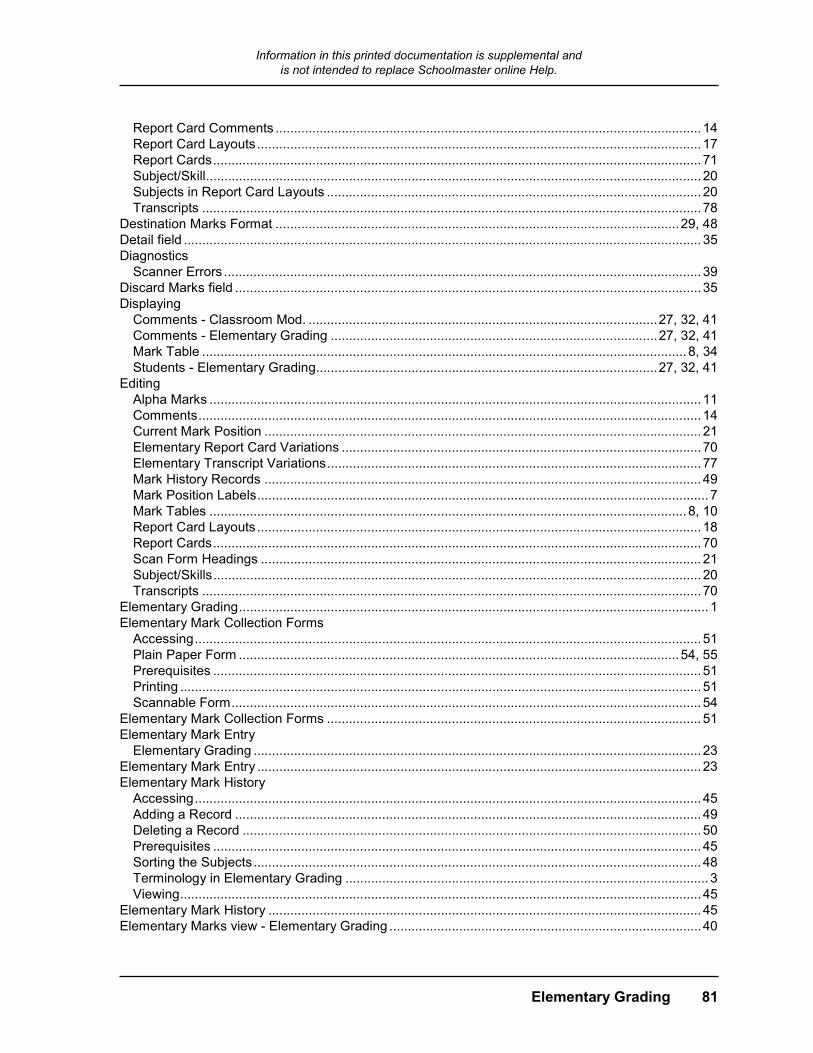
Information in this printed documentation is supplemental and is not intended to replace Schoolmaster online Help.
Elementary Grading 81
Report Card Comments .................................................................................................................... 14 Report Card Layouts ......................................................................................................................... 17 Report Cards..................................................................................................................................... 71 Subject/Skill....................................................................................................................................... 20 Subjects in Report Card Layouts ...................................................................................................... 20 Transcripts ........................................................................................................................................ 78
Destination Marks Format ..............................................................................................................29, 48 Detail field ............................................................................................................................................. 35 Diagnostics
Scanner Errors .................................................................................................................................. 39 Discard Marks field ............................................................................................................................... 35 Displaying
Comments - Classroom Mod. ...............................................................................................27, 32, 41 Comments - Elementary Grading .........................................................................................27, 32, 41 Mark Table .................................................................................................................................... 8, 34 Students - Elementary Grading.............................................................................................27, 32, 41
Editing Alpha Marks ...................................................................................................................................... 11 Comments......................................................................................................................................... 14 Current Mark Position ....................................................................................................................... 21 Elementary Report Card Variations .................................................................................................. 70 Elementary Transcript Variations...................................................................................................... 77 Mark History Records ....................................................................................................................... 49 Mark Position Labels........................................................................................................................... 7 Mark Tables .................................................................................................................................. 8, 10 Report Card Layouts ......................................................................................................................... 18 Report Cards..................................................................................................................................... 70 Scan Form Headings ........................................................................................................................ 21 Subject/Skills..................................................................................................................................... 20 Transcripts ........................................................................................................................................ 70
Elementary Grading................................................................................................................................ 1 Elementary Mark Collection Forms
Accessing.......................................................................................................................................... 51 Plain Paper Form ........................................................................................................................54, 55 Prerequisites ..................................................................................................................................... 51 Printing .............................................................................................................................................. 51 Scannable Form................................................................................................................................ 54
Elementary Mark Collection Forms ...................................................................................................... 51 Elementary Mark Entry
Elementary Grading .......................................................................................................................... 23 Elementary Mark Entry ......................................................................................................................... 23 Elementary Mark History
Accessing.......................................................................................................................................... 45 Adding a Record ............................................................................................................................... 49 Deleting a Record ............................................................................................................................. 50 Prerequisites ..................................................................................................................................... 45 Sorting the Subjects.......................................................................................................................... 48 Terminology in Elementary Grading ................................................................................................... 3 Viewing.............................................................................................................................................. 45
Elementary Mark History ...................................................................................................................... 45 Elementary Marks view - Elementary Grading .....................................................................................40
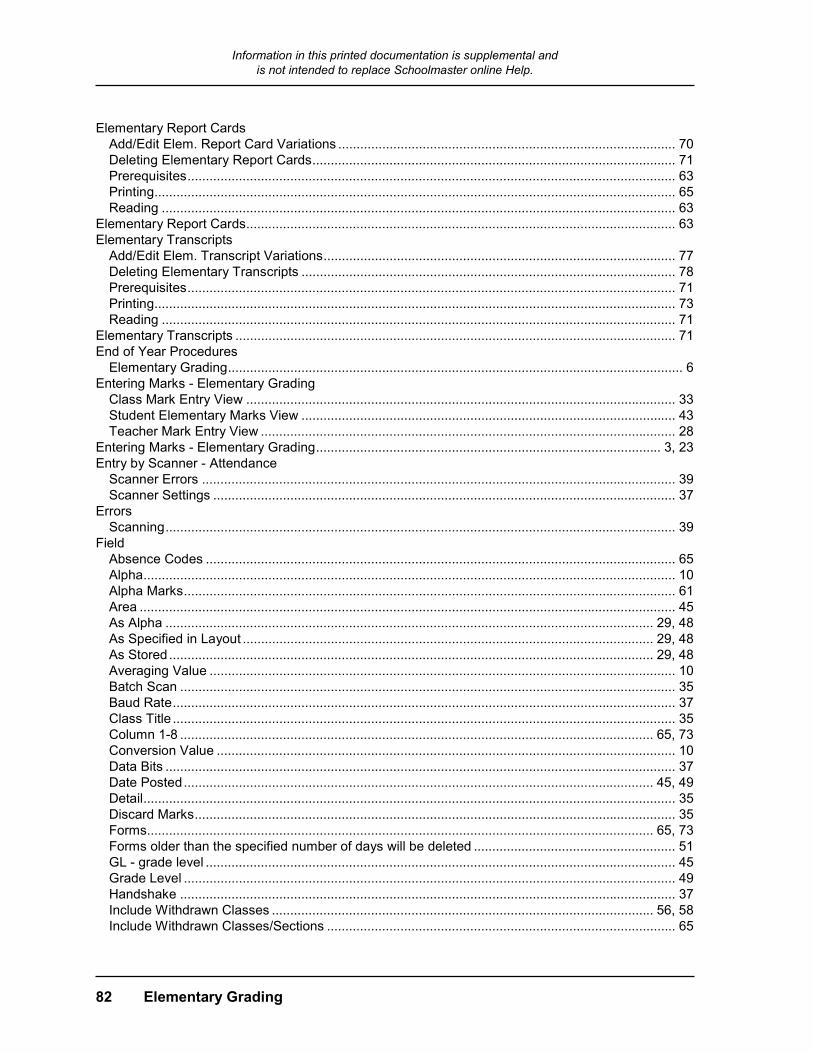
Information in this printed documentation is supplemental and is not intended to replace Schoolmaster online Help.
82 Elementary Grading
Elementary Report Cards Add/Edit Elem. Report Card Variations ............................................................................................ 70 Deleting Elementary Report Cards................................................................................................... 71 Prerequisites..................................................................................................................................... 63 Printing.............................................................................................................................................. 65 Reading ............................................................................................................................................ 63
Elementary Report Cards..................................................................................................................... 63 Elementary Transcripts
Add/Edit Elem. Transcript Variations................................................................................................ 77 Deleting Elementary Transcripts ...................................................................................................... 78 Prerequisites..................................................................................................................................... 71 Printing.............................................................................................................................................. 73 Reading ............................................................................................................................................ 71
Elementary Transcripts ........................................................................................................................ 71 End of Year Procedures
Elementary Grading............................................................................................................................ 6 Entering Marks - Elementary Grading
Class Mark Entry View ..................................................................................................................... 33 Student Elementary Marks View ...................................................................................................... 43 Teacher Mark Entry View ................................................................................................................. 28
Entering Marks - Elementary Grading.............................................................................................. 3, 23 Entry by Scanner - Attendance
Scanner Errors ................................................................................................................................. 39 Scanner Settings .............................................................................................................................. 37
Errors Scanning........................................................................................................................................... 39
Field Absence Codes ................................................................................................................................ 65 Alpha................................................................................................................................................. 10 Alpha Marks...................................................................................................................................... 61 Area .................................................................................................................................................. 45 As Alpha ..................................................................................................................................... 29, 48 As Specified in Layout ................................................................................................................ 29, 48 As Stored.................................................................................................................................... 29, 48 Averaging Value ............................................................................................................................... 10 Batch Scan ....................................................................................................................................... 35 Baud Rate......................................................................................................................................... 37 Class Title ......................................................................................................................................... 35 Column 1-8 ................................................................................................................................. 65, 73 Conversion Value ............................................................................................................................. 10 Data Bits ........................................................................................................................................... 37 Date Posted................................................................................................................................ 45, 49 Detail................................................................................................................................................. 35 Discard Marks................................................................................................................................... 35 Forms.......................................................................................................................................... 65, 73 Forms older than the specified number of days will be deleted ....................................................... 51 GL - grade level ................................................................................................................................ 45 Grade Level ...................................................................................................................................... 49 Handshake ....................................................................................................................................... 37 Include Withdrawn Classes ........................................................................................................ 56, 58 Include Withdrawn Classes/Sections ............................................................................................... 65
Information in this printed documentation is supplemental and is not intended to replace Schoolmaster online Help.
Elementary Grading 83
Include Withdrawn Students - definition same for all occurrences ................................................... 58 Items to Print ...............................................................................................................................65, 73 Legend Line #1-5 .............................................................................................................................. 65 Legend Line 1-5 ..........................................................................................................................65, 73 Mark 1-8 ............................................................................................................................................ 45 Mark Positions.......................................................................................................................56, 58, 61 Mark Table ......................................................................................................................18, 35, 45, 49 Mark Table Title ................................................................................................................................ 10 Mark to Collect .................................................................................................................................. 51 Mark Type ...................................................................................................................................18, 35 Mark Weight ................................................................................................................................45, 49 Maximum....................................................................................................................................... 9, 10 Message Line #1-5 ........................................................................................................................... 65 Message Line 1-5.............................................................................................................................. 73 Number ............................................................................................................................................. 13 Numeric High .................................................................................................................................... 61 Numeric Low ..................................................................................................................................... 61 Office Copies...............................................................................................................................65, 73 Order ................................................................................................................................................. 45 Output Format ................................................................................................................................... 61 Parity ................................................................................................................................................. 37 Period Ending.................................................................................................................................... 65 Periods .............................................................................................................................................. 65 Port.................................................................................................................................................... 37 Post to History................................................................................................................................... 18 Post to Transcript .............................................................................................................................. 18 Print All Comments ........................................................................................................................... 65 Print All Narratives ............................................................................................................................ 65 Print Attendance..........................................................................................................................65, 73 Print General Message ...............................................................................................................65, 73 Print Group Headings .................................................................................................................65, 73 Print Mark Description.................................................................................................................65, 73 Print on Transcript.......................................................................................................................45, 49 Print School Information..............................................................................................................65, 73 Print Subject Lines That Have No Marks.......................................................................................... 65 Report Mode ...............................................................................................................................56, 58 Scan Form......................................................................................................................................... 35 Scan ID ............................................................................................................................................. 35 Scanner.......................................................................................................................................35, 37 School .........................................................................................................................................45, 49 Second Test Score .....................................................................................................................65, 73 Selected Form................................................................................................................................... 35 Sensitivity .......................................................................................................................................... 37 Skill Area .....................................................................................................................................18, 49 Sort Order ......................................................................................................................................... 73 Stop Bits............................................................................................................................................ 37 Student.............................................................................................................................................. 35 Subject ........................................................................................................................................45, 49 Subject Order .................................................................................................................................... 49 Subjects ............................................................................................................................................ 35 T ..................................................................................................................................................45, 49
Information in this printed documentation is supplemental and is not intended to replace Schoolmaster online Help.
84 Elementary Grading
Tardy Codes ..................................................................................................................................... 65 Teacher....................................................................................................................................... 45, 49 Test Date Range ........................................................................................................................ 65, 73 Text................................................................................................................................................... 13 Thresholds ........................................................................................................................................ 65 Title ............................................................................................................................................... 9, 18 Transcript Levels .............................................................................................................................. 73 Use in GPA................................................................................................................................. 45, 49 Use Legal Names ............................................................................................................................. 65 Use Mailing Flags ....................................................................................................................... 65, 73 Weight............................................................................................................................................... 18 Year ............................................................................................................................................ 45, 49
File Comment .......................................................................................................................................... 12 Mark History ..................................................................................................................................... 45 Mark Position Labels .......................................................................................................................... 7 Office Marks ......................................................................................................................... 23, 29, 47 Student ....................................................................................................................................... 63, 71 Teacher Marks............................................................................................................................ 23, 29
Forms 84931L/Plain Paper Elementary Mark Collection............................................................................. 51 84980/84981 Elementary and Standards Report Cards .................................................................. 63 84980/84981 Elementary and Standards Transcripts...................................................................... 63 Elementary Report Cards ................................................................................................................. 63 Elementary Transcripts....................................................................................................................... 7 Mark Collection Forms...................................................................................................................... 51
Forms field...................................................................................................................................... 65, 73 Forms older than the specified number of days will be deleted field ................................................... 51 General Procedures
Office Entry by Scanner - Elementary Grading ................................................................................ 34 Getting Started
Elementary Grading............................................................................................................................ 5 GL field ................................................................................................................................................. 45 Grade Level field .................................................................................................................................. 49 Grading................................................................................................................................................... 1 Handshake field ................................................................................................................................... 37 History
Mark.................................................................................................................................................. 45 Homeroom.............................................................................................................................................. 3 Homeroom Assignment.......................................................................................................................... 3 Include Withdrawn Classes field .................................................................................................... 56, 58 Include Withdrawn Classes/Sections field ........................................................................................... 65 Indexes
Comment .......................................................................................................................................... 15 Introduction to
Elementary Grading............................................................................................................................ 1 Mark Entry ........................................................................................................................................ 23
Items to Print field .......................................................................................................................... 65, 73 Layouts
Report Card ...................................................................................................................................... 15 Layouts................................................................................................................................................. 17
Information in this printed documentation is supplemental and is not intended to replace Schoolmaster online Help.
Elementary Grading 85
Legend Line #1-5 fields ........................................................................................................................ 65 Legend Line 1-5 field ......................................................................................................................65, 73 Length of Comments ............................................................................................................................ 12 Limit per Grading Period....................................................................................................................... 12 Mark 1-8 field ........................................................................................................................................ 45 Mark Collection
Checkbox ....................................................................................................................................24, 56 Mark Collection Forms - Elementary Grading................................................................................... 51 Mark Entry - Elementary Grading ..................................................................................................... 23 Marking the Plain Paper Form - Elementary Grading....................................................................... 55 Marking the Scannable Form - Elementary Grading ........................................................................ 54 Post Teacher Marks to Office - Elementary Grading ........................................................................ 29 Preparing for Elementary Mark Collection ........................................................................................ 23 Prerequisites ..................................................................................................................................... 23
Mark Entry - Elementary Grading Class Mark Entry View...................................................................................................................... 33 Office Entry by Student ..................................................................................................................... 40 Student Elementary Marks View.................................................................................................40, 43 Teacher Mark Entry Views....................................................................................................25, 26, 28
Mark Entry - Elementary Grading ..................................................................................................... 3, 29 Mark Entry by Class (Roster) ............................................................................................................... 25 Mark Entry by Class (Subject) .............................................................................................................. 26 Mark Entry view - Elementary
Entering Marks............................................................................................................................28, 33 Entry by Class (Roster) ..................................................................................................................... 25 Entry by Class (Subject) ................................................................................................................... 26 Locating a Student ............................................................................................................................ 33 Selecting Another Class.................................................................................................................... 32 Showing and Hiding a Mark Table .................................................................................................... 34
Mark Entry view - Elementary............................................................................................................... 23 Mark Entry Views................................................................................................................25, 31, 35, 40 Mark Positions
Accessing............................................................................................................................................ 7 Adding ................................................................................................................................................. 7 Deleting ............................................................................................................................................... 7 Editing ................................................................................................................................................. 7 Mark Position Setup Tasks ................................................................................................................. 7 Overview ............................................................................................................................................. 7
Mark Positions ........................................................................................................................................ 7 Mark Positions field ..................................................................................................................56, 58, 61 Mark Table field ..................................................................................................................18, 35, 45, 49 Mark Table Title field ............................................................................................................................ 10 Mark Tables
Accessing............................................................................................................................................ 8 Adding ................................................................................................................................................. 9 Deleting ............................................................................................................................................... 9 Multiple................................................................................................................................................ 8 Overview ............................................................................................................................................. 8 Printing .............................................................................................................................................. 12 Show/Hide Mark Table in Class Mark Entry ..................................................................................... 34 Show/Hide Mark Table in Teacher Mark Entry .....................................................................27, 32, 41
Information in this printed documentation is supplemental and is not intended to replace Schoolmaster online Help.
86 Elementary Grading
Mark Tables............................................................................................................................................ 3 Mark to Collect field.............................................................................................................................. 51 Mark Type field............................................................................................................................... 18, 35 Mark Verification Report
Overview........................................................................................................................................... 57 Prerequisites............................................................................................................................... 56, 58 Report Card Mark Verification .......................................................................................................... 57 Teacher Mark Verification................................................................................................................. 55
Mark Verification Report................................................................................................................. 55, 57 Mark Weight field ........................................................................................................................... 45, 49 Marking the Plain Paper Form ............................................................................................................. 55 Marking the Scannable Form............................................................................................................... 54 Marks/Grades
Alpha......................................................................................................................................... 3, 8, 10 Definition............................................................................................................................................. 3 Entry ................................................................................................................................................. 23 Numeric .............................................................................................................................................. 3 Numeric Printed as Alpha................................................................................................................... 3 Selected Marks Report ..................................................................................................................... 60
Marks/Grades......................................................................................................................................... 3 Maximum field .................................................................................................................................. 9, 10 Message Line #1-5 fields ..................................................................................................................... 65 Message Line 1-5 field ......................................................................................................................... 73 Module
Grading ............................................................................................................................................... 1 Moving a Subject/Skill .......................................................................................................................... 20 Multiple Mark Tables .............................................................................................................................. 8 Number field......................................................................................................................................... 13 Number of Comments .......................................................................................................................... 12 Numeric Grading
Marking the Scannable Form ........................................................................................................... 54 Numeric or Alpha Grading .................................................................................................................. 8
Numeric Grading .................................................................................................................................... 8 Numeric High field................................................................................................................................ 61 Numeric Low field................................................................................................................................. 61 Numeric Marks ................................................................................................................................. 8, 54 Numeric or Alpha Grading...................................................................................................................... 8 Office Copies field .......................................................................................................................... 65, 73 Office Entry by Class - Elementary and Standards
Accessing ......................................................................................................................................... 31 Entering Marks ................................................................................................................................. 33 Overview of Office Entry by Class.................................................................................................... 30 Reading the Class Mark Entry View................................................................................................. 31
Office Entry by Scanner Accessing ......................................................................................................................................... 35 Diagnostics ....................................................................................................................................... 38 General Procedures for Scanning .................................................................................................... 34 Overview........................................................................................................................................... 34 Preparing Forms............................................................................................................................... 36 Prerequisites..................................................................................................................................... 34 Reading ............................................................................................................................................ 35

Information in this printed documentation is supplemental and is not intended to replace Schoolmaster online Help.
Elementary Grading 87
Office Entry by Scanner........................................................................................................................ 34 Office Entry by Student - All Grading
Accessing.......................................................................................................................................... 40 Entering Marks.................................................................................................................................. 43 Overview of Office Entry by Student ................................................................................................. 40 Reading view..................................................................................................................................... 40
Office Entry by Student - All Grading.................................................................................................... 40 Office Marks File
Mark Entry......................................................................................................................................... 23 Mark/Grading .................................................................................................................................... 23 Office Entry by Class ........................................................................................................................ 30 Office Entry by Scanner .................................................................................................................... 34 Office Entry by Student ..................................................................................................................... 40 Post Teacher Marks to Office ........................................................................................................... 29 Posting Office Marks to Mark History................................................................................................ 47 Report Card Mark Verification........................................................................................................... 57
Office Marks File..................................................................................................................................... 3 Ongoing Activities
Elementary Grading ............................................................................................................................ 6 Order field ............................................................................................................................................. 45 Output Format field.........................................................................................................................56, 61 Overview
Current Mark Position ....................................................................................................................... 21 Elementary Grading ..................................................................7, 8, 21, 23, 24, 29, 30, 34, 40, 63, 71 Mark Tables ........................................................................................................................................ 8 Report Card Layouts ......................................................................................................................... 15 Report Cards..................................................................................................................................... 63 Transcripts ........................................................................................................................................ 71
Overview............................................................................................................................................... 12 Parity field ............................................................................................................................................. 37 Period Ending field ............................................................................................................................... 65 Periods field .......................................................................................................................................... 65 Plain Paper Form
Creating Elementary Mark Collection Forms on plain paper ............................................................ 51 Marking the Plain Paper Form-Elementary Mark Collection............................................................. 55 Printing Mark Collection Forms......................................................................................................... 51 Reading the Plain Paper Form-Elementary Grading ........................................................................ 54
Port field................................................................................................................................................ 37 Post
Office Marks...................................................................................................................................... 47 Teacher and Classroom Marks......................................................................................................... 29 To Mark History................................................................................................................................. 48
Post Office Marks to Mark History ........................................................................................................ 47 Post Teacher Marks to Office ............................................................................................................... 29 Post to History field.........................................................................................................................18, 47 Post to Transcript field.......................................................................................................................... 18 Posting Office Marks ......................................................................................................................47, 48 Preparing Forms................................................................................................................................... 36 Prerequisites
Elementary Mark Collection Forms................................................................................................... 51 Elementary Mark History................................................................................................................... 45
Information in this printed documentation is supplemental and is not intended to replace Schoolmaster online Help.
88 Elementary Grading
Elementary Report Cards ................................................................................................................. 63 Elementary Transcripts..................................................................................................................... 71 Grading ............................................................................................................................................. 23 Mark Collection................................................................................................................................. 23 Mark Verification Reports ................................................................................................................. 58 Office Entry by Scanner.................................................................................................................... 34 Post Teacher Marks to Office........................................................................................................... 29 Report Card Layouts ........................................................................................................................ 16 Report Card Mark Verification .......................................................................................................... 58 Report Cards .................................................................................................................................... 63 Selected Marks Report ..................................................................................................................... 60 Teacher Mark Entry .......................................................................................................................... 24 Teacher Mark Verification................................................................................................................. 56 Transcripts ........................................................................................................................................ 71
Print All Comments field....................................................................................................................... 65 Print All Narratives field........................................................................................................................ 65 Print Attendance field ..................................................................................................................... 65, 73 Print General Message field........................................................................................................... 65, 73 Print Group Headings field ............................................................................................................. 65, 73 Print Mark Description field ............................................................................................................ 65, 73 Print on Transcript field .................................................................................................................. 45, 49 Print School Information field ......................................................................................................... 65, 73 Print Subject Lines That Have No Marks field ..................................................................................... 65 Printing
Comments ........................................................................................................................................ 15 Elementary Mark Collection Forms - 84931/plain paper .................................................................. 51 Elementary Mark Tables................................................................................................................... 12 Elementary Report Cards ................................................................................................................. 65 Elementary Transcripts..................................................................................................................... 73 Mark Collection Forms - Elementary ................................................................................................ 51 Mark Tables ...................................................................................................................................... 12 Mark Verification Reports ........................................................................................................... 56, 58 Report Card Comments.................................................................................................................... 15 Report Card Layouts ........................................................................................................................ 21 Report Card Mark Verification .......................................................................................................... 58 Report Cards .................................................................................................................................... 65 Selected Marks Reports ................................................................................................................... 61 Teacher Mark Verification................................................................................................................. 56 Transcripts ........................................................................................................................................ 73
Reading Classes File Views ..................................................................................................................... 31, 35 Diagnostics Screen........................................................................................................................... 38 Diagnostics Window ......................................................................................................................... 38 Elementary Mark History View ......................................................................................................... 45 Elementary Report Card Layout views............................................................................................. 16 Elementary Report Cards ................................................................................................................. 63 Elementary Transcripts..................................................................................................................... 71 Mark Entry Views............................................................................................................ 25, 31, 35, 40 Office Entry by Class view................................................................................................................ 35 Office Entry by Scanner.................................................................................................................... 35 Office Entry by Student view ............................................................................................................ 40
Information in this printed documentation is supplemental and is not intended to replace Schoolmaster online Help.
Elementary Grading 89
Office Mark Entry Views.................................................................................................................... 40 Plain Paper Form .............................................................................................................................. 54 Report Card Layout views................................................................................................................. 16 Report Cards...............................................................................................................................16, 63 Scannable Form................................................................................................................................ 52 Scanner Diagnostics Screen............................................................................................................. 38 Staff Teacher Mark Entry View ......................................................................................................... 25 Subject List View............................................................................................................................... 16 Teacher Mark Entry by Class......................................................................................................25, 26 Transcripts ........................................................................................................................................ 71
Rename ........................................................................................................................56, 58, 61, 65, 73 Report Card - Elementary - 84980/84981
Adding/Editing Elementary Report Card Variations.......................................................................... 70 Deleting Elementary Report Cards ................................................................................................... 71 Layout ............................................................................................................................................... 15 Mark Verification Report ................................................................................................................... 57 Prerequisites ..................................................................................................................................... 63 Printing .............................................................................................................................................. 65 Reading............................................................................................................................................. 63 Save As in Elementary Report Card Layouts ................................................................................... 17
Report Card - Elementary - 84980/84981 ........................................................................................ 3, 63 Report Card Comments........................................................................................................................ 12 Report Card Layouts - Elementary
Accessing.......................................................................................................................................... 16 Adding ............................................................................................................................................... 17 Adding a Subject/Skill ....................................................................................................................... 18 Deleting a Subject/Skill ..................................................................................................................... 20 Editing ............................................................................................................................................... 18 Editing a Subject/Skill ....................................................................................................................... 20 Editing Scan Form Headings ............................................................................................................ 21 Moving a Subject............................................................................................................................... 20 Overview ........................................................................................................................................... 15 Prerequisites ..................................................................................................................................... 16 Printing .............................................................................................................................................. 21 Reading the Scannable Form ........................................................................................................... 52 Save As in Report Card Layouts....................................................................................................... 17 Terminology in Elementary Grading ................................................................................................... 3 Views................................................................................................................................................. 16
Report Card Layouts - Elementary....................................................................................................... 15 Report Card Mark Verification
Overview ........................................................................................................................................... 57 Prerequisites ..................................................................................................................................... 58 Printing .............................................................................................................................................. 58
Report Card Mark Verification .............................................................................................................. 57 Report Mode field ...........................................................................................................................56, 58 Reports
Elementary Mark Collection Forms................................................................................................... 51 Elementary Report Cards ................................................................................................................. 63 Elementary Transcripts ..................................................................................................................... 71 Report Card Mark Verification........................................................................................................... 57 Report Cards..................................................................................................................................... 63
Information in this printed documentation is supplemental and is not intended to replace Schoolmaster online Help.
90 Elementary Grading
Selected Marks................................................................................................................................. 60 Teacher Mark Verification................................................................................................................. 55 Transcripts ........................................................................................................................................ 71
Save As ................................................................................................................................................ 17 Scan Form field .................................................................................................................................... 35 Scan ID................................................................................................................................................. 36 Scan ID field ......................................................................................................................................... 35 Scan Marks view ............................................................................................................................ 35, 36 Scannable Form - Mark Entry
Alpha Marks...................................................................................................................................... 54 Comments ........................................................................................................................................ 54 Marking the Scannable Form ........................................................................................................... 54 Reading ............................................................................................................................................ 52
Scanned Image .................................................................................................................................... 38 Scanner Entry - Marks by Class
General Procedures ......................................................................................................................... 34 Preparing Forms............................................................................................................................... 36 Prerequisites..................................................................................................................................... 34 Reading ............................................................................................................................................ 35 Using the Class Scan Marks View ................................................................................................... 36
Scanner Entry - Marks by Class........................................................................................................... 34 Scanner field .................................................................................................................................. 35, 37 Scanners
Errors ................................................................................................................................................ 39 Mark Entry Scanning ........................................................................................................................ 36 Reading Diagnostics Display............................................................................................................ 38 Settings............................................................................................................................................. 37 Timing Marks .................................................................................................................................... 38 Using Diagnostics............................................................................................................................. 38
School field..................................................................................................................................... 45, 49 Searching for
Student in the Class Mark Entry View............................................................................................................................ 33
Student in the Student Elementary Marks View ................................................................................................................ 43
Second Test Score field ................................................................................................................. 65, 73 Selected Form field .............................................................................................................................. 35 Selected Marks Report
Elementary Grading Selected Marks.......................................................................................... 60, 61 Selected Marks Report......................................................................................................................... 60 Selecting
Non-Class Member............................................................................................................... 27, 32, 41 Sensitivity field ..................................................................................................................................... 37 Seq field ............................................................................................................................................... 45 Settings for Scanners........................................................................................................................... 37 Show/Hide Mark Tables ........................................................................................................... 27, 32, 41 Showing/Hiding a Mark Table
Class Mark Entry View ..................................................................................................................... 34 Teacher Mark Entry View ..................................................................................................... 27, 32, 41
Showing/Hiding a Mark Table .............................................................................................................. 34 Skill Area field ................................................................................................................................ 18, 49

Information in this printed documentation is supplemental and is not intended to replace Schoolmaster online Help.
Elementary Grading 91
Sort Order field ..................................................................................................................................... 73 Sorting the Subjects - Elementary Mark History................................................................................... 48 Stop Bits field........................................................................................................................................ 37 Student field.......................................................................................................................................... 35 Students File
Classes or Programs views .............................................................................................................. 40 Elementary Mark History View.......................................................................................................... 45 Elementary Marks View ..............................................................................................................40, 43
Subject field ....................................................................................................................................45, 49 Subject Order field ................................................................................................................................ 49 Subjects field ........................................................................................................................................ 35 T field - Transfer ................................................................................................................................... 45 Tardy Codes field.................................................................................................................................. 65 Tasks
Scanner Diagnostics ......................................................................................................................... 38 Teacher
Mark Entry views............................................................................................................................... 24 Mark Verification .........................................................................................................................55, 56
Teacher field ...................................................................................................................................45, 49 Teacher Mark Entry by Class - Elementary Grading
Accessing.......................................................................................................................................... 24 Entering Marks.................................................................................................................................. 33 Prerequisites ..................................................................................................................................... 24 Reading the Teacher Mark Entry Views .....................................................................................25, 26 Using Teacher Entry by Class Features ...............................................................................27, 32, 41
Teacher Mark Entry by Class - Elementary Grading........................................................................ 3, 24 Teacher Mark Entry view - Classroom Module
Showing and Hiding a Mark Table .................................................................................................... 34 Teacher Mark Verification Report......................................................................................................... 55 Teacher Marks File ........................................................................................................................... 3, 29 Terminology
Elementary Grading ............................................................................................................................ 3 Test Date Range field.....................................................................................................................65, 73 Text field ............................................................................................................................................... 13 Thresholds field .................................................................................................................................... 65 Title field ........................................................................................................................................... 9, 18 Transcript Levels field........................................................................................................................... 73 Transcripts
Add/Edit Transcript Variations .......................................................................................................... 77 Deleting Transcript Variations........................................................................................................... 78 Elementary Transcripts ..................................................................................................................... 71 Posting Marks To .............................................................................................................................. 47 Printing .............................................................................................................................................. 73
Use in GPA field .............................................................................................................................45, 49 Use Legal Names field ......................................................................................................................... 65 Use Mailing Flags field ...................................................................................................................65, 73 Using
Report Cards..................................................................................................................................... 63 Save As............................................................................................................................................. 17 Scanners ...............................................................................................................................37, 38, 39 Teacher Mark Entry ..............................................................................................................27, 32, 41
Information in this printed documentation is supplemental and is not intended to replace Schoolmaster online Help.
92 Elementary Grading
Transcripts ........................................................................................................................................ 71 Views
Scan Attendance .............................................................................................................................. 37 Weight field........................................................................................................................................... 18 What Each Chapter Covers
Elementary Grading............................................................................................................................ 1 What to Post to Mark History ............................................................................................................... 47 When to Post to Mark History .............................................................................................................. 47 Work Activity Guide
End of Year Procedures ..................................................................................................................... 6 Getting Started ................................................................................................................................... 5 Ongoing Activities............................................................................................................................... 6
Working with Office Entry by Scanner.................................................................................................................... 34 Office Entry by Student..................................................................................................................... 40 Report Card Layouts ........................................................................................................................ 15 Report Cards .............................................................................................................................. 63, 70
Year field ........................................................................................................................................ 45, 49