student webadvisor training manual - santiago canyon college
TRANSCRIPT

1
Student WebAdvisor Training Manual
Contents � Logging into WebAdvisor………………………………………………………………………..2 � Registering for a Class Section…………………………………………………………………..4 � Paying on My Account ………………………………………………………….…………………9 � Dropping a Class Section…………………………………………………………………………12

2
Logging into WebAdvisor
STEPS SCREENSHOT 1. Click the Log In button.
2. To log in:
A. Enter your WebAdvisor ID (as emailed to you) in the User ID field. Example: sr55837
B. Enter your birth date as MMDDYY in Password field. Example: 010174
C. Click the SUBMIT button.

3
STEPS SCREENSHOT 3. You will be prompted to change your password:
A. Enter your WebAdvisor ID in the User ID field.
B. Enter your birth date in the Old Password field.
C. Create a new password in the New Password field. It must be 6 to 9 characters and must contain one number.
D. Re-enter you new password in the Confirm Password field.
E. Enter a password hint in the Hint field.
F. Click the SUBMIT button. 4. Once you have logged in you will be taken to back to the WebAdvisor home page. Click on the Students button to access the student menu.
10. Student menu links can now be accessed.

4
Registering for a Class Section
STEPS SCREENSHOT 1. In the Student Menu, click the
link.
2. After reading the notice, click the
link.
5
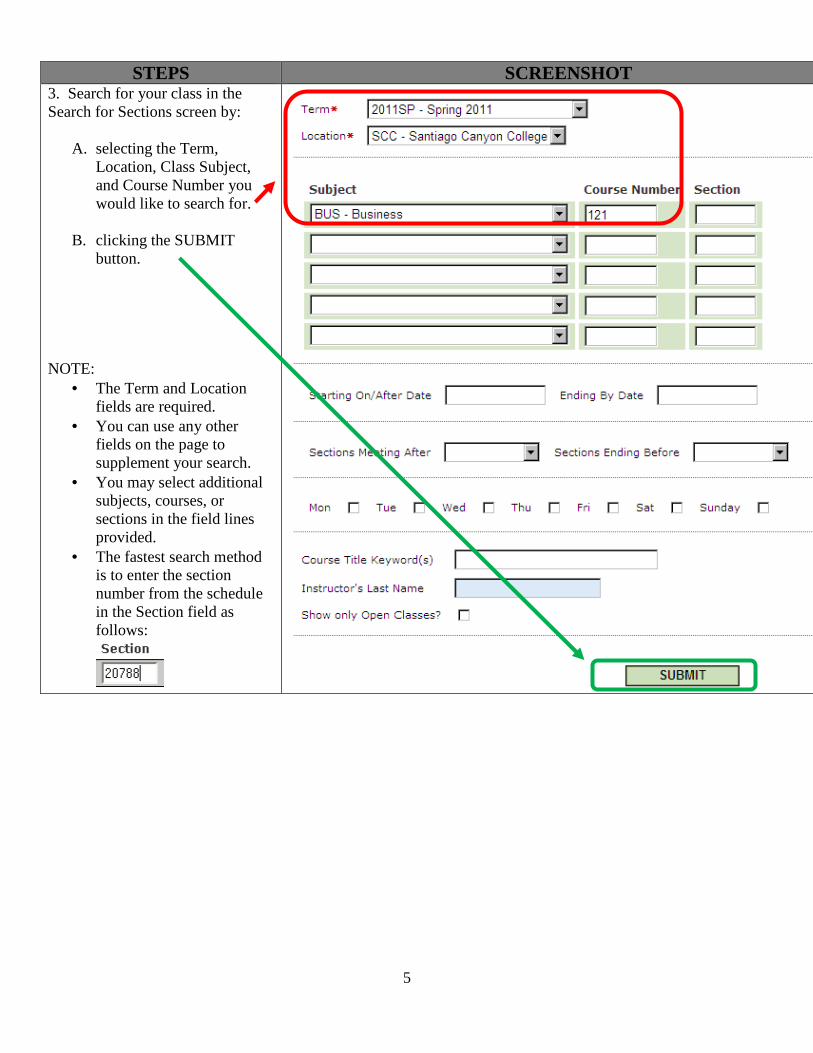
STEPS SCREENSHOT 3. Search for your class in the Search for Sections screen by:
A. selecting the Term, Location, Class Subject, and Course Number you would like to search for.
B. clicking the SUBMIT button.
NOTE:
• The Term and Location fields are required.
• You can use any other fields on the page to supplement your search.
• You may select additional subjects, courses, or sections in the field lines provided.
• The fastest search method is to enter the section number from the schedule in the Section field as follows:

6
STEPS SCREENSHOT
4. Select a class from the Results screen by:
A. clicking the check box in the Select column next to the class you would like to place in your Registration Shopping Cart.
B. clicking the SUBMIT button.
7
STEPS SCREENSHOT
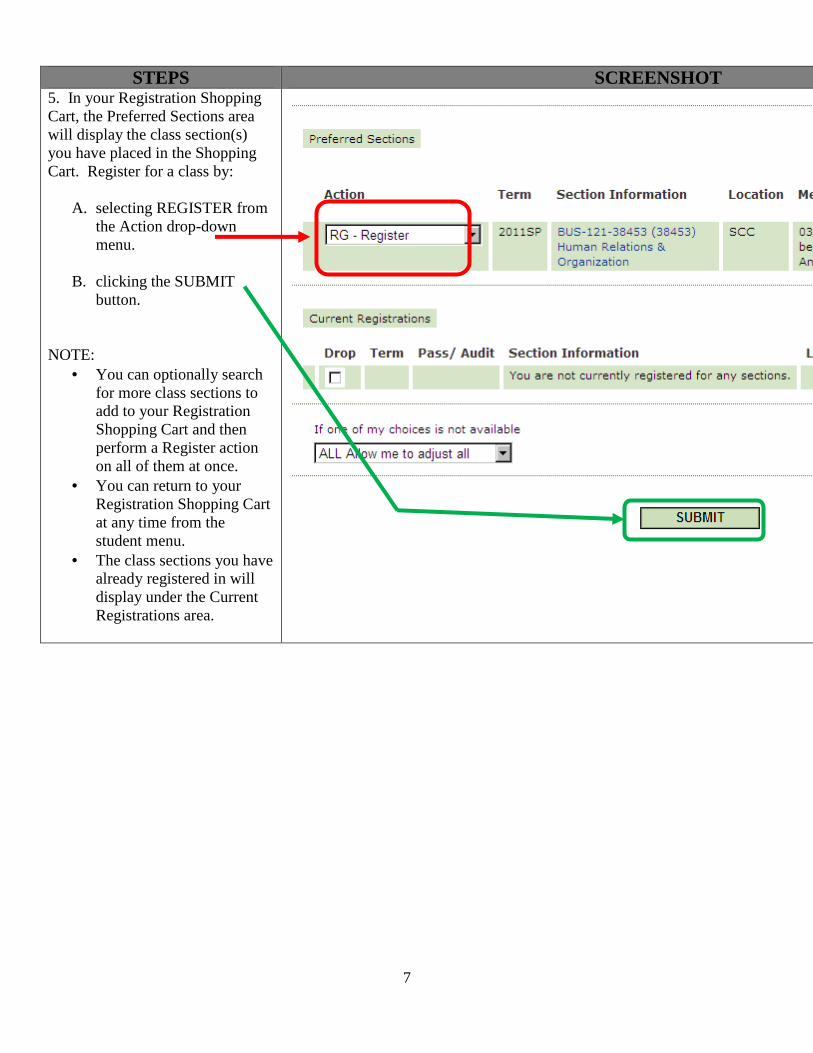
5. In your Registration Shopping Cart, the Preferred Sections area will display the class section(s) you have placed in the Shopping Cart. Register for a class by:
A. selecting REGISTER from the Action drop-down menu.
B. clicking the SUBMIT button.
NOTE:
• You can optionally search for more class sections to add to your Registration Shopping Cart and then perform a Register action on all of them at once.
• You can return to your Registration Shopping Cart at any time from the student menu.
• The class sections you have already registered in will display under the Current Registrations area.
8
STEPS SCREENSHOT
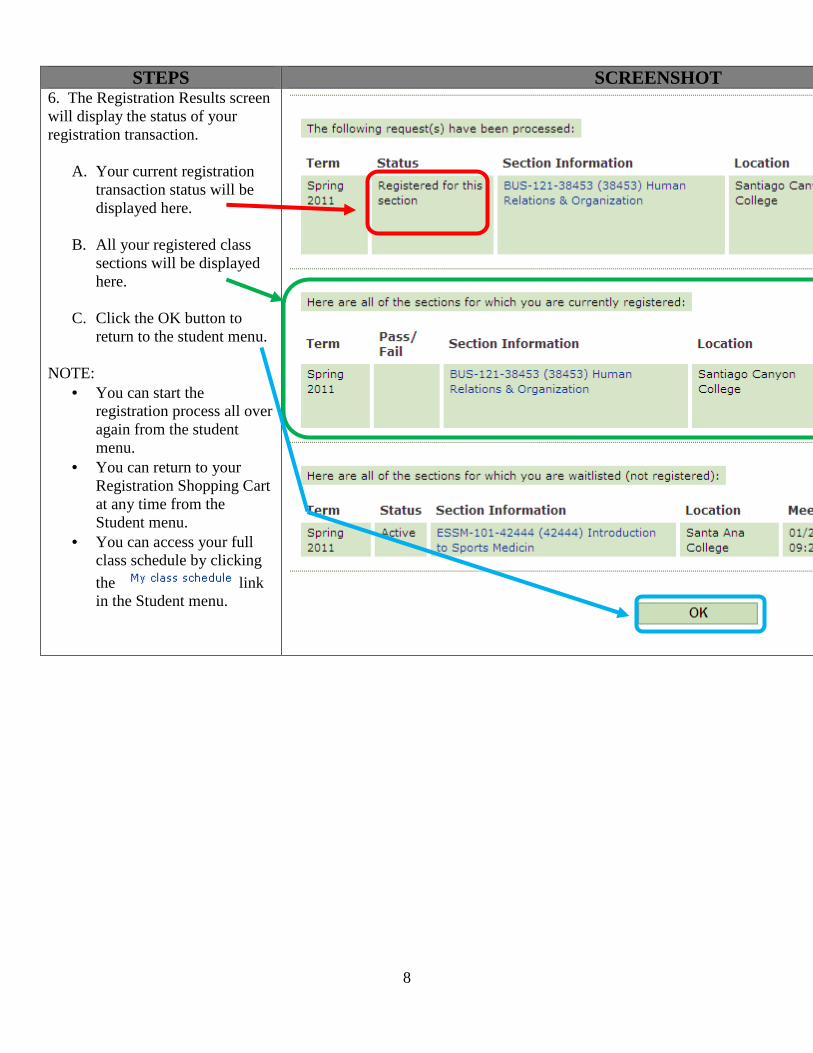
6. The Registration Results screen will display the status of your registration transaction.
A. Your current registration transaction status will be displayed here.
B. All your registered class sections will be displayed here.
C. Click the OK button to return to the student menu.
NOTE:
• You can start the registration process all over again from the student menu.
• You can return to your Registration Shopping Cart at any time from the Student menu.
• You can access your full class schedule by clicking
the link in the Student menu.

9
Paying on My Account
STEPS SCREENSHOT 1. Click on the Pay on My Account link in the Student menu.
2. The Pay on My Account page will display your Balance Due for the listed term will be displayed here. NOTE: The Pay on My Account page will show Balance Due amounts for multiple terms. Be sure you are looking at the correct term.
3. Optional fees can be added to your Balance Due by clicking on the appropriate check box. A. To select Student ID Fee, click
check box next to Student ID Fee.
B. To select Student Services Fee, click check box next to Student Servcs Fee.
C. To select Parking Fee, click check box next to Parking Fee.
4. Click the Update Balance Due button to pay on your account.

10
STEPS SCREENSHOT 5. The Pay on My Account page will be refreshed to update the Balance Due if any optional charges were selected. In the example to the right, the optional charges were added to the previous Balance Due amount ($68.50 + $11 = $79.50)
6. Enter the full Balance Due amount to be paid the in the Payment Amount field. In the example to the right, the full amount of $79.50 needs to be entered. NOTE: The Pay on My Account page will show Balance Due amounts for multiple terms. Be sure you are paying in full for the appropriate term.
7. Select the Credit Card payment type. NOTE: The Credit Card payment options available are:
• Visa • Mastercard • Discover

11
STEPS SCREENSHOT 8. Click the Submit button to pay.
9. To complete your payment:
A. Type your credit card
number in the Credit Card Number field.
B. Select the numeric month of your credit card’s expiration date in the Expiration Date drop down menu.
C. Select the expiration year of your credit card in the Expiration Year drop down menu
D. Enter your credit card security code in the Card Security Code field.
Steps continued on next page.

12
STEPS SCREENSHOT E. Verify your billing
address for you credit card. Make changes as appropriate in the fields provided.
F. Click the Submit button.
10. Your confirmation page will display. Click the OK button to return to the Student menu.

13
Dropping a Class Section
STEPS SCREENSHOT 1. Click on the Drop Classes link in the Student menu.
2. In the Current Registrations area of the page, click the Drop check box next to the section you want to drop
3. Click the Submit button.

14
STEPS SCREENSHOT 4. The Registration Results screen will display the status of your Drop transaction. 5. Click the OK button to return to the Student menu.