study guide - treatment of edentulous patients
TRANSCRIPT

1
STUDY GUIDE
Prosthodontic Prosthodontic Prosthodontic Prosthodontic Treatment of the Treatment of the Treatment of the Treatment of the
Edentulous PatientEdentulous PatientEdentulous PatientEdentulous Patient

2
Table of Contents INTRODUCTION
• Overview • Attendance • Student Performance & Evaluation • Lab Attire • Laboratory Rules • Manual and Assigned Texts • Criteria Sheets • Due Dates • Faculty Critique • Lab Supplies
STUDY GUIDE
• for Boucher's Prosthodontic Treatment of the Edentulous Patient
Chapters
1. EVALUATION OF THE PATIENT
• Diagnosis and Prognosis for Complete Dentures
2. LIMITATION OF COMPLETE DENTURES • Nature of the Denture Foundation • Complications in Wearing Complete Dentures • Efficient use of Complete Dentures • Problems of the Adjustment Period • The Need for Tissue Recovery Periods • Cleaning and Storing Dentures • Importance of Recall • Necessity of a Good Diet • Propaganda and Its Sources • When and How Patient Education Should Be Presented • Present Status of Patient Education
3. PRELIMINARY IMPRESSIONS AND STUDY CASTS 4. ANATOMY OF THE EDENTULOUS PATIENT
• Maxillary • Mandibular
5. FINAL IMPRESSIONS - NOTES

3
• General Discussion • Anatomic Considerations in Complete Denture Extension
6. CUSTOM TRAYS, BORDER MOLDING, AND FINAL IMPRESSIONS Custom Trays Border Molding and Final Impressions
7. CONSTRUCTION OF A STABLE RECORD BASE AND WAX OCCLUSAL RIMS
8. MAXILLO - MANDIBULAR RELATIONSHIPS • Posterior Palatal Seal / Post Dam • Face Bow Transfer - Mounting the Maxillary Cast • Centric Relation Record - Mounting the Mandibular Cast • Clinical Adjustment of Contour Rims & Tentative Registration of
Maxillo-Mandibular Relations
9. ARTIFICIAL TEETH & 0 DEGREE SET-UP • General Discussion • Denture Teeth - Acrylic vs. Porcelain • Set-Up of 0 Degree Teeth
10. TRY-IN AND COMPLETION • Try-In • Speech Sounds and Anterior Tooth Position • Complete Denture Wax-Up • Face Bow Preservation • Processing and Finishing Dentures • Insertion and Occlusal Evaluation • Denture Care Instructions • Post-Insertion Treatment
11. SET-UP OF 30 DEGREE DENTURE TEETH
12. ADDITIONAL DENTURE SERVICES • Immediate Dentures • Repairing Fractured Dentures • Replacing Teeth • Denture Relines • Denture Rebasing

4
EVALUATION OF THE PATIENT
Chapter 1
EVALUATION OF THE PATIENT: DIAGNOSIS AND PROGNOSIS FOR COMPLETE DENTURES
In the construction of complete dentures, success or failure may depend upon a clear understanding of the limits and possibilities of each case. To obtain this, a thorough, systematic examination of all the conditions of the mouth and of the patient is essential.
The following outline will aid in completing the Complete Denture Record Chart and in evaluating the patient.
1. AGE
Record chronological age whenever possible. When the exact information is unobtainable, an estimate may be made and age listed as "under 40", "40 to 60 years", and "over 60 years". The significance of the age from the prosthodontistíc standpoint is in the ability of a patient to wear dentures successfully. Two main factors present themselves:
A. Adaptability
It is generally believed that young people adapt themselves with greater ease and therefore are more likely to have successful denture experiences. Preservation of tissues is of vast importance as well. Mental attitudes of the patient must also be considered and discussed with the students.
B. Physiological Condition of Supporting Structures
Age is a factor in the condition of the supporting structures. From the biological standpoint, it would be difficult to name the period in a patient’s life when the ridges are least subject to change. There probably is never a static period. Normally, the rate of change in the edentulous alveolar ridge is comparatively slow. Generally, however, metabolism or the rate of interchange of nutritious elements for bone formation is better in young people. Under normal conditions, the process of aging (from the prosthetic standpoint) would imply poorer calcification of bones. The role of the endocrine glands in this connection is now better understood, especially the influence of the sex glands on calcium metabolism. In older people, when sex hormones are at a minimum or entirely absent, the quality of the bone is poor and more unfavorable experiences in wearing dentures may be anticipated. The overlying mucosa is affected in a manner similar to the bone.

5
2. SEX
Record the sex of the patient. Sex has a bearing on denture construction from the standpoint of esthetics and of the influence of sex hormones on the supporting structures. In the first category, women can be more demanding and are usually more concerned with their appearance than men. Unlike men, women may regard appearance even above the efficient functioning of the replacement teeth.
In the second consideration, normal physiologic change decrees that women undergo menopause, a period productive of many problems which mitigate against easy denture construction. The withdrawal of some or most of the ovarian secretion affects the alveolar ridge adversely, both as to the bone and the overlying gingivae. Often, mental instability of varying degrees accompanies the menopause and this factor may make difficult the wearing of dentures oven to a greater degree than do the physical changes.
3. OCCUPATION
The occupation of an individual may demand special consideration in denture construction from the standpoint of esthetics, phonetics, or function. People generally making public appearances, such as artists, actors, salesmen, public speakers, singers, teachers, etc., are particularly concerned with the esthetics and phonetics of replacements while tradesmen, mechanics, or laborers, etc., are concerned with functional efficiency. Occupation is also important because of possible deleterious effects on health as in occupational metal poisonings, or bronchial irritations. People like beauticians, who open bites bobby pins with their teeth, might place leverage on the front of the CD and cause problems of function; i.e. retention.
4. GENERAL HEALTH
Record on chart as normal or indicate pertinent illnesses. The general health of an individual has a bearing on success in denture construction. This is especially so since so many of these patients are at an age that general health deficiencies of varying degrees expected. Healthy patients can make a better adjustment than the ill, tense, nervous patient. Many chronic, debilitating diseases offer a poor prognosis. Many diseases have early oral manifestations. Some diseases affect the jaws more directly than others and may give rise to symptoms which, if recognized, may save the operator considerable annoyance and enable him to serve the patient better. The symptoms may be subjective, as pain or burning sensations; or they may be objective, actually involving tissue change in both bone and overlying integument.
Some of the diseases causing pain or burning sensations may be anemia, diabetes, aclorhydria, estrogen privia or other endocrine or nutritional disorders.

6
Prominent here also are psychological disturbances resulting from financial troubles, family worries, or maladjusted sex relations. Diseases causing actual tissue changes are syphilis, tuberculous, blood dyscrasias, diabetes, endocrinopathies such as acromegly, neoplasms or osteodystrophies of undetermined origin. Caution should be exercised in the care necessary in denture construction following radiation therapy in the region of the jaws because of the detrimental effect on the ability of tissues to repair and because of the susceptibility of infection following injury.
Other types of diseases affecting success in wearing dentures are those relating to the bronchi, as in asthma. Metal poisonings are very seldom encountered in edentulous cases; bismuth or phosphorous might be considered occupational but more properly would belong under the pathological as they are not induced by occupation. For example, bismuth poisoning may not be an occupational disease solely, as this metal is used to a considerable extent in the treatment of syphilis and some nervous disorders.
The following is a list of some of the diseases frequently encountered in a prosthodontic practice and the considerations that must be made by the dentist:
DIABETES
How is the problem met by the prostbodontist?
a. The patient must have this condition under proper medical control. This is important, for the success of dentures goes hand in hand with medical control.
b. The operator should use an impression technique that will produce maximum physiologic compatibility of the denture base with the supporting tissues
c. Careful occlusal corrections should be accomplished to remove all interferences.
d. The food table should be small and the patient should be given detailed instructions on eating habits and oral hygiene.
e. Frequent evaluation of the dentures is necessary.
ARTHRITIS
The problems for the prosthodontist are as follows:
a. The limited movement of the mandible during impression making may necessitate special trays and procedures.

7
b. It may be difficult to get proper registrations. Generally, the tactile method is the most satisfactory.
c. Occlusal corrections must be made often because of arthritic changes in the tempromandibular joint.
BELL'S PALSY
In the fabrication of complete dentures, the following problems are presented:
a. Retention is often hard to achieve, and an adhesive may be necessary.
b. Support becomes a problem. Both function and esthetics emphasize the importance of support for paralyzed musculature. Such support can be accomplished by using resins, modeling compound or wax extensions.
c. The patient should be educated in mastication and oral hygiene.
PARKINSON’S DISEASE
a. Control of the patient during fabrication of the denture can be accomplished with sedatives.
b. Retention is difficult, and an adhesive may be necessary.
c. It may be wise to remove dentures when they are not in use. This will add to the comfort of the patient and eliminate the danger of swallowing them.
ANEMIA
It is important that patients with anemia first be placed under proper medical care. Next, the dentist must achieve:
a. Efficient dentures, since diet is such an important part of the medical treatment.
b. A small food table with maximum supporting area to keep the supporting tissue from being overstimulated.
c. Careful patient instruction for good oral hygiene.
RADIATION
Radiation is such an extremely complex subject that hours could be spent discussing it alone. Though I can do no more than mention it, the following should be remembered.-

8
a. If dentures are to be made, it in imperative that no abrasion or irritation be present on the supporting tissues.
b. An open lesion may be the start of a serious condition, namely osteonecrosis.
c. It is best not to use dentures at all over irradiated tissues, but if dentures are necessary, they should not be used until at least two years after radiotherapy.
NICOTINIC STOMATITIS
Nicotinic Stomatitis is a form of chemical injury to the oral mucosa and mucous glands.
a. The area may be covered with a denture.
b. Even in patients with natural dentition, the area is covered as part of the treatment.
c. Because of excessive secretion from the mucous glands, plaster is the impression material of choice.
CLEIDOCRANIAL DYSOSTOSIS
a. The prosthetic treatment calls for fabrication of the dentures over the unerupted teeth.
b. Teeth should be removed at they erupt, for very little bone structure would be left if the supernumerary, impacted and unerupted teeth were all extracted at once.
OSTEITIS
Osteitis Deformans in a chronic osseous disturbance. The prosthetic situation is this:
The continual enlarging and changing of supporting structures, especially of the maxillary tuberosities, necessitate frequent remakes and adjustments.
AGROMEGLIA
The prosthetic requirement is simply this:

9
Make a periodic check of the prosthesis to determine whether the continuing growth of the mandible and maxilla necessitates any adjustment or reconstruction.
LEUKOPLAKIA
Leukoplakia is a term often loosely applied to smooth white, diffuse patches on the mucous membranes of lips, tongue, and cheeks.
a. Biopsy is the method of diagnosis; if the histologic examination indicates a premalignant lesion, the affected area should be removed. If reports state that the patch on the membrane is heaped-up keratin, surgical intervention is unnecessary.
b. It may be covered with a denture.
5. DENTURE HISTORY - DENTURE WEARING EXPERIENCE
The length of time and the fact that patients have worn dentures have a bearing on the type of foundation present, muscle tone and development, functional ability, mental reaction and cooperation and the correctness and ease of establishing vertical and maxillo-mandibular relations. The type of denture, whether full or partial, metal or plastic, may have either a beneficial or detrimental effect on the end results obtained.
The ease with which patients can establish new habits is important. A patient who has successfully worn dentures before might be easier to work with than one who has had several unattractive and/or inefficient dentures. Important is the patient with a bag full of dentures. They usually present a bleak outlook. How could so many dentists all be wrong? Yet a favorable denture history offers a good prognosis. Register the complaints and problems of previous dentures. Examine old dentures and evaluate them for retention, stability, occlusion, extension, etc. If old dentures were completely satisfactory, use these as models.
6. MUSCULAR TONE
Usually normal when no degenerative changes have occurred in the muscles of expression and mastication,

10
Chapter 2
LIMITATION OF COMPLETE DENTURES
Some patient have mistakenly believe that complete dentures mean the end to oral problems and that the original dentures should last forever. Nothing is further from the truth and expectations of this nature must be corrected. The relining, remaking, or occlusal correction of complete dentures is necessary whenever tissue changes that promote instability of the denture have occurred. Patients must be made fully aware of the necessity for such procedures.
Artificial substitutes are rarely as satisfactory from a standpoint of comfort and efficiency as the once healthy structures which they replace, but in most instances appearance and speech need not be compromised in the complete denture service.
NATURE OF THE DENTURE FOUNDATION
The phenomenon of bone resorption due to excessive pressure of dentures and the resultant change in the denture foundation should be explained to the patient. Some degree of change will usually occur under the most ideal conditions.
Excessive amounts of soft tissues interposed between the denture and the supporting bone will render the denture less stable. An unstable denture seems to exert pressures beyond the physiological tolerance of the tissue. Often observed is a vicious circle of excessive movement, traumatic pressure, resorption, and an increased amount of soft tissue. Therefore, an adequate diet and good nutrition are essential to help maintain a relatively healthy condition of the supporting structures of the dentures. Prolonged illness may also favor a faster resorption of bone than would be encountered during health.
COMPLICATIONS IN WEARING COMPLETE DENTURES
Certain undesirable situation of a physical, emotional or occupational nature will be evident during the diagnostic phase of the complete denture service. Patients having complications of this nature include:
(a) those for whom oral surgery would enhance the denture foundation but is contraindicated for various reasons;
(b) those who cannot control jaw or tongue movements,
(c) those who have experienced excessive vertical and horizontal resorption of the residual ridges,
(d) patients who have had maxillofacial surgery,

11
(e) patients who demand more than can possibly be accomplished, considering their condition,
(f) patients who seemingly cannot adjust psychologically to complete dentures,
(g) patients who lack mental capacity to comprehend fully the complete denture service, and
(h) patients who play wind instruments.
Persons who fall into thes e categories should be informed of the limitations, imposed by their particular situation, on the wearing of dentures.
EFFICIENT USE OF COMPLETE DENTURES
Efficient use of complete dentures is a learned process. Training in the use of complete dentures is primarily directed to mastication and speech, but initially involves overcoming a feeling of strangeness when the dentures are in the mouth. At first, most patients experience a sensation of fullness--the tongue feels crowded by the lower denture and the upper lip feels distended. This feeling usually passes within a few days, and it is interesting to note that eventually many patients feel as strange without their dentures as they did when the dentures were initially placed.
Stable dentures enhance mastication and speech. The tongue can be an important factor in stabilizing complete dentures, particularly the lower denture. The patient must learn to hold his tongue in a position on top of the lingual flanges of the lower denture and completely fill the tongue space of the lower denture. In this normal position only the occlusal surfaces of the lower teeth are visible. A retracted tongue has a tendency to physically dislodge the dentures and, at the same time, positions the floor to the mouth, thus breaking the border seal of the denture. The retracted tongue position can be corrected through exercises and concentrated effort by the patient.
Learning to eat with dentures takes time and perseverance. The patient should be advised to avoid foods that are sticky, tough, and generally difficult to prepare for swallowing. The chewing of softer foods should be mastered before resistant types of food are eaten.
Unilateral chewing with complete dentures should be discouraged; chewing on both sides simultaneously will stabilize the dentures. The trick seems to be to cut the food into small pieces and to divide the bolus of food in the mouth and position it on both sides of the lower denture with tongue.
Complete denture patients should deny themselves the natural habit of biting with the front teeth. In the denture, the relationship of the anterior teeth to the residual ridge is conducive to increased tipping forces when pressure is applied to the incisal edges. The crests of the residual ridges in the anterior portion of the mouth are least suited to withstand pressure from biting, and bone seemingly resorb quite rapidly from trauma in

12
these regions. Patients who had no particular desire for apples and corn on the cob when they had natural teeth seem to develop a craving for these foods when they have complete dentures. At times, food served at social gatherings demands that the denture-wearer commit acts of eating that are especially detrimental to residual ridges. For example, celery and carrot sticks require biting rather than cutting with a knife. If such food is eaten, biting in the canine region is preferable to biting with the anterior teeth. Pressure to the upper denture, created by biting, is better tolerated when directed inward and upward. Relative values must be placed on the situation occurring at the moment, for sometimes the cure is worse than disease (embarrassment vs. biting).
Correctly-made complete dentures seldom interfere with speech and often improve speech. Difficulty with certain words may occur during the "getting acquainted" period, but this is usually shortly resolved by practice. Difficult words should be repeated out loud until a speech defect no longer exists. On occasion, the position of the anterior teeth, the premolars, the molars, or the shape of the palatal surface will have to be altered to clear up a speech difficulty.
PROBLEMS OF THE ADJUSTMENT PERIOD
Patients with new dentures usually suffer from discomfort due to soreness occurring within a few hours after the dentures have been initially placed in the mouth. Because of soreness, more than one adjustment of the dentures may be required within the first two weeks of use. The patients will accept the discomfort and the adjustment if he is forewarned; otherwise, he may question the quality of the denture service. Under no circumstances should patients attempt to adjust the dentures themselves.
THE NEED FOR TISSUE RECOVERY PERIODS
Complete dentures should be removed from the mouth for a minimum of six to eight hours a day to allow the supporting tissues to rest. Most patients find the most convenient time to do so is during the night. If sleeping without the dentures causes either temporomandibular joint disturbances or muscular disturbances, provisions should be made for several short periods of tissue recovery during the day. Oral structures that are called upon to bear an imposed load seemingly greater than that encountered with healthy natural teeth will react more favorably to additional pressures if the forces are not constantly applied. Should the removal of the complete denture produce a mental reaction of insurmountable embarrassment, the overall benefit to the patient's well-being should be realized by allowing the restoration to remain in the mouth except for short rest periods during privacy.
CLEANING AND STORING THE DENTURES
Residual foods should be removed from the denture after each meal and the mouth should be thoroughly rinsed. Such a procedure will help eliminate "denture breath" caused by

13
decomposing foodstuffs and stagnant saliva. Food retained between the denture base and the oral tissues does not contribute to stability of the denture and may result in an inflammatory condition of the basal seat tissues.
The dentures should be held carefully when being cleaned. A basin partially filled with water will provide a cushion if the dentures are dropped during the cleaning process. The lower denture should be held on one side only to avoid a midline fracture due to squeezing the denture.
Dentures made of acrylic resin should be placed in water or a denture cleaning solution when not in the mouth since acrylic resin dentures have a slight tendency to slight dimensional changes when allowed to dry. Covered plastic containers especially designed to store dentures are available commercially, and dentures should be safely stored in them during periods of tissue recovery, out to the reach of curious or inquisitive persons.
IMPORTANCE OF RECALL
A periodic recall should be suggested, and its objective should be explained to the patient. The elapsed time for recall will depend on the physical, mental, and emotional situations encountered during the course of treatment. Recalls spaced four or five months apart are not unusual. However, the patient should be examined at least once a year. Early interception of a developing undesirable situation can improve the oral health of the patient as well as save him money. For example, early detection of a discrepancy between centric relation and centric occlusion may be corrected before gross changes to the supporting structures take place.
NECESSITY OF A GOOD DIET
It is the responsibility of the dentist to inform the patient of evidence of inadequate diet and to suggest a consultation with a physician to correct diet deficiencies or sequelae of an insufficient diet. The dentist is obligated to have the patient's dietary deficiencies corrected before proceeding with total definitive treatment.
Cooperation between the patient, the dentally oriented physician and the dentist will result in a greater service to the patient than would otherwise be possible.
It is important that dietary habits be evaluated at each recall appointment. Literature on the preparation of foods to render them suitable for mastication by patients with complete dentures should be supplied by the dentist.
PROPAGANDA AND ITS SOURCES
Some commercial firms employ the media of television, radio, and newspapers and other periodicals to advertise services or products for patients who have complete dentures. For the most part, this bombardment of advertising is directed toward correcting the ills of faulty dentures. The advertising is legal but is an injustice to many denture wearers, since

14
it not only suggests usually unobtainable results but also delays many patients from seeking the advice of a dentist. Another source of misinformation to the patient with complete dentures is a fellow denture wearer. The experiences of one patient are relayed to another patient and are represented as the gospel. But each patient has individual problems and what applies to one will not necessarily apply to another. Patients should be warned about miracle fix-its and should seek advice about dentures only from a dentist.
WHEN AND HOW PATIENT EDUCATION SHOULD BE PRESENTED
Education of the patient begins at the initial contact with the dentist. Patients are very sensitive to their reception, the demeanor of the dentist, and the atmosphere of the dental office. Education of the patient should continue throughout the complete denture service, but is of primary importance at the presentation of the treatment plan.
Patients have a right to know the whats, whys and hows of that which is being performed on and for them. Questions should be answered logically and patiently; explanations or demonstrations which will be informative to the patient should be given. Predicted problems and limitations of his complete denture service are usually well- accepted by the patient; unanticipated problems,. arising after the initial placement of the dentures, are not as readily excused by the patient.
An enthusiastic approach to patient education on the part of the dentist will be reflected in the patient's acceptance of the treatment plan, problems., and limitations. The progress of the complete denture service is of vital importance to the patient, and often his acceptance is heightened by visual aids that help him understand his own oral problems.
The patient should not be expected to retain all the information presented to him prior to the completion and insertion of the restorations. For this reason, one of the current booklets containing the salient points of complete denture treatment and care should be given the patient for review.
PRESENT STATUS OF PATIENT EDUCATION
Currently, the education of patients is probably one of the most neglected phases of the complete denture service. Many dentists are not motivated to provide adequate information about complete dentures; therefore, they do not take the time to give this important service. The lack of motivation may be the result of weariness on the part of the dentist - his repeated educational efforts having constantly fallen on the ears of his indifferent patients - or it may be the result of inadequate instruction concerning the importance of patient education.
However, a dentist has a moral as well as a professional obligation to present to the patient any information which may be useful in solving the oral problems for which the patient initially sought help.

15
Chapter 3
PRELIMINARY IMPRESSIONS
A. DEFINITION
A negative imprint of an edentulous arch.
B. PURPOSE
To make a negative imprint of an edentulous dental arch from which a positive cast can be poured.
C. OBJECTIVES
1. Perform and discuss tray selection for preliminary impressions for CDs.
2. List types of materials for preliminary impressions for CDs.
3. Be familiar with the advantages and disadvantages of each impression material.
4. Be familiar with the properties and characteristics of alginate impression material.
5. Perform an impression procedure using alginate.
6. List the requirements of a good impression.
7. Be familiar with the properties of dental stone.
8. Perform and discuss the beading and boxing of an alginate impression.
9. Be familiar with alternate methods for #8 above.
10. Perform and describe the mixing, pouring and trimming of a preliminary study cast.
11. Discuss the requirements of a good preliminary/study cast.
D. INSTRUMENTS AND MATERIALS
1. Assortment of sterilized perforated edentulous impression trays 2. Knife 3. Alginate 4. Mixing bowl and spatula 5. Water measurer 6. Periphery wax 7. Boxing wax

16
E. PROCEDURE
Position of Patient: The patient should be seated comfortably and in the proper position for the procedure. Generally, the most comfortable working height is when the patient's mouth is approximately on the level with the operators elbows. The head should be tilted so that the occlusal plane of the arch being worked on is parallel to the floor when the
mouth is open.
Selection of Trays
Maxillary: Select a tray which is about 3mm larger than the alveolar ridge contours and long enough to extend slightly posterior to a line joining the pterygomaxillary notches. While holding the upper lip forward, position the tray into contact with the crest of the alveolar ridge. In this position there should be a space of 3mm between the tray and the facial side of the ridge, and the flange of the tray should just contact the frena and muscle attachments. Periphery wax should be use to extend the tray if necessary.
Mandibular: Select a tray which is 3mm larger than the bucco-lingual width of the alveolar ridge contours, and long enough to extend to the posterior border of the retro- alveolar pads. With the tray in contact with the crest of the ridge it should extend slightly beyond the mylohyoid ridges and the angle of deflection of the muscles of the floor of the mouth and facially should contact the frena and muscle attachments. Periphery wax should be used to extend the tray if necessary.
Preparation and Manipulation of Materials: If using loose alginate from a can, you will use 3 scoops for the maxillary and 2 for the mandibular. First, place 3 measures of room temperature water (or 2 for the mandibular) into bowl. Sift powder into water. Thoroughly mix, trop, blend and mash against the sides of the bowl with bold, swift strokes until smooth and creamy. Scrape the material together, pick alginate up on spatula and load border area of tray by scraping the blade along the outside of the tray at the

17
height of the border. Keep the blade in constant contact with the tray border. Pull the blade downward with one hand as the tray is rotated in the other hand. Wipe along the inside of the tray between borderge crest bilaterally. For maxillary spread the material across the palate. These movements serve to spread the material evenly in the tray, to eliminate bubbles and remove any excess material. At this point additional material may be added if necessary.
Making the Impression
Maxillary: While holding the upper lip forward, position the loaded tray slightly anterior to its final position and carry the tray upward and slightly posteriorly until the alginate just fills the mucolabial-muconuccal fold. The fully seated tray should be positioned to that 1) the handle is approximately parallel to the ala-tragus line antero-posteriorly; 2) parallel to a line through the pupils of the eyes from an anterior aspect; and 3) centered over the arch. The impression can be removed by grasping the tray with the thumb and first two fingers of the hand and by inserting the index finger of the other hand between the patient's cheek and posterior flange of the impression. This will break the seal and permit it to be removed. Rinse the impression with cold water, shake off excess water and examine for details. Study the entire impression to make certain of the following: 1) that the basal seat area is included; 2) that the entire mucobuccal-mucolabial fold is filled; 3) that the buccal and labial frena are indicated; 4) that the pterygomaxillary notches and fovea palatinae are indicated; and 5) that the tissue surface of the impression present a smooth, non-grainy, non-folded surface.
Mandibular: While holding the lower lip forward, position the loaded tray over the mandibular ridge. During the seating of the tray, direct the patient to raise the tongue above the tray in order to prevent impingement of the tongue and tissues of the floor of the mouth. Carry the tray to place in a downward direction to complete its placement and simultaneously direct the patient to relax the tongue. The fully seated tray is positioned so that 1) its handle is approximately parallel to the inferior border of the body of the mandible antero-posteriorly; 2) parallel to a line through the pupils of the eyes from an anterior aspect; and 3) in the center of the face from a superior aspect.
Remove the impression in a manner similar to that described for the maxillary impression. Rinse the impression with cold water, shake and examine for details. Make certain of the following: 1) that the entire basal seat area is included; 2) that the frena attachments are all indicated; 3) that the external oblique and mylohyoid ridges are indicated; 4) that the retro-molar areas are included; and 5) that the surface of the alginate is smooth, non-grainy and without folds.
Dentiform: Center the loaded tray over the dentiform and seat with a gentle rocking motion until excess alginate appears at all of the borders. Prior to final set, excess material along the base of the dentiform can be removed with the edge of the spatula. If the material has set, excess can be removed with a sharp knife. When the material is set, grasp the tray handle and the base of the dentiform and slowly pull apart. In some instances a gentle pry with a knife may be required. Examine impression for accuracy of

18
anatomy, lack of voids and bubbles, proper seating of tray and lack of pressure spots. The impression should also be smooth, non-grainy and without folds. If large voids or pressure spots appear, or, if the tray has been improperly seated, remove impression material and DO IT OVER!

19
F. PROBLEMS AND ERRORS
1. Selecting an impression tray to small will result in incomplete coverage of the basal seat area and a penetration of the flanges of the tray through the alginate.
2. Selecting an impression tray to large results in a distortion of the border tissues and an incomplete compression of the alginate over the ridge areas.
3. Improper mixing of the alginate will result in an inaccurate impression and/or the lack of detail on its surface.
4. Improper loading and distribution of the alginate in the tray will cause an over distortion of the border tissues in some areas and an incomplete impression in others.
5. Failure to center the tray properly results in metal flanges of the tray making contact or cutting the ridge tissues. The alginate is then prevented from filling in the mucobuccal fold on the tight side and an over distribution of the cheek on the opposite side.
6. Improper removal of the tray, such as removing before rigidity has been achieved, will result in a distortion. Distortion may also occur as a result of careless handling before pouring the cast, such as storing the impression for too long.

20
BEADING, BOXING & POURING STUDY CASTS
A. MATERIALS
1. Beading or periphery wax 2. Boxing wax 3. Wax spatula 4. Mixing bowl 5. Plaster spatula 6. Glass slab 7. Knife
B. DIRECTIONS
BEADING
It is usually very difficult to apply beading or periphery wax to an alginate impression that is made in the clinic in a real patients mouth. However, wax can be applied to a clinical impression or to the impression made of the dentiform if the alginate is trimmed back properly. Excess alginate should be trimmed back to, and just short of the periphery roll. That is - the mucobuccal fold should be preserved and the tray exposed (refer to diagrams at the end of this chapter).
Place 2 strips of beading wax or 1 strip of periphery wax around the entire edge of the impression, about 2-3 mm below the height of the peripheral roll. Be certain that, when viewed occlusally, the beading wax can be seen around the entire impression. The mandibular impression must also be filled with a sheet of wax (use boxing wax here) in the lingual/tongue area. The beading creates the "land" of the cast and preserves the outer portion of the mucobuccal fold or border area.
*NOTE: All mandibular casts for Prosthodontics have a full base. Except for certain procedures in Fixed Prosthodontics, NEVER MAKE A HORSESHOE SHAPED LOWER.
BOXING
Use a strip of boxing wax long enough to surround the impression with about an inch overlap. Place the boxing wax strip about the beading wax with its flat surface perpendicular to the beading wax.
*NOTE: Once the boxing is completed, be certain that when viewed from above, the beading wax can be seen COMPLETELY around the impression -
especially at the mandibular retro-molar pad areas - otherwise there will be little if any land in those areas of the poured cast.

21
POURING
Follow the manufacturer’s directions and prepare a proper amount of artificial stone in a plaster bowl. A denser mix, free of air bubbles, may be achieved by use of a Vacuspat mechanical spatulator. Use the Vacuspat if it is available. Turn on the vibrator and hold the boxed impression in one hand with one corner slightly higher than the rest of the impression. Flow the stone into one posterior corner of the impression from the tip of the spatula, allowing the stone to flow slowly over the interior of the impression guarding against the entrapment of air bubbles. **The entire interior of the impression should be filled in this manner until the stone reaches the top of the boxing wax.
ALTERNATE POURING METHOD - INVERTING (see diagram)
Follow the above directions down to **... The interior of the impression should be filled in this manner until the stone reaches slightly above the mucobuccal fold of the impression. Without use of a vibrator, place the remainder of the stone on the piece of tile or the glass slab in the form of a mound. Invert the previously poured impression in this mass and depress it to develop a cast thickness of 3/8 inch at the thinnest portion and allow the stone to exceed beyond the fold slightly.

22
RECOVER CASTS
Allow stone to set for 40 to 45 minutes. Remove boxing and beading wax. If stone has pushed up and onto the tray use a knife to remove this thin "flash" before trying to recover the cast. Use the knife to gently separate the impression from the cast. Using a model trimmer, trim both casts to approximately the size of the patient’s dentiform. You should keep this size in mind for trimming clinical casts. REMEMBER - the base of the cast shoul
d be 3/8ths to 1/2 inch thick and the land area should be 4mm wide!

23

24

25
Chapter 4
ANATOMY OF THE EDENTULOUS PATIENT
A. OBJECTIVES
1. Identify, locate and discuss the importance and/or action of macroscopic supporting and limiting structures in the fabrication of a complete denture.
2. List, describe and discuss primary and secondary denture stress bearing areas
3. Describe and discuss relief and retentive areas
4. Be familiar with microscopic anatomy
5. Discuss clinical considerations of microscopic anatomy
6. Discuss non-surgical methods of patient preparation for CD's
7. Discuss surgical methods of patient preparation for CD's
MAXILLARY COMPLETE DENTURE BORDERS
The following is a list of the significance and movements or manipulations the dentist and/or the patient make to capture the following important denture border landmarks:
1. Labial Frenum Usually no muscular fibers in the edentulous state. Must be manipulated by the operator in order to get a more defined recording.
2. Orbicularis Oris Exaggerated "M" sound.
3. Buccal Frenum Buccinator "O" or "E" sound or in patients inability to Muscle/Buccinator Insertion manipulate by pulling corner of mouth out and down.
4. Coronoid Process Lateral border of post malar pocket. Open moderately wide and move mandible side to side.
5. Palatoglossus Posterior border of post malar pocket. Open wide and place tongue out of the mouth.

26
6. Hamular Notch DOES NOT interfere with pterygomandibular raphe (from hamulus to retromolar pad) between tuberosity and hamulus of medial pterygoid plate posterior boundary. Open and close several times.
7. Pterygomandibular Ligament/Raphe Is pulled forward when mouth is open wide
8. Fovea Palatini Remnants of nasopharyngeal ducts (coalescence of mucous glands). Always on soft tissues.
9. Post Dam Area Comprised of tensor palatini; predominantly horizontal fibers Levator veil palatini; predominantly oblique fibers. Uvealis; predominantly vertical fibers.
10. Vibrating Line Imaginary line - notch to notch, usually about 2mm in front of fovea. Always on soft tissue. Higher vault - more abrupt and forward. Flat vault - more posterior. Denture ends at/or 1-2mm past this line.

27
MANDIBULAR COMPLETE DENTURE BORDERS
When teeth are lost the mandible gets shorter and narrower bucco-lingually. The crest gets narrow and sharp. The width of bone widens in molar areas as crest resorbs. In the anterior, bone is lost from the lingual and bone appears to move forward. Bone is often at the level of floor of mouth when mandible is viewed from side. Overall, mandibular ridge is high in posterior and low in the anterior.
The following is a list of the significance of, and movements or manipulations the dentist and/or the patient make to capture the following important denture border landmarks:

28
1. Labial Frenum No muscular fiber. Should manipulate.
2. Orbicularis Oris Exaggerated "M" sound.
3. Anterior Masseter Fibers pass outside buccinator. Muscle pushes in. Clenching or biting closing force while bordermolding will contract muscle.
4. Pterygomandibular Ligament Open wide. Stretch.
5. Retromylohyoid Posterior Border Styloglossus, Stylohyoid, Palatalglossus; Place tongue over handle of tray.
6. Mylohyoid Fibers become shorter or smaller progressing anteriorly. Place tongue into opposite cheek.
7. Genioglossus Place tongue over handles of tray and wet upper lip.
8. Anterior Portion Several muscles attached (buccal frenum to buccal frenum). Short flange (mental foramen - often on top of ridge). Labial frenum attached to orbicularis oris sensitive and active.
9. Buccal Vestibule Extends from buccal frenum to retromolar pad and from crest of ridge to cheek.
10. Buccal Frenum "OU" or "E" sound if necessary. Connects with band from maxillary thru modiolus. Fibers will pull and must be free to move. Lip must be supported.
11. Buccinator Muscle "OU" or "E" sound if necessary. Extends from modiolus to pterygomandibular raphe.
12. Buccal Shelf Bordered: medially by crest of ridge, anteriorly by buccal frenum, laterally by external oblique ridge and distally by retromolar pad.
Buccinator fibers run anterior-posterior and parallel to the bone. Inferior portion attached to buccal shelf. WILL NOT LIFT DENTURE 1 stress bearing area of mandibular denture. Has good cortical bone at right angle to occlusal plane.

29
13. Buccal flange Extends from frenum to anterior masseter. Is wide and extends into the cheek to cover buccal shelf.
14. External Oblique Ridge DOES NOT LIMIT extent of buccal flanges. Flange can extend up to or over ridge - wherever the muccobuccal fold ends. Use the external ridge AS LANDMARK -- TEST FOLDS IN THIS AREA WITH MIRROR.
15. Distobuccal Flange Masseter region - flange converges medially with action of masseter.
16. Distal Extent Limited by buccinator and lateral bony process. Denture extends to include retromolar pad which provides a soft tissue seal.
17. Retromolar Pad Contains some glandular tissue, tendon of temporal muscle, buccinator fibers, fibers of the superior pharyngeal constrictor on the lingual and from the pterygomanidular raphe at the distal.

30

31
CHAPTER 5
FINAL IMPRESSIONS - NOTES
A. DEFINITION
An impression is a record of the negative form of the tissues of the oral cavity that make up the basal seat of the denture. It is used to make a CAST - a positive replica.
Maximum support is provided by thick fibrous connective tissue that is attached firmly to compact bone. The mid-palatal suture, for example, has non-resilient mucous membrane that does not tolerate much. Therefore, impressions must selectively place pressure on mucous membrane and bone in amounts compatible with their histological tolerances.
B. CHARACTERISTICS OF A GOOD IMPRESSION
1. Include everything within limits of health and function 2. Borders should be in harmony with limiting structures 3. Physiologic type bordermolding 4. Proper space allowed for impression material 5. Selective pressure while making impression 6. Should not damage tissue 7. Should be properly positioned 8. Dimensionally stable materials 9. Shape of impression is similar to form of denture
C. 5 OBJECTIVES OF IMPRESSION to provide:
1. Retention 2. Stability 3. Support 4. Esthetics 5. Maintain Health
1. Retention - Resistance to removal in direction opposite that of insertion. Resists gravity, sticky foods, opening and closing jaws. It is the means by which dentures are held in mouth. If tissues are displaced under pressure the denture may lose retention because of change in adaptation of basal surface.
2. Stability - Quality of denture to be firm, steady and constant in position when forces are applied to it. It especially provides resistance against horizontal rotating movement. It depends on the size and form of basal seat, quality of final impression, form of polished surfaces and location and arrangement of artificial teeth.
3. Support - Resistance to vertical components of mastication and occlusal direction towards the basal seat

32
4. Esthetics
5. Maintain Health
D. THE IMPRESSION ITSELF
1. Consistency - can control the position and shape of the oral tissues. Soft or fluid impression materials displace tissues less. Stiffer impression materials will displace tissue.
2. Tray of Correct Size
a. should not displace tissues b. design of tray should be related to type of impression material selected, e.g., -compound needs lot of room - ZOE (like toothpaste is thin and requires very little room - plaster of Paris is in between
3. ZOE, plaster, irreversible hydrocolloid, silicone, polysulfide, polyether, tissue conditioning materials all have been used for secondary (final) impression
a. Plaster usually sets slow, requires a separating medium before pouring, and absorbs mucous secretions.
b. ZOE requires a tray of almost exact dimensions. It is so thin that mucous secretions cause defects in surface of impression.
c. Hydrocolloid capture mucous bubbles, lose moisture, and distorts easily. It should be poured immediately and the weight of stone may distort it.
d. Tissue Conditioning Materials are very good, accurate and good for functional impressions because it flows up to 24 hours.
e. Rubber Base (polysulfide rubber). Tray must fit accurately so that rubber can be closely confined to tissues to be accurate. Very good for thin mandibular ridges with soft tissue undercuts. Can also be removed (separated) from cast without breaking cast.
f. Polyether is good. It can be shaped with fingers and can support itself 4-5 mm. Its disadvantage is that it is opaque -- CANNOT SEE PRESSURE SPOTS in the impression.

33
E. TECHNIQUE
1. First you have to BORDERMOLD the final impression tray. Border mold by moving tissues against soft material that is SUPPORTED and controlled by tray.
Borders of tray must be 2 mm short of reflection of tissue. The tray should always be checked in the mouth before border molding is started as the preliminary cast may have been more than 2 mm over extended. Green stick is added in sections, heated in a flame, tempered in a water bath, and placed in mouth.
2. Border molding will be affected by:
a. viscosity of material (soft or stiff) b. space available for material c. type and amount of manipulation d. quality of tissue - loose or tight
1. Maxillary border molding
- upper lip out, down and in - buccal frenum - cheek out, down, in, back and forward - post buccal - cheek out, down, in, move jaw side to side for coronoid process - post palatal area - compound is put on the tray over the vibrating line area and thru hamular notches. Place in mouth - relax, swallow, relax, open wide - border molding of post palatal seal will
i. slightly displace soft tissue to enhance seal ii. guide for positioning tray for impression iii. prevent excess from running down throat
2. Mandibular border molding
- anterior labial - lip out, up, in - buccal frenum - cheek out, up, in, back, forward - buccal shelf - cheek out, up, in - mandibular lingual flange - 5 steps
i. anterior region - look for clearance of lingual frenum, sublingual folds, submaxillary ducts
ii. add compound to anterior lingual flange. Have patient stick out tongue and then push tongue against the palate to get functional border.
iii. premylohoid fossa area (canine - premolar area) - flange will extend below mylohyoid line in this area and will slope towards tongue.

34
iv. add to molar regions between pre and post mylohyoid areas, protrude tongue, allow action of mylohyoid muscle to shape the flange in this area. NOTE: After you are finished - relieve compound to prevent the tray from binding in this area. The area will be recaptured by the impression material.
v. very back of lingual flange - add compound and protrude tongue so that the retromylohyoid curtain and superior constrictor muscle will shape the area. Also - ask patient to close to contract medial pterygoid.
- When finished - patient should be able to touch upper lip without much displacement of tray
CHAPTER 6
BORDER MOLDING AND FINAL IMPRESSIONS
BORDER MOLDING
A. OBJECTIVES
Students will be able to make a border of modeling compound on a shortened impression tray in relation to a patient’s dentiform while observing anatomical landmarks.
B. EQUIPMENT/SUPPLIES
1. Patient’s dentiform 2. Final impression trays 3. Green stick compound 4. Vaseline 5. Alcohol Torch 6. Alcohol lamp 7. Knife
C. DIRECTIONS
1. Lubricate dentiform with vaseline 2. Verify proper length of tray first on preliminary casts and then on patient dentiform 3. Borders should be 2mm short of mucobuccal/mucolingual fold 4. Frenum attachments should be well relieved with "V" notches

35
Maxillary Will be done in 8 sections:
1. Buccal space 2. Buccal frenum 3. Labial frenum 4. Buccal frenum 5. Buccal space 6. Hamular notch 7. Opposite hamular notch 8. Post dam area
Mandibular Suggested sections
1. Buccal Shelf 2. Buccal frenum 3. Labial Portion 4. Buccal frenum 5. Buccal shelf 6. Distal border/ retromylohyoid area 7. Lingual flange 8. Sublingual crescent area 9. Lingual flange 10. Distal border/ retromylohyoid area
5. Hold stick of compound over flame. Twirl stick as compound is being heated. It is ready to use when stick first begins to slump.
NOTE: If overheated, the compound will drip and flow in an uncontrolled manner. It must be kept under control. When melted it is extremely hot and likely to burn if it should contact skin.
6. Add the softened compound carefully to the edge of tray building the compound to a height of 3-4mm above border of the tray.
NOTE: After using desired amount of compound, chill the remainder of stick of softened compound in a bowl of cold water to prevent compound from sticking to the work bench.
7. Shape the compound with vaselined fingers.
8. Flame the compound with the alcohol torch, sweeping the flame back and forth.

36
9. Temper the compound on tray (about 3 seconds).
10. Quickly seat the tray in place on the dentiform. Using a wet or vaselined finger, press the compound into place, molding it into the peripheral roll.
11. Remove - chill in water - examine for detail.
12. Use a knife to remove excess compound that has flowed inside the tray.
NOTE: Remove compound from tuberosity areas but NOT from post dam area.
13. Continue addition of compound until all areas/borders have been captured. Compound should be dull in order. Each new section should be smooth, rounded, and well blended into previous sections.
Both Maxillary and Mandibular:
14. Remove excess inside tray
15. Remove flash from outside tray (LAND area of dentiform).
16. Scrape very lightly a thin layer of compound from inside of compound border to prepare room for impression material.

37
FINAL IMPRESSIONS
A. OBJECTIVES
The student shall be able to select a proper material for a secondary impression, properly manipulate that material and make an acceptable secondary impression using that material.
B. EQUIPMENT/SUPPLIES
1. Edentulous dentiform 2. Border molded custom trays 3. Mixing spatula 4. Glass slab 5. Final impression material 6. Knife
C. DIRECTIONS
1. Examine border molded custom tray .
2. Correct any discrepancies before impression.
3. Relieve compound at the land areas and any excess that oozed inside the tray.
NOTE: Your impression will be a "wash" type; basically intended to add tissue detail to an already border molded custom tray which has been extended into the height/depth of the fold areas. The less body or "carrying power" a material has, the more dependent it is upon support from the tray. Therefore, the accuracy of the impression depends on the accuracy of the tray.
4. Coat the inside of the tray as well as the borders.
5. Place equal amounts of base and catalyst materials on glass slab.
6. Using the edge of the spatula, incorporate the base and catalyst until thoroughly mixed and free of any color streaks.
7. Scrape all material together in center of glass slab.
8. Lift all at once with spatula - twirling it as you approach tray to gather up any impression material that may be trailing from the spatula.
NOTE: The fewer transfers the neater the job. Quick, decisive movements will result in better control of readily flowing materials.

38
9. To load the tray, first load the border area by scraping the flat surface of the blade along the outside of the tray at the height of the border. Keep the blade in constant contact with the tray border. Pull the blade slowly downward with one hand as the tray is rotated in the other hand.
10. When the border is covered, wipe along the inside of the tray between border and ridge crest bilaterally. For maxillary, spread across the palate.
NOTE: These movements serve to spread the material in the tray, to eliminate air bubbles, and to remove any excess material.
11. At this point, additional material may be added if necessary. A thin, unpenetrated layer of material should remain, as this is a "wash" type impression.
12. Excess material along the base of the dentiform can be removed with the edge of the spatula prior to final set. If material has set, excess can be removed with a sharp knife.
13. When material is set, grasp the tray handle and the base of the dentiform and pull slowly apart. In some instances a gentle pry with a knife may be required.
14. Examine impression for accuracy of anatomy, lack of voids and bubbles, proper seating of tray, and pressure spots. Four voids less then 3mm in size in noncritical areas are acceptable. If large pressure spots appear, make a note of their location, remove impression material, scrape compound to relieve pressure, and remake the impression.
15. If large voids appear or if tray has been improperly seated, remove impression material and D.I.O. (DO IT OVER).

39
.
Boxing -- Maxillary and Mandibular
1. A strip of boxing wax is wrapped around each beaded impression and sealed at all margins. The wax should be placed so as to create a cast base that is 1/2 to 3/4 inch thick. Future procedures will be compromised if the bases are too thick.
Pouring Impressions:
1. The impressions are poured in yellow dental stone that has been mixed at a ratio of 30ml/100gm.
Separating Impression from Casts:
1. After stone is set (about 45 minutes) remove all wax.
2. Place casts in hot water to soften border molding compound. This will facilitate separation of impressions from casts.
3. Gently pry with knife at border of stone and plaster/pumice and separate the two. If more force is needed, rap the plaster./pumice portion with a spatula handle to initially loosen cast, then tray again. The plaster nippers may also be used to remove the plaster/pumice.
TRIM THE MASTER CASTS so that:
1. The bases are parallel to the projected plane of occlusion; 2. The bases are 1/2 inch thick; 3. A minimum of 3mm of land area remains - are smooth and beveled; 4. Peripheral sulcus has been preserved; and 5. Grooves have been placed for indexing.

40

41
CUSTOM TRAYS
A. DEFINITION
A Custom Tray is an individualized tray made from a cast recovered from a preliminary impression. It is used in making a final impression.
B. OBJECTIVES
1. Recognize and discuss the significance of anatomical landmarks on the preliminary casts related to oral anatomy.
2. Describe and discuss the requirements of a good final/custom impression tray as set forth in the evaluation criteria sheet.
3. Outline tray borders on casts prior to their construction and discuss the significance of that outline.
4. Perform the proper manipulation of self-polymerizing acrylic resin.
5. Identify those areas of the cast requiring relief.
6. List the various materials used to relieve a cast. Perform the cast relieving procedure.
7. Perform and describe the fabrication of a final/custom tray by adapting tray material to the cast and adding a tray handle during or following polymerization of the tray proper.
8. Perform the trimming and polishing and finish of final/custom trays.
9. Be familiar with properties and characteristic of self-curing acrylic resin.
10. Be familiar with different types of custom impression trays.
11. Be familiar with the advantages and disadvantages of each of the above trays.
C. MATERIALS
1. Diagnostic casts 2. Shellac Baseplate 3. Vaseline 4. Pink wax 5. Sharp knife 6. Red/Blue pencil and scissors

42
D. DIRECTIONS
Part I: Outlining the casts:
Maxillary:
1. Using the blue pencil, outline the depth of fold. Posteriorly the line extends from hamular notch to hamular notch, 2mm posterior to the fovea.
2. Using red pencil, draw a line 2mm short of the mucobuccal fold (the line of flexure of the mucous membrane as it passes from the maxilla or mandible to the cheek). Be certain to provide ample room for the frenum attachments. Posteriorly the red line should extend from hamular notch to hamular notch, COINCIDING with the blue line.
Mandibular:
1. Using blue pencil, outline the depth of fold.
2. Using red pencil, draw a line 2 mm short to the mucobuccal fold...
Start at the retromolar pad. Outline the distal extent of the pad line should coincide with the blue line at this point only. Carry the lateral end of the line to the external oblique ridge. Follow the ridge to about the 2nd bicuspid area. As you approach the 2nd bicuspid area, the outline leaves the ridge and is continued 2 mm above the mucobuccal fold, to the same point on the opposite side. Remember to leave adequate room for frena. Lingually the tray outline is 2mm short of the floor of the mouth. The distal-lingual border is obtained by dropping a line from the distal of the retromolar pad perpendicular to the floor of the mouth.
REMEMBER: The outline of the tray is an educated approximation. Clinically, 1 impression are often more than 2 mm overextended. All trays are subject to refinement when tried in the
mouth.

43
Part II: Fabrication of shellac base plate trays:
1. Forming the tray: Upon consultation with your instructor, it may be advisable to relieve the tray by use of a suitable material, e.g., ring liner material, wax or tinfoil. In general the following areas may require relief:
a. Labial undercut on maxillary anterior ridge
b. Slight buccal undercuts in the bicuspid region
c. Tori
d. Labial undercut on the mandibular ridge
e. Retromylohyoid areas
f. Areas of non-operable redundant tissue
These may be relieved as necessary by one of the above fillers before the tray is fabricated.
1. Lubricate the cast with Vaseline ( Petroleum jelly). Heat a pink wax and place it over the cast to serve as wax relief or wax spacer.

44
2. Heat the shellac base plate and adapt it first in the palate and working peripherally over the ridge and into the fold areas of the cast.
3. For the lower, adapt the material on one side of arch first and move over the remaining portion of the arch.
4. Use a sharp knife to cut excess material beyond the land area of the cast..
5. Excess material can be shaped into a tray handle and placed onto the front of the tray in the shape to the LENGTH, WIDTH AND INCLINATION OF 2 CENTRAL INCISORS.
The handle should be positioned just lingual to the crest of the ridge, in the midline and so that it will not interfere with the lip or with border molding. Bind the material of the handle to make it smooth and wrinkle free and flatten top handle of the tray.

45
E. PROBLEMS AND ERRORS
1. An incorrectly outlined model will result in a tray which is severely overextended or under-extended, either of which will complicate the final impression.
2. Excessively thick trays require much mechanical reduction and polishing at the chairside to make them useful in the mouth.
3. Excessively thin trays will be weak and distort in the final impression procedure. Thin trays may also break.
4. Incorrectly designed tray handles will prevent proper manipulation of the tray and interfere with accurate impression procedures.
5. Any imperfection on the internal surface of the tray is a reflection of an inaccurate cast.

46
CHAPTER 7
CONSTRUCTION OF A STABLE RECORD BASE
A. OBJECTIVE:
The student will prepare the master cast for the construction of a "brush on" base plate, fabricate the base plates, and "accurately" fit this temporary base to the master cast in a manner that will be stable in the mouth when transferred.
B. MATERIALS/SUPPLIES:
1. Red/blue pencil 2. Base plate wax 3. Self-cured acrylic resin and liquid 4. Vaseline 5. Acrylic brush 6. Acrylic bur 7. Micromotor
C. PROCEDURE/DIRECTIONS:
Maxillary Cast:
1. With instructors help, identify undercuts.
2. Fill all undercuts with base plate wax. Do not use heavy block out in the maxillary anterior area.
3. Lubricate the cast with Vaseline ( Petroleum jelly).
4. Apply mixed resin on the cast, starting it first in the palate and working peripherally over the ridge and into the fold areas.
5. For the lower, apply the resin material on one side of arch first and moving over the remaining portion of the arch.
6. Use a sharp knife to cut excess material beyond the land area of the cast. Be careful not to stretch any of the peripheral resin.
7. Use an acrylic bur to remove any areas internally that may be binding as the tray is placed on and off the cast.

47
8. Use an acrylic bur on a micromotor to remove and trim excess material so that it has a full peripheral roll for added stability.
DO NOT POLISH THE TISSUE (INTERNAL) SURFACE.
.
Mandibular Cast:
Follow same procedure as for maxillary cast.
FABRICATION OF WAX OCCLUSION RIMS
A. OBJECTIVE:
The student will be able to construct occlusion rims on record bases in a manner that will enable him to restore facial contours for the edentulous patient.
B. MATERIALS/EQUIPMENT:
1. Trail record bases 2. Master casts 3. Patient dentiform 4. Base plate wax 5. Sticky wax 6. Wax spatulas 7. Broad wax spatula/rim former 8. Alcohol lamp
C. DIRECTIONS:
1. A bead of sticky wax is applied to the crest of the ridge of each trial record base.
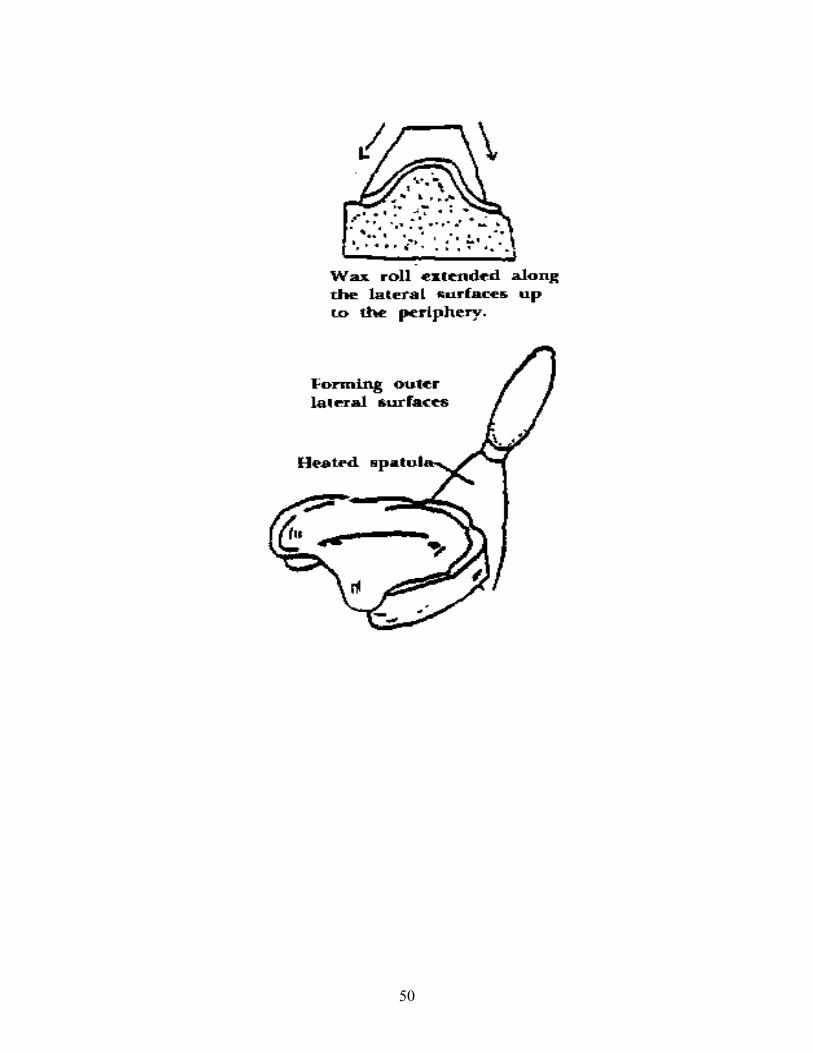
2. A sheet of baseplate wax is warmed over the alcohol lamp
3. The wax is rolled after heating to make a log of wax.
4. The soft log of wax is bent and placed on the trial record base, centered over the crest of the ridge.
5. A HOT spatula is used to seal the baseplate wax to the trial record base.

48
6. While wax is still soft the cast should be inverted onto the glass slab to flatten the occlusal surface.
7. If necessary fill in the buccal/facial surface with wax to make it a solid Surface.
8. Use the broad wax spatula to smooth the facial and buccal surfaces of the occlusal rims.
9. The broad wax spatula is also used to flatten the occlusal surface of the occlusion rim.
10. The smaller wax spatulas are used to smooth the lingual surfaces of the occlusal rim.
NOTE: The above procedures are used to fabricate both The maxillary and mandibular occlusion rims.
The DIMENSIONS of each rim are as follows:
MAXILLARY:
1. Terminate just anterior to the tuberosity 2. Occlusal plane parallel to base of cast 3. 10mm high at molar area (measure from the outer surface of the Baseplate on top of the ridge, anterior to the tuberosity, to top of wax) 4. 22mm high at anterior (frenum to occlusal plane) 5. 10mm wide at molar area 6. 4mm wide at anterior area 7. 2-5 degree incisal flair 8. 45 degree angle at posterior end
MANDIBULAR:
1. Terminate just anterior to retromolar pad 2. Occlusal plane parallel to base of cast 3. Distal occlusal height even with 1/2 height of retromolar pad 4. 18mm high at anterior (frenum to occlusal plane) 5. 10mm wide at molar area 6. 4mm wide at anterior area 7. 2 degree incisal flair 8. 45 degree angle at posterior end
Both rims should be given a final smoothing and finishing with the alcohol torch.

49
50

51

52

53
Chapter 8
CLINICAL ADJUSTMENT OF CONTOUR RIMS & THE TENTATIVE REGISTRATION OF MAXILLO-MANDIBULAR
RELATIONS
A. DEFINITION:
A tentative registration of the positional relationship of the mandibular arch to the maxillary arch in centric relation at a given vertical dimension.
B. PURPOSE:
1. To establish the posterior extent of the maxillary denture.
2. To establish esthetic labial and buccal contours.
3. To establish the occlusal plane.
4. To mark the mid-line, high lip line, and cuspid-to-cuspid distance.
5. To mount the maxillary cast on the articulator in a manner which relates it to certain cranial landmarks.
6. To measure rest relations.
7. To register the vertical dimension of occlusion and centric relation.
C. INSTRUMENTS AND MATERIALS:
1. Mouth mirror
2. Ball burnisher
3. Cleoid instrument
4. Alcohol torch
5. Hot plate
6. Bench knife
7. Dental floss

54
8. Fox gauge/plane
9. Flexible ruler
10. Inside caliper
11. Pooling spatula
12. Face bow assembly
13. Wax spatula #7
14. Wax knife
15. Indelible pencil
16. Baseplate wax
17. Sticky wax
D. PROCEDURE:
1. Establishing the Posterior Border of the Maxillary Denture -
The position of the posterior border of the maxillary denture is usually located in a zone overlaying the tensor veil palatini muscle. The actual location is determined by observing the fovea palatini and the line of deflection between the movable and non-movable tissues. This junction may be demonstrated by having the patient say "ahh" or by having the patient hold his nose and blow. The air forces the muscles of the soft palate to drop sharply. Depending upon the throat form, the length of the denture will vary from the vibrating line to several millimeters posterior to it as one progresses from Class III to Class I.
In the Class I throat form it may be possible to extend the denture as much as six millimeters beyond the fovea palatini:

55
In the Class II throat form, the posterior border will vary from 2 to 4 millimeters beyond the fovea palatini:
In the Class III throat form, the posterior border of the maxillary denture must be located at or close to the vibrating line:
Insert the maxillary contour rim and direct the patient to say "ahh" several times or blow as above. Study the relation of its posterior border and shorten it by scraping it with a sharp bench knife until it conforms to the above described length.
The post-dam should vary in width and amount of pressure exerted according to the resiliency of the underlying tissues. The further posterior the denture will be extended, the greater will be the need for increasing the depth of the post-dam. The greatest amount of resilient tissue lies between the pterygo-maxillary notch and the median line on each side. The underlying tissue at this point is ordinarily the belly of the tensor veil palatini muscle. The least resilient tissue is located in the median line area and is composed mainly of tendinous tissue.
With the aid of an egg-shaped ball burnisher, record the degree of displaceability of the tissues in the patient's mouth just anterior to the previously determined posterior border of the maxillary denture. Test various points along this border from one pterygomaxillary notch to the other. Record the displaceability of the tissue as to width as well as depth at

56
the various points. Divide the recorded measurements of displaceability along the posterior border by two and mark this figure on the cast at the various points along the border. A typical post-dam picture on a cast would like the following diagram:
Place the contour rim which was place to determine posterior extension of the denture on the stone cast. With a sharp pencil or knife, trace the posterior border of the baseplate on the master cast. Remove the contour rim and draw the anterior termination of the post-dam on the cast based upon observations of the displaceability in the mouth.
Scrape the post-dam into the cast by means of the cleoid or other sharp suitable instrument, to follow these outlines, reducing the amount of scraping gradually toward the anterior border, so that at the anterior termination of the post-dam, the stone is cut to a minimum and blends with the unscraped palatal area of the cast. This procedure will also compensate for the palatal lift of the methyl methacrylate denture resulting from processing (See Dental Materials section.)
Readapt the baseplate by adding Duralay acrylic in the manner taught in Preclinic lab (see sheet earlier in this manual). Reinsert the contour rim into the mouth and test its retention against anterior dislodging force. Its retention should be greatly improved.
2. Establishing Esthetic Labial and Buccal Contours:
The final labial contour of the maxillary denture is established by altering that surface of the contour rim. With the maxillary contour rim in the patient's mouth, observe the facial contours from both the front and side views. If necessary, recontour the facial surface of the rim until the desired contour is achieved. Observe the relationship of the rim to the relaxed upper lip.
3. The Occlusal Plane is next established using the following guidelines:
a) The level of the anterior portion of the occlusal {plane usually extends 1 mm below the lower border of the relaxed upper lip}.

57
b) The antero-posterior component of the plane is parallel to (but not at the same level as) a line drawn from the ala of the nose to the tragus of the ear (ala-tragus line).
c) The lateral component of the plane is parallel to a line drawn between the pupils of the eyes (the interpupillary line).
Trim or add wax to the contour rim to achieve this relationship. With the contour rim in the mouth, insert the Fox gauge against its occlusal surface. Study the relationship of the Fox gauge to the interpupillary and ala-tragus lines. It should be trimmed or adjusted until it is parallel to both of these guidelines. Final adjustment to the guidelines is achieved by use of the hot plate.
4. Establishing the Midline, High Lip and Cuspid Line:
With the maxillary contour rim in the patient's mouth, study the face from a front view. Divide the philtrum of the lip and mark this point on the labial surface of the contour rim with a #7 spatula. This is the midline of the anterior segment.
The distal surface of the natural maxillary canine is usually located near the corner of the mouth and a vertical line dropped from the ala of the nose to the occlusal plane will often pass through the middle of the natural maxillary canine. These landmarks will provide an estimation of the position for the artificial canines and the width of six artificial teeth on a curve.
Direct patient to smile and make a horizontal mark at the lower border of the upper lip. This is the high lip line. This mark is used to estimate the length of a maxillary central incisor.
5. To Measure Rest Relation:
In order to establish the proper interarch distance and the required interocclusal distance or Freeway Space of 2-4mm, it is necessary to study and measure rest relation of the mandible with respect to the maxilla. Rest relation is the postural relation of the mandible to the maxilla when the patient is resting comfortably in the upright position and the condyles are in a neutral unstrained position in the mandibular fossae. Cut two small triangles of tape and place one on the tip of the nose and the other on the chin at the midline so that their apices face one another. Direct the patient to sit upright, free of any back or head support and relax. Insert the upper contour rim. Ask the patient to count slowly from 1 to 10. Then direct the patient to moisten the lips and swallow. Measure the distance between the apices of the tape with a ruler or a Boley gauge. Repeat the measurement several times until a consistent result is obtained. Make sure that the position of the mandibular triangle is not influenced by the mentalis contraction. Make a note of the rest position measurement. It will be used the registration of the vertical dimension of occlusion.

58
6. To Register the Vertical Dimension of Occlusion (VDO) and Centric Relation (CR):
Insert the mandibular occlusal rim and adjust its occluding surface until rest position is achieved. There should be uniform contact between the maxillary and the mandibular rims at this level. At this point it is often necessary to re-evaluate the previous tentative determination of the occlusal plane in order to permit proper placement of teeth. The occlusal plane may be altered bearing in mind that the lateral orientation of the plane remains parallel to the interpupillary line.
The VDO is established by an arbitrary reduction of 2-3mm from the vertical dimension at rest relation. The Freeway Space is evaluated at this time. Look at the "Closest Speaking Space" - when the patient makes "S", "SH" and "SH" sounds the posterior portions of the wax rims should just miss. If this is not the case, the rims should be adjusted accordingly, keeping in mind anterior esthetics and the "fixed" height of the posterior mandibular rim.
Remove 2mm of wax from the MANDIBULAR rim from the 1st bicuspid back on both sides and THEN make 2 small "V" notches. On the maxillary rim make 2 small non-parallel "V" notches on both sides and lightly vaseline. Soften Alu wax and place a "mound" on both sides of the mandibular posterior to a level at least 2mm higher than the occlusal plane. Insert wax rims in the patient's mouth and guide the patient's closure into Centric Relation. Remove the rims and mount the mandibular cast on the articulator.
Please Note: This procedure may have to be repeated as the patient frequently resists being guided into position until he understands what is being done. It is wise to practice with the patient before the final registration is made.
E. PROBLEMS AND ERRORS
1. When the posterior border of the maxillary denture is too short, the seal is reduced resulting in a less retentive denture.
2. When the posterior border of the maxillary is too long, the soft palate tissues are irritated and the seal is broken by the movement of the soft palate.
3. When the cast is not cut deep enough for the posterior palatal seal, the denture will not make sufficient contact with the tissues resulting in poor retention.
4. When the cast is cut too deeply for the posterior palatal seal the denture will displace the tissue excessively resulting in irritation of the related tissues.
5. When the labial surface of the contour rim is improperly formed the anterior teeth will be malpositioned resulting in a non-esthetic denture.

59
6. When the occlusal plane is incorrectly oriented, the teeth will be incorrectly positioned resulting in 1) decreased stability in either or both dentures; 2) poor esthetics; 3) poor articulation.
7. When the VDO is excessive, the Freeway Space is reduced or eliminated resulting in excessive pressure on the alveolar ridges and premature contacts of the teeth during non-masticatory functions.
8. When the VDO is insufficient the Freeway Space is increased resulting in possible TMJ disturbances, neuromuscular disorders and distortions of facial contours.
9. Incorrect CR will result in an occlusion of the teeth which is not in harmony with the proper position of the condyles in the mandibular fossae.
FACE BOW TRANSFER
MOUNTING THE MAXILLARY CAST
A. OBJECTIVE:
The student shall be able to use the Whip Mix face bow instrument to register the relationship of the maxillary member of the typodont to the condylar analogue of the typodont, transfer that relationship to the articulator and mount the maxillary master cast on the articulator and mount the maxillary master cast on the articulator using the face bow.

60
B. MATERIALS / EQUIPMENT
1. Whip Mix articulator
2. Face bow with accessories
3. Patient dentiform
4. Record bases & occlusal rims
5. Buffalo knife
6. Mounting plaster
7. Plaster bowl & spatula
8. Cast supporter
9. Red cake compound
10. Water Bath
C. DIRECTIONS:
1. Mark the midline of the maxillary arch on the base of the dentiform with a pencil.
2. Place maxillary record base on the "patient" and score the wax rim at the midline.
3. Place notches, 2 each on either side between the 1st premolar area and end of wax rim, 2 mm. deep and 2 mm. wide. Lightly vaseline the notches.
4. Soften a cake of red compound in the water bath. Wrap the softened compound around the face bow fork.
5. Remove maxillary record base and invert the occlusal surface onto the softened compound, lining up the midline in wax with the gold knob on the face bow fork.
6. Place record base with fork into "patient’s mouth".
7. Attach bow to end of fork and attach the ear pieces to the ears of patient.
8. Attach the nasion indicator to the anterior of the bow and adjust it to the nose of the patient. Tighten screws, a little at a time, first one, then the other, then the first, then the second, until both are tightened firmly.

61
9. Remove nasion indicator from face bow.
10. Remove face bow apparatus from patient.
11. Attach cast supporter and face bow supporter to lower member of articulator.
12. Attach face bow to its supporter on the articulator making certain the maxillary wax rim is centered from right to left between upper and lower halves of the articulator.
13. Place soaked and notched maxillary master cast into baseplate.
14. Check for adequate clearance of master cast superiorly and posteriorly.
15. Lightly vaseline ONLY THE NOTCHES of cast.
16. Attach maxillary cast to articulator with mounting plaster.
17. Trim and smooth mounting plaster when set.

62
CENTRIC RELATION RECORD AND MOUNTING
OF MANDIBULAR CAST
PRE-CLINIC LABORATORY STEPS
A. OBJECTIVES:
The student will be able to record centric relation on the dentiform, transfer that recording to the articulator and mount the mandibular cast at the proper articulator settings.
B. DEFINITION:
Centric relation is the most retruded relation of the mandible to the maxilla when the condyles are in their most posterior unstrained position in the glenoid fossa from which lateral movement can be made, at any degree of jaw separation.
When a centric relation record is made there are three requirements that must always be fulfilled. They are:
1. The mandible should be in its correct horizontal relationship to the maxilla.

63
2. There should be equal bilateral vertical contact between the occlusion rims or opposing recording surfaces. The ideal recording medium is a freely-flowing material that will allow bilaterally equalized pressure. The material should be rigid and stable upon setting. Quick-setting plaster, ZnOE Bite Registration Paste and Aluwax are three such acceptable mediums.
3. The relation record should be capable of being separated and rechecked in the mouth and must be stable and recognizably accurate in the horizontal, vertical and sagittal planes.
C. PROCEDURE:
Wax is removed from the mandibular wax rim (2mm in depth) from the first bicuspid area back. The platforms on the mandibular rim are then scored with a knife so the registration medium will adhere to these areas. The maxillary rim is then lubricated lightly with vaseline so that it will separate easily.
Aluwax is then softened over a flame and/or in hot water, placed on mandibular platforms and built up to a level of at least 3 mm. above the occlusal plane. The dentiform is closed as the patient would close in the centric relation position and the aluwax is allowed to harden. The aluwax should completely fill the maxillary grooves. After the wax is completely hard, excess wax is trimmed away from the registration area with a sharp knife.
Remove both record bases (as a unit if possible). Place the maxillary base on the maxillary cast, invert the articulator, gently place the mandibular cast into the mandibular baseplate. Check to see that the relationship is stable, that the heels of the casts do touch and that there is sufficient clearance for mounting plaster.
PLEASE NOTE:
1. Mandibular cast should be scored and soaked before it is mounted.
2. ALL ARTICULATOR SETTING SHOULD BE AT ZERO!
3. THE INCISAL PIN SHOULD BE AT ZERO!
4. THE INCISAL PIN SHOULD TOUCH THE INCISAL TABLE!

64

65

66
POSTERIOR PALATAL SEAL / POST DAM
A. OBJECTIVES
To be able to define a post dam, list its purpose and list its types in writing. To be able to answer questions about the former on a written exam. To be able to prepare a post dam on the pre-clinic laboratory cast and baseplate and on a clinical case. To be able to demonstrate or delineate the post dam area on a patient.
B. EQUIPMENT / MATERIALS:
1. Patient dentiform
2. Maxillary master cast
3. Maxillary record base and occlusal rime
4. #8 round laboratory carbide bur
5. Duralay
6. Dappen dishes
7. Foilcoat
8. Paint brush
9. Buffalo knife
10. Cleoid-discoid
11. Laboratory acrylic bur
12. Color transfer sticks
C. DIRECTIONS:
1. Using color transfer applicator draw terminal edge of denture in "patient's" mouth from hamular notch to hamular notch at the vibrating line.
2. Place record base on patient. The purple line should be transferred onto the record base.
3. The record base is trimmed back to the line.

67
4. Place record base on the master cast.
5. Scribe a line in cast along terminal edge of record base.
6. Draw gull wing shape in palate of "Patient" as described in lecture.
7. Replace record base on "patient" and transfer gull wing shape onto it.
8. Place record base back onto master cast and transfer gull wing shape onto cast.
9. Remove record base.
10. Using #8 round bur in the slow speed handpiece, re-scribe terminal line of post dam to a depth of 1 to 1 1/2 mm.
11. Using the cleoid-discoid carve post dam area by removing stone from the outlined area.
12. REMEMBER: The post dam is deepest in the posterior and should fade to a feather edge anteriorly.
13. The entire area should then be smoothed with the back end of the Buffalo knife.
14. Paint the posterior area of the master cast with foilcoat and let it dry.
15. Build up the post dam area with Duralay.
16. Paint the posterior portion of the record base with Duralay monomer.
17. Seat the record base solidly and firmly on the master cast.
18. Allow Duralay to set.
19. Remove the record base and inspect the post dam.
20. Remove flash around the anterior portion with a knife.
21. Trim along the posterior portion with acrylic bur.
REMEMBER! Your "patient" does not have compressible tissue. Do not try to force the record base on. This exercise was only to demonstrate how a post dam is added to an acrylic record base. Before continuing on to the next phase of denture fabrication, the Duralay post dam must be removed with an acrylic bur.

68
Chapter 9
ARTIFICIAL TEETH - GENERAL DISCUSSION
A. DEFINITION:
Denture teeth are artificial substitutes for the coronal portions of the missing teeth. They are usually made of porcelain or plastic. Porcelain denture teeth contain various retentive devices such as platinum-iridium pins and diatoric holes, to secure them to the plastic denture base.
B. PURPOSE:
To select the proper anterior and posterior denture teeth which will fulfill the esthetic and functional requirements of the patient.
C. INSTRUMENTS and MATERIALS:
1. Occlusion and contour rims 2. Tooth mold and shade guides 3. Flexible ruler 4. Large hand mirror
D. PROCEDURE:
1. The maxillary anterior denture teeth are selected according to size, shape, shade and material.
a. Size:
Insert the maxillary occlusion and contour rim which was used to establish the tentative vertical dimension and centric relation. If the contour rim lacks retention, it is advisable to use denture adhesive. With the patient's facial musculature relaxed, indicate the midline of the face on the labial aspect by inscribing a line parallel to the mid-sagittal plane of the head with a #7 spatula. This line usually bisects the philtrum of the upper lip. It does NOT ALWAYS coincide with the labial frenum.

69
Establish the level of the high lip line on the contour rim by asking the patient to smile broadly. This will aid in the determination of the tooth length. The width of the six maxillary anterior teeth is determined by using the following methods: 1) by dropping a perpendicular from the lateral surface of the ala of the nose. This indicates the center of the cuspid. 2) By marking the corner of the mouth with the lips relaxed on the contour rim with the #7 spatula. This indicates the distal of the cuspid. 3) By dropping a perpendicular midway between the ala of the nose and the pupil of the eye and marking it with the #7 spatula on the contour rim. This may also indicate the distal of the cuspid. These guides are used as a starting point for the selection of the maxillary anterior teeth. Variations may be made to suit the esthetic and bio-mechanical requirements of the patient.
b. Shade
The shade may be selected according to the facial skin coloration or complexion and the age of the patient. The shade should be selected in natural light or a proper substitute. Select two or three of the most suitable shades for the patient form the shade guide of the manufacturer of the teeth to be used. Consult with the patient as to which shade will be tried initially. The large hand mirror will aid the patient in the determination.
c. Shape
The shape or mold of the artificial anterior tooth is selected by studying the contour of the face and by the sex of the patient. Some studies have shown an esthetic harmony between the contour of the face and the contour of the inverted maxillary central incisor. This harmony does not always exist in regard to natural teeth but it does provide a guide to selection of artificial teeth. Those who follow the system divide the face into square, tapering, or ovoid and various combinations of these. One denture tooth manufacturing company groups its artificial teeth according to this plan. It will be found that most faces fall into the tapering with modification group. Another company divides its teeth according to flat or curved labial surfaces.
Consult the manufacturers mold guide, using the information obtained thus far. Select one or more molds that conforms to the shape, length (from the high lip line), and width of six anterior teeth as measured on a curve (distal of cuspid to distal of cuspid lines marked on wax rim). Make your final selection the one that most suits your particular patient. Record the mold number in the patient's chart.
d. Material
See section Acrylic Vs. Porcelain teeth.
2. The mandibular anterior teeth:
Remove the maxillary contour rim and place it on the articulator. Study the relationship of the facial contour of the maxillary rim to the mandibular alveolar ridge. In the average

70
mouth where there is slight to moderate horizontal overlap, the mold suggested by the manufacturer which corresponds to the maxillary anteriors may be used. If the mandible is retruded, it will be necessary to select a narrower mold of lower incisors. If the mandible is in protrusive relation, it will be necessary to select a larger width mandibular incisor. The degree of horizontal overlap affects the relative widths of the maxillary and mandibular anteriors because the radii of the curvature of the arches varies. In order to achieve functional anterior occlusion, the correct corresponding width must be used. In addition, it may be desirable to incline the incisors labially or lingually.

71
TOOTH FORM AND SIZE GUIDE
SELECTION OF POSTERIOR DENTURE TEETH

72
I. Positions of Artificial Teeth are influenced by:
1. Functions of surrounding structures 2. Cellular structure of the basal seat tissues 3. Anatomic limits

73
4. Mechanical aspects 5. The horizontal relations of the residual ridges 6. The vertical positions of the occlusal surfaces and incisal edges between the residual ridges 7. Esthetic requirements
II. Requirements for Artificial Teeth:
1. Natural appearance 2. Efficient mastication 3. Bilateral balance 4. Ease of handling 5. Least problems after settling
III. Types:
1. Cusp teeth
a. 33 degrees & 30 degrees = anatomic;
b.20 degrees & 10 degrees = semi-anatomic, modified, or low-cusp
2. Cuspless teeth ; 0 degree
3. Special forms
-Advantages of anatomic teeth:
a. Closely resemble natural teeth - esthetic b. Proper contours for crushing and triturating c. Adequate sluiceways d. Greater chewing efficiency, excessive chewing pressure minimized e. More vertical chewing stroke f. Cuspal inclines provide a depth to obtain eccentric balance g. Provides a greater resistance to rotation of dentures h. Provides a comfortable position to return to when cusps are making contact in fossaes
-Disadvantages of anatomic teeth:
a. More difficult and time consuming to balance b. Settling results in more damaging interferences c. Possibilities of more lateral stress in function d. Settling also causes the VDO to decrease and the mandible to move forward e. Settling will cause resorption

74
-Cusp Teeth Occlusal Schemes:
a. Bilateral balance b. Balance in centric only c. Non-intercusping cusp (modified occlusion)
-Advantages of semi-anatomic teeth:
a. Easier to set up and balance b. Can provide freedom if settling occurs c. Reduction of lateral stresses d. Provides all the advantages of cusp teeth
-Disadvantages of semi anatomic teeth:
a. Less esthetic (buccal cusps are shorter) b. Less chewing efficiency (some claim greater)
-Advantages of 0 degree (flat, monoplane, or cusp less) teeth:
a. Easy to set up b. Least lateral stress c. Least anterior-posterior interferences after settling d. Best for patients with poor muscular control e. Best for patients with poor ridge relationships f. Reduced bucco-lingual width and sharp grooves and sluiceways compensate for cusps for about equal chewing efficiency
-Disadvantages of 0 degree (flat, monoplane, or cusp less) teeth:
a. Very difficult to obtain balance in excursive movements b. Less chewing efficiency for fibrous or tough food c. Poor esthetics d. When set on a flat plane, a space develops posteriorly when excursions occur, causing excessive pressure and resorption in the anterior
-Cusp less Teeth Occlusal Schemes:
a. Bilateral balance with a compensating curve b. 3 point balance with a balancing ramp c. Flat plane-balance in centric only d. Reverse-pitch (Anti-Monson) curve

75
Dr. Phillips makes corrections HERE!!!!
1. Advantages
a. More stable lower denture during mastication b. More vertical chewing stroke c. More shear in the chewing stroke d. More tongue room
2. Disadvantages:
a. Less stability to the upper denture b. No balance in excursive glides (unless Pleasure curve added)
-Special Tooth Forms
(French posteriors, Cutter bars, Masticators, V.O. posteriors, Sosin bladed teeth and many others) NOTE: Cutter bars and masticators are no longer available.
1. Advantages:
a. Some can provide moderate to excellent function b. To date, most efficient design is Sosin bladed
2. Disadvantages:
a. Often esthetics is poor b. Best forms require meticulous execution and skill (higher cost) c. Many are poorly designed and have only "gimmick" value
IV. Cusp vs. Non-Cusp Controversy
1. Little conclusive evidence on efficiency 2. Patient experience no better or worse with either 3. Little difference in soreness and discomfort 4. Little difference in quality or quantity of supporting bone with either
- Studies have been and are being done to determine which occlusal form might be better. There are various schools of thought with strong supporters on either side. So far, no conclusive evidence exists.
- The author of the text you are using, Boucher, believes that more deformation of bone takes place using anatomic teeth.

76
- Simultaneous contact of all teeth in centric relation is not the problem. Everyone agrees this is necessary for comfort, function and stability.
BUT... Do we NEED bilateral balance???
YES - It is difficult to achieve with monoplane teeth
- You must program the articulator and use the utmost care in setting anatomic teeth
NO - Then, why bother with anatomic teeth since they must be balanced to be used properly. Why not use monoplane???
MAYBE - How long does the patient stay in balance? When he starts to function, what happens to balance???
V. Which Posterior Tooth to Use?
1. Which best fulfills the patient's requirements? 2. Which can the patient afford? He may not be able to pay you what it would cost in terms of the extra time and number of visits that an anatomic denture might cost. 3. Which can YOU handle most proficiently??? 4. You want to give the patient
a. Function b. Stability c. Comfort
5. You want to look at the patient’s:
a. Health b. Physiologic age c. Neuromuscular ability d. Esthetic requirement
6. You have to balance:
A husky and healthy patient with good ridges. A frail patient with little in the way of ridges.
7. The prognathic patient with little protrusive movement usually chews with a vertical stroke and might do well with cusp teeth.
8. The orthognathic patient has a wide range of mandibular movements and it is difficult to find a position that is "right" for him. You may want something that is non-interfering.

77
9. A patient with a unilateral or bilateral cross-bite is one that will cause you all kinds of difficulty setting anatomic teeth. This patient may require a monoplane.
10. If the patient is a "veteran" denture wearer, evaluate what he is used to. Do not make any drastic change if the patient is satisfied with what he has.
11. When there has been advanced ridge resorption, the movement of the denture becomes excessive, and the ridges are severely irritated. We generally select flat cusped posteriors for these cases.
12. In the geriatric patient, a number of other conditions must be considered, such as:
a. reduced circulation to the tissue b. reduced density of the alveolar bone c. degenerative changes in the tempo-mandibular joint d. reduced tonus of the muscles involved in oral function e. reduced neural responses f. selection of Posterior Teeth
The posterior denture teeth are selected according to shade, size, occlusal form and material.
a. The shade will be the same as the anterior teeth if the anterior tooth shade is Bioform or Biotone. If the anterior shade is a Bioblend shade, consult the mold guide (pamphlet) and use the conversion chart to select the Bioform or Biotone posterior shade that compliments that anterior Bioblend shade.
b. The size (or width of four posterior teeth) is determined primarily by the anterior-posterior distance available. Mark on the occlusion rim the approximate point of the distal of the canine as well as the approximate point of the distal of the second molar. This distance, measured in millimeters, will be the width of four posterior teeth. A mold may then be selected based on this width or "size".
c. Occlusal configuration is discussed above.
d. Material: (see also Acrylic vs. Porcelain Teeth below for information on physical properties.)
1. In the healthy patient where the ridges favor good denture stability and where mastication can be expected to be normal, porcelain teeth may be used.
2. In the debilitated geriatric patient, plastic teeth may be indicated, because their wear characteristics result in fewer traumas to the basal bone.
3. Knowing the physical properties of the tow materials will enable the operator at times to select teeth in various combinations to suit varying situations, for example: porcelain

78
maxillary anteriors to oppose porcelain fixed prostheses on the mandibular. Mandibular posteriors are usually chosen to correspond to the maxillary posterior teeth with regard to dimension, shade, cuspal orientation and material.
4. In patients with extremely short inter-ridge distance, as discussed above, it may be necessary to grind the ridge lap surface of the teeth. When the mechanical retentive devices of porcelain teeth are sufficiently reduced or eliminated in effectiveness, plastic teeth must be used. Plastic teeth are also far easier to reshape by grinding than are porcelain teeth.
VI. Careful Records Required
1. Face bow (to mount upper cast) 2. Centric relation 3. Lateral} Eccentric 4. Protrusive} Movements
These records must be programmed into the articulator.
Landmarks on the Casts
Upper
1. Midline (mid-palatal suture, anterior papilla, anterior base of the cast). 2. A line parallel to the crest of ridge on base of cast.
Lower
1. Line across the anterior crest ridge. 2. Line through the retro molar pad and posterior crest of ridge. (If ridge is curved, select the straightest line possible.) 3. Line 1/2 the height of the retromolar pad. 4. All of the above lines MUST be extended on the LAND AREA of the cast.
Replace the lower wax rim and transfer the crest of ridge lines onto the wax.

79
E. PROBLEM
S AND ERRORS
1. Improper dimensional selection will result in an unesthetic denture. 2. Improper shade selection will result in an artificially appearing denture.
Chapter 10
TRY-IN
A. DEFINITION:
The try-in is the trial insertion of a completed waxed denture.
B. OBJECTIVE:
To be able to verify centric relation and occlusion, vertical dimension, eccentric occlusion, esthetics and phonetics in a clinical Complete Denture case and to answer questions about a wax try-in on a written exam.

80
C. INSTRUMENTS AND MATERIALS:
1. Buffalo knife
2. #7 Spatula
3. Hand Mirror
4. Base plate wax
5. Articulating paper
6. Pan of cold water
7. Denture adhesive
D. PROCEDURE:
Wet the denture prior to insertion. Insert each denture and determine it's stability by exerting dislodging pressure in various areas. If either denture is not stable, sprinkle a little adhesive powder in the denture. Because trial denture bases are adapted and not processed, they may not have the retentive quality that the processed denture bases would have.
With both dentures inserted, observe the effects of the denture form on the contours of the lips and cheeks. Study the lip for relaxed closure or for excessive bulging of the area under the nose due to over-contour of the denture flanges. Corrections should be made by adding or reducing wax to the desired amount. Direct the patient to slightly open the mouth and study the relation of the maxillary incisors to the lip. In the average patient, 1 mm of tooth should be visible beyond the lower border of the relaxed lip. Direct the patient to smile and study the high lip line. A minimum of denture base material should be visible. Check the midline with a strip of dental floss. Make any necessary changes in position of the anterior teeth.
Direct the patient to make contact with his teeth lightly in centric occlusion. This should coincide with the relation. Look for any tilting movement if either denture due to premature contact. If there is movement, its cause must be isolated with the aid of articulating paper. In most cases it is possible to remove one or two interfering teeth or to selectively grind. If the interference is of a great magnitude, such as incorrect centric, the check bite must be registered and the lower case remounted. The teeth should then be re-set and the dentures tried in again.
Repeat these trials until the intraoral occlusion exactly duplicated the articulator set-up. Direct the patient to move into protrusive and lateral positions and observe for proper articulation in these positions. Test for phonetics, especially for "S", "F" and "Th"

81
sounds. Make any necessary corrections for phonetics using the guidelines outlined in the section "Speech Sounds and Anterior Tooth Position."
E. PROBLEMS AND ERRORS:
1. Permitting the trial dentures to become warm will result in a softening of the wax and movement of the teeth.
2. Heavy closure by the patient will dislodge teeth or displace the dentures excessively
SPEECH SOUNDS AND ANTERIOR TOOTH POSITION
Labial Sounds - P and B
Influenced by - Labiolingual position of the anterior teeth
- Thickness of labial flanges
The labial sounds P and B are made at the lips. Air pressure is built up behind the lips and released with or without a voice sound. Insufficient support by the teeth and denture base can cause these sounds to be defective.
Labiodental Sounds - F and V
Influenced by - Labiolingual position of upper anterior teeth length of upper anterior teeth
- Labiolingual position of lower anterior teeth
When F and V sounds are being made, if:
V sounds like F - Uppers too short
F sounds like V - Uppers too long
Uppers touch labial of lower lip - Uppers too far forward or too far back
Lower lip drop away from lower teeth - lowers too far back
Imprints of lower labials on inside lower lip - Lowers too far forward

82
Uppers contact lingual of lower lip - Uppers too far back or lower too far forward in relation to the lower residual ridge
Linguodental Sounds - TH (as in this, these)
These sounds are made with tip of tongue extending slightly between the upper and lower anterior teeth.
If about 1/8 inch of tongue is not visible - Anterior teeth too far forward (except Class II)
If more than 1/4/ inch of tongue is visible - Anterior teeth too far lingual
Linguopalatal Sounds - T and D
T and D - are formed by contact of the tip of the tongue with anterior palate of linguals of anteriors
Teeth too far lingual - T tends to sound like D
Teeth too far anterior - D more like a T or
- Denture too thick in rugae area
CH, J and S (related sounds)
CH, J and S - Upper and lower incisors should approach each other end to end but NOT touch
S - (For most people) tip of tongue is against the palate in the rugae area with a small space for escape of air between the tongue and palate
If opening is too small - whistle
If opening is too broad - S sounds like SH (lisp)
S - (One third of the people) tip of tongue contacts the lingual of lower anteriors and arches up against the palate to form the desired sound
Lower anteriors too far back - whistle) tongue forced up into a higher position and airway is too small)
Lower lingual flange too thick - faulty S sound (tongue space being encroached upon) TH - Tip of tongue place between the anterior teeth - If this sound cannot be produced properly, it could be too much of a VDO preventing proper tongue placement

83
COMPLETE DENTURE WAX-UP
Text, Lecture and Demonstration
Prepared by
Ms. Louise Gayle, MA, CDT
A. OBJECTIVE:
To simulate natural gingival contours on a complete denture by waxing or festooning the gingival portion.
B. MATERIALS AND SUPPLIES:
1. Completed and approved complete denture set-up
2. Wax spatula
3. Slow speed hand piece
4. Acrylic burs
5. Die saw
6. Bunsen burner
7. Hanau torch
8. Pink base plate wax
C. SPECIAL CONSIDERATIONS:
1. Palate of maxillary denture should be even in thinness, provide room for the tongue, and not interfere with speech. The palate may be completely smooth or have rugae in the anterior portion.
2. The denture must be self-cleaning. Holes or rough areas provide food traps. Interdental papillae must be smooth and flat or slightly convex.
3. Lingual flange of mandibular denture may be slightly concave but not so much as to cause dislodgment of the denture by the tongue.
4. The denture should appear natural. Natural teeth do not have grooves between them nor should denture teeth.

84
5. Light should deflect off the denture. This can be accomplished by stippling in the wax-up or on the processed acrylic denture.
6. The denture must replace lost bony structure; therefore the canine eminence at the corner of the mouth and the gingival bulge on the buccal are very important.
7. The denture base must be uniform in outer thickness. Lumps and bumps are very uncomfortable, draw attraction to their presence and provide a site for debris accumulation.
8. The waxed denture is exactly duplicated. Care must be taken to wax the denture exactly as you wish the final denture to appear.
9. The posterior palatal seal helps retain the denture and must be performed before the denture is sealed down and processed.
D. BEFORE BEGINNING:
ALL wax must be removed from the clinical crowns of denture teeth. All other remaining wax should be smooth and even.
E. PROCEDURE:
Maxillary:
The palate of the base plate is removed and replaced with one thickness of base plate wax to provide for uniform thinness of the palate of the denture.
1. Remove Palate
Use die saw to remove the palate of the base plate by cutting as close to the lingual surfaces of the maxillary teeth as possible. Use care not to exert pressure on the base plate as this can result in breakage or warpage. Let the blade do the cutting.
Smooth the edges of the base plate. Be certain not to leave a ridge of acrylic particularly on the tissue side. Place the base plate back on the cast and recheck the occlusion and tooth alignment. Make corrections if necessary.
2. Add Wax to Palate
Remove maxillary mounted cast from the articulator. Flow a thin film of wax over the palate area of the cast. Roll a piece of base plate wax by folding it over 3 times so that it is approximately 5 mm wide. Soften the roll and flow wax to the lingual of the teeth (as shown in waxing demonstration).

85
Adapt one sheet of softened baseplate wax over the palate. Seal and smooth the wax with a spatula and/or torch. Extend the sheet of baseplate wax to the posterior border of the posterior palatal seal. Flame and smooth palatal surface with Hanau torch.
3. Carve Palatal Surface
Use the knife end of a Roach carver to carve wax on the palatal side of posterior teeth 20 below the horizontal palatal Plane. The angel will be greater on the side of anterior teeth.
Remove ALL wax from the lingual of the teeth above the collar or finish line. Flame and smooth with Hanau torch. Use sharp instrument to remove any remaining wax around the gingival margin of each tooth.
4. Contour Facial and Buccal
Flow thin layer of wax onto the baseplate and around the necks of the teeth. Adapt a softened roll of wax along the facial surface of the baseplate. Be certain to have full extension of the borders.

86
Contour the wax to form fullness or convexity above the anterior teeth to simulate attached gingiva. Contour prominent canine root eminence that stops short of the border. Contour root eminence over centrals (not as prominent as canines). Prepare slight depression over laterals.
Contour "gingival bulge". Bulge is almost nonexistent above the 1st bicuspid. Starts over the 2nd bicuspid and widens as it travels to the distal of the 2nd molar. Place a slight depression in the premolar area. This is the canine fossa and is important if normal facial expression is to be obtained. Place a slight concavity along the buccal between the gingival bulge and the peripheral roll.
5. Carve Wax Around Buccal and Facial of Teeth
Seal the wax with a hot spatula around the necks of the teeth. Be sure to adequately seal the wax so that it will not separate, flake or chip when carved. Trim around the necks of the teeth with a Roach carver at the junction of the collar and crown.
Remove all remaining wax from teeth. Carve to produce a convex interdental papilla. Gently flame with Hanau torch to produce a smooth gingival margin. After flaming use a small sharp instrument to remove any wax around gingival margins of each tooth.

87
Mandibular
1. Lingual
Flow wax on the lingual surfaces of the teeth and carve gingival margins to an angle of up to 20 below the horizontal on posteriors and 45 on anteriors.
Wax the posterior lingual flanges from the teeth to the peripheral roll making an incline plane that slopes toward the tongue and is not convex. It may be slightly concave but not so much as to cause the tongue to dislodge the denture.
Contour and wax the distolingual area of the flange so that it blends into the retromylohyoid space. The peripheral roll should be rounded and completely fill the mucolingual sulcus of the cast. Flame and smooth with torch.
2. Labial and Buccal
Wax a small gingival bulge just below the gingival margins of the four incisors (similar to the bulge on the maxillary). Wax canine eminences (not as prominent as on the maxillary).
Posterior gingival bulge should be convex with no root prominence. Place concavity between gingival bulge and peripheral roll. Carve gingival margin and remove all excess wax from teeth.

88
Contour interdental papilla. Flame to smooth. Use sharp instrument to remove any wax around gingival margins of each tooth.
Seal Maxillary and Mandibular Dentures to Cast
Use a narrow roll of baseplate wax to add a very thin line of wax around the entire periphery of each denture. Use a hot spatula to seal and smooth the wax. Make sure to blend this additional wax into portions already waxed and take care not to distort or ruin work already done.
Place mounted casts back on articulator.
Check occlusion and tooth alignment.
Adjust occlusion and rewax if necessary.
NO DENTURE WILL BE ACCEPTED FOR PROCESSING UNTIL SET-UP AND WAX-UP IS FIRST APPROVED BY CLINICAL INSTRUCTOR AND THEN BY LABORATORY TECHNICIAN.
F. A CLOSER LOOK:
Maxillary:
1. Anteriors:
Central Incisors - sight root eminence, gingival bulge, depression above the bulge.
Lateral Incisors - slight gingival bulge, slight depression above the bulge.

89
Canines - canines’ eminence which stops short of the peripheral roll
2. Posteriors:
1st Bicuspid - hint of gingival bulge, canine eminence rolls into the area of the 1st bicuspid to create the canine fossa
2nd Bicuspid - starts gingival bulge.
1st molar - prominent gingival bulge, concavity above the bulge to the peripheral roll
2nd Molar - gingival bulge 5-6 mm wide and blends into the distal of tooth
Mandibular:
1. Anteriors:
Central Incisors - slight gingival bulge
Lateral Incisors - slight gingival bulge
Canines - canine eminence that stops short of the peripheral roll and not as large as the maxillary eminence
2. Posteriors:
1st Bicuspid - slight gingival bulge
2nd Bicuspid - slight gingival bulge
1st Molar - gingival bulge, depression below on the bulge rolling into the peripheral roll
2nd Molar - gingival bulge rolls into the distal
3. Lingual:
Anterior - smooth and sloped to the peripheral roll
Posterior - smooth and sloped to the peripheral roll, slight depression in the molar region, distolingual flange blends into the retromylohyoid space.

90
PROCESSING AND FINISHING DENTURES
A. DEFINITION:
A process that substitutes acrylic resin for the baseplate material and wax that makes up the denture base. The contours of the basal seat and the external surface will be accurately reproduced and the denture teeth will be retained in their correct position.
B. PURPOSE:
To produce an acrylic resin denture base containing teeth.
C. INSTRUMENTS AND SUPPLIES:
1. Upper and lower investing and processing flasks
2. Plaster bowl and spatula
3. Waxed denture on master casts.
4. Glass jar and metal spatula
5. Acrylic resin - monomer and polymer
6. Measuring vials
7. Plaster shears and plaster saw
8. Brush
9. Tin foil substitutes
10. Acrylic trimmers - burs and stones
11. Rag wheel
12. Felt wheel
13. Pumice and green polishing compound
14. Flask press

91
D. PROCEDURE:
1. Investing:
The investing procedure is the placing of the waxed denture bases and teeth in suitable investing media in preparation for wax elimination and packing of acrylic resin in its place. Plaster and stone, contained within a split metal flask, are the investing materials because of their hardness and ability to reproduce surface detail.
Lubricate the artificial denture casts on all exposed surfaces with Vaseline. (At this stage the wax form should be sealed to the stone base around the entire periphery.)
Prepare the appropriate flask by lubricating all internal surfaces with Vaseline. Note that most processing flasks contain a lid, an upper and lower component (divided according to whether it is used for an upper or lower denture) and a bottom knock out disc.
Each denture is first invested in the lower half of the respective flask. Make a mix of plaster and place it into the flask. Position the cast into the plaster allowing the excess plaster to squeeze upward around the periphery. Trim off excess plaster so that it is flush with the land area of the casts and clear of the flask lip. The depth to which the cast is placed into the plaster is determined by the height of the teeth in relation to the top of the flask. Therefore it is advisable to place the upper half on the flask, without the lid, to make this determination. A minimum of one half inch clearance from the top of the flask to the teeth is essential. No difficulty will be experienced if the cast thickness is correct as described in the procedure for pouring and trimming the master cast. the cast may be further pressed into the plaster until the correct height is achieved. This must be accomplished while the plaster is still soft and all excess should be removed after each manipulation. Allow plaster to set a minimum of 20 minutes. Trim and smooth all paste surfaces. Remove excess plaster edges so that the halves of the flask can be placed in opposition.
Apply tin foil substitute to the exposed plaster and stone surfaces. The separator is painted on with a brush until a shiny surface is attained. Allow the separator to dry. Place the upper half of the flask in place without the lid. Make a mix of plaster and vibrate it into the flask up to the limit of the occlusal third of the teeth. The amount of plaster needed will depend upon the size of the denture. In most cases the amount normally used for 2 models is sufficient.
Prepare a mix of stone (enough for 1 model) and carefully apply it to the occlusal portions of the teeth. Vibrate additional stone into the flask to slightly overfill it. Place the lid on and press completely to place, allowing excess stone to squeeze out of the lid holes. Clear excess stone and place the flask in a press under light pressure. Artificial stone is used over the teeth because its greater strength will better resist pressures against the teeth during packing. Allow the stone to set for 45 minutes.

92
2. Wax Elimination:
Immerse the flask in boiling water for 5 minutes to soften the wax. Remove from water and carefully pry open the flask halves. Peel away the baseplate and unmelted portions of wax. Note that the teeth are retained in the upper half of the flask. Clear all traces of wax from all surfaces and teeth by flushing repeatedly with clean boiling water.
3. Packing and Curling:
Allow the flasks to cool to room temperature and paint all surfaces. EXCEPT THE TEETH, with tin foil substitute until shiny.
Prepare a mix of acrylic resin sufficient for a denture (30 gr polymer to 30 cc monomer is enough for the average case). Follow manufacturers' directions for proper mixing and packing consistency. See dental materials section at the end for characteristics of polymerization.
There are methods of packing; trial pack closure and single pack closure.
For trial pack closure, acrylic is placed into each half of the flask in slight excess and a sheet of plastic is placed between the halves before closure. The flask is slowly compressed in a (pneumatic) press allowing excess acrylic to slowly squeeze out between flask halves. The flask is opened and excess acrylic can be added if necessary and the process repeated until complete closure is achieved. The final closure will not contain the plastic sheet. When applying the acrylic to the molds, care should be exercised so that the teeth are not lifted or moved. The packing pressure should be moderate and applied gradually as the excess acrylic escapes. Great pressure can be directed at the teeth during closure which can displace or intrude them into the investing material.
4. Curing:
The flasks should remain under pressure for at least 15 minutes. This is known as bench curing and lets the acrylic equalize its flow before curing. If 2 dentures are to be cured, they may be transferred to a double processing press.
The manufacturers should be followed for curing. Most acrylic resins are cured in water at 160 F for 1 hour, followed by another hour at boiling. An alternative method is 160 F for 10 hours. The flasks are removed and allowed to bench cool. Bench cool is very important as separating the denture while is to hot may cause fracture.
5. Recovery (Deflasking):
Removing the flask lid by wedging an instrument in the notch that is provided on the flat end of the flask. Using a mallet, tap the insert disc at the bottom of the flask until the investment is dislodged from the flask. Using plaster shears or nippers, chip the plaster from around the periphery of the stone cast until the base is exposed. Using plaster saw

93
and shears remove al plaster until the denture is exposed. The plaster should be removed in small increments so that the acrylic, the cast nor the teeth are fractured. You should recover a processed denture base containing teeth attached to a stone master cast.
6. Occlusal Correction (a.k.a., Laboratory Remount):
The recovered dentures are luted to their original mountings with sticky wax or compound and then replaced on the articulator. The accuracy of the occlusal should be checked. The most common fault found is an increase in vertical dimension (incisal pin open-not on the incisal table) due to the slight excess in the flask. An occlusal error up to 3/4mm is acceptable and can be corrected by occlusal alteration. Follow the procedure for selective grinding until the correct vertical dimension (incisal pin is again flush on the incisal table) and balanced occlusion is obtained.
7. Finish:
After equilibration is completed, the denture is removed from the stone casts using a plaster saw and shears. Acrylic may crack or fracture if excess pressure or wedging forces are exerted. Remember that parts of the ridge configuration may contain undercuts which will hold the denture fast. These areas must be chipped away carefully.
Trim all gross excess acrylic down to the original waxed denture form, being careful not to remove the following:
- Buccal, facial and lingual fold contour
- Post-dam area
- Gingival festooning around the teeth
- Surface contour and root eminences
Minor alteration of these areas may be made with acrylic buts, small burs and stone
- Inspect the tissue side of the dentures for small blebs due to voids in the casts. Remove these with burs
- Finish the external surface and peripheral fold with rubber wheels to remove gross defects and to impart final contour
- Using a wet rag wheel mounted on a lather, polish the external surfaces up to the peripheral fold with medium pumice followed by fine flour of pumice until all scratches are removed. It is advisable to use the low speed on the lathe in order to better control the amount of polish. Maneuver the denture so that the depressed or concave areas are polished. Maintain the surface contour during this procedure . Final impart a high shine

94
on the same areas using a felt wheel and green compound. Note that the basal seat surfaces are not altered or shined.
INSERTION AND OCCLUSAL EVALUATION
A. DEFINITION:
Insertion is the intraoral placing of a dental prosthesis and evaluation of the occlusion using a clinical remount procedure.
B. OBJECTIVE:
To test the retention and stability of a denture, to correct any occlusal disharmonies and to have a patient wear this denture home. The student must also be able to correctly answer questions on denture insertion and occlusal equilibration on a written examination.
C. INSTRUMENTS AND MATERIALS:
1. Mouth mirror
2. Handpiece and suitable stones and buts
3. Maxillary "remount cast" on articulator
4. Mandibular "remount cast
5. Articulating paper
6. Alu wax
7. Pressure Indicating Paste (PIP) with brush or Q-tips
8. Thompson's indicator sticks
D. PROCEDURE:
Prior to the patient's arrival each denture should be carefully inspected. The borders should be cut back to the mucobuccal fold and should be rounded and smooth. The maxillary denture should end at the terminal extent of the posterior palatal seal and not beyond. All frenum attachments should be well defined. There should be no blebs of acrylic inside or outside the denture, especially on or near the teeth. All sharp spines and spicules should be removed, especially in the rugae area.

95
In addition to the above, prior to the patient's arrival, remount casts should be made. The undercuts are blocked out of the maxillary denture using wet pumice or wet paper toweling and it is placed on the face-bow preservation on the articulator. The "remount cast" is poured inside the maxillary denture and is mounted in the articulator all in one pour. Next the mandibular denture is blocked out and a "remount cast" is poured. Both "casts" are now ready for the clinical remount procedure.
Before the dentures are remounted however, each denture painted with a light, even coat of PIP with the streaks all going in the same e direction and is inserted separately and tested for retention and stability. While the denture is gently held in place, manipulate the lips and cheeks to test for possible overextension especially in the border and frenum areas. Apply pressure to the teeth at various angles to test for stability.
Frenum attachments should be relieved with a narrow acrylic but or a carbide but where they do not move freely or where they dislodge the denture. Borders should be adjusted if they are overextended. The inside of the denture is inspected for pressure spots - these will appear as areas wiped free of PIP - and gently relieved with an acrylic bur. Make certain that the areas are legitimate pressure spots and not a place that was disturbed by your fingers. NOTE ALSO that because the maxillary anterior is frequently undercut, pressure spots appearing in this area are not routinely removed - UNLESS & UNTIL the patient feels uncomfortable, this are is NOT relieved. If the patient does feel some discomfort, the denture is taken down ONLY enough to be able to insert and remove the denture comfortably. The denture should be re-painted, re-inserted and relieved repeatedly until there are no pressure spots and/or the patient is comfortable. Denture should be re-polished if necessary.
Next put both dentures in together and observe the occlusion. Have the patient close slowly and STOP upon first contact. If the occlusion is obviously open on one side or anteriorly, a Clinical Remount is indicated at this time. If a discrepancy is not obvious, the occlusion is checked with articulating paper. If the discrepancies are small, adjustments are made using the articulator paper marks as your guide and the remount is set aside for a subsequent visit. If the discrepancies are large, do a remount. The Clinical Faculty member will assist and guide you in evaluating and adjusting the dentures.
The Clinical Remount-
Soften a layer of Alu wax and lay it over the lower posterior teeth. Place the mandibular denture in the mouth (the maxillary denture should already be in) and guide the patient into centric relation. It may be necessary to do this a few times to make certain the patient goes comfortably and reliably into CR. The dentures are removed and placed together (if they were not removed as one unit) and inverted onto the maxillary "remount cast". The mandibular "remount cast" is gently but firmly placed into the mandibular denture and the mandibular "cast" is mounted in the articulator. The equilibration of the dentures is performed in the same manner as that of a laboratory remount.

96
Insert articulating paper, tap to find the high spots and relieve. The denture should be relieved in excursions as well as centric relation. Anatomic contours should be maintained and/or recreated to the best of your ability.
Remove the dentures from the articulator, save the mounting for possible repeat of procedure and polish the teeth if necessary. At this point the patient is instructed in the use and care of the dentures.
E. PROBLEMS AND ERRORS:
1. Improper or excessive grinding will obliterate occlusal anatomy and adversely affect occlusal plane, vertical dimension, compensating curve and efficiency of the teeth.
DENTURE CARE INSTRUCTIONS
Columbia University School of Dental and Oral Surgery
Division of Prosthetics
Robert F. Wright, D.D.S.
Adam J. Freeman, D.D.S.
Initial Sensations
When you first begin to wear your dentures, they may feel loose. Until you have learned to keep them in place with the muscles of your cheeks and tongue, they may tip when you chew, allowing food or liquids to pass under them.
No matter how thin the dentures are, they will feel bulky. They may make your tongue feel crowded or may cause a slight gagging sensation. Until your gum ridges are use to supporting dentures, your mouth may feel sore or irritated. Your saliva flow may also increase temporarily.
After a few weeks, as your oral tissues become adjusted to wearing dentures, these problems should decrease. If you continue to experience irritation or excessive soreness in any area, you should see your dentist.

97
Appearance
When you first get dentures, your facial expression may seem different. A more normal expression will return when the muscles of your cheeks and lips adapt to the dentures.
Dentures may improve your appearance by changing the shape of your face, and reducing facial creases.
Eating
When you are first learning to use your dentures, it is best to eat soft foods. Cut your food into small pieces and chew slowly on both sides with your back teeth to keep your dentures from tipping. After a few days, when your dentures are feeling more comfortable try coarser and harder foods until you are able to eat a more normal diet. Learning to chew with dentures takes practice!
Speaking
Sometimes, wearing dentures can make a difference in the way you pronounce certain words. To help overcome any speech difficulties, practice reading aloud. If the denture teeth click together when you talk, speak more slowly. Bring any problems to the attention of your dentist.
At first, you may find that your dentures become loose when you laugh, or cough, or even smile. To reposition them, close your teeth together gently and swallow.
When To Wear Your Dentures
Follow your dentist's advice on how long you should wear your dentures each day.
Day 1____hrs., Day 2____hrs, Day 3____hrs, Day 4____hrs, Day 5____hrs
You should always take your dentures out before bed at night, and put them back in the morning. This gives your mouth a chance to rest and helps maintain oral health.
Caring for Your Mouth
Even with dentures, you still need to take care of your mouth. Each day before inserting your denture, brush your gums, tongue and palate with a soft-bristled brush, to remove plaque and to stimulate circulation.
Visit your dentist regularly (even if you no longer have any natural teeth) for a complete oral examination. Besides checking your dentures, the dentist will for signs of oral cancer, and examine your gum ridges, tongue, palate and jaw joints (TMJ).

98
Caring For Your Dentures
For a healthy mouth and fresh breath, clean plaque and food deposits from your dentures daily. This also helps keep the dentures from becoming permanently stained.
Dentures should be handled carefully! Dropping them (even a few inches into the sink) can break the denture base or a tooth. When cleaning or inserting your dentures, hold then over a towel ora basin half-filled with water. And always keep your dentures out to the reach of children and pets.
Before brushing your dentures, rinse them well to remove any loose particles. Next, apply your favorite denture cleaner to a moistened brush and clean all surfaces of the dentures. Brush thoroughly but carefully. Scrubbing too hard can damage the plastic parts of the denture or bend metal clasps.
Many special denture-cleaning agents are available (ask your dentist about them), follow their instructions carefully. Some people prefer to use hand soap, a mild dishwashing liquid or baking soda. Household cleaners and some toothpastes should not be used because they are too abrasive. Never use bleach on your dentures!
If your dentures become dry, they may change shape. When you take your dentures out at night, place them in a container of denture-cleaning solution or water. Never put dentures in hot water, they can warp.
If your dentures break, crack or chip, or if a denture tooth becomes loose, call your dentist immediately. We can usually repair your dentures, but try to save the broken pieces.
Long-Term Denture Success
Although your dentures (if cared for properly) will keep their shape, your mouth continues to change. The bone and gum ridges that support your dentures can recede or shrink. If ridge shrinkage occurs, your dentures will begin to feel loose and less stable, and your ability to chew may decrease.
Prolonged use of ill fitting dentures can irritate the gums, tongue and cheeks and cause the ridges of the mouth to shrink to the point where it will be almost impossible to fit them with normal dentures.
To prevent or correct these problems, you should see your dentist regularly.
Your success in wearing dentures depends on you! With a positive attitude, persistence and regular check-ups, you can become one of the millions of people who wear dentures successfully.

99
Modified with permission from a brochure written by The Federation of prosthodontics Organization.
Chapter 11
SET-UP OF 30 DEGREE DENTURE TEETH
A. DEFINITION:
The set-up is the arrangement of artificial denture teeth on a denture base suitable for mouth trial.
B. OBJECTIVES:
1. To properly position maxillary anterior teeth in wax with relation to an opposing mandibular occlusal rim, to a midline and to one another.
2. To properly position mandibular anterior teeth with relation to maxillary anterior teeth so as to have a degree of horizontal overlap.
3. To properly position mandibular posterior zero degree teeth with relation to the occlusal surface and guide lines on the mandibular wax rim.
4. To properly position maxillary posterior teeth with relation to mandibular posterior teeth in centric relation and eccentric relations.
5. To maintain the vertical dimension of occlusion during the set-up procedure.
C. INSTRUMENTS AND MATERIALS:
1. Adjustable articulator with master casts mounted
2. Record bases and wax rims
3. Denture teeth
4. #7 wax spatula
5. Pink baseplate wax

100
6. Buffalo knife
7. Alcohol torch
8. Bunsen burner
9. Cotton rolls
D. REQUIREMENTS:
1. Re-contoured wax rims and baseplates that have been graded "Pass"
2. Hanau Articulator positioned at the following settings:
Condylar guidance: 30 degrees
Bennett angle: 15 degrees
Incisal table: 30 degrees
E. PROCEDURE:
1. The set-up:
The primary goal of the position of teeth, arch form and occlusion is to permit optimum functioning of the stomatognathic system, i.e., respiration, deglutition, mastication, speech and esthetics.
a. Maxillary anteriors:
Arrange the selected maxillary anterior teeth on the maxillary wax rim in a manner similar to that done for the 0° set-up. Follow the contour of the wax rim for the labial arch form and position of the incisal edges.
b. Maxillary posteriors:
The position of the posterior teeth has a direct bearing on the stability of the dentures. Under ideal conditions a more favorable position for mechanical advantage would be over the respective ridges. Where this cannot be accomplished in normal schema of occlusion, other occlusal relationships of teeth may be considered, such as cross-bite, etc.
Locate the crest of ridge by lightly inscribing a line from the mesial of the second bicuspid through the distal of the second molar regions on both casts. With a straight edge held parallel to these lines, mark a projection of the lines onto the casts beyond the denture area anteriorly and posteriorly (land areas of the casts). Study the ridge

101
relationships of these lines to determine any gross variations and problems that might exist. At this time the final selection of the occlusal configuration is made according to the ridge relationships and condition of the ridges as previously described. A ridge relationship which will permit a normal set-up would show the mandibular ridge crest falling within a range of 1/4 inch medial to the maxillary ridge crest line.
Proceed to set up the maxillary posterior teeth using the occlusal plane plate and the enclosed handout as your guides. Position the teeth with their proper angulation so that the lingual cusps fall directly over the ridge crest line. Occasionally it will be necessary to realign the first an/or second bicuspid so that the proper continuity of arch form is achieved with the cuspid. In most cases a compensating curve is incorporated by raising the second molar above the occlusal plane. The exact degree of curvature required will ultimately be a function of the interrelationship between the condylar guidance the incisal guide angle.
RELATIONSHIP OF MAXILLARY POSTERIOR TEETH TO OCCLUSAL PLANE
premolars
- long axix perpendicular to the plane.
- lingual cusps on the plane.
- buccal cuspa 1/2 mm above the plane.
1st molar
- mesial lingual cusp on the plane.
- mesial buccal cusp 1/2 mm above the plane.
- distal lingual cusp about 3/4 mm above the plane.
- distal buccal cusp 1 mm above the plane.

102
2nd molar
- mesial lingual cusp 1/2 mm above the plane.
- mesial buccal cusp 1 mm above the plane.
- distal lingual cusp about 1 1/2 mm above the plane.
- distal buccal cusp 1- 1 1/2 mm above the plane.
These measurements are meant as a guide and only shows relative positions of the teeth to one another and to the occlusal plane.
OCCLUSAL VIEW WITH OCCLUSAL PLANE PLATE LINED UP AGAINST THE BUCCALS
:
Buccal Alignment
- The canine, 1st and 2nd premolars and mesial buccal of the 1st molar should be in a straight line.
- All 4 buccal cusps of the molars should be in a straight line.
c. Mandibular posteriors:
Begin the set-up of the mandibular posteriors by positioning the right and left first molars. Before any other teeth are set you must check ALL EXCURSIONS (protrusive, working and balancing)! Next position the second bicuspids followed by the second molars. At this stage these teeth should be balanced. Finally, place the first bicuspid.

103
1st molar -
Place the lower 1st molar on the ridge so that the mesial lingual cusp of the upper 1st molar seats into the central fossa of the lower 1st molar. From the buccal, the mesial buccal cusp is lined up with the anterior buccal groove of the lower 1st molar. From the lingual, the mesial lingual cusp of the lower molar fits into the embrasure formed by the upper 2nd bicuspid and the 1st molar.
2nd premolar
Place the lower 2nd premolar with the buccal cusp between the upper 1st and 2nd premolars - the tip of the cusp touching the marginal ridge of each.
1st premolar -
Place the lower 1st premolar with the tip of the buccal cusp in contact with the mesial marginal ridge of the upper 1st premolar.
2nd molar -
After the 1st molar and premolars have been set, you can then go back and place the 2nd molar and then the lower anterior teeth.

104
In order to perfect a balanced occlusion it may be necessary to modify the degree of the antero-posterior compensating curvature, raising or lowering certain teeth, together with a change in the mesio-distal angulation. It may also be necessary to alter the bucco-lingual angulation in order to change the medio-lateral compensating curve.
d. Mandibular anteriors:
Position a mandibular central incisor so that the ridge lap would fall just labial to the mandibular ridge. With the normal labial angulation observe the overlap relationships. The amount of overlap is influenced but nor necessarily controlled by the degree of condylar angulation. The most desirable overlap relationship would be within a 2mm vertical range. The greater the condylar angulation the greater the vertical overlap that may be incorporated in arranging at a protrusive balance.

105
For the pre-clinic laboratory case, your anterior teeth should be set with a 1-2mm vertical overlap AND in position so that both mandibular central incisors just kiss the maxillary central incisors when the articulator is placed in a protrusive excursion.
At the same time, posterior teeth should be in their proper protrusive relationship. The central incisors should not jump over one another. The incisal pin should remain in contact with the occlusal table in protrusive.
NOTE ALSO: in some cases a space problem may occur - there may not be enough room for the mandibular canines. One should narrow the mandibular first bicuspid mesio-distally mesio-distally AND/OR the mandibular canine to create room. Please remember to maintain the anatomical configuration of any tooth that is altered AND to maintain it's proper inter-occlusal position (working, balancing and protrusive).
Chapter 12
ADDITIONAL DENTURE SERVICES
REPAIRING FRACTURED DENTURES
The basic techniques described in this section may be modified for handling any type repair commonly encountered by the prosthetic technician. In making repairs, the fractured parts must be lined up carefully and accurately in order to maintain the proper relationships in the repaired denture.
Assemble the parts of the broken denture and lute them together with sticky wax on the external surface. While the sticky wax is being added and while it is hardening, the parts must be stabilized. The assemblage may be strengthened with discarded burs or plastic or wooden sticks.
Fill in any deep undercut on the denture prior to pouring a cast in the denture, so that the denture can later be removed
REPLACING TEETH
The replacement of loosened or broken teeth is relatively simple. Loosened teeth which have not been chipped or broken are simply reattached in their original positions. A stone cast is seldom needed for the simple replacement of teeth on a complete denture.
Cut away the fractured teeth with burs, leaving enough space for the placement of new teeth. Usually the acrylic resin on the facial surface of the denture base need not be disturbed, for the repair can be effected from the lingual aspect. Cut away the acrylic
106
resin on the lingual side to provide sufficient access, and dovetail the area to provide better mechanical retention of the new acrylic resin.
If the original tooth is being replace, it will go into position easily and accurately. If a new tooth is used, the mold number of the original tooth, which indicates its size and shape, may be obtained from the ridge lap or from the imprint of the tooth in the denture base. If the denture was made here at SDOS, the mold number should be recorded in the patient chart. If the information you require is not in any of the above places, measure the width and length of the contralateral tooth and/or compare the occlusal form of the contralateral tooth with those from the mold guide and chart. The shade is determined from the adjacent teeth with the aid of a shade guide.
Position the tooth in proper alignment. If the original tooth was altered, either gingivally, proximally or incisally, alter the new tooth similarly to reestablish esthetics and function. Attach the new tooth to the adjacent teeth with sticky wax on the facial surfaces, to keep it in the proper alignment. Add self-curing acrylic resin, allow it to polymerize, and finish the repair in the same manner as for the repair of broken denture.
DENTURE REBASING
Rebasing is the process of refitting a denture by replacing most of the denture base material without changing the occlusal relations of the teeth. Dentures may require rebasing because of tissue changes, damage to the denture base, and/or broken teeth.
This procedure is similar to the relining procedure. The difference is that all of the old acrylic resin is removed, except just enough to hold the denture teeth together in one U shaped piece, and replace with new acrylic.

107
Appendix: QUALITY EVALUATION CRITERIA SHEETS
Custom Impression Trays Baseplate & Wax Occlusal Rims Mounted Wax rims for 0 Degree Set-Up Setting Anterior Teeth - 0 Degree Setting Mandibular Posterior Teeth - 0 Degree Setting Maxillary Posterior Teeth / Denture Completion - 0 Degree Mounted Wax Rims for 30 Degree Set-Up Setting Maxillary Anterior Teeth - 30 Degree Setting Maxillary Posterior Teeth - 30 Degree Setting Mandibular Posterior Teeth - 30 Degree Setting Mandibular Anterior Teeth - 30 Degree Waxing and Festooning - 30 Degree Completed 30 Degree Set-Up
Acknowledgments
Boston University: Dr Jeane Emerling, Dr Remo Sinibaldi
Columbia University: Dr John Lucca, Dr Joseph DeLisi
Southern Illinois University: Dr Paul Tischler, Dr Elwood Stade