study unit motorcycle maintenance unit motorcycle maintenance by ed abdo. about the author edward...
TRANSCRIPT
Study Unit
MotorcycleMaintenance
By
Ed Abdo

About the Author
Edward Abdo has been actively involved in the motorcycle and ATV industry for morethan 25 years. He received factory training from Honda, Kawasaki, Suzuki, and Yamahatraining schools. He has worked as a motorcycle technician, service manager, andService/Parts department director.
After being a chief instructor for several years, Ed is now the Curriculum DevelopmentManager for the Motorcycle Mechanics Institute in Phoenix, Arizona. He is also a contractinstructor and administrator for American Honda’s Motorcycle Service EducationDepartment.
All terms mentioned in this text that are known to be trademarks or servicemarks have been appropriately capitalized. Use of a term in this text shouldnot be regarded as affecting the validity of any trademark or service mark.
Copyright © 1998 by Thomson Education Direct
All rights reserved. No part of the material protected by this copyright may bereproduced or utilized in any form or by any means, electronic or mechanical,including photocopying, recording, or by any information storage and retrievalsystem, without permission in writing from the copyright owner.
Requests for permission to make copies of any part of the work should be mailedto Copyright Permissions, Thomson Education Direct, 925 Oak Street, Scranton,Pennsylvania 18515.
Printed in the United States of America
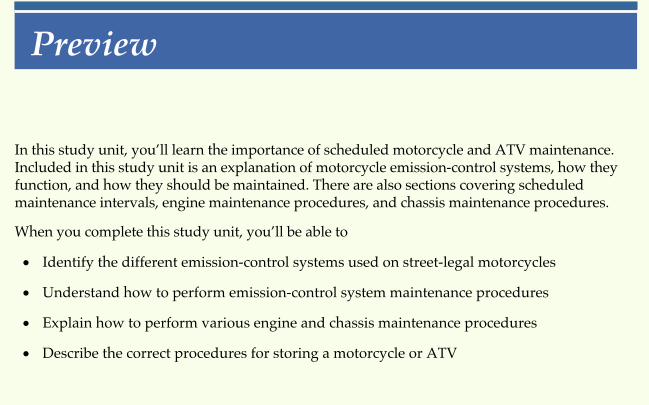
In this study unit, you’ll learn the importance of scheduled motorcycle and ATV maintenance.Included in this study unit is an explanation of motorcycle emission-control systems, how theyfunction, and how they should be maintained. There are also sections covering scheduledmaintenance intervals, engine maintenance procedures, and chassis maintenance procedures.
When you complete this study unit, you’ll be able to
� Identify the different emission-control systems used on street-legal motorcycles
� Understand how to perform emission-control system maintenance procedures
� Explain how to perform various engine and chassis maintenance procedures
� Describe the correct procedures for storing a motorcycle or ATV
Preview
iii
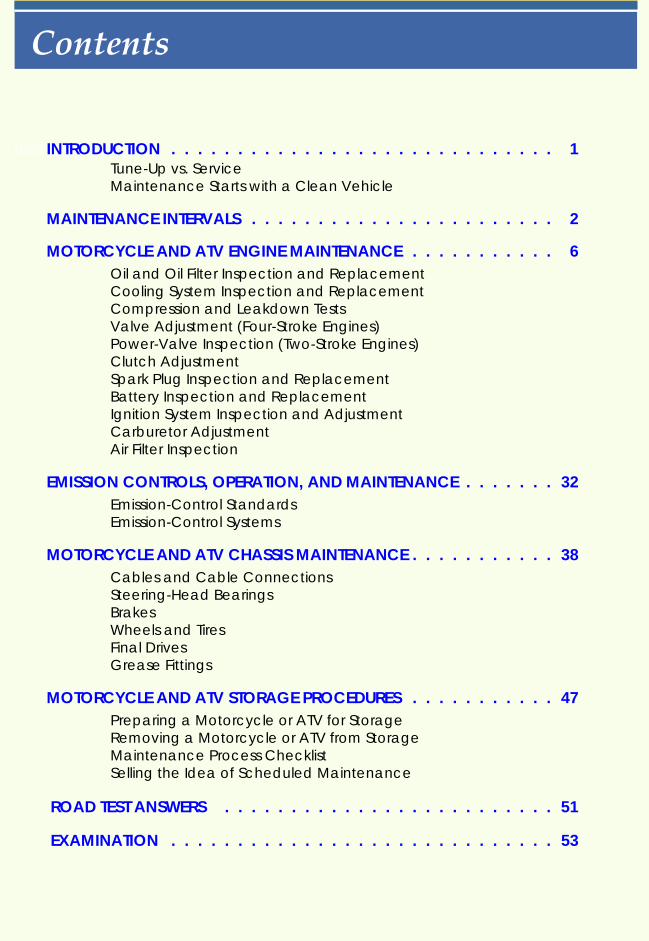
03381800tc.txtINTRODUCTION . . . . . . . . . . . . . . . . . . . . . . . . . . . . . 1Tune-Up vs. ServiceMaintenance Starts with a Clean Vehicle
MAINTENANCE INTERVALS . . . . . . . . . . . . . . . . . . . . . . . 2
MOTORCYCLE AND ATV ENGINE MAINTENANCE . . . . . . . . . . . 6Oil and Oil Filter Inspection and ReplacementCooling System Inspection and ReplacementCompression and Leakdown TestsValve Adjustment (Four-Stroke Engines)Power-Valve Inspection (Two-Stroke Engines)Clutch AdjustmentSpark Plug Inspection and ReplacementBattery Inspection and ReplacementIgnition System Inspection and AdjustmentCarburetor AdjustmentAir Filter Inspection
EMISSION CONTROLS, OPERATION, AND MAINTENANCE . . . . . . . 32Emission-Control StandardsEmission-Control Systems
MOTORCYCLE AND ATV CHASSIS MAINTENANCE . . . . . . . . . . . 38Cables and Cable ConnectionsSteering-Head BearingsBrakesWheels and TiresFinal DrivesGrease Fittings
MOTORCYCLE AND ATV STORAGE PROCEDURES . . . . . . . . . . . 47Preparing a Motorcycle or ATV for StorageRemoving a Motorcycle or ATV from StorageMaintenance Process ChecklistSelling the Idea of Scheduled Maintenance
ROAD TEST ANSWERS . . . . . . . . . . . . . . . . . . . . . . . . . 51
EXAMINATION . . . . . . . . . . . . . . . . . . . . . . . . . . . . . 53
v
Contents
INTRODUCTIONWhat are the benefits to having motorcycles and ATVs tuned-up andserviced on a regular basis? Motorcycle and ATV technicians arefrequently asked this question. Peak performance from a motorcycleor ATV requires that each part be in good working condition andcorrectly adjusted. An experienced technician knows that if a partisn’t functioning correctly, it can affect the performance of otherrelated parts, and the performance of the entire machine. Forexample, a spark plug that doesn’t fire when it should affects thepower output of the engine. Spark plug failures can be caused by anelectrical system malfunction or by carburetion system problems.Tune-ups and scheduled service ensure that marginal parts andout-of-tolerance adjustments are routinely corrected.
Tune-Up vs. ServiceAll vehicles require some level of routine maintenance. Thismaintenance is divided into two categories—tune-ups and service. Atune-up generally consists of inspecting, testing, and adjusting themotorcycle or ATV engine. During a tune-up, parts such as sparkplugs, ignition points (where used), condensers, and filters arereplaced. Tune-ups are needed to keep engines operating at peakefficiency. Normally, a tune-up can be done without removing theengine from the motorcycle or ATV frame. Any maintenanceprocedures outside of the limits of a tune-up are usually consideredto be service. Complete service may include inspecting, repairing, andadjusting various parts and systems such as the clutch, cables, chains,tires, brakes, steering, and exhaust.
As you’ll find, the word tune-up means different things to differentpeople. For instance, some motorcycle or ATV owners assume thatcertain items will be serviced during a routine tune-up, when in fact,the tune-up may not include that level of service. A fairly commoncustomer misconception is that a tune-up automatically includescarburetor overhaul service. Some shops may include this in atune-up, others won’t. Another example of tune-up variations is thatsome service shops will adjust the valves in a four-stroke engineduring a tune-up while other service shops won’t. Some shopsconsider this level of maintenance to be service. The differences inwhat different shops provide during a tune-up is one of the mainreasons that you’ll find a wide range of prices for tune-ups.
Motorcycle Maintenance
1
Maintenance Starts with a Clean VehicleThe first step in performing quality maintenance on any motorcycleor ATV is to start with a clean vehicle. It’s very important that dirt orother foreign material not contaminate the internal working parts ofthe engine. Use soap and water or a commercially available degreaserto clean the exterior. (It isn’t advisable to use steam for cleaningbecause it can damage the parts of the electrical system). Cleanmotorcycles and ATVs are also easier to work on and look betterwhen you have finished the maintenance work. If you’re operatingyour own repair shop, the cost of vehicle cleaning can be added to theprice you charge for the service work. If you make your clean-vehiclepolicy known to your customers, you can encourage them to bring inclean vehicles when they’re having service work done.
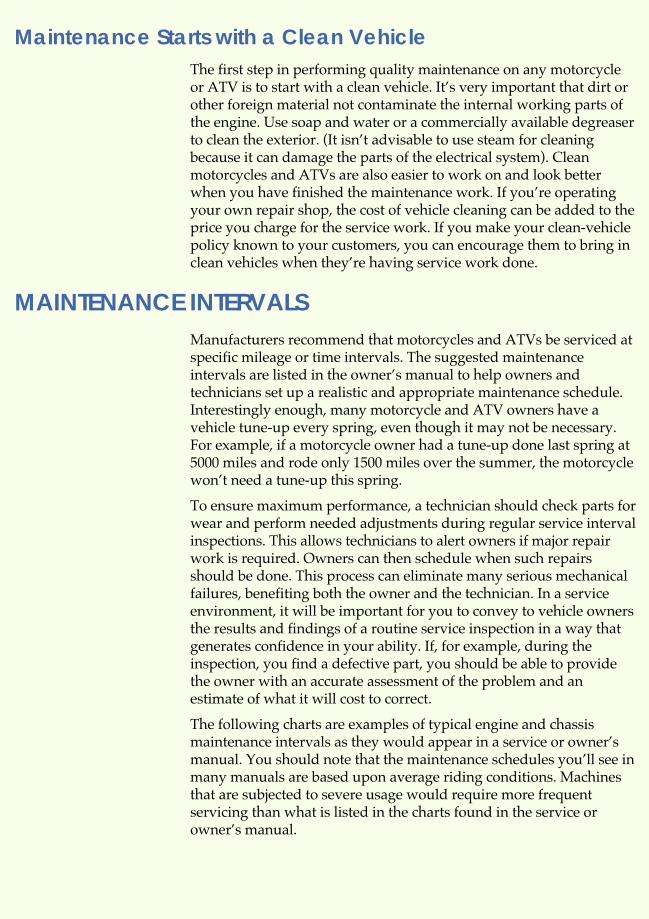
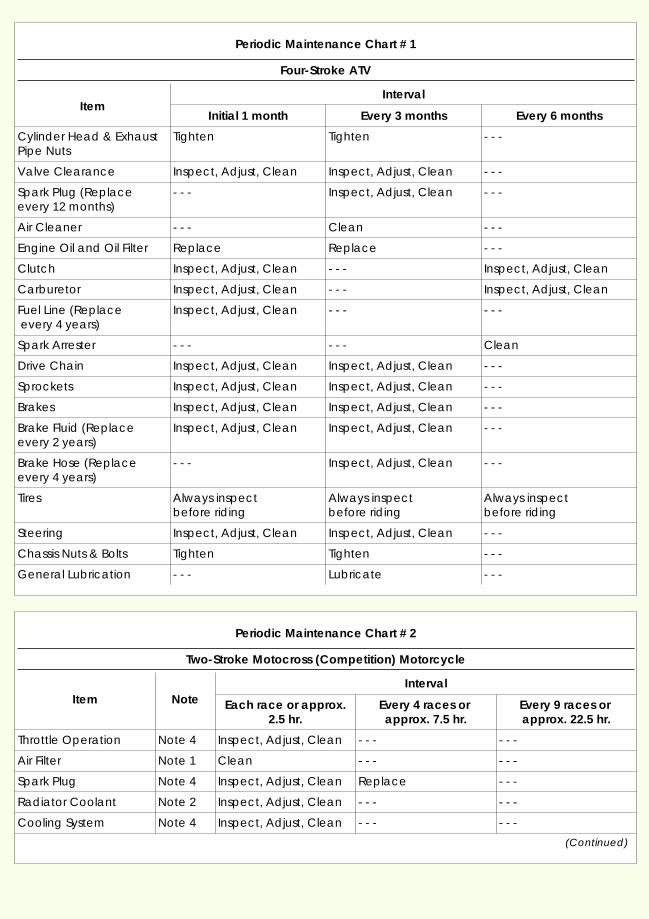
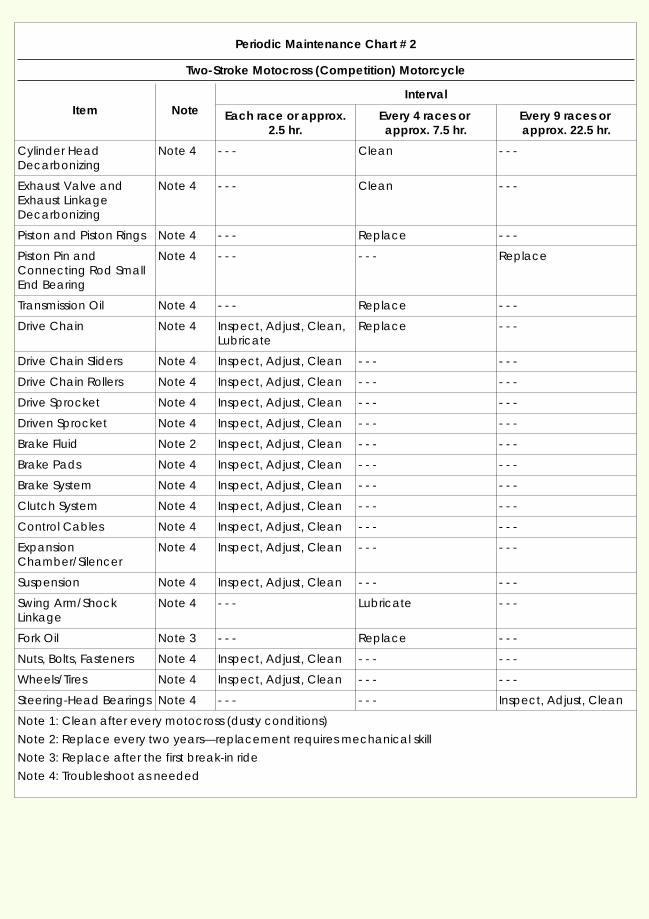
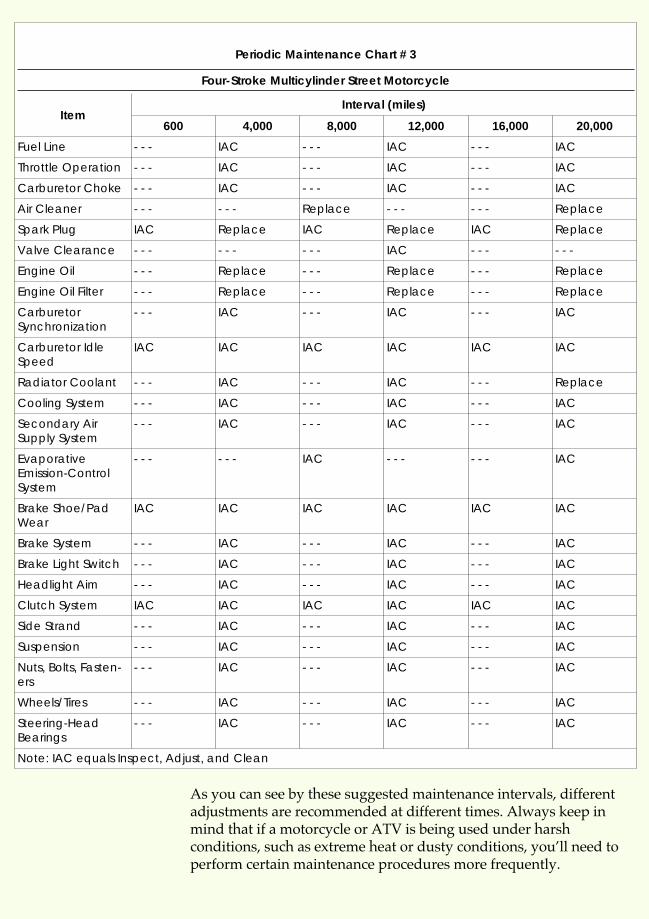
MAINTENANCE INTERVALSManufacturers recommend that motorcycles and ATVs be serviced atspecific mileage or time intervals. The suggested maintenanceintervals are listed in the owner’s manual to help owners andtechnicians set up a realistic and appropriate maintenance schedule.Interestingly enough, many motorcycle and ATV owners have avehicle tune-up every spring, even though it may not be necessary.For example, if a motorcycle owner had a tune-up done last spring at5000 miles and rode only 1500 miles over the summer, the motorcyclewon’t need a tune-up this spring.
To ensure maximum performance, a technician should check parts forwear and perform needed adjustments during regular service intervalinspections. This allows technicians to alert owners if major repairwork is required. Owners can then schedule when such repairsshould be done. This process can eliminate many serious mechanicalfailures, benefiting both the owner and the technician. In a serviceenvironment, it will be important for you to convey to vehicle ownersthe results and findings of a routine service inspection in a way thatgenerates confidence in your ability. If, for example, during theinspection, you find a defective part, you should be able to providethe owner with an accurate assessment of the problem and anestimate of what it will cost to correct.
The following charts are examples of typical engine and chassismaintenance intervals as they would appear in a service or owner’smanual. You should note that the maintenance schedules you’ll see inmany manuals are based upon average riding conditions. Machinesthat are subjected to severe usage would require more frequentservicing than what is listed in the charts found in the service orowner’s manual.
2 Motorcycle Maintenance
Periodic Maintenance Chart # 1
Four-Stroke ATV
ItemInterval
Initial 1 month Every 3 months Every 6 months
Cylinder Head & ExhaustPipe Nuts
Tighten Tighten - - -
Valve Clearance Inspect, Adjust, Clean Inspect, Adjust, Clean - - -
Spark Plug (Replaceevery 12 months)
- - - Inspect, Adjust, Clean - - -
Air Cleaner - - - Clean - - -
Engine Oil and Oil Filter Replace Replace - - -
Clutch Inspect, Adjust, Clean - - - Inspect, Adjust, Clean
Carburetor Inspect, Adjust, Clean - - - Inspect, Adjust, Clean
Fuel Line (Replaceevery 4 years)
Inspect, Adjust, Clean - - - - - -
Spark Arrester - - - - - - Clean
Drive Chain Inspect, Adjust, Clean Inspect, Adjust, Clean - - -
Sprockets Inspect, Adjust, Clean Inspect, Adjust, Clean - - -
Brakes Inspect, Adjust, Clean Inspect, Adjust, Clean - - -
Brake Fluid (Replaceevery 2 years)
Inspect, Adjust, Clean Inspect, Adjust, Clean - - -
Brake Hose (Replaceevery 4 years)
- - - Inspect, Adjust, Clean - - -
Tires Always inspectbefore riding
Always inspectbefore riding
Always inspectbefore riding
Steering Inspect, Adjust, Clean Inspect, Adjust, Clean - - -
Chassis Nuts & Bolts Tighten Tighten - - -
General Lubrication - - - Lubricate - - -
Periodic Maintenance Chart # 2
Two-Stroke Motocross (Competition) Motorcycle
Item NoteInterval
Each race or approx.2.5 hr.
Every 4 races orapprox. 7.5 hr.
Every 9 races orapprox. 22.5 hr.
Throttle Operation Note 4 Inspect, Adjust, Clean - - - - - -
Air Filter Note 1 Clean - - - - - -
Spark Plug Note 4 Inspect, Adjust, Clean Replace - - -
Radiator Coolant Note 2 Inspect, Adjust, Clean - - - - - -
Cooling System Note 4 Inspect, Adjust, Clean - - - - - -
(Continued)
Motorcycle Maintenance 3
Periodic Maintenance Chart # 2
Two-Stroke Motocross (Competition) Motorcycle
Item NoteInterval
Each race or approx.2.5 hr.
Every 4 races orapprox. 7.5 hr.
Every 9 races orapprox. 22.5 hr.
Cylinder HeadDecarbonizing
Note 4 - - - Clean - - -
Exhaust Valve andExhaust LinkageDecarbonizing
Note 4 - - - Clean - - -
Piston and Piston Rings Note 4 - - - Replace - - -
Piston Pin andConnecting Rod SmallEnd Bearing
Note 4 - - - - - - Replace
Transmission Oil Note 4 - - - Replace - - -
Drive Chain Note 4 Inspect, Adjust, Clean,Lubricate
Replace - - -
Drive Chain Sliders Note 4 Inspect, Adjust, Clean - - - - - -
Drive Chain Rollers Note 4 Inspect, Adjust, Clean - - - - - -
Drive Sprocket Note 4 Inspect, Adjust, Clean - - - - - -
Driven Sprocket Note 4 Inspect, Adjust, Clean - - - - - -
Brake Fluid Note 2 Inspect, Adjust, Clean - - - - - -
Brake Pads Note 4 Inspect, Adjust, Clean - - - - - -
Brake System Note 4 Inspect, Adjust, Clean - - - - - -
Clutch System Note 4 Inspect, Adjust, Clean - - - - - -
Control Cables Note 4 Inspect, Adjust, Clean - - - - - -
ExpansionChamber/Silencer
Note 4 Inspect, Adjust, Clean - - - - - -
Suspension Note 4 Inspect, Adjust, Clean - - - - - -
Swing Arm/ShockLinkage
Note 4 - - - Lubricate - - -
Fork Oil Note 3 - - - Replace - - -
Nuts, Bolts, Fasteners Note 4 Inspect, Adjust, Clean - - - - - -
Wheels/Tires Note 4 Inspect, Adjust, Clean - - - - - -
Steering-Head Bearings Note 4 - - - - - - Inspect, Adjust, Clean
Note 1: Clean after every motocross (dusty conditions)
Note 2: Replace every two years—replacement requires mechanical skill
Note 3: Replace after the first break-in ride
Note 4: Troubleshoot as needed
4 Motorcycle Maintenance
Periodic Maintenance Chart # 3
Four-Stroke Multicylinder Street Motorcycle
ItemInterval (miles)
600 4,000 8,000 12,000 16,000 20,000
Fuel Line - - - IAC - - - IAC - - - IAC
Throttle Operation - - - IAC - - - IAC - - - IAC
Carburetor Choke - - - IAC - - - IAC - - - IAC
Air Cleaner - - - - - - Replace - - - - - - Replace
Spark Plug IAC Replace IAC Replace IAC Replace
Valve Clearance - - - - - - - - - IAC - - - - - -
Engine Oil - - - Replace - - - Replace - - - Replace
Engine Oil Filter - - - Replace - - - Replace - - - Replace
CarburetorSynchronization
- - - IAC - - - IAC - - - IAC
Carburetor IdleSpeed
IAC IAC IAC IAC IAC IAC
Radiator Coolant - - - IAC - - - IAC - - - Replace
Cooling System - - - IAC - - - IAC - - - IAC
Secondary AirSupply System
- - - IAC - - - IAC - - - IAC
EvaporativeEmission-ControlSystem
- - - - - - IAC - - - - - - IAC
Brake Shoe/PadWear
IAC IAC IAC IAC IAC IAC
Brake System - - - IAC - - - IAC - - - IAC
Brake Light Switch - - - IAC - - - IAC - - - IAC
Headlight Aim - - - IAC - - - IAC - - - IAC
Clutch System IAC IAC IAC IAC IAC IAC
Side Strand - - - IAC - - - IAC - - - IAC
Suspension - - - IAC - - - IAC - - - IAC
Nuts, Bolts, Fasten-ers
- - - IAC - - - IAC - - - IAC
Wheels/Tires - - - IAC - - - IAC - - - IAC
Steering-HeadBearings
- - - IAC - - - IAC - - - IAC
Note: IAC equals Inspect, Adjust, and Clean
As you can see by these suggested maintenance intervals, differentadjustments are recommended at different times. Always keep inmind that if a motorcycle or ATV is being used under harshconditions, such as extreme heat or dusty conditions, you’ll need toperform certain maintenance procedures more frequently.
Motorcycle Maintenance 5

Road Test 1
At the end of each section of Motorcycle Maintenance, you’ll be asked to check yourunderstanding of what you’ve just read by completing a “Road Test.” Writing the answers tothese questions will help you review what you’ve learned so far. Please complete Road Test 1now.
1. True or False? All four-stroke motorcycles and ATVs must have at least one yearly tune-upthat includes adjusting the valves.
2. Based on the service interval charts, service intervals for street-legal motorcycles are givenin miles, and service intervals for off-road motorcycles and ATVs are given in _______.
3. True or False? Based on the service interval chart for a four-stroke street motorcycle, the oiland oil filter should be replaced at different intervals.
4. When should the transmission oil in a two-stroke motocross motorcycle be changed?
5. How frequently should the spark plug be changed in a four-stroke multicylinder streetmotorcycle?
Check your answers with those on page 51.
MOTORCYCLE AND ATV ENGINE MAINTENANCEAs a motorcycle and ATV technician, you’ll need to perform enginetune-ups and vehicle maintenance including cleaning, adjusting, andreplacing parts. This will ensure that parts meet the manufacturer'sspecifications. The parts and systems listed below are subject to dirt,wear, and/or vibration, and should be carefully inspected (andreplaced or adjusted as necessary) when you’re doing an enginetune-up and vehicle maintenance. In addition, certain tests may needto be performed, such as a compression and leakdown test.
� Oil and oil filter
� Cooling system and coolant
� Valve adjustment (four-stroke engines)
� Power valve (two-stroke engines)
� Clutch
� Spark plug
� Battery
6 Motorcycle Maintenance
� Ignition system
� Carburetor
� Air filter
Oil and Oil Filter Inspection and ReplacementIn an earlier study unit, we introduced you to maintaining bothtwo-stroke and four-stroke engine lubrication systems. We’ll nowreview some of what you’ve learned as well as cover some newmaterial.
Two-Stroke EngineThe only maintenance required with the two-stroke enginelubrication system is to be certain that there’s a correct ratio of oil tofuel in the premix type of lubrication system. For an oil-injectionlubrication system, you must verify that there’s an adequate supply oftwo-stroke oil in the oil reservoir.
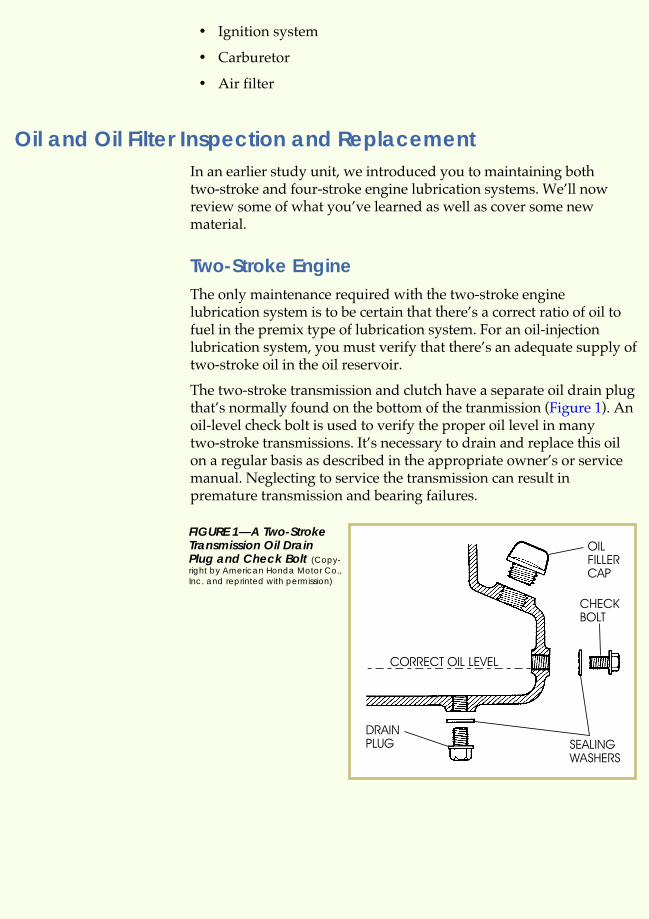
The two-stroke transmission and clutch have a separate oil drain plugthat’s normally found on the bottom of the tranmission (Figure 1). Anoil-level check bolt is used to verify the proper oil level in manytwo-stroke transmissions. It’s necessary to drain and replace this oilon a regular basis as described in the appropriate owner’s or servicemanual. Neglecting to service the transmission can result inpremature transmission and bearing failures.
Motorcycle Maintenance 7
FIGURE 1—A Two-StrokeTransmission Oil DrainPlug and Check Bolt (Copy-right by American Honda Motor Co.,Inc. and reprinted with permission)
Four-Stroke EngineMost four-stroke motorcycle and ATV engines use the same oil tolubricate the engine, transmission, and clutch components. Theseengines usually have only one drain plug for removing the oil fromthe engine crankcase. In most cases, there’s also an oil filter thatshould be replaced whenever the engine oil is changed. Changing theoil filter is just as important as changing the engine oil. The filter trapsand contains most of the dirt and contaminants that the engine hasreleased into the engine oil.
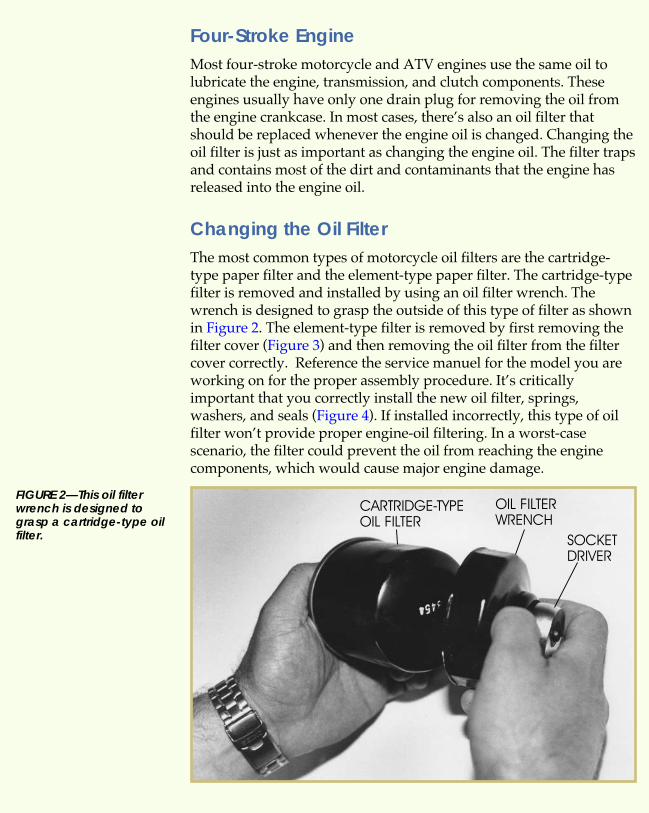
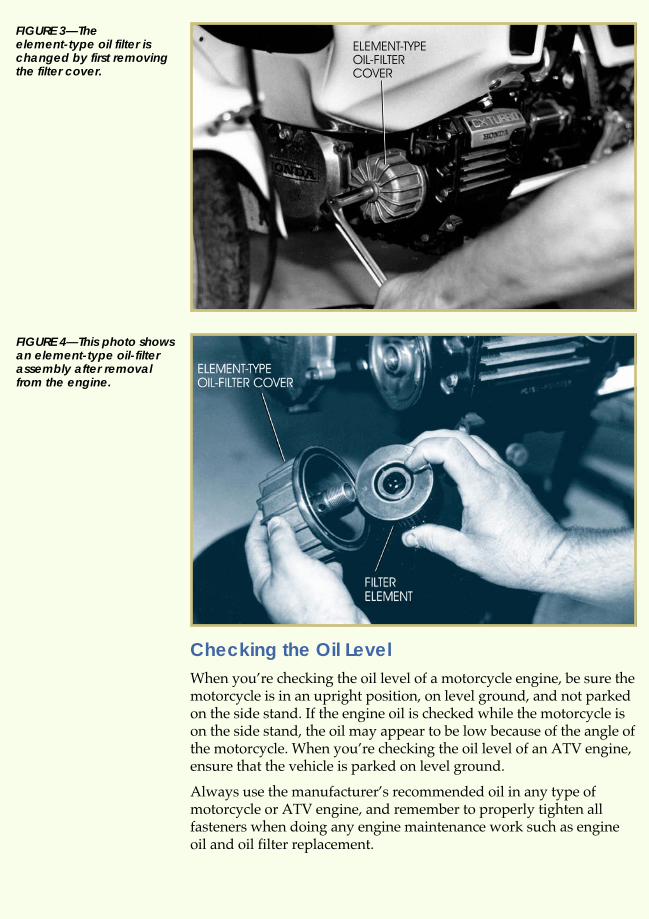
Changing the Oil FilterThe most common types of motorcycle oil filters are the cartridge-type paper filter and the element-type paper filter. The cartridge-typefilter is removed and installed by using an oil filter wrench. Thewrench is designed to grasp the outside of this type of filter as shownin Figure 2. The element-type filter is removed by first removing thefilter cover (Figure 3) and then removing the oil filter from the filtercover correctly. Reference the service manuel for the model you areworking on for the proper assembly procedure. It’s criticallyimportant that you correctly install the new oil filter, springs,washers, and seals (Figure 4). If installed incorrectly, this type of oilfilter won’t provide proper engine-oil filtering. In a worst-casescenario, the filter could prevent the oil from reaching the enginecomponents, which would cause major engine damage.
8 Motorcycle Maintenance
FIGURE 2—This oil filterwrench is designed tograsp a cartridge-type oilfilter.
Checking the Oil LevelWhen you’re checking the oil level of a motorcycle engine, be sure themotorcycle is in an upright position, on level ground, and not parkedon the side stand. If the engine oil is checked while the motorcycle ison the side stand, the oil may appear to be low because of the angle ofthe motorcycle. When you’re checking the oil level of an ATV engine,ensure that the vehicle is parked on level ground.
Always use the manufacturer’s recommended oil in any type ofmotorcycle or ATV engine, and remember to properly tighten allfasteners when doing any engine maintenance work such as engineoil and oil filter replacement.
Motorcycle Maintenance 9
FIGURE 3—Theelement-type oil filter ischanged by first removingthe filter cover.
FIGURE 4—This photo showsan element-type oil-filterassembly after removalfrom the engine.
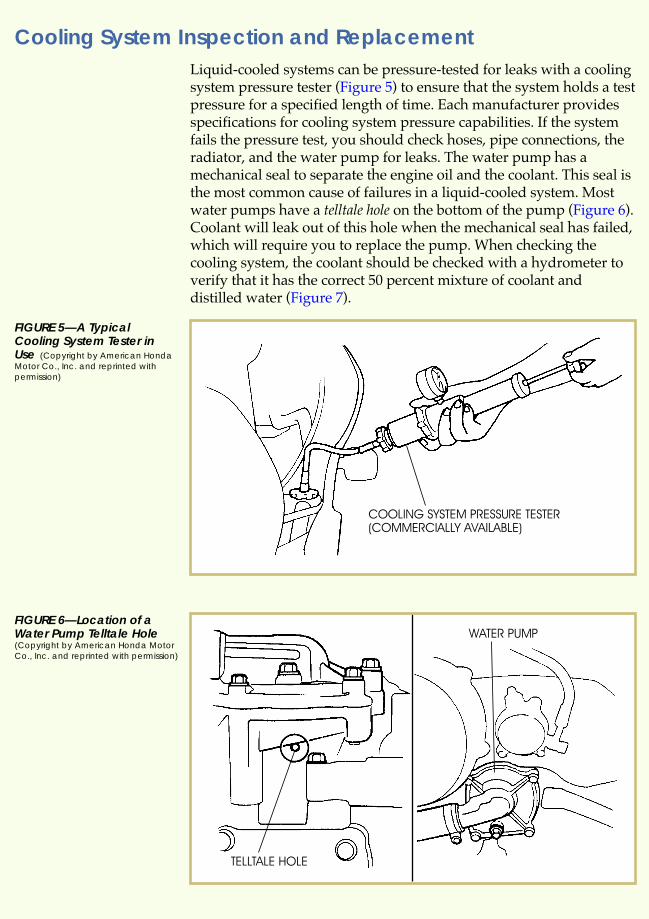
Cooling System Inspection and ReplacementLiquid-cooled systems can be pressure-tested for leaks with a coolingsystem pressure tester (Figure 5) to ensure that the system holds a testpressure for a specified length of time. Each manufacturer providesspecifications for cooling system pressure capabilities. If the systemfails the pressure test, you should check hoses, pipe connections, theradiator, and the water pump for leaks. The water pump has amechanical seal to separate the engine oil and the coolant. This seal isthe most common cause of failures in a liquid-cooled system. Mostwater pumps have a telltale hole on the bottom of the pump (Figure 6).Coolant will leak out of this hole when the mechanical seal has failed,which will require you to replace the pump. When checking thecooling system, the coolant should be checked with a hydrometer toverify that it has the correct 50 percent mixture of coolant anddistilled water (Figure 7).
10 Motorcycle Maintenance
FIGURE 5—A TypicalCooling System Tester inUse (Copyright by American HondaMotor Co., Inc. and reprinted withpermission)
FIGURE 6—Location of aWater Pump Telltale Hole(Copyright by American Honda MotorCo., Inc. and reprinted with permission)

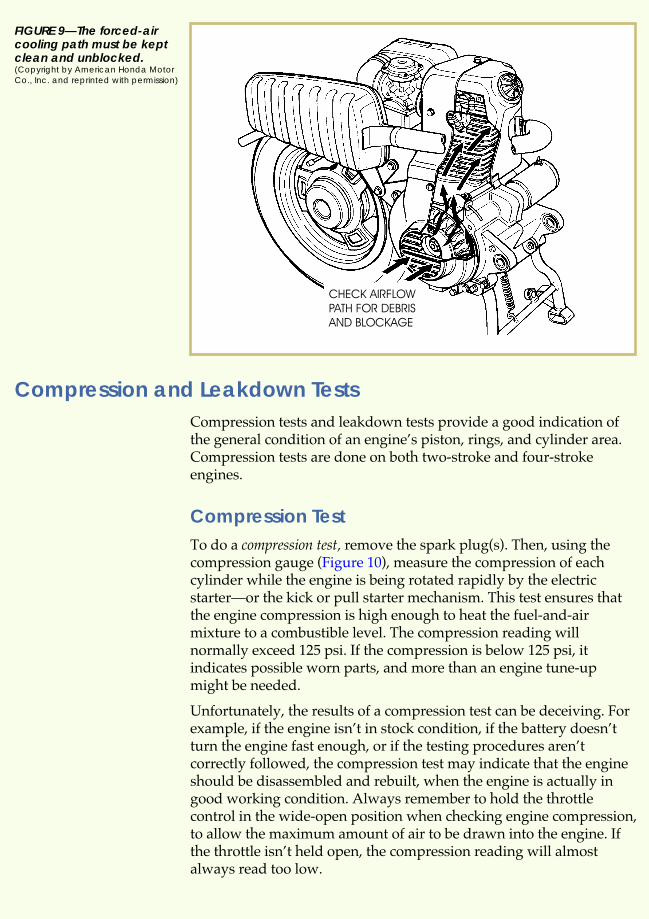
Air-cooled engines must have clean cooling fins (Figure 8). Theforced-air cooling systems used on many motorscooters and on someATVs (Figure 9) should be inspected after vehicle storage. Field miceand other small rodents have been known to build their winter homesinside these types of engine housings.
Motorcycle Maintenance 11
FIGURE 7—Checking theCoolant Mixture with aHydrometer
FIGURE 8—The cooling finsof an air-cooled enginemust be kept clean forproper cooling.
Compression and Leakdown TestsCompression tests and leakdown tests provide a good indication ofthe general condition of an engine’s piston, rings, and cylinder area.Compression tests are done on both two-stroke and four-strokeengines.
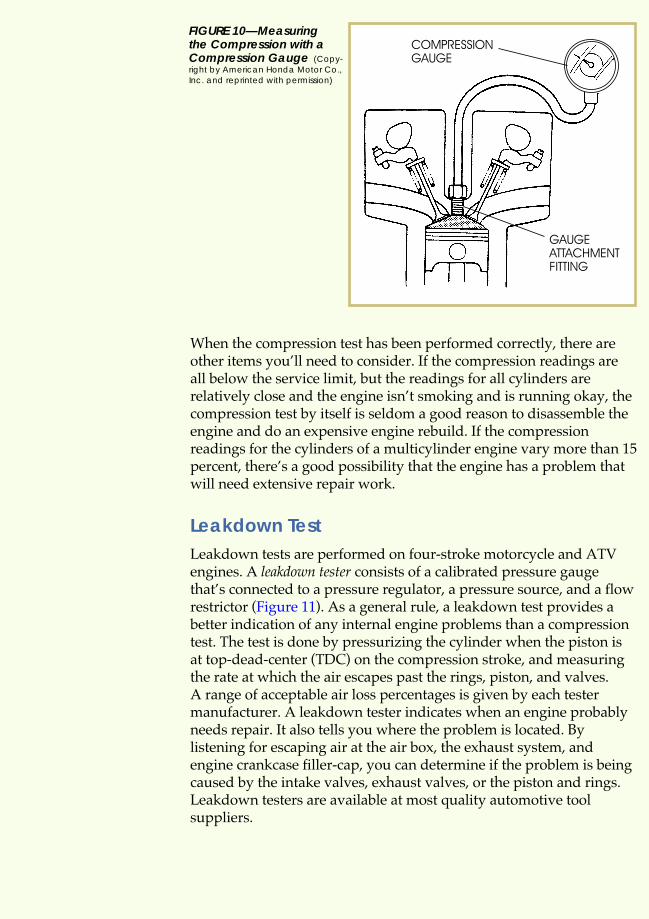
Compression TestTo do a compression test, remove the spark plug(s). Then, using thecompression gauge (Figure 10), measure the compression of eachcylinder while the engine is being rotated rapidly by the electricstarter—or the kick or pull starter mechanism. This test ensures thatthe engine compression is high enough to heat the fuel-and-airmixture to a combustible level. The compression reading willnormally exceed 125 psi. If the compression is below 125 psi, itindicates possible worn parts, and more than an engine tune-upmight be needed.
Unfortunately, the results of a compression test can be deceiving. Forexample, if the engine isn’t in stock condition, if the battery doesn’tturn the engine fast enough, or if the testing procedures aren’tcorrectly followed, the compression test may indicate that the engineshould be disassembled and rebuilt, when the engine is actually ingood working condition. Always remember to hold the throttlecontrol in the wide-open position when checking engine compression,to allow the maximum amount of air to be drawn into the engine. Ifthe throttle isn’t held open, the compression reading will almostalways read too low.
12 Motorcycle Maintenance
FIGURE 9—The forced-aircooling path must be keptclean and unblocked.(Copyright by American Honda MotorCo., Inc. and reprinted with permission)
When the compression test has been performed correctly, there areother items you’ll need to consider. If the compression readings areall below the service limit, but the readings for all cylinders arerelatively close and the engine isn’t smoking and is running okay, thecompression test by itself is seldom a good reason to disassemble theengine and do an expensive engine rebuild. If the compressionreadings for the cylinders of a multicylinder engine vary more than 15percent, there’s a good possibility that the engine has a problem thatwill need extensive repair work.
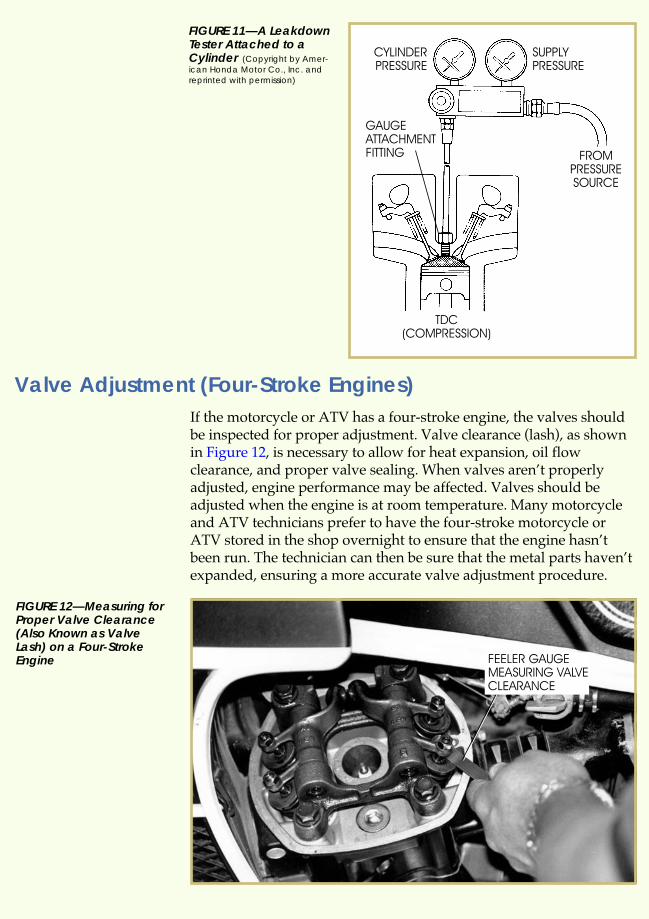
Leakdown TestLeakdown tests are performed on four-stroke motorcycle and ATVengines. A leakdown tester consists of a calibrated pressure gaugethat’s connected to a pressure regulator, a pressure source, and a flowrestrictor (Figure 11). As a general rule, a leakdown test provides abetter indication of any internal engine problems than a compressiontest. The test is done by pressurizing the cylinder when the piston isat top-dead-center (TDC) on the compression stroke, and measuringthe rate at which the air escapes past the rings, piston, and valves.A range of acceptable air loss percentages is given by each testermanufacturer. A leakdown tester indicates when an engine probablyneeds repair. It also tells you where the problem is located. Bylistening for escaping air at the air box, the exhaust system, andengine crankcase filler-cap, you can determine if the problem is beingcaused by the intake valves, exhaust valves, or the piston and rings.Leakdown testers are available at most quality automotive toolsuppliers.
Motorcycle Maintenance 13
FIGURE 10—Measuringthe Compression with aCompression Gauge (Copy-right by American Honda Motor Co.,Inc. and reprinted with permission)
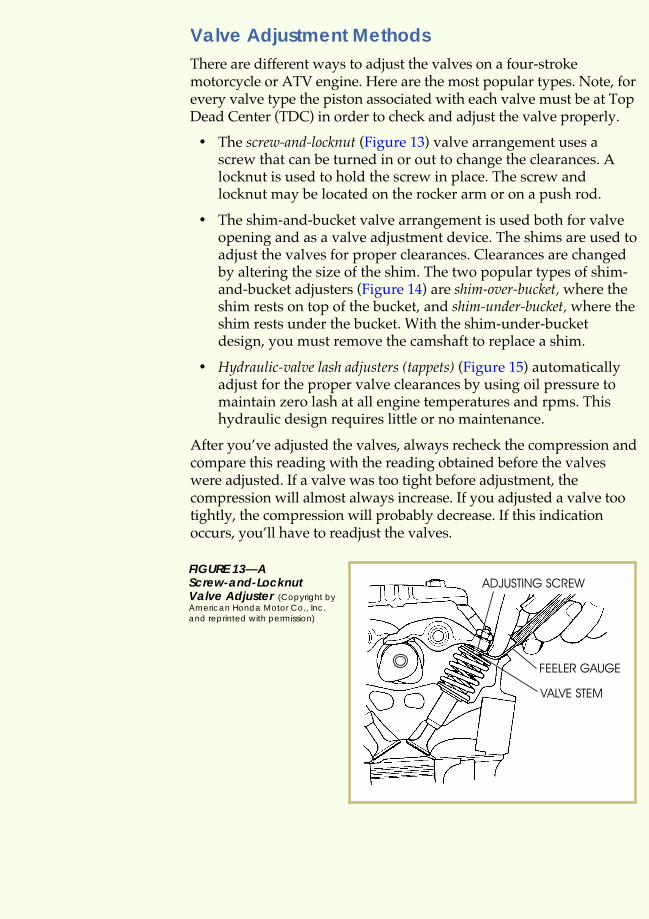
Valve Adjustment (Four-Stroke Engines)If the motorcycle or ATV has a four-stroke engine, the valves shouldbe inspected for proper adjustment. Valve clearance (lash), as shownin Figure 12, is necessary to allow for heat expansion, oil flowclearance, and proper valve sealing. When valves aren’t properlyadjusted, engine performance may be affected. Valves should beadjusted when the engine is at room temperature. Many motorcycleand ATV technicians prefer to have the four-stroke motorcycle orATV stored in the shop overnight to ensure that the engine hasn’tbeen run. The technician can then be sure that the metal parts haven’texpanded, ensuring a more accurate valve adjustment procedure.
14 Motorcycle Maintenance
FIGURE 11—A LeakdownTester Attached to aCylinder (Copyright by Amer-ican Honda Motor Co., Inc. andreprinted with permission)
FIGURE 12—Measuring forProper Valve Clearance(Also Known as ValveLash) on a Four-StrokeEngine
Valve Adjustment MethodsThere are different ways to adjust the valves on a four-strokemotorcycle or ATV engine. Here are the most popular types. Note, forevery valve type the piston associated with each valve must be at TopDead Center (TDC) in order to check and adjust the valve properly.
� The screw-and-locknut (Figure 13) valve arrangement uses ascrew that can be turned in or out to change the clearances. Alocknut is used to hold the screw in place. The screw andlocknut may be located on the rocker arm or on a push rod.
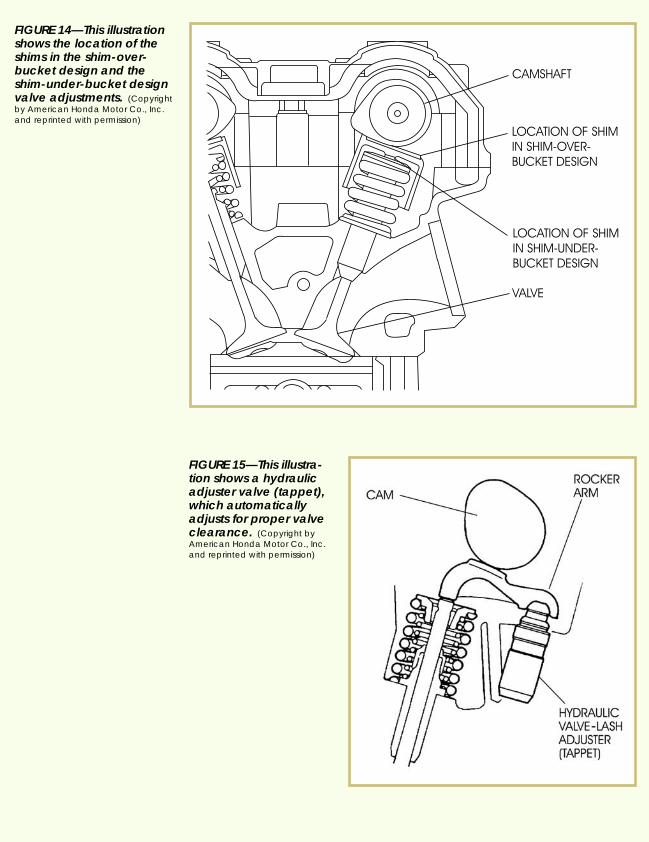
� The shim-and-bucket valve arrangement is used both for valveopening and as a valve adjustment device. The shims are used toadjust the valves for proper clearances. Clearances are changedby altering the size of the shim. The two popular types of shim-and-bucket adjusters (Figure 14) are shim-over-bucket, where theshim rests on top of the bucket, and shim-under-bucket, where theshim rests under the bucket. With the shim-under-bucketdesign, you must remove the camshaft to replace a shim.
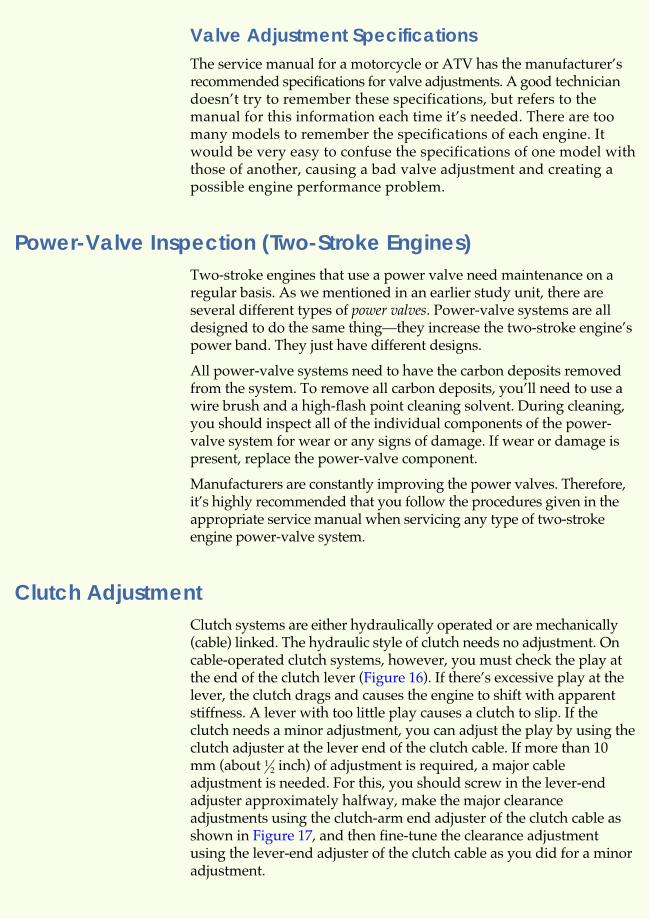
� Hydraulic-valve lash adjusters (tappets) (Figure 15) automaticallyadjust for the proper valve clearances by using oil pressure tomaintain zero lash at all engine temperatures and rpms. Thishydraulic design requires little or no maintenance.
After you’ve adjusted the valves, always recheck the compression andcompare this reading with the reading obtained before the valveswere adjusted. If a valve was too tight before adjustment, thecompression will almost always increase. If you adjusted a valve tootightly, the compression will probably decrease. If this indicationoccurs, you’ll have to readjust the valves.
Motorcycle Maintenance 15
FIGURE 13—AScrew-and-LocknutValve Adjuster (Copyright byAmerican Honda Motor Co., Inc.and reprinted with permission)
16 Motorcycle Maintenance
FIGURE 14—This illustrationshows the location of theshims in the shim-over-bucket design and theshim-under-bucket designvalve adjustments. (Copyrightby American Honda Motor Co., Inc.and reprinted with permission)
FIGURE 15—This illustra-tion shows a hydraulicadjuster valve (tappet),which automaticallyadjusts for proper valveclearance. (Copyright byAmerican Honda Motor Co., Inc.and reprinted with permission)
Valve Adjustment SpecificationsThe service manual for a motorcycle or ATV has the manufacturer’srecommended specifications for valve adjustments. A good techniciandoesn’t try to remember these specifications, but refers to themanual for this information each time it’s needed. There are toomany models to remember the specifications of each engine. Itwould be very easy to confuse the specifications of one model withthose of another, causing a bad valve adjustment and creating apossible engine performance problem.
Power-Valve Inspection (Two-Stroke Engines)Two-stroke engines that use a power valve need maintenance on aregular basis. As we mentioned in an earlier study unit, there areseveral different types of power valves. Power-valve systems are alldesigned to do the same thing—they increase the two-stroke engine’spower band. They just have different designs.
All power-valve systems need to have the carbon deposits removedfrom the system. To remove all carbon deposits, you’ll need to use awire brush and a high-flash point cleaning solvent. During cleaning,you should inspect all of the individual components of the power-valve system for wear or any signs of damage. If wear or damage ispresent, replace the power-valve component.
Manufacturers are constantly improving the power valves. Therefore,it’s highly recommended that you follow the procedures given in theappropriate service manual when servicing any type of two-strokeengine power-valve system.
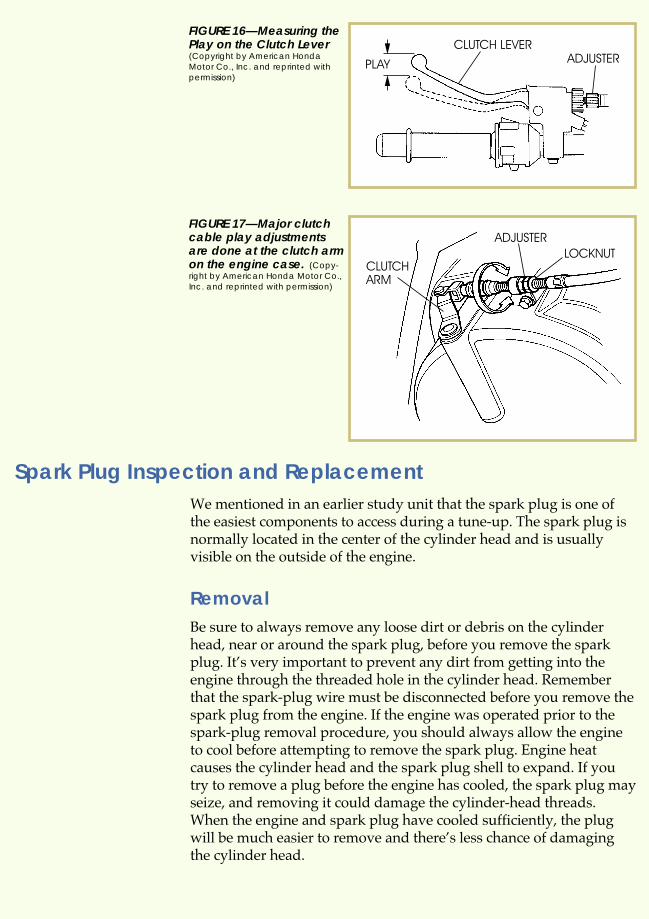
Clutch AdjustmentClutch systems are either hydraulically operated or are mechanically(cable) linked. The hydraulic style of clutch needs no adjustment. Oncable-operated clutch systems, however, you must check the play atthe end of the clutch lever (Figure 16). If there’s excessive play at thelever, the clutch drags and causes the engine to shift with apparentstiffness. A lever with too little play causes a clutch to slip. If theclutch needs a minor adjustment, you can adjust the play by using theclutch adjuster at the lever end of the clutch cable. If more than 10mm (about 1
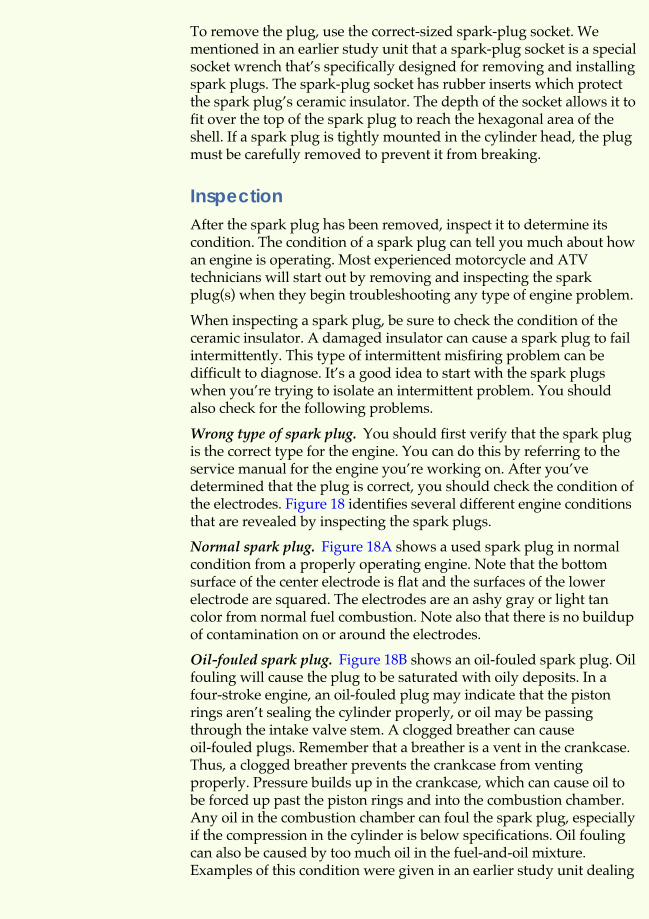
2 inch) of adjustment is required, a major cableadjustment is needed. For this, you should screw in the lever-endadjuster approximately halfway, make the major clearanceadjustments using the clutch-arm end adjuster of the clutch cable asshown in Figure 17, and then fine-tune the clearance adjustmentusing the lever-end adjuster of the clutch cable as you did for a minoradjustment.
Motorcycle Maintenance 17
Spark Plug Inspection and ReplacementWe mentioned in an earlier study unit that the spark plug is one ofthe easiest components to access during a tune-up. The spark plug isnormally located in the center of the cylinder head and is usuallyvisible on the outside of the engine.
RemovalBe sure to always remove any loose dirt or debris on the cylinderhead, near or around the spark plug, before you remove the sparkplug. It’s very important to prevent any dirt from getting into theengine through the threaded hole in the cylinder head. Rememberthat the spark-plug wire must be disconnected before you remove thespark plug from the engine. If the engine was operated prior to thespark-plug removal procedure, you should always allow the engineto cool before attempting to remove the spark plug. Engine heatcauses the cylinder head and the spark plug shell to expand. If youtry to remove a plug before the engine has cooled, the spark plug mayseize, and removing it could damage the cylinder-head threads.When the engine and spark plug have cooled sufficiently, the plugwill be much easier to remove and there’s less chance of damagingthe cylinder head.
18 Motorcycle Maintenance
FIGURE 16—Measuring thePlay on the Clutch Lever(Copyright by American HondaMotor Co., Inc. and reprinted withpermission)
FIGURE 17—Major clutchcable play adjustmentsare done at the clutch armon the engine case. (Copy-right by American Honda Motor Co.,Inc. and reprinted with permission)
To remove the plug, use the correct-sized spark-plug socket. Wementioned in an earlier study unit that a spark-plug socket is a specialsocket wrench that’s specifically designed for removing and installingspark plugs. The spark-plug socket has rubber inserts which protectthe spark plug’s ceramic insulator. The depth of the socket allows it tofit over the top of the spark plug to reach the hexagonal area of theshell. If a spark plug is tightly mounted in the cylinder head, the plugmust be carefully removed to prevent it from breaking.
InspectionAfter the spark plug has been removed, inspect it to determine itscondition. The condition of a spark plug can tell you much about howan engine is operating. Most experienced motorcycle and ATVtechnicians will start out by removing and inspecting the sparkplug(s) when they begin troubleshooting any type of engine problem.
When inspecting a spark plug, be sure to check the condition of theceramic insulator. A damaged insulator can cause a spark plug to failintermittently. This type of intermittent misfiring problem can bedifficult to diagnose. It’s a good idea to start with the spark plugswhen you’re trying to isolate an intermittent problem. You shouldalso check for the following problems.
Wrong type of spark plug. You should first verify that the spark plugis the correct type for the engine. You can do this by referring to theservice manual for the engine you’re working on. After you’vedetermined that the plug is correct, you should check the condition ofthe electrodes. Figure 18 identifies several different engine conditionsthat are revealed by inspecting the spark plugs.
Normal spark plug. Figure 18A shows a used spark plug in normalcondition from a properly operating engine. Note that the bottomsurface of the center electrode is flat and the surfaces of the lowerelectrode are squared. The electrodes are an ashy gray or light tancolor from normal fuel combustion. Note also that there is no buildupof contamination on or around the electrodes.
Oil-fouled spark plug. Figure 18B shows an oil-fouled spark plug. Oilfouling will cause the plug to be saturated with oily deposits. In afour-stroke engine, an oil-fouled plug may indicate that the pistonrings aren’t sealing the cylinder properly, or oil may be passingthrough the intake valve stem. A clogged breather can causeoil-fouled plugs. Remember that a breather is a vent in the crankcase.Thus, a clogged breather prevents the crankcase from ventingproperly. Pressure builds up in the crankcase, which can cause oil tobe forced up past the piston rings and into the combustion chamber.Any oil in the combustion chamber can foul the spark plug, especiallyif the compression in the cylinder is below specifications. Oil foulingcan also be caused by too much oil in the fuel-and-oil mixture.Examples of this condition were given in an earlier study unit dealing
Motorcycle Maintenance 19
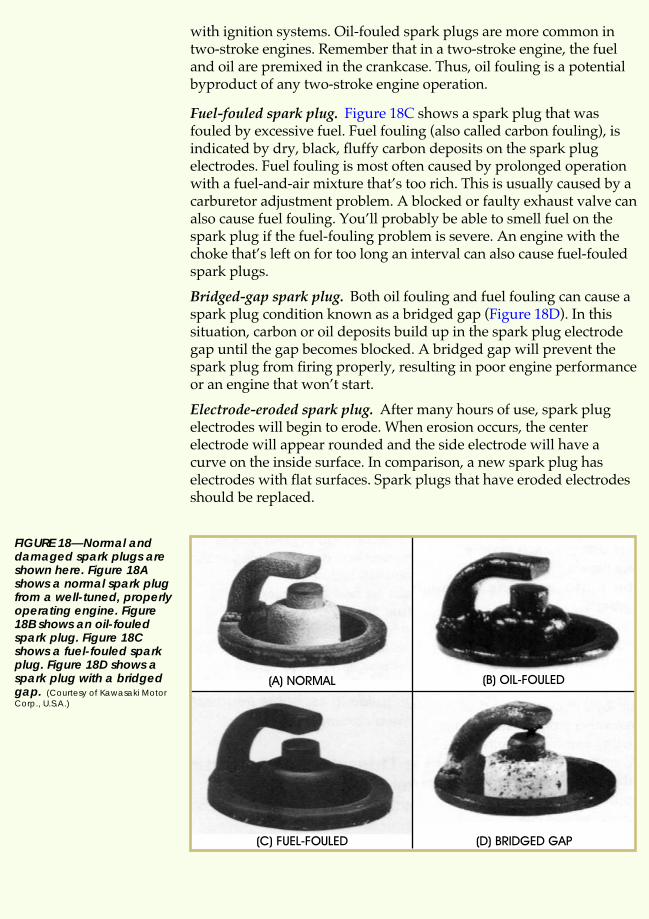
with ignition systems. Oil-fouled spark plugs are more common intwo-stroke engines. Remember that in a two-stroke engine, the fueland oil are premixed in the crankcase. Thus, oil fouling is a potentialbyproduct of any two-stroke engine operation.
Fuel-fouled spark plug. Figure 18C shows a spark plug that wasfouled by excessive fuel. Fuel fouling (also called carbon fouling), isindicated by dry, black, fluffy carbon deposits on the spark plugelectrodes. Fuel fouling is most often caused by prolonged operationwith a fuel-and-air mixture that’s too rich. This is usually caused by acarburetor adjustment problem. A blocked or faulty exhaust valve canalso cause fuel fouling. You’ll probably be able to smell fuel on thespark plug if the fuel-fouling problem is severe. An engine with thechoke that’s left on for too long an interval can also cause fuel-fouledspark plugs.
Bridged-gap spark plug. Both oil fouling and fuel fouling can cause aspark plug condition known as a bridged gap (Figure 18D). In thissituation, carbon or oil deposits build up in the spark plug electrodegap until the gap becomes blocked. A bridged gap will prevent thespark plug from firing properly, resulting in poor engine performanceor an engine that won’t start.
Electrode-eroded spark plug. After many hours of use, spark plugelectrodes will begin to erode. When erosion occurs, the centerelectrode will appear rounded and the side electrode will have acurve on the inside surface. In comparison, a new spark plug haselectrodes with flat surfaces. Spark plugs that have eroded electrodesshould be replaced.
20 Motorcycle Maintenance
FIGURE 18—Normal anddamaged spark plugs areshown here. Figure 18Ashows a normal spark plugfrom a well-tuned, properlyoperating engine. Figure18B shows an oil-fouledspark plug. Figure 18Cshows a fuel-fouled sparkplug. Figure 18D shows aspark plug with a bridgedgap. (Courtesy of Kawasaki MotorCorp., U.S.A.)
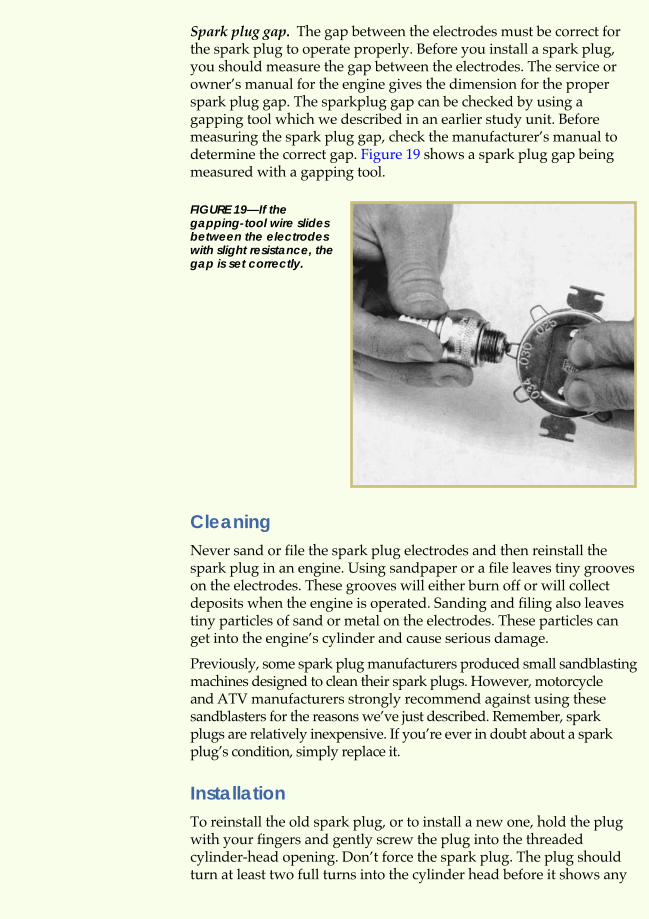
Spark plug gap. The gap between the electrodes must be correct forthe spark plug to operate properly. Before you install a spark plug,you should measure the gap between the electrodes. The service orowner’s manual for the engine gives the dimension for the properspark plug gap. The sparkplug gap can be checked by using agapping tool which we described in an earlier study unit. Beforemeasuring the spark plug gap, check the manufacturer’s manual todetermine the correct gap. Figure 19 shows a spark plug gap beingmeasured with a gapping tool.
CleaningNever sand or file the spark plug electrodes and then reinstall thespark plug in an engine. Using sandpaper or a file leaves tiny grooveson the electrodes. These grooves will either burn off or will collectdeposits when the engine is operated. Sanding and filing also leavestiny particles of sand or metal on the electrodes. These particles canget into the engine’s cylinder and cause serious damage.
Previously, some spark plug manufacturers produced small sandblastingmachines designed to clean their spark plugs. However, motorcycleand ATV manufacturers strongly recommend against using thesesandblasters for the reasons we’ve just described. Remember, sparkplugs are relatively inexpensive. If you’re ever in doubt about a sparkplug’s condition, simply replace it.
InstallationTo reinstall the old spark plug, or to install a new one, hold the plugwith your fingers and gently screw the plug into the threadedcylinder-head opening. Don’t force the spark plug. The plug shouldturn at least two full turns into the cylinder head before it shows any
Motorcycle Maintenance 21
FIGURE 19—If thegapping-tool wire slidesbetween the electrodeswith slight resistance, thegap is set correctly.
signs of resistance. When the resistance point has been reached, use aspark-plug socket to tighten the plug into the cylinder head. Be sureto tighten the spark plug to the manufacturer’s specifications, whichis normally in the range of 15 foot-pounds. Use a torque wrench totighten the spark plug.
Battery Inspection and ReplacementAs we mentioned in an earlier study unit, you should be very carefulwhen working with batteries. Always wear safety glasses. Batteryacid can cause severe burns if it contacts your skin, and will damageclothing. If you accidentally spill any battery acid, the spill should becleaned up immediately. Use a water and baking soda solution toclean the spill area. This combination helps neutralize the acid.
Inspection and CleaningIf the motorcycle or ATV has a battery, the battery should beinspected for cracks in the casing, broken terminals, or other signs ofdamage. This includes checking for sulfation or warping on theinternal plates. If any of these conditions are found, the batteryshould be replaced. You should also ensure that the battery cableconnectors make good contact with the battery terminals. If the cableconnectors or terminals are corroded or loose, clean and tighten theconnections. As we explained earlier, battery cables are cleaned witha wire brush. An application of dielectric grease on the cableconnectors and battery terminals helps to prevent future corrosion.
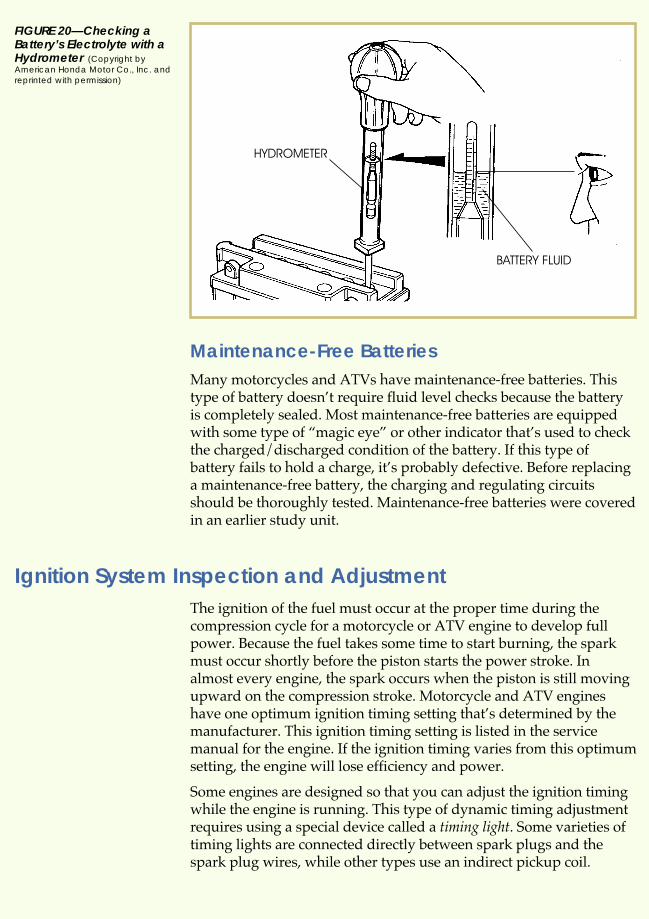
Electrolyte TestingThe electrical condition of a battery is determined by measuring thespecific gravity of the battery’s electrolyte. The specific gravity ismeasured with a hydrometer (Figure 20). The electrolyte should havea specific gravity of 1.280 to 1.320 (depending on the air temperature).As the battery becomes discharged, this reading decreases.
RefillingRemember that batteries are filled with an acid and distilled water-electrolyte solution. The acid in the battery won’t evaporate, but thewater does. When refilling batteries, add only distilled water.Distilled water should be used to prevent minerals and otherimpurities from contaminating the sulfuric acid and the lead platesin the battery.
22 Motorcycle Maintenance
Maintenance-Free BatteriesMany motorcycles and ATVs have maintenance-free batteries. Thistype of battery doesn’t require fluid level checks because the batteryis completely sealed. Most maintenance-free batteries are equippedwith some type of “magic eye” or other indicator that’s used to checkthe charged/discharged condition of the battery. If this type ofbattery fails to hold a charge, it’s probably defective. Before replacinga maintenance-free battery, the charging and regulating circuitsshould be thoroughly tested. Maintenance-free batteries were coveredin an earlier study unit.
Ignition System Inspection and AdjustmentThe ignition of the fuel must occur at the proper time during thecompression cycle for a motorcycle or ATV engine to develop fullpower. Because the fuel takes some time to start burning, the sparkmust occur shortly before the piston starts the power stroke. Inalmost every engine, the spark occurs when the piston is still movingupward on the compression stroke. Motorcycle and ATV engineshave one optimum ignition timing setting that’s determined by themanufacturer. This ignition timing setting is listed in the servicemanual for the engine. If the ignition timing varies from this optimumsetting, the engine will lose efficiency and power.
Some engines are designed so that you can adjust the ignition timingwhile the engine is running. This type of dynamic timing adjustmentrequires using a special device called a timing light. Some varieties oftiming lights are connected directly between spark plugs and thespark plug wires, while other types use an indirect pickup coil.
Motorcycle Maintenance 23
FIGURE 20—Checking aBattery’s Electrolyte with aHydrometer (Copyright byAmerican Honda Motor Co., Inc. andreprinted with permission)

Each time the spark plug fires, the timing light produces a flash oflight. The stroboscopic effect of the timing light freezes the rotatingtiming marks. This allows you to observe and accurately adjust thetiming of the ignition system. Engines that can be timed dynamicallyusually have spark-advance mechanisms. These mechanisms havethree timing marks as Figure 21 illustrates—a top-dead-center (TDC)mark, a fire mark, and an advance mark.
Adjusting the Timing on a Typical Ignition SystemTo check and adjust the timing of a dynamically adjustable ignitionsystem, perform the steps that follow.
Note: The illustrations used in the following example procedure arecourtesy of the American Honda Motor Co., Inc. and reprinted withpermission.
1 Adjust the point gap according tothe manufacturer’s specifications.If this requires removing theflywheel, the flywheel will have tobe reinstalled before the timing canbe checked.
2 Locate the timing marks. On someengines, an inspection cover orplug must be removed to exposethe flywheel timing marks. Accentthe timing marks with chalk tomake them easier to see.
Install the timing light, followingthe instructions provided with thelight.
24 Motorcycle Maintenance
FIGURE 21—An Illustrationof Ignition-Timing Marks(Courtesy of Kawasaki Motor Corp.,U.S.A.)

Start the engine and run it at idlespeed. This speed varies depend-ing upon the engine. Consult themanufacturer’s service manual orowner’s manual for the properspeed setting. The best results areobtained if a tachometer is used tomeasure the engine speed.
5 Aim the timing light beam at thetiming marks. The light flasheseach time the spark plug fires,creating a stroboscopic effect. Thisfreezes the rotating marks. Thetiming marks will appear to bestationary. If the timing marks areproperly aligned, the timing iscorrect. If they’re not aligned, thetiming needs to be adjusted.
Engines with a provision fordynamically checking the ignitionsystem timing usually have ameans for adjusting the timing. Themethod varies depending on theengine and the type of ignitionsystem. Externally mounted pointsare usually adjusted by looseningthe locking screws and rotating thepoints assembly around the camwith a screwdriver. Make thenecessary adjustments to advanceor retard the spark plug firing timeuntil the timing marks are perfectlyaligned in the timing light beam.
Electronic Ignition SystemsMost modern motorcycles and ATVs use nonadjustable electronicignition systems. These systems have the correct timing built into theelectronic components. It’s possible to check for proper ignitionoperation with a timing light. However, in most cases, the ignitionsystem timing is either correct, or the electronic ignition system won’tfunction at all. In these cases, component replacement is required tocorrect the problem. Because the new electronic ignition systems useno moving parts, it’s a rare occurrence to see a timing problem withthem.
Motorcycle Maintenance 25
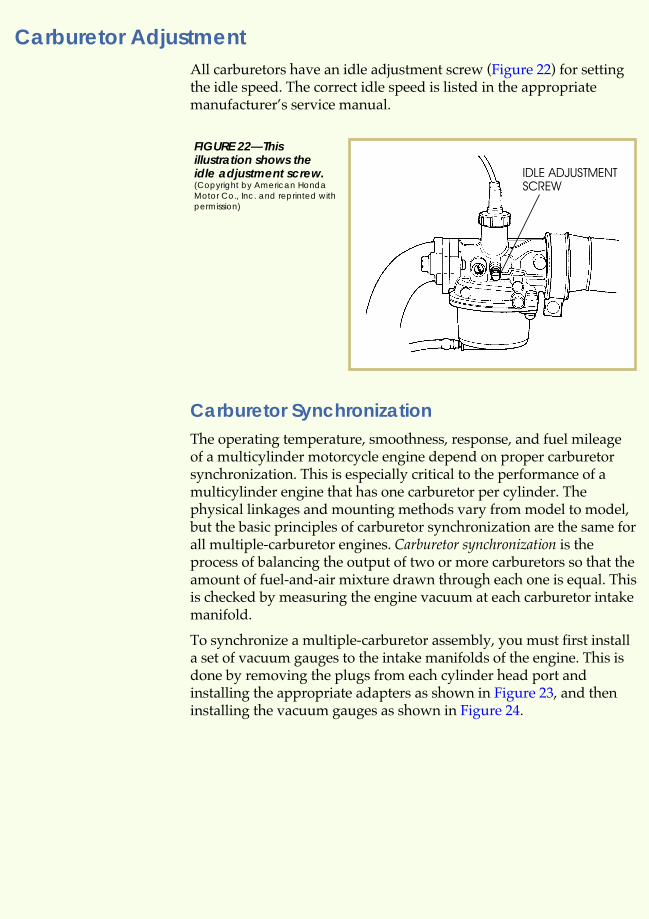
Carburetor AdjustmentAll carburetors have an idle adjustment screw (Figure 22) for settingthe idle speed. The correct idle speed is listed in the appropriatemanufacturer’s service manual.
Carburetor SynchronizationThe operating temperature, smoothness, response, and fuel mileageof a multicylinder motorcycle engine depend on proper carburetorsynchronization. This is especially critical to the performance of amulticylinder engine that has one carburetor per cylinder. Thephysical linkages and mounting methods vary from model to model,but the basic principles of carburetor synchronization are the same forall multiple-carburetor engines. Carburetor synchronization is theprocess of balancing the output of two or more carburetors so that theamount of fuel-and-air mixture drawn through each one is equal. Thisis checked by measuring the engine vacuum at each carburetor intakemanifold.
To synchronize a multiple-carburetor assembly, you must first installa set of vacuum gauges to the intake manifolds of the engine. This isdone by removing the plugs from each cylinder head port andinstalling the appropriate adapters as shown in Figure 23, and theninstalling the vacuum gauges as shown in Figure 24.
26 Motorcycle Maintenance
FIGURE 22—Thisillustration shows theidle adjustment screw.(Copyright by American HondaMotor Co., Inc. and reprinted withpermission)

Motorcycle Maintenance 27
FIGURE 23—Carburetorsynchronization adaptersare shown in this illus-tration. (Copyright by AmericanHonda Motor Co., Inc. and reprintedwith permission)
FIGURE 24—VacuumGauges Installed toCheck CarburetorSynchronization (Copyrightby American Honda Motor Co., Inc.and reprinted with permission)
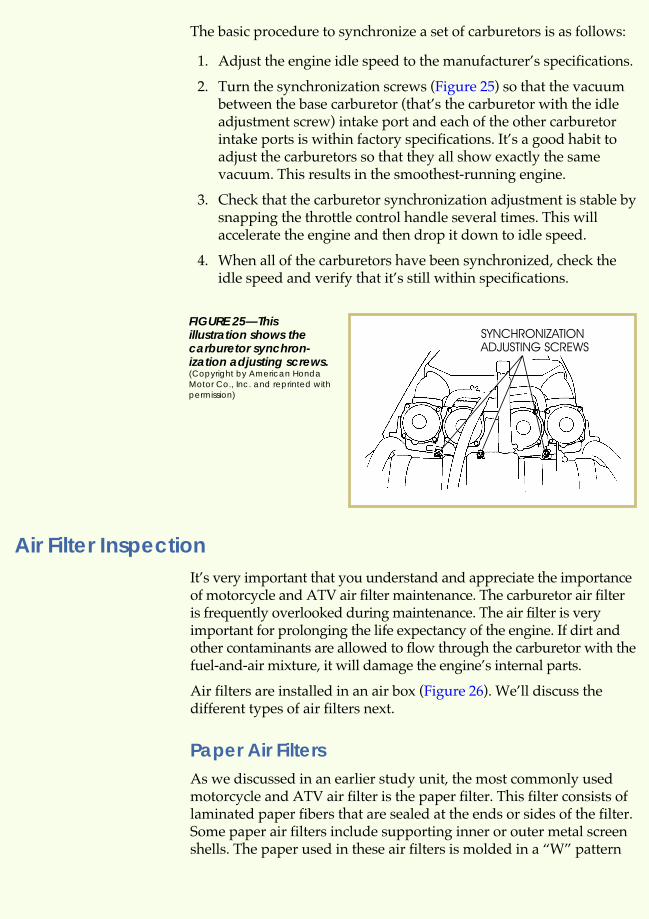
The basic procedure to synchronize a set of carburetors is as follows:
1. Adjust the engine idle speed to the manufacturer’s specifications.
2. Turn the synchronization screws (Figure 25) so that the vacuumbetween the base carburetor (that’s the carburetor with the idleadjustment screw) intake port and each of the other carburetorintake ports is within factory specifications. It’s a good habit toadjust the carburetors so that they all show exactly the samevacuum. This results in the smoothest-running engine.
3. Check that the carburetor synchronization adjustment is stable bysnapping the throttle control handle several times. This willaccelerate the engine and then drop it down to idle speed.
4. When all of the carburetors have been synchronized, check theidle speed and verify that it’s still within specifications.
Air Filter InspectionIt’s very important that you understand and appreciate the importanceof motorcycle and ATV air filter maintenance. The carburetor air filteris frequently overlooked during maintenance. The air filter is veryimportant for prolonging the life expectancy of the engine. If dirt andother contaminants are allowed to flow through the carburetor with thefuel-and-air mixture, it will damage the engine’s internal parts.
Air filters are installed in an air box (Figure 26). We’ll discuss thedifferent types of air filters next.
Paper Air FiltersAs we discussed in an earlier study unit, the most commonly usedmotorcycle and ATV air filter is the paper filter. This filter consists oflaminated paper fibers that are sealed at the ends or sides of the filter.Some paper air filters include supporting inner or outer metal screenshells. The paper used in these air filters is molded in a “W” pattern
28 Motorcycle Maintenance
FIGURE 25—Thisillustration shows thecarburetor synchron-ization adjusting screws.(Copyright by American HondaMotor Co., Inc. and reprinted withpermission)
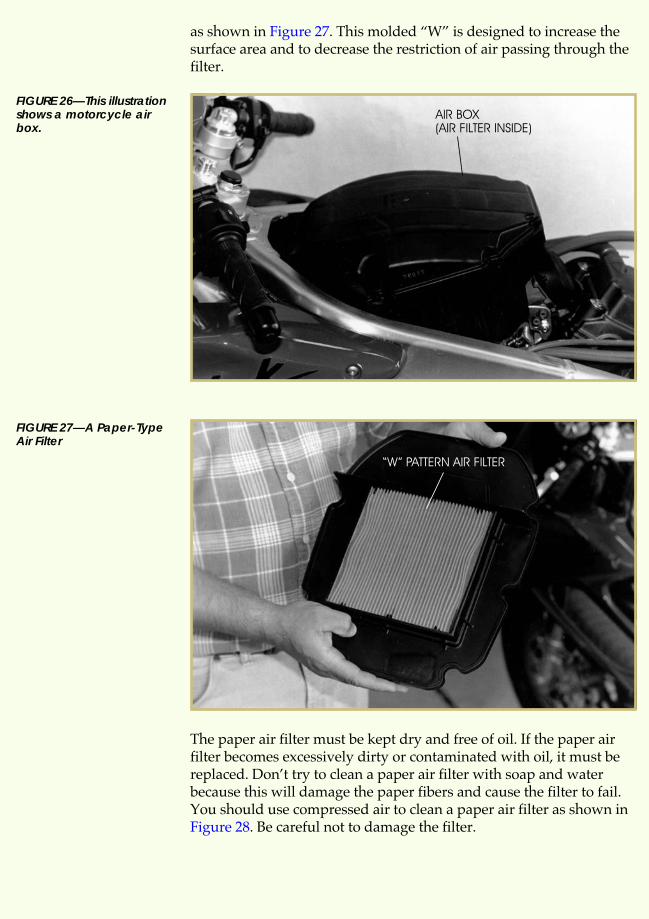
as shown in Figure 27. This molded “W” is designed to increase thesurface area and to decrease the restriction of air passing through thefilter.
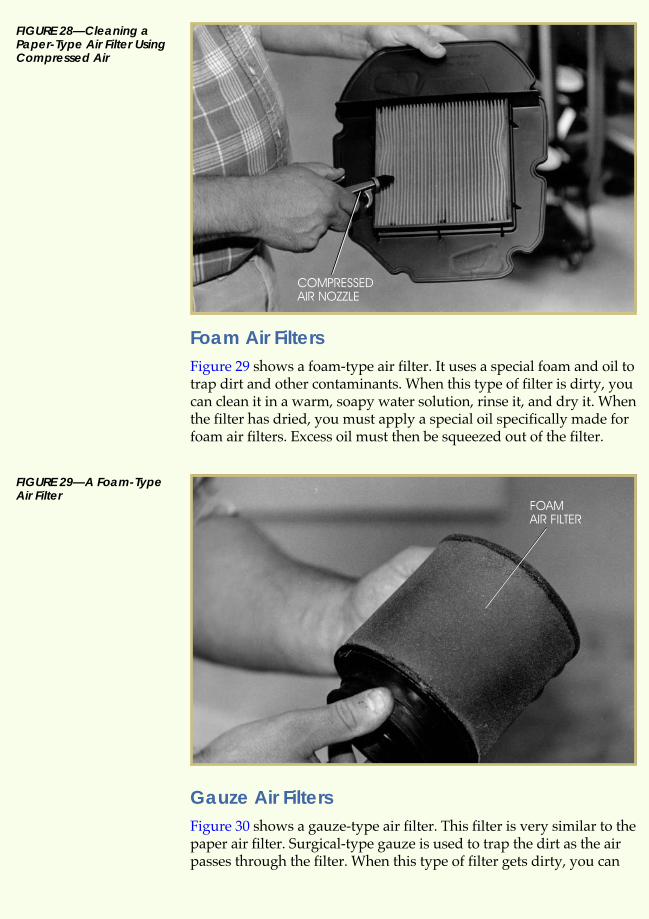
The paper air filter must be kept dry and free of oil. If the paper airfilter becomes excessively dirty or contaminated with oil, it must bereplaced. Don’t try to clean a paper air filter with soap and waterbecause this will damage the paper fibers and cause the filter to fail.You should use compressed air to clean a paper air filter as shown inFigure 28. Be careful not to damage the filter.
Motorcycle Maintenance 29
FIGURE 26—This illustrationshows a motorcycle airbox.
FIGURE 27—A Paper-TypeAir Filter
Foam Air FiltersFigure 29 shows a foam-type air filter. It uses a special foam and oil totrap dirt and other contaminants. When this type of filter is dirty, youcan clean it in a warm, soapy water solution, rinse it, and dry it. Whenthe filter has dried, you must apply a special oil specifically made forfoam air filters. Excess oil must then be squeezed out of the filter.
Gauze Air FiltersFigure 30 shows a gauze-type air filter. This filter is very similar to thepaper air filter. Surgical-type gauze is used to trap the dirt as the airpasses through the filter. When this type of filter gets dirty, you can
30 Motorcycle Maintenance
FIGURE 28—Cleaning aPaper-Type Air Filter UsingCompressed Air
FIGURE 29—A Foam-TypeAir Filter
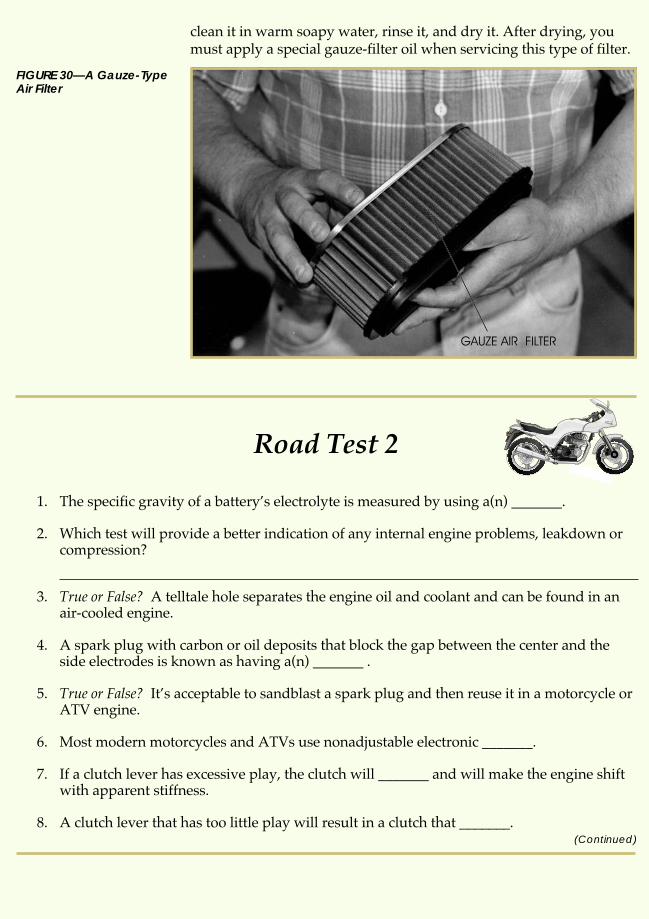
clean it in warm soapy water, rinse it, and dry it. After drying, youmust apply a special gauze-filter oil when servicing this type of filter.
Road Test 2
1. The specific gravity of a battery’s electrolyte is measured by using a(n) _______.
2. Which test will provide a better indication of any internal engine problems, leakdown orcompression?
3. True or False? A telltale hole separates the engine oil and coolant and can be found in anair-cooled engine.
4. A spark plug with carbon or oil deposits that block the gap between the center and theside electrodes is known as having a(n) _______ .
5. True or False? It’s acceptable to sandblast a spark plug and then reuse it in a motorcycle orATV engine.
6. Most modern motorcycles and ATVs use nonadjustable electronic _______.
7. If a clutch lever has excessive play, the clutch will _______ and will make the engine shiftwith apparent stiffness.
8. A clutch lever that has too little play will result in a clutch that _______.(Continued)
Motorcycle Maintenance 31
FIGURE 30—A Gauze-TypeAir Filter
Road Test 2
9. True or False? Most four-stroke motorcycle and ATV engines use the same oil to lubricatethe engine, the transmission, and the clutch components.
10. True or False? A two-stroke engine uses intake and exhaust valves that must be adjustedwhile the engine is at room temperature.
11. Many modern motorcycles and ATVs use _______ batteries that don’t require fluid-levelchecks.
Check your answers with those on page 51.
EMISSION CONTROLS, OPERATION, AND MAINTENANCEA technician performing engine maintenance on any modernstreet-legal motorcycle will very likely be working with some type ofemission-control system. In an earlier study unit, we discussed thechemical changes that occur in an internal-combustion engine. Duringcombustion, the fuel-and-air mixture that burns in the engineproduces chemical gases.
� Carbon monoxide (CO) is the result of partial combustion. As wementioned in an earlier study unit, carbon monoxide is acolorless, odorless, poisonous, and potentially deadly gas.
� Hydrocarbons (HC) are the unburned (raw or vaporized) fuel.
� Carbon dioxide (CO2) is a gas that results from completecombustion of the fuel.
� Oxides of nitrogen (NOx) are oxidized nitrogen gases resultingfrom extremely high combustion temperatures.
� Water (H2O) is a byproduct of combustion. Every gallon ofburned fuel produces approximately one gallon of water in avaporized form.
Emission-Control StandardsIn the United States, the Environmental Protection Agency (EPA) hasdeveloped emission standards for street-legal motorcycle manufac-turers to follow. Since 1978, motorcycles designed for street use havehad to comply with all EPA emission standards. The EPA has alsoestablished and regulates acceptable noise levels as part of theemission-control standards.
32 Motorcycle Maintenance
Emission-Control SystemsWe’ll discuss the basic operation and maintenance of severalemission-control devices found on motorcycles. It should be notedthat emission-control systems used on street-legal motorcycles won’tsignificantly reduce the power output of motorcycle engines. Thefollowing are the emission controls used to reduce street-legalmotorcycle exhaust emissions.
� Crankcase-emission controls
� Evaporative-emission controls
� Exhaust-emission controls
� Noise-emission controls
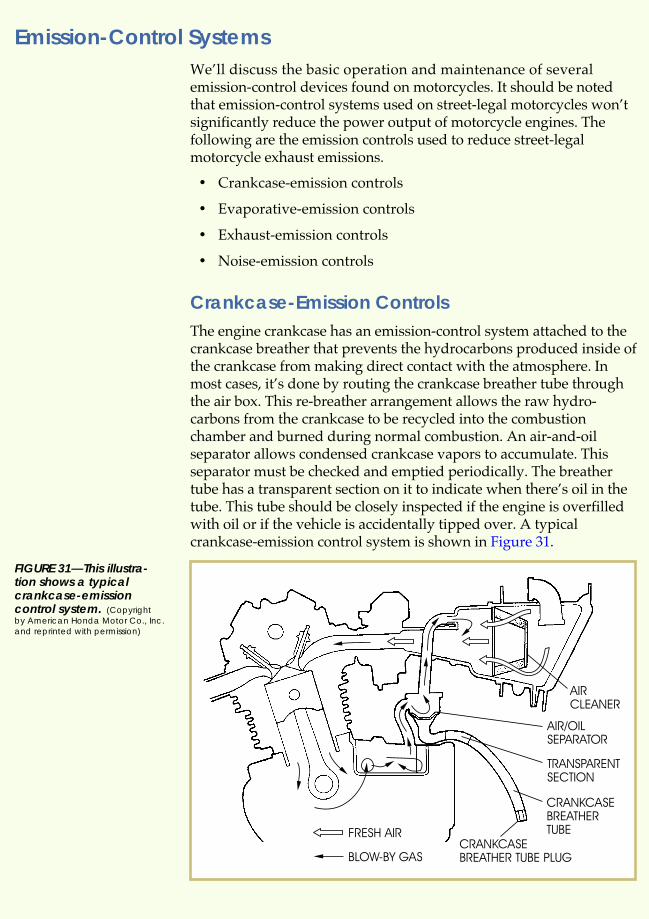
Crankcase-Emission ControlsThe engine crankcase has an emission-control system attached to thecrankcase breather that prevents the hydrocarbons produced inside ofthe crankcase from making direct contact with the atmosphere. Inmost cases, it’s done by routing the crankcase breather tube throughthe air box. This re-breather arrangement allows the raw hydro-carbons from the crankcase to be recycled into the combustionchamber and burned during normal combustion. An air-and-oilseparator allows condensed crankcase vapors to accumulate. Thisseparator must be checked and emptied periodically. The breathertube has a transparent section on it to indicate when there’s oil in thetube. This tube should be closely inspected if the engine is overfilledwith oil or if the vehicle is accidentally tipped over. A typicalcrankcase-emission control system is shown in Figure 31.
Motorcycle Maintenance 33
FIGURE 31—This illustra-tion shows a typicalcrankcase-emissioncontrol system. (Copyrightby American Honda Motor Co., Inc.and reprinted with permission)

Evaporative-Emission ControlsMotorcycles sold in California that are designed for street use mustcomply with California Air Resources Board (CARB) requirements forevaporative-emission regulations. Although evaporative-emissioncontrols are required by law in California, many manufacturers arestarting to build street-legal motorcycles for use in other states thatcomply with these requirements.
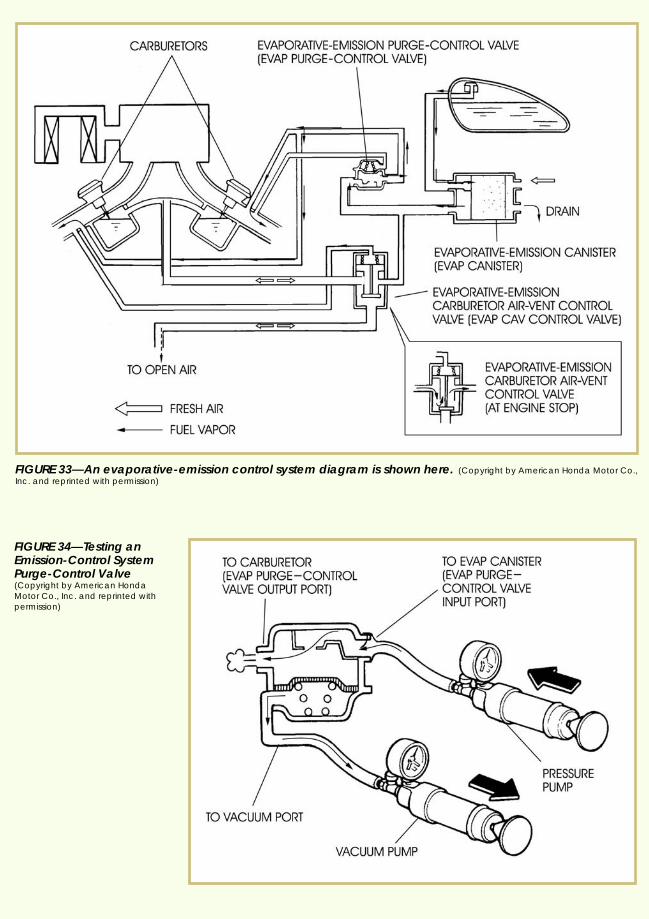
Evaporative emissions come from the gasoline in the fuel tank.Gasoline vapors are pure hydrocarbons. When the engine isn’trunning, these vapors are routed into a charcoal canister (EVAPcanister). In the canister, the vapors are absorbed and stored(Figure 32). When the engine is running, the vapors are routedthrough the carburetor and into the engine via a purge-control valve(EVAP purge-control valve). The evaporative-emission carburetorair-vent control valve (EVAP CAV control valve) is opened to allowair to be drawn into the carburetor through the valve. A diagram of atypical evaporative-emission system is shown in Figure 33.
Maintenance of the evaporative-emission control system includeschecking all hoses within the system for cracks and loose connec-tions, and checking for airflow through the purge-control valve(Figure 34). The charcoal canister should also be inspected for cracksor other damage. The charcoal canister must be replaced if themotorcycle is ever tipped over and the canister becomes contaminatedwith raw gasoline.
34 Motorcycle Maintenance
FIGURE 32—CharcoalCanisters—Assembled andDisassembled
Motorcycle Maintenance 35
FIGURE 33—An evaporative-emission control system diagram is shown here. (Copyright by American Honda Motor Co.,Inc. and reprinted with permission)
FIGURE 34—Testing anEmission-Control SystemPurge-Control Valve(Copyright by American HondaMotor Co., Inc. and reprinted withpermission)
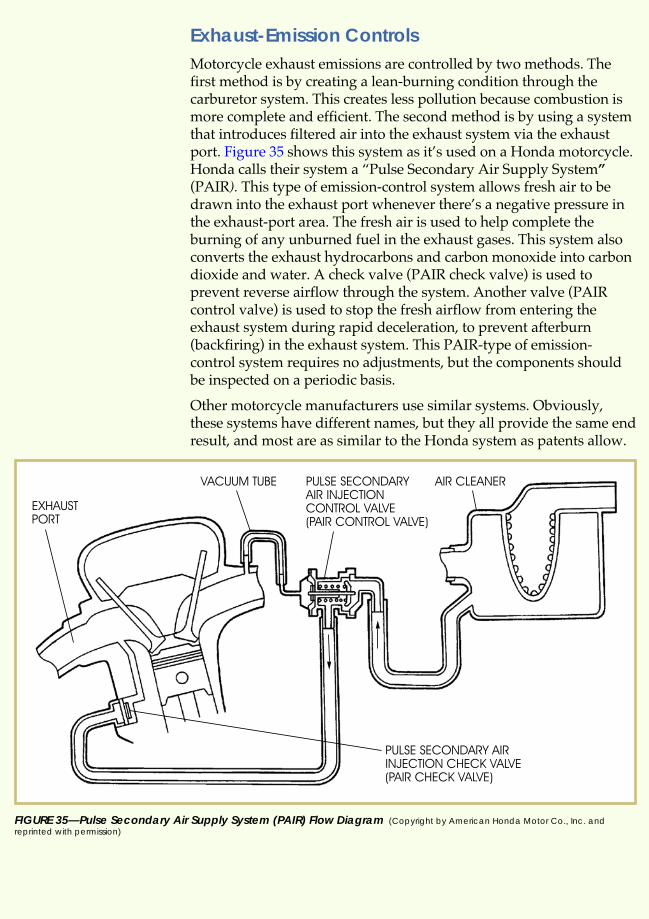
Exhaust-Emission ControlsMotorcycle exhaust emissions are controlled by two methods. Thefirst method is by creating a lean-burning condition through thecarburetor system. This creates less pollution because combustion ismore complete and efficient. The second method is by using a systemthat introduces filtered air into the exhaust system via the exhaustport. Figure 35 shows this system as it’s used on a Honda motorcycle.Honda calls their system a “Pulse Secondary Air Supply System”(PAIR). This type of emission-control system allows fresh air to bedrawn into the exhaust port whenever there’s a negative pressure inthe exhaust-port area. The fresh air is used to help complete theburning of any unburned fuel in the exhaust gases. This system alsoconverts the exhaust hydrocarbons and carbon monoxide into carbondioxide and water. A check valve (PAIR check valve) is used toprevent reverse airflow through the system. Another valve (PAIRcontrol valve) is used to stop the fresh airflow from entering theexhaust system during rapid deceleration, to prevent afterburn(backfiring) in the exhaust system. This PAIR-type of emission-control system requires no adjustments, but the components shouldbe inspected on a periodic basis.
Other motorcycle manufacturers use similar systems. Obviously,these systems have different names, but they all provide the same endresult, and most are as similar to the Honda system as patents allow.
36 Motorcycle Maintenance
FIGURE 35—Pulse Secondary Air Supply System (PAIR) Flow Diagram (Copyright by American Honda Motor Co., Inc. andreprinted with permission)
Noise-Emission ControlsManufacturers of all street-legal motorcycles use exhaust systems thatmeet EPA standards. Tampering with these exhaust systems isforbidden by law. The EPA states that federal law prohibits
� The removal or disabling of any noise-control device or elementof design except for the purpose of maintenance, repair, orreplacement, or
� The use of a vehicle after such device or element of design hasbeen removed/disabled
Among those acts presumed to constitute tampering are the actslisted below:
� Removal or puncturing of the muffler, baffles, header pipes, orany other component which conducts exhaust gases
� Removal or puncturing of any part of the intake system
� Lack of proper emission-control system maintenance
� Replacing any moving parts of the vehicle, or parts of theexhaust or the intake system, with parts other than thosespecified by the manufacturer
As you can see, all street-legal motorcycles have emission-controlsystems. These control systems are designed to help keep ouratmosphere clean and our neighborhoods quiet, while causing norestrictions to the vehicle’s usable power.
Road Test 3
1. When an evaporative-emission control system is used, the vapors from the fuel tank arecollected into a _______ when the engine isn’t running.
2. An exhaust-emission control system converts exhaust hydrocarbons and carbon monoxideinto what two compounds?
3. True or False? According to federal law, it’s illegal to replace an air intake or exhaustsystem on a street-legal motorcycle with anything other than a system specified by theoriginal manufacturer.
4. Crankcase breathers are routed into the _______ to prevent raw hydrocarbons fromentering the atmosphere.
(Continued)
Motorcycle Maintenance 37
Road Test 3
5. What are hydrocarbons?
6. What is carbon monoxide?
7. True or False? Carbon dioxide is a poisonous gas.
Check your answers with those on page 51.
MOTORCYCLE AND ATV CHASSIS MAINTENANCEMotorcycle and ATV chassis maintenance includes cleaning, inspect-ing, and replacing parts that are subject to wear. The technicianperforming this maintenance adjusts and tunes the vehicle’s chassissystems to the settings specified by the manufacturer. Chassis partsthat require attention during maintenance include
� Cables and cable connections
� Steering-head bearings
� Brakes
� Wheels and tires
� Final drives
� Grease fittings
Cables and Cable Connections
Inspection and LubricationCable maintenance consists of inspecting all cables for the specifiedamount of play and ensuring that the cables work freely and don’tbind or stick. Cable maintenance also includes checking that thecables are properly lubricated. Figure 36 shows a special cable-lubricating tool that dispenses lubricant into the cable.
38 Motorcycle Maintenance
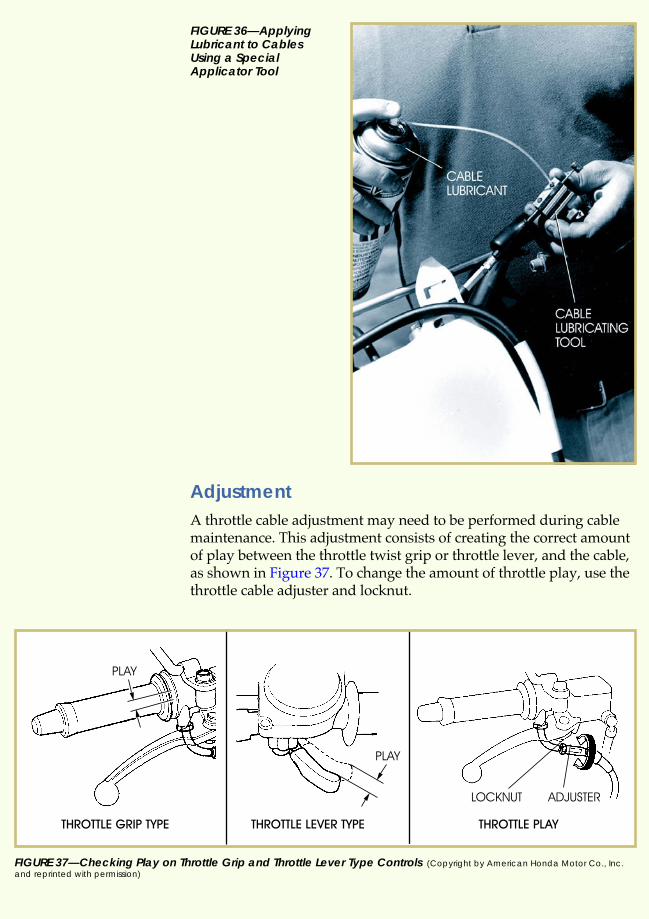
AdjustmentA throttle cable adjustment may need to be performed during cablemaintenance. This adjustment consists of creating the correct amountof play between the throttle twist grip or throttle lever, and the cable,as shown in Figure 37. To change the amount of throttle play, use thethrottle cable adjuster and locknut.
Motorcycle Maintenance 39
FIGURE 36—ApplyingLubricant to CablesUsing a SpecialApplicator Tool
FIGURE 37—Checking Play on Throttle Grip and Throttle Lever Type Controls (Copyright by American Honda Motor Co., Inc.and reprinted with permission)
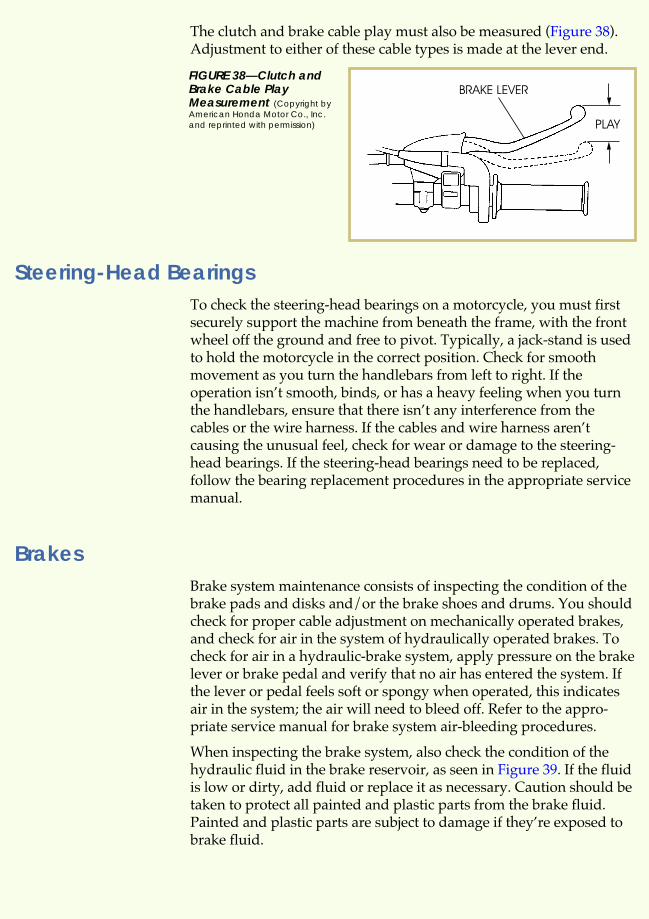
The clutch and brake cable play must also be measured (Figure 38).Adjustment to either of these cable types is made at the lever end.
Steering-Head BearingsTo check the steering-head bearings on a motorcycle, you must firstsecurely support the machine from beneath the frame, with the frontwheel off the ground and free to pivot. Typically, a jack-stand is usedto hold the motorcycle in the correct position. Check for smoothmovement as you turn the handlebars from left to right. If theoperation isn’t smooth, binds, or has a heavy feeling when you turnthe handlebars, ensure that there isn’t any interference from thecables or the wire harness. If the cables and wire harness aren’tcausing the unusual feel, check for wear or damage to the steering-head bearings. If the steering-head bearings need to be replaced,follow the bearing replacement procedures in the appropriate servicemanual.
BrakesBrake system maintenance consists of inspecting the condition of thebrake pads and disks and/or the brake shoes and drums. You shouldcheck for proper cable adjustment on mechanically operated brakes,and check for air in the system of hydraulically operated brakes. Tocheck for air in a hydraulic-brake system, apply pressure on the brakelever or brake pedal and verify that no air has entered the system. Ifthe lever or pedal feels soft or spongy when operated, this indicatesair in the system; the air will need to bleed off. Refer to the appro-priate service manual for brake system air-bleeding procedures.
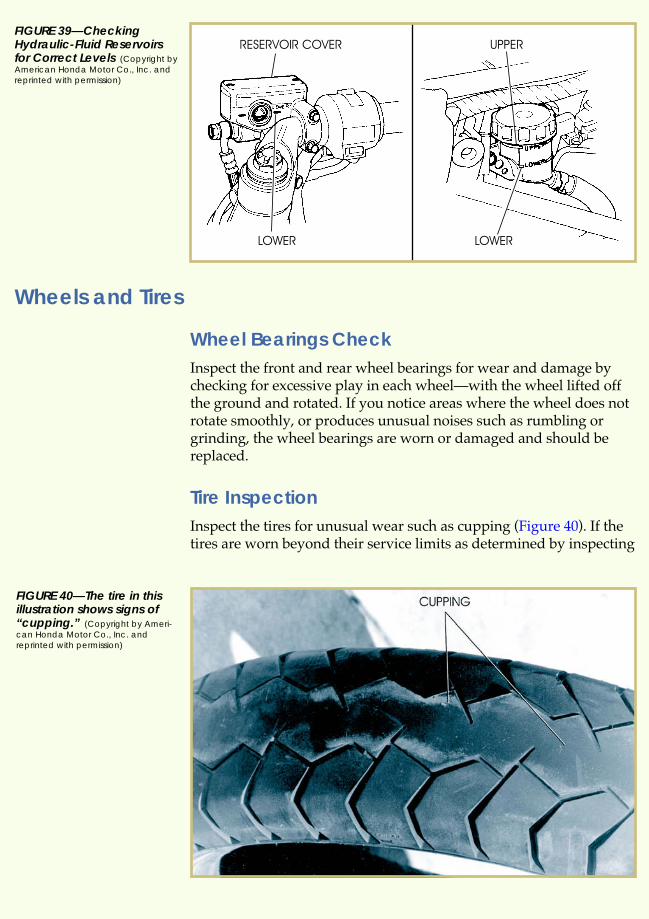
When inspecting the brake system, also check the condition of thehydraulic fluid in the brake reservoir, as seen in Figure 39. If the fluidis low or dirty, add fluid or replace it as necessary. Caution should betaken to protect all painted and plastic parts from the brake fluid.Painted and plastic parts are subject to damage if they’re exposed tobrake fluid.
40 Motorcycle Maintenance
FIGURE 38—Clutch andBrake Cable PlayMeasurement (Copyright byAmerican Honda Motor Co., Inc.and reprinted with permission)
Wheels and Tires
Wheel Bearings CheckInspect the front and rear wheel bearings for wear and damage bychecking for excessive play in each wheel—with the wheel lifted offthe ground and rotated. If you notice areas where the wheel does notrotate smoothly, or produces unusual noises such as rumbling orgrinding, the wheel bearings are worn or damaged and should bereplaced.
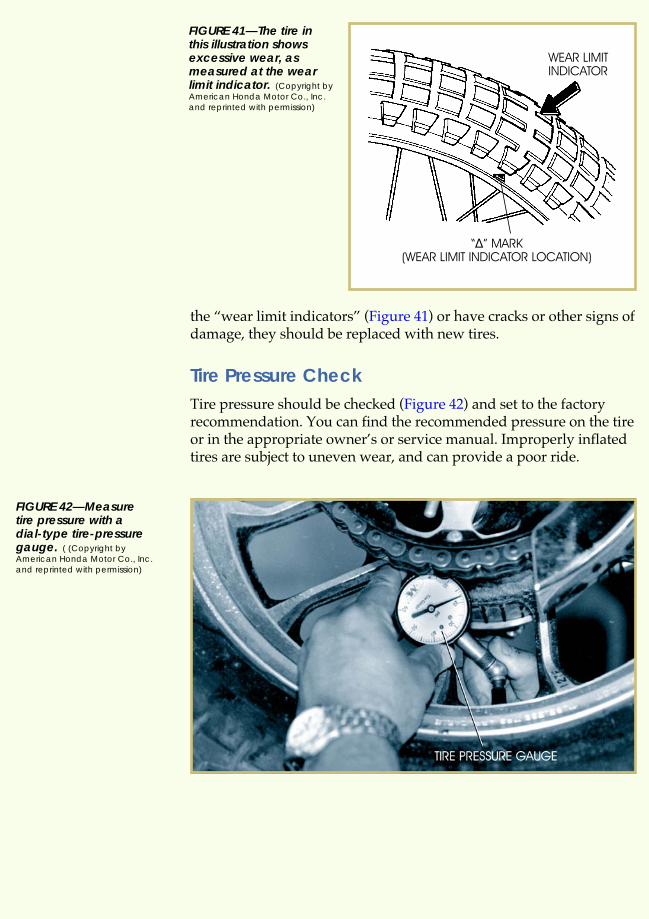
Tire InspectionInspect the tires for unusual wear such as cupping (Figure 40). If thetires are worn beyond their service limits as determined by inspecting
Motorcycle Maintenance 41
FIGURE 39—CheckingHydraulic-Fluid Reservoirsfor Correct Levels (Copyright byAmerican Honda Motor Co., Inc. andreprinted with permission)
FIGURE 40—The tire in thisillustration shows signs of“cupping.” (Copyright by Ameri-can Honda Motor Co., Inc. andreprinted with permission)
the “wear limit indicators” (Figure 41) or have cracks or other signs ofdamage, they should be replaced with new tires.
Tire Pressure CheckTire pressure should be checked (Figure 42) and set to the factoryrecommendation. You can find the recommended pressure on the tireor in the appropriate owner’s or service manual. Improperly inflatedtires are subject to uneven wear, and can provide a poor ride.
42 Motorcycle Maintenance
FIGURE 41—The tire inthis illustration showsexcessive wear, asmeasured at the wearlimit indicator. (Copyright byAmerican Honda Motor Co., Inc.and reprinted with permission)
FIGURE 42—Measuretire pressure with adial-type tire-pressuregauge. ( (Copyright byAmerican Honda Motor Co., Inc.and reprinted with permission)
Final Drives
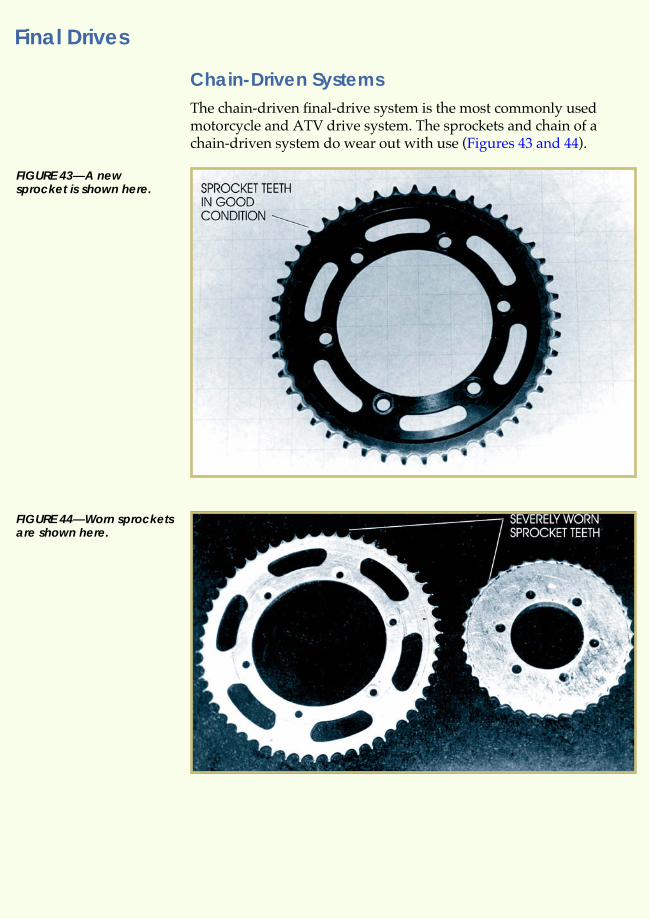
Chain-Driven SystemsThe chain-driven final-drive system is the most commonly usedmotorcycle and ATV drive system. The sprockets and chain of achain-driven system do wear out with use (Figures 43 and 44).
Motorcycle Maintenance 43
FIGURE 43—A newsprocket is shown here.
FIGURE 44—Worn sprocketsare shown here.
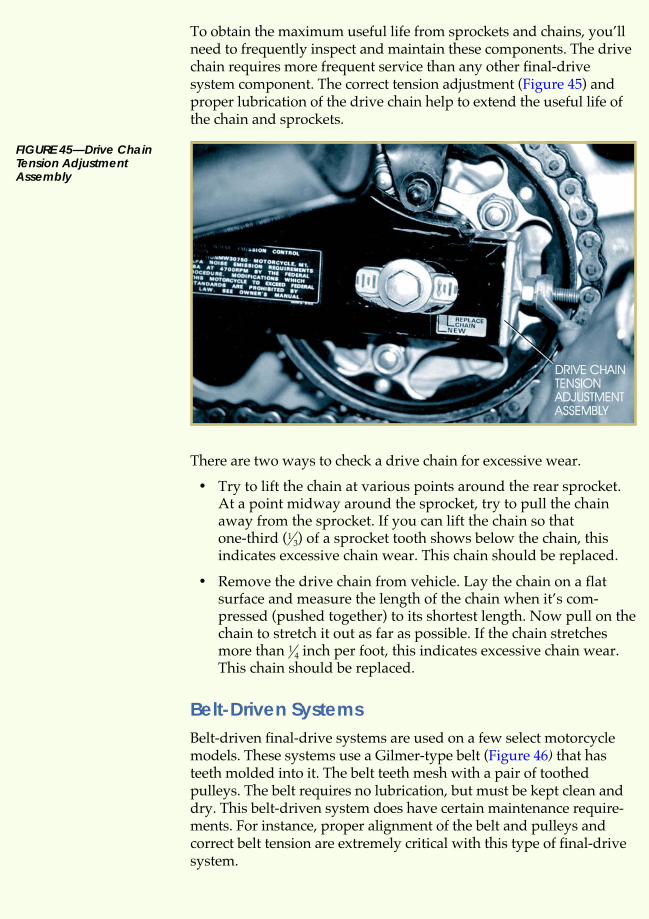
To obtain the maximum useful life from sprockets and chains, you’llneed to frequently inspect and maintain these components. The drivechain requires more frequent service than any other final-drivesystem component. The correct tension adjustment (Figure 45) andproper lubrication of the drive chain help to extend the useful life ofthe chain and sprockets.
There are two ways to check a drive chain for excessive wear.
� Try to lift the chain at various points around the rear sprocket.At a point midway around the sprocket, try to pull the chainaway from the sprocket. If you can lift the chain so thatone-third (1
3) of a sprocket tooth shows below the chain, thisindicates excessive chain wear. This chain should be replaced.
� Remove the drive chain from vehicle. Lay the chain on a flatsurface and measure the length of the chain when it’s com-pressed (pushed together) to its shortest length. Now pull on thechain to stretch it out as far as possible. If the chain stretchesmore than 1
4 inch per foot, this indicates excessive chain wear.This chain should be replaced.
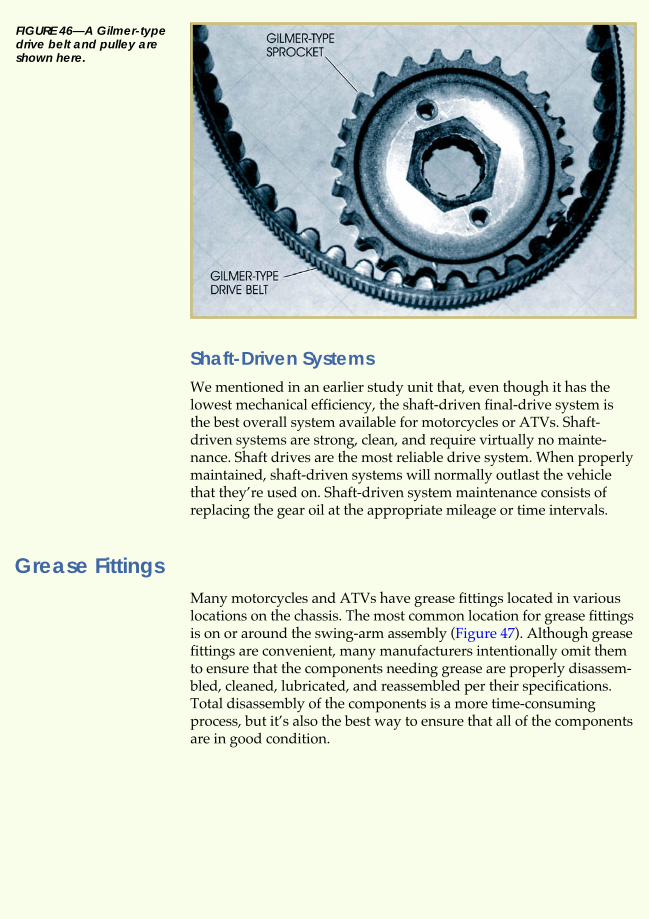
Belt-Driven SystemsBelt-driven final-drive systems are used on a few select motorcyclemodels. These systems use a Gilmer-type belt (Figure 46) that hasteeth molded into it. The belt teeth mesh with a pair of toothedpulleys. The belt requires no lubrication, but must be kept clean anddry. This belt-driven system does have certain maintenance require-ments. For instance, proper alignment of the belt and pulleys andcorrect belt tension are extremely critical with this type of final-drivesystem.
44 Motorcycle Maintenance
FIGURE 45—Drive ChainTension AdjustmentAssembly
Shaft-Driven SystemsWe mentioned in an earlier study unit that, even though it has thelowest mechanical efficiency, the shaft-driven final-drive system isthe best overall system available for motorcycles or ATVs. Shaft-driven systems are strong, clean, and require virtually no mainte-nance. Shaft drives are the most reliable drive system. When properlymaintained, shaft-driven systems will normally outlast the vehiclethat they’re used on. Shaft-driven system maintenance consists ofreplacing the gear oil at the appropriate mileage or time intervals.
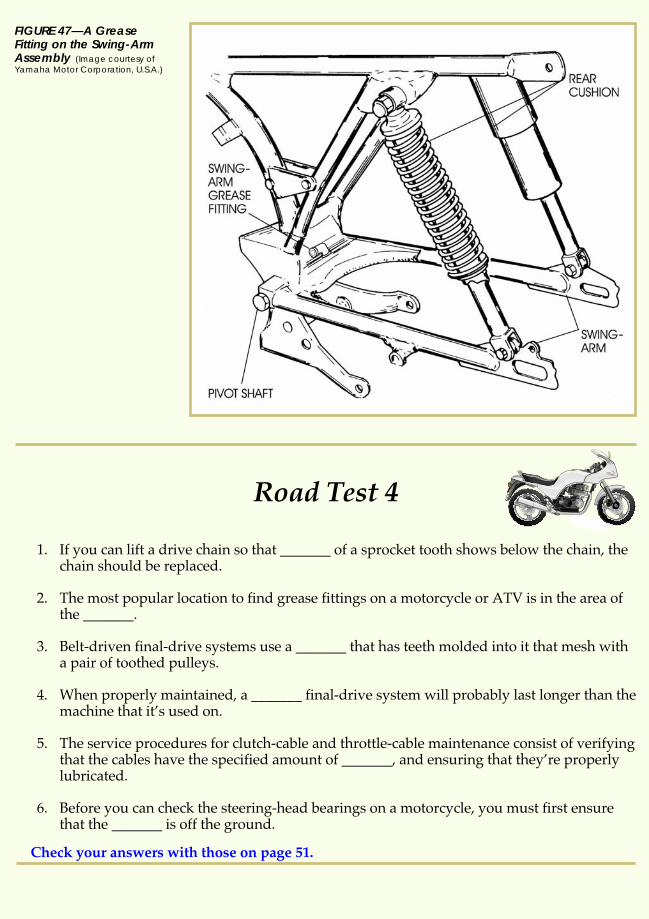
Grease FittingsMany motorcycles and ATVs have grease fittings located in variouslocations on the chassis. The most common location for grease fittingsis on or around the swing-arm assembly (Figure 47). Although greasefittings are convenient, many manufacturers intentionally omit themto ensure that the components needing grease are properly disassem-bled, cleaned, lubricated, and reassembled per their specifications.Total disassembly of the components is a more time-consumingprocess, but it’s also the best way to ensure that all of the componentsare in good condition.
Motorcycle Maintenance 45
FIGURE 46—A Gilmer-typedrive belt and pulley areshown here.
Road Test 4
1. If you can lift a drive chain so that _______ of a sprocket tooth shows below the chain, thechain should be replaced.
2. The most popular location to find grease fittings on a motorcycle or ATV is in the area ofthe _______.
3. Belt-driven final-drive systems use a _______ that has teeth molded into it that mesh witha pair of toothed pulleys.
4. When properly maintained, a _______ final-drive system will probably last longer than themachine that it’s used on.
5. The service procedures for clutch-cable and throttle-cable maintenance consist of verifyingthat the cables have the specified amount of _______, and ensuring that they’re properlylubricated.
6. Before you can check the steering-head bearings on a motorcycle, you must first ensurethat the _______ is off the ground.
Check your answers with those on page 51.
46 Motorcycle Maintenance
FIGURE 47—A GreaseFitting on the Swing-ArmAssembly (Image courtesy ofYamaha Motor Corporation, U.S.A.)
MOTORCYCLE AND ATV STORAGE PROCEDURESWhen preparing to store a motorcycle or ATV for an extended periodof time, you should take certain steps to reduce the chances of havingstorage-related problems. If the motorcycle or ATV to be stored needsany repairs, the repairs should be completed before the vehicle isstored, so that you don’t forget what needs to be done or tie up thevehicle for repairs at the start of the next riding season.
Preparing a Motorcycle or ATV for StorageTo prepare a motorcycle or ATV for storage, you should do thefollowing:
1. Change the engine oil and filter.
2. If the motorcycle or ATV engine is liquid-cooled, be sure that thecooling system is filled with a 50 percent antifreeze solution toprevent the cooling-system components from freezing.
3. Fill the fuel tank with fuel and add a fuel stabilizer. The fuelstabilizer will prevent the fuel tank from rusting, and prevent thefuel from deteriorating during storage. Also, turn off the fuelpetcock while you’re servicing the fuel system. This will preventfuel seepage during storage.
4. Drain the carburetors. To verify that all of the fuel is out of thecarburetor float bowls, start the engine (choke in the On position)after the bowls have been drained. The engine will run for a briefinterval while any remaining fuel is consumed.
5. To prevent rusting in the cylinders, you need to remove the sparkplugs from the cylinders, pour a teaspoon of clean engine oil intoeach cylinder, and cover the spark plug holes with a piece ofcloth. Crank the engine several times to disperse the oil in thecylinders. Reinstall the spark plugs.
6. Remove the battery and verify that it’s fully charged. Store thebattery in an area that’s protected from freezing and directsunlight. You should put the battery on a trickle charger monthlywhile it’s in storage to prevent the battery from discharging.
7. Wash and dry the motorcycle or ATV, then wax all of the paintedsurfaces. This will protect the vehicle while it’s in storage, andwill provide a clean, polished appearance when the vehicle isbrought out of storage for the next riding season.
8. Lubricate the drive chain to prevent rust during storage.
9. Inflate the tires to the factory-recommended air pressure. Ifpossible, store the vehicle with all of the tires off the ground andprotected from direct sunlight.
Motorcycle Maintenance 47

10. Cover the motorcycle or ATV with a suitable cover and store it inan area that’s free of excessive dampness, dust, and chemicalfumes.
Removing a Motorcycle or ATV from StorageWhen you remove a motorcycle or ATV from storage, you should dothe following:
1. Uncover and clean the vehicle.
2. Change the engine oil if the vehicle was stored for more than 4months.
3. Charge and reinstall the battery as appropriate.
4. Check the following pre-ride inspection items—tire pressure,fluid leaks, chain condition, cable adjustment, smooth throttlemovement, brake function, gauge operation, and lights operation.
5. Start the motorcycle or ATV and ride the vehicle slowly in a saferiding area to verify that everything is operating correctly.
Maintenance Process ChecklistMany of the adjustments and repairs related to motorcycle and ATVmaintenance can be completed in any order the technician chooses.However, you’ll find that a standard routine, applicable to servicingevery type of vehicle, will help you do the job more efficiently.
All technicians will adopt and practice a routine or system that worksbest for them. We suggest that you adopt a structured approachbased on the list that follows. You can modify the list to match yourunique requirements. The important thing is to get into a fixedroutine so that your service technique isn’t “hit or miss,” butstructured and complete.
The following list can be used for both two-stroke and four-strokemotorcycles and ATVs. Because of the differences in the engines,some steps and procedures should be skipped as appropriate.
1. Wash the vehicle.
2. Test the compression and leakdown.
3. Adjust the valves (four-stroke).
4. Recheck the compression (four-stroke).
5. Service the air cleaner.
6. Service the battery.
48 Motorcycle Maintenance
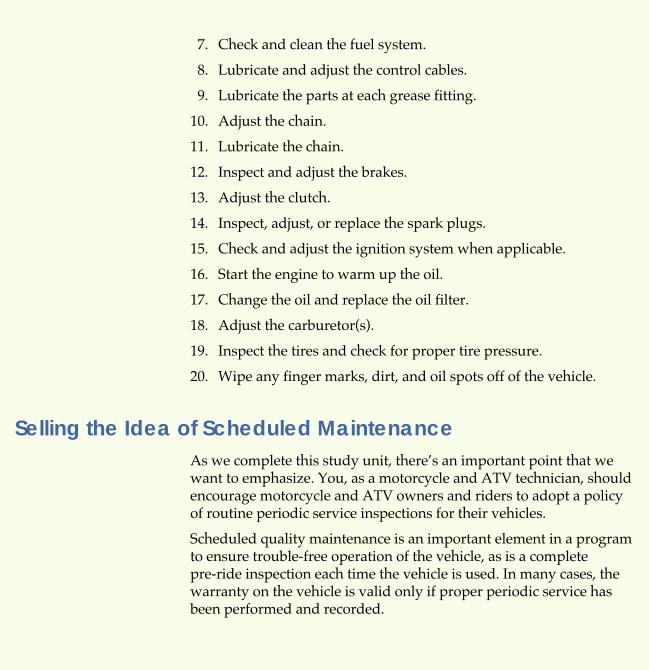
7. Check and clean the fuel system.
8. Lubricate and adjust the control cables.
9. Lubricate the parts at each grease fitting.
10. Adjust the chain.
11. Lubricate the chain.
12. Inspect and adjust the brakes.
13. Adjust the clutch.
14. Inspect, adjust, or replace the spark plugs.
15. Check and adjust the ignition system when applicable.
16. Start the engine to warm up the oil.
17. Change the oil and replace the oil filter.
18. Adjust the carburetor(s).
19. Inspect the tires and check for proper tire pressure.
20. Wipe any finger marks, dirt, and oil spots off of the vehicle.
Selling the Idea of Scheduled MaintenanceAs we complete this study unit, there’s an important point that wewant to emphasize. You, as a motorcycle and ATV technician, shouldencourage motorcycle and ATV owners and riders to adopt a policyof routine periodic service inspections for their vehicles.
Scheduled quality maintenance is an important element in a programto ensure trouble-free operation of the vehicle, as is a completepre-ride inspection each time the vehicle is used. In many cases, thewarranty on the vehicle is valid only if proper periodic service hasbeen performed and recorded.
Motorcycle Maintenance 49

Road Test 5
1. Why should all needed repairs be performed before storing a motorcycle or ATV for anextended period of time?
2. How can you verify that all of the fuel has been removed from the carburetors whenyou’re preparing a vehicle for storage?
3. You should change the engine oil if the motorcycle or ATV has been stored for more than_______ months.
4. True or False? To prevent rusting in the cylinders, you should pour fuel into the cylinders.
5. True or False? To prevent cooling system freeze-ups, liquid-cooled systems should bedrained before the vehicles are stored for the winter.
Check your answers with those on page 52.
50 Motorcycle Maintenance

1
1. False
2. hours or number of races
3. False
4. Every four races or approximately7.5 hours
5. Every 4,000, 12,000, and 20,000 miles
2
1. hydrometer
2. Leakdown
3. False
4. bridged gap
5. False
6. ignitions
7. drag
8. slips
9. True
10. False
11. maintenance-free
3
1. charcoal canister
2. Carbon dioxide and H2O
3. True
4. air box
5. Unburned or raw fuel
6. Fuel that hasn’t completely burnedduring the combustion process. Carbonmonoxide is a colorless, odorless, poi-sonous, and deadly gas.
7. False
4
1. 13
2. swing arm
3. Gilmer-type belt
4. shaft-driven
5. play
6. front wheel
Road Test Answers
51
5
1. You could forget that the repairs areneeded. Also, delaying the repairs willprobably tie up the vehicle at the start ofthe next riding season.
2. Start and run the engine after drainingthe carburetors.
3. four
4. False
5. False
52 Road Test Answers
925 Oak StreetScranton, Pennsylvania 18515-0001
Motorcycle Maintenance
When you feel confident that you have mastered the material in this study unit, complete thefollowing examination. Then submit only your answers to the school for grading, using one ofthe examination answer options described in your “Test Materials” envelope. Send your answersfor this examination as soon as you complete it. Do not wait until another examination is ready.
Questions 1–20: Select the one best answer to each question.
1. If you should accidentally spill battery acid, what should you use to neutralize it?
A. C.A nonflammable household cleaner Water and baking sodaB. D.Water Baking soda
2. Which type of air filter is most commonly used on motorcycles and ATVs?
A. C.The foam air filter The oil bath-type air filterB. D.The gauze-type air filter The paper-type air filter
3. Motorcycle and ATV manufacturers recommend that their machines be
A. serviced at specific mileage or time intervals.B. serviced every 4 months.C. serviced when they no longer run properly.D. tuned-up at least once a year.
Examination 53
EXAMINATION NUMBER:
03301801Whichever method you use in submitting your exam
answers to the school, you must use the number above.
For the quickest test results, go tohttp://www.takeexamsonline.com

4. After you adjust the valves on a four-stroke motorcycle or ATV, you should
A. check the valve timing.B. start the engine and check the oil pressure.C. perform a compression test.D. check the ignition settings.
5. For every gallon of fuel burned in a motorcycle or ATV engine, approximately how much water is produced?
A. C.½ gallon 1½ gallonsB. D.1 gallon 2 gallons
6. What fluid is used to replenish a low battery?
A. C.Tap water Baking sodaB. D.Sulfuric acid Distilled water
7. A paper air filter is cleaned by
A. washing it in soap and water and letting it drip-dry.B. using a nonflammable cleaning solution.C. using compressed air.D. spraying on a cleaner provided by the manufacturer of the filter.
8. When preparing a motorcycle for storage, you should
A. drain the oil and leave the drain plug open.B. drain the fuel from the tank.C. leave open the fuel line petcock.D. start the engine after all of the fuel has been drained from the carburetors.
9. What should you check first if the steering operation isn’t smooth, or if there are snags or a tight, heavy feelas you turn the handlebars on a motorcycle or ATV?
A. C.Faulty ball bearings Faulty roller bearingsB. D.Interference from the cables or wire harness Properly lubricated bushings
10. The four-stroke valve adjuster system that requires little or no maintenance is the
A. C.hydraulic valve adjuster arrangement. shim-under-bucket arrangement.B. D.shim-over-bucket arrangement. screw-and-locknut arrangement.
11. To ensure that the carburetor synchronization adjustment is stable, you should
A. adjust the idle to 1,200 rpms.B. lock the synchronization screws down correctly.C. snap the throttle control grip a couple of times.D. synchronize the carburetors after adjusting the valves.
12. Where is the most common location for the oil drain plug on a two-stroke engine transmission and clutch?
A. C.On the bottom of the transmission housing Near the water pumpB. D.On the clutch cover Next to the magneto
13. What is used to test a cooling system for the correct mixture of coolant and water?
A. C.Barometer ManometerB. D.Hydrometer Thermometer
54 Examination
14. When performing a compression test, which of the following readings would be considered sufficient?
A. C.Below 75 psi Above 100 psiB. D.Above 12.5 psi Above 125 psi
15. If a hydraulic brake lever or brake pedal feels soft or spongy when operated, the system most likely has
A. C.dirty fluid in it. air in it.B. D.water in it. rust in it.
16. The final-drive system that requires the least amount of maintenance is the
A. C.shaft-driven final drive. chain-driven final drive.B. D.belt-driven final drive. gear-driven final drive.
17. The four-stroke valve adjuster system that requires camshaft removal to make valve clearance adjustmentsis the
A. C.screw and locknut. shim-over-bucket.B. D.shim-under-bucket. hydraulic tappet.
18. Which reading represents the specific gravity of the electrolyte in a fully charged battery?
A. C.12.80 to 13.20 0.1280 to 0.1320B. D.1.280 to 1.320 1.280 to 13.20
19. What is the maintenance interval for spark plug replacement on a four-stroke ATV?
A. C.After every 10 rides Every 3 monthsB. D.No interval—replace to correct problems Every 12 months
20. When used, an exhaust-emission control system directs fresh air into the exhaust port whenever there’s anegative pressure in the
A. C.carburetor venturi. exhaust-port area.B. D.intake-port area. combustion chamber.
Examination 55