subfinder for operators - cobb county school district subcast information tab 4.11.4 editing a site...
TRANSCRIPT

SubFinder for Operators
Users Guide for SubFinder 5.9


Table of Contents _____________________________________________________________________________
_________________________________________________________________________________________________ Version 5.8 Table of Contents Rev. 4/08
i
Table of Contents 1.0 Introduction to SubFinder General 1.0.1 System Programs 1.0.1 2.0 General Information Commonly Used Terminology 2.0.1 Opening Any SubFinder Program 2.0.1 Opening and Closing the Call and Job Processor Programs 2.0.2 Performing a Print Screen 2.0.2 Using Phone Shortcuts 2.0.3 Deleting Items in SubFinder 2.0.3 3.0 SubFinder Control Panel Introduction 3.0.1 Opening the Control Panel 3.0.1 Basic Functions of the Control Panel 3.0.1 3.1 Menu Options 3.1.1 File 3.1.1 Edit 3.1.1 Adding a Configuration Profile 3.1.2 Editing a Configuration Profile 3.1.3 3.2 General System 3.2.1 3.3 Dialing Properties The Attributes Tab 3.3.1 Adding an Attribute 3.3.1 Editing an Attribute 3.3.2 Deleting an Attribute 3.3.2 The Area Codes and Exchanges Tab 3.3.3 Adding and Area Code/Exchange Combination 3.3.3 Editing an Area Code/Exchange Combination 3.3.4 Deleting an Area Code/Exchange Combination 3.3.4 3.4 System Schedule 3.4.1 3.5 General Profile 3.5.1 3.6 Call In 3.6.1 3.7 Call Out 3.7.1 3.8 Call Out Calendar 3.9 Absence/Job Creation 3.9.1 3.10 Substitute Selection 3.10.1 3.11 Substitute Disqualification 3.11.1 3.12 Certified Options 3.12.1

Table of Contents _____________________________________________________________________________
_________________________________________________________________________________________________ Version 5.8 Table of Contents Rev. 4/08
ii
3.13 SubAlarm Options 3.13.1 3.14 Custom Options 3.14.1 3.15 Pre-Registration Options 3.15.1 3.16 SubFinder Passwords 3.16.1 The Option Setup 3.16.1 The User List Tab 3.16.2 Adding a New User 3.16.2 Editing an Existing User 3.16.5 Deleting an Existing User 3.16.5
3.17 Email Notifications 3.17.1
4.0 Introduction to SubFinder Edit Introduction 4.0.1 Starting the Edit Program 4.0.1 Basic Functions of the Edit Program 4.0.1 Additional Functions of the Edit Program 4.0.2 4.1 The Job Button 4.1.1 Displaying Absences and Jobs 4.1.2 Adding an Absence 4.1.3 Adding a Job 4.1.6 Editing an Absence or Job 4.1.8 Splitting an Absence or Job 4.1.9 Viewing an Absence or Job 4.1.13 Viewing the Job Log 4.1.13 How Do I…? 4.1.15 Investigate Why an Absence or Job Failed to Fill? 4.1.15 Stop Call Out on a Particular Job 4.1.15 Locate a Working Substitute 4.1.15 4.2 The Employees Button 4.2.1 Displaying Employees 4.2.2 Searching for Employees 4.2.2 Adding an Employee 4.2.3 The Top of the Screen 4.2.3 The General Information Tab 4.2.3 The Address Tab 4.2.5 The Schedule Tab 4.2.6 The Itinerant Schedule Tab 4.2.6 The User Defined Codes Tab 4.2.8 The Certification Tab 4.2.8 The Leave Control Tab 4.2.9 Saving the Record 4.2.12 Editing an Employee 4.2.12 How Do I…? 4.2.14 Delete an Employee 4.2.14 Transfer an Employee to a New Site 4.2.14 Find an Employee’s SubFinder-Assigned ID Number 4.2.15 4.3 The Substitutes Button 4.3.1 Displaying Substitutes 4.3.2 Searching for Substitutes 4.3.2

Table of Contents _____________________________________________________________________________
_________________________________________________________________________________________________ Version 5.8 Table of Contents Rev. 4/08
iii
Adding a Substitute 4.3.3 The Top of the Screen 4.3.3 The General Information Tab 4.3.3 The Address Tab 4.3.5 The Schedule Tab 4.3.6 The Sites Tab 4.3.9 The Positions Tab 4.3.10 The User Defined Codes Tab 4.3.11 The Certification Tab 4.3.12 The Disqualification Tab 4.3.13 Saving the Record 4.3.13 Editing a Substitute 4.3.13 How Do I…? 4.3.15 Delete a Substitute 4.3.15 Find a Substitute’s SubFinder-Assigned ID Number 4.3.15 4.4 Preference Lists and the Skill List 4.4.1 Introduction 4.4.1 Preference Lists 4.4.1 Skill List 4.4.1 Skill Levels 4.4.2 The Preference List Buttons 4.4.2 The Preference List – Add/Edit Button 4.4.2 Adding a Preference List 4.4.4 Editing a Preference List 4.4.6 Copying a Preference List 4.4.7 Deleting a Preference List 4.4.8 The Preference List – Assign to Employees Button 4.4.8 Assigning Lists to and Viewing List for an Employee 4.4.9 Removing Preference Lists from an Employee 4.4.10 The Preference List – Assign to All Button 4.4.11 Assigning Lists to All Employees 4.4.12 Removing Lists from All Employees 4.4.13 The Assign Skill List to All Button 4.4.13 How Do I…? 4.4.14 Move the Skill List from the First Position to the Last Position to The Last Position for All Employees at One Site 4.4.14 4.5 The Sites Button 4.5.1 Adding a Site 4.5.1 The Top of the Screen 4.5.2 The General Information Tab 4.5.2 The Reasons Tab 4.5.4 The Administrator Codes Tab 4.5.5 The User Defined Codes Tab 4.5.6 The SubCast Information Tab 4.5.7 The Site Region Tab 4.5.7 Saving the Record 4.5.8 Editing a Site 4.5.8 Deleting a Site 4.5.9 4.6 The Job Positions Button 4.6.1 Adding a Job Position 4.6.2 Saving the Record 4.6.3 Editing a Job Position 4.6.3 Assigning a Job Position 4.6.4

Table of Contents _____________________________________________________________________________
_________________________________________________________________________________________________ Version 5.8 Table of Contents Rev. 4/08
iv
Using the Subs… Button 4.6.4 Deleting a Job Position 4.6.6 4.7 The Calendar Tracks Button 4.7.1 Adding a Calendar 4.7.2 Editing a Calendar 4.7.3 4.8 The Reasons Button 4.8.1 Adding a Reason 4.8.2 The Miscellaneous Code Tab 4.8.3 The Monthly Limits Tab 4.8.3 Editing a Reason 4.8.4 Additional Notes on Reasons 4.8.4 4.9 The Verification Button 4.9.1 Displaying Remote Sites/Site Groups 4.9.2 Editing/Verifying Absences and Jobs 4.9.3 Viewing the Verification Job Log 4.9.7 4.10 The Call Request List Button 4.10.1 Using the Call Request List 4.10.2 4.11 Menu Options 4.11.1 File 4.11.1 Edit 4.11.1 Site Groups 4.11.2 Adding a Site Group 4.11.3 The Group Members Tab 4.11.3 The Administrator Codes Tab 4.11.4 The SubCast Information Tab 4.11.4 Editing a Site Group 4.11.5 Deleting a Site Group 4.11.6 Job Position Groups 4.11.6 Adding a Job Position Group 4.11.7 Editing a Job Position Group 4.11.8 Deleting a Job Position Group 4.11.9 Reason Groups 4.11.9 Adding a Reason Group 4.11.10 Editing a Reason Group 4.11.11 Pay Periods 4.11.11 Adding a Pay Period 4.11.12 Editing a Pay Period 4.11.13 Deleting a Pay Period 4.11.13 Tools 4.11.14 Copy Database 4.11.14 Count 4.11.14 Leave Control Accrual 4.11.14 Recalculate Sub Hours 4.11.15 Recalculate Job Count 4.11.16 Inactivate All Substitutes 4.11.16 Purge Database 4.11.16 5.0 The Job Processor Introduction 5.0.1 Starting the Job Processor 5.0.1

Table of Contents _____________________________________________________________________________
_________________________________________________________________________________________________ Version 5.8 Table of Contents Rev. 4/08
v
5.1 Menu Options 5.1.1 Control 5.1.1 Stand-by 5.1.2 Set Date/Time 5.1.2 Exit 5.1.2 Call Request 5.1.2 View 5.1.2 Monitor 5.1.4 Options 5.1.5 SubFinder via the Internet 5.1.5 6.0 The Call Processor Introduction 6.0.1 Starting the Call Processor 6.0.1 6.1 Menu Options 6.1.1 Control 6.1.1 Set Date/Time 6.1.1 Exit 6.1.1 Line 6.1.1 Options 6.1.1 Monitor 6.1.2 Status 6.1.3 Options 6.1.3 6.2 Recording Names 6.2.1 Setting up the System 6.2.1 Using the Record Names Program 6.2.2 Making a Recording 6.2.3 Reviewing a Recording 6.2.4 Deleting a Recording 6.2.4 7.0 Data Exchange Introduction 7.0.1 Starting Data Exchange 7.0.1 Functions Common Throughout Data Exchange 7.0.2 7.1 Menu Options 7.1.1 File 7.1.1 Exit 7.1.1 Imports Exports 7.1.1 Imports 7.1.1 Exports 7.1.1 SubPay Imports 7.1.2 SubPay Exports 7.1.2 Options 7.1.2 Preferences 7.1.2 7.2 Importing Data 7.2.1 Records Available for Import 7.2.1 Performing a SubFinder Data Import 7.2.2 Performing a SubPay Data Import 7.2.3 8.0 Reporting Introduction 8.0.1

Table of Contents _____________________________________________________________________________
_________________________________________________________________________________________________ Version 5.8 Table of Contents Rev. 4/08
vi
Starting the Reports Program 8.0.1 Functions Common to All Report Categories 8.0.2 Control Buttons 8.0.2 Selection Criteria 8.0.3 The Preview Screen 8.0.4 8.1 Menu Options 8.1.1 File 8.1.1 Print Setup 8.1.1 Exit 8.1.1 Reports 8.1.1 Options 8.1.2 Preferences 8.1.2 8.2 Absence/Job Reports 8.2.1 Running a Report 8.2.1 The Sort Criteria Tab 8.2.2 The Filter Criteria Tab 8.2.3 Generating the Report 8.2.5 Available Job Reports 8.2.5 8.3 Employee Reports 8.3.1 Available Employee Reports 8.3.1 8.4 Substitute Reports 8.4.1 Available Substitute Reports 8.4.1 8.5 Site Reports 8.5.1 Available Site Reports 8.5.1 8.6 Preference List Reports 8.6.1 Available Preference List Reports 8.6.1 8.7 Job Position Reports 8.7.1 Available Job Position Reports 8.7.1 8.8 Reason Reports 8.8.1 Available Reason Reports 8.8.1 8.9 Verification Reports 8.9.1 Available Verification Reports 8.9.1 8.10 Payroll Reports 8.10.1 Available Payroll Reports 8.10.1 9.0 SubCast Introduction 9.0.1 Starting the SubCast Program 9.0.1 9.1 Menu Options 9.1.1 File 9.1.1 Standby 9.1.1 Set Report Time 9.1.2 Set Report Options 9.1.2 Send Next Report with No Delay 9.1.3 Exit 9.1.3

Table of Contents _____________________________________________________________________________
_________________________________________________________________________________________________ Version 5.8 Table of Contents Rev. 4/08
vii
Profile 9.1.3 Help 9.1.3 9.2 Working with Profiles 9.2.1 Adding a Profile 9.2.2 Activating Your Profile(s) 9.2.4 10.0 Data Exchange Pro Introduction 10.0.1 Starting the Data Exchange Pro Program 10.0.1 10.1 Menu Options 10.1.1 File 10.1.1 Standby 10.1.1 Set Running Time 10.1.2 Exit 10.1.2 Profile 10.1.2 Manual 10.1.3 Help 10.1.3 10.2 Working with Profiles 10.2.1 Edit Import Profiles 10.2.1 Adding an Import Profile 10.2.2 Editing an Import Profile 10.2.4 Deleting an Import Profile 10.2.5 Edit Export Profile 10.2.5 Adding an Export Profile 10.2.6 Editing an Export Profile 10.2.8 Deleting an Export Profile 10.2.9 Activating Your Profile(s) 10.2.10 11.0 SubFinder Custom Exports Introduction 11.0.1 Working with Export Profiles 11.1.1 Running Export Profiles 11.2.1 12.0 SubFinder Report Requester Introduction 12.0.1 Opening the SubFinder Report Requester 12.0.1 Basic Functions of the Report Requester 12.0.1 12.1 Menu Options 12.1.1 13.0 SubFinder Email Notifications Processor Introduction 13.0.1 Opening the SubFinder Notifications Processor 13.0.1 Basic Functions of the Notifications Processor 13.0.1 13.1 Menu Options 13.1.1 14.0 Remote Desktop Starting a Session 14.0.1 Ending a Session 14.0.2


Chapter 1 – Introduction to SubFinder _____________________________________________________________________________
_____________________________________________________________________________ Version 5.9 Introduction to SubFinder 1.0.1 Rev. 9/09
1.0 Introduction to the SubFinder System
General SubFinder1 is a Windows-based software application which automates your employee absence reporting, substitute placement, and data analysis processes. It is designed for both certified and classified employees. SubFinder has solved some of the most challenging problems facing Personnel and Human Resource managers everywhere such as easing the absence reporting and substitute placement process. With SubFinder, employees utilize a touch-tone telephone or an Internet browser to contact the system and report their absences. Once absences have been reported, SubFinder begins securing the very best substitutes for you. And best of all; it is completely automated. SubFinder is a proactive staff management tool; operating 24 hours a day, 7 days a week, 365 days a year. Employees have the ability to report absences up to a year in advance. SubFinder is designed to know if a substitute is needed and when it is best to begin offering each job; whether the substitute initiates the search or SubFinder calls the substitute. Managing complex schedules, placing the very best substitute employees, and transmitting accurate payroll data to your accounting system is all a part of SubFinder’s daily routine. This means that you gain complete information about each absence every time, and can get easy to read reports or export the data in a format common to other computing platforms. Schools and businesses win big by saving money in unemployment claims. With SubFinder, you can instantly demonstrate what dates and times contacts were made, how many contacts were made, the disposition of each contact, and the reasons people decline offers; everything you need to successfully defend against unfair or unsubstantiated claims. Using Interactive Voice Response (IVR) technology and/or an Internet browser, SubFinder manages the complete process by guiding the employee and substitute through each step in an orderly manner. This means that you gain complete information about each absence every time. You should never have to re-enter data. This is a giant step towards obtaining a paperless office. The combination of Windows technology and our easy-to-use design ensure optimal performance and quick program comprehension by employees. SubFinder is mouse driven and the information is logically organized to meet the needs of Personnel and Human Resource managers.
System Programs
SubFinder is made of several separate, independent programs. Together they perform the tasks necessary to make the system work. The following chapters describe how each program performs specific tasks.


Chapter 2 – General Information _____________________________________________________________________________
_____________________________________________________________________________ Version 5.9 General Information 2.0.1 Rev. 9/09
2.0 SubFinder General Information Commonly Used Terminology
The following conventions have been applied throughout this document. It is important to read this section since it will aid you in following and understanding the terms used in this manual:
1. The word “click” as part of an instruction indicates a single click of the left mouse button.
2. The word “select” as part of an instruction indicates a single click of the left mouse button.
3. “Double-click” indicates a double click of the left mouse button.
4. “Right-click” indicates a single click of the right mouse button.
5. The word “flag” as part of an instruction indicates a click in the check box to the left of the specified field. When a field is flagged the check box will have a check mark in it - . When a field is not flagged the check box will be empty - .
6. Specific keys that need to be pressed will be bracketed. For example: <ALT>, <CTRL>, and <PRINT SCRN>. If several keys need to be pressed together they will be separated with a slash. For example: <CTRL>/<V>.
7. The Task Bar: The Task Bar is the bar which contains the Start button, the clock, and any programs currently running. It is typically displayed at either the top or bottom of your screen.
8. The Title Bar: The Title Bar contains the name of the program you are running. For example, if you are using the SubFinder Edit Program, the Title Bar will display “SubFinder Edit.”
9. The Menu Bar: The Menu Bar consists of word options, such as File, Control, etc. This menu is located in the space directly under the Title Bar. Clicking on a Menu Bar option will display a drop down menu that will allow you to perform various functions.
10. Function Description: When the mouse pointer rests on one of the function buttons, the recessed area below the buttons will provide a description of what that button does.
Opening Any SubFinder Program
1. Click the Start button.
2. Highlight SubFinder for Windows.
3. Highlight the desired program module (SubFinder Edit, SubFinder Reports, etc.) and click.
• Or, double-click on the desktop icon (if available).

Chapter 2 – General Information _____________________________________________________________________________
_____________________________________________________________________________ Version 5.9 General Information 2.0.2 Rev. 9/09
Opening and Closing the Call and Job Processor Programs
It is very important to remember that no phone calls can be made or received unless both of these programs are up and running.
How to Open the Call and Job Processors:
1. Go to the computer that runs the Job Processor program.
2. Click the Start button.
3. Highlight SubFinder for Windows.
4. Highlight SubFinder Job Processor and click.
• Or, double-click on the desktop icon (if available).
5. Wait for the SubFinder splash screen to disappear.
6. Go to the computer that runs the Call Processor program.
7. Click the Start button.
8. Highlight SubFinder for Windows.
9. Highlight SubFinder Call Processor and click. (If you have more than one Call Processor computer, follow this same procedure on each machine.)
• Or, double-click on the desktop icon (if available). Note: If you are running SubFinder on an SPC (Single PC Configuration), the Job and Call Processor programs will be found on the same computer. How to Close the Call and Job Processor Programs:
• In the Job Processor program, from the Menu Bar click Control, then click Standby. Wait for the Job Processor to go into Standby mode.
• In the Call Processor program, from the Menu Bar click Control, then click Exit. (If you have more than one Call Processor program, perform this function on each one).
• In the Job Processor program, from the Menu Bar click Control, then click Exit.
Performing a Print Screen 1. Press <ALT>/<PRINT SCRN>.
2. Click the Start button.
3. Highlight Programs.
4. Highlight Accessories.
5. Highlight Word Pad and click.

Chapter 2 – General Information _____________________________________________________________________________
_____________________________________________________________________________ Version 5.9 General Information 2.0.3 Rev. 9/09
6. Press <CTRL>/<V> and your print screen should appear.
7. Click File, then click Print, and then click OK in the Print window that appears.
8. When the printing is complete click File, click Exit.
9. When the box appears which says, “Do you want to save this document,” click No.
Using Phone Shortcuts
• During the various narrations, the Star Key (*) can be used as a fast forward. (For example, when administrators are reviewing absences at their site.)
• The Pound Key (#) is used as an enter key after entries which can be more than one character. (For example: an Employee ID number or a date.)
• The Nine Key (9) can be used to exit the menu you are in and return to the previous menu.
• The system will typically repeat any narration 4 times, pausing up to 30 seconds between each narration. If a correct response has not been entered in that time period, the call will be terminated.
Deleting Items in SubFinder
Deleting items in SubFinder is a two-step process for the following functions: • Employees • Substitutes • Sites • Job Positions • Calendars
First, the item must be flagged as inactive. You will find an Inactive field in the following SubFinder Edit areas:
• Employees, Substitutes and Sites – on the General Information Tab
• Positions and Calendars – on the Edit screen.
Second, a Database Purge must be performed. For more information on the Database Purge function, please refer to section 4.11 of this manual.
Preference Lists may be deleted by going into Preference Lists in SubFinder Edit, highlighting the desired list, and clicking Delete. A message will appear asking you if you’re sure you want to delete the selected list. Deleting a Preference List automatically removes it from any employee to which it was assigned.
Reasons cannot be deleted. If a reason is no longer applicable, use the edit function to change the Name to unused, and de-flag all users/uses for the reason. You should also delete the voicing for the reason. When you need to add a new reason to your program, reuse any unused reasons before adding another entry.


Chapter 3 – SubFinder Control Panel _____________________________________________________________________________
_____________________________________________________________________________ Version 5.9 SubFinder Control Panel – Introduction 3.0.1 Rev. 9/09
3.0 The SubFinder Control Panel Introduction
The SubFinder Control Panel is the heart of SubFinder. You will use the functions contained within this program to customize the system to fit your needs. The Control Panel relies on a group of options and parameters called a Configuration Profile to control how SubFinder performs. While every district will define a Default Profile, you may also elect to create additional profiles to allow for more detailed customization.
Opening the Control Panel To open SubFinder’s Control Panel:
1. Click the Start button on the Windows Task Bar. A menu will appear with your options.
2. Highlight SubFinder for Windows and a menu will appear listing the SubFinder programs available on that computer.
3. Highlight SubFinder Control Panel and click. • Or, double-click the desktop icon (if available).
Basic Functions of the Control Panel
Once opened, SubFinder will display the Control Panel window:
Each option within the Control Panel window is represented by an icon and includes a brief description of the option. The following Menu options are also available from the Control Panel window:
• File Menu - accessed by clicking on the word File. • Edit Menu - accessed by clicking on the word Edit.

Chapter 3 – SubFinder Control Panel _____________________________________________________________________________
_____________________________________________________________________________ Version 5.9 SubFinder Control Panel – Introduction 3.0.2 Rev. 9/09
We will cover each of these options in the following sections of this chapter, beginning with the Menu options and then working our way from the General System icon to the SubFinder Passwords icon.

Chapter 3 – SubFinder Control Panel ___________________________________________________________________________
___________________________________________________________________________ Version 5.9 SubFinder Control Panel – Menu Options 3.1.1 Rev. 9/09
3.1 Menu Options The menu options are found under the Title Bar of the SubFinder Control Panel.
File Click on the word File, and SubFinder will display the following drop down menu:
By selecting this option, the only choice you will have is Exit. If you click Exit you will close the SubFinder Control Panel window.
Edit Click on the word Edit, and SubFinder will display the following drop down menu:
Selecting this option gives you access to the area of the Control Panel where you can create additional Configuration Profiles. These profiles will allow you to establish different

Chapter 3 – SubFinder Control Panel ___________________________________________________________________________
___________________________________________________________________________ Version 5.9 SubFinder Control Panel – Menu Options 3.1.2 Rev. 9/09
call out times for different sites, or allow certain sites to perform some functions which others cannot. Click on Configuration Profiles… and SubFinder will display the Configuration Profile List window:
The Configuration Profile List window contains the following components and buttons: Display Area: The display area is the open area in the Configuration Profile List window. It shows a listing of configuration profiles, in ascending alphabetical order. Control Buttons:
Exits the Configuration Profile List window and returns you to the Control Panel window.
Allows you to add a new configuration profile
Allows you to change information for an existing configuration profile
Allows you to access the on-line help system
Adding a Configuration Profile
To add a new configuration profile click the Add… button on the right side of the Configuration Profile List window. SubFinder will display the Add Configuration Profile screen:

Chapter 3 – SubFinder Control Panel ___________________________________________________________________________
___________________________________________________________________________ Version 5.9 SubFinder Control Panel – Menu Options 3.1.3 Rev. 9/09
Name: What do you want to call your new profile? We suggest using a descriptive name that will indicate the purpose of the profile. For example: ELEMENTARY SCHOOL PROFILE for a profile that will apply to any elementary school in your district. Once you have named the profile, you can assign it to the appropriate site(s). Select each site that this profile is to be associated with and click the Assign button. SubFinder will display the following message:
Click the Yes button if you want to assign that profile to the site. If you do not want to assign the profile, click the No button and SubFinder will return you to the Add Configuration Profile screen. Once you have assigned the profile to all of the applicable sites, click the OK button on the Add Configuration screen and SubFinder will return you to the SubFinder Control Panel window. Editing a Configuration Profile Once a configuration profile has been added to SubFinder you may find that you need to make changes. To edit a profile:
1. Select the appropriate profile within the Configuration Profile List window.

Chapter 3 – SubFinder Control Panel ___________________________________________________________________________
___________________________________________________________________________ Version 5.9 SubFinder Control Panel – Menu Options 3.1.4 Rev. 9/09
2. Click the Edit… button on the right side of the Configuration Profile List window. SubFinder will display the Edit Configuration Profile screen:
When you edit a profile you can change the name of the profile and/or assign the profile to additional sites. The one exception to this is the profile named Default. This profile is created automatically by SubFinder and its name cannot be changed. You will also notice that all the sites in the district may not be included in the list of sites available to have the profile assigned. Any site that has already been assigned this profile will not be included in the list.

Chapter 3 – SubFinder Control Panel _____________________________________________________________________________
_____________________________________________________________________________ Version 5.9 SubFinder Control Panel – General System 3.2.1 Rev. 9/09
3.2 General System
This function houses some of the system-wide setup information. Once the information has been entered during the set up process, it seldom needs to be changed. However, if you add new phone lines to the system, or want to enable the Archiving feature, you will need to make those adjustments here. Double click on the General System icon and the General System Options screen will appear:
• Number of Call Processors: How many Call Processor computers do you have in your SubFinder system? This will be set for you during your initial installation and would typically be changed only if you add another Call Processor computer.
• Number of Job Processes: How many jobs do you want SubFinder to work on at any given time? This value should equal the total number of SubFinder’s outgoing phone lines.
• Supervisor ID: Enter a unique, easily remembered number between 6 and 9 characters. This number, in conjunction with the Universal Password, will allow you to call the system and 1) stop the system from calling out during the current calling period, 2) resume calling out, 3) place the Job Processor in Standby mode, or 4) bring the Job Processor out of Standby mode.

Chapter 3 – SubFinder Control Panel _____________________________________________________________________________
_____________________________________________________________________________ Version 5.9 SubFinder Control Panel – General System 3.2.2 Rev. 9/09
• Universal Password: Enter a unique, easily remembered number between 6 and 9 characters. This number, in conjunction with the Supervisor ID, will allow you to call the system and 1) stop the system from calling out during the current calling period, 2) resume calling out, 3) place the Job Processor in Standby mode, or 4) bring the Job Processor out of Standby mode.
• Job Archival Threshold: SubFinder has two sets of data files relating to your absences and jobs – the active files and the archive files. The entries contained in the active files are accessible by both the Edit and Reports programs. The entries contained in the archive files are accessible only by the Reports program. They are not available for editing.
If you would like to take advantage of archiving, determine how many days, after the completion of an absence or job, you would still like full editing access to the entry. Enter that value in this field. For example: If you enter 90 days in this field, all absences and jobs will be moved from the active file to the archive file 90 days after completion. At this point, the entries will no longer be available to the Edit program for viewing or editing. The entries can only be viewed in a report.
If you do not want to use this option, LEAVE THE FIELD BLANK.
• Days Ahead to Notify Certificate Expiration: SubFinder has the ability to notify your employees and substitutes when one of their certifications (entered on the Certification tab of their record) is about to expire. If you would like to take advantage of this feature, enter the number of days in advance of the expiration that you want SubFinder to begin the notification. The notification message will be “One or more of your certifications will expire in the near future. Please contact your supervisor.” Notifications will be made on incoming employee calls, incoming substitute calls, and outgoing substitute calls, and will continue until the expiration date is changed. This function does not generate a special phone call to notify that a certificate is about to expire!
If you do not want to use this option, LEAVE THE FIELD BLANK.
• Delete Special Instructions After Job Ends: SubFinder offers the ability to automatically delete the special instructions (the message an employee can record for the substitute) from your system. If you would like to take advantage of this feature, enter the number of days after the completion of an absence or job that you would like to have the recording removed.
If you do not want to use this option, LEAVE THE FIELD BLANK.
• Half-day Threshold: Many districts have what is referred to as a half-day threshold for the payment of their substitutes. This threshold is used by many of the absence reports available in SubFinder, as well as the data export function of the program. It is expressed as hours and minutes. If a substitute works for an amount of time that is less than or equal to the defined value, SubFinder will report that they worked a half day. If they work for an amount of time greater than the defined value, SubFinder will report that they worked a full day. For example: If your Half Day Threshold is set at 04:00 (four hours and zero minutes), any substitute who worked four hours or less will be shown as having worked a half day. Any substitute working four hours and one minute or more will be shown as having worked a full day. Enter the amount of time in an HH:MM format and the colon (:) will be added automatically for you. For example: 4 hours and 0 minutes would be entered as 0400.
• Full-day Threshold: Enter the hours and minutes that constitutes a full day of work. Enter the amount of time in an HH:MM format and the colon (:) will be added automatically for you. This is currently a memo field and does not affect any reports.

Chapter 3 - SubFinder Control Panel _____________________________________________________________________________
_____________________________________________________________________________ Version 5.9 SubFinder Control Panel – Dialing Attributes 3.3.1 Rev. 9/09
3.3 Dialing Properties Dialing attributes define the dialing sequences used when SubFinder makes an outgoing phone call to offer your substitutes jobs. Do you need to dial a “9” to get an outside line? Do you have to dial a “1” before the area code for long distance calling? If this is not properly configured, your substitutes will not be called. Double click on the Dialing Properties icon and the Dialing Properties screen will appear:
The Attributes Tab
On the Attributes tab you designate the different types of calls that you could make to substitutes and how those calls should be dialed. The display window on this tab provides the following information about the dialing attributes currently defined:
• Name: This is the name of a given attribute. It should describe what type of call it represents. Local and Long Distance are the defaults.
• Prefix: What numbers need to be dialed before dialing the actual phone number?
• Use Area Code: Indicates if the area code needs to be dialed when calling a number that has been assigned the particular attribute.
• Suffix: What numbers need to be dialed after dialing the actual phone number? Adding an Attribute
To add a new attribute, click the Add button on the Attributes tab. SubFinder will display the Add Dial Attribute screen:

Chapter 3 - SubFinder Control Panel _____________________________________________________________________________
_____________________________________________________________________________ Version 5.9 SubFinder Control Panel – Dialing Attributes 3.3.2 Rev. 9/09
• Name: What do you want to call your new dialing attribute? We suggest using a
descriptive name that will indicate the purpose of the entry. For example: LD W/CODE would indicate an attribute that would include a special prefix code.
• Dial Prefix: When using this attribute, what, if anything needs to be dialed before the actual phone number? Do you need to dial a 9 to get an outside line? Do you need to dial a 1? If you need to include a pause before, or after, the dial prefix, insert a comma (,).
• Dial Suffix: When using this attribute, what, if anything needs to be dialed after the actual phone number? Do you need to dial a special code for accounting purposes? If you need to include a pause prior to the code, insert a comma (,).
• Use Area Code When Dialing: If you need to include the area code when using this attribute, flag this box.
Once you have completed the dial attribute, click the OK button in the lower-left corner of the Add Dial Attribute screen. SubFinder will save your new entry and return you to the Attributes tab of the Dialing Properties screen.
Editing an Attribute
Once an attribute has been added to SubFinder, you may find the need to edit it. To edit a Dial Attribute:
1. Select the appropriate Dial Attribute from the Attributes tab of the Dialing Properties screen.
2. Click the Edit button on the bottom-center of the Attributes tab. SubFinder will display the Edit Dial Attribute screen:

Chapter 3 - SubFinder Control Panel _____________________________________________________________________________
_____________________________________________________________________________ Version 5.9 SubFinder Control Panel – Dialing Attributes 3.3.3 Rev. 9/09
When you edit a Dial Attribute, all fields can be changed as necessary. Once you have completed changing the attribute, click the OK button in the lower-left corner of the screen. SubFinder will save your changes and return you to the Attributes tab of the Dialing Properties screen.
Deleting an Attribute To delete an attribute:
1. Select the appropriate Dial Attribute from the Attributes tab of the Dialing Properties screen.
2. Click the Delete button. SubFinder will delete the attribute and return you to the Attributes tab of the Dialing Properties screen.
The Area Codes and Exchanges Tab
You will use the Area Codes and Exchanges tab to tell SubFinder which Dial Attribute to use each time it dials a specific phone number.
• Display Window: The display window on this tab will list each area code/exchange combination that is currently defined, along with the dial attribute that has been assigned to it.
• Default: The attribute that is shown as the “default” will be the one used anytime SubFinder tries to dial an area code/exchange combination that does not appear in the display window. Using the above screen as an example, if SubFinder needed to call someone with an area code of 570 and an exchange of 949, it would dial the call using the Local attribute since the combination is not defined in the display window list.
Adding an Area Code/Exchange Combination
Typically, you should define all long distance and “special” combinations and set the default to local. This will minimize the chance of SubFinder not being able to call a local substitute

Chapter 3 - SubFinder Control Panel _____________________________________________________________________________
_____________________________________________________________________________ Version 5.9 SubFinder Control Panel – Dialing Attributes 3.3.4 Rev. 9/09
because the combination was not properly defined. To add a new area code/exchange combination, click the Add button on the Area Codes and Exchanges tab. SubFinder will display the Add Area Code and Exchange screen:
• Area Code: Enter the Area Code - the first 3 numbers of a 10 digit phone number. The number entered in this field will be the default the next time the Add button is selected from the previous window.
• Exchange: Enter the Exchange - the second 3 numbers of a 10 digit phone number.
• Attribute: Select the attribute that should be used when calling someone with this area code/exchange combination. To select a specific attribute, click on the arrow at the end of the Attribute field and choose the desired type from the list presented. The entry chosen will be the default the next time the Add button is selected from the previous window.
Once you have entered the appropriate information, click the OK button in the lower-left corner of the Add Area Code and Exchange screen. SubFinder will save your new entry and return you to the Area Codes and Exchanges tab of the Dialing Properties screen.
Editing an Area Code/Exchange Combination Once an area code/exchange combination has been added to SubFinder you may find the need to edit it. To edit an entry:
1. Select the appropriate combination from the Area Codes and Exchanges tab of the Dialing Properties screen.
2. Click the Edit button on the bottom-center of the Area Codes and Exchanges tab. SubFinder will display the Edit Area Code and Exchange screen:

Chapter 3 - SubFinder Control Panel _____________________________________________________________________________
_____________________________________________________________________________ Version 5.9 SubFinder Control Panel – Dialing Attributes 3.3.5 Rev. 9/09
When you edit an area code/exchange combination, all fields can be changed as necessary. Once you have completed your changes, click the OK button in the lower-left corner of the screen. SubFinder will save your changes and return you to the Area Codes and Exchanges tab of the Dialing Properties screen.
Deleting an Area Code/Exchange Combination To delete an area code/exchange combination:
1. Select the appropriate combination from the Area Codes and Exchanges tab of the Dialing Properties screen.
2. Click the Delete button. SubFinder will delete the entry and return you to the Area Codes and Exchanges tab of the Dialing Properties screen.


Chapter 3 - SubFinder Control Panel _____________________________________________________________________________
_____________________________________________________________________________ Version 5.9 SubFinder Control Panel – System Schedule 3.4.1 Rev. 9/09
3.4 System Schedule
The System Schedule section of SubFinder’s Control Panel manages the timed functions of the program, the call out periods, and the Database Copy. Double click on the System Schedule icon and the System Schedule screen will appear:
Note: Any field followed by a globe must have the same value entered for all profiles.
• Profile: This is a section of the Control Panel where different profiles can be utilized. SubFinder will always start with the Default Profile. If you have established others, click on the arrow at the end of the profile field and choose the appropriate profile from the list presented.
• Morning Calling Start Time: What time do you want SubFinder to begin calling substitutes for jobs that are scheduled to start today? SubFinder will utilize the morning call out period only on those days for which there are jobs remaining to be filled for the current day. The time should be entered using the format HHMMA/P. For example: 6:00 a.m. would be entered as 0600A. This time can vary for different profiles.
• Morning Calling End Time: What time do you want SubFinder to stop calling substitutes for jobs that are scheduled to start today? If you anticipate having any afternoon jobs to fill, adjust this value accordingly. The time should be entered using the format HHMMA/P. For example: 10:30 a.m. would be entered as 1030A. The time entered can be after Noon, which will allow SubFinder to call out on any jobs that may not start until later in the afternoon or evening. This time must be the same for all profiles.
• Evening Calling Start Time: What time do you want SubFinder to start calling substitutes for future jobs? SubFinder will utilize the evening call out period 7 days a

Chapter 3 - SubFinder Control Panel _____________________________________________________________________________
_____________________________________________________________________________ Version 5.9 SubFinder Control Panel – System Schedule 3.4.2 Rev. 9/09
week. The time should be entered using the format HHMMA/P. For example: 5:30 p.m. would be entered as 0530P. This time must be the same for different profiles.
• Evening Calling Stop Time: What time do you want SubFinder to stop calling substitutes for future jobs? The time should be entered using the format HHMMA/P. For example: 10:30 p.m. would be entered as 1030P. This time can vary for different profiles.
• Automatic Database Copy: The Database Copy is the first part of SubFinder’s backup procedure. During this phase, SubFinder copies all of the data and voice files from the C:\SUBFIND\DATA directory to a new directory on your C drive called SFWBACK. During the second phase of the backup, the files from the SFWBACK directory are copied to a backup tape or a hard drive, whichever your system uses.
Since the system will be unavailable for a short time during the Database Copy, we recommend running it at a time when few people would be calling in. Our experience has shown us that 2:00 a.m. works well for most districts. The time should be entered using the format HHMMA/P. For example: 2:00 a.m. would be entered as 0200A. This time must be the same for all profiles.
• Automatic Database Copy on Sat and Sun: Do you want the system to perform the copy over the weekend? Flag the box following this field if the system is to copy the data files as stated above on Saturday and Sunday as well as on Monday through Friday. This field must be the same for all profiles.
Once you have entered the appropriate information, click the OK button in the lower-left corner of the System Schedule screen. SubFinder will save your entries and return you to the SubFinder Control Panel.

Chapter 3 – SubFinder Control Panel _____________________________________________________________________________
_____________________________________________________________________________ Version 5.9 SubFinder Control Panel – General Profiles 3.5.1 Rev. 9/09
3.5 General Profile Double click on the General Profile icon and the General Profile Options screen will appear:
• Profile: This is the section of the Control Panel where different profiles can be utilized. SubFinder will always start with the Default profile. If you have established others, click on the arrow at the end of the profile field and choose the appropriate profile from the list presented.
• Long-term Threshold: The long-term threshold is a parameter that pertains to one of SubFinder’s reports – Long Term Assignments. It is the minimum number of days that a substitute must work in a single job before the job is considered “long-term.”
The following are considered Advanced Options. By flagging the corresponding box, SubFinder will allow you to use the option. If the box is blank, the system will not allow use of the option.
• Use Itinerant Employees: An Itinerant Employee is an employee who travels among several different sites during the week. For example: On Monday, Wednesday and Friday the employee is at Washington Elementary, and on Tuesday and Thursday the employee is at Jefferson Elementary. Or, the employee works at Washington Elementary every day from 7:45 a.m. until 11:15 a.m. and then goes to Jefferson Elementary from 11:45 a.m. until 2:45 p.m. If you want to have the ability to set up the schedules for your itinerant employees, this field must be flagged. For information about establishing an employee’s itinerant schedule, please refer to section 4.2 of this manual.
• Ask for Cancellation Reasons: SubFinder can be configured to ask your substitutes for a reason any time they cancel a job. If you flag this option you must also establish reasons for cancellation using the Edit Program. If no cancellation reasons are created, the substitute will not be able to select a reason and as a result will not be able to cancel. For information about creating reasons, please refer to section 4.8 of this manual.
• Ask for rejection reasons: SubFinder can be configured to ask your substitutes for a reason any time they reject a job. If you flag this option you must also establish reasons for rejection using the Edit Program. If no rejection reasons are created, the substitute will not be able to select a reason and as a result will not be able to reject a job. For information about creating reasons, please refer to section 4.8 of this manual.

Chapter 3 – SubFinder Control Panel _____________________________________________________________________________
_____________________________________________________________________________ Version 5.9 SubFinder Control Panel – General Profiles 3.5.2 Rev. 9/09
Note: If you choose to take advantage of cancellation and rejection reasons, we recommend that you make these reasons fairly general; you will stand a better chance of getting an accurate response from the substitutes.
Once you have entered the appropriate information, click the OK button in the lower-left corner of the General Profile Options screen. SubFinder will save your entries and return you to the SubFinder Control Panel.

Chapter 3 - SubFinder Control Panel ____________________________________________________________________________
_____________________________________________________________________________ Version 5.9 SubFinder Control Panel – Call In Options 3.6.1 Rev. 9/09
3.6 Call In
This section of SubFinder’s Control Panel is where you determine if your substitutes will be allowed to call into the system and review jobs for which they are qualified – a feature frequently referred to as job shopping – and how this feature can be configured. This is also where you can turn this option off. By turning this option off, your substitutes can only accept jobs when SubFinder calls them. Double click on the Call In icon and the Call In Options screen will appear:
• Profile: This is a section of the Control Panel where different profiles can be utilized. SubFinder will always start with the Default profile. If you have established others, click on the arrow at the end of the profile field and choose the appropriate profile from the list presented.
• Administrator Review Job Sequence: When the Site Administrators call into SubFinder to review the absences/jobs at their sites, there is a choice of the order that the absences will be stated:
o Ascending: Absences will be heard beginning with the earliest absence and moving to the latest. For example: If the administrator is reviewing absences for a single day, he/she would hear those that start at 7:30 a.m. followed by those starting at 8:00 a.m. and so on.
o Descending: Absences will be heard beginning with the latest absence and moving to the earliest. For example: If the administrator is reviewing absences for a single day, he/she would hear those that start at 11:30 a.m. followed by those that start at 11:00 a.m. and so on.
• Allow Call In: Flagging this box will allow your substitutes to call into SubFinder to review an unfilled absence for which they are qualified and accept it if they want the assignment.

Chapter 3 - SubFinder Control Panel ____________________________________________________________________________
_____________________________________________________________________________ Version 5.9 SubFinder Control Panel – Call In Options 3.6.2 Rev. 9/09
If you choose to enable this feature, use the following options to control when substitutes are permitted to hear your jobs. If you decide not to enable this feature the next 7 parameters will be inactive.
o Offer Jobs Previously Reviewed: Flagging this option will allow a substitute who has previously called in to review available jobs to hear those jobs again.
o Offer Jobs to Disqualified Substitute: Flagging this option will allow a substitute who has been disqualified from morning call out to call into the system and hear available jobs. For more information on substitute disqualification, please refer to section 3.10 of this manual.
• Minimum Skill Level: This option, in conjunction with At or Above Minimum Skill Level (below), defines the minimum skill level a substitute must possess before being allowed to call in and review a job for which they are qualified based on job position. The default level is B, but this value may be set anywhere from A (the highest) through J (the lowest). The skill levels are assigned to an individual substitute’s job positions using the SubFinder Edit Program.
• Offer Jobs to Substitutes:
o On Preference List: Number of days and/or hours prior to the start of the job that a substitute who is a member of any preference list assigned to the absent employee can hear the job on call in. This value is typically set at several days less than Days Ahead to Begin Calling (please refer to section 3.7 – Call Out). If you do not wish to use this particular parameter, set both values to zero – 0 days, and 0:00 hours.
o At or Above Minimum Skill Level: Number of days and/or hours, prior to the start of the job, that a substitute with a job position matching the absent employee’s and a skill level (for that job position) equal to or greater than that specified in Minimum Skill Level can hear the job on call in. This value is typically set at or several days more than Days Ahead to Use Skill List (please refer to section 3.9 – Substitute Selection). If you do not wish to use this particular parameter, set both values to zero – 0 days, and 0:00 hours.
o Below Minimum Skill Level: Number of days and/or hours, prior to the start of the job, that a substitute with a job position matching the absent employee’s and a skill level (for that job position) less than that specified in Minimum Skill Level can hear the job on call in. This value is typically set at several days less than Days Ahead to Use Skill List (please refer to section 3.9 – Substitute Selection). If you do not wish to use this particular parameter, set both values to zero – 0 days, and 0:00 hours.
o Without Desired Job Position: Number of day and/or hours, prior to the start of the job, that any substitute in your system can hear the job on call in. Some districts will use this option to ensure that they at least secure a “responsible adult” to supervise the classroom. This value, if chosen, is typically set between one and two hours. If you do not wish to use this particular parameter, set both values to zero – 0 days, and 0:00 hours.
Once you have entered the appropriate information, click the OK button in the lower-left corner of the Call In Options screen. SubFinder will save your entries and return you to the SubFinder Control Panel.

Chapter 3 - SubFinder Control Panel ____________________________________________________________________________
_____________________________________________________________________________ Version 5.9 SubFinder Control Panel – Call Out 3.7.1 Rev. 9/09
3.7 Call Out
This section of the Control Panel gives you access to several of SubFinder’s call out options. Double click on the Call Out icon and the Call Out Options screen will appear:
• Profile: This is a section of the Control Panel where different profiles can be utilized. SubFinder will always start with the Default profile. If you have established others, click on the arrow at the end of the profile field and choose the appropriate profile from the list presented.
• Notify Substitute of Cancellation: Flagging this box will cause SubFinder to notify the appropriate substitute anytime an employee cancels a previously reported absence.
• Days Ahead to Begin Calling: The number of days prior to the start of a job that you want SubFinder to begin making outgoing calls to try and fill the absence. Initially, SubFinder will call only those substitutes who are on the absent employee’s preference lists. The system will not begin calling from the Skill List until it reaches the value set in Days Ahead to Use Skill List, please refer to section 3.9 – Substitute Selection.
• Stop Calling Requested Substitutes: The number of days and/or hours, prior to the start of a job, that SubFinder should quit trying to call a requested substitute and begin using the employee’s preference lists and Skill List. A common value for this option is 12 hours.
If a specific substitute has been requested for an absence, SubFinder will call that substitute exclusively until he/she accepts or rejects the job or until this deadline is reached.
If a substitute is requested after the deadline has been reached, SubFinder will make one (1) attempt to call the requested substitute before moving on to the employee’s assigned lists.
Once you have entered the appropriate information, click the OK button in the lower-left corner of the Call Out Options screen. SubFinder will save your entries and return you to the SubFinder Control Panel.


Chapter 3 - SubFinder Control Panel ____________________________________________________________________________
_____________________________________________________________________________ Version 5.9 SubFinder Control Panel – Call Out Calendar 3.8.1 Rev. 9/09
3.8 Call Out Calendar
By default, SubFinder will have two calling periods each and every day. Morning calling is used to call on jobs for the current day, while evening calling is used to call on future jobs. (For more information on calling periods, please refer to Chapter 3.4 of this manual.) This section of SubFinder’s Control Panel is where you configure the days and calling periods when SubFinder will not make any outgoing calls. Double click on the Call Out Calendar icon and the following Call Out Calendar screen will appear:
• Name: This is a section of the Control Panel where different profiles can be utilized. SubFinder will always start with the Default profile. If you have established others, click on the arrow at the end of the profile field and choose the appropriate profile from the list presented.
• Year: For which calendar year do you wish to affect call out? To select the appropriate year, click on the arrow at the end of the year field and choose the appropriate profile from the list presented. NOTE: The list of available years will automatically update at the beginning of each year to include the upcoming year; you do not have to manually create new calendar years.
• Inactive: Once a calendar year is no longer being utilized, it may be flagged inactive. This marks the particular calendar year for deletion the next time a calendar purge is run.
• Month tabs: Each tab displays three consecutive months. The days of the month are color coded as follows:
o Black: Both Evening and Morning Call Out are active.

Chapter 3 - SubFinder Control Panel ____________________________________________________________________________
_____________________________________________________________________________ Version 5.9 SubFinder Control Panel – Call Out Calendar 3.8.2 Rev. 9/09
o Yellow: Only Morning Call Out is active. SubFinder will not make any outgoing calls during the evening calling period for future jobs.
o Blue: Only Evening Call Out is active. SubFinder will not make any outgoing calls during the morning calling period for jobs for this specific day.
o Red: Both Morning and Evening Call Out are inactive. SubFinder will not make any outgoing calls at all on this specific day.
To change the setting for a particular day, highlight a day with a click of the mouse and then right click on the same day to access the Calendar Options menu:
• All (day selected) no morning call out – Every day of the selected type, for the selected year, will be set for no morning call out.
• All (day selected) no evening call out – Every day of the selected type, for the selected year, will be set for no evening call out.
• All (day selected) morning call out – Every day of the selected type, for the selected year, will be set for morning call out.
• All (day selected) evening call out – Every day of the selected type, for the selected year, will be set for evening call out.
• Remainder of (day selected) no morning call out – Every day of the selected type, from the day selected to the end of the year, will be set for no morning call out.
• Remainder of (day selected) no evening call out – Every day of the selected type, from the day selected to the end of the year, will be set for no evening call out.
• Remainder of (day selected) morning call out – Every day of the selected type, from the day selected to the end of the year, will be set for morning call out.
• Remainder of (day selected) evening call out – Every day of the selected type, from the day selected to the end of the year, will be set for evening call out.

Chapter 3 - SubFinder Control Panel ____________________________________________________________________________
_____________________________________________________________________________ Version 5.9 SubFinder Control Panel – Call Out Calendar 3.8.3 Rev. 9/09
• This week no morning call out – Every day of the selected week will be set for no morning call out.
• This week no evening call out – Every day of the selected week will be set for no evening call out.
• This week morning call out – Every day of the selected week will be set for morning call out.
• This week evening call out – Every day of the selected week will be set for evening call out.
• Today no morning call out – The selected day will be set for no morning call out.
• Today no evening call out – The selected day will be set for no evening call out.
• Today morning call out – The selected day will be set for morning call out.
• Today evening call out – The selected day will be set for evening call out.
Once you have completed the calendar, click the OK button in the lower-left corner of the Call Out Calendar screen. SubFinder will save your entries and return you to the SubFinder Control Panel.


Chapter 3 - SubFinder Control Panel ____________________________________________________________________________
_____________________________________________________________________________ Version 5.9 SubFinder Control Panel – Absence/Job Creation 3.9.1 Rev. 9/09
3.9 Absence/Job Creation
This section of SubFinder’s Control Panel is where you configure the parameters related to absence and job creation. Double click on the Absence/Job Creation icon and the Absence/Job Creation Options screen will appear:
• Profile: This is a section of the Control Panel where different profiles can be utilized.
SubFinder will always start with the Default profile. If you have established others, click on the arrow at the end of the profile field and choose the appropriate profile from the list presented.
• Allow Job and Absence Times to Differ: Flagging this box will allow you and your employees to create an absence for one date/time, while requesting a substitute for a different date/time. For example: An employee will be absent on November 13th from 7:45 a.m. to 3:15 p.m., but will only need substitute coverage from 11:30 a.m. to 3:15 p.m. If this box is not flagged, the absence and job times will always be the same at the time of absence/job creation. Note: Once the absence/job has been created, absence and job times may be set to differ by the system operator or by an administrative user coming in via SubFinder online.
• Limit Reporting of Absences By: (Choose one of the following options.)
o Days In Advance: How many days, prior to the start of the absence, do you want your employees to be able to report their absences? For example: Setting this option at 60 days would allow an absence for December 15th to be reported as early as October 16th. A value between 1 day and 365 days may be entered.

Chapter 3 - SubFinder Control Panel ____________________________________________________________________________
_____________________________________________________________________________ Version 5.9 SubFinder Control Panel – Absence/Job Creation 3.9.2 Rev. 9/09
o Latest Allowable Start Date: What is the latest start date that you want your employees to be able to use when reporting an absence? Absences may be reported to SubFinder as long as they do not start after the date specified. Those companies who want to allow their employees to report absences through the end of the current year or fiscal year-end typically use this option.
Note: If you use this option, this field must be updated in order to allow absences to be entered after the date specified.
• Advanced Options: The following options control how you want your absence reasons handled by the system.
o Link Miscellaneous Codes to Absence Reasons: Flagging this field will cause SubFinder to only accept one of the 3-digit codes that has been established for an absence reason that uses Miscellaneous Codes. CAUTION: While SubFinder will read a list of the actual reasons, SubFinder will not play a list of the miscellaneous codes. Use of this feature requires that your employees be furnished with a listing of all Miscellaneous Codes for each absence reason. (For more information on Miscellaneous Codes, please refer to section 4.8 – The Reasons Button.)
o Limit Absences By Day: SubFinder gives you the ability to limit how many absences are reported each day for a particular reason(s). This can be set up district-wide or site-by-site. (For a district-wide limit, please refer to section 4.8 – The Reasons Button. For site-by-site limits, please refer to section 4.5 – The Sites Button – The Reasons Tab.) This option ALLOWS you to limit the reasons; it does not make it mandatory. When the limit on an absence has been reached, any additional employees trying to use that reason will be instructed by SubFinder to call the phone number entered on the site record. You have three options:
All: All absences for the particular absence reason will be counted towards the limit regardless of whether they require a substitute.
Requiring Substitutes: Only those absences that require a substitute will be counted toward the absence reason limit. No Substitute Required absences will not be included in the count.
No Limit: If you do not want to set a daily limit on any of your absence reasons, flag this option. This is the default setting.
o Limit Absences By Month: SubFinder gives you the ability to limit how many absences are reported each month for a particular reason(s). This can be set up district-wide or site-by-site. This option ALLOWS you to limit the reasons; it does not make it mandatory. When the limit on an absence has been reached, any additional employees trying to use that reason will be instructed by SubFinder to call the phone number entered on the site record. You have three options:
All: All absences for the particular absence reason will be counted towards the limit regardless of whether they require a substitute.
Requiring Substitutes: Only those absences that require a substitute will be counted toward the absence reason limit. “No Substitute Required” absences will not be included in the count.
No Limit: If you do not want to set a monthly limit on any of your absence reasons, flag this option. This is the default setting.

Chapter 3 - SubFinder Control Panel ____________________________________________________________________________
_____________________________________________________________________________ Version 5.9 SubFinder Control Panel – Absence/Job Creation 3.9.3 Rev. 9/09
Once you have entered the appropriate information, click the OK button in the lower-left corner of the Absence/Job Creation Options screen. SubFinder will save your entries and return you to the SubFinder Control Panel.


Chapter 3 - SubFinder Control Panel ____________________________________________________________________________
_____________________________________________________________________________ Version 5.9 SubFinder Control Panel – Substitute Selection 3.10.1 Rev. 9/09
3.10 Substitute Selection
This is the section of the SubFinder Control Panel where you configure how SubFinder will select your substitutes during call out. How many passes should the system make through each list? When should the Skill List be used? These questions and more will be answered in this section. Double click on the Substitute Selection icon and the Substitute Selection Options screen will appear:
• Profile: This is a section of the Control Panel where different profiles can be utilized. SubFinder will always start with the Default profile. If you have established others, click on the arrow at the end of the profile field and choose the appropriate profile from the list presented.
• Use Permanent Subs: Flagging this option tells SubFinder that you will be using Permanent Substitutes as one method to fill your absences. Permanent Subs automatically report to a particular classroom, site, or group of sites each and every day, similar to a regular employee. These selected individuals are automatically assigned to the first job(s) created each day by the employees to whom the list applies. SubFinder never calls Permanent Substitutes. (For information on how to create Permanent Sub Lists, please refer to Chapter 4.4 of this manual.)

Chapter 3 - SubFinder Control Panel ____________________________________________________________________________
_____________________________________________________________________________ Version 5.9 SubFinder Control Panel – Substitute Selection 3.10.2 Rev. 9/09
• Preference Lists: The following parameters control how SubFinder utilizes your Preference Lists. You must select one of the following:
o Always Start at Top of List: Each time SubFinder processes a particular list it will always start with the first substitute on the list. Use this option if your lists were created with the idea that the substitutes should be considered in the order they appear.
o Always Start with the Next Substitute in List: Each time SubFinder processes a particular list it will pick up where it left off the last time. For example: If the third substitute on the list accepts the job, SubFinder will start with the fourth substitute the next time the list is used. Use this option if your lists were created with the idea that all substitutes on the list are equally preferred.
• Maximum Passes Through Preference Lists: How many times, during each calling period, do you want SubFinder to process each preference list for a particular job? SubFinder will cease calling on the preference list for a specified period of time between each pass through the list during any evening calling period. If an employee has multiple preference lists, SubFinder will process each list the specified number of times before moving to the next list. A common value would be 3.
• Minutes to Check Job in Morning Calling: This is a system function that occurs during morning calling. The system will, at the time interval entered, check all jobs currently listed in the Job Processor to evaluate their status and make changes accordingly. For example, if a job has exceeded the ‘Fail to Fill’ deadline, the status will be changed at this time. Three is the default and should not be changed without first consulting CRS Client Services.
• Minutes to Pause Job: How many minutes do you want SubFinder to pause between each pass through a Preference List or the Skill List? The pause should be long enough to allow people to get home (in case SubFinder reaches an answering machine), hang up the phone (in case SubFinder gets a busy signal), etc., but not so long as to limit how many times the system can call out on any one job. This value can vary widely depending on the length of your evening call out. However, a typical value would be anywhere from 15 to 30 minutes. This pause will only be used during the evening calling period.
• Skill List: The following parameters control how SubFinder utilizes your Skill List. You must select one of the following:
o Always Start at Top of List: Each time SubFinder processes the Skill List it will always start with the first “A” level substitute on the list. After processing all the “A” level substitutes it will move on to the B’s, C’s, etc.
o Always start at highest skill level: Each time SubFinder processes the Skill List it will pick up where it left off the last time within the “A” level substitutes. It will cycle through all “A” level substitutes before moving on to “B” level, “C” level, etc. For example: If the third “A” level substitute on the list accepts the job, SubFinder will start with the fourth “A” level substitute the next time the list is used. When SubFinder reaches the last “A” level substitute, it would go back to the top and consider the first, second, and third substitutes on the list before moving on to the “B” level substitutes.
o Always Start with the Next Substitute in List: Each time SubFinder processes the Skill List it will pick up where it left off the last time, regardless of skill level. For example: If the third “C” level substitute on the list accepts the job, SubFinder will start with the fourth “C” level substitute the next time the list is used and move through the end of the list before going back to the “A” level substitutes.
Chapter 3 - SubFinder Control Panel ____________________________________________________________________________
_____________________________________________________________________________ Version 5.9 SubFinder Control Panel – Substitute Selection 3.10.3 Rev. 9/09
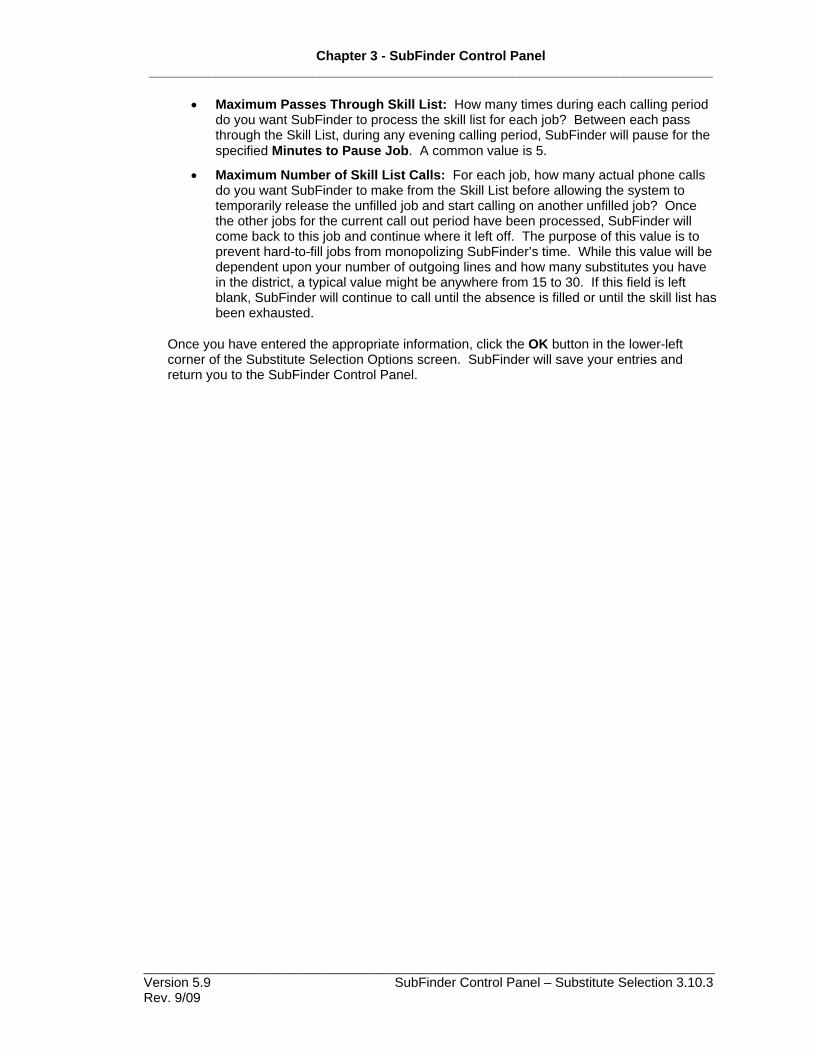
• Maximum Passes Through Skill List: How many times during each calling period do you want SubFinder to process the skill list for each job? Between each pass through the Skill List, during any evening calling period, SubFinder will pause for the specified Minutes to Pause Job. A common value is 5.
• Maximum Number of Skill List Calls: For each job, how many actual phone calls do you want SubFinder to make from the Skill List before allowing the system to temporarily release the unfilled job and start calling on another unfilled job? Once the other jobs for the current call out period have been processed, SubFinder will come back to this job and continue where it left off. The purpose of this value is to prevent hard-to-fill jobs from monopolizing SubFinder’s time. While this value will be dependent upon your number of outgoing lines and how many substitutes you have in the district, a typical value might be anywhere from 15 to 30. If this field is left blank, SubFinder will continue to call until the absence is filled or until the skill list has been exhausted.
Once you have entered the appropriate information, click the OK button in the lower-left corner of the Substitute Selection Options screen. SubFinder will save your entries and return you to the SubFinder Control Panel.


Chapter 3 - SubFinder Control Panel ____________________________________________________________________________
_____________________________________________________________________________ Version 5.9 SubFinder Control Panel – Substitute Disqualification 3.11.1 Rev. 9/09
3.11 Substitute Disqualification
You can use this section of SubFinder’s Control Panel to establish substitute “disqualifiers” for the morning and evening call out periods. These disqualifiers will prevent SubFinder from making additional calls to a substitute who has reached any one of the possible thresholds described below during the current calling period. Double click on the Substitute Disqualification icon and the Substitute Disqualify Options screen will appear:
• Profile: This is a section of the Control Panel where different profiles can be utilized. SubFinder will always start with the Default profile. If you have established others, click on the arrow at the end of the profile field and choose the appropriate profile from the list presented.
• Use Morning Calling Substitute Disqualification: Flagging this option tells SubFinder that you will be using at least one of the disqualification options during the morning calling period.
• Use Evening Calling Substitute Disqualification: Flagging this option tells SubFinder that you will be using at least one of the disqualification options during the evening calling period.
• Disqualification Options:
o Connect No Responses: The call was answered, but no PIN (Personal Identification Number) was entered. This is typically an answering machine and will only last a maximum of 1 minute. When considering this setting, keep in mind that a popular substitute can receive numerous calls in a short period of time. If you set this too low you could quickly disqualify a substitute while they are in the shower or out walking the dog! We recommend that you set this at a

Chapter 3 - SubFinder Control Panel ____________________________________________________________________________
_____________________________________________________________________________ Version 5.9 SubFinder Control Panel – Substitute Disqualification 3.11.2 Rev. 9/09
relatively high value of 8 or 10. If you do not wish to disqualify your substitutes for this type of call, leave this field blank.
o Rejections – The substitute has answered the call, listened to the absence, and rejected the offer. While a substitute could reject a job for a valid reason – a bad experience the last time they substituted at a particular site, or for a particular employee – too many rejections may indicate that a substitute is just being overly picky. Experience has shown us that 3 is a reasonable setting. If you do not wish to disqualify your substitutes for this type of call, leave this field blank.
o Cancellations: The substitute has called into SubFinder during morning call out and canceled a job they had previously agreed to fill. While one cancellation may be valid – unexpected transportation problems prohibit the substitute from driving 10 miles to the site – additional cancellations would be questionable. Experience has shown us that 2 is a suitable value for this field. If you do not wish to disqualify your substitutes for this type of call, leave this field blank.
o No Answers: SubFinder called the substitute but the call was never answered. SubFinder will let the phone ring approximately 8 times before disconnecting and moving on to the next substitute. When considering this setting, keep in mind that a popular substitute can receive numerous calls in a short period of time. If you set this too low you could quickly disqualify a substitute while they are in the shower or out walking the dog! We recommend that you set this at a relatively high value of 8 or 10. If you do not wish to disqualify your substitutes for this type of call, leave this field blank.
o Busys: SubFinder calls the substitute and gets a busy signal. SubFinder will immediately try to call the next substitute. Since this takes up very little of SubFinder’s time, we generally recommend that you leave this setting blank. If you do decide to use it, set it to a relatively high value of 20 or 25. If you do not wish to disqualify your substitutes for this type of call, leave this field blank.
o Hangups after PIN entered: The substitute answered the call, entered their PIN (Personal Identification Number), and then hung up without accepting or rejecting the job. While one or two of these may be valid – the substitute must drop the phone and run to handle an emergency with one of their children – an excessive number of these usually indicates someone who doesn’t want to accept a job but is unwilling to actually reject it. Our experience has shown us that 3 is a suitable value for this field. If you do not wish to disqualify your substitutes for this type of call, leave this field blank.
o Operator Intercepts: The call generated a phone company message such as “The number you have dialed is no longer in service…” Sometimes an operator intercept can be caused when the phone circuits are too busy, but generally these mean that you have a bad phone number. 2 or 3 is probably a suitable value for this field. If you do not wish to disqualify your substitutes for this type of call, leave this field blank.
Once you have entered the appropriate information, click the OK button in the lower-left corner of the Substitute Selection Options screen. SubFinder will save your entries and return you to the SubFinder Control Panel.

Chapter 3 - SubFinder Control Panel _____________________________________________________________________________
_____________________________________________________________________________ Version 5.9 SubFinder Control Panel – Certified Options 3.12.1 Rev. 9/09
3.12 Certified Options
This section of SubFinder’s Control Panel allows you to configure SubFinder’s Certified Options. These options allow the system to distinguish between those employees and substitutes who are certified, and those who are not. By using this option you can control whether a non-certified substitute will be allowed to accept certified job positions, and/or how many days they may work in these types of positions. Double click on the Certified Options icon and the Certified & Classified Options screen will appear:
• Use Certified Options – By flagging this field, the system will allow you to utilize one of the certified options listed below:
o Non-certified Substitutes May Not Pick Up Certified Jobs: Flagging this option will prevent a substitute who has not been marked as Certified from ever picking up a certified job.
o Non-certified Substitutes May Not Pick Up Certified Jobs After Working More Than ____ Days in Certified Jobs: Flagging this option will allow a non-certified substitute to work no more than X number of days in certified jobs. Specify the appropriate number of days in the field provided. SubFinder will automatically keep a count of the Certified Job Days in each substitute’s record. For more information, please refer to section 4.3 – The Substitutes Button – The General Information Tab.
Note: Use of this option can have a very significant effect on your SubFinder system. In order for the Certified Options to work correctly, the following fields must be updated in the SubFinder Edit program: (1) Substitutes – General Information Tab: Indicate whether substitute is Certified, Classified, or both. For more information, please refer to section 4.3 – The Substitutes Button – The General Information Tab. (2) Job Position: Indicate whether the job position is Certified, Classified, or both. For more information please refer to section 4.6 – The Job Positions Button.
Once you have entered the appropriate information, click the OK button in the lower-left corner of the Certified & Classified Options screen. SubFinder will save your entries and return you to the SubFinder Control Panel.


Chapter 3 - SubFinder Control Panel _____________________________________________________________________________
_____________________________________________________________________________ Version 5.9 SubFinder Control Panel – SubAlarm 3.13.1 Rev. 9/09
3.13 SubAlarm Options
SubAlarm is an option that is purchased in addition to the SubFinder program. SubAlarm works in conjunction with a battery backup and allows SubFinder to call specified individuals if the system is on battery backup power. If you have purchased SubAlarm, please contact CRS Client Services for assistance with the setup.


Chapter 3 - SubFinder Control Panel ____________________________________________________________________________
_____________________________________________________________________________ Version 5.9 SubFinder Control Panel – Custom Options 3.14.1 Rev. 9/09
3.14 Custom Options
Custom Options are special features that were developed for a specific SubFinder client. Under normal conditions, these features will be unavailable for selection, as illustrated below:
However, since some sites may find one or more of these features useful, explanations will be provided below. If you feel that one may be of use to your site, please contact CRS Client Services for assistance.
• Only Offer Requested Jobs to Substitutes: Flagging this option will limit the evening call out period to only those jobs that have been entered as Requested Substitute jobs. SubFinder will not call out on Substitute Required jobs until the morning of the job.
• Use Employee Number Instead of ID: Flagging this option will allow administrators to use the Employee Number (typically the Social Security number), instead of the SubFinder-assigned ID number, when creating an absence for the employee. This will also allow administrators and employees to use a substitute’s Employee Number (typically the Social Security number), instead of the SubFinder-assigned ID number, when either requesting or assigning a substitute to a job.
• Use LAUSD Substitute Selection Process: Flagging this option activates a special Substitute Selection Process that was designed specifically for Los Angeles Unified School District. The process involves a number of inter-related variables, including geographic location, skill level, and seniority. If you are interested in learning more about this process, please contact CRS Client Services for information.
Once you have entered the appropriate information, click the OK button in the lower-left corner of the Custom Options screen. SubFinder will save your entries and return you to the SubFinder Control Panel.


Chapter 3 - SubFinder Control Panel _____________________________________________________________________________
_____________________________________________________________________________ Version 5.9 SubFinder Control Panel – Pre-Registration Options 3.15.1 Rev. 9/09
3.15 Pre-Registration Options This feature allows you to automate the substitute pre-registration process, placing the responsibility on each substitute to indicate, via phone, whether or not they will be available to work during the next school year. This function works in conjunction with the Pre-Registered field in the Substitute data record. Using this function allows substitutes to call into SubFinder during the defined pre-registration period, and indicate their availability for the upcoming school year. When substitutes call into the SubFinder system during the pre-registration period, they will hear the full menu including the option to Pre-register. Once the substitute chooses that option, SubFinder will tell them that they are now registered and take them back to the Main Menu. During this period, substitutes CAN receive calls and job shop (if allowed by the district), even without pre-registering. You will also be able to Prearrange or Request an unregistered substitute via the Edit program without receiving a warning during the Pre-Registration Period. Once the Pre-Registration Period has ended, any substitute who has not called to pre-register will receive a message telling them they are not yet registered and that they should call their administrator. They will not be able to job shop and they will not receive calls from SubFinder. As the operator, if you try to Prearrange an unregistered substitute via the Edit program, you will receive a warning and will be given the option to override the warning to place the substitute in the job. However, if you try to Request an unregistered substitute, you will receive a warning and will not be able to override the warning since SubFinder will not call an unregistered substitute. As the operator, you can go into a substitute’s data record and manually mark the substitute as Pre-registered. Once that is done, the substitute will be eligible to receive calls from SubFinder and job shop (if allowed by the district). Note: If you are entering a new substitute after the Pre-registration period has ended, you must mark that substitute as Pre-registered. If they are not marked as such SubFinder will not attempt to contact them for job offers or allow them to job shop. Double click on the Pre-Registration Options icon and the Pre-Registration Values screen will appear:
• Use Substitute Pre-Registration: Flagging this field activates the automated
Substitute Pre-Registration function. • Start Date: This indicates the date that the pre-registration period begins, typically
sometime after the last day of school for the current school year.

Chapter 3 - SubFinder Control Panel _____________________________________________________________________________
_____________________________________________________________________________ Version 5.9 SubFinder Control Panel – Pre-Registration Options 3.15.2 Rev. 9/09
• End Date: This indicates the date that the pre-registration period ends, typically sometime shortly before or after the first day of school for the upcoming school year.
• Reset Pre-Registered Values: This button is used at the beginning of the pre-registration period to clear the Pre-Registered field in each substitute data record. This action is irreversible once this button has been clicked and the choice has been confirmed.
Once you have entered the appropriate information, click the OK button in the lower-left corner of the Pre-Registration Values screen. SubFinder will save your entries and return you to the SubFinder Control Panel.

Chapter 3 - SubFinder Control Panel _____________________________________________________________________________
_____________________________________________________________________________ Version 5.9 SubFinder Control Panel – SubFinder Passwords 3.16.1 Rev. 9/09
3.16 SubFinder Passwords SubFinder Passwords allows you to set password protection on various SubFinder modules such as Edit, Reports, SubRemote and SubRemote Pro. Additionally this is where you will create user accounts for your site or site group administrative users to access SubFinder via the Internet (a module formerly referred to as WebConnect Pro). Double click on the SubFinder Passwords icon and the Control Panel Login screen will appear:
Once you enter your Username and Password, the Password Options screen will appear:
The Option Setup Tab
On the Option Setup tab you designate whether or not you wish to enable password protection, and which program modules you want to protect. NOTE: Checking the Use Password box in this portion of Password Options will only pertain to users accessing the SubFinder Edit, SubRemote, SubRemote Pro, and Reports modules. This box does not need to be checked to create access for users via the Internet (formally WebConnect Pro).
• Use Password: Flagging this option indicates that you wish to use password protection within SubFinder. Once this field is flagged, the program modules will become available. If you do not wish to use password protection, leave this field un-flagged.

Chapter 3 - SubFinder Control Panel _____________________________________________________________________________
_____________________________________________________________________________ Version 5.9 SubFinder Control Panel – SubFinder Passwords 3.16.2 Rev. 9/09
• Use Password On: Flag each program module that you wish to protect with a password.
The User List Tab
The User List tab is used to create user accounts for each person that will have access to the protected program modules. This is also where you will create access for users via the Internet.
The following buttons are available on this tab:
Adding a New User
To add a new user, click the Add button and the Add User Record screen will appear:
Allows you to add a new user Allows you to change the information for an existing user Allows you to delete an existing user

Chapter 3 - SubFinder Control Panel _____________________________________________________________________________
_____________________________________________________________________________ Version 5.9 SubFinder Control Panel – SubFinder Passwords 3.16.3 Rev. 9/09
• Username: Enter the name that will be used each time the user accesses the designated program modules. This field is alphanumeric and must be between one and thirteen characters in length.
• Password: Enter the password that will be assigned to this user. This field is alphanumeric and must be between one and fifteen characters in length.
• Choose User Level: You may choose to assign each user one of three user levels:
o Master: Has full control over all features, including the ability to add, edit, and delete users.
o Supervisor: Has full control over all features, except the ability to add, edit and delete users.
o User: Has access only to those features that are assigned.
• User Rights: Select which program modules this user can access. By default, a user with a level of Supervisor or Master will be assigned all rights. NOTE: If your District is using SubFinder via the Internet, you must select the WebConnect Pro / SubRemote Pro option when adding site-based administrators to the User List. Flagging this box will the enable you to select the appropriate Internet options which the user may access.

Chapter 3 - SubFinder Control Panel _____________________________________________________________________________
_____________________________________________________________________________ Version 5.9 SubFinder Control Panel – SubFinder Passwords 3.16.4 Rev. 9/09
• SubFinder via the Internet ONLY: If you are creating users for the Internet portion of SubFinder you must select which modules they may access within the program.
o Preference list access: Checking this box will allow the user to view preference lists that pertain to their particular site or site group.
o Preference list update: Checking this box will allow the user to edit preference lists that pertain to their site or site group.
o Job list access: Checking this box will allow the user to view absence/job information which pertains to their site or site group.
o Job add / update: Checking this box will allow the user to add and edit past, present, or future information pertaining to absences/jobs at their site or site group.
o Allow add no employee job: Checking this box will allow the user to add a job into the Internet portion of SubFinder (formally WebConnect Pro) for which there is no specific employee absence, but a supplemental substitute is required.
• Site: This field will only become available when either SubRemote or SubRemote Pro has been choosen under User Rights. Use it to assign the user to the appropriate site or site group for which they can access on SubFinder via the Internet.
• WebConnect Pro / SubRemote Pro Option – Access: If SubRemote Pro was selected as a User Right, use this field to indicate whether or not employee and substitute records should be available for access.
o Disable employee (5): The Employees Button will not display in SubFinder via the Internet; the user will not be able to access employee records.
o Disable substitute (10): The Substitutes Button will not display in SubFinder via the Internet; the user will not be able to access substitute records.
o Disable both employee and substitute (0): Neither the Employee Button nor the Substitute Button will display in SubFinder via the Internet; the user will not be able to access either category of records.
o Enable both employee and substitute (15): Both the Employee Button and the Substitute Button will display in SubFinder via the Internet; the user will be able to access both categories of records.
• WebConnect Pro / SubRemote Pro Option – Modify: If SubRemote Pro was selected as a User Right, use this field to indicate whether or not employee and substitute records should be available for modification.
o Substitute view only (23): The user will have view only access to substitute records, but will be able the edit employee records.
o Employee view only (32): The user will have view only access to employee records, but will be able to edit substitute records.
o Employee and substitute view only (33): The user will have view only access to both employee and substitute records.

Chapter 3 - SubFinder Control Panel _____________________________________________________________________________
_____________________________________________________________________________ Version 5.9 SubFinder Control Panel – SubFinder Passwords 3.16.5 Rev. 9/09
o Full right to employee and substitute (11): The user will have complete access to all substitute records and employee records for those employees that belong to their particular site or site group. They will also be permitted to add new employee and substitute records.
o Full right to employee and substitute (22): The user will not be permitted to add new employees and substitutes. They will also be unable to edit the following information in the employee and substitute records:
• Employee Home Site
• Employee Calendar Track
• Employee Certified, Classified, Restricted, and Inactive checkboxes
• Substitute Restricted and Inactive checkboxes
• SubRemote Option – Option: If SubRemote was selected as a User Right, use this field to indicate whether or not employee and site records should be available for viewing. This option is only available for selection if you are currently using SubRemote. This does not apply to SubRemote Pro or the Internet portion of SubFinder.
Once you have entered the appropriate information, click the OK button in the lower-left corner of the Add User Record screen. SubFinder will save your entries and return you to the Password Options Screen.
Editing an Existing User
Once a user has been added, you may need to make changes to their record. To edit a user record:
1. From the Option Setup tab of the Password Options screen, highlight the appropriate user.
2. Click the Edit button on the right side of the Option Setup tab and SubFinder will display the Edit User Record screen:

Chapter 3 - SubFinder Control Panel _____________________________________________________________________________
_____________________________________________________________________________ Version 5.9 SubFinder Control Panel – SubFinder Passwords 3.16.6 Rev. 9/09
When you edit a user, all fields can be changed except for the Username. Once you have made the desired changes, click the OK button in the lower-left corner of the Edit User Record screen. SubFinder will save your changes and return you to the Option Setup tab. Note: For detailed explanations of the fields available on this screen please refer to the section of this chapter titled Adding a New User.
Deleting an Existing User
You may occasionally find the need to remove a user from your system. To delete a user record:
1. From the Option Setup tab of the Password Options screen, highlight the appropriate user.
2. Click the Delete button. SubFinder will immediately remove the user from the system.
Note: If the user is currently signed into SubFinder, they will be able to continue their session. They will not be locked out of the system until they close out of that session.

Chapter 3 - SubFinder Control Panel _____________________________________________________________________________
_____________________________________________________________________________ Version 5.9 SubFinder Control Panel – Email Notifications 3.17.1 Rev. 9/09
3.17 Email Notifications SubFinder has the ability to generate email notifications regarding the creation, fulfillment, and cancellation of absences and jobs, which can be sent to Administrators, Employees, and Substitutes. While the option to select the desired email notifications is configured within this section of the Control Panel, recipients are established within various sections of SubFinder’s Edit program. For additional information on adding email addresses for recipients, please review sections 4.2, 4.3 and 4.5 of the SubFinder User Guide. Double click on the Email Notification icon and the Email Notification Options screen will appear:
This is a section of the Control Panel where different profiles can be utilized. SubFinder will always start with the Default Profile. If you have established others, click on the arrow at the end of the profile field and choose the appropriate profile from the list presented. Administrator Options – Administrators will only receive notifications related to the site(s) to which they are assigned.
• Absence / Job Creation – This notification will be sent to administrators any time an absence or no employee job is created by the operator, an administrator, or employee.

Chapter 3 - SubFinder Control Panel _____________________________________________________________________________
_____________________________________________________________________________ Version 5.9 SubFinder Control Panel – Email Notifications 3.17.2 Rev. 9/09
• Absence / Job Filled - This notification will be sent to administrators any time an absence or no employee job is filled by a substitute, whether through prearrangement, a Permanent Substitute list, or through substitute job shopping.
• Job Failed to Fill - This notification will be sent to administrators any time a job related to an absence or no employee job reaches the status of Failed to Fill.
• Absence Cancellation - This notification will be sent to administrators any time an employee absence is cancelled by the operator, an administrator, or employee.
• No Employee Job Cancelled – This notification will be sent to administrators any time a no employee job is cancelled by the operator or an administrator.
• Job Cancelation – Substitute Removed from the Assignment - This notification will be sent to administrators any time a substitute is removed from an assignment by the operator, an administrator, employee, or the substitute.
Employee Options
• Job Filled – This notification will be sent to the employee any time one of their absences is filled by a substitute, whether through prearrangement, a Permanent Substitute list, or through substitute job shopping.
• Job Cancelation – Substitute Removed from the Assignment – This notification will be sent to the employee any time a substitute is removed from their assignment by the operator, an administrator, or the substitute.
Substitute Options
• Substitute Prearranged - This notification will be sent to the substitute any time they are prearranged for a job assignment by the operator, an administrator, or an employee.
• Substitute in Permanent Assignment - This notification will be sent to the substitute any time they are placed in a job based their assignment to a Permanent Substitute list.
• Job Cancelation – Substitute Removed from the Assignment - This notification will be sent to the substitute any time a job they previously accepted has been canceled by the operator, administrator, or the employee, or in the event they are removed from a previously accepted assignment by the operator or administrator.

Chapter 4 – SubFinder Edit _____________________________________________________________________________
_____________________________________________________________________________ Version 5.9 SubFinder Edit – Introduction 4.0.1 Rev. 9/09
4.0 Introduction to SubFinder Edit Introduction
Before SubFinder can begin processing calls you must input or create records containing information about your employees, substitutes, sites, job positions, reasons for absence, etc. Some of this information may already exist in a computer system at your business or school. Please contact your MIS department regarding the transfer of this information into SubFinder.
Starting the Edit Program The Edit program is used to enter the information which operates SubFinder. To start the Edit program:
1. Click the Start button on the Windows Task Bar. A menu will appear with your options.
2. Highlight SubFinder for Windows and a menu will appear listing the SubFinder programs available on that computer.
3. Highlight SubFinder Edit and click.
• Or, double-click the desktop icon (if available).
Basic Functions of the Edit Program Once started, SubFinder will display the Edit bar:
The buttons on the Edit bar, from left to right, represent:
• Exit – Close the SubFinder Edit program. • Jobs – Add, edit, and view absences and jobs. • Employees – Add, edit, and delete employee information. • Substitutes – Add, edit, and delete substitute information. • Preference Lists – Add, edit, copy, and delete preference lists. • Preference Lists: Assign to Employee – Assign lists to and view lists for individual
employees at a particular site. • Preference Lists: Assign to All – Assign lists to or Remove lists from all employees
at a particular site. • Skill List: Assign to All – Assign the skill list to every employee in the system. • Sites – Add, edit, and delete site information. • Job Positions – Add, edit, and delete job position information. • Calendars – Add, edit, and delete calendar track information. • Reasons – Add and edit reason information.

Chapter 4 – SubFinder Edit _____________________________________________________________________________
_____________________________________________________________________________ Version 5.9 SubFinder Edit – Introduction 4.0.2 Rev. 9/09
• Verification – Check verification status for your absences and jobs. • Call Request List – View the call request list for the current calling period. • Help – Display Help Contents.
Also available from the Edit Bar:
• File Menu - accessed by clicking on the word File. • Edit Menu - accessed by clicking on the word Edit. • Tools Menu - accessed by clicking on the word Tools.
We will go through each of these options in the following sections, beginning with the buttons from left to right and ending with the File, Edit, and Tools Menus. Note: If you are setting up SubFinder for the first time, start by entering Reasons and work your way left to the Employee button.
Additional Functions of the Edit Program • The Search: There are many locations within the SubFinder programs where you can
use the built-in search feature. This feature is available in any field that uses a drop box to display multiple selections, such as the Site field in the employee record, and in lists of entries, such as the Employee List window.
Once you have highlighted an entry within a field, you may simply type the desired name (employee, substitute, job position, etc.). With each letter you type you will move closer to the desired entry.
For example: R will take you to the first last name beginning with an R, RA will take you to the first last name beginning with RA, etc. Once you get close to the name you want you can use the up and down arrow keys to scroll through the list one employee at a time. If you make a mistake while typing, simply click on another name and begin again.
• Button Identifiers: Resting the mouse’s pointer on any button in the SubFinder Edit Tool Bar will cause the button name to be displayed in a text balloon. A more in-depth description of the button will appear in the Function Description area located across the bottom of the Edit Bar. For example, if you rest the pointer on the head with an E, a text balloon would display “Employees” and the Function Description area would display “Create/modify employee information.”

Chapter 4 – SubFinder Edit ____________________________________________________________________________
_____________________________________________________________________________ Version 5.9 SubFinder Edit – The Job Button 4.1.1 Rev. 9/09
4.1 The Job Button
The Job button is used to add, modify, or view absences and jobs for your school district or business. From the Edit bar click the Job button,
and SubFinder will display the Job List window:
The Job List window contains the following components and buttons: List Jobs By: The options in this box control which absences and jobs will be shown in the display area at the bottom of the Job List window. These options are discussed in detail in the section of this chapter titled Displaying Absences and Jobs.

Chapter 4 – SubFinder Edit ____________________________________________________________________________
_____________________________________________________________________________ Version 5.9 SubFinder Edit – The Job Button 4.1.2 Rev. 9/09
Display Area: The display area is the open area on the bottom half of the Job List window. It is used to show the absences and jobs that match the criteria selected in the List Jobs By box.
Control Buttons:
Exits the Job List window and returns you to the Edit bar
Allows you to add a new absence or job
Allows you to change an existing absence or job
Allows you to view an existing absence or job. You may not edit an entry using this option.
Allows you to break up an existing multiple-day job into single day units
Allows you to access the on-line help system Displaying Absences and Jobs
You have a number of options available when telling SubFinder which absences and jobs to show in the display area. The options available in the List Jobs By box are:
• ID: This option will display all absences/jobs in ascending ID (job number) order. You may enter an ID Range, using the First ID and Last ID fields to limit what is displayed in the job list. The entries made in these fields will not be recognized until you use the TAB key to move out of the last field.
• Job Start: When this option is selected with no date range specified, all absences/jobs are listed in ascending date order according to the Job Start Date. You may specify a date range, using the First Date and Last Date fields, to limit what is displayed in the job list. When you specify a date range, SubFinder will list all jobs where the Job Start Date falls within the specified range. The entries made in these fields will not be recognized until you use the TAB key to move out of the last field.
• Date: When this option is selected, with no date range specified, all absences/jobs are listed in ascending date order according to the Job Start Date. You may enter a date range, using the First Date and Last Date fields, to limit what is displayed in the job list. When you specify a date range, SubFinder will list all jobs where at least one day of the job falls within the specified range. The entries made in these fields will not be recognized until you use the TAB key to move out of the last field.
Note: Use of the Date option may result in a noticeable lag time while SubFinder searches for all absences/jobs that fit the criteria.
• Site: This option will display all absences for the selected site in ascending date order according to the Job Start Date. To select a specific site, click on the arrow at the end of the site field and choose the desired location from the list presented.

Chapter 4 – SubFinder Edit ____________________________________________________________________________
_____________________________________________________________________________ Version 5.9 SubFinder Edit – The Job Button 4.1.3 Rev. 9/09
• Employee: This option will display all absences for the selected employee in ascending date order according to the Job Start Date. To select a specific employee, click on the arrow at the end of the employee field and choose the desired person from the list presented.
• Substitute: This option will display all absences/jobs associated with the selected substitute in ascending date order according to the Job Start Date. To select a specific substitute, click on the arrow at the end of the substitute field and choose the desired person from the list presented.
Note: You must choose one of the above listed criteria – ID, Job Start, Date, Site, Employee, or Substitute – when viewing jobs.
In addition to the six criteria listed above, you may choose to use neither, one, or both of the following to further restrict the absences/jobs that SubFinder displays:
• Job Type: When this option is flagged, only absences/jobs with the selected type will be displayed. To select a specific type, click on the arrow at the end of the job type field and choose the desired type from the list presented.
o No Substitute Required: Absences that do not require any substitute coverage.
o Prearranged Substitute: Absences/jobs where the substitute was arranged ahead of time. SubFinder will not make any calls to fill this vacancy.
o Requested Substitute: Absences/jobs where a specific substitute was requested. SubFinder will call the requested substitute exclusively until a specified time, at which point it will begin calling through the preference lists and skill list.
o Substitute Required: Absences/jobs that SubFinder has worked on, or will work on, using the applicable preference lists and skill list.
• Job Status: When this option is flagged, only absences/jobs with the selected status will be displayed. To select a specific status, click on the arrow at the end of the job status field and choose the desired status from the list presented.
o Cancelled: Absences/jobs that were entered into SubFinder and then later cancelled by the employee, the administrator, or the SubFinder system operator.
o Failed to Fill: Absences/jobs that SubFinder was unable to fill, either because it ran out of time or substitutes.
o Filled: Absences/jobs that were filled.
o No Show: Absences/jobs where the substitute who agreed to fill in never showed up. The Operator can enter a No Show status using the keyboard. The administrator of a site can enter a No Show status through SubFinder via the Internet when given those rights.
o Unfilled: Absences/jobs that SubFinder have not yet filled. SubFinder still has time to work on absences with this status.
o None: An absence that was reported as No Substitute Required.

Chapter 4 – SubFinder Edit ____________________________________________________________________________
_____________________________________________________________________________ Version 5.9 SubFinder Edit – The Job Button 4.1.4 Rev. 9/09
Adding an Absence Typically, employees will be reporting their absences via a touch-tone telephone or Internet. However, there may be times when you want or need to enter a new absence via the keyboard. To add an absence, click the Add… button on the right side of the Job List window. SubFinder will display the Add Job screen:
When adding an absence for an employee you must provide the following information:
• Employee Name: Who is absent? To select the specific employee, click on the arrow at the end of the employee field and choose the desired person from the list presented. You will notice that once the employee has been selected, the site and position will be completed automatically.
• Site: What site does the absent employee work at? This will be completed automatically when you select the employee.
• Calendar Track: Which calendar track does the absent employee follow? This will be completed automatically when you select the employee.
• Position: What does the absent employee do? This will be completed automatically when you select the employee.
• Absence Start Date/Time and Stop Date/Time: What are the dates and times of the absence? These values will default to the current date and the standard work times for the selected employee, but may be changed as needed. Dates should be entered using the format MMDDYY. For example: November 1, 2009 would be entered as 110109. Times should be entered using the format HHMMA/P. For example: 8:25 a.m. would be entered as 0825A.

Chapter 4 – SubFinder Edit ____________________________________________________________________________
_____________________________________________________________________________ Version 5.9 SubFinder Edit – The Job Button 4.1.5 Rev. 9/09
• Absence Times Follow: For a multiple day absence you have the option of specifying that the absence times follow either the Employee’s Schedule or the Same Times Every Day. Employee’s Schedule is the default and means that each day of the absence will follow the standard work times for that employee. Same Times Every Day means that the absence will be reported for the same times each day of the absence. These options typically do not become important unless you have reported a non-standard absence for the employee.
For example: The employee’s standard work day runs from 7:45 a.m. until 2:35 p.m. A three-day absence is reported that starts at 11:15 a.m. on Monday and runs until 2:35 p.m. on Wednesday. Choosing Employee’s Schedule would result in a 2 ½ day absence - 11:15 to 2:35 on Monday and 7:45 until 2:35 on Tuesday and Wednesday. Choosing Same Times Every Day would result in a 1 ½ day absence - 11:15 to 2:35 on Monday, Tuesday, and Wednesday (three half-days).
• Reason: Why is the person absent? To select the appropriate reason, click on the arrow at the end of the reason field and choose one from the list presented.
• Job Start Date/Time and Stop Date/Time: What are the dates and times that a substitute is required? These values will default to the same values as the Absence Start Date/Time and Stop Date/Time, but may be changed as needed.
• Job Times Follow: For a multiple day job you have the option of specifying that the job times follow either the Employee’s Schedule or the Same Times Every Day. Employee’s Schedule is the default and means that each day of the job will follow the standard work times for that employee. Same Times Every Day means that the job will be reported for the same times each day of the job. These options typically do not become important unless you have reported a non-standard job.
For example: The employee’s standard work day runs from 7:45 a.m. until 2:35 p.m. A three-day job is reported that starts at 11:15 a.m. on Monday and runs until 2:35 p.m. on Wednesday. Choosing Employee’s Schedule would result in a 2 ½ day job - 11:15 to 2:35 on Monday and 7:45 until 2:35 on Tuesday and Wednesday. Choosing Same Times Every Day would result in a 1 ½ day absence - 11:15 to 2:35 on Monday, Tuesday, and Wednesday.
• Account Code: If your district requires the use of a miscellaneous code with certain types of absences you may enter the code here. To select a specific code from a predefined list, click on the arrow at the end of the miscellaneous code field and select it from the list presented. Otherwise simply type in the appropriate code number.
• Job Type: What type of absence is this? You may select from the following types:
o No Substitute Required: No substitute coverage is required for the absence.
o Prearranged Substitute: You already have a substitute who has agreed to fill the absence. SubFinder will not call a Prearranged Substitute.
o Requested Substitute: You would like SubFinder to attempt to fill the absence with a particular substitute. SubFinder will call the requested substitute exclusively until the Stop Calling Requested Substitutes deadline (located in the Call Out section of the SubFinder Control Panel) has been reached. If the substitute has not been secured at that point, SubFinder will begin using the preference list(s) and skill list.
o Substitute Required: You would like SubFinder to find a substitute for you using the absent employee’s preference list(s) and skill list.
• Job Status: Depending upon the Job Type selected, SubFinder will automatically assign one of the following statuses:

Chapter 4 – SubFinder Edit ____________________________________________________________________________
_____________________________________________________________________________ Version 5.9 SubFinder Edit – The Job Button 4.1.6 Rev. 9/09
o Filled: The absence is filled with an appropriate substitute. This status will be automatically applied to Prearranged Substitute absences.
o Unfilled: SubFinder has not yet filled the absence. This status will be automatically applied to Requested Substitute or Substitute Required absences.
o None: This status applies only to No Substitute Required absences.
• Substitute Name: If the Job Type is Prearranged Substitute or Requested Substitute, you must tell SubFinder who will be substituting. To select the specific substitute, click on the arrow at the end of the substitute field and choose the desired person from the list presented. If the Job Type is No Substitute Required or Substitute Required you will not be given access to this field.
Once you have entered all the required information, click the OK button at the lower-left corner of the Add Job screen. SubFinder will save the absence, assign the absence a job number, and return you to the Job List window.
Adding a Job There may be times when you need a substitute at a site within your district but do not have an absent employee associated with the job. For example, a school is hosting a special gymnastics event and needs some extra coverage or simply needs to cover a vacant teaching position. Instead of creating an absence, you will want to create a job. To add a job, click the Add… button on the right side of the Job List window. SubFinder will display the Add Job screen. Now, click the No Employee button in the upper-right portion of the Add Job screen and the screen will change to the following:
When adding a job you must provide the following information:

Chapter 4 – SubFinder Edit ____________________________________________________________________________
_____________________________________________________________________________ Version 5.9 SubFinder Edit – The Job Button 4.1.7 Rev. 9/09
• Site: What site needs the extra substitute(s)? To select the specific site, click on the arrow at the end of the site field and choose it from the list presented.
• Number of Jobs: How many jobs do you want to create? Indicate the appropriate number here. When creating more than one job at a time, please keep the following points in mind:
o All jobs created will have the same position.
o You can not prearrange or request a specific substitute when creating more than one job at a time.
• Calendar Track: What calendar track does this job follow? To select the specific track, click on the arrow at the end of the calendar track field and choose one from the list presented. The default value will be Standard.
• Preference List: What preference list should be used when filling this job? To select the specific list, click on the arrow at the end of the preference list field and choose it from the list presented. You will only be able to see lists that have been created for the selected site.
Note: If you select a preference list, SubFinder will ONLY use that list when trying to fill your job. SubFinder will NOT use the Skill List. If no list is selected, SubFinder will only use the Skill List when filling this job.
• Position: What position does the substitute need to cover? To select the specific position, click on the arrow at the end of the position field and choose it from the list presented.
• Reason: Why do you need this substitute? To select the appropriate reason, click on the arrow at the end of the reason field and choose it from the list presented. Entering the reason is optional for a No Employee Job.
• Job Start Date/Time and Stop Date/Time: What are the dates and times that a substitute is required? The times will default to the standard work times for the selected site, but may be changed as needed. Dates should be entered using the format MMDDYY. For example: June 1, 2007 would be entered as 060107. Times should be entered using the format HHMMA/P. For example: 8:25 a.m. would be entered as 0825A.
• Job Times Follow: This field is not available when creating a “No Employee” job. SubFinder will automatically default to Same Times Every Day.
• Account Code: If your district requires the use of a miscellaneous code with certain types of jobs you may enter the code here. To select a specific code from a predefined list, click on the arrow at the end of the miscellaneous code field and choose one from the list presented. Otherwise simply type in the appropriate code number.
• Job Type: What type of job is this? You may select from the following types:
o No Substitute Required: No substitute coverage is required for the job. While this is a “selectable” job type, it is not a valid choice when creating a job.
o Prearranged Substitute: You already have a substitute who has agreed to fill the job. SubFinder will not call a Prearranged Substitute. If you are entering 2 or more jobs at the same time, this option will not be available.
o Requested Substitute: You would like SubFinder to attempt to fill the job with a particular substitute. SubFinder will call the requested substitute exclusively until the Stop Calling Requested Substitutes deadline has been reached, at which

Chapter 4 – SubFinder Edit ____________________________________________________________________________
_____________________________________________________________________________ Version 5.9 SubFinder Edit – The Job Button 4.1.8 Rev. 9/09
point it will begin calling through the skill list. If you are entering 2 or more jobs at the same time, this option will not be available.
o Substitute Required: You would like SubFinder to find a substitute for you using the skill list associated with the selected position.
• Job Status: Depending upon the Job Type selected, SubFinder will automatically assign one of the following statuses:
o Filled: The absence is filled with an appropriate substitute. This status will automatically be applied to a Prearranged Substitute job.
o Unfilled: SubFinder needs to do some work to fill the job. This status will automatically be applied to a Requested Substitute or Substitute Required job.
• Substitute Name: If the Job Type is Prearranged Substitute or Requested Substitute, you must tell SubFinder who will be substituting. To select the specific substitute, click on the arrow at the end of the substitute field and choose the desired person from the list presented. If the Job Type is Substitute Required you will not be given access to this field.
Once you have entered all the required information, click the OK button on the lower-left corner of the Add Job screen. SubFinder will create the appropriate number of jobs, each with its’ own Job ID number, and return you to the Job List window.
Editing an Absence or Job There may be times when you will want to change a field in an existing absence or job (i.e., the dates or times, type, status, etc.). To edit a particular absence or job, select the desired entry in the display area at the bottom of the Job List window and click the Edit… button on the right side of the Job List window. SubFinder will display the Edit Job screen:

Chapter 4 – SubFinder Edit ____________________________________________________________________________
_____________________________________________________________________________ Version 5.9 SubFinder Edit – The Job Button 4.1.9 Rev. 9/09
When you edit an absence or job, all fields can be changed as necessary. The only exception is, once an absence has begun, the employee name cannot be edited. Once you have made the desired changes, click the OK button in the lower-left corner of the Edit Job screen. SubFinder will save your changes and return you to the Job List window. Note: For detailed explanations of the fields available on this screen please refer to the section of this chapter titled Adding an Absence.
Splitting an Absence or Job There may be times when you need to break an existing absence or job into one or more pieces. For example:
• A substitute has accepted a long-term assignment and needs to be absent sometime during the job.
• A multiple-day job has failed to fill on the first day and you want the system to continue to try and fill the remaining days.
• A single-day absence needs to be split into two pieces to allow two different substitutes to cover the job – one in the morning and another in the afternoon.
All of these situations can be managed using the Split button. In the display area at the bottom of the Job List window, select the appropriate job or absence:

Chapter 4 – SubFinder Edit ____________________________________________________________________________
_____________________________________________________________________________ Version 5.9 SubFinder Edit – The Job Button 4.1.10 Rev. 9/09
and click the Split button. SubFinder will display the following screen:
This screen displays the dates and times of the absence and the job and presents you with several different ‘split’ options:

Chapter 4 – SubFinder Edit ____________________________________________________________________________
_____________________________________________________________________________ Version 5.9 SubFinder Edit – The Job Button 4.1.11 Rev. 9/09
• Multiple One-day Jobs: Choosing this option will result in SubFinder creating a new entry for each working day of the absence or job. In the example shown above, the job would be split into two individual single-day units.
When using this option, please be aware that each of the single-day units will be assigned a new job number and the original number will no longer appear within SubFinder.
• Specify Time – Single-day Job: This option will only be available when splitting a single-day job into two pieces. Once you select this option SubFinder will ask you to enter the specific time that you want the split to occur.
• Specify Date – Multiple-day Job: Choosing this option will result in SubFinder splitting the multiple-day job into two jobs, based on the date that you specify.
Click the OK button and you will see the final result of the split.
Please be aware that the first half of the job, from 11/03/09 to 11/14/09, will retain the original job number. The second half, from 11/05/09 to 11/13/09, will be assigned a new job number.
Viewing an Absence or Job
There may be times when you will want to look at the specific details of an absence or job without making any changes. To view a particular absence or job, select the desired entry in the display area at the bottom of the Job List window and click the View… button on the right side of the Job List window. SubFinder will display the View Job screen:

Chapter 4 – SubFinder Edit ____________________________________________________________________________
_____________________________________________________________________________ Version 5.9 SubFinder Edit – The Job Button 4.1.12 Rev. 9/09
The View Job screen contains all the basic information related to the absence or job. This screen is for display purposes only. No changes can be made to a job from the View Job screen. When you are finished viewing the absence or job, click the Close button in the lower-left corner of the View Job screen. SubFinder will return you to the Job List window.
Viewing the Job Log Each time an absence or job is created; SubFinder creates a Job Log to record the activity that occurs. The Job Log starts with the creation of the absence or job and continues until the job is archived. By default, the Job Log will record:
• All actual calls made in conjunction with the job. • All instances when the job was reviewed by a substitute and the substitute was
offered a choice regarding acceptance. • All changes made to the job.
The Job Log can also be configured to keep track of all job activity, including ‘non-call’ entries where a substitute was considered for the job but was not called due to a conflict – already working, unavailable, do not disturb, etc. Please contact CRS Incorporated Client Services for more information on the level of information tracked.

Chapter 4 – SubFinder Edit ____________________________________________________________________________
_____________________________________________________________________________ Version 5.9 SubFinder Edit – The Job Button 4.1.13 Rev. 9/09
The Job Log can be accessed when viewing or editing an absence or job. To view the Job Log for a particular job click the Job Log… button at the bottom of the Edit Job or View Job screen. SubFinder will display the View Job Log screen:
This screen will display the activity that occurred while trying to fill the job. Each entry will include the date and time as well as a brief description of the entry. If you want to see more detail about a particular entry, select the desired entry and click the View… button at the bottom of the View Job Log screen. SubFinder will display the Job Log Entry screen:
The Job Log Entry screen will give you more specific details on the selected entry. The information may include (if applicable) the name of the substitute, how the entry was made, the preference list the entry was from, and the line number the call was processed on.

Chapter 4 – SubFinder Edit ____________________________________________________________________________
_____________________________________________________________________________ Version 5.9 SubFinder Edit – The Job Button 4.1.14 Rev. 9/09
When you are finished viewing the information, click the Close button at the bottom-center of the Job Log Entry screen. SubFinder will return you to the View Job Log screen. Click the Close button at the bottom-left corner of that screen to return to the previous Edit Job or View Job screen.
How Do I…?
Investigate Why an Absence or Job Failed to Fill?
1. Click the Job button on the Edit bar.
2. Click Job Start under List Jobs By and enter the desired date or date range in the First Date and Last Date fields.
3. Flag Job Status and select FAILED TO FILL as the active status.
4. Select the desired job on the Job List.
5. Click the View… button.
6. Click Job Log… button.
7. If the job failed immediately, access the Preference Lists through the Assign to Employee button and view the lists assigned to the appropriate employee. If no lists have been assigned, assign the appropriate lists. (For more information on Preference List assignment, please refer to Chapter 4.5 of this manual.) Once the lists have been assigned, return to the job, change the status of the job from FAILED TO FILL to UNFILLED, and allow SubFinder to begin calling on the job again.
8. Other reasons why a job might fail to fill:
• All available substitutes from all assigned lists were called. You may have to do some manual calling.
• The Failed to Fill time, specified in the site record, has been reached.
Stop Call Out on a Particular Job
1. Click the Job button on the Edit bar.
2. Use one of the six “List Jobs By” criteria, along with Job Type and/or Job Status, to locate the appropriate job.
3. Select the desired job on the Job List.
4. Click the Edit… button.
5. Click the Stop Attempting… button.
6. A message will appear on the screen: “Are you sure that you want the Job Processor to Stop Attempting to fill this job?” Click the Yes button.
7. Another message will appear on the screen: “Your request to stop attempting to fill the job has been forwarded to the Job Processor.” Click the OK button.
8. Click the Close button at the bottom-left corner of the Edit Job screen to return to the Job List window. SubFinder must finish the present call before it can stop calling out for the job, therefore it may take a minute or so for your request to be implemented.

Chapter 4 – SubFinder Edit ____________________________________________________________________________
_____________________________________________________________________________ Version 5.9 SubFinder Edit – The Job Button 4.1.15 Rev. 9/09
Locate a Working Substitute
1. Click the Job button on the Edit bar.
2. Click Substitute under List Jobs By and choose the appropriate substitute from the drop-down list. (Make sure that the Job Type and the Job Status are not flagged.)
3. All assignments for the substitute will appear in the display area at the bottom of the Job List screen in ascending date order.
4. Highlight the job for the desired date.
5. Using the scroll bar at the bottom of the Job List window, scroll to the right to see where the substitute is working on the selected date.


Chapter 4 – SubFinder Edit _____________________________________________________________________________
_____________________________________________________________________________ Version 5.9 SubFinder Edit – The Employees Button 4.2.1 Rev. 9/09
4.2 The Employees Button
The Employees button is used to add, edit, and view information for employees within your SubFinder system. From the Edit bar click the Employees button,
and SubFinder will display the Employee List window:
The Employee List window contains the following components and buttons:
List Employees By: The options in this box control which employees will be shown in the display area at the bottom of the Employee List window. These options are discussed in detail in the section of this chapter titled Displaying Employees.
Find Employee By: The options in this box allow you to search for a particular employee by entering an Employee Number, PIN, ID, or Phone Number. These options are discussed in detail in the section of this chapter titled Searching for Employees.

Chapter 4 – SubFinder Edit _____________________________________________________________________________
_____________________________________________________________________________ Version 5.9 SubFinder Edit – The Employees Button 4.2.2 Rev. 9/09
Display Area: The display area is the open area on the bottom half of the Employee List window. It will be used to show a listing of employees, in ascending alphabetical order by last name, that match the criteria selected in the List Employees By box. Control Buttons:
Exits the Employee List window and returns you to the Edit bar.
Allows you to add a new employee
Allows you to change information for an existing employee
Allows you to access the on-line help system
Displaying Employees You may use one of the following options in the List Employees By box to choose how the employees are displayed:
• All: This option will list all employees in your SubFinder system in ascending alphabetical order according to their last names.
• Site: This option will list all employees at the chosen site in ascending alphabetic order according to their last names. To select a specific site click on the arrow at the end of the site field and choose one from the list presented.
Searching for Employees
You may use one of the following options in the Find Employee By box to search for a particular employee record:
• Employee Number: The Employee Number is the number that SubFinder uses to reference the employee on the various reports. It is the first number entered in the employee record.
• PIN: The PIN (Personal Identification Number) is the number that your employees use to identify themselves to SubFinder. It is the second number entered in the employee record. Often, the PIN and Employee Number are the same.
• ID: The ID is the number that SubFinder assigns to each employee when the employee is first entered into the system. This is the number administrators use to create or cancel an absence for one of their employees. This number is displayed in the title bar of the Edit Employee screen.
• Phone Number: This is the employee’s phone number and must include the area code. While entering the phone number, do not include any hyphens. SubFinder will automatically insert them as you type.
To perform a search using one of these numbers:
1. Select the circle to the left of the number you want to use for your search. 2. Click in the box to the right. Enter the number. 3. Click the Find button. 4. If there is an employee with that matching number, their name will be highlighted in
the display area below.

Chapter 4 – SubFinder Edit _____________________________________________________________________________
_____________________________________________________________________________ Version 5.9 SubFinder Edit – The Employees Button 4.2.3 Rev. 9/09
You may also search for an employee using their last name. To perform a name search:
1. Click on any name within the list of employees.
2. Begin typing the employee’s last name. With each letter you type you will get closer to the name you want. For example: R will take you to the first last name beginning with an R. RA will take you to the first last name beginning with RA, etc.
3. Once you get close to the name you want, you can use the up and down arrow keys to move through the field one employee at a time.
4. If you make a mistake while typing, simply click on another name and begin again. Adding an Employee
Throughout the year you will find the need to add new employees to SubFinder. To add a new employee click the Add… button on the right side of the Employee List window. SubFinder will display the Add Employee screen:
When adding a new employee you must complete the fields prefaced with an asterisk (*). All other fields are optional.
The Top of the Screen • * First Name
• MI: Middle Initial, if applicable.
• * Last Name

Chapter 4 – SubFinder Edit _____________________________________________________________________________
_____________________________________________________________________________ Version 5.9 SubFinder Edit – The Employees Button 4.2.4 Rev. 9/09
• * Employee Number: What number do you want SubFinder to use to reference the employee in the various reports and payroll export files? Many districts use the employee’s Social Security Number.
• * PIN: What number do you want the employee to use to identify themselves to SubFinder? Since the employee will use this number every time they use SubFinder, it is best to use something they can easily remember. Many districts use the employee’s Social Security Number. When entering a new employee, this number will default to the same value as the Employee Number. It can be changed if necessary.
The General Information Tab
• * Home Site: Where does the employee work? To select a specific site, click on the arrow at the end of the Home Site field and select the site from the list presented. Even if this is an itinerant employee, one who travels from site to site, you must still assign a home site.
• * Calendar Track: What calendar does this employee follow? Standard is the default, but you may select from any available calendars by clicking on the arrow at the end of the Calendar Track field and choosing the desired calendar from the list presented.
• * Primary Job Position: What position does the employee fill at the site? The Primary Job Position is one factor that can be used to match the employee to an appropriate substitute. To select a specific position, click on the arrow at the end of the Primary Job Position field and select the job position from the list presented.
• Secondary Job Position: If applicable, you can specify a second job position for an employee. To select a specific position, click on the arrow at the end of the Secondary Job Position field and select it from the list presented. SubFinder will use this secondary position in several ways:

Chapter 4 – SubFinder Edit _____________________________________________________________________________
_____________________________________________________________________________ Version 5.9 SubFinder Edit – The Employees Button 4.2.5 Rev. 9/09
o Any substitute being offered an absence for this employee will hear both job positions.
o If SubFinder can’t find a substitute for the Primary Job Position, and there is still time available on the morning of the absence before the job is scheduled to change to Failed to Fill, SubFinder will process the Skill List again based on the Secondary Job Position.
• Work Hours - Start and End: What are the employee’s normal working hours? If the employee’s normal working hours are the same as the Open and Close Times in the employee’s home site record, leave these fields blank. If this employee has working hours that differ from the sites, enter them using the format HHMM A/P; for 8:25 a.m. you would type 0825A. Using this format, the colon (:) will be entered automatically.
• Make-up Teacher: If this employee will serve as a make-up teacher, working during an off-track period, place a check in this box. This field is used for reporting purposes only.
• Certified: If this employee’s job position is considered to be certified, a teaching position, for example, place a check in this box. This field is used for reporting purposes only.
• Classified: If this employee’s job position is considered to be classified, food service positions, for example, place a check in this box. This field is used for reporting purposes only.
• Hire Date: What date was this employee hired by your district? Dates should be entered using the format MMDDYY; for June 1st, 2006 you would type 060106. Using this format, the slashes (/) will be entered automatically.
• Date Added: This field is automatically completed by SubFinder and is not available for editing. It reflects the date that the record was added into the system.
• Restricted: Flagging the employee record as restricted tells SubFinder not to allow the employee to report any absences to SubFinder.
• Inactive: Flagging the employee record as inactive tells SubFinder not to allow the employee to report any absences to SubFinder. It also marks the record for deletion the next time the employee purge is run.

Chapter 4 – SubFinder Edit _____________________________________________________________________________
_____________________________________________________________________________ Version 5.9 SubFinder Edit – The Employees Button 4.2.6 Rev. 9/09
The Address Tab
• Street
• City
• State: Enter the two-letter state abbreviation. The title label for this field may be customized (for example: Province). Please call CRS Incorporated Client Services for assistance.
• Zip Code: You may enter either the 5-digit or the 9-digit zip code. If you choose to use the 9-digit zip code you must enter the hyphen (-). For example: 17701-3734. The title label and the entry format for this field may be customized. Please call CRS Incorporated Client Services for assistance.
• Phone: Enter the phone number, including the area code. SubFinder will insert the required hyphens (-).
• Gender: If desired, you can specify the employee’s gender. To select the gender, click on the arrow at the end of the Gender field and select it from the list presented. This field is used for reporting purposes only.
• Ethnicity: If desired, you can specify the employee’s ethnicity. To select the ethnicity, click on the arrow at the end of the Ethnicity field and select it from the list presented. This field is used for reporting purposes only.
• Email: If the employee wishes to receive email notifications (previously discussed in Chapter 3.17 – Control Panel – Email Notifications), their email address must be entered in this field. The employee, by default, will have the ability to add and edit their email address in SubFinder via the Internet.
• Notes: The open window at the bottom of the Address tab is for any notes you would like to record regarding the employee. If you choose to use this area, we
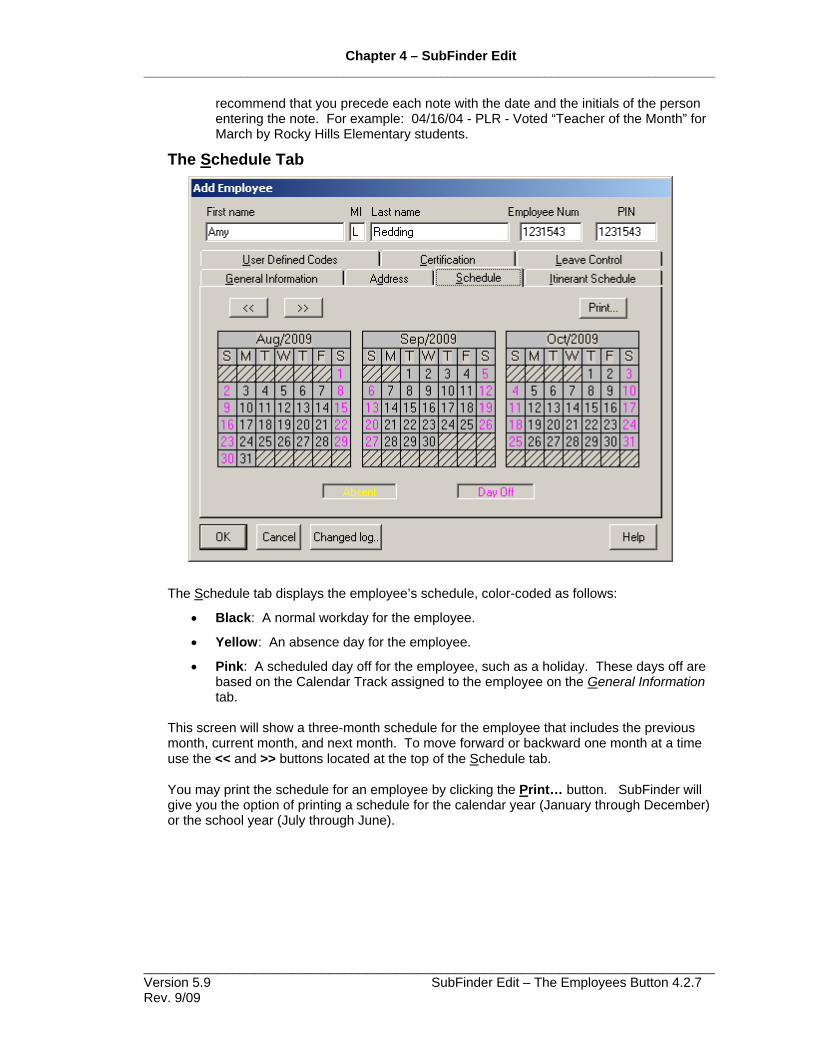
Chapter 4 – SubFinder Edit _____________________________________________________________________________
_____________________________________________________________________________ Version 5.9 SubFinder Edit – The Employees Button 4.2.7 Rev. 9/09
recommend that you precede each note with the date and the initials of the person entering the note. For example: 04/16/04 - PLR - Voted “Teacher of the Month” for March by Rocky Hills Elementary students.
The Schedule Tab
The Schedule tab displays the employee’s schedule, color-coded as follows:
• Black: A normal workday for the employee.
• Yellow: An absence day for the employee.
• Pink: A scheduled day off for the employee, such as a holiday. These days off are based on the Calendar Track assigned to the employee on the General Information tab.
This screen will show a three-month schedule for the employee that includes the previous month, current month, and next month. To move forward or backward one month at a time use the << and >> buttons located at the top of the Schedule tab. You may print the schedule for an employee by clicking the Print… button. SubFinder will give you the option of printing a schedule for the calendar year (January through December) or the school year (July through June).

Chapter 4 – SubFinder Edit _____________________________________________________________________________
_____________________________________________________________________________ Version 5.9 SubFinder Edit – The Employees Button 4.2.8 Rev. 9/09
The Itinerant Schedule Tab
If this employee is an itinerant employee, one who travels from site to site, you will want to record their schedule in SubFinder. SubFinder will use the schedule to determine which administrators should hear the employee’s absence on any given day. In order to utilize this function, you must indicate you will be using Itinerant Employees in the General Profile section of the SubFinder Control Panel. To add a schedule item for an itinerant employee:
1. Select the appropriate day of the week by clicking on the circle to the left of the day.
2. Click the Add… button. SubFinder will display the Add Site Schedule Item window:
3. Complete the information requested:
• Site: What site will the employee be working at? To select a specific site, click on the arrow at the end of the Site field and select the site from the list presented.

Chapter 4 – SubFinder Edit _____________________________________________________________________________
_____________________________________________________________________________ Version 5.9 SubFinder Edit – The Employees Button 4.2.9 Rev. 9/09
• Start Work Time: What time does the employee report to this site? Enter the time using the format HHMM A/P; for 1:00PM you would type 0100P.
• Stop Work Time: What time does the employee leave this site? Enter the time using the format HHMM A/P; for 3:00PM you would type 0300p.
4. Click the OK button. SubFinder will save the schedule information and return you to the Itinerant Schedule tab.
5. Repeat steps 1-4 until you have entered the employee’s schedule for the entire week. Include those portions of the schedule that occur at the employee’s assigned home site.
6. Additional functions allowed:
• By selecting a schedule entry and then clicking the Edit button, you can change any of the information displayed. Only one line can be edited at a time.
• By selecting a schedule entry and then clicking the Delete button, you can delete a line if it was entered incorrectly or if it is no longer needed.
• By selecting a schedule entry and then clicking the Copy button, you can copy a line from one day to one or more days. Only one line can be copied at a time.
Note: The entry of the itinerant schedule will not serve as notification to a substitute accepting an absence for the employee. The substitute must be notified of the employee’s absence through the use of the special instructions or the itinerant schedule voicing option.

Chapter 4 – SubFinder Edit _____________________________________________________________________________
_____________________________________________________________________________ Version 5.9 SubFinder Edit – The Employees Button 4.2.10 Rev. 9/09
The User Defined Codes Tab
The User Defined Codes tab allows you to keep track of up to 10 additional pieces of data pertaining to the employee. For example: You might want to use User Defined Code 6 to keep track of whether or not a background check was completed. The fifth code has already been set up to keep track of an employee’s Termination Date. If used, this field will appear on the Employee Hire Date report. The different codes available have different character lengths:
User Defined Codes 1 - 2: up to 32 alpha/numeric characters User Defined Codes 3 - 5: up to 10 alpha/numeric characters User Defined Codes 6 - 10: up to 6 alpha/numeric characters
If you decide to use any of these codes, the field name can be changed to reflect the content. Please contact CRS Incorporated Client Services for assistance. Note: Some of the export formats available with SubFinder require the use of one or more of the user defined codes. If you will be exporting SubFinder data to a payroll system, please refer to the Import, Export, and Data Definition File document for detailed information on your particular export format.

Chapter 4 – SubFinder Edit _____________________________________________________________________________
_____________________________________________________________________________ Version 5.9 SubFinder Edit – The Employees Button 4.2.11 Rev. 9/09
The Certification Tab
You can use the Certification tab to enter up to eight different certifications that the employee holds, along with an expiration date for each one. Enter the Expiration Date in the format MMDDYY and SubFinder will automatically insert the required punctuation; for July 31, 2007 you would enter 073107.

Chapter 4 – SubFinder Edit _____________________________________________________________________________
_____________________________________________________________________________ Version 5.9 SubFinder Edit – The Employees Button 4.2.12 Rev. 9/09
The Leave Control Tab
SubFinder’s Leave Control is a powerful tool that allows your district to track employee leave and entitlements. This tool provides the following features:
• Leave can be calculated in units of either hours or days. • Each controlled leave reason can have a unique limit. • You have the ability to view both Leave Used and Leave Available. • Leave can be accrued at whatever intervals you require – monthly, quarterly,
annually, etc. • You can roll unused leave over to the same reason or a different reason.
To apply controls to a particular reason:
1. Select the desired reason in the Available Reason list on the left side of the Leave Control tab.
2. Click the Add>> button to transfer the reason to the Controlled Reasons list on the right side of the Leave Control tab.
3. Select the transferred reason and click the Reason Details… button. SubFinder will display the Controlled Reason Customization screen:

Chapter 4 – SubFinder Edit _____________________________________________________________________________
_____________________________________________________________________________ Version 5.9 SubFinder Edit – The Employees Button 4.2.13 Rev. 9/09
• Unit Selection: What time units do you want to use to calculate leave for this reason?
• Accrual Type: How often will you run an accrual on this reason? Your selection here will correspond with a choice that must be made each time you run an accrual. The available choices are: Annual, Monthly, Semi-monthly, Bi-weekly, Weekly, and Others.
• Include in Selected Reasons: If this is a reason that you will accrue from year to year (carry the unused balance over each time you run a manual accrual), check this box. When the box is checked, any unused balance shown in the Time Available field will be carried over to the reason specified under Accrue to Reason when a manual accrual is run for the particular Accrual Type.
• Refuse if Limit is Reached: When the employee has used all the leave time allowed for this reason, should SubFinder refuse to accept any more absences for this reason? If the answer is yes, flag the box. If the box is not flagged, SubFinder will allow the employee to continue reporting absences for this reason, even when the limit has been reached.
• Last Accrual Date: This field will display the last date that an accrual was manually run. If you have not yet run an accrual, this field will indicate when this particular reason was set up. This field is automatically completed by SubFinder and is not available for editing.
• Accrue to Reason: If the unused balance of leave time for this reason is to be accrued from year to year, to which reason should it be accrued? To select a specific reason, click on the arrow at the end of the Reason field and select the reason from the list presented. The default reason will be the same reason for which you are applying the controls.
• Allotment per Period: How much leave time is allotted to this reason for the period specified under Accrual Type? Typically, this will be equal to the amount of leave given for the period. However, if you are setting up leave control mid-year you may need to set this to a smaller amount of time. While this field is typically not available for editing, it can be changed through the use of the Override button.

Chapter 4 – SubFinder Edit _____________________________________________________________________________
_____________________________________________________________________________ Version 5.9 SubFinder Edit – The Employees Button 4.2.14 Rev. 9/09
• Accrual from Last Period: How much leave time was carried over from the last accrual period? SubFinder will automatically generate this number at the time you perform a manual accrual. While this field is typically not available for editing, it can be changed through the use of the Override button.
• Accumulation: This is the total of the Allotment Per Period and Accrual from Last Period fields. While this field is typically not available for editing, it can be changed through the use of the Override button.
• Time Used: This field represents that amount of leave time that has been used, for this reason, since the last manual accrual was run. SubFinder will automatically keep track of this for you as absences for the employee are entered in the system. Please keep in mind that this field will include scheduled absences which have not yet occurred, i.e. future absences. While this field is typically not available for editing, it can be changed through the use of the Override button.
• Time Available: This field represents the amount of leave time still available to the employee, for this reason. SubFinder will automatically keep track of this for you as absences for the employee are entered in the system. While this field is typically not available for editing, it can be changed through the use of the Override button.
• The Override button: The Override button is used to either change the default settings for the five fields above or to establish a value for a field where there is no default. Clicking this button will provide you with edit-access to the above five fields, as illustrated in the following screen:
After clicking the Override button, you may change any of the fields as necessary.
• The Calculate button: The Calculate button is used to recalculate the values in the Accumulation and Time Available fields whenever a change is made using the Override button. When you click this button the following message will appear:

Chapter 4 – SubFinder Edit _____________________________________________________________________________
_____________________________________________________________________________ Version 5.9 SubFinder Edit – The Employees Button 4.2.15 Rev. 9/09
If you are sure that you want to apply your change, click the Yes button and the appropriate values will be recalculated.
4. Once you have entered all the desired information on the Controlled Reason Customization screen, click the OK button in the lower-left corner. SubFinder will save the information and return you to the employee record.
If you are going to utilize the Leave Control feature, defaults may be established that will apply to each controlled reason on a system-wide basis. These defaults can make the initial setup easier for you. For assistance in applying these defaults, please contact CRS Incorporated Client Services. Once you have established the appropriate Leave Control settings for all of your employees, you must determine if and when you will perform your accruals. Accruals need to be done for any reason where unused time is forwarded or carried over to the next accrual period. For detailed instructions on performing an accrual, please refer to the section of Chapter 4.10 of this manual titled Leave Control Accrual.
Saving the Record Once you have entered all the desired information for the employee’s record, click the OK button in the lower-left corner of the Add Employee screen. SubFinder will save your new employee, assign an ID number, and display the following prompt:
If you click the Yes button, SubFinder will automatically assign the Skill List to your new employee and then return you to the Employee List window. Note: Please remember to assign any applicable Preference List(s) to all new employees after saving their record. For more information on assigning these lists, please refer to section 4.4 of this manual. If you click the No button, no list will be assigned and you will be returned to the Employee List window.

Chapter 4 – SubFinder Edit _____________________________________________________________________________
_____________________________________________________________________________ Version 5.9 SubFinder Edit – The Employees Button 4.2.16 Rev. 9/09
Note: Please remember that SubFinder will be unable to fill absences for your new employee until you assign any applicable Preference List(s) and the Skill List. For more information on assigning these lists, please refer to section 4.4 of this manual.
Editing an Employee Once an employee has been added to SubFinder, you may need to make changes to their record. To edit an employee’s record:
1. From the Employee List window, locate the employee using one of the methods described in the section of this chapter titled Searching for Employees.
2. Click the Edit… button on the right side of the Employee List window and SubFinder will display the Edit Employee screen:
When you edit an employee, all fields can be changed as necessary. Once you have made the desired changes, click the OK button in the lower-left corner of the Edit Employee screen. SubFinder will save your changes and return you to the Employee List window. Note: For detailed explanations of the fields available on this screen please refer to the section of this chapter titled Adding an Employee. There may also be times when you wish to review the changes made to an employee record. To do so:
1. From the Employee List window, locate the employee using one of the methods described in the section of this chapter titled Searching for Employees.

Chapter 4 – SubFinder Edit _____________________________________________________________________________
_____________________________________________________________________________ Version 5.9 SubFinder Edit – The Employees Button 4.2.17 Rev. 9/09
2. Click the Edit… button on the right side of the Employee List window and SubFinder will display the Edit Employee screen.
3. Click the Changed Log… button at the bottom of the screen, and the following screen will appear:
If you would like more detail on a particular entry, select the desired entry and click the View… button at the bottom of the View Person Log. SubFinder will display the Person Log view screen:
The Person Log view screen will give you more specific details on the selected entry. The information may include (if applicable) the previous information in the record, the current information, when the change was made, on which work station the change was made, the user who made the change, and how the change was entered.
When you are finished viewing the information, click the Close button at the bottom-center of the Person Log view screen. SubFinder will return you to the View Person Log screen. Click the Close button at the bottom-left corner of that screen to return to the previous Edit Employee screen.

Chapter 4 – SubFinder Edit _____________________________________________________________________________
_____________________________________________________________________________ Version 5.9 SubFinder Edit – The Employees Button 4.2.18 Rev. 9/09
How Do I…? Delete an Employee An employee’s name and general information will still be available for reporting purposes, even after the employee has been deleted from SubFinder. An employee is not entirely removed from the system until a final deletion of purged records has been performed. To perform the first step in the deletion process:
1. Click the Employee button on the Edit bar. 2. Select the desired person on the Employee List. 3. Click the Edit… button. 4. Mark the employee inactive by flagging the Inactive box on the General
Information tab of the employee record, and then click the OK button in the lower-left corner of the Edit Employee screen to save the change.
5. When you are ready, use the Database Purge function to remove the employee from SubFinder’s employee list. A description of the Database Purge function can be found in the section of this chapter titled Tools.
Transfer an Employee to a New Site
1. Click the Employee button on the Edit bar. 2. Select the desired employee from the Employee List. 3. Click the Edit… button. 4. On the General Information tab of the employee record change the Home Site
field to reflect the employee’s new site. 5. Click the OK button in the lower-left corner of the Edit Employee screen to save
the change. If the employee has any scheduled absences for future dates, SubFinder will advise you that they exist and may need to be changed.
6. Once the employee is transferred, you must re-assign any applicable Preference List(s). If the Skill List was assigned prior to the transfer, it will remain a part of the employee’s profile.
Find an Employee’s SubFinder-Assigned ID Number
1. Click the Employee button on the Edit bar.
2. Select the desired person on the Employee List.
3. Click the Edit… button.
Look at the Title Bar of the screen. To the right of the title, Edit Employee, you will find the ID number that SubFinder has assigned to this person.

Chapter 4 – SubFinder Edit _____________________________________________________________________________
_____________________________________________________________________________________________ Version 5.9 SubFinder Edit – The Substitutes Button 4.3.1 Rev. 9/09
4.3 The Substitutes Button
The Substitutes button is used to add, edit, and view information for substitutes within your SubFinder system. From the Edit bar click the Substitutes button,
and SubFinder will display the Substitute List window:
The Substitute List window contains the following components and buttons: Find Substitute By: The options in this box allow you to search for a particular substitute by entering an Employee Number, PIN, ID, or Phone Number. These options are discussed in detail in the section of this chapter titled Searching for Substitutes. Display Area: The display area is the open area on the bottom half of the Substitute List window. It will be used to show a listing of substitutes, in ascending alphabetical order by last name. Control Buttons:
Exits the Substitute List window and returns you to the Edit bar.

Chapter 4 – SubFinder Edit _____________________________________________________________________________
_____________________________________________________________________________________________ Version 5.9 SubFinder Edit – The Substitutes Button 4.3.2 Rev. 9/09
Allows you to add a new substitute.
Allows you to edit an existing substitute.
Allows you to access the on-line help system.
Displaying Substitutes All substitute names are automatically displayed in ascending alphabetical order by last name.
Searching for Substitutes You may use one of the following options in the Find Substitute By box to search for a particular substitute record:
• Employee Number: The Employee Number is the number that SubFinder uses to reference the substitute on various reports. It is the first number entered in the substitute record.
• PIN: The PIN (Personal Identification Number) is the number that your substitutes use to identify themselves to SubFinder. It is the second number entered in the substitute record. Often, the PIN and Employee Number will be the same.
• ID: The ID is the number that SubFinder assigns to each substitute when they are first entered into the system. This is the number that an administrator or employee will use to request or prearrange a particular substitute. This number is displayed in the title bar of the Edit Substitute screen.
• Phone Number: This is the substitute’s phone number and must include the area code. While entering the phone number, do not include any hyphens (-). SubFinder will automatically insert them as you type.
To perform a search using one of these numbers:
1. Select the circle to the left of the number you want to use for your search.
2. Click in the box to the right. Enter the number.
3. Click the Find button.
4. If there is a substitute that matches the number, their name will be highlighted in the display area below.
You may also search for a substitute using their last name. To perform a name search:
1. Click on any name within the list of substitutes.
2. Begin typing the substitute’s last name. With each letter you type you will get closer to the name you want. For example: R will take you to the first last name beginning with an R, RA will take you to the first last name beginning with RA, etc.

Chapter 4 – SubFinder Edit _____________________________________________________________________________
_____________________________________________________________________________________________ Version 5.9 SubFinder Edit – The Substitutes Button 4.3.3 Rev. 9/09
3. Once you get close to the name you want, you can use the up and down arrow keys to move up or down one employee at a time.
4. If you make a mistake while typing, simply click on another name and begin again.
Adding a Substitute
Throughout the year you will find the need to add new substitutes to SubFinder. To add a new substitute click the Add… button on the right side of the Substitute List window. SubFinder will display the Add Substitute screen:
When adding a new substitute you must complete the fields prefaced with an asterisk (*). All other fields are optional. The Top of the Screen
• * First Name • MI: Middle Initial, if applicable. • * Last Name • * Employee Number: What number do you want SubFinder to use to reference the
substitute in the various reports and payroll export files? Many districts use the substitute’s Social Security Number.
• * PIN: What number do you want the substitute to use to identify themselves to SubFinder? Since the substitute will use this number every time they use SubFinder, it is best to use something they can easily remember. Many districts use the substitute’s Social Security Number. When entering a new substitute, this number

Chapter 4 – SubFinder Edit _____________________________________________________________________________
_____________________________________________________________________________________________ Version 5.9 SubFinder Edit – The Substitutes Button 4.3.4 Rev. 9/09
will default to the same value as the Employee Number. It can be changed if necessary.
The General Information Tab
• Availability: This indicates the substitute’s availability “as a rule” for each day. The
days will be color coded as follows:
o Black: The substitute is available to work at least 8 hours on that day.
o Blue: The substitute has limited availability on that day - they can work for less than 8 hours.
o Pink: The substitute is not available to work at all on that day.
By default a new substitute will be available Monday through Friday for a maximum of 10 hours each day. They will be unavailable on Saturday and Sunday.
The availability for any day can be changed by first clicking on the button in front of the desired day, then using combinations of the following four fields. Each day must be changed individually.
• From: What is the earliest time that the substitute is available to begin working on the selected day? Enter the time using the format HHMMA/P; for 8:00 a.m. you would type 0800A. Leave this field blank if there is no preference.
• To: What is the latest time the substitute is available to work until on the selected day? Enter the time using the format HHMMA/P; for 3:30 p.m. you would type 0330P. Leave this field blank if there is no preference.

Chapter 4 – SubFinder Edit _____________________________________________________________________________
_____________________________________________________________________________________________ Version 5.9 SubFinder Edit – The Substitutes Button 4.3.5 Rev. 9/09
• Minimum Hours: What is the minimum number of hours the substitute is able to work on the selected day? The substitute would never be offered a job on this day that is less than the minimum specified. You may enter a value from 0 to 24. Leave this field blank if there is no preference.
• Maximum Hours: What is the maximum number of hours that the substitute is able to work on the selected day? The substitute would never be offered a job on this day that is more than the maximum specified. If the substitute is not available to work on a certain day, enter 0. You may enter a value from 0 to 24. The default for this field is 10.
• Home Site/Group: This field can be used to tie a substitute to a particular site for reporting purposes. It will not be used to limit the substitute to working only at the selected site. If the substitute serves as both an employee and a substitute within the district, this field will reflect their home site from the employee record. Typically, this field will be left blank.
• Max Days to Work: How many days is the substitute permitted to work during the current reporting period – typically a school year? If there is no limit, leave this field blank. This can be used to prevent retired teachers from working more days than they desire or are allowed.
• Total Days Worked: This field is automatically updated by SubFinder and is not available for editing. It displays the total number of days the substitute has been scheduled to work, including past, present, and future jobs, as of the current date.
• Certified Job Days: This field is automatically updated by SubFinder and is not available for editing. It displays the total number of days the substitute has worked in job positions designated as “certified”. This can be used in conjunction with the Certified Options section of the SubFinder Control Panel to control how substitutes are placed in your various job positions. For more information on the Certified Options, please refer to Chapter 3.12 of this manual.
• Max Hours/Week: How many hours is the substitute permitted to work during any given week? This may be used for a substitute who has been newly hired and is still in a “probationary” period, or for a substitute who wants to work no more than a certain number of hours per week. If there is no limit, leave this field blank.
• Hire Date: What date was this substitute hired by your district? Dates should be entered using the format MMDDYY; for June 1, 2006 you would type 060106.
• Date Added: This field is automatically completed by SubFinder and is not available for editing. It reflects the date that the record was added into the system.
• Make-up Teacher: If this substitute will serve as a make-up teacher, working during an off-track period, place a check in this box. This field is used for reporting purposes only.
• Pre-Registered: If you have enabled the pre-registration function, this field will indicate whether or not the substitute has called into SubFinder and indicated their availability. As an operator, you can manually flag (or unflag) this field as well. For more information on the Pre-Registration, please refer to Chapter 3.15 of this manual.
• Call Priority: This field works in conjunction with the LAUSD Substitute Selection Process, discussed in section 3.14 of this manual. It defines a substitute’s call priority or seniority when using this special selection process. Do not complete this field unless you have enabled the LAUSD Substitute Selection Process.

Chapter 4 – SubFinder Edit _____________________________________________________________________________
_____________________________________________________________________________________________ Version 5.9 SubFinder Edit – The Substitutes Button 4.3.6 Rev. 9/09
• Certified: Is this substitute qualified to work certified positions, as a Third Grade Teacher for example, within your district? If so, flag the box. This can be used in conjunction with the Certified Options section of the SubFinder Control Panel to control how substitutes are placed in your various job positions. For more information on the Certified Options, please refer to Chapter 3.12 of this manual.
• Classified: Is this substitute qualified to work classified positions, as a Food Service Worker for example, within your district? If so, flag the box. This can be used in conjunction with the Certified Options section of the SubFinder Control Panel to control how substitutes are placed in your various job positions. For more information on the Certified Options, please refer to Chapter 3.12 of this manual.
• Restricted: Flagging a substitute as restricted tells SubFinder not to offer any jobs to the substitute, no matter what. The substitute will not be considered until the restriction is removed.
• Inactive: Flagging a substitute as inactive restricts them from working and marks them for deletion the next time the substitute purge is run.
The Address Tab
The Address tab allows you to enter the address, phone number, and any notes you may have for a substitute.
• Street • City • State: Enter the two-letter state abbreviation. The title label for this field may be
customized (for example: Province). Please call CRS Incorporated Client Services for assistance.

Chapter 4 – SubFinder Edit _____________________________________________________________________________
_____________________________________________________________________________________________ Version 5.9 SubFinder Edit – The Substitutes Button 4.3.7 Rev. 9/09
• Zip Code: You may enter either the 5-digit or the 9-digit zip code. If you choose to use the 9-digit zip code you must enter the hyphen (-). For example: 17701-3734. The title label and the entry format for this field may be customized. Please call CRS Incorporated Client Services for assistance.
• Phone: Enter the phone number, including the area code. SubFinder will insert the required hyphens (-). If the phone number is not present in a substitute’s record when they first call in to register with SubFinder, they will be required to enter it at that time.
• Gender: If desired, you can specify the substitute’s gender. To select the gender, click on the arrow at the end of the Gender field and select it from the list presented. This field is used for reporting purposes only.
• Ethnicity: If desired, you can specify the substitute’s ethnicity. To select the ethnicity, click on the arrow at the end of the Ethnicity field and select it from the list presented. This field is used for reporting purposes only.
• Calling Area: This field works in conjunction with the LAUSD Substitute Selection Process, discussed in section 3.13 of this manual. It defines the Site Group/Region that this substitute belongs to for calling purposes. This field will only accept a valid Site Group Number. Do not complete this field unless you have enabled the LAUSD Substitute Selection Process.
• Email: If the substitute wishes to receive email notifications (previously discussed in Chapter 3.17 – Control Panel – Email Notifications), their email address must be entered in this field. The substitute, by default, will have the ability to add and edit their email address in SubFinder via the Internet.
• Notes: The open window at the bottom of the Address tab is for any notes that you would like to record regarding the substitute. If you choose to use this area, we recommend that you precede each note with the date and the initials of the person entering the note. For example: 01/16/04 - PLR - Outstanding foreign language skills.
The Schedule Tab

Chapter 4 – SubFinder Edit _____________________________________________________________________________
_____________________________________________________________________________________________ Version 5.9 SubFinder Edit – The Substitutes Button 4.3.8 Rev. 9/09
There are two different views available on the Schedule tab: Standard View and Disqualification View. The Standard View displays the substitute’s schedule, color-coded as follows:
• Black: The substitute is available to work at least 8 hours on the indicated day.
• Green: The substitute is scheduled to work for at least a portion of the indicated day.
• Red: The substitute has indicated they are unavailable to work on the indicated day.
• Yellow: The substitute has requested a “do not disturb” for at least a portion of the indicated day.
• Pink: The substitute has indicated that this day will always be a day off.
• Blue: The substitute has limited availability on the indicated day - they can work a portion of the day but less than 8 hours total.
This screen will show a three-month schedule for the substitute that includes the previous month, the current month, and the next month. To move forward or backward one month at a time use the << and >> buttons located at the top of the Schedule tab. You may print the schedule for a substitute by clicking the Print… button at the top-center of the Schedule tab. SubFinder will give you the option of printing a schedule for the calendar year (January through December) or the school year (July through June). You also have the ability to interact with the substitute’s schedule, while in Standard View, to make changes such as adding an Unavailable Date Range or removing a Do Not Disturb. Click on the desired date and then right-click on the same date and SubFinder will display the following menu:

Chapter 4 – SubFinder Edit _____________________________________________________________________________
_____________________________________________________________________________________________ Version 5.9 SubFinder Edit – The Substitutes Button 4.3.9 Rev. 9/09
The functions that are available to you for the chosen date will appear in bold type. Any options that are not in bold are not available for the selected day. The possible options include:
• Add ‘Do Not Disturb’: Use this option to add a Do Not Disturb to the substitute’s record for a single day or date range. A Do Not Disturb means that SubFinder will not call the substitute to offer them any jobs on the day or during the date range that has been entered. It does not mean that the substitute is not available to work. The substitute can still call into SubFinder to shop for jobs if your district allows this option. SubFinder could also call them, prior to the Do Not Disturb, and offer them work for the selected day or date range. You can not enter a Do Not Disturb for a past date.
• Edit ‘Do Not Disturb’: Use this option to edit an existing Do Not Disturb. You can not change dates and times if they are in the past, but you will be able to edit any future portions of an existing Do Not Disturb.
• Remove ‘Do Not Disturb’: Use this option to remove an existing Do Not Disturb if it is for future dates and times only. You can not remove a Do Not Disturb if any portion of it is in the past.
• Add ‘Unavailable’: Use this option to add an Unavailable to the substitute’s record for a single day or date range. Unavailable means that SubFinder will not offer the substitute any jobs for the day or during the date range that has been entered. It does not mean that the substitute is not taking calls for future dates. SubFinder may still call the substitute during the evening callout period to offer work for a future date.
• Edit ‘Unavailable’: Use this option to edit an existing Unavailable. You can not change any dates and times if they are in the past, but you will be able to edit any future portions of an existing Unavailable.

Chapter 4 – SubFinder Edit _____________________________________________________________________________
_____________________________________________________________________________________________ Version 5.9 SubFinder Edit – The Substitutes Button 4.3.10 Rev. 9/09
• Remove ‘Unavailable’: Use this option to remove an existing Unavailable if it is for future dates and times only. You can not remove an Unavailable if any portion of it is in the past.
• Show Weekly Hours Worked: This will display the total number of hours the substitute has worked and/or is scheduled to work during the selected week. You can select any day of a Sunday through Saturday period when using this option.
Note: In order for Show Weekly Hours Worked to work properly, Limit Substitute Hours by Week must be enabled in the General System Options section of the SubFinder Control Panel.
The Disqualification View displays the substitute’s disqualification history, color-coded as follows:
• Black: The substitute is available to work at least 8 hours on the indicated day.
• Green: The substitute is scheduled to work for at least a portion of the indicated day.
• Yellow: The substitute was disqualified for call out during the morning calling period.
• Light Blue: The substitute was disqualified for call out during the evening calling period.
• Red: The substitute was disqualified for call out during both the morning and evening calling periods.
• Pink: The substitute has indicated that this day will always be a day off.
• Blue: The substitute has limited availability on the indicated day - they can work a portion of the day but less than 8 hours total.
This screen will show a three-month schedule for the substitute that includes the previous month, the current month, and the next month. To move forward or backward one month at a time use the << and >> buttons located at the top of the Schedule tab. You may print the schedule for a substitute by clicking the Print… button at the top-center of the Schedule tab. SubFinder will give you the option of printing a schedule for the calendar year (January through December) or the school year (July through June).

Chapter 4 – SubFinder Edit _____________________________________________________________________________
_____________________________________________________________________________________________ Version 5.9 SubFinder Edit – The Substitutes Button 4.3.11 Rev. 9/09
The Sites Tab
The Sites tab tells SubFinder what sites the substitute will or will not work at. By default, any new substitute will be set to Will Work At All Sites. If the substitute has some specific site preferences you can change them using the following steps:
1. Click on the arrow at the end of the field located at the top-right corner of the Sites tab. SubFinder will present you with the following options:
• Will Work At All Sites: The substitute has no site preferences. They are willing to work at any site that needs them. If this option is selected, all the sites in the Available Sites list (located on the left side of the tab) will be unavailable for selection.
• Will Only Work At These Sites: The substitute is only willing to work at certain sites. They will only receive calls for jobs at the sites that are listed in the area below this field.
• Will Not Work At These Sites: The substitute is not willing to work at certain sites. They will never receive a call from a site that is listed in the area below this field.
Select the desired option from the list.
2. If you chose Will Only Work At These Sites or Will Not Work At These Sites you must now transfer the appropriate sites from the list of Available Sites (located on the left side of the tab) to the box on the right side. To transfer a site from the left to the right simply:
• Select the site name.
• Click the Add>> button.

Chapter 4 – SubFinder Edit _____________________________________________________________________________
_____________________________________________________________________________________________ Version 5.9 SubFinder Edit – The Substitutes Button 4.3.12 Rev. 9/09
• Repeat steps a. and b. until all the appropriate sites have been transferred.
Note: If you ever need to change the Will Work At option on this screen you must use the <<Remove button to transfer all sites back to the Available Sites list before making a new choice.
In addition to transferring the sites over one at a time you may also transfer them in groups using one of the following methods:
• To select and transfer a contiguous group of sites: Click on the first site, hold down the <Shift> key, click on the last site. All the sites, inclusive of the first and last, will be selected and can now be transferred by clicking the Add>> button.
• To select and transfer a non-contiguous group of sites: Click on the first site, hold down the <Ctrl> key, click on each additional site. Once all the desired sites are highlighted, click the Add>> button to transfer the entire group.
• You can also create Site Groups, either by location or level (i.e. elementary, secondary). If you have Site Groups created, by selecting the Site Group Name from the Available Sites and assigning it to the Current Sites (right side), any site contained in this grouping will then be assigned. For more information on creating Site Groups, please refer to Chapter 4.10 of this manual.
To remove a site from a substitute’s list:
1. Select the desired site in the right-hand list.
2. Click the <<Remove button. The site will be transferred back to the Available Sites list.

Chapter 4 – SubFinder Edit _____________________________________________________________________________
_____________________________________________________________________________________________ Version 5.9 SubFinder Edit – The Substitutes Button 4.3.13 Rev. 9/09
The Positions Tab
The Positions tab is where you tell SubFinder what job positions the substitute is willing/able to fill.
• Available Job Positions: This is a list of all the job positions that are available to be assigned to the substitute.
• Able to Work Job Positions: This is a list of the job positions that the substitute is willing/able to work. If you want this substitute to receive Skill List-based job offers, you must assign positions to the substitute.
• Skill: This shows the skill level associated with each job position assigned to the Able to Work Job Positions list. Skill levels run from A through J with A being the highest.
• Default Skill Level: This is the skill level that will be initially assigned to all positions transferred from the Available Job Positions list to the Able to Work Job Positions list. If you want most of the job positions to be assigned at the “C” level, change this field first, then any job positions added will be added with the “C” skill level.
To assign positions to a substitute:
1. Select the desired position in the Available Job Positions list. 2. Click the Add>> button to transfer the position to the Able To Work Job Positions list. 3. If necessary, change the skill level for the transferred position by clicking on the skill
level and typing in the appropriate letter - A being the highest and J being the lowest. 4. Repeat steps 2. and 3. until all the desired positions have been assigned.
In addition to transferring the positions over one at a time you may also transfer them in groups using one of the following methods:

Chapter 4 – SubFinder Edit _____________________________________________________________________________
_____________________________________________________________________________________________ Version 5.9 SubFinder Edit – The Substitutes Button 4.3.14 Rev. 9/09
• To select and transfer a continuous group of positions: Click on the first position, hold down the <Shift> key, click on the last position. All the positions, inclusive of the first and last, will be selected and can now be transferred by clicking the Add>> button.
• To select and transfer a non-continuous group of positions: Click on the first position, hold down the <Ctrl> key, click on any other positions. Once all the desired positions are selected click the Add>> button to transfer the entire group.
• You can also create Job Position Groups, either by subject/type or level (i.e. elementary, secondary, clerical). If you have Job Position Groups created, by selecting the Job Position Group Name from the Available Job Positions list and assigning it to the Able to Work Job Positions list, any job position contained in this grouping will be assigned. For more information on creating Job Position Groups, please refer to Chapter 4.10 of this manual.
To remove a position from a substitute’s list:
1. Select on the desired position in the Able to Work Job Positions list.
2. Click the <<Remove button. The position will be transferred back to the Available Job Positions list.
The User Defined Codes Tab
The User Defined Codes tab allows you to keep track of up to 10 additional pieces of data pertaining to the substitute. For example: You might want to use User Defined Code 4 to keep track of whether or not a background check was completed. Some of the codes have already been created for you:

Chapter 4 – SubFinder Edit _____________________________________________________________________________
_____________________________________________________________________________________________ Version 5.9 SubFinder Edit – The Substitutes Button 4.3.15 Rev. 9/09
• The fifth code has been set up to keep track of a substitute’s Termination Date. If used, this field will appear on the Substitute Hire Date report.
• The sixth and seventh codes work together and are updated by the Substitute Payroll Report.
• The ninth and tenth codes work with the various CIMS payroll exports. The different codes available have different character lengths: User Defined Codes 1 - 2: up to 32 alpha/numeric characters User Defined Codes 3 - 7: up to 10 alpha/numeric characters User Defined Codes 8 - 10: up to 6 alpha/numeric characters If you decide to use any of these codes, the field name can be changed to reflect the content. Please contact CRS Incorporated Client Services for assistance. Note: Some of the export formats available with SubFinder require the use of one or more of the user defined codes. If you will be exporting SubFinder data to a payroll system, please refer to the Import, Export, and Data Definition File document for detailed information on your particular export format.
The Certification Tab
You can use the Certification tab to enter up to eight different certifications the substitute holds along with an expiration date for each one. Enter the Expiration Date in the format MMDDYY and SubFinder will automatically insert the required punctuation. For example: January 3, 2007 would be entered as 010307.

Chapter 4 – SubFinder Edit _____________________________________________________________________________
_____________________________________________________________________________________________ Version 5.9 SubFinder Edit – The Substitutes Button 4.3.16 Rev. 9/09
Note: Once an entered certification reaches the expiration date the substitute will be restricted from any work until a new expiration is entered. When you edit the record of a substitute with an expired certification you will see CERTIFICATION EXPIRED, in red letters, at the bottom right corner of their record.
The Disqualification Tab
If your district has enabled Substitute Disqualification in the SubFinder Control Panel, the Disqualification tab will indicate how many of each of the “disqualifying” events a substitute has accrued during the current calling period only! Each potential disqualifier has two values beside it - Count and Maximum. The Count column shows how many times an event has occurred. The Maximum column shows how many times an event is allowed to occur before the substitute will not receive any more calls from SubFinder for that morning calling period. Once the value in the Count column reaches the value in the Maximum column for any single event, the substitute is disqualified. If you would like to re-qualify the substitute for any reason during the current calling period simply click the Reset Count button. The values in the Count column will be removed and the substitute will be eligible to receive additional calls from SubFinder. If you do nothing, SubFinder will automatically reset all counts before the next call out period begins. Note: The values in the Maximum column can not be changed on this screen. For more information regarding the use of Substitute Disqualifications, please refer to Chapter 3.11 of this manual. If you have set up different Configuration Profiles in your SubFinder Control Panel you will need to assign the appropriate profile to the substitute. Click on the arrow at the end of the Configuration Profile field and select the appropriate profile from those listed. For more information on Configuration Profiles, please refer to Chapter 3.1 of this manual.

Chapter 4 – SubFinder Edit _____________________________________________________________________________
_____________________________________________________________________________________________ Version 5.9 SubFinder Edit – The Substitutes Button 4.3.17 Rev. 9/09
Saving the Record
Once you have entered all the desired information for the substitute’s record, click the OK button in the lower-left corner of the Add Substitute screen. SubFinder will save your new substitute, assign an ID number, and return you to the Substitute List window.
Editing a Substitute
Once a substitute has been added to SubFinder you may need to make changes to their record. To edit a substitute’s record:
1. From the Substitute List window locate the substitute using one of the methods described in the section of this chapter titled Searching for Substitutes.
2. Click the Edit… button on the right side of the Substitute List window and SubFinder will display the Edit Substitute screen:
When you edit a substitute, all fields can be changed as necessary. Once you have made the desired changes, click the OK button in the lower-left corner of the Edit Substitute screen. SubFinder will save your changes and return you to the Substitute List window. Note: For detailed explanations of the fields available on this screen please refer to the section of this chapter titled Adding a Substitute. There may also be times when you wish to review the changes made to a substitute record. To do so:
1. From the Substitute List window, locate the substitute using one of the methods described in the section of this chapter titled Searching for Substitutes.

Chapter 4 – SubFinder Edit _____________________________________________________________________________
_____________________________________________________________________________________________ Version 5.9 SubFinder Edit – The Substitutes Button 4.3.18 Rev. 9/09
2. Click the Edit… button on the right side of the Substitute List window and SubFinder will display the Edit Substitute screen.
3. Click the Changed Log… button at the bottom of the screen, and the following screen will appear:
If you would like more detail on a particular entry, select the desired entry and click the View… button at the bottom of the View Person Log screen. SubFinder will display the Person Log view screen:
The Person Log view screen will give you more specific details on the selected entry. The information may include (if applicable) the previous information in the record, the current information, when the change was made, on which work station the change was made, the user who made the change, and how the change was entered.
When you are finished viewing the information, click the Close button at the bottom-center of the Person Log view screen. SubFinder will return you to the View Person Log screen. Click the Close button at the bottom-left corner of that screen to return to the previous Edit Substitute screen.

Chapter 4 – SubFinder Edit _____________________________________________________________________________
_____________________________________________________________________________________________ Version 5.9 SubFinder Edit – The Substitutes Button 4.3.19 Rev. 9/09
How Do I…? Delete a Substitute Even after a substitute has been deleted from SubFinder, their name and basic information will still be available for reporting purposes. A substitute is not entirely removed from the system until a final deletion of purged records has been performed. To perform the first step in the deletion process:
1. Click the Substitute button on the Edit bar.
2. Select the desired person on the Substitute List.
3. Click the Edit… button.
4. Mark the substitute inactive by flagging the Inactive field on the General Information tab of the substitute’s record, and then click the OK button in the lower-left corner of the Edit Substitute screen to save the change.
5. When you are ready, use the Database Purge function to remove the substitute from SubFinder’s substitute list. A description of the Database Purge function can be found in the section of this chapter titled Tools.
Find a Substitute’s System Assigned ID Number
1. Click the Substitute button on the Edit bar.
2. Highlight the desired person on the Substitute List.
3. Click the Edit… button.
4. Look at the Title Bar of the screen. To the right of the title, Edit Substitute, you will find the ID number that SubFinder has assigned to this person.


Chapter 4 – SubFinder Edit _____________________________________________________________________________
_____________________________________________________________________________ Version 5.9 SubFinder Edit – Preference Lists and the Skill List 4.4.1 Rev. 9/09
4.4 Preference Lists and the Skill List Preference Lists
Preference Lists are an integral part of the SubFinder system. Their primary use is to ensure that your best substitutes will get the first calls for open absences. Simply stated, they are lists that specify which substitutes should, and in some cases should not, be called to fill a particular employee’s absence. There are three basic types of preference lists that you might want to use:
1. Personal Preference List: This list would typically be applied to a single employee. It is a list of substitutes, usually specified by the employee, that the employee has had positive experiences with in the past.
2. Subject-Based Preference List: This list would typically be applied to a group of
employees who have the same job position. It is a list of substitutes, usually generated by a department head or administrators, who are considered to be above average in a particular subject area or position. For example: you may create a preference list to be used for all Boys PE teachers.
3. Site-Based Preference List: This list would be applied to all employees at a
particular site. It is a list of substitutes, usually generated by the building administrator, who are capable of filling in for any employee within the building. You must be very careful using a site-based list, since preference lists do not take job position into account.
Preparation of the preference lists should be done at the site level by someone with a knowledge of the site’s or employee’s substitute preferences, so that classes may be filled by those substitutes who do the best job and/or are the most qualified. Once the lists are ready, they need to be sent to the SubFinder operator for entry into the system. After the preference lists have been entered into SubFinder they must be assigned to each employee. When SubFinder begins call out for a particular absence, it will first call from the preference lists associated with the absent employee. Once the preference lists have been processed, the next calls will be made from the Skill List.
Skill List In addition to the preference lists, SubFinder also uses a list called the Skill List. The Skill List is generated by SubFinder. It contains all of the substitutes in your system, sorted by the positions they are willing/able to work. If the substitutes have been ‘rated’ with Skill Levels, SubFinder will sort them by rating as well. When SubFinder uses the Skill List, it matches the position of the absent employee with those substitutes who are able and willing to work that same position. For example: when an employee with the Primary Position ‘Math’ is absent, SubFinder will pull together a list of all substitutes who have the position ‘Math’ assigned to them as one of their ‘Able to Work Job Positions.’ It will then look at each substitute on an individual basis to determine whether or not they are eligible to be called for the absence, based upon their availability, site preferences, presence on an applicable exclusion list, etc. Typically, the Skill List is the last list that you want SubFinder to use when trying to fill an absence.

Chapter 4 – SubFinder Edit _____________________________________________________________________________
_____________________________________________________________________________ Version 5.9 SubFinder Edit – Preference Lists and the Skill List 4.4.2 Rev. 9/09
Skill Levels When you tell SubFinder what positions a particular substitute can work you also have the option of assigning a skill level to each position. The skill levels run from A to J, with A begin the highest and J being the lowest. Many districts will use the skill level to indicate the amount of education or experience a substitute may have in a certain area. For example: someone who holds a certification in a particular area would be an ‘A’. Someone who holds a degree, but no certification, would be a ‘B’, and someone without a degree would be a ‘C’. By default, SubFinder assigns the ‘A’ level to each position in a substitute’s record. Note: An important point to consider BEFORE going further is that Preference Lists DO NOT CONSIDER JOB POSITIONS! For example: if a substitute, whose only assigned job position is ART, is included on a preference list that has been assigned to a CHEMISTRY teacher, that substitute will be called for the CHEMISTRY teacher’s absence.
The Preference List Buttons On the SubFinder Edit Bar you will find several buttons that are used when working with the Preference Lists and the Skill List. These buttons appear as pieces of paper, either blank or with a single red letter. Using the four (4) buttons specified below will allow you to create, edit, and view your preference lists, and assign them to your employees.
• The first button, a ‘blank piece of paper’, is where you create, edit, and view the preference lists for each site in your system. Using this function, you will also be able to delete an existing list or copy a list to other sites. This button is referred to as the Add/Edit button.
• The second button, a ‘piece of paper with a red E’, is where you assign a list to a specific employee, remove a list from a specific employee, and view the preference lists currently assigned to an employee. This button is referred to as the Assign to Employee button.
• The third button, a ‘piece of paper with a red A’, is where you assign a list to or remove a list from EVERYONE at a specific site. This button is referred to as the Assign to All button.
• The fourth button, a ‘piece of paper with a red S’, is where you can assign the Skill List to ALL the employees within SubFinder. This button is referred to as the Assign Skill List to All button.

Chapter 4 – SubFinder Edit _____________________________________________________________________________
_____________________________________________________________________________ Version 5.9 SubFinder Edit – Preference Lists and the Skill List 4.4.3 Rev. 9/09
The Preference List – Add/Edit Button
Any time you want SubFinder to call through a specific list of substitutes to fill an absence you need to create or add a preference list. From the Edit Bar click the Add/Edit button.
SubFinder will display the Preference Lists window.
The Preference Lists window contains the following components and buttons: Site Selection Box: For which site do you need to create a preference list? To select a specific site, click on the arrow at the end of the field and choose the desired location from the list presented. Display Area: The display area is the open area on the bottom half of the Preference Lists window. It is used to show a listing of Preference Lists for the selected site, in ascending alphabetical order according to the name of the Preference List. Control Buttons:
Exits the Preference List window and returns you to the Edit bar
Allows you to add a new preference list
Allows you to change the information for an existing preference list
Allows you to copy an existing preference list from one site to another

Chapter 4 – SubFinder Edit _____________________________________________________________________________
_____________________________________________________________________________ Version 5.9 SubFinder Edit – Preference Lists and the Skill List 4.4.4 Rev. 9/09
Allows you to delete an existing preference list
Allows you to access the on-line help system Adding a Preference List
To add a new preference list, select the appropriate site in the Site Selection Box and then click the Add… button. SubFinder will display the Add Preference List screen:
• Name: What do you want to call the list? We suggest using a descriptive name that will indicate the purpose of the list. For example:
o Regular Lists: English PL (a position-based preference list), Smith, J PPL (an employee’s personal preference list), Rocky Hills Elementary SPL (a site-based preference list).
o Personal Exclusion Lists: Smith, J PEL (an employee’s personal exclusion list), Secretarial EL (a position-based exclusion list).
o Personal Permanent Sub List: Smith, J PPS (an employee’s personal permanent sub list).
o Site Exclusion List: Rocky Hills SEL (a site-based exclusion list). o Site Permanent Sub List: Rocky Hills SPS (a site-based permanent sub
list). • Type: What type of list are you creating? You can choose from six different list types:
o Personal Exclusion List: This is a list of substitutes who are to be excluded from filling a particular absence. These lists can be employee-based (substitutes who should not be called for a particular employee) or position-based (substitutes who should not be called for any employee that works in a particular position). You can create as many Personal Exclusion Lists at a site as necessary. This list must be assigned to the individual employee(s).
o Personal Permanent Sub List: This is a list of substitutes who will always fill in for a particular absence. These lists can be employee-based (substitutes who will fill in for a particular employee) or position-based (substitutes who will fill in for a particular position). You can create as many Personal Permanent Sub Lists at a site as necessary. It is important to note that a permanent substitute is NEVER called by SubFinder. SubFinder will assign the permanent substitute(s) to the first absence(s) created for the

Chapter 4 – SubFinder Edit _____________________________________________________________________________
_____________________________________________________________________________ Version 5.9 SubFinder Edit – Preference Lists and the Skill List 4.4.5 Rev. 9/09
employee(s) on any given day. This list must be assigned to the individual employee(s).
o Regular List: This is a list of substitutes who should be called for a particular absence. These lists can be employee-based (substitutes who fill in for a particular employee), position-based (substitutes who will fill in for a particular position), or site-based (substitutes who will fill in for any absence at the site). You can create as many Regular Lists at a site as necessary. This list must be assigned to the individual employee(s).
o Site Exclusion List: This is a list of substitutes who are to be excluded from an entire site. This list will automatically be assigned to all employees who have the site listed as their Home Site on the General Information Tab of their employee record. You can only create one Site Exclusion List per site.
o Site Permanent Sub List: This is a list of substitutes who will always fill in for any employee at the site. This list will automatically be assigned to all employees who have the site listed as their Home Site on the General Information Tab of their employee record. It is important to note that a permanent substitute is NEVER called by SubFinder. SubFinder will assign the permanent substitute(s) to the first absence(s) created at the site on any given day. You can create one Site Permanent Sub List per site.
o Alternate Site Permanent Sub List: This is a second list of substitutes who will always fill in for any employee at the site. This list will automatically be assigned to all employees who have the site listed as their Home Site on the General Information Tab of their employee record. It will be used after the Site Permanent Sub List. It is important to note that a permanent substitute is NEVER called by SubFinder. SubFinder will assign the permanent substitute(s) to the first absence(s) created at the site on any given day. You can only create one Site Permanent Sub List per site.
• Available Substitutes: This is a list of all the substitutes that are available to be assigned to the preference list.
• Current Substitutes: This is a list of all the substitutes that have been assigned to the preference list.
Once you have named the list and specified the list type, you’re ready to assign the substitutes:
1. Highlight the name of the desired substitute in the Available Substitutes list on the left side of the screen.
2. Click the Add>> button. The substitute will be moved from the Available Substitutes list to the Current Substitutes list.
3. Repeat steps 1 & 2 until all the desired substitutes have been added to the list. 4. If you add a substitute to the list by mistake, simply highlight that person’s name and
click the <<Remove button. The substitute will be transferred back to the Available Substitutes list.
5. If the substitutes are not in the desired calling order within the Current Substitutes list, highlight the desired name and use the Move Up^ and/or Move Down∨ buttons to move them to the correct position.
When the list is complete, click the OK button in the lower-left corner of the Add Preference List screen; SubFinder will save your new preference list and return you to the Preference Lists window. Note: We suggest that you limit the number of substitutes assigned to each list, both for ease of maintenance and for maximum efficiency. Populating a Preference List too heavily defeats the intended use of this feature.

Chapter 4 – SubFinder Edit _____________________________________________________________________________
_____________________________________________________________________________ Version 5.9 SubFinder Edit – Preference Lists and the Skill List 4.4.6 Rev. 9/09
• The Assign to Employee… button: You can use the Assign to Employee… button (located at the bottom-center of the Add Preference List screen) to assign the current preference list to one employee at a time.
Once you’re done assigning substitutes, click on the Assign to Employee… button and SubFinder will display the Assign ‘Preference List Name’ To Employee screen:
From the list presented, select the employee to whom you want this list assigned and click the Assign… button. SubFinder will display the following message:
Click the OK button located at the bottom of the message box and you’ll be returned to the Assign ‘Preference List Name’ To Employee screen. At this point you can assign the list to another employee by repeating the above process.
Note: Please use caution when using the Assign to Employee… button. Any list assigned using this button will be assigned as the employee’s last preference list. Since the lists are called in the order they are assigned, you may need to change their order. For instructions on how to do this, refer to the Assign to Employee section of this chapter.
Once you have finished assigning this list, click on the Close button located in the top-right corner of the screen. SubFinder will return you to the Add Preference List screen. Click on the OK button located in the bottom-left corner of that screen and you will return to the Preference Lists window.
Editing a Preference List
There may be times when you will need to change one of your existing preference lists - add substitutes to the list, remove substitutes from list, or change their order within the list. To edit an existing preference list:
1. From the Preference Lists window, select the appropriate site in the Site Selection Box.

Chapter 4 – SubFinder Edit _____________________________________________________________________________
_____________________________________________________________________________ Version 5.9 SubFinder Edit – Preference Lists and the Skill List 4.4.7 Rev. 9/09
2. Select the desired list from those presented, and then click the Edit… button. SubFinder will display the Edit Preference List screen:
The only field that cannot be changed when editing a list is the Type. If you need to change the Type you must delete the list and recreate it. All other areas can be changed as necessary. Note: For detailed explanations of the fields available on this screen, please refer to the section of this chapter titled Adding a Preference List.
Copying a Preference List
The Copy function will allow you to copy an existing list from one site to one or more additional sites. This can be very useful when creating subject-based lists that might apply to employees at many different sites. Please keep in mind that you will still have to assign the list to the appropriate employees once it has been copied. To copy an existing preference list, select the appropriate site in the Site Selection Box, select the desired list from those presented, and then click the Copy… button. SubFinder will display the Copy ‘Preference List Name’ to Sites screen:

Chapter 4 – SubFinder Edit _____________________________________________________________________________
_____________________________________________________________________________ Version 5.9 SubFinder Edit – Preference Lists and the Skill List 4.4.8 Rev. 9/09
1. Select the site(s) you want the list copied to from the list presented. If you want to copy to more than one site, hold the <Ctrl> key on your keyboard down while selecting the additional sites. If you want to copy the list to all sites, select the Select All button. All sites will become selected.
2. Click the Copy button.
3. A message box will briefly appear on your screen which states “‘List name’ has been copied to selected sites”.
4. The site(s) you copied the list to will disappear from the listing of available sites to copy the list to.
5. Click the Close button on the upper-right side of the Copy ‘Preference List Name’ to Sites screen. You will be returned to the Preference Lists window.
Deleting a Preference List
The Delete function will allow you to remove an existing list from the selected site. When you delete a preference list it will also remove it from any employee to whom it has been assigned. To delete an existing preference list:
1. From the Preference Lists window, select the appropriate site in the Site Selection Box.
2. Select the desired list from those presented, and then click the Delete… button. SubFinder will display the following message:
Click the Yes button and SubFinder will delete the list and return you to the Preference Lists window.

Chapter 4 – SubFinder Edit _____________________________________________________________________________
_____________________________________________________________________________ Version 5.9 SubFinder Edit – Preference Lists and the Skill List 4.4.9 Rev. 9/09
The Preference List – Assign to Employees Button
This button will allow you to assign both preference lists and the Skill List to an employee, view the lists that have already been assigned to them, and change the order in which they’ve been assigned. From the Edit bar click the Assign to Employee button,
and SubFinder will display the Assign Lists to Employee window:
Site Selection Box: To which site’s employees do you need to assign a list(s)? To select a specific site, click on the arrow at the end of the field and choose the desired location from the list presented. Display Area: The display area is the open area on the bottom half of the Assign Lists to Employee window. It will show you a listing of employees at the selected site, in ascending alphabetical order by last name. Control Buttons:
Exits the Assign Lists to Employee window and returns you to the Edit bar.
Allows you to view or change preference list assignments for an employee.
Allows you to access the on-line help system.

Chapter 4 – SubFinder Edit _____________________________________________________________________________
_____________________________________________________________________________ Version 5.9 SubFinder Edit – Preference Lists and the Skill List 4.4.10 Rev. 9/09
Assigning Lists to and Viewing Lists for an Employee
To assign a preference list or lists to a particular employee, select the appropriate site in the Site Selection Box, select the desired employee from the list presented, and click the Edit… button. SubFinder will display the Assign Preference Lists to Employee screen:
• Name: This is the name of the employee you selected on the previous screen. This field is for reference purposes only and is not available for editing.
• Available Preference Lists: This is a list of all the preference lists at the chosen site that are available for assignment to the employee.
Note: If you created a Site Exclusion list, Site Permanent Sub list, or Alternate Site Permanent Sub list for this site, they will not appear on this screen. They are automatically assigned to all employees at the site and not available for assignment.
• Current Preference Lists: This is a list of all the preference lists that have already been assigned to the employee.
To assign preference lists to an employee:
1. Highlight the desired entry in the list of Available Preference Lists on the left side of the screen.
2. Click the Add>> button. The selected list will be moved from Available Preference Lists to Current Preference Lists.
3. Repeat steps 1 & 2 until all the desired lists have been assigned to the employee. Once you have assigned the lists, you must place them in the proper order. The order of the assigned lists is very important; since SubFinder will call through them in the order they are assigned. If the lists are not in the desired order within the list of Current Preference Lists, use the Move Up∧ and/or Move Down∨ buttons to move them to the correct position. The Preference Lists for an employee should typically be assigned in the following order:
1. Employee’s Personal Preference List (if applicable)
2. Subject-oriented Preference List (if applicable)
3. Site Preference List (if applicable)

Chapter 4 – SubFinder Edit _____________________________________________________________________________
_____________________________________________________________________________ Version 5.9 SubFinder Edit – Preference Lists and the Skill List 4.4.11 Rev. 9/09
4. Skill List
5. Employee’s Personal Exclusion List (if applicable)
When all of the appropriate lists have been assigned, click the OK button in the lower-left corner of the Assign Preference Lists to Employee screen. SubFinder will save the employee’s preference list assignments and return you to the Assign Lists to Employee window.
Removing Preference Lists from an Employee
There may be times when you will want to remove a preference list from an employee’s assignments. To remove a preference list or lists from a particular employee, select the appropriate site in the Site Selection Box, select the desired employee from the list presented, and click the Edit… button. SubFinder will display the Assign Preference Lists to Employee screen:
• Name: This is the name of the employee you selected on the previous screen. This field is for reference purposes only and is not available for editing.
• Available Preference Lists: This is a list of all the preference lists at the chosen site that are available for assignment to the employee.
• Current Preference Lists: This is a list of all the preference lists that have already been assigned to the employee.
Note: If you created a Site Exclusion list, Site Permanent Sub list, or Alternate Site Permanent Sub list for this site, they will not appear on this screen. They are automatically assigned to all employees at this site and not available for removal.
To remove preference lists from an employee:
1. Highlight the desired entry in the list of Current Preference Lists on the right side of the screen.
2. Click the <<Remove button. The selected list will be moved from Current Preference Lists to Available Preference Lists.
3. Repeat steps 1 & 2 until all the desired lists have been removed from the employee.

Chapter 4 – SubFinder Edit _____________________________________________________________________________
_____________________________________________________________________________ Version 5.9 SubFinder Edit – Preference Lists and the Skill List 4.4.12 Rev. 9/09
Once all of the appropriate lists have been removed, click the OK button in the lower-left corner of the Assign Preference Lists to Employee screen. SubFinder will save the employee’s preference list assignments and return you to the Assign Lists to Employee window.
The Preference List – Assign to All Button
This button will allow you to assign a list to, or remove a list from, all the employees at a particular site. From the Edit Bar click the Assign to All button,
and SubFinder will display the Assign/Remove List window:
Site Selection Box: Which site’s preference lists do you need to access? To select a specific site, click on the arrow at the end of the field and choose the desired location from the list presented. Display Area: The display area is the open area on the bottom half of the Assign/Remove List window. It will show you a listing of preference lists for the selected site, in ascending alphabetical order by list name. Control buttons:
Exits the Assign Lists to Employee List window and returns you to the Edit bar
Allows you to assign the selected Preference List to All Employees at the selected site
Allows you to remove the selected Preference List from All Employees at the selected site

Chapter 4 – SubFinder Edit _____________________________________________________________________________
_____________________________________________________________________________ Version 5.9 SubFinder Edit – Preference Lists and the Skill List 4.4.13 Rev. 9/09
Allows you to access the on-line help system
Assigning Lists to All Employees
To assign a list to all of the employees at a site, select the appropriate site in the Site Selection Box, select the desired preference list from the list presented, and click the Assign… button. SubFinder will display the following message:
If you are sure that you want to assign the chosen list to all the employees at the site, click the Yes button. SubFinder will assign the selected list to the last position in each employee’s list assignments. Once you receive the “Operation Complete” message you can click the Close button. SubFinder will return you to the Assign/Remove List window. Note: Any list assigned in this manner will be assigned as the employee’s last preference list. Since the lists are called in the order they are assigned, you may need to change their order. For instructions on how to do this, refer to the Assign to Employee section of this chapter.
Removing Lists from All Employees
To remove a list from all of the employees at a site, select the appropriate site in the Site Selection Box, select the desired preference list from the list presented, and click the Remove… button. SubFinder will display the following message:
If you are sure that you want to remove the chosen list from all the employees at the site, click the Yes button. SubFinder will remove the selected list from each employee’s list assignments. Once you receive the “Operation Complete” message you can click the Close button. SubFinder will return you to the Assign/Remove List window.

Chapter 4 – SubFinder Edit _____________________________________________________________________________
_____________________________________________________________________________ Version 5.9 SubFinder Edit – Preference Lists and the Skill List 4.4.14 Rev. 9/09
The Assign Skill List to All Button This button will allow you to assign the Skill List to ALL of the employees within your SubFinder system. From the Edit Bar click the Assign Skill List to All button,
and SubFinder will display the following message:
If you are sure that you want to assign the Skill List to all the employees within your SubFinder system, click the Yes button. SubFinder will assign the Skill List to the last position in all of your employees’ list assignments. Once you receive the “Operation Complete” message you can click the Close button. SubFinder will return you to the Edit Bar. If the Skill list has already been assigned to someone, SubFinder will not assign it twice, and will not change its position within that employee’s assignments.
How Do I…?
Move the Skill List from the First Position to the Last Position for All Employees at One Site
If the Skill List was assigned before the Preference Lists were created and assigned, the Skill List will be the first list SubFinder will use to fill an absence. This can be corrected site by site using the following procedure:
1. Create the necessary Preference Lists at the site in question, and assign them to the appropriate employees.
2. Click the Preference Lists – Assign to All button on the Edit Bar.
3. Select the site the lists were just created for.
4. Select the Skill List.
5. Click the Remove… button. The skill list will be removed from all employees at the selected site.
6. Select the Skill List again and click the Assign… button. The skill list will be reassigned to everyone at that site as the last list to be processed when filling an absence.

Chapter 4 – SubFinder Edit _____________________________________________________________________________
_____________________________________________________________________________________________ Version 5.9 SubFinder Edit – The Sites Button 4.5.1 Rev. 9/09
4.5 The Sites Button
The Sites button is used to add, edit, and view information for the sites within your SubFinder system. From the Edit Bar click the Sites button
and SubFinder will display the Site List window:
Display Area: The display area is the open area on the bottom half of the Site List window. It will show you a listing of sites in ascending alphabetical order by site name. Control Buttons:
Exits the Site List window and returns you to the Edit bar.
Allows you to add a new site.
Allows you to change information for an existing site.
Allows you to access the on-line help system.

Chapter 4 – SubFinder Edit _____________________________________________________________________________
_____________________________________________________________________________________________ Version 5.9 SubFinder Edit – The Sites Button 4.5.2 Rev. 9/09
Adding a Site
If a new school is opened in your district, or if you are just getting started with your SubFinder system, you will need to add a new site(s) to the system. To add a new site, click the Add… button on the right side of the Site List window. SubFinder will display the Add Site window:
When adding a new site, you must complete the fields prefaced with an asterisk (*). All other fields are optional. The Top of the Screen
• *Name: What is the name of the site?
• *Number: What number do you want SubFinder to use to reference the site in the various reports and payroll export files? If your district does not have pre-assigned site numbers, you may use the number assigned by the system. The site number can later be changed to a number of your choosing.

Chapter 4 – SubFinder Edit _____________________________________________________________________________
_____________________________________________________________________________________________ Version 5.9 SubFinder Edit – The Sites Button 4.5.3 Rev. 9/09
The General Information Tab
• Street
• City
• State: Enter the 2-letter state abbreviation. The title label for this field may be customized. For example: Province. Please call CRS Incorporated Client Services for assistance.
• Zip Code: You may enter either the 5-digit or the 9-digit zip code. If you choose to use the 9-digit zip code you must enter the hyphen (-). For example: 17701-3734. The title label and the entry format for this field may be customized. For example: Postal Code and N3R 7K1. Please call CRS Incorporated Client Services for assistance.
• Phone: Enter the phone number, including the area code. SubFinder will insert the required hyphens (-). This phone number will be the number employees and substitutes will be instructed to call after certain deadlines have been reached. These deadlines are described below.
• *Open Time: Enter the opening time for this site. This time will be used as the default start work time for all employees at this site. Enter the time using the format HHMMA/P; for 8:15 a.m. you would type 0815A. Using this format, the colon (:) will be entered automatically.
• *Close Time: Enter the closing time for this site. This will be used as the default stop work time for all employees at this site. Enter the time using the format HHMM A/P; for 3:10 p.m. you would type 0310P. Using this format, the colon (:) will be entered automatically.

Chapter 4 – SubFinder Edit _____________________________________________________________________________
_____________________________________________________________________________________________ Version 5.9 SubFinder Edit – The Sites Button 4.5.4 Rev. 9/09
• Enable Verification: Flagging this option indicates that this site will use SubFinder’s Verification feature. If you do not flag this field, verification records will not be created for jobs at this site.
• *Report Deadline: The latest time, prior to the start of an employee’s absence, at which the employee can report the absence without administrative assistance. This can be expressed in days, hours, or a combination of the two. For example: If employees are allowed to call absences directly into the SubFinder system up to an hour and a half before the starting time, you would enter zero (0) for Days and 0130 for Hours. By entering the hours in the format HHMM, the colon (:) will be entered automatically.
Using a Report Deadline of 1 hour and 30 minutes, an employee reporting an absence that starts at 8:25 a.m. would be able to report that absence until 6:55 a.m. on the day the absence begins. Starting at 6:55 a.m., the employee would be instructed by SubFinder to call their Administrator at the phone number entered in the site record.
When setting this value, be sure that you allow ample time for SubFinder to attempt to fill the absence prior to the Fail Unfilled Jobs Offset discussed below.
• *Employee Cancel Deadline: The latest time, prior to the start of an employee’s previously reported absence, at which the employee can cancel the absence without administrative assistance. This can be expressed in days, hours, or a combination of the two. For example: If employees are allowed to cancel an absence up to 12 hours before the starting time, you would enter zero (0) for Days and 1200 for Hours. By entering the hours in the format HHMM, the colon (:) will be entered automatically.
Using an Employee Cancel Deadline of 12 hours, an employee with an absence that starts at 8:25 a.m. would be able to cancel that absence until 8:25 p.m. on the night before the absence. Starting at 8:25 p.m., the employee would be instructed by SubFinder to call their Administrator at the phone number entered on the site record.
When setting this value, be sure that you allow ample time for SubFinder to notify the substitute of the cancellation and offer them another job.
• *Substitute Cancel Deadline: The latest time, prior to the start of a substitute’s job, at which the substitute can cancel the job without administrative assistance. This can be expressed in days, hours, or a combination of the two. For example: If substitutes are allowed to cancel jobs up to an hour and a half before the starting time, you would enter zero (0) for Days and 0130 for Hours. By entering the hours in the format HHMM, the colon (:) will be entered automatically.
Using a Substitute Cancel Deadline of 1 hour and 30 minutes, a substitute with a job that starts at 8:25 a.m. would be able to cancel that job until 6:55 a.m. on the day the job begins. Starting at 6:55 a.m., the substitute would be instructed by SubFinder to call their Administrator at the phone number entered in the site record.
When setting this value, be sure that you allow ample time for SubFinder to attempt to re-fill the absence prior to the Fail Unfilled Jobs Offset discussed below.
• Configuration Profile: This field represents the set of controlling values that will be used for this site. Any Configuration Profiles that have been established can be selected by using the arrow at the end of the field. For more information on Configuration Profiles, please refer to Chapter 3.1 of this manual.
• Allow Employees to Prearrange Subs: Flagging this option will permit employees at this site to specify a prearranged substitute when reporting an absence. Since SubFinder will not call a prearranged substitute, this feature should be used only if an agreement has already been made with the substitute.

Chapter 4 – SubFinder Edit _____________________________________________________________________________
_____________________________________________________________________________________________ Version 5.9 SubFinder Edit – The Sites Button 4.5.5 Rev. 9/09
• Allow Employees to Request Subs: Flagging this option will permit employees at this site to ask SubFinder to call a specific substitute when reporting an absence. SubFinder will call only this substitute until the Stop Calling Requested Substitute deadline is reached. For more information on the Stop Calling Requested Substitute deadline, please refer to Chapter 3.7 of this manual.
• Fail Unfilled Jobs __ Minutes Before/After the Start of the Job: These two fields indicate the point at which any unfilled absence changes to the status of Failed to Fill. At this point, SubFinder will no longer call out on the job, nor allow substitutes calling in to hear the job. The value is expressed in minutes and the combo box allows you to select either before or after the starting time of the job. For example: If you specify 30 minutes after, and a job is scheduled to start at 8:30 a.m., if the job is not filled by 9:00 a.m. it’s status will change to Failed to Fill.
• Inactive: Flagging the record as inactive marks the record for deletion the next time a site purge is run.
The Reasons Tab
This tab allows you to customize the absence, cancellation, and rejection reasons available to a site.
Using the drop box located in the upper-right corner of this tab, select one of the following:
• Will Use All Reasons: By selecting this option, any people associated with this site (employees, administrators, and substitutes who have accepted jobs) will have access to any and all applicable reasons that have been created. If this option is selected, the Available Reasons listing will be unavailable (grayed out), and no further action is required. This is the default setting for all new sites.

Chapter 4 – SubFinder Edit _____________________________________________________________________________
_____________________________________________________________________________________________ Version 5.9 SubFinder Edit – The Sites Button 4.5.6 Rev. 9/09
• Will Only Use These Reasons: By selecting this option, only the reasons selected from the Available Reasons list will be able to be used by the people associated with this site. After selecting this option:
1. Select the specific reasons the site will use from the list of Available Reasons on
the left side of the tab. 2. Click the Add>> button to transfer the selected reasons to the right side of the
tab. 3. Customize the reasons, if necessary. You can change the order they are read
over the phone, who can hear the reason, the payroll code, the number of absences allowed per day or per month for the specified reason, and the Miscellaneous Codes used with the reason. To customize, select the appropriate reason and click on the Customize Reason… button. For more information on reasons, please refer to Chapter 4.8 of this manual.
Note: If you decide to customize the reasons for a site, please be aware of the following: anytime a change is made to the basic reason list using the Reason Button on the Edit Bar, the changes must also be made at the individual site level, if appropriate.
To remove a customized reason from the site: 1. Select the reasons. 2. Click the <<Remove button.
To change a site back to the default Will Use All Reasons:
1. Remove all of the reasons using the procedure outlined above. 2. Change the drop box option back to Will Use All Reasons. You must remove the
reasons before SubFinder will allow you to change this option.

Chapter 4 – SubFinder Edit _____________________________________________________________________________
_____________________________________________________________________________________________ Version 5.9 SubFinder Edit – The Sites Button 4.5.7 Rev. 9/09
The Administrator Codes Tab This is the tab where you will establish the codes that the site principal and/or secretary will use as a PIN when they call into the system to create and/or review absences and jobs for their site.
To add an administrator code, click the Add… button and SubFinder will display the Enter Administrator Code screen:
• Administrator Code: What number do you want the administrator to use to identify him/herself to SubFinder? This number can be a maximum of 6 digits and cannot conflict with any other numbers (PINS, IDS, etc.) on the system. We strongly recommend using all six digits since this will minimize the chance of having a conflicting number.
• Inactive: Flagging an administrator as inactive restricts them from accessing the IVR portion of SubFinder.
• Administrator Name: Enter a name for the Site Administrator. We recommend using a generic name since this will eliminate the need for changes when you experience administrative shifts.

Chapter 4 – SubFinder Edit _____________________________________________________________________________
_____________________________________________________________________________________________ Version 5.9 SubFinder Edit – The Sites Button 4.5.8 Rev. 9/09
When finished, click the OK button. Your new code and name will be displayed on the Administrator Codes tab. This process can be repeated if the site requires more than one administrator code.
The User Defined Codes Tab
The User Defined Codes tab allows you to keep track of up to six additional pieces of data pertaining to the site. Information entered in these fields will print on the Site Detail Report. The different codes available have different character lengths:
User Defined Code 1: up to 32 alpha/numeric characters
User Defined Codes 2 - 3: up to 10 alpha/numeric characters
User Defined Codes 4 - 6: up to 6 alpha/numeric characters If you decide to use any of these codes, the field name can be changed to reflect the content. Please contact CRS Incorporated Client Services for assistance.

Chapter 4 – SubFinder Edit _____________________________________________________________________________
_____________________________________________________________________________________________ Version 5.9 SubFinder Edit – The Sites Button 4.5.9 Rev. 9/09
The SubCast Information Tab This tab contains information that works in conjunction with SubCast, a separate SubFinder program module that allows you to e-mail and/or fax daily absence reports to each of the sites in your district.
• To: Who should be the primary recipient of the absence report for the site? Enter the e-mail address of the appropriate individual.
• CC: If you want the report copied to any other people, enter each e-mail address in these fields. You can enter up to 4 additional “Carbon Copy” recipients. Please enter only one e-mail address per field.
• Send Reports By Fax…: If you wish the report to be faxed to the site instead of being sent by e-mail, check this box and then enter the site’s fax number in the following field.
• Fax: Enter the fax number for the site, including the area code. SubFinder will insert the required hyphens (-). This field is only needed if the Send Reports by Fax… box has been flagged.
• Second Phone: This field is currently for informational use only. It is not used for any calling or reporting purposes.
The Notification Emails Tab
This tab contains information that works in conjunction with SubFinder Email Notifications, whereby designated administrators may receive email notices regarding absences and jobs reported at their site. You may enter up to five (5) email recipients for each site. Additional information regarding email notifications can be found in Chapter 3.17 of this user manual.

Chapter 4 – SubFinder Edit _____________________________________________________________________________
_____________________________________________________________________________________________ Version 5.9 SubFinder Edit – The Sites Button 4.5.10 Rev. 9/09
• To: Who should be the primary recipient of the email notification for the site? Enter the e-mail address of the appropriate individual.
• CC: If you want the notices copied to any other people, enter each e-mail address in these fields. You can enter up to 4 additional “Carbon Copy” recipients. Please enter only one e-mail address per field.

Chapter 4 – SubFinder Edit _____________________________________________________________________________
_____________________________________________________________________________________________ Version 5.9 SubFinder Edit – The Sites Button 4.5.11 Rev. 9/09
The Site Region Tab This tab contains information that works in conjunction with the LAUSD Substitute Selection Process, discussed in section 3.13 of this manual. It defines the Site regions that will be used to determine which substitutes will be called for absences at this site, and the order they will be considered. Do not complete this tab unless you have enabled the LAUSD Substitute Selection Process.
To add one or more regions to this tab, click the Add… button and SubFinder will display the Site Region screen:
• Site Group: What site group/region do you want to use when determining which
substitutes will be called for absences at this site? To select a specific site group, click on the arrow at the end of the site field and choose it from the list presented.
• Order Number: What priority should the substitutes from this site group/region receive when being placed on the call list? An Order Number of 1 would receive top priortiy, followed by 2, then 3, and so on. If you are only assigning one site group/region to this site, use an Order Number of 1.

Chapter 4 – SubFinder Edit _____________________________________________________________________________
_____________________________________________________________________________________________ Version 5.9 SubFinder Edit – The Sites Button 4.5.12 Rev. 9/09
When finished, click the OK button. Your new Site Group Name and Order Number will be displayed on the Site Region tab. This process can be repeated if the site requires more than one site group/region assigned. Saving the Record
Once you have entered all the information for the site record, click the OK button in the lower-left corner of the Add Site screen. SubFinder will save your new site, assign an ID number, and return you to the Site List window. Editing a Site Once a site has been added to SubFinder you may find that you need to make changes to the record. For example: Originally, employees may not have been allowed to request a substitute, and now it has been decided to test this function at one or more sites. To edit a site record:
1. Select the appropriate site within the Site List window.
2. Click the Edit… button on the right side of the Site List window and SubFinder will display the Edit Site screen:
When you edit a site, all fields can be changed as necessary. Once you have made the desired changes, click the OK button in the lower-left corner of the Edit Site screen. SubFinder will save your changes and return you to the Site List window. Note: For detailed explanations of the fields available on these screens, please refer to the section of this chapter titled Adding a Site.

Chapter 4 – SubFinder Edit _____________________________________________________________________________
_____________________________________________________________________________________________ Version 5.9 SubFinder Edit – The Sites Button 4.5.13 Rev. 9/09
Deleting a Site There may be times when you will want to delete a site from SubFinder. To delete a site record:
1. From the Site List window, select the site to be deleted. 2. Click on the Edit… button. 3. Mark the site inactive by flagging the Inactive field on the General Information tab of
the site’s record, and then click the OK button in the lower-left corner of the Edit Site screen to save the change.
4. When you are ready, use the Database Purge function to remove the site from SubFinder’s site list. A description of the Database Purge function can be found in the section of this chapter titled Tools.
Note: In order for a site to be purged, no employees or substitutes can have the site assigned as their Home Site. If even one employee or substitute has the site assigned, the site will not be purged.


Chapter 4 – SubFinder Edit ____________________________________________________________________________
______________________________________________________________________________________________ Version 5.9 SubFinder Edit – The Job Positions Button 4.6.1 Rev. 9/09
4.6 The Job Positions Button
Job Positions are very important to SubFinder. The job position assigned to an employee is matched to the job positions substitutes will teach. This is one of the ways SubFinder searches for the right substitute for an absent employee. The Job Positions button is used to add new positions, modify existing ones, assign job positions to all substitutes, and add and prioritize substitutes in the Skill List. From the Edit Bar, click the Job Positions button
and SubFinder will display the Job Position List window:
The Job Position List window contains the following components and buttons: Display Area: The display area is the open area in the Job Position List window. It shows a listing of job positions in ascending alphabetical order. Control Buttons:
Exits the Job Position List window and returns you to the Edit bar.
Allows you to add a new job position.
Allows you to change information for an existing job position.
Allows you to Assign the selected job position to ALL substitutes currently in the system.

Chapter 4 – SubFinder Edit ____________________________________________________________________________
______________________________________________________________________________________________ Version 5.9 SubFinder Edit – The Job Positions Button 4.6.2 Rev. 9/09
Allows you to view which substitutes are assigned to the selected job position.
Allows you to access the on-line help system.
Adding a Job Position To add a new job position, click the Add… button on the upper-right side of the Job Position List window. SubFinder will display the Add Job Position screen:
When adding a new job position, you must complete the fields prefaced with an asterisk (*). All other fields are optional.
• *Name: What is the name of the job position? We suggest combining the level and the position together in the name. For example: E - MUSIC or S - MATH.
• *Number: What number do you want SubFinder to use to reference the job position in the various reports and export files? Site Administrators will also use this number if they create a No-Employee Job via a touch-tone telephone.
• *Category: This number can be used to run reports on a select grouping of job positions. For example: You may have all certified job positions as Category 1, Food Service as Category 2, and Custodians as Category 3. When running absence or job reports and filtering them by the category number, only those job positions related to that category would be printed.
• *When are Subs Required: This field determines whether or not substitutes are required if an absence is reported by an employee to whom this position is assigned. You must choose from one of the following three options:
o Always: When this option is selected, the employee will never be offered a choice when reporting an absence. SubFinder will always try to fill the absence. This option should be used with caution since it allows for no exceptions to the rule.
o Sometimes: When this option is selected, the employee will be asked if a substitute is required each time they report an absence. This is the default setting and is most commonly used.
o Never: When this option is selected, the employee will never be offered a choice when reporting an absence. SubFinder will never try to fill the

Chapter 4 – SubFinder Edit ____________________________________________________________________________
______________________________________________________________________________________________ Version 5.9 SubFinder Edit – The Job Positions Button 4.6.3 Rev. 9/09
absence. You might choose this option for a position, such as SCHOOL PSYCHOLOGIST, for which you would never call a substitute.
• First and Second Period Call Start and Call End: If you want the call out times for this position to differ from those established in the System Schedule section of the SubFinder Control Panel, complete these fields. The start and end times must not fall between the Morning Calling End Time and the Evening Calling Start as defined in the System Schedule section of the SubFinder Control Panel. Times should be entered using the format HHMMA/P; for 8:25 a.m. you would enter 0825A. If you want to use specialized calling times, you must enter values in all four fields.
• Use Grade Level: Select this box if you would like a grade level to be recorded for employees using this position. If this is selected, any employee with this position assigned as their primary will be asked to record/verify the grade level when they report an absence. The grade level will then be offered to substitutes when they hear the absence.
• Certified: Select this box if the job position should only be filled by substitutes who have been designated as certified. This field can affect substitute selection and reporting.
• Classified: Select this box if the job position should only be filled by substitutes who have been designated as classified. This field can affect substitute selection and reporting. Note: Both certified and classified may be selected for a single job position. These fields are used only if you have chosen to use the certified function in the Certified Options section of the SubFinder Control Panel.
• Inactive: Flagging the record as inactive marks the record for deletion the next time a job position purge is run.
• Use Time Adjustment: Select this box to track lunches and breaks. Breaks will be deducted thereby accurately calculating total hours worked for reports and Leave Control values.
• Half-day Threshold: Many districts have what is referred to as a half-day threshold for the payment of their substitutes. This threshold is used by many of the absence reports available in SubFinder, as well as the data export function of the program. It is expressed as hours and minutes. If a substitute works for an amount of time that is less than or equal to the defined value, SubFinder will report that they worked a half day. If they work for an amount of time greater than the defined value, SubFinder will report that they worked a full day. If the half-day threshold for this position is the same as the value established in SubFinder Control Panel – General System, leave this field at the default value of 0:00. If the half-day threshold for this position differs from the value established in SubFinder Control Panel – General System, enter the amount of time in an HH:MM format and the colon (:) will be added automatically for you. For example: 4 hours and 0 minutes would be entered as 0400.
Saving the Record Once you have entered all the desired information for the job position record, click the OK button in the lower-left corner of the Add Job Position screen. SubFinder will save your new position and return you to the Job Position List window.
Editing a Job Position
Once a job position has been added to SubFinder, you may find that you need to make changes to the record. To edit a job position record:

Chapter 4 – SubFinder Edit ____________________________________________________________________________
______________________________________________________________________________________________ Version 5.9 SubFinder Edit – The Job Positions Button 4.6.4 Rev. 9/09
1. Select the appropriate job position within the Job Position List window.
2. Click the Edit… button on the right side of the Job Position List window. SubFinder will display the Edit Job Position screen:
When you edit a job position, all fields can be changed as necessary. Once you have made the desired changes, click the OK button in the lower-left corner of the Edit Job Position screen. SubFinder will save your changes and return you to the Job Position List window.
Assigning a Job Position By selecting a job position from the Job Position List window and clicking the Assign… button, you can assign the position to every substitute in the system. Note: Use this option with caution since the only way to reverse this action is to edit each and every substitute record. After clicking the Assign… button, the following message box will appear:
If you’re certain that you want to assign the job position to ALL SUBSTITUTES, click the Yes button. SubFinder will make the assignment. Once you receive the “Operation Complete” message, you can click the Close button. SubFinder will return you to the Job Position List window. If you decide that you would like to cancel your action, simply click the No button. SubFinder will return you to the Job Position List window without performing the assignment.

Chapter 4 – SubFinder Edit ____________________________________________________________________________
______________________________________________________________________________________________ Version 5.9 SubFinder Edit – The Job Positions Button 4.6.5 Rev. 9/09
Using the Subs… Button By selecting a job position within the Job Position List window and clicking the Subs… button, you will be able to:
• See which substitutes are assigned this job position and at which skill level. This is the Skill List for the selected position.
• Assign the job position to additional substitutes at the proper skill level.
• Change the order in which the substitutes are currently assigned to the position. Select the desired job position from the Job Position List window and click the Subs… button. SubFinder will display the Job Position Substitutes screen:
• Job Position Name: The selected Job Position will be displayed in the top-left corner of the screen. This is a display only field and is not available for editing.
• Skill level: This option displays the selected skill level for the job position. The Current Substitutes list will display only those substitutes who have been assigned at the selected skill level. Skill levels range from A through J, with A being the highest and J being the lowest.
• Available substitutes: This list box displays the substitutes that are not assigned to the selected job position at the specified skill level. To assign a substitute this job position at the selected skill level:
1. Select the substitute’s name. 2. Click the Add>> button. 3. Repeat until all the substitutes who desire this job position are added.
• Current substitutes: This list box displays the substitutes assigned to the current job position at the specified skill level. This is the Skill List for this position. To remove this job position from a substitute:
1. Select the substitute’s name. 2. Click the <<Remove button. 3. Repeat until all the substitutes who do not want to work this job position, or
who are not qualified for this job position, are removed.

Chapter 4 – SubFinder Edit ____________________________________________________________________________
______________________________________________________________________________________________ Version 5.9 SubFinder Edit – The Job Positions Button 4.6.6 Rev. 9/09
• Add>> button: Click on this button to move one or more selected substitutes from the Available Substitutes to the Current Substitutes list. This button is enabled only when at least one substitute on the Current Substitute list is selected.
• <<Remove button: Click on this button to remove one or more substitutes from the Skill List for this job position at the selected skill level. The substitute will be removed from the Current Substitutes and placed back on the Available Substitutes list. This button is enabled only when at least one substitute on the Current Substitute list is selected.
• Move Up ∧ and Move Down ∨ buttons: These buttons give you the ability to move the selected substitute up or down on the Skill List for the selected job position. By highlighting a substitute’s name and then clicking on the Move Down button; the substitute will be moved one spot lower on the list. The Move Up button will move the substitute’s name one spot higher on the list.
Once you are done working with the job position, click the OK button in the lower-left corner of the Job Position Substitutes screen. SubFinder will save your changes and return you to the Job Position List window.
Deleting a Job Position 1. From the Job position List window, select the job position.
2. Click the Edit… button.
3. Flag the Inactive box.
4. Click the OK button.
5. Next time the Purge program is run with Job Positions selected, the Job Position will be purged.
Note: In order for a Job Position to be purged, no employees or substitutes can have that position assigned to them. If the position is still assigned to someone, it will be reactivated.

Chapter 4 – SubFinder Edit _____________________________________________________________________________
____________________________________________________________________________ Version 5.9 SubFinder Edit – The Calendar Tracks Button 4.7.1 Rev. 9/09
4.7 The Calendar Tracks Button
Calendar tracks are used by SubFinder to determine the days an employee works and the days the employee is off due to holidays, weekends, breaks, etc. SubFinder will not allow an absence to be entered for a non-work day. Each employee record is assigned a specific calendar track which you will create in this portion of the Edit program. The Calendar Tracks button is used to create new calendar tracks and modify existing ones. From the Edit Bar click the Calendar Tracks button,
and SubFinder will display the Calendar Track List window:
The Calendar Track List window contains the following components and buttons: Display Area: The display area is the open area in the Calendar Track List window. It shows a listing of calendars in ascending alphabetical order. Control Buttons:
Exits the Calendar Track List window and returns you to the Edit bar.
Allows you to add a new calendar track .
Allows you to change information for an existing calendar track.
Allows you to access the on-line help system.

Chapter 4 – SubFinder Edit _____________________________________________________________________________
____________________________________________________________________________ Version 5.9 SubFinder Edit – The Calendar Tracks Button 4.7.2 Rev. 9/09
Note: SubFinder will automatically create a Standard Calendar track that cannot be removed from the system. If you plan to use multiple calendar tracks within your district, we suggest using the Standard track for the largest group of employees – typically teachers – since that track will automatically be assigned to all new employees. If you will be using only one calendar track for the entire district, simply modify the Standard track to fit your needs.
Adding a Calendar To add a new calendar track, click the Add… button on the upper-right side of the Calendar Tracks List window. SubFinder will display the Add Calendar Track screen:
When adding a new calendar, you must complete the fields prefaced with an asterick (*). All other fields are optional.
• *Name: What do you want to call your new calendar? We suggest using a descriptive name that will indicate the purpose of the calendar. For example: 12 MONTH EMPLOYEES for those employees who work year-round.
• *Year: When adding a new calendar, the year will automatically default to the current year based on your computer’s system date. If you want to add a future year, delete the year that’s displayed and enter the year you wish to add. As soon as you leave the Year field the calendar below will adjust accordingly.
• Inactive: Once a calendar year is no longer being utilized, it may be flagged inactive. This marks the particular calendar year for deletion the next time a calendar purge is run.
• Month tabs: Each tab displays three consecutive months. The days of the month are color coded as follows:
o Black: A normal workday for employees.
o Pink: A scheduled day off for employees. This would include holidays, weekends, and breaks.
There are two ways you can change a day from a work day to a non-work day (or visa versa). For a Single day: Highlight a day with a click of the mouse. The day will toggle between pink (a non-work day) and black (a work day).

Chapter 4 – SubFinder Edit _____________________________________________________________________________
____________________________________________________________________________ Version 5.9 SubFinder Edit – The Calendar Tracks Button 4.7.3 Rev. 9/09
For Multiple day changes: Using your mouse, click on the day, then right click on the same day to access the Calendar Options menu:
All (day selected) Days Off – Every day of the selected type, for the selected year,
will be made a non-work day.
All (day selected) Work Days – Every day of the selected type, for the selected year, will be made a work day.
Remainder of (day selected) Days Off – Every day of the selected type, from the day selected to the end of the year, will be made non-work days.
Remainder of (day selected) Work Days - Every day of the selected type, from the day selected to the end of the year, will be made a work day.
This Week Off - Every day of the selected week will be made a non-work day.
This Week On - Every day of the selected week will be made a work day. This includes Saturday and Sunday. If every day but Saturday and Sunday are work days, click on Saturday and Sunday to toggle them back to non-work days.
Once you have completed the calendar, click the OK button in the lower-left corner of the Add Calendar Track screen. SubFinder will save your new calendar and return you to the Calendar Tracks List window.
Editing a Calendar Once a calendar has been added to SubFinder you will need to edit it periodically to add additional calendar years, mark school holidays, etc. To edit a Calander track:
1. Select the appropriate Calendar Track within the Calendar Track List window.
2. Click the Edit… button on the right side of the Calendar Track List window. SubFinder will display the Edit Calendar Track screen:

Chapter 4 – SubFinder Edit _____________________________________________________________________________
____________________________________________________________________________ Version 5.9 SubFinder Edit – The Calendar Tracks Button 4.7.4 Rev. 9/09
When you edit a calendar track, typically all fields can be changed as necessary. The one exception to this rule is the Name of the Standard track. This track is created automatically by SubFinder and its name cannot be changed. Once you have completed updating the calendar, click the OK button in the lower-left corner of the screen. SubFinder will save your changes and return you to the Calendar Track List window.

Chapter 4 – SubFinder Edit _____________________________________________________________________________
_____________________________________________________________________________ Version 5.9 SubFinder Edit – The Reasons Button 4.8.1 Rev. 9/09
4.8 The Reasons Button
Both your employees and substitutes can use reasons. Employees will use them any time they need to report an absence, and you have the option of requiring your substitutes to use them when canceling and/or rejecting jobs. These reasons are an important part of the program since they provide vital data for absence tracking and trend analysis. By selecting this option, you can add new reasons or modify existing ones. From the edit bar, click the Reasons button,
and SubFinder will display the Reasons List window:
The Reasons List window contains the following components and buttons: Display Area: The display area is the open area at the bottom of the Reason List window. It will be used to show a listing of reasons in ascending alphabetical or numerical order by the name of the reason. Control Buttons:
Exits the Reasons List window and returns you to the Edit bar.
Allows you to add a new reason.
Allows you to change information on an existing reason.
Allows you to access the on-line help system.

Chapter 4 – SubFinder Edit _____________________________________________________________________________
_____________________________________________________________________________ Version 5.9 SubFinder Edit – The Reasons Button 4.8.2 Rev. 9/09
Adding a Reason To add a reason, click on the Add… button. The Add Reason window will be displayed:
When adding a new reason, you must complete the fields prefaced with an asterisk (*). All other fields are optional.
• *Name: Enter the name of the reason in this field. (Many operators have chosen to include the reason type (A for absence, C for cancellation, and R for rejection) and number in this field so the reasons will be displayed in the order employees hear them – for example - A001 Personal Illness.) The sort is in ascending alphanumeric order.
• User’s box: Who will have access to this reason? You may flag one or more of the following users for each reason: o Employee may use: If this option is selected, the current reason will be heard
by an employee when reporting an absence. o Administrator may use: If this option is selected, the current reason will be
heard by an administrator when reporting an absence for one of his or her employees.
o Use for cancellation: If this option is selected, the current reason will be heard by substitutes when canceling a job assignment. Before cancellation reasons can be used, they must be activated in the General Profile section of the SubFinder Control Panel.
o Use for rejection: If this option is selected, the current reason will be heard by substitutes when rejecting a job assignment. Before rejection reasons can be used, they must be activated in the General Profile section of the SubFinder Control Panel.
• *Reason Number: This number will control the manner in which SubFinder will order the reasons. To insure that the reasons are ordered correctly, please use the same number of digits for ALL reason numbers. We strongly recommend using a minimum of three digits; reason number one would be 001, reason 10 would be 010, etc.
• Reason code: This code number is used by many of the payroll export formats available with SubFinder. It may be up to six characters in length. If you will be

Chapter 4 – SubFinder Edit _____________________________________________________________________________
_____________________________________________________________________________ Version 5.9 SubFinder Edit – The Reasons Button 4.8.3 Rev. 9/09
exporting SubFinder data to a payroll system, please refer to the Import, Export, and Data Definition File document for detailed information on your particular export format.
• Daily limit: Enter the maximum number of absences or jobs allowed for the entire company/school district for this reason. If there will be no daily limit, leave the field blank. Before a daily absence limit can be used, it must be activated in the Absence/Job Creation section of the SubFinder Control Panel.
The Miscellaneous Code Tab This tab controls the usage of miscellaneous codes for the current reason. Miscellaneous codes are typically used to add an additional level of detail to an absence reason. For example: You may have a general absence reason for SCHOOL BUSINESS which is then sub-divided into a number of codes that specify the exact type of school business. If you decide to utilize these codes, they can be used in several ways:
• You want your employees to enter a code that is already in use by your district without any validation by SubFinder. If this is the option that you would like to use, simply flag the Use Miscellaneous Code field on this tab. Any time someone reports an absence for this reason; SubFinder will ask for a Miscellaneous Code and will accept whatever number is entered.
• You want your employees to enter a code that will be validated by SubFinder at the time of entry. SubFinder will not allow the entry of a number that has not been defined.
This tab will be disabled if neither Employee May Use nor Administrator May Use has been flagged in the Users box.
Adding a Miscellaneous Code
1. Flag the Use Miscellaneous Code field on this tab. 2. Click on the Add… button. SubFinder will display the Add Miscellaneous Code
screen:
3. Enter the appropriate description or number for the code. 4. Click the OK button to save the code. 5. Repeat these steps for each code you need to create.
Please note that SubFinder will automatically assign a three-digit number to each code, beginning with 001 and increasing sequentially. This will be the number that an employee or administrator will be required to use when selecting a Miscellaneous Code for this absence reason on the phone. On web connect the Miscellaneous Code is a drop down box.. These numbers cannot be changed. Before a validated miscellaneous code can be used, it must be activated in the Absence/Job Creation section of the SubFinder Control Panel.

Chapter 4 – SubFinder Edit _____________________________________________________________________________
_____________________________________________________________________________ Version 5.9 SubFinder Edit – The Reasons Button 4.8.4 Rev. 9/09
Note: The employee or administrator reporting the absence on the phone MUST KNOW the three-digit code that SubFinder assigns to each miscellaneous code added. SubFinder will ask the employee to “Please enter the miscellaneous code,” but WILL NOT list the miscellaneous code choices.
Editing a Miscellaneous Code
1. Ensure that the Use Miscellaneous Code field on this tab is flagged. 2. Highlight the desired Miscellaneous Code. 3. Click on the Edit… button. SubFinder will display the Edit Miscellaneous Code
screen:
4. Make any necessary changes to the code. 5. Click the OK button to save your changes. 6. Repeat these steps for each code you need to modify.
Deleting a Miscellaneous Code
1. Ensure that the Use Miscellaneous Code field on this tab is flagged. 2. Highlight the desired Miscellaneous Code. 3. Click on the Delete… button. SubFinder will remove the selected Miscellaneous
Code from the list. 4. Repeat these steps for each code you need to delete.
The Monthly Limits Tab
This tab allows you to enter any monthly absence/job limits for the current reason. Enter the maximum number of absences or jobs allowed for the entire company/school district for this reason during a particular month. If there will be no limits for a particular month, leave the field blank. Before a monthly absence limit can be used, it must be activated in the Absence/Job Creation section of the SubFinder Control Panel.
This tab will be disabled if neither Employee May Use nor Administrator May Use has been flagged in the Users box. When you have finished entering the reason, click OK. You will be returned to the Reasons List window. Editing a Reason Once a reason has been added to SubFinder, you may find the need to edit it. To edit a reason:
1. Select the appropriate reason from the Reason List window.

Chapter 4 – SubFinder Edit _____________________________________________________________________________
_____________________________________________________________________________ Version 5.9 SubFinder Edit – The Reasons Button 4.8.5 Rev. 9/09
2. Click the Edit… button on the right side of the Reason List window. SubFinder will display the Edit Reason screen:
When you edit a reason, all fields can be changed as necessary. Once you have finished editing the reason, click the OK button in the lower-left corner of the screen. SubFinder will save your changes and return you to the Reason List window. Note: If you change the name of the reason, you must re-record the voicing as well. For more information on voicing, please refer to Chapter 6.2 of this manual. Additional Notes on Reasons • If you add a reason and do not select any of the options in the Users box, only a person
at the keyboard will be able to select that reason. • Reasons cannot be deleted. If you no longer want to use a reason:
1. Change the number to something that is far beyond your current reason numbers.
2. Add three Z’s in front of the name to indicate its unused status. 3. Delete the voicing. For more information on voicing, please refer to Chapter 6.2
of this manual.


Chapter 4 – SubFinder Edit _____________________________________________________________________________
_____________________________________________________________________________ Version 5.9 SubFinder Edit – The Verification Button 4.9.1 Rev. 9/09
4.9 The Verification Button
Before the absences and jobs in SubFinder are submitted to payroll, you may want to have them verified. Verification can be completed by someone at the central office or by someone at each individual site through SubFinder via the Internet or SubRemote Pro. If the Verification feature is being used, all absences and jobs must be verified before they can be exported to your payroll system. To monitor the activity at each remote site, or to verify their absences and jobs, click the Verification button on the Edit Bar
and SubFinder will display the Verification Monitor window:
The Verification Monitor window contains the following components and buttons:
Pay Period: Allows you to select the appropriate pay period for which jobs must be verified. Entries for the selected pay period will appear in the Display Area at the bottom of the window.
Filter By: The options in this area provide additional control with regard to what will appear in the Display Area at the bottom of the screen. These options are described in detail in the section of this chapter titled Displaying Absences and Jobs.

Chapter 4 – SubFinder Edit _____________________________________________________________________________
_____________________________________________________________________________ Version 5.9 SubFinder Edit – The Verification Button 4.9.2 Rev. 9/09
Lock: The lock button allows you to lock (disable) or unlock (enable) all modifications and verification for the absences and jobs falling within a particular pay period, and all preceeding pay periods. A lock should be applied to a pay period prior to exporting jobs using Data Exchange or Data Exchange Pro.
Display Area: The display area is the open area at the bottom of the Verification Monitor window. It will show you which remote sites/site groups have been enabled for verification matching the criteria selected through the Pay Period and Filter By options. Note: Only those sites/site groups that have had the Enable Verfication field flagged will appear in the display area. For more information regarding this feature, please refer to Chapters 4.5 and 4.10 of this manual. Control Buttons:
Prevents the modification of any jobs for the selected pay period as well as all prior pay periods. Before finalizing the lock, SubFinder will ask you to verify the action. This procedure should be completed before exporting the jobs to your payroll system using either Data Exchange or Data Exchange Pro.
Exits the Verification Monitor window and returns you to the Edit bar.
Allows you to modify and/or verify absences and jobs for the selected site or site group.
Allows you to refresh the content of the display area, showing any changes that have occurred since the window was opened or last refreshed.
Allows you to access the on-line help system.
Displaying Remote Sites/Site Groups
You have a number of options available when telling SubFinder which remote sites and/or site groups to show in the display area. These options are controlled by using the Pay Period field and the Filter By options:

Chapter 4 – SubFinder Edit _____________________________________________________________________________
_____________________________________________________________________________ Version 5.9 SubFinder Edit – The Verification Button 4.9.3 Rev. 9/09
• Pay Period: For which pay period do you wish to view absences and jobs? To select the appropriate period, click on the arrow at the end of the pay period field and choose one from the drop-down list presented. The actual Pay Periods are established through the Edit Menu. For more information on this function, please refer to chapter 4.10 of this manual.
• Verify Status: When this option is flagged, only those remote sites/site groups with the selected verification status for the current pay period will be displayed. To select a specific status, click on the arrow at the end of the verify status field and choose one from the list presented.
o Complete: This status indicates that all absences and jobs for the selected remote site/site group have been verified, either as approved or disapproved, for the selected pay period.
o Incomplete: This status indicates that at least one absence or job for the selected remote site/site group has not been verified for the selected pay period.
• Process Status: When this option is flagged, only those remote sites/site groups with the selected process status for the prior pay period will be displayed. To select a specific status, click on the arrow at the end of the process status field and choose it from the list presented.
o Status OK: This status indicates that all absences and jobs for the selected remote site/site group have been verified, either as approved or disapproved, for the pay period prior to that selected.
o Verification Required: This status indicates that at least one absence or job for the selected remote site/site group has not been verified for the pay period prior to that selected.

Chapter 4 – SubFinder Edit _____________________________________________________________________________
_____________________________________________________________________________ Version 5.9 SubFinder Edit – The Verification Button 4.9.4 Rev. 9/09
Editing/Verifying Absences and Jobs Typically, absences and jobs will be verified by the administrator responsible for each remote site or site group. However, there may be times when you will want, or need, to conduct this process yourself. You may also, from time to time, want to check on the work being done by the remote site staff. To access the absences/jobs for a remote site or site group, select the desired Pay Period, set the Filter By criteria as appropriate, choose the Remote Site/Site group from the list presented in the Display Area, and click the Edit… button. SubFinder will display the Verification List window:
Once you have selected a site or site group, your next concern is selecting which absences/jobs to edit. It is important to note that each day of a multiple-day job will appear on this screen as a single day unit; you may have multiple entries on this screen with the same Job ID.
• List Jobs By:
o ID: When this option is selected, all absences/jobs for the specified pay period are listed in ascending ID (job number) order. You may enter an ID Range, using the First ID and Last ID fields, to further control what is displayed in the job list. The entries made in these fields will not be recognized until you use the TAB key to move out of the last field.
o Date: When this option is selected without a specified date range, all absences/jobs are listed in ascending date order. You may enter a date

Chapter 4 – SubFinder Edit _____________________________________________________________________________
_____________________________________________________________________________ Version 5.9 SubFinder Edit – The Verification Button 4.9.5 Rev. 9/09
range, using the First Date and Last Date fields, to further control what is displayed in the job list. The entries made in these fields will not be recognized until you use the TAB key to move out of the last field.
o Site: When this option is selected, all absences for the selected site are listed in ascending date order. To select a specific site, click on the arrow at the end of the site field and choose the desired location from the list presented. This option is only applicable when you are working with a site group.
o Employee: When this option is selected, all absences for the selected employee are listed in ascending date order according to the Job Start Date. To select a specific employee, click on the arrow at the end of the employee field and choose the desired person from the list presented.
o Substitute: When this option is selected, all absences/jobs associated with the selected substitute are listed in ascending date order according to the Job Start Date. To select a specific substitute, click on the arrow at the end of the substitute field and choose the desired person from the list presented.
Note: You must choose one of the above listed criteria – ID, Job Start, Date, Site, Employee, or Substitute – when viewing jobs. In addition to the five criteria listed above, you may choose to use neither, one, or both of the following to further restrict the absences/jobs that SubFinder displays:
• Process Status:
o Not Processed: All jobs will start with this status. It indicates that the job has not been processed by the Data Exchange export program.
o Processed: This indicates that the job has been exported by the Data Exchange program.
o Post Modified Process: This indicates that the job was modified after being verified and then exported by the Data Exchange program. Since the information has already been sent to Payroll, these jobs typically require special handling.
• Verify Status:
o Unverified: All jobs will start with this status. It indicates that the job has not been verified. In the Job List, this status will be represented by the letter U.
o Verified, Approved: This indicates that the job has been reviewed by either the system operator or the site administrator and the information is correct. Once approved, the data is available for export by the Data Exchange program. In the Job List, this status will be represented by the letter A.
o Verified, Disapproved: This indicates that the job has been reviewed by either the system operator or the site administrator and the information is incorrect. Jobs with a status of Verified, Disapproved are not available for export by the Data Exchange program. In the Job List, this status will be represented by the letter D.

Chapter 4 – SubFinder Edit _____________________________________________________________________________
_____________________________________________________________________________ Version 5.9 SubFinder Edit – The Verification Button 4.9.6 Rev. 9/09
• Job Display: This list box allows you to choose how the selected jobs will be displayed in the job list. You may choose from the following options:
o Employee: Jobs will be displayed with the following information: Job ID, Job Date, Employee, Site, and Verify Status/Date.
o Substitute: Jobs will be displayed with the following information: Job ID, Job Date, Substitute, Site, and Verify Status/Date.
o Substitute and Employee: Jobs will be displayed with the following information: Job ID, Job Date, Substitute, Employee, and Verify Status/Date.
Once all of your choices have been made, highlight the job that you wish to edit and click the Edit… button. SubFinder will display the View Job screen:
The main purpose of this screen is to indicate the verification status of the job. However, this screen can also be used to make changes to the job, including the absence time (employee information), job time (substitute information), site, employee, position, reason, substitute, account code and personal budget code.
• Employee Information: If you are verifying a job which is the result of an employee’s absence, this field will display the specific date and times of the absence. You may edit the absence start and end times if necessary.
• Substitute Information: If a substitute was required for the absence or if you are verifying a no-employee job, this field will display the substitute job date and times. You may edit the job start and end times if necessary. If your district is using the time adjustment feature within SubFinder, the correct adjustment time will also display in this field. You may edit this field if necessary.

Chapter 4 – SubFinder Edit _____________________________________________________________________________
_____________________________________________________________________________ Version 5.9 SubFinder Edit – The Verification Button 4.9.7 Rev. 9/09
• Unverified: Indicates that the job has not been verified.
• Verified, Approved: This indicates that the job has been reviewed by either the system operator or the site administrator and the information is correct. Once approved, the data is available for export by the Data Exchange program.
• Verified, Disapproved: This indicates that the job has been reviewed by either the system operator or the site administrator and the information is incorrect. Jobs with a status of Verified, Disapproved are not available for export by the Data Exchange or Data Exchange Pro programs.
• Verified Date: This field will display the date on which the absence/job was verified by the SubFinder Operator or a site/site group administrator.
• Processed or Not Processed: Under normal circumstances, this field will display a status of either processed or not processed. If the record has been processed the absence and job data has been exported for payroll using either Data Exchange or Data Exchange Pro. If the status reads not processed, the data has not been exported for payroll.
• Site: This field displays the site at which the absence and/or job occurred.
• Employee: If there is an employee absence, the employee’s name and Employee Number will appear in this field.
• Position: This field contains the absent employee’s primary job position as indicated in the employee’s individual record. If this is a no-employee job, the job position selected in creating the job will appear instead.
• Reason: The reason selected for the particular absence or job is listed in this field.
• Substitute: If a substitute was required for an employee absence or filled a no-employee job, the substitute’s name and Employee Number will appear in this field.
• Account Code: If a miscellaneous code was entered at the time the absence/job was created, it will appear in this field. The Account Code field does not accept manually entered miscellaneous codes; one must be entered in the corresponding reason record. (Please refer to chapter 4.8 -The Reasons Button – for more information on entering and using miscellaneous codes.)
• Personal Budget Code: If the absent employee has a specific budget code entered in their personal budget code User Defined field, the code will display in this field and will also be included in the Verification Export. (Please refer to Chapter 4.2 of this guide for more information on Employee User Defined Codes.) This field can be turned off if you do not wish to export personal budget codes. Please contact your Account Specialist at CRS Incorporated if you would like to turn this feature off.
• No Employee: You can remove the employee from the absence, or the particular day of a multiple-day absence.
• No Substitute: You can remove the substitute from the job, or the particular day of a multiple-day job.

Chapter 4 – SubFinder Edit _____________________________________________________________________________
_____________________________________________________________________________ Version 5.9 SubFinder Edit – The Verification Button 4.9.8 Rev. 9/09
To verify the job:
1. Indicate the verification status (Verified, Approved or Verified, Disapproved) by clicking on the appropriate radio button. Verified, Approved means that the information is correct and can be exported to Payroll by the Data Exchange program. Verified, Disapproved means that the information is incorrect and can not be exported to Payroll by the Data Exchange program.
2. If you have not already done so, select the appropriate Account Code by clicking on the arrow at the end of the account code field and choosing one from the list presented. You will not be able to save the job record until a code has been selected.
3. Click the OK button. SubFinder will save the job record and return you to the Verification List window.
If the verification record is part of a multiple-day job, SubFinder will display the following message:
If you click the Yes button, SubFinder will take the original job and split it into the appropriate number of jobs to allow for the modification. If you click the No button, SubFinder will leave the original job intact and simply record the verification status of this particular day.
Viewing the Verification Job Log
Each time a job record is verified, SubFinder creates a Verification Job Log to record the activity that occurs. The Job Log contains major activity that occurs throughout the verification process. The Job Log can be accessed when viewing or editing a job record. To view the Verification Job Log for a particular job record click the Job Log… button at the bottom of the View Job screen. SubFinder will display the View Job Log screen:

Chapter 4 – SubFinder Edit _____________________________________________________________________________
_____________________________________________________________________________ Version 5.9 SubFinder Edit – The Verification Button 4.9.9 Rev. 9/09
This screen will display the activity that occurred during the verification process. Each entry will include the date and time as well as a brief description of the entry. If you want to see more details about a particular entry, select the desired entry and click the View… button at the bottom of the View Job Log screen. SubFinder will display the Verify Job Log Entry screen:
The Verify Job Log Entry screen will give you more specific details on the selected entry. The information may include (if applicable) the previous status, current status, the stations where the change was made and the user who made the change. When you are finished viewing the information, click the Close button at the bottom of the Verify Job Log Entry screen. SubFinder will return you to the View Job Log screen. Click the Close button at the bottom-left corner of that screen to return to the View Job screen.


Chapter 4 – SubFinder Edit _____________________________________________________________________________
_____________________________________________________________________________________________ Version 5.9 SubFinder Edit – The Call Request List Button 4.10.1 Rev. 9/09
4.10 The Call Request List Button
The Call Request button is only active during your Morning and Evening calling periods. By selecting this option, you will be able to view information regarding the absences and jobs the system is working on or needs to work on. (The Call Request List can also be found on the Job Processor under Menu Options). From the edit bar, click the Call Request List button,
and SubFinder will display the Call Request List window:
Display Area: The display area is the open area of the Call Request List window. It is used to show the absences and jobs that the system is currently working on during the current calling period. Control Buttons:
Exits the Call Request List window and returns you to the Edit bar.
Allows you to view information about a call request.
Allows you to access the on-line help system.
Using the Call Request List
During call-out periods, the Call Request List window will display the current list of calls being processed by the Job Processor. If you wish to view additional information about a call:
1. Select the appropriate job from the list presented.

Chapter 4 – SubFinder Edit _____________________________________________________________________________
_____________________________________________________________________________________________ Version 5.9 SubFinder Edit – The Call Request List Button 4.10.2 Rev. 9/09
2. Click the View… button. SubFinder will display the View Call Request screen:
The top box on the View Call Request screen displays information regarding the scheduling of the selected job:
• Type: This field displays the type of the job you are viewing and corresponds to the Job Type field of the original absence or job. Possible types are:
o Substitute Required: This is a request for SubFinder to make calls to find a suitable substitute. SubFinder will try to fill the opening using the absent employee’s preference list(s) and skill list.
o Requested Substitute: This is a request for SubFinder to make calls to one particular substitute. SubFinder will call the requested substitute exclusively until the Stop Calling Requested Substitutes deadline (located in the Call Out section of the SubFinder Control Panel) has been reached. If the substitute has not been secured at that point, SubFinder will begin calling through the preference list(s) and skill list.
o Notification of Cancellation: This is a request for SubFinder to call a substitute to notify them of a job cancellation.
• Status: This field displays the status of the Call Request. Some possible values are:
o Inactive: The request has not yet been acted upon.
o In Work: The request is currently being processed by the SubFinder Job Processor.
o Paused: The request has been processed but is currently inactive. If time allows, SubFinder will come back to this job and make additional calls.
• Make next call after: This field displays the earliest time that SubFinder will make calls on this request.
• Stop calling at: This field displays the time when no more calls will be made for this request. If the request is still unfilled, it will be changed to Failed to Fill.
• Priority: This field displays the priority of the request in the overall list. The lower the number, the higher the priority. Currently this field is not in use.
• Override: By selecting this button, you can move the specified job’s call request to a higher priority or a lower priority. Currently this button is not in use.

Chapter 4 – SubFinder Edit _____________________________________________________________________________
_____________________________________________________________________________________________ Version 5.9 SubFinder Edit – The Call Request List Button 4.10.3 Rev. 9/09
The center box of the View Call Request window displays information about the selected job itself:
• Job ID: Displays the Job number of the job you are currently viewing.
• Which starts on date at time: Displays the starting date and time for the job you are currently viewing.
• Substitute: If the job type for this job was Requested Substitute, the name of the substitute who was requested would be displayed in this location. Since the job type in our illustration above is Substitute Required, this field is N/A (not applicable).
The bottom box of the View Call Request window displays information about the calls that have been made to fill the job:
• Number of calls: This field displays the total number of calls that have been made for this job, from both the preference list(s) and skill list.
• Preference list pass: This field displays which pass is currently being made through the preference lists for this job.
• Skill list calls: This field displays the total number of calls that have been made from the Skill list for this job.
Note: The Call Request List is static. In order to refresh the list you must close and then reopen it.
When you have finished viewing the Call Request, click the Close button. You will return to the Call Request List window. At this point you can view another Call Request or click the Close button to be returned to the Edit Bar.


Chapter 4 – SubFinder Edit _____________________________________________________________________________
_____________________________________________________________________________________________ Version 5.9 SubFinder Edit – Menu Options 4.11.1 Rev. 9/09
4.11 Menu Options
The Menu Options are found under the Title Bar of the SubFinder Edit program. These options provide access to all of the functions previously reviewed in this chapter as well as some additional functions. Each will be discussed in the sections that follow:
File
Click on the word File, and SubFinder will display the following drop down menu:
• View: Allows you to open and view the various log files created by SubFinder. This
is an option that is typically used only by CRS Incorporated Client Services. • Print: Allows you to print the contents of a selected file. This is an option that is
typically used only by CRS Incorporated Client Services. • Print Setup: Allows you to change the printer settings that will be used when the
Print option is selected. This is an option that is typically used only by CRS Incorporated Client Services.
• Call Request List: This will provide access to the Call Request List window. For more information on this feature, please refer to Chapter 4.9 of this manual.
• Exit: Closes the SubFinder Edit Bar. Edit
Click on the word Edit, and SubFinder will display the following menu:

Chapter 4 – SubFinder Edit _____________________________________________________________________________
_____________________________________________________________________________________________ Version 5.9 SubFinder Edit – Menu Options 4.11.2 Rev. 9/09
This menu will provide access to all of the same functions that are available from the Edit Bar itself. For more information on these functions, please refer to Chapters 4.1 through 4.8 of this manual. The Edit menu also introduces four additional functions, Site Groups, Job Position Groups, Reason Groups, and Pay Periods, which will be explored in the sections that follow.
Site Groups A Site Group is a collection of sites linked together under a single name. These groups can be used to:
• Allow a single administrator to monitor the absences for all sites within the site group.
• Run a report that will only include information on the sites within the site group.
• Simplify the site assignment process for substitutes. By assigning a Site Group, you can add multiple sites to a substitute’s record with a single click.
To access the Site Group function:
1. From the Menu Options, click on the word Edit.
2. Click on Site Groups…, and SubFinder will display the Site Group List window:
The Site Group List window contains the following components and buttons:
Display Area: The display area is the open area in the Site Group List window. It shows a listing of site groups in ascending alphabetical order. Control Buttons:
Exits the Site Group List window and returns you to the Edit bar.
Allows you to add a new site group.

Chapter 4 – SubFinder Edit _____________________________________________________________________________
_____________________________________________________________________________________________ Version 5.9 SubFinder Edit – Menu Options 4.11.3 Rev. 9/09
Allows you to change information for an existing site group.
Allows you to access the on-line help system. Adding a Site Group
To add a new site group, click on the Add… button on the upper-right side of the Site Group List window. SubFinder will display the Add Site Group screen:
• Name: What do you want to call the Site Group? We suggest using a descriptive name that will indicate the purpose of the group. For example: ROCKY HILLS GROUP for a group of sites that belong to the Rocky Hills School District, or ELEMENTARY GROUP for a group of all the elementary schools within your district. You may also want to precede the name with a symbol, such as an exclamation point (!) or an asterisk (*). This will place the group name at the top of any listing.
• Number: This number can be a maximum of nine digits and cannot conflict with any other numbers (PINS, IDS, etc.) on the system. We strongly recommend using all nine digits since this will minimize the chance of a conflicting number.
• Enable Verification: Flagging this option indicates that this site group administrator will use SubFinder’s Verification feature. If you do not flag this field, the site group administrator will not have access to the Verification feature.
• Inactive: Flagging the record as inactive marks it for deletion the next time a site group purge is run.

Chapter 4 – SubFinder Edit _____________________________________________________________________________
_____________________________________________________________________________________________ Version 5.9 SubFinder Edit – Menu Options 4.11.4 Rev. 9/09
The Group Members Tab
Use this tab to assign the individual sites to the group.
1. Select the sites to be assigned to the group from the Available Sites list.
Click on the Add>> button. The names will be moved from the Available Sites list to the Current Sites list.
The Administrator Codes Tab
If the site group is being created to allow an Administrator to monitor the group via the telephone or web connect, an Administrator Code must be created. To do this, select the Administrator Codes Tab.
To add an administrator code, click the Add… button and SubFinder will display the Enter Administrator Code screen:
Administrator code: What number do you want the administrator to use to identify him/herself to SubFinder? This number can be a maximum of six digits and cannot conflict

Chapter 4 – SubFinder Edit _____________________________________________________________________________
_____________________________________________________________________________________________ Version 5.9 SubFinder Edit – Menu Options 4.11.5 Rev. 9/09
with any other numbers (PINS, IDS, etc.) on the system. We strongly recommend using all six digits since this will minimize the chance of a conflicting number.
Administrator name: Enter a name for the Site Administrator. We recommend using a generic name since this will eliminate the need for changes when you experience administrative shifts.
When finished, click the OK button in the lower-left corner of the Enter Administrator Code screen. Your new code and name will be displayed on the Administrator Codes tab. This process can be repeated if the group site requires more than one administrator code.
The SubCast Information Tab
This tab contains information that works in conjunction with SubCast, a separate SubFinder program module that allows you to e-mail and/or fax daily absence reports to each of the sites in your district.
• To: Who should be the primary recipient of the absence report for the site? Enter the e-mail address of the appropriate individual.
• CC: If you want the report copied to any other people, enter their e-mail address in this field. You can enter up to 4 additional ‘Carbon Copy” recipients. Please enter only one e-mail address per field.
• Send Reports By Fax…: If you wish the report to be faxed to the site instead of being sent by e-mail, check this box and then enter the site’s fax number in the following field.
• Fax: Enter the fax number for the site, including the area code. SubFinder will insert the required hyphens (-). This field is only needed if the Send Reports by Fax… box has been flagged.

Chapter 4 – SubFinder Edit _____________________________________________________________________________
_____________________________________________________________________________________________ Version 5.9 SubFinder Edit – Menu Options 4.11.6 Rev. 9/09
• Second Phone: This field is currently for informational use only. It is not used for any calling or reporting purposes.
Once you have entered all the information for the site group record, click the OK button in the lower-left corner of the Add Site Group screen. SubFinder will save your new site group, assign it an ID number, and return you to the Site Group List window.
The Notification Emails Tab
This tab contains information that works in conjunction with SubFinder Email Notifications, whereby designated site group administrators may receive email notices regarding absences and jobs reported at their sites. You may enter up to five (5) email recipients for each site group. Additional information regarding email notifications can be found in Chapter 3.17 of this user manual.
• To: Who should be the primary recipient of the email notification for the site group? Enter the e-mail address of the appropriate individual.
• CC: If you want the notices copied to any other people, enter each e-mail address in these fields. You can enter up to 4 additional “Carbon Copy” recipients. Please enter only one e-mail address per field.
Once you have entered all the information for the site group record, click the OK button in the lower-left corner of the Add Site Group screen. SubFinder will save your new site group, assign it an ID number, and return you to the Site Group List window.

Chapter 4 – SubFinder Edit _____________________________________________________________________________
_____________________________________________________________________________________________ Version 5.9 SubFinder Edit – Menu Options 4.11.7 Rev. 9/09
Editing a Site Group
Once a site group has been added to SubFinder, you may find that you need to make changes; add more sites, remove sites, change the administrator code, etc. To edit a site group:
1. Select the appropriate site group within the Site Group List window.
2. Click the Edit… button on the right side of the Site Group List window. SubFinder will display the Edit Site Group screen:
When you edit a site group, all fields can be changed as necessary. Once you have made the desired changes, click the OK button in the lower-left corner of the Edit Site Group screen. SubFinder will save your changes and return you to the Site Group List window.
Note: For detailed explanations of the fields available on these screens, please refer to the section of this chapter titled Adding Site Group.
Deleting a Site Group
There may be a time when you will need to delete a site group from SubFinder. To delete a site group:
1. Select the appropriate site group within the Site Group List window.
2. Click the Edit… button.
3. Select the Group Members tab.

Chapter 4 – SubFinder Edit _____________________________________________________________________________
_____________________________________________________________________________________________ Version 5.9 SubFinder Edit – Menu Options 4.11.8 Rev. 9/09
4. Using the <<Remove button, transfer all the sites in the Current Sites list over to the Available Sites list.
5. Select the Administrator Codes tab.
6. Edit each administrator code and flag it Inactive.
7. Mark the site inactive by flagging the Inactive field at the top-right corner of the Edit Site Group screen, and then click the OK button in the lower-left corner of the screen to save the change.
8. When you are ready, use the Database Purge function to remove the site group from SubFinder. A description of the Database Purge function can be found in the section of this chapter titled Tools.
Job Position Groups
A Job Position Group is a collection of job positions linked together under a single name. These groups can be used to
• Run a report which will only include information on the positions within the job position group.
• Simplify the position assignment process for substitutes. By assigning a Job Position Group, you can add multiple positions to a substitute’s record with a single click.
To access the Job Position Groups function:
1. From the Menu Options, click on the word Edit.
2. Click on Job Position Groups…, and SubFinder will display the Job Position Group List window:
The Job Position Group List window contains the following components and buttons:
Display Area: The display area is the open area in the Job Position Group List window. It shows a listing of job position groups in ascending alphabetical order.
Control Buttons:

Chapter 4 – SubFinder Edit _____________________________________________________________________________
_____________________________________________________________________________________________ Version 5.9 SubFinder Edit – Menu Options 4.11.9 Rev. 9/09
Exits the Job Position Group List window and returns you to the Edit bar.
Allows you to add a new job position group.
Allows you to change information for an existing job position group.
Allows you to access the on-line help system.
Adding a Job Position Group
To add a new job position group, click on the Add… button on the upper-right side of the Job Position Group List window. SubFinder will display the Add Job Position Group screen:
• Name: What do you want to call the Job Position Group? We suggest using a descriptive name that will indicate the purpose of the group. For example: SECONDARY CERTIFIED GROUP for a group of teaching positions at the secondary level. You may also want to precede the name with a symbol, such as an exclamation point (!) or an asterisk (*). This will place the group name at the top of any listing.
• Number: This number can be a maximum of nine digits and cannot conflict with any other numbers (PINS, IDS, etc.) on the system. We strongly recommend using all nine digits since this will minimize the chance of a conflicting number.
• Inactive: Flagging the record as inactive marks it for deletion the next time a job position group purge is run.
To assign the individual positions to the group:
1. Select the positions to be assigned to the group from the Available Job Positions list.

Chapter 4 – SubFinder Edit _____________________________________________________________________________
_____________________________________________________________________________________________ Version 5.9 SubFinder Edit – Menu Options 4.11.10 Rev. 9/09
2. Click on the Add>> button. The names will be moved from the Available Job Positions list to the Current Job Positions list.
Once you have entered all the information for the job position group record, click the OK button in the lower-left corner of the Add Job Position Group screen. SubFinder will save your new job position group and return you to the Job Position Group List window.
Editing a Job Position Group
Once a job position group has been added to SubFinder, you may find that you need to add or remove positions. To edit a job position group:
1. Select the appropriate job position group within the Job Position Group List window.
2. Click the Edit… button on the right side of the Job Position Group List window. SubFinder will display the Edit Job Position Group screen:
When you edit a job position group, all fields can be changed as necessary. Once you have made the desired changes, click the OK button in the lower-left corner of the Edit Job Position Group screen. SubFinder will save your changes and return you to the Job Position Group List window.
Note: For detailed explanations of the fields available on these screens, please refer to the section of this chapter titled Adding a Job Position Group.
Deleting a Job Position Group
There may be a time when you will want to delete a job position group from SubFinder. To delete a position group:
1. Select the appropriate position group within the Job Position Group List window.
2. Click the Edit… button.

Chapter 4 – SubFinder Edit _____________________________________________________________________________
_____________________________________________________________________________________________ Version 5.9 SubFinder Edit – Menu Options 4.11.11 Rev. 9/09
3. Using the <<Remove button, transfer all the positions in the Current Job Positions list over to the Available Job Positions list.
4. Flag the Inactive box in the upper-right corner of the Edit Job Position Group screen.
5. Click the OK button in the lower-left corner of the Edit Job Position Group screen.
6. The next time the Purge program is run, with Job Position Groups selected, the job position group will be deleted.
Reason Groups
A Reason Group is a collection of absence reasons linked together under a single name. These groups are used by SubPay, a SubFinder add-on program, to assist with the assignment of budget codes. Do not create Reason Groups unless you have purchased the SubPay module.
To access the Reason Groups function:
1. From the Menu Options, click on the word Edit.
2. Click on Reason Groups…, and SubFinder will display the Reason Group List window:
The Reason Group List window contains the following components and buttons:
Display Area: The display area is the open area in the Reason Group List window. It shows a listing of reason groups in ascending alphabetical order.
Control Buttons:
Exits the Reason Group List window and returns you to the Edit bar.
Allows you to add a new reason group.
Allows you to change information for an existing reason group.

Chapter 4 – SubFinder Edit _____________________________________________________________________________
_____________________________________________________________________________________________ Version 5.9 SubFinder Edit – Menu Options 4.11.12 Rev. 9/09
Allows you to access the on-line help system.
Adding a Reason Group
To add a new reason group, click on the Add… button on the upper-right side of the Reason Group List window. SubFinder will display the Add Reason Group screen:
• Name: What do you want to call the Reason Group? We suggest using a descriptive name that will indicate the purpose of the group. For example: ABSENCE REASONS - ILLNESS for a group of absence reasons that pertain to illness. You may also want to precede the name with a symbol, such as an exclamation point (!) or an asterisk (*). This will place the group name at the top of any listing.
To assign the individual reasons to the group:
1. Select the reason to be assigned to the group from the Available Reasons list.
2. Click on the Add>> button. The names will be moved from the Available Reasons list to the Current Reasons list.
Once you have entered all the information for the reason group record, click the OK button in the lower-left corner of the Add Reason Group screen. SubFinder will save your new reason group and return you to the Reason Group List window.
Editing a Reason Group
Once a reason group has been added to SubFinder, you may find that you need to add or remove a reason. To edit a reason group:
1. Select the appropriate reason group within the Reason Group List window.
2. Click the Edit… button on the right side of the Reason Group List window. SubFinder will display the Edit Reason Group screen:

Chapter 4 – SubFinder Edit _____________________________________________________________________________
_____________________________________________________________________________________________ Version 5.9 SubFinder Edit – Menu Options 4.11.13 Rev. 9/09
When you edit a reason group, all fields can be changed as necessary. Once you have made the desired changes, click the OK button in the lower-left corner of the Edit Reason Group screen. SubFinder will save your changes and return you to the Reason Group List window.
Note: For detailed explanations of the fields available on these screens, please refer to the section of this chapter titled Adding a Reason Group.
Pay Periods
Pay Periods are used by SubFinder’s Verification feature. Each one defines a particular date range that makes up a single pay period. If your school district issues paychecks once a month, you would need to create 12 pay periods to cover an entire year. Do not create Pay Periods unless you are using the Verification feature of SubFinder.
To access the Pay Periods function:
1. From the Menu Options, click on the word Edit.
2. Click on Pay Periods…, and SubFinder will display the Pay Period List window:

Chapter 4 – SubFinder Edit _____________________________________________________________________________
_____________________________________________________________________________________________ Version 5.9 SubFinder Edit – Menu Options 4.11.14 Rev. 9/09
The Pay Period List window contains the following components and buttons:
Display Area: The display area is the open area in the Pay Period List window. It shows a listing of pay periods in ascending date order, according to the starting date of the pay period.
Control Buttons:
Exits the Reason Group List window and returns you to the Edit bar.
Allows you to add a new pay period
Allows you to change information for an existing pay period
Allows you to delete an existing pay period
Allows you to access the on-line help system
Adding a Pay Period
To add a new pay period, click on the Add button on the upper-right side of the Pay Period List window. SubFinder will display the Add Pay Period screen:
• Name: What do you want to call the Pay Period? We suggest using a descriptive name that will indicate the period covered.

Chapter 4 – SubFinder Edit _____________________________________________________________________________
_____________________________________________________________________________________________ Version 5.9 SubFinder Edit – Menu Options 4.11.15 Rev. 9/09
• Start Date: When does the pay period begin? Dates should be entered using the format MMDDYY; for November 8, 2009 you would type 110809. Using this format, the slashes (/) will be entered automatically.
• End Date: When does the pay period end? Dates should be entered using the format MMDDYY; for November 8, 2009 you would type 110809. Using this format, the slashes (/) will be entered automatically.
• Check Date: By what date should all jobs for the pay period be verified? Dates should be entered using the format MMDDYY; for November 23, 2009 you would type 112309. Using this format, the slashes (/) will be entered automatically.
Once you have entered all the information for the pay period record, click the OK button in the lower-left corner of the Add Pay Period screen. SubFinder will save your new pay period and return you to the Pay Period List window.
Editing a Pay Period
Once a pay period has been added to SubFinder, you may find that you need to make changes to it. To edit a pay period:
1. Select the appropriate pay period within the Pay Period List window.
2. Click the Edit button on the right side of the Pay Period List window. SubFinder will display the Edit Pay Period screen:
When you edit a pay period, all fields can be changed as necessary. Please note that you can not edit a past pay period or the current pay period.
Once you have made the desired changes, click the OK button in the lower-left corner of the Edit Pay Period screen. SubFinder will save your changes and return you to the Reason Group List window.
Deleting a Pay Period
Once a pay period has been added to SubFinder, you may find that you need to remove it. To delete a pay period:
1. Select the appropriate pay period within the Pay Period List window.
2. Click the Delete button on the right side of the Pay Period List window. SubFinder will delete the pay period and return you to the Pay Period List window. Please note that you can not delete a past pay period or the current pay period.
Tools

Chapter 4 – SubFinder Edit _____________________________________________________________________________
_____________________________________________________________________________________________ Version 5.9 SubFinder Edit – Menu Options 4.11.16 Rev. 9/09
Click on the word Tools, and SubFinder will display the following drop down menu:
Copy Database
When you select this option, a copy of the data and voice files located in the SubFind\Data directory will be made and placed in a predetermined location, typically C:\Sfwback. To run a database copy:
1. Place the Job Processor (and the Internet portion of SubFinder when applicable) in Standby. Please refer to Chapter 5 of this manual for detailed instructions.
2. From the Menu Options, click on the word Tools.
3. Click on Copy Database. SubFinder will copy the data files. When the copy is complete, a message box will appear stating, “Operation Complete.”
4. Click the Close button.
5. Take the Job Processor (and the Internet portion of SubFinder when applicable) out of Standby. Please refer to Chapter 5 of this manual for detailed instructions.
Count
When you select this option, SubFinder will display a count of Employees, Substitutes, and Sites. The count includes active, inactive, and restricted entries.
Leave Control Accrual
This option is used to perform an accrual on those absence reasons that you are managing via the Leave Control feature. (For more information on this feature, please refer to the Leave Control Tab section of Chapter 4.2.) To perform a Leave Control Accrual:
1. Place the Job Processor (and the Internet portion of SubFinder when applicable) in Standby. Please refer to Chapter 5 of this manual for detailed instructions.
2. From the Menu Options, click on the word Tools.
3. Click on Leave Control Accrual. SubFinder will display the Leave Control Accrual Processing screen:

Chapter 4 – SubFinder Edit _____________________________________________________________________________
_____________________________________________________________________________________________ Version 5.9 SubFinder Edit – Menu Options 4.11.17 Rev. 9/09
• Criteria: When you perform the accrual, what reasons do you want to include? If you want to include ALL controlled reasons in the accrual, select All Reasons. If you only want to include those reasons that you flagged as “Include in Selected Reasons”, select Selected Reasons Only.
• Run Type: When you perform the accrual, what Accrual Type do you want to run? If you want to include ALL accrual types, select All. If you want to perform the accrual for a specific type, such as Annual or Monthly, select Single and then choose the appropriate type from the drop-down list.
• Site Criteria: When you perform the accrual, what sites do you want to include? If you want to perform the accrual for ALL sites, select All Sites. If you would like to perform the accrual for a specific site or site group, select Single Site or Site Group and then choose the appropriate entry from the drop-down list. If you do not have any site groups defined, this option will not be available.
• Employee Type: When you perform the accrual, what employee types do you want to include? If you want to perform the accrual for ALL employees, select All Employees. If you would like to limit the accrual to either Certified or Classified employees, as designated on the General Information tab of each employee’s record, select either Certified Employees or Classified Employees.
Note: If you have any employees who are flagged as being both Certified AND Classified, you must use caution when running you Leave Control Accrual. Running it twice, one for Certified and once for Classified would cause those employees to receive more leave than they should. In a situation like this, it would be best to temporarily remove both the Certified and Classified designation from each employee record and then perform the accrual manually using the Override and Calculate buttons on the Leave Control tab of the employee record.
Once you have made your selections, click the Run… button. SubFinder will display the following message:

Chapter 4 – SubFinder Edit _____________________________________________________________________________
_____________________________________________________________________________________________ Version 5.9 SubFinder Edit – Menu Options 4.11.18 Rev. 9/09
If you click the Yes button, SubFinder will perform the Leave Control Accrual and will notify you when the process is complete. If you click the No button, SubFinder will return you to the Leave Control Accrual Processing screen. You can make changes or exit and return to the SubFinder Edit Bar.
Note: When you have completed the Leave Control Accrual process, make sure you take the Job Processor (and the Internet portion of SubFinder when applicable) out of Standby. Please refer to Chapter 5 of this manual for detailed instructions.
Recalculate Sub Hours
When you select this option, SubFinder will recalculate both the Total Days Worked and Total Certified Job Days fields for all substitutes. We recommend that you perform this function prior to running any reports or exports dealing with payroll. To run a recalculation of substitute hours:
1. Place the Job Processor (and the Internet portion of SubFinder when applicable) in Standby. Please refer to Chapter 5 of this manual for detailed instructions.
2. From the Menu Options, click on the word Tools.
3. Click on Recalculate Sub Hours. SubFinder will perform the procedure. When it is complete, a message box will appear stating, “Operation Complete.”
4. Click the Close button.
5. Take the Job Processor program out of Standby. Please refer to Chapter 5 of this manual for detailed instructions.
Recalculate Job Count
When you select this function, SubFinder will recalculate your daily and monthly absence reason limits and verify the number of jobs contained in the archive file. Typically, you will not perform this function without first speaking with CRS Incorporated Client Services.
Inactivate All Substitutes
By selecting this function, SubFinder will flag every substitute in your system as inactive, marking them for deletion the next time a substitute purge is run.
Some districts will use this at the end of each school year, along with a request for each substitute to re-register. As the substitutes re-register, the Inactive flag in their record will be removed. Once the deadline for re-registration has been reached, a substitute purge is run. Any substitute still flagged Inactive is removed. For more detailed instructions on performing a purge, please refer to the section of this chapter titled Purge Database.

Chapter 4 – SubFinder Edit _____________________________________________________________________________
_____________________________________________________________________________________________ Version 5.9 SubFinder Edit – Menu Options 4.11.19 Rev. 9/09
Purge Database
Purging the database is the second part of deleting a record from the SubFinder system. Typically, you will not perform this function without first speaking with CRS Incorporated Client Services.
Note: Please use extreme caution anytime you run a database purge. In many cases, once the data has been removed from the system it cannot be recalled without experiencing some loss. Call CRS Incorporated Client Services before performing this function.
To perform a purge:
1. Place the Job Processor (and the Internet portion of SubFinder when applicable) in Standby. Please refer to Chapter 5 of this manual for detailed instructions.
2. From the Menu Options, click on the word Tools.
3. Click on Copy Database. SubFinder will copy the data files. When the copy is complete, a message box will appear stating, “Operation Complete.” It is critical that you perform a Database Copy prior to purging data.
4. Click the Close button.
5. From the Menu Options, click on the word Tools.
6. Click on Purge Database. SubFinder will display the Database Purge Options screen:
• Purge Before Date: This section of the screen contains the options related to purging Jobs and Non-call Log Entries (considerations made by the SubFinder system when looking for a substitute which did not result in an actual phone call) from SubFinder.
Flag the appropriate option(s), specifying the date prior to which you want the entries purged. For example, if you want all Non-call Log Entries purged for

Chapter 4 – SubFinder Edit _____________________________________________________________________________
_____________________________________________________________________________________________ Version 5.9 SubFinder Edit – Menu Options 4.11.20 Rev. 9/09
2006, the date you would enter is 010108. Any entries up to and including 12/31/07 would be purged.
• Delete Inactive: This section of the screen contains the options related to purging any items that have been flagged inactive. These items will be deleted ONLY IF the record is flagged inactive and ONLY IF the field on this screen is flagged when the purge is run.
Note: SITES, CALENDARS and JOB POSITIONS have an ADDED safety feature. If an inactive record of this type is attached to an active employee, the system will not purge that record. The inactive flag from that record will also be removed.

Chapter 5 – The Job Processor _____________________________________________________________________________
_____________________________________________________________________________ Version 5.9 The Job Processor – Introduction 5.0.1 Rev 9/09
5.0 The Job Processor
The Job Processor is the component of the SubFinder system that searches for substitutes to fill jobs. In addition, it supports the SubFinder Call Processor by verifying requested and assigned substitutes when absences are reported over the telephone. The Job Processor also searches to find appropriate jobs for substitutes who call in to “job shop.”
Starting the Job Processor To start the Job Processor program:
1. Click the Start button on the Windows Task Bar. A menu will appear with your options.
2. Highlight SubFinder for Windows and a menu will appear listing the SubFinder programs available on that computer.
3. Highlight SubFinder Job Processor and click.
• Or double-click the desktop icon (if available). Note: The Job Processor program must be up and running BEFORE the Call Processor program can be started on its computer.
The Job Processor window displays the following information: • Title Bar: Shows the name of the program. • Menu Options: These are located immediately below the Title Bar. For more
information, please refer to Chapter 5.1 of this manual. • The Display Area, located under the Menu Options, contains the following information:
o ID: When the Job Processor program is calling out, it creates a temporary index number for each job that will be considered. It always starts with one (1) and continues incrementally by one. This number is only used during the current calling period, and will not be used by any of the reports available with SubFinder.
o Type: This will indicate the job type. The different types which can be displayed are: Sub Required: SubFinder will fill the absence/job using the appropriate
preference lists and skill list. Requested Sub: SubFinder will try to fill the absence/job with the specific
substitute that was requested. SubFinder will call the requested substitute

Chapter 5 – The Job Processor _____________________________________________________________________________
_____________________________________________________________________________ Version 5.9 The Job Processor – Introduction 5.0.2 Rev 9/09
exclusively until a specified time, at which point it will begin calling through the preference lists and skill list.
Cancellation: An employee has canceled their absence. SubFinder is calling to let the substitute know they are no longer required for the job.
o Job ID: This is the number that SubFinder assigned to the absence/job when it was created. The Job ID number will be given to the substitute when they accept the job.
o Call After: This will indicate the earliest time when SubFinder will begin calling on a particular job or pick it back up if the job has been paused.
o Status: This will indicate the current status of a job. The different statuses are: Filled: The job has been filled. Unfilled: The job is not yet filled. SubFinder will continue to try to get a
substitute. Calling: SubFinder is currently working on the job. Paused: SubFinder has placed the job in a temporary holding state for one of
several reasons: 1) it has called the specified number of substitutes from the Skill List, or 2) it has processed a preference list and is waiting to process it again. SubFinder will come back to this job sometime after the time indicated in the Call After column.
Attempt Failed: SubFinder tried to find a substitute but was unsuccessful. SubFinder will no longer call out on this job. However, if you allow your substitutes to “job shop,” substitutes calling into the system will be allowed to review and accept it.
Failed to Fill: SubFinder was unable to find a substitute and the Fail to Fill time for the appropriate site has been reached. SubFinder will no longer call out on this job, and substitutes calling in to “job shop” will not be able to hear the job.
• Status Bar: This indicates the current state of the Job Processor program, as well as the time and date. Possible program states are: o Standby: SubFinder is not making any attempts to fill jobs and the Call Processor
program will not allow any incoming calls. Anybody calling in will hear the following message: “The system is temporarily unavailable, please call again later.”
o Morning Calling: SubFinder is making outgoing calls to fill any unfilled jobs for today only. It is also accepting incoming calls from employees, substitutes, and administrators. If they have been enabled, Substitute Disqualifications (Chapter 3.10 of this manual) are in effect during this call out period.
o Break Time: SubFinder is not in a call out period, but it is accepting incoming calls from employees, substitutes, and administrators.
o Evening Calling: SubFinder is making outgoing calls to fill any unfilled jobs for future dates. It is also accepting incoming calls from employees, substitutes, and administrators.

Chapter 5 – The Job Processor _____________________________________________________________________________
_____________________________________________________________________________ Version 5.9 The Job Processor – Menu Options 5.1.1 Rev. 9/09
5.1 Menu Options
The Menu Options are found under the Title Bar of the SubFinder Job Processor. These options give you some control over the state of the Job Processor program as well as some other functions. Each will be discussed in the sections that follow:
Control Click on the word Control, and SubFinder will display the following drop down menu:
Stand-by
The Stand-by option works as a toggle.
• Clicking on Stand-by when SubFinder is in an active state (Morning Calling, Break Time, or Evening Calling) will cause the Job Processor to go into a stand-by mode and the Call Processor status will change to “Not Taking Calls.” While on Stand-by, SubFinder will not make any outgoing calls and will not accept any incoming calls. Anybody calling in will hear the following message: “The system is temporarily unavailable, please call again later.”
• Clicking on Stand-by when SubFinder is in a stand-by mode will cause the system to attempt to come out of stand-by and enter the appropriate active state – Morning Calling, Break Time, or Evening Calling. Before SubFinder can come out of stand-by the Call Processor program must be running on the appropriate computer(s). SubFinder will read in the Control Panel parameters, the Job Processor status will change to the one appropriate for the time of day, and the Call Processor status will change to “Taking Calls.”
There are several reasons why you would want to place the Job Processor program in stand-by mode:
1. To Reset a Job: If you put the Job Processor and the Internet portion of SubFinder into stand-by and then bring it back out during a morning or evening calling period, any jobs with a status of Attempt Failed will be reset to Unfilled and SubFinder will begin calling out on them again.
2. After Making Control Panel Changes: SubFinder will not recognize any changes made to the Control Panel until the Job Processor is placed in stand-by and then brought back out.
3. Performing Various Maintenance Tasks: There are several procedures, such as the Database Copy and the Recalculate Sub Hours, which require that the Job Processor and the Internet portion of SubFinder to be placed in stand-by before they can be run. If you attempt to run them while the system is in an active state you will receive the following message: “The Job Processor must be in stand-by to perform this task.”

Chapter 5 – The Job Processor _____________________________________________________________________________
_____________________________________________________________________________ Version 5.9 The Job Processor – Menu Options 5.1.2 Rev. 9/09
4. Shutting SubFinder Down Completely: Any time you are getting ready to completely shut SubFinder down – rebooting the computers, closing the office for an extended holiday or the summer, etc. – you must place the Job Processor in stand-by before closing the Call Processor program(s). This allows SubFinder to finish any incoming or outgoing calls and properly close any open data files.
Set Date/Time By selecting this option you can change the date and time for the computer where the Job Processor program resides. Exit This is one method that can be used to close the Job Processor program.
Call Request The Call Request option is only active during the morning and evening call out periods. By selecting this option, you will be able to see information about the absences/jobs the system is working on or needs to work on. Click on the words Call Request, and SubFinder will display the following drop down menu:
View
During a call out period, the Display Area of the Job Processor program displays basic information about each of the absences/jobs being processed. If you wish to view additional information about an entry:
1. Click on the ID number of the appropriate entry. This is the number located in the first column of the Display Area.
2. Click on the words Call Request in the Menu Options.
3. Click on the word View. SubFinder will display the View Call Request screen:

Chapter 5 – The Job Processor _____________________________________________________________________________
_____________________________________________________________________________ Version 5.9 The Job Processor – Menu Options 5.1.3 Rev. 9/09
The top box on the View Call Request screen displays information regarding the scheduling of the selected job:
• Type: This field displays the type of the job you are viewing and relates back to the Job Type field of the original absence or job. Possible types are:
o Substitute Required: This is a request for SubFinder to make calls to find a suitable substitute. SubFinder will try to fill the opening using the absent employee’s preference list(s) and skill list.
o Requested Substitute: This is a request for SubFinder to make calls to one particular substitute. SubFinder will call the requested substitute exclusively until the Stop Calling Requested Substitutes deadline (located in the Call Out section of the SubFinder Control Panel) has been reached. If the substitute has not been secured at that point, SubFinder will begin calling through the preference list(s) and skill list.
o Notification of Cancellation: This is a request for SubFinder to call a substitute to notify them of a job cancellation.
• Status: This field displays the status of the Call Request. Some possible values are:
o Inactive: The request has not yet been acted upon.
o In Work: The request is currently being processed by the SubFinder Job Processor.
o Paused: The request has been processed but is currently inactive. If time allows, SubFinder will come back to this job and make additional calls.
• Make next call after: This field displays the earliest time that SubFinder will make calls on this request.
• Stop calling at: This field displays the time when no more calls will be made for this request. If the request is still unfilled, it will be changed to Failed to Fill.
• Priority: This field displays the priority of the request in the overall list. The lower the number, the higher the priority. This field is not currently in use.
• Override: By selecting this button, you can move the specified job’s call request to a higher priority or a lower priority. This button is not currently in use.

Chapter 5 – The Job Processor _____________________________________________________________________________
_____________________________________________________________________________ Version 5.9 The Job Processor – Menu Options 5.1.4 Rev. 9/09
The center box of the View Call Request window displays information about the selected job itself:
• Job ID: Displays the Job number of the job you are currently viewing.
• Which starts on: Displays the starting date and time for the job you are currently viewing.
• Substitute: If the job type for this job was Requested Substitute, the name of the substitute who was requested would be displayed in this location. Since the job type in our illustration above is Substitute Required, this field is N/A (not applicable).
The bottom box of the View Call Request window displays information about the calls that have been made to fill the job:
• Number of calls: This field displays the total number of calls that have been made for this job, from both the preference list(s) and skill list.
• Preference list pass: This field displays which pass is currently being made through the preference list(s) for this job.
• Skill list calls: This field displays the total number of calls that have been made from the Skill list for this job.
Note: The View Call Request screen is static. In order to refresh the screen you must close and then reopen it. When you are finished viewing the Call Request, click the Close button. SubFinder will return you to the Job Processor program.
Monitor
You also have the option of monitoring the process that the Job Processor follows as it tries to fill an absence/job.
1. Click on the ID number of the appropriate entry. This is the number located in the first column of the Display Area.
2. Click on the words Call Request in the Menu Options.
3. Click on the word Monitor. SubFinder will display the Request # Monitor window:

Chapter 5 – The Job Processor _____________________________________________________________________________
_____________________________________________________________________________ Version 5.9 The Job Processor – Menu Options 5.1.5 Rev. 9/09
• The Title Bar will display the ID number of the absence/job that is being monitored.
• The Display Area will show you what actions the Job Processor is making as it looks for an appropriate substitute. Please keep in mind that this does not display information regarding the actual calls, only the considerations SubFinder makes before placing a call.
• The Stop Monitoring button allows you to halt the flow of information to look at a particular entry in the list. Once clicked, the button will change to read Start Monitoring. Clicking the button again will restart the monitoring process. When you are finished monitoring the absence/job, click the Close button. SubFinder will return you to the Job Processor program.
Options
Click on the word Options, and SubFinder will display the following drop down menu:
This menu will give you view-only access to some of the areas in SubFinder’s Control Panel. Select the area that you would like to view and SubFinder will display the appropriate screen. If you need to change any of the values, you must do so using the Control Panel program on the appropriate computer. For additional information on the items available here, please refer to the appropriate Control Panel chapters of this manual. When you are finished viewing the option, click the Close button. You will be returned to the Job Processor window.

Chapter 5 – The Job Processor _____________________________________________________________________________
_____________________________________________________________________________ Version 5.9 The Job Processor – Menu Options 5.1.6 Rev. 9/09
WebConnect Click on the word WebConnect, and SubFinder will display the following drop down menu:
The WebConnect Stand-by option works as a toggle for controlling the Internet portion of SubFinder.
• Clicking on WebConnect Stand-by when the Internet portion of SubFinder is in an active
state will cause the respective module to go into stand-by mode. While on Stand-by, SubFinder online will not allow users to log in. Anyone attempting to log in will receive the following message: “SubFinder is not available. The system is not available right now, because SubFinder is in standby status.”
• Clicking on WebConnect Stand-by when the Internet portion of SubFinder is in a stand-by state will cause the respective module to go into an active mode. While in an active mode, SubFinder online will allow users to log in.
Tools
Click on the word Tools, and SubFinder will display the following drop down menu:
Synchronize Global Configuration This option is used to synchronize changes made to certain SubFinder settings with the corresponding settings for the Internet portion of SubFinder. This option should be used any time you change one or more of the following items:
• Control Panel – General System – Half-day Threshold • Control Panel – General System – Limit Substitute Hours by Week • Control Panel – Certified Options (all fields) • Control Panel – Custom Options – Offer Only Requested Jobs to Substitutes • Control Panel – Pre-Registration – Use Substitute Pre-Registration • Control Panel – Pre-Registration – Start Date • Control Panel – Pre-Registration – End Date
This function will be automatically run any time the Job Processor leaves Stand-by mode. The only time it needs to be run manually through this option is when a change has been made mid-day and SubFinder via the Internet needs to immediately recognize the change.

Chapter 6 - SubFinder Call Processor Program _____________________________________________________________________________
_____________________________________________________________________________ Version 5.9 The Call Processor 6.0.1 Rev. 9/09
6.0 The Call Processor
The Call Processor is the component of the SubFinder system that handles all of the phone calls – incoming and outgoing. It works in conjunction with the Job Processor to determine who should be called for each absence/job and keeps track of the activities associated with each call. You will also use the Call Processor to record the names of your sites, job positions, reasons, employees, substitutes, administrators, and personalize the introduction.
Starting the Call Processor To start the Call Processor program:
1. Click the Start button on the Windows Task Bar. A menu will appear with your options.
2. Highlight SubFinder for Windows and a menu will appear listing the SubFinder programs available on that computer.
3. Highlight SubFinder Call Processor and click. The call processor program will start, and after a short delay, the individual lines will begin to appear.
• Or double-click the desktop icon (if available). Note: The Job Processor program must be up and running BEFORE the Call Processor program can be started on its computer.
The Call Processor window displays the following information:
• Title Bar: Shows the name of the program. In the case of the Call Processor, it also displays the program number – Call Processor 1 indicates that it is the first machine that has a Call Processor Program.
• Menu Options: These are located immediately below the Title Bar. For more information, please refer to Chapter 6.1 of this manual.
• The Display Area, located under the Menu Options, contains the following information:
o Line: This is an index reference to the quantity of phone lines available to the Call Processor. It will always start with line one and increase incrementally by one.
o Type: This indicates the function of a particular line. The line types available are:
Incoming: The line will only process incoming phone calls. Outgoing: The line will only process outgoing phone calls. Incoming/Outgoing: The line will process both incoming and outgoing calls.

Chapter 6 - SubFinder Call Processor Program _____________________________________________________________________________
_____________________________________________________________________________ Version 5.9 The Call Processor 6.0.2 Rev. 9/09
Sleeping: The line will not process any calls until it is manually changed to another type.
Record Names: The line is being used, by the system operator, to record various parts of SubFinder’s narration – Job Positions, Site Names, etc.
For more information on using the various line types, please refer to Chapter 6.1 of this manual.
o Caller: This field will show the name of the person who is currently using a particular line.
o Status: This will indicate the current status of the line. On Hook means no call is in process and the line is available. Other statuses will give a brief description of what is occurring on the line.
• Status Bar: This indicates the current state of the Call Processor program, the number of calls processed since the program was last started, and the time and date. Possible program states are:
o Status: The status will either be Taking Calls (the Call Processor is available to accept and/or make calls) or Not Taking Calls (the Call Processor will not accept or make any calls). Anyone calling in while the Call Processor is ‘Not Taking Calls’ will hear the following message: “The system is temporarily unavailable, please call again later.”
o Number of Calls: How many calls the Call Processor has processed since the last time it was started.

Chapter 6 – The Call Processor _____________________________________________________________________________
_____________________________________________________________________________ Version 5.9 The Call Processor – Menu Options 6.1.1 Rev. 9/09
6.1 Menu Options
The Menu Options are found under the Title Bar of the SubFinder Call Processor. These options allow you to control the line configuration as well as view certain sections of SubFinder’s Control Panel. Each option available will be discussed in the sections that follow:
Control Click on the word Control, and SubFinder will display the following drop down menu:
Set Date/Time By selecting this option, you can change the date and time for the computer where the Call Processor program resides. Exit This is one method that can be used to close the Call Processor program.
Line Before using any of the functions available under the Line option, the desired line must first be selected. Click on the physical number of the line to select it, and then click on the word Line. SubFinder will display the following drop down menu:
Options When you choose this option, you can change the function of the selected line. Once you click on Options, SubFinder will display the following screen:

Chapter 6 – The Call Processor _____________________________________________________________________________
_____________________________________________________________________________ Version 5.9 The Call Processor – Menu Options 6.1.2 Rev. 9/09
• Line Type: This is the attribute that is assigned to the selected phone line. To select a specific type, click on the arrow at the end of the line type field and choose the desired type from the list presented. o Incoming: The line will only process incoming phone calls. The line must
be a part of the incoming call hunt group. o Outgoing: The line will only process outgoing phone calls.
If you select Outgoing, you must make sure that the appropriate Dialing Attributes (displayed below the Line Type) are properly selected. The selected phone line will only be able to make calls of the type(s) selected. For example: If only local is checked, the selected phone line will only make local phone calls. No long distance calls will be made. In the example above, Line 3 will be able to make both Local and Long Distance calls. To select one box, just click in the box and the X will toggle on and off. To select more than one box, click in the first box, press and hold the CTRL key on your keyboard, and then click on any other box(es) you would like to select.
o Incoming/Outgoing: The line will process both incoming and outgoing calls. The line must be a part of the incoming call hunt group and also have the appropriate Dialing Attributes selected.
o Sleeping: The line is dormant and will not process any calls until it is manually changed to another type. Some possible reasons for choosing sleeping: 1) Placing your outgoing lines to sleep during a vacation period will allow SubFinder to accept incoming calls but will restrict any outgoing calls. You must remember to change the lines back to Outgoing several days before the break ends! 2) You may have the capacity for a total of eight lines, but are only using the first six. The last two lines would be set to Sleeping until they are ready to be utilized.
o Record Names: The line is being used, by the system operator, to record various parts of SubFinder’s narration – Job Positions, Site Names, etc. For detailed instructions on the Record Names function, please refer to the section of this chapter titled Recording Names. Once you have selected the desired Line Type, click OK.
Monitor Choosing the Monitor option will allow you to view a detailed accounting of what is happening on a selected phone line. While this is typically used as a technical support resource, it can also be used by you, the system operator, to help a frustrated user troubleshoot a call! Once you’ve selected the desired line, click on the word Monitor. SubFinder will display the Line Monitor window:

Chapter 6 – The Call Processor _____________________________________________________________________________
_____________________________________________________________________________ Version 5.9 The Call Processor – Menu Options 6.1.3 Rev. 9/09
The display area of the window will show you what is happening on the call, step by step. In the example above, SubFinder has examined the site record, configuration profile, and calendar track for the employee calling in and has begun to create an absence for all day tomorrow. Any time you monitor a call you will notice that the information sometimes scrolls past too quickly to follow. At the bottom-center of the window there is a Stop Monitoring button. Clicking on that button will cause SubFinder to cease monitoring the call and allow you to closely examine the details presented so far. Once you click on the button it will change to read Start Monitoring. If you click on it again, SubFinder will resume the monitor function. When you are finished monitoring the line, click the Close button. SubFinder will close the window and return you to the Call Processor. Note: This window is strictly for viewing. None of the information can be changed.
Status Choosing the Status option will allow you to see the current status of the selected line and even allow you to terminate a call that is in progress. Once you’ve selected the desired line, click on the work Status. SubFinder will display the Line Status window:
• Call Status: If there is a call on the selected line, this will indicate when the call began. If you choose a line that was not in use, this will indicate that the line is On Hook.
• Line Status: This will give you a very limited description of what is currently happening within the call.
• Hang Up button: This button will only be active a) if you are using analog lines, and b) if the line is currently in an off hook mode, meaning that a call is in progress. By clicking the button, you will be able to terminate the phone call. Another window will appear to confirm the termination. Click OK and the call will be disconnected.
• Reset Button: This button will only be active a) if you are using digital lines, and b) if the line is currently in an off hook mode, meaning that a call is in progress. By clicking the button, you will be able to terminate the phone call. Another window will appear to confirm the termination. Click OK and the call will be disconnected.
When you are finished with the Line Status window, click the Close button. SubFinder will return you to the Call Processor.

Chapter 6 – The Call Processor _____________________________________________________________________________
_____________________________________________________________________________ Version 5.9 The Call Processor – Menu Options 6.1.4 Rev. 9/09
Options Click on the word Options, and SubFinder will display the following drop down menu. This menu will give you access to some of the areas in the SubFinder Control Panel. Select the area that you would like to view and SubFinder will display the appropriate screen. These are only available for viewing purposes. If you need to change any of the values, you must do so using the Control Panel program on the appropriate computer. For additional information on the items available here, please refer to the appropriate Control Panel chapters of this manual.
When you are finished viewing the option, click the Close button. You will be returned to the Call Processor window.

Chapter 6 – The Call Processor ____________________________________________________________________________
_____________________________________________________________________________ Version 5.9 The Call Processor – Recording Names 6.2.1 Rev. 9/09
6.2 Recording Names
When SubFinder “talks” to your administrators, employees, and substitutes, it follows a script which includes many pre-recorded messages. But much of the information you entered into the SubFinder edit program is unique to your system – job positions, site names, absences reasons, etc. – and there are no recordings on file for these items. Part of the initial setup of your system involves recording these unique items. This function can also be used to “modify/change” the voicing for existing information (positions, sites, reasons, etc.) or to “delete” the voicing for existing information.
Setting up the system
Recordings are typically done through the use of the telephone located at the call processor computer. To set up the system:
1. Select which line you will use for recording purposes. Make sure you know the direct dial number for the line. We recommend using the last outgoing line, since you won’t have to be concerned about an incoming call interrupting your work. Once you have decided which line to use, click on that line in the Call Processor window.
2. Once the line has been selected, click on the word Line within your Menu Options at the top of the Call Processor window. When the drop down menu appears, click on the word Options and the Line Options screen will appear.
3. Within the Line Options screen, change the Line Type from Outgoing to Record Names and then click OK. The Call Processor window should now reflect the new line type.
4. Using a telephone convenient to the computer, call the phone number associated with the line selected in step #1 above. The Record Names program screen will appear. For detailed instructions on using the Record Names program, please refer to the section of this chapter titled Using the Record Names Program.
5. Once you have completed all of your recordings, click the Close button on the right side of the Record Names screen and then hang up the phone.
6. In the Call Processor screen, click on the line that you selected in step # 1 above.
7. Click on the word Line within your Menu Options at the top of the Call Processor window. When the drop down menu appears, click on the word Options and the Line Options screen will appear.
8. Within the Line Options screen, change the Line Type from Record Names to Outgoing and then click OK. The Call Processor window should now reflect the original line type.

Chapter 6 – The Call Processor ____________________________________________________________________________
_____________________________________________________________________________ Version 5.9 The Call Processor – Recording Names 6.2.2 Rev. 9/09
Using the Record Names Program Once you have the system set up using one of the methods described above and have placed your call, the Record Names program screen will appear:
The Record Names window contains the following buttons and components: Control Buttons:
Exits the Record Names program and returns you to the Call Processor.
Allows you to record the selected item.
Allows you to listen to an existing recording.
Allows you to delete an existing recording.
Allows you to access the on-line help system.
Name Type box: This box gives you a list of all the categories that have recordable items.
Name Selection Criteria box: Allows you to choose which items you will see in the display area to the right:

Chapter 6 – The Call Processor ____________________________________________________________________________
_____________________________________________________________________________ Version 5.9 The Call Processor – Recording Names 6.2.3 Rev. 9/09
• All Names: Checking this option will display all of the items in the selected category regardless of whether or not they have a recording.
• Names Missing Recordings: Checking this option will display only those items, in the selected category, that have not been recorded.
Language Selection: If you have a foreign language module for SubFinder, this allows you to choose the language you wish to record. SubFinder currently supports English and Spanish.
Include Names from Site box: This option can be used to limit the list of items in the display area to only those from a particular site. The option will only be available when an appropriate category has been selected in the Name Type box. Display Area: The display area is the open area on the right half of the Record Names screen. It will display a list of the items that are available for the category selected in the Name Type box.
Display Box: Displays the listing of names for the selected Name Type. For example: If you select the Name Type Sites, a listing of all sites will be displayed in the display box.
Making a Recording
1. Select the desired Name Type by clicking on the appropriate radio button.
2. If you have selected a type that has a list of recordable items, make the appropriate choice in the Name Selection Criteria box. If the goal of the session is to record all unrecorded items, choosing Names Missing Recordings will work best.
3. Within the Display Area, select the desired name to be recorded by clicking on it.
4. Click the Record… button.
5. SubFinder will do two things at this point. First, the Recording Voice message box will appear with a Stop button.
And second, a tone will sound in the handset of the telephone. When you hear the tone, make your recording. As soon as you are done speaking, click the Stop button in the message box. Once the button has been clicked, SubFinder will replay the recording for your verification.
6. Repeat steps 1 - 5 as many times as is necessary to record all the desired items.
7. When you are completely done recording, click the Close button. This will close the Record Names program.
8. Hang up the phone. Using the steps listed above under the appropriate setup method; change the line setup of the Call Processor back to its original state.
Note: Anytime a name, job position, site, reason, etc., is changed or added to the system, that name must be recorded.

Chapter 6 – The Call Processor ____________________________________________________________________________
_____________________________________________________________________________ Version 5.9 The Call Processor – Recording Names 6.2.4 Rev. 9/09
Reviewing a Recording There may be times when you will want to review a recording. For example: You may need to review the special instruction that an employee created when they entered their absence. Once you have set your system up using one of the two methods described in Setting up the System, follow these steps:
1. Select the desired Name Type by clicking on the appropriate radio button.
2. If you have selected a type that has a list of recordable items, make sure that you have selected All Names within the Name Selection Criteria box.
3. Within the Display Area, select the desired name to be reviewed by clicking on it.
4. Click the Review… button.
5. SubFinder will play the recording for the selected item.
6. Repeat steps 1 - 5 as many times as is necessary to review all the desired items.
7. When you are completely done, click the Close button. This will close the Record Names program.
8. Hang up the phone. Using the steps listed above under the appropriate setup method; change the line setup of the Call Processor back to its original state.
Deleting a Recording
There may be a time when you will want to delete a recording. For example: You have decided to quit using a particular absence reason and you’d like to remove the recording from the system. Once you have set your system up using one of the two methods described in Setting up the System, follow these steps:
1. Select the desired Name Type by clicking on the appropriate radio button.
2. If you have selected a type that has a list of recordable items, make sure that you have selected All Names within the Name Selection Criteria box.
3. Within the Display Area, select the desired name to be deleted by clicking on it.
4. Click the Delete… button.
5. SubFinder will delete the recording and display a verification box. Click the OK button to close the box and return to the Record Names Program.
6. Repeat steps 1 - 5 as many times as is necessary to delete all the desired items.
7. When you are completely done, click the Close button. This will close the Record Names program.
8. Hang up the phone. Using the steps listed above under the appropriate setup method; change the line setup of the Call Processor back to its original state.

Chapter 7 – SubFinder Data Exchange _____________________________________________________________________________
_____________________________________________________________________________ Version 5.9 Data Exchange – Introduction 7.0.1 Rev. 9/09
7.0 Data Exchange
The Data Exchange program can be used to import new records into SubFinder, apply changes and deletes to existing records, and export absence and job information to a payroll system. By utilizing the import features, you are able to quickly add information into the SubFinder system. This can be very beneficial to districts that are just starting to implement the SubFinder system since it eliminates much of the initial data entry. Information can be entered into the system even before training starts! In addition, large districts can utilize the import program to make changes to existing records and import new records even after the initial start-up. By utilizing the various export formats, information can be taken from the SubFinder system and introduced to another program in the correct format. This will save hours of data entry by your payroll department. If the format that you need is not currently available within SubFinder, a new export can be tailored to your specific needs.
Starting Data Exchange
To start the Data Exchange program:
1. Click the Start button on the Windows Task Bar. A menu will appear with your options.
2. Highlight SubFinder for Windows and a menu will appear listing the SubFinder programs available on that computer.
3. Highlight SubFinder Data Exchange and click. SubFinder will display the Data Exchange toolbar:
• Or double-click the desktop icon (if available).
The Data Exchange Tool Bar displays the following information:
Title Bar: Shows the name of the program.
Menu Options: These are located immediately below the Title Bar and give you access to all of the functions of the Data Exchange program. For more information, please refer to the section of this chapter titled Menu Options.
Option Buttons: These buttons give you quick access to most of the available functions as well as access to the help system and a means to exit the program. They represent, from left to right:
o Exit: Close the Data Exchange program.
o Imports: Provides access to all available import formats.
o Exports: Provides access to all available export formats.
o SubPay Imports: Provides access to all available SubPay import formats.
o SubPay Exports: Provides access to all available SubPay export formats.

Chapter 7 – SubFinder Data Exchange _____________________________________________________________________________
_____________________________________________________________________________ Version 5.9 Data Exchange – Introduction 7.0.2 Rev. 9/09
o Help: Access the on-line help system.
Functions Common throughout Data Exchange
Any time you open an Import or Export function, SubFinder will display the same basic list window of available formats:
The screen contains the following components and buttons:
Control Buttons
Allows you to close the current window
Starts the import or export process for the chosen format
Gives you a description of the selected format
Allows you to view the on-line help function

Chapter 7 – SubFinder Data Exchange _____________________________________________________________________________
_____________________________________________________________________________ Version 5.9 Data Exchange – Menu Options 7.1.1 Rev. 9/09
7.1 Menu Options
The Menu Options are found under the Title Bar of the SubFinder Data Exchange program. Each option available will be discussed in the sections that follow:
File
Click on the word File and SubFinder will display the following drop down menu:
Exit
This is one method that can be used to close the Data Exchange program.
Imports Exports
Click on the words Imports Exports and SubFinder will display the following drop down menu:
Imports
Selecting this option will display a list window of the various import options available. These options will be discussed further in Chapter 7.2 of this manual.
Exports
Selecting this option will display a list window of the various export options available. These options will be discussed further in Chapter 7.3 of this manual.

Chapter 7 – SubFinder Data Exchange _____________________________________________________________________________
_____________________________________________________________________________ Version 5.9 Data Exchange – Menu Options 7.1.2 Rev. 9/09
SubPay Imports
Selecting this option will display a list window of the various SubPay import options available. These options will be discussed further in Chapter 7.2 of this manual. These import options will only be used if you have purchased the SubPay program add-on module.
SubPay Exports
Selecting this option will display a list window of the various SubPay export options available. These options will be discussed further in Chapter 7.3 of this manual. These export options will only be used if you have purchased the SubPay program add-on module.
Options
Click on the word Options and SubFinder will display the following drop down menu:
Preferences
This option allows you to specify which file(s) should be used when SubFinder performs an export. Click on the word Preferences, and SubFinder will display Use Archive Files screen:
At the present time, exports can only be run from your current data files. Any data which has been transferred to an archive file is unavailable for exporting.

Chapter 7 – SubFinder Data Exchange _____________________________________________________________________________
_____________________________________________________________________________ Version 5.9 Data Exchange – Importing Data 7.2.1 Rev. 9/09
7.2 Importing Data The SubFinder system allows you to import many types of data with varying degrees of detail. Things such as Job Positions, Sites, Reasons, Substitutes, and Employees can all be imported into SubFinder, saving you hours of data entry work.
Records Available for Import
The following records are currently available for import:
• Calendars
• Employees
o Without Certified/Classified option
o With Certified/Classified option
o Full Import option
o With User Defined Field 3
o Certifications
o Leave Control Values
o Update Employee Numbers
o WinOcular Employee
• Job Positions
o Without Certified/Classified options
o With Certified/Classified options
o Job Position Groups
• Pay Periods (for use with the Verification feature)
• Preference Lists
• Reasons
o Reasons
o Miscellaneous Codes
o Reason Groups
• Sites
o Sites
o Site Regions
o Site Groups
• SubPay
o SubPay Employee User Defined Codes
o SubPay Position User Defined Codes
o SubPay Site User Defined Codes
o SubPay Substitute User Defined Codes

Chapter 7 – SubFinder Data Exchange _____________________________________________________________________________
_____________________________________________________________________________ Version 5.9 Data Exchange – Importing Data 7.2.2 Rev. 9/09
• Substitutes
o Without Certified/Classified option
o With Certified/Classified option
o Full Import option
o Certifications
o Sites to Work At
o Substitute Positions
o Update Employee Numbers
o WinOcular Substitute For detailed information on what fields are available for each import type, please contact CRS Incorporated Client Services and request a copy of the Data Import Formats.
Performing a SubFinder Data Import
To perform a SubFinder data import, click the Imports button on the Data Exchange Tool Bar
and SubFinder will display the Import List window:
Highlight the desired import, click the Open button, and SubFinder will display the appropriate import screen:

Chapter 7 – SubFinder Data Exchange _____________________________________________________________________________
_____________________________________________________________________________ Version 5.9 Data Exchange – Importing Data 7.2.3 Rev. 9/09
• Data Format: Choose the format of the file that you will be importing. You may
choose from:
o Comma Delimited: Each piece of data is limited to a maximum field size and separated only by a comma. When using this format, you must ensure that there are no “stray” commas located in any of the data fields within a record.
o Fixed Field: Each piece of data is limited to a maximum field size and a specific starting position. For example: The third field of the record will always start at position 21 and never exceed 25 characters.
• Record Delimiter: Choose the manner in which each record is separated within the import file. You may choose from:
o Carriage Return: Each new record will start on a new line, but will not necessarily begin at position number one.
o Carriage Return/Line Feed: Each new record will start on a new line at position number one. This is the default value and is almost always used.
• First Line as Field Names: Flag this option if the first line of your import file contains the field names of the data elements of each record.
• File Name: What is the name of the file to be imported? If you are going to manually enter the name of the file, you must include the full path. For example: If the file was named SITES.CMA and located in the Subfind\Data directory of the C: drive you would enter C:\SUBFIND\DATA\SITES.CMA.
If you are unsure of the file name or don’t know the exact location, utilize the Browse… button to locate the file. This will bring up a function common to many Windows-based programs that will allow you to browse through the various resources available to your computer, including any floppy and hard drives, to find the desired file.
Once you have made the appropriate choices and provided the name of the file to be imported, click the Import… button. SubFinder will begin the data import. If there were errors with any of the records, an Import Messages window will appear and list the errors according to the line number of the record and the field number where the error occurred. This information will also be written to a file located in the SUBFIND\DATA directory of the computer that houses your data files. The file name would be the name of the file imported followed by the date the import was done. For example, if you imported Cert_Emp on June 12, 2007 the corresponding log file would be Cert_Emp 2007-06-12.log. Once the import is complete, click the Close button on the Import Messages window and click the Close button on the Import window. SubFinder will return you to the Data Exchange Tool Bar.

Chapter 7 – SubFinder Data Exchange _____________________________________________________________________________
_____________________________________________________________________________ Version 5.9 Data Exchange – Importing Data 7.2.4 Rev. 9/09
Performing a SubPay Data Import
The SubPay Import is used to import data into SubFinder’s SubPay module. These import options will only be used if you have purchased the SubPay program add-on module. To perform a SubFinder data import, click the SubPay Imports button on the Data Exchange Tool Bar
and SubFinder will display the SubPay Import List window:
From this point on, the import will proceed in the same fashion as described above in the section titled Performing a SubFinder Data Import.

Chapter 7 – SubFinder Data Exchange _____________________________________________________________________________
_____________________________________________________________________________ Version 5.9 Data Exchange – Exporting Data 7.3.1 Rev. 9/09
7.3 Exporting Data The SubFinder system allows you to export a wide range of absence and job data, as well as data pertaining to SubPay and some basic employee and substitute information. Many districts use SubFinder’s export function to pass information on to their payroll systems. For detailed information regarding the exports available in Data Exchange, please refer to the SubFinder Import and Export Specification document.
Performing a SubFinder Data Export
To perform a SubFinder data export, click the Exports button on the Data Exchange Tool Bar
and SubFinder will display the Export List window:
Highlight the desired export, click the Open button, and SubFinder will display the appropriate export screen. (For the purpose of illustration we will look at an export in the SubFinder format.)

Chapter 7 – SubFinder Data Exchange _____________________________________________________________________________
_____________________________________________________________________________ Version 5.9 Data Exchange – Exporting Data 7.3.2 Rev. 9/09
• Date Range: Enter the Begin and End dates for the period you would like the export to cover. Dates should be entered using the format MMDDYY. For example: June 25, 2007 would be entered as 062507. If the dates are entered in this fashion, SubFinder will automatically insert the appropriate slashes (/).
• Filter By: You may choose to have the export cover All Sites, a Single Site, or a Site Group. If you choose Single Site or Site Group, click on the arrow at the end of the field and choose the appropriate entry from the list presented. If you don’t have any group sites created, this option will not be available. With some of the formats, you may not have a choice. SubFinder will default to the setting that is needed.
• Data Format: Choose the format of the file that you will be exporting. You may choose from:
o Comma Delimited: Each piece of data is limited to a maximum field size and separated only by a comma.
o Fixed Field: Each piece of data is limited to a maximum field size and a specific starting position. For example: The third field of the record will always start at position 21 and never exceed 25 characters.
Please note that some of the formats will not offer a choice. In those instances, SubFinder will default to the setting that is needed.
• Record Delimiter: Choose the manner in which each record is separated within the export file. You may choose from:
o Carriage Return: Each new record will start on a new line, but will not necessarily begin at position number one.
o Carriage Return/Line Feed: Each new record will start on a new line at position number one. This is the default value and is almost always used.
Please note that some of the formats will not offer a choice. In those instances, SubFinder will default to the setting that is needed.
Once you have made the appropriate choices, click the Export… button. SubFinder will begin the data export and display a progress window. When the export is complete, the progress window will display the following message:

Chapter 7 – SubFinder Data Exchange _____________________________________________________________________________
_____________________________________________________________________________ Version 5.9 Data Exchange – Exporting Data 7.3.3 Rev. 9/09
Click the Close button on the progress window and click the Close button on the Export screen. SubFinder will return you to the Data Exchange Tool Bar. When you perform a data export, your file(s) will be created in the SUBFIND\DATA directory of the computer that houses your data files.
Performing a SubPay Data Export
The SubPay Export is used to Export data from SubFinder’s SubPay module. These export options will only be used if you have purchased the SubPay program add-on module. To perform a SubFinder data export, click the SubPay Exports button on the Data Exchange Tool Bar
and SubFinder will display the SubPay Export List window:
From this point on, the export will proceed in the same fashion as described above in the section titled Performing a SubFinder Data Export.

Chapter 8 – SubFinder Reports _____________________________________________________________________________
_____________________________________________________________________________ Version 5.9 Reports – Introduction 8.0.1 Rev. 9/09
8.0 SubFinder Reports
For some, especially administrators and managers, the SubFinder reports and other information gathering tools are very exciting. SubFinder is loaded with reports and analysis tools to help make their jobs easier. Through day-to-day operations, SubFinder gathers a great deal of valuable data pertaining to your absences, jobs, employees, substitutes, etc. Without a means of accessing this data, it is virtually useless! SubFinder’s Reports module gives you the means to utilize this data to its fullest potential.
Starting the Reports Program The SubFinder Reports Tool Bar gives you access to a wide range of reports. To start the Report program:
1. Click the Start button on the Windows Task Bar. A menu will appear with your options.
2. Highlight SubFinder for Windows and a menu will appear listing the SubFinder programs available on that computer.
3. Highlight SubFinder Reports and click.
o Or double-click on the desktop icon (if available).
The Reports Tool Bar contains the following items:
• Title Bar: Shows the name of the program.
• Menu Options: These are located directly below the Title Bar and give you access to all of the reports as well as some configuration options for the Reports program. For more information, please refer to the section of this chapter titled Menu Options.
• Option Buttons: These buttons give you quick access to all of the report categories available within the Reports program as well as access to the help system and a means to exit the program. They represent, from left to right:
o Exit: Close the SubFinder Reports program.
o Jobs: Allows you to view and print reports dealing with jobs and absences.
o Employees: Allows you to view and print reports dealing with your employees.
o Substitutes: Allows you to view and print reports dealing with your substitutes.
o Sites: Allows you to view and print reports dealing with your sites.
o Preference Lists: Allows you to view and print reports dealing with your preference lists.

Chapter 8 – SubFinder Reports _____________________________________________________________________________
_____________________________________________________________________________ Version 5.9 Reports – Introduction 8.0.2 Rev. 9/09
o Job Positions: Allows you to view and print reports dealing with your job positions.
o Reasons: Allows you to view and print reports dealing with your absence, cancellation, and rejection reasons.
o Verification: Allows you to view and print reports dealing with SubFinder’s Verification feature.
o Payroll: Allows you to view and print reports dealing with payroll issues.
o Help: Access the on-line help system.
Functions Common to all Report Categories Any time you open a report category, SubFinder will display the same basic list window of all the reports available.
The screen contains the following components and buttons:
Control Buttons
Allows you to close the current window
Allows you to view the report on-screen
Sends one copy of the selected report directly to your default printer - the report will not be previewed on-screen
Gives you a description of the selected report

Chapter 8 – SubFinder Reports _____________________________________________________________________________
_____________________________________________________________________________ Version 5.9 Reports – Introduction 8.0.3 Rev. 9/09
Allows you to view the on-line help function
Selection Criteria
These options are available for all reports, although they may not apply to all categories. For example, Include Employee Numbers would not apply to a site report. You may select one or more options each time you run a report. Your selections will be retained until you make a change.
• Include Employee Numbers: If you flag this option, the employee number (General Information tab of the employee and substitute record) will appear in parentheses after the employee’s and/or substitute’s name. Careful use of this option will ensure that the employee number will remain confidential.
• Include Inactive Employees: If you flag this option, employees and/or substitutes flagged as inactive (General Information tab of the employee and substitute record) will be included in the report. If this option is not selected, any employee or substitute who is flagged inactive will NOT appear on the report.
• Include Restricted Employees: If you flag this option, employees and/or substitutes that have been flagged as restricted (General Information tab of the employee and substitute record) will be included in the report. If this option is not selected, any substitute who is flagged restricted will NOT appear on the report.
• Print Report to ASCII File: By selecting this option, SubFinder will save the report to a file on your computer’s hard drive as well as printing or previewing it. The report will be saved to the SUBFIND\DATA directory of the computer that houses your data files. At the writing of this document, the following reports are available for use with this function:
o Absence Report By Employee o Absence Report By Site o Absence Report By Site By Employee o Absence Report By Site By Employee (line) o Absence Report Francis Howell (line) o Individual Substitute Jobs o Individual Substitute Jobs (line) o Overall Substitute Jobs o Overall Substitute Jobs (line)
• Certified Only: By flagging this option, only those records (employee, substitute, and job position) that are flagged as only being certified will appear on reports.
• Classified Only: By flagging this option, only those records (employee, substitute, and job position) that are flagged as only being classified will appear on reports.
• Both Certified and Classified: By flagging this option, only those records (employee, substitute, and job position) that are flagged as being both certified and classified will appear on reports.
• Non-certified and Non-classified: By flagging this option, only those records (employee, substitute, and job position) that are flagged as being neither certified nor classified will appear on reports.
Note: If you are not using the Certified/Classified option, it is VERY important that the Non-certified and Non-classified option be selected. Leaving it unflagged will result in many of your reports coming up blank.

Chapter 8 – SubFinder Reports _____________________________________________________________________________
_____________________________________________________________________________ Version 5.9 Reports – Introduction 8.0.4 Rev. 9/09
The Preview Screen
Any time you preview a report SubFinder will display the report preview window:
The preview Window contains the following elements:
• Title Bar: Shows the name of the report being previewed.
• Tool Bar: The Tool Bar contains a number of buttons that can be used to manipulate the report:
This button will allow you to print the previewed report. You can select one page or all, one copy or many; and you can have the report print collated, or not.
This button will allow you to e-mail the previewed report as a PDF file. In order to e-mail the report you will need to have an e-mail client, such as MS Outlook Express, installed on your computer. The recipient(s) of the report will need to have Adobe Reader installed on their computer in order to read the report. This viewer is available free-of-charge and has been provided to you by CRS.
This button will bring the viewed report back to a one to one scaling.
This button will cause the report to be displayed in a “full page” view on your screen.
This button will increase the magnification of the report on your screen, making it easier to read. You may go as high as four times magnification. This function can also be accessed by left-clicking on the body of the report.
This button will reduce the magnification of the report on your screen, allowing you to see more of the report. You may go as low as one quarter

Chapter 8 – SubFinder Reports _____________________________________________________________________________
_____________________________________________________________________________ Version 5.9 Reports – Introduction 8.0.5 Rev. 9/09
(0.25) time magnification. This function can also be accessed by right-clicking on the body of the report.
If you are viewing any page of the report other than the very first, this button will take you back to the first page.
If you are viewing any page of the report other than the very first, this button
will take you back to the previous page.
If you are viewing any page of the report other than the very last, this button will take you forward to the next page.
If you are viewing any page of the report other than the very last, this button will take you forward to the last page.
This button will exit the preview screen and take you back to the list window for the report category with which you’re currently working.
• Status Bar: The Status Bar contains two pieces of information.
o Magnification: This indicates the level of magnification that you are currently using to view the report. On the sample screen above the report is being viewed at 75% (0.75) of the full-scale view.
o Pagination: This indicates what page of the report you are viewing as well as the total number of pages. The sample screen on the previous page displays page one of three of the Absence Report by Site.
• The Slider Bar: The Slider Bar is a tool you can use to navigate from page to page. Clicking on the right or left arrow will move you forward or back one page at a time. Clicking and holding the slider and then dragging it to the right or the left will have the same effect. Clicking in the gray area to the right or left of the slider will take you to the last page of the report or back to the first.

Chapter 8 – SubFinder Reports _____________________________________________________________________________
_____________________________________________________________________________ Version 5.9 Reports – Menu Options 8.1.1 Rev. 9/09
8.1 Menu Options
The Menu Options are found under the Title Bar of the SubFinder Reports program. These options allow you to change the printer setup, access any of the report categories, and specify which file(s) is accessed when running reports. Each option available will be discussed in the sections that follow:
File
Click on the word File, and SubFinder will display the following drop down menu:
Print Setup
By selecting this option, you have the ability to change the printer that SubFinder will use and certain paper settings. We recommend using the default settings since changing them could affect the clarity of your reports. Exit This is one method that can be used to close the Reports program.
Reports Click on the word Reports, and SubFinder will display the following drop down menu:
You may use this menu to select which report category you want to access. These selections mirror the buttons on the Reports Tool Bar.

Chapter 8 – SubFinder Reports _____________________________________________________________________________
_____________________________________________________________________________ Version 5.9 Reports – Menu Options 8.1.2 Rev. 9/09
Options Click on the word Options, and SubFinder will display the following drop down menu:
Preferences This option allows you to specify which file(s) should be used when SubFinder generates a report. Click on the word Preferences, and SubFinder will display Use Archive Files screen:
• Select Files for Reports: Which files do you want SubFinder to use when pulling data for the reports? You have three choices:
o Use Current Files: By selecting this option, SubFinder will pull information only from the active data files to generate reports. If you are not utilizing the archiving function (Job Archival Threshold within the General System Options of the SubFinder Control Panel), this would be the appropriate option to choose.
If you are utilizing the archive function, you must decide if the report should contain only current data or current and archived data. For example: If you have the Job Archival Threshold set for 90 days and the date range for the report being run is 120 days, any information on a job which was completed from 91 days to 120 days in the past WILL NOT BE INCLUDED IN THE REPORT.
o Use Archive Files: By selecting this option, SubFinder will pull information only from the archived data files to generate reports. No current data will be included. If you are not utilizing the archiving function (Job Archival Threshold within the General System Options of the SubFinder Control Panel), do not select this option. Using it would cause your reports to come up blank!
If you are utilizing the archive function, you must decide if the report should contain only current data or current and archived data. For example: If you have the Job Archival Threshold set for 90 days and the date range for the report being run is 120 days, any information on a job which was completed prior to 91 days in the past WILL NOT BE INCLUDED IN THE REPORT.
o Use Both Files: By selecting this option, SubFinder will look at both the current and archive files when generating reports. While this can slow down the creation of reports, it may be the best option to choose if you are utilizing the archiving function (Job Archival Threshold within the General System Options of the SubFinder Control Panel) and frequently ask for reports that would need data from both files.

Chapter 8 – SubFinder Reports _____________________________________________________________________________
_____________________________________________________________________________ Version 5.9 Reports – Absence/Jobs 8.2.1 Rev. 9/09
8.2 Absence/Job Reports
Absence/Job Reports provide information about who will be absent, when and why the absences occur, who the substitutes will be, etc. The information is available in a number of different formats designed to meet the many needs of your district personnel. Before running many of the absence/job reports, you must first select the type of data you would like to have included. This is accomplished through the use of the report criteria screens. While different reports have different screens, understanding the basic concepts will help you tailor each report to your specific needs. We will look at the screens available when running the Absence Report by Site. From the Reports Tool Bar click the Jobs button, and SubFinder will display the Job Reports list window:
Running a Report
From the Job Reports list window, highlight the Absence Report by Site and click either the Preview… or the Print… button. SubFinder will display the Absence Report Criteria screen:

Chapter 8 – SubFinder Reports _____________________________________________________________________________
_____________________________________________________________________________ Version 5.9 Reports – Absence/Jobs 8.2.2 Rev. 9/09
You’ll notice that this screen has two tabs, the Sort Criteria tab and the Filter Criteria tab. We will look at each one in detail, beginning with the Sort Criteria.
The Sort Criteria Tab
By using the options available on the Sort Criteria tab, you can determine how the data is presented on your report.
• Site Selection Box: The first selection box allows you to choose the sites, site, or site group that will appear on the report.
o All Sites: By selecting this option, the report will present the absence/job information in ascending alphabetical order by site, including all sites in one report.
o Single Site: By selecting this option, you can run the report for one particular site. To select a specific site, click on the arrow at the end of the field and choose the desired entry from the list presented.
o Site Group: By selecting this option, you can choose to run the report for one of the site groups that you’ve already created. The report will present the absence/job information in ascending alphabetical order by site, including only those sites that are a member of the selected group. To select a specific site group, click on the arrow at the end of the field and choose the desired entry from the list presented. If you have not created any site groups, this field will not be available.
• Absence Date Range: By selecting this option and then entering a First Date and Last Date, you can specify the period that the report should cover. Since this report is frequently run for “today’s absences and jobs,” the dates will automatically default to the current system date. If you manually enter the dates, use the format MMDDYY. For example: June 25, 2007 would be entered as 062507.
• Time Units: Select the time units you would like the report to display for your absences and jobs.

Chapter 8 – SubFinder Reports _____________________________________________________________________________
_____________________________________________________________________________ Version 5.9 Reports – Absence/Jobs 8.2.3 Rev. 9/09
o Hours: The total time for each absence/job will be displayed in hours and partial hours up to 3 decimal places. For example: 7.625 hours.
o Half Days: The total time for each absence/job will be reported in half-day increments based on the Half-Day Threshold field in the General System Options of the SubFinder Control Panel. For example: If an employee is absent for 1 ½ days, the report would show 3 half-days.
o Whole Days: The total time for each absence/job will be reported as full days only. Whether the absence is for 1 hour or 10 hours, it will be reported as a whole day.
o Partial Days: The total time for each absence/job will be reported in full and half day combinations based on the Half-Day Threshold field in the General System Options of the SubFinder Control Panel. For example: If an employee is absent for 1 ½ days, the report would show 1.5 days.
• Miscellaneous Options: The following options should be flagged only if you want the information included in the report.
o Include Sites Without Absences: Selecting this option will cause sites that did not have any absences during the specified Date Range to appear on the report. The site name will appear with the following notation under it: “There are no jobs that match the selection criteria.”
o Include Cancelled Absences: Selecting this option will cause absences that were cancelled by the employee, the site administrator, or the SubFinder system operator to be included in the report.
o Include No Sub Required Absences: Selecting this option will cause absences for employees who do not need a substitute to be included in the report.
o Add Page Break Between Sites: Selecting this option will cause the absences/jobs for each site to begin on a new page. If this option is not selected, the absences/jobs for each site will simply be separated by a header for each new site.
• Show Only Summary: When running the absence/job reports, a summary page is automatically included as the last page of the report. By selecting this option, the summary page will be the only page generated.
The Filter Criteria Tab
By utilizing the options available on the Filter Criteria tab, you can quickly narrow a report down to a very specific data set.

Chapter 8 – SubFinder Reports _____________________________________________________________________________
_____________________________________________________________________________ Version 5.9 Reports – Absence/Jobs 8.2.4 Rev. 9/09
• Position Selection Box: The first selection box allows you to choose the positions, position, or position group that will appear on the report.
o All Job Positions: By selecting this option, the report will present the absence/job information for all applicable job positions.
o Single Job Position: By selecting this option, you can run the report for one particular position. To select a specific position, click on the arrow at the end of the field and choose the desired entry from the list presented.
o Job Position Group: By selecting this option, you can choose to run the report for one of the job position groups that you’ve already created. The report will present the absence/job information for only those positions that are a member of the selected group. To select a specific job position group, click on the arrow at the end of the field and choose the desired entry from the list presented. If you have not created any job position groups, this field will not be available.
• Substitute: Selecting this option will allow you to run the report for the absences/jobs filled by one substitute. To select a specific substitute, click on the arrow at the end of the field and choose the desired entry from the list presented.
• Reason: Selecting this option will allow you to run the report for the absences/jobs entered for one particular absence reason. To select a specific reason, click on the arrow at the end of the field and choose the desired entry from the list presented.
• Job Status: Selecting this option will allow you to run the report for the absences/jobs with a particular job status. To select a specific status, click on the arrow at the end of the field and choose the desired entry from the list presented. Your choices are:
o Cancelled: Absences/jobs that have been cancelled by the employee, the administrator, or the SubFinder system operator.

Chapter 8 – SubFinder Reports _____________________________________________________________________________
_____________________________________________________________________________ Version 5.9 Reports – Absence/Jobs 8.2.5 Rev. 9/09
o Failed to Fill: Absences/jobs that SubFinder was unable to fill either because it ran out of time or ran out of substitutes.
o Filled: Absences/jobs that were filled.
o No Show: Absences/jobs where the substitute who agreed to fill in never showed up. Only a System Operator can enter a No Show status using the keyboard.
o None: An absence that was reported as No Substitute Required.
o Unfilled: Absences/jobs that SubFinder have not yet filled. SubFinder still has time to work on absences with this status.
• Job Type: Selecting this option will allow you to run the report for the absences/jobs with a particular job type. To select a specific type, click on the arrow at the end of the field and choose the desired entry from the list presented. Your choices are:
o No Substitute Required: Absences that do not require any substitute coverage.
o Prearranged Substitute: Absences/jobs where the substitute was arranged ahead of time.
o Requested Substitute: Absences/jobs where a specific substitute was requested.
o Substitute Required: Absences/jobs that SubFinder worked on using the applicable preference list(s) and skill list.
• Category: If you assigned category numbers to your job positions (Job Positions on the Edit Bar) you can select this option and specify the category number you wish to use to limit the report.
Generating the Report
Once you have customized the report to your requirements, click the OK button at the bottom of the Absence Report Criteria screen. SubFinder will generate the report and either display it on-screen or send it directly to the printer, depending upon your selection.
Available Job Reports
There are many reports available with SubFinder to aid you in the analysis of your absences, both for individual sites and district-wide. The following is a listing of the reports available at the writing of this document, along with a brief summary of what each report includes:
• Absence Authorization Report: This report provides all of an employee's absences for the specified time period along with the reason and length of each absence. It includes a space for the employee and principal to sign off. Certain aspects of the report can be customized to your needs. Call CRS Incorporated Client Services for assistance in customizing the report.

Chapter 8 – SubFinder Reports _____________________________________________________________________________
_____________________________________________________________________________ Version 5.9 Reports – Absence/Jobs 8.2.6 Rev. 9/09
• Absence Days Report: This report provides a listing of any employees who have been absent ‘X’ number of days or more during a specified date range.
• Absence Report by Employee: This report provides absence information sorted by employee and then absence start date.
• Absence Report by Site: This report provides absence information sorted by site and then by start date. While this report will include itinerant absences, they will only be displayed for the employee’s home site. A sample of the report follows:
• Absence Report by Site (Itinerant): This report provides absence information
sorted by site and then by absence start date. It includes complete itinerant absence information.
• Absence Report by Site by Employee: This report provides absence information sorted by site, then by employee name.
• Absence Report by Site by Employee (line): This report provides a summary of absences by site, sorted by employee name. It includes less information than the Absence Report by Employee and is printed in a “single line per entry” format.
• Absence Report Francis Howell (line): This report provides a summary of absences by site, sorted by employee name, absence reason, and miscellaneous code. The report is printed in a “single line per entry” format.
• Absence Responses Report: This report summarizes the responses to jobs within a given Date Range or ID range. The responses counted include: accepts, rejects,

Chapter 8 – SubFinder Reports _____________________________________________________________________________
_____________________________________________________________________________ Version 5.9 Reports – Absence/Jobs 8.2.7 Rev. 9/09
cancels, Do Not Disturbs entered by a substitute, requests, busy signals, no answers, connects-no-response, no ring backs, operator intercepts, hang-ups after PIN entered, and job reviewed on call-in.
• Absence Verification Report: This report provides a listing of employee absences for the included time period along with the absence reason, length of the absence and space for the employee to sign off.
• Bi-Weekly Employee Attendance Chart: This report provides a bi-weekly calendar with employee absences for a two week period, the absence reason, whether the absence was a partial day or a full day, and whether or not a substitute was utilized. The start date of this report must be a Sunday.
• Configuration Profile Report: This report provides information about the configuration profiles for your district as well as other Control Panel information.
• Employee Absence Analysis: This report provides a summary of employee absences by reason and day of week. Percentages can be included for each day of the week and for each reason.
• Half-Day Jobs Report By Site by Employee (line): This report provides a summary of half-day jobs by site, sorted by employee name. The report is printed in a “single line per entry” format.
• Individual Substitute Absences: This report provides absence information sorted by substitute and then absence start date. A separate page is generated for each substitute. This report will only be applicable if you are allowing your substitutes to report absences.
• Individual Substitute Jobs: This report provides job information sorted by substitute and then by job start date. A separate page is generated for each substitute.
• Individual Substitute Jobs (line): This report provides job information sorted by substitute and then by start date. The report will run as a continuous report, with only a new header for each new substitute. It includes less detailed information than the Individual Substitute Jobs report and is printed in a “single line per entry” format.
• Itinerant Absence Report: This report provides absence information for any itinerant employees during a given date range.
• Job Call List Report: This report will list substitutes in the order by which they will be called for a particular job.
• Job Log Report: This report provides a detailed accounting of the actions taken to fill an absence or job. It includes any changes made to the absence or job as well as the steps SubFinder took to fill it.
• LAUSD Substitute Selection List: This report provides a detailed listing of which substitutes would be considered for any given absence. This report only functions if your district is using the LAUSD Substitute Selection Process.
• Long Term Assignments Report: This report provides absence information on any long-term assignments during the specified time period. Whether or not an absence or job is long-term is determined by using the Long Term Threshold within the General Profile Options of the SubFinder Control Panel.

Chapter 8 – SubFinder Reports _____________________________________________________________________________
_____________________________________________________________________________ Version 5.9 Reports – Absence/Jobs 8.2.8 Rev. 9/09
• No Employee Jobs Report: This report provides job information for No Employee Jobs, sorted by site.
• Operator Intercept Report: This report provides a list of “operator intercepts” (i.e. disconnected numbers, undefined area code/exchange, etc.) received from calling substitutes. This may be helpful in determining why certain substitutes were not contacted.
• Overall Absence Analysis: This report provides the absences for ALL SITES or a SINGLE SITE, calculating the percentage of absences by day and by reason. A sample of the report follows:
• Overall Substitute Jobs: This report provides job information sorted by substitute
and then start date. The option to add a page break between substitutes is available.
• Overall Substitute Jobs (line): This report provides job information sorted by substitute and then by start date. This report will be continuous rather than using a separate page for each substitute. It includes less detailed information than the Overall Substitute Jobs report and is printed in a “single line per entry” format.
• Pending Cancel Notifications: This report provides information on any cancelled absence or job that requires a cancellation call to the substitute.
• Phone Attributes Report: This report provides a list of dialing attributes as defined in the Control Panel, as well as a listing of the area codes and exchange attributes.

Chapter 8 – SubFinder Reports _____________________________________________________________________________
_____________________________________________________________________________ Version 5.9 Reports – Absence/Jobs 8.2.9 Rev. 9/09
• Substitute Job Exceptions: This report shows information on which jobs a substitute had cancelled, rejected, or was a no show. This report can be used to show information needed for unemployment claim processing.
• Substitute Pay Sheet Report: This report provides information on jobs a substitute worked for the specified time period along with the name of the absent employee, the pay rate, and the length of each absence. There is a space for the Substitute and Administrator to sign off.
• Substitute Range Activity Report: This report provides a listing of any substitutes who have worked ‘X’ number of days or more during a specified date range.
• Substitute Timesheet Report: This report provides all of a substitute's jobs for the specified time period along with the name of the absent employee and the length of each absence. It includes a space for the substitute and site administrator to sign off. Certain aspects of the report can be customized to your needs. Call CRS Incorporated Client Services for assistance in customizing the report.
• Usage Statistics Report: This report shows a statistical comparison of how often employees, substitutes, administrators, and the SubFinder Operator(s) are using the Call Processor, the Internet portion of SubFinder, and the Edit programs to report, fill, and cancel absences and job assignments. This is a single page report that is run for a specific date range.


Chapter 8 – SubFinder Reports _____________________________________________________________________________
_____________________________________________________________________________ Version 5.9 Reports – Employee Reports 8.3.1 Rev. 9/09
8.3 Employee Reports
Any information regarding the employee that is not directly related to absences can be found in the Employee Reports section. Many of the available reports have sorts and filters that will allow you to customize the content of the report to your own specific needs. From the Reports Tool Bar click the Employees button, and SubFinder will display the Employee Reports list window:
Please remember, do not flag the Include Employee Numbers option on this screen unless you need the employee’s Employee Number on the report!
Available Employee Reports
The following is a listing of the reports available along with a brief summary of what each report includes:
• Employee Absence Summary: This report provides a summary of employee absences, listing the employee’s name, their position, and their absence total for the specified period.
• Employee Assignment Code Report: This report is part of a custom programming project. It is not available for use with this version of SubFinder.
• Employee Certifications: This report provides an alphabetical listing of all employees, indicating their certifications and associated expiration dates. This report can also be used to find out whose certifications are about to expire.

Chapter 8 – SubFinder Reports _____________________________________________________________________________
_____________________________________________________________________________ Version 5.9 Reports – Employee Reports 8.3.2 Rev. 9/09
• Employee Count: This report calculates the total employees within the system, at each site, at a single site, or at each site within a site group.
• Employee Details: This report provides a detailed listing of the information entered for each employee, including address, phone number, home site, job position(s), and User Defined Codes. Each employee will be printed on a separate page. This report does include the employee number.
• Employee Hire Date: This report provides a listing of employees, their hire dates, and their termination dates. This report uses the employee’s User Defined Code #5 to retrieve the termination date information.
• Employee ID: This report prints a listing of employee names and their SubFinder-assigned ID number. Administrators will use the ID number any time they need to create an absence for one of their own employees via the phone.
• Employee Leave Control: This report provides a detailed accounting of employees within your system who have been set up to utilize SubFinder’s Leave Control feature. Selection criterion includes single employee, all employees, all employees by site, all employees at a single site, and all employees within a single site group. You may also choose to include all controlled reasons or a single reason.
• Employee Mailing Labels (#5160): This creates a report which uses the Avery 5160 label format (3 across, 30 per page) to print address labels for employees.
• Employee Mailing Labels (#5161): This creates a report which uses the Avery 5161 label format (2 across, 20 per page) to print address labels for employees.
• Employee Phone List: This report provides a listing of employee names and phone numbers. It will also indicate the employee’s certified/classified status if appropriate.
• Employee PIN’s: This report provides a listing of employee names and Personal Identification Numbers (PIN). The PIN is the number employees use to identify themselves to SubFinder.
• Employee Site Labels: This report generates labels including the employee’s name and their home site. It uses the Avery 5161 label format.
• Employee Validation Report: This report should be run after importing employees into the SubFinder system. It verifies that the home site, job position, and calendars are valid for each employee. Any employee considered "invalid” will appear on the report along with an indication of what data is missing.
• Employees: This report provides a detailed listing of the information entered for each employee, including address, phone number, home site, and job position(s). Unlike the Employee Details report this does not include the User Defined Codes, and the report will be run continuously without a page break between each employee.
• Employees (+ Misc. Codes): This report provides a detailed listing of the information entered for each employee, including address, phone number, home site, job position(s), and User Defined Codes. The report will be run continuously without a page break between each employee.
• Employee by Primary Job Position: This report provides an alphabetical listing of job positions along with the employees who have had the position assigned as their primary position. If the employee has a secondary job position, it will also be included in the report.

Chapter 8 – SubFinder Reports _____________________________________________________________________________
_____________________________________________________________________________ Version 5.9 Reports – Employee Reports 8.3.3 Rev. 9/09
• Employees by Secondary Job Position: This report provides an alphabetical listing of job positions along with the employees who have had the position assigned as their secondary position. The report will also indicate the primary position assigned to the employee.
• Employees Who Are Also Substitutes: This report provides a listing of employees who are also entered in the system as a substitute. The report will include their ID number and current status as an employee and substitute, i.e. inactive and/or restricted.
• Inactive Employees: This report will provide an alphabetical listing of inactive employees along with their ID number and their phone number.
• Itinerant Employees: This report produces a list of your itinerant employees, their basic information, and their schedules.
• Make-Up Teacher List: This report provides a listing of all those employees who have been designated as a make-up teacher on the General Information tab of their employee record.
• Monday/Friday Absence Analysis: This report counts and summarizes the number of employee absences on Mondays and Fridays during a specified date range.
• Monthly Leave Report: This report displays leave control information for the selected employee. The report displays the number of hours (or days) for each absence reason for the current period or for year to date.
• Perfect Attendance Report: This report provides a listing of those employees who have a perfect attendance record based upon criteria that you specify. The option to exclude absences for particular reasons, such as jury duty or school business, is included in the setup for this report.
• Purged Employees: This report provides a listing of employees who have been purged from the system. This will only pick up employees that were purged using version 3.3.5N or greater.
• Unvoiced Employees: This report will provide a listing of any employees who have not “voice-registered” with SubFinder. It will include their name and phone number.


Chapter 8 – SubFinder Reports _____________________________________________________________________________
____________________________________________________________________________ Version 5.9 Reports – Substitute 8.4.1 Rev. 9/09
8.4 Substitute Reports
Any information regarding the substitute that is not directly related to absences can be found in the Substitutes Reports section. Many of the available reports have sorts and filters that will allow you to customize the content of the report to your own specific needs. From the Reports Tool Bar click the Substitutes button, and SubFinder will display the Substitute Reports list window:
Please remember, do not flag the Include Employee Numbers option on this screen unless you need the employee’s Employee Number on the report.
Available Substitute Reports
The following is a listing of reports available along with a brief summary of what each report includes:
• All Substitute Listing: This report provides an alphabetical listing of all substitutes, their ID numbers, their phone numbers, and their certified/classified status.
• Available Substitutes: This report provides an alphabetical listing of all substitutes who are available to work all of the days of the specified date range.
• Days Remaining to Work: This report provides a listing of all substitutes, the number of days they have worked in certified jobs, and the number of days left to work in certified jobs. The report is based on parameters entered in Certified Options of the SubFinder Control Panel.

Chapter 8 – SubFinder Reports _____________________________________________________________________________
____________________________________________________________________________ Version 5.9 Reports – Substitute 8.4.2 Rev. 9/09
• Idle Substitute Report: This report provides an alphabetical listing of substitutes who have not worked during the specified date range.
• Inactive & Restricted Substitutes: This report will provide an alphabetical listing of inactive, restricted, or both inactive and restricted substitutes. If you select inactive and restricted, only those substitutes who qualify as both will be included.
• Job Log by Substitute (sort by job ID): This report provides detailed information about a substitute’s activities with regard to both job shopping and calls received from SubFinder. The report will sort the information by Job ID number.
• Job Log by Substitute (sort by log entry date): This report provides detailed information about a substitute’s activities with regard to both job shopping and calls received from SubFinder. The report will sort the information by the date that the activity occurred.
• Non-Certified Substitute Job: This report provides an alphabetical listing of all non-certified substitutes and the number of days they have worked in certified job positions.
• Overall Substitute Responses: This report provides a summary of a substitute’s activities with regard to both job shopping and calls received from SubFinder for a specified date range.
• Pre-registered Substitutes Report: This report provides a listing of substitutes, their PIN, their phone number, and their pre-registration status.
• Purged Substitutes: This report provides a listing of substitutes who have been purged from the system. This will only pick up substitutes that were purged using version 3.3.5N or greater.
• Substitute Assignment Code Report: This report is part of a custom programming project. It is not available for use with this version of SubFinder.
• Substitute Availability Report: Prints weekly heading with substitute availability hours and times.
• Substitute by Site: This report provides an alphabetical listing of all substitutes who will work at a particular site. You can also request only those substitutes who are available to work on a specified day or date range.
• Substitute Certifications: This report provides an alphabetical listing of all substitutes, indicating their certifications and associated expiration dates. This report can also be used to find out whose certifications are about to expire.
• Substitute Cross-Reference with Positions Description: This report will print a listing of all substitutes assigned to your job positions. You may select all positions, a single position, or a job position group. The report will indicate which substitutes work which positions along with the assigned skill level. If a skill level lower than C is assigned to a substitute for a particular job position, only an asterisk (*) will appear in the box.
• Substitute Details: This report prints out all the information pertaining to a substitute as entered in their record. This report prints one substitute per page. This report does include the substitute’s Employee Number.
• Substitute Disqualification Report: This report will print those substitutes who have been disqualified from call-out. Among other things, you can specify the date range, the calling period and the disqualification reason.

Chapter 8 – SubFinder Reports _____________________________________________________________________________
____________________________________________________________________________ Version 5.9 Reports – Substitute 8.4.3 Rev. 9/09
• Substitute Hire Date: This report provides a listing of substitutes, their hire dates, and their termination dates. This report uses the substitute’s User Defined Code #5 to retrieve the termination date information.
• Substitute ID’s: This report prints a listing of substitute names and their SubFinder-assigned ID number. Administrators and/or employees will use the ID number any time they need to request or prearrange substitutes via the phone.
• Substitute Mailing Labels (#5160): This creates a report which uses the Avery 5160 label format (3 across, 30 per page) to print address labels for substitutes.
• Substitute Mailing Labels (#5161): This creates a report which uses the Avery 5161 label format (2 across, 20 per page) to print address labels for substitutes.
• Substitute Number of Days Worked: This report will print a list of all substitutes, the number of days they have worked at certified jobs, max days they can work, and the remaining number of days they can work.
• Substitute PINs: This report provides a listing of substitute names and PIN numbers. The PIN is the number substitutes use to identify themselves to SubFinder.
• Substitute Positions: This report creates an alphabetical listing of substitutes and the positions they are willing to teach. The report can also be run for a single substitute. You are given the option to include or exclude the substitute’s PIN and phone number.
• Substitute Preference List Assignments: This report generates an alphabetical listing of substitutes and the preference lists to which they have been assigned.
• Substitute Responses and Rejections Report: This report provides information on substitutes that include the sites at which the substitute will work, the job positions assigned to the substitute, jobs the substitute has worked, and the total calls SubFinder made to the substitute along with the responses the substitute gave to those calls. This report provides valuable information that can be used in the defense of unemployment claims.
• Substitute Site Preferences: This report creates an alphabetical listing of substitutes and the sites at which they are willing to work. The report can also be run for a single substitute. This report does include the substitute’s PIN and phone number.
• Substitute Telephone List: This report provides a listing of substitute names and phone numbers.
• Substitute Usage Summary: This report takes two job position groups and compares the number of sub required jobs, filled jobs, and unfilled jobs for a specified date or date range. It also provides the ratios of filled and unfilled jobs. This report will not function properly if you have not created any job position groups.
• Substitutes: This report will print out an alphabetical listing of all substitutes with their names, addresses, phone numbers, PIN’s, and SubFinder-assigned ID numbers.
• Substitutes by Position: This report is the same as the Substitutes ID by Position report, but it does not include the substitute’s ID number.
• Substitutes ID by Position: This report generates an alphabetical listing of job positions and the substitutes who are able to teach each one. The substitute’s name, ID number, phone number, and skill level are included. This report can also be run to see which substitutes are available to teach a particular job position for a specified date or date range.

Chapter 8 – SubFinder Reports _____________________________________________________________________________
____________________________________________________________________________ Version 5.9 Reports – Substitute 8.4.4 Rev. 9/09
• Unavailable Substitutes: This report generates an alphabetical listing of the substitutes who are not available to work on a specified date or date range along with the reason why they are unavailable. It also includes the substitute’s phone number.
• Unvoiced Substitutes: This report provides an alphabetical listing of all unvoiced substitutes along with their phone numbers. These are the substitutes who have not yet registered with SubFinder.
• Unvoiced Substitutes by Position: This report generates an alphabetical listing of job positions and the substitutes who are able to teach each one but are still unvoiced. The substitute’s name, phone number, and skill level are included. This report can also be run to see which unvoiced substitutes are available to teach a particular job position for a specified date or date range.
• Working Substitutes: This report will generate an alphabetical list of substitutes who are working for you on a specified date or date range. The report includes each substitute’s phone number.

Chapter 8 – SubFinder Reports _____________________________________________________________________________
_____________________________________________________________________________ Version 5.9 Reports – Sites 8.5.1 Rev. 9/09
8.5 Site Reports
There are a few select reports that will provide you with information regarding each individual site as set up in the Edit program of SubFinder. From the Reports Tool Bar click the Sites button, and SubFinder will display the Site Reports list window:
Available Site Reports
The following is a listing of the reports available along with a brief summary of what each report includes:
• Site Details: This report prints out all the information contained on the General Information and User Defined Codes tabs of each site record. The report prints one site per page.
• Site Phone List: This report provides a listing of site names and phone numbers. It also includes the site number and the SubFinder-assigned ID number.
• Site Report: This report has the same basic information as the Site Details report, but it is generated in a paper saving mode – the sites are listed continuously rather than one per page. This report also includes information from the Administrator Codes tab.


Chapter 8 – SubFinder Reports _____________________________________________________________________________
_____________________________________________________________________________ Version 5.9 Reports – Preference Lists 8.6.1 Rev. 9/09
8.6 Preference List Reports
Preference List reports give you information about existing Preference and Exclusion Lists. You use them to see which substitutes are on a Preference List or who is excluded from different sites. From the Reports Tool Bar click the Preference Lists button, and SubFinder will display the Preference List Reports list window:
Available Preference List Reports
The following is a listing of the reports available along with a brief summary of what each report includes:
• Preference List Assignment Form: This report generates a form that can be sent out to each site. It provides an alphabetical listing of employees at each site along with space to indicate which preference list should be assigned to each employee and whether or not the Skill List would be appropriate.
• Preference List for Employees: This report provides an alphabetical listing of employees at a site along with their preference list assignments.
• Preference List for Substitutes: This report generates a listing of preference lists at a site and the substitutes who have been assigned to those lists. You have the option of showing all preference lists or choosing only certain types – personal exclusion, site exclusion, personal permanent substitute, site permanent substitute, or regular.
• Substitute’s Preference List: This report prints an alphabetical listing of substitutes and the preference lists to which they belong. You have the option of showing all

Chapter 8 – SubFinder Reports _____________________________________________________________________________
_____________________________________________________________________________ Version 5.9 Reports – Preference Lists 8.6.1 Rev. 9/09
preference lists or choosing only certain types – personal exclusion, site exclusion, personal permanent substitute, site permanent substitute, or regular.

Chapter 8 – SubFinder Reports _____________________________________________________________________________
_____________________________________________________________________________ Version 5.8 Reports – Job Positions 8.7.1 Rev. 9/09
8.7 Job Position Reports
Job Position reports give you information about the positions that you have created with your SubFinder system. From the Reports Tool Bar click the Job Positions button, and SubFinder will display the Job Position Reports list window:
Available Job Position Reports
The following is a listing of the reports available along with a brief summary of what each report includes:
• Job Position Details: This report presents a detailed alphabetical listing of all job positions within the SubFinder system, including their certified/classified status.
• Job Position List: This report presents a simple alphabetical listing of all job positions within the SubFinder system, including their name, number, and category number.


Chapter 8 – SubFinder Reports _____________________________________________________________________________
_____________________________________________________________________________ Version 5.9 Reports – Reasons 8.8.1 Rev. 9/09
8.8 Reason Reports
Just like the Job Position reports, the Reason reports are very simple. They display the information entered into the SubFinder system having to do with reasons. From the Reports Tool Bar click the Reasons button, and SubFinder will display the Reason Reports list window:
Available Reason Reports
The following is a listing of the reports available along with a brief summary of what each report includes:
• Reasons Detail Report: This report provides an alphabetical listing of the reasons, an indication of who has access to the reason, and information regarding any daily limit and miscellaneous code usage.
• Reason Report (with Misc. Code): This report includes the same information as the Reason Detail report plus any associated Miscellaneous Codes.
• Reason Report (with monthly limits): This report includes the same information as the Reason Detail report plus any associated monthly absence limits.


Chapter 8 – SubFinder Reports _____________________________________________________________________________
_____________________________________________________________________________ Version 5.9 Reports – Verification 8.9.1 Rev. 9/09
8.9 Verification Reports
The Verification reports correspond with the Verification feature in SubFinder and add filters specific to that feature. If you are not using the Verification feature of SubFinder, you will not use the reports in this area. From the Reports Tool Bar click the Verification button, and SubFinder will display the Verification Reports list window:
Available Verification Reports
The following is a listing of the reports available along with a brief summary of what each report includes:
• Absence Report by Site: This report provides absence information sorted by site and then start date. While this report will include itinerant absences, they will only be displayed for the employee’s home site. In addition to the filters available on the standard Absence Report by Site, this report also allows filtering by verify status and process status.
• Overall Substitute Jobs: This report provides job information sorted by substitute and then start date. It will be continuous rather than using a separate page for each substitute. In addition to the filters available on the standard Overall Substitute Jobs report, this report also allows filtering by verify status and process status.


Chapter 8 – SubFinder Reports _____________________________________________________________________________
_____________________________________________________________________________ Version 5.9 Reports – Payroll 8.10.1 Rev. 9/09
8.10 Payroll Reports
The Payroll reports are an aid in helping to confirm the time substitutes have worked and what their pay rate should be. From the Reports Tool Bar click the Payroll button, and SubFinder will display the Payroll Reports list window:
Note: When running Payroll reports you will probably want to flag the Include Employee Numbers option.
Available Payroll Reports
The following is a listing of the reports available along with a brief summary of what each report includes:
• Budget Code Transmittal: This report calculates substitute pay, sorted by the Miscellaneous Code used for each job. All jobs that do not have an associated Miscellaneous Code will be grouped together. A field in the selection window allows you to enter either an hourly or a daily rate.
• Substitute Payroll Report: This report aids you in tracking pay rate changes for your substitutes based on an escalation of pay after a substitute has worked a certain number of days. For example: your district has a policy to pay substitutes at a higher pay rate after they have worked 30 days. Substitute ‘A’ has worked a total

Chapter 8 – SubFinder Reports _____________________________________________________________________________
_____________________________________________________________________________ Version 5.9 Reports – Payroll 8.10.2 Rev. 9/09
of 30 days as of December 15th. Starting with the 31st day of work, Substitute ‘A’ receives an extra $10.00 a day through the end of the school year.
This report provides the following information: Job ID, Absence Reason, Miscellaneous Code, Site Number, Job Date, length of job (in days or hours), T1 (calculated quantity of total days worked to that point), the Pay Code, and Change Date. The change field will have a *** the FIRST TIME the substitute reaches the pay code change threshold.
After running the report, the date the substitute reached the minimal days needed will automatically be entered by SubFinder in the substitute’s User Defined Code field #7 – Payroll Report Date. A pay code of 2 will automatically be entered by SubFinder in the substitute’s User Defined Code field #6 – Payroll Report Code.
• Substitute Transmittal Report: This report calculates a substitute’s pay. A field in the selection window allows you to enter either an hourly or a daily rate. The report sorts by Job ID.

Chapter 9 – SubCast _____________________________________________________________________________
_____________________________________________________________________________ Version 5.9 SubCast - Introduction 9.0.1 Rev. 9/09
9.0 SubCast
SubCast is a module available with the SubFinder system. Use of this program will allow you to automatically send certain reports out to your various sites, via e-mail, fax, or a combination of the two.
Starting the SubCast Program To start the SubCast program:
1. Click the Start button on the Windows Task Bar. A menu will appear with your options.
2. Highlight SubFinder for Windows and a menu will appear listing the SubFinder programs available on that computer.
3. Highlight SubFinder SubCast and click.
• Or double-click on the desktop icon (if available).
The SubCast window contains the following items:
• Title Bar: Shows the name of the program.
• Menu Options: These are located directly below the Title Bar and give you access to all of the various options available for the program. For more information, please refer to the section of this chapter titled Menu Options.
• The Display Area, located under the Menu Options, contains the following information:
o ID: When SubCast is in the Automatic Report mode it creates a temporary index number for each report that is scheduled. It always starts with one (1) and continues incrementally by one. This number is only used during the current report period, and will not be used by any other SubFinder program.

Chapter 9 – SubCast _____________________________________________________________________________
_____________________________________________________________________________ Version 5.9 SubCast - Introduction 9.0.2 Rev. 9/09
o Report: This will indicate the report profile that is scheduled to run.
o Start Time: This will indicate the time that the indicated profile will begin to execute.
o Status: This will indicate the status of the indicated profile. The different statuses are:
Pending: The profile has not yet been run.
Complete: The profile has been run and was completed successfully.
Skipped: The profile was skipped. This typically happens when the previous profile runs beyond the start time of the next profile.
Failed: The profile has been run but was unsuccessful. You will need to examine the log file to determine why it could not be completed successfully.
• Status Bar: This indicates the current state of the SubCast program, as well as the time and date. Possible program states are:
o Standby: SubCast is not making any attempts to perform automatic exports.
o Automatic Report: SubCast is in an active reporting mode.
o Break Time: SubCast is idle, waiting for the next active reporting period to begin.

Chapter 9 – SubCast _____________________________________________________________________________
_____________________________________________________________________________ Version 5.9 SubCast – Working with Profiles 9.2.1 Rev. 9/09
9.1 Menu Options
The Menu Options are found under the Title Bar of the SubCast program. These options give you access to all of the functions of the program. Each available option will be discussed in the sections that follow:
File
Click on the word File, and SubCast will display the following drop down menu:
Stand-by
• Clicking on Stand-by when SubCast is in a stand-by mode will cause the program to attempt to come out of stand-by and enter an active state – Automatic Report or Break Time. Automatic Report is the state in which the program will send out the reports that you have specified in your profiles. Break Time is the state in which the program is simply idle, waiting for the next active reporting period to begin. Please notice that the word Stand-by is checked in the diagram, indicating that the program is currently in the stand-by or inactive mode.

Chapter 9 – SubCast _____________________________________________________________________________
_____________________________________________________________________________ Version 5.9 SubCast – Working with Profiles 9.2.2 Rev. 9/09
• Clicking on Stand-by when SubCast is in an active state (Automatic Report or Break Time) will cause the program to go into a stand-by mode. While in stand-by, SubCast will NOT send out any of the reports that you have specified in your profiles. The program must be placed in stand-by any time you need to create or modify a profile.
Set Report Time
This is used to set the times when the SubCast program will be available to actively send reports. Select this option and the Set Available Report Time screen will appear:
• Start Time: What time should the SubCast program become available to begin your automatic reports each day? We recommend that this time be set approximately 15 minutes before the first scheduled report. For example: If your first automatic report is scheduled for 5:45 am, your Start Time should be set for 5:30 am.
• End Time: What time should the program leave the Auto Report mode and enter into its Break Time mode? During Break Time the program will not be available to perform any automatic reports. We recommend that this time be set approximately 15 minutes after the last scheduled report. For example: If your last automatic report is scheduled for 3:45 pm, your End Time should be set for 4:00 pm.
Set Report Options
This is used to specify some general parameters for the report that you send out. Please keep in mind that these settings will apply to ALL reports that are generated by SubCast. Select this option and the SubCast Predefined Report Options screen will appear:
• Include Employee Numbers: If you flag this option, the employee number (General Information tab of the employee and substitute record) will appear in parentheses

Chapter 9 – SubCast _____________________________________________________________________________
_____________________________________________________________________________ Version 5.9 SubCast – Working with Profiles 9.2.3 Rev. 9/09
after the employee’s and/or substitute’s name. Careful use of this option will ensure that the employee number will remain confidential.
• Include Inactive Employees: If you flag this option, employees and/or substitutes flagged as inactive (General Information tab of the employee and substitute record) will be included in the report. If this option is not selected, any employee or substitute who is flagged inactive will NOT appear on the report.
• Include Restricted Employees: If you flag this option, substitutes that have been flagged as restricted (General Information tab of the substitute record) will be included in the report. If this option is not selected, any substitute who is flagged restricted will NOT appear on the report.
• Include Non-certified Employees: By NOT flagging this option, only those employees and substitutes that are flagged as certified (General Information tab of the employee and substitute record) will appear on reports. By selecting this option, all employees and substitutes will appear on the report whether they are certified or not.
• Send HTML Reports as Attachments: If you flag this option, any reports that you choose to send in an HTML format will be sent as an attachment to the e-mail. Please note that all e-mail programs do not support this option.
Send Next Report with No Delay
Selecting this option will cause SubCast to immediately execute the next scheduled report, as displayed in the SubCast window. Once the report has been sent it will be marked as complete and WILL NOT be sent again at its regularly scheduled time. Exit This is one method that can be used to close the SubCast program. Please remember that the program must be placed in Stand-by mode before it can be closed.
Profile Click on the word Profile, and SubCast will display the following drop down menu:
You will use this option to create a new profile and/or edit a profile you have already created. We will discuss this option further in the section of this chapter titled Working with Profiles.
Help
Click on the word Help to access the on-line help system.


Chapter 9 – SubCast _____________________________________________________________________________
_____________________________________________________________________________ Version 5.9 SubCast – Working with Profiles 9.2.4 Rev. 9/09
9.2 Working with Profiles
Profiles are the key to the SubCast program. They tell it what to do and when to do it. This section of the chapter will explore the various functions that are available when working with your profiles. Click on the word Profile below the Title Bar of the SubCast program, and SubCast will display the following drop down menu:
Now click on the words Edit Export Profile, and SubCast will display the Report Profile List window:
The Report Profile List window contains the following components and buttons: Display Area: The display area is the open area on the left side of the Report Profile List window. It is used to display any profiles that currently exist within the program. Profiles will be listed in ascending alphabetical order. Control Buttons:
Exits the Export Profile List window and returns you to the SubCast program.
Allows you to add a new profile
Allows you to change an existing profile
Allows you to delete an existing profile

Chapter 9 – SubCast _____________________________________________________________________________
_____________________________________________________________________________ Version 5.9 SubCast – Working with Profiles 9.2.5 Rev. 9/09
Allows you to access the on-line help system
Adding a Profile
Before using SubCast you must tell it what you want it to do. This is done through the use of a profile or through multiple profiles. To add a new profile, click the Add… button on the right side of the Report Profile List window. SubCast will display the Add Report Profile screen:
• Name: What do you want to call this profile? We suggest using a descriptive name that will indicate the purpose of the profile. For example: TWICE DAILY SITE REPORT - ELEM for a profile that will be used to send two absence reports to the elementary schools on a daily basis.
• Start Time: What time do you want SubCast to send the first report for this profile? Times should be entered using the format HHMMA/P. For example: 2:00 p.m. would be entered as 0200P.
• End Time: What is the latest time that SubCast should consider sending a report for this profile? Please note that this does not necessarily mean that a report will be sent at this time, it is simply the latest time that one could be sent. If you are going to schedule a report to be sent at the same time as the end time, please add 15 minutes to the End Time value. The examples shown below will help illustrate this point. Times should be entered using the format HHMMA/P. For example: 02:45 p.m. would be entered as 0245P.
• Run Every XXX Minutes: How often should SubCast send a report between the Start Time and End Time defined above? This value is expressed in the form of minutes. Sample Report Schedules: o 1 report at 8:00 am: Start Time = 8:00 am, End Time = 8:15 am, Run Every
XXX Minutes = 30.

Chapter 9 – SubCast _____________________________________________________________________________
_____________________________________________________________________________ Version 5.9 SubCast – Working with Profiles 9.2.6 Rev. 9/09
o 2 reports, one at 8:00 am and another at 2:00 pm: Start Time = 8:00 am, End Time = 2:15 pm, Run Every XXX Minutes = 360.
• Send Reports Only on Calendar Workday: What days do you want your report profile to be run? If you want the profile to be run every day of the year, including Saturdays, Sundays, and holidays, do not check this box. If you want to control the days that your report will be run through a calendar that you specify, click this box and then complete the Calendar Track field.
• Calendar Track: If you have checked the box for Send Reports Only on Calendar Workday, use this field to specify the calendar that your profile should use when determining what days to send the report. To select the specific calendar track, click on the arrow at the end of the field and choose it from the list presented. If the desired calendar track does not exist, please refer to section 4.7 of this manual titled The Calendar Tracks Button for detailed information on creating a new calendar track.
• Select Report: What report do you want to send out? The following choices are available: o Available Substitutes Report (HTML format): This is the Available Substitutes
report, formatted for optimal viewing via an internet browser. When choosing this report you may also use the Options button to ‘fine tune’ the report to your specific needs.
o Daily Absence Report (HTML format): This is the Daily Absence Report by Site, formatted for optimal viewing via an Internet browser. The report includes a number of ‘hot links’ to key informational areas within the report, such as detailed employee and substitute information.
o Overall Substitute Jobs Summary (HTML format): This is the line version of the Overall Substitute Jobs report, formatted for optimal viewing via an internet browser. When choosing this report you may also use the Options button to ‘fine tune’ the report to your specific needs.
o Overall Substitute Jobs Summary (text format): This is the line version of the Overall Substitute Jobs report, formatted as a basic text file for easy viewing through any program capable of opening a text file. When choosing this report you may also use the Options button to ‘fine tune’ the report to your specific needs.
o Daily Absence Report (text format): This is the Daily Absence Report by Site, formatted as a basic text file for easy viewing through any program capable of opening a text file.
o SubPay Summary Report (text format): This report provides a very basic summary of the time worked during the specified period. When choosing this report you may also use the Options button to ‘fine tune’ the report to your specific needs.
• Options: The Options button is available when you choose one of the Overall Substitute Jobs Summary reports, the Available Substitutes Report, or the SubPay Summary Report. Clicking this button will bring up a screen where you can customize the content of the report to meet your specific needs.
• Date Range: What date range would you like the report to cover? The date range is expressed as a certain number of days before and/or after the current day. Sample Date Ranges: o A report run each day that includes only the information for that day: 0 days
before until 0 days after Current day.

Chapter 9 – SubCast _____________________________________________________________________________
_____________________________________________________________________________ Version 5.9 SubCast – Working with Profiles 9.2.7 Rev. 9/09
o A report run each Friday that includes the information for that week (Monday through Friday): 4 days before until 0 days after Current day.
• Site Selection: Choose what site or sites should be included in the profile by transferring the appropriate sites from the list of Available Sites (located on the left side of the screen) to the list of Current Sites on the right side. To transfer a site from the left to the right simply:
o Select the site name.
o Click the Add>> button.
o Repeat steps a. and b. until all the appropriate sites have been transferred. Once you have entered all the desired information for the profile, click the OK button in the lower-left corner of the Add Report Profile screen. SubCast will save your new profile and return you to the Report Profile List window.
Activating your Profile(s)
Once you have created the profile or profiles that you wish to use, you must activate the SubCast program. The program is activated in much the same way as the Job Processor program. From the SubCast program window, click on the word File. SubCast will display the following drop down menu:
You will notice that the word Stand-by is checked, indicating that the program is currently in a stand-by or inactive mode. Click on the word Stand-by and SubCast will build a list of any exports that are scheduled for today, and then enter Automatic Report mode:

Chapter 9 – SubCast _____________________________________________________________________________
_____________________________________________________________________________ Version 5.9 SubCast – Working with Profiles 9.2.8 Rev. 9/09
Any reports that are scheduled for today will be displayed on the screen with the status Pending. Once a report has been sent, the status will change from Pending to Complete.
The SubCast program must be in the active or Automatic Report mode in order for your profiles to be run.

Chapter 9 – SubCast _____________________________________________________________________________
_____________________________________________________________________________ Version 5.9 SubCast – Working with Profiles 9.2.9 Rev. 9/09
Editing a Profile
Once a profile has been added to SubCast, you may have a need to change it. To edit an existing profile:
1. Make sure that SubCast is in Standby mode. If it is not, place it in Standby by clicking the word File and then clicking Standby.
2. Once SubCast is in Standby click on the word Profile, and then choose Edit Report Profile from the menu presented. SubCast will display the Report Profile List.
3. Highlight the desired profile from within the Report Profile List window and click the Edit… button. SubCast will display the Edit Report Profile screen.
4. Make any needed changes to the profile. When you are done, click the OK button to save your changes and return to the Report Profile List.
Deleting a Profile
To delete an existing profile: 1. Make sure that SubCast is in Standby mode. If it is not, place it in Standby by
clicking the word File and then clicking Standby. 2. Once SubCast is in Standby click on the word Profile, and then choose Edit Report
Profile from the menu presented. SubCast will display the Report Profile List. 3. Highlight the desired profile from within the Report Profile List window and click the
Delete button. SubCast will display a message requesting confirmation of the deletion.
4. If you are certain that you want to permanently delete the profile, click the Yes button. SubCast will remove the profile and return you to the Report Profile List.

Chapter 10 – Data Exchange Pro _____________________________________________________________________________
_____________________________________________________________________________ Version 5.9 Data Exchange Pro – Intro 10.0.1 Rev. 9/09
10.0 Data Exchange Pro
Data Exchange Pro is a module available with the SubFinder system. Use of this program will allow you to automate the data transfers between SubFinder and your Payroll and Human Resources systems, scheduling them whenever you want and as often as you want. And of course, Data Exchange Pro still allows you to perform manual exports and imports.
Starting the Data Exchange Pro Program To start the Data Exchange Pro program:
1. Click the Start button on the Windows Task Bar. A menu will appear with your options.
2. Highlight SubFinder for Windows and a menu will appear listing the SubFinder programs available on that computer.
3. Highlight SubFinder Data Exchange Pro and click.
• Or double-click on the desktop icon (if available).
The Data Exchange Pro window contains the following items:
• Title Bar: Shows the name of the program.
• Menu Options: These are located directly below the Title Bar and give you access to all of the various options available for the program. For more information, please refer to the section of this chapter titled Menu Options.
• The Display Area, located under the Menu Options, contains the following information:
o ID: When Data Exchange Pro is in the Auto Export mode it creates a temporary index number for each export that is scheduled. It always starts with one (1) and continues incrementally by one. This number is only used during the current processing period, and will not be used by any other SubFinder program.
o Profile: This will indicate the profile that is scheduled to run.

Chapter 10 – Data Exchange Pro _____________________________________________________________________________
_____________________________________________________________________________ Version 5.9 Data Exchange Pro – Intro 10.0.2 Rev. 9/09
o Start Time: This will indicate the time that the indicated profile will begin to execute.
o Status: This will indicate the status of the indicated profile. The different statuses are:
Pending: The profile has not yet been run.
Complete: The profile has been run and was completed successfully.
Skipped: The profile was skipped. This typically happens when the previous profile runs beyond the start time of the next profile.
Failed: The profile has been run but was unsuccessful. You will need to examine the log file to determine why it could not be completed successfully.
• Status Bar: This indicates the current state of the Data Exchange Pro program, as well as the time and date. Possible program states are:
o Standby: Data Exchange Pro is not making any attempts to perform automatic exports.
o Auto Data Exchange: Data Exchange Pro is in an active processing mode.
o Break Time: Data Exchange Pro is idle, waiting for the next active exporting period to begin.

Chapter 10 – Data Exchange Pro _____________________________________________________________________________
_____________________________________________________________________________ Version 5.9 Data Exchange Pro – Menu Options Rev. 9/09
10.1.1
10.1 Menu Options
The Menu Options are found under the Title Bar of the Data Exchange Pro program. These options give you access to all of the functions of the program. Each option available will be discussed in the sections that follow:
File
Click on the word File, and Data Exchange Pro will display the following drop down menu:
Stand-by
• Clicking on Stand-by when Data Exchange Pro is in a stand-by mode will cause the program to attempt to come out of stand-by and enter an active state – Auto Export or Break Time. Auto Export is the state in which the program will perform the exports that you have defined in your profiles. Break Time is the state in which the program is simply idle, waiting for the next active exporting period to begin. You will notice that the word Stand-by is checked in the diagram, indicating that the program is currently in a stand-by or inactive mode.
• Clicking on Stand-by when Data Exchange Pro is in an active state (Auto Export or Break Time) will cause the program to go into a stand-by mode. While in stand-by,

Chapter 10 – Data Exchange Pro _____________________________________________________________________________
_____________________________________________________________________________ Version 5.9 Data Exchange Pro – Menu Options Rev. 9/09
10.1.2
Data Exchange Pro will NOT perform any of the exports that you have defined in your profiles. The program must be placed in stand-by any time you need to create or modify a profile.
Set Running Time
This is used to set the times when the Data Exchange Pro program will be available to actively export information. Select this option and the Set Running Time screen will appear:
• Start Time: What time should the Data Exchange Pro program become available to begin your automatic exports each day? We recommend that this time be set approximately 15 minutes before the first scheduled export. For example: If your first automatic export is scheduled for 7:00 am, your Start Time should be set for 6:45 am.
• End Time: What time should the program leave the Auto Export mode and enter into its Break Time mode? During Break Time the program will not be available to perform any automatic exports. We recommend that this time be set approximately 15 minutes after the last scheduled export. For example: If your last automatic export is scheduled for 7:00 pm, your End Time should be set for 7:15 pm.
Exit
This is one method that can be used to close the Data Exchange Pro program. Please remember that the program must be placed in Stand-by mode before it can be closed.
Profile
Click on the word Profile, and Data Exchange Pro will display the following drop down menu:

Chapter 10 – Data Exchange Pro _____________________________________________________________________________
_____________________________________________________________________________ Version 5.9 Data Exchange Pro – Menu Options Rev. 9/09
10.1.3
You will use this option to create new profiles and/or edit profiles you have already created. We will discuss this option further in the section of this chapter titled Working with Profiles.
Manual
Click on the word Manual, and Data Exchange Pro will display the following drop down menu:
This is the option you would choose any time you want to perform a manual data import or export. For detailed information on using this feature, please refer to sections 7.2 and 7.3 of this manual.
Help
Click on the word Help to access the on-line help system.

Chapter 10 – Data Exchange Pro _____________________________________________________________________________
_____________________________________________________________________________ Version 5.9 Data Exchange Pro – Working with Profiles 10.2.1 Rev. 9/09
10.2 Working with Profiles
Profiles are the key to the Data Exchange Pro program. They tell it what to do and when to do it. This section of the chapter will explore the various functions that are available when working with your profiles. Click on the word Profile below the Title Bar of the Data Exchange Pro program, and Data Exchange Pro will display the following drop down menu:
Import Profiles
Import profiles are used to configure automatic imports into your SubFinder system. Select Edit Import Profile from the Profile Menu and SubFinder will display the Import Profile List window:
The Import Profile List window contains the following components and buttons: Display Area: The display area is the open area on the left side of the Import Profile List window. It is used to display any profiles that currently exist within the program. Profiles will be listed in ascending alphabetical order. Control Buttons:
Exits the Import Profile List window and returns you to the Data Exchange Pro program.
Allows you to add a new profile.

Chapter 10 – Data Exchange Pro _____________________________________________________________________________
_____________________________________________________________________________ Version 5.9 Data Exchange Pro – Working with Profiles 10.2.2 Rev. 9/09
Allows you to change an existing profile.
Allows you to delete an existing profile.
Allows you to access the on-line help system.
Adding an Import Profile
Before using Data Exchange Pro you must tell it what you want it to do. This is done through the use of a profile or through multiple profiles. To add a new profile, click the Add… button on the right side of the Import Profile List window. Data Exchange Pro will display the Add Import Profile screen:
• Name: What do you want to call this profile? We suggest using a descriptive name that will indicate the purpose of the profile. For example: ‘Weekly Substitute Import’ for a profile that will be used to import substitutes once each week.
• Import Format: What Import format do you want Data Exchange Pro to use? To select the specific format, click on the arrow at the end of the field and choose it from the list presented.
• Import File: Where should Data Exchange Pro look for the file to be imported? If you know the exact path to the desired directory, type it in here. For example: If the import file will be in SubFinder’s DATA directory on the computer where Data Exchange Pro is running you might enter C:\Subfind\Data\[import file name]. Before entering the path, make sure that the specified directory does exist! If you do not know the exact path, use the Browse button to the right of the Import File field to locate it. Click the Browse button and the Browse for Folder window will be displayed:

Chapter 10 – Data Exchange Pro _____________________________________________________________________________
_____________________________________________________________________________ Version 5.9 Data Exchange Pro – Working with Profiles 10.2.3 Rev. 9/09
Locate and highlight the desired output folder by browsing through the appropriate locations and then click the OK button. Your choice will be written to the Output Directory field.
• Run File: Is there a program that you would like to run once the import files have been created and written to the appropriate directory? (For example, you may run a routine that will send the exception log to a particular person via e-mail.) If so, click the check box to the left of the field and then use the Browse button to the right to locate and select the appropriate file. The field and the Browse button will not be enabled until the field has been activated through the check box.
• Start Time: What time do you want Data Exchange Pro to perform the first import for this profile? Times should be entered using the format HHMMA/P. For example: 3:15 p.m. would be entered as 0315P.
• End Time: What is the latest time that Data Exchange Pro should consider performing an import for this profile? Times should be entered using the format HHMMA/P. For example: 3:45 p.m. would be entered as 0345P. Please note that this does not necessarily mean that an import will be done at this time, it is simply the latest time that one could be done. If you are going to schedule an import to be done at the same time as the end time, please add 15 minutes to the End Time value. The examples shown below will help illustrate this point.
• Run Every XXX Minutes: How often should Data Exchange Pro perform an import between the Start Time and End Time defined above? This value is expressed in the form of minutes. Sample Import Schedules: o 1 import at 4:00 pm: Start Time = 4:00 pm, End Time = 4:15 pm, Run Every
XXX Minutes = 30. o 2 imports, one at 12:00 pm and another at 2:00 pm: Start Time = 12:00 pm, End
Time = 2:15 pm, Run Every XXX Minutes = 120. • Import Only on Workday: What days do you want your import profile to be active?
If you want the import to be done every day of the year, including Saturdays, Sundays, and holidays, do not check this box. If you want to control the days that your import will be performed through a calendar that you specify, click this box and then complete the Calendar Track field.
• Calendar Track: If you have checked the box for Export Only on Workday, use this field to specify the calendar that your profile should use when determining what days to perform an import. To select the specific calendar track, click on the arrow at the end of the field and choose it from the list presented. If the desired calendar track

Chapter 10 – Data Exchange Pro _____________________________________________________________________________
_____________________________________________________________________________ Version 5.9 Data Exchange Pro – Working with Profiles 10.2.4 Rev. 9/09
does not exist, please refer to section 4.7 of this manual titled The Calendar Tracks Button for detailed information on creating a new calendar track.
• Data Format: Choose the data format that your payroll system requires. With some of the formats, you may not have a choice. SubFinder will default to the setting that is needed.
• Record Delimiter: Choose the record delimiter that your payroll system requires. With some of the formats, you may not have a choice. SubFinder will default to the setting that is needed.
• First Line as Field Names: Flag this option if the first line of the import file specified in the Import File field contains the field names of the data elements of each record.
Once you have entered all the desired information for the profile, click the OK button in the lower-left corner of the Add Import Profile screen. Data Exchange Pro will save your new profile and return you to the Import Profile List window.
Editing an Import Profile
There may be times when you will need to change one of your existing profiles – change the times, attach a different calendar, etc. To edit an existing profile:
1. Make sure that Data Exchange Pro is in Standby mode. If it is not, place it in Standby by clicking the word File and then clicking Standby.
2. Click on the word Profile and then click Edit Import Profile.
3. From the Import Profile List window, select the appropriate profile in the display area and click the Edit… button. SubFinder will display the Edit Import Profile screen:
All fields can be changed as necessary. When you are done making changes, click the OK button in the lower-left corner of the Edit Import Profile screen. Data Exchange Pro will save your changes and return you to the Import Profile List window.

Chapter 10 – Data Exchange Pro _____________________________________________________________________________
_____________________________________________________________________________ Version 5.9 Data Exchange Pro – Working with Profiles 10.2.5 Rev. 9/09
Note: For detailed explanations of the fields available on this screen, please refer to the section of this chapter titled Adding an Import Profile.
Deleting an Import Profile
There may be times when you no longer need to utilize a profile. To delete an existing profile:
1. Make sure that Data Exchange Pro is in Standby mode. If it is not, place it in Standby by clicking the word File and then clicking Standby.
2. Click on the word Profile and then click Edit Import Profile.
3. From the Import Profile List window, select the appropriate profile in the display area and click the Delete button. SubFinder will display the following message:
Click the Yes button and SubFinder will delete the profile and return you to the Import Profile List window.
Export Profiles
Export profiles are used to configure automatic exports from your SubFinder system. Select Edit Export Profile from the Profile Menu and SubFinder will display the Export Profile List window:
The Export Profile List window contains the following components and buttons: Display Area: The display area is the open area on the left side of the Export Profile List window. It is used to display any profiles that currently exist within the program. Profiles will be listed in ascending alphabetical order.

Chapter 10 – Data Exchange Pro _____________________________________________________________________________
_____________________________________________________________________________ Version 5.9 Data Exchange Pro – Working with Profiles 10.2.6 Rev. 9/09
Control Buttons:
Exits the Export Profile List window and returns you to the Data Exchange Pro program.
Allows you to add a new profile
Allows you to change an existing profile
Allows you to delete an existing profile
Allows you to access the on-line help system
Adding an Export Profile
Before using Data Exchange Pro you must tell it what you want it to do. This is done through the use of a profile or through multiple profiles. To add a new profile, click the Add… button on the right side of the Export Profile List window. Data Exchange Pro will display the Add Export Profile screen:

Chapter 10 – Data Exchange Pro _____________________________________________________________________________
_____________________________________________________________________________ Version 5.9 Data Exchange Pro – Working with Profiles 10.2.7 Rev. 9/09
• Name: What do you want to call this profile? We suggest using a descriptive name
that will indicate the purpose of the profile. For example: ‘Bi-Weekly Payroll Export’ for a profile that will be used to perform an export every two weeks.
• Export Format: What export format do you want Data Exchange Pro to use? To select the specific format, click on the arrow at the end of the field and choose it from the list presented.
• Output Directory: Where should Data Exchange Pro place the export files that are created? If you know the exact path to the desired directory, type it in here. For example: If the export files should be placed in the TEMP directory of the computer where Data Exchange Pro is running you would enter C:\TEMP. Before entering the path, make sure that the specified directory does exist. If you do not know the exact path, use the Browse button to the right of the Output Directory field to locate it. Click the Browse button and the Browse for Folder window will be displayed:
Locate and highlight the desired output folder by browsing through the appropriate locations and then click the OK button. Your choice will be written to the Output Directory field.
• Run File: Is there a program that you would like to run once the export files have been created and written to the appropriate directory? If so, click the check box to the left of the field and then use the Browse button to the right to locate and select the appropriate file. The field and the Browse button will not be enabled until the field has been activated through the check box.
• Start Time: What time do you want Data Exchange Pro to perform the first export for this profile? Times should be entered using the format HHMMA/P. For example: 5:00 p.m. would be entered as 0500P.
• End Time: What is the latest time that Data Exchange Pro should consider performing an export for this profile? Times should be entered using the format HHMMA/P. For example: 5:15 p.m. would be entered as 0515P. Please note that this does not necessarily mean that an export will be done at this time, it is simply the latest time that one could be done. If you are going to schedule an export to be done at the same time as the end time, please add 15 minutes to the End Time value. The examples shown below will help illustrate this point.

Chapter 10 – Data Exchange Pro _____________________________________________________________________________
_____________________________________________________________________________ Version 5.9 Data Exchange Pro – Working with Profiles 10.2.8 Rev. 9/09
• Run Every XXX Minutes: How often should Data Exchange Pro perform an export between the Start Time and End Time defined above? This value is expressed in the form of minutes. Sample Export Schedules: o 1 export at 4:00 pm: Start Time = 4:00 pm, End Time = 4:15 pm, Run Every
XXX Minutes = 30. o 2 exports, one at 12:00 pm and another at 2:00 pm: Start Time = 12:00 pm, End
Time = 2:15 pm, Run Every XXX Minutes = 120. • Export Only on Workday: What days do you want your export profile to be active?
If you want the export to be done every day of the year, including Saturdays, Sundays, and holidays, do not check this box. If you want to control the days that your export will be performed through a calendar that you specify, click this box and then complete the Calendar Track field.
• Calendar Track: If you have checked the box for Export Only on Workday, use this field to specify the calendar that your profile should use when determining what days to perform an export. To select the specific calendar track, click on the arrow at the end of the field and choose it from the list presented. If the desired calendar track does not exist, please refer to section 4.7 of this manual titled The Calendar Tracks Button for detailed information on creating a new calendar track.
• Date Range: What date range would you like the export to cover? The date range is expressed as a certain number of days before and/or after the current day. Sample Date Ranges: o An export run each day that includes only the information for that day: -0 until +0 o An export run each Friday that includes the information for that week (Monday
through Friday): -4 until +0 o An Export run every other Friday that includes the information for the past two
weeks: -13 until +0. • Site Selection: Choose what site or sites should be included in the export by
clicking the appropriate option. If you choose Single Site or Site Group, select the specific entry by clicking on the arrow at the end of the field and choosing it from the list presented. Please be aware that these fields are not available in all export formats.
• Data Format: Choose the data format that your payroll system requires. With some of the formats, you may not have a choice. SubFinder will default to the setting that is needed.
• Record Delimiter: Choose the record delimiter that your payroll system requires. With some of the formats, you may not have a choice. SubFinder will default to the setting that is needed.
Once you have entered all the desired information for the profile, click the OK button in the lower-left corner of the Add Export Profile screen. Data Exchange Pro will save your new profile and return you to the Export Profile List window.
Editing an Export Profile There may be times when you will need to change one of your existing profiles – change the times, attach a different calendar, etc. To edit an existing profile:
1. Make sure that Data Exchange Pro is in Standby mode. If it is not, place it in Standby by clicking the word File and then clicking Standby.
2. Click on the word Profile and then click Edit Export Profile.

Chapter 10 – Data Exchange Pro _____________________________________________________________________________
_____________________________________________________________________________ Version 5.9 Data Exchange Pro – Working with Profiles 10.2.9 Rev. 9/09
3. From the Export Profile List window, select the appropriate profile in the display area and click the Edit… button. SubFinder will display the Edit Export Profile screen:
All fields can be changed as necessary. When you are done making changes, click the OK button in the lower-left corner of the Edit Export Profile screen. Data Exchange Pro will save your changes and return you to the Export Profile List window. Note: For detailed explanations of the fields available on this screen, please refer to the section of this chapter titled Adding an Export Profile.
Deleting an Export Profile
There may be times when you no longer need to utilize a profile. To delete an existing profile:
1. Make sure that Data Exchange Pro is in Standby mode. If it is not, place it in Standby by clicking the word File and then clicking Standby.
2. Click on the word Profile and then click Edit Export Profile.
3. From the Export Profile List window, select the appropriate profile in the display area and click the Delete button. SubFinder will display the following message:

Chapter 10 – Data Exchange Pro _____________________________________________________________________________
_____________________________________________________________________________ Version 5.9 Data Exchange Pro – Working with Profiles 10.2.10 Rev. 9/09
Click the Yes button and SubFinder will delete the profile and return you to the Export Profile List window.
Activating your Profile(s) Once you have created the profile or profiles that you wish to use, you must activate the Data Exchange Pro program. The program is activated in much the same way as the Job Processor program. From the SubFinder Data Exchange Pro program window, click on the word File. Data Exchange Pro will display the following drop down menu:
You will notice that the word Stand-by is checked, indicating that the program is currently in a stand-by or inactive mode. Click on the word Stand-by and Data Exchange Pro will build a list of any exports that are scheduled for today, and then enter Auto Data Exchange mode.
Any jobs that are scheduled for today will be displayed on the screen with the status Pending. Once a job has been run, the status will change from Pending to Complete.

Chapter 10 – Data Exchange Pro _____________________________________________________________________________
_____________________________________________________________________________ Version 5.9 Data Exchange Pro – Working with Profiles 10.2.11 Rev. 9/09
Note: When performing automated imports, Data Exchange Pro will place the Job Processor program in Standby before performing the scheduled import. Once the imports are complete, the Job Processor will be taken out of Standby and returned to an active status. The Data Exchange Pro program must be in the active or Auto Export mode in order for your profiles to be run.

Chapter 11 – Custom Exports _____________________________________________________________________________
_____________________________________________________________________________ Version 5.9 Custom Exports – Introduction 11.0.1 Rev. 9/09
11.0 Custom Exports
SubFinder offers the ability to create custom exports to meet your payroll data and reporting requirements. Use of this program will allow you to create absence and job files to be used for data transfers between SubFinder and your Payroll and Human Resources systems.
Starting the Custom Exports Program To start the Custom Exports program:
1. Click the Start button on the Windows Task Bar. A menu will appear with your options.
2. Highlight SubFinder for Windows and a menu will appear listing the SubFinder programs available on that computer.
3. Highlight Custom Exports and click.
• Or double-click on the desktop icon (if available).
The Custom Exports Profile List contains the following features and functions:
Export Profile List: This window displays the custom export profiles you previously created and saved.
Run: Clicking Run will provide you with the filter criteria screen for the export profile selected within the Export Profile List window. This is also where you will execute the desired export.
Add: To add a new export profile, click Add.
Edit: To edit an existing export profile, click Edit.
Delete: To delete an existing export profile, click Delete.

Chapter 11 – Custom Exports _____________________________________________________________________________
_____________________________________________________________________________ Version 5.9 Custom Exports – Introduction 11.0.2 Rev. 9/09
Print: To review the details of the data fields included in a particular profile and the format of the export, click Print.
Setup: The Setup option allows users to include field headers in their export profiles and the option to export one line of data for each day of a multi-day absence and / or job. For example, if an absence last for five consecutive days, the export will include one row of data for each of the five days included in the export file. Setup options can be configured for each export profile created by highlighting the desired profile name within the List window and clicking on Setup.
Additionally options for marking Verification records as processed after an export is run and unlocking Verification records after an export is run are available. Note: these options are only available if the export profile includes data related to Verification.
Setup options are specific to each export profile created.
Log: The Log will display information related to export profile creation, modification, deletion, and execution.
Close: Clicking on Close will close the Export Profile List window.

Chapter 11 – Custom Exports _____________________________________________________________________________
_____________________________________________________________________________ Version 5.9 Custom Exports – Working with Export Profiles 11.1.1 Rev. 9/09
11.1 Working with Export Profiles Custom exports will provide you with valuable data related to employee absences, substitute jobs, personnel data tracked within SubFinder, and Verification records. You may create as many export profiles as necessary, and include the data that you need. For example you may want to create files for the payroll department to update employee leave and substitute time worked, or even information to merge for mailing labels.
Adding an Export Profile
To add a new custom export profile, simply click on the Add button within the export profile list box and the following screen will appear:
• Profile Name: What do you want to call this profile? We suggest using a descriptive name that will indicate the purpose of the profile. For example: ‘Biweekly Payroll Export’ for a profile that will be used biweekly for payroll processing.
• Export Filename: Where do you want the custom export program to place the file? If you know the exact path to the desired directory, type it in here. For example: If

Chapter 11 – Custom Exports _____________________________________________________________________________
_____________________________________________________________________________ Version 5.9 Custom Exports – Working with Export Profiles 11.1.2 Rev. 9/09
the export file will be deposited in SubFinder’s DATA directory on the computer where the custom export application is running you might enter C:\Subfind\Data\[export file name]. Before entering the path, make sure that the specified directory does exist!
If you do not know the exact path, use the Browse button to the right of the Import File field to locate it. Click the Browse button and the Browse for Folder window will be displayed. Before browsing for the proper directory, you will need to create a blank Excel or basic text file in that directory.
• Database Category: Click on the dropdown list to select the type of data you wish to include in your export. Selecting a database category will update the Category Fields list with the data options related to the selected category. Your options include:
o Absence and Job: This category includes the data fields that are specific to absence and job records such as dates, times, employee and substitute names and numbers, site user defined codes, reason, miscellaneous code, position, etc.
o Employees: This category includes data stored within the SubFinder employee profiles such as name, numbers, mailing address, email address, site, position, certified / classified status, restricted / inactive status, user defined fields, etc.
o Substitutes: This category includes data stored within the SubFinder substitute profiles such as name, numbers, mailing address, email address, certified / classified status, restricted / inactive status, user defined fields, etc.
o Verification: This category includes the data fields that are specific to Verification records such as absence and job dates, times, employee and substitute names and numbers, site user defined codes, reason, miscellaneous code, position, verify status, process status etc. Note: this option is only available if your organization has Verification enabled in SubFinder.
• Record Delimiter: Choose the record delimiter you wish to apply. Your options include:
o Carriage Return: Each new record will start on a new line, but will not necessarily begin at position number one.
o Carriage Return & Line Feed: Each new record will start on a new line at position number one. We recommend that you use this option if you plan on working with the file in Excel or another application.
• Category Fields: This display area contains the list of data fields available for exporting in relation to the Database Category selected. To add a field to your export profile, simply double click on the desired field name or highlight the field with a single click and select Add Field. You may use the Shift click or Control Click functions to select multiple database fields and add them at one time.
• Export Profile Fields: This display area contains the list of fields selected for exporting. Fields will appear in the order in which they appear in the output file; each field is numbered accordingly. The display area also shows to which database category the field is related.
o To remove a field from the Export Profile Fields list, highlight the selected field and click the Delete button.
o To change the order in which a field is listed, highlight the field and click on the Move Up or Move Down button. For example, if you add the Job Number field in

Chapter 11 – Custom Exports _____________________________________________________________________________
_____________________________________________________________________________ Version 5.9 Custom Exports – Working with Export Profiles 11.1.3 Rev. 9/09
position 3, but you need for it to be in position 1, highlight Job Number and click the Move Up button until it is first on the list.
• Field Size: This is a read only field which displays the maximum number of characters allowed for the selected field within SubFinder.
• Sort Order: You may choose to have your data sorted in a particular order based on ease in review the file. For example if you would like to sort your file by employee last name then by absence start date, you would need to highlight the employee start name field within the Export Profile Fields display, then enter a 1 in the Sort Order field. You would then select the absence start date field and enter a 2 in the Sort Order field.
Once you have created the desired export profile, click the Save button. Clicking Close will result in a loss of any changes made to the profile.

Chapter 11 – Custom Exports _____________________________________________________________________________
_____________________________________________________________________________ Version 5.9 Custom Exports – Working with Export Profiles 11.1.4 Rev. 9/09
Editing an Export Profile To edit an existing custom export profile, simply highlight the appropriate export from within the Export Profile List window and click on the Edit button. The following screen will appear:
You may change any portion of the Export Profile within this screen. Once the desired changes have been made, simply click Save to store the changes. Clicking Close will cancel any changes you made within the Edit screen.

Chapter 11 – Custom Exports _____________________________________________________________________________
_____________________________________________________________________________ Version 5.9 Custom Exports – Working with Export Profiles 11.1.5 Rev. 9/09
Deleting an Export Profile To delete an existing custom export profile, simply highlight the appropriate export from within the Export Profile List window and click on the Delete button.
The program will ask for a confirmation prior to deleting the profile. If you inadvertently started to delete the wrong profile, simply click No. If you are sure you wish to delete the profile, click Yes.
Print As you begin to create custom exports, you may want to keep a record of what each profile includes and their format. That is exactly what the Print option is designed for. The Print option will provide you with a report outlining the profile parameters including the database fields included, their order of appearance, corresponding database category, field name, field size, sort order, and field format. Simply highlight the appropriate export profile and click the Print button.

Chapter 11 – Custom Exports _____________________________________________________________________________
_____________________________________________________________________________ Version 5.9 Custom Exports – Working with Export Profiles 11.1.6 Rev. 9/09
The resulting report is similar to other SubFinder reports and can be saved to a directory, emailed to an individual, or printed.

Chapter 11 – Custom Exports _____________________________________________________________________________
_____________________________________________________________________________ Version 5.9 Custom Exports – Working with Export Profiles 11.1.7 Rev. 9/09
Setup As mentioned in the previous chapter, you may configure certain Setup options for each export profile created. To access the Setup options, highlight the desired export profile within the Export Profile List screen and click Setup.
To apply a Setup option, select the checkbox next to the desired option. Exporting the first record as field names will insert a row into the beginning of the file to include the names of each field in the file.
Exporting multiple day jobs as individual records will result in a file including one row of data for each day of a multiday assignment. For example, if one job lasts for five days, there will be five individual rows of data related to that job in the export file.

Chapter 11 – Custom Exports _____________________________________________________________________________
_____________________________________________________________________________ Version 5.9 Custom Exports – Working with Export Profiles 11.1.8 Rev. 9/09
Note: the following Setup options only appear if Verification is enabled in SubFinder and the export you have selected includes Verification data fields.
Exports including data from Verification will provide two additional Setup options. Marking verified jobs as processed after exporting will indicate that the jobs have already been exported from SubFinder. When running Verification exports you will have the option to exclude jobs that have been previously exported from your output file.
If you are using Verification, it is recommended that you Lock Verification records prior to exporting the data. This will prevent site administrators from making changes to the jobs once the Verification period is over. By selecting the unlock pay period when exporting completes option, you will allow modifications to be made once the jobs have been exported.

Chapter 11 – Custom Exports _____________________________________________________________________________
_____________________________________________________________________________ Version 5.9 Custom Exports – Running Export Profiles 11.2.1 Rev. 9/09
11.2 Running Export Profiles Once an export profile has been created and your setup options have been selected, you may run the export according to your needs; the profile will remain in your Export Profile list until it is deleted. To run a custom export profile, simply highlight the appropriate export name from the Export Profile List and click the Run button.
The following screen will appear:

Chapter 11 – Custom Exports _____________________________________________________________________________
_____________________________________________________________________________ Version 5.9 Custom Exports – Running Export Profiles 11.2.2 Rev. 9/09
• Selected Export Profile: This is the name of the export profile selected.
• Export To: This field contains the path you entered when you created the export profile, and where the file will be placed once you click Start. You may change the export to path if necessary. If you know the exact path to the desired directory, type it in here. For example: If the export file will be deposited in SubFinder’s DATA directory on the computer where the custom export application is running you might enter C:\Subfind\Data\[export file name]. Before entering the path, make sure that the specified directory does exist!
If you do not know the exact path, use the Browse button to the right of the Import File field to locate it. Click the Browse button and the Browse for Folder window will be displayed. Before browsing for the proper directory, you will need to create a blank Excel or basic text file in that directory.
• Jobs Date Range: If the export profile is related to absence, job, and/or Verification data, you may enter a date range. Only absences and/or jobs entered within that date range will be included. The date range field does not apply to exports which only include data from the Employee and/or Substitute database categories.
• Job Options: This tab includes filter options for only those exports related to absences and/or jobs.
o Sites: Data can be filtered by all sites, a single site, or by a site group.
o Positions: Data can be filtered by all job positions, a single job position, or by a job position group. Please note, if you need to generate one export file for certificated absences and jobs, and one for classified records, we suggest that you create a job position group for each category and run one file for each one.
o Reasons: Data can be filtered by all reasons, a single reason, or by a reason group.
o Include No Employee Jobs: Selecting this option will include any no employee jobs reported during the date range selected. Leaving this option unchecked will exclude no employee jobs from the export file.

Chapter 11 – Custom Exports _____________________________________________________________________________
_____________________________________________________________________________ Version 5.9 Custom Exports – Running Export Profiles 11.2.3 Rev. 9/09
• Personnel Options: This tab includes filter options for only those exports related to employees and substitutes. Note: these filter options are not applied to absence, job, and/or Verification exports.
o Single Employee: If you choose to export data related to a single employee, select the check box and use the corresponding dropdown menu to select the appropriate employee from the list.
o Include Certified: Selecting this option will result in the export file only including employees marked as Certified.
o Include Classified: Selecting this option will result in the export file only including employees marked as Classified.
o Include Both Certified and Classified: Selecting this option will result in the export file only including employees marked as both Certified and Classified.
o Include Non-Certified and Non-Classified: Selecting this option will result in the export file only including employees marked as neither Certified nor Classified.
* Note: If you want to include all employees regardless of their Certified or Classified Status, be sure to check each of the four options listed above.
o Include Restricted Employees: Selecting this option will result in the export including employees marked Restricted. It will not limit the file to include only those employees marked Restricted, but rather include those employees that are marked as such in addition to those who are not.

Chapter 11 – Custom Exports _____________________________________________________________________________
_____________________________________________________________________________ Version 5.9 Custom Exports – Running Export Profiles 11.2.4 Rev. 9/09
o Include Inactive Employees: Selecting this option will result in the export including employees marked Inactive. It will not limit the file to include only those employees marked Inactive, but rather include those employees that are marked as such in addition to those who are not.
o Single Substitute: If you choose to export data related to a single substitute, select the check box and use the corresponding dropdown menu to select the appropriate substitute from the list.
o Include Certified: Selecting this option will result in the export file only including substitutes marked as Certified.
o Include Classified: Selecting this option will result in the export file only including substitutes marked as Classified.
o Include Both Certified and Classified: Selecting this option will result in the export file only including substitutes marked as both Certified and Classified.
o Include Non-Certified and Non-Classified: Selecting this option will result in the export file only including substitutes marked as neither Certified nor Classified.
* Note: If you want to include all substitutes regardless of their Certified or Classified Status, be sure to check each of the four options listed above.
o Include Restricted Substitutes: Selecting this option will result in the export including substitutes marked Restricted. It will not limit the file to include only those substitutes marked Restricted, but rather include those substitutes that are marked as such in addition to those who are not.
o Include Inactive Substitutes: Selecting this option will result in the export including substitutes marked Inactive. It will not limit the file to include only those substitutes marked Inactive, but rather include those substitutes that are marked as such in addition to those who are not.

Chapter 11 – Custom Exports _____________________________________________________________________________
_____________________________________________________________________________ Version 5.9 Custom Exports – Running Export Profiles 11.2.5 Rev. 9/09
• Verification Options: This tab includes filter options for only those exports related to Verification records. This tab is only available if you have enabled Verification in SubFinder.
o Sites: Data can be filtered by all sites, a single site, or by a site group.
o Positions: Data can be filtered by all job positions, a single job position, or by a job position group. Please note, if you need to generate one export file for certificated absences and jobs, and one for classified records, we suggest that you create a job position group for each category and run one file for each one.
o Reasons: Data can be filtered by all reasons, a single reason, or by a reason group.
o Pay Period: This filter option allows you to select one of your predefined pay periods established in conjunction with Verification. If you choose to run your export for a pay period the date range selection at the top of the screen will be disabled.
o Verify Status: Data may be filtered by those records that are Unapproved; Verified, Approved; and Verified, Disapproved.
o Process Status: Data may be filtered by those records that are Not Processed, Processed, and Post-Modified Processed.

Chapter 11 – Custom Exports _____________________________________________________________________________
_____________________________________________________________________________ Version 5.9 Custom Exports – Running Export Profiles 11.2.6 Rev. 9/09
o Include No Employee Jobs: Selecting this option will include any no employee jobs reported during the date range selected. Leaving this option unchecked will exclude no employee jobs from the export file.
o Only for Those Sites that Use Verification: Selecting this option will filter out any records pertaining to sites that do not use the Verification feature.
Once you have made the appropriate filter criteria selections, click Start to run the export. The file will be placed in the directory selected. All files will be exported as a comma delimited file and therefore may be opened in Excel.

Chapter 12 – Report Requester _____________________________________________________________________________
_____________________________________________________________________________ Version 5.9 Report Requester - Introduction 12.0.1 Rev. 9/09
12.0 The SubFinder Report Requester Note: This chapter of the SubFinder User’s Manual only applies to customers using the Internet portion of SubFinder and the SubFinder Reports option of that program. Introduction The SubFinder Report Requester is used to generate specific reports within the Internet portion of SubFinder. If your Internet users are set up to access SubFinder Reports, their report requests are sent to the Report Requester and generated in the order in which they are received. Opening the Report Requester To open the Report Requestor:
1. Click the Start button on the Windows task bar. A menu will appear with your options.
2. Highlight SubFinder for Windows and a menu will appear listing the SubFinder programs available on that computer.
3. Highlight the Report Requester and click.
• Or double click on the Report Requester icon located on the desktop. Basic Functions of the Report Requester Once open, the Report Requester window will display:
The Report Requester window contains the following items:
• Title Bar: Shows the name of the program.
• Menu Option: This is located directly below the Title Bar and gives you access to the various options in the program. For more information on the Menu option please refer to the section of this chapter titled Menu Options.

Chapter 12 – Report Requester _____________________________________________________________________________
_____________________________________________________________________________ Version 5.9 Report Requester - Introduction 12.0.2 Rev. 9/09
• Status Bar: This area indicates the status of the Report Requester. There are two different status designations that this program will present:
o Idle: This indicates that the program is in an inactive state and not accepting requests from SubFinder users via the Internet.
o Scanning: This indicates that the Report Requester program is actively accepting report requests and is scanning the database for requests.
• The Display Area: This is located below the Menu Option and contains a listing of the report requests in queue. As a user requests a new report via the Internet, an entry will be logged in the display area.
• State: This area indicates the current state of the Report Requester program as well as the number of reports in queue. The different states of this program are:
o Idle: This indicates that the program is not currently accepting requests for reports.
o Processing Mode: This indicates that the program is accepting report requests from SubFinder users via the Internet.
Note: This program must remain open and active in order to process SubFinder Report requests from SubFinder users via the Internet. You may minimize the window so that it is not displayed on the desktop, but the application must be in a processing mode.

Chapter 13 – Email Notifications Processor _____________________________________________________________________________
_____________________________________________________________________________ Version 5.9 Email Notifications Processor - Introduction 13.0.1 Rev. 9/09
13.0 The SubFinder Email Notifications Processor Note: This chapter of the User’s Manual only applies to customers using the SubFinder Email Notifications feature. Please refer to chapter 3.17 of the manual for additional information on setting up email notifications. Introduction The SubFinder Email Notifications Processor is used to manage the issuance of email messages related to absences and jobs. Opening the Email Notifications Processor To open the Email Notifications Processor:
1. Click the Start button on the Windows task bar. A menu will appear with your options.
2. Highlight SubFinder for Windows and a menu will appear listing the SubFinder programs available on that computer.
3. Highlight the Email Notifications Processor and click.
• Or double click on the Email Notifications Processor icon located on the desktop. Basic Functions of the Email Notifications Processor Once open, the following window will display:
The window contains the following items:
• Title Bar: Shows the name of the program.
• Menu Option: This is located directly below the Title Bar and gives you access to the various options in the program. For more information on the Menu option please refer to the section of this chapter titled Menu Options.

Chapter 13 – Email Notifications Processor _____________________________________________________________________________
_____________________________________________________________________________ Version 5.9 Email Notifications Processor - Introduction 13.0.2 Rev. 9/09
• Status Bar: This area indicates the status of the Email Notification Processor. There are two different status designations that this program will present:
o Idle: This indicates that the program is in an inactive state and not monitoring for changes to absences and jobs that would trigger a notification.
o Scanning: This indicates that the program is actively monitoring for changes to absences and jobs that would trigger a notification.
• The Display Area: This is located below the Menu Option and contains a listing of the email notifications in queue.
• State: This area indicates the current state of the Email Notification Processor program as well as the number of reports in queue. The different states of this program are:
o Idle: This indicates that the program is in an inactive sate.
o Processing Mode: This indicates that the program is in an active state.
Note: This program must remain open and active in order to process Email Notifications. You may minimize the window so that it is not displayed on the desktop, but the application must be in a processing mode.

Chapter 13 – Email Notifications Processor _____________________________________________________________________________
_____________________________________________________________________________ Version 5.9 Email Notifications Processor – Menu Options 13.1.1 Rev. 9/09
13.1 Menu Options The menu options are found under the Title Bar of the Email Notifications Processor window. These functions give you control over the deployment of email notifications. Their functions will be described in the following section. File Click on the word File, and SubFinder will display the following menu:
Start Clicking on Start will activate the Email Notifications Processor, allowing the program to send email notifications; the status bar will display Processing Mode. Stop Clicking on Stop will deactivate the Email Notifications Processor; the status bar will display Idle. When this program is stopped, email notifications will not be sent. This also prepares the application to be closed.
Exit
This is one method that can be used to close the Report Requester program. Prior to selecting exit, the Report Requester must be in an idle mode.

Chapter 14 – Using Remote Desktop _____________________________________________________________________________
_____________________________________________________________________________ Version 5.9 Using Remote Desktop –14.0.1 Rev. 9/09
14.0 Using Remote Desktop Remote Desktop is a Microsoft Windows tool which allows users to access applications on a remote computer. Once launched, Remote Desktop allows you to control the selected computer using the keyboard and mouse at your workstation. If you subscribe to CRS Incorporated’s ASP service, you will use Remote Desktop to access your SubFinder ASP server. Starting a Session
To begin a remote session:
1. Click the Start button on the Windows Task Bar. A menu will appear with your options.
2. Highlight All Programs and a menu will appear listing the Windows programs available on that computer.
3. Highlight Accessories, and from the menu select Communications.
4. Highlight Remote Desktop Connection and click.
• Or, double-click the desktop icon (if available).
The following screen will appear:
Enter your assigned computer name into the Computer field. Typically this name will follow the format of: DistrictName.SubFinderOnline.com. Click Connect and a login screen will appear.
Enter your User Name and Password, and click OK.

Chapter 14 – Using Remote Desktop _____________________________________________________________________________
_____________________________________________________________________________ Version 5.9 Using Remote Desktop –14.0.2 Rev. 9/09
You are now remotely connected to your SubFinder machine. If at any time you need to work on programs hosted on your local workstation, you can simply minimize the remote session screen. Minimizing the screen will allow you to come back to SubFinder at another time and resume any work you may have started earlier. Ending a Session
To end a remote session: 1. Click the Start button on the Windows Task Bar. A menu will appear with your
options.

Chapter 14 – Using Remote Desktop _____________________________________________________________________________
_____________________________________________________________________________ Version 5.9 Using Remote Desktop –14.0.3 Rev. 9/09
2. Select Disconnect. The following message will appear on your screen.
Click OK if you wish to end the remote session; otherwise click Cancel.


SubFinder® is a product of CRS Advanced Technology 926 Plaza Drive
Montoursville, PA 17754 d: 800.782.3463, ext. 6762
f: 570.651.4595 [email protected]
www.crsadvancedtechnology.com