subx3c premium sound system quick start guide e.indd
TRANSCRIPT
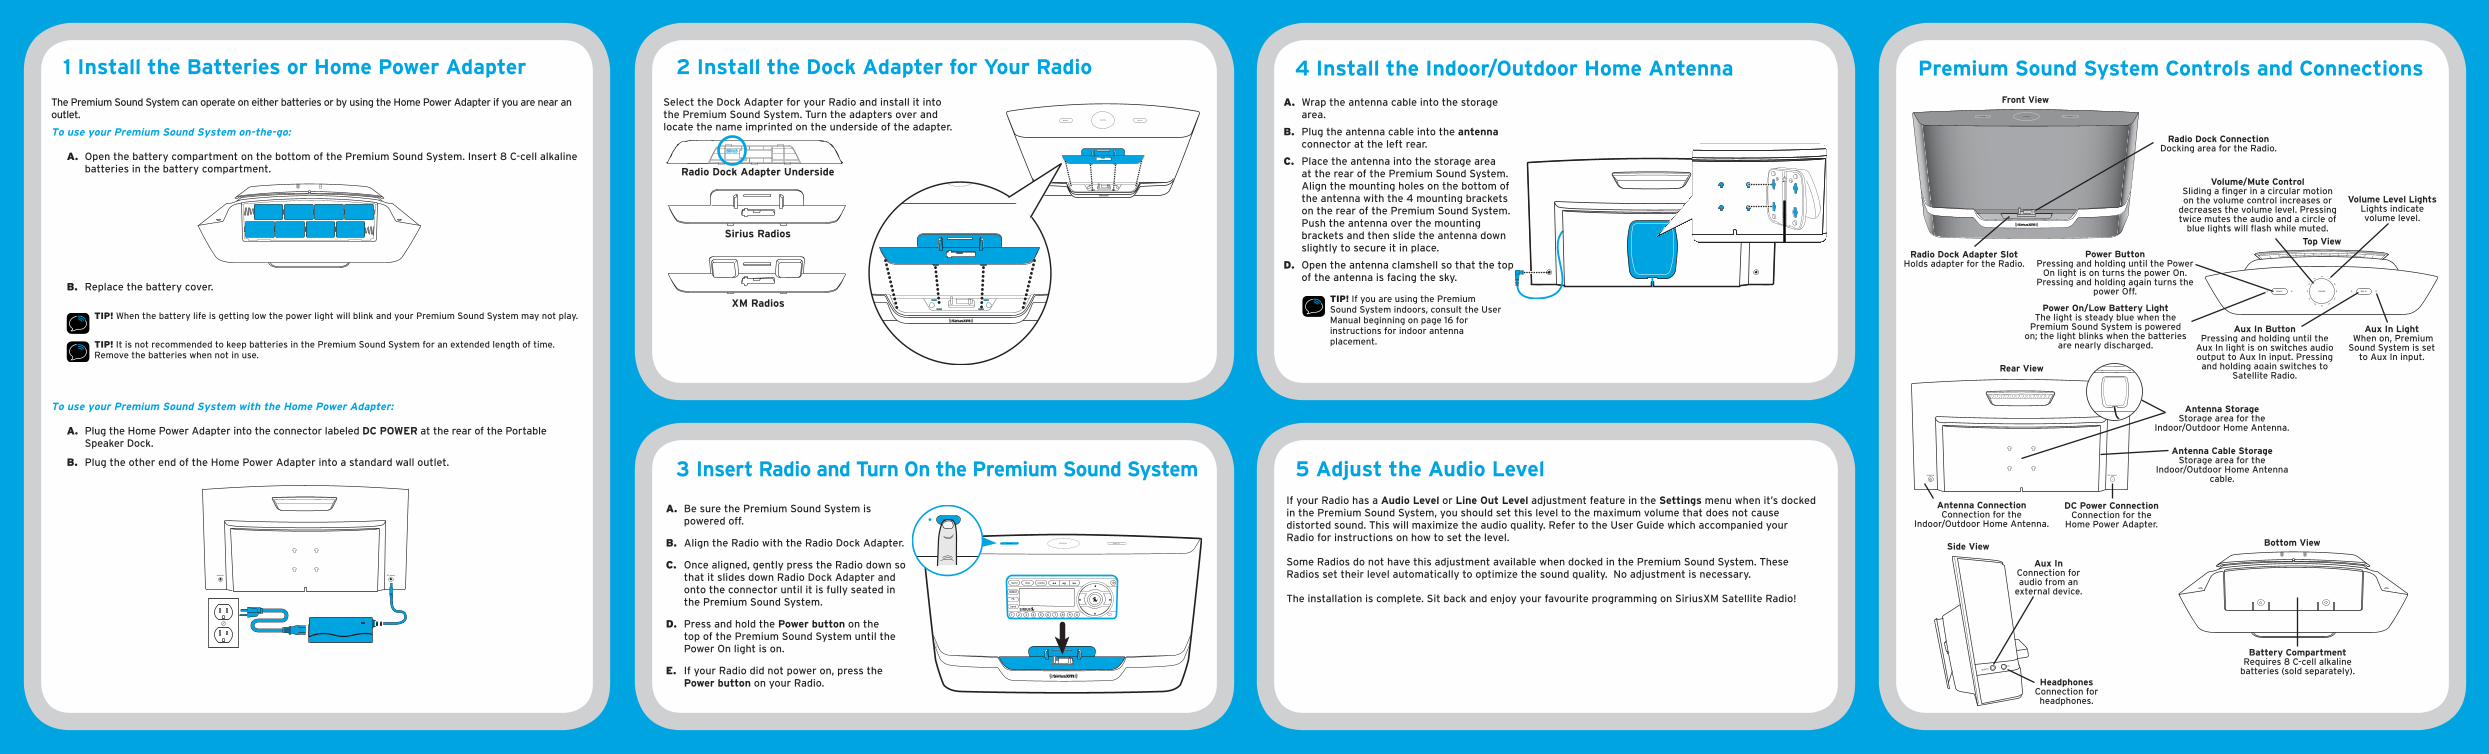
1 Install the Batteries or Home Power Adapter 2 Install the Dock Adapter for Your Radio
3 Insert Radio and Turn On the Premium Sound System
4 Install the Indoor/Outdoor Home Antenna Premium Sound System Controls and Connections
5 Adjust the Audio Level
The Premium Sound System can operate on either batteries or by using the Home Power Adapter if you are near an outlet.
To use your Premium Sound System on-the-go:
A. Open the battery compartment on the bottom of the Premium Sound System. Insert 8 C-cell alkaline batteries in the battery compartment.
B. Replace the battery cover.
TIP! When the battery life is getting low the power light will blink and your Premium Sound System may not play.
TIP! It is not recommended to keep batteries in the Premium Sound System for an extended length of time. Remove the batteries when not in use.
To use your Premium Sound System with the Home Power Adapter:
A. Plug the Home Power Adapter into the connector labeled DC POWER at the rear of the Portable Speaker Dock.
B. Plug the other end of the Home Power Adapter into a standard wall outlet.
DC powerantenna
Select the Dock Adapter for your Radio and install it into the Premium Sound System. Turn the adapters over and locate the name imprinted on the underside of the adapter.
volumepower aux in
XM Radios
Sirius Radios
Radio Dock Adapter Underside
A. Be sure the Premium Sound System is powered off.
B. Align the Radio with the Radio Dock Adapter.
C. Once aligned, gently press the Radio down so that it slides down Radio Dock Adapter and onto the connector until it is fully seated in the Premium Sound System.
D. Press and hold the Power button on the top of the Premium Sound System until the Power On light is on.
E. If your Radio did not power on, press the Power button on your Radio.
power volume aux in
power
A. Wrap the antenna cable into the storage area.
B. Plug the antenna cable into the antenna connector at the left rear.
C. Place the antenna into the storage area at the rear of the Premium Sound System. Align the mounting holes on the bottom of the antenna with the 4 mounting brackets on the rear of the Premium Sound System. Push the antenna over the mounting brackets and then slide the antenna down slightly to secure it in place.
D. Open the antenna clamshell so that the top of the antenna is facing the sky.
TIP! If you are using the Premium Sound System indoors, consult the User Manual beginning on page 16 for instructions for indoor antenna placement.
If your Radio has a Audio Level or Line Out Level adjustment feature in the Settings menu when it’s docked in the Premium Sound System, you should set this level to the maximum volume that does not cause distorted sound. This will maximize the audio quality. Refer to the User Guide which accompanied your Radio for instructions on how to set the level.
Some Radios do not have this adjustment available when docked in the Premium Sound System. These Radios set their level automatically to optimize the sound quality. No adjustment is necessary.
The installation is complete. Sit back and enjoy your favourite programming on SiriusXM Satellite Radio!
Radio Dock Adapter Slot Holds adapter for the Radio.
Radio Dock Connection Docking area for the Radio.
Front View
power volume aux in
Top View
volumepower aux in
Side View
Headphones Connection for headphones.
Aux In Connection for audio from an
external device.
aux in
Bottom View
Battery Compartment Requires 8 C-cell alkaline
batteries (sold separately).
Rear View
Antenna Cable Storage Storage area for the
Indoor/Outdoor Home Antenna cable.
Antenna Connection Connection for the
Indoor/Outdoor Home Antenna.
Antenna Storage Storage area for the
Indoor/Outdoor Home Antenna.
DC Power Connection Connection for the
Home Power Adapter.
DC powerantenna
Aux In Button Pressing and holding until the
Aux In light is on switches audio output to Aux In input. Pressing and holding again switches to
Satellite Radio.
Aux In Light When on, Premium Sound System is set
to Aux In input.
Power On/Low Battery Light The light is steady blue when the
Premium Sound System is powered on; the light blinks when the batteries
are nearly discharged.
Power Button Pressing and holding until the Power
On light is on turns the power On. Pressing and holding again turns the
power Off.
Volume/Mute Control Sliding a finger in a circular motion on the volume control increases or
decreases the volume level. Pressing twice mutes the audio and a circle of
blue lights will flash while muted.
Volume Level Lights Lights indicate volume level.
Quick Start Guide
Premium Sound System
siriusxm.ca
Sirius XM Canada Inc.135 Liberty St. - 4th floorToronto, Ontario, M6K 1A7
1-888-539-7474
© 2016 Sirius XM Canada Inc.
SUBX3C QSG E 151128a
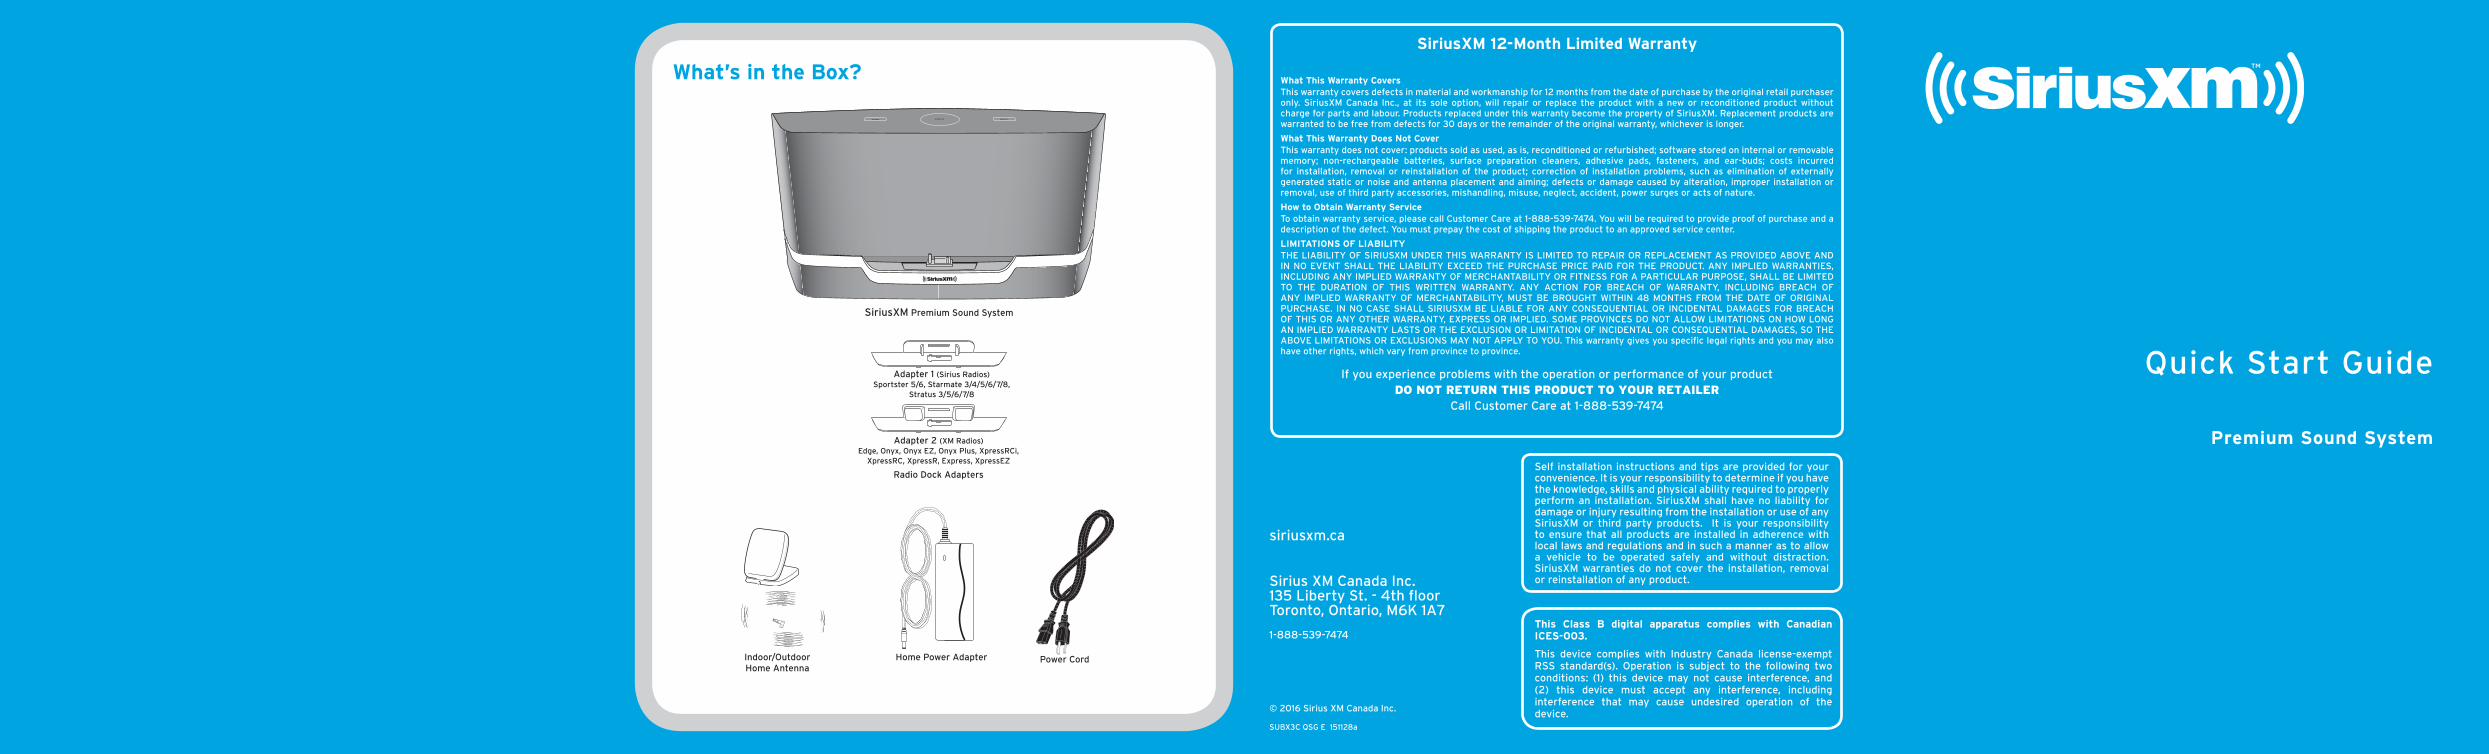
Indoor/Outdoor Home Antenna
Home Power Adapter Power Cord
SiriusXM Premium Sound System
Radio Dock Adapters
power volume aux in
Adapter 1 (Sirius Radios) Sportster 5/6, Starmate 3/4/5/6/7/8,
Stratus 3/5/6/7/8
Adapter 2 (XM Radios) Edge, Onyx, Onyx EZ, Onyx Plus, XpressRCi,
XpressRC, XpressR, Express, XpressEZ
What’s in the Box?
Self installation instructions and tips are provided for your convenience. It is your responsibility to determine if you have the knowledge, skills and physical ability required to properly perform an installation. SiriusXM shall have no liability for damage or injury resulting from the installation or use of any SiriusXM or third party products. It is your responsibility to ensure that all products are installed in adherence with local laws and regulations and in such a manner as to allow a vehicle to be operated safely and without distraction. SiriusXM warranties do not cover the installation, removal or reinstallation of any product.
This Class B digital apparatus complies with Canadian ICES-003.
This device complies with Industry Canada license-exempt RSS standard(s). Operation is subject to the following two conditions: (1) this device may not cause interference, and (2) this device must accept any interference, including interference that may cause undesired operation of the device.
SiriusXM 12-Month Limited Warranty
What This Warranty CoversThis warranty covers defects in material and workmanship for 12 months from the date of purchase by the original retail purchaser only. SiriusXM Canada Inc., at its sole option, will repair or replace the product with a new or reconditioned product without charge for parts and labour. Products replaced under this warranty become the property of SiriusXM. Replacement products are warranted to be free from defects for 30 days or the remainder of the original warranty, whichever is longer.
What This Warranty Does Not CoverThis warranty does not cover: products sold as used, as is, reconditioned or refurbished; software stored on internal or removable memory; non-rechargeable batteries, surface preparation cleaners, adhesive pads, fasteners, and ear-buds; costs incurred for installation, removal or reinstallation of the product; correction of installation problems, such as elimination of externally generated static or noise and antenna placement and aiming; defects or damage caused by alteration, improper installation or removal, use of third party accessories, mishandling, misuse, neglect, accident, power surges or acts of nature.
How to Obtain Warranty ServiceTo obtain warranty service, please call Customer Care at 1-888-539-7474. You will be required to provide proof of purchase and a description of the defect. You must prepay the cost of shipping the product to an approved service center.
LIMITATIONS OF LIABILITYTHE LIABILITY OF SIRIUSXM UNDER THIS WARRANTY IS LIMITED TO REPAIR OR REPLACEMENT AS PROVIDED ABOVE AND IN NO EVENT SHALL THE LIABILITY EXCEED THE PURCHASE PRICE PAID FOR THE PRODUCT. ANY IMPLIED WARRANTIES, INCLUDING ANY IMPLIED WARRANTY OF MERCHANTABILITY OR FITNESS FOR A PARTICULAR PURPOSE, SHALL BE LIMITED TO THE DURATION OF THIS WRITTEN WARRANTY. ANY ACTION FOR BREACH OF WARRANTY, INCLUDING BREACH OF ANY IMPLIED WARRANTY OF MERCHANTABILITY, MUST BE BROUGHT WITHIN 48 MONTHS FROM THE DATE OF ORIGINAL PURCHASE. IN NO CASE SHALL SIRIUSXM BE LIABLE FOR ANY CONSEQUENTIAL OR INCIDENTAL DAMAGES FOR BREACH OF THIS OR ANY OTHER WARRANTY, EXPRESS OR IMPLIED. SOME PROVINCES DO NOT ALLOW LIMITATIONS ON HOW LONG AN IMPLIED WARRANTY LASTS OR THE EXCLUSION OR LIMITATION OF INCIDENTAL OR CONSEQUENTIAL DAMAGES, SO THE ABOVE LIMITATIONS OR EXCLUSIONS MAY NOT APPLY TO YOU. This warranty gives you specific legal rights and you may also have other rights, which vary from province to province.
If you experience problems with the operation or performance of your productDO NOT RETURN THIS PRODUCT TO YOUR RETAILER
Call Customer Care at 1-888-539-7474