super simple quilts 4
DESCRIPTION
ÂTRANSCRIPT
Boo
ke
d wnloadt
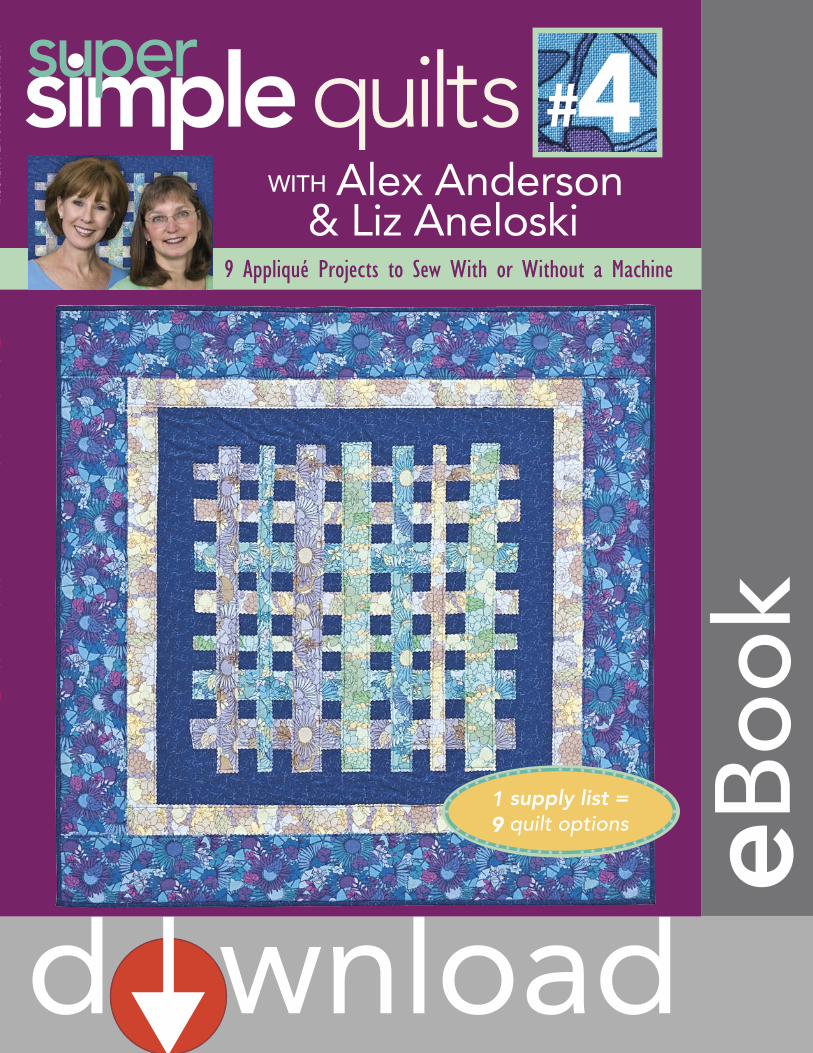
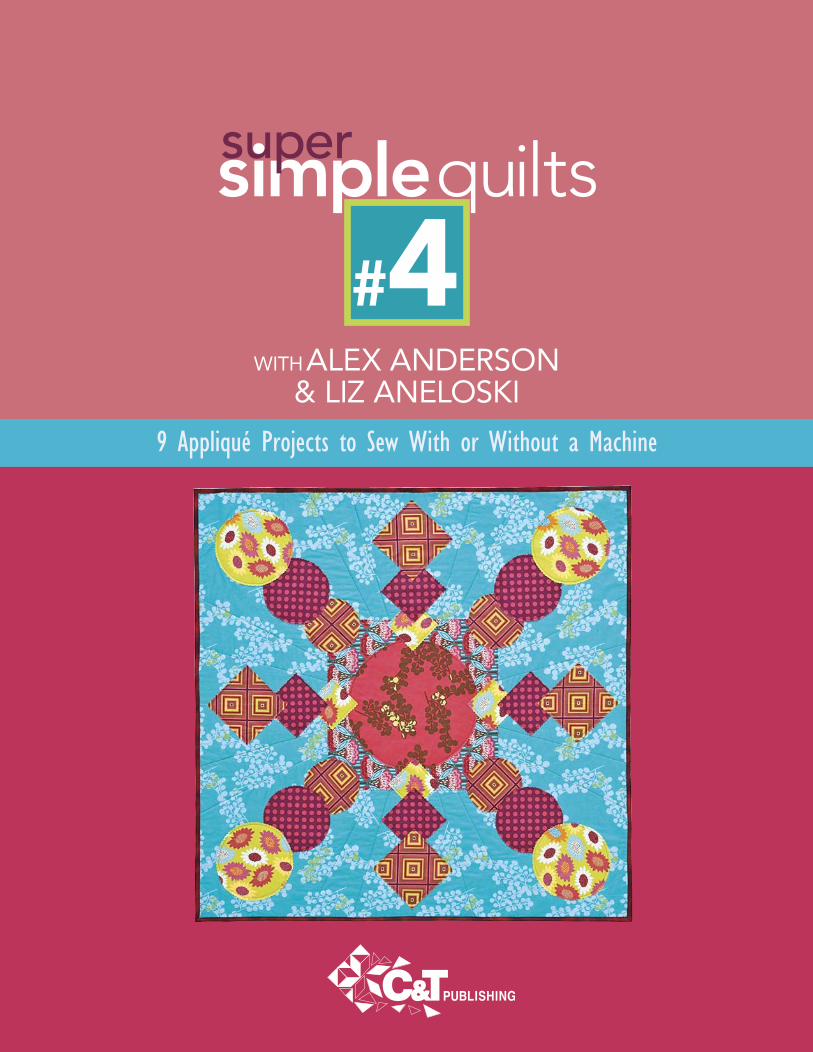
simple quiltsWITH Alex Anderson & Liz Aneloski
super
9 Appliqué Projects to Sew With or Without a Machine
1 supply list =9 quilt options
#4
US $9.95
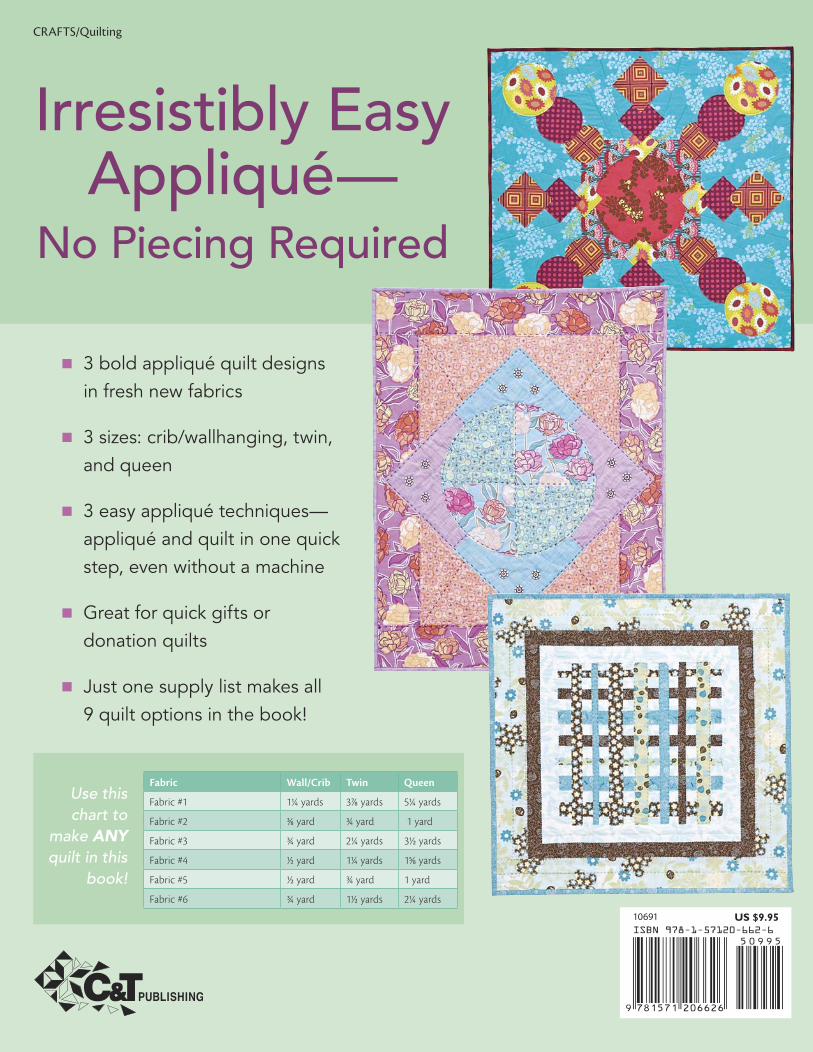
Irresistibly Easy Appliqué—
No Piecing Required
ALE
X A
ND
ER
SON
& LIZ A
NE
LOSK
IC
&T PU
BLISHIN
G SU
PE
R SIM
PLE
QU
ILTS #4 WITH
ALE
X A
ND
ER
SON
& LIZ
AN
ELO
SKI
n 3 bold appliqué quilt designs in fresh new fabrics
n 3 sizes: crib/wallhanging, twin, and queen
n 3 easy appliqué techniques—appliqué and quilt in one quick step, even without a machine
n Great for quick gifts or donation quilts
n Just one supply list makes all 9 quilt options in the book!
CRAFTS/Quilting
Use this chart to
make ANY quilt in this
book!
10691
Fabric Wall/Crib Twin Queen
Fabric #1 11/4 yards 37/8 yards 51/4 yards
Fabric #2 3/8 yard 3/4 yard 1 yard
Fabric #3 3/4 yard 21/4 yards 31/2 yards
Fabric #4 1/2 yard 11/4 yards 15/8 yards
Fabric #5 1/2 yard 3/4 yard 1 yard
Fabric #6 3/4 yard 11/2 yards 21/4 yards
10691_fullcover.indd 1 6/9/09 11:04:19 AM
LEGAL PAGE
Super Simple Quilts #4 with Alex Anderson and Liz Aneloski
Copyright © 2009 by C&T Publishing, Inc.
ISBN 978-1-60705-108-4
Published by C&T Publishing, Inc., PO Box 1456, Lafayette, CA 94549. www.ctpub.com
All rights reserved. No part of this work covered by the copyright hereon may be used in any form or reproduced by any means—graphic, electronic, or mechanical, including photocopying, recording, taping, or information storage and retrieval systems—without written permission from the Publisher.
Acceptable uses of this ELECTRONIC PRODUCT:
1. Purchaser is entitled to print out as many copies of this ELECTRONIC PRODUCT as they wish for personal use. Photocopying, digitizing, and all other forms of copying to “share” or “distribute” the ELECTRONIC PRODUCT, whether for profit or not, is strictly prohibited.
2. Purchaser may not transfer the ELECTRONIC PRODUCT to any other person, via the Internet, email, on disk, in electronic or printed form or any other form without the written permission of C&T Publishing. Purchaser may not make the ELECTRONIC PRODUCT available over a network where it could be used by multiple computers at the same time.
3. Purchaser may not rent, lease, transfer, lend, or share the ELECTRONIC PRODUCT.
Limited Warranty: Limited Warranty on this ELECTRONIC PRODUCT. C&T Publishing, Inc. warrants the ELECTRONIC PRODUCT will be delivered by C&T Publishing, Inc. free from defects in materials and workmanship under normal use for a period of ninety (90) days from the date of original purchase. C&T Publishing, Inc. will not replace the ELECTRONIC PRODUCT due to Purchaser changing computers or accidentally deleting ELECTRONIC PRODUCT or for any other loss of the file that is considered out of the control of C&T Publishing, Inc. Your exclusive remedy under this Section shall be, at C&T Publishing, Inc.’s option, a refund of the purchase price of the ELECTRONIC PRODUCT.
Contact us at 800-284-1114 or www.ctpub.com for more information about the C&T Teachers Program.
We take great care to ensure that the information included in our products is accurate and presented in good faith, but no warranty is provided nor are results guaranteed. Having no control over the choices of materials or procedures used, neither the author nor C&T Publishing, Inc., shall have any liability to any person or entity with respect to any loss or damage caused directly or indirectly by the information contained in this book. For your convenience, we post an up-to-date listing of corrections on our website (www.ctpub.com). If a correction is not already noted, please contact our customer service department at [email protected] or at P.O. Box 1456, Lafayette, CA 94549.
Trademark (™) and registered trademark (®) names are used throughout this ELECTRONIC PRODUCT. Rather than use the symbols with every occurrence of a trademark or registered trademark name, we are using the names only in the editorial fashion and to the benefit of the owner, with no intention of infringement.
simplequiltssuper
#4WITH ALEX ANDERSON
& LIZ ANELOSKI
9 Appliqué Projects to Sew With or Without a Machine
10691_SSQ4_01.indd 1 6/3/09 3:58:22 PM
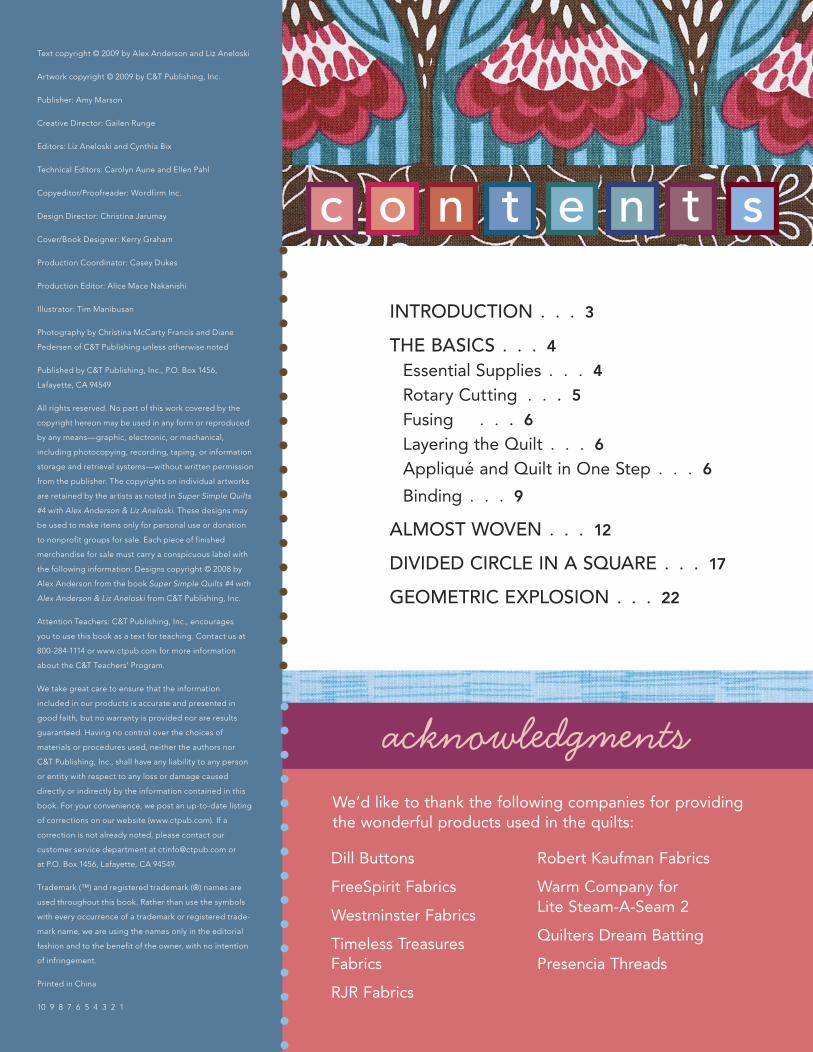
INTRODUCTION . . . 3
THE BASICS . . . 4
Essential Supplies . . . 4
Rotary Cutting . . . 5
Fusing . . . 6
Layering the Quilt . . . 6
Appliqué and Quilt in One Step . . . 6
Binding . . . 9
ALMOST WOVEN . . . 12
DIVIDED CIRCLE IN A SQUARE . . . 17
GEOMETRIC EXPLOSION . . . 22
c o t en n st
Robert Kaufman Fabrics
Warm Company for Lite Steam-A-Seam 2
Quilters Dream Batting
Presencia Threads
Dill Buttons
FreeSpirit Fabrics
Westminster Fabrics
Timeless Treasures Fabrics
RJR Fabrics
acknowledgmentsWe’d like to thank the following companies for providing the wonderful products used in the quilts:
Text copyright © 2009 by Alex Anderson and Liz Aneloski
Artwork copyright © 2009 by C&T Publishing, Inc.
Publisher: Amy Marson
Creative Director: Gailen Runge
Editors: Liz Aneloski and Cynthia Bix
Technical Editors: Carolyn Aune and Ellen Pahl
Copyeditor/Proofreader: Wordfirm Inc.
Design Director: Christina Jarumay
Cover/Book Designer: Kerry Graham
Production Coordinator: Casey Dukes
Production Editor: Alice Mace Nakanishi
Illustrator: Tim Manibusan
Photography by Christina McCarty Francis and Diane
Pedersen of C&T Publishing unless otherwise noted
Published by C&T Publishing, Inc., P.O. Box 1456,
Lafayette, CA 94549
All rights reserved. No part of this work covered by the
copyright hereon may be used in any form or reproduced
by any means—graphic, electronic, or mechanical,
including photocopying, recording, taping, or information
storage and retrieval systems—without written permission
from the publisher. The copyrights on individual artworks
are retained by the artists as noted in Super Simple Quilts
#4 with Alex Anderson & Liz Aneloski. These designs may
be used to make items only for personal use or donation
to nonprofit groups for sale. Each piece of finished
merchandise for sale must carry a conspicuous label with
the following information: Designs copyright © 2008 by
Alex Anderson from the book Super Simple Quilts #4 with
Alex Anderson & Liz Aneloski from C&T Publishing, Inc.
Attention Teachers: C&T Publishing, Inc., encourages
you to use this book as a text for teaching. Contact us at
800-284-1114 or www.ctpub.com for more information
about the C&T Teachers’ Program.
We take great care to ensure that the information
included in our products is accurate and presented in
good faith, but no warranty is provided nor are results
guaranteed. Having no control over the choices of
materials or procedures used, neither the authors nor
C&T Publishing, Inc., shall have any liability to any person
or entity with respect to any loss or damage caused
directly or indirectly by the information contained in this
book. For your convenience, we post an up-to-date listing
of corrections on our website (www.ctpub.com). If a
correction is not already noted, please contact our
customer service department at [email protected] or
at P.O. Box 1456, Lafayette, CA 94549.
Trademark (™) and registered trademark (®) names are
used throughout this book. Rather than use the symbols
with every occurrence of a trademark or registered trade-
mark name, we are using the names only in the editorial
fashion and to the benefit of the owner, with no intention
of infringement.
Printed in China
10 9 8 7 6 5 4 3 2 1
10691_SSQ4_01.indd 2 6/3/09 3:58:37 PM
i n t r o d u c t i o n 3
These quilts can be first quilts for beginners or fast quilts for more experienced quilters looking for the perfect gift, donation, or baby quilt. Choose from three raw-edge appliqué techniques:
No handwork required (all machine appliqué)
No machine required (all hand appliqué)
Mix & match the hand and machine methods for your perfect style
This book offers3 quilt designs using
3 raw-edge appliquéstyles in
3 sizes with
3 binding techniques
Choose the size of quilt you want, and from one materials list you can make any of the three quilt designs. This means you can choose a size, shop for fabric (photos of fabric swatches will help you), and then go home and decide which quilt design you want to make. Choose an appliqué style (appliqué and quilt in one step) and binding technique, and you’re done! See how easy?
We have included basic guidance to get you started and a great list of books (page 27) you can refer to if you want more information.
I often have the pleasure of brainstorming with Liz. I always treasure the time together. We each bring our own perspective to the table, and more often than not, we are keenly in sync. One such occasion was in the recent past. We were chatting about what sort of book was needed. As usual, life took its twists and turns, and that conversation was left on the back burner, or so I thought. Several months lat-er I received a call from Liz, and she wanted to show me “something.” Bingo, her quilts hit the nail on the head. She asked if I would be interested in providing the general quiltmaking instructions for the book and before we knew it, Liz and I were co-authors! We are both very excited about this collaboration—fast, fun, simple projects, perfect for the beginner or the seasoned quilter who wants a quick project, in perfect C&T style.
–Alex
Over the many years that Alex and I have known each other, our relationship has developed through many different experiences: quilt show chair and vendor, quilting friends/parents, editor and author, and now co-authors. The fun just never ends. With this book, we have combined Alex’s expertise in quiltmaking knowledge with my design and project writing skills. I hope you have fun with the simple designs, techniques, and many options that await you.
–Liz
i n r ot d cu i o nt
10691_SSQ4_01.indd 3 6/3/09 3:58:39 PM
4 S u P E r S i M P L E Q u i L t S # 4 W i t H A L E X A n d E r S o n & L i Z A n E L o S K i
essential suppliesn Sewing machine (good working
condition, with proper tension [refer
to the manufacturer’s guide for proper
adjustment], an even stitch, and a good-
quality size 80 needle)
n 45mm rotary cutter
Straight-edge cutter
Decorative-edge cutters
n 18˝ × 24˝ self-healing rotary
cutting mat (must be used with
the rotary cutter)
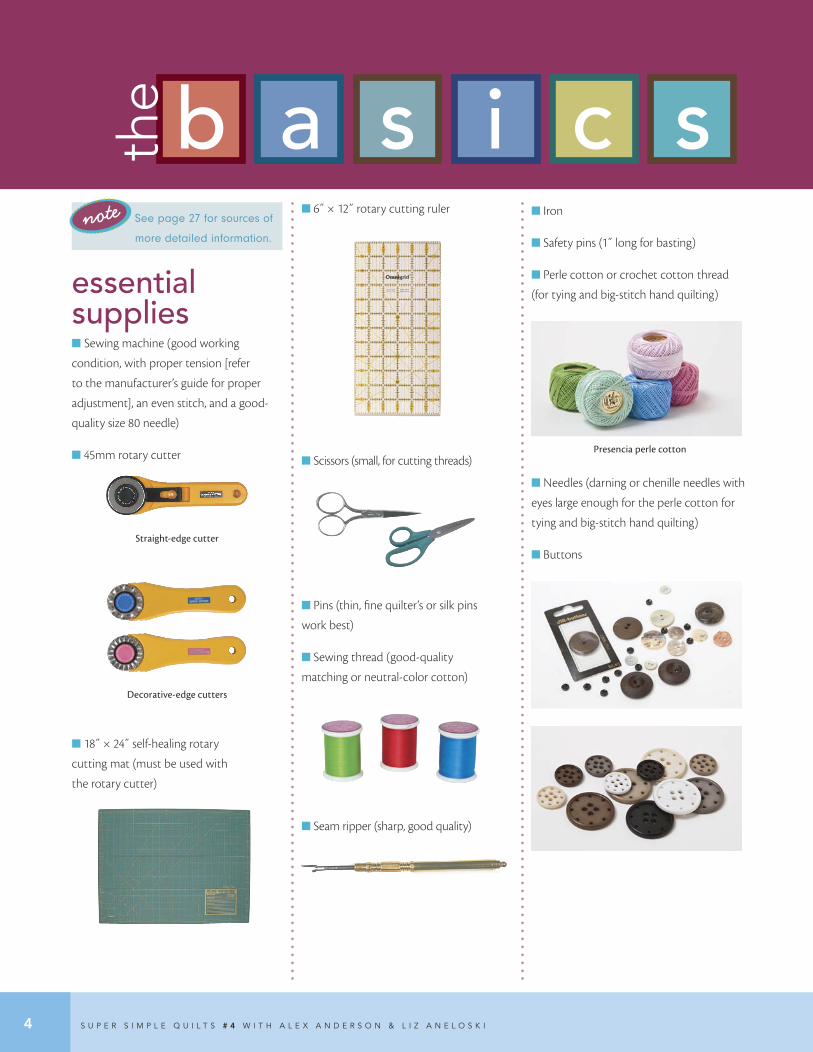
b a s i scthe
n 6˝ × 12˝ rotary cutting ruler
n Scissors (small, for cutting threads)
n Pins (thin, fine quilter’s or silk pins
work best)
n Sewing thread (good-quality
matching or neutral-color cotton)
n Seam ripper (sharp, good quality)
n Iron
n Safety pins (1˝ long for basting)
n Perle cotton or crochet cotton thread
(for tying and big-stitch hand quilting)
Presencia perle cotton
n Needles (darning or chenille needles with
eyes large enough for the perle cotton for
tying and big-stitch hand quilting)
n Buttons
See page 27 for sources of
more detailed information.
note
10691_SSQ4_01.indd 4 6/3/09 3:59:03 PM
t H E b A S i c S 5
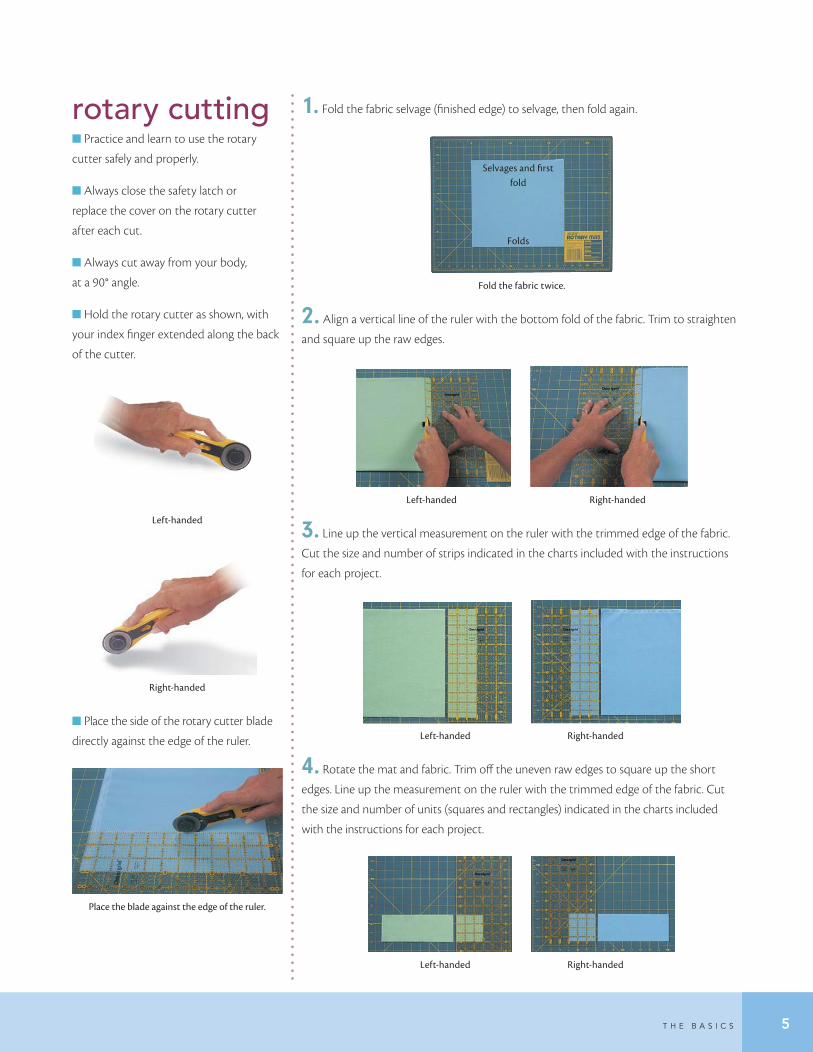
rotary cuttingn Practice and learn to use the rotary
cutter safely and properly.
n Always close the safety latch or
replace the cover on the rotary cutter
after each cut.
n Always cut away from your body,
at a 90° angle.
n Hold the rotary cutter as shown, with
your index finger extended along the back
of the cutter.
Left-handed
Right-handed
n Place the side of the rotary cutter blade
directly against the edge of the ruler.
Place the blade against the edge of the ruler.
1. Fold the fabric selvage (finished edge) to selvage, then fold again.
Fold the fabric twice.
2. Align a vertical line of the ruler with the bottom fold of the fabric. Trim to straighten
and square up the raw edges.
Left-handed Right-handed
3. Line up the vertical measurement on the ruler with the trimmed edge of the fabric.
Cut the size and number of strips indicated in the charts included with the instructions
for each project.
Left-handed Right-handed
4. Rotate the mat and fabric. Trim off the uneven raw edges to square up the short
edges. Line up the measurement on the ruler with the trimmed edge of the fabric. Cut
the size and number of units (squares and rectangles) indicated in the charts included
with the instructions for each project.
Left-handed Right-handed
Selvages and first fold
Folds
10691_SSQ4_01.indd 5 6/3/09 3:59:10 PM
6 S u P E r S i M P L E Q u i L t S # 4 W i t H A L E X A n d E r S o n & L i Z A n E L o S K i
fusingThe fusing method used for the quilts in
this book is a little different than you might
usually use. Please read the directions
before proceeding.
1. With a straight-edge rotary cutting
blade, cut the pieces from paper-backed
fusible adhesive using the second chart in
each project.
2. Remove the paper backing and fuse
the pieces to the appropriate fabrics, 1/2˝
apart, using the third chart in each project.
3. With the wavy-edge rotary cutting
blade, cut out the pieces, leaving 1/4˝ of
unfused fabric around the edges of the
fusible adhesive. This will allow you to
stitch through the fabric only, not through
the fusible adhesive. Don’t worry if your
cutting isn’t perfect, it doesn’t matter.
layeringthe quiltBATTING AND BACKINGBatting (low-loft polyester or cotton,
approximately 2˝ larger than the quilt
top on each side)
Backing (approximately 2˝ larger than the
quilt top on each side)
If your quilt top is larger than one width
of fabric, you will need to sew pieces of
fabric together to make the backing
(trim off the selvages first). If you’re using
leftover fabrics, sew pieces together to
achieve the size listed in the Materials
chart. You may have some leftover fabrics
from making the project quilts to use for
backing and binding.
LAYERING1. Place the backing wrong side up.
Secure the backing to a large, flat surface,
pulling the backing smooth and taut (not
too tight). Use masking tape to secure on
a table or hard floor or T-pins on nonloop
carpet.
2. Place the batting on top of the
backing and smooth out the wrinkles.
3. Smooth the quilt top onto the
batting, right side up.
BASTINGPin baste evenly across the quilt about
every 3˝ with safety pins.
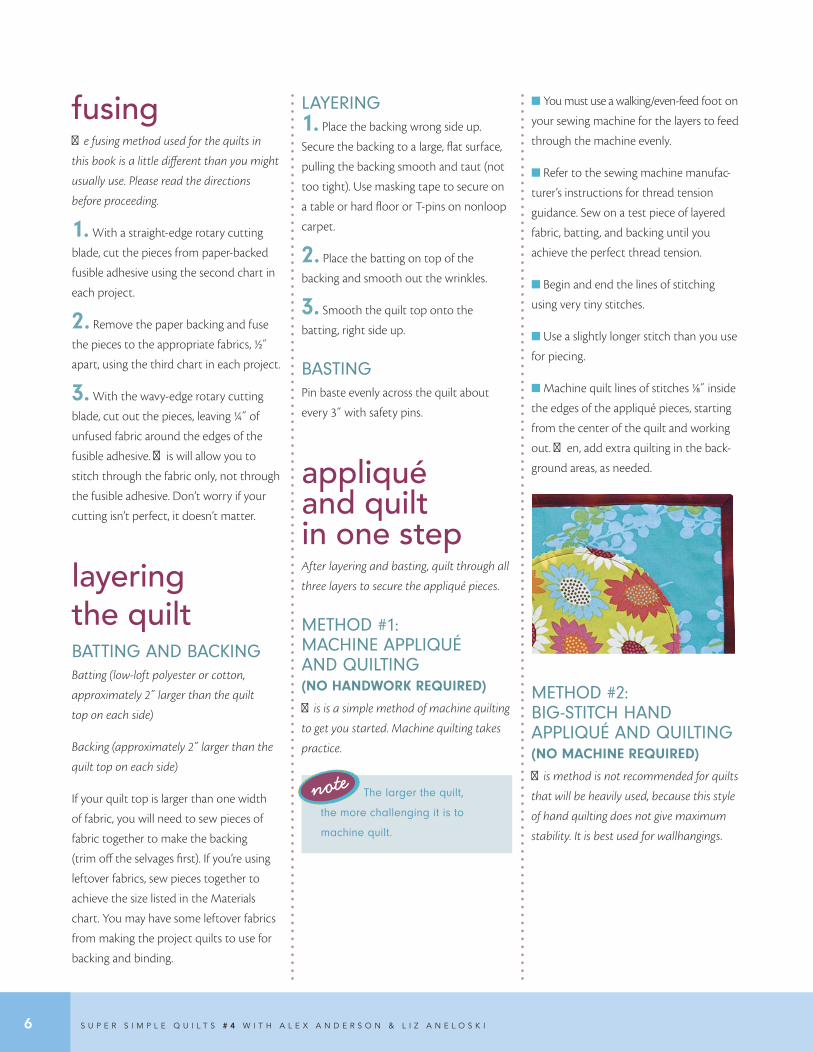
appliqué and quilt in one stepAfter layering and basting, quilt through all
three layers to secure the appliqué pieces.
METhoD #1: MAChINE AppLIqué AND quILTING (No HaNdwork required)
This is a simple method of machine quilting
to get you started. Machine quilting takes
practice.
The larger the quilt,
the more challenging it is to
machine quilt.
n You must use a walking/even-feed foot on
your sewing machine for the layers to feed
through the machine evenly.
n Refer to the sewing machine manufac-
turer’s instructions for thread tension
guidance. Sew on a test piece of layered
fabric, batting, and backing until you
achieve the perfect thread tension.
n Begin and end the lines of stitching
using very tiny stitches.
n Use a slightly longer stitch than you use
for piecing.
n Machine quilt lines of stitches 1/8˝ inside
the edges of the appliqué pieces, starting
from the center of the quilt and working
out. Then, add extra quilting in the back-
ground areas, as needed.
METhoD #2: BIG-STITCh hAND AppLIqué AND quILTING (No MacHiNe required)
This method is not recommended for quilts
that will be heavily used, because this style
of hand quilting does not give maximum
stability. It is best used for wallhangings.
note
10691_SSQ4_01.indd 6 6/3/09 3:59:12 PM
t H E b A S i c S 7
It is not necessary to use
a quilting hoop or frame when
big-stitch hand quilting, but you
have to be very careful not to pull
the stitches too tight. You want
your quilt to remain very flat and
smooth.
The methods shown here for big-
stitch hand quilting differ from
traditional hand quilting methods
because of the thickness of the
thread and the size of the stitches.
1. Knot one end of the thread. (The
quilts in this book were quilted with
Presencia perle cotton or crochet cotton
thread.)
2. Insert the needle from the back of
the quilt and pull the thread through to
the front, leaving the knot showing on the
back. Sew a running stitch, making the
stitches approximately 1/4˝ long, 1/8˝ inside
from the edges of the appliqué pieces.
Then, add extra quilting in the background
areas, if needed.
For perfect, even stitches,
try the peel-and-stick ease of
Inchie Ruler Tape (C&T publishing).
Running stitch
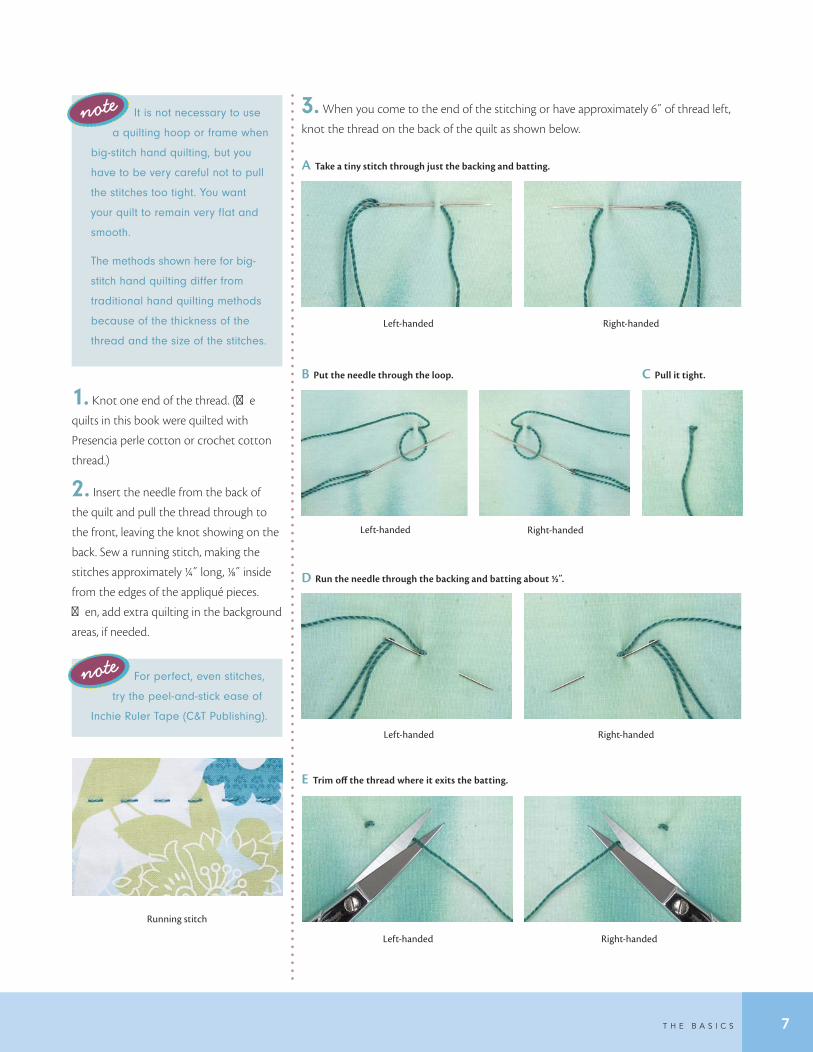
3. When you come to the end of the stitching or have approximately 6˝ of thread left,
knot the thread on the back of the quilt as shown below.
A Take a tiny stitch through just the backing and batting.
Left-handed Right-handed
B Put the needle through the loop. C Pull it tight.
Left-handed Right-handed
D Run the needle through the backing and batting about 1/2 .̋
Left-handed Right-handed
E Trim off the thread where it exits the batting.
Left-handed Right-handed
note
note
10691_SSQ4_01.indd 7 6/3/09 4:00:06 PM
8 S u P E r S i M P L E Q u i L t S # 4 W i t H A L E X A n d E r S o n & L i Z A n E L o S K i
tyingTying is another option for securing
the quilt layers and is an alternative to
machine appliqué and quilting (page 6)
and big-stitch hand appliqué and quilting
(pages 6–7).
1. Decide whether you want the knots
and tails to be on the front or the back of
the quilt.
2. Thread a large-eyed needle with the
tying thread. (The quilts in this book were
tied with DMC perle cotton or crochet
cotton thread.)
You can use a single or
double thread, depending on how
much you want the thread to show.
3. Push the needle through all 3 layers,
so it comes out through the other side.
If you want the knots on
the front, push the needle in from
the front. If you want the knots
on the back, push the needle in
from the back.
4. Push the needle back through the
layers, approximately 1/8˝–1/4˝ from where it
originally went through the layers. Pull the
thread, leaving a 11/2˝–2˝ tail.
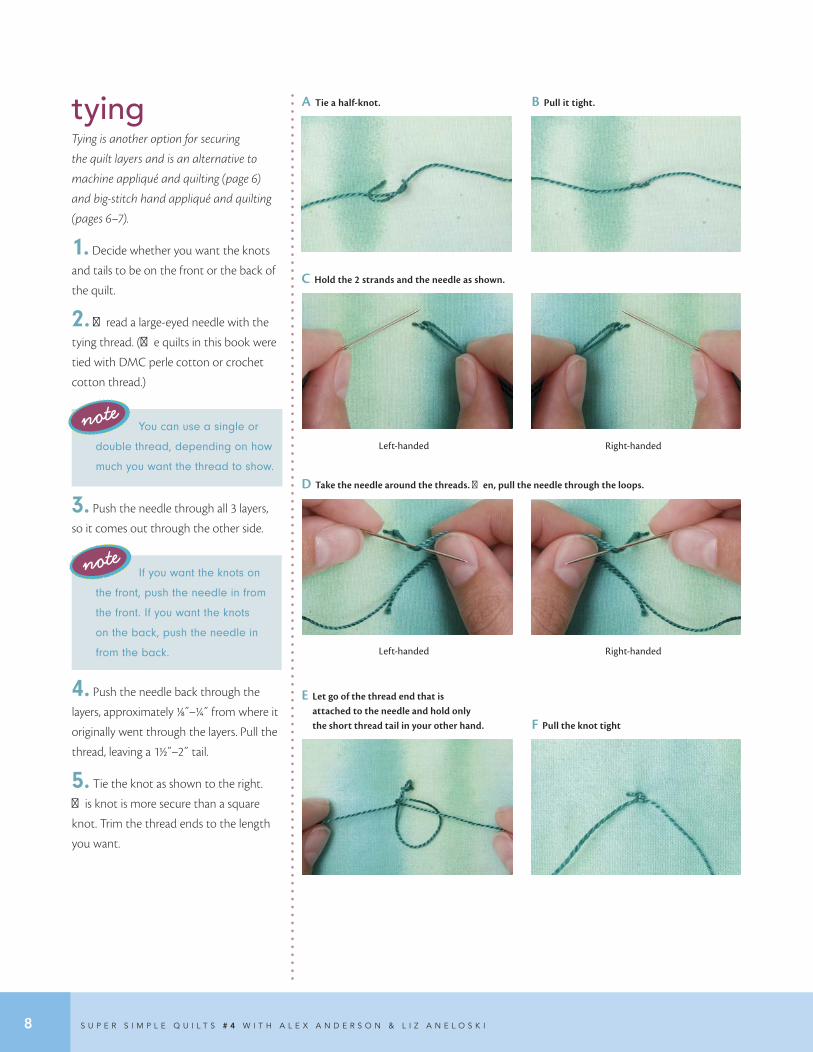
5. Tie the knot as shown to the right.
This knot is more secure than a square
knot. Trim the thread ends to the length
you want.
A Tie a half-knot. B Pull it tight.
C Hold the 2 strands and the needle as shown.
Left-handed Right-handed
D Take the needle around the threads. Then, pull the needle through the loops.
Left-handed Right-handed
E Let go of the thread end that is attached to the needle and hold only the short thread tail in your other hand. F Pull the knot tight
note
note
10691_SSQ4_01.indd 8 6/3/09 4:00:51 PM
t H E b A S i c S 9
You can tie on buttons
using the same method.
bindingWe recommend that you use leftover
fabrics for binding and then supplement
as necessary. You can use one to four differ-
ent fabrics. Look at the quilts throughout
the book for ideas.
BINDING METhoD #1 (No HaNdwork required)
1. Follow Steps 1–4 for Binding
Method #3, pages 10–11.
2. Align the raw edges of the binding
with the top edge of the back of the quilt.
Let the binding extend 1/2˝ past the corners
of the quilt. Sew using a 1/4˝ seam allowance.
Repeat for the bottom edge of the quilt.
Raw edge
Folded edge
Quilt back
042
Sew the binding to the top edge of the quilt.
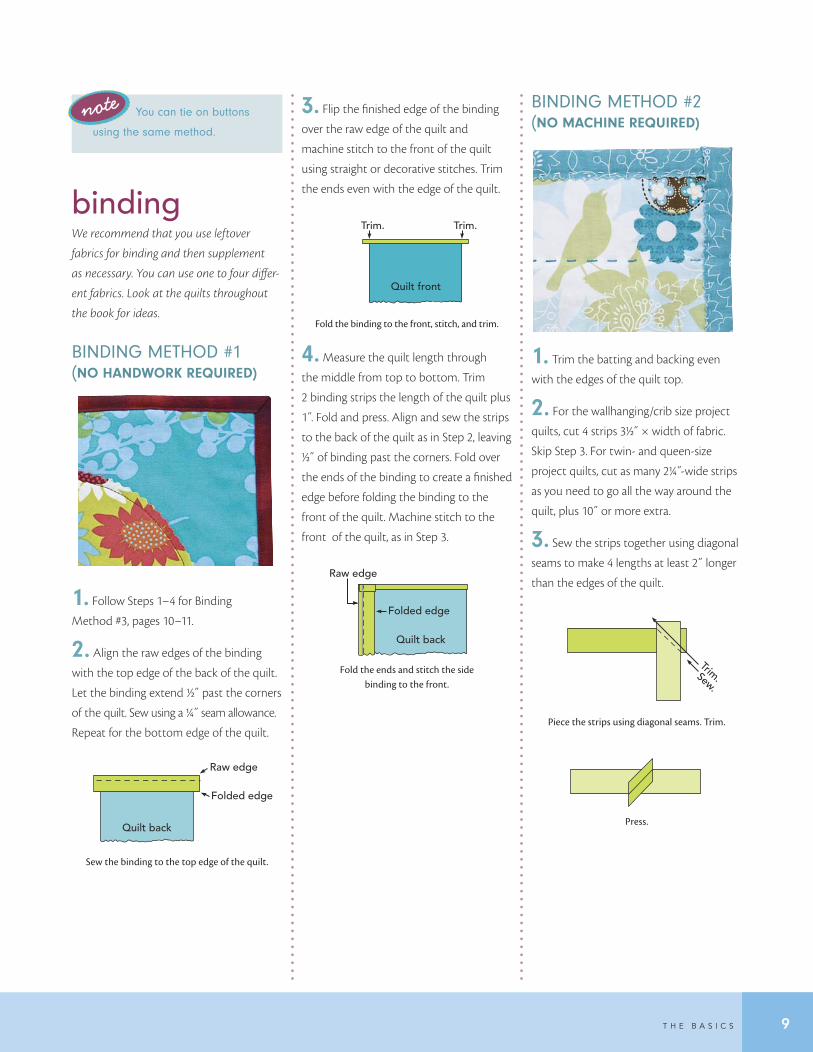
3. Flip the finished edge of the binding
over the raw edge of the quilt and
machine stitch to the front of the quilt
using straight or decorative stitches. Trim
the ends even with the edge of the quilt.
Trim. Trim.
Quilt front
043
Fold the binding to the front, stitch, and trim.
4. Measure the quilt length through
the middle from top to bottom. Trim
2 binding strips the length of the quilt plus
1 .̋ Fold and press. Align and sew the strips
to the back of the quilt as in Step 2, leaving
1/2˝ of binding past the corners. Fold over
the ends of the binding to create a finished
edge before folding the binding to the
front of the quilt. Machine stitch to the
front of the quilt, as in Step 3.
Raw edge
Folded edge
Quilt back
044
Fold the ends and stitch the side binding to the front.
BINDING METhoD #2 (No MacHiNe required)
1. Trim the batting and backing even
with the edges of the quilt top.
2. For the wallhanging/crib size project
quilts, cut 4 strips 31/2˝ × width of fabric.
Skip Step 3. For twin- and queen-size
project quilts, cut as many 21/4 -̋wide strips
as you need to go all the way around the
quilt, plus 10˝ or more extra.
3. Sew the strips together using diagonal
seams to make 4 lengths at least 2˝ longer
than the edges of the quilt.
035
Trim.Sew.
Piece the strips using diagonal seams. Trim.
036
Press.
note
10691_SSQ4_01.indd 9 6/3/09 4:01:06 PM
10 S u P E r S i M P L E Q u i L t S # 4 W i t H A L E X A n d E r S o n & L i Z A n E L o S K i
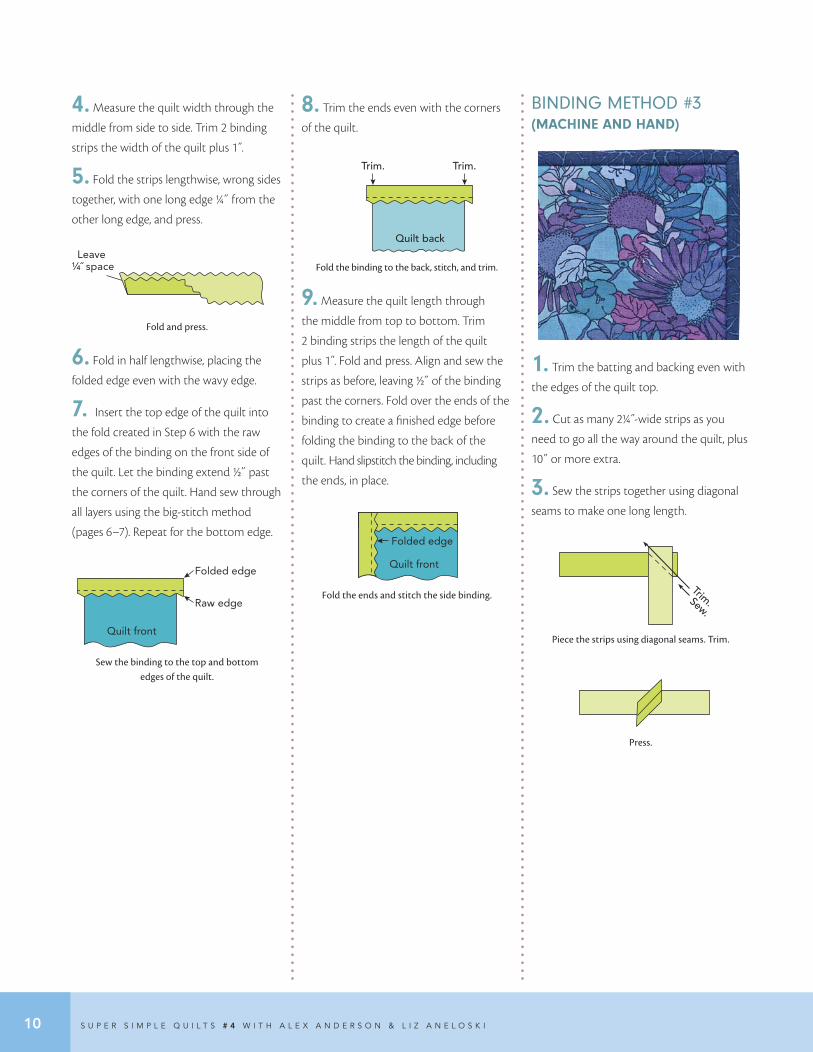
4. Measure the quilt width through the
middle from side to side. Trim 2 binding
strips the width of the quilt plus 1 .̋
5. Fold the strips lengthwise, wrong sides
together, with one long edge 1/4˝ from the
other long edge, and press.
037.eps
Leave ¼˝ space
Fold and press.
6. Fold in half lengthwise, placing the
folded edge even with the wavy edge.
7. Insert the top edge of the quilt into
the fold created in Step 6 with the raw
edges of the binding on the front side of
the quilt. Let the binding extend 1/2˝ past
the corners of the quilt. Hand sew through
all layers using the big-stitch method
(pages 6–7). Repeat for the bottom edge.
038.eps
Folded edge
Raw edge
Quilt front
Sew the binding to the top and bottom edges of the quilt.
8. Trim the ends even with the corners
of the quilt.
039.eps
Trim.Trim.
Quilt back
Fold the binding to the back, stitch, and trim.
9. Measure the quilt length through
the middle from top to bottom. Trim
2 binding strips the length of the quilt
plus 1 .̋ Fold and press. Align and sew the
strips as before, leaving 1/2˝ of the binding
past the corners. Fold over the ends of the
binding to create a finished edge before
folding the binding to the back of the
quilt. Hand slipstitch the binding, including
the ends, in place.
040.eps
Quilt front
Folded edge
003.eps
Fold the ends and stitch the side binding.
BINDING METhoD #3 (MacHiNe aNd HaNd)
1. Trim the batting and backing even with
the edges of the quilt top.
2. Cut as many 21/4 -̋wide strips as you
need to go all the way around the quilt, plus
10˝ or more extra.
3. Sew the strips together using diagonal
seams to make one long length.
046
Trim.Sew.
Piece the strips using diagonal seams. Trim.
047
Press.
10691_SSQ4_01.indd 10 6/3/09 4:01:14 PM
t H E b A S i c S 11
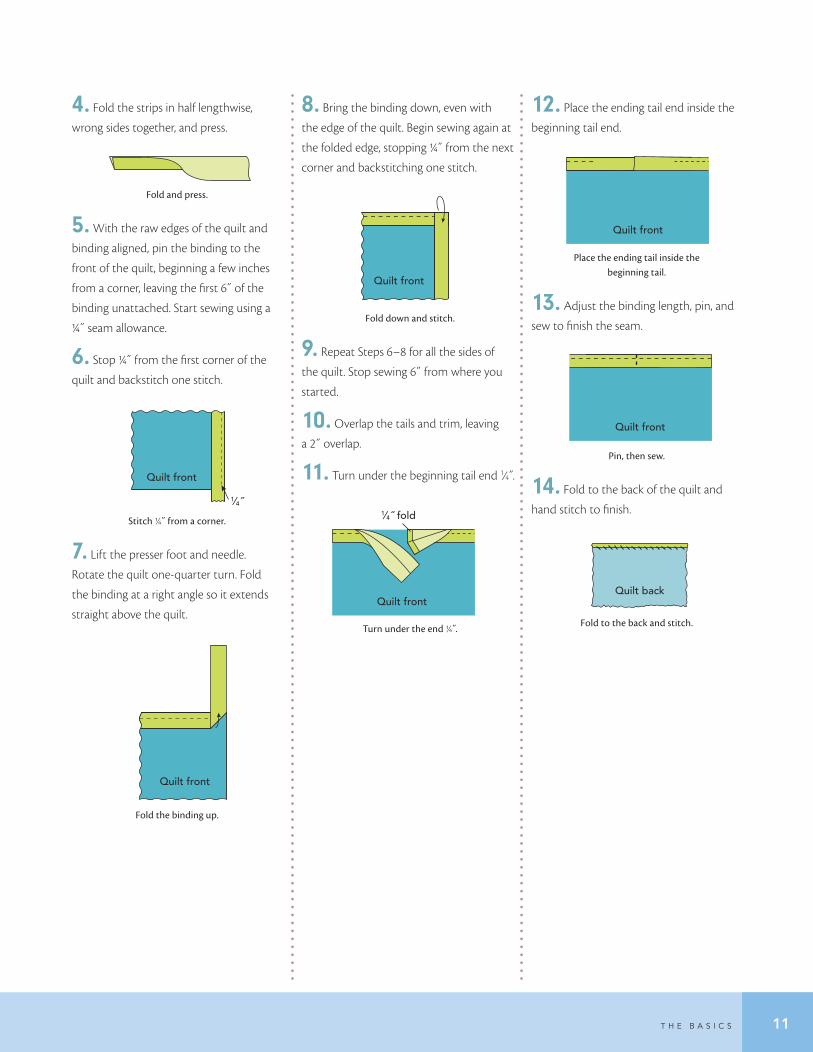
4. Fold the strips in half lengthwise,
wrong sides together, and press.
048
Fold and press.
5. With the raw edges of the quilt and
binding aligned, pin the binding to the
front of the quilt, beginning a few inches
from a corner, leaving the first 6˝ of the
binding unattached. Start sewing using a
1/4˝ seam allowance.
6. Stop 1/4˝ from the first corner of the
quilt and backstitch one stitch.
049
Quilt front
1⁄4 ˝
Stitch 1/4˝ from a corner.
7. Lift the presser foot and needle.
Rotate the quilt one-quarter turn. Fold
the binding at a right angle so it extends
straight above the quilt.
050
Quilt front
Fold the binding up.
8. Bring the binding down, even with
the edge of the quilt. Begin sewing again at
the folded edge, stopping 1/4˝ from the next
corner and backstitching one stitch.
051
Quilt front
Fold down and stitch.
9. Repeat Steps 6–8 for all the sides of
the quilt. Stop sewing 6˝ from where you
started.
10. Overlap the tails and trim, leaving
a 2˝ overlap.
11. Turn under the beginning tail end 1⁄4 .̋
1⁄4 ˝ fold
052.eps
Quilt front
Turn under the end 1/4 .̋
12. Place the ending tail end inside the
beginning tail end.
053.eps
Quilt front
Place the ending tail inside the beginning tail.
13. Adjust the binding length, pin, and
sew to finish the seam.
054.eps
Quilt front
Pin, then sew.
14. Fold to the back of the quilt and
hand stitch to finish.
Quilt back
055.eps
Fold to the back and stitch.
10691_SSQ4_01.indd 11 6/3/09 4:01:17 PM
12 S U P E R S I M P L E Q U I L T S # 4 W I T H A L E X A N D E R S O N & L I Z A N E L O S K I
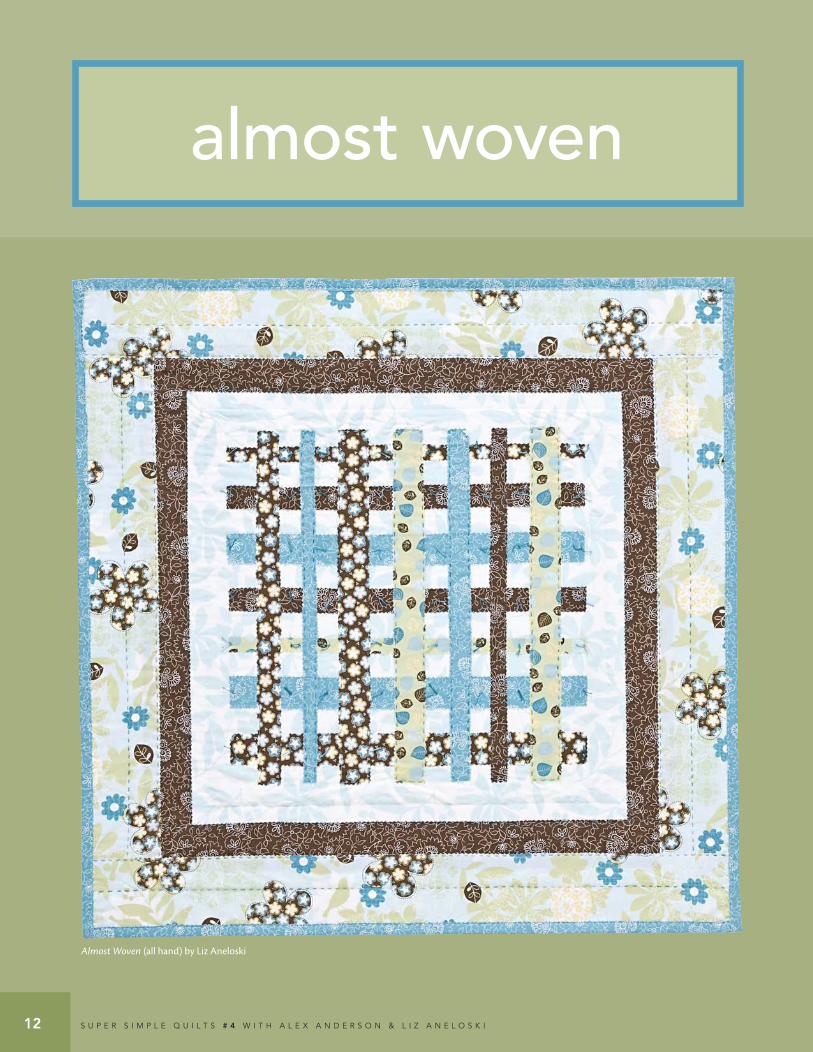
almost woven
Almost Woven (all hand) by Liz Aneloski
10691_SSQ4_01AW.indd 12 6/9/09 10:44:35 AM

A L M O S T W O v E N 13
Wall/Crib: 40˝ × 40˝
Twin: 63˝ × 87˝
Queen: 84˝ × 92˝
materialsYardages are based on 42˝-wide fabric.
Fabric Wall/Crib Twin Queen
Fabric #1 11/4 yards 37/8 yards 51/4 yards
Fabric #2 3/8 yard 3/4 yard 1 yard
Fabric #3 3/4 yard 21/4 yards 31/2 yards
Fabric #4 1/2 yard 11/4 yards 15/8 yards
Fabric #5 1/2 yard 3/4 yard 1 yard
Fabric #6 3/4 yard 11/2 yards 21/4 yards
Paper-backed fusible adhesive (based on 12˝ width) 2 yards 51/2 yards 61/4 yards
Backing 44˝ × 44˝ (Use leftovers and supplement as necessary.)
67˝ × 91˝ (Use leftovers and supplement as necessary.)
88˝ × 96˝ (Use leftovers and supplement as necessary.)
Binding Leftovers or 5/8 yard Leftovers or 1 yard Leftovers or 11/8 yards
Batting 44˝ × 44˝ 67˝ × 91˝ 88˝ × 96˝
cuttingWall/Crib Twin Queen
Fabric Number of Strips* Size of Pieces Number of Strips* Size of Pieces Number of Strips* Size of Pieces
Fusible Adhesive 4 1/2˝ × 221/2˝ 5 1/2˝ × 36˝ 5 1/2˝ × 521/2˝*
3 1/2˝ × 591/2˝* 5 1/2˝ × 60˝*
4 1˝ × 221/2˝ 5 1˝ × 36˝ 5 1˝ × 521/2˝*
3 1˝ × 591/2˝* 5 1˝ × 60˝*
6 11/2˝ × 221/2˝ 9 11/2˝ × 36˝ 9 11/2˝ × 521/2˝*
5 11/2˝ × 591/2˝* 7 11/2˝ × 60˝*
4 (inner borders) 1/2˝ × 331/2˝ 2 (inner borders) 1/2˝ × 521/2˝* 2 (inner borders) 1/2˝ × 691/2˝*
2 (inner borders) 1/2˝ × 761/2˝* 2 (inner borders) 1/2˝ × 771/2˝*
4 (outer borders) 1/2˝ × 391/2˝ 2 (outer borders) 1/2˝ × 621/2˝* 2 (outer borders) 1/2˝ × 831/2˝*
2 (outer borders) 1/2˝ × 861/2˝* 2 (outer borders) 1/2˝ × 911/2˝*
#3 Inner Border 4 3˝ × 34˝ 2 51/2˝ × 53˝** 2 6˝ × 70˝**
2 51/2˝ × 77˝** 2 6˝ × 78˝**
#6 Outer Border 4 4˝ × 40˝ 2 6˝ × 63˝** 2 8˝ × 84˝**
2 6˝ × 87˝** 2 8˝ × 92˝**
#1 Background 1 30˝ × 30˝ 1 44˝ × 68˝*** 1 60˝ × 68˝***
* Cut strips and fuse multiple pieces, end to end, on the fabric to create the lengths indicated. ** Cut strips the width of the fabric, sew together into one long strip, and then cut the lengths indicated. *** Cut pieces of fabric, and sew them together to make the size needed.
10691_SSQ4_01AW.indd 13 6/9/09 10:44:46 AM
14 S U P E R S I M P L E Q U I L T S # 4 W I T H A L E X A N D E R S O N & L I Z A N E L O S K I
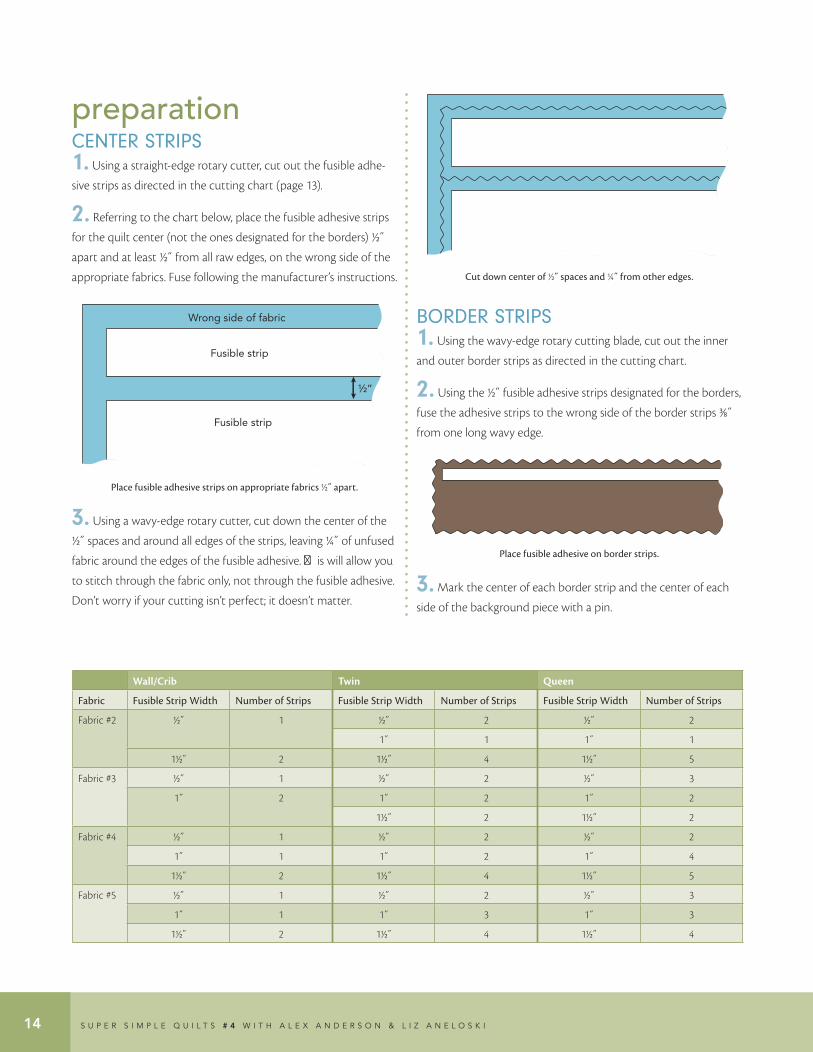
preparationCenter StripS1. Using a straight-edge rotary cutter, cut out the fusible adhe-
sive strips as directed in the cutting chart (page 13).
2. Referring to the chart below, place the fusible adhesive strips
for the quilt center (not the ones designated for the borders) 1/2˝
apart and at least 1/2˝ from all raw edges, on the wrong side of the
appropriate fabrics. Fuse following the manufacturer’s instructions.
001.eps
Wrong side of fabric
Fusible strip
Fusible strip
½”
Place fusible adhesive strips on appropriate fabrics 1/2˝ apart.
3. Using a wavy-edge rotary cutter, cut down the center of the
1/2˝ spaces and around all edges of the strips, leaving 1/4˝ of unfused
fabric around the edges of the fusible adhesive. This will allow you
to stitch through the fabric only, not through the fusible adhesive.
Don’t worry if your cutting isn’t perfect; it doesn’t matter.
002.eps
Cut down center of 1/2˝ spaces and 1/4˝ from other edges.
Border StripS1. Using the wavy-edge rotary cutting blade, cut out the inner
and outer border strips as directed in the cutting chart.
2. Using the 1/2˝ fusible adhesive strips designated for the borders,
fuse the adhesive strips to the wrong side of the border strips 3/8˝
from one long wavy edge.
003.epsPlace fusible adhesive on border strips.
3. Mark the center of each border strip and the center of each
side of the background piece with a pin.
Wall/Crib Twin Queen
Fabric Fusible Strip Width Number of Strips Fusible Strip Width Number of Strips Fusible Strip Width Number of Strips
Fabric #2 1/2˝ 1 1/2˝ 2 1/2˝ 2
1˝ 1 1˝ 1
11/2˝ 2 11/2˝ 4 11/2˝ 5
Fabric #3 1/2˝ 1 1/2˝ 2 1/2˝ 3
1˝ 2 1˝ 2 1˝ 2
11/2˝ 2 11/2˝ 2
Fabric #4 1/2˝ 1 1/2˝ 2 1/2˝ 2
1˝ 1 1˝ 2 1˝ 4
11/2˝ 2 11/2˝ 4 11/2˝ 5
Fabric #5 1/2˝ 1 1/2˝ 2 1/2˝ 3
1˝ 1 1˝ 3 1˝ 3
11/2˝ 2 11/2˝ 4 11/2˝ 4
10691_SSQ4_01AW.indd 14 6/9/09 10:44:50 AM
A L M O S T W O v E N 15
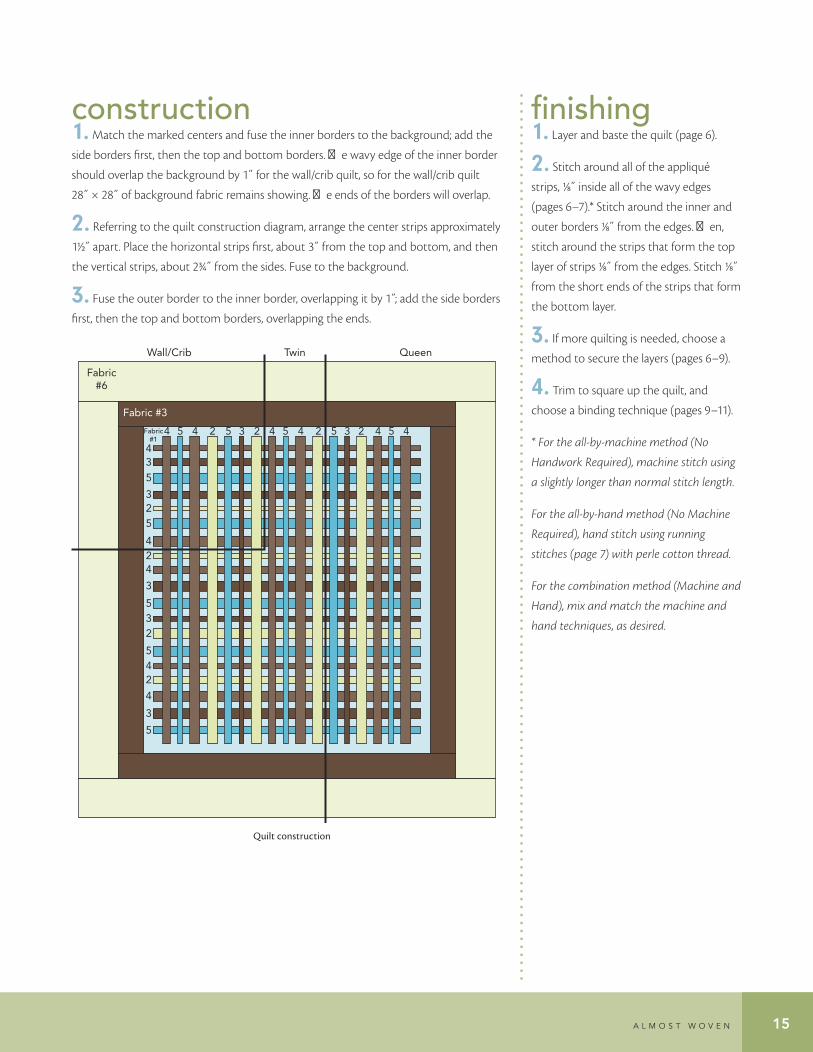
construction1. Match the marked centers and fuse the inner borders to the background; add the
side borders first, then the top and bottom borders. The wavy edge of the inner border
should overlap the background by 1˝ for the wall/crib quilt, so for the wall/crib quilt
28˝ × 28˝ of background fabric remains showing. The ends of the borders will overlap.
2. Referring to the quilt construction diagram, arrange the center strips approximately
11/2˝ apart. Place the horizontal strips first, about 3˝ from the top and bottom, and then
the vertical strips, about 23/4˝ from the sides. Fuse to the background.
3. Fuse the outer border to the inner border, overlapping it by 1 ;̋ add the side borders
first, then the top and bottom borders, overlapping the ends.
004.eps
4 5 4 2 5 3 2 4 5 4 2 5 3 2 4 5 4
43
5
325
424
3
532
542
4
3
5
Fabric#6
Fabric #3
Fabric#1
Wall/Crib Twin Queen
Quilt construction
finishing1. Layer and baste the quilt (page 6).
2. Stitch around all of the appliqué
strips, 1/8˝ inside all of the wavy edges
(pages 6–7).* Stitch around the inner and
outer borders 1/8˝ from the edges. Then,
stitch around the strips that form the top
layer of strips 1/8˝ from the edges. Stitch 1/8˝
from the short ends of the strips that form
the bottom layer.
3. If more quilting is needed, choose a
method to secure the layers (pages 6–9).
4. Trim to square up the quilt, and
choose a binding technique (pages 9–11).
* For the all-by-machine method (No
Handwork Required), machine stitch using
a slightly longer than normal stitch length.
For the all-by-hand method (No Machine
Required), hand stitch using running
stitches (page 7) with perle cotton thread.
For the combination method (Machine and
Hand), mix and match the machine and
hand techniques, as desired.
10691_SSQ4_01AW.indd 15 6/9/09 10:44:51 AM

16 S U P E R S I M P L E Q U I L T S # 4 W I T H A L E X A N D E R S O N & L I Z A N E L O S K I
Almost Woven (all machine) by Liz Aneloski F
Almost Woven (hand and machine) by Liz Aneloski
Fabric
#1
#2
#3
#4
#5
#6
Fabric
#1
#2
#3
#4
#5
#6
10691_SSQ4_01AW.indd 16 6/9/09 10:45:28 AM
d i v i d e d c i r c l e i n a s q u a r e 17
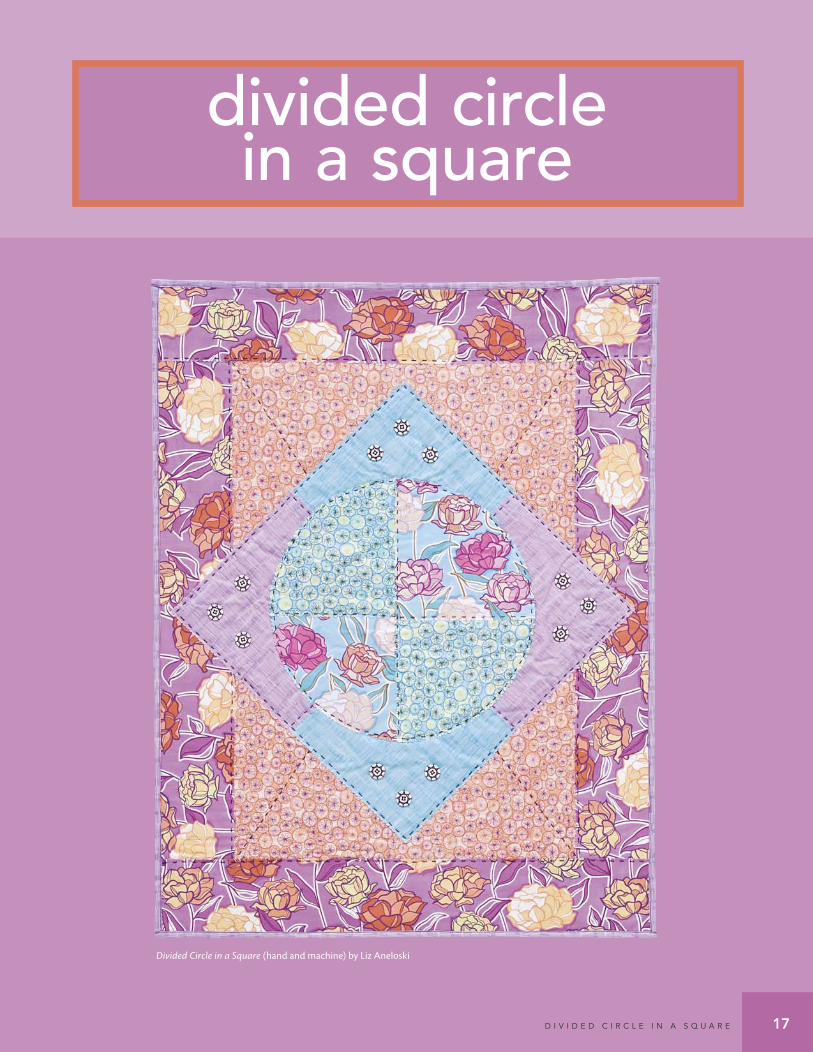
Divided Circle in a Square (hand and machine) by Liz Aneloski
divided circle in a square
10691_SSQ4_02DCS.indd 17 6/9/09 10:49:48 AM
18 s u P e r s i M P l e q u i l T s # 4 W i T H a l e X a n d e r s O n & l i Z a n e l O s K i
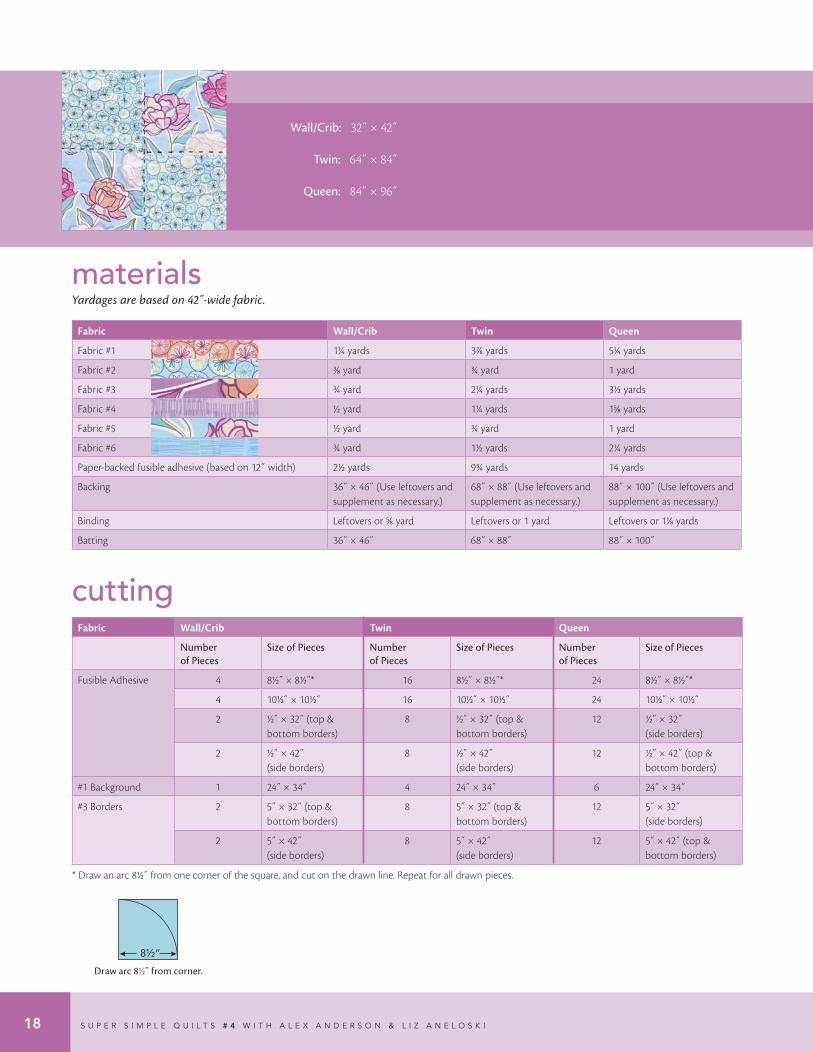
materialsYardages are based on 42˝-wide fabric.
Fabric Wall/Crib Twin Queen
Fabric #1 11/4 yards 37/8 yards 51/4 yards
Fabric #2 3/8 yard 3/4 yard 1 yard
Fabric #3 3/4 yard 21/4 yards 31/2 yards
Fabric #4 1/2 yard 11/4 yards 15/8 yards
Fabric #5 1/2 yard 3/4 yard 1 yard
Fabric #6 3/4 yard 11/2 yards 21/4 yards
Paper-backed fusible adhesive (based on 12˝ width) 21/2 yards 93/4 yards 14 yards
Backing 36˝ × 46˝ (Use leftovers and supplement as necessary.)
68˝ × 88˝ (Use leftovers and supplement as necessary.)
88˝ × 100˝ (Use leftovers and supplement as necessary.)
Binding Leftovers or 5/8 yard Leftovers or 1 yard Leftovers or 11/8 yards
Batting 36˝ × 46˝ 68˝ × 88˝ 88˝ × 100˝
cuttingFabric Wall/Crib Twin Queen
Number of Pieces
Size of Pieces Number of Pieces
Size of Pieces Number of Pieces
Size of Pieces
Fusible Adhesive 4 81/2˝ × 81/2˝* 16 81/2˝ × 81/2˝* 24 81/2˝ × 81/2˝*
4 101/2˝ × 101/2˝ 16 101/2˝ × 101/2˝ 24 101/2˝ × 101/2˝
2 1/2˝ × 32˝ (top & bottom borders)
8 1/2˝ × 32˝ (top & bottom borders)
12 1/2˝ × 32˝ (side borders)
2 1/2˝ × 42˝ (side borders)
8 1/2˝ × 42˝ (side borders)
12 1/2˝ × 42˝ (top & bottom borders)
#1 Background 1 24˝ × 34˝ 4 24˝ × 34˝ 6 24˝ × 34˝
#3 Borders 2 5˝ × 32˝ (top & bottom borders)
8 5˝ × 32˝ (top & bottom borders)
12 5˝ × 32˝ (side borders)
2 5˝ × 42˝ (side borders)
8 5˝ × 42˝ (side borders)
12 5˝ × 42˝ (top & bottom borders)
* Draw an arc 81/2˝ from one corner of the square, and cut on the drawn line. Repeat for all drawn pieces.
005.eps
8½”
Draw arc 81/2˝ from corner.
Wall/Crib: 32˝ × 42˝
Twin: 64˝ × 84˝
Queen: 84˝ × 96˝
10691_SSQ4_02DCS.indd 18 6/9/09 10:49:59 AM

d i v i d e d c i r c l e i n a s q u a r e 19
preparationAppliqué pieces1. Using the straight-edge rotary cutting blade, cut out the
fusible adhesive pieces as directed in the cutting chart.
2. Place the fusible adhesive shapes (not the ones marked
for the borders) 1/2˝ apart on the wrong side of the appropriate
fabrics. Fuse following the manufacturer’s instructions.
006a.eps
½“ space
FusibleFusible
Wrong side
Place fusible pieces 1/2˝ apart.
Wall/Crib Twin Queen
Fabric Fusible Piece Number of Pieces
Fusible Piece Number of Pieces
Fusible Piece Number of Pieces
Fabric #2 1/4 circles 2 1/4 circles 8 1/4 circles 12
Fabric #4 101/2˝ × 101/2˝ 2 101/2˝ × 101/2˝ 8 101/2˝ × 101/2˝ 12
Fabric #5 1/4 circles 2 1/4 circles 8 1/4 circles 12
Fabric #6 101/2˝ × 101/2˝ 2 101/2˝ × 101/2˝ 8 101/2˝ × 101/2˝ 12
3. Using the wavy-edge rotary cutting blade, cut out the
pieces, leaving 1/4˝ of unfused fabric around the edge of the fusible
adhesive. This will allow you to stitch through the fabric only,
not through the fusible adhesive, creating a softer edge.
006b.eps
Cut out pieces 1/4˝ from edges of fusible adhesive.
Border strips1. Using the wavy-edge rotary cutting blade, cut out the border strips as directed in the chart.
2. Using the 1/2˝ fusible adhesive strips marked for the borders, fuse the adhesive strips to the
wrong side of the border strips 3/8˝ from one long wavy edge.
007.eps
Place fusible adhesive on border strips.
3. Mark the center of each border strip and the center of each side of the background with a pin.
10691_SSQ4_02DCS.indd 19 6/9/09 10:50:00 AM
20 s u P e r s i M P l e q u i l T s # 4 W i T H a l e X a n d e r s O n & l i Z a n e l O s K i
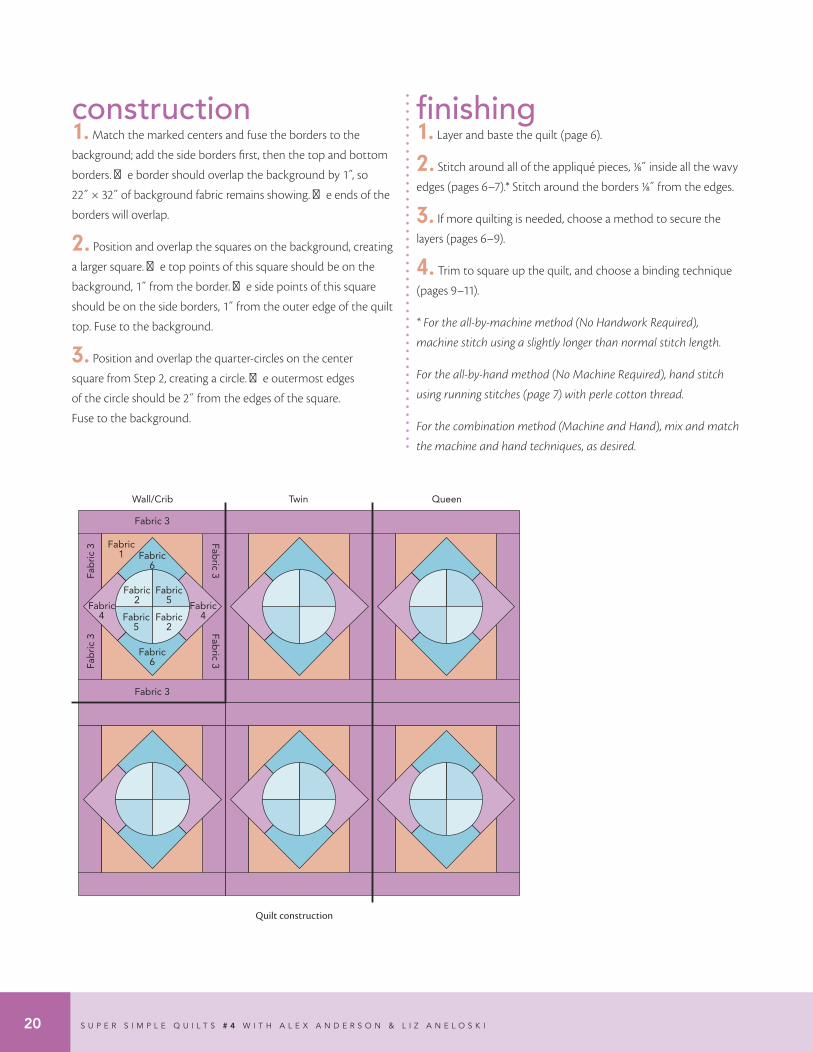
construction1. Match the marked centers and fuse the borders to the
background; add the side borders first, then the top and bottom
borders. The border should overlap the background by 1 ,̋ so
22˝ × 32˝ of background fabric remains showing. The ends of the
borders will overlap.
2. Position and overlap the squares on the background, creating
a larger square. The top points of this square should be on the
background, 1˝ from the border. The side points of this square
should be on the side borders, 1˝ from the outer edge of the quilt
top. Fuse to the background.
3. Position and overlap the quarter-circles on the center
square from Step 2, creating a circle. The outermost edges
of the circle should be 2˝ from the edges of the square.
Fuse to the background.
008.eps
Fabric 3
Fabric 3
Fabric6
Fabric6
Fabric1
Fabric4
Fabric4Fabric
2Fabric
5
Fabric2
Fabric5
Fab
ric
3Fa
bri
c 3 Fab
ric 3Fab
ric 3
Wall/Crib Twin Queen
Quilt construction
finishing1. Layer and baste the quilt (page 6).
2. Stitch around all of the appliqué pieces, 1/8˝ inside all the wavy
edges (pages 6–7).* Stitch around the borders 1/8˝ from the edges.
3. If more quilting is needed, choose a method to secure the
layers (pages 6–9).
4. Trim to square up the quilt, and choose a binding technique
(pages 9–11).
* For the all-by-machine method (No Handwork Required),
machine stitch using a slightly longer than normal stitch length.
For the all-by-hand method (No Machine Required), hand stitch
using running stitches (page 7) with perle cotton thread.
For the combination method (Machine and Hand), mix and match
the machine and hand techniques, as desired.
10691_SSQ4_02DCS.indd 20 6/9/09 10:50:00 AM
d i v i d e d c i r c l e i n a s q u a r e 21
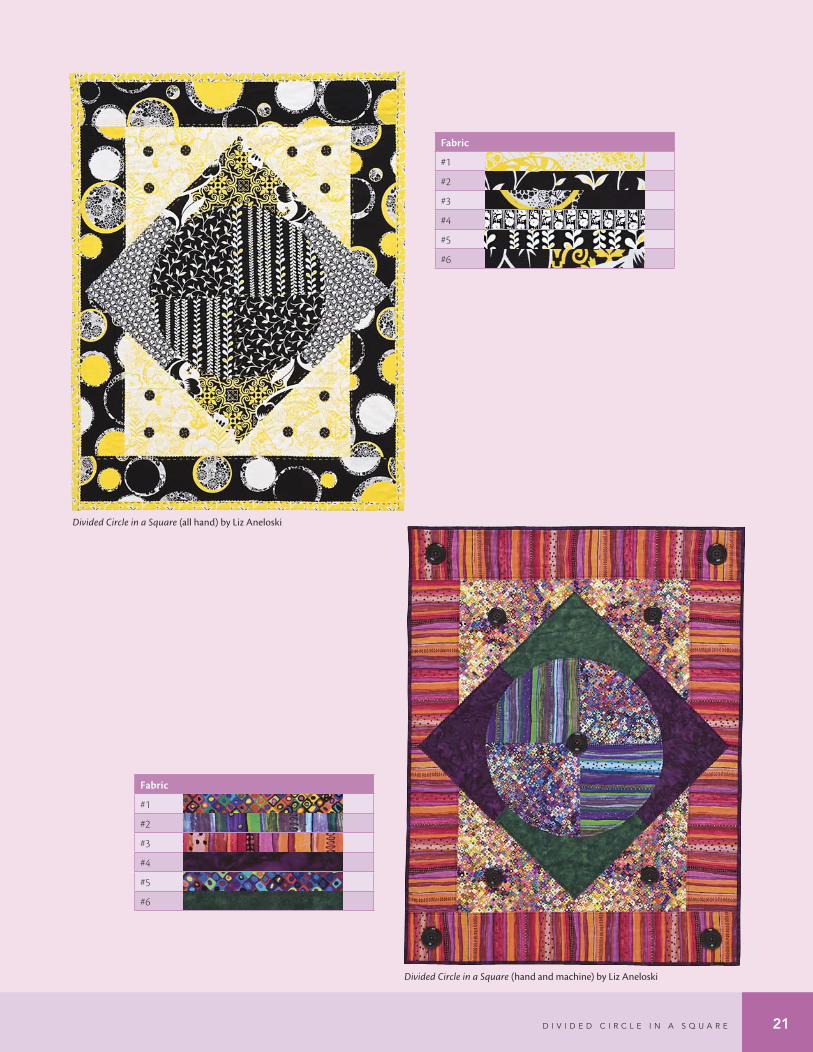
Divided Circle in a Square (hand and machine) by Liz Aneloski
Divided Circle in a Square (all hand) by Liz Aneloski
Fabric
#1
#2
#3
#4
#5
#6
Fabric
#1
#2
#3
#4
#5
#6
10691_SSQ4_02DCS.indd 21 6/9/09 10:50:31 AM
22 S U P E R S I M P L E Q U I L T S # 4 W I T H A L E X A N D E R S O N & L I Z A N E L O S K I
geometric explosion
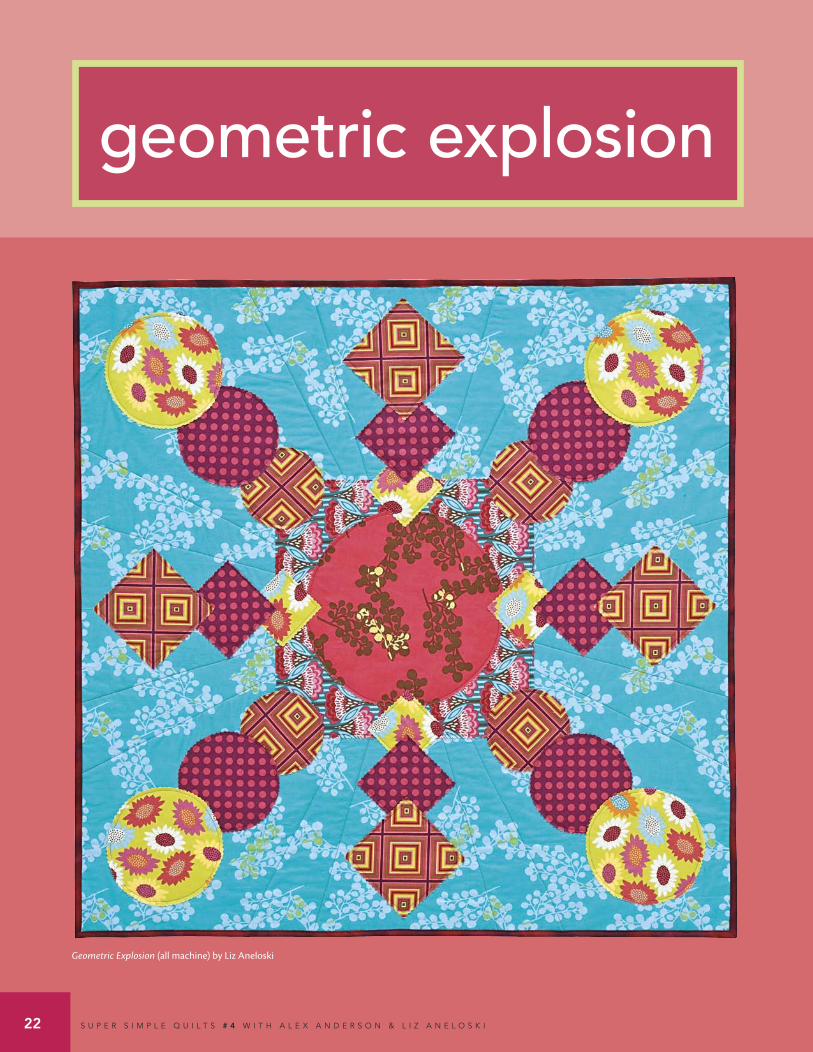
Geometric Explosion (all machine) by Liz Aneloski
10691_SSQ4_03GE.indd 22 6/9/09 10:58:59 AM
g E O M E T R I c E X P L O S I O N 23
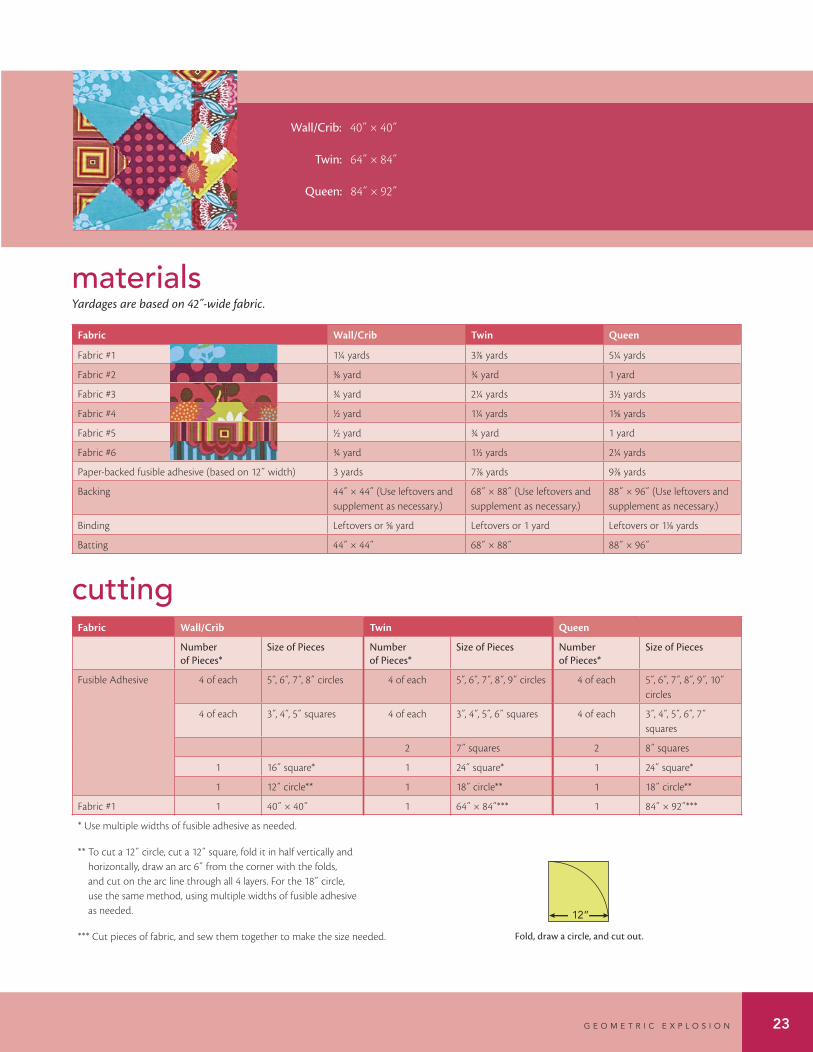
Wall/Crib: 40˝ × 40˝
Twin: 64˝ × 84˝
Queen: 84˝ × 92˝
materialsYardages are based on 42˝-wide fabric.
Fabric Wall/Crib Twin Queen
Fabric #1 11/4 yards 37/8 yards 51/4 yards
Fabric #2 3/8 yard 3/4 yard 1 yard
Fabric #3 3/4 yard 21/4 yards 31/2 yards
Fabric #4 1/2 yard 11/4 yards 15/8 yards
Fabric #5 1/2 yard 3/4 yard 1 yard
Fabric #6 3/4 yard 11/2 yards 21/4 yards
Paper-backed fusible adhesive (based on 12˝ width) 3 yards 77/8 yards 97/8 yards
Backing 44˝ × 44˝ (Use leftovers and supplement as necessary.)
68˝ × 88˝ (Use leftovers and supplement as necessary.)
88˝ × 96˝ (Use leftovers and supplement as necessary.)
Binding Leftovers or 5/8 yard Leftovers or 1 yard Leftovers or 11/8 yards
Batting 44˝ × 44˝ 68˝ × 88˝ 88˝ × 96˝
cuttingFabric Wall/Crib Twin Queen
Number of Pieces*
Size of Pieces Number of Pieces*
Size of Pieces Number of Pieces*
Size of Pieces
Fusible Adhesive 4 of each 5 ,̋ 6 ,̋ 7 ,̋ 8˝ circles 4 of each 5 ,̋ 6 ,̋ 7 ,̋ 8 ,̋ 9˝ circles 4 of each 5 ,̋ 6 ,̋ 7 ,̋ 8 ,̋ 9 ,̋ 10˝ circles
4 of each 3 ,̋ 4 ,̋ 5˝ squares 4 of each 3 ,̋ 4 ,̋ 5 ,̋ 6˝ squares 4 of each 3 ,̋ 4 ,̋ 5 ,̋ 6 ,̋ 7˝ squares
2 7˝ squares 2 8˝ squares
1 16˝ square* 1 24˝ square* 1 24˝ square*
1 12˝ circle** 1 18˝ circle** 1 18˝ circle**
Fabric #1 1 40˝ × 40˝ 1 64˝ × 84˝*** 1 84˝ × 92˝***
* Use multiple widths of fusible adhesive as needed.
** To cut a 12˝ circle, cut a 12˝ square, fold it in half vertically and horizontally, draw an arc 6˝ from the corner with the folds, and cut on the arc line through all 4 layers. For the 18˝ circle, use the same method, using multiple widths of fusible adhesive as needed.
*** Cut pieces of fabric, and sew them together to make the size needed.009.eps
12”
Fold, draw a circle, and cut out.
10691_SSQ4_03GE.indd 23 6/9/09 10:59:09 AM
24 S U P E R S I M P L E Q U I L T S # 4 W I T H A L E X A N D E R S O N & L I Z A N E L O S K I
Fabroc Wall/Crib Twin Queen
Fusible Piece Number of Pieces Fusible Piece Number of Pieces Fusible Piece Number of Pieces
Fabric #2 9˝ circles 4 9˝ circles 4
6˝ circles 4 6˝ circles 4 6˝ circles 4
7˝ squares 2 7˝ squares 4
4˝ squares 4 4˝ squares 4 4˝ squares 4
Fabric #3 12˝ circle 1 18˝ circle 1 18˝ circle 1
Fabric #4 10˝ circles 4
7˝ circles 4 7˝ circles 4 7˝ circles 4
6˝ squares 4 6˝ squares 4
3˝ squares 4 3˝ squares 4 3˝ squares 4
Fabric #5 8˝ circles 4 8˝ circles 4
5˝ circles 4 5˝ circles 4 5˝ circles 4
7˝ squares 2 8˝ squares 2
5˝ squares 4 5˝ squares 4 5˝ squares 4
Fabric #6 16˝ square 1 24˝ square 1 24˝ square 1
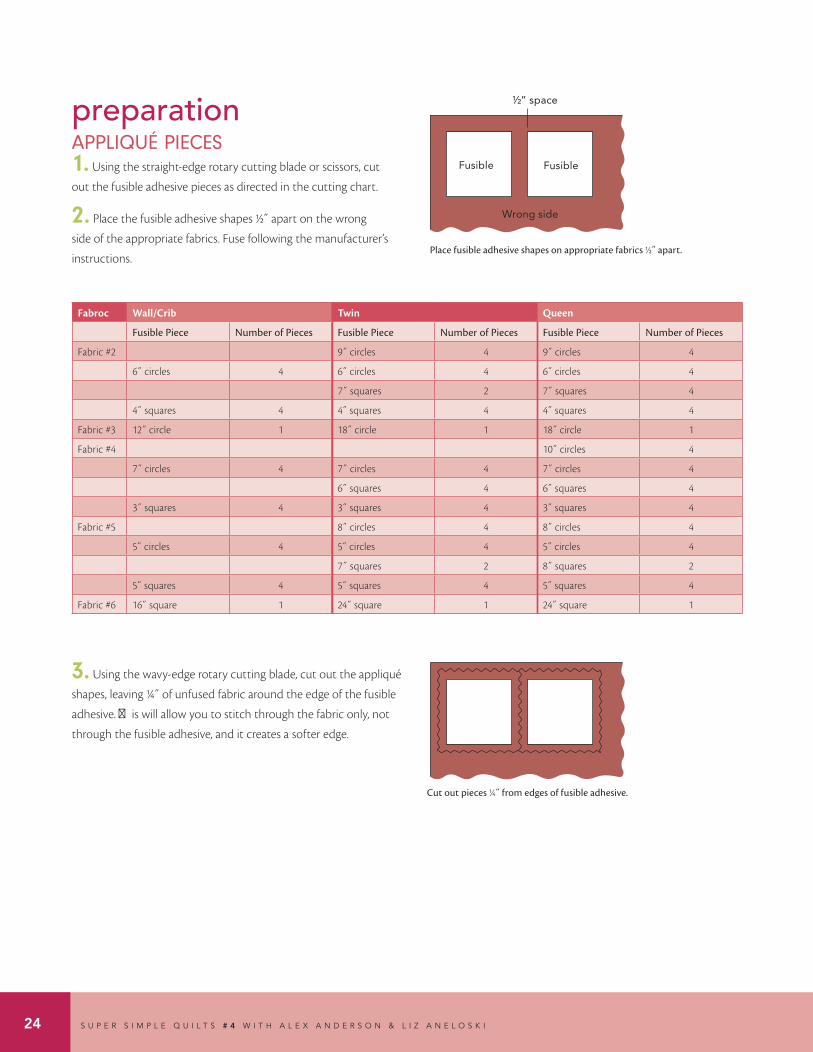
3. Using the wavy-edge rotary cutting blade, cut out the appliqué
shapes, leaving 1/4˝ of unfused fabric around the edge of the fusible
adhesive. This will allow you to stitch through the fabric only, not
through the fusible adhesive, and it creates a softer edge.
006b.eps
Cut out pieces 1/4˝ from edges of fusible adhesive.
010.eps
½” space
Fusible Fusible
Wrong side
Place fusible adhesive shapes on appropriate fabrics 1/2˝ apart.
preparationAppliqué pieces1. Using the straight-edge rotary cutting blade or scissors, cut
out the fusible adhesive pieces as directed in the cutting chart.
2. Place the fusible adhesive shapes 1/2˝ apart on the wrong
side of the appropriate fabrics. Fuse following the manufacturer’s
instructions.
10691_SSQ4_03GE.indd 24 6/9/09 10:59:10 AM
g E O M E T R I c E X P L O S I O N 25
013a.eps
013a.eps
Fabric 1
Fabric 3
Fabric 6
5”
3” 4” 5”
6”
7”
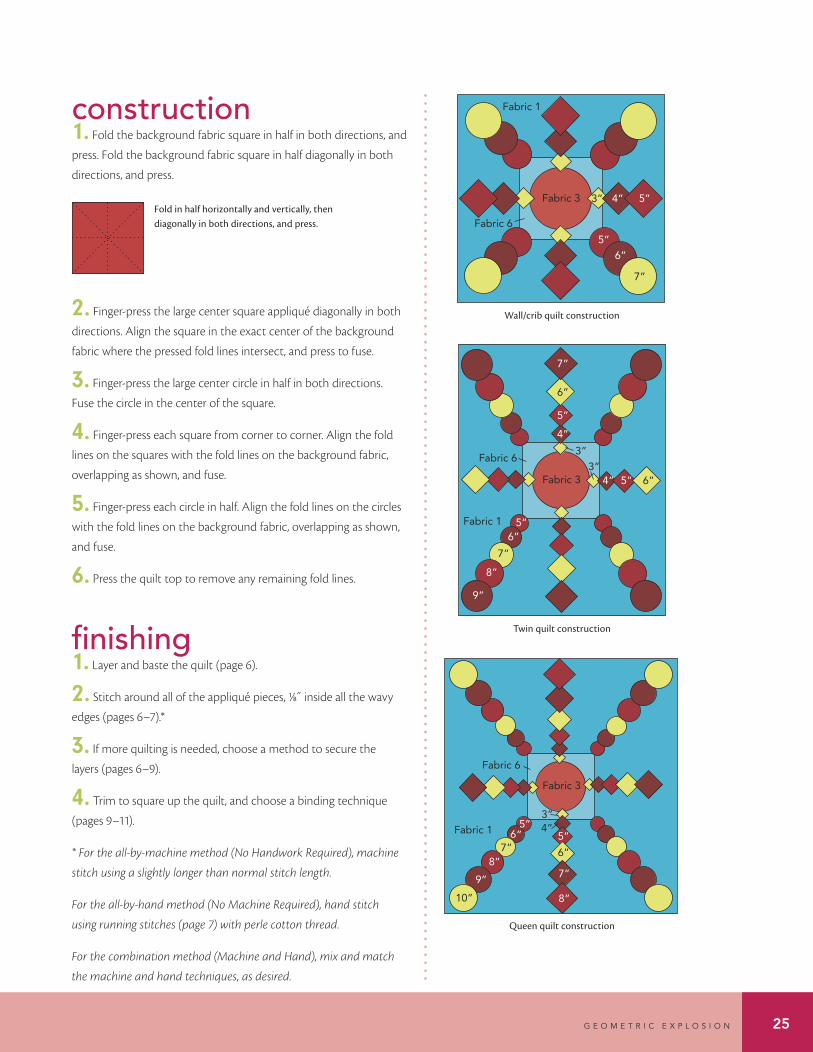
Wall/crib quilt construction
013b.eps
Fabric 3
Fabric 6
Fabric 1 5”6”
7”
8”
9”
3”
3”
4”
4” 5” 6”
5”
6”
7”
Twin quilt construction
013c.eps
6”5”
Fabric 3
Fabric 6
Fabric 1
7”8”
9”
10”
3”4”
6”
7”
8”
5”
Queen quilt construction
construction1. Fold the background fabric square in half in both directions, and
press. Fold the background fabric square in half diagonally in both
directions, and press.
012.eps
Fold in half horizontally and vertically, then diagonally in both directions, and press.
2. Finger-press the large center square appliqué diagonally in both
directions. Align the square in the exact center of the background
fabric where the pressed fold lines intersect, and press to fuse.
3. Finger-press the large center circle in half in both directions.
Fuse the circle in the center of the square.
4. Finger-press each square from corner to corner. Align the fold
lines on the squares with the fold lines on the background fabric,
overlapping as shown, and fuse.
5. Finger-press each circle in half. Align the fold lines on the circles
with the fold lines on the background fabric, overlapping as shown,
and fuse.
6. Press the quilt top to remove any remaining fold lines.
finishing1. Layer and baste the quilt (page 6).
2. Stitch around all of the appliqué pieces, 1/8˝ inside all the wavy
edges (pages 6–7).*
3. If more quilting is needed, choose a method to secure the
layers (pages 6–9).
4. Trim to square up the quilt, and choose a binding technique
(pages 9–11).
* For the all-by-machine method (No Handwork Required), machine
stitch using a slightly longer than normal stitch length.
For the all-by-hand method (No Machine Required), hand stitch
using running stitches (page 7) with perle cotton thread.
For the combination method (Machine and Hand), mix and match
the machine and hand techniques, as desired.
10691_SSQ4_03GE.indd 25 6/9/09 10:59:11 AM
26 S U P E R S I M P L E Q U I L T S # 4 W I T H A L E X A N D E R S O N & L I Z A N E L O S K I
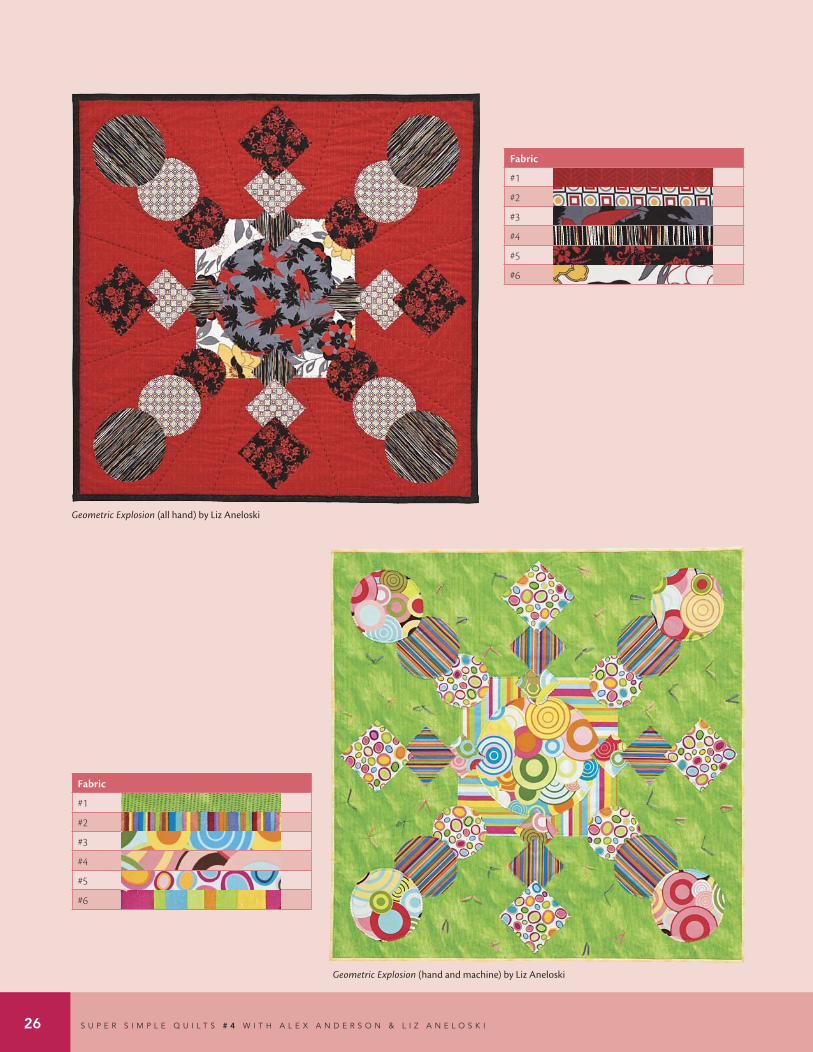
Geometric Explosion (hand and machine) by Liz Aneloski
Fabric
#1
#2
#3
#4
#5
#6
Fabric
#1
#2
#3
#4
#5
#6
Geometric Explosion (all hand) by Liz Aneloski
10691_SSQ4_03GE.indd 26 6/9/09 10:59:43 AM
27
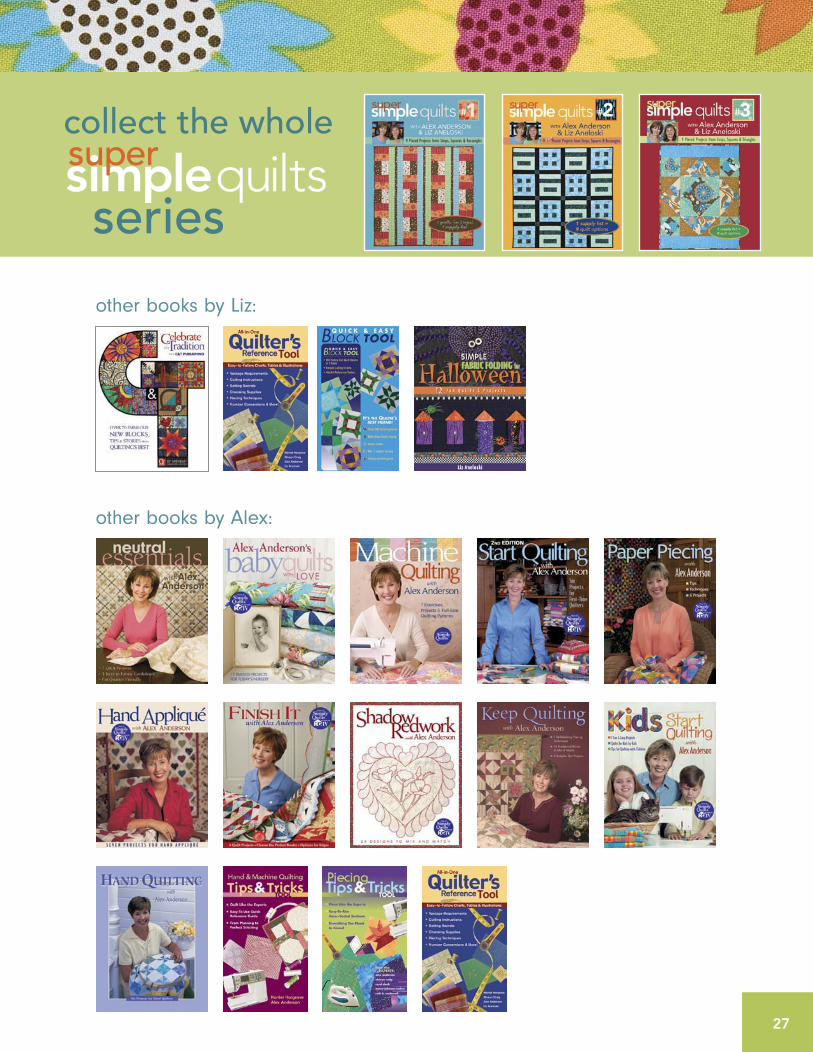
other books by Liz:
other books by Alex:
simplequiltssuper
series
collect the whole
10691_SSQ4_06back.indd 27 6/9/09 10:57:56 AM
28 S U P E R S I M P L E Q U I L T S # 3 W I T H A L E X A N D E R S O N & L I Z A N E L O S K I
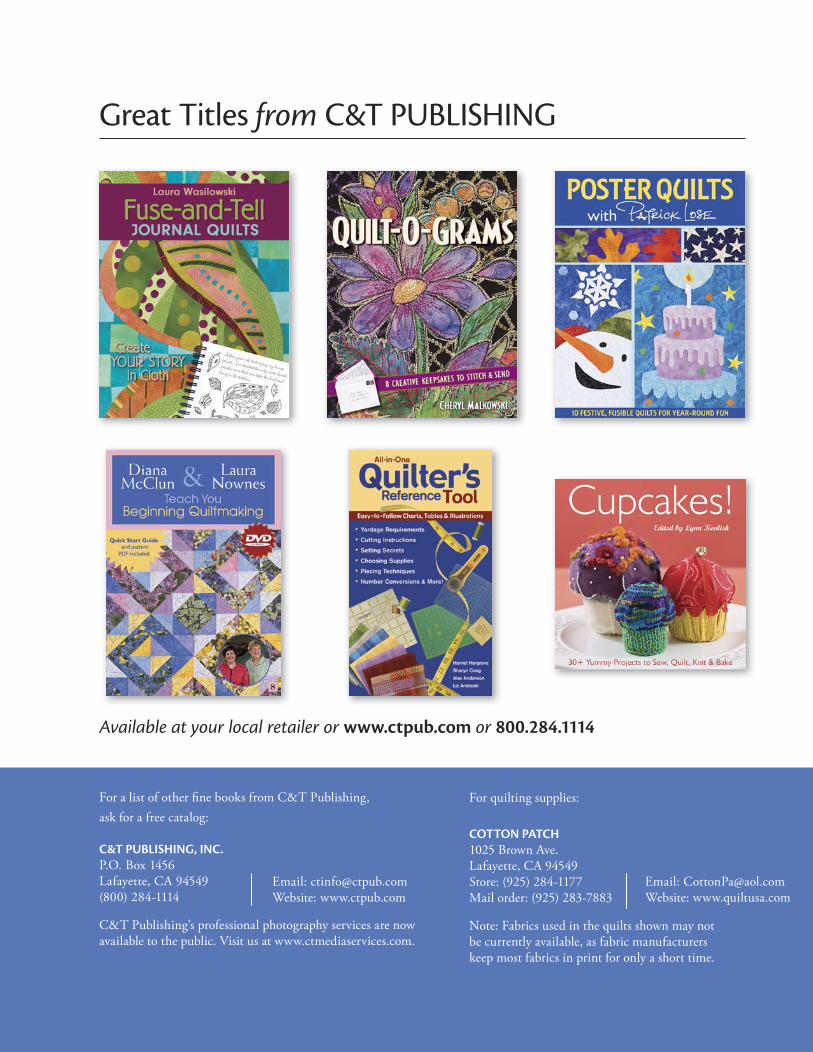
Great Titles from C&T PUBLISHING
Available at your local retailer or www.ctpub.com or 800.284.1114
For a list of other fi ne books from C&T Publishing, ask for a free catalog:
C&T PUBLISHING, INC.P.O. Box 1456Lafayette, CA 94549(800) 284-1114
C&T Publishing’s professional photography services are now available to the public. Visit us at www.ctmediaservices.com.
Email: [email protected]: www.ctpub.com
For quilting supplies:
COTTON PATCH1025 Brown Ave.Lafayette, CA 94549Store: (925) 284-1177Mail order: (925) 283-7883
Note: Fabrics used in the quilts shown may not be currently available, as fabric manufacturers keep most fabrics in print for only a short time.
Email: [email protected]: www.quiltusa.com
10691_SSQ4_06back.indd 28 6/9/09 10:58:10 AM
simple quiltsWITH Alex Anderson & Liz Aneloski
super
9 Appliqué Projects to Sew With or Without a Machine
1 supply list =9 quilt options
#4
US $9.95
Irresistibly Easy Appliqué—
No Piecing Required
ALE
X A
ND
ER
SON
& LIZ A
NE
LOSK
IC
&T PU
BLISHIN
G SU
PE
R SIM
PLE
QU
ILTS #4 WITH
ALE
X A
ND
ER
SON
& LIZ
AN
ELO
SKI
n 3 bold appliqué quilt designs in fresh new fabrics
n 3 sizes: crib/wallhanging, twin, and queen
n 3 easy appliqué techniques—appliqué and quilt in one quick step, even without a machine
n Great for quick gifts or donation quilts
n Just one supply list makes all 9 quilt options in the book!
CRAFTS/Quilting
Use this chart to
make ANY quilt in this
book!
10691
Fabric Wall/Crib Twin Queen
Fabric #1 11/4 yards 37/8 yards 51/4 yards
Fabric #2 3/8 yard 3/4 yard 1 yard
Fabric #3 3/4 yard 21/4 yards 31/2 yards
Fabric #4 1/2 yard 11/4 yards 15/8 yards
Fabric #5 1/2 yard 3/4 yard 1 yard
Fabric #6 3/4 yard 11/2 yards 21/4 yards
10691_fullcover.indd 1 6/9/09 11:04:19 AM