supplier contract management (scm) importing contracts and … · 2020-06-24 · click contract id...
TRANSCRIPT

Indiana Department of AdministrationProcurement Division
Supplier Contract Management (SCM)
Importing Contracts and Amendments
Version 18.08-06
Browser and Software Requirements
Internet Explorer(IE) version 11.0 or earlier and Mozilla Firefox are the acceptable browsers to use when signing a contract. Google Chrome is not compatible and cannot be used. Adobe Reader version 10.0 or later is required. Adobe Reader can be downloaded for free from www.adobe.com/reader/
10.0+Reader
Using this process, an existing executed contract is imported into SCM so that a new amendment/renewal can be processed in SCM. The existing contracts may be governed by the Professional Services Contract manual posted at www.in.gov/idoa/3000.htm or the Delegation of Purchasing Authority Program manual posted at www.in.gov/idoa/2865.htm.
If questions arise when SCM is being used, refer to www.in.gov/idoa/3016.htm for:• Archived News Flashes• Supporting Materials• Online Trainings•
You will find video resources (include audio) throughout this manual indicated by the Watch It icon. The videos are also posted on the SCM Video Resources Center at https://www.in.gov/idoa/3016.htm.

Importing Existing Executed Documents ................................................. 4
Considerations when Using the Importing Contracts and Amendments Manual ........................................................................................................ 5
Financials Procedure Overview ................................................................ 7Purchase that does require solicitation and an SCM contract ..........................7
Phase 1: Create the Transactional Contract Document ....................... Phase1-1Sample of Transactional Contract Document ....................................................................................Phase1-4
Phase 2: Upload the Text Contract Document(s) .................................. Phase2-1Importing Only the Original Contract/Document .............................................................................Phase2-4Importing the Original Contract/Document and One Amendment/Renewal ....................................Phase2-5Importing the Original Contract/Document and Multiple Amendments/Renewals ..........................Phase2-7Sample of Imported Document Management Page .........................................................................Phase2-10
Creating Amendments/Renewals (From Imported Contracts) . Phase2-11Phase 3: Update the Transactional Contract Document ...................... Phase3-1
Phase 4: Create the Text Contract Document ....................................... Phase4-1Step 1: Initiate the Text Contract Document .....................................................................................Phase4-1Step 2: Choose Configurator ID ........................................................................................................Phase4-2Step 3: Build the Text Contract Document .......................................................................................Phase4-3Document Management Page ............................................................................................................Phase4-4Step 4: Review/Edit the Text Contract Document ............................................................................Phase4-5
Check Out the Text Contract Document . . . . . . . . . . . . . . . . . . . . . . . . . . . . . . . . . . . . . . . . Phase4-5Edit the Text Contract Document . . . . . . . . . . . . . . . . . . . . . . . . . . . . . . . . . . . . . . . . . . . . . . . . . Phase4-6Save the Text Contract Document. . . . . . . . . . . . . . . . . . . . . . . . . . . . . . . . . . . . . . . . . . . . . . . . . Phase4-7Check In the Text Contract Document . . . . . . . . . . . . . . . . . . . . . . . . . . . . . . . . . . . . . . . . . . Phase4-8
Step 5: Supplemental Documents ....................................................................................................Phase4-10Step 6: Internal Collaboration ..........................................................................................................Phase4-12
Set up Internal Contact(s) . . . . . . . . . . . . . . . . . . . . . . . . . . . . . . . . . . . . . . . . . . . . . . . . . . . . . . . . . . Phase4-13Launch Internal Collaboration . . . . . . . . . . . . . . . . . . . . . . . . . . . . . . . . . . . . . . . . . . . . . . . . . . . Phase4-14
PeopleSoft Email Notifications .......................................................................................................Phase4-16Finalize Internal Collaboration . . . . . . . . . . . . . . . . . . . . . . . . . . . . . . . . . . . . . . . . . . . . . . . . . . Phase4-17
Recreate Document (If Necessary) ..................................................................................................Phase4-19Step 7: External Signer Set Up .......................................................................................................Phase4-20
Find the Bidder ID through the Bidder File . . . . . . . . . . . . . . . . . . . . . . . . . . . . . . . . . Phase4-21
Table of Contents

Find the Bidder ID through the Vendor ID . . . . . . . . . . . . . . . . . . . . . . . . . . . . . . . . . . Phase4-22Identify Existing External Signer’s User ID . . . . . . . . . . . . . . . . . . . . . . . . . . . . . . . Phase4-23Creating a New External Signer . . . . . . . . . . . . . . . . . . . . . . . . . . . . . . . . . . . . . . . . . . . . . . . . Phase4-24Assign the External Signer . . . . . . . . . . . . . . . . . . . . . . . . . . . . . . . . . . . . . . . . . . . . . . . . . . . . . . . . Phase4-25
Step 8: Prepare Document for Signing ............................................................................................Phase4-26Step 9: Upload the Prepared Document .........................................................................................Phase4-28Step 10: Send the SCM Contract Document for External Signature .................................................... Phase4-29Step 11: Send the SCM Contract Document for Internal Signature ..................................................... Phase4-32
Sign the SCM Contract Document on the State’s Behalf . . . . . . . . . . . . . . . Phase4-33Set up Internal Contacts/Signers . . . . . . . . . . . . . . . . . . . . . . . . . . . . . . . . . . . . . . . . . . . . . . . . Phase4-34Route for Internal Signatures . . . . . . . . . . . . . . . . . . . . . . . . . . . . . . . . . . . . . . . . . . . . . . . . . . . . . Phase4-36To Correct Internal Signature Errors . . . . . . . . . . . . . . . . . . . . . . . . . . . . . . . . . . . . . . . . . . Phase4-37
Step 12: Document Completion of Contract Clearance Checks ......................................................Phase4-39Step 13: Send for SCM Contract Document Approvals (Workflow) ................................................... Phase4-40
Phase 5: Execute the SCM Contract Document .................................... Phase5-1Step 1: Dispatch ................................................................................................................................Phase5-1Step 2: Execute the SCM Contract Document .................................................................................Phase5-2Step 3: Update Transactional Contract Document ............................................................................Phase5-4Step 4: Copy Requisition to Existing Purchase Order .......................................................................Phase5-5
Record of Document Updates .............................................................. Update1-1Version 18.08-06 ............................................................................................................................ Update1-1Version 17.08-25 ............................................................................................................................ Update1-1

4
Importing Existing Executed Documents
A Transactional Contract Document does not exist in SCM and must be created prior to creating the SCM Amendment Document. The executed document(s) need(s) to be imported into PeopleSoft in order to do a future amendment/renewal within SCM.
Before beginning the process, gather the following information/documents:1. Vendor must be in PeopleSoft and tied to an active Bidder ID. Does the vendor have an active Bidder
Registration? What is the Bidder ID? If not, Bidder Registration must be completed by the vendor.
2. What is the original contract’s last signature date?
3. Are amendments/renewals to be imported as well? How many? Are the amendment/renewal documents available electronically? What is the last signature date for each amendment/renewal?

5Indiana Department of Administration
Considerations when Using the Importing Contracts and Amendments Manual
1. Does the Vendor/Contractor/Grantee have an Active status with the Auditor of State? Yes _____ No _____ What is the Vendor ID number? ____________________________________________________________
2. Information required from the original contract, previous Amendments and/or previous Renewals:a. How many Amendments/Renewals are there to import? ________________________________________________b. Who should be listed as the Administrator? __________________________________________________________c. What was the original contract begin date? ___________________________________________________________d. What is the most current expiration date? ____________________________________________________________e. What should be entered as the contract description? ____________________________________________________f. What should be entered as the maximum amount? _____________________________________________________g. What should be entered as the business unit, ship to, and department number? ______________________________h. What should be entered as the line item information or UNSPSC category? _________________________________i. Is there any subcontractor commitment? Yes ___ No _____
The required details: Tier 2 Type, bidder id, participation percentage, utilization date and scope of work for each one.
3. Document Type – which contract template was used on the original contract? ________________________4. Requisition Type – what was the type of the original contract document? ____________________________5. You must select the appropriate import path – just the original, the original plus one Amendment/Renewal,
or the original plus many Amendments/Renewalsa. Do you have the last signature date for each document? Yes ___ No _____b. Do you have electronic versions of each document? Yes ___ No _____c. Are the file name(s) less than 60 characters? Yes ___ No _____
6. You must have an approved and valid Requisition if there will be an increase in funds as a result of the new Amendment/Renewal being created in SCM
7. You must be able to select the appropriate Import Configurator ID for the Amendment/Renewal being created in SCM
8. Does the Amendment/Renewal require IOT approval? Yes ___ No ____9. Is the Amendment/Renewal a zero dollar amount? Yes ___ No ____10. You must edit the Amendment/Renewal appropriately – add, delete or edit contract clauses 11. Where should your working files should be saved? _____________________________________________12. Do you have electronic versions of the supplemental documents? Yes ___ No ____13. If using internal collaboration, does the collaborator have the required access? Yes ___ No ____ 14. Has the Vendor/Contractor/Grantee at least started the bidder registration process? Yes ___ No ____
What is the Bidder ID number? _____________________________________________________________15. Who is the External Signer? You will need the first name, last name and email address so you can identify
or create the signer id ____________________________________________________________________a. Is it the person listed to the right of the Bidder ID to copy field? Yes ____ No _____b. Is the person already in the existing Signers Table? Yes ____ No _____c. Do you need to create a new Signer ID? Yes ____ No _____
16. Who is the Internal Signer? ________________________________________________________________ Does the user have the required access? Yes ___ No ____

6Indiana Department of Administration
17. Do you have access to the contract clearance check results? Yes ___ No ____ 18. Which oversight agencies should be in the approval workflow? ___________________________________19. Should the contract be placed on the Indiana Transparency Portal? Yes ___ No ____ 20. Who do you need let know that the contract has been executed? ___________________________________

7Indiana Department of Administration
Financials Procedure OverviewPurchase that does require solicitation and an SCM contract

Phase1-1
Phase 1: Create the Transactional Contract DocumentMain Menu >> Supplier Contracts >> Create Contracts & Documents >> Contract Entry
1. Click the Add a New Value tab
2. Click Add
3. Review/Complete the Header Requirements
a. Enter/Look up Administrator/Buyer (PS User ID of contract author)
b. Enter/Look up Vendor Name or Vendor ID (found on the most current Executive Document Summary [EDS])
c. Enter Begin Date (original contract Date)
d. Enter the Expire Date (the most current expiration date)e. Enter the Maximum Amount (this includes original contract and all amendment/renewal amounts even if entering
.001 for a zero dollar contract)f. Enter Contract Description (enter the 3 digit Business Unit followed by a description; 30 character limit)
4. Enter Line Items or a Line Category - Choose only one of the two options.
! If this is a Zero based contract, the Line Category
must be 01234567.

Phase1-2
5. Click PO Defaults hyperlink
6. Complete PO Defaults page
a. Enter/Look up Business Unit (required)
b. Enter/Look up Ship To: (required)
! All Ship To codes begin with the three-digit Business Unit number. By entering
the three digit Business Unit number before clicking Look Up (magnifying glass), a list of every Ship To code for that agency will be returned.
c. Enter/Look up Dept (agency department ID) (required)
d. Click OK
7. Click Tier 2 Details tab (Minority/Women/Veteran Business Enterprises participation)
!All minority, women-owned and veteran business enterprises participating as subcontractors in fulfillment of the Contractor’s duties should be recorded on the Transactional Contract Document. The entry accurately
documents sub-participation. a. Review the original contract to acquire participants’ information b. Select Tier 2 Type (If no participation, select NONE and go to 8 on Phase1-3)c. Enter/Look up Bidder IDd. Enter participation Percentagee. Enter Utilization Datef. Enter Scope
g. Click Add (+) to insert additional lines, then repeat b-f above.
STOP These values are critical to route the SCM Contract Document through the correct approval workflow.

Phase1-3
8. Click Contract tab
9. Click Save Make note of the 25 digit Contract ID assigned by PeopleSoft.

Phase1-4Sample of Transactional Contract Document
Sample of Transactional Contract Document
]
]
Set IDPopulated as STIND (State of Indiana).
Contract IDA 25 digit contract number auto-assigned by PeopleSoft. The Contract ID number replaces the
EDS number.
Vendor/Vendor IDConfirm that the Vendor name or Vendor ID matches the most current Executed Document
Summary (EDS).
Begin Date & Expire DateDates that should reflect the expected term of the contract. Confirm the Begin Date is the original contract date and the Expire Date is the most current expiration date.
Description Confirm entry of the 3 digit Business Unit and description.
Maximum Amount Confirm this includes original contract and all amendment/renewal amounts.
]Add Comments Can be used to document information specific to the Transactional Contract Document.
Contract Activities Can be used to record action/activities concerning the Transactional Contract Document.
Contract Header Agreement Not to be used at this time.
Contract Releases Used to issue a Purchase Order when the SCM Contract Document has been executed.
Activity Log Displays system-recorded activity concerning this Transactional Contract Document.
Document Status A search tool that locates all documents associated with this Transactional Contract Document.
(Requisition, Sourcing Event, Purchase Order, Receipt(s), Voucher(s), Payment(s), etc.)\
Thresholds & Notifications Not available at this time.
StatusAll Transactional Contract Documents will be
created and edited in Open status.
Administrator/Buyer The PeopleSoft ID of the contract author.
Add a DocumentClicking this begins the creation process of the SCM Contract Document after all fields have been completed. (Displayed only for new Transactional Contract Documents where no SCM Contract Document exists)

Phase2-1
Phase 2: Upload the Text Contract Document(s)Main Menu >> Supplier Contracts >> Create Contracts and Documents >> Document Management
1. Click Add a Document The Create Document page will appear
2. Choose Criteria to Build Templatea. Click Look Up (magnifying glass) to
select Document Type (should represent the boilerplate used on original executed contract)
b. Review/update Description A 60 character field used to describe this contract.
c. Review/update Administrator
d. Enter Sponsor (if desired) Not required, this field provides an option to note a secondary/alternate agency contact. SCM generated email notifications are not sent to the sponsor.
e. Review/update Department Required for all SCM Contract Documents as it designates workflow approval route; comes from PO Defaults.
f. Click the drop down arrow to select Requisition Type (Represents the Req/PO type used on the original executed contract.) See list on next page.
STOP The Requisition Type is critical to route the SCM Contract Document through the correct approval workflow.
Phase2-2Sample of Transactional Contract Document
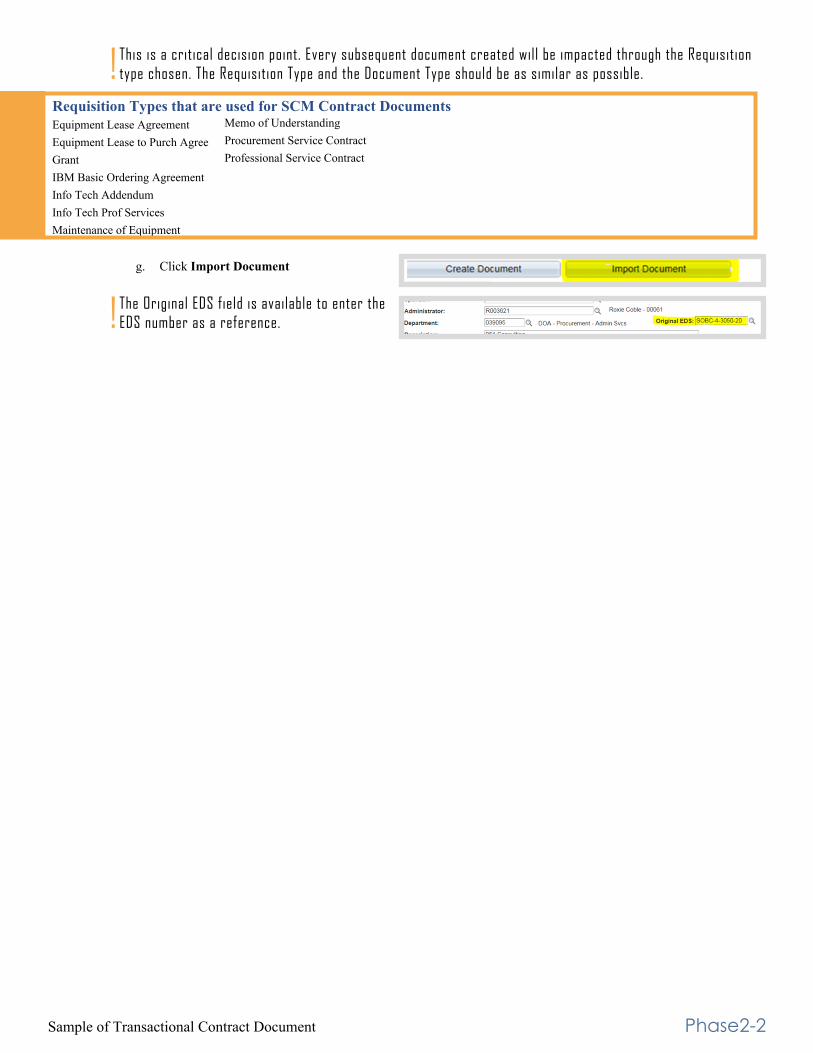
! This is a critical decision point. Every subsequent document created will be impacted through the Requisition type chosen. The Requisition Type and the Document Type should be as similar as possible.
g. Click Import Document
! The Original EDS field is available to enter the EDS number as a reference.
Requisition Types that are used for SCM Contract Documents Equipment Lease Agreement Equipment Lease to Purch Agree Grant IBM Basic Ordering Agreement Info Tech Addendum Info Tech Prof Services Maintenance of Equipment
Memo of Understanding Procurement Service Contract Professional Service Contract

Phase2-3
Only the Original Contract/ Document
Original Contract/Document and
1 Amendment/Renewal
Original Contract/Documentand
Multiple Amendments/Renewals
Complete actions on Phase2-4
Complete actions on Phase2-5 through Phase 2-6
Complete actions on Phase2-7 through Phase 2-9
3. Determine the appropriate path based on what is being imported
! SCM will consider the document an “amendment” if it was an amendment and/or a renewal when originally executed.

Phase2-4Importing Only the Original Contract/Document
1. Verify Current Contract/Document is selected
2. Enter the appropriate information for the Original Contract/Document
a. Enter Version = 1.0b. Enter Status Date (last
signature date of the contract)
3. Click Upload
4. Click Browse Search the network file directories and locate/select the saved Text Contract Document.
5. Click Upload
! If the message below is received, decrease the size of the file name to less than 60 characters.
6. Click Done with Import A warning pop-up box will appear.
7. Select the appropriate option to indicate if changes are needed. a. Click Yes if no changes needed. No further edits will be available.b. Click No if changes are necessary.
8. Continue to Document Management Page on Phase2-10
Importing Only the Original Contract/DocumentO
rigi
nal O
nly
... O
rigi
nal O
nly
... O
rigi
nal O
nly
... O
rigi
nal O
nly
... O
rigi
nal O
nly
... O
rigi
nal O
nly
... O
rigi
nal O
nly
...
STOP If the Contract Administrator answered Yes when the answer should have been No, a GMIS issue will need to be submitted to cancel the Transactional Contract Document. It will be necessary to restart the Create the Transactional Contract Document process.

Phase2-5Importing the Original Contract/Document and One Amendment/Renewal
1. Select Original and Amendment
2. Enter the appropriate information for the Original Contract/Document
a. Enter Version = 1.0b. Enter Status Date (last
signature date of the contract)
3. Click Upload
4. Click Browse Search the network file directories and locate/select the saved Text Contract Document.
5. Click Upload
! If the message below is received, decrease the size of the file name to less than 60 characters.
6. Enter the appropriate information for the Amendment/Renewal Document
! SCM will consider the document an amendment if it was an
amendment and/or a renewal when originally executed.
a. Enter Version = 2.0b. Enter Amendment = 1c. Enter Status Date (last
signature date of the amendment/renewal)
Importing the Original Contract/Document and One Amendment/Renewal
Ori
gina
l +1
--- O
rigi
nal
+1 --
- Ori
gina
l +1
--- O
rigi
nal
+1 --
- Ori
gina
l +1
--- O
rigi
nal
+1 --
- Ori
gina
l +1
--- O
rigi
nal
+1 --
- Ori
gi

Phase2-6Importing the Original Contract/Document and One Amendment/Renewal
7. Click Upload
8. Click Browse Search the network file directories and locate/select the saved Text Contract Document.
9. Click Upload
! If the message below is received, decrease the size of the file name to less than 60 characters.
10. Click Done with Import A warning pop-up box will appear.
11. Select the appropriate option to indicate if changes are needed. a. Click Yes if no changes needed. No further edits will be available.b. Click No if changes are necessary.
12. Continue to Document Management Page on Phase2-10
Ori
gina
l +1
--- O
rigi
nal
+1 --
- Ori
gina
l +1
--- O
rigi
nal
+1 --
- Ori
gina
l +1
--- O
rigi
nal
+1 --
- Ori
gina
l +1
--- O
rigi
nal
+1 --
- Ori
g
STOP If the Contract Administrator answered Yes when the answer should have been No, a GMIS issue will need to be submitted to cancel the Transactional Contract Document. It will be necessary to restart the Create the Transactional Contract Document process.

Phase2-7Importing the Original Contract/Document and Multiple Amendments/Renewals
1. Select Original and Amendment
2. Enter the appropriate information for the Original Contract/Document
a. Enter Version = 1.0b. Enter Status Date (last
signature date of the contract)
3. Click Upload
4. Click Browse Search the network file directories and locate/select the saved Text Contract Document.
5. Click Upload
! If the message below is received, decrease the size of the file name to less than 60 characters.
6. Enter the appropriate information for the Amendment/Renewal Document
! SCM will consider the document an amendment if it was an amendment and/or a renewal when originally executed.
Enter Version = 2.0
a. Enter Amendment The quantity is the total number of amendments/renewals being uploaded.
b. Enter Status Date (last signature date of the most current amendment/renewal)
Importing the Original Contract/Document and Multiple Amendments/Renewals
Ori
gina
l +M
ultip
le +
++ O
rigi
nal
+Mul
tiple
+++
Ori
gina
l +M
ultip
le +
++ O
rigi
nal
+Mul
tiple
+++
Ori
gina
l +M
ulti

Phase2-8Importing the Original Contract/Document and Multiple Amendments/Renewals
7. Click the triangle left of Prior Versions to add additional Amendments/Renewals
8. Enter the appropriate information for the Amendment Document
a. Enter Version = 3.0b. Notice the Amendment
defaultsc. Enter Status Date
(last signature date of corresponding amendment/renewal)
9. Click Upload
10. Click Browse Search the network file directories and locate/select the saved Text Contract Document.
11. Click Upload
! If the message below is received, decrease the size of the file name to less than 60 characters.
12. Repeat steps 8-11 for all remaining amendment/renewal documents Increase the version number by one with each additional amendment/renewal document entered.
13. Click Done with Import A warning pop-up box will appear.
Ori
gina
l +M
ultip
le +
++ O
rigi
nal
+Mul
tiple
+++
Ori
gina
l +M
ultip
le +
++ O
rigi
nal
+Mul
tiple
+++
Ori
gina
l +M
ultip

Phase2-9Importing the Original Contract/Document and Multiple Amendments/Renewals
14. Select the appropriate option to indicate if changes are needed. a. Click Yes if no changes needed. No further edits will be available.b. Click No if changes are necessary.
15. Continue to Document Management Page on Phase2-10
Ori
gina
l +M
ultip
le +
++ O
rigi
nal
+Mul
tiple
+++
Ori
gina
l +M
ultip
le +
++ O
rigi
nal
+Mul
tiple
+++
Ori
gina
l +M
ultip
l
STOP If the Contract Administrator answered Yes when the answer should have been No, a GMIS issue will need to be submitted to cancel the Transactional Contract Document. It will be necessary to restart the Create the Transactional Contract Document process.
Phase2-10Sample of Imported Document Management Page
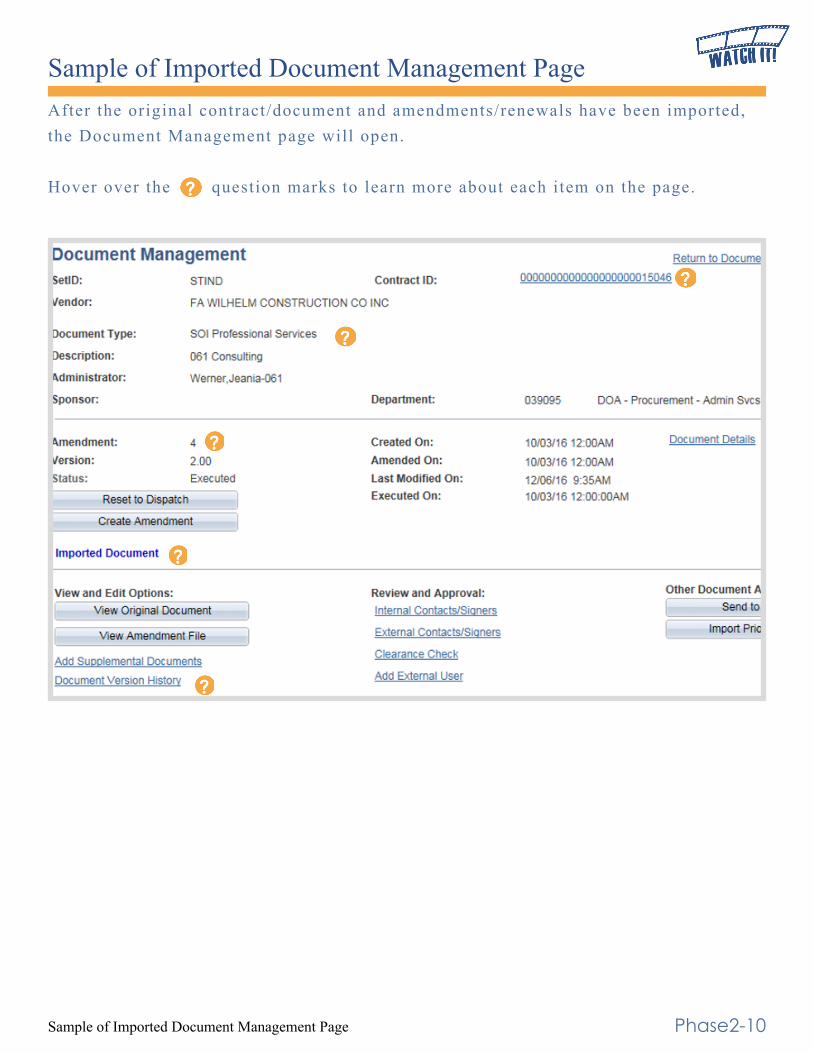
After the original contract/document and amendments/renewals have been imported, the Document Management page will open. Hover over the question marks to learn more about each item on the page.
Sample of Imported Document Management Page
Phase2-11
Creating Amendments/Renewals (From Imported Contracts)Main Menu >> Supplier Contracts >> Create Contracts & Documents >> Contract Entry
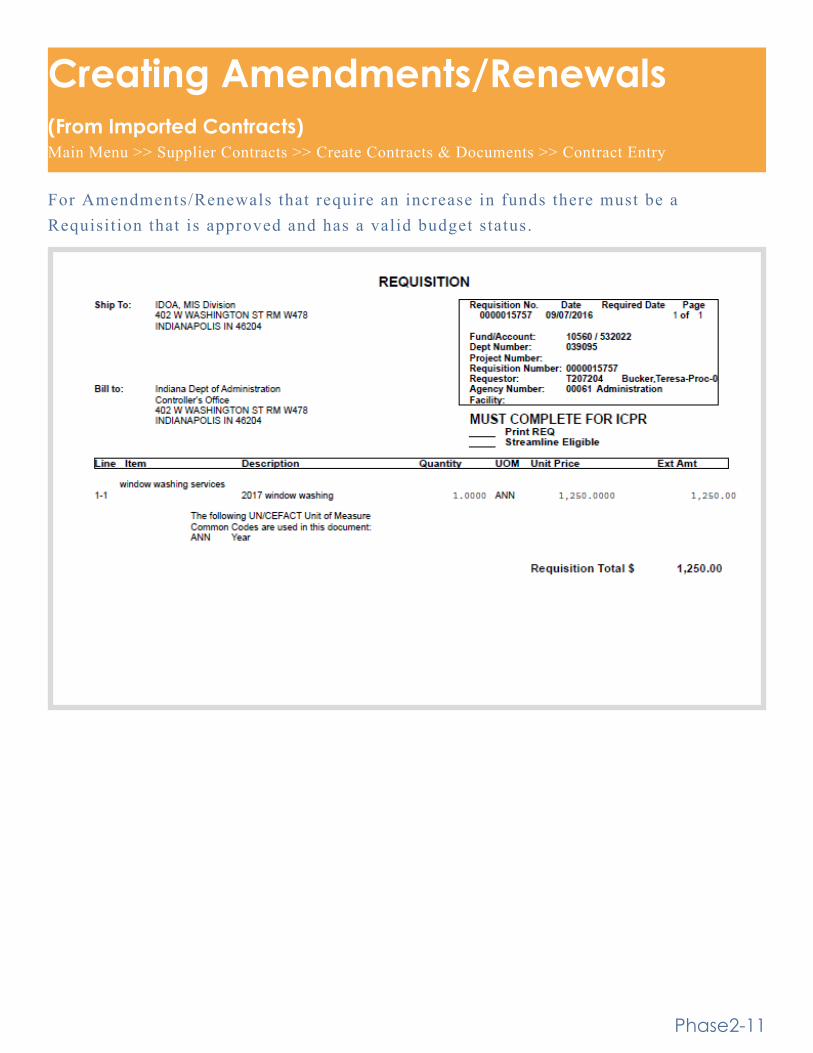
For Amendments/Renewals that require an increase in funds there must be a Requisition that is approved and has a valid budget status.
Phase3-1
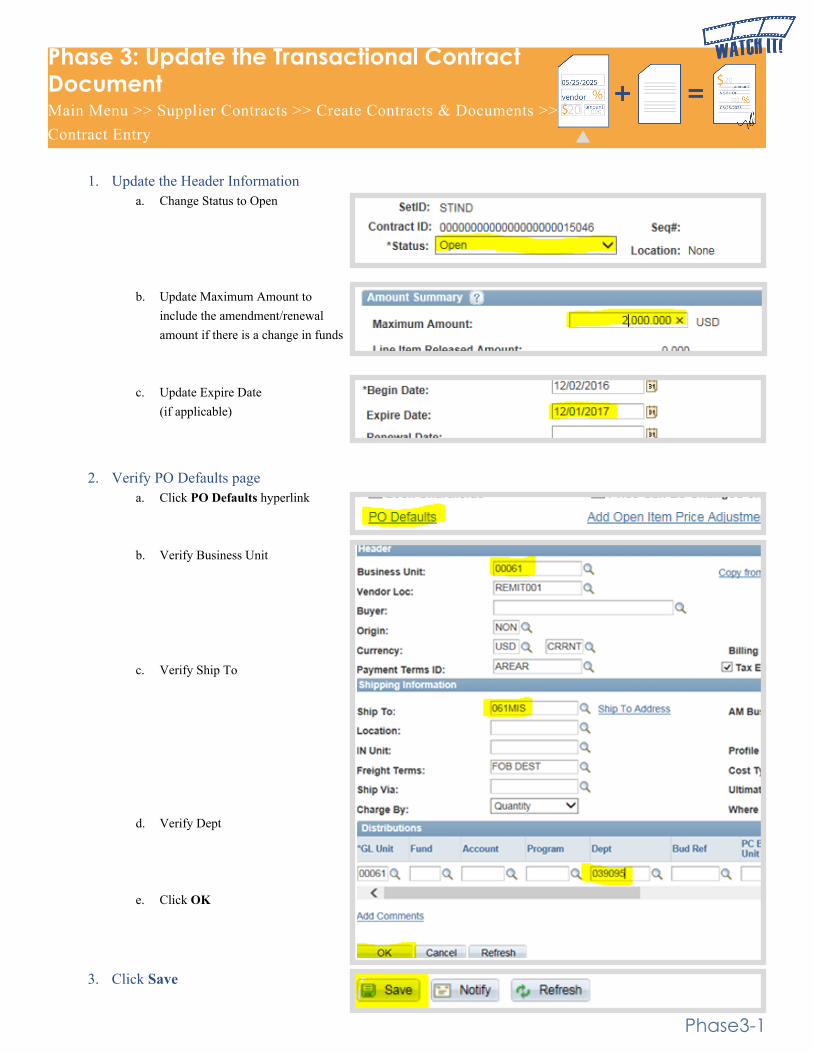
Phase 3: Update the Transactional Contract DocumentMain Menu >> Supplier Contracts >> Create Contracts & Documents >> Contract Entry
1. Update the Header Informationa. Change Status to Open
b. Update Maximum Amount to include the amendment/renewal amount if there is a change in funds
c. Update Expire Date (if applicable)
2. Verify PO Defaults pagea. Click PO Defaults hyperlink
b. Verify Business Unit
c. Verify Ship To
d. Verify Dept
e. Click OK
3. Click Save

Phase4-1Step 1: Initiate the Text Contract Document
Phase 4: Create the Text Contract DocumentMain Menu >> Supplier Contracts >> Create Contracts and Documents >> Document Management
1. Click Add a Document The Create Document page will appear
! This becomes Maintain Document if the Contract Administrator
logged out of PeopleSoft.
2. Click Create Amendment A message window will open regarding Clearance Checks
3. Click Yes
Step 1: Initiate the Text Contract Document

Phase4-2Step 2: Choose Configurator ID
Step 2: Choose Configurator ID
1. Leave Amendment Option as Amendment Files Only (do not change)
2. Click Look Up (magnifying glass) to select the Amendment Configurator ID
3. Select the appropriate Configurator ID specifically with “IMPORT” in the name to determine the amendment/renewal boilerplate based on the original executed contract.
! If the user does not select one with the word “import”, then the approval boxes will not be present on the document.

Phase4-3Step 3: Build the Text Contract Document
Step 3: Build the Text Contract Document
1. Select whether this Amendment/Renewal requires IOT approval; Yes or No
2. Select whether this is a Zero Amount Amendment; Yes or No
a. If no, enter only the amount of the new amendment/renewal in the Amendment field
b. If Yes, no further action is required
3. Leave Version as defaulted (do not change)
4. Add Comments (optional)
5. Click OK
6. Click OK to the Generation Error Message

Phase4-4Document Management Page
Below is the updated Document Management Page. Hover over the question marks to learn more about each item on the page.
Document Management Page

Phase4-5Step 4: Review/Edit the Text Contract Document
Step 4: Review/Edit the Text Contract DocumentThe check-out process ensures the integrity of the Text Contract Document is maintained by preventing revisions by other Contract Administrators until the Text Contract Document is checked in again.
The Contract Administrator should at a minimum review the Text Contract Document carefully after i t is created to make sure the language and required information is complete.
Check Out the Text Contract Document
1. Click Edit Amendment File A pop-up message will offer the option to open or save the file.
2. Click the drop down arrow to the right of Save
3. Select Save As
4. Select location to save file
! Do not change the file name or file extension (XML) and
remember where it is saved.
5. Click Save
6. Click Open
The determination to open or first save the Text Contract Document is based on the Contract Administrator’s personal preference. Once the Text Contract Document is opened the Document Management page in PeopleSoft will update indicating that the
SCM Contract Document has been checked out. The Text Contract Document must be saved before it can be checked in again.

Phase4-6Step 4: Review/Edit the Text Contract Document
Edit the Text Contract DocumentComplete the Text Contract Document according to the contractual obligations and/or negotiations that have taken place.
The Text Contract Document will be checked out in Microsoft Word with Track Changes turned on.
It is recommended that Track Changes remain on at this point if the Text Contract Document will be routed for internal collaboration (see Internal Collaboration, Phase4-12).
For additional information, refer to the Microsoft Word: How to Track Changes in Documents training video on http://www.in.gov/idoa/3016.htm.
1. Enter missing variables
! Look for “%%” and blanks.
2. Add Attachments/Exhibits Attachments/exhibits that need to be incorporated as part of the legally binding SCM Contract Document must be inserted into the Text Contract Document directly following the signature/approval page. The entire SCM Contract Document will be posted to the Transparency Portal if designated by the Contract Administrator.
How to Accept/Reject Tracked Changes
a. Select Review
b. Locate Accept or Reject Icon
c. Click the Accept or Reject Arrow for all options
d. Select the option that best fits the business practice

Phase4-7Step 4: Review/Edit the Text Contract Document
Exhibit/Attachment Formatting Considerations
• Inserting PDF files into the Text Contract Document Convert PDF files to TIFF files.
• Microsoft Word Functions Copy/paste can be used. Microsoft Excel tables can be used, but be careful with the formatting.
• Graphics/Images Graphics can be included, but be careful with the formatting.
• File Size Limitations There is no file size limit as long as the SCM Contract Document is not being emailed. If the file needs to be emailed, then the file size must be less than 25 MB.
Save the Text Contract DocumentIt is crit ical that users are cautious and mindful of the location where the Text Contract Document is saved.
1. Save the Text Contract Document using one of the following methods. When checking out the Text Contract Document initially if
a. Save As was selected, click Save
b. Open was selected,• Click File• Click Save As• Select location to save file
! Do not change the file name or file extension (XML) and
remember where it is saved.• Click Save
2. Click the X in the upper right hand corner to close the Text Contract Document
If there is an ERROR with the following fields, it
will be necessary to follow the below instructions.
• State Name If this is wrong, recreate the document (Phase4-19)
• Vendor Name If this is wrong, update the Transactional Contract Document and recreate the document (Phase4-19)
• Start /End Date If this is wrong, update the Transactional Contract Document and recreate the document (Phase4-19)
• Consideration Amount If this is wrong, the Contract Administrator must have the individual who completed the sourcing event update the amount in Sourcing. Then, recreate the document (Phase4-19)

Phase4-8Step 4: Review/Edit the Text Contract Document
Check In the Text Contract Document
Once the Text Contract Document has been reviewed and any necessary adjustments made, the Word (XML) document must be checked in through PeopleSoft. If the Contract Administrator did not have the opportunity to check in the Text Contract Document in a reasonable time and is logged out of PeopleSoft, the process begins from the Document Management page.
1. Navigate to the Contract Entry page Main Menu > Supplier Contracts > Create Contracts and Documents > Contract Entry
2. Ensure the Find an Existing Value tab is selected
3. Enter search criteria for the Transactional Contract Document
4. Click Search
5. Click any hyperlink in the row of the appropriate SCM Contract Document The Transactional Contract Document will open.

Phase4-9Step 4: Review/Edit the Text Contract Document
6. Click Maintain Document The Document Management page will open in a new tab.
7. Click Check In The Check In Document page will open.
8. Verify that the correct SCM Contract Document and version will be checked in.
! The Minor Version option will be selected by default. Do not change.
9. Add Comments concerning this check in action (if applicable)
10. Click OK A pop-up window will open.
11. Click Browse Search network file directories and locate/select the saved Text Contract Document.
12. Click Upload The check in process will return to the Document Management page when the Text Contract Document has been successfully uploaded.

Phase4-10Step 5: Supplemental Documents
Step 5: Supplemental Documents
Supplemental documents are references that are only accessible by internal resources and are not incorporated into the SCM Contract Document. These documents do not appear on the Transparency Portal. The Contract Administrator may elect to allow the supplemental documents to be emailed to the External Signer when the SCM Contract Document is sent for signature.
Any attachment, exhibit , or extraneous document referenced must be inserted into the SCM Contract Document and must follow the signature/approval page (See Edit the Text Contract Document, Phase4-6).
1. Click Add Supplemental Documents The Supplemental and Related Documents page will open.
2. Click Upload a Supplemental Document File A pop-up window will open.
Required Supplemental Documents
To validate the procurement method used, the Contract Administrator must upload the appropriate supplemental document(s) that may include:
• RFP Award Letter
• Subcontractors’ Minority or Women Business Certification letters
• DPAP Solicitation Summary
• Special Procurement Form and Approval
• Any documentation that explains the purchasing method and evaluation/award
• Clearance check results
! Failure to provide these details may delay SCM Contract Document approval.
An agency’s business process may require other supplemental documents such as:
• Email correspondence concerning negotiations
• Research information gathered during planning phases
• Notes outlining specifications/qualifications to consider

Phase4-11Step 5: Supplemental Documents
3. Click Browse Search network file directories and locate/select the saved supplemental document.
4. Click Upload The uploaded file will be displayed under the Supplemental Documents section.
5. Click OK when finished The screen will return to the Document Management page.
1
Click Upload Another Supplemental Document File to include additional documents.
2
Check Allow Email/Dispatch to prepare the supplemental document to be shared with the External Signer. (If applicable)
3
The File Name is what the supplemental document was originally titled when uploaded into PeopleSoft.
4
Use the Title field to rename the supplemental document according to the agency’s business process. (If applicable)
5
Click View to open and review the supplemental document.
1
2
3
4
5
6
Click Delete (-) at the end of the row to remove the supplemental document if needed.6

Phase4-12Step 6: Internal Collaboration
Step 6: Internal Collaboration
SCM provides an opportunity for the Contract Administrator to work with other agency personnel in preparing/authoring the Text Contract Document through the collaboration feature. The access granted (review or edit) to the Collaborator is set up by the Contract Administrator.
View AccessThis provides the Collaborator the abili ty to review the Text Contract Document draft and provide comments to the Contract Administrator.
Edit AccessThis provides the Collaborator the abili ty to review and edit the Text Contract Document draft and provide comments to the Contract Administrator.
! The Collaborator role is granted after completing the IDOA Contract Administrator training or the online collaboration training and a GMIS issue is submitted by the Agency Fiscal Security Coordinator. If there are
access problems, submit an issue to GMIS.
! The Internal Collaboration process may be completed as many times as appropriate for the Business Unit’s business process.
Collaboration must be finalized before the External Signer and Internal Signer can sign the SCM Contract Document.

Phase4-13Step 6: Internal Collaboration
Set up Internal Contact(s)
1. Click Internal Contacts/Signers The Internal Contacts List page will open.
2. Select the Collaboration Settings tab
3. Enter the User ID Manually enter the Collaborator’s User ID or use the Look Up (magnifying glass) to locate it using the search options. The Description field will populate with the name of the User ID entered/selected.
! Best Practice: Verify that the user being set up as a collaborator has the required PeopleSoft access. PeopleSoft will allow users to be entered who do not have the appropriate access.
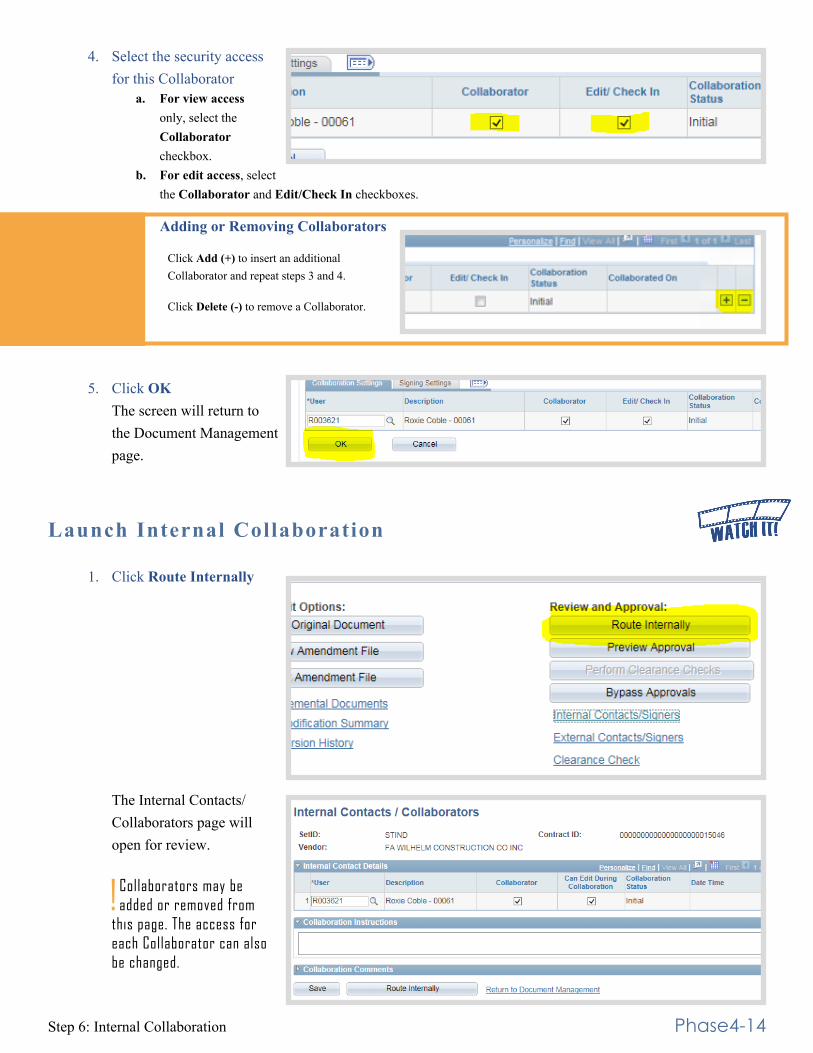
Phase4-14Step 6: Internal Collaboration
Adding or Removing Collaborators
Click Add (+) to insert an additional Collaborator and repeat steps 3 and 4.
Click Delete (-) to remove a Collaborator.
4. Select the security access for this Collaborator
a. For view access only, select the Collaborator checkbox.
b. For edit access, select the Collaborator and Edit/Check In checkboxes.
5. Click OK The screen will return to the Document Management page.
Launch Internal Collaboration
1. Click Route Internally The Internal Contacts/Collaborators page will open for review.
! Collaborators may be added or removed from
this page. The access for each Collaborator can also be changed.

Phase4-15Step 6: Internal Collaboration
2. Enter instructions or comments for the Collaborator(s) in the Collaboration Instructions field
3. Click Route Internally An email will be sent to all the contact(s) requesting collaboration. If there is more than one Collaborator, they will access the SCM Contract Document in a “first come, first served” basis. The Document Management Page will open.
1
Once Internal Collaboration has been routed, the Document status will be Pending Collaboration.
2
Click the Expand icon to open the Collaboration Comments section if collapsed.
3
Collaboration may be canceled at any time by the Contract Administrator. Canceling will remove all Collaborators and associated comments.
4
Collaboration may be modified if additional Collaborators are necessary or additional comments/instructions are required. Collaborators can be added, but Collaborators who are pending cannot be deleted.
1
2
3
4
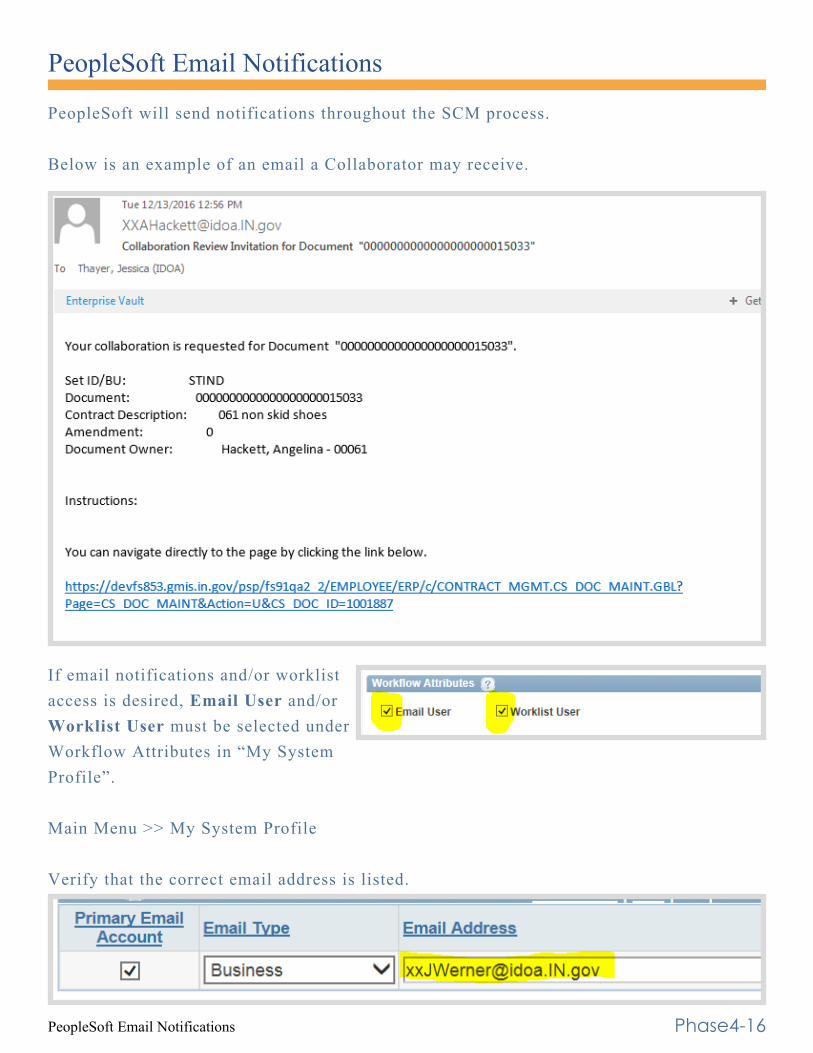
Phase4-16PeopleSoft Email Notifications
PeopleSoft will send notifications throughout the SCM process.
Below is an example of an email a Collaborator may receive.
If email notifications and/or worklist access is desired, Email User and/or Worklist User must be selected under Workflow Attributes in “My System Profile”.
Main Menu >> My System Profile
Verify that the correct email address is listed.
PeopleSoft Email Notifications

Phase4-17Step 6: Internal Collaboration
Finalize Internal Collaboration
An email notice is sent to the Contract Administrator when the last Collaborator clicks “Mark as Reviewed”.
1. Access the SCM Contract Document’s Document Management Page using one of the following methods:a. Email Hyperlink
Click the hyperlink provided in the email notification.
b. Worklist Click the hyperlink to access the collaboration item (will be marked as “Collaboration Complete”).
c. Navigation Main Menu >> Supplier Contracts >> Create Contracts and Documents >> Contract Entry. Click Maintain Document after locating the appropriate SCM Contract Document.

Phase4-18Step 6: Internal Collaboration
2. Review Collaboration Comments
3. Click Edit Amendment File
! The Contract Administrator must accept/reject the
changes as appropriate. The Text Contract Document should represent the version that will be prepared for signature. When finished, save and check the Text Contract Document in. (See Review/Edit the Text Contract Document Phase4-5).
4. Click Finalize Collaboration
! If needed, additional collaboration can be set up,
launched and finalized.

Phase4-19Recreate Document (If Necessary)
Recreate Document (If Necessary)Use the Recreate Document process to:
• rebuild the Text Contract Document completely• correct the Document Type• update answers to wizard questions• return to the boilerplate template
1. Click Recreate Document The Recreate Document Options window will open.
2. Update Amendment Configurator ID (if applicable)
3. Update response to IOT approval question
! Leave the Version as defaulted.
4. Enter Comments (if applicable)
5. Click OK A pop-up will open.
6. Click Yes Continue to confirm previous wizard answers and make changes as necessary to rebuild the Text Contract Document.

Phase4-20Step 7: External Signer Set Up
Step 7: External Signer Set Up To set up the External Signer, the Contract Administrator must have the person’s first and last name. In addition, the SCM electronic signature process requires that every company has completed Bidder Registration Part 1 (Collect the Required Materials) and Part 2 (Request New Profile Creation) in PeopleSoft. The resulting User ID and password is necessary for the External Signer to access SCM Contract Documents prepared for signature through the State’s Supplier Portal.
This process covers finding an existing User ID or creating one if necessary for the External Signer.
Find the Bidder ID through the Vendor ID
Identify Existing Signer’s User ID
? 0000001234
Complete Steps on Phase4-22
Complete Steps on Phase4-23
Find the Bidder ID through the Bidder File
Complete Steps on Phase4-21
?

Phase4-21Step 7: External Signer Set Up
Find the Bidder ID through the Bidder FileUse this process to search for Bidder information.
1. Navigate to the Bidder information Main Menu >> Sourcing >> Bidder Information
! View access can be granted by submitting a GMIS issue.
2. Enter search criteria
3. Click Search Click anywhere on the row of the desired bidder
4. Select the Header tab
5. Note the ten digit Bidder ID In most cases, the person listed under CEO Name will be the EXTxxxxxxxxxx external signer (in this example EXT0000030443).
! If there is not a Bidder ID, the Contract Administrator must
request the vendor complete Part 1 and Part 2 of the Bidder Registration at www.in.gov/idoa/2464.htm.

Phase4-22Step 7: External Signer Set Up
Find the Bidder ID through the Vendor IDUse this process when the Vendor ID is known/available, but the Bidder ID is not.
1. Copy the Vendor ID from the Transactional Contract Document
2. Navigate to the vendor file Main Menu >> Vendors >> Vendor Information >> Add/Update >> Vendor
! View access can be granted by submitting a GMIS issue.
3. Enter the Vendor ID as search criteria
4. Click Search
5. Select the Profile tab
6. Note the ten digit Bidder ID
! If there is not a Bidder ID, the Contract Administrator must
request the vendor complete Part 1 and Part 2 of the Bidder Registration at www.in.gov/idoa/2464.htm.

Phase4-23Step 7: External Signer Set Up
Identify Existing External Signer’s User ID It is possible that the designated External Signer may have already been issued his/her own unique ID and password associated with the Bidder ID.
1. Click Add External User
2. Enter Bidder ID (10 Characters) or Click Look Up (magnifying glass) to search for the Bidder ID.
3. Tab Out or Click in the User Name field This allows PeopleSoft to provide the user name tied to the Bidder ID.
4. Review the existing External Signers tied to the Bidder IDa. If the External Signer’s
name appears next to the magnifying glass, note the Bidder ID. Do not create a new signer.
b. If the External Signer’s name and Email ID appear in the Existing External Signers table, note the User ID . (Example: EXS0000000911) Do not create a new signer.
! Check all pages of the Existing External Signers table. If there are duplicate
entries, submit a GMIS issue to request removal.
! If the External Signer’s name does not appear click Cancel , see Creating a New External Signer (Phase4-24) to create a new signer.
5. Click OK
6. Continue to Assign the Signer (Phase4-25)

Phase4-24Step 7: External Signer Set Up
Creating a New External Signer If the External Signer’s name did not appear during the Identify Existing External Signer process, a User ID must be created. The External Signer’s first and last name and email address are required for this process.
1. Click Add External User
2. Enter Bidder ID (10 Characters)
3. Enter the signer’s first and last name
!A warning will appear if an External Signer’s name is a
duplicate. The original User ID will be given as well as a request to not create a new External Signer.
4. Enter the signer’s email address
5. Click Create New User The page will refresh and display the assigned User ID and password in red. An email notification will be sent to the signer providing the User ID and initial password.
!Do not leave the page until a new User ID populates.
6. Note the New User ID
7. Click OK
STOP Do not complete this process if the External Signer was identified on Phase4-23.

Phase4-25Step 7: External Signer Set Up
Assign the External SignerThe External Signer identified (new or existing), must be assigned as an external contact in order to sign the SCM Contract Document. Multiple users may be set up as external contacts for collaboration or review, but only one can be designated as the signer.
1. Click External Contacts/Signers The External Contacts page will open.
2. Enter the External Signer’s User ID in the External User field (EXT or EXS number)a. Enter “EXT” before the 10 digit Bidder
ID number noted from step 4a of Identify Existing External Signer. (Example: EXT0000030443)
b. Enter the User ID noted from step 4b of Identify Existing External Signer. (Example: EXS0000000835)
c. Enter the User ID noted from Creating a New External Signer on Phase4-24. (Example: EXS0000000911)
3. Tab Out or Click in the Contact Name field The signer’s name will populate to the right of the field.
! If the signer’s name is spelled incorrectly, submit a GMIS issue. Do not create another External User ID.
4. Enter the signer’s name in the Contact Name field The email address for the signer will default based on the User ID.
! If the email address does not populate, submit a GMIS issue. Do not create another External User ID.
5. Select the Allow Document View Access, Primary Document Owner and Required to Sign Document checkboxes
6. Click OK
More than 1 External User (Non-Signer) Click Add (+) to designate additional contacts. The Primary Document Owner and Required to Sign Document checkboxes will not be available for these users.

Phase4-26Step 8: Prepare Document for Signing
Step 8: Prepare Document for Signing
1. Click Prepare Document for Signing The Prepare Document for Signatures page will open.
2. Review the External list of Signers and verify the correct person has been designateda. If the list is not correct,
click Cancel and return to the external contact list to make any revisions necessary.
b. If the list is correct, proceed to step 3.
3. Click OK When the processing is complete, there will be two pop-up messages. It does not matter which one the Contract Administrator answers first.
4. Click OK to the usage rights for Adobe Reader pop-up message.
5. Click the drop down arrow to the right of Save
6. Select Save As
7. Select location to save file
! Do not change the file name or file extension (PDF) and
remember where it is saved.
8. Click Save

Phase4-27Step 8: Prepare Document for Signing
9. Click Open
10. Verify that the SCM Contract Document is correct. Check that all modifications have been appropriately accepted or rejected.
! If the SCM Contract Document does not represent the version
that will be prepared for signature and changes need to be made,• cancel the signature process• edit Text Contract Document• accept and/or reject modifications• prepare SCM Contract Document for signing
11. Close the SCM Contract Document
The Document Management page will now indicate that the SCM Contract Document has been checked out and is pending document certification by the Contract Administrator.

Phase4-28Step 9: Upload the Prepared Document
Step 9: Upload the Prepared Document After the SCM Contract Document has been prepared for signing, the current format must be uploaded so that i t can be circulated for electronic signatures.
1. Click Upload Prepared Document A pop-up window will open.
2. Click Browse Search the network file directories and locate/select the saved SCM Contract Document.
3. Click Upload
! If the SCM Contract Document was saved under a different title other than what was system-generated, the following warning message will appear in a pop-up
window. As long as it is the correct SCM Contract Document, there is no reason to be concerned. Click Yes .
Once the prepared SCM Contract Document has been uploaded, the Document Management page will update and display the current status in the Signing Details section.

Phase4-29Step 10: Send the SCM Contract Document for External Signature
Step 10: Send the SCM Contract Document for External Signature
1. Click Send to Contacts
! If Send to Contacts is not displayed, check the External
Contact set-up and make certain that Required to Sign is selected.
2. Click the drop down arrow next to the Delivery Method field
3. Select Email and Online Signatures This will automatically check the Current Document and Send Copy to Administrator checkboxes in the Files to Be Sent section.
! The Current Document can be unchecked so a copy is not
emailed to the External Signer. This removes the 25MB file size limitation caused by Outlook.
Sending Supplemental Documents to External Contacts
To send Supplemental Documents to an External Contact the following must be completed:
a. The Allow Email Dispatch checkbox was checked; see Supplemental Documents section
b. The Supplemental Documents checkbox must be checked - Verify the documents listed in the Supplemental Documents section are intended to be sent to the External Signer. Uncheck the box next to the file name if the file is not to be sent.

Phase4-30Step 10: Send the SCM Contract Document for External Signature
4. Review the External Signer’s email address
! If there is an error, make the correction and submit a GMIS
issue to update the External Signer’s email address.
5. Click OK
An email notification will be sent to the Contract Administrator and External Signer to let them know an SCM Contract Document is ready for review/signature. A PDF version is attached to the email if the Contract Administrator left the “Current document ,” checkbox selected.
The Document Management page will update displaying the status as **Pending Supplier’s Signature**
1
The Subject field will default and will include the Contract ID number. The Subject can be modified if necessary.
2
The Description field will default; the Description can be modified if necessary. Do not change the links to the following: the Vendor eSigning guide, the Supplier Portal, and the Password reset option.
1
2

Phase4-31Step 10: Send the SCM Contract Document for External Signature
If the External Signer has trouble with the eSigning process, direct him/her to the eSigning Electronic Contracts web page: www.in.gov/idoa/2977.htm and help walk him/her through the steps. If there is sti l l an issue, have him/her submit a GMIS issue.
When the External Signer has reviewed, signed, and uploaded the signed SCM Contract Document, the Contract Administrator will receive an email notification similar to the one below. Receipt of this message indicates that the SCM Contract Document is ready for Internal signature. The SCM Contract Document may be accessed through the link in the email or from the PeopleSoft Main Menu.
Canceling the Supplier Signing Process
If it becomes necessary for any reason to stop the signature process before it is complete, click Cancel Supplier Signing. It can be sent again at any time by repeating the steps in this section. Otherwise,
a. Verify the External Signer has signed correctly If the External Signer signs using encryption, the Contract Administrator cannot take further action. The Contract Administrator will need to cancel the signature process and request the External Signer to sign the SCM Contract Document correctly.
b. Verify the External Signer did not change the file name If the External Signer changed the file name, this will cause system issues. The Contract Administrator will need to cancel the signature process and request the External Signer to sign the SCM Contract Document correctly using the appropriate file name.
c. Verify the External Signer did not change the content If the External Signer changed the content, the Contract Administrator will need to cancel the signature process and request the External Signer sign the SCM Contract Document as prepared.

Phase4-32Step 11: Send the SCM Contract Document for Internal Signature
Step 11: Send the SCM Contract Document for Internal SignatureMain Menu >> Supplier Contracts >> Create Contracts and Documents >> Document Management
Once the External Signer has completed the eSigning process and the Contract Administrator has reviewed the contract for any errors, the SCM Contract Document is ready for Internal signature.
The next steps of this process are determined by who has authority to sign the SCM Contract Document. Choose the appropriate path.
If the Contract Administrator is the Internal Signer,
If the Contract Administrator is not the Internal Signer,
complete steps on Phase4-33
complete steps on Phase4-34 through Phase 4-36
ADMIN ADMIN
! Confirm with the intended signer that he/she has completed the Internal Signer training, has appropriate
PeopleSoft access and is authorized to sign on behalf of the agency.

Phase4-33Step 11: Send the SCM Contract Document for Internal Signature
Sign the SCM Contract Document on the State’s Behalf
1. Click Sign Document (On Behalf)
2. Refer to the Internal eSigning a Contract manual (pages 4-8) for reference on completing the signature process: www.in.gov/idoa/files/PeopleSoftGuide_SCM_InternaleSigningContract.pdf.
Sign
on
Beh
alf .
.. Si
gn o
n B
ehal
f ...
Sign
on
Beh
alf .
.. Si
gn o
n B
ehal
f ...
Sign
on
Beh
alf .
.. Si
gn o
n B
ehal
f ...
Sign
on
Beh
alf .
..

Phase4-34Step 11: Send the SCM Contract Document for Internal Signature
Set up Internal Contacts/Signers
1. Click Internal Contacts/Signers The Internal Contacts List page will open.
2. Select the Signing Settings tab
3. Enter manually or use Look Up (magnifying glass) to select the Internal Signer’s User ID.
4. Select the Required to Sign Document checkbox
Set u
p an
d R
oute
---S
et u
p an
d R
oute
--- S
et u
p an
d R
oute
---S
et u
p an
d R
oute
--- S
et u
p an
d R
oute
--- S
et u
p an
d R
oute

Phase4-35Step 11: Send the SCM Contract Document for Internal Signature
5. Verify that the Visible Signer checkbox is checked
6. Click OK
If the Internal Signer will also be the Fiscal Approver, nothing more is needed. The user will sign and approve in the same step when the SCM Contract Document is routed for approval.
If the Internal Signer is not included in the fiscal approval workflow, the SCM Contract Document must be routed for internal signatures separately.
Set u
p an
d R
oute
--- S
et u
p an
d R
oute
--- S
et u
p an
d R
oute
--- S
et u
p an
d R
oute
--- S
et u
p an
d R
oute
--- S
et u
p an
d R
oute

Phase4-36Step 11: Send the SCM Contract Document for Internal Signature
Route for Internal Signatures
1. Click Route for Internal Signatures The Route for Internal Signatures page will open for review.
! Internal Signers may be added or removed
from this page. The access for each can be updated.
2. Enter instructions or comments for the Internal Signer(s) in the instructions field
3. Click OK
An email will be sent to the designated Internal Signer.
The Contract Administrator will receive an email notification when the SCM Contract Document has been signed. Receipt of this message indicates that the SCM Contract Document is ready for remaining steps.
Set u
p an
d R
oute
--- S
et u
p an
d R
oute
--- S
et u
p an
d R
oute
--- S
et u
p an
d R
oute
--- S
et u
p an
d R
oute
--- S
et u
p an
d R
oute

Phase4-37Step 11: Send the SCM Contract Document for Internal Signature
To Correct Internal Signature ErrorsIf the Internal Signer needs to be changed because the SCM Contract Document was routed to the wrong person or the wrong person signed the SCM Contract Document, then cancel the signature process.
! A signature cannot be removed from a PDF file once it is uploaded in PeopleSoft. The Contract Administrator must send it again for external signature before re-routing for internal signature(s).
1. Click Stop Internal Signatures Enter Comment Click OK
2. Click Internal Contacts/Signers The Internal Contacts List page will open.
3. Select the Signing Settings tab
4. Click Add (+) to create a new row

Phase4-38Step 11: Send the SCM Contract Document for Internal Signature
5. Click Delete (-) on the row with the previous Internal Signer or uncheck the Required to Sign Document checkbox next to the User ID
6. Enter manually or use Look Up (magnifying glass) to select the Internal Signer’s User ID.
7. Select the Required to Sign Document checkbox
8. Verify that the Visible Signer checkbox is checked
9. Click OK
10. Click Route for Internal Signatures (See the Route for Internal Signatures section Phase4-35).
If the Internal Signer failed to Upload the signed PDF,
a. Click “Recycle Sign Status to Initial” within the Internal Contacts/Signers page
b. Click OK
c. Click Route for Internal Signatures on the Document Management page See the Route Internal Signatures section Phase4-35

Phase4-39Step 12: Document Completion of Contract Clearance Checks
Step 12: Document Completion of Contract Clearance Checks
Before an SCM Contract Document is executed, the State requires the following:1. That the vendor is in good standing with the Indiana Department of Revenue
and the Department of Workforce Development. 2. The vendor must be registered with the Secretary of State’s office (if required). 3. The vendor must not appear on the State or federal suspended vendor lists.
These checks and clearances are done outside of PeopleSoft SCM with the results documented manually. This process can be documented at any time but must be completed in order to proceed to Contract Approvals.
! Clearance Check results must be included as a supplemental document if they are required (see Phase4-10).
1. Click Clearance Check The Contract Clearance Checklist page will open
2. Use the checkboxes, radio buttons and date cleared fields to document clearance check procedures were followed
! Click the Clearance Check Not Required checkbox if clearance
checks are not required. An explanation must be provided in the Reason text field.
3. Click OK Returns to the Document Management page.

Phase4-40Step 13: Send for SCM Contract Document Approvals (Workflow)
Step 13: Send for SCM Contract Document Approvals (Workflow)
The oversight agencies (Indiana Office of Technology, State Budget Agency, Indiana Department of Administration, and Attorney General) that manually signed contracts in the paper-based procedures will approve electronically in SCM. The User ID of the Approver and the date/time of the approval will be recorded and documented (in the Document Version History) in l ieu of a wet signature.
SCM Contract Documents may be submitted for oversight agency approvals when externally signed, internally signed, and the contract clearances have been documented.
! If the Internal Signer is also an Approver within one of the oversight agencies, the SCM Contract Document may be signed and approved by that person in the workflow steps.
1. Click Preview Approval The Document Approval page will open detailing the required approval path.
2. Review Approval Workflow
! If an approver is missing or should not be included, click Return to
Document Management to exit the approval preview and submit a GMIS issue.
3. Click Submit for Approval to route the SCM Contract Document through workflow
! If it becomes necessary to cancel the approval process after submission,
from the Document Management page, click Approval Details , then click Cancel Approval Process .
If your contract was denied and needs to be edited, click Approval Details, click Cancel Approval Process, click Return
to Document Management link, click Cancel Signature Process, and follow the steps to edit the text contract document
through sending for SCM Contract Document Approvals.

Phase4-41Step 13: Send for SCM Contract Document Approvals (Workflow)
After submission, the status displayed on the Document Management page will update to Pending Approval.
When all approvals are completed the Document Management Page will update to Approved Status and the Contract Administrator will receive an email.

Phase5-1Step 1: Dispatch
Phase 5: Execute the SCM Contract DocumentMain Menu >> Supplier Contracts >> Create Contracts and Documents >> Document Management
Step 1: Dispatch
A signed and approved SCM Contract Document must be dispatched before the final step, Execute. Although required, the Dispatch step does nothing more than prepare the SCM Contract Document so that i t may be executed.
1. Click Dispatch The Dispatch page will open. There are no updates/changes required on this page.
2. Click OK The status displayed on the Document Management page will update to Dispatched.

Phase5-2Step 2: Execute the SCM Contract Document
Step 2: Execute the SCM Contract Document
An SCM Contract Document is eligible to be executed when the status on the Document Management page is indicated as Dispatched. Completion of this step sends an email notification when executed and allows the Contract Administrator to indicate whether or not the SCM Contract Document will be viewable to the public on the Transparency Portal.
! If a Ship To ID was not identified on the Transactional Contract Document in the PO Defaults section, an error message will be generated redirecting the Contract Administrator to that page. An SCM Contract Document
will not execute without this information.
1. Click Execute Contract
2. Click Yes or No as appropriate
The SCM Contract Document status will update to Executed and the Transparency ID will be assigned.
STOP If answered incorrectly, submit a GMIS issue immediately.
If the SCM Contract Document has not been internally and/or externally signed, the following message is received:
a. Click No
b. Submit a GMIS Issue.
Not all Internal Signers have signed this document (10421, 198)
This document has not received all internal signatures yet - Are you sure you want to proceed with this action?
You can review who has not signed the document yet by checking the Internal Contacts page vs the signature section in the document. (Please note that if some users signed the document offline, the system will not know about it.)

Phase5-3Step 2: Execute the SCM Contract Document
After an SCM Contract Document has been executed and if the Contract Administrator indicated that the SCM Contract Document should be viewable to the public, a nightly process initiates that generates a fi le with Executed SCM Contract Documents for the day and sends them to IDOA.
At that t ime, IDOA will move SCM Contract Documents to the Transparency Portal and the External Signer and Contract Administrator will receive an email that states the SCM Contract Document has been approved. Allow a few days for the SCM Contract Document to appear on the Transparency Portal.
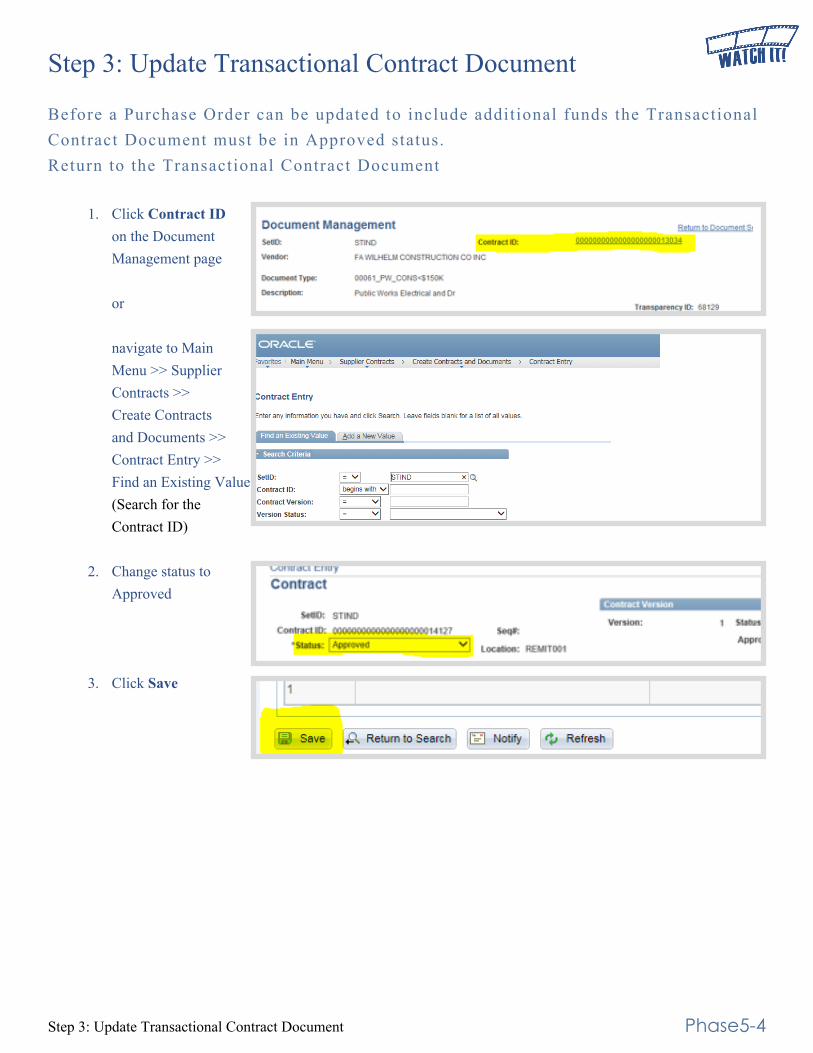
Phase5-4Step 3: Update Transactional Contract Document
Step 3: Update Transactional Contract Document
Before a Purchase Order can be updated to include additional funds the Transactional Contract Document must be in Approved status. Return to the Transactional Contract Document
1. Click Contract ID on the Document Management page or navigate to Main Menu >> Supplier Contracts >> Create Contracts and Documents >> Contract Entry >> Find an Existing Value (Search for the Contract ID)
2. Change status to Approved
3. Click Save
Phase5-5Step 4: Copy Requisition to Existing Purchase Order
Step 4: Copy Requisition to Existing Purchase OrderFor Amendments/Renewals that required an increase in funds follow the Instructions for Contract Amendments and Renewals document on the Procurement PeopleSoft Guides Purchase Orders web page: www.in.gov/idoa/2934.htm.

Update1-1Version 18.08-06
Record of Document Updates
Version 18.08-06Added Considerations when Creating Contracts Page 5Added Financials Procedure Overview Page 6Updated Requisition Types that are used for SCM Contract Documents chart Phase 2-2 Updated Screenshot Phase 4-30Added troubleshooting box Phased 4-40 Added Watch It! Videos as neededUpdated page references as needed
Version 17.08-25Added “even if entering .001 for a zero dollar contract” Phase 1-1Updated screenshot 5 Phase 1-2Added Document Type screenshot Phase 2-1Moved Clearance Check bullet point to clarify Clearance Check requirements Phase 4-10Added note to clarify Clearance Check requirements Phase 4-38