surplus property program online databaserm.fs.ucf.edu/forms/rm surplus property program...
TRANSCRIPT

Resource ManagementSurplus Property Program
Surplus Property Program Database PCT User’s Manual
Surplus Property Program
Online Database Property Custodian User’s Manual
Last Updated 16‐September‐2015
Resource ManagementSurplus Property Program
Surplus Property Program Database PCT User’s Manual
Page 2 of 41
Table of Contents
Database overview
3
Surplus Property Program process
4
System access and roles
5
Property Custodian profile setup 6
Property custodian responsibilities and related database actions
7
Property adoption list 7
Adopting assets for your department 8
Approving and denying adoption requests 12
Creating a new surplus request 17
Listing a non‐tagged item 18
Listing a tagged asset 25
Duplicating an entry 32
Researching your past entries 34
My profile 36
Frequently asked questions 37
References 41
Resource ManagementSurplus Property Program
Surplus Property Program Database PCT User’s Manual
Page 3 of 41
Database Overview
In 2014, Resource Management’s Surplus Property Program underwent an audit during which it was
determined that an updated version of the program’s online database was in order. The database was
designed, developed, and launched during 2014 and 2015. The new database encompasses all aspects of the
program:
Initial entry by the Property Custodian
Physical inspection of the asset (including acceptance or rejection of the request)
Physical removal of the asset from the originating location
Evaluation and recommendations by the Surplus Property Program’s support team
Property Board approvals and rejections (under development as of 9/21/15)
Physical disposition of the asset through third‐party recycling services or through a sale to
the general public (under development as of 9/21/15)
Requests for relief of responsibility for property related to donations, trade‐ins,
cannibalization requests, and lost/missing/stolen items (under development as of 9/21/15)
In addition to many new features that will be detailed below, the new database has several enhancements
over the legacy version:
A much improved security profile in that NID authentication and role assignments are
enforced at each step in the process
Daily uploads of the current records from PeopleSoft Financials of the Departmental
Authorization List (DAL) and Departmental Asset Lists to ensure that only the proper
personnel are accessing the system and facilitating the disposal of university property
An improved searchable adoption screen with photos for items listed to make adopting
property for your department easier than ever!
A quantity field has been added so that lots may be split for partial adoptions or partial
rejections
Resource ManagementSurplus Property Program
Surplus Property Program Database PCT User’s Manual
Page 4 of 41
Surplus Property Program Process
1. A department wishes to dispose of an unneeded asset (whether tagged or untagged – all assets are
university property regardless of value thresholds).
2. The department or project’s Dean, Director, or Chair grants permission to the assigned Property
Custodian to initiate the disposal of the asset.
3. The department’s Property Custodian enters the item for pickup in the Surplus Property Program’s
online database at https://secure.fs.ucf.edu/Surplus.
4. The item is then available for adoption by other departments or projects for a period of ten (10)
business days from the date of entry. This ten (10) day window automatically adjusts for university
holidays to ensure that ten (10) working days are included for each asset listed.
5. If the item is adopted, it is removed from the list of available assets within the database.
6. If the item is not adopted within the ten (10) day period, the Property Manager will review the entry
and schedule a pickup of the asset.
7. The asset is brought to the Facilities and Safety warehouse by the Property Manager(s) for evaluation
by the Surplus Property Program’s support team.
8. The support team evaluates the asset and makes a written recommendation as to the best possible
disposition. The recommendation is sent to the Property Board for review.
9. The Property Board reviews the recommendation and approves or rejects it.
10. If a recommendation is rejected, it is sent back to the support team for further evaluation of the asset.
11. If a recommendation is approved, the Account Manager facilitates the recommendation. Assets are
then recycled or sold to the general public at auction.
12. The Account Manager maintains all records of recycling and sales, which are reported to the VP for
Administration and Finance every quarter and to university audit upon request.
Resource ManagementSurplus Property Program
Surplus Property Program Database PCT User’s Manual
Page 5 of 41
System Access and Roles
Access is restricted to the various modules of the database by role. Users will only be able to access the areas
and related data that are pertinent to the user’s individual role and NID credentials. For example, individuals
with the DAL code of PCT will be able to enter pickup requests, individuals with the role code of Property
Board Voting Member will be able to determine the final disposition of an asset within the system, etc.
Individuals with the DAL assignment of DDC (Deans, Directors, and Chairs) or RFO (Responsible Financial Officer) may also enter requests in the absence of the department’s Property Custodian.
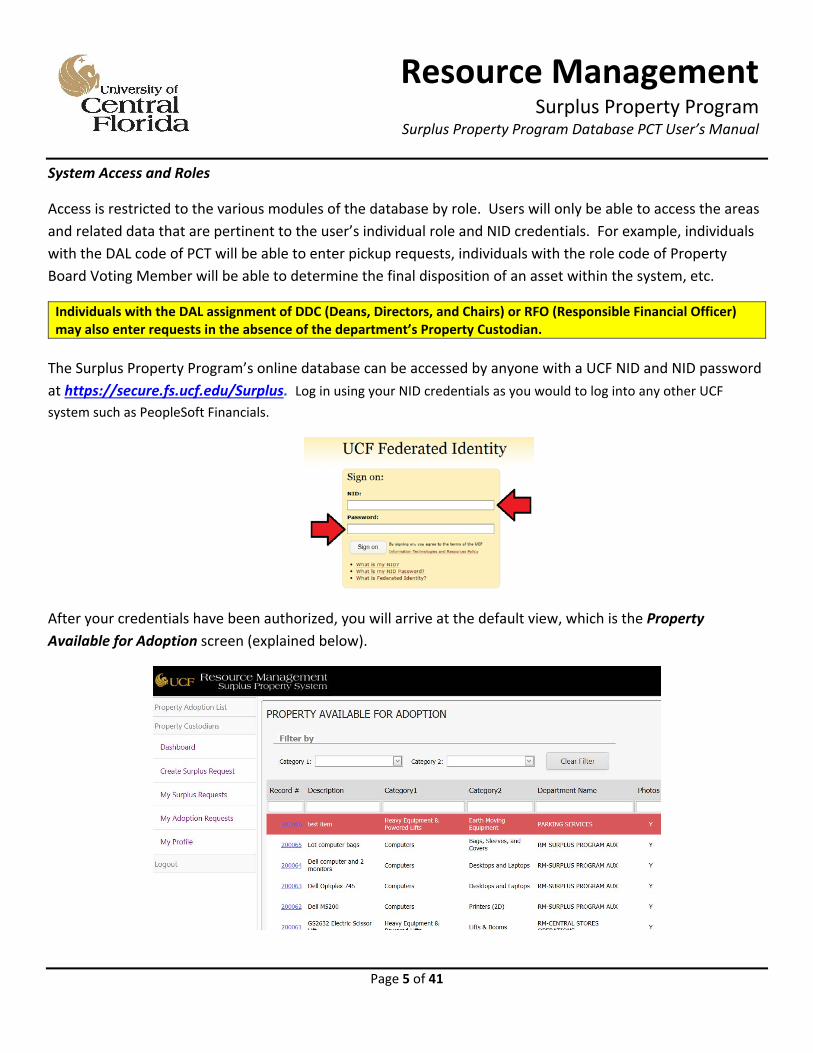
The Surplus Property Program’s online database can be accessed by anyone with a UCF NID and NID password
at https://secure.fs.ucf.edu/Surplus. Log in using your NID credentials as you would to log into any other UCF
system such as PeopleSoft Financials.
After your credentials have been authorized, you will arrive at the default view, which is the Property
Available for Adoption screen (explained below).
Resource ManagementSurplus Property Program
Surplus Property Program Database PCT User’s Manual
Page 6 of 41
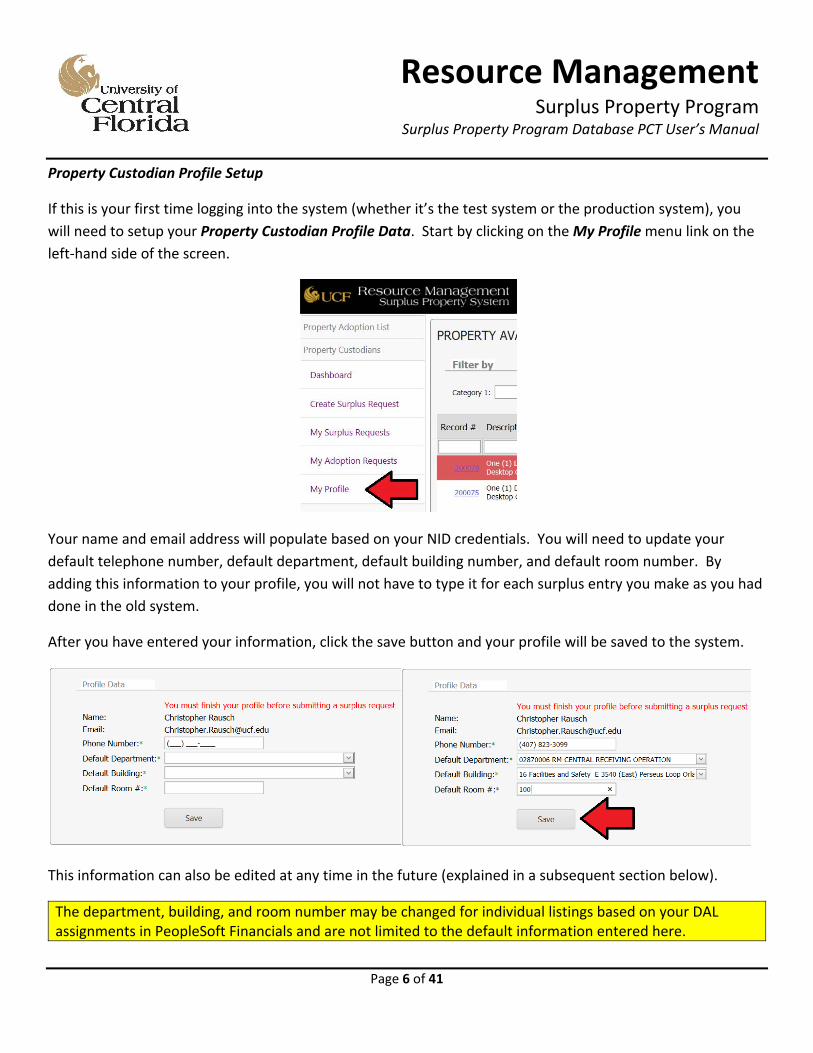
Property Custodian Profile Setup
If this is your first time logging into the system (whether it’s the test system or the production system), you
will need to setup your Property Custodian Profile Data. Start by clicking on the My Profile menu link on the
left‐hand side of the screen.
Your name and email address will populate based on your NID credentials. You will need to update your
default telephone number, default department, default building number, and default room number. By
adding this information to your profile, you will not have to type it for each surplus entry you make as you had
done in the old system.
After you have entered your information, click the save button and your profile will be saved to the system.
This information can also be edited at any time in the future (explained in a subsequent section below).
The department, building, and room number may be changed for individual listings based on your DAL assignments in PeopleSoft Financials and are not limited to the default information entered here.

Resource ManagementSurplus Property Program
Surplus Property Program Database PCT User’s Manual
Page 7 of 41
Property Custodian Responsibilities and Related Database Actions
The Property Custodian section of the database is broken down into six (6) main sections.
1. Property Adoption List: This screen provides a listing of all items that are currently available for adoption.
2. Dashboard: This screen provides an overview of your inbound adoption requests, your outbound transfers of property adopted from your department by other departments, and pending pickups for items adopted by your department from other departments.
3. Create Surplus Request: This screen enables you to requests a pickup of an asset that your department no longer needs. The entry of an asset in this screen starts the ten (10) day adoption window.
4. My Surplus Requests: This screen provides an overview of your current pickup requests as well as a listing of your historic requests.
5. My Adoption Requests: This screen provides a listing of items that you have adopted or are in the process of adopting for your department.
6. My Profile: This screen provides you with the opportunity to update your default information that populates to each new request.
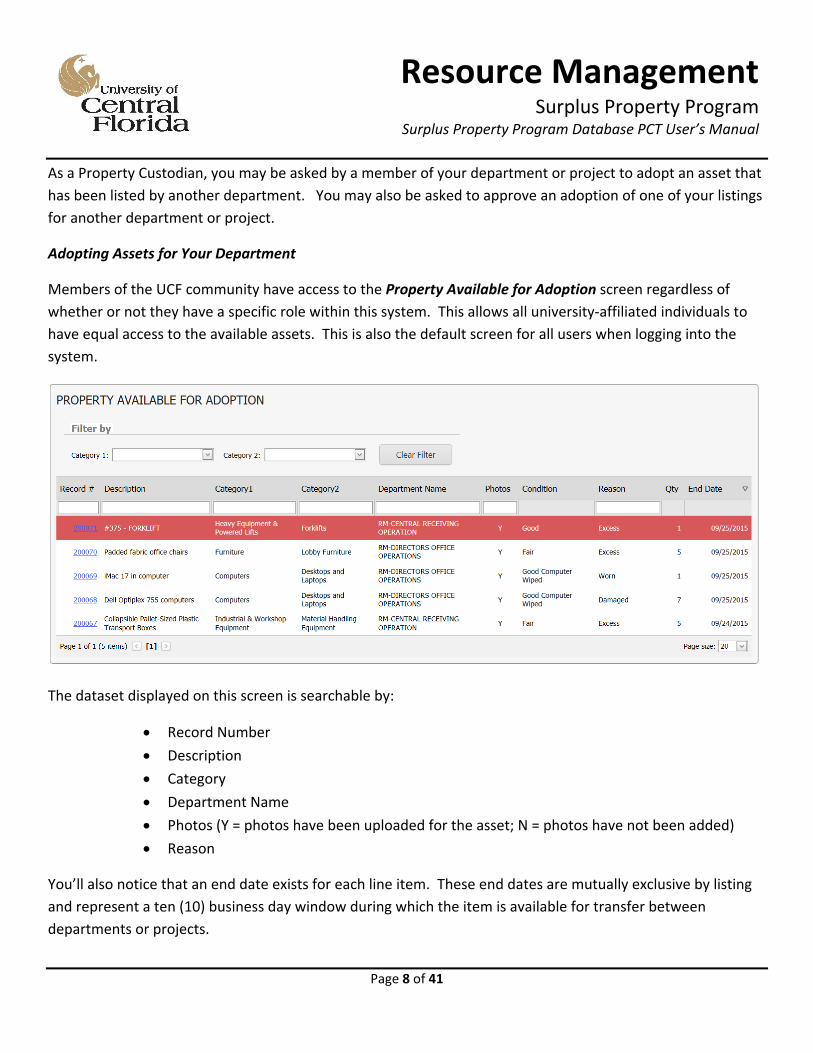
Property Adoption List
In an effort to keep acquisition costs for the university to a minimum, each item listed for surplus is made
available to other departments for a period of ten (10) business days from the date of entry. To view the list
of available assets that have been entered by the various departments, click on the Property Adoption List
menu bar link on the left‐hand side of the screen.
Resource ManagementSurplus Property Program
Surplus Property Program Database PCT User’s Manual
Page 8 of 41
As a Property Custodian, you may be asked by a member of your department or project to adopt an asset that
has been listed by another department. You may also be asked to approve an adoption of one of your listings
for another department or project.
Adopting Assets for Your Department
Members of the UCF community have access to the Property Available for Adoption screen regardless of
whether or not they have a specific role within this system. This allows all university‐affiliated individuals to
have equal access to the available assets. This is also the default screen for all users when logging into the
system.
The dataset displayed on this screen is searchable by:
Record Number
Description
Category
Department Name
Photos (Y = photos have been uploaded for the asset; N = photos have not been added)
Reason
You’ll also notice that an end date exists for each line item. These end dates are mutually exclusive by listing
and represent a ten (10) business day window during which the item is available for transfer between
departments or projects.
Resource ManagementSurplus Property Program
Surplus Property Program Database PCT User’s Manual
Page 9 of 41
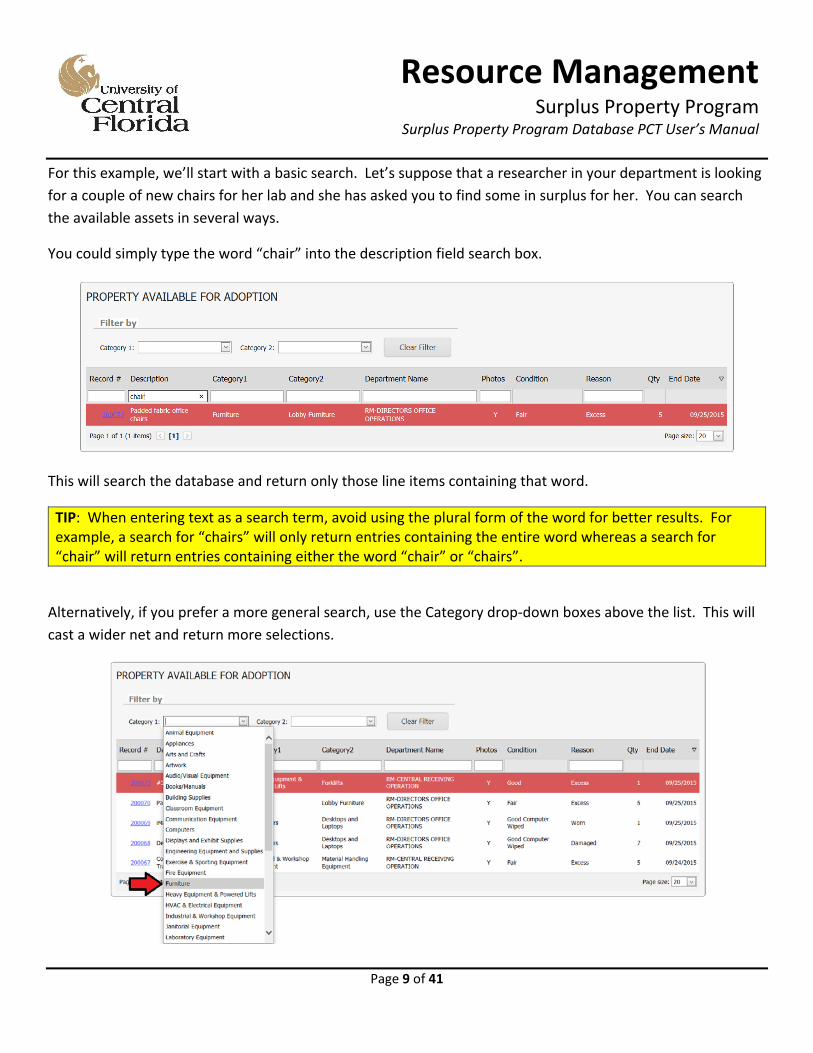
For this example, we’ll start with a basic search. Let’s suppose that a researcher in your department is looking
for a couple of new chairs for her lab and she has asked you to find some in surplus for her. You can search
the available assets in several ways.
You could simply type the word “chair” into the description field search box.
This will search the database and return only those line items containing that word.
TIP: When entering text as a search term, avoid using the plural form of the word for better results. For example, a search for “chairs” will only return entries containing the entire word whereas a search for “chair” will return entries containing either the word “chair” or “chairs”.
Alternatively, if you prefer a more general search, use the Category drop‐down boxes above the list. This will
cast a wider net and return more selections.
Resource ManagementSurplus Property Program
Surplus Property Program Database PCT User’s Manual
Page 10 of 41
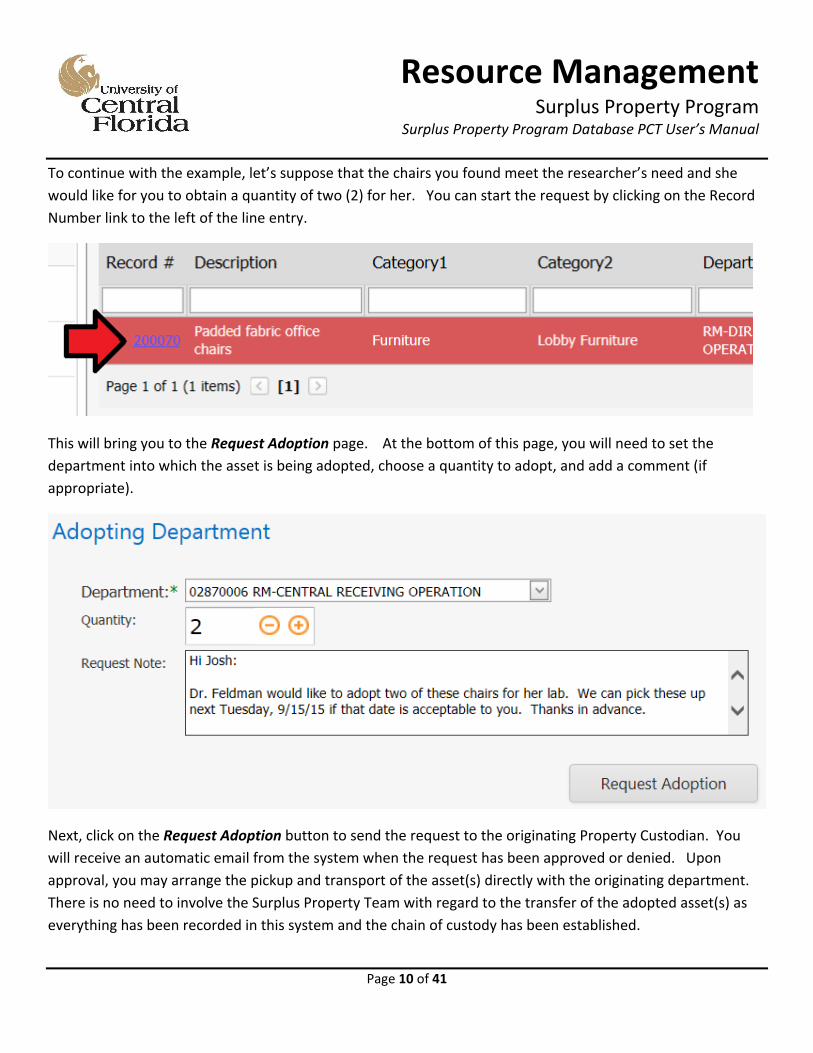
To continue with the example, let’s suppose that the chairs you found meet the researcher’s need and she
would like for you to obtain a quantity of two (2) for her. You can start the request by clicking on the Record
Number link to the left of the line entry.
This will bring you to the Request Adoption page. At the bottom of this page, you will need to set the
department into which the asset is being adopted, choose a quantity to adopt, and add a comment (if
appropriate).
Next, click on the Request Adoption button to send the request to the originating Property Custodian. You
will receive an automatic email from the system when the request has been approved or denied. Upon
approval, you may arrange the pickup and transport of the asset(s) directly with the originating department.
There is no need to involve the Surplus Property Team with regard to the transfer of the adopted asset(s) as
everything has been recorded in this system and the chain of custody has been established.
Resource ManagementSurplus Property Program
Surplus Property Program Database PCT User’s Manual
Page 11 of 41
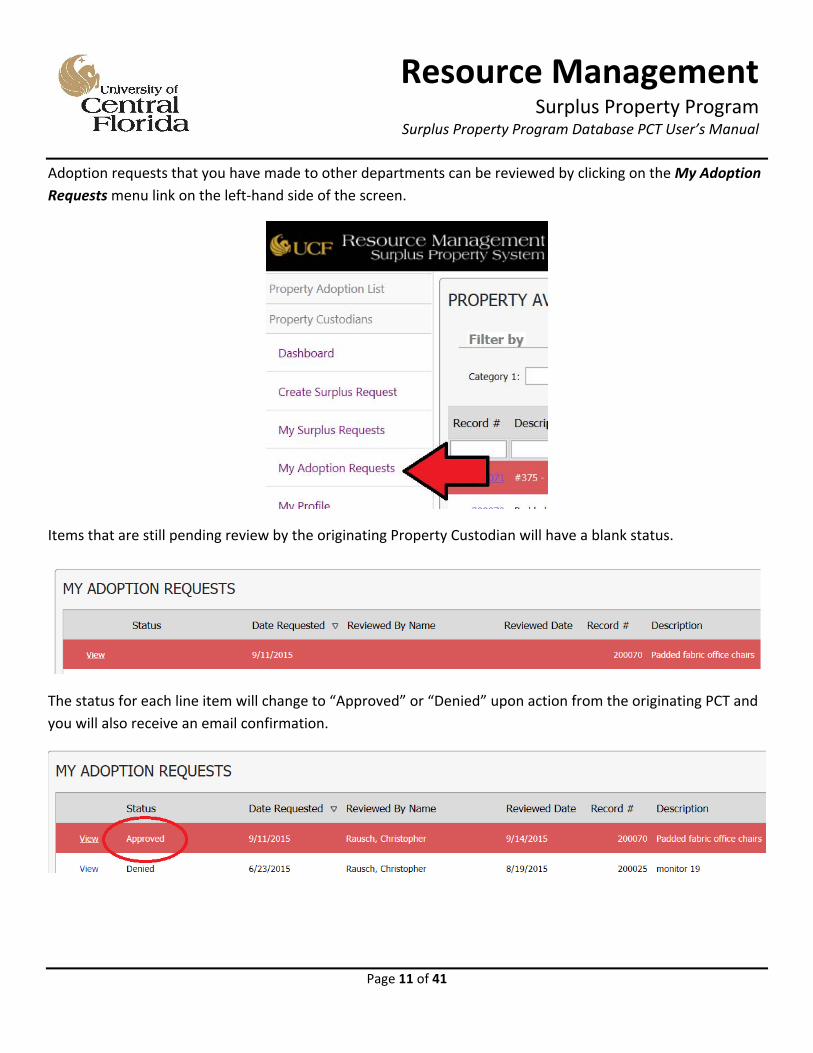
Adoption requests that you have made to other departments can be reviewed by clicking on the My Adoption
Requests menu link on the left‐hand side of the screen.
Items that are still pending review by the originating Property Custodian will have a blank status.
The status for each line item will change to “Approved” or “Denied” upon action from the originating PCT and
you will also receive an email confirmation.
Resource ManagementSurplus Property Program
Surplus Property Program Database PCT User’s Manual
Page 12 of 41
Approving and Denying Adoption Requests
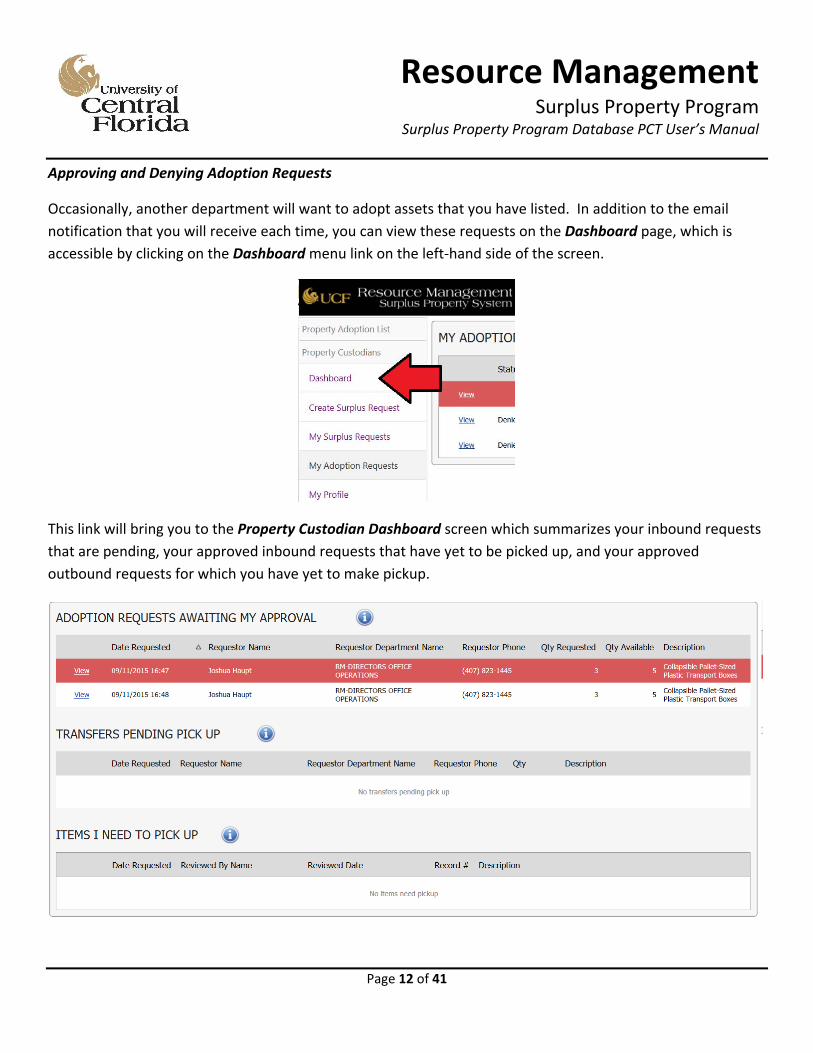
Occasionally, another department will want to adopt assets that you have listed. In addition to the email
notification that you will receive each time, you can view these requests on the Dashboard page, which is
accessible by clicking on the Dashboard menu link on the left‐hand side of the screen.
This link will bring you to the Property Custodian Dashboard screen which summarizes your inbound requests
that are pending, your approved inbound requests that have yet to be picked up, and your approved
outbound requests for which you have yet to make pickup.
Resource ManagementSurplus Property Program
Surplus Property Program Database PCT User’s Manual
Page 13 of 41
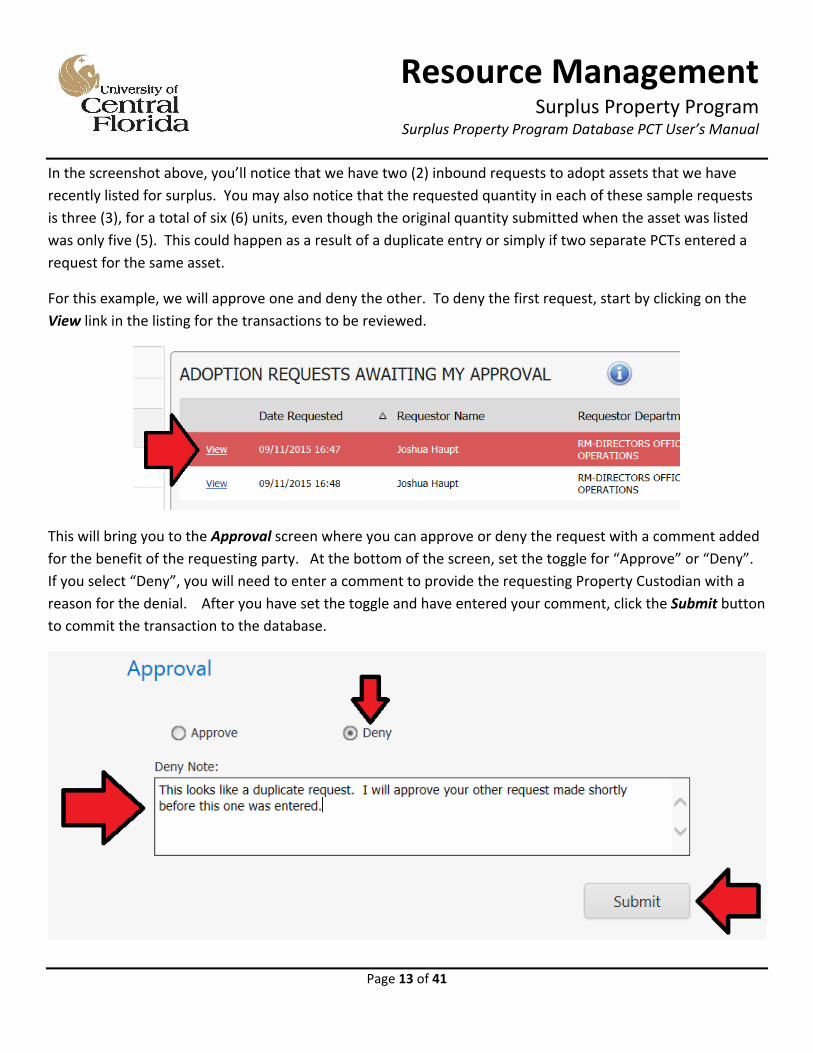
In the screenshot above, you’ll notice that we have two (2) inbound requests to adopt assets that we have
recently listed for surplus. You may also notice that the requested quantity in each of these sample requests
is three (3), for a total of six (6) units, even though the original quantity submitted when the asset was listed
was only five (5). This could happen as a result of a duplicate entry or simply if two separate PCTs entered a
request for the same asset.
For this example, we will approve one and deny the other. To deny the first request, start by clicking on the
View link in the listing for the transactions to be reviewed.
This will bring you to the Approval screen where you can approve or deny the request with a comment added
for the benefit of the requesting party. At the bottom of the screen, set the toggle for “Approve” or “Deny”.
If you select “Deny”, you will need to enter a comment to provide the requesting Property Custodian with a
reason for the denial. After you have set the toggle and have entered your comment, click the Submit button
to commit the transaction to the database.
Resource ManagementSurplus Property Program
Surplus Property Program Database PCT User’s Manual
Page 14 of 41
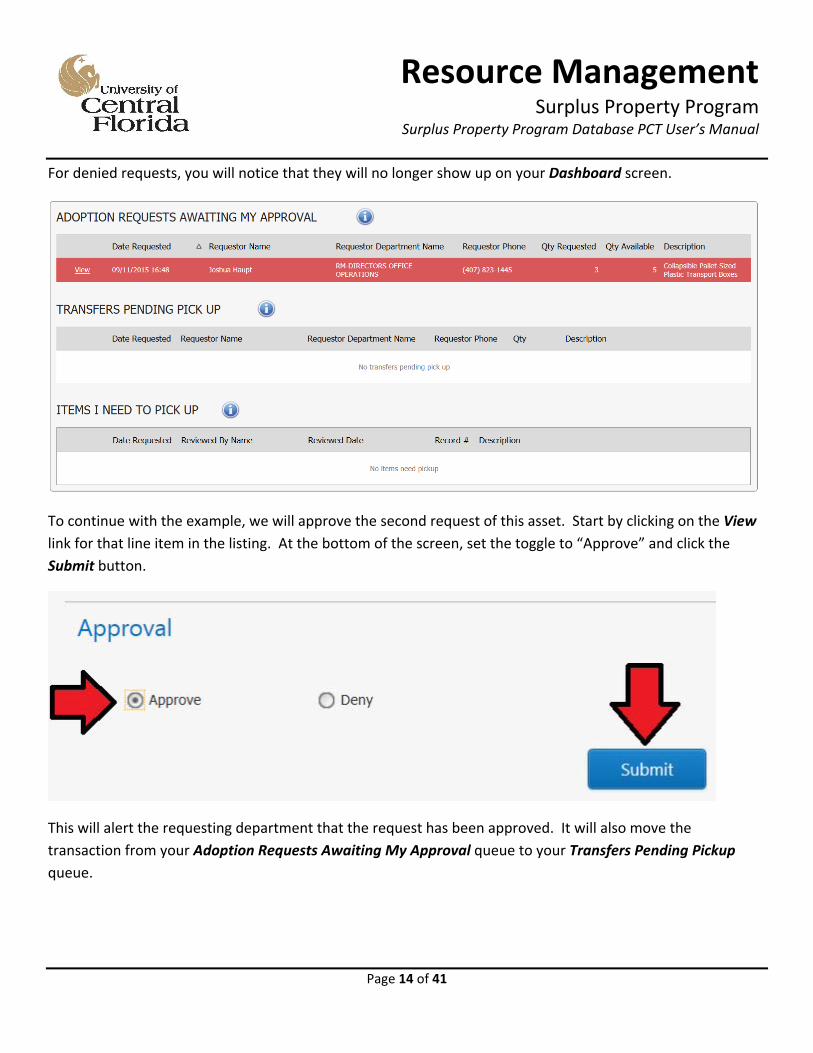
For denied requests, you will notice that they will no longer show up on your Dashboard screen.
To continue with the example, we will approve the second request of this asset. Start by clicking on the View
link for that line item in the listing. At the bottom of the screen, set the toggle to “Approve” and click the
Submit button.
This will alert the requesting department that the request has been approved. It will also move the
transaction from your Adoption Requests Awaiting My Approval queue to your Transfers Pending Pickup
queue.
Resource ManagementSurplus Property Program
Surplus Property Program Database PCT User’s Manual
Page 15 of 41
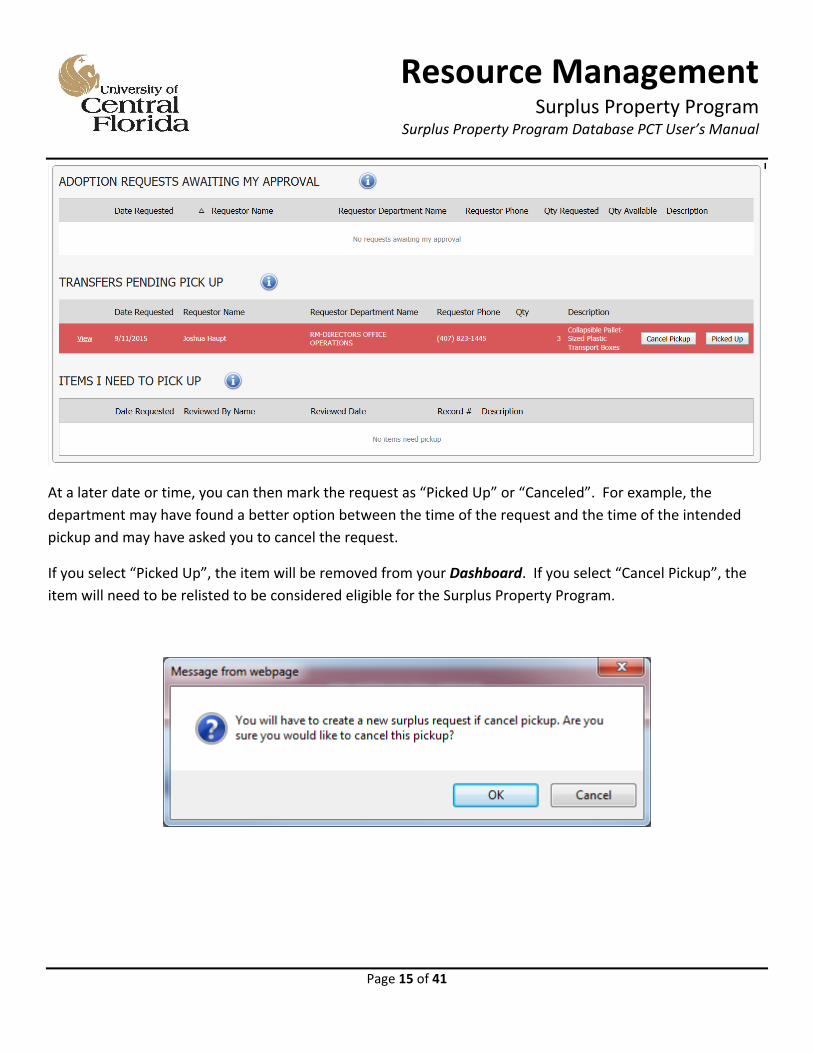
At a later date or time, you can then mark the request as “Picked Up” or “Canceled”. For example, the
department may have found a better option between the time of the request and the time of the intended
pickup and may have asked you to cancel the request.
If you select “Picked Up”, the item will be removed from your Dashboard. If you select “Cancel Pickup”, the
item will need to be relisted to be considered eligible for the Surplus Property Program.
Resource ManagementSurplus Property Program
Surplus Property Program Database PCT User’s Manual
Page 16 of 41
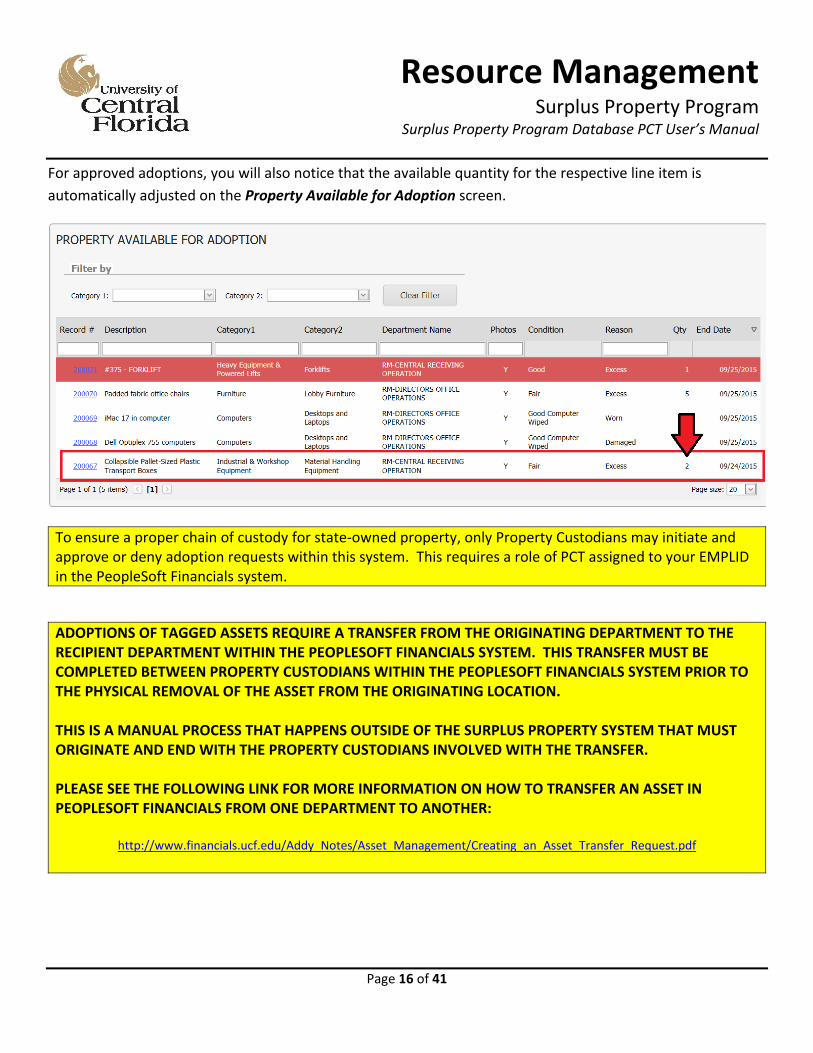
For approved adoptions, you will also notice that the available quantity for the respective line item is
automatically adjusted on the Property Available for Adoption screen.
To ensure a proper chain of custody for state‐owned property, only Property Custodians may initiate and approve or deny adoption requests within this system. This requires a role of PCT assigned to your EMPLID in the PeopleSoft Financials system.
ADOPTIONS OF TAGGED ASSETS REQUIRE A TRANSFER FROM THE ORIGINATING DEPARTMENT TO THE RECIPIENT DEPARTMENT WITHIN THE PEOPLESOFT FINANCIALS SYSTEM. THIS TRANSFER MUST BE COMPLETED BETWEEN PROPERTY CUSTODIANS WITHIN THE PEOPLESOFT FINANCIALS SYSTEM PRIOR TO THE PHYSICAL REMOVAL OF THE ASSET FROM THE ORIGINATING LOCATION. THIS IS A MANUAL PROCESS THAT HAPPENS OUTSIDE OF THE SURPLUS PROPERTY SYSTEM THAT MUST ORIGINATE AND END WITH THE PROPERTY CUSTODIANS INVOLVED WITH THE TRANSFER. PLEASE SEE THE FOLLOWING LINK FOR MORE INFORMATION ON HOW TO TRANSFER AN ASSET IN PEOPLESOFT FINANCIALS FROM ONE DEPARTMENT TO ANOTHER:
http://www.financials.ucf.edu/Addy_Notes/Asset_Management/Creating_an_Asset_Transfer_Request.pdf
Resource ManagementSurplus Property Program
Surplus Property Program Database PCT User’s Manual
Page 17 of 41
Creating a New Surplus Request
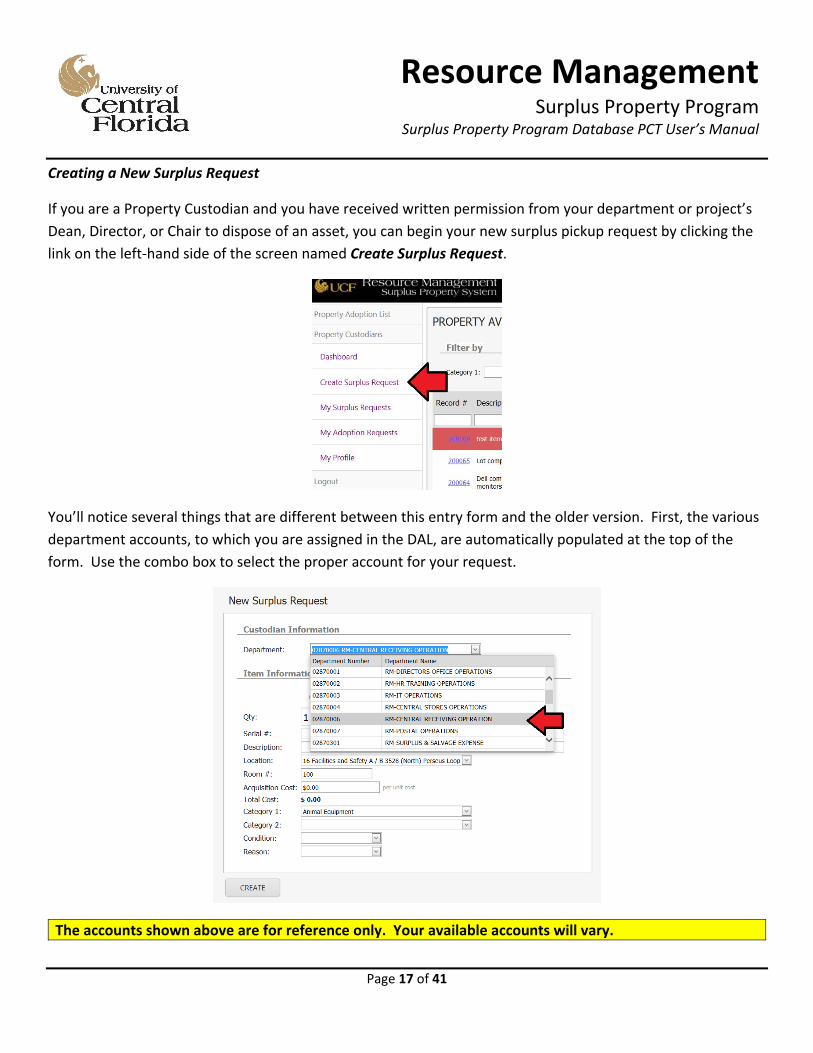
If you are a Property Custodian and you have received written permission from your department or project’s
Dean, Director, or Chair to dispose of an asset, you can begin your new surplus pickup request by clicking the
link on the left‐hand side of the screen named Create Surplus Request.
You’ll notice several things that are different between this entry form and the older version. First, the various
department accounts, to which you are assigned in the DAL, are automatically populated at the top of the
form. Use the combo box to select the proper account for your request.
The accounts shown above are for reference only. Your available accounts will vary.
Resource ManagementSurplus Property Program
Surplus Property Program Database PCT User’s Manual
Page 18 of 41
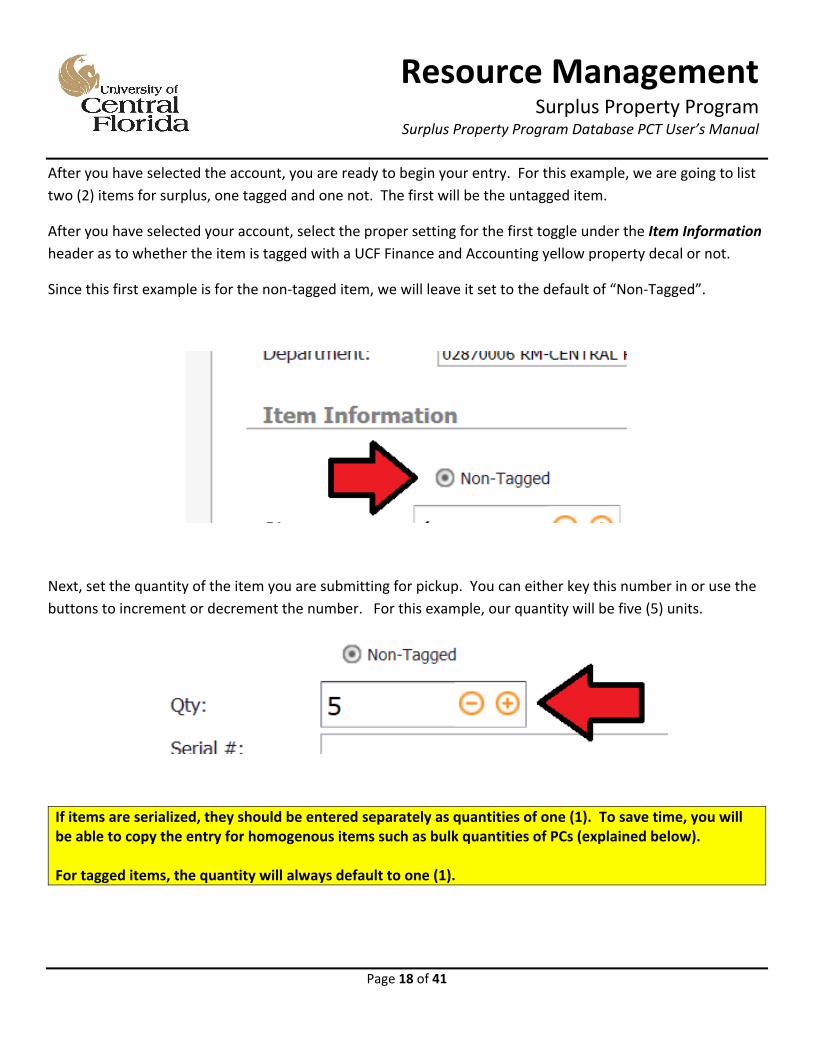
After you have selected the account, you are ready to begin your entry. For this example, we are going to list
two (2) items for surplus, one tagged and one not. The first will be the untagged item.
After you have selected your account, select the proper setting for the first toggle under the Item Information
header as to whether the item is tagged with a UCF Finance and Accounting yellow property decal or not.
Since this first example is for the non‐tagged item, we will leave it set to the default of “Non‐Tagged”.
Next, set the quantity of the item you are submitting for pickup. You can either key this number in or use the
buttons to increment or decrement the number. For this example, our quantity will be five (5) units.
If items are serialized, they should be entered separately as quantities of one (1). To save time, you will be able to copy the entry for homogenous items such as bulk quantities of PCs (explained below). For tagged items, the quantity will always default to one (1).
Resource ManagementSurplus Property Program
Surplus Property Program Database PCT User’s Manual
Page 19 of 41
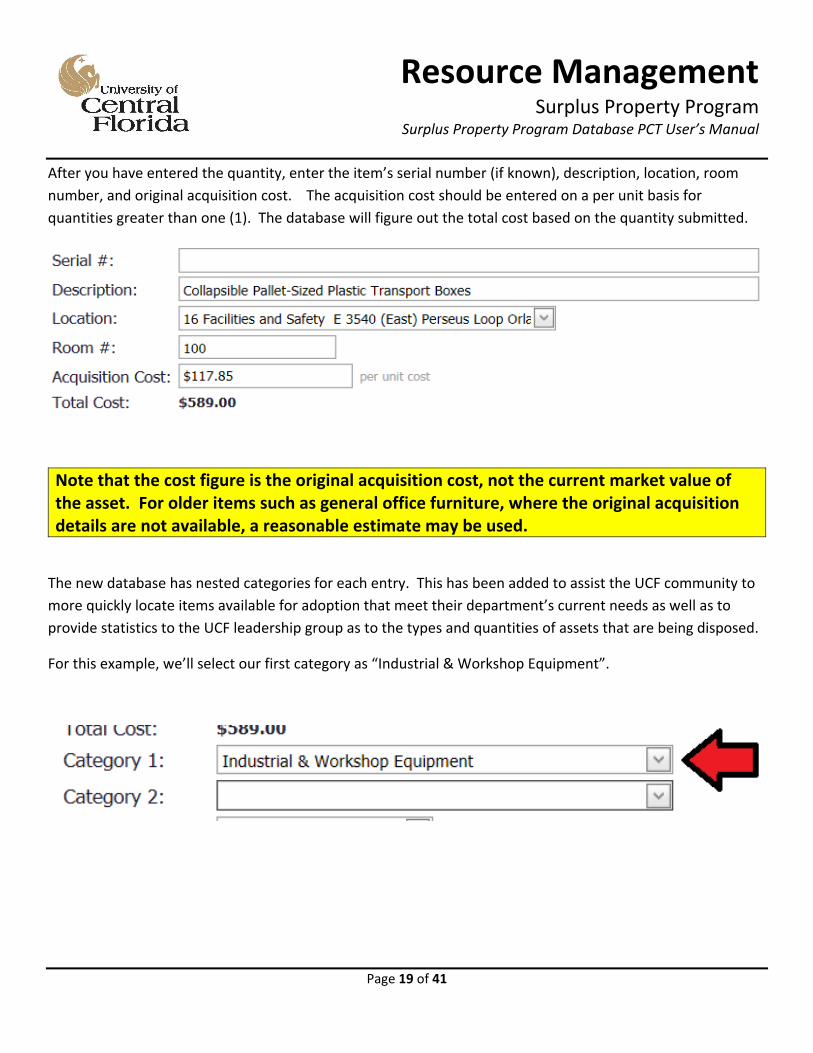
After you have entered the quantity, enter the item’s serial number (if known), description, location, room
number, and original acquisition cost. The acquisition cost should be entered on a per unit basis for
quantities greater than one (1). The database will figure out the total cost based on the quantity submitted.
Note that the cost figure is the original acquisition cost, not the current market value of the asset. For older items such as general office furniture, where the original acquisition details are not available, a reasonable estimate may be used.
The new database has nested categories for each entry. This has been added to assist the UCF community to
more quickly locate items available for adoption that meet their department’s current needs as well as to
provide statistics to the UCF leadership group as to the types and quantities of assets that are being disposed.
For this example, we’ll select our first category as “Industrial & Workshop Equipment”.
Resource ManagementSurplus Property Program
Surplus Property Program Database PCT User’s Manual
Page 20 of 41
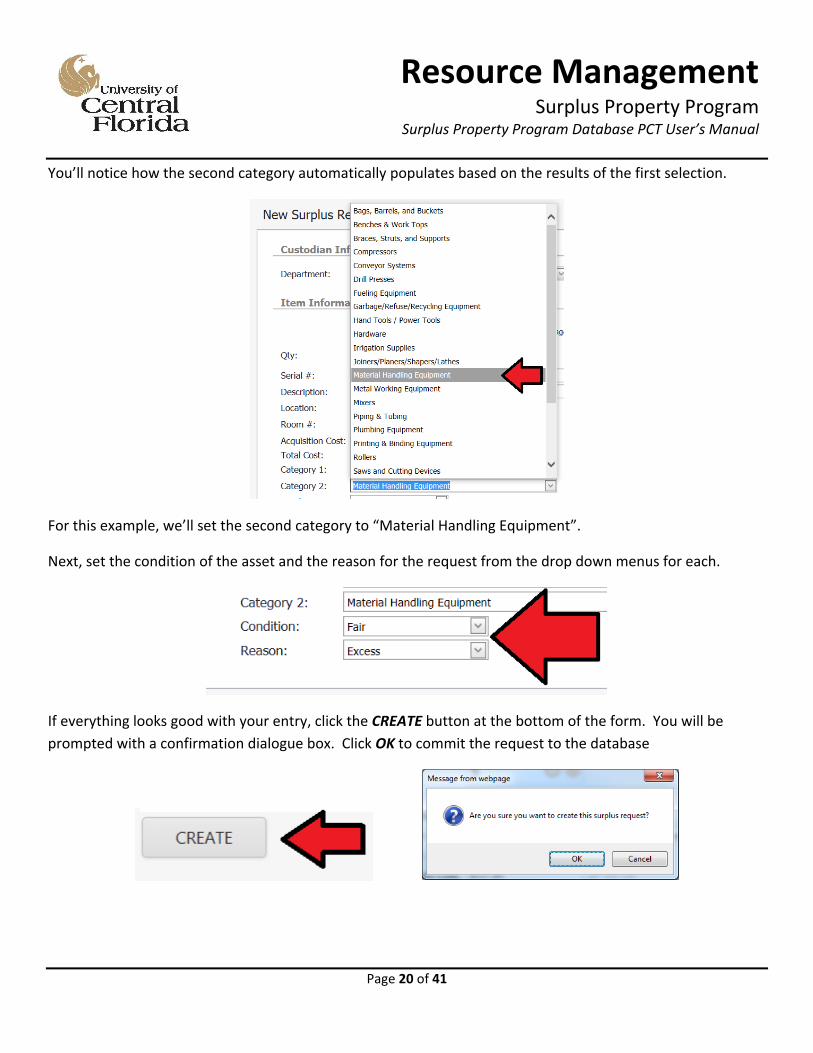
You’ll notice how the second category automatically populates based on the results of the first selection.
For this example, we’ll set the second category to “Material Handling Equipment”.
Next, set the condition of the asset and the reason for the request from the drop down menus for each.
If everything looks good with your entry, click the CREATE button at the bottom of the form. You will be
prompted with a confirmation dialogue box. Click OK to commit the request to the database

Resource ManagementSurplus Property Program
Surplus Property Program Database PCT User’s Manual
Page 21 of 41
Your entry will then be assigned a record number and your contact information will automatically populate to
the entry.
Resource ManagementSurplus Property Program
Surplus Property Program Database PCT User’s Manual
Page 22 of 41
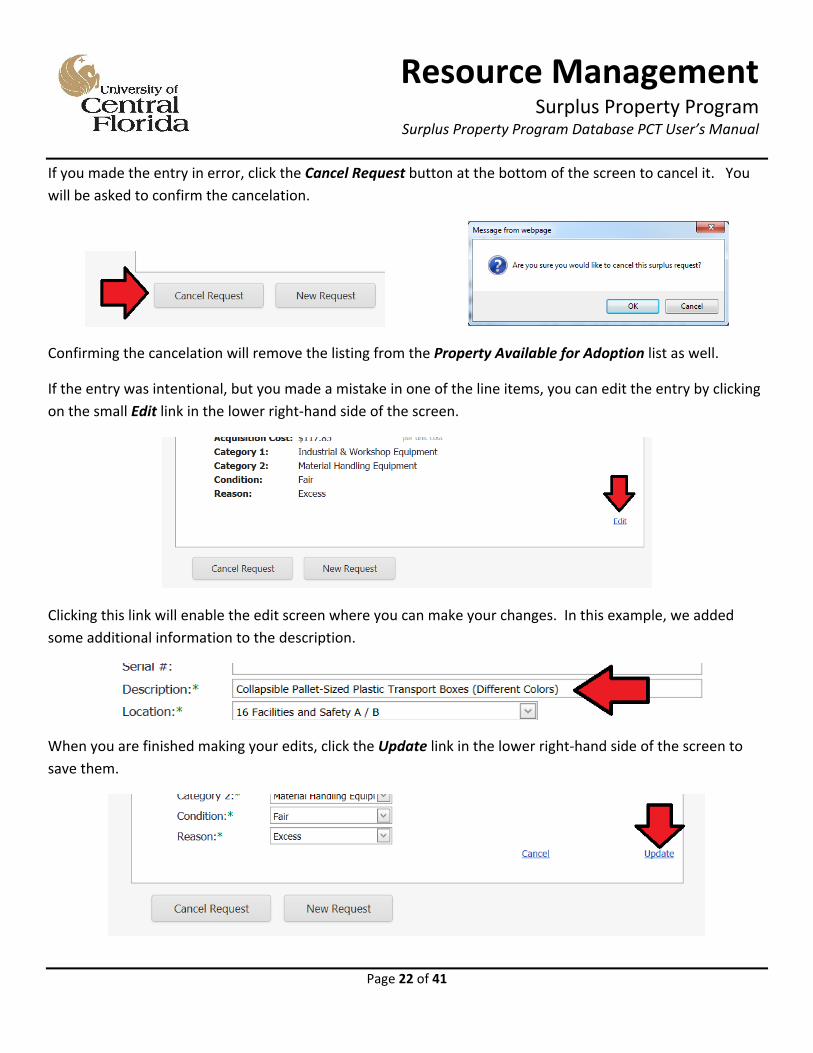
If you made the entry in error, click the Cancel Request button at the bottom of the screen to cancel it. You
will be asked to confirm the cancelation.
Confirming the cancelation will remove the listing from the Property Available for Adoption list as well.
If the entry was intentional, but you made a mistake in one of the line items, you can edit the entry by clicking
on the small Edit link in the lower right‐hand side of the screen.
Clicking this link will enable the edit screen where you can make your changes. In this example, we added
some additional information to the description.
When you are finished making your edits, click the Update link in the lower right‐hand side of the screen to
save them.
Resource ManagementSurplus Property Program
Surplus Property Program Database PCT User’s Manual
Page 23 of 41
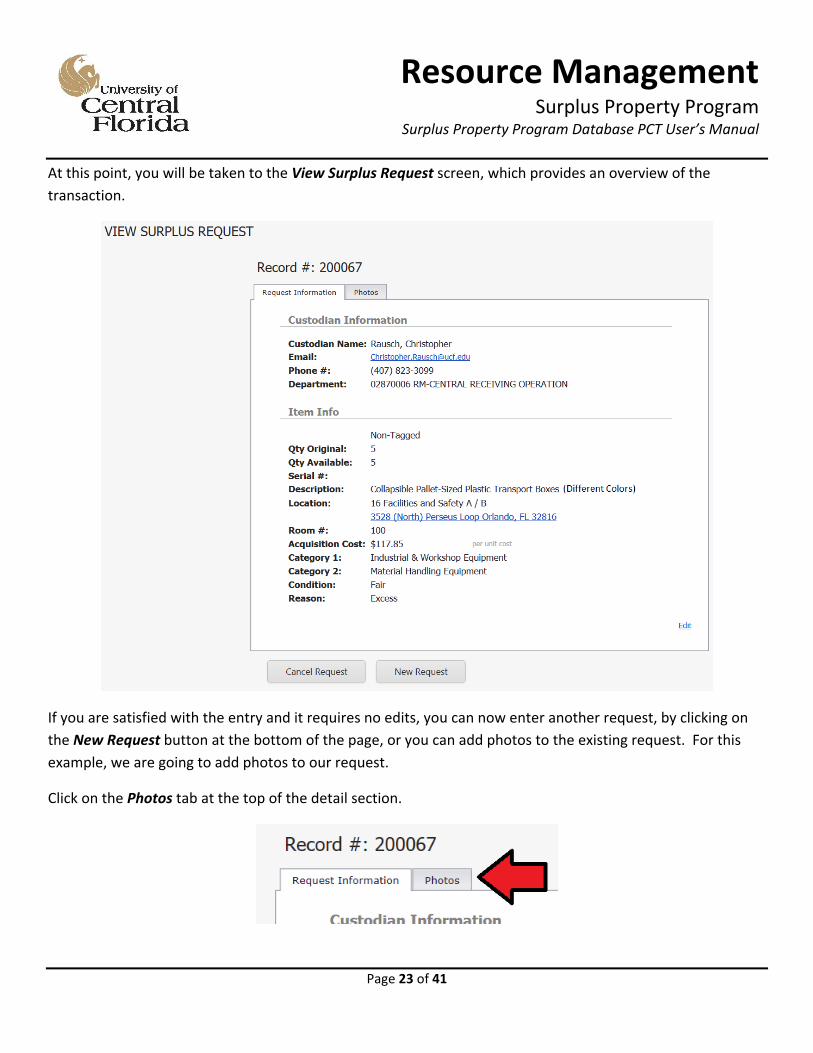
At this point, you will be taken to the View Surplus Request screen, which provides an overview of the
transaction.
If you are satisfied with the entry and it requires no edits, you can now enter another request, by clicking on
the New Request button at the bottom of the page, or you can add photos to the existing request. For this
example, we are going to add photos to our request.
Click on the Photos tab at the top of the detail section.
Resource ManagementSurplus Property Program
Surplus Property Program Database PCT User’s Manual
Page 24 of 41
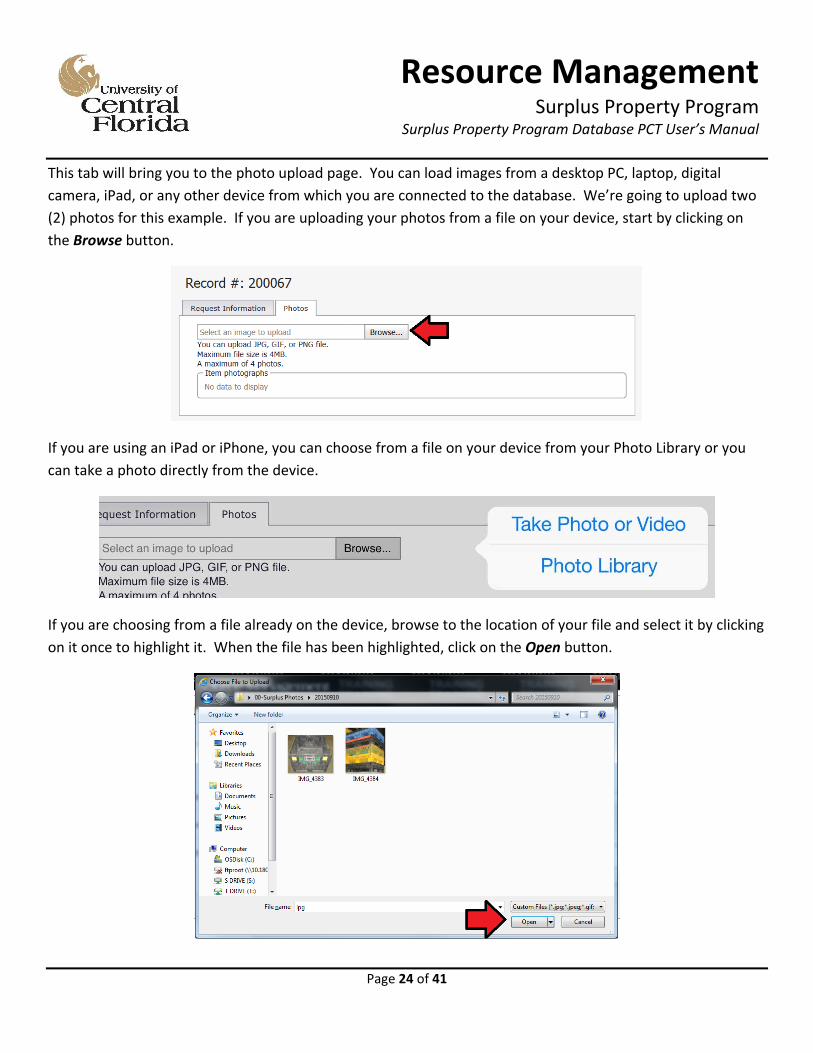
This tab will bring you to the photo upload page. You can load images from a desktop PC, laptop, digital
camera, iPad, or any other device from which you are connected to the database. We’re going to upload two
(2) photos for this example. If you are uploading your photos from a file on your device, start by clicking on
the Browse button.
If you are using an iPad or iPhone, you can choose from a file on your device from your Photo Library or you
can take a photo directly from the device.
If you are choosing from a file already on the device, browse to the location of your file and select it by clicking
on it once to highlight it. When the file has been highlighted, click on the Open button.
Resource ManagementSurplus Property Program
Surplus Property Program Database PCT User’s Manual
Page 25 of 41
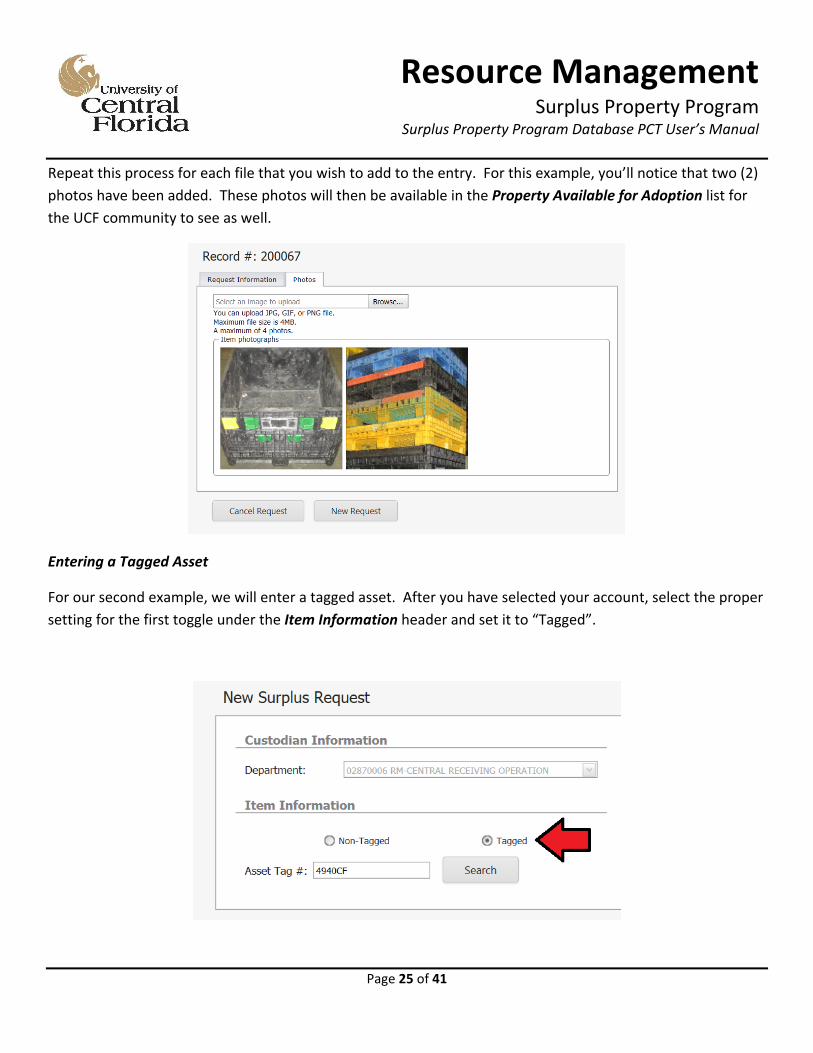
Repeat this process for each file that you wish to add to the entry. For this example, you’ll notice that two (2)
photos have been added. These photos will then be available in the Property Available for Adoption list for
the UCF community to see as well.
Entering a Tagged Asset
For our second example, we will enter a tagged asset. After you have selected your account, select the proper
setting for the first toggle under the Item Information header and set it to “Tagged”.
Resource ManagementSurplus Property Program
Surplus Property Program Database PCT User’s Manual
Page 26 of 41
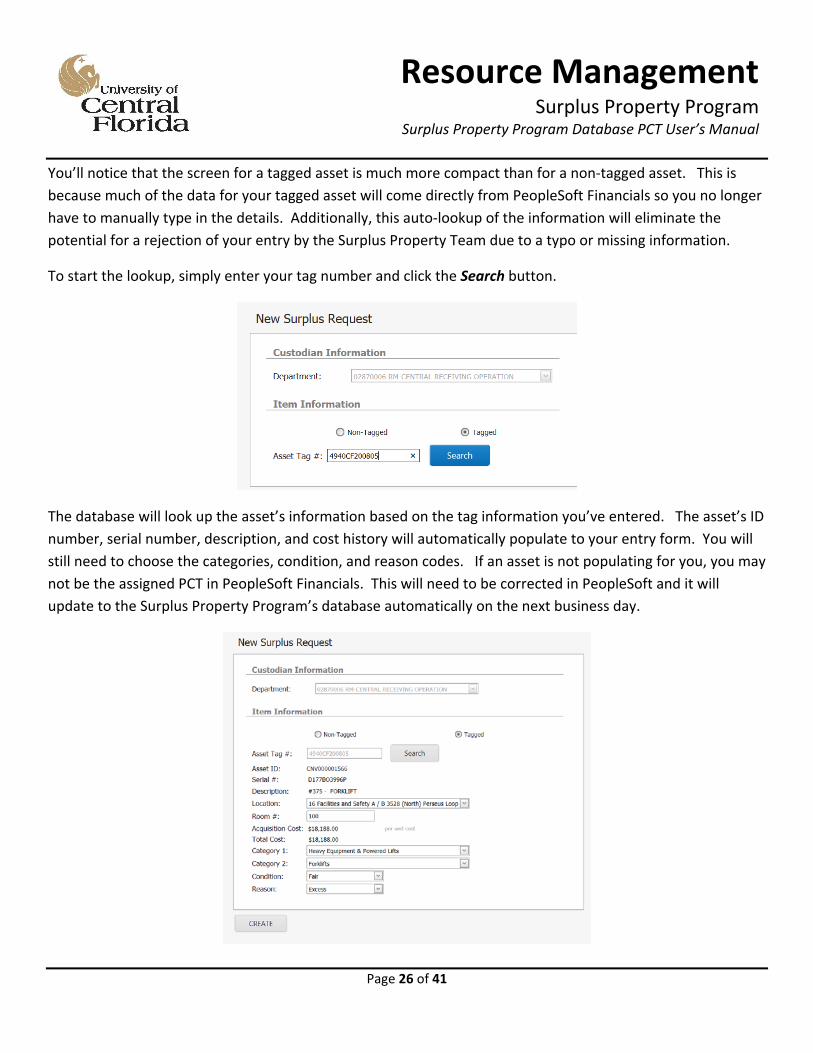
You’ll notice that the screen for a tagged asset is much more compact than for a non‐tagged asset. This is
because much of the data for your tagged asset will come directly from PeopleSoft Financials so you no longer
have to manually type in the details. Additionally, this auto‐lookup of the information will eliminate the
potential for a rejection of your entry by the Surplus Property Team due to a typo or missing information.
To start the lookup, simply enter your tag number and click the Search button.
The database will look up the asset’s information based on the tag information you’ve entered. The asset’s ID
number, serial number, description, and cost history will automatically populate to your entry form. You will
still need to choose the categories, condition, and reason codes. If an asset is not populating for you, you may
not be the assigned PCT in PeopleSoft Financials. This will need to be corrected in PeopleSoft and it will
update to the Surplus Property Program’s database automatically on the next business day.
Resource ManagementSurplus Property Program
Surplus Property Program Database PCT User’s Manual
Page 27 of 41
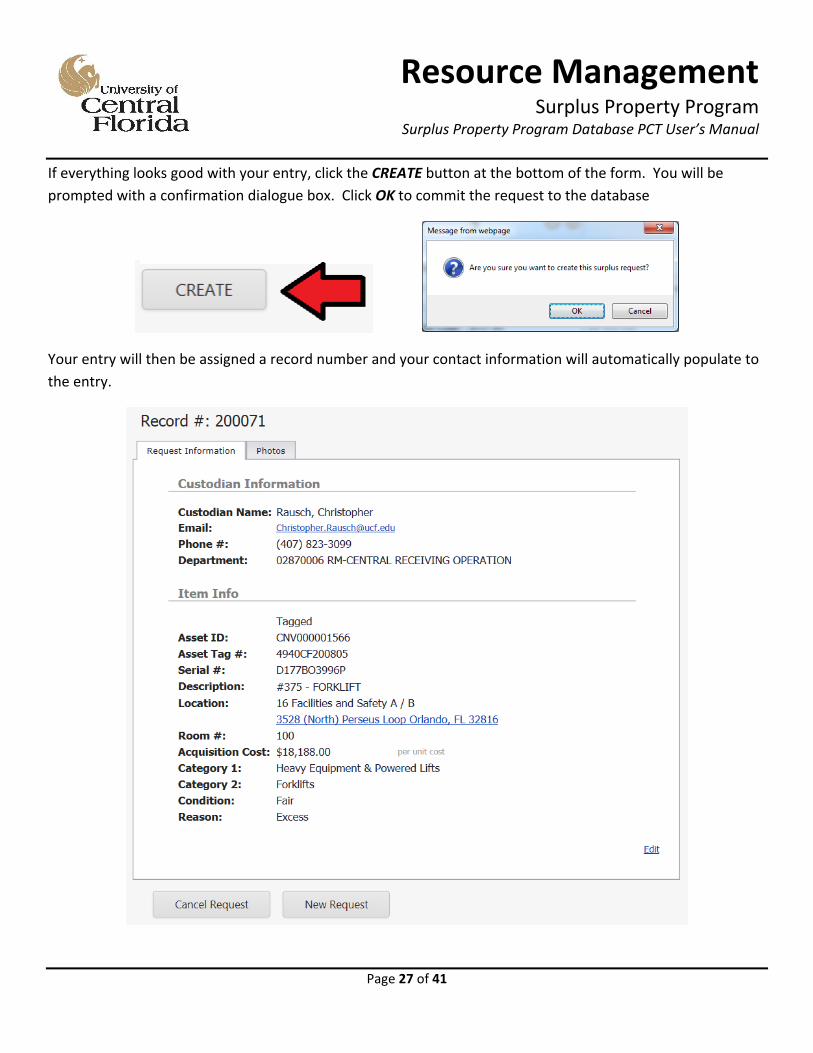
If everything looks good with your entry, click the CREATE button at the bottom of the form. You will be
prompted with a confirmation dialogue box. Click OK to commit the request to the database
Your entry will then be assigned a record number and your contact information will automatically populate to
the entry.
Resource ManagementSurplus Property Program
Surplus Property Program Database PCT User’s Manual
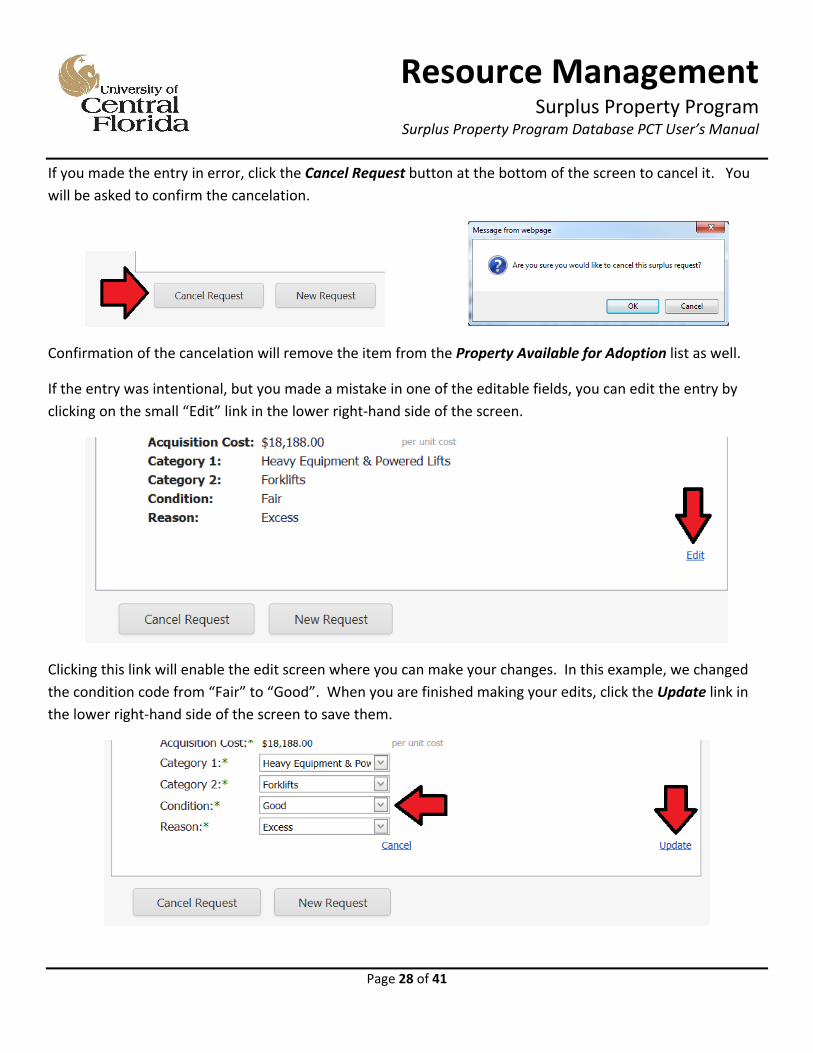
Page 28 of 41
If you made the entry in error, click the Cancel Request button at the bottom of the screen to cancel it. You
will be asked to confirm the cancelation.
Confirmation of the cancelation will remove the item from the Property Available for Adoption list as well.
If the entry was intentional, but you made a mistake in one of the editable fields, you can edit the entry by
clicking on the small “Edit” link in the lower right‐hand side of the screen.
Clicking this link will enable the edit screen where you can make your changes. In this example, we changed
the condition code from “Fair” to “Good”. When you are finished making your edits, click the Update link in
the lower right‐hand side of the screen to save them.
Resource ManagementSurplus Property Program
Surplus Property Program Database PCT User’s Manual
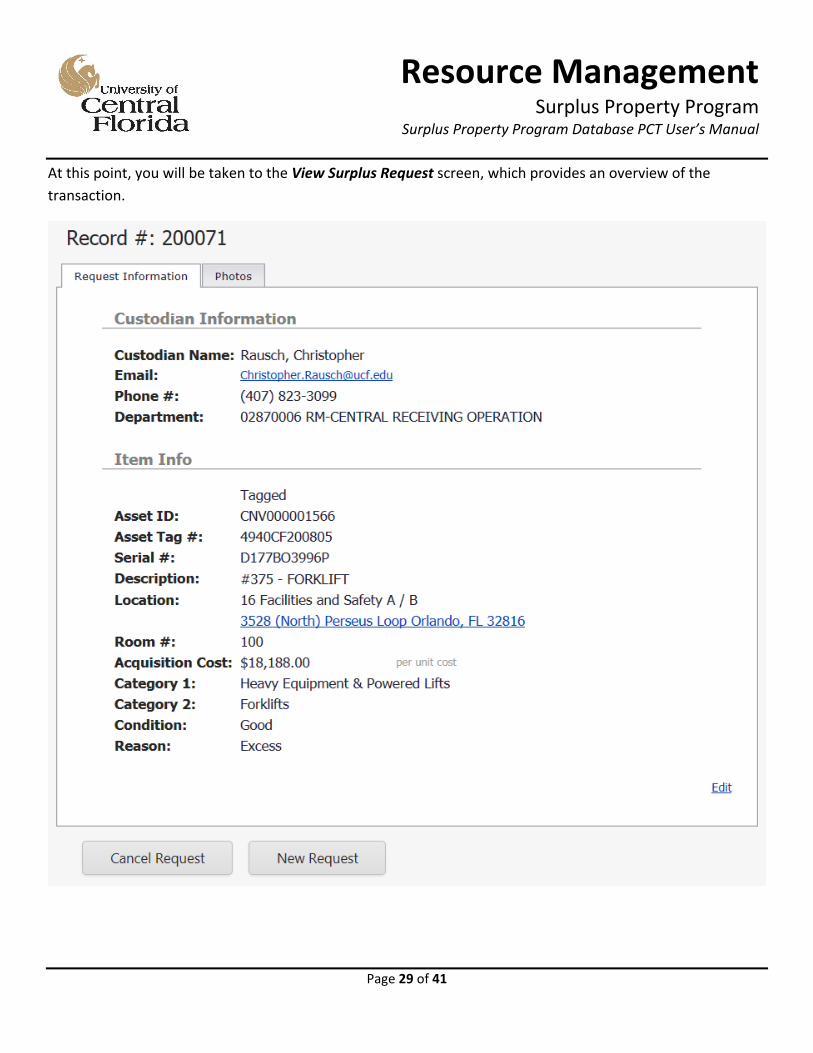
Page 29 of 41
At this point, you will be taken to the View Surplus Request screen, which provides an overview of the
transaction.
Resource ManagementSurplus Property Program
Surplus Property Program Database PCT User’s Manual
Page 30 of 41
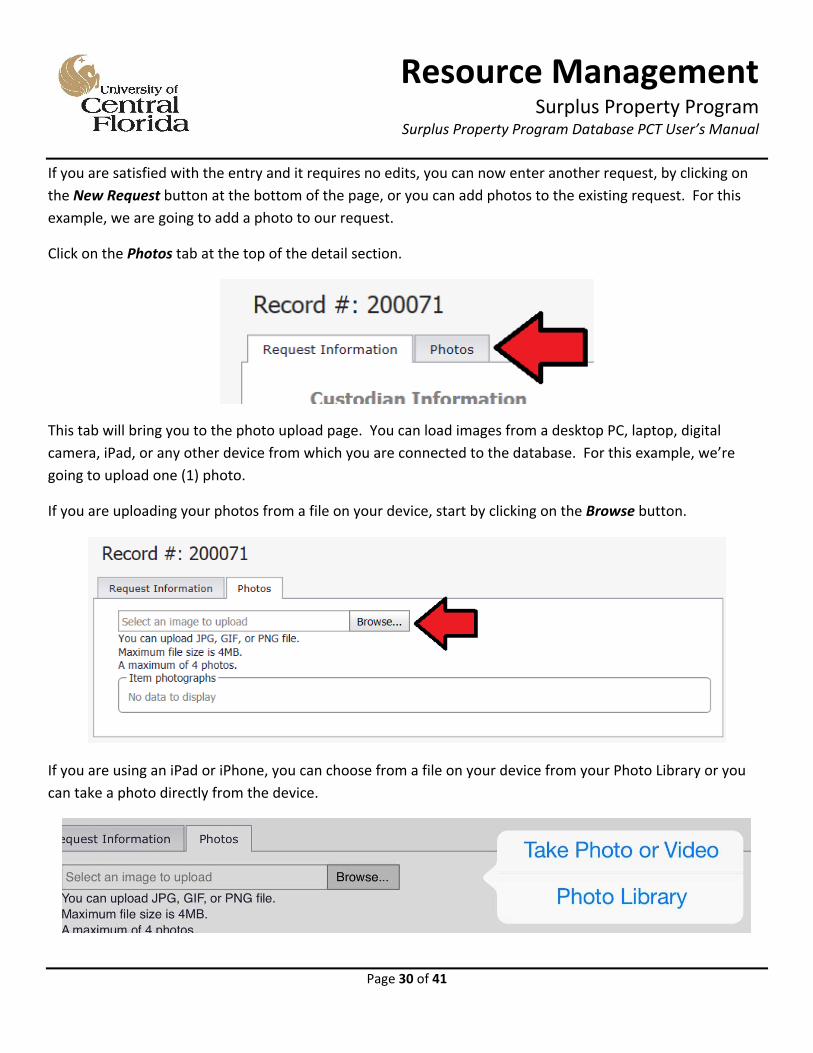
If you are satisfied with the entry and it requires no edits, you can now enter another request, by clicking on
the New Request button at the bottom of the page, or you can add photos to the existing request. For this
example, we are going to add a photo to our request.
Click on the Photos tab at the top of the detail section.
This tab will bring you to the photo upload page. You can load images from a desktop PC, laptop, digital
camera, iPad, or any other device from which you are connected to the database. For this example, we’re
going to upload one (1) photo.
If you are uploading your photos from a file on your device, start by clicking on the Browse button.
If you are using an iPad or iPhone, you can choose from a file on your device from your Photo Library or you
can take a photo directly from the device.
Resource ManagementSurplus Property Program
Surplus Property Program Database PCT User’s Manual
Page 31 of 41
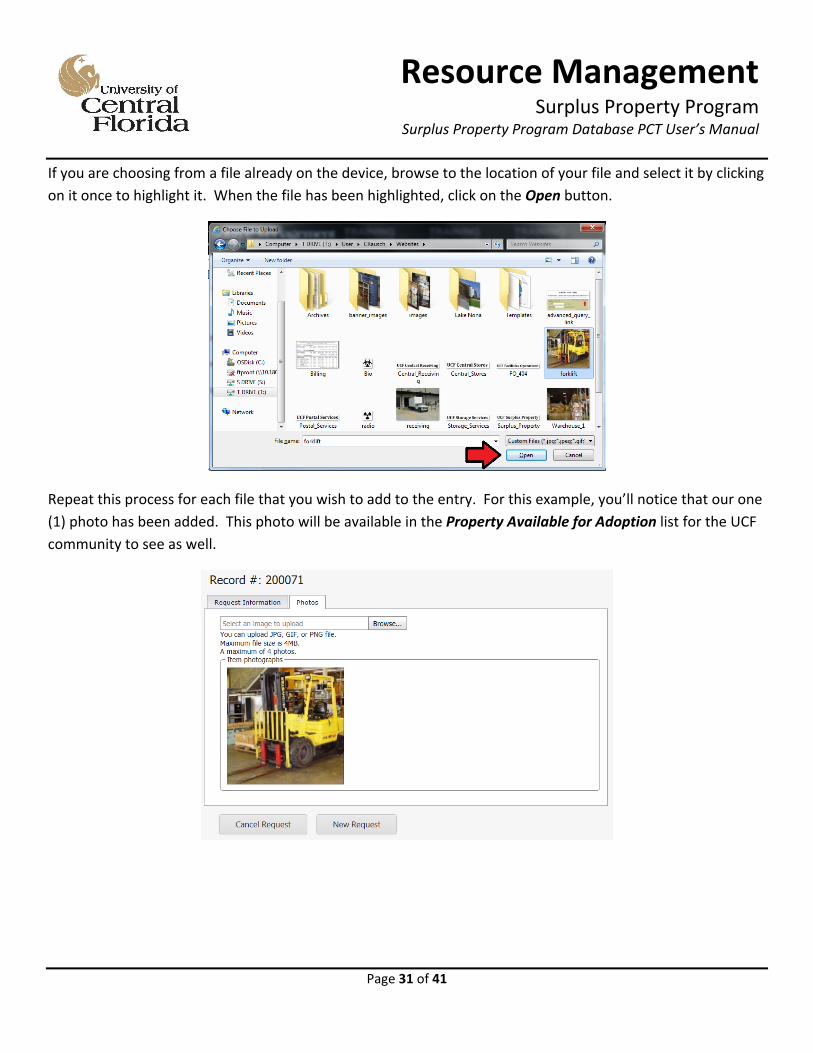
If you are choosing from a file already on the device, browse to the location of your file and select it by clicking
on it once to highlight it. When the file has been highlighted, click on the Open button.
Repeat this process for each file that you wish to add to the entry. For this example, you’ll notice that our one
(1) photo has been added. This photo will be available in the Property Available for Adoption list for the UCF
community to see as well.
Resource ManagementSurplus Property Program
Surplus Property Program Database PCT User’s Manual
Page 32 of 41
Duplicating an Entry
Occasionally, you may have a large listing of similar items to enter for surplus pickup such as a room full of
computers. Rather than list each item separately, the database permits you to duplicate the entry if the only
information that is changing is the serial number for each unit.
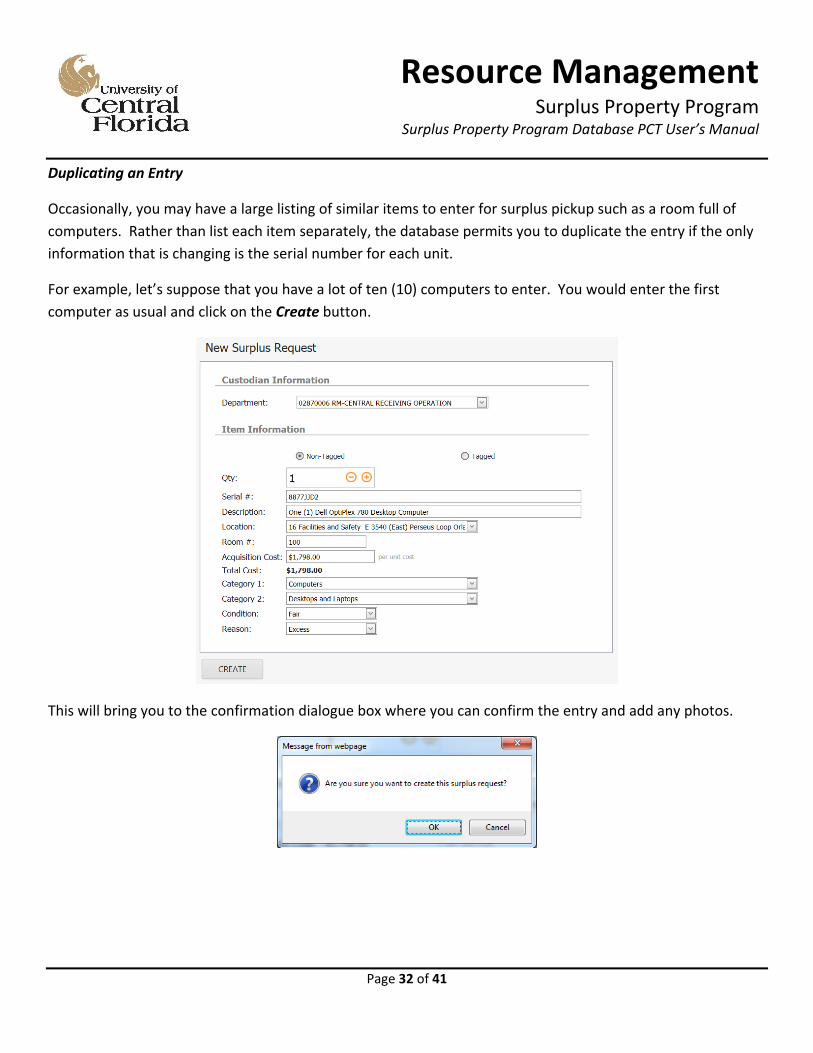
For example, let’s suppose that you have a lot of ten (10) computers to enter. You would enter the first
computer as usual and click on the Create button.
This will bring you to the confirmation dialogue box where you can confirm the entry and add any photos.

Resource ManagementSurplus Property Program
Surplus Property Program Database PCT User’s Manual
Page 33 of 41
After you have added any photos to the listing, you will notice that you have three options at the bottom of
the screen. You can cancel the request, duplicate the request, or start a new request. Since this example
includes ten (10) similar computers with the same values that are located in the same room, the only piece of
data that needs to be changed for each would be the serial number.
TIP: Add photos to the original listing before duplicating the transaction. That way, the photos are also duplicated to the subsequent entries and you only have to add them one time.
To continue the example, we are going to duplicate this entry nine (9) times to get to our total of ten
computers. Start the first duplicate by clicking on the Duplicate Request button at the bottom of the screen.
Clicking on the Duplicate Request button copies all data except the serial number into a new record. You will
be prompted to enter the serial number for the second unit and each subsequent unit duplicated beyond that.
This option cannot be used on tagged assets. It is further recommended that this option only be used on
serialized homogenous items that are located in the same building and room number and have identical
original acquisition values.
Resource ManagementSurplus Property Program
Surplus Property Program Database PCT User’s Manual
Page 34 of 41
Researching Your Past Entries
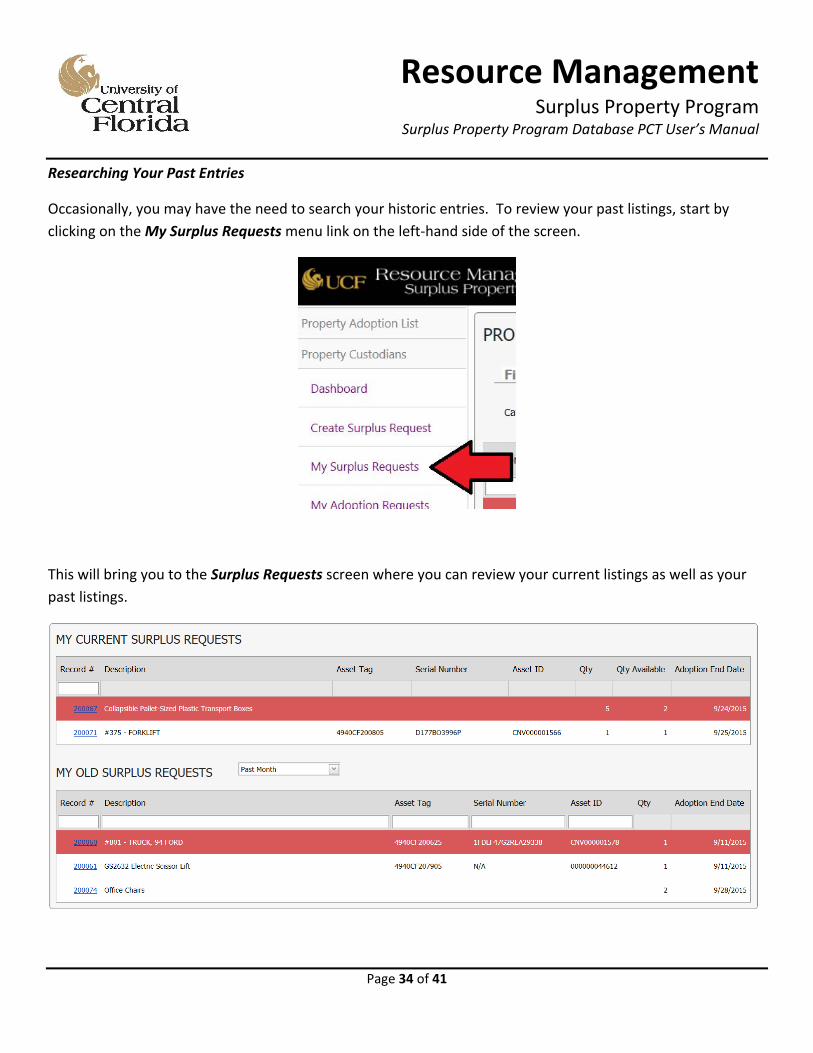
Occasionally, you may have the need to search your historic entries. To review your past listings, start by
clicking on the My Surplus Requests menu link on the left‐hand side of the screen.
This will bring you to the Surplus Requests screen where you can review your current listings as well as your
past listings.
Resource ManagementSurplus Property Program
Surplus Property Program Database PCT User’s Manual
Page 35 of 41
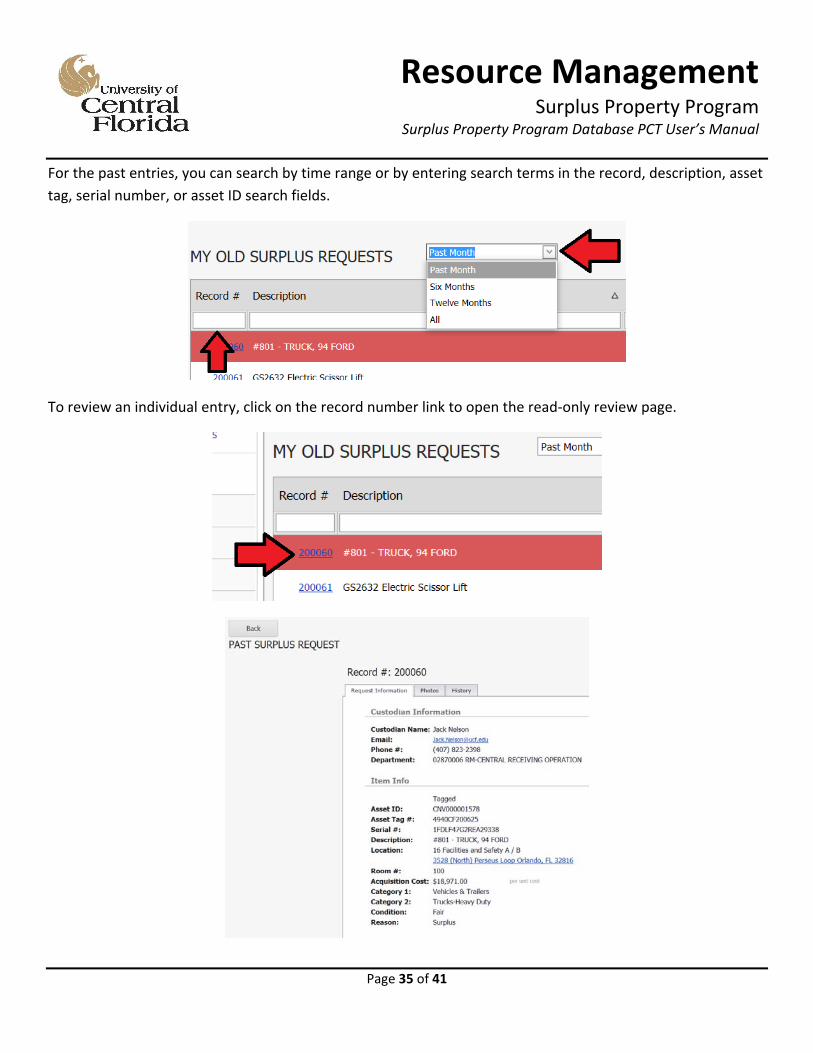
For the past entries, you can search by time range or by entering search terms in the record, description, asset
tag, serial number, or asset ID search fields.
To review an individual entry, click on the record number link to open the read‐only review page.
Resource ManagementSurplus Property Program
Surplus Property Program Database PCT User’s Manual
Page 36 of 41
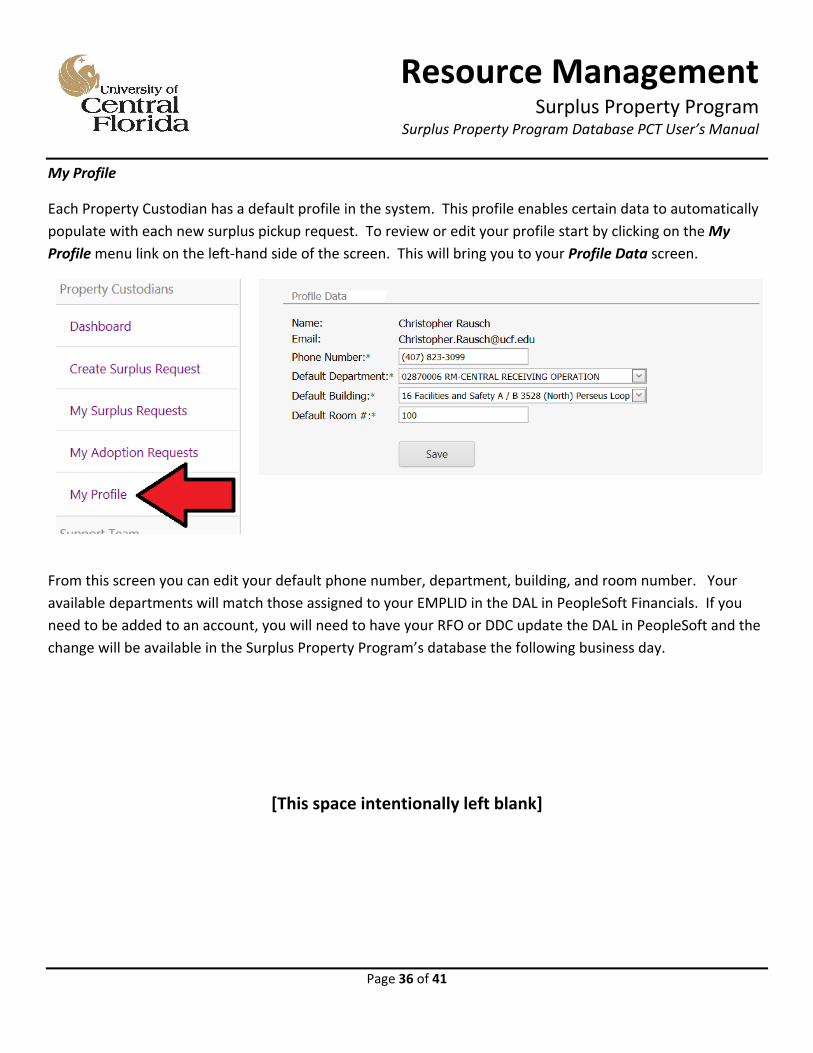
My Profile
Each Property Custodian has a default profile in the system. This profile enables certain data to automatically
populate with each new surplus pickup request. To review or edit your profile start by clicking on the My
Profile menu link on the left‐hand side of the screen. This will bring you to your Profile Data screen.
From this screen you can edit your default phone number, department, building, and room number. Your
available departments will match those assigned to your EMPLID in the DAL in PeopleSoft Financials. If you
need to be added to an account, you will need to have your RFO or DDC update the DAL in PeopleSoft and the
change will be available in the Surplus Property Program’s database the following business day.
[This space intentionally left blank]
Resource ManagementSurplus Property Program
Surplus Property Program Database PCT User’s Manual
Page 37 of 41
Frequently Asked Questions
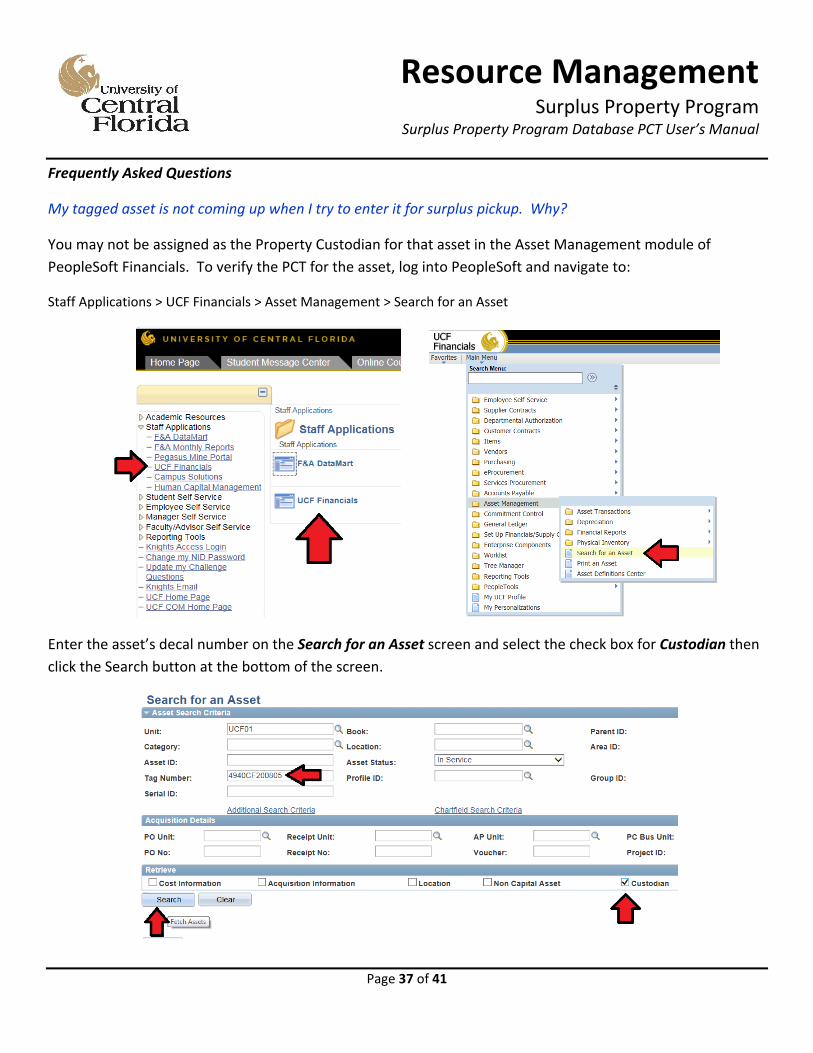
My tagged asset is not coming up when I try to enter it for surplus pickup. Why?
You may not be assigned as the Property Custodian for that asset in the Asset Management module of
PeopleSoft Financials. To verify the PCT for the asset, log into PeopleSoft and navigate to:
Staff Applications > UCF Financials > Asset Management > Search for an Asset
Enter the asset’s decal number on the Search for an Asset screen and select the check box for Custodian then
click the Search button at the bottom of the screen.
Resource ManagementSurplus Property Program
Surplus Property Program Database PCT User’s Manual
Page 38 of 41
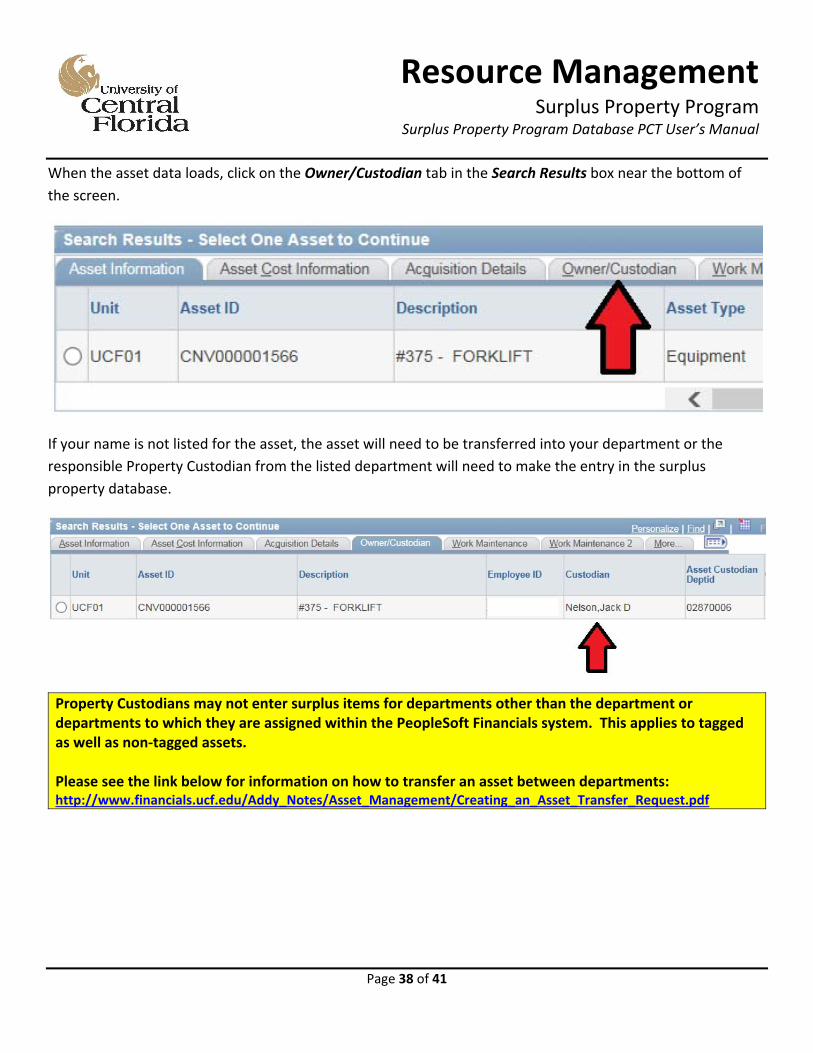
When the asset data loads, click on the Owner/Custodian tab in the Search Results box near the bottom of
the screen.
If your name is not listed for the asset, the asset will need to be transferred into your department or the
responsible Property Custodian from the listed department will need to make the entry in the surplus
property database.
Property Custodians may not enter surplus items for departments other than the department or departments to which they are assigned within the PeopleSoft Financials system. This applies to tagged as well as non‐tagged assets. Please see the link below for information on how to transfer an asset between departments: http://www.financials.ucf.edu/Addy_Notes/Asset_Management/Creating_an_Asset_Transfer_Request.pdf
Resource ManagementSurplus Property Program
Surplus Property Program Database PCT User’s Manual
Page 39 of 41
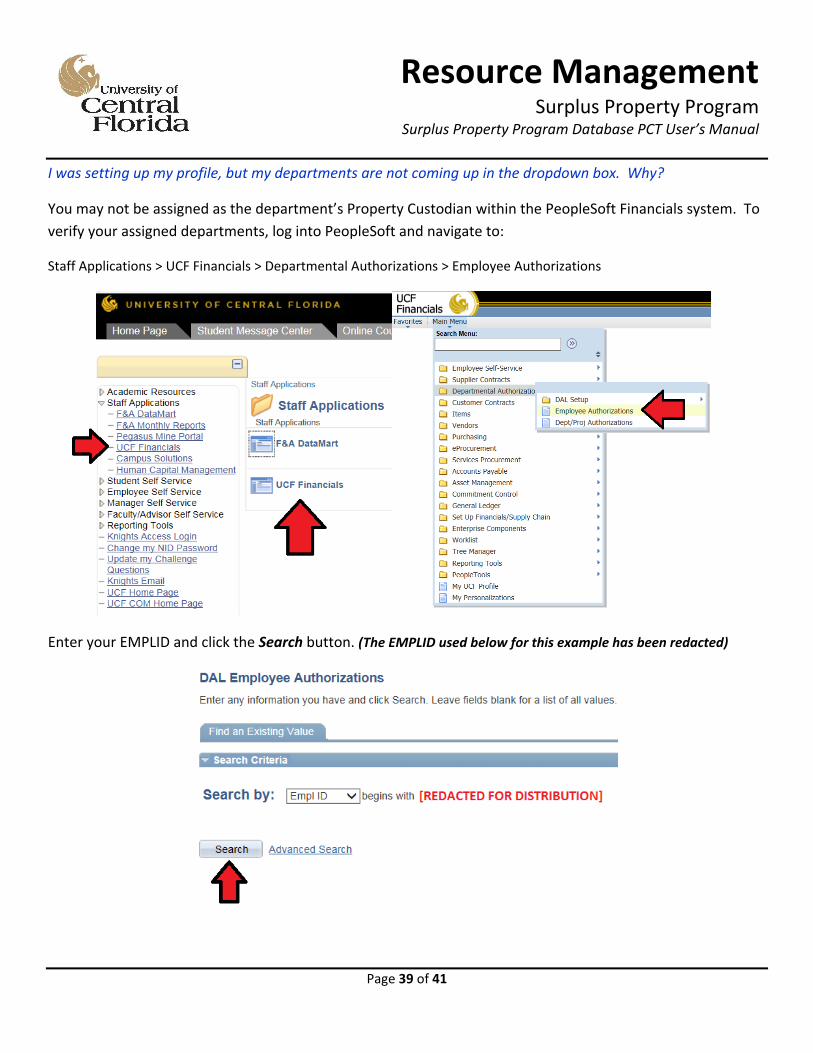
I was setting up my profile, but my departments are not coming up in the dropdown box. Why?
You may not be assigned as the department’s Property Custodian within the PeopleSoft Financials system. To
verify your assigned departments, log into PeopleSoft and navigate to:
Staff Applications > UCF Financials > Departmental Authorizations > Employee Authorizations
Enter your EMPLID and click the Search button. (The EMPLID used below for this example has been redacted)
Resource ManagementSurplus Property Program
Surplus Property Program Database PCT User’s Manual
Page 40 of 41
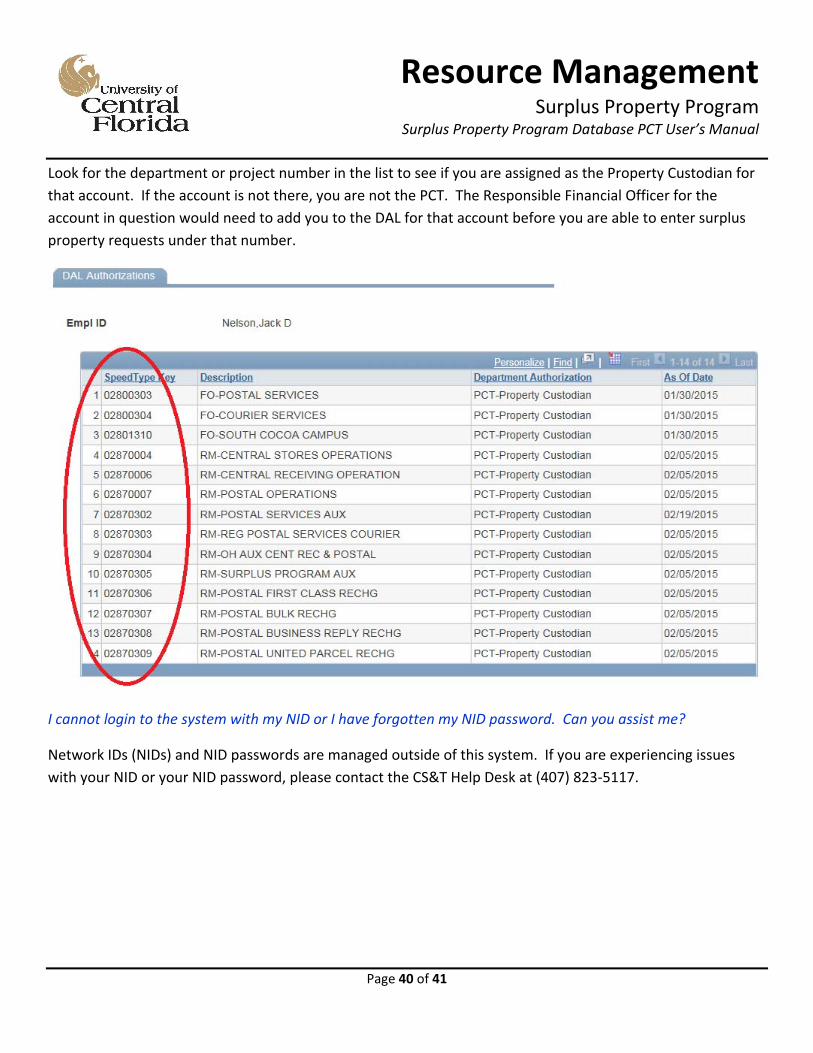
Look for the department or project number in the list to see if you are assigned as the Property Custodian for
that account. If the account is not there, you are not the PCT. The Responsible Financial Officer for the
account in question would need to add you to the DAL for that account before you are able to enter surplus
property requests under that number.
I cannot login to the system with my NID or I have forgotten my NID password. Can you assist me?
Network IDs (NIDs) and NID passwords are managed outside of this system. If you are experiencing issues
with your NID or your NID password, please contact the CS&T Help Desk at (407) 823‐5117.
Resource ManagementSurplus Property Program
Surplus Property Program Database PCT User’s Manual
Page 41 of 41
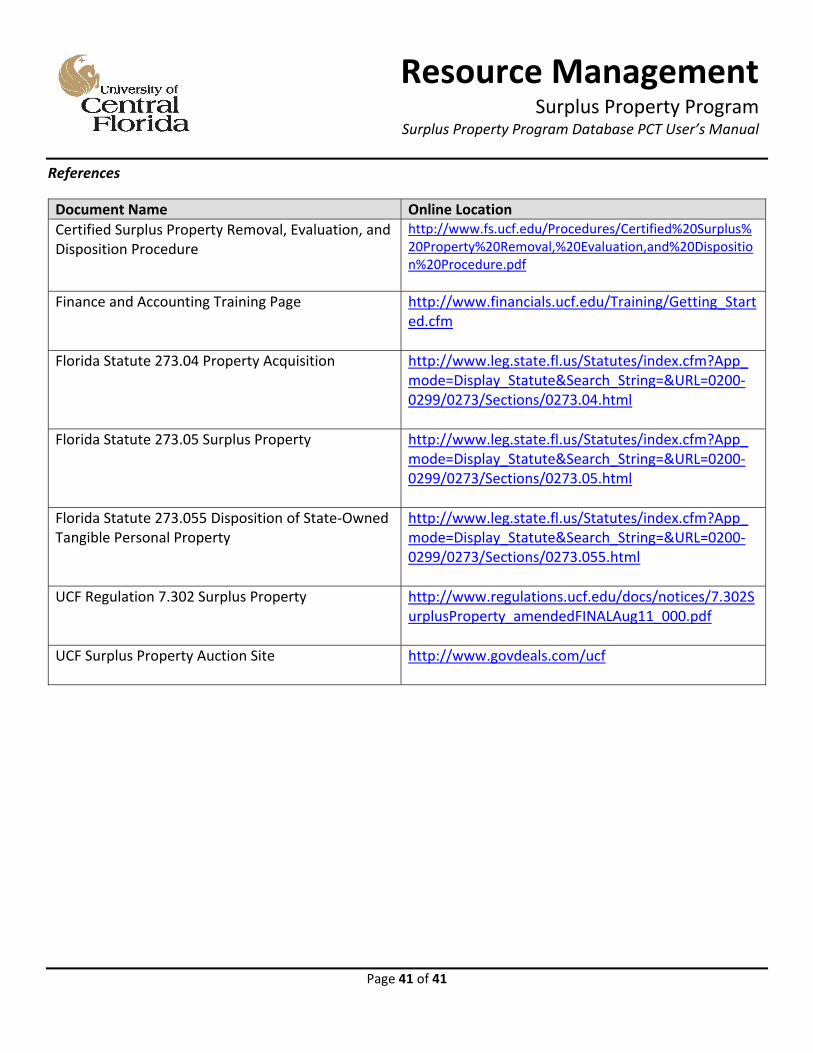
References
Document Name Online Location
Certified Surplus Property Removal, Evaluation, and Disposition Procedure
http://www.fs.ucf.edu/Procedures/Certified%20Surplus%20Property%20Removal,%20Evaluation,and%20Disposition%20Procedure.pdf
Finance and Accounting Training Page http://www.financials.ucf.edu/Training/Getting_Started.cfm
Florida Statute 273.04 Property Acquisition http://www.leg.state.fl.us/Statutes/index.cfm?App_mode=Display_Statute&Search_String=&URL=0200‐0299/0273/Sections/0273.04.html
Florida Statute 273.05 Surplus Property http://www.leg.state.fl.us/Statutes/index.cfm?App_mode=Display_Statute&Search_String=&URL=0200‐0299/0273/Sections/0273.05.html
Florida Statute 273.055 Disposition of State‐Owned Tangible Personal Property
http://www.leg.state.fl.us/Statutes/index.cfm?App_mode=Display_Statute&Search_String=&URL=0200‐0299/0273/Sections/0273.055.html
UCF Regulation 7.302 Surplus Property http://www.regulations.ucf.edu/docs/notices/7.302SurplusProperty_amendedFINALAug11_000.pdf
UCF Surplus Property Auction Site http://www.govdeals.com/ucf