suse linux install
DESCRIPTION
kumarTRANSCRIPT

Installing SUSE Linux Linux Install
STEP 1 : Juzt-Reboot Suse Linux Backup Installation
- Install Juzt-Reboot using "Advanced Install"
- Partition your hard drive from the Juzt-Reboot FDISK menu.
Partition: Attribute: Name: Size: File System: 1. [B or C] [SUSE] [6000] [Linux] 2. [P] [SUSE] [1000] [Linux S/W]
[B] - Backup Restoration Boot Partition[C] - No Restoration Boot Partition[P] - Private Data Partition (Named the same as the boot partition)
Note: Partition sizes can be set to whatever required.
- When FDISK install operation is completed press [ESC Key] to save & exit.
- System will now reboot and the Juzt-Reboot multi boot menu will appear, place Linux disk in CDROM drive and select boot partition from menu by pressing [Enter Key] to begin install.
STEP 2: Begin Linux Suse Install > Press Enter to “boot”.

STEP 3: Select “Manual Installation”.
STEP 4: Start loading Linux Kernel.

STEP 5: Select Language > English is the default.

STEP 6: Setup Keyboard > U.S. English is the default.
STEP 7: Install > Select Start installation.

STEP 8: Select > Start installation Update.

STEP 9: Select CD-ROM.
STEP 10: Select Language.

STEP 11: Finding Device > To load the driver [OK] or [Cancel] to continue.

STEP 12: Installation Settings. There are two settings that must be changed.
STEP 13: Click “Change” and select “Partitioning”.

STEP 14: Choose the third option “Create custom partition setup”.

STEP 15: Choose Custom partitioning for experts.
STEP 16: Choose /dev/hda1 linux native and Click Edit

STEP 17: Partitioning screen displays. Setup /dev/hda1 File system to ext3” and Mount Point to “/” Setup /dev/hda2 File system to“swap” Click OK and Next to continue.


STEP 18: Back to Installation Settings and select Booting > Boot Loader Setup. Boot Loader Type: You can select either GRUB or LILO. Here we choose LILO.


STEP 19: Warning message appears after changing the settings. Choose “Propose New Configuration”.

STEP 20: Boot Loader Setup > Select Boot Loader Location and click Edit. Choose Boot Sector of Boot Partition /dev/hda1.


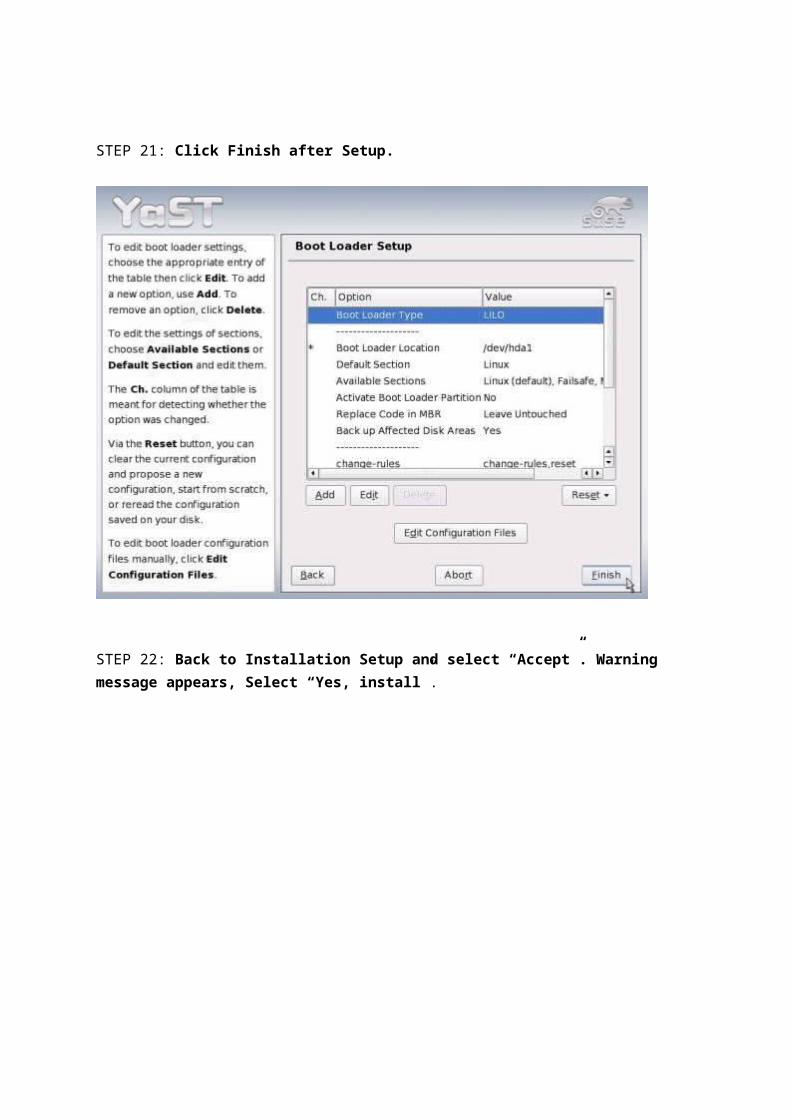
STEP 21: Click Finish after Setup.
STEP 22: Back to Installation Setup and select “Accept”. Warning message appears, Select “Yes, install”.


STEP 23: Start Installing. Wait for the installation.
STEP 24: First entry after installation will show some device finding screen, to install press Continue, or press Skip to exit.


2. Preparing the NetWeaver installation
Before starting the NetWeaver install, you will need to do a few simple tasks.
First of all(unless you customized your packages when installing SUSE), you need to install compatibility libraries and the Java SDK, which are needed by NetWeaver along with wget, a download utility and a simple text editor, pico.
Insert SUSE CD1 in your CD-ROM drive and enter the command
yast –i java-1_4_2-sun pico wget libstdc++-libc6 compat
This will load YaST and you will be asked about the package dependencies. Select NX from the dependencies list using the spacebar and then select Solve

In the main YaST screen select Accept and then Ok in the dialog with the automatic changes list.
Next, you should set up a couple of configuration files that will be needed by for running NetWeaver properly.
The easy to use pico editor is now installed and we are going to use it to edit the temporary filesystem value in file /etc/sysconfig/kernel
pico /etc/sysconfig/kernel
Find the SHMFS_SIZE variable and set it to
SHMFS_SIZE ="1G"

Press Ctrl-X to exit pico, press Y to save changes and Enter to confirm the file path.
The next file that you need to edit is the network interface configuration file and doing this will help avoiding a problem that the NetWeaver server would have after the first system restart.Because the NetWeaver setup script edits an obsolete network configuration script(from SUSE 9.0/9.1), unless you do this, after the first post-install system reboot NetWeaver will fail to start if the file is not edited.The file can be found in the /etc/sysconfig/network folder and is named using the convention ifcfg-eth-id-your network card’s MAC address In order to edit this configuration file and remove the obsolete one, use the commands:
cd /etc/sysconfig/networklspico ifcfg-eth-id-your network card’s MAC address
Note: If you have more than one network card, there will be more than one configuration file. If that is the case, use the command ifconfig to find out the MAC addresses of the network cards in your system and pick the configuration file that is named using the MAC address of the eth0 card.
At the end of the configuration file, append following lines:
IPADDR_0='195.155.155.1' NETMASK_0='255.255.255.0'
LABEL_0=0

Next, assign the hostname nw4host to the 195.155.155.1 IP address in the /etc/hosts file:
cd /etc/pico hosts
At the end of the file, append the following line:
195.155.155.1 nw4host
Save the file and type the command
reboot
The reboot is needed to reinitialize the temporary filesystem size you have edited earlier and will also initialize the new IP address for the eth0 network interface.
Next, you should create the NetWeaver Testdrive ISO from the part files.
After booting, if you haven't already downloaded the NetWeaver ISO part files, do it now. Create a directory for the kit files, I'll call it SAPKIT.
mkdir /SAPKITcd /SAPKIT
Downloading can be easily done using the command wget:
wget ftp://ftp.sap.com/pub/linuxlab/test_drive/NW4/i386/NW4_TestDrive.iso_Part_aa
...and so on to ae.
If you already have the files on a Windows system and you don't know how to mount Windows shares, you can either read a tutorial on that or transfer them from the Windows

system by using SCP.If you prefer transferring the files through SCP, you can download WinSCP. It offers a simple Norton Commander style split screen interface. Just enter the IP address that you've set up for your Linux system and login using the name and password of the user you've created at the end of the Linux setup and copy the files.
Once all the kit files are in the same directory merge them into the proper ISO file by using the command
cat NW4_TestDrive.iso_Part_a* > NW4_TestDrive.iso
After the file combine is finished, login as the superuser using the su command and mount the ISO image using the command:
mount NW4_TestDrive.iso /media/cdrom/ -o loop
Now it's time to run the NetWeaver install script:
cd /media/cdrom/./install.sh
Unfortunately the install script won’t run properly in many cases and it will exit with a “No SAPEULA License found" error. If that happens you will have to edit the install script. Since ISO is a read only filesystem, you will have to copy the whole contents of /media/cdrom/ to a temporary directory.
cp –a /media/cdrom/ /SAPKIT/cd /SAPKIT/cdrompico install.sh
The problem lies in the part of the script that displays the EULA License. In order to solve the problem without breaking any legal aspects, the script must be edited to dump the EULA to the screen using the cat command.
Press CTRL+W to activate the search function and search for show_licenseIn the show_license() function body, change the lines
kdialog --textbox ${sap_eula_path} 600 400 &> /dev/null
and
dialog --textbox ${sap_eula_path} 25 80
to:
cat ${sap_eula_path} | more

and the line
kdialog --yesno "Do you agree to the above license terms ?" 10 50
to
dialog --yesno "Do you agree to the above license terms ?" 10 50
Save the script and execute it:
./install.sh
The install process takes a while, so it’s a proper time to take a snack after all this trouble. You’ll need it to have energy for the upcoming part.
After the install process has completed, remove the obsolete network interface configuration file that the script has installed in /etc/sysconfig/network.
cd /etc/sysconfig/network/rm ifcfg-eth0:0
Next, start the server, then request a Hardware Key for your License.
su nw4admstartsap nw4hostsaplicense -get

Go to http://www50.sap.com/linux/eval/nw4/ and fill in the form with your personal details and the Hardware Key that you have received. Check your email and download the .rpm file that has been attached to the email you have received.Copy it to a temporary directory on your Linux server and install it by running
rpm –ihv license key file name
If you encounter any problems, you can also manually install the license key like this:
su nw4admsaplicense –install
You will be prompted to type the license details that were emailed to you.
Once the server is running, configure your SAPGui/PlatinGUI for connecting to the server.

If you are using PlatinGUI, add a new connection, go to the Advanced tab and check "Use expert configuration". Enter a connection string like conn=/H/your NW server’s IP address/S/3200&expert=true
If you are using the Windows SAPGUI, enter your server’s IP address in the Application Server field, System Id SCS and System Number 00.
Once you have succesfully connected, log in with the user SAP* and password SAPSTAR.
4. Enabling BW functionality

Save your new client, end your current session and log on to the new client, with user SAP*, password pass.
Start transaction SCCL – Client Copy. Select the following: Profile SAP_ALL, Source Client 000 and Source Client User Masters 000, then click on Schedule as Background Job.


Check Start Immediately in the next screen and then click on Continue. The client copy job has now started and is running in the background, you can check the Job Status using transaction SCC3.
After the copy process is finished, you must assign BW to client 001.Start transaction SE16 – Data Browser and enter the RSADMINA table name.Select BW in the CUSTOMIZID field and Execute(press F8)In the next screen, select the table row and click on Change(press F6).Enter 001 in the BWMANDT field and Save(press CTRL+S).


Start transaction SU01 – User Maintenance. Enter the user name BWUSER and click on Create.In the Defaults tab, set the User Start Menu RS00_BW. In the Roles tab, select the SAP_BW_ALL role. In the Profiles tab, select S_RS_ALL and SAP_ALL. Save the user, and log in as BWUSER on client 001.


Start transaction RSA1 - BW Administrator Workbench. You will be prompted to create a new Logical System. Click on Create.Select New Entries(press F5) from the Logical Systems Overview screen and create a new logical system. Save it and you will be prompted to create a Workbench request. Save the request and exit. Click on Assign, and select client 001 in the next screen.In the Client Details screen, select the logical system that you have created and save.


You will be asked if you wish to replicate metadata, select Only Activate.BW is now functional and the BW Administrator Workbench will load.You may also want to remove the SAP_ALL profile of the BWUSER user, by accessing transaction SU01.
Congratulations, you have finished installing the 32 bit Linux Testdrive of SAP Netweaver 2004 and enabled BW functionality !