swift notes for professionals - kicker · swift swift notes for professionals ™ notes for...
TRANSCRIPT

SwiftNotes for ProfessionalsSwift™
Notes for Professionals
GoalKicker.comFree Programming Books
DisclaimerThis is an unocial free book created for educational purposes and is
not aliated with ocial Swift™ group(s) or company(s).All trademarks and registered trademarks are
the property of their respective owners
200+ pagesof professional hints and tricks

ContentsAbout 1 ...................................................................................................................................................................................
Chapter 1: Getting started with Swift Language 2 .......................................................................................... Section 1.1: Your first Swift program 2 ............................................................................................................................ Section 1.2: Your first program in Swift on a Mac (using a Playground) 3 ................................................................. Section 1.3: Your first program in Swift Playgrounds app on iPad 7 ........................................................................... Section 1.4: Installing Swift 8 ............................................................................................................................................ Section 1.5: Optional Value and Optional enum 8 .........................................................................................................
Chapter 2: Variables & Properties 10 ..................................................................................................................... Section 2.1: Creating a Variable 10 ................................................................................................................................. Section 2.2: Property Observers 10 ................................................................................................................................ Section 2.3: Lazy Stored Properties 11 ........................................................................................................................... Section 2.4: Property Basics 11 ....................................................................................................................................... Section 2.5: Computed Properties 12 ............................................................................................................................. Section 2.6: Local and Global Variables 12 ................................................................................................................... Section 2.7: Type Properties 13 .......................................................................................................................................
Chapter 3: Numbers 14 .................................................................................................................................................. Section 3.1: Number types and literals 14 ...................................................................................................................... Section 3.2: Convert numbers to/from strings 15 ........................................................................................................ Section 3.3: Rounding 15 .................................................................................................................................................. Section 3.4: Random number generation 16 ................................................................................................................. Section 3.5: Convert one numeric type to another 17 .................................................................................................. Section 3.6: Exponentiation 17 ........................................................................................................................................
Chapter 4: Strings and Characters 18 ................................................................................................................... Section 4.1: String & Character Literals 18 ..................................................................................................................... Section 4.2: Concatenate strings 19 ............................................................................................................................... Section 4.3: String Encoding and Decomposition 20 .................................................................................................... Section 4.4: Examine and compare strings 20 .............................................................................................................. Section 4.5: Reversing Strings 21 .................................................................................................................................... Section 4.6: Check if String contains Characters from a Defined Set 21 .................................................................... Section 4.7: String Iteration 22 ........................................................................................................................................ Section 4.8: Splitting a String into an Array 24 .............................................................................................................. Section 4.9: Unicode 24 .................................................................................................................................................... Section 4.10: Converting Swift string to a number type 25 .......................................................................................... Section 4.11: Convert String to and from Data / NSData 25 ........................................................................................ Section 4.12: Formatting Strings 26 ................................................................................................................................ Section 4.13: Uppercase and Lowercase Strings 26 ...................................................................................................... Section 4.14: Remove characters from a string not defined in Set 27 ........................................................................ Section 4.15: Count occurrences of a Character into a String 27 ................................................................................ Section 4.16: Remove leading and trailing WhiteSpace and NewLine 27 ...................................................................
Chapter 5: Booleans 29 .................................................................................................................................................. Section 5.1: What is Bool? 29 ........................................................................................................................................... Section 5.2: Booleans and Inline Conditionals 29 .......................................................................................................... Section 5.3: Boolean Logical Operators 30 .................................................................................................................... Section 5.4: Negate a Bool with the prefix ! operator 30 ..............................................................................................
Chapter 6: Arrays 31 ....................................................................................................................................................... Section 6.1: Basics of Arrays 31 ....................................................................................................................................... Section 6.2: Extracting values of a given type from an Array with flatMap(_:) 32 ...................................................

Section 6.3: Combining an Array's elements with reduce(_:combine:) 32 ................................................................. Section 6.4: Flattening the result of an Array transformation with flatMap(_:) 33 ................................................... Section 6.5: Lazily flattening a multidimensional Array with flatten() 33 ................................................................... Section 6.6: Filtering out nil from an Array transformation with flatMap(_:) 34 ....................................................... Section 6.7: Subscripting an Array with a Range 34 ..................................................................................................... Section 6.8: Removing element from an array without knowing it's index 35 ........................................................... Section 6.9: Sorting an Array of Strings 35 .................................................................................................................... Section 6.10: Accessing indices safely 36 ....................................................................................................................... Section 6.11: Filtering an Array 37 ................................................................................................................................... Section 6.12: Transforming the elements of an Array with map(_:) 37 ...................................................................... Section 6.13: Useful Methods 38 ...................................................................................................................................... Section 6.14: Sorting an Array 38 .................................................................................................................................... Section 6.15: Finding the minimum or maximum element of an Array 39 ................................................................. Section 6.16: Modifying values in an array 40 ............................................................................................................... Section 6.17: Comparing 2 Arrays with zip 40 ................................................................................................................ Section 6.18: Grouping Array values 41 .......................................................................................................................... Section 6.19: Value Semantics 42 .................................................................................................................................... Section 6.20: Accessing Array Values 42 .......................................................................................................................
Chapter 7: Tuples 44 ........................................................................................................................................................ Section 7.1: What are Tuples? 44 .................................................................................................................................... Section 7.2: Decomposing into individual variables 44 ................................................................................................ Section 7.3: Tuples as the Return Value of Functions 45 ............................................................................................. Section 7.4: Using a typealias to name your tuple type 45 ......................................................................................... Section 7.5: Swapping values 46 ..................................................................................................................................... Section 7.6: Tuples as Case in Switch 46 ........................................................................................................................
Chapter 8: Enums 48 ....................................................................................................................................................... Section 8.1: Basic enumerations 48 ................................................................................................................................. Section 8.2: Enums with associated values 48 .............................................................................................................. Section 8.3: Indirect payloads 49 .................................................................................................................................... Section 8.4: Raw and Hash values 50 ............................................................................................................................ Section 8.5: Initializers 51 ................................................................................................................................................. Section 8.6: Enumerations share many features with classes and structures 52 ..................................................... Section 8.7: Nested Enumerations 53 .............................................................................................................................
Chapter 9: Structs 54 ...................................................................................................................................................... Section 9.1: Structs are value types 54 ........................................................................................................................... Section 9.2: Accessing members of struct 54 ................................................................................................................ Section 9.3: Basics of Structs 54 ..................................................................................................................................... Section 9.4: Mutating a Struct 55 .................................................................................................................................... Section 9.5: Structs cannot inherit 55 .............................................................................................................................
Chapter 10: Sets 57 ........................................................................................................................................................... Section 10.1: Declaring Sets 57 ........................................................................................................................................ Section 10.2: Performing operations on sets 57 ............................................................................................................ Section 10.3: CountedSet 58 ............................................................................................................................................. Section 10.4: Modifying values in a set 58 ...................................................................................................................... Section 10.5: Checking whether a set contains a value 58 ........................................................................................... Section 10.6: Adding values of my own type to a Set 58 ..............................................................................................
Chapter 11: Dictionaries 60 ........................................................................................................................................... Section 11.1: Declaring Dictionaries 60 ............................................................................................................................ Section 11.2: Accessing Values 60 .................................................................................................................................... Section 11.3: Change Value of Dictionary using Key 61 ................................................................................................

Section 11.4: Get all keys in Dictionary 61 ....................................................................................................................... Section 11.5: Modifying Dictionaries 61 ........................................................................................................................... Section 11.6: Merge two dictionaries 62 ..........................................................................................................................
Chapter 12: Switch 63 ...................................................................................................................................................... Section 12.1: Switch and Optionals 63 ............................................................................................................................. Section 12.2: Basic Use 63 ................................................................................................................................................ Section 12.3: Matching a Range 63 ................................................................................................................................. Section 12.4: Partial matching 64 .................................................................................................................................... Section 12.5: Using the where statement in a switch 65 ............................................................................................... Section 12.6: Matching Multiple Values 65 ...................................................................................................................... Section 12.7: Switch and Enums 66 ................................................................................................................................. Section 12.8: Switches and tuples 66 .............................................................................................................................. Section 12.9: Satisfy one of multiple constraints using switch 67 ................................................................................ Section 12.10: Matching based on class - great for prepareForSegue 67 .................................................................. Section 12.11: Switch fallthroughs 68 ...............................................................................................................................
Chapter 13: Optionals 69 ................................................................................................................................................ Section 13.1: Types of Optionals 69 ................................................................................................................................. Section 13.2: Unwrapping an Optional 69 ...................................................................................................................... Section 13.3: Nil Coalescing Operator 71 ........................................................................................................................ Section 13.4: Optional Chaining 71 .................................................................................................................................. Section 13.5: Overview - Why Optionals? 72 ..................................................................................................................
Chapter 14: Conditionals 74 ......................................................................................................................................... Section 14.1: Optional binding and "where" clauses 74 ................................................................................................. Section 14.2: Using Guard 75 ........................................................................................................................................... Section 14.3: Basic conditionals: if-statements 75 ......................................................................................................... Section 14.4: Ternary operator 76 ................................................................................................................................... Section 14.5: Nil-Coalescing Operator 77 .......................................................................................................................
Chapter 15: Error Handling 78 .................................................................................................................................... Section 15.1: Error handling basics 78 ............................................................................................................................. Section 15.2: Catching dierent error types 79 ............................................................................................................. Section 15.3: Catch and Switch Pattern for Explicit Error Handling 80 ........................................................................ Section 15.4: Disabling Error Propagation 81 ................................................................................................................ Section 15.5: Create custom Error with localized description 81 .................................................................................
Chapter 16: Loops 83 ....................................................................................................................................................... Section 16.1: For-in loop 83 ............................................................................................................................................... Section 16.2: Repeat-while loop 85 ................................................................................................................................. Section 16.3: For-in loop with filtering 85 ........................................................................................................................ Section 16.4: Sequence Type forEach block 86 ............................................................................................................. Section 16.5: while loop 86 ............................................................................................................................................... Section 16.6: Breaking a loop 87 .....................................................................................................................................
Chapter 17: Protocols 88 ................................................................................................................................................ Section 17.1: Protocol Basics 88 ....................................................................................................................................... Section 17.2: Delegate pattern 90 ................................................................................................................................... Section 17.3: Associated type requirements 91 ............................................................................................................. Section 17.4: Class-Only Protocols 93 ............................................................................................................................. Section 17.5: Protocol extension for a specific conforming class 94 ........................................................................... Section 17.6: Using the RawRepresentable protocol (Extensible Enum) 94 ............................................................... Section 17.7: Implementing Hashable protocol 95 ........................................................................................................
Chapter 18: Functions 97 ...............................................................................................................................................

Section 18.1: Basic Use 97 ................................................................................................................................................. Section 18.2: Functions with Parameters 97 ................................................................................................................... Section 18.3: Subscripts 98 ............................................................................................................................................... Section 18.4: Methods 99 .................................................................................................................................................. Section 18.5: Variadic Parameters 100 ........................................................................................................................... Section 18.6: Operators are Functions 100 .................................................................................................................... Section 18.7: Passing and returning functions 101 ........................................................................................................ Section 18.8: Function types 101 ..................................................................................................................................... Section 18.9: Inout Parameters 101 ................................................................................................................................ Section 18.10: Throwing Errors 101 ................................................................................................................................. Section 18.11: Returning Values 102 ................................................................................................................................ Section 18.12: Trailing Closure Syntax 102 ..................................................................................................................... Section 18.13: Functions With Closures 103 ....................................................................................................................
Chapter 19: Extensions 105 ........................................................................................................................................... Section 19.1: What are Extensions? 105 .......................................................................................................................... Section 19.2: Variables and functions 105 ...................................................................................................................... Section 19.3: Initializers in Extensions 106 ...................................................................................................................... Section 19.4: Subscripts 106 ............................................................................................................................................. Section 19.5: Protocol extensions 106 ............................................................................................................................. Section 19.6: Restrictions 107 .......................................................................................................................................... Section 19.7: What are extensions and when to use them 107 ....................................................................................
Chapter 20: Classes 109 ................................................................................................................................................. Section 20.1: Defining a Class 109 .................................................................................................................................. Section 20.2: Properties and Methods 109 .................................................................................................................... Section 20.3: Reference Semantics 109 ......................................................................................................................... Section 20.4: Classes and Multiple Inheritance 110 ...................................................................................................... Section 20.5: deinit 111 ....................................................................................................................................................
Chapter 21: Type Casting 112 ...................................................................................................................................... Section 21.1: Downcasting 112 ......................................................................................................................................... Section 21.2: Type casting in Swift Language 112 ........................................................................................................ Section 21.3: Upcasting 114 ............................................................................................................................................. Section 21.4: Example of using a downcast on a function parameter involving subclassing 114 ........................... Section 21.5: Casting with switch 115 ..............................................................................................................................
Chapter 22: Generics 116 ............................................................................................................................................... Section 22.1: The Basics of Generics 116 ....................................................................................................................... Section 22.2: Constraining Generic Placeholder Types 117 ........................................................................................ Section 22.3: Generic Class Examples 118 ..................................................................................................................... Section 22.4: Using Generics to Simplify Array Functions 119 .................................................................................... Section 22.5: Advanced Type Constraints 119 .............................................................................................................. Section 22.6: Generic Class Inheritance 120 .................................................................................................................. Section 22.7: Use generics to enhance type-safety 121 ..............................................................................................
Chapter 23: OptionSet 122 ............................................................................................................................................ Section 23.1: OptionSet Protocol 122 ..............................................................................................................................
Chapter 24: Reading & Writing JSON 123 ............................................................................................................ Section 24.1: JSON Serialization, Encoding, and Decoding with Apple Foundation and the Swift Standard
Library 123 ................................................................................................................................................................ Section 24.2: SwiftyJSON 126 ......................................................................................................................................... Section 24.3: Freddy 127 ................................................................................................................................................. Section 24.4: JSON Parsing Swift 3 129 ......................................................................................................................... Section 24.5: Simple JSON parsing into custom objects 131 ......................................................................................

Section 24.6: Arrow 132 ...................................................................................................................................................
Chapter 25: Advanced Operators 135 .................................................................................................................... Section 25.1: Bitwise Operators 135 ................................................................................................................................ Section 25.2: Custom Operators 136 .............................................................................................................................. Section 25.3: Overflow Operators 137 ........................................................................................................................... Section 25.4: Commutative Operators 137 .................................................................................................................... Section 25.5: Overloading + for Dictionaries 138 .......................................................................................................... Section 25.6: Precedence of standard Swift operators 138 .........................................................................................
Chapter 26: Method Swizzling 140 ............................................................................................................................ Section 26.1: Extending UIViewController and Swizzling viewDidLoad 140 ................................................................ Section 26.2: Basics of Swift Swizzling 141 .................................................................................................................... Section 26.3: Basics of Swizzling - Objective-C 141 ......................................................................................................
Chapter 27: Reflection 143 ........................................................................................................................................... Section 27.1: Basic Usage for Mirror 143 ........................................................................................................................ Section 27.2: Getting type and names of properties for a class without having to instantiate it 143 ....................
Chapter 28: Access Control 147 ................................................................................................................................. Section 28.1: Basic Example using a Struct 147 ............................................................................................................. Section 28.2: Subclassing Example 148 ......................................................................................................................... Section 28.3: Getters and Setters Example 148 ............................................................................................................
Chapter 29: Closures 149 ............................................................................................................................................... Section 29.1: Closure basics 149 ...................................................................................................................................... Section 29.2: Syntax variations 150 ................................................................................................................................ Section 29.3: Passing closures into functions 150 ......................................................................................................... Section 29.4: Captures, strong/weak references, and retain cycles 152 ................................................................... Section 29.5: Using closures for asynchronous coding 153 ........................................................................................ Section 29.6: Closures and Type Alias 154 ....................................................................................................................
Chapter 30: Initializers 155 ........................................................................................................................................... Section 30.1: Convenience init 155 .................................................................................................................................. Section 30.2: Setting default property values 157 ........................................................................................................ Section 30.3: Customizing initialization with parameters 158 ...................................................................................... Section 30.4: Throwable Initilizer 159 .............................................................................................................................
Chapter 31: Associated Objects 160 ......................................................................................................................... Section 31.1: Property, in a protocol extension, achieved using associated object 160 ............................................
Chapter 32: Concurrency 163 ...................................................................................................................................... Section 32.1: Obtaining a Grand Central Dispatch (GCD) queue 163 ......................................................................... Section 32.2: Concurrent Loops 163 ............................................................................................................................... Section 32.3: Running tasks in a Grand Central Dispatch (GCD) queue 164 ............................................................. Section 32.4: Running Tasks in an OperationQueue 166 ............................................................................................. Section 32.5: Creating High-Level Operations 167 .......................................................................................................
Chapter 33: Getting Started with Protocol Oriented Programming 169 .............................................. Section 33.1: Using protocols as first class types 169 ................................................................................................... Section 33.2: Leveraging Protocol Oriented Programming for Unit Testing 172 ......................................................
Chapter 34: Functional Programming in Swift 174 .......................................................................................... Section 34.1: Extracting a list of names from a list of Person(s) 174 .......................................................................... Section 34.2: Traversing 174 ........................................................................................................................................... Section 34.3: Filtering 174 ................................................................................................................................................ Section 34.4: Using Filter with Structs 175 ..................................................................................................................... Section 34.5: Projecting 176 ............................................................................................................................................
Chapter 35: Function as first class citizens in Swift 178 ................................................................................

Section 35.1: Assigning function to a variable 178 ........................................................................................................ Section 35.2: Passing function as an argument to another function, thus creating a Higher-Order Function
179 ............................................................................................................................................................................. Section 35.3: Function as return type from another function 179 ..............................................................................
Chapter 36: Blocks 180 ................................................................................................................................................... Section 36.1: Non-escaping closure 180 ......................................................................................................................... Section 36.2: Escaping closure 180 .................................................................................................................................
Chapter 37: The Defer Statement 182 ................................................................................................................... Section 37.1: When to use a defer statement 182 ......................................................................................................... Section 37.2: When NOT to use a defer statement 182 ...............................................................................................
Chapter 38: Style Conventions 183 .......................................................................................................................... Section 38.1: Fluent Usage 183 ........................................................................................................................................ Section 38.2: Clear Usage 184 ........................................................................................................................................ Section 38.3: Capitalization 185 ......................................................................................................................................
Chapter 39: NSRegularExpression in Swift 187 .................................................................................................. Section 39.1: Extending String to do simple pattern matching 187 ............................................................................. Section 39.2: Basic Usage 188 ........................................................................................................................................ Section 39.3: Replacing Substrings 188 .......................................................................................................................... Section 39.4: Special Characters 189 ............................................................................................................................. Section 39.5: Validation 189 ............................................................................................................................................ Section 39.6: NSRegularExpression for mail validation 189 ........................................................................................
Chapter 40: RxSwift 191 ................................................................................................................................................ Section 40.1: Disposing 191 ............................................................................................................................................. Section 40.2: RxSwift basics 191 ..................................................................................................................................... Section 40.3: Creating observables 192 ......................................................................................................................... Section 40.4: Bindings 193 ............................................................................................................................................... Section 40.5: RxCocoa and ControlEvents 193 .............................................................................................................
Chapter 41: Swift Package Manager 196 .............................................................................................................. Section 41.1: Creation and usage of a simple Swift package 196 ................................................................................
Chapter 42: Working with C and Objective-C 198 ............................................................................................ Section 42.1: Use a module map to import C headers 198 .......................................................................................... Section 42.2: Using Objective-C classes from Swift code 198 ..................................................................................... Section 42.3: Specify a bridging header to swiftc 200 .................................................................................................. Section 42.4: Use the C standard library 200 ................................................................................................................ Section 42.5: Fine-grained interoperation between Objective-C and Swift 200 ........................................................ Section 42.6: Using Swift classes from Objective-C code 201 .....................................................................................
Chapter 43: Documentation markup 203 ............................................................................................................. Section 43.1: Class documentation 203 .......................................................................................................................... Section 43.2: Documentation styles 203 ........................................................................................................................
Chapter 44: Typealias 207 ........................................................................................................................................... Section 44.1: typealias for closures with parameters 207 ............................................................................................ Section 44.2: typealias for empty closures 207 ............................................................................................................ Section 44.3: typealias for other types 207 ...................................................................................................................
Chapter 45: Dependency Injection 208 .................................................................................................................. Section 45.1: Dependency Injection with View Controllers 208 .................................................................................... Section 45.2: Dependency Injection Types 211 .............................................................................................................
Chapter 46: Caching on disk space 214 ................................................................................................................. Section 46.1: Reading 214 ................................................................................................................................................ Section 46.2: Saving 214 ..................................................................................................................................................

Chapter 47: Algorithms with Swift 215 .................................................................................................................. Section 47.1: Sorting 215 .................................................................................................................................................. Section 47.2: Insertion Sort 218 ....................................................................................................................................... Section 47.3: Selection sort 218 ....................................................................................................................................... Section 47.4: Asymptotic analysis 219 ........................................................................................................................... Section 47.5: Quick Sort - O(n log n) complexity time 219 .......................................................................................... Section 47.6: Graph, Trie, Stack 220 ...............................................................................................................................
Chapter 48: Swift Advance functions 234 ............................................................................................................ Section 48.1: Flatten multidimensional array 234 ......................................................................................................... Section 48.2: Introduction with advance functions 234 ................................................................................................
Chapter 49: Completion Handler 236 ..................................................................................................................... Section 49.1: Completion handler with no input argument 236 ................................................................................... Section 49.2: Completion handler with input argument 236 ........................................................................................
Chapter 50: Swift HTTP server by Kitura 238 ..................................................................................................... Section 50.1: Hello world application 238 .......................................................................................................................
Chapter 51: Generate UIImage of Initials from String 241 ........................................................................... Section 51.1: InitialsImageFactory 241 ............................................................................................................................
Chapter 52: Design Patterns - Creational 242 .................................................................................................... Section 52.1: Singleton 242 .............................................................................................................................................. Section 52.2: Builder Pattern 242 .................................................................................................................................... Section 52.3: Factory Method 248 .................................................................................................................................. Section 52.4: Observer 249 .............................................................................................................................................. Section 52.5: Chain of responsibility 250 ........................................................................................................................ Section 52.6: Iterator 252 .................................................................................................................................................
Chapter 53: Design Patterns - Structural 253 .................................................................................................... Section 53.1: Adapter 253 ................................................................................................................................................. Section 53.2: Facade 253 .................................................................................................................................................
Chapter 54: (Unsafe) Buer Pointers 255 ............................................................................................................ Section 54.1: UnsafeMutablePointer 255 ........................................................................................................................ Section 54.2: Practical Use-Case for Buer Pointers 256 ............................................................................................
Chapter 55: Cryptographic Hashing 257 ............................................................................................................... Section 55.1: HMAC with MD5, SHA1, SHA224, SHA256, SHA384, SHA512 (Swift 3) 257 ............................................. Section 55.2: MD2, MD4, MD5, SHA1, SHA224, SHA256, SHA384, SHA512 (Swift 3) 258 .............................................
Chapter 56: AES encryption 260 ................................................................................................................................ Section 56.1: AES encryption in CBC mode with a random IV (Swift 3.0) 260 ............................................................ Section 56.2: AES encryption in CBC mode with a random IV (Swift 2.3) 262 ........................................................... Section 56.3: AES encryption in ECB mode with PKCS7 padding 264 .........................................................................
Chapter 57: PBKDF2 Key Derivation 266 ............................................................................................................... Section 57.1: Password Based Key Derivation 2 (Swift 3) 266 ..................................................................................... Section 57.2: Password Based Key Derivation 2 (Swift 2.3) 267 ................................................................................. Section 57.3: Password Based Key Derivation Calibration (Swift 2.3) 268 ................................................................. Section 57.4: Password Based Key Derivation Calibration (Swift 3) 268 ....................................................................
Chapter 58: Logging in Swift 270 .............................................................................................................................. Section 58.1: dump 270 .................................................................................................................................................... Section 58.2: Debug Print 271 ......................................................................................................................................... Section 58.3: print() vs dump() 272 ................................................................................................................................ Section 58.4: print vs NSLog 272 ....................................................................................................................................
Chapter 59: Memory Management 274 .................................................................................................................

Section 59.1: Reference Cycles and Weak References 274 ......................................................................................... Section 59.2: Manual Memory Management 275 .........................................................................................................
Chapter 60: Performance 276 .................................................................................................................................... Section 60.1: Allocation Performance 276 ......................................................................................................................
Credits 278 ............................................................................................................................................................................
You may also like 282 ......................................................................................................................................................

GoalKicker.com – Swift™ Notes for Professionals 1
About
Please feel free to share this PDF with anyone for free,latest version of this book can be downloaded from:
https://goalkicker.com/SwiftBook
This Swift™ Notes for Professionals book is compiled from Stack OverflowDocumentation, the content is written by the beautiful people at Stack Overflow.Text content is released under Creative Commons BY-SA, see credits at the end
of this book whom contributed to the various chapters. Images may be copyrightof their respective owners unless otherwise specified
This is an unofficial free book created for educational purposes and is notaffiliated with official Swift™ group(s) or company(s) nor Stack Overflow. Alltrademarks and registered trademarks are the property of their respective
company owners
The information presented in this book is not guaranteed to be correct noraccurate, use at your own risk
Please send feedback and corrections to [email protected]
GoalKicker.com – Swift™ Notes for Professionals 2
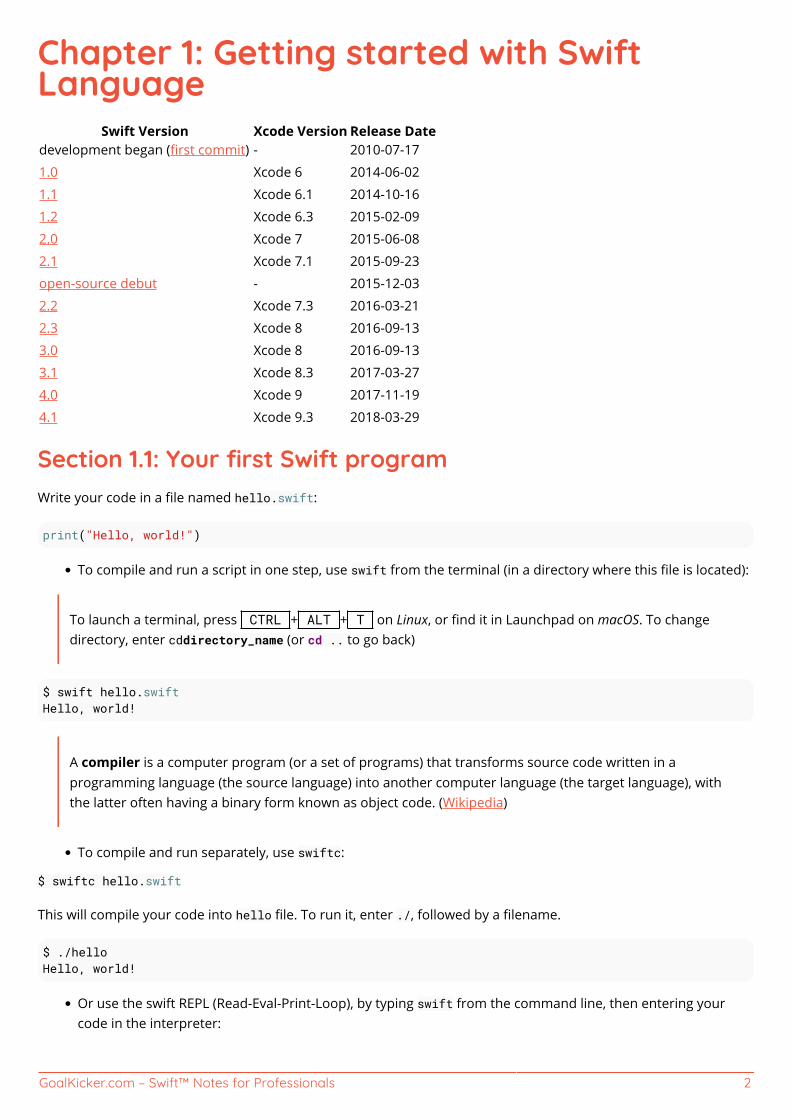
Chapter 1: Getting started with SwiftLanguage
Swift Version Xcode Version Release Datedevelopment began (first commit) - 2010-07-17
1.0 Xcode 6 2014-06-02
1.1 Xcode 6.1 2014-10-16
1.2 Xcode 6.3 2015-02-09
2.0 Xcode 7 2015-06-08
2.1 Xcode 7.1 2015-09-23
open-source debut - 2015-12-03
2.2 Xcode 7.3 2016-03-21
2.3 Xcode 8 2016-09-13
3.0 Xcode 8 2016-09-13
3.1 Xcode 8.3 2017-03-27
4.0 Xcode 9 2017-11-19
4.1 Xcode 9.3 2018-03-29
Section 1.1: Your first Swift programWrite your code in a file named hello.swift:
print("Hello, world!")
To compile and run a script in one step, use swift from the terminal (in a directory where this file is located):
To launch a terminal, press CTRL + ALT + T on Linux, or find it in Launchpad on macOS. To changedirectory, enter cddirectory_name (or cd .. to go back)
$ swift hello.swiftHello, world!
A compiler is a computer program (or a set of programs) that transforms source code written in aprogramming language (the source language) into another computer language (the target language), withthe latter often having a binary form known as object code. (Wikipedia)
To compile and run separately, use swiftc:
$ swiftc hello.swift
This will compile your code into hello file. To run it, enter ./, followed by a filename.
$ ./helloHello, world!
Or use the swift REPL (Read-Eval-Print-Loop), by typing swift from the command line, then entering yourcode in the interpreter:

GoalKicker.com – Swift™ Notes for Professionals 3
Code:
func greet(name: String, surname: String) { print("Greetings \(name) \(surname)")}
let myName = "Homer"let mySurname = "Simpson"
greet(name: myName, surname: mySurname)
Let's break this large code into pieces:
func greet(name: String, surname: String) { // function body } - create a function thattakes a name and a surname.
print("Greetings \(name) \(surname)") - This prints out to the console "Greetings ", then name,then surname. Basically \(variable_name) prints out that variable's value.
let myName = "Homer" and let mySurname = "Simpson" - create constants (variables which valueyou can't change) using let with names: myName, mySurname and values: "Homer", "Simpson"respectively.
greet(name: myName, surname: mySurname) - calls a function that we created earlier supplying thevalues of constants myName, mySurname.
Running it using REPL:
$ swiftWelcome to Apple Swift. Type :help for assistance. 1> func greet(name: String, surname: String) { 2. print("Greetings \(name) \(surname)") 3. } 4> 5> let myName = "Homer"myName: String = "Homer" 6> let mySurname = "Simpson"mySurname: String = "Simpson" 7> greet(name: myName, surname: mySurname)Greetings Homer Simpson 8> ^D
Press CTRL + D to quit from REPL.
Section 1.2: Your first program in Swift on a Mac (using aPlayground)From your Mac, download and install Xcode from the Mac App Store following this link.
After the installation is complete, open Xcode and select Get started with a Playground:

GoalKicker.com – Swift™ Notes for Professionals 4
On the next panel, you can give your Playground a name or you can leave it MyPlayground and press Next:
Select a location where to save the Playground and press Create:

GoalKicker.com – Swift™ Notes for Professionals 5
The Playground will open and your screen should look something like this:

GoalKicker.com – Swift™ Notes for Professionals 6
Now that the Playground is on the screen, press ⇧ + cmd + Y to show the Debug Area.
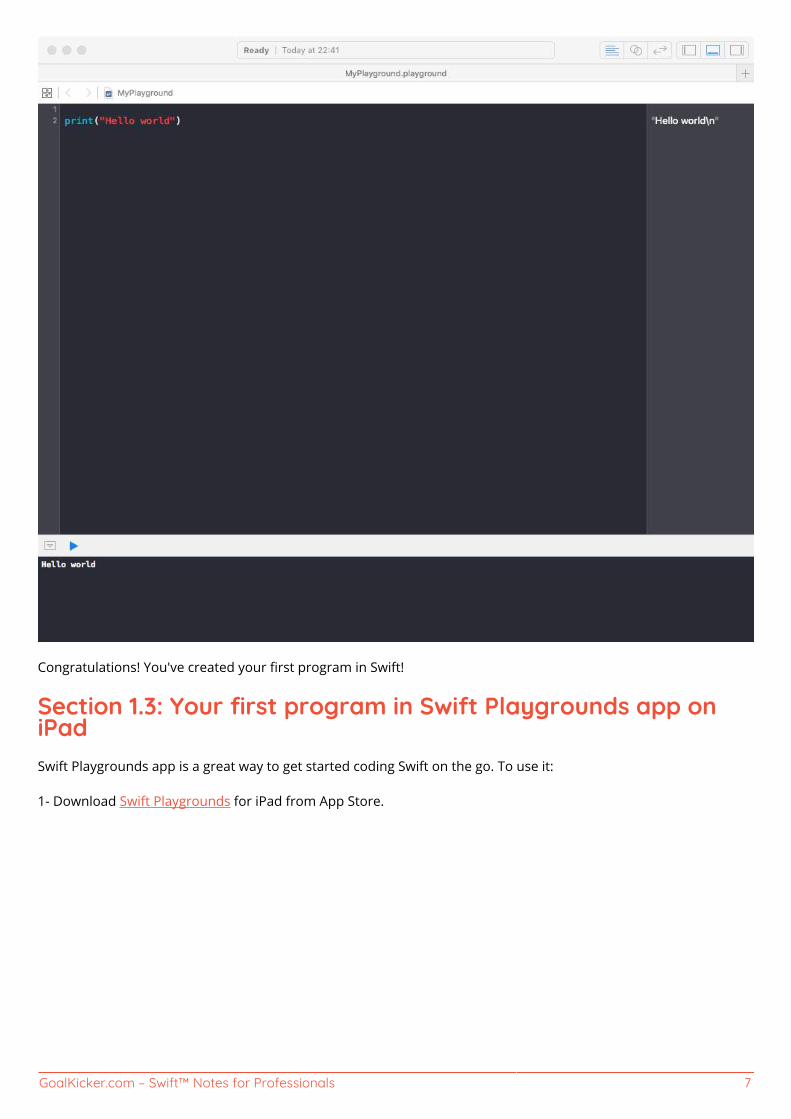
Finally delete the text inside Playground and type:
print("Hello world")
You should see 'Hello world' in the Debug Area and "Hello world\n" in the right Sidebar:
GoalKicker.com – Swift™ Notes for Professionals 7
Congratulations! You've created your first program in Swift!
Section 1.3: Your first program in Swift Playgrounds app oniPadSwift Playgrounds app is a great way to get started coding Swift on the go. To use it:
1- Download Swift Playgrounds for iPad from App Store.

GoalKicker.com – Swift™ Notes for Professionals 8
2- Open the app.
3- In the My Playgrounds tab, tap + on the top left corner and then select Blank template.
4- Enter your code.
5- Tap Run My Code to run your code.
6- At the front of each line, the result will be stored in a small square. Tap it to reveal the result.
7- To step slowly through code to trace it, tap the button next to Run My Code.
Section 1.4: Installing SwiftFirst, download the compiler and components.
Next, add Swift to your path. On macOS, the default location for the downloadable toolchain is/Library/Developer/Toolchains. Run the following command in Terminal:
export PATH=/Library/Developer/Toolchains/swift-latest.xctoolchain/usr/bin:"${PATH}"
On Linux, you will need to install clang:
$ sudo apt-get install clang
If you installed the Swift toolchain to a directory other than the system root, you will need to run the followingcommand, using the actual path of your Swift installation:
$ export PATH=/path/to/Swift/usr/bin:"${PATH}"
You can verify you have the current version of Swift by running this command:
$ swift --version
Section 1.5: Optional Value and Optional enumOptionals type, which handles the absence of a value. Optionals say either "there is a value, and it equals x" or"there isn't a value at all".
GoalKicker.com – Swift™ Notes for Professionals 9
An Optional is a type on its own, actually one of Swift’s new super-powered enums. It has two possible values, Noneand Some(T), where T is an associated value of the correct data type available in Swift.
Let's have a look at this piece of code for example:
let x: String? = "Hello World"
if let y = x { print(y)}
In fact if you add a print(x.dynamicType) statement in the code above you'll see this in the console:
Optional<String>
String? is actually syntactic sugar for Optional, and Optional is a type in its own right.
Here's a simplified version of the header of Optional, which you can see by command-clicking on the word Optionalin your code from Xcode:
enum Optional<Wrapped> {
/// The absence of a value. case none
/// The presence of a value, stored as `Wrapped`. case some(Wrapped)}
Optional is actually an enum, defined in relation to a generic type Wrapped. It has two cases: .none to represent theabsence of a value, and .some to represent the presence of a value, which is stored as its associated value of typeWrapped.
Let me go through it again: String? is not a String but an Optional<String>.The fact that Optional is a typemeans that it has its own methods, for example map and flatMap.

GoalKicker.com – Swift™ Notes for Professionals 10
Chapter 2: Variables & PropertiesSection 2.1: Creating a VariableDeclare a new variable with var, followed by a name, type, and value:
var num: Int = 10
Variables can have their values changed:
num = 20 // num now equals 20
Unless they're defined with let:
let num: Int = 10 // num cannot change
Swift infers the type of variable, so you don't always have to declare variable type:
let ten = 10 // num is an Intlet pi = 3.14 // pi is a Doublelet floatPi: Float = 3.14 // floatPi is a Float
Variable names aren't restricted to letters and numbers - they can also contain most other unicode characters,although there are some restrictions
Constant and variable names cannot contain whitespace characters, mathematical symbols, arrows,private-use (or invalid) Unicode code points, or line- and box-drawing characters. Nor can they begin witha number
Source developer.apple.com
var π: Double = 3.14159var ��: String = "Apples"
Section 2.2: Property ObserversProperty observers respond to changes to a property's value.
var myProperty = 5 { willSet { print("Will set to \(newValue). It was previously \(myProperty)") } didSet { print("Did set to \(myProperty). It was previously \(oldValue)") }}myProperty = 6// prints: Will set to 6, It was previously 5// prints: Did set to 6. It was previously 5
willSet is called before myProperty is set. The new value is available as newValue, and the old value is stillavailable as myProperty.

GoalKicker.com – Swift™ Notes for Professionals 11
didSet is called after myProperty is set. The old value is available as oldValue, and the new value is nowavailable as myProperty .
Note: didSet and willSet will not be called in the following cases:
Assigning an initial valueModifying the variable within its own didSet or willSet
The parameter names for oldValue and newValue of didSet and willSet can also be declared to increasereadability:
var myFontSize = 10 { willSet(newFontSize) { print("Will set font to \(newFontSize), it was \(myFontSize)") } didSet(oldFontSize) { print("Did set font to \(myFontSize), it was \(oldFontSize)") }}
Caution: While it is supported to declare setter parameter names, one should be cautious not to mixnames up:
willSet(oldValue) and didSet(newValue) are entirely legal, but will considerably confuse readersof your code.
Section 2.3: Lazy Stored PropertiesLazy stored properties have values that are not calculated until first accessed. This is useful for memory savingwhen the variable's calculation is computationally expensive. You declare a lazy property with lazy:
lazy var veryExpensiveVariable = expensiveMethod()
Often it is assigned to a return value of a closure:
lazy var veryExpensiveString = { () -> String in var str = expensiveStrFetch() str.expensiveManipulation(integer: arc4random_uniform(5)) return str}()
Lazy stored properties must be declared with var.
Section 2.4: Property BasicsProperties can be added to a class or struct (technically enums too, see "Computed Properties" example). Theseadd values that associate with instances of classes/structs:
class Dog { var name = ""}
In the above case, instances of Dog have a property named name of type String. The property can be accessed and

GoalKicker.com – Swift™ Notes for Professionals 12
modified on instances of Dog:
let myDog = Dog()myDog.name = "Doggy" // myDog's name is now "Doggy"
These types of properties are considered stored properties, as they store something on an object and affect itsmemory.
Section 2.5: Computed PropertiesDifferent from stored properties, computed properties are built with a getter and a setter, performing necessarycode when accessed and set. Computed properties must define a type:
var pi = 3.14
class Circle { var radius = 0.0 var circumference: Double { get { return pi * radius * 2 } set { radius = newValue / pi / 2 } }}
let circle = Circle()circle.radius = 1print(circle.circumference) // Prints "6.28"circle.circumference = 14print(circle.radius) // Prints "2.229..."
A read-only computed property is still declared with a var:
var circumference: Double { get { return pi * radius * 2 }}
Read-only computed properties can be shortened to exclude get:
var circumference: Double { return pi * radius * 2}
Section 2.6: Local and Global VariablesLocal variables are defined within a function, method, or closure:
func printSomething() { let localString = "I'm local!" print(localString)}
func printSomethingAgain() {

GoalKicker.com – Swift™ Notes for Professionals 13
print(localString) // error}
Global variables are defined outside of a function, method, or closure, and are not defined within a type (thinkoutside of all brackets). They can be used anywhere:
let globalString = "I'm global!"print(globalString)
func useGlobalString() { print(globalString) // works!}
for i in 0..<2 { print(globalString) // works!}
class GlobalStringUser { var computeGlobalString { return globalString // works! }}
Global variables are defined lazily (see "Lazy Properties" example).
Section 2.7: Type PropertiesType properties are properties on the type itself, not on the instance. They can be both stored or computedproperties. You declare a type property with static:
struct Dog { static var noise = "Bark!"}
print(Dog.noise) // Prints "Bark!"
In a class, you can use the class keyword instead of static to make it overridable. However, you can only applythis on computed properties:
class Animal { class var noise: String { return "Animal noise!" }}class Pig: Animal { override class var noise: String { return "Oink oink!" }}
This is used often with the singleton pattern.

GoalKicker.com – Swift™ Notes for Professionals 14
Chapter 3: NumbersSection 3.1: Number types and literalsSwift's built-in numeric types are:
Word-sized (architecture-dependent) signed Int and unsigned UInt.Fixed-size signed integers Int8, Int16, Int32, Int64, and unsigned integers UInt8, UInt16, UInt32, UInt64.Floating-point types Float32/Float, Float64/Double, and Float80 (x86-only).
Literals
A numeric literal's type is inferred from context:
let x = 42 // x is Int by defaultlet y = 42.0 // y is Double by default
let z: UInt = 42 // z is UIntlet w: Float = -1 // w is Floatlet q = 100 as Int8 // q is Int8
Underscores (_) may be used to separate digits in numeric literals. Leading zeros are ignored.
Floating point literals may be specified using significand and exponent parts (gnificand» e «exponent» for decimal;b> «significand» p «exponent» for hexadecimal).
Integer literal syntaxlet decimal = 10 // tenlet decimal = -1000 // negative one thousandlet decimal = -1_000 // equivalent to -1000let decimal = 42_42_42 // equivalent to 424242let decimal = 0755 // equivalent to 755, NOT 493 as in some other languageslet decimal = 0123456789
let hexadecimal = 0x10 // equivalent to 16let hexadecimal = 0x7FFFFFFFlet hexadecimal = 0xBadFacelet hexadecimal = 0x0123_4567_89ab_cdef
let octal = 0o10 // equivalent to 8let octal = 0o755 // equivalent to 493let octal = -0o0123_4567
let binary = -0b101010 // equivalent to -42let binary = 0b111_101_101 // equivalent to 0o755let binary = 0b1011_1010_1101 // equivalent to 0xB_A_D
Floating-point literal syntaxlet decimal = 0.0let decimal = -42.0123456789let decimal = 1_000.234_567_89
let decimal = 4.567e5 // equivalent to 4.567×10⁵, or 456_700.0let decimal = -2E-4 // equivalent to -2×10⁻⁴, or -0.0002let decimal = 1e+0 // equivalent to 1×10⁰, or 1.0
let hexadecimal = 0x1p0 // equivalent to 1×2⁰, or 1.0let hexadecimal = 0x1p-2 // equivalent to 1×2⁻², or 0.25

GoalKicker.com – Swift™ Notes for Professionals 15
let hexadecimal = 0xFEEDp+3 // equivalent to 65261×2³, or 522088.0let hexadecimal = 0x1234.5P4 // equivalent to 0x12345, or 74565.0let hexadecimal = 0x123.45P8 // equivalent to 0x12345, or 74565.0let hexadecimal = 0x12.345P12 // equivalent to 0x12345, or 74565.0let hexadecimal = 0x1.2345P16 // equivalent to 0x12345, or 74565.0let hexadecimal = 0x0.12345P20 // equivalent to 0x12345, or 74565.0
Section 3.2: Convert numbers to/from stringsUse String initializers for converting numbers into strings:
String(1635999) // returns "1635999"String(1635999, radix: 10) // returns "1635999"String(1635999, radix: 2) // returns "110001111011010011111"String(1635999, radix: 16) // returns "18f69f"String(1635999, radix: 16, uppercase: true) // returns "18F69F"String(1635999, radix: 17) // returns "129gf4"String(1635999, radix: 36) // returns "z2cf"
Or use string interpolation for simple cases:
let x = 42, y = 9001"Between \(x) and \(y)" // equivalent to "Between 42 and 9001"
Use initializers of numeric types to convert strings into numbers:
if let num = Int("42") { /* ... */ } // num is 42if let num = Int("Z2cF") { /* ... */ } // returns nil (not a number)if let num = Int("z2cf", radix: 36) { /* ... */ } // num is 1635999if let num = Int("Z2cF", radix: 36) { /* ... */ } // num is 1635999if let num = Int8("Z2cF", radix: 36) { /* ... */ } // returns nil (too large for Int8)
Section 3.3: Roundinground
Rounds the value to the nearest whole number with x.5 rounding up (but note that -x.5 rounds down).
round(3.000) // 3round(3.001) // 3round(3.499) // 3round(3.500) // 4round(3.999) // 4
round(-3.000) // -3round(-3.001) // -3round(-3.499) // -3round(-3.500) // -4 *** careful here ***round(-3.999) // -4
ceil
Rounds any number with a decimal value up to the next larger whole number.
ceil(3.000) // 3ceil(3.001) // 4ceil(3.999) // 4

GoalKicker.com – Swift™ Notes for Professionals 16
ceil(-3.000) // -3ceil(-3.001) // -3ceil(-3.999) // -3
floor
Rounds any number with a decimal value down to the next smaller whole number.
floor(3.000) // 3floor(3.001) // 3floor(3.999) // 3
floor(-3.000) // -3floor(-3.001) // -4floor(-3.999) // -4
Int
Converts a Double to an Int, dropping any decimal value.
Int(3.000) // 3Int(3.001) // 3Int(3.999) // 3
Int(-3.000) // -3Int(-3.001) // -3Int(-3.999) // -3
Notes
round, ceil and floor handle both 64 and 32 bit architecture.
Section 3.4: Random number generationarc4random_uniform(someNumber: UInt32) -> UInt32
This gives you random integers in the range 0 to someNumber - 1.
The maximum value for UInt32 is 4,294,967,295 (that is, 2^32 - 1).
Examples:
Coin flip
let flip = arc4random_uniform(2) // 0 or 1
Dice roll
let roll = arc4random_uniform(6) + 1 // 1...6
Random day in October
let day = arc4random_uniform(31) + 1 // 1...31
Random year in the 1990s
let year = 1990 + arc4random_uniform(10)

GoalKicker.com – Swift™ Notes for Professionals 17
General form:
let number = min + arc4random_uniform(max - min + 1)
where number, max, and min are UInt32.
Notes
There is a slight modulo bias with arc4random so arc4random_uniform is preferred.You can cast a UInt32 value to an Int but just beware of going out of range.
Section 3.5: Convert one numeric type to anotherfunc doSomething1(value: Double) { /* ... */ }func doSomething2(value: UInt) { /* ... */ }
let x = 42 // x is an IntdoSomething1(Double(x)) // convert x to a DoubledoSomething2(UInt(x)) // convert x to a UInt
Integer initializers produce a runtime error if the value overflows or underflows:
Int8(-129.0) // fatal error: floating point value cannot be converted to Int8 because it is lessthan Int8.minInt8(-129) // crash: EXC_BAD_INSTRUCTION / SIGILLInt8(-128) // okInt8(-2) // okInt8(17) // okInt8(127) // okInt8(128) // crash: EXC_BAD_INSTRUCTION / SIGILLInt8(128.0) // fatal error: floating point value cannot be converted to Int8 because it is greaterthan Int8.max
Float-to-integer conversion rounds values towards zero:
Int(-2.2) // -2Int(-1.9) // -1Int(-0.1) // 0Int(1.0) // 1Int(1.2) // 1Int(1.9) // 1Int(2.0) // 2
Integer-to-float conversion may be lossy:
Int(Float(1_000_000_000_000_000_000)) // 999999984306749440
Section 3.6: ExponentiationIn Swift, we can exponentiate Doubles with the built-in pow() method:
pow(BASE, EXPONENT)
In the code below, the base (5) is set to the power of the exponent (2) :
let number = pow(5.0, 2.0) // Equals 25

GoalKicker.com – Swift™ Notes for Professionals 18
Chapter 4: Strings and CharactersSection 4.1: String & Character LiteralsString literals in Swift are delimited with double quotes ("):
let greeting = "Hello!" // greeting's type is String
Characters can be initialized from string literals, as long as the literal contains only one grapheme cluster:
let chr: Character = "H" // validlet chr2: Character = "�" // validlet chr3: Character = "abc" // invalid - multiple grapheme clusters
String Interpolation
String interpolation allows injecting an expression directly into a string literal. This can be done with all types ofvalues, including strings, integers, floating point numbers and more.
The syntax is a backslash followed by parentheses wrapping the value: \\(value). Any valid expression may appearin the parentheses, including function calls.
let number = 5let interpolatedNumber = "\\(number)" // string is "5"let fortyTwo = "\\(6 * 7)" // string is "42"
let example = "This post has \\(number) view\\(number == 1 ? "" : "s")"// It will output "This post has 5 views" for the above example.// If the variable number had the value 1, it would output "This post has 1 view" instead.
For custom types, the default behavior of string interpolation is that "\\(myobj)" is equivalent to String(myobj),the same representation used by print(myobj). You can customize this behavior by implementing theCustomStringConvertible protocol for your type.
Version ≥ 3.0
For Swift 3, in accordance with SE-0089, String.init<T>(_:) has been renamed to String.init<T>(describing:).
The string interpolation "\\(myobj)" will prefer the new String.init<T: LosslessStringConvertible>(_:)initializer, but will fall back to init<T>(describing:) if the value is not LosslessStringConvertible.
Special Characters
Certain characters require a special escape sequence to use them in string literals:
Character Meaning\\0 the null character\\\\ a plain backslash, \\\\t a tab character\\v a vertical tab\\r a carriage return\\n a line feed ("newline")\\" a double quote, "\\' a single quote, '

GoalKicker.com – Swift™ Notes for Professionals 19
\\u{n} the Unicode code point n (in hexadecimal)
Example:
let message = "Then he said, \\"I \\u{1F496} you!\\""
print(message) // Then he said, "I � you!"
Section 4.2: Concatenate stringsConcatenate strings with the + operator to produce a new string:
let name = "John"let surname = "Appleseed"let fullName = name + " " + surname // fullName is "John Appleseed"
Append to a mutable string using the += compound assignment operator, or using a method:
let str2 = "there"var instruction = "look over"instruction += " " + str2 // instruction is now "look over there"
var instruction = "look over"instruction.append(" " + str2) // instruction is now "look over there"
Append a single character to a mutable String:
var greeting: String = "Hello"let exclamationMark: Character = "!"greeting.append(exclamationMark)// produces a modified String (greeting) = "Hello!"
Append multiple characters to a mutable String
var alphabet:String = "my ABCs: "alphabet.append(contentsOf: (0x61...0x7A).map(UnicodeScalar.init) .map(Character.init) )// produces a modified string (alphabet) = "my ABCs: abcdefghijklmnopqrstuvwxyz"Version ≥ 3.0
appendContentsOf(_:) has been renamed to append(_:).
Join a sequence of strings to form a new string using joinWithSeparator(_:):
let words = ["apple", "orange", "banana"]let str = words.joinWithSeparator(" & ")
print(str) // "apple & orange & banana"Version ≥ 3.0
joinWithSeparator(_:) has been renamed to joined(separator:).
The separator is the empty string by default, so ["a", "b", "c"].joined() == "abc".

GoalKicker.com – Swift™ Notes for Professionals 20
Section 4.3: String Encoding and DecompositionA Swift String is made of Unicode code points. It can be decomposed and encoded in several different ways.
let str = "ที่�①!"
Decomposing Strings
A string's characters are Unicode extended grapheme clusters:
Array(str.characters) // ["ท่ี", "�", "①", "!"]
The unicodeScalars are the Unicode code points that make up a string (notice that ที่ is one grapheme cluster, but3 code points — 3607, 3637, 3656 — so the length of the resulting array is not the same as with characters):
str.unicodeScalars.map{ $0.value } // [3607, 3637, 3656, 128076, 9312, 33]
You can encode and decompose strings as UTF-8 (a sequence of UInt8s) or UTF-16 (a sequence of UInt16s):
Array(str.utf8) // [224, 184, 151, 224, 184, 181, 224, 185, 136, 240, 159, 145, 140, 226, 145,160, 33]Array(str.utf16) // [3607, 3637, 3656, 55357, 56396, 9312, 33]
String Length and Iteration
A string's characters, unicodeScalars, utf8, and utf16 are all Collections, so you can get their count and iterateover them:
// NOTE: These operations are NOT necessarily fast/cheap!
str.characters.count // 4str.unicodeScalars.count // 6str.utf8.count // 17str.utf16.count // 7
for c in str.characters { // ...for u in str.unicodeScalars { // ...for byte in str.utf8 { // ...for byte in str.utf16 { // ...
Section 4.4: Examine and compare stringsCheck whether a string is empty:
if str.isEmpty { // do something if the string is empty}
// If the string is empty, replace it with a fallback:let result = str.isEmpty ? "fallback string" : str
Check whether two strings are equal (in the sense of Unicode canonical equivalence):
"abc" == "def" // false"abc" == "ABC" // false"abc" == "abc" // true
// "LATIN SMALL LETTER A WITH ACUTE" == "LATIN SMALL LETTER A" + "COMBINING ACUTE ACCENT"

GoalKicker.com – Swift™ Notes for Professionals 21
"\u{e1}" == "a\u{301}" // true
Check whether a string starts/ends with another string:
"fortitude".hasPrefix("fort") // true"Swift Language".hasSuffix("age") // true
Section 4.5: Reversing StringsVersion = 2.2
let aString = "This is a test string."
// first, reverse the String's characterslet reversedCharacters = aString.characters.reverse()
// then convert back to a String with the String() initializerlet reversedString = String(reversedCharacters)
print(reversedString) // ".gnirts tset a si sihT"Version = 3.0
let reversedCharacters = aString.characters.reversed()let reversedString = String(reversedCharacters)
Section 4.6: Check if String contains Characters from aDefined SetLetters
Version = 3.0
let letters = CharacterSet.letters
let phrase = "Test case"let range = phrase.rangeOfCharacter(from: letters)
// range will be nil if no letters is foundif let test = range { print("letters found")}else { print("letters not found")}Version = 2.2
let letters = NSCharacterSet.letterCharacterSet()
let phrase = "Test case"let range = phrase.rangeOfCharacterFromSet(letters)
// range will be nil if no letters is foundif let test = range { print("letters found")}else { print("letters not found")}
The new CharacterSet struct that is also bridged to the Objective-C NSCharacterSet class define several predefinedsets as:

GoalKicker.com – Swift™ Notes for Professionals 22
decimalDigits
capitalizedLetters
alphanumerics
controlCharacters
illegalCharacters
and more you can find in the NSCharacterSet reference.
You also can define your own set of characters:
Version = 3.0
let phrase = "Test case"let charset = CharacterSet(charactersIn: "t")
if let _ = phrase.rangeOfCharacter(from: charset, options: .caseInsensitive) { print("yes")}else { print("no")}Version = 2.2
let charset = NSCharacterSet(charactersInString: "t")
if let _ = phrase.rangeOfCharacterFromSet(charset, options: .CaseInsensitiveSearch, range: nil) { print("yes")}else { print("no")}
You can also include range:
Version = 3.0
let phrase = "Test case"let charset = CharacterSet(charactersIn: "t")
if let _ = phrase.rangeOfCharacter(from: charset, options: .caseInsensitive, range:phrase.startIndex..<phrase.endIndex)) { print("yes")}else { print("no")}
Section 4.7: String IterationVersion < 3.0
let string = "My fantastic string"var index = string.startIndex
while index != string.endIndex { print(string[index]) index = index.successor()}
Note: endIndex is after the end of the string (i.e. string[string.endIndex] is an error, butstring[string.startIndex] is fine). Also, in an empty string (""), string.startIndex == string.endIndex is true.Be sure to check for empty strings, since you cannot call startIndex.successor() on an empty string.

GoalKicker.com – Swift™ Notes for Professionals 23
Version = 3.0
In Swift 3, String indexes no longer have successor(), predecessor(), advancedBy(_:), advancedBy(_:limit:), ordistanceTo(_:).
Instead, those operations are moved to the collection, which is now responsible for incrementing anddecrementing its indices.
Available methods are .index(after:), .index(before:) and .index(_:, offsetBy:).
let string = "My fantastic string"var currentIndex = string.startIndex
while currentIndex != string.endIndex { print(string[currentIndex]) currentIndex = string.index(after: currentIndex)}
Note: we're using currentIndex as a variable name to avoid confusion with the .index method.
And, for example, if you want to go the other way:
Version < 3.0
var index:String.Index? = string.endIndex.predecessor()
while index != nil { print(string[index!]) if index != string.startIndex { index = index.predecessor() } else { index = nil }}
(Or you could just reverse the string first, but if you don't need to go all the way through the string you probablywould prefer a method like this)
Version = 3.0
var currentIndex: String.Index? = string.index(before: string.endIndex)
while currentIndex != nil { print(string[currentIndex!]) if currentIndex != string.startIndex { currentIndex = string.index(before: currentIndex!) } else { currentIndex = nil }}
Note, Index is an object type, and not an Int. You cannot access a character of string as follows:
let string = "My string"string[2] // can't do thisstring.characters[2] // and also can't do this
But you can get a specific index as follows:

GoalKicker.com – Swift™ Notes for Professionals 24
Version < 3.0
index = string.startIndex.advanceBy(2)Version = 3.0
currentIndex = string.index(string.startIndex, offsetBy: 2)
And can go backwards like this:
Version < 3.0
index = string.endIndex.advancedBy(-2)Version = 3.0
currentIndex = string.index(string.endIndex, offsetBy: -2)
If you might exceed the string's bounds, or you want to specify a limit you can use:
Version < 3.0
index = string.startIndex.advanceBy(20, limit: string.endIndex)Version = 3.0
currentIndex = string.index(string.startIndex, offsetBy: 20, limitedBy: string.endIndex)
Alternatively one can just iterate through the characters in a string, but this might be less useful depending on thecontext:
for c in string.characters { print(c)}
Section 4.8: Splitting a String into an ArrayIn Swift you can easily separate a String into an array by slicing it at a certain character:
Version = 3.0
let startDate = "23:51"
let startDateAsArray = startDate.components(separatedBy: ":") // ["23", "51"]`Version = 2.2
let startDate = "23:51"
let startArray = startDate.componentsSeparatedByString(":") // ["23", "51"]`
Or when the separator isn't present:
Version = 3.0
let myText = "MyText"
let myTextArray = myText.components(separatedBy: " ") // myTextArray is ["MyText"]Version = 2.2
let myText = "MyText"
let myTextArray = myText.componentsSeparatedByString(" ") // myTextArray is ["MyText"]
Section 4.9: UnicodeSetting values
Using Unicode directly

GoalKicker.com – Swift™ Notes for Professionals 25
var str: String = "I want to visit 北京, Москва, म◌ु◌ंबई, القاهرة, and 서울시. �"var character: Character = "�"
Using hexadecimal values
var str: String = "\\u{61}\\u{5927}\\u{1F34E}\\u{3C0}" // a大�πvar character: Character = "\\u{65}\\u{301}" // é = "e" + accent mark
Note that the Swift Character can be composed of multiple Unicode code points, but appears to be a singlecharacter. This is called an Extended Grapheme Cluster.
Conversions
String --> Hex
// Accesses views of different Unicode encodings of `str`str.utf8str.utf16str.unicodeScalars // UTF-32
Hex --> String
let value0: UInt8 = 0x61let value1: UInt16 = 0x5927let value2: UInt32 = 0x1F34E
let string0 = String(UnicodeScalar(value0)) // alet string1 = String(UnicodeScalar(value1)) // 大let string2 = String(UnicodeScalar(value2)) // �
// convert hex array to Stringlet myHexArray = [0x43, 0x61, 0x74, 0x203C, 0x1F431] // an Int arrayvar myString = ""for hexValue in myHexArray { myString.append(UnicodeScalar(hexValue))}print(myString) // Cat‼�
Note that for UTF-8 and UTF-16 the conversion is not always this easy because things like emoji cannot be encodedwith a single UTF-16 value. It takes a surrogate pair.
Section 4.10: Converting Swift string to a number typeInt("123") // Returns 123 of Int typeInt("abcd") // Returns nilInt("10") // Returns 10 of Int typeInt("10", radix: 2) // Returns 2 of Int typeDouble("1.5") // Returns 1.5 of Double typeDouble("abcd") // Returns nil
Note that doing this returns an Optional value, which should be unwrapped accordingly before being used.
Section 4.11: Convert String to and from Data / NSDataTo convert String to and from Data / NSData we need to encode this string with a specific encoding. The most

GoalKicker.com – Swift™ Notes for Professionals 26
famous one is UTF-8 which is an 8-bit representation of Unicode characters, suitable for transmission or storage byASCII-based systems. Here is a list of all available String Encodings
String to Data/NSData
Version = 3.0
let data = string.data(using: .utf8)Version = 2.2
let data = string.dataUsingEncoding(NSUTF8StringEncoding)
Data/NSData to String
Version = 3.0
let string = String(data: data, encoding: .utf8)Version = 2.2
let string = String(data: data, encoding: NSUTF8StringEncoding)
Section 4.12: Formatting StringsLeading Zeroslet number: Int = 7let str1 = String(format: "%03d", number) // 007let str2 = String(format: "%05d", number) // 00007
Numbers after Decimallet number: Float = 3.14159let str1 = String(format: "%.2f", number) // 3.14let str2 = String(format: "%.4f", number) // 3.1416 (rounded)
Decimal to Hexadecimallet number: Int = 13627let str1 = String(format: "%2X", number) // 353Blet str2 = String(format: "%2x", number) // 353b (notice the lowercase b)
Alternatively one could use specialized initializer that does the same:
let number: Int = 13627let str1 = String(number, radix: 16, uppercase: true) //353Blet str2 = String(number, radix: 16) // 353b
Decimal to a number with arbitrary radixlet number: Int = 13627let str1 = String(number, radix: 36) // aij
Radix is Int in [2, 36].
Section 4.13: Uppercase and Lowercase StringsTo make all the characters in a String uppercase or lowercase:
Version = 2.2
let text = "AaBbCc"let uppercase = text.uppercaseString // "AABBCC"

GoalKicker.com – Swift™ Notes for Professionals 27
let lowercase = text.lowercaseString // "aabbcc"Version = 3.0
let text = "AaBbCc"let uppercase = text.uppercased() // "AABBCC"let lowercase = text.lowercased() // "aabbcc"
Section 4.14: Remove characters from a string not defined inSetVersion = 2.2
func removeCharactersNotInSetFromText(text: String, set: Set<Character>) -> String { return String(text.characters.filter { set.contains( $0) })}
let text = "Swift 3.0 Come Out"var chars = Set([Character]("abcdefghijklmnopqrstuvwxyzABCDEFGHIJKLKMNOPQRSTUVWXYZ".characters))let newText = removeCharactersNotInSetFromText(text, set: chars) // "SwiftComeOut"Version = 3.0
func removeCharactersNotInSetFromText(text: String, set: Set<Character>) -> String { return String(text.characters.filter { set.contains( $0) })}
let text = "Swift 3.0 Come Out"var chars = Set([Character]("abcdefghijklmnopqrstuvwxyzABCDEFGHIJKLKMNOPQRSTUVWXYZ".characters))let newText = removeCharactersNotInSetFromText(text: text, set: chars)
Section 4.15: Count occurrences of a Character into a StringGiven a String and a Character
let text = "Hello World"let char: Character = "o"
We can count the number of times the Character appears into the String using
let sensitiveCount = text.characters.filter { $0 == char }.count // case-sensitivelet insensitiveCount = text.lowercaseString.characters.filter { $0 ==Character(String(char).lowercaseString) } // case-insensitive
Section 4.16: Remove leading and trailing WhiteSpace andNewLineVersion < 3.0
let someString = " Swift Language \n"let trimmedString =someString.stringByTrimmingCharactersInSet(NSCharacterSet.whitespaceAndNewlineCharacterSet())// "Swift Language"
Method stringByTrimmingCharactersInSet returns a new string made by removing from both ends of the Stringcharacters contained in a given character set.
We can also just remove only whitespace or newline.
Removing only whitespace:
let trimmedWhiteSpace =

GoalKicker.com – Swift™ Notes for Professionals 28
someString.stringByTrimmingCharactersInSet(NSCharacterSet.whitespaceCharacterSet())// "Swift Language \n"
Removing only newline:
let trimmedNewLine =someString.stringByTrimmingCharactersInSet(NSCharacterSet.newlineCharacterSet())// " Swift Language "Version = 3.0
let someString = " Swift Language \n"
let trimmedString = someString.trimmingCharacters(in: .whitespacesAndNewlines)// "Swift Language"
let trimmedWhiteSpace = someString.trimmingCharacters(in: .whitespaces)// "Swift Language \n"
let trimmedNewLine = someString.trimmingCharacters(in: .newlines)// " Swift Language "
Note: all these methods belong to Foundation. Use import Foundation if Foundation isn't already imported via otherlibraries like Cocoa or UIKit.

GoalKicker.com – Swift™ Notes for Professionals 29
Chapter 5: BooleansSection 5.1: What is Bool?Bool is a Boolean type with two possible values: true and false.
let aTrueBool = truelet aFalseBool = false
Bools are used in control-flow statements as conditions. The if statement uses a Boolean condition to determinewhich block of code to run:
func test(_ someBoolean: Bool) { if someBoolean { print("IT'S TRUE!") } else { print("IT'S FALSE!") }}test(aTrueBool) // prints "IT'S TRUE!"
Section 5.2: Booleans and Inline ConditionalsA clean way to handle booleans is using an inline conditional with the a ? b : c ternary operator, which is part ofSwift's Basic Operations.
The inline conditional is made up of 3 components:
question ? answerIfTrue : answerIfFalse
where question is a boolean that is evaluated and answerIfTrue is the value returned if the question is true, andanswerIfFalse is the value returned if the question is false.
The expression above is the same as:
if question { answerIfTrue} else { answerIfFalse}
With inline conditionals you return a value based on a boolean:
func isTurtle(_ value: Bool) { let color = value ? "green" : "red" print("The animal is \(color)")}
isTurtle(true) // outputs 'The animal is green'isTurtle(false) // outputs 'The animal is red'
You can also call methods based on a boolean value:
func actionDark() {
GoalKicker.com – Swift™ Notes for Professionals 30
print("Welcome to the dark side")}
func actionJedi() { print("Welcome to the Jedi order")}
func welcome(_ isJedi: Bool) { isJedi ? actionJedi() : actionDark()}
welcome(true) // outputs 'Welcome to the Jedi order'welcome(false) // outputs 'Welcome to the dark side'
Inline conditionals allow for clean one-liner boolean evaluations
Section 5.3: Boolean Logical OperatorsThe OR (||) operator returns true if one of its two operands evaluates to true, otherwise it returns false. Forexample, the following code evaluates to true because at least one of the expressions either side of the ORoperator is true:
if (10 < 20) || (20 < 10) { print("Expression is true")}
The AND (&&) operator returns true only if both operands evaluate to be true. The following example will returnfalse because only one of the two operand expressions evaluates to true:
if (10 < 20) && (20 < 10) { print("Expression is true")}
The XOR (^) operator returns true if one and only one of the two operands evaluates to true. For example, thefollowing code will return true since only one operator evaluates to be true:
if (10 < 20) ^ (20 < 10) { print("Expression is true")}
Section 5.4: Negate a Bool with the prefix ! operatorThe prefix ! operator returns the logical negation of its argument. That is, !true returns false, and !false returnstrue.
print(!true) // prints "false"print(!false) // prints "true"
func test(_ someBoolean: Bool) { if !someBoolean { print("someBoolean is false") }}

GoalKicker.com – Swift™ Notes for Professionals 31
Chapter 6: ArraysArray is an ordered, random-access collection type. Arrays are one of the most commonly used data types in anapp. We use the Array type to hold elements of a single type, the array's Element type. An array can store any kindof elements---from integers to strings to classes.
Section 6.1: Basics of ArraysArray is an ordered collection type in the Swift standard library. It provides O(1) random access and dynamicreallocation. Array is a generic type, so the type of values it contains are known at compile time.
As Array is a value type, its mutability is defined by whether it is annotated as a var (mutable) or let (immutable).
The type [Int] (meaning: an array containing Ints) is syntactic sugar for Array<T>.
Read more about arrays in The Swift Programming Language.
Empty arrays
The following three declarations are equivalent:
// A mutable array of Strings, initially empty.
var arrayOfStrings: [String] = [] // type annotation + array literalvar arrayOfStrings = [String]() // invoking the [String] initializervar arrayOfStrings = Array<String>() // without syntactic sugar
Array literals
An array literal is written with square brackets surrounding comma-separated elements:
// Create an immutable array of type [Int] containing 2, 4, and 7let arrayOfInts = [2, 4, 7]
The compiler can usually infer the type of an array based on the elements in the literal, but explicit typeannotations can override the default:
let arrayOfUInt8s: [UInt8] = [2, 4, 7] // type annotation on the variablelet arrayOfUInt8s = [2, 4, 7] as [UInt8] // type annotation on the initializer expressionlet arrayOfUInt8s = [2 as UInt8, 4, 7] // explicit for one element, inferred for the others
Arrays with repeated values// An immutable array of type [String], containing ["Example", "Example", "Example"]let arrayOfStrings = Array(repeating: "Example",count: 3)
Creating arrays from other sequenceslet dictionary = ["foo" : 4, "bar" : 6]
// An immutable array of type [(String, Int)], containing [("bar", 6), ("foo", 4)]let arrayOfKeyValuePairs = Array(dictionary)
Multi-dimensional arrays
In Swift, a multidimensional array is created by nesting arrays: a 2-dimensional array of Int is [[Int]] (orArray<Array<Int>>).
let array2x3 = [ [1, 2, 3],
GoalKicker.com – Swift™ Notes for Professionals 32
[4, 5, 6]]// array2x3[0][1] is 2, and array2x3[1][2] is 6.
To create a multidimensional array of repeated values, use nested calls of the array initializer:
var array3x4x5 = Array(repeating: Array(repeating: Array(repeating: 0,count: 5),count: 4),count: 3)
Section 6.2: Extracting values of a given type from an Arraywith flatMap(_:)The things Array contains values of Any type.
let things: [Any] = [1, "Hello", 2, true, false, "World", 3]
We can extract values of a given type and create a new Array of that specific type. Let's say we want to extract allthe Int(s) and put them into an Int Array in a safe way.
let numbers = things.flatMap { $0 as? Int }
Now numbers is defined as [Int]. The flatMap function discard all nil elements and the result thus contains onlythe following values:
[1, 2, 3]
Section 6.3: Combining an Array's elements withreduce(_:combine:)reduce(_:combine:) can be used in order to combine the elements of a sequence into a single value. It takes aninitial value for the result, as well as a closure to apply to each element – which will return the new accumulatedvalue.
For example, we can use it to sum an array of numbers:
let numbers = [2, 5, 7, 8, 10, 4]
let sum = numbers.reduce(0) {accumulator, element in return accumulator + element}
print(sum) // 36
We're passing 0 into the initial value, as that's the logical initial value for a summation. If we passed in a value of N,the resulting sum would be N + 36. The closure passed to reduce has two arguments. accumulator is the currentaccumulated value, which is assigned the value that the closure returns at each iteration. element is the currentelement in the iteration.
As in this example, we're passing an (Int, Int) -> Int closure to reduce, which is simply outputting the additionof the two inputs – we can actually pass in the + operator directly, as operators are functions in Swift:
let sum = numbers.reduce(0, combine: +)

GoalKicker.com – Swift™ Notes for Professionals 33
Section 6.4: Flattening the result of an Array transformationwith flatMap(_:)As well as being able to create an array by filtering out nil from the transformed elements of a sequence, there isalso a version of flatMap(_:) that expects the transformation closure to return a sequence S.
extension SequenceType { public func flatMap<S : SequenceType>(transform: (Self.Generator.Element) throws -> S) rethrows-> [S.Generator.Element]}
Each sequence from the transformation will be concatenated, resulting in an array containing the combinedelements of each sequence – [S.Generator.Element].
Combining the characters in an array of strings
For example, we can use it to take an array of prime strings and combine their characters into a single array:
let primes = ["2", "3", "5", "7", "11", "13", "17", "19"]let allCharacters = primes.flatMap { $0.characters }// => "["2", "3", "5", "7", "1", "1", "1", "3", "1", "7", "1", "9"]"
Breaking the above example down:
primes is a [String] (As an array is a sequence, we can call flatMap(_:) on it).1.The transformation closure takes in one of the elements of primes, a String2.(Array<String>.Generator.Element).The closure then returns a sequence of type String.CharacterView.3.The result is then an array containing the combined elements of all the sequences from each of the4.transformation closure calls – [String.CharacterView.Generator.Element].
Flattening a multidimensional array
As flatMap(_:) will concatenate the sequences returned from the transformation closure calls, it can be used toflatten a multidimensional array – such as a 2D array into a 1D array, a 3D array into a 2D array etc.
This can simply be done by returning the given element $0 (a nested array) in the closure:
// A 2D array of type [[Int]]let array2D = [[1, 3], [4], [6, 8, 10], [11]]
// A 1D array of type [Int]let flattenedArray = array2D.flatMap { $0 }
print(flattenedArray) // [1, 3, 4, 6, 8, 10, 11]
Section 6.5: Lazily flattening a multidimensional Array withflatten()We can use flatten() in order to lazily reduce the nesting of a multi-dimensional sequence.
For example, lazy flattening a 2D array into a 1D array:
// A 2D array of type [[Int]]let array2D = [[1, 3], [4], [6, 8, 10], [11]]

GoalKicker.com – Swift™ Notes for Professionals 34
// A FlattenBidirectionalCollection<[[Int]]>let lazilyFlattenedArray = array2D.flatten()
print(lazilyFlattenedArray.contains(4)) // true
In the above example, flatten() will return a FlattenBidirectionalCollection, which will lazily apply theflattening of the array. Therefore contains(_:) will only require the first two nested arrays of array2D to beflattened – as it will short-circuit upon finding the desired element.
Section 6.6: Filtering out nil from an Array transformationwith flatMap(_:)You can use flatMap(_:) in a similar manner to map(_:) in order to create an array by applying a transform to asequence's elements.
extension SequenceType { public func flatMap<T>(@noescape transform: (Self.Generator.Element) throws -> T?) rethrows ->[T]}
The difference with this version of flatMap(_:) is that it expects the transform closure to return an Optional valueT? for each of the elements. It will then safely unwrap each of these optional values, filtering out nil – resulting inan array of [T].
For example, you can this in order to transform a [String] into a [Int] using Int's failable String initializer,filtering out any elements that cannot be converted:
let strings = ["1", "foo", "3", "4", "bar", "6"]
let numbersThatCanBeConverted = strings.flatMap { Int($0) }
print(numbersThatCanBeConverted) // [1, 3, 4, 6]
You can also use flatMap(_:)'s ability to filter out nil in order to simply convert an array of optionals into an arrayof non-optionals:
let optionalNumbers : [Int?] = [nil, 1, nil, 2, nil, 3]
let numbers = optionalNumbers.flatMap { $0 }
print(numbers) // [1, 2, 3]
Section 6.7: Subscripting an Array with a RangeOne can extract a series of consecutive elements from an Array using a Range.
let words = ["Hey", "Hello", "Bonjour", "Welcome", "Hi", "Hola"]let range = 2...4let slice = words[range] // ["Bonjour", "Welcome", "Hi"]
Subscripting an Array with a Range returns an ArraySlice. It's a subsequence of the Array.
In our example, we have an Array of Strings, so we get back ArraySlice<String>.
Although an ArraySlice conforms to CollectionType and can be used with sort, filter, etc, its purpose is not for
GoalKicker.com – Swift™ Notes for Professionals 35
long-term storage but for transient computations: it should be converted back into an Array as soon as you'vefinished working with it.
For this, use the Array() initializer:
let result = Array(slice)
To sum up in a simple example without intermediary steps:
let words = ["Hey", "Hello", "Bonjour", "Welcome", "Hi", "Hola"]let selectedWords = Array(words[2...4]) // ["Bonjour", "Welcome", "Hi"]
Section 6.8: Removing element from an array withoutknowing it's indexGenerally, if we want to remove an element from an array, we need to know it's index so that we can remove iteasily using remove(at:) function.
But what if we don't know the index but we know the value of element to be removed!
So here is the simple extension to an array which will allow us to remove an element from array easily withoutknowing it's index:
Swift3extension Array where Element: Equatable {
mutating func remove(_ element: Element) { _ = index(of: element).flatMap { self.remove(at: $0) } }}
e.g.
var array = ["abc", "lmn", "pqr", "stu", "xyz"] array.remove("lmn") print("\(array)") //["abc", "pqr", "stu", "xyz"] array.remove("nonexistent") print("\(array)") //["abc", "pqr", "stu", "xyz"] //if provided element value is not present, then it will do nothing!
Also if, by mistake, we did something like this: array.remove(25) i.e. we provided value with different data type,compiler will throw an error mentioning-cannot convert value to expected argument type
Section 6.9: Sorting an Array of StringsVersion = 3.0
The most simple way is to use sorted():
let words = ["Hello", "Bonjour", "Salute", "Ahola"]let sortedWords = words.sorted()print(sortedWords) // ["Ahola", "Bonjour", "Hello", "Salute"]

GoalKicker.com – Swift™ Notes for Professionals 36
or sort()
var mutableWords = ["Hello", "Bonjour", "Salute", "Ahola"]mutableWords.sort()print(mutableWords) // ["Ahola", "Bonjour", "Hello", "Salute"]
You can pass a closure as an argument for sorting:
let words = ["Hello", "Bonjour", "Salute", "Ahola"]let sortedWords = words.sorted(isOrderedBefore: { $0 > $1 })print(sortedWords) // ["Salute", "Hello", "Bonjour", "Ahola"]
Alternative syntax with a trailing closure:
let words = ["Hello", "Bonjour", "Salute", "Ahola"]let sortedWords = words.sorted() { $0 > $1 }print(sortedWords) // ["Salute", "Hello", "Bonjour", "Ahola"]
But there will be unexpected results if the elements in the array are not consistent:
let words = ["Hello", "bonjour", "Salute", "ahola"]let unexpected = words.sorted()print(unexpected) // ["Hello", "Salute", "ahola", "bonjour"]
To address this issue, either sort on a lowercase version of the elements:
let words = ["Hello", "bonjour", "Salute", "ahola"]let sortedWords = words.sorted { $0.lowercased() < $1.lowercased() }print(sortedWords) // ["ahola", "bonjour", "Hello", "Salute"]
Or import Foundation and use NSString's comparison methods like caseInsensitiveCompare:
let words = ["Hello", "bonjour", "Salute", "ahola"]let sortedWords = words.sorted { $0.caseInsensitiveCompare($1) == .orderedAscending }print(sortedWords) // ["ahola", "bonjour", "Hello", "Salute"]
Alternatively, use localizedCaseInsensitiveCompare, which can manage diacritics.
To properly sort Strings by the numeric value they contain, use compare with the .numeric option:
let files = ["File-42.txt", "File-01.txt", "File-5.txt", "File-007.txt", "File-10.txt"]let sortedFiles = files.sorted() { $0.compare($1, options: .numeric) == .orderedAscending }print(sortedFiles) // ["File-01.txt", "File-5.txt", "File-007.txt", "File-10.txt", "File-42.txt"]
Section 6.10: Accessing indices safelyBy adding the following extension to array indices can be accessed without knowing if the index is inside bounds.
extension Array { subscript (safe index: Int) -> Element? { return indices ~= index ? self[index] : nil }}
example:

GoalKicker.com – Swift™ Notes for Professionals 37
if let thirdValue = array[safe: 2] { print(thirdValue)}
Section 6.11: Filtering an ArrayYou can use the filter(_:) method on SequenceType in order to create a new array containing the elements of thesequence that satisfy a given predicate, which can be provided as a closure.
For example, filtering even numbers from an [Int]:
let numbers = [22, 41, 23, 30]
let evenNumbers = numbers.filter { $0 % 2 == 0 }
print(evenNumbers) // [22, 30]
Filtering a [Person], where their age is less than 30:
struct Person { var age : Int}
let people = [Person(age: 22), Person(age: 41), Person(age: 23), Person(age: 30)]
let peopleYoungerThan30 = people.filter { $0.age < 30 }
print(peopleYoungerThan30) // [Person(age: 22), Person(age: 23)]
Section 6.12: Transforming the elements of an Array withmap(_:)As Array conforms to SequenceType, we can use map(_:) to transform an array of A into an array of B using aclosure of type (A) throws -> B.
For example, we could use it to transform an array of Ints into an array of Strings like so:
let numbers = [1, 2, 3, 4, 5]let words = numbers.map { String($0) }print(words) // ["1", "2", "3", "4", "5"]
map(_:) will iterate through the array, applying the given closure to each element. The result of that closure will beused to populate a new array with the transformed elements.
Since String has an initialiser that receives an Int we can also use this clearer syntax:
let words = numbers.map(String.init)
A map(_:) transform need not change the type of the array – for example, it could also be used to multiply an arrayof Ints by two:
let numbers = [1, 2, 3, 4, 5]let numbersTimes2 = numbers.map {$0 * 2}print(numbersTimes2) // [2, 4, 6, 8, 10]

GoalKicker.com – Swift™ Notes for Professionals 38
Section 6.13: Useful MethodsDetermine whether an array is empty or return its size
var exampleArray = [1,2,3,4,5]exampleArray.isEmpty //falseexampleArray.count //5
Reverse an Array Note: The result is not performed on the array the method is called on and must be putinto its own variable.
exampleArray = exampleArray.reverse()//exampleArray = [9, 8, 7, 6, 5, 3, 2]
Section 6.14: Sorting an Arrayvar array = [3, 2, 1]
Creating a new sorted array
As Array conforms to SequenceType, we can generate a new array of the sorted elements using a built in sortmethod.
Version = 2.1 Version = 2.2
In Swift 2, this is done with the sort() method.
let sorted = array.sort() // [1, 2, 3]Version ≥ 3.0
As of Swift 3, it has been re-named to sorted().
let sorted = array.sorted() // [1, 2, 3]
Sorting an existing array in place
As Array conforms to MutableCollectionType, we can sort its elements in place.
Version = 2.1 Version = 2.2
In Swift 2, this is done using the sortInPlace() method.
array.sortInPlace() // [1, 2, 3]Version ≥ 3.0
As of Swift 3, it has been renamed to sort().
array.sort() // [1, 2, 3]
Note: In order to use the above methods, the elements must conform to the Comparable protocol.
Sorting an array with a custom ordering
You may also sort an array using a closure to define whether one element should be ordered before another –

GoalKicker.com – Swift™ Notes for Professionals 39
which isn't restricted to arrays where the elements must be Comparable. For example, it doesn't make sense for aLandmark to be Comparable – but you can still sort an array of landmarks by height or name.
struct Landmark { let name : String let metersTall : Int}
var landmarks = [Landmark(name: "Empire State Building", metersTall: 443), Landmark(name: "Eifell Tower", metersTall: 300), Landmark(name: "The Shard", metersTall: 310)]
Version = 2.1 Version = 2.2
// sort landmarks by height (ascending)landmarks.sortInPlace {$0.metersTall < $1.metersTall}
print(landmarks) // [Landmark(name: "Eifell Tower", metersTall: 300), Landmark(name: "The Shard",metersTall: 310), Landmark(name: "Empire State Building", metersTall: 443)]
// create new array of landmarks sorted by namelet alphabeticalLandmarks = landmarks.sort {$0.name < $1.name}
print(alphabeticalLandmarks) // [Landmark(name: "Eifell Tower", metersTall: 300), Landmark(name:"Empire State Building", metersTall: 443), Landmark(name: "The Shard", metersTall: 310)]Version ≥ 3.0
// sort landmarks by height (ascending)landmarks.sort {$0.metersTall < $1.metersTall}
// create new array of landmarks sorted by namelet alphabeticalLandmarks = landmarks.sorted {$0.name < $1.name}
Note: String comparison can yield unexpected results if the strings are inconsistent, see Sorting an Arrayof Strings.
Section 6.15: Finding the minimum or maximum element of anArrayVersion = 2.1 Version = 2.2
You can use the minElement() and maxElement() methods to find the minimum or maximum element in a givensequence. For example, with an array of numbers:
let numbers = [2, 6, 1, 25, 13, 7, 9]
let minimumNumber = numbers.minElement() // Optional(1)let maximumNumber = numbers.maxElement() // Optional(25)Version ≥ 3.0
As of Swift 3, the methods have been renamed to min() and max() respectively:
let minimumNumber = numbers.min() // Optional(1)let maximumNumber = numbers.max() // Optional(25)
The returned values from these methods are Optional to reflect the fact that the array could be empty – if it is, nilwill be returned.

GoalKicker.com – Swift™ Notes for Professionals 40
Note: The above methods require the elements to conform to the Comparable protocol.
Finding the minimum or maximum element with a custom ordering
You may also use the above methods with a custom closure, defining whether one element should be orderedbefore another, allowing you to find the minimum or maximum element in an array where the elements aren'tnecessarily Comparable.
For example, with an array of vectors:
struct Vector2 { let dx : Double let dy : Double var magnitude : Double {return sqrt(dx*dx+dy*dy)}}
let vectors = [Vector2(dx: 3, dy: 2), Vector2(dx: 1, dy: 1), Vector2(dx: 2, dy: 2)]
Version = 2.1 Version = 2.2
// Vector2(dx: 1.0, dy: 1.0)let lowestMagnitudeVec2 = vectors.minElement { $0.magnitude < $1.magnitude }
// Vector2(dx: 3.0, dy: 2.0)let highestMagnitudeVec2 = vectors.maxElement { $0.magnitude < $1.magnitude }Version ≥ 3.0
let lowestMagnitudeVec2 = vectors.min { $0.magnitude < $1.magnitude }let highestMagnitudeVec2 = vectors.max { $0.magnitude < $1.magnitude }
Section 6.16: Modifying values in an arrayThere are multiple ways to append values onto an array
var exampleArray = [1,2,3,4,5]exampleArray.append(6)//exampleArray = [1, 2, 3, 4, 5, 6]var sixOnwards = [7,8,9,10]exampleArray += sixOnwards//exampleArray = [1, 2, 3, 4, 5, 6, 7, 8, 9, 10]
and remove values from an array
exampleArray.removeAtIndex(3)//exampleArray = [1, 2, 3, 5, 6, 7, 8, 9, 10]exampleArray.removeLast()//exampleArray = [1, 2, 3, 5, 6, 7, 8, 9]exampleArray.removeFirst()//exampleArray = [2, 3, 5, 6, 7, 8, 9]
Section 6.17: Comparing 2 Arrays with zipThe zip function accepts 2 parameters of type SequenceType and returns a Zip2Sequence where each elementcontains a value from the first sequence and one from the second sequence.
Example

GoalKicker.com – Swift™ Notes for Professionals 41
let nums = [1, 2, 3]let animals = ["Dog", "Cat", "Tiger"]let numsAndAnimals = zip(nums, animals)
nomsAndAnimals now contains the following values
sequence1 sequence11 "Dog"
2 "Cat"
3 "Tiger"
This is useful when you want to perform some kind of comparation between the n-th element of each Array.
Example
Given 2 Arrays of Int(s)
let list0 = [0, 2, 4]let list1 = [0, 4, 8]
you want to check whether each value into list1 is the double of the related value in list0.
let list1HasDoubleOfList0 = !zip(list0, list1).filter { $0 != (2 * $1)}.isEmpty
Section 6.18: Grouping Array valuesIf we have a struct like this
struct Box { let name: String let thingsInside: Int}
and an array of Box(es)
let boxes = [ Box(name: "Box 0", thingsInside: 1), Box(name: "Box 1", thingsInside: 2), Box(name: "Box 2", thingsInside: 3), Box(name: "Box 3", thingsInside: 1), Box(name: "Box 4", thingsInside: 2), Box(name: "Box 5", thingsInside: 3), Box(name: "Box 6", thingsInside: 1)]
we can group the boxes by the thingsInside property in order to get a Dictionary where the key is the number ofthings and the value is an array of boxes.
let grouped = boxes.reduce([Int:[Box]]()) { (res, box) -> [Int:[Box]] in var res = res res[box.thingsInside] = (res[box.thingsInside] ?? []) + [box] return res}
Now grouped is a [Int:[Box]] and has the following content

GoalKicker.com – Swift™ Notes for Professionals 42
[ 2: [Box(name: "Box 1", thingsInside: 2), Box(name: "Box 4", thingsInside: 2)], 3: [Box(name: "Box 2", thingsInside: 3), Box(name: "Box 5", thingsInside: 3)], 1: [Box(name: "Box 0", thingsInside: 1), Box(name: "Box 3", thingsInside: 1), Box(name: "Box6", thingsInside: 1)]]
Section 6.19: Value SemanticsCopying an array will copy all of the items inside the original array.
Changing the new array will not change the original array.
var originalArray = ["Swift", "is", "great!"]var newArray = originalArraynewArray[2] = "awesome!"//originalArray = ["Swift", "is", "great!"]//newArray = ["Swift", "is", "awesome!"]
Copied arrays will share the same space in memory as the original until they are changed. As a result of this there isa performance hit when the copied array is given its own space in memory as it is changed for the first time.
Section 6.20: Accessing Array ValuesThe following examples will use this array to demonstrate accessing values
var exampleArray:[Int] = [1,2,3,4,5]//exampleArray = [1, 2, 3, 4, 5]
To access a value at a known index use the following syntax:
let exampleOne = exampleArray[2]//exampleOne = 3
Note: The value at index two is the third value in the Array. Arrays use a zero based index which means the firstelement in the Array is at index 0.
let value0 = exampleArray[0]let value1 = exampleArray[1]let value2 = exampleArray[2]let value3 = exampleArray[3]let value4 = exampleArray[4]//value0 = 1//value1 = 2//value2 = 3//value3 = 4//value4 = 5
Access a subset of an Array using filter:
var filteredArray = exampleArray.filter({ $0 < 4 })//filteredArray = [1, 2, 3]
Filters can have complex conditions like filtering only even numbers:
var evenArray = exampleArray.filter({ $0 % 2 == 0 })

GoalKicker.com – Swift™ Notes for Professionals 43
//evenArray = [2, 4]
It is also possible to return the index of a given value, returning nil if the value wasn't found.
exampleArray.indexOf(3) // Optional(2)
There are methods for the first, last, maximum or minimum value in an Array. These methods will return nil if theArray is empty.
exampleArray.first // Optional(1)exampleArray.last // Optional(5)exampleArray.maxElement() // Optional(5)exampleArray.minElement() // Optional(1)

GoalKicker.com – Swift™ Notes for Professionals 44
Chapter 7: TuplesA tuple type is a comma-separated list of types, enclosed in parentheses.
This list of types also can have name of the elements and use those names to refer to the values of the individualelements.
An element name consists of an identifier followed immediately by a colon (:).
Common use -
We can use a tuple type as the return type of a function to enable the function to return a single tuple containingmultiple values
Section 7.1: What are Tuples?Tuples group multiple values into a single compound value. The values within a tuple can be of any type and do nothave to be of the same type as each other.
Tuples are created by grouping any amount of values:
let tuple = ("one", 2, "three")
// Values are read using index numbers starting at zeroprint(tuple.0) // oneprint(tuple.1) // 2print(tuple.2) // three
Also individual values can be named when the tuple is defined:
let namedTuple = (first: 1, middle: "dos", last: 3)
// Values can be read with the named propertyprint(namedTuple.first) // 1print(namedTuple.middle) // dos
// And still with the index numberprint(namedTuple.2) // 3
They can also be named when being used as a variable and even have the ability to have optional values inside:
var numbers: (optionalFirst: Int?, middle: String, last: Int)?
//Later Onnumbers = (nil, "dos", 3)
print(numbers.optionalFirst)// nilprint(numbers.middle)//"dos"print(numbers.last)//3
Section 7.2: Decomposing into individual variablesTuples can be decomposed into individual variables with the following syntax:
let myTuple = (name: "Some Name", age: 26)let (first, second) = myTuple

GoalKicker.com – Swift™ Notes for Professionals 45
print(first) // "Some Name"print(second) // 26
This syntax can be used regardless of if the tuple has unnamed properties:
let unnamedTuple = ("uno", "dos")let (one, two) = unnamedTupleprint(one) // "uno"print(two) // "dos"
Specific properties can be ignored by using underscore (_):
let longTuple = ("ichi", "ni", "san")let (_, _, third) = longTupleprint(third) // "san"
Section 7.3: Tuples as the Return Value of FunctionsFunctions can return tuples:
func tupleReturner() -> (Int, String) { return (3, "Hello")}
let myTuple = tupleReturner()print(myTuple.0) // 3print(myTuple.1) // "Hello"
If you assign parameter names, they can be used from the return value:
func tupleReturner() -> (anInteger: Int, aString: String) { return (3, "Hello")}
let myTuple = tupleReturner()print(myTuple.anInteger) // 3print(myTuple.aString) // "Hello"
Section 7.4: Using a typealias to name your tuple typeOccasionally you may want to use the same tuple type in multiple places throughout your code. This can quickly getmessy, especially if your tuple is complex:
// Define a circle tuple by its center point and radiuslet unitCircle: (center: (x: CGFloat, y: CGFloat), radius: CGFloat) = ((0.0, 0.0), 1.0)
func doubleRadius(ofCircle circle: (center: (x: CGFloat, y: CGFloat), radius: CGFloat)) -> (center:(x: CGFloat, y: CGFloat), radius: CGFloat) { return (circle.center, circle.radius * 2.0)}
If you use a certain tuple type in more than one place, you can use the typealias keyword to name your tuple type.
// Define a circle tuple by its center point and radiustypealias Circle = (center: (x: CGFloat, y: CGFloat), radius: CGFloat)
let unitCircle: Circle = ((0.0, 0.0), 1)

GoalKicker.com – Swift™ Notes for Professionals 46
func doubleRadius(ofCircle circle: Circle) -> Circle { // Aliased tuples also have access to value labels in the original tuple type. return (circle.center, circle.radius * 2.0)}
If you find yourself doing this too often, however, you should consider using a struct instead.
Section 7.5: Swapping valuesTuples are useful to swap values between 2 (or more) variables without using temporary variables.
Example with 2 variables
Given 2 variables
var a = "Marty McFly"var b = "Emmett Brown"
we can easily swap the values
(a, b) = (b, a)
Result:
print(a) // "Emmett Brown"print(b) // "Marty McFly"
Example with 4 variablesvar a = 0var b = 1var c = 2var d = 3
(a, b, c, d) = (d, c, b, a)
print(a, b, c, d) // 3, 2, 1, 0
Section 7.6: Tuples as Case in SwitchUse tuples in a switch
let switchTuple = (firstCase: true, secondCase: false) switch switchTuple { case (true, false): // do something case (true, true): // do something case (false, true): // do something case (false, false): // do something}
Or in combination with an Enum For example with Size Classes:

GoalKicker.com – Swift™ Notes for Professionals 47
let switchTuple = (UIUserInterfaceSizeClass.Compact, UIUserInterfaceSizeClass.Regular) switch switchTuple { case (.Regular, .Compact): //statement case (.Regular, .Regular): //statement case (.Compact, .Regular): //statement case (.Compact, .Compact): //statement }
GoalKicker.com – Swift™ Notes for Professionals 48
Chapter 8: EnumsSection 8.1: Basic enumerationsAn enum provides a set of related values:
enum Direction { case up case down case left case right}
enum Direction { case up, down, left, right }
Enum values can be used by their fully-qualified name, but you can omit the type name when it can be inferred:
let dir = Direction.uplet dir: Direction = Direction.uplet dir: Direction = .up
// func move(dir: Direction)...move(Direction.up)move(.up)
obj.dir = Direction.upobj.dir = .up
The most fundamental way of comparing/extracting enum values is with a switch statement:
switch dir {case .up: // handle the up casecase .down: // handle the down casecase .left: // handle the left casecase .right: // handle the right case}
Simple enums are automatically Hashable, Equatable and have string conversions:
if dir == .down { ... }
let dirs: Set<Direction> = [.right, .left]
print(Direction.up) // prints "up"debugPrint(Direction.up) // prints "Direction.up"
Section 8.2: Enums with associated valuesEnum cases can contain one or more payloads (associated values):
enum Action { case jump case kick

GoalKicker.com – Swift™ Notes for Professionals 49
case move(distance: Float) // The "move" case has an associated distance}
The payload must be provided when instantiating the enum value:
performAction(.jump)performAction(.kick)performAction(.move(distance: 3.3))performAction(.move(distance: 0.5))
The switch statement can extract the associated value:
switch action {case .jump: ...case .kick: ...case .move(let distance): // or case let .move(distance): print("Moving: \(distance)")}
A single case extraction can be done using if case:
if case .move(let distance) = action { print("Moving: \(distance)")}
The guard case syntax can be used for later use extraction:
guard case .move(let distance) = action else { print("Action is not move") return}
Enums with associated values are not Equatable by default. Implementation of the == operator must be donemanually:
extension Action: Equatable { }
func ==(lhs: Action, rhs: Action) -> Bool { switch lhs { case .jump: if case .jump = rhs { return true } case .kick: if case .kick = rhs { return true } case .move(let lhsDistance): if case .move (let rhsDistance) = rhs { return lhsDistance ==rhsDistance } } return false}
Section 8.3: Indirect payloadsNormally, enums can't be recursive (because they would require infinite storage):
enum Tree<T> { case leaf(T) case branch(Tree<T>, Tree<T>) // error: recursive enum 'Tree<T>' is not marked 'indirect'}
GoalKicker.com – Swift™ Notes for Professionals 50
The indirect keyword makes the enum store its payload with a layer of indirection, rather than storing it inline.You can use this keyword on a single case:
enum Tree<T> { case leaf(T) indirect case branch(Tree<T>, Tree<T>)}
let tree = Tree.branch(.leaf(1), .branch(.leaf(2), .leaf(3)))
indirect also works on the whole enum, making any case indirect when necessary:
indirect enum Tree<T> { case leaf(T) case branch(Tree<T>, Tree<T>)}
Section 8.4: Raw and Hash valuesEnums without payloads can have raw values of any literal type:
enum Rotation: Int { case up = 0 case left = 90 case upsideDown = 180 case right = 270}
Enums without any specific type do not expose the rawValue property
enum Rotation { case up case right case down case left}
let foo = Rotation.upfoo.rawValue //error
Integer raw values are assumed to start at 0 and increase monotonically:
enum MetasyntacticVariable: Int { case foo // rawValue is automatically 0 case bar // rawValue is automatically 1 case baz = 7 case quux // rawValue is automatically 8}
String raw values can be synthesized automatically:
enum MarsMoon: String { case phobos // rawValue is automatically "phobos" case deimos // rawValue is automatically "deimos"}
A raw-valued enum automatically conforms to RawRepresentable. You can get an enum value's corresponding raw

GoalKicker.com – Swift™ Notes for Professionals 51
value with .rawValue:
func rotate(rotation: Rotation) { let degrees = rotation.rawValue ...}
You can also create an enum from a raw value using init?(rawValue:):
let rotation = Rotation(rawValue: 0) // returns Rotation.Uplet otherRotation = Rotation(rawValue: 45) // returns nil (there is no Rotation with rawValue 45)
if let moon = MarsMoon(rawValue: str) { print("Mars has a moon named \(str)")} else { print("Mars doesn't have a moon named \(str)")}
If you wish to get the hash value of a specific enum you can access its hashValue, The hash value will return theindex of the enum starting from zero.
let quux = MetasyntacticVariable(rawValue: 8)// rawValue is 8quux?.hashValue //hashValue is 3
Section 8.5: InitializersEnums can have custom init methods that can be more useful than the default init?(rawValue:). Enums can alsostore values as well. This can be useful for storing the values they where initialized with and retrieving that valuelater.
enum CompassDirection { case north(Int) case south(Int) case east(Int) case west(Int)
init?(degrees: Int) { switch degrees { case 0...45: self = .north(degrees) case 46...135: self = .east(degrees) case 136...225: self = .south(degrees) case 226...315: self = .west(degrees) case 316...360: self = .north(degrees) default: return nil } } var value: Int = { switch self { case north(let degrees): return degrees case south(let degrees):
GoalKicker.com – Swift™ Notes for Professionals 52
return degrees case east(let degrees): return degrees case west(let degrees): return degrees } }}
Using that initializer we can do this:
var direction = CompassDirection(degrees: 0) // Returns CompassDirection.northdirection = CompassDirection(degrees: 90) // Returns CompassDirection.eastprint(direction.value) //prints 90direction = CompassDirection(degrees: 500) // Returns nil
Section 8.6: Enumerations share many features with classesand structuresEnums in Swift are much more powerful than some of their counterparts in other languages, such as C. They sharemany features with classes and structs, such as defining initialisers, computed properties, instance methods,protocol conformances and extensions.
protocol ChangesDirection { mutating func changeDirection()}
enum Direction { // enumeration cases case up, down, left, right // initialise the enum instance with a case // that's in the opposite direction to another init(oppositeTo otherDirection: Direction) { self = otherDirection.opposite } // computed property that returns the opposite direction var opposite: Direction { switch self { case .up: return .down case .down: return .up case .left: return .right case .right: return .left } }}
// extension to Direction that adds conformance to the ChangesDirection protocolextension Direction: ChangesDirection { mutating func changeDirection() { self = .left }}

GoalKicker.com – Swift™ Notes for Professionals 53
var dir = Direction(oppositeTo: .down) // Direction.up
dir.changeDirection() // Direction.left
let opposite = dir.opposite // Direction.right
Section 8.7: Nested EnumerationsYou can nest enumerations one inside an other, this allows you to structure hierarchical enums to be moreorganized and clear.
enum Orchestra { enum Strings { case violin case viola case cello case doubleBasse } enum Keyboards { case piano case celesta case harp } enum Woodwinds { case flute case oboe case clarinet case bassoon case contrabassoon }}
And you can use it like that:
let instrment1 = Orchestra.Strings.violalet instrment2 = Orchestra.Keyboards.piano

GoalKicker.com – Swift™ Notes for Professionals 54
Chapter 9: StructsSection 9.1: Structs are value typesUnlike classes, which are passed by reference, structures are passed through copying:
first = "Hello"second = firstfirst += " World!"// first == "Hello World!"// second == "Hello"
String is a structure, therefore it's copied on assignment.
Structures also cannot be compared using identity operator:
window0 === window1 // works because a window is a class instance"hello" === "hello" // error: binary operator '===' cannot be applied to two 'String' operands
Every two structure instances are deemed identical if they compare equal.
Collectively, these traits that differentiate structures from classes are what makes structures value types.
Section 9.2: Accessing members of structIn Swift, structures use a simple “dot syntax” to access their members.
For example:
struct DeliveryRange { var range: Double let center: Location}let storeLocation = Location(latitude: 44.9871, longitude: -93.2758)var pizzaRange = DeliveryRange(range: 200, center: storeLocation)
You can access(print) the range like this:
print(pizzaRange.range) // 200
You can even access members of members using dot syntax:
print(pizzaRange.center.latitude) // 44.9871
Similar to how you can read values with dot syntax, you can also assign them.
pizzaRange.range = 250
Section 9.3: Basics of Structsstruct Repository { let identifier: Int

GoalKicker.com – Swift™ Notes for Professionals 55
let name: String var description: String?}
This defines a Repository struct with three stored properties, an integer identifier, a string name, and an optionalstring description. The identifier and name are constants, as they've been declared using the let-keyword. Onceset during initialization, they cannot be modified. The description is a variable. Modifying it updates the value of thestructure.
Structure types automatically receive a memberwise initializer if they do not define any of their own custominitializers. The structure receives a memberwise initializer even if it has stored properties that do not have defaultvalues.
Repository contains three stored properties of which only description has a default value (nil). Further it definesno initializers of its own, so it receives a memberwise initializer for free:
let newRepository = Repository(identifier: 0, name: "New Repository", description: "Brand NewRepository")
Section 9.4: Mutating a StructA method of a struct that change the value of the struct itself must be prefixed with the mutating keyword
struct Counter { private var value = 0 mutating func next() { value += 1 }}
When you can use mutating methods
The mutating methods are only available on struct values inside variables.
var counter = Counter()counter.next()
When you can NOT use mutating methods
On the other hand, mutating methods are NOT available on struct values inside constants
let counter = Counter()counter.next()// error: cannot use mutating member on immutable value: 'counter' is a 'let' constant
Section 9.5: Structs cannot inheritUnlike classes, structures cannot inherit:
class MyView: NSView { } // works
struct MyInt: Int { } // error: inheritance from non-protocol type 'Int'
Structures, however, can adopt protocols:

GoalKicker.com – Swift™ Notes for Professionals 56
struct Vector: Hashable { ... } // works

GoalKicker.com – Swift™ Notes for Professionals 57
Chapter 10: SetsSection 10.1: Declaring SetsSets are unordered collections of unique values. Unique values must be of the same type.
var colors = Set<String>()
You can declare a set with values by using the array literal syntax.
var favoriteColors: Set<String> = ["Red", "Blue", "Green", "Blue"]// {"Blue", "Green", "Red"}
Section 10.2: Performing operations on setsCommon values from both sets:
You can use the intersect(_:) method to create a new set containing all the values common to both sets.
let favoriteColors: Set = ["Red", "Blue", "Green"]let newColors: Set = ["Purple", "Orange", "Green"]
let intersect = favoriteColors.intersect(newColors) // a AND b// intersect = {"Green"}
All values from each set:
You can use the union(_:) method to create a new set containing all the unique values from each set.
let union = favoriteColors.union(newColors) // a OR b// union = {"Red", "Purple", "Green", "Orange", "Blue"}
Notice how the value "Green" only appears once in the new set.
Values that don't exist in both sets:
You can use the exclusiveOr(_:) method to create a new set containing the unique values from either but notboth sets.
let exclusiveOr = favoriteColors.exclusiveOr(newColors) // a XOR b// exclusiveOr = {"Red", "Purple", "Orange", "Blue"}
Notice how the value "Green" doesn't appear in the new set, since it was in both sets.
Values that are not in a set:
You can use the subtract(_:) method to create a new set containing values that aren't in a specific set.
let subtract = favoriteColors.subtract(newColors) // a - (a AND b)// subtract = {"Blue", "Red"}
Notice how the value "Green" doesn't appear in the new set, since it was also in the second set.

GoalKicker.com – Swift™ Notes for Professionals 58
Section 10.3: CountedSetVersion = 3.0
Swift 3 introduces the CountedSet class (it's the Swift version of the NSCountedSet Objective-C class).
CountedSet, as suggested by the name, keeps track of how many times a value is present.
let countedSet = CountedSet()countedSet.add(1)countedSet.add(1)countedSet.add(1)countedSet.add(2)
countedSet.count(for: 1) // 3countedSet.count(for: 2) // 1
Section 10.4: Modifying values in a setvar favoriteColors: Set = ["Red", "Blue", "Green"]//favoriteColors = {"Blue", "Green", "Red"}
You can use the insert(_:) method to add a new item into a set.
favoriteColors.insert("Orange")//favoriteColors = {"Red", "Green", "Orange", "Blue"}
You can use the remove(_:) method to remove an item from a set. It returns optional containing value that wasremoved or nil if value was not in the set.
let removedColor = favoriteColors.remove("Red")//favoriteColors = {"Green", "Orange", "Blue"}// removedColor = Optional("Red")
let anotherRemovedColor = favoriteColors.remove("Black")// anotherRemovedColor = nil
Section 10.5: Checking whether a set contains a valuevar favoriteColors: Set = ["Red", "Blue", "Green"]//favoriteColors = {"Blue", "Green", "Red"}
You can use the contains(_:) method to check whether a set contains a value. It will return true if the set containsthat value.
if favoriteColors.contains("Blue") { print("Who doesn't like blue!")}// Prints "Who doesn't like blue!"
Section 10.6: Adding values of my own type to a SetIn order to define a Set of your own type you need to conform your type to Hashable
struct Starship: Hashable {

GoalKicker.com – Swift™ Notes for Professionals 59
let name: String var hashValue: Int { return name.hashValue }}
func ==(left:Starship, right: Starship) -> Bool { return left.name == right.name}
Now you can create a Set of Starship(s)
let ships : Set<Starship> = [Starship(name:"Enterprise D"), Starship(name:"Voyager"),Starship(name:"Defiant") ]

GoalKicker.com – Swift™ Notes for Professionals 60
Chapter 11: DictionariesSection 11.1: Declaring DictionariesDictionaries are an unordered collection of keys and values. Values relate to unique keys and must be of the sametype.
When initializing a Dictionary the full syntax is as follows:
var books : Dictionary<Int, String> = Dictionary<Int, String>()
Although a more concise way of initializing:
var books = [Int: String]()// orvar books: [Int: String] = [:]
Declare a dictionary with keys and values by specifying them in a comma separated list. The types can be inferredfrom the types of keys and values.
var books: [Int: String] = [1: "Book 1", 2: "Book 2"]//books = [2: "Book 2", 1: "Book 1"]var otherBooks = [3: "Book 3", 4: "Book 4"]//otherBooks = [3: "Book 3", 4: "Book 4"]
Section 11.2: Accessing ValuesA value in a Dictionary can be accessed using its key:
var books: [Int: String] = [1: "Book 1", 2: "Book 2"]let bookName = books[1]//bookName = "Book 1"
The values of a dictionary can be iterated through using the values property:
for book in books.values { print("Book Title: \(book)")}//output: Book Title: Book 2//output: Book Title: Book 1
Similarly, the keys of a dictionary can be iterated through using its keys property:
for bookNumbers in books.keys { print("Book number: \(bookNumber)")}// outputs:// Book number: 1// Book number: 2
To get all key and value pair corresponding to each other (you will not get in proper order since it is a Dictionary)
for (book,bookNumbers)in books{print("\(book) \(bookNumbers)")}

GoalKicker.com – Swift™ Notes for Professionals 61
// outputs:// 2 Book 2// 1 Book 1
Note that a Dictionary, unlike an Array, in inherently unordered-that is, there is no guarantee on the order duringiteration.
If you want to access multiple levels of a Dictionary use a repeated subscript syntax.
// Create a multilevel dictionary.var myDictionary: [String:[Int:String]]! =["Toys":[1:"Car",2:"Truck"],"Interests":[1:"Science",2:"Math"]]
print(myDictionary["Toys"][2]) // Outputs "Truck"print(myDictionary["Interests"][1]) // Outputs "Science"
Section 11.3: Change Value of Dictionary using Keyvar dict = ["name": "John", "surname": "Doe"]// Set the element with key: 'name' to 'Jane'dict["name"] = "Jane"print(dict)
Section 11.4: Get all keys in Dictionarylet myAllKeys = ["name" : "Kirit" , "surname" : "Modi"]let allKeys = Array(myAllKeys.keys)print(allKeys)
Section 11.5: Modifying DictionariesAdd a key and value to a Dictionary
var books = [Int: String]()//books = [:]books[5] = "Book 5"//books = [5: "Book 5"]books.updateValue("Book 6", forKey: 5)//[5: "Book 6"]
updateValue returns the original value if one exists or nil.
let previousValue = books.updateValue("Book 7", forKey: 5)//books = [5: "Book 7"]//previousValue = "Book 6"
Remove value and their keys with similar syntax
books[5] = nil//books [:]books[6] = "Deleting from Dictionaries"//books = [6: "Deleting from Dictionaries"]let removedBook = books.removeValueForKey(6)//books = [:]//removedValue = "Deleting from Dictionaries"

GoalKicker.com – Swift™ Notes for Professionals 62
Section 11.6: Merge two dictionariesextension Dictionary { func merge(dict: Dictionary<Key,Value>) -> Dictionary<Key,Value> { var mutableCopy = self for (key, value) in dict { // If both dictionaries have a value for same key, the value of the other dictionary isused. mutableCopy[key] = value } return mutableCopy }}

GoalKicker.com – Swift™ Notes for Professionals 63
Chapter 12: SwitchParameter Details
Value to test The variable that to compare against
Section 12.1: Switch and OptionalsSome example cases when the result is an optional.
var result: AnyObject? = someMethod()
switch result {case nil: print("result is nothing")case is String: print("result is a String")case _ as Double: print("result is not nil, any value that is a Double")case let myInt as Int where myInt > 0: print("\(myInt) value is not nil but an int and greater than 0")case let a?: print("\(a) - value is unwrapped")}
Section 12.2: Basic Uselet number = 3switch number {case 1: print("One!")case 2: print("Two!")case 3: print("Three!")default: print("Not One, Two or Three")}
switch statements also work with data types other than integers. They work with any data type.Here's an exampleof switching on a string:
let string = "Dog"switch string {case "Cat", "Dog": print("Animal is a house pet.")default: print("Animal is not a house pet.")}
This will print the following:
Animal is a house pet.
Section 12.3: Matching a RangeA single case in a switch statement can match a range of values.

GoalKicker.com – Swift™ Notes for Professionals 64
let number = 20switch number {case 0: print("Zero")case 1..<10: print("Between One and Ten")case 10..<20: print("Between Ten and Twenty")case 20..<30: print("Between Twenty and Thirty")default: print("Greater than Thirty or less than Zero")}
Section 12.4: Partial matchingSwitch statement make use of partial matching.
let coordinates: (x: Int, y: Int, z: Int) = (3, 2, 5)
switch (coordinates) {case (0, 0, 0): // 1 print("Origin")case (_, 0, 0): // 2 print("On the x-axis.")case (0, _, 0): // 3 print("On the y-axis.")case (0, 0, _): // 4 print("On the z-axis.")default: // 5 print("Somewhere in space")}
Matches precisely the case where the value is (0,0,0). This is the origin of 3D space.1.Matches y=0, z=0 and any value of x. This means the coordinate is on the x- axis.2.Matches x=0, z=0 and any value of y. This means the coordinate is on they- axis.3.Matches x=0, y=0 and any value of z. This means the coordinate is on the z- axis.4.Matches the remainder of coordinates.5.
Note: using the underscore to mean that you don't care about the value.
If you don't want to ignore the value, then you can use it in your switch statement, like this:
let coordinates: (x: Int, y: Int, z: Int) = (3, 2, 5)
switch (coordinates) {case (0, 0, 0): print("Origin")case (let x, 0, 0): print("On the x-axis at x = \(x)")case (0, let y, 0): print("On the y-axis at y = \(y)")case (0, 0, let z): print("On the z-axis at z = \(z)")case (let x, let y, let z): print("Somewhere in space at x = \(x), y = \(y), z = \(z)")}
Here, the axis cases use the let syntax to pull out the pertinent values. The code then prints the values using string

GoalKicker.com – Swift™ Notes for Professionals 65
interpolation to build the string.
Note: you don't need a default in this switch statement. This is because the final case is essentially the default—itmatches anything, because there are no constraints on any part of the tuple. If the switch statement exhausts allpossible values with its cases, then no default is necessary.
We can also use the let-where syntax to match more complex cases. For example:
let coordinates: (x: Int, y: Int, z: Int) = (3, 2, 5)
switch (coordinates) {case (let x, let y, _) where y == x: print("Along the y = x line.")case (let x, let y, _) where y == x * x: print("Along the y = x^2 line.")default:break}
Here, We match the "y equals x" and "y equals x squared" lines.
Section 12.5: Using the where statement in a switchThe where statement may be used within a switch case match to add additional criteria required for a positivematch. The following example checks not only for the range, but also if the number is odd or even:
switch (temperature) { case 0...49 where temperature % 2 == 0: print("Cold and even")
case 50...79 where temperature % 2 == 0: print("Warm and even")
case 80...110 where temperature % 2 == 0: print("Hot and even")
default: print("Temperature out of range or odd")}
Section 12.6: Matching Multiple ValuesA single case in a switch statement can match on multiple values.
let number = 3switch number {case 1, 2: print("One or Two!")case 3: print("Three!")case 4, 5, 6: print("Four, Five or Six!")default: print("Not One, Two, Three, Four, Five or Six")}

GoalKicker.com – Swift™ Notes for Professionals 66
Section 12.7: Switch and EnumsThe Switch statement works very well with Enum values
enum CarModel { case Standard, Fast, VeryFast}
let car = CarModel.Standard
switch car {case .Standard: print("Standard")case .Fast: print("Fast")case .VeryFast: print("VeryFast")}
Since we provided a case for each possible value of car, we omit the default case.
Section 12.8: Switches and tuplesSwitches can switch on tuples:
public typealias mdyTuple = (month: Int, day: Int, year: Int)
let fredsBirthday = (month: 4, day: 3, year: 1973)
switch theMDY{//You can match on a literal tuple:case (fredsBirthday): message = "\(date) \(prefix) the day Fred was born"
//You can match on some of the terms, and ignore others:case (3, 15, _): message = "Beware the Ides of March"
//You can match on parts of a literal tuple, and copy other elements//into a constant that you use in the body of the case:case (bobsBirthday.month, bobsBirthday.day, let year) where year > bobsBirthday.year: message = "\(date) \(prefix) Bob's \(possessiveNumber(year - bobsBirthday.year))" + "birthday"
//You can copy one or more elements of the tuple into a constant and then//add a where clause that further qualifies the case:case (susansBirthday.month, susansBirthday.day, let year) where year > susansBirthday.year: message = "\(date) \(prefix) Susan's " + "\(possessiveNumber(year - susansBirthday.year)) birthday"
//You can match some elements to ranges:.case (5, 1...15, let year): message = "\(date) \(prefix) in the first half of May, \(year)"}

GoalKicker.com – Swift™ Notes for Professionals 67
Section 12.9: Satisfy one of multiple constraints using switchYou can create a tuple and use a switch like so:
var str: String? = "hi"var x: Int? = 5
switch (str, x) {case (.Some,.Some): print("Both have values")case (.Some, nil): print("String has a value")case (nil, .Some): print("Int has a value")case (nil, nil): print("Neither have values")}
Section 12.10: Matching based on class - great forprepareForSegueYou can also make a switch statement switch based on the class of the thing you're switching on.
An example where this is useful is in prepareForSegue. I used to switch based on the segue identifier, but that'sfragile. if you change your storyboard later and rename the segue identifier, it breaks your code. Or, if you usesegues to multiple instances same view controller class (but different storyboard scenes) then you can't use thesegue identifier to figure out the class of the destination.
Swift switch statements to the rescue.
Use Swift case let var as Class syntax, like this:
Version < 3.0
override func prepareForSegue(segue: UIStoryboardSegue, sender: AnyObject?) { switch segue.destinationViewController { case let fooViewController as FooViewController: fooViewController.delegate = self
case let barViewController as BarViewController: barViewController.data = data
default: break }}Version ≥ 3.0
In Swift 3 the sytax has changed slightly:
override func prepare(for segue: UIStoryboardSegue, sender: AnyObject?) { switch segue.destinationViewController { case let fooViewController as FooViewController: fooViewController.delegate = self
case let barViewController as BarViewController: barViewController.data = data
default:

GoalKicker.com – Swift™ Notes for Professionals 68
break }}
Section 12.11: Switch fallthroughsIt is worth noting that in swift, unlike other languages people are familiar with, there is an implicit break at the endof each case statement. In order to follow through to the next case (i.e. have multiple cases execute) you need touse fallthrough statement.
switch(value) {case 'one': // do operation one fallthroughcase 'two': // do this either independant, or in conjunction with first casedefault: // default operation}
this is useful for things like streams.

GoalKicker.com – Swift™ Notes for Professionals 69
Chapter 13: Optionals“ An optional value either contains a value or contains nil to indicate that a value is missing”
Excerpt From: Apple Inc. “The Swift Programming Language (Swift 3.1 Edition).” iBooks. https://itun.es/us/k5SW7.l
Basic optional use cases include: for a constant (let), use of an optional within a loop (if-let), safely unwrapping anoptional value within a method (guard-let), and as part of switch loops (case-let), defaulting to a value if nil, usingthe coalesce operator (??)
Section 13.1: Types of OptionalsOptionals are a generic enum type that acts as a wrapper. This wrapper allows a variable to have one of two states:the value of the user-defined type or nil, which represents the absence of a value.
This ability is particularly important in Swift because one of the stated design objectives of the language is to workwell with Apple's frameworks. Many (most) of Apple's frameworks utilize nil due to its ease of use and significanceto programming patterns and API design within Objective-C.
In Swift, for a variable to have a nil value, it must be an optional. Optionals can be created by appending either a !or a ? to the variable type. For example, to make an Int optional, you could use
var numberOne: Int! = nilvar numberTwo: Int? = nil
? optionals must be explicitly unwrapped, and should be used if you aren't certain whether or not the variable willhave a value when you access it. For example, when turning a string into an Int, the result is an optional Int?,because nil will be returned if the string is not a valid number
let str1 = "42"let num1: Int? = Int(str1) // 42
let str2 = "Hello, World!"let num2: Int? = Int(str2) // nil
! optionals are automatically unwrapped, and should only be used when you are certain that the variable will have avalue when you access it. For example, a global UIButton! variable that is initialized in viewDidLoad()
//myButton will not be accessed until viewDidLoad is called,//so a ! optional can be used herevar myButton: UIButton!
override func viewDidLoad(){ self.myButton = UIButton(frame: self.view.frame) self.myButton.backgroundColor = UIColor.redColor() self.view.addSubview(self.myButton)}
Section 13.2: Unwrapping an OptionalIn order to access the value of an Optional, it needs to be unwrapped.
You can conditionally unwrap an Optional using optional binding and force unwrap an Optional using the ! operator.
GoalKicker.com – Swift™ Notes for Professionals 70
Conditionally unwrapping effectively asks "Does this variable have a value?" while force unwrapping says "Thisvariable has a value!".
If you force unwrap a variable that is nil, your program will throw an unexpectedly found nil while unwrapping anoptional exception and crash, so you need to consider carefully if using ! is appropriate.
var text: String? = nilvar unwrapped: String = text! //crashes with "unexpectedly found nil while unwrapping an Optionalvalue"
For safe unwrapping, you can use an if-let statement, which will not throw an exception or crash if the wrappedvalue is nil:
var number: Int?if let unwrappedNumber = number { // Has `number` been assigned a value? print("number: \(unwrappedNumber)") // Will not enter this line} else { print("number was not assigned a value")}
Or, a guard statement:
var number: Int?guard let unwrappedNumber = number else { return}print("number: \(unwrappedNumber)")
Note that the scope of the unwrappedNumber variable is inside the if-let statement and outside of the guard block.
You can chain unwrapping of many optionals, this is mainly useful in cases that your code requires more thenvariable to run correctly:
var firstName:String?var lastName:String?
if let fn = firstName, let ln = lastName { print("\(fn) + \(ln)")//pay attention that the condition will be true only if both optionalsare not nil.}
Note that all the variables have to be unwrapped in order to pass successfully the test, otherwise you would haveno way to determine which variables were unwrapped and which weren't.
You can chain conditional statements using your optionals immediately after it is unwrapped. This means nonested if - else statements!
var firstName:String? = "Bob"var myBool:Bool? = false
if let fn = firstName, fn == "Bob", let bool = myBool, !bool { print("firstName is bob and myBool was false!")}

GoalKicker.com – Swift™ Notes for Professionals 71
Section 13.3: Nil Coalescing OperatorYou can use the nil coalescing operator to unwrap a value if it is non-nil, otherwise provide a different value:
func fallbackIfNil(str: String?) -> String { return str ?? "Fallback String"}print(fallbackIfNil("Hi")) // Prints "Hi"print(fallbackIfNil(nil)) // Prints "Fallback String"
This operator is able to short-circuit, meaning that if the left operand is non-nil, the right operand will not beevaluated:
func someExpensiveComputation() -> String { ... }
var foo : String? = "a string"let str = foo ?? someExpensiveComputation()
In this example, as foo is non-nil, someExpensiveComputation() will not be called.
You can also chain multiple nil coalescing statements together:
var foo : String?var bar : String?
let baz = foo ?? bar ?? "fallback string"
In this example baz will be assigned the unwrapped value of foo if it is non-nil, otherwise it will be assigned theunwrapped value of bar if it is non-nil, otherwise it will be assigned the fallback value.
Section 13.4: Optional ChainingYou can use Optional Chaining in order to call a method, access a property or subscript an optional. This is done byplacing a ? between the given optional variable and the given member (method, property or subscript).
struct Foo { func doSomething() { print("Hello World!") }}
var foo : Foo? = Foo()
foo?.doSomething() // prints "Hello World!" as foo is non-nil
If foo contains a value, doSomething() will be called on it. If foo is nil, then nothing bad will happen – the code willsimply fail silently and continue executing.
var foo : Foo? = nil
foo?.doSomething() // will not be called as foo is nil
(This is similar behaviour to sending messages to nil in Objective-C)
The reason that Optional Chaining is named as such is because ‘optionality’ will be propagated through themembers you call/access. What this means is that the return values of any members used with optional chaining
GoalKicker.com – Swift™ Notes for Professionals 72
will be optional, regardless of whether they are typed as optional or not.
struct Foo { var bar : Int func doSomething() { ... }}
let foo : Foo? = Foo(bar: 5)print(foo?.bar) // Optional(5)
Here foo?.bar is returning an Int? even though bar is non-optional, as foo itself is optional.
As optionality is propagated, methods returning Void will return Void? when called with optional chaining. This canbe useful in order to determine whether the method was called or not (and therefore if the optional has a value).
let foo : Foo? = Foo()
if foo?.doSomething() != nil { print("foo is non-nil, and doSomething() was called")} else { print("foo is nil, therefore doSomething() wasn't called")}
Here we’re comparing the Void? return value with nil in order to determine whether the method was called (andtherefore whether foo is non-nil).
Section 13.5: Overview - Why Optionals?Often when programming it is necessary to make some distinction between a variable that has a value and one thatdoes not. For reference types, such as C Pointers, a special value such as null can be used to indicate that thevariable has no value. For intrinsic types, such as an integer, it is more difficult. A nominated value, such as -1 canbe used, but this relies on interpretation of the value. It also eliminates that "special" value from normal use.
To address this, Swift allows any variable to be declared as an optional. This is indicated by the use of a ? or ! afterthe type (See Types of optionals)
For example,
var possiblyInt: Int?
declares a variable that may or may not contain an integer value.
The special value nil indicates that no value is currently assigned to this variable.
possiblyInt = 5 // PossiblyInt is now 5possiblyInt = nil // PossiblyInt is now unassigned
nil can also be used to test for an assigned value:
if possiblyInt != nil { print("possiblyInt has the value \(possiblyInt!)")}
Note the use of ! in the print statement to unwrap the optional value.
As an example of a common use of optionals, consider a function that returns an integer from a string containing

GoalKicker.com – Swift™ Notes for Professionals 73
digits; It is possible that the string may contain non-digit characters, or may even be empty.
How can a function that returns a simple Int indicate failure? It cannot do so by returning any specific value as thiswould preclude that value from being parsed from the string.
var someIntsomeInt = parseInt("not an integer") // How would this function indicate failure?
In Swift, however, that function can simply return an optional Int. Then failure is indicated by return value of nil.
var someInt?someInt = parseInt("not an integer") // This function returns nil if parsing failsif someInt == nil { print("That isn't a valid integer")}

GoalKicker.com – Swift™ Notes for Professionals 74
Chapter 14: ConditionalsConditional expressions, involving keywords such as if, else if, and else, provide Swift programs with the ability toperform different actions depending on a Boolean condition: True or False. This section covers the use of Swiftconditionals, Boolean logic, and ternary statements.
Section 14.1: Optional binding and "where" clausesOptionals must be unwrapped before they can be used in most expressions. if let is an optional binding, whichsucceeds if the optional value was not nil:
let num: Int? = 10 // or: let num: Int? = nil
if let unwrappedNum = num { // num has type Int?; unwrappedNum has type Int print("num was not nil: \(unwrappedNum + 1)")} else { print("num was nil")}
You can reuse the same name for the newly bound variable, shadowing the original:
// num originally has type Int?if let num = num { // num has type Int inside this block}
Version ≥ 1.2 Version < 3.0
Combine multiple optional bindings with commas (,):
if let unwrappedNum = num, let unwrappedStr = str { // Do something with unwrappedNum & unwrappedStr} else if let unwrappedNum = num { // Do something with unwrappedNum} else { // num was nil}
Apply further constraints after the optional binding using a where clause:
if let unwrappedNum = num e unwrappedNum % 2 == 0 { print("num is non-nil, and it's an even number") }
If you're feeling adventurous, interleave any number of optional bindings and where clauses:
if let num = num // num must be non-nil where num % 2 == 1, // num must be odd let str = str, // str must be non-nil let firstChar = str.characters.first // str must also be non-empty where firstChar != "x" // the first character must not be "x"{ // all bindings & conditions succeeded!}Version ≥ 3.0
In Swift 3, where clauses have been replaced (SE-0099): simply use another , to separate optional bindings andboolean conditions.

GoalKicker.com – Swift™ Notes for Professionals 75
if let unwrappedNum = numwrappedNum % 2 == 0 { print("num is non-nil, and it's an even number") } if let num =num, // num must be non-nil num % 2 == 1, // num must be odd let str = str, // str must be non-nil let firstChar =str.characters.first, // str must also be non-empty firstChar != "x" // the first character must not be "x" { // allbindings & conditions succeeded! }
Section 14.2: Using GuardVersion ≥ 2.0
Guard checks for a condition, and if it is false, it enters the branch. Guard check branches must leave its enclosingblock either via return, break, or continue (if applicable); failing to do so results in a compiler error. This has theadvantage that when a guard is written it's not possible to let the flow continue accidentally (as would be possiblewith an if).
Using guards can help keep nesting levels low, which usually improves the readability of the code.
func printNum(num: Int) { guard num == 10 else { print("num is not 10") return } print("num is 10")}
Guard can also check if there is a value in an optional, and then unwrap it in the outer scope:
func printOptionalNum(num: Int?) { guard let unwrappedNum = num else { print("num does not exist") return } print(unwrappedNum)}
Guard can combine optional unwrapping and condition check using where keyword:
func printOptionalNum(num: Int?) {guard let unwrappedNum = num, unwrappedNum == 10 else { print("num does not exist or is not 10") return}print(unwrappedNum)}
Section 14.3: Basic conditionals: if-statementsAn if statement checks whether a Bool condition is true:
let num = 10
if num == 10 { // Code inside this block only executes if the condition was true. print("num is 10")}
let condition = num == 10 // condition's type is Boolif condition {
GoalKicker.com – Swift™ Notes for Professionals 76
print("num is 10")}
if statements accept else if and else blocks, which can test alternate conditions and provide a fallback:
let num = 10if num < 10 { // Execute the following code if the first condition is true. print("num is less than 10")} else if num == 10 { // Or, if not, check the next condition... print("num is 10")} else { // If all else fails... print("all other conditions were false, so num is greater than 10")}
Basic operators like && and || can be used for multiple conditions:
The logical AND operatorlet num = 10let str = "Hi"if num == 10 && str == "Hi" { print("num is 10, AND str is \"Hi\"")}
If num == 10 was false, the second value wouldn't be evaluated. This is known as short-circuit evaluation.
The logical OR operatorif num == 10 || str == "Hi" { print("num is 10, or str is \"Hi\")}
If num == 10 is true, the second value wouldn't be evaluated.
The logical NOT operatorif !str.isEmpty { print("str is not empty")}
Section 14.4: Ternary operatorConditions may also be evaluated in a single line using the ternary operator:
If you wanted to determine the minimum and maximum of two variables, you could use if statements, like so:
let a = 5let b = 10let min: Int
if a < b { min = a} else { min = b}
let max: Int
if a > b { max = a

GoalKicker.com – Swift™ Notes for Professionals 77
} else { max = b}
The ternary conditional operator takes a condition and returns one of two values, depending on whether thecondition was true or false. The syntax is as follows: This is equivalent of having the expression:
(<CONDITION>) ? <TRUE VALUE> : <FALSE VALUE>
The above code can be rewritten using ternary conditional operator as below:
let a = 5let b = 10let min = a < b ? a : blet max = a > b ? a : b
In the first example, the condition is a < b. If this is true, the result assigned back to min will be of a; if it's false, theresult will be the value of b.
Note: Because finding the greater or smaller of two numbers is such a common operation, the Swift standardlibrary provides two functions for this purpose: max and min.
Section 14.5: Nil-Coalescing OperatorThe nil-coalescing operator <OPTIONAL> ?? <DEFAULT VALUE> unwraps the <OPTIONAL> if it contains a value, orreturns <DEFAULT VALUE> if is nil. <OPTIONAL> is always of an optional type. <DEFAULT VALUE> must match the typethat is stored inside <OPTIONAL>.
The nil-coalescing operator is shorthand for the code below that uses a ternary operator:
a != nil ? a! : b
this can be verified by the code below:
(a ?? b) == (a != nil ? a! : b) // outputs true
Time For An Example
let defaultSpeed:String = "Slow"var userEnteredSpeed:String? = nil
print(userEnteredSpeed ?? defaultSpeed) // outputs "Slow"
userEnteredSpeed = "Fast"print(userEnteredSpeed ?? defaultSpeed) // outputs "Fast"

GoalKicker.com – Swift™ Notes for Professionals 78
Chapter 15: Error HandlingSection 15.1: Error handling basicsFunctions in Swift may return values, throw errors, or both:
func reticulateSplines() // no return value and no errorfunc reticulateSplines()
nt // always returns a value func reticulateSplines() throws // no return value, but may throw an error funcreticulateSplines() throws -> Int // may either return a value or throw an error
Any value which conforms to the ErrorType protocol (including NSError objects) can be thrown as an error.Enumerations provide a convenient way to define custom errors:
Version ≥ 2.0 Version ≤ 2.2
enum NetworkError: ErrorType { case Offline case ServerError(String)}Version = 3.0
enum NetworkError: Error { // Swift 3 dictates that enum cases should be `lowerCamelCase` case offline case serverError(String)}
An error indicates a non-fatal failure during program execution, and is handled with the specialized control-flowconstructs do/catch, throw, and try.
func fetchResource(resource: NSURL) throws -> String { if let (statusCode, responseString) = /* ...from elsewhere...*/ { if case 500..<600 = statusCode { throw NetworkError.serverError(responseString) } else { return responseString } } else { throw NetworkError.offline }}
Errors can be caught with do/catch:
do { let response = try fetchResource(resURL) // If fetchResource() didn't throw an error, execution continues here: print("Got response: \\(response)") ...} catch { // If an error is thrown, we can handle it here. print("Whoops, couldn't fetch resource: \\(error)")}
Any function which can throw an error must be called using try, try?, or try!:
// error: call can throw but is not marked with 'try'

GoalKicker.com – Swift™ Notes for Professionals 79
let response = fetchResource(resURL)
// "try" works within do/catch, or within another throwing function:do { let response = try fetchResource(resURL)} catch { // Handle the error}
func foo() throws { // If an error is thrown, continue passing it up to the caller. let response = try fetchResource(resURL)}
// "try?" wraps the function's return value in an Optional (nil if an error was thrown).if let response = try? fetchResource(resURL) { // no error was thrown}
// "try!" crashes the program at runtime if an error occurs.let response = try! fetchResource(resURL)
Section 15.2: Catching dierent error typesLet's create our own error type for this example.
Version = 2.2
enum CustomError: ErrorType { case SomeError case AnotherError}
func throwing() throws { throw CustomError.SomeError}Version = 3.0
enum CustomError: Error { case someError case anotherError}
func throwing() throws { throw CustomError.someError}
The Do-Catch syntax allows to catch a thrown error, and automatically creates a constant named error available inthe catch block:
do { try throwing()} catch { print(error)}
You can also declare a variable yourself:
do { try throwing()} catch let oops {

GoalKicker.com – Swift™ Notes for Professionals 80
print(oops)}
It's also possible to chain different catch statements. This is convenient if several types of errors can be thrown inthe Do block.
Here the Do-Catch will first attempt to cast the error as a CustomError, then as an NSError if the custom type wasnot matched.
Version = 2.2
do { try somethingMayThrow()} catch let custom as CustomError { print(custom)} catch let error as NSError { print(error)}Version = 3.0
In Swift 3, no need to explicitly downcast to NSError.
do { try somethingMayThrow()} catch let custom as CustomError { print(custom)} catch { print(error)}
Section 15.3: Catch and Switch Pattern for Explicit ErrorHandlingclass Plane { enum Emergency: ErrorType { case NoFuel case EngineFailure(reason: String) case DamagedWing }
var fuelInKilograms: Int
//... init and other methods not shown
func fly() throws { // ... if fuelInKilograms <= 0 { // uh oh... throw Emergency.NoFuel } }
}
In the client class:
let airforceOne = Plane()do {

GoalKicker.com – Swift™ Notes for Professionals 81
try airforceOne.fly()} catch let emergency as Plane.Emergency { switch emergency { case .NoFuel: // call nearest airport for emergency landing case .EngineFailure(let reason): print(reason) // let the mechanic know the reason case .DamagedWing: // Assess the damage and determine if the president can make it }}
Section 15.4: Disabling Error PropagationThe creators of Swift have put a lot of attention into making the language expressive and error handling is exactlythat, expressive. If you try to invoke a function that can throw an error, the function call needs to be preceded bythe try keyword. The try keyword isn't magical. All it does, is make the developer aware of the throwing ability of thefunction.
For example, the following code uses a loadImage(atPath:) function, which loads the image resource at a given pathor throws an error if the image can’t be loaded. In this case, because the image is shipped with the application, noerror will be thrown at runtime, so it is appropriate to disable error propagation.
let photo = try! loadImage(atPath: "./Resources/John Appleseed.jpg")
Section 15.5: Create custom Error with localized descriptionCreate enum of custom errors
enum RegistrationError: Error { case invalidEmail case invalidPassword case invalidPhoneNumber}
Create extension of RegistrationError to handle the Localized description.
extension RegistrationError: LocalizedError { public var errorDescription: String? { switch self { case .invalidEmail: return NSLocalizedString("Description of invalid email address", comment: "InvalidEmail") case .invalidPassword: return NSLocalizedString("Description of invalid password", comment: "InvalidPassword") case .invalidPhoneNumber: return NSLocalizedString("Description of invalid phoneNumber", comment: "Invalid PhoneNumber") } }}
Handle error:
let error: Error = RegistrationError.invalidEmail

GoalKicker.com – Swift™ Notes for Professionals 82
print(error.localizedDescription)

GoalKicker.com – Swift™ Notes for Professionals 83
Chapter 16: LoopsSection 16.1: For-in loopThe for-in loop allows you to iterate over any sequence.
Iterating over a range
You can iterate over both half-open and closed ranges:
for i in 0..<3 { print(i)}
for i in 0...2 { print(i)}
// Both print:// 0// 1// 2
Iterating over an array or setlet names = ["James", "Emily", "Miles"]
for name in names { print(name)}
// James// Emily// Miles
Version = 2.1 Version = 2.2
If you need the index for each element in the array, you can use the enumerate() method on SequenceType.
for (index, name) in names.enumerate() { print("The index of \(name) is \(index).")}
// The index of James is 0.// The index of Emily is 1.// The index of Miles is 2.
enumerate() returns a lazy sequence containing pairs of elements with consecutive Ints, starting from 0. Thereforewith arrays, these numbers will correspond to the given index of each element – however this may not be the casewith other kinds of collections.
Version ≥ 3.0
In Swift 3, enumerate() has been renamed to enumerated():
for (index, name) in names.enumerated() { print("The index of \(name) is \(index).")}

GoalKicker.com – Swift™ Notes for Professionals 84
Iterating over a dictionarylet ages = ["James": 29, "Emily": 24]
for (name, age) in ages { print(name, "is", age, "years old.")}
// Emily is 24 years old.// James is 29 years old.
Iterating in reverseVersion = 2.1 Version = 2.2
You can use the reverse() method on SequenceType in order to iterate over any sequence in reverse:
for i in (0..<3).reverse() { print(i)}
for i in (0...2).reverse() { print(i)}
// Both print:// 2// 1// 0
let names = ["James", "Emily", "Miles"]
for name in names.reverse() { print(name)}
// Miles// Emily// JamesVersion ≥ 3.0
In Swift 3, reverse() has been renamed to reversed():
for i in (0..<3).reversed() { print(i)}
Iterating over ranges with custom strideVersion = 2.1 Version = 2.2
By using the stride(_:_:) methods on Strideable you can iterate over a range with a custom stride:
for i in 4.stride(to: 0, by: -2) { print(i)}
// 4// 2
for i in 4.stride(through: 0, by: -2) { print(i)}

GoalKicker.com – Swift™ Notes for Professionals 85
// 4// 2// 0
Version = 1.2 Version ≥ 3.0
In Swift 3, the stride(_:_:) methods on Stridable have been replaced by the global stride(_:_:_:) functions:
for i in stride(from: 4, to: 0, by: -2) { print(i)}
for i in stride(from: 4, through: 0, by: -2) { print(i)}
Section 16.2: Repeat-while loopSimilar to the while loop, only the control statement is evaluated after the loop. Therefore, the loop will alwaysexecute at least once.
var i: Int = 0
repeat { print(i) i += 1} while i < 3
// 0// 1// 2
Section 16.3: For-in loop with filteringwhere clause1.
By adding a where clause you can restrict the iterations to ones that satisfy the given condition.
for i in 0..<5 where i % 2 == 0 { print(i)}
// 0// 2// 4
let names = ["James", "Emily", "Miles"]
for name in names where name.characters.contains("s") { print(name)}
// James// Miles
case clause2.
It's useful when you need to iterate only through the values that match some pattern:
GoalKicker.com – Swift™ Notes for Professionals 86
let points = [(5, 0), (31, 0), (5, 31)]for case (_, 0) in points { print("point on x-axis")}
//point on x-axis//point on x-axis
Also you can filter optional values and unwrap them if appropriate by adding ? mark after binding constant:
let optionalNumbers = [31, 5, nil]for case let number? in optionalNumbers { print(number)}
//31 //5
Section 16.4: Sequence Type forEach blockA type that conforms to the SequenceType protocol can iterate through it's elements within a closure:
collection.forEach { print($0) }
The same could also be done with a named parameter:
collection.forEach { item in print(item)}
*Note: Control flow statements (such as break or continue) may not be used in these blocks. A return can be called,and if called, will immediately return the block for the current iteration (much like a continue would). The nextiteration will then execute.
let arr = [1,2,3,4]
arr.forEach { // blocks for 3 and 4 will still be called if $0 == 2 { return }}
Section 16.5: while loopA while loop will execute as long as the condition is true.
var count = 1
while count < 10 { print("This is the \(count) run of the loop") count += 1}
GoalKicker.com – Swift™ Notes for Professionals 87
Section 16.6: Breaking a loopA loop will execute as long as its condition remains true, but you can stop it manually using the break keyword. Forexample:
var peopleArray = ["John", "Nicole", "Thomas", "Richard", "Brian", "Novak", "Vick", "Amanda","Sonya"]var positionOfNovak = 0
for person in peopleArray { if person == "Novak" { break } positionOfNovak += 1}
print("Novak is the element located on position [\(positionOfNovak)] in peopleArray.")//prints out: Novak is the element located on position 5 in peopleArray. (which is true)

GoalKicker.com – Swift™ Notes for Professionals 88
Chapter 17: ProtocolsProtocols are a way of specifying how to use an object. They describe a set of properties and methods which aclass, structure, or enum should provide, although protocols pose no restrictions on the implementation.
Section 17.1: Protocol BasicsAbout Protocols
A Protocol specifies initialisers, properties, functions, subscripts and associated types required of a Swift object type(class, struct or enum) conforming to the protocol. In some languages similar ideas for requirement specificationsof subsequent objects are known as ‘interfaces’.
A declared and defined Protocol is a Type, in and of itself, with a signature of its stated requirements, somewhatsimilar to the manner in which Swift Functions are a Type based on their signature of parameters and returns.
Swift Protocol specifications can be optional, explicitly required and/or given default implementations via a facilityknown as Protocol Extensions. A Swift Object Type (class, struct or enum) desiring to conform to a Protocol that’sfleshed out with Extensions for all its specified requirements needs only state its desire to conform to be in fullconformance. The default implementations facility of Protocol Extensions can suffice to fulfil all obligations ofconforming to a Protocol.
Protocols can be inherited by other Protocols. This, in conjunction with Protocol Extensions, means Protocols canand should be thought of as a significant feature of Swift.
Protocols and Extensions are important to realising Swift’s broader objectives and approaches to program designflexibility and development processes. The primary stated purpose of Swift’s Protocol and Extension capability isfacilitation of compositional design in program architecture and development. This is referred to as ProtocolOriented Programming. Crusty old timers consider this superior to a focus on OOP design.
Protocols define interfaces which can be implemented by any struct, class, or enum:
protocol MyProtocol { init(value: Int) // required initializer func doSomething() -> Bool // instance method var message: String { get } // instance read-only property var value: Int { get set } // read-write instance property subscript(index: Int) -> Int { get } // instance subscript static func instructions() -> String // static method static var max: Int { get } // static read-only property static var total: Int { get set } // read-write static property}
Properties defined in protocols must either be annotated as { get } or { get set }. { get } means that theproperty must be gettable, and therefore it can be implemented as any kind of property. { get set } means thatthe property must be settable as well as gettable.
A struct, class, or enum may conform to a protocol:
struct MyStruct : MyProtocol { // Implement the protocol's requirements here}class MyClass : MyProtocol { // Implement the protocol's requirements here}

GoalKicker.com – Swift™ Notes for Professionals 89
enum MyEnum : MyProtocol { case caseA, caseB, caseC // Implement the protocol's requirements here}
A protocol may also define a default implementation for any of its requirements through an extension:
extension MyProtocol { // default implementation of doSomething() -> Bool // conforming types will use this implementation if they don't define their own func doSomething() -> Bool { print("do something!") return true }}
A protocol can be used as a type, provided it doesn't have associatedtype requirements:
func doStuff(object: MyProtocol) { // All of MyProtocol's requirements are available on the object print(object.message) print(object.doSomething())}
let items : [MyProtocol] = [MyStruct(), MyClass(), MyEnum.caseA]
You may also define an abstract type that conforms to multiple protocols:
Version ≥ 3.0
With Swift 3 or better, this is done by separating the list of protocols with an ampersand (&):
func doStuff(object: MyProtocol & AnotherProtocol) { // ...}
let items : [MyProtocol & AnotherProtocol] = [MyStruct(), MyClass(), MyEnum.caseA]Version < 3.0
Older versions have syntax protocol<...> where the protocols are a comma-separated list between the anglebrackets <>.
protocol AnotherProtocol { func doSomethingElse()}
func doStuff(object: protocol<MyProtocol, AnotherProtocol>) { // All of MyProtocol & AnotherProtocol's requirements are available on the object print(object.message) object.doSomethingElse()}
// MyStruct, MyClass & MyEnum must now conform to both MyProtocol & AnotherProtocollet items : [protocol<MyProtocol, AnotherProtocol>] = [MyStruct(), MyClass(), MyEnum.caseA]
Existing types can be extended to conform to a protocol:

GoalKicker.com – Swift™ Notes for Professionals 90
extension String : MyProtocol { // Implement any requirements which String doesn't already satisfy}
Section 17.2: Delegate patternA delegate is a common design pattern used in Cocoa and CocoaTouch frameworks, where one class delegatesresponsibility for implementing some functionality to another. This follows a principle of separation of concerns,where the framework class implements generic functionality while a separate delegate instance implements thespecific use case.
Another way to look into delegate pattern is in terms of object communication. Objects often needs to talks to eachother and to do so an object need conform to a protocol in order to become a delegate of another Object. Oncethis setup has been done, the other object talks back to its delegates when interesting things happens.
For example, A view in userinterface to display a list of data should be responsible only for the logic of how data isdisplayed, not for deciding what data should be displayed.
Let's dive into a more concrete example. if you have two classes, a parent and a child:
class Parent { }class Child { }
And you want to notify the parent of a change from the child.
In Swift, delegates are implemented using a protocol declaration and so we will declare a protocol which thedelegate will implement. Here delegate is the parent object.
protocol ChildDelegate: class { func childDidSomething()}
The child needs to declare a property to store the reference to the delegate:
class Child { weak var delegate: ChildDelegate?}
Notice the variable delegate is an optional and the protocol ChildDelegate is marked to be only implemented byclass type (without this the delegate variable can't be declared as a weak reference avoiding any retain cycle. Thismeans that if the delegate variable is no longer referenced anywhere else, it will be released). This is so the parentclass only registers the delegate when it is needed and available.
Also in order to mark our delegate as weak we must constrain our ChildDelegate protocol to reference types byadding class keyword in protocol declaration.
In this example, when the child does something and needs to notify its parent, the child will call:
delegate?.childDidSomething()
If the delegate has been defined, the delegate will be notified that the child has done something.
The parent class will need to extend the ChildDelegate protocol to be able to respond to its actions. This can bedone directly on the parent class:

GoalKicker.com – Swift™ Notes for Professionals 91
class Parent: ChildDelegate { ...
func childDidSomething() { print("Yay!") }}
Or using an extension:
extension Parent: ChildDelegate { func childDidSomething() { print("Yay!") }}
The parent also needs to tell the child that it is the child's delegate:
// In the parentlet child = Child()child.delegate = self
By default a Swift protocol does not allow an optional function be implemented. These can only be specified if yourprotocol is marked with the @objc attribute and the optional modifier.
For example UITableView implements the generic behavior of a table view in iOS, but the user must implement twodelegate classes called UITableViewDelegate and UITableViewDataSource that implement how the specific cellslook like and behave.
@objc public protocol UITableViewDelegate : NSObjectProtocol, UIScrollViewDelegate { // Display customizationoptional public func tableView(tableView: UITableView, willDisplayCell cell: UITableViewCell, forRowAtIndexPathindexPath: NSIndexPath) optional public func tableView(tableView: UITableView, willDisplayHeaderView view:UIView, forSection section: Int) optional public func tableView(tableView: UITableView, willDisplayFooterView view:UIView, forSection section: Int) optional public func tableView(tableView: UITableView, didEndDisplayingCell cell:UITableViewCell, forRowAtIndexPath indexPath: NSIndexPath) ... }
You can implement this protocol by changing your class definition, for example:
class MyViewController : UIViewController, UITableViewDelegate
Any methods not marked optional in the protocol definition (UITableViewDelegate in this case) must beimplemented.
Section 17.3: Associated type requirementsProtocols may define associated type requirements using the associatedtype keyword:
protocol Container {
ciatedtype Element var count: Int { get } subscript(index: Int) -> Element { get set } }
Protocols with associated type requirements can only be used as generic constraints:
// These are allowed, because Container has associated type requirements: func displayValues(container:Container) { ... } class MyClass { let container: Container } // > error: protocol 'Container' can only be used as a

GoalKicker.com – Swift™ Notes for Professionals 92
generic constraint // > because it has Self or associated type requirements // These are allowed: funcdisplayValues<T: Container>(container: T) { ... } class MyClass<T: Container> { let container: T }
A type which conforms to the protocol may satisfy an associatedtype requirement implicitly, by providing a giventype where the protocol expects the associatedtype to appear:
struct ContainerOfOne<T>: Container { let count = 1 // satisfy the count requirement var value: T // satisfy the subscript associatedtype requirement implicitly, // by defining the subscript assignment/return type as T // therefore Swift will infer that T == Element subscript(index: Int) ->
> { get { precondition(index == 0) return value } set { precondition(index == 0) value = newValue } } } let container =ContainerOfOne(value: "Hello")
(Note that to add clarity to this example, the generic placeholder type is named T – a more suitable name would beElement, which would shadow the protocol's associatedtype Element. The compiler will still infer that the genericplaceholder Element is used to satisfy the associatedtype Element requirement.)
An associatedtype may also be satisfied explicitly through the use of a typealias:
struct ContainerOfOne<T>: Container {
alias Element = T subscript(index: Int) -> Element { ... } // ... }
The same goes for extensions:
// Expose an 8-bit integer as a collection of boolean values (one for each bit).extension UInt8: Container {
// as noted above, this typealias can be inferred typealias Element = Bool
var count: Int { return 8 } subscript(index: Int) -> Bool { get { precondition(0 <= index && index < 8) return self & 1 << UInt8(index) != 0 } set { precondition(0 <= index && index < 8) if newValue { self |= 1 << UInt8(index) } else { self &= ~(1 << UInt8(index)) } } }}
If the conforming type already satisfies the requirement, no implementation is needed:
extension Array: Container {} // Array satisfies all requirements, including Element

GoalKicker.com – Swift™ Notes for Professionals 93
Section 17.4: Class-Only ProtocolsA protocol may specify that only a class can implement it through using the class keyword in its inheritance list.This keyword must appear before any other inherited protocols in this list.
protocol ClassOnlyProtocol: s, SomeOtherProtocol { // Protocol requirements }
If a non-class type tries to implement ClassOnlyProtocol, a compiler error will be generated.
struct MyStruct: ClassOnlyProtocol { // error: Non-class type 'MyStruct' cannot conform to class protocol 'ClassOnlyProtocol' }
Other protocols may inherit from the ClassOnlyProtocol, but they will have the same class-only requirement.
protocol MyProtocol: ClassOnlyProtocol { // ClassOnlyProtocol Requirements // MyProtocol Requirements}
class MySecondClass: MyProtocol { // ClassOnlyProtocol Requirements // MyProtocol Requirements}
Reference semantics of class-only protocols
Using a class-only protocol allows for reference semantics when the conforming type is unknown.
protocol Foo : class { var bar : String { get set }}
func takesAFoo(foo:Foo) {
// this assignment requires reference semantics, // as foo is a let constant in this scope. foo.bar = "new value"}
In this example, as Foo is a class-only protocol, the assignment to bar is valid as the compiler knows that foo is aclass type, and therefore has reference semantics.
If Foo was not a class-only protocol, a compiler error would be yielded – as the conforming type could be a valuetype, which would require a var annotation in order to be mutable.
protocol Foo { var bar : String { get set }}
func takesAFoo(foo:Foo) { foo.bar = "new value" // error: Cannot assign to property: 'foo' is a 'let' constant}
func takesAFoo(foo:Foo) {

GoalKicker.com – Swift™ Notes for Professionals 94
foo = foo // mutable copy of foo foo.bar = "new value" // no error – satisfies both reference and value semantics }Weak variables of protocol type
When applying the weak modifier to a variable of protocol type, that protocol type must be class-only, as weak canonly be applied to reference types.
weak var weakReference : ClassOnlyProtocol?
Section 17.5: Protocol extension for a specific conformingclassYou can write the default protocol implementation for a specific class.
protocol MyProtocol { func doSomething()}
extension MyProtocol where Self: UIViewController { func doSomething() { print("UIViewController default protocol implementation") }}
class MyViewController: UIViewController, MyProtocol { }
let vc = MyViewController()vc.doSomething() // Prints "UIViewController default protocol implementation"
Section 17.6: Using the RawRepresentable protocol (ExtensibleEnum)// RawRepresentable has an associatedType RawValue.// For this struct, we will make the compiler infer the type// by implementing the rawValue variable with a type of String//// Compiler infers RawValue = String without needing typealias//struct NotificationName: RawRepresentable { let rawValue: String
static let dataFinished = NotificationNames(rawValue: "DataFinishedNotification")}
This struct can be extended elsewhere to add cases
extension NotificationName { static let documentationLaunched = NotificationNames(rawValue:"DocumentationLaunchedNotification")}
And an interface can design around any RawRepresentable type or specifically your enum struct
func post(notification notification: NotificationName) -> Void { // use notification.rawValue}

GoalKicker.com – Swift™ Notes for Professionals 95
At call site, you can use dot syntax shorthand for the typesafe NotificationName
post(notification: .dataFinished)
Using generic RawRepresentable function
// RawRepresentable has an associate type, so the// method that wants to accept any type conforming to// RawRepresentable needs to be genericfunc observe<T: RawRepresentable>(object: T) -> Void { // object.rawValue}
Section 17.7: Implementing Hashable protocolTypes used in Sets and Dictionaries(key) must conform to Hashable protocol which inherits from Equatableprotocol.
Custom type conforming to Hashable protocol must implement
A calculated property hashValueDefine one of the equality operators i.e. == or !=.
Following example implements Hashable protocol for a custom struct:
struct Cell { var row: Int var col: Int init(_ row: Int, _ col: Int) { self.row = row self.col = col }}
extension Cell: Hashable { // Satisfy Hashable requirement var hashValue: Int { get { return row.hashValue^col.hashValue } }
// Satisfy Equatable requirement static func ==(lhs: Cell, rhs: Cell) -> Bool { return lhs.col == rhs.col && lhs.row == rhs.row } }
// Now we can make Cell as key of dictonaryvar dict = [Cell : String]()
dict[Cell(0, 0)] = "0, 0"dict[Cell(1, 0)] = "1, 0"dict[Cell(0, 1)] = "0, 1"
// Also we can create Set of Cells
GoalKicker.com – Swift™ Notes for Professionals 96
var set = Set<Cell>()
set.insert(Cell(0, 0))set.insert(Cell(1, 0))
Note: It is not necessary that different values in custom type have different hash values, collisions are acceptable. Ifhash values are equal, equality operator will be used to determine real equality.

GoalKicker.com – Swift™ Notes for Professionals 97
Chapter 18: FunctionsSection 18.1: Basic UseFunctions can be declared without parameters or a return value. The only required information is a name (hello inthis case).
func hello(){ print("Hello World")}
Call a function with no parameters by writing its name followed by an empty pair of parenthesis.
hello()//output: "Hello World"
Section 18.2: Functions with ParametersFunctions can take parameters so that their functionality can be modified. Parameters are given as a commaseparated list with their types and names defined.
func magicNumber(number1: Int){ print("\(number1) Is the magic number")}
Note: The \(number1) syntax is basic String Interpolation and is used to insert the integer into the String.
Functions with parameters are called by specifying the function by name and supplying an input value of the typeused in the function declaration.
magicNumber(5)//output: "5 Is the magic numberlet example: Int = 10magicNumber(example)//output: "10 Is the magic number"
Any value of type Int could have been used.
func magicNumber(number1: Int, number2: Int){ print("\(number1 + number2) Is the magic number")}
When a function uses multiple parameters the name of the first parameter is not required for the first but is onsubsequent parameters.
let ten: Int = 10let five: Int = 5magicNumber(ten,number2: five)//output: "15 Is the magic number"
Use external parameter names to make function calls more readable.
GoalKicker.com – Swift™ Notes for Professionals 98
func magicNumber(one number1: Int, two number2: Int){ print("\(number1 + number2) Is the magic number")}
let ten: Int = 10let five: Int = 5magicNumber(one: ten, two: five)
Setting the default value in the function declaration allows you to call the function without giving any input values.
func magicNumber(one number1: Int = 5, two number2: Int = 10){ print("\(number1 + number2) Is the magic number")}
magicNumber()//output: "15 Is the magic number"
Section 18.3: SubscriptsClasses, structures, and enumerations can define subscripts, which are shortcuts for accessing the memberelements of a collection, list, or sequence.
Example
struct DaysOfWeek { var days = ["Sun", "Mon", "Tue", "Wed", "Thu", "Fri", "Sat"] subscript(index: Int) -> String { get { return days[index] } set { days[index] = newValue } }}
Subscript Usage
var week = DaysOfWeek()//you access an element of an array at index by array[index].debugPrint(week[1])debugPrint(week[0])week[0] = "Sunday"debugPrint(week[0])
Subscripts Options:
Subscripts can take any number of input parameters, and these input parameters can be of any type. Subscriptscan also return any type. Subscripts can use variable parameters and variadic parameters, but cannot use in-outparameters or provide default parameter values.
Example:

GoalKicker.com – Swift™ Notes for Professionals 99
struct Food { enum MealTime { case Breakfast, Lunch, Dinner } var meals: [MealTime: String] = [:] subscript (type: MealTime) -> String? { get { return meals[type] } set { meals[type] = newValue } }}
Usage
var diet = Food()diet[.Breakfast] = "Scrambled Eggs"diet[.Lunch] = "Rice"
debugPrint("I had \(diet[.Breakfast]) for breakfast")
Section 18.4: MethodsInstance methods are functions that belong to instances of a type in Swift (a class, struct, enumeration, orprotocol). Type methods are called on a type itself.
Instance Methods
Instance methods are defined with a func declaration inside the definition of the type, or in an extension.
class Counter { var count = 0 func increment() { count += 1 }}
The increment() instance method is called on an instance of the Counter class:
let counter = Counter() // create an instance of Counter class counter.increment() // call the instance method on this instance
Type Methods
Type methods are defined with the static func keywords. (For classes, class func defines a type method that canbe overridden by subclasses.)
class SomeClass { class func someTypeMethod() { // type method implementation goes here }}
GoalKicker.com – Swift™ Notes for Professionals 100
SomeClass.someTypeMethod() // type method is called on the SomeClass type itself
Section 18.5: Variadic ParametersSometimes, it's not possible to list the number of parameters a function could need. Consider a sum function:
func sum(_ a: Int, _ b: Int) -> Int { return a + b}
This works fine for finding the sum of two numbers, but for finding the sum of three we'd have to write anotherfunction:
func sum(_ a: Int, _ b: Int, _ c: Int) -> Int { return a + b + c}
and one with four parameters would need another one, and so on. Swift makes it possible to define a function witha variable number of parameters using a sequence of three periods: .... For example,
func sum(_ numbers: Int...) -> Int { return numbers.reduce(0, combine: +)}
Notice how the numbers parameter, which is variadic, is coalesced into a single Array of type [Int]. This is true ingeneral, variadic parameters of type T... are accessible as a [T].
This function can now be called like so:
let a = sum(1, 2) // a == 3let b = sum(3, 4, 5, 6, 7) // b == 25
A variadic parameter in Swift doesn't have to come at the end of the parameter list, but there can only be one ineach function signature.
Sometimes, it's convenient to put a minimum size on the number of parameters. For example, it doesn't reallymake sense to take the sum of no values. An easy way to enforce this is by putting some non-variadic requiredparameters and then adding the variadic parameter after. To make sure that sum can only be called with at leasttwo parameters, we can write
func sum(_ n1: Int, _ n2: Int, _ numbers: Int...) -> Int { return numbers.reduce(n1 + n2, combine: +)}
sum(1, 2) // oksum(3, 4, 5, 6, 7) // oksum(1) // not oksum() // not ok
Section 18.6: Operators are FunctionsOperators such as +, -, ?? are a kind of function named using symbols rather than letters. They are invokeddifferently from functions:
Prefix: >x

GoalKicker.com – Swift™ Notes for Professionals 101
Infix: x > yPostfix: xb>
You can read more about basic operators and advanced operators in The Swift Programming Language.
Section 18.7: Passing and returning functionsThe following function is returning another function as its result which can be later assigned to a variable andcalled:
func jediTrainer () -> ((String, Int) -> String) { func train(name: String, times: Int) -> (String) { return "\(name) has been trained in the Force \(times) times" } return train}
let train = jediTrainer()train("Obi Wan", 3)
Section 18.8: Function typesEvery function has its own function type, made up of the parameter types and the return type of the function itself.For example the following function:
func sum(x: Int, y: Int) -> (result: Int) { return x + y }
has a function type of:
(Int, Int) -> (Int)
Function types can thus be used as parameters types or as return types for nesting functions.
Section 18.9: Inout ParametersFunctions can modify the parameters passed to them if they are marked with the inout keyword. When passing aninout parameter to a function, the caller must add a & to the variable being passed.
func updateFruit(fruit: inout Int) { fruit -= 1}
var apples = 30 // Prints "There's 30 apples"print("There's \(apples) apples")
updateFruit(fruit: &apples)
print("There's now \(apples) apples") // Prints "There's 29 apples".
This allows reference semantics to be applied to types which would normally have value semantics.
Section 18.10: Throwing ErrorsIf you want a function to be able to throw errors, you need to add the throws keyword after the parentheses thathold the arguments:

GoalKicker.com – Swift™ Notes for Professionals 102
func errorThrower()throws -> String {}
When you want to throw an error, use the throw keyword:
func errorThrower()throws -> String { if true { return "True" } else { // Throwing an error throw Error.error }}
If you want to call a function that can throw an error, you need to use the try keyword in a do block:
do { try errorThrower()}
For more on Swift errors: Errors
Section 18.11: Returning ValuesFunctions can return values by specifying the type after the list of parameters.
func findHypotenuse(a: Double, b: Double) -> Double{ return sqrt((a * a) + (b * b))}
let c = findHypotenuse(3, b: 5)//c = 5.830951894845301
Functions can also return multiple values using tuples.
func maths(number: Int) -> (times2: Int, times3: Int){ let two = number * 2 let three = number * 3 return (two, three)}let resultTuple = maths(5)//resultTuple = (10, 15)
Section 18.12: Trailing Closure SyntaxWhen the last parameter of a function is a closure
func loadData(id: String, completion:(result: String) -> ()) { // ... completion(result:"This is the result data")}
the function can be invoked using the Trailing Closure Syntax
loadData("123") { result in print(result)

GoalKicker.com – Swift™ Notes for Professionals 103
}
Section 18.13: Functions With ClosuresUsing functions that take in and execute closures can be extremely useful for sending a block of code to beexecuted elsewhere. We can start by allowing our function to take in an optional closure that will (in this case)return Void.
func closedFunc(block: (()->Void)? = nil) { print("Just beginning")
if let block = block { block() }}
Now that our function has been defined, let's call it and pass in some code:
closedFunc() { Void in print("Over already")}
By using a trailing closure with our function call, we can pass in code (in this case, print) to be executed at somepoint within our closedFunc() function.
The log should print:
Just beginning
Over already
A more specific use case of this could include the execution of code between two classes:
class ViewController: UIViewController {
override func viewDidLoad() { let _ = A.init(){Void in self.action(2)} }
func action(i: Int) { print(i) }}
class A: NSObject { var closure : ()?
init(closure: (()->Void)? = nil) { // Notice how this is executed before the closure print("1") // Make sure closure isn't nil self.closure = closure?() }}

GoalKicker.com – Swift™ Notes for Professionals 104
The log should print:
1
2

GoalKicker.com – Swift™ Notes for Professionals 105
Chapter 19: ExtensionsSection 19.1: What are Extensions?Extensions are used to extend the functionality of existing types in Swift. Extensions can add subscripts, functions,initializers, and computed properties. They can also make types conform to protocols.
Suppose you want to be able to compute the factorial of an Int. You can add a computed property in an extension:
extension Int { var factorial: Int { return (1..<self+1).reduce(1, combine: *) }}
Then you can access the property just as if it had been included in original Int API.
let val1: Int = 10
val1.factorial // returns 3628800
Section 19.2: Variables and functionsExtensions can contain functions and computed/constant get variables. They are in the format
extension ExtensionOf { //new functions and get-variables}
To reference the instance of the extended object, self can be used, just as it could be used
To create an extension of String that adds a .length() function which returns the length of the string, for example
extension String { func length() -> Int { return self.characters.count }}
"Hello, World!".length() // 13
Extensions can also contain get variables. For example, adding a .length variable to the string which returns thelength of the string
extension String { var length: Int { get { return self.characters.count } }}
"Hello, World!".length // 13

GoalKicker.com – Swift™ Notes for Professionals 106
Section 19.3: Initializers in ExtensionsExtensions can contain convenience initializers. For example, a failable initializer for Int that accepts a NSString:
extension Int { init?(_ string: NSString) { self.init(string as String) // delegate to the existing Int.init(String) initializer }}
let str1: NSString = "42"Int(str1) // 42
let str2: NSString = "abc"Int(str2) // nil
Section 19.4: SubscriptsExtensions can add new subscripts to an existing type.
This example gets the character inside a String using the given index:
Version = 2.2
extension String { subscript(index: Int) -> Character { let newIndex = startIndex.advancedBy(index) return self[newIndex] }}
var myString = "StackOverFlow"print(myString[2]) // aprint(myString[3]) // cVersion = 3.0
extension String { subscript(offset: Int) -> Character { let newIndex = self.index(self.startIndex, offsetBy: offset) return self[newIndex] }}
var myString = "StackOverFlow"print(myString[2]) // aprint(myString[3]) // c
Section 19.5: Protocol extensionsA very useful feature of Swift 2.2 is having the ability of extending protocols.
It works pretty much like abstract classes when regarding a functionality you want to be available in all the classesthat implements some protocol (without having to inherit from a base common class).
protocol FooProtocol { func doSomething()}
extension FooProtocol { func doSomething() {

GoalKicker.com – Swift™ Notes for Professionals 107
print("Hi") }}
class Foo: FooProtocol { func myMethod() { doSomething() // By just implementing the protocol this method is available }}
This is also possible using generics.
Section 19.6: RestrictionsIt is possible to write a method on a generic type that is more restrictive using where sentence.
extension Array where Element: StringLiteralConvertible { func toUpperCase() -> [String] { var result = [String]() for value in self { result.append(String(value).uppercaseString) } return result } }
Example of use
let array = ["a","b","c"]let resultado = array.toUpperCase()
Section 19.7: What are extensions and when to use themExtensions add new functionality to an existing class, structure, enumeration, or protocol type. This includes theability to extend types for which you do not have access to the original source code.
Extensions in Swift can:
Add computed properties and computed type propertiesDefine instance methods and type methodsProvide new initializersDefine subscriptsDefine and use new nested typesMake an existing type conform to a protocol
When to use Swift Extensions:
Additional functionality to SwiftAdditional functionality to UIKit / FoundationAdditional functionality without messing with other persons codeBreakdown classes into: Data / Functionality / Delegate
When not to use:
Extend your own classes from another file

GoalKicker.com – Swift™ Notes for Professionals 108
Simple example:
extension Bool { public mutating func toggle() -> Bool { self = !self return self }}
var myBool: Bool = trueprint(myBool.toggle()) // false
Source

GoalKicker.com – Swift™ Notes for Professionals 109
Chapter 20: ClassesSection 20.1: Defining a ClassYou define a class like this:
class Dog {}
A class can also be a subclass of another class:
class Animal {}class Dog: Animal {}
In this example, Animal could also be a protocol that Dog conforms to.
Section 20.2: Properties and MethodsClasses can define properties that instances of the class can use. In this example, Dog has two properties: name anddogYearAge:
class Dog { var name = "" var dogYearAge = 0}
You can access the properties with dot syntax:
let dog = Dog()print(dog.name)print(dog.dogYearAge)
Classes can also define methods that can be called on the instances, they are declared similar to normal functions,just inside the class:
class Dog { func bark() { print("Ruff!") }}
Calling methods also uses dot syntax:
dog.bark()
Section 20.3: Reference SemanticsClasses are reference types, meaning that multiple variables can refer to the same instance.
class Dog { var name = ""}
let firstDog = Dog()firstDog.name = "Fido"

GoalKicker.com – Swift™ Notes for Professionals 110
let otherDog = firstDog // otherDog points to
same Dog instance otherDog.name = "Rover" // modifying otherDog also modifies firstDog print(firstDog.name) //prints "Rover"
Because classes are reference types, even if the class is a constant, its variable properties can still be modified.
class Dog { var name: String // name is a variable property. let age: Int // age is a constant property. init(name: String, age: Int) { self.name = name self.age = age }}
let constantDog = Dog(name: "Rover", age: 5)// This instance is a constant.var variableDog = Dog(name: "Spot", age 7)// This instance is a variable.
constantDog.name = "Fido" // Not an error because name is a variable property.constantDog.age = 6 // Error because age is a constant property.constantDog = Dog(name: "Fido", age: 6)/* The last one is an error because you are changing the actual reference, notjust what the reference points to. */
variableDog.name = "Ace" // Not an error because name is a variable property.variableDog.age = 8 // Error because age is a constant property.variableDog = Dog(name: "Ace", age: 8)/* The last one is not an error because variableDog is a variable instance andtherefore the actual reference can be changed. */
Test whether two objects are identical (point to the exact same instance) using ===:
class Dog: Equatable { let name: String init(name: String) { self.name = name }}
// Consider two dogs equal if their names are equal.func ==(lhs: Dog, rhs: Dog) -> Bool { return lhs.name == rhs.name}
// Create two Dog instances which have the same name.let spot1 = Dog(name: "Spot")let spot2 = Dog(name: "Spot")
spot1 == spot2 // true, because the dogs are equalspot1 != spot2 // false
spot1 === spot2 // false, because the dogs are different instancesspot1 !== spot2 // true
Section 20.4: Classes and Multiple InheritanceSwift does not support multiple inheritance. That is, you cannot inherit from more than one class.
class Animal { ... }class Pet { ... }

GoalKicker.com – Swift™ Notes for Professionals 111
class Dog: Animal, Pet { ... } // This will result in a compiler error.
Instead you are encouraged to use composition when creating your types. This can be accomplished by usingprotocols.
Section 20.5: deinitclass ClassA {
var timer: NSTimer!
init() { // initialize timer }
deinit { // code timer.invalidate() }}

GoalKicker.com – Swift™ Notes for Professionals 112
Chapter 21: Type CastingSection 21.1: DowncastingA variable can be downcasted to a subtype using the type cast operators as?, and as!.
The as? operator attempts to cast to a subtype.It can fail, therefore it returns an optional.
let value: Any = "John"
let name = value as? Stringprint(name) // prints Optional("John")
let age = value as? Doubleprint(age) // prints nil
The as! operator forces a cast.It does not return an optional, but crashes if the cast fails.
let value: Any = "Paul"
let name = value as! Stringprint(name) // prints "Paul"
let age = value as! Double // crash: "Could not cast value…"
It is common to use type cast operators with conditional unwrapping:
let value: Any = "George"
if let name = value as? String { print(name) // prints "George"}
if let age = value as? Double { print(age) // Not executed}
Section 21.2: Type casting in Swift Language
Type Casting
Type casting is a way to check the type of an instance, or to treat that instance as a different superclass or subclassfrom somewhere else in its own class hierarchy.
Type casting in Swift is implemented with the is and as operators. These two operators provide a simple andexpressive way to check the type of a value or cast a value to a different type.
Downcasting
A constant or variable of a certain class type may actually refer to an instance of a subclass behind the scenes.Where you believe this is the case, you can try to downcast to the subclass type with a type cast operator (as? or

GoalKicker.com – Swift™ Notes for Professionals 113
as!).
Because downcasting can fail, the type cast operator comes in two different forms. The conditional form, as?,returns an optional value of the type you are trying to downcast to. The forced form, as!, attempts the downcastand force-unwraps the result as a single compound action.
Use the conditional form of the type cast operator (as?) when you are not sure if the downcast will succeed. Thisform of the operator will always return an optional value, and the value will be nil if the downcast was not possible.This enables you to check for a successful downcast.
Use the forced form of the type cast operator (as!) only when you are sure that the downcast will always succeed.This form of the operator will trigger a runtime error if you try to downcast to an incorrect class type. Know more.
String to Int & Float conversion : - let numbers = "888.00" let intValue = NSString(string: numbers).integerValue print(intValue) // Output - 888
let numbers = "888.00" let floatValue = NSString(string: numbers).floatValue print(floatValue) // Output : 888.0
Float to String Conversion let numbers = 888.00 let floatValue = String(numbers) print(floatValue) // Output : 888.0
// Get Float value at particular decimal point let numbers = 888.00 let floatValue = String(format: "%.2f", numbers) // Here %.2f will give 2 numbers after decimalpoints we can use as per our need print(floatValue) // Output : "888.00"
Integer to String value let numbers = 888 let intValue = String(numbers) print(intValue) // Output : "888"
Float to String value let numbers = 888.00 let floatValue = String(numbers) print(floatValue)
Optional Float value to String let numbers: Any = 888.00 let floatValue = String(describing: numbers) print(floatValue) // Output : 888.0
Optional String to Int value let hitCount = "100" let data :AnyObject = hitCount let score = Int(data as? String ?? "") ?? 0 print(score)
Downcasting values from JSON

GoalKicker.com – Swift™ Notes for Professionals 114
let json = ["name" : "john", "subjects": ["Maths", "Science", "English", "C Language"]] as[String : Any] let name = json["name"] as? String ?? "" print(name) // Output : john let subjects = json["subjects"] as? [String] ?? [] print(subjects) // Output : ["Maths", "Science", "English", "C Language"]
Downcasting values from Optional JSON let response: Any = ["name" : "john", "subjects": ["Maths", "Science", "English", "CLanguage"]] let json = response as? [String: Any] ?? [:] let name = json["name"] as? String ?? "" print(name) // Output : john let subjects = json["subjects"] as? [String] ?? [] print(subjects) // Output : ["Maths", "Science", "English", "C Language"]
Manage JSON Response with conditions let response: Any = ["name" : "john", "subjects": ["Maths", "Science", "English", "CLanguage"]] //Optional Response guard let json = response as? [String: Any] else { // Handle here nil value print("Empty Dictionary") // Do something here return } let name = json["name"] as? String ?? "" print(name) // Output : john let subjects = json["subjects"] as? [String] ?? [] print(subjects) // Output : ["Maths", "Science", "English", "C Language"]
Manage Nil Response with condition let response: Any? = nil guard let json = response as? [String: Any] else { // Handle here nil value print("Empty Dictionary") // Do something here return } let name = json["name"] as? String ?? "" print(name) let subjects = json["subjects"] as? [String] ?? [] print(subjects)
Output : Empty Dictionary
Section 21.3: UpcastingThe as operator will cast to a supertype. As it cannot fail, it does not return an optional.
let name = "Ringo"let value = string as Any // `value` is of type `Any` now
Section 21.4: Example of using a downcast on a function

GoalKicker.com – Swift™ Notes for Professionals 115
parameter involving subclassingA downcast can be used to make use of a subclass's code and data inside of a function taking a parameter of itssuperclass.
class Rat { var color = "white"}
class PetRat: Rat { var name = "Spot"}
func nameOfRat(�: Rat) -> String { guard let petRat = (� as? PetRat) else { return "No name" } return petRat.name}
let noName = Rat()let spot = PetRat()
print(nameOfRat(noName))print(nameOfRat(spot))
Section 21.5: Casting with switchThe switch statement can also be used to attempt casting into different types:
func checkType(_ value: Any) -> String { switch value {
// The `is` operator can be used to check a type case is Double: return "value is a Double"
// The `as` operator will cast. You do not need to use `as?` in a `switch`. case let string as String: return "value is the string: \(string)"
default: return "value is something else" }
}
checkType("Cadena") // "value is the string: Cadena"checkType(6.28) // "value is a Double"checkType(UILabel()) // "value is something else"

GoalKicker.com – Swift™ Notes for Professionals 116
Chapter 22: GenericsSection 22.1: The Basics of GenericsGenerics are placeholders for types, allowing you to write flexible code that can be applied across multiple types.The advantage of using generics over Any is that they still allow the compiler to enforce strong type-safety.
A generic placeholder is defined within angle brackets <>.
Generic Functions
For functions, this placeholder is placed after the function name:
/// Picks one of the inputs at random, and returns itfunc pickRandom
;T>(_ a:T, _ b:T) -> T { return arc4random_uniform(2) == 0 ? a : b }
In this case, the generic placeholder is T. When you come to call the function, Swift can infer the type of T for you (asit simply acts as a placeholder for an actual type).
let randomOutput = pickRandom(5, 7) // returns an Int (that's either 5 or 7)
Here we’re passing two integers to the function. Therefore Swift is inferring T == Int – thus the function signatureis inferred to be (Int, Int) -> Int.
Because of the strong type safety that generics offer – both the arguments and return of the function must be thesame type. Therefore the following will not compile:
struct Foo {}
let foo = Foo()
let randomOutput = pickRandom(foo, 5) // error: cannot convert value of type 'Int' to expectedargument type 'Foo'
Generic Types
In order to use generics with classes, structs or enums, you can define the generic placeholder after the type name.
class Bar;T> { var baz : T init(baz:T) { self.baz = baz } }
This generic placeholder will require a type when you come to use the class Bar. In this case, it can be inferred fromthe initialiser init(baz:T).
let bar = Bar(baz: "a string") // bar's type is Bar<String>
Here the generic placeholder T is inferred to be of type String, thus creating a Bar<String> instance. You can alsospecify the type explicitly:
let bar = Bar;String>(baz: "a string")
When used with a type, the given generic placeholder will keep its type for the entire lifetime of the given instance,and cannot be changed after initialisation. Therefore when you access the property baz, it will always be of typeString for this given instance.

GoalKicker.com – Swift™ Notes for Professionals 117
let str = bar.baz // of type String
Passing Around Generic Types
When you come to pass around generic types, in most cases you have to be explicit about the generic placeholdertype you expect. For example, as a function input:
func takeABarInt(bar:Bar;Int>) { ... }
This function will only accept a Bar<Int>. Attempting to pass in a Bar instance where the generic placeholder type isnot Int will result in a compiler error.
Generic Placeholder Naming
Generic placeholder names are not just limited to single letters. If a given placeholder represents a meaningfulconcept, you should give it a descriptive name. For example, Swift’s Array has a generic placeholder called Element,which defines the element type of a given Array instance.
public struct Array;Element> : RandomAccessCollection, MutableCollection { ... }
Section 22.2: Constraining Generic Placeholder TypesIt is possible to force the type parameters of a generic class to implement a protocol, for example, Equatable
class MyGenericClass<Type: Equatable>{ var value: Type init(value: Type){ self.value = value } func getValue() -> Type{ return self.value }
func valueEquals(anotherValue: Type) -> Bool{ return self.value == anotherValue }}
Whenever we create a new MyGenericClass, the type parameter has to implement the Equatable protocol(ensuring the type parameter can be compared to another variable of the same type using ==)
let myFloatGeneric = MyGenericClass<Double>(value: 2.71828) // validlet myStringGeneric = MyGenericClass<String>(value: "My String") // valid
// "Type [Int] does not conform to protocol 'Equatable'"let myInvalidGeneric = MyGenericClass<[Int]>(value: [2])
let myIntGeneric = MyGenericClass<Int>(value: 72)print(myIntGeneric.valueEquals(72)) // trueprint(myIntGeneric.valueEquals(-274)) // false
// "Cannot convert value of type 'String' to expected argument type 'Int'"print(myIntGeneric.valueEquals("My String"))

GoalKicker.com – Swift™ Notes for Professionals 118
Section 22.3: Generic Class ExamplesA generic class with the type parameter Type
class MyGenericClass<Type>{ var value: Type init(value: Type){ self.value = value } func getValue() -> Type{ return self.value } func setValue(value: Type){ self.value = value }}
We can now create new objects using a type parameter
let myStringGeneric = MyGenericClass<String>(value: "My String Value")let myIntGeneric = MyGenericClass<Int>(value: 42) print(myStringGeneric.getValue()) // "My String Value"print(myIntGeneric.getValue()) // 42 myStringGeneric.setValue("Another String")myIntGeneric.setValue(1024) print(myStringGeneric.getValue()) // "Another String"print(myIntGeneric.getValue()) // 1024
Generics can also be created with multiple type parameters
class AnotherGenericClass<TypeOne, TypeTwo, TypeThree>{ var value1: TypeOne var value2: TypeTwo var value3: TypeThree init(value1: TypeOne, value2: TypeTwo, value3: TypeThree){ self.value1 = value1 self.value2 = value2 self.value3 = value3 } func getValueOne() -> TypeOne{return self.value1} func getValueTwo() -> TypeTwo{return self.value2} func getValueThree() -> TypeThree{return self.value3}}
And used in the same way
let myGeneric = AnotherGenericClass<String, Int, Double>(value1: "Value of pi", value2: 3, value3:3.14159) print(myGeneric.getValueOne() is String) // trueprint(myGeneric.getValueTwo() is Int) // true

GoalKicker.com – Swift™ Notes for Professionals 119
print(myGeneric.getValueThree() is Double) // trueprint(myGeneric.getValueTwo() is String) // false print(myGeneric.getValueOne()) // "Value of pi"print(myGeneric.getValueTwo()) // 3print(myGeneric.getValueThree()) // 3.14159
Section 22.4: Using Generics to Simplify Array FunctionsA function that extends the functionality of the array by creating an object oriented remove function.
// Need to restrict the extension to elements that can be compared.// The `Element` is the generics name defined by Array for its item types.// This restriction also gives us access to `index(of:_)` which is also// defined in an Array extension with `where Element: Equatable`.public extension Array where Element: Equatable { /// Removes the given object from the array. mutating func remove(_ element: Element) { if let index = self.index(of: element ) { self.remove(at: index) } else { fatalError("Removal error, no such element:\"\(element)\" in array.\n") } }}
Usage
var myArray = [1,2,3]print(myArray)
// Prints [1,2,3]
Use the function to remove an element without need for an index. Just pass the object to remove.
myArray.remove(2)print(myArray)
// Prints [1,3]
Section 22.5: Advanced Type ConstraintsIt's possible to specify several type constraints for generics using the where clause:
func doSomething<T where T: Comparable, T: Hashable>(first: T, second: T) { // Access hashable function guard first.hashValue == second.hashValue else { return } // Access comparable function if first == second { print("\(first) and \(second) are equal.") }}
It's also valid to write the where clause after the argument list:
func doSomething<T>(first: T, second: T) where T: Comparable, T: Hashable {

GoalKicker.com – Swift™ Notes for Professionals 120
// Access hashable function guard first.hashValue == second.hashValue else { return } // Access comparable function if first == second { print("\(first) and \(second) are equal.") }}
Extensions can be restricted to types that satisfy conditions. The function is only available to instances which satisfythe type conditions:
// "Element" is the generics type defined by "Array". For this example, we// want to add a function that requires that "Element" can be compared, that// is: it needs to adhere to the Equatable protocol.public extension Array where Element: Equatable { /// Removes the given object from the array. mutating func remove(_ element: Element) { // We could also use "self.index(of: element)" here, as "index(of:_)" // is also defined in an extension with "where Element: Equatable". // For the sake of this example, explicitly make use of the Equatable. if let index = self.index(where: { $0 == element }) { self.remove(at: index) } else { fatalError("Removal error, no such element:\"\(element)\" in array.\n") } }}
Section 22.6: Generic Class InheritanceGeneric classes can be inherited:
// Modelsclass MyFirstModel {}
class MySecondModel: MyFirstModel {}
// Generic classesclass MyFirstGenericClass<T: MyFirstModel> { func doSomethingWithModel(model: T) { // Do something here } }
class MySecondGenericClass<T: MySecondModel>: MyFirstGenericClass<T> { override func doSomethingWithModel(model: T) { super.doSomethingWithModel(model) // Do more things here } }
GoalKicker.com – Swift™ Notes for Professionals 121
Section 22.7: Use generics to enhance type-safetyLet's take this example without using generics
protocol JSONDecodable { static func from(_ json: [String: Any]) -> Any?}
The protocol declaration seems fine unless you actually use it.
let myTestObject = TestObject.from(myJson) as? TestObject
Why do you have to cast the result to TestObject? Because of the Any return type in the protocol declaration.
By using generics you can avoid this problem that can cause runtime errors (and we don't want to have them!)
protocol JSONDecodable { associatedtype Element static func from(_ json: [String: Any]) -> Element?}
struct TestObject: JSONDecodable { static func from(_ json: [String: Any]) -> TestObject? { }}
let testObject = TestObject.from(myJson) // testObject is now automatically `TestObject?`

GoalKicker.com – Swift™ Notes for Professionals 122
Chapter 23: OptionSetSection 23.1: OptionSet ProtocolOptionSetType is a protocol designed to represent bit mask types where individual bits represent members of theset. A set of logical and/or functions enforce the proper syntax:
struct Features : OptionSet { let rawValue : Int static let none = Features(rawValue: 0) static let feature0 = Features(rawValue: 1 << 0) static let feature1 = Features(rawValue: 1 << 1) static let feature2 = Features(rawValue: 1 << 2) static let feature3 = Features(rawValue: 1 << 3) static let feature4 = Features(rawValue: 1 << 4) static let feature5 = Features(rawValue: 1 << 5) static let all: Features = [feature0, feature1, feature2, feature3, feature4, feature5]}
Features.feature1.rawValue //2Features.all.rawValue //63
var options: Features = [.feature1, .feature2, .feature3]
options.contains(.feature1) //trueoptions.contains(.feature4) //false
options.insert(.feature4)options.contains(.feature4) //true
var otherOptions : Features = [.feature1, .feature5]
options.contains(.feature5) //false
options.formUnion(otherOptions)options.contains(.feature5) //true
options.remove(.feature5)options.contains(.feature5) //false

GoalKicker.com – Swift™ Notes for Professionals 123
Chapter 24: Reading & Writing JSONSection 24.1: JSON Serialization, Encoding, and Decoding withApple Foundation and the Swift Standard LibraryThe JSONSerialization class is built into Apple's Foundation framework.
Version = 2.2
Read JSON
The JSONObjectWithData function takes NSData, and returns AnyObject. You can use as? to convert the result toyour expected type.
do { guard let jsonData = "[\"Hello\", \"JSON\"]".dataUsingEncoding(NSUTF8StringEncoding) else { fatalError("couldn't encode string as UTF-8") }
// Convert JSON from NSData to AnyObject let jsonObject = try NSJSONSerialization.JSONObjectWithData(jsonData, options: []) // Try to convert AnyObject to array of strings if let stringArray = jsonObject as? [String] { print("Got array of strings: \(stringArray.joinWithSeparator(", "))") }} catch { print("error reading JSON: \(error)")}
You can pass options: .AllowFragments instead of options: [] to allow reading JSON when the top-level objectisn't an array or dictionary.
Write JSON
Calling dataWithJSONObject converts a JSON-compatible object (nested arrays or dictionaries with strings,numbers, and NSNull) to raw NSData encoded as UTF-8.
do { // Convert object to JSON as NSData let jsonData = try NSJSONSerialization.dataWithJSONObject(jsonObject, options: []) print("JSON data: \(jsonData)") // Convert NSData to String let jsonString = String(data: jsonData, encoding: NSUTF8StringEncoding)! print("JSON string: \(jsonString)")} catch { print("error writing JSON: \(error)")}
You can pass options: .PrettyPrinted instead of options: [] for pretty-printing.
Version = 3.0
Same behavior in Swift 3 but with a different syntax.
do { guard let jsonData = "[\"Hello\", \"JSON\"]".data(using: String.Encoding.utf8) else {

GoalKicker.com – Swift™ Notes for Professionals 124
fatalError("couldn't encode string as UTF-8") } // Convert JSON from NSData to AnyObject let jsonObject = try JSONSerialization.jsonObject(with: jsonData, options: []) // Try to convert AnyObject to array of strings if let stringArray = jsonObject as? [String] { print("Got array of strings: \(stringArray.joined(separator: ", "))") }} catch { print("error reading JSON: \(error)")}
do { // Convert object to JSON as NSData let jsonData = try JSONSerialization.data(withJSONObject: jsonObject, options: []) print("JSON data: \(jsonData)")
// Convert NSData to String let jsonString = String(data: jsonData, encoding: .utf8)! print("JSON string: \(jsonString)")} catch { print("error writing JSON: \(error)")}
Note: The Following is currently available only in Swift 4.0 and later.
As of Swift 4.0, the Swift standard library includes the protocols Encodable and Decodable to define a standardizedapproach to data encoding and decoding. Adopting these protocols will allow implementations of the Encoder andDecoder protocols take your data and encode or decode it to and from an external representation such as JSON.Conformance to the Codable protocol combines both the Encodable and Decodable protocols. This is now therecommended means to handle JSON in your program.
Encode and Decode Automatically
The easiest way to make a type codable is to declare its properties as types that are already Codable. These typesinclude standard library types such as String, Int, and Double; and Foundation types such as Date, Data, and URL. Ifa type's properties are codable, the type itself will automatically conform to Codable by simply declaring theconformance.
Consider the following example, in which the Book structure conforms to Codable.
struct Book: Codable { let title: String let authors: [String] let publicationDate: Date}
Note that standard collections such as Array and Dictionary conform to Codable if they contain codabletypes.
By adopting Codable, the Book structure can now be encoded to and decoded from JSON using the AppleFoundation classes JSONEncoder and JSONDecoder, even though Book itself contains no code to specifically handle

GoalKicker.com – Swift™ Notes for Professionals 125
JSON. Custom encoders and decoders can be written, as well, by conforming to the Encoder and Decoder protocols,respectively.
Encode to JSON data// Create an instance of Book called booklet encoder = JSONEncoder()let data = try! encoder.encode(book) // Do not use try! in production codeprint(data)
Set encoder.outputFormatting = .prettyPrinted for easier reading. ## Decode from JSON data
Decode from JSON data// Retrieve JSON string from some sourcelet jsonData = jsonString.data(encoding: .utf8)!let decoder = JSONDecoder()let book = try! decoder.decode(Book.self, for: jsonData) // Do not use try! in production codeprint(book)
In the above example, Book.self informs the decoder of the type to which the JSON should be decoded.
Encoding or Decoding Exclusively
Sometimes you may not need data to be both encodable and decodable, such as when you need only read JSONdata from an API, or if your program only submits JSON data to an API.
If you intend only to write JSON data, conform your type to Encodable.
struct Book: Encodable { let title: String let authors: [String] let publicationDate: Date}
If you intend only to read JSON data, conform your type to Decodable.
struct Book: Decodable { let title: String let authors: [String] let publicationDate: Date}
Using Custom Key Names
APIs frequently use naming conventions other than the Swift-standard camel case, such as snake case. This canbecome an issue when it comes to decoding JSON, since by default the JSON keys must align exactly with yourtype's property names. To handle these scenarios you can create custom keys for your type using the CodingKeyprotocol.
struct Book: Codable { // ... enum CodingKeys: String, CodingKey { case title case authors

GoalKicker.com – Swift™ Notes for Professionals 126
case publicationDate = "publication_date" }}
CodingKeys are generated automatically for types which adopt the Codable protocol, but by creating our ownimplementation in the example above we're allow our decoder to match the local camel case publicationDate withthe snake case publication_date as it's delivered by the API.
Section 24.2: SwiftyJSONSwiftyJSON is a Swift framework built to remove the need for optional chaining in normal JSON serialization.
You can download it here: https://github.com/SwiftyJSON/SwiftyJSON
Without SwiftyJSON, your code would look like this to find the name of the first book in a JSON object:
if let jsonObject = try NSJSONSerialization.JSONObjectWithData(data, options: .AllowFragments) as?[[String: AnyObject]],let bookName = (jsonObject[0]["book"] as? [String: AnyObject])?["name"] as? String { //We can now use the book name}
In SwiftyJSON, this is hugely simplified:
let json = JSON(data: data)if let bookName = json[0]["book"]["name"].string { //We can now use the book name}
It removes the need to check every field, as it will return nil if any of them are invalid.
To use SwiftyJSON, download the correct version from the Git repository - there is a branch for Swift 3. Simply dragthe "SwiftyJSON.swift" into your project and import into your class:
import SwiftyJSON
You can create your JSON object using the following two initializers:
let jsonObject = JSON(data: dataObject)
or
let jsonObject = JSON(jsonObject) //This could be a string in a JSON format for example
To access your data, use subscripts:
let firstObjectInAnArray = jsonObject[0]let nameOfFirstObject = jsonObject[0]["name"]
You can then parse your value to a certain data type, which will return an optional value:
let nameOfFirstObject = jsonObject[0]["name"].string //This will return the name as a string
let nameOfFirstObject = jsonObject[0]["name"].double //This will return null

GoalKicker.com – Swift™ Notes for Professionals 127
You can also compile your paths into a swift Array:
let convolutedPath = jsonObject[0]["name"][2]["lastName"]["firstLetter"].string
Is the same as:
let convolutedPath = jsonObject[0, "name", 2, "lastName", "firstLetter"].string
SwiftyJSON also has functionality to print its own errors:
if let name = json[1337].string { //You can use the value - it is valid} else { print(json[1337].error) // "Array[1337] is out of bounds" - You cant use the value}
If you need to write to your JSON object, you can use subscripts again:
var originalJSON:JSON = ["name": "Jack", "age": 18]originalJSON["age"] = 25 //This changes the age to 25originalJSON["surname"] = "Smith" //This creates a new field called "surname" and adds the value toit
Should you need the original String for the JSON, for example if you need to write it to a file, you can get the rawvalue out:
if let string = json.rawString() { //This is a String object //Write the string to a file if you like}
if let data = json.rawData() { //This is an NSData object //Send the data to your server if you like}
Section 24.3: FreddyFreddy is a JSON parsing library maintained by Big Nerd Ranch. It has three principal benefits:
Type Safety: Helps you work with sending and receiving JSON in a way that prevents runtime crashes.1.
Idiomatic: Takes advantage of Swift's generics, enumerations, and functional features, without complicated2.documentation or magical custom operators.
Error Handling: Provides informative error information for commonly occurring JSON errors.3.
Example JSON Data
Let's define some example JSON data for use with these examples.
{ "success": true, "people": [ { "name": "Matt Mathias", "age": 32, "spouse": true },
GoalKicker.com – Swift™ Notes for Professionals 128
{ "name": "Sergeant Pepper", "age": 25, "spouse": false } ], "jobs": [ "teacher", "judge" ], "states": { "Georgia": [ 30301, 30302, 30303 ], "Wisconsin": [ 53000, 53001 ] }}
let jsonString = "{\"success\": true, \"people\": [{\"name\": \"Matt Mathias\",\"age\":32,\"spouse\": true},{\"name\": \"Sergeant Pepper\",\"age\": 25,\"spouse\": false}],\"jobs\":[\"teacher\",\"judge\"],\"states\": {\"Georgia\": [30301,30302,30303],\"Wisconsin\":[53000,53001]}}"let jsonData = jsonString.dataUsingEncoding(NSUTF8StringEncoding)!
Deserializing Raw Data
To deserialize the data, we initialize a JSON object then access a particular key.
do { let json = try JSON(data: jsonData) let success = try json.bool("success")} catch { // do something with the error}
We try here because accessing the json for the key "success" could fail--it might not exist, or the value might notbe a boolean.
We can also specify a path to access elements nested in the JSON structure. The path is a comma-separated list ofkeys and indices that describe the path to a value of interest.
do { let json = try JSON(data: jsonData) let georgiaZipCodes = try json.array("states", "Georgia") let firstPersonName = try json.string("people", 0, "name")} catch { // do something with the error}
Deserializing Models Directly
JSON can be directly parsed to a model class that implements the JSONDecodable protocol.
public struct Person { public let name: String public let age: Int

GoalKicker.com – Swift™ Notes for Professionals 129
public let spouse: Bool}
extension Person: JSONDecodable { public init(json: JSON) throws { name = try json.string("name") age = try json.int("age") spouse = try json.bool("spouse") }}
do { let json = try JSON(data: jsonData) let people = try json.arrayOf("people", type: Person.self)} catch { // do something with the error}
Serializing Raw Data
Any JSON value can be serialized directly to NSData.
let success = JSON.Bool(false)let data: NSData = try success.serialize()
Serializing Models Directly
Any model class that implements the JSONEncodable protocol can be serialized directly to NSData.
extension Person: JSONEncodable { public func toJSON() -> JSON { return .Dictionary([ "name": .String(name), "age": .Int(age), "spouse": .Bool(spouse) ]) }}
let newPerson = Person(name: "Glenn", age: 23, spouse: true)let data: NSData = try newPerson.toJSON().serialize()
Section 24.4: JSON Parsing Swift 3Here is the JSON File we will be using called animals.json
{ "Sea Animals": [ { "name": "Fish", "question": "How many species of fish are there?" }, { "name": "Sharks", "question": "How long do sharks live?" }, { "name": "Squid", "question": "Do squids have brains?" }, { "name": "Octopus",
GoalKicker.com – Swift™ Notes for Professionals 130
"question": "How big do octopus get?" }, { "name": "Star Fish", "question": "How long do star fish live?" } ], "mammals": [ { "name": "Dog", "question": "How long do dogs live?" }, { "name": "Elephant", "question": "How much do baby elephants weigh?" }, { "name": "Cats", "question": "Do cats really have 9 lives?" }, { "name": "Tigers", "question": "Where do tigers live?" }, { "name": "Pandas", "question": "WHat do pandas eat?" } ] }
Import your JSON File in your project
You can perform this simple function to print out your JSON file
func jsonParsingMethod() { //get the file let filePath = Bundle.main.path(forResource: "animals", ofType: "json") let content = try! String(contentsOfFile: filePath!) let data: Data = content.data(using: String.Encoding.utf8)! let json: NSDictionary = try! JSONSerialization.jsonObject(with: data as Data,options:.mutableContainers) as! NSDictionary //Call which part of the file you'd like to pare if let results = json["mammals"] as? [[String: AnyObject]] { for res in results { //this will print out the names of the mammals from out file. if let rates = res["name"] as? String { print(rates) } } } }
If you want to put it in a table view, I would create a dictionary first with an NSObject.
Create a new swift file called ParsingObject and create your string variables.
Make sure that the variable name is the same as the JSON File

GoalKicker.com – Swift™ Notes for Professionals 131
. For example, in our project we have name and question so in our new swift file, we will use
var name: String?var question: String?
Initialize the NSObject we made back into our ViewController.swift var array = ParsingObject Then we wouldperform the same method we had before with a minor modification.
func jsonParsingMethod() { //get the file let filePath = Bundle.main.path(forResource: "animals", ofType: "json") let content = try! String(contentsOfFile: filePath!) let data: Data = content.data(using: String.Encoding.utf8)! let json: NSDictionary = try! JSONSerialization.jsonObject(with: data as Data,options:.mutableContainers) as! NSDictionary //This time let's get Sea Animals let results = json["Sea Animals"] as? [[String: AnyObject]] //Get all the stuff using a for-loop for i in 0 ..< results!.count { //get the value let dict = results?[i] let resultsArray = ParsingObject() //append the value to our NSObject file resultsArray.setValuesForKeys(dict!) array.append(resultsArray) } }
Then we show it in our tableview by doing this,
func tableView(_ tableView: UITableView, numberOfRowsInSection section: Int) -> Int { return array.count } func tableView(_ tableView: UITableView, cellForRowAt indexPath: IndexPath) ->UITableViewCell { let cell = tableView.dequeueReusableCell(withIdentifier: "Cell", for: indexPath)//This is where our values are stored let object = array[indexPath.row] cell.textLabel?.text = object.name cell.detailTextLabel?.text = object.question return cell }
Section 24.5: Simple JSON parsing into custom objectsEven if third-party libraries are good, a simple way to parse the JSON is provided by protocols You can imagine youhave got an object Todo as
struct Todo { let comment: String

GoalKicker.com – Swift™ Notes for Professionals 132
}
Whenever you receive the JSON, you can handle the plain NSData as shown in the other example usingNSJSONSerialization object.
After that, using a simple protocol JSONDecodable
typealias JSONDictionary = [String:AnyObject]protocol JSONDecodable { associatedtype Element static func from(json json: JSONDictionary) -> Element?}
And making your Todo struct conforming to JSONDecodable does the trick
extension Todo: JSONDecodable { static func from(json json: JSONDictionary) -> Todo? { guard let comment = json["comment"] as? String else { return nil } return Todo(comment: comment) }}
You can try it with this json code:
{ "todos": [ { "comment" : "The todo comment" } ]}
When you got it from the API, you can serialize it as the previous examples shown in an AnyObject instance. Afterthat, you can check if the instance is a JSONDictionary instance
guard let jsonDictionary = dictionary as? JSONDictionary else { return }
The other thing to check, specific for this case because you have an array of Todo in the JSON, is the todosdictionary
guard let todosDictionary = jsonDictionary["todos"] as? [JSONDictionary] else { return }
Now that you got the array of dictionaries, you can convert each of them in a Todo object by using flatMap (it willautomatically delete the nil values from the array)
let todos: [Todo] = todosDictionary.flatMap { Todo.from(json: $0) }
Section 24.6: ArrowArrow is an elegant JSON parsing library in Swift.
It allows to parse JSON and map it to custom model classes with help of an
<--
operator:

GoalKicker.com – Swift™ Notes for Professionals 133
identifier <-- json["id"]name <-- json["name"]stats <-- json["stats"]
Example:
Swift model
struct Profile { var identifier = 0 var name = "" var link: NSURL? var weekday: WeekDay = .Monday var stats = Stats() var phoneNumbers = [PhoneNumber]()}
JSON file
{ "id": 15678, "name": "John Doe", "link": "https://apple.com/steve", "weekdayInt" : 3, "stats": { "numberOfFriends": 163, "numberOfFans": 10987 }, "phoneNumbers": [{ "label": "house", "number": "9809876545" }, { "label": "cell", "number": "0908070656" }, { "label": "work", "number": "0916570656" }]}
Mapping
extension Profile: ArrowParsable { mutating func deserialize(json: JSON) { identifier <-- json["id"] link <-- json["link"] name <-- json["name"] weekday <-- json["weekdayInt"] stats <- json["stats"] phoneNumbers <-- json["phoneNumbers"] }}
Usage
let profile = Profile()profile.deserialize(json)
Installation:

GoalKicker.com – Swift™ Notes for Professionals 134
Carthage
github "s4cha/Arrow"
CocoaPods
pod 'Arrow'use_frameworks!
Manually
Simply Copy and Paste Arrow.swift in your Xcode Project
https://github.com/s4cha/Arrow
As A Framework
Download Arrow from the GitHub repository and build the Framework target on the example project. Then Linkagainst this framework.

GoalKicker.com – Swift™ Notes for Professionals 135
Chapter 25: Advanced OperatorsSection 25.1: Bitwise OperatorsSwift Bitwise operators allow you to perform operations on the binary form of numbers. You can specify a binaryliteral by prefixing the number with 0b, so for example 0b110 is equivalent to the binary number 110 (the decimalnumber 6). Each 1 or 0 is a bit in the number.
Bitwise NOT ~:
var number: UInt8 = 0b01101100let newNumber = ~number// newNumber is equal to 0b01101100
Here, each bit get changed to its opposite. Declaring the number as explicitly UInt8 ensures that the number ispositive (so that we don't have to deal with negatives in the example) and that it is only 8 bits. If 0b01101100 was alarger UInt, there would be leading 0s that would be converted to 1s and become significant upon inversion:
var number: UInt16 = 0b01101100// number equals 0b0000000001101100// the 0s are not significantlet newNumber = ~number// newNumber equals 0b1111111110010011// the 1s are now significant
0 -> 11 -> 0
Bitwise AND &:
var number = 0b0110let newNumber = number & 0b1010// newNumber is equal to 0b0010
Here, a given bit will be 1 if and only if the binary numbers on both sides of the & operator contained a 1 at that bitlocation.
0 & 0 -> 00 & 1 -> 01 & 1 -> 1
Bitwise OR |:
var number = 0b0110let newNumber = number | 0b1000// newNumber is equal to 0b1110
Here, a given bit will be 1 if and only if the binary number on at least one side of the | operator contained a 1 atthat bit location.
0 | 0 -> 00 | 1 -> 11 | 1 -> 1
Bitwise XOR (Exclusive OR) ^:

GoalKicker.com – Swift™ Notes for Professionals 136
var number = 0b0110let newNumber = number ^ 0b1010// newNumber is equal to 0b1100
Here, a given bit will be 1 if and only if the bits in that position of the two operands are different.
0 ^ 0 -> 00 ^ 1 -> 11 ^ 1 -> 0
For all binary operations, the order of the operands makes no difference on the result.
Section 25.2: Custom OperatorsSwift supports the creation of custom operators. New operators are declared at a global level using the operatorkeyword.
The operator's structure is defined by three parts: operand placement, precedence, and associativity.
The prefix, infix and postfix modifiers are used to start an custom operator declaration. The prefix and1.postfix modifiers declare whether the operator must be before or after, respectively, the value on which itacts. Such operators are urnary, like 8 and 3++ **, since they can only act on one target. The infix declares abinary operator, which acts on the two values it is between, such as 2+3.
Operators with higher precedence are calculated first. The default operator precedence is just higher than2.?...: (a value of 100 in Swift 2.x). The precedence of standard Swift operators can be found here.
Associativity defines the order of operations between operators of the same precedence. Left associative3.operators are calculated from left to right (reading order, like most operators), while right associativeoperators calculate from right to left.
Version ≥ 3.0
Starting from Swift 3.0, one would define the precedence and associativity in a precedence group instead of theoperator itself, so that multiple operators can easily share the same precedence without referring to the crypticnumbers. The list of standard precedence groups is shown below.
Operators return values based on the calculation code. This code acts as a normal function, with parametersspecifying the type of input and the return keyword specifying the calculated value that the operator returns.
Here is the definition of a simple exponential operator, since standard Swift does not have an exponential operator.
import Foundation
infix operator ** { associativity left precedence 170 }
func ** (num: Double, power: Double) -> Double{ return pow(num, power)}
The infix says that the ** operator works in between two values, such as 9**2. Because the function has leftassociativity, 3**3**2 is calculated as (3**3)**2. The precedence of 170 is higher than all standard Swift operations,meaning that 3+2**4 calculates to 19, despite the left associativity of **.
Version ≥ 3.0

GoalKicker.com – Swift™ Notes for Professionals 137
import Foundation
infix operator **: BitwiseShiftPrecedence
func ** (num: Double, power: Double) -> Double { return pow(num, power)}
Instead of specifying the precedence and associativity explicitly, on Swift 3.0 we could use the built-in precedencegroup BitwiseShiftPrecedence that gives the correct values (same as <<, >>).
**: The increment and decrement are deprecated and will be removed in Swift 3.
Section 25.3: Overflow OperatorsOverflow refers to what happens when an operation would result in a number that is either larger or smaller thanthe designated amount of bits for that number may hold.
Due to the way binary arithmetic works, after a number becomes too large for its bits, the number overflows downto the smallest possible number (for the bit size) and then continues counting up from there. Similarly, when anumber becomes too small, it underflows up to the largest possible number (for its bit size) and continues countingdown from there.
Because this behavior is not often desired and can lead to serious security issues, the Swift arithmetic operators +,-, and * will throw errors when an operation would cause an overflow or underflow. To explicitly allow overflow andunderflow, use &+, &-, and &* instead.
var almostTooLarge = Int.maxalmostTooLarge + 1 // not allowedalmostTooLarge &+ 1 // allowed, but result will be the value of Int.min
Section 25.4: Commutative OperatorsLet's add a custom operator to multiply a CGSize
func *(lhs: CGFloat, rhs: CGSize) -> CGSize{ let height = lhs*rhs.height let width = lhs*rhs.width return CGSize(width: width, height: height)}
Now this works
let sizeA = CGSize(height:100, width:200) let sizeB = 1.1 * sizeA //=> (height: 110, width: 220)
But if we try to do the operation in reverse, we get an error
let sizeC = sizeB * 20 // ERROR
But it's simple enough to add:
func *(lhs: CGSize, rhs: CGFloat) -> CGSize{ return rhs*lhs

GoalKicker.com – Swift™ Notes for Professionals 138
}
Now the operator is commutative.
let sizeA = CGSize(height:100, width:200) let sizeB = sizeA * 1.1 //=> (height: 110, width: 220)
Section 25.5: Overloading + for DictionariesAs there is currently no simple way of combining dictionaries in Swift, it can be useful to overload the + and +=operators in order to add this functionality using generics.
// Combines two dictionaries together. If both dictionaries contain// the same key, the value of the right hand side dictionary is used.func +<K, V>(lhs: [K : V], rhs: [K : V]) -> [K : V] { var combined = lhs for (key, value) in rhs { combined[key] = value } return combined}
// The mutable variant of the + overload, allowing a dictionary// to be appended to 'in-place'.func +=<K, V>(inout lhs: [K : V], rhs: [K : V]) { for (key, value) in rhs { lhs[key] = value }}Version ≥ 3.0
As of Swift 3, inout should be placed before the argument type.
func +=<K, V>(lhs: inout [K : V], rhs: [K : V]) { ... }
Example usage:
let firstDict = ["hello" : "world"]let secondDict = ["world" : "hello"]var thirdDict = firstDict + secondDict // ["hello": "world", "world": "hello"]
thirdDict += ["hello":"bar", "baz":"qux"] // ["hello": "bar", "baz": "qux", "world": "hello"]
Section 25.6: Precedence of standard Swift operatorsOperators that bound tighter (higher precedence) are listed first.
Operators Precedence group (≥3.0) Precedence Associativity. ∞ left
?, !, ++, --, [], (), {} (postfix)
!, ~, +, -, ++, -- (prefix)
~> (swift ≤2.3) 255 left
<<, >> BitwiseShiftPrecedence 160 none
*, /, %, &, &* MultiplicationPrecedence 150 left
+, -, |, ^, &+, &- AdditionPrecedence 140 left

GoalKicker.com – Swift™ Notes for Professionals 139
..., ..< RangeFormationPrecedence 135 none
is, as, as?, as! CastingPrecedence 132 left?? NilCoalescingPrecedence 131 right
<, <=, >, >=, ==, !=, ===, !==, ~= ComparisonPrecedence 130 none&& LogicalConjunctionPrecedence 120 left|| LogicalDisjunctionPrecedence 110 left
DefaultPrecedence* none
?...: TernaryPrecedence 100 right
=, +=, -=, *=, /=, %=, <<=, >>=, &=, |=, ^= AssignmentPrecedence 90 right, assignment-> FunctionArrowPrecedence rightVersion ≥ 3.0
The DefaultPrecedence precedence group is higher than TernaryPrecedence, but is unordered with the restof the operators. Other than this group, the rest of the precedences are linear.
This table can be also be found on Apple's API referenceThe actual definition of the precedence groups can be found in the source code on GitHub
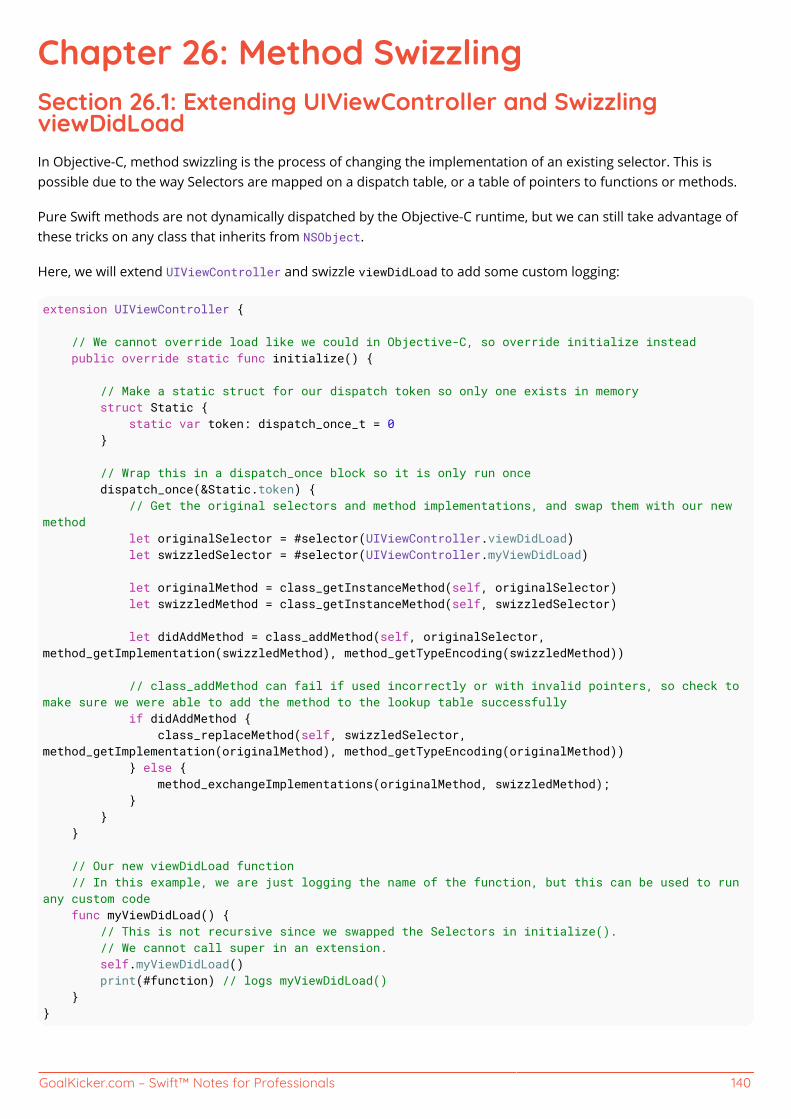
GoalKicker.com – Swift™ Notes for Professionals 140
Chapter 26: Method SwizzlingSection 26.1: Extending UIViewController and SwizzlingviewDidLoadIn Objective-C, method swizzling is the process of changing the implementation of an existing selector. This ispossible due to the way Selectors are mapped on a dispatch table, or a table of pointers to functions or methods.
Pure Swift methods are not dynamically dispatched by the Objective-C runtime, but we can still take advantage ofthese tricks on any class that inherits from NSObject.
Here, we will extend UIViewController and swizzle viewDidLoad to add some custom logging:
extension UIViewController { // We cannot override load like we could in Objective-C, so override initialize instead public override static func initialize() { // Make a static struct for our dispatch token so only one exists in memory struct Static { static var token: dispatch_once_t = 0 } // Wrap this in a dispatch_once block so it is only run once dispatch_once(&Static.token) { // Get the original selectors and method implementations, and swap them with our newmethod let originalSelector = #selector(UIViewController.viewDidLoad) let swizzledSelector = #selector(UIViewController.myViewDidLoad) let originalMethod = class_getInstanceMethod(self, originalSelector) let swizzledMethod = class_getInstanceMethod(self, swizzledSelector) let didAddMethod = class_addMethod(self, originalSelector,method_getImplementation(swizzledMethod), method_getTypeEncoding(swizzledMethod)) // class_addMethod can fail if used incorrectly or with invalid pointers, so check tomake sure we were able to add the method to the lookup table successfully if didAddMethod { class_replaceMethod(self, swizzledSelector,method_getImplementation(originalMethod), method_getTypeEncoding(originalMethod)) } else { method_exchangeImplementations(originalMethod, swizzledMethod); } } } // Our new viewDidLoad function // In this example, we are just logging the name of the function, but this can be used to runany custom code func myViewDidLoad() { // This is not recursive since we swapped the Selectors in initialize(). // We cannot call super in an extension. self.myViewDidLoad() print(#function) // logs myViewDidLoad() }}
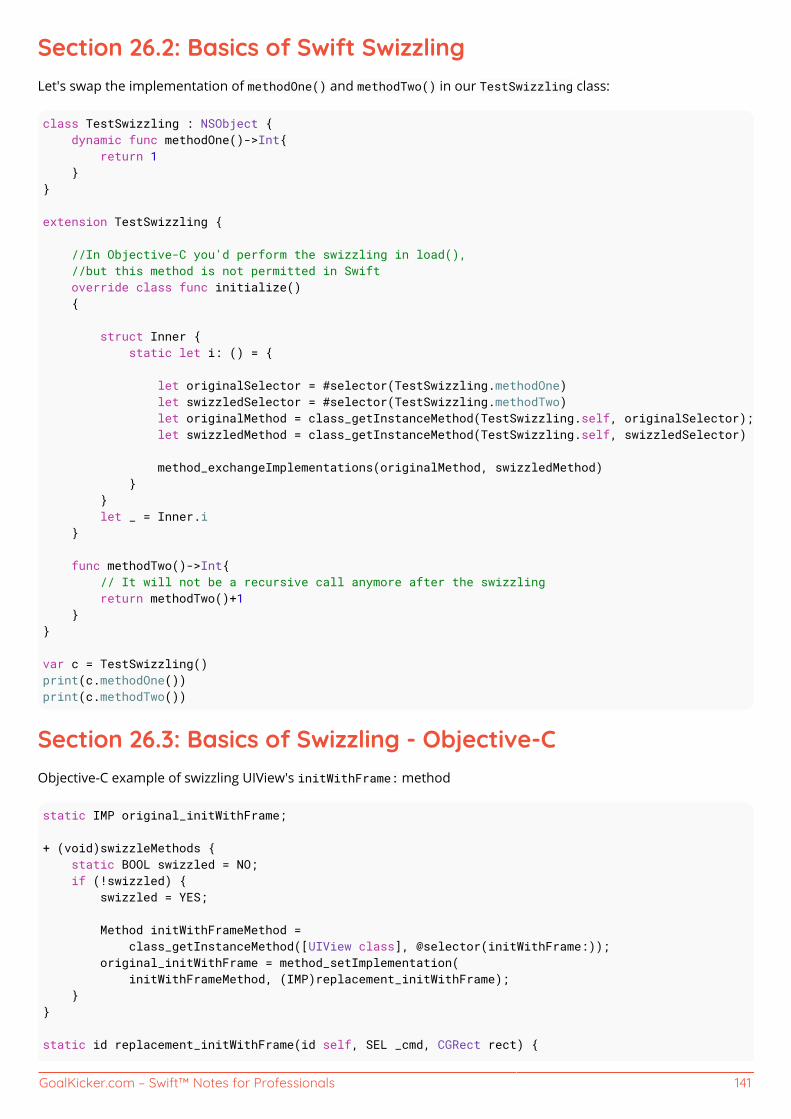
GoalKicker.com – Swift™ Notes for Professionals 141
Section 26.2: Basics of Swift SwizzlingLet's swap the implementation of methodOne() and methodTwo() in our TestSwizzling class:
class TestSwizzling : NSObject { dynamic func methodOne()->Int{ return 1 }}
extension TestSwizzling { //In Objective-C you'd perform the swizzling in load(), //but this method is not permitted in Swift override class func initialize() {
struct Inner { static let i: () = {
let originalSelector = #selector(TestSwizzling.methodOne) let swizzledSelector = #selector(TestSwizzling.methodTwo) let originalMethod = class_getInstanceMethod(TestSwizzling.self, originalSelector); let swizzledMethod = class_getInstanceMethod(TestSwizzling.self, swizzledSelector) method_exchangeImplementations(originalMethod, swizzledMethod) } } let _ = Inner.i } func methodTwo()->Int{ // It will not be a recursive call anymore after the swizzling return methodTwo()+1 }}
var c = TestSwizzling()print(c.methodOne())print(c.methodTwo())
Section 26.3: Basics of Swizzling - Objective-CObjective-C example of swizzling UIView's initWithFrame: method
static IMP original_initWithFrame;
+ (void)swizzleMethods { static BOOL swizzled = NO; if (!swizzled) { swizzled = YES;
Method initWithFrameMethod = class_getInstanceMethod([UIView class], @selector(initWithFrame:)); original_initWithFrame = method_setImplementation( initWithFrameMethod, (IMP)replacement_initWithFrame); }}
static id replacement_initWithFrame(id self, SEL _cmd, CGRect rect) {
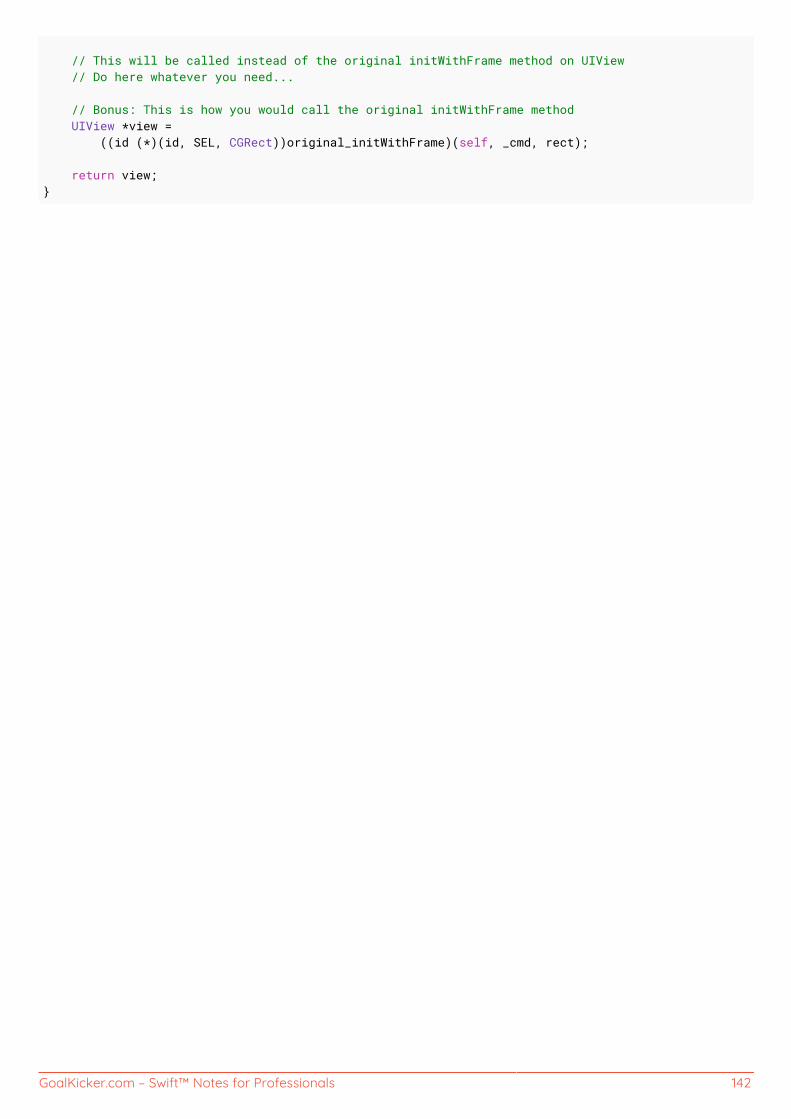
GoalKicker.com – Swift™ Notes for Professionals 142
// This will be called instead of the original initWithFrame method on UIView // Do here whatever you need...
// Bonus: This is how you would call the original initWithFrame method UIView *view = ((id (*)(id, SEL, CGRect))original_initWithFrame)(self, _cmd, rect);
return view;}
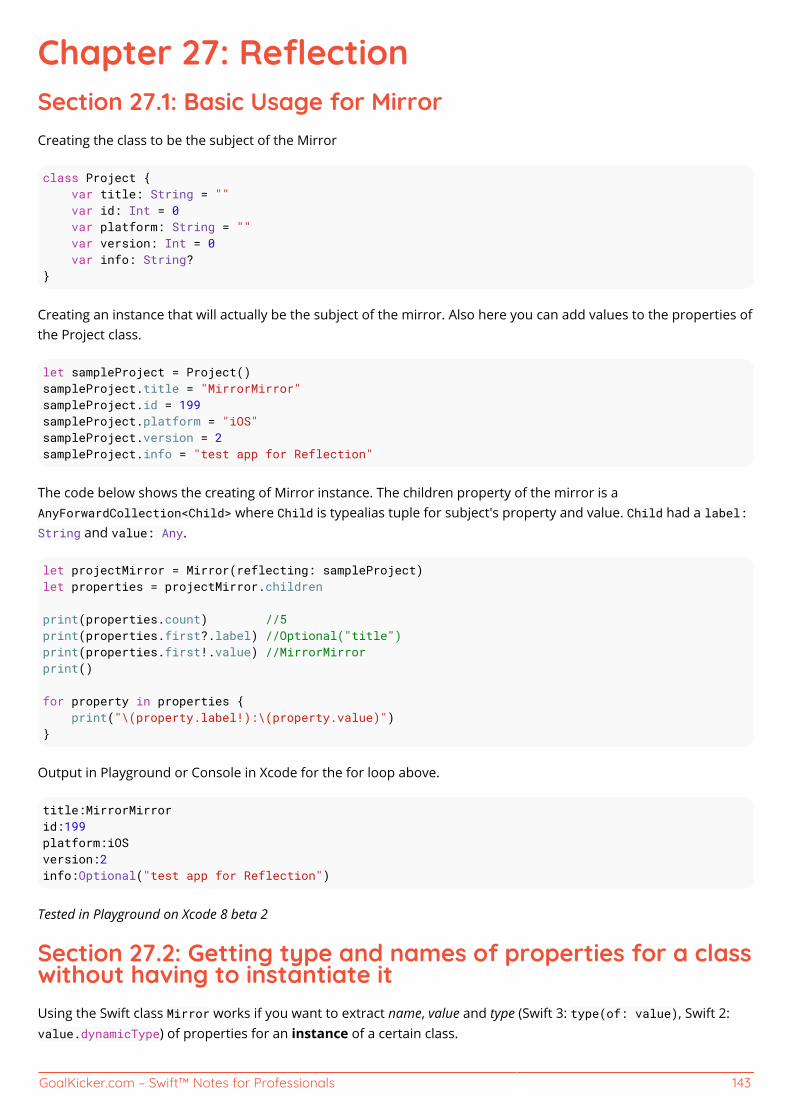
GoalKicker.com – Swift™ Notes for Professionals 143
Chapter 27: ReflectionSection 27.1: Basic Usage for MirrorCreating the class to be the subject of the Mirror
class Project { var title: String = "" var id: Int = 0 var platform: String = "" var version: Int = 0 var info: String?}
Creating an instance that will actually be the subject of the mirror. Also here you can add values to the properties ofthe Project class.
let sampleProject = Project()sampleProject.title = "MirrorMirror"sampleProject.id = 199sampleProject.platform = "iOS"sampleProject.version = 2sampleProject.info = "test app for Reflection"
The code below shows the creating of Mirror instance. The children property of the mirror is aAnyForwardCollection<Child> where Child is typealias tuple for subject's property and value. Child had a label:String and value: Any.
let projectMirror = Mirror(reflecting: sampleProject)let properties = projectMirror.children
print(properties.count) //5print(properties.first?.label) //Optional("title")print(properties.first!.value) //MirrorMirrorprint()
for property in properties { print("\(property.label!):\(property.value)")}
Output in Playground or Console in Xcode for the for loop above.
title:MirrorMirrorid:199platform:iOSversion:2info:Optional("test app for Reflection")
Tested in Playground on Xcode 8 beta 2
Section 27.2: Getting type and names of properties for a classwithout having to instantiate itUsing the Swift class Mirror works if you want to extract name, value and type (Swift 3: type(of: value), Swift 2:value.dynamicType) of properties for an instance of a certain class.

GoalKicker.com – Swift™ Notes for Professionals 144
If you class inherits from NSObject, you can use the method class_copyPropertyList together withproperty_getAttributes to find out the name and types of properties for a class - without having an instance ofit. I created a project on Github for this, but here is the code:
func getTypesOfProperties(in clazz: NSObject.Type) -> Dictionary<String, Any>? { var count = UInt32() guard let properties = class_copyPropertyList(clazz, &count) else { return nil } var types: Dictionary<String, Any> = [:] for i in 0..<Int(count) { guard let property: objc_property_t = properties[i], let name = getNameOf(property:property) else { continue } let type = getTypeOf(property: property) types[name] = type } free(properties) return types}
func getTypeOf(property: objc_property_t) -> Any { guard let attributesAsNSString: NSString = NSString(utf8String:property_getAttributes(property)) else { return Any.self } let attributes = attributesAsNSString as String let slices = attributes.components(separatedBy: "\"") guard slices.count > 1 else { return getPrimitiveDataType(withAttributes: attributes) } let objectClassName = slices[1] let objectClass = NSClassFromString(objectClassName) as! NSObject.Type return objectClass} func getPrimitiveDataType(withAttributes attributes: String) -> Any { guard let letter = attributes.substring(from: 1, to: 2), let type =primitiveDataTypes[letter] else { return Any.self } return type }
Where primitiveDataTypes is a Dictionary mapping a letter in the attribute string to a value type:
let primitiveDataTypes: Dictionary<String, Any> = [ "c" : Int8.self, "s" : Int16.self, "i" : Int32.self, "q" : Int.self, //also: Int64, NSInteger, only true on 64 bit platforms "S" : UInt16.self, "I" : UInt32.self, "Q" : UInt.self, //also UInt64, only true on 64 bit platforms "B" : Bool.self, "d" : Double.self, "f" : Float.self, "{" : Decimal.self] func getNameOf(property: objc_property_t) -> String? { guard let name: NSString = NSString(utf8String: property_getName(property)) else { returnnil } return name as String }
It can extract the NSObject.Type of all properties which class type inherits from NSObject such as NSDate (Swift3:Date), NSString(Swift3: String?) and NSNumber, however it is store in the type Any (as you can see as the type of thevalue of the Dictionary returned by the method). This is due to the limitations of value types such as Int, Int32,

GoalKicker.com – Swift™ Notes for Professionals 145
Bool. Since those types do not inherit from NSObject, calling .self on e.g. an Int - Int.self does not returnNSObject.Type, but rather the type Any. Thus the method returns Dictionary<String, Any>? and notDictionary<String, NSObject.Type>?.
You can use this method like this:
class Book: NSObject { let title: String let author: String? let numberOfPages: Int let released: Date let isPocket: Bool
init(title: String, author: String?, numberOfPages: Int, released: Date, isPocket: Bool) { self.title = title self.author = author self.numberOfPages = numberOfPages self.released = released self.isPocket = isPocket }}
guard let types = getTypesOfProperties(in: Book.self) else { return }for (name, type) in types { print("'\(name)' has type '\(type)'")}// Prints:// 'title' has type 'NSString'// 'numberOfPages' has type 'Int'// 'author' has type 'NSString'// 'released' has type 'NSDate'// 'isPocket' has type 'Bool'
You can also try to cast the Any to NSObject.Type, which will succeed for all properties inheriting from NSObject,then you can check the type using standard == operator:
func checkPropertiesOfBook() { guard let types = getTypesOfProperties(in: Book.self) else { return } for (name, type) in types { if let objectType = type as? NSObject.Type { if objectType == NSDate.self { print("Property named '\(name)' has type 'NSDate'") } else if objectType == NSString.self { print("Property named '\(name)' has type 'NSString'") } } }}
If you declare this custom == operator:
func ==(rhs: Any, lhs: Any) -> Bool { let rhsType: String = "\(rhs)" let lhsType: String = "\(lhs)" let same = rhsType == lhsType return same}
You can then even check the type of value types like this:

GoalKicker.com – Swift™ Notes for Professionals 146
func checkPropertiesOfBook() { guard let types = getTypesOfProperties(in: Book.self) else { return } for (name, type) in types { if type == Int.self { print("Property named '\(name)' has type 'Int'") } else if type == Bool.self { print("Property named '\(name)' has type 'Bool'") } }}
LIMITATIONS This solution does not work when value types are optionals. If you have declared a property in youNSObject subclass like this: var myOptionalInt: Int?, the code above won't find that property because themethod class_copyPropertyList does not contain optional value types.

GoalKicker.com – Swift™ Notes for Professionals 147
Chapter 28: Access ControlSection 28.1: Basic Example using a StructVersion ≥ 3.0
In Swift 3 there are multiple access-levels. This example uses them all except for open:
public struct Car { public let make: String let model: String //Optional keyword: will automatically be "internal" private let fullName: String fileprivate var otherName: String public init(_ make: String, model: String) { self.make = make self.model = model self.fullName = "\(make)\(model)" self.otherName = "\(model) - \(make)" }}
Assume myCar was initialized like this:
let myCar = Car("Apple", model: "iCar")
Car.make (public)print(myCar.make)
This print will work everywhere, including targets that import Car.
Car.model (internal)print(myCar.model)
This will compile if the code is in the same target as Car.
Car.otherName (fileprivate)print(myCar.otherName)
This will only work if the code is in the same file as Car.
Car.fullName (private)print(myCar.fullName)
This won't work in Swift 3. private properties can only be accessed within the same struct/class.
public struct Car {
public let make: String //public let model: String //internal private let fullName: String! //private
public init(_ make: String, model model: String) { self.make = make

GoalKicker.com – Swift™ Notes for Professionals 148
self.model = model self.fullName = "\(make)\(model)" }}
If the entity has multiple associated access levels, Swift looks for the lowest level of access. If a private variableexists in a public class, the variable will still be considered private.
Section 28.2: Subclassing Examplepublic class SuperClass { private func secretMethod() {}} internal class SubClass: SuperClass { override internal func secretMethod() { super.secretMethod() }}
Section 28.3: Getters and Setters Examplestruct Square { private(set) var area = 0
var side: Int = 0 { didSet { area = side*side } }}
public struct Square { public private(set) var area = 0 public var side: Int = 0 { didSet { area = side*side } } public init() {}}

GoalKicker.com – Swift™ Notes for Professionals 149
Chapter 29: ClosuresSection 29.1: Closure basicsClosures (also known as blocks or lambdas) are pieces of code which can be stored and passed around withinyour program.
let sayHi = { print("Hello") }// The type of sayHi is "() -> ()", aka "() -> Void"
sayHi() // prints "Hello"
Like other functions, closures can accept arguments and return results or throw errors:
let addInts = { (x: Int, y: Int) -> Int in return x + y}// The type of addInts is "(Int, Int) -> Int"
let result = addInts(1, 2) // result is 3
let divideInts = { (x: Int, y: Int) throws -> Int in if y == 0 { throw MyErrors.DivisionByZero } return x / y}// The type of divideInts is "(Int, Int) throws -> Int"
Closures can capture values from their scope:
// This function returns another function which returns an integerfunc makeProducer(x: Int) -> (() -> Int) { let closure = { x } // x is captured by the closure return closure}
// These two function calls use the exact same code,// but each closure has captured different values.let three = makeProducer(3)let four = makeProducer(4)three() // returns 3four() // returns 4
Closures can be passed directly into functions:
let squares = (1...10).map({ $0 * $0 }) // returns [1, 4, 9, 16, 25, 36, 49, 64, 81, 100]let squares = (1...10).map { $0 * $0 }
NSURLSession.sharedSession().dataTaskWithURL(myURL, completionHandler: { (data: NSData?, response: NSURLResponse?, error: NSError?) in if let data = data { print("Request succeeded, data: \(data)") } else { print("Request failed: \(error)") } }).resume()
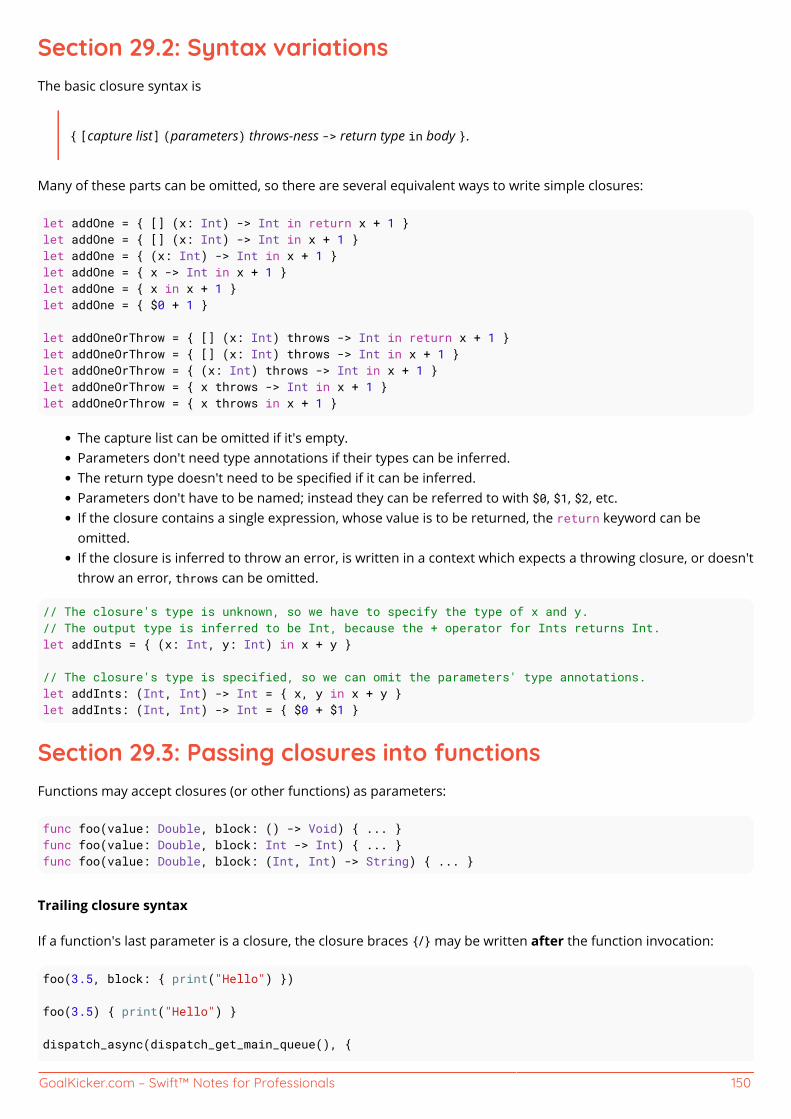
GoalKicker.com – Swift™ Notes for Professionals 150
Section 29.2: Syntax variationsThe basic closure syntax is
{ [capture list] (parameters) throws-ness -> return type in body }.
Many of these parts can be omitted, so there are several equivalent ways to write simple closures:
let addOne = { [] (x: Int) -> Int in return x + 1 }let addOne = { [] (x: Int) -> Int in x + 1 }let addOne = { (x: Int) -> Int in x + 1 }let addOne = { x -> Int in x + 1 }let addOne = { x in x + 1 }let addOne = { $0 + 1 }
let addOneOrThrow = { [] (x: Int) throws -> Int in return x + 1 }let addOneOrThrow = { [] (x: Int) throws -> Int in x + 1 }let addOneOrThrow = { (x: Int) throws -> Int in x + 1 }let addOneOrThrow = { x throws -> Int in x + 1 }let addOneOrThrow = { x throws in x + 1 }
The capture list can be omitted if it's empty.Parameters don't need type annotations if their types can be inferred.The return type doesn't need to be specified if it can be inferred.Parameters don't have to be named; instead they can be referred to with $0, $1, $2, etc.If the closure contains a single expression, whose value is to be returned, the return keyword can beomitted.If the closure is inferred to throw an error, is written in a context which expects a throwing closure, or doesn'tthrow an error, throws can be omitted.
// The closure's type is unknown, so we have to specify the type of x and y.// The output type is inferred to be Int, because the + operator for Ints returns Int.let addInts = { (x: Int, y: Int) in x + y }
// The closure's type is specified, so we can omit the parameters' type annotations.let addInts: (Int, Int) -> Int = { x, y in x + y }let addInts: (Int, Int) -> Int = { $0 + $1 }
Section 29.3: Passing closures into functionsFunctions may accept closures (or other functions) as parameters:
func foo(value: Double, block: () -> Void) { ... }func foo(value: Double, block: Int -> Int) { ... }func foo(value: Double, block: (Int, Int) -> String) { ... }
Trailing closure syntax
If a function's last parameter is a closure, the closure braces {/} may be written after the function invocation:
foo(3.5, block: { print("Hello") })
foo(3.5) { print("Hello") }
dispatch_async(dispatch_get_main_queue(), {

GoalKicker.com – Swift™ Notes for Professionals 151
print("Hello from the main queue")})
dispatch_async(dispatch_get_main_queue()) { print("Hello from the main queue")}
If a function's only argument is a closure, you may also omit the pair of parentheses () when calling it with thetrailing closure syntax:
func bar(block: () -> Void) { ... }
bar() { print("Hello") }
bar { print("Hello") }
@noescape parameters
Closure parameters marked @noescape are guaranteed to execute before the function call returns, so using self. isnot required inside the closure body:
func executeNow(scape block: () -> Void) { // Since `block` is @noescape, it's illegal to store it to an externalvariable. // We can only call it right here. block() } func executeLater(block: () -> Void) {dispatch_async(dispatch_get_main_queue()) { // Some time in the future... block() } }
class MyClass { var x = 0 func showExamples() { // error: reference to property 'x' in closure requires explicit 'self.' to make capturesemantics explicit executeLater { x = 1 }
executeLater { self.x = 2 } // ok, the closure explicitly captures self
// Here "self." is not required, because executeNow() takes a @noescape block. executeNow { x = 3 }
// Again, self. is not required, because map() uses @noescape. [1, 2, 3].map { $0 + x } }}
Swift 3 note:
Note that in Swift 3, you no longer mark blocks as @noescape. Blocks are now not escaping by default. In Swift 3,instead of marking a closure as non-escaping, you mark a function parameter that is an escaping closure asescaping using the "@escaping" keyword.
throws and rethrows
Closures, like other functions, may throw errors:
func executeNowOrIgnoreError(block: () ws -> Void) { do { try block() } catch { print("error: \(error)") } }
The function may, of course, pass the error along to its caller:
func executeNowOrThrow(block: () ws -> Void) throws { try block() }

GoalKicker.com – Swift™ Notes for Professionals 152
However, if the block passed in doesn't throw, the caller is still stuck with a throwing function:
// It's annoying that this requires "try", because "print()" can't throw!try executeNowOrThrow { print("Just printing, no errors here!") }
The solution is rethrows, which designates that the function can only throw if its closure parameter throws:
func executeNowOrRethrow(block: () ws -> Void) rethrows { try block() } // "try" is not required here, because theblock can't throw an error. executeNowOrRethrow { print("No errors are thrown from this closure") } // This blockcan throw an error, so "try" is required. try executeNowOrRethrow { throw MyError.Example }
Many standard library functions use rethrows, including map(), filter(), and indexOf().
Section 29.4: Captures, strong/weak references, and retaincyclesclass MyClass { func sayHi() { print("Hello") } deinit { print("Goodbye") }}
When a closure captures a reference type (a class instance), it holds a strong reference by default:
let closure: () -> Voiddo { let obj = MyClass() // Captures a strong reference to `obj`: the object will be kept alive // as long as the closure itself is alive. closure = { obj.sayHi() } closure() // The object is still alive; prints "Hello"} // obj goes out of scopeclosure() // The object is still alive; prints "Hello"
The closure's capture list can be used to specify a weak or unowned reference:
let closure: () -> Voiddo { let obj = MyClass() // Captures a weak reference to `obj`: the closure will not keep the object alive; // the object becomes optional inside the closure. closure = { [weak obj] in obj?.sayHi() } closure() // The object is still alive; prints "Hello"} // obj goes out of scope and is deallocated; prints "Goodbye"closure() // `obj` is nil from inside the closure; this does not print anything.
let closure: () -> Voiddo { let obj = MyClass() // Captures an unowned reference to `obj`: the closure will not keep the object alive; // the object is always assumed to be accessible while the closure is alive. closure = { [unowned obj] in obj.sayHi() } closure() // The object is still alive; prints "Hello"} // obj goes out of scope and is deallocated; prints "Goodbye"closure() // crash! obj is being accessed after it's deallocated.
For more information, see the Memory Management topic, and the Automatic Reference Counting section of TheSwift Programming Language.

GoalKicker.com – Swift™ Notes for Professionals 153
Retain cycles
If an object holds onto a closure, which also holds a strong reference to the object, this is a retain cycle. Unless thecycle is broken, the memory storing the object and closure will be leaked (never reclaimed).
class Game { var score = 0 let controller: GCController init(controller: GCController) { self.controller = controller
// BAD: the block captures self strongly, but self holds the controller // (and thus the block) strongly, which is a cycle. self.controller.controllerPausedHandler = { let curScore = self.score print("Pause button pressed; current score: \(curScore)") }
// SOLUTION: use `weak self` to break the cycle. self.controller.controllerPausedHandler = { [weak self] in guard let strongSelf = self else { return } let curScore = strongSelf.score print("Pause button pressed; current score: \(curScore)") } }}
Section 29.5: Using closures for asynchronous codingClosures are often used for asynchronous tasks, for example when fetching data from a website.
Version < 3.0
func getData(urlString: String, callback: (result: NSData?) -> Void) {
// Turn the URL string into an NSURLRequest. guard let url = NSURL(string: urlString) else { return } let request = NSURLRequest(URL: url) // Asynchronously fetch data from the given URL. let task = NSURLSession.sharedSession().dataTaskWithRequest(request) {(data: NSData?, response:NSURLResponse?, error: NSError?) in
// We now have the NSData response from the website. // We can get it "out" of the function by using the callback // that was passed to this function as a parameter.
callback(result: data) } task.resume()}
This function is asynchronous, so will not block the thread it is being called on (it won't freeze the interface if calledon the main thread of your GUI application).
Version < 3.0
print("1. Going to call getData")
getData("http://www.example.com") {(result: NSData?) -> Void in

GoalKicker.com – Swift™ Notes for Professionals 154
// Called when the data from http://www.example.com has been fetched. print("2. Fetched data")}
print("3. Called getData")
Because the task is asynchronous, the output will usually look like this:
"1. Going to call getData""3. Called getData""2. Fetched data"
Because the code inside of the closure, print("2. Fetched data"), will not be called until the data from the URL isfetched.
Section 29.6: Closures and Type AliasA closure can be defined with a typealias. This provides a convenient type placeholder if the same closuresignature is used in multiple places. For example, common network request callbacks or user interface eventhandlers make great candidates for being "named" with a type alias.
public typealias ureType = (x: Int, y: Int) -> Int
You can then define a function using the typealias:
public func closureFunction(closure: ureType) { let z = closure(1, 2) } closureFunction() { (x: Int, y: Int) -> Int inreturn x + y }

GoalKicker.com – Swift™ Notes for Professionals 155
Chapter 30: InitializersSection 30.1: Convenience initSwift classes supports having multiple ways of being initialized. Following Apple's specs this 3 rules must berespected:
A designated initializer must call a designated initializer from its immediate superclass.1.
A convenience initializer must call another initializer from the same class.2.A convenience initializer must ultimately call a designated initializer.3.

GoalKicker.com – Swift™ Notes for Professionals 156
class Foo {
var someString: String var someValue: Int var someBool: Bool
// Designated Initializer init(someString: String, someValue: Int, someBool: Bool) { self.someString = someString self.someValue = someValue self.someBool = someBool }
// A convenience initializer must call another initializer from the same class. convenience init() { self.init(otherString: "") }
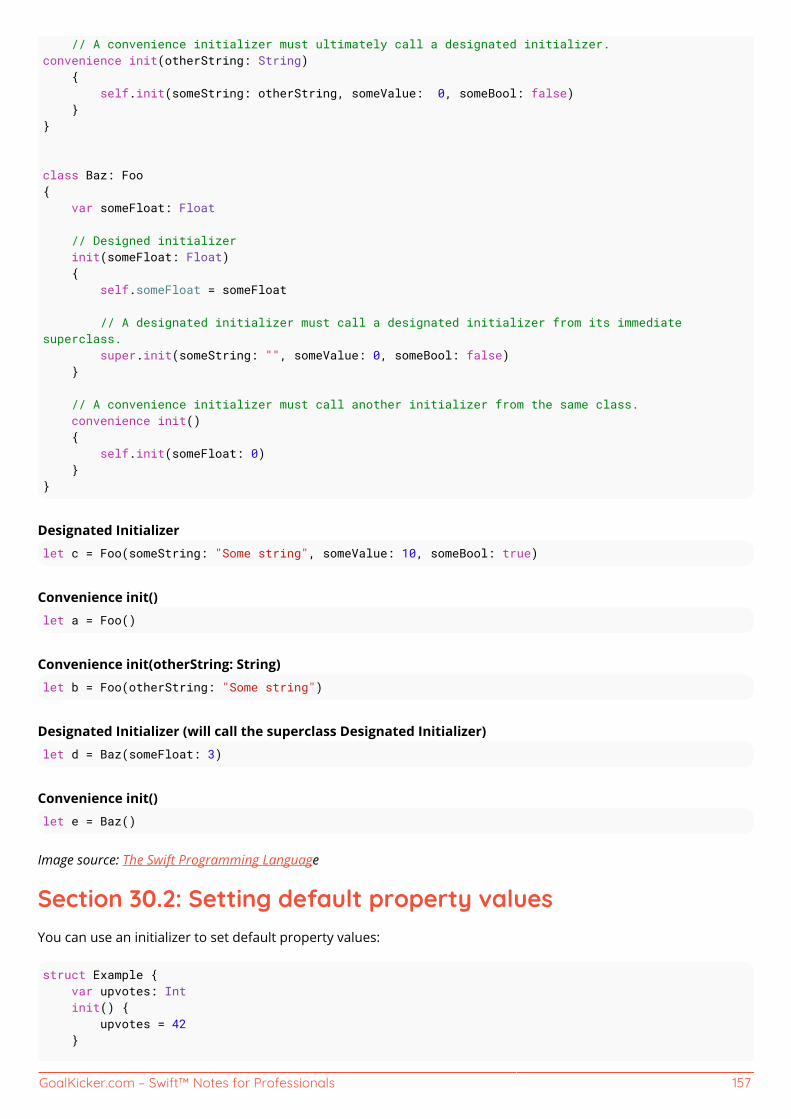
GoalKicker.com – Swift™ Notes for Professionals 157
// A convenience initializer must ultimately call a designated initializer.convenience init(otherString: String) { self.init(someString: otherString, someValue: 0, someBool: false) }}
class Baz: Foo{ var someFloat: Float // Designed initializer init(someFloat: Float) { self.someFloat = someFloat // A designated initializer must call a designated initializer from its immediatesuperclass. super.init(someString: "", someValue: 0, someBool: false) } // A convenience initializer must call another initializer from the same class. convenience init() { self.init(someFloat: 0) }}
Designated Initializerlet c = Foo(someString: "Some string", someValue: 10, someBool: true)
Convenience init()let a = Foo()
Convenience init(otherString: String)let b = Foo(otherString: "Some string")
Designated Initializer (will call the superclass Designated Initializer)let d = Baz(someFloat: 3)
Convenience init()let e = Baz()
Image source: The Swift Programming Language
Section 30.2: Setting default property valuesYou can use an initializer to set default property values:
struct Example { var upvotes: Int init() { upvotes = 42 }

GoalKicker.com – Swift™ Notes for Professionals 158
}let myExample = Example() // call the initializerprint(myExample.upvotes) // prints: 42
Or, specify default property values as a part of the property's declaration:
struct Example { var upvotes = 42 // the type 'Int' is inferred here}
Classes and structs must set all stored properties to an appropriate initial value by the time an instance is created.This example will not compile, because the initializer did not give an initial value for downvotes:
struct Example { var upvotes: Int var downvotes: Int init() { upvotes = 0 } // error: Return from initializer without initializing all stored properties}
Section 30.3: Customizing initialization with parametersstruct MetricDistance { var distanceInMeters: Double
init(fromCentimeters centimeters: Double) { distanceInMeters = centimeters / 100 } init(fromKilometers kilos: Double) { distanceInMeters = kilos * 1000 }}
let myDistance = MetricDistance(fromCentimeters: 42)// myDistance.distanceInMeters is 0.42let myOtherDistance = MetricDistance(fromKilometers: 42)// myOtherDistance.distanceInMeters is 42000
Note that you cannot omit the parameter labels:
let myBadDistance = MetricDistance(42) // error: argument labels do not match any availableoverloads
In order to allow omission of parameter labels, use an underscore _ as the label:
struct MetricDistance { var distanceInMeters: Double init(_ meters: Double) { distanceInMeters = meters }}let myDistance = MetricDistance(42) // distanceInMeters = 42
If your argument labels share names with one or more properties, use self to explicitly set the property values:
struct Color {

GoalKicker.com – Swift™ Notes for Professionals 159
var red, green, blue: Double init(red: Double, green: Double, blue: Double) { self.red = red self.green = green self.blue = blue }}
Section 30.4: Throwable InitilizerUsing Error Handling to make Struct(or class) initializer as throwable initializer:
Example Error Handling enum:
enum ValidationError: Error { case invalid}
You can use Error Handling enum to check the parameter for the Struct(or class) meet expected requirement
struct User { let name: String
init(name: String?) throws {
guard let name = name else { ValidationError.invalid }
self.name = name }}
Now, you can use throwable initializer by:
do { let user = try User(name: "Sample name") // success}catch ValidationError.invalid { // handle error}

GoalKicker.com – Swift™ Notes for Professionals 160
Chapter 31: Associated ObjectsSection 31.1: Property, in a protocol extension, achieved usingassociated objectIn Swift, protocol extensions cannot have true properties.
However, in practice you can use the "associated object" technique. The result is almost exactly like a "real"property.
Here is the exact technique for adding an "associated object" to a protocol extension:
Fundamentally, you use the objective-c "objc_getAssociatedObject" and _set calls.
The basic calls are:
get { return objc_getAssociatedObject(self, & _Handle) as! YourType }set { objc_setAssociatedObject(self, & _Handle, newValue, .OBJC_ASSOCIATION_RETAIN) }
Here's a full example. The two critical points are:
In the protocol, you must use ": class" to avoid the mutation problem.1.
In the extension, you must use "where Self:UIViewController" (or whatever appropriate class) to give the2.confirming type.
So, for an example property "p":
import Foundationimport UIKitimport ObjectiveC // don't forget this
var _Handle: UInt8 = 42 // it can be any value
protocol Able: class { var click:UIView? { get set } var x:CGFloat? { get set } // note that you >> do not << declare p here}
extension Able where Self:UIViewController { var p:YourType { // YourType might be, say, an Enum get { return objc_getAssociatedObject(self, & _Handle) as! YourType // HOWEVER, SEE BELOW } set { objc_setAssociatedObject(self, & _Handle, newValue, .OBJC_ASSOCIATION_RETAIN) // often, you'll want to run some sort of "setter" here... __setter() } }

GoalKicker.com – Swift™ Notes for Professionals 161
func __setter() { something = p.blah() } func someOtherExtensionFunction() { p.blah() } // it's ok to use "p" inside other extension functions, // and you can use p anywhere in the conforming class}
In any conforming class, you have now "added" the property "p":
You can use "p" just as you would use any ordinary property in the conforming class. Example:
class Clock:UIViewController, Able { var u:Int = 0
func blah() { u = ... ... = u // use "p" as you would any normal property p = ... ... = p }
override func viewDidLoad() { super.viewDidLoad() pm = .none // "p" MUST be "initialized" somewhere in Clock }}
Note. You MUST initialize the pseudo-property.
Xcode will not enforce you initializing "p" in the conforming class.
It is essential that you initialize "p", perhaps in viewDidLoad of the confirming class.
It is worth remembering that p is actually just a computed property. p is actually just two functions, with syntacticsugar. There is no p "variable" anywhere: the compiler does not "assign some memory for p" in any sense. For thisreason, it is meaningless to expect Xcode to enforce "initializing p".
Indeed, to speak more accurately, you must remember to "use p for the first time, as if you were initializing it".(Again, that would very likely be in your viewDidLoad code.)
Regarding the getter as such.
Note that it will crash if the getter is called before a value for "p" is set.
To avoid that, consider code such as:
get { let g = objc_getAssociatedObject(self, &_Handle) if (g == nil) { objc_setAssociatedObject(self, &_Handle, _default initial value_, .OBJC_ASSOCIATION) return _default initial value_ } return objc_getAssociatedObject(self, &_Handle) as! YourType }
To repeat. Xcode will not enforce you initializing p in the conforming class. It is essential that you initialize p, say in
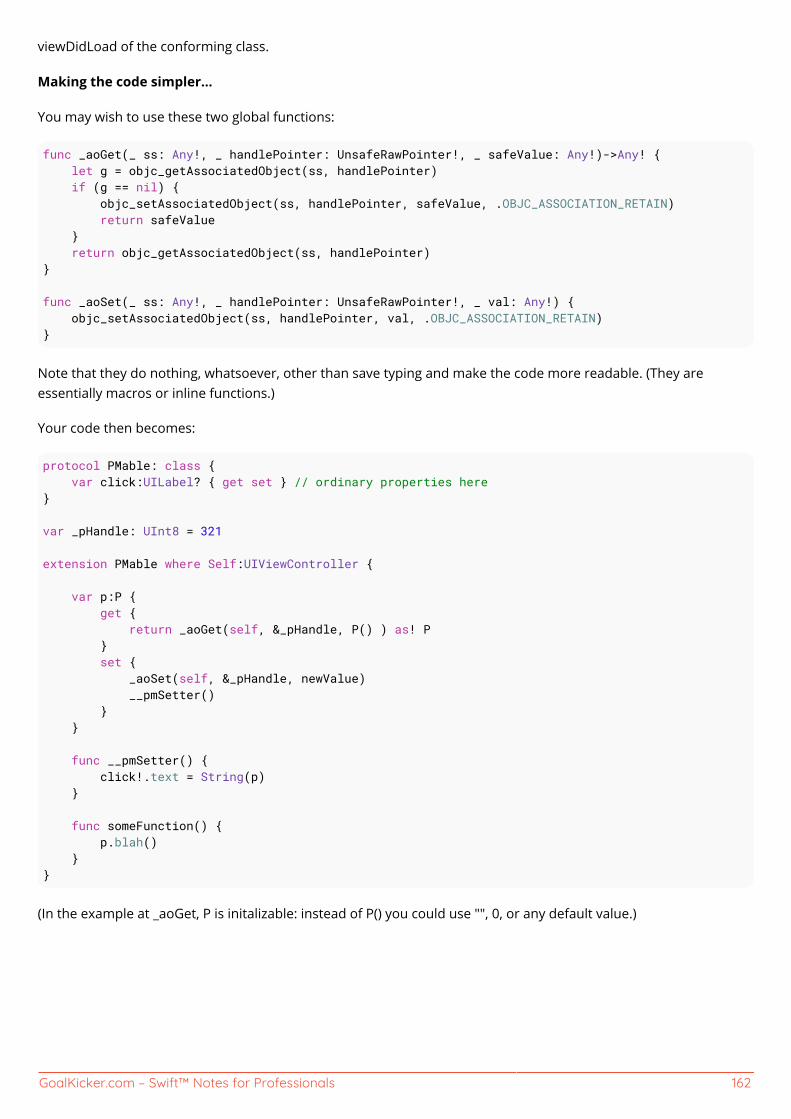
GoalKicker.com – Swift™ Notes for Professionals 162
viewDidLoad of the conforming class.
Making the code simpler...
You may wish to use these two global functions:
func _aoGet(_ ss: Any!, _ handlePointer: UnsafeRawPointer!, _ safeValue: Any!)->Any! { let g = objc_getAssociatedObject(ss, handlePointer) if (g == nil) { objc_setAssociatedObject(ss, handlePointer, safeValue, .OBJC_ASSOCIATION_RETAIN) return safeValue } return objc_getAssociatedObject(ss, handlePointer) }
func _aoSet(_ ss: Any!, _ handlePointer: UnsafeRawPointer!, _ val: Any!) { objc_setAssociatedObject(ss, handlePointer, val, .OBJC_ASSOCIATION_RETAIN)}
Note that they do nothing, whatsoever, other than save typing and make the code more readable. (They areessentially macros or inline functions.)
Your code then becomes:
protocol PMable: class { var click:UILabel? { get set } // ordinary properties here}
var _pHandle: UInt8 = 321
extension PMable where Self:UIViewController {
var p:P { get { return _aoGet(self, &_pHandle, P() ) as! P } set { _aoSet(self, &_pHandle, newValue) __pmSetter() } } func __pmSetter() { click!.text = String(p) } func someFunction() { p.blah() }}
(In the example at _aoGet, P is initalizable: instead of P() you could use "", 0, or any default value.)

GoalKicker.com – Swift™ Notes for Professionals 163
Chapter 32: ConcurrencySection 32.1: Obtaining a Grand Central Dispatch (GCD) queueGrand Central Dispatch works on the concept of "Dispatch Queues". A dispatch queue executes tasks you designatein the order which they are passed. There are three types of dispatch queues:
Serial Dispatch Queues (aka private dispatch queues) execute one task at a time, in order. They arefrequently used to synchronize access to a resource.Concurrent Dispatch Queues (aka global dispatch queues) execute one or more tasks concurrently.The Main Dispatch Queue executes tasks on the main thread.
To access the main queue:
Version = 3.0
let mainQueue = DispatchQueue.mainVersion < 3.0
let mainQueue = dispatch_get_main_queue()
The system provides concurrent global dispatch queues (global to your application), with varying priorities. You canaccess these queues using the DispatchQueue class in Swift 3:
Version = 3.0
let globalConcurrentQueue = DispatchQueue.global(qos: .default)
equivalent to
let globalConcurrentQueue = DispatchQueue.global()Version < 3.0
let globalConcurrentQueue = dispatch_get_global_queue(DISPATCH_QUEUE_PRIORITY_DEFAULT, 0)
In iOS 8 or later, the possible quality of service values which may be passed are .userInteractive,.userInitiated, .default, .utility, and .background. These replace the DISPATCH_QUEUE_PRIORITY_ constants.
You can also create your own queues with varying priorities:
Version = 3.0
let myConcurrentQueue = DispatchQueue(label: "my-concurrent-queue", qos: .userInitiated,attributes: [.concurrent], autoreleaseFrequency: .workItem, target: nil)let mySerialQueue = DispatchQueue(label: "my-serial-queue", qos: .background, attributes: [],autoreleaseFrequency: .workItem, target: nil)Version < 3.0
let myConcurrentQueue = dispatch_queue_create("my-concurrent-queue", DISPATCH_QUEUE_CONCURRENT)let mySerialQueue = dispatch_queue_create("my-serial-queue", DISPATCH_QUEUE_SERIAL)
In Swift 3, queues created with this initializer are serial by default, and passing .workItem for autorelease frequencyensures an autorelease pool is created and drained for each work item. There is also .never, which means you willbe managing your own autorelease pools yourself, or .inherit which inherits the setting from the environment. Inmost cases you probably won't use .never except in cases of extreme customization.
Section 32.2: Concurrent LoopsGCD provides mechanism for performing a loop, whereby the loops happen concurrently with respect to each

GoalKicker.com – Swift™ Notes for Professionals 164
other. This is very useful when performing a series of computationally expensive calculations.
Consider this loop:
for index in 0 ..< iterations { // Do something computationally expensive here}
You can perform those calculations concurrently using concurrentPerform (in Swift 3) or dispatch_apply (in Swift2):
Version = 3.0
DispatchQueue.concurrentPerform(iterations: iterations) { index in // Do something computationally expensive here}Version < 3.0
dispatch_apply(iterations, queue) { index in // Do something computationally expensive here}
The loop closure will be invoked for each index from 0 to, but not including, iterations. These iterations will berun concurrently with respect to each other, and thus the order that they run is not guaranteed. The actual numberof iterations that happen concurrently at any given time is generally dictated by the capabilities of the device inquestion (e.g. how many cores does the device have).
A couple of special considerations:
The concurrentPerform/dispatch_apply may run the loops concurrently with respect to each other, but thisall happens synchronously with respect to the thread from which you call it. So, do not call this from the mainthread, as this will block that thread until the loop is done.
Because these loops happen concurrently with respect to each other, you are responsible for ensuring thethread-safety of the results. For example, if updating some dictionary with the results of thesecomputationally expensive calculations, make sure to synchronize those updates yourself.
Note, there is some overhead associated in running concurrent loops. Thus, if the calculations beingperformed inside the loop are not sufficiently computationally intensive, you may find that any performancegained by using concurrent loops may be diminished, if not be completely offset, by the overhead associatedwith the synchronizing all of these concurrent threads.
So, you are responsible determining the correct amount of work to be performed in each iteration of theloop. If the calculations are too simple, you may employ "striding" to include more work per loop. Forexample, rather than doing a concurrent loop with 1 million trivial calculations, you may do 100 iterations inyour loop, doing 10,000 calculations per loop. That way there is enough work being performed on eachthread, so the overhead associated with managing these concurrent loops becomes less significant.
Section 32.3: Running tasks in a Grand Central Dispatch (GCD)queueVersion = 3.0
To run tasks on a dispatch queue, use the sync, async, and after methods.
To dispatch a task to a queue asynchronously:

GoalKicker.com – Swift™ Notes for Professionals 165
let queue = DispatchQueue(label: "myQueueName")
queue.async { //do something DispatchQueue.main.async { //this will be called in main thread //any UI updates should be placed here }}// ... code here will execute immediately, before the task finished
To dispatch a task to a queue synchronously:
queue.sync { // Do some task}// ... code here will not execute until the task is finished
To dispatch a task to a queue after a certain number of seconds:
queue.asyncAfter(deadline: .now() + 3) { //this will be executed in a background-thread after 3 seconds}// ... code here will execute immediately, before the task finished
NOTE: Any updates of the user-interface should be called on the main thread! Make sure, that you putthe code for UI updates inside DispatchQueue.main.async { ... }
Version = 2.0
Types of queue:
let mainQueue = dispatch_get_main_queue()let highQueue = dispatch_get_global_queue(DISPATCH_QUEUE_PRIORITY_HIGH, 0)let backgroundQueue = dispatch_get_global_queue(DISPATCH_QUEUE_PRIORITY_BACKGROUND, 0)
To dispatch a task to a queue asynchronously:
dispatch_async(queue) { // Your code run run asynchronously. Code is queued and executed // at some point in the future.}// Code after the async block will execute immediately
To dispatch a task to a queue synchronously:
dispatch_sync(queue) { // Your sync code}// Code after the sync block will wait until the sync task finished
To dispatch a task to after a time interval (use NSEC_PER_SEC to convert seconds to nanoseconds):
dispatch_after(dispatch_time(DISPATCH_TIME_NOW, Int64(2.5 * Double(NSEC_PER_SEC))),

GoalKicker.com – Swift™ Notes for Professionals 166
dispatch_get_main_queue()) { // Code to be performed in 2.5 seconds here}
To execute a task asynchronously and than update the UI:
dispatch_async(queue) { // Your time consuming code here dispatch_async(dispatch_get_main_queue()) { // Update the UI code }}
NOTE: Any updates of the user-interface should be called on the main thread! Make sure, that you putthe code for UI updates inside dispatch_async(dispatch_get_main_queue()) { ... }
Section 32.4: Running Tasks in an OperationQueueYou can think of an OperationQueue as a line of tasks waiting to be executed. Unlike dispatch queues in GCD,operation queues are not FIFO (first-in-first-out). Instead, they execute tasks as soon as they are ready to beexecuted, as long as there are enough system resources to allow for it.
Get the main OperationQueue:
Version ≥ 3.0
let mainQueue = OperationQueue.main
Create a custom OperationQueue:
Version ≥ 3.0
let queue = OperationQueue()queue.name = "My Queue"queue.qualityOfService = .default
Quality of Service specifies the importance of the work, or how much the user is likely to be counting on immediateresults from the task.
Add an Operation to an OperationQueue:
Version ≥ 3.0
// An instance of some Operation subclasslet operation = BlockOperation { // perform task here}
queue.addOperation(operation)
Add a block to an OperationQueue:
Version ≥ 3.0
myQueue.addOperation { // some task}
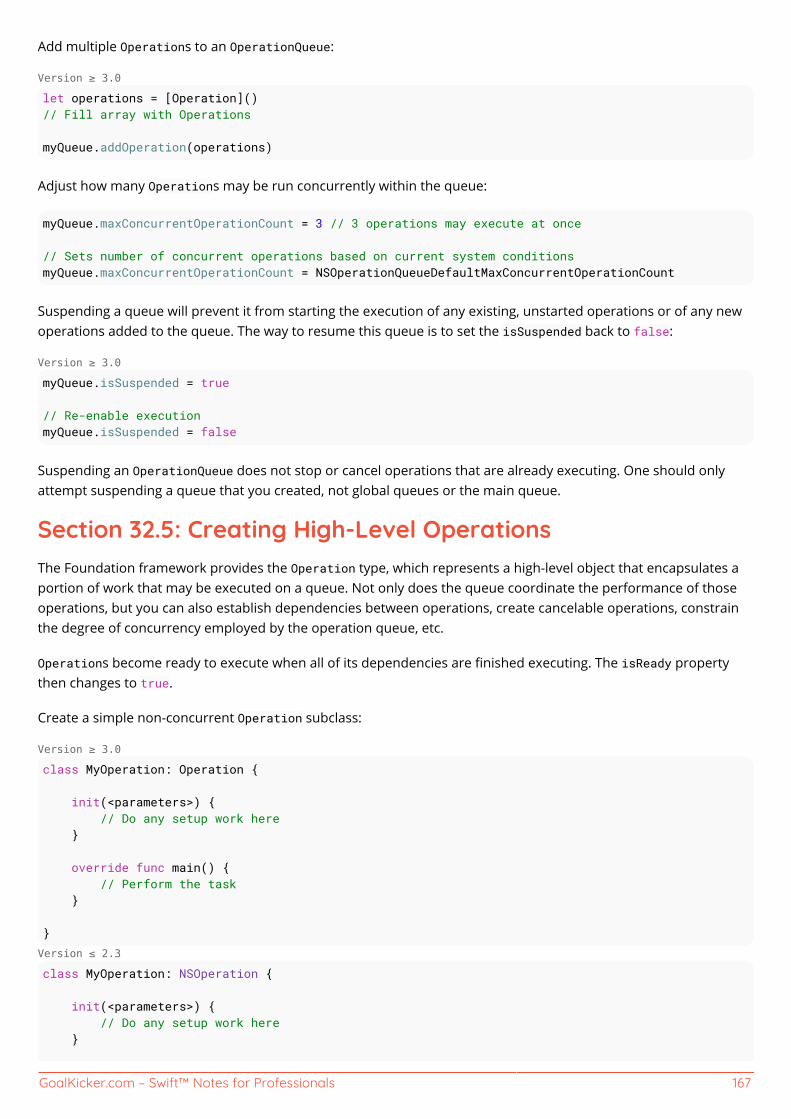
GoalKicker.com – Swift™ Notes for Professionals 167
Add multiple Operations to an OperationQueue:
Version ≥ 3.0
let operations = [Operation]()// Fill array with Operations
myQueue.addOperation(operations)
Adjust how many Operations may be run concurrently within the queue:
myQueue.maxConcurrentOperationCount = 3 // 3 operations may execute at once
// Sets number of concurrent operations based on current system conditionsmyQueue.maxConcurrentOperationCount = NSOperationQueueDefaultMaxConcurrentOperationCount
Suspending a queue will prevent it from starting the execution of any existing, unstarted operations or of any newoperations added to the queue. The way to resume this queue is to set the isSuspended back to false:
Version ≥ 3.0
myQueue.isSuspended = true
// Re-enable executionmyQueue.isSuspended = false
Suspending an OperationQueue does not stop or cancel operations that are already executing. One should onlyattempt suspending a queue that you created, not global queues or the main queue.
Section 32.5: Creating High-Level OperationsThe Foundation framework provides the Operation type, which represents a high-level object that encapsulates aportion of work that may be executed on a queue. Not only does the queue coordinate the performance of thoseoperations, but you can also establish dependencies between operations, create cancelable operations, constrainthe degree of concurrency employed by the operation queue, etc.
Operations become ready to execute when all of its dependencies are finished executing. The isReady propertythen changes to true.
Create a simple non-concurrent Operation subclass:
Version ≥ 3.0
class MyOperation: Operation {
init(<parameters>) { // Do any setup work here }
override func main() { // Perform the task }
}Version ≤ 2.3
class MyOperation: NSOperation {
init(<parameters>) { // Do any setup work here }
GoalKicker.com – Swift™ Notes for Professionals 168
override func main() { // Perform the task }
}
Add an operation to an OperationQueue:
Version ≥ 1.0
myQueue.addOperation(operation)
This will execute the operation concurrently on the queue.
Manage dependencies on an Operation.
Dependencies define other Operations that must execute on a queue before that Operation is considered ready toexecute.
Version ≥ 1.0
operation2.addDependency(operation1)
operation2.removeDependency(operation1)
Run an Operation without a queue:
Version ≥ 1.0
operation.start()
Dependencies will be ignored. If this is a concurrent operation, the task may still be executed concurrently if itsstart method offloads work to background queues.
Concurrent Operations.
If the task that an Operation is to perform is, itself, asynchronous, (e.g. a URLSession data task), you shouldimplement the Operation as a concurrent operation. In this case, your isAsynchronous implementation shouldreturn true, you'd generally have start method that performs some setup, then calls its main method whichactually executes the task.
When implementing an asynchronous Operation begins you must implement isExecuting, isFinished methodsand KVO. So, when execution starts, isExecuting property changes to true. When an Operation finishes its task,isExecuting is set to false, and isFinished is set to true. If the operation it is cancelled both isCancelled andisFinished change to true. All of these properties are key-value observable.
Cancel an Operation.
Calling cancel simply changes the isCancelled property to true. To respond to cancellation from within your ownOperation subclass, you should check the value of isCancelled at least periodically within main and respondappropriately.
Version ≥ 1.0
operation.cancel()

GoalKicker.com – Swift™ Notes for Professionals 169
Chapter 33: Getting Started with ProtocolOriented ProgrammingSection 33.1: Using protocols as first class typesProtocol oriented programing can be used as a core Swift design pattern.
Different types are able to conform to the same protocol, value types can even conform to multiple protocols andeven provide default method implementation.
Initially protocols are defined that can represent commonly used properties and/or methods with either specific orgeneric types.
protocol ItemData { var title: String { get } var description: String { get } var thumbnailURL: NSURL { get } var created: NSDate { get } var updated: NSDate { get } }
protocol DisplayItem { func hasBeenUpdated() -> Bool func getFormattedTitle() -> String func getFormattedDescription() -> String
}
protocol GetAPIItemDataOperation { static func get(url: NSURL, completed: ([ItemData]) -> Void)}
A default implementation for the get method can be created, though if desired conforming types may override theimplementation.
extension GetAPIItemDataOperation { static func get(url: NSURL, completed: ([ItemData]) -> Void) { let date = NSDate( timeIntervalSinceNow: NSDate().timeIntervalSince1970 + 5000) // get data from url let urlData: [String: AnyObject] = [ "title": "Red Camaro", "desc": "A fast red car.", "thumb":"http://cars.images.com/red-camaro.png", "created": NSDate(), "updated": date] // in this example forced unwrapping is used // forced unwrapping should never be used in practice // instead conditional unwrapping should be used (guard or if/let)

GoalKicker.com – Swift™ Notes for Professionals 170
let item = Item( title: urlData["title"] as! String, description: urlData["desc"] as! String, thumbnailURL: NSURL(string: urlData["thumb"] as! String)!, created: urlData["created"] as! NSDate, updated: urlData["updated"] as! NSDate) completed([item]) }}
struct ItemOperation: GetAPIItemDataOperation { }
A value type that conforms to the ItemData protocol, this value type is also able to conform to other protocols.
struct Item: ItemData { let title: String let description: String let thumbnailURL: NSURL let created: NSDate let updated: NSDate }
Here the item struct is extended to conform to a display item.
extension Item: DisplayItem { func hasBeenUpdated() -> Bool { return updated.timeIntervalSince1970 > created.timeIntervalSince1970 } func getFormattedTitle() -> String { return title.stringByTrimmingCharactersInSet( .whitespaceAndNewlineCharacterSet()) } func getFormattedDescription() -> String { return description.stringByTrimmingCharactersInSet( .whitespaceAndNewlineCharacterSet()) }}
An example call site for using the static get method.
ItemOperation.get(NSURL()) { (itemData) in // perhaps inform a view of new data // or parse the data for user requested info, etc. dispatch_async(dispatch_get_main_queue(), { // self.items = itemData }) }
Different use cases will require different implementations. The main idea here is to show conformance from

GoalKicker.com – Swift™ Notes for Professionals 171
varying types where the protocol is the main point of the focus in the design. In this example perhaps the API datais conditionally saved to a Core Data entity.
// the default core data created classes + extensionclass LocalItem: NSManagedObject { }
extension LocalItem { @NSManaged var title: String @NSManaged var itemDescription: String @NSManaged var thumbnailURLStr: String @NSManaged var createdAt: NSDate @NSManaged var updatedAt: NSDate}
Here the Core Data backed class can also conform to the DisplayItem protocol.
extension LocalItem: DisplayItem { func hasBeenUpdated() -> Bool { return updatedAt.timeIntervalSince1970 > createdAt.timeIntervalSince1970 } func getFormattedTitle() -> String { return title.stringByTrimmingCharactersInSet( .whitespaceAndNewlineCharacterSet()) } func getFormattedDescription() -> String { return itemDescription.stringByTrimmingCharactersInSet( .whitespaceAndNewlineCharacterSet()) }}
// In use, the core data results can be// conditionally casts as a protocolclass MyController: UIViewController {
override func viewDidLoad() { let fr: NSFetchRequest = NSFetchRequest( entityName: "Items") let context = NSManagedObjectContext( concurrencyType: .MainQueueConcurrencyType) do { let items: AnyObject = try context.executeFetchRequest(fr) if let displayItems = items as? [DisplayItem] { print(displayItems) } } catch let error as NSError { print(error.localizedDescription) } }

GoalKicker.com – Swift™ Notes for Professionals 172
}
Section 33.2: Leveraging Protocol Oriented Programming forUnit TestingProtocol Oriented Programming is a useful tool in order to easily write better unit tests for our code.
Let's say we want to test a UIViewController that relies on a ViewModel class.
The needed steps on the production code are:
Define a protocol that exposes the public interface of the class ViewModel, with all the properties and1.methods needed by the UIViewController.Implement the real ViewModel class, conforming to that protocol.2.Use a dependency injection technique to let the view controller use the implementation we want, passing it3.as the protocol and not the concrete instance.
protocol ViewModelType { var title : String {get} func confirm()}
class ViewModel : ViewModelType { let title : String
init(title: String) { self.title = title } func confirm() { ... }}
class ViewController : UIViewController { // We declare the viewModel property as an object conforming to the protocol // so we can swap the implementations without any friction. var viewModel : ViewModelType! @IBOutlet var titleLabel : UILabel!
override func viewDidLoad() { super.viewDidLoad() titleLabel.text = viewModel.title }
@IBAction func didTapOnButton(sender: UIButton) { viewModel.confirm() }}
// With DI we setup the view controller and assign the view model.// The view controller doesn't know the concrete class of the view model,// but just relies on the declared interface on the protocol.let viewController = //... Instantiate view controllerviewController.viewModel = ViewModel(title: "MyTitle")
Then, on unit test:
Implement a mock ViewModel that conforms to the same protocol1.Pass it to the UIViewController under test using dependency injection, instead of the real instance.2.Test!3.

GoalKicker.com – Swift™ Notes for Professionals 173
class FakeViewModel : ViewModelType { let title : String = "FakeTitle"
var didConfirm = false func confirm() { didConfirm = true }}
class ViewControllerTest : XCTestCase { var sut : ViewController! var viewModel : FakeViewModel!
override func setUp() { super.setUp()
viewModel = FakeViewModel() sut = // ... initialization for view controller sut.viewModel = viewModel
XCTAssertNotNil(self.sut.view) // Needed to trigger view loading }
func testTitleLabel() { XCTAssertEqual(self.sut.titleLabel.text, "FakeTitle") }
func testTapOnButton() { sut.didTapOnButton(UIButton()) XCTAssertTrue(self.viewModel.didConfirm) }}

GoalKicker.com – Swift™ Notes for Professionals 174
Chapter 34: Functional Programming inSwiftSection 34.1: Extracting a list of names from a list of Person(s)Given a Person struct
struct Person { let name: String let birthYear: Int?}
and an Array of Person(s)
let persons = [ Person(name: "Walter White", birthYear: 1959), Person(name: "Jesse Pinkman", birthYear: 1984), Person(name: "Skyler White", birthYear: 1970), Person(name: "Saul Goodman", birthYear: nil)]
we can retrieve an array of String containing the name property of each Person.
let names = persons.map { $0.name }// ["Walter White", "Jesse Pinkman", "Skyler White", "Saul Goodman"]
Section 34.2: Traversinglet numbers = [3, 1, 4, 1, 5]// non-functionalfor (index, element) in numbers.enumerate() { print(index, element)}
// functionalnumbers.enumerate().map { (index, element) in print((index, element))}
Section 34.3: FilteringCreate a stream by selecting the elements from a stream that pass a certain condition is called filtering
var newReleases = [ [ "id": 70111470, "title": "Die Hard", "boxart": "http://cdn-0.nflximg.com/images/2891/DieHard.jpg", "uri": "http://api.netflix.com/catalog/titles/movies/70111470", "rating": 4.0, "bookmark": [] ], [ "id": 654356453, "title": "Bad Boys",

GoalKicker.com – Swift™ Notes for Professionals 175
"boxart": "http://cdn-0.nflximg.com/images/2891/BadBoys.jpg", "uri": "http://api.netflix.com/catalog/titles/movies/70111470", "rating": 5.0, "bookmark": [[ "id": 432534, "time": 65876586 ]] ], [ "id": 65432445, "title": "The Chamber", "boxart": "http://cdn-0.nflximg.com/images/2891/TheChamber.jpg", "uri": "http://api.netflix.com/catalog/titles/movies/70111470", "rating": 4.0, "bookmark": [] ], [ "id": 675465, "title": "Fracture", "boxart": "http://cdn-0.nflximg.com/images/2891/Fracture.jpg", "uri": "http://api.netflix.com/catalog/titles/movies/70111470", "rating": 5.0, "bookmark": [[ "id": 432534, "time": 65876586 ]] ]]
var videos1 = [[String: AnyObject]]()/** * Filtering using map */newReleases.map { e in if e["rating"] as! Float == 5.0 { videos1.append(["id": e["id"] as! Int, "title": e["title"] as! String]) }}
print(videos1)
var videos2 = [[String: AnyObject]]()/** * Filtering using filter and chaining */newReleases .filter{ e in e["rating"] as! Float == 5.0 } .map { e in videos2.append(["id": e["id"] as! Int, "title": e["title"] as! String])}
print(videos2)
Section 34.4: Using Filter with StructsFrequently you may want to filter structures and other complex data types. Searching an array of structs for entriesthat contain a particular value is a very common task, and easily achieved in Swift using functional programmingfeatures. What's more, the code is extremely succinct.
struct Painter { enum Type { case Impressionist, Expressionist, Surrealist, Abstract, Pop } var firstName: String var lastName: String var type: Type
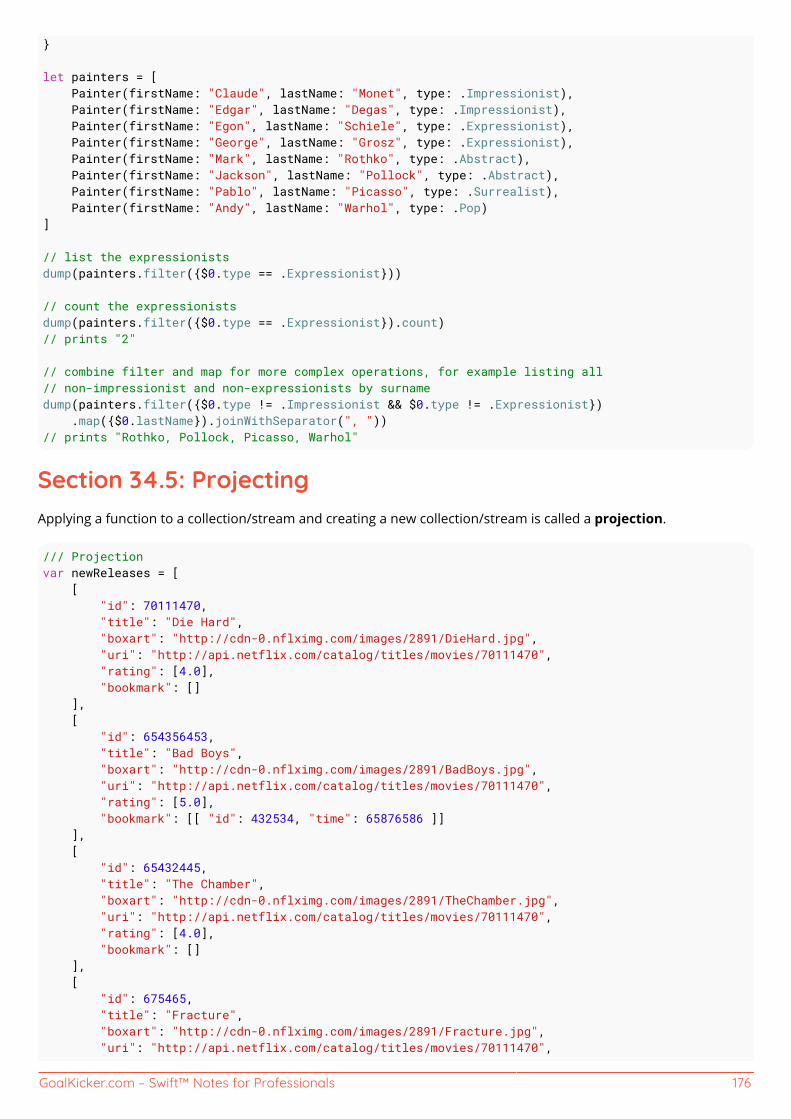
GoalKicker.com – Swift™ Notes for Professionals 176
}
let painters = [ Painter(firstName: "Claude", lastName: "Monet", type: .Impressionist), Painter(firstName: "Edgar", lastName: "Degas", type: .Impressionist), Painter(firstName: "Egon", lastName: "Schiele", type: .Expressionist), Painter(firstName: "George", lastName: "Grosz", type: .Expressionist), Painter(firstName: "Mark", lastName: "Rothko", type: .Abstract), Painter(firstName: "Jackson", lastName: "Pollock", type: .Abstract), Painter(firstName: "Pablo", lastName: "Picasso", type: .Surrealist), Painter(firstName: "Andy", lastName: "Warhol", type: .Pop)]
// list the expressionistsdump(painters.filter({$0.type == .Expressionist}))
// count the expressionistsdump(painters.filter({$0.type == .Expressionist}).count) // prints "2"
// combine filter and map for more complex operations, for example listing all// non-impressionist and non-expressionists by surnamedump(painters.filter({$0.type != .Impressionist && $0.type != .Expressionist}) .map({$0.lastName}).joinWithSeparator(", ")) // prints "Rothko, Pollock, Picasso, Warhol"
Section 34.5: ProjectingApplying a function to a collection/stream and creating a new collection/stream is called a projection.
/// Projectionvar newReleases = [ [ "id": 70111470, "title": "Die Hard", "boxart": "http://cdn-0.nflximg.com/images/2891/DieHard.jpg", "uri": "http://api.netflix.com/catalog/titles/movies/70111470", "rating": [4.0], "bookmark": [] ], [ "id": 654356453, "title": "Bad Boys", "boxart": "http://cdn-0.nflximg.com/images/2891/BadBoys.jpg", "uri": "http://api.netflix.com/catalog/titles/movies/70111470", "rating": [5.0], "bookmark": [[ "id": 432534, "time": 65876586 ]] ], [ "id": 65432445, "title": "The Chamber", "boxart": "http://cdn-0.nflximg.com/images/2891/TheChamber.jpg", "uri": "http://api.netflix.com/catalog/titles/movies/70111470", "rating": [4.0], "bookmark": [] ], [ "id": 675465, "title": "Fracture", "boxart": "http://cdn-0.nflximg.com/images/2891/Fracture.jpg", "uri": "http://api.netflix.com/catalog/titles/movies/70111470",

GoalKicker.com – Swift™ Notes for Professionals 177
"rating": [5.0], "bookmark": [[ "id": 432534, "time": 65876586 ]] ]]
var videoAndTitlePairs = [[String: AnyObject]]()newReleases.map { e in videoAndTitlePairs.append(["id": e["id"] as! Int, "title": e["title"] as! String])}
print(videoAndTitlePairs)

GoalKicker.com – Swift™ Notes for Professionals 178
Chapter 35: Function as first class citizensin SwiftFunctions as First-class members means, it can enjoy privileges just like Objects does. It can be assigned to avariable, passed on to a function as parameter or can be used as return type.
Section 35.1: Assigning function to a variablestruct Mathematics{ internal func performOperation(inputArray: [Int], operation: (Int)-> Int)-> [Int] { var processedArray = [Int]() for item in inputArray { processedArray.append(operation(item)) } return processedArray } internal func performComplexOperation(valueOne: Int)-> ((Int)-> Int) { return ({ return valueOne + $0 }) } }
let arrayToBeProcessed = [1,3,5,7,9,11,8,6,4,2,100]
let math = Mathematics()
func add2(item: Int)-> Int{ return (item + 2)}
// assigning the function to a variable and then passing it to a function as paramlet add2ToMe = add2print(math.performOperation(inputArray: arrayToBeProcessed, operation: add2ToMe))
Output:
[3, 5, 7, 9, 11, 13, 10, 8, 6, 4, 102]
Similarly the above could be achieved using a closure
// assigning the closure to a variable and then passing it to a function as paramlet add2 = {(item: Int)-> Int in return item + 2}print(math.performOperation(inputArray: arrayToBeProcessed, operation: add2))

GoalKicker.com – Swift™ Notes for Professionals 179
Section 35.2: Passing function as an argument to anotherfunction, thus creating a Higher-Order Functionfunc multiply2(item: Int)-> Int{ return (item + 2)}
let multiply2ToMe = multiply2
// passing the function directly to the function as paramprint(math.performOperation(inputArray: arrayToBeProcessed, operation: multiply2ToMe))
Output:
[3, 5, 7, 9, 11, 13, 10, 8, 6, 4, 102]
Similarly the above could be achieved using a closure
// passing the closure directly to the function as paramprint(math.performOperation(inputArray: arrayToBeProcessed, operation: { $0 * 2 }))
Section 35.3: Function as return type from another function// function as return typeprint(math.performComplexOperation(valueOne: 4)(5))
Output:
9

GoalKicker.com – Swift™ Notes for Professionals 180
Chapter 36: BlocksFrom Swift Documentarion
A closure is said to escape a function when the closure is passed as an argument to the function, but is called afterthe function returns. When you declare a function that takes a closure as one of its parameters, you can write@escaping before the parameter’s type to indicate that the closure is allowed to escape.
Section 36.1: Non-escaping closureIn Swift 1 and 2, closure parameters were escaping by default. If you knew your closure wouldn’t escape thefunction body, you could mark the parameter with the @noescape attribute.
In Swift 3, it’s the other way around: closure parameters are non-escaping by default. If you intend for it to escapethe function, you have to mark it with the @escaping attribute.
class ClassOne { // @noescape is applied here as default func methodOne(completion: () -> Void) { // }}
class ClassTwo { let obj = ClassOne() var greeting = "Hello, World!"
func methodTwo() { obj.methodOne() { // self.greeting is required print(greeting) } }}
Section 36.2: Escaping closureFrom Swift Documentarion
@escaping
Apply this attribute to a parameter’s type in a method or function declaration to indicate that theparameter’s value can be stored for later execution. This means that the value is allowed to outlive thelifetime of the call. Function type parameters with the escaping type attribute require explicit use of self.for properties or methods.
class ClassThree {
var closure: (() -> ())?
func doSomething(completion: @escaping () -> ()) { closure = finishBlock }

GoalKicker.com – Swift™ Notes for Professionals 181
}
In the above example the completion block is saved to closure and will literally live beyond the function call. Socomplier will force to mark completion block as @escaping.

GoalKicker.com – Swift™ Notes for Professionals 182
Chapter 37: The Defer StatementSection 37.1: When to use a defer statementA defer statement consists of a block of code, which will be executed when a function returns and should be usedfor cleanup.
As Swift's guard statements encourage a style of early return, many possible paths for a return may exist. A deferstatement provides cleanup code, which then does not need to be repeated every time.
It can also save time during debugging and profiling, as memory leaks and unused open resources due to forgottencleanup can be avoided.
It can be used to deallocate a buffer at the end of a function:
func doSomething() { let data = UnsafeMutablePointer<UInt8>(allocatingCapacity: 42) // this pointer would not be released when the function returns // so we add a defer-statement defer { data.deallocateCapacity(42) } // it will be executed when the function returns. guard condition else { return /* will execute defer-block */ } } // The defer-block will also be executed on the end of the function.
It can also be used to close resources at the end of a function:
func write(data: UnsafePointer<UInt8>, dataLength: Int) throws { var stream:NSOutputStream = getOutputStream() defer { stream.close() }
let written = stream.write(data, maxLength: dataLength) guard written >= 0 else { throw stream.streamError! /* will execute defer-block */ } } // the defer-block will also be executed on the end of the function
Section 37.2: When NOT to use a defer statementWhen using a defer-statement, make sure the code remains readable and the execution order remains clear. Forexample, the following use of the defer-statement makes the execution order and the function of the code hard tocomprehend.
postfix func ++ (inout value: Int) -> Int { defer { value += 1 } // do NOT do this! return value}

GoalKicker.com – Swift™ Notes for Professionals 183
Chapter 38: Style ConventionsSection 38.1: Fluent UsageUsing natural languageFunctions calls should be close to natural English language.
Example:
list.insert(element, at: index)
instead of
list.insert(element, position: index)
Naming Factory MethodsFactory methods should begin with the prefix `make`.
Example:
factory.makeObject()
Naming Parameters in Initializers and Factory MethodsThe name of the first argument should not be involved in naming a factory method or initializer.
Example:
factory.makeObject(key: value)
Instead of:
factory.makeObject(havingProperty: value)
Naming according to side effects
Functions with side effects (mutating functions) should be named using verbs or nouns prefixed with form- .Functions without side effects (nonmutating functions) should be named using nouns or verbs with the suffix-ing or -ed.
Example: Mutating functions:
print(value)array.sort() // in place sortinglist.add(value) // mutates listset.formUnion(anotherSet) // set is now the union of set and anotherSet
Nonmutating functions:
let sortedArray = array.sorted() // out of place sortinglet union = set.union(anotherSet) // union is now the union of set and another set
Boolean functions or variablesStatements involving booleans should read as assertions.
GoalKicker.com – Swift™ Notes for Professionals 184
Example:
set.isEmptyline.intersects(anotherLine)
Naming Protocols
Protocols describing what something is should be named using nouns.Protocols describing capabilities should have -able, -ible or -ing as suffix.
Example:
Collection // describes that something is a collectionProgressReporting // describes that something has the capability of reporting progressEquatable // describes that something has the capability of being equal to something
Types and PropertiesTypes, variables and properties should read as nouns.
Example:
let factory = ...let list = [1, 2, 3, 4]
Section 38.2: Clear UsageAvoid AmbiguityThe name of classes, structures, functions and variables should avoid ambiguity.
Example:
extension List { public mutating func remove(at position: Index) -> Element { // implementation }}
The function call to this function will then look like this:
list.remove(at: 42)
This way, ambiguity is avoided. If the function call would be just list.remove(42) it would be unclear, if an Elementequal to 42 would be removed or if the Element at Index 42 would be removed.
Avoid RedundancyThe name of functions should not contain redundant information.
A bad example would be:
extension List { public mutating func removeElement(element: Element) -> Element? { // implementation }}

GoalKicker.com – Swift™ Notes for Professionals 185
A call to the function may look like list.removeElement(someObject). The variable someObject already indicates,that an Element is removed. It would be better for the function signature to look like this:
extension List { public mutating func remove(_ member: Element) -> Element? { // implementation }}
The call to this function looks like this: list.remove(someObject).
Naming variables according to their roleVariables should be named by their role (e.g. supplier, greeting) instead of their type (e.g. factory, string, etc..)
High coupling between Protocol Name and Variable NamesIf the name of the type describes its role in most cases (e.g. Iterator), the type should be named with the suffix`Type`. (e.g. IteratorType)Provide additional details when using weakly typed parametersIf the type of an object does not indicate its usage in a function call clearly, the function should be named with apreceding noun for every weakly typed parameter, describing its usage.Example:
func addObserver(_ observer: NSObject, forKeyPath path: String)
to which a call would look like `object.addObserver(self, forKeyPath: path)
instead of
func add(_ observer: NSObject, for keyPath: String)
to which a call would look like object.add(self, for: path)
Section 38.3: CapitalizationTypes & Protocols
Type and protocol names should start with an uppercase letter.
Example:
protocol Collection {}struct String {}class UIView {}struct Int {}enum Color {}
Everything else...
Variables, constants, functions and enumeration cases should start with a lowercase letter.
Example:
let greeting = "Hello"let height = 42.0
enum Color {

GoalKicker.com – Swift™ Notes for Professionals 186
case red case green case blue}
func print(_ string: String) { ...}
Camel Case:
All naming should use the appropriate camel case. Upper camel case for type/protocol names and lower camelcase for everything else.
Upper Camel Case:
protocol IteratorType { ... }
Lower Camel Case:
let inputView = ...
Abbreviations
Abbreviations should be avoided unless commonly used (e.g. URL, ID). If an abbreviation is used, all letters shouldhave the same case.
Example:
let userID: UserID = ...let urlString: URLString = ...

GoalKicker.com – Swift™ Notes for Professionals 187
Chapter 39: NSRegularExpression in SwiftSection 39.1: Extending String to do simple pattern matchingextension String { func matchesPattern(pattern: String) -> Bool { do { let regex = try NSRegularExpression(pattern: pattern, options: NSRegularExpressionOptions(rawValue: 0)) let range: NSRange = NSMakeRange(0, self.characters.count) let matches = regex.matchesInString(self, options: NSMatchingOptions(), range: range) return matches.count > 0 } catch _ { return false } }}
// very basic examples - check for specific stringsdump("Pinkman".matchesPattern("(White|Pinkman|Goodman|Schrader|Fring)"))
// using character groups to check for similar-sounding impressionist paintersdump("Monet".matchesPattern("(M[oa]net)"))dump("Manet".matchesPattern("(M[oa]net)"))dump("Money".matchesPattern("(M[oa]net)")) // false
// check surname is in listdump("Skyler White".matchesPattern("\\\\w+ (White|Pinkman|Goodman|Schrader|Fring)"))
// check if string looks like a UK stock tickerdump("VOD.L".matchesPattern("[A-Z]{2,3}\\\\.L"))dump("BP.L".matchesPattern("[A-Z]{2,3}\\\\.L"))
// check entire string is printable ASCII charactersdump("tab\\tformatted text".matchesPattern("^[\\u{0020}-\\u{007e}]*$"))
// Unicode example: check if string contains a playing card suitdump("♠�".matchesPattern("[\\u{2660}-\\u{2667}]"))dump("♡".matchesPattern("[\\u{2660}-\\u{2667}]"))dump("�".matchesPattern("[\\u{2660}-\\u{2667}]")) // false
// NOTE: regex needs Unicode-escaped charactersdump("♣�".matchesPattern("♣�")) // does NOT work
Below is another example which builds on the above to do something useful, which can't easily be done by anyother method and lends itself well to a regex solution.
// Pattern validation for a UK postcode.// This simply checks that the format looks like a valid UK postcode and should not fail on falsepositives.private func isPostcodeValid(postcode: String) -> Bool { return postcode.matchesPattern("^[A-Z]{1,2}([0-9][A-Z]|[0-9]{1,2})\\\\s[0-9][A-Z]{2}")}
// valid patterns (from https://en.wikipedia.org/wiki/Postcodes_in_the_United_Kingdom#Validation)// will return truedump(isPostcodeValid("EC1A 1BB"))dump(isPostcodeValid("W1A 0AX"))dump(isPostcodeValid("M1 1AE"))

GoalKicker.com – Swift™ Notes for Professionals 188
dump(isPostcodeValid("B33 8TH"))dump(isPostcodeValid("CR2 6XH"))dump(isPostcodeValid("DN55 1PT"))
// some invalid patterns// will return falsedump(isPostcodeValid("EC12A 1BB"))dump(isPostcodeValid("CRB1 6XH"))dump(isPostcodeValid("CR 6XH"))
Section 39.2: Basic UsageThere are several considerations when implementing Regular Expressions in Swift.
let letters = "abcdefg"let pattern = "[a,b,c]"let regEx = try NSRegularExpression(pattern: pattern, options: [])let nsString = letters as NSStringlet matches = regEx.matches(in: letters, options: [], range: NSMakeRange(0, nsString.length))let output = matches.map {nsString.substring(with: $0.range)}//output = ["a", "b", "c"]
In order to get an accurate range length that supports all character types the input string must be converted to aNSString.
For safety matching against a pattern should be enclosed in a do catch block to handle failure
let numbers = "121314"let pattern = "1[2,3]"do { let regEx = try NSRegularExpression(pattern: pattern, options: []) let nsString = numbers as NSString let matches = regEx.matches(in: numbers, options: [], range: NSMakeRange(0, nsString.length)) let output = matches.map {nsString.substring(with: $0.range)} output} catch let error as NSError { print("Matching failed")}//output = ["12", "13"]
Regular expression functionality is often put in an extension or helper to separate concerns.
Section 39.3: Replacing SubstringsPatterns can be used to replace part of an input string.
The example below replaces the cent symbol with the dollar symbol.
var money = "¢¥€£$¥€£¢"let pattern = "¢"do { let regEx = try NSRegularExpression (pattern: pattern, options: []) let nsString = money as NSString let range = NSMakeRange(0, nsString.length) let correct$ = regEx.stringByReplacingMatches(in: money, options: .withTransparentBounds,range: range, withTemplate: "$")} catch let error as NSError { print("Matching failed")

GoalKicker.com – Swift™ Notes for Professionals 189
}//correct$ = "$¥€£$¥€£$"
Section 39.4: Special CharactersTo match special characters Double Backslash should be used \. becomes \\.
Characters you'll have to escape include
(){}[]/\+*$>.|^?
The below example get three kinds of opening brackets
let specials = "(){}[]"let pattern = "(\\(|\\{|\\[)"do { let regEx = try NSRegularExpression(pattern: pattern, options: []) let nsString = specials as NSString let matches = regEx.matches(in: specials, options: [], range: NSMakeRange(0, nsString.length)) let output = matches.map {nsString.substring(with: $0.range)}} catch let error as NSError { print("Matching failed")}//output = ["(", "{", "["]
Section 39.5: ValidationRegular expressions can be used to validate inputs by counting the number of matches.
var validDate = false
let numbers = "35/12/2016"let usPattern = "^(0[1-9]|1[012])[-/.](0[1-9]|[12][0-9]|3[01])[-/.](19|20)\\d\\d$"let ukPattern = "^(0[1-9]|[12][0-9]|3[01])[-/](0[1-9]|1[012])[-/](19|20)\\d\\d$"do { let regEx = try NSRegularExpression(pattern: ukPattern, options: []) let nsString = numbers as NSString let matches = regEx.matches(in: numbers, options: [], range: NSMakeRange(0, nsString.length)) if matches.count > 0 { validDate = true } validDate } catch let error as NSError { print("Matching failed")}//output = false
Section 39.6: NSRegularExpression for mail validationfunc isValidEmail(email: String) -> Bool {
let emailRegEx = "[A-Z0-9a-z._%+-]+@[A-Za-z0-9.-]+\\.[A-Za-z]{2,4}" let emailTest = NSPredicate(format:"SELF MATCHES %@", emailRegEx) return emailTest.evaluate(with: email)
GoalKicker.com – Swift™ Notes for Professionals 190
}
or you could use String extension like this:
extension String{ func isValidEmail() -> Bool {
let emailRegEx = "[A-Z0-9a-z._%+-]+@[A-Za-z0-9.-]+\\.[A-Za-z]{2,4}" let emailTest = NSPredicate(format:"SELF MATCHES %@", emailRegEx) return emailTest.evaluate(with: self) }}
GoalKicker.com – Swift™ Notes for Professionals 191
Chapter 40: RxSwiftSection 40.1: DisposingAfter the subscription was created, it is important to manage its correct deallocation.
The docs told us that
If a sequence terminates in finite time, not calling dispose or not using addDisposableTo(disposeBag)won't cause any permanent resource leaks. However, those resources will be used until the sequencecompletes, either by finishing production of elements or returning an error.
There are two ways of deallocate resources.
Using disposeBags and addDisposableTo operator.1.Using takeUntil operator.2.
In the first case you manually pass the subscription to the DisposeBag object, which correctly clears all takenmemory.
let bag = DisposeBag()Observable.just(1).subscribeNext { print($0)}.addDisposableTo(bag)
You don't actually need to create DisposeBags in every class that you create, just take a look at RxSwift Community'sproject named NSObject+Rx. Using the framework the code above can be rewritten as follows:
Observable.just(1).subscribeNext { print($0)}.addDisposableTo(rx_disposeBag)
In the second case, if the subscription time coincides with the self object lifetime, it is possible to implementdisposing using takeUntil(rx_deallocated):
let _ = sequence .takeUntil(rx_deallocated) .subscribe { print($0) }
Section 40.2: RxSwift basicsFRP, or Functional Reactive Programming, has some basic terms which you need to know.
Every piece of data can be represented as Observable, which is an asynchronous data stream. The power of FRP isin representation synchronous and asynchronous events as streams, Observables, and providing the sameinterface to work with it.
Usually Observable holds several (or none) events that holds the date - .Next events, and then it can be terminatedsuccessfully (.Success) or with an error (.Error).
Let's take a look at following marble diagram:

GoalKicker.com – Swift™ Notes for Professionals 192
--(1)--(2)--(3)|-->
In this example there is a stream of Int values. As time moves forward, three .Next events occurred, and then thestream terminated successfully.
--X->
The diagram above shows a case where no data was emitted and .Error event terminates the Observable.
Before we move on, there are some useful resources:
RxSwift. Look at examples, read docs and getting started.1.RxSwift Slack room has a few channels for education problem solving.2.Play around with RxMarbles to know what operator does, and which is the most useful in your case.3.Take a look on this example, explore the code by yourself.4.
Section 40.3: Creating observablesRxSwift offers many ways to create an Observable, let's take a look:
import RxSwift
let intObservale = Observable.just(123) // Observable<Int>let stringObservale = Observable.just("RxSwift") // Observable<String>let doubleObservale = Observable.just(3.14) // Observable<Double>
So, the observables are created. They holds just one value and then terminates with success. Nevertheless, nothinghappening after it was created. Why?
There are two steps in working with Observables: you observe something to create a stream and then yousubscribe to the stream or bind it to something to interact with it.
Observable.just(12).subscribe { print($0)}
The console will print:
.Next(12)
.Completed()
And if I interested only in working with data, which take place in .Next events, I'd use subscribeNext operator:
Observable.just(12).subscribeNext { print($0) // prints "12" now}
If I want create an observable of many values, I use different operators:
Observable.of(1,2,3,4,5).subscribeNext { print($0)}// 1// 2

GoalKicker.com – Swift™ Notes for Professionals 193
// 3// 4// 5
// I can represent existing data types as Observables also:[1,2,3,4,5].asObservable().subscribeNext { print($0)}// result is the same as before.
And finally, maybe I want an Observable that does some work. For example, it is convenient to wrap a networkoperation into Observable<SomeResultType>. Let's take a look of do one can achieve this:
Observable.create { observer in // create an Observable ... MyNetworkService.doSomeWorkWithCompletion { (result, error) in if let e = error { observer.onError(e) // ..that either holds an error } else { observer.onNext(result) // ..or emits the data observer.onCompleted() // ..and terminates successfully. } } return NopDisposable.instance // here you can manually free any resources //in case if this observable is being disposed.}
Section 40.4: BindingsObservable.combineLatest(firstName.rx_text, lastName.rx_text) { $0 + " " + $1 }.map { "Greetings, \($0)" }.bindTo(greetingLabel.rx_text)
Using the combineLatest operator every time an item is emitted by either of two Observables, combine the latestitem emitted by each Observable. So in this way we combine the result of the two UITextField's creating a newmessage with the text "Greetings, \($0)" using string interpolation to later bind to the text of a UILabel.
We can bind data to any UITableView and UICollectionView in an very easy way:
viewModel.rows.bindTo(resultsTableView.rx_itemsWithCellIdentifier("WikipediaSearchCell", cellType:WikipediaSearchCell.self)) { (_, viewModel, cell) in cell.title = viewModel.title cell.url = viewModel.url}.addDisposableTo(disposeBag)
That’s an Rx wrapper around the cellForRowAtIndexPath data source method. And also Rx takes care of theimplementation of the numberOfRowsAtIndexPath, which is a required method in a traditional sense, but you don’thave to implement it here, it’s taken care of.
Section 40.5: RxCocoa and ControlEventsRxSwift provides not only the ways to control your data, but to represent user actions in a reactive way also.
RxCocoa contains everything you need. It wraps most of the UI components' properties into Observables, but notreally. There are some upgraded Observables called ControlEvents (which represent events) and

GoalKicker.com – Swift™ Notes for Professionals 194
ControlProperties (which represent properties, surprise!). These things holds Observable streams under thehood, but also have some nuances:
It never fails, so no errors.It will Complete sequence on control being deallocated.It delivers events on the main thread (MainScheduler.instance).
Basically, you can work with them as usual:
button.rx_tap.subscribeNext { _ in // control event print("User tapped the button!")}.addDisposableTo(bag)
textField.rx_text.subscribeNext { text in // control property print("The textfield contains: \(text)")}.addDisposableTo(bag)// notice that ControlProperty generates .Next event on subscription// In this case, the log will display// "The textfield contains: "// at the very start of the app.
This is very important to use: as long as you use Rx, forget about the @IBAction stuff, everything you need you canbind and configure at once. For example, viewDidLoad method of your view controller is a good candidate todescribe how the UI-components work.
Ok, another example: suppose we have a textfield, a button, and a label. We want to validate text in the textfieldwhen we tap the button, and display the results in the label. Yep, seems like an another validate-email task, huh?
First of all, we grab the button.rx_tap ControlEvent:
----()-----------------------()----->
Here empty parenthesis show user taps. Next, we take what's written in the textField with withLatestFrom operator(take a look at it here, imagine that upper stream represents user taps, bottom one represents text in the text field).
button.rx_tap.withLatestFrom(textField.rx_text)
----("")--------------------("123")--->// ^ tap ^ i wrote 123 ^ tap
Nice, we have a stream of strings to validate, emitted only when we need to validate.
Any Observable has such familiar operators as map or filter, we'll take map to validate the text. CreatevalidateEmail function yourself, use any regex you want.
button.rx_tap // ControlEvent<Void> .withLatestFrom(textField.rx_text) // Observable<String> .map(validateEmail) // Observable<Bool> .map { (isCorrect) in return isCorrect ? "Email is correct" : "Input the correct one, please" } // Observable<String> .bindTo(label.rx_text) .addDisposableTo(bag)
Done! If you need more custom logic (like showing error views in case of error, making a transition to another

GoalKicker.com – Swift™ Notes for Professionals 195
screen on success...), just subscribe to the final Bool stream and write it there.

GoalKicker.com – Swift™ Notes for Professionals 196
Chapter 41: Swift Package ManagerSection 41.1: Creation and usage of a simple Swift packageTo create a Swift Package, open a Terminal then create an empty folder:
mkdir AwesomeProject cd AwesomeProject
And init a Git repository:
git init
Then create the package itself. One could create the package structure manually but there's a simple way using theCLI command.
If you want to make an executable:
swift package init --type executable
Several files will be generated. Among them, main.swift will be the entry point for your application.
If you want to make a library:
swift package init --type library
The generated AwesomeProject.swift file will be used as the main file for this library.
In both cases you can add other Swift files in the Sources folder (usual rules for access control apply).
The Package.swift file itself will be automatically populated with this content:
import PackageDescription
let package = Package( name: "AwesomeProject")
Versioning the package is done with Git tags:
git tag '1.0.0'
Once pushed to a remote or local Git repository, your package will be available to other projects.
Your package is now ready to be compiled:
swift build
The compiled project will be available in the .build/debug folder.
Your own package can also resolve dependencies to other packages. For example, if you want to include"SomeOtherPackage" in your own project, change your Package.swift file to include the dependency:
import PackageDescription
let package = Package( name: "AwesomeProject", targets: [],

GoalKicker.com – Swift™ Notes for Professionals 197
dependencies: [ .Package(url: "https://github.com/someUser/SomeOtherPackage.git", majorVersion: 1), ])
Then build your project again: the Swift Package Manager will automatically resolve, download and build thedependencies.

GoalKicker.com – Swift™ Notes for Professionals 198
Chapter 42: Working with C and Objective-CSection 42.1: Use a module map to import C headersA module map can simply import mymodule by configuring it to read C header files and make them appear as Swiftfunctions.
Place a file named module.modulemap inside a directory named mymodule:
Inside the module map file:
// mymodule/module.modulemapmodule mymodule { header "defs.h"}
Then import the module:
// demo.swiftimport mymoduleprint("Empty color: \(Color())")
Use the -I ctory flag to tell swiftc where to find the module:
swiftc -I . demo.swift # "-I ." means "search for modules in the current directory"
For more information about the module map syntax, see the Clang documentation about module maps.
Section 42.2: Using Objective-C classes from Swift codeIf MyFramework contains Objective-C classes in its public headers (and the umbrella header), then importMyFramework is all that's necessary to use them from Swift.
Bridging headers
A bridging header makes additional Objective-C and C declarations visible to Swift code. When adding project files,Xcode may offer to create a bridging header automatically:
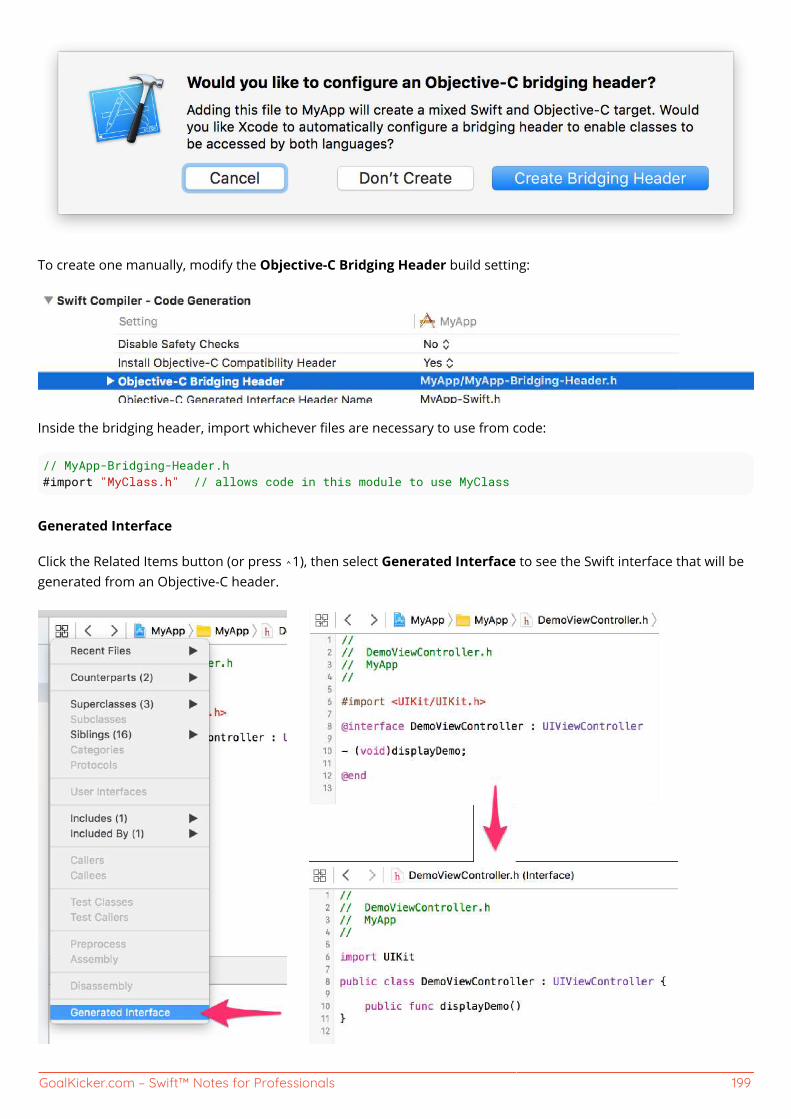
GoalKicker.com – Swift™ Notes for Professionals 199
To create one manually, modify the Objective-C Bridging Header build setting:
Inside the bridging header, import whichever files are necessary to use from code:
// MyApp-Bridging-Header.h#import "MyClass.h" // allows code in this module to use MyClass
Generated Interface
Click the Related Items button (or press ⌃1), then select Generated Interface to see the Swift interface that will begenerated from an Objective-C header.

GoalKicker.com – Swift™ Notes for Professionals 200
Section 42.3: Specify a bridging header to swiftcThe -import-objc-header flag specifies a header for swiftc to import:
// defs.hstruct Color { int red, green, blue;};
#define MAX_VALUE 255
// demo.swiftextension Color: CustomStringConvertible { // extension on a C struct public var description: String { return "Color(red: \(red), green: \(green), blue: \(blue))" }}print("MAX_VALUE is: \(MAX_VALUE)") // C macro becomes a constantlet color = Color(red: 0xCA, green: 0xCA, blue: 0xD0) // C struct initializerprint("The color is \(color)")
$ swiftc demo.swift -import-objc-header defs.h && ./demo MAX_VALUE is: 255 The color is Color(red: 202, green:202, blue: 208)
Section 42.4: Use the C standard librarySwift's C interoperability allows you to use functions and types from the C standard library.
On Linux, the C standard library is exposed via the Glibc module; on Apple platforms it's called Darwin.
#if os(macOS) || os(iOS) || os(tvOS) || os(watchOS)import Darwin#elseif os(Linux)import Glibc#endif
// use open(), read(), and other libc features
Section 42.5: Fine-grained interoperation between Objective-C and SwiftWhen an API is marked with NS_REFINED_FOR_SWIFT, it will be prefixed with two underscores (__) when imported toSwift:
@interface MyClass : NSObject- (NSInteger)indexOfObject:(id)obj
EFINED_FOR_SWIFT; @end
The generated interface looks like this:
public class MyClass : NSObject { public func
dexOfObject(obj: AnyObject) -> Int }
Now you can replace the API with a more "Swifty" extension. In this case, we can use an optional return value,filtering out NSNotFound:

GoalKicker.com – Swift™ Notes for Professionals 201
extension MyClass { // Rather than returning NSNotFound if the object doesn't exist, // this "refined" API returns nil. func
xOfObject(obj: AnyObject) -> Int? { let idx = __indexOfObject(obj) if idx == NSNotFound { return nil } return idx } } //Swift code, using "if let" as it should be: let myobj = MyClass() if let idx = myobj.indexOfObject(something) { // dosomething with idx }
In most cases you might want to restrict whether or not an argument to an Objective-C function could be nil. Thisis done using _Nonnull keyword, which qualifies any pointer or block reference:
voiddoStuff(const void *const _Nonnull data, void (^_Nonnull completion)()){ // complex asynchronous code}
With that written, the compiler shall emit an error whenever we try to pass nil to that function from our Swift code:
doStuff( nil, // error: nil is not compatible with expected argument type 'UnsafeRawPointer' nil) // error: nil is not compatible with expected argument type '() -> Void'
The opposite of _Nonnull is _Nullable, which means that it is acceptable to pass nil in this argument. _Nullable isalso the default; however, specifying it explicitly allows for more self-documented and future-proof code.
To further help the compiler with optimising your code, you also might want to specify if the block is escaping:
voidcallNow(__attribute__((noescape)) void (^_Nonnull f)()){ // f is not stored anywhere}
With this attribute we promise not to save the block reference and not to call the block after the function hasfinished execution.
Section 42.6: Using Swift classes from Objective-C codeIn the same module
Inside a module named "MyModule", Xcode generates a header named MyModule-Swift.h which exposes publicSwift classes to Objective-C. Import this header in order to use the Swift classes:
// MySwiftClass.swift in MyAppimport Foundation
// The class must be `public` to be visible, unless this target also has a bridging header
ic class MySwiftClass: NSObject { // ... }
// MyViewController.m in MyApp
#import "MyViewController.h"
ort "MyApp-Swift.h" // import the generated interface #import <MyFramework/MyFramework-Swift.h> // or useangle brackets for a framework target @implementation MyViewController - (void)demo { [[MySwiftClass alloc] init];// use the Swift class } @end

GoalKicker.com – Swift™ Notes for Professionals 202
Relevant build settings:
Objective-C Generated Interface Header Name: controls the name of the generated Obj-C header.Install Objective-C Compatibility Header: whether the -Swift.h header should be a public header (forframework targets).
In another module
Using @import MyFramework; imports the whole module, including Obj-C interfaces to Swift classes (if theaforementioned build setting is enabled).

GoalKicker.com – Swift™ Notes for Professionals 203
Chapter 43: Documentation markupSection 43.1: Class documentationHere is a basic class documentation example:
/// Class descriptionclass Student {
// Member description var name: String /// Method description /// /// - parameter content: parameter description /// /// - returns: return value description func say(content: String) -> Bool { print("\(self.name) say \(content)") return true }}
Note that with Xcode 8, you can generate the documentation snippet with command + option + / .
This will return:
Section 43.2: Documentation styles/** Adds user to the list of poople which are assigned the tasks. - Parameter name: The name to add - Returns: A boolean value (true/false) to tell if user is added successfully to the people list.*/func addMeToList(name: String) -> Bool { // Do something.... return true}

GoalKicker.com – Swift™ Notes for Professionals 204
/// This is a single line commentfunc singleLineComment() { }
/** Repeats a string `times` times. - Parameter str: The string to repeat. - Parameter times: The number of times to repeat `str`. - Throws: `MyError.InvalidTimes` if the `times` parameter is less than zero. - Returns: A new string with `str` repeated `times` times.*/func repeatString(str: String, times: Int) throws -> String { guard times >= 0 else { throw MyError.invalidTimes } return "Hello, world"}

GoalKicker.com – Swift™ Notes for Professionals 205
/** # Lists You can apply *italic*, **bold**, or `code` inline styles. ## Unordered Lists - Lists are great, - but perhaps don't nest - Sub-list formatting - isn't the best. ## Ordered Lists 1. Ordered lists, too 2. for things that are sorted; 3. Arabic numerals 4. are the only kind supported.*/func complexDocumentation() { }
/** Frame and construction style. - Road: For streets or trails. - Touring: For long journeys. - Cruiser: For casual trips around town. - Hybrid: For general-purpose transportation.*/enum Style { case Road, Touring, Cruiser, Hybrid

GoalKicker.com – Swift™ Notes for Professionals 206
}

GoalKicker.com – Swift™ Notes for Professionals 207
Chapter 44: TypealiasSection 44.1: typealias for closures with parameterstypealias SuccessHandler = (NSURLSessionDataTask, AnyObject?) -> Void
This code block creates a type alias named SuccessHandler, just in the same way var string = "" creates avariable with the name string.
Now whenever you use SuccessHandler, for example:
func example(_ handler: SuccessHandler) {}
You are essentilly writing:
func example(_ handler: (NSURLSessionDataTask, AnyObject?) -> Void) {}
Section 44.2: typealias for empty closurestypealias Handler = () -> Voidtypealias Handler = () -> ()
This block creates a type alias that works as a Void to Void function (takes in no parameters and returns nothing).
Here is a usage example:
var func: Handler?
func = {}
Section 44.3: typealias for other typestypealias Number = NSNumber
You can also use a type alias to give a type another name to make it easier to remember, or make your code moreelegant.
typealias for Tuples
typealias PersonTuple = (name: String, age: Int, address: String)
And this can be used as:
func getPerson(for name: String) -> PersonTuple { //fetch from db, etc return ("name", 45, "address")}

GoalKicker.com – Swift™ Notes for Professionals 208
Chapter 45: Dependency InjectionSection 45.1: Dependency Injection with View ControllersDependenct Injection Intro
An application is composed of many objects that collaborate with each other. Objects usually depend on otherobjects to perform some task. When an object is responsible for referencing its own dependencies it leads to ahighly coupled, hard-to-test and hard-to-change code.
Dependency injection is a software design pattern that implements inversion of control for resolving dependencies.An injection is passing of dependency to a dependent object that would use it. This allows a separation of client'sdependencies from the client's behaviour, which allows the application to be loosely coupled.
Not to be confused with the above definition - a dependency injection simply means giving an object itsinstance variables.
It's that simple, but it provides a lot of benefits:
easier to test your code (using automated tests like unit and UI tests)when used in tandem with protocol-oriented programming it makes it easy to change the implementation ofa certain class - easier to refactorit makes the code more modular and reusable
There are three most commonly used ways Dependency Injection (DI) can be implemented in an application:
Initializer injection1.Property injection2.Using third party DI frameworks (like Swinject, Cleanse, Dip or Typhoon)3.
There is an interesting article with links to more articles about Dependency Injection so check it out if you want todig deeper into DI and Inversion of Control principle.
Let's show how to use DI with View Controllers - an every day task for an average iOS developer.
Example Without DI
We'll have two View Controllers: LoginViewController and TimelineViewController. LoginViewController is usedto login and upon successful loign, it will switch to the TimelineViewController. Both view controllers are dependenton the FirebaseNetworkService.
LoginViewController
class LoginViewController: UIViewController {
var networkService = FirebaseNetworkService() override func viewDidLoad() { super.viewDidLoad() }}
TimelineViewController
class TimelineViewController: UIViewController {
GoalKicker.com – Swift™ Notes for Professionals 209
var networkService = FirebaseNetworkService() override func viewDidLoad() { super.viewDidLoad() } @IBAction func logoutButtonPressed(_ sender: UIButton) { networkService.logutCurrentUser() }}
FirebaseNetworkService
class FirebaseNetworkService {
func loginUser(username: String, passwordHash: String) { // Implementation not important for this example } func logutCurrentUser() { // Implementation not important for this example }}
This example is very simple, but let's assume you have 10 or 15 different view controller and some of them are alsodependent on the FirebaseNetworkService. At some moment you want to change Firebase as your backend servicewith your company's in-house backend service. To do that you'll have to go through every view controller andchange FirebaseNetworkService with CompanyNetworkService. And if some of the methods in theCompanyNetworkService have changed, you'll have a lot of work to do.
Unit and UI testing is not the scope of this example, but if you wanted to unit test view controllers with tightlycoupled dependencies, you would have a really hard time doing so.
Let's rewrite this example and inject Network Service to our view controllers.
Example with Dependancy Injection
To make the best out of the Dependency Injection, let's define the functionality of the Network Service in a protocol.This way, view controllers dependent on a network service won't even have to know about the real implementationof it.
protocol NetworkService { func loginUser(username: String, passwordHash: String) func logutCurrentUser()}
Add an implementation of the NetworkService protocol:
class FirebaseNetworkServiceImpl: NetworkService { func loginUser(username: String, passwordHash: String) { // Firebase implementation } func logutCurrentUser() { // Firebase implementation }}

GoalKicker.com – Swift™ Notes for Professionals 210
Let's change LoginViewController and TimelineViewController to use new NetworkService protocol instead ofFirebaseNetworkService.
LoginViewController
class LoginViewController: UIViewController {
// No need to initialize it here since an implementation // of the NetworkService protocol will be injected var networkService: NetworkService? override func viewDidLoad() { super.viewDidLoad() }}
TimelineViewController
class TimelineViewController: UIViewController {
var networkService: NetworkService? override func viewDidLoad() { super.viewDidLoad() } @IBAction func logoutButtonPressed(_ sender: UIButton) { networkService?.logutCurrentUser() }}
Now, the question is: How do we inject the correct NetworkService implementation in the LoginViewController andTimelineViewController?
Since LoginViewController is the starting view controller and will show every time the application starts, we caninject all dependencies in the AppDelegate.
func application(_ application: UIApplication, didFinishLaunchingWithOptions launchOptions:[UIApplicationLaunchOptionsKey: Any]?) -> Bool { // This logic will be different based on your project's structure or whether // you have a navigation controller or tab bar controller for your starting view controller if let loginVC = window?.rootViewController as? LoginViewController { loginVC.networkService = FirebaseNetworkServiceImpl() } return true}
In the AppDelegate we are simply taking the reference to the first view controller (LoginViewController) andinjecting the NetworkService implementation using the property injection method.
Now, the next task is to inject the NetworkService implementation in the TimelineViewController. The easiest way isto do that when LoginViewController is transitioning to the TimlineViewController.
We'll add the injection code in the prepareForSegue method in the LoginViewController (if you are using a differentapproach to navigate through view controllers, place the injection code there).
Our LoginViewController class looks like this now:

GoalKicker.com – Swift™ Notes for Professionals 211
class LoginViewController: UIViewController { // No need to initialize it here since an implementation // of the NetworkService protocol will be injected var networkService: NetworkService? override func viewDidLoad() { super.viewDidLoad() } override func prepare(for segue: UIStoryboardSegue, sender: Any?) { if segue.identifier == "TimelineViewController" { if let timelineVC = segue.destination as? TimelineViewController { // Injecting the NetworkService implementation timelineVC.networkService = networkService } } }}
We are done and it's that easy.
Now imagine we want to switch our NetworkService implementation from Firebase to our custom company'sbackend implementation. All we would have to do is:
Add new NetworkService implementation class:
class CompanyNetworkServiceImpl: NetworkService { func loginUser(username: String, passwordHash: String) { // Company API implementation } func logutCurrentUser() { // Company API implementation }}
Switch the FirebaseNetworkServiceImpl with the new implementation in the AppDelegate:
func application(_ application: UIApplication, didFinishLaunchingWithOptions launchOptions:[UIApplicationLaunchOptionsKey: Any]?) -> Bool { // This logic will be different based on your project's structure or whether // you have a navigation controller or tab bar controller for your starting view controller if let loginVC = window?.rootViewController as? LoginViewController { loginVC.networkService = CompanyNetworkServiceImpl() } return true }
That's it, we have switched the whole underlaying implementation of the NetworkService protocol without eventouching LoginViewController or TimelineViewController.
As this is a simple example, you might not see all the benefits right now, but if you try to use DI in your projects,you'll see the benefits and will always use Dependency Injection.
Section 45.2: Dependency Injection TypesThis example will demonstrate how to use Dependency Injection (DI) design pattern in Swift using these methods:

GoalKicker.com – Swift™ Notes for Professionals 212
Initializer Injection (the proper term is Constructor Injection, but since Swift has initializers it's called1.initializer injection)Property Injection2.Method Injection3.
Example Setup without DI protocol Engine { func startEngine() func stopEngine() } class TrainEngine: Engine { func startEngine() { print("Engine started") } func stopEngine() { print("Engine stopped") } } protocol TrainCar { var numberOfSeats: Int { get } func attachCar(attach: Bool)}
class RestaurantCar: TrainCar { var numberOfSeats: Int { get { return 30 } } func attachCar(attach: Bool) { print("Attach car") }}
class PassengerCar: TrainCar { var numberOfSeats: Int { get { return 50 } } func attachCar(attach: Bool) { print("Attach car") }} class Train { let engine: Engine? var mainCar: TrainCar?}
Initializer Dependency Injection
As the name says, all dependencies are injected through the class initializer. To inject dependencies through theinitializer, we'll add the initializer to the Train class.
Train class now looks like this:
class Train {

GoalKicker.com – Swift™ Notes for Professionals 213
let engine: Engine? var mainCar: TrainCar? init(engine: Engine) { self.engine = engine }}
When we want to create an instance of the Train class we'll use initializer to inject a specific Engine implementation:
let train = Train(engine: TrainEngine())
NOTE: The main advantage of the initializer injection versus the property injection is that we can set the variable asprivate variable or even make it a constant with the let keyword (as we did in our example). This way we can makesure that no one can access it or change it.
Properties Dependency Injection
DI using properties is even simpler that using an initializer. Let's inject a PassengerCar dependency to the trainobject we already created using the properties DI:
train.mainCar = PassengerCar()
That's it. Our train's mainCar is now a PassengerCar instance.
Method Dependency Injection
This type of dependency injection is a little different that the previous two because it won't affect the whole object,but it will only inject a dependency to be used in the scope of one specific method. When a dependency is only usedin a single method, it's usually not good to make the whole object dependent on it. Let's add a new method to theTrain class:
func reparkCar(trainCar: TrainCar) { trainCar.attachCar(attach: true) engine?.startEngine() engine?.stopEngine() trainCar.attachCar(attach: false)}
Now, if we call the new Train's class method, we'll inject the TrainCar using the method dependency injection.
train.reparkCar(trainCar: RestaurantCar())

GoalKicker.com – Swift™ Notes for Professionals 214
Chapter 46: Caching on disk spaceCaching videos, images and audios using URLSession and FileManager
Section 46.1: Readinglet url = "https://path-to-media"guard let documentsUrl = FileManager.default.urls(for: .documentDirectory, in:.userDomainMask).first, let searchQuery = url.absoluteString.components(separatedBy: "/").last else { return nil}
do { let directoryContents = try FileManager.default.contentsOfDirectory(at: documentsUrl,includingPropertiesForKeys: nil, options: []) let cachedFiles = directoryContents.filter { $0.absoluteString.contains(searchQuery) } // do something with the files found by the url} catch { // Could not find any files}
Section 46.2: Savinglet url = "https://path-to-media"let request = URLRequest(url: url)let downloadTask = URLSession.shared.downloadTask(with: request) { (location, response, error) in guard let location = location, let response = response, let documentsPath = NSSearchPathForDirectoriesInDomains(.documentDirectory,.userDomainMask, true).first else { return } let documentsDirectoryUrl = URL(fileURLWithPath: documentsPath) let documentUrl = documentsDirectoryUrl.appendingPathComponent(response.suggestedFilename) let _ = try? FileManager.default.moveItem(at: location, to: documentUrl)
// documentUrl is the local URL which we just downloaded and saved to the FileManager}.resume()

GoalKicker.com – Swift™ Notes for Professionals 215
Chapter 47: Algorithms with SwiftAlgorithms are a backbone to computing. Making a choice of which algorithm to use in which situationdistinguishes an average from good programmer. With that in mind, here are definitions and code examples ofsome of the basic algorithms out there.
Section 47.1: SortingBubble Sort
This is a simple sorting algorithm that repeatedly steps through the list to be sorted, compares each pair ofadjacent items and swaps them if they are in the wrong order. The pass through the list is repeated until no swapsare needed. Although the algorithm is simple, it is too slow and impractical for most problems. It has complexity ofO(n2) but it is considered slower than insertion sort.
extension Array where Element: Comparable {
func bubbleSort() -> Array<Element> { //check for trivial case guard self.count > 1 else { return self } //mutated copy var output: Array<Element> = self for primaryIndex in 0..<self.count { let passes = (output.count - 1) - primaryIndex //"half-open" range operator for secondaryIndex in 0..<passes { let key = output[secondaryIndex] //compare / swap positions if (key > output[secondaryIndex + 1]) { swap(&output[secondaryIndex], &output[secondaryIndex + 1]) } } } return output}
}
Insertion sort
Insertion sort is one of the more basic algorithms in computer science. The insertion sort ranks elements byiterating through a collection and positions elements based on their value. The set is divided into sorted andunsorted halves and repeats until all elements are sorted. Insertion sort has complexity of O(n2). You can put it inan extension, like in an example below, or you can create a method for it.
extension Array where Element: Comparable {
func insertionSort() -> Array<Element> {

GoalKicker.com – Swift™ Notes for Professionals 216
//check for trivial case guard self.count > 1 else { return self } //mutated copy var output: Array<Element> = self for primaryindex in 0..<output.count { let key = output[primaryindex] var secondaryindex = primaryindex while secondaryindex > -1 { if key < output[secondaryindex] { //move to correct position output.remove(at: secondaryindex + 1) output.insert(key, at: secondaryindex) } secondaryindex -= 1 } } return output}}
Selection sort
Selection sort is noted for its simplicity. It starts with the first element in the array, saving it's value as a minimumvalue (or maximum, depending on sorting order). It then itterates through the array, and replaces the min valuewith any other value lesser then min it finds on the way. That min value is then placed at the leftmost part of thearray and the process is repeated, from the next index, until the end of the array. Selection sort has complexity ofO(n2) but it is considered slower than it's counterpart - Selection sort.
func selectionSort() -> Array { //check for trivial case guard self.count > 1 else { return self }
//mutated copyvar output: Array<Element> = self for primaryindex in 0..<output.count { var minimum = primaryindex var secondaryindex = primaryindex + 1 while secondaryindex < output.count { //store lowest value as minimum if output[minimum] > output[secondaryindex] { minimum = secondaryindex } secondaryindex += 1 } //swap minimum value with array iteration if primaryindex != minimum { swap(&output[primaryindex], &output[minimum]) }} return output

GoalKicker.com – Swift™ Notes for Professionals 217
}
Quick Sort - O(n log n) complexity time
Quicksort is one of the advanced algorithms. It features a time complexity of O(n log n) and applies a divide &conquer strategy. This combination results in advanced algorithmic performance. Quicksort first divides a largearray into two smaller sub-arrays: the low elements and the high elements. Quicksort can then recursively sort thesub-arrays.
The steps are:
Pick an element, called a pivot, from the array.
Reorder the array so that all elements with values less than the pivot come before the pivot, while all elements withvalues greater than the pivot come after it (equal values can go either way). After this partitioning, the pivot is in itsfinal position. This is called the partition operation.
Recursively apply the above steps to the sub-array of elements with smaller values and separately to the sub-arrayof elements with greater values.
mutating func quickSort() -> Array {
func qSort(start startIndex: Int, _ pivot: Int) { if (startIndex < pivot) { let iPivot = qPartition(start: startIndex, pivot) qSort(start: startIndex, iPivot - 1) qSort(start: iPivot + 1, pivot) }}qSort(start: 0, self.endIndex - 1)return self}
mutating func qPartition(start startIndex: Int, _ pivot: Int) -> Int {
var wallIndex: Int = startIndex
//compare range with pivotfor currentIndex in wallIndex..<pivot { if self[currentIndex] <= self[pivot] { if wallIndex != currentIndex { swap(&self[currentIndex], &self[wallIndex]) } //advance wall wallIndex += 1 }} //move pivot to final position if wallIndex != pivot { swap(&self[wallIndex], &self[pivot]) } return wallIndex}

GoalKicker.com – Swift™ Notes for Professionals 218
Section 47.2: Insertion SortInsertion sort is one of the more basic algorithms in computer science. The insertion sort ranks elements byiterating through a collection and positions elements based on their value. The set is divided into sorted andunsorted halves and repeats until all elements are sorted. Insertion sort has complexity of O(n2). You can put it inan extension, like in an example below, or you can create a method for it.
extension Array where Element: Comparable {
func insertionSort() -> Array<Element> { //check for trivial case guard self.count > 1 else { return self } //mutated copy var output: Array<Element> = self for primaryindex in 0..<output.count { let key = output[primaryindex] var secondaryindex = primaryindex while secondaryindex > -1 { if key < output[secondaryindex] { //move to correct position output.remove(at: secondaryindex + 1) output.insert(key, at: secondaryindex) } secondaryindex -= 1 } } return output}}
Section 47.3: Selection sortSelection sort is noted for its simplicity. It starts with the first element in the array, saving it's value as a minimumvalue (or maximum, depending on sorting order). It then itterates through the array, and replaces the min valuewith any other value lesser then min it finds on the way. That min value is then placed at the leftmost part of thearray and the process is repeated, from the next index, until the end of the array. Selection sort has complexity ofO(n2) but it is considered slower than it's counterpart - Selection sort.
func selectionSort() -> Array<Element> { //check for trivial case guard self.count > 1 else { return self } //mutated copy var output: Array<Element> = self for primaryindex in 0..<output.count { var minimum = primaryindex

GoalKicker.com – Swift™ Notes for Professionals 219
var secondaryindex = primaryindex + 1 while secondaryindex < output.count { //store lowest value as minimum if output[minimum] > output[secondaryindex] { minimum = secondaryindex } secondaryindex += 1 } //swap minimum value with array iteration if primaryindex != minimum { swap(&output[primaryindex], &output[minimum]) } } return output}
Section 47.4: Asymptotic analysisSince we have many different algorithms to choose from, when we want to sort an array, we need to know whichone will do it's job. So we need some method of measuring algoritm's speed and reliability. That's whereAsymptotic analysis kicks in. Asymptotic analysis is the process of describing the efficiency of algorithms as theirinput size (n) grows. In computer science, asymptotics are usually expressed in a common format known as Big ONotation.
Linear time O(n): When each item in the array has to be evaluated in order for a function to achieve it's goal,that means that the function becomes less efficent as number of elements is increasing. A function like this issaid to run in linear time because its speed is dependent on its input size.Polynominal time O(n2): If complexity of a function grows exponentialy (meaning that for n elements of anarray complexity of a function is n squared) that function operates in polynominal time. These are usuallyfunctions with nested loops. Two nested loops result in O(n2) complexity, three nested loops result in O(n3)complexity, and so on...Logarithmic time O(log n): Logarithmic time functions's complexity is minimized when the size of its inputs(n) grows. These are the type of functions every programmer strives for.
Section 47.5: Quick Sort - O(n log n) complexity timeQuicksort is one of the advanced algorithms. It features a time complexity of O(n log n) and applies a divide &conquer strategy. This combination results in advanced algorithmic performance. Quicksort first divides a largearray into two smaller sub-arrays: the low elements and the high elements. Quicksort can then recursively sort thesub-arrays.
The steps are:
Pick an element, called a pivot, from the array.1.
Reorder the array so that all elements with values less than the pivot come before the pivot, while all2.elements with values greater than the pivot come after it (equal values can go either way). After thispartitioning, the pivot is in its final position. This is called the partition operation.
Recursively apply the above steps to the sub-array of elements with smaller values and separately to the sub-3.array of elements with greater values.
mutating func quickSort() -> Array<Element> {

GoalKicker.com – Swift™ Notes for Professionals 220
func qSort(start startIndex: Int, _ pivot: Int) { if (startIndex < pivot) { let iPivot = qPartition(start: startIndex, pivot) qSort(start: startIndex, iPivot - 1) qSort(start: iPivot + 1, pivot) }}qSort(start: 0, self.endIndex - 1)return self
}
mutating func qPartition(start startIndex: Int, _ pivot: Int) -> Int {
var wallIndex: Int = startIndex
//compare range with pivotfor currentIndex in wallIndex..<pivot { if self[currentIndex] <= self[pivot] { if wallIndex != currentIndex { swap(&self[currentIndex], &self[wallIndex]) } //advance wall wallIndex += 1 }}
//move pivot to final position if wallIndex != pivot { swap(&self[wallIndex], &self[pivot]) } return wallIndex}
Section 47.6: Graph, Trie, StackGraph
In computer science, a graph is an abstract data type that is meant to implement the undirected graph and directedgraph concepts from mathematics. A graph data structure consists of a finite (and possibly mutable) set of verticesor nodes or points, together with a set of unordered pairs of these vertices for an undirected graph or a set ofordered pairs for a directed graph. These pairs are known as edges, arcs, or lines for an undirected graph and asarrows, directed edges, directed arcs, or directed lines for a directed graph. The vertices may be part of the graphstructure, or may be external entities represented by integer indices or references. A graph data structure may alsoassociate to each edge some edge value, such as a symbolic label or a numeric attribute (cost, capacity, length, etc.).(Wikipedia, source)
//// GraphFactory.swift// SwiftStructures//// Created by Wayne Bishop on 6/7/14.// Copyright (c) 2014 Arbutus Software Inc. All rights reserved.//

GoalKicker.com – Swift™ Notes for Professionals 221
import Foundation
public class SwiftGraph { //declare a default directed graph canvas private var canvas: Array<Vertex> public var isDirected: Bool init() { canvas = Array<Vertex>() isDirected = true } //create a new vertex func addVertex(key: String) -> Vertex { //set the key let childVertex: Vertex = Vertex() childVertex.key = key //add the vertex to the graph canvas canvas.append(childVertex) return childVertex } //add edge to source vertex func addEdge(source: Vertex, neighbor: Vertex, weight: Int) { //create a new edge let newEdge = Edge() //establish the default properties newEdge.neighbor = neighbor newEdge.weight = weight source.neighbors.append(newEdge) print("The neighbor of vertex: \(source.key as String!) is \(neighbor.key as String!)..") //check condition for an undirected graph if isDirected == false { //create a new reversed edge let reverseEdge = Edge() //establish the reversed properties reverseEdge.neighbor = source
GoalKicker.com – Swift™ Notes for Professionals 222
reverseEdge.weight = weight neighbor.neighbors.append(reverseEdge) print("The neighbor of vertex: \(neighbor.key as String!) is \(source.key asString!)..") } }
/* reverse the sequence of paths given the shortest path. process analagous to reversing a linked list. */
func reversePath(_ head: Path!, source: Vertex) -> Path! { guard head != nil else { return head } //mutated copy var output = head var current: Path! = output var prev: Path! var next: Path! while(current != nil) { next = current.previous current.previous = prev prev = current current = next } //append the source path to the sequence let sourcePath: Path = Path() sourcePath.destination = source sourcePath.previous = prev sourcePath.total = nil output = sourcePath return output }
//process Dijkstra's shortest path algorthim func processDijkstra(_ source: Vertex, destination: Vertex) -> Path? {

GoalKicker.com – Swift™ Notes for Professionals 223
var frontier: Array<Path> = Array<Path>() var finalPaths: Array<Path> = Array<Path>() //use source edges to create the frontier for e in source.neighbors { let newPath: Path = Path() newPath.destination = e.neighbor newPath.previous = nil newPath.total = e.weight //add the new path to the frontier frontier.append(newPath) }
//construct the best path var bestPath: Path = Path() while frontier.count != 0 { //support path changes using the greedy approach bestPath = Path() var pathIndex: Int = 0
for x in 0..<frontier.count { let itemPath: Path = frontier[x] if (bestPath.total == nil) || (itemPath.total < bestPath.total) { bestPath = itemPath pathIndex = x } } //enumerate the bestPath edges for e in bestPath.destination.neighbors { let newPath: Path = Path() newPath.destination = e.neighbor newPath.previous = bestPath newPath.total = bestPath.total + e.weight //add the new path to the frontier frontier.append(newPath) }

GoalKicker.com – Swift™ Notes for Professionals 224
//preserve the bestPath finalPaths.append(bestPath) //remove the bestPath from the frontier //frontier.removeAtIndex(pathIndex) - Swift2 frontier.remove(at: pathIndex) } //end while //establish the shortest path as an optional var shortestPath: Path! = Path() for itemPath in finalPaths { if (itemPath.destination.key == destination.key) { if (shortestPath.total == nil) || (itemPath.total < shortestPath.total) { shortestPath = itemPath } } } return shortestPath } ///an optimized version of Dijkstra's shortest path algorthim func processDijkstraWithHeap(_ source: Vertex, destination: Vertex) -> Path! { let frontier: PathHeap = PathHeap() let finalPaths: PathHeap = PathHeap() //use source edges to create the frontier for e in source.neighbors { let newPath: Path = Path() newPath.destination = e.neighbor newPath.previous = nil newPath.total = e.weight //add the new path to the frontier frontier.enQueue(newPath) }

GoalKicker.com – Swift™ Notes for Professionals 225
//construct the best path var bestPath: Path = Path() while frontier.count != 0 { //use the greedy approach to obtain the best path bestPath = Path() bestPath = frontier.peek() //enumerate the bestPath edges for e in bestPath.destination.neighbors { let newPath: Path = Path() newPath.destination = e.neighbor newPath.previous = bestPath newPath.total = bestPath.total + e.weight //add the new path to the frontier frontier.enQueue(newPath) } //preserve the bestPaths that match destination if (bestPath.destination.key == destination.key) { finalPaths.enQueue(bestPath) } //remove the bestPath from the frontier frontier.deQueue() } //end while //obtain the shortest path from the heap var shortestPath: Path! = Path() shortestPath = finalPaths.peek() return shortestPath } //MARK: traversal algorithms //bfs traversal with inout closure function func traverse(_ startingv: Vertex, formula: (_ node: inout Vertex) -> ()) {
//establish a new queue let graphQueue: Queue<Vertex> = Queue<Vertex>()

GoalKicker.com – Swift™ Notes for Professionals 226
//queue a starting vertex graphQueue.enQueue(startingv) while !graphQueue.isEmpty() { //traverse the next queued vertex var vitem: Vertex = graphQueue.deQueue() as Vertex! //add unvisited vertices to the queue for e in vitem.neighbors { if e.neighbor.visited == false { print("adding vertex: \(e.neighbor.key!) to queue..") graphQueue.enQueue(e.neighbor) } }
/* notes: this demonstrates how to invoke a closure with an inout parameter. By passing by reference no return value is required. */ //invoke formula formula(&vitem) } //end while print("graph traversal complete..") }
//breadth first search func traverse(_ startingv: Vertex) { //establish a new queue let graphQueue: Queue<Vertex> = Queue<Vertex>() //queue a starting vertex graphQueue.enQueue(startingv) while !graphQueue.isEmpty() { //traverse the next queued vertex let vitem = graphQueue.deQueue() as Vertex! guard vitem != nil else { return } //add unvisited vertices to the queue for e in vitem!.neighbors {

GoalKicker.com – Swift™ Notes for Professionals 227
if e.neighbor.visited == false { print("adding vertex: \(e.neighbor.key!) to queue..") graphQueue.enQueue(e.neighbor) } } vitem!.visited = true print("traversed vertex: \(vitem!.key!)..") } //end while print("graph traversal complete..") } //end function //use bfs with trailing closure to update all values func update(startingv: Vertex, formula:((Vertex) -> Bool)) { //establish a new queue let graphQueue: Queue<Vertex> = Queue<Vertex>() //queue a starting vertex graphQueue.enQueue(startingv) while !graphQueue.isEmpty() { //traverse the next queued vertex let vitem = graphQueue.deQueue() as Vertex! guard vitem != nil else { return } //add unvisited vertices to the queue for e in vitem!.neighbors { if e.neighbor.visited == false { print("adding vertex: \(e.neighbor.key!) to queue..") graphQueue.enQueue(e.neighbor) } } //apply formula.. if formula(vitem!) == false { print("formula unable to update: \(vitem!.key)") } else { print("traversed vertex: \(vitem!.key!)..") } vitem!.visited = true

GoalKicker.com – Swift™ Notes for Professionals 228
} //end while print("graph traversal complete..") }
}
Trie
In computer science, a trie, also called digital tree and sometimes radix tree or prefix tree (as they can be searchedby prefixes), is a kind of search tree—an ordered tree data structure that is used to store a dynamic set orassociative array where the keys are usually strings. (Wikipedia, source)
//// Trie.swift// SwiftStructures//// Created by Wayne Bishop on 10/14/14.// Copyright (c) 2014 Arbutus Software Inc. All rights reserved.//import Foundation
public class Trie { private var root: TrieNode! init(){ root = TrieNode() } //builds a tree hierarchy of dictionary content func append(word keyword: String) { //trivial case guard keyword.length > 0 else { return } var current: TrieNode = root while keyword.length != current.level { var childToUse: TrieNode! let searchKey = keyword.substring(to: current.level + 1) //print("current has \(current.children.count) children..")

GoalKicker.com – Swift™ Notes for Professionals 229
//iterate through child nodes for child in current.children { if (child.key == searchKey) { childToUse = child break } } //new node if childToUse == nil { childToUse = TrieNode() childToUse.key = searchKey childToUse.level = current.level + 1 current.children.append(childToUse) } current = childToUse } //end while //final end of word check if (keyword.length == current.level) { current.isFinal = true print("end of word reached!") return } } //end function
//find words based on the prefix func search(forWord keyword: String) -> Array<String>! { //trivial case guard keyword.length > 0 else { return nil } var current: TrieNode = root var wordList = Array<String>() while keyword.length != current.level { var childToUse: TrieNode! let searchKey = keyword.substring(to: current.level + 1)

GoalKicker.com – Swift™ Notes for Professionals 230
//print("looking for prefix: \(searchKey)..") //iterate through any child nodes for child in current.children { if (child.key == searchKey) { childToUse = child current = childToUse break } } if childToUse == nil { return nil } } //end while //retrieve the keyword and any descendants if ((current.key == keyword) && (current.isFinal)) { wordList.append(current.key) }
//include only children that are words for child in current.children { if (child.isFinal == true) { wordList.append(child.key) } } return wordList
} //end function
}
(GitHub, source)
Stack
In computer science, a stack is an abstract data type that serves as a collection of elements, with two principaloperations: push, which adds an element to the collection, and pop, which removes the most recently addedelement that was not yet removed. The order in which elements come off a stack gives rise to its alternative name,LIFO (for last in, first out). Additionally, a peek operation may give access to the top without modifying the stack.(Wikipedia, source)
See license info below and original code source at (github)

GoalKicker.com – Swift™ Notes for Professionals 231
//// Stack.swift// SwiftStructures//// Created by Wayne Bishop on 8/1/14.// Copyright (c) 2014 Arbutus Software Inc. All rights reserved.//import Foundation
class Stack<T> { private var top: Node<T> init() { top = Node<T>() } //the number of items - O(n) var count: Int { //return trivial case guard top.key != nil else { return 0 } var current = top var x: Int = 1 //cycle through list while current.next != nil { current = current.next! x += 1 } return x } //add item to the stack func push(withKey key: T) { //return trivial case guard top.key != nil else { top.key = key return } //create new item let childToUse = Node<T>() childToUse.key = key //set new created item at top childToUse.next = top

GoalKicker.com – Swift™ Notes for Professionals 232
top = childToUse
}
//remove item from the stack func pop() { if self.count > 1 { top = top.next } else { top.key = nil } } //retrieve the top most item func peek() -> T! {
//determine instance if let topitem = top.key { return topitem } else { return nil } } //check for value func isEmpty() -> Bool { if self.count == 0 { return true } else { return false } }
}
The MIT License (MIT)
Copyright (c) 2015, Wayne Bishop & Arbutus Software Inc.
Permission is hereby granted, free of charge, to any person obtaining a copy of this software andassociated documentation files (the "Software"), to deal in the Software without restriction, includingwithout limitation the rights to use, copy, modify, merge, publish, distribute, sublicense, and/or sell copiesof the Software, and to permit persons to whom the Software is furnished to do so, subject to thefollowing conditions:

GoalKicker.com – Swift™ Notes for Professionals 233
The above copyright notice and this permission notice shall be included in all copies or substantialportions of the Software.
THE SOFTWARE IS PROVIDED "AS IS", WITHOUT WARRANTY OF ANY KIND, EXPRESS OR IMPLIED,INCLUDING BUT NOT LIMITED TO THE WARRANTIES OF MERCHANTABILITY, FITNESS FOR A PARTICULARPURPOSE AND NONINFRINGEMENT. IN NO EVENT SHALL THE AUTHORS OR COPYRIGHT HOLDERS BELIABLE FOR ANY CLAIM, DAMAGES OR OTHER LIABILITY, WHETHER IN AN ACTION OF CONTRACT, TORTOR OTHERWISE, ARISING FROM, OUT OF OR IN CONNECTION WITH THE SOFTWARE OR THE USE OROTHER DEALINGS IN THE SOFTWARE.

GoalKicker.com – Swift™ Notes for Professionals 234
Chapter 48: Swift Advance functionsAdvance functions like map, flatMap, filter, and reduce are used to operate on various collection types like Arrayand Dictionary. Advance functions typically require little code and can be chained together in order to build upcomplex logic in a concise way.
Section 48.1: Flatten multidimensional arrayTo flatten multidimensional array into single dimension, flatMap advance functions is used. Other use case is toneglect nil value from array & mapping values. Let's check with example:
Suppose We have an multidimensional array of cities & we want to sorted city name list in ascending order. In thatcase we can use flatMap function like:
let arrStateName = [["Alaska", "Iowa", "Missouri", "New Mexico"], ["New York", "Texas","Washington", "Maryland"], ["New Jersey", "Virginia", "Florida", "Colorado"]]
Preparing a single dimensional list from multidimensional array,
let arrFlatStateList = arrStateName.flatMap({ $0 }) // ["Alaska", "Iowa", "Missouri", "New Mexico","New York", "Texas", "Washington", "Maryland", "New Jersey", "Virginia", "Florida", "Colorado"]
For sorting array values, we can use chaining operation or sort flatten array. Here below example showing chainingoperation,
// Swift 2.3 syntaxlet arrSortedStateList = arrStateName.flatMap({ $0 }).sort(<) // ["Alaska", "Colorado","Florida", "Iowa", "Maryland", "Missouri", "New Jersey", "New Mexico", "New York", "Texas","Virginia", "Washington"]
// Swift 3 syntaxlet arrSortedStateList = arrStateName.flatMap({ $0 }).sorted(by: <) // ["Alaska", "Colorado","Florida", "Iowa", "Maryland", "Missouri", "New Jersey", "New Mexico", "New York", "Texas","Virginia", "Washington"]
Section 48.2: Introduction with advance functionsLet's take an scenario to understand advance function in better way,
struct User { var name: String var age: Int var country: String?}
//User's informationlet user1 = User(name: "John", age: 24, country: "USA")let user2 = User(name: "Chan", age: 20, country: nil)let user3 = User(name: "Morgan", age: 30, country: nil)let user4 = User(name: "Rachel", age: 20, country: "UK")let user5 = User(name: "Katie", age: 23, country: "USA")let user6 = User(name: "David", age: 35, country: "USA")let user7 = User(name: "Bob",age: 22, country: nil)
//User's array list

GoalKicker.com – Swift™ Notes for Professionals 235
let arrUser = [user1, user2, user3, user4, user5, user6, user7]
Map Function:
Use map to loop over a collection and apply the same operation to each element in the collection. The mapfunction returns an array containing the results of applying a mapping or transform function to each item.
//Fetch all the user's name from arraylet arrUserName = arrUser.map({ $0.name }) // ["John", "Chan", "Morgan", "Rachel", "Katie","David", "Bob"]
Flat-Map Function:
The simplest use is as the name suggests to flatten a collection of collections.
// Fetch all user country name & ignore nil value.let arrCountry = arrUser.flatMap({ $0.country }) // ["USA", "UK", "USA", "USA"]
Filter Function:
Use filter to loop over a collection and return an Array containing only those elements that match an includecondition.
// Filtering USA user from the array user list.let arrUSAUsers = arrUser.filter({ $0.country == "USA" }) // [user1, user5, user6]
// User chaining methods to fetch user's name who live in USAlet arrUserList = arrUser.filter({ $0.country == "USA" }).map({ $0.name }) // ["John", "Katie","David"]
Reduce:
Use reduce to combine all items in a collection to create a single new value.
Swift 2.3:
//Fetch user's total age.let arrUserAge = arrUser.map({ $0.age }).reduce(0, combine: { $0 + $1 }) //174
//Prepare all user name string with separated by commalet strUserName = arrUserName.reduce("", combine: { $0 == "" ? $1 : $0 + ", " + $1 }) // John,Chan, Morgan, Rachel, Katie, David, Bob
Swift 3:
//Fetch user's total age.let arrUserAge = arrUser.map({ $0.age }).reduce(0, { $0 + $1 }) //174
//Prepare all user name string with separated by commalet strUserName = arrUserName.reduce("", { $0 == "" ? $1 : $0 + ", " + $1 }) // John, Chan, Morgan,Rachel, Katie, David, Bob

GoalKicker.com – Swift™ Notes for Professionals 236
Chapter 49: Completion HandlerVirtually all apps are using asynchronous functions to keep the code from blocking the main thread.
Section 49.1: Completion handler with no input argumentfunc sampleWithCompletion(completion:@escaping (()-> ())){ let delayInSeconds = 1.0 DispatchQueue.main.asyncAfter(deadline: DispatchTime.now() + delayInSeconds) { completion() }}
//Call the functionsampleWithCompletion { print("after one second")}
Section 49.2: Completion handler with input argumentenum ReadResult{ case Successful case Failed case Pending}
struct OutpuData { var data = Data() var result: ReadResult var error: Error?}
func readData(from url: String, completion: @escaping (OutpuData) -> Void) { var _data = OutpuData(data: Data(), result: .Pending, error: nil) DispatchQueue.global().async { let url=URL(string: url) do { let rawData = try Data(contentsOf: url!) _data.result = .Successful _data.data = rawData completion(_data) } catch let error { _data.result = .Failed _data.error = error completion(_data) } }}
readData(from: "https://raw.githubusercontent.com/trev/bearcal/master/sample-data-large.json") {(output) in switch output.result { case .Successful: break case .Failed:

GoalKicker.com – Swift™ Notes for Professionals 237
break case .Pending: break }}

GoalKicker.com – Swift™ Notes for Professionals 238
Chapter 50: Swift HTTP server by KituraSwift server with Kitura
Kitura is a web framework written in swift that is created for web services. It's very easy to set up for HTTPrequests. For environment, it needs either OS X with XCode installed, or Linux running swift 3.0.
Section 50.1: Hello world applicationConfiguration
First, create a file called Package.swift. This is the file that tells swift compiler where the libraries are located. In thishello world example, we are using GitHub repos. We need Kitura and HeliumLogger. Put the following code insidePackage.swift. It specified the name of the project as kitura-helloworld and also the dependency urls.
import PackageDescriptionlet package = Package( name: "kitura-helloworld", dependencies: [ .Package(url: "https://github.com/IBM-Swift/HeliumLogger.git", majorVersion: 1, minor:6), .Package(url: "https://github.com/IBM-Swift/Kitura.git", majorVersion: 1, minor: 6) ] )
Next, create a folder called Sources. Inside, create a file called main.swift. This is the file that we implement all thelogic for this application. Enter the following code into this main file.
Import libraries and enable logging
import Kituraimport Foundationimport HeliumLogger
HeliumLogger.use()
Adding a router. Router specifies a path, type, etc of the HTTP request. Here we are adding a GET request handlerwhich prints Hello world, and then a post request that reads plain text from the request and then send it back.
let router = Router()
router.get("/get") { request, response, next in response.send("Hello, World!") next()}
router.post("/post") { request, response, next in var string: String? do{ string = try request.readString() } catch let error { string = error.localizedDescription } response.send("Value \(string!) received.") next()
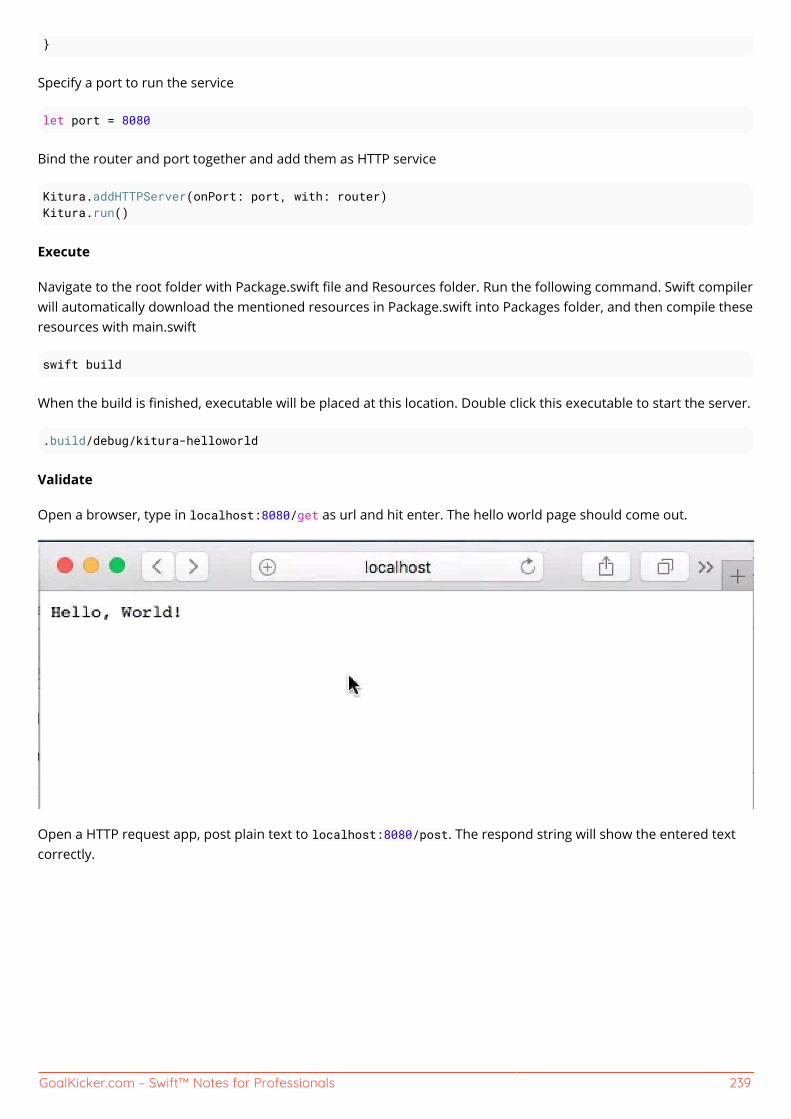
GoalKicker.com – Swift™ Notes for Professionals 239
}
Specify a port to run the service
let port = 8080
Bind the router and port together and add them as HTTP service
Kitura.addHTTPServer(onPort: port, with: router)Kitura.run()
Execute
Navigate to the root folder with Package.swift file and Resources folder. Run the following command. Swift compilerwill automatically download the mentioned resources in Package.swift into Packages folder, and then compile theseresources with main.swift
swift build
When the build is finished, executable will be placed at this location. Double click this executable to start the server.
.build/debug/kitura-helloworld
Validate
Open a browser, type in localhost:8080/get as url and hit enter. The hello world page should come out.
Open a HTTP request app, post plain text to localhost:8080/post. The respond string will show the entered textcorrectly.

GoalKicker.com – Swift™ Notes for Professionals 240
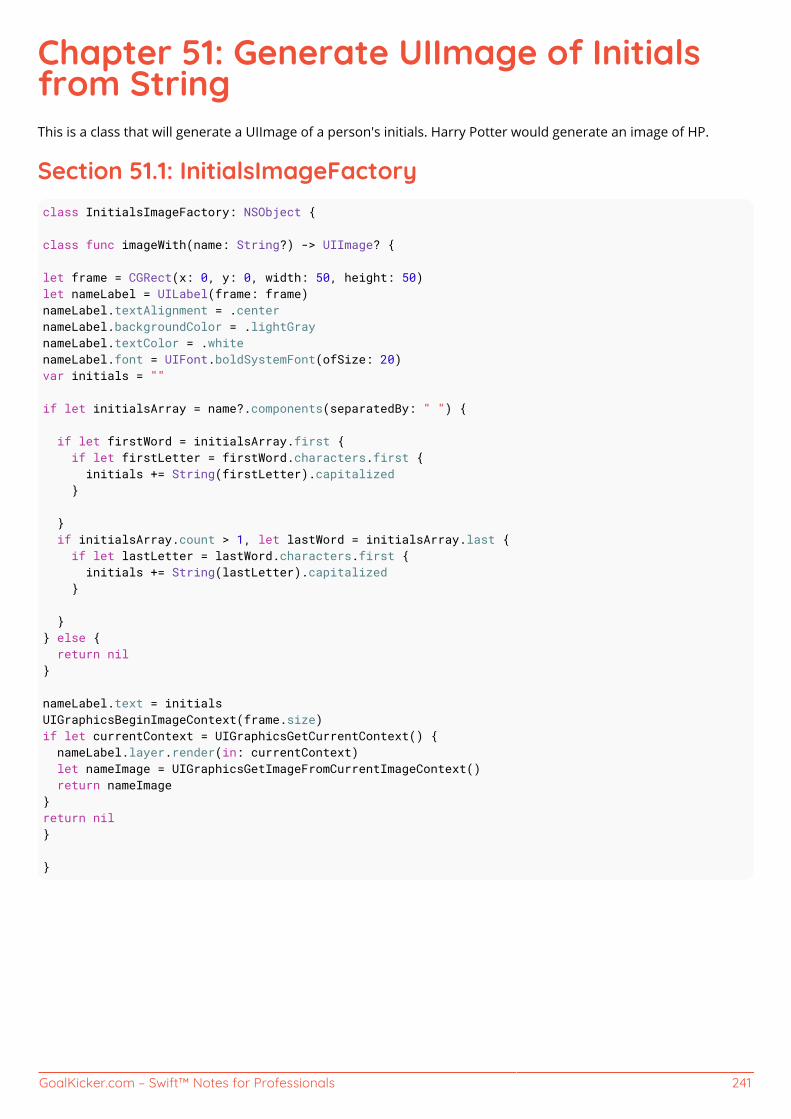
GoalKicker.com – Swift™ Notes for Professionals 241
Chapter 51: Generate UIImage of Initialsfrom StringThis is a class that will generate a UIImage of a person's initials. Harry Potter would generate an image of HP.
Section 51.1: InitialsImageFactoryclass InitialsImageFactory: NSObject {
class func imageWith(name: String?) -> UIImage? {
let frame = CGRect(x: 0, y: 0, width: 50, height: 50)let nameLabel = UILabel(frame: frame)nameLabel.textAlignment = .centernameLabel.backgroundColor = .lightGraynameLabel.textColor = .whitenameLabel.font = UIFont.boldSystemFont(ofSize: 20)var initials = ""
if let initialsArray = name?.components(separatedBy: " ") { if let firstWord = initialsArray.first { if let firstLetter = firstWord.characters.first { initials += String(firstLetter).capitalized } } if initialsArray.count > 1, let lastWord = initialsArray.last { if let lastLetter = lastWord.characters.first { initials += String(lastLetter).capitalized } }} else { return nil}
nameLabel.text = initialsUIGraphicsBeginImageContext(frame.size)if let currentContext = UIGraphicsGetCurrentContext() { nameLabel.layer.render(in: currentContext) let nameImage = UIGraphicsGetImageFromCurrentImageContext() return nameImage}return nil}
}

GoalKicker.com – Swift™ Notes for Professionals 242
Chapter 52: Design Patterns - CreationalDesign patterns are general solutions to problems that frequently occur in software development. The following aretemplates of standardized best practices in structuring and designing code, as well as examples of commoncontexts in which these design patterns would be appropriate.
Creational design patterns abstract the instantiation of objects to make a system more independent of theprocess of creation, composition, and representation.
Section 52.1: SingletonSingletons are a frequently used design pattern which consists of a single instance of a class that is sharedthroughout a program.
In the following example, we create a static property that holds an instance of the Foo class. Remember that astatic property is shared between all objects of a class and can't be overwritten by subclassing.
public class Foo{ static let shared = Foo() // Used for preventing the class from being instantiated directly private init() {} func doSomething() { print("Do something") }}
Usage:
Foo.shared.doSomething()
Be sure to remember the private initializer:
This makes sure your singletons are truly unique and prevents outside objects from creating their owninstances of your class through virtue of access control. Since all objects come with a default publicinitializer in Swift, you need to override your init and make it private. KrakenDev
Section 52.2: Builder Pattern
The builder pattern is an object creation software design pattern. Unlike the abstract factory patternand the factory method pattern whose intention is to enable polymorphism, the intention of the builderpattern is to find a solution to the telescoping constructor anti-pattern. The telescoping constructor anti-pattern occurs when the increase of object constructor parameter combination leads to an exponentiallist of constructors. Instead of using numerous constructors, the builder pattern uses another object, abuilder, that receives each initialization parameter step by step and then returns the resultingconstructed object at once.
-Wikipedia

GoalKicker.com – Swift™ Notes for Professionals 243
The main goal of the builder pattern is to setup a default configuration for an object from its creation. It is anintermediary between the object will be built and all other objects related to building it.
Example:
To make it more clear, let's take a look at a Car Builder example.
Consider that we have a Car class contains many options to create an object, such as:
Color.Number of seats.Number of wheels.Type.Gear type.Motor.Airbag availability.
import UIKit
enum CarType { case sportage, saloon}
enum GearType { case manual, automatic}
struct Motor { var id: String var name: String var model: String var numberOfCylinders: UInt8}
class Car: CustomStringConvertible { var color: UIColor var numberOfSeats: UInt8 var numberOfWheels: UInt8 var type: CarType var gearType: GearType var motor: Motor var shouldHasAirbags: Bool var description: String { return "color: \(color)\nNumber of seats: \(numberOfSeats)\nNumber of Wheels:\(numberOfWheels)\n Type: \(gearType)\nMotor: \(motor)\nAirbag Availability: \(shouldHasAirbags)" } init(color: UIColor, numberOfSeats: UInt8, numberOfWheels: UInt8, type: CarType, gearType:GearType, motor: Motor, shouldHasAirbags: Bool) { self.color = color self.numberOfSeats = numberOfSeats self.numberOfWheels = numberOfWheels

GoalKicker.com – Swift™ Notes for Professionals 244
self.type = type self.gearType = gearType self.motor = motor self.shouldHasAirbags = shouldHasAirbags }}
Creating a car object:
let aCar = Car(color: UIColor.black, numberOfSeats: 4, numberOfWheels: 4, type: .saloon, gearType: .automatic, motor: Motor(id: "101", name: "Super Motor", model: "c4", numberOfCylinders: 6), shouldHasAirbags: true)
print(aCar)
/* Printing color: UIExtendedGrayColorSpace 0 1 Number of seats: 4 Number of Wheels: 4 Type: automatic Motor: Motor(id: "101", name: "Super Motor", model: "c4", numberOfCylinders: 6) Airbag Availability: true*/
The problem arises when creating a car object is that the car requires many configuration data to be created.
For applying the Builder Pattern, the initializer parameters should have default values which are changeable ifneeded.
CarBuilder class:
class CarBuilder { var color: UIColor = UIColor.black var numberOfSeats: UInt8 = 5 var numberOfWheels: UInt8 = 4 var type: CarType = .saloon var gearType: GearType = .automatic var motor: Motor = Motor(id: "111", name: "Default Motor", model: "T9", numberOfCylinders: 4) var shouldHasAirbags: Bool = false func buildCar() -> Car { return Car(color: color, numberOfSeats: numberOfSeats, numberOfWheels: numberOfWheels,type: type, gearType: gearType, motor: motor, shouldHasAirbags: shouldHasAirbags) }}
The CarBuilder class defines properties that could be changed to to edit the values of the created car object.
Let's build new cars by using the CarBuilder:
var builder = CarBuilder()// currently, the builder creates cars with default configuration.

GoalKicker.com – Swift™ Notes for Professionals 245
let defaultCar = builder.buildCar()//print(defaultCar.description)/* prints color: UIExtendedGrayColorSpace 0 1 Number of seats: 5 Number of Wheels: 4 Type: automatic Motor: Motor(id: "111", name: "Default Motor", model: "T9", numberOfCylinders: 4) Airbag Availability: false*/
builder.shouldHasAirbags = true// now, the builder creates cars with default configuration,// but with a small edit on making the airbags available
let safeCar = builder.buildCar()print(safeCar.description)/* prints color: UIExtendedGrayColorSpace 0 1 Number of seats: 5 Number of Wheels: 4 Type: automatic Motor: Motor(id: "111", name: "Default Motor", model: "T9", numberOfCylinders: 4) Airbag Availability: true */
builder.color = UIColor.purple// now, the builder creates cars with default configuration// with some extra features: the airbags are available and the color is purple
let femaleCar = builder.buildCar()print(femaleCar)/* prints color: UIExtendedSRGBColorSpace 0.5 0 0.5 1 Number of seats: 5 Number of Wheels: 4 Type: automatic Motor: Motor(id: "111", name: "Default Motor", model: "T9", numberOfCylinders: 4) Airbag Availability: true*/
The benefit of applying the Builder Pattern is the ease of creating objects that should contain much ofconfigurations by setting default values, also, the ease of changing these default values.
Take it Further:
As a good practice, all properties that need default values should be in a separated protocol, which should beimplemented by the class itself and its builder.
Backing to our example, let's create a new protocol called CarBluePrint:
import UIKit
enum CarType { case sportage, saloon}
enum GearType {
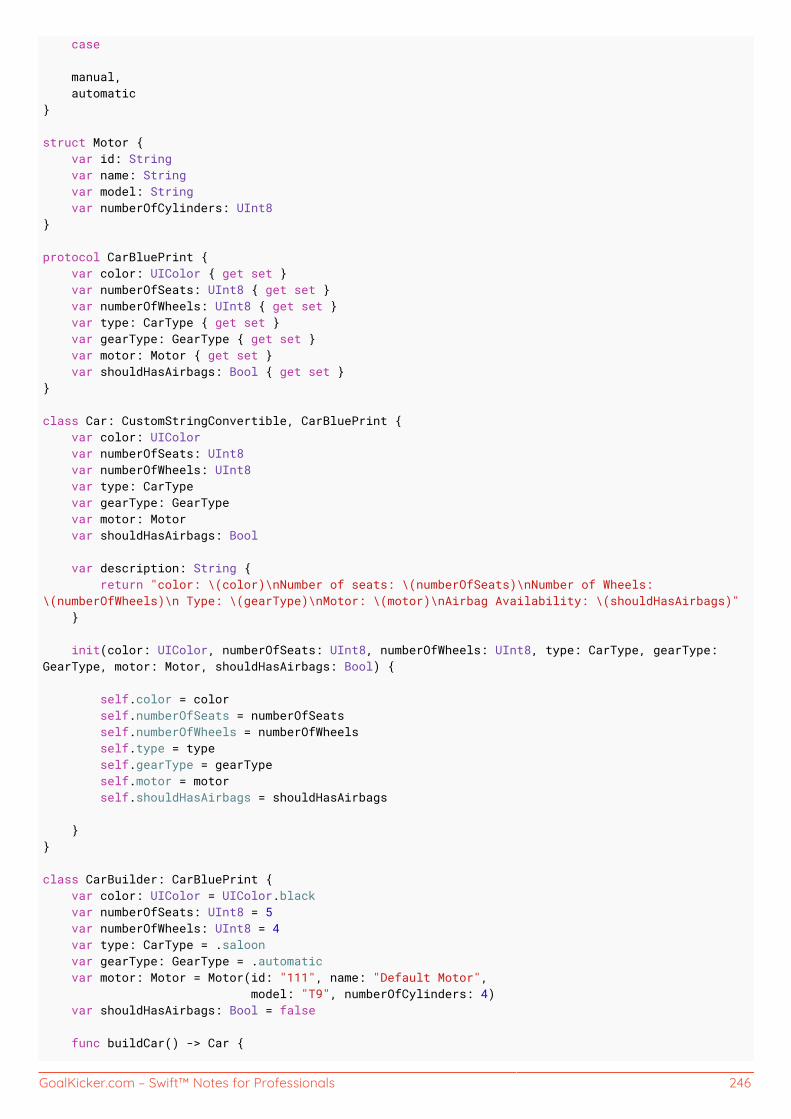
GoalKicker.com – Swift™ Notes for Professionals 246
case manual, automatic}
struct Motor { var id: String var name: String var model: String var numberOfCylinders: UInt8}
protocol CarBluePrint { var color: UIColor { get set } var numberOfSeats: UInt8 { get set } var numberOfWheels: UInt8 { get set } var type: CarType { get set } var gearType: GearType { get set } var motor: Motor { get set } var shouldHasAirbags: Bool { get set }}
class Car: CustomStringConvertible, CarBluePrint { var color: UIColor var numberOfSeats: UInt8 var numberOfWheels: UInt8 var type: CarType var gearType: GearType var motor: Motor var shouldHasAirbags: Bool var description: String { return "color: \(color)\nNumber of seats: \(numberOfSeats)\nNumber of Wheels:\(numberOfWheels)\n Type: \(gearType)\nMotor: \(motor)\nAirbag Availability: \(shouldHasAirbags)" } init(color: UIColor, numberOfSeats: UInt8, numberOfWheels: UInt8, type: CarType, gearType:GearType, motor: Motor, shouldHasAirbags: Bool) { self.color = color self.numberOfSeats = numberOfSeats self.numberOfWheels = numberOfWheels self.type = type self.gearType = gearType self.motor = motor self.shouldHasAirbags = shouldHasAirbags }}
class CarBuilder: CarBluePrint { var color: UIColor = UIColor.black var numberOfSeats: UInt8 = 5 var numberOfWheels: UInt8 = 4 var type: CarType = .saloon var gearType: GearType = .automatic var motor: Motor = Motor(id: "111", name: "Default Motor", model: "T9", numberOfCylinders: 4) var shouldHasAirbags: Bool = false func buildCar() -> Car {
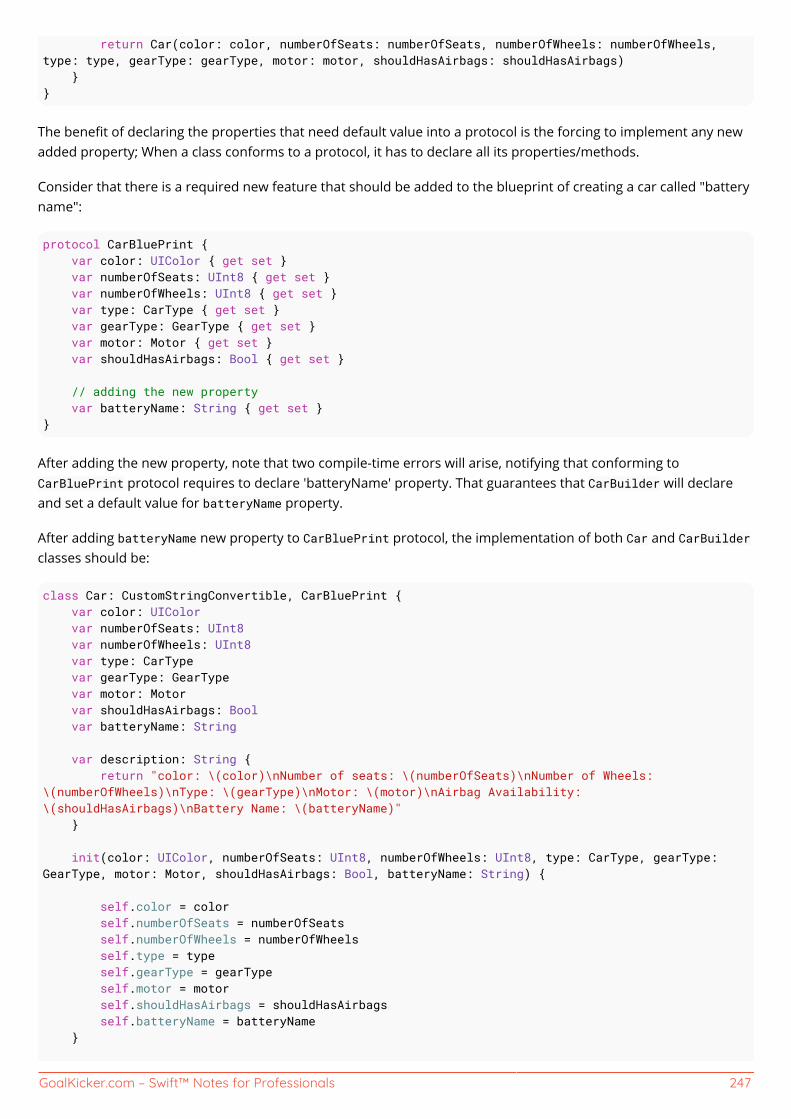
GoalKicker.com – Swift™ Notes for Professionals 247
return Car(color: color, numberOfSeats: numberOfSeats, numberOfWheels: numberOfWheels,type: type, gearType: gearType, motor: motor, shouldHasAirbags: shouldHasAirbags) }}
The benefit of declaring the properties that need default value into a protocol is the forcing to implement any newadded property; When a class conforms to a protocol, it has to declare all its properties/methods.
Consider that there is a required new feature that should be added to the blueprint of creating a car called "batteryname":
protocol CarBluePrint { var color: UIColor { get set } var numberOfSeats: UInt8 { get set } var numberOfWheels: UInt8 { get set } var type: CarType { get set } var gearType: GearType { get set } var motor: Motor { get set } var shouldHasAirbags: Bool { get set } // adding the new property var batteryName: String { get set }}
After adding the new property, note that two compile-time errors will arise, notifying that conforming toCarBluePrint protocol requires to declare 'batteryName' property. That guarantees that CarBuilder will declareand set a default value for batteryName property.
After adding batteryName new property to CarBluePrint protocol, the implementation of both Car and CarBuilderclasses should be:
class Car: CustomStringConvertible, CarBluePrint { var color: UIColor var numberOfSeats: UInt8 var numberOfWheels: UInt8 var type: CarType var gearType: GearType var motor: Motor var shouldHasAirbags: Bool var batteryName: String var description: String { return "color: \(color)\nNumber of seats: \(numberOfSeats)\nNumber of Wheels:\(numberOfWheels)\nType: \(gearType)\nMotor: \(motor)\nAirbag Availability:\(shouldHasAirbags)\nBattery Name: \(batteryName)" } init(color: UIColor, numberOfSeats: UInt8, numberOfWheels: UInt8, type: CarType, gearType:GearType, motor: Motor, shouldHasAirbags: Bool, batteryName: String) { self.color = color self.numberOfSeats = numberOfSeats self.numberOfWheels = numberOfWheels self.type = type self.gearType = gearType self.motor = motor self.shouldHasAirbags = shouldHasAirbags self.batteryName = batteryName }

GoalKicker.com – Swift™ Notes for Professionals 248
}
class CarBuilder: CarBluePrint { var color: UIColor = UIColor.red var numberOfSeats: UInt8 = 5 var numberOfWheels: UInt8 = 4 var type: CarType = .saloon var gearType: GearType = .automatic var motor: Motor = Motor(id: "111", name: "Default Motor", model: "T9", numberOfCylinders: 4) var shouldHasAirbags: Bool = false var batteryName: String = "Default Battery Name" func buildCar() -> Car { return Car(color: color, numberOfSeats: numberOfSeats, numberOfWheels: numberOfWheels,type: type, gearType: gearType, motor: motor, shouldHasAirbags: shouldHasAirbags, batteryName:batteryName) }}
Again, let's build new cars by using the CarBuilder:
var builder = CarBuilder()
let defaultCar = builder.buildCar()print(defaultCar)/* prints color: UIExtendedSRGBColorSpace 1 0 0 1 Number of seats: 5 Number of Wheels: 4 Type: automatic Motor: Motor(id: "111", name: "Default Motor", model: "T9", numberOfCylinders: 4) Airbag Availability: false Battery Name: Default Battery Name*/
builder.batteryName = "New Battery Name"
let editedBatteryCar = builder.buildCar()print(editedBatteryCar)/* color: UIExtendedSRGBColorSpace 1 0 0 1 Number of seats: 5 Number of Wheels: 4 Type: automatic Motor: Motor(id: "111", name: "Default Motor", model: "T9", numberOfCylinders: 4) Airbag Availability: false Battery Name: New Battery Name */
Section 52.3: Factory Method
In class-based programming, the factory method pattern is a creational pattern that uses factorymethods to deal with the problem of creating objects without having to specify the exact class of theobject that will be created. Wikipedia reference
protocol SenderProtocol{

GoalKicker.com – Swift™ Notes for Professionals 249
func send(package: AnyObject)}
class Fedex: SenderProtocol{ func send(package: AnyObject) { print("Fedex deliver") }}
class RegularPriorityMail: SenderProtocol{ func send(package: AnyObject) { print("Regular Priority Mail deliver") }}
// This is our Factoryclass DeliverFactory{ // It will be responsable for returning the proper instance that will handle the task static func makeSender(isLate isLate: Bool) -> SenderProtocol { return isLate ? Fedex() : RegularPriorityMail() }}
// Usage:let package = ["Item 1", "Item 2"]
// Fedex class will handle the deliveryDeliverFactory.makeSender(isLate:true).send(package)
// Regular Priority Mail class will handle the deliveryDeliverFactory.makeSender(isLate:false).send(package)
By doing that we don't depend on the real implementation of the class, making the sender() completelytransparent to who is consuming it.
In this case all we need to know is that a sender will handle the deliver and exposes a method called send(). Thereare several other advantages: reduce classes coupling, easier to test, easier to add new behaviours without havingto change who is consuming it.
Within object-oriented design, interfaces provide layers of abstraction that facilitate conceptualexplanation of the code and create a barrier preventing dependencies.Wikipedia reference
Section 52.4: Observer
The observer pattern is where an object, called the subject, maintains a list of its dependents, calledobservers, and notifies them automatically of any state changes, usually by calling one of their methods.It is mainly used to implement distributed event handling systems. The Observer pattern is also a key partin the familiar model–view–controller (MVC) architectural pattern.Wikipedia reference

GoalKicker.com – Swift™ Notes for Professionals 250
Basically the observer pattern is used when you have an object which can notify observers of certain behaviors orstate changes.
First lets create a global reference (outside of a class) for the Notification Centre :
let notifCentre = NotificationCenter.default
Great now we can call this from anywhere. We would then want to register a class as an observer...
notifCentre.addObserver(self, selector: #selector(self.myFunc), name: "myNotification", object:nil)
This adds the class as an observer for "readForMyFunc". It also indicates that the function myFunc should be calledwhen that notification is received. This function should be written in the same class:
func myFunc(){ print("The notification has been received")}
One of the advantages to this pattern is that you can add many classes as observers and thus performmany actions after one notification.
The notification can now simply be sent(or posted if you prefer) from almost anywhere in the code with the line:
notifCentre.post(name: "myNotification", object: nil)
You can also pass information with the notification as a Dictionary
let myInfo = "pass this on"notifCentre.post(name: "myNotification", object: ["moreInfo":myInfo])
But then you need to add a notification to your function:
func myFunc(_ notification: Notification){ let userInfo = (notification as NSNotification).userInfo as! [String: AnyObject] let passedInfo = userInfo["moreInfo"] print("The notification \(moreInfo) has been received") //prints - The notification pass this on has been received}
Section 52.5: Chain of responsibility
In object-oriented design, the chain-of-responsibility pattern is a design pattern consisting of a source ofcommand objects and a series of processing objects. Each processing object contains logic that definesthe types of command objects that it can handle; the rest are passed to the next processing object in thechain. A mechanism also exists for adding new processing objects to the end of this chain. Wikipedia
Setting up the classes that made up the chain of responsibility.
First we create an interface for all the processing objects.

GoalKicker.com – Swift™ Notes for Professionals 251
protocol PurchasePower { var allowable : Float { get } var role : String { get } var successor : PurchasePower? { get set }}
extension PurchasePower { func process(request : PurchaseRequest){ if request.amount < self.allowable { print(self.role + " will approve $ \(request.amount) for \(request.purpose)") } else if successor != nil { successor?.process(request: request) } }}
Then we create the command object.
struct PurchaseRequest { var amount : Float var purpose : String}
Finally, creating objects that made up the chain of responsibility.
class ManagerPower : PurchasePower { var allowable: Float = 20 var role : String = "Manager" var successor: PurchasePower?}
class DirectorPower : PurchasePower { var allowable: Float = 100 var role = "Director" var successor: PurchasePower?}
class PresidentPower : PurchasePower { var allowable: Float = 5000 var role = "President" var successor: PurchasePower?}
Initiate and chaining it together :
let manager = ManagerPower()let director = DirectorPower()let president = PresidentPower()
manager.successor = directordirector.successor = president
The mechanism for chaining up objects here is property access
Creating request to run it :
manager.process(request: PurchaseRequest(amount: 2, purpose: "buying a pen")) // Manager will
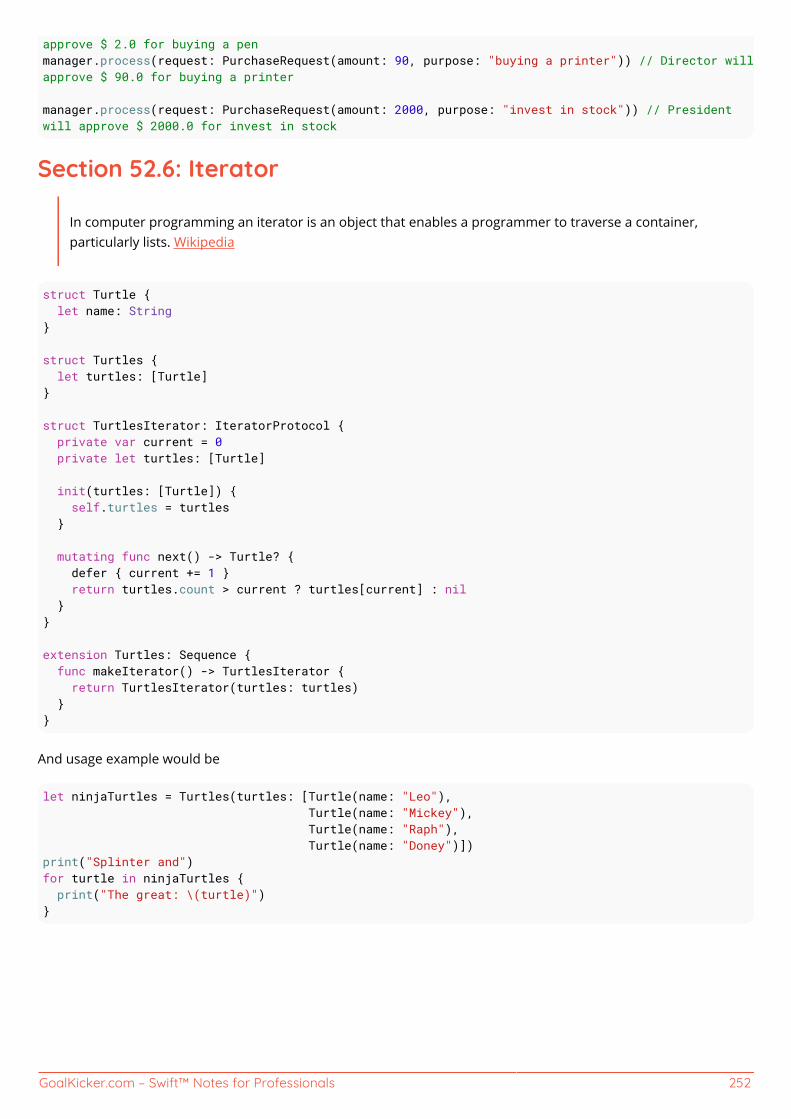
GoalKicker.com – Swift™ Notes for Professionals 252
approve $ 2.0 for buying a penmanager.process(request: PurchaseRequest(amount: 90, purpose: "buying a printer")) // Director willapprove $ 90.0 for buying a printer
manager.process(request: PurchaseRequest(amount: 2000, purpose: "invest in stock")) // Presidentwill approve $ 2000.0 for invest in stock
Section 52.6: Iterator
In computer programming an iterator is an object that enables a programmer to traverse a container,particularly lists. Wikipedia
struct Turtle { let name: String}
struct Turtles { let turtles: [Turtle]}
struct TurtlesIterator: IteratorProtocol { private var current = 0 private let turtles: [Turtle]
init(turtles: [Turtle]) { self.turtles = turtles }
mutating func next() -> Turtle? { defer { current += 1 } return turtles.count > current ? turtles[current] : nil }}
extension Turtles: Sequence { func makeIterator() -> TurtlesIterator { return TurtlesIterator(turtles: turtles) }}
And usage example would be
let ninjaTurtles = Turtles(turtles: [Turtle(name: "Leo"), Turtle(name: "Mickey"), Turtle(name: "Raph"), Turtle(name: "Doney")])print("Splinter and")for turtle in ninjaTurtles { print("The great: \(turtle)")}

GoalKicker.com – Swift™ Notes for Professionals 253
Chapter 53: Design Patterns - StructuralDesign patterns are general solutions to problems that frequently occur in software development. The following aretemplates of standardized best practices in structuring and designing code, as well as examples of commoncontexts in which these design patterns would be appropriate.
Structural design patterns focus on the composition of classes and objects to create interfaces and achievegreater functionality.
Section 53.1: AdapterAdapters are used to convert the interface of a given class, known as an Adaptee, into another interface, called theTarget. Operations on the Target are called by a Client, and those operations are adapted by the Adapter andpassed on to the Adaptee.
In Swift, Adapters can often be formed through the use of protocols. In the following example, a Client able tocommunicate with the Target is provided with the ability to perform functions of the Adaptee class through the useof an adapter.
// The functionality to which a Client has no direct accessclass Adaptee { func foo() { // ... }}
// Target's functionality, to which a Client does have direct accessprotocol TargetFunctionality { func fooBar() {}}
// Adapter used to pass the request on the Target to a request on the Adapteeextension Adaptee: TargetFunctionality { func fooBar() { foo() }}
Example flow of a one-way adapter: Client -> Target -> Adapter -> Adaptee
Adapters can also be bi-directional, and these are known as two-way adapters. A two-way adapter may be usefulwhen two different clients need to view an object differently.
Section 53.2: FacadeA Facade provides a unified, high-level interface to subsystem interfaces. This allows for simpler, safer access to themore general facilities of a subsystem.
The following is an example of a Facade used to set and retrieve objects in UserDefaults.
enum Defaults {
static func set(_ object: Any, forKey defaultName: String) { let defaults: UserDefaults = UserDefaults.standard defaults.set(object, forKey:defaultName) defaults.synchronize()

GoalKicker.com – Swift™ Notes for Professionals 254
}
static func object(forKey key: String) -> AnyObject! { let defaults: UserDefaults = UserDefaults.standard return defaults.object(forKey: key) as AnyObject! }
}
Usage might look like the following.
Defaults.set("Beyond all recognition.", forKey:"fooBar")Defaults.object(forKey: "fooBar")
The complexities of accessing the shared instance and synchronizing UserDefaults are hidden from the client, andthis interface can be accessed from anywhere in the program.

GoalKicker.com – Swift™ Notes for Professionals 255
Chapter 54: (Unsafe) Buer Pointers“A buffer pointer is used for low-level access to a region of memory. For example, you can use a buffer pointer forefficent processing and communication of data between apps and services.”
Excerpt From: Apple Inc. “Using Swift with Cocoa and Objective-C (Swift 3.1 Edition).” iBooks.https://itun.es/us/utTW7.l
You are responsible for handling the life cycle of any memory you work with through buffer pointers, to avoid leaksor undefined behavior.
Section 54.1: UnsafeMutablePointerstruct UnsafeMutablePointer<Pointee>
A pointer for accessing and manipulating data of a specific type.
You use instances of the UnsafeMutablePointer type to access data of a specific type in memory. The type of datathat a pointer can access is the pointer's Pointee type. UnsafeMutablePointer provides no automated memorymanagement or alignment guarantees. You are responsible for handling the life cycle of any memory you work withthrough unsafe pointers to avoid leaks or undefined behavior.
Memory that you manually manage can be either untyped or bound to a specific type. You use theUnsafeMutablePointer type to access and manage memory that has been bound to a specific type. (Source)
import Foundation
let arr = [1,5,7,8]
let pointer = UnsafeMutablePointer<[Int]>.allocate(capacity: 4)pointer.initialize(to: arr)
let x = pointer.pointee[3]
print(x)
pointer.deinitialize()pointer.deallocate(capacity: 4)
class A { var x: String? convenience init (_ x: String) { self.init() self.x = x } func description() -> String { return x ?? "" }}
let arr2 = [A("OK"), A("OK 2")]let pointer2 = UnsafeMutablePointer<[A]>.allocate(capacity: 2)

GoalKicker.com – Swift™ Notes for Professionals 256
pointer2.initialize(to: arr2)
pointer2.pointeelet y = pointer2.pointee[1]
print(y)
pointer2.deinitialize()pointer2.deallocate(capacity: 2)
Converted to Swift 3.0 from original source
Section 54.2: Practical Use-Case for Buer PointersDeconstructing the use of an unsafe pointer in the Swift library method;
public init?(validatingUTF8 cString: UnsafePointer<CChar>)
Purpose:
Creates a new string by copying and validating the null-terminated UTF-8 data referenced by the given pointer.
This initializer does not try to repair ill-formed UTF-8 code unit sequences. If any are found, the result of theinitializer is nil. The following example calls this initializer with pointers to the contents of two different CChararrays---the first with well-formed UTF-8 code unit sequences and the second with an ill-formed sequence at theend.
Source, Apple Inc., Swift 3 header file (For header access: In Playground, Cmd+Click on the word Swift)in the line of code:
import Swift
let validUTF8: [CChar] = [67, 97, 102, -61, -87, 0] validUTF8.withUnsafeBufferPointer { ptr in let s = String(validatingUTF8: ptr.baseAddress!) print(s as Any) } // Prints "Optional(Café)"
let invalidUTF8: [CChar] = [67, 97, 102, -61, 0] invalidUTF8.withUnsafeBufferPointer { ptr in let s = String(validatingUTF8: ptr.baseAddress!) print(s as Any) }// Prints "nil"
(Source, Apple Inc., Swift Header File Example)

GoalKicker.com – Swift™ Notes for Professionals 257
Chapter 55: Cryptographic HashingSection 55.1: HMAC with MD5, SHA1, SHA224, SHA256, SHA384,SHA512 (Swift 3)
These functions will hash either String or Data input with one of eight cryptographic hash algorithms.
The name parameter specifies the hash function name as a String Supported functions are MD5, SHA1, SHA224,SHA256, SHA384 and SHA512
This example requires Common CryptoIt is necessary to have a bridging header to the project:#import <CommonCrypto/CommonCrypto.h>Add the Security.framework to the project.
These functions takes a hash name, message to be hashed, a key and return a digest:
hashName: name of a hash function as String message: message as Data key: key as Data returns: digest as Data
func hmac(hashName:String, message:Data, key:Data) -> Data? { let algos = ["SHA1": (kCCHmacAlgSHA1, CC_SHA1_DIGEST_LENGTH), "MD5": (kCCHmacAlgMD5, CC_MD5_DIGEST_LENGTH), "SHA224": (kCCHmacAlgSHA224, CC_SHA224_DIGEST_LENGTH), "SHA256": (kCCHmacAlgSHA256, CC_SHA256_DIGEST_LENGTH), "SHA384": (kCCHmacAlgSHA384, CC_SHA384_DIGEST_LENGTH), "SHA512": (kCCHmacAlgSHA512, CC_SHA512_DIGEST_LENGTH)] guard let (hashAlgorithm, length) = algos[hashName] else { return nil } var macData = Data(count: Int(length))
macData.withUnsafeMutableBytes {macBytes in message.withUnsafeBytes {messageBytes in key.withUnsafeBytes {keyBytes in CCHmac(CCHmacAlgorithm(hashAlgorithm), keyBytes, key.count, messageBytes, message.count, macBytes) } } } return macData}
hashName: name of a hash function as String message: message as String key: key as String returns: digest as Data
func hmac(hashName:String, message:String, key:String) -> Data? { let messageData = message.data(using:.utf8)! let keyData = key.data(using:.utf8)! return hmac(hashName:hashName, message:messageData, key:keyData)}
hashName: name of a hash function as String message: message as String key: key as Data returns: digest as Data
func hmac(hashName:String, message:String, key:Data) -> Data? { let messageData = message.data(using:.utf8)! return hmac(hashName:hashName, message:messageData, key:key)}

GoalKicker.com – Swift™ Notes for Professionals 258
// Examples
let clearString = "clearData0123456"let keyString = "keyData8901234562"let clearData = clearString.data(using:.utf8)!let keyData = keyString.data(using:.utf8)!print("clearString: \(clearString)")print("keyString: \(keyString)")print("clearData: \(clearData as NSData)")print("keyData: \(keyData as NSData)")
let hmacData1 = hmac(hashName:"SHA1", message:clearData, key:keyData)print("hmacData1: \(hmacData1! as NSData)")
let hmacData2 = hmac(hashName:"SHA1", message:clearString, key:keyString)print("hmacData2: \(hmacData2! as NSData)")
let hmacData3 = hmac(hashName:"SHA1", message:clearString, key:keyData)print("hmacData3: \(hmacData3! as NSData)")
Output:
clearString: clearData0123456keyString: keyData8901234562clearData: <636c6561 72446174 61303132 33343536>keyData: <6b657944 61746138 39303132 33343536 32>
hmacData1:hmacData2:hmacData3:
Section 55.2: MD2, MD4, MD5, SHA1, SHA224, SHA256, SHA384,SHA512 (Swift 3)
These functions will hash either String or Data input with one of eight cryptographic hash algorithms.
The name parameter specifies the hash function name as a StringSupported functions are MD2, MD4, MD5, SHA1, SHA224, SHA256, SHA384 and SHA512
This example requires Common CryptoIt is necessary to have a bridging header to the project:#import <CommonCrypto/CommonCrypto.h>Add the Security.framework to the project.
This function takes a hash name and Data to be hashed and returns a Data:
name: A name of a hash function as a String data: The Data to be hashed returns: the hashed result as Data
func hash(name:String, data:Data) -> Data? { let algos = ["MD2": (CC_MD2, CC_MD2_DIGEST_LENGTH), "MD4": (CC_MD4, CC_MD4_DIGEST_LENGTH), "MD5": (CC_MD5, CC_MD5_DIGEST_LENGTH), "SHA1": (CC_SHA1, CC_SHA1_DIGEST_LENGTH), "SHA224": (CC_SHA224, CC_SHA224_DIGEST_LENGTH), "SHA256": (CC_SHA256, CC_SHA256_DIGEST_LENGTH), "SHA384": (CC_SHA384, CC_SHA384_DIGEST_LENGTH),

GoalKicker.com – Swift™ Notes for Professionals 259
"SHA512": (CC_SHA512, CC_SHA512_DIGEST_LENGTH)] guard let (hashAlgorithm, length) = algos[name] else { return nil } var hashData = Data(count: Int(length))
_ = hashData.withUnsafeMutableBytes {digestBytes in data.withUnsafeBytes {messageBytes in hashAlgorithm(messageBytes, CC_LONG(data.count), digestBytes) } } return hashData}
This function takes a hash name and String to be hashed and returns a Data:
name: A name of a hash function as a String string: The String to be hashed returns: the hashed result as Data
func hash(name:String, string:String) -> Data? { let data = string.data(using:.utf8)! return hash(name:name, data:data)}
Examples:
let clearString = "clearData0123456"let clearData = clearString.data(using:.utf8)!print("clearString: \(clearString)")print("clearData: \(clearData as NSData)")
let hashSHA256 = hash(name:"SHA256", string:clearString)print("hashSHA256: \(hashSHA256! as NSData)")
let hashMD5 = hash(name:"MD5", data:clearData)print("hashMD5: \(hashMD5! as NSData)")
Output:
clearString: clearData0123456clearData: <636c6561 72446174 61303132 33343536>
hashSHA256: <aabc766b 6b357564 e41f4f91 2d494bcc bfa16924 b574abbd ba9e3e9d a0c8920a>hashMD5: <4df665f7 b94aea69 695b0e7b baf9e9d6>

GoalKicker.com – Swift™ Notes for Professionals 260
Chapter 56: AES encryptionSection 56.1: AES encryption in CBC mode with a random IV(Swift 3.0)The iv is prefixed to the encrypted data
aesCBC128Encrypt will create a random IV and prefixed to the encrypted code.aesCBC128Decrypt will use the prefixed IV during decryption.
Inputs are the data and key are Data objects. If an encoded form such as Base64 if required convert to and/or fromin the calling method.
The key should be exactly 128-bits (16-bytes), 192-bits (24-bytes) or 256-bits (32-bytes) in length. If another key sizeis used an error will be thrown.
PKCS#7 padding is set by default.
This example requires Common CryptoIt is necessary to have a bridging header to the project:#import <CommonCrypto/CommonCrypto.h>Add the Security.framework to the project.
This is example, not production code.
enum AESError: Error { case KeyError((String, Int)) case IVError((String, Int)) case CryptorError((String, Int))}
// The iv is prefixed to the encrypted datafunc aesCBCEncrypt(data:Data, keyData:Data) throws -> Data { let keyLength = keyData.count let validKeyLengths = [kCCKeySizeAES128, kCCKeySizeAES192, kCCKeySizeAES256] if (validKeyLengths.contains(keyLength) == false) { throw AESError.KeyError(("Invalid key length", keyLength)) }
let ivSize = kCCBlockSizeAES128; let cryptLength = size_t(ivSize + data.count + kCCBlockSizeAES128) var cryptData = Data(count:cryptLength)
let status = cryptData.withUnsafeMutableBytes {ivBytes in SecRandomCopyBytes(kSecRandomDefault, kCCBlockSizeAES128, ivBytes) } if (status != 0) { throw AESError.IVError(("IV generation failed", Int(status))) }
var numBytesEncrypted :size_t = 0 let options = CCOptions(kCCOptionPKCS7Padding)
let cryptStatus = cryptData.withUnsafeMutableBytes {cryptBytes in data.withUnsafeBytes {dataBytes in keyData.withUnsafeBytes {keyBytes in CCCrypt(CCOperation(kCCEncrypt), CCAlgorithm(kCCAlgorithmAES),

GoalKicker.com – Swift™ Notes for Professionals 261
options, keyBytes, keyLength, cryptBytes, dataBytes, data.count, cryptBytes+kCCBlockSizeAES128, cryptLength, &numBytesEncrypted) } } }
if UInt32(cryptStatus) == UInt32(kCCSuccess) { cryptData.count = numBytesEncrypted + ivSize } else { throw AESError.CryptorError(("Encryption failed", Int(cryptStatus))) }
return cryptData;}
// The iv is prefixed to the encrypted datafunc aesCBCDecrypt(data:Data, keyData:Data) throws -> Data? { let keyLength = keyData.count let validKeyLengths = [kCCKeySizeAES128, kCCKeySizeAES192, kCCKeySizeAES256] if (validKeyLengths.contains(keyLength) == false) { throw AESError.KeyError(("Invalid key length", keyLength)) }
let ivSize = kCCBlockSizeAES128; let clearLength = size_t(data.count - ivSize) var clearData = Data(count:clearLength)
var numBytesDecrypted :size_t = 0 let options = CCOptions(kCCOptionPKCS7Padding)
let cryptStatus = clearData.withUnsafeMutableBytes {cryptBytes in data.withUnsafeBytes {dataBytes in keyData.withUnsafeBytes {keyBytes in CCCrypt(CCOperation(kCCDecrypt), CCAlgorithm(kCCAlgorithmAES128), options, keyBytes, keyLength, dataBytes, dataBytes+kCCBlockSizeAES128, clearLength, cryptBytes, clearLength, &numBytesDecrypted) } } }
if UInt32(cryptStatus) == UInt32(kCCSuccess) { clearData.count = numBytesDecrypted } else { throw AESError.CryptorError(("Decryption failed", Int(cryptStatus))) } return clearData;}
Example usage:

GoalKicker.com – Swift™ Notes for Professionals 262
let clearData = "clearData0123456".data(using:String.Encoding.utf8)!let keyData = "keyData890123456".data(using:String.Encoding.utf8)!print("clearData: \(clearData as NSData)")print("keyData: \(keyData as NSData)")
var cryptData :Data?do { cryptData = try aesCBCEncrypt(data:clearData, keyData:keyData) print("cryptData: \(cryptData! as NSData)")}catch (let status) { print("Error aesCBCEncrypt: \(status)")}
let decryptData :Data?do { let decryptData = try aesCBCDecrypt(data:cryptData!, keyData:keyData) print("decryptData: \(decryptData! as NSData)")}catch (let status) { print("Error aesCBCDecrypt: \(status)")}
Example Output:
clearData: <636c6561 72446174 61303132 33343536>keyData: <6b657944 61746138 39303132 33343536>cryptData: <92c57393 f454d959 5a4d158f 6e1cd3e7 77986ee9 b2970f49 2bafcf1a 8ee9d51a bde49c31d7780256 71837a61 60fa4be0>decryptData: <636c6561 72446174 61303132 33343536>
Notes:One typical problem with CBC mode example code is that it leaves the creation and sharing of the random IV to theuser. This example includes generation of the IV, prefixed the encrypted data and uses the prefixed IV duringdecryption. This frees the casual user from the details that are necessary for CBC mode.
For security the encrypted data also should have authentication, this example code does not provide that in orderto be small and allow better interoperability for other platforms.
Also missing is key derivation of the key from a password, it is suggested that PBKDF2 be used is text passwords areused as keying material.
For robust production ready multi-platform encryption code see RNCryptor.
Updated to use throw/catch and multiple key sizes based on the provided key.
Section 56.2: AES encryption in CBC mode with a random IV(Swift 2.3)The iv is prefixed to the encrypted data
aesCBC128Encrypt will create a random IV and prefixed to the encrypted code. aesCBC128Decrypt will use theprefixed IV during decryption.
Inputs are the data and key are Data objects. If an encoded form such as Base64 if required convert to and/or from

GoalKicker.com – Swift™ Notes for Professionals 263
in the calling method.
The key should be exactly 128-bits (16-bytes). For other key sizes see the Swift 3.0 example.
PKCS#7 padding is set by default.
This example requires Common Crypto It is necessary to have a bridging header to the project: #import<CommonCrypto/CommonCrypto.h> Add the Security.framework to the project.
See Swift 3 example for notes.
This is example, not production code.
func aesCBC128Encrypt(data data:[UInt8], keyData:[UInt8]) -> [UInt8]? { let keyLength = size_t(kCCKeySizeAES128) let ivLength = size_t(kCCBlockSizeAES128) let cryptDataLength = size_t(data.count + kCCBlockSizeAES128) var cryptData = [UInt8](count:ivLength + cryptDataLength, repeatedValue:0)
let status = SecRandomCopyBytes(kSecRandomDefault, Int(ivLength),UnsafeMutablePointer<UInt8>(cryptData)); if (status != 0) { print("IV Error, errno: \(status)") return nil }
var numBytesEncrypted :size_t = 0 let cryptStatus = CCCrypt(CCOperation(kCCEncrypt), CCAlgorithm(kCCAlgorithmAES128), CCOptions(kCCOptionPKCS7Padding), keyData, keyLength, cryptData, data, data.count, &cryptData + ivLength, cryptDataLength, &numBytesEncrypted)
if UInt32(cryptStatus) == UInt32(kCCSuccess) { cryptData.removeRange(numBytesEncrypted+ivLength..<cryptData.count) } else { print("Error: \(cryptStatus)") return nil; }
return cryptData;}
func aesCBC128Decrypt(data data:[UInt8], keyData:[UInt8]) -> [UInt8]? { let clearLength = size_t(data.count) var clearData = [UInt8](count:clearLength, repeatedValue:0)
let keyLength = size_t(kCCKeySizeAES128) let ivLength = size_t(kCCBlockSizeAES128)
var numBytesDecrypted :size_t = 0 let cryptStatus = CCCrypt(CCOperation(kCCDecrypt), CCAlgorithm(kCCAlgorithmAES128), CCOptions(kCCOptionPKCS7Padding), keyData, keyLength, data, UnsafePointer<UInt8>(data) + ivLength, data.count - ivLength,
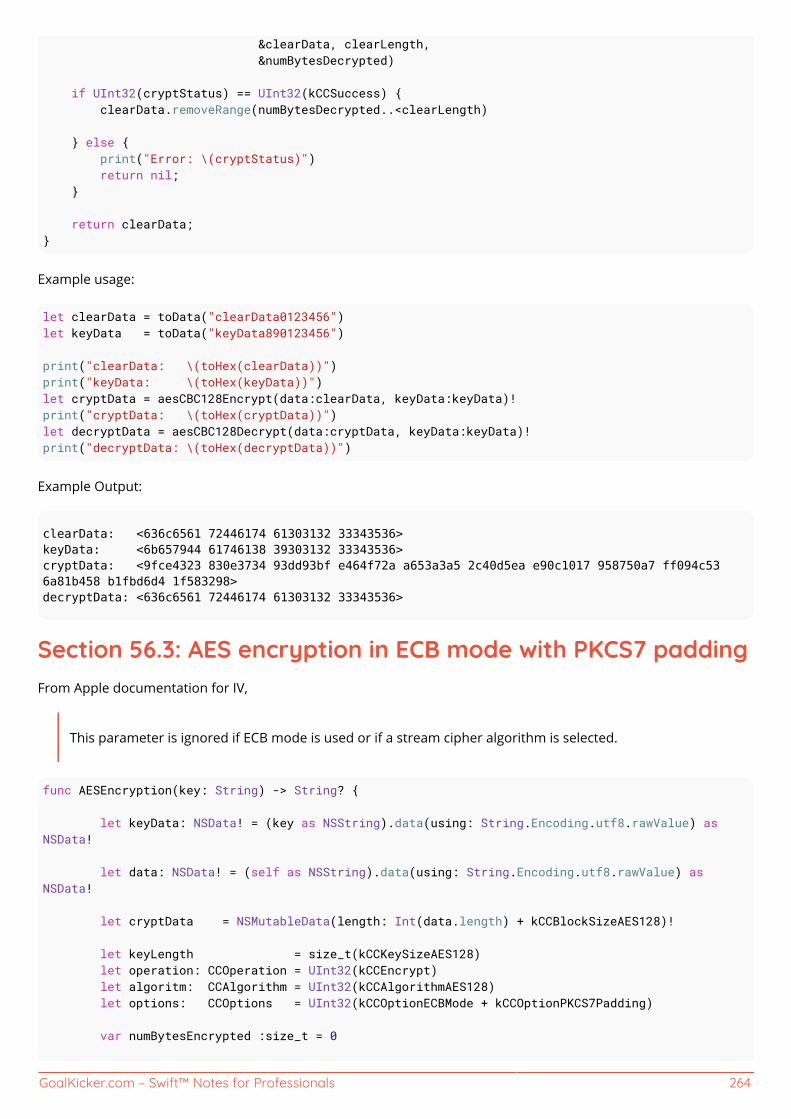
GoalKicker.com – Swift™ Notes for Professionals 264
&clearData, clearLength, &numBytesDecrypted)
if UInt32(cryptStatus) == UInt32(kCCSuccess) { clearData.removeRange(numBytesDecrypted..<clearLength)
} else { print("Error: \(cryptStatus)") return nil; }
return clearData;}
Example usage:
let clearData = toData("clearData0123456")let keyData = toData("keyData890123456")
print("clearData: \(toHex(clearData))")print("keyData: \(toHex(keyData))")let cryptData = aesCBC128Encrypt(data:clearData, keyData:keyData)!print("cryptData: \(toHex(cryptData))")let decryptData = aesCBC128Decrypt(data:cryptData, keyData:keyData)!print("decryptData: \(toHex(decryptData))")
Example Output:
clearData: <636c6561 72446174 61303132 33343536>keyData: <6b657944 61746138 39303132 33343536>cryptData: <9fce4323 830e3734 93dd93bf e464f72a a653a3a5 2c40d5ea e90c1017 958750a7 ff094c536a81b458 b1fbd6d4 1f583298>decryptData: <636c6561 72446174 61303132 33343536>
Section 56.3: AES encryption in ECB mode with PKCS7 paddingFrom Apple documentation for IV,
This parameter is ignored if ECB mode is used or if a stream cipher algorithm is selected.
func AESEncryption(key: String) -> String? { let keyData: NSData! = (key as NSString).data(using: String.Encoding.utf8.rawValue) asNSData! let data: NSData! = (self as NSString).data(using: String.Encoding.utf8.rawValue) asNSData! let cryptData = NSMutableData(length: Int(data.length) + kCCBlockSizeAES128)! let keyLength = size_t(kCCKeySizeAES128) let operation: CCOperation = UInt32(kCCEncrypt) let algoritm: CCAlgorithm = UInt32(kCCAlgorithmAES128) let options: CCOptions = UInt32(kCCOptionECBMode + kCCOptionPKCS7Padding) var numBytesEncrypted :size_t = 0

GoalKicker.com – Swift™ Notes for Professionals 265
let cryptStatus = CCCrypt(operation, algoritm, options, keyData.bytes, keyLength, nil, data.bytes, data.length, cryptData.mutableBytes, cryptData.length, &numBytesEncrypted) if UInt32(cryptStatus) == UInt32(kCCSuccess) { cryptData.length = Int(numBytesEncrypted) var bytes = [UInt8](repeating: 0, count: cryptData.length) cryptData.getBytes(&bytes, length: cryptData.length) var hexString = "" for byte in bytes { hexString += String(format:"%02x", UInt8(byte)) } return hexString } return nil }

GoalKicker.com – Swift™ Notes for Professionals 266
Chapter 57: PBKDF2 Key DerivationSection 57.1: Password Based Key Derivation 2 (Swift 3)Password Based Key Derivation can be used both for deriving an encryption key from password text and saving apassword for authentication purposes.
There are several hash algorithms that can be used including SHA1, SHA256, SHA512 which are provided by thisexample code.
The rounds parameter is used to make the calculation slow so that an attacker will have to spend substantial timeon each attempt. Typical delay values fall in the 100ms to 500ms, shorter values can be used if there isunacceptable performance.
This example requires Common CryptoIt is necessary to have a bridging header to the project:#import <CommonCrypto/CommonCrypto.h>Add the Security.framework to the project.
Parameters:
password password String salt salt Data keyByteCount number of key bytes to generaterounds Iteration rounds
returns Derived key
func pbkdf2SHA1(password: String, salt: Data, keyByteCount: Int, rounds: Int) -> Data? { return pbkdf2(hash:CCPBKDFAlgorithm(kCCPRFHmacAlgSHA1), password:password, salt:salt,keyByteCount:keyByteCount, rounds:rounds)}
func pbkdf2SHA256(password: String, salt: Data, keyByteCount: Int, rounds: Int) -> Data? { return pbkdf2(hash:CCPBKDFAlgorithm(kCCPRFHmacAlgSHA256), password:password, salt:salt,keyByteCount:keyByteCount, rounds:rounds)}
func pbkdf2SHA512(password: String, salt: Data, keyByteCount: Int, rounds: Int) -> Data? { return pbkdf2(hash:CCPBKDFAlgorithm(kCCPRFHmacAlgSHA512), password:password, salt:salt,keyByteCount:keyByteCount, rounds:rounds)}
func pbkdf2(hash :CCPBKDFAlgorithm, password: String, salt: Data, keyByteCount: Int, rounds: Int)-> Data? { let passwordData = password.data(using:String.Encoding.utf8)! var derivedKeyData = Data(repeating:0, count:keyByteCount)
let derivationStatus = derivedKeyData.withUnsafeMutableBytes {derivedKeyBytes in salt.withUnsafeBytes { saltBytes in
CCKeyDerivationPBKDF( CCPBKDFAlgorithm(kCCPBKDF2), password, passwordData.count, saltBytes, salt.count, hash, UInt32(rounds),

GoalKicker.com – Swift™ Notes for Professionals 267
derivedKeyBytes, derivedKeyData.count) } } if (derivationStatus != 0) { print("Error: \(derivationStatus)") return nil; }
return derivedKeyData}
Example usage:
let password = "password"//let salt = "saltData".data(using: String.Encoding.utf8)!let salt = Data(bytes: [0x73, 0x61, 0x6c, 0x74, 0x44, 0x61, 0x74, 0x61])let keyByteCount = 16let rounds = 100000
let derivedKey = pbkdf2SHA1(password:password, salt:salt, keyByteCount:keyByteCount, rounds:rounds)print("derivedKey (SHA1): \(derivedKey! as NSData)")
Example Output:
derivedKey (SHA1): <6b9d4fa3 0385d128 f6d196ee 3f1d6dbf>
Section 57.2: Password Based Key Derivation 2 (Swift 2.3)See Swift 3 example for usage information and notes
func pbkdf2SHA1(password: String, salt: [UInt8], keyCount: Int, rounds: Int) -> [UInt8]? { return pbkdf2(CCPBKDFAlgorithm(kCCPRFHmacAlgSHA1), password:password, salt:salt,keyCount:keyCount, rounds:UInt32(rounds))}
func pbkdf2SHA256(password: String, salt: [UInt8], keyCount: Int, rounds: Int) -> [UInt8]? { return pbkdf2(CCPBKDFAlgorithm(kCCPRFHmacAlgSHA256), password:password, salt:salt,keyCount:keyCount, rounds:UInt32(rounds))}
func pbkdf2SHA512(password: String, salt: [UInt8], keyCount: Int, rounds: Int) -> [UInt8]? { return pbkdf2(CCPBKDFAlgorithm(kCCPRFHmacAlgSHA512), password:password, salt:salt,keyCount:keyCount, rounds:UInt32(rounds))}
func pbkdf2(hash :CCPBKDFAlgorithm, password: String, salt: [UInt8], keyCount: Int, rounds:UInt32!) -> [UInt8]! { let derivedKey = [UInt8](count:keyCount, repeatedValue:0) let passwordData = password.dataUsingEncoding(NSUTF8StringEncoding)!
let derivationStatus = CCKeyDerivationPBKDF( CCPBKDFAlgorithm(kCCPBKDF2), UnsafePointer<Int8>(passwordData.bytes), passwordData.length, UnsafePointer<UInt8>(salt), salt.count, CCPseudoRandomAlgorithm(hash), rounds, UnsafeMutablePointer<UInt8>(derivedKey), derivedKey.count)

GoalKicker.com – Swift™ Notes for Professionals 268
if (derivationStatus != 0) { print("Error: \(derivationStatus)") return nil; }
return derivedKey}
Example usage:
let password = "password"// let salt = [UInt8]("saltData".utf8)let salt = [UInt8]([0x73, 0x61, 0x6c, 0x74, 0x44, 0x61, 0x74, 0x61])let rounds = 100_000let keyCount = 16
let derivedKey = pbkdf2SHA1(password, salt:salt, keyCount:keyCount, rounds:rounds)print("derivedKey (SHA1): \(NSData(bytes:derivedKey!, length:derivedKey!.count))")
Example Output:
derivedKey (SHA1): <6b9d4fa3 0385d128 f6d196ee 3f1d6dbf>
Section 57.3: Password Based Key Derivation Calibration(Swift 2.3)See Swift 3 example for usage information and notes
func pbkdf2SHA1Calibrate(password:String, salt:[UInt8], msec:Int) -> UInt32 { let actualRoundCount: UInt32 = CCCalibratePBKDF( CCPBKDFAlgorithm(kCCPBKDF2), password.utf8.count, salt.count, CCPseudoRandomAlgorithm(kCCPRFHmacAlgSHA1), kCCKeySizeAES256, UInt32(msec)); return actualRoundCount}
Example usage:
let saltData = [UInt8]([0x73, 0x61, 0x6c, 0x74, 0x44, 0x61, 0x74, 0x61])let passwordString = "password"let delayMsec = 100
let rounds = pbkdf2SHA1Calibrate(passwordString, salt:saltData, msec:delayMsec)print("For \(delayMsec) msec delay, rounds: \(rounds)")
Example Output:
For 100 msec delay, rounds: 94339
Section 57.4: Password Based Key Derivation Calibration

GoalKicker.com – Swift™ Notes for Professionals 269
(Swift 3)Determine the number of PRF rounds to use for a specific delay on the current platform.
Several parameters are defaulted to representative values that should not materially affect the round count.
password Sample password. salt Sample salt. msec Targeted duration we want to achieve for a key derivation.
returns The number of iterations to use for the desired processing time.
func pbkdf2SHA1Calibrate(password: String, salt: Data, msec: Int) -> UInt32 { let actualRoundCount: UInt32 = CCCalibratePBKDF( CCPBKDFAlgorithm(kCCPBKDF2), password.utf8.count, salt.count, CCPseudoRandomAlgorithm(kCCPRFHmacAlgSHA1), kCCKeySizeAES256, UInt32(msec)); return actualRoundCount}
Example usage:
let saltData = Data(bytes: [0x73, 0x61, 0x6c, 0x74, 0x44, 0x61, 0x74, 0x61])let passwordString = "password"let delayMsec = 100
let rounds = pbkdf2SHA1Calibrate(password:passwordString, salt:saltData, msec:delayMsec)print("For \(delayMsec) msec delay, rounds: \(rounds)")
Example Output:
For 100 msec delay, rounds: 93457

GoalKicker.com – Swift™ Notes for Professionals 270
Chapter 58: Logging in SwiftSection 58.1: dumpdump prints the contents of an object via reflection (mirroring).
Detailed view of an array:
let names = ["Joe", "Jane", "Jim", "Joyce"]dump(names)
Prints:
▿ 4 elements- [0]: Joe- [1]: Jane- [2]: Jim- [3]: Joyce
For a dictionary:
let attributes = ["foo": 10, "bar": 33, "baz": 42]dump(attributes)
Prints:
▿ 3 key/value pairs▿ [0]: (2 elements)- .0: bar- .1: 33▿ [1]: (2 elements)- .0: baz- .1: 42▿ [2]: (2 elements)- .0: foo- .1: 10
dump is declared as dump(_:name:indent:maxDepth:maxItems:).
The first parameter has no label.
There's other parameters available, like name to set a label for the object being inspected:
dump(attributes, name: "mirroring")
Prints:
▿ mirroring: 3 key/value pairs▿ [0]: (2 elements)

GoalKicker.com – Swift™ Notes for Professionals 271
- .0: bar- .1: 33▿ [1]: (2 elements)- .0: baz- .1: 42▿ [2]: (2 elements)- .0: foo- .1: 10
You can also choose to print only a certain number of items with maxItems:, to parse the object up to a certaindepth with maxDepth:, and to change the indentation of printed objects with indent:.
Section 58.2: Debug PrintDebug Print shows the instance representation that is most suitable for debugging.
print("Hello")debugPrint("Hello")
let dict = ["foo": 1, "bar": 2]
print(dict)debugPrint(dict)
Yields
>>> Hello>>> "Hello">>> [foo: 1, bar: 2]>>> ["foo": 1, "bar": 2]
This extra information can be very important, for example:
let wordArray = ["foo", "bar", "food, bars"]
print(wordArray)debugPrint(wordArray)
Yields
>>> [foo, bar, food, bars]>>> ["foo", "bar", "food, bars"]
Notice how in the first output it appears that there are 4 elements in the array as opposed to 3. For reasons likethis, it is preferable when debugging to use debugPrint
Updating a classes debug and print valuesstruct Foo: Printable, DebugPrintable { var description: String {return "Clear description of the object"} var debugDescription: String {return "Helpful message for debugging"}}
var foo = Foo()
print(foo)
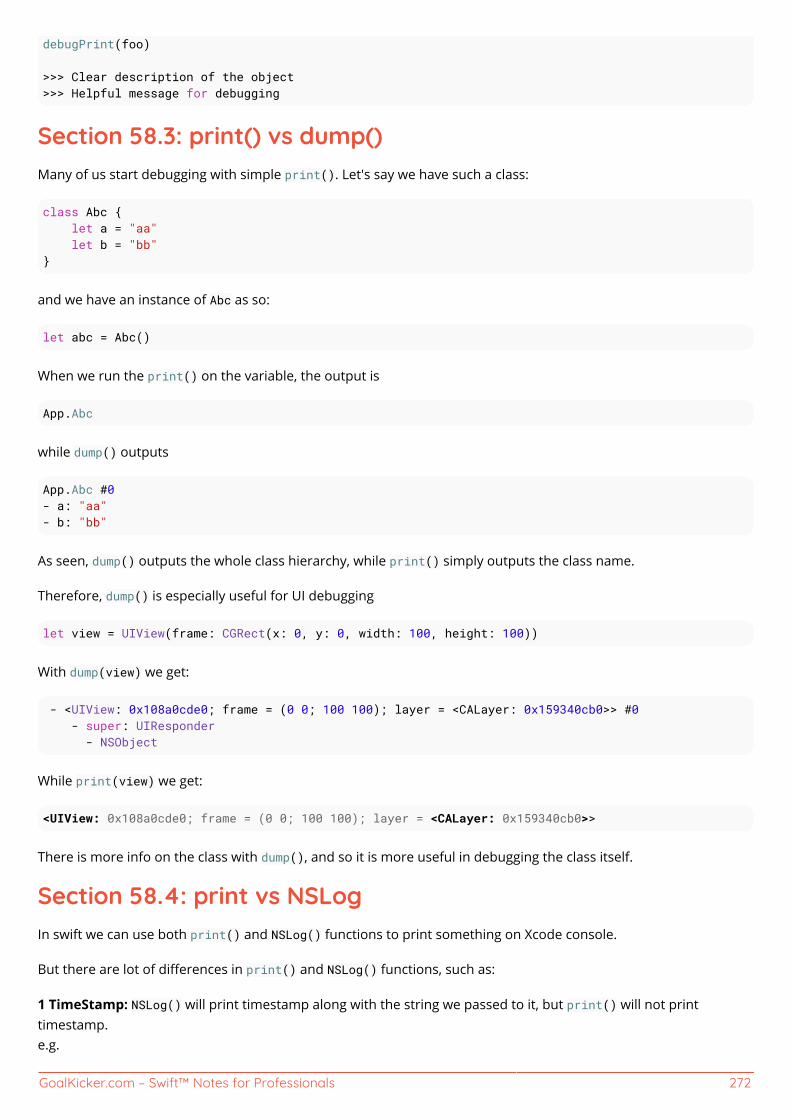
GoalKicker.com – Swift™ Notes for Professionals 272
debugPrint(foo)
>>> Clear description of the object>>> Helpful message for debugging
Section 58.3: print() vs dump()Many of us start debugging with simple print(). Let's say we have such a class:
class Abc { let a = "aa" let b = "bb"}
and we have an instance of Abc as so:
let abc = Abc()
When we run the print() on the variable, the output is
App.Abc
while dump() outputs
App.Abc #0- a: "aa"- b: "bb"
As seen, dump() outputs the whole class hierarchy, while print() simply outputs the class name.
Therefore, dump() is especially useful for UI debugging
let view = UIView(frame: CGRect(x: 0, y: 0, width: 100, height: 100))
With dump(view) we get:
- <UIView: 0x108a0cde0; frame = (0 0; 100 100); layer = <CALayer: 0x159340cb0>> #0 - super: UIResponder - NSObject
While print(view) we get:
<UIView: 0x108a0cde0; frame = (0 0; 100 100); layer = <CALayer: 0x159340cb0>>
There is more info on the class with dump(), and so it is more useful in debugging the class itself.
Section 58.4: print vs NSLogIn swift we can use both print() and NSLog() functions to print something on Xcode console.
But there are lot of differences in print() and NSLog() functions, such as:
1 TimeStamp: NSLog() will print timestamp along with the string we passed to it, but print() will not printtimestamp.e.g.
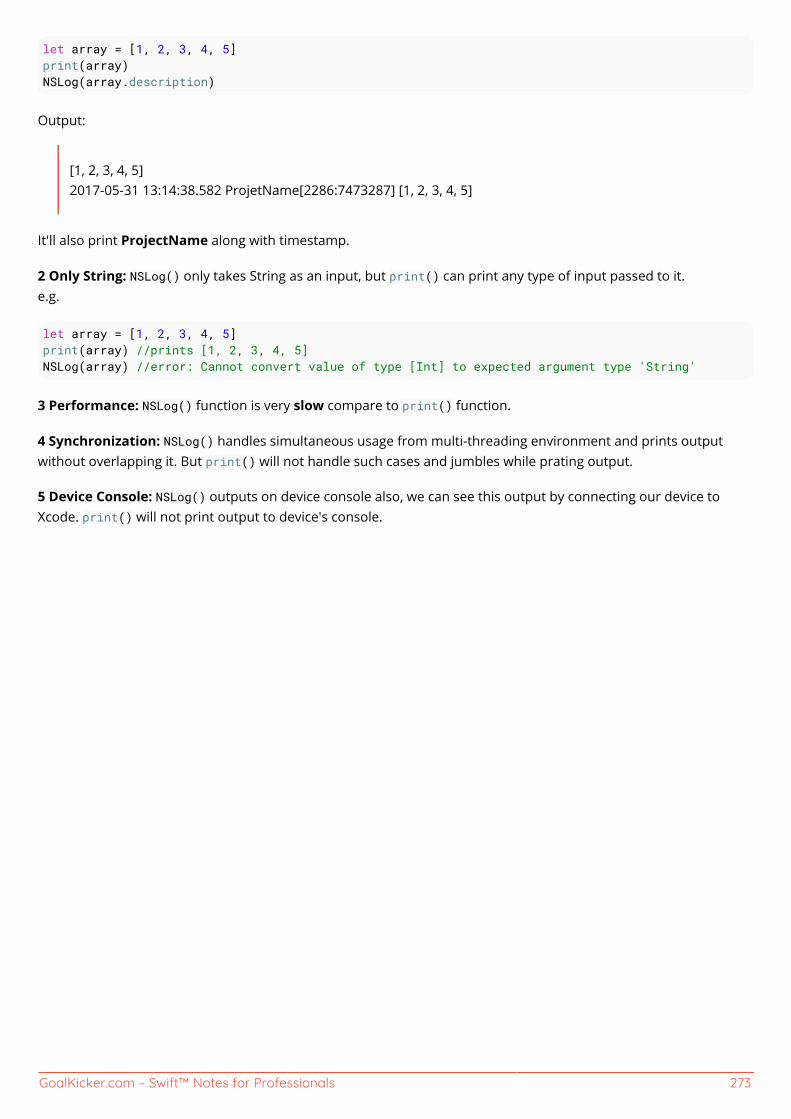
GoalKicker.com – Swift™ Notes for Professionals 273
let array = [1, 2, 3, 4, 5]print(array)NSLog(array.description)
Output:
[1, 2, 3, 4, 5]2017-05-31 13:14:38.582 ProjetName[2286:7473287] [1, 2, 3, 4, 5]
It'll also print ProjectName along with timestamp.
2 Only String: NSLog() only takes String as an input, but print() can print any type of input passed to it.e.g.
let array = [1, 2, 3, 4, 5]print(array) //prints [1, 2, 3, 4, 5]NSLog(array) //error: Cannot convert value of type [Int] to expected argument type 'String'
3 Performance: NSLog() function is very slow compare to print() function.
4 Synchronization: NSLog() handles simultaneous usage from multi-threading environment and prints outputwithout overlapping it. But print() will not handle such cases and jumbles while prating output.
5 Device Console: NSLog() outputs on device console also, we can see this output by connecting our device toXcode. print() will not print output to device's console.

GoalKicker.com – Swift™ Notes for Professionals 274
Chapter 59: Memory ManagementThis topic outlines how and when the Swift runtime shall allocate memory for application data structures, and whenthat memory shall be reclaimed. By default, the memory backing class instances is managed through referencecounting. The structures are always passed through copying. To opt out of the built-in memory managementscheme, one could use [Unmanaged][1] structure. [1]: https://developer.apple.com/reference/swift/unmanaged
Section 59.1: Reference Cycles and Weak ReferencesA reference cycle (or retain cycle) is so named because it indicates a cycle in the object graph:
Each arrow indicates one object retaining another (a strong reference). Unless the cycle is broken, the memory forthese objects will never be freed.
A retain cycle is created when two instances of classes reference each other:
class A { var b: B? = nil }class B { var a: A? = nil }
let a = A()let b = B()
a.b = b // a retains bb.a = a // b retains a -- a reference cycle
Both instances they will live on until the program terminates. This is a retain cycle.
Weak References
To avoid retain cycles, use the keyword weak or unowned when creating references to break retain cycles.
class B { var a: A? = nil }

GoalKicker.com – Swift™ Notes for Professionals 275
Weak or unowned references will not increase the reference count of an instance. These references don'tcontribute to retain cycles. The weak reference becomes nil when the object it references is deallocated.
a.b = b // a retains bb.a = a // b holds a weak reference to a -- not a reference cycle
When working with closures, you can also use weak and unowned in capture lists.
Section 59.2: Manual Memory ManagementWhen interfacing with C APIs, one might want to back off Swift reference counter. Doing so is achieved withunmanaged objects.
If you need to supply a type-punned pointer to a C function, use toOpaque method of the Unmanaged structure toobtain a raw pointer, and fromOpaque to recover the original instance:
setupDisplayLink() { let pointerToSelf: UnsafeRawPointer = Unmanaged.passUnretained(self).toOpaque() CVDisplayLinkSetOutputCallback(self.displayLink, self.redraw, pointerToSelf)}
func redraw(pointerToSelf: UnsafeRawPointer, /* args omitted */) { let recoveredSelf = Unmanaged<Self>.fromOpaque(pointerToSelf).takeUnretainedValue() recoveredSelf.doRedraw()}
Note that, if using passUnretained and counterparts, it's necessary to take all precautions as with unownedreferences.
To interact with legacy Objective-C APIs, one might want to manually affect reference count of a certain object. Forthat Unmanaged has respective methods retain and release. Nonetheless, it is more desired to use passRetainedand takeRetainedValue, which perform retaining before returning the result:
func preferredFilenameExtension(for uti: String) -> String! { let result = UTTypeCopyPreferredTagWithClass(uti, kUTTagClassFilenameExtension) guard result != nil else { return nil }
return result!.takeRetainedValue() as String}
These solutions should always be the last resort, and language-native APIs sould always be preferred.

GoalKicker.com – Swift™ Notes for Professionals 276
Chapter 60: PerformanceSection 60.1: Allocation PerformanceIn Swift, memory management is done for you automatically using Automatic Reference Counting. (See MemoryManagement) Allocation is the process of reserving a spot in memory for an object, and in Swift understanding theperformance of such requires some understanding of the heap and the stack. The heap is a memory locationwhere most objects get placed, and you may think of it as a storage shed. The stack, on the other hand, is a callstack of functions that have led to the current execution. (Hence, a stack trace is a sort of printout of the functionson the call stack.)
Allocating and deallocating from the stack is a very efficient operation, however in comparison heap allocation iscostly. When designing for performance, you should keep this in mind.
Classes:
class MyClass {
let myProperty: String
}
Classes in Swift are reference types and therefore several things happen. First, the actual object will be allocatedonto the heap. Then, any references to that object must be added to the stack. This makes classes a moreexpensive object for allocation.
Structs:
struct MyStruct {
let myProperty: Int
}
Because structs are value types and therefore copied when passed around, they are allocated on the stack. Thismakes structs more efficient than classes, however, if you do need a notion of identity and/or reference semantics,a struct cannot provide you with those things.
Warning about structs with Strings and properties that are classes
While structs are generally cheeper than classes, you should be careful about structs with properties that areclasses:
struct MyStruct {
let myProperty: MyClass
}
Here, due to reference counting and other factors, the performance is now more similar to a class. Further, if morethan one property in the struct is a class, the performance impact may be even more negative than if the structwere a class instead.
Also, while Strings are structs, they internally store their characters on the heap, so are more expensive than most

GoalKicker.com – Swift™ Notes for Professionals 277
structs.

GoalKicker.com – Swift™ Notes for Professionals 278
CreditsThank you greatly to all the people from Stack Overflow Documentation who helped provide this content,
more changes can be sent to [email protected] for new content to be published or updated
4444 Chapter 23Abdul Yasin Chapter 43Accepted Answer Chapters 7, 17, 42 and 59Adam Bardon Chapter 58Adda_25 Chapter 32Ahmad F Chapter 52Ajith R Nayak Chapter 18Ajwhiteway Chapter 12AK1 Chapters 9, 12 and 14Alessandro Chapter 23Alessandro Orrù Chapter 33Alex Popov Chapter 8Alexander Olferuk Chapter 40AMAN77 Chapter 52Anand Nimje Chapter 21Andrea Antonioni Chapter 4Andreas Chapter 5Andrey Gordeev Chapter 22Andy Ibanez Chapter 18andyvn22 Chapter 21antonio081014 Chapter 4Asdrubal Chapters 27 and 28AstroCB Chapter 4atxe Chapter 14Avi Chapter 8avismara Chapter 25Axe Chapter 4Bartłomiej Semańczyk Chapter 44Ben Trengrove Chapter 6brduca Chapters 14, 19, 30 and 52Caleb Kleveter Chapters 4, 7, 13, 16, 18 and 44Christopher Oezbek Chapter 2Cory Wilhite Chapter 17ctietze Chapter 29Cyril Ivar Garcia Chapter 24D31 Chapter 16D4ttatraya Chapters 6, 44 and 58Dalija Prasnikar Chapters 10 and 17DanHabib Chapter 58DarkDust Chapters 6, 14 and 22David Chapter 19Diogo Antunes Chapters 8, 9 and 11Duncan C Chapters 12 and 29Echelon Chapters 34 and 39egor.zhdan Chapters 4 and 15elprl Chapter 12Esqarrouth Chapter 19

GoalKicker.com – Swift™ Notes for Professionals 279
esthepiking Chapters 1 and 17Fangming Ning Chapter 50Fattie Chapter 31Feldur Chapter 4FelixSFD Chapters 2, 28, 30 and 32Ferenc Kiss Chapter 1Fred Faust Chapters 16 and 33fredpi Chapter 9Glenn R. Fisher Chapters 22 and 24godisgood4 Chapter 21Govind Rai Chapter 4Guilherme Torres Castro Chapter 4Hady Nourallah Chapters 39 and 47Hamish Chapters 4, 6, 8, 13, 14, 16, 17, 22, 25 and 29HariKrishnan.P Chapter 4HeMet Chapter 4Ian Rahman Chapters 24, 52 and 53iBelieve Chapter 17Idan Chapter 16Intentss Chapter 25iOSDevCenter Chapter 11Jack Chorley Chapter 24JAL Chapters 4, 25, 26, 31 and 32Jason Bourne Chapter 15Jeff Lewis Chapter 16Jim Chapter 1joan Chapter 12Jojodmo Chapters 2, 4, 7, 13, 19, 22 and 29Josh Brown Chapter 9JPetric Chapter 45jtbandes Chapters 1, 3, 4, 5, 6, 8, 14, 15, 17, 18, 19, 20, 24, 29 and 42juanjo Chapters 8 and 13kabiroberai Chapters 4 and 33kennytm Chapter 25Kevin Chapters 5, 6 and 9Kirit Modi Chapter 11Kote Chapter 18Koushik Chapter 11Kumar Vivek Mitra Chapter 35Kyle KIM Chapter 4Lope Chapter 4LopSae Chapters 4, 21 and 29lostAtSeaJoshua Chapter 24Luca Angeletti Chapters 1, 4, 6, 7, 9, 10, 12, 16, 18 and 34Luca Angioloni Chapter 1Luca D'Alberti Chapters 22 and 24Luke Chapter 2LukeSideWalker Chapters 4 and 32Mahmoud Adam Chapter 4Marcus Rossel Chapter 9Mark Chapter 42Martin Delille Chapter 43Matt Chapters 20, 36 and 56

GoalKicker.com – Swift™ Notes for Professionals 280
matt.baranowski Chapter 17Matthew Seaman Chapters 4, 8, 17, 25, 29, 32 and 60Max Desiatov Chapter 4maxkonovalov Chapter 24Maysam Chapter 49Mehul Sojitra Chapter 15Michaël Azevedo Chapter 13Moritz Chapters 4, 6, 7, 13, 15, 19, 24, 41 and 58Moriya Chapter 6Mr. Xcoder Chapter 16M_G Chapter 32Nate Cook Chapter 4Nathan Kellert Chapters 7, 8 and 13Nick Podratz Chapters 8 and 21Nikolai Ruhe Chapters 4 and 8Noam Chapter 26noor Chapter 18Oleg Danu Chapter 17orccrusher99 Chapter 25pableiros Chapters 5 and 6Palle Chapters 32, 37, 38 and 59Panda Chapter 4Paulw11 Chapter 13pixatlazaki Chapter 4Rahul Chapter 17Rick Pasveer Chapter 7Rob Chapter 32Rob Napier Chapter 9Ronald Martin Chapter 7RubberDucky4444 Chapter 51Ryan H. Chapters 20 and 38saagarjha Chapters 6, 11 and 18Sagar Thummar Chapter 48Sajjon Chapter 27Santa Claus Chapters 2, 12, 30 and 32sasquatch Chapter 11sdasdadas Chapter 4SeanRobinson159 Chapters 8 and 17Seyyed Parsa Neshaei Chapter 1shannoga Chapters 8 and 13Shijing Lv Chapter 34shim Chapter 4SKOOP Chapters 13 and 17solidcell Chapter 4Sơn Đỗ Đình Thy Chapter 52SteBra Chapter 47Steve Moser Chapter 10Suneet Tipirneni Chapters 11 and 22Sunil Prajapati Chapter 1Sunil Sharma Chapter 4Suragch Chapters 3 and 4Tanner Chapters 1 and 13taylor swift Chapter 4

GoalKicker.com – Swift™ Notes for Professionals 281
ThaNerd Chapter 14Thorax Chapter 52ThrowingSpoon Chapters 6, 11, 12, 18 and 39Timothy Rascher Chapter 29tktsubota Chapters 2, 7, 13, 14 and 20Tom Magnusson Chapter 15tomahh Chapter 6Tommie C. Chapters 47 and 54torinpitchers Chapter 14Umberto Raimondi Chapter 26Undo Chapter 17user3480295 Chapters 4 and 8user5389107 Chapter 4vacawama Chapter 6Victor Sigler Chapters 4, 17 and 40Viktor Gardart Chapter 46Vinupriya Arivazhagan Chapters 4 and 30Vladimir Nul Chapter 6WMios Chapter 4xoudini Chapter 16Zack Chapter 20zaph Chapters 55, 56 and 57ZGski Chapters 3 and 18��ʀ����ɴ Chapter 1

You may also like