swiss knitter & passap goldy manual
TRANSCRIPT
NEW HOMEswissknitter
english
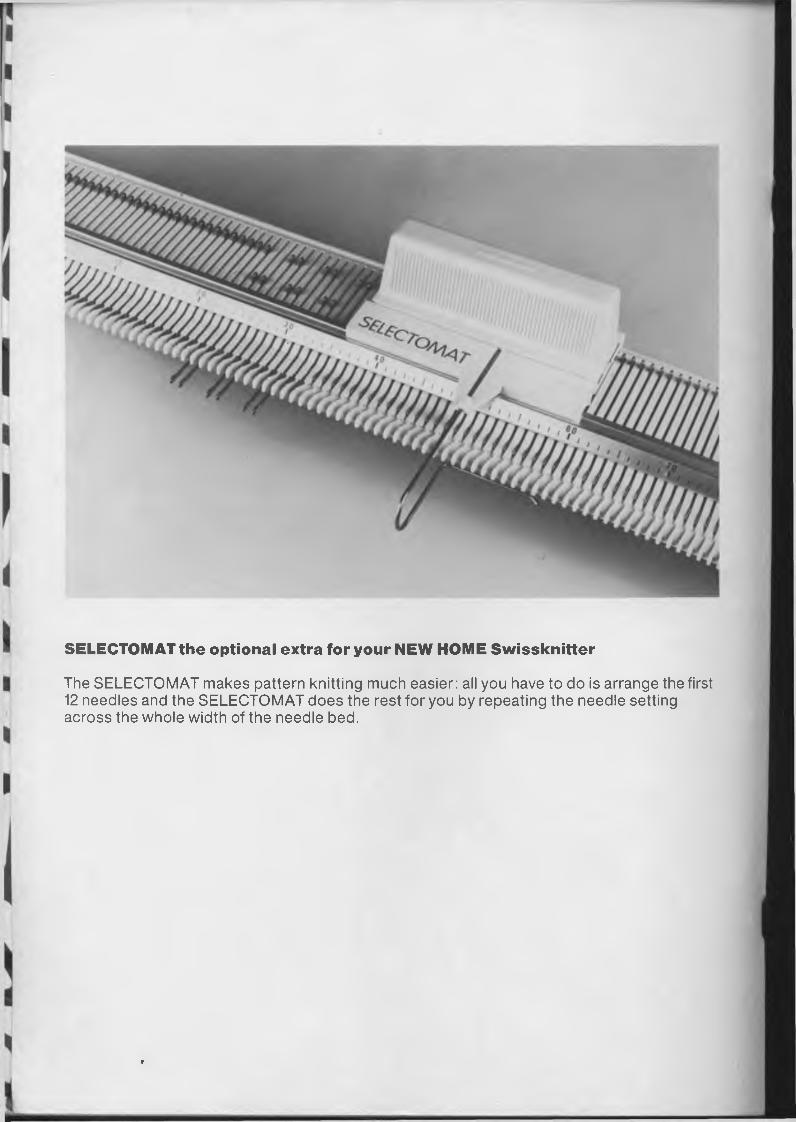
SELECTO M AT the optional extra for your NEW HOME Swissknitter
The SELECTOMAT makes pattern knitting much easier: all you have to do is arrange the first 12 needles and the SELECTOMAT does the rest for you by repeating the needle setting across the whole width of the needle bed.
*
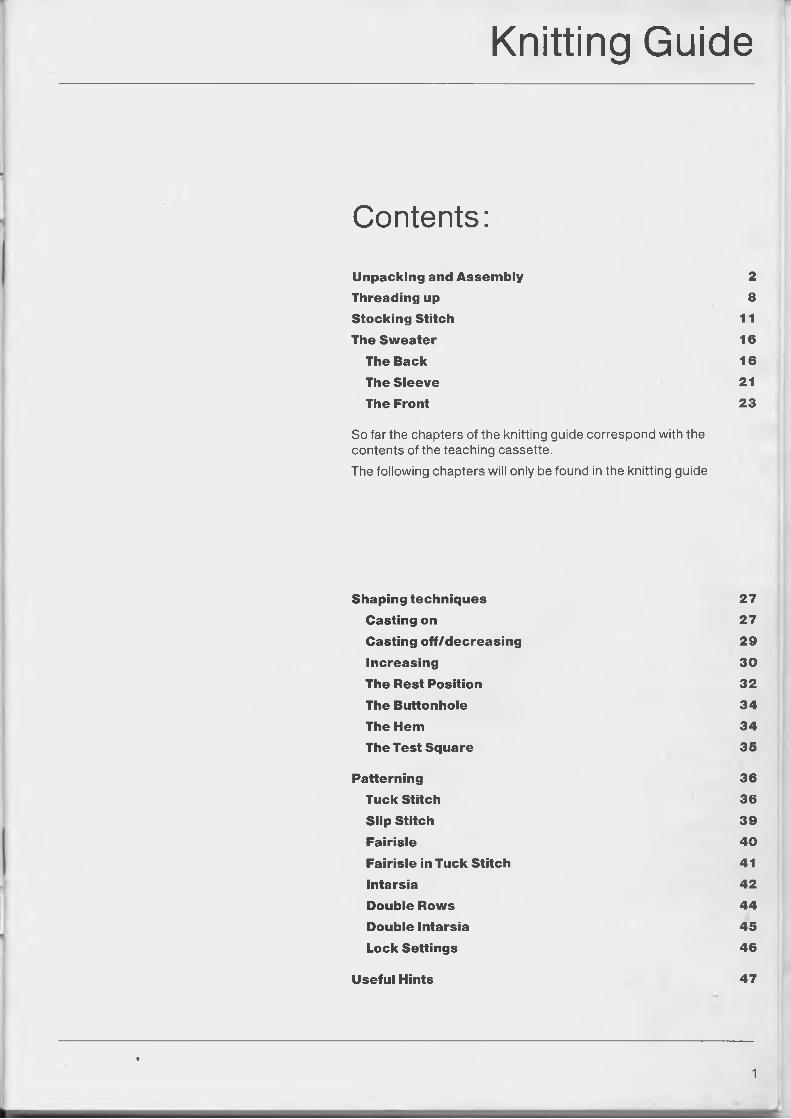
Knitting Guide
Contents:Unpacking and Assembly 2Threading up 8Stocking Stitch 11
The Sweater 16
The Back 16
The Sleeve 21
The Front 23
So far the chapters of the knitting guide correspond with the contents of the teaching cassette.The following chapters will only be found in the knitting guide
Shaping techniques 27Casting on 27Casting off/decreasing 29Increasing 30The Rest Position 32The Buttonhole 34The Hem 34The Test Square 35
Patterning 36Tuck Stitch 36Slip Stitch 39Fairisle 40Fairisle in Tuck Stitch 41Intarsia 42Double Rows 44Double Intarsia 45Lock Settings 46
Useful Hints 47
♦
1
-
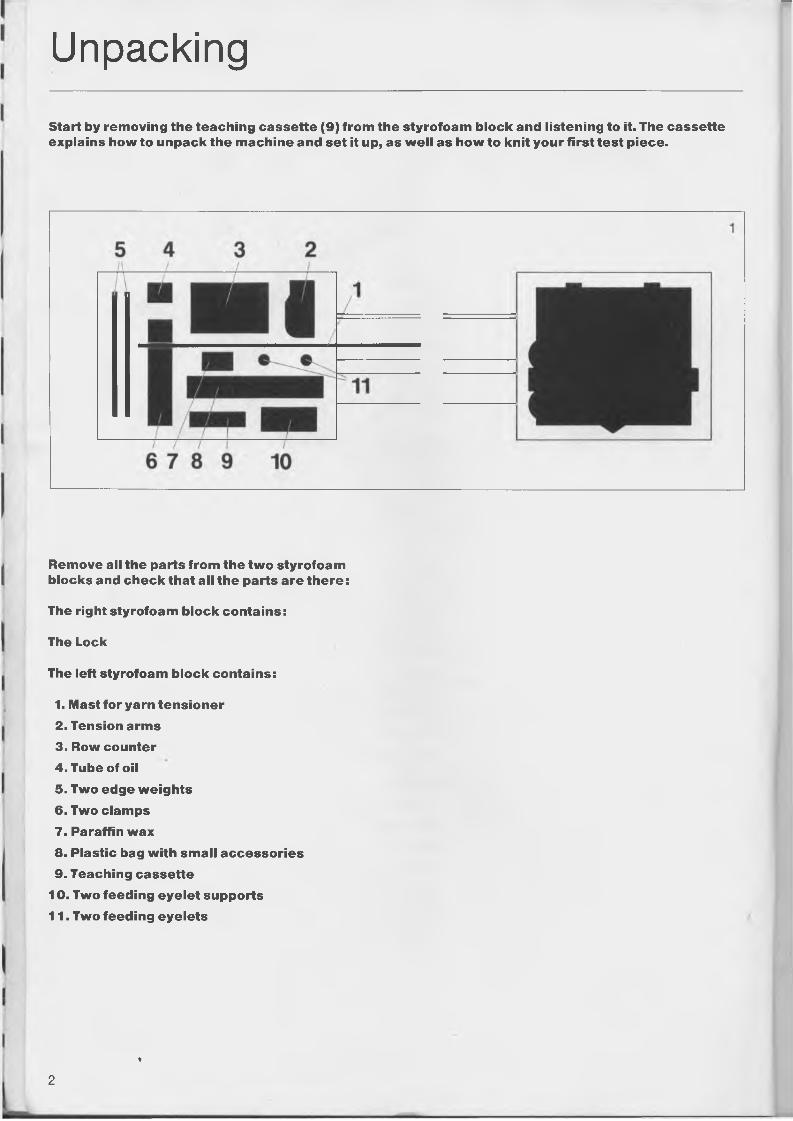
UnpackingStart by removing the teaching cassette (9) from the styrofoam block and listening to it. The cassette explains how to unpack the machine and set it up, as well as how to knit your first test piece.
Remove all the parts from the two styrofoam blocks and check that all the parts are there:
The right styrofoam block contains:
The Lock
The left styrofoam block contains:
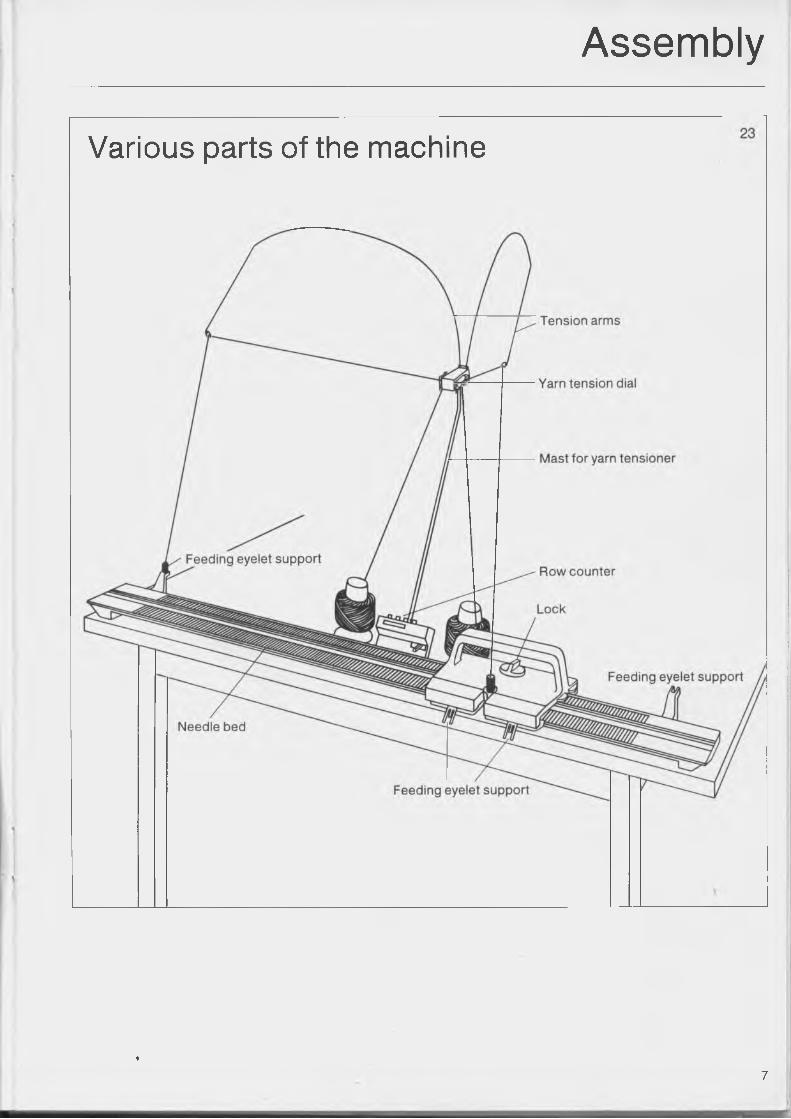
1. Mast for yam tensioner2. Tension arms3. Row counter4. Tube of oil5. Two edge weights6. Two clamps7. Paraffin wax
8. Plastic bag with small accessories9. Teaching cassette
10. Two feeding eyelet supports11. Two feeding eyelets
2
♦
Unpacking
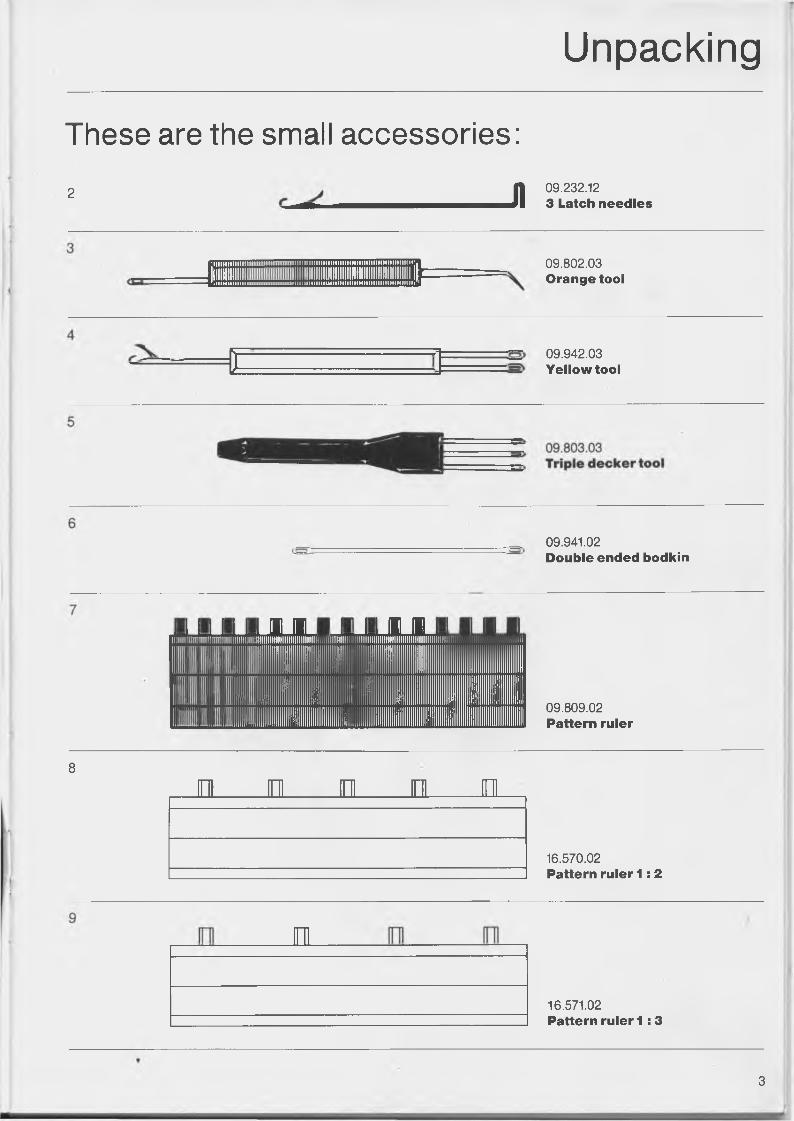
These are the small accessories:
2 ____________I) 09.232.12 3 Latch needles
I I 09.802.03 Orange tool
€ 09.942.03 Yellow tool
09.941.02Double ended bodkin
HJL UL
09.809.02 Pattern ruler
8
O___ 0___ 0___ 0___ 01
JDL
16.570.02Pattern ruler 1 :2
16.571.02Pattern ruler 1 : 3
3
Assembly
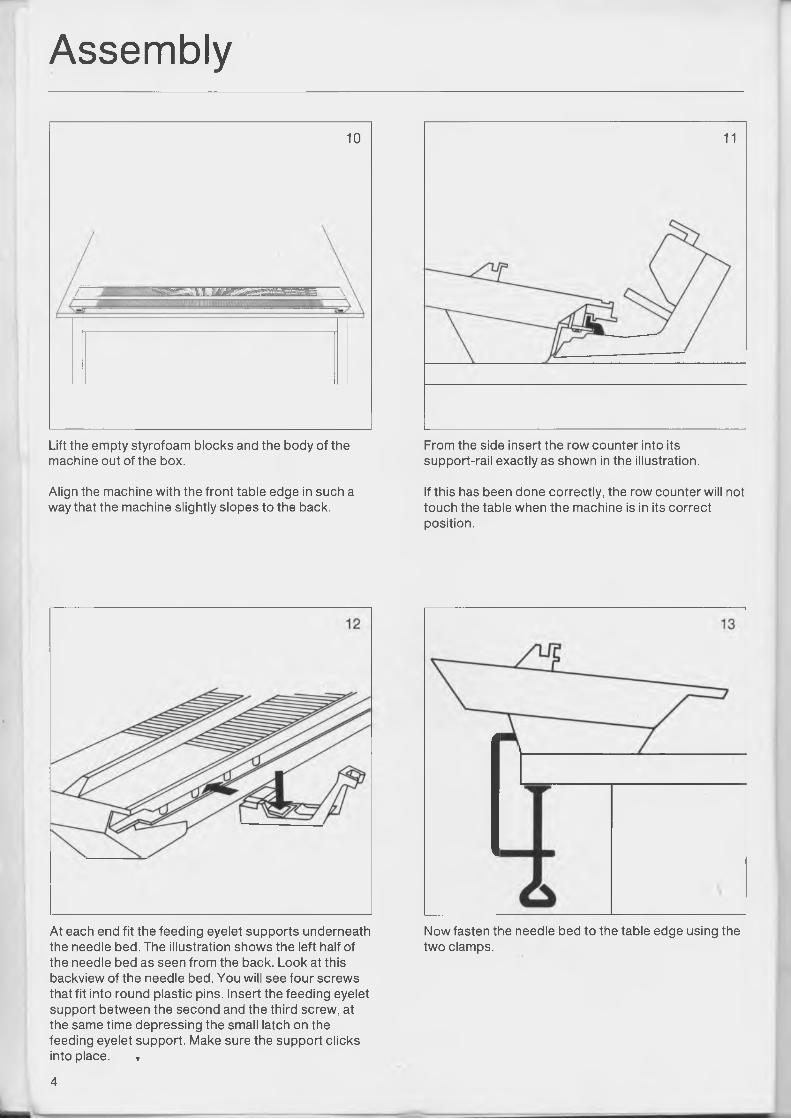
10
Lift the empty styrofoam blocks and the body of the machine out of the box.
Align the machine with the front table edge in such a way that the machine slightly slopes to the back.
At each end fit the feeding eyelet supports underneath the needle bed. The illustration shows the left half of the needle bed as seen from the back. Look at this backview of the needle bed. You will see four screws that fit into round plastic pins. Insert the feeding eyelet support between the second and the third screw, at the same time depressing the small latch on the feeding eyelet support. Make sure the support clicks into place. t
11
From the side insert the row counter into its support-rail exactly as shown in the illustration.
If this has been done correctly, the row counter will not touch the table when the machine is in its correct position.
Now fasten the needle bed to the table edge using the two clamps.
4
Assembly
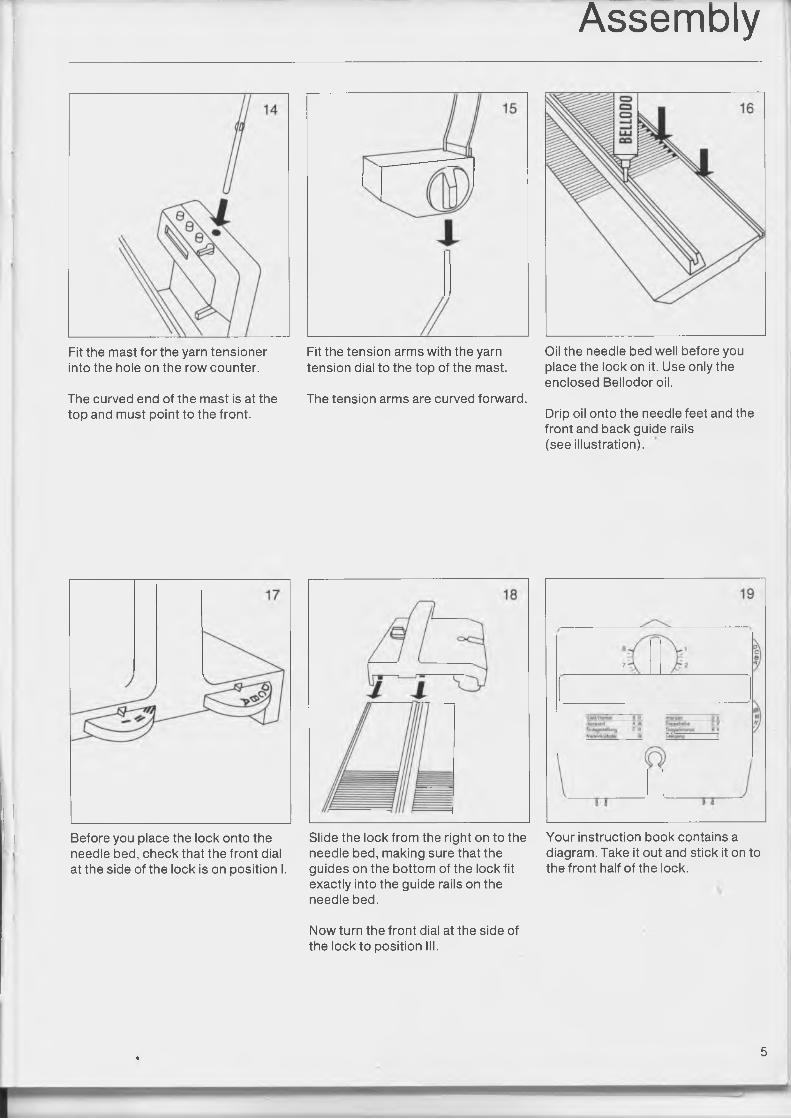
Oil the needle bed well before you place the lock on it. Use only the enclosed Bellodoroil.
Drip oil onto the needle feet and the front and back guide rails (see illustration).
The curved end of the mast is at the The tension arms are curved forward, top and must point to the front.
Fit the mast for the yarn tensioner into the hole on the row counter.
Fit the tension arms with the yarn tension dial to the top of the mast.
Before you place the lock onto the Slide the lock from the right on to the Your instruction book contains a needle bed, check that the front dial needle bed, making sure that the diagram. Take it out and stick it on to at the side of the lock is on position I. guides on the bottom of the lock fit the front half of the lock.
exactly into the guide rails on the needle bed.
Now turn the front dial at the side of the lock to position III.
* 5
, Assemblyi
20
needle head
c .needle foot
_ n
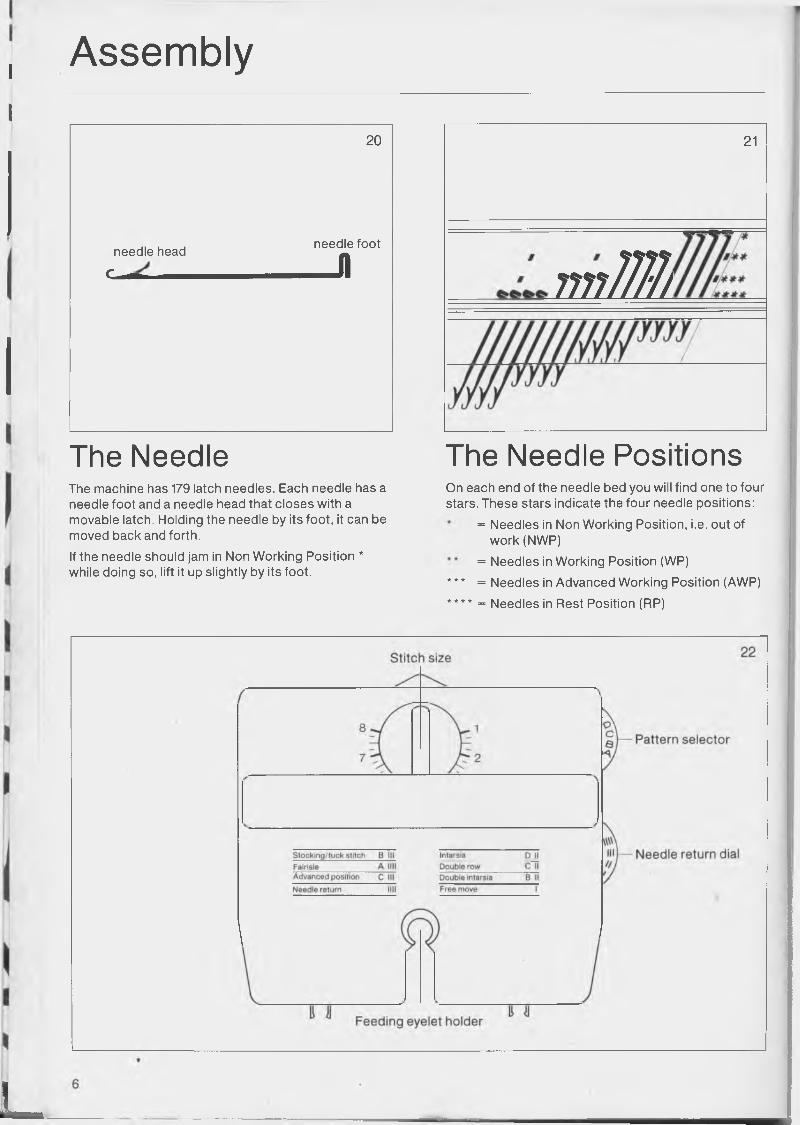
The NeedleThe machine has 179 latch needles. Each needle has a needle foot and a needle head that closes with a movable latch. Holding the needle by its foot, it can be moved back and forth.If the needle should jam in Non Working Position * while doing so, lift it up slightly by its foot.
21
rm fflJ i
The Needle PositionsOn each end of the needle bed you will find one to four stars. These stars indicate the four needle positions:
= Needles in Non Working Position, i.e. out of work (NWP)
= Needles in Working Position (WP)* * * = Needles in Advanced Working Position (AWP)* * * * = Needles in Rest Position (RP)
L
Assembly
Various parts of the machine
♦
7
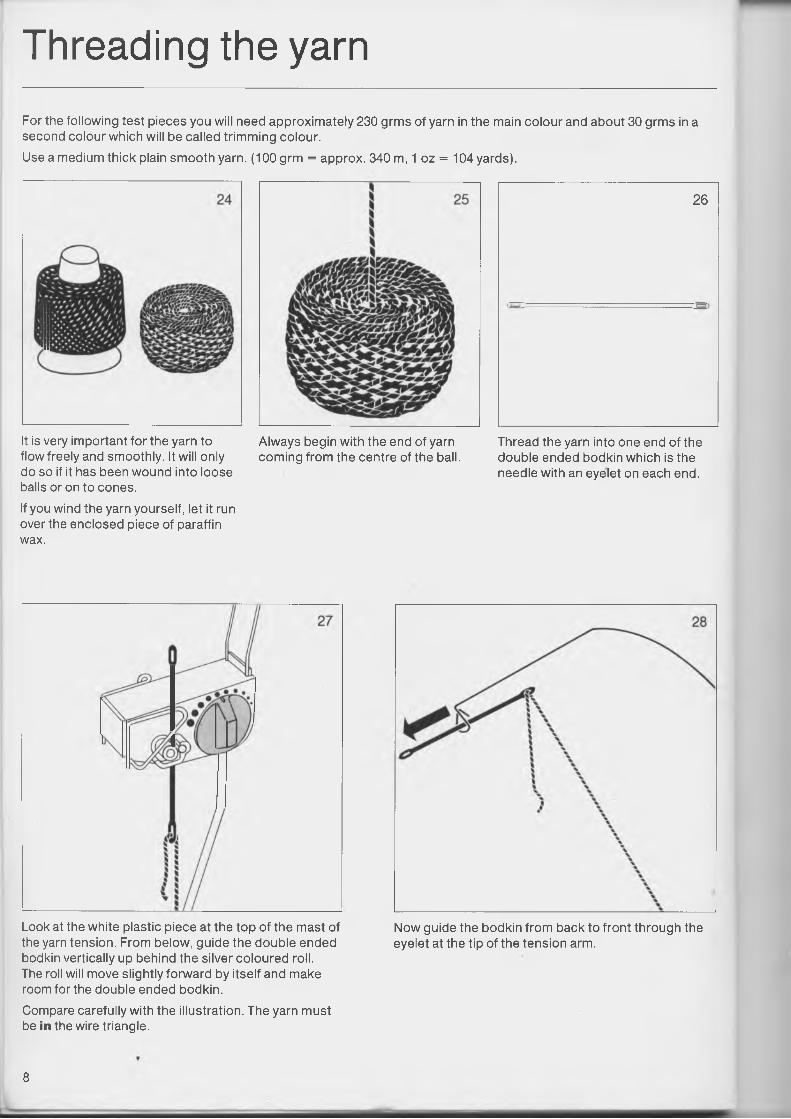
Threading the yarnFor the following test pieces you will need approximately 230 grms of yarn in the main colour and about 30 grms in a second colour which will be called trimming colour.Use a medium thick plain smooth yarn. (100 grm = approx. 340 m, 1 oz = 104 yards).
26
It is very important for the yarn to flow freely and smoothly. It will only do so if it has been wound into loose balls or on to cones.If you wind the yarn yourself, let it run over the enclosed piece of paraffin wax.
Always begin with the end of yarn coming from the centre of the ball.
Thread the yarn into one end of the double ended bodkin which is the needle with an eyelet on each end.
Look at the white plastic piece at the top of the mast of Now guide the bodkin from back to front through thethe yarn tension. From below, guide the double ended eyelet at the tip of the tension arm.bodkin vertically up behind the silver coloured roll.The roll will move slightly forward by itself and make room for the double ended bodkin.Compare carefully with the illustration. The yarn must be in the wire triangle.
8
Threading the yarn
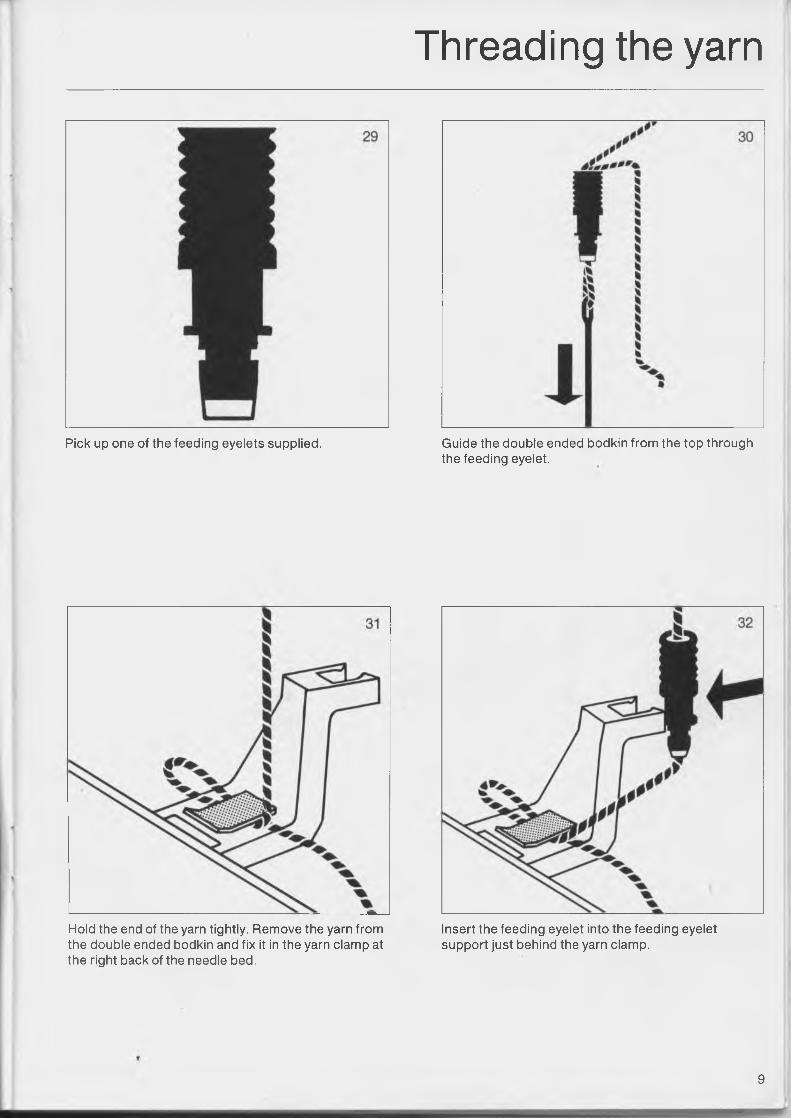
Pick up one of the feeding eyelets supplied. Guide the double ended bodkin from the top through the feeding eyelet.
Hold the end of the yarn tightly. Remove the yarn from the double ended bodkin and fix it in the yarn clamp at the right back of the needle bed.
Insert the feeding eyelet into the feeding eyelet support just behind the yarn clamp.
9
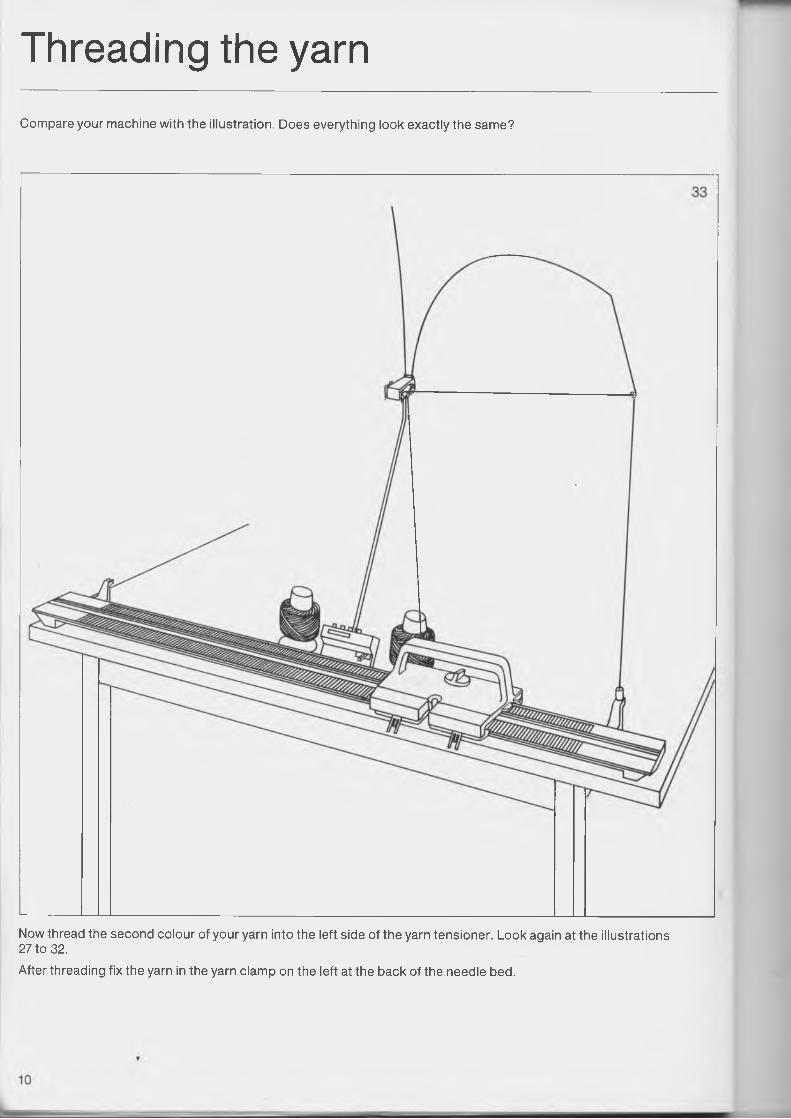
Threading the yarnCompare your machine with the illustration. Does everything look exactly the same?
Now thread the second colour of your yarn into the left side of the yarn tensioner. Look again at the illustrations27 to 32.After threading fix the yarn in the yarn clamp on the left at the back of the needle bed.
Stocking Stitch
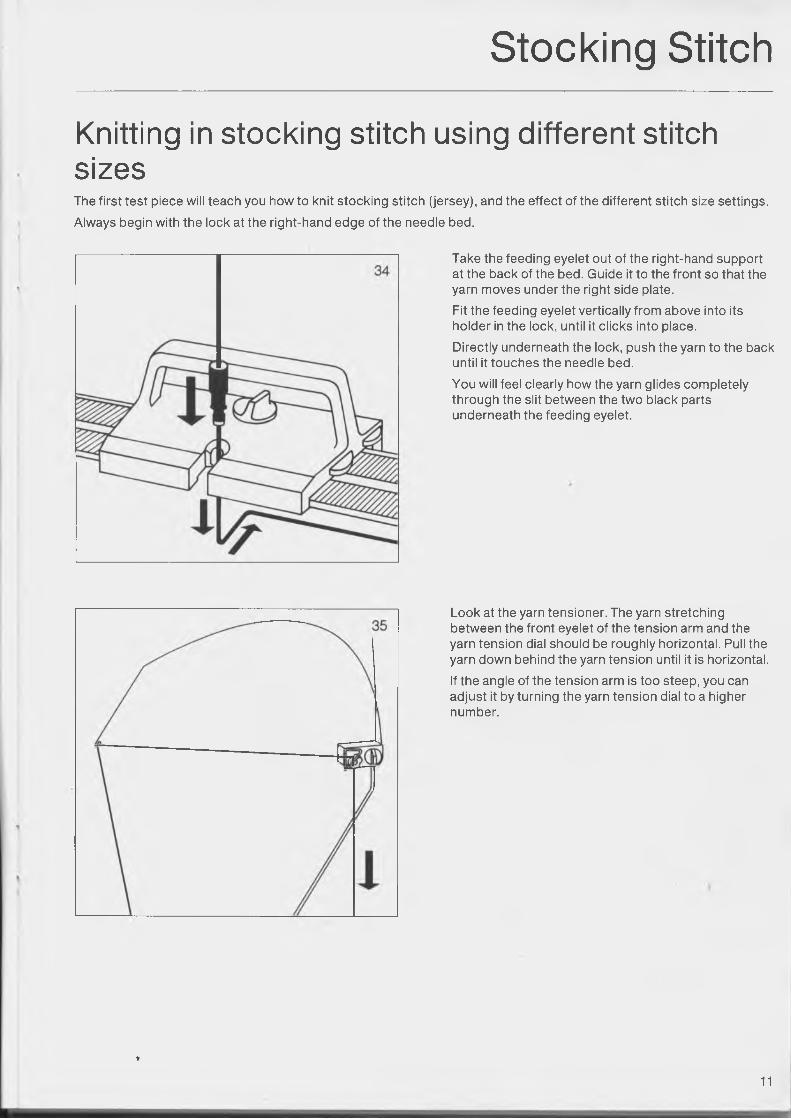
Knitting in stocking stitch using different stitch sizesThe first test piece will teach you how to knit stocking stitch (jersey), and the effect of the different stitch size settings. Always begin with the lock at the right-hand edge of the needle bed.
Take the feeding eyelet out of the right-hand support at the back of the bed. Guide it to the front so that the yarn moves under the right side plate.Fit the feeding eyelet vertically from above into its holder in the lock, until it clicks into place.Directly underneath the lock, push the yarn to the back until it touches the needle bed.You will feel clearly how the yarn glides completely through the slit between the two black parts underneath the feeding eyelet.
Look at the yarn tensioner. The yarn stretching between the front eyelet of the tension arm and the yarn tension dial should be roughly horizontal. Pull the yarn down behind the yarn tension until it is horizontal.If the angle of the tension arm is too steep, you can adjust it by turning the yarn tension dial to a higher number.
t
11
Stocking Stitch
The basic cast on
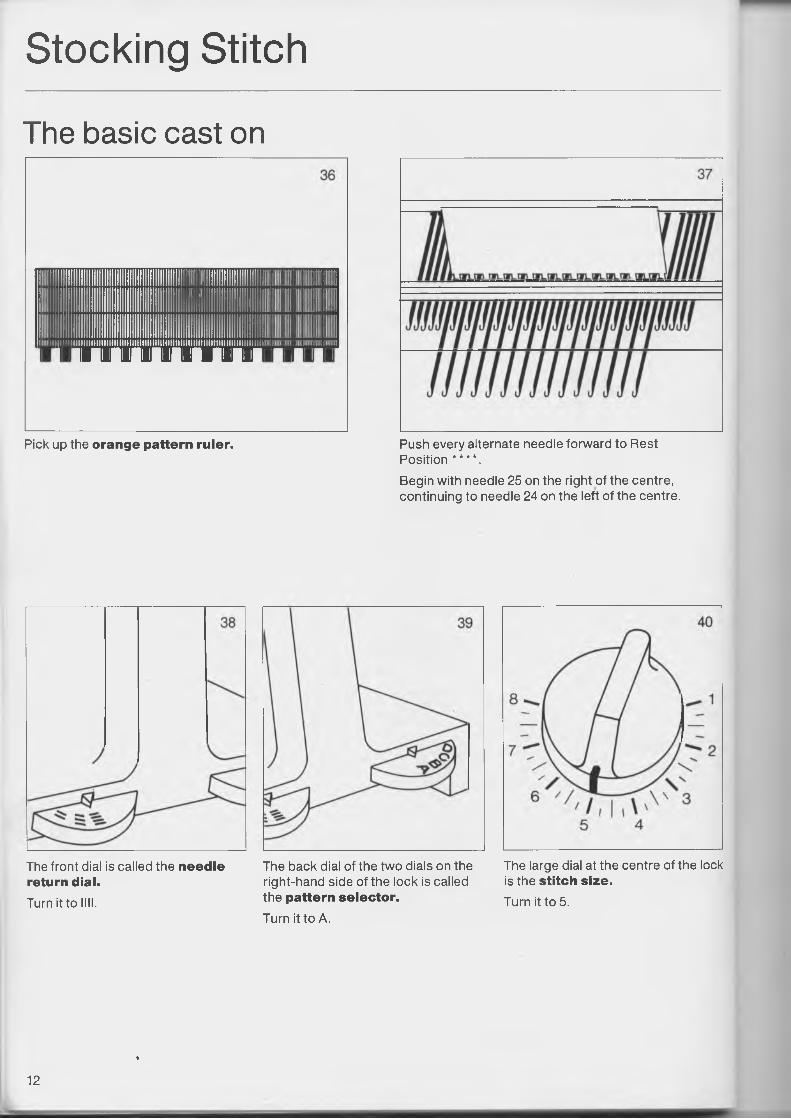
Pick up the orange pattern ruler. Push every alternate needle forward to Rest Position ****.Begin with needle 25 on the right of the centre, continuing to needle 24 on the left of the centre.
The front dial is called the needle return dial.Turn it to Mil.
The back dial of the two dials on the right-hand side of the lock is called the pattern selector.Turn it to A.
The large dial at the centre of the lock is the stitch size.Turn it to 5.
12
t
Stocking Stitch
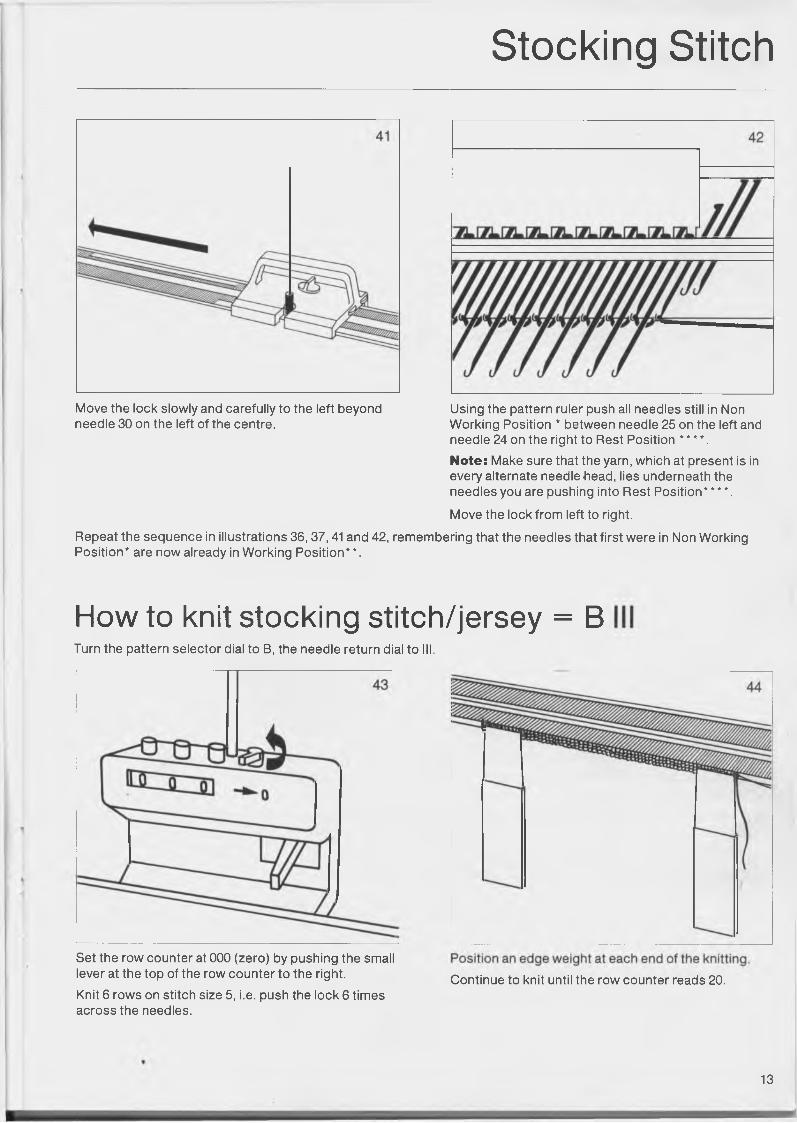
Move the lock slowly and carefully to the left beyond Using the pattern ruler push all needles still in Nonneedle 30 on the left of the centre. Working Position * between needle 25 on the left and
needle 24 on the right to Rest Position * * * *.Note: Make sure that the yarn, which at present is in every alternate needle head, lies underneath the needles you are pushing into Rest Position****.
Move the lock from left to right.
Repeat the sequence in illustrations 36,37,41 and 42, remembering that the needles that first were in Non Working Position* are now already in Working Position**.
How to knit stocking stitch/jersey = BTurn the pattern selector dial to B, the needle return dial to III.
Set the row counter at 000 (zero) by pushing the small lever at the top of the row counter to the right.Knit 6 rows on stitch size 5, i.e. push the lock 6 times across the needles.
Continue to knit until the row counter reads 20.
13
Stocking Stitch
Changing colour
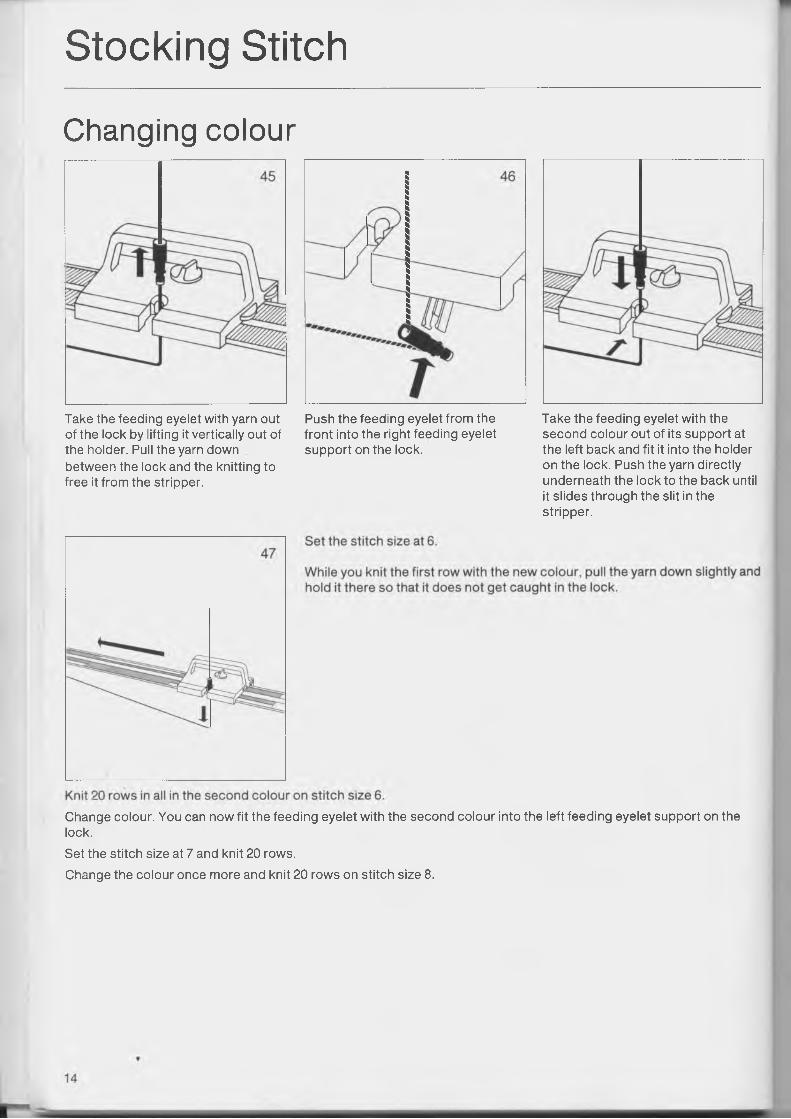
Take the feeding eyelet with yarn out of the lock by lifting it vertically out of the holder. Pull the yarn down between the lock and the knitting to free it from the stripper.
Push the feeding eyelet from the front into the right feeding eyelet support on the lock.
Take the feeding eyelet with the second colour out of its support at the left back and fit it into the holder on the lock. Push the yarn directly underneath the lock to the back until it slides through the slit in the stripper.
Change colour. You can now fit the feeding eyelet with the second colour into the left feeding eyelet support on the lock.Set the stitch size at 7 and knit 20 rows.Change the colour once more and knit 20 rows on stitch size 8.
Stocking Stitch
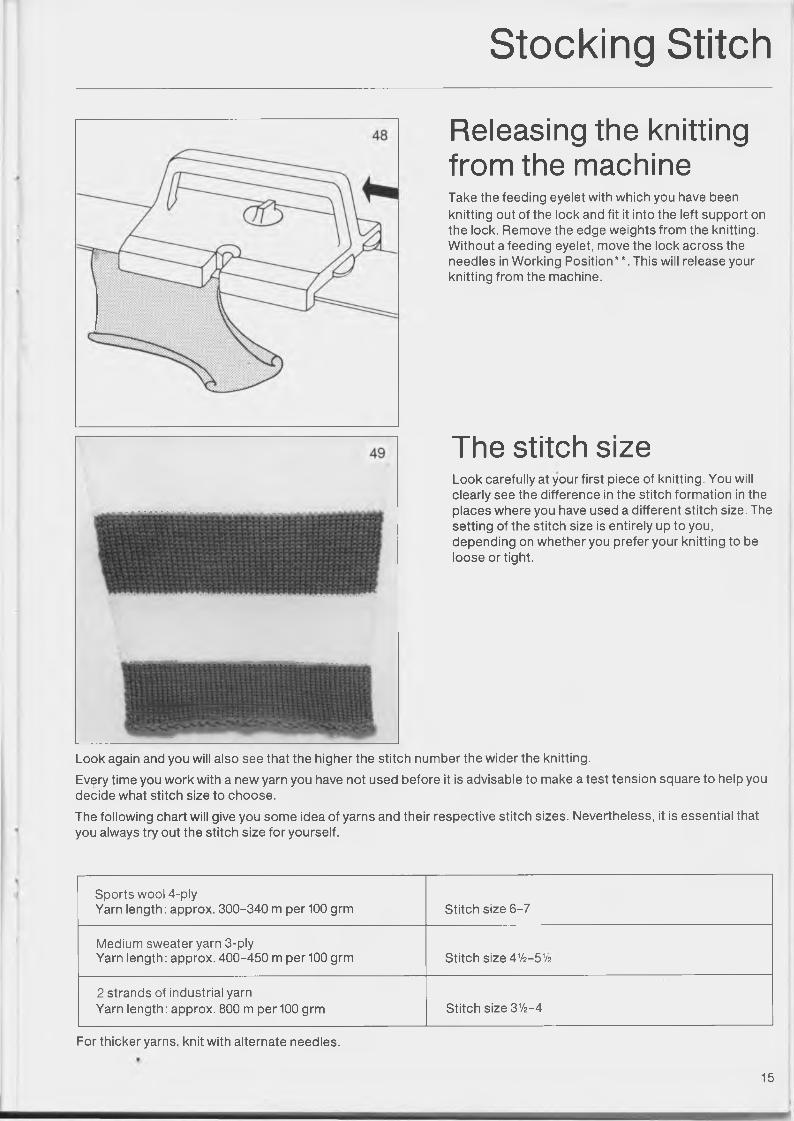
Releasing the knitting from the machineTake the feeding eyelet with which you have been knitting out of the lock and fit it into the left support on the lock. Remove the edge weights from the knitting. Without a feeding eyelet, move the lock across the needles in Working Position**. This will release your knitting from the machine.
The stitch sizeLook carefully at your first piece of knitting. You will clearly see the difference in the stitch formation in the places where you have used a different stitch size. The setting of the stitch size is entirely up to you, depending on whether you prefer your knitting to be loose or tight.
Look again and you will also see that the higher the stitch number the wider the knitting.Every time you work with a new yarn you have not used before it is advisable to make a test tension square to help you decide what stitch size to choose.The following chart will give you some idea of yarns and their respective stitch sizes. Nevertheless, it is essential that you always try out the stitch size for yourself.
Sports wool 4-plyYarn length: approx. 300-340 m per 100 grm Stitch size 6-7
Medium sweater yarn 3-plyYarn length: approx. 400-450 m per 100 grm Stitch size 41£ -5 1/2
2 strands of industrial yarnYarn length: approx. 800 m per 100 grm Stitch size 31/2-4
For thicker yarns, knit with alternate needles.
15
The Sweater
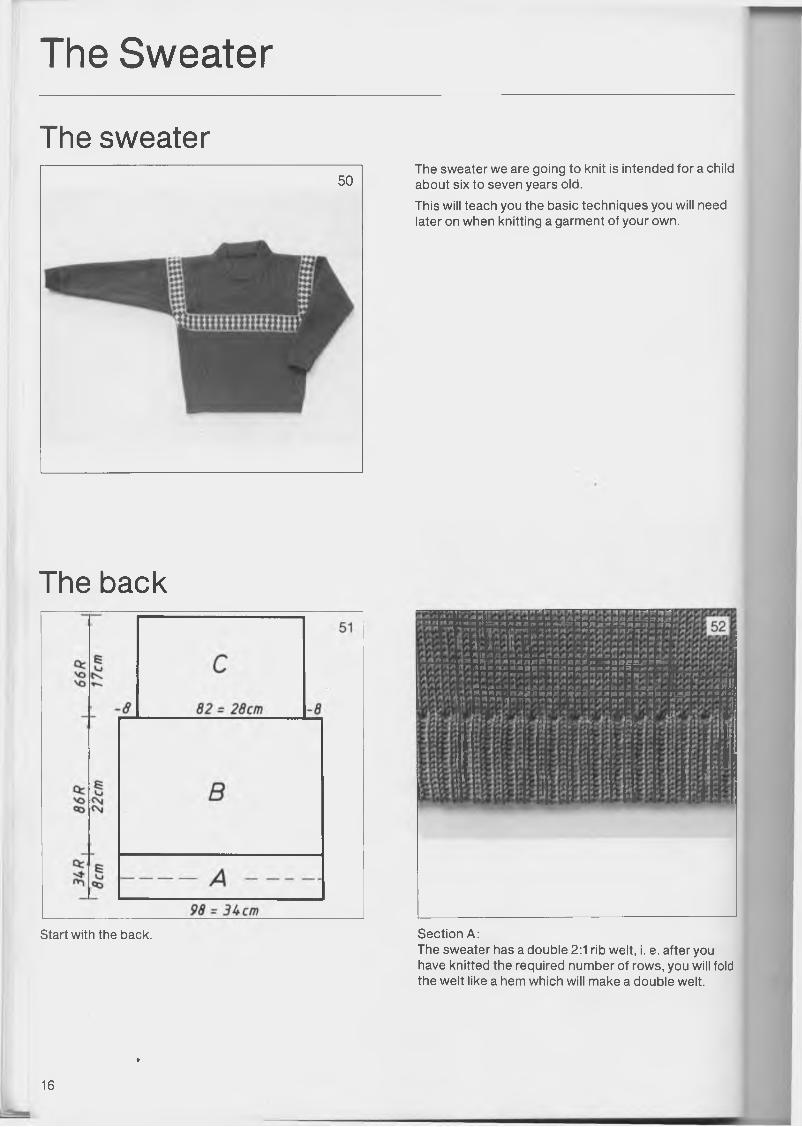
The sweater50
The sweater we are going to knit is intended for a child about six to seven years old.This will teach you the basic techniques you will need later on when knitting a garment of your own.
The back
Start with the back. Section A :The sweater has a double 2:1 rib welt, i. e. after you have knitted the required number of rows, you will fold the welt like a hem which will make a double welt.
16
t

The Sweater
Cast on for 2:1 ribPick up the black pattern ruler, i.e. the one where the teeth are closer together. Its teeth will fit behind every third needle.
Push every third needle to Rest Position****.Begin with needle 49 at right of centre and continue to needle 48 at left of centre.Fit the feeding eyelet with the trimming colour into the lock; that is your second colour of which you have less yarn.
Stitch size 5 Lock A llll Knit one row
Beginning with needle 49 left of centre push every third needle to Rest Position****.Knit one row.
Repeat the pushing forward of needles and the knitting of the first and second needle group (Illustrations 54 and 55). Knitting in stocking stitch = Lock B IIIKnit 10 rows, hanging edge weights on the knitting after about 6 rows.Change to the main colour, i.e. first colour. Knit 34 rows for the welt.
♦17
The Sweater
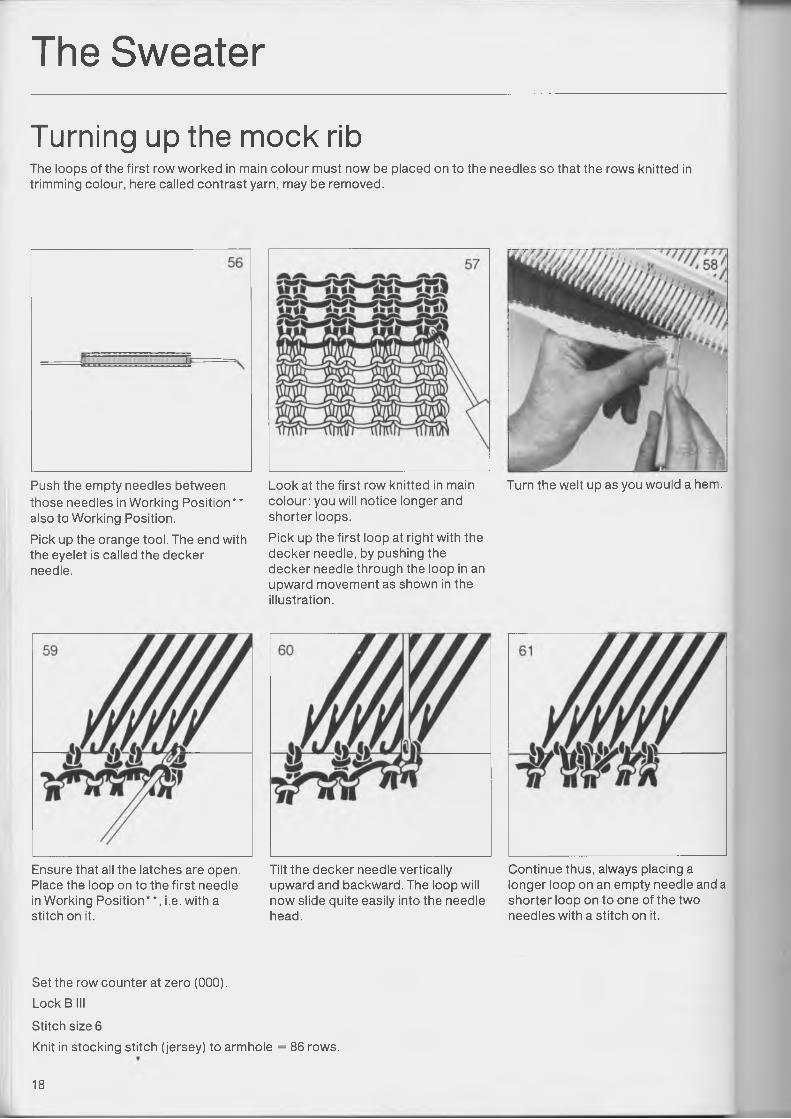
Turning up the mock ribThe loops of the first row worked in main colour must now be placed on to the needles so that the rows knitted in trimming colour, here called contrast yarn, may be removed.
Push the empty needles between those needles in Working Position* * also to Working Position.Pick up the orange tool. The end with the eyelet is called the decker needle.
Look at the first row knitted in main colour: you will notice longer and shorter loops.Pick up the first loop at right with the decker needle, by pushing the decker needle through the loop in an upward movement as shown in the illustration.
Turn the welt up as you would a hem.
Ensure that all the latches are open. Place the loop on to the first needle in Working Position* *, i.e. with a stitch on it.
Tilt the decker needle vertically upward and backward. The loop will now slide quite easily into the needle head.
Continue thus, always placing a longer loop on an empty needle and a shorter loop on to one of the two needles with a stitch on it.
Set the row counter at zero (000).Lock Bill
Stitch size 6Knit in stocking stitch (jersey) to armhole = 86 rows.
18
The Sweater
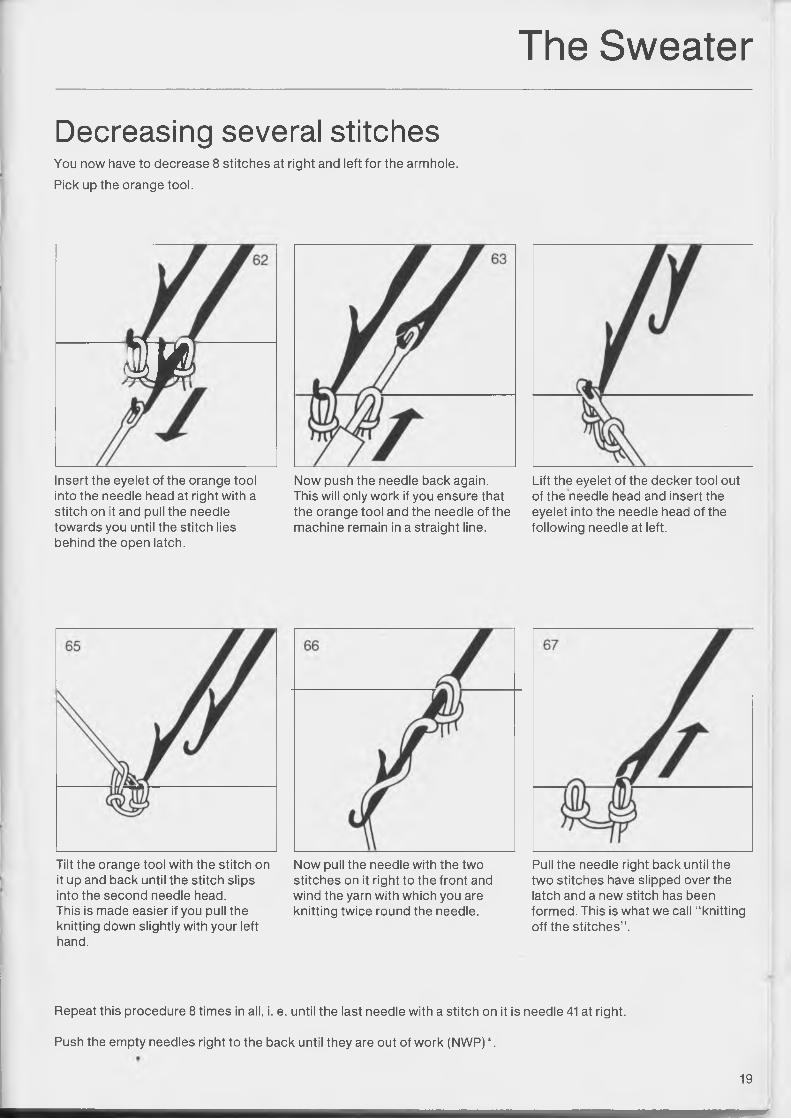
Decreasing several stitchesYou now have to decrease 8 stitches at right and left for the armhole. Pick up the orange tool.
i'2Insert the eyelet of the orange tool into the needle head at right with a stitch on it and pull the needle towards you until the stitch lies behind the open latch.
Now push the needle back again. This will only work if you ensure that the orange tool and the needle of the machine remain in a straight line.
Lift the eyelet of the decker tool out of the needle head and insert the eyelet into the needle head of the following needle at left.
Tilt the orange tool with the stitch on it up and back until the stitch slips into the second needle head.This is made easier if you pull the knitting down slightly with your left hand.
Now pull the needle with the two stitches on it right to the front and wind the yarn with which you are knitting twice round the needle.
Pull the needle right back until the two stitches have slipped over the latch and a new stitch has been formed. This is what we call “ knitting off the stitches” .
Repeat this procedure 8 times in all, i. e. until the last needle with a stitch on it is needle 41 at right.
Push the empty needles right to the back until they are out of work (NWP) *.
19
■r
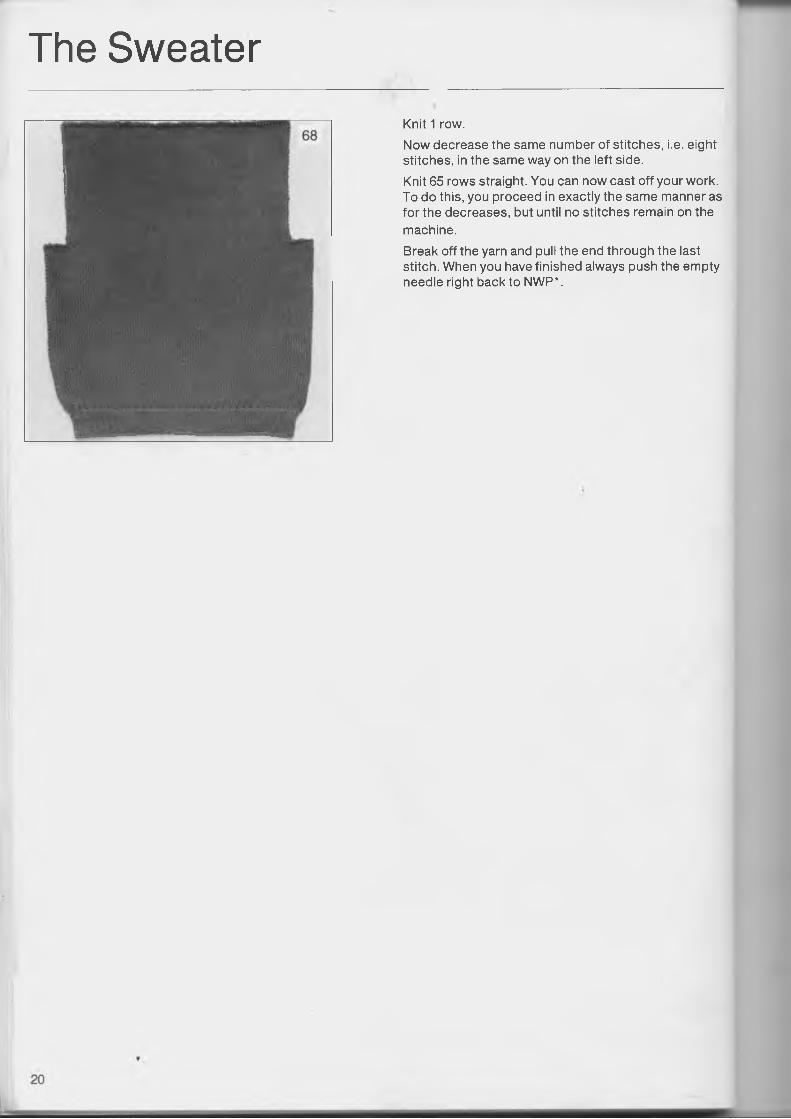
The SweaterKnit 1 row.Now decrease the same number of stitches, i.e. eight stitches, in the same way on the left side.Knit 65 rows straight. You can now cast off your work. To do this, you proceed in exactly the same manner as for the decreases, but until no stitches remain on the machine.Break off the yarn and pull the end through the last stitch. When you have finished always push the empty needle right back to NWP*.
The Sweater
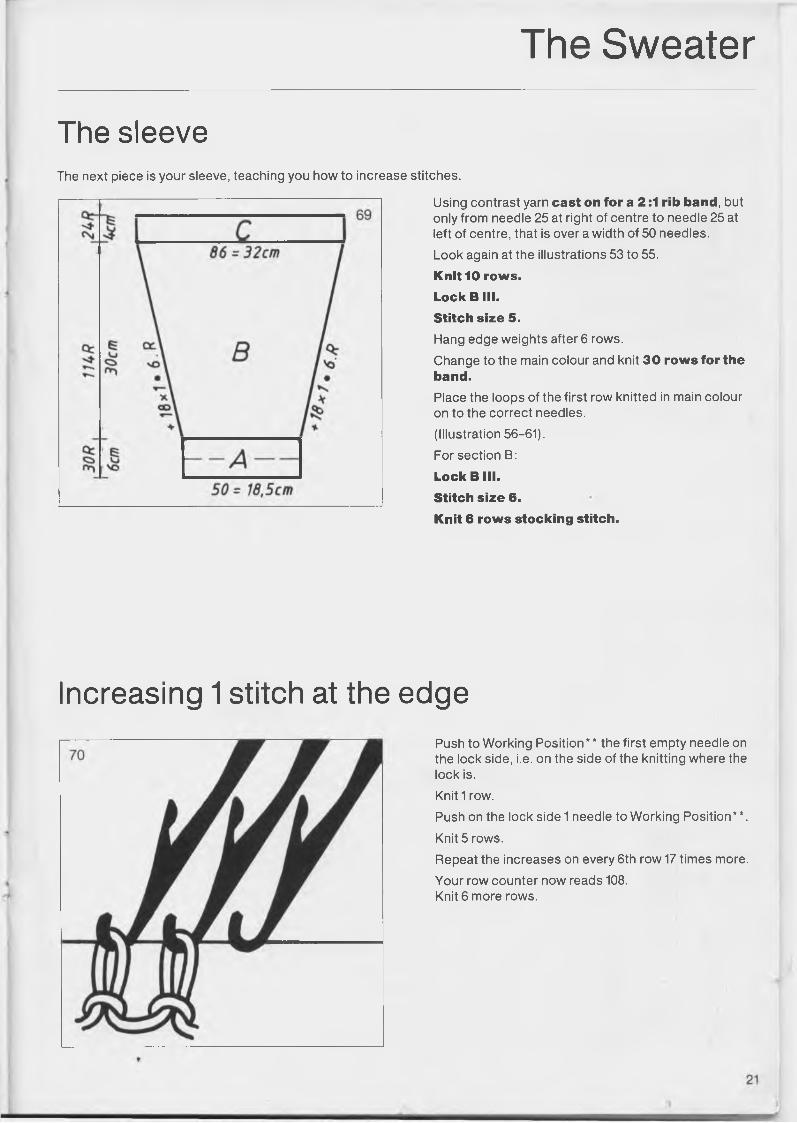
The sleeveThe next piece is your sleeve, teaching you how to increase stitches.
Using contrast yarn cast on for a 2:1 rib band, but only from needle 25 at right of centre to needle 25 at left of centre, that is over a width of 50 needles.Look again at the illustrations 53 to 55.Knit 10 rows.Lock B III.Stitch size 5.Hang edge weights after 6 rows.Change to the main colour and knit 30 rows for the band.Place the loops of the first row knitted in main colour on to the correct needles.(Illustration 56-61).For section B:Lock B ill.Stitch size 6.Knit 6 rows stocking stitch.
Increasing 1 stitch at the edgePush to Working Position* * the first empty needle on the lock side, i.e. on the side of the knitting where the lock is.Knit 1 row.Push on the lock side 1 needle to Working Position**. Knit 5 rows.Repeat the increases on every 6th row 17 times more.Your row counter now reads 108.Knit 6 more rows.
The Sweater
• I. ■ « /»A/. ■'« A i'SiM ,»/»/•.•.♦a i** <>* f > *" # <*;! <s <*« ** <* ■<m i
K MU l• #i ✓*/»/* .J'l/t/t *W'« f* **/.,*!>» **'<%%)>♦ •• * <1 /•*/*,»«*»****.**.« 1*« AM *4* M A » / « A
#* %& / f *A A A * ♦ M * > M » $ <*f * *2 4**% tott a / *% <** *4 &*&** f t '*} ** ** #<! * 5*1A <N /I ** m‘* $ M /* /H H A M /* A A $!?% <4 J4 «S® # * JW M , slit Mh‘ jNfc M jjS >*% .<*» ./ * >*& jj>’1
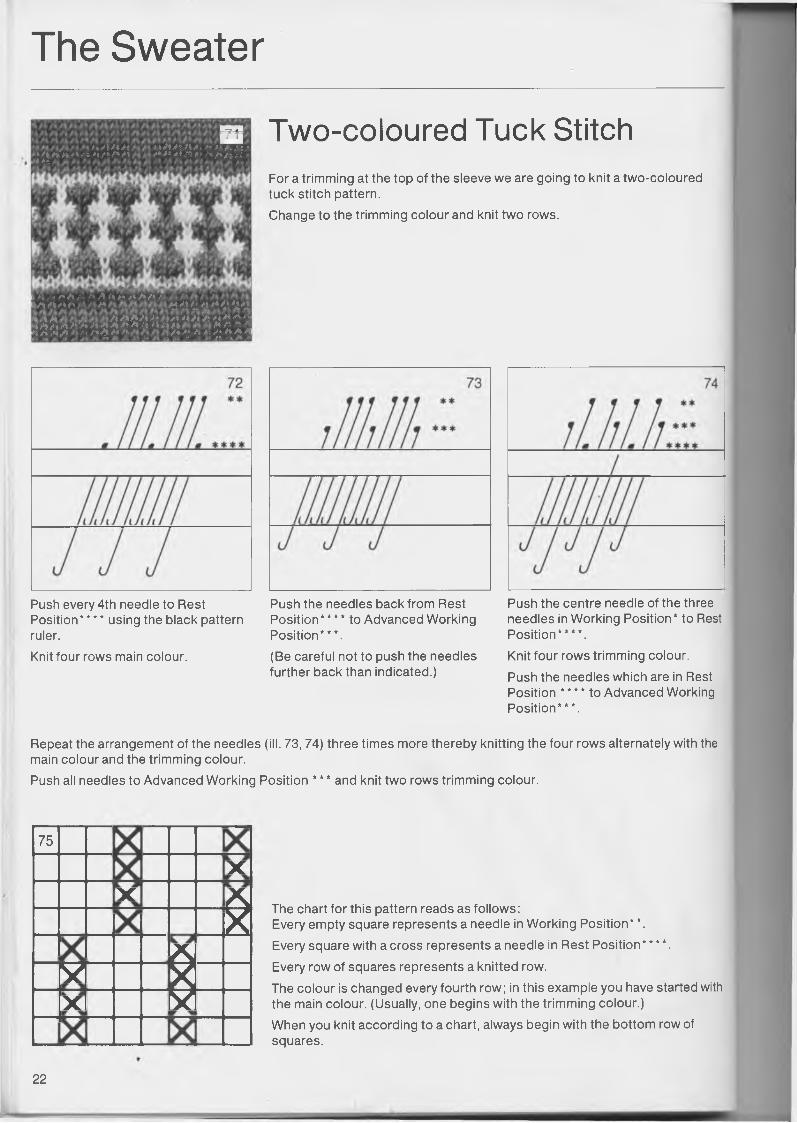
Two-coloured Tuck StitchFor a trimming at the top of the sleeve we are going to knit a two-coloured tuck stitch pattern.Change to the trimming colour and knit two rows.
Push every 4th needle to Rest Position* * * * using the black pattern ruler.Knit four rows main colour.
Push the needles back from Rest Position**** to Advanced Working Position***.(Be careful not to push the needles further back than indicated.)
Push the centre needle of the three needles in Working Position* to Rest Position****.Knit four rows trimming colour.Push the needles which are in Rest Position * * * * to Advanced Working Position***.
Repeat the arrangement of the needles (ill. 73, 74) three times more thereby knitting the four rows alternately with the main colour and the trimming colour.Push all needles to Advanced Working Position * * * and knit two rows trimming colour.
75
XX X
X£M
jxl M
The chart for this pattern reads as follows:Every empty square represents a needle in Working Position* *.Every square with across represents a needle in Rest Position****.Every row of squares represents a knitted row.The colour is changed every fourth row; in this example you have started with the main colour. (Usually, one begins with the trimming colour.)When you knit according to a chart, always begin with the bottom row of squares.
22
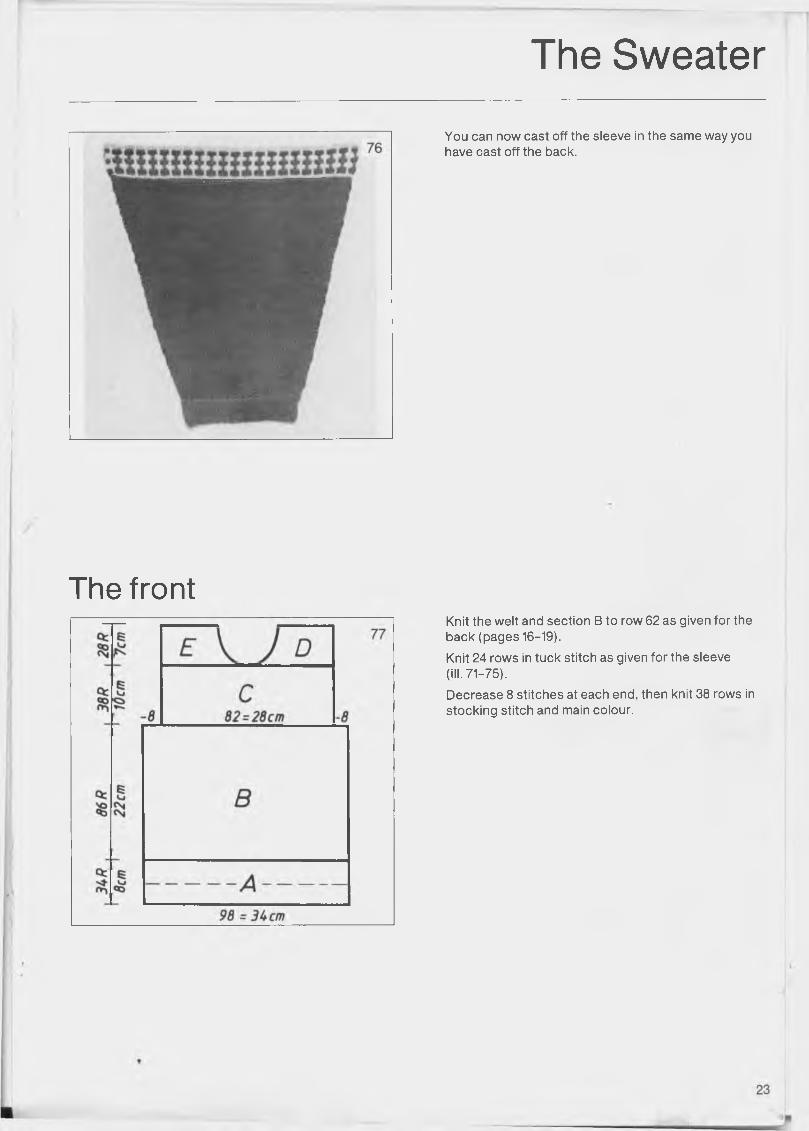
The SweaterYou can now cast off the sleeve in the same way you have cast off the back.
The frontKnit the welt and section B to row 62 as given for the back (pages 16-19).Knit 24 rows in tuck stitch as given for the sleeve (ill. 71-75).Decrease 8 stitches at each end, then knit 38 rows in stocking stitch and main colour.
The Sweater
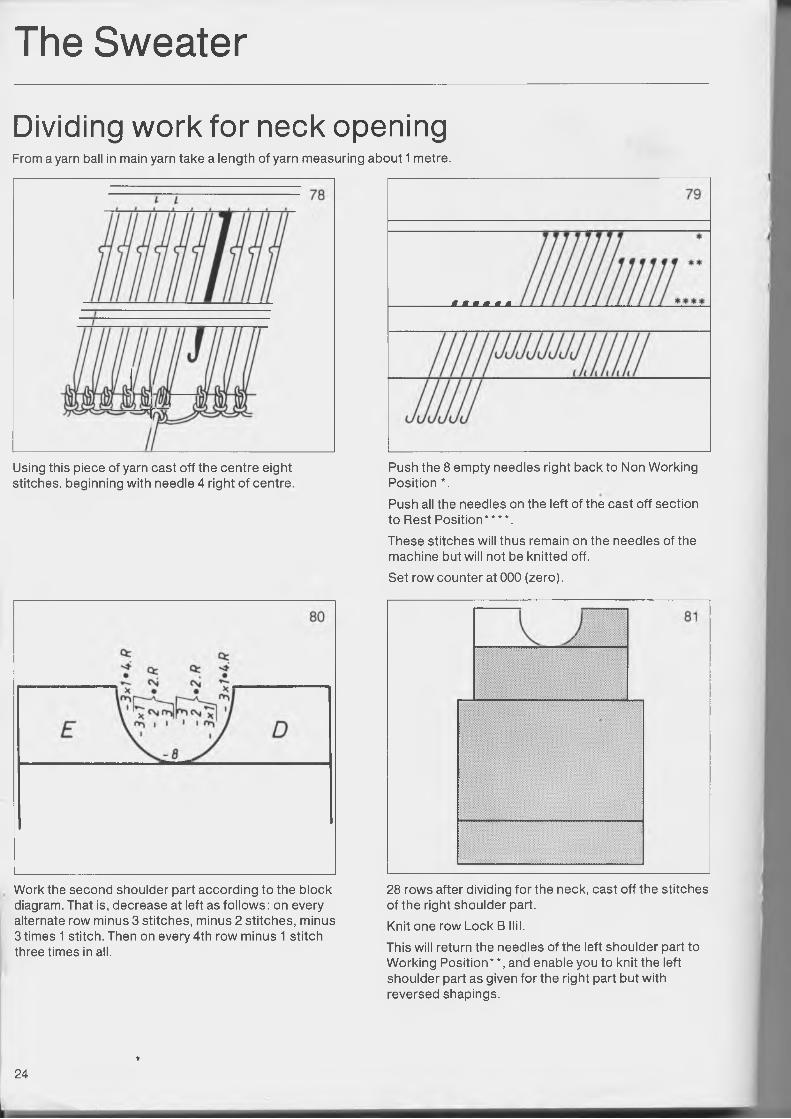
Dividing work for neck openingFrom a yarn ball in main yarn take a length of yarn measuring about 1 metre.
Using this piece of yarn cast off the centre eight stitches, beginning with needle 4 right of centre
These stitches will thus remain on the needles of the machine but will not be knitted off.Set row counter at 000 (zero).
Push the 8 empty needles right back to Non Working Position *.Push all the needles on the left of the cast off section to Rest Position****.
Work the second shoulder part according to the block diagram. That is, decrease at left as follows: on every alternate row minus 3 stitches, minus 2 stitches, minus 3 times 1 stitch. Then on every 4th row minus 1 stitch three times in all.
28 rows after dividing for the neck, cast off the stitches of the right shoulder part.Knit one row Lock B Nil.This will return the needles of the left shoulder part to Working Position* *, and enable you to knit the left shoulder part as given for the right part but with reversed shapings.
24t
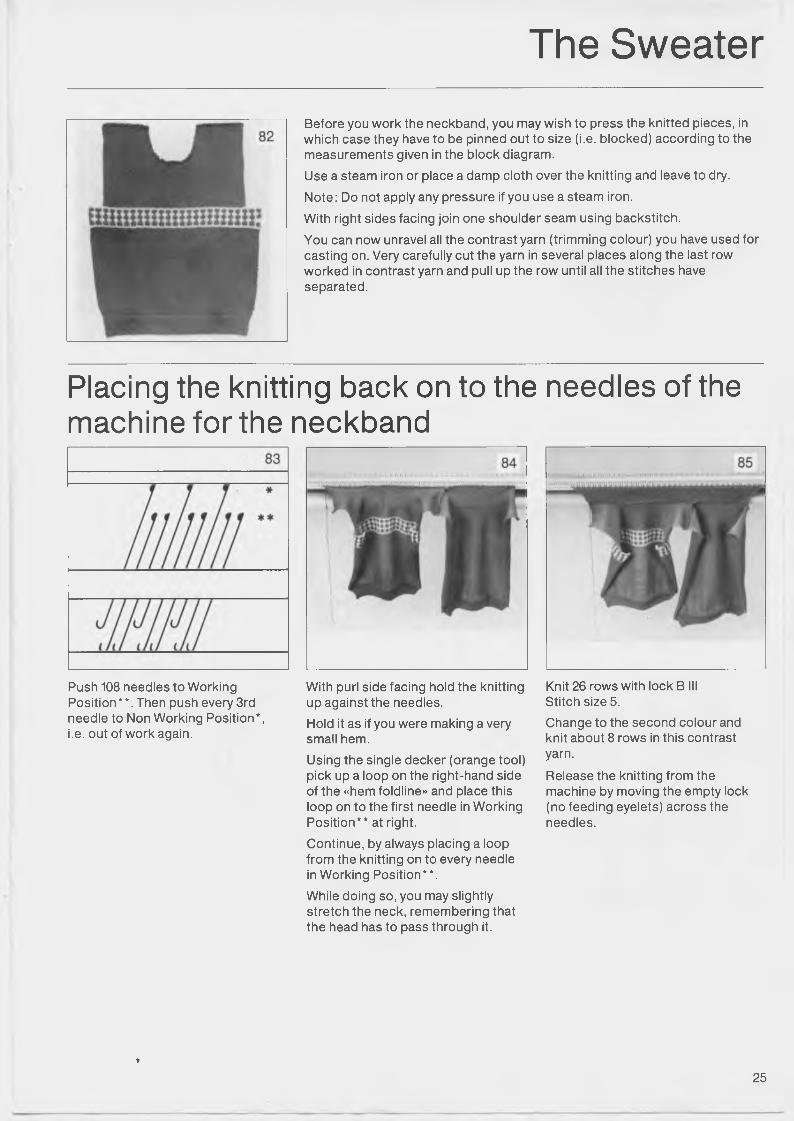
The SweaterBefore you work the neckband, you may wish to press the knitted pieces, in which case they have to be pinned out to size (i.e. blocked) according to the measurements given in the block diagram.Use a steam iron or place a damp cloth over the knitting and leave to dry.Note: Do not apply any pressure if you use a steam iron.With right sides facing join one shoulder seam using backstitch.You can now unravel all the contrast yarn (trimming colour) you have used for casting on. Very carefully cut the yarn in several places along the last row worked in contrast yarn and pull up the row until all the stitches have separated.
Placing the knitting back on to the needles of the machine for the neckband
Push 108 needles to Working Position**. Then push every 3rd needle to Non Working Position*, i.e. out of work again.
With purl side facing hold the knitting up against the needles.Hold it as if you were making a very small hem.Using the single decker (orange tool) pick up a loop on the right-hand side of the «hem foldline» and place this loop on to the first needle in Working Position** at right.Continue, by always placing a loop from the knitting on to every needle in Working Position**.While doing so, you may slightly stretch the neck, remembering that the head has to pass through it.
Knit 26 rows with lock B III Stitch size 5.Change to the second colour and knit about 8 rows in this contrast yarn.
Release the knitting from the machine by moving the empty lock (no feeding eyelets) across the needles.
♦
25
The Sweater
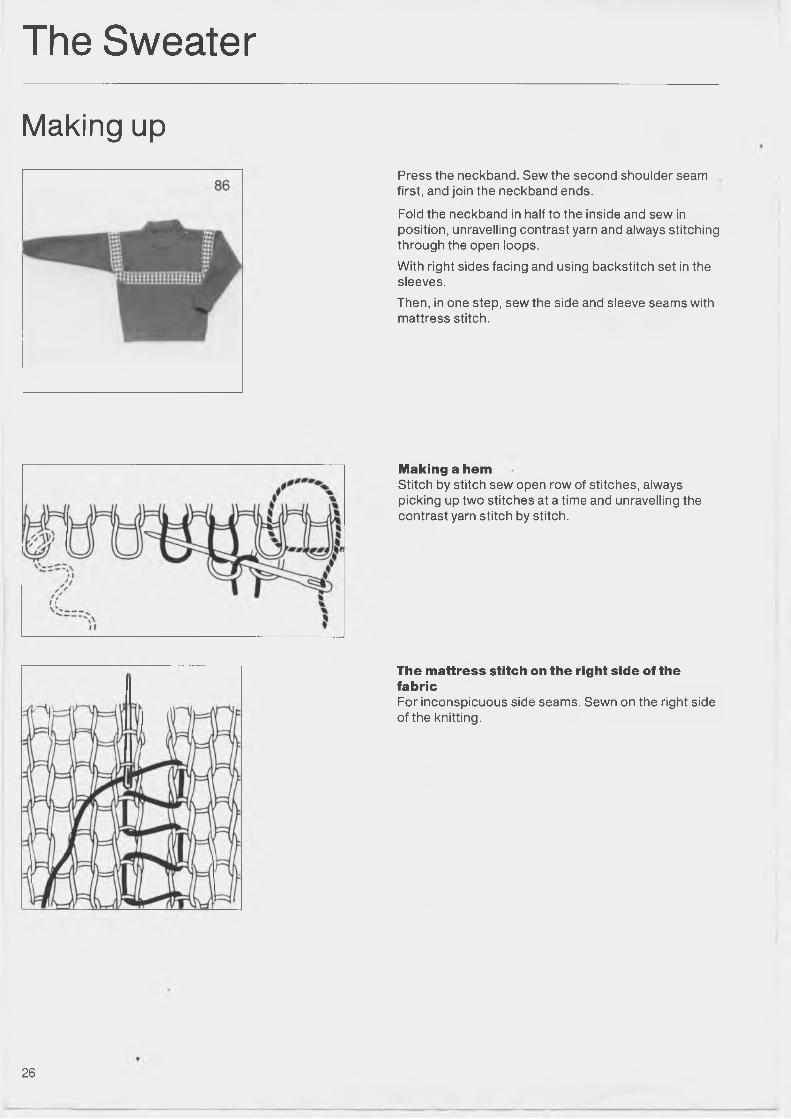
Making upPress the neckband. Sew the second shoulder seam first, and join the neckband ends.
Fold the neckband in half to the inside and sew in position, unravelling contrast yarn and always stitching through the open loops.With right sides facing and using backstitch set in the sleeves.Then, in one step, sew the side and sleeve seams with mattress stitch.
Making a hemStitch by stitch sew open row of stitches, always picking up two stitches at a time and unravelling the contrast yarn stitch by stitch.
The mattress stitch on the right side of the fabricFor inconspicuous side seams. Sewn on the right side of the knitting.
26
Casting on
Shaping techniquesIn the following section we are setting out once again all you need to know about shaping as well as the working principles you have already learnt while knitting the sweater.
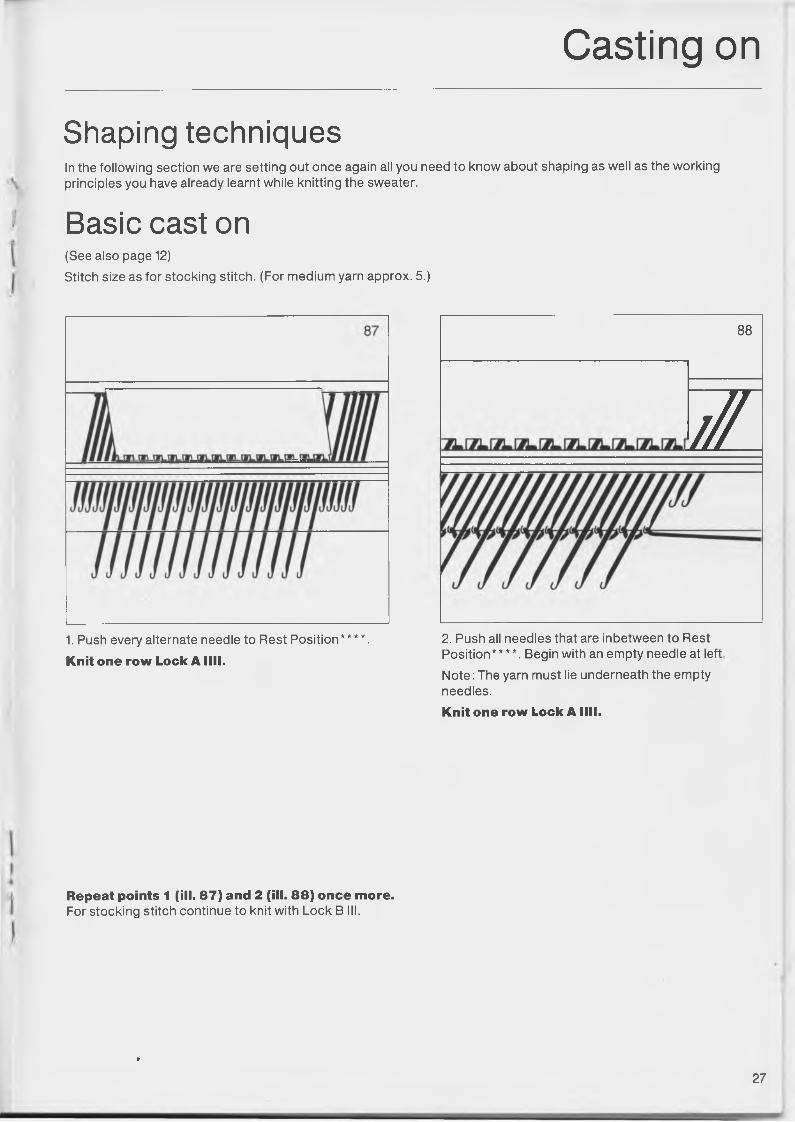
Basic cast on(See also page 12)Stitch size as for stocking stitch. (For medium yarn approx. 5.)
88
w .
1. Push every alternate needle to Rest Position****. Knit one row Lock A Mil.
2. Push all needles that are inbetween to Rest Position****. Begin with an empty needle at leftNote: The yarn must lie underneath the empty needles.Knit one row Lock A MM.
Repeat points 1 (ill. 87) and 2 (ill. 88) once more.For stocking stitch continue to knit with Lock B III.
♦
27
Casting on
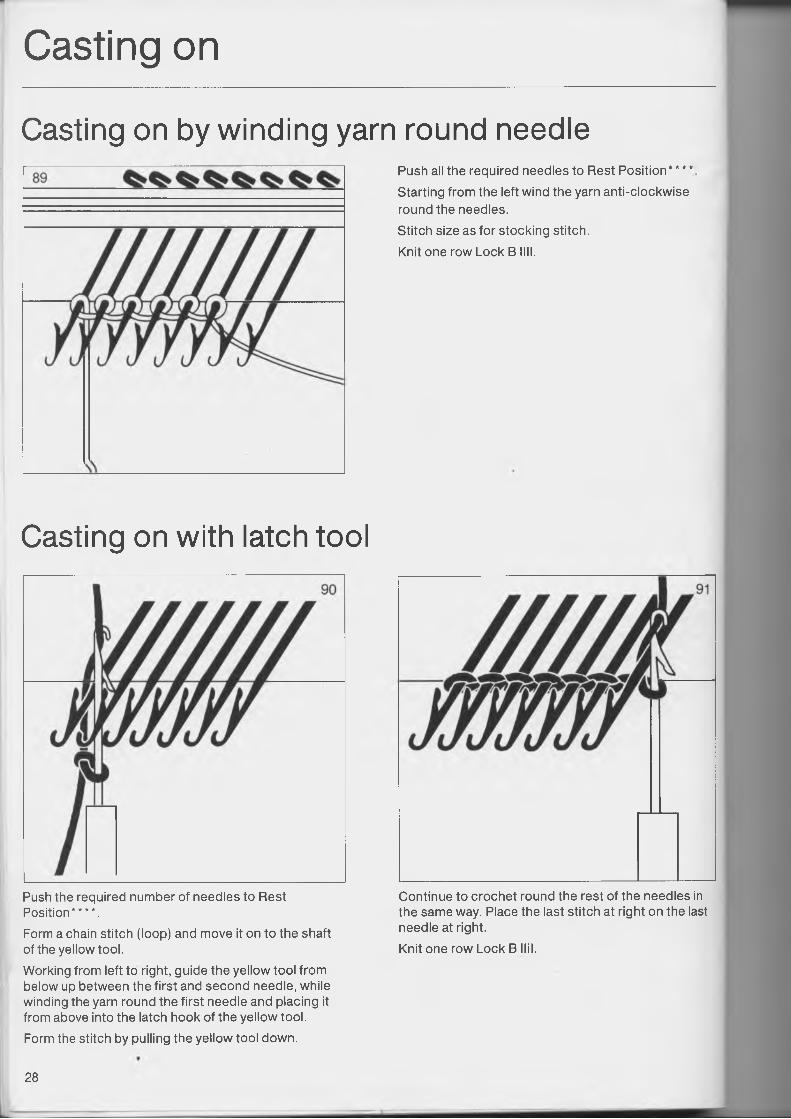
Casting on by winding yarn round needlePush all the required needles to Rest Position**** Starting from the left wind the yarn anti-clockwise round the needles.Stitch size as for stocking stitch.Knit one row Lock B INI.
Casting on with latch tool
Push the required number of needles to Rest Position****.Form a chain stitch (loop) and move it on to the shaft of the yellow tool.Working from left to right, guide the yellow tool from below up between the first and second needle, while winding the yarn round the first needle and placing it from above into the latch hook of the yellow tool.Form the stitch by pulling the yellow tool down.
Continue to crochet round the rest of the needles in the same way. Place the last stitch at right on the last needle at right.Knit one row Lock B Nil.
28
Decreasing
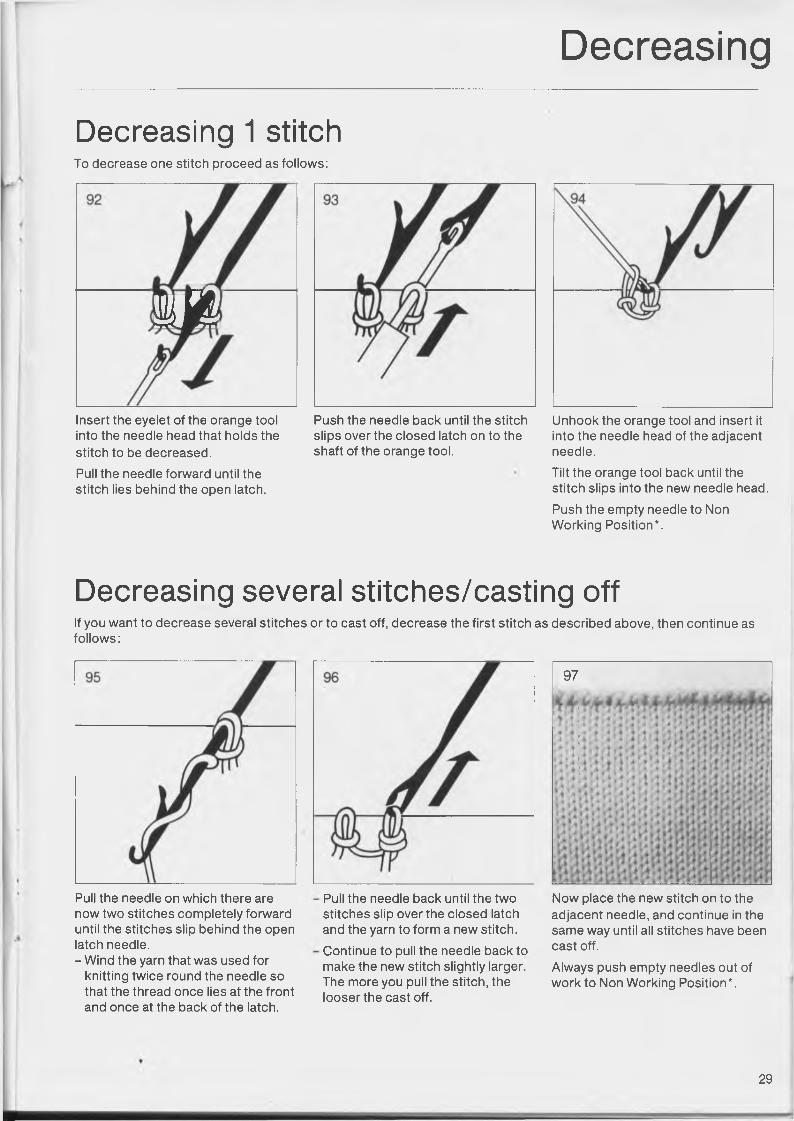
Decreasing 1 stitchTo decrease one stitch proceed as follows:
m l
Insert the eyelet of the orange tool into the needle head that holds the stitch to be decreased.Pull the needle forward until the stitch lies behind the open latch.
Push the needle back until the stitch slips over the closed latch on to the shaft of the orange tool.
Unhook the orange tool and insert it into the needle head of the adjacent needle.Tilt the orange tool back until the stitch slips into the new needle head.Push the empty needle to Non Working Position*.
Decreasing several stitches/casting offIf you want to decrease several stitches or to cast off, decrease the first stitch as described above, then continue as follows:
Pull the needle on which there are now two stitches completely forward until the stitches slip behind the open latch needle.- Wind the yarn that was used for
knitting twice round the needle so that the thread once lies at the front and once at the back of the latch.
Pull the needle back until the two stitches slip over the closed latch and the yarn to form a new stitch.Continue to pull the needle back to make the new stitch slightly larger. The more you pull the stitch, the looser the cast off.
97
Now place the new stitch on to the adjacent needle, and continue in the same way until all stitches have been cast off.Always push empty needles out of work to Non Working Position*.
29
Decreasing/Increasing
Decreasing 1 stitch using triple decker tool
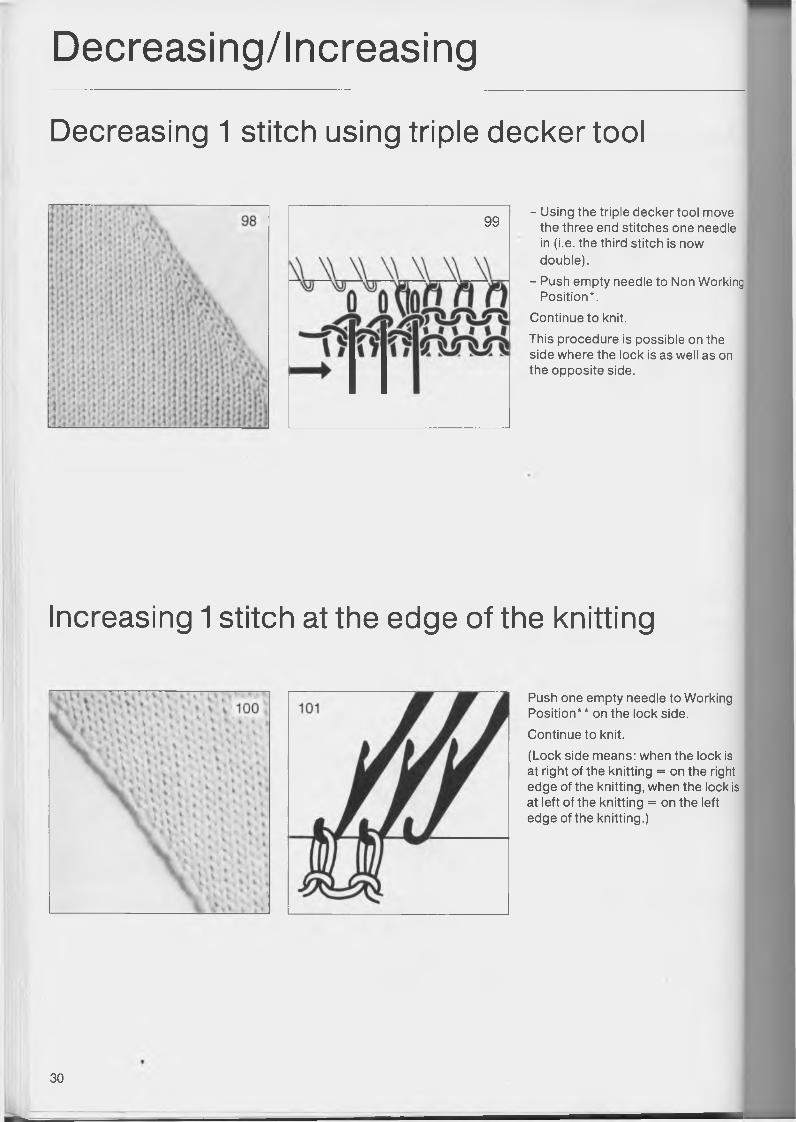
99- Using the triple decker tool move
the three end stitches one needle in (i.e. the third stitch is now double).
- Push empty needle to Non Working Position*.
Continue to knit.This procedure is possible on the side where the lock is as well as on the opposite side.
Increasing 1 stitch at the edge of the knitting
Push one empty needle to Working Position* * on the lock side.Continue to knit.(Lock side means: when the lock is at right of the knitting = on the right edge of the knitting, when the lock is at left of the knitting = on the left edge of the knitting.)
30
Increasing
Increasing 1 stitch using triple decker tool
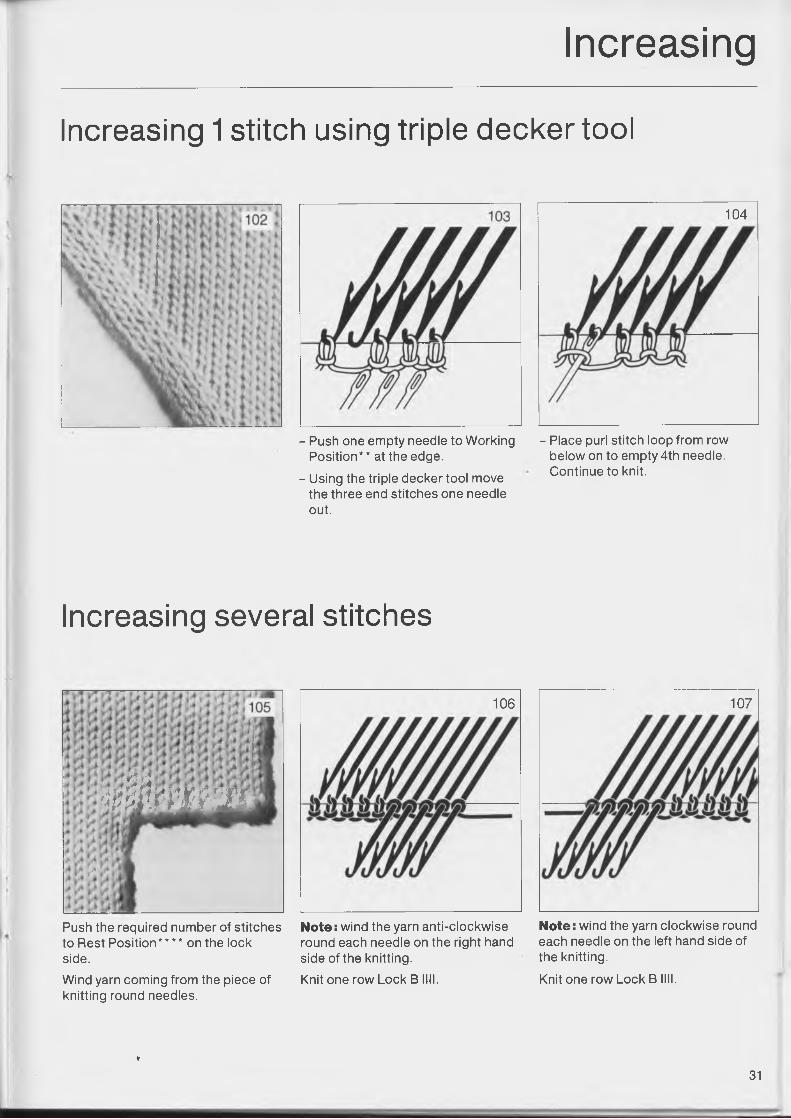
- Push one empty needle to Working Position** at the edge.
- Using the triple decker tool move the three end stitches one needle out.
104
- Place purl stitch loop from row below on to empty 4th needle. Continue to knit.
Increasing several stitches
106 107
Push the required number of stitches to Rest Position* * * * on the lock side.Wind yarn coming from the piece of knitting round needles.
Note: wind the yarn anti-clockwise round each needle on the right hand side of the knitting.Knit one row Lock B INI.
Note: wind the yarn clockwise round each needle on the left hand side of the knitting.
Knit one row Lock B INI.
m M m w .
*•*
t
31
Rest Position
The needles in Rest Position* * * *When the needles are in Rest Position* * * * the stitches remain on them without being knitted off.
Automatic needle returnIf on a row you want all needles so far in Rest Position * * * * to be working again, you can knit them off again automatically by using the return dial Mil.
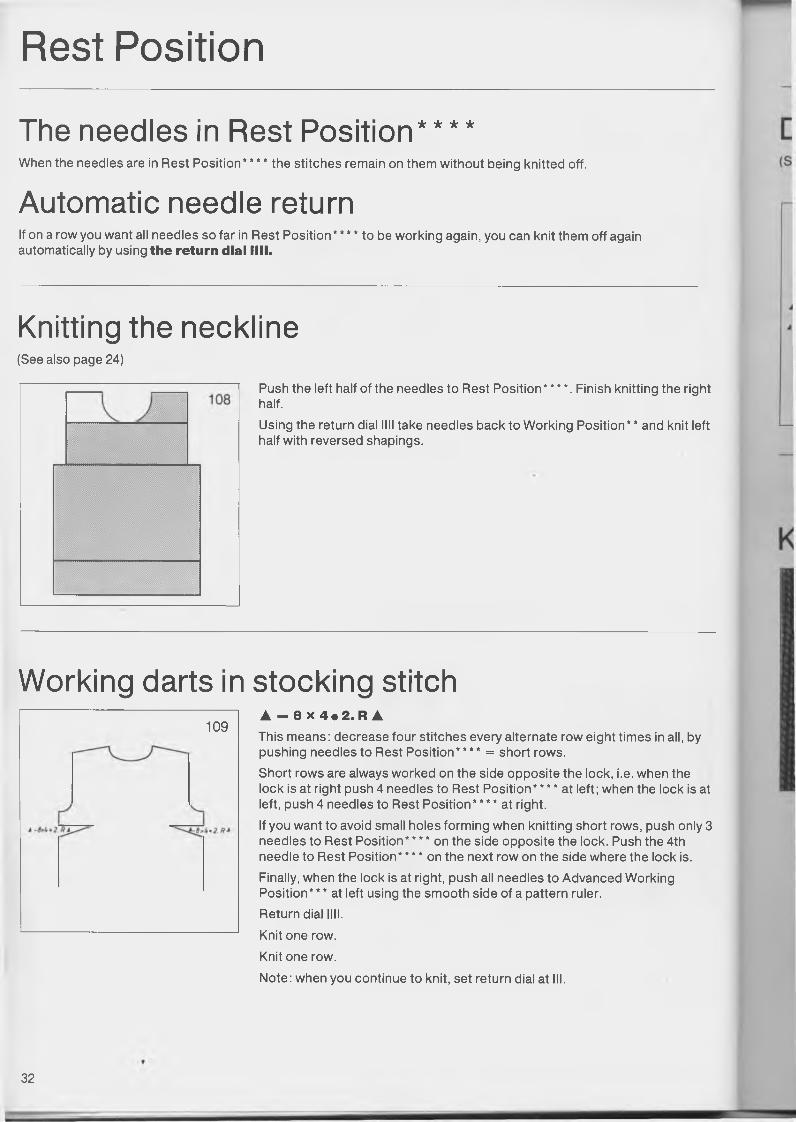
Knitting the neckline(See also page 24)
Push the left half of the needles to Rest Position****. Finish knitting the right half.Using the return dial INI take needles back to Working Position** and knit left half with reversed shapings.
Working darts in stocking stitchA — 8 X 4 * 2 . R AThis means: decrease four stitches every alternate row eight times in all, by pushing needles to Rest Position**** = short rows.Short rows are always worked on the side opposite the lock, i.e. when the lock is at right push 4 needles to Rest Position**** at left; when the lock is at left, push 4 needles to Rest Position**** at right.If you want to avoid small holes forming when knitting short rows, push only 3 needles to Rest Position* * * * on the side opposite the lock. Push the 4th needle to Rest Position* * * * on the next row on the side where the lock is.Finally, when the lock is at right, push all needles to Advanced Working Position*** at left using the smooth side of a pattern ruler.Return dial INI.Knit one row.Knit one row.Note: when you continue to knit, set return dial at III.
109
32
Rest Position
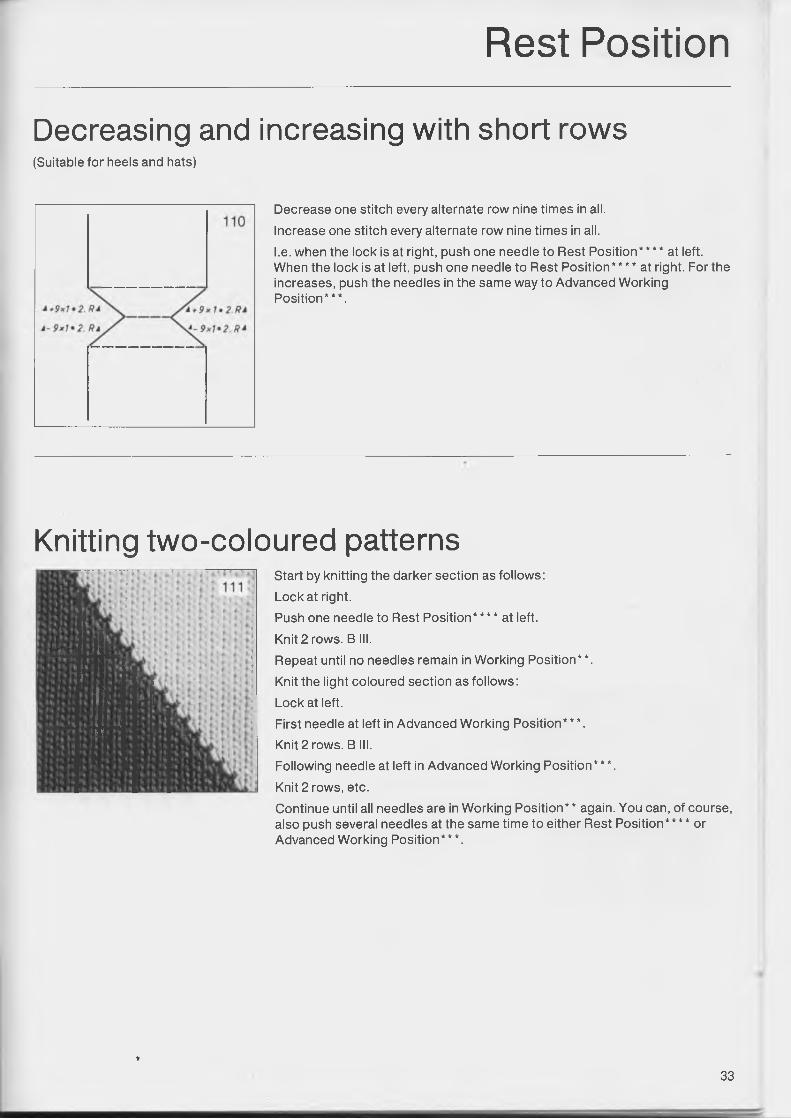
Decreasing and increasing with short rows(Suitable for heels and hats)
Decrease one stitch every alternate row nine times in all.Increase one stitch every alternate row nine times in all.I.e. when the lock is at right, push one needle to Rest Position**** at left. When the lock is at left, push one needle to Rest Position**** at right. For the increases, push the needles in the same way to Advanced Working Position***.
Knitting two-coloured patternsStart by knitting the darker section as follows:Lock at right.Push one needle to Rest Position**** at left.Knit 2 rows. B III.Repeat until no needles remain in Working Position**.Knit the light coloured section as follows:Lock at left.First needle at left in Advanced Working Position***.Knit 2 rows. B III.Following needle at left in Advanced Working Position * * *.Knit 2 rows, etc.Continue until all needles are in Working Position* * again. You can, of course, also push several needles at the same time to either Rest Position**** or Advanced Working Position * * *.
♦
33
Buttonhole
Horizontal buttonhole
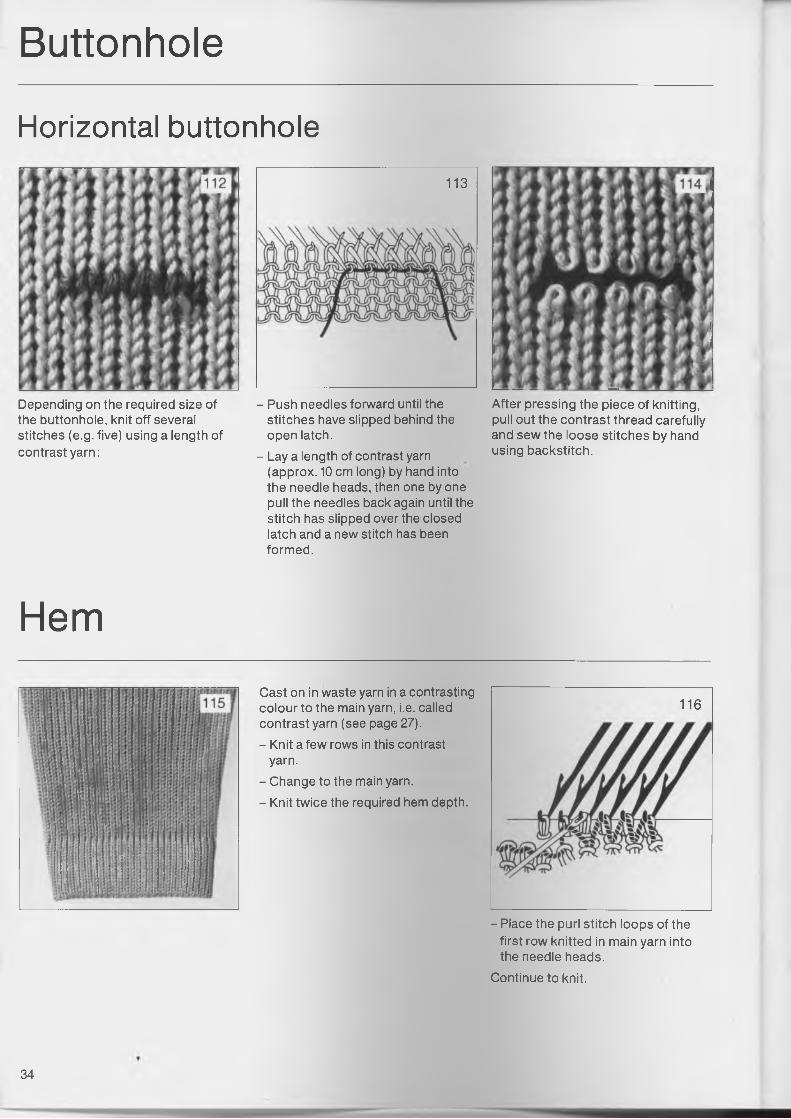
Depending on the required size of the buttonhole, knit off several stitches (e.g. five) using a length of contrast yarn:
Hem
34
113
- Push needles forward until the stitches have slipped behind the open latch.
- Lay a length of contrast yarn (approx. 10 cm long) by hand into the needle heads, then one by one pull the needles back again until the stitch has slipped over the closed latch and a new stitch has been formed.
Cast on in waste yarn in a contrasting colour to the main yarn, i.e. called contrast yarn (see page 27).- Knit a few rows in this contrast
yarn.- Change to the main yarn.- Knit twice the required hem depth.
After pressing the piece of knitting, pull out the contrast thread carefully and sew the loose stitches by hand using backstitch.
116
- Place the purl stitch loops of the first row knitted in main yarn into the needle heads.
Continue to knit.
Test squareTo knit your own designs, it is absolutely vital that you make a test square first, for only thus can you work out the number of stitches and rows you will have to knit.A test square is always knitted in the yarn, the pattern, the stitch size, and the yarn tension you will be using for your garment.How to choose the stitch size is explained on pages 11-15.Knit 100 rows with 100 stitches, for only a test square of this size will ensure the accuracy of your calculations.Casting on and off always with contrast yarn.After casting on knit approx. 6 to 10 rows in contrast yarn, before changing to your main yarn. Then, before you release your knitting, change back to contrast yarn. Knit 10 to 12 rows and release.In the case of materials which need pressing under a damp cloth, press your test square first, and then measure it.When using synthetic yarns it is advisable to measure the test square before pressing it, in order to see how the material reacts. If you liked the texture of the fabric better before pressing it, then use the measurements you took before pressing. Otherwise, measure the test square again after pressing it, as the measurements may well have altered. It is always a good thing to let the test square rest for 24 hours before measuring it.
♦
35
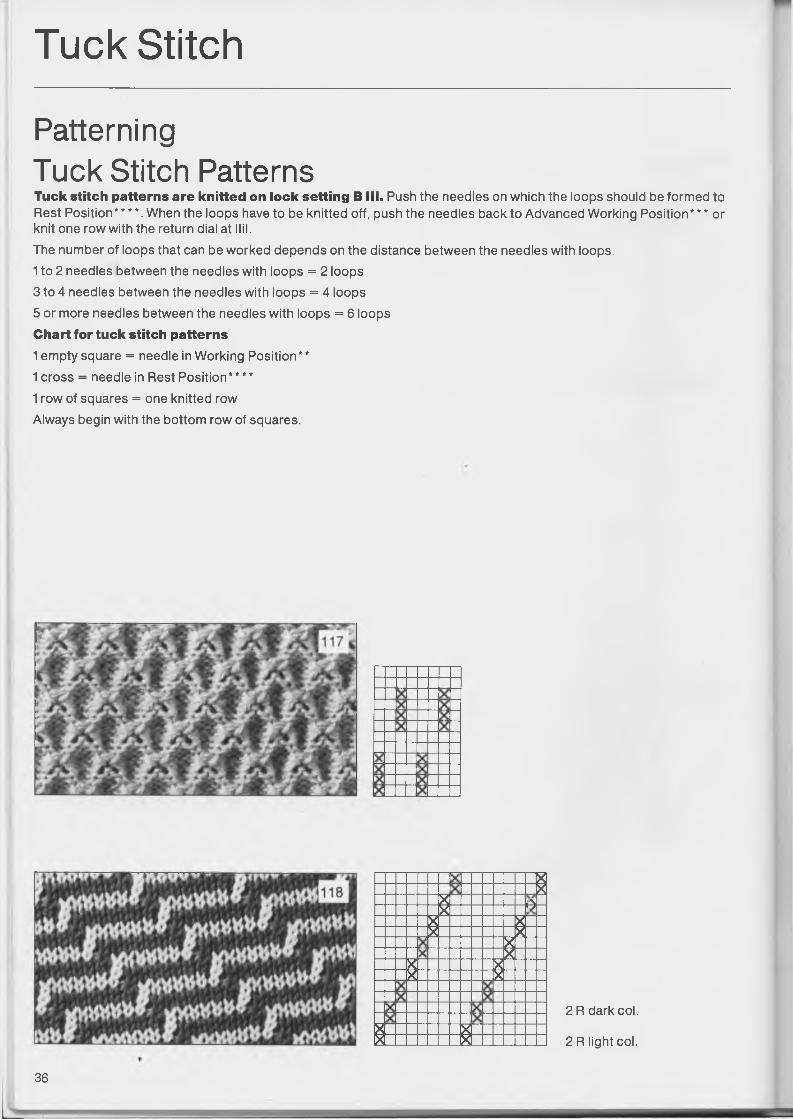
Tuck Stitch
Patterning Tuck Stitch PatternsTuck stitch patterns are knitted on lock setting B III. Push the needles on which the loops should be formed to Rest Position * * * *. When the loops have to be knitted off, push the needles back to Advanced Working Position * * * or knit one row with the return dial at Mil.The number of loops that can be worked depends on the distance between the needles with loops.1 to 2 needles between the needles with loops = 2 loops 3 to 4 needles between the needles with loops = 4 loops 5 or more needles between the needles with loops = 6 loops Chart for tuck stitch patterns
1 empty square = needle in Working Position * *1 cross = needle in Rest Position****1 row of squares = one knitted row Always begin with the bottom row of squares.
I1
II
I
I1I■>
1
2 R dark col.
2 R light col.
36
Tuck Stitch
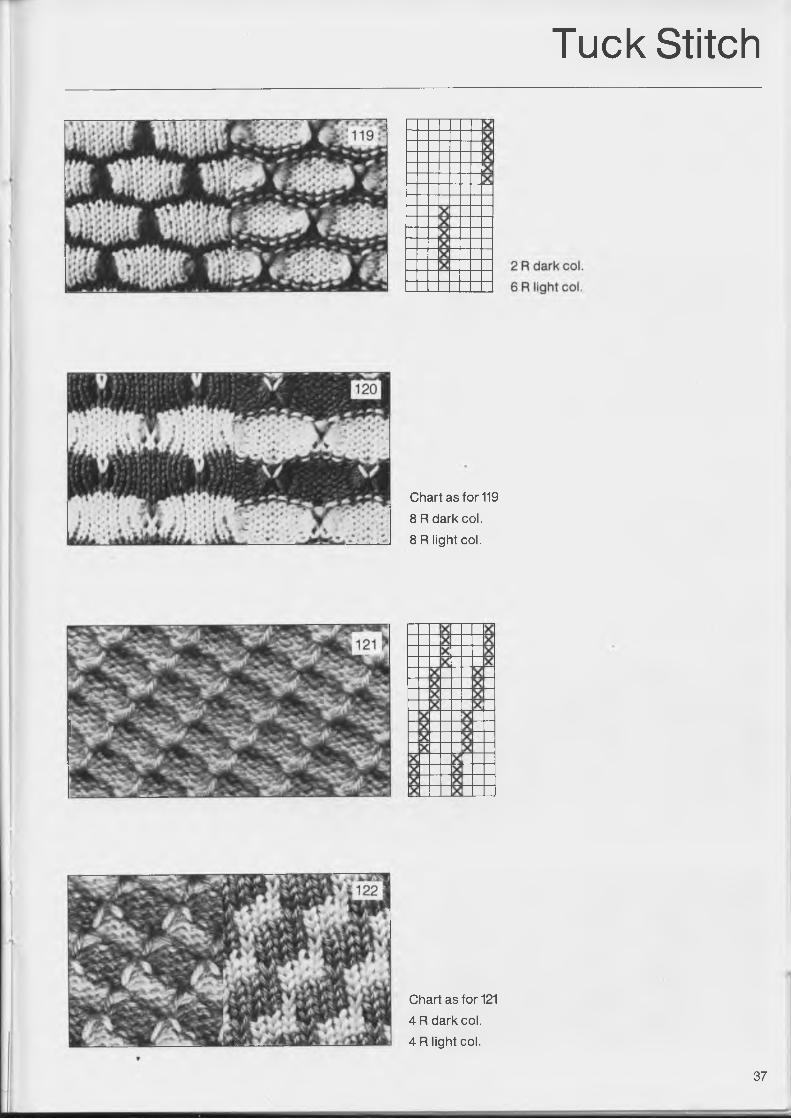
Chart as for 119 8 R dark col.8 R light col.
Chart as for 121 4 R dark col.4 R light col.
37
Tuck Stitch
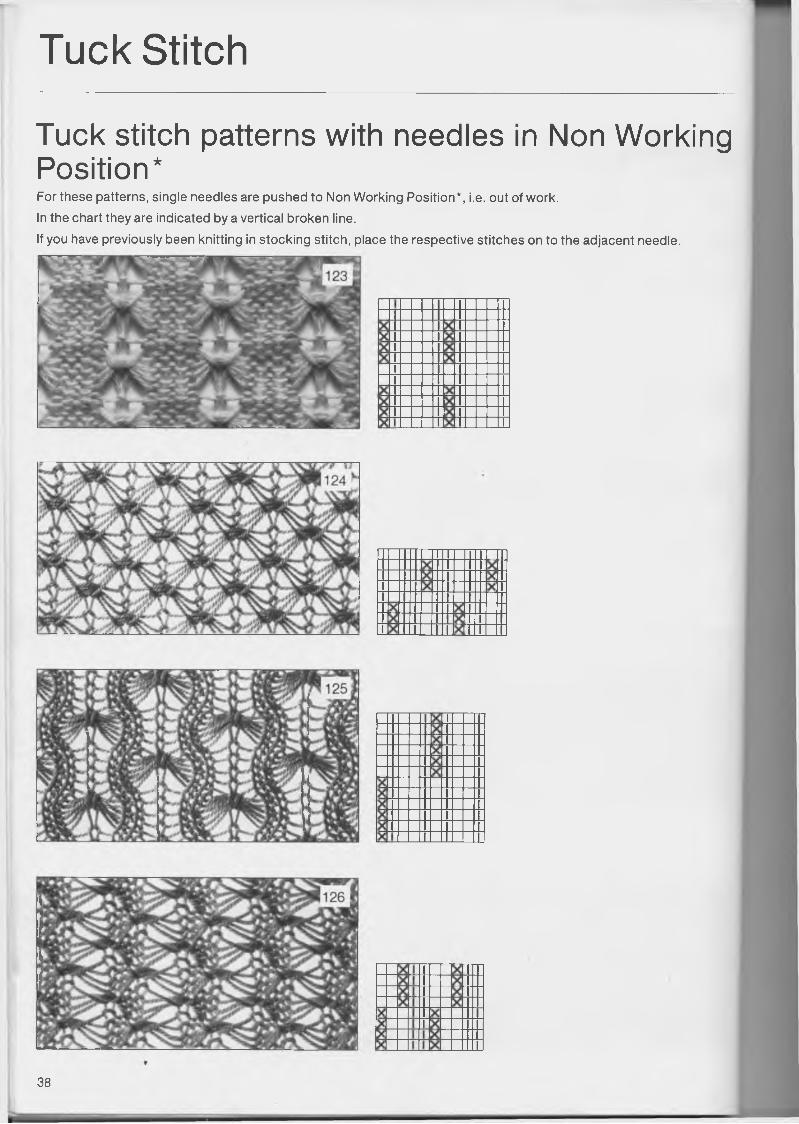
Tuck stitch patterns with needles in Non Working Position*For these patterns, single needles are pushed to Non Working Position*, i.e. out of work.In the chart they are indicated by a vertical broken line.If you have previously been knitting in stocking stitch, place the respective stitches on to the adjacent needle.
38
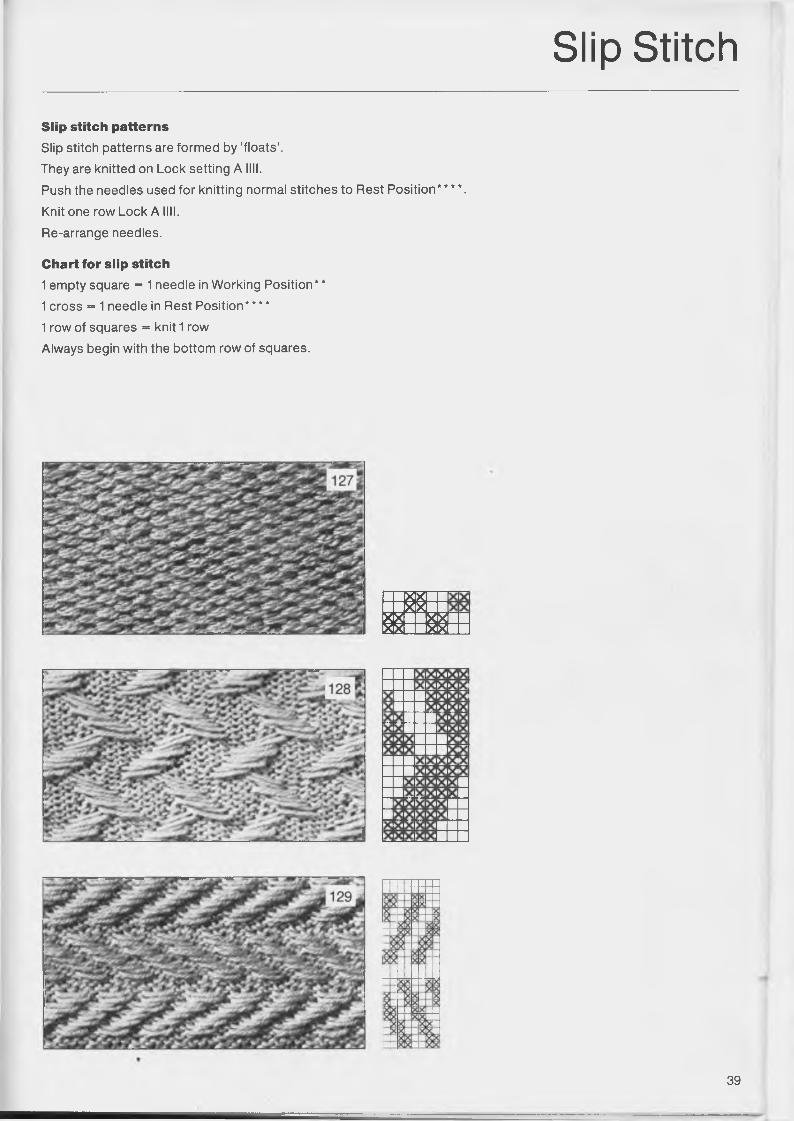
Slip StitchSlip stitch patternsSlip stitch patterns are formed by ‘floats’.They are knitted on Lock setting A llll.Push the needles used for knitting normal stitches to Rest Position****. Knit one row Lock A llll.Re-arrange needles.
Chart for slip stitch1 empty square = 1 needle in Working Position * *1 cross = 1 needle in Rest Position****1 row of squares = knit 1 rowAlways begin with the bottom row of squares.
8£& 88
39
Fairisle
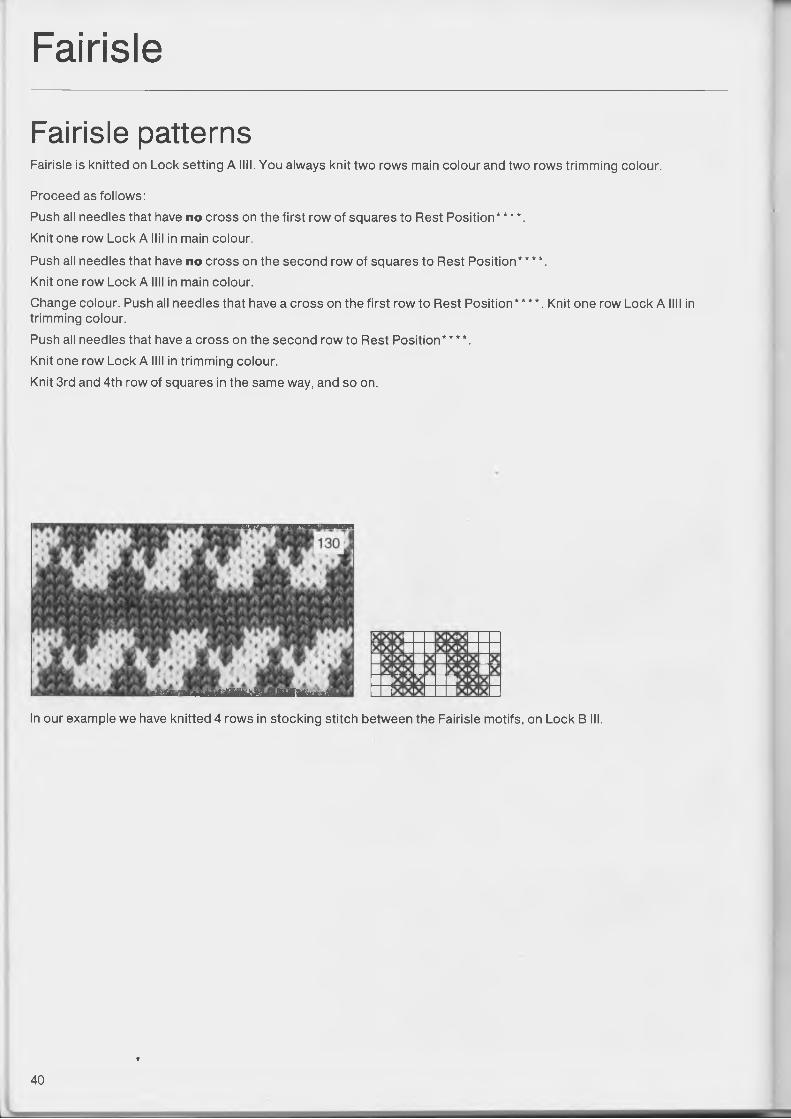
Fairisle patternsFairisle is knitted on Lock setting A INI. You always knit two rows main colour and two rows trimming colour.
Proceed as follows:Push all needles that have no cross on the first row of squares to Rest Position****.Knit one row Lock A Nil in main colour.
Push all needles that have no cross on the second row of squares to Rest Position****.Knit one row Lock A INI in main colour.Change colour. Push all needles that have a cross on the first row to Rest Position****. Knit one row Lock A INI in trimming colour.Push all needles that have a cross on the second row to Rest Position****.Knit one row Lock A INI in trimming colour.Knit 3rd and 4th row of squares in the same way, and so on.
In our example we have knitted 4 rows in stocking stitch between the Fairisle motifs, on Lock B III.
40
♦
Fairisle in Tuck Stitch
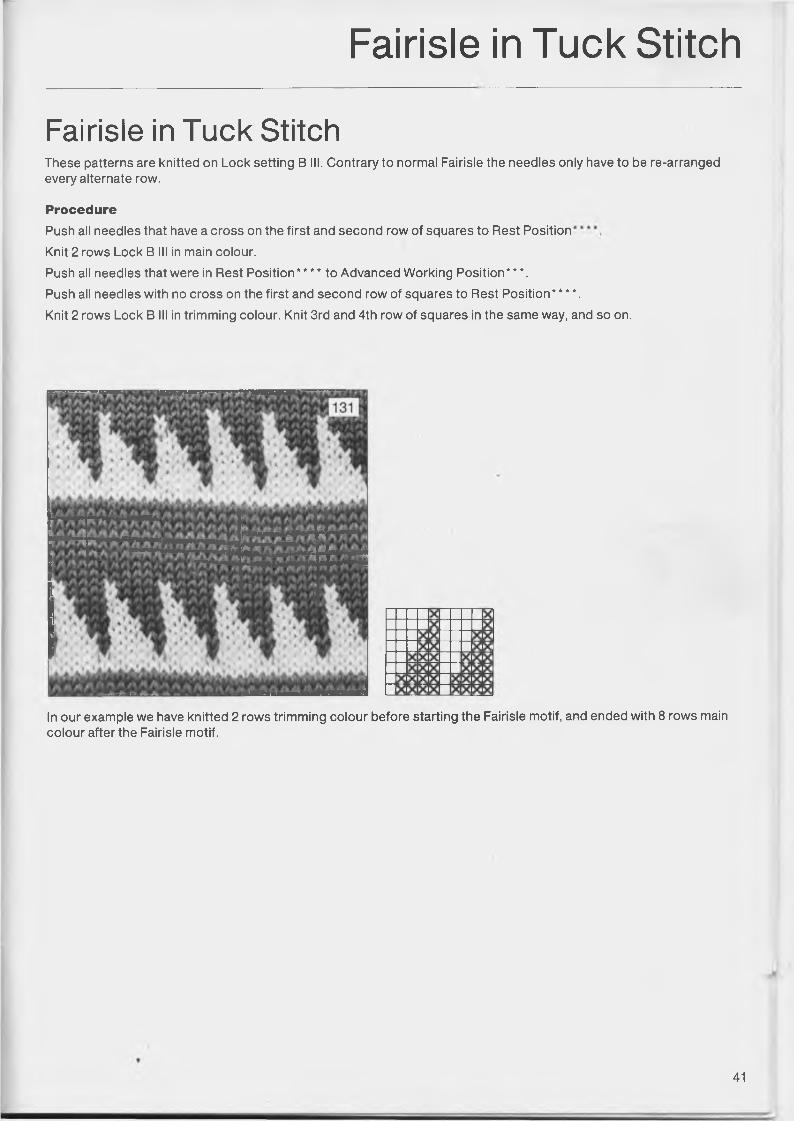
Fairisle in Tuck StitchThese patterns are knitted on Lock setting B III. Contrary to normal Fairisle the needles only have to be re-arranged every alternate row.
ProcedurePush all needles that have a cross on the first and second row of squares to Rest Position Knit 2 rows Lock B III in main colour.Push all needles that were in Rest Position**** to Advanced Working Position***.Push all needles with no cross on the first and second row of squares to Rest Position****.Knit 2 rows Lock B III in trimming colour. Knit 3rd and 4th row of squares in the same way, and so on.
In our example we have knitted 2 rows trimming colour before starting the Fairisle motif, and ended with 8 rows main colour after the Fairisle motif.
41
Intarsia
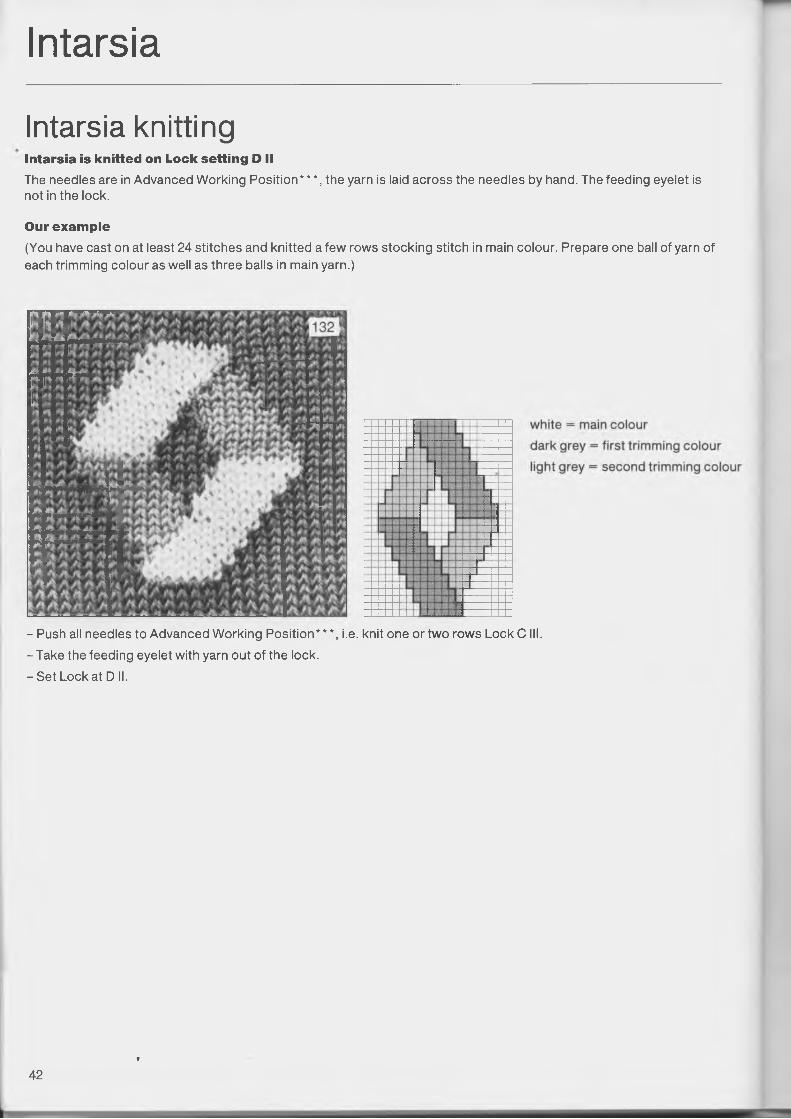
Intarsia knittingIntarsia is knitted on Lock setting D IIThe needles are in Advanced Working Position***, the yarn is laid across the needles by hand. The feeding eyelet is not in the lock.
Our example(You have cast on at least 24 stitches and knitted a few rows stocking stitch in main colour. Prepare one ball of yarn of each trimming colour as well as three balls in main yarn.)
- Push all needles to Advanced Working Position***, i.e. knit one or two rows Lock C III.- Take the feeding eyelet with yarn out of the lock.- Set Lock at D II.
42t
Intarsia
_______________________________________135
W 0 h
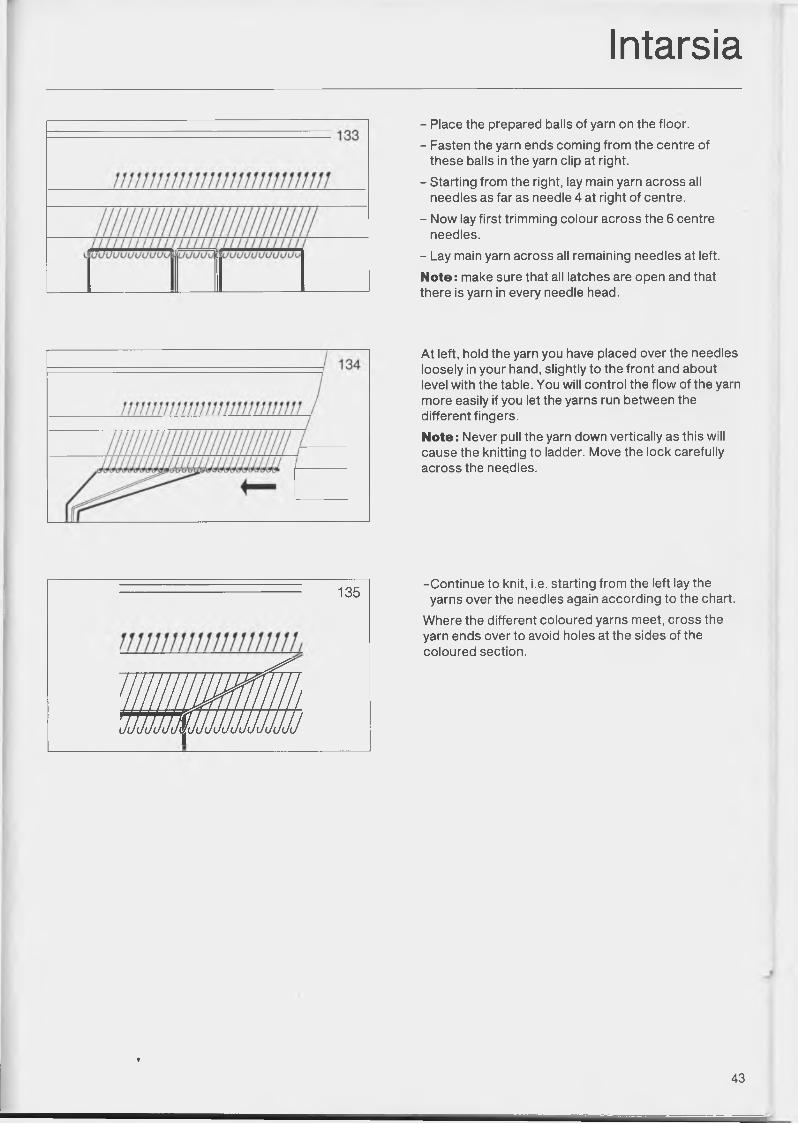
- Place the prepared balls of yarn on the floor.- Fasten the yarn ends coming from the centre of
these balls in the yarn clip at right.- Starting from the right, lay main yarn across all
needles as far as needle 4 at right of centre.- Now lay first trimming colour across the 6 centre
needles.- Lay main yarn across all remaining needles at left.Note: make sure that all latches are open and that there is yarn in every needle head.
At left, hold the yarn you have placed over the needles loosely in your hand, slightly to the front and about level with the table. You will control the flow of the yarn more easily if you let the yarns run between the different fingers.Note: Never pull the yarn down vertically as this will cause the knitting to ladder. Move the lock carefully across the needles.
-Continue to knit, i.e. starting from the left lay the yarns over the needles again according to the chart.
Where the different coloured yarns meet, cross the yarn ends over to avoid holes at the sides of the coloured section.
t
43
Double Rows
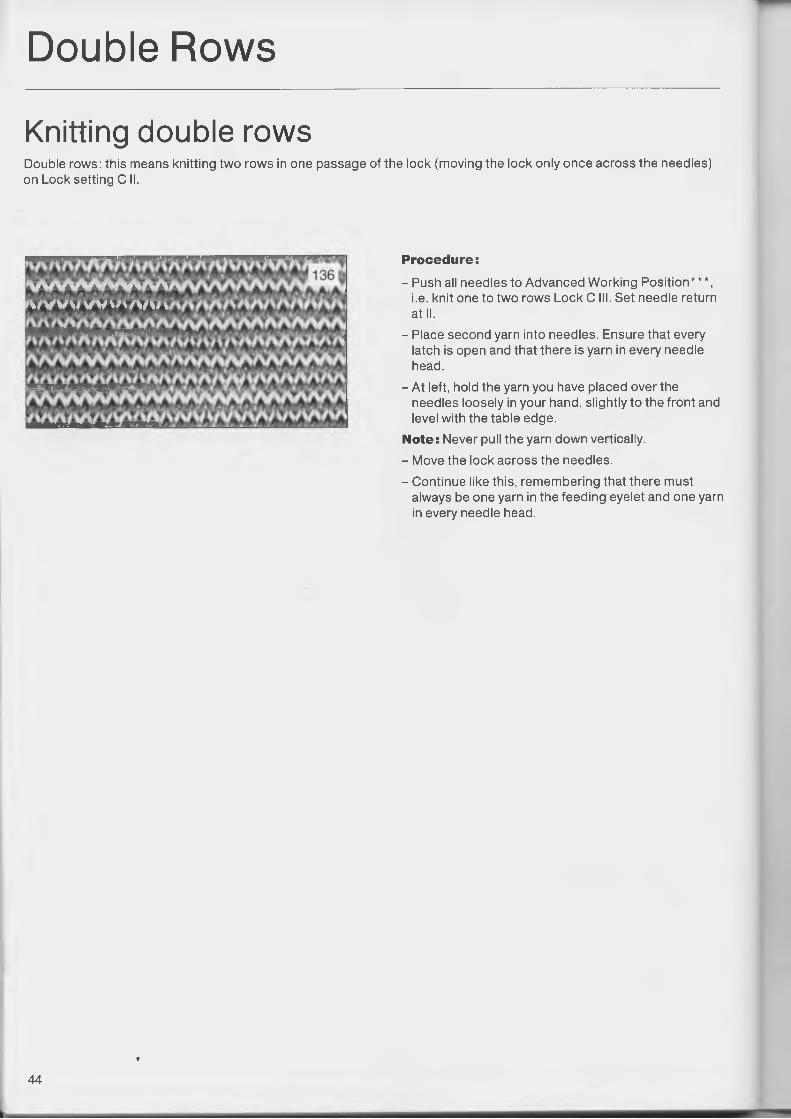
Knitting double rowsDouble rows: this means knitting two rows in one passage of the lock (moving the lock only once across the needles) on Lock setting CII.
Procedure:
- Push all needles to Advanced Working Position***,i.e. knit one to two rows Lock C III. Set needle return at II.
- Place second yarn into needles. Ensure that every latch is open and that there is yarn in every needle head.
- At left, hold the yarn you have placed over the needles loosely in your hand, slightly to the front and level with the table edge.
Note: Never pull the yarn down vertically.- Move the lock across the needles.- Continue like this, remembering that there must
always be one yarn in the feeding eyelet and one yarn in every needle head.
r W V W W W t A / W v
44
♦
’
Double Intarsia
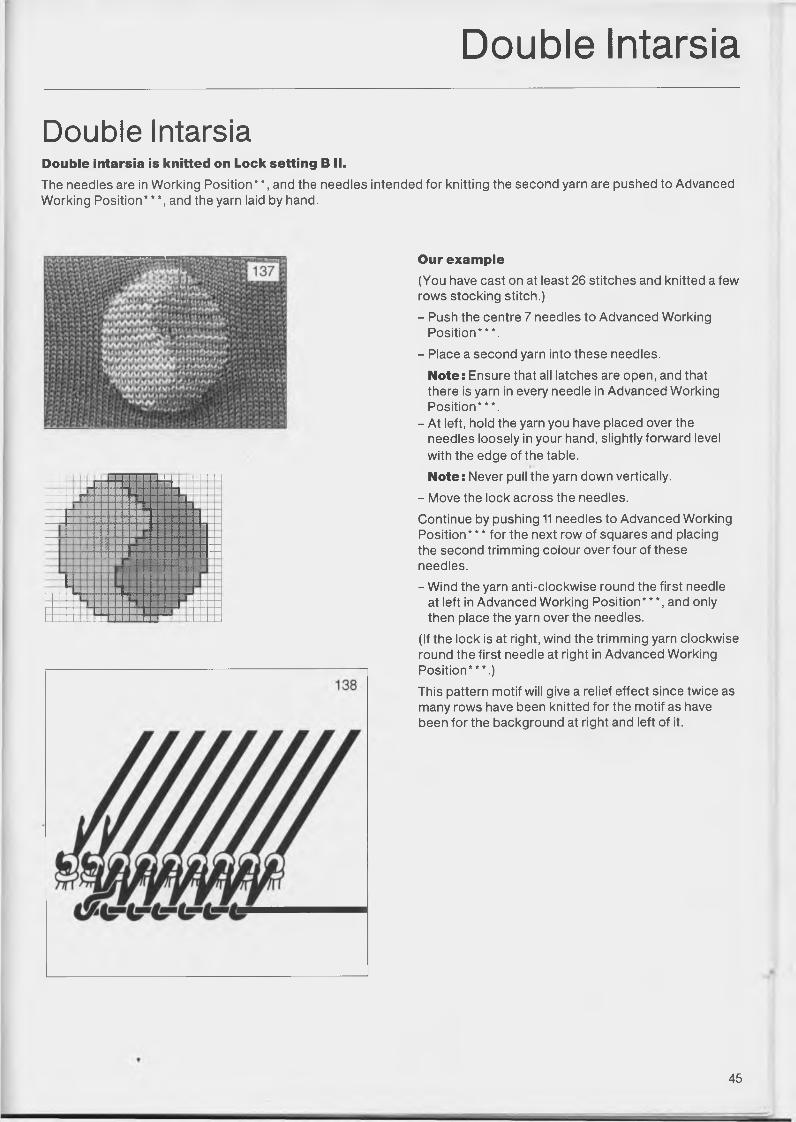
Double IntarsiaDouble intarsia is knitted on Lock setting BII.The needles are in Working Position**, and the needles intended for knitting the second yarn are pushed to Advanced Working Position***, and the yarn laid by hand.
Our example(You have cast on at least 26 stitches and knitted a few rows stocking stitch.)- Push the centre 7 needles to Advanced Working
Position***.- Place a second yarn into these needles.
Note: Ensure that all latches are open, and that there is yarn in every needle in Advanced Working Position***.
- At left, hold the yarn you have placed over the needles loosely in your hand, slightly forward level with the edge of the table.Note: Never pull the yarn down vertically.
- Move the lock across the needles.Continue by pushing 11 needles to Advanced Working Position * * * for the next row of squares and placing the second trimming colour over four of these needles.- Wind the yarn anti-clockwise round the first needle
at left in Advanced Working Position * * *, and only then place the yarn over the needles.
(If the lock is at right, wind the trimming yarn clockwise round the first needle at right in Advanced Working Position***.)This pattern motif will give a relief effect since twice as many rows have been knitted for the motif as have been for the background at right and left of it.
45
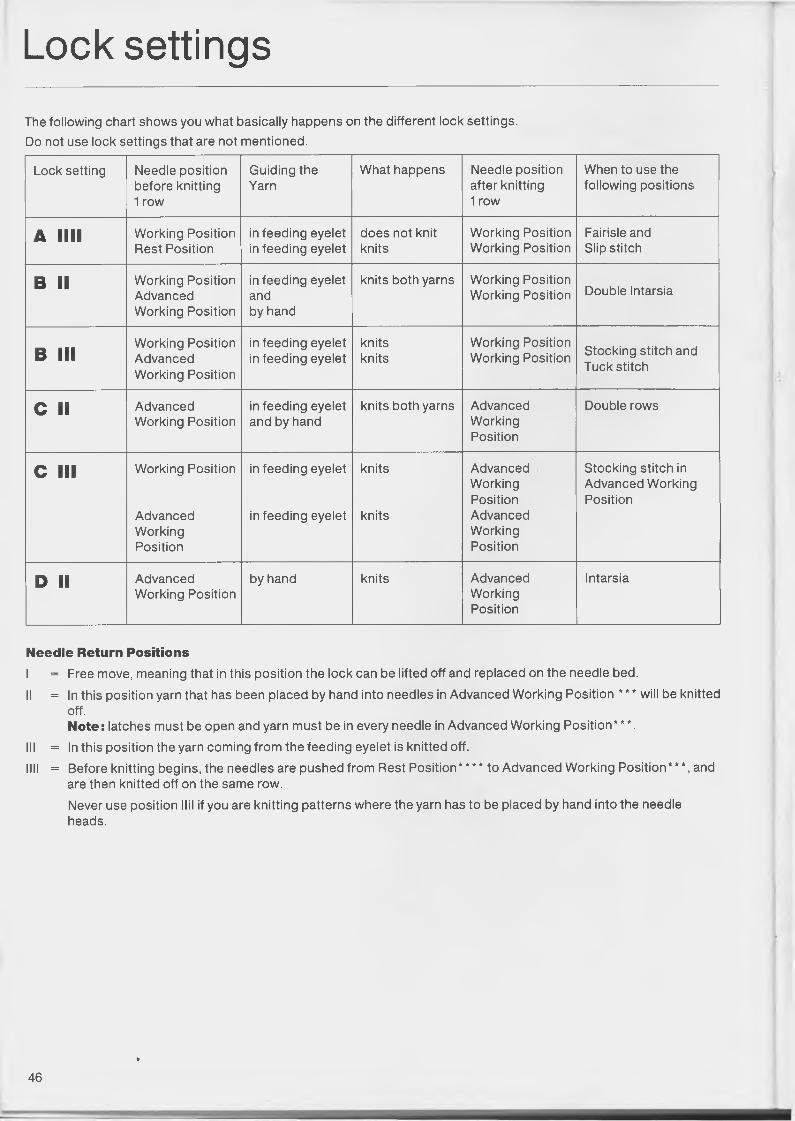
Lock settingsThe following chart shows you what basically happens on the different lock settings. Do not use lock settings that are not mentioned.
Lock setting Needle position before knitting 1 row
Guiding the Yarn
What happens Needle position after knitting 1 row
When to use the following positions
A llll Working Position Rest Position
in feeding eyelet in feeding eyelet
does not knit knits
Working Position Working Position
Fairisle and Slip stitch
B II Working Position Advanced Working Position
in feeding eyelet andby hand
knits both yarns Working Position Working Position Double Intarsia
B IIIWorking Position Advanced Working Position
in feeding eyelet in feeding eyelet
knitsknits
Working Position Working Position Stocking stitch and
Tuck stitch
C II Advanced Working Position
in feeding eyelet and by hand
knits both yarns AdvancedWorkingPosition
Double rows
C III Working Position
AdvancedWorkingPosition
in feeding eyelet
in feeding eyelet
knits
knits
AdvancedWorkingPositionAdvancedWorkingPosition
Stocking stitch in Advanced Working Position
D II Advanced Working Position
by hand knits AdvancedWorkingPosition
Intarsia
Needle Return PositionsI = Free move, meaning that in this position the lock can be lifted off and replaced on the needle bed.II = In this position yarn that has been placed by hand into needles in Advanced Working Position * * * will be knitted
off.Note: latches must be open and yarn must be in every needle in Advanced Working Position***.
III = In this position the yarn coming from the feeding eyelet is knitted off.INI = Before knitting begins, the needles are pushed from Rest Position**** to Advanced Working Position***, and
are then knitted off on the same row.Never use position Nil if you are knitting patterns where the yarn has to be placed by hand into the needle heads.
46f
Useful Hints
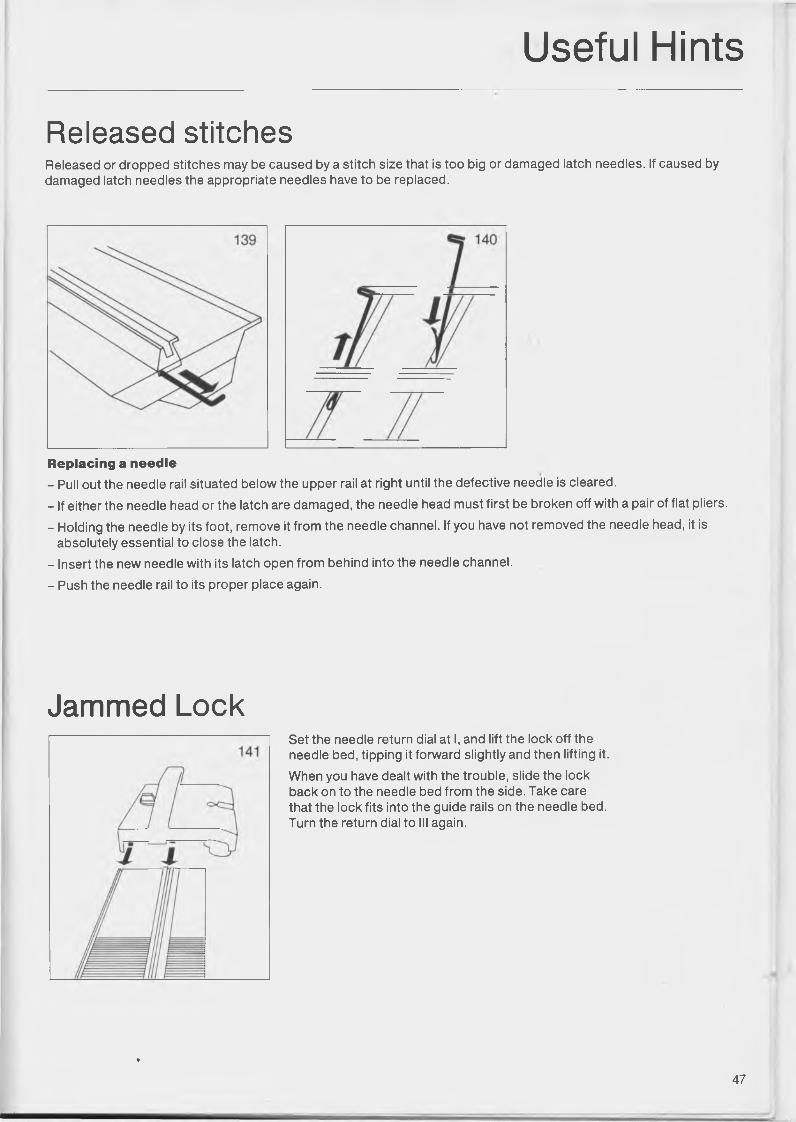
Released stitchesReleased or dropped stitches may be caused by a stitch size that is too big or damaged latch needles. If caused by damaged latch needles the appropriate needles have to be replaced.
Replacing a needle- Pull out the needle rail situated below the upper rail at right until the defective needle is cleared.- If either the needle head or the latch are damaged, the needle head must first be broken off with a pair of flat pliers.- Holding the needle by its foot, remove it from the needle channel. If you have not removed the needle head, it is
absolutely essential to close the latch.- Insert the new needle with its latch open from behind into the needle channel.- Push the needle rail to its proper place again.
Jammed LockSet the needle return dial at I, and lift the lock off the needle bed, tipping it forward slightly and then lifting it.When you have dealt with the trouble, slide the lock back on to the needle bed from the side. Take care that the lock fits into the guide rails on the needle bed. Turn the return dial to III again.
♦
47
Useful Hints
Cleaning Never clean the machine while there is a piece of knitting in it.Cleaning:Every time a garment is finished or daily if the machine is in constant use, proceed as follows:1. With a soft dry cloth wipe off all surplus oil, or oil that
has become black, from the lock and needle bed.2.With a dry brush remove remaining yarn fluff from
the needle bed and the interior of the lock.Special note:Never use petrol/gasoline on the plastic parts of your machine. Use soapy water instead.After cleaning oil again.
Special noteUse only Bellodor oil. Other qualities of oil may contain ingredients harmful to the plastic parts of the machine.
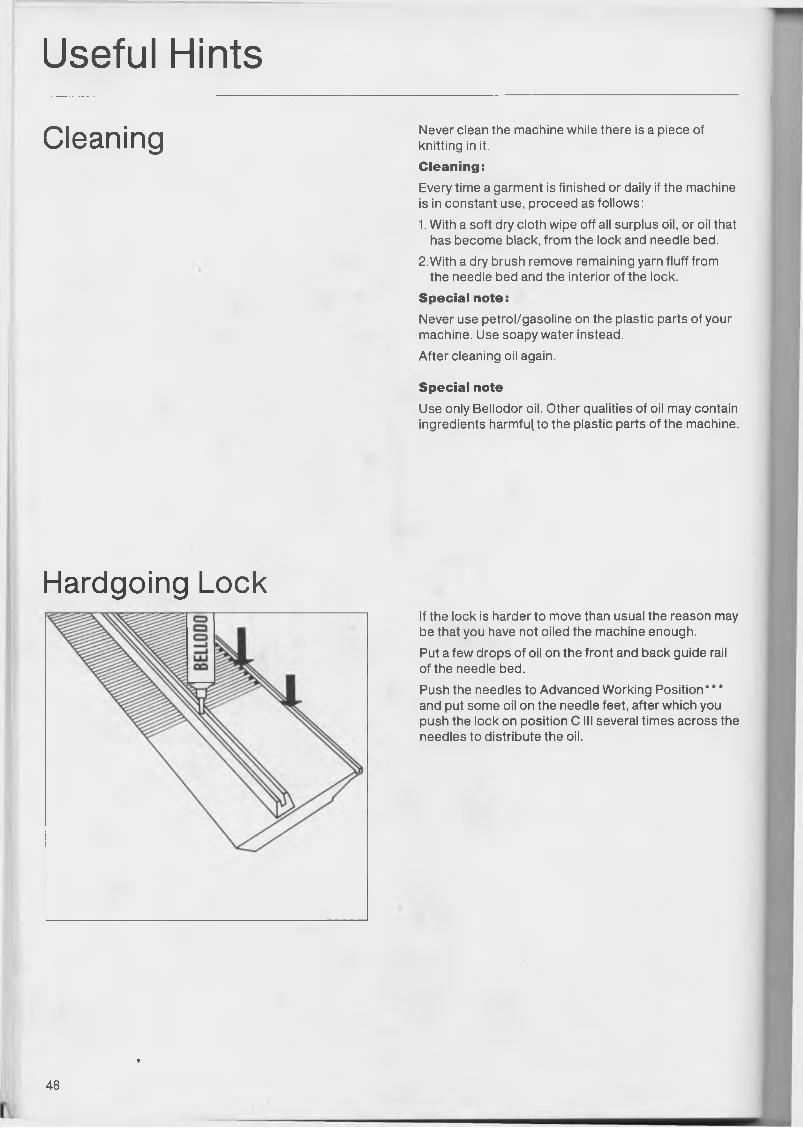
Hardgoing LockIf the lock is harder to move than usual the reason may be that you have not oiled the machine enough.Put a few drops of oil on the front and back guide rail of the needle bed.Push the needles to Advanced Working Position * * * and put some oil on the needle feet, after which you push the lock on position C III several times across the needles to distribute the oil.
48
*

Useful Hints
Cleaning Never clean the machine while there is a piece of knitting in it.Cleaning:Every time a garment is finished or daily if the machine is in constant use, proceed as follows:1. With a soft dry cloth wipe off all surplus oil, or oil that
has become black, from the lock and needle bed.2. With a dry brush remove remaining yarn fluff from
the needle bed and the interior of the lock.Special note:Never use petrol/gasoline on the plastic parts of your machine. Use soapy water instead.After cleaning oil again.
Special noteUse only Bellodor oil. Other qualities of oil may contain ingredients harmful,to the plastic parts of the machine.
Hardgoing LockIf the lock is harder to move than usual the reason may be that you have not oiled the machine enough.Put a few drops of oil on the front and back guide rail of the needle bed.Push the needles to Advanced Working Position* * * and put some oil on the needle feet, after which you push the lock on position C III several times across the needles to distribute the oil.
48
t