sybex ccna 640-802 chapter 5: managing a cisco internetwork 1
TRANSCRIPT

Sybex CCNA 640-802Chapter 5: Managing a Cisco
Internetwork
1

Chapter 5 Objectives
• Cisco Router Components• Boot Sequence• Configuration register• Backing up and restoring the IOS• Backing up and restoring the configuration• Cisco Discovery Protocol• Telnet• Resolving hostnames• Troubleshooting tools
2 2

Cisco Router Components
• Bootstrap– Brings up the router during initialization
• POST– Checks basic functionality; hardware & interfaces
• ROM monitor– Manufacturing testing & troubleshooting
• Mini-IOS– Loads Cisco IOS into flash memory
• RAM– Holds packet buffers, routing tables, & software– Stores running-config
3/252

Cisco Router Components (cont)
• ROM– Starts & maintains the router
• Flash Memory– Holds Cisco IOS– Not erased when the router is reloaded
• NVRAM– Holds router (& switch) configurations (startup-config)– Not erased when the router is reloaded
• Configuration Register– Controls how the router boots up
4

Boot Sequence
1: Router performs a POST
2: Bootstrap looks for & loads the Cisco IOS
3: IOS software looks for a valid configuration file
4: Startup-config file (from NVRAM) is loaded– If startup-config file is not found, the router will start the setup mode
5 /253

Configuration Registers• Register
– 16-bit software written into NVRAM– Loads from flash memory & looks for the startup-config file
• Configuration Register Bits– 16 bits read 15-0, from left to right– default setting: 0x2102
Register 2 1 0 2 ,Bit number 15 14 13 12 11 10 9 8 7 6 5 4 3 2 1 0Binary 0 0 1 0 0 0 0 1 0 0 0 0 0 0 1 0
6
• NOTE: 0x means the digits that follow are in hexadecimal• You read the numbers in the “Binary” (lower) line above as four groups of
four bits each.• Each group reads across: “8 4 2 1”, so in the binary line, the groups are:
• 0 0 1 0 = 2, 0 0 0 1 = 1, 0 0 0 0 = 0, and 0 0 1 0 = 2• The entire row, therefore, reads “2102”

Register 2 1 0 2 ,Bit number 15 14 13 12 11 10 9 8 7 6 5 4 3 2 1 0Binary 0 0 1 0 0 0 0 1 0 0 0 0 0 0 1 0
• The characters “0x” indicates that the following digits are in hexadecimal.
• Note that with reference to the config register, each hex character translates as a separate “nibble”, or a 4-bit, binary number.
• This is why the hex 0x2102 translates as the “Binary” line above
7 / 254
Configuration Registers (cont)

• The lowest four bits of the configuration register (bits 3, 2, 1, and 0) form the boot field. The order in which the switch/router looks for system bootstrap information depends on the boot field setting in the configuration register.
• When the boot field is set to either 0 or 1 (0-0-0-0 or 0-0-0-1), the system ignores any boot instructions in the system configuration file and the following occurs:– When the boot field is set to 1 you will boot from an IOS image stored
in ROM.– When the boot field is set to 0, you must boot the operating system
manually by giving a boot command to the system bootstrap program, or ROM monitor (ROMmon mode).
8
Configuration Registers (cont)

Configuration Registers (full text)
9 / 256

Checking the Register ValueRouter#sh version
Cisco Internetwork Operating System Software
IOS ™ C2600 Software (C2600-I-M), Version 12.0(3)T3
RELEASE SOFTWARE (fc1)
[output cut]
Configuration register is 0x2102
10

Configuration Meanings
11 / 255

Boot Field Meanings(Config Register bits 00 – 03)
12

Changing the Configuration Register
• Why would you want to change the config register? Several reasons:
• to force the system into the ROM monitor mode• to select a boot source & default boot filename• to enable or disable the BreakBreak function• to set the console terminal baud rate• to load operating software from ROM• to enable booting from a TFTP server
13 / 256

Changing the Configuration Register
One way to change the config register is to use the command below:
Router(config)#config-register 0x0101
Router(config)#^Z
Router#sh ver
Configuration register is 0x2102 (will be 0x0101 at next reload)
• The command displays both the current value of the config register as well as the value at the next reload.
14

Recovering Passwords1: Boot the router
1(a): interrupt the boot sequence by performing a break
2: Change the configuration register to turn on bit 6 (0x2142)
3: Reload the router
4: Enter the privileged mode
5: Copy the startup-config to running-config
6: Change the password
7: Reset the configuration register to the default value
8: Reload the router
Note: You need physical access to the router to do this.
15 / 258

Recovering Passwords – (Step by step)
1: Boot the router & interrupt the boot sequence by performing a break using the Ctrl+Break key combination.
You may need to upgrade your version of hyper-terminal in order for this to work successfully.
(I’ve never had to do this, and I’ve used some pretty old versions of HyperTerminal; grain of salt here).
16

Recovering Passwords2: Change the configuration register to turn on bit 6 (0x2142)
rommon>confreg 0x2142You must reset or power cycle for new config to take effect
3: Reload the router– Type reset
• The router will reload & ask if you want to enter setup mode– Answer NO
4: Enter the privileged modeRouter>enableRouter#
17

Recovering Passwords
5: Copy the startup-config to running-configRouter#copy startup-config running-config
6: Change the passwordRouter#config t
Router(config)#enable secret ciscocisco
7: Reset the configuration register to the default valueRouter(config)#config-register 0x2102
8: Reload the router
18

Backing up & Restoring the Cisco IOSIOS
• Before you upgrade…..– Copy the existing IOS to a TFTP host!
• Verify Flash MemoryRouter#sh flash
System flash directory:
File Length Name/status
1 8121000 c2500-js-1.112-18.bin
[8121064 bytes used, 8656152 available, 16777216 total]
16384K bytes of processor board System flash (Read ONLY)
Router#
19 / 262-64

Restoring or Upgrading the Cisco IOS
#1: Ensure you have good connectivity to the TFTP host
Router#ping 192.168.0.120
#2: Copy the IOS from the TFTP host to flash
Router#copy tftp flash
• This copies the new IOS, currently in the default directory of the TFTP server, to NVRAM where it will become the operating system for the router, switch or other Cisco device being upgraded.
• The TFTP host must have a default directory specified
• Copying the IOS from a TFTP host to flash requires a router reboot
20 / 265

Backing up the Cisco IOSIOS
#1: Ensure you have good connectivity to the TFPT host
Router#ping 192.168.0.120
#2: Copy the IOS from flash to the TFTP hostRouter#copy flash tftp• This command copies the contents of flash (the old IOS
version) to the TFTP host.• The TFTP host must have a default directory specified
21 / 264

Backing up the Configuration
1: Verify the Current Configuration Router#sh run
2: Verify the Stored Configuration Router#sh start
• Verify available memory
3: Copy running-config to NVRAM Router#copy run start
Router#sh start
The configuration you are currently running becomes the config that you will now boot to, after copying it to NVRAM, the startup config.
4: Copy running-config to a TFTP host Router#copy run tftp
• A second backup22

Restoring the Configuration• Used when…
– You need to copy the startup-config to the running-config• Errors made in editing the running-config
– Changes made at the TFTP host need to be copied to the running-config or startup-config
Router#copy tftp run or Router#copy tftp start• NOTE: The configuration file is ASCII. Any text editor will enable changes
• Erasing the ConfigurationRouter#erase startup-config
Note: When the router reboots it will be in setup mode• See Supp Power Point 2 for recovering the Configuration using
Xmodem:– “Download using Xmodem from rommon >”
23
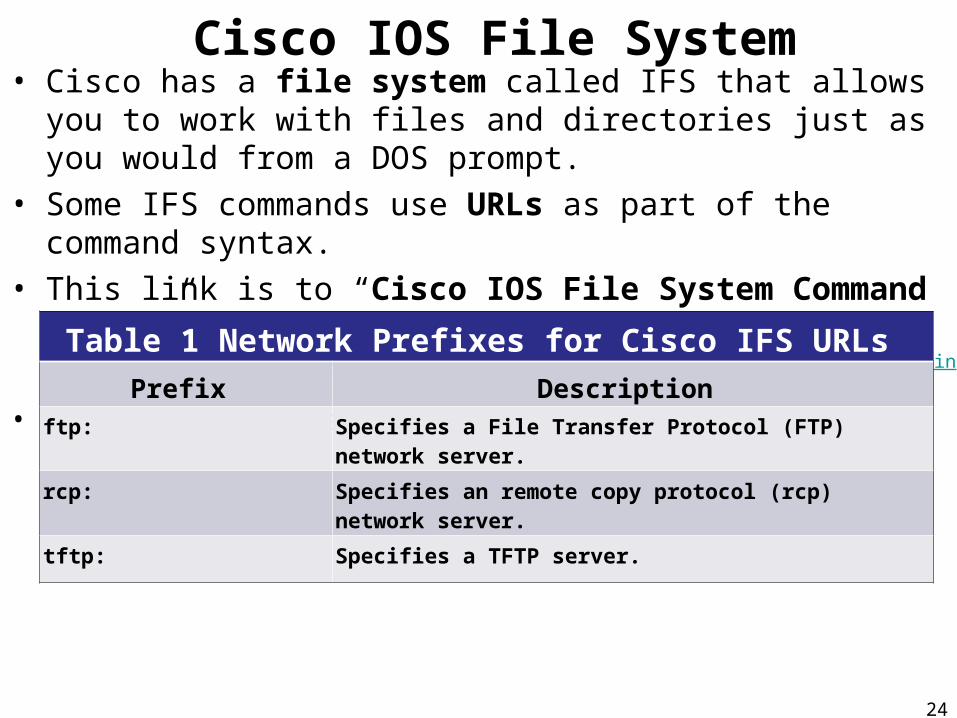
Cisco IOS File System• Cisco has a file system called IFS that allows you to work with
files and directories just as you would from a DOS prompt.• Some IFS commands use URLs as part of the command syntax.• This link is to “Cisco IOS File System Command Syntax”
• http://www.cisco.com/en/US/docs/ios/12_3/configfun/command/reference/cfrintro.html#wp1071821
• Below are some tables showing examples of the IFS:
24
Table 1 Network Prefixes for Cisco IFS URLs
Prefix Description ftp: Specifies a File Transfer Protocol (FTP) network server.
rcp: Specifies an remote copy protocol (rcp) network server.
tftp: Specifies a TFTP server.

Cisco IOS File System
Table 2 File ID Suffixes for Cisco IFS URLs
Prefix Suffix Options
ftp: [[//[username[:password]@]location]/directory]/filename
For example:
ftp://network-config (prefix://filename)
ftp://jeanluc:[email protected]/ship-config
rcp: rcp:[[//[username@]location]/directory]/filename
tftp: tftp:[[//location]/directory]/filename
25

Cisco IOS File SystemTable 3: File System Prefixes for Cisco IFS URLs
Prefix Description bootflash: Bootflash memory.
disk0: Rotating disk media.
flash: [partition-#] Flash memory. This prefix is available on all platforms
flh: Flash load helper log files.
null: Null destination for copies. Copy a remote file to null to find its size.
nvram: NVRAM. This is the default location for the running-configuration file.
slavebootflash: Internal Flash on slave RSP card of a router configured with 2 RSPs.
slavenvram: NVRAM on a slave RSP card.
slaveslot0: First PCMCIA card on a slave RSP card.
slaveslot1: Second PCMCIA card on a slave RSP card.
slot0: First PCMCIA Flash memory card.
slot1: Second PCMCIA Flash memory card.
xmodem: Obtain the file from a network machine using the Xmodem protocol.
ymodem: Obtain the file from a network machine using the Ymodem protocol. 26

Cisco IOS File System• The limitations of the IFS are, of course, that it is simply a tool
to carry out some fairly basic tasks: copying files, transferring files, working with specific types of memory found in routers and switches, etc. But within these parameters, it does have some benefits:
• One of the benefits is that the file system’s user interface is universal — it’s not platform specific. You get to use the same syntax for all your commands on all of your routers.
• Another benefit is that it cuts down on all those obligatory prompts for a lot of the commands. – If you want to enter a command, all you have to do is type all the
necessary info straight into the command line.– if you want to copy a file to an FTP server, all you do is:
• first indicate where the desired source file is on your router• pinpoint where the destination file is on the FTP server• determine the username and password you’re going to use, and • type it all in on one line!
27

Using Cisco Discovery Protocol (CDP)
• A Cisco proprietary protocol– Designed to collect information about directly
attached & remote devices• Hardware information• Protocol information
– Useful in troubleshooting & documenting the network
28 / 283
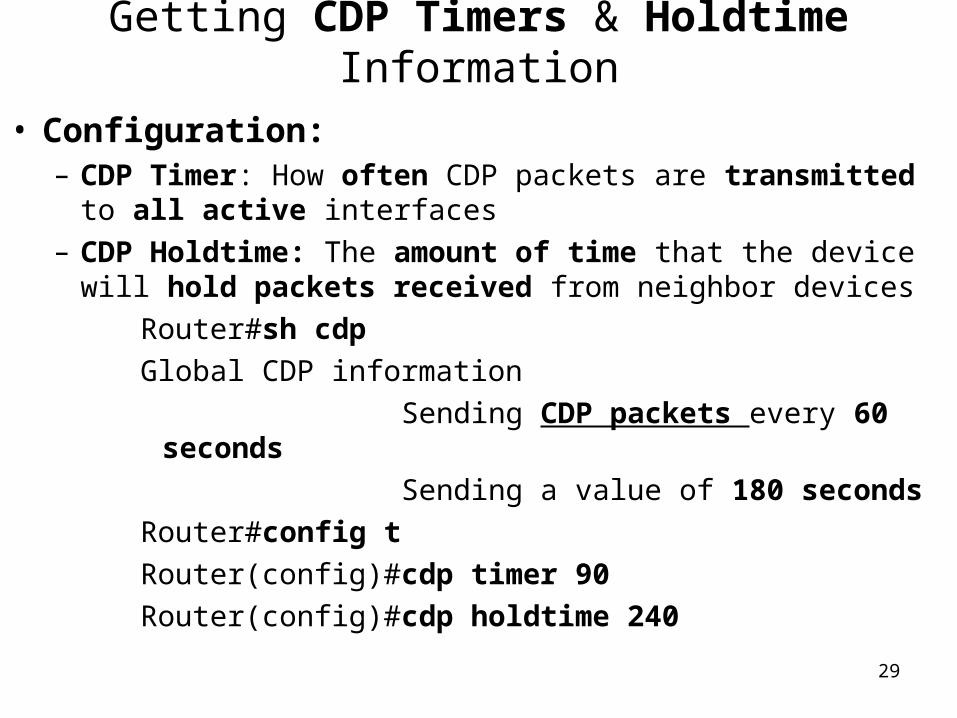
Getting CDP Timers & Holdtime Information
• Configuration:– CDP Timer: How often CDP packets are transmitted to all
active interfaces– CDP Holdtime: The amount of time that the device will
hold packets received from neighbor devices
Router#sh cdp
Global CDP information
Sending CDP packets every 60 seconds
Sending a value of 180 seconds
Router#config t
Router(config)#cdp timer 90
Router(config)#cdp holdtime 24029

Getting Neighbor Information
• Shows information about directly connected devices– CDP packets are not passed through a Cisco
switch– Can only see what is directly attached
Router#sh cdp nei (“nei” stands for “Neighbor”, i.e., “directly attached” devices).
or
Router#sh cdp neighbor detail– Detailed information; hostname, IP address, etc
30

Getting Interface Traffic & Port Information
• Interface Traffic Information:– CDP packets sent & received– Errors with CDP
Router# sh cdp traffic
• Port & Interface Information:– Encapsulation on the line– Timer & Holdtime for each interface
Router# sh cdp interface
31

Using Telnet
• A virtual terminal protocol– Part of the TCP/IP suite– Allows connections to remote devices
• Gather information• Run programs
Note: The VTY passwords must be set on the routers in order for them to allow a telnet session.
32 / 295

Using Telnet
• Setting VTY passwords:RouterB#config t - to global config mode
RouterB(config)#line vty 0 4 - to get to line-config mode, for telnet
RouterB(config)#login - sets the state to enter login PW
RouterB(config)#password cisco - set the login PW as “cisco”
RouterB(config)#^Z - brings you back to privileged mode
RouterA#172.16.10.2 - entering just an IP addr tries telnet
Trying 172.16.10.2 … Open
User Access Verification
Password:
RouterB>33

Using Telnet
• Setting VTY password:RouteBr#config tRouterB(config)#line vty 0 4RouterB(config)#loginRouterB(config)#password ciscoRouterB(config)#^ZRouterA#172.16.10.2Trying 172.16.10.2 … Open
User Access Verification
Password:RouterB>
Remember….– VTY password is the user mode (>)
password - not the enable mode (#) password
– With no enable/enable secret password set, the following happens:
RouterB>en% No password setRouterB>
This equates to good security!
(in other words, with telnet, you MUST have a password set in order to access the utility!)
34

Telnet Commands
• Telnetting into Multiple DevicesCtrl+Shift+6 (release) X
• Checking Telnet ConnectionsRouter#sh sessions
• Checking Telnet UsersRouter#sh users
• Closing Telnet SessionsRouterB>exit
RouterB>disconnect
35

Resolving Hostnames
• To use a hostname rather than an IP address to connect to a remote host a device must be able to translate the hostname to an IP address– Build a host table on each router– Build a Domain Name System (DNS) server
36

Building a Host Table
• Provides name resolution only on the router on which it is built
[ip host name tcp_port_number ip_address]u
Router(config)#ip host RouterB 172.16.10.2
Router(config)#ip host switch 192.168.0.148
Router#sh hosts• Default TCP port number: 23
Router#RouterB
RouterB#(Ctrl+Shift+6) (X)
Router#switch
37
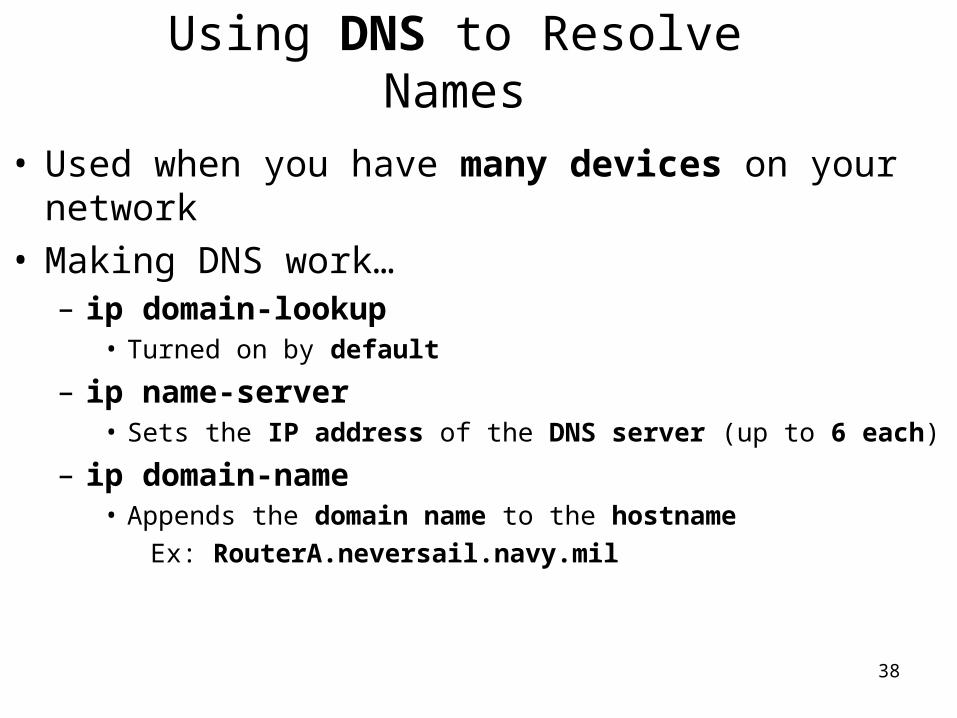
Using DNS to Resolve Names
• Used when you have many devices on your network• Making DNS work…
– ip domain-lookup• Turned on by default
– ip name-server• Sets the IP address of the DNS server (up to 6 each)
– ip domain-name• Appends the domain name to the hostname
Ex: RouterA.neversail.navy.mil
38

Checking Network Connectivity
• Ping– Displays the minimum, average, & maximum times it takes
for a ping packet to find a specified system + returnRouter#ping RouterB
• Trace– Shows the path a packet takes to get to a remote device
Router#trace RouterB
39

Summary
• Go through all the written and review questions• Go through the answers with the class
40 40