symantec antivirus deployment considerations for...
TRANSCRIPT
Recommended Solutions for Installing Symantec Endpoint Protection 12.1.x in Shared and PvD Virtual Machines
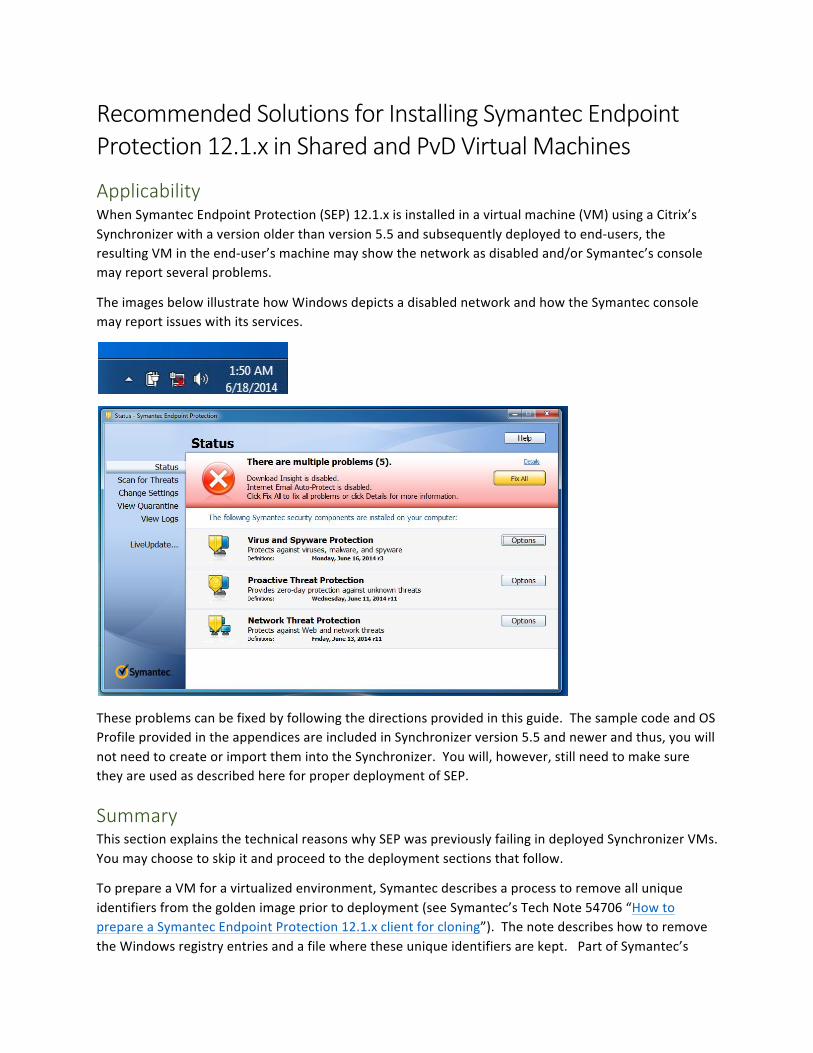
Applicability When Symantec Endpoint Protection (SEP) 12.1.x is installed in a virtual machine (VM) using a Citrix’s Synchronizer with a version older than version 5.5 and subsequently deployed to end-‐users, the resulting VM in the end-‐user’s machine may show the network as disabled and/or Symantec’s console may report several problems.
The images below illustrate how Windows depicts a disabled network and how the Symantec console may report issues with its services.
These problems can be fixed by following the directions provided in this guide. The sample code and OS Profile provided in the appendices are included in Synchronizer version 5.5 and newer and thus, you will not need to create or import them into the Synchronizer. You will, however, still need to make sure they are used as described here for proper deployment of SEP.
Summary This section explains the technical reasons why SEP was previously failing in deployed Synchronizer VMs. You may choose to skip it and proceed to the deployment sections that follow.
To prepare a VM for a virtualized environment, Symantec describes a process to remove all unique identifiers from the golden image prior to deployment (see Symantec’s Tech Note 54706 “How to prepare a Symantec Endpoint Protection 12.1.x client for cloning”). The note describes how to remove the Windows registry entries and a file where these unique identifiers are kept. Part of Symantec’s
protection against attacks on its services is to protect changes to its files and registry keys. This security feature is called Tamper Protection and it must be disabled prior to making these changes, as specified in Symantec Tech Note 192023 “How to disable Tamper Protection in Symantec Endpoint Protection 12.1”. If this step is not performed, you won’t be able to remove the registry entries and file. After these changes are made and after the first boot of that “clean” image, a Symantec service will generate a new unique ID and register with the Symantec Management server.
During the process of preparing a VM for deployment, Synchronizer will boot the VM one time to install its services. The need to boot the VM after it has been “cleaned” causes the Symantec service to generate a unique ID, as described above, and thus, the golden image is imprinted with a unique identifier, which, if it were to be deployed, would cause all endpoints to register with the same ID in the Symantec Manager. To get around this problem, Synchronizer documents how to modify the VM publish process to properly remove the unique identifiers after the publish process finishes.
This extension to the publishing process requires manual intervention by an administrator prior to publishing the VM. The administrator must copy the file “publishExtend-‐SEP.cmd” from Synchronizer’s configuration directory (typically C:\Program Files\Citrix\Synchronizer\conf\scripts) to the VM’s C:\ drive and rename that file “publishExtend.cmd”. This needs to be done only once for each VM that has Symantec installed. The purpose of this file (refer to Appendix A for an example of its contents) is to remove the Symantec registry entries and file which contain the unique Symantec identifiers. PublishExtend.cmd will fail to execute properly if Tamper Protection is enabled, and for this reason, Synchronizer must first disable all Symantec services. This is done by another file in Synchronizer’s configuration directory called “disableServicesXXX.txt” where XXX is the OS type (XP, VISTA, WIN7, WIN8, etc.). See Appendix B for a portion of its contents.
When the VM is finally deployed to an endpoint, Citrix software in the endpoint will ensure the same services that were disabled by “disableServicesXXX.txt” are re-‐enabled. For PvD VMs, which virtualize the file system and Windows’ registry access, the re-‐enablement of the Symantec SEP services happens in the virtual registry, which is not accessible at the time Symantec services are initiated. The end result is that Symantec services are not fully re-‐enabled. In this state, Symantec automatically shuts down the network and reports problems with services that could not be started.
For Shared VMs, the process of preparing a VM in the client requires that the C:\ProgramData directory be moved to the user drive (U:). Citrix then installs a shortcut or link from C:\ProgramData to the new location. SEP 12.1.x keeps some of its critical data and services under C:\ProgramData and this re-‐direction to another drive causes SEP to refuse to start those services.
Recommended Solution To resolve the issues described in the previous sections, Citrix recommends that you perform the following steps when publishing a PvD and Shared VM. The goal is to have the Synchronizer “golden” VMs placed in an SEP group which has Tamper Protection disabled, thus allowing modification of the critical SEP files and registry entries needed to create a “clean” image. Then when those golden VMs are deployed to an end-‐user, they are automatically placed in another SEP group with Tamper Protection enabled.
NOTE: This solution only works with PvD and Shared VMs with snapback enabled. Custom and Shared VMs with snapback disabled are not supported.
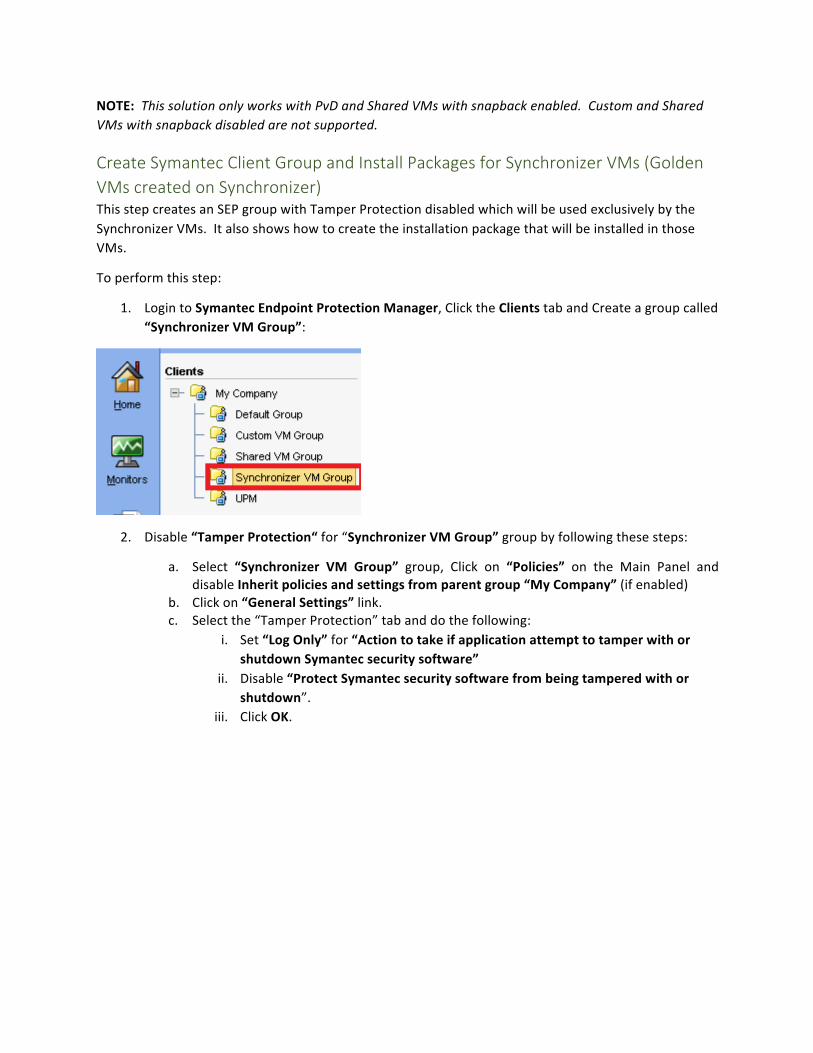
Create Symantec Client Group and Install Packages for Synchronizer VMs (Golden VMs created on Synchronizer) This step creates an SEP group with Tamper Protection disabled which will be used exclusively by the Synchronizer VMs. It also shows how to create the installation package that will be installed in those VMs.
To perform this step:
1. Login to Symantec Endpoint Protection Manager, Click the Clients tab and Create a group called “Synchronizer VM Group”:
2. Disable “Tamper Protection“ for “Synchronizer VM Group” group by following these steps:
a. Select “Synchronizer VM Group” group, Click on “Policies” on the Main Panel and disable Inherit policies and settings from parent group “My Company” (if enabled)
b. Click on “General Settings” link. c. Select the “Tamper Protection” tab and do the following:
i. Set “Log Only” for “Action to take if application attempt to tamper with or shutdown Symantec security software”
ii. Disable “Protect Symantec security software from being tampered with or shutdown”.
iii. Click OK.
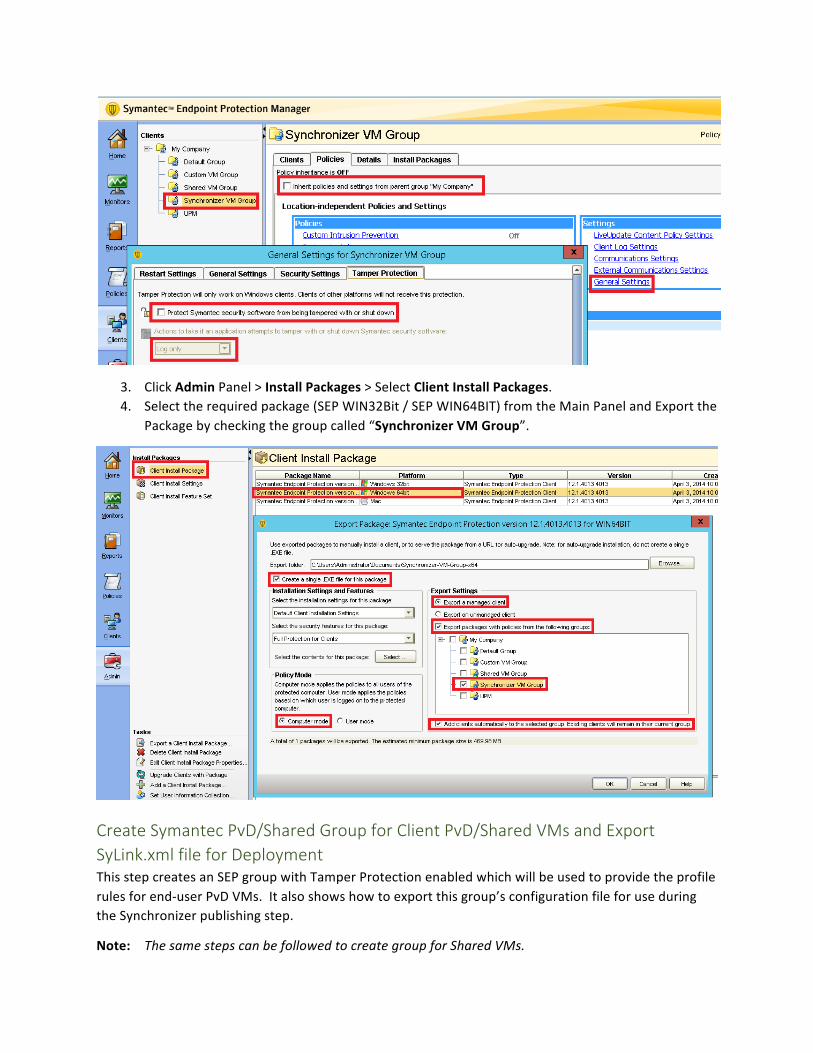
3. Click Admin Panel > Install Packages > Select Client Install Packages. 4. Select the required package (SEP WIN32Bit / SEP WIN64BIT) from the Main Panel and Export the
Package by checking the group called “Synchronizer VM Group”.
Create Symantec PvD/Shared Group for Client PvD/Shared VMs and Export SyLink.xml file for Deployment This step creates an SEP group with Tamper Protection enabled which will be used to provide the profile rules for end-‐user PvD VMs. It also shows how to export this group’s configuration file for use during the Synchronizer publishing step.
Note: The same steps can be followed to create group for Shared VMs.
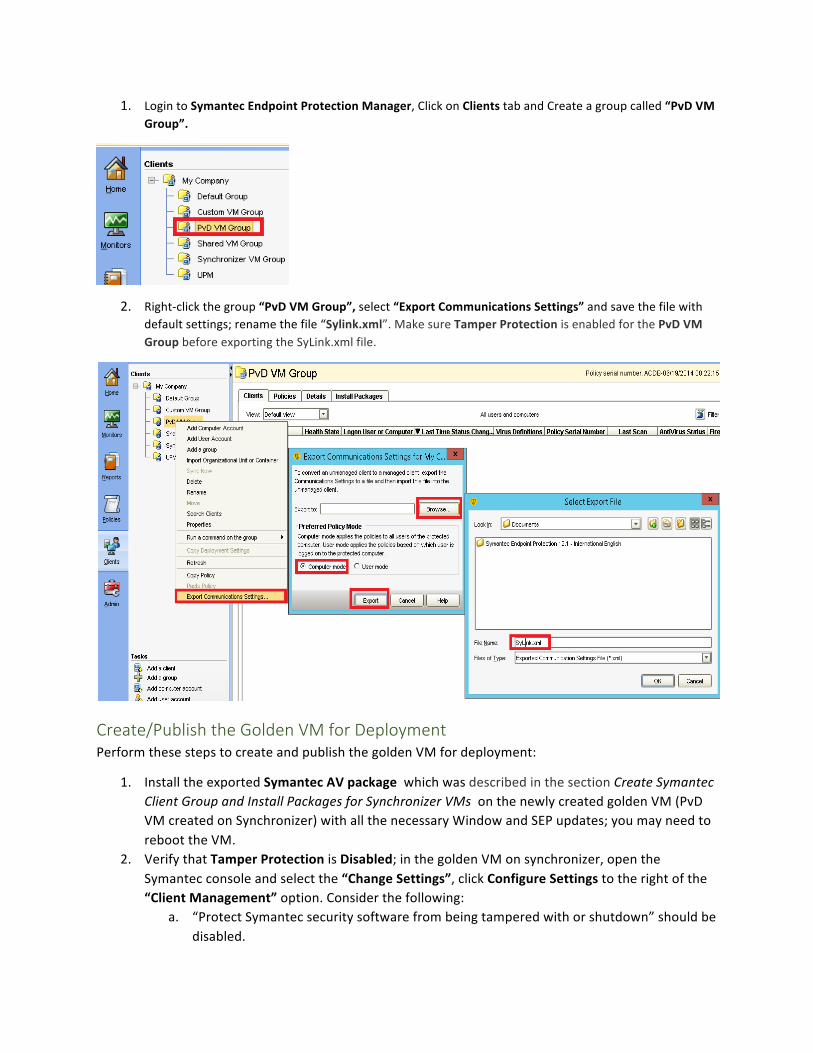
1. Login to Symantec Endpoint Protection Manager, Click on Clients tab and Create a group called “PvD VM Group”.
2. Right-‐click the group “PvD VM Group”, select “Export Communications Settings” and save the file with default settings; rename the file “Sylink.xml”. Make sure Tamper Protection is enabled for the PvD VM Group before exporting the SyLink.xml file.
Create/Publish the Golden VM for Deployment Perform these steps to create and publish the golden VM for deployment:
1. Install the exported Symantec AV package which was described in the section Create Symantec Client Group and Install Packages for Synchronizer VMs on the newly created golden VM (PvD VM created on Synchronizer) with all the necessary Window and SEP updates; you may need to reboot the VM.
2. Verify that Tamper Protection is Disabled; in the golden VM on synchronizer, open the Symantec console and select the “Change Settings”, click Configure Settings to the right of the “Client Management” option. Consider the following:
a. “Protect Symantec security software from being tampered with or shutdown” should be disabled.
b. The “Action to take if application attempt to tamper with or shutdown Symantec security software” option should be set to “Log Only”. Refer to Symantec Tech Note 192023 for more information.
3. Create a backup copy of “disableServicesXXX.txt” in the Synchronizer configuration directory (typically C:\Program Files\Citrix\Synchronizer\conf). XXX represents the OS type (XP, VISTA, WIN7, WIN8, etc.) of the VM to be published.
4. In Synchronizer versions older than 5.5, please edit “disableServicesXXX.txt” in the Synchronizer configuration directory and remove all entries that deal with Symantec services except the entries “SmcService” and “SepMasterService”. These entries are the ones listed Appendix B.
5. Boot the golden VM you want to deploy and do the following: a. Copy the scripts “publishExtend-‐SEP.cmd“ and “publishExtend.cmd” found in the
Synchronizer’s “C:\Program Files\Citrix\Synchronizer\conf\scripts” directory to "C:\" of the VM to be published. In Synchronizer 5.5 and earlier, these scripts do not exist. Copy the contents of Appendix C to the respective files. Make sure that long lines, such as the registry key name, are not entered as two separate lines but rather one long line.
b. Copy “Sylink.xml” (described in the previous section) to the C:\ drive. 6. Shutdown the VM and publish the VM using Synchronizer. 7. Assign the VM to different endpoints. Boot those client VMs and verify that Symantec now
works, and access to the network has been restored.
Important Information about Publishing
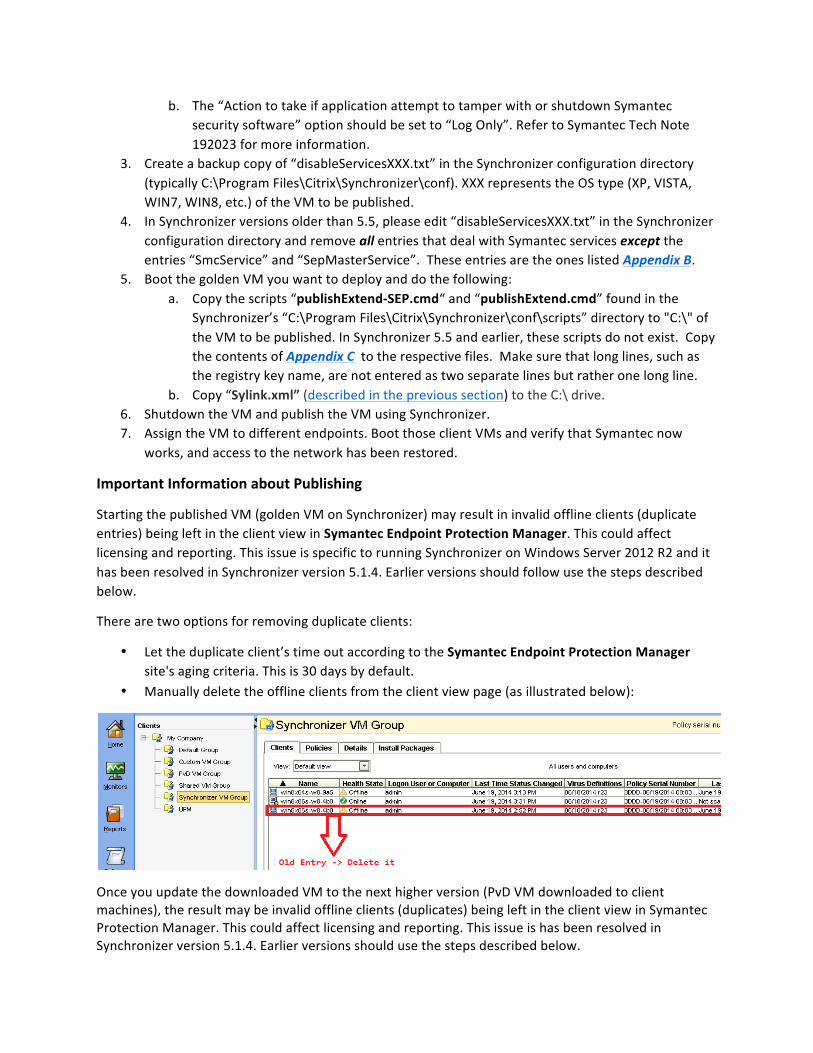
Starting the published VM (golden VM on Synchronizer) may result in invalid offline clients (duplicate entries) being left in the client view in Symantec Endpoint Protection Manager. This could affect licensing and reporting. This issue is specific to running Synchronizer on Windows Server 2012 R2 and it has been resolved in Synchronizer version 5.1.4. Earlier versions should follow use the steps described below.
There are two options for removing duplicate clients:
• Let the duplicate client’s time out according to the Symantec Endpoint Protection Manager site's aging criteria. This is 30 days by default.
• Manually delete the offline clients from the client view page (as illustrated below):
Once you update the downloaded VM to the next higher version (PvD VM downloaded to client machines), the result may be invalid offline clients (duplicates) being left in the client view in Symantec Protection Manager. This could affect licensing and reporting. This issue is has been resolved in Synchronizer version 5.1.4. Earlier versions should use the steps described below.
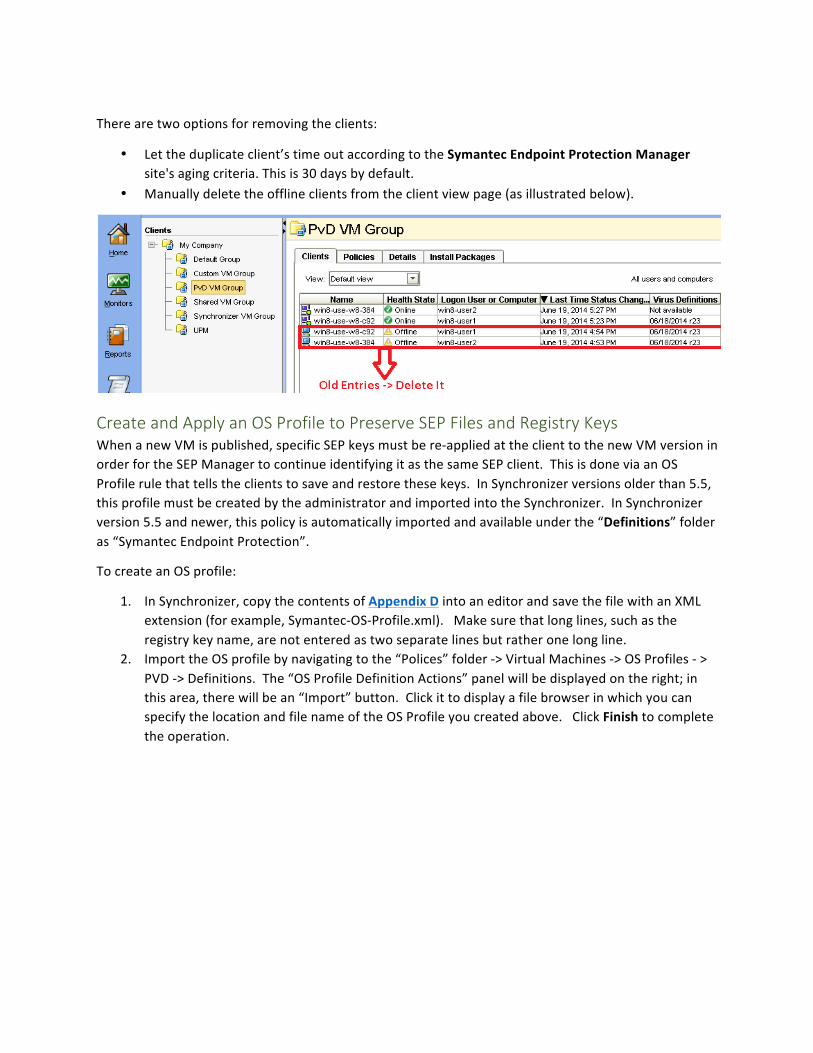
There are two options for removing the clients:
• Let the duplicate client’s time out according to the Symantec Endpoint Protection Manager site's aging criteria. This is 30 days by default.
• Manually delete the offline clients from the client view page (as illustrated below).
Create and Apply an OS Profile to Preserve SEP Files and Registry Keys When a new VM is published, specific SEP keys must be re-‐applied at the client to the new VM version in order for the SEP Manager to continue identifying it as the same SEP client. This is done via an OS Profile rule that tells the clients to save and restore these keys. In Synchronizer versions older than 5.5, this profile must be created by the administrator and imported into the Synchronizer. In Synchronizer version 5.5 and newer, this policy is automatically imported and available under the “Definitions” folder as “Symantec Endpoint Protection”.
To create an OS profile:
1. In Synchronizer, copy the contents of Appendix D into an editor and save the file with an XML extension (for example, Symantec-‐OS-‐Profile.xml). Make sure that long lines, such as the registry key name, are not entered as two separate lines but rather one long line.
2. Import the OS profile by navigating to the “Polices” folder -‐> Virtual Machines -‐> OS Profiles -‐ > PVD -‐> Definitions. The “OS Profile Definition Actions” panel will be displayed on the right; in this area, there will be an “Import” button. Click it to display a file browser in which you can specify the location and file name of the OS Profile you created above. Click Finish to complete the operation.
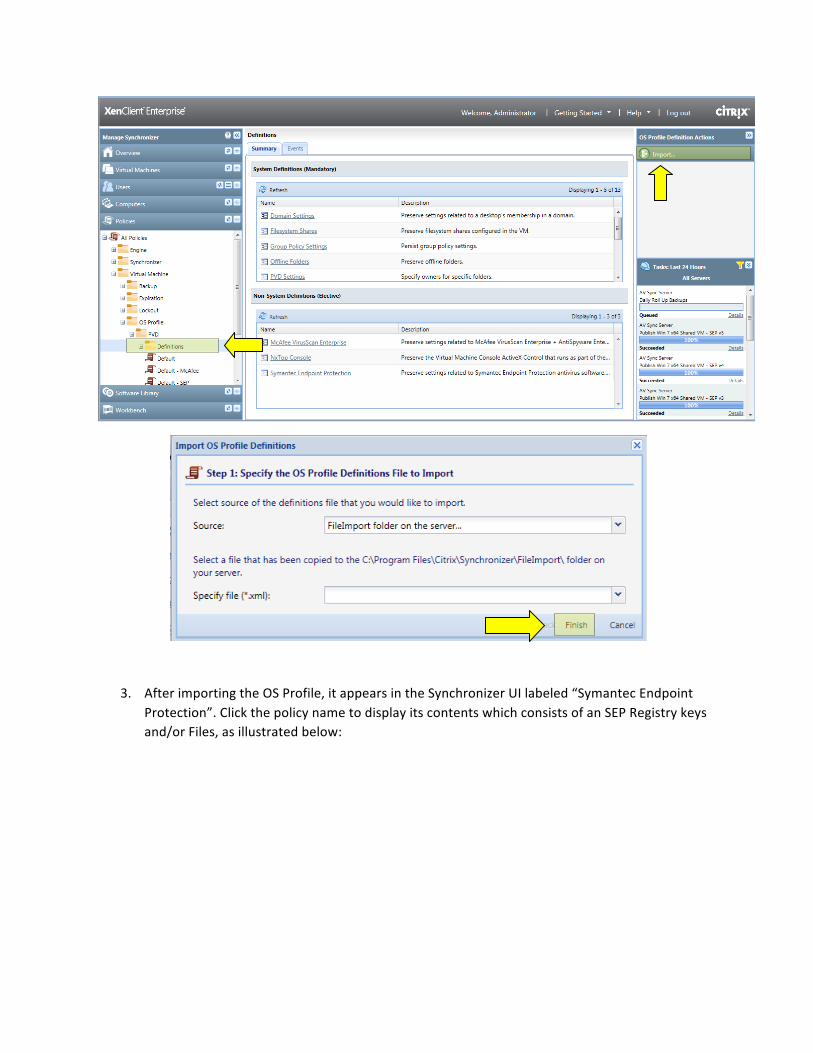
3. After importing the OS Profile, it appears in the Synchronizer UI labeled “Symantec Endpoint Protection”. Click the policy name to display its contents which consists of an SEP Registry keys and/or Files, as illustrated below:
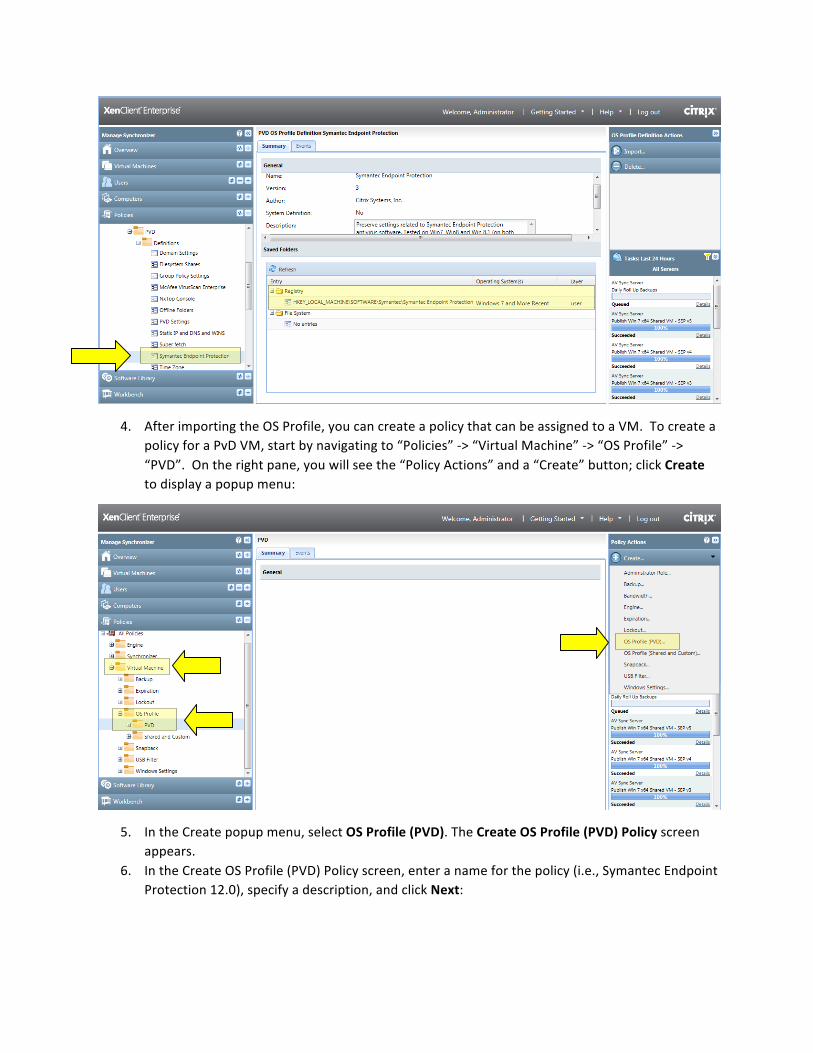
4. After importing the OS Profile, you can create a policy that can be assigned to a VM. To create a policy for a PvD VM, start by navigating to “Policies” -‐> “Virtual Machine” -‐> “OS Profile” -‐> “PVD”. On the right pane, you will see the “Policy Actions” and a “Create” button; click Create to display a popup menu:
5. In the Create popup menu, select OS Profile (PVD). The Create OS Profile (PVD) Policy screen appears.
6. In the Create OS Profile (PVD) Policy screen, enter a name for the policy (i.e., Symantec Endpoint Protection 12.0), specify a description, and click Next:
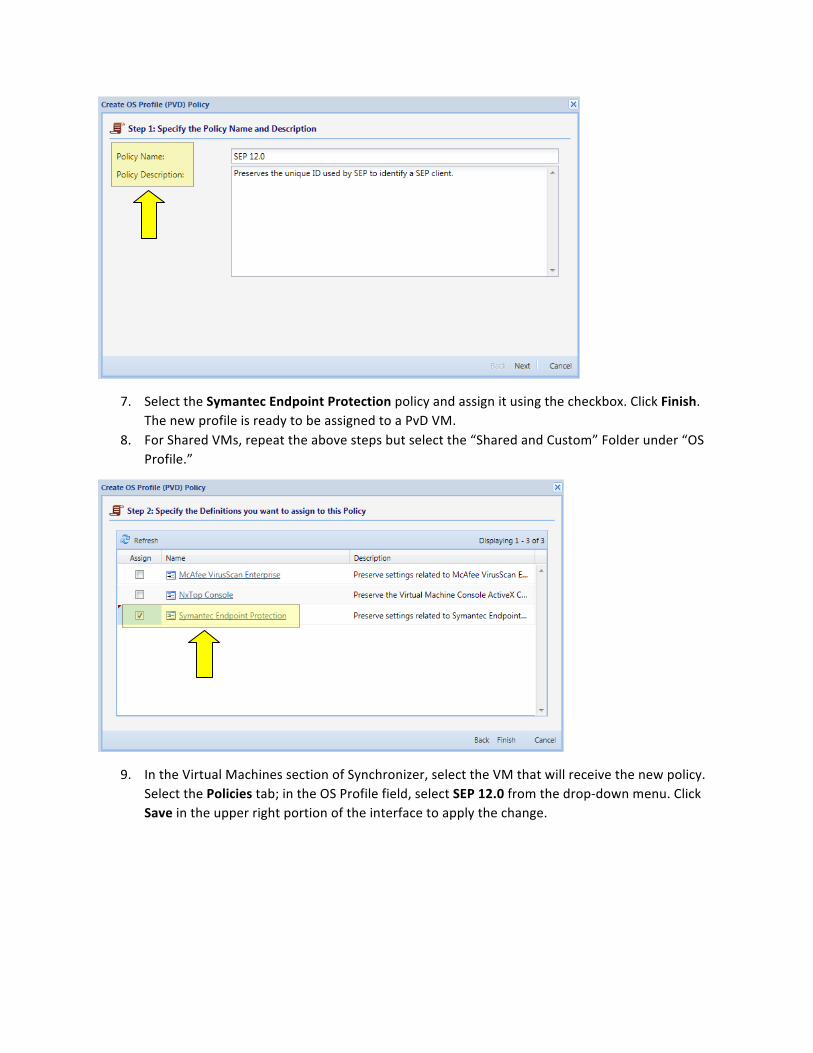
7. Select the Symantec Endpoint Protection policy and assign it using the checkbox. Click Finish. The new profile is ready to be assigned to a PvD VM.
8. For Shared VMs, repeat the above steps but select the “Shared and Custom” Folder under “OS Profile.”
9. In the Virtual Machines section of Synchronizer, select the VM that will receive the new policy. Select the Policies tab; in the OS Profile field, select SEP 12.0 from the drop-‐down menu. Click Save in the upper right portion of the interface to apply the change.
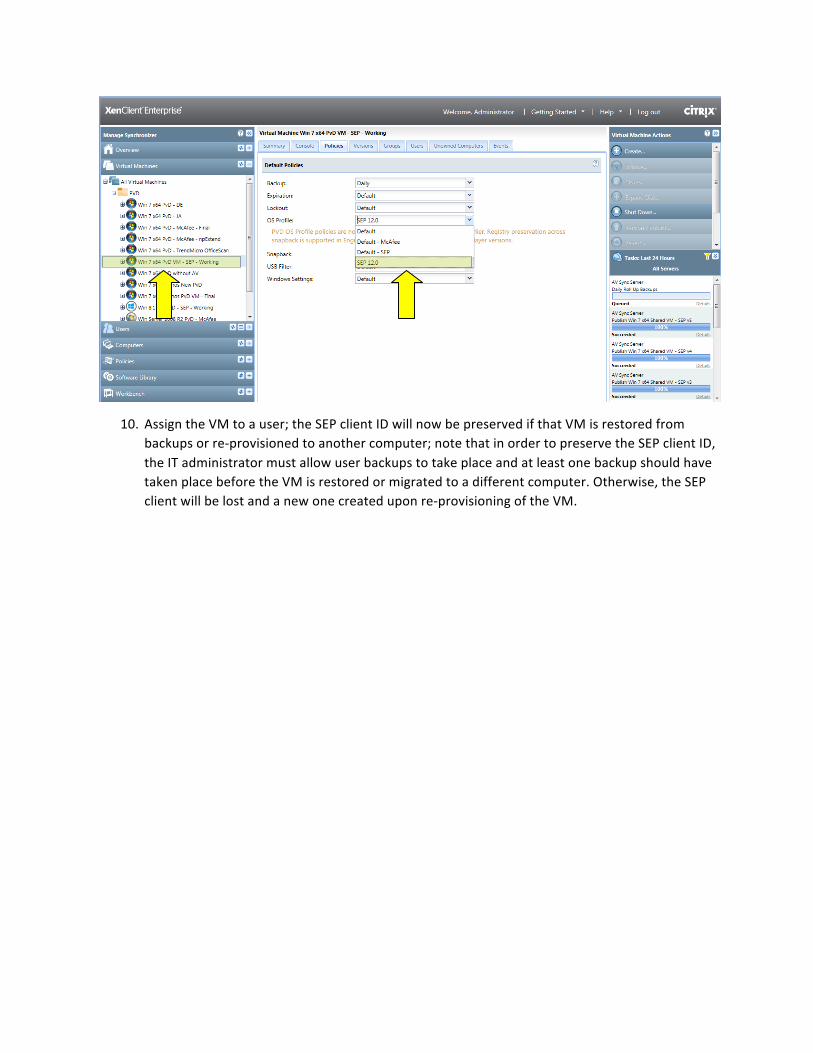
10. Assign the VM to a user; the SEP client ID will now be preserved if that VM is restored from backups or re-‐provisioned to another computer; note that in order to preserve the SEP client ID, the IT administrator must allow user backups to take place and at least one backup should have taken place before the VM is restored or migrated to a different computer. Otherwise, the SEP client will be lost and a new one created upon re-‐provisioning of the VM.
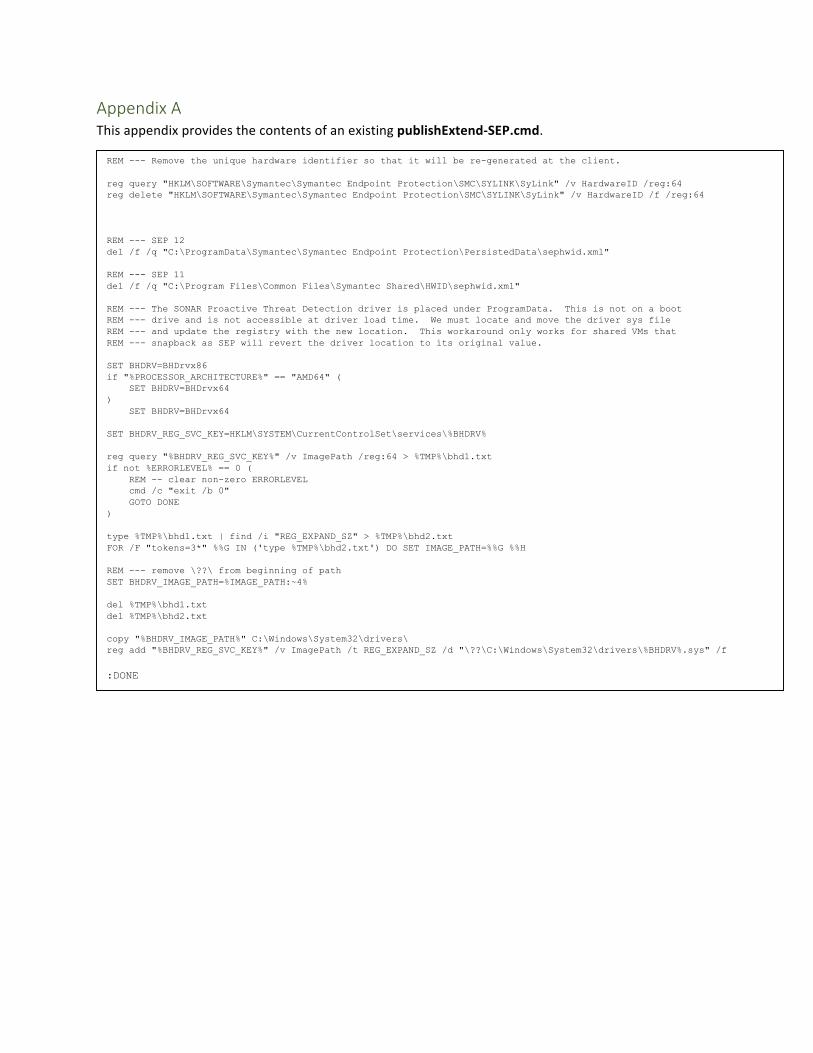
Appendix A This appendix provides the contents of an existing publishExtend-‐SEP.cmd.
REM --- Remove the unique hardware identifier so that it will be re-generated at the client. reg query "HKLM\SOFTWARE\Symantec\Symantec Endpoint Protection\SMC\SYLINK\SyLink" /v HardwareID /reg:64 reg delete "HKLM\SOFTWARE\Symantec\Symantec Endpoint Protection\SMC\SYLINK\SyLink" /v HardwareID /f /reg:64 REM --- SEP 12 del /f /q "C:\ProgramData\Symantec\Symantec Endpoint Protection\PersistedData\sephwid.xml" REM --- SEP 11 del /f /q "C:\Program Files\Common Files\Symantec Shared\HWID\sephwid.xml" REM --- The SONAR Proactive Threat Detection driver is placed under ProgramData. This is not on a boot REM --- drive and is not accessible at driver load time. We must locate and move the driver sys file REM --- and update the registry with the new location. This workaround only works for shared VMs that REM --- snapback as SEP will revert the driver location to its original value. SET BHDRV=BHDrvx86 if "%PROCESSOR_ARCHITECTURE%" == "AMD64" ( SET BHDRV=BHDrvx64 ) SET BHDRV=BHDrvx64 SET BHDRV_REG_SVC_KEY=HKLM\SYSTEM\CurrentControlSet\services\%BHDRV% reg query "%BHDRV_REG_SVC_KEY%" /v ImagePath /reg:64 > %TMP%\bhd1.txt if not %ERRORLEVEL% == 0 ( REM -- clear non-zero ERRORLEVEL cmd /c "exit /b 0" GOTO DONE ) type %TMP%\bhd1.txt | find /i "REG_EXPAND_SZ" > %TMP%\bhd2.txt FOR /F "tokens=3*" %%G IN ('type %TMP%\bhd2.txt') DO SET IMAGE_PATH=%%G %%H REM --- remove \??\ from beginning of path SET BHDRV_IMAGE_PATH=%IMAGE_PATH:~4% del %TMP%\bhd1.txt del %TMP%\bhd2.txt copy "%BHDRV_IMAGE_PATH%" C:\Windows\System32\drivers\ reg add "%BHDRV_REG_SVC_KEY%" /v ImagePath /t REG_EXPAND_SZ /d "\??\C:\Windows\System32\drivers\%BHDRV%.sys" /f :DONE

Appendix B Partial contents of existing disableServicesWIN7.txt:
Services that must remain disabled. Note all other services were removed from this list.
; -- Symantec Endpoint Protection ccEvtMgr ccSetMgr SmcService SNAC Symantec AntiVirus ; -- Symantec Endpoint Protection 11 EraserUtilDrvI9 LiveUpdate SRTSPL SymEvent ; -- Symantec Endpoint Protection 12 SepMasterService SRTSP SRTSPX SyDvCtrl SymDS SymEFA SymIRON SYMNETS BHDrvx64 BHDrvx86 eeCtrl EraserUtilRebootDrv IDSVia64 IDSVix86 NAVENG NAVEX15 SysPlant Teefer2
; -- Symantec Endpoint Protection SmcService SepMasterService
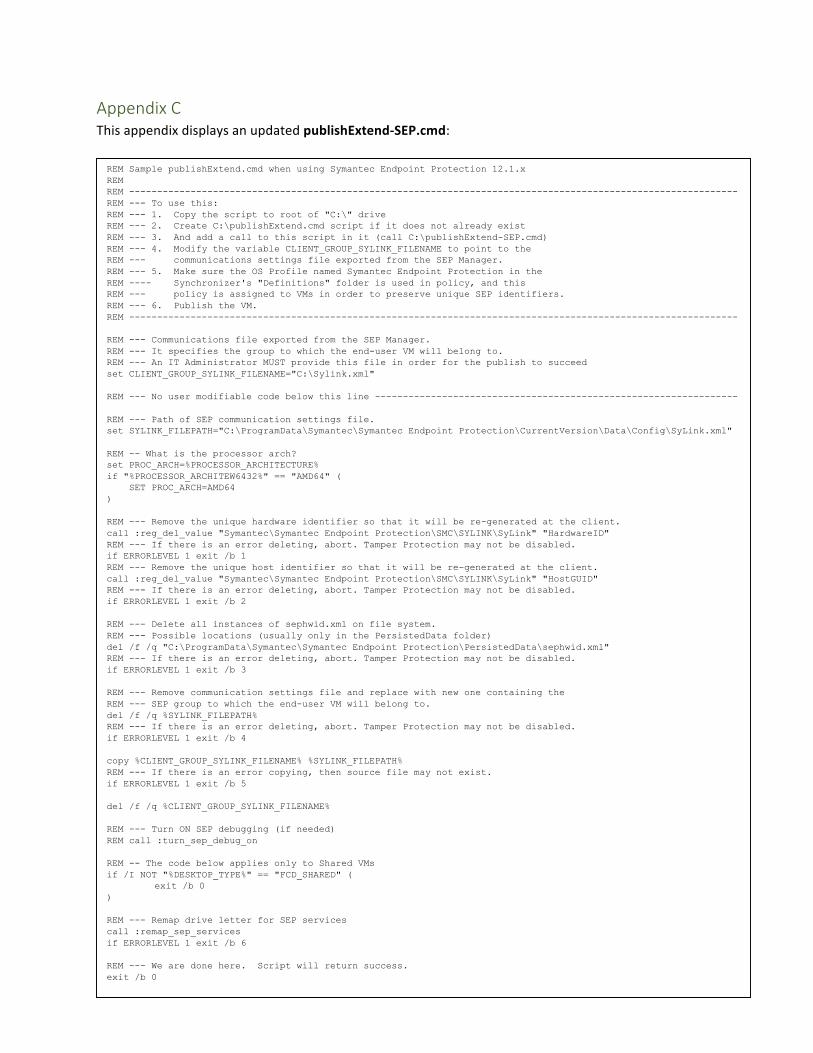
Appendix C This appendix displays an updated publishExtend-‐SEP.cmd:
REM Sample publishExtend.cmd when using Symantec Endpoint Protection 12.1.x REM REM ------------------------------------------------------------------------------------------------------------- REM --- To use this: REM --- 1. Copy the script to root of "C:\" drive REM --- 2. Create C:\publishExtend.cmd script if it does not already exist REM --- 3. And add a call to this script in it (call C:\publishExtend-SEP.cmd) REM --- 4. Modify the variable CLIENT_GROUP_SYLINK_FILENAME to point to the REM --- communications settings file exported from the SEP Manager. REM --- 5. Make sure the OS Profile named Symantec Endpoint Protection in the REM ---- Synchronizer's "Definitions" folder is used in policy, and this REM --- policy is assigned to VMs in order to preserve unique SEP identifiers. REM --- 6. Publish the VM. REM ------------------------------------------------------------------------------------------------------------- REM --- Communications file exported from the SEP Manager. REM --- It specifies the group to which the end-user VM will belong to. REM --- An IT Administrator MUST provide this file in order for the publish to succeed set CLIENT_GROUP_SYLINK_FILENAME="C:\Sylink.xml" REM --- No user modifiable code below this line ----------------------------------------------------------------- REM --- Path of SEP communication settings file. set SYLINK_FILEPATH="C:\ProgramData\Symantec\Symantec Endpoint Protection\CurrentVersion\Data\Config\SyLink.xml" REM -- What is the processor arch? set PROC_ARCH=%PROCESSOR_ARCHITECTURE% if "%PROCESSOR_ARCHITEW6432%" == "AMD64" ( SET PROC_ARCH=AMD64 ) REM --- Remove the unique hardware identifier so that it will be re-generated at the client. call :reg_del_value "Symantec\Symantec Endpoint Protection\SMC\SYLINK\SyLink" "HardwareID" REM --- If there is an error deleting, abort. Tamper Protection may not be disabled. if ERRORLEVEL 1 exit /b 1 REM --- Remove the unique host identifier so that it will be re-generated at the client. call :reg_del_value "Symantec\Symantec Endpoint Protection\SMC\SYLINK\SyLink" "HostGUID" REM --- If there is an error deleting, abort. Tamper Protection may not be disabled. if ERRORLEVEL 1 exit /b 2 REM --- Delete all instances of sephwid.xml on file system. REM --- Possible locations (usually only in the PersistedData folder) del /f /q "C:\ProgramData\Symantec\Symantec Endpoint Protection\PersistedData\sephwid.xml" REM --- If there is an error deleting, abort. Tamper Protection may not be disabled. if ERRORLEVEL 1 exit /b 3 REM --- Remove communication settings file and replace with new one containing the REM --- SEP group to which the end-user VM will belong to. del /f /q %SYLINK_FILEPATH% REM --- If there is an error deleting, abort. Tamper Protection may not be disabled. if ERRORLEVEL 1 exit /b 4 copy %CLIENT_GROUP_SYLINK_FILENAME% %SYLINK_FILEPATH% REM --- If there is an error copying, then source file may not exist. if ERRORLEVEL 1 exit /b 5 del /f /q %CLIENT_GROUP_SYLINK_FILENAME% REM --- Turn ON SEP debugging (if needed) REM call :turn_sep_debug_on REM -- The code below applies only to Shared VMs if /I NOT "%DESKTOP_TYPE%" == "FCD_SHARED" ( exit /b 0 ) REM --- Remap drive letter for SEP services call :remap_sep_services if ERRORLEVEL 1 exit /b 6 REM --- We are done here. Script will return success. exit /b 0
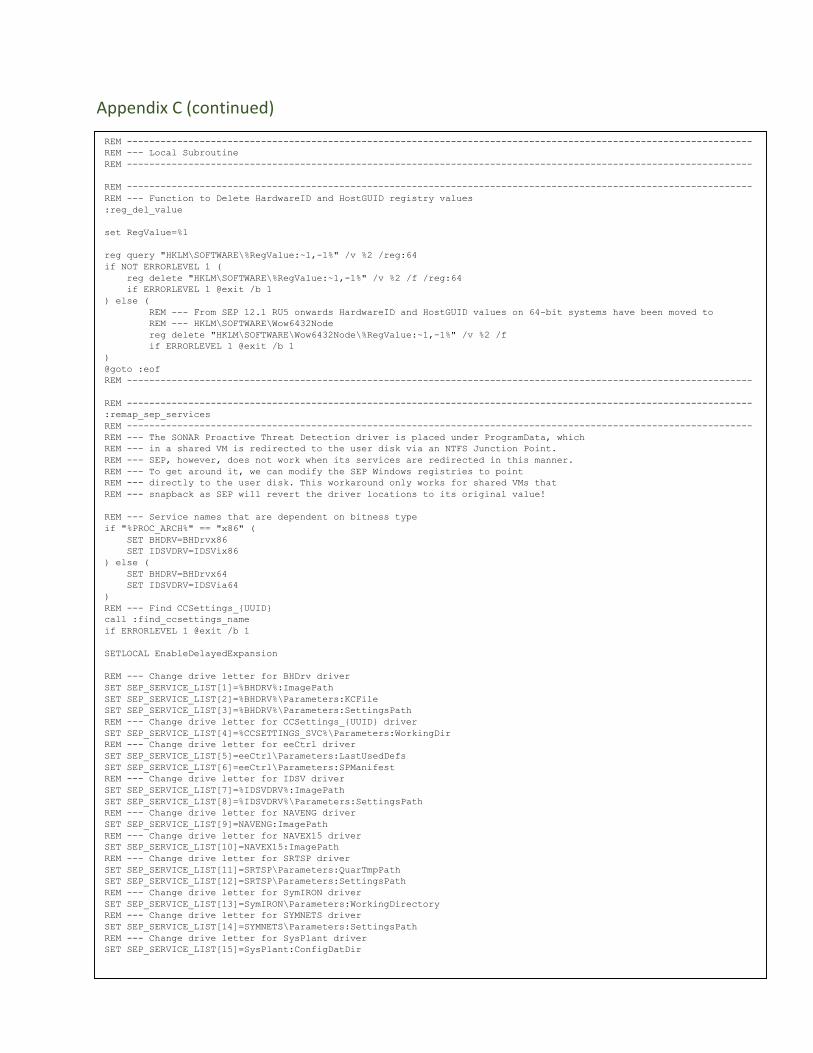
Appendix C (continued)
REM ---------------------------------------------------------------------------------------------------------------- REM --- Local Subroutine REM ---------------------------------------------------------------------------------------------------------------- REM ---------------------------------------------------------------------------------------------------------------- REM --- Function to Delete HardwareID and HostGUID registry values :reg_del_value set RegValue=%1 reg query "HKLM\SOFTWARE\%RegValue:~1,-1%" /v %2 /reg:64 if NOT ERRORLEVEL 1 ( reg delete "HKLM\SOFTWARE\%RegValue:~1,-1%" /v %2 /f /reg:64 if ERRORLEVEL 1 @exit /b 1 ) else ( REM --- From SEP 12.1 RU5 onwards HardwareID and HostGUID values on 64-bit systems have been moved to REM --- HKLM\SOFTWARE\Wow6432Node reg delete "HKLM\SOFTWARE\Wow6432Node\%RegValue:~1,-1%" /v %2 /f if ERRORLEVEL 1 @exit /b 1 ) @goto :eof REM ---------------------------------------------------------------------------------------------------------------- REM ---------------------------------------------------------------------------------------------------------------- :remap_sep_services REM ---------------------------------------------------------------------------------------------------------------- REM --- The SONAR Proactive Threat Detection driver is placed under ProgramData, which REM --- in a shared VM is redirected to the user disk via an NTFS Junction Point. REM --- SEP, however, does not work when its services are redirected in this manner. REM --- To get around it, we can modify the SEP Windows registries to point REM --- directly to the user disk. This workaround only works for shared VMs that REM --- snapback as SEP will revert the driver locations to its original value! REM --- Service names that are dependent on bitness type if "%PROC_ARCH%" == "x86" ( SET BHDRV=BHDrvx86 SET IDSVDRV=IDSVix86 ) else ( SET BHDRV=BHDrvx64 SET IDSVDRV=IDSVia64 ) REM --- Find CCSettings_{UUID} call :find_ccsettings_name if ERRORLEVEL 1 @exit /b 1 SETLOCAL EnableDelayedExpansion REM --- Change drive letter for BHDrv driver SET SEP_SERVICE_LIST[1]=%BHDRV%:ImagePath SET SEP_SERVICE_LIST[2]=%BHDRV%\Parameters:KCFile SET SEP_SERVICE_LIST[3]=%BHDRV%\Parameters:SettingsPath REM --- Change drive letter for CCSettings_{UUID} driver SET SEP_SERVICE_LIST[4]=%CCSETTINGS_SVC%\Parameters:WorkingDir REM --- Change drive letter for eeCtrl driver SET SEP_SERVICE_LIST[5]=eeCtrl\Parameters:LastUsedDefs SET SEP_SERVICE_LIST[6]=eeCtrl\Parameters:SPManifest REM --- Change drive letter for IDSV driver SET SEP_SERVICE_LIST[7]=%IDSVDRV%:ImagePath SET SEP_SERVICE_LIST[8]=%IDSVDRV%\Parameters:SettingsPath REM --- Change drive letter for NAVENG driver SET SEP_SERVICE_LIST[9]=NAVENG:ImagePath REM --- Change drive letter for NAVEX15 driver SET SEP_SERVICE_LIST[10]=NAVEX15:ImagePath REM --- Change drive letter for SRTSP driver SET SEP_SERVICE_LIST[11]=SRTSP\Parameters:QuarTmpPath SET SEP_SERVICE_LIST[12]=SRTSP\Parameters:SettingsPath REM --- Change drive letter for SymIRON driver SET SEP_SERVICE_LIST[13]=SymIRON\Parameters:WorkingDirectory REM --- Change drive letter for SYMNETS driver SET SEP_SERVICE_LIST[14]=SYMNETS\Parameters:SettingsPath REM --- Change drive letter for SysPlant driver SET SEP_SERVICE_LIST[15]=SysPlant:ConfigDatDir
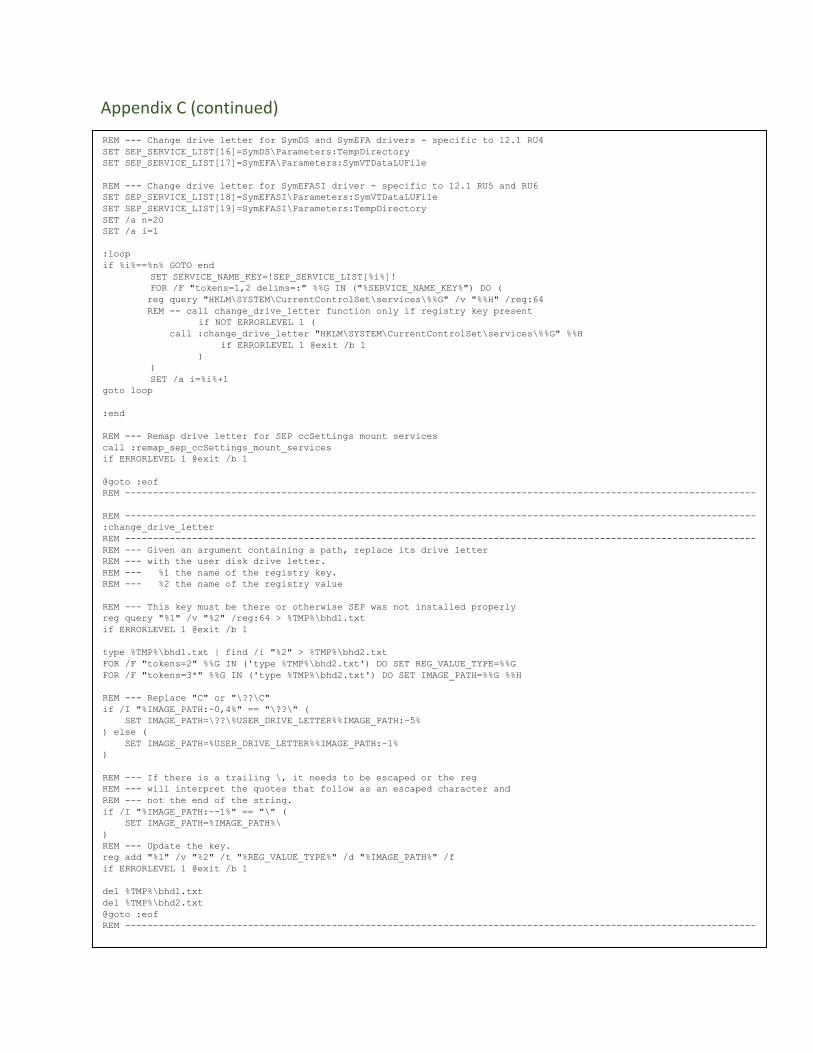
Appendix C (continued)
REM --- Change drive letter for SymDS and SymEFA drivers - specific to 12.1 RU4 SET SEP_SERVICE_LIST[16]=SymDS\Parameters:TempDirectory SET SEP_SERVICE_LIST[17]=SymEFA\Parameters:SymVTDataLUFile REM --- Change drive letter for SymEFASI driver - specific to 12.1 RU5 and RU6 SET SEP_SERVICE_LIST[18]=SymEFASI\Parameters:SymVTDataLUFile SET SEP_SERVICE_LIST[19]=SymEFASI\Parameters:TempDirectory SET /a n=20 SET /a i=1 :loop if %i%==%n% GOTO end SET SERVICE_NAME_KEY=!SEP_SERVICE_LIST[%i%]! FOR /F "tokens=1,2 delims=:" %%G IN ("%SERVICE_NAME_KEY%") DO ( reg query "HKLM\SYSTEM\CurrentControlSet\services\%%G" /v "%%H" /reg:64 REM -- call change_drive_letter function only if registry key present if NOT ERRORLEVEL 1 ( call :change_drive_letter "HKLM\SYSTEM\CurrentControlSet\services\%%G" %%H if ERRORLEVEL 1 @exit /b 1 ) ) SET /a i=%i%+1 goto loop :end REM --- Remap drive letter for SEP ccSettings mount services call :remap_sep_ccSettings_mount_services if ERRORLEVEL 1 @exit /b 1 @goto :eof REM ----------------------------------------------------------------------------------------------------------------- REM ----------------------------------------------------------------------------------------------------------------- :change_drive_letter REM ----------------------------------------------------------------------------------------------------------------- REM --- Given an argument containing a path, replace its drive letter REM --- with the user disk drive letter. REM --- %1 the name of the registry key. REM --- %2 the name of the registry value REM --- This key must be there or otherwise SEP was not installed properly reg query "%1" /v "%2" /reg:64 > %TMP%\bhd1.txt if ERRORLEVEL 1 @exit /b 1 type %TMP%\bhd1.txt | find /i "%2" > %TMP%\bhd2.txt FOR /F "tokens=2" %%G IN ('type %TMP%\bhd2.txt') DO SET REG_VALUE_TYPE=%%G FOR /F "tokens=3*" %%G IN ('type %TMP%\bhd2.txt') DO SET IMAGE_PATH=%%G %%H REM --- Replace "C" or "\??\C" if /I "%IMAGE_PATH:~0,4%" == "\??\" ( SET IMAGE_PATH=\??\%USER_DRIVE_LETTER%%IMAGE_PATH:~5% ) else ( SET IMAGE_PATH=%USER_DRIVE_LETTER%%IMAGE_PATH:~1% ) REM --- If there is a trailing \, it needs to be escaped or the reg REM --- will interpret the quotes that follow as an escaped character and REM --- not the end of the string. if /I "%IMAGE_PATH:~-1%" == "\" ( SET IMAGE_PATH=%IMAGE_PATH%\ ) REM --- Update the key. reg add "%1" /v "%2" /t "%REG_VALUE_TYPE%" /d "%IMAGE_PATH%" /f if ERRORLEVEL 1 @exit /b 1 del %TMP%\bhd1.txt del %TMP%\bhd2.txt @goto :eof REM -----------------------------------------------------------------------------------------------------------------
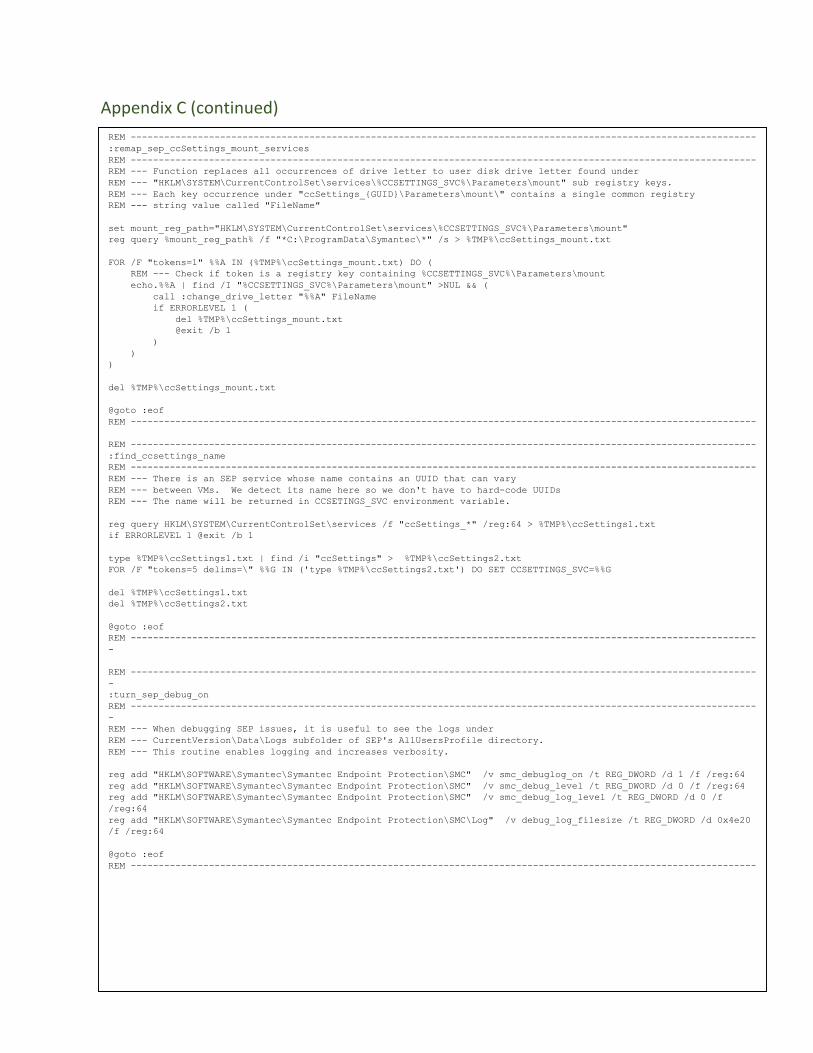
Appendix C (continued) REM ---------------------------------------------------------------------------------------------------------------- :remap_sep_ccSettings_mount_services REM ---------------------------------------------------------------------------------------------------------------- REM --- Function replaces all occurrences of drive letter to user disk drive letter found under REM --- "HKLM\SYSTEM\CurrentControlSet\services\%CCSETTINGS_SVC%\Parameters\mount" sub registry keys. REM --- Each key occurrence under "ccSettings_{GUID}\Parameters\mount\" contains a single common registry REM --- string value called "FileName" set mount_reg_path="HKLM\SYSTEM\CurrentControlSet\services\%CCSETTINGS_SVC%\Parameters\mount" reg query %mount_reg_path% /f "*C:\ProgramData\Symantec\*" /s > %TMP%\ccSettings_mount.txt FOR /F "tokens=1" %%A IN (%TMP%\ccSettings_mount.txt) DO ( REM --- Check if token is a registry key containing %CCSETTINGS_SVC%\Parameters\mount echo.%%A | find /I "%CCSETTINGS_SVC%\Parameters\mount" >NUL && ( call :change_drive_letter "%%A" FileName if ERRORLEVEL 1 ( del %TMP%\ccSettings_mount.txt @exit /b 1 ) ) ) del %TMP%\ccSettings_mount.txt @goto :eof REM ---------------------------------------------------------------------------------------------------------------- REM ---------------------------------------------------------------------------------------------------------------- :find_ccsettings_name REM ---------------------------------------------------------------------------------------------------------------- REM --- There is an SEP service whose name contains an UUID that can vary REM --- between VMs. We detect its name here so we don't have to hard-code UUIDs REM --- The name will be returned in CCSETINGS_SVC environment variable. reg query HKLM\SYSTEM\CurrentControlSet\services /f "ccSettings_*" /reg:64 > %TMP%\ccSettings1.txt if ERRORLEVEL 1 @exit /b 1 type %TMP%\ccSettings1.txt | find /i "ccSettings" > %TMP%\ccSettings2.txt FOR /F "tokens=5 delims=\" %%G IN ('type %TMP%\ccSettings2.txt') DO SET CCSETTINGS_SVC=%%G del %TMP%\ccSettings1.txt del %TMP%\ccSettings2.txt @goto :eof REM ----------------------------------------------------------------------------------------------------------------- REM ----------------------------------------------------------------------------------------------------------------- :turn_sep_debug_on REM ----------------------------------------------------------------------------------------------------------------- REM --- When debugging SEP issues, it is useful to see the logs under REM --- CurrentVersion\Data\Logs subfolder of SEP's AllUsersProfile directory. REM --- This routine enables logging and increases verbosity. reg add "HKLM\SOFTWARE\Symantec\Symantec Endpoint Protection\SMC" /v smc_debuglog_on /t REG_DWORD /d 1 /f /reg:64 reg add "HKLM\SOFTWARE\Symantec\Symantec Endpoint Protection\SMC" /v smc_debug_level /t REG_DWORD /d 0 /f /reg:64 reg add "HKLM\SOFTWARE\Symantec\Symantec Endpoint Protection\SMC" /v smc_debug_log_level /t REG_DWORD /d 0 /f /reg:64 reg add "HKLM\SOFTWARE\Symantec\Symantec Endpoint Protection\SMC\Log" /v debug_log_filesize /t REG_DWORD /d 0x4e20 /f /reg:64 @goto :eof REM ----------------------------------------------------------------------------------------------------------------
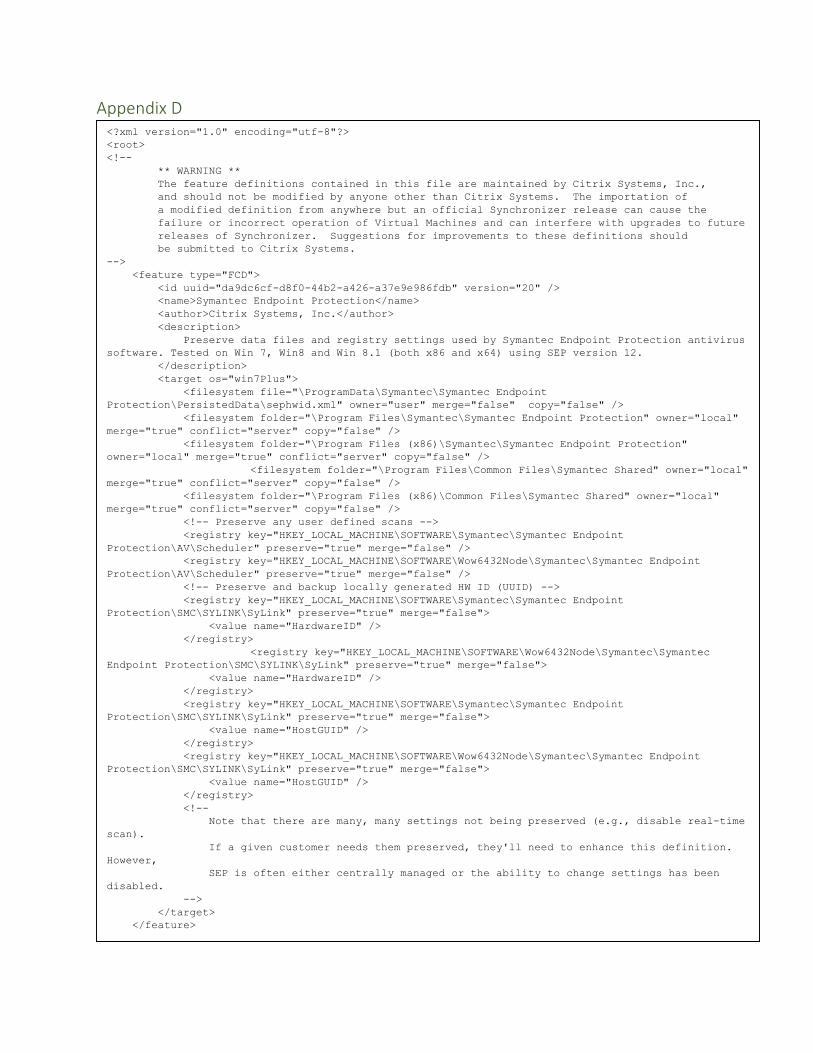
Appendix D
<?xml version="1.0" encoding="utf-8"?> <root> <!-- ** WARNING ** The feature definitions contained in this file are maintained by Citrix Systems, Inc., and should not be modified by anyone other than Citrix Systems. The importation of a modified definition from anywhere but an official Synchronizer release can cause the failure or incorrect operation of Virtual Machines and can interfere with upgrades to future releases of Synchronizer. Suggestions for improvements to these definitions should be submitted to Citrix Systems. --> <feature type="FCD"> <id uuid="da9dc6cf-d8f0-44b2-a426-a37e9e986fdb" version="20" /> <name>Symantec Endpoint Protection</name> <author>Citrix Systems, Inc.</author> <description> Preserve data files and registry settings used by Symantec Endpoint Protection antivirus software. Tested on Win 7, Win8 and Win 8.1 (both x86 and x64) using SEP version 12. </description> <target os="win7Plus"> <filesystem file="\ProgramData\Symantec\Symantec Endpoint Protection\PersistedData\sephwid.xml" owner="user" merge="false" copy="false" /> <filesystem folder="\Program Files\Symantec\Symantec Endpoint Protection" owner="local" merge="true" conflict="server" copy="false" /> <filesystem folder="\Program Files (x86)\Symantec\Symantec Endpoint Protection" owner="local" merge="true" conflict="server" copy="false" /> <filesystem folder="\Program Files\Common Files\Symantec Shared" owner="local" merge="true" conflict="server" copy="false" /> <filesystem folder="\Program Files (x86)\Common Files\Symantec Shared" owner="local" merge="true" conflict="server" copy="false" /> <!-- Preserve any user defined scans --> <registry key="HKEY_LOCAL_MACHINE\SOFTWARE\Symantec\Symantec Endpoint Protection\AV\Scheduler" preserve="true" merge="false" /> <registry key="HKEY_LOCAL_MACHINE\SOFTWARE\Wow6432Node\Symantec\Symantec Endpoint Protection\AV\Scheduler" preserve="true" merge="false" /> <!-- Preserve and backup locally generated HW ID (UUID) --> <registry key="HKEY_LOCAL_MACHINE\SOFTWARE\Symantec\Symantec Endpoint Protection\SMC\SYLINK\SyLink" preserve="true" merge="false"> <value name="HardwareID" /> </registry> <registry key="HKEY_LOCAL_MACHINE\SOFTWARE\Wow6432Node\Symantec\Symantec Endpoint Protection\SMC\SYLINK\SyLink" preserve="true" merge="false"> <value name="HardwareID" /> </registry> <registry key="HKEY_LOCAL_MACHINE\SOFTWARE\Symantec\Symantec Endpoint Protection\SMC\SYLINK\SyLink" preserve="true" merge="false"> <value name="HostGUID" /> </registry> <registry key="HKEY_LOCAL_MACHINE\SOFTWARE\Wow6432Node\Symantec\Symantec Endpoint Protection\SMC\SYLINK\SyLink" preserve="true" merge="false"> <value name="HostGUID" /> </registry> <!-- Note that there are many, many settings not being preserved (e.g., disable real-time scan). If a given customer needs them preserved, they'll need to enhance this definition. However, SEP is often either centrally managed or the ability to change settings has been disabled. --> </target> </feature>
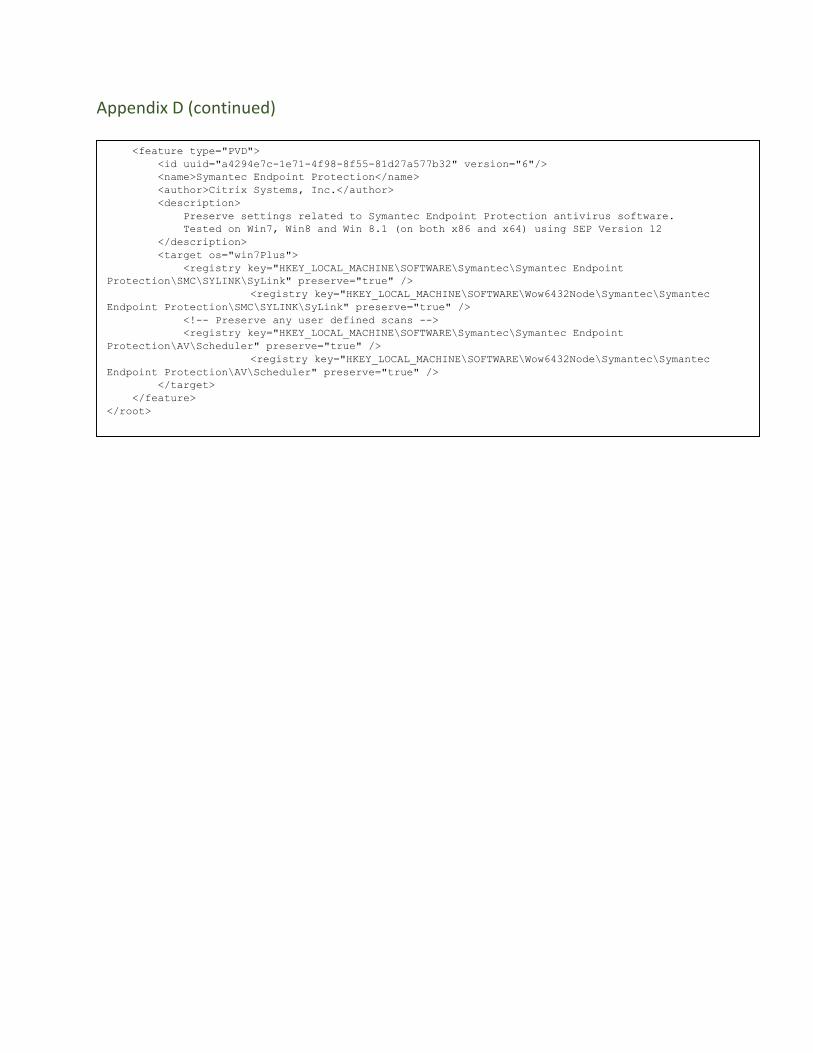
Appendix D (continued)
<feature type="PVD"> <id uuid="a4294e7c-1e71-4f98-8f55-81d27a577b32" version="6"/> <name>Symantec Endpoint Protection</name> <author>Citrix Systems, Inc.</author> <description> Preserve settings related to Symantec Endpoint Protection antivirus software. Tested on Win7, Win8 and Win 8.1 (on both x86 and x64) using SEP Version 12 </description> <target os="win7Plus"> <registry key="HKEY_LOCAL_MACHINE\SOFTWARE\Symantec\Symantec Endpoint Protection\SMC\SYLINK\SyLink" preserve="true" /> <registry key="HKEY_LOCAL_MACHINE\SOFTWARE\Wow6432Node\Symantec\Symantec Endpoint Protection\SMC\SYLINK\SyLink" preserve="true" /> <!-- Preserve any user defined scans --> <registry key="HKEY_LOCAL_MACHINE\SOFTWARE\Symantec\Symantec Endpoint Protection\AV\Scheduler" preserve="true" /> <registry key="HKEY_LOCAL_MACHINE\SOFTWARE\Wow6432Node\Symantec\Symantec Endpoint Protection\AV\Scheduler" preserve="true" /> </target> </feature> </root>