symantec netbackup searchadministrator'sguidedanno/symantec/netbackup_admin...netbackup search...
TRANSCRIPT
Symantec NetBackup™Search Administrator's Guide
Release 7.5
21220063
The software described in this book is furnished under a license agreement andmay be usedonly in accordance with the terms of the agreement.
Documentation version: 7.5
Legal NoticeCopyright © 2012 Symantec Corporation. All rights reserved.
Symantec, the Symantec Logo, NetBackup, and NetBackup Search are trademarks orregistered trademarks of Symantec Corporation or its affiliates in the U.S. and othercountries. Other names may be trademarks of their respective owners.
This Symantec product may contain third party software for which Symantec is requiredto provide attribution to the third party (“Third Party Programs”). Some of the Third PartyPrograms are available under open source or free software licenses. The LicenseAgreementaccompanying the Software does not alter any rights or obligations you may have underthose open source or free software licenses. Please see theThird Party LegalNoticeAppendixto this Documentation or TPIP ReadMe File accompanying this Symantec product for moreinformation on the Third Party Programs.
The product described in this document is distributed under licenses restricting its use,copying, distribution, and decompilation/reverse engineering. No part of this documentmay be reproduced in any form by any means without prior written authorization ofSymantec Corporation and its licensors, if any.
THEDOCUMENTATIONISPROVIDED"ASIS"ANDALLEXPRESSORIMPLIEDCONDITIONS,REPRESENTATIONS AND WARRANTIES, INCLUDING ANY IMPLIED WARRANTY OFMERCHANTABILITY, FITNESS FOR A PARTICULAR PURPOSE OR NON-INFRINGEMENT,ARE DISCLAIMED, EXCEPT TO THE EXTENT THAT SUCH DISCLAIMERS ARE HELD TOBELEGALLYINVALID.SYMANTECCORPORATIONSHALLNOTBELIABLEFORINCIDENTALOR CONSEQUENTIAL DAMAGES IN CONNECTION WITH THE FURNISHING,PERFORMANCE, OR USE OF THIS DOCUMENTATION. THE INFORMATION CONTAINEDIN THIS DOCUMENTATION IS SUBJECT TO CHANGE WITHOUT NOTICE.
The Licensed Software andDocumentation are deemed to be commercial computer softwareas defined in FAR12.212 and subject to restricted rights as defined in FARSection 52.227-19"Commercial Computer Software - Restricted Rights" and DFARS 227.7202, "Rights inCommercial Computer Software or Commercial Computer Software Documentation", asapplicable, and any successor regulations. Any use, modification, reproduction release,performance, display or disclosure of the Licensed Software andDocumentation by theU.S.Government shall be solely in accordance with the terms of this Agreement.

Symantec Corporation350 Ellis StreetMountain View, CA 94043
http://www.symantec.com
Technical SupportSymantec Technical Support maintains support centers globally. TechnicalSupport’s primary role is to respond to specific queries about product featuresand functionality. TheTechnical Support group also creates content for our onlineKnowledge Base. The Technical Support group works collaboratively with theother functional areas within Symantec to answer your questions in a timelyfashion. For example, theTechnical Support groupworkswithProductEngineeringand Symantec Security Response to provide alerting services and virus definitionupdates.
Symantec’s support offerings include the following:
■ A range of support options that give you the flexibility to select the rightamount of service for any size organization
■ Telephone and/or Web-based support that provides rapid response andup-to-the-minute information
■ Upgrade assurance that delivers software upgrades
■ Global support purchased on a regional business hours or 24 hours a day, 7days a week basis
■ Premium service offerings that include Account Management Services
For information about Symantec’s support offerings, you can visit our Web siteat the following URL:
www.symantec.com/business/support/
All support services will be delivered in accordance with your support agreementand the then-current enterprise technical support policy.
Contacting Technical SupportCustomers with a current support agreement may access Technical Supportinformation at the following URL:
www.symantec.com/business/support/
Before contacting Technical Support, make sure you have satisfied the systemrequirements that are listed in your product documentation. Also, you should beat the computer onwhich theproblemoccurred, in case it is necessary to replicatethe problem.
When you contact Technical Support, please have the following informationavailable:
■ Product release level
■ Hardware information
■ Available memory, disk space, and NIC information
■ Operating system
■ Version and patch level
■ Network topology
■ Router, gateway, and IP address information
■ Problem description:
■ Error messages and log files
■ Troubleshooting that was performed before contacting Symantec
■ Recent software configuration changes and network changes
Licensing and registrationIf yourSymantecproduct requires registrationor a licensekey, access our technicalsupport Web page at the following URL:
www.symantec.com/business/support/
Customer serviceCustomer service information is available at the following URL:
www.symantec.com/business/support/
Customer Service is available to assist with non-technical questions, such as thefollowing types of issues:
■ Questions regarding product licensing or serialization
■ Product registration updates, such as address or name changes
■ General product information (features, language availability, local dealers)
■ Latest information about product updates and upgrades
■ Information about upgrade assurance and support contracts
■ Information about the Symantec Buying Programs
■ Advice about Symantec's technical support options
■ Nontechnical presales questions
■ Issues that are related to CD-ROMs, DVDs, or manuals

Support agreement resourcesIf youwant to contact Symantec regarding an existing support agreement, pleasecontact the support agreement administration team for your region as follows:
[email protected] and Japan
[email protected], Middle-East, and Africa
[email protected] America and Latin America
Technical Support . . . . . . . . . . . . . . . . . . . . . . . . . . . . . . . . . . . . . . . . . . . . . . . . . . . . . . . . . . . . . . . . . . . . . . . . . . . . . . . . . . . . . . . . . . . . . . . 4
Chapter 1 About NetBackup Search . . . . . . . . . . . . . . . . . . . . . . . . . . . . . . . . . . . . . . . . . . . . . . . . . . . . 9
About NetBackup Search .... . . . . . . . . . . . . . . . . . . . . . . . . . . . . . . . . . . . . . . . . . . . . . . . . . . . . . . . . . . . . . 9How NetBackup Search works .... . . . . . . . . . . . . . . . . . . . . . . . . . . . . . . . . . . . . . . . . . . . . . . . . . . . . 10What you can do with NetBackup Search .... . . . . . . . . . . . . . . . . . . . . . . . . . . . . . . . . . . . . . . 11Components of NetBackup Search .... . . . . . . . . . . . . . . . . . . . . . . . . . . . . . . . . . . . . . . . . . . . . . . . 13About snapshots and NetBackup Search .... . . . . . . . . . . . . . . . . . . . . . . . . . . . . . . . . . . . . . . . 14
Chapter 2 Installation and Configuration . . . . . . . . . . . . . . . . . . . . . . . . . . . . . . . . . . . . . . . . . 17
Installing NetBackup Search .... . . . . . . . . . . . . . . . . . . . . . . . . . . . . . . . . . . . . . . . . . . . . . . . . . . . . . . 17Installing NetBackup Search in a clustered environment .... . . . . . . . . . . . 21
Changing the staging directory andport specifications forNetBackupSearch after installation .... . . . . . . . . . . . . . . . . . . . . . . . . . . . . . . . . . . . . . . . . . . . . . . . . . . . . . . 22
About protection of the indexing servers ... . . . . . . . . . . . . . . . . . . . . . . . . . . . . . . . . . . . . . . . 23
Chapter 3 Indexing Management . . . . . . . . . . . . . . . . . . . . . . . . . . . . . . . . . . . . . . . . . . . . . . . . . . . . . . . . 25
About indexing of backups .... . . . . . . . . . . . . . . . . . . . . . . . . . . . . . . . . . . . . . . . . . . . . . . . . . . . . . . . . . 25About indexing jobs ... . . . . . . . . . . . . . . . . . . . . . . . . . . . . . . . . . . . . . . . . . . . . . . . . . . . . . . . . . . . . . . . . . . . 28Adding indexing servers ... . . . . . . . . . . . . . . . . . . . . . . . . . . . . . . . . . . . . . . . . . . . . . . . . . . . . . . . . . . . . . 29Modifying indexing server schedules ... . . . . . . . . . . . . . . . . . . . . . . . . . . . . . . . . . . . . . . . . . . . . 30Configuring an indexing server in a policy ... . . . . . . . . . . . . . . . . . . . . . . . . . . . . . . . . . . . . . 31Decommissioning an indexing server ... . . . . . . . . . . . . . . . . . . . . . . . . . . . . . . . . . . . . . . . . . . . . 32
Chapter 4 Search Queries . . . . . . . . . . . . . . . . . . . . . . . . . . . . . . . . . . . . . . . . . . . . . . . . . . . . . . . . . . . . . . . . . . . . . 37
About searches queries ... . . . . . . . . . . . . . . . . . . . . . . . . . . . . . . . . . . . . . . . . . . . . . . . . . . . . . . . . . . . . . . 37Searching for indexed backups .... . . . . . . . . . . . . . . . . . . . . . . . . . . . . . . . . . . . . . . . . . . . . . . . . . . . 38Search terms .... . . . . . . . . . . . . . . . . . . . . . . . . . . . . . . . . . . . . . . . . . . . . . . . . . . . . . . . . . . . . . . . . . . . . . . . . . . . 41About using wildcard characters in a search .... . . . . . . . . . . . . . . . . . . . . . . . . . . . . . . . . . . 43Editing a saved search query .... . . . . . . . . . . . . . . . . . . . . . . . . . . . . . . . . . . . . . . . . . . . . . . . . . . . . . . 44Running a saved search .... . . . . . . . . . . . . . . . . . . . . . . . . . . . . . . . . . . . . . . . . . . . . . . . . . . . . . . . . . . . . . 46Viewing search results ... . . . . . . . . . . . . . . . . . . . . . . . . . . . . . . . . . . . . . . . . . . . . . . . . . . . . . . . . . . . . . . . 47Deleting a saved search .... . . . . . . . . . . . . . . . . . . . . . . . . . . . . . . . . . . . . . . . . . . . . . . . . . . . . . . . . . . . . . 48Deleting search results ... . . . . . . . . . . . . . . . . . . . . . . . . . . . . . . . . . . . . . . . . . . . . . . . . . . . . . . . . . . . . . . . 48
Contents
Chapter 5 Holds Management . . . . . . . . . . . . . . . . . . . . . . . . . . . . . . . . . . . . . . . . . . . . . . . . . . . . . . . . . . . . . 51
Placing a hold on a backup image .... . . . . . . . . . . . . . . . . . . . . . . . . . . . . . . . . . . . . . . . . . . . . . . . . 51Viewing hold details ... . . . . . . . . . . . . . . . . . . . . . . . . . . . . . . . . . . . . . . . . . . . . . . . . . . . . . . . . . . . . . . . . . . 55Releasing a hold .... . . . . . . . . . . . . . . . . . . . . . . . . . . . . . . . . . . . . . . . . . . . . . . . . . . . . . . . . . . . . . . . . . . . . . . . 56How to find the media information of images on hold .... . . . . . . . . . . . . . . . . . . . . . 59About restoring the data on hold and ingesting it into Enterprise
Vault ... . . . . . . . . . . . . . . . . . . . . . . . . . . . . . . . . . . . . . . . . . . . . . . . . . . . . . . . . . . . . . . . . . . . . . . . . . . . . . . . . 60Viewing hold reports ... . . . . . . . . . . . . . . . . . . . . . . . . . . . . . . . . . . . . . . . . . . . . . . . . . . . . . . . . . . . . . . . . . 61
Chapter 6 Troubleshooting . . . . . . . . . . . . . . . . . . . . . . . . . . . . . . . . . . . . . . . . . . . . . . . . . . . . . . . . . . . . . . . . . . 63
Known Issues ... . . . . . . . . . . . . . . . . . . . . . . . . . . . . . . . . . . . . . . . . . . . . . . . . . . . . . . . . . . . . . . . . . . . . . . . . . . . 63About status codes and log files ... . . . . . . . . . . . . . . . . . . . . . . . . . . . . . . . . . . . . . . . . . . . . . . . . . . . 67Re-initiating indexing jobs that have failed .... . . . . . . . . . . . . . . . . . . . . . . . . . . . . . . . . . . . 67Recovering from “disk full” situations .... . . . . . . . . . . . . . . . . . . . . . . . . . . . . . . . . . . . . . . . . . . 69Recovering from "disk error" situations .... . . . . . . . . . . . . . . . . . . . . . . . . . . . . . . . . . . . . . . . 70About Java and MFC UI differences ... . . . . . . . . . . . . . . . . . . . . . . . . . . . . . . . . . . . . . . . . . . . . . . 71
Index . . . . . . . . . . . . . . . . . . . . . . . . . . . . . . . . . . . . . . . . . . . . . . . . . . . . . . . . . . . . . . . . . . . . . . . . . . . . . . . . . . . . . . . . . . . . . . . . . . . . . . . . . . . . . . . . . . . . 73
Contents8
About NetBackup Search
This chapter includes the following topics:
■ About NetBackup Search
■ How NetBackup Search works
■ What you can do with NetBackup Search
■ Components of NetBackup Search
■ About snapshots and NetBackup Search
About NetBackup SearchNetBackup Search provides a mechanism to index the file system metadata thatis associated with backup images. This mechanism makes searching for relevantinformation simple, powerful, and fast. Once information is found, the user isable to take actions on that information. NetBackupSearch provides a robust legalhold mechanism. This mechanism ensures that images relevant to a legal caseare not inadvertently deleted or allowed to expire based on retention levels.
Note: NetBackup Search is a licensed feature.
WithNetBackup Search you can determine the data in the catalog at file level andlocate any file or folder from the repository. Further, you can select the requiredfiles or folders (backup images) and retain them by placing them on hold. Afteryou release the Hold, the files or folders can be expired.
The following capabilities are provided with this feature:
■ Advanced search capabilities enable you to find relevant information faster:
■ Search across multiple domains.
1Chapter
■ Save and edit search queries for legal traceability.
■ Robust solution for legal hold management.
■ Legal holds provide a mechanism to retain backup images regardless ofexisting retention levels. Legal holds ensure that backup images andassociated media are retained until the legal proceeding completes.
■ Hold reports in OpsCenter provide insight into size and age of legal holdand length of time of the associated holds.
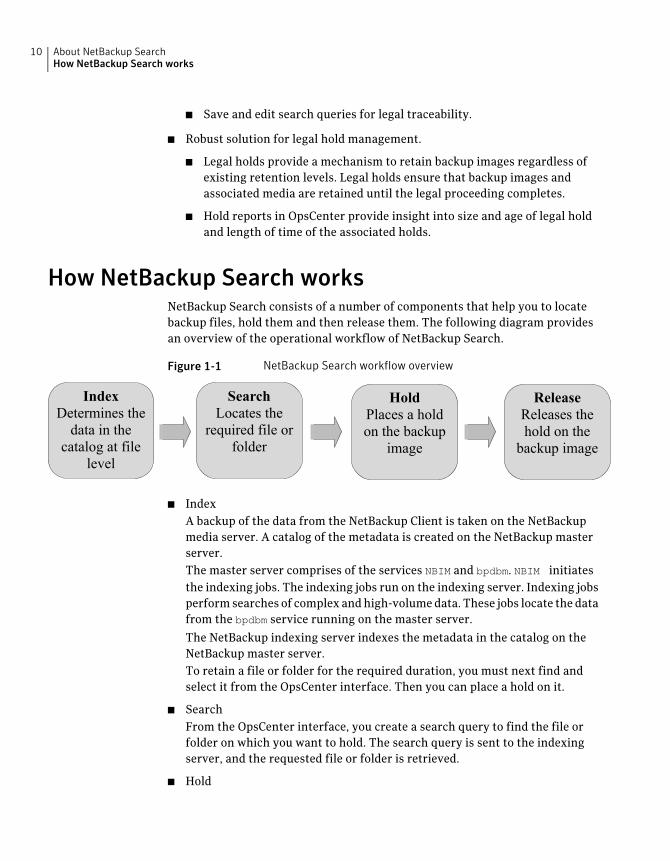
How NetBackup Search worksNetBackup Search consists of a number of components that help you to locatebackup files, hold them and then release them. The following diagram providesan overview of the operational workflow of NetBackup Search.
Figure 1-1 NetBackup Search workflow overview
IndexDetermines thedata in the
catalog at filelevel
SearchLocates the
required file orfolder
HoldPlaces a holdon the backup
image
ReleaseReleases thehold on the
backup image
■ IndexA backup of the data from the NetBackup Client is taken on the NetBackupmedia server. A catalog of the metadata is created on the NetBackup masterserver.The master server comprises of the services NBIM and bpdbm. NBIM initiatesthe indexing jobs. The indexing jobs run on the indexing server. Indexing jobsperformsearches of complex andhigh-volumedata. These jobs locate the datafrom the bpdbm service running on the master server.
The NetBackup indexing server indexes the metadata in the catalog on theNetBackup master server.To retain a file or folder for the required duration, you must next find andselect it from the OpsCenter interface. Then you can place a hold on it.
■ SearchFrom the OpsCenter interface, you create a search query to find the file orfolder on which you want to hold. The search query is sent to the indexingserver, and the requested file or folder is retrieved.
■ Hold
About NetBackup SearchHow NetBackup Search works
10
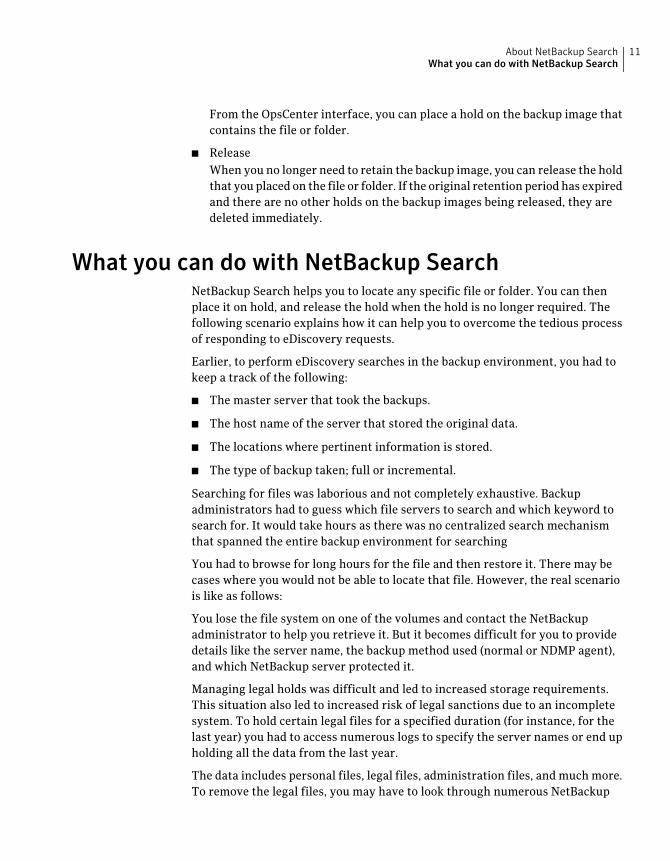
From the OpsCenter interface, you can place a hold on the backup image thatcontains the file or folder.
■ ReleaseWhen you no longer need to retain the backup image, you can release the holdthat you placed on the file or folder. If the original retention period has expiredand there are no other holds on the backup images being released, they aredeleted immediately.
What you can do with NetBackup SearchNetBackup Search helps you to locate any specific file or folder. You can thenplace it on hold, and release the hold when the hold is no longer required. Thefollowing scenario explains how it can help you to overcome the tedious processof responding to eDiscovery requests.
Earlier, to perform eDiscovery searches in the backup environment, you had tokeep a track of the following:
■ The master server that took the backups.
■ The host name of the server that stored the original data.
■ The locations where pertinent information is stored.
■ The type of backup taken; full or incremental.
Searching for files was laborious and not completely exhaustive. Backupadministrators had to guess which file servers to search and which keyword tosearch for. It would take hours as there was no centralized search mechanismthat spanned the entire backup environment for searching
You had to browse for long hours for the file and then restore it. There may becases where you would not be able to locate that file. However, the real scenariois like as follows:
You lose the file system on one of the volumes and contact the NetBackupadministrator to help you retrieve it. But it becomes difficult for you to providedetails like the server name, the backup method used (normal or NDMP agent),and which NetBackup server protected it.
Managing legal holds was difficult and led to increased storage requirements.This situation also led to increased risk of legal sanctions due to an incompletesystem. To hold certain legal files for a specified duration (for instance, for thelast year) you had to access numerous logs to specify the server names or end upholding all the data from the last year.
The data includes personal files, legal files, administration files, and much more.To remove the legal files, you may have to look through numerous NetBackup
11About NetBackup SearchWhat you can do with NetBackup Search
storage servers to find the files onwhichyouapplied thehold. This leads to anotherproblem; are you sure that there are no other holds applied to the images? Theprocess may get tedious and prompt you to buy more storage. It may also leadyou to leave the previously held tapes to gather dust in the storage vault withinfinite retentions.
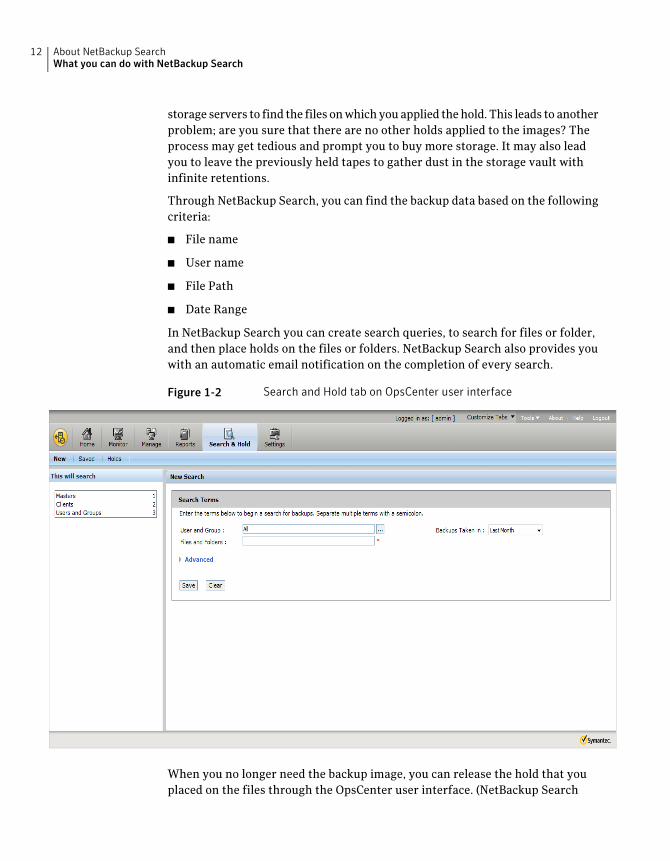
Through NetBackup Search, you can find the backup data based on the followingcriteria:
■ File name
■ User name
■ File Path
■ Date Range
In NetBackup Search you can create search queries, to search for files or folder,and then place holds on the files or folders. NetBackup Search also provides youwith an automatic email notification on the completion of every search.
Figure 1-2 Search and Hold tab on OpsCenter user interface
When you no longer need the backup image, you can release the hold that youplaced on the files through the OpsCenter user interface. (NetBackup Search
About NetBackup SearchWhat you can do with NetBackup Search
12
options are visible in OpsCenter only if you have added a valid NetBackup Searchlicense key in OpsCenter and you log on as a Security Administrator.)
NetBackup Search helps you to:
■ Reduce the time and the effort that is required for locating and preservingrequired backup images.
■ Reduce the cost of storage to 'hold everything'.
■ Maintain only the required data in the Catalog.
■ Efficiently recover the backup files.
■ Maintain confidentiality of user data.
Components of NetBackup SearchThe components of NetBackup Search and their descriptions are as follows:
Table 1-1 NetBackup Search components
DescriptionComponent
Search services on the NetBackup master server and media server
This servicemanages the Indexing andHold functionality. NBIMruns on the NetBackup master server.
Indexing manager(NBIM)
The indexing server is installed on a media server. The indexingengine and the Search executor run on indexing server.
Indexing server
TheSearch executor runs the catalog searchqueryon the indexingserver.
Search executor
The indexing engine is a Web server service that runs on theindexing server.
Indexing engine
OpsCenter components
TheNetBackupSearchuser interface is available on theOpsCenterUI. (NetBackup Search options are visible in OpsCenter only ifyouhave added avalidNetBackupSearch license key inOpsCenterand you log on as a Security Administrator.)
Search UI
The Search Broker allows search requests to search acrossmultiple NetBackup domains.
Search Broker
13About NetBackup SearchComponents of NetBackup Search
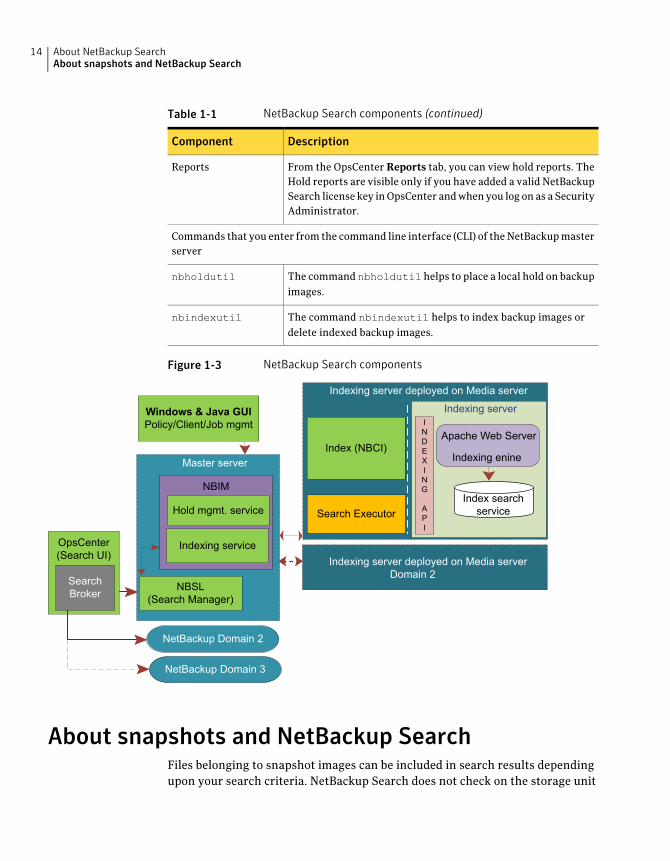
Table 1-1 NetBackup Search components (continued)
DescriptionComponent
From the OpsCenter Reports tab, you can view hold reports. TheHold reports are visible only if you have added a valid NetBackupSearch license key inOpsCenter andwhenyou log on as a SecurityAdministrator.
Reports
Commands that you enter from the command line interface (CLI) of theNetBackupmasterserver
The command nbholdutil helps to place a local hold on backupimages.
nbholdutil
The command nbindexutil helps to index backup images ordelete indexed backup images.
nbindexutil
Figure 1-3 NetBackup Search components
SearchFederator
NetBackup Domain 2
NetBackup Domain 3
NCF
Indexing server
OpsCenter(Search UI)
SearchBroker
Windows & Java GUIPolicy/Client/Job mgmt
NBIM
Hold mgmt. service
Indexing service
NBSL(Search Manager)
Index (NBCI)
Search Executor
Master server
Indexing server
Apache Web Server
Indexing enine
Index searchservice
INDEXING
API
Indexing server deployed on Media server
Indexing server deployed on Media serverDomain 2
About snapshots and NetBackup SearchFiles belonging to snapshot images can be included in search results dependingupon your search criteria. NetBackup Search does not check on the storage unit
About NetBackup SearchAbout snapshots and NetBackup Search
14
type or the backup method used for individual images. You can place a snapshotimage on hold. However, only the tar ball copies of the selected snapshot imageare placed on hold. You cannot expire the tar ball copies of the snapshot image ifthey are on hold. However, you can delete or change the expiration date of theprimary copy.
Note: The primary copy and tar ball copy differ in size for the snapshot image.The hold only consists of the overall size of the tar ball copies.
15About NetBackup SearchAbout snapshots and NetBackup Search

About NetBackup SearchAbout snapshots and NetBackup Search
16
Installation andConfiguration
This chapter includes the following topics:
■ Installing NetBackup Search
■ Changing the staging directory and port specifications for NetBackup Searchafter installation
■ About protection of the indexing servers
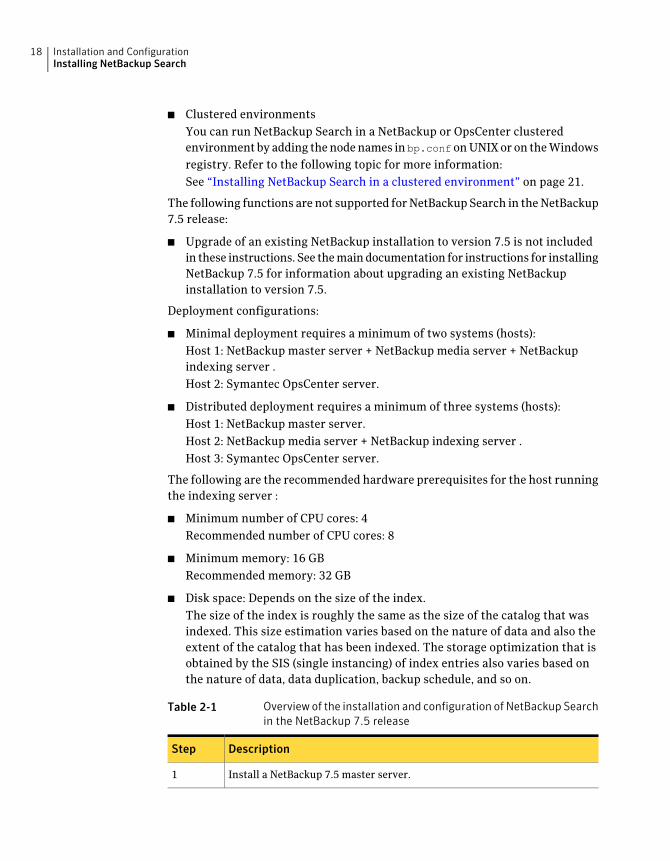
Installing NetBackup SearchThe following deployment scenarios are supported for NetBackup Search in theNetBackup 7.5 release:
■ Indexing serverTheNetBackup indexing servermust be installed on aNetBackupmedia server.The indexing server is supported only onWindows2008R2 (x64) systems. TheIndexing server can support Pure IPv6 if it is on a dual stack computer withno public IPv4 address, and the etc/host has the following entry:
127.0.0.1 localhost loopback
For details on support for Pure IPv6 on NetBackup refer to the NetBackupAdministrators guide.
■ Search user interfaceThe NetBackup Search user interface (UI) is installed as part of SymantecOpsCenter 7.5. No separate installation is needed.
■ Holds managementTheNetBackupholdsmanagement software is installed as part of aNetBackup7.5 master server. No separate installation is needed.
2Chapter
■ Clustered environmentsYou can run NetBackup Search in a NetBackup or OpsCenter clusteredenvironment by adding thenodenames in bp.confonUNIXor on theWindowsregistry. Refer to the following topic for more information:See “Installing NetBackup Search in a clustered environment” on page 21.
The following functions are not supported forNetBackupSearch in theNetBackup7.5 release:
■ Upgrade of an existing NetBackup installation to version 7.5 is not includedin these instructions. See themaindocumentation for instructions for installingNetBackup 7.5 for information about upgrading an existing NetBackupinstallation to version 7.5.
Deployment configurations:
■ Minimal deployment requires a minimum of two systems (hosts):Host 1: NetBackup master server + NetBackup media server + NetBackupindexing server .Host 2: Symantec OpsCenter server.
■ Distributed deployment requires a minimum of three systems (hosts):Host 1: NetBackup master server.Host 2: NetBackup media server + NetBackup indexing server .Host 3: Symantec OpsCenter server.
The following are the recommended hardware prerequisites for the host runningthe indexing server :
■ Minimum number of CPU cores: 4Recommended number of CPU cores: 8
■ Minimum memory: 16 GBRecommended memory: 32 GB
■ Disk space: Depends on the size of the index.The size of the index is roughly the same as the size of the catalog that wasindexed. This size estimation varies based on the nature of data and also theextent of the catalog that has been indexed. The storage optimization that isobtained by the SIS (single instancing) of index entries also varies based onthe nature of data, data duplication, backup schedule, and so on.
Table 2-1 Overview of the installation and configuration of NetBackup Searchin the NetBackup 7.5 release
DescriptionStep
Install a NetBackup 7.5 master server.1
Installation and ConfigurationInstalling NetBackup Search
18
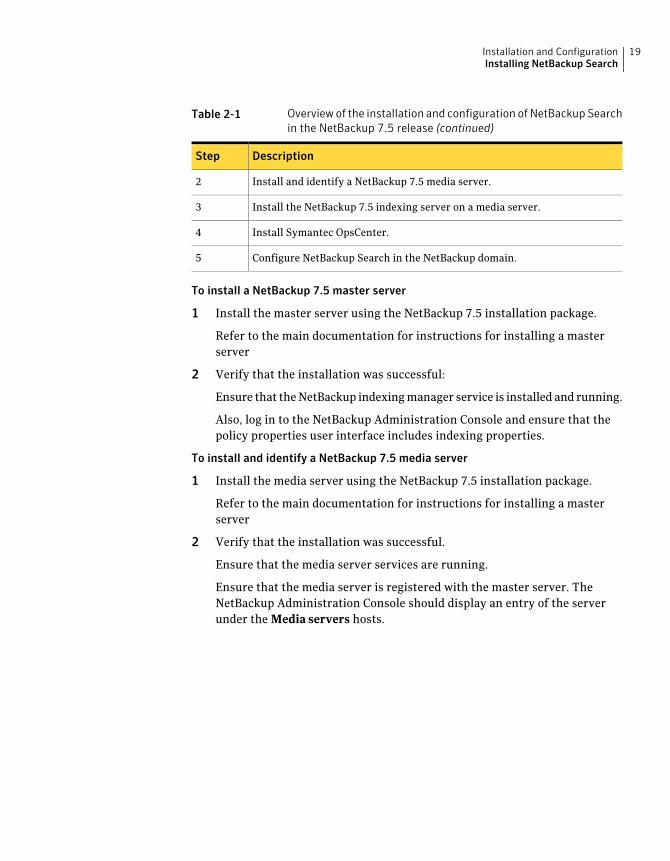
Table 2-1 Overview of the installation and configuration of NetBackup Searchin the NetBackup 7.5 release (continued)
DescriptionStep
Install and identify a NetBackup 7.5 media server.2
Install the NetBackup 7.5 indexing server on a media server.3
Install Symantec OpsCenter.4
Configure NetBackup Search in the NetBackup domain.5
To install a NetBackup 7.5 master server
1 Install the master server using the NetBackup 7.5 installation package.
Refer to the main documentation for instructions for installing a masterserver
2 Verify that the installation was successful:
Ensure that theNetBackup indexingmanager service is installed and running.
Also, log in to the NetBackup Administration Console and ensure that thepolicy properties user interface includes indexing properties.
To install and identify a NetBackup 7.5 media server
1 Install the media server using the NetBackup 7.5 installation package.
Refer to the main documentation for instructions for installing a masterserver
2 Verify that the installation was successful.
Ensure that the media server services are running.
Ensure that the media server is registered with the master server. TheNetBackup Administration Console should display an entry of the serverunder the Media servers hosts.
19Installation and ConfigurationInstalling NetBackup Search
To install the NetBackup 7.5 indexing server on a media server
1 Install the indexing server using the NetBackup 7.5 installation package.Select Search Software Installation from the main menu of the NetBackupinstallation wizard.
2 Follow the prompts that the installer presents to install the indexing serveron the NetBackup media server.
Note:When specifying the install path for the indexing server, specify alocation (partition) that has a lot of disk space. The indexing server createsand maintains the index database in one of the directories under itsinstallation location. This path can be different from the installation path ofthe NetBackup media server on that host.
You must exclude the NetBackup Search component directory(<NBU_Install_Path>\..\Symantec\NetBackupSearch\) from the antivirusscanning list.
At the end of the installation wizard, there is a checkbox for launching theNetBackup Search Configuration Wizard immediately after the installationcompletes. This option is enabled by default. However, in case you clearedthis option, you can launch the NetBackup Search Configuration Wizard byentering the following command:
<NBU_Install_Path>\..\Symantec\NetBackupSearch\bin\SearchConfig.exe
3 Verify that the installation was successful.
Ensure that the NetBackup Search Executor service is installed and running.
For better performance and scalability, you can install multiple indexingservers per domain. See “ Adding indexing servers” on page 29.
To install Symantec OpsCenter
1 Install Symantec OpsCenter using the NetBackup 7.5 installation package.
Refer to the main documentation for instructions for installing SymantecOpsCenter.
2 Verify that the installation was successful.
Ensure that the Search&Hold tab is visible and functional in the OpsCenterUI. You must log in to OpsCenter with an ID that has Security Administratorrights to view the Search & Hold tab.
Ensure that the NetBackup Search Broker service is installed and running.
Installation and ConfigurationInstalling NetBackup Search
20
To configure NetBackup Search in the NetBackup domain
1 Add the indexing server to the NetBackup domain.
See “ Adding indexing servers” on page 29.
2 Provide a schedule for indexing server.
See “Modifying indexing server schedules” on page 30.
3 Configure the indexing server in a policy.
See “Configuring an indexing server in a policy” on page 31.
Installing NetBackup Search in a clustered environment■ You can run NetBackup Search in a clustered environment of NetBackup or
OpsCenter. You must add each node names to bp.conf on UNIX or on theWindows registry. Refer to the following scenarios while running NetBackupSearch in a clustered environment:For NetBackup cluster mode, the Search Broker server list must contain thenameof eachNetBackupnode in the cluster and the virtual server ofNetBackupcluster. For a OpsCenter clustermode, the NetBackup server list must containthe name of each OpsCenter node in the Cluster and the virtual server ofOpsCenter cluster.
■ If NetBackup Master Server is Clustered and OpsCenter is Non-Clustered:Nodes of NetBackup Master Server: NBU_Node1, NBU_Node2Virtual Name: NBU_VirtualYoumust add the NBU_Node1, NBU_Node2, and NBU_Virtual at followinglocation:On Windows OpsCenter:HKEY_LOCAL_MACHINE\SOFTWARE\Symantec\SearchBroker\CurrentVersion\Config\Server
On UNIX OpsCenter:/opt/SYMCSearchBroker/bp.conf
■ If OpsCenter is Clustered and NetBackup Master Server is Non-Clustered:Nodes of OpsCenter: OpsC_Node1, OpsC_Node2Virtual Name: OpsC_VirtualYoumust add theOpsC_Node1,OpsC_Node2, andOpsC_Virtual at followinglocation:On Windows NetBackup:HKEY_LOCAL_MACHINE\SOFTWARE\Veritas\NetBackup\CurrentVersion\Config\Server
On UNIX NetBackup:/usr/openv/netbackup/bp.conf
■ If NetBackup and OpsCenter both are clustered:
21Installation and ConfigurationInstalling NetBackup Search
Nodes of NetBackup Master Server: NBU_Node1, NBU_Node2Virtual Name: NBU_VirtualYou must add the NBU_Node1, NBU_Node2, and the NBU_Virtual on eachnode of OpsCenter at the following location:On Windows OpsCenter:HKEY_LOCAL_MACHINE\SOFTWARE\Symantec\SearchBroker\CurrentVersion\Config\Server
On UNIX OpsCenter:/opt/SYMCSearchBroker/bp.conf
Nodes of OpsCenter: OpsC_Node1, OpsC_Node2Virtual Name: OpsC_VirtualYoumust add theOpsC_Node1, OpsC_Node2, and theOpsC_Virtual on eachnode of NetBackup at following location:On Windows NetBackup:HKEY_LOCAL_MACHINE\SOFTWARE\Veritas\NetBackup\CurrentVersion\Config\Server
On UNIX NetBackup:/usr/openv/netbackup/bp.conf
Note: If these entries are not added, then search operations fail giving themessage Communication Failed. In logs, themessage NO PERMISSION appears.
Changing the stagingdirectory andport specificationsfor NetBackup Search after installation
Complete this procedure if you want to change the staging directory or the portnumber for the NetBackup Search indexing server.
To change the staging directory and port specification after installation
1 Ensure that no indexing job or search operation is running on the indexingserver.
2 Stop both the NetBackup Search Executer service and theNetbackupIndexingEngine service with the following command:
<install_path>\Symantec\NetBackupSearch\bin\velocity-shutdown.exe
3 Launch the NetBackup Search Configuration Wizard with the followingcommand:
<install_path>\Symantec\NetBackupSearch\bin\SearchConfig.exe
Installation and ConfigurationChanging the staging directory and port specifications for NetBackup Search after installation
22
4 When you are prompted, enter the new staging directory path and portnumber values.
Note: Ensure that both staging directory and port number values are correct.
5 Click Configure to complete the configuration changes.
6 Exit the NetBackup Search Configuration Wizard.
About protection of the indexing serversThe procedures to protect a NetBackup indexing server uses tools, techniques,and practices available in NetBackup. As such, it assumes a certain level offamiliarity with administration of the product.
For information about the protection of indexing servers, refer to the followingdocument:
Indexing Server Protection
This document explains the following aspects of protecting your indexing servers:
■ Configuring a backup policy for protecting indexing servers
■ Running the backup of an indexing server
■ Restoring the index database from a backup
The document also includes recommended best practices for most commonscenarios as well as some alternative practices in non-standard scenarios.
23Installation and ConfigurationAbout protection of the indexing servers

Installation and ConfigurationAbout protection of the indexing servers
24
Indexing Management
This chapter includes the following topics:
■ About indexing of backups
■ About indexing jobs
■ Adding indexing servers
■ Modifying indexing server schedules
■ Configuring an indexing server in a policy
■ Decommissioning an indexing server
About indexing of backupsBackups are classified into on-going backups and historical backups.
■ Indexing on-going backupsThe backup policy types that are supported for indexing can be configured forindexing on a particular indexing server.When the backups are completed forpolicies configured for indexing, their backup image IDs are added to theindexingqueue for indexing requests. These images are indexedby the indexingjob which is available when the indexing window is open for the indexingschedule of the associated indexing server.
■ Indexing of historical backupsolder backups or the backup images of the policies which were not configuredfor indexing are called historical backups. For indexing historical backups,use the command nbindexutil to add the indexing request to the indexingqueue.
You can index the backup images that meet the following criteria:
■ Backups that are older than NetBackup Search 7.5
3Chapter

■ Backups that are already indexed, but you want to reindex them.
■ Backups for which the policy is not selected in NetBackup Search 7.5 indexingserver.
To index the backup image files, use the base command nbindexutil with thecommand [-add] or [-list] or [-remove] to perform the required operation.You can use the command nbindexutil -help with the command add or list orremove to view the help for that command. For example: enter the commandnbindexutil -help[-add] to view the help for add.
The command nbindexutil -add lets you submit the indexing or purging requestfor backup images. The following table lists the options and descriptions of thebase command nbindexutil -add:
Table 3-1 Options of nbindexutil -add
DescriptionOptions
Enter the Backup ID with bid or path of thefile containing Backup IDs with bid_file
-bid <Backup ID> | -bid_file
<name of the file that contains the backupIDs>
Enter the indexing server Name, it isrequired for adding the images for indexing.
-indexserver <Indexing Server
Name>
For re-indexing the indexed Backup ID(s).
Note: This option is not applicable for theindexing of Backup Ids which are in waitingor in progress state.
[-force]
Select 1 for adding a new image or 2 fordeleting a selected image. By default 1 isselected.
Note: The -Indexserver option is notapplicable for Delete operation.
[-operation <Operation ID>]
Set the indexing job Priority to Low or High.The default value is set to Low.
[-priority <Priority>]
The command nbindexutil -list lists the current status of the images beingindexed.The following table lists theoptions anddescriptionsof thebase commandnbindexutil -list:
Indexing ManagementAbout indexing of backups
26
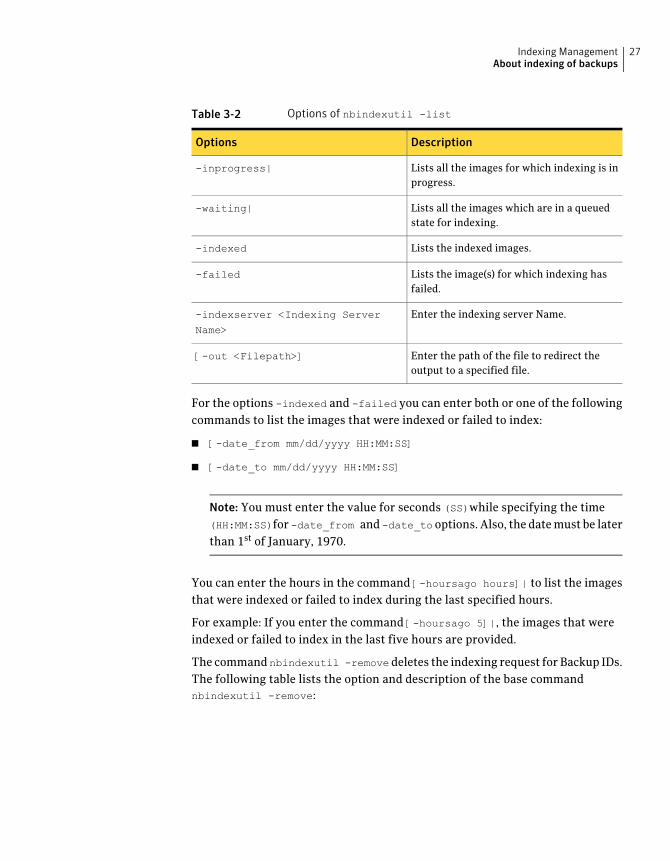
Table 3-2 Options of nbindexutil -list
DescriptionOptions
Lists all the images for which indexing is inprogress.
-inprogress|
Lists all the images which are in a queuedstate for indexing.
-waiting|
Lists the indexed images.-indexed
Lists the image(s) for which indexing hasfailed.
-failed
Enter the indexing server Name.-indexserver <Indexing Server
Name>
Enter the path of the file to redirect theoutput to a specified file.
[-out <Filepath>]
For the options -indexed and -failed you can enter both or one of the followingcommands to list the images that were indexed or failed to index:
■ [-date_from mm/dd/yyyy HH:MM:SS]
■ [-date_to mm/dd/yyyy HH:MM:SS]
Note: You must enter the value for seconds (SS)while specifying the time(HH:MM:SS)for -date_from and -date_to options. Also, the datemust be laterthan 1st of January, 1970.
You can enter the hours in the command [-hoursago hours]| to list the imagesthat were indexed or failed to index during the last specified hours.
For example: If you enter the command [-hoursago 5]|, the images that wereindexed or failed to index in the last five hours are provided.
The command nbindexutil -removedeletes the indexing request for Backup IDs.The following table lists the option and description of the base commandnbindexutil -remove:
27Indexing ManagementAbout indexing of backups
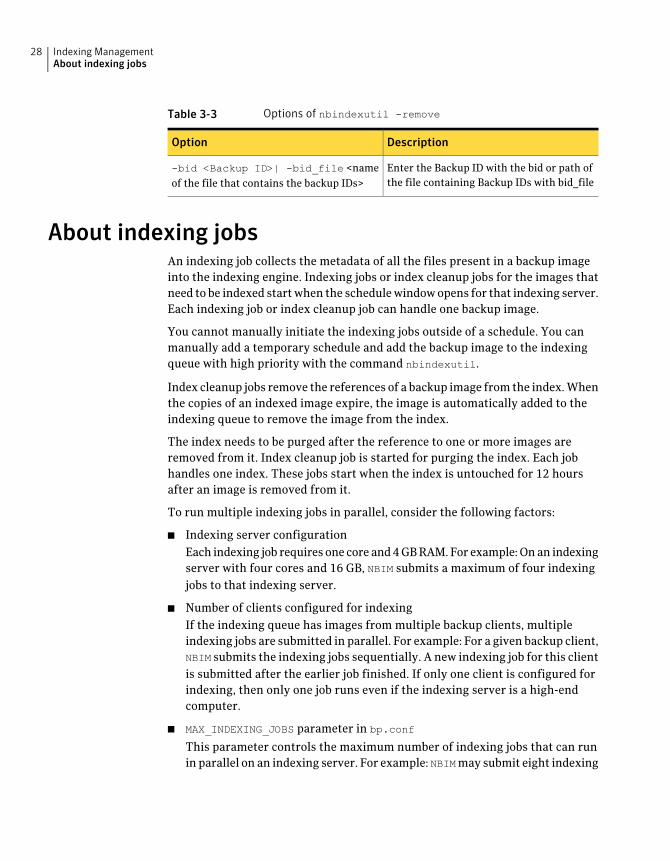
Table 3-3 Options of nbindexutil -remove
DescriptionOption
Enter the Backup ID with the bid or path ofthe file containing Backup IDs with bid_file
-bid <Backup ID>| -bid_file <nameof the file that contains the backup IDs>
About indexing jobsAn indexing job collects the metadata of all the files present in a backup imageinto the indexing engine. Indexing jobs or index cleanup jobs for the images thatneed to be indexed startwhen the schedulewindowopens for that indexing server.Each indexing job or index cleanup job can handle one backup image.
You cannot manually initiate the indexing jobs outside of a schedule. You canmanually add a temporary schedule and add the backup image to the indexingqueue with high priority with the command nbindexutil.
Index cleanup jobs remove the references of a backup image from the index.Whenthe copies of an indexed image expire, the image is automatically added to theindexing queue to remove the image from the index.
The index needs to be purged after the reference to one or more images areremoved from it. Index cleanup job is started for purging the index. Each jobhandles one index. These jobs start when the index is untouched for 12 hoursafter an image is removed from it.
To run multiple indexing jobs in parallel, consider the following factors:
■ Indexing server configurationEach indexing job requires one core and4GBRAM.For example:Onan indexingserver with four cores and 16 GB, NBIM submits a maximum of four indexingjobs to that indexing server.
■ Number of clients configured for indexingIf the indexing queue has images from multiple backup clients, multipleindexing jobs are submitted in parallel. For example: For a given backup client,NBIM submits the indexing jobs sequentially. A new indexing job for this clientis submitted after the earlier job finished. If only one client is configured forindexing, then only one job runs even if the indexing server is a high-endcomputer.
■ MAX_INDEXING_JOBS parameter in bp.conf
This parameter controls the maximum number of indexing jobs that can runin parallel on an indexing server. For example: NBIMmay submit eight indexing
Indexing ManagementAbout indexing jobs
28
jobs. If the MAX_INDEXING_JOBS parameter is set to 5, only five jobs can run inparallel. The other three jobs are queued.
You need a robustmaster server as its services NBIM and bpdbm play an importantrole in indexing jobs and performing the search operation. NBIM service initiatesthe indexing jobs (nbci), which index a high volume of data on the indexingserver. The indexing jobs search the data from bpdbm service which runs on themaster server.
Adding indexing serversYou can add an indexing server to the NetBackup domain (master server, mediaserver, and client server). The prerequisites for adding an indexing server are asfollows:
■ Configure a NetBackup domain.
■ Install the NetBackup Search application on Windows 2008 R2 media serversystem.This system is your indexing server.
29Indexing ManagementAdding indexing servers

To add an indexing server from the NetBackup Administration Console:
1 From the task panel click Host Properties > Media Servers.
The media servers are listed in the details panel.
Note: Select amedia server that is configuredwithWindows 2008R2 and hasthe NetBackup Search installed on it. You can set the media server as theindexing server.
If required, you can add multiple indexing servers by selecting the mediaservers that meet the prerequisites.
2 From the Menu, click Actions > Configure Index Servers or click HostProperties > Indexing Servers
The Choose Index Server window opens.
3 Enter the name of themedia server you selected as the indexing server. ClickOK.
Note: If while adding indexing serverwith a short name fails, trywith its fullyqualified domain name. It is recommended to use the same name for theconfiguration of the media server and the indexing server.
You have to create a schedule for the index server. See “Modifying indexingserver schedules” on page 30.
Modifying indexing server schedulesYou can view and modify the properties of the configured indexing server fromthe IndexingServerPropertieswindow. The IndexingServerPropertieswindowopens after you add the index server.
Note: You can only view the configuration properties and modify the schedule ofthe indexing server.
The properties of the indexing server are provided in the details panel.
To modify the schedules, click Schedules, a list of schedules is provided. You canview or delete these schedules or add a new schedule. The following points helpyou to view or delete schedules from the Indexing Server Properties window:
■ Select a schedule and click Properties to view its properties.
Indexing ManagementModifying indexing server schedules
30
■ Select a schedule and clickDelete to delete the schedule of the indexing server.
You can add and modify a new schedule from the Add New Schedule wizard asfollows:
To add and modify a new schedule:
1 Click New. The Add New Schedule wizard opens.
2 Under Attributes enter the name of the schedule. Click OK.
You can select Calendar to determine the specific days to run a policy. TheCalendar Schedule tab displays. Under the Calendar Schedule tab you canschedule the days to run a task by indicating specific dates, recurringweekdays, recurring days of the month.
For more information, see the Calendar Schedule chapter of the NetBackupAdministrator's Guide, Volume I.
3 Click Start Window tab.
You have to set the time periods during which NetBackup can start indexingusing a schedule. Click OK
You can exclude the specific dates from a schedule by clicking the ExcludeDates tab. If a date is excluded from a schedule, the policy does not run onthat day. The tab displays a calendar of three consecutive months. Use thelists at the top of the calendar to change the first month or year displayed.After you exclude the dates, click OK.
You have successfully added and modified the schedule.
If a schedule is not available or not added to an index server then the indexingserver becomesnon-operational.However, you cannot removean index serverthat is configured to a media server or master server.
Configuring an indexing server in a policyYou must configure the indexing server in a policy to enable indexing of the databacked up by that policy. From the Add New Policy wizard, you must select theEnable indexing for search option on the Attribute, Schedule, and Clients tabs.
The Enable indexing for search option is available for the following policy types:
■ FlashBackup
■ FlashBackup-Windows
■ Hyper-V
■ MS-Windows
31Indexing ManagementConfiguring an indexing server in a policy
■ NDMP
■ Standard
■ VMware
Note: If you enable indexing with VMware and Hyper-V policy types, you mustalso select Enable filerecoveryfromVMbackup on the VMware or Hyper-V tabof the policy window.
To configure the indexing server in a policy:
1 From Add New Policy > Attributes, select Enable indexing for search.
From the IndexingServerdrop-down list, select the required indexing server.
2 Click Schedules > New. The Add New Schedule - Policy <policy_name>window opens. Select Enable indexing for search, and click OK.
3 Click Clients > New. The Client Hardware and Operating System windowopens. Select Enable indexing for search, and click OK.
4 Click OK on the Add New Policy window.
Decommissioning an indexing serverThis procedure explains how to decommission an indexing server. You may needto decommission an indexing server to install software updates or to migrate anindexing server to another server.
This procedure also contains a reference to the procedures to decommission amedia server. If you want to decommission a media server on which you haveinstalled an indexing server, you must decommission the indexing server first.
Warning: If you recover a NetBackup master server catalog that includes backupimages from the decommissioned indexing server, then searches for those backupimages may fail. To fix this problem, you must explicitly remove references tothe decommissioned indexing server entries from the recovered master catalog.
To decommission an indexing server
1 Ensure that no indexing jobs are scheduled on the indexing server that youwant to decommission.
■ From the NetBackup Administration Console, select Host Properties >Indexing Servers.
Indexing ManagementDecommissioning an indexing server
32
■ Select the indexing server that you want to decommission.
■ Select Properties > Schedules.To decommission the indexing serverwhile indexing schedules are active,suspend indexing for indexing server. Froma commandprompt, issue thefollowing command:nbindexutil -suspend -indexingserver <index server name>
Note: This command ensures that no new indexing jobs are submitted.This commanddoesnot stop the indexing jobs that are currently running.If you choose to proceedwith decommissioning the indexing server beforejobs complete, those jobs will fail.
2 Delete all indexing schedules for the indexing server.
From Properties > Schedules on the NetBackup Administration Console,select all indexing schedules and click Delete.
3 To migrate the indexing server to a different indexing server, complete thefollowing steps:
■ Back up existing images that are indexed on the indexing server that youwant to decommission. From a command prompt, issue the followingcommands:nbindexutil -list -indexserver <index server name> -waiting
-out<output file path>
nbindexutil -list -indexserver <index server name> -inprogress
-out<output file path>
nbindexutil -list -indexserver <index server name> [-date_from
mm/dd/yyyy [HH:MM:SS]] [-date_to mm/dd/yyyy [HH:MM:SS]] -out
<output file path>nbindexutil -list -indexserver <index server name> -failed
[-date_from mm/dd/yyyy [HH:MM:SS]] [-date_to mm/dd/yyyy
[HH:MM:SS]] -out <output file path>
The date must be later than January 1, 1970. To list the images indexedafter January 2,1970, you can give the following command on indexingserver hpindexSever. nbindexutil -list -indexed -indexserver
hpindexSever -date_from 01/02/1970.
Note: If you do not specify the date for -indexed and -failed options ,nbindexutillists the images that were indexed or failed to index on thatday. It is recommended to give -date_from option with an older date.
33Indexing ManagementDecommissioning an indexing server
■ Back up all backup policy names. From a command prompt, issue thefollowing command:nbindexutil -listpolicies -indexserver <index server name>
-out <ouput file of policy names>
After you successfully decommission the indexing server, you can completethe migration to the new indexing server.
Note: As per the migration process, you have to submit the Backup Ids forIndexing or re-Indexing on another Index Server. It does not migrate theindexed data.
See step 8 for more instructions.
4 Remove indexing server references from themaster server. Froma commandprompt, issue the following command:
nbindexutil -removeindexserver -indexserver <index server name>
This command removes all index server references and data from themasterserver index tables. All existing backup policies are updated by removingindex server references and disabling the indexing option from policyattributes. This command does not have any effect on other indexing serversin themaster server domain; indexingon theother indexing servers continues.
If this command fails with an error, rerun the command to ensure cleanerremoval of the indexing server references.
5 Ensure that all indexing server references and data have been removed.
■ Run the following command from a command prompt to ensure that nopolicies refer to the indexing server that you want to decommission:nbindexutil -listpolicies -indexserver <index server name>
■ Run the following command from a command prompt to ensure that noindexed images exist on the indexing server that you want todecommission:nbindexutil -list -indexserver <index server name> -indexed
■ Ensure that the indexing server no longer appears on the indexing serverlist.From the NetBackup Administration Console, select Host Properties >Indexing Servers.Select Refresh All from the View menu.Confirm that the indexing server is not listed.
Indexing ManagementDecommissioning an indexing server
34
6 Uninstall the NetBackup Search software using the NetBackup Installationand Configuration Wizard.
7 To decommission the media server, see the following topics in SymantecNetBackupAdministrator'sGuide,Volume I, Release 7.5, Chapter 6:ManagingMedia Servers:
■ About decommissioning a media server
■ Decommissioning a media server
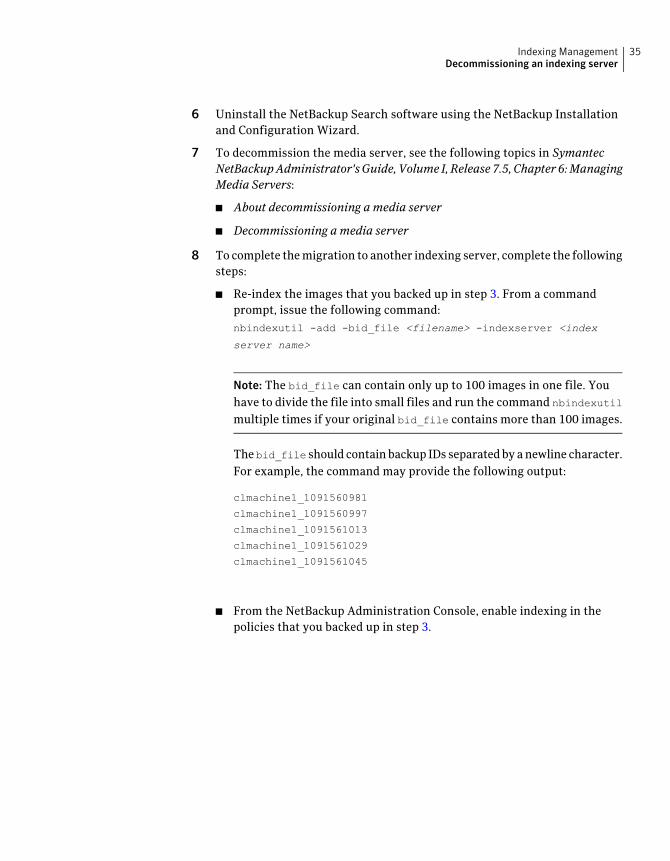
8 To complete themigration to another indexing server, complete the followingsteps:
■ Re-index the images that you backed up in step 3. From a commandprompt, issue the following command:nbindexutil -add -bid_file <filename> -indexserver <index
server name>
Note: The bid_file can contain only up to 100 images in one file. Youhave to divide the file into small files and run the command nbindexutilmultiple times if your original bid_file contains more than 100 images.
Thebid_file should contain backup IDs separatedby anewline character.For example, the command may provide the following output:
clmachine1_1091560981
clmachine1_1091560997
clmachine1_1091561013
clmachine1_1091561029
clmachine1_1091561045
■ From the NetBackup Administration Console, enable indexing in thepolicies that you backed up in step 3.
35Indexing ManagementDecommissioning an indexing server

Indexing ManagementDecommissioning an indexing server
36
Search Queries
This chapter includes the following topics:
■ About searches queries
■ Searching for indexed backups
■ Search terms
■ About using wildcard characters in a search
■ Editing a saved search query
■ Running a saved search
■ Viewing search results
■ Deleting a saved search
■ Deleting search results
About searches queriesUse NetBackup Search to search for data in indexed backups. Backed up data issearched based on the criteria that you provide in the query page.
More information is available:
See “Searching for indexed backups” on page 38.
See “Editing a saved search query” on page 44.
See “Running a saved search” on page 46.
See “Viewing search results” on page 47.
See “Deleting a saved search” on page 48.
See “Deleting search results” on page 48.
4Chapter
Searching for indexed backupsTo create a new search for data in indexed backups
1 From the OpsCenter interface, select Search > New.
Make sure that index data collection has completed. The left pane of the NewSearch Criteria page displays the numbers of masters, clients, users, andviews for which index data collection has completed. Note that if there aretwo master servers for which index data is in the process of being collected,the left pane does not include those two master servers in the master count.Also note that the numbers in the left pane change appropriately when youselect a master, client, user, or view in the right pane.
To view the status of the index data collection, selectSettings>Configurationand look at the NetBackup Masters data collection status.
Search QueriesSearching for indexed backups
38

2 Select the appropriate criteria for the search. To refine the search, clickAdvanced and add one or more of the criteria that is displayed. Detailedinformation about the search terms is available:
See “Search terms” on page 41.
See “About using wildcard characters in a search” on page 43.
39Search QueriesSearching for indexed backups
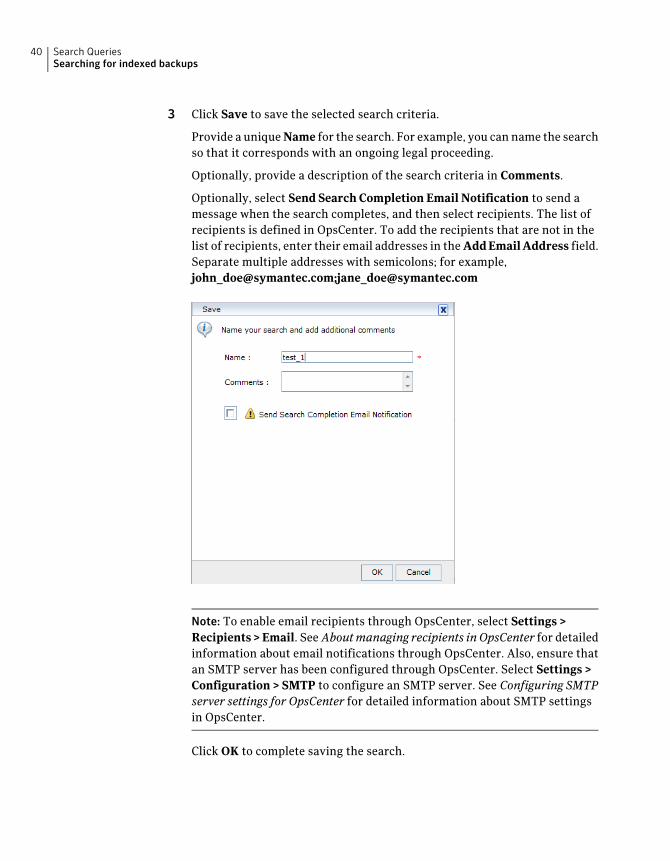
3 Click Save to save the selected search criteria.
Provide a uniqueName for the search. For example, you can name the searchso that it corresponds with an ongoing legal proceeding.
Optionally, provide a description of the search criteria in Comments.
Optionally, select Send Search Completion Email Notification to send amessage when the search completes, and then select recipients. The list ofrecipients is defined in OpsCenter. To add the recipients that are not in thelist of recipients, enter their email addresses in the AddEmailAddress field.Separate multiple addresses with semicolons; for example,[email protected];[email protected]
Note: To enable email recipients through OpsCenter, select Settings >Recipients>Email. SeeAboutmanaging recipients in OpsCenter for detailedinformation about email notifications through OpsCenter. Also, ensure thatan SMTP server has been configured through OpsCenter. Select Settings >Configuration > SMTP to configure an SMTP server. See Configuring SMTPserver settings for OpsCenter for detailed information about SMTP settingsin OpsCenter.
Click OK to complete saving the search.
Search QueriesSearching for indexed backups
40
Next, a list of saved searches is displayed. The list is sorted initially by name.Click theplus symbolnext to thenameof a saved search todisplay informationabout it.
More information is available:
See “Editing a saved search query” on page 44.
See “Running a saved search” on page 46.
See “Viewing search results” on page 47.
See “Deleting a saved search” on page 48.
See “Deleting search results” on page 48.
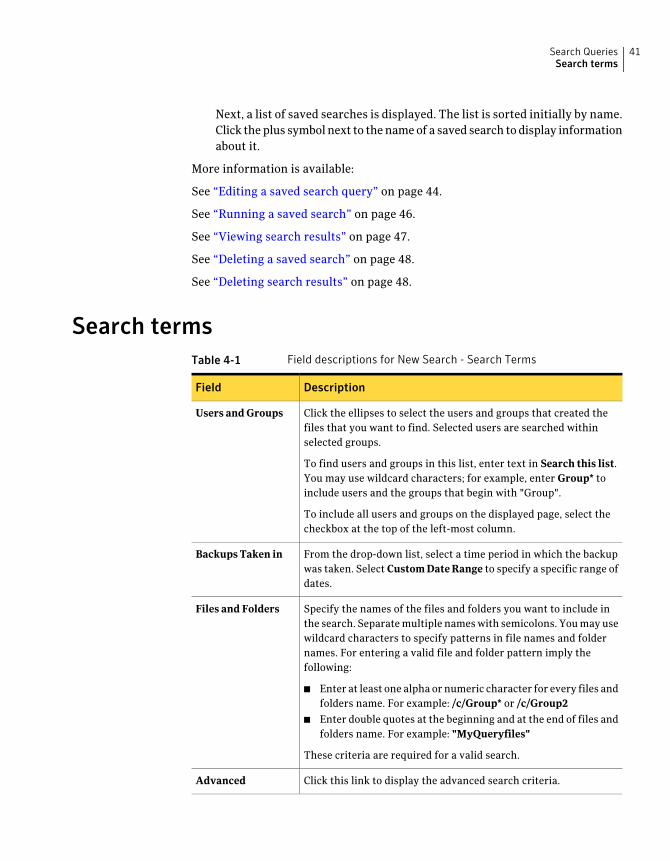
Search termsTable 4-1 Field descriptions for New Search - Search Terms
DescriptionField
Click the ellipses to select the users and groups that created thefiles that you want to find. Selected users are searched withinselected groups.
To find users and groups in this list, enter text in Search this list.You may use wildcard characters; for example, enter Group* toinclude users and the groups that begin with "Group".
To include all users and groups on the displayed page, select thecheckbox at the top of the left-most column.
Users and Groups
From the drop-down list, select a time period in which the backupwas taken. Select CustomDateRange to specify a specific range ofdates.
Backups Taken in
Specify the names of the files and folders you want to include inthe search. Separatemultiple nameswith semicolons. Youmay usewildcard characters to specify patterns in file names and foldernames. For entering a valid file and folder pattern imply thefollowing:
■ Enter at least one alpha or numeric character for every files andfolders name. For example: /c/Group* or /c/Group2
■ Enter double quotes at the beginning and at the end of files andfolders name. For example: "MyQueryfiles"
These criteria are required for a valid search.
Files and Folders
Click this link to display the advanced search criteria.Advanced
41Search QueriesSearch terms

Table 4-1 Field descriptions for New Search - Search Terms (continued)
DescriptionField
Choose to search Domains or Views:
■ ChooseDomain to search thebackups thatwere taken formasterservers and clients.
■ Choose View to search the backups that were taken for masterserver views or client views. Onlymaster servers of clients thatare configured for indexing are listed with views.
Domain
Views
Click the ellipses to select the names of the NetBackup masterservers youwant to include in this search. Separatemultiple nameswith semicolons.
To find master servers in this list, enter text in the Search this listfield. You may use wildcard characters; for example, enter*symantec.com to include master servers that end with"symantec.com".
From the Version drop-down list, select a version number to findthemaster servers that are running a specific version ofNetBackup.
Master servers
Note: (Domainselection only)
Click the ellipses to select the names of the views you want toinclude in this search.
Name
Note: (Viewsselection only)
Click the ellipses to select the names of the clients you want toinclude in this search. Separate multiple names with semicolons.
To find clients in this list, enter text in the Search this list field.Youmayusewildcard characters; for example, enter *symantec.comto include the clients that end with "symantec.com".
To view clients on othermaster servers and select them if requiredfor this search, select the MasterServers from the drop-down list.
Clients
Note: (Domainselection only)
Select one or more of the following file types to include in thesearch:
■ Excel Spreadsheets (xls and xlx)
■ PDF Documents (pdf)
■ PowerPoint Presentation (ppt and pptx)
■ Text Files (txt and rtf)
■ Word Documents (doc and docx)
■ (Other) / Specify . Use a semicolon to specifymultiple file types;for example: exe;png;mp3 and so on.
Separate multiple values with semicolons.
File Type
Search QueriesSearch terms
42
Table 4-1 Field descriptions for New Search - Search Terms (continued)
DescriptionField
From the drop-down list, select a time period in which the files forthe search were created. Select Custom Date Range to specify aspecific range of dates.
File Created
From the drop-down list, select a time period in which the files forthe searchweremost recently changed. SelectCustomDateRangeto specify a specific range of dates.
File Modified
For the Backups Taken in, File Created, and File Modified fields, the valid dateoptions are as follows:
■ Today - This is the current day.
■ Yesterday
■ Last week - The time span consists of the last seven days. For Example: If thecurrent day is Wednesday, then the span is calculated from last Wednesdayto the current day (Wednesday).
■ Lastmonth - The time span consists of the last 31 days. For Example: If currentdate is 7thDecember, then span is calculated from7thNovember to the currentday (7th December).
■ Last 90 days - The time span consists of the last 90 days. For Example: If thecurrent day is 8th December, then the span is calculated from 8th Septemberto the current day (8th December).
■ Last year - The time span consists of the last year. For Example: If the currentdate is 7th December, 2011, then the span is calculated from 7th December,2010 to the current day (7th December, 2011).
■ Custom date range - You can select the from and to date options.
More information is available:
See “About using wildcard characters in a search” on page 43.
See “Searching for indexed backups” on page 38.
See “Editing a saved search query” on page 44.
About using wildcard characters in a searchWildcards are special characters that support a single ormulti-character sequence.You can search for files or folders by using the following wildcard entries:
■ ?
43Search QueriesAbout using wildcard characters in a search
When you use a question mark, your entry is matched with a single characterentry. For example:The query Ren?s matches the terms Renás and Renas.
The query t?llmatches the words tall, tell, and till. Any three-characterword that begins with t, followed by any other character, and endswith ll arematched.Similarly for the query ??ll any four-character word that ends with thecharacters ll are matched.
■ *
When you use an asterisk, your entry is matched with any sequence of zeroor more characters.Thiswildcard expression can bewritten in phrases like ?Name LNa*, but it doesnot match terms that are used in a phrase. For example:The querry ?Name LNa* matches FName LName, but F*L does not match withFName LName.
Similarly, the query ??ow*ng matches terms like growing and flowing. Anyword that begins with any two characters, followed by the character sequenceow, followed by any number of other characters, and ending in the charactersequence ng are matched.
More information about searches is available:
See “Searching for indexed backups” on page 38.
See “Search terms” on page 41.
Editing a saved search queryTo edit a saved search for data in indexed backups
1 From the OpsCenter interface, select Search & Hold > Saved.
2 Click the Name of the saved search that you want to edit.
3 Make the changes youwant to the criteria for the search.Detailed informationabout the search terms is available:
See “Search terms” on page 41.
A basic search includes one or more of the following criteria:
■ Users and Groups
■ Backups Taken in
■ Files and Folders (required)
Search QueriesEditing a saved search query
44
Click Advanced to change or add one or more of the advanced criteria.
4 Click Save to save the changed search criteria.
Click Save as to save the changed search with another name.
■ If you clicked Save as, provide a Name for the search.
■ Optionally, provide a description of the search criteria in Comments.
■ Optionally, select Send Search Completion Email Notification to send amessage when the search completes, and then select recipients. The listof recipients is defined in OpsCenter. To add the recipients that are notin the list of recipients, enter their email addresses in the Add EmailAddress field. Separatemultiple addresseswith semicolons; for example,[email protected];[email protected]
Note: To enable email recipients through OpsCenter, select Settings >Recipients > Email. See About managing recipients in OpsCenter fordetailed information about email notifications through OpsCenter.
■ Click OK to complete saving the search.
Next, a list of saved searches is displayed. You can find the recently changedsaved search at the top of the list. Click the plus symbol next to the name ofa saved search to display information about it.
More information is available:
See “Searching for indexed backups” on page 38.
See “Running a saved search” on page 46.
See “Viewing search results” on page 47.
See “Deleting a saved search” on page 48.
See “Deleting search results” on page 48.
45Search QueriesEditing a saved search query
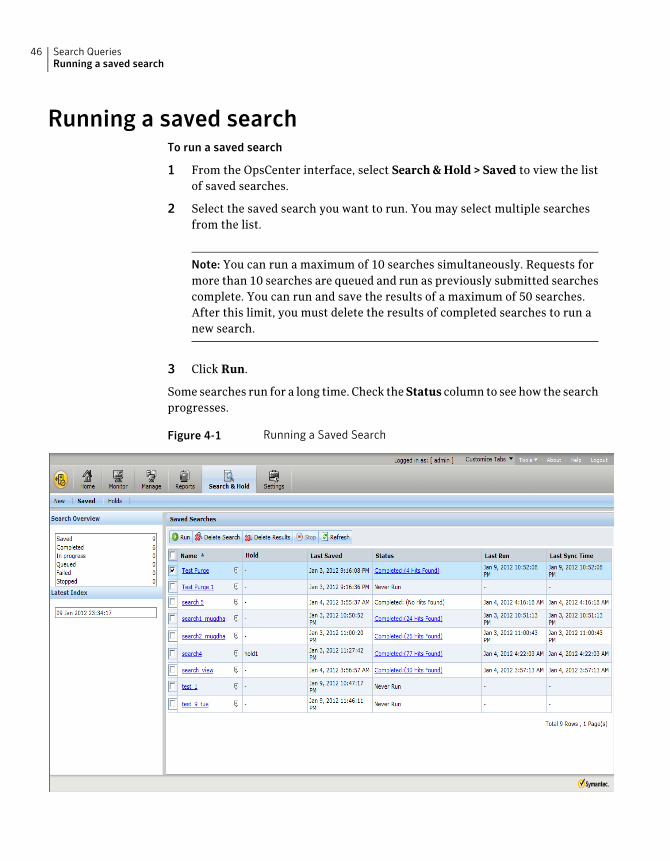
Running a saved searchTo run a saved search
1 From the OpsCenter interface, select Search & Hold > Saved to view the listof saved searches.
2 Select the saved search you want to run. You may select multiple searchesfrom the list.
Note: You can run a maximum of 10 searches simultaneously. Requests formore than 10 searches are queued and run as previously submitted searchescomplete. You can run and save the results of a maximum of 50 searches.After this limit, you must delete the results of completed searches to run anew search.
3 Click Run.
Some searches run for a long time. Check theStatus column to see how the searchprogresses.
Figure 4-1 Running a Saved Search
Search QueriesRunning a saved search
46
More information is available:
See “Searching for indexed backups” on page 38.
See “Editing a saved search query” on page 44.
See “Viewing search results” on page 47.
See “Deleting a saved search” on page 48.
See “Deleting search results” on page 48.
Viewing search resultsTo view search results
1 From the OpsCenter interface, select Search & Hold > Saved to view the listof saved searches.
2 To view search results, find the saved search and select the Status link. Forexample, Completed, In Progress, or Failed.
The search results for the saved search that you selected are displayed.
3 To view list of the files thatmatched the search criteria in that backup, selectthe backup from the BackupTakenAt column. Then click the plus sign nextto the date to view the corresponding backup image details.
4 To filter the backups in the search results, enable filter criteria from the leftpanel.
Filters are available on Master and Client only. These filters are persistedacross sessions when you select Apply. Click Clear to remove the filter.
5 To place a hold, select the backups that youwant to hold and then click Hold.
More information about holds is available:
See “Placing a hold on a backup image” on page 51.
More information is available:
See “Searching for indexed backups” on page 38.
See “Editing a saved search query” on page 44.
See “Running a saved search” on page 46.
See “Deleting a saved search” on page 48.
See “Deleting search results” on page 48.
47Search QueriesViewing search results
Deleting a saved searchTo delete a saved search
1 From the OpsCenter interface, select Search & Hold > Saved to view the listof saved searches.
2 Select the saved search you want to delete. You may select multiple searchesfrom the list.
3 Click Delete Search.
4 Respond to the prompt Are you sure you want to delete the selected searchcriteria?
Click OK to delete the search. Click Cancel to keep the saved search.
More information is available:
See “Searching for indexed backups” on page 38.
See “Editing a saved search query” on page 44.
See “Running a saved search” on page 46.
See “Viewing search results” on page 47.
See “Deleting search results” on page 48.
Deleting search resultsUse this procedure to delete the search results froma saved search. Youmaywantto perform this procedure in the following scenarios:
■ You want to retain the saved search criteria, but you do not need the currentresults of the search.
■ You have reached the limit of 50 completed searches, and you want to runmore searches.
To delete search results
1 From the OpsCenter interface, select Search & Hold > Saved to view the listof saved searches.
2 Select the saved search you want to delete. You may select multiple searchesfrom the list.
Search QueriesDeleting a saved search
48

3 Click Delete Search Results.
4 Respond to the prompt Are you sure you want to delete the results forselected search criteria?
Click OK to delete the search results. Click Cancel to keep the search results.
More information is available:
See “Searching for indexed backups” on page 38.
See “Editing a saved search query” on page 44.
See “Viewing search results” on page 47.
See “Running a saved search” on page 46.
See “Deleting a saved search” on page 48.
49Search QueriesDeleting search results

Search QueriesDeleting search results
50
Holds Management
This chapter includes the following topics:
■ Placing a hold on a backup image
■ Viewing hold details
■ Releasing a hold
■ How to find the media information of images on hold
■ About restoring the data on hold and ingesting it into Enterprise Vault
■ Viewing hold reports
Placing a hold on a backup imageNetBackup Search provides two methods for placing a hold on a backup image:
■ Legal hold. You create a legal hold from Symantec OpsCenter based on theresults of a saved search.
■ Local hold. You create a local hold from the command line interface of theNetBackup master server.
Caution: Placing a hold on backup images may disrupt new backups fromcompleting. Storagemay fill up if previous backups are not automatically expired.
To place a legal hold on a backup image through OpsCenter
1 From the OpsCenter interface, select Search > Saved.
2 Find the saved search that contains the backup images that youwant to hold.
5Chapter
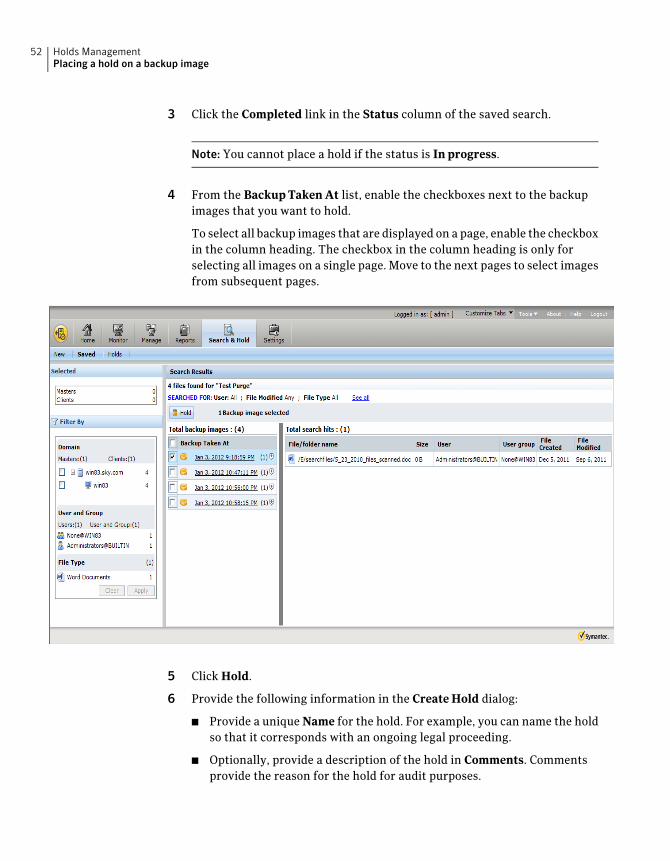
3 Click the Completed link in the Status column of the saved search.
Note: You cannot place a hold if the status is In progress.
4 From the Backup Taken At list, enable the checkboxes next to the backupimages that you want to hold.
To select all backup images that are displayed on a page, enable the checkboxin the column heading. The checkbox in the column heading is only forselecting all images on a single page. Move to the next pages to select imagesfrom subsequent pages.
5 Click Hold.
6 Provide the following information in the Create Hold dialog:
■ Provide a unique Name for the hold. For example, you can name the holdso that it corresponds with an ongoing legal proceeding.
■ Optionally, provide a description of the hold in Comments. Commentsprovide the reason for the hold for audit purposes.
Holds ManagementPlacing a hold on a backup image
52
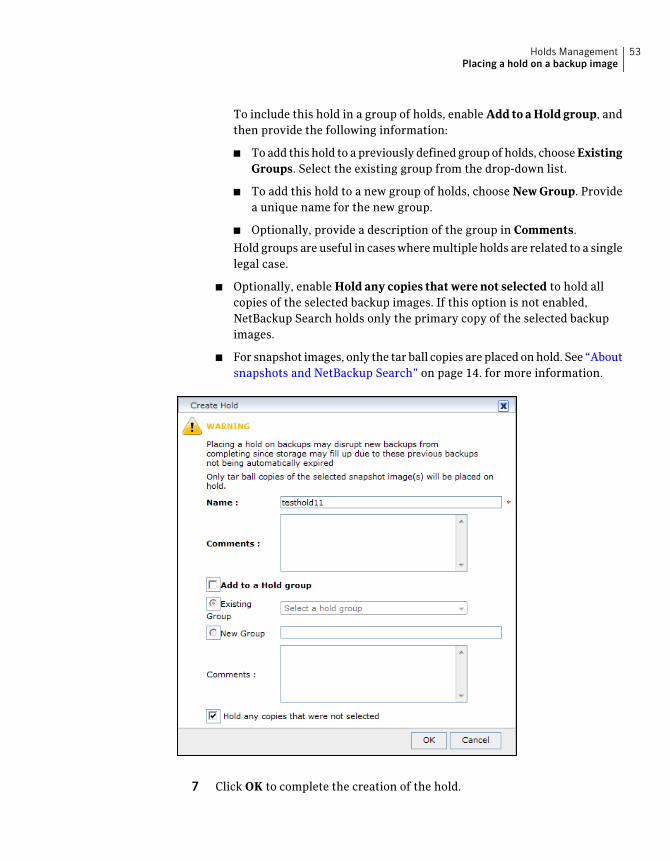
To include this hold in a group of holds, enable Add to a Hold group, andthen provide the following information:
■ Toadd this hold to a previously defined group of holds, chooseExistingGroups. Select the existing group from the drop-down list.
■ To add this hold to a new group of holds, choose New Group. Providea unique name for the new group.
■ Optionally, provide a description of the group in Comments.Hold groups are useful in caseswheremultiple holds are related to a singlelegal case.
■ Optionally, enable Hold any copies that were not selected to hold allcopies of the selected backup images. If this option is not enabled,NetBackup Search holds only the primary copy of the selected backupimages.
■ For snapshot images, only the tar ball copies are placed onhold. See “Aboutsnapshots and NetBackup Search” on page 14. for more information.
7 Click OK to complete the creation of the hold.
53Holds ManagementPlacing a hold on a backup image
To place a local hold on a backup image through the command line interface
1 From the command line interface of the NetBackup master server, enternbholdutil -create with appropriate options and elements. For example:
nbholdutil.exe -create -holdname legal_case1 -backupid
win81.sky.com_1307425938 -allcopy
This command creates a local hold that is called legal_case1. The backupimage ID is win81.sky.com_1307425938. The option -allcopy indicates thatthe hold includes all copies of the selected backup image. If this option is notincluded, NetBackup Search holds only the primary copy of the selectedbackup image.
See Table 5-1 for more information about related command options.
2 To display a list of holds, enter the nbholdutil -list command withappropriate options and elements. For example:
nbholdutil.exe -list
See Table 5-2 for more information about related command options.
3 To display help information about the command and its options, enternbholdutil -help [-option]
The commandnbholdutil -create lets you create a local hold for a backup image.The following table lists the options and descriptions of the base commandnbholdutil -create:
Table 5-1 Options of nbholdutil -create
DescriptionOption
Enter a unique name for the hold.-holdname <hold name>
Enter a description of the hold . Thecomment provides the reason for the holdfor audit purposes. This option is optional.
[-reason <reason>]
Specify the file path or the backup ID to thebackup image.
Also, include one of the following copymethods:
■ To include only the primary copy of thespecified backup image, specify-primarycopy or -p.
■ To include all copies of the specifiedbackup image, specify -allcopy or -a.
-filepath <filepath> | -backupid
<backup ID> -primarycopy |
-allcopy
Holds ManagementPlacing a hold on a backup image
54
The command nbholdutil.exe -list lists the holds that have been placed onbackup images. The following table lists the options and descriptions of the basecommand nbholdutil.exe -list:
Table 5-2 Options of nbholdutil.exe -list
DescriptionOption
Enter the name for the hold. This option isoptional.
[-holdname <hold name>]
Specify the backup ID for the backup image.
Also, include one of the following copymethods:
■ To include only the primary copy of thespecified backup image, specify-primarycopy or -p.
■ To include all copies of the specifiedbackup image, specify -allcopy or -a.
This option is optional.
[-backupid <backup ID>
-primarycopy | -allcopy]
Specify this option to display detailed outputfor all holds. This option is optional.
[-U]
For more information about the nbindexutil command, see the SymantecNetBackup Commands Reference Guide.
Viewing hold detailsTo view hold details
1 From the OpsCenter interface, select Search & Hold > Holds.
The list of holds that is displayed can contain two types of holds:
■ Local Holds are created using the NetBackup command line interface(CLI).
■ Legal Holds are created using OpsCenter
55Holds ManagementViewing hold details
Each hold type has its own icon.
2 In the Name column, find the hold or hold group for which you want to viewdetails.
To display the members of a hold group, click the plus sign before the holdgroup name.
To view the stored comments about the hold or the hold group, click the plussign after the hold name or the hold group name.
3 To view the Hold Details page, click the Complete/Failed link for a specifichold. This page contains a list of images that are a part of a hold and detailsof any errors that occurred when this hold was in progress.
If a hold creation or hold deletion fails for any reason, click Retry to try theoperation again after you resolve any issue that caused the failure.
For a legal hold, click View Associated Search Results to view the SearchResults from which this hold was created. Images that are a part of this holdare shown as pre-selected on this page. Any filters that were applied whenthe hold was placed appear on the left portion of the page. You can changethese filters and view the resulting images. However you cannot save yourchanges to these filters. Original filters are retained to maintain traceabilitybetween the Search Results and the Hold.
Releasing a holdYou can release local holds and legal holds through OpsCenter. However, you canrelease only local holds through the command line interface.
Holds ManagementReleasing a hold
56
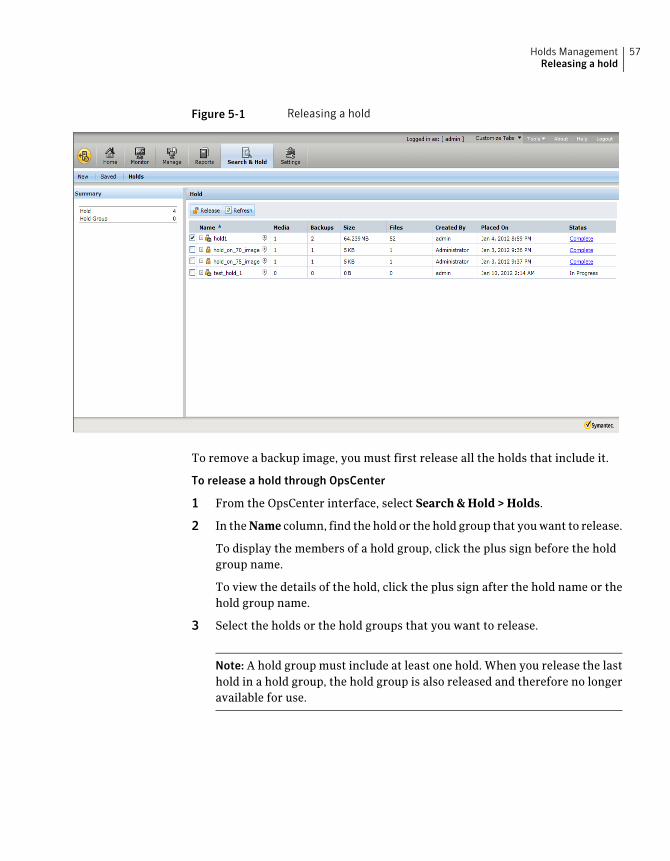
Figure 5-1 Releasing a hold
To remove a backup image, you must first release all the holds that include it.
To release a hold through OpsCenter
1 From the OpsCenter interface, select Search & Hold > Holds.
2 In theName column, find the hold or the hold group that youwant to release.
To display the members of a hold group, click the plus sign before the holdgroup name.
To view the details of the hold, click the plus sign after the hold name or thehold group name.
3 Select the holds or the hold groups that you want to release.
Note: A hold group must include at least one hold. When you release the lasthold in a hold group, the hold group is also released and therefore no longeravailable for use.
57Holds ManagementReleasing a hold
4 Click Release.
The following message appears:
Releasing selected holds may delete nn backup images. If the originalretention period has expired and there are no other holds on the backupimages being released they will be immediately deleted.
A backup image is expired only after the last hold on it is released and itsexpiration time has passed.
5 Click OK to proceed with the release. Click Cancel to keep the hold active.
To release a local hold through the command line interface
1 From the command line interface of the NetBackup master server, enternbholdutil -delete with appropriate options and elements. For example:
nbholdutil.exe -delete -holdname legal_case1 -force -reason
Legal_Case1 resolved
This command releases a local hold that is called legal_case1. The optionaloption -force instructs the command to bypass a prompt that asks you toconfirm the release of the hold. If this option is not included, NetBackupSearch prompts you to confirm the release of the hold. The optional option-reasonprovides a a brief description of the release of this hold. For example,for audit purposes:
See Table 5-3 for more information about related command options.
Note:After the command completes successfully, the hold status is displayedas CLI Modified.
2 To display help information about the command and its options, enternbholdutil -help [-option]
The command nbholdutil -delete lets you release a local hold. The followingtable lists the options anddescriptions of the base command nbholdutil -delete:
Table 5-3 Options of nbholdutil -delete
DescriptionOption
Provide either the hold ID or the name forthe hold.
-holdid <holdid> | -holdname <hold
name>
Holds ManagementReleasing a hold
58
Table 5-3 Options of nbholdutil -delete (continued)
DescriptionOption
Bypasses a prompt to confirm the release ofthe local hold. This option is useful in ascript because it allows the releaseoperations to continue without waiting fora response to the prompt. This option isoptional.
[-force]
Enter a description of the release of the hold.The comment provides the reason for therelease of the hold for audit purposes. Thisoption is optional.
[-reason <reason>]
For more information about the nbindexutil command, see the SymantecNetBackup Commands Reference Guide.
How to find themedia information of images on holdTo find the media information of backup images that are on hold, you can issuethe bpimage command from a command prompt. For example:
bpimage -backupid <image_id>
The variable <image_id> refers to the Image ID value for the backup image.
To determine the Image ID, select Search & Hold > Saved in the OpsCenter UI,then select the status link for a saved search. The resulting view displays detailedinformation about a hold that has been placed on backed up images. Find thebackup image you want in the Backup Taken At column, and click the plus signto the right of the backup to view details about the backup. Image ID is one of thedetails displayed.
For example, if the Image ID for the backup image is client1_1319540407, youcan issue the following command froma commandprompt to viewdetailed imageinformation, including media information:
bpimage -backupid client1_1319540407
The output of this command includes information similar to the following display:
...
Media Type: Disk (0)
Density: qscsi (0)
File Num: 0
ID: /diskstu1/clinet1_1319540407_C1_F1
59Holds ManagementHow to find the media information of images on hold
Host: reabl2.min.veritas.com
Block Size: 262144
...
Note: You must scroll down through the display to find these fields.
Refer to theSymantecNetBackupCommandsReferenceGuide formore informationabout the bpimage command.
About restoring the data on hold and ingesting it intoEnterprise Vault
A natural progression of placing holds on backup images is the ability to ingestthat data into an eDiscovery product. This ability allows data on hold to beprocessed further through the eDiscovery workflow and eventually presented inthe context of a legal case. For NetBackup, the obvious eDiscovery product choiceis Symantec’s market-leading products Enterprise Vault/Discovery Accelerator.
To provide a seamless transition of data between the backup world and theeDiscovery domain,NetBackup 7.5 provides a command for ingesting the relevantdata into EnterpriseVault. To facilitate this task, NetBackup also provides a utilityfor restoring the data that is placed on hold. The light-weight utility generatesinput files and batch files with the pre-formatted bprestore commands thatrestore the required data on legal hold.
The utility generates some additionalmetadata files that are required for the nextstep of ingesting the restored data into Enterprise Vault. Using themetadata andthe restored data as inputs, the utility ingests the files one-by-one into the VaultStore of the designated Enterprise Vault server. One important value additionthis commandmakes is that it adds originalmetadata attributes to the files beingingested. Thismetadatamakes these files searchable based onoriginal attributes,such asNetBackupClient name, original timestamps, and so on, even inEnterpriseVault.
For details about restoring data on hold and ingesting into Enterprise Vault, referto the following document:
Restoring Data Under Legal Holds and Ingesting It into Enterprise Vault
Holds ManagementAbout restoring the data on hold and ingesting it into Enterprise Vault
60

Viewing hold reports
Note: Symantec OpsCenter Help contains the information and procedures for thereports that are generated from OpsCenter. Click Help at the top left corner ofthe OpsCenter browser to open Help, and then go to Reporting in OpsCenter forcomplete details about reporting options.
You can viewHold reports only if youhave added a validNetBackupSearch licensekey in OpsCenter and you log on to OpsCenter as a Security Administrator.
To view a hold report
1 From the OpsCenter interface, select Reports > Report Template.
2 In the left pane, expand Hold Reports.
3 Select a hold report template:
■ Image Retention Summary
■ Top Holds by Size
■ Top Holds by Age
61Holds ManagementViewing hold reports

Holds ManagementViewing hold reports
62
Troubleshooting
This chapter includes the following topics:
■ Known Issues
■ About status codes and log files
■ Re-initiating indexing jobs that have failed
■ Recovering from “disk full” situations
■ Recovering from "disk error" situations
■ About Java and MFC UI differences
Known IssuesThe following are the known issues of NetBackup Search in the NetBackup 7.5release:
■ Indexing engine service does not start with the bpup.exe or when search isinitiated.The NetBackup indexing engine service (webserver service) does not start orstop with bpup or bpdown CLI.
Workaround: The NetBackup indexing engine service (webserver service)resides on the indexing server and starts when installation completes. If theindexing engine service does not start or stop by using the CLIs bpup or bpdown,start it manually.
Note: If any service fails or restarts, the existing search operation fails. Youhave to restart the search operation to make it function with the currentservice.
6Chapter
■ TheNetBackup Search component crashes if antivirus software scans it whileit runs an indexing job.Workaround: Exclude the NetBackup Search component directory from theantivirus scanning list.
■ NetBackup Search does not currently support synthetic backups.Synthetic backups are not taken by the NetBackup Search directory.
■ It takes a long time to view the last page of search results for backup imageswith large number of hits.The request may time out when you attempt to view backup images withapproximately one million or more hits.
■ Some of the indexing service processes continue to run even after you stopthe NetBackup indexer service.Workaround: If you want to shut down all indexing services, you have to usethe velocity-shutdown command present in the NetbackupSearch\bin folder.
■ The indexing server is supported only on Windows 2008 R2. The indexingserver must be installed and configured on a NetBackup media server.NetBackup Search supports master servers and OpsCenters servers on all ofthe platforms that NetBackup 7.5 supports.
■ The NetBackup Access Control (NBAC) REQUIRED mode is not supported onthe master server. Only the AUTOMATIC mode is supported.You can find NetBackup Access Control properties under the Host Propertiesof the NetBackup Administrative Console. General information about accesscontrol is available in the NetBackup Security and Encryption Guide.
■ NetBackup Search does not support pure IPv6 Master at this time.
■ Indexing of imported images must be performed manually.
■ Holds do not persist after backup images are imported to NetBackup. If youimport images that previously were placed on hold, you must re-apply theholds after images are successfully imported.
■ When you retry a failed Hold creation, an empty hold is created if the backupimages have expired between the initial hold and the retry.
■ Some reports on NetBackup Administration Console user interface are notconsistent with the reports in Java user interface with regards to Hold andIndexing status.
■ The Hold and Index columns in the Catalog node of the NetBackupAdministration Console are overlapped with other columns. You may need toexpand them manually.
TroubleshootingKnown Issues
64
■ The velocity.exe program may crash occasionally when an indexing job isrunning.
■ Both the NetBackup Administration Console and Java UIs do not validate theexistence of the search server packagewhenyou configure the indexing server.
■ In NBAC mode, the catalog node on the NetBackup Administration Consoleshows incorrect statuses for hold and indexing.
■ Occasionally, some indexing jobs may remain in progress for hours.
■ OnLinuxVCSclusters, indexing schedules arenot visible after saving.However,indexing performs properly.
■ Indexing jobs may exit with the status 5028 (nothing to index) if there is nodata to index in the backup image. This situation occurs when a backup imagecontains only special files such as device files.
■ If a policy for which indexing and mapping are enabled specifies a virtualmachine (VM) for whichmapping is not supported, the indexing job fails. Thissituation may occur when the policy contains both mapping-supported andmapping-unsupported types of VMs. The backup job completes successfully(although mapping does not occur), but the indexing job fails.
■ Policy validation fails if Indexing is selected and 'enable File recovery fromVM' option is not selectedIndexing is not supported for unmapped backups, hence the indexing job failswith the error status 5028 for the following scenarios:
■ Policy type is VMware, indexing is selected, and 'enable File recovery fromVM' is not selected.
■ Policy type is VMware, indexing is selected, and 'enable File recovery fromVM' is selected. The guest operating system is other than Windows andLinux.
The scenarios are applicable for VMware and Hyper-V policy types.
■ NCFNBCI generates 500GB of logs in 2 days.
If NCFNBCI generates 500GB of logs in 2 days for each indexing server, the loglevels of NCFNBCI should be reduced to 3 or less than 3. If the logging levelsincreases, then do the following:vxlogcfg -a -p 51216 -o 385 -s DebugLevel=3
This command overrides the default logging levels for originator ID 385 andsets the logging level to 3.
■ NBCI consumes high memory when logging is high during indexing.
If NBCI is consuming high memory when logging is high during indexing,reduce the log levels of NBCI to 3 or less than 3.
65TroubleshootingKnown Issues
■ After the first batch of indexing jobs run, the subsequent indexing jobs arenot triggered for the indexing server.If the indexing server is configured on a computer that has less thanrecommended hardware configuration, the RAM and core do not get updatedin the database after the first indexing job.
To activate the indexing server and update the RAM and core in the database,perform the following tasks:
■ Upgrade the hardware.
■ Decommission the indexing server.See “Decommissioning an indexing server” on page 32.
■ Reconfigure the indexing server.
■ Re-run the indexing jobs that completed in the first run. Use the commandnbindexutilfor running the jobs.
See “Re-initiating indexing jobs that have failed” on page 67.The RAM and core are updated in the database with successive indexing jobs.
■ When you add a new client to a policy in NetBackup, the checkbox to enableindexing for search appears as a tristate box.Workaround: You must select or clear the checkbox. The third state‘indeterminate’ is not applicable.
■ Whenyou editmultiple client in aNetBackup policy, ensure that the checkboxto enable indexing for search is enabled. Otherwise, the status of indexingmayappear to be incorrect.Workaround: You have to manually update the indexing status for the clientsthat have an incorrect status.
■ The ‘Last Sync Time’ column on the OpsCenter UI does not change for aconsiderable duration when a search operation is run.When you run the search operation, OpsCenter receives results for the Searchand updates the ‘Last Sync Time’ column. The ‘Last Sync Time’ column liststhe most recent time when OpsCenter receives results for a given Search. Ifthe ‘Last SyncTime’ columndoes not change for a considerable duration, thenthere is a possibility of one ormoreSearch services beingdownorunresponsiveon related Hosts.Workaround: Youhave to analyze the progress informationpresent onSearchBroker at Install_path\SearchBroker\var\progress\{search-id}.csv to knowabout status of the search on related hosts. You may have to stop and re-runthe search operation.
TroubleshootingKnown Issues
66
About status codes and log files■ For information about status codes, see the SymantecNetBackup™StatusCodes
Reference Guide.
■ You may need to refer to log files to resolve issues that occur. The followingdocument provides the locations of the log files that are associated withNetBackup Search.Symantec NetBackup Search 7.5 Logging Information
Re-initiating indexing jobs that have failedIndexing jobs may fail due to external issues such as disk space exhaustion,network outage, and so on. After the external issue is resolved, perform thefollowing procedure on the master server.
67TroubleshootingAbout status codes and log files
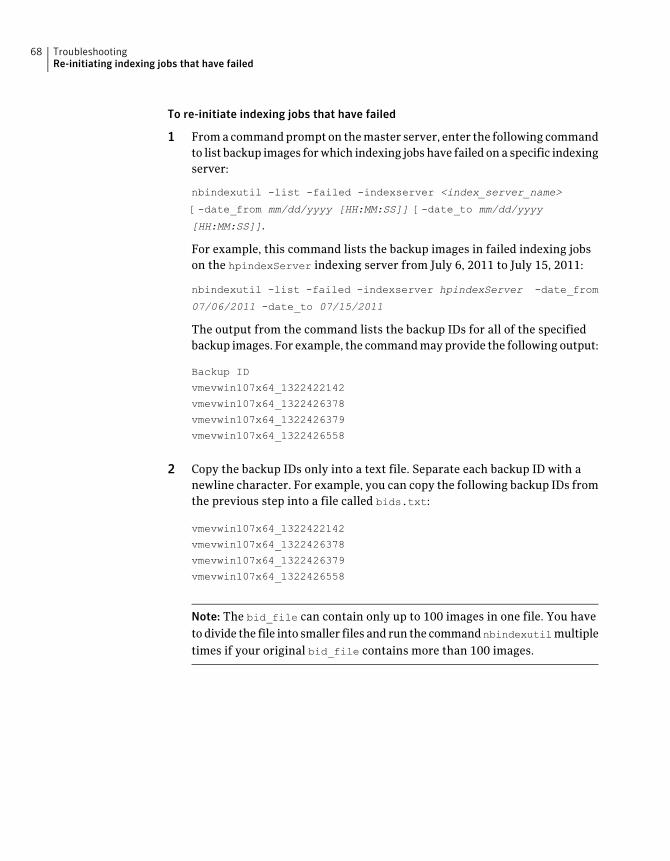
To re-initiate indexing jobs that have failed
1 Fromacommandprompt on themaster server, enter the following commandto list backup images forwhich indexing jobshave failed on a specific indexingserver:
nbindexutil -list -failed -indexserver <index_server_name>
[-date_from mm/dd/yyyy [HH:MM:SS]] [-date_to mm/dd/yyyy
[HH:MM:SS]].
For example, this command lists the backup images in failed indexing jobson the hpindexServer indexing server from July 6, 2011 to July 15, 2011:
nbindexutil -list -failed -indexserver hpindexServer -date_from
07/06/2011 -date_to 07/15/2011
The output from the command lists the backup IDs for all of the specifiedbackup images. For example, the commandmayprovide the following output:
Backup ID
vmevwin107x64_1322422142
vmevwin107x64_1322426378
vmevwin107x64_1322426379
vmevwin107x64_1322426558
2 Copy the backup IDs only into a text file. Separate each backup ID with anewline character. For example, you can copy the following backup IDs fromthe previous step into a file called bids.txt:
vmevwin107x64_1322422142
vmevwin107x64_1322426378
vmevwin107x64_1322426379
vmevwin107x64_1322426558
Note: The bid_file can contain only up to 100 images in one file. You haveto divide the file into smaller files and run the commandnbindexutilmultipletimes if your original bid_file contains more than 100 images.
TroubleshootingRe-initiating indexing jobs that have failed
68
3 If youwant to index the backup images from the failed job onanother indexingserver, remove the failed image entries from the indexing queue of the firstindexing server with the following command:
nbindexutil -remove -bid_file <file_path>
For example, this command removes indexing requests for the backup imageslisted in the text file bids.txt from the indexing queue of the first indexingserver, where the indexing job failed:
nbindexutil -remove -bid_file E:\bids.txt
Note: This step is not necessary if you re-initiate the failed job on the sameindexing server. This step is necessary only if you want to add the indexingrequests listed in the text file to the indexing queue of a different indexingserver. In step 4, you can specify the indexing server on which you want tore-initiate the indexing job.
4 Fromacommandprompt on themaster server, enter the following commandto re-initiate an indexing job for the backup images in the text file bids.txt:
nbindexutil -add -bid_file <file_path> -indexserver
<index_server_name> - force
For example, this command adds indexing requests for backup images listedin the text filebids.txt to the indexingqueue for thehpindexServer indexingserver. The job indexes the backup images that are listed in the text file:
nbindexutil -add -bid_file E:\bids.txt -indexserver hpindexServer
The indexing job runs per backup image (listed in text file) when the indexingschedule window is open for processing. These jobs index the backup imagesthat are listed in the text file.
For more information about the nbindexutil command, see the SymantecNetBackup Commands Reference Guide.
Recovering from “disk full” situationsWhen available disk space is exhausted, indexing jobs may fail. To recover fromthis situation, you must shut down the indexing engine, resolve the disk spaceissue, and then restart the indexing engine.
69TroubleshootingRecovering from “disk full” situations
To recover from “disk full” situations:
1 Froma commandprompt on themaster server, enter the following command:
nbindexutil -suspend -indexserver <index_server_name>
This command suspends further initiation of indexing jobs for the indexingserver.
2 From a command prompt on the indexing server, navigate to the NetBackupSearch server folder:
cd <install_path>\NetBackupSearch\bin
3 From a command prompt on the indexing server, enter the followingcommand:
velocity_shutdown.exe
This command shuts down the indexing engine.
4 Resolve the disk space issue.
5 From a command prompt on the indexing server, enter the followingcommand:
velocity_startup.exe
This command restarts the indexing engine.
6 Froma commandprompt on themaster server, enter the following command:
nbindexutil -resume -indexserver <index_server_name>
This command resumes the processing of indexing jobs for the indexingserver.
7 Re-initiate any indexing jobs that have failed due to the disk full scenario.
See “Re-initiating indexing jobs that have failed” on page 67.
For more information about the nbindexutil command, see the SymantecNetBackup Commands Reference Guide.
Recovering from "disk error" situationsWhen a disk controller fails, the disk error occours, and the indexing jobs getcaught in an infinite loop.
TroubleshootingRecovering from "disk error" situations
70
To recover from a "disk error" situation:
1 Cancel the hung indexing job from the NetBackup Activity Monitor
2 Froma commandprompt on themaster server, enter the following command:
nbindexutil -suspend -indexserver <index_server_name>
This command suspends further initiation of indexing jobs for the indexingserver.
3 From a command prompt on the indexing server, navigate to the NetBackupSearch server folder:
cd <install_path>\NetBackupSearch\bin
4 From the NetBackup Search Install path on the indexing server, enter thefollowing command:
velocity_shutdown.exe
This command shuts down the indexing engine.
5 Review the audit log to check that the queued jobs are not indexed.
6 Correct the system failure.
7 From a command prompt on the indexing server, enter the followingcommand:
velocity_startup.exe
This command restarts the indexing engine.
8 Queue the entries that were not indexed when they were queued in step 2.
9 Re-initiate any indexing jobs that have failed due to the disk error scenario.
See “Re-initiating indexing jobs that have failed” on page 67.
You can use the nbindexutil command to get a list of failed indexing jobs andthen resubmit those jobs for indexing.
For more information about the nbindexutil command, see the SymantecNetBackup Commands Reference Guide.
About Java and MFC UI differencesFor certain consoles of the NetBackup Search functionality, there are differencesin the Java UI and MFC UI. The differences are as follows:
■ In the Java UI and MFC UI, Indexing and/or Hold columns are provided forcertain reports. To retrieve information for indexing and/or hold column fromthe MFC UI and/or Java UI, you can use CLs for the following reports:
71TroubleshootingAbout Java and MFC UI differences
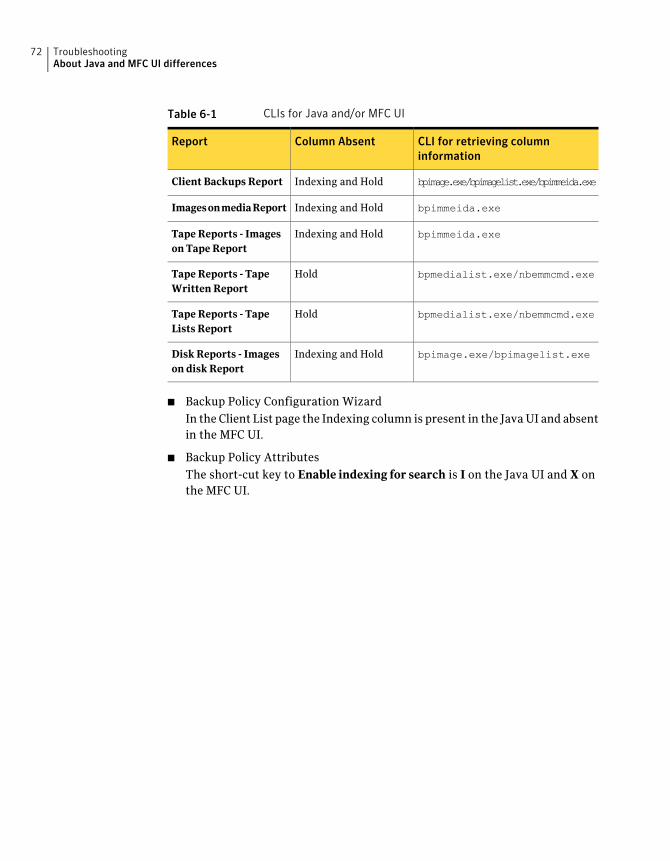
Table 6-1 CLIs for Java and/or MFC UI
CLI for retrieving columninformation
Column AbsentReport
bpimage.exe/bpimagelist.exe/bpimmeida.exeIndexing and HoldClient Backups Report
bpimmeida.exeIndexing and HoldImagesonmediaReport
bpimmeida.exeIndexing and HoldTape Reports - Imageson Tape Report
bpmedialist.exe/nbemmcmd.exeHoldTape Reports - TapeWritten Report
bpmedialist.exe/nbemmcmd.exeHoldTape Reports - TapeLists Report
bpimage.exe/bpimagelist.exeIndexing and HoldDisk Reports - Imageson disk Report
■ Backup Policy Configuration WizardIn the Client List page the Indexing column is present in the JavaUI and absentin the MFC UI.
■ Backup Policy AttributesThe short-cut key to Enable indexing for search is I on the Java UI and X onthe MFC UI.
TroubleshootingAbout Java and MFC UI differences
72
Bbackups
historical 25on-going 25
Cclustered environments 21configuration 21–22
Ddeployment configurations 18
EEnterprise Vault
restoring data on hold 60
Hholds
finding media information 59placing 51releasing 56restoring and ingesting intoEnterpriseVault 60viewing hold details 55viewing hold reports 61
Iindexing engine 13indexing jobs 28
re-initiating failed jobs 67recovering from “disk error” situations 70recovering from “disk full” situations 69
indexing manager 13indexing server
protecting 23indexing servers 13
adding 29configuring in a policy 31decommissioning 32modifying schedules 30
installation 17clustered environments 21
JJava and MFC UI differences 71
Kknown issues 63
Llegal holds 51local holds 54log files 67
Mmedia information for images on hold 59
NNBIM 13
Pport number 22protection of indexing servers 23
SSearch Broker 13Search executor 13searches
creating a new search 38deleting a saved search query 48deleting search results 48editing a saved search query 44running a saved search query 46terms 41using wildcards 43viewing search results 47
snapshots 14staging directory 22status codes 67
Index

Ttar ball copies 14
Wwildcard characters 43
Index74