synergy sis - g-a schools · edupoint’s synergy sis student information system software and...
TRANSCRIPT

Volume 01, Edition 01, Revision 05 September 2013
Copyright© 2013 Edupoint Educational Systems, LLC Document Number: SISTXUG - 010103
Synergy SIS©
TeacherVUE
User Guide
Edupoint Educational Systems, LLC
1955 South Val Vista Road, Ste 210 Mesa, AZ 85204
Phone (877) 899-9111 Fax (800) 338-7646

TeacherVUE User Guide
Copyright© 2013 Edupoint Educational Systems, LLC
Fifth Revision, September 2013 This edition applies to Synergy SIS™ Student Information System software and TeacherVUE© software and all subsequent releases and modifications until indicated with new editions or revisions. Edupoint’s Synergy SIS Student Information System software and TeacherVUE software and any form of supporting documentation are proprietary and confidential. Unauthorized reproduction or distribution of the software and any form of supporting documentation is strictly prohibited and may result in severe civil and criminal penalties. Information in this document is provided in connection with Edupoint Educational Systems products. No license to any intellectual property rights is granted by this document. The screens, procedural steps, and sample reports in this manual may be slightly different from the actual software due to modifications in the software based on state requirements and/or school district customization. The data in this document may include the names of individuals, schools, school districts, companies, brands, and products. Any similarities to actual names and data are entirely coincidental. Synergy SIS is a trademark of Edupoint Educational Systems, LLC. TeacherVUE is a copyright of Edupoint Educational Systems, LLC. * Other names and brands may be claimed as the property of others. Copyright © 2006-2013, Edupoint Educational Systems, LLC. All rights reserved.

TeacherVUE User Guide
Copyright© 2013 Edupoint Educational Systems, LLC 3
TABLE OF CONTENTS CHAPTER ONE : OVERVIEW & LOGIN .......................................... 7
Overview of the TeacherVUE Software .......................................................... 8 Accessing the TeacherVUE Software ............................................................ 9 Dual Log On ................................................................................................. 11 Changing Classes ........................................................................................ 15
Go to Current Class ..................................................................................... 17
CHAPTER TWO : SEATING CHART ............................................. 18
Viewing the Seating Chart ............................................................................ 19
Details .......................................................................................................... 20 Preferences .................................................................................................. 24 Students ....................................................................................................... 28
CHAPTER THREE :VIEWING INDIVIDUAL STUDENT INFORMATION 35
Additional Seating Chart Information ............................................................ 36
Daily Attendance .......................................................................................... 37 Period Attendance ........................................................................................ 38 Discipline ...................................................................................................... 40
Discipline Incident ........................................................................................ 41 Health ........................................................................................................... 42
Request for Assistance ................................................................................ 43
Student ......................................................................................................... 45
Student ALC ................................................................................................. 48 Student Course History ................................................................................ 50
StudentVUE ................................................................................................. 50 Student IEP .................................................................................................. 51 Individual Student Reports ........................................................................... 52
Communication to a Student ........................................................................ 53 Grade Book .................................................................................................. 57 Notes About Students .................................................................................. 58 Contact for a Students ................................................................................. 59
CHAPTER FOUR : WORKING WITH ALL STUDENTS ..................... 61
Student Groups ............................................................................................ 62 Additional Menu Information ........................................................................ 62 Reports ........................................................................................................ 63 Test Group Analysis ..................................................................................... 65 ALC .............................................................................................................. 68
Incident Referral ........................................................................................... 69 Parent Conference ....................................................................................... 71 Universal Breakfast ...................................................................................... 72
Announcements ........................................................................................... 73

TeacherVUE User Guide
4 Copyright© 2013 Edupoint Educational Systems, LLC
Communication to Multiple Students ............................................................ 75
CHAPTER FIVE : TAKING ATTENDANCE ..................................... 80
Attendance Notification ................................................................................. 81
Taking Attendance By Chart ......................................................................... 82 Taking Attendance By List ............................................................................ 84 Taking Supplemental Attendance ................................................................. 86 Taking Lunch Counts .................................................................................... 87
CHAPTER SIX : VIEWING & EDITING GRADES ............................ 89
Viewing Grades ............................................................................................ 90 Updating Grades .......................................................................................... 94
Grade-Related Reports ................................................................................ 96 Return to Seating Chart ................................................................................ 97 Accessing Grade Book ................................................................................. 98
CHAPTER SEVEN : USING THE TEACHERVUE MOBILE APP ....... 99
Features ..................................................................................................... 100
Hardware and Software Requirements ....................................................... 100 Setup on a Device ...................................................................................... 101 Logging in ................................................................................................... 102
Getting Started ........................................................................................... 102 Seating Chart.............................................................................................. 106
Adding a seating chart ................................................................................ 106
Editing a freeform seating chart .................................................................. 107
Selecting Seating Charts ............................................................................ 108 Setting Seating Chart Preferences ............................................................. 108 Attendance ................................................................................................. 109
Taking attendance by seating chart ............................................................ 109 Taking attendance by list ............................................................................ 110
Lunch Counts ............................................................................................. 112 Grade Book ................................................................................................ 113 Sorting/Filtering Data .................................................................................. 113
Setting Grade Book Options ....................................................................... 114 Adding New Assignments: .......................................................................... 115 Entering Scores .......................................................................................... 117 Viewing Student Score Details ................................................................... 118
Student Information .................................................................................... 119 Notes .......................................................................................................... 120 Incident Referral ......................................................................................... 121
INDEX .................................................................................... 124

TeacherVUE User Guide
Copyright© 2013 Edupoint Educational Systems, LLC 5
ABOUT THIS MANUAL Edupoint Educational Systems develops software with multiple release dates for the software and related documentation. The documentation is being released in multiple volumes to meet this commitment. The table below lists the release date, software version, documentation volume number, and the content included in each volume of documentation to date.
Software and Document History
Date Volume Edition Revision Content
September 2009 1 1 1 Initial release of this document
March 2010 1 1 2 Updated to include changes from the November 2009 release and the February and March patches.
June 2011 1 1 3 Updated to include changes from the June 2011 release.
May 2013 1 1 4 Updated to the 8.0 release
September 2013 1 1 5 Updated to the 8.0.4.0 release

TeacherVUE User Guide
6 Copyright© 2013 Edupoint Educational Systems, LLC
CONVENTIONS USED IN THIS MANUAL
Bold Text Bold Text - Indicates a button or menu or other text on the screen to click, or text to type.
Tip – Suggests advanced techniques or alternative ways of approaching the subject.
Note – Provides additional information or expands on the topic at hand.
Reference – Refers to another source of information, such as another manual or website
Caution – Warns of potential problems. Take special care when reading these sections.
BEFORE YOU BEGIN Before installing any of the Edupoint family of software products, please be sure to review the system requirements and make sure the district’s computer hardware and software meet the minimum requirements. If there are any questions about the system requirements, please contact an Edupoint representative at (877) 899-9111.
Caution: The Edupoint family of software does not support the use of pop-up blockers or third-party toolbars in the browser used to access Synergy SIS. Please disable any pop-up blockers (also known as pop-up ad blockers) and extra toolbars in the browser before logging into any Edupoint product.
At any point, if there are any technical difficulties, please contact the Edupoint technical support team at [email protected] or by phone at 1-877-899-9111 option 1.

Chapter One TeacherVUE User Guide
Copyright© 2013 Edupoint Educational Systems, LLC 7
Chapter One: OVERVIEW &
LOGIN
In this chapter, the following topics are covered:
► Overview of the TeacherVUE software
► How to logon to the TeacherVUE software

TeacherVUE User Guide Chapter One
8 Copyright© 2013 Edupoint Educational Systems, LLC
OVERVIEW OF THE TeacherVUE SOFTWARE The TeacherVUE software, frequently abbreviated TVUE OR TXP and previously known as Teacher Experience, provides districts with an easy method to give teachers access to just the student information they need. Rather than spending hours modifying and tweaking the security system to adjust the access rights for teachers just so, the TeacherVUE software can be implemented with just a few steps. It provides access to attendance and grades with customizable security rights, and can display any report needed. This manual illustrates how to view and edit attendance and grades in the TeacherVUE-related screens. Additional information regarding student discipline, tests, and health may also be reviewed from the TeacherVUE software. The companion manual to the User Guide, Synergy SIS – TeacherVUE Administrator Guide, illustrates how to setup and configure the TeacherVUE software. The unique security options available for TeacherVUE are also outlined in that guide.

Chapter One TeacherVUE User Guide
Copyright© 2013 Edupoint Educational Systems, LLC 9
ACCESSING THE TeacherVUE SOFTWARE To access the TeacherVUE software:
1. Log into the Synergy SIS system using a username and password configured for the TeacherVUE software.
Figure 1.1 – Synergy SIS Log In Page
2. A red highlighted box then appears in the middle of the screen. Select the correct semester from the drop-down list at the top of the screen.
Figure 1.2 –Class Selection screen, Confirm Semester
3. Select the class to be graded or for which attendance is to be recorded by clicking the radio button in the Period column.
Figure 1.3 – Please Select a Class Screen, Select a Period

TeacherVUE User Guide Chapter One
10 Copyright© 2013 Edupoint Educational Systems, LLC
4. Click OK. If students were added or dropped from the section, the Acknowledge Adds and Drops screen pops-up. To add the new student(s) to the seating chart, check the box Add to Chart. This is automatically checked by default.
Figure 1.4 – Acknowledge Adds and Drops Screen
5. Click OK to acknowledge the student changes. If announcements have been entered in Synergy SIS, the Announcements screen pops-up.
Figure 1.5 – Announcements Screen
6. Click OK to close the announcements. The main screen of the TeacherVUE software is displayed.
Figure 1.6 – Main Screen, TeacherVUE

Chapter One TeacherVUE User Guide
Copyright© 2013 Edupoint Educational Systems, LLC 11
DUAL LOG ON If the teacher’s logon is configured to access the normal Synergy SIS interface as well as the TeacherVUE software, the teacher can switch between the TeacherVUE software and the Synergy SIS interface at the click of a button. To access Synergy SIS from the TeacherVUE:
1. Click the Synergy SIS button at the top left-hand side of the screen.
Figure 1.7 – Synergy SIS Button
2. A warning message may appear. Click OK or select Leave Page.
Figure 1.8 – Leaving TeacherVUE Screen Warning Message
3. The Synergy SIS screen appears.
Figure 1.9 – Synergy SIS Screen

TeacherVUE User Guide Chapter One
12 Copyright© 2013 Edupoint Educational Systems, LLC
To return to the TeacherVUE screen from the main Synergy SIS screen:
1. Click the TVUE button at the top left-hand side of the screen.
Figure 1.10 – TVUE Button
2. A warning message may appear. Click OK or select Leave Page.
Figure 1.11 – Leaving Synergy SIS Screen Warning Message
3. Select the desired class to view using the radio buttons in the Period column.
Figure 1.12 – Please select a class
4. Click OK. The main TeacherVUE screen appears.

Chapter One TeacherVUE User Guide
Copyright© 2013 Edupoint Educational Systems, LLC 13
Figure 1.13 – Main Screen, TeacherVUE
When a user with a dual logon signs into Synergy SIS, it can be set to first open TeacherVUE or first open Synergy SIS. By default, it will first open TeacherVUE. Each user can specify their first application to open by:
1. Go to User Password and Preferences, found under Synergy SIS > User Preferences.
Figure 1.14 – User Password and Preferences Screen
2. Click on the Preferences tab.

TeacherVUE User Guide Chapter One
14 Copyright© 2013 Edupoint Educational Systems, LLC
Figure 1.15 – Preferences Tab, User Password, and Preferences Screen
3. Under the Preferred Application to Log Into, select Synergy SIS, Synergy TeacherVUE, or Last Application.
4. If Last Application is selected, the user will be sent to the application they used last before logging off. The last application is indicated in the Last Log In Page box.
5. Click the Save button at the top of the screen.

Chapter One TeacherVUE User Guide
Copyright© 2013 Edupoint Educational Systems, LLC 15
CHANGING CLASSES In the TeacherVUE software, only one class’ attendance and grades is displayed. To switch to another section to view its attendance and grades:
1. Return to the main TeacherVUE screen, the Seating Chart, and click the Change Class icon.
Figure 1.16 – Seating Chart Screen
2. A red highlighted box appears in the middle of the screen. Select the correct semester from the drop-down list at the top of the screen.
Figure 1.17 –Class Selection screen, Confirm Semester
3. Select the class to be graded or for which attendance is to be recorded by clicking the radio button in the Period column.
Figure 1.18 – Please Select a Class Screen, Select a Period
4. Click OK. The main screen of the TeacherVUE software is displayed for the newly selected class.

TeacherVUE User Guide Chapter One
16 Copyright© 2013 Edupoint Educational Systems, LLC
Note: If the teacher has classes at more than one school, the selection screen requires the teacher select the school before selecting the term and/or day.

Chapter One TeacherVUE User Guide
Copyright© 2013 Edupoint Educational Systems, LLC 17
GO TO CURRENT CLASS To view the current class:
1. Return to the main TeacherVUE screen, the Seating Chart, and click the Go to Current Class icon.
Figure 1.19 – Seating Chart Screen
2. The main screen of the TeacherVUE software is displayed for the class currently in session for the teacher logged into the software.

TeacherVUE User Guide Chapter Three
18 Copyright© 2013 Edupoint Educational Systems, LLC
Chapter Two: SEATING
CHART
In this chapter, the following topics are covered:
► Viewing the student seating chart
► Customizing the student seating chart
► Changing a password
Chapter Three TeacherVUE User Guide
Copyright© 2013 Edupoint Educational Systems, LLC 19
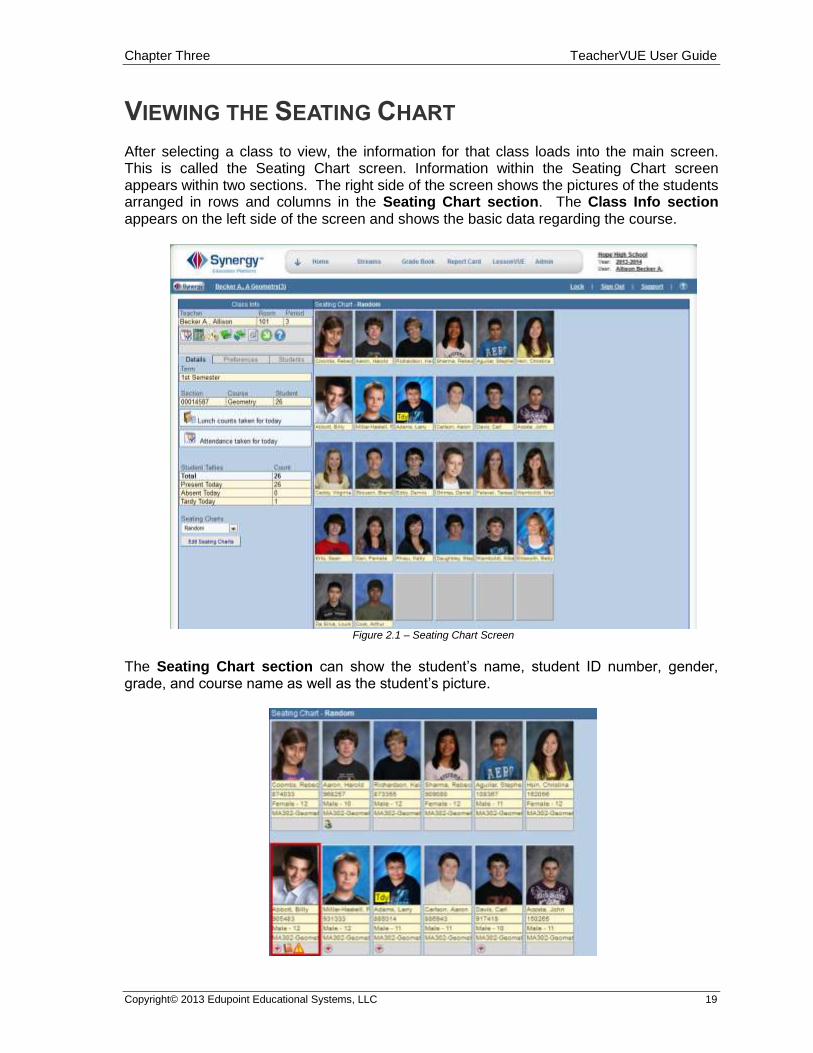
VIEWING THE SEATING CHART After selecting a class to view, the information for that class loads into the main screen. This is called the Seating Chart screen. Information within the Seating Chart screen appears within two sections. The right side of the screen shows the pictures of the students arranged in rows and columns in the Seating Chart section. The Class Info section appears on the left side of the screen and shows the basic data regarding the course.
Figure 2.1 – Seating Chart Screen
The Seating Chart section can show the student’s name, student ID number, gender, grade, and course name as well as the student’s picture.

TeacherVUE User Guide Chapter Three
20 Copyright© 2013 Edupoint Educational Systems, LLC
Figure 2.2 – Seating Chart by Alphabet
Note: To view more information about a student, click on the student’s picture. A menu of options appears. These options are discussed in another section of this chapter.
The Class Info section lists information about the section, such as teacher of the section, room number, and period number. There are also additional tabs that contain further information about the course: Details, Preferences, and Students.
Figure 2.3 – Class Info Section
DETAILS Details regarding a particular class can be found under the Class Info section. These details include the current term, section ID, course name and number of students enrolled.
Figure 2.4 – Details Tab
Underneath the Section information, the status of the day’s attendance is displayed. If at a daily attendance school that takes attendance twice a day, the status of both the AM and PM attendance is displayed.

Chapter Three TeacherVUE User Guide
Copyright© 2013 Edupoint Educational Systems, LLC 21
Figure 2.5 – Attendance Not Taken
Figure 2.6 – Attendance Taken
If at a daily attendance school that only takes attendance once a day, or at a period attendance school, only one status line appears.
Figure 2.7 – Attendance Not Taken
Figure 2.8 – Attendance Taken
If Lunch Counts are enabled, the status of the lunch counts is displayed beneath the Section information. Lunch counts are only available for the students’ homerooms, and they must be enabled as outlined in the Synergy SIS – TeacherVUE Administrator Guide.
Figure 2.9 – Lunch Counts Not Taken
Figure 2.10 – Lunch Counts Taken
The Student Tallies information is related to the attendance within that course. It presents information regarding the number of students present, absent, and tardy.
Figure 2.11 – Details Tab, Student Tallies
If logged into TeacherVUE on a non-school day, the details of the students present or absent are not shown. Instead, N/A is displayed in red to indicate that the day is not a valid school day, and no attendance or lunch count status is displayed.
Figure 2.12 – Student Tallies, Non-School Day

TeacherVUE User Guide Chapter Three
22 Copyright© 2013 Edupoint Educational Systems, LLC
The Seating Charts screen can be sorted in a number of ways. The default-seating chart is set to sort students in alphabetical order by the student’s last name. To create a new seating chart with a different sort order:
1. Click the Edit Seating Charts button.
Figure 2.13 – Edit Seating Charts
2. Click the Add button.
Figure 2.14 – Edit Seating Chart, Add Button
3. A new sorting option appears at the bottom of the list. Enter a name for the new chart in the Chart Name column, and select the sort order to be used in the Type drop-down list. The sorting options are Alpha to sort by alphabetically by student’s last name, Random to sort students randomly, Empty to create an empty seating chart that the teacher can sort manually, or Freeform to create a seating chart where the teacher can arrange the chart based on their room configuration.
Figure 2.15 – Entering a New Seating Chart
4. To select which seating chart is set as the default-seating chart, click in the radio button in the Default column.
5. To delete a seating chart, check the box in the X column.

Chapter Three TeacherVUE User Guide
Copyright© 2013 Edupoint Educational Systems, LLC 23
6. To save the changes, click the Save and Return to Seating Chart button. To cancel the changes, click the Cancel and Return to Seating Chart button.
Figure 2.16 – Save and Return to Seating Chart
7. To switch between seating charts when more than one is available, select the chart to view from the Seating Charts drop-down list.
Figure 2.17 – Seating Chart Screen

TeacherVUE User Guide Chapter Three
24 Copyright© 2013 Edupoint Educational Systems, LLC
PREFERENCES The Preferences tab of the Class Info Section allows the instructor to customize the information displayed in the Seating Chart. The instructor can also change their password here. To access the preferences, click on the Preferences tab.
Figure 2.18 – Preferences Tab
When first assigned to the Synergy SIS system, an instructor is given a generic password specific to that district. The password should be changed immediately in order to ensure a teacher’s account security. To change the password:
1. On the Preferences tab, click the Change Password button.
Figure 2.19 – Change Password Button
2. Enter the Current Password, and then enter the new password in the New Password and Confirm New Password boxes.
Figure 2.20 – Change Password Screen
3. Click the Save button to change the password.
Chapter Three TeacherVUE User Guide
Copyright© 2013 Edupoint Educational Systems, LLC 25
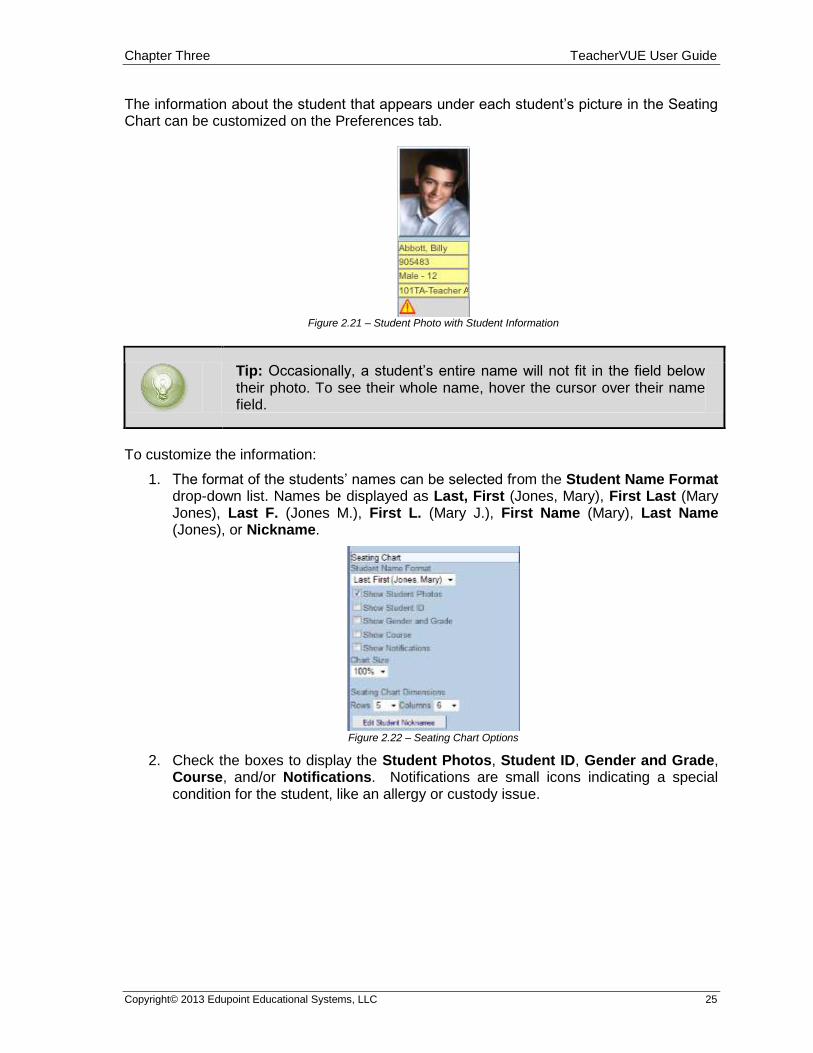
The information about the student that appears under each student’s picture in the Seating Chart can be customized on the Preferences tab.
Figure 2.21 – Student Photo with Student Information
Tip: Occasionally, a student’s entire name will not fit in the field below their photo. To see their whole name, hover the cursor over their name field.
To customize the information:
1. The format of the students’ names can be selected from the Student Name Format drop-down list. Names be displayed as Last, First (Jones, Mary), First Last (Mary Jones), Last F. (Jones M.), First L. (Mary J.), First Name (Mary), Last Name (Jones), or Nickname.
Figure 2.22 – Seating Chart Options
2. Check the boxes to display the Student Photos, Student ID, Gender and Grade, Course, and/or Notifications. Notifications are small icons indicating a special condition for the student, like an allergy or custody issue.

TeacherVUE User Guide Chapter Three
26 Copyright© 2013 Edupoint Educational Systems, LLC
The size of the Seating Chart or the number of seats showing within the Seating Chart can be altered as well using the Chart Size and Seating Chart Dimension functions.
Figure 2.23 – Preferences Tab, Chart Size and Seating Chart Dimensions
1. The Chart Size can be set from 50% to 200% in 25% increments. The percentages increase or decrease the size of the student photos and student information displayed in the seating chart.
2. The number of Rows and Columns displayed in the seating chart can be set to Rows from 1 to 59 and Columns from 1 to 40. The numbers chosen should closely match the seating arrangement of the classroom.
Note: Be sure to set the Seating Chart Dimensions so that there are enough spaces to show all the seats in the room. An example would be a class of 23 students. If the Seating Chart Dimensions are only set to four rows with five columns, this gives only a total of 20 seats. Three students would not be shown in the main Seating Chart screen.
To edit the Student Nicknames:
1. Click Edit Student Nicknames on the Preferences tab. The Edit Student Nicknames screen appears.
Figure 2.24 – Seating Chart Options
2. Enter the student’s nickname in the Nickname column and click the Save and Return to Seating Chart button.

Chapter Three TeacherVUE User Guide
Copyright© 2013 Edupoint Educational Systems, LLC 27
Figure 2.25 - Edit Student Nicknames screen
3. On the Preferences tab, select the Nickname option from the Student Name Format drop-down field. The seating chart displays the students’ nicknames.
Figure 2.26 - Seating Chart displaying nicknames

TeacherVUE User Guide Chapter Three
28 Copyright© 2013 Edupoint Educational Systems, LLC
STUDENTS The first time a class is opened in the TeacherVUE software, the Seating Chart is display as an empty classroom with gray boxes indicating each seat.
Figure 2.27 – Empty Seating Chart
As students are added to the class, they are not automatically added to the seating chart as well. Anytime there are students assigned to the class that have not been added to the seating chart, a message appears in red at the bottom of the Class Info section warning that there are student currently not in the chart.
Figure 2.28 – Students Currently Not in Chart Message

Chapter Three TeacherVUE User Guide
Copyright© 2013 Edupoint Educational Systems, LLC 29
To add students to the seating chart:
1. Click on the Students tab of the Class Info section.
Figure 2.29 – Students Tab, Class Info Section
2. If the Seating Chart Dimensions are set with enough possible seats, then all of the students can be added to the Seating Chart screen. To add students to the Seating Chart screen, click the Edit button.
Figure 2.30 – Editing Students
3. To add the students to the seating chart automatically, click the Fill Open Seats with Students button.
Figure 2.31 – Students Tab, Fill Open Seats with Students

TeacherVUE User Guide Chapter Three
30 Copyright© 2013 Edupoint Educational Systems, LLC
4. To add the students to the seating chart manually, click on the student’s name in the list of students under Students not in the chart, and drag the name to the boxes on the chart. As the name is dragged into the chart area, the name of the student appears in a box under the mouse cursor. Release the mouse when the student’s name appears over the correct box.
Figure 2.32 – Clicking and Dragging to Arrange the Chart
5. To rearrange students already placed in the chart, click on the student’s picture and drag it to a new box. The existing student in the new box or empty location is swapped with the first location clicked. Remember, to make any changes to the chart the Edit button must be clicked first.
6. Click the Save button to save the changes to the seating chart, or click the Undo button to cancel the changes.

Chapter Three TeacherVUE User Guide
Copyright© 2013 Edupoint Educational Systems, LLC 31
To create a freeform seating chart:
1. On the Details tab, click Edit Seating Chart. The Edit Seating chart screen displays.
Figure 2.33 - TeacherVUE seating chart
Figure 2.34 - Edit Seating Chart
2. Click the Add button. A new row diplays.
Figure 2.35 - Edit Seating Chart
3. Enter a Chart Name.
4. Select Freeform from the Type drop down list.
5. Click Save and Return to Seating Chart.

TeacherVUE User Guide Chapter Three
32 Copyright© 2013 Edupoint Educational Systems, LLC
Figure 2.36 - TeacherVUE seating chart - Details tab
6. Select the freeform seating chart from the Seating Charts drop down list. The blank seating chart displays.
Figure 2.37 - Freeform seating chart - Students tab
7. Select the Student tab and click Edit. The seating chart is in edit mode.

Chapter Three TeacherVUE User Guide
Copyright© 2013 Edupoint Educational Systems, LLC 33
Figure 2.38 - Freeform seating chart - Students tab
8. Select a student’s name from the list of Students not in the chart and drag it to the empty chart. OR Click the Add Remaining Students to the Chart to add all the students from the list to the chart.
Figure 2.39 - Freeform seating chart - Students tab
9. Arrange the students by dragging and dropping them in the desired location on the screen.
10. Click Save.

TeacherVUE User Guide Chapter Three
34 Copyright© 2013 Edupoint Educational Systems, LLC
Changing the front of the classroom:
On the Preferences tab, select the direction from the Front of the Classroom drop down list. The “Front” label is moved to the appropriate location on the screen.
Figure 2.40 – Preference tab, Front of the Classroom drop down list

Chapter Three TeacherVUE User Guide
Copyright© 2013 Edupoint Educational Systems, LLC 35
Chapter Three:VIEWING INDIVIDUAL STUDENT
INFORMATION
In this chapter, the following topics are covered:
► Viewing additional student information from the seating chart
► Printing individual student reports
► Sending individual student messages

TeacherVUE User Guide Chapter Three
36 Copyright© 2013 Edupoint Educational Systems, LLC
ADDITIONAL SEATING CHART INFORMATION From the Seating Chart, additional information about a particular student can be accessed by clicking on the student’s picture. This Student Drop-Down Menu can include information about the student’s demographics, period attendance, daily attendance, health, discipline, ALC attendance, and grades. It can also link to the StudentVUE portal for the student, display the student’s Grade Book information, and send an email to the student and parent. The options available are customized by each district. For instructions on how to customize the information available, please see the section on TeacherVUE User Groups in the Synergy SIS – TeacherVUE Administrator Guide. To access additional student information through the seating chart:
1. Click on the picture of the student. A drop down menu of options appears.
Figure 3.1 – Student Information, List of Student Detail Options
2. Click on an option to view the information about the student. The student detail information opens in a new window.

Chapter Three TeacherVUE User Guide
Copyright© 2013 Edupoint Educational Systems, LLC 37
DAILY ATTENDANCE The Daily Attendance screen is generally only available in the list of options for schools taking daily attendance. This screen shows three tabs with information: Days of Activity, Totals, and Letters. The Days of Activity tab lists all days for which an absence was recorded for the student. Each absence is recorded with the date of the absences, the day of the week, the code for the absence type, and the amount of the absence. If absences are recorded twice a day, the first half of the day is recorded in the Reason 1 column and the second half of the day is recorded in the Reason 2 column.
Figure 3.2 – Days of Activity Tab, Daily Attendance Screen
The Totals tab shows the total number of absences recorded for the student by reason and by type of absence reason. It also shows the percentage of each.
Figure 3.3 – Totals Tab, Daily Attendance Screen
The Letters tab lists all attendance letters that were generated for the student. For each letter, the type of letter is listed in the Letter Name column, the number of absence needed to reach the threshold for generating the letter is listed in the Threshold Achieved column, and the date on which the threshold was met is shown in the Date Achieved column.
Figure 3.4 – Letters Tab, Daily Attendance Screen

TeacherVUE User Guide Chapter Three
38 Copyright© 2013 Edupoint Educational Systems, LLC
PERIOD ATTENDANCE The Period Attendance screen is generally only available in the list of options for schools taking period attendance. This screen shows three tabs with information: Days of Activity, Totals, and Letters. The Days of Activity tab lists all days for which an absence was recorded for the student. Each absence is recorded with the date of the absences, the absence code for each period, and the absence code for the entire day. An N/S in the period indicates the student was not scheduled for a class during the period.
Figure 3.5 – Period Attendance Screen, Days of Activity Tab

Chapter Three TeacherVUE User Guide
Copyright© 2013 Edupoint Educational Systems, LLC 39
The Totals tab shows the total number of absences recorded for the student by reason and by type of absence reason for each bell period as well as overall.
Figure 3.6 – Period Attendance Screen, Totals tab
The Letters tab lists all attendance letters that were generated for the student. For each letter, the type of letter is listed in the Letter Name column, the number of absence needed to reach the threshold for generating the letter is listed in the Threshold Achieved column, and the date on which the threshold was met is shown in the Date Achieved column.
Figure 3.7 – Period Attendance Screen, Letters Tab

TeacherVUE User Guide Chapter Three
40 Copyright© 2013 Edupoint Educational Systems, LLC
DISCIPLINE The Discipline screen, used by schools using the Discipline module instead of the Discipline Incident module, lists the student’s discipline records. The time and date of the incident is provided as well as a description of the incident and person who referred the student for discipline issues.
Figure 3.8 –Discipline Screen
Clicking on any of the blue underlined details of a discipline incident brings up the details of the incident.
Figure 3.9 – Discipline Detail
To return to the main Discipline screen, click on the link at the top of the screen.

Chapter Three TeacherVUE User Guide
Copyright© 2013 Edupoint Educational Systems, LLC 41
DISCIPLINE INCIDENT The Discipline Incident screen, used by schools using the Discipline Incident module instead of the Discipline module, lists all of the discipline incidents in which the student was involved. For each incident, it displays the date and time of the incident, the role the student played in the incident such as offender or victim, a brief description of the incident, who referred the student, and the staff member that managed the incident.
Figure 3.10 – Discipline Incident Screen
Clicking on any of the blue underlined details of a discipline incident brings up the details of the incident.
Figure 3.11 – Discipline Incident Detail
To return to the main Discipline Incident screen, click on the link at the top of the screen.

TeacherVUE User Guide Chapter Three
42 Copyright© 2013 Edupoint Educational Systems, LLC
HEALTH The Health screen shows two types of information. The Nurse Visits tab lists information about each time a student has visited the school nurse, including the date and time of the visit, the code assigned to the type of visit, and who referred the student to the nurse.
Figure 3.12 – Health Screen, Nurse Visits Tab
Clicking on any of the blue underlined details of a nurse visit brings up the details of the visit.
Figure 3.13 – Health Detail
To return to the main Health screen, click on the link at the top of the screen.

Chapter Three TeacherVUE User Guide
Copyright© 2013 Edupoint Educational Systems, LLC 43
The Conditions tab lists all medical alerts and health conditions for the student, including the start and end date for the condition, the code assigned to the condition, and a description of the condition is usually included in the Comments field.
Figure 3.14 – Health Screen, Conditions Tab
REQUEST FOR ASSISTANCE If the district uses the special education software Synergy SE, the companion product to Synergy SIS, the Special Ed Referral screen can give teachers the ability to refer a student for Special Education evaluation & determination of eligibility directly from TeacherVUE. The teacher fills out the form, indicating the Comment Teacher and Reason For Referral, and then saves the form. The teacher can also highlight the areas in which the student is having problems in the Reading, Written, Spelling, Math, Content Area, Communication, Behavior, and Motor Skills boxes. They can also describe what interventions they have tried in the Intervention box. The Save button is located at the top of the form.

TeacherVUE User Guide Chapter Three
44 Copyright© 2013 Edupoint Educational Systems, LLC
Figure 3.15 – Request for Assistance screen
Once the form is saved, the data will be entered into the GENAZ 01 Referral Document in Synergy SE. The special ed team can then edit the information as necessary.

Chapter Three TeacherVUE User Guide
Copyright© 2013 Edupoint Educational Systems, LLC 45
STUDENT The Student screen includes several tabs for information about the student’s Demographics, Parent/Guardian, Emergency, Classes, Documents, and Access. The Demographics tab includes both the student’s basic demographic information such as the student’s address, homeroom, counselor, and home language, as well as a list of all phone numbers associated with the student.
Figure 3.16 – Student Profile, Demographics Tab
On the Parent/Guardian tab, names and phone numbers for all parents and guardians for the student are listed in the Parent/Guardian section. Any siblings enrolled within the school or district are listed in the Siblings section.
Figure 3.17 – Student Profile, Parent/Guardian Tab

TeacherVUE User Guide Chapter Three
46 Copyright© 2013 Edupoint Educational Systems, LLC
Note: If the option is selected during setup, deceased parents of the student may also be listed on this tab.
On the Emergency tab, names and phone numbers for the people to contact in case of an emergency with the student are listed within the Emergency Contacts section. Any doctor information is found within the Physician Information section.
Figure 3.18 – Student Profile, Emergency Tab
The sections in which the student is enrolled for the current term are listed on the Classes tab.
Figure 3.19 – Student Profile, Classes Tab

Chapter Three TeacherVUE User Guide
Copyright© 2013 Edupoint Educational Systems, LLC 47
The Documents tab lists any school documents, such as the student’s birth certificate or a field trip consent form, that have been uploaded to the student’s record. To view the uploaded document, click on the icon in the Document column.
Figure 3.20 – Student Profile, Documents Tab
For schools using the StudentVUE software, the Access tab provides a history of the times a student logged in to the StudentVUE software. It also lists information about the IP Address used to access the student’s account as well as the Login Status.
Figure 3.21 – Student Profile, Access Tab

TeacherVUE User Guide Chapter Three
48 Copyright© 2013 Edupoint Educational Systems, LLC
STUDENT ALC The Student ALC screen tracks student participation in Area Learning Center programs for Minnesota public school students.
Figure 3.22 – Student ALC Screen
To add a record:
1. Click the Add button, and a new line will appear above the list of ALC participation.
Figure 3.23 - Adding an ALC Record
2. Enter the Date on which the student participated in the program in MM/DD/YY format, or click on the Calendar button to select the date.
3. Enter the number of Units in which the student attended.
4. Enter the weight to assign to the units recorded in the Unit Weight column. Units may be either hours or minutes. If minutes were recorded, the Unit Weight would be 60. If hours were recorded in the Units column, the Unit Weight would be 1.
5. Enter any notes about the student’s participation in the Comment box.
6. Click the Add button to save the new record.
To edit a record:
1. Click the Edit button, and the data will appear above the list of ALC participation.
Figure 3.24 – Editing an ALC Record
2. Make the changes in the line above, and click the Save button to save the changes.

Chapter Three TeacherVUE User Guide
Copyright© 2013 Edupoint Educational Systems, LLC 49
To delete a record:
1. Click the Edit button next to the record to be deleted.
Figure 3.25 – Deleting an ALC Record
2. Click the Delete button at the top of the screen to delete the record.
Once a record has been posted to course history and the student has received credit for the course, the Posted column will be checked and the record can no longer be edited. If the section is an independent study course, the units and unit weight are used to calculate the number of Membership Hours submitted to MARSS. Seat-based courses do not use the units to calculate the data sent to MARSS.

TeacherVUE User Guide Chapter Three
50 Copyright© 2013 Edupoint Educational Systems, LLC
STUDENT COURSE HISTORY The Student Course History is most applicable for teachers in secondary schools. It shows a list of all the previous courses that the student has taken, and lists when the student took the course and the grade they received.
Figure 3.26 – Student Course History
STUDENTVUE The StudentVUE menu item links to the StudentVUE portal, and logs the teacher into the portal as the student. This enables the teacher to view the information in Synergy SIS as the student sees it from the StudentVUE portal. For more information about the StudentVUE software, please see the Synergy SIS – ParentVUE & StudentVUE Parent & Student Guide.
Figure 3.27 – StudentVUE Portal

Chapter Three TeacherVUE User Guide
Copyright© 2013 Edupoint Educational Systems, LLC 51
STUDENT IEP If the district uses the special education software Synergy SE, the companion product to Synergy SIS, the district may make the finalized IEP available to teachers through TeacherVUE for those special ed students in their classes. The IEP is displayed in a PDF format, and may be printed or saved.
Figure 3.28 – Student IEP
Caution: The Student IEP must be finalized before it becomes available through TeacherVUE.

TeacherVUE User Guide Chapter Three
52 Copyright© 2013 Edupoint Educational Systems, LLC
INDIVIDUAL STUDENT REPORTS If individual student reports have been added to the list of reports available in the TeacherVUE software (by adding them to the Navigation Menu for the TeacherVUE User Group), these reports appear both in the list of available reports and as an option on the list of screens available by clicking on the student photo.
To print a report for a specific student, simply click on the name of the report from the list of options that appears when the student’s photo is clicked. All reports are run with the default options configured for the TeacherVUE Report User. To customize the reports, they must be run from the regular Synergy SIS interface. For more information about these reports, please see the guide that covers the information contained in the report. For example, for grading reports please refer to the Synergy SIS – Grading User Guide.

Chapter Three TeacherVUE User Guide
Copyright© 2013 Edupoint Educational Systems, LLC 53
COMMUNICATION TO A STUDENT The Communication screen allows an email to be sent from the teacher to the student, to the custodial parent, or both. Clicking on Communication from the menu on the student’s photo allows a message to be sent to an individual student and/or parent. To send a message to all students and their parents, access the Communication screen from the Additional Screens icon on the menu.
Figure 3.29 – Communication Screen
To send a message to an individual student:
1. Select the Message Type by clicking on the radio button in front of the correct option. The Email option sends an email to the parent and/or student selected. The PVUE Message option posts the message notice on the home page of the ParentVUE and/or StudentVUE portal.
Figure 3.30 – Message Notice on StudentVUE
2. The message is automatically configured to be sent to both the student and their parent. To send the message to only the student or only the parent, uncheck the appropriate box in the To section.
3. Enter a Subject for the message.

TeacherVUE User Guide Chapter Three
54 Copyright© 2013 Edupoint Educational Systems, LLC
4. Enter the Message in the box provided. The message is sent in HTML format, and the format of the message may be customized by using the buttons above the message box. The button options are:
Figure 3.31 – Message Format Buttons
(Source)
Toggles HTML code on and off. When the button is clicked on, the message is shown in HTML code format. When off, the message is shown as it will appear on screen.
(Cut)
Deletes the selected text from its current location, and the removed text can be placed elsewhere using the Paste button.
(Copy)
Copies the selected text for placement in another location in the message using the Paste button.
(Paste)
Places the last copied or cut text in the current location of the cursor. The pasted text is inserted in the same format as when it was copied or cut.
(Paste As Plain Text)
Inserts the last copied or cut text as text only without any previous formatting.
(Paste From Word)
When inserting text that has been copied from Microsoft Word into any HTML format (as this message is), Word inserts “bad” HTML code as well. To clean out the “bad” code from Word and insert the clean text, click the Paste From Word button and paste the text in the box that pops-up. Check the box to Remove Styles definitions and click OK.
Figure 3.32 – Paste From Word
(Undo)
Undo the last action.
(Redo)
Redo the action that was previously undone.
(Remove Format)
Removes all formatting from the selected text.

Chapter Three TeacherVUE User Guide
Copyright© 2013 Edupoint Educational Systems, LLC 55
(Table)
Inserts a table with the specifications entered in the Table Properties box that pops-up when the button is clicked.
Figure 3.33 – Table Properties Box
(Line)
Inserts a horizontal line.
(Symbol)
Inserts a special character or symbol.
(Bold)
Bolds the selected text.
(Italic)
Italicizes the selected text.
(Strikethrough)
Runs a line through the middle of the selected text.
(Numbers)
Formats the selected text in a numbered list.
(Bullets)
Formats the selected text in a bulleted list.
(Decrease Indent)
Reduces the indent of previously indented text.
(Indent)
Indents the selected text.
(BlockQuote)
Indents text to both the left and the right.
(Hyperlink)
Inserts a link to a website.
(Remove Link)
Removes a link to a website.
(Anchor)
Creates an anchor, or bookmark, for the selected text that can then be used to create a link from another part of the text.
(Styles)
Select a preformatted custom text style from the drop-down arrow.
Select a standard text style such as Heading 1 from the drop-down arrow.

TeacherVUE User Guide Chapter Three
56 Copyright© 2013 Edupoint Educational Systems, LLC
(Font)
Select the font to be used for the selected text.
(Size)
Select the size to be used for the selected text.
(Maximize)
Brings up the message in a larger window to help when editing long messages.
5. To send the message, click on the Send Message button.
To see a list of the messages that have been posted for the student and/or parent on the ParentVUE (PVUE) and/or StudentVUE (SVUE) portals:
1. Click the PVUE/SVUE Message History button.
Figure 3.34 – Message History
2. A list of the posted messages appears. To remove a message from the portal, check the box in the X column next to the message, then click the Remove Selected Messages button.
Figure 3.35 – List of Posted Messages
3. To return to the Communication screen, click the Click to Send Another Message button. To return to the Seating Chart, click the Seating Chart button.
Figure 3.36 – Closing Message History

Chapter Three TeacherVUE User Guide
Copyright© 2013 Edupoint Educational Systems, LLC 57
GRADE BOOK Grade Book is integrated into TeacherVUE. The top menu bar gives you direct access to all the Grade Book functionality without having to toggle between Grade Book and TeacherVUE screen. The Grade Book software allows educators to record grades at the assignment level instead of just at the grading period level. The assignments are tallied for each grading period mark and the information is synchronized with the grading information in the main Synergy SIS software. For more information about working with the Grade Book software, please see the Synergy SIS – Grade Book Elementary User Guide and the Grade Book Secondary User Guide.
Figure 3.37 – Grade Book menu bar

TeacherVUE User Guide Chapter Three
58 Copyright© 2013 Edupoint Educational Systems, LLC
NOTES ABOUT STUDENTS Teachers can view, add, edit, and delete notes for a specific student. The notes are recorded with the date and time they were entered. If the note is marked as private, only the teacher who entered the note can view it. If it is not marked as private, an icon shows on all other TeacherVUE charts for the same date. Public notes about students entered in TeacherVUE can also be viewed on the Notes tab of the Student screen within Synergy SIS and vice versa. Student notes are specific to the school year. To add notes about a student:
1. Hover over the student picture to see the Add Note icon.
Figure 3.38 - Add Note icon
2. Click the Add Note icon to open the Add Note screen.
Figure 3.39 - Add Note screen
3. Check Do Not Share Comment with Other Teachers to mark note as private.
Note: If notes are not marked as private, an icon shows on all other TeacherVUE charts where this student appears, and on the Notes tab of the Student screen with Synergy SIS.
4. Enter the text for the note.
5. Click Save. The Note icon changes to reflect the number of notes attached to a student. The number on the Notes icon only reflects the number of notes created on the current date and viewable by the user.
Figure 3.40 - Added Note icon

Chapter Three TeacherVUE User Guide
Copyright© 2013 Edupoint Educational Systems, LLC 59
To view, add, edit, or delete a note:
1. Hover and click the Add Note icon on the student’s picture.
2. To add a new note, select Add Note button on Notes screen.
3. To view a note, click the Magnifying Glass icon on the Notes screen.
4. To edit an existing note, select Pencil icon on Notes screen.
5. To delete an existing note, select X icon on Notes screen.
Note: A note can marked as private or not private from Notes screen.
Figure 3.41 - Note History screen
CONTACT FOR A STUDENTS Teachers can record when they have contacted or attempted to contact a parent or guardian regarding a student. The contact record displays on the Contact Log tab of the Student screen in TeacherVUE. It also displays on the Student Contact Log tab of the Student screen in both Synergy SIS and Synergy SE. To add a contact record:
1. Click on the student picture to see the student detail list.

TeacherVUE User Guide Chapter Three
60 Copyright© 2013 Edupoint Educational Systems, LLC
Figure 3.42 – Log Student Contact
2. Select the Log Student Contact option. The Contact Details screen displays.
Figure 3.43 – Contact Details screen
3. Select the Contact Date. The default value is today’s date.
4. Enter the Contact Time. The default is the current time.
5. Enter the Person Contacted or the person you attempted to contact.
6. Select the outcome. The options are Made Contact or Left Message.
7. Enter a comment regarding the situation or the outcome of the contact.
8. Click Log Contact. The contact record displays on the Contact Log tab of the Student screen in TeacherVUE. It also displays on the Student Contact Log tab of the Student screen in both Synergy SIS and Synergy SE.

Chapter Three TeacherVUE User Guide
Copyright© 2013 Edupoint Educational Systems, LLC 61
Chapter Four: WORKING WITH ALL STUDENTS
In this chapter, the following topics are covered:
► Viewing information for all students in a class
► Printing reports for all students
► Sending messages to all students in a class

TeacherVUE User Guide Chapter Three
62 Copyright© 2013 Edupoint Educational Systems, LLC
STUDENT GROUPS If the teacher has been designated as one of the staff working with a student group, this group is available for viewing with TeacherVUE. To view the students in the groups and their information, choose the group instead of selecting a class when changing classes or logging in to TeacherVUE.
Figure 4.1 – Selecting a Student Group
Once the group has been selected, all of the normal student information is available such as the Student drop-down menus and individual student reports, as well as the reports for the entire group. Attendance, grades, and lunch counts cannot be modified or shown.
ADDITIONAL MENU INFORMATION Additional student information can also be viewed from the menu of icons displayed in the Class Info section.
Figure 4.2 – Class Info Section, Menu Icons
Take Attendance By Chart is covered in Chapter Five.
Take Attendance By List is covered in Chapter Five.
View Grades is covered in Chapter Six.
Change Class is covered in Chapter One.
Go To Current Class is covered in Chapter One.
Execute Report is reviewed later in this chapter.
Additional screens lists other menu options, which are outlined later in this chapter
Online Help is also shown if context-sensitive help is configured for Synergy SIS. This brings up the help screen in a separate window.

Chapter Four TeacherVUE User Guide
Copyright© 2013 Edupoint Educational Systems, LLC 63
REPORTS Any number of reports can be printed from the TeacherVUE software. The list of available reports is setup by each district, as outlined in the Synergy SIS – TeacherVUE Administrator Guide. These reports print for every student in the class currently in focus, with the options saved as default under the TVUE Report User as outlined in the Administrator Guide. To print an available report:
1. Click the Execute Report icon.
Figure 4.3 – Execute Report Icon
2. The report can be generated as a PDF file or in text (TXT) format. Select the desired type of output by clicking the radio button in front of the output type.
Figure 4.4 – Execute Report Menu, Select Output Type
3. Select the report to be executed by clicking on the name of the report.
Figure 4.5 – Execute Report Menu, Select a Report

TeacherVUE User Guide Chapter Four
64 Copyright© 2013 Edupoint Educational Systems, LLC
4. A progress screen appears as the report is being generated. The status line is updated throughout the process until the report can be viewed.
Figure 4.6 – Execute Report, Progress Screen
5. Once the report is generated, a dialog box offers the options to Open, Save, or Cancel the report. Click Open to view the report, or Save to save it to the computer.
Figure 4.7 – Open, Save, or Cancel Report
For more information about these reports, please see the guide that covers the information contained in the report. For example, for grading reports please refer to the Synergy SIS – Grading User Guide.

Chapter Four TeacherVUE User Guide
Copyright© 2013 Edupoint Educational Systems, LLC 65
TEST GROUP ANALYSIS The Test Group Analysis screen shows the test results for all students in the section for a specific test such as a state-required test. How to setup which tests are displayed is outlined in the Synergy SIS – TeacherVUE Administrator Guide. To view the test results for all students:
1. Click on the Additional Screens icon.
Figure 4.8 – Additional Screens Icon
2. A drop down list appears. Click on the Test Group Analysis option.
Figure 4.9 – Additional Screens, Test Group Analysis Selection
3. The Test Group Analysis screen is displayed. This screen contains two areas of information. The Test Analysis Options gives the teacher the ability to filter the test results that are displayed, and the Class Test Analysis shows the test results for the students.

TeacherVUE User Guide Chapter Four
66 Copyright© 2013 Edupoint Educational Systems, LLC
Figure 4.10 – Test Group Analysis Screen
To customize what test information is displayed adjust the settings in the Test Analysis Options as follows:
Figure 4.11 – Test Group Analysis, Class Demographics
1. Select which Test Group to display.
2. If the test selected from the Test Group drop-down list is a part-based test, select which Test Group Part to display. If left blank, all parts are displayed.
3. Select which test results should be displayed from the Test Display Type drop-down list. The options are Show Highest Score, Show Most Recent, or Show All. If left blank, all test scores are displayed.
4. To remove students without results from screen, check the box Only Show Student with Results.
5. To highlight certain performance levels in a different color to make it easier to see which students have “passed” the test, check the boxes for the Performance Levels to be highlighted.
6. To select which types of scores are displayed, check the box in front of each type of score in the Score Type Filter section.
Samples of the possible test results that can be displayed are shown below:
Figure 4.12 – Test Group Analysis Screen, Test Results

Chapter Four TeacherVUE User Guide
Copyright© 2013 Edupoint Educational Systems, LLC 67
Figure 4.13 – Test Group Analysis Screen, Test Results
From the Test Group Analysis screen, the Test Analysis Report can be printed as well. To print the report:
1. Click the Print Test Analysis Report icon.
Figure 4.14 – Print Test Analysis Icon
2. A progress screen appears as the report is being generated. The status line is updated as the report is processed until the report can be viewed.
Figure 4.15 – Print Test Analysis Report, Progress Screen
3. Once the report is generated, a dialog box offers the options to Open, Save, or Cancel the report.
Figure 4.16 – Open, Save, or Cancel Report
4. Click Open to view the report.
Figure 4.17 – Class Test Analysis Report
To return to the main seating chart screen from the Test Group Analysis screen:
1. Click the Return to Seating Chart icon.

TeacherVUE User Guide Chapter Four
68 Copyright© 2013 Edupoint Educational Systems, LLC
Figure 4.18 – Return to Seating Chart Icon
ALC The ALC screen tracks membership and attendance hours for Alternative Learning Centers (Schools). This data is used to create the MARSS Extract for Minnesota. To enter ALC data for the entire class:
1. . Click on the Additional Screens icon.
Figure 4.19 – Additional Screens Icon
2. A drop down list appears. Click on the ALC option. The ALC screen for the class opens.
Figure 4.7 – ALC Screen
3. Enter the ALC units for students on the appropriate days.
4. Click Save.

Chapter Four TeacherVUE User Guide
Copyright© 2013 Edupoint Educational Systems, LLC 69
INCIDENT REFERRAL The Incident Referral option enables teachers to enter a Discipline Incident Referral from within TeacherVUE. The incident referral is then forwarded to the appropriate staff member to handle and resolve with the student. To create an incident referral:
1. Click on the Additional Screens icon.
Figure 4.20 – Additional Screens Icon
2. A drop down list appears. Click on the Incident Referral option. The Incident Referral screen opens.
Figure 4.21 – Incident Referral Screen
3. Enter the Discipline Incident Data, including the date, time, the person it should be referred to, when it occurred in terms of during school hours or at a school sponsored event, and where it occurred.
Figure 4.22 – Discipline Incident Details

TeacherVUE User Guide Chapter Four
70 Copyright© 2013 Edupoint Educational Systems, LLC
4. Enter the description of what happened in the Incident Referral Description field.
Figure 4.23 - Select Violations
5. Select a violation from the Select Violation drop-down list.
Figure 4.24 - Select Students
6. Select the student or students involved in the incident from the Select Students drop-down list. The student is added to the Students grid. Once in the Students grid, select the student’s role in the incident and add any comments desired.
Figure 4.25 - Select Interventions
7. Select the intervention performed to stop or because of the incident from the Select Interventions drop-down list. The selected intervention is added to the Interventions grid, where you can add any comments desired.
Figure 4.26 - Refer Incident button
8. Click the Refer Incident button. A confirmation message display indicating that the incident has been successfully referred to the person in the Refer To field. The incident also displays on the Discipline Incidents screen within TeacherVUE.
Figure 4.27 - Confirmation Message
Figure 4.28 - Discipline Incident screen

Chapter Four TeacherVUE User Guide
Copyright© 2013 Edupoint Educational Systems, LLC 71
PARENT CONFERENCE Teachers have the ability to document parent teacher conference within TeacherVUE. The parent teacher conference recorded in TeacherVUE also displays on the Student Conference screen in Synergy. The district must have a code for parent teacher conferences defined the Conference Visitation Codes and the menu option enable within PAD Security for teachers to use this feature. To document a parent teacher conference:
1. Click on the Additional Screens icon.
Figure 4.29 – Additional Screens Icon
2. A drop down list appears. Click on the Parent Conference option. The Parent Teacher Conference screen opens.
Figure 4.30 – Parent Teacher Conference Screen
3. Click the Parent Conference field for the student whose parents you are meeting today. The word “Yes” appears in the field.
4. Enter a comment about the meeting in the Comment field, if desired.

TeacherVUE User Guide Chapter Four
72 Copyright© 2013 Edupoint Educational Systems, LLC
Figure 4.31 - Parent Teacher Conference Screen
5. Click Save. The parent teacher conference information is also displayed on the Student Conference screen.
Figure 4.32 - Student Conference Screen
UNIVERSAL BREAKFAST Universal Breakfast is any program that offers free breakfast to all students, regardless of economic status TeacherVUE enables teachers to note which students are taking advantage of Universal Breakfast. This information can then be used for planning future food purchases, or to track program participation against student performance and attendance data. The district must enable the menu option within PAD Security for teachers to use this feature. To track Universal Breakfast participation:
1. Click on the Additional Screens icon.
Figure 4.33 – Additional Screens Icon

Chapter Four TeacherVUE User Guide
Copyright© 2013 Edupoint Educational Systems, LLC 73
2. A drop down list appears. Click on the Universal Breakfast option. The Universal Breakfast screen opens.
Figure 4.34 – Parent Teacher Conference Screen
3. Click the Universal Breakfast field for the student who participated in the Universal Breakfast program today. The word “Yes” appears in the field.
4. Click Save. The Universal Breakfast participation information is also displayed on the Student Meal screen.
Figure 4.35 - Student Meal Screen
ANNOUNCEMENTS District and school-wide announcements are displayed to teachers each time they logon to the TeacherVUE software. To review these announcements after logon:
1. Click on the Additional Screens icon. A drop down list appears.
Figure 4.36 – Additional Screens Icon
2. Select the Announcements option. The Announcement screen is displayed.
3. This screen will show any district or school-wide messages.

TeacherVUE User Guide Chapter Four
74 Copyright© 2013 Edupoint Educational Systems, LLC
Figure 4.37 – Announcement Screen
4. To close the announcements and return to the main screen, click the Close button.

Chapter Four TeacherVUE User Guide
Copyright© 2013 Edupoint Educational Systems, LLC 75
COMMUNICATION TO MULTIPLE STUDENTS The Communication screen from the Additional Screens menu allows an email to be sent from the teacher to all students in any of the teacher’s classes. To send an e-mail:
1. Click on the Additional Screens icon.
Figure 4.38 – Additional Screens Icon
2. A drop down list appears. Click on the Communication option.
Figure 4.39 – Additional Screens Menu
3. The Communication screen is displayed.
Figure 4.40 – Communication Screen

TeacherVUE User Guide Chapter Four
76 Copyright© 2013 Edupoint Educational Systems, LLC
4. Select the Message Type by clicking on the radio button in front of the correct option. The Email option sends an email to the parents and/or students selected. The teacher can also select to be blind copied on the emails they send. The PVUE Message option posts the message notice on the home page of the ParentVUE and/or StudentVUE portal for the selected students and/or parents.
Figure 4.41 – Message Notice on StudentVUE
5. The message is automatically configured to be sent to the students in the class in focus. To send it to the parents, or both the students and the parents, select the option from the People drop-down list.
6. To send the message to multiple classes, check the boxes in front of the classes.
7. Enter a Subject for the message.
8. Enter the Message in the box provided. The message is sent in HTML format, and the format of the message may be customized by using the buttons above the message box. The button options are:
Figure 4.42 – Message Format Buttons
(Source)
Toggles HTML code on and off. When the button is clicked on, the message is shown in HTML code format. When off, the message is shown as it will appear on screen.
(Cut)
Deletes the selected text from its current location, and the removed text can be placed elsewhere using the Paste button.
(Copy)
Copies the selected text for placement in another location in the message using the Paste button.
(Paste)
Places the last copied or cut text in the current location of the cursor. The pasted text is inserted in the same format as when it was copied or cut.
(Paste As Plain
Text)
Inserts the last copied or cut text as text only without any previous formatting.

Chapter Four TeacherVUE User Guide
Copyright© 2013 Edupoint Educational Systems, LLC 77
(Paste From
Word)
When inserting text that has been copied from Microsoft Word into any HTML format (as this message is), Word inserts “bad” HTML code as well. To clean out the “bad” code from Word and insert the clean text, click the Paste From Word button and paste the text in the box that pops-up. Check the box to Remove Styles definitions and click OK.
Figure 4.43 – Paste From Word
(Undo)
Undo the last action.
(Redo)
Redo the action that was previously undone.
(Remove Format)
Removes all formatting from the selected text.
(Table)
Inserts a table with the specifications entered in the Table Properties box that pops-up when the button is clicked.
Figure 4.44 – Table Properties Box
(Line)
Inserts a horizontal line.
(Symbol)
Inserts a special character or symbol.
(Bold)
Bolds the selected text.
(Italic)
Italicizes the selected text.
Runs a line through the middle of the selected text.

TeacherVUE User Guide Chapter Four
78 Copyright© 2013 Edupoint Educational Systems, LLC
(Strikethrough)
(Numbers)
Formats the selected text in a numbered list.
(Bullets)
Formats the selected text in a bulleted list.
(Decrease Indent)
Reduces the indent of previously indented text.
(Indent)
Indents the selected text.
(BlockQuote)
Indents text to both the left and the right.
(Hyperlink)
Inserts a link to a website.
(Remove Link)
Removes a link to a website.
(Anchor)
Creates an anchor, or bookmark, for the selected text that can then be used to create a link from another part of the text.
(Styles)
Select a preformatted custom text style from the drop-down arrow.
Select a standard text style such as Heading 1 from the drop-down arrow.
(Font)
Select the font to be used for the selected text.
(Size)
Select the size to be used for the selected text.
(Maximize)
Brings up the message in a larger window to help when editing long messages.
9. To send the message, click on the Send Message button.

Chapter Four TeacherVUE User Guide
Copyright© 2013 Edupoint Educational Systems, LLC 79
To see a list of the messages that have been posted for the students and/or parents on the ParentVUE (PVUE) and/or StudentVUE (SVUE) portals:
1. Click the PVUE/SVUE Message History button.
Figure 4.45 – Message History
2. A list of the posted messages appears. To remove a message from the portal, check the box in the X column next to the message, then click the Remove Selected Messages button.
Figure 4.46 – List of Posted Messages
3. To return to the Communication screen, click the Click to Send Another Message button. To return to the Seating Chart, click the Seating Chart button.
Figure 4.47 – Closing Message History

TeacherVUE User Guide Chapter Five
80 Copyright© 2013 Edupoint Educational Systems, LLC
Chapter Five: TAKING
ATTENDANCE
In this chapter, the following topics are covered:
► Taking attendance with the seating chart
► Taking attendance by a student list
► Taking supplemental attendance

Chapter Five TeacherVUE User Guide
Copyright© 2013 Edupoint Educational Systems, LLC 81
ATTENDANCE NOTIFICATION When a teacher logs in to the TeacherVUE software, the software notifies the teacher if attendance has not been taken for today’s date in the Class Info section of the main TeacherVUE screen. The message appears in bright yellow below the section information.
Figure 5.1 – Attendance Notification Message
For schools taking daily attendance twice a day, the message specifies which part of the day is still missing attendance.
Figure 5.2 – Daily Attendance Message
Even if all students are present, the teacher must take attendance by either chart or list as explained later in this chapter. Once the teacher has saved the attendance records, the message on the Detail tab changes to “Attendance taken for today” and the Class Selection screen indicates that attendance was taken also.
Figure 5.3 – Attendance Taken for Today Message

TeacherVUE User Guide Chapter Five
82 Copyright© 2013 Edupoint Educational Systems, LLC
Figure 5.4 – Class Selection screen, Attendance Taken column
TAKING ATTENDANCE BY CHART Attendance can be taken for the current date by using the Seating Chart. If attendance needs to be taken for a previous school day, the Take Attendance By List function should be used. It is discussed later in this chapter. To take attendance using the seating chart:
1. Click on the Take Attendance by Chart icon.
Figure 5.5 – Seating Chart Screen, Class Info
2. A Reason Types Legend appears under the Class Info area. This legend shows the color-coding used for the absence types available. The absence types available are configured during the district & school setup, as outlined in the Synergy SIS – TeacherVUE Administrator Guide.
Figure 5.6 – Reason Types Legend

Chapter Five TeacherVUE User Guide
Copyright© 2013 Edupoint Educational Systems, LLC 83
3. For daily attendance schools that take attendance twice a day, use the drop down arrow to select what time of day that attendance is being taken.
Figure 5.7 – Taking PM Attendance
4. Click on the student’s picture to mark the student as absent or tardy. Continue clicking until the correct code appears.
Figure 5.8 –Marking Attendance by Seating Chart
5. When all absences have been recorded, click the Save Attendance button. Even if no students are absent, be sure to click the Save Attendance button to record that attendance has been taken. To cancel any changes that have been made, click the Cancel button.
Note: Only students who are tardy or absent from the class should be marked. Those students who are present do not have any code appear in the lower left hand corner of their student picture.
6. Once the attendance has been saved, the screen returns to the main Seating Chart screen.
Figure 5.9 – Main Seating Chart Screen

TeacherVUE User Guide Chapter Five
84 Copyright© 2013 Edupoint Educational Systems, LLC
TAKING ATTENDANCE BY LIST Taking attendance by using the student list allows the teacher to take attendance for the current school day or return to previous school days. To take attendance by list:
1. Click on the Take Attendance by List icon.
Figure 5.10 – Seating Chart Screen, Class Info
2. A Reason Types Legend appears under the Class Info area. This legend shows the color-coding used for the absence types available. The absence types available are configured during the district & school setup, as outlined in the Synergy SIS – TeacherVUE Administrator Guide.
Figure 5.11 – Reason Types Legend
3. For daily attendance schools taking attendance twice a day, two columns appear under each date – one for the AM session and one for the PM session. Daily attendance schools taking attendance only once a day only show the date column. Days that the school is not in session, or days on which the student was not enrolled are grayed out with the notation N/E (for not enrolled). Today’s date is highlighted in pale yellow. Supplemental attendance days that are not active for this class are noted with SUP.
Figure 5.12 – Taking Daily Attendance By List

Chapter Five TeacherVUE User Guide
Copyright© 2013 Edupoint Educational Systems, LLC 85
4. For period attendance schools, a column for each date is listed. Days that the school is not in session, or days on which the student was not enrolled are grayed out with the notation N/E (for not enrolled). Today’s date is highlighted in pale yellow. Supplemental attendance days that are not active for this class are noted with SUP.
Figure 5.13 – Taking Daily Attendance By List
5. To change the order in which the calendar days display, select either Ascending (chronologically to today) or Descending (from today back) in the Calendar Day Order drop-down list.
6. If attendance for a different date needs to be marked, the Back 10 Days, Go to Today, and Forward 10 Days buttons at the top of the attendance list can be used to navigate to the desired date. Most schools limit attendance recording to within 3 to 5 days of the current date, but past attendance records may be viewed.
Figure 5.14 – Switching Attendance Dates
7. Once all of the attendance has been recorded, click on the Save Attendance button to save the attendance and return to the main Seating Chart screen. To undo any changes, but remain in the Attendance List, click the Undo Changes button. To undo any changes and return to the main Seating Chart screen, click the Cancel and Return to Seating Chart button.

TeacherVUE User Guide Chapter Five
86 Copyright© 2013 Edupoint Educational Systems, LLC
Figure 5.15 – Saving Attendance
TAKING SUPPLEMENTAL ATTENDANCE When taking supplemental attendance, the student is marked present instead of absent. Supplemental attendance is always taken by period. Currently supplemental attendance may only be recorded by taking attendance by list. To record supplemental attendance:
1. Click on the Take Attendance by List icon.
Figure 5.16 – Seating Chart Screen, Class Info
2. The Present reason does not appear in the Reason Types Legend, but it is available for recording attendance. Click in the box for the date and student that attended for the supplemental class until the reason PRE appears in white.
Figure 5.17 – Taking Supplemental Attendance By List
3. Once all of the attendance has been recorded, click on the Save Attendance button to save the attendance and return to the main Seating Chart screen. To undo any changes but remain in the Attendance List, click the Undo Changes button. To undo any changes and return to the main Seating Chart screen, click the Cancel and Return to Seating Chart button.

Chapter Five TeacherVUE User Guide
Copyright© 2013 Edupoint Educational Systems, LLC 87
TAKING LUNCH COUNTS If Lunch Counts are enabled, the status of the lunch counts is displayed beneath the Section information. Lunch counts are only available for the students’ homerooms, and they must be enabled as outlined in the Synergy SIS – TeacherVUE Administrator Guide. To fill out the Lunch Counts:
Figure 5.18 – Lunch Counts Not Taken
Figure 5.19 - Additional Views
1. Click on the Lunch counts not taken for today bar. OR Select the Lunch Count option form the Additional Views menu. The Lunch Count Entry screen appears.

TeacherVUE User Guide Chapter Five
88 Copyright© 2013 Edupoint Educational Systems, LLC
Note – If your school is setup for lunch counts, the Lunch Count information appears on
the screen.
Figure 5.20 - Lunch Count
If your school is setup to take individual lunch orders, the Lunch Order information appears on the screen.
Figure 5.21 - Lunch Order
2. Enter the lunch count totals or individual lunch orders.
Figure 5.22 – Lunch Count Entry
3. Click Save Lunch Count. The Lunch Counts Saved message appears. The message changes to “Lunch counts taken for today.”
Figure 5.23 – Lunch Counts Taken

Chapter Six TeacherVUE User Guide
Copyright© 2013 Edupoint Educational Systems, LLC 89
Chapter Six: VIEWING &
EDITING
GRADES
In this chapter, the following topics are covered:
► Viewing student grades
► Updating student grades
► Printing the grades report
► What is the Grade Book?

TeacherVUE User Guide Chapter Six
90 Copyright© 2013 Edupoint Educational Systems, LLC
VIEWING GRADES Marks, or grades, for each student may be viewed and edited within the TeacherVUE software. To access the student grades:
1. Click the View Grades icon.
Figure 6.1 – Seating Chart Screen, Class Info
2. There are two main sections within the View Grades screen. The Class Info section shows the details of the different codes that are shown for the grades, and allows the teacher to set preferences for how the grades are viewed. The Grades section displays the marks for each student.
Figure 6.2 – View Grades screen

Chapter Six TeacherVUE User Guide
Copyright© 2013 Edupoint Educational Systems, LLC 91
3. In the Class Info section are two tabs: Details and Preferences. Upon opening the View Grades area, the default tab is the Details tab. Within the Details tab, legends for the codes for Valid Marks, Citizenship, Conduct, Work Habits, and Comments are shown. The codes available are setup at the district and school level. Refer to the Synergy SIS – Grading Administrator Guide for further details regarding setup and configuration of the grades.
Valid Marks refers to the letter grade that can be issued for a student.
Students can be assessed on other items outside of the academic arena. Some of those arenas include Citizenship, Conduct, and Work Habits. Citizenship refers to the student’s overall performance in the course, including grade and interactions with students and staff. Conduct refers to only a student’s interactions with students and staff. Work Habits refers to a student’s tendency to complete work in its entirety and within a timely manner.
The Comments area refers to specific items about a student’s performance in the class whether positive or negative. In the figure below, there are letters associated with various levels of performance. Several comments may be entered for each student in a class, depending on the configuration of the grading setup for the school.
4. The Preferences tab within the Class Info area allows the user to change the grading period being viewed on the main screen. The current grading period is automatically checked.
Figure 6.3 – Screen Grades, Preferences Tab
5. To add the information for a different grading period to the screen on the main screen, check the box next to the grading period to be displayed.

TeacherVUE User Guide Chapter Six
92 Copyright© 2013 Edupoint Educational Systems, LLC
6. The Grades section is automatically updated to show the information for the current grading period as well as the new grading period added.
Figure 6.4 – Updated Screen of Main Screen
7. In the Grades section, information regarding the student name, marks, options, and comments can be found. The boxes within this main screen are not available for editing within View Grades. To edit these boxes, the Update Grades screen must be activated. Updating Grades is discussed later in this chapter.
Figure 6.5 – View Grades screen, Grades Section
8. The first column contains the students’ names. They are listed in alphabetical order with the last name showing first and then the first name.
Figure 6.6 – Grades Section, Student Name Column

Chapter Six TeacherVUE User Guide
Copyright© 2013 Edupoint Educational Systems, LLC 93
9. The next block of columns is labeled Marks. A mark is the grade given for a grading period. More than one mark may be available for a given grading period. The marks available are configured in the Grading Setup screen, as outlined in the Synergy SIS – Grading Administrator Guide.
Figure 6.7 – Grades Section, Marks Columns
10. The Options area of the Grades section contains a variety of information. This includes Credit Override, Attendance, and notes regarding student performance (Citizenship, Conduct, and Work Habits). Credit Override allows a change to the credit amount issued for a course. The Attendance columns, shown here as Excused and Unexcused Absences, can be customized to show a different column title as well as automatically summarize the absences recorded for the student. The attendance may also be manually entered. The Citizenship, Conduct, and Work Habits columns show letters that correspond to the legend shown in the Details tab.
Figure 6.8 – Grades Section, Options Columns
11. The Comments area can display a customized number of columns to capture additional comments regarding a student’s performance within that particular class. The letters placed within these columns correspond with the Comments legend shown in the Details tab.
Figure 6.9 – Grades Section, Comments Columns
12. The Free-Form Comments area displays comment text entered by the teacher for this student.
Figure 6.10 – Grades Section, Free-form Comments Column

TeacherVUE User Guide Chapter Six
94 Copyright© 2013 Edupoint Educational Systems, LLC
UPDATING GRADES To update the student grades:
1. From the View Grades screen, click on the Update Grades icon found in the Class Info section.
Figure 6.11 – View Grades screen, Update Grades icon
Caution: If using the Grade Book, the Grades section in TeacherVUE shows the posted grades from Grade Book. If the grades are updated in TeacherVUE, they will not match the Grade Book grades and if the grades are re-posted from Grade Book, the TeacherVUE changes will be overridden.
2. In the Grades section, all of the boxes turn white instead of gray, and become either drop down menus or editable boxes.
Figure 6.12 – Update Grades screen, Grades Section
3. To change a mark, comment, or any other drop-down list field, click the black drop down menu arrow and select the appropriate letter or enter the appropriate text.
Figure 6.13 – Update Grades screen, Drop Down Menus

Chapter Six TeacherVUE User Guide
Copyright© 2013 Edupoint Educational Systems, LLC 95
4. To change an editable box such as Credit Override or the Attendance columns, click in the box and enter the information.
Figure 6.14 – Update Grades screen, Editable Box
5. When all the grade information has been entered or changed, click the Save Grades button. To cancel any changes that have been made, click the Cancel button. The Grades section returns to the View Grades screen, where the boxes are shaded gray and cannot be edited.
Figure 6.15 – Save Grades and Cancel

TeacherVUE User Guide Chapter Six
96 Copyright© 2013 Edupoint Educational Systems, LLC
GRADE-RELATED REPORTS If grade-related reports have been added to the list of reports available in the TeacherVUE software (by adding them to the Navigation Menu for the TeacherVUE User Group), these reports appear both in the list of available reports from the main Seating Chart screen and as an option on the list of reports available in the View Grades screen. For more information about specific reports, please see the Synergy SIS – Grading User Guide. To print a grade-related report:
1. Click the Execute Report icon.
Figure 6.16 – Execute Report Icon
2. The report can be generated as a PDF file or in text (TXT) format. Select the output type by clicking on the radio buttons.
Figure 6.17 – Execute Report, Select Output Type
3. Click on the report to be printed.
Figure 6.18 – Execute Report, Select a Report
4. A progress screen appears as the report is being generated. The status line is updated as the report is processed until the report can be viewed.
Figure 6.19 – Execute Report, Progress Screen

Chapter Six TeacherVUE User Guide
Copyright© 2013 Edupoint Educational Systems, LLC 97
5. Once the report is generated, a dialog box offers the options to Open, Save, or Cancel the report.
Figure 6.20 – Open, Save, or Cancel Report
6. Click Open to view the report, or click Save to save the report to the computer.
Figure 6.21 – Screen Grades, Mark Verification By Teacher Report
RETURN TO SEATING CHART To return to the main Seating Chart screen from the View Grades screen, click on the Return to Seating Chart icon in the Class Info section.
Figure 6.22 – Return to Seating Chart icon

TeacherVUE User Guide Chapter Six
98 Copyright© 2013 Edupoint Educational Systems, LLC
ACCESSING GRADE BOOK The Grade Book option provides access to the Grade Book software. This software allows educators to record grades at the assignment level instead of just at the grading period level. The assignments are tallied for each grading period mark and the information is synchronized with the grading information in the main Synergy SIS software. For more information about working with the Grade Book software, please see the Synergy SIS – Grade Book User Guide. To access the Grade Book:
1. Click on the Grade Book icon from the main Seating Chart screen.
Figure 6.23 – Seating Chart Screen
2. The Grade Book screen pops-up in a separate window.
Figure 6.24 – Grade Book Screen

TeacherVUE User Guide
Copyright© 2013 Edupoint Educational Systems, LLC 99
Chapter Seven: USING THE TEACHERVUE MOBILE APP
In this chapter, the following topics are covered:
► Mobile App Features
► Hardware and Software Requirements
► Setup on a Device

TeacherVUE User Guide
100 Copyright© 2013 Edupoint Educational Systems, LLC
FEATURES The TeacherVUE Mobile App gives school administrators access to student information and functions for which mobility is required. Much of the functionality available in the desktop version of TeacherVUE. With the TeacherVUE mobile app you can
Create and modify seating charts
View student information
Add Notes to a student
Create an Incident Referral
Take Attendance
Take lunch counts
Access Grade Book
HARDWARE AND SOFTWARE REQUIREMENTS TeacherVUE is compatible with iPhone, iPod touch, and iPad with iOS 4.3 or later. It is optimized for iPhone 5.
User login requires the same name and password used for Synergy.
Note – Your TeacherVUE screens might not look exactly like those shown in this guide. Screen layouts vary slightly by device.

TeacherVUE User Guide
Copyright© 2013 Edupoint Educational Systems, LLC 101
SETUP ON A DEVICE To set up TeacherVUE on a device:
1. Download the TeacherVUE app from iTunes: https://itunes.apple.com/us/app/teachervue/id412056651
2. Follow the instructions provided during the download to install the app.
3. Start the app.
4. Tap the Settings icon in the lower left corner.
5. Enter the URL of the district’s web server, and tap Test.
6. Tap Ok to dismiss the success message, and tap done.
7. Tap Save and the close the Settings window by tapping the ‘X’.

TeacherVUE User Guide
102 Copyright© 2013 Edupoint Educational Systems, LLC
LOGGING IN 1. Launch the TeacherVUE app.
2. Enter your Synergy Username and Password.
3. Tap Login.
GETTING STARTED The screen that appears when you log in is District and School Announcements.
Figure 7.1 - District and School Announcements screen
Tip: Set the Save Username and Save Password options to Yes to skip this step the next time you use TeacherVUE.

TeacherVUE User Guide
Copyright© 2013 Edupoint Educational Systems, LLC 103
Once you close the District and School Announcements screen, the Class/Group Selection screen displays.
Selecting a class or group from the list opens the Details tab of the Class Info screen.

TeacherVUE User Guide
104 Copyright© 2013 Edupoint Educational Systems, LLC
The Details tab provides access to the following functions.
Attendance by Chart: Enables the teacher to take attendance by seating chart. See page 109.
Change Class: Returns the user to the Class/Group list.
Attendance by List: Enables the teacher to take attendance by student list. See page 110.

TeacherVUE User Guide
Copyright© 2013 Edupoint Educational Systems, LLC 105
Grade Book: Access Grade Book to enter grades or create assignments. See page 113.
Incidents: Add discipline incident records. See page Error! Bookmark not defined..
Class Details: Displays student totals for the class.
Lunch Counts: Enables teacher to enter the daily lunch count for their class. See page 112.
Attendance Reminders: Alerts teachers to enter class attendance.
Seating Charts: Enables teachers to select new or modify existing seating charts. See page 108.
Preferences: Selects how the seating chart is arranged and what information is displayed. See page 108.
The Students tab provides access to additional functions.
Add New Chart: Enables the teacher to add a new seating chart. See page 106.
Edit Chart: Allows the teacher to edit the current seating chart.
Tapping a student photo or placeholder on the seating chart provides access to the following functions.
Student: Displays student information and Emergency Contacts. See page 119.
Notes: Enables teachers to view and create notes for a student. See page 120.

TeacherVUE User Guide
106 Copyright© 2013 Edupoint Educational Systems, LLC
SEATING CHART
Adding a seating chart
1. Select a class section from the Class/Group List screen. The class section screen displays.
Figure 7.2 - Student tab
1. On the Students tab, tap Add New Chart. The Add/Edit Chart screen displays.
Figure 7.3 - Add/Edit Chart screen
2. In the Type column, select a chart type.
3. Enter a name in the Chart Name field.
4. Click Save and Return. The new seating chart is created.

TeacherVUE User Guide
Copyright© 2013 Edupoint Educational Systems, LLC 107
Editing a freeform seating chart
1. On the Details tab, click Seating Charts. The Select Chart screen displays.
Figure 7.4 - Select Chart screen
2. Select a freeform seating chart.
Figure 7.5 - Freeform Edit Chart screen
3. Set the Edit Chart option to ON.
4. To add a student from the list of students not in the chart, touch a name on the list and drag it to the seating chart.
5. To move a student, touch the student photo for three seconds and drag the student photo to the new position on the chart.
6. Click Save Chart.
Note: Clicking the question mark symbol (?) on the Edit Chart screen, opens the help screen, which contains instructions and illustrations of how to edit the chart in freeform mode.

TeacherVUE User Guide
108 Copyright© 2013 Edupoint Educational Systems, LLC
Selecting Seating Charts
1. On the Details tab, tap Seating Charts. The Select Chart list displays.
Figure 7.6 - Select Chart list
2. Select a chart from the list.
Setting Seating Chart Preferences
1. On the Details tab, tap Preferences. The Preferences screen opens.
Figure 7.7 - Preferences screen
2. Set the preferences.
3. Tap Save.

TeacherVUE User Guide
Copyright© 2013 Edupoint Educational Systems, LLC 109
ATTENDANCE
Taking attendance by seating chart
1. Tap the attendance by chart icon . The attendance screen displays.
Figure 7.8 - Attendance screen
2. Tap on the student’s photo or placeholder to set their attendance. Tapping multiple times scrolls through the available attendance options.
3. Tap Save Attendance.

TeacherVUE User Guide
110 Copyright© 2013 Edupoint Educational Systems, LLC
Taking attendance by list
1. Tap the attendance by list icon . The attendance list displays.
Figure 7.9 - Attendance screen
2. Tap on the student’s row to set their attendance. Tapping multiple times scrolls through the available attendance options.
3. Tap Save Attendance.

TeacherVUE User Guide
Copyright© 2013 Edupoint Educational Systems, LLC 111

TeacherVUE User Guide
112 Copyright© 2013 Edupoint Educational Systems, LLC
LUNCH COUNTS
1. Tap the lunch count icon . The Lunch Count Entry screen displays.
Figure 7.10 - Lunch Count Entry screen
2. Enter the lunch counts for the class.
3. Click Save.

TeacherVUE User Guide
Copyright© 2013 Edupoint Educational Systems, LLC 113
GRADE BOOK In the mobile version of Grade Book, teachers can view their classes, add assignments, enter scores for assignments, and view student summary information in the Grade Book module.
Sorting/Filtering Data
Tap the Grade Book icon . The Grade Book Main screen displays. On the Grade Book Main screen, sorts/filters exist for Term, Class, Period, Students, Order, Date, and Type.
Figure 7.11 - Grade Book Main screen

TeacherVUE User Guide
114 Copyright© 2013 Edupoint Educational Systems, LLC
Setting Grade Book Options
1. From the Grade Book Main screen, tap the Grade Book Options button. The Grade Book Options window opens.
2. Set the Grade Book options.
Figure 7.12 - Grade Book Options
3. Click Save.

TeacherVUE User Guide
Copyright© 2013 Edupoint Educational Systems, LLC 115
Adding New Assignments:
1. From Grade Book Main screen, click the New Assignment button. The New Assignment screen opens.
Note: The New Assignment screen available in the mobile version of Grade Book is designed for quick entry of assignments – it does not include all functionality that exists in the web-based version of Grade Book. Any options that are not available in mobile version Grade Book can be set when you access the web-based version. The following options are not available when creating new assignments in mobile version of Grade Book:
Assignments cannot be correlated to Report Card Areas.
Assignments cannot be correlated to Standards.
Drop Box options are not available.
Figure 7.13 - New Assignment screen
2. Enter desired assignment details.
3. Click Save.

TeacherVUE User Guide
116 Copyright© 2013 Edupoint Educational Systems, LLC

TeacherVUE User Guide
Copyright© 2013 Edupoint Educational Systems, LLC 117
Entering Scores
1. To enter assignment scores, click on the desired student/assignment cell. A Score window appears.
Figure 7.14 - Score screen
For numeric score types, a numeric keypad allows for score entry. For rubric score types, the rubric items will be available for selection. Grade Book Comments (i.e.: Late, absent, etc…) can also be added on the Score entry popup. Finally, a green ‘fill-down’ arrow is available to fill all scores below (and including) the selected cell with the selected value.
2. Enter desired scores.
3. Click Return to advance to the next student’s cell. Click Close to return to Grade Book Main.
Figure 7.15 - Grade Book Main screen
4. Click Save Changes.

TeacherVUE User Guide
118 Copyright© 2013 Edupoint Educational Systems, LLC
Viewing Student Score Details
To view student score details, click on a student’s name from the Grade Book Main screen. The Student Score Details screen opens. Information on this screen is view-only.
Figure 7.16 - Grade Book Main screen
Figure 7.17 - Student Score Details screen

TeacherVUE User Guide
Copyright© 2013 Edupoint Educational Systems, LLC 119
STUDENT INFORMATION To view student information and emergency contacts:
1. Tap on a student’s photo or placeholder on the TeacherVUE seating chart screen. The Selection Menu opens.
Figure 7.18 - TeacherVUE Selection Menu
2. Select Student. The Student Info screen displays. Information on this screen is view-only.
Figure 7.19 - TeacherVUE Student Info screen

TeacherVUE User Guide
120 Copyright© 2013 Edupoint Educational Systems, LLC
3. Tap the Emergency Contacts button to view the Emergency Contacts screen.
Figure 7.20 - TeacherVUE Emergency Contacts
NOTES To view student notes:
1. Tap on a student’s photo or placeholder on the TeacherVUE seating chart screen. The Selection Menu opens.
Figure 7.21 - TeacherVUE Selection Menu
2. Select Notes. The Notes screen displays. Any notes for the selected student appear in left side of the screen.
Figure 7.22 - TeacherVUE Notes screen
3. Tap on the note to view it.

TeacherVUE User Guide
Copyright© 2013 Edupoint Educational Systems, LLC 121
Note: If no notes are available for the selected student, the system informs you and prompts you to create a note.
To add a note:
1. Tap the Add button on the Notes screen. The Add Notes screen opens.
Figure 7.23 - Add Notes screen
2. Enter the note in the Comments field.
3. Select if the comment can be viewed by other teachers or staff.
4. Tap Save. The new note appears on the left side of the Notes screen.
INCIDENT REFERRAL
1. Tap the incident icon . The Add Incident screen displays.

TeacherVUE User Guide
122 Copyright© 2013 Edupoint Educational Systems, LLC
Figure 7.24 - Attendance screen
2. Enter the incident details in the appropriate fields.
3. Tap the camera icon to attach photos or video to the incident referral.
4. Tap Save. Once the discipline referral has been processed and recorded as a discipline incident, the discipline incident alert icon displays under the student’s photo or placeholder.

TeacherVUE User Guide
Copyright© 2013 Edupoint Educational Systems, LLC 123
Figure 7.25 - Discipline Incident alert icon

TeacherVUE User Guide
124 Copyright© 2013 Edupoint Educational Systems, LLC
INDEX ALC, 37, 49 Attendance, 9, 10, 16, 22, 37, 38, 39, 40,
81, 82, 83, 84, 85, 86, 87, 94 Caution, 7, 52, 95 Chart Size, 27 Citizenship, 92, 94 Class Info, 20, 21, 25, 29, 30, 63, 82, 83,
85, 87, 91, 92, 95, 98 Comments, 44, 92, 94 Conduct, 92, 94 Credit Override, 94, 96 Daily Attendance, 38, 82, 85, 86 Days of Activity, 38, 39 Discipline, 9, 37, 41, 42 district
URL, 102
downloading the app, 102 Emergency, 46, 47 Free-Form Comments, 94 GENAZ 01 Referral Document, 45 Grade Book, 58, 70, 72, 74, 90, 99 Grades, 9, 16, 37, 58, 90, 91, 92, 95, 99 hardware requirements, 101 Health, 9, 37, 44 installing, 102 iPad, 101 iPhone, 101 iPod Touch, 101 iTunes, 102 Navigation Menu, 53, 97 Note, 7, 17, 21, 26, 27, 47, 59, 60, 84,
108, 116, 122 Parent, 46 ParentVUE, 54, 57, 77, 80
Password, 10, 19, 25 PDF, 64, 97 Period, 10, 13, 16, 39, 40 pop-up blockers, 7 Reference, 7 Reports, 2, 53, 64, 65, 97 requirements
hardware and software, 101
Return to Seating Chart, 24, 86, 87, 98 Seating Chart, 16, 18, 19, 20, 21, 23, 24,
25, 26, 27, 29, 30, 37, 68, 69, 83, 84, 85, 86, 87, 91, 97, 98, 99
Seating Chart Dimension, 27 Security, 9, 25 software requirements, 101 Student Drop-Down Menu, 37 StudentVUE, 37, 48, 51, 54, 57, 70, 77,
80 Supplemental attendance, 86, 87 Synergy – Grade Book User Guide, 58,
99 Synergy – Grading Administrator Guide,
92, 94 Synergy – Grading User Guide, 53, 65,
97 Synergy – ParentVUE & StudentVUE
Parent & Student Guide, 51 Synergy – TeacherVUE Administrator
Guide, 9, 22, 37, 64, 66, 83, 85, 88 Term, 21 Tip, 7 TXP, 9 URL, 102 Work Habits, 92, 94

TeacherVUE User Guide
Copyright© 2013 Edupoint Educational Systems, LLC 125
INDEX OF SCREENS Figure 1.1 – Synergy SIS Log In Page ...................................................................................................................................... 9 Figure 1.2 –Class Selection screen, Confirm Semester ............................................................................................................ 9 Figure 1.3 – Please Select a Class Screen, Select a Period ..................................................................................................... 9 Figure 1.4 – Acknowledge Adds and Drops Screen ................................................................................................................ 10 Figure 1.5 – Announcements Screen ..................................................................................................................................... 10 Figure 1.6 – Main Screen, TeacherVUE ................................................................................................................................. 10 Figure 1.7 – Synergy SIS Button ............................................................................................................................................ 11 Figure 1.8 – Leaving TeacherVUE Screen Warning Message ................................................................................................ 11 Figure 1.9 – Synergy SIS Screen ........................................................................................................................................... 11 Figure 1.10 – TVUE Button .................................................................................................................................................... 12 Figure 1.11 – Leaving Synergy SIS Screen Warning Message ............................................................................................... 12 Figure 1.12 – Please select a class ........................................................................................................................................ 12 Figure 1.13 – Main Screen, TeacherVUE ............................................................................................................................... 13 Figure 1.14 – User Password and Preferences Screen .......................................................................................................... 13 Figure 1.15 – Preferences Tab, User Password, and Preferences Screen ............................................................................. 14 Figure 1.16 – Seating Chart Screen ....................................................................................................................................... 15 Figure 1.17 –Class Selection screen, Confirm Semester ........................................................................................................ 15 Figure 1.18 – Please Select a Class Screen, Select a Period ................................................................................................. 15 Figure 1.19 – Seating Chart Screen ....................................................................................................................................... 17 Figure 2.1 – Seating Chart Screen ......................................................................................................................................... 19 Figure 2.2 – Seating Chart by Alphabet .................................................................................................................................. 20 Figure 2.3 – Class Info Section .............................................................................................................................................. 20 Figure 2.4 – Details Tab ......................................................................................................................................................... 20 Figure 2.5 – Attendance Not Taken ........................................................................................................................................ 21 Figure 2.6 – Attendance Taken .............................................................................................................................................. 21 Figure 2.7 – Attendance Not Taken ........................................................................................................................................ 21 Figure 2.8 – Attendance Taken .............................................................................................................................................. 21 Figure 2.9 – Lunch Counts Not Taken .................................................................................................................................... 21 Figure 2.10 – Lunch Counts Taken ........................................................................................................................................ 21 Figure 2.11 – Details Tab, Student Tallies .............................................................................................................................. 21 Figure 2.12 – Student Tallies, Non-School Day ...................................................................................................................... 21 Figure 2.13 – Edit Seating Charts ........................................................................................................................................... 22 Figure 2.14 – Edit Seating Chart, Add Button ......................................................................................................................... 22 Figure 2.15 – Entering a New Seating Chart .......................................................................................................................... 22 Figure 2.16 – Save and Return to Seating Chart .................................................................................................................... 23 Figure 2.17 – Seating Chart Screen ....................................................................................................................................... 23 Figure 2.18 – Preferences Tab ............................................................................................................................................... 24 Figure 2.19 – Change Password Button ................................................................................................................................. 24 Figure 2.20 – Change Password Screen ................................................................................................................................ 24 Figure 2.21 – Student Photo with Student Information ............................................................................................................ 25 Figure 2.22 – Seating Chart Options ...................................................................................................................................... 25 Figure 2.23 – Preferences Tab, Chart Size and Seating Chart Dimensions ............................................................................ 26 Figure 2.24 – Seating Chart Options ...................................................................................................................................... 26 Figure 2.25 - Edit Student Nicknames screen ........................................................................................................................ 27 Figure 2.26 - Seating Chart displaying nicknames .................................................................................................................. 27 Figure 2.27 – Empty Seating Chart ........................................................................................................................................ 28 Figure 2.28 – Students Currently Not in Chart Message ......................................................................................................... 28 Figure 2.29 – Students Tab, Class Info Section ...................................................................................................................... 29 Figure 2.30 – Editing Students ............................................................................................................................................... 29 Figure 2.31 – Students Tab, Fill Open Seats with Students .................................................................................................... 29 Figure 2.32 – Clicking and Dragging to Arrange the Chart ...................................................................................................... 30 Figure 2.33 - TeacherVUE seating chart ................................................................................................................................ 31 Figure 2.34 - Edit Seating Chart ............................................................................................................................................. 31 Figure 2.35 - Edit Seating Chart ............................................................................................................................................. 31 Figure 2.36 - TeacherVUE seating chart - Details tab ............................................................................................................. 32 Figure 2.37 - Freeform seating chart - Students tab................................................................................................................ 32 Figure 2.38 - Freeform seating chart - Students tab................................................................................................................ 33 Figure 2.39 - Freeform seating chart - Students tab................................................................................................................ 33 Figure 2.40 – Preference tab, Front of the Classroom drop down list...................................................................................... 34 Figure 3.1 – Student Information, List of Student Detail Options ............................................................................................. 36 Figure 3.2 – Days of Activity Tab, Daily Attendance Screen ................................................................................................... 37 Figure 3.3 – Totals Tab, Daily Attendance Screen .................................................................................................................. 37 Figure 3.4 – Letters Tab, Daily Attendance Screen ................................................................................................................ 37 Figure 3.5 – Period Attendance Screen, Days of Activity Tab ................................................................................................. 38 Figure 3.6 – Period Attendance Screen, Totals tab ................................................................................................................ 39 Figure 3.7 – Period Attendance Screen, Letters Tab .............................................................................................................. 39
TeacherVUE User Guide
126 Copyright© 2013 Edupoint Educational Systems, LLC
Figure 3.8 –Discipline Screen ................................................................................................................................................. 40 Figure 3.9 – Discipline Detail .................................................................................................................................................. 40 Figure 3.10 – Discipline Incident Screen ................................................................................................................................. 41 Figure 3.11 – Discipline Incident Detail ................................................................................................................................... 41 Figure 3.12 – Health Screen, Nurse Visits Tab ....................................................................................................................... 42 Figure 3.13 – Health Detail ..................................................................................................................................................... 42 Figure 3.14 – Health Screen, Conditions Tab.......................................................................................................................... 43 Figure 3.15 – Request for Assistance screen .......................................................................................................................... 44 Figure 3.16 – Student Profile, Demographics Tab ................................................................................................................... 45 Figure 3.17 – Student Profile, Parent/Guardian Tab................................................................................................................ 45 Figure 3.18 – Student Profile, Emergency Tab........................................................................................................................ 46 Figure 3.19 – Student Profile, Classes Tab ............................................................................................................................. 46 Figure 3.20 – Student Profile, Documents Tab ........................................................................................................................ 47 Figure 3.21 – Student Profile, Access Tab .............................................................................................................................. 47 Figure 3.22 – Student ALC Screen ......................................................................................................................................... 48 Figure 3.23 - Adding an ALC Record ..................................................................................................................................... 48 Figure 3.24 – Editing an ALC Record ...................................................................................................................................... 48 Figure 3.25 – Deleting an ALC Record ................................................................................................................................... 49 Figure 3.26 – Student Course History ..................................................................................................................................... 50 Figure 3.27 – StudentVUE Portal ............................................................................................................................................ 50 Figure 3.28 – Student IEP ....................................................................................................................................................... 51 Figure 3.29 – Communication Screen ..................................................................................................................................... 53 Figure 3.30 – Message Notice on StudentVUE ....................................................................................................................... 53 Figure 3.31 – Message Format Buttons .................................................................................................................................. 54 Figure 3.32 – Paste From Word .............................................................................................................................................. 54 Figure 3.33 – Table Properties Box......................................................................................................................................... 55 Figure 3.34 – Message History ............................................................................................................................................... 56 Figure 3.35 – List of Posted Messages ................................................................................................................................... 56 Figure 3.36 – Closing Message History................................................................................................................................... 56
Figure 3.37 – Grade Book menu bar ....................................................................................................................................... 57 Figure 3.38 - Add Note icon .................................................................................................................................................... 58 Figure 3.39 - Add Note screen ................................................................................................................................................ 58 Figure 3.40 - Added Note icon ................................................................................................................................................ 58 Figure 3.41 - Note History screen ........................................................................................................................................... 59 Figure 3.42 – Log Student Contact ......................................................................................................................................... 60 Figure 3.43 – Contact Details screen ...................................................................................................................................... 60 Figure 4.1 – Selecting a Student Group .................................................................................................................................. 62 Figure 4.2 – Class Info Section, Menu Icons ........................................................................................................................... 62 Figure 4.3 – Execute Report Icon ........................................................................................................................................... 63 Figure 4.4 – Execute Report Menu, Select Output Type ......................................................................................................... 63 Figure 4.5 – Execute Report Menu, Select a Report ............................................................................................................... 63 Figure 4.6 – Execute Report, Progress Screen ....................................................................................................................... 64 Figure 4.7 – Open, Save, or Cancel Report ............................................................................................................................ 64 Figure 4.8 – Additional Screens Icon ...................................................................................................................................... 65 Figure 4.9 – Additional Screens, Test Group Analysis Selection ............................................................................................. 65 Figure 4.10 – Test Group Analysis Screen .............................................................................................................................. 66 Figure 4.11 – Test Group Analysis, Class Demographics ....................................................................................................... 66 Figure 4.12 – Test Group Analysis Screen, Test Results ........................................................................................................ 66 Figure 4.13 – Test Group Analysis Screen, Test Results ........................................................................................................ 67 Figure 4.14 – Print Test Analysis Icon ..................................................................................................................................... 67 Figure 4.15 – Print Test Analysis Report, Progress Screen ..................................................................................................... 67 Figure 4.16 – Open, Save, or Cancel Report .......................................................................................................................... 67 Figure 4.17 – Class Test Analysis Report ............................................................................................................................... 67 Figure 4.18 – Return to Seating Chart Icon ............................................................................................................................. 68 Figure 4.19 – Additional Screens Icon .................................................................................................................................... 68

TeacherVUE User Guide
Copyright© 2013 Edupoint Educational Systems, LLC 127
Figure 4.20 – Additional Screens Icon .................................................................................................................................... 69 Figure 4.21 – Incident Referral Screen ................................................................................................................................... 69 Figure 4.22 – Discipline Incident Details ................................................................................................................................. 69 Figure 4.23 - Select Violations ................................................................................................................................................ 70 Figure 4.24 - Select Students ................................................................................................................................................. 70 Figure 4.25 - Select Interventions ........................................................................................................................................... 70 Figure 4.26 - Refer Incident button ......................................................................................................................................... 70 Figure 4.27 - Confirmation Message....................................................................................................................................... 70 Figure 4.28 - Discipline Incident screen .................................................................................................................................. 70 Figure 4.29 – Additional Screens Icon .................................................................................................................................... 71 Figure 4.30 – Parent Teacher Conference Screen ................................................................................................................. 71 Figure 4.31 - Parent Teacher Conference Screen .................................................................................................................. 72 Figure 4.32 - Student Conference Screen .............................................................................................................................. 72 Figure 4.33 – Additional Screens Icon .................................................................................................................................... 72 Figure 4.34 – Parent Teacher Conference Screen ................................................................................................................. 73 Figure 4.35 - Student Meal Screen ......................................................................................................................................... 73 Figure 4.36 – Additional Screens Icon .................................................................................................................................... 73 Figure 4.37 – Announcement Screen ..................................................................................................................................... 74 Figure 4.38 – Additional Screens Icon .................................................................................................................................... 75 Figure 4.39 – Additional Screens Menu .................................................................................................................................. 75 Figure 4.40 – Communication Screen .................................................................................................................................... 75 Figure 4.41 – Message Notice on StudentVUE ...................................................................................................................... 76 Figure 4.42 – Message Format Buttons .................................................................................................................................. 76 Figure 4.43 – Paste From Word ............................................................................................................................................. 77 Figure 4.44 – Table Properties Box ........................................................................................................................................ 77 Figure 4.45 – Message History ............................................................................................................................................... 79 Figure 4.46 – List of Posted Messages ................................................................................................................................... 79 Figure 4.47 – Closing Message History .................................................................................................................................. 79 Figure 5.1 – Attendance Notification Message ....................................................................................................................... 81 Figure 5.2 – Daily Attendance Message ................................................................................................................................. 81 Figure 5.3 – Attendance Taken for Today Message ............................................................................................................... 81 Figure 5.4 – Class Selection screen, Attendance Taken column ............................................................................................ 82 Figure 5.5 – Seating Chart Screen, Class Info ........................................................................................................................ 82 Figure 5.6 – Reason Types Legend ....................................................................................................................................... 82 Figure 5.7 – Taking PM Attendance ....................................................................................................................................... 83 Figure 5.8 –Marking Attendance by Seating Chart ................................................................................................................. 83 Figure 5.9 – Main Seating Chart Screen ................................................................................................................................. 83 Figure 5.10 – Seating Chart Screen, Class Info ...................................................................................................................... 84 Figure 5.11 – Reason Types Legend...................................................................................................................................... 84 Figure 5.12 – Taking Daily Attendance By List ....................................................................................................................... 84 Figure 5.13 – Taking Daily Attendance By List ....................................................................................................................... 85 Figure 5.14 – Switching Attendance Dates ............................................................................................................................. 85 Figure 5.15 – Saving Attendance ........................................................................................................................................... 86 Figure 5.16 – Seating Chart Screen, Class Info ...................................................................................................................... 86 Figure 5.17 – Taking Supplemental Attendance By List .......................................................................................................... 86 Figure 5.18 – Lunch Counts Not Taken .................................................................................................................................. 87 Figure 5.19 - Additional Views ................................................................................................................................................ 87 Figure 5.20 - Lunch Count ...................................................................................................................................................... 88 Figure 5.21 - Lunch Order ...................................................................................................................................................... 88 Figure 5.22 – Lunch Count Entry ............................................................................................................................................ 88 Figure 5.23 – Lunch Counts Taken ........................................................................................................................................ 88 Figure 6.1 – Seating Chart Screen, Class Info ........................................................................................................................ 90 Figure 6.2 – View Grades screen ........................................................................................................................................... 90 Figure 6.3 – Screen Grades, Preferences Tab ....................................................................................................................... 91 Figure 6.4 – Updated Screen of Main Screen ......................................................................................................................... 92 Figure 6.5 – View Grades screen, Grades Section ................................................................................................................. 92 Figure 6.6 – Grades Section, Student Name Column ............................................................................................................. 92 Figure 6.7 – Grades Section, Marks Columns ........................................................................................................................ 93 Figure 6.8 – Grades Section, Options Columns ...................................................................................................................... 93 Figure 6.9 – Grades Section, Comments Columns ................................................................................................................. 93 Figure 6.10 – Grades Section, Free-form Comments Column ................................................................................................ 93 Figure 6.11 – View Grades screen, Update Grades icon ........................................................................................................ 94 Figure 6.12 – Update Grades screen, Grades Section ........................................................................................................... 94 Figure 6.13 – Update Grades screen, Drop Down Menus....................................................................................................... 94 Figure 6.14 – Update Grades screen, Editable Box ................................................................................................................ 95 Figure 6.15 – Save Grades and Cancel .................................................................................................................................. 95 Figure 6.16 – Execute Report Icon ......................................................................................................................................... 96 Figure 6.17 – Execute Report, Select Output Type ................................................................................................................. 96 Figure 6.18 – Execute Report, Select a Report....................................................................................................................... 96 Figure 6.19 – Execute Report, Progress Screen..................................................................................................................... 96

TeacherVUE User Guide
128 Copyright© 2013 Edupoint Educational Systems, LLC
Figure 6.20 – Open, Save, or Cancel Report .......................................................................................................................... 97 Figure 6.21 – Screen Grades, Mark Verification By Teacher Report ....................................................................................... 97 Figure 6.22 – Return to Seating Chart icon ............................................................................................................................. 97 Figure 6.23 – Seating Chart Screen ........................................................................................................................................ 98 Figure 6.24 – Grade Book Screen .......................................................................................................................................... 98 Figure 7.1 - District and School Announcements screen ....................................................................................................... 102 Figure 7.2 - Student tab ........................................................................................................................................................ 106 Figure 7.3 - Add/Edit Chart screen ........................................................................................................................................ 106 Figure 7.4 - Select Chart screen ........................................................................................................................................... 107 Figure 7.5 - Freeform Edit Chart screen ................................................................................................................................ 107 Figure 7.6 - Select Chart list ................................................................................................................................................. 108 Figure 7.7 - Preferences screen ............................................................................................................................................ 108 Figure 7.8 - Attendance screen ............................................................................................................................................. 109 Figure 7.9 - Attendance screen ............................................................................................................................................. 110 Figure 7.10 - Lunch Count Entry screen ............................................................................................................................... 112 Figure 7.11 - Grade Book Main screen ................................................................................................................................. 113 Figure 7.12 - Grade Book Options ........................................................................................................................................ 114 Figure 7.13 - New Assignment screen .................................................................................................................................. 115 Figure 7.14 - Score screen ................................................................................................................................................... 117 Figure 7.15 - Grade Book Main screen ................................................................................................................................. 117 Figure 7.16 - Grade Book Main screen ................................................................................................................................. 118 Figure 7.17 - Student Score Details screen ........................................................................................................................... 118 Figure 7.18 - TeacherVUE Selection Menu ........................................................................................................................... 119 Figure 7.19 - TeacherVUE Student Info screen ..................................................................................................................... 119 Figure 7.20 - TeacherVUE Emergency Contacts .................................................................................................................. 120 Figure 7.21 - TeacherVUE Selection Menu ........................................................................................................................... 120 Figure 7.22 - TeacherVUE Notes screen .............................................................................................................................. 120 Figure 7.23 - Add Notes screen ............................................................................................................................................ 121 Figure 7.24 - Attendance screen ........................................................................................................................................... 122 Figure 7.25 - Discipline Incident alert icon ............................................................................................................................. 123