system setup - kerui store
TRANSCRIPT

KR-K7 User manual
23
System setup
11.1 Delay setting
Picture 11-1
Arm Delay
Gives the ability to use the arm key on the panel when leaving the guard area to delay the arming for
x seconds. You can set a delay of 0-255 seconds. In the delay arming status, the host beeps every
second till the delay is over and goes into arm status. The value zero means no delay on arming.
Alarm Delay
Gives the ability when entering the guard area to delay the alarm for x seconds. You can set a delay of
0-255 seconds. In the alarm delay status, the host beeps every second till the delay is over. The value
zero means no delay on alarm.

KR-K7 User manual
24
11.2 Auto Arm/Disarm
On the page of Auto Arm/Disarm, you can program the first 8 zones to automatically Arm/Disarm. The
setting supports “time”, “arm/disarm” and “day of week” choice.
Picture 11-2
Delete auto arm/disarm
To delete auto arm/disarm for a zone choose the zone that you want to delete. A dialog [edit/ delete]
will pop up. If you select [edit], you can edit the settings; if you choose [delete] it will delete the auto
arm/disarm.
Picture 11-3
To delete all groups auto arm/disarm click in the top right corner [delete all].
KR-K7 User manual
25
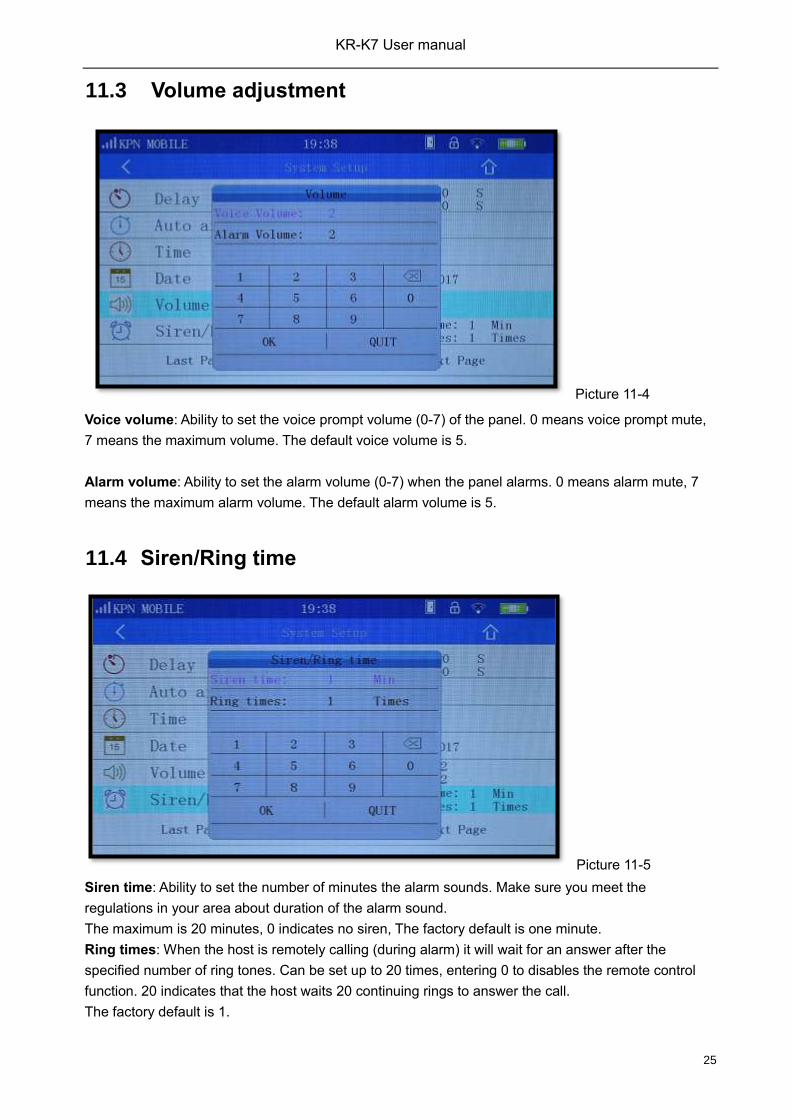
11.3 Volume adjustment
Picture 11-4
Voice volume: Ability to set the voice prompt volume (0-7) of the panel. 0 means voice prompt mute,
7 means the maximum volume. The default voice volume is 5.
Alarm volume: Ability to set the alarm volume (0-7) when the panel alarms. 0 means alarm mute, 7
means the maximum alarm volume. The default alarm volume is 5.
11.4 Siren/Ring time
Picture 11-5
Siren time: Ability to set the number of minutes the alarm sounds. Make sure you meet the
regulations in your area about duration of the alarm sound.
The maximum is 20 minutes, 0 indicates no siren, The factory default is one minute.
Ring times: When the host is remotely calling (during alarm) it will wait for an answer after the
specified number of ring tones. Can be set up to 20 times, entering 0 to disables the remote control
function. 20 indicates that the host waits 20 continuing rings to answer the call.
The factory default is 1.

KR-K7 User manual
26
11.5 Arm/Disarm SMS
Picture 11-6, in the disarming SMS notification page the user can select the desired SMS notification.
Make sure to set the alarm numbers when enabling this function.
Picture 11-6
11.6 Key Tone
Picture 11-7
When the key tone is on, pressing the host screen will trigger a "beep" a sound. The factory default is
On.

KR-K7 User manual
27
11.7 Screensaver
Picture 11-8
On the Screensaver settings page there are six options, "30 seconds", "1 minute", "2 minutes" "5
minutes", "10 Minutes", "never". The factory default is 30 seconds, indicating that without any
operation during 30 seconds, the host display will automatically turn off and be locked. Choosing
“never” means that the display never turns off or will be locked.
11.8 Language
On the ‘System setup’ page under ‘language’ (System > Language) you can choose two languages
(Chinese & English).
11.9 Security
Picture 11-9
As shown in Picture 11-9 users can set [User password], [administrator password] and [Keypad Lock]
User password: Is 4 digits to restrict the access of others. The factory default user password is 1234.
When Keypad lock is “on”, enter your user password can only for open / close / stay arming operation.

KR-K7 User manual
28
Administrator Password: Is 6 digits and used to enter the menu to program the host. This password
is also used for remote setting, telephone, SMS settings and query using the app. The factory default
administrator password is 123456.
Keypad Lock: Choosing Keypad lock ON, in the upper right corner a lock icon on the host displays.
The host automatically will be locked after 20 seconds of no use. When in locked state the screen can
only be operated for Arm / Home / SOS functions. To disarm and other operations the ‘Please enter
password’ screen appears (figure 11-10), and you must enter a password to unlock the keyboard.
Host keypad lock factory default is OFF.
Picture 11-10
Pin code: Used to enter the pin code of the installed SIM card.
11.10 SMS Reply
In the page of SMS Reply, you can choose “YES” or “NO”. When enabling SMS notifications or using
the App by Phone connection, choose “YES” so the host can send feedback SMS to sender. The
default status is on “YES”
Picture 11-11

KR-K7 User manual
29
11.11 Power Alarm
In the settings page of Power Alarm (Picture 11-12), there are 4 choices: Panel Power Off, Panel
Power On, Panel Low Battery, and Sensor Low Battery.
Picture 11-12
Panel Power OFF
When “Panel Power Off” is chosen, four choices pop up:
Voice: Panel will say that the power is Off
Siren: The siren will be activated
SMS: A SMS is send that the power is off
Call: The telephone numbers are called.
After setting the Panel Power Off function, the panel will warn you that the power is off, to avoid the
unnecessary loss of security functions.
Panel Power ON
The same as Panel power OFF, user can choose same choices according to their needs.
Panel Low battery
The same with above, user can choose same choices according to their needs.
Detector Low battery
The same with above, user can choose same choices according to their needs.

KR-K7 User manual
30
11.12 Ready to Arm
This function checks if all door sensors are closed when arming. A door icon will be shown in the top
menu of the host (red color when open, white when closed). When function switched ‘ON’ and a door
is open, the system cannot arm and a voice alert sounds “XX zone on”. You can’t arm the system untill
all door sensors are closed. If you set this function ‘OFF’, no matter a door is open or close, the
system can be armed.
Picture 11-13
11.13 Keypad arm/disarm
Enables the use of the keypad to arm or disarm. When off these functions can only be performed
using a remote controller or the app.
Picture 11-14

KR-K7 User manual
31
11.14 Contact ID
CID No. is the account which is shown on the network center.
Picture 11-15
11.15 Restore factory
Restores the K7 panel to the factory defaults using three options:
Delete Remotes: Delete all programmed remote controls.
Delete Sensors: Delete all programmed sensors.
Restore setting: Except the added remote controls, sensors, smart sockets, sirens and
language all other settings will be restored to factory setting.
Picture 11-16

KR-K7 User manual
32
11.16 Phone Call
As Picture 11-17. In the Call Menu page user can dial any number, like a normal phone.
Picture 11-17
11.17 Recording
When alarming, the recording message will sound first when a telephone number is dialed.
How to set the recording:
As Picture 11-18 shows,press button to record for a maximum of 10 seconds.
The voice alert should be clear and simple, for example: “this is ** home, intruder break into, please
help”. Message is saved automatically. You can press the recording button to overwrite the previous.
Picture 11-18
After the recording is over, press play button to hear if the recording is right or not.

KR-K7 User manual
33
11.18 Alarm Log
All alarms, arms and disarms are logged for audit use.
Picture 11-19
Arm / Disarm Log
As shown in Picture 11-20. In this page the last 99 arm/disarm recordings are shown, for each
recording it shows the date, time and the device (Host, remote control, sms, wifi, gprs) used for
arm/disarm/home.
Picture 11-20

KR-K7 User manual
34
Alarm Log
As shown in Picture 11-21. This page shows the 15 most recent alarm events by the alarmed zone,
date, time, etc.
Picture 11-21
11.19 About me
In the page ‘About Me’, the Version No, UI, IMei and MAC address are shown.
Picture 11-22

KR-K7 User manual
35
SMS Setting and Command Chart
In addition to change settings through host menu or the K7 app, SMS using a phone or other device
can be used to set panel settings using SMS codes. The syntax is as follows:
[System Password][Command No][parameter1][parameter 2][parameter 3][parameter 4][parameter 5]
All commands begins with system password, in below chart the system password is 123456. Make
sure you change the default system password, to prevent others from changing your alarm settings.
Also enable the SMS Reply function so you will receive a conformation reply SMS.
Setting name Command
No
Parameter
1
Parameter
2
Parameter
3
Parameter
4
Parameter
5
Example code
(Setting changed)
Disarm 0 1234560
(Disarm)
Arm 1 1234561
(Arm)
Stay Arm 2 1234562
Call the panel or
monitor
3 1234563
(Call back the panel)
Wireless Socket On 4 1234564
(Ganged Socket On)
Ganged Socket Off 5 1234565
(Ganged Socket Off)
Query Status 6 1234566
(Inquiry arm/disarm,
power., linkage socket)
Set Phone
No.
10 01~08
no.01~08 phone
number
13899998888 123
Alarm Tel
Alarm SMS
CID
123456100113899998888,
12
(Sets the first phone
number for call/SMS)
Delete
Phone No.
11 00 or 01~08
Do not delete all
phone numbers!
1234561005
(Deletes the No.5 phone
number)
Check
Phone No.
11 No1~8 1234561108
(Checks No.8 phone
number)
Set the Zone Type 12 no.01~99 zone 1- Siren when
arming
2-Do not Siren
when arming
1-Normal zone
2-Stay zone
3-Smart zone
4-Emergency zone
5-Close zone
6-Doorbell zone
7-Elder Zone
1-Medicial
2-Fire
3-Robbery
4-Silence
5-Burglar
6-Perimeter
7-Gas
12345612511141
(Sets 51 zone, Siren,
common, silent)

KR-K7 User manual
36
Check Zone Type 12 01-99 Zone 1234561255
(Check No.55 zone type)
Set the Remote
Control sound
13 no. 01~99 remote
control
1-Sound on
0-Sound off
12345613200
(No 20 remote control
without sound)
Check the Remote
Control
13 No.01~99 remote
control
1234561333
(Check Sound of No. 33
Remote Control ON/OFF)
Control Appliances 14 No.01-20 smart
socket
1-Close
0-Off
12345614011
(No. 1 smart socket
Closed)
Check Appliances 14 No.01-20 smart
socket
1234561405
(Check no.5 smart socket)
Appliances timing
setting
15 No. 01-40 Timing 01-20 Smart
Sockets
1 - Timing close
0 - Timing open
08:00
Time
1234567
Week
123456150103108001234
5
(Set no.1 group Timing, at
8:00 on Day 1 No. 3 Smart
Socket Timing Close)
Delete
Scheduling
Appliance Setting
15
00 or 01-40
(00 deletes all
timing settings)
1234561502
(Delete second Group
Appliance Timing)
Check Scheduling
Appliance Setting
16 01-40 Scheduling
Group
1234561601
(Check the first Group
Appliances Timing Set)
Delay
Setting
17 1-Delay Alarm
2-Delay Arm
0~255 12345617136
(Sets Delay Alarm Period
as 36s)
Check Delay
Setting
17 1-Delay Alarm
2-Delay Arm
123456172
(Check Delay Arm Period)
Scheduling
Arm/Disarm Setting
18
01-08
Scheduling
Group
1-Timing Arm
0-Time Disarm
08:00
Time
1234567
Week
12345618011080012345
(Set the first group at 8:00
on day 12345)
Delete Scheduling
Arm/ Disarm Setting
18 00 or 01-08
Scheduling
Group
(00 deletes all
timings)
1234561802
(Delete the second Group
Timing
Arm/Disarm)
Check Scheduling
Arm/ Disarm Setting
19 01-08 Scheduling
Group
1234561901
(Check the first Group
Timing Arm/Disarm Set)
Time &Date Setting 20 20160127 203000 123456202016012720300
0
(Set Time as 20:30:00 on

KR-K7 User manual
37
27 Jan. 2016)
Check System
Time and Date
20 12345620
(Check System Time&
Date)
Set Volume 21 1-Voice
2-Volume
3-Alarm
4-Volume
1~7
(Level)
1234562125
(Set Alarm Volume Level
as 5)
Check Volume 21 1-VoiceVolume
2-AlarmVolume
123456211
(Check Voice Volume)
Set Alarm Siren
Period
22 0-20Mins 1234562205
(Set Alarm Siren Period as
5 minutes)
Check Alarm Siren
Period
22 12345622
(Check Alarm Siren
Period)
Set Ringing Times 23 00-20 1234562308
(Set Ringing 8 times)
Check Ringing
Times
23 12345623
(Check Ringing Times)
Set Password
24 1-UserPassord
(4digits)
2-System
password
(6digits)
1234 or
123456
123456242345612345678
(Set User Password as
345678345678)
Check Password 24 1-User Password
2-Admin
Password
123456241
(Check User Password)
Set CID Number 25 1234
(4digits CID No)
123456251234
(Set CID Number to 1234)
Check CID Number 25 12345625
(Check CID Number)
Set Arm/ Disarm
Upload Center
26 123/0
1-Arm upload
2-Disarm upload
3-Stay upload
0-No Upload
1234562613
(Set Arm, STAY Upload,
Disarm Not Upload)
123456260
(No Upload)
Check Arm/ Disarm
Upload Set
26 12345626
(Check Arm/ Disarm
Upload Set)
Set Zone SMS
Message Content
27 01-99
(1-99 Zone)
ABCDEFG
(SMS
Contents less
Than 25
1234562705ABCDEFG
(Set Zone 5 Alarm
Message)
(Content as ABCDEFG)

KR-K7 User manual
38
characters)
Check Zone SMS
Message Content
27 1-99 Zone 1234562705
(Check Zone 5 Message
Content)
Arm/Disarm SMS 28 123/0
1-Arming form
2-Disarm inform
3-Stay inform
0-No inform
1234562812
(Set Arm, Disarm Inform
STAY not Inform)
123456280
(No Inform to Arm/Disarm)
Check Arm/Disarm
SMS Inform Set
28 12345628
(Check Arm/Disarm SMS
Message Inform Set)
SMS reply set on/off 31 0-No Reply
1-Reply
123456310
(Set SMS Inform when
Read, Not Disarm)
Mobile Network
setting
32 0—Off
1—On
Access point Server IP COM port Account No
(Six-digit)
123456321,CMNT,,,121.5
0.34.7,6501,000123
(When the mobile network
on,Access point is
CMNT,Server IP
121.50.34.7,COM
Port 6501,Account
000123)
Set Ready To Arm 33 0-Close
1-Open
123456331
(Open Ready To Arm)
Set Ganged Siren
Ganged Socket
34 1-Wireless Siren
2-Smart Socket
0-Ganged
1-Not Ganged
12345620
(Set Socket Not Ganged)
12345611
(Set Siren Ganged)

KR-K7 User manual
39
GPRS Management
A network alarm client management software is released by our company, which is low cost but
powerful and can be used by alarm centers, security service companies, police, military, financial
industry, museums and other environments.
13.1 Login Management Center
Management host is also called Management terminal, which is one important man-machine
communication platform. On this platform users can deal with alarm events, user management, event
operation, document management and so on.
Start the management terminal by double-click the icon of management terminal on desktop.
Input the code and password of operator, and IP address, click “Confirm”, the main menu of software
will appear after the data loaded.
13.2 Add new user
Click “Add new user” in “User management”, one “add new user” message pop up
Choose the type of device: KR-8218E, click it to show in the frame of device type. Choose the
partition number, input the account of device, click “Confirm”, one new user record will be built in user
data, and it will appear in the users window.
13.3 Alarm System Networking
Send one SMS to the alarm system, set the connecting point of network and IP address of data
service, port number and account. The SMS format is:
<password>+<32>+<0/1>+<,network access point,>+<IP Add>+<,port,>+<account>
For example: 123456321, CMNT,121.50.34.7,6501,000123
123456 default password
32 setup instruction
1, turn network
CMNT,,, network access point
121.50.34.7 IP Address
,6501, port
000123 the account.
Noted: 1. all “,” in the instruction must be input in English status.
2. The account for management terminal must be the same with the alarm system account.

KR-K7 User manual
40
APP K7
There is an app called K7 available for Android and iOS to remotely use
and configure the KR-K7 alarm panel. There are two ways to connect the
app, by phone (worldwide coverage) or by WIFI (Local). Within the app
you can switch between connection easily so you can use both at the
same time, so WIFI when at home and phone when away.
Connection using Phone: No need for a WIFI connection, but you need to have a 2G/3G sim card
installed in the KR-K7 panel, because the app sends actions towards the KR-K7 using SMS and the
panel receives and answers by sending SMS messages back to your phone. Besides SMS also the
phone connection can be used to contact the KR-K7 panel in order to ‘listen’ or see what is
happening. So make sure you have enough SMS credits on your sim for both phone and panel.
Connection using WIFI: You need he KR-K7 panel to be connected to the same WIFI network as
your phone. No additional costs
Scan the QR code to download the app or search"K7" in App Store.
After installation you need to register an account or connect your mobile phone during first use of the
app. For example: Android Version, there are two ways: Mobile Number and Email register
14.1 Phone Register
When register by phone select the ‘Switch to GSM’ option. Notice:
verification code will be sent to the phone in 60 seconds through
message. If not received, please re-access.

KR-K7 User manual
41
Host number: Enter the telephone number of your Sim card installed
in the KR-K7 panel.
User name: Set a user name
Password (confirm): Enter the password of your admin account on
the KR-K7 panel
Press the checkmark in the top right corner
14.2 Email Register
Email register is needed to make sure that your password can be
retrieved in the future.
Notice: There isn't need verification code in email register. Please
make sure use effective email address.

KR-K7 User manual
42
14.3 Binding equipment
Under App page, If the device shows under {on-line device page}, after clicked on the {unbound
device page}, it means successfully. Mobile phone can detect the other device automatically under the
LAN.
Online device: The device enters the network successes, and the
network well, the cell phone bind with network. When connected by
phone it will show as ‘remote online’, when connected by WIFI it will
show as ‘LAN online’.
Unbound device: The device enters the network successes, and the
cell phone connects with the network well, but the device didn’t bind
with the cell phone at before.
Off-line device: The device enters the network successes, and cell
phone had already bound with network, but the device didn’t enter the
network.
14.4 Password of Device
Clicked on any device under (On-line devices), input correct passwords (original password: 123456),
click OK, you will enter into the operation interface. You can operate the control panel in any place
which without network.

KR-K7 User manual
43
14.5 Operation Control Panel in WIFI mode
After you enter App operation interface, there are four selections in the top part:
In the top part of the interface you have:
Scheduled socket: Here you can set 4 groups socket with
regularly on and off function. You can select any group in 20
sockets
Alarm Phone: See and configure the phone numbers for alarm
notifications
Alarm Logs: See the history of latest 15 alarms
Area settings: There are 99 difference zones that you can modify
the name according to your requirements.
In the middle part of the interface you have:
Smart socket: Under home appliance page, each socket has a
touch switch; means" on & off". You can edit the name of socket,
when you click on the button of socket.
Remote monitoring: You can add high-definition network cameras
by start adding a video device. Click ‘Next’, enter the Wi-Fi
password to connect with phone. After a successful connection it
can be viewed through the phone.
In the lower part of the interface you have the three functions:
Disarm: To disable the Arm or Stay arm mode remotely
Arm: To enable the Arm mode remotely
Stay arm: To enable the Stay arm mode remotely
14.6 Device Property
In the top right part of the app you can select the device property function. Here you can setting the
property of control panel. It included" Device Name", "Device Password"," Voice" {Delete}
Device name: Here you can see and edit the device name of the KR-K7 panel.
Device Password: Here you can change the password. The original password is 123456.
Alarm voice activated switch: When on, the app arming with voice.
Delete: Clicked on the delete button, you can remove the binding state of the device (after removing
equipment).
14.7 System setting
In APP page, click【】to enter the [System Settings] page. In System Settings page, there are[Device
Manager], [Account Management], [help], [on], [switch to GSM equipment list] and [return] 6 functions:

KR-K7 User manual
44
Equipment Management: Click [Device Management] into the device management page or the drop-
down menu, you can choose to use different alarm host;
Account Management: Click to enter the [User Management] page, change the user password; click
on the page [cancel] key, you can log off, when APP open again, need to re-enter your user name and
password.
Help: Gives some answers on FAQ.
About: Shows the current K7 app version number.
Switching to GSM: Click it, turn to host GSM alarm settings Users page.
Click , the user can add GSM mode
Click to switch to WIFI mode.

KR-K7 User manual
45
14.8 Operation Control panel in GSM Mode
In GSM mode the control panel is a little different to that of the one
in Wi-Fi mode. This is because the function are not all equal due to
a different way of communication with the KR-K7 Panel using SMS
codes. Setting instruction sent in GSM mode by SMS, the alarm
host will receive a text message, the panel will "drop" a sound, and
automatically reply a SMS message to mobile phone when the
setting is successful.
To set the alarm number for example:
In the Common page, click ‘Alarm Phone No’ to enter alarm
number Settings page. This page can set 8 alarm numbers, by
clicking on the gear symbol. Enter receiver phone number, and
select Alarm Phone and/or Alarm SMS, or CID only. When
finished, click ‘Confirm”, to send the configuration(by SMS) to the
K7 panel SIM. The KR-K7 Panel will sound a “di” and respond
with a reply SMS message:
<Position No>:<Phone number>,<Alarm setting>
Pressing the lens glass will send an request to the KR-K7 to reply
with the current setting. The Panel will sound a “di” and respond
with a reply SMS message:
<Position No>:<Phone number>,<Alarm setting>
Pressing the trash can will delete the position. No SMS reply is
sent by the host panel.

KR-K7 User manual
46
When sliding from left t right a menu is opened that shows:
User name: The name of the logged in user
Host: The host name
Password: The Password
In the lower part of the menu shows:
Change Host: Ability to change to another host
Change User: Ability to change the user
About us: The manufacturer of the alarm panel
Switch to WiFi: Switches to the Wi-Fi connection.

KR-K7 User manual
47
Measures after Receiving Alarm
When there is an alarm the host will dial the preset phone number and text an SMS message
automatically and siren the alarm according to the setting. If the owner’s phone is busy or couldn’t be
connected the host will dial the next alarm phone number and it will dial all the preset phone numbers
3 times repeatedly. The recording will be displayed after the alarm phone call answered.
User can press the number keys on the phone to realize the corresponding control.
Key [1]:Arm Key [2]:Disarm
Key [3]:Turn On Monitor Key [4]:Turn Off Monitor
Key[5]:Turn On Speaker Key[6]:Turn Off Speaker
Key[7]:Alarm Siren Key[8]:Turn Off Siren
Key[9]:Turn on linkage Socket Key[0]:Turn Off linkage Socket
Key[*]:Exit and hang up.
Remark: If key “*” or “2” are not pressed the host will continue to dial next alarm receiving number.
Remote Control via Phone
User can user any telephone or mobile phone to dial host, and it will be connected automatically after
ringing, user hears “please input password” and then inputs the password (the password is the host
admin password). User will be prompted to re-enter if the password is wrong, and host will hang up
after 3rd wrong attempts. When entered correctly the user can hear “password is right” and needs to
press the number key below to activate the related control function:
Key [1]:Arm Key [2]:Disarm
Key [3]:Turn On Monitor Key [4]:Turn Off Monitor
Key[5]:Turn On Speaker Key[6]:Turn Off Speaker
Key[7]:Alarm Siren Key[8]:Turn Off Siren
Key[9]:Turn on Linkage Socket Key[0]:Turn Off Linkage Gang Socket
Key[*]:Exit and hang up.
After inputting administrator password, user press key # to enter phone to enter the remote control
function in which settings can be performed by using specific keys (press [01-20]+[0/1]to control the
ON/OFF of 01-20 groups smart sockets ( [0/1] 0 means OFF,1 means ON ).

KR-K7 User manual
48
System Parameters
17.1 System Factory Default Zone Type
Normal
Zone
Stay Zone Intelligent
Zone
Intelligent
Stay Zone
Doorbell
Zone
Welcome
Zone
Emergency
Zone
01-59
Zone
60-79
Zone
80-89
Zone
90 Zone 91 Zone 92 Zone 93-99 Zone
17.2 System Factory Default Value
Administrator Password 123456 Send SMS Message ON
User Password 1234 Ringing Times 1 time
Illegal Arm OFF Remote Control SNS Sound ON
Alarm Siren time 60 sec. Delay Alarm 0 Sec.
Delay arm 0 sec. 1-99 Zone Alarm Alarm Siren
Sleep time 30 sec. 1-99 Zone Message XX Zone Alarm
17.3 System Technical Parameters
Input Voltage: DC 5V
Standby Current: <50mA
Alarm Current: <450mA
Wireless Frequency: 433MHz
GSM Standard: Support GSM850/900/1800/1900MHz
Back-up Battery: DC3.7V/2000mAh High Capacity LI Battery
Alarm Loudness: 80dB
Accessories Parameters: This alarm can be compatible with EV1527 sensors. When using EV1527,
vibration resistance is supposed to be 150K-470K.

KR-K7 User manual
49
Installation and Usage of Sensors
18.1 Installation and Use of Door Sensor
Door sensor makes use of magnetic induction to detect close and open state, and consists of a
transmitter (A) and a magnet (B). It can be installed on doors, windows or any object that can be
closed and opened. When the transmitter is separated from the magnetic, the transmitter will send an
alarm signal to the alarm panel, and host begins alarm siren.
The magnet (B) should be installed on the movable part of the door or window. Firstly, clean the
corresponding position, and take out wireless door sensor, then put on the double faced adhesive in
the bottom. The installation should note the items below:
The transmitter (A) (transmitter) and part B (magnet) should be installed on the fixed part (frame) of
the door or window. Make sure that:
1. A and B should be in the same vertical line
2. The arrows on the side of both units are pointed to each other.
3. The distance between A and B should not be less that 2mm and not be greater than 1 cm.
After the installation, the indicator light flashes for 1 second as the door opens, meaning the door
sensor is installed successfully. If the indicator light does not lit for one second or is constant lit
suggests a lack of power. The installation can also be reinforced by screws by removing the bottom
cover, then screw the bottom and buckle the cover to the bottom.
Make sure not to break the black tamper switch lever.
18.2 Replacing the battery
When you receive low battery warnings (by SMS) the battery needs to be replaced.
First remove the sensor from the zone on the host, in order to prevent the tamper switch from
activating the alarm. Remove the cover gently from the sensor by placing a flat screw driver into the
hole on the short edge of the sensor. Lift the cover a little and pull it straight from its mount in order to
prevent the black tamper switch lever from breaking. Install the new battery and buckle the cover (the
arrows on the side of both units should pointed to each other) to the bottom in a straight way until it
clicks in place. Add the sensor to the zone on the host and check its operation.

KR-K7 User manual
50
18.3 Installation and Use of PIR Motion Sensor
Open the power switch before using. Installation height is about 2.2 meters above ground and it
should be installed in the corner of the room to get the best detection range and should form a certain
angle with the indoor walking line at the same time (90 degree angle with people walking direction is
best for detection)
Installation:
Take out mounting bracket; press the bracket to the slot in the sensor bottom. Find the base and
reinforce it with two screws in the wall. Press the PIR with bracket into the center hole of base. and
then adjust the best angle of detecting. (This method is suitable for project installation)
Attention:
1. Sensor should not face the outside of window directly.
2. Within coverage of detection, there should be no any big objects for obstruction.
3. There should be no two infrared sensors in the same space as they will possibly intervene with
each other.
4. Avoid facing window, cooling or warming machines, stoves, or other appliances that cause the
temperature changing sharply and thus cause false alarm.
5. Infrared sensor are indoor use and couldn’t be used outdoor.

KR-K7 User manual
51
Other sensors that can be used
Smoke sensor Wired siren PIR room sensor
PIR curtain sensor Wireless siren
Outdoor siren Emergency key
Sensor repeater Gas detector
Smart socket Water detector Emergency button
Camera Shock sensor Doorbel

KR-K7 User manual
52
Trouble Shooting
Troubleshooting Reasons Methods
1. No dial for alarm
1. No arming
2. Alarm phone unset
3. Parts improperly installed,
distance too far
4. Code no match
1. Perform arming operation
2. re-set according to the specification
3. coordinating the location of parts
4. re-coding
2. Host can’t read SIM
card or won’t dial
and text to preset
alarm phone
number
1. No SIM card
2. PIN code is set for SIM card
3. Bad GSM signal
4. SIM card has scratched
copper
5. Alarm phone number unset
6. Message Alarm number
unset
7. Card balance is insufficient
or out of date
8. Message function is OFF
1. Insert SIM card
2. Cancel PIN code
3. change to a strong signal place
4. change to a normal SIM card
5. set alarm phone number
6. set message alarm number
7. charge SIM card
8. activate the message function
3. Can’t remote
operate
1. Input wrong password 1. Correct password or change to a new
password or restore to factory default
4. No ISD recorded
voice prompt when
alerting
ISD Voice prompt un-recorded Record it again according to user manual
5. Remote Controller
not working
1. Coding unmatched with the
host
2. Insufficient power
3. Battery pieces poor contact
or corroded
4. Unmatched with host
1. re-coding
2. change battery of the same type
3. eliminating the dirt on the pieces
caused by corrosion
4. contact the local dealer to change the
matched remote controller
6. PIR sensor not
work
1. coding unmatched with the
host
2. insufficient power
3. battery pieces poor contact
or corroded
4. unmatched with host
1. re-coding
2. change battery of the same type
3. eliminating the dirt on the pieces
caused by corrosion
4. contact the local dealer to change
the matched remote controller
7. Siren no sound 1. internal siren is OFF Enable internal siren
8. Transmitter
distance for host is
shortened
1. a nearby emitter is sending
code
2. host receiver stop work
3. standby battery of the host
insufficient
1. find the interfering source and
eliminate it
2. post back to the factory for
amendment
3. check host power whether plug well
4. Host no Voice
prompt
1. Voice prompt function is
OFF
1. Enable voice prompt function

KR-K7 User manual
53
Sensor Zone list
Zone Sensors Siren Attribute Event code
01 1.
2.
3.
4.
5.
On/Off
On/Off
On/Off
On/Off
On/Off
02 1.
2.
3.
4.
5.
On/Off
On/Off
On/Off
On/Off
On/Off
03 1.
2.
3.
4.
5.
On/Off
On/Off
On/Off
On/Off
On/Off
04 1.
2.
3.
4.
5.
On/Off
On/Off
On/Off
On/Off
On/Off
05 1.
2.
3.
4.
5.
On/Off
On/Off
On/Off
On/Off
On/Off
06 1.
2.
3.
4.
5.
On/Off
On/Off
On/Off
On/Off
On/Off
07 1.
2.
3.
4.
5.
On/Off
On/Off
On/Off
On/Off
On/Off
08 1.
2.
3.
4.
5.
On/Off
On/Off
On/Off
On/Off
On/Off
Zone Sensors Siren Attribute Event code

KR-K7 User manual
54
09 1.
2.
3.
4.
5.
On/Off
On/Off
On/Off
On/Off
On/Off
10 1.
2.
3.
4.
5.
On/Off
On/Off
On/Off
On/Off
On/Off
11 1.
2.
3.
4.
5.
On/Off
On/Off
On/Off
On/Off
On/Off
12 1.
2.
3.
4.
5.
On/Off
On/Off
On/Off
On/Off
On/Off
13 1.
2.
3.
4.
5.
On/Off
On/Off
On/Off
On/Off
On/Off
14 1.
2.
3.
4.
5.
On/Off
On/Off
On/Off
On/Off
On/Off
15 1.
2.
3.
4.
5.
On/Off
On/Off
On/Off
On/Off
On/Off
16 1.
2.
3.
4.
5.
On/Off
On/Off
On/Off
On/Off
On/Off

KR-K7 User manual
55
Zone Sensors Siren Attribute Event code
17 1.
2.
3.
4.
5.
On/Off
On/Off
On/Off
On/Off
On/Off
18 1.
2.
3.
4.
5.
On/Off
On/Off
On/Off
On/Off
On/Off
19 1.
2.
3.
4.
5.
On/Off
On/Off
On/Off
On/Off
On/Off
20 1.
2.
3.
4.
5.
On/Off
On/Off
On/Off
On/Off
On/Off
21 1.
2.
3.
4.
5.
On/Off
On/Off
On/Off
On/Off
On/Off
22 1.
2.
3.
4.
5.
On/Off
On/Off
On/Off
On/Off
On/Off
23 1.
2.
3.
4.
5.
On/Off
On/Off
On/Off
On/Off
On/Off
24 1.
2.
3.
4.
5.
On/Off
On/Off
On/Off
On/Off
On/Off