table of contents - body for golf
TRANSCRIPT


@BodyforGolf.com. All rights reserved. 2
Table of Contents
Golf Lesson #1: Ground Forces ......................................................................... 4
Golf Lesson #2: Basic Rules in Putting .......................................................... 6
Golf Lesson #3: Keys to Putting ........................................................................ 8
Golf Lesson #4: Impact Position Practice .................................................. 10
Golf Lesson #5: How to Draw and Fade the Ball .................................... 12
Golf Lesson #6: Best Head Position ............................................................. 14
Golf Lesson #7: Low Flying Punch Down Shot ....................................... 16
Golf Lesson #8: Reassing Your Grip ............................................................. 18
Golf Lesson #9: Grip Pressure ........................................................................ 19
Golf Lesson #10: Master Move ....................................................................... 20
Golf Lesson #11: Perfect Golf Grip ............................................................... 21
Golf Lesson #12: Shallowing the Club ....................................................... 24
Golf Lesson #13: Rotating Hips in the Downswing .............................. 25
Golf Lesson #14: Principles of Chipping .................................................... 28
Golf Lesson #15: 3 Moves to Stop Your Slice ........................................... 30
Golf Lesson #16: Golf Swing Made Simple ................................................ 33
Golf Lesson #17: Ground String and Gate Drill....................................... 35
Golf Lesson #18: Short Spinny Pitch ........................................................... 36
Golf Lesson #19: Hit Your Drive Consistently ......................................... 37
Golf Lesson #20: Returning Clubface to Target...................................... 40
Golf Lesson #21: Golf Mobility Moves ........................................................ 41
Golf Lesson #22: Best Chipping and Pitching Practice........................ 43
Golf Lesson #23: Striking Your Irons Pure ............................................... 44
Golf Lesson #24: Hit the Ball then the Turf with Your Irons ............ 47
Golf Lesson #25: How to Shape Your Iron Shots ................................... 51
Golf Lesson #26: Driver Basics with Rory ................................................ 53
Golf Lesson #27: At Home Workout with Tony Finau ........................ 54
Golf Lesson #28: Bunker Shots ...................................................................... 61
Golf Lesson #29: Easiest Putting Tip Ever ................................................ 62

@BodyforGolf.com. All rights reserved. 3
Golf Lesson #30: Optimal Putting Stroke .................................................. 65
Golf Lesson #31: Good Posture ...................................................................... 66
Golf Lesson #32: Lead Wrist Position ......................................................... 67
Golf Lesson #33: Perfect Golf Swing Takeaway ..................................... 68
Golf Lesson #34: The Golf Swing in Detail ................................................ 71
Golf Lesson #35: Swing Like a Dance Routine ........................................ 72
Golf Lesson #36: Iron Swing vs. Driver Swing ........................................ 74
Golf Lesson #37: How to Create Hip Depth .............................................. 78
Golf Lesson #38: Short Game Tips ............................................................... 83
Golf Lesson #39: Daily Movement Prep ..................................................... 87
Golf Lesson #40: How to Strike Your Irons Pure ................................... 93
Golf Lesson #41: Your Hands are the Secret to a Better Swing ...... 96
Golf Lesson #42: How to Fix Your Slice with a Driver ......................... 98

@BodyforGolf.com. All rights reserved. 4
Ground Forces
We’ve all probably heard of sequencing properly by starting from
the ground up or using the ground or ground forces - what does
this mean and why is it important in the golf swing?
When we early extend, that is to say straighten up our legs and
upper body too soon on the downswing, we lose a lot of our
power and the ability to push off the ground. This simple drill that
I work on with my coach is a great way to feel that proper squat
and pressuring the ground with our feet and legs that can help in
so many ways. This can be done indoors and when hitting full
shots on the range.
How do we use the feet? How do we initiate the legs from the top
of the backswing and why this is so important?
So, this is what I mean about using ground forces. Obviously that's
a very modern term, but all the greats from the past, from the
history of the game used and did it very well in their swing.
So, what do I mean about this? We talked about getting that
good set up, tilting of the hips, that allows us to hinge the club up
and support.
It also allows this right leg to straighten, this hip, go up, and from
there we have that position to be able to squat. That allows that
easier-ness of shallowing the club, it allows us to continue to tilt
our bodies towards the ball. I see our hips are nice and square.
Our back is almost facing the target a little bit longer. These are
all great positions and things to think about when we're coming
down.
From there, that's a much more powerful position to be able to
explode off the ground, push off the ground, explode, and create
Golf Lesson #1

@BodyforGolf.com. All rights reserved. 5
a lot more speed. So, a good little drill that I work on with my coach
a lot and to feel what the feet should be feeling is, I grab a couple of
towels, a couple of small towels.
I'm going to put one on my right heel of my right leg, and one on my
left ball of my foot with my left leg, and from there, again, we're
going to take it up to the top.
Think about all those good positions and then even before I got to
the top and start feeling like I'm squatting and squishing these
towels. One with my right heel, one with my left ball of my foot.
Again, notice how my chest is continuing to stay down. I'm not
overextending, not losing that pressure off the ground. I'm not losing
the speed.
That position from there is a great powerful position to be able to
explode off the ground, create a little bit more speed, a little bit
more power, and hopefully help with that ball strike and so try that one out then.
Credit: Luke Donald, PGA Tour Professional Link: https://www.instagram.com/tv/B-pTCdiJbJI

@BodyforGolf.com. All rights reserved. 6
Basic Rules in Chipping
As many of you know, recently I started social media and I want to
use it as a way to help your game, too. I don't like to talk too much
about the full swing because there's a million ways to swing a golf
club.
There's a million ways to putt, but over the course of time, I'll give
some thoughts on those. But when it comes to chipping, there's only
one way to chip.
In fact, there are three things that you have to do, and if you can do
these three things effectively, you'll be able to hit solid chips. And
then all of the other subtleties and nuances that I'll get into later will
come into play.
But the first thing that you have to do when you chip is have your
weight on your front foot. In fact, when you're set up to a shot, if you
can't pick up your rear foot, most likely you're setting up incorrectly.
So the first thing we do is have our weight on our front foot. That
allows us to keep the leading edge down. All three of these things
that I will talk to you about will be designed to keep the leading
edge down. I'll have more for you later.
I talked to you recently about the first thing you need to do in
chipping, which is have your weight on your front foot. The second
thing and where most people go wrong is you have to decide if
you're going low or high with the shot.
If you're going low, the ball will be placed off of your back foot and if
you're going high, the ball will be placed off your front foot.
Now these shots can vary the ball position relative to your front foot
or back foot. It might be way in front for the lob shot. It might be on the toe for moderate shot. On the
low shot, it could be off your toe, or if you're going really low, it could be behind your foot, but it will
never be in between your feet.
Golf Lesson #2

@BodyforGolf.com. All rights reserved. 7
If it's in between your feet and you haven't made a decision what shot you're hitting and you're not able
to put your weight forward because you'll go over the top.
So when the balls in the middle of your feet, your weight then levels out and you end up trying to scoop
it up in the air. We already talked about how you have to have your weight on your front foot. So the
second thing is make a decision if you're going low or high.
Credit: Phil Mickelson, PGA Tour Professional Link: https://www.instagram.com/p/BrlXtSUBv3G/
@BodyforGolf.com. All rights reserved. 8
Keys to Putting
Let's move on to putting and talk about some key fundamentals for putting. Now there are a million
ways to putt. We see a lot of different guys putt a lot of different ways and that's great.
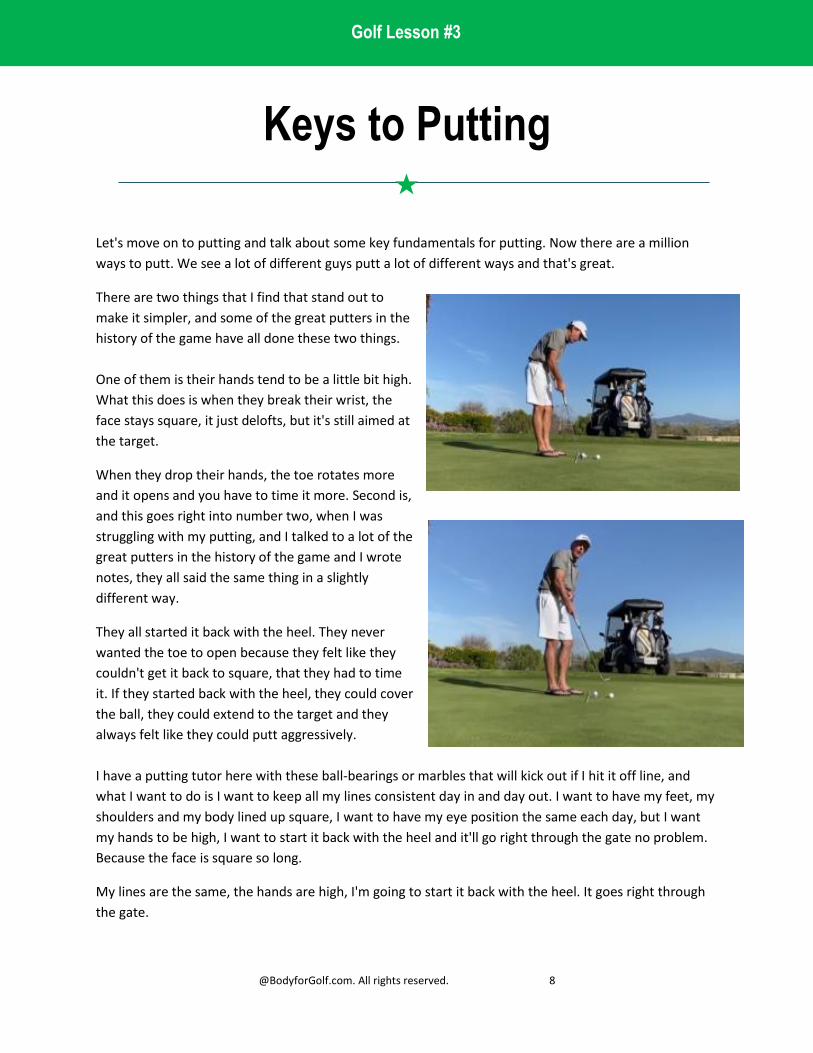
There are two things that I find that stand out to
make it simpler, and some of the great putters in the
history of the game have all done these two things.
One of them is their hands tend to be a little bit high.
What this does is when they break their wrist, the
face stays square, it just delofts, but it's still aimed at
the target.
When they drop their hands, the toe rotates more
and it opens and you have to time it more. Second is,
and this goes right into number two, when I was
struggling with my putting, and I talked to a lot of the
great putters in the history of the game and I wrote
notes, they all said the same thing in a slightly
different way.
They all started it back with the heel. They never
wanted the toe to open because they felt like they
couldn't get it back to square, that they had to time
it. If they started back with the heel, they could cover
the ball, they could extend to the target and they
always felt like they could putt aggressively.
I have a putting tutor here with these ball-bearings or marbles that will kick out if I hit it off line, and
what I want to do is I want to keep all my lines consistent day in and day out. I want to have my feet, my
shoulders and my body lined up square, I want to have my eye position the same each day, but I want
my hands to be high, I want to start it back with the heel and it'll go right through the gate no problem.
Because the face is square so long.
My lines are the same, the hands are high, I'm going to start it back with the heel. It goes right through
the gate.
Golf Lesson #3

@BodyforGolf.com. All rights reserved. 9
Now, as soon as the toe starts opening and I start hitting these ball-bearings, the natural tendency of
any players is just to start adjusting their alignment.
Adjusting their shoulder line and their ball position, changing their lines, changing their fundamentals
and their consistency day in day out. What we want to do is keep everything consistent and just have
our hands high, start it back with the heel, and it should be no problem getting the ball through the
gate. Give that a try.
We'll talk about a lot of different things in putting because there's a million things that we can discuss.
Different ways to putt, reading greens, technique, all that. But this is a good place to start.
Credit: Phil Mickelson, PGA Tour Professional Link: https://www.instagram.com/p/B8-CM3Wj38f/

@BodyforGolf.com. All rights reserved. 10
Impact Position Practice
Let's see if we can work at your ball striking whilst at home. So if you're in the garden or even in the
house, here's a drill that you can work on.
So first of all, let's understand what impact feels like. So take your
setup, and them from there, without doing a back swing, go into an
ideal impact.
Get more pressure into this lead leg. Get more hip rotation, more
chest rotation, opening out towards the target. From there, get the
shaft and lean the shaft further forward.
Again, we're decreasing the loft on the club face. This is where we
need to be. And just keep rehearsing that. Keep rehearsing what it
feels like to be in a nice, powerful impact.
Often we'll find golfers are coming in sort of like this. That's not what
we want to do when we're striking the golf ball. So get into that impact
position.
And then from there, let's put a little bit of pressure and speed and
let's get the body working a little bit. So what I've got is a softball here.
You can do this with a softball against the sofa, or you can do it against
the fence, or if you're lucky enough to have a net.
Judging by the comments, not many, a lot of you are trying to get nets,
but you can't get them. But what we're to need to do from here is,
again, go into that impact.
So push into the left leg, open out the body, lean the shaft forward.
And then from there we want you to push into the ground. So pushing
into the ground with the club and also pushing into my left foot.
And then from there all I'm going to do is turn through. I'm working my
body through, I'm rotating my body hard. But notice the club. It's only
going here right in front of me.
It's not going all the way up into the finish. That's where it causes
problems at home.
Golf Lesson #4

@BodyforGolf.com. All rights reserved. 11
But what we're saying is, let's get you into this impact where you're opening out, leaning the shaft
forward, getting into the left leg. But then from there you are swinging through and really getting the
feeling of working your core, working the ground, working your chest and getting everything moving
through to the targets.
It's not ideal, but it's definitely something. Imagine if you did that 10 minutes a day, or even five minutes
a day, or even 10 reps a day, and you did that for the next couple of weeks. Do you think you'd be in a
better place? I think you will be.
Credit: Me and My Golf Link: https://www.instagram.com/p/B-kWnxZBf7h/

@BodyforGolf.com. All rights reserved. 12
How to Draw and Fade the Ball
Hello, I'm Bernhard Langer and now I'm going to explain to you how I play a draw and a fade. How to
curve the ball both ways. This would be my aim. That's my path. This is my stance. So I'm pretty much
hitting down towards that house.
And normally I would set up with a square clubface as
you can tell in a square stance. Now if I want to draw
the ball, means I want to start it to the right and curve
it to the left.
So I would aim my body not down the line. I would
aim my body more across the line like that. Now you
can tell my feet and my shoulders aiming to the right.
But I close my clubface compared to where I'm
aiming. My clubfaces more on line with the initial
straight shot. So it looks a bit like this.
So I'm aiming out to the right. I'm swinging where I'm
aiming to the right. But a closed clubface will put
side spin on the ball and curve it back to the left.
That way I don't have to change my swing. I can
make the same swing on a straight shot as I do
on the draw or the hook.
All right, let's see if it works. Here we go.
Beautiful. Nice little draw. That's the easiest way
to play a draw in my book.
To play a fade, I just aim my body a little bit more to the left and open the clubface because I want the
ball to start left of the target and curve towards the target. You can see these two clubs on the ground
would be for a straight shot.
Normally I would have my clubface square and I would aim parallel to these clubs on the ground. So for
a fade I would position my body more to the left, more this way as you can tell.
So now I'm aiming left and I open the clubface. I don't keep it square. I open it so I put some side spin on
it. And now I just make my normal swing. That way I don't have to change my swing at all.
Golf Lesson #5

@BodyforGolf.com. All rights reserved. 13
And through the open clubface, the ball should have some side spin and curve to the right. And we got a
gentle fade. That to me is the easiest way to play a fade. And next time I will show you how to hit it high
and low.
Credit: Bernhard Langer, PGA Tour Professional Link: https://www.youtube.com/watch?v=A3sgWFivn7I
@BodyforGolf.com. All rights reserved. 14
Head Position
The single most important element in swinging a golf club is a steady head. Without a steady head, all
the other fundamentals go out the window.
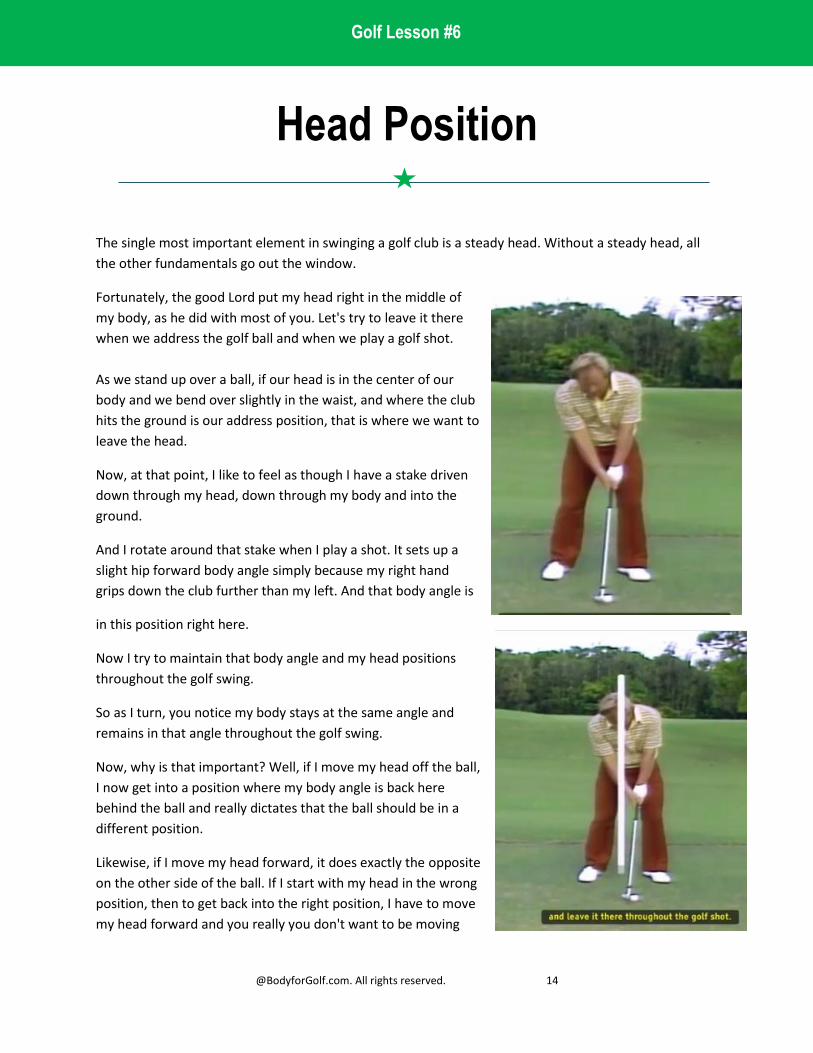
Fortunately, the good Lord put my head right in the middle of
my body, as he did with most of you. Let's try to leave it there
when we address the golf ball and when we play a golf shot.
As we stand up over a ball, if our head is in the center of our
body and we bend over slightly in the waist, and where the club
hits the ground is our address position, that is where we want to
leave the head.
Now, at that point, I like to feel as though I have a stake driven
down through my head, down through my body and into the
ground.
And I rotate around that stake when I play a shot. It sets up a
slight hip forward body angle simply because my right hand
grips down the club further than my left. And that body angle is
in this position right here.
Now I try to maintain that body angle and my head positions
throughout the golf swing.
So as I turn, you notice my body stays at the same angle and
remains in that angle throughout the golf swing.
Now, why is that important? Well, if I move my head off the ball,
I now get into a position where my body angle is back here
behind the ball and really dictates that the ball should be in a
different position.
Likewise, if I move my head forward, it does exactly the opposite
on the other side of the ball. If I start with my head in the wrong
position, then to get back into the right position, I have to move
my head forward and you really you don't want to be moving
Golf Lesson #6

@BodyforGolf.com. All rights reserved. 15
your head because you have just too many variables. So let's try to keep our head right in one spot and
leave it there throughout the golf shot.
Credit: Jack Nicklaus Link: https://www.instagram.com/p/B-iOM5kjnBW

@BodyforGolf.com. All rights reserved. 16
Low Flying Knock Down Shot
How do we play that low flying, knockdown shot and control, the trajectory? Well, there's a couple of
things that we need to do.
First thing, the important thing is, how do we get that low
flying shot? We need to produce a low dynamic loft. We
need to lean the shaft forward through the hitting area.
Now the way we do this is really important. Now what a lot
of people do, they'll move the ball back in the stance and
they will focus on hitting down.
The problem is with this it creates too much steepness and
inconsistent strikes. So what I want you to do is the ball
position being back is actually what's going to help you hit
more down. That's fine.
But how we lean the shaft forward is really important. You
can see the arrow I've got here.
What I want you to focus on next time you play one of
these low knockdown shots is fallback, but through the
swing you're really going to feel that this left shoulder is
going to work up and back.
So it's going to work up and back and disappear behind my
head.
What this will help do, it's going to help you lean the shaft
forward through the golf ball, and that's what's going to
produce that low flying shot.
Instead of us trying to actually hit down, this left shoulder
then drives too much down. So the way that we then
change the height or vary that trajectory is just by how we
finish. If we have a low finish, where the hands finished
pretty low like this, then that's going to produce that lower
flight trajectory. We then have a slightly more medium
finish, and then we can have a slightly longer finish. So think
Golf Lesson #7

@BodyforGolf.com. All rights reserved. 17
about that in order to control the trajectory, to hit it low, get the ball back, lean the shaft forward, get
the left shoulder working this way, and then finish to change the trajectory.
Credit: Me and My Golf Link: https://www.instagram.com/p/B-SgKRnh8Np/

@BodyforGolf.com. All rights reserved. 18
Reassing Your Grip
A good grip allows everything in the swing to happen
naturally.
The most common fault of a golfer with a bad grip is his
inability to be able to get a complete release and a full
extension at the golf ball at the time of impact.
Well, he thinks that he needs more strength within his grip
and he tries to take his left hand and turn it left, what we
call a motorcycle grip, and he tries to take his right hand
underneath the grip.
He feels very strong at this position, but in fact it's a weak
position because one of two things are going to happen.
One is that to keep the club face straight, he cannot release
the club cause he has to keep his hands forward and never
really applies his power or two, if he does release his hands
and the hands want to return to a normal position, the club
face becomes closed resulting in the duck hook.
Credit: Jack Nicklaus Link: https://www.instagram.com/p/B-PdsMejsEd/
Golf Lesson #8

@BodyforGolf.com. All rights reserved. 19
Grip Pressure
Brad Faxon
What is the correct amount of grip pressure when
putting?
In this video I break down the right amount of grip
pressure when putting.
I also address arm pressure. You want softer grip
pressure, softer arm pressure so you can feel the
weight of the putter head when you swing.
I get asked about grip pressure all the time about
putting. What's the right amount of grip pressure?
I'd like to take it a little bit step farther than just grip
pressure.
Yesterday, with Jack Nicklaus, he talked about how
he felt like he had a two or three out of a scale of 10
for his grip pressure. I've always said three or four,
so that's light grip pressure. so you're holding onto it
hard enough that the putter's not going to twist out
of your hand, but it's soft. Okay? It's not a 10.
Now, there's also something called arm pressure. Do you feel your arm's tight sometimes? If somebody
pulled the putter head away from you, would your arms move like this or will your veins be popping
out? I want you to feel like you have this three and four in your arms so your arms and the elbows can
bend and watch. The putter just falls. See, like this but if I have tight arms, I'll hold the putter up here in
the air.
When I soften my arms, that putter falls. Almost every great putter I've talked to likes to have softer grip
pressure, softer arm pressure so they can feel the weight of the putter head when it swings. You want
this thing to swing.
Credit: Brad Faxon, PGA Tour Professional Link: https://www.instagram.com/p/B9DHTxqHtCN/
Golf Lesson #9

@BodyforGolf.com. All rights reserved. 20
The Master Move
What's the master move in golf, Moe?
My vertical drop and the horizontal tug.
Right here. First foot comes straight down. The
club is going further behind my back on my
downswing.
My left arm's way higher than my right, way
higher. You could always put the club in this
way. Never the other way. It would fall there.
My club would always fall. Never in front of me,
always back behind me.
Here's a master move, a feeling of greatness. I'm
the only golfer in the world who's got the feeling
of greatness. The only one living. Feeling of
greatness right here.
I don't believe in hip turn, shoulder turn, not hip.
My hips hardly turn at all, but my shoulders turn.
That's another reason why I hit it so straight.
That's why I hit it so solid every time, there's no
hip movement. My hips can never pull me off
the ball like most people do.
The swing's only three feet long from here to
here. That's your business area in this game of
golf. It's how you arrive here to here. Make sure you arrive there the way you're supposed to. From
three feet behind the ball to three feet in front of it. My club stays on the level of the ball.
Credit: Moe Norman Link: https://www.youtube.com/watch?v=r5LEelOEbQg
Golf Lesson #10

@BodyforGolf.com. All rights reserved. 21
Perfect Golf Grip
The perfect grip for golf is
something that allows you
to produce a consistent
impact that allows you to
strike the golf ball
consistently and get the
desired ball flight that you
want.
There's certain things that
we don't like to see, and
there's certain things that
we like to see that could
certainly help produce a
better impact. So, if you do have a poor grip or it's influencing your ball flight, there's certain things
we're going to go through today that's going to make it easier.
There's three main issues that we see. And just a quick note on the best players in the world. You could
line up all hundred top players in the world at the moment, and they all have slightly different grips. So,
it's all about matching your grip to the shot that you want to get for consistency.
First one we see is when the club gets very high in the lead hand. The shaft is quite vertical there, and
we can see, when I open out the hand there, that the club is running very much up the palm, out the
top, by the thumb and is sort of missing out at the fingers. Now, this is great for putting, if you want to
do that sort of action there, but as soon as getting that club around the body, it's not going to be very
dynamic. So, that's the first one that we don't want to see.
Next one is the deep interlock. There's obviously different ways you can hold a golf club, but when we
see a deep interlock, we see hands that are really sort of jammed in there. Again, there's no freedom in
the grip at all there. You can see by the time I get the hands down there, they're all out of position
there.
And it gets it very much in the palms when you do that. This deep interlock is when people sort of get
their little finger and the index thing here and they jam it right in there. It's almost too much in there as
Golf Lesson #11

@BodyforGolf.com. All rights reserved. 22
opposed to a slight interlock. So, it puts it out of position.
And then, the last one is... this is someone when we've got someone who's slicing the golf ball or a high,
weak ball flight, is when they get their trail hand and they get it too much around toward the target. You
can see my trail hand there is wrapping over on top of the golf club there. Now, what happens from
here is it adds loft to the club face. So, we have to do everything that we can to square the loft up. If we
don't quite square the loft up, it can cause a slice. But as I say, if you do square the loft up, it goes very
high and weak, generally.
So, if you can avoid those three things, and we're going to show you how to avoid those three things in a
moment, then you are going to build a better grip and you're going to be more consistent when you're
striking the golf ball. Okay, so let's start with the high handle. How are we going to fix that?
Ben Hogan's very famous book, Modern Fundamentals, he talks about holding the golf club up in the air
like so, with the right hand and then placing the lead hand on the golf club. By doing this, I think it's a
really good way of doing it, making sure your leading edge is in a good position there. Fidgeting around a
little bit maybe, but getting it so that the club is running in the fingers like so, and then you can just
literally close the hand on the golf club like so.
What I love about this here is I love how the heel of the hand, the heel pad, actually sits on top of the
golf club, but I don't know Hogan does this here. He lets go with all three fingers here, holds on with the
index finger and it's just supported by the heel pad, which is a great sort of test when you've got this.
Yeah, if you were doing the other grip, you have no support of this whatsoever. So, again, when you get
down to the golf ball then, you can see that the shaft angle is dropped down a little bit. It's not up in the
air like you're hitting a putt. It's down on the ground like so. So, from here, it's just so much easier to get
that mobility that you need in those wrists.
Let's correct the deep interlock method. Deep interlock.
We saw this one from a very famous golf coach, who we love, Martin Hall, where you need to get your
palms facing each other. So, you just need to work really hard, bringing in the palms and sort of clap,
clap, and sort of shuffle them around like so. Then now, the same feeling is that when you're on the golf
club. Your palms are facing each other and then from there, literally, you close your fingers on the golf
club, and then you can go into your interlock. It's a way of really making sure that the palms are sort of
facing each other, but also running in the grip correctly.
Now, one thing I will say about the interlock, ask yourself the question whether you need to do it. It is a
good grip for a lot of people, but often when people go for the interlock, it's when the problems happen.
I've definitely got people going from interlock to baseball because when they went for interlock, they
were very deep. So, you could even go baseball as well.

@BodyforGolf.com. All rights reserved. 23
Last one. The right hand, the weak right hand, as we call it, because it weakens the loft on the club face.
We just mentioned there about bringing the palms in, facing each other. Now, the problem we often
see, when we get someone who's got this weak grip, right hand on top, we ask them to back it around
here. By the time they're ready to pull the trigger and take the club back, they're back on top again.
So, what we're going to do with this one is, we're going take the set-up... good left hand obviously there,
Andy, got the Hogan grip there. Now, we're going to get the palm and actually face it out. Not from
coming in facing the other palm. We're going to face it out in front of you, and then bring the hand in
underneath, and then close it on the golf club. Now, you'll see when I'm holding the golf club here, this
might be what we call a little bit strong or close, but I guarantee you, if you're someone who wraps on
too much from this position here, by the time you get into the shot, it will have moved around and
settled, hopefully, exactly where you want it.
What we'll always note is we often talk about the V's. The V on the right hand, going up towards sort of
the trail shoulder and ear. Somewhere between there is a good one. A bad one is when we get that right
hand too much over. And you can see the V now is pointing past Piers' left ear. Again, producing that
sort of high, weak club face position, which just loses power as well.
Things to avoid, really important. The high handle through the palm, making sure we don't get the deep
interlock, and avoiding the weak right hand. If you avoid those three things, and start, as a guide, for the
things that we've just done there. As we said, there is no perfect grip, one perfect grip, but if you can
start with some of these simple things and then, really, have a play around and see what works for you
to get the ball flight.
Credit: Me and My Golf Link: https://www.youtube.com/watch?v=xmb1KetN3io

@BodyforGolf.com. All rights reserved. 24
Shallowing the Club
Shallowing the club from the top of the backswing is something I’ve struggled with at times in my career, it’s certainly been a big focus of mine of late and thanks to the help of my trainer, we’ve come up with some great exercises in the gym to help me increase my external rotation range of my right shoulder. Shallowing the club from the top will not only help to eliminate that dreaded slice, it will also allow you to fully release everything at impact which will increase your speed and distance. Give this simple at home exercise a try. Probably the most common fault I see in amateurs. I will see, most of the time it happens from people really throwing their hands towards the ball from the top. This shaft steepens and then causes that big to right shot. Here's a very simple drill that you can do at home with a towel against the window. Get into a golf posture, put this arm against the wall firmly. Take your back swing and then feel like you initiate your down swing. But while you're doing that, you're rotating this elbow down this way and sternly rotating the shoulder and rotating this hand clockwise at the same time. Make sure your down swing feels like that shoulder's externally rotating. Do that a few times. Grab your club. I'm trying to replicate that as well. So you want to feel like that shadowing elbow gets in front. You're externally rotating that club and the club is shadowing. And that really will help eliminate that horrible over the top left to right slice. Hope that works.
Credit: Luke Donald, PGA Tour Professional Link: https://www.instagram.com/tv/B-CseUqpc7W/
Golf Lesson #33

@BodyforGolf.com. All rights reserved. 25
Secret to Rotating Your Hips in
the Downswing
In today's video, we're going to talk about the secret to rotating your hips in the downswing.
There's a couple of key concepts I want to talk about in this video that I think come largely from a
misunderstanding that I'm seeing from a lot of people who come in for lessons and for online lessons
about, "Hey, how are my hips supposed to work during the downswing?"
When we look at how the lower body or the hips rotate during the downswing, there's two key parts to
your downswing movement, to me, for any player. Number one is, how much should I shift pressure or
weight to my lead side during the downswing? How much should I do it? When should I do it? How
should I do it? That's part one.
And then part two is the rotation part, right? So how much should I rotate? When should I do it? How
should I do it? And the key to getting your down swing pivot right, or the rotation right, is marrying
Golf Lesson #13

@BodyforGolf.com. All rights reserved. 26
those two pieces together. What I see that happens a lot. Okay, marrying those two pieces together
means my pressure shifting forward as I'm turning. My pressure is shifting forward as I'm turning.
Now listen, I'm well aware of people who want you to stay back on your right side, right? I know George
Gankas and some of the stuff, and he put out that video with Johnny about keeping the pressure back.
That's cool. I haven't seen that kind of stuff in person. What I do with people, what I see good players do
is shift forward early, as they turn. That's what I do that works. That's what I've seen that works. That's
what we're going to do that works. Okay? We're not keeping pressure back. What I see is a lot of people
who are trying to rotate around their trail side. And listen, I'm not saying the concept is wrong. I'm
saying your application of that concept typically is wrong, from the people that I see. What I see is a lot
of people trying to rotate and their hips stay back and they're here.
No good. They got swing direction issues, low point issues, contact issues. I don't see good players with
their hips staying back as they turn. I see good players getting their hips forward as they turn. Okay? And
I think all, and I don't bring that up to call them out, I think all of us are trying to do the same thing. I
think all of us that coach are trying to get you to the same end goal. We might just do it different ways.
What I see application-wise that works is that pressure forward, hips forward as you turn. Everyone's
afraid of this move. The slide.
What is a slide? My hips are going forward, my pressure and weight are going forward. What am I not
doing? Turning. If I do a slide, okay, if I do this and I just get my right hip to rotate with it, I look like a
tour star. You guys, that slide don't necessarily have to take out the left motion. You've got to add the
turn motion. Now for me, someone who's chronically been too far, someone who is left accommodated
that your stall flip. Okay, that is true. I have my whole life had been taught to do this. Stop and go this
way. Okay, so hit 16 greens around, but when I do that, I have to feel for me like my right side comes
through.
Everyone gets lost in this lead hip getting out and that's good. I teach that to people. Nothing wrong
with that. But remember if I'm going to shift pressure forward, I need my right side to rotate through.
Okay? So I'm going to do a couple, remember the key here, I'm shifting pressure right away, but as I'm
doing that I'm also turning, I'm shifting pressure and turning. I'm not just shifting pressure and not
turning and I'm also not just turning and not shifting pressure.
Sounded really weird when I said that. What I'm not doing is going like this. This is a pressure shift with
no turn. That is not correct. Also, not correct. A turn without a pressure shift. That made more sense.
Neither of those two are correct. You guys with me on that? One more time so there're no questions. I
am not shifting pressure without turning. You are absolutely under no circumstances supposed to shift
your lead hip forward without turning. No one watching this should do that. Okay? Nobody.
What you are supposed to do is as you're shifting forward, you're turning. None of you guys hits slices or
bad shots because you have too much rotation. Every single golfer in the history of golf who plays well
@BodyforGolf.com. All rights reserved. 27
has a lot of turn. If you hit bad shots, okay, you hit no bad shots because you rotate too much. Zero. You
might have a really bad down swing pattern. You might have really bad risk condition, really bad grip.
You do not hit bad shots because of rotation.
Now when you make your down swing pressure forward and turn is the deal, right? So let's go ahead
and hit a couple. Pressure forward and a turn. Good. And that's it guys. There's nothing more
complicated than that, right? I think a lot of this is just conceptual. What's happening? A pressure shift
and a turn. From the top I'm going forward this way as I'm turning, pressure shift and a turn. Let's go
ahead and demonstrate one more. Good, and that feels really good for me.
Again, someone like me who's chronically this way with no turn, that turn piece obviously puts me
neutral, so I've got to feel more of that than the pressure shift. I feel for me, like when I put my club
across my hips, I'm just trying to get my hips square and up over my left leg. So I'm trying to get my hips,
my right hip, even with my left hip in terms of the target. And I'm trying to get my hips forward, I'm not
keeping my hips back. I'm not going like this. I'm going forward with my hips up over my left leg. So in
terms of a drill wise, that would be the piece. Yeah, that's excellent.
That would be the piece that I would do. I'd take a club here, across my hips and by the time I get to
impact, again pressing forward, by the time I get to my finish, I want the club even. Right hip be by my
left and up over my left leg. I want the club even and up over my left leg when I come through. So that's
the deal. So sort of impromptu. I want to get that message across of your trying to shift pressure
forward early, really early. Okay? Don't be shy with that. You can shift pressure really hard early, so long
as you turn with it, and I don't like the turning without pressure forward. Okay? That's just what it is.
Please get out of this idea that you shouldn't rotate. You need to learn how to shallow club. The point is
that rotation is not the problem. You need to learn how to get rid of whatever club face or path issue
you have first, and then you could do the body rotation. Club face or path issue must go first. That's why
a lot of guys teach this kind of stuff. You have to learn how to do that stuff first. Then the body stuff
comes second, so hopefully that clears up some things.
Credit: Eric Cogorno Link: https://www.youtube.com/watch?v=T6CTbpuYAxA
@BodyforGolf.com. All rights reserved. 28
Principles of Chipping
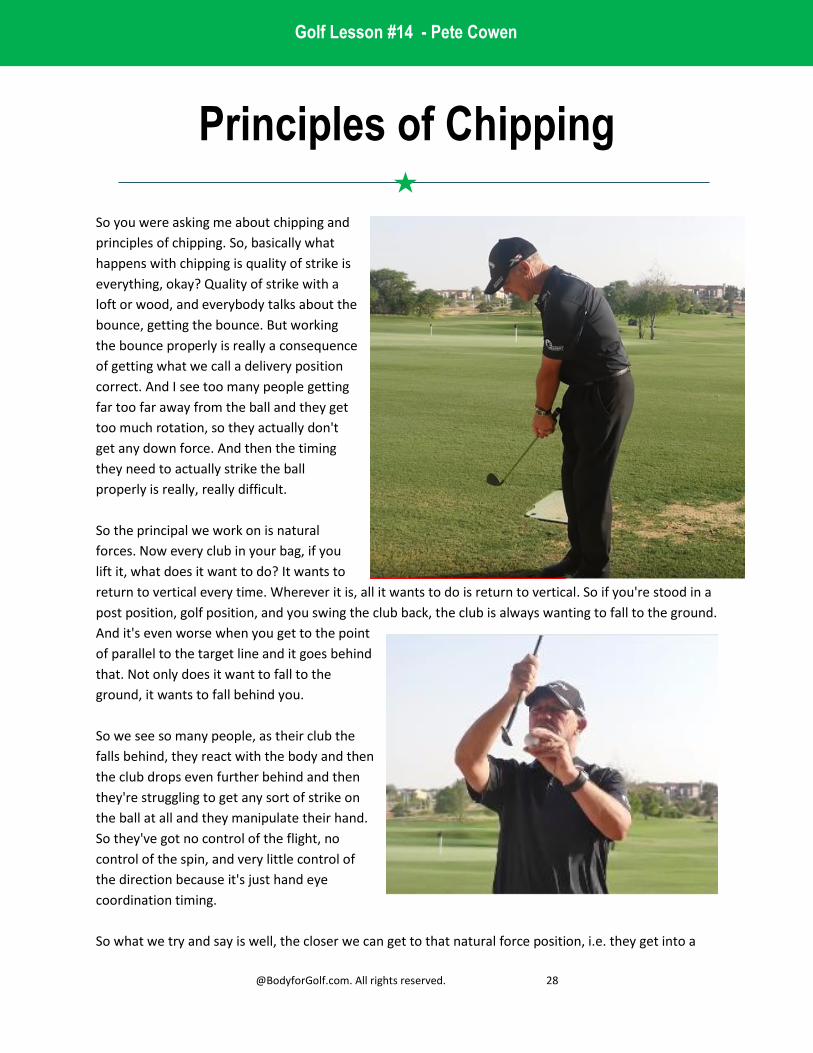
So you were asking me about chipping and
principles of chipping. So, basically what
happens with chipping is quality of strike is
everything, okay? Quality of strike with a
loft or wood, and everybody talks about the
bounce, getting the bounce. But working
the bounce properly is really a consequence
of getting what we call a delivery position
correct. And I see too many people getting
far too far away from the ball and they get
too much rotation, so they actually don't
get any down force. And then the timing
they need to actually strike the ball
properly is really, really difficult.
So the principal we work on is natural
forces. Now every club in your bag, if you
lift it, what does it want to do? It wants to
return to vertical every time. Wherever it is, all it wants to do is return to vertical. So if you're stood in a
post position, golf position, and you swing the club back, the club is always wanting to fall to the ground.
And it's even worse when you get to the point
of parallel to the target line and it goes behind
that. Not only does it want to fall to the
ground, it wants to fall behind you.
So we see so many people, as their club the
falls behind, they react with the body and then
the club drops even further behind and then
they're struggling to get any sort of strike on
the ball at all and they manipulate their hand.
So they've got no control of the flight, no
control of the spin, and very little control of
the direction because it's just hand eye
coordination timing.
So what we try and say is well, the closer we can get to that natural force position, i.e. they get into a
Golf Lesson #14 - Pete Cowen

@BodyforGolf.com. All rights reserved. 29
position where this club is more vertical there. If I now swing the club back and let it come back, it's
virtually going to come back to the same position every time. So I'd like to see people who struggle with
the chip in particular to get a much tighter grip on there and they worry about the heel being off the
ground, but they shouldn't because it's not going to affect the lie because I'm not hitting it hard enough,
I'm not swinging the club hard enough.
So really, more vertical, let your arms extend to a full length, let your club extend, so you've got a
constant from your shoulder position to your club face. And now if you just go back and let the club fall,
you'll start striking the same point every time. So you get a much, much better strike all the time. So I
like to see people chip in more vertical, arm length constant, eyes over the ball, back, bang, ball.
Simple principle. So the club returns to square very easily all the time. Now another thing when we
actually practice on this, you know Bermuda grass, you get very, very difficult lies because of the grain.
Sometimes the grain is empty or sometimes it's down. It's quite easy to play shots when the grains
down. It's not very easy to play shots into the grain because the grass snags the club. So if you play an
ordinary shot as an ordinary stance, and you get any what we call shaft lean and shaft drive, you're
going to get grass trapped between the ball and the club face and possibly too much grass so that you
actually duff the ball, all right? So a principle for into the grain shots really is getting up vertical, turn the
toe in and really allow the toe to go down onto the ball and that virtually guarantees the stripe. So it
takes away the shaft lean. You're just allowing the toe to release back down into the ball. Okay, so the
reason we say that is purely and simply because obviously when the ball sat on the grass, I want to strike
the ball at the same time as the leading edge is hitting the ground.
Well, if I do that, the leading edge is hitting the ground, there's a big gap between the ball and the club
face and now grass can get there. If I go this way and I get the toe turned down, while it feels closed.
Now as soon as the leading edge touches the ground, I'm striking the ball. So virtually, not always, but
virtually guarantees the strike. All right? We know the ball's going to go a little bit lower, but at least
you're going to have a strike on that, and there's not, what we call, massive drive and flush speed, which
really is the disastrous shot when you're hitting. So I'd like to see much more players getting in tighter,
more vertical, and then really letting natural forces help me to actually play the shot. Okay? And then
turn it in a little bit more for a difficult lie, even a bad lie, doesn't have to be grainy, a bad lie. If you turn
it in and let the toe go into the ball, you'll strike the ball first. So you'll still get good elevation. Simple tip,
but very effective .
Credit: Pete Cowen Link: https://www.youtube.com/watch?v=ytI1mpKQb4g

@BodyforGolf.com. All rights reserved. 30
3 Moves to Stop your Slice
My name is Chris Ryan. In this video we're talking all about that dreaded slice, and I'm going to give you
three things that you can look at or implement into your backswing, which is definitely going to reduce
the chances of that ball finishing in the right rough.
So we know that the slice comes because of what happens at impact, because of the interaction
between the golf club and the ball. And if we don't change the impact, we won't change the slice. So
changing the backswing on its own, won't necessarily stop that ball finishing off target. However, many
of the things that we're going to go through in this video, in the backswing, can definitely influence the
impact, and that's ultimately what we're trying to do.
Now, the reason I've picked the backswing here
is because for many golfers it's much easier to
make some tweaks or some changes in the
backswing.
Very often, the downswing happens that quick,
that we really just get to the top of the swing
and then before we know it, the ball has been
hit, it's off to the right, it's sliced. I know many of
the golfers really feel that they struggle to stop
that shot. So there's three things that you can do
in your backswing, which I think is definitely going to help you get that ball a little bit more in play, and
certainly that's going to be a good way to lower the scores.
So the first thing we're going to look at is how we control the club face through the backswing. Now as
you can probably imagine, the club face is a huge part or plays a huge part in the golf swing and plays a
huge part in where that ball finishes.
So it would make sense that if that ball finishes to the right of the target, we have the golf club face too
much open in the backswing for many of these golfers. Here's what I want you to focus on, and this is
really the first thing I want you to focus on. I want you to try at the top of the goal swing, to get the logo
on your glove, so in this case it's the color TaylorMade logo on the Velcro. That logo is going to feel like it
points towards the sky at the top of my backswing, so that would look a little bit more like this.
So my feeling is I'm trying to get the back of my hand to point way up towards the sky. Obviously, the
opposite to that will be the palm of my hand feels like it's pointing very much down towards the ground.
Golf Lesson #15
@BodyforGolf.com. All rights reserved. 31
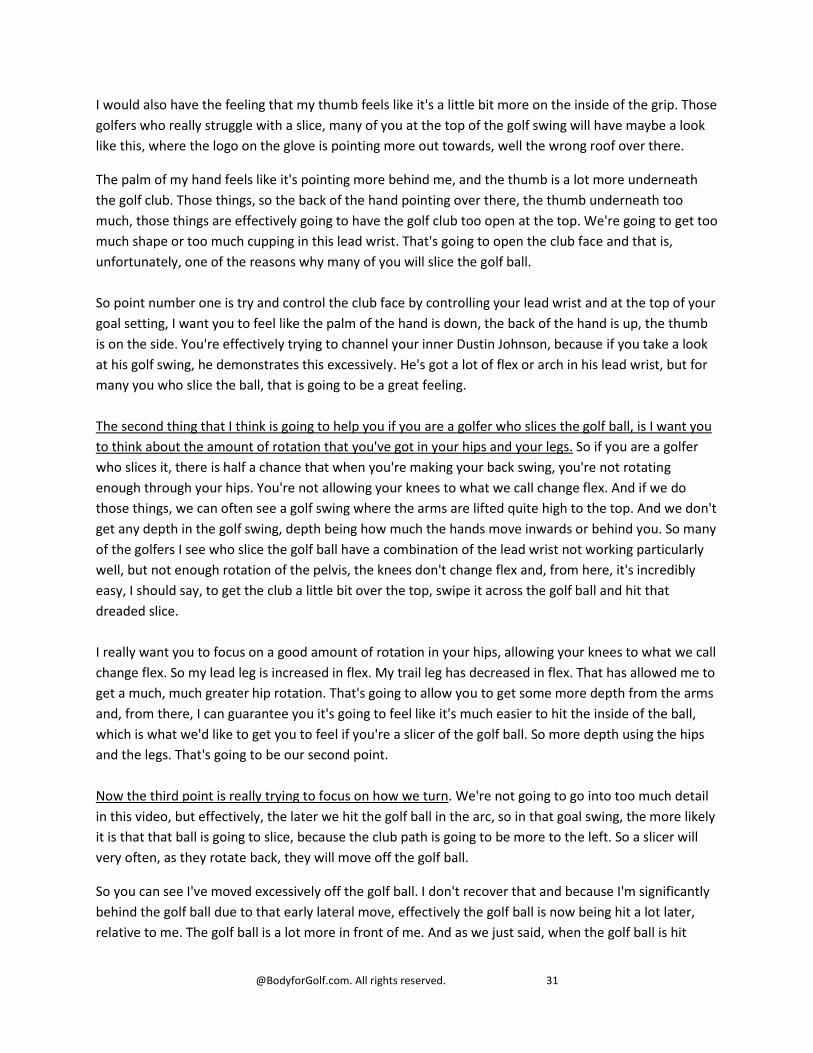
I would also have the feeling that my thumb feels like it's a little bit more on the inside of the grip. Those
golfers who really struggle with a slice, many of you at the top of the golf swing will have maybe a look
like this, where the logo on the glove is pointing more out towards, well the wrong roof over there.
The palm of my hand feels like it's pointing more behind me, and the thumb is a lot more underneath
the golf club. Those things, so the back of the hand pointing over there, the thumb underneath too
much, those things are effectively going to have the golf club too open at the top. We're going to get too
much shape or too much cupping in this lead wrist. That's going to open the club face and that is,
unfortunately, one of the reasons why many of you will slice the golf ball.
So point number one is try and control the club face by controlling your lead wrist and at the top of your
goal setting, I want you to feel like the palm of the hand is down, the back of the hand is up, the thumb
is on the side. You're effectively trying to channel your inner Dustin Johnson, because if you take a look
at his golf swing, he demonstrates this excessively. He's got a lot of flex or arch in his lead wrist, but for
many you who slice the ball, that is going to be a great feeling.
The second thing that I think is going to help you if you are a golfer who slices the golf ball, is I want you
to think about the amount of rotation that you've got in your hips and your legs. So if you are a golfer
who slices it, there is half a chance that when you're making your back swing, you're not rotating
enough through your hips. You're not allowing your knees to what we call change flex. And if we do
those things, we can often see a golf swing where the arms are lifted quite high to the top. And we don't
get any depth in the golf swing, depth being how much the hands move inwards or behind you. So many
of the golfers I see who slice the golf ball have a combination of the lead wrist not working particularly
well, but not enough rotation of the pelvis, the knees don't change flex and, from here, it's incredibly
easy, I should say, to get the club a little bit over the top, swipe it across the golf ball and hit that
dreaded slice.
I really want you to focus on a good amount of rotation in your hips, allowing your knees to what we call
change flex. So my lead leg is increased in flex. My trail leg has decreased in flex. That has allowed me to
get a much, much greater hip rotation. That's going to allow you to get some more depth from the arms
and, from there, I can guarantee you it's going to feel like it's much easier to hit the inside of the ball,
which is what we'd like to get you to feel if you're a slicer of the golf ball. So more depth using the hips
and the legs. That's going to be our second point.
Now the third point is really trying to focus on how we turn. We're not going to go into too much detail
in this video, but effectively, the later we hit the golf ball in the arc, so in that goal swing, the more likely
it is that that ball is going to slice, because the club path is going to be more to the left. So a slicer will
very often, as they rotate back, they will move off the golf ball.
So you can see I've moved excessively off the golf ball. I don't recover that and because I'm significantly
behind the golf ball due to that early lateral move, effectively the golf ball is now being hit a lot later,
relative to me. The golf ball is a lot more in front of me. And as we just said, when the golf ball is hit

@BodyforGolf.com. All rights reserved. 32
much later in the arc, there is a greater chance of the club path being to the left and if there's a greater
chance the path being to the left, there is a greater chance of the ball, unfortunately, finishing to the
right.
So if you I chronic slicer of the golf ball, every single drive you hit, finishes to the right, there is half a
chance, unfortunately, that you're going to do all three things. You're going to probably have a lack of
rotation, you're going to have a lateral movement off the ball, you're going to have a very, very open
face at the top and this, unfortunately, is not an uncommon look for a slicer.
From here, very, very easy to turn out the waist, slice across it, the ball goes very much to the right, it's
very weak. We don't really feel that we get the distance that we would require and it's definitely a shot
that you're going to want to get rid of, if you can. So three things, all backswing-related, which I think
are going to give you a greater chance of creating a much better impact position and if we can create a
better impact position, we can create a better ball flight.
Quick recap. Club face control through lead wrist. A good amount of depth using the hips and the legs to
change flex, and making sure that from the face-on view of the rotation, the hips and the head are not
sliding too much behind the golf ball, we haven't got too much lateral slide. Three things which are
definitely going to help you eliminate that right side of the golf course. Take it to the range first, because
it will feel a little strange. So rather than taking it straight to the course, a little bit of practice and
hopefully you'll lay a few more fairways. Okay, and I'll tell you, that one is first drive of the day, but it
probably might just cut to the left rough, but I'll definitely take that and it definitely didn't slice, which is
the important thing.
So three backswing things, if you can focus on those, I really think that's going to help you deliver the
club better, that's going to help hit more fairways, and as a bonus you'll probably also hit the ball a little
bit further because your efficiency of contact will be greater, and that's going to increase the ball speed.
Credit: Chris Ryan Link: https://www.youtube.com/watch?v=j3ZdO91MajA

@BodyforGolf.com. All rights reserved. 33
Golf Swing Made Simple
Today we're going to be helping you understand the golf swing a little bit more for all you beginners out
there.
So today, we want to make sure that you can really
understand what we're trying to do with the golf
swing and then have something practical that you can
use as well.
So we want to go through some of the mistakes that a
lot of you guys make. So first of all, we're going to talk
about probably the most important part of the golf
swing, which is from hip height, both sides of the
swing. And what we're looking forward to produce a
consistent or a straight shot.
So the first thing that we want you want to
understand is that the club is going to move in and
around. So from a good golf swing, we want the club
to move in from the target line back to the target line
and then in from the target line on the way through.
So as you can see there, nothing travels in a straight
line, hopefully the ball. But the golf club does not
travel in a straight line. So, that will help us produce a
straight shot.
There's something else that's going to help us to produce a straight shot as well. Apart from the
direction of the club swinging, that's the club face.
This is another thing that people get confused with is that they think that to hit that ball straight, we've
got to keep that club pointing at that target. And what does that lead to? Lots of bad shots
unfortunately.
The club moves in and around from the target line on an arc not straight and the club face opens and
closes. Now how can we then put this into something practical that we can do Piers? So if we grab a golf
Golf Lesson #16

@BodyforGolf.com. All rights reserved. 34
club.
One of the biggest problems we have with coaching sometimes, you get too complicated but I do think
it's important to have these checkpoints. So I think a great thing that I like to get people to do when
they're first starting is to allow the club to turn.
But at this waist high position, the leading edge or the toe of the golf club we want it pointing up and on
the way through again corresponding, we want it pointing up. I think that's a really useful checkpoint
because people can do that in mini swings. So they can stand here do this, do this and actually hit some
shots doing this. And what tends to happen, they turn the club but they get used to knowing how to
turn the body as well. And I think that's really important.
And working on this part of the golf swing, this is the most important. This is where we're going to hit
the golf ball. So if we can work on this and then maybe extend as we get better and better and more
comfortable with this, it's going to help. That's just going to increase the power. But certainly allowing
the club to open and close through the right position and the club to move in and around the body is
going to have a big effect on your consistency.
Credit: Me and My Golf Link: https://www.youtube.com/watch?v=sXtekwuT8R0

@BodyforGolf.com. All rights reserved. 35
Ground String and Gate Drill
Love using the string to help me start the ball on line (with the tees in front of ball) and also seeing the
ball break off the string with my eyes. Great drill that visually helps me.
Credit: Justin Thomas, PGA Tour Professional Link: https://www.instagram.com/p/B8r686FhnpN/
Golf Lesson #17

@BodyforGolf.com. All rights reserved. 36
Short Spinny Pitch
Probably one of the toughest shots for amateurs
to pull off - the biggest mistake is in your set up
usually. Everyone in the past has been told to
stand way open with the ball back in your stance
and the handle forward which puts you in a
position where you feel you have to loft the ball in
the air. You want the following:
1) Ball forward of center
2) Weight just a little left
3) Handle centered
4) Open club face then take your grip with a
weaker left hand
5) Path is a little more out going back (club head
outside your hands)
Hitting down to get the ball in the air is very critical
here - let the loft of the club (this is my 60 deg LW) do
the work. Swing down and thru and let the loft of your
wedge create the height with a short sharp motion.
Credit: Luke Donald, PGA Tour Professional Link: https://www.instagram.com/tv/B-r8dKCpEmV
Golf Lesson #18

@BodyforGolf.com. All rights reserved. 37
Hit Your Driver Consistently
Longer and Straighter
So, you want to hit your driver longer. Well stay tuned to this video because I've got three very easy
steps to make sure you're getting the most efficiency and the fastest ball speed by making sure you
strike the middle. Let's smash this bad boy and
hit it further. My name is Rick Shiels.
So, the trick to hitting the driver further, it's
making sure that we get the most efficiency
from the club head speed to transfer that into
ball speed to make the ball travel further. And
the biggest factor of this is making sure that we
strike the middle of the driver head, to
maximize our efficiency and to get the best
smash factor, the best ball speed, we need to
be finding in the middle.
First thing we've got to establish where you as
a golfer hit on the club face. This is my advice of
how you can find out where you hit on the club
face. Now, I use foot powder spray, and as you
can see here, I'm spraying it on the club face, a
fair amount of that spray. And that spray turns
white after about 30 seconds or so, go away
and hit three to five golf shots with that spray
on, and what you'll see is that there is a pattern
that'll start to emerge on your club face.
Are you seeing that you hit low on the head, high on the head, toe, heel or are you already hitting
somewhere close to the middle? That's a really good starting block to figure out how we can become
more efficient and hit the ball further. We need to know first off where you are hitting on the club face.
We're going to start off with tee height. This is incredibly important factor to making sure you strike the
driver in the middle of the club head. My rule of thumb is to try and get the golf ball when teed up, half
of the ball above the crown of the head. Now, as you can see from these examples, the tees on the right
Golf Lesson #19

@BodyforGolf.com. All rights reserved. 38
hand side have the ball in the middle of the head when the club is actually flat to the ground. But when
we come into hit a driver shot, the club is actually off the ground, so we need a tee that's a little bit
higher.
The tees on the other side of the screen, they are demonstrating much better tee heights. The pink tee,
as you can see from this diagram, that the ball is above the club face perfectly. That way when you come
in to strike the ball, the club will be off the ground and you have a much better chance of striking the
middle of the club head. The orange tee, as well, is another good example of the tee being a good size
for the driver that I am actually showing. Now, if I switch drivers and show you a driver face that's a little
bit shallow, you can see from the diagram's here that the pink tee is still perfect, but the orange tee
does get a little bit on the high side.
So, it is going to be a factor of how deep the driver face you use actually is. If you tee it too low you are
going to hit low on the head, unless you are taking a bit of a divot with your driver, which is not
advisable. You're going to be producing too much spin and the ball is going to launch too low and if you
get up tee height too high, you could end up hitting too high on the club head. And again, that's not
going to be the most efficient way to get maximum ball speeds to hit the ball longer. So, the first tip is to
make sure we get the correct tee height, so that you have the best chance of striking the middle of the
driver face.
So, tip number two. Now, this ties in quite nicely to the tee height, but it is a separate tip on its own, and
this is about the angle of attack that the club comes in and hits the golf ball at. Now, it is advised, for a
driver, to get the best distance and to get the best efficiency from your driver, you want to be hitting
slightly on the way up into the golf ball. Now, there are factors that will influence the way you hit up or
down into the driver and we're going to start off with ball position. Ball position is an incredibly
important aspect to hitting driver well. As you can see from this example here, I've got the ball position
just inside my left heel. That's going to encourage an upward hit into the golf ball to get the most
efficient strike location on the club face.
The other factor we see here at setup, I've actually encouraged my upper body to tilt slightly to the
right. Now, this is only a slight tilt. Naturally your shoulders are going to tilt anyway because the right
hand is lower than the left, for a right-handed golfer, but it's nothing wrong with just slightly
exaggerating that, to make sure, again, you prompt that slightly upward hit into the ball. And coming
into contact, I would actively encourage you, if you want to strike more in the middle of the head, to
make sure you're still staying in that tilted position as you hit the golf ball so that you get the best
efficiency of strike. Now, bad examples of this is if your upper body is leaning too far to the left with the
driver, you're more likely to hit down into the driver and that will encourage a strike that's slightly too
high on the club head.
You link that with a tee height that's too high and it's not a pretty place to be. You're going to end up
scratching the top of your head and not getting good strike locations and maximum ball speed. On the

@BodyforGolf.com. All rights reserved. 39
flip side, if I lean back too much as I come in to hit the golf ball, to hit too far on the way up, the strike
location will come low on the club head and not getting the most efficiency. Tee height, ball position,
and the angle of attack are all very closely linked to work out the strike location top to bottom of driver.
We want it to be middle, if not slightly high from middle, to get the most efficient ball speed from the
club head speed that you're delivering.
So, tip number three to make sure you're striking the driver more in the middle, more of the time, is to
make sure that you're striking it, not from the toe or the heel, you are making good contact to the
middle.
Now, a lot of players instantly presume that if they set the ball in the middle of the club head, they're
going to return that club head in the same way. Well, we are not robots. Golfers have swing changes.
The club head changes direction all the time, so to guarantee a middle strike is not particularly easy to
do, just by aiming it from the middle. What you've got to take into consideration is if you hit the toe,
there might be a tendency of you having the club face too closed as your club head is coming into the
golf ball. And when that club head is too closed, the first point of collision is that toe location.
Likewise, if you come into the golf ball and your club face is too far open, almost all the time, the strike
location is going to be much closer to the heel side of center. Now, if you're a slicer of the golf ball, your
strike location will probably be slightly heely. And if you're more of a golfer that shapes the ball with a
hook/draw, you're more likely to be hitting the toe side of the head, just because of the way that the
club head's orientation is as you come in to hit the ball. Now, to fix this it's all about neutralizing your
grip, making sure you don't have a grip that's too strong. Ie. The hands are twisted too far around the
back, or a grip that's too weak, where hands are more on top of the golf club. I'm going to put a link in
the corner because I've done a grip video in the past that is incredibly detailed and it's only from last
year.
So, have a look at that grip video to see where your grip sits and how we can neutralize it, because that
is a really, really solid way to make sure you're striking the middle and not presenting a closed head,
which hits the toe, or an open head, which hits the heel. And again, like I mentioned at the start this
video, spray the face, monitor it, check it to see if you are improving, every single practice session you
do.
Make sure the tips that I've just talked about in the video, the tee height, the ball position, the angle of
attack, and even how your club face is coming back into hit the ball, is all in check to give you guys the
best chance of striking the middle of the club head, to giving you the best ball speeds to hit the ball as
far as you can.
Credit: Rick Shiels Link: https://www.youtube.com/watch?v=N0VPEC5L8qM

@BodyforGolf.com. All rights reserved. 40
Returning Clubface to Intended
Target
Returning your club face back to your intended target line is
key. What I want you to do, get an alignment stick, get two
golf balls about 12 inches in front of your golf ball.
Leave a little bit of a gap so the ball can actually pass
through there. Be as hard or as easy as you like on yourself.
All my job is, is to just do a good job of returning that club
back to square and missing that.
Okay, so here we go. This is the important thing, just a nice
easy stroke.
Can we get it to roll through? What you're going to find with
this is, it's going to show up any tendencies.
If you consistently hit the one on the right, we know your
club face is coming back open.
If you consistently hit the one on the left, then the face
wants to return square.
Credit: Me and My Golf Link: https://www.instagram.com/p/B-K5ONdBj9p/
Golf Lesson #20

@BodyforGolf.com. All rights reserved. 41
Golf Mobility Moves
Here is a daily mobility routine designed by a golf physio.
Mobility Routine day
1.Hip Hinge with Reach and Retract
2.Modified Triangle Pose: Regular and Reverse
3. Marnus Move
Golf Lesson #21

@BodyforGolf.com. All rights reserved. 42
Credit: Golf Physio Link: https://www.instagram.com/p/B-zWe8VFbID/

@BodyforGolf.com. All rights reserved. 43
Best Chip and Pitch Practice
When I first turned professional, I moved to Orlando and I used to practice in a development there
called The Grand Cypress.
There was a great instructor there named Fred Griffin, who's still
a friend, but Phil Rogers, the great player who used to teach
short game to a lot of top players, including Jack Nicklaus, taught
me how to chip and pitch and hit bunker shots with just my left
hand, which was really hard to do.
But, I've become pretty good at being able to hit the shots with
just my left hand. Learned how to hit a lob shot that way.
If you can learn how to hit it high, I think it's going to teach you
to use the face the right way when you hit these shots. I'm going
to hit this one real high open-face. That's a lot of spin on it.
Experiment with that. Use just your left hand to hit some chip
shots.
Credit: Brad Faxon, PGA Tour Professional Link: https://www.instagram.com/p/B7WglYRFKWa/
Golf Lesson #22

@BodyforGolf.com. All rights reserved. 44
Strike Your Irons Pure
Today is all about the irons. Can we show you how to pure these irons?
A lot of people asking about actually striking their irons. They really want to be able to get that nice pure
strike with their irons and we know
that's a crucial part to playing good golf,
because it has a massive effect on
actually just the consistency of actually
reaching the target, doesn't it as well?
People often hit the ball... They know
when they it bad, but they often hit the
ball okay, but they think that's good.
Eventually, sometimes when we get
them on a lesson and they hit one and
go, "Oh, I've never felt that before." And
suddenly it's something that felt out of
the ordinary in a good way. So that's
what we're going to show you, perhaps
how we can achieve that.
... to control the flight on the golf ball at
this great links course. Let's talk about
first of all, why people struggle with the
contact and what do we generally see in
terms of why we get the poor contact
with these golfers.
Okay, the best thing to do when we're talking about this is to imagine that there's a circle, we're
swinging on a circle. Now, what we generally see is the club head on this circle bottoms out before the
golf ball. So we can see here, the club head is bottoming out before the golf ball. That basically means I
can hit the ground before the ball or I can hit it thin or I can hit it very high. Even if I hit a good strike,
from this position, it's going to be a high shot more often than not. The bottom of the arc is happening
before the golf ball.
Golf Lesson #23

@BodyforGolf.com. All rights reserved. 45
We want to get that circle and we want to move it over here. From setup all the way up to the top
down, we move the bottom of the arc past the golf ball so now you can see that the circle, the bottom
of the circle is bottoming out after the golf ball. That is what we want. That will mean that you'll get the
ball and then the turf.
Yeah and we've all seen this pros striking the golf ball, they're taking the divots after the shot and the
divot happens after the golf ball. This means the club head is descending onto the golf ball. As Piers
mentioned, that a bottom of the circle is happening after the golf ball. It's a great way to just think of it,
isn't it? And something we talk a lot about Piers, we don't tell our students to hit down on a golf ball,
although there is a downward hit on the golf ball with the club head, we don't tell them to. We just get
them to understand that actually the bottom of the circle is going to happen after. Probably one of the
best rules we've used without having to go in and think about lag or shaft position or weight shift, this is
more of an external focus base that allows people to just improve without thinking about too much.
What you need to do is get some spray paint. Now, Mr. Downing here the owner of the Astbury is
probably not going to be too impressed if we start spraying white lines all over his golf course. Luckily,
I've got this spray paint that disappears actually just after I've hit it, it's like football isn't it, Andy? What
we are looking for is a line... That wasn't me, that was the sound effects from the can. We want a line on
the ground.
About an inch wide. And what you're going to do is, first thing to do is place the golf balls that you're
going to hit right in the middle of that line. Now we always say to people to start with, before they hit
shots, have practice swings and work really hard at making sure you contact the ground but you contact
the ground past the white line. You can see as I'm doing this, I'm actually getting the bottom of my arc
in my swing to happen after the white line.
I mean, Piers doesn't need to try and do this and he's trying to do it now and that bottom of the arc is
happening way after the line. And what you guys are going to find out when you do this, no balls at the
moment, but you're going to find that actually you'll hit the ground either before, on the line, maybe get
it after but he won't be that consistent to start with. And we're looking for that consistent bottom of the
arc to be after the golf ball. It's a really good awareness thing, it brings the awareness in terms of what
your golf swing is-
Definitely. Remember when you're set, take your set up... You can go with all mixture of shots, mini
shots, whatever you want to do. But let's go with a full one here. So here we go, full shot. And you can
see, that felt superb, it felt really good contact. That white line, I've missed it.
You've missed the white. And it's interesting there, you've hit the ball followed by the turf, not a massive
divot but you can see the turf is sort of, has came up after the shot there. Sometimes you can get that,
you can get a deeper divot depending on the... it's quite firm here at the moment. But the key thing is
actually hitting some shots, evaluating where the bottom of the arc is, we do want to make a contact

@BodyforGolf.com. All rights reserved. 46
with the ground, we definitely want to make the contact with the ground and that's really going to help
you understand maybe where your bottom of the arc is. And if it's before, then we need to do certain
things to get it moving a bit more after.
And it's exactly right what you said there about evaluating, making sure that you understand what your
bad one is. And you'll hit shots that actually... you'll hit a shot, and you'll go, "Actually, that was quite a
nice shot." And you might go towards your normal target, you'll look down at the ground and you'll see
the grass has been hit before the white line and you'll go, "Well actually, how much more have I got in
the tank if I were to not do that to get it a little bit later?" And that's that sort of eureka moment when
someone goes, "Wow, now that felt very different to what we're doing."
But basically, , use the white line to evaluate where you are first of all. Then secondly, just put it down
there all the time. Hit your shots all time off the white line and you will just get better. And you don't got
to use the spray paint, if you're on a range mat, and again you're not going to be perhaps flavor of the
month at the range-
Credit: Me and My Golf Link: https://www.youtube.com/watch?v=WixemQhFp3E

@BodyforGolf.com. All rights reserved. 47
Hit the Ball, Then the Turf with
Your Irons
So let me know if you guys have had this happen to you, you're sitting in front of the nice, wide open
green, pins right in the middle, you got a short to mid iron, and you're thinking, man, I'm really going to
hit this solid. Then all of a sudden, chunk behind the ball, or maybe you thin the shot, and you're just
really inconsistent through contact. But,
man, that is super frustrating, that's
probably one of the most frustrating
things in golf.
Well in this video, I'm going to break down
a really easy drill that's going to help you
to make that clean contact in front of the
golf ball every single time. Let's go ahead
and get started.
All right, so I got an awesome drill for you
to help you take the divot in front. But
first, we need a great way to have
feedback. And I have this Dr. Sholl's, it's
called Odor-X Odor Fighting Spray Powder
With Sweat Max Technology. This is
actually one of the really good ones. They
make multiple kinds of these, this shows
up really white on the ground. I also use
this for my club face. You can probably see
that on the camera there. I use that to
show where you're making contact on the club face. So it's not only good for drawing lines on the
ground, it's good for other drills in game too.
So not going to get into that in this video, but we will be using this for drawing a nice straight line on the
turf here. And once that dries, it's going to be really, really white. It's a great way to see where you're
making your divot in relationship to the golf ball. So let's start out by taking some divots in front of this
line, that's the number one thing that we're working on here.
Golf Lesson #24

@BodyforGolf.com. All rights reserved. 48
What I'm going to do is, I'm going to set up as though this line is my golf ball, and I'm going to take my
normal stance to get started. Now, from here, I'm going to go ahead and drop my front foot back until
it's almost touching my back foot. And the reason we're doing this is, we're actually going to get that
momentum coming through the shot in the swing.
So if you want to take that divot in front, in the downswing, we need our momentum moving to the left,
coming down and through the ball, and that divot is going to happen in front of that line. If we do this
incorrectly, we're going to be falling back to the right, our right shoulder lowers, everything gets closer
to the ground back here, and now you can see, I'm going to want to hit behind this line. Or if I miss the
line, I may flip to reach the golf ball, and actually hit it thin. So any time I fall back this way, really going
to cause problems in the golf swing.
So again, let's set up this line, drop the front foot back. And now what I'm going to do is, I'm going to
take a step forward, and I'm going to swing, and I'm going to take a divot in front of this line. And as I
follow through, I want your right foot to come all the way on around just like you're walking down the
fairway toward the green.
So let's set up. Put the feet together. I'm going to make a swing. Brush the grass in front. I want to take a
little bit more of a divot here so we can really see that. But you can see that started about right there.
And then I brush the turf. That's completely fine if you're doing this, but I'm going to exaggerate it,
maybe even take a little too steep of a divot here so that you can see this really easily. Again, that's way
in front. You can see my divot started right there, that's almost eight of 10 inches in front of this line. No
way I'm going anywhere near going behind this line. I'm going to try one more just to give you a feel for
what that would be. And again, you're seeing that that is in front.
Now we can go ahead and do the same thing with a gold ball. So I'm just going to put a golf ball right on
this line. If I make contact on the line or in front, I'm going to be perfectly fine, this is going to be a nice
solid shot, it's going to be nice and crisp. If I make it behind that line, now I'm going to have a tough
time. With this step drill, it's going to be almost impossible to make contact behind that line.
So let's go ahead and try one out with a golf ball. When you're doing this, don't worry about if you don't
hit one very solid, it's completely fine if you don't make perfectly crisp contact right off the bat, this is
just to get that weight going forward. There we go. So now I hit the ball. Did I hit it perfect? No, it wasn't
the best shot in the world, but I got so much momentum moving forward, I couldn't hit behind the line if
I wanted to. And again, you see my divot started in front of that gold ball, and in front of the line.
Let's go ahead and go back now. One of the big keys with this is to always start without a ball. So we did,
let's say five or 10 practice swings without a ball, then we hit a ball. Let's take the ball away again, and
get comfortable with this motion, build some muscle memory, and then we're going to bring another
golf ball into play without taking this step.

@BodyforGolf.com. All rights reserved. 49
So again, I'm going to try to build that same feeling. Feet are close together, take a step. Divot was in
front, my divot was way up here. I can even take a bigger divot if you want to, if you really want to
exaggerate. Having a hard time. I did it so far in front, it's hard to get it, but you can see, that is a nice
clean divot, well out in front of that line. So again, that's too far in front, that's a little bit exaggerated,
but its awesome practice for those of you who have been going a little farther behind the line.
Now let's make this like a real shot. So here I'm going to set up like I would in my normal stance. Now
I'm going to have the same feeling. As I come through this shot, I want my right toe to be the only thing
touching in the follow through, and I want all my weight on my front foot. If I was to pick up my back
foot, I would be able to balance there for about a half second before falling back. That's ensuring that
I'm getting the same type of forward weight shift that allows that divot to happen in front, just like this
drill.
So let's go ahead and set up, try a normal shot now, and see how that goes. There we go, divot right in
front. Again there, that divot started almost two or three inches in front of this ball. That means I was
coming in really shallow, and getting the ball contact first. Let's go ahead and try this one more time.
And I'm going to give you one more key to focus on here that's really going to help with this.
Now, we talked about earlier how, if you're hitting a divot behind, that right elbow, or right shoulder is
dropping lower to the ground. You can see this moving down. When that happens, look how much
closer my right hand gets to the ground, look how much closer my club gets to the ground. Now I'm
geared up to hit way back here behind this golf ball. Again, if I do that, I'm either going to chunk the ball
like that, my right shoulder goes down, I hit a big divot there. Or if I happen to compensate perfectly,
that right shoulder drops, maybe I hit it thin like that. I didn't chunk it, but man, I barely hit the ball, hit
way off the bottom of the club.
So the focus that I want you to have with this one is, let's go ahead and set up with that golf ball there
again, and now I'm going to work on my right shoulder in the follow through. As I come through the
shot, I want my right shoulder to be high, and facing down the fairway as much as I can. If you're not as
flexible, it may be going to the right rough. That's completely fine, but I want the momentum of this
going forward, I don't want the momentum going down, and then I won't be able to finish my swing. If I
get that momentum forward, I'm really going to be able to get that divot in front.
So do a good 10 practice swings again. Set up to the line, work on that right shoulder going forward.
Now you have that divot in front. Do 10 of those just to get that muscle memory, get that feel of that,
then we're going to go back to the golf ball again. Put it just on the front side of the line. Now all I'm
working on here, I've got a feel for the momentum forward, I've got a feel for my right shoulder going
forward. I'm just going to recreate that same muscle memory. There we go, right down the middle. Best
of luck, guys, go through those drills, it's going to make a world of difference.
Hey, guys, hope y'all really enjoyed that video. But I've got an even better one for you. One of the

@BodyforGolf.com. All rights reserved. 50
toughest things to do in golf is to stop getting ball bound, and allow yourself to release that club through
the ball, just letting the ball get in the way. That's what we call the straight line release in the Top Speed
Golf System, and I've got an awesome bonus video for you. So if you go ahead and click the I-card that's
going to pop up on your screen, or down below in the description, you'll get instant access to that full
video. Let's go ahead and get started with the straight line release.
So a common misconception that I see is, that we want to create lag, and we just want to hold that lag
all the way on through contact, and get as much lag as we can coming through contact. And that's
simply not true. In the release section, we're going to talk about how to turn that lag into energy, how to
turn that into speed, so that you can hit it very far, and do it like we mentioned, without hardly any
effort at all.
And as we're coming through contact, we're going to fully release this angle as we're about 45 past
contact. So if I draw a 45 degree angle, I should be looking at both arms, nice and straight, the club
splitting those arms so that, by releasing the club, by getting this angle to release as we're coming
through contact, that's what's going to create the speed. Our hands are moving a very short distance,
our club is moving a very long distance through contact, and it creates that whip like effect.
Very different swings hitting the exact same position. So first, let's take a look at Dustin Johnson.
Releasing the club 45 past. And the reason we're going to see such similar, or such different swings
producing similar positions is that, this is the real physics of how this has to happen. Here we're looking
at Sergio Garcia. Again, we're going to see tons of ...
Credit: Clay Ballard Link: https://www.youtube.com/watch?v=N1Yd_CXkdi4

@BodyforGolf.com. All rights reserved. 51
How to Shape Your Iron Shots
We're going to talk shot shaping and I'm going to try to keep it really simple at first. I'll get into the
complexities later.
When we shape the shot into a slicer or a hook,
we want to keep it as simple as possible and make
the same golf swing, in general. What I'll do is to
hit one straight, all align my body at the target, set
up the face square, make a swing and try to hit it
reasonably straight.
From there, with that same golf swing, I can hit
draws and fades. To hit a fade, I'll adjust my body.
And to aim where I want the ball to start, I'll adjust
face to where I want it to end up and then I'll grip
the club, and that's going to be key. We don't
want to just turn the hands.
Okay, so this is going to be straight and falls just to
the left, just a little fade. I'm opening, I'm set up
open. The face is slightly open. I want the ball to
go straight and then just work a little bit to the left
as it falls out. That's fairly straight. There might be
a little wind there. Let me just curve it a little bit more. I open my body, I opened the face to the target
and swing down that and get it to curve back.
And then with the draw, I try to do the exact
opposite. I aim slightly closed, where I want the
ball to start. I close the face, make the same swing
and get the ball to just turn back to the target.
There's a lot more we can do with shot shaping.
We can bring it in low, get the ball to run back. We
can bring it in high and get the ball to stop quick.
We can get the ball to go a little bit longer, hitting a draw. Get the ball to go a little shorter, hitting a
fade. There's a lot we can do to get you shot shaping as a way to get the ball close to the hole.
Golf Lesson #25

@BodyforGolf.com. All rights reserved. 52
If I want to take a couple yards off of a five iron, I'll just simply open up the face slightly and hit a little bit
of a cut and it should go roughly three yards less. And so it should just fall out of the sky to the left.
If I want the ball to turn more, I want to get that closing rate a little bit faster, one of the things I'll do if I
want to hit a really, a rounded hook, is I'll fold the front elbow. So if the front elbow goes through
straight, the face is never really closing. But if I keep that elbow bent and close to my body, the club face
things naturally closes without me really adding any hands to it. I'm going to aim significantly to the left
and I'll shut the face, but then I'm also going to fold that front elbow.
And then conversely, to hit a big fade, what I want to do is, I obviously want to open the face, but I want
to cover the ball more. I want to come in steeper and trap it so that it gets the ball to start low and to
the right. If we just swing to the right of the target with an open face, the ball will hit the face and
usually start more where the face is aimed about 80%. I want to cover it a little bit more and come in
steeper. To get it to really slice, I'll open up the face significantly and my body the same just like we
talked about. But I'll really come and steep. And by coming in steep, I'm able to get more coverage on
the ball with the face and get it to really curve. And you can see that that is going significantly shorter
because we're not giving it as much impact.
We can keep it simple, making the same swing and just opening our face a little bit and our body
adjustment at the start or closing it to hit a draw. We can keep it simple or we can make it complex,
your choice.
Credit: Phil Mickelson, PGA Tour Professional Link: https://www.youtube.com/watch?v=SKcD7IjbhE8

@BodyforGolf.com. All rights reserved. 53
Driver Basics
Big thing for me, I use the ground a lot. Maybe use my legs a little more than some other guys do. Set
my feet apart a little wider than shoulder width.
Just to give me a really stable base. And then I just
think of width on the way back. Taking this back in one
piece.
And obviously you don't want to reach, but just getting
a nice stretch on your back and on your lats there.
And then just really getting that and load into your
right side. I try to keep this right leg, very flexed, but
still load in for it.
From there you've got so much energy transfer onto
your left side again. And then my first move on the way
down is that shift on the left side, before anything
happens up here.
I'm really pumping into that left side and pressure goes
down that left leg and then I come down. Just before
impact that goes up.
Credit: Rory McIlroy, PGA Tour Professional Link: https://www.instagram.com/p/B9oJs0VBIXW/
Golf Lesson #26

@BodyforGolf.com. All rights reserved. 54
At Home Workout
With Tony Finau
Hey guys, I want to take you through a little short circuit I do while I'm at home and you can easily do
while you're at home. It doesn't include any weights and it focuses on stability, flexibility, and mobility.
The three areas I work with my trainer on.
Golf Lesson #27

@BodyforGolf.com. All rights reserved. 55

@BodyforGolf.com. All rights reserved. 56

@BodyforGolf.com. All rights reserved. 57

@BodyforGolf.com. All rights reserved. 58

@BodyforGolf.com. All rights reserved. 59

@BodyforGolf.com. All rights reserved. 60
Credit: Tony Finau, PGA Tour Professional
Link: https://www.instagram.com/p/B-cPRnyptQ-/

@BodyforGolf.com. All rights reserved. 61
Bunker Shots
I've got a bunker shot here. I got a pretty high lip. The flag stick's
pretty close to me, so I need some height on here. If you want to hit
this shot more up in the air, I think one of the big keys that I've
learned, and what the best players do, is they open this club face
quite a bit and they open the face before they take their grip.
They open the club face before they take their grip.
So now the club face is open. Now I take my grip. I've got a lot of
weight in my forward foot, my lead foot here. I'm going to keep my
knee flexed as I take this club back, and as I take the club back I'm
really going to try and feel like I'm rotating my forearm so the club
face opens, and you'll see the club face goes to the other side of the
shaft.
With that open face, it's going to allow me to swing pretty hard to
get the ball up in the air and not have it roll a long way.
So weight's forward, club face is open. I'm going to roll the face on
the back swing and keep my weight on my forward foot. See how
high that got up out of the ground. It rolled up there nice.
Credit: Brad Faxon, PGA Tour Professional Link: https://www.instagram.com/p/B7_ykShl43K/
Golf Lesson #28

@BodyforGolf.com. All rights reserved. 62
Easiest Putting Tip Ever
After working and exploring the best putting techniques over a period of 30 years, both Mike Cahill and I
come up with what we think is the very best golf putting technique that anybody has in the world.
It is very very simple pendulum point or one pivotal point. If
you are right handed it might hold the putter primarily in
your right hand and if you are left handed you might
primarily hold the putter in your left hand.
We are going to take six or seven golf balls and hold the
putter in our right hand only. So what we are going to do is
putt using our right hand only. I will just get a feel for what
seems to be working best for me. Then what I am going to do
after hitting several of those putts with my right arm is
switch over to holding the golf putter in my left hand and hit
several putts and make some putts.
If I were doing this with a student I would observe the golf
shots and ask questions about which felt most comfortable,
what felt the most coordinated.
Once we have established which arm we are going to put with
whether it is our left or right. For instance I am going to hold
the putter only in the palm of my right hand.
I am going to point my fingers down to the ground and place
the golf putter right along my lifeline the close my fingers up.
It is a very simple grip. The palm of my hand is facing toward
the target. The back of my hand is pointing directly away from
the target. That is very very simple grip. There is really not
much to this golf swing.
We are just going to hit golf putts with one arm and that grip.
We are not doing anything beyond that at this point we are only holding the putter in our right and
putting with our right arm.
Golf Lesson #29

@BodyforGolf.com. All rights reserved. 63
We are going to get used to that idea first and what it
feels like to hold the putter in that way. Then we are
just lining up the putt and swing from the central
fulcrum point which is our right shoulder. There is
nothing more to it than that.
Now that we have established which arm I am going to
putt with and which hand I am going to hold the putter
with, and it might be my right or left and let’s say for me
it is my right and we have also talked about how we are
going to hold it in the palm of our hand, facing with our
fingers wrapped around very simple.
The advantage of putting this way is that there is one
pivotal point with no other moving parts.
You may have noticed that tour players sometimes
practice a little bit with one arm just to get the feel.
You will notice when I am doing this there is only one
thing that is moving or one point that the swing is
moving from and this is my right shoulder.
I am not using my wrist and I am not using my elbow all I
am doing is going back and forth from this one pivotal
point. Also notice something else that when I do this
little stroke I am not having my hips move or my shoulders move back and forth at all.
It is very much simplified. there is not much going on. All it is this nice simple motion that is with my
arm. Notice that my sternum is staying quiet, right here this central point. This is a very simple stroke
that is why it works so well.
The next thing I do with my students is we are going to hit several dozen golf putts. Now we are going to
pay attention to our sternum staying very very quiet. There is no rocking motion. Nothing side to side.
Our hips are also going to stay very quiet.
We going to only work on that one thing at this point. So we just line up and everything is going to be
quiet and the only thing that is happening is that my arm is swinging from that once pivotal point.
They might hit 20 putts. Once they get the putter head lined up correctly they start to make putts. Alot
of times there is a misconception that when we a are putting whether it is from a single fulcrum point or
other method that we are taking the putter straight back and straight forward along a line.

@BodyforGolf.com. All rights reserved. 64
That is not really accurate when we are hitting full golf shots
either. Because this club is at an angle and this angle is an
inclined plane. When we take the putter back it actually goes
up this inclined plane which matches this shaft so it is
traveling a little inside the line on the ground.
When it comes over to the forward swing side it follow up the
incline plane on the forward side of the putting stroke. So it is
not straight back and straight through.
If you want to watch this awhile you are putting with a line on
the ground You will notice the putter traveling inside the line
slightly on the back swing and then inside slightly again of the
forward swing. You are trying to force the putter straight back
or straight forward along that line. A little bit up the inclined
plane on each side of the stroke.
That is just because you’re letting your arm swing freely,
smoothly, from the fulcrum point without forcing it and forcing
it. And when you just allow your arm to swing it travels along
the inclined plane on the way back and the way forward.
One of the best ways to practice this is if you have a line on the
ground you can visually see it. In this case I have a stick on the
ground but a chalk line would be even better. You may have a
practice aid stick.
You will notice I can visually see as I go back a forward the club
head travels inside the line on both sides a little over the stick
on both sides. You can actually see that as you putt. The next
question that come up is should i just keep on putting with one
hand the whole time.
Well you know you could do that and there are some very
successful players who have done just that exact same thing. All they have done is make all their putts
with one arm. Now if you are not comfortable you can take and put your other hand like you are doing a
high five. Now without grasping we are going to just lay it very gently, just for stability, and what we
have to do is have to leave our leading elbow very relaxed. It is going to tuck in on the way forward so
we are not moving our shoulders around. You see how this right elbow just tucks in. Now I do not need
to move my sternum.
Credit: Cahill Golf Schools Link: https://www.youtube.com/watch?v=ITRaVI6lDPE

@BodyforGolf.com. All rights reserved. 65
The Optimal Putting Stroke
When I was a struggling PGA tour player in the late '80s, I got an unbelievable tip from Ben Crenshaw. It
really changed my putting life. It changed my putting statistics, but it's not something you would expect
a tour player to tell you. This is what Ben Crenshaw said.
He said, "When I putt, I try to make my back swing longer than my follow-through." Now that's unusual
because we've been taught to take the club back low, slow, short, and follow-through and accelerate
when we putt, take it back low, slow, follow-through and accelerate. I've set up a couple tees here. I'm
going to put the ball down at the middle tee. Got this tee back here, which is about a 25-foot putt where
I'm going to make sure my putter gets back to this tee right here.
So on my backstroke, I'm going to get back to this tee. And I'm going to stop before this tee. I like this
idea that Ben Crenshaw said. It gets the putter swinging back. It gives you enough time to give a nice hit
on the ball, and you don't have to have that long follow-through that you see a lot of amateurs have. So
watch the symmetry here in the stroke. I'm going to take the putter back, get it to the tee, and then
follow through. It's going to be short of the second tee.
Almost went in. You're going to have better distance control when you do this. You'll be a better putter
on your longer putts, for sure. Make that backstroke long enough.
Credit: Brad Faxon, PGA Tour Professional Link: https://www.instagram.com/p/B9hzCaUllDu/
Golf Lesson #30

@BodyforGolf.com. All rights reserved. 66
Good Posture
Today’s tip is on the importance of posture in the golf swing. One of
the basics that we all need to consistently check each and every day.
Good posture allows you to turn much better with the upper body,
creating some resistance with the lower body.
If you don’t tilt from the hips, but bend at the knees & just slump at
the shoulders you can’t turn properly.
Tilting towards the ground with your upper body also helps get the
club more on plane as you are able to hinge the club up better.
Just spending a few minutes a day checking your posture in the mirror
while stuck inside can really help you down the road.
Credit: Luke Donald, PGA Tour Professional Link: https://www.instagram.com/p/B-bANNPJ_uI/
Golf Lesson #31

@BodyforGolf.com. All rights reserved. 67
Lead Wrist Position If your balls consistently miss to the right or left, this is something you may want to check out. I find a mirror to be the best way to work on this at first.. and then see if you can get there on feel.
Here's a quick way to check where your
club base is at the top. We're going to only
focus on the left hand or the lead hand if
you're a righty.
So if you start like this, let's call this
extension and flexion, so what I'm doing is
I'm just going to side to side with my wrist.
Somewhere in the middle is neutral. That's
how you'd start when you address the ball. And when you
move up into the top of the backswing. I'll go sideways here
so you can see.
When you go up to the top of the backswing, I want you to
play around with that wrist.
So look at what the club looks like in the background. You can
see I put a stick on the leading edge.
See what matches my forearm. That's a square face. If I go
like this, that's an open face. Can you see what I've done with
my wrist? I've gone into extension. This is flexion, like Dustin
Johnson. Now it's a shot face, right? So this is a good thing to
be aware of. I think neutral's a nice place to be if you really
don't know where you should be and notice what happens
with your ball flight when you make that change.
Credit: Trillium Rose, PGA/LPGA Teaching Professional
Link: https://www.instagram.com/p/B8XIlb4lwIt
Golf Lesson #32

@BodyforGolf.com. All rights reserved. 68
Perfect Golf Swing Takeaway
Drill Hey everybody, Danny Maude, here. Thanks for joining us. This week, I want to give you two simple drills, and probably the only drills you're ever going to need to get the takeaway right, every single time. We're going to talk about why the takeaway is so important for your ball striking and consistency. So in the takeaway, when you're playing, what we want to do is... what are we after, in a takeaway? We want a coordinated move. We want the arms and the body coordinated and moving away, together. Right? That's the first thing. The second thing we want, is when they do move away together, we want a few lines in play. We want the shaft line, when the hands get to about hip-high, in line with the feet. And we want the face in line with or parallel with the body line. Right? Those are a couple of checkpoints that we really, really need when we're in the takeaway. So the question is: How do you go about achieving those positions every single time? Very, very simply. All we do is, and what I got my dad to do, was take your lead hand, just have a small, little set in the wrist, and from here, move the club back, straight back here. So left hand goes straight back, and put your right hand on. That is as simple as that. Very different to the person who moves this. Now, what's happening here? What you've got to remember, this golf club is a lever. There's a top end and there's a bottom end. If you move the bottom end, the top end moves out here. Okay? We don't want any lever being activated at all in the first part of the swing. What we want to do is keep this lever nice and solid. So what we do is, by moving the left hand here all in one, this lever now is working as one unit. It's only when it gets to about here that we're going to allow the wrist to hinge, and suddenly, as that lever goes down, the head goes up.
Golf Lesson #33

@BodyforGolf.com. All rights reserved. 69
So we want to go straight back here, right hand goes on, then we go up. That's the only time the lever is activated. So let me show you from this angle. We don't want any lever work in here. We don't want the club coming here, this... hands moving out here. We want a straight back movement, nice and coordinated here, right hand on top. From this position, then we can work the club up in position. So let's have a look how we can go about working this. Nice and simple. So take a golf ball, just have a small, little set in your left hand, or your lead hand, move the club back here, and get a rhythm for that. Yeah? Nice and simple. Or is it? You'll notice something else stuck at the end of this grip. What I've put here is a tee peg. One thing when I've worked on this drill with some people, what they sometimes do is they move their left arm, and they're moving it on line, but they're moving... again, they're allowing the grip end on the butt end to move away from their body. What happens when that happens? Remember, this club's a lever. If the butt end moves away from the body, where's the head end move? It works around the body. We don't want that. So what we're doing is this tee peg now just helps you with a little reference point. As you move your left hand back on its own here, with a little hinge, you're simply keeping that tee peg nice and close to your body. You'll notice here, if there's a movement here, where's the tee peg gone? Immediately, you can see it's gone away from your back leg. So, start to get a rhythm of that. You've now got a checkpoint here. Get a feel for that, then just put the right hand in, get a feel for what you're doing, get a sensation here. We want to be rhythmical as possible. Work it up, work it back down. So I often get people to get a rhythm with it, first. Put the right hand in, start to get that rhythm, work it up, then hit the golf ball. Let's have a look at this. So, a couple of practice swings again. Let's get the rhythm going. Right hand in, it's nice and close, there's the checkpoint, face is parallel to spine, club's parallel with the feet, all working good. Let's get to the golf ball. Let's make the shot. Lovely strike. So, it is as simple as that, and that's all we did. If you can get that club working much, much more on line here, it starts to work up and do, so the energy now is going down into the golf ball, it's going through the shot far more efficiently. Without having to make all those weird loops, you're going to increase your power, and clearly you're going to increase your consistency of strike. So in summary, what have we done? We need to get checkpoints. Club needs to be in line with the feet. You need to have a coordinated move-away, not a pick-up with the arms. So biceps nice and connected to the body at this stage. When you move it back, you've got a checkpoint not only with your line of your feet, the face of the club now is slightly angled here, it's parallel with your body alignment. It's not twisted open. Okay? It's parallel, here.

@BodyforGolf.com. All rights reserved. 70
How do we then go about working on this? You simply need to get into a rhythm, but start off with just hinging the wrist with your lead hand, move it back so it's opposite your right thigh, and as you're doing that, use a tee as a checkpoint to make sure that you're not moving it away from your leg. You're keeping it nice and close, get a rhythm, put the rear hand on, backwards and forwards, get a rhythm. Once you've done that, work it up, work it back down, and start hitting those shots. And it is as simple as that. If it was, like we'd all be doing it. But do some practice with this. It really, really works. It certainly helped my dad, and I'm hoping it's going to help you, too.
Credit: Danny Maude Link: https://www.youtube.com/watch?v=wqhXzwiFCJY

@BodyforGolf.com. All rights reserved. 71
The Golf Swing in Detail Set up position one. The best way to do this is feel the inside of the left palm work directly back, straight at the camera. That club face is going to feel like it's a little bit closed. It's inline with the spine and pointed at the ball. And then you're going to slide the inside of your bicep up the left cut. Now once you're to about handle height with the pectorals right here, you're going to feel as this hip gets higher and more to the target and these hands work directly over the right shoulder there, right there you have a nice design of incline in the shoulders. You have a lot of hip depth. The hand path is in a good place right over the right shoulder. And from there we can work the lead shoulder down. These hands classified as the hands and hand path as they're working down are working more down and out toward the ball. You're pushing down on the ground with both knees. As you're working a little bit leftward linearly and rotationally this club's going to be right in line with the target line. Then you can work with some right side tilt, the handle working it up, the face is tracing the spine right down the target line.
Credit: James Jordan Golf
Link: https://www.instagram.com/p/B-aR9HmgEqs
Golf Lesson #34

@BodyforGolf.com. All rights reserved. 72
Swing Like A Dance Routine We call in the golf swing the pyramid of learning, so you learn from the bottom to the top, and the bottom is really good posture, good arm position, good grip. So I'm going to show you how to get good posture before we get good movement. What you should do is get your feet about shoulder width apart. So check your shoulder width here and the middle of your feet there. That's the actual stance you want most of the time, a little bit shorter or narrower for short shots, a little bit wider, but only a little bit, for the longer shots. And then from there I'm going to turn around to the side now and show you how to get really good posture. So feet shoulder width apart, stand up perfectly tall, balanced, so you've got straight body. Now your hip bone, find your hip bone. You've got two of them. You should have, big round bone each side in the hips. Club across the hips, touch the hip bone with your thumbs, and from there this is what you should do correctly, which is bend from the hip bone forward and you're feeling that you're pulling your hamstrings up to your backside, to your gluts here, not this one, which everybody does. All right, so you're pulling up, and then from there allow your arms to relax and lower yourself into your knees and ankles. Lower, don't sit down, just lower yourself so you've got the ground. The better you have control of the ground, the better you'll have control of everything above the ground. So that's the most important thing. Get the posture right, let your arms relax, and then put your club in position. From there I'm ready to go. Now I'm going to show you the movement that you can make, which is really like the dance routine of getting your body to work properly, not just turn and turn back. Load the power as you're turning. We call it the spiral movement.
Golf Lesson #35

@BodyforGolf.com. All rights reserved. 73
The quickest way to getting from the ground floor to the first floor is straight up. The second is spiral around, around, so that's what we want in the golf swing. We want the weight to come up from the left foot and spiral all the way up to the right shoulder. All the way, like a rope tied to my left foot, twisting, twisting, twisting, twisting, and I can feel all the muscles turning up to the top. That's the first movement. Then from there, as we tighten that rope to the top you can feel it wants to get pulled back down, pulled back down, so that's why we call it the spiral. The spiral becomes left foot to right ankle, left ankle to right shin, left shin to right knee, left knee to right thigh, left thigh to right hip, left abs to right chest, left chest to right shoulder as we're going, so a little bit like taking a cork out of the bottle. We push it in and twist it up, so we're twisting to the top. I put a club behind me and I wind and feel the while thing twisting. So the right hip has to go up and back on itself, not just turn. We lose the power if we do that. And then because you've loaded this way, what happens then on the downswing, the spring loading becomes obviously the unloading, down, around and through. So it's a spiral around and up and a spiral down and around and through. It's not just a turn and a turn. The reason it's not a turn and a turn is because if I turn I'm trying to find the club position. If I work the body and move the club with me the club moves through those positions very, very easily.
Credit: Pete Cowen Link: https://www.youtube.com/watch?v=mHLoRILhfqo

@BodyforGolf.com. All rights reserved. 74
Iron Swing vs. Driver Swing
Have you ever found that you can hit your irons pretty
good, but maybe you kind of struggle with your driver?
Or maybe you're a good driver of the golf ball, but
when it comes to hitting your irons, you struggle to
strike them as pure as you'd like?
The reason being is there's a difference between the
way you strike an iron versus a wood and there's a
difference between the way you set up to them.
There's very little loft on the driver. So what we have to
do is make sure that when we swing, we swing in a way
that hits up and gets that ball up in the air. We don't
have to worry about it going too high because there's
not enough loft in there. So in our bodies and the way
we set up, we need to get that upward strike.
Let's look at what we have to do first of all in the setup.
In the setup, we position the ball inside our left heel
and we get the handle of the golf club just behind the
ball and we get our head just behind the handle.
And you'll notice when we do this, there becomes a
slight tilt, the right shoulder is a little bit lower than the
left and the stance is quite wide. I like to have a slightly
wider stance because one, it's a more ballistic shot, much more aggression, but it also helps too in a
sense if we have a narrow stance here, the right shoulder becomes too high.
We've widened it up and we get to sit more behind that golf ball. Now you can see here from this
position, there's no body behind the golf ball here. The low point of the arc ends up behind the ball and
that once we get to about here, we can now strike up on the shot. So we want to really be behind that
golf ball through the impact area. We don't want to be over the golf ball, which is slightly different with
an iron. So that's the first thing, we change the setup. We lean back here, ball forward and away we go.
Simple as that with driver. With an iron, it's slightly different. With an iron, what we're going to do is we
want a descending blow into the golf ball. Now for those of you who are struggling with irons, this can
be counterintuitive.
Golf Lesson #36

@BodyforGolf.com. All rights reserved. 75
You might find that, "Hang on, I'm still going to get the
ball up in the air, why would I want to hit down on the
golf ball?" Well, golf is counterintuitive. In order to get
the ball up, we hit down. We need the loft of the golf ball
striking that golf ball, we want the ball rolling up the face
so it produces a backspin and gets the ball up in the air.
I know that can be confusing, particularly if you've been
struggling to strike your irons. People who do strike their
irons poorly, generally are often trying to get underneath
the golf ball and try and help it. But we don't, we want to
strike down. So what do we do in the setup to strike down or helped you to strike down? The first thing
we do is this, difference in the ball position, we've said with the driver, it's our far left heel, with an iron
now we've started to move much more towards the center of the stance here. And the reason being is
this would be where driver would be.
So we're catching the ball as if there was a pendulum
here, if you imagine a pendulum. With the driver, we're
catching the ball, now watch this, slightly on the way up,
so there's a slight lean with the handle behind. With an
iron, we want to catch the ball on the downward bit of
this pendulum, so suddenly the handle is ahead. So by
doing that, watch this, by moving the ball position, watch
this, we've now moved the handle ahead just by moving
the ball position back, encouraging a downward strike or
catching it on the way down. So the hands... a little
reference point, hands inside left thigh, ball fairly central
in your stance. You'll notice here as well I'm not fairly narrow at stance.
I'm not sitting back, my sternum now is directly over the golf ball because again, I don't want to be back
here and hitting up on the ball, I want to be catching the ball at the bottom of my arc here, so we get
that down with strike. So look here, there's a different setup of ball, now we're central, hands are ahead,
sternum is directly over the top of that golf ball. My shoulders aren't level, but they're more level than
driver. So with driver I was more here, with an iron I'm more here. Don't get this right at the start, you're
going to find it really difficult in the next phase, which is the swing.
Okay. So now you've set up correctly to an iron, it's pretty straight forward. The next thing is you need
to just kind of train the way you strike an iron versus a wood. So we want to encourage a downward
strike. And one of the best drills for this is simply just get an old towel, stick it along the ground behind
the back of the golf ball. Now for those of you who aren't striking your irons very well, what you might
find is that you sit back here, your sternum starts to fall backwards and you start to strike the towel. We
don't want to do that, right?

@BodyforGolf.com. All rights reserved. 76
Because that's going to lead to poor strikes. What we want to do is, and encourage a downward strike.
So all we've got to do now is make sure when we're swinging, we're going to swing and we're going to
avoid this towel as we come down. So we're going to try and strike the ball, then the ground by simply
avoiding the towel. Very, very straightforward drill and it will give you immediate feedback. So let's have
a go at this. So all I'm going to do now, make a simple golf swing just avoiding this towel.
And as you can see here, when you look at there, the ball is in front of the towel, my divot is actually
after the golf ball, nowhere near the towel, and I struck a perfect strike. And it'll give me instant
feedback. You might find when you try this drill to start off with, you start striking the towel, not a
problem. It's a way of feeding back to you as to exactly what you're doing. So just take your time, work
on some small swings with this, work on striking that ball, then the ground, and in time you'll start to
improve the quality of the strikes with your irons. Now, for those of you who struggle too with the
woods, let's see what we can do.
So for those of you who are hitting your irons pretty good, but struggle with your woods, the chances
are you've got a descending blow into the woods, we do not want that. So I've got a really simple drill
that you can work on to try and encourage this upward strike into the shot. So one of the things... As
we've said, you must have the setup right. Use a mirror to do this by the way. When you're setting up
here, we said we need to be sit behind the golf ball. There's one thing I found when I'm coaching people,
even when we've gone through these little exercises, they never go as far as they should do because it
kind of feels weird. So what I would do, start at home, get in front of a mirror, start to practice this
because if you can get yourself into mirroring this position here, you might feel like you're like this to
start off with, absolutely fine. But it's really important because there's a difference between feel and
real.
This is the reality. It can be perfect, but the feeling might be like this. So important, before you head to a
driving range or head to a golf course is that you do this in front of a mirror first. So with that out of the
way, let me go through this exercise. We need to encourage an upward strike through the ball. So where
the ball position is inside left heel, we position our body behind, and all I've done here is I put a tee peg,
a full height driver tee peg, about six to eight inches in front of the golf ball. And now if you are a
downward striker, you're going to strike down and you're actually going to end up striking that tee peg
out of the ground. We don't want to do that, right? So what we want to do is we want to strike this golf
ball and we want to go above the tee peg. Simple as that.
So I'm going to make a swing now and I'm going to do it in a way that... I'm going to do a small swing
because I think that's one of the best ways to work on this. I find when I'm coaching people, when
they're doing big, long swings to start off with, it's difficult to learn this field. So I'm going to do a small
swing and exactly how I want you to work on it because you need to train this upward motion. So nice
and small and I'm going to avoid hitting that tee peg after this shot.

@BodyforGolf.com. All rights reserved. 77
Beautiful. Missed the tee peg, swept that ball up in the air, small swing, gives me the chance of kind of
feeling that motion. So look at what we're doing, the difference between irons and woods really simply
is this, hitting irons, we need to hit down, hitting driver, we need to hit up. Therefore, we need the
difference in the way we sit up. With the driver, we need to sit in a way that encourage an upper strike,
we need to sit behind the golf ball, not sitting like this, sitting like this. So everything is a little bit behind,
right? With an iron, we need to get everything more over the golf ball, so now our sternums over the
golf ball, why? Because we want to hit down on the golf ball. We're giving you two drills. One drill is just
a towel behind the golf ball. Put it just an inch behind and try and strike the ball without hitting the
towel, it will encourage a downward strike.
And with your driver put a full length tee peg about six to eight inches in front of the golf ball and start
making swings trying to avoid it. So here you're encouraging this upward strike. It won't work to start off
with, so start with some small swings. I find a lot of my clients are very quick to want to give these big,
massive swings. And it's too difficult to learn your golf swing when you're at full speed and at full swing.
So really give yourself a break and make this as easy as possible so you can feel the difference between
this strike and this strike.
Credit: Danny Maude Link: https://www.youtube.com/watch?v=p4Cd3L4zv5o

@BodyforGolf.com. All rights reserved. 78
How to Create Hip Depth Mike M.: So you start here. You make a swing. Right foot back, left foot back. Right foot back, left foot back. Right foot back, left foot back. Right foot back, left foot back. So you're constantly moving away. Eric C.: That was impressive. Mike M.: Straight line. Straight line. Say right hip back, left hip back, right hip back. So you feel like you're moving in a straight line. Now if we put it on the video, your hips are going to turn both directions. But you feel like you're just walking straight backwards. See when you walk, when I walk backwards, my pelvis rotates. But it's a straight line force. See what my hips are doing? They're turning. But I'm more open in straight line forces. Mike M.: That's how your body works. Eric C.: Hey guys, we're out here in beautiful Gold Canyon, Arizona at the Superstition Mountain Golf Club. We've got a special treat today. We have Mike Malaska. I know a lot of you guys know who Mike is. If you don't know who Mike is, Mike has just about every accolade you can have in golf. He's led the Jack Nicklaus Academies for a long time. He's a Golf Magazine Top 100 Teacher, Golf Digest Top 50 Teacher, PGA National Teacher of the Year, and the Southwest Section PGA Teacher of the Year. Mike M.: So we're going to talk about your hips and how they work. So what this club is, is this is my pelvis. So this is my right hip socket and this is my left hip socket. This is the middle of my pelvis. Now here's the task. The task is as my hips rotate, the center of my pelvis can't move closer to the ball. If I move closer to the ball, you're in trouble. You're jammed, you're steep, you have all kinds of problems. So here's what happened with a lot of people. Because they tended to sway away from the ball, which is another issue in and of itself. But what everybody said, "Okay, I want you to keep your right knee flexed, stabilize your right hip." So let's see what happens if you do that. So if this is my right hip socket right here. And I
Golf Lesson #37

@BodyforGolf.com. All rights reserved. 79
stabilize it so it's not going to move, and I turn my pelvis or hips at all. What just happened to my center? It just moved four, five, six inches closer to the ball. Mike M.: So if I stabilize this and I turn my hips, and then I tried to get off my right side and clear my hips, what's your center keep doing? You keep moving closer and closer to the ball. Somebody says, "You're going into early extension." I go, "No, you're just moving closer to the ball." Why? Bad task. Here's your task. Now at the very least, whatever amount your left hip is going to go this way, your right hip has to move back, your hip socket. So if you did this, some of the tour players do that. And then they go here, and then they move to their left side, and then they push their left hip out of the way. So what did this do? It's moving further away from the ball. Mike M.: Now here's where most of the tour players hang out. When they go back, this left hip socket doesn't move out. It moves a little lateral, and their right hip moves back. So they do this. So what's this done? Further away, and then they move this back. What did they just do? That's why you see all this room for their arms. That's why they can shallow the club or shallow their arms. There's space. If you're sitting there stabilizing this hip, right now game over, abort mission. We're done. You're going to be steep and over it. Mike M.: So you got to start to understand that once you set up, once you set up, when I start back, this hip socket has to get moved back. It has to move back. If it stays there, and my hips turn it all, now I'm in trouble. Eric C.: Okay, Mike. So what an unbelievable visual. I've never seen someone do that. I think for me, someone who genuinely struggles in this area, maybe let's talk about some different fields, drills, thoughts of hey, if I'm that guy or gal, how do I apply this? Mike M.:

@BodyforGolf.com. All rights reserved. 80
Okay. First thing, if you set up to the ball, let's take you out of golf for a minute, but set up to the golf ball like you're going to hit it. Now, if I do this and I get rid of the club. So now we're in the gym, and there's a cable right here and it has a pulley system right there. Now if I told you to pull the cable back, use your hip and pull it back. Pull, pull, pull, pull. Okay, see what's happening there? So where's your way going? Is going into your heel, and you see how your hip socket moved back? Mike M.: Okay. Now let the cable come back down. Pull it back again. Okay. Now if I had another cable that was hooked here, now you start to let that one come down. And then as it comes down now, right there, your left starts to push-pull this cable back. Boom. So now let's do it again, back, and the other way. That's it. So the cables are what, if the cables are on the right angle, the cables imitate the direction of force that the clubs pull on you. And then what you're doing is you're pushing in a parallel, what they call a parallel force factor, away from the force of the club. Okay. But when I do this, I've never seen anybody sway their hips. So here's the ca- I've never seen anybody do that or go out to their toe. So when I say pull the cable back, everybody goes like that. And they load into their right heel. And then I take this and I say, "Okay, we come back down." And then I say, "Now pull the other cable." I mean that's perfect. Mike M.: And then so you say, give me a feel. I do that to people. And they go, "I've never felt that in my swing." I said, "Well, that's why you're no good, because you've never felt it." I said, "I don't know what you're trying to do, but that's all I feel." Mike M.: And if you use the cables correctly on the right angle, then the way, the force of the cables pulling you, it's create the same type of force that the club is on an angle. So it's a parallel force factor for what a club does. And so now you start to feel how you offset that inward momentum of the club. And then as soon as people feel that they go, "Oh, I can do that." It has nothing to do with flexibility, but now it's a feel. So that's one. I would say just do that and you're going to get it. Eric C.: And I think, and it's always interesting to go through these, too, and kind of see what it feels like and express the thoughts and feelings. A lot of these drills and fields are so straightforward and simple that it doesn't even need reiteration. That's pretty basic and straight to the point. I think for some people the knowledge would be the key. Like, Oh wow. Like, Hey, if I were to just kind of think of my belt buckle or center of pelvis here going farther from the ball during my back swing, and then going farther again from the ball during my down swing, in and of itself could be enlightening. Mike M.: It is, because people are trying to stabilize and clear their hips. See if I tried to stabilize my right hip, if I

@BodyforGolf.com. All rights reserved. 81
tried to stabilize and clear, I'm going to throw right up into the ball. Because that's my task. But if my task is to move my pelvis further away from the ball, then you got something. What you just did there, and here's what ... I talked to Tiger and Jack, pretty good players. Tiger made the comment that in his lower body, they asked him what he was trying to do with his lower body. He said on his back swing, all he tries to do is get his right hip as deep as he can get it. And on his down swing he tries to get his left hip is deep as he can get it. He said nothing about turn. Deep is a straight line force. Turn is confusing. Mike M.: I asked Jack and I put my, this is unfortunate. I've put my hands on Jack's hips and had him move. And I said, "So what do you, what are you trying to do?" And he basically says, "Well, I'm trying to do is just get my right hip out of the way." And you put your hands on his hips and he goes, and if you're not, if you're not careful and you're standing there and you're touching his hip when he goes, wham. I mean his fricking hip comes back so hard. It's incredible. Mike M.: Oh no, it'd knock you down. So there's no stable hip. He's doing this. So he's trying to get his hip out of the way. Tiger's trying to get his hip as deep as he can get it. The majority of people are trying to stabilize their hip. That whole stabilize your hips and coil against your lower body was a killer. It was popular for a while. Had some ideas that it might work. It didn't work. It's going away. You have to get that right hip deep. And what you just did, thinking about get your belt buckle away or pull, are really good ways to do it. Mike M.: Now I want to show you one more drill. Mike M.: I hesitate to, because it's, it's almost magic. And it's athleticism. You have to learn so that your body understands that it's trying to move away from the ball. So it's trying to move away from the ball, and it's trying to move away from the ball in straight line forces. Now I'm saying it and you might be a little confused, but as soon as I show you, you're going to get it. Mike M.: Here's what we got, Eric. We got four balls. Now here's what we're going to, I'm going to show the camera this way first. So what we're going to do is we're going to start outside of this ball. And what you do is you make a swing, and now we're going to go backwards. So we're, and I'll do it first, then I'll have you do it. Mike M.: But here's what's going to happen. You swing and as you swing back, you've got to step your right foot back, and then your left foot back and hit. Right foot, left foot. So you're constantly moving away from the ball. So here's what we're going to do. So you start here. You make a swing. Right foot back, left foot back. Right foot back, left foot back. Right foot back, left foot back. Right foot back, left foot back. So you're constantly moving away. Eric C.: That was impressive. Mike M.:

@BodyforGolf.com. All rights reserved. 82
Your straight line, straight line. Say right hip back, left hip back, right hip back. So you feel like you're moving in a straight line. Mike M.: Now if we put it on the video, your fricking hips are going to turn both directions. But you feel like you're just walking straight backwards. See when you walk, when I walk backwards, my pelvis rotates. But it's a straight line force. See what my hips are doing? They're turning. But I'm more open in straight line forces. Mike M.: That's how your body works. So all we're doing is tuning into right hip back, which is turning your pelvis. And you're moving away from the ball. Mike M.: Okay. So you swing forward and then your right foot drops back, then your left foot drops back and you hit. You're good. And then you just keep going. Just hit them easy.
Credit: Mike Malaska Link: https://www.youtube.com/watch?v=dF55XUErEHc

@BodyforGolf.com. All rights reserved. 83
Short Game Tips Even for these very long bunker shots, you'll see me play a lot of loft, a lot of face open. And by playing it open, you think, "Oh, I'm not going to hit the ball very far," but the more I play it open, the more bounce on putting on. And for me, bounce is the most important thing to create distance in a bunker shot. So even though I'm playing a super wide open, I also have my stance really, really wide. And the other reason I do that, is I feel like the narrower I stand, the steeper my angle of attack. The wider I stand, the shallower my angle of attack. So again, more ability to use that bounce, and less chance of my club digging in. So, it's a very wide, and I'm going to go a lot more weight on my left side. Now, I'm going to be using a different part of the club, and I'm going to be really trusting the leading edge. Again, super wide open, and I'm going to be just chopping down the leading edge, right behind the ball. So, that's the way I would play it to come out super short, and sometimes that's the way you have to play it when there's not a lot of sand in the bunker. When you're trying to play a super delicate shot and you sort of like ... you're already trying to get under the ball. If you go too much, and there's not enough sand, the club is going to bounce, and you're not going to be able to get that coming out soft. I'm going to play it how I feel is almost a very shallow, sweepy draw feel. I want to feel very connected with my elbows and my body. A bit like the bunker, I'm going to have the ball up. I'm going to have my hands low, but I'm not going to be open. And I'm basically just going to stay very connected. I'm just going to sweep underneath it.
Golf Lesson #38

@BodyforGolf.com. All rights reserved. 84
This doesn't now offer me that same opportunity. Now, I'm going to be using the front end of the golf club, so now obviously I need loft. I'm very willing to lay it wide open. Now, I'm putting 90% of my weight on my front foot. This is a bit more of how Mickelson would hit his lob shots. He's way open, weight is way left, and then he really commits to driving the leading edge down. And you say, "How do you know you've designed it with almost 25 degrees of bounce on the leading edge?" That would give me the confidence to really drive that leading edge down into the ground. So, with a bad lie, I'm going weight forward, way open, and driving it down. And one thing I've learned not to be scared of, even on a tight lie is, so you have position one, two, and three. So I've always felt that the most important ball position relative to your upper body, not necessarily your feet. I feel like when we're chipping, the club always wants to lengthen to be at its longest point underneath the left arm, or left arm pit area. So, that's the low point. So if I put the ball back, my low point is ahead of the ball. So it's always going to be descending, descending, descending, descending, descending, until it gets to my low point, which is the head of the ball. So, that's a way to guarantee contact. So if I want to hit a soft shot, I'm sometimes more than happy to play the ball and the low point at the same point. But I'm happy to actually put the handle of the club behind. So position one, position one, position two with the ball, and now just keeping this little connection with my armpits turned through, and that's, believe it or not, a lot of how Seve chipped there. He was hitting three, four inches behind it. He often talked about that the ground absorbing energy of the club. So like we were talking about the sand slowing the

@BodyforGolf.com. All rights reserved. 85
club down. Seve always liked the ball to come out soft, and he never relied on spin. He always wanted it rolling in as much as he could, like a putt. So he would always go for height, land roll out, rather than the low gravity spinner. ... approach would be, he's always committing to driving that thing down. He's that hinge it and pinch it, so he's always working that leading edge down. I guess that's why he uses a 64 degree. His method is very different. Seve would have used a 56 degree. Seve could hit incredibly soft shots with just ... his whole technique was designed about returning loft, increasing loft of the club, and he would always be really soft on grip pressure. One thing, he would always hold it one or two out of 10. He could literally chip it, and let go of the club. That's how soft he would be with his hands. But anyways, the other approach is, if you got the heebie jeebies with hitting the ball, and hitting the ground first, Phil's approach is the simplest possible shot he can hit is everything off the back foot with the square club face. And there's that hinge, and pinch it through. And then obviously if he needs to do something different, he will play from foot, open club face but still very much the same, hinge it, pinch it through. But that's all well and good, but the contact isn't ... there's no margin for error there. You need to be spot on every single time. I think for me, if you basically just some principles are, if you want to hit shots that are going to get back to a back pin, I always tend to go long arc. So with the club in my left arm being long, and that arc is quite long. That's going to have more energy, more mass on the strike. So, that's always coming out quite quick. I'm going to always get the ball back to a back pin. If I'm playing something a little shorter to a front pin, I almost feel like I'm now getting down to it. I'm cracking the left elbows. I'm making the radius, the length here shorter, so there's less energy, less mass. And now I'm going to be shortening it even more to get that coming out soft. So, just some of the principles, really that are involved. So when I putt traditionally, I am very sensitive. I feel every little tiny movement in my stroke, and I start to nitpick my stroke way too much. When I put this grip in play, I felt like it calm down all the sensations that I was feeling a little bit and just made everything a lot more simple up here. So I don't fight the stroke as much. I think that's the most important thing. But, so yeah, I would say I get in there this way, but the reason I tucked the shirt in last week, is that I felt like I was beginning to steer it a little bit. I felt like I was beginning to push my hands out a little bit too much. So just by popping this here, I wasn't jamming it in, but it just gave me an incentive for my chest and my upper left arm to work in rhythm together. And that felt like it just really helped the release and the flow of the stroke, a pretty cheap training aid. And then as I walk into the putt, I'm building that picture back to the ball. So I'm kind of aware of where the ball is, and I'm building that line back. I, then, quiet my eyes down on the ball. Then, the back of my putter, it has a channel. So I feel like I'm laying down a bit of a tube, or a channel, just for the first couple feet of the putt. So this little clear area, it pretty much is the width of the ball. So I feel like I'm just laying down a little starting tube, really, that's what the ball is going to start down. So I don't really consciously aim the putter, but I set my tube, is what it feels like. And then I send my

@BodyforGolf.com. All rights reserved. 86
awareness to the hole, and then I track my eyes down the line to the hole, awareness back to the ball, eyes back to the ball. And now the key is, my eyes are staying dead still on the ball, but my awareness goes to the hole, and I'll react to that.
Credit: Justin Rose Link: https://www.youtube.com/watch?v=-Du2qLG6qpY

@BodyforGolf.com. All rights reserved. 87
Daily Movement Prep
I'm Jon Rahm. This is my trainer, Spencer Tatum. And we're going to go today through one of my
favorite warm-ups. I do it before every round, I do it almost every day. And it consists of basically
warming up your core and glutes, the king and queen muscles in the golf swing. And those days that
we're all at home, sitting down a lot, is the first two
that are going to go. So getting your core and your
abs activated is going to be very important.
So he's going to guide me through it and explain to
you guys what we're doing and I'm going to give you
my personal input of what I feel, see if it helps out.
The one thing you will need is an iron, try to get a
long iron. I have a five iron here and you're going to
be using it throughout the whole exercise.
Spencer Tatum:
So this warm-up right here helps us not only to help
John with his mobility, stability, but also prepare him to play. And we can also use it as strength warm-
up on the road, too. If you're at home, if you're sitting around, a lot of times you're getting really tight
hip flexors, playing a little Xbox. I know somebody that likes to do that. But on the other side, it's kind of
getting everything back in line before you get back to swing your golf club or you get back in training
sessions. We're going to take you through it.So we're going to start with, John's going to lay on his back.
As you can see he's got his five iron golf club, and what he's really trying to feel is that pelvic tilt. So he's
going to really push in the ground, he's going to take the club, apply a little bit of pressure to hold this
core and hold it lock ed in.
Spencer Tatum:
So he's going to breathe in, and he's going to
push one down. The whole time he's holding that
midline as he's coming back up. So we're working
stability right here of the core, but we're also
working mobility of the hips. So John's going to
demonstrate about three reps here. And as you
can see, he's really focused on pushing that club,
keeping pressure in the upper body and the
lower body and maintain that stability.
Spencer Tatum:
So after we kind of get this going, he's going to
Golf Lesson #39

@BodyforGolf.com. All rights reserved. 88
move to a bridge. So it's a core activation bridge. He's still using his five iron, same concepts apply. He's
going to try to hold that midline, create that pressure. He's going to bridge up. He's really focused on
extending that hip. I know a lot of us are going to want to arch that low back. Make sure you really hold
it here. You drive into the ground, extend that hip. So, John's going to do three reps. Notice the
pressure, his breathing. He's breathing out at the top, breathing in. Hold it. And then breathe in. He's
really working single leg strength in the lower leg and mobility of the hip and he's working core stability
up top.
Spencer Tatum:
So now we're going to move. Now we're going to start getting a little more T spine mobility. So John's
going to start right here. He's going to
move right to the left, feet are going to
go opposite of the club. He's going to
come back and he's really focusing that
separation. How far can he go each way,
and he's trying not to let that back arch.
So he's trying to keep those knees in line
with the hips and he's trying to breathe
out, breathe in, hold the breath and
transition, breathing back out. We really
like this in creating a separation for his
golf swing and mobilizing his T spine and
getting ready to go.
John Rahm:
This could actually be my favorite exercise. Very important to be focused on the timing of things. So you
try to have your legs get to the limit at the same time as your club or your upper body to get into the
limit. If you go without sequence, it's kind of going to look like this and you're not going to be working
very well on what we're trying to accomplish. So it's also going to help you with timing and sequencing
on your golf swing.
Spencer Tatum:
This right here really helps him lock his midline in. The one thing we don't want is that reverse spine
angle or the early extension. So John's going to really focus creating pressure with his top hand with his
lat. He's really pushing down right here and compressing the lower leg. Breathe it in and he's trying to
get as long as he can without losing that midline. Soon as it come in, breathe in, and breathe out. I
should be able to touch right here and he shouldn't be able to lose it. So notice the pressure he's putting
into it. It's a lot of pressure, really working that compression force as we work and we're at impact.
John Rahm:

@BodyforGolf.com. All rights reserved. 89
It's very important to keep that pressure. If you lose it, this arm is going to get loose, you might arch
your back. If you keep this pressure continuously going throughout the whole exercise, it's very hard to
arch it, especially if you use that hip and push into the hand.
Spencer Tatum:
So now we'll do the other side just so we're balanced out. And we're doing three to five reps here, so
you can do three to five reps and what
you're really trying is to get that feel. So
notice how he's coming in, coming back,
coming in, coming back, really keeping that
everything locked up. And he's thinking
about it, he's compressing that opposite
shoulder to the opposite hip.
Spencer Tatum:
Okay, so now we're going to move a little
bit more in our straight leg sit-ups.
Spencer Tatum:
So, boom. Really working, rolling. Think
about, we're going down, click, click, click down the vertebrate and click, click, click on the way up.
Jon Rahm:
Try to keep those arms above your head at all times. I'm in-pulsing a little bit. The stronger you are, the
easier it will be. So, essentially, you try to keep them straight without really using your arms to get up.
It's going to be a really good way to get
that ab connection again and really make it
work and warm up.
Spencer Tatum:
And really prepare you for hip hinging,
which is important for the setup.
John Rahm:
Exactly. So we usually do somewhere
between 8 or 10. Whenever you feel

@BodyforGolf.com. All rights reserved. 90
you're warmed up, you get to that point.
Spencer Tatum:
Good. So now we're going to
start working up the chain. So
you noticed how we started on
the back? Just like how we learn
how to move, we're warming up
in that same process. We're
starting on the back, moving the
arms and limbs, we started
compressing midline, which is
like our crawling pattern, and
now we're going to half kneeling
transition period.
Jon Rahm:
Yeah, so in this exercise, you basically start by relaxing back in your hip. Put a little bit of pressure down
on the club and then you basically drive through and try to extend that hip. Create this middle line,
balance in the right hip, and just make it works. If you do it properly, you should feel a stretch in the hip
while you're pressing down on the club and you will feel that connection basically from your right
shoulder all the way down to your right knee. And then you relax and keep that pressure on. Do it for
maybe two seconds, maybe five reps each side, and that should be enough.
Spencer Tatum:
Now notice how we're working on what we call the rack and stack. John's racking it up and he's stacking
it straight up.
Jon Rahm:
And, again, all the previous warm-up is going to help. If you have all your core activated and working
properly, you're not going to lose your back. Your abs are going to stay in there and make you just feel
like a straight plank.
Spencer Tatum:
Yep. So do three more right here. And notice, when he comes up, he was pushing down first and he's
driving that hip through, really getting that nice stacked feeling.
Jon Rahm:
You will feel... It's pretty similar to the dead bug, honestly. If you do it one-handed, it would be a very
similar feel to that when you're pressing down through your arm and just feel the same connection.

@BodyforGolf.com. All rights reserved. 91
Spencer Tatum:
Right. So now we've worked in a transitional period, now we're going to standing. All right. Single leg
stance, I'd say it's a little important.
Jon Rahm:
Yeah. So now, RDLs. Not my favorite exercise. It's hard to keep balance throughout doing them for most
people. I struggle if I don't warm-up properly or if I don't do anything for a week. So, basically you try to
keep your arm extended, keep that pressure, put your toes up. Keep that pressure between the legs,
between the leg and the arm, and basically do a normal RDL. Try to go to parallel if you can, if you can't,
whatever you get to, but never lose that pressure between your arm and you leg.
Spencer Tatum:
But you notice, he's really working those feet. So when you think of that bottom foot, when you go
down, you're gripping those toes in the ground to anchor that foot down. This will help with our sway
and slide in our golf swing.
Spencer Tatum:
And we're also really working on loading that right and left hip. Can you get right here? As you're
transitioning, bang, right here so we can snap it and drive the ball.
Jon Rahm:
Now, I also understand, not everybody works out every day and not everybody is used to have this
stability. Just work on it. If you fall a couple of times, don't worry about it. Just try to work on it and feel
how your body is warming up and don't worry too much about the RDLs if you can't do it just because it
is a little bit more technical so you can just work up to it.
Spencer Tatum:
Because now we have all the joints involved. So now it's a higher level pattern. So the last thing we're
going to work on is a little two-legged hip hinge to get us ready to swing the golf club. So-
Jon Rahm:
For people that know, it's almost like pre-set to a deadlift. But try to keep your elbows open, not closed
like this, try to keep them open and try to keep the club touching your body as much as possible and just
hinge.
Spencer Tatum:
What we're looking for, is can John keep his head, shoulder blades, and glutes all connected to the club
as he's putting force in the ground and loading those hips? Now notice how his shin angle is staying nice
and vertical. He's not going backwards where he's losing power, he's not going too much farther than
that squat.

@BodyforGolf.com. All rights reserved. 92
Spencer Tatum:
Now this is a challenging pattern. It looks simple, but it's way more challenging than you think.
Jon Rahm:
Try switching hands as well. And I would say, as soon as you feel the club leaving your body, so you see if
I start bending my upper body without hinging, you'll see the bottom of the club and the grip will not be
touching my spine.
Spencer Tatum:
Now, John, how important is the breath when you do this? When you're breathing?
Jon Rahm:
It's important to keep that tempo. So you probably explained it better than I can, but just being able to
breathe throughout it so you don't gas out, especially also in the golf swing, just having the proper
breath at the right time. You're not going to hit the ball while you're inhaling. So you kind of need to
work on that as well. So, basically, you hold your breath while you're doing. Basically, you inhale and you
hold your breath while you're doing the challenging part. And then when you basically need to explode
is when you exhale.
Spencer Tatum:
So, an easy way to think about this, breathe in for stability, holding that breath in transitional periods,
and breathing out when you're getting mobility and power. So he's breathing in, holding that breath,
breathing out, hard exhale at top. So, very simple warm-up, just need a five iron, a mat if you have a
hard ground or hard surface, and I think it kind of gets you ready to go.
Jon Rahm:
Yeah, it's something everybody can do now that you're home every day, especially if we're sitting down
a lot, like most of us are since you can't really do anything. It's going to work out to at least not give you
some back pain and avoid that and just get some of the muscles working properly.
Spencer Tatum:
Yeah. And if you find in one area... We normally going to go three to five reps on each side of each leg or
three to five reps on each movement. If you find that, "Hey, you know what? After the three to five, I
don't really feel like I got it," do two or three more until you feel it. And if you feel like it's easy, it's no
problem, do three and then just move on. It's more about the feeling and the quality of movement than
the amount of volume. And you can do this two to three times a day or one time a day and you'll see a
major improvement in your mobility, stability, and it will hopefully translate into swinging a better golf
swing. Credit: Jon Rahm
Link: https://www.youtube.com/watch?v=AzCqG5RSp_8

@BodyforGolf.com. All rights reserved. 93
How to Strike Your Irons Pure
You want to peer your irons like a tour pro? Are you tired of hitting it fat, thin, toed, heeled, maybe in
the shank? I'm here to help you today. We're going to find the best way to peer those irons, get some
distance back in there, and hit them straight, high, and knock down some flag stakes.
My name's Matt Walter, PGA teaching professional at Vanderbilt Legends Club. So today, we're going to
get you underway of hitting your irons the best you ever have. I have three drills that we're going to do
today, all of which are going to help you find the center of the club face with your irons the best way
possible.
Let's talk about what happens when you
hit a good iron shot. What are we looking
for dynamically on impact? When we hit
a good iron shot, it should be ball first
contact, and the club head should be
traveling down, still, as it contacts the
golf ball. Our divots are actually taking
place three to four inches after the ball
and not before the ball or at the golf ball.
If you want to hit your irons peer, we
have to be able to ensure that we're
hitting the golf ball first, the club head's
still going down and catches the golf ball
with the divot just past the ball and go in
through the shot. Now just because I said
the club head's going down, doesn't mean your arms are going down. But the club head's still traveling
down.
Also at impact, we want some shaft lean, right? We want to have our hands in front of the golf ball,
that's the holy grail of golf shots everybody talks about, is got to have more shaft lean, more and more
shaft lean. Well, today's drills are going to help you achieve that and it's not going to be the ways you
might think, where you're actually going to focus on shaft lean.
We're going to do it by focusing on some other drills, that are going to bring it in because you have to
have shaft lean to hit the shots the way you want. The first drill here is with a towel. What we'll do is,
we'll take our towel and we stuff it under left arm, under right arm. This gives us our connection
Golf Lesson #40

@BodyforGolf.com. All rights reserved. 94
between our arms and our body. The tour player is able to connect their arms back to their body on the
down swing, and that's why they can hit such great shots. Is that there's no loss between their arms and
their body.
I put the ball in the tee to help make
this drill a little easier. All we're trying
to do is make little half swings to feel
out how our body turns and twists.
When we do this, it's not a full swing.
You can make fuller swings as you get
better, but I'd only recommend a half.
Ball's in a tee to keep it simple. And
we're going to take a couple swings
and hit a couple shots to see what it
feels like.
Now, for some of you, this move's
going to feel horrible. It's going to feel
awkward, it's going to feel like you're
doing it wrong and you can't make
contact. That is because we have a tendency to lose that connection. What will happen for you, if this is
a tough drill for you, is that your arms will start to float away from your body too soon, okay? We've got
to have our arms, our elbows back into our rib cage as we hit this strike.
So when we're up at the top of our back swing, this is a great drill for the players who have fast hits,
arms get stuck behind. Or you have slow hits and the hands get way out in front and you flip. Okay? This
drill will help you find that connection, so you know what it should feel like on the down swing.
We get set up, again, we're just making nice little half wing, basically going to feel like a punt shot. But if
we do this, it should feel like you're going to absolutely peer your irons and it's going to feel really, really
crisp. Now, the next drill's a little bit more fun in my book, because I don't feel so restricted. But it's still
another great drill for those that have an unstable lower body.
This drill, I call it the hand speed drill. This drill, we're taking away your lower body and making you use
your arms and your hands more. Okay? The reason for that is, I'll see a lot of players lunging the ball or
they'll twist backwards on their right leg. You have all the other garbage that your lower body can do
that throws you off. Getting your toes, fall back on your heels. All right?
We're going to put our feet together. Again, ball's on the tee, feet together. All we're going to try and do
here is make as big of an arm swing as we can without losing balance and quality of contact. Okay? I can
make a pretty big swing because I've done it for so long. You may only make a golf swing that's a half

@BodyforGolf.com. All rights reserved. 95
swing. We may only be able to take it back to here and hit shots that are solid because we're not sure
how to get the connection back and how to use our arms correctly.
It's a great drill to develop hand/eye coordination, right? This is another great drill to help speed up
them hands so we get a little more distance in our bag. Once you've practiced this drill, I want to see you
making full-ish golf swings as fast as you can in-bounds. The trick to this drill is that your feet have to
touch and your knees have to touch. If you're more bow-legged, your knees won't touch.
But be aware of their movements. Are your knees flexing and extending? Or are they staying calm and
still and letting your arms do the work? We're trying not to use our feet a whole lot here, we're trying to
use our arms and our hands to develop that consistency at impact.
Our next drill, I call this drill the baseball drill. We get set up, we put a tee in front of our left foot and
our right foot, okay? The reason for the tees, is because we don't want to overstep our golf swing. I see
too many players do this drill and they'll step way out and get a huge, wide stance they never have, and
they can't turn effectively, and it's not a good golf swing.
We want to make sure we rebuild our stance so we put the tees in front of our big toes. You'll see what I
mean, why I see more players step out. What we'll do is we'll get set up, right foot to left foot, okay?
Now to start the backswing, you have to swing the club back and step your left leg out. The trick here is,
the hands have to hit the three quarter mark the same time your left foot hits the ground, so we're
here.
I'll see this, and the club doesn't get up enough, foot's on the ground. Well, now you're too early. I'll see
this, hands are already there before my foot gets there, now you're late. I want hands to three quarter,
left foot hits the ground. If you just have to do this a couple times to get the feel, great. But you should
be feeling like you're changing your pressure with each step, okay?
Then, let's make a real swing. We set up, left foot to right foot, step, and swing through. You should be
able to feel your momentum moving to the target, okay? This is a great one if you find yourself stuck on
your right foot too often and you never get to your left side. Again, the key to this drill is that while you
start your step, your left foot hits the ground the same time your hands hit the top for that three
quarter position in your backswing.
We've gone through three drills. The towel drill, underneath your arm, making half swings, working on
the connection. The hand speed drill, feet together, knees together, swinging the golf club as big as you
can in balance with good contact. Then we have the baseball drill, where we're stepping it out, making
good swings towards our target. Do these three drills, and you'll start peering those irons. Credit: Matt Walter
Link: https://www.youtube.com/watch?v=FCrUo3ASV7k

@BodyforGolf.com. All rights reserved. 96
Your Hands are the Secret to a
Better Golf Swing I'm Mike Malaska from Malaska Golf and I've been teaching a long time, website malaskagolf.com, I've taught all over the world, PGA, played for a living, went through the whole thing, took tons of lessons, worked on my game. I was a lot better player or ball striker when I was 17, 18, 19. When I really started playing, I really got really good fast. Then all of a sudden in my attempt to get better, I got worse. And well-intended that everybody was trying to help, some of the things they did really.. . Didn't ruin me, but they made the swing a lot more complicated than it had to be. So my whole life has been about, how does this game... How do we learn it? How do we teach it to people? There's all kinds of ideas out there. There's all kinds of ways to swing a golf club. Believe me, I've done almost every one of them. I've practiced them. I watch what's on YouTube. I see what they're doing. I look at it relative to what I've learned. Does this make sense? If it does, I'm going to give it a try. Here's the deal. The industry or most what everybody hears out there, is all about your core. It's what your core does. It's how fast this moves. It's how strong you are in here. Well, there's no question your body's important. I've led this industry since the 80s when I put a program together called The Swing Game for the PGA of America about how you teach movement patterns and how you bring golf into somebody's life. The way we teach it now, in general. "Put your hands kind of whatever, stand up, shift your weight, turn, swing through, shift your weight, turn. There we go. Go have a wonderful life. Oh, and all your power comes from your core. So here's what we're going to do. When you get here, you want to get turned as much as you can. And then from here you just want to unwind as hard as you can unwind." Well, I get a lot of that. I've worked on it, but here's the real deal. You play the game. Listen to me, really close. You play the game with your hands. Here's the game. This is an important part. Here's what you have to learn. You've got to learn how these work. Now, I tell people you even play with your fingers
Golf Lesson #41

@BodyforGolf.com. All rights reserved. 97
and your fingertips. This whole "Quiet your hands down". Are you kidding me? Every really good player I've ever been around is unbelievably talented with their hands and how the club face works. That's why they can do what they do with their bodies. You've got to train this first, and by the way, in my opinion, where's your major speed producer? It's right here. It's the first thing we should all learn and teach. How to throw. This relationship of my arm to my wrist and the speed that that generates. I put something in my hand and create speed with it this way and I hook it to my core and I create it this way. When you watch that, they're both important, but after teaching and doing this for almost 55 years, here's where you start. Your hands. You have to get your grip on there correctly. In your fingers. I tell people that all the time. And where does the club end up? Their fingers touch it, but it's in the palm of their hand. Your wrist can't work. You see tour players standing like this and they're holding the club on their shoulder. Where does the club end up? It's in their fingers. There's where your strength is. I very seldom see somebody show up with the club too much in their fingers, but I almost always see them show up with it too much in the palm of their hands. So the club has to be in your fingers, your fingertips. Once you get that, now you can start to create this lever system. Well, that lever system right here is my golf swing. I mean that's it. All right, now if I want this to swing in a bigger arc or make a bigger swing, all of a sudden my body starts to move to transport that lever system. So this is a transport mechanism for this lever system, the club and the club head. So it's not just good enough either to feel the club head. You have to feel this whole club. Where is it? How does it work? Get control of it like this. Then control it over here. It's the same thing. So you get control of it with your hands, arms and wrists and how to control the face. You learn how to use that lever system. Just this lever system right here. You learn how to do that. How this lever system works without moving. I mean, that seven iron right there is going to go about 130 yards. That's where your speed comes from. Now, if I learn that lever system and I start to let myself turn a little more. Okay? Now I've got the potential for more speed, but it starts here. I mean, shooting a basketball, throwing a baseball, hitting a baseball, table tennis. It starts here. What we've tried to do is teach it from here.
Credit: Mike Malaska Link: https://www.youtube.com/watch?v=Pg2O50I90bs

@BodyforGolf.com. All rights reserved. 98
How to Fix Your Slice with a
Driver I need you to understand first what causes the slice before we go on, on how to fix it. Now, I see a lot of
golfers in person who struggle with the slice, certainly we work with a lot of slicers. And a lot of people
come in and they come in with all kinds of different reasons as to why they slice the ball. And no one
emphasizes the most important
part, which is that the club face is
open to the path. You need to
understand that first.
You don't hit a slice because
you're too far over the top. You
don't hit a slice because you hang
back on your right foot. You don't
hit a slice because your ball
position's off or your setup's off.
You hit a slice because your club
face is open to the path.
That is the most important part of
this or any video you're going to
watch on how to fix your slice. You
have to understand and believe
that part first. In order for us to fix
that slice and fix it quick, we have
to fix the face first.
Now, how do we do that? When I
take my normal setup, I need to ensure that my grip is on the club at least neutral to slightly strong. We
cannot be trying to fix a slice if I have my grip on here in a weak position. If my left hand grip is overly
weak, if my right hand grip is overly weak. And we have other videos on the grip and there's plenty out
there, refer to those. But we need to have that grip go from a weak to a neutral or a strong position. You
can play golf with a weak grip but not if we're trying to fix the slice pattern. If you have a weaker grip, I
need you to get those hands turned clockwise on that club. Right? From face on. I want to see some of
that logo of the backhand. I want to see some of those knuckles. I want that V pointing at my right
shoulder. I need my right hand getting in here at or underneath here a little bit on the grip.
Golf Lesson #42

@BodyforGolf.com. All rights reserved. 99
I can't have my right hand more on top in this fashion. It's not going to work for us. Need my right hand
underneath. Again, I want that V on my right hand at or towards my right shoulder. Need a stronger grip
pattern. That can help ensure the beginning parts of closing a club face. That's non negotiable. If you're
watching this video and you've struggled with a slice for years on end, you can't play golf with that weak
grip. We have to get the grip part, number one.
Now part number two again,
fixing the club face. I need to
make sure that the club face
stays square to slightly closed
at two key checkpoints.
Number one is during the
takeaway. I need you guys to
get that club face tilted slightly
down towards the ground, or
even all the way towards the
ground. Is that too shut?
Absolutely it is. For you that
hits a slice, you need too shut.
We have to close the club face
down so we can get rid of that
shot. So I want to get a normal
setup. I want to take my
takeaway. I want to start to feel my left hand point down towards the ground. My logo is pointing down
to the ground. Notice how that twists that club face shut here. I want to see that at this checkpoint. I also in the follow through
want to see the same
checkpoints. I want to see
that the club face is tilted
down towards the ground.
The back of my left hand is
down towards the ground. Is
that an exaggeration and
does that close the club face?
Absolutely it does. That's the
entire point here. If I can get
my grip strong enough. If I can
keep my face slightly close to
square on this side halfway
back, and slightly close to
square halfway through, my club face is going to be shut for sure and I could start to curve balls to the

@BodyforGolf.com. All rights reserved. 100
left.
And that brings me to my next key point. To get rid of the slice we just talked about we need to fix the
face, but your brain also needs to see a different shot pattern. Okay? We're not looking to go from slice
to right down in the middle on ball number one. On ball number one, two, three, four, five, 10, you need
to start to see something different, which is the golf ball hooking to the left. We want to see it going
hard to the left in the beginning for two reasons. One, you need to do these pieces and your brain needs
to be convinced that they're going to work when you go play when you're on the golf course. We need
to see that what I just felt there gave me something different. That's part number one.
Part number two is once we get this club face closed and the ball's curving to the left, now I have a lot of
motivation. I'm going to be able to start to fix that down swing path, right? Obviously. A lot of you guys
during the downswing with that face open start to get this outside-in swing path, and that doesn't do
any good for us. We hit it shorter that way. The ball curves even more. And I can't fix that though, and
this is important too. You are not going to fix your over the top pattern until you fix club face. If you're
someone who has a slice and you've been trying to fix your over the top forever and it didn't work, it's
because your face was too open and it's never going to work that way.
If I have an open club face, my face is pointed to the right of the target, the only way I can get that club
face pointed at the target and hit a functional golf shot is by swinging outside in. If I made a good path,
swung inside with my face open, the ball's going to go 100 yards to the right. So now that our face is
going to get shut, now you can work all those things you did before. They were probably good, but it
wouldn't work because of your club face. Now I can start to work that path inside out and straighten out
the golf ball. But, first before we do that, we need to fix the face. We need to hit some shots to the left
on purpose. This is how you fix your driver. You get rid of that slice with your driver. I'm going to go
ahead and demonstrate an exaggerated version.
I take my normal setup first. I get my grip on here. And I want my grip to be stronger than normal. So for
my face-on perspective, my left hand is turned towards the camera. You can see more logo. Stronger
grip than normal. I'm going to get the face shut down going back, and get it shut down going through,
and I want to hit it left on purpose. Let's give that one a shot. Grip is strong, closed closed, hook on
purpose. Good. And that's a low hook there to the left is exactly what I want to see. And I want to do
that multiple times. I want my brain to see that a lot. And now as I continue to practice after I do that for
a little bit, I'm going to hit as many shots as needed. Right? You should literally, if you do it correct, I'm
talking about you're fixing your slice in one golf ball. If you fix your face, it takes one swing and nothing
else.
Now, part number two is now I take that same feel, but I'm going to get my path going more neutral,
and now I can hit a golf ball that's going to go straight out there. I don't need to hit it left forever, just
enough to give me motivation to swing from the inside. So now instead of me making a swing, grip
strong, closed down, closed down, trying to hit a hook on purpose, I want to make a swing where I do

@BodyforGolf.com. All rights reserved. 101
the same piece and I hit a golf ball dead straight with that.
So that would be the next part of your training. Okay? Fix the club face first. You can literally fix your
slice in one golf swing. Hit some golf balls to the left, curve it, and then work the path after. You can fix
your slice within that practice session, definitely within this weekend. Do that first. Do not start by fixing
your path. Fix your face first. Do it that way. We'll get rid of your slice for you.
Credit: Eric Cogorno Link: https://www.youtube.com/watch?v=4STWsFzFh9E