table of contents - cloud object storage | store & …€¢ begin all exercises slowly to ensure...
TRANSCRIPT

Table of Contents
Levels of Resistance 2 Door Anchor Instructions 3 Workout Safety Instructions 4 Storage and Care of Resistance Bands 5 Warranty 6 HITT Workouts 7 Tabata Workouts 8 Workout Dice Game 9 Top Resistance Band Training Exercises Arms - Bicep Curl (One Arm Standing) 10 Back - Back Row (With Squat) 10 Chest - High Chest Press (Two Arm Standing) 10 Legs - Squats 11 Shoulders - Front Shoulder Raise 11 Abs - Ab Crunch (Kneeling) 11 Arms - Tricep Extension (Overhead) 12 Back - Bent over One Arm Row 12 Chest - Resisted Push Up 12 Legs - Lunge 13 Shoulders - Upright Row 13 Abs - Resisted Crunch 13 Legs - Leg Abductor Seated 14 Legs - Leg Adductor (Standing) 14 Legs - Calf Raise (Standing) 14 Abs - Ab Twist 15 Arms - Tricep Kickback (Two Arms) 15 Chest - One Arm Chest Fly (Standing) 15
v For Access to the Members Club, please go to www.caymanfitness.com/bonus
1

Levels of Resistance Yellow ----------- Extra Light ------------ up to 08 Lbs. of Tension Green ----------- Light ------------ up to 11 Lbs. of Tension Red ----------- Medium ------------ up to 14 Lbs. of Tension Blue ----------- Heavy ------------ up to 18 Lbs. of Tension Black ----------- Extra Heavy ------------ up to 22 Lbs. of Tension
2

Door Anchor Instructions
Step 1: Open the door. Step 2: Go behind the door and thread the loop of the anchor through the opening on the hinge side. (Below the hinge)
Step 3: Open the loop of the door anchor.
Step 4: Thread your band(s) through the loop of the door anchor. Then securely close door.
3

Workout Safety Instructions
• Use flat bottom shoes when stepping on the bands. • Always void uneven or rough surfaces. • Use a yoga mat to ensure the integrity of the bands. • Don’t wrap bands around sharp or rough surfaces • Avoid overstretching the bands. • Place the door anchor on the hinge side for maximum safety • Never release a resistance band while under tension. A release under
tension can cause the band to snap back toward the user and result in significant injury.
• Begin all exercises slowly to ensure band strength. • Avoid jerking the band. • Inspect bands and handles before every use. Check for cuts, nicks,
scratches, cracks, punctures, discoloration, or anything that looks like the band may be weakened in that area. If any flaws are discovered discard the band immediately and never attempt to repair a damaged band.
• Do not place the resistance band handles over feet. They can easily slip off and strike the user.
• Never stretch a resistance band over 2.5 times their length. • Do not exercise with resistance bands on uneven surfaces • Resistance bands are not toys and should never be used for any activity
other then the specific exercises they were designed for.
4

Storage and Care of Resistance Bands
Resistance bands can be a great and inexpensive exercise tool, but as with any piece of fitness equipment, proper maintenance is a critical aspect to ensure safe and proper function.
• Clean bands by wiping with a damp cloth • Do not use soap or any cleaning products to clean bands as these can
deteriorate the strength of the band. • Avoid storing bands near direct sunlight • Keep stored bands away from heat sources • Bands should not be stored outside or in cold environments • The ends of the band where the handles are connected to the band are the
weak areas and should be checked before every use for damage
5

Warranty
• All bands come with 100% warranty for 1 year. (shipping and handling charges may apply)
• The warranty does not cover incidental damage. • Cayman Fitness ® reserves the right to alter or void the warranty at any
time. • Void, where or prohibited by law. • Email or telephone Cayman Fitness if there is any damage, defect or
missing products.
WARRANTY HELPDESK [email protected] Telephone (1800) 450 3654
6

H.I.T.T – High Intensity Interval Training
High-intensity interval training (HIIT) describes any workout that alternates between intense bursts of activity and fixed periods of less-intense activity or even complete rest. It sounds too simple to be effective, but science doesn't stretch the truth. Here are a few other benefits from HIIT:
1. Increases Your Metabolism. 2. Quick and Convenient. 3. Can be done from home.
Workout Example:
50 RESISTED PUSH UPS 40 UPRIGHT ROWS 30 SQUATS 20 OVERHEAD TRICEP EXTENSIONS 10 LUNGES 30 seconds of RESISTED AB CRUNCH
At this point you can be done or REST 2 Minutes and complete this...
30 seconds of RESISTED AB CRUNCH 10 LUNGES 20 OVERHEAD TRICEP EXTENSIONS 30 SQUATS 40 UPRIGHT ROWS 50 RESISTED PUSH UPS
Try your own movements and mix it up!
7

Tabata Workout
Known as the closest thing we have to a fitness miracle, the Tabata workout is loved by researchers and fitness pros alike for its unparalleled fat-torching abilities and simplicity.
To do a "Tabata," simply pick an exercise and set a timer for 20 seconds on and 10 seconds rest. Do the exercise as hard as you possibly can for 20 seconds and then rest for 10, repeating 8-20 times total.
Don't be fooled: These moves may seem simple,
But they're not!
Workout Example:
20 Sec of SQUATS 10 Sec of Rest 20 Sec of HIGH LOW WOOD CHOP 10 Sec of Rest 20 Sec of SQUATS 10 Sec of Rest 20 Sec of HIGH LOW WOOD CHOP 10 Sec of Rest 20 Sec of SQUATS 10 Sec of Rest 20 Sec of HIGH LOW WOOD CHOP 10 Sec of Rest 20 Sec of SQUATS 10 Sec of Rest 20 Sec of HIGH LOW WOOD CHOP Done
Or repeat for desired number of rounds.
Try your own movements and mix it up!
8

Workout Dice Game
Feeling Lucky? Grab your dice and get ready for a fun workout! There are many exercise games that you can play with the dice. Here is one example: (Use both dice)
1.) Choose any 6 exercises: (ie; Squats,abs,lunges,pushups,biceps,back)
2.) Pick one dice color to be exercise baseline: (ie: If you have green and red, then red could be the baseline. Each time you roll the dice, the red dice will tell you which exercise to do.
Here’s how it works: Assign each workout a number: 1. Resisted Squats 2. Resisted Pushups 3. Kneeling Ab Crunch
4. Single Arm Bicep Curl 5. Squatted Back Row 6. Resisted Lunge
3.) Play the game Step 1: Roll both the dice. Step 2: Check your baseline color Step 3: What number did it land on (that’s the exercise you do) Step 4: Add the dice together (that’s the total number of reps to do) Step 5: Make it more challenging, each time you doubles, double your reps!
You roll the dice and it lands on… Red - 1 and Green - 6. The workout is: Resisted squats x 7 Reps
Roll again and the dice land on…Red – 3 and Green – 5 The workout is: Kneeling Ab Crunch x 8 reps
9

BICEP CURL (ONE ARM STANDING)1.) Stand in an upright position with the feet wider than hip
width part, one foot over the end of the resistance bandwith the other hand holding the band so there’s enough tension the band is taught.
2.) Curl the band up towards the body, bending at the elbow and using the bicep muscle to direct the movement.
3.) Pause at the top of the movement and then slowly lower the band back down to the starting position to complete the rep.
4.) Once all reps are completed, switch sides and repeat.
BACK ROW (WITH SQUAT)1.) Attach a door anchor above your head. 2.) Stand 3-4 feet away from the door, facing the door with
the knees bent and the body bent over at about a 45degree angle.
3.) Reach forward and grab a hold of the resistance band keeping the elbows relatively straight.
4.) Bend the elbows and pull the hands into your stomach until they are almost touching.
5.) Pause in this position and then reverse directions to complete the rep.
HIGH CHEST PRESS (TWO ARM STANDING)1.) Secure the door anchor at shoulder height.
2.) Attach each end of the Resistance Bands to the anchor.
3.) Grip the handles with each hand and step away from thedoor until you reach the desired tension.
4.) Elbows are inline with your shoulder, bend slightly at thewaist and look straight ahead.
5.) Push the handles forward together with your elbows upuntil your arms are nearly straight.
6.) Return to the start position and repeat desired reps.
10

SQUATS1.) Get into a standing position, placing the resistance band
under the feet, holding it with either hand with the knees bent at 90 degrees.
2.) Bring the band up so the arms are just above shoulderheight, elbows bent and tucked into your side.
3.) Slowly straighten the knees as you move into the full standing position to complete the rep.
4.) Bend the knees again to assume the starting position to repeat again.
FRONT SHOULDER RAISE1.) Stand in an upright position, feet over top of the middle of
the resistance band. 2.) Arms should be down by your sides, holding onto either
end of the band. 3.) Keeping the back straight, slowly lift the hands upward
until they’re at shoulder height level. 4.) Pause in this position and then lower back down to
complete the rep.
AB CRUNCH (KNEELING)1.) Attach the door anchor at the top of a door.
2.) Position the body in a kneeling position, body facing the door,
holding the resistance band in each hand.
3.) Exhale and contract the abs as you lower into the ground,
pulling the band down to the floor.
4.) Once elbows are almost touching the ground, pause here
and then reverse up to the starting position to complete the
rep.
11
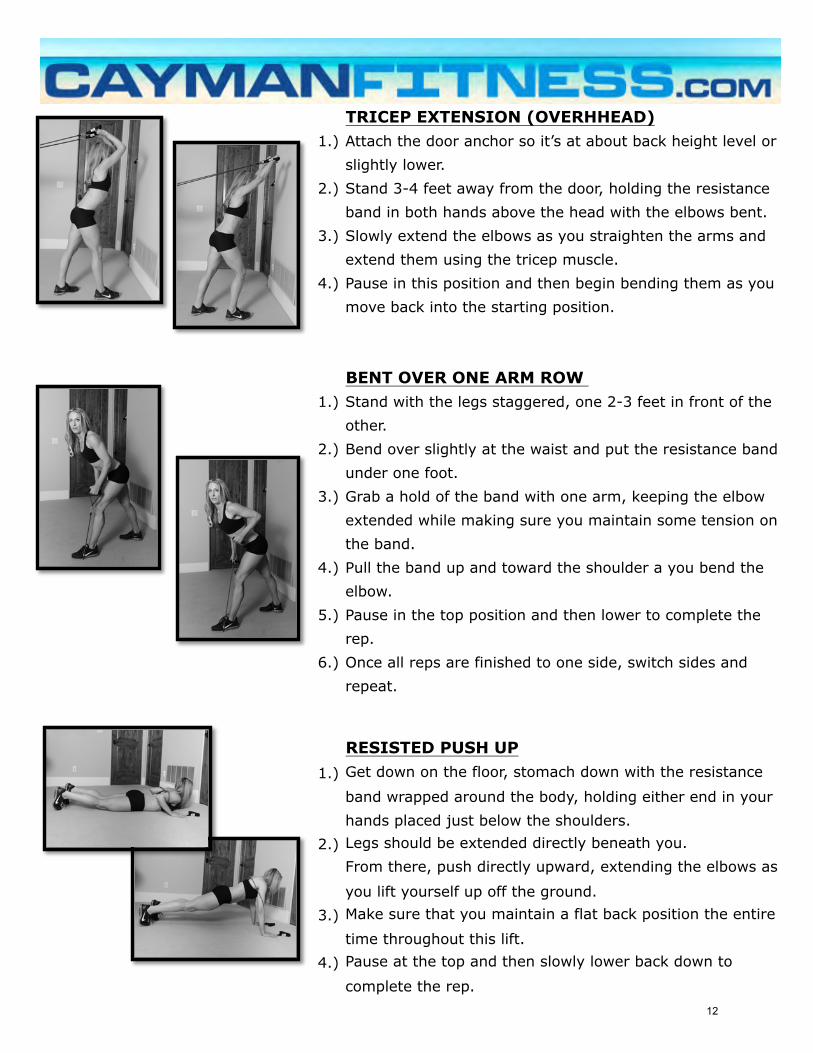
TRICEP EXTENSION (OVERHHEAD)1.) Attach the door anchor so it’s at about back height level or
slightly lower. 2.) Stand 3-4 feet away from the door, holding the resistance
band in both hands above the head with the elbows bent. 3.) Slowly extend the elbows as you straighten the arms and
extend them using the tricep muscle. 4.) Pause in this position and then begin bending them as you
move back into the starting position.
BENT OVER ONE ARM ROW 1.) Stand with the legs staggered, one 2-3 feet in front of the
other. 2.) Bend over slightly at the waist and put the resistance band
under one foot. 3.) Grab a hold of the band with one arm, keeping the elbow
extended while making sure you maintain some tension onthe band.
4.) Pull the band up and toward the shoulder a you bend theelbow.
5.) Pause in the top position and then lower to complete the rep.
6.) Once all reps are finished to one side, switch sides andrepeat.
RESISTED PUSH UP1.) Get down on the floor, stomach down with the resistance
band wrapped around the body, holding either end in yourhands placed just below the shoulders.
2.) Legs should be extended directly beneath you. From there, push directly upward, extending the elbows as
you lift yourself up off the ground. 3.) Make sure that you maintain a flat back position the entire
time throughout this lift. 4.) Pause at the top and then slowly lower back down to
complete the rep. 12

LUNGE1.) Get into a standing position and then step one foot forward
2-3 feet so it’s a comfortable distance. 2.) Position the resistance band underneath the front foot,
holding either end in your hands, placed up at shoulder height level, elbows bent and tucked under the shoulders.
3.) From there, bend the front knee as you lower down into a lunge position.
4.) Pause at the bottom before pressing back up to complete the rep.
5.) Once all reps are completed, switch sides and repeat.
UPRIGHT ROW1.) Get into a standing position, the feet over top of the middle
of the resistance band. 2.) Hold the resistance band in either hands, down by your
sides. 3.) From there, lift the hands directly upward, flaring the
elbows out to the side as you go. 4.) Bring the hands up so they are right in front of the chest.
Pause and then lower back down to complete the rep.
RESISTED CRUNCH1.) Attach the door anchor over your head.2.) Position the body, back down on the ground a few feet
away so you are facing away from the door.3.) Hold the resistance band in either hand down by the side
of the legs, elbows extended.4.) Once you have sufficient tension in the band, crunch
upward, pause and then lower back down to complete therep.
5.) Think of keeping the lower back pressed flat into the floorat all times as you move through the exercise.
13

LEG ABDUCTOR (SEATED)1.) Attach the door anchor at the bottom of the door. 2.) Sit flat down on the ground, back upright with the outside
leg crossed over the inner leg. 3.) Attach the resistance band to the outside leg ankle strap.
Keeping the back straight (putting the arms on the ground for balance), extend the leg out sideways as far as you can
go.4.) Pause in this position and then return to the start to
complete the rep. 5.) Once all reps are completed, switch sides and repeat.
LEG ADDUCTOR (STANDING)1.) Attach the door anchor to the bottom of the door, placing a
chair about 1-2 feet from the door. 2.) Stand on the side of the chair furthest away from the door,
holding on for balance. 3.) Attach the resistance band to the ankle closest to the door
and then cross it over the body, past the other foot as faras you can go.
4.) Pause at your maximum position and then return to the start to complete the rep.
5.) Once all reps are completed, switch sides and repeat.
CALF RAISE (STANDING)1.) Attach the door anchor to the bottom of the door. 2.) Stand 3-4 feet from the door, facing away. 3.) Lean forward slightly and hold the resistance band, one
end in each hand, at shoulder height, elbows tucked in. 4.) Slowly rise up onto the toes, elevating the body.
5.) Pause and then lower back down to complete the rep.
14

AB TWIST1.) Position the door anchor at about waist level.
2.) Stand a few feet from the door, holding the resistanceband with both hands at the side of the body closest to
the door.3.) Begin to twist at the waist, contracting the abs as you
rotate the body along with the band to the other side.4.) Pause and then reverse direction to complete the rep.
5.) Once all reps are completed, switch sides and repeat.
TRICEP KICKBACK (TWO ARMS)1.) Attach the door anchor so it’s at the top of the door or at
least head height level. 2.) Bend over at the waist so you’re at about a 45 degree lean
forward, leaning toward the door. 3.) Hold the resistance band in both hands, bending the
elbows so the hands are in front of the body. 4.) From there, extend the arms as you move the hands back
towards each hip. 5.) Pause in the extended position and then return to the start
to complete the rep.
ONE ARM CHEST FLY (STANDING)1.) Attach the door anchor at about shoulder height level.
2.) Stand 3-4 feet away from the door, body perpendicular tothe door, holding the resistance band directly in front of the body at shoulder height level.
3.) From there, allow the arm to move sideways towards thedoor until it’s pointing directly to the door but not hyperextending the shoulder joint.
4.) Pause in this position and then return the arm to thestarting position directly in front of the body.
5.) Once all reps are completed, switch sides and repeat.
15