table of contents - columbus state universitycoehp.columbusstate.edu/livetext/eportfolios.pdf ·...
TRANSCRIPT

e-Portfolios
1
Table of Contents Introduction 2 The Goals of the Portfolio 3
The Professional Portfolio 4 The Program Portfolio 5 The Reflective Portfolio 5
Portfolio Structure 7 Organizing Artifacts 7
Required Content 7 Self-Selected Artifacts 7 Reflections 7 Effectively Using All Three in the Same Portfolio 8
Creating a Portfolio Template 9 Things to Consider When Building Templates 9 Creating and Managing Pages 10
Creating a New Page 10 Managing Pages 11
Creating and Managing Sections 11 Types of Sections 11 Creating a New Section 12
Domain Templates 13 Converting a Document to a Domain Template 13 Managing Domain Templates and Folders 14
Assignment Templates 16 Building a Portfolio 18
Creating a Portfolio 18 Introduction / Welcome Pages 18 Adding Artifacts 18 Authoring in the Portfolio 18
File Attachments 19 Copying Text from Other Sources 20
Inserting other LiveText Documents 21 Create a Form Viewer Section 21 Customizing the Portfolio 23
Document Styles 23 Submitting & Assessing the Portfolio 26
Submit to a Course 26 Submitting for Review 26
Visitor Passes 28 Creating a Visitor Pass 28 Sharing Documents with a Visitor Pass 29 Managing Visitor Passes 30 Logging in with a Visitor Pass 30
Exporting Documents 31 Public Documents 31
Summary 32

e-Portfolios
2
Introduction Historically, electronic portfolios have served as a valuable learning tool for students. The process of thoughtfully selecting key artifacts illustrating growth and significant learning milestones engenders a process of self-reflection, proven to be valuable and beneficial to the student. Portfolios have evolved significantly, reaching beyond the student and the learning experience, broadening its benefits to faculty, administrators, state agencies, accreditation bodies and the labor market.
In this guides, we will reflect on the purpose of the portfolio as it relates to various stakeholders such as students, administrators, and future employers. Identifying the purpose of the portfolio will allow programs and institutions to more clearly define the portfolio’s organization, content, distribution and points of assessment. Based on the goals for the portfolio, we will illustrate the diverse options for managing the development, distribution and assessment of the portfolio.
e-Portfolios
3
The Goals of the Portfolio LiveText’s web-based platform can be used to create electronic portfolios that serve a wide range of purposes. Identifying a clear goal for the portfolio will go a long way towards achieving the desired outcome for the program. Electronic portfolios are designed for organizing, sharing, and presenting work done in the program, for reflecting on experiences, both in the program and during field/internship experiences, and for sharing personal beliefs, goals and ongoing professional growth. In addition to the student’s experience, colleges often use the portfolio for assessing program effectiveness. Whether for accreditation or for program improvement, the portfolio can serve as an important source of data to drive program changes.
Many programs have developed electronic portfolios to fulfill their specific requirements. In this guide, we will focus on three main types of e-Portfolios: Professional Portfolios, Program Portfolios, and Reflective Portfolios. Professional portfolios are focused on a presentation of an individual’s experiences in order to help gain employment or track professional activities and development. Program portfolios are a way for the program to collect critical assignments that are used for tracking student learning outcomes for accreditation or program review. Reflective portfolios are usually structured around program goals or outcomes and are focused on collecting activities and journals from the student in which they present and describe how they have worked toward and achieved these goals.
LiveText is designed to meet each of these needs for programs of all disciplines. The purpose of this guide is to demonstrate how to create effective portfolio templates from the Administrator or Faculty role. With a suite of tools, LiveText members can create professional or personal portfolios that meet their respective needs and allow for the ability to apply a unique personal touch. Through appropriate template design, training and submission practices, a single LiveText portfolio can serve as a professional portfolio for the student, as an effective data collection tool for the program, and a rich and reflective activity for an individual student’s personal growth.
This guide will focus on the process from the student’s perspective but the same techniques can be applied for faculty portfolios, program reports, or other collections of work for presentation.

e-Portfolios
4
The Professional Portfolio For the purposes of this guide, a “professional” portfolio is an electronic presentation of an individual’s abilities, skills, and experiences. The professional portfolio is shared with professors and peers, potential employers, or professional organizations. Typically, the individual will include materials such as a resume, an objective statement, a short biography, and/or examples of work that are selected to appeal directly to the intended audience, as seen in Figure 1. For example, business students applying for a market research position would select projects featuring data collection and analysis over advertising or budgeting projects.
Figure 1: Student Professional Portfolio
Most often programs will develop a template for students to utilize when authoring a portfolio. The template for the portfolio can be built using pages and sections, with general guidelines for what should be included. Often, these portfolios will have a very loose structure and the portfolio experience will rely heavily on student creativity. Using LiveText for this type of portfolio would generally involve training students on how to add content, create their own pages and sections, customize the applied style, and include a presentation of the best practices for what types of activities and artifacts to include. Faculty can also create professional portfolios like the one seen in Figure 2.
Figure 2: A Faculty Professional Portfolio

e-Portfolios
5
The Program Portfolio The “program” portfolio, as shown in Figure 3, is a collection of key tasks, critical assignments or hallmark activities that are required by the institution for all students. The purpose of this portfolio is to collect all of the artifacts used to meet program goals or accreditation standards. The program will identify key activities to be assessed and then collect them all in one portfolio. These activities are mapped out for the student when they create the portfolio, and students will be responsible for putting the artifacts in the appropriate place in the portfolio as they complete the activity.
Program portfolios are also used by teacher induction programs. Teacher induction programs are centered on beginning teachers in their first couple years of teaching and the requirements by the state to complete their licensure process. One example of this is the teacher induction process using the “Beginning Teacher Support and Assessment,” BTSA in California. The BTSA induction process in California requires first and second- year teachers to complete a professional portfolio that includes key work samples on school, classroom demographics, lesson plans, and other various work samples. Each teacher is required to submit their portfolios at various check points or inquiries to support providers, coaches, or reviewers.
Figure 3: Student or Teacher Program Portfolio
The Reflective Portfolio Similar to the program portfolio, the “reflective” portfolio is designed around meeting program goals or standards. The reflective portfolio differs in that students self-select artifacts and projects they feel best demonstrate their understanding of the standard or their attainment of the program goal. Often the student will also complete a justification, summary, or reflection to explain why they feel the selected artifact meets the goal or standard. They often also explain how the project contributed to their personal growth.

e-Portfolios
6
Figure 4: Student Reflective Portfolio
e-Portfolios
7
Portfolio Structure The structure of each portfolio is shaped by the needs and requirements of each program as well as the purpose of the portfolio. When creating the portfolio template, programs often mirror the design of their traditional paper process, with different sections containing descriptions of the artifacts that are required and in what format. When utilizing LiveText for an electronic portfolio, students can be given rich templates that provide the student with clear guidance. The individual program determines the best way to achieve the portfolio goals and then structures a template accordingly.
Organizing Artifacts In LiveText, institutions are able to design portfolio templates that guide students through the portfolio development process, which can include a combination of required content, self-selected artifacts, and reflective activities. Sequence and content is all customizable, and will vary from program to program based on the short and long term goals of the portfolio. What an effective template requires however, is a well-planned, clear layout with detailed directions.
Required Content The template for a portfolio should be viewed as a framework that students will fill with their own work. Commonly, institutions will create pages that follow a standardized table of contents and provide empty text and image sections for any required content. However, sometimes the template is intended to simply give students a starting point for customizing the portfolio format on their own (e.g., a student may wish to include an artifact from a course).
Self-Selected Artifacts Guidelines or expectations should be clearly spelled out for portfolios featuring self-selected artifacts. As the portfolio takes shape, the instructions are generally removed and replaced with the artifact. The guidelines will help the student select an appropriate artifact and also function as a placeholder for the artifact, but no other requirement is specified.
Reflections Similar to the section above, students will select artifacts they feel best demonstrate their achievement or understanding of a program’s goals. Programs may also want to include instructions or guidelines to students that enable them to write a rich, effective reflection on the activity. This can help the student in several ways. First, it helps students make a more informed decision when selecting an artifact to showcase. Second, by providing guidance within a template, a program can pose thought-provoking questions for students to reflect upon in the portfolio. Lastly, providing instruction can help a student describe an activity to an audience who may not be familiar with the project or its significance to the student’s growth in the program.

e-Portfolios
8
Effectively Using All Three in the Same Portfolio Programs can also design portfolio templates for students that include a combination of required content, self-selected artifacts, and reflective activities. A program need only plan the layout and provide appropriate guidance and expectations throughout the document.

e-Portfolios
9
Creating a Portfolio Template A portfolio template has three different functions that assist the user in entering information into the document: communicating requirements, providing structure, and providing LiveText assistance. The portfolio template will communicate requirements to users by way of directions throughout the portfolio. From beginning to end, the user will be prompted and instructed on how the portfolio will be populated with required artifacts and what the end product should look like. Since users may obtain the portfolio template at different points throughout the program, it is extremely helpful to provide thorough instructions and prompts so that any one user is able to complete the requested artifacts at any point in time.
The portfolio template will communicate requirements to users that may include a page with an introduction and/or a page with a table of contents that contains the following information: An explanation of the required artifacts and what courses they’re collected in; the requirements of the portfolio at designated checkpoints or benchmarks; an explanation of the requirements for each artifact; or even the assessment rubric that will be used on the completed portfolio.
Templates standardize the layout of what the students are turning in and make it easier for faculty to navigate the group of submissions because they are consistent. The student is given pages and sections to fill in rather than having to create the document from scratch.
Creating a template in LiveText starts with basic document creation. Administrators and faculty developing the templates decide what the intended use and purpose of the template will be by choosing a document and layout. The overall document structure and creation process is the same whether the document is a portfolio template or an individual assignment. Documents are made up of one or more pages, which appear in the table of contents. These pages are made up of one or more sections that can be expanded in the Table of Contents. Each section of a document is designed to develop content for that document. How students and faculty use these sections varies based upon the purpose and requirements. Whether typing information out, uploading file attachments, or adding pictures or videos, each user controls the information and unique style that takes shape in their document. Assessment documents, portfolios, and templates share the same structure. Therefore, the ability to edit documents is the basis for creating most materials used by students and faculty.
Things to Consider When Building Templates When a student or faculty member uses the template to create his or her own document, the template is copied into the student or faculty member’s individual account. All of the pages, sections, text, standards and styles from the template will be duplicated exactly in the user’s account. The resulting document is independent of the source template. The owner of this new document is free to make any changes to their personal document. A common misconception is that by changing the template, administrators will affect documents made from an earlier version of the template. This is not the case.
Training both students and faculty on some of these basic skills will also provide them with the knowledge to customize or create their own materials. Students using a portfolio

e-Portfolios
10
during their job search can create multiple portfolios that can be customized for each potential employer. Adding pages and sections or hiding certain portfolio components is a great way to customize their product. The same is true for faculty portfolios.
Creating and Managing Pages Pages in LiveText are used to group together multiple sections of content that will be loaded on the screen at one time. Scrolling down provides access to the contents of a page that extend beyond the user’s screen. All pages of a document are listed at the highest hierarchical level in the Table of Contents. Every document must have at least one page, but there is no system limit on the number of pages a document may contain.
In a template, pages are generally used to outline the main areas of the activity that the student will need to complete. Pages of a template will often be named for outcomes, objectives or a list of required components of the document that the student will complete.
Creating a New Page 1. From within a document, click the Manage Pages tab. The Manage Pages tab is the third tab from the left within the document.
2. Click the New button.
3. Enter a Page Title.
4. Click the OK button.
5. The page will be displayed in the Manage Pages screen.
6. Click the Save & Finish button in the top right corner of the screen to view the document.

e-Portfolios
11
Managing Pages After pages have been created it is possible to make changes to the pages and the layout of the document without losing the content. The functions on the “Manage Pages” tab include:
Page Order Re-order pages quickly without retyping content.
Hide The page will exist in the new document after a template is used, but the page will not be visible except on the “Manage Pages” screen. All contents of the page are retained.
Unhide Reveal hidden pages.
Edit Titles Quickly change all selected pages at once without needing to edit each separately.
Copy “Clone” all contents on a page to reduce the need to retype.
Delete Permanently remove a page and all its contents. This is not reversible.
Creating and Managing Sections The sections on a page are areas that allow the author to house specific content. A page may contain multiple sections and can have multiple types of sections on a single page.
Types of Sections
Text and Image
This is the most commonly used section type. This provides a text area for students to enter content. It also provides a place for the creator of the template to put instructions or guidelines in the template. Each “Text and Image” section allows users to attach up to 10 files and to directly link a YouTube or other video.
Standards
Templates can have standards sections included to display standards from the LiveText database without retyping or copying them in from other sources. Students can also be prompted to align their document to standards by including a blank section for their own standards.
Resources This section allows the author to include other resources such as Learn360® content.
Rubrics
Templates can provide areas for students to create their own rubrics using the same editor the programs use to build assessment documents. While they cannot be used to collect data, faculty can review the artifact, which includes a rubric, make comments, and score the student’s performance using assessment documents.
Note: Hiding a page is an easy way for students to repurpose their portfolio for different viewers. Students can quickly hide specific pages and share a Visitor Pass with potential employers, instructors, or peers.

e-Portfolios
12
Form Viewer Responders to a form can provide a link to those responses in a document.
Creating a New Section 1. From within a document, click the page title in the Table of Contents to be
edited.
2. Click the Manage Sections button located in the top right corner of each page within the document.
3. Click the Create Section button on the left side of the screen.
4. Select the section type (e.g. Text & Image, Standards, Resources, Rubric, Form Viewer) from the dropdown menu.
5. Enter a Section Title.
6. Click the OK button.
e-Portfolios
13
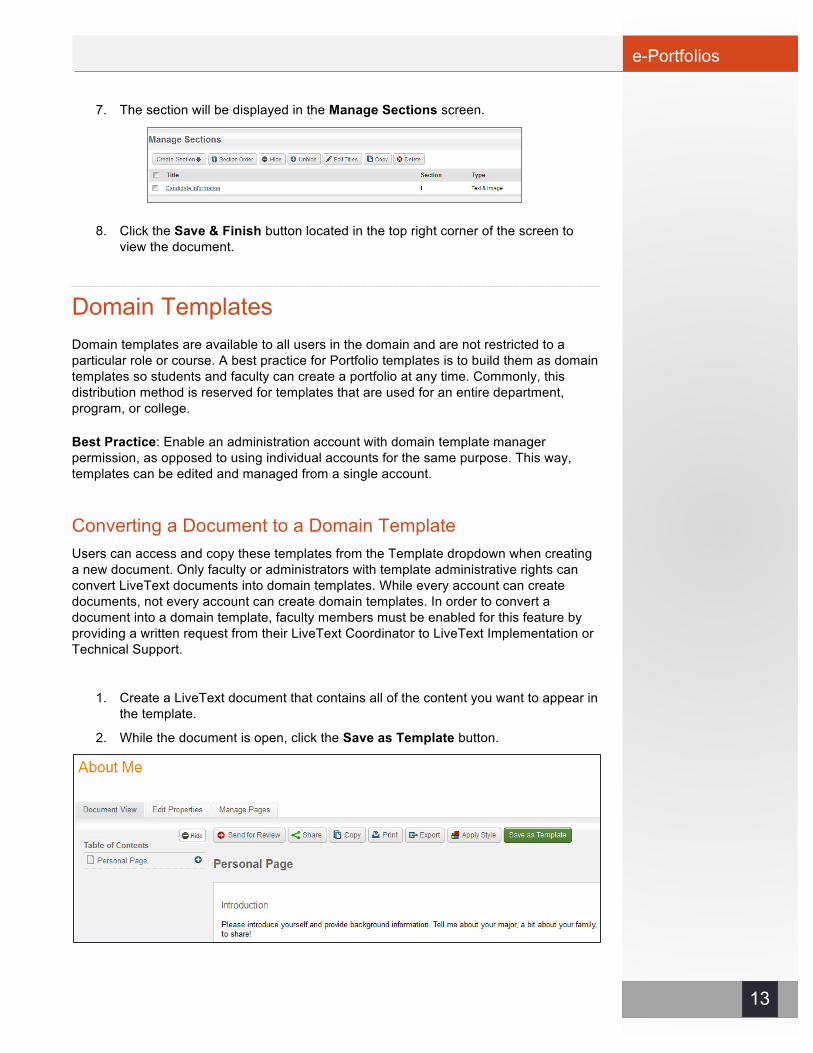
7. The section will be displayed in the Manage Sections screen.
8. Click the Save & Finish button located in the top right corner of the screen to view the document.
Domain Templates Domain templates are available to all users in the domain and are not restricted to a particular role or course. A best practice for Portfolio templates is to build them as domain templates so students and faculty can create a portfolio at any time. Commonly, this distribution method is reserved for templates that are used for an entire department, program, or college.
Best Practice: Enable an administration account with domain template manager permission, as opposed to using individual accounts for the same purpose. This way, templates can be edited and managed from a single account.
Converting a Document to a Domain Template Users can access and copy these templates from the Template dropdown when creating a new document. Only faculty or administrators with template administrative rights can convert LiveText documents into domain templates. While every account can create documents, not every account can create domain templates. In order to convert a document into a domain template, faculty members must be enabled for this feature by providing a written request from their LiveText Coordinator to LiveText Implementation or Technical Support.
1. Create a LiveText document that contains all of the content you want to appear in
the template.
2. While the document is open, click the Save as Template button.

e-Portfolios
14
3. Select a folder in the Choose a folder to place template in dropdown menu. The folder you choose determines which folder the template will be located in. If you prefer to create a new folder to place the template in, select "[New Folder]".
4. Click the Create link. If you selected an existing folder in step 3, then the template will be placed within that folder. If you instead chose to create a new folder in step 3, you will be prompted to enter a folder name. In the "Enter Folder Name" textbox, enter a folder name, click the OK button, and then go back to step 3.
The new template will appear both in the list of documents in the Documents area and in the list of templates in the Templates area. The domain template can be identified by looking for the icon. This is the “live” template that is available to all users in the domain.
Modifying this document will change the “live” template available, but will not have any effect on documents that have already been created. Once a template is used, the resulting document is completely separate from the template.
Managing Domain Templates and Folders Domain Template Managers can customize the folders that templates appear in. This can be useful when organizing templates for easy access by students or faculty. These folders can be classified by program, document type, course or any other category the administrator may wish to use. These folders are visible to all members registered in the domain.
Templates
1. Click Templates under the Admin tab to access all templates in the institution’s domain.
2. Click Add for the corresponding folder that the template will reside in.
NOTE: If the folder is removed, the link(s) to any template(s) contained within it are removed as well. However, the template will remain in the author’s account.

e-Portfolios
15
3. The “Template Chooser,” a list of LiveText documents to choose from, will appear.
4. Select the checkbox next to the template to be added to the folder.
5. Click Add.
Folders
Administrators can customize the folders to address specific needs and name them accordingly. For example, in some domains, the folders have been created to match the different document types. Some common themes for domain template folders include:
• Role (Student, Faculty, etc.)
• Course
• Program/Department
• Activity Type (Portfolio, Lesson Plan, Assignment, etc.)
Folders have a single level, so administrators cannot create folders within folders. A template can be added to multiple folders for easy access if associated with multiple groups.

e-Portfolios
16
Assignment Templates Assignment templates are created from documents that have been created in faculty or administrator accounts. The difference between assignment templates and domain templates is based on the process for distributing the templates. Assignment templates are distributed through courses and are only accessible by the participants in that course. The use of assignment templates helps administrators and faculty provide the correct document to students. When the term is over, access to the assignment template is disabled. This is useful if the portfolio is introduced in a specific course or if a Portfolio course is loaded and the first portfolio submission is tracked and assessed.
1. Click the Dashboard tab.
2. On the right side of the screen, click the course code for the course with the assignment.
3. Click the Assignments tab.
4. Click the New option.
5. After filling in the assignment information, scroll down to the “Assignment Templates” area.
6. Scroll down to “Assignment Templates” and click the Browse... button.
7. Select a Label (e.g. My Work, Inbox, or a custom label) where the document is listed.

e-Portfolios
17
8. Check the checkbox in front of the title of the LiveText document(s) that you want to act as the template(s) for this assignment.
9. Click the Insert Document(s) button.
10. Click the green Save Assignment button.
On the “Assignment Details” page, the name of the template document will be listed with the version number. Administrators have the ability to copy assignments to other courses and sections. Each faculty member has the ability to copy this assignment to any course or section they instruct. Copying this assignment to other sections will maintain the reference to the same version of the document. Administrators and faculty members have the ability to copy assignments from previous terms to current terms. This process allows courses to use that same assignment and templates from course to course.
Note: Documents that have been used as an assignment template will not be indicated with the “T” icon in the Documents area. Additionally, modifying the source document does not affect the assignments in which the template has already been added.

e-Portfolios
18
Building a Portfolio Now that the portfolio template has been distributed and students have access to it, here are some tips for training and facilitating portfolio development.
Creating a Portfolio
Introduction / Welcome Pages The Introduction/Welcome Page can serve as a LiveText gateway assignment and is an ideal, low stakes opportunity to train a new user on the software. Content is often authored directly into the document and can include an autobiography, philosophy of education, or personal goals.
Adding Artifacts How one adds artifacts to the portfolio depends on the requirements of the portfolio itself. If the artifact is a required element, it can be directly entered into the portfolio and submitted as an assignment or specific task. Conversely, if the artifact is student-selected, the artifact may have been completed through another course-based assignment that is not part of the portfolio. In this latter case, the student will have to insert the artifact in the portfolio as a LiveText link. If the artifact is a non-LiveText file type, it can be uploaded from the File Manager or hard drive as an attachment in the portfolio. If the artifact is a form, a Form Viewer Section will have to be created within the portfolio. See below for some ways that artifacts can be added to the portfolio.
Authoring in the Portfolio The Text and Image section can be used to customize the document for graphic and aesthetic purposes. The Text Editor allows the user to edit text much like Microsoft Word in that users can edit the font (e.g. change the font color, size, or even the text positioning). Users are also able to insert images into the Text Editor. Using these tools, users can enhance their portfolios to create an eye-catching submission.
Note: Users should keep in mind that each time a template is used a new portfolio document is created. Because users often want to keep portfolios consistent, it is recommended that users create one portfolio from the template and copy it when appropriate, rather than re-using the template from scratch. Users should be instructed to use the “New Document” function or the “Use This Template” button only once to avoid confusion about which portfolio document contains their content.

e-Portfolios
19
File Attachments Files such as Word documents, JPEGs, PDFs, PowerPoint files, or even movie files can be directly attached to a Text and Image section, or first uploaded to the File Manager, a repository for any non-LiveText documents. With this tool, users have more options to customize their portfolio.
1. Click the Documents tab.
2. Click the title of the LiveText document to which you want to attach a file.
3. Click the title of the page under the Table of Contents where you want to attach a file.
4. Click the Edit button of the Text & Image section where you want to add the attachment.
5. Click the File Attachments tab located underneath the section title.
6. Go to the Uncategorized label dropdown menu and choose the label where the file is located in the File Manager. By default, users should see files in the Uncategorized label.
7. Select the checkbox associated with the file(s).
8. Once the file(s) is selected, it automatically attaches to the document.
9. If you have not uploaded your file to the File Manager, you can click the Upload New File...button on top of the area.
10. Click the Browse...button.
11. Select the file you want to upload from the pop up window.
12. Click the Upload File button.
13. Wait until you see the Completed message.
NOTE: There is a limit of ten attachments per Text & Image section. Create additional Text & Image sections to add more than ten attachments to the document.

e-Portfolios
20
14. Click the Save Changes button to go back to the Text & Image Editor or click the Save & Finish button to go back to the Document View page.
Copying Text from Other Sources Copying text from other sources can be performed within the Section Editor of a LiveText document. However, pasting formatted text will not translate correctly into LiveText. Therefore, it is recommended to use the Paste as Word text tool (icon is below) in LiveText to remove any extraneous formatting on the copied text.
Users can copy text from an outside source by using either “Ctrl + C” or by selecting the text, right-clicking the mouse, and choosing Copy.
1. Click the Edit button of the Text & Image section where you want to paste content.
2. Copy the text from the Microsoft Word document.
3. Click in the large text box of the Text & Image Section Editor.
4. Click the Paste icon, the Paste From Word, or Paste as Plain Text icon on the LiveText editing toolbar.
5. Format the text within LiveText using the LiveText editing toolbar if desired.

e-Portfolios
21
Inserting other LiveText Documents If a required artifact is student-selected, it may have been completed through another course-based assignment that is not part of the portfolio. In that case, the student will have to insert the artifact into the portfolio as a LiveText link.
A LiveText Link may be inserted into a section of any LiveText document, and will lead to another LiveText document. Disable any pop-up blocking software on your web browser before inserting a LiveText link to allow the Insert LiveText link pop-up window to open.
1. While editing a Text & Image section, click the Insert LiveText Link icon.
2. Choose the label associated with the LiveText document from the Materials dropdown menu in the Insert LiveText Link pop-up window.
3. Check the checkbox that corresponds with the LiveText document.
4. Click the Insert button.
5. The link will appear as the document title in the Section Editor.
Create a Form Viewer Section The Form Viewer section allows for a form and its answers to be included in a LiveText document that can be shared with others for viewing and evaluation purposes.
1. From within a LiveText document, click the page title in the Table of Contents that you wish to edit.
NOTE: The Form Viewer section will only retrieve and display form information that you have taken and submitted in your LiveText account.

e-Portfolios
22
2. Click the Manage Sections button located in the top right corner of each page within the document.
3. Click the Create Section button on the left side of the screen.
4. Select Form Viewer from the dropdown menu.
5. Enter a Section Title.
6. Click the OK button.
7. The section will be displayed in the Manage Sections screen.
8. Click the Save & Finish button located in the top right corner of the screen to view the document.

e-Portfolios
23
Customizing the Portfolio Customizing each portfolio can start with the template provided by the administrator or faculty member. Further customization is available in the form of an institutional or program style set, requested by an institution’s LiveText Coordinator. Multiples styles can exist for different programs within the same domain and are available to all users. These style sets can include institutional logos, color, and images. This provides a new and unique view for the users or viewer of the portfolio.
Users should customize their portfolio for the intended audience. Some of the styles available may not be appropriate for a job interview, but may be appropriate for a lesson plan used in a classroom setting. Much like choosing the background theme for a PowerPoint presentation, the style set helps set the tone for the audience and set the mood for the experience. Users may have different audiences for whom to customize a portfolio, thus the need for versions of a portfolio. With that in mind, users can make multiple copies of a portfolio and utilize different styles for each portfolio to customize for the intended audience.
Having customizable documents encourages users to take ownership and pride in the work they produce, and it allows users to highlight their abilities and experiences to potential employers. Users may take advantage of the various styles that are available for the document header and background to customize the look of the document pages, or users may even enhance the portfolio by uploading imagery and video.
Document Styles This feature of LiveText allows students to select from a library of styles to customize the colors, backgrounds, and layout of their portfolio.
1. From within a document, click the Edit Properties tab. The Edit Properties tab is the second tab from the left, and is located between the Document View and Manage Pages tabs.
2. Select a style from the Style dropdown menu.
3. Click the Save button located in the lower left of the Edit Properties area.

e-Portfolios
24
Users can also change the style while working within the document. This feature allows the user to toggle between the various styles available without having to create a new document.
1. From within the document view, click Apply Style.
2. Page through the style previews by clicking on Next Page.
3. Click on the desired Style preview.
4. Click Insert Selected Style Set.
Copy a Portfolio
Maintaining an electronic portfolio in LiveText allows users to make modifications and continually update their portfolio throughout their academic career. One of the benefits of maintaining an e-Portfolio, is the ability to quickly make copies of the portfolio. Creating different versions of a portfolio allows users to tailor those copies to specific audiences. For example, a student may create a portfolio and add activities to it over time as he or she progresses through a program. Then, that portfolio can be taken to interviews, included in a resume, or shared with potential employers. In the same way a job applicant would customize a resume and cover letter for a particular job, students can customize a portfolio to highlight their abilities as they relate to a specific position.
1. From within the document, click the Copy button. The Copy button is located above the page title on right.

e-Portfolios
25
2. Enter a new title in the text box in the Enter title of new document window.
3. Click the OK button.
4. The new document will open.
5. The screen will populate with the copied document.
The user will now be editing a new, separate document and can make modifications that will not affect the original document. Students and faculty members can create as many copies as they need. It is also recommended to make a separate Visitor Pass for each potential viewer which allows for visits to be tracked individually. This will be discussed in a later section, “Sharing the Portfolio.”
Students and faculty can share portfolios with other LiveText members and outside evaluators as well such as colleagues, or potential employers. Depending on how a program assesses these portfolios, there may be scoring with a rubric or a form that is completed by the viewer of the portfolio. The following sections will describe common ways of sharing portfolios.

e-Portfolios
26
Submitting & Assessing the Portfolio LiveText provides various avenues for delivering portfolios to assessors or reviewers. Programs can make use of course assignments, reviews, or even the editing capabilities for evaluating student portfolios.
The courses feature provides improved structure and tracking of assignments. This feature also allows individual instructors to assess submitted artifacts without requiring the student to submit an entire portfolio. This can reduce the amount of time an instructor must spend reviewing assignments for an individual assignment; however, this can also reduce the amount of time students spend working on the portfolio during the actual course. A good practice is to have the student attach the final, graded artifact into the portfolio and for the instructor or program to periodically check to ensure the portfolio is being developed over time. Some institutions will set up a course assignment where the student submits the entire portfolio to a course instructor who is responsible for checking on progress. Other institutions will have this responsibility fall on advisors or other identified faculty or staff by using the “Send for Review” function for these checks.
Periodic portfolio checks can be either course activities built as assignments in courses or stand-alone portfolio checks using the Reviews feature. Another option is to use Visitor Passes and evaluation forms launched to field supervisors or other evaluators who do not have LiveText accounts.
Submit to a Course For this method, the program will identify a course or series of courses where the instructor will perform a portfolio review as a course activity. Students are responsible for completing the required portions of the portfolio and submitting it as a course activity. To set up this option, create a course assignment with any applicable rubrics and have the student submit the entire portfolio as they would any other assignment. A rubric can be provided for scoring the portfolio, or a checklist can be used to inventory artifacts.
A good practice is to use a holistic portfolio rubric at several points. These points are often referred to as milestones, benchmarks, or gates. The data collected using this rubric can be used to chart growth for an individual student but it can also be aggregated and used to show how the portfolio can demonstrate student growth over time. On the reporting page, the course, assignment title or term can be used as a filter to distinguish between pre-assessments and the final portfolio review.
Submitting for Review Since an advisor, supervisor, or other evaluator may perform does some portfolio checks, that person may not have a particular student in a course at the appropriate assessment point. In this case, the student should be instructed to submit the portfolio for review. Students can send for review at any time as this process is not anchored to a particular course or term. This allows a program the flexibility to still review when courses are not taken in sequence. To best achieve this, the rubric can still be used, but rather than distinguishing assessment points by course or term, milestones should be built into the

e-Portfolios
27
rubric so the evaluator can identify the appropriate assessment point during scoring and the report can accurately disaggregate assessment data based on these points.
It is important to check that the portfolio is in progress so that students who may be struggling with meeting requirements can be identified and offered assistance or counseling when appropriate. It can also show summative data on the process for accreditation. Most importantly for some programs, it prevents the student from hastily assembling a portfolio at the last minute at the end instead of understanding the formative nature of the portfolio.

e-Portfolios
28
Visitor Passes Visitor Passes are the most efficient way to share a portfolio with outside evaluators. The benefits of a visitor pass include controlling access to a document, the ability to track visits, and the flexibility to present customized content to different audiences. A Visitor Pass can be created from a student account, a faculty account, and even an administrator account.
Creating a Visitor Pass 1. Once you log into LiveText, click Visitor Passes under Quick Links on the right
side of the screen.
2. Click the New...button.
3. Enter a title for the Visitor Pass, usually the name of the visitor.
4. Click the Save button.
5. You will see your Visitor Pass listed with a code consisting of letters and numbers.
e-Portfolios
29
6. The next step is to then share a document with your newly created Visitor Pass, as outlined below.
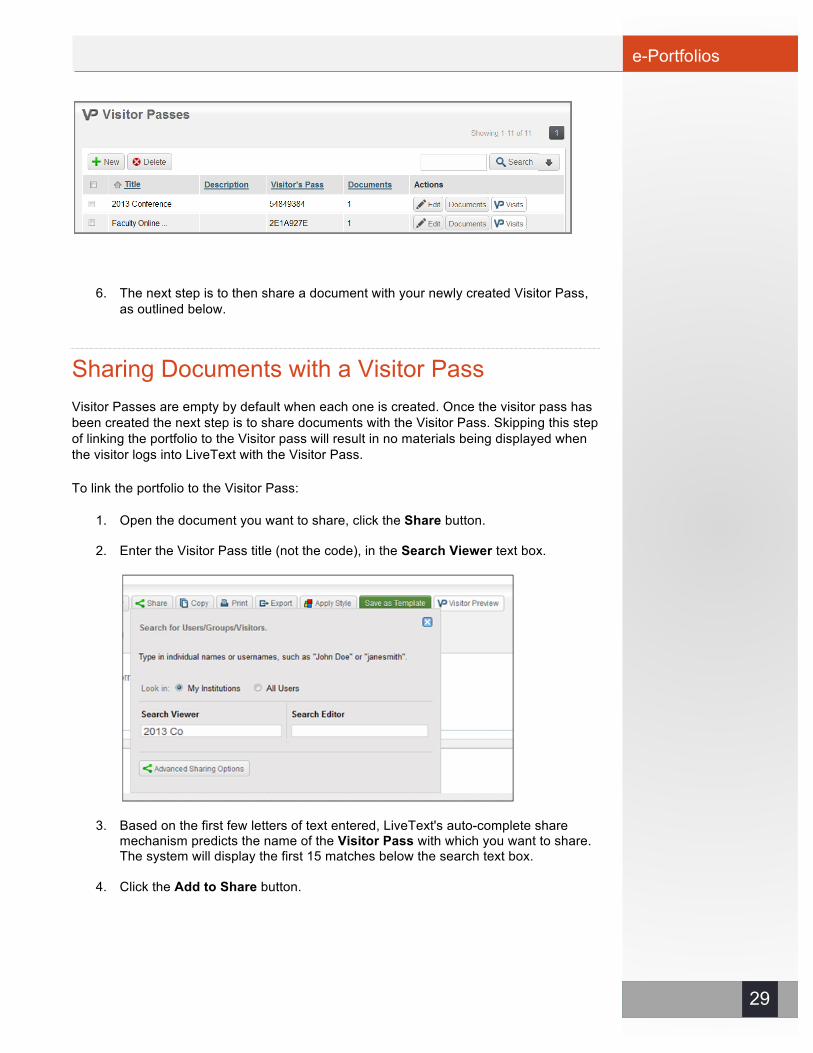
Sharing Documents with a Visitor Pass Visitor Passes are empty by default when each one is created. Once the visitor pass has been created the next step is to share documents with the Visitor Pass. Skipping this step of linking the portfolio to the Visitor pass will result in no materials being displayed when the visitor logs into LiveText with the Visitor Pass.
To link the portfolio to the Visitor Pass:
1. Open the document you want to share, click the Share button.
2. Enter the Visitor Pass title (not the code), in the Search Viewer text box.
3. Based on the first few letters of text entered, LiveText's auto-complete share mechanism predicts the name of the Visitor Pass with which you want to share. The system will display the first 15 matches below the search text box.
4. Click the Add to Share button.

e-Portfolios
30
If the user is not listed, the system was not able to identify the Visitor Pass. Revise your entry and try again. Give the Visitor Pass code to the visitor and direct them to www.livetext.com and the Visitor Pass Login Area on the main page. Here they will enter the code and click “Visitor Login” to view the portfolio or other shared documents.
Managing Visitor Passes Many students will opt to create Visitor Passes for each individual viewer when sharing their portfolio. On the visitor pass list, students can view settings (e.g. visitor pass name and description). They can also view which documents are shared with the Visitor Pass and access them quickly for editing or updating. Using the “Visits” area, students can track how many times their document has been accessed by visitors. This is one reason why creating a pass for each visitor is helpful. The student can get an idea of who is interested and how often her portfolio has been accessed.
Logging in with a Visitor Pass From the LiveText home page at www.livetext.com, click the User Visitor Pass button at the top of the webpage. The visitor pass code can be entered and will give access only to the documents shared within the pass. Visitors will only see prepared and limited materials as determined by the student. Visitor passes do not grant visitors any editing capabilities.

e-Portfolios
31
Exporting Documents Documents such as portfolios can be exported from LiveText in their entirety. The exported file is in a zip format and contains all files for the portfolio including the HTML documents itself, all referenced pages, and any file attachments. Often, this exported file is extracted and the contents are placed on a CD, DVD, thumb drive or hosted elsewhere on the web. This is a good way for all users to download their portfolios and other LiveText documents for distribution to visitors without internet access or for storage if the user no longer plans to use LiveText. Some students have found creative ways to distribute portfolios, such as “Business Card” type CDs that contain roughly 180MB of space and can be printed with their own contact information on them. Some opt for the high capacity DVDs or thumb drives for portfolios with large amounts of media content.
These devices or media can be set up to “auto-run” and open when the viewer uses it. This makes it extremely easy to use and highlights the strong technology skills of the student. It also addresses any possible Internet connectivity issues that the user may experience by making the portfolio available on removable media.
Public Documents LiveText users have the ability to turn their portfolio or any other document in their MyWork area into a public document. This feature allows users to make their document accessible without the need for viewers to log into a LiveText account or use a Visitor Pass. Public documents can be accessed by typing in the URL of the document in the address bar of the web browser. There is no visitor tracking and no restrictions on access. Public documents can be easily linked from other sites. This method is preferred for very general portfolio documents. Public documents will not be included in the results on search engines such as Google or Yahoo (see the LiveText Help section for more information on public documents or contact your Implementation Coordinator).

e-Portfolios
32
Summary Electronic Portfolios have become very dynamic and powerful tools used by faculty and students across various programs. Effective portfolios can be the cornerstone of a program’s data collection process or a student’s reflective experience on their own learning. They are also a tremendous way to demonstrate the student’s potential impact on the community. Setting clear goals for your program’s portfolios, designing useful templates, developing a simple yet robust assessment process, and developing effective communication can help programs establish a multi-faceted portfolio with value to all involved. LiveText’s e-Portfolio and Assessment Management Platform have been combined to offer institutions the ability to collect assessment data while offering students and faculty the ability to create e-Portfolios for professional and reflective purposes.