table of contents - dagang net technologies malaysia trader.pdf · table of contents table of...
TRANSCRIPT

TABLE OF CONTENTS
TABLE OF CONTENTS............................................................................................................................................................................................................... 2
RELEASE HISTORY ................................................................................................................................................................................................................... 3
INTRODUCTION TO ePERMIT .................................................................................................................................................................................................. 4
1 TRADER LOGIN ............................................................................................................................................................................................................... 5
2 TRADER PROFILE............................................................................................................................................................................................................. 6
3 PERMITS MENU .............................................................................................................................................................................................................. 7
3.1 Search By Filtering ....................................................................................................................... 8
3.2 Advanced Search ....................................................................................................................... 10
3.3 Create New Import Permit ......................................................................................................... 15
3.4 Edit Import Permit ..................................................................................................................... 25
3.5 Create New Export Permit .......................................................................................................... 27
3.6 Edit Export Permit ...................................................................................................................... 37
4 ARCHIVED PERMITS MENU ........................................................................................................................................................................................... 39
5 ePERMIT – eDECLARE INTEGRATION ............................................................................................................................................................................ 45

3 Version 1.1
RELEASE HISTORY
Version Date Author Summary Of Changes
4 Version 1.1
INTRODUCTION TO ePERMIT
ePermit is a web-based value-added service provided by Dagang Net Technologies Sdn Bhd (DNT). It enables importers, exporters and appointed
forwarding agents to apply for permit from Other Government Agencies (OGA) and obtain the approval online via the internet. Approved permits from OGA
will be transmitted to Sistem Maklumat Kastam (SMK) electronically for validation and cross reference purposes.
ePermit is designed to accommodate the specific requirements of each OGA, for example consignment details, quota details, grading summary and product
database. There are three modules assigned to different groups of users;
1. Importers/Exporters Module
Enables importers/exporters to apply for permit online and submit their application for approval via the Internet.
2. Forwarding Agents Module
Enabling appointed forwarding agents to apply for permit online on behalf of the importers/exporters and submit their application for approval via
the Internet.
3. OGA Module
Enabling OGA to verify and approve the permit application received and send the approved permit electronically via the Internet. The module also
enables OGA to access to daily statistical report on issued and rejected permits.
In this module, Traders or Importer/Exporters will have deeper understanding of ePermit system with the help of visual and step by step guide. By the end
of this module, user will benefit from the system as it reduce turnaround time, ease of use, convenient and offers multi-tasking.

5 Version 1.1
1 TRADER LOGIN
Prior to access ePermit system, users must ensure that their company is registered with the respective OGA.
Step 1
Key In Username And Password
Type in username and password.
Click on the checkbox Remember Password to disable automatic logout if there were no activity
above 30 minutes.
Click on the button to access the system.
Insert Username &
Password
Insert Username &
Password
6 Version 1.1
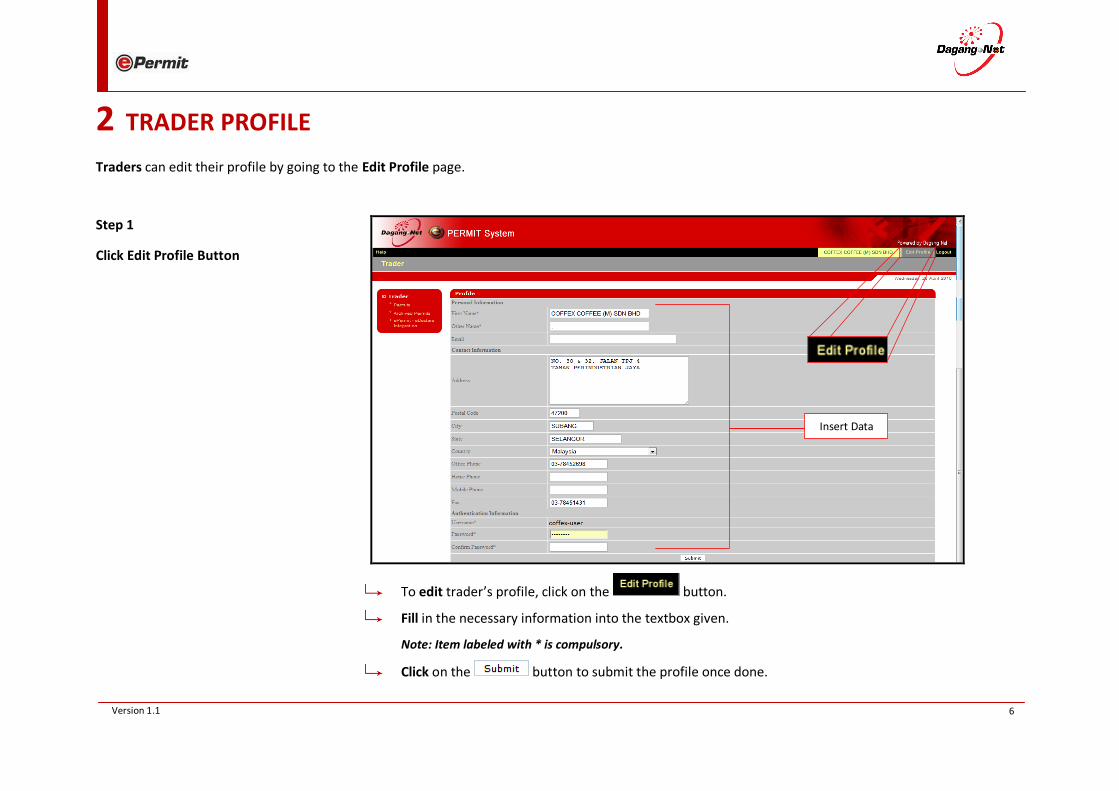
2 TRADER PROFILE
Traders can edit their profile by going to the Edit Profile page.
Step 1
Click Edit Profile Button
To edit trader’s profile, click on the button.
Fill in the necessary information into the textbox given.
Note: Item labeled with * is compulsory.
Click on the button to submit the profile once done.
Insert Data
7 Version 1.1
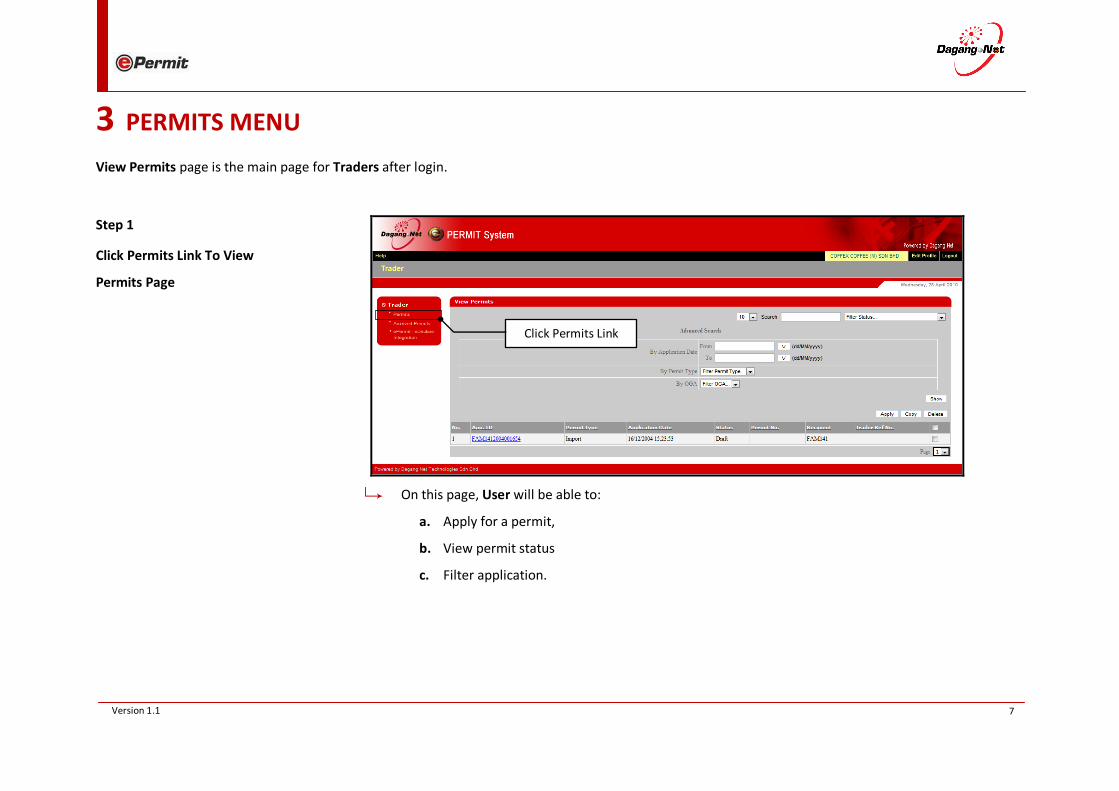
3 PERMITS MENU
View Permits page is the main page for Traders after login.
Step 1
Click Permits Link To View
Permits Page
On this page, User will be able to:
a. Apply for a permit,
b. View permit status
c. Filter application.
Click Permits Link

8 Version 1.1
3.1 Search By Filtering
To Search By Filtering, user must first determine their Application ID and Permit Status in order to view the search result.
Step 1
Search Filtering
Choose the amount of search result to be shown.
Insert the Application ID into the textbox.
Choose Permit Status from the dropdown list.
Then click the button.
Limits Amount Of Permit
Insert Application ID
Choose Permit Status
9 Version 1.1
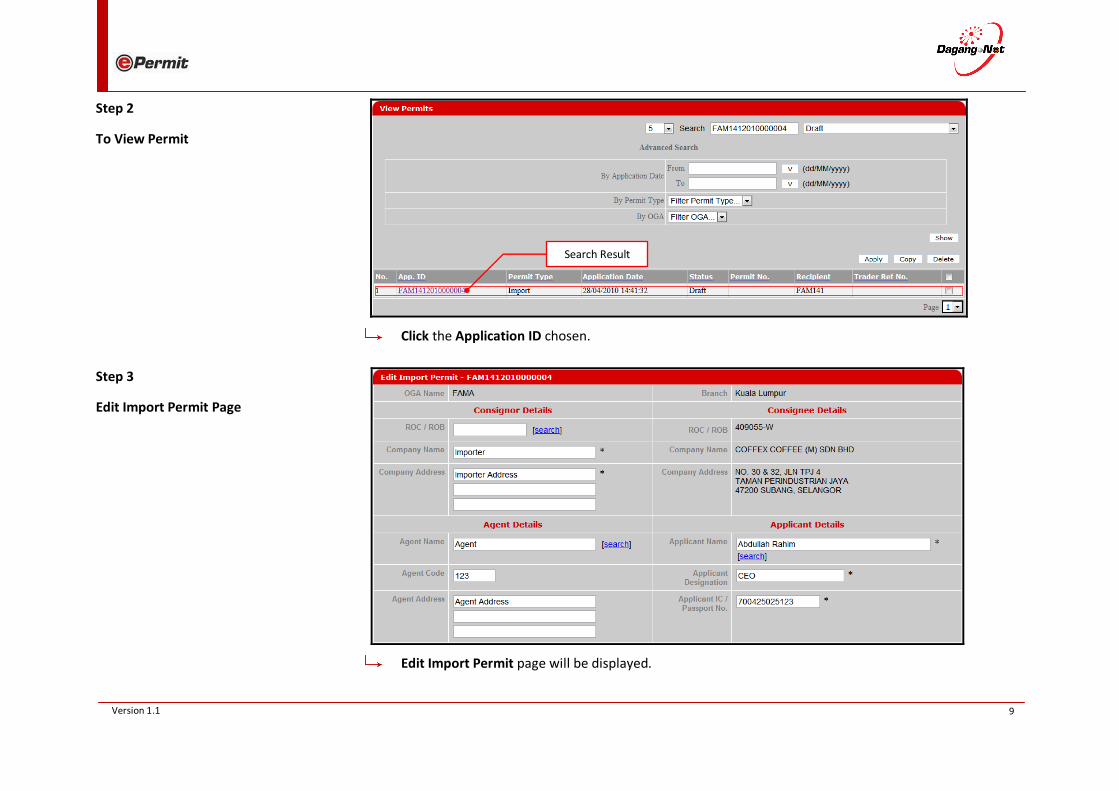
Step 2
To View Permit
Click the Application ID chosen.
Step 3
Edit Import Permit Page
Edit Import Permit page will be displayed.
Search Result
10 Version 1.1
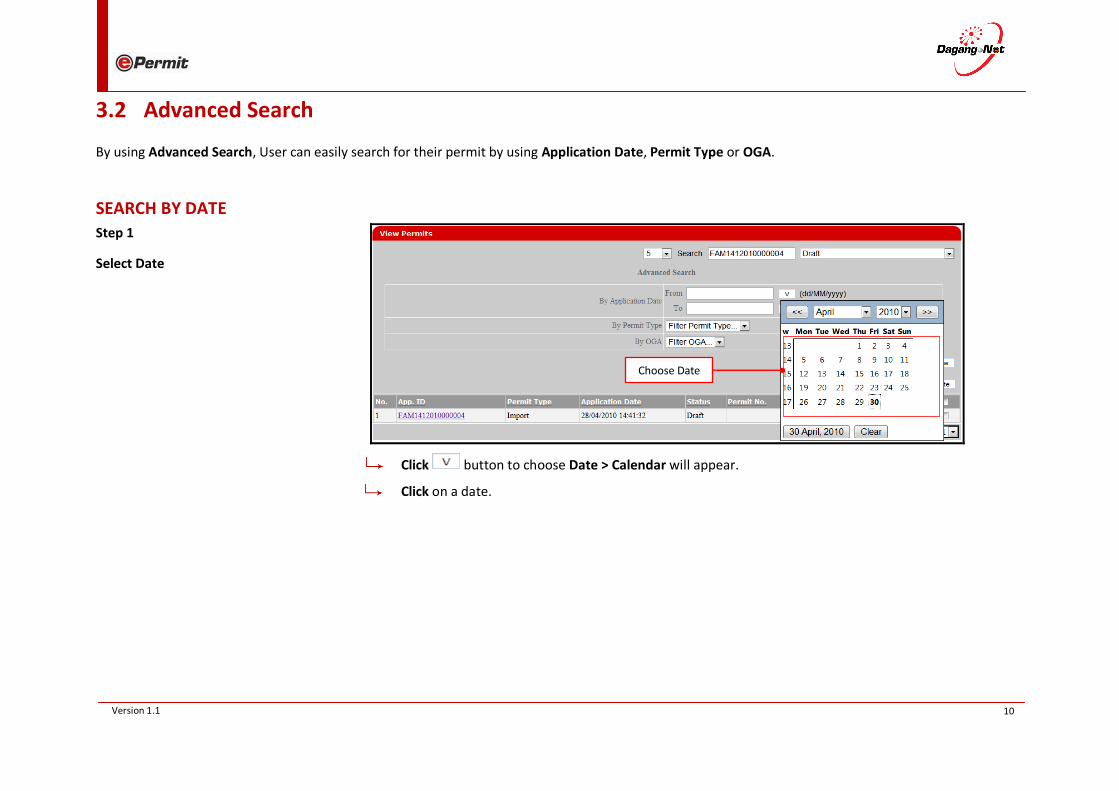
3.2 Advanced Search
By using Advanced Search, User can easily search for their permit by using Application Date, Permit Type or OGA.
SEARCH BY DATE
Step 1
Select Date
Click button to choose Date > Calendar will appear.
Click on a date.
Choose Date

11 Version 1.1
Step 2
To View Permit
Click button to view search result.
Click the Application ID chosen.
Step 3
Edit Import Permit Page
Edit Import Permit page will be displayed.
Search Result
12 Version 1.1
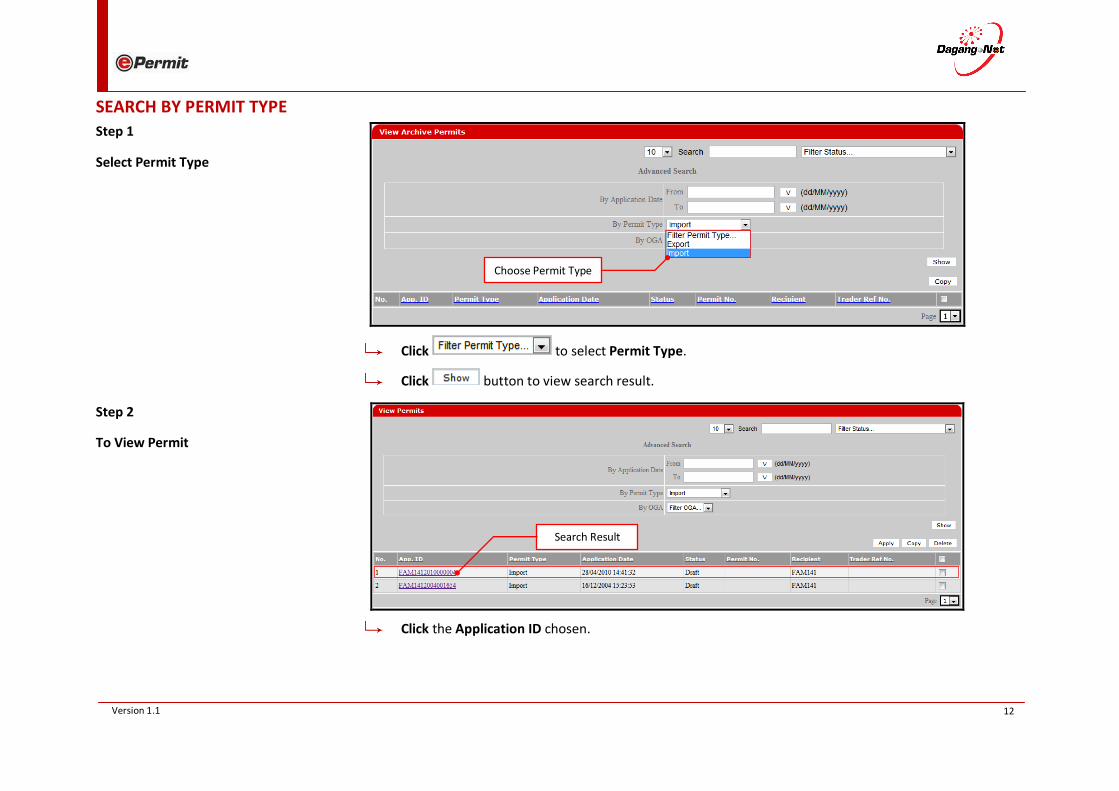
SEARCH BY PERMIT TYPE
Step 1
Select Permit Type
Click to select Permit Type.
Click button to view search result.
Step 2
To View Permit
Click the Application ID chosen.
Search Result
Choose Permit Type

13 Version 1.1
Step 3
Edit Import Permit Page
Edit Import Permit page will be displayed.
SEARCH BY OGA
Step 1
Select OGA
Click to select OGA.
Click button to view search result.
Select OGA
14 Version 1.1
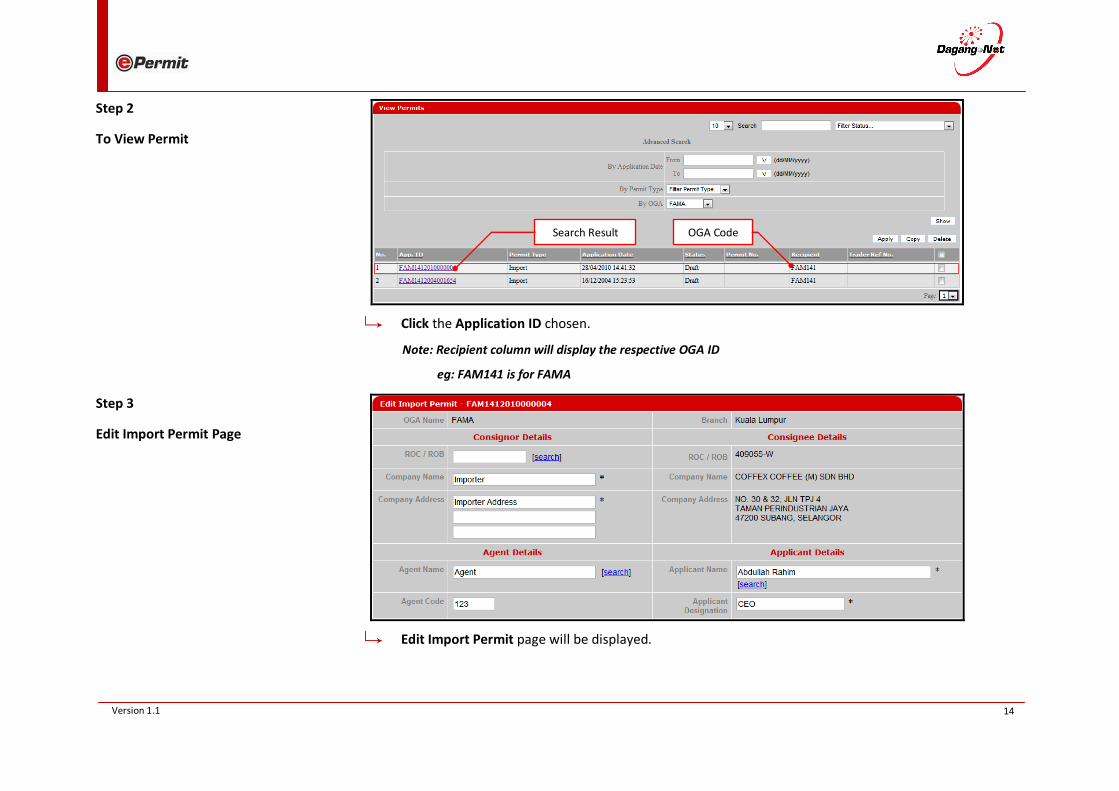
Step 2
To View Permit
Click the Application ID chosen.
Note: Recipient column will display the respective OGA ID
eg: FAM141 is for FAMA
Step 3
Edit Import Permit Page
Edit Import Permit page will be displayed.
Search Result OGA Code
15 Version 1.1
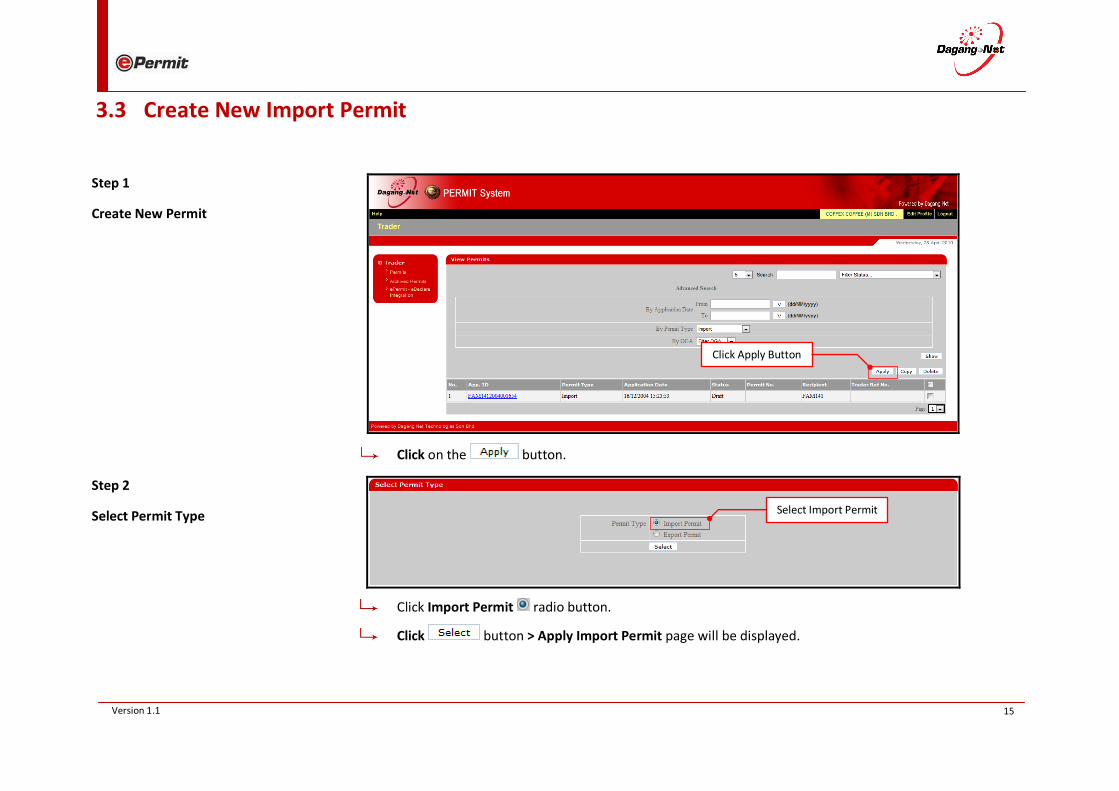
3.3 Create New Import Permit
Step 1
Create New Permit
Click on the button.
Step 2
Select Permit Type
Click Import Permit radio button.
Click button > Apply Import Permit page will be displayed.
Select Import Permit
Click Apply Button
16 Version 1.1
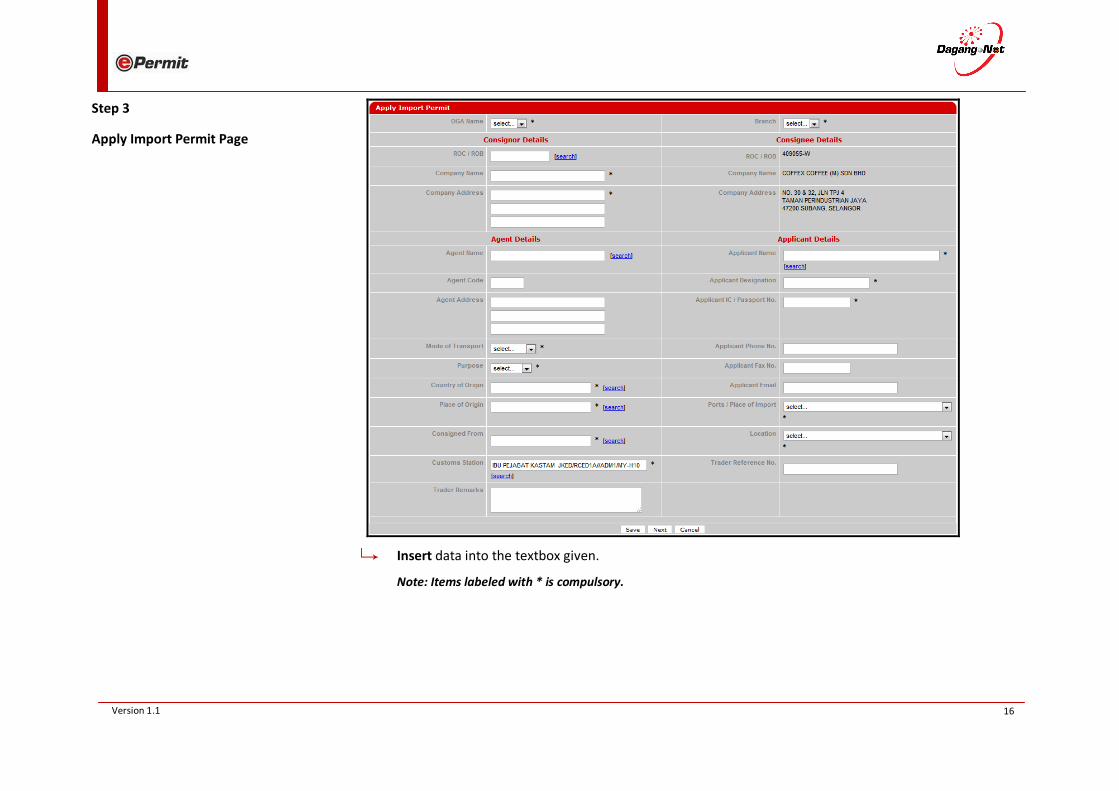
Step 3
Apply Import Permit Page
Insert data into the textbox given.
Note: Items labeled with * is compulsory.

17 Version 1.1
Step 4
Select OGA
Select the respective OGA from the OGA Name list.
Step 5
Select OGA Branch
Select the OGA Branch from the Branch list.
Step 6
Fill In Consignor Details
For User’s convenience, Click link to view ROC/ROB number.
Click on the exporter’s ROC/ROB number > Consignor Details will be updated.
Select OGA Branch
Select OGA
Fill In Consignor Details
18 Version 1.1
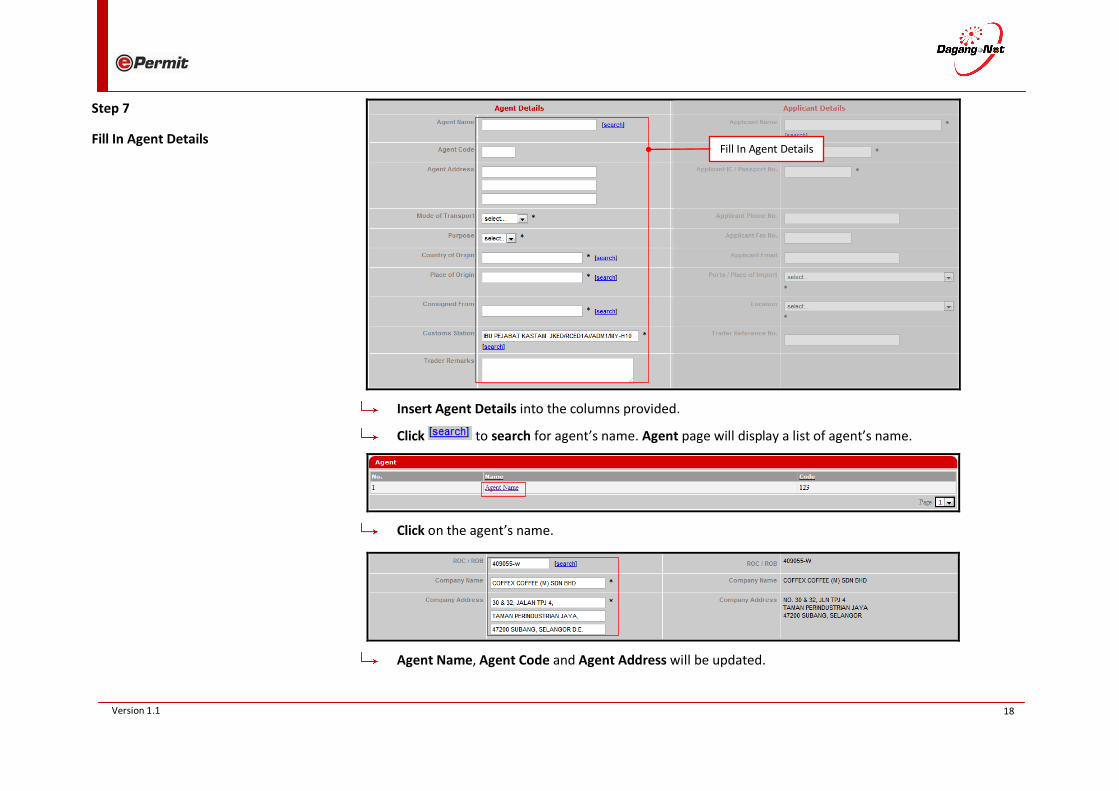
Step 7
Fill In Agent Details
Insert Agent Details into the columns provided.
Click to search for agent’s name. Agent page will display a list of agent’s name.
Click on the agent’s name.
Agent Name, Agent Code and Agent Address will be updated.
Fill In Agent Details
19 Version 1.1
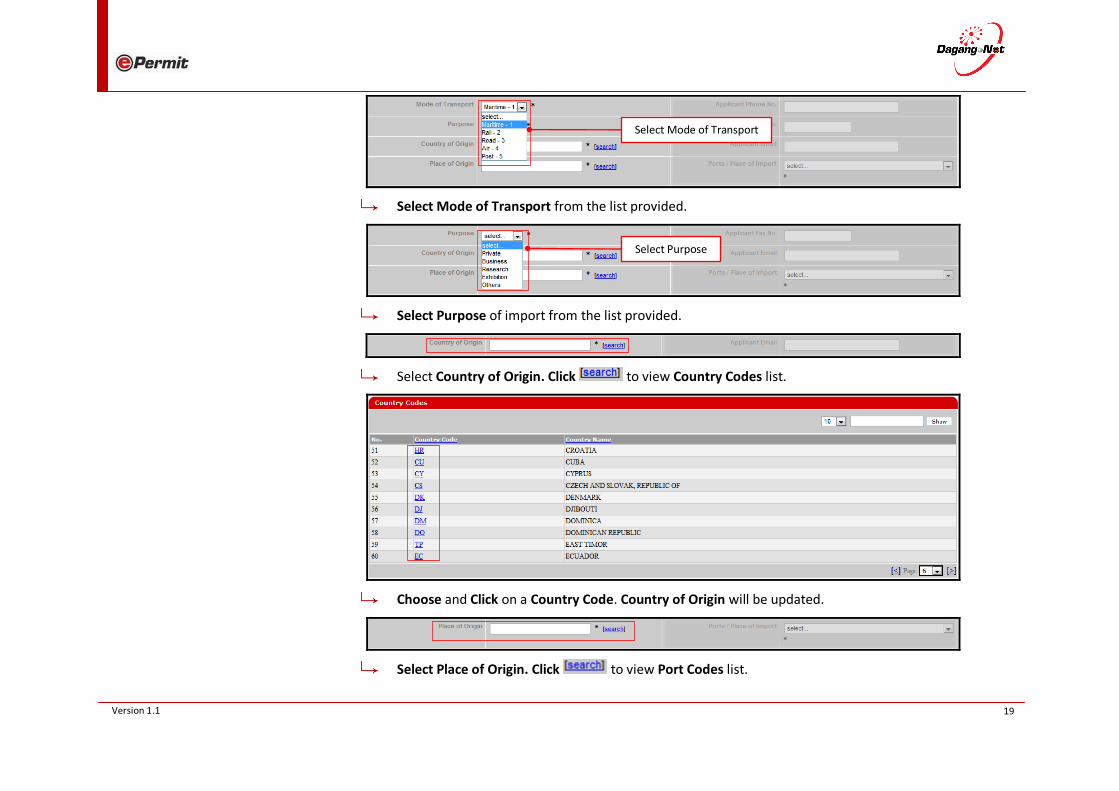
Select Mode of Transport from the list provided.
Select Purpose of import from the list provided.
Select Country of Origin. Click to view Country Codes list.
Choose and Click on a Country Code. Country of Origin will be updated.
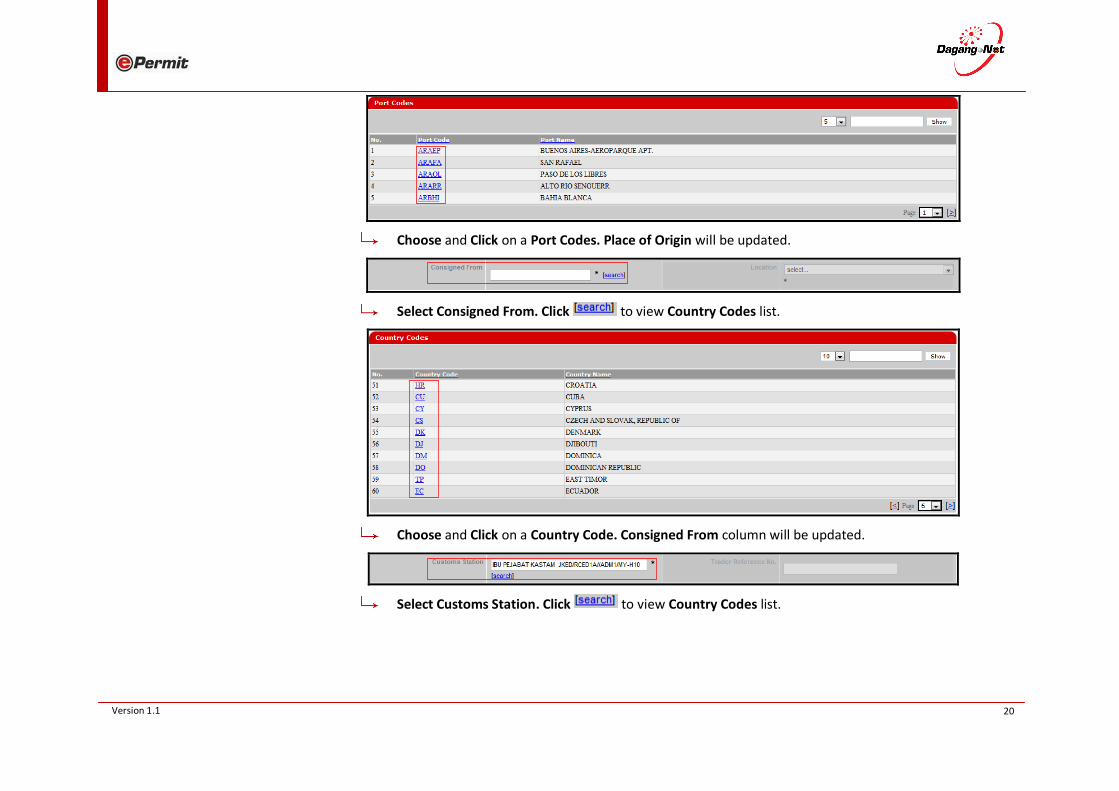
Select Place of Origin. Click to view Port Codes list.
Select Mode of Transport
Select Purpose
20 Version 1.1
Choose and Click on a Port Codes. Place of Origin will be updated.
Select Consigned From. Click to view Country Codes list.
Choose and Click on a Country Code. Consigned From column will be updated.
Select Customs Station. Click to view Country Codes list.
21 Version 1.1
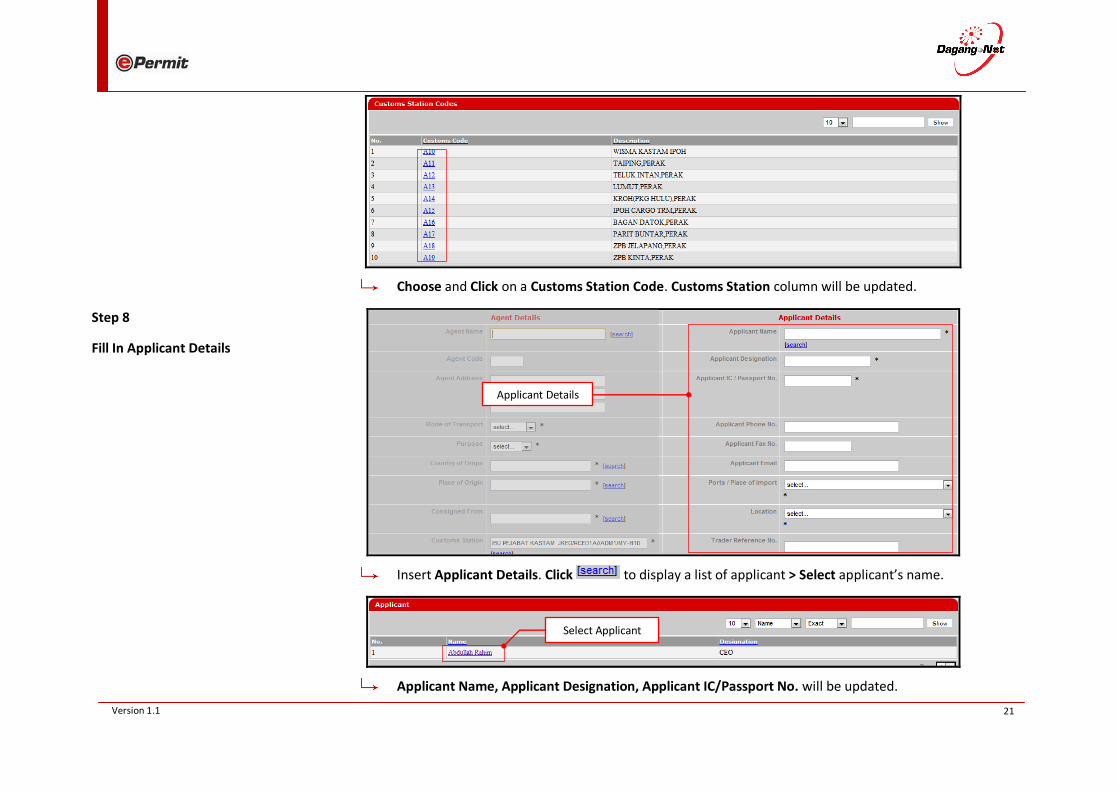
Choose and Click on a Customs Station Code. Customs Station column will be updated.
Step 8
Fill In Applicant Details
Insert Applicant Details. Click to display a list of applicant > Select applicant’s name.
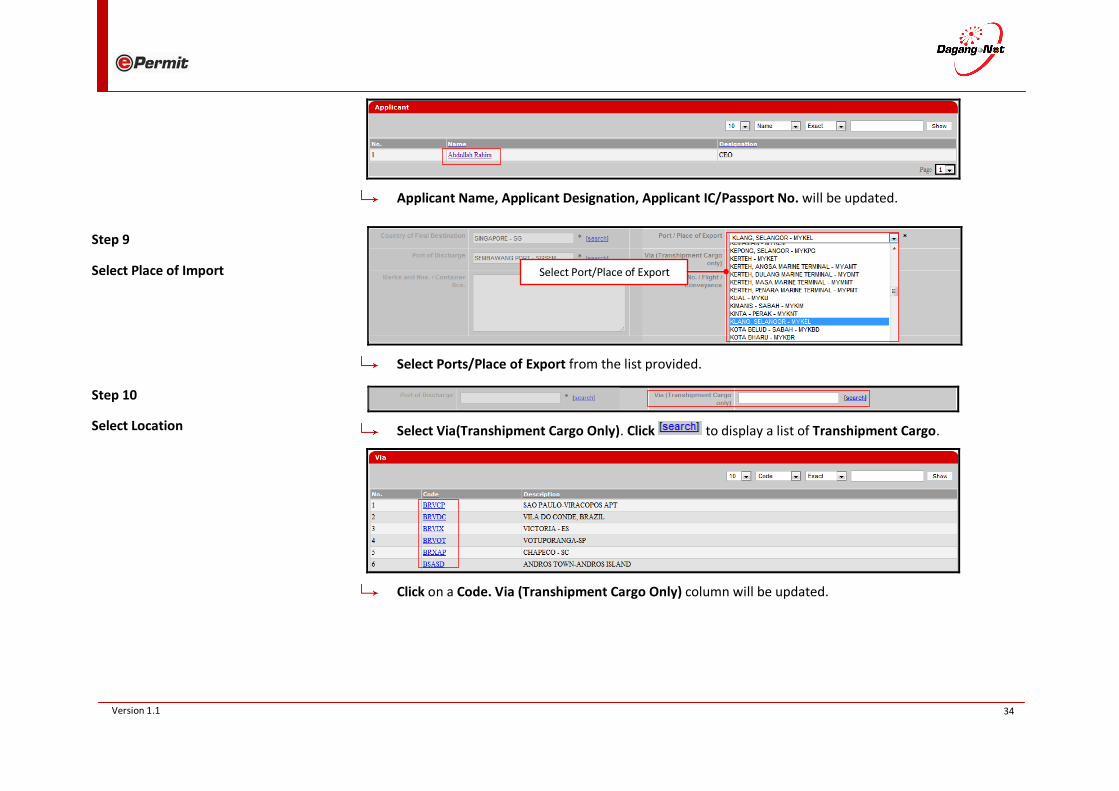
Applicant Name, Applicant Designation, Applicant IC/Passport No. will be updated.
Applicant Details
Select Applicant
22 Version 1.1
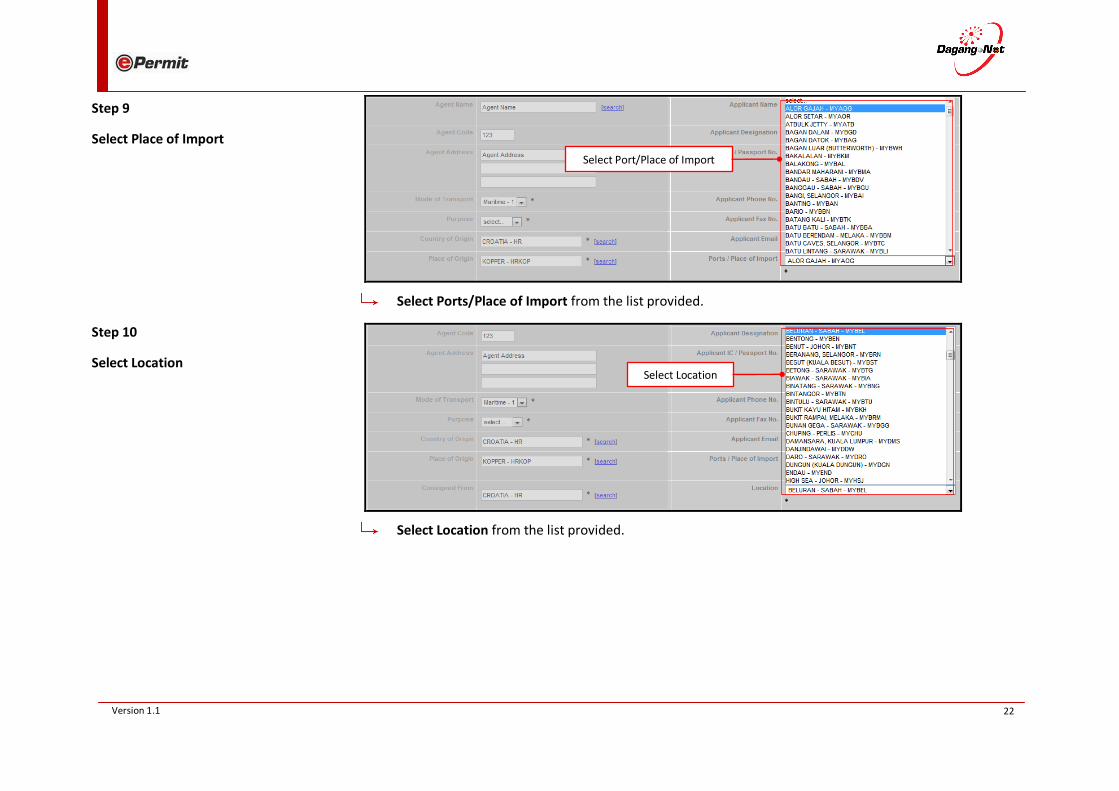
Step 9
Select Place of Import
Select Ports/Place of Import from the list provided.
Step 10
Select Location
Select Location from the list provided.
Select Port/Place of Import
Select Location
23 Version 1.1
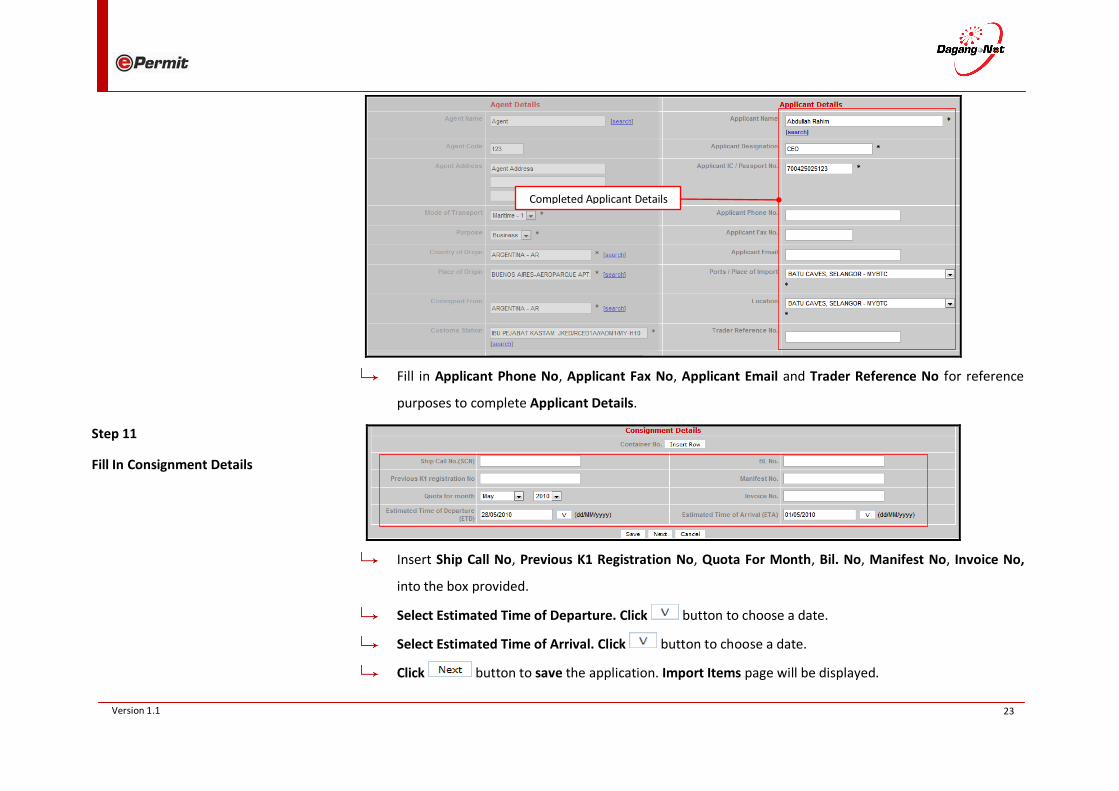
Fill in Applicant Phone No, Applicant Fax No, Applicant Email and Trader Reference No for reference
purposes to complete Applicant Details.
Step 11
Fill In Consignment Details
Insert Ship Call No, Previous K1 Registration No, Quota For Month, Bil. No, Manifest No, Invoice No,
into the box provided.
Select Estimated Time of Departure. Click button to choose a date.
Select Estimated Time of Arrival. Click button to choose a date.
Click button to save the application. Import Items page will be displayed.
Completed Applicant Details
24 Version 1.1
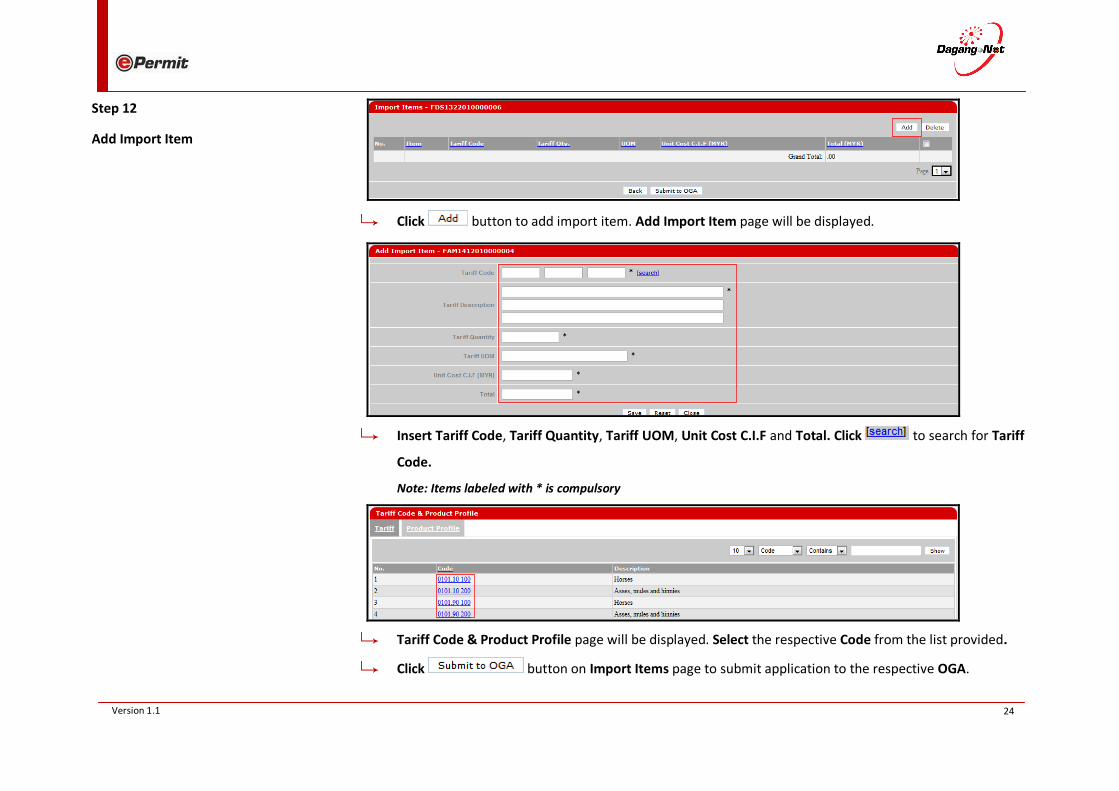
Step 12
Add Import Item
Click button to add import item. Add Import Item page will be displayed.
Insert Tariff Code, Tariff Quantity, Tariff UOM, Unit Cost C.I.F and Total. Click to search for Tariff
Code.
Note: Items labeled with * is compulsory
Tariff Code & Product Profile page will be displayed. Select the respective Code from the list provided.
Click button on Import Items page to submit application to the respective OGA.
25 Version 1.1
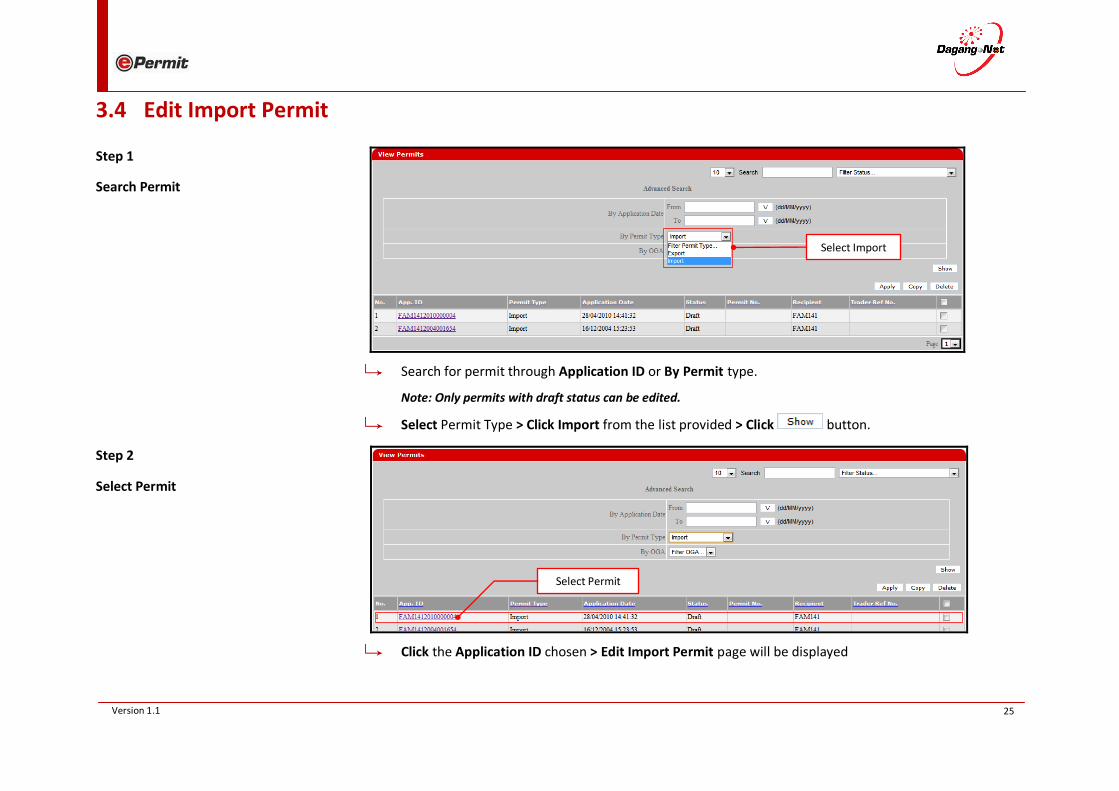
3.4 Edit Import Permit
Step 1
Search Permit
Search for permit through Application ID or By Permit type.
Note: Only permits with draft status can be edited.
Select Permit Type > Click Import from the list provided > Click button.
Step 2
Select Permit
Click the Application ID chosen > Edit Import Permit page will be displayed
Select Permit
Select Import
26 Version 1.1
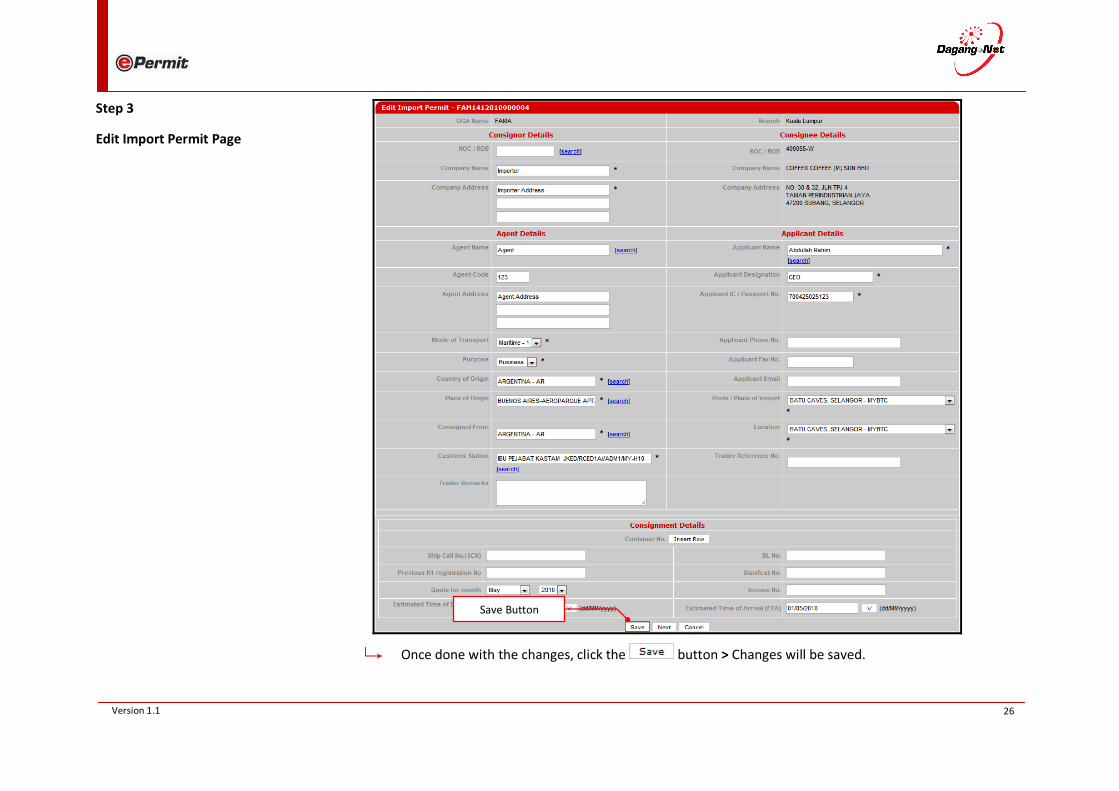
Step 3
Edit Import Permit Page
Once done with the changes, click the button > Changes will be saved.
Save Button
27 Version 1.1
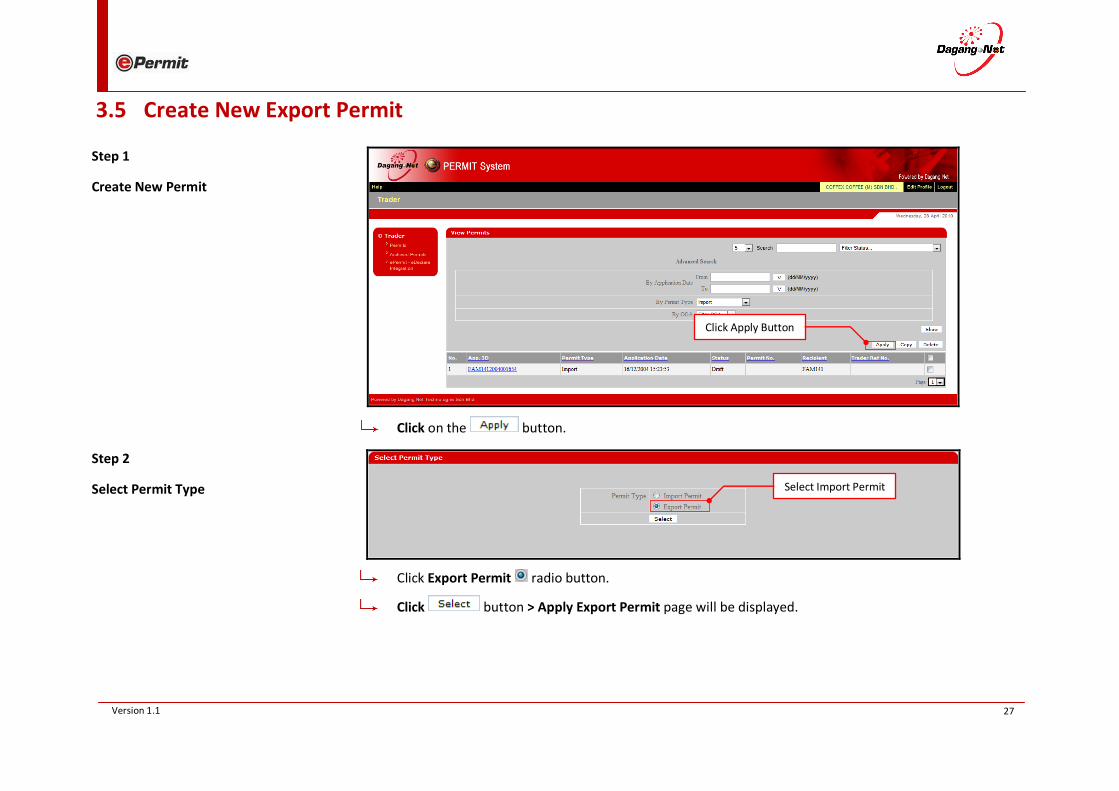
3.5 Create New Export Permit
Step 1
Create New Permit
Click on the button.
Step 2
Select Permit Type
Click Export Permit radio button.
Click button > Apply Export Permit page will be displayed.
Click Apply Button
Select Import Permit

28 Version 1.1
Step 3
Apply Export Permit Page
Insert data into the textbox given.
Note: Items labeled with * is compulsory.
Consignee Details
Agent Details
Other Details
Cancel Button
Next Button
Cancel Button
29 Version 1.1
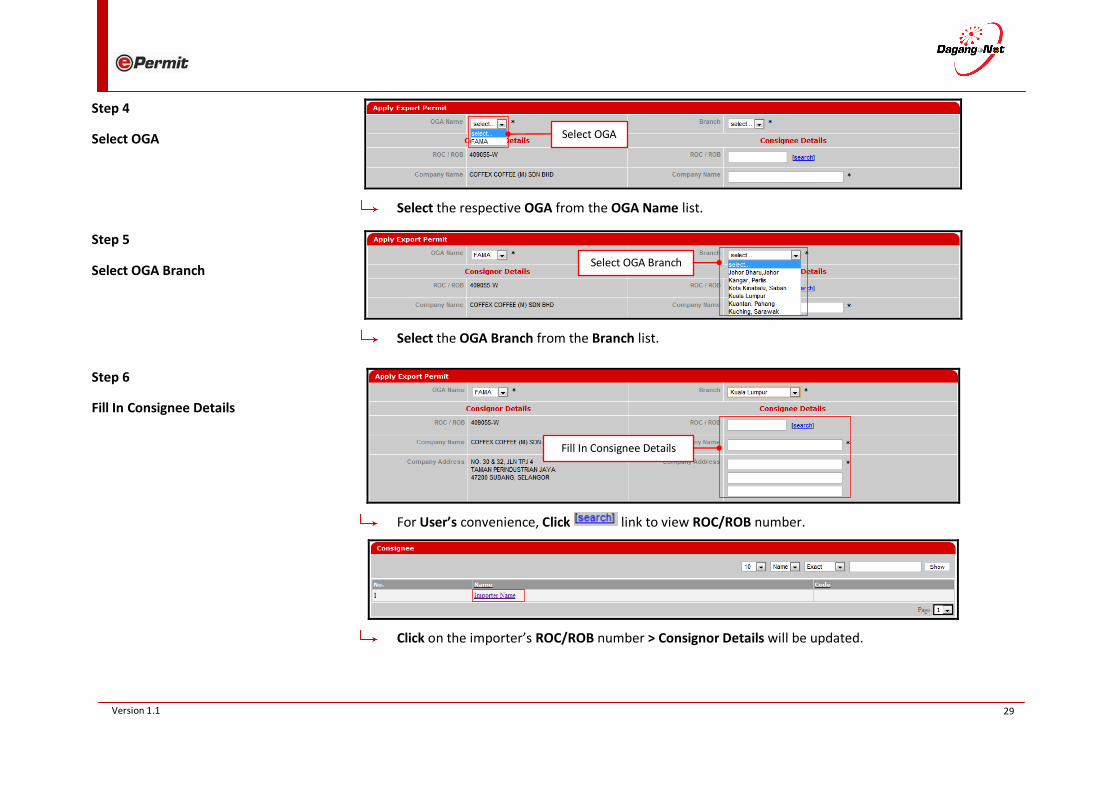
Step 4
Select OGA
Select the respective OGA from the OGA Name list.
Step 5
Select OGA Branch
Select the OGA Branch from the Branch list.
Step 6
Fill In Consignee Details
For User’s convenience, Click link to view ROC/ROB number.
Click on the importer’s ROC/ROB number > Consignor Details will be updated.
Select OGA
Select OGA Branch
Fill In Consignee Details
30 Version 1.1
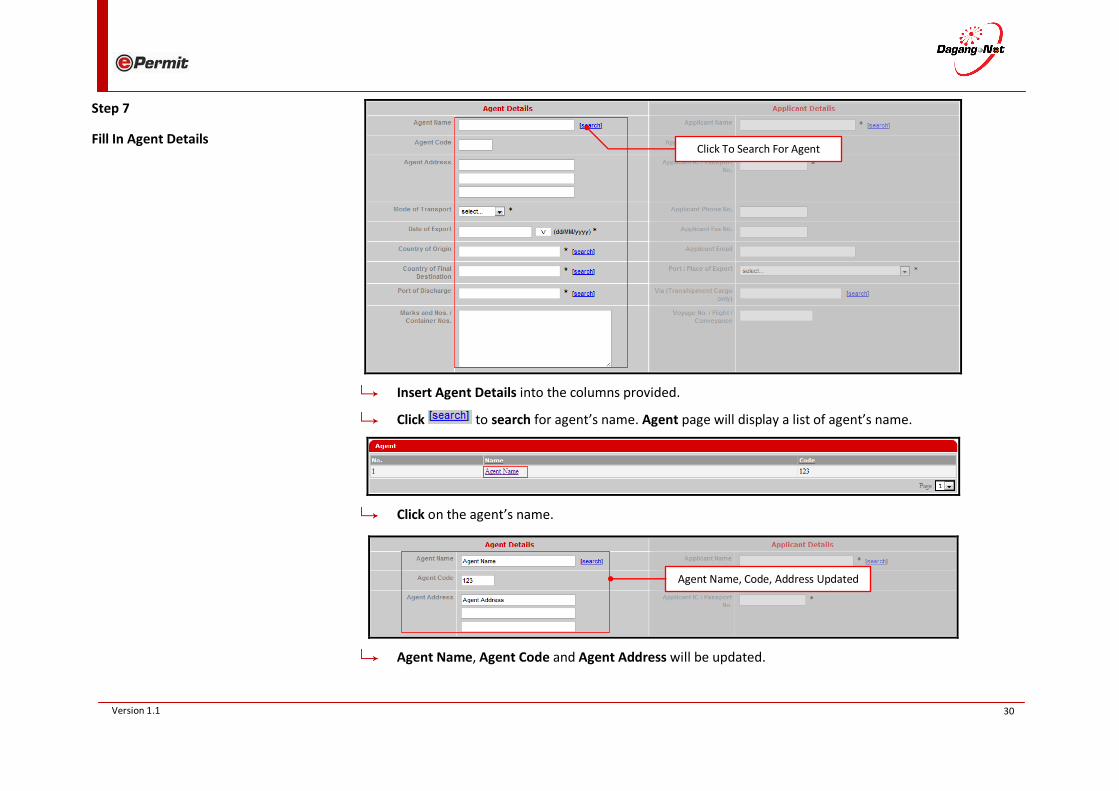
Step 7
Fill In Agent Details
Insert Agent Details into the columns provided.
Click to search for agent’s name. Agent page will display a list of agent’s name.
Click on the agent’s name.
Agent Name, Agent Code and Agent Address will be updated.
Click To Search For Agent
Agent Name, Code, Address Updated
31 Version 1.1
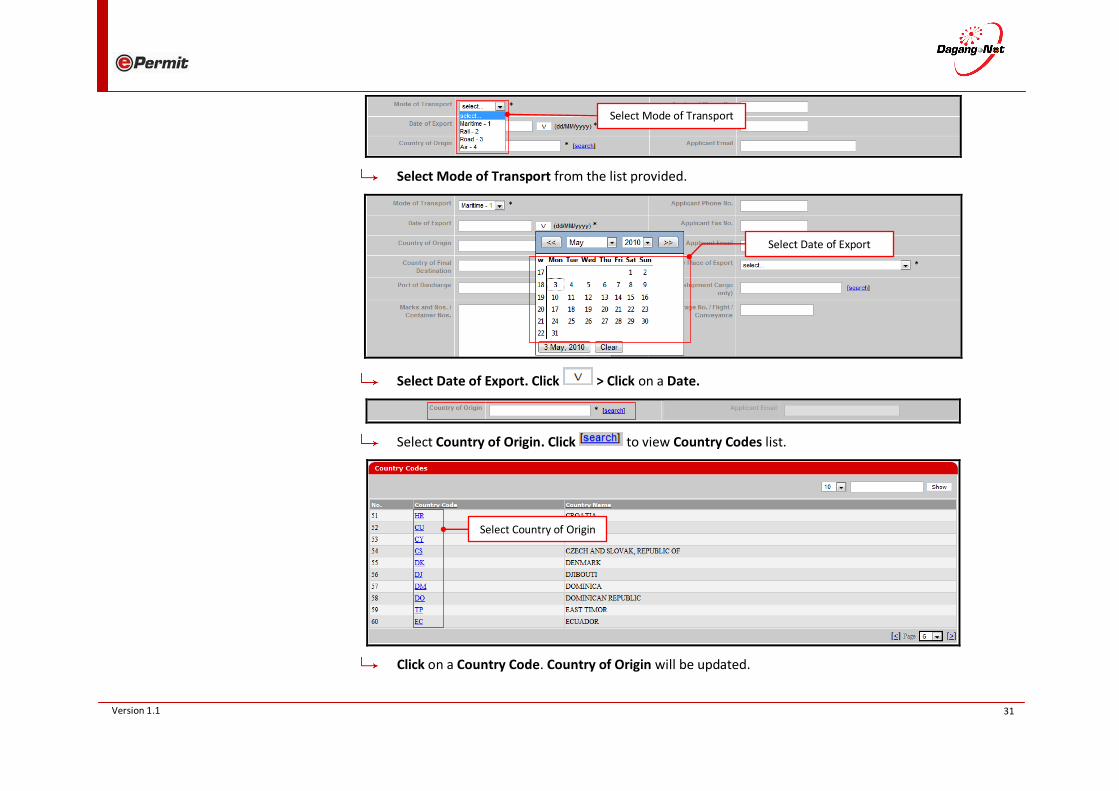
Select Mode of Transport from the list provided.
Select Date of Export. Click > Click on a Date.
Select Country of Origin. Click to view Country Codes list.
Click on a Country Code. Country of Origin will be updated.
Select Mode of Transport
Select Date of Export
Select Country of Origin
32 Version 1.1
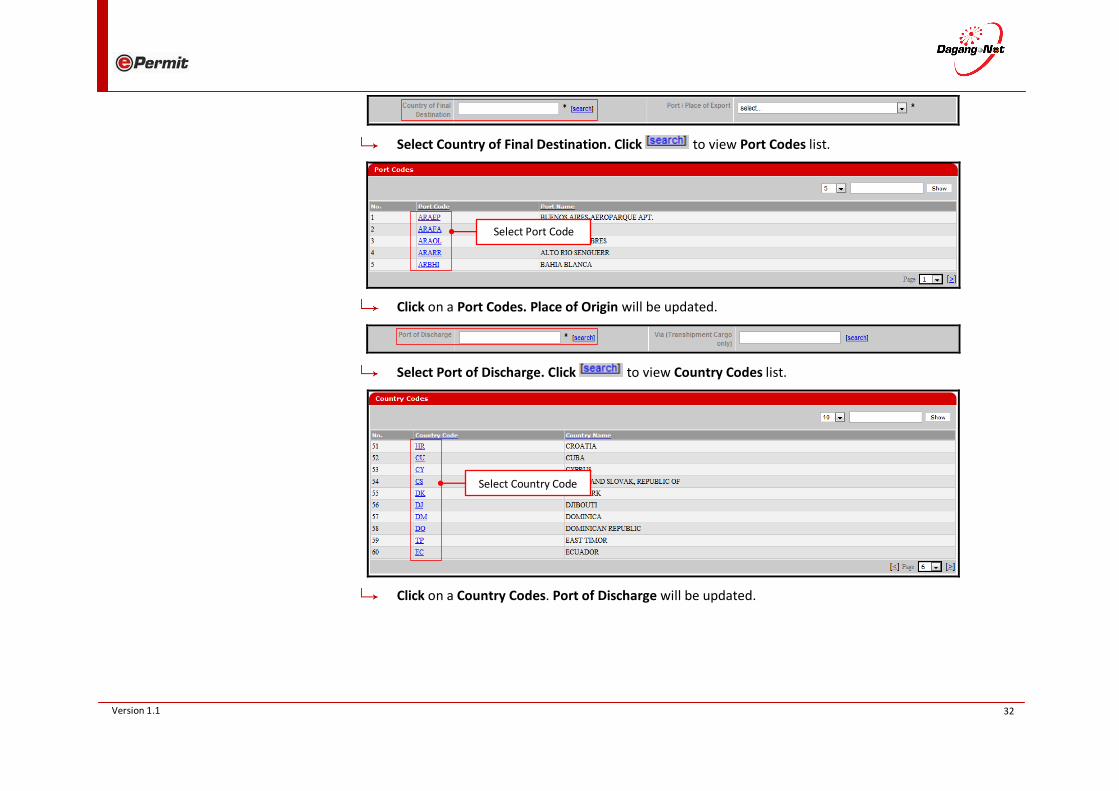
Select Country of Final Destination. Click to view Port Codes list.
Click on a Port Codes. Place of Origin will be updated.
Select Port of Discharge. Click to view Country Codes list.
Click on a Country Codes. Port of Discharge will be updated.
Select Port Code
Select Country Code

33 Version 1.1
Completed Agent Details.
Step 8
Fill In Applicant Details
Insert Applicant Details. Click to display a list of applicant > Select applicant’s name.
Agent Details
Fill In Applicant Details
34 Version 1.1
Applicant Name, Applicant Designation, Applicant IC/Passport No. will be updated.
Step 9
Select Place of Import
Select Ports/Place of Export from the list provided.
Step 10
Select Location
Select Via(Transhipment Cargo Only). Click to display a list of Transhipment Cargo.
Click on a Code. Via (Transhipment Cargo Only) column will be updated.
Select Port/Place of Export
35 Version 1.1
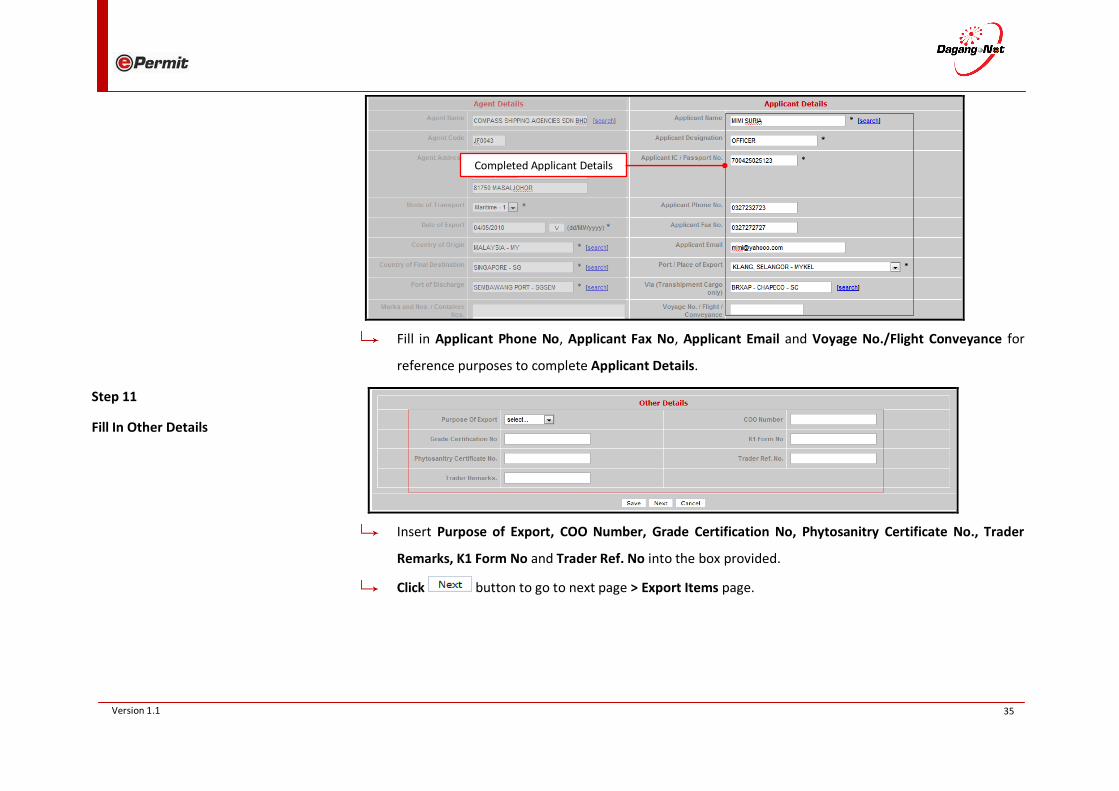
Fill in Applicant Phone No, Applicant Fax No, Applicant Email and Voyage No./Flight Conveyance for
reference purposes to complete Applicant Details.
Step 11
Fill In Other Details
Insert Purpose of Export, COO Number, Grade Certification No, Phytosanitry Certificate No., Trader
Remarks, K1 Form No and Trader Ref. No into the box provided.
Click button to go to next page > Export Items page.
Completed Applicant Details

36 Version 1.1
Step 12
Add Export Item
Click button to add import item. Add Export Items page will be displayed.
Insert Tariff Code. Click to search for Tariff Code.
Tariff Code & Product Profile page will be displayed. Select the respective Code from the list provided.
Click button to submit application to the respective OGA.
37 Version 1.1
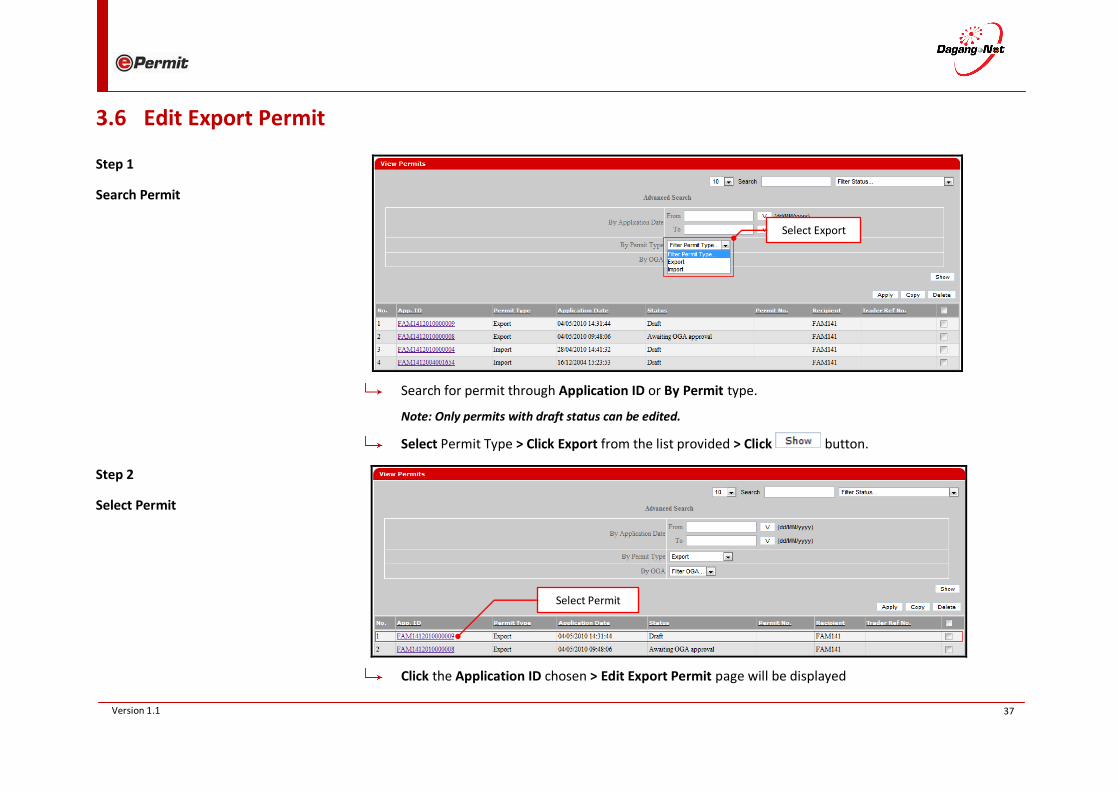
3.6 Edit Export Permit
Step 1
Search Permit
Search for permit through Application ID or By Permit type.
Note: Only permits with draft status can be edited.
Select Permit Type > Click Export from the list provided > Click button.
Step 2
Select Permit
Click the Application ID chosen > Edit Export Permit page will be displayed
Select Permit
Select Export

38 Version 1.1
Step 3
Edit Export Permit Page
Once done with the changes, click the button > Changes will be saved.
Save Button
39 Version 1.1
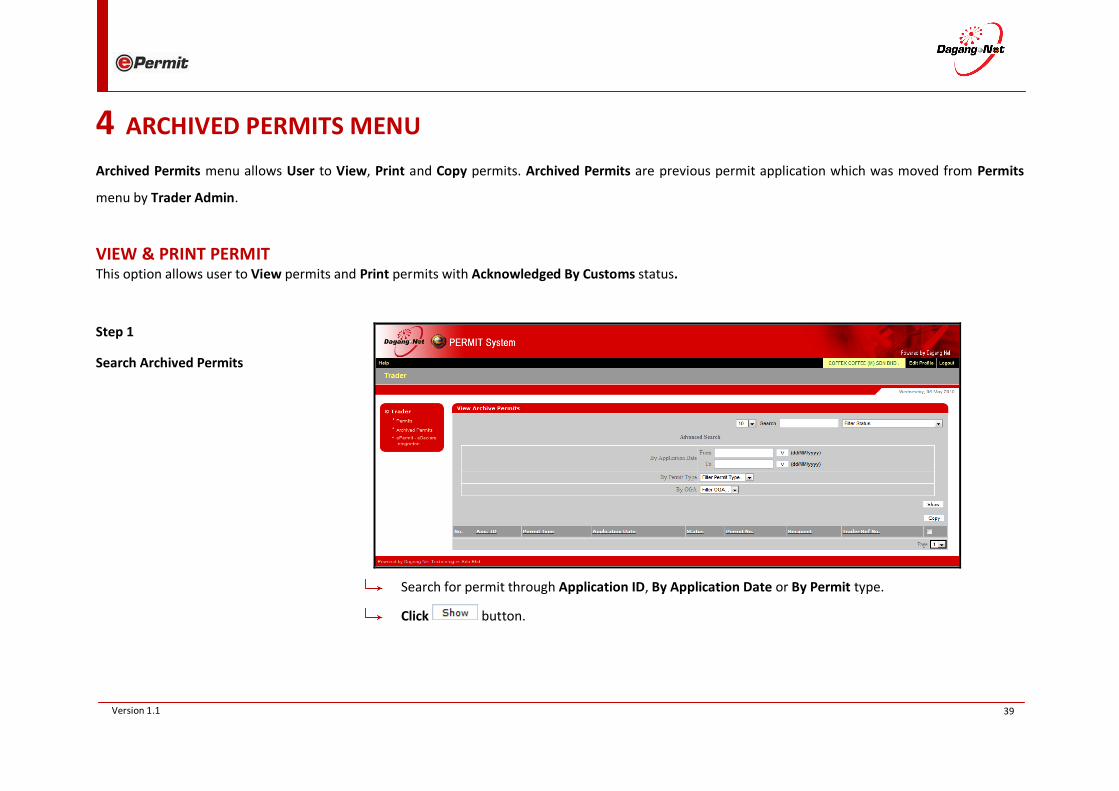
4 ARCHIVED PERMITS MENU
Archived Permits menu allows User to View, Print and Copy permits. Archived Permits are previous permit application which was moved from Permits
menu by Trader Admin.
VIEW & PRINT PERMIT This option allows user to View permits and Print permits with Acknowledged By Customs status.
Step 1
Search Archived Permits
Search for permit through Application ID, By Application Date or By Permit type.
Click button.

40 Version 1.1
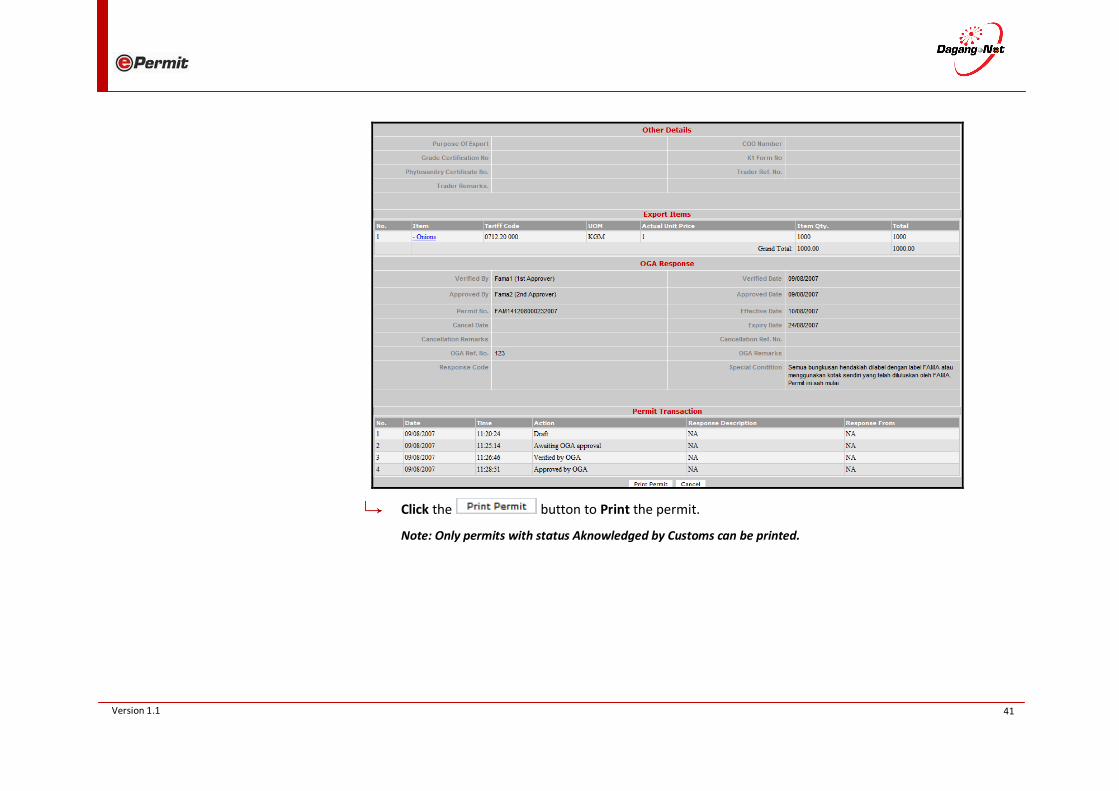
Step 2
View Permit
Click the Application ID chosen > View Export Permit page will be displayed
Note: Permits can only be viewed, only permits with Acknowledged by Customs can be printed.
41 Version 1.1
Click the button to Print the permit.
Note: Only permits with status Aknowledged by Customs can be printed.
42 Version 1.1
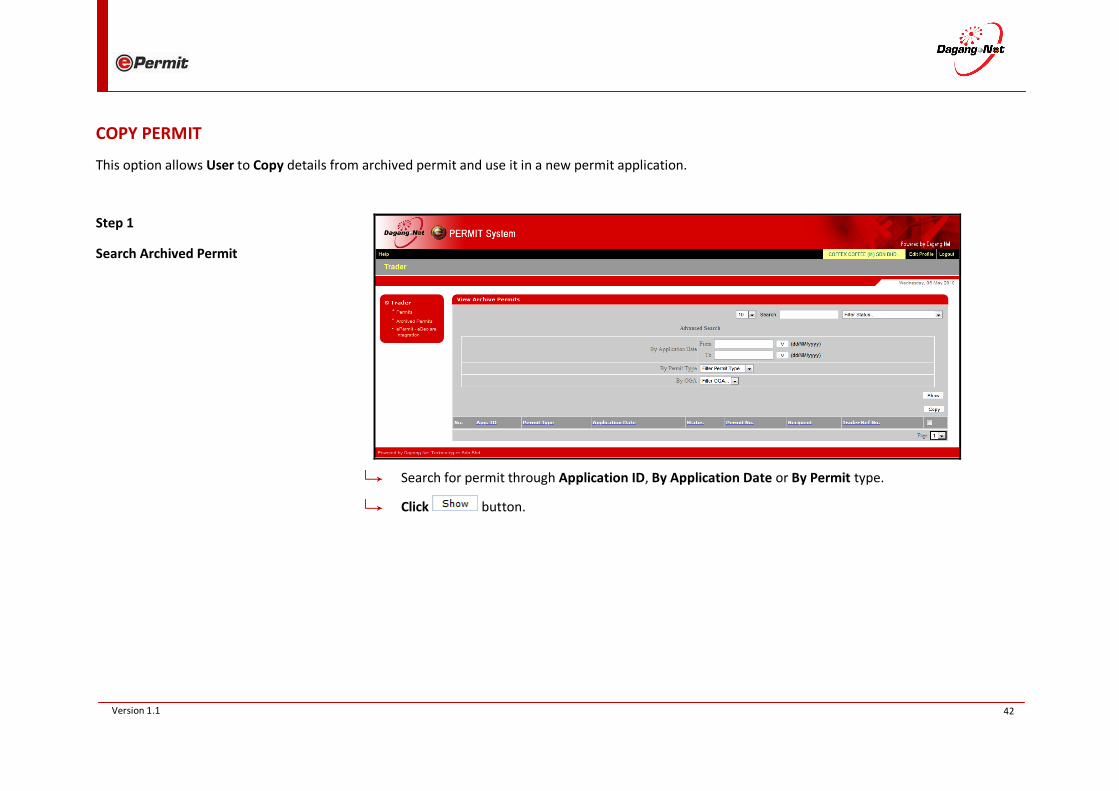
COPY PERMIT
This option allows User to Copy details from archived permit and use it in a new permit application.
Step 1
Search Archived Permit
Search for permit through Application ID, By Application Date or By Permit type.
Click button.

43 Version 1.1
Step 2
Select Permit
Select the Application ID to be copied, Tick on the checkbox.
Click button > Copy Export Permit page will be displayed.
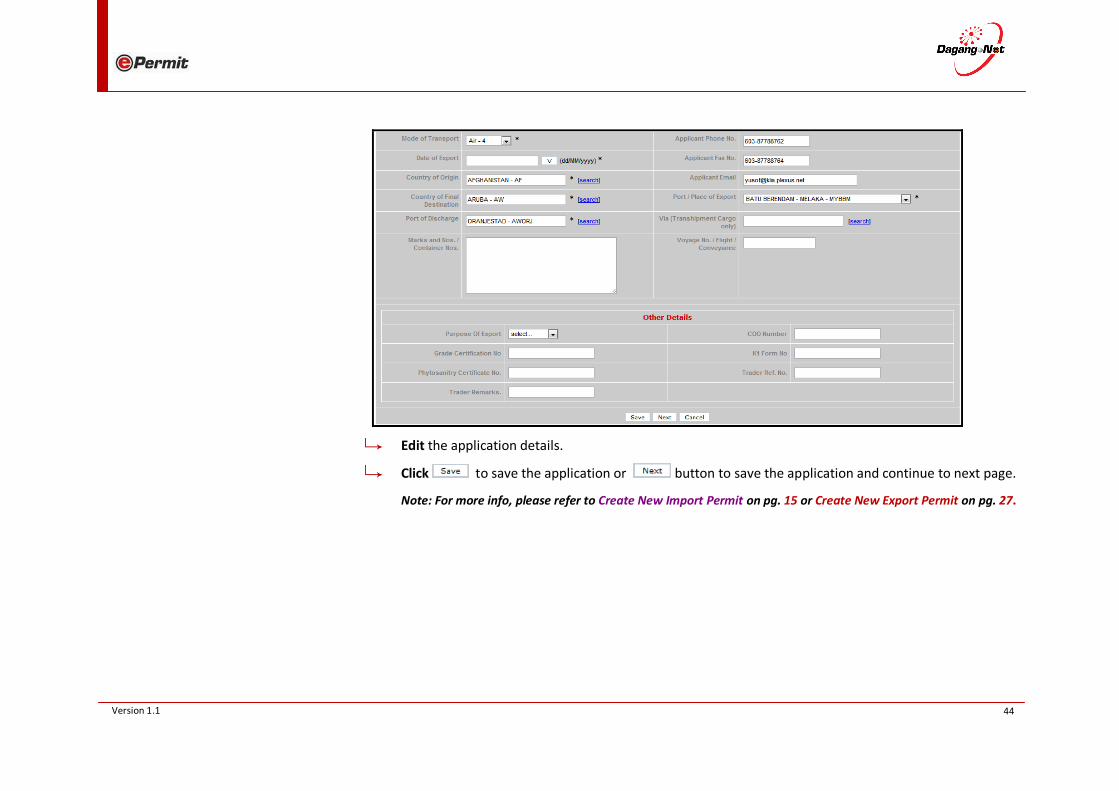
Step 3
Copy Permit Page
44 Version 1.1
Edit the application details.
Click to save the application or button to save the application and continue to next page.
Note: For more info, please refer to Create New Import Permit on pg. 15 or Create New Export Permit on pg. 27.
45 Version 1.1
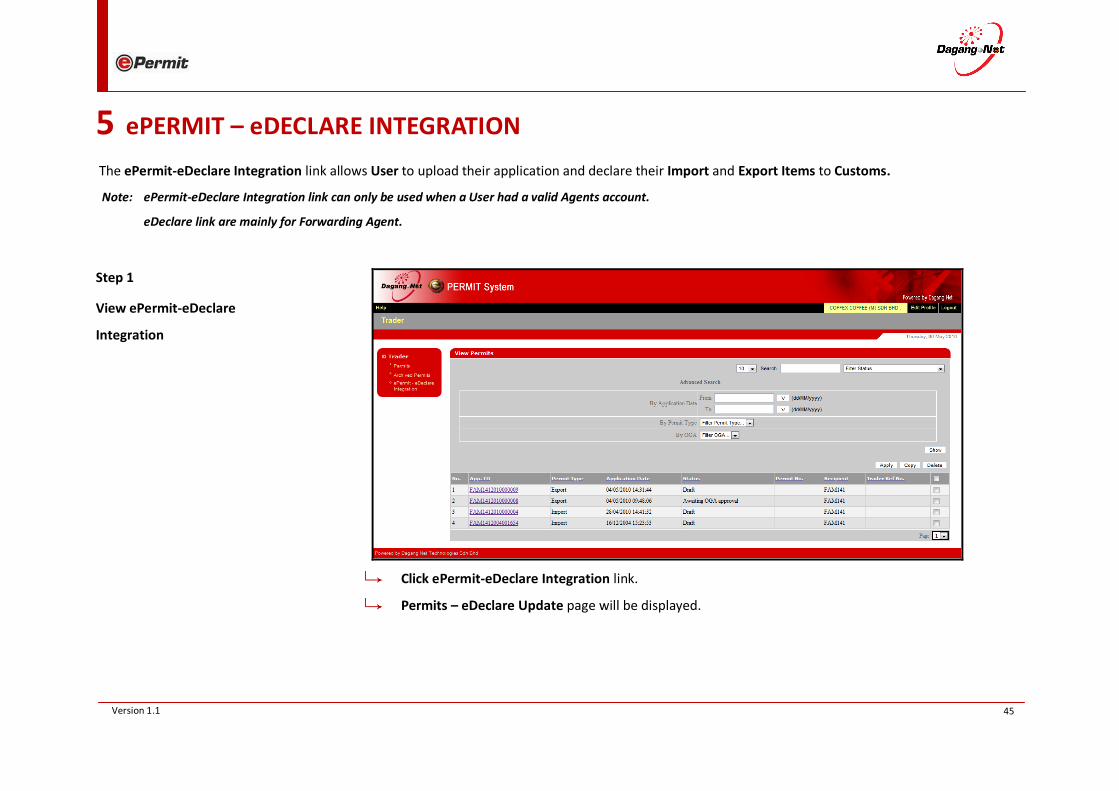
5 ePERMIT – eDECLARE INTEGRATION
The ePermit-eDeclare Integration link allows User to upload their application and declare their Import and Export Items to Customs.
Note: ePermit-eDeclare Integration link can only be used when a User had a valid Agents account.
eDeclare link are mainly for Forwarding Agent.
Step 1
View ePermit-eDeclare
Integration
Click ePermit-eDeclare Integration link.
Permits – eDeclare Update page will be displayed.

46 Version 1.1
Step 2
Select Permit
Select the Application ID to be uploaded into eDeclare, Tick on the checkbox.
Click button > Upload to eDeclare page will be displayed.
Step 3
Upload to eDeclare
Select the Account No and User ID.
Click button to submit the application.