table of contents - flaman fitness 1232011 11ft... · 11 foot square trampoline and ... 12 hj201112...
TRANSCRIPT

11 FOOT SQUARE TRAMPOLINE AND
ENCLOSURE WITH PITCHBALL
OWNER’S
MANUAL
MODEL NO. 1232011
Assembly Adjustments Parts Warranty
CAUTION You must read and understand this owner’s manual before operating unit.

Customer Service 1-888-707-1880 2 Maurice Pincoffs Canada Inc. 2008
TABLE OF CONTENTS
Assembly Instructions for trampoline . . . . . . . . . . . . . . . . . . . . . . . . . . . . . . . . . . . . . . . . . . 3-15
Installation . . . . . . . . . . . . . . . . . . . . . . . . . . . . . . . . . . . . . . . . . . . . . . . . . . . . . . . . . . . ….. 3
Assembly . . . . . . . . . . . . . . . . . . . . . . . . . . . . . . . . . . . . . . . . . . . . . . . . . . . . . . . . . . . ……. 4-16
Care and Maintenance . . . . . . . . . . . . . . . . . . . . . . . . . . . . . . . . . . . . . . . . . . . . . . . . . . . . . . . . . . . . 17
Assembly Instructions for enclosure and pitchballl . . . . . . . . . . . . . . . . . . . . . . . . 18-28
Installation . . . . . . . . . . . . . . . . . . . . . . . . . . . . . . . . . . . . . . . . . . . . . . . . . . . . . . . . . . . ….. 18
Assembly . . . . . . . . . . . . . . . . . . . . . . . . . . . . . . . . . . . . . . . . . . . . . . . . . . . . . . . . . . . ……. 19-28
Care and Maintenance . . . . . . . . . . . . . . . . . . . . . . . . . . . . . . . . . . . . . . . . . . . . . . . . . . . . . . . . . . . . 29
Warning Information . . . . . . . . . . . . . . . . . . . . . . . . . . . . . . . . . . . . . . . . . . . . . . . . . . . . . . . . . . . . ….. 30
Use Instruction . . . . . . . . . . . . . . . . . . . . . . . . . . . . . . . . . . . . . . . . . . . . . . . . . . . . . . . . . . . . ………. 31-32
Additional trampoline safety instructions . . . . . . . . . . . . . . . . . . . . . . . . . . 32-34
Tips to reduce risks and accidents . . . . . . . . . . . . . . . . . . . . . . . . . . . . . . . . . . . . 34
Lesson Plan . . . . . . . . . . . . . . . . . . . . . . . . . . . . . . . . . . . . . . . . . . . . . . . . . . . . . . . . . . . . . . . …. 35
Basic Trampoline Bounces . . . . . . . . . . . . . . . . . . . . . . . . . . . . . . . . . . . . . . . . . . . . . . 36
Warranty . . . . . . . . . . . . . . . . . . . . . . . . . . . . . . . . . . . . . . . . . . . . . . . . . . . . . . . . . . . . …………………….. 37
Liability . . . . . . . . . . . . . . . . . . . . . . . . . . . . . . . . . . . . . . . . . . . . . . . . . . . . . . . . . . . . …………………….. 37

Customer Service 1-888-707-1880 3 Maurice Pincoffs Canada Inc. 2008
ASSEMBLY AND INSTALLATION INSTRUCTION
! WARNING
PLEASE READ ENTIRE INSTRUCTION BOOKLET BEFORE YOU ASSEMBLE OR USE
THIS TRAMPOLINE
INSTALLATION OF THE TRAMPOLINE
MAKE SURE THE ASSEMBLED TRAMPOLINE IS ON LEVEL GROUND!
The owner and supervisors of the trampoline are responsible to make all users aware of practices specified in the use
instructions.
Use trampoline only with mature, knowledgeable supervision.
Secure the trampoline and trampoline enclosure against unauthorized and unsupervised use. Inspect before use. Keep frame padding in place.
While keeping the head erect, focus eyes on the trampoline toward the perimeter.
Avoid bouncing when tired.
The minimum overhead clearance required is 24 feet (7.3 meters). In terms of horizontal clearance, please ensure that
no hazardous objects are near the trampoline such as tree limbs, other recreational objects (i.e. swing sets, swimming
pools), electrical power wiring, walls, fences, etc. Maintain a clear space on all sides of the trampoline.
For safe use of the trampoline, please be aware of the following when selecting a place for your trampoline:
• Make sure it is placed on a level surface.
• The area is well-lighted. Artificial illumination maybe required for indoor or shady areas.
• There are no obstructions beneath the trampoline.
• When not in use, the trampoline should be secured against unauthorized use.
• Do not place trampoline on concrete floor, hard ground surface (i.e. rock), on slippery surface. Do not use indoor.
If you do not follow these guidelines, you increase the risk of someone getting injured.
ASSEMBLING THE TRAMPOLINE
Trampolines over 20 inches (51 cm) tall are not recommended for children under six years of age. Weight limit: 225lbs.

Customer Service 1-888-707-1880 4 Maurice Pincoffs Canada Inc. 2008
ASSEMBLING THE TRAMPOLINE
To assemble this trampoline, all you need is our special spring loading tool provided with this
product. During periods of non-use, this trampoline can be easily disassembled and stored. Please
read the assembly instructions before beginning to assemble the product. It is recommended that
no less than 2 persons participate in the assembly of this product.
Prior to assembling
Please refer to the parts list for part descriptions and numbers. The assembly steps use these
descriptions and numbers as reference for your convenience.
Make sure that you have all parts listed. If you are missing any parts, please call our customer
service number 1-888-707-1880 toll free to attain any parts.
To prevent any injuries to your hands from pinch points during assembly, please use gloves to
protect your hands.
PARTS LIST
Ref # Parts Description Q’ty
1-L HJ201101L
STRAIGHT TOP FRAME WITH ONE
LEG SOCKET ( LEFT ) 4
1-R HJ201101R STRAIGHT TOP FRAME WITH ONE
LEG SOCKET ( RIGHT ) 4
2 HJ201102
MIDDLE TOP FRAME RAIL 4
3 HJ201103
CORNER TOP FRAME RAIL 4
4-L HJ201104L
CURVED LEG TUBE (LEFT) 4
4-R HJ201104R CURVED LEG TUBE (RIGHT) 4
5 HJ201105
GROUND LEG TUBE 4
6 HJ201106
LONG BOLT (M8 X 72mm) 8
7 HJ201107
SHORT BOLT(M8 X 20mm) 16

Customer Service 1-888-707-1880 5 Maurice Pincoffs Canada Inc. 2008
Ref # Parts Description Q’ty
8 HJ201108
CAP NUT 8
9
HJ201109 ARC WASHER 32
10 HJ201110
SPRING 64
11 HJ201111
MAT 1
12 HJ201112
SAFETY PAD 4
13 HJ201113
SPRING LOADING TOOL 1
14 HJ201114
WRENCH 1
15 HJ201115
ALLEN WRENCH 1
16 HJ201116
END CAP (PRE-ASSEMBLED on
#2 and #3) 8
17
HJ201117
SPRING LOCK WASHER
8

Customer Service 1-888-707-1880 6 Maurice Pincoffs Canada Inc. 2008
WARNING
PLEASE USE GLOVES DURING ASSEMBLY TO AVOID PINCHING.
AT LEAST 2 PEOPLE ARE REQUIRED TO ASSEMBLE THE TRAMPOLINE.
ASSEMBLY INSTRUCTIONS Remove all the contents from inside the carton and verify that you have all listed parts as
shown on the PARTS LIST.
STEP 1 – FRAME LAYOUT
PLEASE BE SURE THAT YOU HAVE THE FOLLOWING PARTS:
A. 4pcs – Straight Top Frame with One Leg Socket (#1 R)
B. 4pcs – Straight Top Frame with One Leg Socket (#1 L)
C. 4pcs – Middle Top Frame Rail (# 2)
D. 4pcs – Corner Top Frame Rail (# 3)
E. 4pcs – Curved Leg Tube (#4 R)
F. 4pcs - Curved Leg Tube (#4 L)
G. 4pcs – Ground Leg Tube(# 5)
There are a total of 28 pieces of tubing parts that are needed to assemble the trampoline frame.
Lay out all the parts as shown in FIGURE1.
Some of tubing parts are labeled with “R” (Right) and “L” (Left). Please assemble those parts
with the direction as shown in FIGURE1.
4R
5
4L
3
1L
2
1R
3
3
3
2
2
2
1R
1R
1R
1L
1L
1L
4R
4R
4R
4L
4L
4L
5
5
5
FIGURE 1

Customer Service 1-888-707-1880 7 Maurice Pincoffs Canada Inc. 2008
LEG ASSEMBLY
STEP 2 – Slide CURVED LEG TUBE (#4L and #4R) into GROUND LEG TUBE #5 as shown in
FIGURE2. Secure using ARC WASHER #9 and SHORT BOLT #7 with ALLEN
WRENCH #15. Do same installation for all 4 sets of “LEG BASE”.
MAIN FRAME ASSEMBLY
STEP 3 - Slide the STRAIGHT TOP FRAME RAIL WITH ONE LEG SOCKET (#1L and #1R) to
MIDDLE TOP FRAME RAIL #2 as shown in FIGURE 3. Please make sure that the
end of frame rail (#1L and #1R) with hole is attached to MIDDLE TOP FRAME RAIL
#2
4L 5
4R
7
9
LEG BASE
4R 4L
16
FIGURE 2
LEG SOCKET LEG SOCKET
2
1L 1R
FIGURE 3
HOLE HOLE

Customer Service 1-888-707-1880 8 Maurice Pincoffs Canada Inc. 2008
STEP 4 - Secure using LONG BOLT #6, ARC WASHER #9, SPRING LOCK WASHER#17 and
CAP NUT #8 by using WRENCH #14 and ALLEN WRENCH #15 as shown in
FIGURE 4. Do same installation for all 4 sets of “MAIN FRAME”.
STEP 5 - You will have the trampoline frame layout like the diagram as shown in FIGURE 5.
8
17 9
6
8
17 9
6
15 15
FIGURE 4 14 14
MAIN FRAME
LEG BASE
4R
5 4L
3
1L
2
1R
3
3 2
2
2
1R
1R
1R
1L
1L
1L
4R
4R
4
R
4L
4L
4L
3
5
5
5
FIGURE 5
Customer Service 1-888-707-1880 9 Maurice Pincoffs Canada Inc. 2008
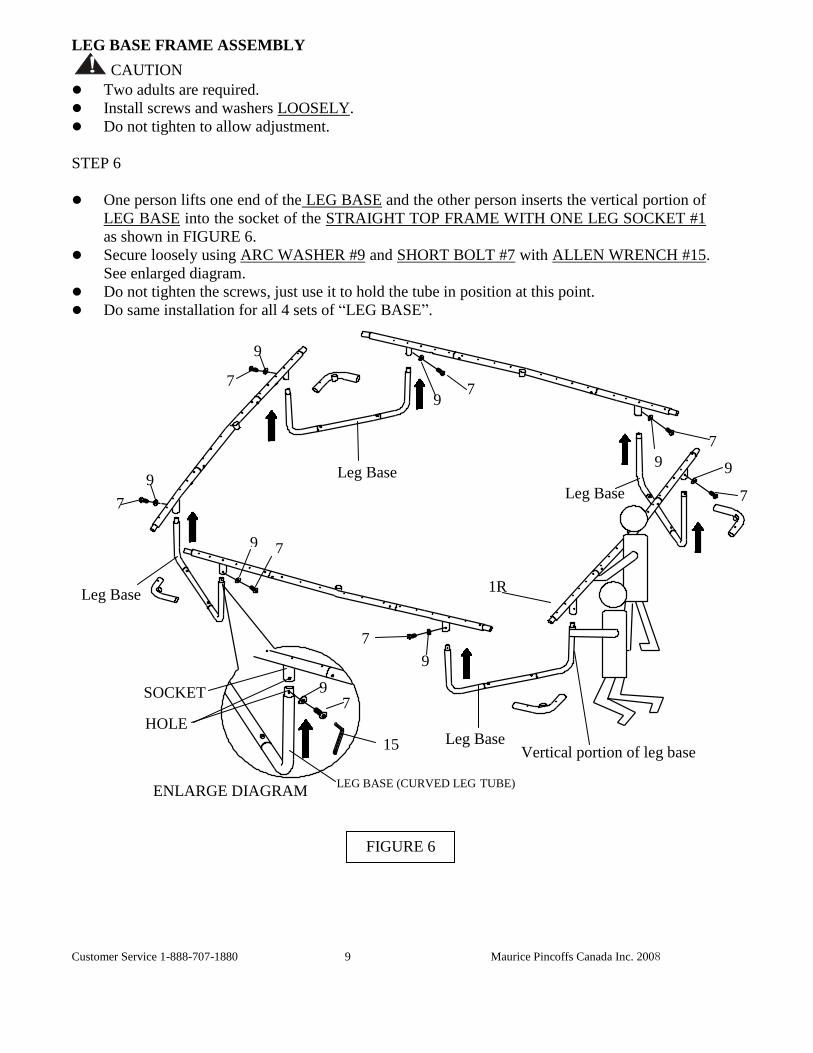
LEG BASE FRAME ASSEMBLY
! CAUTION
Two adults are required.
Install screws and washers LOOSELY.
Do not tighten to allow adjustment.
STEP 6
One person lifts one end of the LEG BASE and the other person inserts the vertical portion of
LEG BASE into the socket of the STRAIGHT TOP FRAME WITH ONE LEG SOCKET #1
as shown in FIGURE 6.
Secure loosely using ARC WASHER #9 and SHORT BOLT #7 with ALLEN WRENCH #15.
See enlarged diagram.
Do not tighten the screws, just use it to hold the tube in position at this point.
Do same installation for all 4 sets of “LEG BASE”.
LEG BASE (CURVED LEG TUBE)
SOCKET
HOLE
ENLARGE DIAGRAM
7 9
7
9
7
9
7
9
7
9
7 9
7
9
15
Leg Base
Vertical portion of leg base Leg Base
Leg Base
Leg Base
FIGURE 6
1R
9 7

Customer Service 1-888-707-1880 10 Maurice Pincoffs Canada Inc. 2008
You will have the trampoline layout as shown in FIGURE 7.
STEP 7 – Attach CORNER TOP FRAME RAIL #3 to the STRAIGHT TOP FRAME WITH ONE
LEG SOCKET #1 as shown in FIGURE 8.
3
3
3
3
FIGURE 7
3
3
1L
1R
3
FIGURE 8
1R
1R
1R
1L
1L
1L
3

Customer Service 1-888-707-1880 11 Maurice Pincoffs Canada Inc. 2008
STEP 8 – Now, use ALLEN WRENCH (#15) to tighten all the SCREWS (#7) as shown in
FIGURE 9.
# 4 CURVED LEG TUBE
SOCKET
ENLARGED DIAGRAM
# 4 CURVED
LEG TUBE
7 9
15
FIGURE 9
LEG BASE
LEG BASE

Customer Service 1-888-707-1880 12 Maurice Pincoffs Canada Inc. 2008
ATTACHING THE JUMPING MAT TO THE FRAME
! WARNING
Failure to follow instructions may result in damaged springs or frame
warping/displacement.
SPRINGS SHOULD BE ATTACHED AS PER INSTRUCTIONS BELOW ! !
Make sure all spring hooks face down
All warning labels must be facing upwards
Spring hooks must be pushed securely into the frame holes
STEP 9 - Lay out the MAT #11 inside the frame with warning labels facing up, as shown in
FIGURE 10.
Error!
FIGURE 10
MAT #11

Customer Service 1-888-707-1880 13 Maurice Pincoffs Canada Inc. 2008
SPRING LOADING INSTRUCTION
! CAUTION`
Two adults are required in this assembling STEP.
Wear heavy duty working gloves to protect your hand.
Use the special spring loading tool included.
STEP 10 - Attach the SPRING #10 with “R” hook end to the triangle ring on the mat as shown in
FIGURE 11.
HINT: Holding the spring at 45 degree in relation to the mat surface will be much easier to install
into triangle ring.
STEP 11 - Hold the spring loading tool underhand and pull spring hook towards steel frame as
shown in FIGURE 12. Drop hook into frame hole until it latches on completely and tap
it down if hook is not completely in the hole.
MAT#11
TRIANGLE RING
SPRING #10
FRAME HOLE SPRING LOADING TOOL #13
SPRING LOADING TOOL
“R” HOOK END MAT # 11
TRIANGLE - RING
45º
SPRING #10
FIGURE 11
FIGURE 12

Customer Service 1-888-707-1880 14 Maurice Pincoffs Canada Inc. 2008
STEP 12 - Attach the SPRING #10 on 4 corners (8pcs) first, as shown in FIGURE 13.
STEP 13 - Attach the SPRING #10 at number 8th
and 9th
spring of each side which are the TWO
mid points per side, as shown in FIGURE 14.
STEP 14 - Attach the SPRING #10 at number 2th
, 5
th, 12
th and 15
th, starting from SIDE A, then
SIDE B, then SIDE C, and finally SIDE D, as shown in FIGURE 15.
SIDE B
SIDE D SIDE C
SIDE A
2 5 12 15
FIGURE 15
FIGURE 13
SPRING # 10
SPRING#10
8 9
SIDE C SIDE D
SIDE A
(MID POINT)
SIDE B
FIGURE 14
SPRING # 10
SIDE D
SIDE B
FIGURE 14
SPRING # 10

Customer Service 1-888-707-1880 15 Maurice Pincoffs Canada Inc. 2008
STEP 15 - Now, attach the remaining springs
PAD ASSEMBLY
! WARNING
Never use the trampoline without attaching the frame pad, properly tie down the frame pad before
each use!!
STEP 16 -Lay the SAFETY PAD #12 over the trampoline so that the springs and the steel frame
are covered. Please ensure that the Frame Pads cover all metal parts.
STEP 17 - Secure one end of SAFETY PAD #12 with the VELCRO on each end of the PAD as
shown below. Do this until you have attached all the sections together.
Then, tie straps on each end of pad, as securely as possible.
STEP 18 - Line up the tie straps as shown in FIGURE 16 .Tie the straps to a knot over the middle
top main frame rail as shown in the ENLARGED DIAGRAM-1of FIGURE 16.
HINT: Make sure the loop is loose as this will help the safety pad to stay in place without tearing
the safety pad.
12
12
12
12
FIGURE 16
ENLARGED
DIAGRAM-1
ENLARGED
DIAGRAM-2
VELCRO

Customer Service 1-888-707-1880 16 Maurice Pincoffs Canada Inc. 2008
STEP 19 - Tie the elastic straps located on the outside of pad over main frame rail as shown in the
ENLARGED DIAGRAM-2 of FIGURE 17, Repeat for all 8 straps.
STEP 20 - Tie another small elastic strap which is near the jumping mat to one triangle hook with
a knot as shown in FIGURE 18.
Make sure the knot is tight and the safety pad fits securely on the trampoline .Repeat
same manner for all 16 straps.
! IMPORTANT NOTICE: Make sure the safety pad is securely attached to the frame and completely covers the frame and all springs
before using this trampoline. Do not use trampoline if even one spring or Triangle -ring is damaged on
missing.
STEP 21- Safety Placard Attachment Using the tie wrap, attach the Safety Instruction Placard to the trampoline. The tie wrap should go around
the Vertical Frame Joint and the Top Rail to ensure that it doesn’t slide off the trampoline.
CARE AND MAINTENANCE AND USE INSTRUCTIONS MUST BE READ CAREFULLY BEFORE
USING THE TRAMPOLINE!
FIGURE 17
ENLARGED
DIAGRAM-2
ENLARGED
DIAGRAM-1
FIGURE 18

Customer Service 1-888-707-1880 17 Maurice Pincoffs Canada Inc. 2008
CARE AND MAINTENANCE
This trampoline was designed and manufactured with quality materials and craftsmanship. If proper care
and maintenance is provided, it will provide all jumpers with years of exercise, fun, and enjoyment as well
as reduce the risk of injury. Please follow the guidelines listed below.
This trampoline is designed to withhold a certain amount of weight and use. Please make sure that only one
person at any one time uses the trampoline. Also, the person should weigh less than 225 pounds. Please be
aware that street shoes or tennis shoes should NOT be worn while using the trampoline. In order to prevent
the trampoline mat from getting cut or damaged please do not allow any pets onto the mat. Also, jumpers
should remove all sharp objects from their person prior to using the trampoline. Any type of sharp or
pointed objects should be kept off the trampoline mat at all times.
Always inspect the trampoline before each use for worn, abused or missing parts. A number of conditions
could arise that may increase your chances of getting injured. Please be aware that the following could
represent potential hazards:
FRAME • A bent or broken frame.
• Stretched or ruptured springs.
• Sharp protrusions on the frame or suspension system.
• Sleeve welds should be painted once per year.
Remove any rust which may exist by using a wire brush. Apply a coat of grey primer enamel spray paint
and then a coat of aluminum enamel spray paint, following directions on paint can.
JUMPING MAT • Punctures, frays, tears or holes worn in the jumping mat.
• Deterioration in the stitching of the jumping mat.
• Sagging jumping mat.
• Snow on the jumping mat will stretch springs.
• Jumping beds must be kept free of dirt particles and sand.
• Clean bed surfaces with cold water but do not use soaps, detergents or chemical cleaners.
• Mats can be damaged by belts with large buckles or levis with rivets. Mats are not resistant to scratching.
• Shoes should not be worn while using the trampoline. Wear a gymnastic slipper or jump in bare feet.
• The mat and safety pads are not fire retardant. Keep trampoline away from fire, sparks and fireworks.
• Sun can deteriorate the mat fabric and stitching.
SAFETY PADS • Punctures, frays, tears or holes in the safety pad.
• Deterioration in the stitching of the safety pad.
• Missing, improperly positioned or insecurely attached safety pad.
• The safety pad could crack if exposed to extreme cold. Safety pads must be in place when using
trampoline.
! WARNING
IF YOU FIND ANY OF THE PREVIOUS CONDITIONS, OR ANYTHING ELSE THAT YOU
FEEL COULD CAUSE HARM TO ANY USER, THE TRAMPOLINE SHOULD BE
DISASSEMBLED OR SECURED FROM USE UNTIL THE CONDITION(S) HAS BEEN
RESOLVED.

Customer Service 1-888-707-1880 18 Maurice Pincoffs Canada Inc. 2008
INSTALLATION OF THE TRAMPOLINE ENCLOSURE
MAKE SURE THE ASSEMBLED TRAMPOLINE IS ON LEVEL GROUND! The owner and supervisors of the trampoline and trampoline enclosure are responsible to make all users aware of
practices specified in the use instructions.
Use trampoline and trampoline enclosure only with mature, knowledgeable supervision.
Children using a trampoline with a trampoline enclosure must be supervised by adults. Young children must be
supervised constantly. Adults must pay particular attention to:
Things that children bring into the enclosure.
Children’s activities inside the enclosure.
Conditions inside the enclosure while children are using it.
The way children get into and out of the enclosure.
Adequate overhead clearance is essential. The minimum of 24ft (7.3 meters) from ground level is recommended. Provide clearance for wires, tree limbs, and other possible hazards. Lateral clearance is essential. Place the trampoline and trampoline enclosure away from wall, structures, fences, and other play areas. Maintain a clear space on all sides of the trampoline and trampoline enclosure. The trampoline enclosure is only to be used as an enclosure for a trampoline and the trampoline must be of the appropriate size as covered by the specific enclosure.
For safe use of the trampoline and trampoline enclosure, please be aware of the following when selecting a place:
•Place the trampoline and trampoline enclosure on a level surface before use. • Use the trampoline and trampoline enclosure in a well-lighted area. Artificial illumination may be
required for indoor or shady areas. • Secure the trampoline and trampoline enclosure against unauthorized and unsupervised use. • Remove any obstructions from beneath the trampoline and trampoline enclosure. • Do not place trampoline and trampoline enclosure on concrete floor, hard ground surface (i.e. rock), on slippery
surface. Do not use indoor or shady areas.
If you do not follow these guidelines, you increase the risk of someone getting injured.
WARNING!!
PLEASE READ ENTIRE INSTRUCTION BOOKLET BEFORE YOU USE THIS TRAMPOLINE. Use trampoline only with mature, knowledgeable supervision.
WARNING!!
ASSEMBLING THE TRAMPOLINE ENCLOSURE During periods of non-use, this trampoline and trampoline enclosure can be easily disassembled and stored. Please
read the assembly instructions before beginning to assemble the product.
ASSEMBLING THE TRAMPOLINE ENCLOSURE During periods of non-use, this trampoline and trampoline enclosure can be easily disassembled and stored. Please
read the assembly instructions before beginning to assemble the product.
Trampolines over 20 inches (51 cm) tall are not recommended for
children under six years of age. Weight limit: 225LBS
Trampolines over 20 inches (51 cm) tall are not recommended for
children under six years of age. Weight limit: 225LBS

Customer Service 1-888-707-1880 19 Maurice Pincoffs Canada Inc. 2008
PARTS LIST
NO DIAGRAM DESCRIPTION Q’TY
A.
LOWER FRAME TUBE WITH
FOAM 8 PCS
B.
UPPER FRAME TUBE (ONE
COMPRESSED END) WITH FOAM 3 PCS
C.
UPPER FRAME TUBE WITH FOAM 5 PCS
D.
HORIZONTAL TUBE (TWO
COMPRESSED ENDS) WITH FOAM 2 PCS
E.
LEFT HORIZONTAL TUBE WITH
FOAM 1 PC
F.
RIGHT HORIZONTAL TUBE WITH
FOAM 1 PC
G.
UPPER PITCHBALL FRAME WITH
FOAM 1 PC
H.
LOWER PITCHBALL FRAME (TWO
COMPRESSED ENDS) WITH FOAM 1PC
I.
F-SHAPED SUPPORTING TUBE
WITH FOAM 1PC
J.
BOLT (M8 x 50mm) 7 PCS
K.
BOLT (M8 x 54mm) 4 PCS
L.
NUT 9 PCS

Customer Service 1-888-707-1880 20 Maurice Pincoffs Canada Inc. 2008
M.
BOLT (M8 x 20mm) 8 PCS
N.
ARC WASHER 28 PCS
O.
T-PART WITH FOAM 1 PC
P.
PITCHBALL GOAL WITH FLASH
LIGHT (BATTERY NOT
INCLUDED)
1 PC
Q.
CORD 6 PCS
R.
TUBE CAP 5 PCS
S.
END CAP
(PRE-ASSEMBED ON # P) 1 PC
T
ENCLOSURE NETTING 1 PC
U
SPRING LOCK WASHER
9 PC

Customer Service 1-888-707-1880 21 Maurice Pincoffs Canada Inc. 2008
ASSEMBLY INSTRUCTIONS FOR ENCLOSURE AND PITCHBALL NOTICE: TWO (2) “AA” BATTERIES ARE REQUIRED (NOT INCLUDED) TO OPERATE
THE PITCHBALL LIGHT FEATURE. THE SYSTEM IS MOTION ACTIVATED. THE
ON/OFF SWITCH IS LOCATED ON THE BATTERY HOUSING. TURN THE SWITCH TO
“ON”. THE MOTION SENSOR WILL DETECT THE MOTION OF THE BALL AS WELL AS
IMPACT AND ACTIVATE THE LIGHT.
! WARNING!!
Do not mix old and new batteries.
Do not mix alkaline, standard, or rechargeable batteries.
STEP 1 – PITCHBALL FRAME ASSEMBLY
A. Insert LOWER PITCHBALL FRAME (TWO COMPRESSED ENDS) WITH FOAM (H) to
UPPER PITCHBALL FRAME WITH FOAM (G).
B. Attach the Frame assembled in PART A above with F-SHAPED SUPPORTING TUBE WITH
FOAM (I) with 2 pieces of BOLT (K) and 2 pieces of ARC WASHER (N) with the ALLEN
WRENCH provided for the trampoline.
K N
G
H

Customer Service 1-888-707-1880 22 Maurice Pincoffs Canada Inc. 2008
C. Attach the PITCHBALL GOAL (P) to the Frame assembled in PART B above as shown below.
Secure the Strap onto the PITCHBALL GOAL as shown below following FIGURE 1, then
FIGURE 2 and FIGURE 3 and secure them in the sequence shown in FIGURE 4.
P I
1
1 1
1
3 3
3 3
4 4
4 4
5 5
2 2
2 2
I
FIGURE 1 FIGURE 2 FIGURE 3
FIGURE 4

Customer Service 1-888-707-1880 23 Maurice Pincoffs Canada Inc. 2008
STEP 2 – HORIZONTAL FRAME ASSEMBLY
A. Attach the LEFT HORIZONTAL TUBE WITH FOAM (E) and HORIZONTAL TUBE (TWO
COMPRESSED ENDS) WITHFOAM (D) with BOLT (#J), ARC WASHER (N), SPRING LOCK
WASHER (U) and CAP NUT (L) with the WRENCH and ALLEN WRENCH provided for the
trampoline.
B. Attach the RIGHT HORIZONTAL TUBE WITH FOAM (F) and HORIZONTAL TUBE (TWO
COMPRESSED ENDS) WITH FOAM (D) with BOLT (J), ARC WASHER (N), SPRING LOCK
WASHER (U) and CAP NUT (L) with the WRENCH and ALLEN WRENCH provided for the
trampoline.
STEP 3 – ENCLOSURE POLE ASSEMBLY
Attach LOWER FRAME TUBE WITH FOAM (A) and UPPER FRAME TUBE (ONE COMPRESSED
END) WITH FOAM (B) as shown below. Do this for 3 Sets of UPPER FRAME TUBE (ONE
COMPRESSED END) WITH FOAM (B).
L
J
D
U N
E
D
F
B
B
A
A

Customer Service 1-888-707-1880 24 Maurice Pincoffs Canada Inc. 2008
STEP 4
HINT: please remove the FOAM pre-assembled on T-PART WITH FOAM (O) before assembling
below.
Please assemble this step by placing the enclosure netting on the trampoline bed. Insert the
ENCLOSURE POLE assembled in above step to the sleeve. Then, attached T-PART WITH
FOAM (O) to the ENCLOSURE POLE secure by using BOLT (J),ARC WASHER (N), SPRING
LOCK WASHER (U), and CAP NUT (L) using WRENCH and ALLEN WRENCH provided for
the trampoline as shown below.
STEP 5-
A. Insert the assembled HORIZONTAL FRAME from STEP 2 to the sleeve at the top of the
ENCLOSURE NETTING (T). Then, attach the HORIZONTAL FRAME to T-PART WITH
FOAM (O) by using BOLT (J), ARC WASHER (N), SPRING LOCK WASHER (U), and CAP
NUT (L) using WRENCH and ALLEN WRENCH provided for the trampoline as shown below.
O
N
U L J
O
T
ENCLOSURE POLE
Customer Service 1-888-707-1880 25 Maurice Pincoffs Canada Inc. 2008
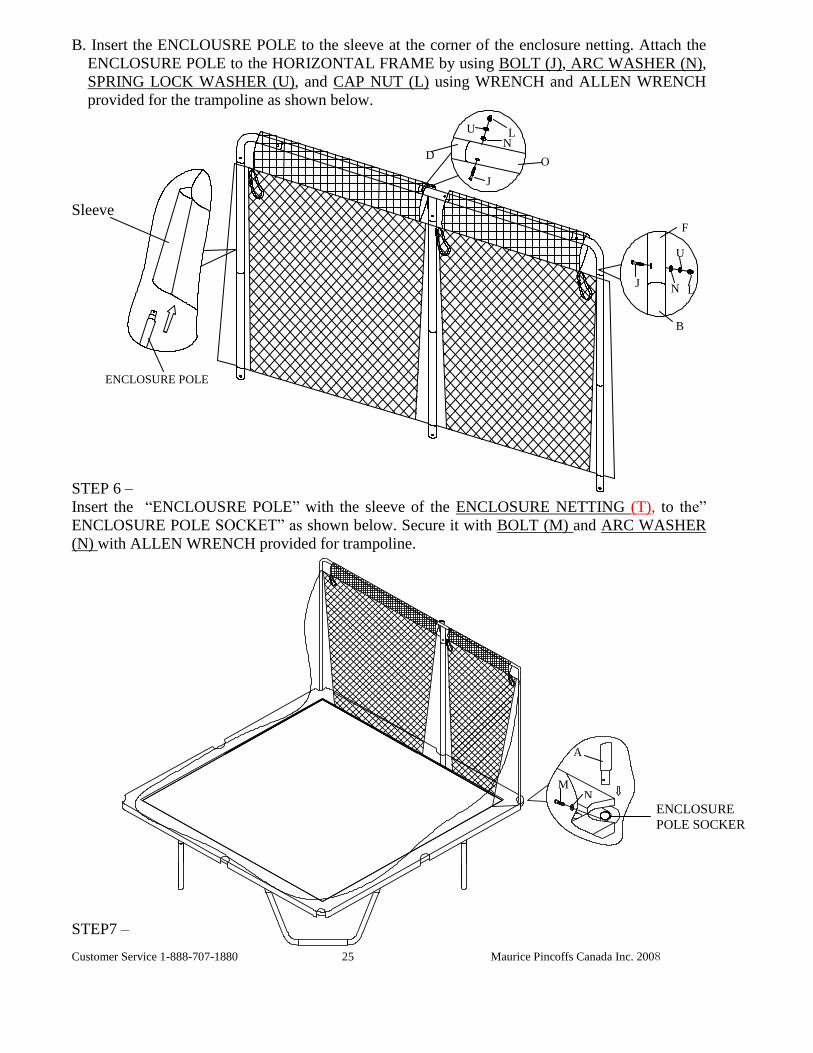
B. Insert the ENCLOUSRE POLE to the sleeve at the corner of the enclosure netting. Attach the
ENCLOSURE POLE to the HORIZONTAL FRAME by using BOLT (J), ARC WASHER (N),
SPRING LOCK WASHER (U), and CAP NUT (L) using WRENCH and ALLEN WRENCH
provided for the trampoline as shown below.
Sleeve
STEP 6 –
Insert the “ENCLOUSRE POLE” with the sleeve of the ENCLOSURE NETTING (T), to the”
ENCLOSURE POLE SOCKET” as shown below. Secure it with BOLT (M) and ARC WASHER
(N) with ALLEN WRENCH provided for trampoline.
STEP7 –
A
M N
D
J
N L U
U
J L N
O
B
F
ENCLOSURE POLE
ENCLOSURE
POLE SOCKER

Customer Service 1-888-707-1880 26 Maurice Pincoffs Canada Inc. 2008
A. Attach UPPER FRAME TUBE WITH FOAM (C) and LOWER FRAME TUBE WITH FOAM
(A). Do this for all 5 sets.
B. Attach the TUBE CAP (R) onto UPPER FRAME TUBE WITH FOAM (C) Do this for 5 pcs
of UPPER FRAME TUBE WITH FOAM (C).
C. Now, insert the “ENCLOSURE POLE” into the sleeve next to the ZIP DOOR of the
ENCLOSURE NETTING (T). Then, insert this “ENCLOSURE POLE” to the enclosure pole
socket on the “SIDE B” of the trampoline. Secure the Pole with BOLT (M) and ARC
WASHER (N) using ALLEN WRENCH provide for the trampoline. Insert other 2 “POLES”
into the enclosure pole socket locating on the MIDDLE TOP FRAME RAIL (SIDE C &
SIDE D)
R
C
C
A
A
M N
SIDE A
SIDE B
SIDE C
SIDE D
R
C
T
ENCLOSURE
POLE SOCKET

Customer Service 1-888-707-1880 27 Maurice Pincoffs Canada Inc. 2008
D. Insert the 2 “ENCLOSURE POLE” for the 2 corners of SIDE B with the sleeve of the
ENCLOSURE NETTING (T), and then, into enclosure pole sockets same as shown in previous
page. Secure the Pole with BOLT (M) and ARC WASHER (N) using ALLEN WRENCH
provide for the trampoline.
ENCLOSURE NETTING ASSEMBLY
STEP 8 –
A. Attach the snap in buckles on the top of the ENCLOSURE NETTING (T) to TUBE CAP (R)
as shown. Please make sure the cap holder is facing outward. Do this for 5 sets of the tubes.
B. For the remaining buckles, snap in buckles as shown below.
C. Please keep the length of the strap loose.
SIDE A SIDE C
SIDE B
SIDE D
F
T
T C
R

Customer Service 1-888-707-1880 28 Maurice Pincoffs Canada Inc. 2008
STEP 9–CORD ASSEMBLY
A. Tie one end of the CORD (Q) to the trampoline mat ring right next to the “POLE”. Do this for
all 8 “POLES”. Those ends are the “STARTING POINTS”.
B. First, pull the CORD (Q) from the “STARTING POINT” to the trampoline mat ring as shown
below. Tie the CORD (Q) to the mat ring before you reach the next” STARTING POINT”.
Repeat this until you have finished with all 8 pieces of CORD (Q).
C. Pull the ZIPPER of the ENCLOSURE NETTING (T) at the door. Then snap two buckles
closely (one not shown as it may be covered by the pad of the trampoline).
T Q Q T
T
ZIP
STARTING POINT

Customer Service 1-888-707-1880 29 Maurice Pincoffs Canada Inc. 2008
STEP 10–PITCHBALL FRAME AND BASE ASSEMBLY
Insert the PITCHBALL FRAME to the “PITCHBALL FRAME BASE” as shown below. Secure it
with BOLT (K), ARC WASHER (N), and NUT (L) with the WRENCH and ALLEN WRENCH
provided for the trampoline.
STEP 11– STRAP LENGTH ADJUSTMENT
Now, go back to adjust the length of the strap which you have assembled in STEP 8.
STEP 12 :
Now, use the included plastic tie, attach the Safety Placard (not shown in the parts list) to the netting near
the door.
DISASSEMBLY
To disassemble, simply start from STEP 11, then STEP 10 until you have disassembled the enclosure.
L
P
K
I
I
M O

Customer Service 1-888-707-1880 30 Maurice Pincoffs Canada Inc. 2008
CARE AND MAINTENANCE This trampoline enclosure was designed and manufactured with quality materials and craftsmanship. If proper care and maintenance is provided, it will provide all jumpers with years of exercise, fun, and enjoyment as well as reduce the risk of injury. Please follow the guidelines listed below. This trampoline enclosure is designed to withhold a certain amount of weight and use. Please make sure that only one person at any one time uses the trampoline. Also, the person should weigh less than 225 pounds. Please be aware that street shoes or tennis shoes should NOT be worn while using the trampoline. In order to prevent the trampoline mat from getting cut or damaged please do not allow any pets onto the mat. Also, jumpers should remove all sharp objects from their person prior to using the trampoline. Any type of sharp or pointed objects should be kept off the trampoline mat at all times. Always inspect the trampoline enclosure before each use for worn, abused or missing parts. A number of conditions could arise that may increase your chances of getting injured. Please be aware that the following could represent potential hazards: Missing, improperly positioned or insecurely attached netting, enclosure tubes, or foam sleeves Punctures, frays, tears, or holes worn in the netting or foam sleeves Deterioration in the stitching or fabric of the netting Bent or broken enclosure tubes Sagging net Sharp protrusions on enclosure tubes WARNING IF YOU FIND ANY OF THE PREVIOUS CONDITIONS, OR ANYTHING ELSE THAT YOU FEEL COULD CAUSE HARM TO ANY USER, THE TRAMPOLINE AND TRAMPOLINE ENCLOSURE SHOULD BE DISASSEMBLED OR SECURED FROM USE UNTIL THE CONDITION(S) HAS BEEN RESOLVED.
!

Customer Service 1-888-707-1880 31 Maurice Pincoffs Canada Inc. 2008
! WARNING
PLEASE READ ENTIRE INSTRUCTION BOOKLET BEFORE YOU USE THIS
TRAMPOLINE
Use trampoline only with mature, knowledgeable supervision
USE INSTRUCTIONS
Before you begin use of this trampoline, be sure to carefully read all the information provided to you in this
manual. Just like any other type of physical recreational activity, participants can be injured. To reduce the
risk of injury, be sure to follow appropriate safety rules and tips.
Do not attempt or allow somersaults. Landing on the head or neck can cause serious injury, paralysis, or
death, even when landing in the middle of the mat.
Do not allow more than one person on the trampoline. Use by more than one person at the same time can
result in serious injuries.
Use trampoline only with mature, knowledgeable supervision.
Trampolines over 20 in. (51cm) tall are not recommended for use by children under 6 years of age.
Inspect the trampoline before each use. Make sure the trampoline safety pad is correctly and securely
positioned. Replace any worn, defective or missing parts.
You should always mount and dismount properly in order to avoid injury. It is dangerous practice to jump
from the trampoline to the floor or ground when dismounting, or to jump onto the trampoline when
mounting. Do not use the trampoline as a springboard to other objects. Use the trampoline only for
trampolinestyle bouncing.
Stop bounce by flexing knees as feet come in contact with the trampoline bed. Learn this skill before
attempting others. This technique should also be practiced while you are learning each of the basic
bounces. The skill of braking should be used whenever you lose balance or control of your jump.

Customer Service 1-888-707-1880 32 Maurice Pincoffs Canada Inc. 2008
Initially, you should get accustomed to the feel and bounce of the trampoline. The focus must be on the
fundamentals of your body position and you should practice each bounce (the basic bounces) until you can
do each skill with ease and control.
Always learn the simplest bounce first and be consistent with the control of your bounce before moving on
to more difficult and advanced bounces. A controlled bounce is one when your take off point and landing
point is the same spot on the mat. If you move up to the next bounce without first mastering the previous,
you increase your chances of getting injured.
Avoid bouncing too high. Stay low until bounce control and repeated landing in the center of the
trampoline can be accomplished. Control is more important than height.
Do not bounce recklessly on the trampoline since this will increase your chances of getting injured. The
key to safety and having fun on the trampoline is control and mastering the various bounces. Never try to
out-bounce another bouncer in terms of height! Never use the trampoline alone without supervision.
Do not bounce on the trampoline for extended periods of time because fatigue can increase your
chances of becoming injured. Bounce for a brief period of time and then allow others to join in on the fun!
Never have more than one person bouncing on the trampoline.
Focus your eyes on the end of the trampoline, this will help you control your bounce. Do check your
position while jumping by checking your position in relation to the center circle. Do not jump more than 1
foot from edge of circle.
Jumpers should wear t-shirt, shorts or sweats, and regulation gymnastic slippers, heavy socks, or be
barefoot. If you are just beginning, you may want to wear long sleeve shirts and pants to protect against
scrapes and abrasions until you master correct landing positions and form. Do not wear hard sole shoes,
such as tennis shoes, on the trampoline as this will cause excessive wear on the mat material.
Keep objects away that could interfere with the performer. Maintain a clear area around the trampoline.
Bounce only when the surface of the mat is dry. Wind or air movement should be calm to gentle. The
trampoline must not be used in gusty or severe winds.
Do not use the trampoline when under the influence of alcohol or drugs.
Climb on and off the trampoline. It is a dangerous practice to jump from the trampoline to the floor or
ground when dismounting, or to jump onto the trampoline when mounting. Do not use the trampoline as a
springboard to other objects.
Learn fundamental bounces and body positions thoroughly before trying more advanced skills. A variety of
trampoline activities can be carried out by performing the basic fundamentals in various series and
combinations, performing one fundamental after another, with or without feet bounces between them.
While keeping the head erect, focus eyes on the trampoline toward the perimeter. This will help control
bounce.
Avoid bouncing when tired. Keep turns short.
Do not attempt to jump over the barrier. Do not attempt to crawl under the barrier.
Do not intentionally rebound off the barrier. Do not hang from, kick, cut or climb on the barrier.
Wear clothing free of drawstrings, hooks, loops or anything that could get caught in the barrier.

Customer Service 1-888-707-1880 33 Maurice Pincoffs Canada Inc. 2008
Do not attach anything to the barrier that is not a manufacturer-approved accessory or part of the enclosure
system,
Enter and exit the enclosure only at the enclosure door or barrier opening designated for that purpose.
Properly secure the trampoline when not in use. Protect it against unauthorized use. If a trampoline ladder
is used, the supervisor should remove it from the trampoline when leaving the area to prevent unsupervised
access by children under 6 years of age.
For further information or additional instructional materials on skill training, contact a competent
trampoline instructor.
For additional information concerning the trampoline equipment contact Maurice Pincoffs Canada Inc. at 1-
888-707-1880 or write to the following address: 6050 Don Murie, Niagara Falls, Ontario L2E 6X8 or email
us at: [email protected]
Properly secure the trampoline when not in use. Protect it against unauthorized use.
ADDITIONAL TRAMPOLINE SAFETY INSTRUCTIONS
Mounting and Dismounting:
Be very careful when getting on and off the trampoline. DO NOT mount the trampoline by grabbing the
safety pad, stepping onto the springs, or by jumping onto the mat of the trampoline from any object (i.e. a
deck, roof, or ladder). This will increase your chances of getting injured! DO NOT dismount by jumping off
the trampoline and landing on the ground, regardless of the makeup of the ground. If small children are
playing on the trampoline, they may need help dismounting.
Use of Alcohol and Drugs:
DO NOT consume any alcohol or drugs when using this trampoline! This will increase your chances of
getting injured since these foreign substances impair your judgment, reaction time, and overall physical
coordination.
Multiple Jumpers:
Multiple jumpers (more than one person on the trampoline at any one time), increase the chance of getting
injured. Injuries could occur when you fly off the trampoline, lose control, collide with the other jumper(s),
or land on the springs. Generally, the lightest person on the trampoline will get injured. No more than one
person at a time on the trampoline.
Striking the Frame or Springs:
When playing on the trampoline, STAY in the center of the mat. This will reduce your risk of getting
injured by landing on the frame or springs. Always keep the safety pad covering the frame of the
trampoline. DO NOT jump or step onto the safety pad directly since it was not intended to support the
weight of a person.
Loss of Control:
DO NOT try difficult maneuvers, or any maneuvers until you have mastered the previous maneuver, or if
you are just learning how to jump on a trampoline. If you do, you will increase your risk of getting injured
by landing on the frame, springs, or off the trampoline completely because you might lose control of your
jump. A controlled jump is considered landing on the same spot that you took off from. If you do lose
control when you are jumping on the trampoline, bend your knees sharply when you land and this will
allow you to regain control and stop your jump.
Somersaults (Flips):
DO NOT PERFORM Somersaults of any type (backwards or forwards) on this trampoline. If you make a
mistake when trying to perform a somersault, you could land on your head or neck. This will increase your
chances of getting your neck or back broken, which could result in death or paralysis.

Customer Service 1-888-707-1880 34 Maurice Pincoffs Canada Inc. 2008
Foreign Objects:
DO NOT use the trampoline if there are pets, other people, or any objects underneath the trampoline. This
will increase the chances of an injury occurring. DO NOT hold any foreign objects in your hand and DO
NOT place any objects on the trampoline while anyone is playing on it. Please be aware of what is overhead
when you are playing on the trampoline. Tree limbs, wires, or other objects located over the trampoline will
increase your chances of getting injured.
Poor Maintenance of Trampoline:
A trampoline in poor condition will increase your risk of getting injured. Please inspect trampoline before
each use for bent steel tubes, torn mat, loose or broken springs, and overall stability of the trampoline.
Weather Conditions:
Please be aware of the weather conditions when using the trampoline. If the mat of the trampoline is wet,
the jumper could slip and injure him or herself. If it is too windy, jumpers could lose control.
Use trampoline only when the jumping mat is clean and dry. A wet jumping mat is extremely slick and
prevents a stable landing.
Windy conditions
In severe wind situations, the trampoline can be blown about. If you expect windy weather conditions, the
trampoline should be moved to a sheltered area or disassembled. Another option is to tie the round, outside
portion (top frame) of the trampoline, to the ground using ropes and stakes. To ensure security, at least three
(3) tie downs should be used. Do not just secure the legs of the trampoline to the ground because they can
pull out of the frame sockets.
Moving the trampoline If you need to reposition the trampoline, two people should be used. All connector points should be
wrapped and secured with weather resistant tape, such as duct tape. This will keep the frame intact during
the move and prevent the connector points from dislocating and separating. When moving, lift the
trampoline slightly off the ground and keep it horizontal to the ground. For any type of other move, you
should disassemble the trampoline.
TIPS TO REDUCE THE RISK OF ACCIDENTS
All jumpers need to be supervised, regardless of skill level or age.
Jumpers role in accident prevention
The key here is to stay in control of your jumps. DO NOT move onto more complicated, more difficult
maneuvers until you have mastered the basic, fundamental bounce. Education is also key to safety and very
important. Read, understand, and practice all safety precautions and warnings prior to using the trampoline.
A controlled jump is when you land and take off from the same location.
For additional safety tips and instructions, contact a certified trampoline instructor.
Supervisor’s or owner’s role in accident prevention
Supervisors need to understand and enforce all safety rules and guidelines. It is the responsibility of the
supervisor to provide knowledgeable advice and guidance to all jumpers of the trampoline. If supervision is
unavailable or inadequate, the trampoline could be stored in a secure place, disassembled to prevent
unauthorized use, or covered with a heavy tarp that can be locked or secured with lock or chains. The
supervisor is also responsible to ensure that the safety placard is placed on the trampoline and that jumpers
are informed of these warnings and instructions.
Customer Service 1-888-707-1880 35 Maurice Pincoffs Canada Inc. 2008
LESSON PLAN
The following lessons are suggested in order to learn basic steps and bounces before moving onto more
difficult, complicated bounces. Before actually getting on and using the trampoline, you should read and
understand all safety instructions. A complete discussion and demonstration of body mechanics and
trampoline guidelines should occur between the supervisor and student as
well.
Lesson 1 A. Mounting and Dismounting - Demonstration of proper techniques
B. The Basic Bounce - Demonstration and practice
C. Braking (check the bounce) - Demonstration and practice. Learn to brake on command
D. Hands and Knees - Demonstration and practice. Stress should be on four-point landing and
alignment.
Lesson 2 A. Review and practice of techniques learned in Lesson 1.
B. Knee Bounce - Demonstration and practice. Learn the basic down to knee and back up before trying half
twist to left and right.
C. Seat Bounce - Demonstration and practice. Learn basic seat bounce then add a knee bounce, hands and
knees; repeat.
Lesson 3 A. Review and practice skills and techniques learned in previous lessons.
B. Front Drop - To avoid mat burns and teach the front bounce position, all students should be requested to
assume the prone position (face down on the ground) while the instructor checks for faulty positions
that could cause injury.
C. Start with a hands and knees bounce and then extend body into prone position, land on the mat and
return to feet.
D. Practice Routine - Hands and Knees Bounce, Front Bounce, back to feet, seat bounce, back to feet
Lesson 4 A. Review and practice skills and techniques learned in previous lessons.
B. Half- Turn
i. Start from front drop position and as you make contact with mat, push off with arms in either
the right or left direction and turn head and shoulders in same direction.
ii. During turn, be sure to keep back parallel to mat and head up.
iii. After completing turn, land in front drop position.
After completing this lesson, the student now has a basic foundation of trampoline bounces.
Jumpers should be encouraged to try and develop their own routines with the emphasis on control and form.

Customer Service 1-888-707-1880 36 Maurice Pincoffs Canada Inc. 2008
BASIC TRAMPOLINE BOUNCE
! WARNING ALWAYS START YOUR JUMP AT THE CENTER CIRCLE.
WHEN YOU LAND MORE THAN 1 FOOT AWAY FROM THE EDGE
OF THE CENTER CIRCLE, STOP YOUR JUMP IMMEDIATELY!
RESTART YOUR JUMP AT THE CENTER OF CIRCLE.

Customer Service 1-888-707-1880 37 Maurice Pincoffs Canada Inc. 2008
LIMITED WARRANTY
Maurice Pincoffs Canada Inc. warrants this unit, to the original purchaser, to be free from defects in
material and workmanship for the period of time listed below. Warranty time begins at the time of purchase.
Normal wear and user’s abuse are not covered in the warranty. Weather damage and other such acts of
nature are not covered by the Manufacturer’s warranty. Commercial use and/or transfer of ownership voids
the warranty.
Trampoline
Frame 10 Years
Mat Fabric 5 Years
Mat Stitching 2 Years
Springs 1 Year
Safety Pad 1 Year
Enclosure Net Support poles 10 years
Metal hardware 1 year
Pole pads 6 months
Other components 90 days
Flash Zone
30 days
For warranty service contact our Customer Service Dept.:
1-888-707-1880 (toll free)
Monday-Friday
8:30 A.M. to 5:00 P.M.
Eastern Standard Time
LIABILITY While every attempt is made to embody the highest degree of safety in all equipment we cannot, however,
guarantee freedom from injury. The user assumes all risk of injury due to use. All merchandise is sold on
this condition, that no representative of the Company can waive or change. This equipment is intended for
residential use only. This equipment is not to be used in places of public assembly such as schools,
nurseries, day care centre, churches and parks. Maurice Pincoffs Canada Inc. cannot assume any liability for
such use. Any commercial, institutional or public use of this equipment will void the warranty.