table of contents - fleming collegeuserpages.flemingc.on.ca/~mosinga/patient care iv/incubator...
TRANSCRIPT


Table of ContentsTable of Contents
PageNos.
I. Introduction …………………………………………………. 1
II. Objectives of the Manual ……………………………………. 2
III. Description of the IAD ……………………………………… 3
IV. Advantages of the IAD ……………………………………… 4
V. Transporting Neonates ………………………………………. 5
VI. Recommended Procedures for the IAD ………………….….. 6-8
VII. Transferring the IAD onto the 35A stretcher …………….…. 9-12
VIII. Transporting the IAD by Land Ambulance …………………. 13-15
IX. Transporting the IAD by Air Ambulance …………………… 16
• Dedicated Fixed Wing Aircraft with the LifePort Aero-Sled Loading Ramp ………………………………………. 17-21
• Dedicated Fixed Wing Aircraft without Loading Ramp …. 23
• Dedicated Ministry of Health and Long-Term CareHelicopters …………………………………………….…. 23-25
X. References …………………………………………………... 26

Table of Contents Cont’d….Table of Contents Cont’d….
PageNos.
XI. Incubator Adapter Deck Installation Information …………... 27-31
XII. Incubator Adapter Deck Maintenance Manual ……………… 32
XIII. Incubator Adapter Deck Parts List ………………………….. 33-37

1
IntroductionIntroduction
The Incubator Adapter Deck (IAD) has been introduced to the Ontario ambulancesystem. The IAD was designed and developed by the Emergency Health ServicesBranch in conjunction with a number of experts and specialists to help address themany lifting and transportation challenges associated with transporting neonates inincubators by ambulance.
To help the EMAs/Paramedics and other professionals utilize the IAD effectively, theMinistry of Health and Long-Term Care training program Utilizing the IncubatorAdapter Deck was developed. This EMA/Paramedic Users’ Manual was developed tocoincide with that training program. Although this manual provides various procedureson how to utilize the IAD, it cannot address all the different loading, unloading andsecuring configurations utilized in Ontario especially those of aircrafts. TheEMAs/Paramedics are required to use sound judgement and discretion to adapt to thevarious circumstances encountered.

2
Objectives of the ManualObjectives of the Manual
Assisting EMAs/Paramedics in:
• becoming familiar with the design and features of the Incubator Adapter Deck.
• knowing how to transfer the IAD onto the 35A stretcher.
• knowing how to transport the IAD by Land Ambulance.
• becoming familiar with how to transport the IAD by Air Ambulance specifically for the:
– dedicated fixed wing aircraft with the lifeport aero-sled loading ramp.
– dedicated fixed wing aircraft without loading ramp.
– dedicated Ministry of Health and Long Term Care Helicopters.

3
Description of the IADDescription of the IAD
The IAD is a platform designed to accommodate many commercially available transportincubators as well as accessory equipment. It is designed to be loaded onto a 35A stretcher.Each IAD:
• has some similarities to the #9 stretcher. For example, both devices have similar dimensions. In addition both devices have two small wheels at the head end and two small pegs at the foot end. Also the IAD, without the legs, can be loaded in a way similarto that of the #9 portable stretcher when used in the aircraft that normally utilize portablestretchers.
• is made with a light-weight aluminum frame. The solid deck is made of a laminatedaluminum and composite material.
• is supported by four removable legs with wheels. Furthermore, each leg is secured witha safety strap. These safety straps also secure the IAD to a stretcher when the legs areremoved.
• comes with a carrying bag. The bag stores the four legs and the two supplemental restraint straps.

4
Advantages Of the IADAdvantages Of the IAD
Listed below are some of the key advantages of the IAD.
• Helps reduce the risk of injury. The IAD facilitates proper lifting and carryingprocedures. The weight on the IAD is distributed in such a way that promotes the useof proper body mechanics.
• Allows additional equipment to be secured to the IAD. As a result, some equipmentdoes not have to be transported and secured separately. This in turn improves thesafety of the neonate and neonatal team members. In addition, the deck provides alarger work area.
• Eliminates the need to transport extra oxygen and air tanks with Level IIIincubators. E cylinders are now attached to the IAD. It should be noted that on-boardambulance oxygen should be utilized when possible to conserve the use of theincubator’s gas supply.
• Simplifies securement of the incubator within the land or air ambulance. Thereare only two supplemental restraint straps needed to secure the IAD in the ambulance.
• Reduces the number of out-of-service ambulances that occur with incubatortransfers. This is because the main stretcher no longer has to be left behind.

5
Transporting NeonatesTransporting Neonates
Transporting neonates involves a team of professionals with specialized skills. Those team membersinclude the neonatal transport team Registered Nurses, Physician Neonatologists, RespiratoryTherapists, Ambulance Communication Officers, Emergency Medical Attendants and Paramedics(both land and air), Pilots and many others.
Although there may be some overlap, each team member has a distinct role to play while at the sametime relying on the assistance and cooperation of each other. Each must know their responsibilitieswell so that the team can perform in a highly competent manner.
The EMAs/Paramedics are responsible for the loading and unloading of the IAD including attachingthe legs and supplemental restraint straps. They have the training and skills to operate the ambulanceequipment and are familiar with safe lifting techniques. This way, the transport team members cankeep their focus on the patient and not be distracted by becoming involved in loading and unloadingprocedures. The transport team members are responsible for all patient care unless otherwiseindicated. The EMAs/ Paramedics can assist where possible by providing any extraequipment, skills or information should the need arise.
Staff utilizing the IAD are encouraged to:
• read this document, Using the Incubator Adapter Deck and
• review and improve/refine their utilization of the IAD

6
Recommended Procedures for the IADRecommended Procedures for the IAD
In General
Listed below are some general procedures to follow when utilizing the IAD.
* Follow appropriate and relevant lifting procedures whenever possible.
Remember to do the following:- Use a four person lift whenever possible.- Ask for lifting assistance if necessary. Avoid exceeding your lifting ability.
* Reduce heat loss whenever possible. Heat loss can have immediate effects on the neonatewho has a limited ability to generate its own heat. Sources of heat loss include cold air,wind, rain and snow. These sources can cause unnecessary heat loss from the incubator dueto convection, radiation and conduction. Listed below are recommended methods to reduceheat loss.
- Limit the exposure time of the incubator to the heat loss sources.
- Cover the incubator with a blanket or special insulating cover.
- Prepare the ambulance by preheating the patient compartment and closing (if possible)any windows;
- During harsh weather conditions, protect equipment and supplies such as I.V. bags andtubing from the extreme cold.

7
* Utilize the hospital’s and ambulance’s power and oxygen supply. The IAD’ s powerand oxygen supply are very limited.
- Connect and disconnect the power and oxygen supply only when directed to do soby the transport team unless otherwise indicated.
- Utilize the appropriate wall outlets for power. The battery supplied on the IAD is a12 volt type and has a limited capacity. It may be required to supply power to a number of systems and equipment including interior heating, lighting, cardiac monitors, I.V. pumps, etc.
- Utilize the oxygen supply of the hospital (e.g. wall outlet or portable cylinder) or ambulance whenever possible.
* Select an appropriate transfer location. • Consider meeting at a location other than the Special Care Nursery to transfer the
IAD. The incubator adapter deck is a self-supporting mobile transporter that can bemaneuvered independently and does not require a 35A stretcher when being movedwithin a hospital. Suggested areas to conduct the transfer include:- emergency departments and holding areas when in a hospital.- hangar facilities or beside the aircraft ( if conditions permit) when at an airport.
• Choose a safe location. Whenever possible, ensure the location selected:- provides shelter from heat loss sources/harsh weather such as cold air, wind,
rain, snow.- provides protection from excessively loud noises such as aircraft engines.
Procedures Cont’d….Procedures Cont’d….

8
• is located away from high pedestrian traffic such as a busy hallway in anEmergency Department.
• has a smooth, flat floor to prevent uncontrolled rolling of the IAD or 35A stretcher.
• has good lighting.
• ensure that the waiting area chosen has both an oxygen and power source that the incubatorcan be connected to, if there is an extended waiting period. This would then help conservethe incubator’s own oxygen and power supply.
Procedures Cont’d….Procedures Cont’d….

9
Transferring the IAD onto the 35ATransferring the IAD onto the 35AStretcherStretcher
Follow these steps when transferring an IAD onto the 35A stretcher.
1. Prepare the 35A stretcher:
- remove all equipment and linen from on top and under the mattress. Suchequipment includes oxygen kits, cardiac monitors and CPR boards. Secure theseitems in the ambulance.
- connect all the stretcher straps on top of the mattress (fig. 2). Ensure there are nostraps hanging over the edge of the mattress.
2. Position the IAD onto the 35A stretcher:
- lower the 35A stretcher side rails and place the 35A stretcher along side the IAD.
- have the EMAs/Paramedics position themselves at each end of the 35A stretcher.
- lower the stretcher to a height that will allow it to pass under the IAD from eitherend (fig. 3).
- roll the 35A gently under the IAD (fig. 4). Be careful not to bump the IAD.
- raise the 35A until it lifts the IAD wheels off the ground (fig. 5). Ensure the 35A islocked in position before releasing your grip.

10
3. Remove the legs and fasten the safety straps to the 35A stretcher.- Unfasten each of the four safety straps that are holding the legs onto the IAD. Release
the strap by squeezing the retaining clasp to allow the jaws to open.- Remove the legs from the IAD by pulling them straight out from the deck in a horizontal
motion (fig. 6).- Place each of the four safety straps around the main frame of the 35A stretcher. Place the
two rear-most straps at the foot-end forward of the shock position mechanism. ENSUREthe straps are not placed around the stretcher mechanism or through the side release handle.
Transferring Cont’d….Transferring Cont’d….

11
- Push the mattress in with one hand in order to expose the main frame of the 35A to alloweasy passage of the straps (fig. 7).
- Feed the strap and clasp through and secure the clasp to the D ring (fig. 8).
- Tighten the safety straps. Pull them evenly to avoid pulling the IAD to one side.
- DO NOT attach the safety straps to the rear-most D rings located on each side of the IAD atthe foot end to the floor of the ambulance. These D rings are used to connect thesupplemental restraint straps from the IAD to the floor of the ambulance.
- Place the legs in the carrying bag that accompanies the IAD.
Transferring Cont’d….Transferring Cont’d….

12
4. Lower the 35A stretcher.- Lower the 35A stretcher - with an EMA/Paramedic at each end of the stretcher - to a height of 6 or
less (fig. 10). Remember, NEVER transport the 35A stretcher at height level 7 or 8. Theselevels are for loading and unloading only.
- Check the IAD and stretcher for overhanging wires, tubes and straps.
- Transport the IAD and stretcher to the ambulance. Both EMAs/Paramedics must ensure they keep afirm grip on the 35A / IAD stretcher at all times when moving (fig. 11).
Transferring Cont’d….Transferring Cont’d….
13
Transporting the IAD by LandTransporting the IAD by LandAmbulanceAmbulance
Loading the 35A stretcher/IAD into the Land Ambulance
Follow these steps when loading the 35A stretcher/IAD combination into the land ambulance.
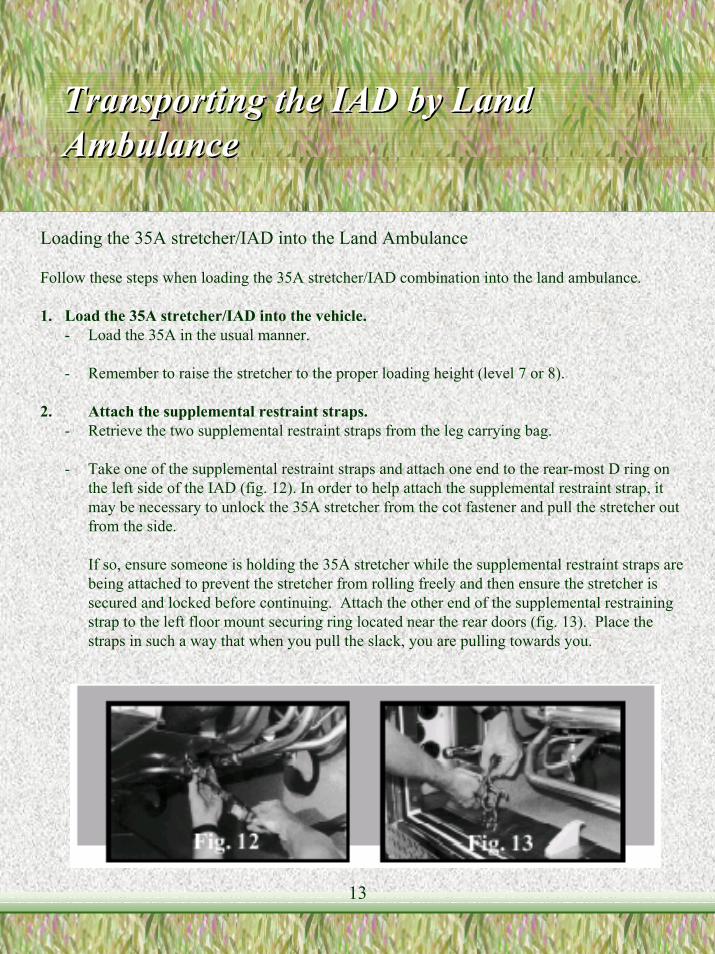
1. Load the 35A stretcher/IAD into the vehicle.- Load the 35A in the usual manner.
- Remember to raise the stretcher to the proper loading height (level 7 or 8).
2. Attach the supplemental restraint straps.- Retrieve the two supplemental restraint straps from the leg carrying bag.
- Take one of the supplemental restraint straps and attach one end to the rear-most D ring onthe left side of the IAD (fig. 12). In order to help attach the supplemental restraint strap, itmay be necessary to unlock the 35A stretcher from the cot fastener and pull the stretcher outfrom the side.
If so, ensure someone is holding the 35A stretcher while the supplemental restraint straps arebeing attached to prevent the stretcher from rolling freely and then ensure the stretcher issecured and locked before continuing. Attach the other end of the supplemental restrainingstrap to the left floor mount securing ring located near the rear doors (fig. 13). Place thestraps in such a way that when you pull the slack, you are pulling towards you.
14
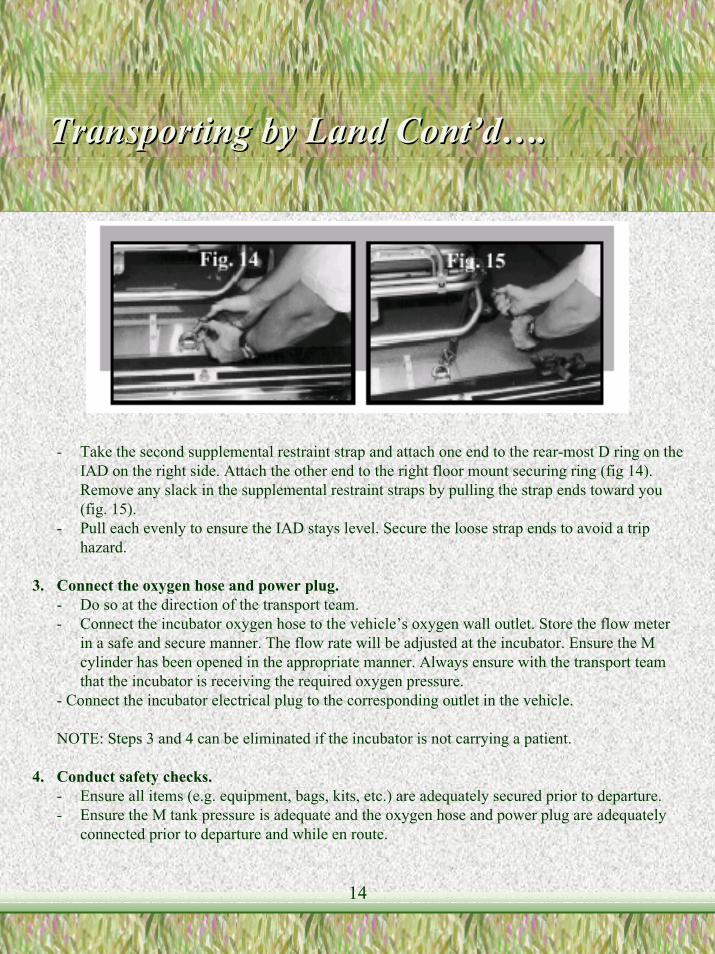
- Take the second supplemental restraint strap and attach one end to the rear-most D ring on theIAD on the right side. Attach the other end to the right floor mount securing ring (fig 14).Remove any slack in the supplemental restraint straps by pulling the strap ends toward you(fig. 15).
- Pull each evenly to ensure the IAD stays level. Secure the loose strap ends to avoid a triphazard.
3. Connect the oxygen hose and power plug.- Do so at the direction of the transport team.- Connect the incubator oxygen hose to the vehicle’s oxygen wall outlet. Store the flow meter
in a safe and secure manner. The flow rate will be adjusted at the incubator. Ensure the Mcylinder has been opened in the appropriate manner. Always ensure with the transport teamthat the incubator is receiving the required oxygen pressure.
- Connect the incubator electrical plug to the corresponding outlet in the vehicle.
NOTE: Steps 3 and 4 can be eliminated if the incubator is not carrying a patient.
4. Conduct safety checks.- Ensure all items (e.g. equipment, bags, kits, etc.) are adequately secured prior to departure.- Ensure the M tank pressure is adequate and the oxygen hose and power plug are adequately
connected prior to departure and while en route.
Transporting by Land Cont’d….Transporting by Land Cont’d….

15
Reverse the loading steps, after arriving at the destination.
1. Disconnect the oxygen hose and power plug:
- do so at the direction of the transport team.
- store them safely in or around the IAD to prevent themfrom hanging over the sides of the 35A stretcher/IAD.
2. Release the two supplemental restraint straps:
- in order to help access and release the supplementalrestraint strap, it may be necessary to unlock the 35Astretcher from the cot fastener and pull the stretcher outfrom the side. If so, ensure someone is holding the 35Astretcher while the supplemental restraint straps arebeing released to prevent the stretcher from rollingfreely then ensure the stretcher is secured and lockedbefore continuing.
- store the straps in the leg bag.
3. Unload the 35A stretcher/IAD from the vehicle.
- Unload the 35A stretcher in the usual manner.
- Lower the 35A stretcher to a transport height of 6 or less prior to rolling the stretcher from thevehicle.
4. Connect the legs and fasten the safety straps.
- Fasten the straps as per fig. 16
CAUTION
When wheels areattached they must be
secured using the strapsas shown to preventthem accidentally
detaching which couldresult in personal injury
Transporting by Land Cont’d….Transporting by Land Cont’d….

16
Transporting the IAD by Air AmbulanceTransporting the IAD by Air Ambulance
In Ontario, there are numerous types of aircraft dedicated to the care and transportation of patients andtransport incubators. These aircraft include fixed-wing turbo-prop aircraft, jets and helicopters.Private medivac aircraft are also utilized and vary in design and type.
Furthermore, there are a number of situations where the IAD’s are transported in ambulance aircraft.In Ontario, there are numerous types of aircraft that utilize a variety of stretcher systemsincluding the Aero-Sled manufactured by LifePort, and the modified #30 stretchers (for thehelicopters).
In General
When working around and in aircraft, remember these general procedures.* All land ambulance EMA/Paramedics must follow the directions of the air ambulance crew
at all times.
- Land EMAs/Paramedics must not approach an aircraft unless directed to do so by the pilots orair ambulance medical crew members. In addition, land ambulance personnel should followthe loading instructions of the air ambulance crew as they are most familiar with the loadingprocedures for their particular aircraft.
- Park the land ambulance in a safe area away from the aircraft.
* All air ambulance medical crew members should be familiar with their aircraft’sloading and securement procedures as per the flight operation manual(s).
* All proper safety procedures must be followed as per the Ontario Air Ambulance Manual,Aircraft Safety, Emergency and Crash Procedures and as per local protocol.
* Ensure the incubator can be easily accessed when in-flight, when loaded in the aircraft.

17
Transporting by Air Ambulance Cont’d...Transporting by Air Ambulance Cont’d...
Dedicated Fixed Wing Aircraft with the LifePort Aero-SledLoading Ramp
The primary stretcher system utilized on all dedicated fixed wing air ambulances is the LifePortAero-Sled. The Aero-Sled reduces the lift requirements by using a stretcher slider and loadingramp, which is especially useful when transferring heavy loads.
Loading the IAD onto the Aero-Sled
Follow these steps when loading the 35A/IAD onto the Aero-Sled.
• Disconnect the incubator’s oxygen hose and power plug. The ambulance crew will do thefollowing:
- disconnect the incubator’ s oxygen hose and power plug from the corresponding outlets inthe ambulance under the direction of the transport team (when applicable).
- confirm with the transport team that the incubator is receiving adequate oxygen and powerfrom its own self contained supply (when applicable).
• Prepare the loading ramp. The flight crew members will prepare the loading ramp bydoing the following.
- Connect the loading ramp to the Aero-Sled base and position the stretcher slider into theaircraft doorway.
- Secure the seat belt harness straps on top of the stretcher slider and check to ensure there areno loose straps hanging over the side of the stretcher slider.
- Slide the stretcher slider on the loading ramp.
- Lower the loading ramp to the inclined position.

18
• Transfer the leg bag and unload the 35A stretcher/IAD. The land ambulance crew will,under the direction of the flight crew:
- transfer the leg carrying bag and all other accompanying equipment to one of the airambulance medical crew members for loading onto the aircraft.
- unload the 35A stretcher with the IAD.
• Position the 35A stretcher/IAD by the loading ramp. The land ambulance crew, underthe direction of the flight crew will:
- move the 35A stretcher/IAD toward the aircraft,
- lower the 35A stretcher/IAD to a height just below that of the loading ramp,
- move the 35A stretcher/IAD as close as possible to the loading ramp in order to reducethe distance required to carry the IAD,
- disconnect the four safety straps from the D-rings and place them on the IAD.
• Load the IAD onto the stretcher slider. The land and air ambulance crew memberswill, under the direction of the air ambulance medical crew member who is at the foot end ofthe IAD:
- position themselves so that one flight crew member is at each corner of the head end ofthe IAD and one air ambulance and one land ambulance EMA/Paramedic is at eachcorner of the foot end of the IAD. The other air ambulance medical crew member willremain in the aircraft to operate the stretcher slider mechanism once the IAD is secured.
- lift the IAD off the #35A stretcher in unison following the lifting count of the airambulance crew member at the foot end of the IAD.
- place the head of the IAD onto the stretcher slider so that the wheels of the IAD are incontact with the stretcher slider.
Transporting by Air Ambulance Cont’d...Transporting by Air Ambulance Cont’d...

19
- push the IAD up the stretcher slider until the IAD foot pins line up with thecorresponding foot pin holes on the stretcher slider.
NOTE: All crew members should never release their grip from the IAD until it issafely secured on the stretcher slider.
• Attach the supplemental restraint strap and head end straps. The flight crew will thenapply the supplemental restraint strap by:
- passing the attached strap under the stretcher slider ensuring the strap does not interferewith the stretcher slider mechanism.
- connecting the strap to the corresponding D-ring and then pull it tight.
- looping the two foot end restraint straps through the corresponding holes on the stretcherslider and secure them to each D-ring.
- raising the loading ramp and stretcher slider to the horizontal position. The airambulance medical crew member inside the aircraft will secure the two head end straps.
• Slide the IAD into the aircraft. The air ambulance medical crew member inside the aircraftwill slide the IAD on the stretcher slider along the loading ramp into the aircraft to the AeroSled base and secure it in the locked position.
- Connect the incubator’ s oxygen hose and power plug.
The air ambulance EMA/Paramedic inside the aircraft will:
- connect the incubator’ s oxygen hose and power plug to the corresponding outlets in theaircraft under the direction of the transport team (when applicable).
- confirm with the transport team (when applicable) that the aircraft’ s oxygen and powersystems are adequately supplying the incubator.
Transporting by Air Ambulance Cont’d...Transporting by Air Ambulance Cont’d...

20
• Store loading ramp and conduct safety check. The pilot in command, who is ultimatelyresponsible for the securement of the IAD in the aircraft will:
- remove the loading ramp from the Aero-Sled base and then secure the loading ramp in theaircraft storage compartment.
- ensure the aircraft cabin contents are secured, the IAD and incubator are secured on thestretcher slider and the stretcher slider is in the locked position.
Unloading the IAD from the Aero-Sled
Follow these steps when unloading the IAD from the Aero-Sled.
• Disconnect the incubator’s oxygen hose and power supply. The air ambulance medical crewwill do the following.
- Disconnect the incubator’s oxygen hose and power plug from the corresponding outlets inthe ambulance under the direction of the transport team. (when applicable).
- Confirm with the transport team (when applicable) that the incubator is receiving adequateoxygen and power from its own self contained supply.
• Prepare the loading ramp and the IAD for unloading. The flight crew members will:
- remove all non-essential passengers from the aircraft.
- remove the loading ramp from the aircraft storage compartment.
- connect the loading ramp to the Aero-Sled base, leaving it in the horizontal position.
- check to ensure there are no loose straps hanging over the side of the stretcher slider.
- slide the IAD and stretcher slider onto the loading ramp protruding through the aircraftdoorway.
Transporting by Air Ambulance Cont’d...Transporting by Air Ambulance Cont’d...

21
- lower the loading ramp to the inclined position ensuring that the flight crew members takehold of the loading ramp and not the IAD.
• Remove the supplemental restraint straps. The flight crew members will do the following.- Secure the strap on top of the IAD unit and remove the supplemental restraint strap from
under the stretcher slider.
- Disconnect the two foot end restraint straps while the air ambulance medical crew memberinside the aircraft disconnects the head end restraint.
• Prepare the 35A stretcher. The land EMA/Paramedics will prepare the 35A stretcherfollowing the procedures previously indicated in this manual.
• Position the 35A stretcher by the loading ramp. The land EMA/Paramedics, under thedirection of the flight crew will:
- put both side rails of the 35A stretcher up so they act as a reference guides for placing theIAD evenly on the mattress,
- lower the 35A to a height just below that of the loading ramp,
- position themselves and the 35A at the end of the loading ramp so that the 35A stretcher isas close as possible to the loading ramp in order to reduce the distance required to carry theIAD.
• Unload the IAD from the stretcher slider. The land and air ambulance crew members,under the direction of the air ambulance medical crew member who is at the foot end of theIAD will:
- position themselves in the same manner as when loading the IAD so that one flight crewmember is at each corner of the head end of the IAD and one air ambulance and one landambulance EMA/Paramedic is at each corner of the foot end of the IAD. The other airambulance EMA/Paramedic will remain in the aircraft to operate the stretcher slidermechanism once the stretcher slider containing the IAD is released from the locked position.
Transporting by Air Ambulance Cont’d...Transporting by Air Ambulance Cont’d...

22
- lift the foot end of the IAD so that the foot pins come out of the corresponding foot pinholes on the stretcher slider.
- slide the IAD down the loading ramp slowly.
- the flight crew members will then lift the head end of the IAD then all four crew memberswill lift the IAD on the 35A stretcher following the lifting count of the air ambulanceEMA/Paramedic at the foot end of the IAD.
- fasten the safety straps. Do so in the usual manner.
• Load the IAD into the vehicle. The land EMA/Paramedics will do this in the usual manner.
• Connect the incubator’s oxygen hose and power supply. Connect the incubator’s oxygenhose and power supply to the corresponding outlets in the land ambulance vehicle. The landEMA/Paramedics will do this in the usual manner.
• Transfer the leg bag and equipment. The air ambulance medical crew member will transferthe leg bag and accompanying medical equipment and baggage to one of the land EMA/Paramedics for storage in the land ambulance.
Three Person Lift
In the event an appropriate helper is not available, you may have to conduct a 3-person lift. Inthis case the air ambulance medical crew members will:
• position themselves so that one is positioned at the foot end of the IAD.
• angle the 35A stretcher to the ramp. This then helps facilitate the lifting process by reducingthe amount of lifting.
Transporting by Air Ambulance Cont’d...Transporting by Air Ambulance Cont’d...

23
Dedicated Fixed Wing Aircraft Without Loading Ramp
Loading and Unloading the IAD
When loading and unloading the IAD into/from the fixed wing aircraft without a loading ramp,remember these key points.
• Consider loading the IAD onto an aircraft the same way one would load a #9 portablestretcher. Remember that both devices have similar dimensions and that both devices have twosmall wheels at the head end and two small pegs at the foot end.
• Position an air ambulance crew member onboard the aircraft. This way he/she can receivethe IAD as it is being passed onto the aircraft from the other crew members.
• Keep the IAD level and avoid any unnecessary rough handling.
• Ensure the IAD is safely secured when loaded onboard.
Dedicated Ministry of Health and Long-Term CareHelicopters
Transferring the IAD from the Land Ambulance Stretcher to the AirAmbulance Stretcher
When loading and unloading the IAD into/from the fixed wing aircraft without a loading ramp,remember these important points.
• Prepare the aircraft stretcher. Follow similar procedures previously indicated in thismanual.
Transporting by Air Ambulance Cont’d...Transporting by Air Ambulance Cont’d...
24
• Position both stretchers alongside each other.
- Adjust both heights of the aircraft stretcher and land ambulance stretcher (with the IAD) so theyare at the same height.
- Lower the side rails on the land ambulance stretcher (with the IAD) only. Keep the side rails upon the empty stretcher. These act as reference guides for placing the IAD evenly on themattress.
- Undo the four IAD safety straps on the land ambulance 35A stretcher and pull the straps freefrom the 35A main frame. Place these straps on top of the IAD so they will not be hanging loosewhen the IAD is lifted.
- Place the aircraft and land ambulance stretchers side-by-side with the ends of the stretchersorientated the same way.
• Transfer the IAD to the aircraft stretcher.
- Position one EMA/Paramedic at each corner of the IAD. If possible, have someone brace theaircraft stretcher to prevent stretcher movement.
- Lift the IAD straight up and move it over to the aircraft stretcher while following a lifting count.
- Lower the IAD gently onto the stretcher. Ensure the IAD safety straps aren’t caught under theIAD.
- Move the land ambulance 35A stretcher away.
Transporting by Air Ambulance Cont’d...Transporting by Air Ambulance Cont’d...

25
• Fasten the safety straps to the aircraft stretcher. Follow the same procedures previouslyindicated in this manual.
• Transfer the leg bag and equipment. Ensure the leg bag and all accompanyingequipment is stored in the aircraft following established procedures for the particularaircraft.
Loading the Aircraft Stretcher/IAD into the Aircraft
Follow the loading procedures unique to that particular aircraft and do the following.
• Secure the stretcher in the aircraft in the usual manner. There is no need to utilize anysupplemental restraint straps in the aircraft to secure the IAD as seen in the landambulance.
• Connect the incubator’s oxygen and power supply cord to the corresponding outletsin the aircraft. The air ambulance EMA/Paramedic inside the aircraft will:
- connect the incubator’ s oxygen hose and power plug to the corresponding outlets inthe aircraft under the direction of the transport team (when applicable).
- confirm with the transport team (when applicable) that the aircraft’ s oxygen and powersystems are adequately supplying the incubator.
Unloading the IAD and Stretcher from the Aircraft/Transferring the IADfrom the Land Ambulance Stretcher to the Air Ambulance Stretcher
After arriving at your destination and rendezvousing with a land ambulance, reverse theseprocedures.
Transporting by Air Ambulance Cont’d...Transporting by Air Ambulance Cont’d...

26
• Lifting Training Program for Emergency Medical Attendants :
- A Lifting Program for Emergency Medical Attendants, Participant Workbook,Occupational Health and Safety, Educational Services, Emergency Health ServicesBranch, Ontario Ministry of Health, 1991.
- Video, A Lifting Training Program for Emergency Medical Attendants.
- Participant’s Lifting Methods Analysis checklist.
• Refer to the Emergency Health Service’s Lifting Training Program for EmergencyMedical Attendants, Participant’s Guide and the #30 Stretcher Utilizing UntrainedHelpers Participant’s Guide.
ReferencesReferences

27
IAD Installation InformationIAD Installation Information
1. Recommended incubator envelope
1.1 The envelope is described in the following diagram. NOTE THAT THEENVELOPE MUST NOT OVERHANG THE BACK OF THE INCUBATORADAPTER DECK (IAD).
TYPICAL INCUBATORS SHOWN WITHIN THE REQUIRED ENVELOPE

28
IAD Installation Cont’d...IAD Installation Cont’d...
1.2 The incubator may be positioned anywhere on the IAD within the envelope, butMUST be oriented as shown in the following diagram:
NOTE ORIENTATION OF IAD"HEAD" OR WHEEL END ON RIGHT SIDE
FRONT ACCESS TO INCUBATOR

29
2. Other mounting considerations
2.1 Note that the side bar on a Ferno #35A stretcher may interfere with incubatorcontrols. The location of the incubator should consider this possible interference.
IAD Installation Cont’d...IAD Installation Cont’d...
SIDE BAR

30
IAD Installation Cont’d...IAD Installation Cont’d...
2.2 There must be a minimum of 2 fasteners (screws or bolts) for each piece ofequipment. The required number of screws is as follows:
Number of screws required = 1 screw for each 50 lbs. of equipment, butnot less than 2 screws for equipment, and 4 screws for an incubator.
2.3 The minimum fastener size is a #10 (3/16”) (120,000 psi ultimate tensile strengthor grade 5).
2.4 The fasteners should be spaced as widely apart as possible.
2.5 The equipment should be fastened down such that the fasteners do notexperience prying loads.
INCORRECT

31
IAD Installation Cont’d...IAD Installation Cont’d...
2.6 Equipment may be fastened anywhere on the deck, as long as the edge distance isat least 0.50” for fasteners up to & including 1/4” and 1.00” for fasteners greater than1/4” (edge distance = distance from center of the fastener hole to the edge of theIAD).
2.7 DO NOT countersink the holes or use countersunk screws in the IAD. Impropercountersinking will weaken the attachment of the equipment to the IAD.
2.8 All fasteners attaching equipment to the IAD require self-locking nuts with aminimum of 1.5 threads exposed, with washers under the nuts.
2.9 Torque fasteners as follows:
2.10 Where possible, install fasteners from bottom up to prevent tearing of the #35A

32
IAD Maintenance ManualIAD Maintenance Manual
1. Purpose: This manual provides recommended maintenance practices to ensurethat the Incubator Adapter is kept in a safe and functional state. Maintenance ofthe deck consists of periodic inspection for defects and appropriate rectification ofany defects found.
2. Schedule: A thorough visual inspection should be performed at intervals notexceeding one year. The following is a list of probable defects and appropriaterectification.
3. Spare Parts: Spare parts may be obtained from the following source:
Ferno Canada755 The Queensway E.Unit 12Mississauga, ONL4Y 4C5Phone: 800 387 7044Fax: 905 615 1199
When ordering parts, identify the part required in the Incubator Adapter Deck Parts List.

33
IAD Parts ListIAD Parts List
34
IAD Parts List Cont’d…IAD Parts List Cont’d…

35
IAD Parts List Cont’d…IAD Parts List Cont’d…

36
IAD Parts List Cont’d…IAD Parts List Cont’d…

37
IAD Parts List Cont’d…IAD Parts List Cont’d…