table of contents - korg.com · one of the best-selling synthesizers in history, the korg m1...
TRANSCRIPT


2
Table of Contents
Introduction .......................................... 3Main Features.......................................... 3iM1 Modes and Structure ....................... 4Combination (Combi) mode ....................................... 4Multi mode.................................................................. 5Program mode ........................................................... 6SETTINGS mode ....................................................... 7
On-Screen Controls............................... 8
The Browser......................................... 14
Available Parameters by Mode.......... 18Combination mode............................... 18Timbre Parameters .................................................. 19PERFORMANCE page ............................................ 21MIDI page................................................................. 23MASTER FX page.................................................... 25EASY page............................................................... 28OSC page ................................................................ 31VDF page................................................................. 36VDA page................................................................. 39CONTROL page....................................................... 41
INSERT FX page......................................................44Multi mode............................................ 47TIMBRES Parameter................................................48PERFORMANCE, MIDI page...................................49MASTER FX page....................................................50EASY, OSC, VDF, VDA, CONTROL, INSERT FX page.................................................................................52
Program mode...................................... 53TIMBRES Parameter................................................54EASY, OSC, VDF, VDA, CONTROL, INSERT FX page.................................................................................55
SETTINGS mode .................................... 56
Writing, Saving, and Loading Data ... 59Writing to internal memory................. 59Session.....................................................................59Combinations............................................................60Programs..................................................................60Drum Kits..................................................................62
Specifications...................................... 64
Support and service ........................... 65

Introduction
Thank you for purchasing the iM1 for iPad. To fully enjoy your iM1 software synthesizer, please read this owner’s manual carefully and keep it handy for future reference. Always use this product only as directed.Main FeaturesOne of the best-selling synthesizers in history, the Korg M1 defined the Workstation category for years to come. First introduced in 1988, this enormously successful PCM synthe-sizer was appreciated for its distinctive sonic character. With the iM1 for iPad, Korg has resurrected the legendary M1 as an up-to-date software synthesizer containing all of the orig-inal sounds, plus all-new sounds and new features as well.
Over 2,700 Preset SoundsAs a workstation, the original M1 contained the vast selec-tion of sounds needed to create an entire song-without the need for additional equipment. The iM1 for iPad contains all of the original sounds of the M1EX with its expanded internal PCM, plus all of the PCM data, Program data, and Combination data included in the 19 optional ROM cards, as well as the sound data of the Korg T1. (Some of this content requires a separate purchase.) A new "Best Program Card" that collects legendary M1 sounds is also featured. The iM1 for iPad contains all of the instrument, drum, and synthesizer PCM and Program data
required for today's song-production, providing a stagger-ing total of more than 2,700 preset sounds.
Easy-to-Use InterfaceThe iM1 for iPad interface has been designed to ensure max-imum ease of use. The new Browser feature can quickly search for sounds by instrument type or tonal character, finding the right sound instantly-before your inspiration escapes!Once the sound has been selected, it can be easily edited and customized using either the Easy page or the Performance page.
New Features for Enhanced PerformanceThe iM1 for iPad adds many new features that were wished-for by users of the original M1. New to the iM1 are Filter res-onance, VDA modulation, and compressor effects. The two effects processors of the original M1 have been replaced by Two Insert effects for each Timbre (Track) and two Master effects, providing for richer sound creation. In addition, the all-new Multi mode allows the iM1 for iPad as to be used as an eight-part multi-timbral sound module.
3

Introduction
iM1 Modes and StructureThe iM1 for iPad loads the Program data independently for each mode; Programs within each mode can be edited with-out affecting the other modes.
Combination (Combi) modeIn this mode, the sound consists of eight Timbres; each Tim-bre is individually assigned to its own Program..
Each Combination contains the following parameters:• Individual parameters for each Timbre, such as the output
level, pan, and Insert effect on/off settings. • MIDI-related parameters for each Timbre.
• Master effect parameters.• Sound-creation parameters for each Program.Combinations can be selected from the 32 preset cards and from the new Combinations (the KLC PRESET card). Combi-nation that you have tweaked, edited, or created from scratch can be saved to any of the six User cards. Each User card can hold 50 Combinations, for a total of 300 User Combinations. In addition, the iM1 provides four user cards that are saved in the session, and two library cards that are stored within iM1 itself.
Program
MFX 1
MFX 2
TIMBRE 1
TIMBRE 8
TIMBRE 2
TIMBRE 3
TIMBRE 4
TIMBRE 5
TIMBRE 6
TIMBRE 7
Program
Program
Program
Program
Program
Program
Program
Master FX
4

Introduction
Multi modeIn this mode, the iM1 for iPad can be used as an eight-part multi-timbral sound module..
Multi mode and Combination mode are structured almost identically, but have the following differences.• Default MIDI channel setting for each track (track 1 is chan-
nel 1, track 2 is channel 2, …)• In Multi mode, the master effects are used as send effects.
The send levels, return levels, and return destinations will determine how the signal is routed. If you lower the send levels to 0, the signals from the insert effects will be output directly, bypassing the master effects. If you raise the send levels, the direct sound will be mixed with the signals from the master effects and then output.
Except for the points listed above, Combination mode and Multi mode have the same structure. You can use Combina-tion mode as a multi-timbral sound module, or use Multi mode to create a single sound just like a combination.
Program
MFX 1
MFX 2
Track 1
Track 8
Track 2
Track 3
Track 4
Track 5
Track 6
Track 7
Program
Program
Program
Program
Program
Program
Program
Master FX Return
5

Introduction
Program modeThis mode is used to play and edit individual Programs.Programs can be selected from the 32 preset cards and from the new KLC PRESET card and iM1 Special card. Programs that you have tweaked, edited, or created from scratch can be saved to any of the six User cards. Each User card can hold 50 Programs, for a total of 300 user Programs. Each Program uses one of the three oscillator modes: Single, Double, or Drums.
SingleSingle Programs use a single oscillator. The oscillator consists of the OSC, VDF, VDA, and Insert FX sections.The multisounds available for use by the oscillator can be selected from the 16 preset cards.
DoubleDouble Programs use two oscillators. Each oscillator consists of the OSC, VDF, and VDA sections. The combined output of the oscillators is routed to the Insert FX.
DrumsDrum Programs use a Drum Kit as the oscillator. The Drum Kit oscillator consists of an OSC, VDF, VDA, and the Insert FX.
On the original M1, the SETTINGS mode was used to edit a Drum Kit. The iM1 for iPad now allows the Drum Kit param-eters to be part of the Program.
Insert FX 1
Insert FX 2
Insert FX
OSC 1
Multisound
VDF VDA
Insert FX 1
Insert FX 2
Insert FX
OSC 1
Multisound
VDF VDA
OSC 2
Multisound
VDF VDA
Insert FX 1
Insert FX 2
Insert FX
OSC 1
Drumkit
VDF VDA
6

Introduction
Drum Kits can be selected from 21 of the preset cards, and from the new KLC PRESET card. Drum Kits that you have tweaked, edited, or created from scratch can be saved to any of the four User cards (2 User cards; 2 Library cards). Each User card can hold 20 Drum Kits, for a total of 80 User Drum Kits.
SETTINGS modeThis mode is used to access and adjust parameters that affect the entire iM1 for iPad operation, such as Master Tune, Trans-pose, Global MIDI Channel, MIDI Filter, and User Scale.(Refer to "SETTINGS mode" on page 56)
7
On-Screen Controls
1 2 3 4
6
7
8
5
8

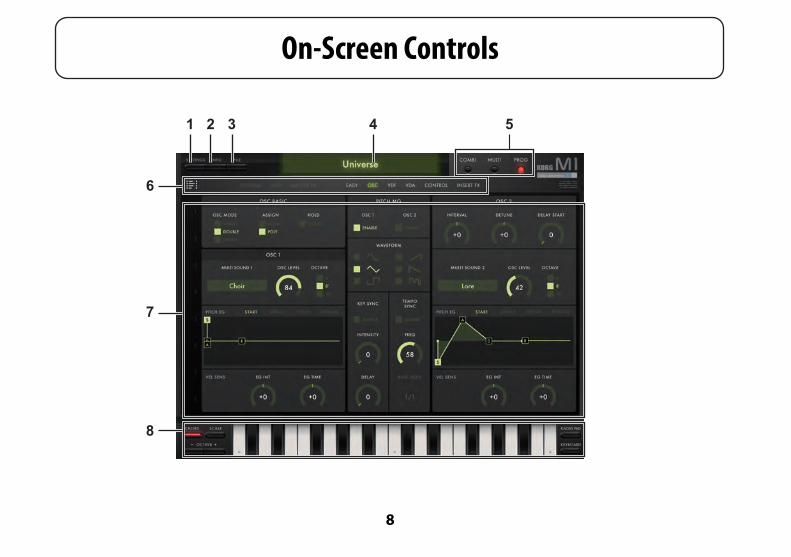
On-Screen Controls
1. SETTINGS buttonRefer to "SETTINGS mode" on page 56
2. INFO buttonPressing the INFO button will display the version number of the iM1 for iPad, plus additional instructions on how to use it.Manual: Displays this Owner's Manual.FAQ: Displays the KORG App Help Center.
You’ll need an Internet connection in order to view the operating manual or the KORG App Help Center.
3. FILE buttonThe FILE button is used to save and load iM1 for iPad file data, or to import system exclusive data.Click the FILE button and select an option from the menu that appears:(Refer to "Writing to internal memory" on page 59)
4. Combi/Prog NameThis area of the screen displays the name of the currently selected Program or Combination. To switch to a different Combination or Program, simply tap the name (Refer to "The Browser" on page 14).
5. Mode Select switchesPress one of these buttons to select the appropriate mode:
COMBI: Selects Combination mode.Refer to "Combination mode" on page 18MULTI: Selects Multi mode.Refer to "Multi mode" on page 47PROG: Selects Program mode.Refer to "Program mode" on page 53
6. Page Select switchesThese buttons are used to select the edit pages available in each mode. The editing area (described below in section 7.) located below this row of buttons displays the parameters available in the selected edit page.TIMBERS: Press this button to display the TIMBRE page.Refer to "Timbre Parameters" on page 19PERFORMANCE: Press this button to display the PERFOR-MANCE page.Refer to "PERFORMANCE page" on page 21MIDI: Press this button to display the MIDI page.Refer to "MIDI page" on page 23MASTER FX: Press this button to display the MASTER FX page.Refer to "MASTER FX page" on page 25EASY: Press this button to display the EASY edit page.
9

On-Screen Controls
Refer to "EASY page" on page 28OSC: Press this button to display the OSC page.Refer to "OSC page" on page 31VDF: Press this button to display the VDF page. Refer to "VDF page" on page 36VDA: Press this button to display the VDA page.Refer to "VDA page" on page 39CONTROL: Press this button to display the CONTROL page.Refer to "CONTROL page" on page 41INSERT FX: Press this button to display the INSERT FX page.Refer to "INSERT FX page" on page 44
7. Editing areaThe items and parameters available for editing in this area will vary depending on the current Mode and the Page selected. Tap on a controller or a parameter to select it; now the value of the selected item can be edited.
Parameters
Tap a value to select it; choose a new value from the popup menu that appears.
Knobs
Select a knob and drag up or down to adjust the value.Flick the knob to change the value in single steps.
Value bars, Zone bars
Drag the bar left or right to adjust the value.
10

On-Screen Controls
Switches
Tap the value to switch the setting.
Slide switches
Select the switch setting by tapping the appropriate value.
Graphical envelopes
Drag a point to adjust its value.If multiple points overlap, use the Point Select switch to choose the point to be edited.
If the oscillator mode is Double, the Point Select switch function will apply to the EG that is designated by the EG SELECT setting in the EASY page.
Graphical filters
Drag a point to adjust its value.
11

On-Screen Controls
8. ControllersUse the buttons provided to select either a Keyboard or a Kaoss pad controller
Keyboard
Tap the keyboard to play notes. Notes are sounded by Tracks that have the same MIDI channel as the currently selected Track. Drag across the keyboard to play a glissando. Select either the full-size keyboard-providing a chromatic scale (FULL SIZE), or a Gadget keyboard that displays a different number of keys depending on the scale setting.
FULL SIZE Keyboard ButtonsPitch Bend wheel: The Bend wheel allows the performer to momentarily increase or decrease the overall pitch of the iM1.Modulation wheel: The MG wheel (Modulation Generator) is often used to add varying amounts of pitch modulation (Vibrato), but can also be used to control many other modula-tion parameters in an expressive manner.OCTAVE -: Shifts the overall pitch of the keyboard down by one octave.
OCTAVE +: Shifts the overall pitch of the keyboard up by one octave.CLOSE: Closes the full size keyboard, and switches to the Gadget keyboard.KAOSS PAD: Switches to the Kaosspads.
Gadget Keyboard ButtonsCHORD: When lit, enables the playing of chords.SCALE: Used to select the scale.OCTAVE -: Shifts the overall pitch of the keyboard down by one octave.OCTAVE +: Shifts the overall pitch of the keyboard up by one octave.KEYBOARD: Switches to the full-size keyboard.KAOSS PAD: Switches to the Kaosspads.
Kaoss pads
In place of the keyboard, the iM1 can instead provide two Korg Kaoss pads as the control surface. By dragging across the Kaoss pad surface, you can play sounds and control mul-
12

On-Screen Controls
tiple parameters at once-those assigned to the X-axis (hori-zontal motion) and those assigned to the Y-axis (vertical motion). Although the two Kaoss pads look nearly identical, their functions are different. The left-hand pad (Kaoss Pad L) offers assignable parameters. The right-hand pad (Kaoss Pad R) is set to control the pitch and the inversion type when playing chords.KEYBOARD: Switches to the full-size keyboard.CLOSE: This button will close the Keyboard or Kaoss Pad control window.HOLD: If this is on, the state controlled by the left-hand pad is maintained even after you release your finger.KAOSS PAD L: This Kaoss Pad will control the parameters that have been assigned to the X and Y axes. Use the MODE button to choose the parameters that will be controlled.MODE: These buttons select which parameters will be con-trolled by Kaoss Pad L• OSC:Use this button to choose an Oscillator parameter to
be controlled.• FILTER: Use this button to choose a Filter parameter to be
controlled.• EFFECTS: Use this button to choose an Effect parameter to
be controlled.
KAOSS PAD R: This Kaoss pad is dedicated to controlling the note. Dragging along the X-axis changes the pitch based on the the key and scale that are specified by using the SCALE button. Dragging along the Y-axis changes the inver-sion when playing chords. This feature has no effect if the VOICES parameter is set to Mono.SCALE: Tap here to specify the musical Key (root note) and Scale that will determine what notes are when using the Kaoss pad.VOICES: Use these buttons to choose the number of notes being played.• MONO: Only single notes are played.• 2POLY: Two-note chords are produced; the chord inversion
is controlled by the Y-Axis• 3POLY: Three-note chords are produced; the chord inver-
sion is controlled by the Y-Axis• 4POLY: Four-note chords are produced; the chord inver-
sion is controlled by the Y-Axis.
13
The Browser
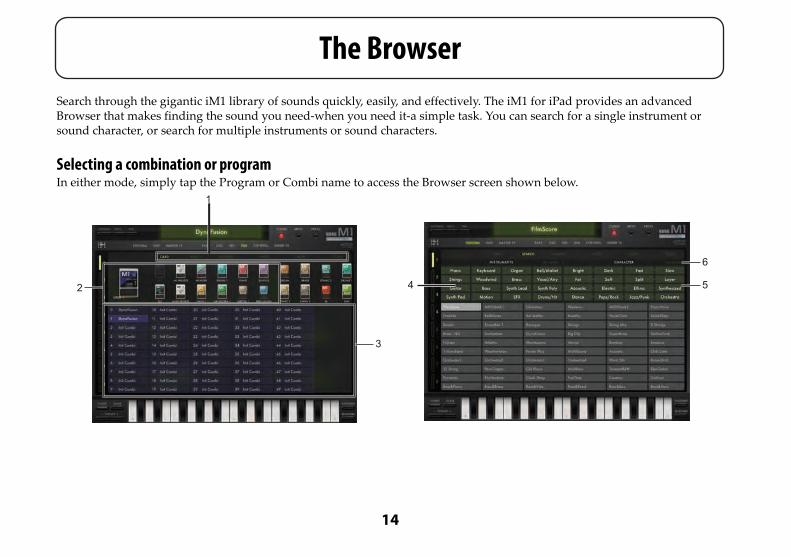
Search through the gigantic iM1 library of sounds quickly, easily, and effectively. The iM1 for iPad provides an advanced Browser that makes finding the sound you need-when you need it-a simple task. You can search for a single instrument or sound character, or search for multiple instruments or sound characters.Selecting a combination or programIn either mode, simply tap the Program or Combi name to access the Browser screen shown below.
2
3
1
6
54
14

The Browser
1. Select tabsA variety of search functions are available by tapping one of these tabs.CARD: Choose this tab to search by card banks.SEARCH: Choose this tab to search by type of instrument or sound character.RANKING: Selecting this tab displays the available sounds by popularity of use.WRITE: Choose this tab to save a Combination or Program that you created.STORE: Choose this tab to purchase additional sound con-tent.CLOSE: Selecting this tab will close the Browser.
2. SOUND CARD DETAILDisplays the selected card and a list of cards. The contents of the card you selected by tapping are shown in the sound list.
3. Sound list This area shows the contents of the selected card, or the com-binations or programs for which you searched. Double-click a displayed name to select that sound and close the browser.When you tap a sound in the list to select it, and then play a note on the on-screen keyboard or an external MIDI device, the note is played by the sound that is selected in the browser and also by any timbres that are assigned the same MIDI
channel as the currently selected timbre (track). If the [SOLO] button is on, only the sound selected in the list will be heard.
When you're selecting a sound in the browser, you can't use a connected external MIDI device to edit the sound (or perform automation or control changes).
4. INSTRUMENTSIf you’ve chosen the SEARCH tab, you can tap one of the but-tons here to specify the type of instrument you want to find.
5. CHARACTERIf you’ve chosen the SEARCH or RANKING tab, you can tap one of the buttons here to specify the character of the sound you want to find.
Items that allow only one selection within each pair:• BRIGHT ⇄ DARK• SPLIT ⇄ LAYER (combinations only)• FAST ⇄ SLOW• SOLO ⇄ ENSEMBLE (Programs only)• FAT ⇄ SOFT
15
The Browser
Items that allow only one selection within each group.
6.ALL CLEAR buttonUse this button to clear all of the selected sound characters.
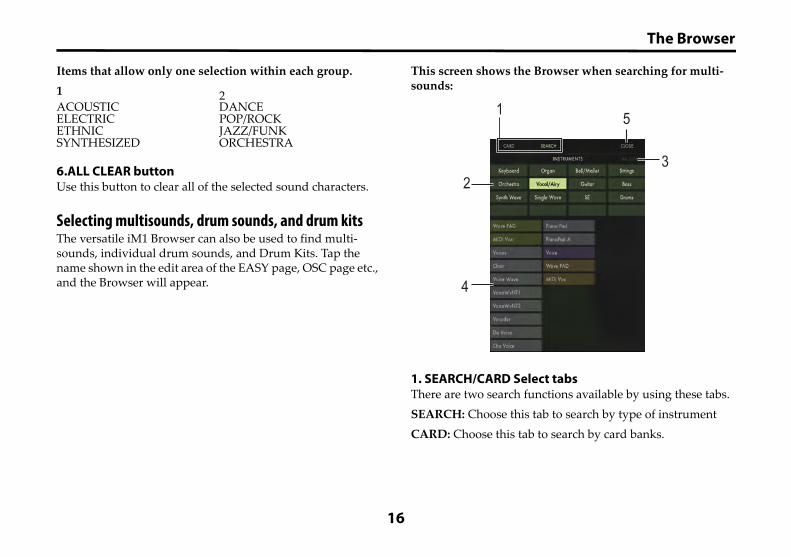
Selecting multisounds, drum sounds, and drum kitsThe versatile iM1 Browser can also be used to find multi-sounds, individual drum sounds, and Drum Kits. Tap the name shown in the edit area of the EASY page, OSC page etc., and the Browser will appear.
This screen shows the Browser when searching for multi-sounds:
1. SEARCH/CARD Select tabsThere are two search functions available by using these tabs.SEARCH: Choose this tab to search by type of instrumentCARD: Choose this tab to search by card banks.
1 2ACOUSTIC DANCEELECTRIC POP/ROCKETHNIC JAZZ/FUNKSYNTHESIZED ORCHESTRA
1
2
4
3
5
16

The Browser
2. INSTRUMENTSIf you've chosen the SEARCH tab, you can tap one of the but-tons here to specify the type of instrument you want to find. You can specify multiple instruments. However, if no further sounds would be found by clicking another choice, that instrument type will be grayed-out, and cannot be selected.
3.ALL CLEAR buttonUse this button to clear all of the selected instrument types.
4. Sound listThis area displays the multisounds, drum sounds or Drum Kits that were found by your search. Tap any displayed name to select that item and close the Browser.When you select a sound and play it using the on-screen key-board or an external MIDI device, only the selected multi-sound showing in the screen will play.
When selecting a sound in the Browser, you cannot use a connected external MIDI device to edit the sound(or perform automation or control changes).
5. CLOSE buttonChoosing this button will close the Browser.
17

Available Parameters by Mode
Combination modeIn this mode you can create a single sound by assigning different programs to up to eight timbres. Click the [COMBI] button to enter Combination mode.
18
Available Parameters by Mode
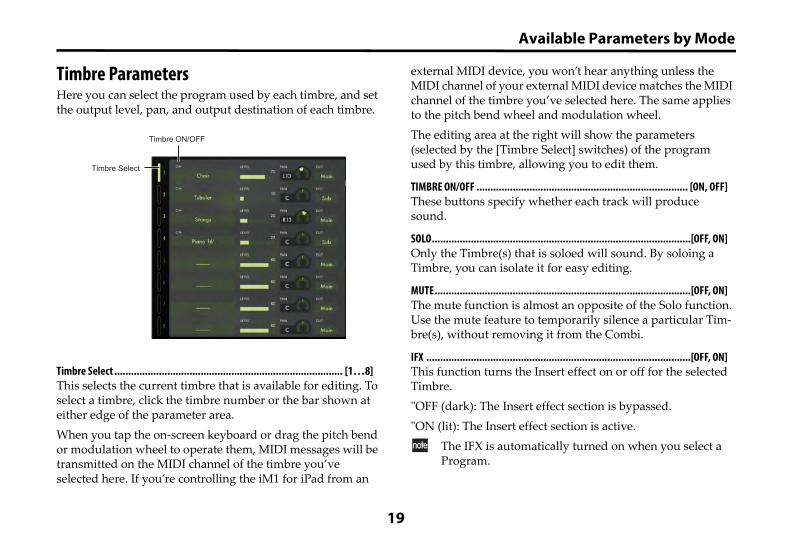
Timbre ParametersHere you can select the program used by each timbre, and set the output level, pan, and output destination of each timbre.
Timbre Select .................................................................................. [1…8]This selects the current timbre that is available for editing. To select a timbre, click the timbre number or the bar shown at either edge of the parameter area.When you tap the on-screen keyboard or drag the pitch bend or modulation wheel to operate them, MIDI messages will be transmitted on the MIDI channel of the timbre you’ve selected here. If you’re controlling the iM1 for iPad from an
external MIDI device, you won’t hear anything unless the MIDI channel of your external MIDI device matches the MIDI channel of the timbre you’ve selected here. The same applies to the pitch bend wheel and modulation wheel.The editing area at the right will show the parameters (selected by the [Timbre Select] switches) of the program used by this timbre, allowing you to edit them.
TIMBRE ON/OFF ............................................................................ [ON, OFF]These buttons specify whether each track will produce sound.
SOLO.............................................................................................[OFF, ON]Only the Timbre(s) that is soloed will sound. By soloing a Timbre, you can isolate it for easy editing.
MUTE............................................................................................[OFF, ON]The mute function is almost an opposite of the Solo function. Use the mute feature to temporarily silence a particular Tim-bre(s), without removing it from the Combi.
IFX ...............................................................................................[OFF, ON]This function turns the Insert effect on or off for the selected Timbre."OFF (dark): The Insert effect section is bypassed."ON (lit): The Insert effect section is active.
The IFX is automatically turned on when you select a Program.
Timbre Select
Timbre ON/OFF
19

Available Parameters by Mode
PROGRAM Select........................................................................ [BROWSER]Selects the program used by the timbre. Refer to "The Browser" on page 14
LEVEL...........................................................................................[00…99]This knob specifies the output level of each Timbre.
PAN ............................................................................... [L50…C00…R50]This knob specifies the position in the stereo field (pan) of each Timbre.
If DRUMS is specified as the oscillator mode ("OSC MODE" on page 29) in the Program used by this Tim-bre, the "PAN" field will not appear. Use the "PAN" set-ting in the DRUM KIT EDIT section ("PAN" on page 34) of the OSC page to specify the pan of each sound in the Drum Kit.
OUT ......................................................................................[--, Main, Sub]Use this parameter to choose the output.
20

Available Parameters by Mode
PERFORMANCE pageTap the PERFORMANCE button to access this page. Here you can adjust the Program parameters used by each Timbre.
Adjusting the parameters in the PERFORMANCE page will not change the displayed value of the Program parameters. When you execute one of the Write, Copy, or Apply performance commands, then the adjustments you made here will be applied to the Program parameters.
21

Available Parameters by Mode
OSCBALANCE ...................................................................... [–50…+00…+50]This parameter controls the relative mix of the two oscillators.If the Program's "OSC MODE" is Double, this adjusts the vol-ume balance of OSC1 and OSC2. The adjusted value is added to the OSC1 "OSC LEVEL," and subtracted from the OSC2 "OSC LEVEL."
VDFRESONANCE .................................................................. [–50…+00…+50]This parameter adjusts the VDF (Filter) resonance level. The adjusted value is added tothe VDF1 and VDF2 "RESO-NANCE."
This setting is unavailable if the OSC page "RESO-NANCESwitch" (page 29) is OFF.
CUTOFF ........................................................................ [–50…+00…+50]This parameter adjusts the VDF cutoff level (frequency). The adjusted value is added to the VDF1 and VDF2 "CUTOFF."
VDF EG INT ................................................................... [–50…+00…+50]This parameter adjusts the VDF EG INT (Envelope Generator Intensity). The adjusted value is added to the VDF1 and VDF2 "EG INT."
VDF&VDA EGATTACK TIME .................................................................[–50…+00…+50]This parameter simultaneously adjusts the VDF EG and VDA EG attack time. The adjusted value is added to the "Attack Time" of each EG (Envelope Generator).
DECAY TIME ...................................................................[–50…+00…+50]This parameter simultaneously adjusts the VDF EG and VDA EG decay time. The adjusted value is added to the "Attack Time" of each EG.
RELEASE TIME................................................................[–50…+00…+50]This parameter simultaneously adjusts the VDF EG and VDA EG release time. The adjusted value is added to the "Attack Time" of each EG.
INSERT FXIFX BALANCE..................................................................[–50…+00…+50]This parameter adjusts the balance between the Insert effect's processed sound and the direct sound. The adjusted value is added to the "DRY/WET" setting of each effect. If a composite effect (Delay/Hall - Delay/Tremolo) is selected, the adjusted value is added to both of the "DRY/WET" settings.
22

Available Parameters by Mode
MIDI pageTap the MIDI button to access this page. Here you can specify the MIDI channel, MIDI filtering, key zone, velocity zone, and pitch for each Timbre.
23

Available Parameters by Mode
MIDI Ch
MIDI Ch ........................................................................................[01…16]This parameter specifies the MIDI channel for each Timbre.
KEY ZONEBy setting a Top key and a Bottom key, Zoning allows you to limit and/or specify the range of keys played by each Timbre.
TOP............................................................................................[C–1…G9]
BOTTOM .....................................................................................[C–1…G9]
VELOCITY ZONEBy setting a Top velocity level and a Bottom velocity level, this type of Zoning allows you to limit and/or specify the range of MIDI velocity levels played by each Timbre.
TOP.......................................................................................... [001…127]
BOTTOM ................................................................................... [001…127]
MIDI FILTERMIDI Filtering can selectively determine which MIDI mes-sages are received by each Timbre.Activate the MIDI filter by turning it on (lit) to prevent the specific type of message from being received.
PC (Program Change).................................................................... [OFF, ON]OFF (dark): Program Change messages are received.
ON (lit): Program Change messages are not received (fil-tered).
CC (Control Change) .......................................................................[OFF, ON]OFF (dark): Control Change messages are received.ON (lit): Control Change messages are not received (filtered).
AT (After Touch).............................................................................[OFF, ON]OFF (dark): Aftertouch messages are received.ON (lit): Aftertouch messages are not received (filtered).
DMP (Damper) ..............................................................................[OFF, ON]OFF (dark): Damper pedal messages are received.ON (lit): Damper pedal messages are not received (filtered).
DETUNE
DETUNE ........................................................................[–50…+00…+50]This parameter adjusts the pitch of each Timbre in one-cent steps.
TRANSPOSE
TRANSPOSE ...................................................................[–12…+00…+12]This parameter adjusts of each Timbre in semitone steps.
24

Available Parameters by Mode
MASTER FX pageTap the MASTER FX button to access this page. The parameters on this page allow you to specify the Master effects being used by the Combi, adjust the individual Master effect parameters, and set the Master effect routings.
25

Available Parameters by Mode
MASTER FXROUTING TYPE ............................................................... [SERIAL, PARALLEL]This parameter determines how the two Master effects are routed. SERIAL sends the output of one Master effect to the input of the other Master effect.PARALLEL allows the two Master effects to operate indepen-dently, side by side.
FX 1/FX 2 ..................................................................................... [OFF, ON]Each Master effect can be turned on or off individually
PAN ON/OFF.................................................................................. [OFF, ON]This parameter switches the pan On and Off.If this setting is OFF, the signals will not be sent.
PAN ............................................................................... [L50…C00…R50]Panning specifies the position in the stereo field (pan) of the Master effect.
FX 1/FX 2EFFECT TYPE ......................................... [No Effect, Reverb…Delay/Tremolo]Tap here to select the Master effect type, including No Effect.
Effect ParametersEach Master effect type will have its own specific set of adjustable parameters.
Refer to M1 owner’s manual PDF, page 36 “3 - Effect parame-ters”
For details on the other effect parameters, refer to the original M1 owner's manual PDF which is available on the Web. Refer to M1 owner's manual PDF, page 36 "3 - Effect parameters"
CompressorThis effect compresses the input signal, making it more con-sistent. It is particularly good when applied to instruments such as guitar, piano, and drums.
ATTACK ................................................................................ [000…500ms]Adjusts the strength of the attack.
SENSITIVITY ................................................................................. [00…99]Adjusts the sensitivity of the compressor.
OUT LEVEL................................................................................ [000…100]Adjusts the output level of the compressor.
Left
Right
WET / DRY
WET / DRY
Compressor
Compressor OUT LEVEL
OUT LEVEL
Envelope - Control
Envelope - Control
26

Available Parameters by Mode
EQ TRIM ................................................................................... [000…100]Adjusts the input level to the compressor.
PRE LEQ ................................................................... [–15…+00…+15dB]This EQ control will boost or cut the low frequencies of the input signal, before the compressor.
PRE HEQ ................................................................... [–15…+00…+15dB]This EQ control will boost or cut the high frequencies of the input signal, before the compressor.
DRY/WET ...................................................................[DRY, 001…099, WET]Adjusts the balance of the processed sound and the direct sound.
Using MIDI control change messages to control the speed of the Rotary SpeakerWhen the Rotary Speaker has been selected as a Master effect, the rotation speed can be switched using MIDI CC (Control Change) messages.Transmitting a CC#76 (Vibrato Rate) message from your external MIDI device on the Global MIDI Channel (Refer to "MIDI" on page 57) with a value of 64-127 will switch the rotary speed to Fast; transmitting a value of 00-63 will switch the rotary speed to Slow.
27

Available Parameters by Mode
EASY pageTap the EASY button to access this page. The parameters on this page allow you to easily tweak and modify the Program assigned to each Timbre by adjusting the most important and commonly used sound creation parameters. Additional Program Parameters not shown in this page can be edited in the OSC - INSERT FX pages..
28

Available Parameters by Mode
OSCOSC MODE ............................................................. [SINGLE, DOUBLE, DRUM]This parameter selects the oscillator mode.
MULTISOUND 1/MULTISOUND 2/DRUMKIT..................................... [BROWSER]Tap here to open the Browser to select a multisound or Drum Kit. Refer to "The Browser" on page 14
LEVEL...........................................................................................[00…99]This parameter specifies the oscillator's output level.
VDFVDF SELECTUse this function to determine whether VDF1 or VDF2 will be shown in the active editing display.
CUTOFF ........................................................................................[00…99]This parameter specifies the cutoff frequency. Drag the point in the graphic.
RESONANCE ..................................................................................[00…99]This parameter specifies the resonance. Drag the point in the graphic.
RESONANCE Switch ....................................................................... [OFF, ON]This parameter turns the filter resonance on or off.Refer to "RESONANCE Switch" on page 37
EG INT 1 ...................................................................................... [00…99]This parameter specifies how deeply the VDF EG1 will be applied.
EG INT 2 ....................................................................................... [00…99]This parameter specifies how deeply the VDF EG2 will be applied.
29

Available Parameters by Mode
VDF EGVDF EG SELECTUse this function to determine whether VDF EG1 or the VDF EG2 will be shown in the active editing display
VDF EGModify the shape of the VDF EG by simply dragging the points of the graphic envelope display.
VDA EGVDA EG SELECTUse this function to determine whether VDA EG1 or the VDA EG2 will be shown in the active editing display.
VDA EGModify the shape of the VDA EG by simply dragging the points of the graphic envelope display.
INSERT FXFX1/FX2 ....................................................................................... [OFF, ON]Use these switches to turn each Insert effect On or Off
FX1/FX2 EFFECT TYPE............................. [No Effect, Reverb…Delay/Tremolo]Tap here to choose the Insert effect type.
FX1/FX2 DRY/WET ...................................................... [DRY, 001…099, WET]This parameter specifies the wet/dry mix between the origi-nal signal and the effect output.
If you're using the composite effect (Delay/Hall etc.) as an Insert effect, and if the "DRY/WET" values differ between Delay and Hall, the Delay value is shown here.If you've selected a composite effect (such as Delay/Hall or Delay/Chorus) as an Insert effect, editing "DRY/WET" in the EASY page will set the "DRY/WET" values of both effects to the same value.
30

Available Parameters by Mode
OSC pageTap the OSC button to access this page. The parameters on this page allow detailed editing of the OSC (Oscillator) parameters of the individual Programs assigned to the Timbres contained in the Combi.
31

Available Parameters by Mode
OSC BASICRefer to M1 owner’s manual PDF, page 22 “OSC BASIC”
OSC MODE ........................................................... [SINGLE, DOUBLE, DRUMS]Use this parameter to choose the oscillator mode.
ASSIGN.................................................................................. [MONO, POLY]Use this parameter to choose monophonic or polyphonic playability.MONO: Monophonic (one note at a time).POLY: Play polyphonically (many notes at once).
HOLD ............................................................................. [DISABLE, ENABLE]Use the HOLD function to determine how the sound will play. DISABLE: The sound will decay according to the settings of the VDA.ENABLE: The sound will continue even if you release the keyboard.
OSC1Refer to M1 owner’s manual PDF, page 22 “F0-2: OSC1”
MULTISOUND 1 .......................................................................... [BROWSER]Tap the multisound name to access the Browser and make your selection. (Refer to "The Browser" on page 14)
OSC LEVEL .................................................................................... [00…99]This parameter specifies the oscillator's output level.
OCTAVE ........................................................................................[4’, 8’, 16’]Use this parameter to select the octave setting of the oscilla-tor.
PITCH EGThe shape of the Pitch EG can be easily modified by simply dragging the points of the graphical envelope in the display. (Refer to "Graphical envelopes" on page 11)
VEL SENS
EG INT...........................................................................[–99…+00…+99]This parameter specifies how velocity will affect the depth of the EG.
EG TIME ........................................................................[–99…+00…+99]This parameter specifies how velocity will affect the speed of the EG.
OSC2INTERVAL ................................................................................ [–12…+12]This parameter specifies the pitch of Oscillator 2 relative to Oscillator 1, in semitones.
DETUNE .................................................................................. [–50…+50]This parameter specifies the pitch of Oscillator 2 relative to Oscillator 1, in cents.
32
Available Parameters by Mode
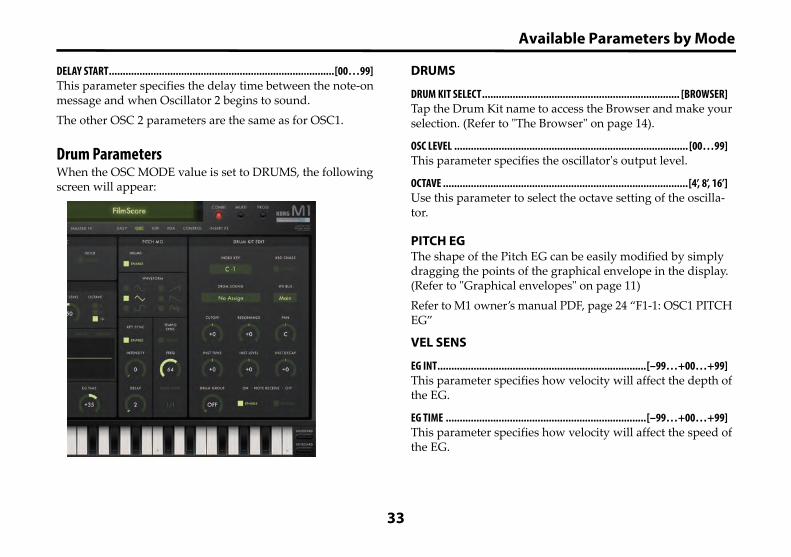
DELAY START.................................................................................[00…99]This parameter specifies the delay time between the note-on message and when Oscillator 2 begins to sound.The other OSC 2 parameters are the same as for OSC1.
Drum ParametersWhen the OSC MODE value is set to DRUMS, the following screen will appear:
DRUMS
DRUM KIT SELECT....................................................................... [BROWSER]Tap the Drum Kit name to access the Browser and make your selection. (Refer to "The Browser" on page 14).
OSC LEVEL .................................................................................... [00…99]This parameter specifies the oscillator's output level.
OCTAVE ........................................................................................[4’, 8’, 16’]Use this parameter to select the octave setting of the oscilla-tor.
PITCH EGThe shape of the Pitch EG can be easily modified by simply dragging the points of the graphical envelope in the display. (Refer to "Graphical envelopes" on page 11)Refer to M1 owner’s manual PDF, page 24 “F1-1: OSC1 PITCH EG”
VEL SENS
EG INT...........................................................................[–99…+00…+99]This parameter specifies how velocity will affect the depth of the EG.
EG TIME ........................................................................[–99…+00…+99]This parameter specifies how velocity will affect the speed of the EG.
33

Available Parameters by Mode
DRUM KIT EDITThe following parameters allow you to customize the makeup and performance of a Drum Kit.
INDEX KEY .................................................................... [000: C-1…127: G9]You can use this parameter to select the note you wish to edit.
DRUM SOUND ............................................................................ [BROWSER]Tap the drum sound name to access the Browser and make your selection. (Refer to "The Browser" on page 14)
KBD CHASE ................................................................................... [OFF, ON]ON: Receiving a note-on message will automatically set the index to that key.OFF: Use the Index Key parameter to set the key manually
IFX BUS .....................................................................................[A+B, C+D]Use this parameter to choose one of the busses to the Insert effect.
CUTOFF ........................................................................... [–99…+00…99]This parameter adjusts the relative value of the VDF CUTOFF setting.
RESONANCE ..................................................................... [–99…+00…99]This parameter adjusts the relative value of the VDF Reso-nance setting.
PAN ............................................................................... [L50…C00…R50]This parameter sets the panning of each drum sound.
INST TUNE ............................................................................[–120…+120]This parameter sets the tuning (or pitch) of each drum sound.
INST LEVEL .............................................................................. [–99…+99]This parameter specifies the volume level of each drum sound.
INST DECAY ............................................................................. [–99…+99]This parameter sets the decay time of each drum sound.
NOTE ON RECEIVE ............................................................ [DISABLE, ENABLE]This parameter selects whether note-on messages will be received by the Drum Kit.DISABLE: Note-on messages are NOT received.ENABLE: Note-on messages ARE received
NOTE OFF RECEIVE........................................................... [DISABLE, ENABLE]This parameter selects whether note-on messages will be received by the Drum Kit.DISABLE: Note off messages are NOT received.ENABLE: Note-off messages ARE received
PITCH MGThe PITCH MG (Modulation Generator) applies modulation to the pitch of the oscillators.Refer to M1 owner’s manual PDF, page 30 “F6-1: PITCH MG”
34

Available Parameters by Mode
OSC 1/OSC 2/DRUMS ........................................................ [DISABLE, ENABLE]Use this parameter to choose which oscillator(s) the PICH MG modulation will be applied to.
WAVEFORM ....................................................................... [SIN…RANDOM]This parameter selects the modulation waveform.
KEY SYNC........................................................................ [DISABLE, ENABLE]Key Sync allows the phase of the modulation generator to occur in exactly the same position with each new note-on message. Without Key Sync, the modulation generator will continue to vary its phase based on the modulation speed.ENABLE: Key Sync is on DISABLE: Key Sync is off
INTENSITY ....................................................................................[00…99]This parameter specifies the depth of modulation.
DELAY ..........................................................................................[00…99]This parameter sets the time interval between the note-on and when the modulation is applied.
TEMPO SYNC ................................................................... [DISABLE, ENABLE]Tempo Sync allows the modulation speed to be musically related to the tempo.DISABLE: Tempo Sync is offENABLE: Tempo Sync is active
FREQ/TIMES.......................................................................[00…99/1…16]TEMPO SYNC DISABLED: Frequency [00…99]
This parameter will directly specify the MG frequency.TEMPO SYNC ENABLED: Times [1…16]This parameter will set the MG frequency in conjunction with the BASE NOTE setting.
BASE NOTE ...............................................................................[1/1…1/32]TEMPO SYNC DISABLED: This parameter is ignored.TEMPO SYNC ENABLED: 1/1 equals a whole note, 1/32 equals a thirty-second note, etc.This parameter will set the MG frequency in conjunction with the BASE NOTE setting. One cycle of the MG will be equal to the value specified in FREQ/TIMES x the BASE NOTE value relative to the synchronized tempo.For example, when the BASE NOTE value is set to 1/4 (quar-ter note), the resulting beats per MG cycle will be:• TIMES = 1 (one beat per MG cycle)• TIMES = 2 (two beats per MG cycle)• TIMES = 4 (four beats per MG cycle)Conversely, when the BASE NOTE value is set to 1/16 (six-teenth note), the resulting MG cycles per beat will be:• TIMES = 1 (four MG cycles per beat)• TIMES = 2 (two MG cycles per beat)• TIMES = 4 (one MG cycle per beat)
35

Available Parameters by Mode
VDF pageTap the VDF button to access this page. The parameters on this page allow detailed editing of the VDF (Filter) parameters of the individual Programs assigned to the Timbres contained in the Combi.
36

Available Parameters by Mode
VDF1CUTOFF ........................................................................................[00…99]Use this parameter to set the VDF filter cutoff frequency.
RESONANCE Switch ....................................................................... [OFF, ON]The iM1 for iPad adds a new RESONANCE parameter that was not included on the original M1. The CUTOFF response will vary depending on whether this is ON or OFF. In order to faithfully reproduce the preset sounds of the original M1, the RESONANCE Switch is normally turned OFF. If you want to use resonance, turn the RESONANCE Switch ON.
RESONANCE ..................................................................................[00…99]This parameter boosts the filter response at the cutoff fre-quency.
EG INT ..........................................................................................[00…99]This parameter specifies the depth of tonal change produced by the VDF 1 EG.Refer to M1 owner’s manual PDF, page 25 “F2-1: VDF1”
VDF 1 EGThe shape of the VDF1 EG can be easily modified by simply dragging the points of the graphical envelope in the display. (Refer to "Graphical envelopes" on page 11)Refer to M1 owner’s manual PDF, page 25 “F2-2: VDF1 EG”
VEL SENSThis important set of Velocity Sensitivity parameters can help determine how the dynamics of a performance will affect the articulation of the sound. Performance dynamics-Velocity Level-can be used to increase or decrease the timing of each stage of the EG, as well as the overall intensity of the EG.Refer to M1 owner’s manual PDF, page 26 “F2-3: VDF1 VEL SENS”
EG INT...........................................................................[–99…+00…+99]This parameter will control how velocity sensitivity can increase or decrease the EG intensity.
EG TIME ....................................................................................... [00…99]This parameter will control how velocity sensitivity will alter the timing of each envelope stage.Refer to "OSC1" on page 32
TIME POLARITY A, D, S, R .................................................................[+, x, –]The value set by the previous EG TIME parameter can be applied to lengthen (+) or shorten (-) each envelope stage individually; A (Attack Time), D (Decay Time), S (Slope Time), and R (Release Time). Using a value of (X) means no change is applied.
KBD TRKKeyboard tracking allows the note number of the key being played to affect certain parameters.
37

Available Parameters by Mode
Refer to M1 owner’s manual PDF, page 27 “F2-4: VDF1 KBD TRK”
CUTOFF ........................................................................ [–99…+00…+99]This parameter specifies the degree to which keyboard track-ing will increase or decrease the cutoff frequency.
EG TIME........................................................................................[00…99]This parameter will control how keyboard tracking will alter the timing of the VDF EG.
TIME POLARITY A, D, S, R..................................................................[+, x, –]The value set by the previous EG TIME parameter can be applied to lengthen (+) or shorten (-) each envelope stage individually; A (Attack Time), D (Decay Time), S (Slope Time), and R (Release Time). Using a value of (X) means no change is applied.
CENTER KEY .................................................................................[C-1…G9]The value or key (note) that you enter here will be used as the center for keyboard tracking.
VDF MGThe VDF MG applies modulation to the VDF. These parame-ters are the same as for the PITCH MG of the OSC page.Refer to "PITCH MG" on page 34
VDF 2These parameters are the same as for VDF 1.
Refer to "VDF1" on page 37.
38

Available Parameters by Mode
VDA pageTap the VDF button to access this page. The parameters on this page allow detailed editing of the VDA (Amplifier) parameters of the individual Programs assigned to the Timbres contained in the Combi.
39

Available Parameters by Mode
VDA1
VDA EGThe shape of the VDA1 EG can be easily modified by simply dragging the points of the graphical envelope in the display. ("Graphical envelopes" on page 11)Refer to M1 owner’s manual PDF, page 28 “F4-1: VDA1 EG”
VEL SENSRefer to M1 owner’s manual PDF, page 28 “F4-2: VDA1 VEL SENS”
EG INT .......................................................................... [–99…+00…+99]
EG TIME........................................................................................[00…99]
Refer to "OSC1" on page 32.
TIME POLARITY A, D, S, R..................................................................[+, x, –]
Refer to "TIME POLARITY A, D, S, R" on page 37.
KBD TRKKeyboard tracking allows the note number of the key being played to affect certain parameters.Refer to M1 owner’s manual PDF, page 28 “F4-3: VDA1 KBD TRK”
AMPLITUDE ...................................................................[–99…+00…+99]This parameter specifies the degree to which keyboard track-ing will increase or decrease the amplitude.
EG TIME ....................................................................................... [00…99]This parameter will control how keyboard tracking will alter the timing of the VDA EG
TIME POLARITY A, D, S, R .................................................................[+, x, –]The value set by the previous EG TIME parameter can be applied to lengthen (+) or shorten (-) each envelope stage individually; A (Attack Time), D (Decay Time), S (Slope Time), and R (Release Time).Using a value of (X) means no change is applied.
CENTER KEY ................................................................................. [C-1…G9]The value or key (note) that you enter here will be used as the center for keyboard tracking.
VDA MGThe VDA MG applies modulation to the VDA. These parame-ters are the same as for the PITCH MG of the OSC page.Refer to "PITCH MG" on page 34
VDA 2These parameters are the same as for VDA 1.
40

Available Parameters by Mode
CONTROL pageTap the CONTROL button to access this page. The parameters on this page determine how the use of Aftertouch and other exter-nal MIDI controllers will alter the pitch, tone, and other parameters of the individual Programs assigned to the Timbres con-tained in the Combi.
41

Available Parameters by Mode
AFTER TOUCHCertain MIDI keyboards and other controller transmit after-touch. On a keyboard, aftertouch allows the performer to send a signal that will alter the sound AFTER the key is depressed by simply pressing the key a bit further. This allows the performer to create a more expressive perfor-mance. Aftertouch may also be sent from other MIDI control-lersRefer to M1 owner’s manual PDF, page 32 “F7-1: AFTER TOUCH”
PITCH........................................................................... [–12…+00…+12]This parameter specifies the degree to which aftertouch will affect the pitch.
PITCH MG .....................................................................................[00…99]This parameter specifies the degree to which aftertouch will affect the PITCH MG depth.
CUTOFF VDF .................................................................. [–99…+00…+99]This parameter specifies the degree to which aftertouch will affect the VDF cutoff frequency.
VDF MG ........................................................................................[00…99]This parameter specifies the degree to which aftertouch will affect the VDF MG depth.
VDA AMPLITUDE............................................................ [–99…+00…+99]This parameter specifies the degree to which aftertouch will affect the VDA volume change.
VDA MG........................................................................................ [00…99]This parameter specifies the degree to which aftertouch will affect the VDA MG depth.
42

Available Parameters by Mode
CONTROLLERIn addition to MIDI keyboards, there are many MIDI control-lers and control surfaces that can send a MIDI CC signal to expressively alter certain sound-creation parameters in the iM1.Refer to M1 owner’s manual PDF, page 33 “F7-2: JOY STICK”
PITCHBEND................................................................... [–12…+00…+12]This parameter specifies the pitch bend range of an external controller.
This setting may have no effect, depending on the SET-TINGS mode "GLOBAL PITCHBEND Switch" setting. (Refer to "GLOBAL PITCHBEND" on page 57)
VDF SWEEP INT ............................................................. [–99…+00…+99]This parameter specifies the amount of VDF cutoff frequency change produced by an external controller.
PITCH MG INT................................................................................[00…99]This parameter specifies the degree to which an external con-troller will affect the PITCH MG depth.
PITCH MG FREQ/PITCH MG TIMES ....................................................... [0…3]This parameter specifies how an external controller will affect the PITCH MG speed as a ratio relative to the "FREQ/TIMES" value of the OSC page.This setting will be either PITCH MG FREQ or PITCH MG TIMES, depending on the OSC page "TEMPO SYNC" setting.
VDF MG INT .................................................................................. [00…99]This parameter specifies the degree to which an external con-troller will affect the VDF MG depth.
VDF MG FREQ/VDF MG TIMES..............................................................[0…3]This parameter specifies how an external controller will affect the VDF MG speed as a ratio relative to the "FREQ/TIMES" value of the VDF page.This setting will be either VDF MG FREQ or VDF MG TIMES, depending on the VDF page "TEMPO SYNC" setting.
VDA MG INT .................................................................................. [00…99]This parameter specifies the degree to which an external con-troller will affect the VDA MG depth.
VDA MG FREQ/VDA MG TMES ..............................................................[0…3]This parameter specifies the how an external controller will affect the VDA MG speed as a ratio relative to the "FREQ/TIMES" value of the VDA page.This setting will be either VDA MG FREQ or VDA MG TIMES, depending on the VDA page "TEMPO SYNC" setting.
43
Available Parameters by Mode
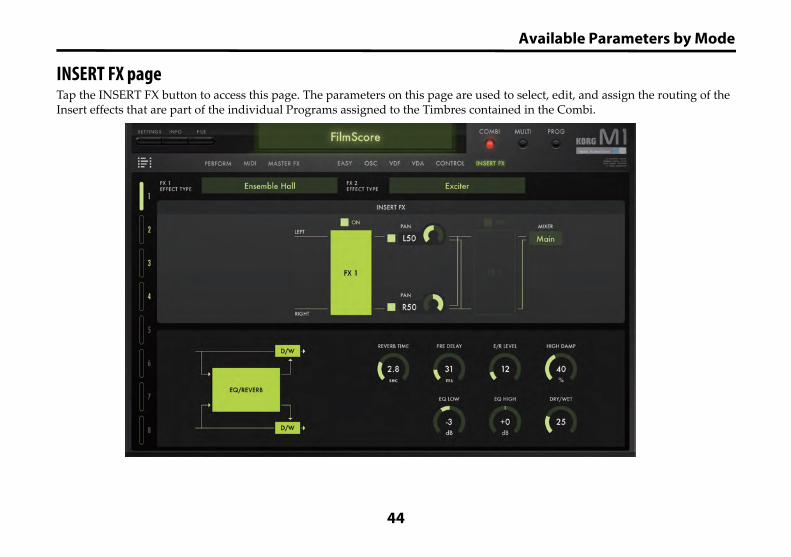
INSERT FX pageTap the INSERT FX button to access this page. The parameters on this page are used to select, edit, and assign the routing of the Insert effects that are part of the individual Programs assigned to the Timbres contained in the Combi.
44

Available Parameters by Mode
INSERT FXThere are two Insert effects available for every Timbre in a Combi. Refer to M1 owner’s manual PDF, page 36 “3 - Effect parame-ters”
IFX............................................................................................... [OFF, ON]This switch acts as a bypass, turning the entire Insert effect section On or Off.This setting is linked with the Timbre Parameter “IFX.”OFF (dark): The Insert effects will not be heard (bypassed).ON (lit): The Insert effects will be heard (active).
ROUTING TYPE ............................................................... [SERIAL, PARALLEL]This parameter determines how the two Insert effects are routed. SERIAL sends the output of one Insert effect to the input of the other Insert effect.PARALLEL allows the two Insert effects to operate indepen-dently, side by side.
The Routing Type can only be selected when the OSC MODE (page 29) is set to DRUMS. In this case, there are two stereo buses available. When the OSC MODE is set to SINGLE or DOUBLE, only one stereo bus is avail-able, the Routing Type is set to Serial, and PAN controls are inserted between FX1 and FX2.
FX 1/FX 2 .......................................................................................[OFF, ON]Each Insert effect can be turned on or off individually.
PAN ON/OFF ..................................................................................[OFF, ON]This parameter switches the pan On and Off.If this setting is OFF, the signals will not be sent.
If you've turned PAN off in DRUM mode and then change the OSC MODE to SINGLE or DOUBLE, you will need to turn the PAN controls on again in order to hear any sound.
PAN ................................................................................[L50…C00…R50]This parameter sets the panning of busses A and B when the OSC MODE is set to SINGLE or DOUBLE. When the OSC MODE is set to DRUMS, this parameter will control the panning of busses C and D.
MIXER..................................................................................[---, Main, Sub]Use this parameter to choose the output.
FX 1/FX 2EFFECT TYPE ......................................... [No Effect, Reverb…Delay/Tremolo]Tap here to select the Master effect type, including No Effect.
Effect ParameterEach Insert effect type will have its own specific set of adjustable parameters. For the effects that were added in the iM1 for iPad, refer to Effect Parameters on page 23.
45

Available Parameters by Mode
For details on the other effect parameters, refer to the original M1 owner's manual PDF which is available on the Web. Refer to M1 owner’s manual PDF, page 36 “3 - Effect parameters”
Using MIDI CC messages to control the speed of the Rotary SpeakerWhen the Rotary Speaker has been selected as an Insert effect, the rotation speed can be switched using MIDI CC (Control Change) messages.Transmitting a CC#76 (Vibrato Rate) message from your external MIDI device on the MIDI Channel (Refer to "MIDI Ch" on page 24) with a value of 64-127 will switch the rotary speed to Fast; transmitting a value of 00-63 will switch the rotary speed to Slow.
46
Available Parameters by Mode
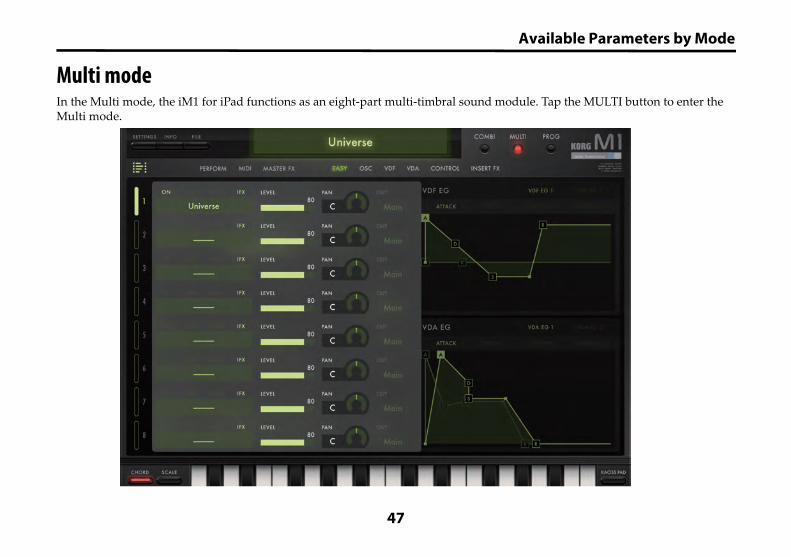
Multi modeIn the Multi mode, the iM1 for iPad functions as an eight-part multi-timbral sound module. Tap the MULTI button to enter the Multi mode.
47

Available Parameters by Mode
TIMBRES ParameterThese parameters allow you to select the Program used by each Track, as well as control the output level, pan, and out-put destination of each Track.
Track Select..................................................................................... [1…8]There are up to eight Tracks available in the Multi mode. To choose an individual Track to edit, tap one of the eight Track Select buttons in the column at the left-hand side of the parameter area.
When you tap the on-screen keyboard-or drag the pitch bend or modulation wheel-MIDI messages will be transmitted on the MIDI channel of the Track that you've selected here. If you're controlling the iM1 for iPad from an external MIDI device, you won't hear anything unless the MIDI channel of your external MIDI device matches the MIDI channel of the selected Track. The same applies to the pitch bend wheel and modulation wheel. The editing area at the right will show the parameters (as determined by the Track Select buttons) of the Program used by the selected Track, and allow them to be edited.
MIDI Indicator (Track indicator)When a Track receives MIDI messages from the on-screen keyboard or pitch bend wheel etc., or from an external MIDI device, the number of that Track (i.e., the Track of the match-ing MIDI Channel) will light. However, this indicator will not light in response to incoming MIDI realtime messages.
TIMBRE ON/OFF .............................................................................[OFF, ON]These buttons are used to choose which Tracks will play. If the Track is Off, no information is displayed, and this Track will not produce any sound.
SOLO.............................................................................................[OFF, ON]Only the Tracks(s) that is soloed will sound. By soloing a Tim-bre, you can isolate it for easy editing.
Track Select
MIDI Indicator Timbre ON/OFF
48

Available Parameters by Mode
MUTE ........................................................................................... [OFF, ON]The mute function is almost an opposite of the Solo function. Use the mute feature to temporarily silence a particular Track(s).
IFX............................................................................................... [OFF, ON]This function turns the Insert effect on or off for the selected Timbre.OFF (dark): The Insert effect section is bypassed.ON (lit): The Insert effect section is active.
The IFX is automatically turned on when you select a Program.
PROGRAM Select........................................................................ [BROWSER]Using the Browser, select the Program to be used by the Track. (Refer to "The Browser" on page 14).
LEVEL...........................................................................................[00…99]This knob specifies the output level of each Track.
PAN ............................................................................... [L50…C00…R50]This knob specifies the position in the stereo field (pan) of each Track.
If DRUMS is specified as the oscillator mode ("OSC MODE" on page 29) in the Program used by this Track, the "PAN" field will not appear. Use the "PAN" setting in the DRUM KIT EDIT section ("PAN" on page 34) of the OSC page to specify the pan of each sound in the Drum Kit.
OUT .....................................................................................[---, Main, Sub]
Use this parameter to choose the output.
PERFORMANCE, MIDI pageThese parameters are the same as in Combination mode. Refer to "PERFORMANCE page" on page 21.
49

Available Parameters by Mode
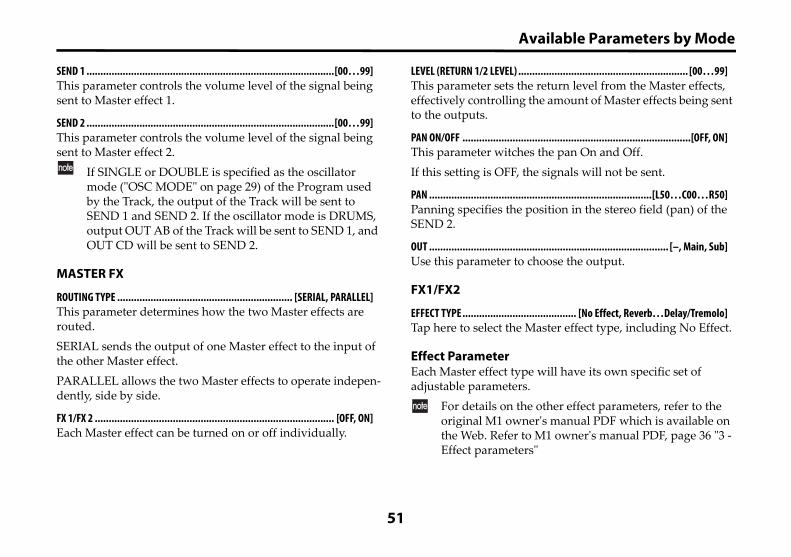
MASTER FX pageTap the MASTER FX button to access this page. The parameters on this page allow you to specify the Master effects being used and adjust the individual Master effect parameters. In Multi mode the Master effects are used as send effects, so the input and output of the effects is determined by the send, return, and return destination settings.
50
Available Parameters by Mode
SEND 1 .........................................................................................[00…99]This parameter controls the volume level of the signal being sent to Master effect 1.
SEND 2 .........................................................................................[00…99]This parameter controls the volume level of the signal being sent to Master effect 2.
If SINGLE or DOUBLE is specified as the oscillator mode ("OSC MODE" on page 29) of the Program used by the Track, the output of the Track will be sent to SEND 1 and SEND 2. If the oscillator mode is DRUMS, output OUT AB of the Track will be sent to SEND 1, and OUT CD will be sent to SEND 2.
MASTER FX
ROUTING TYPE ............................................................... [SERIAL, PARALLEL]This parameter determines how the two Master effects are routed. SERIAL sends the output of one Master effect to the input of the other Master effect.PARALLEL allows the two Master effects to operate indepen-dently, side by side.
FX 1/FX 2 ...................................................................................... [OFF, ON]Each Master effect can be turned on or off individually.
LEVEL (RETURN 1/2 LEVEL) ............................................................. [00…99]This parameter sets the return level from the Master effects, effectively controlling the amount of Master effects being sent to the outputs.
PAN ON/OFF ..................................................................................[OFF, ON]This parameter witches the pan On and Off.If this setting is OFF, the signals will not be sent.
PAN ................................................................................[L50…C00…R50]Panning specifies the position in the stereo field (pan) of the SEND 2.
OUT ...................................................................................... [–, Main, Sub]Use this parameter to choose the output.
FX1/FX2
EFFECT TYPE ......................................... [No Effect, Reverb…Delay/Tremolo]Tap here to select the Master effect type, including No Effect.
Effect ParameterEach Master effect type will have its own specific set of adjustable parameters.
For details on the other effect parameters, refer to the original M1 owner's manual PDF which is available on the Web. Refer to M1 owner's manual PDF, page 36 "3 - Effect parameters"
51

Available Parameters by Mode
EASY, OSC, VDF, VDA, CONTROL, INSERT FX pageThese pages contain the parameters used to edit the Pro-grams assigned to each Track.The parameters are the same as in Combination mode. Refer to "EASY page" on page 28.Refer to "OSC page" on page 31.Refer to "VDF page" on page 36Refer to "VDA page" on page 39Refer to "CONTROL page" on page 41Refer to "INSERT FX page" on page 44
52
Available Parameters by Mode
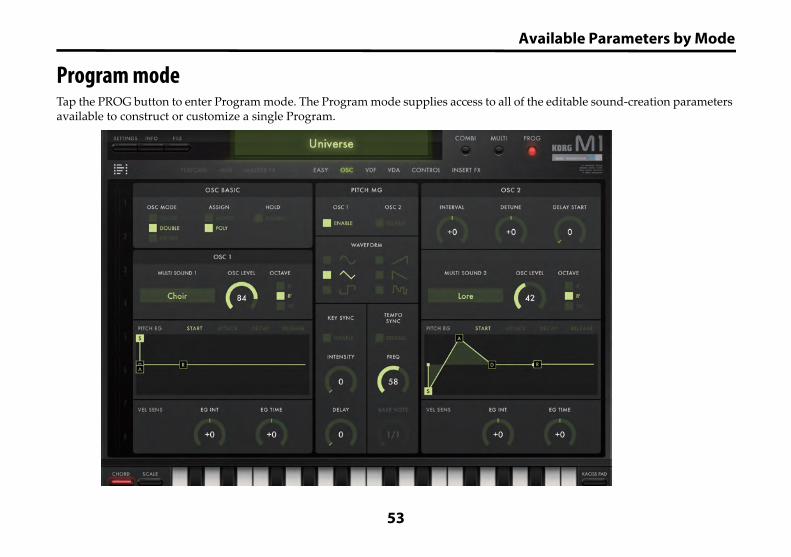
Program modeTap the PROG button to enter Program mode. The Program mode supplies access to all of the editable sound-creation parameters available to construct or customize a single Program.
53

Available Parameters by Mode
TIMBRES ParameterHere you can edit the program’s output level, pan, and out-put destination.
TIMBRE ON/OFF ............................................................................ [ON, OFF]These buttons specify whether each timber will produce sound.
IFX............................................................................................... [OFF, ON]This function turns the Insert effect section On and Off.OFF (dark): The Insert effect section is bypassed.
ON (lit): The Insert effect section is active.The IFX is automatically turned on when you select a Program.
PROGRAM Select ....................................................................... [BROWSER]Using the Browser, select the Program to be used by the Tim-bre.(Refer to "The Browser" on page 14)
LEVEL .......................................................................................... [00…99]This knob specifies the output level of the Program
PAN ................................................................................[L50…C00…R50]This knob specifies the position in the stereo field (pan) of the Program
If DRUMS is specified as the oscillator mode ("OSC MODE" on page 29) in this Program the "PAN" field will not appear. Use the "PAN" setting in the DRUM KIT EDIT section ("PAN" on page 20) of the OSC page to specify the pan of each sound in the Drum Kit.
OSC, VDF, VDF&VDA, EG, INSERT FXThese parameters are the same as in Combination mode. Refer to "PERFORMANCE page" on page 21.
54

Available Parameters by Mode
EASY, OSC, VDF, VDA, CONTROL, INSERT FX pageThese pages provide access to the Program sound-creation parameters. The parameters are the same as in the Combina-tion mode. Refer to "EASY page" on page 28.Refer to "OSC page" on page 31.Refer to "VDF page" on page 36Refer to "VDA page" on page 39Refer to "CONTROL page" on page 41Refer to "INSERT FX page" on page 44
55

Available Parameters by Mode
SETTINGS modeThis mode is used to access and adjust parameters that affect the entire iM1 for iPad operation, such as Master Tune, Transpose, Global MIDI Channel, MIDI Filter, and User Scale..
56

Available Parameters by Mode
MIDI SETTING
MIDI
BLUETOOTH MIDI ........................................................................ [ (Search)]When you press the Search button, the detectable Bluetooth MIDI devices will be searched.
GLOBAL MIDI CHANNEL ..................................................................[01…16]This parameter is used to designate the global MIDI channel.The global MIDI channel is used for several purposes. In Combination mode, it's used as the channel for changing from one Combi to another, and for controlling the master effects (the rotary speed when when "EFFECT TYPE" is Rotary Speaker page 27). In Multi mode, it's used as the chan-nel for controlling the Master effects. In Program mode, it's used as the channel that will play the Program and for con-trolling the Insert effects (the rotary speed when “EFFECT TYPE” is Rotary Speaker page 27).
GLOBAL PITCHBEND
GLOBAL PITCHBEND......................................................... [DISABLE, ENABLE]The Pitch Bend range can be individually stored with each Program; the Global Pitchbend parameter will override these individual settingsDISABLE: The individual Program parameter CONTROL page PITCHBEND settings in each mode will be used.
ENABLE: The RANGE setting set in the following parameter will be used for every Program in every mode.
RANGE .................................................................................... [–12…+12]This parameter sets the Global Pitchbend range. If "GLOBAL PITCHBEND" is set to ENABLE, this setting will be used for every Program in every mode.
MIDI FILTERMIDI Filtering can determine which MIDI messages are received by the Program.Activate the MIDI filter by turning it on (lit) to prevent the specific type of message from being received.
CONTROL CHANGE FILTER ................................................................[OFF, ON]OFF (dark): Control Change messages are received.ON (lit): Control Change messages are not received (filtered).
COMBI/PROG CHANGE FILTER ..........................................................[OFF, ON]OFF (dark): Program Change messages are received.ON (lit): Program Change messages are not received (fil-tered).
AFTER TOUCH FILTER ......................................................................[OFF, ON]OFF (dark): Aftertouch messages are received.ON (lit): Aftertouch messages are not received (filtered).
57

Available Parameters by Mode
KEYBOARD SETTING
TUNNING
MASTER TUNE A4......................................................... [420.00…460.00 Hz]This parameter adjusts the overall pitch of the iM1 for iPad in 0.01 Hz steps. The value shown is set as the pitch of the A4 (Concert A) note.
TRANSPOSE ............................................................................. [–24…+24]This parameter adjusts the overall pitch of the iM1 for iPad in semitone (100 cent) steps. The range is +/- 2 octaves.
SCALE
ROOT KEY ........................................................................................ [C…B]This parameter specifies the tonic or root key for the scale selected in SCALE TYPE.
SCALE TYPE................................ [Equal Temp…Pure Minor, User1…User12]Use this parameter to select the scale type (temperament).Equal Temp: This is the most commonly used scale. Each semitone is spaced at an equal distance from the others (equal temperament).Equal Temp Random Pitch: A random pitch deviation is applied to equal temperament each time a note-on occurs.Pure Major: In this scale, the principle major chords in the selected key will be perfectly harmonious (pure major tem-perament).
Pure Minor: In this scale, the principle minor chords in the selected key will be perfectly harmonious (pure minor tem-perament).User 1–12: You can create twelve of your own customized user scales.
USER SCALE ...................................................................... [–99…+99 cent]To create a User Scale, begin by selecting one of the User Scales in SCALE TYPE.Next, simply adjust the pitch of each note of in the octave. These settings are saved automatically. You can recall your User Scale at any time by selecting it using the SCALE TYPE parameter.You can adjust each note of the octave (C-B) in a range of -99 through +99 cents. These adjustments are relative to the equal tempered pitch (0). A setting of +99 raises the pitch approxi-mately one semitone above the standard pitch. A setting of -99 lowers the pitch approximately one semitone below the standard pitch.
You can't make "USER SCALE" settings when "SCALE" is set to Equal Temp, Equal Temp Random Pitch, Pure Major, or Pure Minor.
AUDIO/OTHER SETTINGS ....................................................................[OPEN]Opens a page where you can make settings such as the audio latency, how the knobs operate, and whether to enable mobile communication.
58

Writing, Saving, and Loading Data
Writing to internal memoryAny of the settings you edit or create can be stored in the iM1 for iPad's internal memory. On the original M1, the Pro-grams used by a Combination used the same data as the Programs in Program mode. The iM1 for iPad loads Pro-gram data into the edit buffer independently for each mode (Combination, Multi, or Program), which means that editing a Program in Program mode will not affect the sound of Pro-grams used in Combination mode or Multi mode.By using the File menu, the data that you edit can also be saved for individual sections. Programs that are saved in library cards can be shared across the entire application.
The WRITE command does not save the data to your computer; it only stores it to the iM1 for iPad's internal memory. Any data you've stored will be lost if you exit the application without saving. If you want to keep your stored Combinations and Programs, click the [FILE] button and use "Save" to save them (“Session”).
SessionBy saving a Session, the Combi and Program edit data-and the data that is saved in the user cards-is saved all together.
Session commands• New: Resets all stored data of the session, and returns the
software to its initial state.• Open: Loads session data from a file.• Save: Saves session data by overwriting the old file.• Save As: Saves session data under a different name.• Import from KLC: Imports KLC M1 compatible data.• Export toKLC: Saves data in a form that is compatible
with the KLC M1.• Import from M1: Imports data created on the original M1
series as a system exclusive file into iM1 for iPad.The data to be imported or the data that you've exported can be written to or read from your iPad via iTunes software on your computer.When you import each type of data, it will overwrite the USER card. If you want to keep the current session, use "Save as" to back it up before importing.
59

Writing, Saving, and Loading Data
Settings that are remembered when you write a Ses-sion:The sound generator parameters of Combi, Multi, and Pro-gram modes
SETTINGS parametersUser Programs, Combinations, and Drum Kits that are saved in User cards
Settings that are NOT remembered when you write a Session:User Programs, Combinations, and Drum Kits that are stored in library cards. Programs that are saved in library cards are automatically stored within iM1 for iPad itself, and can be shared by all sessions.
CombinationsCombinations you create or edit can be written (stored) into the iM1 for iPad's internal memory. The iM1 for iPad has six user cards, each of which holds 50 Combinations. This means that the M1 can hold a total of 300 Combinations (four user cards and two library cards).
Settings that are remembered when you Write• Programs used by each Timbre
• Each Timbre's output settings, MIDI settings, key zone, velocity zone, and Master effect settings
The Program adjustment parameters in the Perfor-mance page are applied to the Program parameters when you Write, and their values will be reset to 00.
Settings that are not remembered when you Write• Solo/Mute.• The TABLE settings of the Performance page.• The VDF Select, VDF EG Select, and VDA EG Select set-
tings of the EASY page.• The KBD CHASE setting of the OSC page DRUM KIT• EDIT section and the Point Select setting of the PITCH EG
section.• The Point Select setting of the VDF page VDF EG section.• The Point Select setting the VDA page VDA EG section.
ProgramsPrograms you created or edited in Combination, Multi, or Program mode can be written (stored) to a user card in the iM1 for iPad. The iM1 for iPad provides six internal "user cards," each holding 50 Programs. This gives you a total of 300 Programs stored within the M1.
60
Writing, Saving, and Loading Data
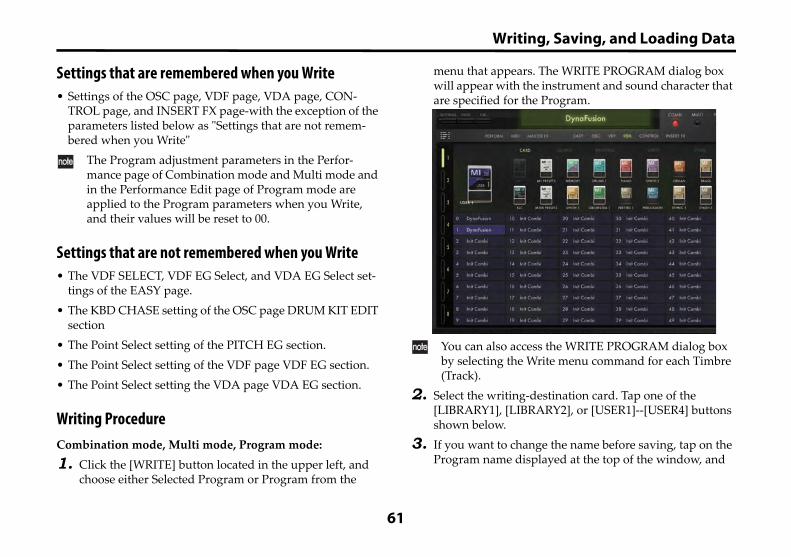
Settings that are remembered when you Write• Settings of the OSC page, VDF page, VDA page, CON-
TROL page, and INSERT FX page-with the exception of the parameters listed below as "Settings that are not remem-bered when you Write"
The Program adjustment parameters in the Perfor-mance page of Combination mode and Multi mode and in the Performance Edit page of Program mode are applied to the Program parameters when you Write, and their values will be reset to 00.
Settings that are not remembered when you Write• The VDF SELECT, VDF EG Select, and VDA EG Select set-
tings of the EASY page.• The KBD CHASE setting of the OSC page DRUM KIT EDIT
section• The Point Select setting of the PITCH EG section.• The Point Select setting of the VDF page VDF EG section.• The Point Select setting the VDA page VDA EG section.
Writing ProcedureCombination mode, Multi mode, Program mode:1. Click the [WRITE] button located in the upper left, and
choose either Selected Program or Program from the
menu that appears. The WRITE PROGRAM dialog box will appear with the instrument and sound character that are specified for the Program.
You can also access the WRITE PROGRAM dialog box by selecting the Write menu command for each Timbre (Track).
2. Select the writing-destination card. Tap one of the [LIBRARY1], [LIBRARY2], or [USER1]--[USER4] buttons shown below.
3. If you want to change the name before saving, tap on the Program name displayed at the top of the window, and
61

Writing, Saving, and Loading Data
using the pop-up keyboard, type in a name and press the [Enter] key.
4. Select the type of instrument in the SEARCH "INSTRU-MENTS" area, and the character of the sound in the "CHARACTER" section. You can select multiple items for the type of instrument or sound character. (Refer to "4. INSTRUMENTS" on page 15 and "5. CHARACTER" on page 15)
5. Specify a name for the Program that you want to save, and press the [Enter] button.
6. Close the keyboard.The Program is written to the Write-Destination User Card.
Drum KitsDrum kits you created or edited in Combination, Multi, or Program mode can be written (stored) to a user card in the iM1 for iPad.The iM1 for iPad provides two internal “user cards” for stor-ing drum kits. Since each card holds 20 drum kits, this gives you a total of 40 drum kits stored within the M1.
Settings that are remembered when you WriteOSC page DRUM KIT EDIT section parameters other than KBD CHASE will be remembered when you Write.
Writing1. Click the [WRITE] button in the OSC page DRUMS sec-
tion of any mode.The WRITE DRUM KIT dialog box will appear with the attribute that is specified for the Drum Kit selected..
62

Writing, Saving, and Loading Data
2. Select the writing-destination card.Tap one of the [LIBRARY1], [LIBRARY2], [USER1], or [USER2] buttons shown below.
3. Select the desired attribute(s) for this Drum Kit. You may select multiple attributes.
4. Specify a name for the Program that you want to save, and press the [Enter] button.
5. Click the [OK] button.The Drum Kit will be written to the user card.
RenamingUsing the keyboard that is displayed when Writing, enter a name and then press the Return key.
Names can be entered for a combination, Program, or Drum Kit that can be written to a memory card. Names cannot be entered for a multisound or drum sound.
63

Specifications
iM1 for iPad• Maximum polyphony: 64 notes (depends on the model ofiPad)• Number of parts: 8• PCM waveforms: more than 900• Sounds:
Presets: more than 2,700User presets: 440 (including the drum kits)
• Effects: 34 types• Supported sampling rates: 44.1 kHz• Realtime MIDI control and automation is supported* Appearance and specifications of this product are subject to change without
notice.
64

Support and service
If you have questions about the product, please contact the Korg distributor for the country in which you purchased it.Information to provide when contacting usIn order for us to help you, we'll need the following informa-tion since product support cannot be provided without it• Your name• The name and version of the product (How to check the
version)• The name of the device that you're using• The version of the operating system• Your question (provide as much detail as possible)
Before you contact us• Before you contact us, check whether this manual or
KORG app Help Center has an answer for your question.• Please be aware that we cannot answer questions about
products that are not made by Korg, such as basic opera-tion of your hardware device, or general questions about creating songs or sounds.
65