table of contents - native-instruments.com · electric sunburst deluxe combines a pattern-based...
TRANSCRIPT


Table of Contents1. Disclaimer .................................................................................................................. 1
2. Welcome to ELECTRIC SUNBURST DELUXE ............................................................. 22.1. What’s new in DELUXE? ................................................................................... 22.2. About SESSION GUITARIST – ELECTRIC SUNBURST DELUXE ....................... 3
3. Using ELECTRIC SUNBURST DELUXE ...................................................................... 43.1. Playing Melodies .............................................................................................. 43.2. Combining Melodies and Patterns ..................................................................... 53.3. Pattern Selection and Playback ......................................................................... 63.4. Playing Manual or Automatic Chords ................................................................. 7
3.4.1. The Voicing Generator and Auto Chords .................................................. 83.5. Playing Endings and Slides ............................................................................... 93.6. Controlling the Dynamics of the Performance ................................................... 103.7. Loading / Saving Sound Presets ...................................................................... 103.8. Locking Parameters When Loading Snapshots or Songs ................................... 113.9. Resetting the Round Robin Counter .................................................................. 113.10. Defining the Downbeat after Signature Changes ............................................. 12
4. The Inspector Panel .................................................................................................. 13
5. The Song Browser .................................................................................................... 15
6. The Pattern Browser ................................................................................................. 16
7. The Guitar Settings Page .......................................................................................... 19
8. The Amps & FX Page ............................................................................................... 21
9. The Playback Page ................................................................................................... 24
10. Tips and Tricks ....................................................................................................... 2610.1. Use the Melody Instrument to enhance the Pattern Playback ........................... 2610.2. Vary the number of played notes in Arpeggio Patterns ..................................... 2610.3. Create Natural Transitions between Chords .................................................... 2610.4. Combine Patterns Creatively ......................................................................... 2710.5. Create Custom Groove Variations .................................................................. 2710.6. Use Authentic Humanization .......................................................................... 2810.7. Use the Impact Slider as a “Drama Controller” ................................................ 2810.8. Use Multiple Session Guitarist Instruments Simultaneously ............................. 28
11. Credits ................................................................................................................... 29

1. DISCLAIMER
The information in this document is subject to change without notice and does not represent acommitment on the part of Native Instruments GmbH. The software described by this document issubject to a License Agreement and may not be copied to other media. No part of this publicationmay be copied, reproduced or otherwise transmitted or recorded, for any purpose, without priorwritten permission by Native Instruments GmbH, hereinafter referred to as Native Instruments.
“Native Instruments”, “NI” and associated logos are (registered) trademarks of Native InstrumentsGmbH.
Mac, macOS, GarageBand, Logic and iTunes are registered trademarks of Apple Inc., registeredin the U.S. and other countries.
Windows and DirectSound are registered trademarks of Microsoft Corporation in the United Statesand/or other countries.
All other trademarks are the property of their respective owners and use of them does not implyany affiliation with or endorsement by them.
Document authored by: Daniel Scholz
Software version: 1.0 (03/2020)
Disclaimer
1
2. WELCOME TO ELECTRIC SUNBURST DELUXE
Thank you for purchasing SESSION GUITARIST – ELECTRIC SUNBURST DELUXE, an electricguitar sample library powered by KONTAKT. This document will provide you with instructions andadvice on how to use the library, as well as some additional information.
We hope that you will be truly inspired by using SESSION GUITARIST – ELECTRIC SUNBURSTDELUXE
2.1. What’s new in DELUXE?ELECTRIC SUNBURST DELUXE is the first installment of the SESSION GUITARIST series allow-ing you to play melodies on an electric guitar. The DELUXE version contains the entire pattern li-brary of the original ELECTRIC SUNBURST library. In addition to the added melody feature, thepattern library has been expanded, featuring 27 new strumming patterns and an advanced pickingengine with 28 new arpeggio patterns. We also added a selection of reversed patterns, which addan entirely new sonic palette to ELECTRIC SUNBURST’S library. The total number of includedpatterns is 237, covering a wide selection of musical genres and playing styles, such as pre-recor-ded riffs, strumming and picking of arpeggiated chords in open, muted and flageolet playing styles.
The melody instrument provides open, muted, flageolet and tremolo articulations. Each articulationcan be played with fingers or plectrum. An optional monophonic mode makes it possible to playsingle-note melodies with unprecedented realism. Advanced features like recorded slides, realisticemulation of fret noises and the automatic triggering of hammer-ons and pull-offs lead to authen-tic-sounding results in no time.
The pitch bend wheel, which controls the impact/velocity of patterns, doubles as a pitch bend con-trol in melody mode. When the pitch bend type is set to All, pitch bend affects all played notes. Ifone of the other entries is selected, only specific notes (lowest, highest, softest, loudest, latestnote) in a voicing are affected. This enables the emulation of specific playing techniques on guitarswhere only some of the played strings are bent and others, e.g. open strings retain their originalpitch. The modwheel controls the vibrato of both patterns and melodies. We have added differentvibrato styles (slow, medium, fast) as presets next to the vibrato control.
ELECTRIC SUNBURST DELUXE also provides a selection of new sound presets featuring thenew Replika Delay, a new algorithmic Reverb unit, as well as the new, meticulously emulatedstomp boxes Choral (Chorus), Flair (Flanger) and Phasis (Phaser).
The guitar settings page contains a new control to continuously adjust the decay time of mutedsingle notes. To adjust the decay in real-time, right-click to assign a MIDI controller.
The voicing generator module has been updated and provides new voicings with pedal points.This feature was first introduced with PICKED ACOUSTIC and provides a convenient way to playchord progressions with voicings resembling open tunings. To use this feature, select a voicingwith an asterisk next to one or multiple intervals listed in the voicing menu. This feature is onlyavailable for selected patterns.
Welcome to ELECTRIC SUNBURST DELUXE
2

By default, patterns are loaded with the first voicing being selected in the voicing generator. Thisprovides a quick way to hear the pattern with suitable voicing. If you generally prefer to play voic-ings manually instead of relying on the voicing generator, you can permanently deactivate the voic-ing feature for all patterns by selecting OFF in the voicing drop-down menu. This will deactivatethe voicing generator, even when loading different patterns or songs. To reactivate, select one ofthe preset voicings in the menu.
2.2. About SESSION GUITARIST – ELECTRIC SUNBURST DE-LUXEELECTRIC SUNBURST DELUXE combines a pattern-based guitar library with a sophisticatedmultisample set, designed to deliver authentic-sounding melodies, riffs, arpeggio and strummingpatterns for songwriting and music production. Its samples originate from a carefully selected in-stance of the iconic single-cutaway, double humbucker electric guitar. The instrument was recor-ded through Universal Audio Solo 610 preamps, whose bold transient reproduction and tube satu-ration prepared the guitar for further effects processing with virtual amps, cabinets and effects. Toenable you to freely combine the two pickups, the individual signals were routed through two sepa-rate outputs and recorded through two separate preamps. In addition, for greater sonic variability,a small membrane condenser microphone was mounted directly above the strings to capture thesound of the plectrum hitting the strings.
The signals were then converted by the SPL Madison analog-to-digital converter, and fed into anRME MADIface XT via MADI. Thanks to the superior tonal balance of the instrument, it was notnecessary to add further effects like EQ or compression. When playing the instrument throughhigh quality guitar amp and cabinet emulations, the sound will be as true to the original as techni-cally possible.
Patterns and sample content were performed live by professional studio guitarists Andreas Dom-bert, Joschi Joachimsthaler and Christoph Bernewitz. The patterns are grouped in song presets,containing 4–6 patterns that go together well, as well as a matching sound preset. You can selectpatterns via keyswitches and play them as chords on your MIDI keyboard. Pattern playback willalways stay in sync with your host project.
Regarding sound options, ELECTRIC SUNBURST DELUXE delivers the full flexibility of the origi-nal instrument: selection and volume control of the included pickups, individual tone control perpickup, and a microphone signal that can be added to enhance the pickup signals. These com-bined source signals are routed through a signal chain of up to seven audio effects, comprising aselection of guitar effects pedals, amps, and cabinets, as well as professional-grade reverb anddelay units. Like the other products in the SESSION GUITARIST series, ELECTRIC SUNBURSTDELUXE provides a true doubling mode. Depending on the selected pattern, it can be played overa pitch range of almost four octaves.
The key feature of ELECTRIC SUNBURST DELUXE is its revolutionary playback engine. You canseamlessly switch between different patterns, and also alter the dynamics in real-time, thus creat-ing true-to-life musical performances. In contrast to most pattern-based instruments, the number ofavailable chord types is virtually endless. Because all the nuances of the original performance,such as exact timing and dynamics, have been preserved, you will notice that the instrument feelsvery natural and organic. All of the integrated patterns can be played over a wide tempo range inoutstanding sound quality.
Welcome to ELECTRIC SUNBURST DELUXE
3

3. USING ELECTRIC SUNBURST DELUXE
Just like in the PICKED ACOUSTIC product, the new melody feature is provided in a separateMelody instrument. While the regular Electric Sunburst Deluxe.nki is designed for the conven-ient playback of patterns, the melody instrument allows you to play your own melodies and com-bine melodies and patterns within a single instrument.
The ELECTRIC SUNBURST DELUXE instruments are designed to be played using a MIDI key-board. The patterns are triggered and selected via MIDI, allowing for fast arranging.
Patterns will automatically sync to the master or host tempo. The patterns in this library can beplayed at any tempo between ca. 60-65 bpm and up to 160 bpm and even above. Since there isno time-stretching involved in the process, you will always hear the patterns in the highest possiblequality.
The patterns are based on actual recordings by a professional studio guitarist, sothey sound best in the typical tempo range preferred by most guitarists.
KONTAKT’s on-screen keyboard, presenting the current keyboard layout.
On KONTAKT’s on-screen keyboard, all relevant keys and key ranges are color-coded: keyswitch-es for melody articulations (yellow), patterns (red), endings (purple), and slide (green). Melodies orchords can be played in the blue key range. For an alternative overview, you can open the Map-ping Panel by clicking the small keyboard icon in the bottom right corner of the instrument.
The Mapping panel, which presents a more detailed graphical overview of the keyboard layout.
3.1. Playing MelodiesAfter loading the Melody instrument up, you are presented with a melody section on the left and apattern section on the right. If the melody section is selected, you will not hear the notes you playsequenced as a pattern, but as you actually play them, much like on a piano. This way, you canplay any melody you can think of with ELECTRIC SUNBURST DELUXE.
Using ELECTRIC SUNBURST DELUXE
4

Melody and pattern sections in the melody instrument.
▪ To change melody articulations, use the keyswitches from C1 to D#1 to select between open,muted, flageolet and tremolo styles.
▪ Plectrum / Finger switch: Below the articulation keyswitches, you can choose to play all of theabove articulations with either Plectrum or Fingers.
▪ Poly / Mono switch: The monophonic mode creates smooth transitions between notes, whichsounds best when playing solo melodies. The polyphonic mode enables you to play multiple notesat the same time. This mode is perfect for playing sustained chords or for playing your own arpeg-gios. However, the transitions between single notes sound best in monophonic mode. In bothmodes, you can use the sustain pedal just like on a piano.
▪ To apply vibrato or pitch bend, use the pitch and modwheel of your keyboard. When playingpatterns, the pitch wheel doubles as an Impact controller, modifying the velocity and accent inten-sity of performed patterns (for more information, see Controlling the Dynamics of the Perform-ance ). From the Vibrato drop-down menu, you can choose between three different vibrato styles.The bend drop-down menu offers the standard pitchbend mode (All), as well as a unique modewhere only specific notes (lowest, highest, softest, loudest, latest note) in a voicing are affected bythe pitch bend. This enables the emulation of specific playing techniques on guitars where onlysome of the played strings are bent and others, e.g., open strings retain their original pitch.
When playing adjacent open notes, hammer-on and pull-off samples are added au-tomatically if the velocity of the following note is significantly softer than the one pre-viously played. This works only for overlapping (legato) notes up to an interval of aminor third.
3.2. Combining Melodies and PatternsThe melody instrument provides two different modes, namely the Melody mode and the Patternmode. By default, it is in Melody mode.
Using ELECTRIC SUNBURST DELUXE
5
▪ To switch from melody to pattern, hold down one of the pattern keyswitches from E1 to G1with your left hand, while playing notes with your right hand. The instrument will temporarily per-form those notes as a pattern. If a voicing (see The Voicing Generator and Auto Chords) is selec-ted for a pattern, triggering its keyswitch will cause the pattern to be played back using the notescontained in the selected voicing rather than the very notes you play.
▪ To switch back to melody, release the pattern keyswitch with your left hand. If you still holdnotes in your right hand at that moment, the instrument tries to sequence one more note thatwould have followed had you continued with the pattern playback. For example, if you release thepattern keyswitch shortly before the next downbeat while still holding notes with your right hand,the instrument will switch back to melody mode with one last note onto that downbeat.
▪ To play patterns instead of melodies by default: If you are mainly intending to use the melodyinstrument to play back patterns, you can change the default mode from Melody to Pattern on thePlayback page (see The Playback Page). When Pattern is selected as the default mode, holdingdown one of the Melody keyswitches (C1 to D#1) will engage the melody mode temporarily.
To achieve musically convincing results, it is advisable to use the instrument withinyour sequencer and to play along with its metronome.
The included pattern library is identical in the pattern instrument and the melody in-strument, and the procedures to load, modify and play back patterns are similar.However, to accommodate the melody articulations, the number of pattern slots hasbeen reduced from eight to four in the melody instrument.
3.3. Pattern Selection and PlaybackThe following section describes the pattern instrument. While most of the information also appliesto the melody instrument, please refer to Playing Melodies and Combining Melodies and Patternsfor detailed information about the features which are specific to the melody instrument.
▪ To select a pattern, press the corresponding keyswitch MIDI note or click on the pattern youwish to use.
▪ To play a pattern, play chords on your MIDI keyboard. After releasing the keys, playback will bestopped within a specified note duration (see the Latch Mode section in The Playback Page). Bydefault, each pattern comes with a set of suitable voicings. To deactivate the voicing feature,choose As played in the voicing drop-down menu for the respective pattern slot. If you want topermanently stick to the As played mode for all patterns and songs, select OFF from the menu.
▪ To stop the playback, either trigger one of the three endings (see section Playing Endings andSlides) via keyswitch or release all keys on your keyboard.
▪ To load a different pattern into a slot, click on the magnifier icon in the current slot. This willopen the pattern browser (see section The Pattern Browser).
▪ To cycle through all available patterns within one slot, click on the little left or right arrow but-tons in the current slot.
Using ELECTRIC SUNBURST DELUXE
6

▪ To remove a pattern (i.e. clear a slot), [Alt] + click on a slot.
It is always best to play chord or pattern changes a little before the beat, to give theplayback engine time to anticipate the transition. This way, the engine has enoughtime to add fret noises and the transition will sound more natural. As the perform-ance is bound to the metronome of the sequencer, the timing of incoming MIDIevents has no effect on the timing of the performance. For more information, readTips and Tricks.
If available, “Chase Events” should be enabled in your DAW settings; this will ensurethat the engine gets proper note information on sequencer start or cycle jumps.
3.4. Playing Manual or Automatic ChordsELECTRIC SUNBURST DELUXE offers three different pattern types and each type reacts to in-coming MIDI notes in a slightly different manner:
▪ Strumming patterns: Strumming patterns are based on recorded loops. If you play more thanone single note, additional single notes will be added on top of the originally recorded loop. Forbest results, do not play too many notes at a time.
▪ Arpeggio patterns: When playing arpeggio patterns, the playback engine analyzes the incomingor generated chord and allocates the individual notes to different strings of the guitar. The morenotes you press on the keyboard, the more sophisticated the resulting arpeggio pattern will sound.Therefore, playing up to six notes at a time can lead to interesting variations. Depending on theselected pattern, several notes of a voicing will be performed as hammer-ons and pull-offs.
▪ Riffs: Riffs come as pre-recorded performances. However, they adapt to incoming chords bychromatically adjusting individual notes of the riff to the incoming chord. For example, if the presetriff contains minor thirds and sevenths, pressing a Cma7 voicing on the keyboard will cause theplayback engine to adapt the pattern such that the minor third is replaced by a major third and theminor seventh is replaced by a major seventh.
ELECTRIC SUNBURST DELUXE recognizes all intervals, as well as a great variety of chords, in-cluding major, minor, no-third, diminished, augmented, half-diminished, various suspensions, op-tions, and alterations, and even slash chords (e.g. C/E, D/C, Dmi7/F, Ami/E, etc.). You can alsohold a chord or an interval with your left hand while playing a melody on top with your right hand,or the other way round: say you hold the fifth interval in your right hand while you play differentbass notes in your left hand, which is especially well suited for the arpeggio patterns. Generally,the instrument tries to play everything in the very pitch range you press it. This leads to a virtuallyendless number of available chords and voicings.
Using ELECTRIC SUNBURST DELUXE
7

The chord detection engine does not like overlapping notes, because an overlapwould technically mean that two different chords exist at the same time. To avoidthose overlaps, fully release a chord, or some notes of it, shortly before you playnew ones.
When playing arpeggio patterns, you can trigger slides between different chords orvoicings by hard pressing the newly added keys: The next suitable note of an arpeg-gio pattern will start with a slide if it is being played with a velocity greater than 110.To use slides when playing melodies, hold down the B1 keyswitch while playing mel-ody notes.
3.4.1. The Voicing Generator and Auto ChordsIf you are less familiar with playing typical guitar voicings on a piano or keyboard, you have twoadditional options: Use the integrated voicing generator and/or activate the Auto Chords mode.
▪ To enable or disable the voicing generator, select a pattern, and then click on the Voicingdrop-down menu.
Choose from one of five included voicing presets for the selected pattern. The number of notescontained in the voicing may affect the rhythmical structure of the pattern. If you press only onesingle key, you will hear the unaltered voicing preset. If you press thirds, sixths, sevenths and/orother options, the voicing preset will be adapted accordingly. This way, you can easily convert amajor to a minor chord or vice versa. To deactivate the voicing generator, choose As played. Thevoicing will then be an exact representation of the incoming MIDI notes.
▪ To take full control of your voicings, disable the voicing generator by selecting As played andalso disable the auto chords mode (see below). If you want to permanently stick to the As playedmode for all patterns and songs, select OFF from the menu.
▪ To enable or disable the Auto Chords mode, click on the little power button next to the AutoChords button. The Auto Chords mode will always be combined with the voicing generator andprovides the most basic chords (major and minor as well as some options), auto-mapped and au-to-transposed on the white keys.
The Auto Chords Panel with the key set to G major. Therefore, the root pitch G is map-ped to the original C key; all other pitches are mapped (transposed) consequently.
Using ELECTRIC SUNBURST DELUXE
8

▪ To show or hide the Auto Chords Panel, click on the Auto Chords button.
▪ To set the key of your song, select the key and mode from the drop-down menus. This willtranspose/shift the chord layout such that, in case of a major key, the root pitch will always be as-signed to the original C key; in case of a minor key, the root pitch will always be mapped to theoriginal A key.
▪ To play chords in the Auto Chords mode, simply play a single white key anywhere in the bluechord range (see keyboard layout of section Pattern Selection and Playback). This will play thechord labeled on that key. In other words, no matter which key and mode you choose, you canalways play the seven diatonic pitches (plus the diminished seventh pitch) with the white keys fromC to B (plus the B flat key, which is represented as a white key as well).
▪ To add options or suspensions, click, or play and hold, any of the labeled black keys. To re-move an option or suspension, click the corresponding key again, or release that key on your MIDIkeyboard.
▪ To exclude the Auto Chords settings from Songs or snapshots, click the lock icon in the topleft corner of the Auto Chords Panel (see section Locking Parameters When Loading Snapshots orSongs).
The intervals contained in a voicing are listed in the voicing drop-down menu. An as-terisk (*) next to an interval means that this interval is defined relative to the key ofthe song, as defined in the auto chords panel, rather than relative to the root note ofa chord. For example, if D major is selected in the auto chords panel and a voicingcontains *octave, a high d will always sound, no matter which chord is played. Thisfeature emulates open strings in open guitar tunings like open C or DADGAD.
Although only one octave is displayed in the Auto Chords Panel, you can play thefull range of the instrument even in Auto Chords mode. However, the most powerfulmode is the standard chord mode (disable auto chords, disable voicings), wherechords, intervals, options, or tensions are played on the very pitches you press onthe keyboard.
3.5. Playing Endings and SlidesIn addition to the actual patterns, ELECTRIC SUNBURST DELUXE provides a variety of endings,as well as slides and percussive sounds. The corresponding sets of keys are marked purple andgreen on the KONTAKT on-screen keyboard. The table below describes the functionality of eachkeyswitch for both the pattern instrument and the melody instrument:
Using ELECTRIC SUNBURST DELUXE
9

Pattern Instrument Melody Instrument
G#1 Long ending Slide up: End sounding notes with an upward slide. If there are nosounding notes, you will hear a regular slide. The speed of the slidedepends on the incoming velocity.
A1 Slide down: End sounding notes with adownward slide. If there are no sound-ing notes, a long ending will be playedand the slide will sound only when re-leasing the key.
Slide down: End sounding notes with a downward slide. If there areno sounding notes, you will hear a regular slide. The speed of theslide depends on the incoming velocity.
Bb1 Mute strings → Hit guitar body withknuckles → Slap strings with thumb
B1 Pickup slide down Slide modifier: Hold this key to start melody notes with a slide. If theprevious note was lower, you will hear an upward slide, and viceversa.
3.6. Controlling the Dynamics of the PerformanceThe patterns included in ELECTRIC SUNBURST DELUXE ignore the velocity information comingfrom your MIDI keyboard or host software/DAW. Instead, you can continuously control the dynam-ics of the performance with the impact slider. As the melody instrument is velocity-sensitive whilein melody mode, the pitch bend wheel doubles as a pitch bend controller when playing melodies.
The Impact feature
Use your MIDI keyboard’s pitch wheel to control the Impact/pitch bend. It works as a bi-polar con-trol to increase or decrease the playing intensity of the guitarist. The neutral default position is thecenter position which can also be recalled via [Cmd] + click.
The Impact feature can be used to smoothen transitions between patterns with dif-fering overall dynamics.
While the velocity coming from your keyboard doesn’t affect the dynamics of the per-formance, you can use it to trigger slide transitions when playing arpeggio patterns.When playing a chord change, try hitting a chord with a velocity greater than 110. Aslide transition will be added at the next suitable position.
3.7. Loading / Saving Sound PresetsWith ELECTRIC SUNBURST DELUXE, you can easily customize the sound. Each sound presetincludes all parameters of the Guitar Settings page as well as the Amps & FX page (see chapterThe Guitar Settings Page and The Amps & FX Page. You can load sound presets from the SoundPreset drop-down menu in the top right corner of the instrument.
Using ELECTRIC SUNBURST DELUXE
10

The Sound Preset box in the top right corner of the instrument
▪ To load a factory or user sound preset, either
– select a preset from the drop-down menu, or
– cycle through all presets by clicking the little left and right arrow buttons.
▪ To save a new user sound preset, enter a preset name into the field and click on the floppy diskicon. This will store the current sound settings (see chapter The Guitar Settings Page), includingthe Voicing and Impact slider positions, into a new user preset.
▪ To overwrite a user sound preset, click on the floppy-disk icon again, after you've changedsound settings, without changing the preset name itself.
▪ To delete a user sound preset, select it from the drop-down menu, then click the circular Deletebutton.
▪ Linking sound presets to Song presets: If the Link to Song switch is enabled, selecting asong preset (see section The Song Browser) will also load its corresponding sound preset. Dese-lect to change songs without altering your guitar and effects settings.
3.8. Locking Parameters When Loading Snapshots or SongsNormally, when you load snapshots or songs (see section The Song Browser) of the instrument,all parameters will be set accordingly. Therefore, snapshots and songs are stored and recalledglobally. To prevent the Playback and/or Auto Chords parameters from being changed by loadingsnapshots or songs, click the lock icon on the Playback tab.
If the Playback parameters are locked, they will not be changed by snapshots or songs
3.9. Resetting the Round Robin CounterTo enhance the realism of Electric Sunburst Deluxe, the entire sample content employs a methodwhich is called “Round Robin”: Each sample was recorded multiple times and if the same pitch isbeing played with the same velocity multiple times in a row, Electric Sunburst Deluxe automaticallyalternates between those different recorded samples of a given pitch and velocity. These varia-tions are called “Round Robins”. The result is repetitions that sound less mechanical and more likea performance by a real musician, as the tone varies ever so slightly. As the instrument is automat-ically cycling through the different Round Robins, the performance will slightly differ each timeyou’re playing it back in your sequencer.
While this is beneficial to the overall realism, you might find that a certain Round Robin samplematches the required phrase better than another. You can reset the Round Robin counter by send-ing continuous controller 3 (CC#3) to the instrument at the beginning of a song section. This way,you will be hearing the exact same samples every time the section is being played back.
Using ELECTRIC SUNBURST DELUXE
11

When exporting/bouncing your song, placing a CC#3 value at the beginning of yourarrangement will lead to a deterministic result: Each bounce will be using the exactsame samples, rather than a random constellation of Round Robins.
3.10. Defining the Downbeat after Signature ChangesSince there is no way for the instrument to recognize signature changes or insertions of half a baretc., present in your DAW session, its pattern playback would get out of sync in those cases. Tosolve this problem, you can use the global transport offset feature to compensate for a change ofsignature or bar length during playback.
→ To define a global transport offset in ticks, send MIDI CC#111.
The value you send (ranging from 0 to 127) will be multiplied by 80 ticks and added as an offset tothe host transport. 80 Ticks is the length of a 32th triplet, which is the greatest common divisor forall note values available in the instrument. Twelve 32th triplets equal a quarter note. Therefore, toinsert half a 4/4th bar (i.e. shift the playback by two quarters or 2 × 12 32th triplets), you wouldneed to send MIDI CC#111 with value 24, etc.
The following table shows typical values needed for common offsets:
Offset CC#111 value
No offset 0
One quarter 12
Two quarters 24
Three quarters 36
Four quarters (= one 4/4 bar) 48
Five quarters 60
Six quarters 72
Seven quarters 84
Two 4/4 bars (= no offset) 96
Minus one quarter 84
Minus two quarters 72
Minus three quarters 60
One eighth note 6
One eighth triplet 4
Using ELECTRIC SUNBURST DELUXE
12

4. THE INSPECTOR PANEL
The Inspector Panel provides access to various parameters that will modify the length, start posi-tion, volume and tempo of any pattern. The values of the Inspector Panel will always refer to theselected pattern. In other words, if you select a different pattern, the Inspector Panel will adapt itscontent according to the new pattern.
To show or hide the Inspector Panel, click on the button with the wrench icon.
The Inspector Panel
▪ Shift: Edit this value to shift the selected pattern's start (entry) position. Alternatively, you candrag the pattern's rhythm display left or right.
▪ End: Edit this value to reduce the selected pattern's length so that it will loop earlier. Alternatively,you can drag the terminating flag left or right.
You can use the End Step feature very creatively. For example, you can trim a 4/4signature pattern by eight 16th snippets, so that it will perfectly fit a 3/4 signature.You can also trim any pattern to odd signatures, such as 5/8 or 7/8. Combined withthe Start Shift feature, you have very powerful tools to create whole new patternsand feels (e.g. start-shift a constant eighths pattern from on-beats to off-beats, etc.).Be creative!
▪ Tempo: With the three tempo choices in the drop-down menu, you can switch the selected pat-tern's tempo from normal (1:1) to half time (1/2) or double time (×2). Please note that there is alsoa global time scaling feature on the Playback page (see The Playback Page). Its tempo factor willbe multiplied by each pattern's individual tempo factor.
▪ Style (available for arpeggio patterns only): From this drop-down menu, you can select three dif-ferent playing techniques: open, muted and flageolet, each played with fingers and plectrum. Forsome of the patterns, you can also choose a pre-defined mixture of them (mixed).
▪ Fret Pos (available for arpeggio patterns only): Change this value to make the virtual guitaristplay in higher fret positions, which typically results in a more mellow tone.
▪ Vol: Change this value to adjust the volume of the selected pattern, ranging from -24 dB up to+24 dB in 0.1 dB increments.
The Inspector Panel
13

▪ Voicing: Choose from one of five included voicing presets for the selected pattern. The numberof notes contained in the voicing may affect the rhythmical structure of the pattern. If you pressonly one single key, you will hear the unaltered voicing preset. If you press thirds, sixths, seventhsand/or other options, the voicing preset will be adapted accordingly. This way, you can easily con-vert a major to a minor chord or vice versa. To deactivate the voicing generator, choose Asplayed. The voicing will then be an exact representation of the incoming MIDI notes. If you want topermanently stick to the As played mode for all patterns and songs, select OFF from the menu.
With slow host tempos, switching a pattern to half time may not work if the actualrelative tempo falls below the limit of ca. 65 bpm.
The Inspector Panel
14

5. THE SONG BROWSER
In ELECTRIC SUNBURST DELUXE, a Song is a preset that contains up to eight related patternsalong with a factory sound preset (see section Loading / Saving Sound Presets) as well as somesettings of the Playback page (see The Playback Page). The patterns contained in a Song are loa-ded into the pattern slots.
If you want songs to apply their recommended sound settings, activate the Link toSong feature in the top right box. If you deactivate this feature, the current soundsettings won't be changed when you load a song.
To browse songs and then load a Song:
1. Click on the current song name; this will open the Song Browser.
2. Use the three attribute buttons at the top of the browser to refine the list of displayed Songsby including or excluding different signatures. To show all Songs, deselect all attribute but-tons.
3. To load a Song, double-click its name or click on the tick button. (If you wish to exit the SongBrowser without changing anything, click on the X button instead).
Alternatively, you can cycle through the included Songs, without entering the SongBrowser, by clicking on the triangular arrows to the left and right of the current Songname.
The Song Browser
15

6. THE PATTERN BROWSER
Since a preset Song may not meet your exact needs, you may wish to change a slot's pattern, orload additional patterns into specific slots.
Clicking the magnifying glass icon will open the Pattern Browser
The top area of the Pattern Browser holds a series of buttons that you can use to refine yoursearch, including a Rhythm Search strip, which is a very powerful tool for finding patterns thatmatch your custom rhythm. The body of the Pattern Browser contains a list of all patterns match-ing the current search criteria. If the list is too long to fit the screen, you can scroll through the listby dragging the scroll handle on the right up or down.
To avoid misconceptions: The Rhythm Search strip is merely a tool to find pre-recor-ded patterns in the pattern library. It is technically impossible to create your own pat-terns by entering a certain rhythm, so, despite its look, the Rhythm Search stripshould not be confused with a step sequencer.
• To search a pattern by attributes (and not by rhythm), make sure the Rhythm Search strip iscleared. If it is not, click the Clear button next to the strip. Then refine your search by selectingany of the attributes, such as Strum, Arpeggio, 4/4, etc. If you want to bypass a category (suchas Open/Muted/Mixed), deselect all attributes of that category. Consequently, you would needto deselect all attributes to display all recorded patterns.
• To search a pattern by attributes and rhythm, first, select/deselect the desired attributes asdescribed above. Then, enter a rhythm on a 16ths note basis into the Rhythm Search strip.With each new rhythm snippet that you enter, the pattern list will be refreshed in real-time, sor-ted by the similarity of the desired rhythm to the rhythm of all patterns available in the library, indescending order.
There is a powerful shortcut feature to quickly enter a repeating pattern into theRhythm Search strip: enter the beginning of the pattern and then [Alt] + click on theposition of the first repetition. Furthermore, if you [Alt] + click on the first snippet, allother snippets will be activated/deactivated.
The Pattern Browser
16
• To 'tap in' a desired rhythm: first press the Record button and hear the metronome count-in.Then start playing a rhythm on your MIDI keyboard or click on the 'Tap' button. You can start atany time, so you can also start with a pickup beat. After 2 bars the recording will automaticallystop, and the search results will be listed.
The rhythm search algorithm is very powerful. It will compare the rhythm defined in the RhythmSearch strip not only to the rhythm of the other patterns from start but also from any possible shif-ted starting position. This way, patterns with specific start shift offsets might be revealed as musi-cally matching-patterns which otherwise would simply be overlooked. If the perfect start shift offsetis different from 0, the value is appended to the pattern name. Upon loading a pattern, that offsetwill automatically be applied and entered into the Inspector Panel (see section The Inspector Pan-el Also, the Rhythm Search algorithm will rate accents higher than non-accentuated snippets. So,if you're searching for accents following a certain rhythm, try entering the accents only.
If you cannot find a desired rhythm straight away, chances are that you can createthat particular rhythm by separately searching for the first and second half of therhythm of a desired pattern, loading the two halves into two different slots and com-bining them during playback. Alternatively, you can load the same pattern into twodifferent slots and adjust the Start Shift of one of them, in order to shift accents tothe desired positions.
• To search for patterns similar to the selected one, you would need to search for patternswith a rhythm similar to the selected pattern's rhythm. Instead of entering and copying therhythm manually, you can simply transfer the rhythm of the selected pattern into the RhythmSearch strip by clicking on the Similar button.
This will start a search and put the selected pattern at the very top of the listed results, sincethat pattern matches its own rhythm a 100 percent, of course. Rhythmically similar patterns willbe listed subsequently.
• To play a preview of a pattern, click on any of the listed patterns. This will also display thepattern's rhythm structure in the second strip. The preview playback will sync to the host tempoand transport position if the transport is running. However, only one selectable chord and pitchcan be previewed; incoming MIDI chords will be ignored.
• To stop the preview playback, simply click on the playing pattern again or, if the host trans-port is running, stop it.
• To change the preview chord, select a pitch and a chord type in the top drop-down menus orvalue dragger.
• To load a pattern, simply double-click the pattern or click the tick button. (If you want to cancelthe process, click the X button instead.)
The Pattern Browser
17

• To load a pattern to a different slot than the currently selected one, choose one of the eightavailable pattern slots from the drop-down menu in the upper right corner. Confirm by clickingthe tick button, or double-click the respective pattern.
The selected pattern will now be loaded into the selected slot; a previous pattern of that slot willbe replaced. The pattern browser will be closed.
The Pattern Browser
18

7. THE GUITAR SETTINGS PAGE
Click on the Guitar Settings tab (at the bottom of the instrument) to display the Guitar Settingspage. This page provides controls that you can use to adjust the sound of the guitar itself, whereasthe Amps & FX page provides virtual effects, such as amplifiers, EQ or reverb. This page is divi-ded into several sections, each of which is described below.
The Guitar Settings Page
▪ Pickup selector: Use the pickup selector switch to choose either the bridge pickup, neck pickup,or a combination of both pickups. The bridge pickup provides a brighter sound with a stronger at-tack, while the neck pickup sounds softer.
▪ Volume and Tone controls: Use these controls to adjust the volume and brightness of eachpickup individually.
▪ Mic signal: In addition to the two pickup signals, you can dial in the acoustic signal of a micro-phone which was mounted directly above the strings. The pickup signals and the mic signal aremixed down to a single bus, and are sent to the sound processors found on the Amps & FX pagefor further processing.
To save memory, make sure to deactivate unused pickup and microphone signals in-stead of only turning their volume knob down, as each active signal requires a shareof your computer’s memory.
▪ Doubling: When this button is activated, you will hear two separate guitars playing in unison, oneon the left, and one on the right. This creates a very wide stereo image.
The Guitar Settings Page
19

▪ Muted Notes: You can set the decay time of muted single notes by adjusting the Decay control.To adjust the decay in real-time, right-click to assign a MIDI controller to this knob. This way, it ispossible to emulate continuous progressions from very short notes to a gradually longer decay orvice versa.
▪ Velocity Reduction (melody instrument): With this control, you can limit the playable velocityrange that applies both for melodies and arpeggio patterns. With the knob turned fully left, youhave the guitar’s full dynamic range at your fingertips, while at the maximum right position, a morenarrow dynamic range is achieved. It is important to note that the compression applies to the ve-locity level, not the audio level.
▪ Fret Noise: Use this knob to adjust the volume of fret noises, which are automatically addedupon changing chords.
▪ Noise Floor: Use this knob to raise the noise floor. The noise floor is switched off while the in-strument is not playing.
▪ Tuning: Use this knob to detune the guitar.
Moderate levels of noise, detune, fret noises, and a little dose of mic signal can helpadd realism, and create a more “tangible” guitar sound.
If you prefer to use external amp simulations instead of using the effects provided onthe Amps & FX page (The Amps & FX Page), keep in mind that stereo doubling re-quires two individual signal chains, i.e. one amp simulation for the left output chan-nel and another one for the right output channel. If in doubt, listen to the stereowidth: If the stereo doubled signal collapses to mono when applying external effects,the signal path is not “true stereo”.
The Guitar Settings Page
20

8. THE AMPS & FX PAGE
Clicking on the Amps & FX tab (at the bottom of the instrument) will open a page where you canapply several studio effects to the signal.
The Amps & FX Page
The effects chain displays the currently loaded effects. Clicking an effect icon displays its settingsin the inspector section below.
• To change the order of the effects, simply drag and drop the respective icon in the effectschain display.
• To bypass an effect, click the yellow square button next to its name.• To bypass the entire effects chain, click on the yellow square to the left of the Amps & FX
page title. Please consider that the effects still require processing power, unless the effectschain is cleared.
• To clear the entire effects chain, click on the Clear All button in the upper right corner and
confirm.
If you want to process the unaltered direct signal with external effect plugins, youcan save CPU resources by clearing the entire FX chain. Keep in mind that if stereodoubling is enabled, two individual signal chains are required, i.e., one amp simula-tion for the left output channel and another one for the right output channel. If indoubt, listen to the stereo width: If the stereo doubled signal collapses to mono whenapplying external effects, the signal path is not “true stereo”.
The Amps & FX Page
21

• To remove an effect, click on the Clear Slot button on the right side. • To automate effects parameters, record the knob movements as automation data via the
“write automation” functionality of your sequencer. Alternatively, you can assign MIDI control-lers via right-click on the respective knob. However, if you change the loaded effects subse-quently, it is recommended to delete previously recorded automation to avoid accidental arbi-trary modulation of parameters.
• To load a different effect into the current slot, click the magnifier icon next to the inspectorheading or click the magnifier icon that appears when hovering the name of an effect slot. Thiswill open the AMPS & FX BROWSER. In that browser, click on the desired effect to load it intothe selected slot. If the effect slot wasn’t empty, the loaded effect will automatically replace thepreviously loaded one.
The Amps & FX Browser
The sound presets are fully backward-compatible to the first version of ELECTRICSUNBURST. This means that the legacy chorus, flanger and phaser effects are stillincluded. To load those legacy versions, ALT+click on Choral, Flair, and Phasis inthe Amps & FX browser.
The Amps & FX Page
22

For greater sonic versatility, the included amp models do not include speaker mod-els. Instead, you can freely combine each amp model with each virtual speaker cabi-net. Therefore, to simulate a traditional guitar amplifier, make sure that an amp mod-el is always followed by a virtual speaker cabinet in a separate effect slot. It is advis-able to study some of the included presets for reference.
The Amps & FX Page
23

9. THE PLAYBACK PAGE
Clicking on the Playback tab (at the bottom of the instrument) will open the Playback page. Thispage contains settings that affect the way the patterns are played back. This page is divided intoseveral sections, each of which is described below.
• To exclude the Playback settings from Songs or snapshots, click the lock icon on the Playbacktab at the bottom of the instrument (see section Locking Parameters When Loading Snapshotsor Songs).
The Playback Page
• SWING: Use the Amount knob to set the amount of swing added to each pattern, either on an8th note or a 16th note basis. A setting of 0% would represent the original state of all patterns.
If the Amount knob doesn't affect the playback, it is very likely that either a tripletpattern is selected, or the timing basis has to be changed from 8th to 16th notes.
• HUMANIZE: Use the Performance knob to set the amount of quantization added to all patterns.In the right position, the timing of the original performance will remain unaltered. At the left po-sition, the performance will be fully quantized.
• DEFAULT MODE (melody instrument): In the melody instrument, you can combine melodicplaying and pattern playback into one cohesive performance. When set to Melody, you canplay melodies by default, and holding down a pattern keyswitch will temporarily trigger a pat-tern. When set to Pattern, the instrument will perform patterns by default, and holding down
The Playback Page
24
one of the melody keyswitches will temporarily allow you to play melodies (for more informa-tion, see Combining Melodies and Patterns).
• LATCH MODE: After you have released all keys, the pattern playback will automatically stopwithin the note duration specified in the LATCH MODE drop-down menu.
The slightly delayed stopping of the playback enables the engine to performsmooth transitions from one chord to the next, even if the incoming MIDI notesare not played as a seamless legato performance. However, if you want to stopthe performance at a specific position in the arrangement, e.g., to perform abreak, it is advisable to trigger one of the “ending keys” (G#1, A1, Bb1) at the de-sired position.
• PATTERN SYNC: Use the drop-down menu to select one of two available sync modes.• Sync to host: With this mode selected, pattern playback will start in sync with your host
sequencer. As ELECTRIC SUNBURST DELUXE is based on two-bar patterns, make sureto start your song on bar one or any other uneven bar number (e.g. bar 3, bar 5, bar 17).
• Start on a key: With this mode selected, pattern playback will start from the beginning assoon as the first chord is being played, ignoring the current host playback position. As longas the playback does not get interrupted (see description of the LATCH MODE sectionabove), this shifted performance will be retained even if you subsequently play chords.
• TIMING: Increase the offset for a laid back feel or decrease the offset to have the virtual guita-rist play before the beat.
• TEMPO: Here, you can select between three tempo ratios 1⁄2 (half time), 1:1 (normal time), or×2 (double time), which will globally affect the pattern playback speed relative to the host tem-po. Please note that there is also a local time scaling feature available for each pattern (seesection The Inspector Panel). The individual patterns' tempo factors will each be multiplied bythe global tempo factor.
With slow host tempos, switching the global tempo to half time may not work ifthe actual relative tempo falls below the limit of around 65 bpm.
The Playback Page
25

10. TIPS AND TRICKS
Last, but not least, the developers would like to share a couple of tips to help you get the most outof ELECTRIC SUNBURST DELUXE:
10.1. Use the Melody Instrument to enhance the Pattern Play-backThe new melody feature makes it possible to add melodic fills to spice up an otherwise repetitiveperformance: Load the Melody.nki and switch the default mode on the Playback page to Pattern.Now, you can perform patterns just like in the regular instrument, but holding down a melody key-switch will enable you to add monophonic or polyphonic fill-ins or variations to the pattern perform-ance. The instrument will create smooth transitions between patterns and melody notes, if possi-ble. Use the velocity reduction feature on the Guitar Settings page to even out dynamic differen-ces between pattern and melody playback. This will result in a more cohesive performance. If Asplayed is selected in the voicing drop-down menu, the voicing will be an exact representation ofthe incoming MIDI notes. This way, playback in melody mode and pattern mode will be based onthe exact same notes, which helps create smooth transitions between patterns and melodies.
10.2. Vary the number of played notes in Arpeggio PatternsMost arpeggio patterns contain a lot more variability than meets eye: Depending on the number ofnotes contained in a voicing, the rhythmic structure, as well as the distribution of the incomingnotes varies significantly. To get a general idea of a pattern’s possibilities, it is advisable to listen toits included voicings. For maximum flexibility, however, try deactivating the voicing feature by se-lecting As played in the voicing drop-down menu. Now, you can smoothly transition between thedifferent variations of a pattern, simply by altering the number of notes you play simultaneously.
10.3. Create Natural Transitions between ChordsTo create realistic sounding transitions between chords, do not quantize your keyboard perform-ance. Instead, make sure that all chord and pattern changes are played as early as possible. Thisway, ELECTRIC SUNBURST DELUXE can anticipate that a chord change or pattern change isabout to take place and perform the transitions between patterns and chords in the most naturalway. Depending on the chord progression, an appropriate fret noise is added automatically. Thesenatural transitions would be impossible if you quantized your MIDI data. Don’t worry about the tim-ing, triggering the patterns before the beat will not make the performance sound out of time, as thetiming is bound to the internal metronome of your sequencer. Also make sure that chords do notoverlap, because an overlap would technically mean that two chords are played at the same pointin time.
Tips and Tricks
26
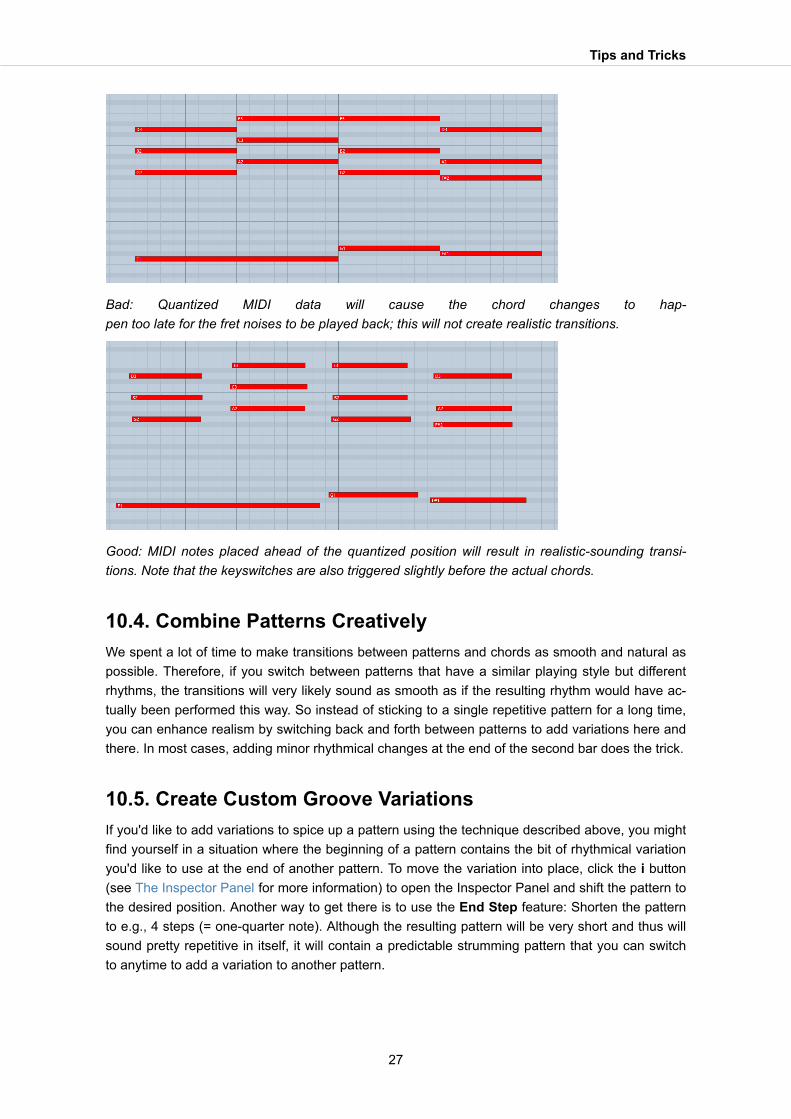
Bad: Quantized MIDI data will cause the chord changes to hap-pen too late for the fret noises to be played back; this will not create realistic transitions.
Good: MIDI notes placed ahead of the quantized position will result in realistic-sounding transi-tions. Note that the keyswitches are also triggered slightly before the actual chords.
10.4. Combine Patterns CreativelyWe spent a lot of time to make transitions between patterns and chords as smooth and natural aspossible. Therefore, if you switch between patterns that have a similar playing style but differentrhythms, the transitions will very likely sound as smooth as if the resulting rhythm would have ac-tually been performed this way. So instead of sticking to a single repetitive pattern for a long time,you can enhance realism by switching back and forth between patterns to add variations here andthere. In most cases, adding minor rhythmical changes at the end of the second bar does the trick.
10.5. Create Custom Groove VariationsIf you'd like to add variations to spice up a pattern using the technique described above, you mightfind yourself in a situation where the beginning of a pattern contains the bit of rhythmical variationyou'd like to use at the end of another pattern. To move the variation into place, click the i button(see The Inspector Panel for more information) to open the Inspector Panel and shift the pattern tothe desired position. Another way to get there is to use the End Step feature: Shorten the patternto e.g., 4 steps (= one-quarter note). Although the resulting pattern will be very short and thus willsound pretty repetitive in itself, it will contain a predictable strumming pattern that you can switchto anytime to add a variation to another pattern.
Tips and Tricks
27
10.6. Use Authentic HumanizationThe Humanize knob does not add random offsets to create some kind of fake realism. Instead, itrecreates the exact timing of the guitarist as he recorded all the patterns in the studio. That means,although the differences may be subtle, the Original setting feels much more like a real guitaristbecause it delivers the actual timing of a real guitarist. To our ears, adding a shuffle value ofaround 5-15% on top of the humanization creates very appealing results.
10.7. Use the Impact Slider as a “Drama Controller”When moving towards a quiet passage in your song, move the impact slider to the left. As you ap-proach the chorus, slowly move it to the right. If applied correctly, this makes the virtual guitaristplay towards a certain musical event, e.g. the chorus or a break. You can also use the pitch wheelto smoothen the transition between patterns which are played at different volumes to a certain de-gree.
10.8. Use Multiple Session Guitarist Instruments Simultane-ouslyInstead of using just one single pattern at a time, try the following: Open two instances of ELEC-TRIC SUNBURST DELUXE. While instance one plays the regular chord progression of the song inthe low voicing, instance two plays only an empty fifth chord as a pedal point in a higher register.Combining several different guitars and/or patterns in this manner can really help to open up yourarrangement. Try creative panning and/or doubling settings.
Tips and Tricks
28

11. CREDITS
Product Concept, Design & Concept: Samuel Dalferth, Daniel Scholz, Sebastian Müller
UI/UX: Mirko Wannemacher, Fabian Ruf
KSP Scripting: Daniel Scholz
Product Owner: Christian Wachsmuth
Guitarists: Andreas Dombert, Joschi Joachimsthaler, Christoph Bernewitz
Recording Engineer: Samuel Dalferth
Documentation: Daniel Scholz, Samuel Dalferth
Library Concept: Samuel Dalferth, Sebastian Müller
Sound Presets: Sebastian Müller, Samuel Dalferth, Jonathan Kranz
Quality Assurance: Martin Müller, Jonathan Kranz, Carlos Ruiz, Francesco Sabatini
Marketing Manager: David Tinning
Artwork: Maik Siemer
Finalization & Encoding: Francesco Sabatini
Speaker IRs: 3 Sigma Audio
Credits
29