table of contents - software solutions for public safety | …€¦ · · 2015-02-18table of...
TRANSCRIPT

Table of Contents PAGE I. Introduction 3 II. Installation Guide
A. Installation 5 1) Network Setup 6 2) Standard Installation Instructions 7 3) Modified Installation Instructions 8
- Microsoft ACCESS XP 4) Create a shortcut icon 9 5) Register ADORE 9
B. Data Sharing/Transfer Settings 1) All PCs connected to Network 10 2) Remote/Host Setup 11
– PCs always connected to Network/Docking PCs 3) Remote/Host Setup 12
– connected to HQ via CDPD/Phoneline (‘Slow’ Connection) 4) External media, e.g. floppy disks 13
C. Add-ons 1) PDA Installation 15 2) SQL Setup 16
III. Customizing ADORE II – Using Maintenance
A. General Setup 17 B. Detailed Instructions
1) Authority Levels 18 2) Authorized Users 19 3) Compact & Protect Database 21 4) Computers 22 5) Direct Access to Database 23 6) DOR Directory 23 7) Field Training Officers – Adding, Deleting, Archiving 24 8) Handheld Support 26 9) Import from Other Databases 27 10) Open Archive File 27 11) Probationary Officers – Adding, Deleting, Archiving 28 12) Properties 30 13) Qualifier - Adding, Deleting 36 14) Questions – Adding, Deleting or Modifying 36 15) Record Analysis 38 16) Report Format Definition 38 17) SQL Server Setup 42 18) Task Log Roles 42 19) Training Sessions 43 20) View Log 44 21) Valid DOR Numbers 44
02/25/05 ADORE© User’s Guide 1
IV. Using ADORE
A. DORs 45 B. Periodic Reports 53 C. Daily Performance 56 D. Display Averages
1) Roll-Up/Narrative Reports 58 2) Graphical Comparisons 61
V. Appendices
A. Installation A-1 B. SQL Database Setup B-1 C. SQL - ADORE Setup C-1 D. Authority Levels
1) PO/Recruit D-1 2) XTO D-2 3) Supervisor D-4 4) XTO Coordinator D-5
E. Quick Reference Guides 1) FTO ‘Cheatsheet’ – DORs, Narrative Reports and Daily Spreadsheets E-1 2) Supervisor Review and Signature E-4 3) Generating Reports….using Display Averages E-5
F. Troubleshooting/Error Messages 1) Yellow Exclamation Point Errors F-1 2) Troubleshooting – General F-2
Provided by: MdE, Inc. 9 Lanhill Court Baltimore, MD 21227 Phone: (877) 500-5396 (301) 497-9508 Fax: (301) 497-9587 www.MdE-Inc.com
Developed by: PTG International, Inc.
NOTE: 1) Microsoft, Windows, Word, ACCESS, PocketPC and SQL are registered trademarks or trademarks of
Microsoft Corporation in the U.S. and/or other countries. 2) Palm is a trademark of Palm, Inc.
02/25/05 ADORE© User’s Guide 2

INTRODUCTION Training Programs Reap Benefit of Computer Advancement Research reveals that the first organized law enforcement field training program was implemented by the Milwaukee Police Department in April 1962. The subsequent, nation-wide adoption of the San Jose model has been the single most beneficial advancement in the entire profession, for no other specialized unit, strategy or policing tool has done as much to improve the overall knowledge, skill or abilities of officers. It is somewhat disheartening then, that the national standard of field training has remained relatively stagnant. Most Field Training Officer (FTO) programs still struggle with a variety of serious problems. The real-life difficulties of a contemporary FTO coordinator often include a lack of support from administrators, poor program communication, inept standardization, sporadic documentation and paperwork that can overwhelm anyone. Tim Dees, the highly respected author of law enforcement computer-related articles and critiques, offered this comment on a significant problem in a recent article in Law & Order magazine. “One of the biggest headaches in administering a field training officer (FTO) program is in the paperwork. Invariably, Daily Observation Reports (DORs) are mislaid, misfiled, or not turned in at all, and those all-important training files get out of wack. A potential software solution for this situation is in the form of ADORE© …” ADORE was five years in development and testing in Police Departments throughout the Country. As a result of test after test with the ADORE Software, we can say with confidence that: FTO Coordinators save many hours of valuable time in reviewing DORs.
FTOs save between 20 and 30 minutes in preparing each DOR.
Training records are more complete and updated, as compared with manual programs.
Automatic spell-check reduces embarrassing report errors.
The ability to review DORs individually, in batches or with graphic display facilitates the review process.
Auto-searching DORs for specific comments allows specific case numbers/comments to be found
immediately. Comparison analyses of training session, phases, categories, etc. assists in the monitoring and revamping
of the FTO program to meet/address current demands, strengths and weaknesses. ADORE Saves Time
04/25/03 ADORE© User’s Guide Introduction 3

04/25/03 ADORE© User’s Guide Introduction 4

SECTION II
INSTALLATION GUIDE
This manual uses the following nomenclature: DOR – Daily Observation Report FTO – Field Training Officer PO – Probationary Officer TO – Training Officer XTO – Training Officer with X representing a variable qualifier, e.g..
CTO – Communications Training Officer DTO – Detention Training Officer

10/09/03 ADORE© User’s Guide Installation 5
INSTALLATION GUIDE A. Installation
This section is designed to be utilized as a ‘check-off’ list. Please copy section A and have it available during the phone installation conference with MdE, Inc.
PRIOR to the installation conference, please fax the following to MdE, Inc. at 301-497-9587:
Section II.A.1) Network Setup Training Coordinator Setup Questionnaire (provided with Welcome letter) Department Statistic Form (provided with Welcome letter)

10/09/03 ADORE© User’s Guide Installation 6
1) Network Setup
If files will be shared/stored on a network, ALL ADORE users must be given READ, WRITE,
CREATE, DELETE, MODIFY, and BROWSE abilities on the subdirectory where these files are installed.
Indicate the exact location of the shared folder where the ADORE files will be located. We
recommend that a folder called ADORE be placed on the network. Either UNC or a mapped drive can be used:
_______________________________________________________
Examples: \\server\apps\adore or s:\adore
Each PC which will utilize ADORE must contain the folder c:\windows\temp. If you utilize Windows NT, XP or Windows 2000, you will most likely have to add this folder to each PC.
ADORE must be installed on the c:\adore drive of each PC which will access ADORE. Only
the shared files reside on the server.
Long file names must be activated.
Remove the Demonstration version of ADORE from any computers on which ADORE will be installed.
NOTES: 1. The individual.mdb contains all report responses. Depending on the system setup, this file may be
shared and/or automatically updated for each PC. We recommend that the Field Training Coordinator run the "Compact and Protect Database" feature in the maintenance section on each computer on a weekly basis. This will compact the file, minimizing space, and improving speed. This will also password-protect the database so that this data cannot be accessed by opening the file in Microsoft ACCESS.
2. The adore_be.mdb contains the list of all Authorized Users, Qualifiers, Training Sessions, Report Formats and Authority Levels. Depending on the system setup, this file may be shared and/or automatically updated for each PC. This file is typically password-protect the database so that this data cannot be accessed by opening the file in Microsoft ACCESS.
3. The Module SanJose.mdb contains the list of DOR questions and SEGs. Depending on the system setup, this file may be shared and automatically updated for each PC. This file is typically password-protect the database so that this data cannot be accessed by opening the file in Microsoft ACCESS.
4. The properties.mdb contains the setup and registration information. This file is not shared.
10/09/03 ADORE© User’s Guide Installation 7
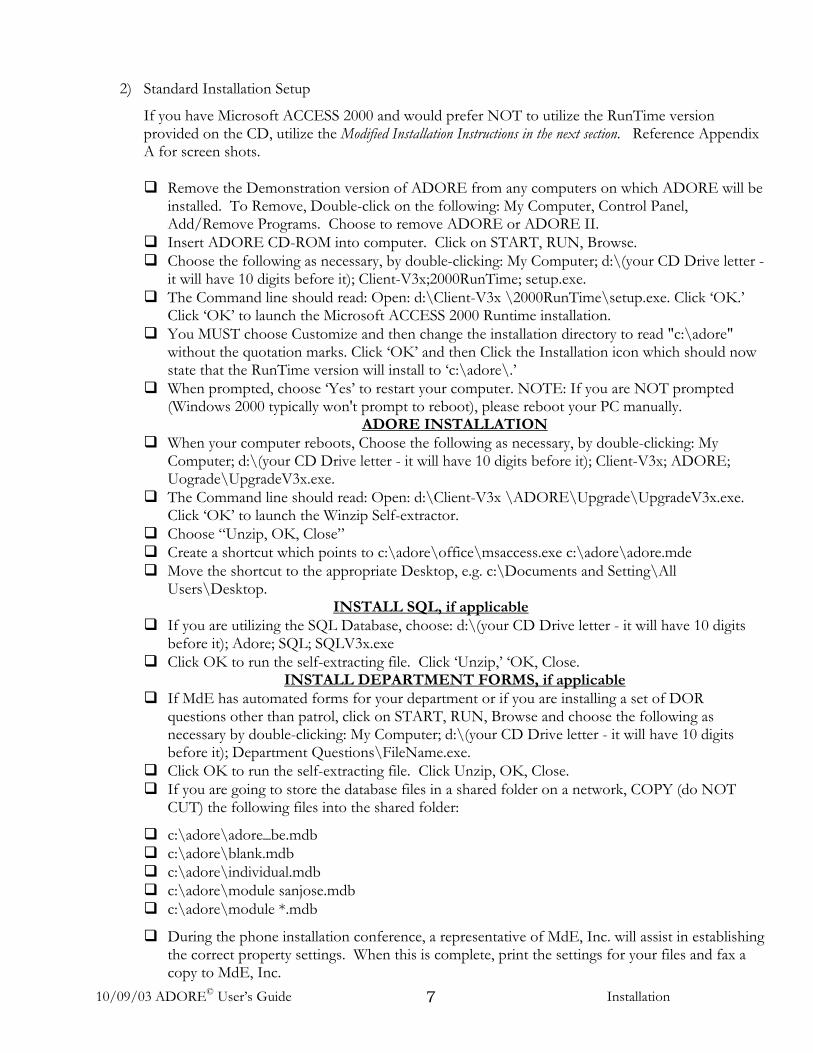
2) Standard Installation Setup
If you have Microsoft ACCESS 2000 and would prefer NOT to utilize the RunTime version provided on the CD, utilize the Modified Installation Instructions in the next section. Reference Appendix A for screen shots.
Remove the Demonstration version of ADORE from any computers on which ADORE will be
installed. To Remove, Double-click on the following: My Computer, Control Panel, Add/Remove Programs. Choose to remove ADORE or ADORE II. Insert ADORE CD-ROM into computer. Click on START, RUN, Browse. Choose the following as necessary, by double-clicking: My Computer; d:\(your CD Drive letter -
it will have 10 digits before it); Client-V3x;2000RunTime; setup.exe. The Command line should read: Open: d:\Client-V3x \2000RunTime\setup.exe. Click ‘OK.’
Click ‘OK’ to launch the Microsoft ACCESS 2000 Runtime installation. You MUST choose Customize and then change the installation directory to read "c:\adore"
without the quotation marks. Click ‘OK’ and then Click the Installation icon which should now state that the RunTime version will install to ‘c:\adore\.’ When prompted, choose ‘Yes’ to restart your computer. NOTE: If you are NOT prompted
(Windows 2000 typically won't prompt to reboot), please reboot your PC manually. ADORE INSTALLATION
When your computer reboots, Choose the following as necessary, by double-clicking: My Computer; d:\(your CD Drive letter - it will have 10 digits before it); Client-V3x; ADORE; Uograde\UpgradeV3x.exe. The Command line should read: Open: d:\Client-V3x \ADORE\Upgrade\UpgradeV3x.exe.
Click ‘OK’ to launch the Winzip Self-extractor. Choose “Unzip, OK, Close” Create a shortcut which points to c:\adore\office\msaccess.exe c:\adore\adore.mde Move the shortcut to the appropriate Desktop, e.g. c:\Documents and Setting\All
Users\Desktop. INSTALL SQL, if applicable
If you are utilizing the SQL Database, choose: d:\(your CD Drive letter - it will have 10 digits before it); Adore; SQL; SQLV3x.exe Click OK to run the self-extracting file. Click ‘Unzip,’ ‘OK, Close.
INSTALL DEPARTMENT FORMS, if applicable If MdE has automated forms for your department or if you are installing a set of DOR
questions other than patrol, click on START, RUN, Browse and choose the following as necessary by double-clicking: My Computer; d:\(your CD Drive letter - it will have 10 digits before it); Department Questions\FileName.exe. Click OK to run the self-extracting file. Click Unzip, OK, Close. If you are going to store the database files in a shared folder on a network, COPY (do NOT
CUT) the following files into the shared folder:
c:\adore\adore_be.mdb c:\adore\blank.mdb c:\adore\individual.mdb c:\adore\module sanjose.mdb c:\adore\module *.mdb
During the phone installation conference, a representative of MdE, Inc. will assist in establishing the correct property settings. When this is complete, print the settings for your files and fax a copy to MdE, Inc.

10/09/03 ADORE© User’s Guide Installation 8
3) Modified Installation Instructions
If your department has Microsoft ACCESS 2000 installed on the PCs which will utilize ADORE, following are installation instructions for ADORE. If you have Word 2000 or WORD XP and NOT ACCESS 2000, install ADORE in accordance with the Standard instructions. Reference Appendix A for screen shots.
Remove the Demonstration version of ADORE from any computers on which ADORE will be
installed. To Remove, Double-click on the following: My Computer, Control Panel, Add/Remove Programs. Choose to remove ADORE or ADORE II. Click on START, RUN, Browse. Choose the following as necessary, by double-clicking: My Computer; d:\(your CD Drive letter -
it will have 10 digits before it); ClientV3x; Adore; UpgradeV3x; UpgradeADOREV3x.exe. NOTE: If you are utilizing the SQL Database, choose: d:\(your CD Drive letter - it will have 10 digits
before it); ClientV3x; Adore; SQL; SQLV3x.exe Click OK to run the self-extracting file. Click ‘Unzip,’ ‘OK, Close.
INSTALL DEPARTMENT FORMS, if applicable If MdE has automated forms for your department or if you are installing a set of DOR
questions other than patrol, click on START, RUN, Browse and choose the following as necessary by double-clicking: My Computer; d:\(your CD Drive letter - it will have 10 digits before it); ClientV3x; ADORE; Department Questions\FileName.exe. Click OK to run the self-extracting file. Click Unzip, OK, Close. If you are going to store the database files in a shared folder on a network, COPY (do NOT
CUT) the following files into the shared folder:
c:\adore\adore_be.mdb c:\adore\blank.mdb c:\adore\individual.mdb c:\adore\module sanjose.mdb c:\adore\module *.mdb
Place a Shortcut icon that points to c:\adore\adore.mde in the appropriate Desktop folder(s). During the phone installation conference, a representative of MdE, Inc. will assist in establishing
the correct property settings. When this is complete, print the settings for your files and fax a copy to MdE, Inc.
NOTES: You may have to open ADORE the first time by utilizing Microsoft ACCESS:
a) Open Microsoft ACCESS. b) Choose to Open an Existing database file (change the file types to *.mde.) c) Choose the file c:\adore\adore.mde.

10/09/03 ADORE© User’s Guide Installation 9
4) Create a shortcut Icon
At each workstation, right-click on the desktop background. Choose “New” and “Shortcut“. For the Command line, type in and click on NEXT:
“c:\ADORE\OFFICE\MSACCESS.EXE” c:\ADORE\adore.mde.
Name the icon “ADORE” and click on FINISH. If your department is utilizing an existing installation of Microsoft Access 2000 in lieu of the
Run-Time version of ACCESS 2000 to operate ADORE, the command line can simply read:
c:\ADORE\adore.mde Based on the consultation with the MdE, Inc. representative, MdE may suggest that the property
settings be located in a different folder on the local drive. The shortcut icon would then have a command line similar to (include quotation marks):
“c:\ADORE\OFFICE\MSACCESS.EXE” c:\ADORE\adore.mde
/cmd:properties=c:\adore\division\properties.mdb
NOTE: These steps should be repeated for each additional workstation for which a shortcut icon is desired. Assuming workstations are setup identically, this shortcut can be copied and pasted to the appropriate desktop locations for the users/groups/PCs as determined by your network administrator. Sample shortcuts are provided on the ADORE CD in d:\Shortcuts.
5) Register ADORE
Start ADORE by Double-Clicking on the “ADORE” icon Type Administrator (or select from the pull-down screen). Press the TAB key and type 5466 (ADORE’s temporary administrator’s pass code). Select “OK.”
Complete all information on the Customer Registration screen – information will be provided
during the initial phone conference with MdE, Inc.

10/09/03 ADORE© User’s Guide Installation 10
B. Data Sharing/Transfer Settings Following are only those property settings which are used to establish the method of data transfer. For a detailed description of each Property setting, refer to the ‘Properties’ section under ‘Customizing ADORE II – Using Maintenance.’ A value of ‘No’ is equivalent to leaving the setting blank. 1) All PCs Connected to Network
Option Setting ADORE Directory \\Server\adore Backup Leave Blank if server is backed up on a regular
basis. Otherwise, set to c:\adore\backup.mdb. (The location of the backup file can be specified by the user and does not have to be c:\adore.)
Individual Database \\Server\adore
10/09/03 ADORE© User’s Guide Installation 11
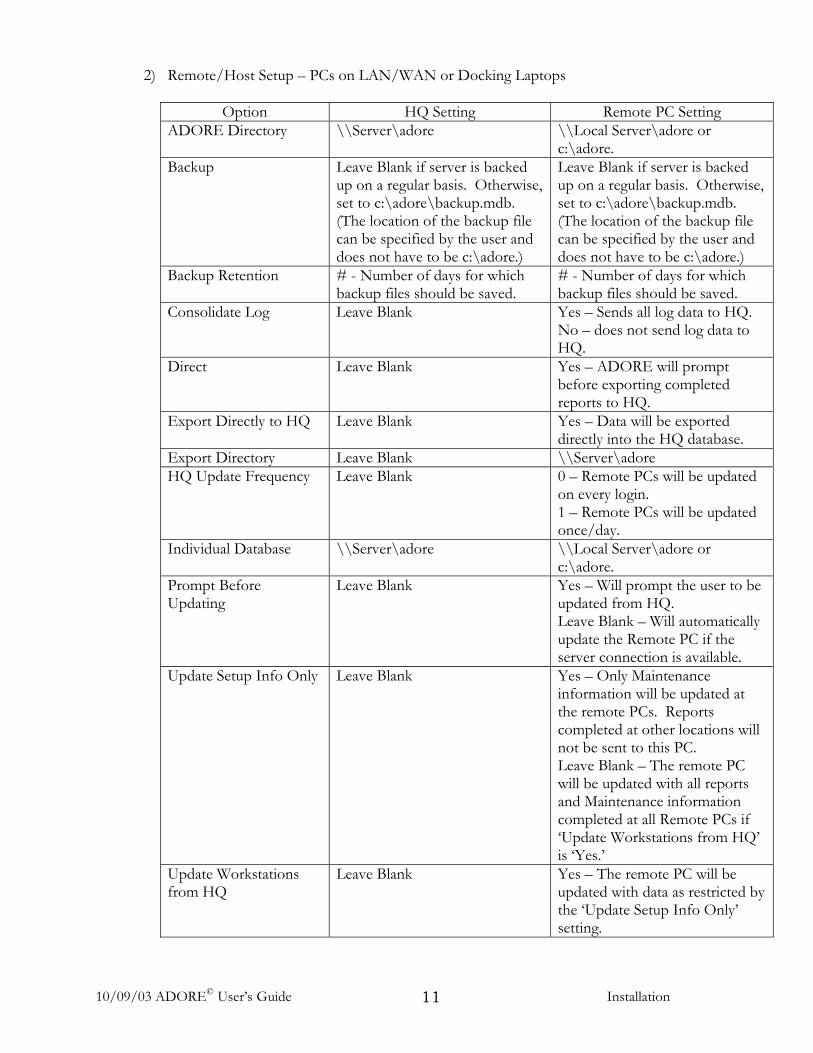
2) Remote/Host Setup – PCs on LAN/WAN or Docking Laptops
Option HQ Setting Remote PC Setting ADORE Directory \\Server\adore \\Local Server\adore or
c:\adore. Backup Leave Blank if server is backed
up on a regular basis. Otherwise, set to c:\adore\backup.mdb. (The location of the backup file can be specified by the user and does not have to be c:\adore.)
Leave Blank if server is backed up on a regular basis. Otherwise, set to c:\adore\backup.mdb. (The location of the backup file can be specified by the user and does not have to be c:\adore.)
Backup Retention # - Number of days for which backup files should be saved.
# - Number of days for which backup files should be saved.
Consolidate Log Leave Blank Yes – Sends all log data to HQ. No – does not send log data to HQ.
Direct Leave Blank Yes – ADORE will prompt before exporting completed reports to HQ.
Export Directly to HQ Leave Blank Yes – Data will be exported directly into the HQ database.
Export Directory Leave Blank \\Server\adore HQ Update Frequency Leave Blank 0 – Remote PCs will be updated
on every login. 1 – Remote PCs will be updated once/day.
Individual Database \\Server\adore \\Local Server\adore or c:\adore.
Prompt Before Updating
Leave Blank Yes – Will prompt the user to be updated from HQ. Leave Blank – Will automatically update the Remote PC if the server connection is available.
Update Setup Info Only Leave Blank Yes – Only Maintenance information will be updated at the remote PCs. Reports completed at other locations will not be sent to this PC. Leave Blank – The remote PC will be updated with all reports and Maintenance information completed at all Remote PCs if ‘Update Workstations from HQ’ is ‘Yes.’
Update Workstations from HQ
Leave Blank Yes – The remote PC will be updated with data as restricted by the ‘Update Setup Info Only’ setting.
10/09/03 ADORE© User’s Guide Installation 12
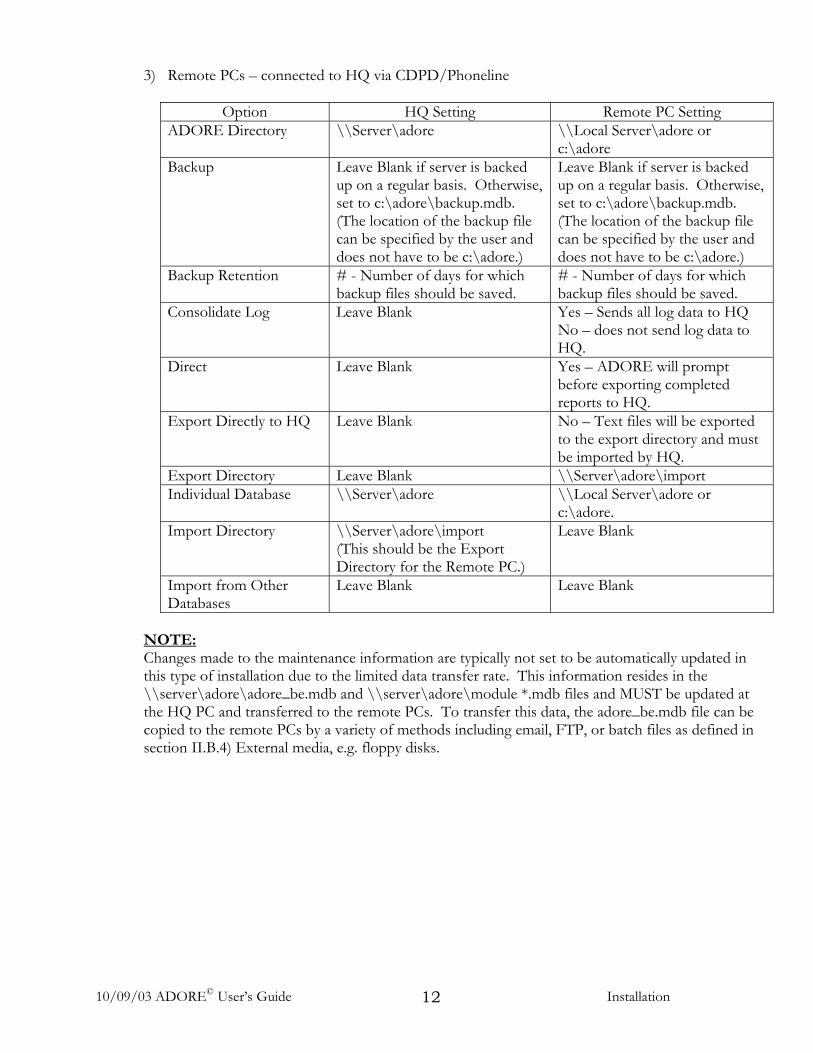
3) Remote PCs – connected to HQ via CDPD/Phoneline
Option HQ Setting Remote PC Setting ADORE Directory \\Server\adore \\Local Server\adore or
c:\adore Backup Leave Blank if server is backed
up on a regular basis. Otherwise, set to c:\adore\backup.mdb. (The location of the backup file can be specified by the user and does not have to be c:\adore.)
Leave Blank if server is backed up on a regular basis. Otherwise, set to c:\adore\backup.mdb. (The location of the backup file can be specified by the user and does not have to be c:\adore.)
Backup Retention # - Number of days for which backup files should be saved.
# - Number of days for which backup files should be saved.
Consolidate Log Leave Blank Yes – Sends all log data to HQ No – does not send log data to HQ.
Direct Leave Blank Yes – ADORE will prompt before exporting completed reports to HQ.
Export Directly to HQ Leave Blank No – Text files will be exported to the export directory and must be imported by HQ.
Export Directory Leave Blank \\Server\adore\import Individual Database \\Server\adore \\Local Server\adore or
c:\adore. Import Directory \\Server\adore\import
(This should be the Export Directory for the Remote PC.)
Leave Blank
Import from Other Databases
Leave Blank Leave Blank
NOTE: Changes made to the maintenance information are typically not set to be automatically updated in this type of installation due to the limited data transfer rate. This information resides in the \\server\adore\adore_be.mdb and \\server\adore\module *.mdb files and MUST be updated at the HQ PC and transferred to the remote PCs. To transfer this data, the adore_be.mdb file can be copied to the remote PCs by a variety of methods including email, FTP, or batch files as defined in section II.B.4) External media, e.g. floppy disks.
10/09/03 ADORE© User’s Guide Installation 13
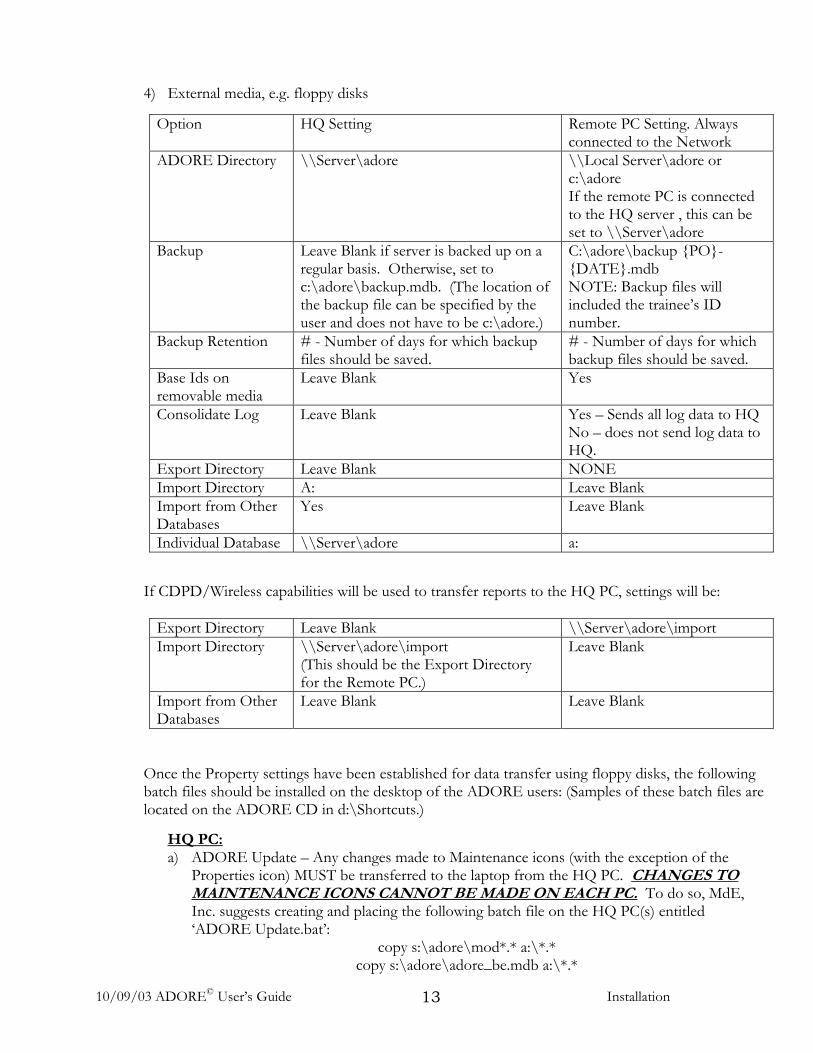
4) External media, e.g. floppy disks
Option HQ Setting Remote PC Setting. Always connected to the Network
ADORE Directory \\Server\adore \\Local Server\adore or c:\adore If the remote PC is connected to the HQ server , this can be set to \\Server\adore
Backup Leave Blank if server is backed up on a regular basis. Otherwise, set to c:\adore\backup.mdb. (The location of the backup file can be specified by the user and does not have to be c:\adore.)
C:\adore\backup {PO}-{DATE}.mdb NOTE: Backup files will included the trainee’s ID number.
Backup Retention # - Number of days for which backup files should be saved.
# - Number of days for which backup files should be saved.
Base Ids on removable media
Leave Blank Yes
Consolidate Log Leave Blank Yes – Sends all log data to HQ No – does not send log data to HQ.
Export Directory Leave Blank NONE Import Directory A: Leave Blank Import from Other Databases
Yes Leave Blank
Individual Database \\Server\adore a:
If CDPD/Wireless capabilities will be used to transfer reports to the HQ PC, settings will be:
Export Directory Leave Blank \\Server\adore\import Import Directory \\Server\adore\import
(This should be the Export Directory for the Remote PC.)
Leave Blank
Import from Other Databases
Leave Blank Leave Blank
Once the Property settings have been established for data transfer using floppy disks, the following batch files should be installed on the desktop of the ADORE users: (Samples of these batch files are located on the ADORE CD in d:\Shortcuts.)
HQ PC: a) ADORE Update – Any changes made to Maintenance icons (with the exception of the
Properties icon) MUST be transferred to the laptop from the HQ PC. CHANGES TO MAINTENANCE ICONS CANNOT BE MADE ON EACH PC. To do so, MdE, Inc. suggests creating and placing the following batch file on the HQ PC(s) entitled ‘ADORE Update.bat’:
copy s:\adore\mod*.* a:\*.* copy s:\adore\adore_be.mdb a:\*.*
10/09/03 ADORE© User’s Guide Installation 14
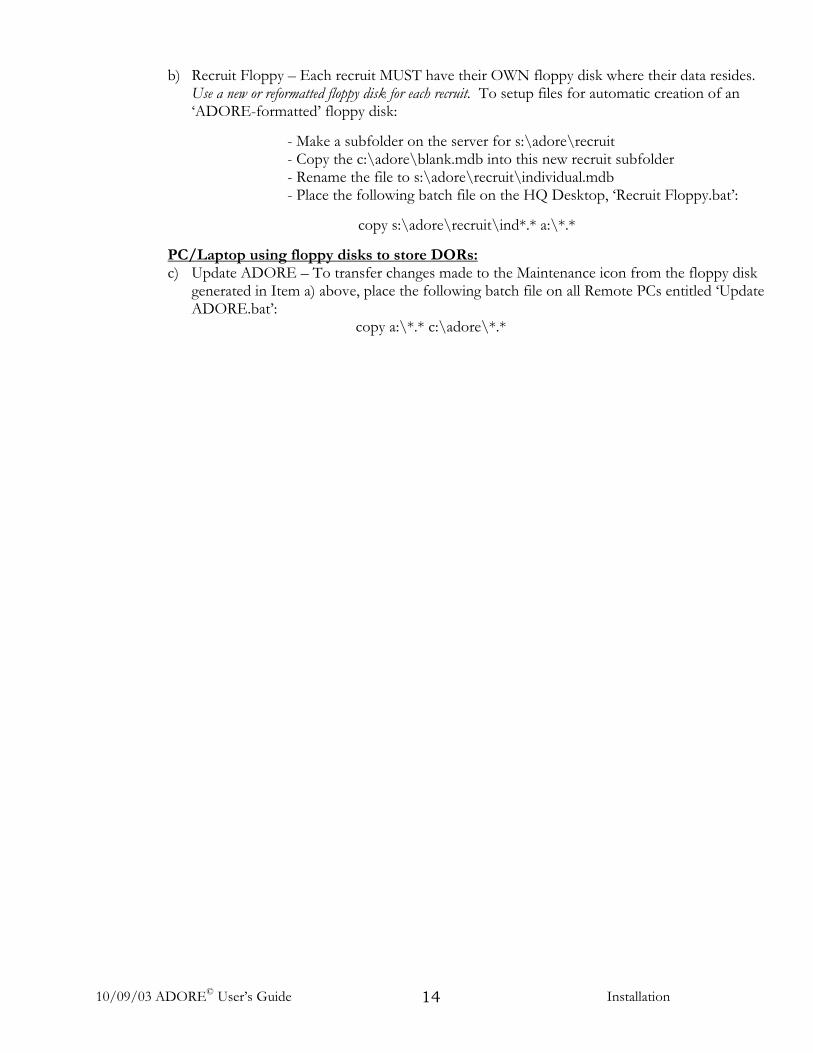
b)
Recruit Floppy – Each recruit MUST have their OWN floppy disk where their data resides. Use a new or reformatted floppy disk for each recruit. To setup files for automatic creation of an ‘ADORE-formatted’ floppy disk:
- Make a subfolder on the server for s:\adore\recruit - Copy the c:\adore\blank.mdb into this new recruit subfolder - Rename the file to s:\adore\recruit\individual.mdb - Place the following batch file on the HQ Desktop, ‘Recruit Floppy.bat’:
copy s:\adore\recruit\ind*.* a:\*.*
PC/Laptop using floppy disks to store DORs: c) Update ADORE – To transfer changes made to the Maintenance icon from the floppy disk
generated in Item a) above, place the following batch file on all Remote PCs entitled ‘Update ADORE.bat’:
copy a:\*.* c:\adore\*.*

10/09/03 ADORE© User’s Guide Installation 15
C. Add-Ons 1) PDA Installation Instructions
Once ADORE is installed and operating correctly, the PDA Add-on of ADORE can be installed. NOTE: Installation of the PDA Add-on to ADORE requires the ability to modify the Registry.
Indicate below the location of the PDA files:
______________________________________________________
Example: c:\palm
Confirm that the Palm Operating System is installed and operating properly. Confirm that PDAs sync correctly for the End-User by having the End-User log into the
Network and hotsync the PDA. Click on START, RUN, Browse. Choose the following as necessary, by double-clicking: My
Computer; d:\(your CD Drive letter - it will have 10 digits before it); PDA; PDAVx.exe. The Command line should read: Open: D:\PDA\PDAVx.exe. Click ‘OK.’ Click on Unzip, ‘OK,’ Close. Turn off the Hotsync Manager. Click on START, RUN, Browse and choose the following as necessary by double-clicking: My
computer; c:\; adore; palm; install.bat. The Command line should read: Open: C:\adore\palm\Install.bat. Click ‘OK.’ Choose one of the PDA Users whom will be using ADORE and click on Done. Click ‘OK’ to
confirm the PDA message regarding installation of ADORE. Answer ‘Yes’ to the question regarding modifying the Registry files. Click ‘OK’ to confirm the
message regarding successful entering of information into the Registry files. Hit the Enter key to complete the installation of the PDA Add-on. Close the ‘Finished-Install’ screen by clicking the Black “X” in the top right corner of the screen. Log into ADORE as the Administrator. Click on Maintenance, Properties. Delete the Checksumm information. Complete the “Handheld” property settings. Exit out of ADORE and Log back in as the Administrator. Fill in the revised Registration information as provided by MdE, Inc. Setup ADORE with the MdE representative or by inputting Training Sessions, Qualifiers,
Probationary Officers, and Field Training Officers in accordance with the ADORE manual. NOTE: Field Training Officers who will be utilizing PDAs MUST have a default PO and default Qualifier defined for ADORE to work properly on the PDAs. Exit ADORE. Turn the Hotsync manager back on. Synchronize the PDAs 2 times. This is necessary each time the PDAs are synchronized. The
first synchronization transfers information to ADORE on the PC. The second synchronization updates the PDA with information from the PC.

10/09/03 ADORE© User’s Guide Installation 16
2) SQL Installation Instructions
Once ADORE is installed and operating correctly, the SQL Add-on of ADORE can be installed. Reference Appendix B for screen shots. NOTE: ADORE will encrypt the password to the SQL database.
Generate a database on the SQL server named ADORE and run the script, c:\adore\define.sql.
Create a login with a password of your choice. Make sure the user has the db_owner database role. Choose SQL Server or Windows NT authentication. Verify connectivity to the database by creating an ODBC Data Source. Have the following information available:
Name/IP Address of ADORE SQL database file ________________________________ User ID _______________________ (SQL Authentication) User Password (must have FULL Access rights to the database, e.g. Read, Write, Create,
Modify, Delete) ______________________________________ (SQL Authentication) Log into ADORE as the Administrator and click on the following: Maintenance, SQL Setup.
NOTE: There is no “EXIT” icon for the SQL Setup screens. Use the lower black “X” in the top right corner to close the yellow SQL screens. Click on “Establish Account and Connection Info.” Fill in the information, Encrypt the
password and choose the Role of the PC – note the HQ PC must be established first – this is a “Direct connection to server.” Click on “Set Properties.” Click on “Import data from ACCESS” and input the location of the existing files or c:\adore if
this is a new installation. Once this is finished, close the SQL server screen by clicking on the lower Black “X” in the top
right corner. EXIT out of ADORE and log back in as the Administrator. ADORE should link to the SQL
Server database as noted in the bottom left corner just above the ‘Start’ icon.

10/09/03 ADORE© User’s Guide Installation 17

SECTION III
CUSTOMIZING ADORE II
Maintenance Functions


04/25/03 ADORE© User’s Guide Customizing ADORE 17
GENERAL SETUP INSTRUCTIONS MdE, Inc. will assist the user in the general setup of ADORE by completing these sections in the following order. A more detailed description of each item follows in Alphabetical order to facilitate future reference.
Authority Levels: give Permissions to each level of personnel using ADORE. Refer to Appendix D or confer with MdE, Inc. for standard setup. Training Sessions: Input the training year, e.g. 2002, unless your department has academy class
numbers to which recruits are assigned. The Start and End dates are optional. Qualifier/Station: Define the Additional Qualifier specified under Maintenance, Properties. Field Training Officers: Input FTO names and IDs - this information will automatically transfer
to the field labeled "Authorized Users" when you Exit this area and answer ‘Yes’ to both establishing Authorization Levels and Passwords. The "Authorized Users" area is where you will confirm the authorization level of XTO, default FTO as him/herself and set each XTO's password. NOTE: ALL XTOs MUST be input in this icon. DO NOT input them in the "Authorized Users" icon. Probationary Officers: Input name, ID and training session at a minimum. You do not have to
input the Probationary Officer's race, sex and/or Date of Birth - these are optional fields. The PO information will automatically transfer to the field labeled "Authorized Users" when you Exit this area and answer ‘Yes’ to both establishing Authorization Levels and Passwords. The "Authorized Users" area is where you will confirm the authorization level of PO/Recruit, default PO as him/herself and set each PO/Recruit's password. NOTE: ALL PO/Recruits MUST be input in this icon. DO NOT input them in the "Authorized Users" icon. Authorized Users: (Those persons who will use ADORE who are not FTOs or PO/Recruits).
Add each User and set their Authority Level and password. We also suggest that you change the Administrator's Password. Computers: The correct names of each PC/Laptop and a unique computer number MUST be
input on a HQ computer in Maintenance, Computers prior to using ADORE. One way to determine the computer name is:
Right click on the "Network'" icon on the desktop Left click on "properties" Left click on the 'Identification tab' Input the ‘Computer Name’ into ADORE EXACTLY as it is shown here. Left Click on "Cancel"
Questions: Modify DOR Categories, SEGs, Task List categories (if Task List Add-On option is
purchased.) and assign Groups. Report Format Definition: Design the signature page and other periodic reports. If you will be
utilizing electronic signature of the DORs, you may opt to design your own signature page instead of using one which is provided. If so, design your report in the "Report Format Definition" icon of the "Maintenance" section. In order for this report to automatically open once a DOR is marked complete, highlight the name of the report and click "Use for DORs." Task Log Roles: Identify the Roles for Calls if this Add-On Option is utilized. Compact & Protect Database: MdE suggests that you run this icon weekly. This will compact
the database to improve speed and efficiency as well as confirm its password protection. Valid DOR Numbers - if you choose to use a numbering system OTHER than conventional
DOR numbers 1,2,3, etc. then EACH DOR number must be defined in this icon, e.g. 1-2, 1-2, 2-1, etc.
04/25/03 ADORE© User’s Guide Customizing ADORE 18
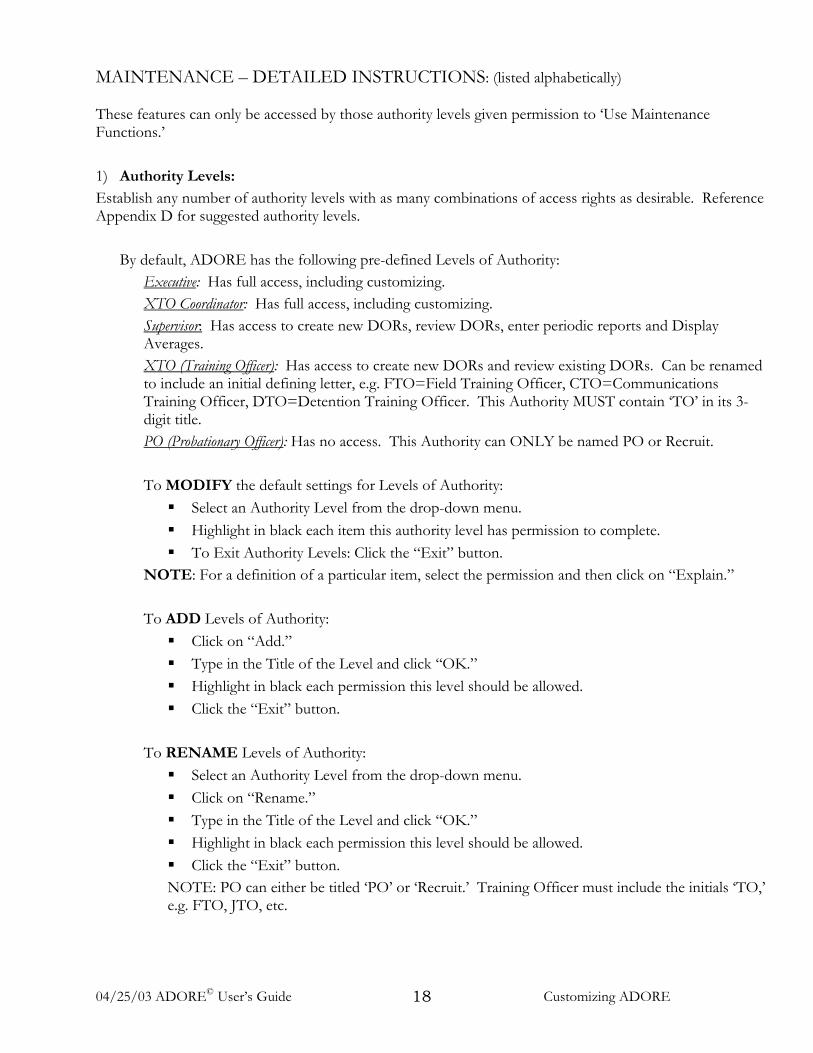
MAINTENANCE – DETAILED INSTRUCTIONS: (listed alphabetically) These features can only be accessed by those authority levels given permission to ‘Use Maintenance Functions.’ 1) Authority Levels: Establish any number of authority levels with as many combinations of access rights as desirable. Reference Appendix D for suggested authority levels.
By default, ADORE has the following pre-defined Levels of Authority:
Executive: Has full access, including customizing. XTO Coordinator: Has full access, including customizing. Supervisor: Has access to create new DORs, review DORs, enter periodic reports and Display Averages. XTO (Training Officer): Has access to create new DORs and review existing DORs. Can be renamed to include an initial defining letter, e.g. FTO=Field Training Officer, CTO=Communications Training Officer, DTO=Detention Training Officer. This Authority MUST contain ‘TO’ in its 3-digit title. PO (Probationary Officer): Has no access. This Authority can ONLY be named PO or Recruit.
To MODIFY the default settings for Levels of Authority: Select an Authority Level from the drop-down menu. Highlight in black each item this authority level has permission to complete. To Exit Authority Levels: Click the “Exit” button.
NOTE: For a definition of a particular item, select the permission and then click on “Explain.” To ADD Levels of Authority: Click on “Add.” Type in the Title of the Level and click ‘‘OK.” Highlight in black each permission this level should be allowed. Click the “Exit” button.
To RENAME Levels of Authority: Select an Authority Level from the drop-down menu. Click on “Rename.” Type in the Title of the Level and click ‘‘OK.” Highlight in black each permission this level should be allowed. Click the “Exit” button.
NOTE: PO can either be titled ‘PO’ or ‘Recruit.’ Training Officer must include the initials ‘TO,’ e.g. FTO, JTO, etc.

04/25/03 ADORE© User’s Guide Customizing ADORE 19
2) Authorized Users Input authorized users other than PO/Recruits and XTOs. NOTE: All Training Officers and Trainees MUST be added by clicking on the “Field Training Officers” and “Probationary Officers” icons. Once entered in their respective categories, these names will automatically appear in the “Authorized Users” section where the default settings and passwords can be assigned. All other users are entered by directly accessing this icon.
To change settings for an existing authorized user:
Click on the name of the officer whose information you would like to modify. Select the Level of Authority to be allowed.
NOTE: Those entered in the Probationary Officer icon MUST retain the Authority Level of PO/Recruit. Those entered in the Field Training Officer icon MUST retain the Authority Level of XTO – this allows their name to appear on the respective ‘drop-down’ lists for electronic signature.
If the Training Officer will utilize ADORE as another authorization level, e.g. also performs Supervisory functions, they MUST be added again as an Authorized User with the appropriate Authority Level as detailed below.
Station/Qualifier – XTO can be assigned a default station/qualifier from the dropdown menu (optional.) If selected, this qualifier will become the default qualifier each time the person enters a new DOR. This is MANDATORY for XTOs utilizing PDAs.
Default PO - The default PO should automatically be filled in for each PO/Recruit properly input in the Probationary Officers icon. (MANDATORY – DO NOT DELETE THIS). For XTO’s, if a default PO is selected from the dropdown list, this PO/Recruit will become the default PO/Recruit name each time the person enters a new DOR. This is MANDATORY for XTOs utilizing PDAs.
Default XTO – The default XTO should automatically be filled in for each XTO properly input in the Field Training Officers icon. (MANDATORY – DO NOT DELETE THIS). Do NOT use this field for authority levels other than XTO.
Handheld Name – if PDAs are used, select the Handheld name from the dropdown list. Type in the ‘New Password.’ Passwords can be alpha/numeric codes and are case-sensitive
as determined by the Administrator in the Properties section. Passwords should be 3-9 characters.
Click the “Exit” button and confirm the password by typing it again and pressing the ‘Enter’ key on the keyboard.

04/25/03 ADORE© User’s Guide Customizing ADORE 20
Authorized Users
To ADD an Authorized User - Authority Level OTHER THAN a PO/Recruit or XTO: Click “Add User.” Input the user’s name, overwriting “new user.” Select the Authority Level from the drop-down menu. NOTE: All POs MUST be input in
the Probationary Officers icon and all Training Officers MUST be input in the Field Training Officers icon. DO NOT use this method for adding POs or XTOs.
Input a password for this User – no other default settings need to be set. Click the “Exit” button and confirm the password by typing it again and pressing the ‘Enter’
key on your keyboard.
To DISABLE an Authorized User: Click on the name of the officer whose information you would like to modify. Delete the Authority by backspacing over it. Click on the name of another user in the list above – Note that the original user is now
marked as ‘-disabled.’
To CHANGE the password of an authorized user: Click on the name of the user whose information you would like to modify. Simply input the new password, which overwrites the old. Click the “Exit” button and confirm the password by typing it again and pressing the ‘Enter’
key on your keyboard
04/25/03 ADORE© User’s Guide Customizing ADORE 21
3) Compact and Protect Database
Utilize this to compact the database on a weekly basis. Compacting the database maximizes efficiency. Password-protection is utilized to ensure that no one enters the ACCESS database directly and modifies the information. If this file needs to be accessed, contact MdE, Inc.
The process will begin once you click on this icon. When notified that the database has been compacted and password-protected, click ‘‘OK.’.’
NOTE: There MUST be a folder named exactly c:\windows\temp for proper operation of this feature.
04/25/03 ADORE© User’s Guide Customizing ADORE 22
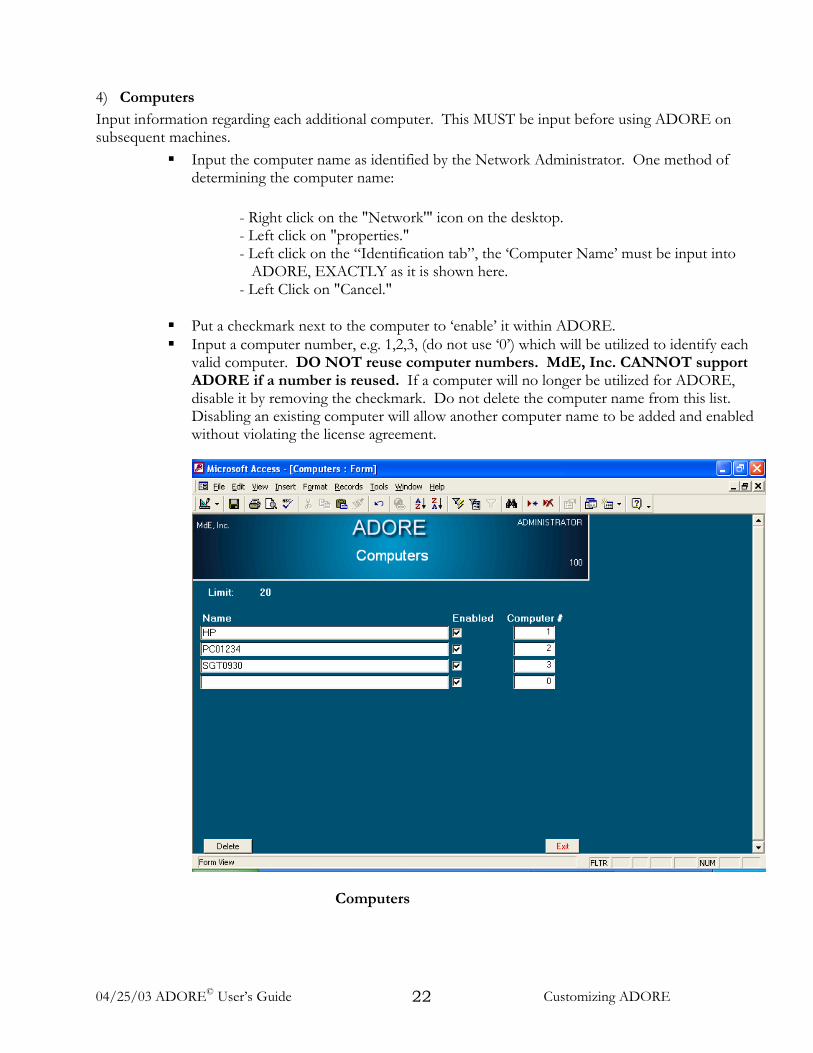
4) Computers
Input information regarding each additional computer. This MUST be input before using ADORE on subsequent machines.
Input the computer name as identified by the Network Administrator. One method of determining the computer name:
- Right click on the "Network'" icon on the desktop. - Left click on "properties." - Left click on the “Identification tab”, the ‘Computer Name’ must be input into
ADORE, EXACTLY as it is shown here. - Left Click on "Cancel."
Put a checkmark next to the computer to ‘enable’ it within ADORE. Input a computer number, e.g. 1,2,3, (do not use ‘0’) which will be utilized to identify each
valid computer. DO NOT reuse computer numbers. MdE, Inc. CANNOT support ADORE if a number is reused. If a computer will no longer be utilized for ADORE, disable it by removing the checkmark. Do not delete the computer name from this list. Disabling an existing computer will allow another computer name to be added and enabled without violating the license agreement.
Computers

04/25/03 ADORE© User’s Guide Customizing ADORE 23
5) Direct Access to Data Directly access the information in the ADORE database files. MdE, Inc. does not suggest use of this area without assistance from MdE, Inc. This is provided for future growth. 6) DOR Directory
Generate a spreadsheet showing dates of completed DORs currently in the ADORE database based on the starting DOR and/or Training Session.
Input the Starting DOR number. Input the Training Session (‘0’ indicates ALL training sessions.) Click on “View Report” to view the status of DORs for each PO/Recruit in the specified
training class. A ‘N/C’ indicates a DOR that is ‘not complete.’ Press the ‘ESC’ on the keyboard to exit the report.
DOR Directory
04/25/03 ADORE© User’s Guide Customizing ADORE 24
7) Field Training Officers – Adding, Deleting, Archiving
Input any number of Training Officers (XTOs.) All persons signing off as Trainers MUST be input under this icon. To ADD a new Training Officer:
Scroll to the last entry in the table. The fields should be blank. Type the Trainer’s name and ID Number in the appropriate columns. The ID Number MUST be a unique number for each officer and cannot be reused by another officer. This is typically a badge number, portion of SSN or some other unique number. The ID number MUST be numeric and can be 1-8 characters.
Click the “Exit” button. Respond ‘Yes’ to the question, “You have added (#) new TOs. Do you want to register
them as authorized users?” If you respond ‘No,’ you will exit to the Maintenance screen and the information will not have been saved, meaning the Training Officer will have no authority to use ADORE.
Respond ‘Yes’ to the question, “Each one has an unknown password and a standard authority level. Would you like to set their passwords, authority levels and/or default PO’s now?” If you respond ‘No,’ you will exit to the Maintenance screen and the Training Officer will not be able to log into ADORE or sign reports until a password is assigned. (See Authorized Users.)
After responding ‘Yes’ to both questions, you will be transferred to the Authorized Users screen. Highlight each Training Officer’s name and assign him/her a unique password. Hit the ‘Enter’ key on your keyboard, confirm the password by typing it again and pressing ‘Enter.’
The Authorization Level MUST be XTO and the ‘default FTO’ MUST be that XTO. All other default settings are optional, and are only assigned if 1) your department restricts the Training Officer’s access to DORs based on their assigned Probationary Officer or 2) your department is utilizing ADORE on Handhelds/PDAs.
Click the “Exit” button when all information has been entered. NOTE: The list of Training Officers is contained within a separate “backend” database named “adore_be.mdb.” If this information already exists in an Access database format, the information can be imported. See “Import from Other Databases” for instructions.
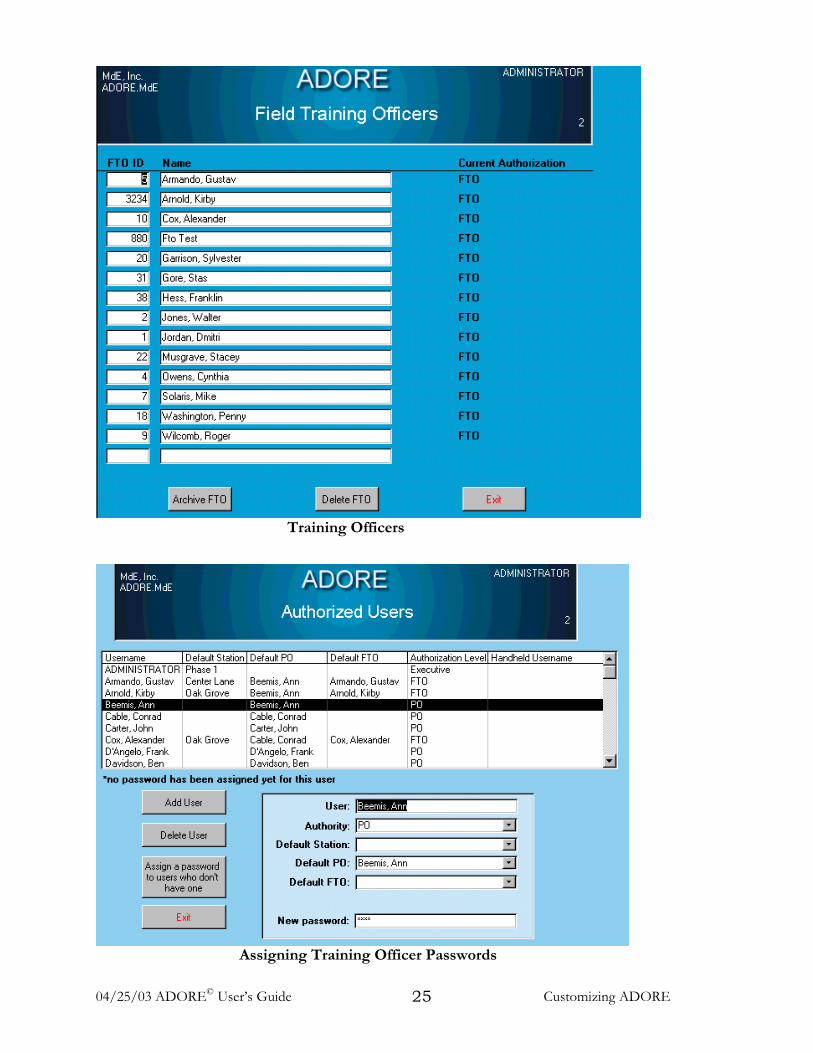
04/25/03 ADORE© User’s Guide Customizing ADORE 25
Training Officers
Assigning Training Officer Passwords
04/25/03 ADORE© User’s Guide Customizing ADORE 26
To DELETE a Training Officer:
NOTE: If the Training Officer is no longer active and you would like to retain his/her reports in ADORE for trending analyses, deactivate the officer so that he/she can NOT log into ADORE by following the instructions in the ‘Authorized Users’ section regarding disabling users.
Highlight the individual’s name. Click the “Delete FTO” icon. ADORE will prompt, “Would you like to delete him/her and all of the DORs he/she has
entered?” All DORs and Periodic Reports completed by this trainer will be deleted unless you answer
‘Yes’ to the following question “Would you like to archive all of the DORs for that XTO first?” If there are no reports to archive, answer ‘No’. Answer ‘Yes’ and the file ‘XTO*.mdb’ will be created in the folder specified in the ‘ADORE Directory’ of the Properties setting, where * is the name of the Training Officer. DO NOT change the default location when saving this file. The file can be moved or copied from the default location.
Answer ‘Yes’ to the following question, “Would you like to delete him/her from the list of Authorized users?”
Click the “Exit” button when complete. To ARCHIVE a Training Officer:
Highlight the individual’s name. Click the “Archive FTO” icon. Click “Save” and the file ‘FTO*.mdb’ will be created in the folder specified in the ‘ADORE
Directory’ of the Properties setting, where * is the name of the officer. DO NOT change the default location when saving this file. The file can be moved or copied from the default location.
ADORE will then prompt: “Would you like to delete FTO * and all reports associated with him/her?” Answer ‘No’ to retain all reports completed by this officer in the database for trending analyses. Answer ‘Yes’ to delete the Training Officer.
Click the “Exit” button. Click on the “Authorized Users” icon and highlight this TOs name. Click ‘‘OK’’ to the
message that this ID is no longer valid. Click the “Delete User” icon. Click the “Exit” button.
8) Handheld Support
Perform support functions associated with the PDA Add-On of ADORE.
Select All – will highlight all PDA Users. Select None – will unhighlight all PDA Users. Upload – if the hotsync process must be repeated, click on this icon to hotsync for the
highlighted users. Store Data for this User – click on this icon to store the data for each user identified in the
“authorized user” icon. Store Generic Data – when changes are made to the maintenance icon, this information
should automatically transfer to each PDA. If it does not, click on this icon.

04/25/03 ADORE© User’s Guide Customizing ADORE 27
9) Import from Other Databases Import information from another ACCESS database or an earlier version of ADORE. If the names and data for Training Officers and PO/Recruits already exists in a database format, the information can be imported directly into ADORE. The Database MUST be a Microsoft ACCESS database with identical table names and columns as those used to store information for ADORE. Please contact MdE, Inc. for assistance. To import data:
Type in the name of the database where the information is contained. Be sure to include the EXACT subdirectory and the ‘.mdb’ file extension.
ADORE will open the database. Choose the tables to import by highlighting the table name(s).
If you would like to ADD this information to the existing data in ADORE, place a checkmark in the ‘Append to Existing Data’ box. If you would like to replace or overwrite the existing data, do not check ‘Append to Existing Data.’
Click on “Import Selected Tables.” ADORE will indicate the number of tables imported. Click ‘OK.’
10) Open Archive Files Open an ADORE file that has been archived.
Type in the name of the directory where the archived file is saved. ADORE will show a list of database files in that directory.
Select the file to be opened. Click on “Open Archive” and this will open the file so only the information in that file is
accessed. “Exit” out of Maintenance. All Data viewed in ADORE will be that data, e.g. Pos, XTOs
and authorized users active at the time this user was archived. Only those reports pertaining to the archived individual will be visible.
To return to reviewing current ADORE files, “Exit” out of ADORE and re-enter.
04/25/03 ADORE© User’s Guide Customizing ADORE 28
11) Probationary Officers – Adding, Deleting, Archiving Input any number of Probationary Officers (PO/Recruit) and accompanying demographic. All PO/Recruits MUST be input under this icon. To ADD a new PO/Recruit:
Click on ‘Add PO.” Type the PO/Recruit’s name, overwriting ‘-* new PO *-.’ Input the ID Number and choose a session from the drop-down list. The ID number
MUST be numeric and can be 1-8 characters. The PO/Recruit’s race, sex and DOB are all optional characteristics, which can be entered at
any time. Click the “Exit” button. Respond ‘Yes’ to the question, “You have added (#) new POs. Do you want to register
them as authorized users?” If you respond ‘No’, you will exit to the Maintenance screen and the Training Officers will have no authority to use ADORE. (See Authorized Users.)
Respond ‘Yes’ to the question, “Each one has an unknown password and a standard authority level. Would you like to set their passwords, authority levels and/or default POs now?” If you respond ‘No,’ you will exit to the Maintenance screen and the PO/Recruit will not be able to log into ADORE or sign reports until a password is assigned.
After responding ‘Yes’ to both questions, you will be transferred to the Authorized Users screen. Highlight each PO/Recruit’s name and assign him/her a unique password. Press the ‘Enter’ key on the keyboard, confirm the password by retyping it, and pressing ‘Enter.’
The ‘Authorization Level’ MUST be PO/Recruit and the ‘default PO’ MUST be that PO/Recruit. All other default settings are optional, and are only assigned if your department assigns the PO/Recruit to a default qualifier, e.g. if the qualifier is District and this PO/Recruit is always assigned to the same district, you may input the default qualifier.
NOTE: The Probationary Officers table is contained within a separate “backend” database named “adore_be.mdb”. If PO/Recruit information already exists in a database format, the information can be imported. See “Import from Other Databases” for instructions.
To DELETE a PO/Recruit:
Highlight the individual’s name. Click the “Delete PO” icon. Respond to the corresponding questions appropriately: “We will delete the PO and every
DOR and Periodic Report associated with him or her. Do you want to continue?” Answer ‘Yes’.
All DORs and Periodic Reports completed regarding this PO will be deleted unless you answer ‘Yes’ to the following question “Would you like to archive all of the DORs and Periodic Reports for that PO first?” If there are no reports to archive, answer ‘No.’ Answer ‘Yes’ and the file ‘PO*.mdb’ will be created in the folder specified in the ‘ADORE Directory’ of the Properties setting, where * is the name of the officer. DO NOT change the default location when saving this file. The file can be moved or copied from the default location.
The PO/Recruit’s name is now deleted from the list of Probationary Officers and the list of Authorized Users.
Click the “Exit” button.
04/25/03 ADORE© User’s Guide Customizing ADORE 29
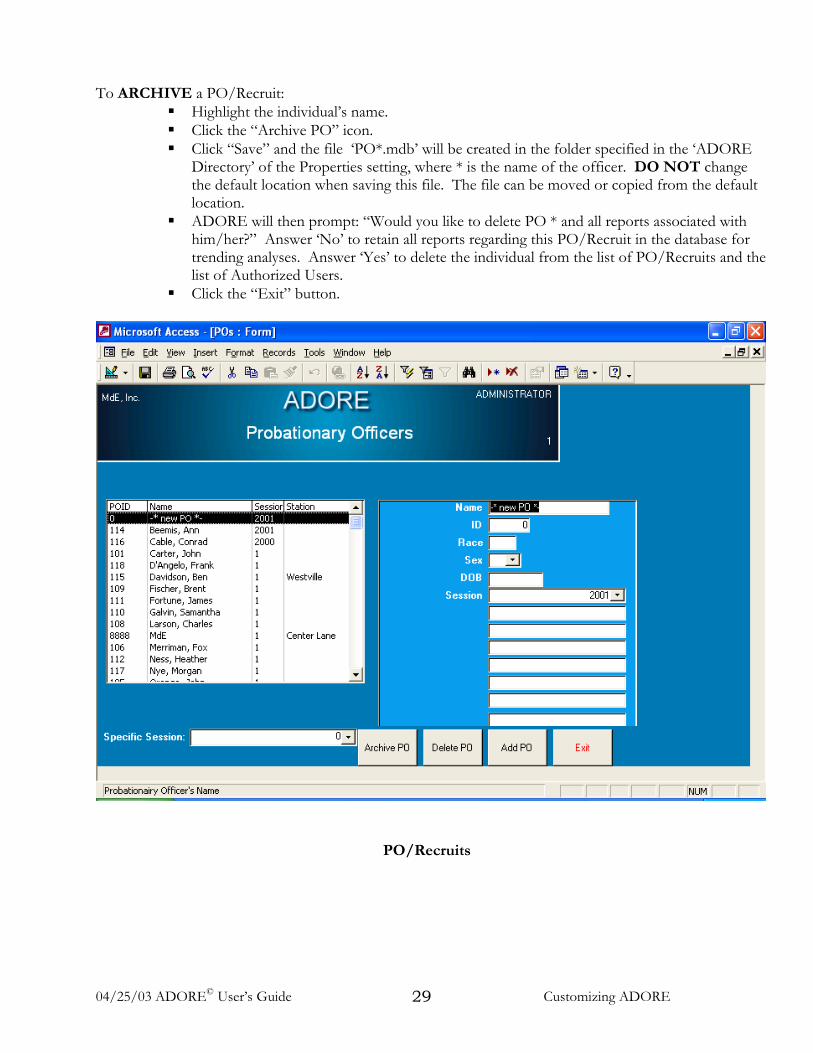
To ARCHIVE a PO/Recruit:
Highlight the individual’s name. Click the “Archive PO” icon. Click “Save” and the file ‘PO*.mdb’ will be created in the folder specified in the ‘ADORE
Directory’ of the Properties setting, where * is the name of the officer. DO NOT change the default location when saving this file. The file can be moved or copied from the default location.
ADORE will then prompt: “Would you like to delete PO * and all reports associated with him/her?” Answer ‘No’ to retain all reports regarding this PO/Recruit in the database for trending analyses. Answer ‘Yes’ to delete the individual from the list of PO/Recruits and the list of Authorized Users.
Click the “Exit” button.
PO/Recruits

04/25/03 ADORE© User’s Guide Customizing ADORE 30
12) Properties Establish multiple user-configurable settings for the ADORE program. All are properly set for conventional single user (PC) installation. Use the following information as a guide for modifying the setup of ADORE for optimum use. NOTE: MdE, Inc. will assist with the initial Property settings during the installation phone conference. In alphabetical order: Additional DOR Qualifier
ADORE allows you to indicate another qualifier in addition to the PO/Recruit's name and XTO name on the DOR. Some examples are: Phase, Station, District or Region. This item is also used to help you analyze the data, e.g. comparing how the class is performing in Phase 1 compared to Phase 2, etc.
ADORE Directory Directory containing ADORE database files, adore_be.mdb and module *.mdb. If files are shared/saved on a network, input the path where these files are found, e.g. “\\servername\adore” or “s:\adore.”
Always Update PALM So that updates are sent to the Palm file upon exiting ADORE, input ‘Yes’ for this item. Backup
The value of this setting indicates where ADORE will create a backup of the file ‘individual.mdb.’ If utilized, ADORE will create a backup of all report responses. This feature is useful if the files are not saved on a server which is backed up regularly, if data is saved to a local drive, e.g. remote PCs/laptops, or if floppy disks are utilized for transferring data. (MdE, Inc. suggests that this be backed up a minimum of once/day.) If a floppy disk fails before the data is transferred, the backup will restore the data. This is typically set to “c:\adore\backup.mdb” for remote PCs or “C:\adore\backup {PO}-{DATE}.mdb” when floppy disks are utilized.
Base Date for Week Numbers As a customizing option, the ADORE user may establish a ‘Start Date’ for DORs. This could be the graduation date from the Training Academy or other appropriate starting time for numbering Periodic Reports. If selected, ADORE automatically numbers the Periodic Reports with the appropriate interval number. If blank, ADORE numbers the Periodic Reports chronologically based on the Interval set in “Report Format Definition.” MdE, Inc. suggests that this feature not be utilized UNLESS the Periodic Reports MUST be initiated within the defined intervals.
Base Ids on Removable Media Set to ‘Yes’ if removable media like floppy disks or flashcards are used to store/transfer reports. Case Sensitive passwords
By default, passwords are NOT case-sensitive in ADORE. Input ‘Yes’ if the passwords utilized will be case-sensitive.

04/25/03 ADORE© User’s Guide Customizing ADORE 31
Checksum
This is provided by MdE, Inc. and must not be changed by the user. This is input automatically when the registration screen is completed during the initial installation process.
Comment Threshold (high)
Establishes response value such that all DOR categories rated equal to or greater than this number will be prompted with “comments required.”
Comment Threshold (low)
Establishes response value such that all DOR categories rated equal to or less than this will be prompted with “comments required.”
Computer Limit
This indicates the number of computers licensed to utilize ADORE. This is input automatically when the registration screen is completed during the initial installation process.
Computer Name This indicates the name of the computer licensed to utilize ADORE. This is filled in automatically from the computer’s registry.
Computer Number
A number assigned to each computer accessing ADORE. This is AUTOMATICALLY updated with the number input in “Computer Names.”
Concurrent User Limit For Future Use of concurrent user restrictions. Consolidate Log
‘Yes’ indicates that log information from each computer will be consolidated in the main files. Fill in ‘No’ if this information should not be consolidated.
Custom DOR Report
Name of the file containing the template for a customized DOR/Evaluation report – optional feature.
Customer
The name of the Department or Agency using ADORE. The ADORE program is customized for each authorized Department or Agency. This is provided by MdE, Inc. and MUST NOT be changed by the User. This is filled in automatically when the registration screen is completed during the initial installation process.
Customization File
Name of the file containing customized titles to be used for various icons and reports throughout ADORE – optional feature.
04/25/03 ADORE© User’s Guide Customizing ADORE 32
Database Storage If a value is entered into this column, ADORE will copy “Individual.mdb” from this location at start-up and to this location upon shut down. This feature is useful if floppy disks are used to maintain DOR records. Example: If the value “a:\individual.mdb” is entered in this column, ADORE will copy the “individual.mdb” database from the A drive to the C drive at the start of ADORE and utilize the C drive during operation. When ADORE is exited, it will copy this updated file from the C drive back onto the A drive.
Default List The client does not modify this field.
Default Module
The default module, San Jose, includes the categories and SEGs for the standard San Jose module. This module will automatically load when a user signs on to ADORE. If you modify the questions and SEGs, this module should still remain the same name as this is linked in the programming process. If MdE, Inc. has automated forms for your department, input the name of the file provided.
Default Training Session Input the number of the current training session to show only current PO/Recruits in the drop-down lists. Input ‘0’ if all PO/Recruits should be viewed on the drop-down lists.
Direct If marked ‘Yes’, ADORE will prompt as to whether completed reports should be uploaded to headquarters S each time ADORE is shutdown. ADORE will export this data to the subdirectory designated in item Export Directory and mark the report(s) uploaded. A DOR that has been uploaded, can only be modified by persons with the proper authority. ‘NO’ is the default setting.
DOR Certification Report
This is the name of the report that will automatically open when a DOR is marked complete, e.g. a report requiring electronic signature. This is set in “Report Format Definition.” DO NOT change this setting here.
Export Directly to HQ
If marked ‘Yes,’ ADORE will export DORs directly to the Headquarters database identified in “Export Directory.” This will be the location of the headquarters database files. If this is ‘No’ and ‘Direct’ is ‘Yes,’ ADORE will export text files to the “Export Directory.” These files must then be imported by Headquarters. ‘No’ is typically used on computers connected to the headquarters database via a slower connection such as phone line, CDPD, 10 Mb transfer rate.
Export Directory
This is the subdirectory where files will be exported. If “Direct” is marked ‘Yes,’ the export directory should be the directory where the headquarters’ individual.mdb (containing all DORs) is stored. This is also the subdirectory used to update remote computers if that feature is utilized.
Faster Startup
This should remain as ‘False’ until ADORE has been opened several times. At that time, this setting can be changed to ‘True’ in order to decrease the startup time.

04/25/03 ADORE© User’s Guide Customizing ADORE 33
Force Entry of Comments
This will force comments to be made when a rating response is given as defined in ‘Comment Threshold High’ and ‘Comment Threshold Low.’ The evaluator will not be able to continue to the next question when a comment is required, if this is marked ‘Yes.’
Group Limit
This is the number of groups to which the Task List items can be assigned. This is provided by MdE, Inc. and must not be changed by the user. This is input automatically when the registration screen is completed during the initial installation process.
Handheld DORs are complete ‘No’ is the default setting. When DORs are hotsynched from the PDA, they will NOT be marked complete. This allows them to be edited by the Training Officer. Input ‘Yes’ if the DORs should be marked complete upon hotsyncing.
Handheld Folder Input the name of the folder where the Palm system is installed, typically “c:\palm”. This is input during the initial installation process and should not be changed without consulting MdE, Inc. for updated ADORE Registration information.
Handheld Type
Input the type of handheld to be used, Palm or PocketPC. Handheld User Limit
This indicates the number of PDAs authorized to utilize ADORE. This is input automatically when the registration screen is completed during the initial installation process.
Handheld Warning Threshold
Set this limit to indicate when the PDA user should be prompted to hotsync the PDA. Example, input ‘2’ if the Trainer should be reminded to hotsync after 2 DORs have been input on the PDA.
HQ Update Frequency
This is how often the remote computers will be updated by the headquarters computer. If “1” is used here, the remote computers will be updated once per day. If “0” is used here, the remote computers will be updated at every log-on. This feature updates remote computers with updated maintenance information (excluding Property settings) and reports completed at other locations as determined by the ‘Update Workstation’ Property Settings.
Identity
Optional file designed for use with floppy disks. If utilized, this requires the user to have an authorized floppy disk in order to open ADORE. To authorize a diskette, copy the blank.mdb file from the ADORE subdirectory where it was originally installed onto the A drive. Rename this file to A:\individual.mdb. In the Identity field, type “A:\individual.mdb”. Make sure the Database Storage field is empty.
04/25/03 ADORE© User’s Guide Customizing ADORE 34
Import Directory
If utilizing a setting of ‘Yes’ for “Direct” with a setting of ‘No’ for “Export Directly to Headquarters,” the headquarters computer must set the “Import Directory” to the remote computers “Export Directory.” In order to import the uploaded data, the user of the headquarters computer would then click on “Import Data” at the Main Menu. This is typically used when remote computers are connected to the headquarters database via a slower connection such as phone line, CDPD, 10 Mb.
If utilizing floppy disks for data transfer, input ‘a:’ in this field on the headquarters computer. The remote computers will set “Individual Database” to “a:” as described in Section II.B.4).
Import from Database
Input ‘Yes’ if utilizing floppy disks for data transfer. Otherwise, set this to ‘No’ or leave the field blank.
Individual Database
Input the subdirectory containing the ADORE database file individual.mdb in which ADORE stores the results of individual DORs and Periodic Reports. This is typically the same location used for the ‘ADORE Directory’ unless floppy disks are utilized in which case this setting should be ‘a:.’
Last Updated
This field will automatically document the date and time that the remote computer was last updated from headquarters.
Limited Time
This field is not utilized by ADORE clients.
Log all Exports Indicate ‘Yes’ so that each export process is documented in the Log file.
Log File
This setting is no longer used. Maximum DOR Number
The user can stipulate the maximum number of DORs per PO/Recruit allowed by ADORE. This should not be larger than 900.
Optional Features This indicates the optional features purchased. This is input automatically when the registration screen is completed during the initial installation process.
PO’s Review DOR’s
Answer ‘Yes’ if the PO/Recruit will be required to electronically sign each DOR.
Prompt Before Updating Indicate ‘Yes’ if the remote user should be prompted before updating the remote computers from headquarters. This feature is typically used for docking laptops or computers that are not always connected to the network.
04/25/03 ADORE© User’s Guide Customizing ADORE 35
Require Date on New DOR’s
Input ‘Yes’ if the date for each DOR is to be input manually. Answer ‘No’ if the DOR should be automatically dated upon initiation.
Require DOR Number Input ‘Yes’ if the DOR number is to be manually input. A drop-down list including the “Valid DOR numbers” should appear in lieu of automatically numbering the DOR. The default setting is ‘No’ if DORs should be numbered sequentially, e.g. 1,2,3, etc.
Require Training
This setting will appear if this option was purchased. Indicate ‘Yes’ if ADORE should require training time when a rating is given as defined in ‘Comment Threshold Low.’
Spell Check
If this is marked ‘Yes’, ADORE automatically checks spelling of text/comment boxes. ‘No’ or a blank space in this column turns spell check off. ‘97’ indicates that this PC utilizes Microsoft Word 97.
NOTE: ADORE utilizes Microsoft Word spell check for this function. If another word processing system is installed, ADORE will not spell check. Microsoft Word must be installed on the computer for ADORE to spell check.
Training Time Units
This feature is no longer used. The units are defined for each category in the “Questions” icon of “Maintenance.” This field should be empty.
Update Setup Info Only Indicate ‘Yes’ if only Maintenance information should be updated from Headquarters. DORs completed at other remote locations will NOT be available for review at this PC if this setting is ‘Yes’ and “Update Workstations from Headquarters” is also ‘Yes.’
Update Workstations From Headquarters
‘Yes’ at the remote workstations allow these computers to be updated from headquarters. ‘No’ will not update remote workstations with reports completed at other stations nor with changes to the Maintenance information. The headquarters must be kept blank for this feature to be activated.
NOTE: Headquarters must read directly from the server for changes made at headquarters to be
updated to workstations; i.e., both the ADORE Directory and Individual Database fields in Properties would be “s:\adore.”
Use Authority
Turns the Table of Authorities on or off. A ‘No’ in this field would allow open access to the ADORE program. Also see “Authorized Users” in the Maintenance Section.
User Limit This indicates the total number of users that can be enabled and given permission to access ADORE. This is input automatically when the registration screen is completed during the initial installation process.
04/25/03 ADORE© User’s Guide Customizing ADORE 36
13) Qualifier – Adding, Deleting Define the qualifier as established in the “Properties” icon.
Scroll to the last entry in the table. The fields should be blank. Type the qualifier name in the empty field. To delete a qualifier from the list, simply highlight the name to be deleted. Click on “Delete
Station” and answer ‘Yes’ to “are you sure you want to delete the station ?” NOTE: The Qualifier table is contained within a separate “backend” database named “adore_be.mdb.” If this information already exists in a database format, the information may be imported under “Import from Other Databases.” 14) Questions – Adding , Deleting or Modifying Modify the DOR categories, SEGs, tasks or response rating value within ADORE. Any number of Questions may be added, deleted or modified. WARNING: If data has been collected and subsequent changes to a question are made, old data will populate that “space.” DO NOT SIGNIFICANTLY MODIFY QUESTIONS AFTER DATA HAS BEEN COLLECTED ON PREVIOUSLY DEVELOPED QUESTIONS. If the questions will be revised, MdE suggests that this be done at an appropriate time with regards to PO/Recruits-in-training and that all existing data be archived and deleted before making significant changes.
Questions
To ADD a question, click on the right arrow with the asterisk in the bottom left corner of the
04/25/03 ADORE© User’s Guide Customizing ADORE 37
screen where ‘record # of #’ is indicated. This will provide a blank template. Complete each section as defined below. To DELETE a question, click on the icon, “Delete this evaluation item” is in the upper right-hand corner. This will delete the question and all accompanying SEGs/anchor points as well as any responses for this question in existing DORs. To MODIFY a category, scroll to the specific category and edit the field as defined below.
Question Number This is the DOR category number AS IT APPEARS on the DOR. ADORE will chronologically number the categories based on this field. To change this number, highlight the number and enter the correct number. Name of Measured Item By default, training can be measured for each category evaluated. This field can be customized to measure calls, number of reports, scores, SIFA, etc. Key in the item to be measured for each category. Leave this field blank if no item will be measured. Units? By default, ‘min.’ is the unit being measured. This unit should be associated with the actual measured item. For example, if number of calls is being measured, type in ‘ea.’. If SIFA is being measured, type in ‘%.’ Average? By default, the measured item will total. If the measured item should average across time, e.g. Test scores, SIFA, place a check mark in this box. Evaluation Item This area is used to define the Category being evaluated. To MODIFY information in any of the text areas, highlight the data you would like to modify and begin typing to replace this text. This entire text will print when generating text reports in “Display Averages.” Category This brief description is used on the drop-down menu within the DOR to allow the XTO to advance to a specific category. Field Size - 20 characters. Category Text This is a description of each category that will appear on printed DORs and bar charts. Field Size - 42 characters. Groups To Add the names of the Groups, click on ‘Add’, typing the name of the group to which an item will be assigned, hit the Enter key on the keyboard and click on “Add..” Highlight at least one group for each category to indicate the group to which it is assigned. A Task list category/item can be assigned to more that one group.
04/25/03 ADORE© User’s Guide Customizing ADORE 38
Scale Responses ADORE allows the user to define a rating scale of 1-7. Only those scale responses which are given a ‘Scale Response Text’ will appear on the DOR. A scale of 1-7 will ALWAYS appear in the Maintenance screen. Scale Response Text Title of the Rating Response, e.g. 1=Unaccceptable, 2=Near Unacceptable, etc. To MODIFY this, click on the number corresponding to the Scale Response and type in the Scale Response Text associated with it. Scale Response Description This is the Standard Evaluation Guideline (SEG) or Anchor Point for the rating. To MODIFY this, click on the number corresponding to the SEG to be modified and type/edit the Scale Response Description associated with it.
To exit, click on “Exit” icon. If numbers are alphanumeric, you MUST answer ‘No’ to the question, “Do you want to renumber the questions?” 15) Record Analysis Analyze and repair the database on a weekly basis. ADORE will search for duplicate records, incorrect linking, invalid ID numbers, etc.
This process will begin once you click on the icon. Click ‘Yes’ to each prompt regarding adding/deleting/modifying records. Answer ‘Yes’ to view invalid data. This data can safely be highlighted and removed by using
the ‘Delete’ key on your keyboard. Upon completion, click ‘OK’ when given a status of the data.
16) Report Format Definition Automate the department’s narrative reports to allow for comments, counters and electronic signature.
Define a Report To ADD a report, click on ADD, type in the name of the report and click ‘OK.’ To DELETE a report, highlight the name of the report to be deleted and click “Delete.” Answer ‘Yes’ to confirm the report should be deleted. This will delete the report as well as any responses associated with that report. To MODIFY a report, highlight the name of the report to be modified. Click “Change” to change/define basic report items. A window entitled, “Definition of Report” will open. Complete all of the applicable fields. In order to see the definition of a field, move the cursor over the field and a definition will automatically appear. To close the window once all changes are made, click “Exit.”

04/25/03 ADORE© User’s Guide Customizing ADORE 39
‘Report Definition’ fields:
Name Type in the name of the report as it will appear on the top of the page.
Interval Set the Interval to zero, ‘0,’ unless you are requiring the report to be completed within a specific interval. If you do NOT use ‘0,’ the numbering of reports is automatic based on the interval and CANNOT be changed.
Interval Name Type in the name of the interval, e.g. Phase, Week, Day, Report, etc. Text at Top Type in optional text to appear at the top of the report. Text at Bottom Type in optional text to appear at the bottom of the report. Users of Type Future use. Can PO see it? Future use. Can PO add new one? Future use. Enabled for use? Check this box if the report should be visible in “Periodic Reports” for review and modification. MdE, Inc. DOES NOT recommend enabling the signature page of a DOR. Assume report is complete when all signatures are entered? Check this box if the report should be assumed complete when all required signatures have been made. If this is not checked, ADORE will ask if the report is complete each time the “Exit” button is clicked.
Design a Report
To ADD a question to a report, choose the report by highlighting it in the Reports list. Click on the “Add” icon to the right of the Certifications block. A window entitled ‘Certifications’ will open. Complete the fields as defined below. Click ‘OK’ when all fields have been completed. To MODIFY/DELETE a single question in a report, choose the report by highlighting it in the Reports list. Highlight the Certification that contains the question to be modified/deleted and then click “Change.” Change/delete any fields associated with that question. To DELETE a set of questions (certification page) in a report, choose the report by highlighting it in the Reports list. Highlight the Certification that is to be deleted and then click “Delete.”
04/25/03 ADORE© User’s Guide Customizing ADORE 40
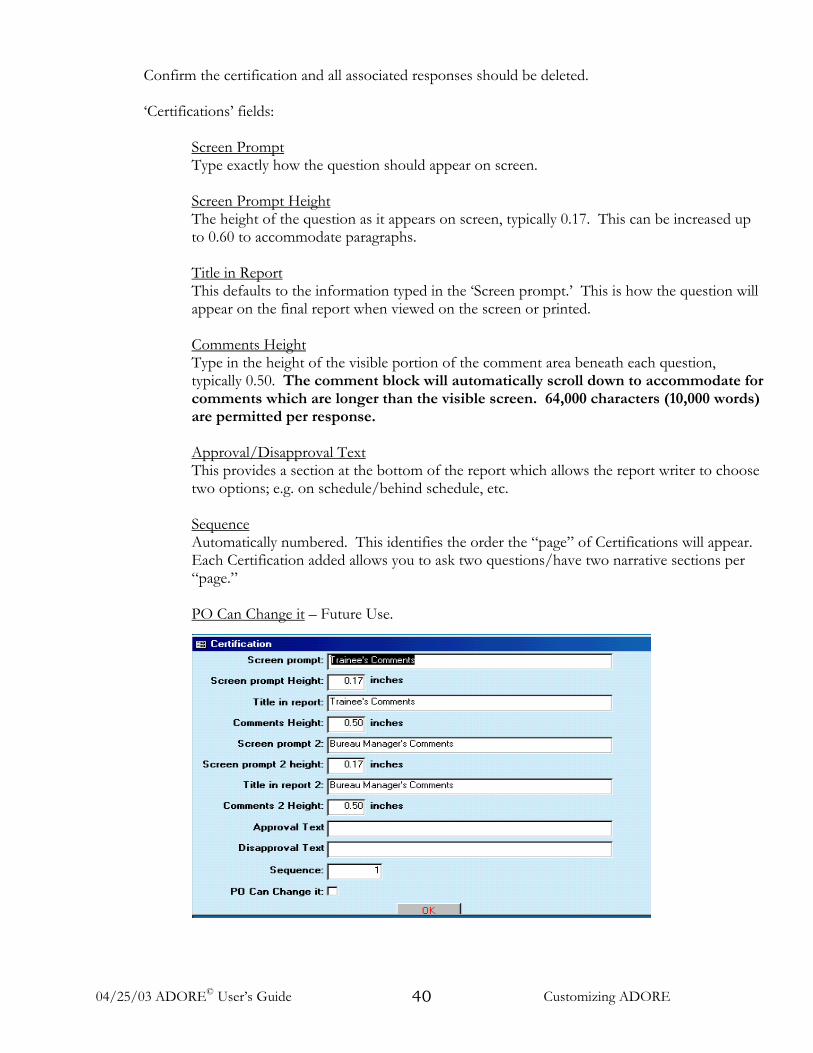
Confirm the certification and all associated responses should be deleted.
‘Certifications’ fields: Screen Prompt Type exactly how the question should appear on screen. Screen Prompt Height The height of the question as it appears on screen, typically 0.17. This can be increased up to 0.60 to accommodate paragraphs. Title in Report This defaults to the information typed in the ‘Screen prompt.’ This is how the question will appear on the final report when viewed on the screen or printed. Comments Height Type in the height of the visible portion of the comment area beneath each question, typically 0.50. The comment block will automatically scroll down to accommodate for comments which are longer than the visible screen. 64,000 characters (10,000 words) are permitted per response. Approval/Disapproval Text This provides a section at the bottom of the report which allows the report writer to choose two options; e.g. on schedule/behind schedule, etc. Sequence Automatically numbered. This identifies the order the “page” of Certifications will appear. Each Certification added allows you to ask two questions/have two narrative sections per “page.” PO Can Change it – Future Use.

04/25/03 ADORE© User’s Guide Customizing ADORE 41
Signatures
Click on the “Add” icon to the right of the Signatures block. Choose the authority level of the person who should enter a signature. Leave box empty, “Can user change user ID?” if you require the signature to be that of the
PO/Recruit/XTO associated with that report. This will automatically be checked for users other than XTO and PO/Recruit so that a drop-down list will appear where the name of the signer can be chosen.
Text for Optional Approval/Disapproval – Text for Signer to Choose, e.g. ‘Approved’ or ‘Disapproved.’ This text will appear at the signature line as: “Electronically signed (Approved/Disapproved) on DATE by AUTHORIZATION LEVEL (Signer’s Name.)
Text to Appear Before Signature – Text which appears at the top of the signature page, e.g. at the top of the PO signature page, it could read ‘I certify that I have read this DOR.’ This text appears on the SCREEN ONLY and NOT on the printed report.
To delete or change an existing signature, highlight it and click “Delete” to delete an existing signature or “Change” to change the fields associated with an existing signature.
Report Types
Counters
Click on the white space in the Counters box and click “Add” to add a Counter. Type in the Name of the Counter; e.g., Shift, Beat, District. Sequence – Automatically numbered. This identifies the order the counters will appear. To delete or change an existing counter, highlight it and click “Delete” to delete an existing
counter or “Change” to change the fields associated with an existing counter.
Linking the Signature Page to the DOR
Once the design of the signature page is complete, highlight the name of the report. Click on “Use for DORs.” Doing this links this report to the DOR so that when the DOR
is marked complete, this signature will automatically open. Click the “Exit” button.

04/25/03 ADORE© User’s Guide Customizing ADORE 42
17) SQL Server Setup See Section II.C.2 and Appendices B and C for specific SQL setup instructions.
18) Task Log Roles
Name of Role – Input the types of roles that each Call/Task will be marked, e.g. Completed, Role Play. Trained.
Code – Input a one-letter designation for each type of Role. Sequence – Input the sequence number for each role. This will determine the order in which the
roles appear on the Spreadsheet and the handheld PDAs, if utilized. Background Color – click on “Set” and choose a color to be utilized on the spreadsheet for each
role.
Task Log Roles
Spreadsheet which will be generated under “Daily Performance
04/25/03 ADORE© User’s Guide Customizing ADORE 43
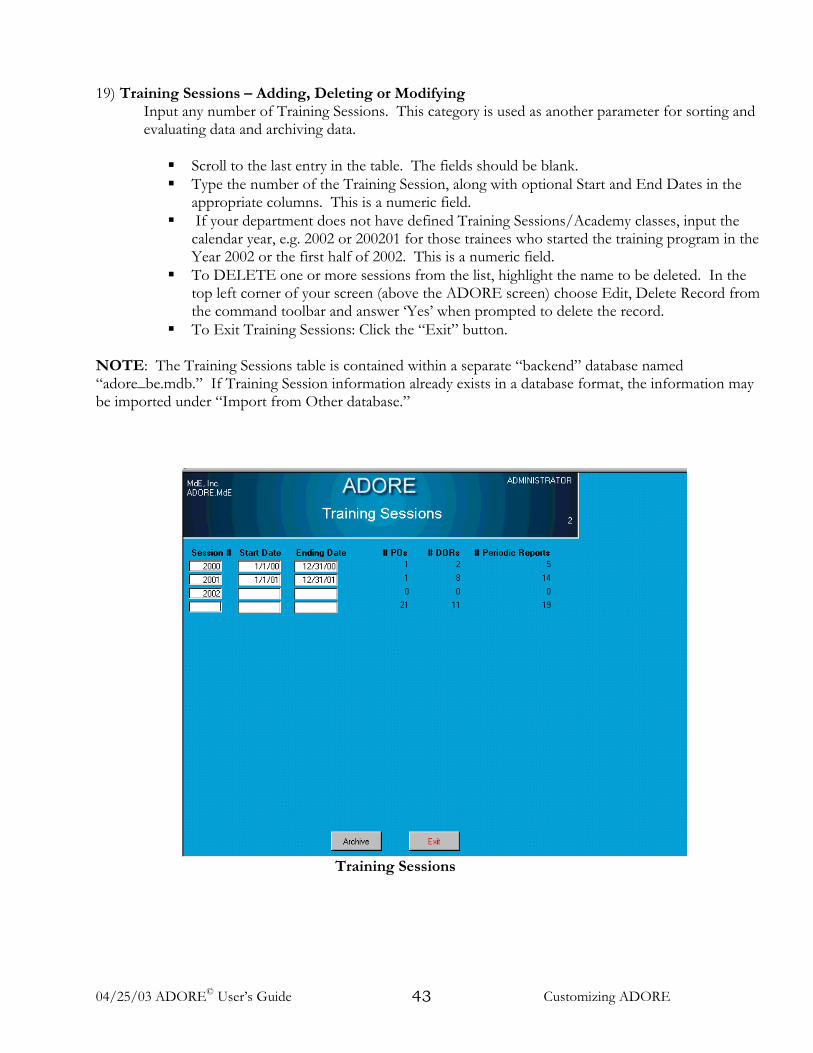
19) Training Sessions – Adding, Deleting or Modifying
Input any number of Training Sessions. This category is used as another parameter for sorting and evaluating data and archiving data.
Scroll to the last entry in the table. The fields should be blank. Type the number of the Training Session, along with optional Start and End Dates in the
appropriate columns. This is a numeric field. If your department does not have defined Training Sessions/Academy classes, input the
calendar year, e.g. 2002 or 200201 for those trainees who started the training program in the Year 2002 or the first half of 2002. This is a numeric field.
To DELETE one or more sessions from the list, highlight the name to be deleted. In the top left corner of your screen (above the ADORE screen) choose Edit, Delete Record from the command toolbar and answer ‘Yes’ when prompted to delete the record.
To Exit Training Sessions: Click the “Exit” button. NOTE: The Training Sessions table is contained within a separate “backend” database named “adore_be.mdb.” If Training Session information already exists in a database format, the information may be imported under “Import from Other database.”
Training Sessions

04/25/03 ADORE© User’s Guide Customizing ADORE 44
20) View Log
View a log of major events in ADORE, documented by User, Location, Date/Time and Action performed. At the bottom of the page, you can choose to look at the log file by a Specific User or a Specific Computer.
21) Valid DOR Numbers
Define DOR numbers other than the conventional autonumbering system of 1,2,3. For example, DORs may be numbered 1-1, 1-2, 1-3 to note the week and day or P1, P2, P3 to note the Probationary period.
Valid DOR Numbers
SECTION IV
USING ADORE
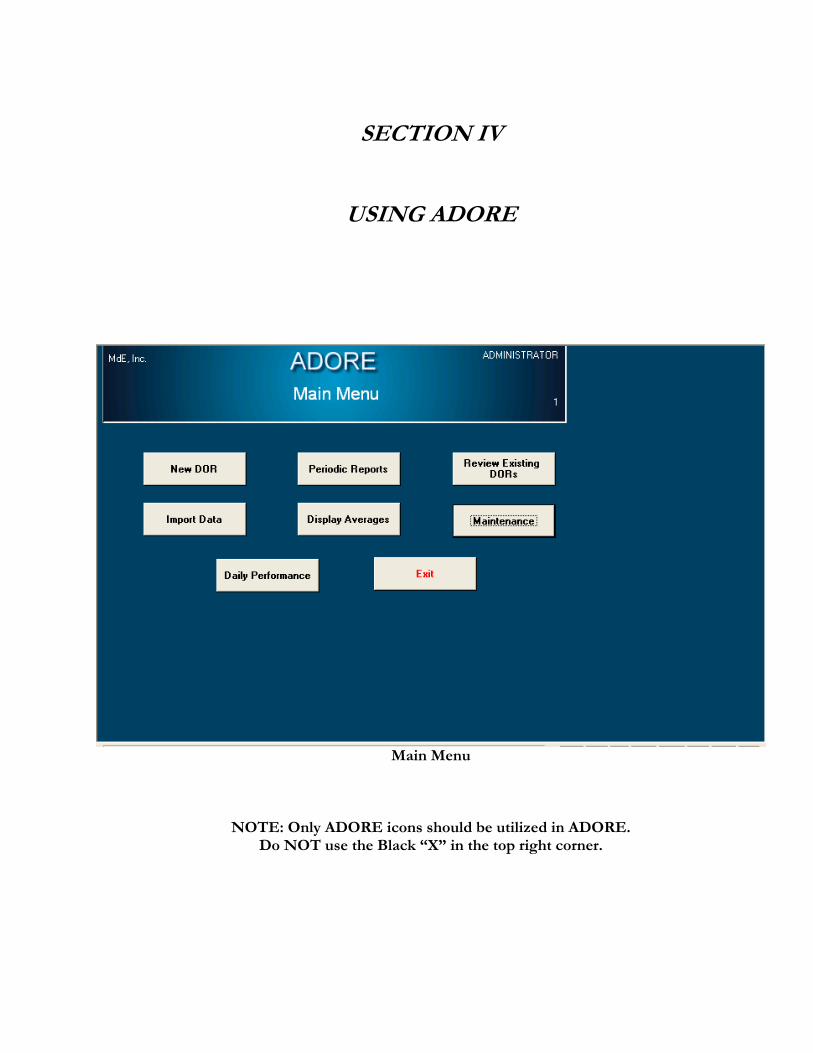
Main Menu
NOTE: Only ADORE icons should be utilized in ADORE. Do NOT use the Black “X” in the top right corner.

04/25/03 ADORE© User’s Guide Using ADORE 45
Using ADORE A. Daily Observation Reports (DORs)
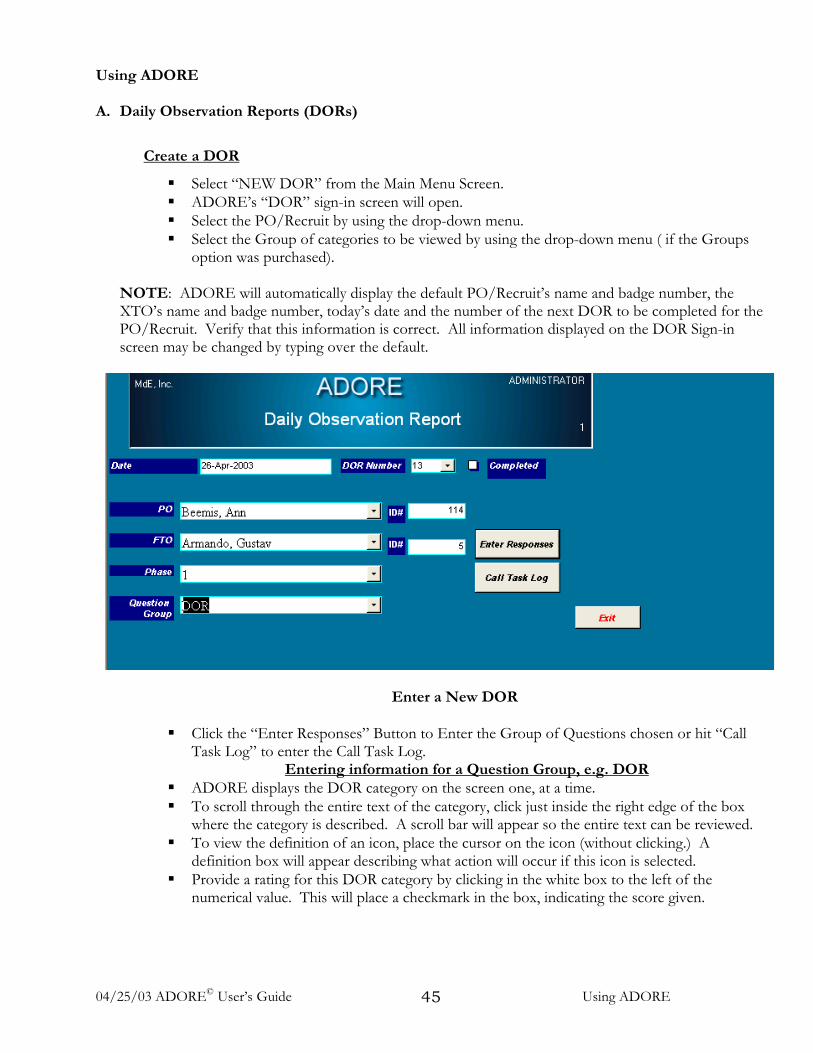
Create a DOR
Select “NEW DOR” from the Main Menu Screen. ADORE’s “DOR” sign-in screen will open. Select the PO/Recruit by using the drop-down menu. Select the Group of categories to be viewed by using the drop-down menu ( if the Groups
option was purchased).
NOTE: ADORE will automatically display the default PO/Recruit’s name and badge number, the XTO’s name and badge number, today’s date and the number of the next DOR to be completed for the PO/Recruit. Verify that this information is correct. All information displayed on the DOR Sign-in screen may be changed by typing over the default.
Enter a New DOR
Click the “Enter Responses” Button to Enter the Group of Questions chosen or hit “Call
Task Log” to enter the Call Task Log. Entering information for a Question Group, e.g. DOR
ADORE displays the DOR category on the screen one, at a time. To scroll through the entire text of the category, click just inside the right edge of the box
where the category is described. A scroll bar will appear so the entire text can be reviewed. To view the definition of an icon, place the cursor on the icon (without clicking.) A
definition box will appear describing what action will occur if this icon is selected. Provide a rating for this DOR category by clicking in the white box to the left of the
numerical value. This will place a checkmark in the box, indicating the score given.

04/25/03 ADORE© User’s Guide Using ADORE 46
NOTE: A full description of the SEGs or Anchor Points are available by clicking on the evaluation description; i.e., place the cursor on the box “2. Near Unacceptable” and click the left mouse button. To remove this definition from the screen, place the cursor in the Comment box and click the left mouse button or choose a scale response value.
SEG/Anchor Points Defined
Comments/Narrative When a value of greater than/equal to the High Comment Threshold or less than/equal to
the Low Comment Threshold established in the Property section is given, the “Comments (Required)” title bar will turn red and the cursor will automatically move into the box so comments can be provided.
Type comments appropriate to the evaluation category. Comments can be provided for any category, not just when required. All comment boxes expand to accommodate 64,000 characters (approximately 10,000 words.)
If the Training Officer chooses to proceed without comment and has given a rating which requires a comment, a window box will appear, asking “Why did you give a rating of (X)?”
The comments MUST be initiated in this box (minimum of 6 letters.) Click ‘OK’ and then click on the icon to ‘Go to the Previous question’ (finger pointing left.)
When the comment is complete, Click on the ‘Go to Next Question’ button (finger pointing right) to initiate spellcheck.
Continue until the DOR is complete.

04/25/03 ADORE© User’s Guide Using ADORE 47
NRT/Training Time: If remedial training is provided on a particular DOR Evaluation Element, enter Time Spent
in the Training box. Note: If Remedial Training Time is required on low scores, a reminder window will appear when the training time is not input in the Training box. Training time MUST be input. Otherwise the rating will be increased to the lowest rating which does not require training time. See Require Training in the Properties section of this manual.
If the PO/Recruit is NOT responding to training (NRT), remove the checkmark for ‘Responded to Training’ by clicking on the checkmark.
Tracking remedial training time and NRTs EXIT the DOR NOTE: A XTO may stop at any point by clicking on the “Done” button. When asked if this DOR is complete, a response of ‘No’ will allow the XTO to return later to complete the DOR. To exit the DOR, click on the RED “Done” button. If the DOR is not complete, i.e. the PO/Recruit and XTO are NOT prepared to sign the
DOR, respond ‘No’ to the question, “(#) of the (#) questions have been answered. Is this DOR complete?”
Click the “Exit” button. (Follow the instructions under Review/Update the DOR regarding changing/completing a DOR.)
OR If the DOR is complete and the XTO will NOT make any changes to the report or will
NOT be inputting data in the Call Task Log, respond ‘Yes’ to the question, “(#) of the (#) questions have been answered. Is this DOR complete?” If electronic signature is utilized, proceed to Signing the DOR.. Otherwise, Click the “Exit” button.
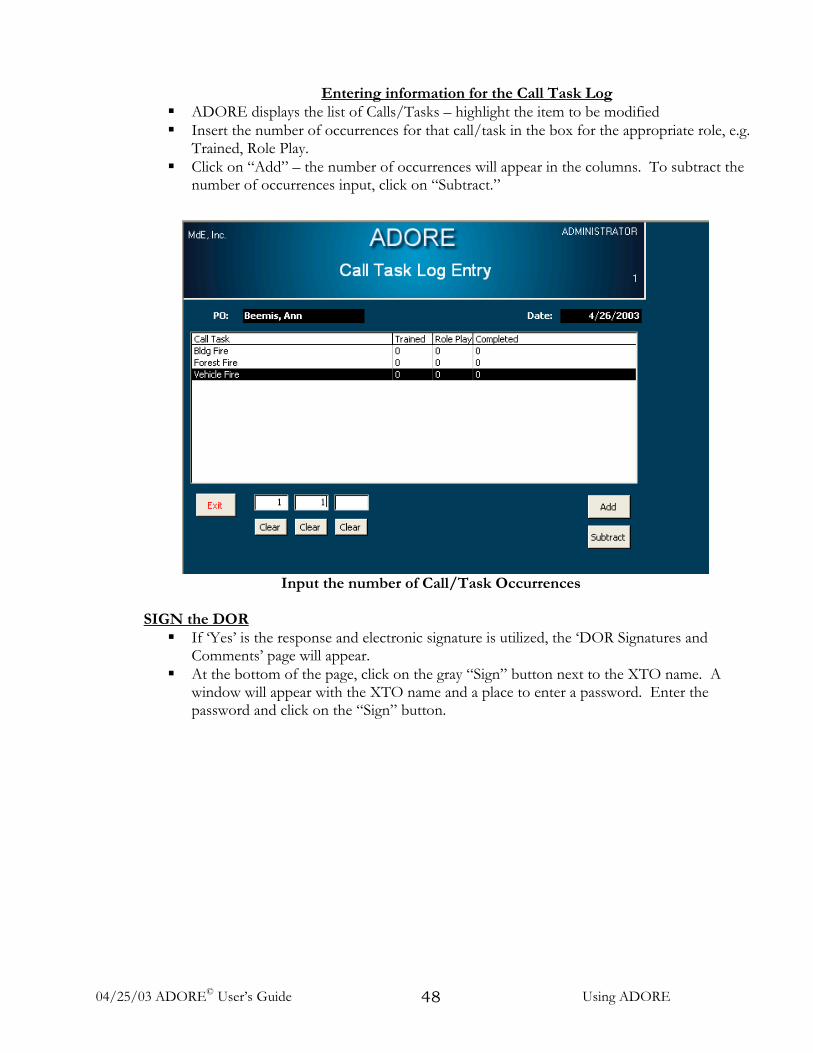
04/25/03 ADORE© User’s Guide Using ADORE 48
Entering information for the Call Task Log
ADORE displays the list of Calls/Tasks – highlight the item to be modified Insert the number of occurrences for that call/task in the box for the appropriate role, e.g.
Trained, Role Play. Click on “Add” – the number of occurrences will appear in the columns. To subtract the
number of occurrences input, click on “Subtract.”
Input the number of Call/Task Occurrences
SIGN the DOR If ‘Yes’ is the response and electronic signature is utilized, the ‘DOR Signatures and
Comments’ page will appear. At the bottom of the page, click on the gray “Sign” button next to the XTO name. A
window will appear with the XTO name and a place to enter a password. Enter the password and click on the “Sign” button.

04/25/03 ADORE© User’s Guide Using ADORE 49
Signature and Comments Page
Unique password required for signature of DOR
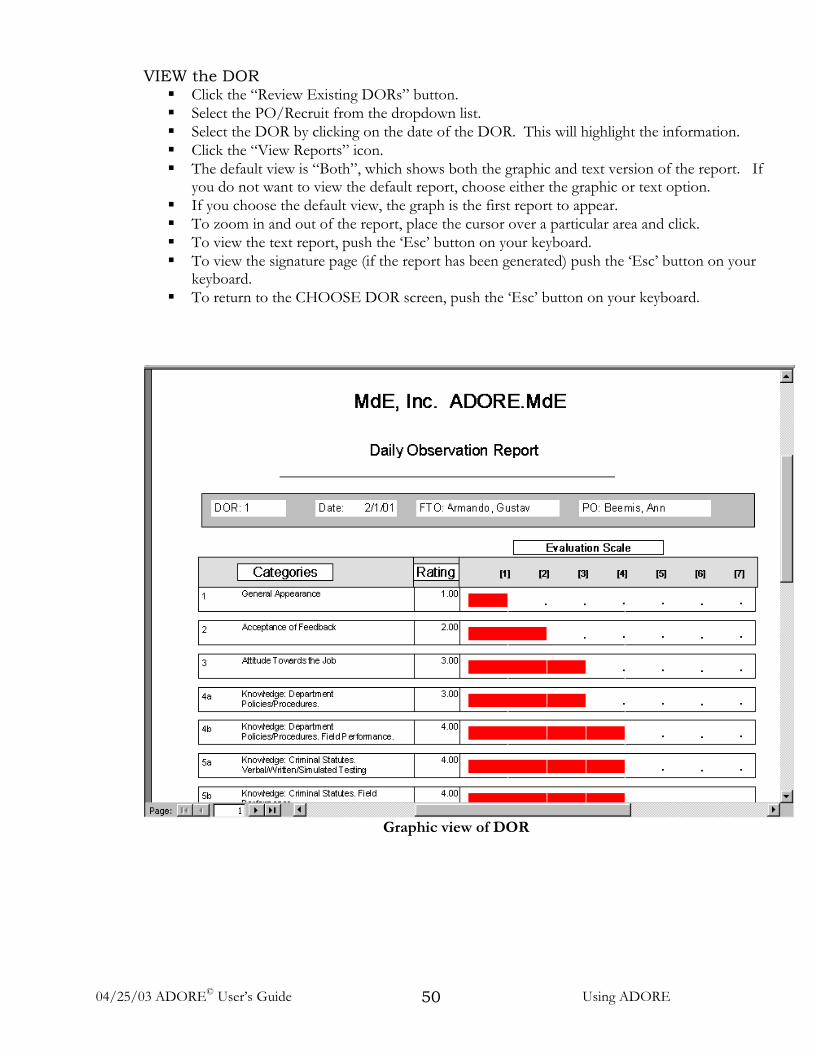
04/25/03 ADORE© User’s Guide Using ADORE 50
VIEW the DOR Click the “Review Existing DORs” button. Select the PO/Recruit from the dropdown list. Select the DOR by clicking on the date of the DOR. This will highlight the information. Click the “View Reports” icon. The default view is “Both”, which shows both the graphic and text version of the report. If
you do not want to view the default report, choose either the graphic or text option. If you choose the default view, the graph is the first report to appear. To zoom in and out of the report, place the cursor over a particular area and click. To view the text report, push the ‘Esc’ button on your keyboard. To view the signature page (if the report has been generated) push the ‘Esc’ button on your
keyboard. To return to the CHOOSE DOR screen, push the ‘Esc’ button on your keyboard.
Graphic view of DOR

Text view of DOR
Signature page for DOR
04/25/03 ADORE© User’s Guide Using ADORE 51
04/25/03 ADORE© User’s Guide Using ADORE 52
REVIEW the DOR (for changing/completing an Existing DOR) Click the “Review Existing DORs” button. Select the PO/Recruit from the dropdown list. Select the DOR by clicking on the date of the DOR. This will highlight the information. Click the “Review/Update Report” icon. Information such as the Date or DOR number can be changed on this screen.
Click the “Examine/Change Responses” icon. Make changes to the DOR and Exit the DOR by clicking on “Done” and completing/signing the DOR as defined above.
PRINT the DOR: Click the “Review Existing DORs” button. Select the PO/Recruit from the dropdown list. Select the DOR by clicking on the date of the DOR. This will highlight the information. Click on the “Print Reports” icon. Choose “Text Report” or “Both.” ADORE will print the current report to the default printer.
DELETE a DOR (must have proper authority to perform this function): Click the “Review Existing DORs” button. Select the PO/Recruit from the dropdown list. Select the DOR by clicking on the date of the DOR. This will highlight the information. Click on the “Delete DOR” icon and confirm that the report should be deleted. NOTE: A
deleted DOR can not be ‘undeleted.’
04/25/03 ADORE© User’s Guide Using ADORE 53
B. Periodic Reports ADORE allows for narrative reports to be automated. Following are general instructions on completing a narrative report. See “Report Format Definition” under “Customizing ADORE” formatting reports.
Create a Periodic Report
ADORE’s “Periodic Report” Selection Screen opens, displaying a list of “Report Types” and a list of PO/Recruits.
Highlight the report to be created. Highlight the PO/Recruit who is being evaluated. Click “Enter Current Report” to create a new report.
Narrative Complete the Narrative Blocks by typing the response in the box provided. Note the number of pages in the middle of the screen. Click on the arrows to move
forward/backward through each narrative section. Click on “Check Spelling” to perform spellcheck of the narrative sections.
Counters Fill in counters by entering a numeric response. This is a strictly numeric field. Press the ‘tab’ key on the keyboard to move to the next field.
Signatures At the bottom of the page, click on the gray “Sign” button next to the appropriate authority
level. A window will appear with the appropriate name/drop-down list and a place to enter a password.
Confirm/Select the appropriate name. Enter the password and click on the “Sign” button.
Exit Click the “Exit” button to close the narrative report. If you have defined this report to query the user whether or not it is complete, the user may
be prompted “Is this report complete?” Answer ‘Yes/No’ accordingly. The default design automatically determines when the report is complete and transfers the
report to headquarters accordingly.
View Highlight the report to be created. Highlight the PO/Recruit who is being evaluated. Select the report listed under “X reports on file for <officer>.” Click “View Report” to view the report on screen. Press the ‘Esc’ button on the keyboard to return to the ‘Periodic Reports’ screen.

04/25/03 ADORE© User’s Guide Using ADORE 54
Review Highlight a particular report. Highlight the PO/Recruit whose report will be reviewed. Select the report listed under ‘X reports on file for <officer>.’ Click “Enter Past Report.” Use the “Exit” button to return to the ‘Periodic Reports’ screen.
Print Highlight the report to be created. Highlight the PO/Recruit who is being evaluated. Click “Print Report” to print the report to the default printer.
Delete (must have proper authority to perform this function) Highlight the type of report to be deleted. Highlight the PO/Recruit whose report is to be deleted. Highlight the report to be deleted under “X reports on file for <officer>.” Click “Delete Report” and confirm that the report should be deleted.
Periodic Reports

04/25/03 ADORE© User’s Guide Using ADORE 55
Periodic Report
List Pending Signatures Click “List Pending Signatures.”
The report, ‘Pending Signatures by Signer,’ will be generated. This lists those persons who have not signed reports and is organized by the Authority Level. Push the ‘Esc’ key on the keyboard to view the ‘Pending Signatures by Type.’ This report lists those persons who have not signed reports and is organized by Report Type. To print this report, press the ‘CTRL’ and ‘P’ keys on the keyboard at the same time.

04/25/03 ADORE© User’s Guide Using ADORE 56
B. Daily Performance Charts
The Daily Performance Chart generates reports for an individual PO/Recruit, showing categories for a selected group and their respective numeric ratings/measured item for each day.
Click the “Daily Performance” icon. Choose a PO/Recruit. Choose a time period, if desired. Choose the color of the report, Black &White, Original or Custom. Select the group of categories to display. Select ‘Ratings’ to show DOR ratings on the spreadsheet OR Select ‘Msrd Item/Training Time’ to show the ‘Measured Item’ on the spreadsheet. If this
item is selected, indicate the number of decimal digits to be viewed. OR Select Call Task Log to view the Call Task Log spreadsheet. Choose the page format, Portrait, Landscape or Landscape Legal. Choose whether the report should be sorted by Date or DOR#. The ‘# of DORs per page’
will automatically calculate but can be overwritten. Click the “View Report” button to view the report on screen or the “Print Report” button
to print the chart. Press the ‘Esc’ on the keyboard to return to the “Daily Performance Chart."
To change the Color settings of the Rating chart, select ‘Change Color’ and select a foreground and background color for all score values, regardless of whether they are utilized by your department.
Daily Performance – Choose the Report to be Generated

04/25/03 ADORE© User’s Guide Using ADORE 57
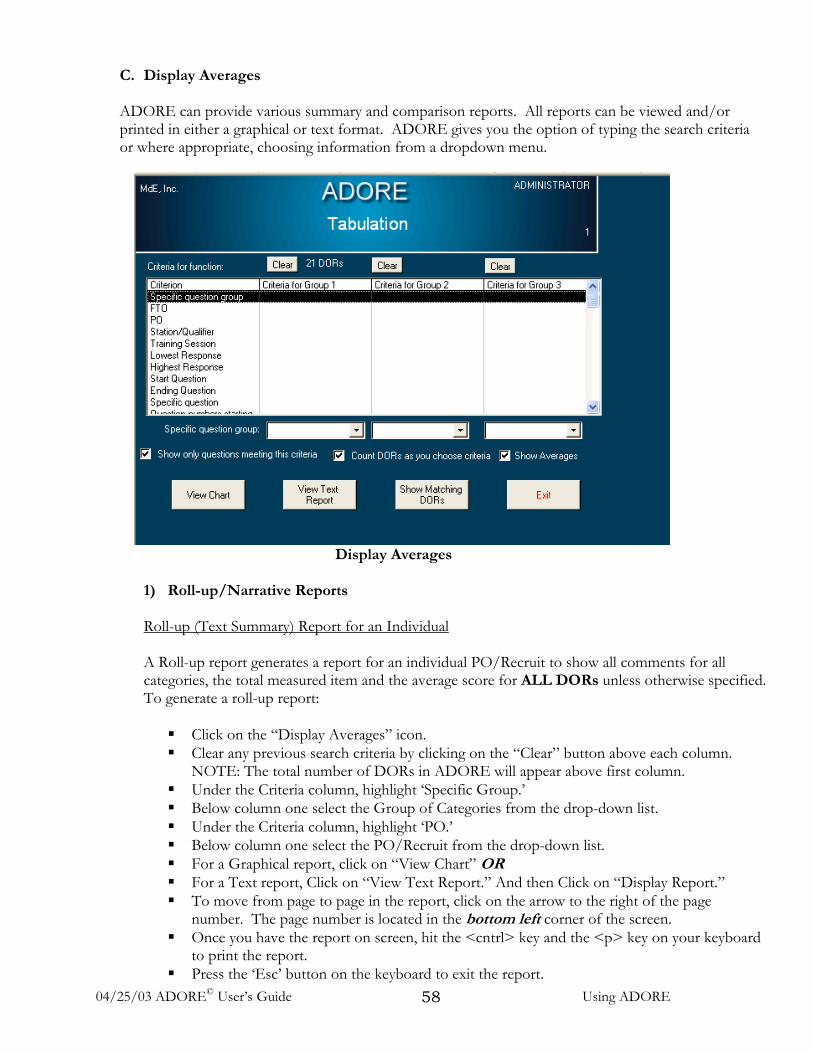
04/25/03 ADORE© User’s Guide Using ADORE 58
C. Display Averages
ADORE can provide various summary and comparison reports. All reports can be viewed and/or printed in either a graphical or text format. ADORE gives you the option of typing the search criteria or where appropriate, choosing information from a dropdown menu.
Display Averages
1) Roll-up/Narrative Reports
Roll-up (Text Summary) Report for an Individual
A Roll-up report generates a report for an individual PO/Recruit to show all comments for all categories, the total measured item and the average score for ALL DORs unless otherwise specified. To generate a roll-up report: Click on the “Display Averages” icon. Clear any previous search criteria by clicking on the “Clear” button above each column.
NOTE: The total number of DORs in ADORE will appear above first column. Under the Criteria column, highlight ‘Specific Group.’ Below column one select the Group of Categories from the drop-down list. Under the Criteria column, highlight ‘PO.’ Below column one select the PO/Recruit from the drop-down list. For a Graphical report, click on “View Chart” OR For a Text report, Click on “View Text Report.” And then Click on “Display Report.” To move from page to page in the report, click on the arrow to the right of the page
number. The page number is located in the bottom left corner of the screen. Once you have the report on screen, hit the <cntrl> key and the <p> key on your keyboard
to print the report. Press the ‘Esc’ button on the keyboard to exit the report.

04/25/03 ADORE© User’s Guide Using ADORE 59
Generating Report for a specific set of DOR/Report Numbers Complete instructions for “Roll-up (Text Summary) Report for an Individual” Under the Criteria column, highlight “Minimum DOR Number.” Beneath column one,
insert the DOR number. Under the Criteria column, highlight “Maximum DOR Number.” Beneath column one,
insert the last DOR number.
NOTE: To view one DOR, the ‘Minimum and Maximum DOR Number’ should be the same.
Generating Report for a specific time period Complete instructions for Roll-up (Text Summary) Report for an Individual Under the Criteria column, highlight “Earliest DOR Date.” Beneath column one, insert the
Starting date, e.g. 1/1/03. Under the Criteria column, highlight “Latest DOR Date.” Beneath column one, insert the
date AFTER the Ending date, e.g. 2/1/03 to include reports through 1/31/03.
NOTE: To view one DOR (or all reports generated on a single day), the dates should be consecutive, e.g. to view the report(s) done on January 1st, the Earliest Date will be 1/1/03 and the
Latest Date will be 1/2/03. View/Print For a Graphical report, click on “View Chart” OR For a Text report, Click on “View Text Report.” And then Click on “Display Report.” To move from page to page in the report, click on the arrow to the right of the page
number. The page number is located in the bottom left corner of the screen. Once you have the report on screen, hit the <cntrl> key and the <p> key on your keyboard
to print the report. Press the ‘Esc’ button on the keyboard to exit the report.
04/25/03 ADORE© User’s Guide Using ADORE 60
Roll-up Report for Designated DOR Categories
Under the Criteria column, highlight ‘PO.’ Below column one, select the PO/Recruit from the drop-down list.
EITHER Under the Criteria column, highlight ‘Specific Group’ AND Below column one select the Group of Categories from the drop-down list.
OR Under the Criteria column, highlight ‘Start Question.’ Beneath column one, insert the
number 1 AND Under the Criteria column, highlight ‘Ending Question.’ Beneath column one, insert the
last DOR category number. OR
Under the Criteria column, highlight ‘Question numbers starting.’ Beneath column one, insert the designator that all questions begin with if category numbers were designated in this manner., e.g. ‘P1’ for Phase 1, ‘F’ for Fire, ‘B’ for Booking, etc.
For a Graphical report, click on “View Chart” OR For a Text report, Click on “View Text Report.” And then Click on “Display Report.” To move from page to page in the report, click on the arrow to the right of the page
number. The page number is located in the bottom left corner of the screen. Once you have the report on screen, hit the <cntrl> key and the <p> key on your keyboard
to print the report. Press the ‘Esc’ button on the keyboard to exit the report.
Roll-up Report for a Designated Qualifier (Phase/Station)
Under the Criteria column, highlight ‘PO.’ Below column one, select the PO/Recruit from the drop-down list. Under the Criteria column, highlight ‘Qualifier.’ Beneath column one, select the Qualifier
(typically Phase/Station) from the drop-down menu. For a Graphical report, click on “View Chart” OR For a Text report, Click on “View Text Report.” And then Click on “Display Report.” To move from page to page in the report, click on the arrow to the right of the page
number. The page number is located in the bottom left corner of the screen. Once you have the report on screen, hit the <cntrl> key and the <p> key on your keyboard
to print the report. Press the ‘Esc’ button on the keyboard to exit the report.

04/25/03 ADORE© User’s Guide Using ADORE 61
Specific Category Report for an Individual
To run a report that displays the total measured item, average score and all of the comments made pertaining to a specific category:
Under the Criteria column, highlight ‘PO.’ Below column one, select the PO/Recruit from the drop-down list. Under the Criteria column, highlight ‘in question.’ Beneath column one, select the specific
category. For a Graphical report, click on “View Chart” OR For a Text report, Click on “View Text Report.” And then Click on “Display Report.” To move from page to page in the report, click on the arrow to the right of the page
number. The page number is located in the bottom left corner of the screen. Once you have the report on screen, hit the <cntrl> key and the <p> key on your keyboard
to print the report. Press the ‘Esc’ button on the keyboard to exit the report.
2) Graphical Comparisons
Compare one PO/Recruit to the ‘average’ PO/Recruit
Under the Criteria column, highlight ‘PO.’ Below column two, select the PO/Recruit from the drop-down list. You can further define this by highlighting another criteria, e.g. ‘Qualifier’ and then choosing
the same Qualifier beneath both Columns 1 and 2, e.g. choose Phase 3 beneath column one and Phase 3 beneath Column two. When you click on “View Chart,” this will compare the Average Phase 3 PO/Recruit to the specified PO/Recruit in Phase 3.
Click on “View Chart.” To move from page to page in the report, click on the arrow to the right of the page
number. The page number is located in the bottom left corner of the screen. Once you have the report on screen, hit the <cntrl> key and the <p> key on your keyboard
to print the report. Press the ‘Esc’ button on the keyboard to exit the report.
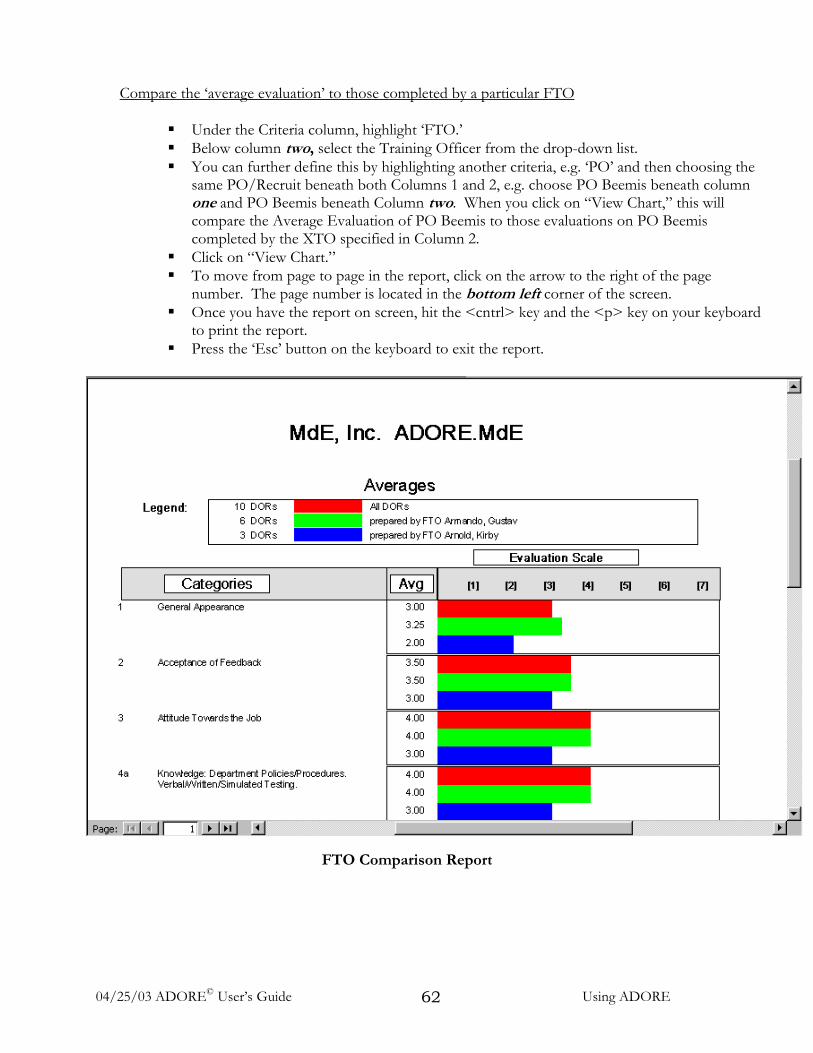
04/25/03 ADORE© User’s Guide Using ADORE 62
Compare the ‘average evaluation’ to those completed by a particular FTO
Under the Criteria column, highlight ‘FTO.’ Below column two, select the Training Officer from the drop-down list. You can further define this by highlighting another criteria, e.g. ‘PO’ and then choosing the
same PO/Recruit beneath both Columns 1 and 2, e.g. choose PO Beemis beneath column one and PO Beemis beneath Column two. When you click on “View Chart,” this will compare the Average Evaluation of PO Beemis to those evaluations on PO Beemis completed by the XTO specified in Column 2.
Click on “View Chart.” To move from page to page in the report, click on the arrow to the right of the page
number. The page number is located in the bottom left corner of the screen. Once you have the report on screen, hit the <cntrl> key and the <p> key on your keyboard
to print the report. Press the ‘Esc’ button on the keyboard to exit the report.
FTO Comparison Report

SECTION V
APPENDICES


02/25/05 ADORE© Use’s Guide Appendix A A-1
APPENDIX A - INSTALLATION To start the installation of ADORE, execute set.exe from inside the ‘Runtime*’ folder of the ADORE CD. When the following window opens, select the “Customize” icon
REMOVE the default location and input c:\adore for the response to: “Install Microsoft Access 2000 Runtime at:” and click “OK..”
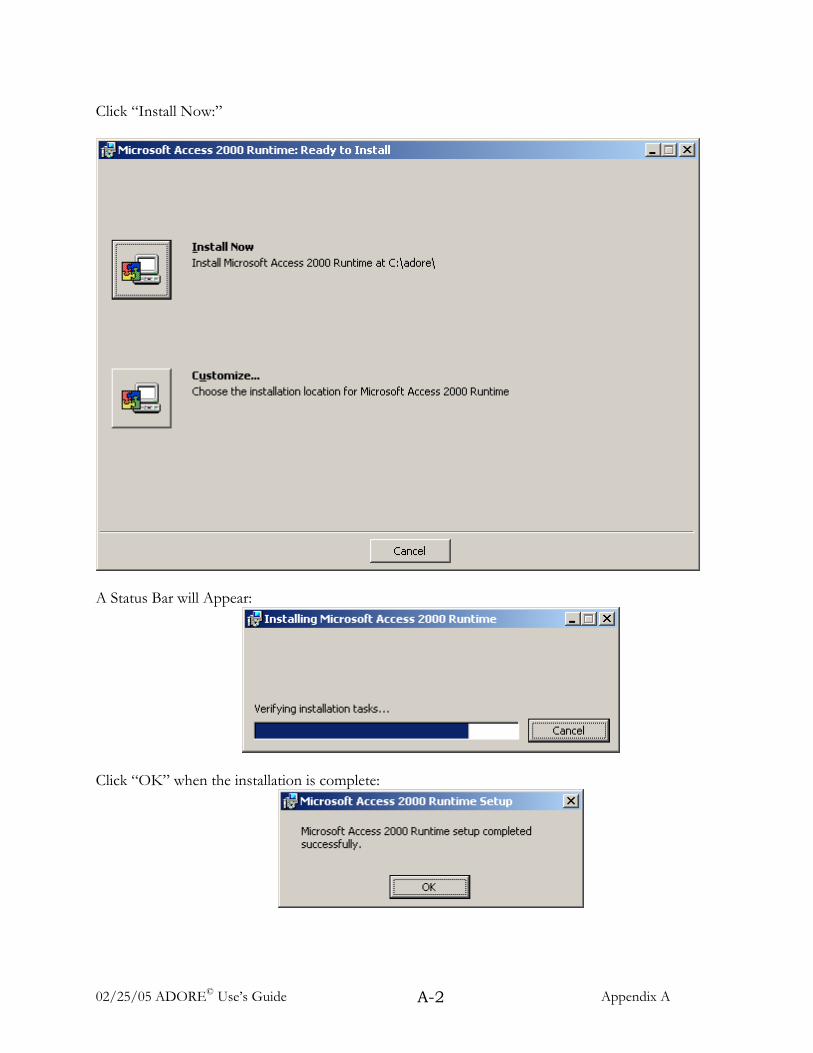
02/25/05 ADORE© Use’s Guide Appendix A A-2
Click “Install Now:”
A Status Bar will Appear:
Click “OK” when the installation is complete:
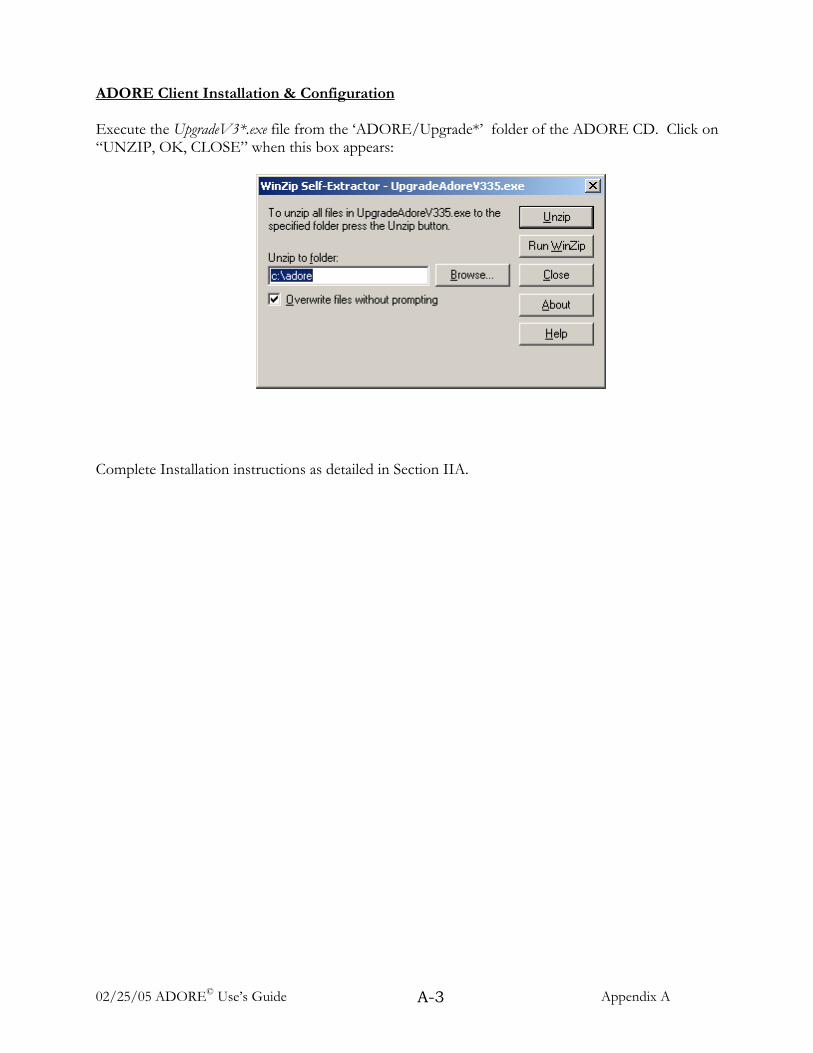
02/25/05 ADORE© Use’s Guide Appendix A A-3
ADORE Client Installation & Configuration Execute the UpgradeV3*.exe file from the ‘ADORE/Upgrade*’ folder of the ADORE CD. Click on “UNZIP, OK, CLOSE” when this box appears:
Complete Installation instructions as detailed in Section IIA.

02/25/05 ADORE© Use’s Guide Appendix A A-4
Initial Startup Start the ADORE product from the ADORE icon. Log into ADORE as the Administrator, Password 5466.
Initial Configuration Complete this form with information provided by MdE, Inc. during the installation phone conference.
Please note the full text for the Customer Name field is important, as this is the text that appears on reports as well. Select the ‘Register’ button when you have completed all entries. Upon successful completion of all registration fields the ADORE Main Menu screen is presented.
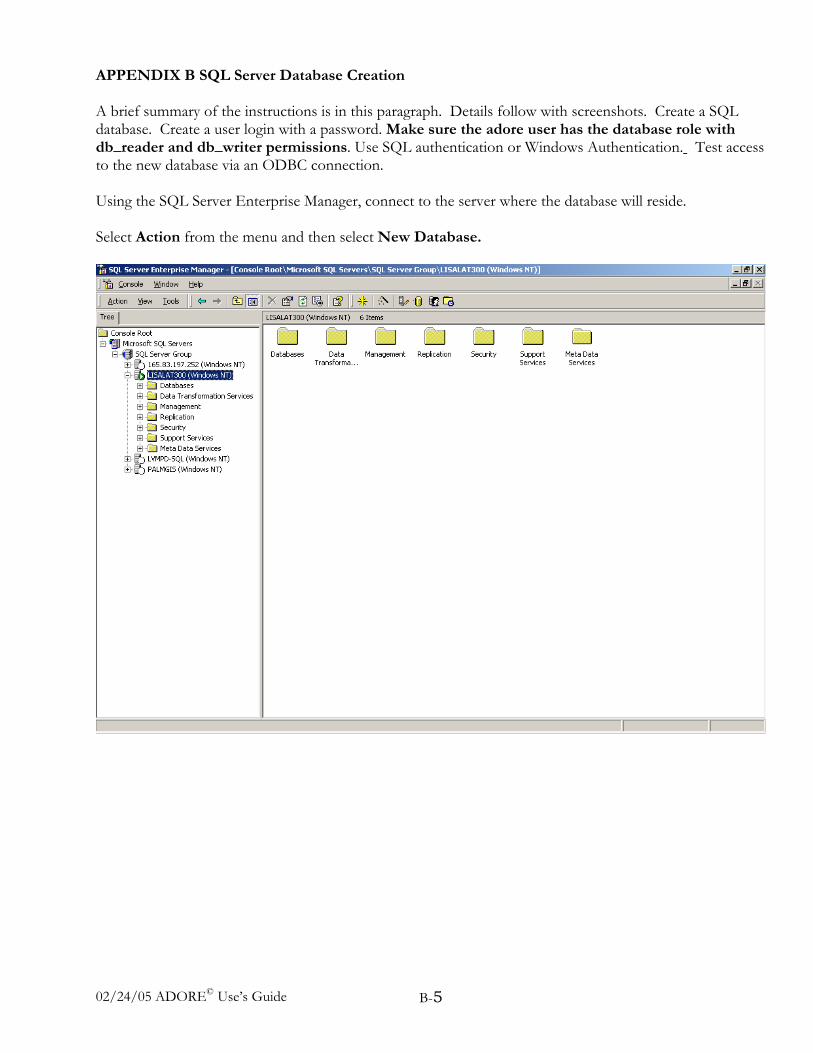
02/24/05 ADORE© Use’s Guide B-5
APPENDIX B SQL Server Database Creation A brief summary of the instructions is in this paragraph. Details follow with screenshots. Create a SQL database. Create a user login with a password. Make sure the adore user has the database role with db_reader and db_writer permissions. Use SQL authentication or Windows Authentication. Test access to the new database via an ODBC connection. Using the SQL Server Enterprise Manager, connect to the server where the database will reside. Select Action from the menu and then select New Database.

B-6
Create a database named for the appropriate division: Patrol= adore. Communications=adoreComm; Corrections=adoreCorr; Fire=adoreFire; EMS=adoreEMS. Enter the sizing for the file that will hold the data on the ‘Data Files’ tab and the sizing for the file that will hold the log information on the ‘Transaction Log’ tab.
Select ‘OK’ when you have entered the information on all three tabs.
Next create the Login for the adore user. Right-click on Logins in the Security folder. Select New Login…
02/24/05 ADORE© Use’s Guide

02/24/05 ADORE© Use’s Guide B-7
On the ‘General’ tab, enter the name, select ‘SQL Server Authentication,’ enter the password you have selected, and specify the database as the adore database you just created. Confirm the password if prompted. Or select ‘Windows Authentication’ and ‘Grant access.’ Fill in the Domain and the default database.
Skip to the ‘Database Access’ tab and place a checkmark in the box next to the appropriate adore database. In the bottom screen, check db_datareader and db_datawriter. Click “OK.

02/24/05 ADORE© Use’s Guide B-8
Extract the appropriate database from the ‘SQL’ folder of the ADORE CD. Restore this database over the database created. To do so:
Right-click on the database; Left-click on “All Tasks|Restore Database.” Bullet “From Device” and then click on Select Devices.
Click on Add:
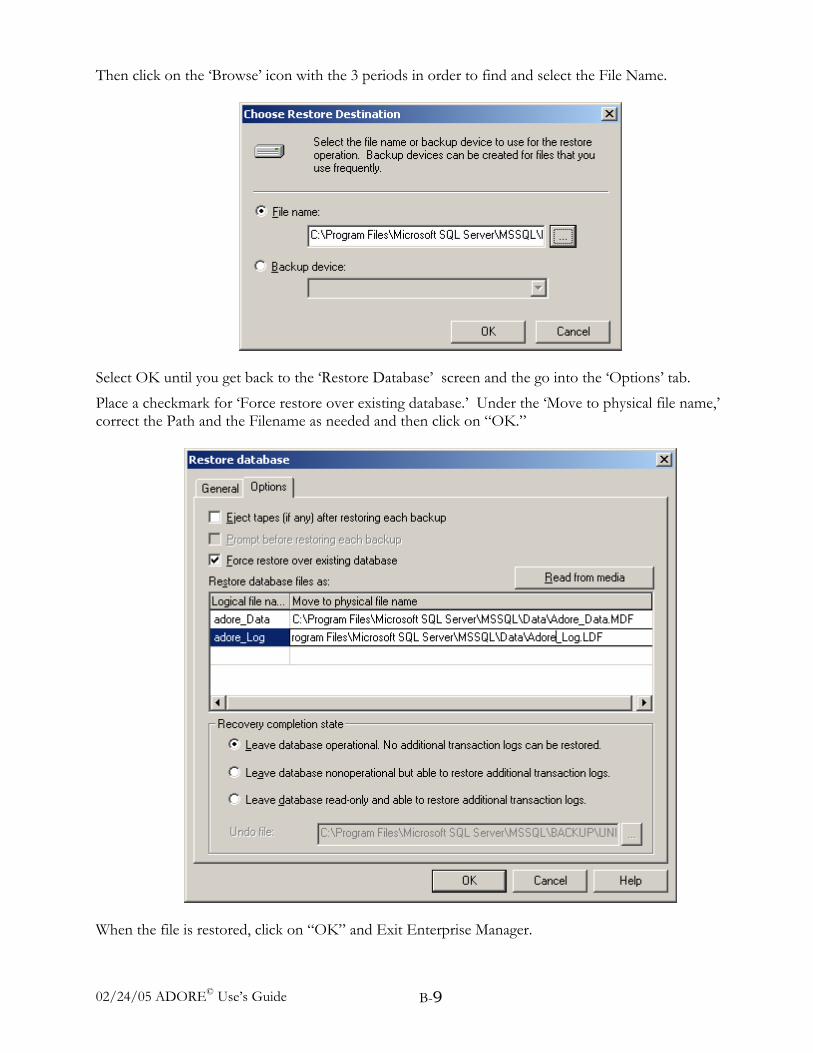
02/24/05 ADORE© Use’s Guide B-9
Then click on the ‘Browse’ icon with the 3 periods in order to find and select the File Name.
Select OK until you get back to the ‘Restore Database’ screen and the go into the ‘Options’ tab.
Place a checkmark for ‘Force restore over existing database.’ Under the ‘Move to physical file name,’ correct the Path and the Filename as needed and then click on “OK.”
When the file is restored, click on “OK” and Exit Enterprise Manager.
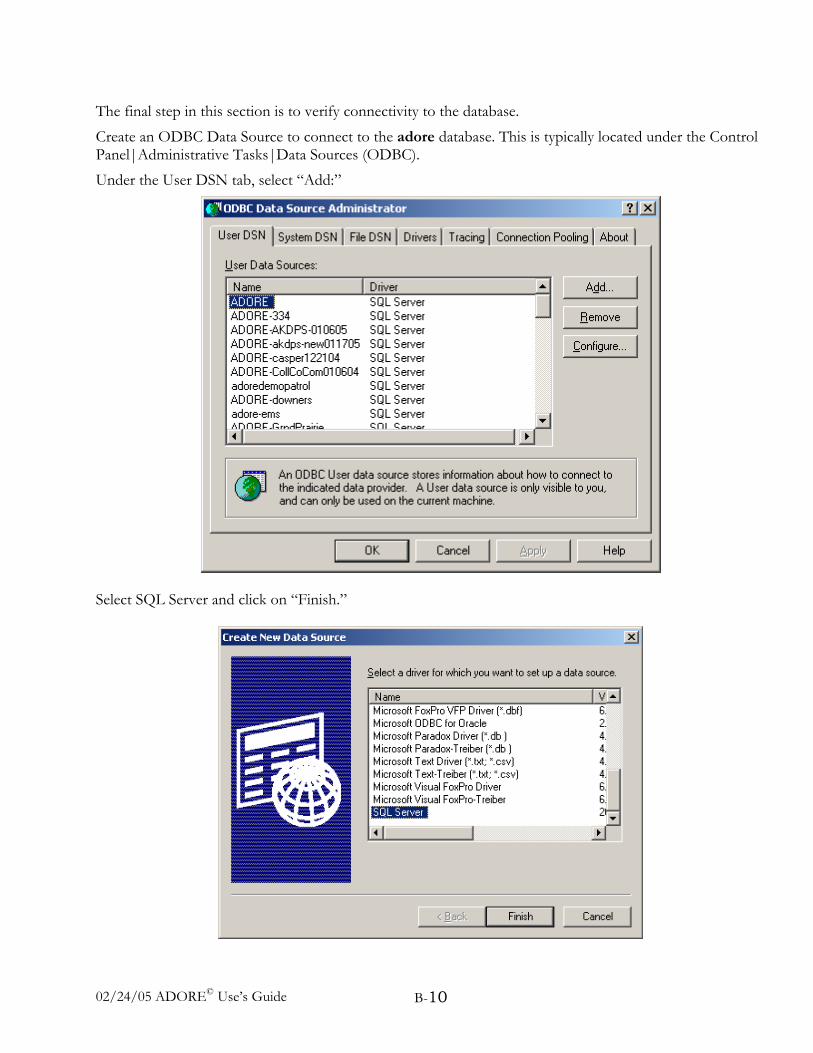
02/24/05 ADORE© Use’s Guide B-10
The final step in this section is to verify connectivity to the database.
Create an ODBC Data Source to connect to the adore database. This is typically located under the Control Panel|Administrative Tasks|Data Sources (ODBC).
Under the User DSN tab, select “Add:”
Select SQL Server and click on “Finish.”

02/24/05 ADORE© Use’s Guide B-11
Fill in the information to create the new data source and click on “Next”:
Choose:
a) “With SQL Server authentication using a login ID and password entered by the user” and input the username and password you selected or
b) “With Windows Authentication”, ensuring you are logged into Windows with a valid
username and password for access to the SQL database. Click on “Next.”

02/24/05 ADORE© Use’s Guide B-12
Click on “Client Configuration” and ensure that ‘TCP/IP’ is selected:
Click on “Next, Next, Finish” and then “Test Data Source:”
Correct if necessary and repeat until tested successfully.

02/25/05 ADORE© Use’s Guide Appendix C C-1
APPENDIX C - SQL ADORE Setup Go into “Maintenance|SQL Server Setup”. There is not an EXIT icon on the following SQL Server Setup screens - please use the lower Black "X" to exit these screens (screens with yellow background).
Select “Establish Account and Connection Info.” Complete the first two (2) fields for Windows Authentication. Complete the first four (4) fields for SQL Authentication. The ‘Optional Data source name?’ is optional and does not need to be filled in.
Place a checkmark for ‘Encrypt.’ Select “Set Properties.”
If MdE, Inc. has customized data for your department, proceed to the next page. Otherwise, close the window using the lower black “X” in the top right corner. Then continue to log out of ADORE using the Exit buttons. Log back into ADORE. As the application starts, you should see it linking to the SQL Server database in the bottom left corner (above the “Start” icon) via the previously tested ODBC Data Source.
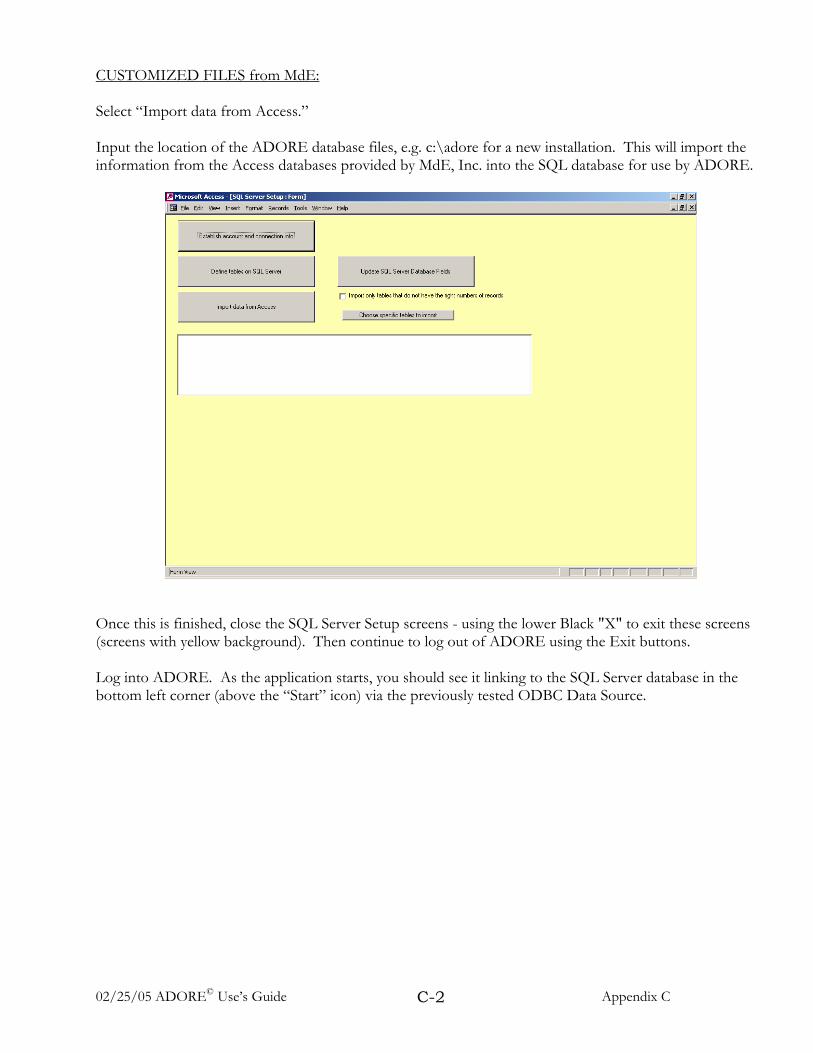
CUSTOMIZED FILES from MdE: Select “Import data from Access.” Input the location of the ADORE database files, e.g. c:\adore for a new installation. This will import the information from the Access databases provided by MdE, Inc. into the SQL database for use by ADORE.
Once this is finished, close the SQL Server Setup screens - using the lower Black "X" to exit these screens (screens with yellow background). Then continue to log out of ADORE using the Exit buttons. Log into ADORE. As the application starts, you should see it linking to the SQL Server database in the bottom left corner (above the “Start” icon) via the previously tested ODBC Data Source.
02/25/05 ADORE© Use’s Guide Appendix C C-2
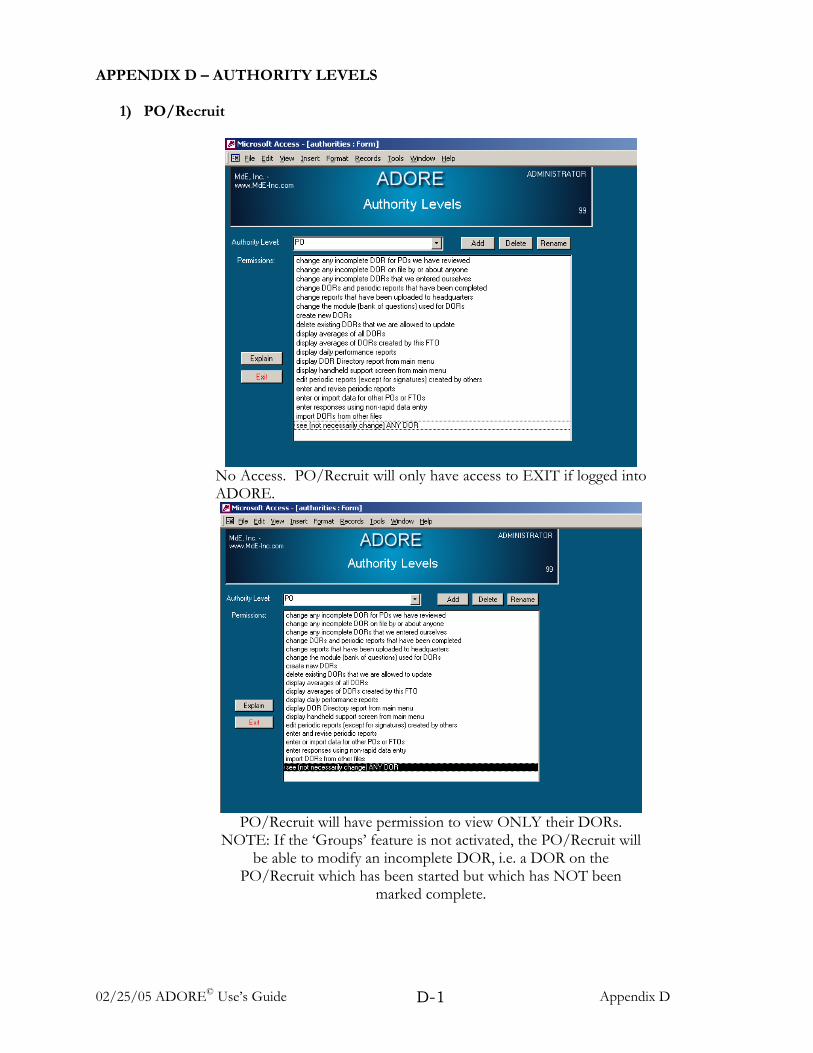
02/25/05 ADORE© Use’s Guide Appendix D D-1
APPENDIX D – AUTHORITY LEVELS
1) PO/Recruit
No Access. PO/Recruit will only have access to EXIT if logged into ADORE.
PO/Recruit will have permission to view ONLY their DORs.
NOTE: If the ‘Groups’ feature is not activated, the PO/Recruit will be able to modify an incomplete DOR, i.e. a DOR on the
PO/Recruit which has been started but which has NOT been marked complete.
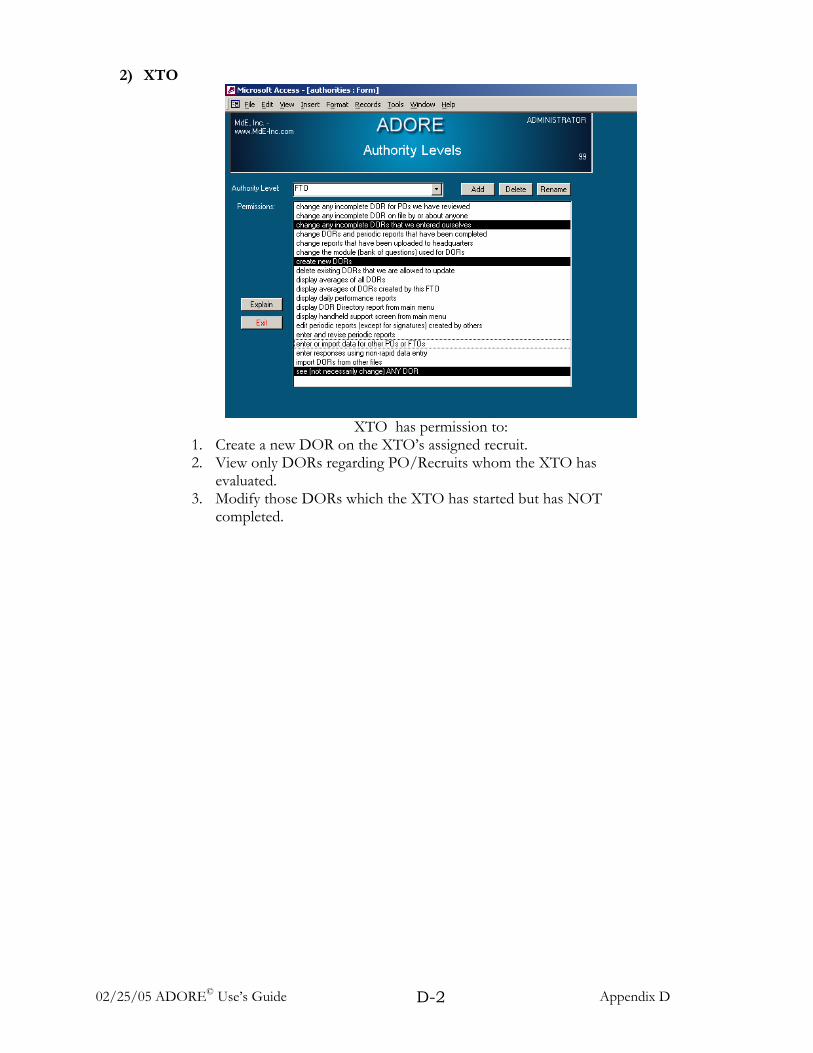
02/25/05 ADORE© Use’s Guide Appendix D D-2
2) XTO
XTO has permission to:
1. Create a new DOR on the XTO’s assigned recruit. 2. View only DORs regarding PO/Recruits whom the XTO has
evaluated. 3. Modify those DORs which the XTO has started but has NOT
completed.
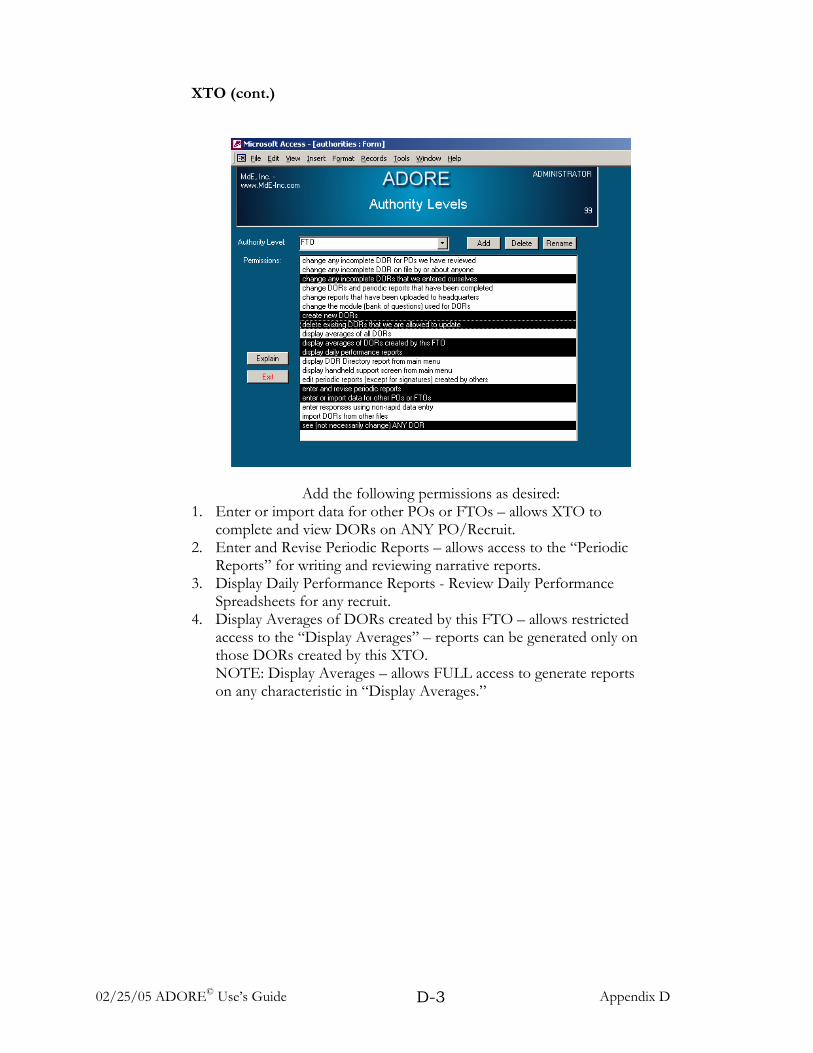
02/25/05 ADORE© Use’s Guide Appendix D D-3
XTO (cont.)
Add the following permissions as desired: 1. Enter or import data for other POs or FTOs – allows XTO to
complete and view DORs on ANY PO/Recruit. 2. Enter and Revise Periodic Reports – allows access to the “Periodic
Reports” for writing and reviewing narrative reports. 3. Display Daily Performance Reports - Review Daily Performance
Spreadsheets for any recruit. 4. Display Averages of DORs created by this FTO – allows restricted
access to the “Display Averages” – reports can be generated only on those DORs created by this XTO. NOTE: Display Averages – allows FULL access to generate reports on any characteristic in “Display Averages.”

02/25/05 ADORE© Use’s Guide Appendix D D-4
3) Supervisor
Basic Supervisor has permission to:
1. Review Any DOR. 2. Review any Periodic Report. 3. Create Periodic Reports. 4. Generate reports on any characteristic in “Display Averages.” 5. Review Daily Performance Spreadsheets
Add the following permissions as desired:
1. Change reports that have been uploaded to HQ – allows the Supervisor to change an uploaded report or mark it incomplete so the XTO can make changes. NOTE: The first 4 permissions must also be highlighted.
2. Change reports that have been completed – allows the Supervisor to change an uploaded report or mark it incomplete so the XTO can make changes. NOTE: The first 3 permissions must also be highlighted.
3. Create New DORs – allows the Supervisor to create new DORs. See instructions for “Authority Levels” regarding adding Supervisor as a XTO to allow for signing the DOR in that capacity.
4. Enter and Revise Periodic Reports (except for signatures) – allows the Supervisor to add comments to an existing Periodic Report.
5. Enter responses using non-rapid data entry. Allows supervisor to correct ‘Objective’ items if that option was purchased.
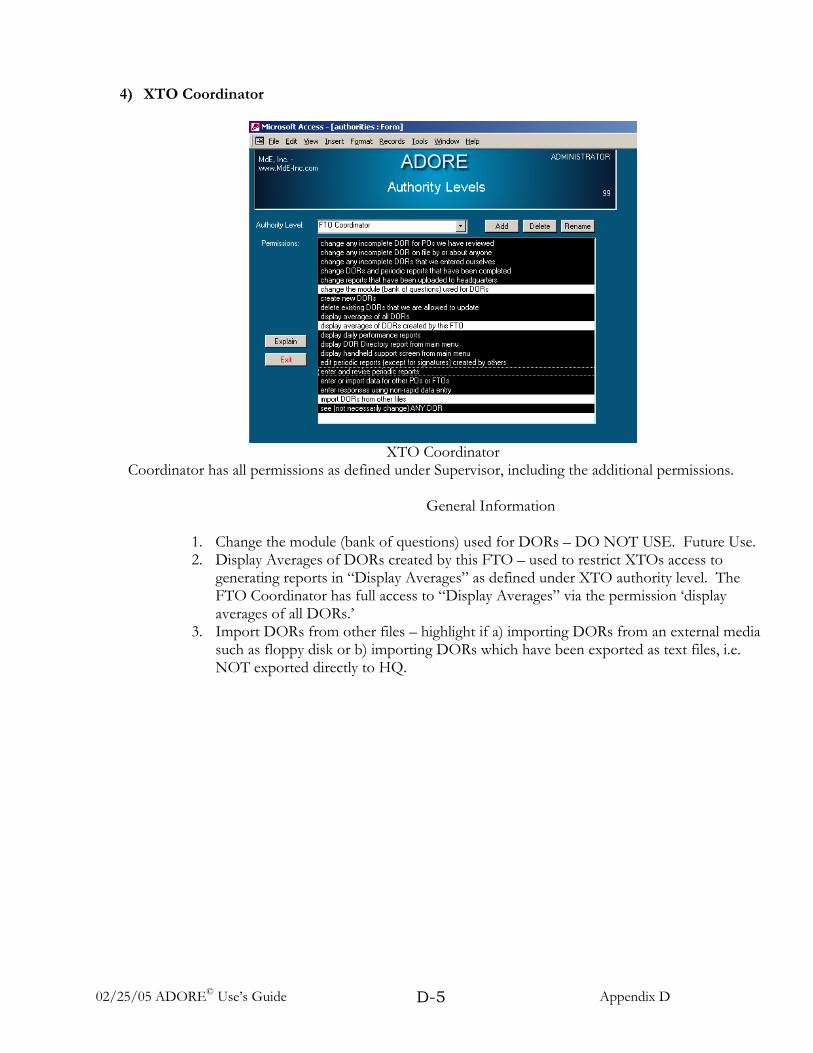
02/25/05 ADORE© Use’s Guide Appendix D D-5
4) XTO Coordinator
XTO Coordinator
Coordinator has all permissions as defined under Supervisor, including the additional permissions.
General Information
1. Change the module (bank of questions) used for DORs – DO NOT USE. Future Use. 2. Display Averages of DORs created by this FTO – used to restrict XTOs access to
generating reports in “Display Averages” as defined under XTO authority level. The FTO Coordinator has full access to “Display Averages” via the permission ‘display averages of all DORs.’
3. Import DORs from other files – highlight if a) importing DORs from an external media such as floppy disk or b) importing DORs which have been exported as text files, i.e. NOT exported directly to HQ.
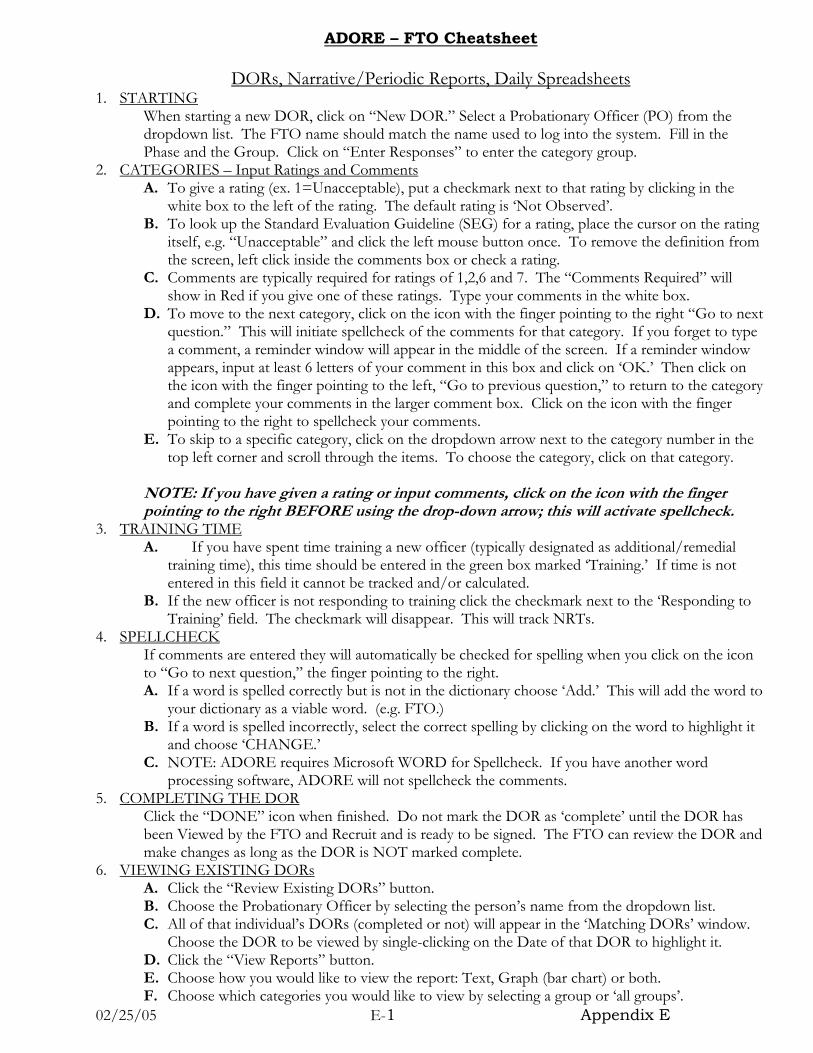
ADORE – FTO Cheatsheet
02/25/05 E-1 Appendix E
DORs, Narrative/Periodic Reports, Daily Spreadsheets
1. STARTING When starting a new DOR, click on “New DOR.” Select a Probationary Officer (PO) from the dropdown list. The FTO name should match the name used to log into the system. Fill in the Phase and the Group. Click on “Enter Responses” to enter the category group.
2. CATEGORIES – Input Ratings and Comments A. To give a rating (ex. 1=Unacceptable), put a checkmark next to that rating by clicking in the
white box to the left of the rating. The default rating is ‘Not Observed’. B. To look up the Standard Evaluation Guideline (SEG) for a rating, place the cursor on the rating
itself, e.g. “Unacceptable” and click the left mouse button once. To remove the definition from the screen, left click inside the comments box or check a rating.
C. Comments are typically required for ratings of 1,2,6 and 7. The “Comments Required” will show in Red if you give one of these ratings. Type your comments in the white box.
D. To move to the next category, click on the icon with the finger pointing to the right “Go to next question.” This will initiate spellcheck of the comments for that category. If you forget to type a comment, a reminder window will appear in the middle of the screen. If a reminder window appears, input at least 6 letters of your comment in this box and click on ‘OK.’ Then click on the icon with the finger pointing to the left, “Go to previous question,” to return to the category and complete your comments in the larger comment box. Click on the icon with the finger pointing to the right to spellcheck your comments.
E. To skip to a specific category, click on the dropdown arrow next to the category number in the top left corner and scroll through the items. To choose the category, click on that category.
NOTE: If you have given a rating or input comments, click on the icon with the finger pointing to the right BEFORE using the drop-down arrow; this will activate spellcheck.
3. TRAINING TIME A. If you have spent time training a new officer (typically designated as additional/remedial
training time), this time should be entered in the green box marked ‘Training.’ If time is not entered in this field it cannot be tracked and/or calculated.
B. If the new officer is not responding to training click the checkmark next to the ‘Responding to Training’ field. The checkmark will disappear. This will track NRTs.
4. SPELLCHECK If comments are entered they will automatically be checked for spelling when you click on the icon to “Go to next question,” the finger pointing to the right. A. If a word is spelled correctly but is not in the dictionary choose ‘Add.’ This will add the word to
your dictionary as a viable word. (e.g. FTO.) B. If a word is spelled incorrectly, select the correct spelling by clicking on the word to highlight it
and choose ‘CHANGE.’ C. NOTE: ADORE requires Microsoft WORD for Spellcheck. If you have another word
processing software, ADORE will not spellcheck the comments. 5. COMPLETING THE DOR
Click the “DONE” icon when finished. Do not mark the DOR as ‘complete’ until the DOR has been Viewed by the FTO and Recruit and is ready to be signed. The FTO can review the DOR and make changes as long as the DOR is NOT marked complete.
6. VIEWING EXISTING DORs A. Click the “Review Existing DORs” button. B. Choose the Probationary Officer by selecting the person’s name from the dropdown list. C. All of that individual’s DORs (completed or not) will appear in the ‘Matching DORs’ window.
Choose the DOR to be viewed by single-clicking on the Date of that DOR to highlight it. D. Click the “View Reports” button. E. Choose how you would like to view the report: Text, Graph (bar chart) or both. F. Choose which categories you would like to view by selecting a group or ‘all groups’.
ADORE – FTO Cheatsheet
02/25/05 E-2 Appendix E
G. To zoom in or zoom out, put your cursor in the center of the screen and click on the left mouse button.
H. To move from page to page, click on the Left or Right arrow in the bottom left corner of the screen.
I. To print the report once it is visible on the screen, press the <ctrl> key and the letter <p> key at the same time.
7. REVIEWING EXISTING REPORTS (to modify DORs which are NOT complete) A. Click the “Review Existing DORs” button. B. Choose the Probationary Officer by selecting the person’s name from the dropdown list. C. All of the individual’s DORs (completed or not) will appear in the ‘Matching DORs’ window.
Choose the DOR to be edited by single-clicking on the Date of that DOR to highlight it. D. Click the “Review/Update DORs” button. E. Complete the drop-down boxes and click on “Examine/Change Responses” to re-enter the
group selected. F. Make necessary edits or additions. G. Once all groups within the daily report are complete, click the “DONE” icon. H. If you are ready to sign the Daily reports, put a checkmark next to ‘Completed.’ The signature
page will automatically appear. Follow the directions listed under step 9 to sign the DOR. 8. REVIEWING EXISTING REPORTS (to sign completed DORs or Manually mark a DOR complete)
A. Click the “Review Existing DORs” button. B. Choose the Probationary Officer by selecting the person’s name from the dropdown list. C. All of the individual’s DORs (completed or not) will appear in the ‘Matching DORs’ window.
Choose the DOR to be edited by single-clicking on the Date of that DOR to highlight it. D. Click the “Review” (or “Review/Update”) button. E. Click on the “Sign” (or “Review Signatures”) button and follow the directions under step 9. F. If the report needs to be marked as complete, put a checkmark in the ‘Completed’ box. The
signature page will automatically appear. G. Follow the directions listed under step 9 to sign the Daily Report.
9. ELECTRONIC SIGNATURES A. Note the number of pages (records) in the gray area in the middle of the signature page.
Complete all applicable comment boxes. Click on the right arrow to move to the next page. B. At the bottom of the signature page click on the gray “Sign” button next to the FTO name. C. A window will appear with the FTO name and a place to enter a password. Enter your
password and click on the “Sign” button. D. The date the report was signed will appear to the right of the “Sign” button. E. Duplicate this procedure for the Probationary Officer by clicking on the appropriate “Sign”
button. 10. NARRATIVE REPORTS, e.g. End of Phase/Bi-Weekly Report
A. From the main menu click on the “Periodic Reports” button. B. Highlight the report to be completed/reviewed. C. Highlight the name of the Probationary Officer. D. Click on “Enter Current Report” to begin a new report. Highlight a report under ‘Reports on
file for that officer’ and click “Enter Past Report” to enter an existing report for modification or click on “View Report” to view the report. To print a report that is visible on the screen, press the <ctrl> key and the letter <p> key at the same time.
E. Note the number of pages (records) in the gray area in the middle of the screen. Complete all applicable comment boxes. To spellcheck the comments, click on “Check Spelling.” Click on the right arrow to move to the next page.
F. Fill in all numeric values for items listed beneath the gray area.

ADORE – FTO Cheatsheet
02/25/05 E-3 Appendix E
11. DAILY PERFORMANCE – RATINGS, TRAINING TIME or CALL LOG A. To display the Probationary Officer’s ratings, click on “Daily Performance.” B. Highlight the Probationary Officer. C. Select the Start and End dates next to ‘Select DORs from,’ if desired. Do not change either setting
to show ALL DORs. D. Choose the Coloring scheme and the Specific Question Group. E. Choose whether to Show Ratings, Training Time or Call Task Log. F. Input the number of decimals for training time if generating a Training Time Spreadsheet G. Choose whether to sort the DORs by date or DOR#. (Typically Date is chosen.) H. Click on “View Report” to view the report on screen or “Print Report” to print to a printer. I. To print a report that is visible on the screen, press the <ctrl> key and the letter <p> key at the
same time. 12. DETERMINE CHECKLIST ITEMS WHICH HAVE NOT BEEN MARKED
A. Click on “Review Existing DORs.” B. Highlight the Probationary Officer. C. Select the “Objectives for PO” icon. D. To zoom in or zoom out, put your cursor in the center of the screen and click on the left mouse
button. E. To move from page to page, click on the Left or Right arrow in the bottom left corner of the screen. F. To print the report once it is visible on the screen, press the <ctrl> key and the letter <p> key at the
same time. G. Hit the “Esc” key on you keyboard to remove the report from your screen.
13. EXITING A. To exit ADORE always chose the red “EXIT” or “CANCEL” buttons. DO NOT close the
program using the “File, Exit” mode or by clicking on either of the black “Xs” in the top right corner of the screen.
B. If you utilize a floppy disk or external media, to transfer the data to HQ: Log into ADORE on one of the station PCs and transfer data by one of 2 methods:
1. Select the ‘Import data’ icon and wait to receive a message regarding number of reports imported. Select ‘OK’ and then ‘Exit’ and remove the floppy disk.
Or, if you do not have the icon ‘Import data:’ 2. When you select the last “Exit” icon, answer ‘Yes’ if you are prompted “Do you want to
export your completed reports to HQ?” This will transfer the completed reports to the Supervisor for review.
GENERAL RULES OF THUMB:
1. ALWAYS use the Red EXIT/DONE/CANCEL icons to leave a screen.
2. If there is not a Red EXIT/DONE/CANCEL icon, use the ‘Esc’ key on your keyboard, generally found in the top left corner of your keyboard.
3. If you are Viewing a report on screen, click on the arrow icons in the Bottom Left corner of the screen to scroll among the pages.
4. If you are Viewing a report on screen, hold the <CTRL> key and the letter <P> to print this report.
5. Do NOT mark a report Complete until you are ready to sign off on the report. Once an FTO has marked the DOR/daily report complete, the FTO cannot modify it.
USEFUL SHORTCUTS CTRL-C – Copies information to the clipboard
CTRL V – Pastes information from the clipboard CTRL X – Cuts data and puts it on the clipboard
CTRL Y – Redoes the procedure you just did CTRL Z – Undoes the procedure you just did
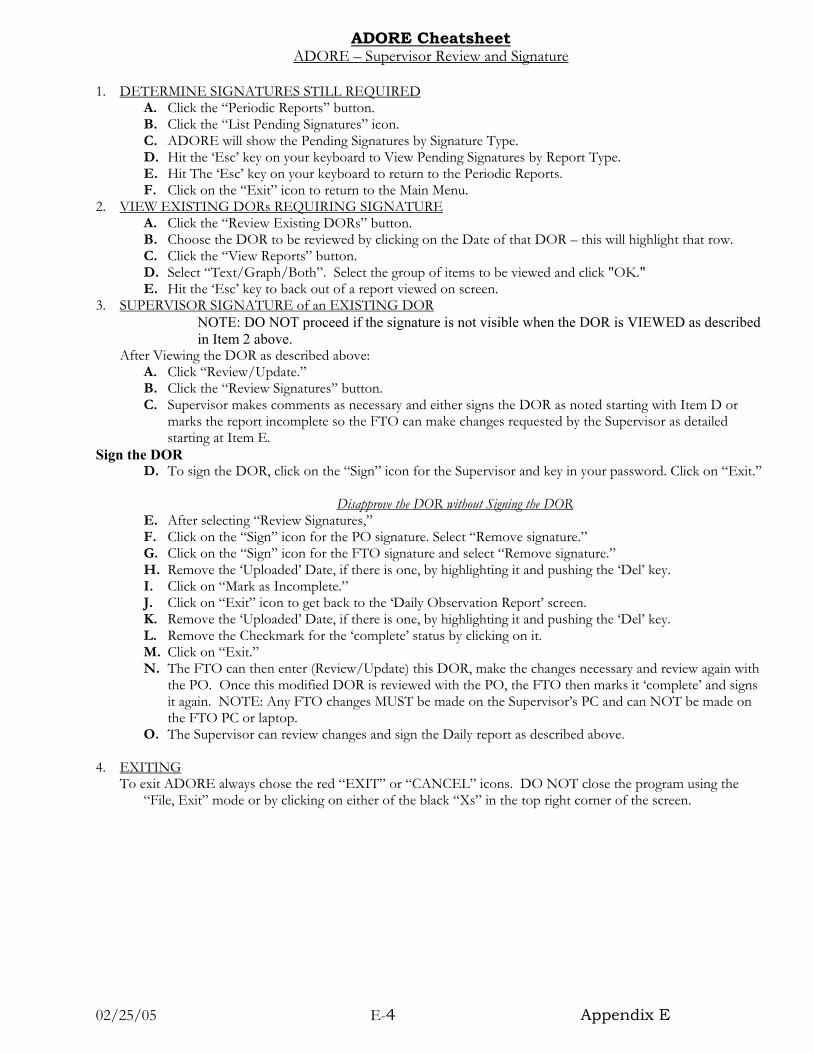
ADORE Cheatsheet
02/25/05 E-4 Appendix E
ADORE – Supervisor Review and Signature
1. DETERMINE SIGNATURES STILL REQUIRED A. Click the “Periodic Reports” button. B. Click the “List Pending Signatures” icon. C. ADORE will show the Pending Signatures by Signature Type. D. Hit the ‘Esc’ key on your keyboard to View Pending Signatures by Report Type. E. Hit The ‘Esc’ key on your keyboard to return to the Periodic Reports. F. Click on the “Exit” icon to return to the Main Menu.
2. VIEW EXISTING DORs REQUIRING SIGNATURE A. Click the “Review Existing DORs” button. B. Choose the DOR to be reviewed by clicking on the Date of that DOR – this will highlight that row. C. Click the “View Reports” button. D. Select “Text/Graph/Both”. Select the group of items to be viewed and click "OK." E. Hit the ‘Esc’ key to back out of a report viewed on screen.
3. SUPERVISOR SIGNATURE of an EXISTING DOR NOTE: DO NOT proceed if the signature is not visible when the DOR is VIEWED as described in Item 2 above.
After Viewing the DOR as described above: A. Click “Review/Update.” B. Click the “Review Signatures” button. C. Supervisor makes comments as necessary and either signs the DOR as noted starting with Item D or
marks the report incomplete so the FTO can make changes requested by the Supervisor as detailed starting at Item E.
Sign the DOR D. To sign the DOR, click on the “Sign” icon for the Supervisor and key in your password. Click on “Exit.”
Disapprove the DOR without Signing the DOR
E. After selecting “Review Signatures,” F. Click on the “Sign” icon for the PO signature. Select “Remove signature.” G. Click on the “Sign” icon for the FTO signature and select “Remove signature.” H. Remove the ‘Uploaded’ Date, if there is one, by highlighting it and pushing the ‘Del’ key. I. Click on “Mark as Incomplete.” J. Click on “Exit” icon to get back to the ‘Daily Observation Report’ screen. K. Remove the ‘Uploaded’ Date, if there is one, by highlighting it and pushing the ‘Del’ key. L. Remove the Checkmark for the ‘complete’ status by clicking on it. M. Click on “Exit.” N. The FTO can then enter (Review/Update) this DOR, make the changes necessary and review again with
the PO. Once this modified DOR is reviewed with the PO, the FTO then marks it ‘complete’ and signs it again. NOTE: Any FTO changes MUST be made on the Supervisor’s PC and can NOT be made on the FTO PC or laptop.
O. The Supervisor can review changes and sign the Daily report as described above.
4. EXITING To exit ADORE always chose the red “EXIT” or “CANCEL” icons. DO NOT close the program using the
“File, Exit” mode or by clicking on either of the black “Xs” in the top right corner of the screen.
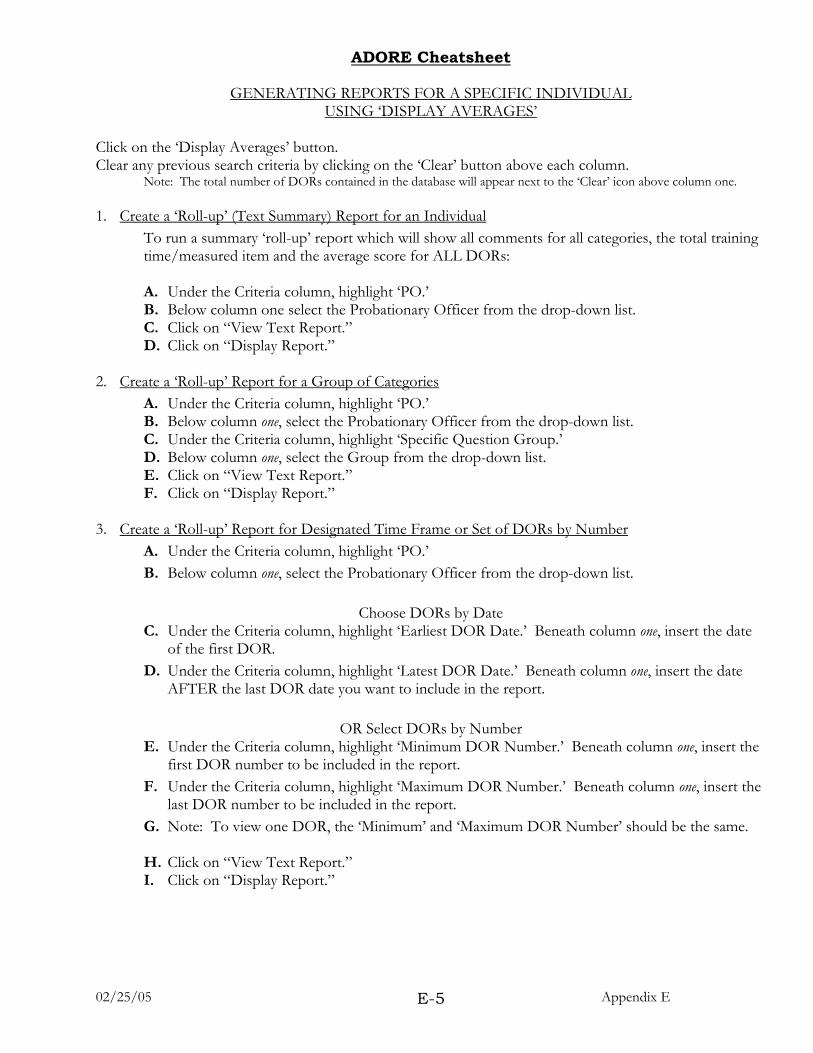
ADORE Cheatsheet
02/25/05 Appendix E E-5
GENERATING REPORTS FOR A SPECIFIC INDIVIDUAL
USING ‘DISPLAY AVERAGES’ Click on the ‘Display Averages’ button. Clear any previous search criteria by clicking on the ‘Clear’ button above each column.
Note: The total number of DORs contained in the database will appear next to the ‘Clear’ icon above column one. 1. Create a ‘Roll-up’ (Text Summary) Report for an Individual
To run a summary ‘roll-up’ report which will show all comments for all categories, the total training time/measured item and the average score for ALL DORs:
A. Under the Criteria column, highlight ‘PO.’ B. Below column one select the Probationary Officer from the drop-down list. C. Click on “View Text Report.” D. Click on “Display Report.”
2. Create a ‘Roll-up’ Report for a Group of Categories
A. Under the Criteria column, highlight ‘PO.’ B. Below column one, select the Probationary Officer from the drop-down list. C. Under the Criteria column, highlight ‘Specific Question Group.’ D. Below column one, select the Group from the drop-down list. E. Click on “View Text Report.” F. Click on “Display Report.”
3. Create a ‘Roll-up’ Report for Designated Time Frame or Set of DORs by Number
A. Under the Criteria column, highlight ‘PO.’ B. Below column one, select the Probationary Officer from the drop-down list.
Choose DORs by Date
C. Under the Criteria column, highlight ‘Earliest DOR Date.’ Beneath column one, insert the date of the first DOR.
D. Under the Criteria column, highlight ‘Latest DOR Date.’ Beneath column one, insert the date AFTER the last DOR date you want to include in the report.
OR Select DORs by Number
E. Under the Criteria column, highlight ‘Minimum DOR Number.’ Beneath column one, insert the first DOR number to be included in the report.
F. Under the Criteria column, highlight ‘Maximum DOR Number.’ Beneath column one, insert the last DOR number to be included in the report.
G. Note: To view one DOR, the ‘Minimum’ and ‘Maximum DOR Number’ should be the same. H. Click on “View Text Report.” I. Click on “Display Report.”
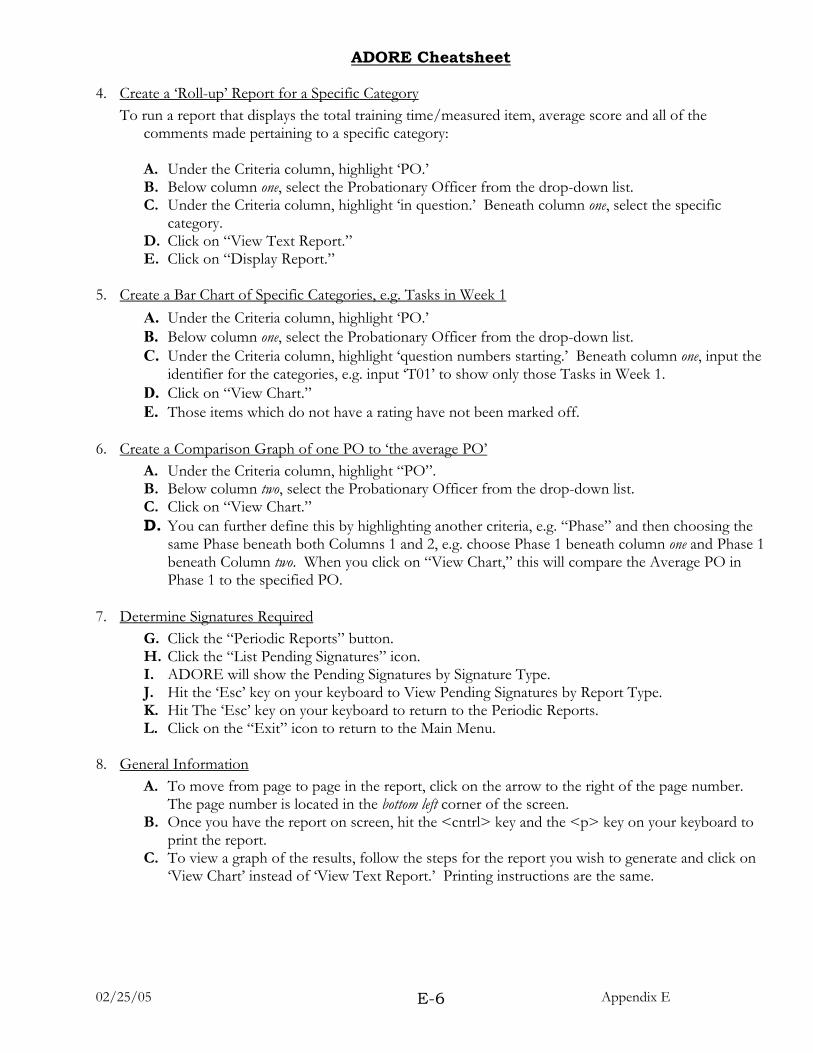
ADORE Cheatsheet
02/25/05 Appendix E E-6
4. Create a ‘Roll-up’ Report for a Specific Category
To run a report that displays the total training time/measured item, average score and all of the comments made pertaining to a specific category:
A. Under the Criteria column, highlight ‘PO.’ B. Below column one, select the Probationary Officer from the drop-down list. C. Under the Criteria column, highlight ‘in question.’ Beneath column one, select the specific
category. D. Click on “View Text Report.” E. Click on “Display Report.”
5. Create a Bar Chart of Specific Categories, e.g. Tasks in Week 1 A. Under the Criteria column, highlight ‘PO.’ B. Below column one, select the Probationary Officer from the drop-down list. C. Under the Criteria column, highlight ‘question numbers starting.’ Beneath column one, input the
identifier for the categories, e.g. input ‘T01’ to show only those Tasks in Week 1. D. Click on “View Chart.” E. Those items which do not have a rating have not been marked off.
6. Create a Comparison Graph of one PO to ‘the average PO’ A. Under the Criteria column, highlight “PO”. B. Below column two, select the Probationary Officer from the drop-down list. C. Click on “View Chart.” D. You can further define this by highlighting another criteria, e.g. “Phase” and then choosing the
same Phase beneath both Columns 1 and 2, e.g. choose Phase 1 beneath column one and Phase 1 beneath Column two. When you click on “View Chart,” this will compare the Average PO in Phase 1 to the specified PO.
7. Determine Signatures Required
G. Click the “Periodic Reports” button. H. Click the “List Pending Signatures” icon. I. ADORE will show the Pending Signatures by Signature Type. J. Hit the ‘Esc’ key on your keyboard to View Pending Signatures by Report Type. K. Hit The ‘Esc’ key on your keyboard to return to the Periodic Reports. L. Click on the “Exit” icon to return to the Main Menu.
8. General Information A. To move from page to page in the report, click on the arrow to the right of the page number.
The page number is located in the bottom left corner of the screen. B. Once you have the report on screen, hit the <cntrl> key and the <p> key on your keyboard to
print the report. C. To view a graph of the results, follow the steps for the report you wish to generate and click on
‘View Chart’ instead of ‘View Text Report.’ Printing instructions are the same.

ADORE Cheatsheet
02/25/05 Appendix F F-1
APPENDIX F – TROUBLESHOOTING
YELLOW EXLAMATION POINT - ERRORS Yellow Exclamation Point
Message in the bottom left corner above Start:
Upgrading \\server\adore\adore_be.mdb
Or Upgrading s:\adore\adore_be.mdb
Most likely a network issue: 1. Verify (e.g. through Windows Explorer) that
the user logged into the network has access to this EXACT path.
2. Verify that the user logged into the network has FULL access rights to this folder, INCLUDING DELETE.
3. Verify that the file blank.mdb is in BOTH c:\adore and the path noted in the error message.
4. Verify the existence of the EXACT folder c:\windows\temp. This typically must be added to PCs with the operating system, Windows 2000 or Windows XP.
Upgrading \\server\adore\individual.mdb
Or Upgrading s:\adore\individual.mdb
1. Verify (e.g. through Windows Explorer) that the user logged into the network has access to this EXACT path.
2. Verify that the user logged into the network has FULL access rights to this folder, INCLUDING DELETE.
3. Verify that the file blank.mdb is in BOTH c:\adore and the path noted in the error message.
4. Verify the existence of the EXACT folder c:\windows\temp. This typically must be added to PCs with the operating system, Windows 2000 or Windows XP.
5. Open the folder containing this file and determine if there are 2 files, individual.mdb and individual.ldb. If so, this typically indicates a damaged database file. This file can be replaced with the most recent backup of the individual.mdb, however those reports completed after this backup, will be permanently lost. It is possible that this file can be repaired by emailing the adore_be.mdb, individual.mdb and module*.mdb files to MdE, Inc.

ADORE Cheatsheet
02/25/05 ADORE© Use’s Guide Appendix F F-2
TROUBLESHOOTING-GENERAL Error Check
Invalid Password (at the Red Registration screen.)
Verify the Version number on the yellow ADORE ‘splash’ screen. Confirm that any upgrades have been installed. Confirm that all data is input EXACTLY as provided by MdE, Inc.
DOR is missing Category 1. Obtain a backup of the file module SanJose.mdb. Copy this into the location where the shared files are, identified by the property setting ‘ADORE Directory.’ Overwrite the existing file. This could occur if the ‘Edit/Delete’ commands in the top left corner of the screen are utilized. Only ADORE icons should be utilized in ADORE. The missing DOR category will NOT appear in any DORs started without the missing category. The missing category will reappear in all DORs completed with this category intact as well as all future DORs.
The list of POs/XTOs is grayed out. 1. Log into ADORE with Administrative access.
2. Go into “Maintenance,” “Authority Levels.” 3. Highlight the authority level which has the
grayed-out boxes. 4. Confirm the ‘Enter or import data for other
POs and FTOs’ is highlighted in black. The question “X number of DORs refer to invalid POs/FTOs/Stations and would not appear. Do you want to correct this problem by adding the missing POs/FTOs/Stations? Their ID numbers will be added, and their names will be ‘?’.
1. The PO/FTO/Station has been removed from the database. Answering ‘Yes’ to this question will make these DORs visible in ADORE and will add the missing data back into the database as a ‘?.’
2. Go into the appropriate maintenance icon, e.g. Probationary Officers/Field Training Officers/Qualifier and key in the user name/Qualifier associated with the ‘?.’
3. These reports can then be reviewed in ADORE and deleted if desired.

ADORE Cheatsheet
02/25/05 ADORE© Use’s Guide Appendix F F-3
Backing up database This PC has the backup feature turned on in the
“Properties” icon and another PC has ADORE open. This PC cannot enter ADORE if another PC has ADORE open because the backup cannot be performed. To enter ADORE on this PC, users on other PCs must Exit ADORE and can log back into ADORE once this PC has backed up ADORE. If ADORE’s backup feature is utilized, it should only be set on one PC if all PCs are using the same shared files. Answer “no” when prompted with this question. If you accidentally answer ‘Yes’, simply close the purple “Reassign ID Numbers” window that appears by clicking on the black ‘X’ in the top right corner of that window. This will take you to the Main Menu of ADORE. If the user gets either of these messages, they need to contact an ADORE Administrator and provide them the computer name in parentheses. The Administrator will go into Maintenance|Computers and locate that computer name. Once located, click on the “Info” button to the right of there and provide the 2 numbers to the user. These numbers are the Highest ID for Signin and Highest ID for the Report Entries as requested in these messages.
ADORE
AutomateD Observation Report and Evaluation