table of contents of contents 2 2008 escape (204) owners guide (post-2002-fmt) usa (fus) maintenance...
TRANSCRIPT

Introduction 4
Instrument Cluster 12
Warning lights and chimes 12Gauges 17
Entertainment Systems 20
Auxiliary input jack 27Satellite radio information 30Navigation system 33
Climate Controls 34
Manual heating and air conditioning 34Dual automatic temperature control 37Rear window defroster 40
Lights 41
Headlamps 41Turn signal control 45Bulb replacement 47
Driver Controls 52
Windshield wiper/washer control 52Steering wheel adjustment 53Power windows 56Mirrors 57Speed control 61Moon roof 65Message center 66
Locks and Security 78
Keys 78Locks 80Anti-theft system 91
Table of Contents
1
2008 Escape (204)Owners Guide (post-2002-fmt)USA (fus)
Seating and Safety Restraints 95
Seating 95Safety restraints 103Airbags 116Child restraints 131
Tires, Wheels and Loading 143
Tire information 146Tire inflation 148Tire Pressure Monitoring System (TPMS) 161Vehicle loading 166Trailer towing 172Recreational towing 177
Driving 178
Starting 178Brakes 182Traction Control™/AdvanceTrac� 184Transmission operation 190
Roadside Emergencies 206
Getting roadside assistance 206Hazard flasher switch 208Fuel pump shut-off switch 208Fuses and relays 209Changing tires 216Lug nut torque 226Jump starting 227Wrecker towing 232
Customer Assistance 234
Reporting safety defects (U.S. only) 241Reporting safety defects (Canada only) 241
Cleaning 242
Table of Contents
2
2008 Escape (204)Owners Guide (post-2002-fmt)USA (fus)

Maintenance and Specifications 249
Engine compartment 251Engine oil 255Battery 259Engine coolant 261Fuel information 267Air filter(s) 280Part numbers 282Maintenance product specifications and capacities 283Engine data 286
Accessories 289
Index 291
All rights reserved. Reproduction by any means, electronic or mechanicalincluding photocopying, recording or by any information storage and retrievalsystem or translation in whole or part is not permitted without writtenauthorization from Ford Motor Company. Ford may change the contents withoutnotice and without incurring obligation.
Copyright © 2006 Ford Motor Company
Table of Contents
3
2008 Escape (204)Owners Guide (post-2002-fmt)USA (fus)

CALIFORNIA Proposition 65 Warning
WARNING: Engine exhaust, some of its constituents, andcertain vehicle components contain or emit chemicals known to
the State of California to cause cancer and birth defects or otherreproductive harm. In addition, certain fluids contained in vehicles andcertain products of component wear contain or emit chemicals knownto the State of California to cause cancer and birth defects or otherreproductive harm.
PERCHLORATE MATERIALCertain components of this vehicle such as air bag modules, seat beltpretensioners, and button cell batteries may contain Perchlorate Material– Special handling may apply for service or vehicle end of life disposal.See www.dtsc.ca.gov/hazardouswaste/perchlorate.
CONGRATULATIONSCongratulations on acquiring your new Ford. Please take the time to getwell acquainted with your vehicle by reading this handbook. The moreyou know and understand about your vehicle, the greater the safety andpleasure you will derive from driving it.
For more information on Ford Motor Company and its products visit thefollowing website:
• In the United States: www.ford.com
• In Canada: www.ford.ca
• In Australia: www.ford.com.au
• In Mexico: www.ford.com.mx
Additional owner information is given in separate publications.
2008 Escape (204)Owners Guide (post-2002-fmt)USA (fus)
Introduction
4

This Owner’s Guide describes every option and model variant availableand therefore some of the items covered may not apply to yourparticular vehicle. Furthermore, due to printing cycles it may describeoptions before they are generally available.
Remember to pass on this Owner’s Guide when reselling the vehicle. Itis an integral part of the vehicle.
Fuel pump shut-off switch: In the event of an accident thesafety switch will automatically cut off the fuel supply to the
engine. The switch can also be activated through sudden vibration(e.g. collision when parking). To reset the switch, refer to the Fuelpump shut-off switch in the Roadside Emergencies chapter.
SAFETY AND ENVIRONMENT PROTECTION
Warning symbols in this guide
How can you reduce the risk of personal injury to yourself or others? Inthis guide, answers to such questions are contained in commentshighlighted by the warning triangle symbol. These comments should beread and observed.
Warning symbols on your vehicle
When you see this symbol, it isimperative that you consult therelevant section of this guide beforetouching or attempting adjustmentof any kind.
2008 Escape (204)Owners Guide (post-2002-fmt)USA (fus)
Introduction
5

Protecting the environmentWe must all play our part inprotecting the environment. Correctvehicle usage and the authorizeddisposal of waste, cleaning andlubrication materials are significantsteps towards this aim. Information in this respect is highlighted in thisguide with the tree symbol.
BREAKING-IN YOUR VEHICLEYour vehicle does not need an extensive break-in. Try not to drivecontinuously at the same speed for the first 1,000 miles (1,600 km) ofnew vehicle operation. Vary your speed frequently in order to give themoving parts a chance to break in.
Drive your new vehicle at least 500 miles (800 km) before towing atrailer. For more detailed information about towing a trailer, refer toTrailer towing in the Tires, Wheels and Loading chapter.
Do not add friction modifier compounds or special break-in oils sincethese additives may prevent piston ring seating. See Engine oil in theMaintenance and Specifications chapter for more information on oilusage.
SPECIAL NOTICES
New Vehicle Limited WarrantyFor a detailed description of what is covered and what is not covered byyour vehicle’s New Vehicle Limited Warranty, refer to the WarrantyGuide that is provided to you along with your Owner’s Guide.
2008 Escape (204)Owners Guide (post-2002-fmt)USA (fus)
Introduction
6

Special instructionsFor your added safety, your vehicle is fitted with sophisticated electroniccontrols.
Please read the section Airbag supplemental restraint system(SRS) in the Seating and Safety Restraints chapter. Failure to
follow the specific warnings and instructions could result in personalinjury.
Front seat mounted rear-facing child or infant seats shouldNEVER be placed in front of an active passenger airbag.
Service Data RecordingService data recorders in your vehicle are capable of collecting andstoring diagnostic information about your vehicle. This potentiallyincludes information about the performance or status of various systemsand modules in the vehicle, such as engine, throttle, steering or brakesystems. In order to properly diagnose and service your vehicle, FordMotor Company, Ford of Canada, and service and repair facilities mayaccess vehicle diagnostic information through a direct connection to yourvehicle when diagnosing or servicing your vehicle.
Event Data RecordingOther modules in your vehicle — event data recorders — are capable ofcollecting and storing data during a crash or near crash event. Therecorded information may assist in the investigation of such an event.The modules may record information about both the vehicle and theoccupants, potentially including information such as:
• how various systems in your vehicle were operating;
• whether or not the driver and passenger seatbelts were buckled;
• how far (if at all) the driver was depressing the accelerator and/or thebrake pedal;
• how fast the vehicle was traveling; and
• where the driver was positioning the steering wheel.
2008 Escape (204)Owners Guide (post-2002-fmt)USA (fus)
Introduction
7
To access this information, special equipment must be directly connectedto the recording modules. Ford Motor Company and Ford of Canada donot access event data recorder information without obtaining consent,unless pursuant to court order or where required by law enforcement,other government authorities or other third parties acting with lawfulauthority. Other parties may seek to access the informationindependently of Ford Motor Company and Ford of Canada.
Notice to owners of pickup trucks and utility type vehicles
Utility vehicles have a significantly higher rollover rate thanother types of vehicles.
Before you drive your vehicle, please read this Owner’s Guide carefully.Your vehicle is not a passenger car. As with other vehicles of this type,failure to operate this vehicle correctly may result in loss of vehiclecontrol, vehicle rollover, personal injury or death.
Using your vehicle with a snowplowDo not use this vehicle for snowplowing.
Your vehicle is not equipped with a snowplowing package.
Using your vehicle as an ambulanceDo not use this vehicle as an ambulance.
Your vehicle is not equipped with the Ford Ambulance PreparationPackage.
2008 Escape (204)Owners Guide (post-2002-fmt)USA (fus)
Introduction
8

Cell phone useThe use of Mobile Communications Equipment has become increasinglyimportant in the conduct of business and personal affairs. However,drivers must not compromise their own or others’ safety when usingsuch equipment. Mobile Communications can enhance personal safetyand security when appropriately used, particularly in emergencysituations. Safety must be paramount when using mobile communicationsequipment to avoid negating these benefits.
Mobile Communication Equipment includes, but is not limited to cellularphones, pagers, portable email devices, in-vehicle communicationssystems, telematics devices and portable two-way radios.
Driving while distracted can result in loss of vehicle control,accident and injury. Ford strongly recommends that drivers use
extreme caution when using any device that may take their focus offthe road. The drivers primary responsibility is the safe operation oftheir vehicle. Only use cell phones and other devices not essential tothe driving task when it is safe to do so.
Export Unique (Non United States / Canada) vehicle specificinformationFor your particular global region, your vehicle may be equipped withfeatures and options that are different from the ones that are describedin this Owner’s Guide; A market unique supplement may be suppliedthat complements this book. By referring to the market uniquesupplement, if provided, you can properly identify those features,recommendations and specifications that are unique to your vehicle. ThisOwner’s Guide is written primarily for the U.S. and Canadian Markets.Features or equipment listed as standard may be different on units builtfor Export. Refer to this Owner’s Guide for all other requiredinformation and warnings.
2008 Escape (204)Owners Guide (post-2002-fmt)USA (fus)
Introduction
9

These are some of the symbols you may see on your vehicle.
Vehicle Symbol Glossary
Safety Alert See Owner’s Guide
Fasten Safety Belt Airbag - Front
Airbag - SideChild Seat LowerAnchor
Child Seat TetherAnchor
Brake System
Anti-Lock Brake System Parking Brake System
Brake Fluid -Non-Petroleum Based
Parking Aid System
Stability Control System Speed Control
Master Lighting Switch Hazard Warning Flasher
Fog Lamps-Front Fuse Compartment
Fuel Pump Reset Windshield Wash/Wipe
WindshieldDefrost/Demist
Rear WindowDefrost/Demist
2008 Escape (204)Owners Guide (post-2002-fmt)USA (fus)
Introduction
10

Vehicle Symbol Glossary
Power WindowsFront/Rear
Power Window Lockout
Child Safety DoorLock/Unlock
Interior LuggageCompartment Release
Panic Alarm Engine Oil
Engine CoolantEngine CoolantTemperature
Do Not Open When Hot Battery
Avoid Smoking, Flames,or Sparks
Battery Acid
Explosive Gas Fan Warning
Power Steering FluidMaintain Correct FluidLevel
MAX
MIN
Emission System Engine Air Filter
Passenger CompartmentAir Filter
Jack
Check Fuel CapLow Tire PressureWarning
2008 Escape (204)Owners Guide (post-2002-fmt)USA (fus)
Introduction
11

WARNING LIGHTS AND CHIMES
Standard instrument cluster
Optional instrument cluster
Warning lights and gauges can alert you to a vehicle condition that maybecome serious enough to cause extensive repairs. A warning light mayilluminate when a problem exists with one of your vehicle’s functions.Many lights will illuminate when you start your vehicle to make sure thebulbs work. If any light remains on after starting the vehicle, refer to therespective system warning light for additional information.
2008 Escape (204)Owners Guide (post-2002-fmt)USA (fus)
Instrument Cluster
12

Check engine: The Check Engineindicator light illuminates when theignition is first turned to the RUNposition to check the bulb and toindicate whether the vehicle is ready for Inspection/Maintenance (I/M)testing. Normally, the �Check Engine� light will stay on until the engine iscranked, then turn itself off if no malfunctions are present. However, ifafter 15 seconds the �Check Engine� light blinks eight times, it meansthat the vehicle is not ready for I/M testing. See the Readiness forInspection/Maintenance (I/M) testing in the Maintenance andSpecifications chapter.
Solid illumination after the engine is started indicates the On BoardDiagnostics System (OBD-II) has detected a malfunction. Refer to Onboard diagnostics (OBD-II) in the Maintenance and Specificationschapter. If the light is blinking, engine misfire is occurring which coulddamage your catalytic converter. Drive in a moderate fashion (avoidheavy acceleration and deceleration) and have your vehicle servicedimmediately by your authorized dealer.
Under engine misfire conditions, excessive exhaust temperaturescould damage the catalytic converter, the fuel system, interior
floor coverings or other vehicle components, possibly causing a fire.
Check fuel cap: Illuminates whenthe fuel cap may not be properlyinstalled. Continued driving withthis light on may cause the Checkengine warning light to come on,refer to Fuel filler cap in theMaintenance and Specification chapter.
Brake system warning light: Toconfirm the brake system warninglight is functional, it willmomentarily illuminate when theignition is turned to the RUNposition when the engine is not running, or in a position between RUNand START, or by applying the parking brake when the ignition is turnedto the RUN position. If the brake system warning light does notilluminate at this time, seek service immediately from your authorizeddealer. Illumination after releasing the parking brake indicates low brake
P!BRAKE
2008 Escape (204)Owners Guide (post-2002-fmt)USA (fus)
Instrument Cluster
13

fluid level or a brake system malfunction and the brake system should beinspected immediately by your authorized dealer.
Driving a vehicle with the brake system warning light on isdangerous. A significant decrease in braking performance may
occur. It will take you longer to stop the vehicle. Have the vehiclechecked by your authorized dealer. Driving extended distances withthe parking brake engaged can cause brake failure and the risk ofpersonal injury.
Anti-lock brake system: If theABS light stays illuminated orcontinues to flash, a malfunction hasbeen detected, have the systemserviced immediately by yourauthorized dealer. Normal braking is still functional unless the brakewarning light also is illuminated.
Airbag readiness: If this light failsto illuminate when ignition is turnedto RUN, continues to flash orremains on, have the systemserviced immediately by your authorized dealer. A chime will also soundwhen a malfunction in the supplemental restraint system has beendetected.
Safety belt: Reminds you to fastenyour safety belt. A Belt-Minder�chime will also sound to remind youto fasten your safety belt. Refer tothe Seating and safety restraintschapter to activate/deactivate the Belt-Minder� chime feature.
Charging system: Illuminates whenthe battery is not charging properly.
Engine oil pressure: Illuminateswhen the oil pressure falls below thenormal range, refer to Engine oil inthe Maintenance andSpecifications chapter.
ABS
2008 Escape (204)Owners Guide (post-2002-fmt)USA (fus)
Instrument Cluster
14

Traction Control�: Illuminateswhen the Traction Control� isactive. If the light remains on, havethe system serviced immediately,refer to the Driving chapter formore information.
Low tire pressure warning:Illuminates when your tire pressureis low. If the light remains ON atstart up or while driving, the tirepressure should be checked. Referto Inspecting and Inflating Your Tires in the Tires, Wheels andLoading chapter. When the ignition is first turned to RUN, the light willilluminate for 3 seconds to ensure the bulb is working. If the light doesnot turn ON or begins to flash, have the system inspected by yourauthorized dealer. For more information on this system, refer toUnderstanding Your Tire Pressure Monitoring System in the Tires,Wheels and Loading chapter.
Low fuel: Illuminates when the fuellevel in the fuel tank is at or nearempty (refer to Fuel gauge in thischapter).
Speed control: Illuminates whenthe speed control is engaged. Turnsoff when the speed control systemis disengaged.
O/D off: Illuminates when theoverdrive function of thetransmission has been turned OFF.Refer to the Driving chapter fortransmission function and operation. If the light flashes steadily, have thetransmission serviced immediately or damage to the transmission couldoccur.
Anti-theft system: Flashes whenthe SecuriLock� Passive Anti-theftSystem has been activated.
O/DOFF
2008 Escape (204)Owners Guide (post-2002-fmt)USA (fus)
Instrument Cluster
15

Throttle control/Powertrain:Illuminates when a powertrain faulthas been detected. Contact yourauthorized dealer as soon aspossible.
Door ajar: Illuminates when theignition is in the RUN position andany door is open.
Turn signal: Illuminates when theleft or right turn signal or thehazard lights are turned on. If theindicators flash faster, check for a burned out bulb.
High beams: Illuminates when thehigh beam headlamps are turned on.
Key-in-ignition warning chime: Sounds when the key is left in theignition in the OFF/LOCK or ACCESSORY position and the driver’s dooris opened.
Headlamps on warning chime: Sounds when the headlamps or parkinglamps are on, the ignition is off (the key is not in the ignition) and thedriver’s door is opened.
Parking brake ON chime: Sounds when the parking brake is left ONand the vehicle is driven. If the warning stays on after the park brake isoff, contact your authorized dealer as soon as possible.
Message center activation chime (if equipped): Sounds when awarning message (except PARKING BRAKE ENGAGED while parked)appears in the message center display for the first time.
2008 Escape (204)Owners Guide (post-2002-fmt)USA (fus)
Instrument Cluster
16

GAUGES
Standard instrument cluster gauges
Optional instrument cluster gauges
Speedometer: Indicates thecurrent vehicle speed.
2008 Escape (204)Owners Guide (post-2002-fmt)USA (fus)
Instrument Cluster
17

Engine coolant temperaturegauge: Indicates engine coolanttemperature. At normal operatingtemperature, the needle will be inthe normal range (between “H” and“C”). If it enters the red section,the engine is overheating. Stopthe vehicle as soon as safelypossible, switch off the engine and let the engine cool.
Never remove the coolant reservoir cap while the engine isrunning or hot.
Fuel gauge: Indicatesapproximately how much fuel is leftin the fuel tank (when the ignitionis in the ON position). The fuelgauge may vary slightly when thevehicle is in motion or on a grade.
The FUEL icon and arrow indicateswhich side of the vehicle the fuelfiller door is located.
Refer to Filling the tank in the Maintenance and Specificationschapter for more information.
Tachometer: Indicates the enginespeed in revolutions per minute.Driving with your tachometerpointer continuously at the top ofthe scale may damage the engine.
Odometer: Registers the total miles(kilometers) of the vehicle.
If equipped with a message center,refer to Message Center in theDriver Controls chapter on how toswitch the display from Metric to English.
2008 Escape (204)Owners Guide (post-2002-fmt)USA (fus)
Instrument Cluster
18

Trip odometer: Registers the miles (kilometers) of individual journeys.
• Standard instrument cluster:Press the SELECT/RESET controlonce to switch from the odometer tothe TRIP A feature. Press thecontrol again to select the TRIP Bfeature. To reset the trip, press andhold the control again until the trip reading is 0.0 miles.
• Optional instrument cluster:Press and release the messagecenter INFO button until TRIP Amode appears in the display. Pressthe control again to select the TRIPB feature. Press and hold theRESET button to reset.
2008 Escape (204)Owners Guide (post-2002-fmt)USA (fus)
Instrument Cluster
19

AUDIO SYSTEMS
AM/FM/single CD/in-dash CD6/MP3 satellite compatible soundsystem
Accessory delay: Your vehicle is equipped with accessory delay. Withthis feature, the window switches, radio and moon roof (if equipped)may be used for up to ten minutes after the ignition is turned off or untileither front door is opened.
Note: Your vehicle is equipped witha unique audio system. If yourdisplay shows six small circles in thedisplay, your audio system is a CD6system. If not, your system is aSingle CD system.
1. EJECT: For a single CDsystem, press EJECT to eject theCD.For a CD6 system, press EJECT and select the desired CD slot bypressing the corresponding memory preset #. The display will readEJECTING #. When the system has ejected the CD, the display will read
2008 Escape (204)Owners Guide (post-2002-fmt)USA (fus)
Entertainment Systems
20
REMOVE CD #. Remove the CD. If you do not remove the CD thesystem will reload the disc.To auto eject all loaded discs, press and hold EJECT. The system willeject all discs and prompt you when to remove them.
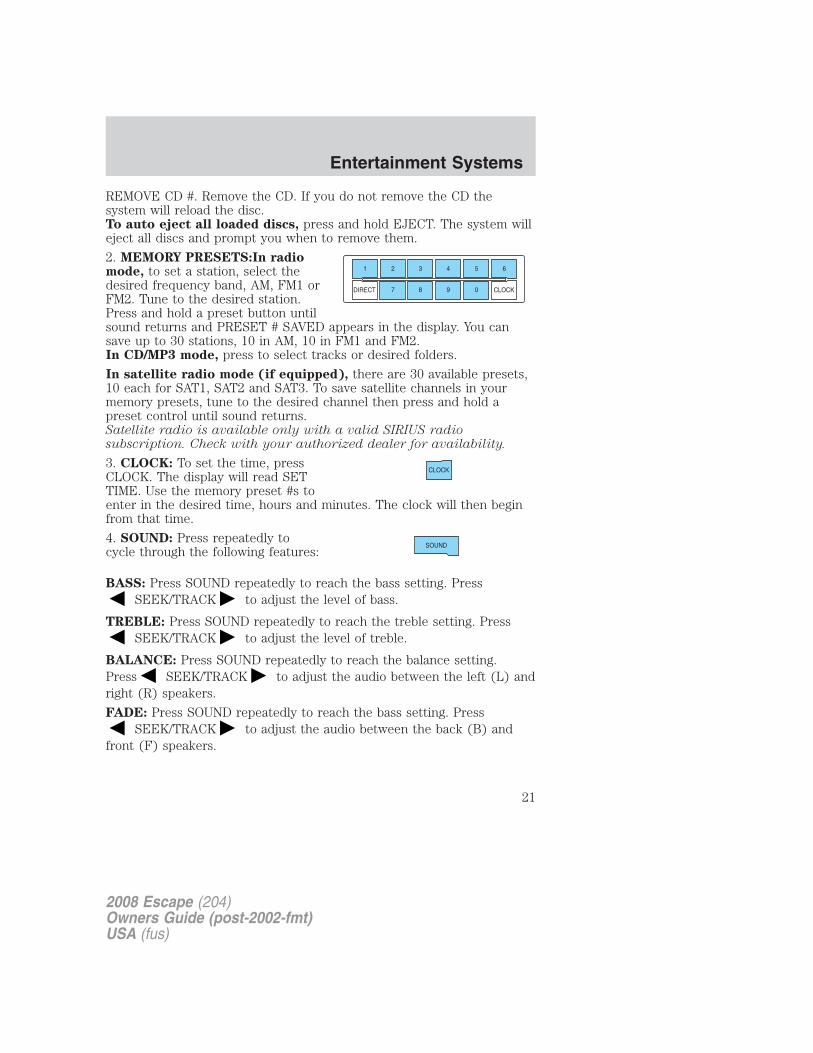
2. MEMORY PRESETS:In radiomode, to set a station, select thedesired frequency band, AM, FM1 orFM2. Tune to the desired station.Press and hold a preset button untilsound returns and PRESET # SAVED appears in the display. You cansave up to 30 stations, 10 in AM, 10 in FM1 and FM2.In CD/MP3 mode, press to select tracks or desired folders.
In satellite radio mode (if equipped), there are 30 available presets,10 each for SAT1, SAT2 and SAT3. To save satellite channels in yourmemory presets, tune to the desired channel then press and hold apreset control until sound returns.Satellite radio is available only with a valid SIRIUS radiosubscription. Check with your authorized dealer for availability.
3. CLOCK: To set the time, pressCLOCK. The display will read SETTIME. Use the memory preset #s toenter in the desired time, hours and minutes. The clock will then beginfrom that time.
4. SOUND: Press repeatedly tocycle through the following features:
BASS: Press SOUND repeatedly to reach the bass setting. PressSEEK/TRACK to adjust the level of bass.
TREBLE: Press SOUND repeatedly to reach the treble setting. PressSEEK/TRACK to adjust the level of treble.
BALANCE: Press SOUND repeatedly to reach the balance setting.Press SEEK/TRACK to adjust the audio between the left (L) andright (R) speakers.
FADE: Press SOUND repeatedly to reach the bass setting. PressSEEK/TRACK to adjust the audio between the back (B) and
front (F) speakers.
2008 Escape (204)Owners Guide (post-2002-fmt)USA (fus)
Entertainment Systems
21

SPEED COMPENSATED VOLUME (if equipped): Press SOUNDrepeatedly to reach the SPEED COMPENSATED VOLUME setting. Radiovolume automatically gets louder with increasing vehicle speed tocompensate for road and wind noise. Use SEEK/TRACK toadjust.
The default setting is off; increasing your vehicle speed will not changethe volume level.
Adjust 1–7: Increasing this setting from 1 (lowest setting) to 7 (highestsetting) allows the radio volume to automatically change slightly withvehicle speed to compensate for road and wind noise.
Recommended level is 1–3; SPEED OFF turns the feature off and level 7is the maximum setting.
ALL SEATS (Occupancy mode, if equipped): Press SOUNDrepeatedly to reach the Occupancy mode setting. Press
SEEK/TRACK to select and optimize sound for ALL SEATS,DRIVERS SEAT or REAR SEATS.
5. TUNE: In radio mode, turnright / left to go up / down thefrequency band in individualincrements.
In satellite radio mode(if equipped), turn right / left togo to the next / previous availableSIRIUS satellite station.
6. MENU: Press repeatedly toaccess the following features:
AUTO PRESET ON/OFF: Press SEEK/TRACK to togglebetween ON/OFF. Autoset allows you to set the strongest local radiostations without losing your original manually set preset stations forAM/FM1/FM2. To activate the autoset feature, toggle AUTOSET to ON,and either wait five seconds for the search to initiate or press OK toimmediately initiate the search. (If you press another control withinthose five seconds, the search will not initiate. ) The 10 strongeststations will be filled and the station stored in preset 1 will begin playing.If there are less than 10 strong stations, the system will store the lastone in the remaining presets.
2008 Escape (204)Owners Guide (post-2002-fmt)USA (fus)
Entertainment Systems
22
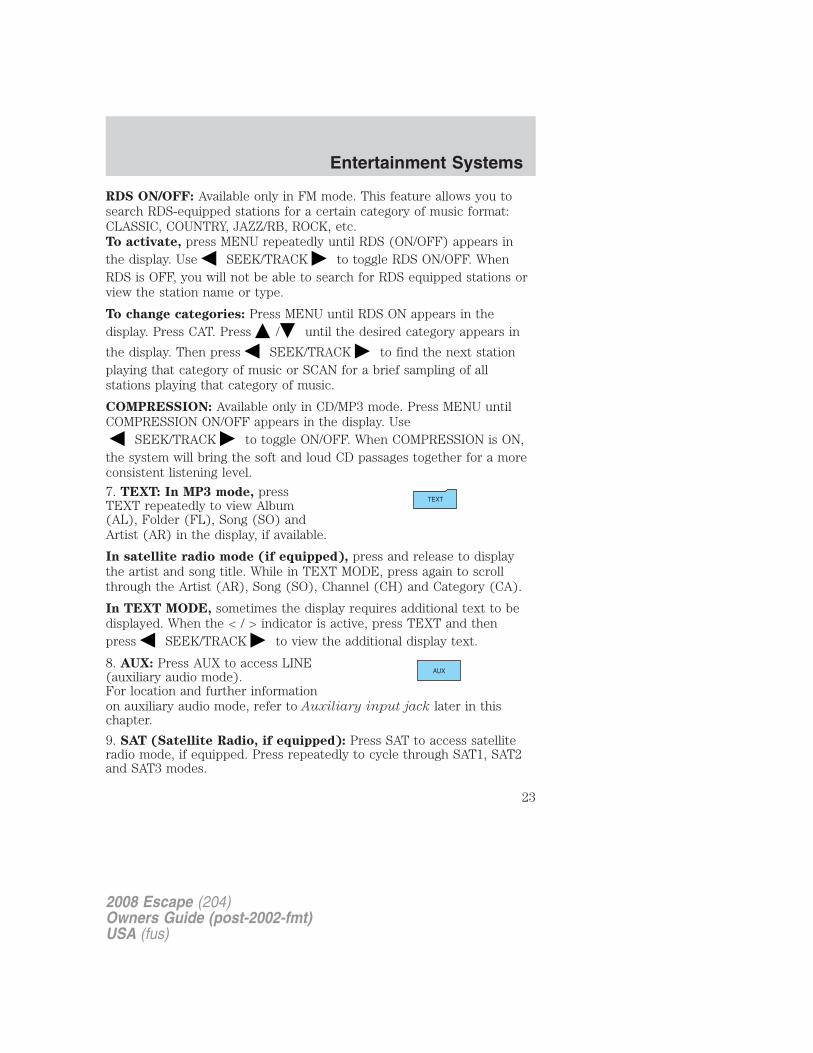
RDS ON/OFF: Available only in FM mode. This feature allows you tosearch RDS-equipped stations for a certain category of music format:CLASSIC, COUNTRY, JAZZ/RB, ROCK, etc.To activate, press MENU repeatedly until RDS (ON/OFF) appears inthe display. Use SEEK/TRACK to toggle RDS ON/OFF. WhenRDS is OFF, you will not be able to search for RDS equipped stations orview the station name or type.
To change categories: Press MENU until RDS ON appears in thedisplay. Press CAT. Press / until the desired category appears in
the display. Then press SEEK/TRACK to find the next stationplaying that category of music or SCAN for a brief sampling of allstations playing that category of music.
COMPRESSION: Available only in CD/MP3 mode. Press MENU untilCOMPRESSION ON/OFF appears in the display. Use
SEEK/TRACK to toggle ON/OFF. When COMPRESSION is ON,the system will bring the soft and loud CD passages together for a moreconsistent listening level.
7. TEXT: In MP3 mode, pressTEXT repeatedly to view Album(AL), Folder (FL), Song (SO) andArtist (AR) in the display, if available.
In satellite radio mode (if equipped), press and release to displaythe artist and song title. While in TEXT MODE, press again to scrollthrough the Artist (AR), Song (SO), Channel (CH) and Category (CA).
In TEXT MODE, sometimes the display requires additional text to bedisplayed. When the < / > indicator is active, press TEXT and thenpress SEEK/TRACK to view the additional display text.
8. AUX: Press AUX to access LINE(auxiliary audio mode).For location and further informationon auxiliary audio mode, refer to Auxiliary input jack later in thischapter.
9. SAT (Satellite Radio, if equipped): Press SAT to access satelliteradio mode, if equipped. Press repeatedly to cycle through SAT1, SAT2and SAT3 modes.
2008 Escape (204)Owners Guide (post-2002-fmt)USA (fus)
Entertainment Systems
23

10. CD: Press to enter CD/MP3mode. If a disc is already loadedinto the system, CD/MP3 play willbegin where it ended last. If no CD is loaded, NO DISC will appear in thedisplay.
11. AM/FM: Press repeatedly toselect AM/FM1/FM2 frequency band.
12. SEEK/TRACK: In radio mode,
press SEEK/TRACK toaccess the previous/next strongradio station.In CD/MP3 mode, press
SEEK/TRACK to access theprevious/next track.
In satellite radio mode (if equipped), press SEEK/TRACK toseek to the previous/next channel. If a specific category is selected,(Jazz, Rock, News, etc.), press SEEK/TRACK to seek to theprevious/next channel in the selected category. Press and hold
SEEK/TRACK to fast seek through the previous/next channels.
In Category mode, press SEEK/TRACK to select a category.Satellite radio is available only with a valid SIRIUS subscription.Check with your authorized dealer for availability.
13. CAT (Category) / FOLD(Folder):In Category mode, use to selectfrom various music categories. To change RDS categories, ensure thatRDS is ON in the Menu listing. Press MENU again until RDS ON appearsin the display. Press CAT. PRESS UP OR DOWN TO CHANGE RDSCATEGORY will appear in the display. Press SEEK/TRACK toscroll through all possible categories. When the desired category appearsin the display, press SEEK/TRACK to find the next stationplaying that selection or press SCAN for a brief sampling of all stationsplaying that category of music.
In MP3 mode, press FOLD and then press / to access theprevious/next folder.
2008 Escape (204)Owners Guide (post-2002-fmt)USA (fus)
Entertainment Systems
24

In satellite radio mode (if equipped), use to select from varioussatellite radio categories. To change categories in satellite radio mode,press CAT/FOLD. The active category will appear in the display.Press SEEK/TRACK or turn the TUNE knob left/right to scrollthrough the available categories. Press and hold SCAN for a briefsampling of all channels in that category or press SEEK to seek to thenext channel in that category.
14. ON/OFF/VOL (Volume): Pressto turn ON/OFF. Turn toincrease/decrease volume.
Note: If the volume is set above acertain level and the ignition isturned off, the volume will comeback on at a “nominal” listeninglevel when the ignition switch isturned back on.
15. SHUFFLE:In CD and MP3 mode,pressSHUFFLE to engage shuffle mode.SHUFFLE ON will appear in the display. If you wish to engage shufflemode right away, press SEEK/TRACK to begin random play.Otherwise, random play will begin when the current track is finishedplaying. SHUFFLE and the track # will appear in the display.To disengage, press SHUFFLE again. SHUFFLE OFF will appear in thedisplay.
For a single CD system, the system will shuffle within the currentdisc.
For a CDX6 system, the system will shuffle between all loaded discs.The disc # will appear in the top left hand corner of the display.
16. SCAN: In radio mode, pressfor a brief sampling of all strongradio stations.In CD/MP3 mode, press for a brief sampling of all tracks on the currentdisc or folder.
In satellite radio mode (if equipped), press SCAN for a briefsampling of all available SIRIUS satellite channels. If a specific categoryis selected, (Jazz, Rock, News, etc.) press SCAN for a brief sampling ofall available SIRIUS satellite channels within the selected Category.
2008 Escape (204)Owners Guide (post-2002-fmt)USA (fus)
Entertainment Systems
25

17. DIRECT: Press to access adesired radio station, track, MP3folder or SIRIUS satellite channel (ifequipped).In radio mode, press DIRECT and then press the desired radiofrequency (i.e. 101.1) using the memory presets.In CD mode, press DIRECT. The display will read DIRECT TRACKMODE SELECT TRACK. Enter the desired track number using thenumbered controls. The system will then begin playing that track.In MP3 folder mode, press DIRECT and the number of the desiredfolder. The system will advance to that specific folder.In satellite radio mode (if equipped), press DIRECT then enter thedesired channel (i.e. 002) using the memory presets. If you only enterone digit, press OK and the system will go to that satellite channel. Ifyou enter three digits, the system will automatically go to that channel, ifavailable. You may cancel your entry by pressing DIRECT. If an invalidstation number is entered, INVALID CHANNEL will appear in the displayand the system will continue playing the current station.
18. LOAD: For a single CDsystem, this control is notoperational. To load a CD, simplyinsert the disc label side up into the CD slot.For a CD6 system, press LOAD. When the display reads SELECTSLOT, choose the desired slot number using memory presets 1–6. Whenthe display reads LOAD CD#, load the desired disc, label side up. If youdo not choose a slot within 5 seconds, the system will choose for you.Once loaded, the first track will begin to play.To auto load up to 6 discs, press and hold LOAD until the displayreads AUTOLOAD#. Load the desired disc, label side up. The system willprompt you to load discs for the remaining available slots. Insert thediscs, one at a time, label side up, when prompted. Once loaded, the discin preset #1 will begin to play.
19. CD slot: For a single CDsystem, insert a CD/MP3, label sideup.For a CD6 system, press LOAD and select a CD slot using the memorypresets. When prompted by the system, insert a CD/MP3 label side up.
2008 Escape (204)Owners Guide (post-2002-fmt)USA (fus)
Entertainment Systems
26

Auxiliary input jackYour vehicle is equipped with anAuxiliary Input Jack (AIJ). TheAuxiliary Input Jack provides a wayto connect your portable musicplayer to the in-vehicle audiosystem. This allows the audio from aportable music player to be playedthrough the vehicle speakers withhigh fidelity. To achieve optimalperformance, please observe thefollowing instructions whenattaching your portable musicdevice to the audio system.
Required equipment:
1. Any portable music player designed to be used with headphones
2. An audio extension cable with stereo male 1/8 in. (3.5 mm)connectors at each end
To play your portable music player using the auxiliary input jack:
1. Begin with the vehicle parked and the radio turned off.
2. Ensure that the battery in your portable music player is new or fullycharged and that the device is turned off.
3. Attach one end of the audio extension cable to the headphone outputof your player and the other end of the audio extension cable to the AIJin your vehicle.
4. Turn the radio on, using either a tuned FM station or a CD loaded intothe system. Adjust the volume to a comfortable listening level.
5. Turn the portable music player on and adjust the volume to 1/2 thevolume.
2008 Escape (204)Owners Guide (post-2002-fmt)USA (fus)
Entertainment Systems
27

6. Press AUX on the vehicle radio repeatedly until LINE IN appears inthe display.You should hear audio from your portable music player although it maybe low.
7. Adjust the sound on your portable music player until it reaches thelevel of the FM station or CD by switching back and forth between theAUX and FM or CD controls.
Troubleshooting:
1. Do not connect the audio input jack to a line level output. Line leveloutputs are intended for connection to a home stereo and are notcompatible with the AIJ. The AIJ will only work correctly with devicesthat have a headphone output with a volume control.
2. Do not set the portable music player’s volume level higher than isnecessary to match the volume of the CD or FM radio in your audiosystem as this will cause distortion and will reduce sound quality. Manyportable music players have different output levels, so not all playersshould be set at the same levels. Some players will sound best at fullvolume and others will need to be set at a lower volume.
3. If the music sounds distorted at lower listening levels, turn theportable music player volume down. If the problems persists, replace orrecharge the batteries in the portable music player.
4. The portable music player must be controlled in the same way mannerwhen it is used with headphones as the AIJ does not provide control(play, pause, etc.) over the attached portable music player.
5. For safety reasons, connecting or adjusting the settings on yourportable music player should not be attempted while the vehicle ismoving. Also, the portable music player should be stored in a securelocation, such as the center console or the glove box, when the vehicle isin motion. The audio extension cable must be long enough to allow theportable music player to be safely stored while the vehicle is in motion.
GENERAL AUDIO INFORMATIONRadio frequencies:
AM and FM frequencies are established by the Federal CommunicationsCommission (FCC) and the Canadian Radio and TelecommunicationsCommission (CRTC). Those frequencies are:
AM: 530, 540–1700, 1710 kHz
FM: 87.7, 87.9–107.7, 107.9 MHz
2008 Escape (204)Owners Guide (post-2002-fmt)USA (fus)
Entertainment Systems
28

Radio reception factors:
There are three factors that can affect radio reception:
• Distance/strength: The further you travel from an FM station, theweaker the signal and the weaker the reception.
• Terrain: Hills, mountains, tall buildings, power lines, electric fences,traffic lights and thunderstorms can interfere with your reception.
• Station overload: When you pass a broadcast tower, a stronger signalmay overtake a weaker one and play while the weak station frequencyis displayed.
CD/CD player care
Do:
• Handle discs by their edges only.(Never touch the playingsurface).
• Inspect discs before playing.
• Clean only with an approved CDcleaner.
• Wipe discs from the center out.
Don’t:
• Expose discs to direct sunlight or heat sources for extended periodsof time.
• Clean using a circular motion.
CD units are designed to play commercially pressed 4.75 in(12 cm) audio compact discs only. Due to technicalincompatibility, certain recordable and re-recordable compactdiscs may not function correctly when used in Ford CD players.
2008 Escape (204)Owners Guide (post-2002-fmt)USA (fus)
Entertainment Systems
29

Do not use any irregular shapedCDs or discs with a scratchprotection film attached.
CDs with homemade paper(adhesive) labels should not beinserted into the CD player asthe label may peel and cause theCD to become jammed. It isrecommended that homemadeCDs be identified withpermanent felt tip marker ratherthan adhesive labels. Ballpoint pens may damage CDs. Pleasecontact your authorized dealer for further information.
Audio system warranty and service
Refer to the Warranty Guide for audio system warranty information. Ifservice is necessary, see your dealer or qualified technician.
Satellite radio information (if equipped)Satellite radio channels: SIRIUS broadcasts a variety of music, news,sports, weather, traffic and entertainment satellite radio channels. Formore information and a complete list of SIRIUS satellite radio channels,visit www.sirius.com in the United States, www.sirius-canada.ca inCanada, or call SIRIUS at 1–888–539–7474.
Satellite radio reception factors: To receive the satellite signal, yourvehicle has been equipped with a satellite radio antenna located on theroof of your vehicle. The vehicle roof provides the best location for anunobstructed, open view of the sky, a requirement of a satellite radiosystem. Like AM/FM, there are several factors that can affect satelliteradio reception performance:
• Antenna obstructions: For optimal reception performance, keep theantenna clear of snow and ice build-up and keep luggage and othermaterial as far away from the antenna as possible.
• Terrain: Hills, mountains, tall buildings, bridges, tunnels, freewayoverpasses, parking garages, dense tree foliage and thunderstorms caninterfere with your reception.
2008 Escape (204)Owners Guide (post-2002-fmt)USA (fus)
Entertainment Systems
30

• Station overload: When you pass a ground based broadcast repeatingtower, a stronger signal may overtake a weaker one and result in anaudio mute.
Unlike AM/FM audible static, you will hear an audio mute when there isa satellite radio signal interference. Your radio display may display NOSIGNAL to indicate the interference.
SIRIUS satellite radio service: SIRIUS Satellite Radio is a subscriptionbased satellite radio service that broadcasts music, sports, news andentertainment programming. A service fee is required in order to receiveSIRIUS service. Vehicles that are equipped with a factory installedSIRIUS Satellite Radio system include:
• Hardware and limited subscription term, which begins on the date ofsale or lease of the vehicle.
• Online media player providing access to all 65 SIRIUS music channelsover the internet (U.S. customers only).
For information on extended subscription terms, contact SIRIUS at1–888–539–7474.
Note: SIRIUS reserves the unrestricted right to change, rearrange, addor delete programming including canceling, moving or adding particularchannels, and its prices, at any time, with or without notice to you.Ford Motor Company shall not be responsible for any such programmingchanges.
Satellite Radio Electronic Serial Number (ESN): This 12–digitSatellite Serial Number is needed to activate, modify or track yoursatellite radio account. You will need this number when communicatingwith SIRIUS. While in Satellite Radio mode, you can view this number onthe radio display by pressing AUX and Preset 1 control simultaneously.
2008 Escape (204)Owners Guide (post-2002-fmt)USA (fus)
Entertainment Systems
31
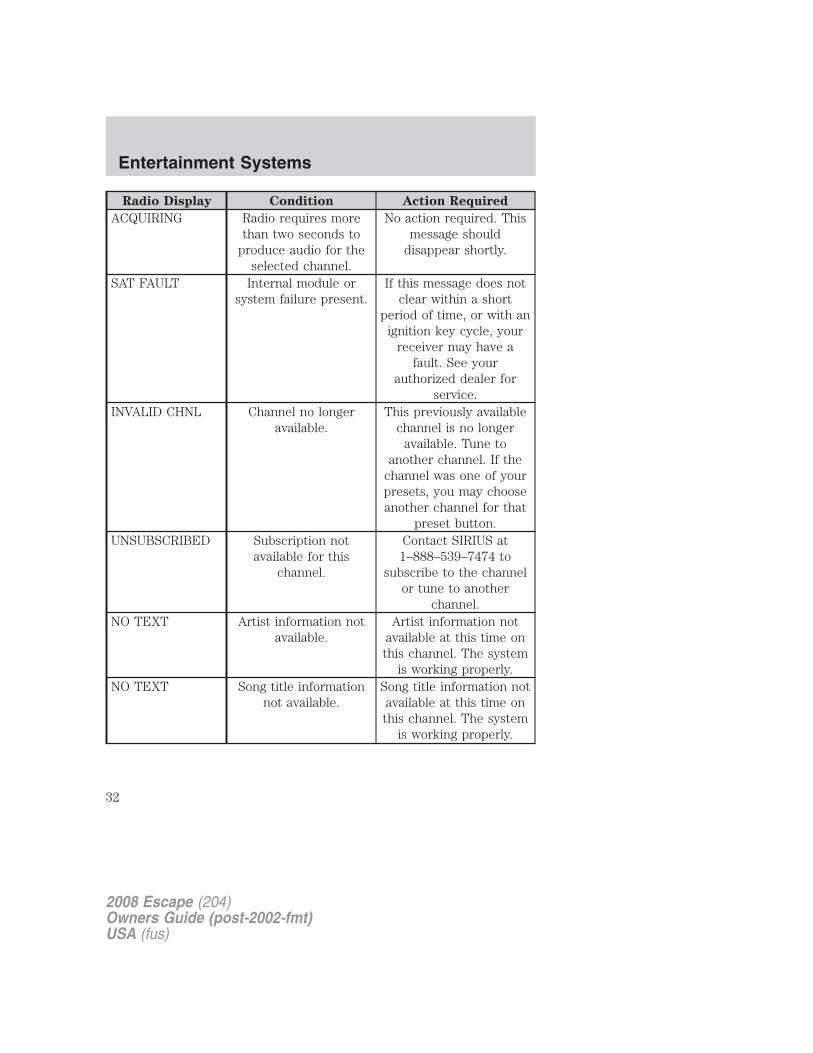
Radio Display Condition Action Required
ACQUIRING Radio requires morethan two seconds to
produce audio for theselected channel.
No action required. Thismessage should
disappear shortly.
SAT FAULT Internal module orsystem failure present.
If this message does notclear within a short
period of time, or with anignition key cycle, your
receiver may have afault. See your
authorized dealer forservice.
INVALID CHNL Channel no longeravailable.
This previously availablechannel is no longer
available. Tune toanother channel. If the
channel was one of yourpresets, you may chooseanother channel for that
preset button.UNSUBSCRIBED Subscription not
available for thischannel.
Contact SIRIUS at1–888–539–7474 to
subscribe to the channelor tune to another
channel.NO TEXT Artist information not
available.Artist information not
available at this time onthis channel. The system
is working properly.NO TEXT Song title information
not available.Song title information notavailable at this time onthis channel. The system
is working properly.
2008 Escape (204)Owners Guide (post-2002-fmt)USA (fus)
Entertainment Systems
32

Radio Display Condition Action Required
NO TEXT Category informationnot available.
Category information notavailable at this time onthis channel. The system
is working properly.NO SIGNAL Loss of signal from the
SIRIUS satellite orSIRIUS tower to the
vehicle antenna.
You are in a location thatis blocking the SIRIUS
signal (i.e., tunnel, underan overpass, dense
foliage, etc). The systemis working properly.
When you move into anopen area, the signal
should return.UPDATING Update of channel
programming inprogress.
No action required. Theprocess may take up to
three minutes.CALL SIRIUS1–888–539–7474
Satellite service hasbeen deactivated by
SIRIUS Satellite Radio.
Call SIRIUS at1–888–539–7474 to
re-activate or resolvesubscription issues.
NAVIGATION SYSTEM (IF EQUIPPED)Your vehicle may be equipped with a Navigation System. Refer to theNavigation supplement for further information.
2008 Escape (204)Owners Guide (post-2002-fmt)USA (fus)
Entertainment Systems
33
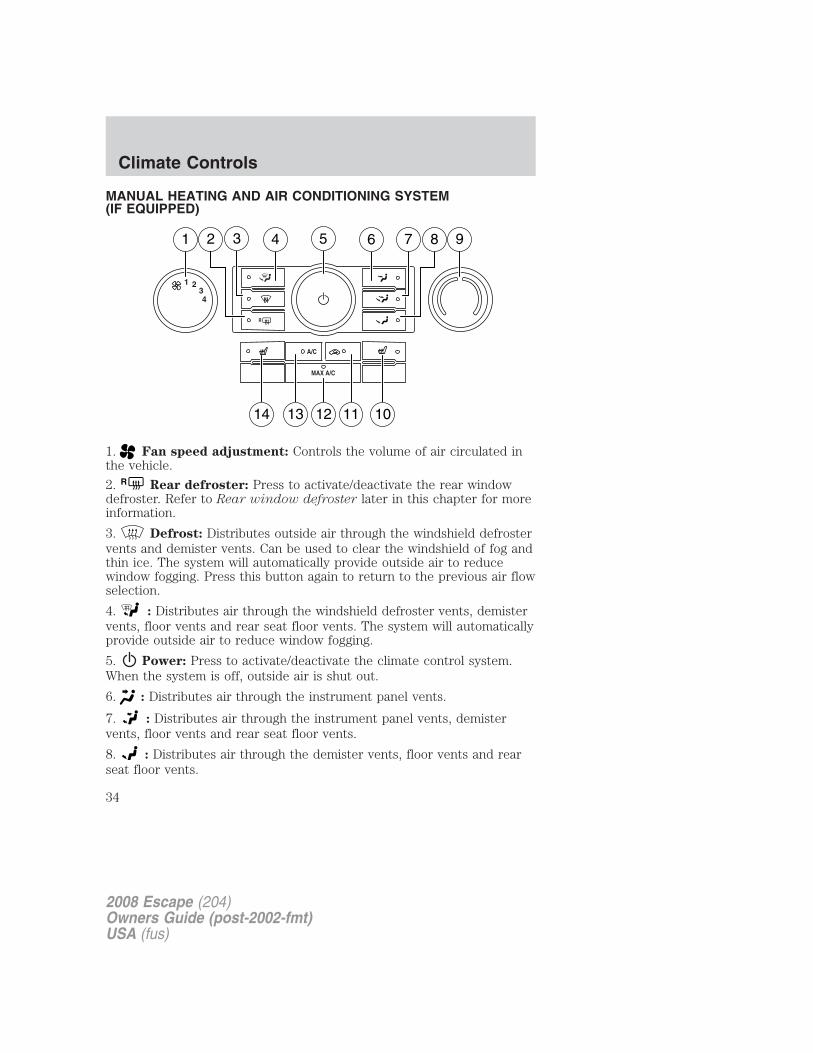
MANUAL HEATING AND AIR CONDITIONING SYSTEM(IF EQUIPPED)
1. Fan speed adjustment: Controls the volume of air circulated inthe vehicle.
2. R Rear defroster: Press to activate/deactivate the rear windowdefroster. Refer to Rear window defroster later in this chapter for moreinformation.
3. Defrost: Distributes outside air through the windshield defrostervents and demister vents. Can be used to clear the windshield of fog andthin ice. The system will automatically provide outside air to reducewindow fogging. Press this button again to return to the previous air flowselection.
4. : Distributes air through the windshield defroster vents, demistervents, floor vents and rear seat floor vents. The system will automaticallyprovide outside air to reduce window fogging.
5. Power: Press to activate/deactivate the climate control system.When the system is off, outside air is shut out.
6. : Distributes air through the instrument panel vents.
7. : Distributes air through the instrument panel vents, demistervents, floor vents and rear seat floor vents.
8. : Distributes air through the demister vents, floor vents and rearseat floor vents.
2008 Escape (204)Owners Guide (post-2002-fmt)USA (fus)
Climate Controls
34

9. Temperature control: Controls the temperature of the airflow in thevehicle.
10. Passenger heated seat control (if equipped): Press toactivate/deactivate the passenger heated seat. See Heated seats in theSeating and Safety Restraints chapter.
11. Recirculated air: Press to activate/deactivate airrecirculation in the vehicle. Recirculated air may reduce the amount oftime needed to cool down the interior of the vehicle and may also helpreduce undesired odors from reaching the interior of the vehicle.Recirculated air engages automatically when MAX A/C is selected or canbe engaged manually in any airflow mode except (defrost).Recirculated air may turn off automatically in all airflow modes exceptMAX A/C. When the ignition switch is turned off and back on, theclimate system will return to the recirculated air mode only if the A/Cbutton LED is illuminated and the air distribution selection is either(panel) or (panel/floor).
12. MAX A/C: Distributes recirculated air through the instrument panelvents to cool the vehicle. This re-cooling of the interior air is moreeconomical and efficient. Recirculated air may also help reduceundesirable odors from entering the vehicle. Press the MAX A/C buttonagain for normal A/C operation.
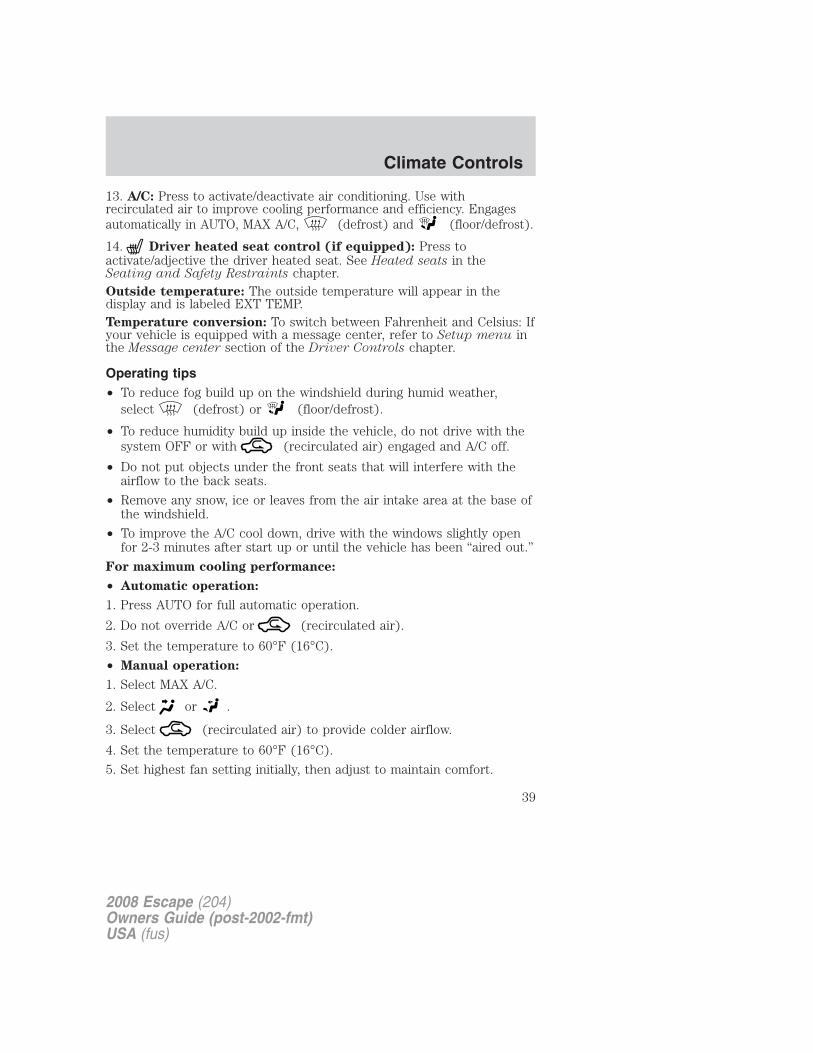
13. A/C: Press to activate/deactivate air conditioning. Use withrecirculated air to improve cooling performance and efficiency. Engagesautomatically in MAX A/C, (defrost) and (floor/defrost).
14. Driver heated seat control (if equipped): Press toactivate/deactivate the driver heated seat. See Heated seats in theSeating and Safety Restraints chapter.
Outside temperature (if equipped): The outside temperature willappear in the display and is labeled EXT TEMP.
Operating tips• To reduce fog build up on the windshield during humid weather,
select (defrost) or (floor/defrost).
• To reduce humidity build up inside the vehicle, do not drive with thesystem off or with (recirculated air) engaged and A/C off.
• Do not put objects under the front seats that will interfere with theairflow to the back seats.
2008 Escape (204)Owners Guide (post-2002-fmt)USA (fus)
Climate Controls
35

• Remove any snow, ice or leaves from the air intake area at the base ofthe windshield.
• To improve the A/C cool down, drive with the windows slightly openfor 2-3 minutes after start up or until the vehicle has been “aired out.”
For maximum cooling performance in MAX A/C mode:
1. Select MAX A/C.
2. Move temperature control selector to the coolest setting.
3. Set the fan to the highest speed initially, then adjust to maintaincomfort.
To aid in side window defogging/demisting in cold weather:
1. Select .
2. Select A/C.
3. Adjust the temperature control to maintain comfort.
4. Set the fan speed to the highest setting.
5. Direct the outer instrument panel vents towards the side windows.
To increase airflow to the outer instrument panel vents, close the ventslocated in the middle of the instrument panel.
Do not place objects on top of the instrument panel as theseobjects may become projectiles in a collision or sudden stop.
2008 Escape (204)Owners Guide (post-2002-fmt)USA (fus)
Climate Controls
36

DUAL AUTOMATIC TEMPERATURE CONTROL (IF EQUIPPED)
1. AUTO/Driver temperature: Press to engage full automaticoperation. The system will automatically determine fan speed, airflowdistribution, A/C on or off, and outside or recirculated air, to heat or coolthe vehicle to reach the desired temperature. Turn to increase/decreasethe temperature on the driver side of the vehicle. The control alsoadjusts the passenger side temperature when PASS TEMP is disengaged.The recommended initial setting is between 72°F (22°C) and 75°F(24°C), then adjust for comfort. The driver side temperature setting willappear in the upper left corner of the display.
2. R Rear defroster: Press to activate/deactivate the rear windowdefroster. Refer to Rear window defroster later in this chapter for moreinformation.
3. Defrost: Distributes outside air through the windshield defrostervents and demister vents. Can be used to clear the windshield of fog andthin ice. The system will automatically provide outside air to reducewindow fogging. Press this button again to return to the previous air flowselection.
4. : Distributes air through the windshield defroster vents, demistervents, floor vents and rear seat floor vents. The system will automaticallyprovide outside air to reduce window fogging.
2008 Escape (204)Owners Guide (post-2002-fmt)USA (fus)
Climate Controls
37

5. Power/ : Press to activate/deactivate the climate controlsystem. When the system is off, outside air is shut out. Turn to manuallyincrease/decrease the fan speed. The manual fan speed setting willappear on the left side of the display. To return to automatic fanoperation, press AUTO.
6. : Distributes air through the instrument panel vents.
7. : Distributes air through the instrument panel vents, demistervents, floor vents and rear seat floor vents.
8. : Distributes air through the demister vents, floor vents and rearseat floor vents.
9. Passenger temperature: Press to engage/disengage separatepassenger side temperature control. Turn to increase/decrease thetemperature on the passenger side of the vehicle. The recommendedinitial setting is between 72°F (22°C) and 75°F (24°C), then adjust forcomfort. The passenger side temperature setting will appear in the upperright corner of the display.
10. Passenger heated seat control (if equipped): Press toactivate/deactivate the passenger heated seat. See Heated seats in theSeating and Safety Restraints chapter.
11. Recirculated air: Press to activate/deactivate airrecirculation in the vehicle. Recirculated air may reduce the amount oftime needed to cool down the interior of the vehicle and may also helpreduce undesired odors from reaching the interior of the vehicle.Recirculated air engages automatically when MAX A/C is selected or canbe engaged manually in any airflow mode except (defrost).Recirculated air may turn off automatically in some airflow modes toreduce fog potential. When the ignition switch is turned off and back on,the climate system will return to the recirculated air mode only if theA/C button LED is illuminated and the air distribution selection is eitherAUTO, (panel) or (panel/floor).
12. MAX A/C: Distributes recirculated air through the instrument panelvents to cool the vehicle. This re-cooling of the interior air is moreeconomical and efficient. Recirculated air may also help reduceundesirable odors from entering the vehicle. Press the MAX A/C buttonagain for normal A/C operation.
2008 Escape (204)Owners Guide (post-2002-fmt)USA (fus)
Climate Controls
38
13. A/C: Press to activate/deactivate air conditioning. Use withrecirculated air to improve cooling performance and efficiency. Engagesautomatically in AUTO, MAX A/C, (defrost) and (floor/defrost).
14. Driver heated seat control (if equipped): Press toactivate/adjective the driver heated seat. See Heated seats in theSeating and Safety Restraints chapter.Outside temperature: The outside temperature will appear in thedisplay and is labeled EXT TEMP.Temperature conversion: To switch between Fahrenheit and Celsius: Ifyour vehicle is equipped with a message center, refer to Setup menu inthe Message center section of the Driver Controls chapter.
Operating tips• To reduce fog build up on the windshield during humid weather,
select (defrost) or (floor/defrost).
• To reduce humidity build up inside the vehicle, do not drive with thesystem OFF or with (recirculated air) engaged and A/C off.
• Do not put objects under the front seats that will interfere with theairflow to the back seats.
• Remove any snow, ice or leaves from the air intake area at the base ofthe windshield.
• To improve the A/C cool down, drive with the windows slightly openfor 2-3 minutes after start up or until the vehicle has been “aired out.”
For maximum cooling performance:
• Automatic operation:
1. Press AUTO for full automatic operation.
2. Do not override A/C or (recirculated air).
3. Set the temperature to 60°F (16°C).
• Manual operation:
1. Select MAX A/C.
2. Select or .
3. Select (recirculated air) to provide colder airflow.
4. Set the temperature to 60°F (16°C).
5. Set highest fan setting initially, then adjust to maintain comfort.
2008 Escape (204)Owners Guide (post-2002-fmt)USA (fus)
Climate Controls
39

To aid in side window defogging/demisting in cold weather:
1. Select .
2. Select A/C.
3. Adjust the temperature control to maintain comfort.
4. Set the fan speed to the highest setting.
5. Direct the outer instrument panel vents towards the side windows.
To increase airflow to the outer instrument panel vents, close the ventslocated in the middle of the instrument panel.
Do not place objects on top of the instrument panel as theseobjects may become projectiles in a collision or sudden stop.
REAR WINDOW DEFROSTERR
The rear defroster control is located on the climate control panel andworks to clear the rear window of fog and thin ice.
The engine must be running to operate the rear window defroster.
Press R to turn the rear window defroster on. An indicator light onthe button will illuminate when active. The rear window defroster turnsoff automatically after a predetermined amount of time, if a low batterycondition is detected or when the ignition is turned to the 1 (LOCK) or2 (ACC) position. To manually turn off the rear window defroster at anytime, press the control again.
If your vehicle is equipped with both rear defroster and heated mirrors,the same button will activate both. Refer to Heated outside mirrors inthe Driver Controls chapter.
Do not use razor blades or other sharp objects to clean the insideof the rear window or to remove decals from the inside or therear window. This may cause damage to the heated grid lines andwill not be covered by your warranty.
2008 Escape (204)Owners Guide (post-2002-fmt)USA (fus)
Climate Controls
40
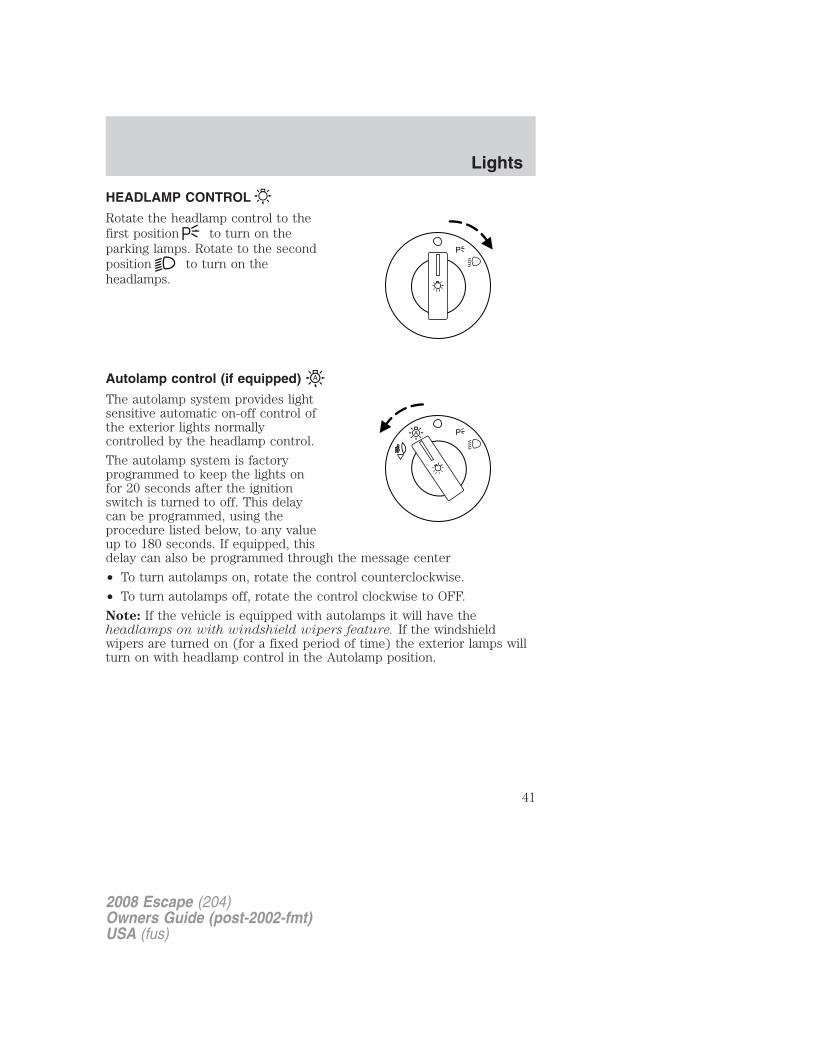
HEADLAMP CONTROL
Rotate the headlamp control to thefirst position to turn on theparking lamps. Rotate to the secondposition to turn on theheadlamps.
Autolamp control (if equipped)
The autolamp system provides lightsensitive automatic on-off control ofthe exterior lights normallycontrolled by the headlamp control.
The autolamp system is factoryprogrammed to keep the lights onfor 20 seconds after the ignitionswitch is turned to off. This delaycan be programmed, using theprocedure listed below, to any valueup to 180 seconds. If equipped, thisdelay can also be programmed through the message center
• To turn autolamps on, rotate the control counterclockwise.
• To turn autolamps off, rotate the control clockwise to OFF.
Note: If the vehicle is equipped with autolamps it will have theheadlamps on with windshield wipers feature. If the windshieldwipers are turned on (for a fixed period of time) the exterior lamps willturn on with headlamp control in the Autolamp position.
2008 Escape (204)Owners Guide (post-2002-fmt)USA (fus)
Lights
41

Autolamp delay system (if equipped)
If your vehicle is equipped with autolamps, you can set the delay time tokeep the headlights on for up to three minutes after the key is turnedOFF. The delay time is set to 20 seconds at the factory, but the delaytime may be changed by following the steps below (Steps 1 through 6must be done within 10 seconds):
1. Turn the key to the 1 (LOCK)position.
2. Rotate the headlamp control tothe autolamp position.
3. Rotate the headlamp control tothe OFF position.
4. Turn the key to the 3 (RUN)position.
5. Turn the key back to the 1(LOCK) position.
6. Turn the headlamp control to the autolamp position (the headlightsshould turn on).
7. Turn the headlamp control to the OFF position when the desireddelay time (up to 3 minutes) has been reached.
Foglamp control (if equipped)
The headlamp control also operatesthe foglamps. The foglamps can beturned on when the headlampcontrol is in the , orpositions and the high beams arenot turned on.
Pull headlamp control towards youto turn foglamps on. The foglampindicator light will illuminate.
2008 Escape (204)Owners Guide (post-2002-fmt)USA (fus)
Lights
42
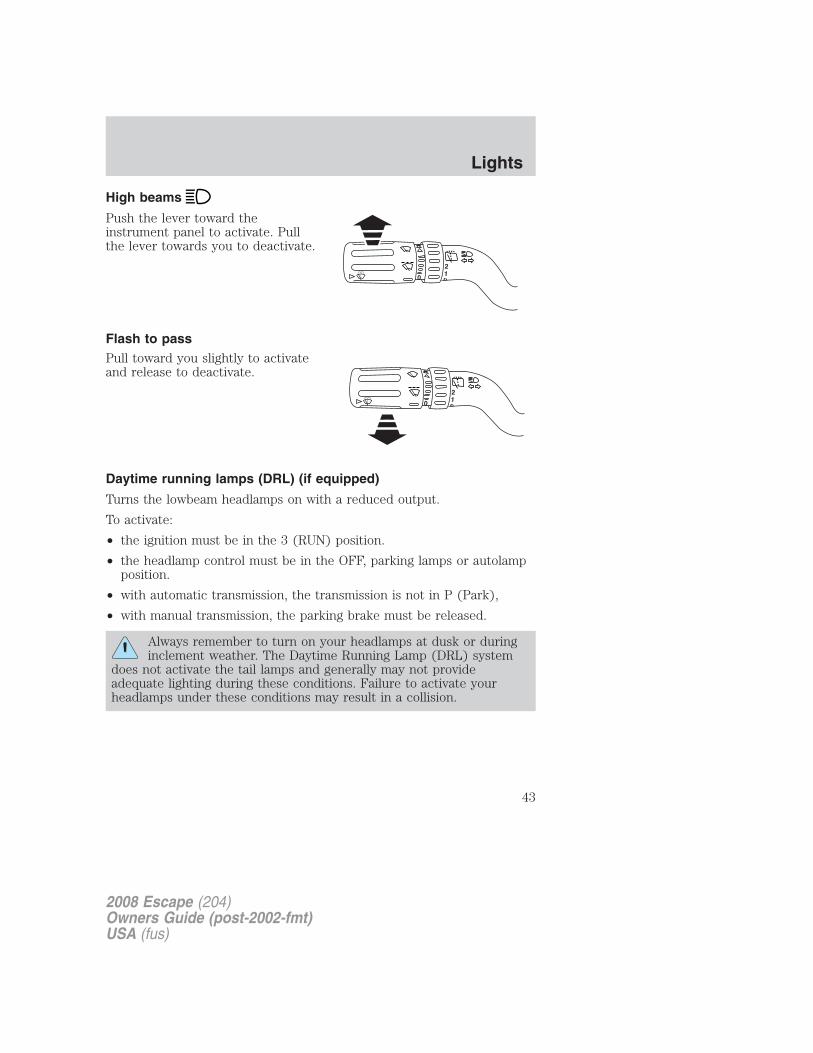
High beams
Push the lever toward theinstrument panel to activate. Pullthe lever towards you to deactivate.
Flash to passPull toward you slightly to activateand release to deactivate.
Daytime running lamps (DRL) (if equipped)
Turns the lowbeam headlamps on with a reduced output.
To activate:
• the ignition must be in the 3 (RUN) position.
• the headlamp control must be in the OFF, parking lamps or autolampposition.
• with automatic transmission, the transmission is not in P (Park),
• with manual transmission, the parking brake must be released.
Always remember to turn on your headlamps at dusk or duringinclement weather. The Daytime Running Lamp (DRL) system
does not activate the tail lamps and generally may not provideadequate lighting during these conditions. Failure to activate yourheadlamps under these conditions may result in a collision.
2008 Escape (204)Owners Guide (post-2002-fmt)USA (fus)
Lights
43

PANEL DIMMER CONTROLUse to adjust the brightness of theinstrument panel and all applicableswitches in the vehicle duringheadlamp and parklamp operation.
Move the control to the full uprightposition, past detent, to turn on theinterior lamps.
Rotate to full down position (pastdetent) to prevent interior lampsfrom illuminating when the doorsare opened.
AIMING THE HEADLAMPS
The headlamps on your vehicle are properly aimed at the assembly plant.If your vehicle has been in an accident the alignment of your headlampsshould be checked by your authorized dealer.
Vertical aim adjustment
1. Park the vehicle directly in front of a wall or screen on a level surface,approximately 25 feet (7.6 meters) away.
• (1) 8 feet (2.4 meters)
• (2) Center height of lamp toground
• (3) 25 feet (7.6 meters)
• (4) Horizontal reference line
2. Measure the height from thecenter of your headlamp to theground and mark an 8 foot(2.4 meter) horizontal reference lineon the vertical wall or screen at thisheight (a piece of masking tape works well). The center of the lamp ismarked by a 3.0 mm circle on the headlamp lens.
3. Turn on the low beam headlamps to illuminate the wall or screen andopen the hood. Cover the left-hand headlamp with an opaque cloth.
2008 Escape (204)Owners Guide (post-2002-fmt)USA (fus)
Lights
44
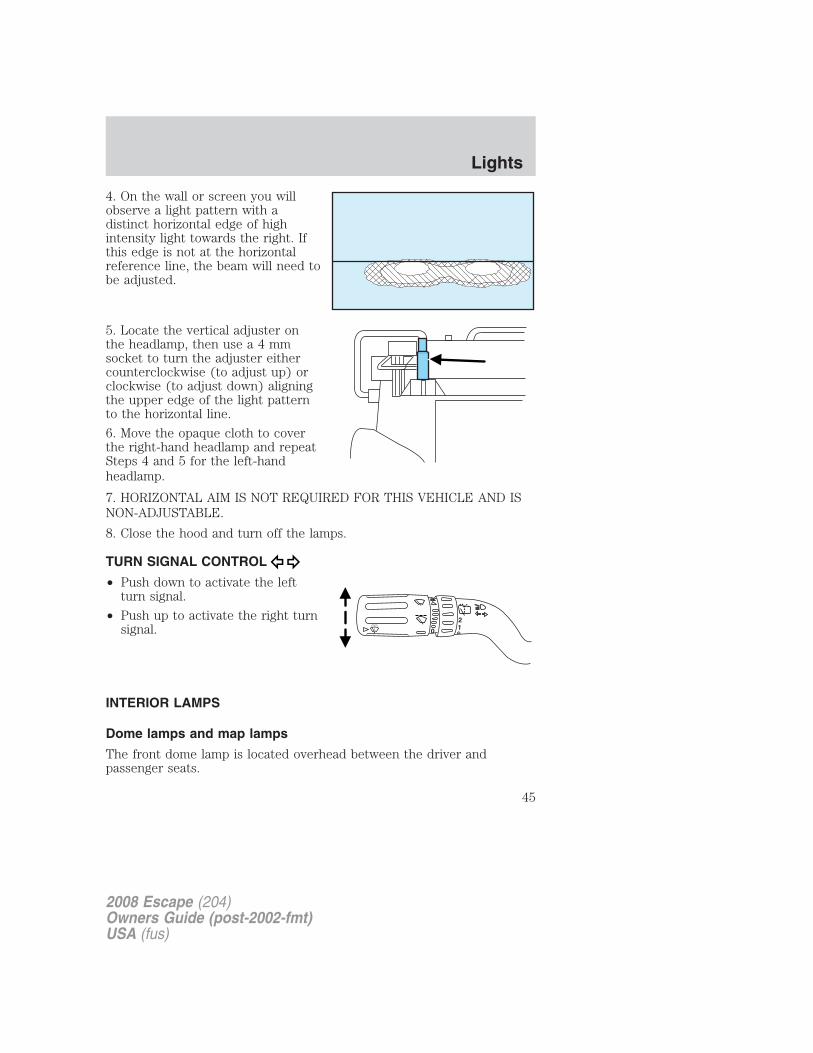
4. On the wall or screen you willobserve a light pattern with adistinct horizontal edge of highintensity light towards the right. Ifthis edge is not at the horizontalreference line, the beam will need tobe adjusted.
5. Locate the vertical adjuster onthe headlamp, then use a 4 mmsocket to turn the adjuster eithercounterclockwise (to adjust up) orclockwise (to adjust down) aligningthe upper edge of the light patternto the horizontal line.
6. Move the opaque cloth to coverthe right-hand headlamp and repeatSteps 4 and 5 for the left-handheadlamp.
7. HORIZONTAL AIM IS NOT REQUIRED FOR THIS VEHICLE AND ISNON-ADJUSTABLE.
8. Close the hood and turn off the lamps.
TURN SIGNAL CONTROL
• Push down to activate the leftturn signal.
• Push up to activate the right turnsignal.
INTERIOR LAMPS
Dome lamps and map lamps
The front dome lamp is located overhead between the driver andpassenger seats.
2008 Escape (204)Owners Guide (post-2002-fmt)USA (fus)
Lights
45

The dome lamp control has threepositions:
• OFF: In this position, the lampwill not illuminate.
• DOOR: In this position, the domelamp will illuminate only when adoor is opened and will remainilluminated for 25 seconds afterthe door is shut.
• ON: In this position, the lamp will remain illuminated.
The map lamp controls (withoutmoon roof) are located on the domelamp. Press the button on eitherside of each map lamp to illuminatethe lamps. Push the button again toturn off the lamps.
For models equipped with a moonroof, the map lamps are located onthe moon roof control panel. Pressthe button on either side of eachmap lamp to illuminate the lamps.Push the button again to turn offthe lamps.
The map lamps will illuminatewhenever a door is opened. Afterthe door is shut, the lamps will remain illuminated for 25 seconds.
Cargo and dome lampRear cargo lamp equipped with anON/OFF/DOOR control will lightwhen:
• the doors are closed and thecontrol is in the ON position.
• the control is in the DOORposition and any door is open.
When the control is in the OFF position, it will not illuminate when youopen the doors.
2008 Escape (204)Owners Guide (post-2002-fmt)USA (fus)
Lights
46

Interior lighting battery saver
The interior lamps will automatically extinguish after 10 minutes whenthe ignition key is in OFF/LOCK position, a door has been left open orthe interior lamp controls are in the ON position.
BULB REPLACEMENT
Headlamp CondensationThe headlamps are vented to equalize pressure. When moist air entersthe headlamp(s) through the vents, there is a possibility thatcondensation can occur. This condensation is normal and will clearwithin 45 minutes of headlamp operation.
Using the right bulbsReplacement bulbs are specified in the chart below. Headlamp bulbsmust be marked with an authorized “D.O.T.” for North America and an“E” for Europe to ensure lamp performance, light brightness and patternand safe visibility. The correct bulbs will not damage the lamp assemblyor void the lamp assembly warranty and will provide quality bulb burntime.
Function Number of bulbs Trade number
Headlamps (high and lowbeams)
2H13
Park/turn lamps (front) 2 3457 NAK (amber)Side marker (front) 2 194Rear stop/tail/sidemarker 2 4157KBackup lamp 2 921Foglamp (front) 2 PS24WFFCenter High-mount stoplamp
5W5WL
Rear license plate lamp 2 168All replacement bulbs are clear in color except where noted.To replace all instrument panel lights - see your authorized dealer
Replacing the interior bulbsCheck the operation of all bulbs frequently.
Replacing exterior bulbsCheck the operation of all the bulbs frequently.
2008 Escape (204)Owners Guide (post-2002-fmt)USA (fus)
Lights
47
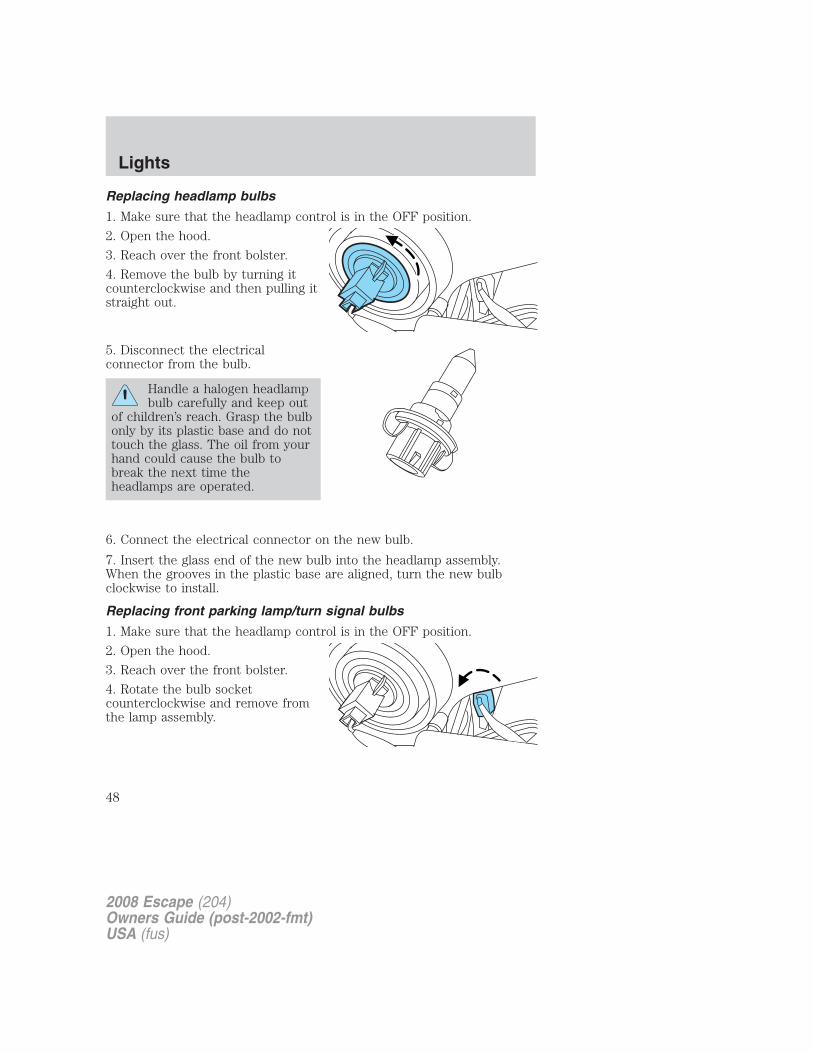
Replacing headlamp bulbs
1. Make sure that the headlamp control is in the OFF position.
2. Open the hood.
3. Reach over the front bolster.
4. Remove the bulb by turning itcounterclockwise and then pulling itstraight out.
5. Disconnect the electricalconnector from the bulb.
Handle a halogen headlampbulb carefully and keep out
of children’s reach. Grasp the bulbonly by its plastic base and do nottouch the glass. The oil from yourhand could cause the bulb tobreak the next time theheadlamps are operated.
6. Connect the electrical connector on the new bulb.
7. Insert the glass end of the new bulb into the headlamp assembly.When the grooves in the plastic base are aligned, turn the new bulbclockwise to install.
Replacing front parking lamp/turn signal bulbs
1. Make sure that the headlamp control is in the OFF position.
2. Open the hood.
3. Reach over the front bolster.
4. Rotate the bulb socketcounterclockwise and remove fromthe lamp assembly.
2008 Escape (204)Owners Guide (post-2002-fmt)USA (fus)
Lights
48
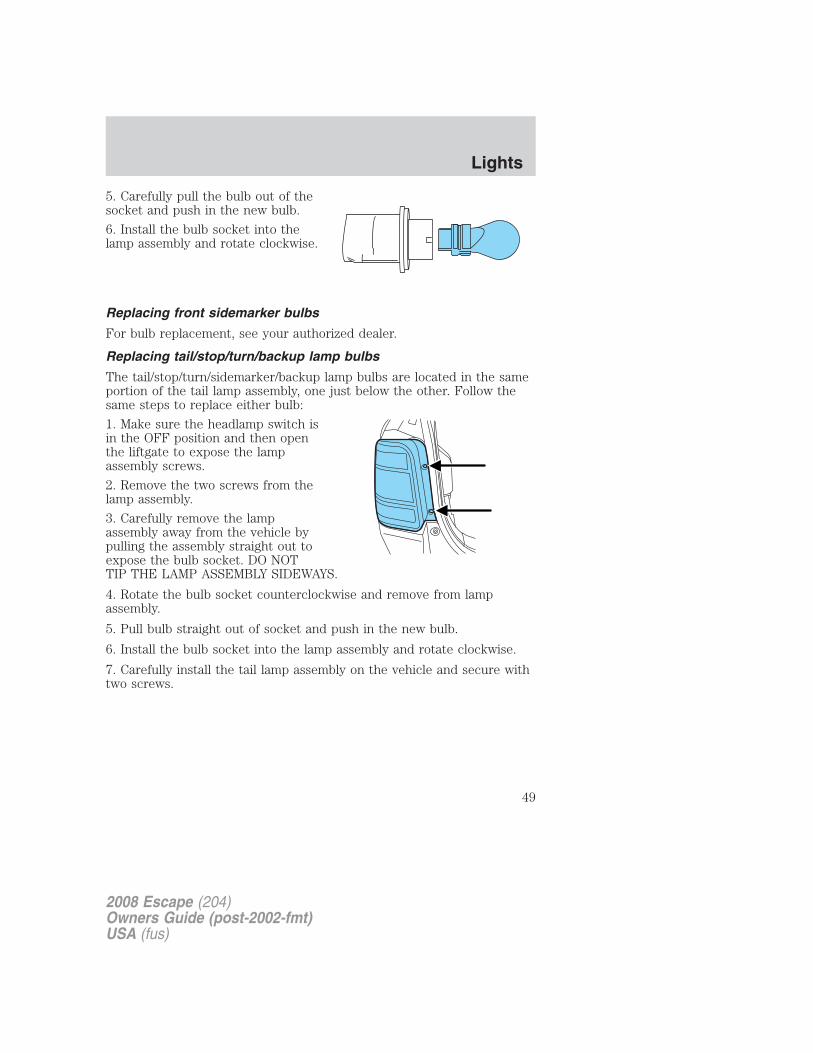
5. Carefully pull the bulb out of thesocket and push in the new bulb.
6. Install the bulb socket into thelamp assembly and rotate clockwise.
Replacing front sidemarker bulbs
For bulb replacement, see your authorized dealer.
Replacing tail/stop/turn/backup lamp bulbs
The tail/stop/turn/sidemarker/backup lamp bulbs are located in the sameportion of the tail lamp assembly, one just below the other. Follow thesame steps to replace either bulb:
1. Make sure the headlamp switch isin the OFF position and then openthe liftgate to expose the lampassembly screws.
2. Remove the two screws from thelamp assembly.
3. Carefully remove the lampassembly away from the vehicle bypulling the assembly straight out toexpose the bulb socket. DO NOTTIP THE LAMP ASSEMBLY SIDEWAYS.
4. Rotate the bulb socket counterclockwise and remove from lampassembly.
5. Pull bulb straight out of socket and push in the new bulb.
6. Install the bulb socket into the lamp assembly and rotate clockwise.
7. Carefully install the tail lamp assembly on the vehicle and secure withtwo screws.
2008 Escape (204)Owners Guide (post-2002-fmt)USA (fus)
Lights
49

Replacing high-mount brake lamp bulbs1. Remove the two screws and movethe lamp assembly away from theliftgate.
2. Remove the bulb holder from thelamp assembly by depressing thesnaps.
3. Pull the bulb straight out of thesocket and push in the new bulb.
Install the new bulbs in reverseorder.
Replacing license plate lamp bulbs1. Make sure the headlamp switch isin the OFF position.
2. Depress the lever and carefullypry the license plate lamp assembly(located above the license plate)from the liftgate.
3. Rotate the bulb socketcounterclockwise and remove fromlamp assembly.
2008 Escape (204)Owners Guide (post-2002-fmt)USA (fus)
Lights
50
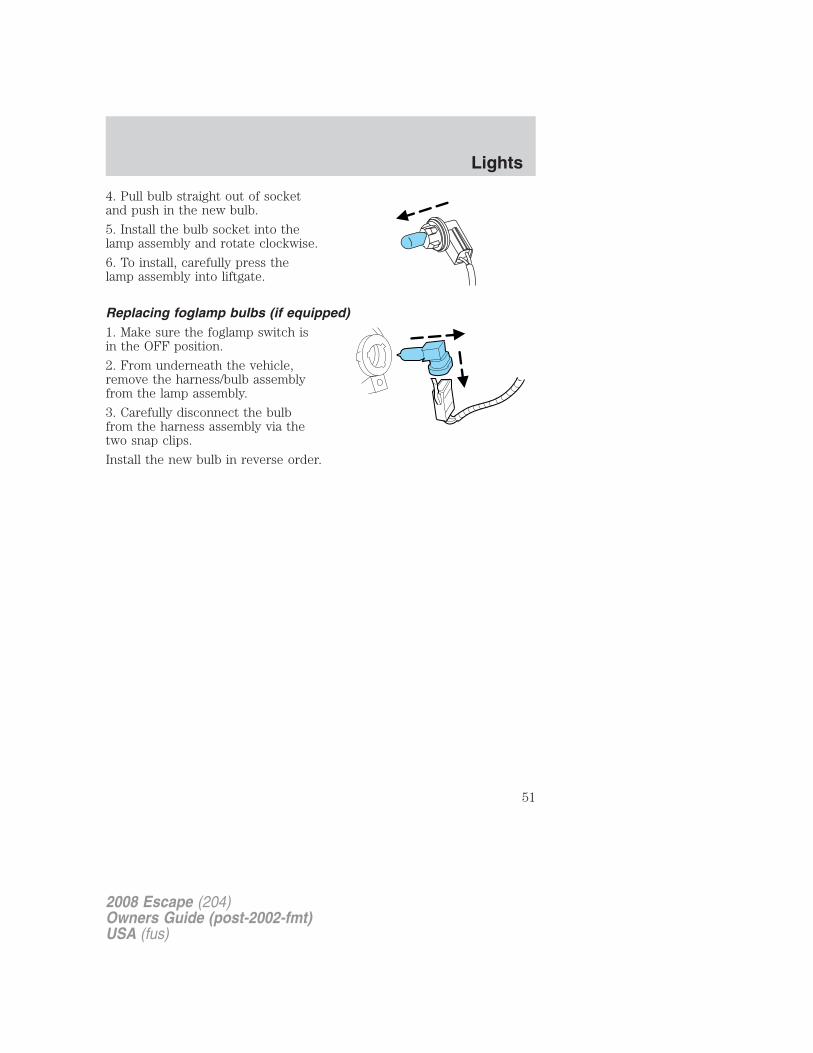
4. Pull bulb straight out of socketand push in the new bulb.
5. Install the bulb socket into thelamp assembly and rotate clockwise.
6. To install, carefully press thelamp assembly into liftgate.
Replacing foglamp bulbs (if equipped)1. Make sure the foglamp switch isin the OFF position.
2. From underneath the vehicle,remove the harness/bulb assemblyfrom the lamp assembly.
3. Carefully disconnect the bulbfrom the harness assembly via thetwo snap clips.
Install the new bulb in reverse order.
2008 Escape (204)Owners Guide (post-2002-fmt)USA (fus)
Lights
51

MULTI-FUNCTION LEVERWindshield wiper: Rotate the endof the control away from you toincrease the speed of the wipers;rotate towards you to decrease thespeed of the wipers.
Windshield washer: Push the endof the stalk:
• briefly: causes a single swipe ofthe wipers without washer fluid.
• a quick push and hold: the wiperswill swipe three times withwasher fluid.
• a long push and hold: the wipers and washer fluid will be activated forup to ten seconds.
Courtesy wipe feature: One extra wipe will happen a few secondsafter washing the front window to clear any water that is dripping downfrom the top of the windshield caused by the washing.
Note: Do not operate the washer when the washer reservoir is empty.This may cause the washer pump to overheat. Check the washer fluidlevel frequently. Do not operate the wipers when the windshield is dry.This may scratch the glass, damage the wiper blades and cause the wipermotor to burn out. Before operating the wiper on a dry windshield,always use the windshield washer. In freezing weather, be sure the wiperblades are not frozen to the windshield before operating the wipers.
Windshield wiper features (if equipped with Autolamp feature)
The exterior lamps will turn on with the ignition on, headlamp control inthe Autolamp position and the windshield wipers are turned on (for afixed period of time).
2008 Escape (204)Owners Guide (post-2002-fmt)USA (fus)
Driver Controls
52
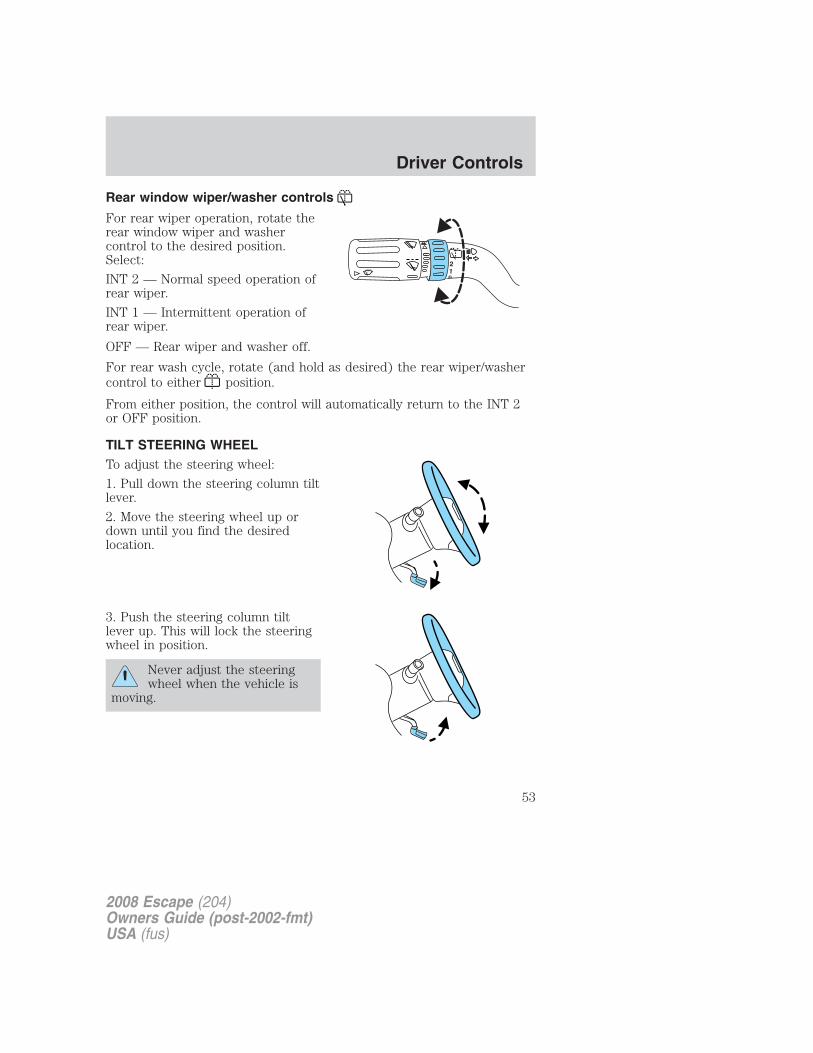
Rear window wiper/washer controls
For rear wiper operation, rotate therear window wiper and washercontrol to the desired position.Select:
INT 2 — Normal speed operation ofrear wiper.
INT 1 — Intermittent operation ofrear wiper.
OFF — Rear wiper and washer off.
For rear wash cycle, rotate (and hold as desired) the rear wiper/washercontrol to either position.
From either position, the control will automatically return to the INT 2or OFF position.
TILT STEERING WHEELTo adjust the steering wheel:
1. Pull down the steering column tiltlever.
2. Move the steering wheel up ordown until you find the desiredlocation.
3. Push the steering column tiltlever up. This will lock the steeringwheel in position.
Never adjust the steeringwheel when the vehicle is
moving.
2008 Escape (204)Owners Guide (post-2002-fmt)USA (fus)
Driver Controls
53
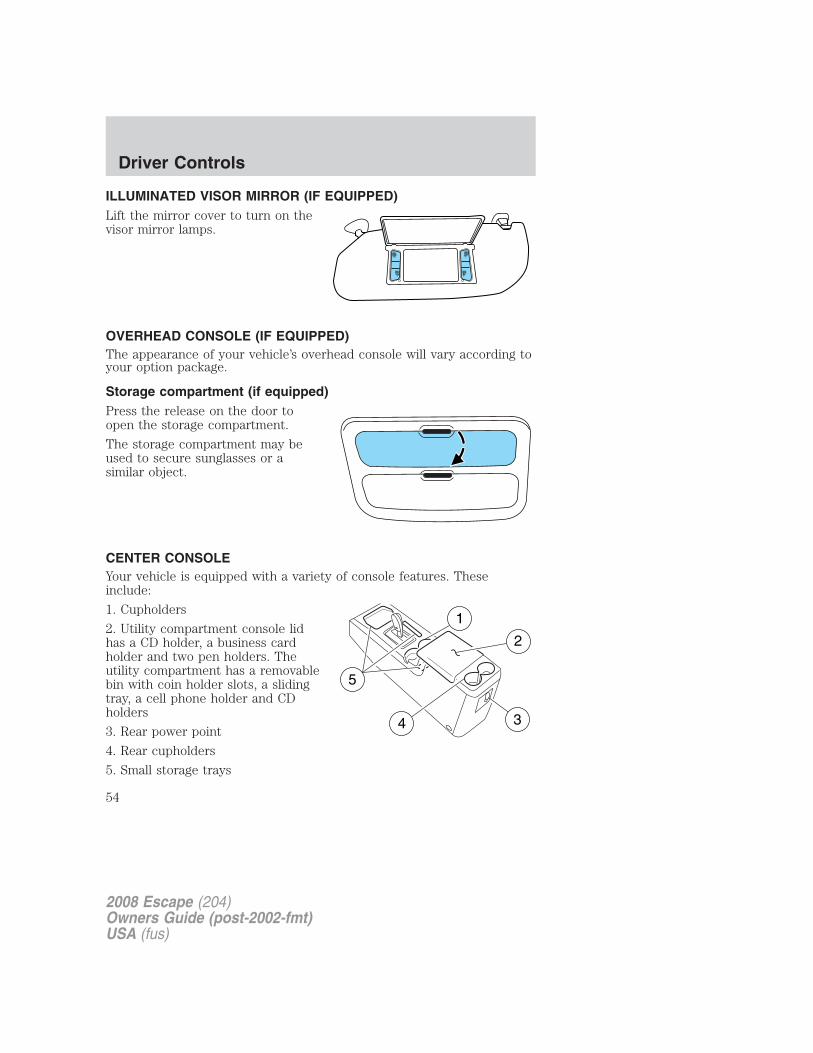
ILLUMINATED VISOR MIRROR (IF EQUIPPED)Lift the mirror cover to turn on thevisor mirror lamps.
OVERHEAD CONSOLE (IF EQUIPPED)The appearance of your vehicle’s overhead console will vary according toyour option package.
Storage compartment (if equipped)Press the release on the door toopen the storage compartment.
The storage compartment may beused to secure sunglasses or asimilar object.
CENTER CONSOLEYour vehicle is equipped with a variety of console features. Theseinclude:
1. Cupholders
2. Utility compartment console lidhas a CD holder, a business cardholder and two pen holders. Theutility compartment has a removablebin with coin holder slots, a slidingtray, a cell phone holder and CDholders
3. Rear power point
4. Rear cupholders
5. Small storage trays
2008 Escape (204)Owners Guide (post-2002-fmt)USA (fus)
Driver Controls
54

Use only soft cups in the cupholders. Hard objects can injureyou in a collision.
The tray and inside bin can beremoved to open up space to fit alaptop computer, MP3 players, CDsor handbags. To remove, open theconsole lid and pull the bin straightup and out from the consolehousing.
The sliding tray and inside bin canbe hooked on the side or rear of theconsole for extra storage.
AUXILIARY POWER POINT (12VDC)
Power outlets are designed for accessory plugs only. Do not insertany other object in the power outlet as this will damage theoutlet and blow the fuse. Do not hang any type of accessory oraccessory bracket from the plug. Improper use of the poweroutlet can cause damage not covered by your warranty.
2008 Escape (204)Owners Guide (post-2002-fmt)USA (fus)
Driver Controls
55

The auxiliary power point is locatedin the instrument panel.
A second auxiliary power point islocated on the rear side of thecenter console.
Do not use the power point foroperating the cigarette lighterelement (if equipped).
To prevent the fuse from beingblown, do not use the powerpoint(s) over the vehicle capacity of 12 VDC/180W. If the power point orcigar lighter socket is not working, a fuse may have blown. Refer toFuses and Relays in the Roadside Emergencies chapter for informationon checking and replacing fuses.
To prevent the battery from being discharged, do not use the powerpoint longer than necessary when the engine is not running.
Always keep the power point caps closed when not being used.
Cigar/Cigarette lighter (if equipped)
Do not plug optional electrical accessories into the cigarette lightersocket.
Do not hold the lighter in with your hand while it is heating, this willdamage the lighter element and socket. The lighter will be released fromits heating position when it is ready to be used.
Improper use of the lighter can cause damage not covered by yourwarranty.
POWER WINDOWS
Do not leave children unattended in the vehicle and do not letchildren play with the power windows. They may seriously injure
themselves.
When closing the power windows, you should verify they are freeof obstructions and ensure that children and/or pets are not in
the proximity of the window openings.
2008 Escape (204)Owners Guide (post-2002-fmt)USA (fus)
Driver Controls
56

Press and pull the window switchesto open and close windows.
• Push down (to the first detent)and hold the switch to open.
• Pull up (to the first detent) andhold the switch to close.
One touch downAllows the driver’s window to openfully without holding the controldown. Push the switch completelydown to the second detent andrelease quickly. The window willopen fully. Momentarily press theswitch to any position to stop thewindow operation.
Window lockThe window lock feature allows onlythe driver to operate the powerwindows.
To lock out all the window controlsexcept for the driver’s press theright side of the control. Press theleft side to restore the windowcontrols.
Accessory delayWith accessory delay, the window switches, moon roof (if equipped) andaudio system may be used for up to ten minutes after the ignition switchis turned to the OFF position or until either front door is opened.
INTERIOR MIRRORThe interior rear view mirror has two pivot points on the support armwhich lets you adjust the mirror UP or DOWN and from SIDE to SIDE.
Do not adjust the mirror while the vehicle is in motion.
AUTO
2008 Escape (204)Owners Guide (post-2002-fmt)USA (fus)
Driver Controls
57

Automatic dimming rear view mirror (if equipped)Your vehicle may be equipped withan inside rear view mirror which hasan auto-dimming function. Theelectronic day/night mirror willchange from the normal (highreflective) state to the non-glare(darkened) state when bright lights (glare) reach the mirror. When themirror detects bright light from behind the vehicle, it will automaticallyadjust (darken) to minimize glare.
The mirror will automatically return to the normal state whenever thevehicle is placed in R (Reverse) (when the mirror is on) to ensure abright clear view when backing up.
Do not block the sensors on the front and back of the inside rearview mirror since this may impair proper mirror performance.
Do not clean the housing or glass of any mirror with harshabrasives, fuel or other petroleum-based cleaning products.
Electronic compass (if equipped)
The compass heading is displayed as one of N, NE, E, SE, S, SW, W andNW in the center stack display.
The compass reading may be affected when you drive near largebuildings, bridges, power lines and powerful broadcast antenna. Magneticor metallic objects placed in, on or near the vehicle may also affectcompass accuracy.
Usually, when something affects the compass readings, the compass willcorrect itself after a few days of operating your vehicle in normalconditions. If the compass still appears to be inaccurate, a manualcalibration may be necessary. Refer to Compass zone adjustment.
Most geographic areas (zones) have a magnetic north compass point thatvaries slightly from the northerly direction on maps. This variation is fourdegrees between adjacent zones and will become noticeable as thevehicle crosses multiple zones. A correct zone setting will eliminate thiserror. Refer to Compass calibration adjustment.
2008 Escape (204)Owners Guide (post-2002-fmt)USA (fus)
Driver Controls
58

Compass zone adjustment1. Determine which magnetic zoneyou are in for your geographiclocation by referring to the zonemap.
2. Turn ignition to the ON position.
3. Locate the reset button on top ofthe compass sensor mounted behindthe mirror.
4. Press and hold the reset buttonon the compass module forapproximately 5 seconds until ZONEXX appears in the center stackdisplay.
5. Continue to press the reset button until the correct zone appears inthe center stack display.
6. The direction will display afterthe button is released. The zone isnow updated.
123
4
5
6 7 8 91011
12
1314
15
2008 Escape (204)Owners Guide (post-2002-fmt)USA (fus)
Driver Controls
59

Compass calibration adjustment
Perform compass calibration in an open area free from steel structuresand high voltage lines. For optimum calibration, turn off all electricalaccessories (heater/air conditioning, wipers, etc.) and make sure allvehicle doors are shut.
1. Start the vehicle.
2. Locate the reset button on the compass sensor mounted on the baseof mirror.
3. To calibrate, press and hold thereset button on the compass modulefor approximately ten seconds untilCAL appears. Release the button.
4. Slowly drive the vehicle in acircle (less than 3 mph [5 km/h]) until the CAL display changes to thedirection value. It may take up to five circles to complete calibration.
5. The compass is now calibrated.
EXTERIOR MIRRORS
Power side view mirrors
To adjust your mirrors:
1. Rotate the control clockwise toadjust the right mirror and rotatethe control counterclockwise toadjust the left mirror.
2. Move the control in the directionyou wish to tilt the mirror.
3. Return to the center position tolock mirrors in place.
2008 Escape (204)Owners Guide (post-2002-fmt)USA (fus)
Driver Controls
60

Fold-away mirrorsFold the side mirrors in carefullywhen driving through a narrowspace, like an automatic car wash.
Heated outside mirrors (if equipped)
Both mirrors are heatedautomatically to remove ice, mistand fog when the rear windowdefrost is activated.
Do not remove ice from themirrors with a scraper orattempt to readjust the mirrorglass if it is frozen in place.These actions could cause damage to the glass and mirrors.
SPEED CONTROL (IF EQUIPPED)
With speed control set, you can maintain a set speed without keepingyour foot on the accelerator pedal.
Do not use the speed control in heavy traffic or on roads thatare winding, slippery or unpaved.
Setting speed controlThe controls for using your speedcontrol are located on the steeringwheel for your convenience.
1. Press the ON control and releaseit.
2. Accelerate to the desired speed.
2008 Escape (204)Owners Guide (post-2002-fmt)USA (fus)
Driver Controls
61

3. Press the SET + control andrelease it.
4. Take your foot off the acceleratorpedal.
5. The indicator light on theinstrument cluster will turn on.
Note:
• Vehicle speed may vary momentarily when driving up and down asteep hill.
• If the vehicle speed increases above the set speed on a downhill, youmay want to apply the brakes to reduce the speed.
• If the vehicle speed decreases more than 10 mph (16 km/h) belowyour set speed on an uphill, your speed control will disengage.
• If the vehicle speed decreases to 30 mph (48 km/h) or less, yourspeed control will disengage
Disengaging speed control
To disengage the speed control:
• Depress the brake pedal
Disengaging the speed control will not erase previous set speed.
Note: When you use the clutch pedal to disengage the speed control,the engine speed may briefly increase, this is normal.
Resuming a set speedPress the RESUME control andrelease it. This will automaticallyreturn the vehicle to the previouslyset speed.
2008 Escape (204)Owners Guide (post-2002-fmt)USA (fus)
Driver Controls
62

Increasing speed while using speed controlThere are three ways to set a higherspeed:
• Press and hold the SET + controluntil you get to the desiredspeed, then release the control.
• Press and release the SET +control to operate the Tap-Upfunction. Each tap will increasethe set speed by 1 mph(1.6 km/h).
• Use the accelerator pedal to get to the desired speed. When thevehicle reaches that speed press and release the SET + control.
Reducing speed while using speed controlThere are three ways to reduce aset speed:
• Press and hold the CST - controluntil you get to the desiredspeed, then release the control.
• Press and release the CST -control to operate the Tap-Downfunction. Each tap will decreasethe set speed by 1 mph(1.6 km/h).
• Depress the brake pedal or theclutch pedal (if equipped) untilthe desired vehicle speed isreached, press the SET + control.
2008 Escape (204)Owners Guide (post-2002-fmt)USA (fus)
Driver Controls
63

Turning off speed controlThere are two ways to turn off thespeed control:
• Press the speed control OFFcontrol.
• Turn OFF the ignition.
Note: When you turn off the speedcontrol or the ignition, your speedcontrol set speed memory is erased.
STEERING WHEEL CONTROLS (IF EQUIPPED)
These controls allow you to operate some audio control features.
Radio control featuresPress MEDIA to select:
• AM, FM1, FM2, or CD
• LINE IN (Auxiliary input jack)(if equipped)
In Radio mode:
• Press to access thenext/previous preset station.
In CD mode:
• Press to listen to thenext track on the disc.
2008 Escape (204)Owners Guide (post-2002-fmt)USA (fus)
Driver Controls
64

In any mode:
• Press VOL + or - to adjust thevolume.
MOON ROOF (IF EQUIPPED)
Do not let children play with the moon roof or leave childrenunattended in the vehicle. They may seriously hurt themselves.
When closing the moon roof, you should verify that it is free ofobstructions and ensure that children and/or pets are not in the
proximity of the moon roof opening.
To operate the moon roof:
• The moon roof is equipped withan automatic, one-touch, expressopening feature. Press andrelease the rear portion of thecontrol. To stop motion at anytime during the one-touchopening, press the control again.
• To close, press and hold the frontportion of the control until the moon roof comes to a complete stopthen release the control.
To operate the moon roof vent position:• To open, press and hold the front portion of the control. This will
open the vent.
• To close, press and hold the rear portion of the control until the moonroof comes to a complete stop then release the control.
Note: If the battery is disconnected, discharged, or a new battery isinstalled, the moon roof needs to be opened to the vent position to resetthe moon roof positions.
2008 Escape (204)Owners Guide (post-2002-fmt)USA (fus)
Driver Controls
65

If you open and close the moon roof repeatedly, the moon roof motormay overheat and shut down for 45 seconds while the motor cools.
MESSAGE CENTER (IF EQUIPPED)With the ignition in the RUNposition, the message center,located on your instrument cluster,displays important vehicleinformation through a constantmonitor of vehicle systems. Youmay select display features on the message center for a display of status.The system will also notify you of potential vehicle problems with adisplay of system warnings followed by a long indicator chime.
Selectable features
ResetPress this control to select and resetfunctions shown in the INFO menuand SETUP menu.
Info menuThis control displays the followingcontrol displays:
• Trip Odometer A or B
• Distance to Empty
• Average Fuel Economy
• Instantaneous Fuel Economy
• Blank (odometer off)
Odometer/Trip odometer
Refer to Gauges in the Instrument Cluster chapter.
2008 Escape (204)Owners Guide (post-2002-fmt)USA (fus)
Driver Controls
66

Distance to empty (DTE)Selecting this function from theINFO menu will give you anestimate of how far you can drivewith the fuel remaining in your tankunder normal driving conditions.Remember to turn the ignition OFFwhen refueling your vehicle. Otherwise, the display will not show theaddition of fuel for a few miles (kilometers). DTE will vary according toyour driving habits.
Average fuel economy (AFE)Select this function from the INFOmenu to display your average fueleconomy in miles/gallon orliters/100 km.
If you calculate your average fueleconomy by dividing miles traveled by gallons of fuel used (liters of fuelby used 100 kilometers traveled), your figure may be different thandisplayed for the following reasons:
• your vehicle was not perfectly level during fill-up
• differences in the automatic shut-off points on the fuel pumps atservice stations
• variations in top-off procedure from one fill-up to another
• rounding off the displayed values to the nearest 0.1 gallon (liter)
1. Drive the vehicle at least 8 km (5 miles) with the speed controlsystem engaged to display a stabilized average.
2. Record the highway fuel economy for future reference.
It is important to press the RESET control after setting the speedcontrol to get accurate highway fuel economy readings.
Instantaneous fuel economySelect this function from the INFOmenu to display your instantaneousfuel economy. This will display yourfuel economy as a Bar Graphranging from poor economyto excellent economy.
2008 Escape (204)Owners Guide (post-2002-fmt)USA (fus)
Driver Controls
67

Your vehicle must be moving to calculate instantaneous fuel economy.When your vehicle is not moving, this function shows , one or no barsilluminated. Instantaneous fuel economy cannot be reset.
Setup menuPress this control for the followingdisplays:
• Reset to English (if in anotherlanguage)
• System Check• Oil Life• Units (English/Metric)• Autolamp Delay (if equipped)• Autolock (if equipped)• Autounlock (if equipped)• Language
Reset to English (if in another language)When entering the SETUP MENUand a non-English language hasbeen selected, “PRESS RESET FORENGLISH” will be displayed tochange back to English.
Press the RESET control to change back to English.
System checkSelecting this function from theSETUP menu causes the messagecenter to cycle through each of thesystems being monitored. For eachof the monitored systems, themessage center will indicate eitheran OK message or a warning message for three seconds.
Pressing the RESET control cycles the message center through each ofthe systems being monitored.
The sequence of the system check report is as follows:
1. Oil life
2. Brake system
2008 Escape (204)Owners Guide (post-2002-fmt)USA (fus)
Driver Controls
68
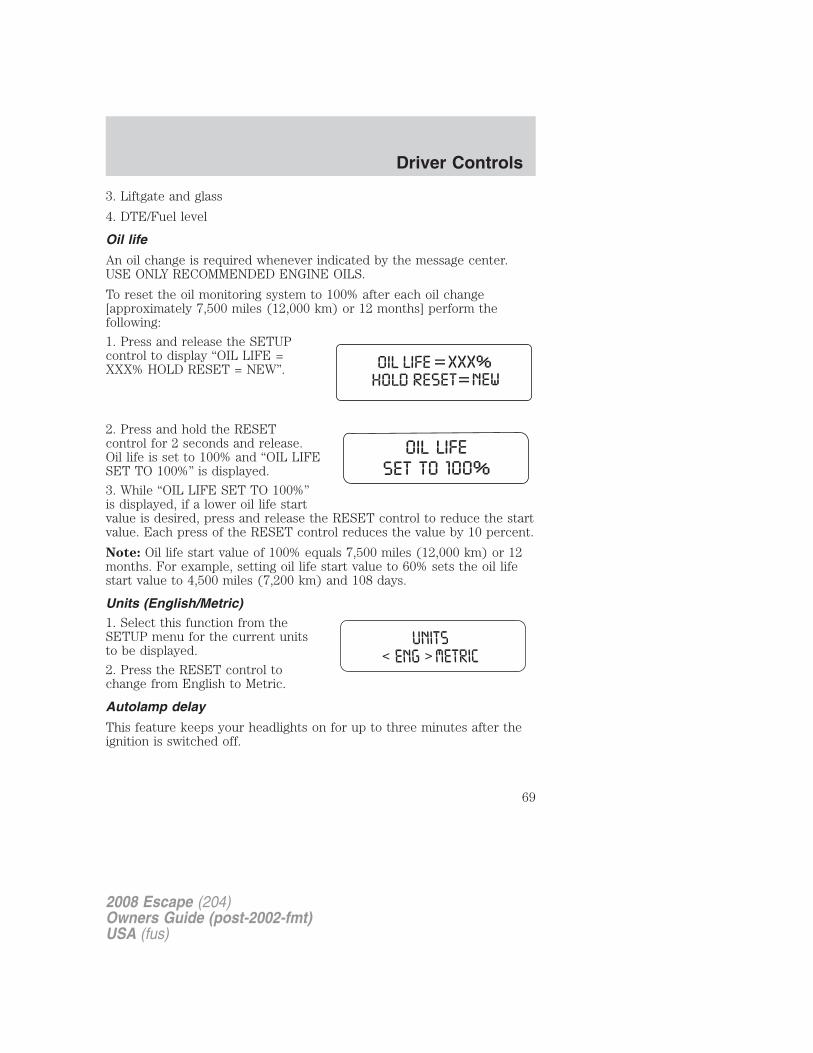
3. Liftgate and glass
4. DTE/Fuel level
Oil life
An oil change is required whenever indicated by the message center.USE ONLY RECOMMENDED ENGINE OILS.
To reset the oil monitoring system to 100% after each oil change[approximately 7,500 miles (12,000 km) or 12 months] perform thefollowing:
1. Press and release the SETUPcontrol to display “OIL LIFE =XXX% HOLD RESET = NEW”.
2. Press and hold the RESETcontrol for 2 seconds and release.Oil life is set to 100% and “OIL LIFESET TO 100%” is displayed.
3. While “OIL LIFE SET TO 100%”is displayed, if a lower oil life startvalue is desired, press and release the RESET control to reduce the startvalue. Each press of the RESET control reduces the value by 10 percent.
Note: Oil life start value of 100% equals 7,500 miles (12,000 km) or 12months. For example, setting oil life start value to 60% sets the oil lifestart value to 4,500 miles (7,200 km) and 108 days.
Units (English/Metric)1. Select this function from theSETUP menu for the current unitsto be displayed.
2. Press the RESET control tochange from English to Metric.
Autolamp delay
This feature keeps your headlights on for up to three minutes after theignition is switched off.
2008 Escape (204)Owners Guide (post-2002-fmt)USA (fus)
Driver Controls
69
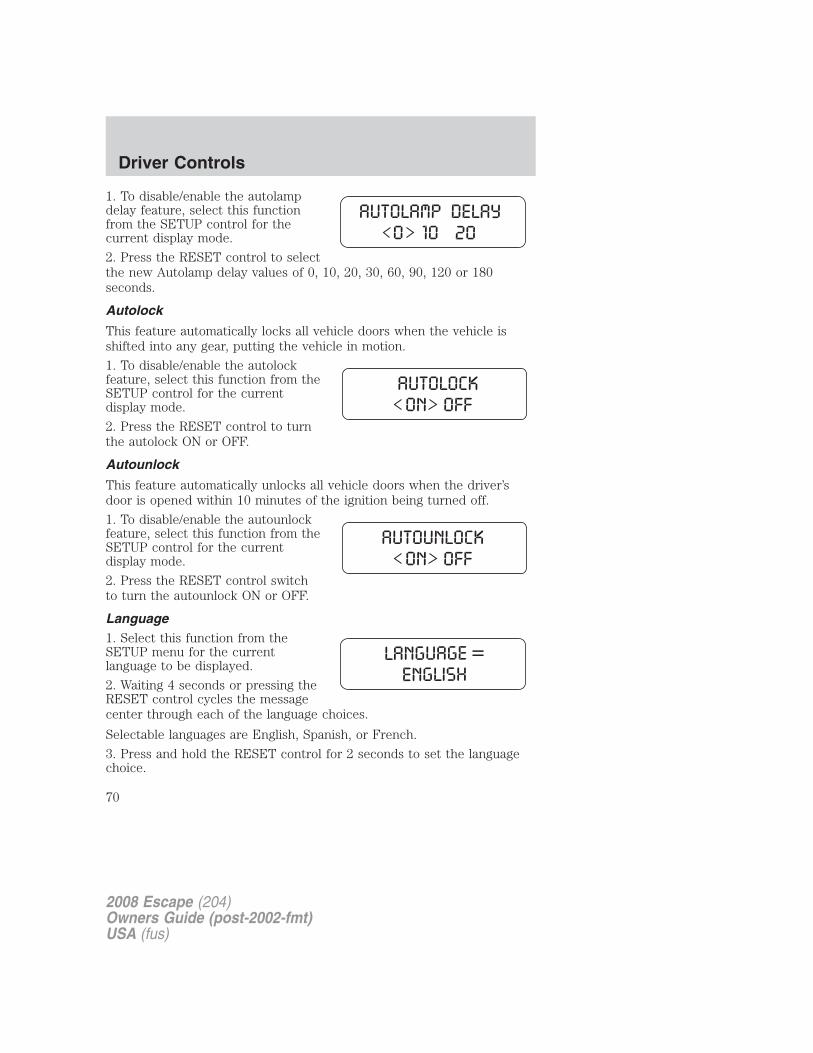
1. To disable/enable the autolampdelay feature, select this functionfrom the SETUP control for thecurrent display mode.
2. Press the RESET control to selectthe new Autolamp delay values of 0, 10, 20, 30, 60, 90, 120 or 180seconds.
Autolock
This feature automatically locks all vehicle doors when the vehicle isshifted into any gear, putting the vehicle in motion.
1. To disable/enable the autolockfeature, select this function from theSETUP control for the currentdisplay mode.
2. Press the RESET control to turnthe autolock ON or OFF.
Autounlock
This feature automatically unlocks all vehicle doors when the driver’sdoor is opened within 10 minutes of the ignition being turned off.
1. To disable/enable the autounlockfeature, select this function from theSETUP control for the currentdisplay mode.
2. Press the RESET control switchto turn the autounlock ON or OFF.
Language1. Select this function from theSETUP menu for the currentlanguage to be displayed.
2. Waiting 4 seconds or pressing theRESET control cycles the messagecenter through each of the language choices.
Selectable languages are English, Spanish, or French.
3. Press and hold the RESET control for 2 seconds to set the languagechoice.
2008 Escape (204)Owners Guide (post-2002-fmt)USA (fus)
Driver Controls
70

System warningsSystem warnings alert you to possible problems or malfunctions in yourvehicle’s operating systems.In the event of a multiple warning situation, the message center willcycle the display to show all warnings by displaying each one for fourseconds.The message center will display the last selected feature if there are nomore warning messages. This allows you to use the full functionality ofthe message center after you acknowledge the warning by pressing theRESET control and clearing the warning message.Warning messages that have been reset are divided into two categories:• They will reappear on the display ten minutes from the reset.• They will not reappear until an ignition OFF-ON cycle has been
completed.This acts as a reminder that these warning conditions still exist withinthe vehicle.
Warnings Status
Driver door ajar Warning cannot be resetPassenger door ajarRear left door ajarRear right door ajarPark brake engaged Warning returns after 10 minutes if
condition still existsXXX miles (km) to empty fuellevel lowLiftgate/Glass ajar Warning returns after the ignition key
is turned from OFF to RUN.Service brake systemLow brake fluidLow tire pressureTire pressure monitor faultTire pressure sensor faultXX% oil life change soonOil change required
DRIVER DOOR AJAR. Displayed when the driver door is notcompletely closed.
PASSENGER DOOR AJAR. Displayed when the passenger door is notcompletely closed.
2008 Escape (204)Owners Guide (post-2002-fmt)USA (fus)
Driver Controls
71
REAR LEFT DOOR AJAR. Displayed when the rear left door is notcompletely closed.
REAR RIGHT DOOR AJAR. Displayed when the rear right door is notcompletely closed.
PARK BRAKE ENGAGED. Displayed when the manual park brake isset, the engine is running and the vehicle is driven more than 3 mph(5 km). If the warning stays on after the park brake is released, contactyour authorized dealer as soon as possible.
XXX MILES TO EMPTY FUEL LEVEL LOW. Displayed as an earlyreminder of a low fuel condition.
LIFTGATE/GLASS AJAR. Displayed when the liftgate or liftgate glassis not completely closed. Press RESET to reset display.
SERVICE BRAKE SYSTEM. Displayed when the braking system is notoperating properly. If the warning stays on or continues to come on,contact your authorized dealer as soon as possible.
LOW BRAKE FLUID. Indicates the brake fluid level is low and thebrake system should be inspected immediately. Refer to Brake fluid
reservoir in the Maintenance and Specifications chapter.
LOW TIRE PRESSURE. Displayed when one or more tires on yourvehicle have low tire pressure. Refer to Inflating Your Tires in theTires, Wheels and Loading chapter.
TIRE PRESSURE MONITOR FAULT. Displayed when the TirePressure Monitoring System is malfunctioning. If the warning stays on orcontinues to come on, have the system inspected by your authorizeddealer.
TIRE PRESSURE SENSOR FAULT. Displayed when a tire pressuresensor is malfunctioning, or your spare tire is in use. For moreinformation on how the system operates under these conditions, refer toUnderstanding Your Tire Pressure Monitoring System in the Tires,Wheels and Loading chapter. If the warning stays on or continues tocome on, have the system inspected by your authorized dealer
XX% OIL LIFE CHANGE SOON/OIL CHANGE REQUIRED.Displayed when the engine oil life remaining is 10% or less. When oil lifeleft is between 10% and 0%, the XX% OIL LIFE CHANGE SOONmessage will be displayed. When oil life left reaches 0%, the OILCHANGE REQUIRED message will be displayed.
2008 Escape (204)Owners Guide (post-2002-fmt)USA (fus)
Driver Controls
72

LIFTGATE• To open the liftgate window,
unlock the liftgate (with thepower door locks or the remoteentry) and push the right sidecontrol button under the licenseplate lamp shield.
• To open the liftgate, unlock theliftgate (with the power doorlocks or the remote entry) andpush the middle control buttonunder the license plate lampshield.
To lock the liftgate and the liftgate window, use the power door locks.
Do not open the liftgate or liftgate glass in a garage or other enclosedarea with a low ceiling. If the liftgate glass is raised and the liftgate isalso opened, both liftgate and glass could be damaged against a lowceiling.
Do not leave the liftgate or liftgate glass open while driving. Doing socould cause serious damage to the liftgate and its components as well asallowing carbon monoxide to enter the vehicle.
Make sure that the liftgate door and/or window are closed toprevent exhaust fumes from being drawn into the vehicle.
Exhaust fumes contain carbon monoxide which can injure your lungsand cause drowsiness and even death. This will also preventpassengers and cargo from falling out. If you must drive with theliftgate door or window open, keep the vents open so outside air comesinto the vehicle.
CARGO AREA FEATURES
Cargo shade (if equipped)
If your vehicle has a cargo shade, you can use it to cover items in thecargo area of your vehicle.
2008 Escape (204)Owners Guide (post-2002-fmt)USA (fus)
Driver Controls
73

To install the shade:
• Insert the ends of the cargoshade into the mounting featureslocated behind the rear seat onthe rear trim panels.
To operate the shade:
1. Grasp the rear edge of the cargoshade and pull rearward.
2. Secure both ends of the supportrod into the retention slots locatedon the rear quarter trim panels.
Ensure that the posts are properly latched in mounting features.The cover may cause injury in a sudden stop or accident if it is
not securely installed.
Do not place any objects on the cargo area shade. They mayobstruct your vision or strike occupants of vehicle in the case of
a sudden stop or collision.
Cargo management system (if equipped)The cargo management system consists of two storage compartmentslocated in the floor of the rear cargo area.
1. The larger, rearward,compartment is for customerstorage.• To open, lift the lid with the pulllatch. The lid can be removed toallow for flexible storage.• To close, lower the lid and pressdown at the latch area until youhear the latch engage. A pad lock orcombination lock can be applied touse the lockable storage feature onthe large customer storage bin.
2008 Escape (204)Owners Guide (post-2002-fmt)USA (fus)
Driver Controls
74

2. The smaller compartment contains the jack kit. There is also extrastorage space for customer use. The lid on the small compartment isaccessible and secured by two snap features.
This storage compartment is not designed to restrain objectsduring a collision with the lid removed.
LUGGAGE RACKYour vehicle is equipped with a roofrack. The maximum load for theroof rack is 100 lbs (44 kg), evenlydistributed on the cross-bars. If it isnot possible to evenly distribute theload, position it in the center or asfar forward on the cross-bars aspossible.
Do not use the vehicle’s doorhandles as tie down loops. Usethe tie-down loops on thethumbwheels to secure load.
To adjust the cross-bar (if equipped) position:1. Loosen the thumbwheel at bothends of the cross-bar (bothcross-bars are adjustable).
2. Slide the cross-bar to the desiredlocation.
3. Tighten the thumbwheel at bothends of the cross-bar.
To remove the cross-bar assembly (if equipped) from the roof rackside rails:1. Loosen the thumbwheel at bothends of the cross-bar (bothcross-bars are adjustable).
2008 Escape (204)Owners Guide (post-2002-fmt)USA (fus)
Driver Controls
75

2. Slide the cross-bar to the end ofthe rail.
3. Use a long, flat object to depressthe tongue in the endcaps on bothsides of the cross-bar.
4. Slide the cross-bar assembly offthe end of the rail.
To reinstall the cross-bar assembly (if equipped) to the roof rackside rails:1. Ensure that both cross-barassemblies are installed with the F(front) arrow facing towards thefront of the vehicle.
2. Use a long, flat object to depressthe tongue in the endcaps on bothsides of the cross-bar.
3. Slide the cross-bar assembliesover the end cap tongue and intothe side rails.
2008 Escape (204)Owners Guide (post-2002-fmt)USA (fus)
Driver Controls
76

4. Tighten thumbwheel at both endsof the cross-bar.
2008 Escape (204)Owners Guide (post-2002-fmt)USA (fus)
Driver Controls
77

KEYSYour vehicle is equipped with twoIntegrated Keyhead Transmitters(IKTs). The IKT functions as both aprogrammed ignition key thatoperates all the locks and starts thevehicle, and a remote keyless entrytransmitter.
Your IKTs are programmed to your vehicle; using a non-programmed keywill not permit your vehicle to start. If you lose your authorized dealersupplied IKTs, replacement IKTs are available through your authorizeddealer. Standard SecuriLock� keys without remote entry transmitterfunctionality can also be purchased from your authorized dealer ifdesired.
Always carry a spare key with you in case of an emergency.
For more information regarding programming replacement IKTs, refer tothe SecuriLock� passive anti-theft system section later in this chapter.
Note: Your vehicle’s IKTs wereissued with an adhesive securitylabel on them that providesimportant vehicle key cutinformation. It is recommended thatyou maintain the label in a safeplace for future reference, such asthe inside front cover of thisOwner’s Guide.
2008 Escape (204)Owners Guide (post-2002-fmt)USA (fus)
Locks and Security
78

RECOMMENDED HANDLING OF THE INTEGRATED KEYHEADTRANSMITTER (IKT)
To avoid inadvertently activating the remote entry functions of yourvehicle, it is recommended that the Integrated Keyhead Transmitter(IKT) be handled properly when starting and turning off your vehicle.
When inserting the IKT into theignition cylinder, place your thumbon the center thumb rest of the IKTand forefinger on the logo badge onthe opposite side.
To gain more leverage when rotatingthe IKT in the ignition lock cylinder,you can readjust the location ofyour thumb to grasp the IKT on theouter edge next to the control.
Likewise, when rotating the IKT tothe 1 (LOCK) position in theignition lock cylinder, the bottomedge of the IKT adjacent to thecontrol can be utilized.
2008 Escape (204)Owners Guide (post-2002-fmt)USA (fus)
Locks and Security
79

POWER DOOR LOCKS
• Press the control to unlock alldoors.
• Press the control to lock alldoors.
Door key unlocking/locking
Unlocking the doorsTurn the key in the door cylinder to unlock the driver’s door only. Allother doors will remain locked.
Locking the doorsTurn the key in the door cylinder to lock the driver’s door only.
AutolockThe autolock feature will lock all the doors, liftgate and liftgate windowwhen:
• all doors are closed,
• the ignition is in the 3 (ON) position,
• you shift into any gear putting the vehicle in motion, and
• the vehicle attains a speed greater than 12 mph (20 km/h).
The autolock feature repeats when:
• any door is opened then closed while the ignition is in the 3 (ON)position and the vehicle speed is 9 mph (15 km/h) or lower, and
• the vehicle attains a speed greater than 12 mph (20 km/h).
Deactivating/activating autolockYour vehicle comes with the autolock feature enabled. There are fourmethods to enable/disable this feature:
• Through your authorized dealer, or
• Performing the power door lock control procedure, or
• Performing the keyless entry key pad (if equipped) procedure, or
• Performing the message center (if equipped) procedure.
2008 Escape (204)Owners Guide (post-2002-fmt)USA (fus)
Locks and Security
80

Note: The autolock feature can be activated/deactivated independentlyof the autounlock feature.Before following the activation or deactivation procedures, make surethat the anti-theft system is not armed, ignition is in the 1 (OFF/LOCK)position, and all vehicle doors, liftgate and liftgate window are closed.
Power door unlock/lock procedureYou must complete Steps 1-5 within30 seconds or the procedure willhave to be repeated. If theprocedure needs to be repeated,you must wait 30 seconds. Note:All doors must be closed andremain closed throughout theconfiguration process.1. The ignition must be off to begin sequence.
2. Turn the ignition to the 3 (ON) position.
3. Press the power door unlock control three times.
4. Turn the ignition from the 3 (ON) to the 1 (OFF/LOCK) position.
5. Press the power door unlock control three times.
6. Turn the ignition back to the 3 (ON) position. The horn will chirp.
7. Press the unlock control, then press the lock control. The horn willchirp once if autolock was deactivated or twice (one short and one longchirp) if autolock was activated.
8. Turn the ignition to the 1 (OFF/LOCK) position. The horn will chirponce to confirm the procedure is complete.
Keyless entry key pad procedure1. Turn the ignition to the 1 (OFF/LOCK) position.
2. Close all doors, the liftgate and liftgate window.
3. Enter 5–digit entry code
4. Press and hold the 3 • 4. While holding the 3 • 4 press the 7 • 8.
5. Release the 7 • 8.
6. Release the 3 • 4.
The user should receive a horn chirp to indicate the system has beendisabled or a chirp followed by a honk to indicate the system has beenenabled.
2008 Escape (204)Owners Guide (post-2002-fmt)USA (fus)
Locks and Security
81
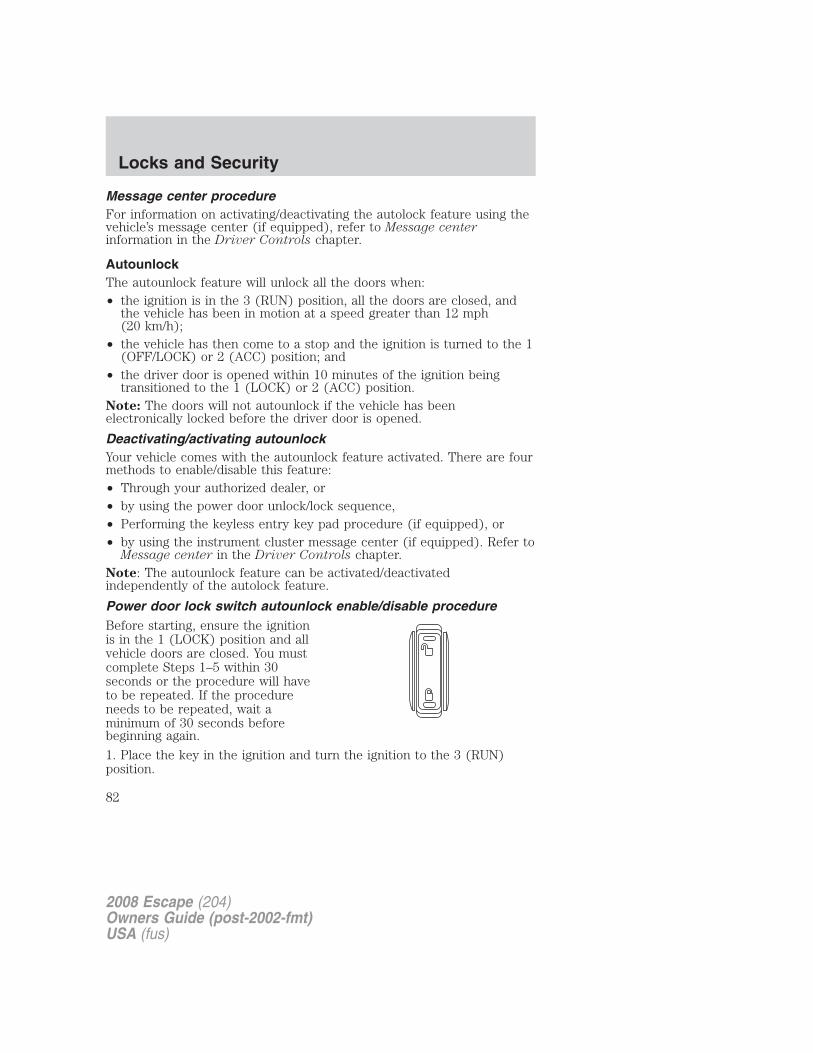
Message center procedureFor information on activating/deactivating the autolock feature using thevehicle’s message center (if equipped), refer to Message centerinformation in the Driver Controls chapter.
AutounlockThe autounlock feature will unlock all the doors when:• the ignition is in the 3 (RUN) position, all the doors are closed, and
the vehicle has been in motion at a speed greater than 12 mph(20 km/h);
• the vehicle has then come to a stop and the ignition is turned to the 1(OFF/LOCK) or 2 (ACC) position; and
• the driver door is opened within 10 minutes of the ignition beingtransitioned to the 1 (LOCK) or 2 (ACC) position.
Note: The doors will not autounlock if the vehicle has beenelectronically locked before the driver door is opened.
Deactivating/activating autounlockYour vehicle comes with the autounlock feature activated. There are fourmethods to enable/disable this feature:• Through your authorized dealer, or• by using the power door unlock/lock sequence,• Performing the keyless entry key pad procedure (if equipped), or• by using the instrument cluster message center (if equipped). Refer to
Message center in the Driver Controls chapter.Note: The autounlock feature can be activated/deactivatedindependently of the autolock feature.
Power door lock switch autounlock enable/disable procedureBefore starting, ensure the ignitionis in the 1 (LOCK) position and allvehicle doors are closed. You mustcomplete Steps 1–5 within 30seconds or the procedure will haveto be repeated. If the procedureneeds to be repeated, wait aminimum of 30 seconds beforebeginning again.
1. Place the key in the ignition and turn the ignition to the 3 (RUN)position.
2008 Escape (204)Owners Guide (post-2002-fmt)USA (fus)
Locks and Security
82

2. Press the power door unlock control on the door panel three times.
3. Turn the ignition from the 3 (RUN) position to the 1 (LOCK) position.
4. Press the power door unlock control on the door panel three times.
5. Turn the ignition back to the 3 (RUN) position. The horn will chirpone time to confirm programming mode has been entered and is active.
6. To enable/disable the autounlock feature, press the lock control, thenpress the unlock control. The horn will chirp once if autounlock wasdeactivated or twice (one short and one long chirp) if autounlock wasactivated.
7. Turn the ignition to the 1 (LOCK) position. The horn will chirp onceto confirm the procedure is complete.
Keyless entry key pad autounlock enable/disable procedure
1. Turn the ignition to the 1 (LOCK) position.
2. Close all doors.
3. Enter factory–set 5–digit entry code.
4. Press and hold the 3 • 4. While holding the 3 • 4, press and releasethe 7 • 8. While still holding the 3 • 4, press and release the 7 • 8 asecond time.
5. Release the 3 • 4.
The user should receive a horn chirp to indicate the system has beendisabled or a chirp followed by a honk to indicate the system has beenenabled.
Message center procedure
For information on activating/deactivating the autounlock feature usingthe vehicle’s message center (if equipped), refer to Message centerinformation in the Driver Controls chapter.
Smart unlocking feature
The smart unlocking feature helps prevent you from locking yourself outof the vehicle. With the key in any ignition position, the driver’s door willautomatically unlock if it is locked using the power lock control on thedriver’s door panel while the driver’s door is open.
2008 Escape (204)Owners Guide (post-2002-fmt)USA (fus)
Locks and Security
83

CHILDPROOF DOOR LOCKSWhen these locks are set, the reardoors cannot be opened from theinside. The rear doors can beopened from the outside when thedoors are unlocked.
The childproof locks are located onrear edge of each rear door andmust be set separately for eachdoor.
NOTE: Setting the lock for onedoor will not automatically set thelock for both doors so you must seteach child lock on each doorseparately.
Insert the key and turn in the direction of arrow shown on the door toengage the child proof lock. Turn in the opposite direction to disengagechildproof locks.
REMOTE ENTRY SYSTEM (IF EQUIPPED)
The Integrated Keyhead Transmitter (IKT) complies with part 15 of theFCC rules and with RSS-210 of Industry Canada. Operation is subject tothe following two conditions: (1) This device may not cause harmfulinterference, and (2) This device must accept any interference received,including interference that may cause undesired operation.
Changes or modifications not expressly approved by the partyresponsible for compliance could void the user’s authority tooperate the equipment.
2008 Escape (204)Owners Guide (post-2002-fmt)USA (fus)
Locks and Security
84

The typical operating range for yourIKT is approximately 33 feet(10 meters). A decrease inoperating range could be caused by:
• weather conditions,
• nearby radio towers,
• structures around the vehicle, or
• other vehicles parked next toyour vehicle.
The IKT allows you to:
• remotely unlock the vehicledoors.
• remotely lock all the vehicledoors.
• remotely open the power liftgate glass.• activate the personal alarm.• operate the illuminated entry feature.The remote entry lock/unlock feature operates in any ignition positionexcept while the key is held in the 4 (START) position. The panicfeature operates with the key in the 1 (LOCK) position.If there are problems with the remote entry system, make sure to takeALL Integrated Keyhead Transmitters with you to the authorizeddealer in order to aid in troubleshooting the problem.
Two step door unlocking
1. Press and release to unlock the driver’s door. Note: The interiorlamps will illuminate if the control on the overhead lamp is in the DOORposition.
2. Press and release again within three seconds to unlock thepassenger doors, the liftgate and liftgate glass.
One step door unlocking
If the one step door unlocking feature is activated, press and releaseonce to unlock all of the doors, the liftgate and liftgate glass. Note: Theinterior lamps will illuminate (refer to the Illuminated entry featurelater in this section), if the control on the overhead lamp is in the DOORposition.
2008 Escape (204)Owners Guide (post-2002-fmt)USA (fus)
Locks and Security
85
Switching from two step to one step door unlocking
Unlocking can be switched between two step and one step doorunlocking by pressing and holding both and buttonssimultaneously on the remote entry transmitter for approximately 4seconds. The turn signal will flash twice to indicate that the vehicle hasswitched to one step unlocking. Repeat the procedure to switch back totwo step unlocking.
Locking the doors
1. Press and release to lock all the doors. Assuming all vehicle doorsand the liftgate are properly closed, the park/turn lamps will flash once.
2. Press and release again within three seconds to confirm that all thedoors and liftgate are closed and locked. Note: The doors will lock againand the horn will chirp once.
If any of the doors or the hood are not properly closed, the horn willchirp twice and park/turn lamps will not flash when the control ispressed.
Opening the liftgate (if equipped)
Press twice within 3 seconds to open the liftgate glass.
Car finder
Press twice within 3 seconds. The horn will chirp and the turn lampswill flash. It is recommended that this method be used to locate yourvehicle, rather than using the panic alarm.
Sounding a panic alarm
Press and hold for 1.5 seconds to activate the alarm. To deactivatethe feature, press the control again, turn the ignition to the 3 (RUN) or 4(START) position, or wait for the alarm to time out in approximately 3minutes.
Note: The panic alarm will only operate when the ignition is in the 1(LOCK) position.
Replacing the batteryThe Integrated Keyhead Transmitter uses one coin type three-voltlithium battery CR2032 or equivalent.
2008 Escape (204)Owners Guide (post-2002-fmt)USA (fus)
Locks and Security
86

To replace the battery:
1. Twist a thin coin in the slot of theIKT near the key ring in order toremove the battery cover.
2. Do not wipe off any grease on thebattery terminals on the backsurface of the circuit board.
3. Remove the old battery. Note: Please refer to local regulations whendisposing of transmitter batteries.
4. Insert the new battery. Refer to the instructions inside the IKT for thecorrect orientation of the battery. Press the battery down to ensure thatthe battery is fully seated in the battery housing cavity.
5. Snap the battery cover back onto the key.
Note: Replacement of the battery will not cause the IKT to becomedeprogrammed from your vehicle. The IKT should operate normally afterbattery replacement.
Replacing lost Integrated Keyhead Transmitters (IKTs)If you would like to have your Integrated Keyhead Transmittersreprogrammed because you lost one, or would like to buy additionalIKTs, you can either reprogram them yourself, or take all IKTs to yourauthorized dealer for reprogramming.
How to reprogram your Integrated Keyhead Transmitters (IKTs)To program a new Integrated Keyhead Transmitter yourself, refer toProgramming spare keys in the SecuriLock� passive anti-theftsection of this chapter. Note: At least two IKTs are required to performthis procedure yourself.
2008 Escape (204)Owners Guide (post-2002-fmt)USA (fus)
Locks and Security
87

Illuminated entryThe interior lamps and puddle lamps (if equipped) illuminate when theIntegrated Keyhead Transmitter or the keyless entry system keypad isused to unlock the door(s).
The illuminated entry system will turn off the interior lights if:
• the ignition is turned to the 3 (RUN) position, or
• the Integrated Keyhead Transmitter lock control is pressed, or
• the vehicle is locked using the keyless entry keypad (if equipped), or
• after 25 seconds of illumination.
The inside lights will not turn off if:
• they have been turned on with the dimmer control, or
• any door is open.
Perimeter lamps illuminated entryWith the Integrated Keyhead Transmitter system, the following items willilluminate when the (unlock) control on the transmitter is pressed:
• Head lamps
• Park lamps
• Tail lamps
The lamps will automatically turn off:
• if the ignition switch is turned to the 3 (RUN) position, or
• the IKT (lock) control is pressed, or
• after 25 seconds of illumination.
Note: On some vehicles, the perimeter lamps illuminated entry featurewill not activate in daylight conditions.
Deactivating/activating perimeter lamps illuminated entryYou may enable/disable this feature by having your vehicle serviced byyour authorized dealer.
You may also perform the following power door lock sequence toenable/disable the perimeter lamps feature. Note: Before starting, ensurethe ignition is in the 1 (LOCK) position and all vehicle doors are closed.You must complete Steps 1–5 within 30 seconds or the procedure willhave to be repeated. If the procedure needs to be repeated, wait aminimum of 30 seconds before beginning again.
2008 Escape (204)Owners Guide (post-2002-fmt)USA (fus)
Locks and Security
88

1. The ignition must be OFF tobegin the sequence.
2. Place the key in the ignition andturn the ignition to the 3 (RUN)position.
3. Press the power door unlockcontrol on the door panel threetimes.
4. Turn the ignition from the 3(RUN) position to the 1 (LOCK)position.5. Press the power door unlock control on the door panel three times.6. Turn the ignition back to the 3 (RUN) position. The horn will chirpone time to confirm programming mode has been entered and is active.7. Press the power door unlock control twice within 5 seconds.Note: The horn will chirp once to indicate the perimeter lighting featurehas been deactivated. The horn will chirp once and honk once (one shortand one long) to indicate the perimeter lighting feature has beenactivated.8. Turn the ignition to the 1 (LOCK) position to exit the procedure.Note: The horn will chirp once to confirm the procedure is complete.
Illuminated exit• The interior lights will illuminate when the key is removed from the
ignition.The lamps automatically turn off after 25 seconds. The dome and cargolamp controls must not be set to the OFF position for the illuminatedexit system to operate.
KEYLESS ENTRY SYSTEM (IF EQUIPPED)You can use the keyless entry keypad to:• lock or unlock the doors without using a key,• activate or deactivate the Autolock and Autounlock feature if
equipped
• release the liftgate glass,
The keypad can be operated with the factory set 5–digit entry code; thiscode is located on the owner’s wallet card in the glove box and isavailable from your authorized dealer. You can also create your own5–digit personal entry code.
2008 Escape (204)Owners Guide (post-2002-fmt)USA (fus)
Locks and Security
89

When pressing the controls on the keyless entry keypad, press themiddle of the controls to ensure a good activation.
Programming your own personal entry codeTo create your own personal entry code:1. Enter the factory set code.2. Within five seconds press the 1 • 2 on the keypad.
3. Enter your personal 5–digit code.Each number must be enteredwithin five seconds of each other.4. Three unique personal entrycodes can be stored:• Pressing 1 • 2 assigns driver 1 settings.• Pressing 3 • 4 assigns driver 2 settings.• Pressing 5 • 6, 7 • 8, or 9 • 0 assigns Driver 3 settings.
5. The doors will again lock then unlock to confirm that your personalkeycode has been programmed to the module.• Do not use five numbers in sequential order.• The factory set code will work even if you have set your own personal
code.
Erasing personal code1. Enter the factory set 5–digit code.2. Within five seconds, press the 1 • 2 on the keypad and release.3. Press and hold the 1 • 2 for two seconds. This must be done withinfive seconds of completing Step 2.
Your personal code is now erased and only the factory set 5–digit codewill work.
Anti-scan featureIf the wrong code has been entered 7 times (35 consecutive buttonpresses), the keypad will go into an anti-scan mode. This mode disablesthe keypad for one minute and the keypad lamp will flash.
The anti-scan feature will turn off after:• one minute of keypad inactivity,• pressing the UNLOCK control on the remote entry transmitter,• or the ignition position changes.
2008 Escape (204)Owners Guide (post-2002-fmt)USA (fus)
Locks and Security
90

Unlocking and locking the doors and liftgate using keyless entry
To unlock the driver’s door, enter the factory set 5-digit code or yourpersonal code. Each number must be pressed within five seconds of eachother. The interior lamps will illuminate.
To unlock all doors and liftgate, press the 3 • 4 control within fiveseconds.
To lock all doors and liftgate, press the 7 • 8 and the 9 • 0 at thesame time. Note: The driver’s door must be closed. You do not need toenter the keypad code first.
To open the liftglass, press the 5 • 6.
SECURILOCK� PASSIVE ANTI-THEFT SYSTEM
SecuriLock� passive anti-theft system is an engine immobilizationsystem. This system is designed to help prevent the engine from beingstarted unless a coded Integrated Keyhead Transmitter (IKT)
programmed to your vehicle is used. The use of the wrong type ofcoded key may lead to a “no-start” condition.
Your vehicle comes with two coded Integrated Keyhead Transmitters;additional coded IKTs may be purchased from your authorized dealer.Standard SecuriLock� keys without remote entry transmitterfunctionality can also be purchased from your authorized dealer ifdesired. The authorized dealer can program your spare IKTs to yourvehicle or you can program the IKTs yourself. Refer to Programming
spare Integrated Keyhead Transmitters for instructions on how toprogram the coded key.
Note: The SecuriLock� passive anti-theft system is not compatible withnon-Ford aftermarket remote start systems. Use of these systems mayresult in vehicle starting problems and a loss of security protection.
Note: Large metallic objects, electronic devices that are used topurchase gasoline or similar items, or a second coded key on the samekey chain may cause vehicle starting issues. You need to prevent theseobjects from touching the coded IKT while starting the engine. Theseobjects will not cause damage to the coded IKT, but may cause amomentary issue if they are too close to the IKT when starting theengine. If a problem occurs, turn the ignition off, remove all objects onthe key chain away from the coded IKT and restart the engine.
2008 Escape (204)Owners Guide (post-2002-fmt)USA (fus)
Locks and Security
91
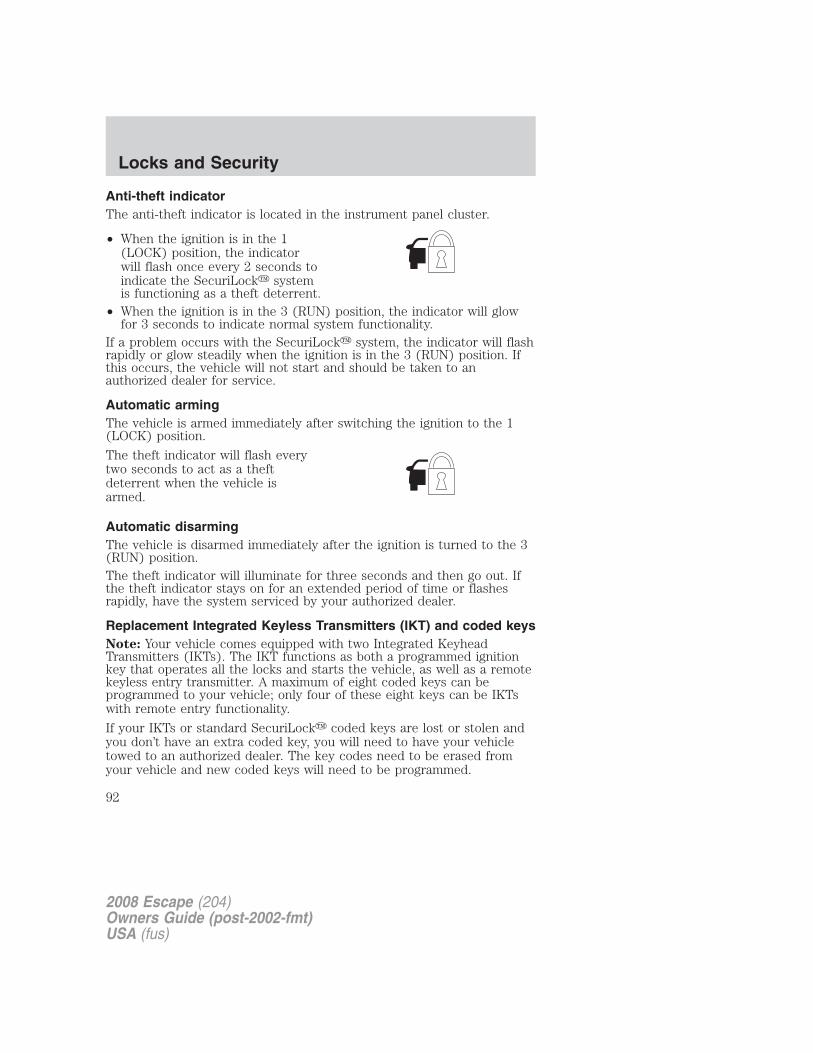
Anti-theft indicatorThe anti-theft indicator is located in the instrument panel cluster.
• When the ignition is in the 1(LOCK) position, the indicatorwill flash once every 2 seconds toindicate the SecuriLock� systemis functioning as a theft deterrent.
• When the ignition is in the 3 (RUN) position, the indicator will glowfor 3 seconds to indicate normal system functionality.
If a problem occurs with the SecuriLock� system, the indicator will flashrapidly or glow steadily when the ignition is in the 3 (RUN) position. Ifthis occurs, the vehicle will not start and should be taken to anauthorized dealer for service.
Automatic armingThe vehicle is armed immediately after switching the ignition to the 1(LOCK) position.
The theft indicator will flash everytwo seconds to act as a theftdeterrent when the vehicle isarmed.
Automatic disarmingThe vehicle is disarmed immediately after the ignition is turned to the 3(RUN) position.The theft indicator will illuminate for three seconds and then go out. Ifthe theft indicator stays on for an extended period of time or flashesrapidly, have the system serviced by your authorized dealer.
Replacement Integrated Keyless Transmitters (IKT) and coded keysNote: Your vehicle comes equipped with two Integrated KeyheadTransmitters (IKTs). The IKT functions as both a programmed ignitionkey that operates all the locks and starts the vehicle, as well as a remotekeyless entry transmitter. A maximum of eight coded keys can beprogrammed to your vehicle; only four of these eight keys can be IKTswith remote entry functionality.
If your IKTs or standard SecuriLock� coded keys are lost or stolen andyou don’t have an extra coded key, you will need to have your vehicletowed to an authorized dealer. The key codes need to be erased fromyour vehicle and new coded keys will need to be programmed.
2008 Escape (204)Owners Guide (post-2002-fmt)USA (fus)
Locks and Security
92

Replacing coded keys can be very costly. Store an extra programmed keyaway from the vehicle in a safe place to help prevent anyinconveniences. Please visit an authorized dealer to purchase additionalspare or replacement keys.
Programming spare keysYou can program your own Integrated Keyhead Transmitters or standardSecuriLock� coded keys to your vehicle. This procedure will programboth the engine immobilizer keycode and the remote entry transmitterportion of the IKT to your vehicle. Note: A maximum of eight codedkeys can be programmed to your vehicle; only four of these eight can beIKTs with remote entry functionality.
Tips:
• Only use Integrated Keyhead Transmitters (IKTs) or standardSecuriLock� keys.
• You must have two previously programmed coded keys (keys thatalready operate your vehicle’s engine) and the new unprogrammedkey(s) readily accessible.
• If two previously programmed coded keys are not available, you musttake your vehicle to your authorized dealer to have the spare key(s)programmed.
Please read and understand theentire procedure before you begin.
1. Insert the first previouslyprogrammed coded key into theignition.
2. Turn the ignition from the 1 (LOCK) position to the 3 (RUN) position.Keep the ignition in the 3 (RUN) position for at least three seconds, butno more than 10 seconds.
3. Turn the ignition to the 1 (LOCK) position and remove the first codedkey from the ignition.
4. Within ten seconds of turning the ignition to the 1 (LOCK) position,insert the second previously coded key into the ignition.
2008 Escape (204)Owners Guide (post-2002-fmt)USA (fus)
Locks and Security
93

5. Turn the ignition from the 1 (LOCK) position to the 3 (RUN) position.Keep the ignition in the 3 (RUN) position for at least three seconds, butno more than 10 seconds.
6. Turn the ignition to the 1 (LOCK) position and remove the secondpreviously programmed coded key from the ignition.
7. Within twenty seconds of turning the ignition to the 1 (LOCK)position and removing the previously programmed coded key, insert thenew unprogrammed key (new key/valet key) into the ignition.
8. Turn the ignition from the 1 (LOCK) position to the 3 (RUN) position.Keep the ignition in the 3 (RUN) position for at least six seconds.
9. Remove the newly programmed coded key from the ignition.
If the key has been successfully programmed it will start the vehicle’sengine and will operate the remote entry system (if the new key is anIntegrated Keyhead Transmitter). The theft indicator light will illuminatefor three seconds and then go out to indicate successful programming.
If the key was not successfully programmed, it will not start yourvehicle’s engine and/or will not operate the remote entry features. Thetheft indicator light may flash on and off. Wait 20 seconds and you mayrepeat Steps 1 through 8. If failure repeats, bring your vehicle to yourauthorized dealer to have the new key(s) programmed.
To program additional new unprogrammed key(s), wait twenty secondsand then repeat this procedure from Step 1.
2008 Escape (204)Owners Guide (post-2002-fmt)USA (fus)
Locks and Security
94

FRONT SEATS
Notes:
Reclining the seatback can cause an occupant to slide under theseat’s safety belt, resulting in severe personal injuries in the
event of a collision.
Do not pile cargo higher than the seatbacks to reduce the risk ofinjury in a collision or sudden stop.
Before returning the seatback to its original position, make surethat cargo or any objects are not trapped behind the seatback.
After returning the seatback to its original position, pull on theseatback to ensure that it has fully latched. An unlatched seat maybecome dangerous in the event of a sudden stop or collision.
Adjustable head restraints
The purpose of these head restraints is to help limit head motion in theevent of a rear collision. To properly adjust your head restraints, lift thehead restraint so that it is located directly behind your head or as closeto that position as possible.
The head restraints can be movedup and down.
2008 Escape (204)Owners Guide (post-2002-fmt)USA (fus)
Seating and Safety Restraints
95
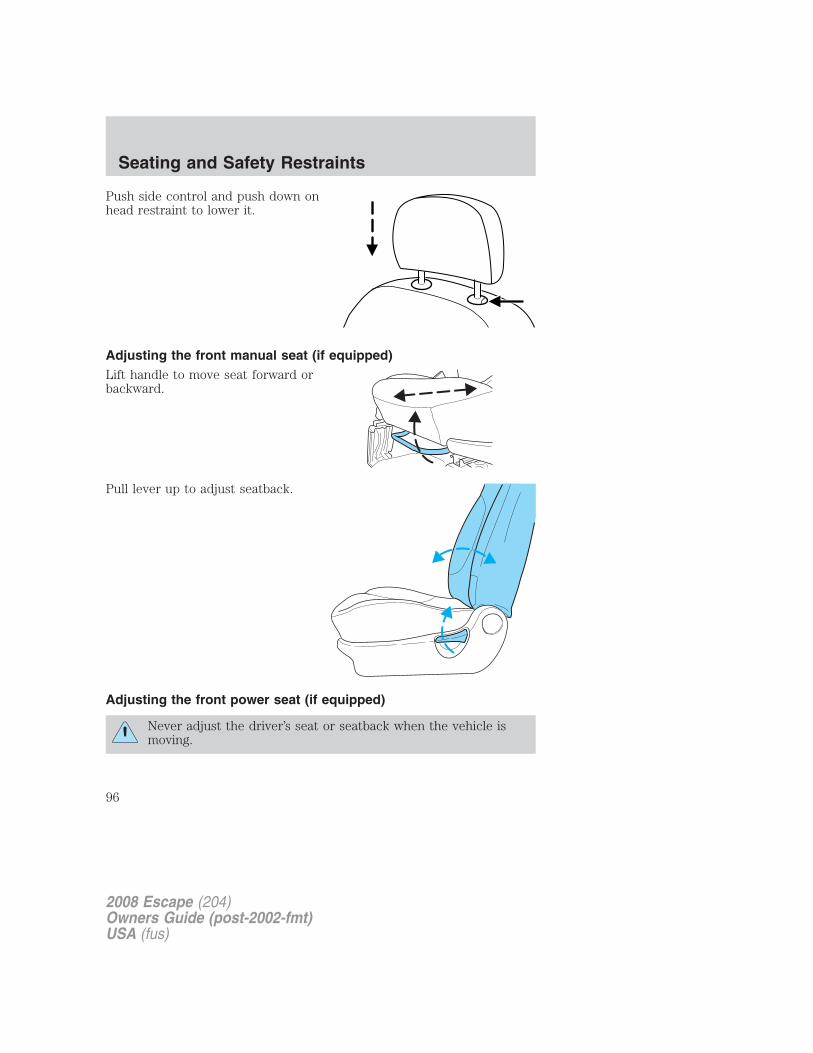
Push side control and push down onhead restraint to lower it.
Adjusting the front manual seat (if equipped)Lift handle to move seat forward orbackward.
Pull lever up to adjust seatback.
Adjusting the front power seat (if equipped)
Never adjust the driver’s seat or seatback when the vehicle ismoving.
2008 Escape (204)Owners Guide (post-2002-fmt)USA (fus)
Seating and Safety Restraints
96
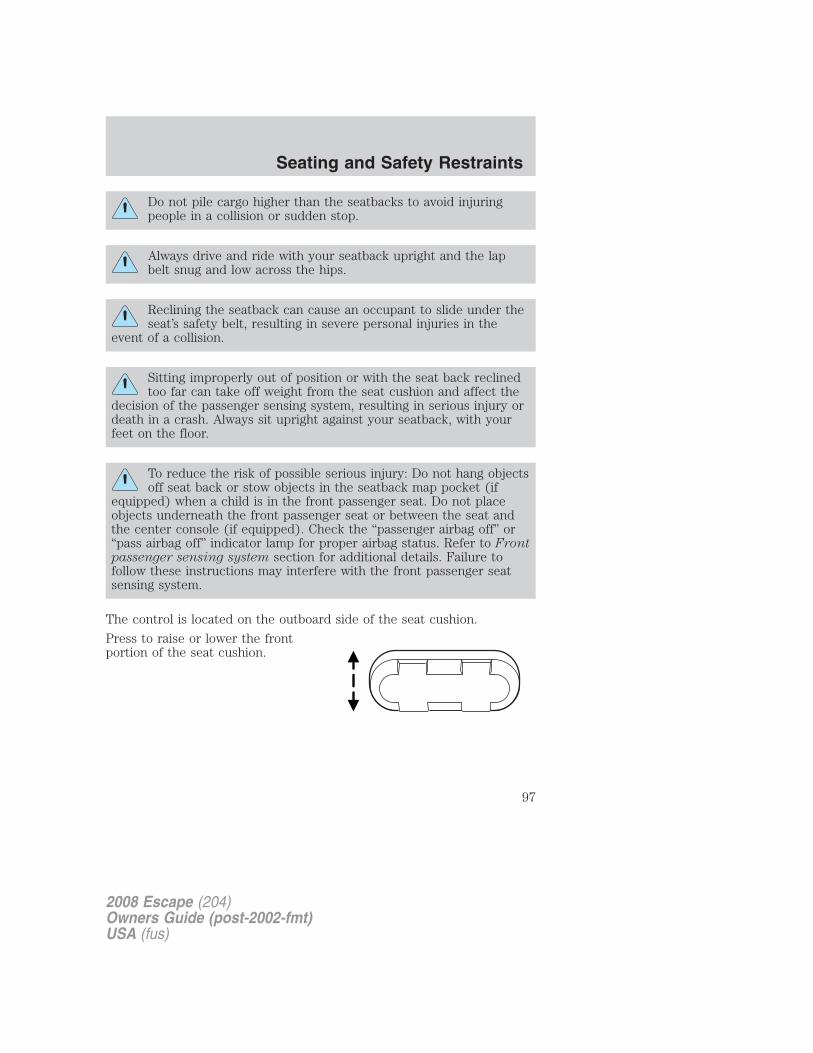
Do not pile cargo higher than the seatbacks to avoid injuringpeople in a collision or sudden stop.
Always drive and ride with your seatback upright and the lapbelt snug and low across the hips.
Reclining the seatback can cause an occupant to slide under theseat’s safety belt, resulting in severe personal injuries in the
event of a collision.
Sitting improperly out of position or with the seat back reclinedtoo far can take off weight from the seat cushion and affect the
decision of the passenger sensing system, resulting in serious injury ordeath in a crash. Always sit upright against your seatback, with yourfeet on the floor.
To reduce the risk of possible serious injury: Do not hang objectsoff seat back or stow objects in the seatback map pocket (if
equipped) when a child is in the front passenger seat. Do not placeobjects underneath the front passenger seat or between the seat andthe center console (if equipped). Check the “passenger airbag off” or“pass airbag off” indicator lamp for proper airbag status. Refer to Frontpassenger sensing system section for additional details. Failure tofollow these instructions may interfere with the front passenger seatsensing system.
The control is located on the outboard side of the seat cushion.
Press to raise or lower the frontportion of the seat cushion.
2008 Escape (204)Owners Guide (post-2002-fmt)USA (fus)
Seating and Safety Restraints
97
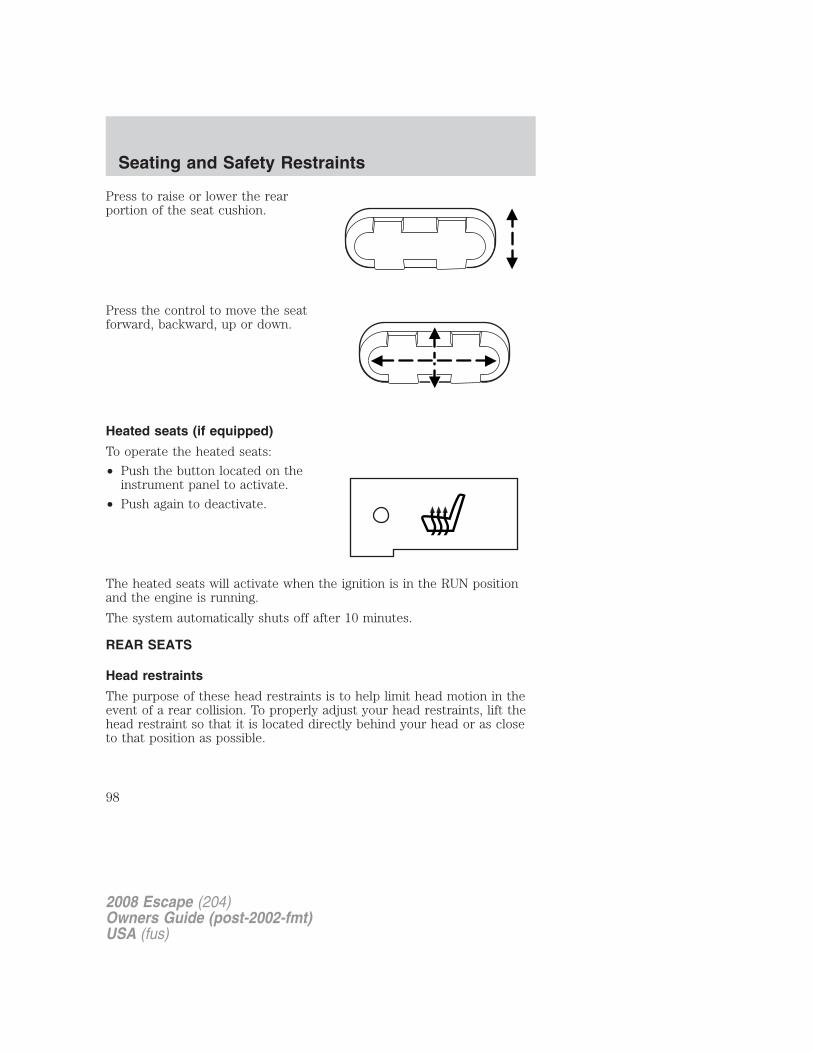
Press to raise or lower the rearportion of the seat cushion.
Press the control to move the seatforward, backward, up or down.
Heated seats (if equipped)
To operate the heated seats:
• Push the button located on theinstrument panel to activate.
• Push again to deactivate.
The heated seats will activate when the ignition is in the RUN positionand the engine is running.
The system automatically shuts off after 10 minutes.
REAR SEATS
Head restraints
The purpose of these head restraints is to help limit head motion in theevent of a rear collision. To properly adjust your head restraints, lift thehead restraint so that it is located directly behind your head or as closeto that position as possible.
2008 Escape (204)Owners Guide (post-2002-fmt)USA (fus)
Seating and Safety Restraints
98

The head restraints can be movedup and down. Lift the head restraintso that it is located directly or asclose as possible behind your head.
Push control to lower or removehead restraint.
Folding down rear seats1. Raise the rear seat head restraintand remove.
2. Place the head restraint underthe front seat for storage.
2008 Escape (204)Owners Guide (post-2002-fmt)USA (fus)
Seating and Safety Restraints
99
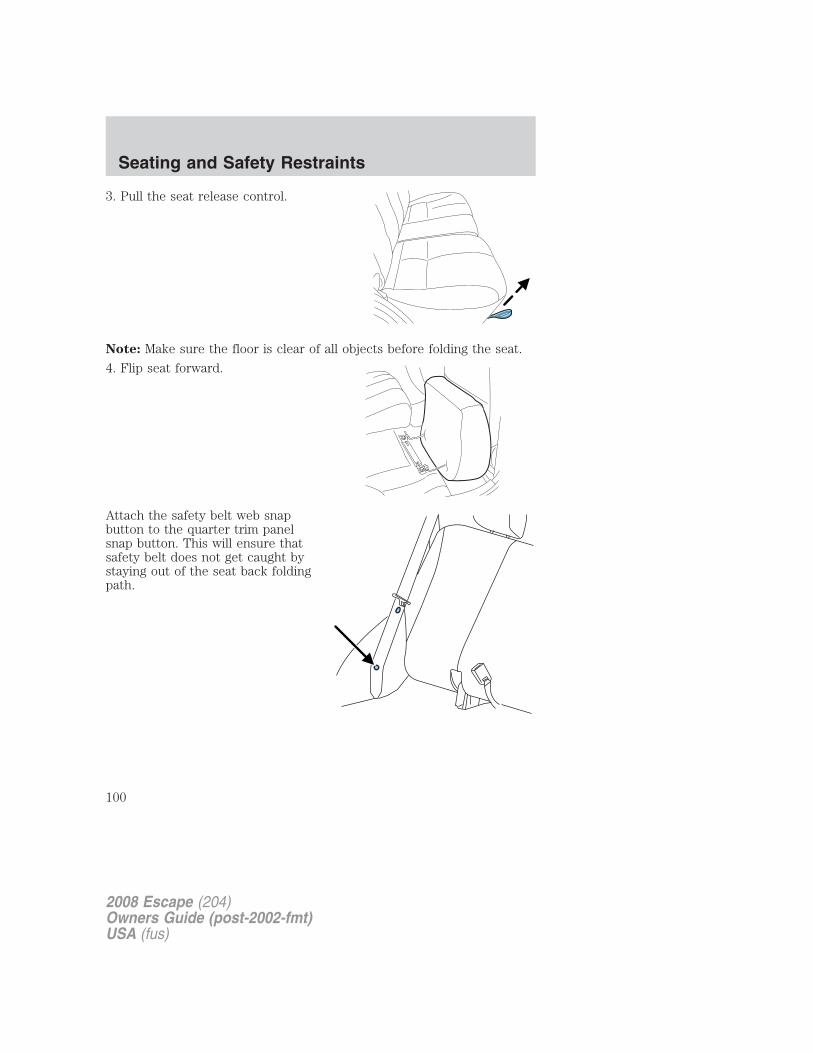
3. Pull the seat release control.
Note: Make sure the floor is clear of all objects before folding the seat.
4. Flip seat forward.
Attach the safety belt web snapbutton to the quarter trim panelsnap button. This will ensure thatsafety belt does not get caught bystaying out of the seat back foldingpath.
2008 Escape (204)Owners Guide (post-2002-fmt)USA (fus)
Seating and Safety Restraints
100
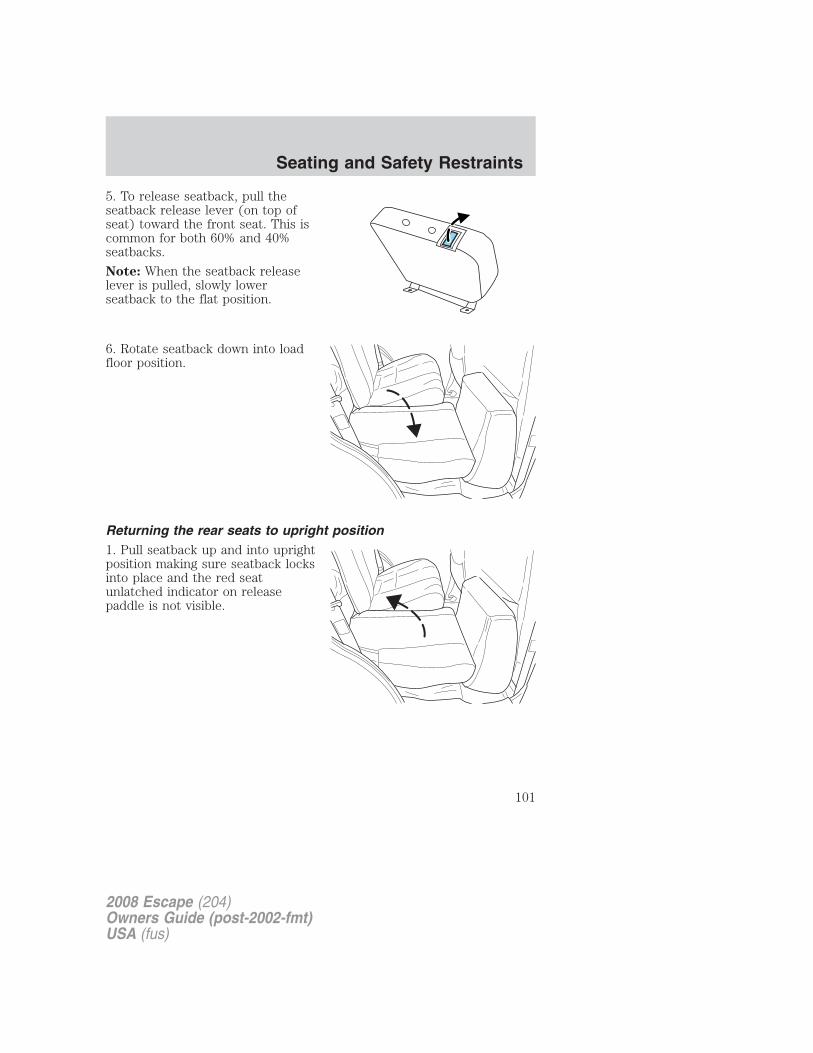
5. To release seatback, pull theseatback release lever (on top ofseat) toward the front seat. This iscommon for both 60% and 40%seatbacks.
Note: When the seatback releaselever is pulled, slowly lowerseatback to the flat position.
6. Rotate seatback down into loadfloor position.
Returning the rear seats to upright position1. Pull seatback up and into uprightposition making sure seatback locksinto place and the red seatunlatched indicator on releasepaddle is not visible.
2008 Escape (204)Owners Guide (post-2002-fmt)USA (fus)
Seating and Safety Restraints
101
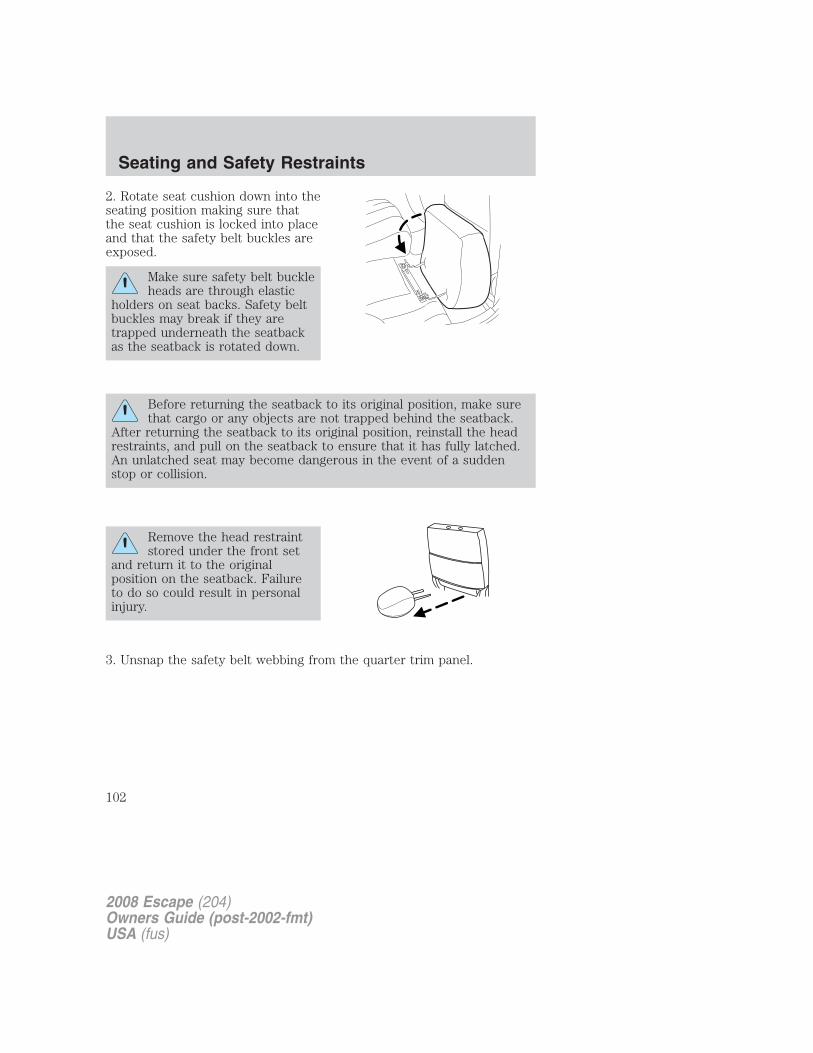
2. Rotate seat cushion down into theseating position making sure thatthe seat cushion is locked into placeand that the safety belt buckles areexposed.
Make sure safety belt buckleheads are through elastic
holders on seat backs. Safety beltbuckles may break if they aretrapped underneath the seatbackas the seatback is rotated down.
Before returning the seatback to its original position, make surethat cargo or any objects are not trapped behind the seatback.
After returning the seatback to its original position, reinstall the headrestraints, and pull on the seatback to ensure that it has fully latched.An unlatched seat may become dangerous in the event of a suddenstop or collision.
Remove the head restraintstored under the front set
and return it to the originalposition on the seatback. Failureto do so could result in personalinjury.
3. Unsnap the safety belt webbing from the quarter trim panel.
2008 Escape (204)Owners Guide (post-2002-fmt)USA (fus)
Seating and Safety Restraints
102

To remove the rear cushion1. Lift the yellow tab to release thehinges.
2. Pull the cushion to the outboardside of the vehicle.
To install the rear cushion1. Push the cushion to the inboardside of the vehicle.
2. Make sure that the hinges arelocked into place.
SAFETY RESTRAINTS
Personal Safety System�
The Personal Safety System� provides an improved overall level offrontal crash protection to front seat occupants and is designed to helpfurther reduce the risk of airbag-related injuries. The system is able toanalyze different occupant conditions and crash severity before activatingthe appropriate safety devices to help better protect a range ofoccupants in a variety of frontal crash situations.
Your vehicle’s Personal Safety System� consists of:
• Driver and passenger dual-stage airbag supplemental restraints.
• Front safety belts with pretensioners, energy management retractors,and safety belt usage sensors.
• Driver’s seat position sensor
• Front passenger sensing system
2008 Escape (204)Owners Guide (post-2002-fmt)USA (fus)
Seating and Safety Restraints
103

• “Passenger airbag off” or “pass airbag off” indicator lamp
• Front crash severity sensor.
• Restraints Control Module (RCM) with impact and safing sensors.
• Restraint system warning light and back-up tone.
• The electrical wiring for the airbags, crash sensor(s), safety beltpretensioners, front safety belt usage sensors, driver seat positionsensor, front passenger sensing system, and indicator lights.
How does the Personal Safety System� work?The Personal Safety System� can adapt the deployment strategy of yourvehicle’s safety devices according to crash severity and occupantconditions. A collection of crash and occupant sensors providesinformation to the Restraints control module (RCM). During a crash, theRCM activates the safety belt pretensioners and/or either one or bothstages of the dual-stage airbag supplemental restraints based on crashseverity and occupant conditions.
The fact that the pretensioners or airbags did not activate for both frontseat occupants in a collision does not mean that something is wrong withthe system. Rather, it means the Personal Safety System� determinedthe accident conditions (crash severity, belt usage, etc.) were notappropriate to activate these safety devices. Front airbags are designedto activate only in frontal and near-frontal collisions (not rollovers, sideimpacts or rear impacts) unless the collision causes sufficientlongitudinal deceleration. The pretensioners are designed to activate infrontal, and in side collisions and rollovers.
Driver and passenger dual-stage airbag supplemental restraintsThe dual-stage airbags offer the capability to tailor the level of airbaginflation energy. A lower, less forceful energy level is provided for morecommon, moderate-severity impacts. A higher energy level is used forthe most severe impacts. Refer to Airbag supplemental restraintssection in this chapter.
Front crash severity sensorThe front crash severity sensor enhances the ability to detect theseverity of an impact. Positioned up front, it provides valuableinformation early in the crash event on the severity of the impact. Thisallows your Personal Safety System� to distinguish between differentlevels of crash severity and modify the deployment strategy of thedual-stage airbags and safety belt pretensioners.
2008 Escape (204)Owners Guide (post-2002-fmt)USA (fus)
Seating and Safety Restraints
104

Driver’s seat position sensorThe driver’s seat position sensor allows your Personal Safety System� totailor the deployment level of the driver dual-stage airbag based on seatposition. The system is designed to help protect smaller drivers sittingclose to the driver airbag by providing a lower airbag output level.
Front passenger sensing systemFor airbags to do their job they must inflate with great force, and thisforce can pose a potentially deadly risk to occupants that are very closeto the airbag when it begins to inflate. For some occupants, like infantsin rear-facing child seats, this occurs because they are initially sittingvery close to the airbag. For other occupants, this occurs when theoccupant is not properly restrained by safety belts or child safety seatsand they move forward during pre-crash braking. The most effective wayto reduce the risk of unnecessary injuries is to make sure all occupantsare properly restrained. Accident statistics suggest that children aremuch safer when properly restrained in the rear seating positions than inthe front.
Air bags can kill or injure a child in a child seat. NEVER place arear-facing child seat in front of an active air bag. If you must
use a forward-facing child seat in the front seat, move the seat all theway back.
Always transport children 12 years old and under in the backseat and always properly use appropriate child restraints.
The front passenger sensing system can automatically turn off thepassenger front airbag. The system is designed to help protect small(child size) occupants from airbag deployments when they areimproperly seated or restrained in the front passenger seat contrary toproper child-seating or restraint usage recommendations. Even with thistechnology, parents are STRONGLY encouraged to always properlyrestrain children in the rear seat. The sensor also turns off the passengerfront airbag and passenger seat-mounted side airbag when the passengerseat is empty.
When the front passenger seat is occupied and the sensing system hasturned off the passenger’s frontal airbag, the “pass airbag off” indicatorwill light and stay lit to remind you that the front passenger frontalairbag is off. See Front passenger sensing system in the airbags sectionof this chapter.
2008 Escape (204)Owners Guide (post-2002-fmt)USA (fus)
Seating and Safety Restraints
105

Front safety belt usage sensorsThe front safety belt usage sensors detect whether or not the driver andfront outboard passenger safety belts are fastened. This informationallows your Personal Safety System� to tailor the airbag deployment andsafety belt pretensioner activation depending upon safety belt usage.Refer to Safety restraints section in this chapter.
Front safety belt pretensionersThe safety belt pretensioners at the front outboard seating positions aredesigned to tighten the safety belts firmly against the occupant’s bodyduring frontal collisions, and in side collisions and rollovers. This helpsincrease the effectiveness of the safety belts. In frontal collisions, thesafety belt pretensioners can be activated alone or, if the collision is ofsufficient severity, together with the front airbags.
Front safety belt energy management retractorsThe front outboard safety belt energy management retractors allowwebbing to be pulled out of the retractor in a gradual and controlledmanner in response to the occupant’s forward momentum. This helpsreduce the risk of force-related injuries to the occupant’s chest bylimiting the load on the occupant. Refer to Energy management featuresection in this chapter.
Determining if the Personal Safety System� is operationalThe Personal Safety System� uses a warning light in the instrumentcluster or a back-up tone to indicate the condition of the system. Referto the Warning light section in the Instrument Cluster chapter.Routine maintenance of the Personal Safety System� is not required.The Restraints control module (RCM) monitors its own internal circuitsand the circuits for the airbag supplemental restraints, crash sensor(s),safety belt pretensioners, front safety belt buckle sensors, driver seatposition sensor, and front passenger sensing system. In addition, theRCM also monitors the restraints warning light in the instrument cluster.A difficulty with the system is indicated by one or more of the following.• The warning light will either flash or stay lit.• The warning light will not illuminate immediately after ignition is
turned on.• A series of five beeps will be heard. The tone pattern will repeat
periodically until the problem and warning light are repaired.
If any of these things happen, even intermittently, have the PersonalSafety System� serviced at an authorized dealer immediately. Unlessserviced, the system may not function properly in the event of acollision.
2008 Escape (204)Owners Guide (post-2002-fmt)USA (fus)
Seating and Safety Restraints
106

Safety restraints precautions
Always drive and ride with your seatback upright and the lapbelt snug and low across the hips.
To reduce the risk of injury, make sure children sit where theycan be properly restrained.
Never let a passenger hold a child on his or her lap while thevehicle is moving. The passenger cannot protect the child from
injury in a collision.
All occupants of the vehicle, including the driver, should alwaysproperly wear their safety belts, even when an airbag
supplemental restraint system (SRS) is provided.
It is extremely dangerous to ride in a cargo area, inside oroutside of a vehicle. In a collision, people riding in these areas
are more likely to be seriously injured or killed. Do not allow people toride in any area of your vehicle that is not equipped with seats andsafety belts. Be sure everyone in your vehicle is in a seat and using asafety belt properly.
In a rollover crash, an unbelted person is significantly more likelyto die than a person wearing a safety belt.
Each seating position in your vehicle has a specific safety beltassembly which is made up of one buckle and one tongue that
are designed to be used as a pair. 1) Use the shoulder belt on theoutside shoulder only. Never wear the shoulder belt under the arm.2) Never swing the safety belt around your neck over the insideshoulder. 3) Never use a single belt for more than one person.
Always transport children 12 years old and under in the backseat and always properly use appropriate child restraints.
2008 Escape (204)Owners Guide (post-2002-fmt)USA (fus)
Seating and Safety Restraints
107

Safety belts and seats can become hot in a vehicle that has beenclosed up in sunny weather; they could burn a small child. Check
seat covers and buckles before you place a child anywhere near them.
Combination lap and shoulder belts1. Insert the belt tongue into theproper buckle (the buckle closest tothe direction the tongue is comingfrom) until you hear a snap and feelit latch. Make sure the tongue issecurely fastened in the buckle.
2. To unfasten, push the releasebutton and remove the tongue fromthe buckle.
Energy Management Feature• This vehicle has a safety belt system with an energy management
feature at the front outboard seating positions to help further reducethe risk of injury in the event of a head-on collision.
• The front outboard safety belt system has a retractor assembly that isdesigned to extend the safety belt webbing in a controlled manner.This helps reduce the belt force acting on the user’s chest.
All safety belts in the vehicle are combination lap and shoulder belts.The passenger safety belts have two types of locking modes describedbelow:Vehicle sensitive modeThis is the normal retractor mode, which allows free shoulder belt lengthadjustment to your movements and locking in response to vehicle
2008 Escape (204)Owners Guide (post-2002-fmt)USA (fus)
Seating and Safety Restraints
108

movement. For example, if the driver brakes suddenly or turns a cornersharply, or the vehicle receives an impact of approximately 5 mph(8 km/h) or more, the combination safety belts will lock to help reduceforward movement of the driver and passengers.
Automatic locking mode
When to use the automatic locking modeIn this mode, the shoulder belt is automatically pre-locked. The belt willstill retract to remove any slack in the shoulder belt. The automaticlocking mode is not available on the driver safety belt.This mode should be used any time a child safety seat, except abooster, is installed in passenger front or rear seating positions. Children12 years old and under should be properly restrained in the rear seatwhenever possible. Refer to Safety restraints for children or Safetyseats for children later in this chapter.
How to use the automatic locking mode• Buckle the combination lap and
shoulder belt.
• Grasp the shoulder portion andpull downward until the entirebelt is pulled out.
• Allow the belt to retract. As the belt retracts, you will hear a clickingsound. This indicates the safety belt is now in the automatic lockingmode.
2008 Escape (204)Owners Guide (post-2002-fmt)USA (fus)
Seating and Safety Restraints
109

How to disengage the automatic locking modeDisconnect the combination lap/shoulder belt and allow it to retractcompletely to disengage the automatic locking mode and activate thevehicle sensitive (emergency) locking mode.
After any vehicle collision, the safety belt systems at all seatingpositions (except the driver position, which doesn’t have this
feature) must be checked by an authorized dealer to verify that theautomatic locking retractor feature for child seats is still functioningproperly. In addition, all safety belts should be checked for properfunction.
BELT AND RETRACTOR ASSEMBLY MUST BE REPLACED ifthe safety belt assembly “automatic locking retractor” feature or
any other safety belt function is not operating properly when checkedby an authorized dealer. Failure to replace the Belt and Retractorassembly could increase the risk of injury in collisions.
Safety belt height adjustmentYour vehicle has safety belt heightadjustments at the front outboardseating positions. Adjust the heightof the shoulder belt so the belt restsacross the middle of your shoulder.
To adjust the shoulder belt height,squeeze and hold the buttons on theside and slide the height adjuster upor down. Release the buttons andpull down on the height adjuster tomake sure it is locked in place.
Position the safety belt height adjusters so that the belt restsacross the middle of your shoulder. Failure to adjust the safety
belt properly could reduce the effectiveness of the safety belt andincrease the risk of injury in a collision.
Safety belt pretensionerYour vehicle is equipped with safety belt pretensioners at the driver andfront passenger seating positions.
2008 Escape (204)Owners Guide (post-2002-fmt)USA (fus)
Seating and Safety Restraints
110

The safety belt pretensioners activate during frontal collisions, and inside collisions and rollovers. A safety belt pretensioner is a device whichtightens the webbing of the lap and shoulder belts in such a way thatthey fit more snugly against the body.
The driver and front passenger safety belt system (includingretractors, buckles and height adjusters) must be replaced if the
vehicle is involved in a collision that results in deployment of frontairbags, seat-mounted side airbags and Safety Canopy�, and safety beltpretensioners.
Failure to replace the safety belt assembly under the aboveconditions could result in severe personal injuries in the event of
a collision.
Safety belt extension assemblyIf the safety belt is too short when fully extended, a 9 inch (23 cm) or12 inch (31 cm) safety belt extension assembly can be added (partnumbers 611C22–A and 611C22–B respectively). These assemblies canbe obtained from an authorized dealer.
Use only extensions manufactured by the same supplier as the safetybelt. Manufacturer identification is located at the end of the webbing onthe label. Also, use the safety belt extension only if the safety belt is tooshort for you when fully extended.
Do not use extensions to change the fit of the shoulder beltacross the torso.
Safety belt maintenanceInspect the safety belt systems periodically to make sure they workproperly and are not damaged. Inspect the safety belts to make surethere are no nicks, tears or cuts. Replace if necessary. All safety beltassemblies, including retractors, buckles, front safety belt buckleassemblies, buckle support assemblies (slide bar-if equipped), shoulderbelt height adjusters (if equipped), shoulder belt guide on seatback (ifequipped), child safety seat LATCH and tether anchors, and attachinghardware, should be inspected after a collision. Ford Motor Companyrecommends that all safety belt assemblies in use in vehicles involved ina collision be replaced. However, if the collision was minor and an
2008 Escape (204)Owners Guide (post-2002-fmt)USA (fus)
Seating and Safety Restraints
111

authorized dealer finds that the belts do not show damage and continueto operate properly, they do not need to be replaced. Safety beltassemblies not in use during a collision should also be inspected andreplaced if either damage or improper operation is noted.
Failure to inspect and if necessary replace the safety beltassembly under the above conditions could result in severe
personal injuries in the event of a collision.
For proper care of soiled safety belts, refer to Interior in the Cleaningchapter.
Safety belt warning light and indicator chime
The safety belt warning light illuminates in the instrument cluster and achime sounds to remind the occupants to fasten their safety belts.
Conditions of operation
If... Then...
The driver’s safety belt is notbuckled before the ignitionswitch is turned to the ONposition...
The safety belt warning lightilluminates 1 minute and the warningchime sounds 6 seconds.
The driver’s safety belt isbuckled while the indicatorlight is illuminated and thewarning chime is sounding...
The safety belt warning light andwarning chime turn off.
The driver’s safety belt isbuckled before the ignitionswitch is turned to the ONposition...
The safety belt warning light andindicator chime remain off.
Belt-Minder�The Belt-Minder� feature is a supplemental warning to the safety beltwarning function. This feature provides additional reminders byintermittently sounding a chime and illuminating the safety belt warninglamp in the instrument cluster when the driver’s and front passenger’ssafety belt is unbuckled.
The Belt-Minder� feature uses information from the front passengersensing system to determine if a front seat passenger is present and
2008 Escape (204)Owners Guide (post-2002-fmt)USA (fus)
Seating and Safety Restraints
112
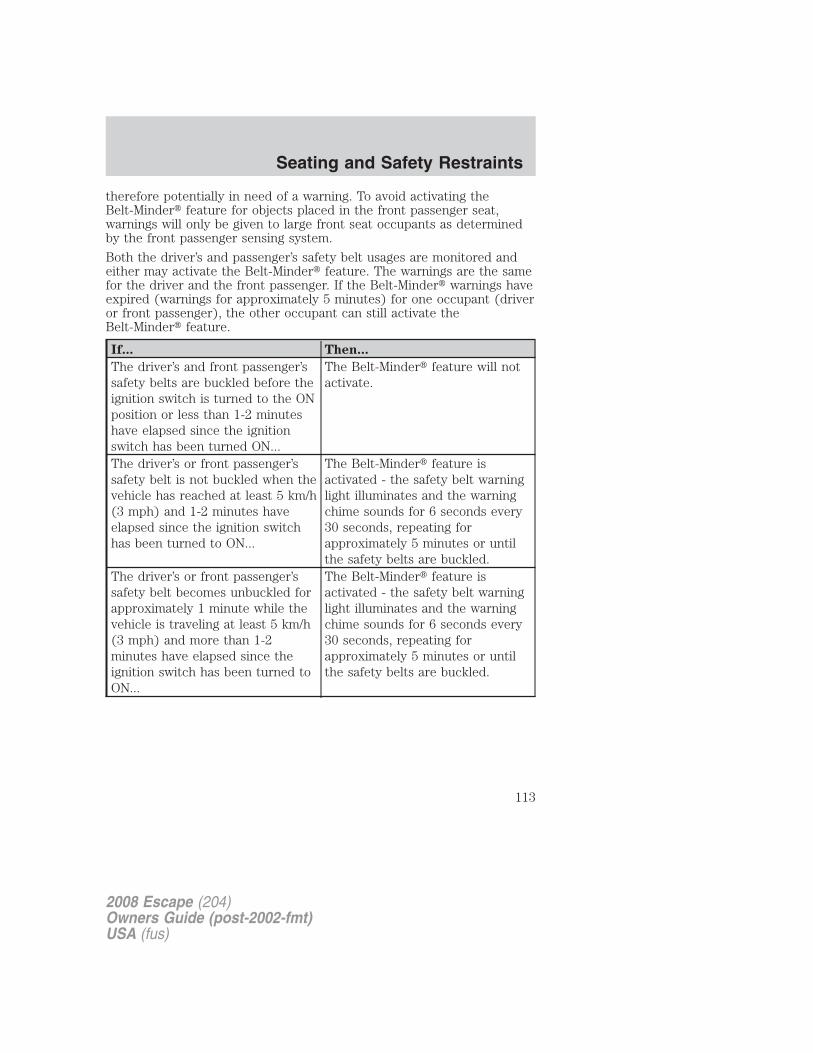
therefore potentially in need of a warning. To avoid activating theBelt-Minder� feature for objects placed in the front passenger seat,warnings will only be given to large front seat occupants as determinedby the front passenger sensing system.
Both the driver’s and passenger’s safety belt usages are monitored andeither may activate the Belt-Minder� feature. The warnings are the samefor the driver and the front passenger. If the Belt-Minder� warnings haveexpired (warnings for approximately 5 minutes) for one occupant (driveror front passenger), the other occupant can still activate theBelt-Minder� feature.
If... Then...
The driver’s and front passenger’ssafety belts are buckled before theignition switch is turned to the ONposition or less than 1-2 minuteshave elapsed since the ignitionswitch has been turned ON...
The Belt-Minder� feature will notactivate.
The driver’s or front passenger’ssafety belt is not buckled when thevehicle has reached at least 5 km/h(3 mph) and 1-2 minutes haveelapsed since the ignition switchhas been turned to ON...
The Belt-Minder� feature isactivated - the safety belt warninglight illuminates and the warningchime sounds for 6 seconds every30 seconds, repeating forapproximately 5 minutes or untilthe safety belts are buckled.
The driver’s or front passenger’ssafety belt becomes unbuckled forapproximately 1 minute while thevehicle is traveling at least 5 km/h(3 mph) and more than 1-2minutes have elapsed since theignition switch has been turned toON...
The Belt-Minder� feature isactivated - the safety belt warninglight illuminates and the warningchime sounds for 6 seconds every30 seconds, repeating forapproximately 5 minutes or untilthe safety belts are buckled.
2008 Escape (204)Owners Guide (post-2002-fmt)USA (fus)
Seating and Safety Restraints
113

The following are reasons most often given for not wearing safety belts(All statistics based on U.S. data):
Reasons given... Consider...
�Crashes are rareevents�
36700 crashes occur every day. The more wedrive, the more we are exposed to �rare� events,even for good drivers. 1 in 4 of us will be
seriously injured in a crash during our
lifetime.
�I’m not going far� 3 of 4 fatal crashes occur within 25 miles of home.�Belts areuncomfortable�
Your Ford safety belts are designed to enhancecomfort. If you are uncomfortable - try differentpositions for the safety belt upper anchorage andseatback which should be as upright as possible;this can improve comfort.
�I was in a hurry� Prime time for an accident. Belt-Minder�reminds us to take a few seconds to buckle up.
�Safety belts don’twork�
Safety belts, when used properly, reduce risk of
death to front seat occupants by 45% in cars,
and by 60% in light trucks.
�Traffic is light� Nearly 1 of 2 deaths occur in single-vehicle
crashes, many when no other vehicles are around.�Belts wrinkle myclothes�
Possibly, but a serious crash can do much morethan wrinkle your clothes, particularly if you areunbelted.
�The people I’mwith don’t wearbelts�
Set the example, teen deaths occur 4 times moreoften in vehicles with TWO or MORE people.Children and younger brothers/sisters imitatebehavior they see.
�I have an airbag� Airbags offer greater protection when used withsafety belts. Frontal airbags are not designed toinflate in rear and side crashes or rollovers.
�I’d rather bethrown clear�
Not a good idea. People who are ejected are 40
times more likely to DIE. Safety belts helpprevent ejection, WE CAN’T �PICK OUR CRASH�.
2008 Escape (204)Owners Guide (post-2002-fmt)USA (fus)
Seating and Safety Restraints
114

Do not sit on top of a buckled safety belt or insert a latchplateinto the buckle to avoid the Belt-Minder� chime. To do so may
adversely affect the performance of the vehicle’s air bag system
One time disableIf at any time the driver/front passenger quickly buckles then unbucklesthe safety belt for that seating position, the Belt-Minder� is disabled forthe current ignition cycle. The Belt-Minder� feature will enable duringthe same ignition cycle if the occupant buckles and remains buckled forapproximately 30 seconds. Confirmation is not given for the one timedisable.
Deactivating/activating the Belt-Minder� featureThe driver and front passenger Belt-Minder� aredeactivated/activated independently. When deactivating/activatingone seating position, do not buckle the other position as this willterminate the process.
Read Steps 1 - 4 thoroughly before proceeding with thedeactivation/activation programming procedure.
The driver and front passenger Belt-Minder� features can bedeactivated/activated by performing the following procedure:Before following the procedure, make sure that:• The parking brake is set• The gearshift is in P (Park) (automatic transmission)• The gearshift is in N (Neutral) (manual transmission)• The ignition switch is in the OFF position
• The driver and front passenger safety belts are unbuckled
While the design allows you to deactivate your Belt-Minder�, thissystem is designed to improve your chances of being safely
belted and surviving an accident. We recommend you leave theBelt-Minder� system activated for yourself and others who may use thevehicle. To reduce the risk of injury, do not deactivate/activate theBelt-Minder� feature while driving the vehicle.
1. Turn the ignition switch to the RUN (or ON) position. (DO NOTSTART THE ENGINE)
2. Wait until the safety belt warning light turns off. (Approximately 1minute)
2008 Escape (204)Owners Guide (post-2002-fmt)USA (fus)
Seating and Safety Restraints
115

• Step 3 must be completed within 50 seconds after the safety beltwarning light turns off.
3. For the seating position being disabled, buckle then unbuckle thesafety belt 9 times, ending in the unbuckled state. (Step 3 must becompleted within 50 seconds after the safety belt warning light turnsoff.)
• After Step 3, the safety belt warning light will be turned on for threeseconds.
4. Within approximately 7 seconds of the light turning off, buckle thenunbuckle the safety belt.
• This will disable the Belt-Minder� feature for that seating position if itis currently enabled. As confirmation, the safety belt warning light willflash 4 times per second for 3 seconds.
• This will enable the Belt-Minder� feature for that seating position if itis currently disabled. As confirmation, the safety belt warning light willflash 4 times per second for 3 seconds, followed by 3 seconds with thelight off, then followed by the safety belt warning light flashing 4 timesper second for 3 seconds again.
• After receiving confirmation, the deactivation/activation procedure iscomplete.
AIRBAG SUPPLEMENTAL RESTRAINT SYSTEM (SRS)
4X4
2008 Escape (204)Owners Guide (post-2002-fmt)USA (fus)
Seating and Safety Restraints
116
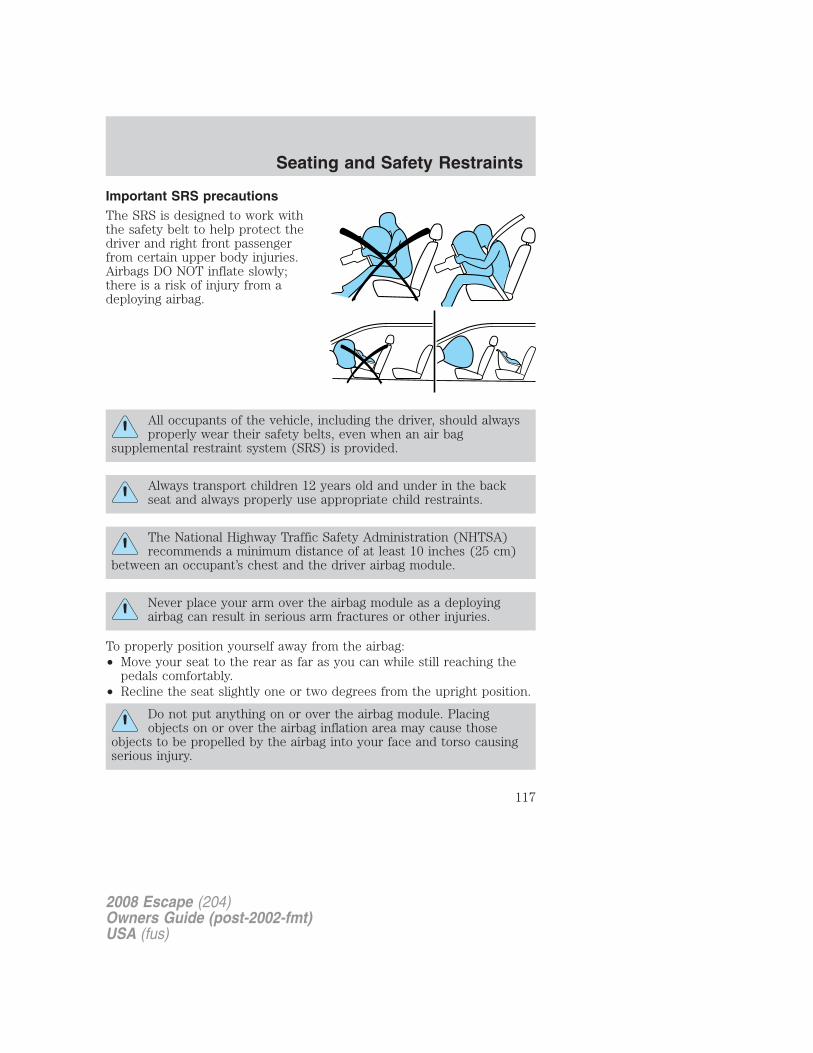
Important SRS precautionsThe SRS is designed to work withthe safety belt to help protect thedriver and right front passengerfrom certain upper body injuries.Airbags DO NOT inflate slowly;there is a risk of injury from adeploying airbag.
All occupants of the vehicle, including the driver, should alwaysproperly wear their safety belts, even when an air bag
supplemental restraint system (SRS) is provided.
Always transport children 12 years old and under in the backseat and always properly use appropriate child restraints.
The National Highway Traffic Safety Administration (NHTSA)recommends a minimum distance of at least 10 inches (25 cm)
between an occupant’s chest and the driver airbag module.
Never place your arm over the airbag module as a deployingairbag can result in serious arm fractures or other injuries.
To properly position yourself away from the airbag:• Move your seat to the rear as far as you can while still reaching the
pedals comfortably.• Recline the seat slightly one or two degrees from the upright position.
Do not put anything on or over the airbag module. Placingobjects on or over the airbag inflation area may cause those
objects to be propelled by the airbag into your face and torso causingserious injury.
2008 Escape (204)Owners Guide (post-2002-fmt)USA (fus)
Seating and Safety Restraints
117

Do not attempt to service, repair, or modify the airbagsupplemental restraint systems or its fuses. See your authorized
dealer.
Modifications to the front end of the vehicle, including frame,bumper, front end body structure, tow hooks and B-pillar
surrounding parts may affect the performance of the airbag sensorsincreasing the risk of injury. Do not modify the front end of thevehicle.
Additional equipment may affect the performance of the airbagsensors increasing the risk of injury. Please refer to the Body
Builders Layout Book for instructions about the appropriateinstallation of additional equipment.
Children and airbagsChildren must always be properlyrestrained. Accident statisticssuggest that children are safer whenproperly restrained in the rearseating positions than in the frontseating position. Failure to followthese instructions may increase therisk of injury in a collision.
Airbags can kill or injure achild in a child seat.
NEVER place a rear-facing childseat in front of an active airbag. Ifyou must use a forward-facingchild seat in the front seat, movethe seat all the way back.
2008 Escape (204)Owners Guide (post-2002-fmt)USA (fus)
Seating and Safety Restraints
118

How does the airbag supplemental restraint system work?The airbag SRS is designed toactivate when the vehicle sustains alongitudinal deceleration sufficientto cause the airbag sensors to closean electrical circuit that initiatesairbag inflation. The fact that theairbags did not inflate in a collisiondoes not mean that something iswrong with the system. Rather, itmeans the forces were not sufficientenough to cause activation. Frontairbags are designed to inflate infrontal and near-frontal collisions, not rollover, side-impact, orrear-impacts unless the collision causes sufficient longitudinaldeceleration.
The airbags inflate and deflaterapidly upon activation. After airbagdeployment, it is normal to notice asmoke-like, powdery residue orsmell the burnt propellant. This mayconsist of cornstarch, talcumpowder or sodium compounds whichmay irritate the skin and eyes, butnone of the residue is toxic.
While the SRS is designed to helpreduce serious injuries, contact witha deploying airbag may also causeabrasions, swelling or temporaryhearing loss. Because airbags mustinflate rapidly and with considerableforce, there is the risk of death orserious injuries such as fractures, facial and eye injuries or internalinjuries, particularly to occupants who are not properly restrained or areotherwise out of position at the time of airbag deployment. It isextremely important that occupants be properly restrained as far awayfrom the airbag module as possible while maintaining vehicle control.
The SRS consists of:
• driver and passenger airbag modules (which include the inflators andairbags).
2008 Escape (204)Owners Guide (post-2002-fmt)USA (fus)
Seating and Safety Restraints
119

• seat-mounted side airbags. Refer to Seat-mounted side airbag systemlater in this chapter
• Safety Canopy� system. Refer to Safety Canopy� system later inthis chapter.
• one or more impact and safing sensors.
• Safety belt pretensioners
• a readiness light and tone.
• diagnostic module.
• and the electrical wiring which connects the components.
• Front passenger sensing system. Refer to Front passenger sensingsystem. later in this chapter.
• “Passenger airbag off” or “pass airbag off” indicator lamp. Refer toFront passenger sensing system later in this chapter.
The RCM (restraints control module) monitors its own internal circuitsand the supplemental airbag electrical system wiring (including theimpact sensors, the system wiring, the airbag system readiness light, theairbag back up power and the airbag ignitors).
Several air bag system components get hot after inflation. Do nottouch them after inflation.
If the airbag has deployed, the airbag will not function againand must be replaced immediately. If the airbag is not
replaced, the unrepaired area will increase the risk of injury in acollision.
Front passenger sensing systemThe front passenger sensing system is designed to meet the regulatoryrequirements of Federal Motor Vehicle Safety Standard (FMVSS) 208and is designed to disable (will not inflate) the front passenger’s frontalairbag under certain conditions.
The front passenger sensing system works with sensors that are part ofthe front passenger’s seat and safety belt. The sensors are designed todetect the presence of a properly seated occupant and determine if thefront passenger’s frontal airbag should be enabled (may inflate) ordisabled (will not inflate).
2008 Escape (204)Owners Guide (post-2002-fmt)USA (fus)
Seating and Safety Restraints
120

The front passenger sensing system will disable (will not inflate) thefront passenger’s frontal airbag if:• the front passenger seat is unoccupied, or has small/medium objects in
the front seat,• the system determines that an infant is present in a rear-facing infant
seat that is installed according to the manufacturer’s instructions,• the system determines that a small child is present in a forward-facing
child restraint that is installed according to the manufacturer’sinstructions,
• the system determines that a small child is present in a booster seat,
• a front passenger takes his/her weight off of the seat for a period oftime,
The front passenger sensing system will turn off the passenger seat sideairbag if:
• the seat is empty and safety belt is unbuckled.
The front passenger sensing systemuses a �passenger airbag off� or�pass airbag off� indicator which willilluminate and stay lit to remind youthat the front passenger frontal airbag is off. The indicator lamp islocated in the center stack of the instrument panel just above the airvents.
Note: The indicator lamp will illuminate for a short period of time whenthe ignition is turned to the ON position to confirm it is functional.
When the front passenger seat is not occupied (empty seat) or in theevent that the front passenger frontal airbag is enabled (may inflate), theindicator lamp will be unlit.
The front passenger sensing system is designed to disable (will notinflate) the front passenger’s frontal airbag when a rear facing infantseat, a forward-facing child restraint, or a booster seat is detected.
• When the front passenger sensing system disables (will not inflate)the front passenger frontal airbag, the indicator lamp will illuminateand stay lit to remind you that the front passenger frontal airbag isdisabled.
• If the child restraint has been installed and the indicator lamp is notlit, then turn the vehicle off, remove the child restraint from thevehicle and reinstall the restraint following the child restraintmanufacturer’s instructions.
2008 Escape (204)Owners Guide (post-2002-fmt)USA (fus)
Seating and Safety Restraints
121

The front passenger sensing system is designed to enable (may inflate)the front passenger’s frontal airbag anytime the system senses that aperson of adult size is sitting properly in the front passenger seat.
• When the front passenger sensing system enables the front passengerfrontal airbag (may inflate), the indicator will be unlit and stay unlit.
If a person of adult size is sitting in the front passenger’s seat, but the�passenger airbag off� or �pass airbag off� indicator lamp is lit, it ispossible that the person isn’t sitting properly in the seat. If this happens:
• Turn the vehicle off and ask the person to place the seatback in thefull upright position.
• Have the person sit upright in the seat, centered on the seat cushion,with the person’s legs comfortably extended.
• Restart the vehicle and have the person remain in this position forabout two minutes. This will allow the system to detect that personand enable the passenger’s frontal airbag.
• If the indicator lamp remains lit even after this, the person should beadvised to ride in the rear seat.
OccupantPass Airbag Off
Indicator Lamp
Passenger
Airbag
Empty seat Unlit DisabledSmall child in child safety seator booster
Lit Disabled
Small child with safety beltbuckled or unbuckled
Lit Disabled
Adult Unlit Enabled
Even with Advanced Restraints Systems, children 12 and undershould be properly restrained in the back seat.
After all occupants have adjusted their seats and put on safety belts, it’svery important that they continue to sit properly. A properly seatedoccupant sits upright, leaning against the seat back, and centered on theseat cushion, with their feet comfortably extended on the floor. Sittingimproperly can increase the chance of injury in a crash event. Forexample, if an occupant slouches, lies down, turns sideways, sits forward,leans forward or sideways, or puts one or both feet up, the chance ofinjury during a crash is greatly increased.
2008 Escape (204)Owners Guide (post-2002-fmt)USA (fus)
Seating and Safety Restraints
122
Sitting improperly out of position or with the seat back reclinedtoo far can take off weight from the seat cushion and affect the
decision of the front passenger sensing system, resulting in seriousinjury or death in a crash.Always sit upright against your seatback, with your feet on the floor.
The front passenger sensing system may detect small or medium objectsplaced on the seat cushion. For most objects that are in the frontpassenger seat, the passenger airbag will be disabled. Even though thepassenger airbag is disabled, the �pass airbag off� lamp may or may notbe illuminated according to the table below.
ObjectsPass Airbag Off
Indicator Lamp
Passenger
Airbag
Small (i.e. 3 ring binder, smallpurse, bottled water)
Unlit Disabled
Medium (i.e. heavy briefcase,fully packed luggage)
Lit Disabled
Empty seat, or small tomedium object with safetybelt buckled
Lit Disabled
If you think that the status of the passenger airbag off indicator lamp isincorrect, check for the following:
• Objects lodged underneath the seat
• Objects between the seat cushion and the center console (ifequipped)
• Objects hanging off the seat back
• Objects stowed in the seatback map pocket (if equipped)
• Objects placed on the occupant’s lap
• Cargo interference with the seat
• Other passengers pushing or pulling on the seat
• Rear passenger feet and knees resting or pushing on the seat
The conditions listed above may cause the weight of a properly seatedoccupant to be incorrectly interpreted by the front passenger sensingsystem. The person in the front passenger seat may appear heavier orlighter due to the conditions described in the list above.
2008 Escape (204)Owners Guide (post-2002-fmt)USA (fus)
Seating and Safety Restraints
123

To reduce the risk of possible serious injury:Do not stow objects in seat back map pocket (if equipped) or
hang objects off seat back if a child is in the front passenger seat.Do not place objects underneath the front passenger seat or betweenthe seat and the center console (if equipped).Check the “passenger airbag off” or “pass airbag off” indicator lamp forproper airbag Status.Failure to follow these instructions may interfere with the frontpassenger seat sensing system.
In case there is a problem with thefront passenger sensing system, theairbag readiness lamp in theinstrument cluster will stay lit.
If the airbag readiness lamp is lit, do the following:
The driver and/or adult passengers should check for any objects thatmay be lodged underneath the front passenger seat or cargo interferingwith the seat.
If objects are lodged and/or cargo is interfering with the seat; please takethe following steps to remove the obstruction:
• Pull the vehicle over.
• Turn the vehicle off.
• Driver and/or adult passengers should check for any objects lodgedunderneath the front passenger seat or cargo interfering with the seat.
• Remove the obstruction(s) (if found).
• Restart the vehicle.
• Wait at least 2 minutes and verify that the airbag readiness lamp is nolonger illuminated
• If the airbag readiness lamp remains illuminated, this may or may/notbe a problem due to the front passenger sensing system.
DO NOT attempt to repair or service the system; take your vehicleimmediately to an authorized dealer.
If it is necessary to modify an advanced front airbag system toaccommodate a person with disabilities, contact the Ford CustomerRelationship Center at the phone number shown in the CustomerAssistance chapter of this Owner’s Guide.
2008 Escape (204)Owners Guide (post-2002-fmt)USA (fus)
Seating and Safety Restraints
124
Any alteration/modification to the front passenger seat mayaffect the performance of the front passenger sensing system.
Determining if the system is operational
The SRS uses a readiness light in the instrument cluster or a tone toindicate the status of the system. Refer to Airbag readiness section inthe Instrument Cluster chapter. Routine maintenance of the airbag isnot required.
A difficulty with the system is indicated by one or more of the following:
• The readiness light will eitherflash or stay lit.
• The readiness light will notilluminate immediately afterignition is turned on.
• A series of five beeps will be heard. The tone pattern will repeatperiodically until the problem and/or light are repaired.
If any of these things happen, even intermittently, have the SRS servicedat an authorized dealer immediately. Unless serviced, the system may notfunction properly in the event of a collision.
Seat-mounted side airbag system
Do not place objects or mount equipment on or near the airbagcover on the side of the seatbacks of the front seats or in front
seat areas that may come into contact with a deploying airbag. Failureto follow these instructions may increase the risk of personal injury inthe event of a collision.
Do not use accessory seat covers. The use of accessory seatcovers may prevent the deployment of the side airbags and
increase the risk of injury in an accident.
Do not lean your head on the door. The side airbag could injureyou as it deploys from the side of the seatback.
2008 Escape (204)Owners Guide (post-2002-fmt)USA (fus)
Seating and Safety Restraints
125
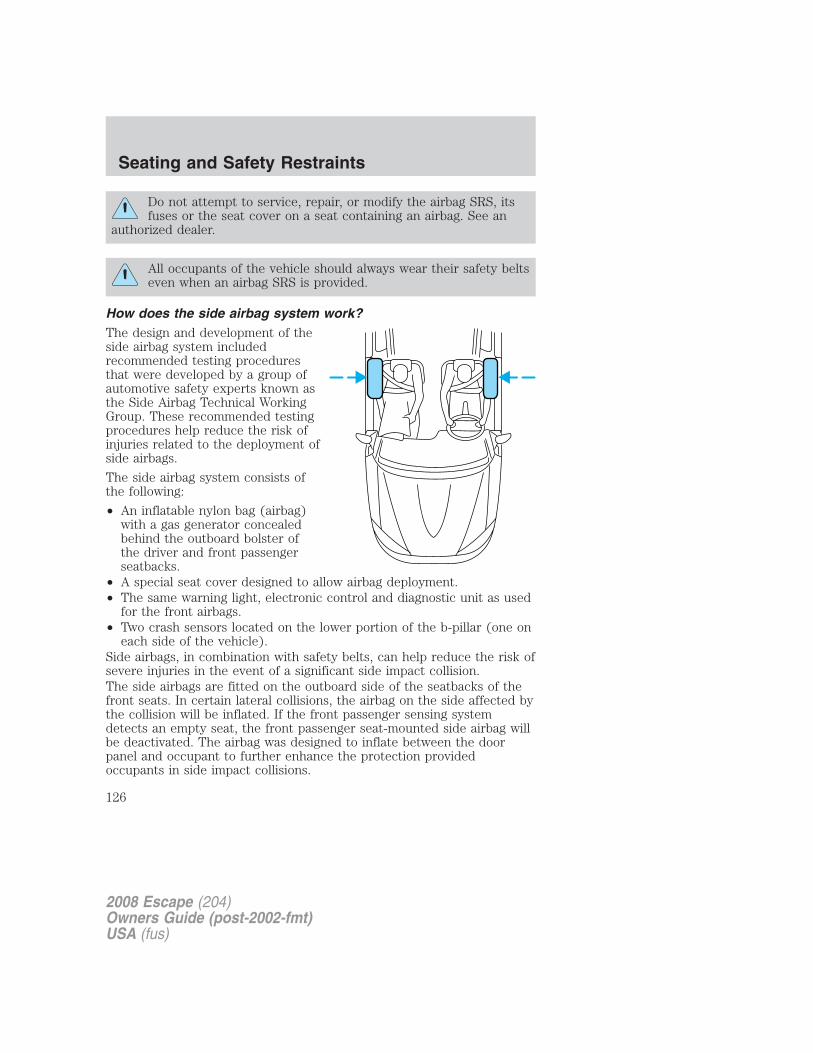
Do not attempt to service, repair, or modify the airbag SRS, itsfuses or the seat cover on a seat containing an airbag. See an
authorized dealer.
All occupants of the vehicle should always wear their safety beltseven when an airbag SRS is provided.
How does the side airbag system work?The design and development of theside airbag system includedrecommended testing proceduresthat were developed by a group ofautomotive safety experts known asthe Side Airbag Technical WorkingGroup. These recommended testingprocedures help reduce the risk ofinjuries related to the deployment ofside airbags.
The side airbag system consists ofthe following:
• An inflatable nylon bag (airbag)with a gas generator concealedbehind the outboard bolster ofthe driver and front passengerseatbacks.
• A special seat cover designed to allow airbag deployment.• The same warning light, electronic control and diagnostic unit as used
for the front airbags.• Two crash sensors located on the lower portion of the b-pillar (one on
each side of the vehicle).Side airbags, in combination with safety belts, can help reduce the risk ofsevere injuries in the event of a significant side impact collision.The side airbags are fitted on the outboard side of the seatbacks of thefront seats. In certain lateral collisions, the airbag on the side affected bythe collision will be inflated. If the front passenger sensing systemdetects an empty seat, the front passenger seat-mounted side airbag willbe deactivated. The airbag was designed to inflate between the doorpanel and occupant to further enhance the protection providedoccupants in side impact collisions.
2008 Escape (204)Owners Guide (post-2002-fmt)USA (fus)
Seating and Safety Restraints
126

The airbag SRS is designed to activate when the vehicle sustains lateraldeceleration sufficient to cause the sensors to close an electrical circuitthat initiates airbag inflation.The fact that the airbags did not inflate in a collision does not mean thatsomething is wrong with the system. Rather, it means the forces werenot of the type sufficient to cause activation. Side airbags are designedto inflate in side-impact collisions, not roll-over, rear-impact, frontal ornear-frontal collisions, unless the collision causes sufficient lateraldeceleration.
Several airbag system components get hot after inflation. Do nottouch them after inflation.
If the side airbag hasdeployed, the airbag will
not function again. The sideairbag system (including theseat) must be inspected andserviced by an authorizeddealer. If the airbag is notreplaced, the unrepaired area willincrease the risk of injury in acollision.
Determining if the system is operationalThe SRS uses a readiness light in the instrument cluster or a tone toindicate the condition of the system. Refer to the Airbag readinesssection in the Instrument Cluster chapter. Routine maintenance of theside airbag is not required.A difficulty with the system is indicated by one or more of the following:• The readiness light (same light as for front airbag system) will either
flash or stay lit.• The readiness light will not illuminate immediately after ignition is
turned on.• A series of five beeps will be heard. The tone pattern will repeat
periodically until the problem and/or light are repaired.If any of these things happen, even intermittently, have the SRS servicedat your authorized dealer immediately. Unless serviced, the system maynot function properly in the event of a collision.
2008 Escape (204)Owners Guide (post-2002-fmt)USA (fus)
Seating and Safety Restraints
127
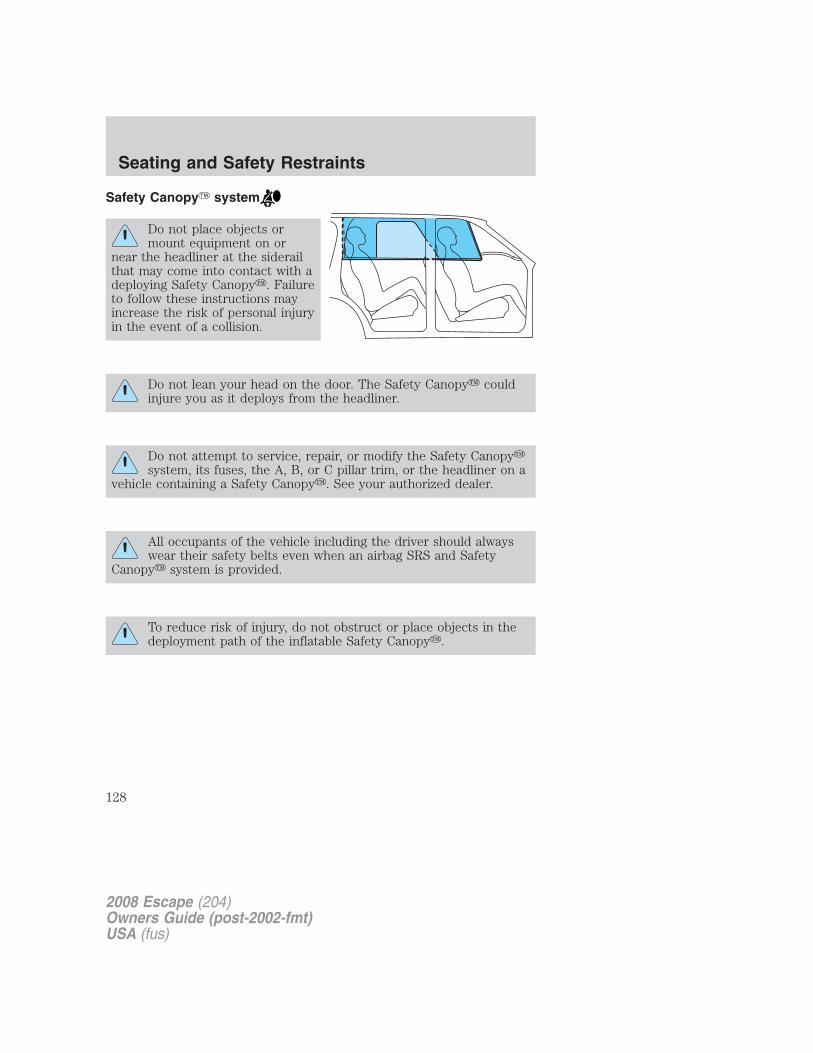
Safety Canopy� system
Do not place objects ormount equipment on or
near the headliner at the siderailthat may come into contact with adeploying Safety Canopy�. Failureto follow these instructions mayincrease the risk of personal injuryin the event of a collision.
Do not lean your head on the door. The Safety Canopy� couldinjure you as it deploys from the headliner.
Do not attempt to service, repair, or modify the Safety Canopy�system, its fuses, the A, B, or C pillar trim, or the headliner on a
vehicle containing a Safety Canopy�. See your authorized dealer.
All occupants of the vehicle including the driver should alwayswear their safety belts even when an airbag SRS and Safety
Canopy� system is provided.
To reduce risk of injury, do not obstruct or place objects in thedeployment path of the inflatable Safety Canopy�.
2008 Escape (204)Owners Guide (post-2002-fmt)USA (fus)
Seating and Safety Restraints
128

How does the Safety Canopy� system work?The design and development of theSafety Canopy� system includedrecommended testing proceduresthat were developed by a group ofautomotive safety experts known asthe Side Airbag Technical WorkingGroup. These recommended testingprocedures help reduce the risk ofinjuries related to the deployment ofside airbags (including the SafetyCanopy�).
The Safety Canopy� systemconsists of the following:
• An inflatable nylon curtain with agas generator concealed behindthe headliner and above the doors(one on each side of vehicle).
• A headliner designed to flex openabove the side doors to allow Safety Canopy� deployment.
• The same warning light, electronic control and diagnostic unit as usedfor the front airbags.
• Two crash sensors mounted at lower B-Pillar (one on each side).
• Two crash sensors located at the c-pillar behind the rear doors (oneon each side).
• Rollover sensor in the restraints control module (RCM).
The Safety Canopy� system, in combination with safety belts, can helpreduce the risk of severe injuries in the event of a significant side impactcollision or rollover event.
Children 12 years old and under should always be properly restrained inthe second or third row seats. The Safety Canopy� will not interferewith children restrained using a properly installed child or booster seatbecause it is designed to inflate downward from the headliner above thedoors along the side window opening.
The Safety Canopy� system is designed to active when the vehiclesustains lateral deceleration sufficient to cause the RCM to initiate SafetyCanopy� inflation or when a certain likelihood of a rollover event isdetected by the rollover sensor.
2008 Escape (204)Owners Guide (post-2002-fmt)USA (fus)
Seating and Safety Restraints
129
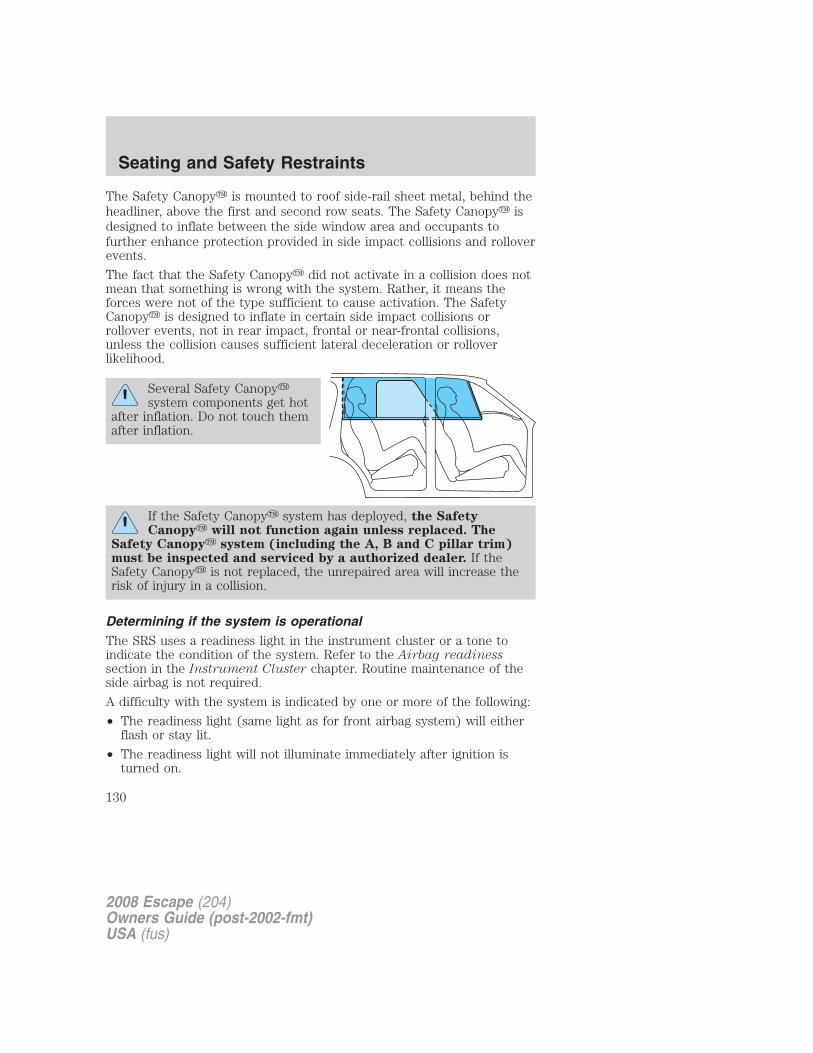
The Safety Canopy� is mounted to roof side-rail sheet metal, behind theheadliner, above the first and second row seats. The Safety Canopy� isdesigned to inflate between the side window area and occupants tofurther enhance protection provided in side impact collisions and rolloverevents.
The fact that the Safety Canopy� did not activate in a collision does notmean that something is wrong with the system. Rather, it means theforces were not of the type sufficient to cause activation. The SafetyCanopy� is designed to inflate in certain side impact collisions orrollover events, not in rear impact, frontal or near-frontal collisions,unless the collision causes sufficient lateral deceleration or rolloverlikelihood.
Several Safety Canopy�system components get hot
after inflation. Do not touch themafter inflation.
If the Safety Canopy� system has deployed, the SafetyCanopy� will not function again unless replaced. The
Safety Canopy� system (including the A, B and C pillar trim)must be inspected and serviced by a authorized dealer. If theSafety Canopy� is not replaced, the unrepaired area will increase therisk of injury in a collision.
Determining if the system is operationalThe SRS uses a readiness light in the instrument cluster or a tone toindicate the condition of the system. Refer to the Airbag readinesssection in the Instrument Cluster chapter. Routine maintenance of theside airbag is not required.
A difficulty with the system is indicated by one or more of the following:
• The readiness light (same light as for front airbag system) will eitherflash or stay lit.
• The readiness light will not illuminate immediately after ignition isturned on.
2008 Escape (204)Owners Guide (post-2002-fmt)USA (fus)
Seating and Safety Restraints
130

• A series of five beeps will be heard. The tone pattern will repeatperiodically until the problem and/or light are repaired.
If any of these things happen, even intermittently, have the SRS servicedat your authorized dealer immediately. Unless serviced, the system maynot function properly in the event of a collision.
Disposal of airbags and airbag equipped vehicles(including pretensioners)See your authorized dealer. Airbags MUST BE disposed of by qualifiedpersonnel.
SAFETY RESTRAINTS FOR CHILDRENSee the following sections for directions on how to properly use safetyrestraints for children. Also see Airbag supplemental restraint system(SRS) in this chapter for special instructions about using airbags.
Important child restraint precautionsYou are required by law to use safety restraints for children in the U.S.and Canada. If small children (generally children who are four years oldor younger and who weigh 40 lb. [18 kg] or less) ride in your vehicle, youmust put them in safety seats made especially for children. Many statesrequire that children use approved booster seats until they are eightyears old. Check your local and state or provincial laws for specificrequirements regarding the safety of children in your vehicle. Whenpossible, always place children under age 12 in the rear seat of yourvehicle. Accident statistics suggest that children are safer when properlyrestrained in the rear seating positions than in the front seating position.
Never let a passenger hold a child on his or her lap while thevehicle is moving. The passenger cannot protect the child from
injury in a collision.
Always follow the instructions and warnings that come with any infant orchild restraint you might use.
Children and safety beltsIf the child is the proper size, restrain the child in a safety seat. Childrenwho are too large for child safety seats (as specified by your child safetyseat manufacturer) should always wear safety belts.
Follow all the important safety restraint and airbag precautions thatapply to adult passengers in your vehicle.
2008 Escape (204)Owners Guide (post-2002-fmt)USA (fus)
Seating and Safety Restraints
131

If the shoulder belt portion of a combination lap and shoulder belt canbe positioned so it does not cross or rest in front of the child’s face orneck, the child should wear the lap and shoulder belt. Moving the childcloser to the center of the vehicle may help provide a good shoulder beltfit.
Do not leave children, unreliable adults, or pets unattended inyour vehicle.
Child booster seatsChildren outgrow a typical convertible or toddler seat when they weigh40 lb. (18 kg) and are around 4 years of age. Although the lap/shoulderbelt will provide some protection, these children are still too small forlap/shoulder belts to fit properly, which could increase the risk of seriousinjury in a crash.
To improve the fit of both the lap and shoulder belt on children whohave outgrown child safety seats, Ford Motor Company recommends useof a belt-positioning booster.
Booster seats position a child so that safety belts fit better. They lift thechild up so that the lap belt rests low across the hips and the kneesbend comfortably. Booster seats may also make the shoulder belt fitbetter and more comfortably. Try to keep the belt near the middle of theshoulder.
When children should use booster seatsChildren need to use booster seats from the time they outgrow thetoddler seat until they are big enough for the vehicle seat andlap/shoulder belt to fit properly. Generally this is when they weigh about80 lb. (36 kg) (about 8 to 12 years old).
Booster seats should be used until you can answer YES to ALL of thesequestions:
• Can the child sit all the way backagainst the vehicle seat back withknees bent comfortably at theedge of the seat withoutslouching?
• Does the lap belt rest low across the hips?
2008 Escape (204)Owners Guide (post-2002-fmt)USA (fus)
Seating and Safety Restraints
132
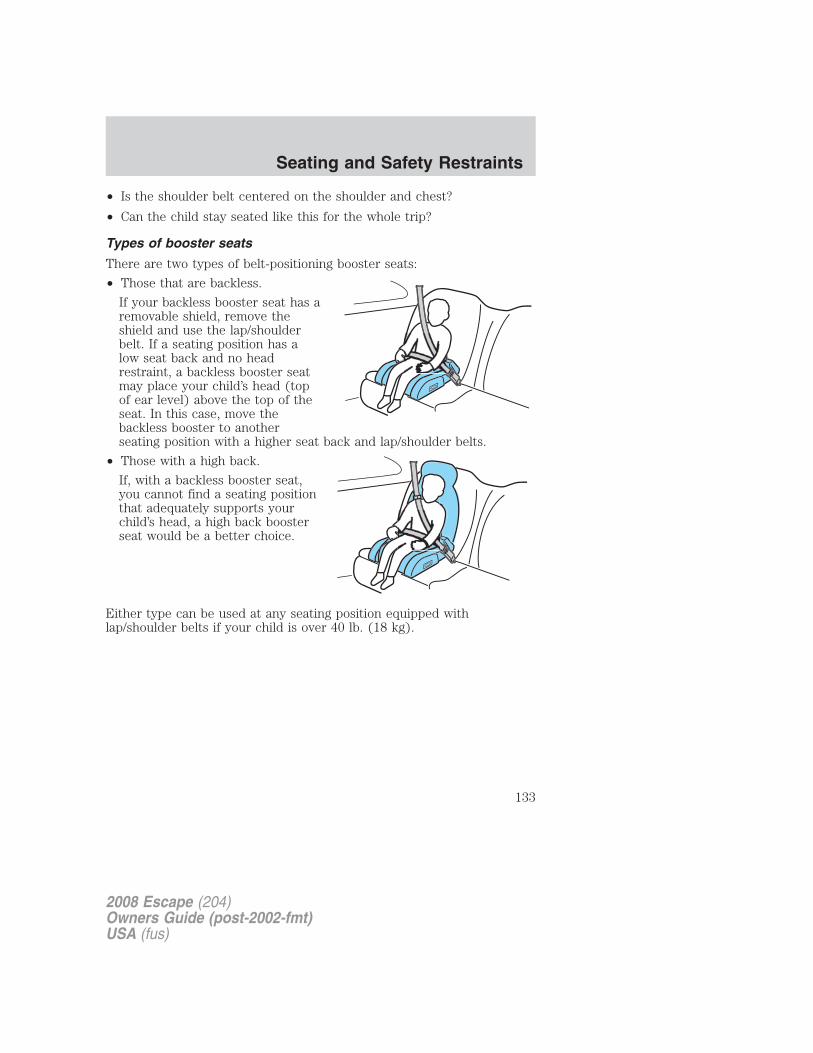
• Is the shoulder belt centered on the shoulder and chest?
• Can the child stay seated like this for the whole trip?
Types of booster seats
There are two types of belt-positioning booster seats:
• Those that are backless.
If your backless booster seat has aremovable shield, remove theshield and use the lap/shoulderbelt. If a seating position has alow seat back and no headrestraint, a backless booster seatmay place your child’s head (topof ear level) above the top of theseat. In this case, move thebackless booster to anotherseating position with a higher seat back and lap/shoulder belts.
• Those with a high back.
If, with a backless booster seat,you cannot find a seating positionthat adequately supports yourchild’s head, a high back boosterseat would be a better choice.
Either type can be used at any seating position equipped withlap/shoulder belts if your child is over 40 lb. (18 kg).
2008 Escape (204)Owners Guide (post-2002-fmt)USA (fus)
Seating and Safety Restraints
133
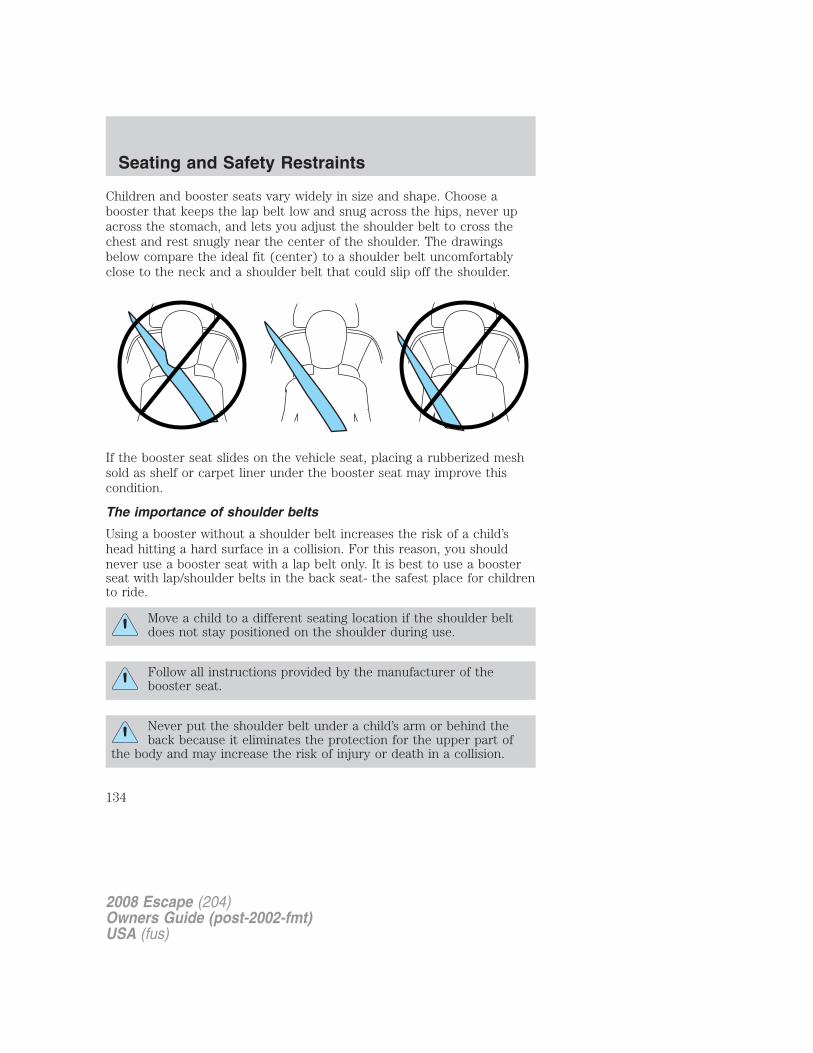
Children and booster seats vary widely in size and shape. Choose abooster that keeps the lap belt low and snug across the hips, never upacross the stomach, and lets you adjust the shoulder belt to cross thechest and rest snugly near the center of the shoulder. The drawingsbelow compare the ideal fit (center) to a shoulder belt uncomfortablyclose to the neck and a shoulder belt that could slip off the shoulder.
If the booster seat slides on the vehicle seat, placing a rubberized meshsold as shelf or carpet liner under the booster seat may improve thiscondition.
The importance of shoulder belts
Using a booster without a shoulder belt increases the risk of a child’shead hitting a hard surface in a collision. For this reason, you shouldnever use a booster seat with a lap belt only. It is best to use a boosterseat with lap/shoulder belts in the back seat- the safest place for childrento ride.
Move a child to a different seating location if the shoulder beltdoes not stay positioned on the shoulder during use.
Follow all instructions provided by the manufacturer of thebooster seat.
Never put the shoulder belt under a child’s arm or behind theback because it eliminates the protection for the upper part of
the body and may increase the risk of injury or death in a collision.
2008 Escape (204)Owners Guide (post-2002-fmt)USA (fus)
Seating and Safety Restraints
134
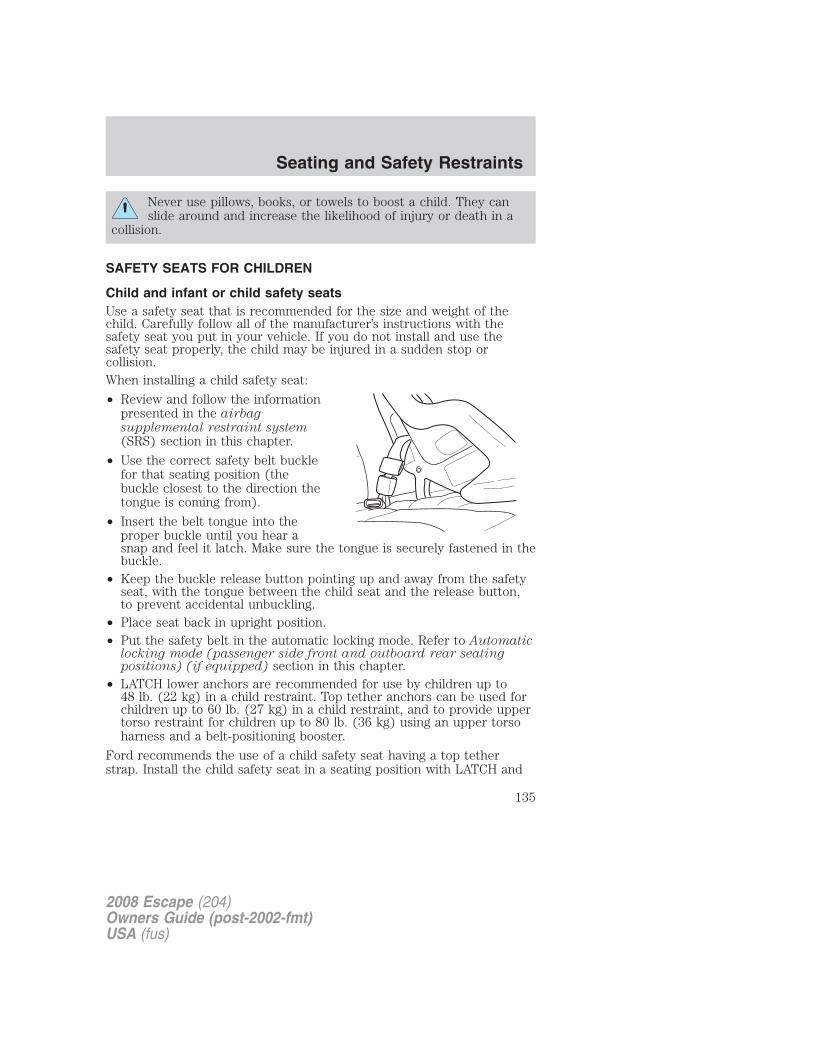
Never use pillows, books, or towels to boost a child. They canslide around and increase the likelihood of injury or death in a
collision.
SAFETY SEATS FOR CHILDREN
Child and infant or child safety seatsUse a safety seat that is recommended for the size and weight of thechild. Carefully follow all of the manufacturer’s instructions with thesafety seat you put in your vehicle. If you do not install and use thesafety seat properly, the child may be injured in a sudden stop orcollision.When installing a child safety seat:
• Review and follow the informationpresented in the airbagsupplemental restraint system(SRS) section in this chapter.
• Use the correct safety belt bucklefor that seating position (thebuckle closest to the direction thetongue is coming from).
• Insert the belt tongue into theproper buckle until you hear asnap and feel it latch. Make sure the tongue is securely fastened in thebuckle.
• Keep the buckle release button pointing up and away from the safetyseat, with the tongue between the child seat and the release button,to prevent accidental unbuckling.
• Place seat back in upright position.• Put the safety belt in the automatic locking mode. Refer to Automatic
locking mode (passenger side front and outboard rear seatingpositions) (if equipped) section in this chapter.
• LATCH lower anchors are recommended for use by children up to48 lb. (22 kg) in a child restraint. Top tether anchors can be used forchildren up to 60 lb. (27 kg) in a child restraint, and to provide uppertorso restraint for children up to 80 lb. (36 kg) using an upper torsoharness and a belt-positioning booster.
Ford recommends the use of a child safety seat having a top tetherstrap. Install the child safety seat in a seating position with LATCH and
2008 Escape (204)Owners Guide (post-2002-fmt)USA (fus)
Seating and Safety Restraints
135

tether anchors. For more information on top tether straps and anchors,refer to Attaching safety seats with tether straps in this chapter. Formore information of LATCH anchors refer to Attaching safety seats withLATCH (Lower Anchors and Tethers for Children) attachments in thischapter.
Carefully follow all of the manufacturer’s instructions includedwith the safety seat you put in your vehicle. If you do not install
and use the safety seat properly, the child may be injured in a suddenstop or collision.
Rear-facing child seats or infant carriers should never be placedin front of an active passenger airbag.
Installing child safety seats with combination lap and shoulderbeltsThe rear seat head restraints must be removed when using a childseat.
Airbags can kill or injure a child in a child seat. NEVER place arear-facing child seat in front of an active air bag. If you must
use a forward-facing child seat in the front seat, move the seat all theway back.
1. Position the child safety seat in aseat with a combination lap andshoulder belt.
Children 12 and under should be properly restrained in the rearseat whenever possible.
2008 Escape (204)Owners Guide (post-2002-fmt)USA (fus)
Seating and Safety Restraints
136

2. Pull down on the shoulder beltand then grasp the shoulder beltand lap belt together.
3. While holding the shoulder andlap belt portions together, route thetongue through the child seataccording to the child seatmanufacturer’s instructions. Be surethe belt webbing is not twisted.
4. Insert the belt tongue into theproper buckle (the buckle closest tothe direction the tongue is comingfrom) for that seating position untilyou hear a snap and feel the latchengage. Make sure the tongue islatched securely by pulling on it.
2008 Escape (204)Owners Guide (post-2002-fmt)USA (fus)
Seating and Safety Restraints
137

5. To put the retractor in theautomatic locking mode, grasp theshoulder portion of the belt and pulldownward until all of the belt isextracted and a click is heard.
6. Allow the belt to retract. The belt will click as it retracts to indicate itis in the automatic locking mode.
7. Pull the lap belt portion acrossthe child seat toward the buckle andpull up on the shoulder belt whilepushing down with your knee on thechild seat.
8. Allow the safety belt to retract toremove any slack in the belt.
9. Before placing the child in theseat, forcibly tilt the seat forwardand back to make sure the seat issecurely held in place. To checkthis, grab the seat at the belt pathand attempt to move it side to sideand forward and back. There shouldbe no more than one inch ofmovement for proper installation.
10. Try to pull the belt out of the retractor to make sure the retractor isin the automatic locking mode (you should not be able to pull more beltout). If the retractor is not locked, unbuckle the belt and repeat Steps 2through 9.
Check to make sure the child seat is properly secured before each use.
2008 Escape (204)Owners Guide (post-2002-fmt)USA (fus)
Seating and Safety Restraints
138

Attaching child safety seats with tether straps
Most new forward-facing child safety seats include a tether strap whichgoes over the back of the seat and hooks to an anchoring point. Tetherstraps are available as an accessory for many older safety seats. Contactthe manufacturer of your child seat for information about ordering atether strap.
The rear seating positions of your vehicle are equipped with built-intether strap anchors located behind the seats on the roof panel in thecargo area.
The tether strap anchors in your vehicle are in the following positions:
Attach the tether strap onlyto the appropriate tether
anchor as shown. The tether strapmay not work properly if attachedsomewhere other than the correcttether anchor.
1. Position the child safety seat on the seat cushion.
2. Route the child safety seat tether strap over the back of the seat.
For vehicles with adjustable head restraints, remove the head restraintfirst, place under the front seat for storage, and then route the tetherstrap over the top of the seatback.
3. Locate the correct anchor for theselected seating position.
There are three tether anchorslocated on the headliner at the rearof the vehicle.
2008 Escape (204)Owners Guide (post-2002-fmt)USA (fus)
Seating and Safety Restraints
139
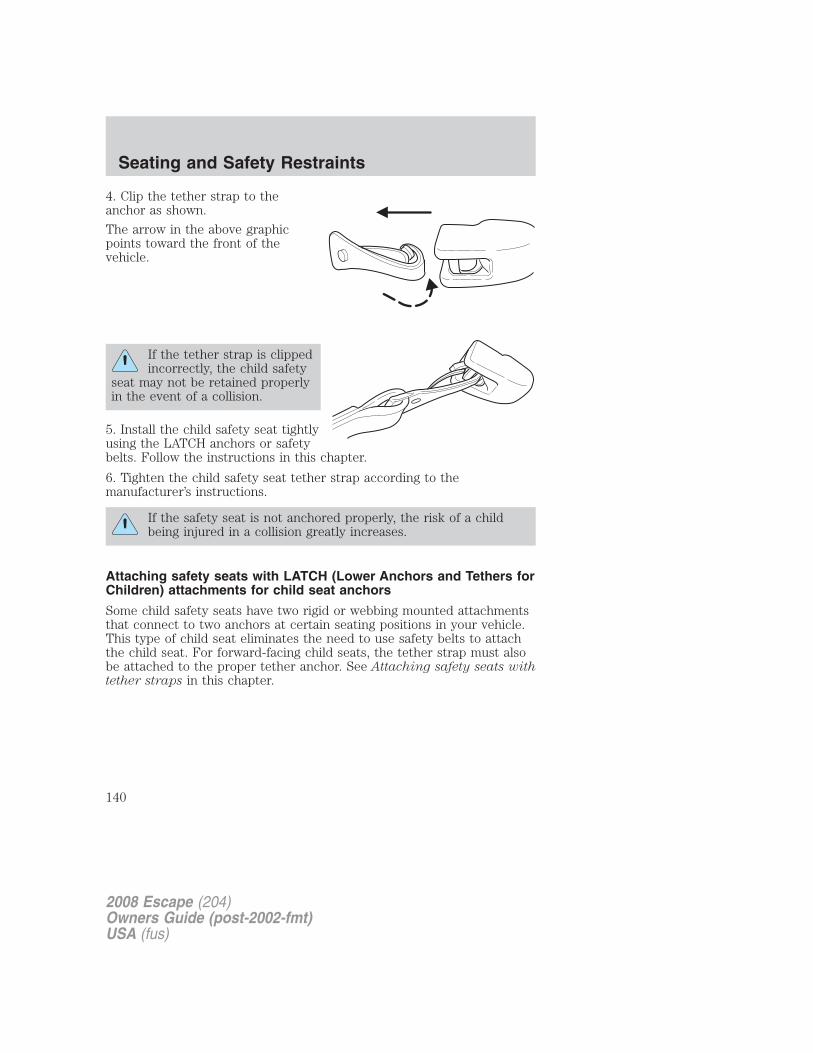
4. Clip the tether strap to theanchor as shown.
The arrow in the above graphicpoints toward the front of thevehicle.
If the tether strap is clippedincorrectly, the child safety
seat may not be retained properlyin the event of a collision.
5. Install the child safety seat tightlyusing the LATCH anchors or safetybelts. Follow the instructions in this chapter.
6. Tighten the child safety seat tether strap according to themanufacturer’s instructions.
If the safety seat is not anchored properly, the risk of a childbeing injured in a collision greatly increases.
Attaching safety seats with LATCH (Lower Anchors and Tethers forChildren) attachments for child seat anchors
Some child safety seats have two rigid or webbing mounted attachmentsthat connect to two anchors at certain seating positions in your vehicle.This type of child seat eliminates the need to use safety belts to attachthe child seat. For forward-facing child seats, the tether strap must alsobe attached to the proper tether anchor. See Attaching safety seats withtether straps in this chapter.
2008 Escape (204)Owners Guide (post-2002-fmt)USA (fus)
Seating and Safety Restraints
140

Your vehicle has LATCH anchors for child seat installation at thefollowing locations:
The anchors on both sides of thecenter of the rear seat are providedprimarily for child seats at theoutboard seats, and are furtherapart than the pairs of loweranchors for child seat installation atother seats. A child seat with rigidLATCH attachments cannot beinstalled at the center rear seat. Achild seat with LATCH attachments on belt webbing can be used at thecenter rear seat unless a child seat at an outboard rear seat is attachedto one of these lower anchors. Install a child seat onto the lower anchorsat the center rear seat ONLY IF the child restraint manufacturerrecommends that the child seat can be installed to anchors that arespaced up to 20 in (500 mm) apart.
Never attach two LATCH child safety seats to the same anchor.In a crash, one anchor may not be strong enough to hold two
child safety seat attachments and may break, causing serious injury ordeath.
The lower anchors for child seatinstallation are located at the rearsection of the second row seatbetween the cushion and seat back.
Follow the child seat manufacturer’s instructions to properly install achild seat with LATCH attachments.
Attach LATCH lower attachments of the child seat only to theanchors shown.
If you install a child seat with rigid LATCH attachments, do not tightenthe tether strap enough to lift the child seat off the vehicle seat cushion
2008 Escape (204)Owners Guide (post-2002-fmt)USA (fus)
Seating and Safety Restraints
141
when the child is seated in it. Keep the tether strap just snug withoutlifting the front of the child seat. Keeping the child seat just touching thevehicle seat gives the best protection in a severe crash.
Each time you use the safety seat, check that the seat is properlyattached to the lower anchors and tether anchor. Try to tilt the childseat from side to side. Also try to tug the seat forward. Check to see ifthe anchors hold the seat in place.
If the safety seat is not anchored properly, the risk of a childbeing injured in a crash greatly increases.
2008 Escape (204)Owners Guide (post-2002-fmt)USA (fus)
Seating and Safety Restraints
142

NOTICE TO UTILITY VEHICLE AND TRUCK OWNERSUtility vehicles and trucks handledifferently than passenger cars inthe various driving conditions thatare encountered on streets,highways and off-road. Utilityvehicles and trucks are not designedfor cornering at speeds as high aspassenger cars any more thanlow-slung sports cars are designedto perform satisfactorily underoff-road conditions.
Utility vehicles have a significantly higher rollover rate thanother types of vehicles. To reduce the risk of serious injury or
death from a rollover or other crash you must:
• Avoid sharp turns and abrupt maneuvers;
• Drive at safe speeds for the conditions;
• Keep tires properly inflated;
• Never overload or improperly load your vehicle; and
• Make sure every passenger is properly restrained.
In a rollover crash, an unbelted person is significantly more likelyto die than a person wearing a seat belt. All occupants must
wear seat belts and children/infants must use appropriate restraints tominimize the risk of injury or ejection.
Study your Owner’s Guide and any supplements for specific informationabout equipment features, instructions for safe driving and additionalprecautions to reduce the risk of an accident or serious injury.
2008 Escape (204)Owners Guide (post-2002-fmt)USA (fus)
Tires, Wheels and Loading
143

VEHICLE CHARACTERISTICS
4WD and AWD Systems (if equipped)
A vehicle equipped with AWD or 4WD (when selected) has the ability touse all four wheels to power itself. This increases traction which mayenable you to safely drive over terrain and road conditions that aconventional two-wheel drive vehicle cannot.
Power is supplied to all four wheels through a transfer case or powertransfer unit. 4WD vehicles allow you to select different drive modes asnecessary. Information on transfer case operation and shifting procedurescan be found in the Driving chapter. Information on transfer casemaintenance can be found in the Maintenance and Specificationschapter. You should become thoroughly familiar with this informationbefore you operate your vehicle.
On some 4WD models, the initial shift from two-wheel drive to 4WDwhile the vehicle is moving can cause a momentary clunk and ratchetingsound. These sounds are normal as the front drivetrain comes up tospeed and is not cause for concern.
Do not become overconfident in the ability of 4WD and AWDvehicles. Although a 4WD or AWD vehicle may accelerate better
than two-wheel drive vehicle in low traction situations, it won’t stopany faster than two-wheel drive vehicles. Always drive at a safe speed.
2008 Escape (204)Owners Guide (post-2002-fmt)USA (fus)
Tires, Wheels and Loading
144
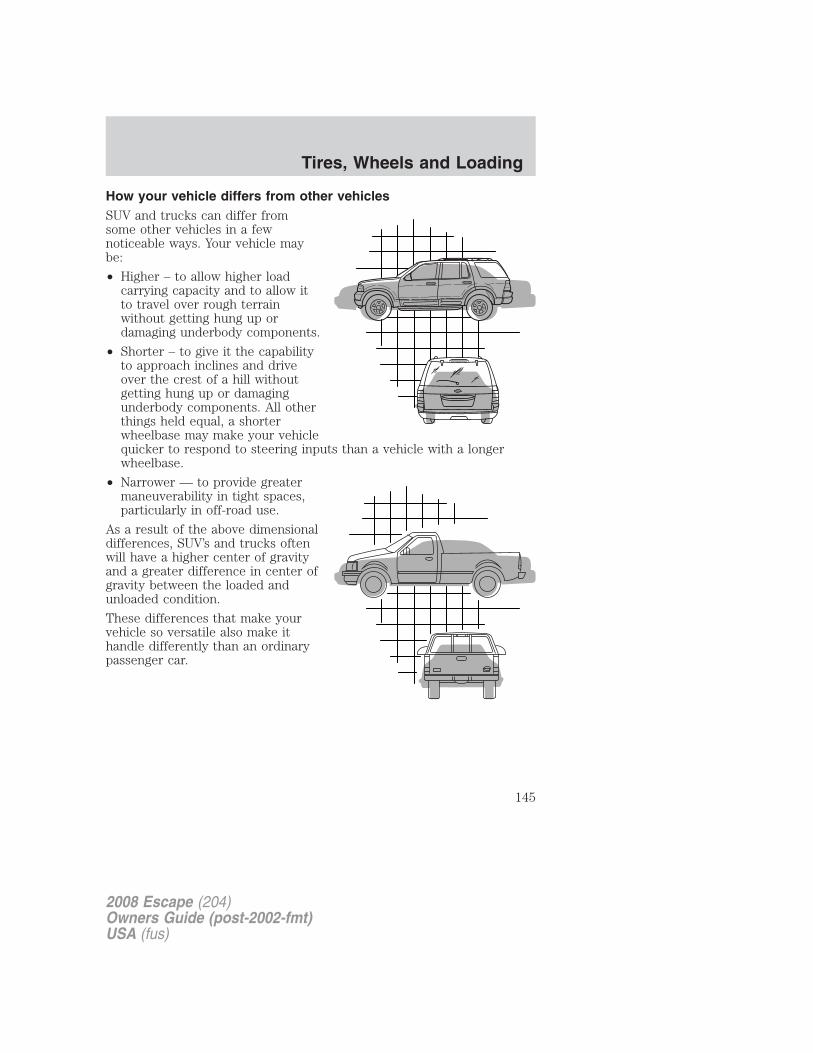
How your vehicle differs from other vehiclesSUV and trucks can differ fromsome other vehicles in a fewnoticeable ways. Your vehicle maybe:
• Higher – to allow higher loadcarrying capacity and to allow itto travel over rough terrainwithout getting hung up ordamaging underbody components.
• Shorter – to give it the capabilityto approach inclines and driveover the crest of a hill withoutgetting hung up or damagingunderbody components. All otherthings held equal, a shorterwheelbase may make your vehiclequicker to respond to steering inputs than a vehicle with a longerwheelbase.
• Narrower — to provide greatermaneuverability in tight spaces,particularly in off-road use.
As a result of the above dimensionaldifferences, SUV’s and trucks oftenwill have a higher center of gravityand a greater difference in center ofgravity between the loaded andunloaded condition.
These differences that make yourvehicle so versatile also make ithandle differently than an ordinarypassenger car.
2008 Escape (204)Owners Guide (post-2002-fmt)USA (fus)
Tires, Wheels and Loading
145

INFORMATION ABOUT UNIFORM TIRE QUALITY GRADINGNew vehicles are fitted with tiresthat have a rating on them calledTire Quality Grades. The Qualitygrades can be found whereapplicable on the tire sidewallbetween tread shoulder andmaximum section width. Forexample:
• Treadwear 200 Traction AA Temperature A
These Tire Quality Grades are determined by standards that the UnitedStates Department of Transportation has set.
Tire Quality Grades apply to new pneumatic tires for use on passengercars. They do not apply to deep tread, winter-type snow tires,space-saver or temporary use spare tires, tires with nominal rimdiameters of 10 to 12 inches or limited production tires as defined inTitle 49 Code of Federal Regulations Part 575.104(c)(2).
U.S. Department of Transportation-Tire quality grades: The U.S.Department of Transportation requires Ford Motor Company to give youthe following information about tire grades exactly as the governmenthas written it.
Treadwear
The treadwear grade is a comparative rating based on the wear rate ofthe tire when tested under controlled conditions on a specifiedgovernment test course. For example, a tire graded 150 would wear oneand one-half (1 1/2) times as well on the government course as a tiregraded 100. The relative performance of tires depends upon the actualconditions of their use, however, and may depart significantly from thenorm due to variations in driving habits, service practices, anddifferences in road characteristics and climate.
Traction AA A B CThe traction grades, from highest to lowest are AA, A, B, and C. Thegrades represent the tire’s ability to stop on wet pavement as measuredunder controlled conditions on specified government test surfaces ofasphalt and concrete. A tire marked C may have poor tractionperformance.
2008 Escape (204)Owners Guide (post-2002-fmt)USA (fus)
Tires, Wheels and Loading
146

The traction grade assigned to this tire is based onstraight-ahead braking traction tests, and does not include
acceleration, cornering, hydroplaning or peak traction characteristics.
Temperature A B CThe temperature grades are A (the highest), B and C, representing thetire’s resistance to the generation of heat and its ability to dissipate heatwhen tested under controlled conditions on a specified indoor laboratorytest wheel. Sustained high temperature can cause the material of the tireto degenerate and reduce tire life, and excessive temperature can lead tosudden tire failure. The grade C corresponds to a level of performancewhich all passenger car tires must meet under the Federal Motor VehicleSafety Standard No. 109. Grades B and A represent higher levels ofperformance on the laboratory test wheel than the minimum required bylaw.
The temperature grade for this tire is established for a tire thatis properly inflated and not overloaded. Excessive speed,
underinflation, or excessive loading, either separately or incombination, can cause heat buildup and possible tire failure.
TIRESTires are designed to give many thousands of miles of service, but theymust be maintained in order to get the maximum benefit from them.
Glossary of tire terminology• Tire label: A label showing the OE (Original Equipment) tire sizes,
recommended inflation pressure and the maximum weight the vehiclecan carry.
• Tire Identification Number (TIN): A number on the sidewall ofeach tire providing information about the tire brand andmanufacturing plant, tire size and date of manufacture. Also referredto as DOT code.
• Inflation pressure: A measure of the amount of air in a tire.• Standard load: A class of P-metric or Metric tires designed to carry a
maximum load at 35 psi [37 psi (2.5 bar) for Metric tires]. Increasingthe inflation pressure beyond this pressure will not increase the tire’sload carrying capability.
• Extra load: A class of P-metric or Metric tires designed to carry aheavier maximum load at 41 psi [43 psi (2.9 bar) for Metric tires].
2008 Escape (204)Owners Guide (post-2002-fmt)USA (fus)
Tires, Wheels and Loading
147

Increasing the inflation pressure beyond this pressure will not increasethe tire’s load carrying capability.
• kPa: Kilopascal, a metric unit of air pressure.
• PSI: Pounds per square inch, a standard unit of air pressure.
• Cold inflation pressure: The tire pressure when the vehicle hasbeen stationary and out of direct sunlight for an hour or more andprior to the vehicle being driven for 1 mile (1.6 km).
• Recommended inflation pressure: The cold inflation pressure foundon the Safety Compliance Certification Label or Tire Label located onthe B-Pillar or the edge of the driver’s door.
• B-pillar: The structural member at the side of the vehicle behind thefront door.
• Bead area of the tire: Area of the tire next to the rim.
• Sidewall of the tire: Area between the bead area and the tread.
• Tread area of the tire: Area of the perimeter of the tire thatcontacts the road when mounted on the vehicle.
• Rim: The metal support (wheel) for a tire or a tire and tube assemblyupon which the tire beads are seated.
INFLATING YOUR TIRESSafe operation of your vehicle requires that your tires are properlyinflated. Remember that a tire can lose up to half of its air pressurewithout appearing flat.
Every day before you drive, check your tires. If one looks lower than theothers, use a tire gauge to check pressure of all tires and adjust ifrequired.
At least once a month and before long trips, inspect each tire and checkthe tire pressure with a tire gauge (including spare, if equipped). Inflateall tires to the inflation pressure recommended by Ford Motor Company.
Use a tire gauge to check the tire inflation pressure, including the spare(if equipped), at least monthly and before long trips. You are stronglyurged to buy a reliable tire pressure gauge, as automatic service stationgauges may be inaccurate. Ford recommends the use of a digital ordial-type tire pressure gauge rather than a stick-type tire pressure gauge.
Use the recommended cold inflation pressure for optimum tireperformance and wear. Under-inflation or over-inflation may causeuneven treadwear patterns.
2008 Escape (204)Owners Guide (post-2002-fmt)USA (fus)
Tires, Wheels and Loading
148

Under-inflation is the most common cause of tire failures andmay result in severe tire cracking, tread separation or �blowout�,
with unexpected loss of vehicle control and increased risk of injury.Under-inflation increases sidewall flexing and rolling resistance,resulting in heat buildup and internal damage to the tire. It also mayresult in unnecessary tire stress, irregular wear, loss of vehicle controland accidents. A tire can lose up to half of its air pressure and notappear to be flat!
Always inflate your tires to the Ford recommended inflation pressureeven if it is less than the maximum inflation pressure information foundon the tire. The Ford recommended tire inflation pressure is found onthe Safety Compliance Certification Label or Tire Label which is locatedon the B-Pillar or the edge of the driver’s door. Failure to follow the tirepressure recommendations can cause uneven treadwear patterns andadversely affect the way your vehicle handles.Maximum Permissible Inflation Pressure is the tire manufacturer’smaximum permissible pressure and/or the pressure at which themaximum load can be carried by the tire. This pressure is normallyhigher than the manufacturer’s recommended cold inflation pressurewhich can be found on the Safety Compliance Certification Label or TireLabel which is located on the B-Pillar or the edge of the driver’s door.The cold inflation pressure should never be set lower than therecommended pressure on the Safety Compliance Certification Label orTire Label.
When weather temperature changes occur, tire inflation pressures alsochange. A 10°F (6°C) temperature drop can cause a corresponding dropof 1 psi (7 kPa) in inflation pressure. Check your tire pressuresfrequently and adjust them to the proper pressure which can be foundon the Safety Compliance Certification Label or Tire Label.
To check the pressure in your tire(s):
1. Make sure the tires are cool, meaning they are not hot from drivingeven a mile.
If you are checking tire pressure when the tire is hot, (i.e. driven morethan 1 mile [1.6 km]), never “bleed” or reduce air pressure. The tires arehot from driving and it is normal for pressures to increase aboverecommended cold pressures. A hot tire at or below recommended coldinflation pressure could be significantly under-inflated.
Note: If you have to drive a distance to get air for your tire(s), checkand record the tire pressure first and add the appropriate air pressure
2008 Escape (204)Owners Guide (post-2002-fmt)USA (fus)
Tires, Wheels and Loading
149

when you get to the pump. It is normal for tires to heat up and the airpressure inside to go up as you drive.
2. Remove the cap from the valve on one tire, then firmly press the tiregauge onto the valve and measure the pressure.
3. Add enough air to reach the recommended air pressure.
Note: If you overfill the tire, release air by pushing on the metal stem inthe center of the valve. Then recheck the pressure with your tire gauge.
4. Replace the valve cap.
5. Repeat this procedure for each tire, including the spare.
Note: Some spare tires operate at a higher inflation pressure than theother tires. For T-type/mini-spare tires (see Dissimilar Spare
Tire/Wheel Information section for description): Store and maintain at60psi (4.15 bar). For Full Size and Dissimilar spare tires (see Dissimilar
Spare Tire/Wheel Information section for description): Store andmaintain at the higher of the front and rear inflation pressure as shownon the Tire Label.
6. Visually inspect the tires to make sure there are no nails or otherobjects embedded that could poke a hole in the tire and cause an airleak.
7. Check the sidewalls to make sure there are no gouges, cuts or bulges.
TIRE CARE
Inspecting your tires
Periodically inspect the tire treads for uneven or excessive wear andremove objects such as stones, nails or glass that may be wedged in thetread grooves. Check for holes or cuts that may permit air leakage fromthe tire and make necessary repairs. Also inspect the tire sidewalls forcracking, cuts, bruises and other signs of damage or excessive wear. Ifinternal damage to the tire is suspected, have the tire demounted andinspected in case it needs to be repaired or replaced. For your safety,tires that are damaged or show signs of excessive wear should not beused because they are more likely to blow out or fail.
Improper or inadequate vehicle maintenance can cause tires to wearabnormally. Inspect all your tires, including the spare, frequently, andreplace them if one or more of the following conditions exist:
2008 Escape (204)Owners Guide (post-2002-fmt)USA (fus)
Tires, Wheels and Loading
150
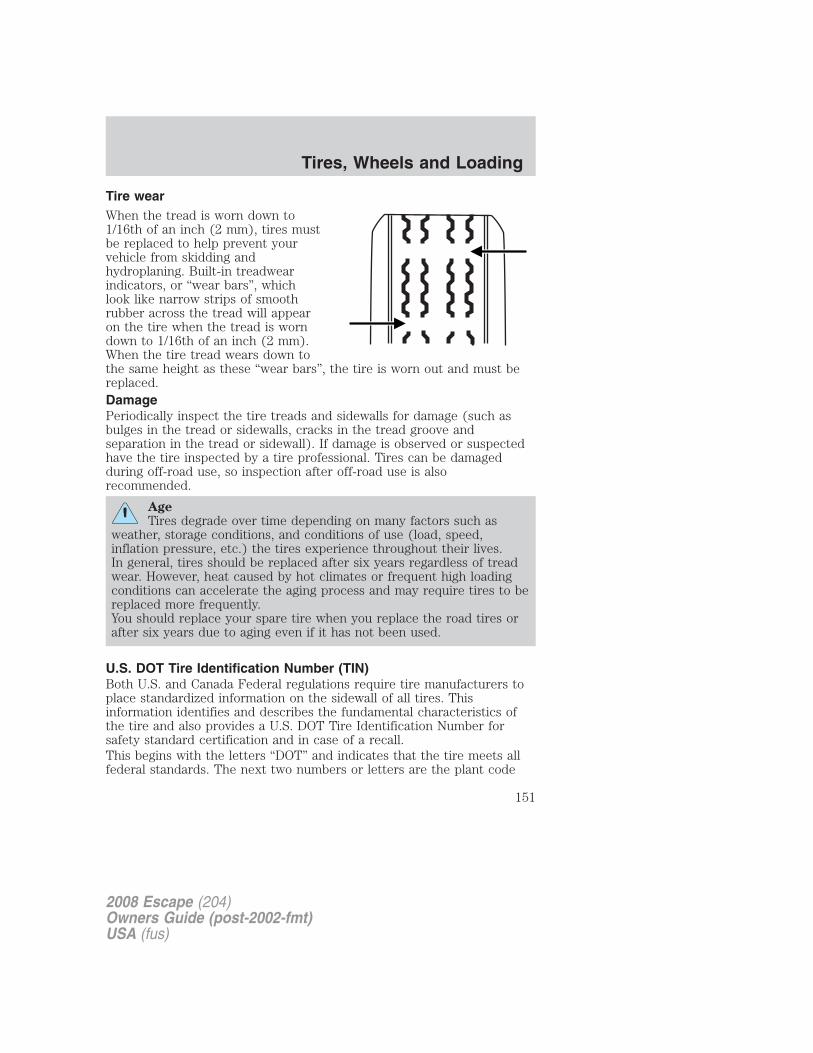
Tire wearWhen the tread is worn down to1/16th of an inch (2 mm), tires mustbe replaced to help prevent yourvehicle from skidding andhydroplaning. Built-in treadwearindicators, or “wear bars”, whichlook like narrow strips of smoothrubber across the tread will appearon the tire when the tread is worndown to 1/16th of an inch (2 mm).When the tire tread wears down tothe same height as these “wear bars”, the tire is worn out and must bereplaced.DamagePeriodically inspect the tire treads and sidewalls for damage (such asbulges in the tread or sidewalls, cracks in the tread groove andseparation in the tread or sidewall). If damage is observed or suspectedhave the tire inspected by a tire professional. Tires can be damagedduring off-road use, so inspection after off-road use is alsorecommended.
AgeTires degrade over time depending on many factors such as
weather, storage conditions, and conditions of use (load, speed,inflation pressure, etc.) the tires experience throughout their lives.In general, tires should be replaced after six years regardless of treadwear. However, heat caused by hot climates or frequent high loadingconditions can accelerate the aging process and may require tires to bereplaced more frequently.You should replace your spare tire when you replace the road tires orafter six years due to aging even if it has not been used.
U.S. DOT Tire Identification Number (TIN)Both U.S. and Canada Federal regulations require tire manufacturers toplace standardized information on the sidewall of all tires. Thisinformation identifies and describes the fundamental characteristics ofthe tire and also provides a U.S. DOT Tire Identification Number forsafety standard certification and in case of a recall.This begins with the letters “DOT” and indicates that the tire meets allfederal standards. The next two numbers or letters are the plant code
2008 Escape (204)Owners Guide (post-2002-fmt)USA (fus)
Tires, Wheels and Loading
151
designating where it was manufactured, the next two are the tire sizecode and the last four numbers represent the week and year the tire wasbuilt. For example, the numbers 317 mean the 31st week of 1997. After2000 the numbers go to four digits. For example, 2501 means the 25thweek of 2001. The numbers in between are identification codes used fortraceability. This information is used to contact customers if a tire defectrequires a recall.
Tire Replacement RequirementsYour vehicle is equipped with tires designed to provide a safe ride andhandling capability.
Only use replacement tires and wheels that are the same size,load index, speed rating and type (such as P-metric versus
LT-metric or all-season versus all-terrain) as those originally providedby Ford. The recommended tire and wheel size may be found on eitherthe Safety Compliance Certification Label or the Tire Label which islocated on the B-Pillar or edge of the driver’s door. If this informationis not found on these labels then you should consult your Ford dealer.Use of any tire or wheel not recommended by Ford can affect thesafety and performance of your vehicle, which could result in anincreased risk of loss of vehicle control, vehicle rollover, personal injuryand death. Additionally the use of non-recommended tires and wheelscould cause steering, suspension, axle or transfer case/power transferunit failure. If you have questions regarding tire replacement, see anauthorized dealer.
2008 Escape (204)Owners Guide (post-2002-fmt)USA (fus)
Tires, Wheels and Loading
152

When mounting replacement tires and wheels, you should notexceed the maximum pressure indicated on the sidewall of the
tire to set the beads without additional precautions listed below. If thebeads do not seat at the maximum pressure indicated, re-lubricate andtry again.When inflating the tire for mounting pressures up to 20 psi greaterthan the maximum pressure on the tire sidewall, the followingprecautions must be taken to protect the person mounting the tire:
1. Make sure that you have the correct tire and wheel size.
2. Lubricate the tire bead and wheel bead seat area again.
3. Stand at a minimum of 12 feet away from the tire wheel assembly.
4. Use both eye and ear protection.For a mounting pressure more than 20 psi greater than the maximumpressure, a Ford Dealer or other tire service professional should do themounting.Always inflate steel carcass tires with a remote air fill with the personinflating standing at a minimum of 12 ft. away from the tire wheelassembly.
Important: Remember to replace the wheel valve stems when the roadtires are replaced on your vehicle.It is recommended that the two front tires or two rear tires generally bereplaced as a pair.The tire pressure sensors mounted in the wheels (originally installed onyour vehicle) are not designed to be used in aftermarket wheels.
The use of wheels or tires not recommended by Ford Motor Companymay affect the operation of your Tire Pressure Monitoring System.
If the TPMS indicator is flashing, your TPMS is malfunctioning. Yourreplacement tire might be incompatible with your TPMS, or somecomponent of the TPMS may be damaged.
Safety practicesDriving habits have a great deal to do with your tire mileage and safety.
• Observe posted speed limits
• Avoid fast starts, stops and turns
• Avoid potholes and objects on the road
• Do not run over curbs or hit the tire against a curb when parking
2008 Escape (204)Owners Guide (post-2002-fmt)USA (fus)
Tires, Wheels and Loading
153

If your vehicle is stuck in snow, mud, sand, etc., do not rapidlyspin the tires; spinning the tires can tear the tire and cause an
explosion. A tire can explode in as little as three to five seconds.
Do not spin the wheels at over 35 mph (56 km/h). The tires mayfail and injure a passenger or bystander.
Highway hazardsNo matter how carefully you drive there’s always the possibility that youmay eventually have a flat tire on the highway. Drive slowly to theclosest safe area out of traffic. This may further damage the flat tire, butyour safety is more important.If you feel a sudden vibration or ride disturbance while driving, or yoususpect your tire or vehicle has been damaged, immediately reduce yourspeed. Drive with caution until you can safely pull off the road. Stop andinspect the tires for damage. If a tire is under-inflated or damaged,deflate it, remove wheel and replace it with your spare tire and wheel. Ifyou cannot detect a cause, have the vehicle towed to the nearest repairfacility or tire dealer to have the vehicle inspected.
Tire and wheel alignmentA bad jolt from hitting a curb or pothole can cause the front end of yourvehicle to become misaligned or cause damage to your tires. If yourvehicle seems to pull to one side when you’re driving, the wheels may beout of alignment. Have an authorized dealer check the wheel alignmentperiodically.
Wheel misalignment in the front or the rear can cause uneven and rapidtreadwear of your tires and should be corrected by an authorized dealer.Front wheel drive (FWD) vehicles and those with an independent rearsuspension (if equipped) may require alignment of all four wheels.
The tires should also be balanced periodically. An unbalanced tire andwheel assembly may result in irregular tire wear.
Tire rotationRotating your tires at the recommended interval (as indicated in thescheduled maintenance information that comes with your vehicle) willhelp your tires wear more evenly, providing better tire performance andlonger tire life. Unless otherwise specified, rotate the tires approximatelyevery 5,000 miles (8,000 km).
2008 Escape (204)Owners Guide (post-2002-fmt)USA (fus)
Tires, Wheels and Loading
154
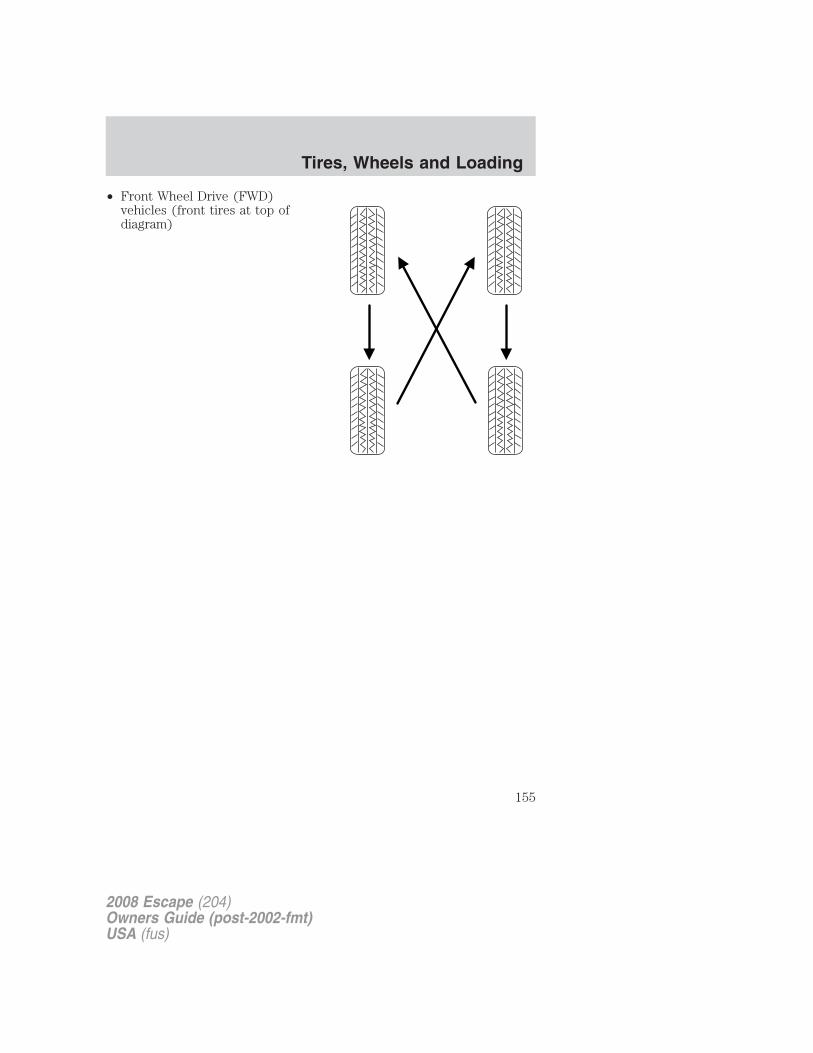
• Front Wheel Drive (FWD)vehicles (front tires at top ofdiagram)
2008 Escape (204)Owners Guide (post-2002-fmt)USA (fus)
Tires, Wheels and Loading
155
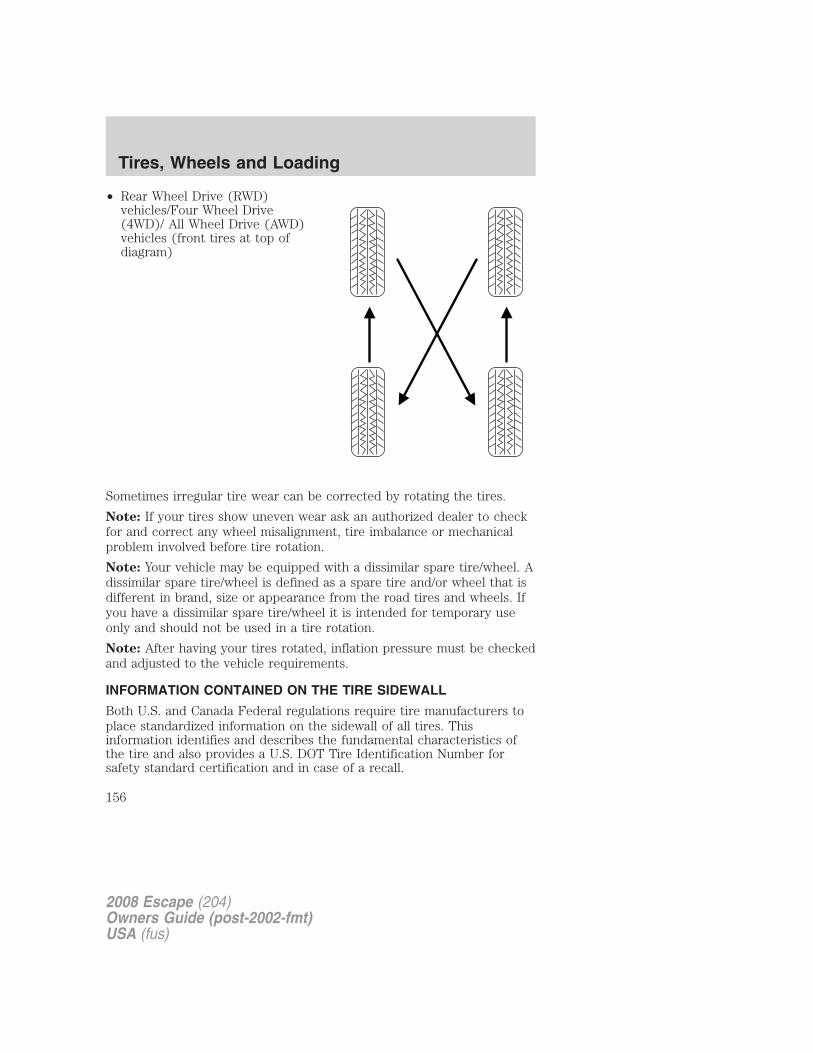
• Rear Wheel Drive (RWD)vehicles/Four Wheel Drive(4WD)/ All Wheel Drive (AWD)vehicles (front tires at top ofdiagram)
Sometimes irregular tire wear can be corrected by rotating the tires.
Note: If your tires show uneven wear ask an authorized dealer to checkfor and correct any wheel misalignment, tire imbalance or mechanicalproblem involved before tire rotation.
Note: Your vehicle may be equipped with a dissimilar spare tire/wheel. Adissimilar spare tire/wheel is defined as a spare tire and/or wheel that isdifferent in brand, size or appearance from the road tires and wheels. Ifyou have a dissimilar spare tire/wheel it is intended for temporary useonly and should not be used in a tire rotation.
Note: After having your tires rotated, inflation pressure must be checkedand adjusted to the vehicle requirements.
INFORMATION CONTAINED ON THE TIRE SIDEWALL
Both U.S. and Canada Federal regulations require tire manufacturers toplace standardized information on the sidewall of all tires. Thisinformation identifies and describes the fundamental characteristics ofthe tire and also provides a U.S. DOT Tire Identification Number forsafety standard certification and in case of a recall.
2008 Escape (204)Owners Guide (post-2002-fmt)USA (fus)
Tires, Wheels and Loading
156

Information on “P” type tiresP215/65R15 95H is an example of atire size, load index and speedrating. The definitions of theseitems are listed below. (Note thatthe tire size, load index and speedrating for your vehicle may bedifferent from this example.)
1. P: Indicates a tire, designated bythe Tire and Rim Association(T&RA), that may be used forservice on cars, SUVs, minivans andlight trucks.
Note: If your tire size does notbegin with a letter this may mean itis designated by either ETRTO(European Tire and Rim Technical Organization) or JATMA (Japan TireManufacturing Association).2. 215: Indicates the nominal width of the tire in millimeters fromsidewall edge to sidewall edge. In general, the larger the number, thewider the tire.3. 65: Indicates the aspect ratio which gives the tire’s ratio of height towidth.4. R: Indicates a “radial” type tire.
5. 15: Indicates the wheel or rim diameter in inches. If you change yourwheel size, you will have to purchase new tires to match the new wheeldiameter.
6. 95: Indicates the tire’s load index. It is an index that relates to howmuch weight a tire can carry. You may find this information in yourOwner’s Guide. If not, contact a local tire dealer.
Note: You may not find this information on all tires because it is notrequired by federal law.
7. H: Indicates the tire’s speed rating. The speed rating denotes thespeed at which a tire is designed to be driven for extended periods oftime under a standard condition of load and inflation pressure. The tireson your vehicle may operate at different conditions for load and inflationpressure. These speed ratings may need to be adjusted for the differencein conditions. The ratings range from 81 mph (130 km/h) to 186 mph(299 km/h). These ratings are listed in the following chart.
2008 Escape (204)Owners Guide (post-2002-fmt)USA (fus)
Tires, Wheels and Loading
157
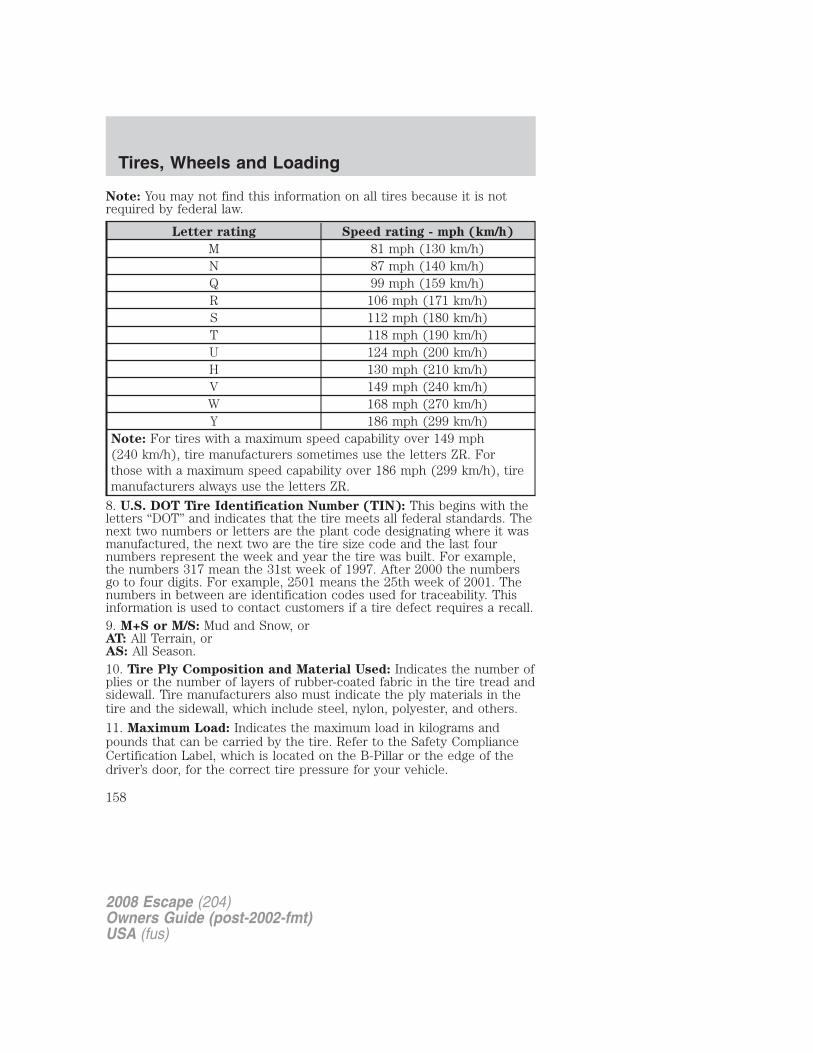
Note: You may not find this information on all tires because it is notrequired by federal law.
Letter rating Speed rating - mph (km/h)
M 81 mph (130 km/h)N 87 mph (140 km/h)Q 99 mph (159 km/h)R 106 mph (171 km/h)S 112 mph (180 km/h)T 118 mph (190 km/h)U 124 mph (200 km/h)H 130 mph (210 km/h)V 149 mph (240 km/h)W 168 mph (270 km/h)Y 186 mph (299 km/h)
Note: For tires with a maximum speed capability over 149 mph(240 km/h), tire manufacturers sometimes use the letters ZR. Forthose with a maximum speed capability over 186 mph (299 km/h), tiremanufacturers always use the letters ZR.
8. U.S. DOT Tire Identification Number (TIN): This begins with theletters “DOT” and indicates that the tire meets all federal standards. Thenext two numbers or letters are the plant code designating where it wasmanufactured, the next two are the tire size code and the last fournumbers represent the week and year the tire was built. For example,the numbers 317 mean the 31st week of 1997. After 2000 the numbersgo to four digits. For example, 2501 means the 25th week of 2001. Thenumbers in between are identification codes used for traceability. Thisinformation is used to contact customers if a tire defect requires a recall.9. M+S or M/S: Mud and Snow, orAT: All Terrain, orAS: All Season.10. Tire Ply Composition and Material Used: Indicates the number ofplies or the number of layers of rubber-coated fabric in the tire tread andsidewall. Tire manufacturers also must indicate the ply materials in thetire and the sidewall, which include steel, nylon, polyester, and others.
11. Maximum Load: Indicates the maximum load in kilograms andpounds that can be carried by the tire. Refer to the Safety ComplianceCertification Label, which is located on the B-Pillar or the edge of thedriver’s door, for the correct tire pressure for your vehicle.
2008 Escape (204)Owners Guide (post-2002-fmt)USA (fus)
Tires, Wheels and Loading
158

12. Treadwear, Traction and Temperature Grades
• Treadwear: The treadwear grade is a comparative rating based on thewear rate of the tire when tested under controlled conditions on aspecified government test course. For example, a tire graded 150would wear one and one-half (11⁄2) times as well on the governmentcourse as a tire graded 100.
• Traction: The traction grades, from highest to lowest are AA, A, B,and C. The grades represent the tire’s ability to stop on wet pavementas measured under controlled conditions on specified government testsurfaces of asphalt and concrete. A tire marked C may have poortraction performance.
• Temperature: The temperature grades are A (the highest), B and C,representing the tire’s resistance to the generation of heat and itsability to dissipate heat when tested under controlled conditions on aspecified indoor laboratory test wheel.
13. Maximum Permissible Inflation Pressure: Indicates the tiremanufacturers’ maximum permissible pressure and/or the pressure atwhich the maximum load can be carried by the tire. This pressure isnormally higher than the manufacturer’s recommended cold inflationpressure which can be found on the Safety Compliance CertificationLabel or Tire Label which is located on the B-Pillar or the edge of thedriver’s door. The cold inflation pressure should never be set lower thanthe recommended pressure on the vehicle label.
The tire suppliers may have additional markings, notes or warnings suchas standard load, radial tubeless, etc.
2008 Escape (204)Owners Guide (post-2002-fmt)USA (fus)
Tires, Wheels and Loading
159
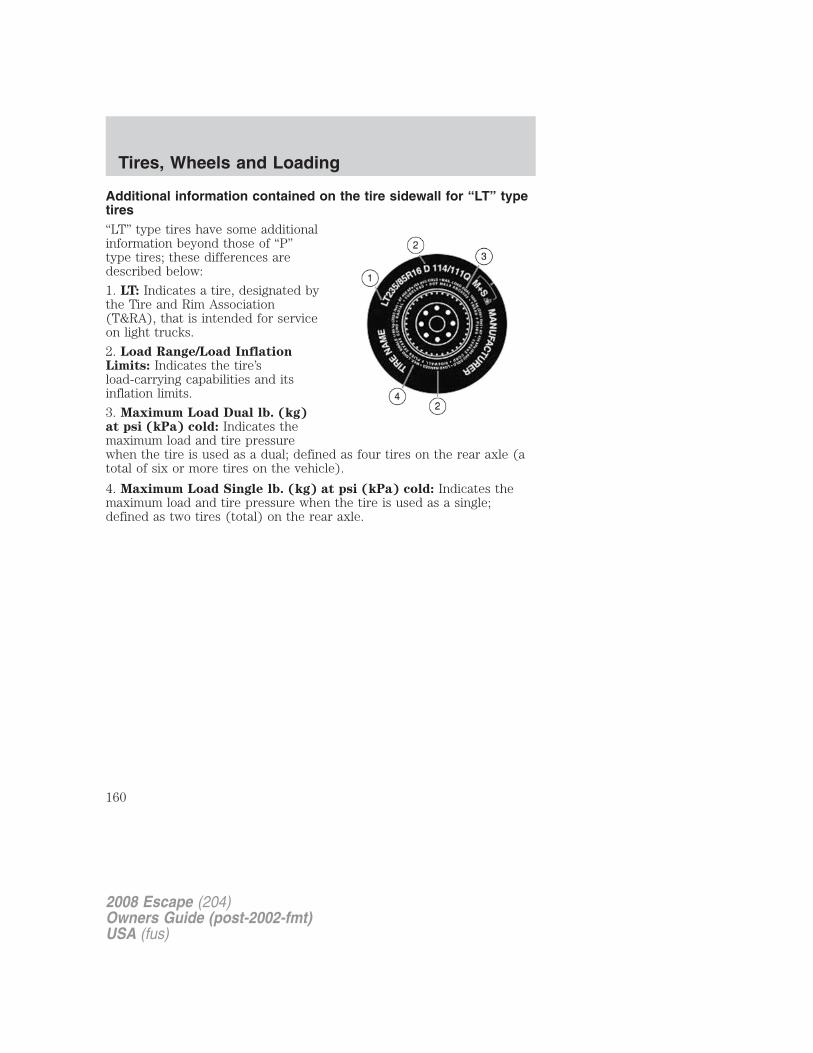
Additional information contained on the tire sidewall for “LT” typetires“LT” type tires have some additionalinformation beyond those of “P”type tires; these differences aredescribed below:
1. LT: Indicates a tire, designated bythe Tire and Rim Association(T&RA), that is intended for serviceon light trucks.
2. Load Range/Load InflationLimits: Indicates the tire’sload-carrying capabilities and itsinflation limits.
3. Maximum Load Dual lb. (kg)at psi (kPa) cold: Indicates themaximum load and tire pressurewhen the tire is used as a dual; defined as four tires on the rear axle (atotal of six or more tires on the vehicle).
4. Maximum Load Single lb. (kg) at psi (kPa) cold: Indicates themaximum load and tire pressure when the tire is used as a single;defined as two tires (total) on the rear axle.
2008 Escape (204)Owners Guide (post-2002-fmt)USA (fus)
Tires, Wheels and Loading
160

Information on “T” type tires“T” type tires have some additionalinformation beyond those of “P”type tires; these differences aredescribed below:
T145/80D16 is an example of a tiresize.Note: The temporary tire size foryour vehicle may be different fromthis example.
1. T: Indicates a type of tire,designated by the Tire and RimAssociation (T&RA), that is intendedfor temporary service on cars, SUVs,minivans and light trucks.
2. 145: Indicates the nominal widthof the tire in millimeters fromsidewall edge to sidewall edge. Ingeneral, the larger the number, the wider the tire.3. 80: Indicates the aspect ratio which gives the tire’s ratio of height towidth. Numbers of 70 or lower indicate a short sidewall.
4. D: Indicates a “diagonal” type tire.R: Indicates a “radial” type tire.
5. 16: Indicates the wheel or rim diameter in inches. If you change yourwheel size, you will have to purchase new tires to match the new wheeldiameter.
Location of the tire labelYou will find a Tire Label containing tire inflation pressure by tire sizeand other important information located on the B-Pillar or the edge ofthe driver’s door. Refer to the payload description and graphic in theVehicle loading — with and without a trailer section.
TIRE PRESSURE MONITORING SYSTEM (TPMS)Each tire, including the spare (ifprovided), should be checkedmonthly when cold and inflated tothe inflation pressure recommendedby the vehicle manufacturer on the
2008 Escape (204)Owners Guide (post-2002-fmt)USA (fus)
Tires, Wheels and Loading
161

vehicle placard or tire inflation pressure label. (If your vehicle has tiresof a different size than the size indicated on the vehicle placard or tireinflation pressure label, you should determine the proper tire inflationpressure for those tires.)
As an added safety feature, your vehicle has been equipped with a tirepressure monitoring system (TPMS) that illuminates a low tire pressuretelltale when one or more of your tires is significantly under-inflated.Accordingly, when the low tire pressure telltale illuminates, you shouldstop and check your tires as soon as possible, and inflate them to theproper pressure. Driving on a significantly under-inflated tire causes thetire to overheat and can lead to tire failure. Under-inflation also reducesfuel efficiency and tire tread life, and may affect the vehicle’s handlingand stopping ability.
Please note that the TPMS is not a substitute for proper tiremaintenance, and it is the driver’s responsibility to maintain correct tirepressure, even if under-inflation has not reached the level to triggerillumination of the TPMS low tire pressure telltale.
Your vehicle has also been equipped with a TPMS malfunction indicatorto indicate when the system is not operating properly. The TPMSmalfunction indicator is combined with the low tire pressure telltale.When the system detects a malfunction, the telltale will flash forapproximately one minute and then remain continuously illuminated.This sequence will continue upon subsequent vehicle start-ups as long asthe malfunction exists.
When the malfunction indicator is illuminated, the system may not beable to detect or signal low tire pressure as intended. TPMS malfunctionsmay occur for a variety of reasons, including the installation ofreplacement or alternate tires or wheels on the vehicle that prevent theTPMS from functioning properly. Always check the TPMS malfunctiontelltale after replacing one or more tires or wheels on your vehicle toensure that the replacement or alternate tires and wheels allow theTPMS to continue to function properly.
The Tire Pressure Monitoring System complies with part 15 of the FCCrules and with RSS-210 of Industry Canada. Operation is subject to thefollowing two conditions: (1) This device may not cause harmfulinterference, and (2) This device must accept any interference received,including interference that may cause undesired operation.
2008 Escape (204)Owners Guide (post-2002-fmt)USA (fus)
Tires, Wheels and Loading
162

The Tire Pressure Monitoring System is NOT a substitute formanually checking tire pressure. The tire pressure should be
checked periodically (at least monthly) using a tire gauge, seeInflating your tires in this chapter. Failure to properly maintain yourtire pressure could increase the risk of tire failure, loss of control,vehicle rollover and personal injury.
Changing tires with TPMS
Each road tire is equipped witha tire pressure sensor fastenedto the inside rim of the wheel.The pressure sensor is coveredby the tire and is not visibleunless the tire is removed. Thepressure sensor is locatedopposite (180 degrees) from thevalve stem. Care must be takenwhen changing the tire to avoiddamaging the sensor. It isrecommended that you always haveyour tires serviced by an authorizeddealer.
The tire pressure should be checkedperiodically (at least monthly) usingan accurate tire gauge, refer toInflating your tires in this chapter.
Understanding your Tire Pressure Monitoring System (TPMS)The Tire Pressure Monitoring System measures pressure in your fourroad tires and sends the tire pressure readings to your vehicle. The LowTire Warning Lamp will turn ON if the tire pressure is significantly low.Once the light is illuminated, your tires are under inflated and need to beinflated to the manufacturer’s recommended tire pressure. Even if thelight turns ON and a short time later turns OFF, your tire pressure stillneeds to be checked.
When your temporary spare tire is installedWhen one of your road tires needs to be replaced with the temporaryspare, the TPMS system will continue to identify an issue to remind youthat the damaged road wheel/tire needs to be repaired and put back onyour vehicle.
2008 Escape (204)Owners Guide (post-2002-fmt)USA (fus)
Tires, Wheels and Loading
163

To restore the full functionality of the Tire Pressure Monitoring System,have the damaged road wheel/tire repaired and remounted on yourvehicle. For additional information, refer to Changing tires with TPMSin this section.
When you believe your system is not operating properlyThe main function of the Tire Pressure Monitoring System is to warn youwhen your tires need air. It can also warn you in the event the system is nolonger capable of functioning as intended. Please refer to the followingchart for information concerning your Tire Pressure Monitoring System:
Low Tire
Pressure
Warning Light
Possible
cause
Customer Action Required
Solid WarningLight
Tire(s)under-inflated
1. Check your tire pressure toensure tires are properly inflated;refer to Inflating your tires in thischapter.2. After inflating your tires to themanufacturer’s recommendedinflation pressure as shown on theTire Label (located on the edge ofdriver’s door or the B-Pillar), thevehicle must be driven for at leasttwo minutes over 20 mph (32 km/h)before the light will turn OFF.
Spare tire inuse
Your temporary spare tire is in use.Repair the damaged road wheel/tireand reinstall it on the vehicle torestore system functionality. For adescription on how the systemfunctions, refer to When your
temporary spare tire is installed
in this section.TPMSmalfunction
If your tires are properly inflated andyour spare tire is not in use and thelight remains ON, have the systeminspected by your authorized dealer.
2008 Escape (204)Owners Guide (post-2002-fmt)USA (fus)
Tires, Wheels and Loading
164

Low Tire
Pressure
Warning Light
Possible
cause
Customer Action Required
FlashingWarning Light
Spare tire inuse
Your temporary spare tire is in use.Repair the damaged road wheel andre-mount it on the vehicle to restoresystem functionality. For adescription of how the systemfunctions under these conditions,refer to When your temporary
spare tire is installed in this section.TPMSmalfunction
If your tires are properly inflatedand your spare tire is not in use andthe TPMS warning light still flashes,have the system inspected by yourauthorized dealer.
When inflating your tiresWhen putting air into your tires (such as at a gas station or in yourgarage), the Tire Pressure Monitoring System may not respondimmediately to the air added to your tires.It may take up to two minutes of driving over 20 mph (32 km/h) for thelight to turn OFF after you have filled your tires to the recommendedinflation pressure.
How temperature affects your tire pressureThe Tire Pressure Monitoring System (TPMS) monitors tire pressure ineach pneumatic tire. While driving in a normal manner, a typicalpassenger tire inflation pressure may increase approximately 2 to 4 psi(14 to 28 kPa) from a cold start situation. If the vehicle is stationaryover night with the outside temperature significantly lower than thedaytime temperature, the tire pressure may decrease approximately 3 psi(20.7 kPa) for a drop of 30° F (16.6°C) in ambient temperature. Thislower pressure value may be detected by the TPMS as being significantlylower than the recommended inflation pressure and activate the TPMSwarning for low tire pressure. If the low tire pressure warning light isON, visually check each tire to verify that no tire is flat. (If one or moretires are flat, repair as necessary.) Check air pressure in the road tires. Ifany tire is under-inflated, carefully drive the vehicle to the nearestlocation where air can be added to the tires. Inflate all the tires to therecommended inflation pressure.
2008 Escape (204)Owners Guide (post-2002-fmt)USA (fus)
Tires, Wheels and Loading
165

SNOW TIRES AND CABLES
Snow tires must be the same size and grade as the tires youcurrently have on your vehicle.
The tires on your vehicle have all weather treads to provide traction inrain and snow. However, in some climates, you may need to use snowtires and cables. If you need to use cables, it is recommended that steelwheels (of the same size and specifications) be used, as cables may chipaluminum wheels.Follow these guidelines when using snow tires and traction devices:• SAE class “S” cables should ONLY be used on the front axle for
P235/70R16 tires.• Do not use cables or chains with P225/65R17 tires.• Install cables securely, verifying that the cables do not touch any
wiring, brake lines or fuel lines.• Drive cautiously. If you hear the cables rub or bang against the
vehicle, stop and retighten them. If this does not work, remove thecables to prevent vehicle damage.
• Avoid overloading your vehicle.• Remove the cables when they are no longer needed.• Do not use cables on dry roads.• Do not exceed 30 mph (48 km/h) with tire cables on your vehicle.Consult your authorized dealer for information on other Ford MotorCompany approved methods of traction control.
VEHICLE LOADING – WITH AND WITHOUT A TRAILERThis section will guide you in the proper loading of your vehicle and/ortrailer, to keep your loaded vehicle weight within its design ratingcapability, with or without a trailer. Properly loading your vehicle willprovide maximum return of vehicle design performance. Before loadingyour vehicle, familiarize yourself with the following terms for determiningyour vehicle’s weight ratings, with or without a trailer, from the vehicle’sTire Label or Safety Compliance Certification Label:Base Curb Weight – is the weight of the vehicle including a full tank offuel and all standard equipment. It does not include passengers, cargo, oroptional equipment.Vehicle Curb Weight – is the weight of your new vehicle when youpicked it up from your authorized dealer plus any aftermarketequipment.
2008 Escape (204)Owners Guide (post-2002-fmt)USA (fus)
Tires, Wheels and Loading
166

Payload – is the combined weight of cargo and passengers that thevehicle is carrying. The maximum payload for your vehicle can be foundon the Tire Label on the B-Pillar or the edge of the driver’s door(vehicles exported outside the US and Canada may not have a TireLabel). Look for “THE COMBINED WEIGHT OF OCCUPANTS ANDCARGO SHOULD NEVER EXCEED XXX kg OR XXX lb.” formaximum payload. The payload listed on the Tire Label is the maximumpayload for the vehicle as built by the assembly plant. If any aftermarketor authorized-dealer installed equipment has been installed on thevehicle, the weight of the equipment must be subtracted from thepayload listed on the Tire Label in order to determine the new payload.
The appropriate loading capacity of your vehicle can be limitedeither by volume capacity (how much space is available) or by
payload capacity (how much weight the vehicle should carry). Onceyou have reached the maximum payload of your vehicle, do not addmore cargo, even if there is space available. Overloading or improperlyloading your vehicle can contribute to loss of vehicle control andvehicle rollover.
2008 Escape (204)Owners Guide (post-2002-fmt)USA (fus)
Tires, Wheels and Loading
167

Example only:
Cargo Weight – includes all weight added to the Base Curb Weight,including cargo and optional equipment. When towing, trailer tongue loador king pin weight is also part of cargo weight.
GAW (Gross Axle Weight) – is the total weight placed on each axle(front and rear) – including vehicle curb weight and all payload.
2008 Escape (204)Owners Guide (post-2002-fmt)USA (fus)
Tires, Wheels and Loading
168

GAWR (Gross Axle Weight Rating) – is the maximum allowableweight that can be carried by a single axle (front or rear). Thesenumbers are shown on the Safety Compliance Certification Labellocated on the B-Pillar or the edge of the driver’s door. The totalload on each axle must never exceed its GAWR.
Note: For trailer towing information refer to Trailer towing found inthis chapter or the RV and Trailer Towing Guide provided by yourauthorized dealer.
GVW (Gross Vehicle Weight) – is the Vehicle Curb Weight + cargo +passengers.
GVWR (Gross Vehicle WeightRating) – is the maximumallowable weight of the fully loadedvehicle (including all options,equipment, passengers and cargo).The GVWR is shown on theSafety Compliance CertificationLabel located on the B-Pillar orthe edge of the driver’s door.The GVW must never exceed theGVWR.
Exceeding the Safety Compliance Certification Label vehicleweight rating limits could result in substandard vehicle handling
or performance, engine, transmission and/or structural damage, seriousdamage to the vehicle, loss of control and personal injury.
2008 Escape (204)Owners Guide (post-2002-fmt)USA (fus)
Tires, Wheels and Loading
169

GCW (Gross Combined Weight) – is the weight of the loaded vehicle(GVW) plus the weight of the fully loaded trailer.GCWR (Gross Combined Weight Rating) – is the maximum allowableweight of the vehicle and the loaded trailer – including all cargo andpassengers – that the vehicle can handle without risking damage.(Important: The towing vehicle’s braking system is rated for operation atGVWR, not at GCWR.) Separate functional brakes should be used forsafe control of towed vehicles and for trailers where the GCW of thetowing vehicle plus the trailer exceed the GVWR of the towing vehicle.The GCW must never exceed the GCWR.
Maximum Loaded Trailer Weight – is the highest possible weight of afully loaded trailer the vehicle can tow. It assumes a vehicle with onlymandatory options, no cargo (internal or external), a tongue load of10–15% (conventional trailer) or king pin weight of 15–25% (fifth wheeltrailer), and driver only (150 lb. [68 kg]). Consult your authorizeddealer (or the RV and Trailer Towing Guide provided by yourauthorized dealer) for more detailed information.
Tongue Load or Fifth Wheel King Pin Weight – refers to the amountof the weight that a trailer pushes down on a trailer hitch.Examples: For a 5,000 lb. (2,268 kg) conventional trailer, multiply 5,000by 0.10 and 0.15 to obtain a proper tongue load range of 500 to 750 lb.(227 to 340 kg). For an 11,500 lb. (5,216 kg) fifth wheel trailer, multiplyby 0.15 and 0.25 to obtain a proper king pin load range of 1,725 to2,875 lb. (782 to 1,304 kg)
Do not exceed the GVWR or the GAWR specified on the SafetyCompliance Certification Label.
Do not use replacement tires with lower load carrying capacitiesthan the original tires because they may lower the vehicle’s
GVWR and GAWR limitations. Replacement tires with a higher limitthan the original tires do not increase the GVWR and GAWRlimitations.
2008 Escape (204)Owners Guide (post-2002-fmt)USA (fus)
Tires, Wheels and Loading
170

Exceeding any vehicle weight rating limitation could result inserious damage to the vehicle and/or personal injury.
Steps for determining the correct load limit:
1. Locate the statement “The combined weight of occupants and cargoshould never exceed XXX kg or XXX lbs.” on your vehicle’s placard.
2. Determine the combined weight of the driver and passengers that willbe riding in your vehicle.
3. Subtract the combined weight of the driver and passengers from XXX kgor XXX lbs.
4. The resulting figure equals the available amount of cargo and luggageload capacity. For example, if the “XXX” amount equals 1,400 lbs. andthere will be five 150 lb. passengers in your vehicle, the amount ofavailable cargo and luggage load capacity is 650 lbs. (1400-750 (5 x 150)= 650 lb.). In metric units (635-340 (5 x 68) = 295 kg.)
5. Determine the combined weight of luggage and cargo being loaded onthe vehicle. That weight may not safely exceed the available cargo andluggage load capacity calculated in Step 4.
6. If your vehicle will be towing a trailer, load from your trailer will betransferred to your vehicle. Consult this manual to determine how thisreduces the available cargo and luggage load capacity of your vehicle.
The following gives you a few examples on how to calculate the availableamount of cargo and luggage load capacity:
• Another example for your vehicle with 1400 lb. (635 kg) of cargo andluggage capacity. You decide to go golfing. Is there enough loadcapacity to carry you, 4 of your friends and all the golf bags? You andfour friends average 220 lb. (99 kg) each and the golf bags weighapproximately 30 lb. (13.5 kg) each. The calculation would be: 1400 -(5 x 220) - (5 x 30) = 1400 - 1100 - 150 = 150 lb. Yes, you haveenough load capacity in your vehicle to transport four friends andyour golf bags. In metric units, the calculation would be: 635 kg - (5 x99 kg) - (5 x 13.5 kg) = 635 - 495 - 67.5 = 72.5 kg.
• A final example for your vehicle with 1400 lb. (635 kg) of cargo andluggage capacity. You and one of your friends decide to pick up cementfrom the local home improvement store to finish that patio you havebeen planning for the past 2 years. Measuring the inside of the vehiclewith the rear seat folded down, you have room for 12-100 lb. (45 kg)bags of cement. Do you have enough load capacity to transport the
2008 Escape (204)Owners Guide (post-2002-fmt)USA (fus)
Tires, Wheels and Loading
171
cement to your home? If you and your friend each weigh 220 lb.(99 kg), the calculation would be: 1400 - (2 x 220) - (12 x 100) = 1400- 440 - 1200 = - 240 lb. No, you do not have enough cargo capacity tocarry that much weight. In metric units, the calculation would be:635 kg - (2 x 99 kg) - (12 x 45 kg) = 635 - 198 - 540 = -103 kg. You willneed to reduce the load weight by at least 240 lb. (104 kg). If you remove3-100 lb. (45 kg) cement bags, then the load calculation would be:1400 - (2 x 220) - (9 x 100) = 1400 - 440 - 900 = 60 lb. Now you havethe load capacity to transport the cement and your friend home. Inmetric units, the calculation would be: 635 kg - (2 x 99 kg) - (9 x45 kg) = 635 - 198 - 405 = 32 kg.
The above calculations also assume that the loads are positioned in yourvehicle in a manner that does not overload the Front or the Rear GrossAxle Weight Rating specified for your vehicle on the Safety ComplianceCertification Label found on the edge of the driver’s door.
Special loading instructions for owners of pickup trucks andutility-type vehicles
For important information regarding safe operation of this typeof vehicle, see the Preparing to drive your vehicle section in
the Driving chapter of this Owner’s Guide.
Loaded vehicles may handle differently than unloaded vehicles.Extra precautions, such as slower speeds and increased stopping
distance, should be taken when driving a heavily loaded vehicle.
Your vehicle can haul more cargo and people than most passenger cars.Depending upon the type and placement of the load, hauling cargo andpeople may raise the center of gravity of the vehicle.
TRAILER TOWINGTrailer towing with your vehicle may require the use of a trailer towoption package.Trailer towing puts additional loads on your vehicle’s engine, transaxle,axle, brakes, tires, and suspension. For your safety and to maximizevehicle performance, be sure to use the proper equipment while towing.
Follow these guidelines to ensure safe towing procedure:
• Stay within your vehicle’s load limits.
• Thoroughly prepare your vehicle for towing. Refer to Preparing totow in this chapter.
2008 Escape (204)Owners Guide (post-2002-fmt)USA (fus)
Tires, Wheels and Loading
172

• Use extra caution when driving while trailer towing. Refer to Driving
while you tow in this chapter.
• Service your vehicle more frequently if you tow a trailer. Refer to yourscheduled maintenance information for more information.
• Do not tow a trailer until your vehicle has been driven at least 800 km(500 miles).
• Refer to the instructions included with towing accessories for theproper installation and adjustment specifications.
Do not exceed the maximum loads listed on the Safety ComplianceCertification Label. For load specification terms found on the label, referto Vehicle loading in this chapter. Remember to figure in the tongueload of your loaded vehicle when figuring the total weight.
4x2
GCWR (Gross Combined Weight Rating)/Trailer Weights
Engine Maximum
GCWR - lb.
(kg)
Trailer Weight
Range - lb.
(kg)
Maximum
frontal area of
trailer - ft2
(m)2
2.3L w/manualtransmission
4940 (2241) 1500 (680) 24 (2.2)
2.3Lw/automatictransmission
4980 (2259) 1500 (6 80) 24 (2.2)
3.0Lw/automatictransmission
7080 (3211) 3500 (1588) 30 (2.8)
Notes: For high altitude operation, reduce GCW by 2% per 1000 ft.(300 meters) elevation. For definitions of terms and instructions oncalculating your vehicle’s load, refer to Vehicle loading in this chapter.Maximum trailer weights shown. The combined weight of the completedtowing vehicle and the loaded trailer must not exceed the GCWR.The Escape is capable of pulling the maximum trailer weight(s) asspecified above. Certain states require electric trailer brakes for trailersover a specified weight. The Escape vehicle electrical system is notequipped to accommodate electric trailer brakes.
2008 Escape (204)Owners Guide (post-2002-fmt)USA (fus)
Tires, Wheels and Loading
173
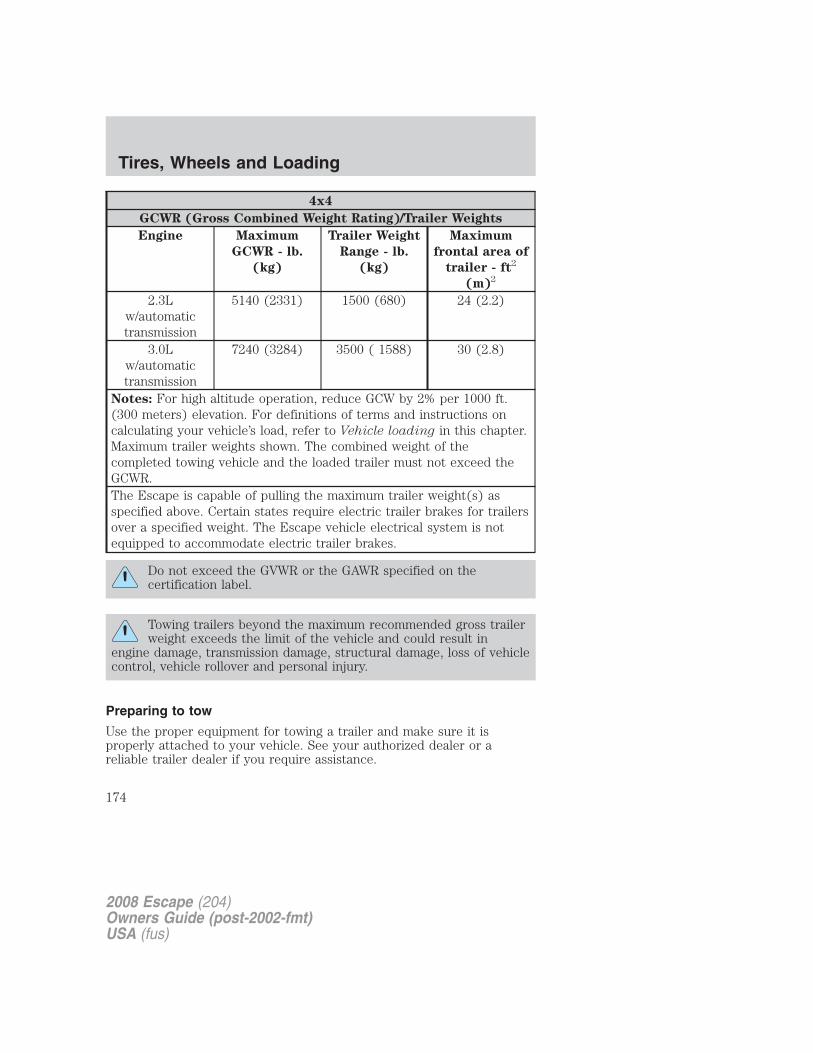
4x4
GCWR (Gross Combined Weight Rating)/Trailer Weights
Engine Maximum
GCWR - lb.
(kg)
Trailer Weight
Range - lb.
(kg)
Maximum
frontal area of
trailer - ft2
(m)2
2.3Lw/automatictransmission
5140 (2331) 1500 (680) 24 (2.2)
3.0Lw/automatictransmission
7240 (3284) 3500 ( 1588) 30 (2.8)
Notes: For high altitude operation, reduce GCW by 2% per 1000 ft.(300 meters) elevation. For definitions of terms and instructions oncalculating your vehicle’s load, refer to Vehicle loading in this chapter.Maximum trailer weights shown. The combined weight of thecompleted towing vehicle and the loaded trailer must not exceed theGCWR.The Escape is capable of pulling the maximum trailer weight(s) asspecified above. Certain states require electric trailer brakes for trailersover a specified weight. The Escape vehicle electrical system is notequipped to accommodate electric trailer brakes.
Do not exceed the GVWR or the GAWR specified on thecertification label.
Towing trailers beyond the maximum recommended gross trailerweight exceeds the limit of the vehicle and could result in
engine damage, transmission damage, structural damage, loss of vehiclecontrol, vehicle rollover and personal injury.
Preparing to tow
Use the proper equipment for towing a trailer and make sure it isproperly attached to your vehicle. See your authorized dealer or areliable trailer dealer if you require assistance.
2008 Escape (204)Owners Guide (post-2002-fmt)USA (fus)
Tires, Wheels and Loading
174

HitchesDo not use hitches that clamp onto the vehicle bumper. Use a loadcarrying hitch. You must distribute the load in your trailer so that10–15% of the total weight of the trailer is on the tongue.
Safety chainsAlways connect the trailer’s safety chains to hook retainers on thevehicle. To connect the trailer’s safety chains, cross the chains under thetrailer tongue and allow slack for turning corners.If you use a rental trailer, follow the instructions that the rental agencygives to you.Do not attach safety chains to the bumper.
Trailer brakesElectric, manual, automatic or surge-type brakes, if compatible with thevehicle, are safe if installed properly and adjusted to the manufacturer’sspecifications. The trailer brakes must meet local and Federalregulations.
Do not connect a trailer’s hydraulic brake system directly to yourvehicle’s brake system. Your vehicle may not have enough
braking power and your chances of having a collision greatly increase.
The braking system of the tow vehicle is rated for operation at theGVWR not GCWR.
Trailer lampsTrailer lamps are required on most towed vehicles. Make sure all runninglights, brake lights, turn signals and hazard lights are working. Do notconnect trailer lamps directly to your vehicle’s tail lamps. This can causedamage to your vehicle’s electrical system. See your authorized dealer ortrailer rental agency for proper instructions and equipment for hookingup trailer lamps.
Driving while you towWhen towing a trailer:
• Keep your speed no faster than 70 mph (112 km/h) during the first500 miles (800 km) of towing a trailer, and don’t make full throttlestarts.
• Turn off the speed control. The speed control may shut offautomatically when you are towing on long, steep grades.
2008 Escape (204)Owners Guide (post-2002-fmt)USA (fus)
Tires, Wheels and Loading
175

• Consult your local motor vehicle speed regulations for towing a trailer.• To eliminate excessive shifting, use a lower gear. This will also assist
in transmission cooling. (For additional information, refer toUnderstanding the gearshift positions of the 4–speed automatictransmission in the Driving chapter.
• Anticipate stops and brake gradually.• Do not exceed the GCWR rating or transmission damage may occur.
Servicing after towingIf you tow a trailer for long distances, your vehicle will require morefrequent service intervals. Refer to your scheduled maintenanceinformation for more information.Trailer towing tips• Practice turning, stopping and backing up before starting on a trip to
get the feel of the vehicle trailer combination. When turning, makewider turns so the trailer wheels will clear curbs and other obstacles.
• Allow more distance for stopping with a trailer attached.• If you are driving down a long or steep hill, shift to a lower gear. Do
not apply the brakes continuously, as they may overheat and becomeless effective.
• The trailer tongue weight should be 10–15% of the loaded trailerweight.
• If you will be towing a trailer frequently in hot weather, hillyconditions, at GCWR, or any combination of these factors, considerrefilling your rear axle with synthetic gear lube if not already soequipped. Refer to the Maintenance and Specifications chapter forthe lubricant specification. Remember that regardless of the rear axlelube used, do not tow a trailer for the first 500 miles (800 km) of anew vehicle, and that the first 500 miles (800 km) of towing be doneat no faster than 70 mph (112 km/h) with no full throttle starts.
• After you have traveled 50 miles (80 km), thoroughly check yourhitch, electrical connections and trailer wheel lug nuts.
• To aid in engine/transmission cooling and A/C efficiency during hotweather while stopped in traffic, place the gearshift lever in P (Park).
• Vehicles with trailers should not be parked on a grade. If you mustpark on a grade, place wheel chocks under the trailer’s wheels.
Launching or retrieving a boatDisconnect the wiring to the trailer before backing the trailerinto the water. Reconnect the wiring to the trailer after thetrailer is removed from the water.
2008 Escape (204)Owners Guide (post-2002-fmt)USA (fus)
Tires, Wheels and Loading
176

When backing down a ramp during boat launching or retrieval:
• do not allow the static water level to rise above the bottom edge ofthe rear bumper.
• do not allow waves to break higher than 6 inches (15 cm) above thebottom edge of the rear bumper.
Exceeding these limits may allow water to enter vehicle components:
• causing internal damage to the components.
• affecting driveability, emissions and reliability.
Replace the rear axle lubricant any time the axle has been submerged inwater. Rear axle lubricant quantities are not to be checked or changedunless a leak is suspected or repair required.
RECREATIONAL TOWINGAn example of “recreational towing” is towing your vehicle behind amotorhome.
If your vehicle is automatic transaxle equipped, with a 4x2 (front-wheeldrive only) configured powertrain, “recreational towing” is permitted bytrailering the vehicle with its front wheels on a dolly. This protects thetransmission’s internal mechanical components from potential lack oflubrication damage.
If your vehicle is automatic transaxle equipped and 4WD (all-wheeldrive), “recreational towing” is permitted only if the vehicle is traileredwith all four (4) wheels off the ground. Otherwise, no “recreationaltowing” is permitted.
If your vehicle is manual transaxle equipped and 2WD or 4WD, shiftingthe transaxle into neutral permits “flat-towing” (all wheels on theground) for pulling behind a motorhome. Your vehicle, with welldesigned towing equipment, may be towed up to a speed of 113 km/h(70 mph) but you should always obey local speed limits.
For other towing requirements, refer to Wrecker towing in the RoadsideEmergencies chapter.
2008 Escape (204)Owners Guide (post-2002-fmt)USA (fus)
Tires, Wheels and Loading
177

STARTING
Positions of the ignition1. LOCK, locks the gearshift leverand steering column and allows keyremoval.
2. ACCESSORY, allows the electricalaccessories such as the radio tooperate while the engine is notrunning.
3. RUN, all electrical circuitsoperational and warning lights willilluminate. This is the position thekey is in when you’re driving.4. START, cranks the engine. Release the key as soon as the enginestarts.
Preparing to start your vehicleEngine starting is controlled by the powertrain control system. Thissystem meets all Canadian Interference-Causing Equipment standardrequirements regulating the impulse electrical field strength of radionoise.When starting a fuel-injected engine, avoid pressing the acceleratorbefore or during starting. Only use the accelerator when you havedifficulty starting the engine. For more information on starting thevehicle, refer to Starting the engine in this chapter.
Extended idling at high engine speeds can produce very hightemperatures in the engine and exhaust system, creating the risk
of fire or other damage.
Do not park, idle, or drive your vehicle in dry grass or other dryground cover. The emission system heats up the engine
compartment and exhaust system, which can start a fire.
Do not start your vehicle in a closed garage or in other enclosedareas. Exhaust fumes can be toxic. Always open the garage door
before you start the engine. See Guarding against exhaust fumes inthis chapter for more instructions.
2008 Escape (204)Owners Guide (post-2002-fmt)USA (fus)
Driving
178

If you smell exhaust fumes inside your vehicle, have your dealerinspect your vehicle immediately. Do not drive if you smell
exhaust fumes.
Important safety precautions
A computer system controls the engine’s idle revolutions per minute(RPM). When the engine starts, the idle RPM runs higher than normal inorder to warm the engine. If the engine idle speed does not slow downautomatically, have the vehicle checked by your authorized dealer.
Before starting the vehicle:
1. Make sure all vehicle occupants have buckled their safety belts. Formore information on safety belts and their proper usage, refer to theSeating and Safety Restraints chapter.
2. Make sure the headlamps and vehicle accessories are off.
If starting a vehicle with anautomatic transmission:
• Make sure the parking brake isset.
2008 Escape (204)Owners Guide (post-2002-fmt)USA (fus)
Driving
179

• Make sure the gearshift is in P(Park).
If starting a vehicle with a manualtransmission:
• Make sure the parking brake isset.
• Push the clutch pedal to thefloor.
3. Turn the key to 3 (ON) withoutturning the key to 4 (START).
Some warning lights will briefly illuminate. See Warning lights andchimes in the Instrument Cluster chapter for more informationregarding the warning lights.
2008 Escape (204)Owners Guide (post-2002-fmt)USA (fus)
Driving
180

Starting the engine1. Turn the key to 3 (RUN) withoutturning the key to 4 (START). Ifthere is difficulty in turning the key,rotate the steering wheel until thekey turns freely. This condition mayoccur when:
• the front wheels are turned
• a front wheel is against the curb
2. Turn the key to 4 (START), thenrelease the key as soon as theengine starts. Excessive cranking could damage the starter.Note: If the engine does not start within five seconds on the first try,turn the key to 1 (LOCK), wait 10 seconds and try again. If the enginestill fails to start, press the accelerator to the floor and try again; this willallow the engine to crank with the fuel shut off in case the engine isflooded with fuel.If your vehicle has an automatic transmission, it will have a computerassisted cranking system. This feature assists in starting the engine. Ifthe ignition key is turned to 4 (START) and then released when theengine begins cranking, the engine may continue cranking for up to 10seconds or until the vehicle starts.
Guarding against exhaust fumesCarbon monoxide is present in exhaust fumes. Take precautions to avoidits dangerous effects.
If you smell exhaust fumes inside your vehicle, have your dealerinspect your vehicle immediately. Do not drive if you smell
exhaust fumes.
Important ventilating informationIf the engine is idling while the vehicle is stopped for a long period oftime, open the windows at least one inch (2.5 cm) or adjust the heatingor air conditioning to bring in fresh air.
ENGINE BLOCK HEATER (IF EQUIPPED)An engine block heater warms the engine coolant which aids in startingand heater/defroster performance. Use of an engine block heater is
2008 Escape (204)Owners Guide (post-2002-fmt)USA (fus)
Driving
181
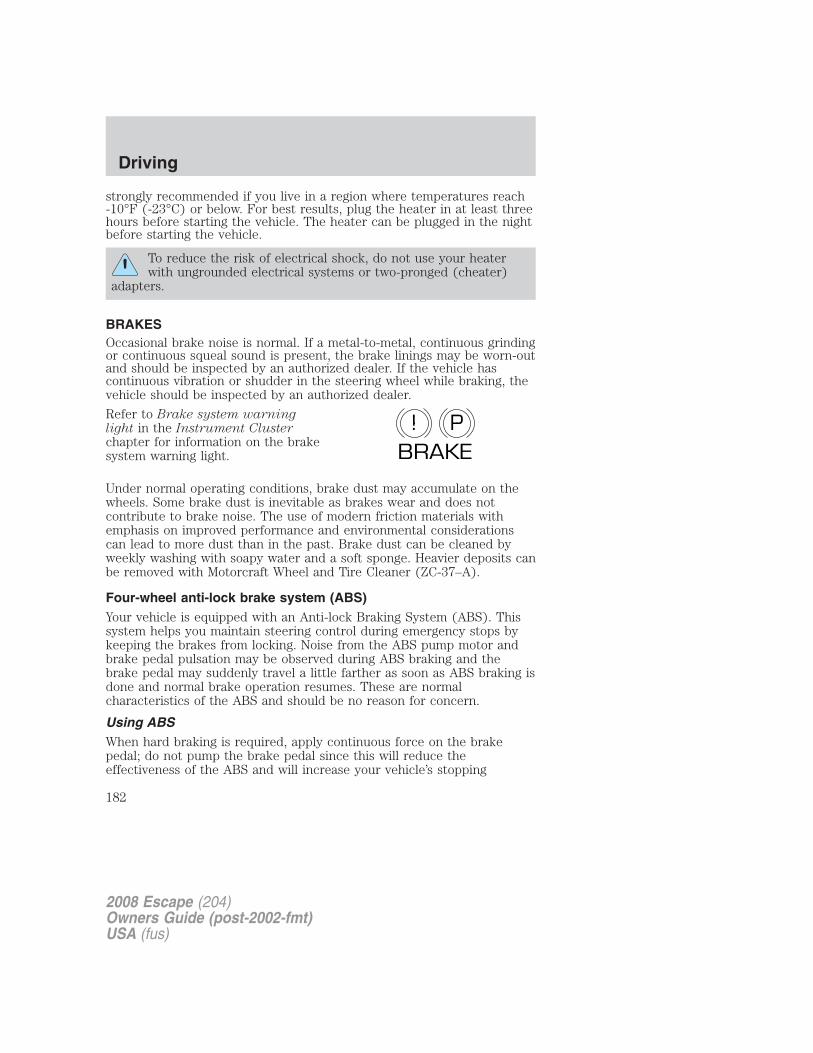
strongly recommended if you live in a region where temperatures reach-10°F (-23°C) or below. For best results, plug the heater in at least threehours before starting the vehicle. The heater can be plugged in the nightbefore starting the vehicle.
To reduce the risk of electrical shock, do not use your heaterwith ungrounded electrical systems or two-pronged (cheater)
adapters.
BRAKESOccasional brake noise is normal. If a metal-to-metal, continuous grindingor continuous squeal sound is present, the brake linings may be worn-outand should be inspected by an authorized dealer. If the vehicle hascontinuous vibration or shudder in the steering wheel while braking, thevehicle should be inspected by an authorized dealer.
Refer to Brake system warninglight in the Instrument Clusterchapter for information on the brakesystem warning light.
Under normal operating conditions, brake dust may accumulate on thewheels. Some brake dust is inevitable as brakes wear and does notcontribute to brake noise. The use of modern friction materials withemphasis on improved performance and environmental considerationscan lead to more dust than in the past. Brake dust can be cleaned byweekly washing with soapy water and a soft sponge. Heavier deposits canbe removed with Motorcraft Wheel and Tire Cleaner (ZC-37–A).
Four-wheel anti-lock brake system (ABS)Your vehicle is equipped with an Anti-lock Braking System (ABS). Thissystem helps you maintain steering control during emergency stops bykeeping the brakes from locking. Noise from the ABS pump motor andbrake pedal pulsation may be observed during ABS braking and thebrake pedal may suddenly travel a little farther as soon as ABS braking isdone and normal brake operation resumes. These are normalcharacteristics of the ABS and should be no reason for concern.
Using ABSWhen hard braking is required, apply continuous force on the brakepedal; do not pump the brake pedal since this will reduce theeffectiveness of the ABS and will increase your vehicle’s stopping
P!BRAKE
2008 Escape (204)Owners Guide (post-2002-fmt)USA (fus)
Driving
182

distance. The ABS will be activated immediately, allowing you to retainsteering control during hard braking and on slippery surfaces. However,the ABS does not decrease stopping distance.
ABS warning lampThe ABS lamp in the instrumentcluster momentarily illuminateswhen the ignition is turned on. Ifthe light does not illuminate duringstart up, remains on or flashes, theABS may be disabled and may need to be serviced.
Even when the ABS is disabled,normal braking is still effective. (Ifyour BRAKE warning lampilluminates with the parking brakereleased, have your brake systemserviced immediately by an authorized dealer.)
Parking brakeApply the parking brake wheneverthe vehicle is parked. To set theparking brake, press the parkingbrake pedal down until the pedalstops.
The BRAKE warning lamp in theinstrument cluster illuminates andremains illuminated (when theignition is turned ON) until theparking brake is released.
If the parking brake is fully released, but the brake warning lampremains illuminated, the brakes may not be working properly.
See your authorized dealer.
ABS
P!BRAKE
P!BRAKE
2008 Escape (204)Owners Guide (post-2002-fmt)USA (fus)
Driving
183

Always set the parking brake fully and make sure that thegearshift is securely latched in P (Park) (automatic
transmission) or in 1 (First) (manual transmission).
The parking brake is not recommended to stop a moving vehicle.However, if the normal brakes fail, the parking brake can be used to stopyour vehicle in an emergency. Since the parking brake applies only therear brakes, the vehicle’s stopping distance will increase greatly and thehandling of your vehicle will be adversely affected.
Pull the release lever to release thebrake. Driving with the parkingbrake on will cause the brakes towear out quickly and reduce fueleconomy.
ADVANCETRAC� WITH ROLL STABILITY CONTROL� (RSC)STABILITY ENHANCEMENT SYSTEMThe AdvanceTrac� with RSC system provides stability enhancementfeatures such as Roll Stability Control� (RSC), Electronic StabilityControl (ESC) and Traction Control (TCS) for certain driving situations.The system includes an AdvanceTrac� with RSC on/off button, and a“sliding car” icon in the instrument cluster.
Some drivers may notice a slight movement of the brake pedal when theAdvanceTrac� with RSC performs a system self-check. DuringAdvanceTrac� with RSC operation you may experience the following:
• A rumble, grunting, or grinding noise after startup and when drivingoff
• A slight deceleration of the vehicle
• The AdvanceTrac� with RSC indicator light will flash when the systemis activated.
• If your foot is on the brake pedal, you will feel a vibration in thepedal.
2008 Escape (204)Owners Guide (post-2002-fmt)USA (fus)
Driving
184

Traction Control
Traction Control helps your vehicle maintain traction, when driving onslippery and/or hilly road surfaces, by detecting and controlling wheelspin. Excessive wheel spin is controlled by momentarily reducing enginepower and/or applying the anti-lock brakes. Traction Control is a driveraid that helps your vehicle.
If your vehicle should become stuck in deep snow or mud, try switchingthe AdvanceTrac� with RSC system off by pressing the AdvanceTrac�with RSC button momentarily. This will allow your tires to “dig” fortraction.
If the AdvanceTrac� with RSC system is activated excessively in a shortperiod of time, the brake portion of the system will disable to allow thebrakes to cool down. In this situation, Traction Control will use onlyengine power reduction to help control the wheels from over-spinning.When the brakes have cooled down, the system will again functionnormally. Anti-lock braking, RSC and ESC are not affected by thiscondition and will function normally during the cool-down period.
If the vehicle is stuck in snow or mud or when driving in deep sand,switching off the AdvanceTrac with RSC system may be beneficial so thewheels are allowed to spin. If your vehicle seems to lose engine powerwhile driving in deep sand or very deep snow, switching off theAdvanceTrac with RSC stability enhancement feature will restore fullengine power and will enhance momentum through the obstacle.
During Traction Control events the “sliding car” icon in the instrumentcluster will flash momentarily.
Electronic Stability Control (ESC)
The Electronic Stability Control (ESC) with RSC system may enhanceyour vehicle’s stability during adverse maneuvers.
The AdvanceTrac� with RSC system helps the driver maintain steeringcontrol. AdvanceTrac� with RSC will attempt to correct the vehiclemotion by applying brake force at individual tires and, if necessary, byreducing engine power.
During Electronic Stability Control events the “sliding car” icon in theinstrument cluster will flash momentarily.
Driving maneuvers which may activate AdvanceTrac� with RSC systeminclude:
• Taking a turn too fast.
• Maneuvering quickly to avoid an accident, pedestrian or obstacle.
2008 Escape (204)Owners Guide (post-2002-fmt)USA (fus)
Driving
185

• Driving over a patch of ice.
• Changing lanes on a snow-rutted road.
• Entering a snow-free road from a snow-covered side street, or viceversa.
• Entering a paved road from a gravel road, or vice versa.
• Driving on slick surfaces.
• Cornering while towing a heavily loaded trailer (refer to Trailertowing in the Tires, Wheels and Loading chapter.)
Roll Stability Control� (RSC)
The RSC system works in conjunction with the AdvanceTrac� system tohelp maintain roll stability of the vehicle during aggressive maneuvers byapplying brake force to one or more wheels.
During Roll Stability Control� (RSC) events the “sliding car” icon in theinstrument cluster will flash momentarily.
Driving conditions that may activate AdvanceTrac� with RSC include:
• Emergency lane-change
• Taking a turn too fast
• Quick maneuvering to avoid an accident, pedestrian or obstacle
AdvanceTrac� with RSC button and icon functionality
The AdvanceTrac� with RSC system automatically turns on each timethe engine is started, even if it was turned off when the engine was lastshut down. The “sliding car” icon which is located with the warninglights in the instrument cluster will illuminate during bulb check at initialstart-up and then go off. This tells you that the system is normal andactive. All functions of the AdvanceTrac� with RSC (RSC, ESC, EngineTraction Control, and Brake Traction Control) will be activated at startup. When the system is left active, the “sliding car” icon will flash onlywhen any of the components of the system are affecting the vehicle’sperformance, otherwise the light will remain off. Consequently, the“sliding car” icon will not be illuminated during most of your normaldriving.
2008 Escape (204)Owners Guide (post-2002-fmt)USA (fus)
Driving
186

The AdvanceTrac� with RSC button,located on the center stack of theinstrument panel, allows the driverto control certain features of theAdvanceTrac� with RSC systembelow 25 mph (40 km/h). If thevehicle is below 25 mph (40 km/h), momentarily pressing theAdvanceTrac� with RSC button will disable RSC, ESC and EngineTraction Control and steadily illuminate the “sliding car” icon. Pressingand holding the AdvanceTrac� with RSC button for more than fiveseconds will further disable the brake portion of the Traction Controlfeature and the “sliding car” icon will flash momentarily and thenilluminate steady.
If the vehicle is above 25 mph (40 km/h), momentarily pressing theAdvanceTrac� with RSC button will steadily illuminate the “sliding car”icon, however, the AdvanceTrac� with RSC system will remain enableduntil the vehicle speed drops below 25 mph. If the vehicle speeddecreases below 25 mph (40 km/h), the system will become deactivated,but if the vehicle speed subsequently increases to above 25 mph(40 km/h), the system will again become active. In general, the systemwill be active at all times the vehicle speed is above 25 mph (40 km/h).
In R (Reverse), ABS and the Traction Control feature will continue tofunction, however ESC and RSC are disabled.
All these conditions are normal during AdvanceTrac� with RSCoperation. Refer to the following table.
AdvanceTrac� with RSC Features
Button
functions
“Sliding
car” iconRSC ESC
Engine
Traction
Control
Brake
Traction
Control
Default atstart-up
Illuminatedduring bulb
checkEnabled Enabled Enabled Enabled
Buttonpressedmomentarily
Illuminatedsolid
Disabledbelow 25mph (40
km/h)
Disabledbelow 25mph (40
km/h)
Disabledbelow 25mph (40
km/h)
Enabled
2008 Escape (204)Owners Guide (post-2002-fmt)USA (fus)
Driving
187

AdvanceTrac� with RSC Features
Button
functions
“Sliding
car” iconRSC ESC
Engine
Traction
Control
Brake
Traction
Control
Buttonpressed andheld morethan fiveseconds
Flashesthen
illuminatedsolid
Disabledbelow 25mph (40
km/h)
Disabledbelow 25mph (40
km/h)
Disabledbelow 25mph (40
km/h)
Disabledbelow 25mph (40
km/h)
Do not alter or modify your vehicle’s suspension or steering; theresulting changes to the vehicle’s handling can adversely affect
the AdvanceTrac� with RSC system.
Aggressive driving in any road conditions can cause you to losecontrol of your vehicle increasing the risk of severe personal
injury or property damage. The occurrence of a AdvanceTrac� withRSC event is an indication that at least some of the tires haveexceeded their ability to grip the road; this may lead to an increasedrisk of loss of vehicle control, vehicle rollover, personal injury anddeath. If you experience a severe road event, SLOW DOWN.
If a failure is detected in the AdvanceTrac� with RSC system, and theAdvanceTrac� with RSC button has not been pushed, the warningindicator light in the instrument cluster will stay on. If the warningindicator light in the instrument cluster remains on while the engine isrunning, have the system serviced by an authorized dealer immediately.
STEERINGYour vehicle is equipped with an Electric Power-Assisted Steering(EPAS) system. There is no fluid reservoir to check or fill.
If your vehicle loses electrical power while you are driving (or if theignition is turned off), you can steer the vehicle manually, but it takesmore effort. Under extreme usage conditions, the steering effort mayincrease. This occurs to prevent overheating and permanent damage toyour steering system. If this should occur, you will neither lose the abilityto steer the vehicle manually nor will it cause permanent damage.Typical steering and driving maneuvers will allow the system to cool andsteering assist will return to normal.
2008 Escape (204)Owners Guide (post-2002-fmt)USA (fus)
Driving
188

If the steering wanders or pulls, check for:
• an improperly inflated tire
• uneven tire wear
• loose or worn suspension components
• loose or worn steering components
• improper steering alignment
A high crown in the road or high crosswinds may also make the steeringseem to wander/pull.
PREPARING TO DRIVE
Utility vehicles have a significantly higher rollover rate thanother types of vehicles.
In a rollover crash, an unbelted person is significantly more likelyto die than a person wearing a seat belt.
Utility vehicles and trucks have larger tires and increased groundclearance, giving the vehicle a higher center of gravity than a passengercar.
Vehicles with a higher center of gravity such as utility vehiclesand trucks handle differently than vehicles with a lower center
of gravity. Utility vehicles and trucks are not designed for cornering atspeeds as high as passenger cars any more than low-slung sports carsare designed to perform satisfactorily under off-road conditions. Avoidsharp turns, excessive speed or abrupt maneuvers in these vehicles.Failure to drive cautiously could result in an increased risk of loss ofvehicle control, vehicle rollover, personal injury and death.
Loaded vehicles, with a higher center of gravity, may handledifferently than unloaded vehicles. Do not overload your vehicle
and use extra precautions, such as driving at slower speeds, avoidingabrupt steering changes and allowing for increased stopping distance,when driving a heavily loaded vehicle. Over loading or loading thevehicle improperly can deteriorate handling capability and contributeto loss of vehicle control and vehicle rollover.
2008 Escape (204)Owners Guide (post-2002-fmt)USA (fus)
Driving
189
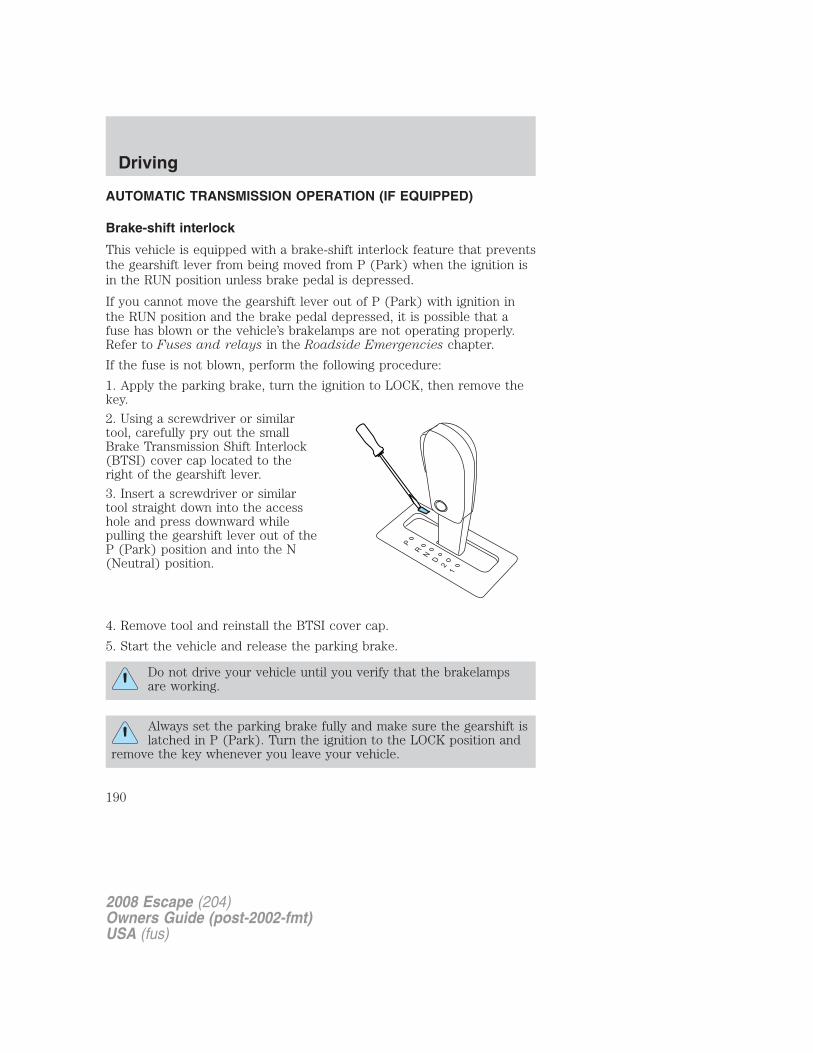
AUTOMATIC TRANSMISSION OPERATION (IF EQUIPPED)
Brake-shift interlock
This vehicle is equipped with a brake-shift interlock feature that preventsthe gearshift lever from being moved from P (Park) when the ignition isin the RUN position unless brake pedal is depressed.
If you cannot move the gearshift lever out of P (Park) with ignition inthe RUN position and the brake pedal depressed, it is possible that afuse has blown or the vehicle’s brakelamps are not operating properly.Refer to Fuses and relays in the Roadside Emergencies chapter.
If the fuse is not blown, perform the following procedure:
1. Apply the parking brake, turn the ignition to LOCK, then remove thekey.
2. Using a screwdriver or similartool, carefully pry out the smallBrake Transmission Shift Interlock(BTSI) cover cap located to theright of the gearshift lever.
3. Insert a screwdriver or similartool straight down into the accesshole and press downward whilepulling the gearshift lever out of theP (Park) position and into the N(Neutral) position.
4. Remove tool and reinstall the BTSI cover cap.
5. Start the vehicle and release the parking brake.
Do not drive your vehicle until you verify that the brakelampsare working.
Always set the parking brake fully and make sure the gearshift islatched in P (Park). Turn the ignition to the LOCK position and
remove the key whenever you leave your vehicle.
2008 Escape (204)Owners Guide (post-2002-fmt)USA (fus)
Driving
190

If the parking brake is fully released, but the brake warning lampremains illuminated, the brakes may not be working properly.
See your authorized dealer as soon as possible.
Driving with an automatic overdrive transaxleYour automatic overdrive transaxleprovides fully automatic operation ineither D (Overdrive) or with theO/D OFF switch depressed. Drivingwith the gearshift lever in D(Overdrive) gives the best fueleconomy for normal drivingconditions.
For manual control, start in 1(First) and then shift manually.
2008 Escape (204)Owners Guide (post-2002-fmt)USA (fus)
Driving
191

Understanding the gearshift positions of the 4–speed automatictransaxle
This vehicle is equipped with an adaptive Transmission Shift Strategy.Adaptive Shift Strategy offers the optimal transmission operation andshift quality. When the vehicle’s battery has been disconnected for anytype of service or repair, the transmission will need to relearn the normalshift strategy parameters, much like having to reset your radio stationswhen your vehicle battery has been disconnected. The AdaptiveTransmission Strategy allows the transmission to relearn these operatingparameters. This learning process could take several transmissionupshifts and downshifts; during this learning process, slightly firmershifts may occur. After this learning process, normal shift feel and shiftscheduling will resume.
P (Park)
This position locks the transaxle and prevents the front wheels fromturning.
To put your vehicle in gear:
• Start the engine
• Depress the brake pedal
• Move the gearshift lever into the desired gear
To put your vehicle in P (Park):
• Come to a complete stop
• Move the gearshift lever and securely latch it in P (Park)
2008 Escape (204)Owners Guide (post-2002-fmt)USA (fus)
Driving
192

Always set the parking brake fully and make sure the gearshift islatched in P (Park). Turn the ignition to the LOCK position and
remove the key whenever you leave your vehicle.
R (Reverse)
With the gearshift lever in R (Reverse), the vehicle will move backward.Always come to a complete stop before shifting into and out of R(Reverse).N (Neutral)
With the gearshift lever in N (Neutral), the vehicle can be started and isfree to roll. Hold the brake pedal down while in this position.
D (Overdrive)
The normal driving position for thebest fuel economy. Transaxleoperates in gears one through four.D (Overdrive) can be deactivated bypressing the O/D OFF switch on theside of the gearshift lever. This willilluminate the O/D OFF light andactivate Drive.
Drive (O/D OFF switch pressed)
Drive is activated when the O/D OFF switch is pressed.
• This position allows for all forward gears except overdrive.
• O/D OFF light is illuminated.
• Provides engine braking.
• Use when driving conditions cause excessive shifting from O/D toother gears. Examples: city traffic, hilly terrain, heavy loads, trailertowing and when engine braking is required.
• To return to O/D (overdrive mode), press the O/D OFF switch. TheO/D OFF light will not be illuminated.
2008 Escape (204)Owners Guide (post-2002-fmt)USA (fus)
Driving
193
• O/D (Overdrive) is automatically returned each time the key is turnedoff.
2 (Second)
This position allows for second gear only.
• Provides engine braking.
• Use to start-up on slippery roads.
• To return to D (Overdrive), move the gearshift lever into the D(Overdrive) position.
• Selecting 2 (Second) at higher speeds will cause the transaxle todownshift to second gear at the appropriate vehicle speed.
1 (First)
• Provides maximum engine braking.
• Allows upshifts by moving gearshift lever.
• Will not downshift into 1 (First) at high speeds; allows for 1 (First)when vehicle reaches slower speeds.
When parking, do not use the gearshift in place of the parkingbrake. Always set the parking brake fully and make sure that the
gearshift is securely latched in P (Park). Turn off the ignitionwhenever you leave your vehicle. Never leave your vehicle unattendedwhile it is running. If you do not take these precautions, your vehiclemay move unexpectedly and injure someone.
Forced downshifts
• Allowed in D (Overdrive) or Drive.
• Depress the accelerator to the floor.
• Allows transmission to select an appropriate gear.
If your vehicle gets stuck in mud or snowIf your vehicle gets stuck in mud or snow, it may be rocked out byshifting between forward and reverse gears, stopping between shifts in asteady pattern. Press lightly on the accelerator in each gear.
Do not rock the vehicle if the engine is not at normal operatingtemperature or damage to the transmission may occur.
Do not rock the vehicle for more than a minute or damage to thetransmission and tires may occur, or the engine may overheat.
2008 Escape (204)Owners Guide (post-2002-fmt)USA (fus)
Driving
194
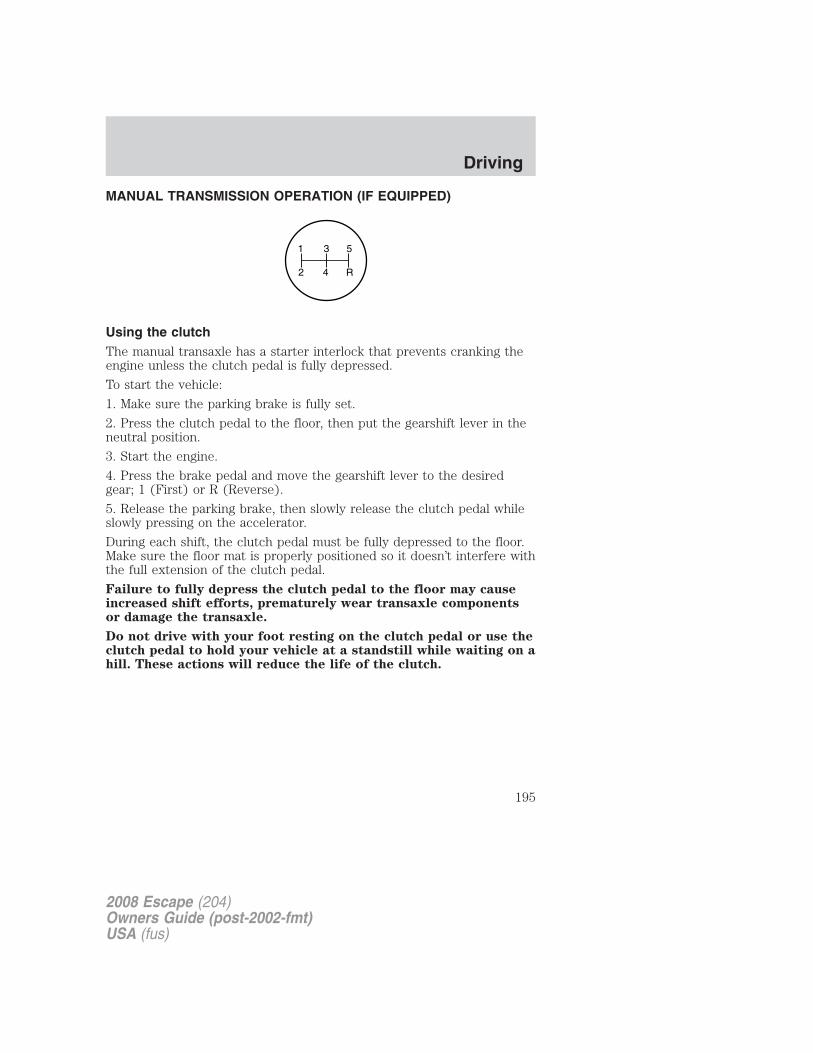
MANUAL TRANSMISSION OPERATION (IF EQUIPPED)
Using the clutchThe manual transaxle has a starter interlock that prevents cranking theengine unless the clutch pedal is fully depressed.
To start the vehicle:
1. Make sure the parking brake is fully set.
2. Press the clutch pedal to the floor, then put the gearshift lever in theneutral position.
3. Start the engine.
4. Press the brake pedal and move the gearshift lever to the desiredgear; 1 (First) or R (Reverse).
5. Release the parking brake, then slowly release the clutch pedal whileslowly pressing on the accelerator.
During each shift, the clutch pedal must be fully depressed to the floor.Make sure the floor mat is properly positioned so it doesn’t interfere withthe full extension of the clutch pedal.
Failure to fully depress the clutch pedal to the floor may causeincreased shift efforts, prematurely wear transaxle componentsor damage the transaxle.
Do not drive with your foot resting on the clutch pedal or use theclutch pedal to hold your vehicle at a standstill while waiting on ahill. These actions will reduce the life of the clutch.
1 3 5
2 4 R
2008 Escape (204)Owners Guide (post-2002-fmt)USA (fus)
Driving
195
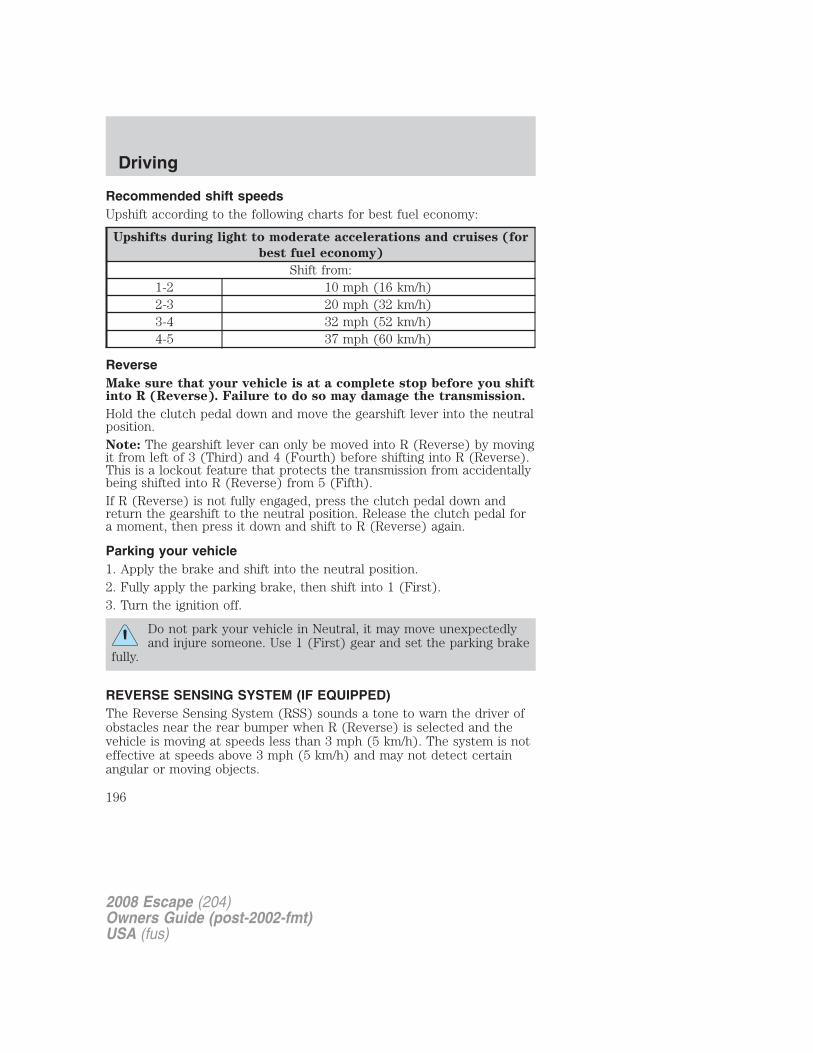
Recommended shift speedsUpshift according to the following charts for best fuel economy:
Upshifts during light to moderate accelerations and cruises (for
best fuel economy)
Shift from:1-2 10 mph (16 km/h)2-3 20 mph (32 km/h)3-4 32 mph (52 km/h)4-5 37 mph (60 km/h)
ReverseMake sure that your vehicle is at a complete stop before you shiftinto R (Reverse). Failure to do so may damage the transmission.
Hold the clutch pedal down and move the gearshift lever into the neutralposition.Note: The gearshift lever can only be moved into R (Reverse) by movingit from left of 3 (Third) and 4 (Fourth) before shifting into R (Reverse).This is a lockout feature that protects the transmission from accidentallybeing shifted into R (Reverse) from 5 (Fifth).If R (Reverse) is not fully engaged, press the clutch pedal down andreturn the gearshift to the neutral position. Release the clutch pedal fora moment, then press it down and shift to R (Reverse) again.
Parking your vehicle1. Apply the brake and shift into the neutral position.2. Fully apply the parking brake, then shift into 1 (First).3. Turn the ignition off.
Do not park your vehicle in Neutral, it may move unexpectedlyand injure someone. Use 1 (First) gear and set the parking brake
fully.
REVERSE SENSING SYSTEM (IF EQUIPPED)The Reverse Sensing System (RSS) sounds a tone to warn the driver ofobstacles near the rear bumper when R (Reverse) is selected and thevehicle is moving at speeds less than 3 mph (5 km/h). The system is noteffective at speeds above 3 mph (5 km/h) and may not detect certainangular or moving objects.
2008 Escape (204)Owners Guide (post-2002-fmt)USA (fus)
Driving
196

To help avoid personal injury, please read and understand thelimitations of the reverse sensing system as contained in this
section. Reverse sensing is only an aid for some (generally large andfixed) objects when moving in reverse on a flat surface at “parkingspeeds”. Inclement weather may also affect the function of the RSS;this may include reduced performance or a false activation.
To help avoid personal injury, always use caution when inreverse and when using the RSS.
This system is not designed to prevent contact with small ormoving objects. The system is designed to provide a warning to
assist the driver in detecting large stationary objects to avoid damagingthe vehicle. The system may not detect smaller objects, particularlythose close to the ground.
Certain add-on devices such as large trailer hitches, bike orsurfboard racks and any device that may block the normal
detection zone of the RSS system may create false beeps.
2008 Escape (204)Owners Guide (post-2002-fmt)USA (fus)
Driving
197

The RSS detects obstacles up to 6feet (1.8 meters) from the rearbumper with a decreased coveragearea at the outer corners of thebumper, (refer to the figures forapproximate zone coverage areas).As you move closer to the obstacle,the rate of the tone increases. Whenthe obstacle is less than 10 inches(25.0 cm) away, the tone will soundcontinuously. If the RSS detects astationary or receding object furtherthan 10 inches (25.0 cm) from theside of the vehicle, the tone willsound for only three seconds. Oncethe system detects an objectapproaching, the tone will soundagain.
The RSS automatically turns onwhen the gear selector is placed inR (Reverse) and the ignition is on.An RSS control allows the driver toturn the RSS on and off. To turn theRSS off, the ignition must be on.The system will remain off untileither the RSS control is pressed again or the ignition is turned off, thenon again. An indicator light on the control will illuminate when thesystem is turned off. If the indicator light illuminates when the RSS isnot turned off, it may indicate a failure in the RSS.
Keep the RSS sensors (located on the rear bumper/fascia) freefrom snow, ice and large accumulations of dirt (do not clean thesensors with sharp objects). If the sensors are covered, it willaffect the accuracy of the RSS.
If your vehicle sustains damage to the rear bumper/fascia, leavingit misaligned or bent, the sensing zone may be altered causinginaccurate measurement of obstacles or false alarms.
2008 Escape (204)Owners Guide (post-2002-fmt)USA (fus)
Driving
198

FOUR WHEEL DRIVE (4WD) SYSTEM (IF EQUIPPED)
For important information regarding safe operation of this typeof vehicle, see Preparing to drive your vehicle in this chapter.
Your vehicle is equipped with an intelligent 4WD System thatcontinuously monitors vehicle conditions and automatically adjusts thepower distribution between the front and rear wheels. It combinestransparent all-surface operation with highly capable four-wheel drive.
The 4WD system is always active and requires no driver input. It iscapable of handling all road conditions, including street and highwaydriving as well as off-road and winter driving.
Driving off-road with truck and utility vehicles4WD vehicles are specially equipped for driving on sand, snow, mud andrough terrain and have operating characteristics that are somewhatdifferent from conventional vehicles, both on and off the road.
How your vehicle differs from other vehiclesTruck and utility vehicles can differ from some other vehicles. Yourvehicle may be higher to allow it to travel over rough terrain withoutgetting hung up or damaging underbody components.
The differences that make your vehicle so versatile also make it handledifferently than an ordinary passenger car.
Maintain steering wheel control at all times, especially in rough terrain.Since sudden changes in terrain can result in abrupt steering wheelmotion, make sure you grip the steering wheel from the outside. Do notgrip the spokes.
Drive cautiously to avoid vehicle damage from concealed objects such asrocks and stumps.
You should either know the terrain or examine maps of the area beforedriving. Map out your route before driving in the area. To maintainsteering and braking control of your vehicle, you must have all fourwheels on the ground and they must be rolling, not sliding or spinning.
Basic operating principles• Drive slower in strong crosswinds which can affect the normal steering
characteristics of your vehicle.
• Be extremely careful when driving on pavement made slippery byloose sand, water, gravel, snow or ice.
2008 Escape (204)Owners Guide (post-2002-fmt)USA (fus)
Driving
199

If your vehicle goes off the edge of the pavement
• If your vehicle goes off the edge of the pavement, slow down, butavoid severe brake application, ease the vehicle back onto thepavement only after reducing your speed. Do not turn the steeringwheel too sharply while returning to the road surface.
• It may be safer to stay on the apron or shoulder of the road and slowdown gradually before returning to the pavement. You may losecontrol if you do not slow down or if you turn the steering wheel toosharply or abruptly.
• It often may be less risky to strike small objects, such as highwayreflectors, with minor damage to your vehicle rather than attempt asudden return to the pavement which could cause the vehicle to slidesideways out of control or roll over. Remember, your safety and thesafety of others should be your primary concern.
Vehicles with a higher center of gravity such as utility andfour-wheel drive vehicles handle differently than vehicles with a
lower center of gravity. Utility and four-wheel drive vehicles are notdesigned for cornering at speeds as high as passenger cars any morethan low-slung sports cars are designed to perform satisfactorily underoff-road conditions. Avoid sharp turns, excessive speed and abruptmaneuvers in these vehicles. Failure to drive cautiously could result inan increased risk of loss of vehicle control, vehicle rollover, personalinjury and death.
If your vehicle gets stuckIf your vehicle gets stuck in mud or snow it may be rocked out byshifting between forward and reverse gears, stopping between shifts, in asteady pattern. Press lightly on the accelerator in each gear.
Do not rock the vehicle if the engine is not at normal operatingtemperature or damage to the transmission may occur.
Do not rock the vehicle for more than a few minutes or damageto the transmission and tires may occur or the engine mayoverheat.
Always set the parking brake fully and make sure the gearshift islatched in P (Park). Turn the ignition to the LOCK position and
remove the key whenever you leave your vehicle.
2008 Escape (204)Owners Guide (post-2002-fmt)USA (fus)
Driving
200

If the parking brake is fully released, but the brake warning lampremains illuminated, the brakes may not be working properly.
See your authorized dealer.
Do not spin the wheels at over 35 mph (56 km/h). The tires mayfail and injure a passenger or bystander.
Emergency maneuvers• In an unavoidable emergency situation where a sudden sharp turn
must be made, remember to avoid “over-driving” your vehicle, i.e.,turn the steering wheel only as rapidly and as far as required to avoidthe emergency. Excessive steering will result in less vehicle control,not more. Additionally, smooth variations of the accelerator and/orbrake pedal pressure should be utilized if changes in vehicle speed arecalled for. Avoid abrupt steering, acceleration or braking which couldresult in an increased risk of loss of vehicle control, vehicle rolloverand/or personal injury. Use all available road surface to return thevehicle to a safe direction of travel.
• In the event of an emergency stop, avoid skidding the tires and do notattempt any sharp steering wheel movements.
Vehicles with a higher center of gravity such as utility andfour-wheel drive vehicles handle differently than vehicles with a
lower center of gravity. Utility and four-wheel drive vehicles are notdesigned for cornering at speeds as high as passenger cars any morethan low-slung sports cars are designed to perform satisfactorily underoff-road conditions. Avoid sharp turns, excessive speed and abruptmaneuvers in these vehicles. Failure to drive cautiously could result inan increased risk of loss of vehicle control, vehicle rollover, personalinjury and death.
• If the vehicle goes from one type of surface to another (i.e., fromconcrete to gravel) there will be a change in the way the vehicleresponds to a maneuver (steering, acceleration or braking). Again,avoid these abrupt inputs.
SandWhen driving over sand, try to keep all four wheels on the most solidarea of the trail. Avoid reducing the tire pressures but shift to a lowergear and drive steadily through the terrain. Apply the accelerator slowlyand avoid spinning the wheels.
2008 Escape (204)Owners Guide (post-2002-fmt)USA (fus)
Driving
201

Avoid excessive speed because vehicle momentum can work against youand cause the vehicle to become stuck to the point that assistance maybe required from another vehicle. Remember, you may be able to backout the way you came if you proceed with caution.
Mud and waterIf you must drive through highwater, drive slowly. Traction orbrake capability may be limited.
When driving through water,determine the depth; avoid waterhigher than the bottom of the hubs(if possible) and proceed slowly. Ifthe ignition system gets wet, thevehicle may stall.
Once through water, always try the brakes. Wet brakes do not stop thevehicle as effectively as dry brakes. Drying can be improved by movingyour vehicle slowly while applying light pressure on the brake pedal.
Be cautious of sudden changes in vehicle speed or direction when youare driving in mud. Even 4WD vehicles can lose traction in slick mud. Aswhen you are driving over sand, apply the accelerator slowly and avoidspinning your wheels. If the vehicle does slide, steer in the direction ofthe slide until you regain control of the vehicle.
If the transmission, transfer case or front axle are submerged in water,their fluids should be checked and changed, if necessary.
Driving through deep water may damage the transmission.
If the front or rear axle is submerged in water, the axle lubricant shouldbe replaced.
After driving through mud, clean off residue stuck to rotating driveshaftsand tires. Excess mud stuck on tires and rotating driveshafts causes animbalance that could damage drive components.
“Tread Lightly” is an educationalprogram designed to increase publicawareness of land-use regulationsand responsibilities in our nationswilderness areas. Ford MotorCompany joins the U.S. Forest Service and the Bureau of LandManagement in encouraging you to help preserve our national forest andother public and private lands by “treading lightly.”
2008 Escape (204)Owners Guide (post-2002-fmt)USA (fus)
Driving
202

Driving on hilly or sloping terrain
Although natural obstacles may make it necessary to travel diagonally upor down a hill or steep incline, you should always try to drive straight upor straight down. Avoid driving crosswise or turning on steep
slopes or hills. A danger lies in losing traction, slipping sideways andpossibly rolling over. Whenever driving on a hill, determine beforehandthe route you will use. Do not drive over the crest of a hill withoutseeing what conditions are on the other side. Do not drive in reverseover a hill without the aid of an observer.
When climbing a steep slope or hill,start in a lower gear rather thandownshifting to a lower gear from ahigher gear once the ascent hasstarted. This reduces strain on theengine and the possibility of stalling.
If you do stall out, Do not try toturnaround because you might rollover. It is better to back down to asafe location.
Apply just enough power to the wheels to climb the hill. Too muchpower will cause the tires to slip, spin or lose traction, resulting in loss ofvehicle control.
Descend a hill in the same gear youwould use to climb up the hill toavoid excessive brake applicationand brake overheating. Do notdescend in neutral; instead,disengage overdrive or manuallyshift to a lower gear. Whendescending a steep hill, avoidsudden hard braking as you couldlose control. When you brake hard,the front wheels can’t turn and ifthey aren’t turning, you won’t beable to steer. The front wheels have to be turning in order to steer thevehicle. Rapid pumping of the brake pedal will help you slow the vehicleand still maintain steering control.
If your vehicle has anti-lock brakes, apply the brakes steadily. Do not“pump” the brakes.
2008 Escape (204)Owners Guide (post-2002-fmt)USA (fus)
Driving
203

Driving on snow and ice4WD vehicles have advantages over 2WD vehicles in snow and ice butcan skid like any other vehicle.Should you start to slide while driving on snowy or icy roads, turn thesteering wheel in the direction of the slide until you regain control.Avoid sudden applications of power and quick changes of direction onsnow and ice. Apply the accelerator slowly and steadily when startingfrom a full stop.Avoid sudden braking as well. Although a 4WD vehicle may acceleratebetter than a two-wheel drive vehicle in snow and ice, it won’t stop anyfaster, because as in other vehicles, braking occurs at all four wheels. Donot become overconfident as to road conditions.Make sure you allow sufficient distance between you and other vehiclesfor stopping. Drive slower than usual and consider using one of the lowergears. In emergency stopping situations, avoid locking of the wheels. Usea “squeeze” technique, push on the brake pedal with a steadily increasingforce which allows the wheels to brake yet continue to roll so that youmay steer in the direction you want to travel. If you lock the wheels,release the brake pedal and repeat the squeeze technique. Since yourvehicle is equipped with a Four Wheel Anti-Lock Brake System (ABS),apply the brake steadily. Do not “pump” the brakes. Refer to the Brakessection of this chapter for additional information on the operation of theanti-lock brake system.
4WD vehicles should be driven with traction devices as referred to inUsing snow tires and traction devices in the Tires, Wheels andLoading chapter.
Maintenance and ModificationsThe suspension and steering systems on your vehicle have been designedand tested to provide predictable performance whether loaded or emptyand durable load carrying capability. For this reason, Ford MotorCompany strongly recommends that you do not make modifications suchas adding or removing parts (such as lift kits or stabilizer bars) or byusing replacement parts not equivalent to the original factory equipment.
Any modifications to a vehicle that raise the center of gravity can makeit more likely the vehicle will roll over as a result of a loss of control.Ford Motor Company recommends that caution be used with any vehicleequipped with a high load or device (such as ladder racks or pickup boxcover).
Failure to maintain your vehicle properly may void the warranty, increaseyour repair cost, reduce vehicle performance and operational capabilities
2008 Escape (204)Owners Guide (post-2002-fmt)USA (fus)
Driving
204
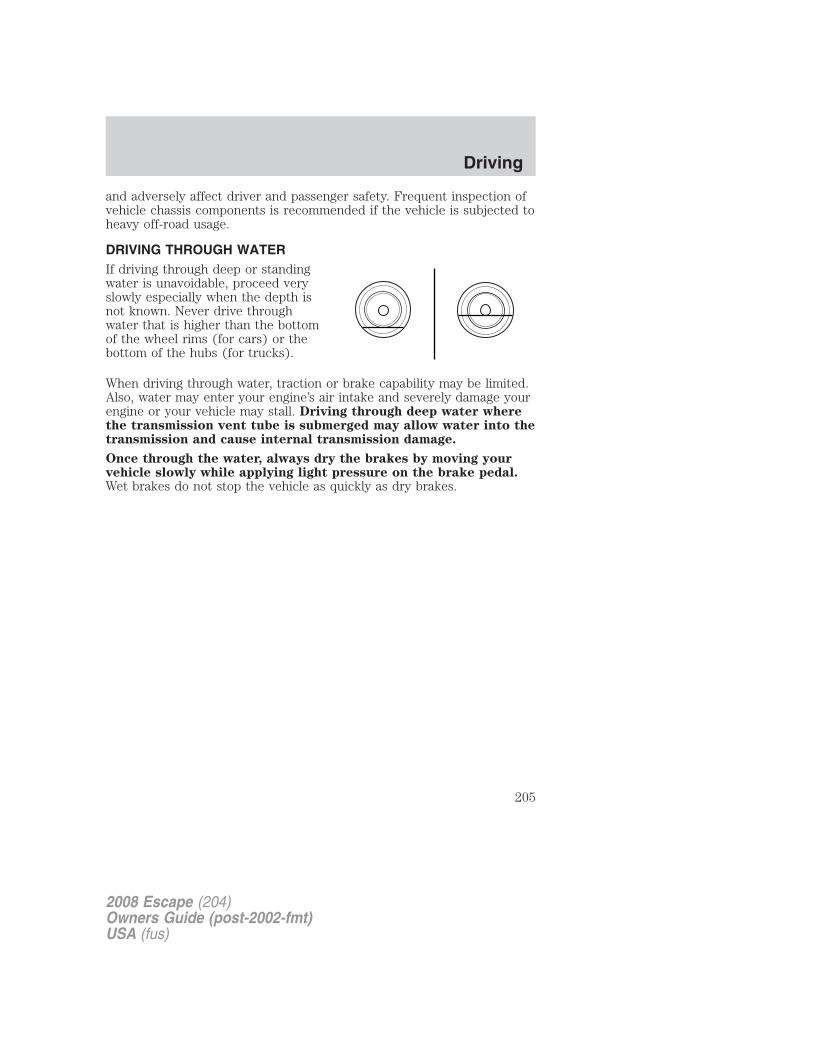
and adversely affect driver and passenger safety. Frequent inspection ofvehicle chassis components is recommended if the vehicle is subjected toheavy off-road usage.
DRIVING THROUGH WATERIf driving through deep or standingwater is unavoidable, proceed veryslowly especially when the depth isnot known. Never drive throughwater that is higher than the bottomof the wheel rims (for cars) or thebottom of the hubs (for trucks).
When driving through water, traction or brake capability may be limited.Also, water may enter your engine’s air intake and severely damage yourengine or your vehicle may stall. Driving through deep water wherethe transmission vent tube is submerged may allow water into thetransmission and cause internal transmission damage.
Once through the water, always dry the brakes by moving yourvehicle slowly while applying light pressure on the brake pedal.Wet brakes do not stop the vehicle as quickly as dry brakes.
2008 Escape (204)Owners Guide (post-2002-fmt)USA (fus)
Driving
205

ROADSIDE ASSISTANCE
Getting roadside assistanceTo fully assist you should you have a vehicle concern, Ford MotorCompany offers a complimentary roadside assistance program. Thisprogram is separate from the New Vehicle Limited Warranty. The serviceis available:
• 24–hours, seven days a week
• for the period of five years or 60,000 miles (100,000 km), whicheveroccurs first on Ford and Mercury vehicles, and six years or 70,000miles (110,000 km) on Lincoln vehicles.
Roadside assistance will cover:
• a flat tire change with a good spare (except Ford GT which has a tireinflation kit)
• battery jump start
• lock-out assistance (key replacement cost is the customer’sresponsibility)
• fuel delivery – Independent Service Contractors, if not prohibited bystate, local or municipal law shall deliver up to 2.0 gallons (7.5L) ofgasoline or 5 gallons (18.9L) of diesel fuel to a disabled vehicle. Fueldelivery service is limited to two no-charge occurrences within a12-month period.
• winch out – available within 100 feet (30.5 meters) of a paved orcounty maintained road, no recoveries.
• towing – Ford/Mercury/Lincoln eligible vehicle towed to an authorizeddealer within 35 miles (56.3 km) of the disablement location or to thenearest authorized dealer. If a member requests to be towed to anauthorized dealer more than 35 miles (56.3 km) from the disablementlocation, the member shall be responsible for any mileage costs inexcess of 35 miles (56.3 km).
Trailers shall be covered up to $100 if the disabled eligible vehiclerequires service at the nearest authorized dealer. If the trailer is disabled,but the towing vehicle is operational, the trailer does not qualify for anyroadside services.
2008 Escape (204)Owners Guide (post-2002-fmt)USA (fus)
Roadside Emergencies
206

Canadian customers refer to your Customer Information Guidefor information on:
• coverage period
• exact fuel amounts
• towing of your disabled vehicle
• emergency travel expense reimbursement
• travel planning benefits
Using roadside assistance
Complete the roadside assistance identification card and place it in yourwallet for quick reference. In the United States, this card is found in theOwner Guide portfolio in the glove compartment. In Canada, the card isfound in the Customer Information Guide in the glove compartment.
U.S. Ford or Mercury vehicle customers who require roadside assistance,call 1–800–241–3673; Lincoln vehicle customers call 1–800–521–4140.
Canadian customers who require roadside assistance, call1–800–665–2006.
If you need to arrange roadside assistance for yourself, Ford MotorCompany will reimburse a reasonable amount. To obtain reimbursementinformation, U.S. Ford or Mercury vehicles customers call1–800–241–3673; Lincoln vehicle customers call 1–800–521–4140.
Canadian customers who need to obtain reimbursement information, call1–800–665–2006.
Roadside coverage beyond basic warranty
In the United States, you may purchase additional roadside assistancecoverage beyond this period through the Ford Auto Club by contactingyour authorized dealer.
Similarly in Canada, for uninterrupted Roadside Assistance coverage, youmay purchase extended coverage prior to your Basic Warranty’s RoadsideAssistance expiring. For more information and enrollment, contact1–877–294–2582 or visit our website at www.ford.ca.
2008 Escape (204)Owners Guide (post-2002-fmt)USA (fus)
Roadside Emergencies
207

HAZARD FLASHER CONTROL
The hazard flasher is located on thesteering column, just behind thesteering wheel. The hazard flasherswill operate when the ignition is inany position or if the key is not inthe ignition.
Push in the flasher control and allfront and rear direction signals willflash. Press the flasher control againto turn them off. Use it when yourvehicle is disabled and is creating asafety hazard for other motorists.
Note: With extended use, the flasher may run down your battery.
FUEL PUMP SHUT-OFF SWITCH
This device stops the electric fuel pump from sending fuel to the enginewhen your vehicle has had a substantial jolt.
After an accident, if the engine cranks but does not start, this switchmay have been activated.
2008 Escape (204)Owners Guide (post-2002-fmt)USA (fus)
Roadside Emergencies
208

This switch is located in the frontpassenger’s footwell, behind aflip-up cover, by the kick panelaccess cover.
To reset the switch:
1. Turn the ignition OFF.
2. Check the fuel system for leaks.
3. If no leaks are apparent, reset theswitch by pushing in on the resetbutton.
4. Turn the ignition ON.
5. Wait a few seconds and returnthe key to OFF.
6. Make another check for leaks.
FUSES AND RELAYS
FusesIf electrical components in thevehicle are not working, a fuse mayhave blown. Blown fuses areidentified by a broken wire withinthe fuse. Check the appropriatefuses before replacing any electricalcomponents.
Note: Always replace a fuse with one that has the specified amperagerating. Using a fuse with a higher amperage rating can cause severe wiredamage and could start a fire.
15
2008 Escape (204)Owners Guide (post-2002-fmt)USA (fus)
Roadside Emergencies
209
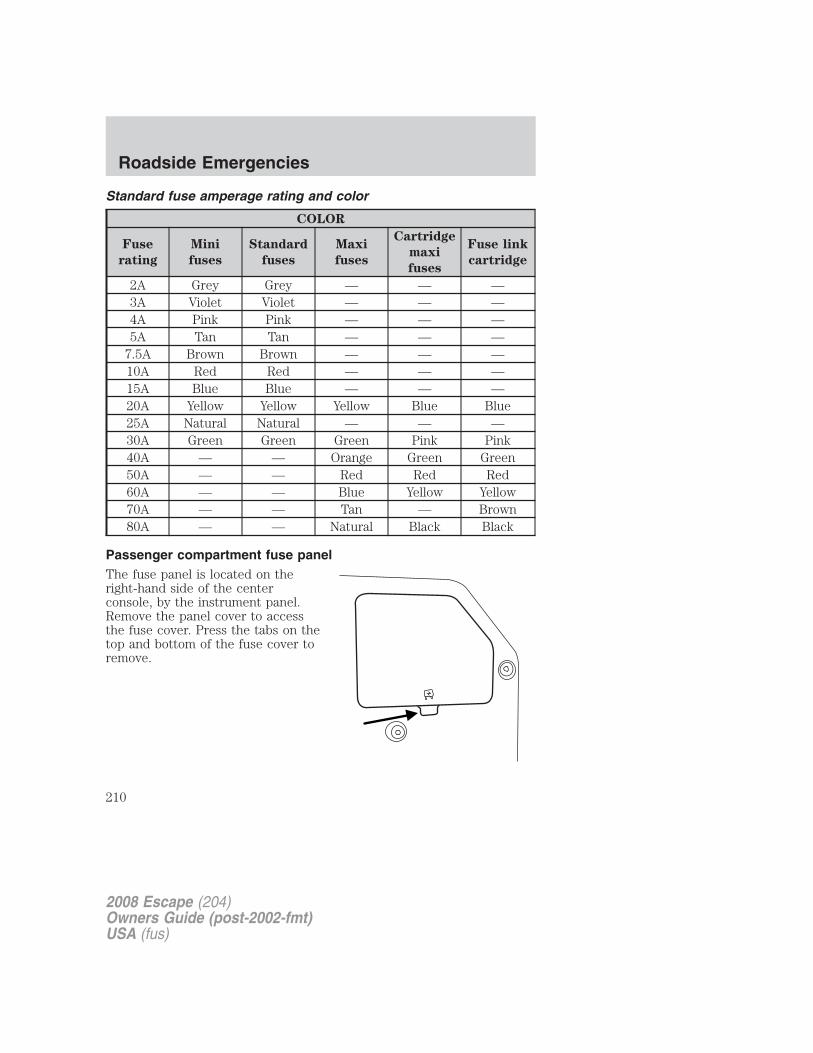
Standard fuse amperage rating and color
COLOR
Fuse
rating
Mini
fuses
Standard
fuses
Maxi
fuses
Cartridge
maxi
fuses
Fuse link
cartridge
2A Grey Grey — — —3A Violet Violet — — —4A Pink Pink — — —5A Tan Tan — — —
7.5A Brown Brown — — —10A Red Red — — —15A Blue Blue — — —20A Yellow Yellow Yellow Blue Blue25A Natural Natural — — —30A Green Green Green Pink Pink40A — — Orange Green Green50A — — Red Red Red60A — — Blue Yellow Yellow70A — — Tan — Brown80A — — Natural Black Black
Passenger compartment fuse panelThe fuse panel is located on theright-hand side of the centerconsole, by the instrument panel.Remove the panel cover to accessthe fuse cover. Press the tabs on thetop and bottom of the fuse cover toremove.
2008 Escape (204)Owners Guide (post-2002-fmt)USA (fus)
Roadside Emergencies
210

The fuses are coded as follows:
Fuse/Relay
Location
Fuse Amp
Rating
Passenger Compartment Fuse
Panel Description
1 30A Not used (spare)2 15A Brake On/Off switch3 15A Not used (spare)4 30A Not used (spare)5 10A Keypad illumination, Brake Shift
Interlock (BSI), SPDJB6 20A Turn signals, Stop lamps7 10A Low beam headlamps (left)8 10A Low beam headlamps (right)9 15A Interior lights
10 15A Backlighting11 10A Four wheel drive12 7.5A Power mirror switch13 7.5A Canister vent14 10A FCIM (radio buttons), Satellite
radio, Front display module15 10A Climate control
2008 Escape (204)Owners Guide (post-2002-fmt)USA (fus)
Roadside Emergencies
211

Fuse/Relay
Location
Fuse Amp
Rating
Passenger Compartment Fuse
Panel Description
16 15A Not used (spare)17 20A All lock motor feeds, Liftgate
release, Liftglass release18 20A Heated seat19 25A Rear wiper20 15A Datalink21 15A Fog lamps22 15A Park lamps23 15A High beam headlamps24 20A Horn relay25 10A Demand lamps26 10A Instrument panel cluster27 20A Ignition switch28 5A Radio29 5A Instrument panel cluster30 5A Overdrive cancel31 10A Compass module32 10A Restraints control module33 10A Speed control switch34 5A Speed control deactivate switch,
ABS35 10A Four wheel drive, EPAS (steering)36 5A PATS transceiver37 10A Climate control38 20A Subwoofer/Amp (Audiophile radio)39 20A Radio40 20A Front power point41 15A Driver/passenger door lock
switches42 10A Not used (spare)43 10A Rear wiper logic, Heated seats
relay, Auto dimming mirror
2008 Escape (204)Owners Guide (post-2002-fmt)USA (fus)
Roadside Emergencies
212
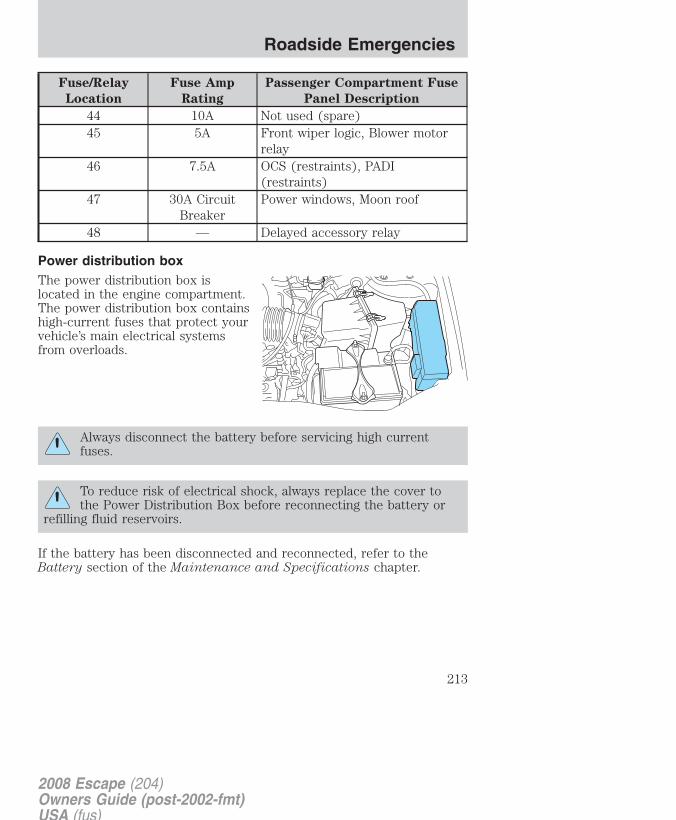
Fuse/Relay
Location
Fuse Amp
Rating
Passenger Compartment Fuse
Panel Description
44 10A Not used (spare)45 5A Front wiper logic, Blower motor
relay46 7.5A OCS (restraints), PADI
(restraints)47 30A Circuit
BreakerPower windows, Moon roof
48 — Delayed accessory relay
Power distribution boxThe power distribution box islocated in the engine compartment.The power distribution box containshigh-current fuses that protect yourvehicle’s main electrical systemsfrom overloads.
Always disconnect the battery before servicing high currentfuses.
To reduce risk of electrical shock, always replace the cover tothe Power Distribution Box before reconnecting the battery or
refilling fluid reservoirs.
If the battery has been disconnected and reconnected, refer to theBattery section of the Maintenance and Specifications chapter.
2008 Escape (204)Owners Guide (post-2002-fmt)USA (fus)
Roadside Emergencies
213
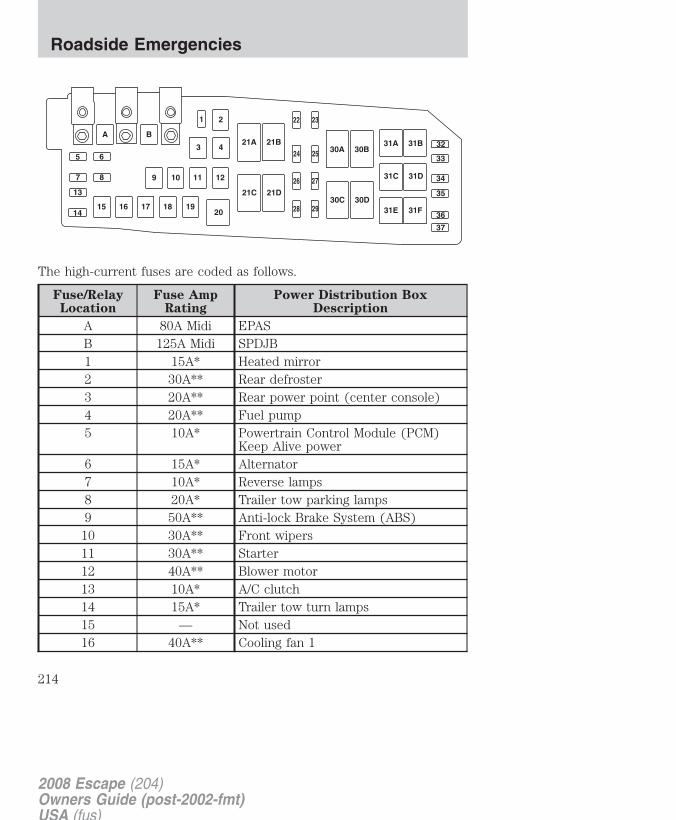
The high-current fuses are coded as follows.
Fuse/RelayLocation
Fuse AmpRating
Power Distribution BoxDescription
A 80A Midi EPASB 125A Midi SPDJB1 15A* Heated mirror2 30A** Rear defroster3 20A** Rear power point (center console)4 20A** Fuel pump5 10A* Powertrain Control Module (PCM)
Keep Alive power6 15A* Alternator7 10A* Reverse lamps8 20A* Trailer tow parking lamps9 50A** Anti-lock Brake System (ABS)
10 30A** Front wipers11 30A** Starter12 40A** Blower motor13 10A* A/C clutch14 15A* Trailer tow turn lamps15 — Not used16 40A** Cooling fan 1
2008 Escape (204)Owners Guide (post-2002-fmt)USA (fus)
Roadside Emergencies
214
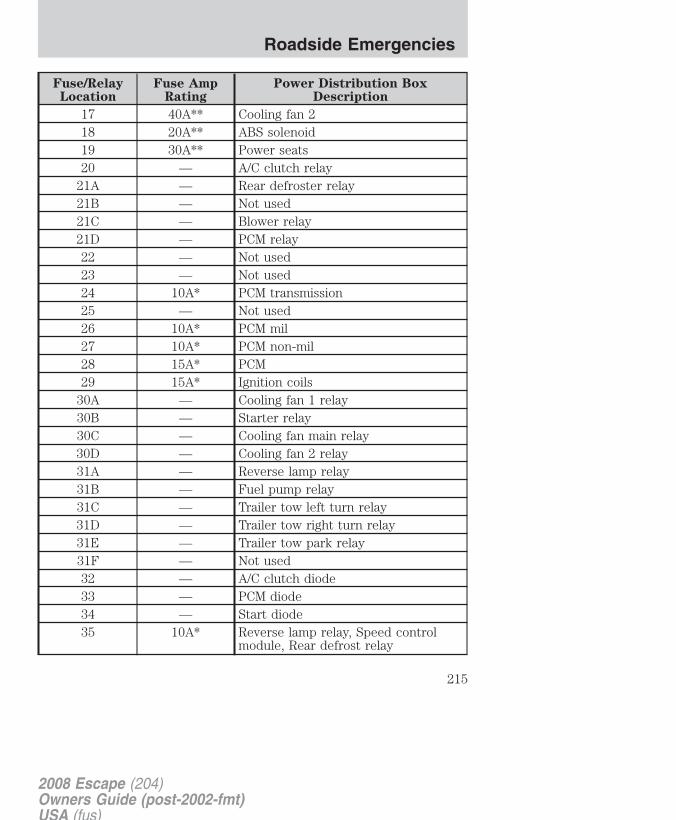
Fuse/RelayLocation
Fuse AmpRating
Power Distribution BoxDescription
17 40A** Cooling fan 218 20A** ABS solenoid19 30A** Power seats20 — A/C clutch relay
21A — Rear defroster relay21B — Not used21C — Blower relay21D — PCM relay22 — Not used23 — Not used24 10A* PCM transmission25 — Not used26 10A* PCM mil27 10A* PCM non-mil28 15A* PCM29 15A* Ignition coils
30A — Cooling fan 1 relay30B — Starter relay30C — Cooling fan main relay30D — Cooling fan 2 relay31A — Reverse lamp relay31B — Fuel pump relay31C — Trailer tow left turn relay31D — Trailer tow right turn relay31E — Trailer tow park relay31F — Not used32 — A/C clutch diode33 — PCM diode34 — Start diode35 10A* Reverse lamp relay, Speed control
module, Rear defrost relay
2008 Escape (204)Owners Guide (post-2002-fmt)USA (fus)
Roadside Emergencies
215

Fuse/RelayLocation
Fuse AmpRating
Power Distribution BoxDescription
36 — Not used37 — Not used
* Mini fuse ** Cartridge fuse
CHANGING A FLAT TIRE
If you get a flat tire while driving:
• do not brake heavily.
• gradually decrease the vehicle’s speed.
• hold the steering wheel firmly.
• slowly move to a safe place on the side of the road.
Your vehicle may be equipped with a conventional spare tire that isdifferent in one or more of the following: type, brand, size, speed ratingand tread design. If this is the case, this dissimilar spare tire is still ratedfor your vehicle loads (GAWR and GVWR). This temporary spare tire isnot equipped with a Tire Pressure Monitor System (TPMS) sensor.
Note: The tire pressure monitoring system (TPMS) indicator light willilluminate when the spare is in use. To restore the full functionality ofthe TPMS system, all road wheels equipped with the tire pressuremonitoring sensors must be mounted on the vehicle.
Have a flat tire serviced by an authorized dealer in order to preventdamage to the TPMS sensor, refer to Tire Pressure Monitoring System(TPMS) in the Tires, Wheels, and Loading chapter. Replace the sparetire with a road tire as soon as possible. During repairing or replacing ofthe flat tire, have the authorized dealer inspect the TPMS sensor fordamage.
The use of tire sealants may damage your tires. The use of tiresealants may also damage your Tire Pressure Monitoring System
and should not be used.
Refer to Tire Pressure Monitoring System (TPMS) in the Tire,Wheels and Loading chapter for important information. If the
tire pressure monitor sensor becomes damaged, it will no longerfunction.
2008 Escape (204)Owners Guide (post-2002-fmt)USA (fus)
Roadside Emergencies
216
Dissimilar spare tire/wheel information
Failure to follow these guidelines could result in an increasedrisk of loss of vehicle control, injury or death.
If you have a dissimilar spare tire/wheel, then it is intended fortemporary use only. This means that if you need to use it, you shouldreplace it as soon as possible with a road tire/wheel that is the same sizeand type as the road tires and wheels that were originally provided byFord. If the dissimilar spare tire or wheel is damaged, it should bereplaced rather than repaired.
A dissimilar spare tire/wheel is defined as a spare tire and/or wheel thatis different in brand, size or appearance from the road tires and wheelsand can be one of three types:
1. T-type mini-spare: This spare tire begins with the letter “T” for tiresize and may have “Temporary Use Only” molded in the sidewall
2. Full-size dissimilar spare with label on wheel: This spare tire hasa label on the wheel that states: “THIS TIRE AND WHEEL FORTEMPORARY USE ONLY”
When driving with one of the dissimilar spare tires listed above, do not:
• Exceed 50 mph (80 km/h)
• Load the vehicle beyond maximum vehicle load rating listed on theSafety Compliance Label
• Tow a trailer
• Use snow chains on the end of the vehicle with the dissimilar sparetire
• Use more than one dissimilar spare tire at a time
• Use commercial car washing equipment
• Try to repair the dissimilar spare tire
Use of one of the dissimilar spare tires listed above at any one wheellocation can lead to impairment of the following:
• Handling, stability and braking performance
• Comfort and noise
• Ground clearance and parking at curbs
• Winter weather driving capability
• Wet weather driving capability
2008 Escape (204)Owners Guide (post-2002-fmt)USA (fus)
Roadside Emergencies
217
For vehicles equipped with 4WD, it is not recommended that the vehiclebe operated in 4WD modes with a temporary emergency spare tire. If4WD operation is necessary, do not operate above speeds of 10 mph(16 km/h) or for distances above 50 miles (80 km).
3. Full-size dissimilar spare without label on wheel
When driving with the full-size dissimilar spare tire/wheel, do not:
• Exceed 70 mph (113 km/h)
• Use more than one dissimilar spare tire/wheel at a time
• Use commercial car washing equipment
• Use snow chains on the end of the vehicle with the dissimilar sparetire/wheel
The usage of a full-size dissimilar spare tire/wheel can lead toimpairment of the following:
• Handling, stability and braking performance
• Comfort and noise
• Ground clearance and parking at curbs
• Winter weather driving capability
• Wet weather driving capability
• All-Wheel driving capability (if applicable)
• Load leveling adjustment (if applicable)
When driving with the full-size dissimilar spare tire/wheel additionalcaution should be given to:
• Towing a trailer
• Driving vehicles equipped with a camper body
• Driving vehicles with a load on the cargo rack
Drive cautiously when using a full-size dissimilar spare tire/wheel andseek service as soon as possible.
2008 Escape (204)Owners Guide (post-2002-fmt)USA (fus)
Roadside Emergencies
218

Stopping and securing the vehicle1. Park on a level surface, set theparking brake and activate hazardflashers.
2. Place gearshift lever in P (Park)(automatic transmission) or R(Reverse) (manual transmission)and turn engine off.
Removing the jack and toolsThe jack and tools are located underthe carpeted load floor.
Pull back the carpet away from theliftgate, and remove the hardboardcover. If your vehicle is equippedwith a cargo management system,the jack and tools are in the forwardcompartment under a lid.
Unbuckle the strap and remove thejack and tools by pulling the rightside up first. Remove the tools fromthe jack in order to remove thespare tire from under the vehicle.
2008 Escape (204)Owners Guide (post-2002-fmt)USA (fus)
Roadside Emergencies
219

Remove the lug wrench from thejack in order to remove the sparetire from under the vehicle.
Removing the spare tire or spare tire and tether (if equipped)1. Insert the lug wrench through theaccess hole in the rear bumper.
2. Turn the handle counterclockwiseand lower the spare tire until it canbe slid rearward and the cable isslack.
3. Slide the retainer through thecenter of the wheel.
If equipped with a tether,perform the following additionalsteps:
4. Lift the spare tire on end toaccess tether attachment (1).
2008 Escape (204)Owners Guide (post-2002-fmt)USA (fus)
Roadside Emergencies
220

5. Use the lug wrench to remove thelug nut from the spare tire tether.
6. If not replacing the spare or flattire to the underbody storage area,raise winch up into the installedposition.
7. Use the attached fastener strap(2) to tie the tether end to thewinch actuator shaft (if equipped).
Tire change procedure
When one of the front wheels is off the ground, the transmissionalone will not prevent the vehicle from moving or slipping off the
jack, even if the vehicle is in P (Park) (automatic transaxle) or R(Reverse) (manual transaxle).
To help prevent the vehicle from moving when you change a tire,be sure the parking brake is set, then block (in both directions)
the wheel that is diagonally opposite (other side and end of thevehicle) to the tire being changed.
If the vehicle slips off the jack, you or someone else could beseriously injured.
2008 Escape (204)Owners Guide (post-2002-fmt)USA (fus)
Roadside Emergencies
221
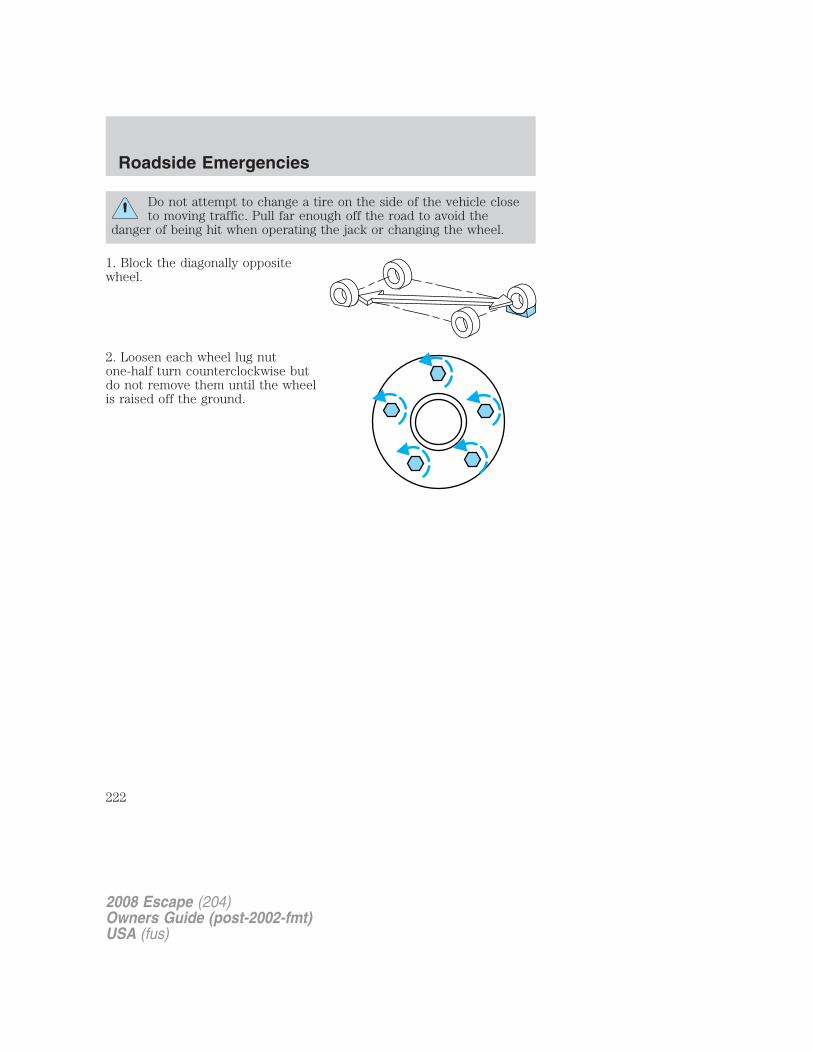
Do not attempt to change a tire on the side of the vehicle closeto moving traffic. Pull far enough off the road to avoid the
danger of being hit when operating the jack or changing the wheel.
1. Block the diagonally oppositewheel.
2. Loosen each wheel lug nutone-half turn counterclockwise butdo not remove them until the wheelis raised off the ground.
2008 Escape (204)Owners Guide (post-2002-fmt)USA (fus)
Roadside Emergencies
222

Before placing the jack under the vehicle, NOTE the jack locations:
• Front
View shown from rear of front tire.Position the jack directly below theprotruding bolt.
2008 Escape (204)Owners Guide (post-2002-fmt)USA (fus)
Roadside Emergencies
223

• Rear
View shown from forward of reartire. Position the jack directly belowthe stud on the rear trailing arm.
3. Position the jack according to theguides and turn the jack handleclockwise until the tire is amaximum of 1 inch (25 mm) off theground.
Never use the differentials as ajacking point.
To lessen the risk ofpersonal injury, do not put
any part of your body under thevehicle while changing a tire. Donot start the engine when yourvehicle is on the jack. The jack isonly meant for changing the tire.
2008 Escape (204)Owners Guide (post-2002-fmt)USA (fus)
Roadside Emergencies
224

4. Remove the lug nuts with the lug nut wrench.
5. Replace the flat tire with the spare tire, making sure the valve stem isfacing outward. Reinstall lug nuts until the wheel is snug against the hub.Do not fully tighten the lug nuts until the wheel has been lowered.
6. Lower the wheel by turning the jack handle counterclockwise.
7. Remove the jack and fully tightenthe lug nuts in the order shown.Refer to Wheel lug nut torquespecifications later in this chapterfor the proper lug nut torquespecification.
Stowing the jack and tools• Make sure the jack is fully
lowered.
• Reclip the tools onto the jackmaking sure that the tools arefully contained by the clips asshown.
• Reinstall the jack in the pocketwith the left side first, then snapthe right side down.
• Ensure that the hold-strapcontains the jack and tools before snapping the buckle.
• Ensure that the jack and tools are oriented as illustrated.
Stowing the flat/spare tire
Note: Failure to follow spare tire stowage instructions may result infailure of cable or loss of spare tire.
If you are stowing a tire that requires reattaching it to thevehicle with a tether, perform these steps first, then proceed withthe steps following.
1
43
25
2008 Escape (204)Owners Guide (post-2002-fmt)USA (fus)
Roadside Emergencies
225
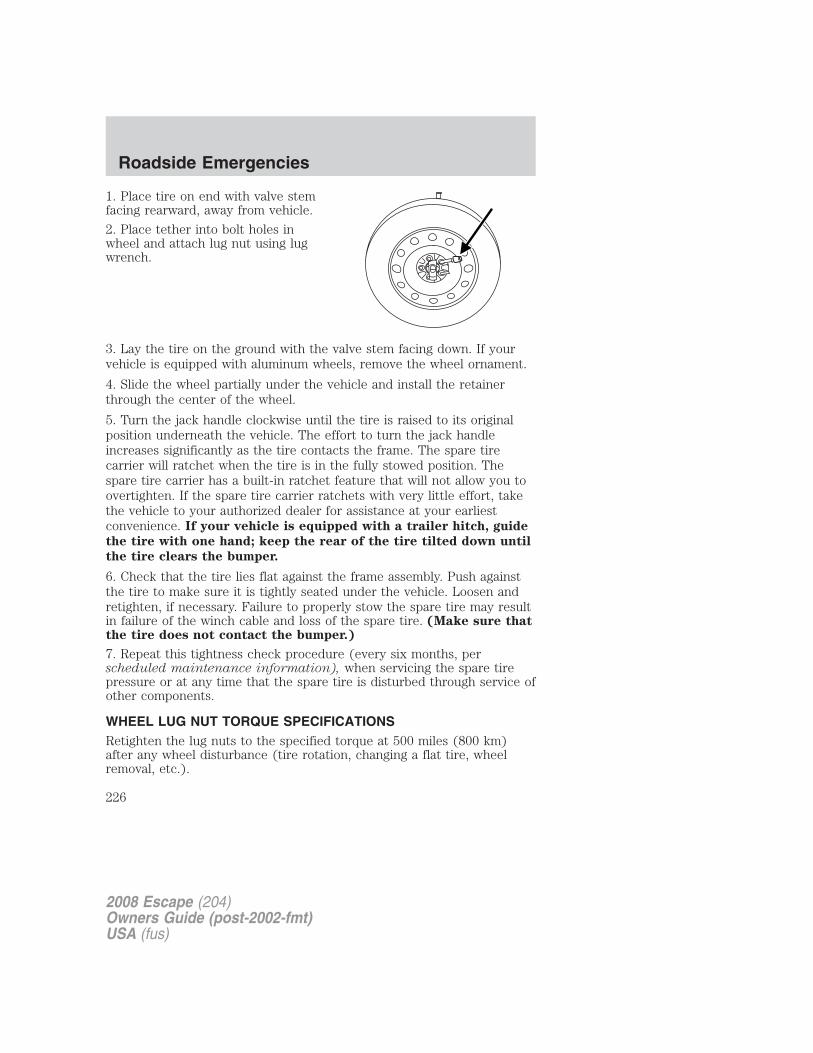
1. Place tire on end with valve stemfacing rearward, away from vehicle.
2. Place tether into bolt holes inwheel and attach lug nut using lugwrench.
3. Lay the tire on the ground with the valve stem facing down. If yourvehicle is equipped with aluminum wheels, remove the wheel ornament.
4. Slide the wheel partially under the vehicle and install the retainerthrough the center of the wheel.
5. Turn the jack handle clockwise until the tire is raised to its originalposition underneath the vehicle. The effort to turn the jack handleincreases significantly as the tire contacts the frame. The spare tirecarrier will ratchet when the tire is in the fully stowed position. Thespare tire carrier has a built-in ratchet feature that will not allow you toovertighten. If the spare tire carrier ratchets with very little effort, takethe vehicle to your authorized dealer for assistance at your earliestconvenience. If your vehicle is equipped with a trailer hitch, guide
the tire with one hand; keep the rear of the tire tilted down until
the tire clears the bumper.
6. Check that the tire lies flat against the frame assembly. Push againstthe tire to make sure it is tightly seated under the vehicle. Loosen andretighten, if necessary. Failure to properly stow the spare tire may resultin failure of the winch cable and loss of the spare tire. (Make sure thatthe tire does not contact the bumper.)
7. Repeat this tightness check procedure (every six months, perscheduled maintenance information), when servicing the spare tirepressure or at any time that the spare tire is disturbed through service ofother components.
WHEEL LUG NUT TORQUE SPECIFICATIONSRetighten the lug nuts to the specified torque at 500 miles (800 km)after any wheel disturbance (tire rotation, changing a flat tire, wheelremoval, etc.).
2008 Escape (204)Owners Guide (post-2002-fmt)USA (fus)
Roadside Emergencies
226

Bolt size Wheel lug nut torque*
lb.ft. N•m
M12 x 1.5 100 135* Torque specifications are for nut and bolt threads free of dirt andrust. Use only Ford recommended replacement fasteners.
When a wheel is installed, always remove any corrosion, dirt orforeign materials present on the mounting surfaces of the wheel
or the surface of the wheel hub, brake drum or brake disc thatcontacts the wheel. Ensure that any fasteners that attach the rotor tothe hub are secured so they do not interfere with the mountingsurfaces of the wheel. Installing wheels without correct metal-to-metalcontact at the wheel mounting surfaces can cause the wheel nuts toloosen and the wheel to come off while the vehicle is in motion,resulting in loss of control.
JUMP STARTING
The gases around the battery can explode if exposed to flames,sparks, or lit cigarettes. An explosion could result in injury or
vehicle damage.
Batteries contain sulfuric acid which can burn skin, eyes andclothing, if contacted.
Do not attempt to push-start your automatic transmissionvehicle. Automatic transmissions do not have push-startcapability. Attempting to push-start a vehicle with an automatictransmission may cause transmission damage.
Preparing your vehicleWhen the battery is disconnected or a new battery is installed, theautomatic transmission must relearn its shift strategy. As a result, thetransmission may have firm and/or soft shifts. This operation isconsidered normal and will not affect function or durability of thetransmission. Over time, the adaptive learning process will fully updatetransmission operation.1. Use only a 12–volt supply to start your vehicle.
2. Do not disconnect the battery of the disabled vehicle as this coulddamage the vehicle’s electrical system.
2008 Escape (204)Owners Guide (post-2002-fmt)USA (fus)
Roadside Emergencies
227

3. Park the booster vehicle close to the hood of the disabled vehiclemaking sure the two vehicles do not touch. Set the parking brake onboth vehicles and stay clear of the engine cooling fan and other movingparts.
4. Check all battery terminals and remove any excessive corrosion beforeyou attach the battery cables. Ensure that vent caps are tight and level.
5. Turn the heater fan on in both vehicles to protect from any electricalsurges. Turn all other accessories off.
Connecting the jumper cables
1. Connect the positive (+) jumper cable to the positive (+) terminal ofthe discharged battery.
Note: In the illustrations, lightning bolts are used to designate theassisting (boosting) battery.
2. Connect the other end of the positive (+) cable to the positive (+)terminal of the assisting battery.
+–
+–
+–
+–
2008 Escape (204)Owners Guide (post-2002-fmt)USA (fus)
Roadside Emergencies
228
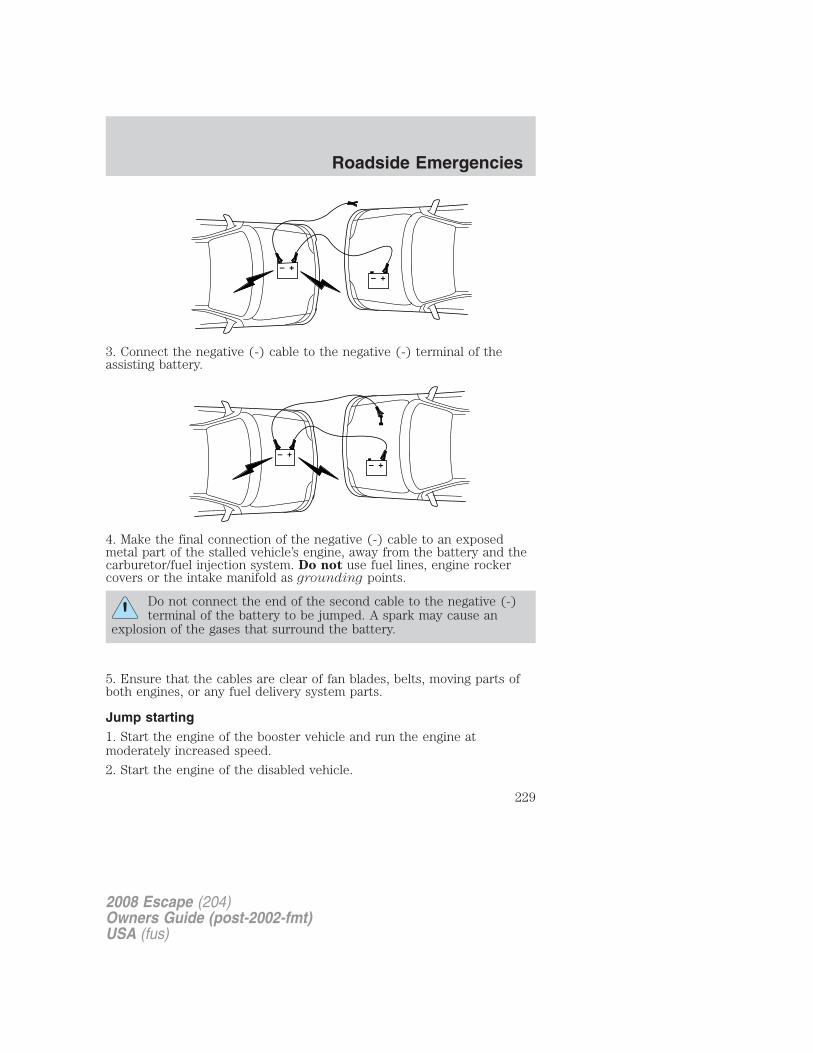
3. Connect the negative (-) cable to the negative (-) terminal of theassisting battery.
4. Make the final connection of the negative (-) cable to an exposedmetal part of the stalled vehicle’s engine, away from the battery and thecarburetor/fuel injection system. Do not use fuel lines, engine rockercovers or the intake manifold as grounding points.
Do not connect the end of the second cable to the negative (-)terminal of the battery to be jumped. A spark may cause an
explosion of the gases that surround the battery.
5. Ensure that the cables are clear of fan blades, belts, moving parts ofboth engines, or any fuel delivery system parts.
Jump starting1. Start the engine of the booster vehicle and run the engine atmoderately increased speed.
2. Start the engine of the disabled vehicle.
+–
+–
+–
+–
2008 Escape (204)Owners Guide (post-2002-fmt)USA (fus)
Roadside Emergencies
229

3. Once the disabled vehicle has been started, run both engines for anadditional three minutes before disconnecting the jumper cables.
Removing the jumper cables
Remove the jumper cables in the reverse order that they wereconnected.
1. Remove the jumper cable from the ground metal surface.
Note: In the illustrations, lightning bolts are used to designate theassisting (boosting) battery.
2. Remove the jumper cable on the negative (-) connection of thebooster vehicle’s battery.
+–
+–
+–
+–
2008 Escape (204)Owners Guide (post-2002-fmt)USA (fus)
Roadside Emergencies
230
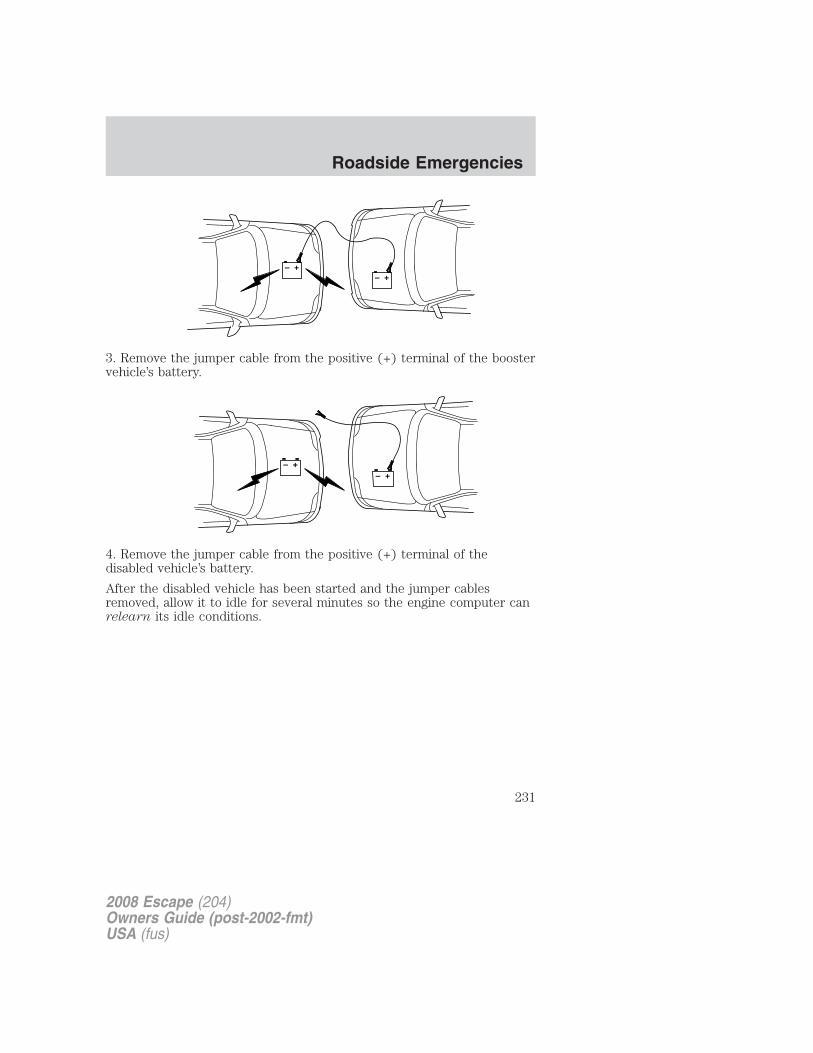
3. Remove the jumper cable from the positive (+) terminal of the boostervehicle’s battery.
4. Remove the jumper cable from the positive (+) terminal of thedisabled vehicle’s battery.
After the disabled vehicle has been started and the jumper cablesremoved, allow it to idle for several minutes so the engine computer canrelearn its idle conditions.
+–
+–
+–
+–
2008 Escape (204)Owners Guide (post-2002-fmt)USA (fus)
Roadside Emergencies
231

WRECKER TOWING
If you need to have your vehicle towed, contact a professional towingservice or, if you are a member of a roadside assistance program, yourroadside assistance service provider.
It is recommended that your vehicle be towed with a wheel lift anddollies or flatbed equipment. Do not tow with a slingbelt. Ford MotorCompany has not approved a slingbelt towing procedure.
On FWD vehicles, if your vehicle is to be towed from the front, ensureproper wheel lift equipment is used to raise the front wheels off theground. The rear wheels can be left on the ground when towed in thisfashion.
If your vehicle is to be towed from the rear using wheel lift equipment, itis required that the front wheels (drive wheels) be placed on a dolly toprevent damage to the automatic transaxle.
On 4WD vehicles, it is required that your vehicle be towed with a wheellift and dollies or flatbed equipment with all the wheels off the ground toprevent damage to the automatic transaxle, 4WD system or vehicle.
2008 Escape (204)Owners Guide (post-2002-fmt)USA (fus)
Roadside Emergencies
232

If the vehicle is towed by other means or incorrectly, vehicledamage may occur.
In case of a roadside emergency with a disabled vehicle (without accessto wheel dollies, car hauling trailer, or flatbed transport vehicle) yourvehicle (regardless of transmission powertrain configuration) can be flattowed (all wheels on the ground) under the following conditions:
• Place the transmission in N (Neutral).
• Maximum distance is 50 miles (80 km).
• Maximum speed is not to exceed 35 mph (56 km/h).
Ford Motor Company produces a towing manual for all authorized towtruck operators. Have your tow truck operator refer to this manual forproper hook-up and towing procedures for your vehicle.
2008 Escape (204)Owners Guide (post-2002-fmt)USA (fus)
Roadside Emergencies
233

GETTING THE SERVICES YOU NEED
At homeYou must take your Ford vehicle to an authorized dealer for warrantyrepairs. While any authorized dealer handling your vehicle line willprovide warranty service, we recommend you return to your sellingauthorized dealer who wants to ensure your continued satisfaction.Please note that certain warranty repairs require special training and/orequipment, so not all authorized dealers are authorized to perform allwarranty repairs. This means that, depending on the warranty repairneeded, you may have to take your vehicle to another authorized dealer.A reasonable time must be allowed to perform a repair after taking yourvehicle to the authorized dealer. Repairs will be made using Ford orMotorcraft parts, or remanufactured or other parts that are authorized byFord.
If you have questions or concerns, or are unsatisfied with the service youare receiving, follow these steps:
1. Contact your Sales Representative or Service Advisor at yourselling/servicing authorized dealer.
2. If your inquiry or concern remains unresolved, contact the SalesManager, Service Manager or Customer Relations Manager.
3. If you require assistance or clarification on Ford Motor Companypolicies or procedures, please contact the Ford Customer RelationshipCenter at 1-800-392-3673 (FORD).
Away from homeIf you own a Ford or Mercury vehicle and are away from home whenyour vehicle needs service, or if you need more help than the authorizeddealer could provide, after following the steps described above, contactthe Ford Customer Relationship Center to find an authorized dealer tohelp you.
In the United States:
Ford Motor CompanyCustomer Relationship CenterP.O. Box 6248Dearborn, MI 481211-800-392-3673 (FORD)(TDD for the hearing impaired: 1-800-232-5952)www.customersaskford.com
2008 Escape (204)Owners Guide (post-2002-fmt)USA (fus)
Customer Assistance
234
In Canada:Customer Relationship CentreFord Motor Company of Canada, LimitedP.O. Box 2000Oakville, Ontario L6J 5E41-800-565-3673 (FORD)www.ford.caIf you own a Lincoln vehicle and are away from home when your vehicleneeds service, or if you need more help than the authorized dealer couldprovide, after following the steps described above, contact the FordCustomer Relationship Center to find an authorized dealer to help you.In the United States:Ford Motor CompanyCustomer Relationship CenterP.O. Box 6248Dearborn, MI 481211-800-521-4140(TDD for the hearing impaired: 1-800-232-5952)www.customersaskford.comIn Canada:Lincoln CentreFord Motor Company of Canada, LimitedP.O. Box 2000Oakville, Ontario L6J 5E41-800-387-9333www.lincolncanada.com
In order to help you service your Lincoln vehicle, please have thefollowing information available when contacting the Lincoln Centre:
• Your telephone number (home and business)
• The name of the authorized dealer and the city where the authorizeddealer is located
• The year and make of your vehicle
• The date of vehicle purchase
• The current odometer reading
• The vehicle identification number (VIN)
Additional AssistanceIf you still have a complaint involving a warranty dispute, you may wishto contact the Better Business Bureau (BBB) AUTO LINE program (U.S.only).
2008 Escape (204)Owners Guide (post-2002-fmt)USA (fus)
Customer Assistance
235

In some states (in the U.S.) you must directly notify Ford in writingbefore pursuing remedies under your state’s warranty laws. Ford is alsoallowed a final repair attempt in some states.In the United States, a warranty dispute must be submitted to the BBBAUTO LINE before taking action under the Magnuson-Moss WarrantyAct, or to the extent allowed by state law, before pursuing replacementor repurchase remedies provided by certain state laws. This disputehandling procedure is not required prior to enforcing state created rightsor other rights which are independent of the Magnuson-Moss WarrantyAct or state replacement or repurchase laws.
IN CALIFORNIA (U.S. ONLY)California Civil Code Section 1793.2(d) requires that, if a manufactureror its representative is unable to repair a motor vehicle to conform to thevehicle’s applicable express warranty after a reasonable number ofattempts, the manufacturer shall be required to either replace thevehicle with one substantially identical or repurchase the vehicle andreimburse the buyer in an amount equal to the actual price paid orpayable by the consumer (less a reasonable allowance for consumeruse). The consumer has the right to choose whether to receive a refundor replacement vehicle.
California Civil Code Section 1793.22(b) presumes that the manufacturerhas had a reasonable number of attempts to conform the vehicle to itsapplicable express warranties if, within the first 18 months of ownershipof a new vehicle or the first 18,000 miles (29,000 km), whichever occursfirst:
1. Two or more repair attempts are made on the same non-conformitylikely to cause death or serious bodily injury OR
2. Four or more repair attempts are made on the same nonconformity (adefect or condition that substantially impairs the use, value or safety ofthe vehicle) OR
3. The vehicle is out of service for repair of nonconformities for a total ofmore than 30 calendar days (not necessarily all at one time)
In the case of 1 or 2 above, the consumer must also notify themanufacturer of the need for the repair of the nonconformity at thefollowing address:
Ford Motor Company16800 Executive Plaza DriveMail Drop 3NE-BDearborn, MI 48126
2008 Escape (204)Owners Guide (post-2002-fmt)USA (fus)
Customer Assistance
236
THE BETTER BUSINESS BUREAU (BBB) AUTO LINE PROGRAM(U.S. ONLY)Your satisfaction is important to Ford Motor Company and to your dealer.Experience has shown that our customers have been very successful inachieving satisfaction by following the three-step procedure outlined onthe front page of the Warranty Guide. However, if your warranty concernhas not been resolved using the three-step procedure, you may beeligible to participate in the BBB AUTO LINE program.
The BBB AUTO LINE program consists of two parts – mediation andarbitration. Initially, the BBB will try to resolve your question or concernthrough mediation. Mediation is a process through which arepresentative of the BBB will contact the parties and explore optionsfor settlement of your claim. If mediation is not successful, customerswith eligible claims may participate in the BBB AUTO LINE arbitrationprocess. An arbitration hearing will be scheduled so that you can presentyour case in an informal setting before an impartial person. Thearbitrator will consider the testimony provided and make a decision afterthe hearing. You are not bound by the decision but may choose to acceptit. If you choose to accept the BBB AUTO LINE decision then Ford mustabide by the accepted decision as well. If the arbitrator has decided inyour favor and you accept the decision, the BBB AUTO LINE programwill contact you to ensure that Ford has complied with the decision in atimely manner. Disputes submitted to the BBB AUTO LINE program areusually decided within forty days after you file your claim with the BBB.
To initiate a claim with the BBB AUTO LINE, you will be asked for yourname and address, general information about your new vehicle,information about your warranty concerns and any steps you havealready taken to try to resolve them. You will then be mailed a CustomerClaim Form that you will need to complete, provide proof of vehicleownership, sign and return the Customer Claim Form to the BBB. Uponreceipt, the BBB will review the claim for eligibility under the ProgramSummary Guidelines.
You can get more information by calling BBB AUTO LINE at1–800–955–5100, or writing to:
BBB AUTO LINE4200 Wilson Boulevard, Suite 800Arlington, Virginia 22203–1833
Note: Ford Motor Company reserves the right to change eligibilitylimitations, modify procedures, or to discontinue this process at any timewithout notice and without obligation.
2008 Escape (204)Owners Guide (post-2002-fmt)USA (fus)
Customer Assistance
237
UTILIZING THE MEDIATION/ARBITRATION PROGRAM(CANADA ONLY)For vehicles delivered to authorized Canadian dealers. In those caseswhere you continue to feel that the efforts by Ford of Canada and theauthorized dealer to resolve a factory-related vehicle service concernhave been unsatisfactory, Ford of Canada participates in an impartialthird party mediation/arbitration program administered by the CanadianMotor Vehicle Arbitration Plan (CAMVAP).
The CAMVAP program is a straight-forward and relatively speedyalternative to resolve a disagreement when all other efforts to produce asettlement have failed. This procedure is without cost to you and isdesigned to eliminate the need for lengthy and expensive legalproceedings.
In the CAMVAP program, impartial third-party arbitrators conducthearings at mutually convenient times and places in an informalenvironment. These impartial arbitrators review the positions of theparties, make decisions and, when appropriate, render awards to resolvedisputes. CAMVAP decisions are fast, fair, and final as the arbitrator’saward is binding both to you and Ford of Canada.
CAMVAP services are available in all territories and provinces. For moreinformation, without charge or obligation, call your CAMVAP ProvincialAdministrator directly at 1-800-207-0685.
FORD EXTENDED SERVICE PLANYou can get more protection for your new car or light truck bypurchasing Ford Extended Service Plan (Ford ESP) coverage. It providesthe following:
• Benefits during the warranty period depending on the plan youpurchase (such as: reimbursement for rentals; coverage for certainmaintenance and wear items).
• Protection against covered repair costs after your Bumper-to-BumperWarranty expires.
You may purchase Ford ESP from any participating authorized dealer.There are several plans available in various time, distance and deductiblecombinations which can be tailored to fit your own driving needs. FordESP also offers reimbursement benefits for towing and rental coverage.
When you buy Ford ESP, you receive Peace-of-Mind protectionthroughout the United States and Canada, provided by a network ofmore than 4,600 participating authorized dealers.
2008 Escape (204)Owners Guide (post-2002-fmt)USA (fus)
Customer Assistance
238

If you did not take advantage of the Ford Extended Service Plan at thetime of purchasing your vehicle, you may still be eligible. Since thisinformation is subject to change, please ask your authorized dealer forcomplete details about Ford Extended Service Plan coverage options, orvisit the Ford ESP website at www.ford-esp.com.
GETTING ASSISTANCE OUTSIDE THE U.S. AND CANADABefore exporting your vehicle to a foreign country, contact theappropriate foreign embassy or consulate. These officials can inform youof local vehicle registration regulations and where to find unleaded fuel.
If you cannot find unleaded fuel or can only get fuel with an anti-knockindex lower than is recommended for your vehicle, contact a regionaloffice or owner relations/customer relationship office.
The use of leaded fuel in your vehicle without proper conversion maydamage the effectiveness of your emission control system and may causeengine knocking or serious engine damage. Ford Motor Company/Ford ofCanada is not responsible for any damage caused by use of improperfuel. Using leaded fuel may also result in difficulty importing your vehicleback into the U.S.
If your vehicle must be serviced while you are traveling or living inCentral America, the Caribbean, or the Middle East, contact the nearestauthorized dealer. If the authorized dealer cannot help you, write or call:
FORD MOTOR COMPANYFORD EXPORT OPERATIONS1555 Fairlane DriveFairlane Business Park #3Allen Park, Michigan 48101U.S.A.Telephone: (313) 594-4857FAX: (313) 390-0804
If you are in another foreign country, contact the nearest authorizeddealer. If the authorized dealer employees cannot help you, they candirect you to the nearest Ford affiliate office.
If you buy your vehicle in North America and then relocate outside ofthe U.S. or Canada, register your vehicle identification number (VIN) andnew address with Ford Motor Company Export Operations.
Customers in the U.S. should call 1–800–392–3673.
2008 Escape (204)Owners Guide (post-2002-fmt)USA (fus)
Customer Assistance
239

ORDERING ADDITIONAL OWNER’S LITERATURETo order the publications in this portfolio, contact Helm, Incorporated at:
HELM, INCORPORATEDP.O. Box 07150Detroit, Michigan 48207
Or call:
For a free publication catalog, order toll free: 1-800-782-4356
Monday-Friday 8:00 a.m. - 6:00 p.m. EST
Helm, Incorporated can also be reached by their website:www.helminc.com.
(Items in this catalog may be purchased by credit card, check ormoney order.)
Obtaining a French owner’s guideFrench Owner’s Guides can be obtained from your authorized dealer orby writing to:Ford Motor Company of Canada, LimitedService Publications CHQ202The Canadian RoadP.O. Box 2000Oakville, ON, CanadaL6J 5E4
2008 Escape (204)Owners Guide (post-2002-fmt)USA (fus)
Customer Assistance
240
REPORTING SAFETY DEFECTS (U.S. ONLY)If you believe that your vehicle hasa defect which could cause a crashor could cause injury or death, youshould immediately inform theNational Highway Traffic SafetyAdministration (NHTSA) in addition to notifying Ford Motor Company.
If NHTSA receives similar complaints, it may open an investigation, andif it finds that a safety defect exists in a group of vehicles, it may order arecall and remedy campaign. However, NHTSA cannot become involvedin individual problems between you, your dealer, or Ford MotorCompany.
To contact NHTSA, you may call the Vehicle Safety Hotline toll-free at1–888–327–4236 (TTY: 1–800–424–9153); go to http://www.safercar.gov;or write to:
AdministratorNHTSA400 Seventh Street, SWWashington, D.C. 20590
You can also obtain other information about motor vehicle safety fromhttp://www.safercar.gov.
REPORTING SAFETY DEFECTS (CANADA ONLY)If you believe that your vehicle has a defect which could cause a crash orcould cause injury or death, you should immediately inform TransportCanada, using their toll-free number: 1–800–333–0510.
2008 Escape (204)Owners Guide (post-2002-fmt)USA (fus)
Customer Assistance
241
WASHING THE EXTERIORWash your vehicle regularly with cool or lukewarm water and a neutralpH shampoo, such as Motorcraft Detail Wash (ZC-3-A), which is availablefrom your authorized dealer.• Never use strong household detergents or soap, such as dish washing
or laundry liquid. These products can discolor and spot paintedsurfaces.
• Never wash a vehicle that is “hot to the touch” or during exposure tostrong, direct sunlight.
• Always use a clean sponge or car wash mitt with plenty of water forbest results.
• Dry the vehicle with a chamois or soft terry cloth towel in order toeliminate water spotting.
• It is especially important to wash the vehicle regularly during thewinter months, as dirt and road salt are difficult to remove and causedamage to the vehicle.
• Immediately remove items such as gasoline, diesel fuel, bird droppingsand insect deposits because they can cause damage to the vehicle’spaintwork and trim over time. Use Bug and Tar Remover, ZC-42,which is available from your authorized dealer.
• Remove any exterior accessories, such as antennas, before entering acar wash.
• Suntan lotions and insect repellents can damage any paintedsurface; if these substances come in contact with your vehicle,wash off as soon as possible.
Exterior chrome
• Wash the vehicle first, using cool or lukewarm water and a neutral pHshampoo, such as Motorcraft Detail Wash (ZC-3-A).
• Use Custom Bright Metal Cleaner (ZC-15), available from yourauthorized dealer. Apply the product as you would a wax to cleanbumpers and other chrome parts; allow the cleaner to dry for a fewminutes, then wipe off the haze with a clean, dry rag.
• Never use abrasive materials such as steel wool or plastic padsas they can scratch the chrome surface.
• After polishing chrome bumpers, apply a coating of MotorcraftPremium Liquid Wax (ZC-53-A), available from your authorized dealer,or an equivalent quality product to help protect from environmentaleffects.
2008 Escape (204)Owners Guide (post-2002-fmt)USA (fus)
Cleaning
242

WAXINGApplying Motorcraft Paint Sealant (ZC-45) to your vehicle every sixmonths will assist in reducing minor scratches and paint damage.• Wash the vehicle first.• Do not use waxes that contain abrasives; use Motorcraft Premium
Liquid Wax (ZC-53-A), which is available from your authorized dealer,or an equivalent quality product.
• Do not allow paint sealant to come in contact with any non-body(low-gloss black) colored trim, such as grained door handles, roofracks, bumpers, side moldings, mirror housings or the windshield cowlarea. The paint sealant will “gray” or stain the parts over time.
PAINT CHIPSYour authorized dealer has touch-up paint to match your vehicle’s color.Take your color code (printed on a sticker in the driver’s door jamb) toyour authorized dealer to ensure you get the correct color.• Remove particles such as bird droppings, tree sap, insect deposits, tar
spots, road salt and industrial fallout before repairing paint chips.• Always read the instructions before using the products.
ALUMINUM WHEELS AND WHEEL COVERSAluminum wheels and wheel covers are coated with a clearcoat paintfinish. In order to maintain their shine:• Clean weekly with Motorcraft Wheel and Tire Cleaner (ZC-37-A),
which is available from your authorized dealer. Heavy dirt and brakedust accumulation may require agitation with a sponge. Rinsethoroughly with a strong stream of water.
• Never apply any cleaning chemical to hot or warm wheel rims orcovers.
• Some automatic car washes may cause damage to the finish on yourwheel rims or covers. Chemical-strength cleaners, or cleaningchemicals, in combination with brush agitation to remove brake dustand dirt, could wear away the clearcoat finish over time.
• Do not use hydrofluoric acid-based or high caustic-based wheelcleaners, steel wool, fuels or strong household detergent.
• To remove tar and grease, use Motorcraft Bug and Tar Remover(ZC-42), available from your authorized dealer.
ENGINEEngines are more efficient when they are clean because grease and dirtbuildup keep the engine warmer than normal. When washing:
2008 Escape (204)Owners Guide (post-2002-fmt)USA (fus)
Cleaning
243

• Take care when using a power washer to clean the engine. Thehigh-pressure fluid could penetrate the sealed parts and causedamage.
• Do not spray a hot engine with cold water to avoid cracking theengine block or other engine components.
• Spray Motorcraft Engine Shampoo and Degreaser (ZC-20) on all partsthat require cleaning and pressure rinse clean.
• Cover the highlighted areas to prevent water damage when cleaningthe engine.
• Never wash or rinse the engine while it is running; water in therunning engine may cause internal damage.
• 2.3L I4
• 3.0L DOHC V6 Duratec Engine
2008 Escape (204)Owners Guide (post-2002-fmt)USA (fus)
Cleaning
244

PLASTIC (NON-PAINTED) EXTERIOR PARTSUse only approved products to clean plastic parts. These products areavailable from your authorized dealer.• For routine cleaning, use Motorcraft Detail Wash (ZC-3-A).• If tar or grease spots are present, use Motorcraft Bug and Tar
Remover (ZC-42).• For plastic headlamp lenses, use Motorcraft Ultra Clear Spray Glass
Cleaner (ZC-23).
WINDOWS AND WIPER BLADESThe windshield, rear and side windows and the wiper blades should becleaned regularly. If the wipers do not wipe properly, substances on thevehicle’s glass or the wiper blades may be the cause. These may includehot wax treatments used by commercial car washes, water repellentcoatings, tree sap, or other organic contamination; these contaminantsmay cause squeaking or chatter noise from the blades, and streaking andsmearing of the windshield. To clean these items, follow these tips:
• The windshield, rear windows and side windows may be cleaned witha non-abrasive cleaner such as Motorcraft Ultra-Clear Spray GlassCleaner (ZC-23), available from your authorized dealer.
• The wiper blades can be cleaned with isopropyl (rubbing) alcohol orMotorcraft Premium Windshield Washer Concentrate (ZC-32-A),available from your authorized dealer. This washer fluid containsspecial solution in addition to alcohol which helps to remove the hotwax deposited on the wiper blade and windshield from automated carwash facilities. Be sure to replace wiper blades when they appearworn or do not function properly.
• Do not use abrasives, as they may cause scratches.
• Do not use fuel, kerosene, or paint thinner to clean any parts.
If you cannot remove those streaks after cleaning with the glass cleaneror if the wipers chatter and move in a jerky motion, clean the outersurface of the windshield and the wiper blades using a sponge or softcloth with a neutral detergent or mild-abrasive cleaning solution. Aftercleaning, rinse the windshield and wiper blades with clean water. Thewindshield is clean if beads do not form when you rinse the windshieldwith water.
Do not use sharp objects, such as a razor blade, to clean theinside of the rear window or to remove decals, as it may causedamage to the rear window defroster’s heated grid lines.
2008 Escape (204)Owners Guide (post-2002-fmt)USA (fus)
Cleaning
245

INSTRUMENT PANEL/INTERIOR TRIM AND CLUSTER LENSClean the instrument panel, interior trim areas and cluster lens with aclean and damp white cotton cloth, then with a clean and dry whitecotton cloth; you may also use Motorcraft Dash & Vinyl Cleaner(ZC-38-A) on the instrument panel and interior trim areas.• Avoid cleaners or polishes that increase the gloss of the upper portion
of the instrument panel. The dull finish in this area helps protect thedriver from undesirable windshield reflection.
• Be certain to wash or wipe your hands clean if you have been incontact with certain products such as insect repellent and suntanlotion in order to avoid possible damage to the interior paintedsurfaces.
• Do not use household or glass cleaners as these may damage thefinish of the instrument panel, interior trim and cluster lens.
Do not use chemical solvents or strong detergents when cleaningthe steering wheel or instrument panel to avoid contamination of
the airbag system.
If a staining liquid like coffee/juice has been spilled on the instrumentpanel or on interior trim surfaces, clean as follows:
1. Wipe up spilled liquid using a clean white cotton cloth.
2. Apply Motorcraft Deluxe Leather and Vinyl Cleaner (ZC-11-A) [InCanada use Motorcraft Multi-Purpose Cleaner (CXC-101)] to the wipedarea and spread around evenly.
3. Apply more Motorcraft cleaner to a clean white cotton cloth and pressthe cloth onto the soiled area–allow this to set at room temperature for30 minutes.
4. Remove the soaked cloth, and if it is not soiled badly, use this cloth toclean the area by using a rubbing motion for 60 seconds.
5. Following this, wipe area dry with a clean white cotton cloth.
INTERIORFor fabric, carpets, cloth seats, safety belts and seats equipped with sideairbags:
• Remove dust and loose dirt with a vacuum cleaner.
• Remove light stains and soil with Motorcraft Professional StrengthCarpet & Upholstery Cleaner (ZC-54).
2008 Escape (204)Owners Guide (post-2002-fmt)USA (fus)
Cleaning
246
• If grease or tar is present on the material, spot-clean the area firstwith Motorcraft Spot and Stain Remover (ZC-14).
• If a ring forms on the fabric after spot cleaning, clean the entire areaimmediately (but do not oversaturate) or the ring will set.
• Do not use household cleaning products or glass cleaners, which canstain and discolor the fabric and affect the flame retardant abilities ofthe seat materials.
Do not use cleaning solvents, bleach or dye on the vehicle’ssafety belts, as these actions may weaken the belt webbing.
Do not use chemical solvents or strong detergents when cleaningthe seat-mounted side airbag (if equipped). Such products could
contaminate the side airbag system and affect performance of the sideairbag in a collision.
LEATHER SEATS (IF EQUIPPED)Your leather seating surfaces have a clear, protective coating over theleather.
• To clean, use a soft cloth with Motorcraft Deluxe Leather and VinylCleaner (ZC-11-A). Dry the area with a soft cloth.
• To help maintain its resiliency and color, use the Motorcraft DeluxeLeather Care Kit (ZC-11-D), available from your authorized dealer.
• Do not use household cleaning products, alcohol solutions, solvents orcleaners intended for rubber, vinyl and plastics, or oil/petroleum-basedleather conditioners. These products may cause premature wearing ofthe clear, protective coating.
Note: In some instances, color or dye transfer can occur when wetclothing comes in contact with leather upholstery. If this occurs, theleather should be cleaned immediately to avoid permanent staining.
UNDERBODYFlush the complete underside of your vehicle frequently. Keep body anddoor drain holes free from packed dirt.
FORD AND LINCOLN MERCURY CAR CARE PRODUCTSYour Ford or Lincoln Mercury authorized dealer has many qualityproducts available to clean your vehicle and protect its finishes. These
2008 Escape (204)Owners Guide (post-2002-fmt)USA (fus)
Cleaning
247

quality products have been specifically engineered to fulfill yourautomotive needs; they are custom designed to complement the styleand appearance of your vehicle. Each product is made from high qualitymaterials that meet or exceed rigid specifications. For best results, usethe following products or products of equivalent quality:
Motorcraft Bug and Tar Remover (ZC-42)
Motorcraft Car Wash (Canada only) (CXC-21)
Motorcraft Multi-Purpose Cleaner (Canada only) (CXC-101)
Motorcraft Custom Bright Metal Cleaner (ZC-15)
Motorcraft Custom Clear Coat Polish (ZC-8-A)
Motorcraft Custom Vinyl Protectant (U.S. only) (ZC-40-A)
Motorcraft Dash and Vinyl Cleaner (ZC-38–A)
Motorcraft Deluxe Leather and Vinyl Cleaner (U.S. only) (ZC-11-A)
Motorcraft Leather Care Kit (ZC-11-D)
Motorcraft Detail Wash (ZC-3-A)
Motorcraft Dusting Cloth Mitt (ZC-47)
Motorcraft Dusting Cloth (ZC-24)
Motorcraft Engine Shampoo and Degreaser (U.S. only) (ZC-20)
Motorcraft One Step Wash and Wax Concentrate (ZC-6-A)
Motorcraft Paint Sealant (ZC-45)
Motorcraft Premium Glass Cleaner (Canada only) (CXC-100)
Motorcraft Premium Liquid Wax (ZC-53-A)
Motorcraft Premium Windshield Washer Concentrate (ZC-32-A)
Motorcraft Professional Strength Carpet & Upholstery Cleaner (ZC-54)
Motorcraft Spot and Stain Remover (U.S. only) (ZC-14)
Motorcraft Tire Clean and Shine (ZC-28)
Motorcraft Triple Clean (U.S. only) (ZC-13)
Motorcraft Ultra-Clear Spray Glass Cleaner (ZC-23)
Motorcraft Vinyl Cleaner (Canada only) (CXC-93)
Motorcraft Wheel and Tire Cleaner (ZC-37-A)
2008 Escape (204)Owners Guide (post-2002-fmt)USA (fus)
Cleaning
248

SERVICE RECOMMENDATIONSTo help you service your vehicle, we provide scheduled maintenanceinformation which makes tracking routine service easy.
If your vehicle requires professional service, your authorized dealer canprovide the necessary parts and service. Check your Warranty Guidetofind out which parts and services are covered.
Use only recommended fuels, lubricants, fluids and service partsconforming to specifications. Motorcraft parts are designed and built toprovide the best performance in your vehicle.
PRECAUTIONS WHEN SERVICING YOUR VEHICLE• Do not work on a hot engine.
• Make sure that nothing gets caught in moving parts.
• Do not work on a vehicle with the engine running in an enclosedspace, unless you are sure you have enough ventilation.
• Keep all open flames and other burning (cigarettes) material awayfrom the battery and all fuel related parts.
Working with the engine off• Automatic transmission/transaxle:
1. Set the parking brake and shift to P (Park).
2. Turn off the engine and remove the key.
3. Block the wheels.
• Manual transmission/transaxle:
1. Set the parking brake, depress the clutch and place the gearshift in 1(First).
2. Turn off the engine and remove the key.
3. Block the wheels.
2008 Escape (204)Owners Guide (post-2002-fmt)USA (fus)
Maintenance and Specifications
249

Working with the engine on
• Automatic transmission:
1. Set the parking brake and shift to P (Park).
2. Block the wheels.
• Manual transmission:
1. Set the parking brake, depress the clutch and place the gearshift in N(Neutral).
2. Block the wheels.
To reduce the risk of vehicle damage and/or personal burninjuries do not start your engine with the air cleaner removed
and do not remove it while the engine is running.
OPENING THE HOOD1. Inside the vehicle, pull the hoodrelease handle located under thebottom of the instrument panel.
2. At the front of the vehicle, lift upon the auxiliary latch handle locatedin the center between the hood andthe grille.
3. Lift the hood open and secure itwith the prop rod.
2008 Escape (204)Owners Guide (post-2002-fmt)USA (fus)
Maintenance and Specifications
250

IDENTIFYING COMPONENTS IN THE ENGINE COMPARTMENT
2.3L I4 engine
1. Engine coolant reservoir
2. Engine oil filler cap
3. Automatic transmission dipstick (if equipped)
4. Brake/Clutch fluid reservoir
5. Air filter assembly
6. Power distribution box
7. Battery
8. Engine coolant bleed valve
9. Engine oil dipstick
10. Windshield washer fluid reservoir
2008 Escape (204)Owners Guide (post-2002-fmt)USA (fus)
Maintenance and Specifications
251
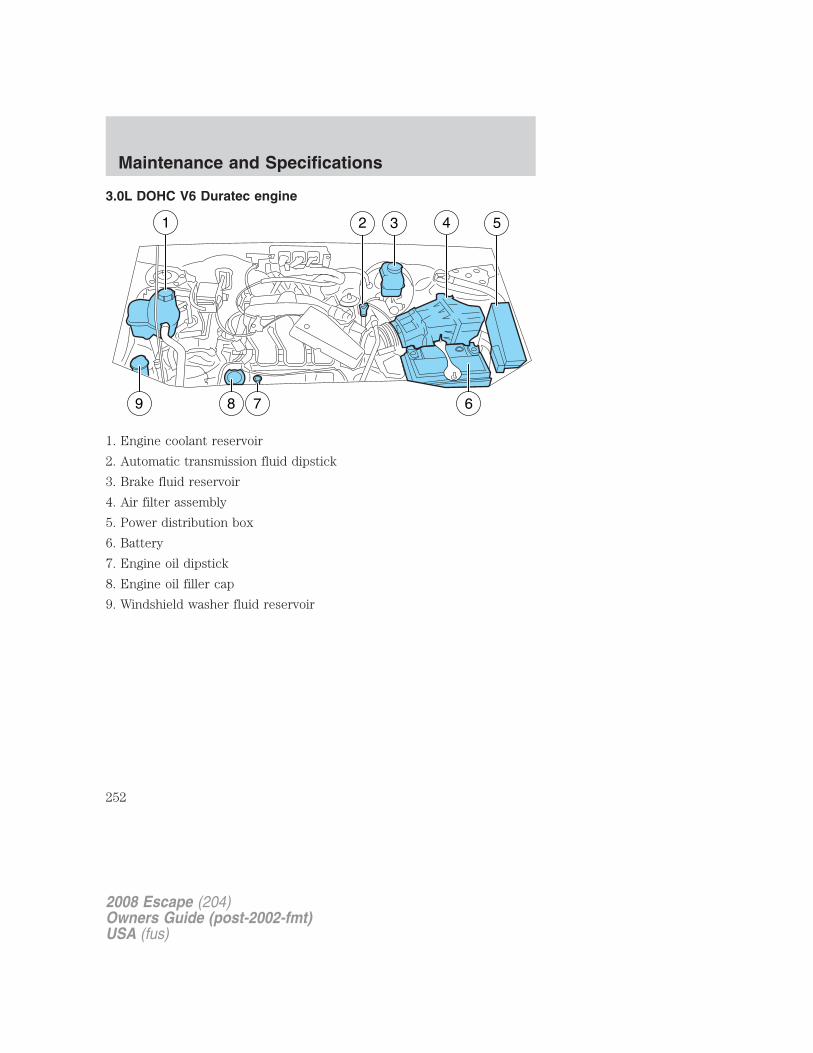
3.0L DOHC V6 Duratec engine
1. Engine coolant reservoir
2. Automatic transmission fluid dipstick
3. Brake fluid reservoir
4. Air filter assembly
5. Power distribution box
6. Battery
7. Engine oil dipstick
8. Engine oil filler cap
9. Windshield washer fluid reservoir
2008 Escape (204)Owners Guide (post-2002-fmt)USA (fus)
Maintenance and Specifications
252

WINDSHIELD WASHER FLUID
Add fluid to fill the reservoir if thelevel is low. In very cold weather, donot fill the reservoir completely.
Only use a washer fluid that meets Ford specifications. Do not use anyspecial washer fluid such as windshield water repellent type fluid or bugwash. They may cause squeaking, chatter noise, streaking and smearing.Refer to the Maintenance product specifications and capacitiessection in this chapter.
State or local regulations on volatile organic compounds may restrict theuse of methanol, a common windshield washer antifreeze additive.Washer fluids containing non-methanol antifreeze agents should be usedonly if they provide cold weather protection without damaging thevehicle’s paint finish, wiper blades or washer system.
If you operate your vehicle in temperatures below 40°F (4.5°C),use washer fluid with antifreeze protection. Failure to use
washer fluid with antifreeze protection in cold weather could result inimpaired windshield vision and increase the risk of injury or accident.
Note: Do not put washer fluid in the engine coolant reservoir. Washerfluid placed in the cooling system may harm engine and cooling systemcomponents.
Checking and adding washer fluid for the liftgate
Washer fluid for the liftgate is supplied by the same reservoir as thewindshield.
2008 Escape (204)Owners Guide (post-2002-fmt)USA (fus)
Maintenance and Specifications
253

CHANGING THE WIPER BLADES1. Pull the wiper blade and armaway from the glass. Turn the bladeat a right angle to the arm.
2. Squeeze the locking tabs torelease the blade from the arm andpull the blade away from the arm toremove it.
3. Attach the new blade to the arm and snap it into place.
Replace wiper blades at least once per year for optimum performance.
Poor wiper quality can be improved by cleaning the wiper blades and thewindshield, refer to Windows and wiper blades in the Cleaningchapter.
To prolong the life of the wiper blades, it is highly recommended toscrape off the ice on the windshield before turning on the wipers. Thelayer of ice has many sharp edges and can damage the micro edge of thewiper rubber element.
Changing rear window wiper bladeThe rear wiper arm is designed without a service position. This reducesthe risk of damage to the blade in an automatic car wash.
2008 Escape (204)Owners Guide (post-2002-fmt)USA (fus)
Maintenance and Specifications
254

To replace the wiper blade:
1. Grab the wiper arm just belowthe blade attachment and pull it asfar away from the glass as possible.Do not use excessive force becauseit can break the wiper arm at theheel. Hold it there until the nextstep.
2. Grab the wiper blade with yourother hand and use your fingers topush the wiper arm tip through thewiper blade center to separate theblade from the arm.
3. Attach the new wiper to thewiper arm and press it into placeuntil a click is heard.
If you find this procedure toodifficult, please see your dealer.
ENGINE OIL
Checking the engine oil
Refer to scheduled maintenance information for the appropriateintervals for checking the engine oil.
1. Make sure the vehicle is on level ground.
2. Turn the engine off and wait a few minutes for the oil to drain into theoil pan.
3. Set the parking brake and ensure the gearshift is securely latched in P(Park) (automatic transmissions) or 1 (First) (manual transmissions).
4. Open the hood. Protect yourself from engine heat.
5. Locate and carefully remove the engine oil level indicator (dipstick).
2008 Escape (204)Owners Guide (post-2002-fmt)USA (fus)
Maintenance and Specifications
255

• 2.3L I4 engine
• 3.0L DOHC V6 Duratec engine
6. Wipe the indicator clean. Insert the indicator fully, then remove itagain.
• If the oil level is within the MIN and MAX marks or the lower andupper holes, the oil level is acceptable. DO NOT ADD OIL.
• If the oil level is below the MIN mark or the lower hole, engine oilmust be added to raise the level within the normal operating range.
• 2.3L I4 engine
2008 Escape (204)Owners Guide (post-2002-fmt)USA (fus)
Maintenance and Specifications
256

• 3.0L DOHC V6 Duratec engine
• If required, add engine oil to the engine. Refer to Adding engine oilin this chapter.
• Do not overfill the engine with oil. Oil levels above the MAXmark or upper hole may cause engine damage. If the engine isoverfilled, some oil must be removed from the engine by an authorizeddealer.
7. Put the indicator back in and ensure it is fully seated.
Adding engine oil
1. Check the engine oil. For instructions, refer to Checking the engineoil in this chapter.
2. If the engine oil level is not within the normal range, add only certifiedengine oil of the recommended viscosity. Remove the engine oil filler capand use a funnel to pour the engine oil into the opening.
3. Recheck the engine oil level. Make sure the oil level is not above theMAX or FULL mark on the engine oil level indicator (dipstick).
4. Install the indicator and ensure it is fully seated.
5. Fully install the engine oil filler cap by turning the filler cap clockwise1/4 of a turn until it is seated.
To avoid possible oil loss, DO NOT operate the vehicle with theengine oil level indicator and/or the engine oil filler cap removed.
2008 Escape (204)Owners Guide (post-2002-fmt)USA (fus)
Maintenance and Specifications
257

Engine oil and filter recommendationsLook for this certificationtrademark.
Use SAE 5W-20 engine oil
Only use oils “Certified For Gasoline Engines” by the AmericanPetroleum Institute (API). An oil with this trademark symbol conformsto the current engine and emission system protection standards and fueleconomy requirements of the International Lubricant Standardization andApproval Committee (ILSAC), comprised of U.S. and Japaneseautomobile manufacturers.
To protect your engine’s warranty use Motorcraft SAE 5W-20 or anequivalent SAE 5W-20 oil meeting Ford specification WSS-M2C930-A.SAE 5W-20 oil provides optimum fuel economy and durabilityperformance meeting all requirements for your vehicle’s engine.
Do not use supplemental engine oil additives, cleaners or other enginetreatments. They are unnecessary and could lead to engine damage thatis not covered by Ford warranty.
Change your engine oil and filter according to the appropriate schedulelisted in scheduled maintenance information.
Ford production and aftermarket (Motorcraft) oil filters are designed foradded engine protection and long life. If a replacement oil filter is usedthat does not meet Ford material and design specifications, start-upengine noises or knock may be experienced.
It is recommended you use the appropriate Motorcraft oil filter (oranother brand meeting Ford specifications) for your engine application.
2008 Escape (204)Owners Guide (post-2002-fmt)USA (fus)
Maintenance and Specifications
258

BATTERY
Your vehicle is equipped with aMotorcraft maintenance-free batterywhich normally does not requireadditional water during its life ofservice.
If your battery has a cover/shield, make sure it is reinstalledafter the battery has been cleaned or replaced.
For longer, trouble-free operation, keep the top of the battery clean anddry. Also, make certain the battery cables are always tightly fastened tothe battery terminals.
If you see any corrosion on the battery or terminals, remove the cablesfrom the terminals and clean with a wire brush. You can neutralize theacid with a solution of baking soda and water.
It is recommended that the negative battery cable terminal bedisconnected from the battery if you plan to store your vehicle for anextended period of time. This will minimize the discharge of your batteryduring storage.
Note: Electrical or electronic accessories or components added tothe vehicle by the dealer or the owner may adversely affectbattery performance and durability.
Batteries normally produce explosive gases which can causepersonal injury. Therefore, do not allow flames, sparks or lighted
substances to come near the battery. When working near the battery,always shield your face and protect your eyes. Always provide properventilation.
When lifting a plastic-cased battery, excessive pressure on theend walls could cause acid to flow through the vent caps,
resulting in personal injury and/or damage to the vehicle or battery.Lift the battery with a battery carrier or with your hands on oppositecorners.
2008 Escape (204)Owners Guide (post-2002-fmt)USA (fus)
Maintenance and Specifications
259
Keep batteries out of reach of children. Batteries contain sulfuricacid. Avoid contact with skin, eyes or clothing. Shield your eyes
when working near the battery to protect against possible splashing ofacid solution. In case of acid contact with skin or eyes, flushimmediately with water for a minimum of 15 minutes and get promptmedical attention. If acid is swallowed, call a physician immediately.
Battery posts, terminals and related accessories contain lead andlead compounds. Wash hands after handling.
Because your vehicle’s engine is electronically controlled by a computer,some control conditions are maintained by power from the battery. Whenthe battery is disconnected or a new battery is installed, the engine mustrelearn its idle and fuel trim strategy for optimum driveability andperformance. To begin this process:
1. With the vehicle at a complete stop, set the parking brake.
2. Put the gearshift in P (Park), turn off all accessories and start theengine.
3. Run the engine until it reaches normal operating temperature.
4. Allow the engine to idle for at least one minute.
5. Turn the A/C on and allow the engine to idle for at least one minute.
6. Drive the vehicle to complete the relearning process.
• The vehicle may need to be driven 10 miles (16 km) or more torelearn the idle and fuel trim strategy.
• If you do not allow the engine to relearn its idle trim, the idlequality of your vehicle may be adversely affected until the idletrim is eventually relearned.
When the battery is disconnected or a new battery installed, thetransmission must relearn its adaptive strategy. As a result of this, thetransmission may shift firmly. This operation is considered normal andwill not affect function or durability of the transmission. Over time theadaptive learning process will fully update transmission operation to itsoptimum shift feel.
If the battery has been disconnected or a new battery has been installed,the clock and the preset radio stations must be reset once the battery isreconnected.
2008 Escape (204)Owners Guide (post-2002-fmt)USA (fus)
Maintenance and Specifications
260

• Always dispose of automotivebatteries in a responsible manner.Follow your local authorizedstandards for disposal. Call yourlocal authorized recycling centerto find out more about recyclingautomotive batteries.
ENGINE COOLANT
Checking engine coolant
The concentration and level of engine coolant should be checked at theintervals listed in scheduled maintenance information. The coolantconcentration should be maintained at 50/50 coolant and distilled water,which equates to a freeze point of -34°F (-36°C). Coolant concentrationtesting is possible with a hydrometer or antifreeze tester (such as theRotunda Battery and Antifreeze Tester, 014–R1060). The level of coolantshould be maintained at the “FULL COLD” level or within the “COLDFILL RANGE” in the coolant reservoir. If the level falls below, addcoolant per the instructions in the Adding engine coolant section.
Your vehicle was factory-filled with a 50/50 engine coolant and waterconcentration. If the concentration of coolant falls below 40% or above60%, the engine parts could become damaged or not work properly. A50–50 mixture of coolant and water provides the following:
• Freeze protection down to -34°F (-36°C).
• Boiling protection up to 265°F (129°C).
• Protection against rust and other forms of corrosion.
• Enables calibrated gauges to work properly.
LE
AD
RE
TU
RN
RECYCLE
2008 Escape (204)Owners Guide (post-2002-fmt)USA (fus)
Maintenance and Specifications
261

When the engine is cold, check thelevel of the engine coolant in thereservoir.
• The engine coolant should be at the “FULL COLD” level or within the“COLD FILL RANGE” as listed on the engine coolant reservoir(depending upon application).
• Refer to scheduled maintenance information for service intervalschedules.
• Be sure to read and understand Precautions when servicing yourvehicle in this chapter.
If the engine coolant has not been checked at the recommended interval,the engine coolant reservoir may become low or empty. If the reservoir islow or empty, add engine coolant to the reservoir. Refer to Addingengine coolant in this chapter.Note: Automotive fluids are not interchangeable; do not use enginecoolant, antifreeze or windshield washer fluid outside of its specifiedfunction and vehicle location.Adding engine coolantWhen adding coolant, make sure it is a 50/50 mixture of engine coolantand distilled water. Add the mixture to the coolant reservoir, when theengine is cool, until the appropriate fill level is obtained.
Do not add engine coolant when the engine is hot. Steam andscalding liquids released from a hot cooling system can burn you
badly. Also, you can be burned if you spill coolant on hot engine parts.
Do not put engine coolant in the windshield washer fluidcontainer. If sprayed on the windshield, engine coolant could
make it difficult to see through the windshield.
• Add Motorcraft Premium Gold Engine Coolant or equivalentmeeting Ford specification WSS-M97B51-A1. Refer toMaintenance product specifications and capacities in this chapter.
2008 Escape (204)Owners Guide (post-2002-fmt)USA (fus)
Maintenance and Specifications
262

Note: Use of Motorcraft Cooling System Stop Leak Pellets or anequivalent product meeting Ford specification WSS-M99B37-B6, maydarken the color of Motorcraft Premium Gold Engine Coolant fromyellow to golden tan.Note: For the 2.3L engine, when adding more than 1 quart (.95L) ofcoolant it is necessary to use the coolant bleed valve. Failure to bleedthe cooling system when adding engine coolant may cause enginedamage. Refer to the Cooling section of the Workshop Manual.• Do not add/mix an orange-colored, extended life coolant such
as Motorcraft Specialty Orange Engine Coolant, meeting Fordspecification WSS-M97B44-D, or DEX-COOL� brand with thefactory-filled coolant. Mixing Motorcraft Specialty Orange EngineCoolant or any orange-colored extended life product such asDEX-COOL� brand with your factory filled coolant can result indegraded corrosion protection.
• A large amount of water without engine coolant may be added, in caseof emergency, to reach a vehicle service location. In this instance, thecooling system must be drained and refilled with a 50/50 mixture ofengine coolant and distilled water as soon as possible. Water alone(without engine coolant) can cause engine damage from corrosion,overheating or freezing.
• Do not use alcohol, methanol, brine or any engine coolantsmixed with alcohol or methanol antifreeze (coolant). Alcoholand other liquids can cause engine damage from overheating orfreezing.
• Do not add extra inhibitors or additives to the coolant. Thesecan be harmful and compromise the corrosion protection of the enginecoolant.
To reduce the risk of personal injury, make sure the engine iscool before unscrewing the coolant pressure relief cap. The
cooling system is under pressure; steam and hot liquid can come outforcefully when the cap is loosened slightly.
1. Before you begin, turn the engine off and let it cool.
2. When the engine is cool, wrap a thick cloth around the coolantpressure relief cap on the coolant reservoir (an opaque plastic bottle).Slowly turn cap counterclockwise (left) until pressure begins to release.
3. Step back while the pressure releases.
4. When you are sure that all the pressure has been released, use thecloth to turn it counterclockwise and remove the cap.
2008 Escape (204)Owners Guide (post-2002-fmt)USA (fus)
Maintenance and Specifications
263

• 2.3L coolant bleed valve
5. For the 2.3L engine ONLY, open the coolant bleed valve on the back ofthe engine water outlet.
6. Fill the coolant reservoir slowly with the proper coolant mixture (seeabove), to within the “COLD FILL RANGE” or the “FULL COLD” level onthe reservoir.
7. For the 2.3L engine ONLY, close the bleed valve.
8. Reinstall the cap on the coolant reservoir. Turn the cap until it istightly installed to prevent coolant loss.
After any coolant has been added, check the coolant concentration.Refer to the Checking engine coolant section. If the concentration isnot 50/50 (protection to –34° F [–36° C]), drain some coolant and adjustthe concentration. It may take several drains and additions to obtain a50/50 coolant concentration.
Whenever coolant has been added, the coolant level in the coolantreservoir should be checked the next few times you drive the vehicle. Ifnecessary, add enough 50/50 concentration of engine coolant anddistilled water to bring the liquid level to the proper level.
If you have to add more than 1.0 quart (1.0 liter) of engine coolant permonth, have your authorized dealer check the engine cooling system.Your cooling system may have a leak. Operating an engine with a lowlevel of coolant can result in engine overheating and possible enginedamage.
Recycled engine coolantFord Motor Company does NOT recommend the use of recycled enginecoolant in vehicles originally equipped with Motorcraft Premium GoldEngine Coolant since a Ford-approved recycling process is not yetavailable.
2008 Escape (204)Owners Guide (post-2002-fmt)USA (fus)
Maintenance and Specifications
264

Used engine coolant should be disposed of in an appropriatemanner. Follow your community’s regulations and standards for recyclingand disposing of automotive fluids.
Coolant refill capacityTo find out how much fluid your vehicle’s cooling system can hold, referto Maintenance product specifications and capacities in this chapter.Fill your engine coolant reservoir as outlined in Adding engine coolantin this section.
Severe climatesIf you drive in extremely cold climates (less than –34°F [–36°C ]):• It may be necessary to increase the coolant concentration
above 50%.
• NEVER increase the coolant concentration above 60%.
• Increased engine coolant concentrations above 60% willdecrease the overheat protection characteristics of the enginecoolant and may cause engine damage.
• Refer to the chart on the coolant container to ensure thecoolant concentration in your vehicle will provide adequatefreeze protection at the temperatures in which you drive in thewinter months.
If you drive in extremely hot climates:
• It is still necessary to maintain the coolant concentrationabove 40%.
• NEVER decrease the coolant concentration below 40%.
• Decreased engine coolant concentrations below 40% willdecrease the corrosion protection characteristics of the enginecoolant and may cause engine damage.
• Decreased engine coolant concentrations below 40% willdecrease the freeze protection characteristics of the enginecoolant and may cause engine damage.
• Refer to the chart on the coolant container to ensure thecoolant concentration in your vehicle will provide adequateprotection at the temperatures in which you drive.
Vehicles driven year-round in non-extreme climates should use a 50/50mixture of engine coolant and distilled water for optimum cooling systemand engine protection.
2008 Escape (204)Owners Guide (post-2002-fmt)USA (fus)
Maintenance and Specifications
265

What you should know about fail-safe cooling (2.3L I4 engine only)If the engine coolant supply is depleted, this feature allows the vehicle tobe driven temporarily before incremental component damage is incurred.The “fail-safe” distance depends on ambient temperatures, vehicle loadand terrain.
How fail-safe cooling worksIf the engine begins to overheat:• The engine coolant temperature gauge will move to the red (hot) area.
• The indicator light will illuminate.
If the engine reaches a preset over-temperature condition, the enginewill automatically switch to alternating cylinder operation. Each disabledcylinder acts as an air pump and cools the engine.When this occurs the vehicle will still operate. However:• The engine power will be limited.
• The air conditioning system will be disabled.
Continued operation will increase the engine temperature and the enginewill completely shut down, causing steering and braking effort toincrease.
Once the engine temperature cools, the engine can be re-started. Takeyour vehicle to an authorized dealer as soon as possible to minimizeengine damage.
When fail-safe mode is activatedYou have limited engine power when in the fail-safe mode, so drive thevehicle with caution. The vehicle will not be able to maintain high-speedoperation and the engine will run rough. Remember that the engine iscapable of completely shutting down automatically to prevent enginedamage, therefore:
1. Pull off the road as soon as safely possible and turn off the engine.
2. Arrange for the vehicle to be taken to an authorized dealer.
3. If this is not possible, wait a short period for the engine to cool.
4. Check the coolant level and replenish if low.
Never remove the coolant reservoir cap while the engine isrunning or hot.
5. Re-start the engine and take your vehicle to an authorized dealer.
2008 Escape (204)Owners Guide (post-2002-fmt)USA (fus)
Maintenance and Specifications
266

Driving the vehicle without repairing the engine problemincreases the chance of engine damage. Take your vehicle to anauthorized dealer as soon as possible.
FUEL FILTERFor fuel filter replacement, see your authorized dealer. Refer toscheduled maintenance information for the appropriate intervals forchanging the fuel filter.
Replace the fuel filter with an authorized Motorcraft part. Thecustomer warranty may be void for any damage to the fuel systemif an authorized Motorcraft fuel filter is not used.
WHAT YOU SHOULD KNOW ABOUT AUTOMOTIVE FUELS
Important safety precautions
Do not overfill the fuel tank. The pressure in an overfilled tankmay cause leakage and lead to fuel spray and fire.
The fuel system may be under pressure. If the fuel filler cap isventing vapor or if you hear a hissing sound, wait until it stops
before completely removing the fuel filler cap. Otherwise, fuel mayspray out and injure you or others.
If you do not use the proper fuel filler cap, excessive vacuum inthe fuel tank may damage the fuel system or cause the fuel cap
to disengage in a collision, which may result in possible personal injury.
Automotive fuels can cause serious injury or death if misused ormishandled.
Gasoline may contain benzene, which is a cancer-causing agent.
2008 Escape (204)Owners Guide (post-2002-fmt)USA (fus)
Maintenance and Specifications
267

Observe the following guidelines when handling automotive fuel:
• Extinguish all smoking materialsand any open flames beforerefueling your vehicle.
• Always turn off the vehicle beforerefueling.
• Automotive fuels can be harmfulor fatal if swallowed. Fuel such as gasoline is highly toxic and ifswallowed can cause death or permanent injury. If fuel is swallowed,call a physician immediately, even if no symptoms are immediatelyapparent. The toxic effects of fuel may not be visible for hours.
• Avoid inhaling fuel vapors. Inhaling too much fuel vapor of any kindcan lead to eye and respiratory tract irritation. In severe cases,excessive or prolonged breathing of fuel vapor can cause seriousillness and permanent injury.
• Avoid getting fuel liquid in your eyes. If fuel is splashed in the eyes,remove contact lenses (if worn), flush with water for 15 minutes andseek medical attention. Failure to seek proper medical attention couldlead to permanent injury.
• Fuels can also be harmful if absorbed through the skin. If fuel issplashed on the skin and/or clothing, promptly remove contaminatedclothing and wash skin thoroughly with soap and water. Repeated orprolonged skin contact with fuel liquid or vapor causes skin irritation.
• Be particularly careful if you are taking “Antabuse” or other forms ofdisulfiram for the treatment of alcoholism. Breathing gasoline vapors,or skin contact could cause an adverse reaction. In sensitiveindividuals, serious personal injury or sickness may result. If fuel issplashed on the skin, promptly wash skin thoroughly with soap andwater. Consult a physician immediately if you experience an adversereaction.
When refueling always shut the engine off and never allowsparks or open flames near the filler neck. Never smoke while
refueling. Fuel vapor is extremely hazardous under certain conditions.Care should be taken to avoid inhaling excess fumes.
The flow of fuel through a fuel pump nozzle can produce staticelectricity, which can cause a fire if fuel is pumped into an
ungrounded fuel container.
2008 Escape (204)Owners Guide (post-2002-fmt)USA (fus)
Maintenance and Specifications
268

Refueling
Fuel vapor burns violently and a fuel fire can cause severeinjuries. To help avoid injuries to you and others:
• Read and follow all the instructions on the pump island;
• Turn off your engine when you are refueling;
• Do not smoke if you are near fuel or refueling your vehicle;
• Keep sparks, flames and smoking materials away from fuel;
• Stay outside your vehicle and do not leave the fuel pump unattendedwhen refueling your vehicle — this is against the law in some places;
• Keep children away from the fuel pump; never let children pumpfuel.
Use the following guidelines to avoid electrostatic charge build-up whenfilling an ungrounded fuel container:• Place approved fuel container on the ground.• DO NOT fill a fuel container while it is in the vehicle (including the
cargo area).• Keep the fuel pump nozzle in contact with the fuel container while
filling.• DO NOT use a device that would hold the fuel pump handle in the fill
position.
Fuel Filler CapYour fuel tank filler cap has an indexed design with a 1/4 turn on/offfeature.When fueling your vehicle:1. Turn the engine/ignition switch to the off position.2. Carefully turn the filler cap counterclockwise until it spins off.3. To install the cap, align the lugs on the cap with the threads on thefiller pipe.4. Turn the filler cap clockwise until it clicks at least once.After refueling, if the indicator comes on and stays on when youstart the engine, the fuel filler cap may not be properly installed. Turnoff the engine, remove the fuel filler cap, align the cap properly andreinstall it securely. The indicator should turn off after three drivingcycles with the fuel filler cap properly installed. A driving cycle consistsof a cold engine start-up followed by mixed city/highway driving.
2008 Escape (204)Owners Guide (post-2002-fmt)USA (fus)
Maintenance and Specifications
269

If you must replace the fuel filler cap, replace it with a fuel fillercap that is designed for your vehicle. The customer warranty maybe void for any damage to the fuel tank or fuel system if thecorrect genuine Ford or Motorcraft fuel filler cap is not used.
The fuel system may be under pressure. Remove fuel filler capslowly. Otherwise, fuel may spray out and injure you or others.
If you do not use the proper fuel filler cap, excessive vacuum inthe fuel tank may damage the fuel system or cause the fuel cap
to disengage in a collision, which may result in possible personal injury.
Choosing the right fuel
Use only UNLEADED fuel or UNLEADED fuel blended with a maximumof 10% ethanol. Your vehicle was not designed to run on E85 fuels thatare blended with a maximum of 85% ethanol. The use of leaded fuel isprohibited by law and could damage your vehicle. Do not use fuelcontaining methanol. It can damage critical fuel system components.
Your vehicle was not designed to use fuel or fuel additives with metalliccompounds, including manganese-based additives. Studies indicate thatthese additives can cause your vehicle’s emission control system todeteriorate more rapidly.
Repairs to correct the effects of using a fuel for which your vehicle wasnot designed may not be covered by your warranty.
2008 Escape (204)Owners Guide (post-2002-fmt)USA (fus)
Maintenance and Specifications
270
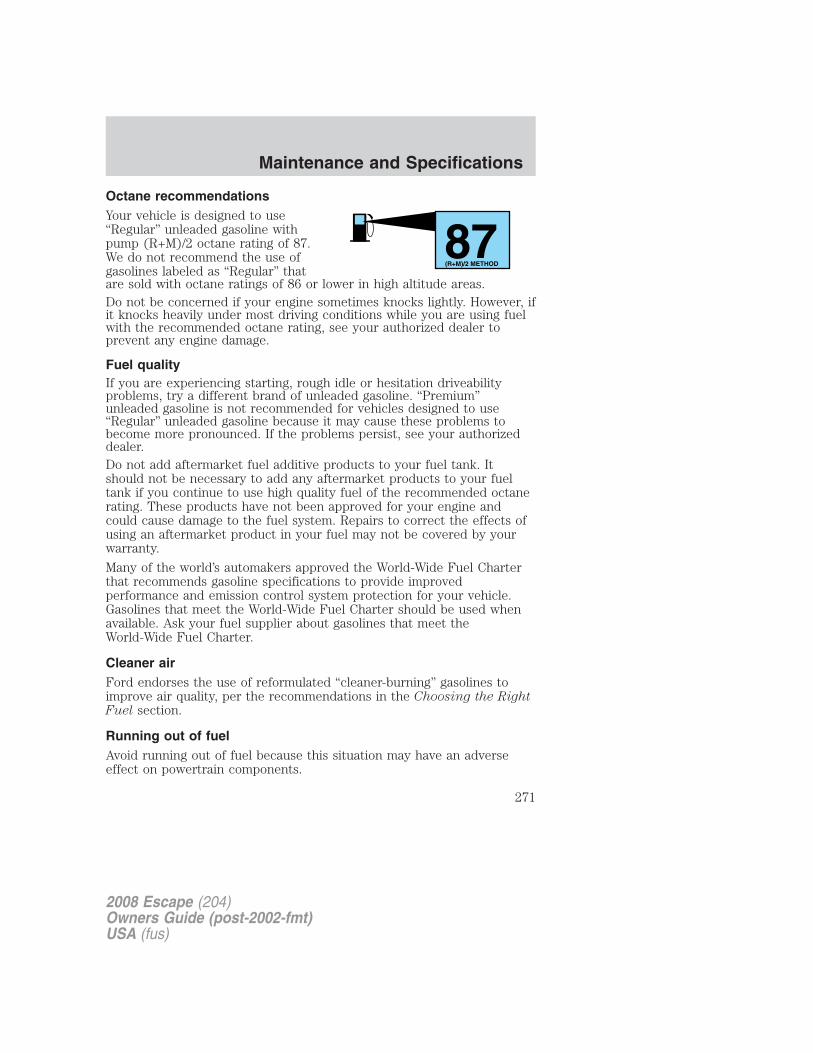
Octane recommendationsYour vehicle is designed to use“Regular” unleaded gasoline withpump (R+M)/2 octane rating of 87.We do not recommend the use ofgasolines labeled as “Regular” thatare sold with octane ratings of 86 or lower in high altitude areas.Do not be concerned if your engine sometimes knocks lightly. However, ifit knocks heavily under most driving conditions while you are using fuelwith the recommended octane rating, see your authorized dealer toprevent any engine damage.
Fuel qualityIf you are experiencing starting, rough idle or hesitation driveabilityproblems, try a different brand of unleaded gasoline. “Premium”unleaded gasoline is not recommended for vehicles designed to use“Regular” unleaded gasoline because it may cause these problems tobecome more pronounced. If the problems persist, see your authorizeddealer.Do not add aftermarket fuel additive products to your fuel tank. Itshould not be necessary to add any aftermarket products to your fueltank if you continue to use high quality fuel of the recommended octanerating. These products have not been approved for your engine andcould cause damage to the fuel system. Repairs to correct the effects ofusing an aftermarket product in your fuel may not be covered by yourwarranty.
Many of the world’s automakers approved the World-Wide Fuel Charterthat recommends gasoline specifications to provide improvedperformance and emission control system protection for your vehicle.Gasolines that meet the World-Wide Fuel Charter should be used whenavailable. Ask your fuel supplier about gasolines that meet theWorld-Wide Fuel Charter.
Cleaner airFord endorses the use of reformulated “cleaner-burning” gasolines toimprove air quality, per the recommendations in the Choosing the RightFuel section.
Running out of fuelAvoid running out of fuel because this situation may have an adverseeffect on powertrain components.
87(R+M)/2 METHOD
2008 Escape (204)Owners Guide (post-2002-fmt)USA (fus)
Maintenance and Specifications
271

If you have run out of fuel:• You may need to cycle the ignition from OFF to ON several times after
refueling to allow the fuel system to pump the fuel from the tank tothe engine. On restarting, cranking time will take a few seconds longerthan normal.
• Normally, adding 1 gallon (3.8L) of fuel is enough to restart theengine. If the vehicle is out of fuel and on a steep grade, more than 1gallon (3.8L) may be required.
• The indicator may come on. For more information on the “checkengine” or the “service engine soon” indicator, refer to Warning lightsand chimes in the Instrument Cluster chapter.
ESSENTIALS OF GOOD FUEL ECONOMY
Measuring techniquesYour best source of information about actual fuel economy is you, thedriver. You must gather information as accurately and consistently aspossible. Fuel expense, frequency of fill-ups or fuel gauge readings areNOT accurate as a measure of fuel economy. We do not recommendtaking fuel economy measurements during the first 1,000 miles(1,600 km) of driving (engine break-in period). You will get a moreaccurate measurement after 2,000 miles–3,000 miles(3,000 km–5,000 km).
Filling the tankThe advertised fuel capacity of the fuel tank on your vehicle is equal tothe rated refill capacity of the fuel tank as listed in the Maintenanceproduct specifications and capacities section of this chapter.
The advertised capacity is the amount of the indicated capacity and theempty reserve combined. Indicated capacity is the difference in theamount of fuel in a full tank and a tank when the fuel gauge indicatesempty. Empty reserve is the small amount of fuel remaining in the fueltank after the fuel gauge indicates empty.
The amount of usable fuel in the empty reserve varies and shouldnot be relied upon to increase driving range. When refueling yourvehicle after the fuel gauge indicates empty, you might not beable to refuel the full amount of the advertised capacity of thefuel tank due to the empty reserve still present in the tank.
For consistent results when filling the fuel tank:
• Turn the engine/ignition switch to the off position prior to refueling,an error in the reading will result if the engine is left running.
2008 Escape (204)Owners Guide (post-2002-fmt)USA (fus)
Maintenance and Specifications
272

• Use the same filling rate setting (low — medium — high) each timethe tank is filled.
• Allow no more than two automatic click-offs when filling.• Always use fuel with the recommended octane rating.• Use a known quality gasoline, preferably a national brand.• Use the same side of the same pump and have the vehicle facing the
same direction each time you fill up.• Have the vehicle loading and distribution the same every time.Your results will be most accurate if your filling method is consistent.
Calculating fuel economy1. Fill the fuel tank completely and record the initial odometer reading(in miles or kilometers).2. Each time you fill the tank, record the amount of fuel added (ingallons or liters).3. After at least three to five tank fill-ups, fill the fuel tank and recordthe current odometer reading.4. Subtract your initial odometer reading from the current odometerreading.5. Follow one of the simple calculations in order to determine fueleconomy:
Calculation 1: Divide total miles traveled by total gallons used.
Calculation 2: Multiply liters used by 100, then divide by totalkilometers traveled.
Keep a record for at least one month and record the type of driving (cityor highway). This will provide an accurate estimate of the vehicle’s fueleconomy under current driving conditions. Additionally, keeping recordsduring summer and winter will show how temperature impacts fueleconomy. In general, lower temperatures give lower fuel economy.
Driving style — good driving and fuel economy habitsGive consideration to the lists that follow and you may be able to changea number of variables and improve your fuel economy.
Habits• Smooth, moderate operation can yield up to 10% savings in fuel.
• Steady speeds without stopping will usually give the best fueleconomy.
2008 Escape (204)Owners Guide (post-2002-fmt)USA (fus)
Maintenance and Specifications
273

• Idling for long periods of time (greater than one minute) may wastefuel.
• Anticipate stopping; slowing down may eliminate the need to stop.• Sudden or hard accelerations may reduce fuel economy.• Slow down gradually.• Driving at reasonable speeds (traveling at 55 mph [88 km/h] uses 15%
less fuel than traveling at 65 mph [105 km/h]).• Revving the engine before turning it off may reduce fuel economy.• Using the air conditioner or defroster may reduce fuel economy.• You may want to turn off the speed control in hilly terrain if
unnecessary shifting between the top gears occurs. Unnecessaryshifting of this type could result in reduced fuel economy.
• Warming up a vehicle on cold mornings is not required and mayreduce fuel economy.
• Resting your foot on the brake pedal while driving may reduce fueleconomy.
• Combine errands and minimize stop-and-go driving.
Maintenance• Keep tires properly inflated and use only recommended size.
• Operating a vehicle with the wheels out of alignment will reduce fueleconomy.
• Use recommended engine oil. Refer to Maintenance productspecifications and capacities in this chapter.
• Perform all regularly scheduled maintenance items. Follow therecommended maintenance schedule and owner maintenance checksfound in scheduled maintenance information.
Conditions• Heavily loading a vehicle or towing a trailer may reduce fuel economy
at any speed.
• Carrying unnecessary weight may reduce fuel economy (approximately1 mpg [0.4 km/L] is lost for every 400 lb [180 kg] of weight carried).
• Adding certain accessories to your vehicle (for example bugdeflectors, rollbars/light bars, running boards, ski/luggage racks) mayreduce fuel economy.
• Using fuel blended with alcohol may lower fuel economy.
2008 Escape (204)Owners Guide (post-2002-fmt)USA (fus)
Maintenance and Specifications
274
• Fuel economy may decrease with lower temperatures during the first8–10 miles (12–16 km) of driving.
• Driving on flat terrain offers improved fuel economy as compared todriving on hilly terrain.
• Transmissions give their best fuel economy when operated in the topcruise gear and with steady pressure on the gas pedal.
• Close windows for high speed driving.
EPA window stickerEvery new vehicle should have the EPA window sticker. Contact yourauthorized dealer if the window sticker is not supplied with your vehicle.The EPA window sticker should be your guide for the fuel economycomparisons with other vehicles.
It is important to note the box in the lower left corner of the windowsticker. These numbers represent the Range of MPG (L/100 km)expected on the vehicle under optimum conditions. Your fuel economymay vary depending upon the method of operation and conditions.
EMISSION CONTROL SYSTEM
Your vehicle is equipped with various emission control components and acatalytic converter which will enable your vehicle to comply withapplicable exhaust emission standards. To make sure that the catalyticconverter and other emission control components continue to workproperly:
• Use only the specified fuel listed.
• Avoid running out of fuel.
• Do not turn off the ignition while your vehicle is moving, especially athigh speeds.
• Have the items listed in scheduled maintenance informationperformed according to the specified schedule.
The scheduled maintenance items listed in scheduled maintenanceinformation are essential to the life and performance of your vehicleand to its emissions system.
If other than Ford, Motorcraft or Ford-authorized parts are used formaintenance replacements or for service of components affectingemission control, such non-Ford parts should be equivalent to genuineFord Motor Company parts in performance and durability.
2008 Escape (204)Owners Guide (post-2002-fmt)USA (fus)
Maintenance and Specifications
275
Do not park, idle, or drive your vehicle in dry grass or other dryground cover. The emission system heats up the engine
compartment and exhaust system, which can start a fire.
Illumination of the indicator, charging system warning light or thetemperature warning light, fluid leaks, strange odors, smoke or loss ofengine power could indicate that the emission control system is notworking properly.
An improperly operating or damaged exhaust system may allow exhaustto enter the vehicle. Have a damaged or improperly operating exhaustsystem inspected and repaired immediately.
Exhaust leaks may result in entry of harmful and potentiallylethal fumes into the passenger compartment.
Do not make any unauthorized changes to your vehicle or engine. Bylaw, vehicle owners and anyone who manufactures, repairs, services,sells, leases, trades vehicles, or supervises a fleet of vehicles are notpermitted to intentionally remove an emission control device or preventit from working. Information about your vehicle’s emission system is onthe Vehicle Emission Control Information Decal located on or near theengine. This decal identifies engine displacement and gives some tune upspecifications.
Please consult your Warranty Guide for complete emission warrantyinformation.
On board diagnostics (OBD-II)Your vehicle is equipped with a computer that monitors the engine’semission control system. This system is commonly known as the OnBoard Diagnostics System (OBD-II). The OBD-II system protects theenvironment by ensuring that your vehicle continues to meetgovernment emission standards. The OBD-II system also assists yourauthorized dealer in properly servicing your vehicle. When theindicator illuminates, the OBD-II system has detected a malfunction.Temporary malfunctions may cause the indicator to illuminate.Examples are:
1. The vehicle has run out of fuel—the engine may misfire or run poorly.
2. Poor fuel quality or water in the fuel—the engine may misfire or runpoorly.
2008 Escape (204)Owners Guide (post-2002-fmt)USA (fus)
Maintenance and Specifications
276

3. The fuel cap may not have been securely tightened. See Fuel fillercap in this chapter.4. Driving through deep water—the electrical system may be wet.These temporary malfunctions can be corrected by filling the fuel tankwith good quality fuel, properly tightening the fuel cap or letting theelectrical system dry out. After three driving cycles without these or anyother temporary malfunctions present, the indicator should stay offthe next time the engine is started. A driving cycle consists of a coldengine startup followed by mixed city/highway driving. No additionalvehicle service is required.
If the indicator remains on, have your vehicle serviced at the firstavailable opportunity. Although some malfunctions detected by theOBD-II may not have symptoms that are apparent, continued drivingwith the indicator on can result in increased emissions, lower fueleconomy, reduced engine and transmission smoothness, and lead to morecostly repairs.
Readiness for Inspection/Maintenance (I/M) testingSome state/provincial and local governments may haveInspection/Maintenance (I/M) programs to inspect the emission controlequipment on your vehicle. Failure to pass this inspection could preventyou from getting a vehicle registration. Your vehicle may not pass the I/Mtest if the indicator is on or not working properly (bulb is burnedout), or if the OBD-II system has determined that some of the emissioncontrol systems have not been properly checked. In this case, the vehicleis considered not ready for I/M testing.
If the indicator is on or the bulb does not work, the vehicle mayneed to be serviced. Refer to the On board diagnostics (OBD-II)description in this chapter.
If the vehicle’s engine or transmission has just been serviced, or thebattery has recently run down or been replaced, the OBD-II system mayindicate that the vehicle is not ready for I/M testing. To determine if thevehicle is ready for I/M testing, turn the ignition key to the ON positionfor 15 seconds without cranking the engine. If the indicator blinkseight times, it means that the vehicle is not ready for I/M testing; ifthe indicator stays on solid, it means that the vehicle is ready forI/M testing.
The OBD-II system is designed to check the emission control systemduring normal driving. A complete check may take several days. If the
2008 Escape (204)Owners Guide (post-2002-fmt)USA (fus)
Maintenance and Specifications
277

vehicle is not ready for I/M testing, the following driving cycle consistingof mixed city and highway driving may be performed:15 minutes of steady driving on an expressway/highway followed by 20minutes of stop-and-go driving with at least four 30-second idle periods.Allow the vehicle to sit for at least eight hours without starting theengine. Then, start the engine and complete the above driving cycle. Theengine must warm up to its normal operating temperature. Once started,do not turn off the engine until the above driving cycle is complete. Ifthe vehicle is still not ready for I/M testing, the above driving cycle willhave to be repeated.
BRAKE/CLUTCH FLUIDBrake and clutch systems are supplied from the same reservoir.
The fluid level will drop slowly asthe brakes wear, and will rise whenthe brake components are replaced.Fluid levels between the “MIN” and“MAX” lines are within the normaloperating range; there is no need toadd fluid. If the fluid levels areoutside of the normal operatingrange the performance of thesystem could be compromised; seekservice from your authorized dealer immediately.
TRANSMISSION FLUID
Checking automatic transmission fluid (if equipped)Refer to your scheduled maintenance information for scheduledintervals for fluid checks and changes. Your transaxle does not consumefluid. However, the fluid level should be checked if the transaxle is notworking properly, i.e., if the transaxle slips or shifts slowly or if younotice some sign of fluid leakage.Automatic transmission fluid expands when warmed. To obtain anaccurate fluid check, drive the vehicle until it is warmed up(approximately 20 miles [30 km]). If your vehicle has beenoperated for an extended period at high speeds, in city trafficduring hot weather or pulling a trailer, the vehicle should beturned off for about 30 minutes to allow fluid to cool beforechecking.
1. Drive the vehicle 20 miles (30 km) or until it reaches normal operatingtemperature.
2008 Escape (204)Owners Guide (post-2002-fmt)USA (fus)
Maintenance and Specifications
278

2. Park the vehicle on a level surface and engage the parking brake.
3. With the parking brake engaged and your foot on the brake pedal,start the engine and move the gearshift lever through all of the gearranges. Allow sufficient time for each gear to engage.
4. Latch the gearshift lever in P (Park) and leave the engine running.
5. Remove the dipstick, wiping it clean with a clean, dry lint free rag. Ifnecessary, refer to Identifying components in the engine compartmentin this chapter for the location of the dipstick.
6. Install the dipstick making sure it is fully seated in the filler tube.
7. Remove the dipstick and inspect the fluid level. The fluid should be inthe crosshatch zone for normal operating temperature.
Low fluid levelDo not drive the vehicle if the fluidlevel is at the bottom of the dipstickand the outside temperatures areabove 50°F (10°C).
Correct fluid levelThe transmission fluid should be checked at normal operatingtemperatures 150°F-170°F (66°C-77°C) on a level surface. The normaloperating temperature can be reached after approximately 20 miles(30 km) of driving.
The transmission fluid should be inthe crosshatch zone if at normaloperating temperature (150°F-170°F[66°C-77°C]).
High fluid levelFluid levels above the crosshatchzone may result in transaxle failure.An overfill condition of transmissionfluid may cause shift and/orengagement concerns and/orpossible damage.
High fluid levels can be caused by an overheating condition.
2008 Escape (204)Owners Guide (post-2002-fmt)USA (fus)
Maintenance and Specifications
279

Adjusting automatic transmission fluid levelsBefore adding any fluid, make sure the correct type is used. The type offluid used is normally indicated on the dipstick blade. Refer toMaintenance product specifications and capacities in this chapter.Use of a non-approved automatic transmission fluid may causeinternal transaxle component damage.
If necessary, add fluid in 1/2 pint (250 ml) increments through the fillertube until the level is correct.
If an overfill occurs, excess fluidshould be removed by an authorizeddealer.
An overfill condition oftransmission fluid may causeshift and/or engagement concerns and/or possible damage.
Do not use supplemental transmission fluid additives, treatments orcleaning agents. The use of these materials may affect transmissionoperation and result in damage to internal transmission components.
Checking and adding manual transmission fluid (if equipped)1. Park the vehicle on a levelsurface.
2. Engage the parking brake fully –put in first gear.
3. Ensure the vehicle cannot move.
4. Clean the filler plug.
5. Remove the filler plug andinspect the fluid level.
6. Fluid level should be at bottom ofthe opening.7. Add enough fluid through the filler opening so that the fluid level is atthe bottom of the opening.8. Install and tighten the fill plug securely.Use only fluid that meets Ford specifications. Refer to the Maintenanceproduct specifications and capacities section in this chapter.
AIR FILTERRefer to scheduled maintenance information for the appropriateintervals for changing the air filter element.
2008 Escape (204)Owners Guide (post-2002-fmt)USA (fus)
Maintenance and Specifications
280

When changing the air filter element, use only the Motorcraft air filterelement listed. Refer to Motorcraft part numbers in this chapter.
To reduce the risk of vehicle damage and/or personal burninjuries do not start your engine with the air cleaner removed
and do not remove it while the engine is running.
1. Loosen the clamp that secures the air inlet tube to the engine air filtercover and disconnect the tube from the cover (for V6 only).
2. Release the clamps that secure the air filter housing cover.
3. Carefully separate the two halvesof the air filter housing.
4. Remove the air filter element from the air filter housing.
5. Wipe the air filter housing and cover clean to remove any dirt ordebris and to ensure good sealing.
6. Install a new air filter element. Becareful not to crimp the filterelement edges between the air filterhousing and cover. This could causefilter damage and allow unfilteredair to enter the engine if notproperly seated.
7. Replace the air filter housing cover and secure the clamps.
8. Replace the air inlet tube and secure the clamp.
Note: Failure to use the correct air filter element may result in severeengine damage. The customer warranty may be void for any damage tothe engine if the correct air filter element is not used.
2008 Escape (204)Owners Guide (post-2002-fmt)USA (fus)
Maintenance and Specifications
281
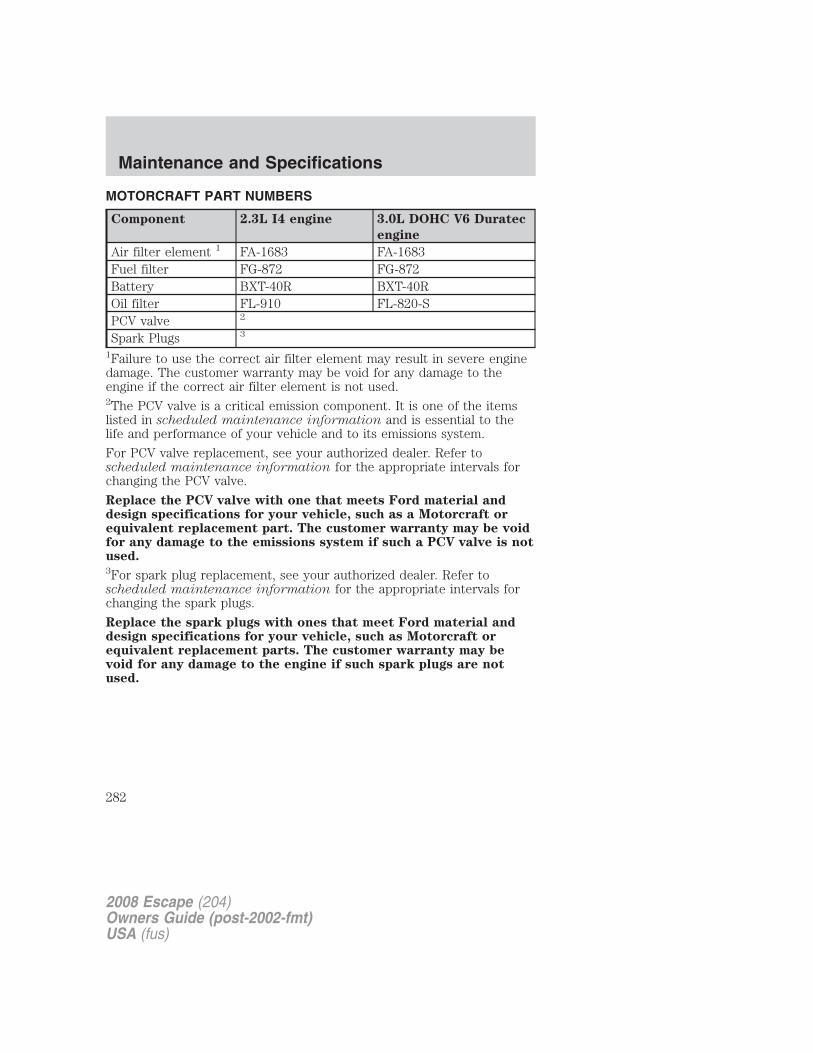
MOTORCRAFT PART NUMBERS
Component 2.3L I4 engine 3.0L DOHC V6 Duratec
engine
Air filter element 1 FA-1683 FA-1683Fuel filter FG-872 FG-872Battery BXT-40R BXT-40ROil filter FL-910 FL-820-SPCV valve 2
Spark Plugs 3
1Failure to use the correct air filter element may result in severe enginedamage. The customer warranty may be void for any damage to theengine if the correct air filter element is not used.2The PCV valve is a critical emission component. It is one of the itemslisted in scheduled maintenance information and is essential to thelife and performance of your vehicle and to its emissions system.
For PCV valve replacement, see your authorized dealer. Refer toscheduled maintenance information for the appropriate intervals forchanging the PCV valve.
Replace the PCV valve with one that meets Ford material anddesign specifications for your vehicle, such as a Motorcraft orequivalent replacement part. The customer warranty may be voidfor any damage to the emissions system if such a PCV valve is notused.3For spark plug replacement, see your authorized dealer. Refer toscheduled maintenance information for the appropriate intervals forchanging the spark plugs.
Replace the spark plugs with ones that meet Ford material anddesign specifications for your vehicle, such as Motorcraft orequivalent replacement parts. The customer warranty may bevoid for any damage to the engine if such spark plugs are notused.
2008 Escape (204)Owners Guide (post-2002-fmt)USA (fus)
Maintenance and Specifications
282

MA
INT
EN
AN
CE
PR
OD
UC
TS
PE
CIF
ICA
TIO
NS
AN
DC
AP
AC
ITIE
S
Item
Cap
acit
yF
ord
part
nam
eo
r
eq
uiv
ale
nt
Fo
rd
part
nu
mb
er
/
Fo
rd
Sp
ecif
icati
on
Bra
kefl
uid
and
(clu
tch
flui
d–i
feq
uipp
ed)
Bet
wee
nM
INan
dM
AX
onre
serv
oir
Mot
orcr
aft
Hig
hP
erfo
rman
ceD
OT
3M
otor
Veh
icle
Bra
keF
luid
PM
-1-C
/W
SS-M
6C62
-A
Doo
rw
eath
erst
rips
—Si
licon
eL
ubri
cant
XL
-6/
ESR
-M13
P4-
AB
ody
hing
es,
latc
hes,
door
stri
ker
plat
esan
dro
llers
,se
attr
acks
,fu
elfi
ller
door
hing
ean
dsp
ring
,pr
imar
yan
dau
xilia
ryho
odla
tche
s
—M
ulti
-Pur
pose
Gre
ase
XG
-4or
XL
-5/
ESB
-M1C
93-B
Eng
ine
cool
ant
2.3L
engi
ne(m
anua
ltr
ansa
xle)
5.3
quar
ts(5
.0L
)M
otor
craf
tP
rem
ium
Gol
dE
ngin
eC
oola
ntw
ith
bitt
erin
gag
ent
(yel
low
-col
ored
)1
VC
-7-B
/W
SS-M
97B
51-A
1E
ngin
eco
olan
t2.
3Len
gine
(aut
omat
ictr
ansa
xle)
6.3
quar
ts(6
.0L
)
Eng
ine
cool
ant
3.0L
engi
ne10
.6qu
arts
(10.
0L)
Coo
ling
syst
emst
ople
akpe
llets
—M
otor
craf
tC
oolin
gSy
stem
Stop
Lea
kP
elle
tsV
C-6
/W
SS-M
99B
37-B
6
2008 Escape (204)Owners Guide (post-2002-fmt)USA (fus)
Maintenance and Specifications
283

Item
Cap
acit
yF
ord
part
nam
eo
r
eq
uiv
ale
nt
Fo
rd
part
nu
mb
er
/
Fo
rd
Sp
ecif
icati
on
Eng
ine
oil
2.3L
engi
ne4.
5qu
arts
(4.2
5L)
Mot
orcr
aft
SAE
5W-2
0P
rem
ium
Synt
heti
cB
lend
Mot
orO
il(U
S)M
otor
craf
tSA
E5W
-20
Supe
rP
rem
ium
Mot
orO
il(C
anad
a)2
XO
-5W
20-Q
SP(U
S)C
XO
-5W
20–L
SP12
(Can
ada)
/W
SS-M
2C93
0-A
wit
hA
PI
Cer
tifi
cati
onM
ark
Eng
ine
oil
3.0L
engi
ne6.
0qu
arts
(5.7
L)
Loc
kcy
linde
rs—
Mot
orcr
aft
Pen
etra
ting
and
Loc
kL
ubri
cant
XL
-1/
Non
eP
ower
Tra
nsfe
rU
nit
flui
d(4
X4)
312
ounc
es(0
.35L
)M
otor
craf
tSA
E75
W-1
40Sy
nthe
tic
Rea
rA
xle
Lub
rica
nt
XY-
75W
140-
QL
/W
SL-M
2C19
2-A
Rea
rax
le(4
X4)
2.4
pint
s(1
.15L
)4M
otor
craf
tSA
E80
W-9
0P
rem
ium
Rea
rA
xle
Lub
rica
nt5
XY-
80W
90-Q
L/
WSP
-M2C
197-
A
Aut
omat
ictr
ansm
issi
onfl
uid
10.2
quar
ts(9
.6L
)6M
otor
craf
tM
ER
CO
N�
VA
TF
7X
T-5-
QM
/M
ER
CO
N�
V
Man
ual
tran
smis
sion
flui
d2.
4qu
arts
(2.3
L)8
Mot
orcr
aft
SAE
75W
-90
Gea
rO
il
XY-
75W
90-Q
GL
/W
SS-M
2C20
3-A
1an
dG
L-4
Win
dshi
eld
was
her
flui
d2.
7qu
arts
(2.6
L)
Mot
orcr
aft
Pre
miu
mW
inds
hiel
dW
ashe
rC
once
ntra
te
ZC
-32-
A/
WSB
-M8B
16-A
2
2008 Escape (204)Owners Guide (post-2002-fmt)USA (fus)
Maintenance and Specifications
284

Item
Cap
acit
yF
ord
part
nam
eo
r
eq
uiv
ale
nt
Fo
rd
part
nu
mb
er
/
Fo
rd
Sp
ecif
icati
on
Fue
lta
nk16
.5ga
llons
(62.
5L)
——
1A
ddth
eco
olan
tty
peor
igin
ally
equi
pped
inyo
urve
hicl
e.2U
seof
synt
heti
cor
synt
heti
cbl
end
mot
oroi
lis
not
man
dato
ry.
Eng
ine
oil
need
only
mee
tth
ere
quir
emen
tsof
For
dsp
ecif
icat
ion
WSS
-M2C
930-
Aan
dth
eA
PI
Cer
tifi
cati
onm
ark.
3T
heP
ower
Tra
nsfe
rU
nit
islu
bric
ated
for
life
wit
hsy
nthe
tic
lube
.L
ubri
cant
leve
lsar
eno
tto
bech
ecke
dor
chan
ged
unle
ssa
leak
issu
spec
ted
orre
pair
requ
ired
.R
epla
ceP
ower
Tra
nsfe
rU
nit
lubr
ican
tw
ith
spec
ifie
dsy
nthe
tic
lubr
ican
tan
ytim
eth
eun
itis
subm
erge
din
wat
er.
4F
illto
1/4
inch
to9/
16in
ch(6
mm
to14
mm
)be
low
bott
omof
fill
hole
.54X
4ve
hicl
esex
pose
dfo
rpr
olon
ged
peri
ods
tote
mpe
ratu
res
less
than
-40°
F(-
40°
C)
shou
ldch
ange
out
the
rear
axle
flui
dto
Mot
orcr
aft
SAE
75W
-140
Synt
heti
cR
ear
Axl
eL
ubri
cant
,F
ord
part
num
ber
XY-
75W
140-
QL
mee
ting
For
dsp
ecif
icat
ion
WSL
-M2C
192-
A.
6In
dica
tes
only
appr
oxim
ate
dry-
fill
capa
city
.So
me
appl
icat
ions
may
vary
base
don
cool
ersi
zean
dif
equi
pped
wit
han
in-t
ank
cool
er.
The
amou
ntof
tran
smis
sion
flui
dan
dfl
uid
leve
lsh
ould
bese
tby
the
indi
cati
onon
the
dips
tick
’sno
rmal
oper
atin
gra
nge.
7A
utom
atic
tran
smis
sion
sth
atre
quir
eM
ER
CO
N�
Vsh
ould
only
use
ME
RC
ON
�V
flui
dor
flui
dth
atis
spec
ifie
ddu
alus
age
ME
RC
ON
�/M
ER
CO
N�
V.R
efer
tosch
ed
ule
dm
ain
ten
an
ce
info
rm
ati
on
tode
term
ine
the
corr
ect
serv
ice
inte
rval
.U
seof
any
flui
dot
her
than
the
reco
mm
ende
dfl
uid
may
caus
etr
ansm
issi
onda
mag
e.8Se
rvic
ere
fill
capa
city
isde
term
ined
byfi
lling
the
tran
smis
sion
toth
ebo
ttom
ofth
efi
ller
hole
wit
hth
eve
hicl
eon
ale
vel
surf
ace.
2008 Escape (204)Owners Guide (post-2002-fmt)USA (fus)
Maintenance and Specifications
285

ENGINE DATA
Engine 2.3L I4 engine 3.0L DOHC V6
Duratec engine
Cubic inches 140 183Required fuel 87 octane 87 octaneFiring order 1-3-4-2 1-4-2-5-3-6Ignition system Coil on plug Coil on plugSpark plug gap 0.049–0.053 inch
(1.25–1.35mm)0.052–0.056 inch(1.32–1.42mm)
Compression ratio 9.7:1 10.0:1
Engine drivebelt routing
• 2.3L I4 Engine with A/C—Without A/C similar
• 3.0L V6 Engine
2008 Escape (204)Owners Guide (post-2002-fmt)USA (fus)
Maintenance and Specifications
286

IDENTIFYING YOUR VEHICLE
Safety Compliance Certification LabelThe National Highway Traffic SafetyAdministration Regulations requirethat a Safety ComplianceCertification Label be affixed to avehicle and prescribe where theSafety Compliance CertificationLabel may be located. The SafetyCompliance Certification Label islocated on the structure (B-Pillar)by the trailing edge of the driver’sdoor or the edge of the driver’sdoor.
Vehicle identification number (VIN)The vehicle identification number islocated on the driver sideinstrument panel.
Please note that in the graphic,XXXX is representative of yourvehicle identification number.
XXXXXXXXXXXXXXXXX
2008 Escape (204)Owners Guide (post-2002-fmt)USA (fus)
Maintenance and Specifications
287

The Vehicle Identification Number (VIN) contains the followinginformation:
1. World manufacturer identifier
2. Brake system / Gross VehicleWeight Rating (GVWR) / RestraintSystem
3. Vehicle line, series, body type
4. Engine type
5. Check digit
6. Model year
7. Assembly plant
8. Production sequence number
TRANSMISSION/TRANSAXLE CODE DESIGNATIONSYou can find atransmission/transaxle code on theSafety Compliance CertificationLabel. The following table tells youwhich transmission or transaxleeach code represents.
Description Code
Five-speed manual 3Four-speed automatic 4
2008 Escape (204)Owners Guide (post-2002-fmt)USA (fus)
Maintenance and Specifications
288

GENUINE FORD ACCESSORIES FOR YOUR VEHICLEA wide selection of Genuine Ford Accessories are available for yourvehicle through your local Ford or Ford of Canada dealer. These qualityaccessories have been specifically engineered to fulfill your automotiveneeds; they are custom designed to complement the style andaerodynamic appearance of your vehicle. In addition, each accessory ismade from high quality materials and meets or exceeds Ford’s rigorousengineering and safety specifications. Ford Motor Company will repair orreplace any properly dealer-installed Genuine Ford Accessories found tobe defective in factory-supplied materials or workmanship during thewarranty period, as well as any component damaged by the defectiveaccessories. The accessories will be warranted for whichever providesyou the greatest benefit:
• 12 months or 12,000 miles (20,000 km) (whichever occurs first), or
• the remainder of your new vehicle limited warranty.
Contact your dealer for details and a copy of the warranty.
The following is a list of several Genuine Ford Accessories. Not allaccessories are available for all models. For a complete listing of theaccessories that are available for your vehicle, please contact your dealeror visit our online store at: www.fordaccessoriesstore.com.
Exterior styleBug shieldsDeflectorsStep bars
Splash guards
Interior styleCargo Logic� / Cargo managementElectrochromatic compass/temperature interior mirrorsFloor matsSecurity shade
LifestyleAsh cup/ smoker’s packageCargo management accessoriesCross barsTrailer hitches, wiring harnesses and accessories
2008 Escape (204)Owners Guide (post-2002-fmt)USA (fus)
Accessories
289

Peace of mindMobile-Ease� hands-free communication system
Remote start system
Vehicle security system
Wheel locks
Not all accessories are available for all models.
For maximum vehicle performance, keep the following information inmind when adding accessories or equipment to your vehicle:
• When adding accessories, equipment, passengers and luggage to yourvehicle, do not exceed the total weight capacity of the vehicle or ofthe front or rear axle (GVWR or GAWR as indicated on the SafetyCompliance Certification label). Consult your authorized dealer forspecific weight information.
• The Federal Communications Commission (FCC) and Canadian RadioTelecommunications Commission (CRTC) regulate the use of mobilecommunications systems — such as two-way radios, telephones andtheft alarms - that are equipped with radio transmitters. Any suchequipment installed in your vehicle should comply with FCC or CRTCregulations and should be installed only by a qualified servicetechnician.
• Mobile communications systems may harm the operation of yourvehicle, particularly if they are not properly designed for automotiveuse.
• To avoid interference with other vehicle functions, such as anti-lockbraking systems, amateur radio users who install radios and antennasonto their vehicle should not locate the Amateur Radio Antennas inthe area of the driver’s side hood.
• Electrical or electronic accessories or components that are added tothe vehicle by the authorized dealer or the owner may adversely affectbattery performance and durability.
2008 Escape (204)Owners Guide (post-2002-fmt)USA (fus)
Accessories
290

A
Accessory delay ..........................57AdvanceTrac ..............................184Air cleaner filter ...............280, 282Air conditioning
automatic temperaturecontrol system ..........................37manual heating and airconditioning system .................34
Airbag supplemental restraintsystem ................116–117, 125, 128
and child safety seats ............118description ..............117, 125, 128disposal ....................................131driver airbag ............119, 126, 129indicator light .........125, 127, 130operation .................119, 126, 129passenger airbag .....119, 126, 129side airbag ...............................125
All Wheel Drive (AWD),driving off road .........................199
Ambulance packages ....................8
Antifreeze(see Engine coolant) ................261
Anti-lock brake system(see Brakes) ..............................182
Anti-theft system ........................91
Audio system (see Radio) .........20
Automatic transaxlefluid, adding ............................278fluid, checking ........................278
Automatic transmission ............190driving an automaticoverdrive .................................192fluid, refill capacities ..............283fluid, specification ..................283
Auxiliary Input Jack ...................27
Auxiliary power point .................55Axle
lubricant specifications ..........283refill capacities ........................283
B
Battery .......................................259acid, treating emergencies .....259jumping a disabled battery ....227maintenance-free ....................259replacement, specifications ...282servicing ..................................259
Belt-Minder� .............................112
Booster seats .............................132
Brakes ........................................182anti-lock ...................................182anti-lock brake system (ABS)warning light ...........................183fluid, checking and adding ....278fluid, refill capacities ..............283fluid, specifications .................283lubricant specifications ..........283parking ....................................183shift interlock ..........................190
Bulbs ............................................47
C
Capacities for refilling fluids ....283
Cargo area shade ........................73
Cargo management system ........74
Cell phone use ..............................9
Child safety restraints ..............131child safety belts ....................131
Child safety seats ......................135attaching with tether straps ..139in front seat ............................136in rear seat ..............................136
2008 Escape (204)Owners Guide (post-2002-fmt)USA (fus)
Index
291

Child safety seats - boosterseats ...........................................132Cleaning your vehicle
engine compartment ..............243instrument panel ....................246interior .....................................246plastic parts ............................245washing ....................................242waxing .....................................243wheels ......................................243wiper blades ............................245
Climate control (see Airconditioning or Heating) ......34, 37
Clutchfluid ..........................................278operation while driving ..........195recommended shift speeds ....196
Compass, electronic ....................58calibration .................................60set zone adjustment .................59
Console ........................................54overhead ....................................54
Controlspower seat .................................96steering column ........................64
Coolantchecking and adding ..............261refill capacities ................265, 283specifications ..........................283
Cruise control(see Speed control) ....................61
Customer Assistance ................206Ford Extended ServicePlan ..........................................238Getting assistance outside theU.S. and Canada .....................239Getting roadside assistance ...206Getting the service youneed .........................................234
Ordering additional owner’sliterature .................................240Utilizing theMediation/ArbitrationProgram ...................................238
D
Daytime running lamps(see Lamps) ................................43Dipstick
automatic transmissionfluid ..........................................278engine oil .................................255
Driving under specialconditions ..................194, 200, 203
sand .........................................201snow and ice ...........................204through water .................202, 205
E
Electronic message center .........66
Emergencies, roadsidejump-starting ..........................227
Emergency Flashers .................208
Emission control system ..........275
Engine ........................................286cleaning ...................................243coolant .....................................261fail-safe cooling .......................266idle speed control ...................259lubrication specifications .......283refill capacities ........................283service points ..................251–252starting after a collision .........208
Engine block heater .................181
Engine oil ..................................255checking and adding ..............255dipstick ....................................255
2008 Escape (204)Owners Guide (post-2002-fmt)USA (fus)
Index
292

filter, specifications ........258, 282recommendations ...................258refill capacities ........................283specifications ..........................283
Exhaust fumes ..........................181
F
Fail safe cooling ........................266
Fluid capacities .........................283
Foglamps .....................................42
Four-Wheel Drive vehiclesdriving off road .......................199preparing to drive yourvehicle .....................................189
Fuel ............................................267calculating fueleconomy ............................67, 272cap ...........................................269capacity ...................................283choosing the right fuel ...........270comparisons with EPA fueleconomy estimates .................275detergent in fuel .....................271filling your vehicle withfuel ...........................267, 269, 272filter, specifications ........267, 282fuel pump shut-off switch .....208improving fuel economy ........272octane rating ...................271, 286quality ......................................271running out of fuel .................271safety information relating toautomotive fuels .....................267
Fuses ..................................209–210
G
Gas cap (see Fuel cap) ............269
Gas mileage(see Fuel economy) .................272Gauges .........................................17
H
Hazard flashers .........................208Head restraints .....................95, 98Headlamps ...................................41
aiming ........................................44bulb specifications ....................47daytime running lights .............43flash to pass ..............................43high beam .................................43replacing bulbs .........................48turning on and off ....................41
Heatingheating and air conditioningsystem .......................................37manual heating and airconditioning system .................34
Hood ..........................................250
I
Ignition ...............................178, 286
Illuminated visor mirror .............54
Infant seats(see Safety seats) .....................135
Inspection/maintenance (I/M)testing ........................................277
Instrument panelcleaning ...................................246cluster ........................................12lighting up panel andinterior .......................................44
J
Jump-starting your vehicle ......227
2008 Escape (204)Owners Guide (post-2002-fmt)USA (fus)
Index
293

K
Keyless entry system .................89autolock ...............................80, 82keypad .......................................90locking and unlocking doors ....91programming entry code .........90
Keys .......................................78, 92positions of the ignition .........178
L
Lampsbulb replacementspecifications chart ..................47daytime running light ...............43fog lamps ...................................42headlamps .................................41headlamps, flash to pass ..........43instrument panel, dimming .....44interior lamps .....................45–47replacing bulbs .........................48
Lane change indicator(see Turn signal) ........................45
Liftgate ..................................73, 86
Lights, warning and indicator ....12anti-lock brakes (ABS) ..........183
Load limits .................................166
Loading instructions .................172
Locksautolock ...............................80, 82childproof ..................................84doors ..........................................80
Lubricant specifications ...........283
Lug nuts ....................................226
Luggage rack ...............................75
M
Manual transaxlefluid, checking and adding ....280
Manual transmission .................195fluid capacities ........................283lubricant specifications ..........283reverse .....................................196
Message center ...........................66english/metric button ...............69system check button ................68warning messages .....................71
Mirrors ...................................57, 60automatic dimming rearviewmirror ........................................58fold away ...................................61heated ........................................61side view mirrors (power) .......60
Moon roof ....................................65
Motorcraft parts ........247, 267, 282
N
Navigation system .......................33
O
Octane rating ............................271
Oil (see Engine oil) ..................255
Overdrive ...................................191
P
Parking brake ............................183
Parts (see Motorcraft parts) ....282
Passenger OccupantClassification Sensor .................105
Power distribution box(see Fuses) ...............................213
2008 Escape (204)Owners Guide (post-2002-fmt)USA (fus)
Index
294

Power door locks ........................80Power mirrors .............................60Power point .................................55
Power steering ..........................188fluid, refill capacity ................283fluid, specifications .................283
Power Windows ...........................56
Preparing to drive yourvehicle ........................................189
R
Radio ............................................20
Relays ........................................209
Remote entry system ...........84–85illuminated entry ................88–89locking/unlocking doors .....85–86opening the trunk .....................86panic alarm ...............................86replacement/additionaltransmitters ...............................87replacing the batteries .............86
Reverse sensing system ...........196
Roadside assistance ..................206
Roof rack .....................................75
S
Safety Belt Maintenance ..........111
Safety belts (see Safetyrestraints) ..................103, 107–110
Safety Canopy ...........125–126, 128
Safety defects, reporting ..........241
Safety restraints ........103, 107–110Belt-Minder� ...........................112extension assembly ................111for adults .........................108–110
for children .............................131Occupant ClassificationSensor ......................................105safety belt maintenance .........111warning light and chime ........112
Safety seats for children ..........135
Safety ComplianceCertification Label ....................287
Satellite Radio Information ........30
Seats ............................................95child safety seats ....................135heated ........................................98
SecuriLock passive anti-theftsystem ..........................................91
Servicing your vehicle ..............249
Snowplowing .................................8
Spark plugs,specifications .....................282, 286
Special noticeambulance conversions ..............8utility-type vehicles ....................8
Specification chart,lubricants ...................................283
Speed control ..............................61
Starting yourvehicle ........................178–179, 181
jump starting ..........................227
Steering wheelcontrols ......................................64tilting .........................................53
T
Tilt steering wheel ......................53
Tire Pressure MonitoringSystem (TPMS)
Tires, Wheels and Loading ....161
2008 Escape (204)Owners Guide (post-2002-fmt)USA (fus)
Index
295
Tires ...................................146–147alignment ................................154care ..........................................150changing ..........................219, 221checking the pressure ............150inflating ...................................148label .........................................161replacing ..................................152rotating ....................................154safety practices .......................153sidewall information ...............156snow tires and chains ............166spare tire .........................217, 219terminology .............................147tire grades ...............................147treadwear ........................146, 151
Towing .......................................172recreational towing .................177trailer towing ..........................172wrecker ....................................232
Transaxlefluid, checking and adding(manual) .................................280
Transmissionautomatic operation ...............190brake-shift interlock (BSI) ....190fluid, checking and adding(automatic) .............................278
fluid, refill capacities ..............283lubricant specifications ..........283manual operation ....................195
Trunk ...........................................86Turn signal ..................................45
V
Vehicle Identification Number(VIN) ..........................................287Vehicle loading ..........................166Ventilating your vehicle ...........181
W
Warning lights (see Lights) .......12Washer fluid ..............................253Water, Driving through .............205Windows
power .........................................56rear wiper/washer .....................53
Windshield washer fluid andwipers ..........................................52
checking and adding fluid .....253liftgate reservoir .....................253replacing wiper blades ...........254
Wrecker towing .........................232
2008 Escape (204)Owners Guide (post-2002-fmt)USA (fus)
Index
296