talend esb - development guide
TRANSCRIPT
Talend ESBDevelopment Guide
5.2.1
Publication date 12 November 2012Copyright © 2011-2012 Talend Inc.
Copyleft
This documentation is provided under the terms of the Creative Commons Public License (CCPL). For moreinformation about what you can and cannot do with this documentation in accordance with the CCPL, please read:http://creativecommons.org/licenses/by-nc-sa/2.0/
This document may include documentation produced at The Apache Software Foundation which is licensed underThe Apache License 2.0.
Notices
Talend and Talend ESB are trademarks of Talend, Inc.
Apache CXF, CXF, Apache Karaf, Karaf, Apache Cellar, Cellar, Apache Camel, Camel, Apache Maven, Maven,Apache Archiva, Archiva are trademarks of The Apache Foundation. Eclipse Equinox is a trademark of the EclipseFoundation, Inc. SoapUI is a trademark of SmartBear Software. Hyperic is a trademark of VMware, Inc. Nagiosis a trademark of Nagios Enterprises, LLC.
All other brands, product names, company names, trademarks and service marks are the properties of theirrespective owners.

Talend ESB Development Guide
Table of Contents1. Development Environment Setup ................................................................................. 1
1.1. Download Java Development Kit (JDK) .............................................................. 11.2. Download Eclipse IDE for Java EE Developers .................................................... 11.3. Download Tomcat 7.x (optional) ....................................................................... 21.4. Download Maven 3 ......................................................................................... 21.5. Install Maven2Eclipse (m2e) Plugin (optional) ..................................................... 31.6. Install soapUI Plugin (optional) ......................................................................... 4
2. Web Services ........................................................................................................... 52.1. Contract-first development ................................................................................ 62.2. Code-first development .................................................................................. 182.3. REST Services .............................................................................................. 26
3. Camel Routes Overview ........................................................................................... 294. Talend ESB Services Overview .................................................................................. 35
4.1. Service Locator ............................................................................................. 354.2. Service Activity Monitoring (SAM) .................................................................. 44

Talend ESB Development Guide
Talend ESB Development Guide
Chapter 1. Development Environment SetupWelcome to Talend ESB! This document looks at best practices in developing with Talend ESB, in particularusing Eclipse and Maven as development tools. While development with the Eclipse IDE is covered within thisguide, note the Eclipse-based Talend ESB Studio can also be used instead, as it already includes the developmentcomponents we'll be configuring below.
Different types of web services (JAX-WS and JAX-RS based) will be covered in Chapter 2, Web Services, andthen we'll explore Camel development in Chapter 3, Camel Routes Overview. Finally, developing with TalendESB specific services such as Service Activity Monitoring and the Service Locator is covered in Chapter 4, TalendESB Services Overview.
In this chapter we'll look in detail at installing our Eclipse development environment along with associated toolsfor development of web services and Camel routes. Note, if you're already working with the pre-configured TalendESB Studio this process can be skipped.
The following sections in this chapter give details of the software needed.
1.1. Download Java Development Kit (JDK)Either Java SE versions 6 or 7 are acceptable and can be obtained from: http://www.oracle.com/technetwork/java/javase/downloads/index.html. As we'll be compiling source files, be sure to download the JDK and not theJRE version.
1.2. Download Eclipse IDE for Java EEDevelopersFrom the Eclipse download page obtain your operating system's version of Eclipse IDE for Java EE Developers.Juno is the most recent Eclipse version as the time of this writing, but if you already have the previous Helios or
Download Tomcat 7.x (optional)
2 Talend ESB Development Guide
Indigo versions of Eclipse on your machine that should work fine as well. After extracting the application, double-clicking the Eclipse icon located in the Eclipse root directory should bring up the IDE; note your specific operatingsystem's version may provide additional convenient options (menu items, desktop icons) for activating Eclipse.
After installing, have Eclipse point to the JDK you downloaded in the previous step. This can be done by selectingmenu item: Windows | Preferences and the corresponding Preferences Dialog, selecting Java | Installed JREs fromthe left-side menu tree.
1.3. Download Tomcat 7.x (optional)This guide will show you how to deploy CXF services and Camel routes using Talend ESB's Karaf-basedContainer. However for testing and debugging it can be helpful to aware of how to deploy on the servlet containerApache Tomcat. Steps involved to deploy a Tomcat installation on your computer:
• Download and uncompress the latest Tomcat release version from the Apache Tomcat site.
• Create a $CATALINA_HOME operating system environment variable pointing to the base directory of Tomcat,and add the $CATALINA_HOME/bin directory to your system path so you can easily start Tomcat from anysystem folder.
• You'll need to edit the $CATALINA_HOME/conf/tomcat-users.xml file to create an administrative user fordeploying and undeploying web applications. Define two new roles, manager-script> and manager-gui and add them to either a new user or any existing user, e.g.:
<tomcat-users> <role rolename="manager-script"/> <role rolename="manager-gui"/> <user username="tomcat" password="tomcat" roles="manager-script,manager-gui"/> ...other users and roles...</tomcat-users>
Of course, for a production deployment you'll want to use a username and password different from the easy-to-guess ones above.
• Next let's test your Tomcat installation. Run sh startup.sh (Linux) or startup.bat (Windows)and navigate to http://localhost:8080 from a browser. You should see the Tomcat welcomescreen indicating a successful activation. Next, shut down Tomcat by running the sh shutdown.sh orshutdown.bat commands as appropriate.
1.4. Download Maven 3Maven is a very popular project management tool that can be run either from a command-line window using simpletext commands or directly from the Eclipse IDE itself, using the Maven2Eclipse (m2e) plugin. The Maven UsersCenter provides a nice overview of working with this tool. Installation steps:
• Download and uncompress the latest Maven release version from the Apache Maven site.
• Create a $MAVEN_HOME operating system environment variable pointing to the base directory of Maven,and add the $MAVEN_HOME/bin directory to your system path so you can easily execute Maven commandsfrom any command-line directory.
• Add the M2_REPO classpath variable to your Eclipse IDE. Maven downloads source code JARs needed byyour projects to your computer, storing them in what is called your local Maven repository, normally thehidden .m2\repository folder in your home directory (i.e., under /home/myusername for Linux or C:
Install Maven2Eclipse (m2e) Plugin (optional)
Talend ESB Development Guide 3
\Documents and Settings\myusername on Windows). Eclipse needs to know this location to loaddependencies. To add this variable, start Eclipse, and from the menu bar, select Window | Preferences | Java |Build Path | Classpath Variables and define an M2_REPO variable pointing to your local repository folder.
• If you installed Tomcat in the previous step, you'll want to edit the $MAVEN_HOME/conf/settings.xml file toadd in the Tomcat username and password you configured above, i.e.:
<servers> <server> <id>myTomcat</id> <username>tomcat</username> <password>tomcat</password> </server> ... other server configurations ...</servers>
The myTomcat ID above (any other ID can also be used) is used within Maven pom.xml files to identify thespecific server username/password combination when deploying applications to various application servers, inthis case Tomcat. As an alternative, this information can be directly configured within each Maven project'spom.xml file whenever you will be doing Tomcat deployment.
• Next let's test your Maven installation. Run mvn version from any command-line prompt. You should seeMaven respond providing the Maven version you downloaded, the JDK version, and various other associatedinformation.
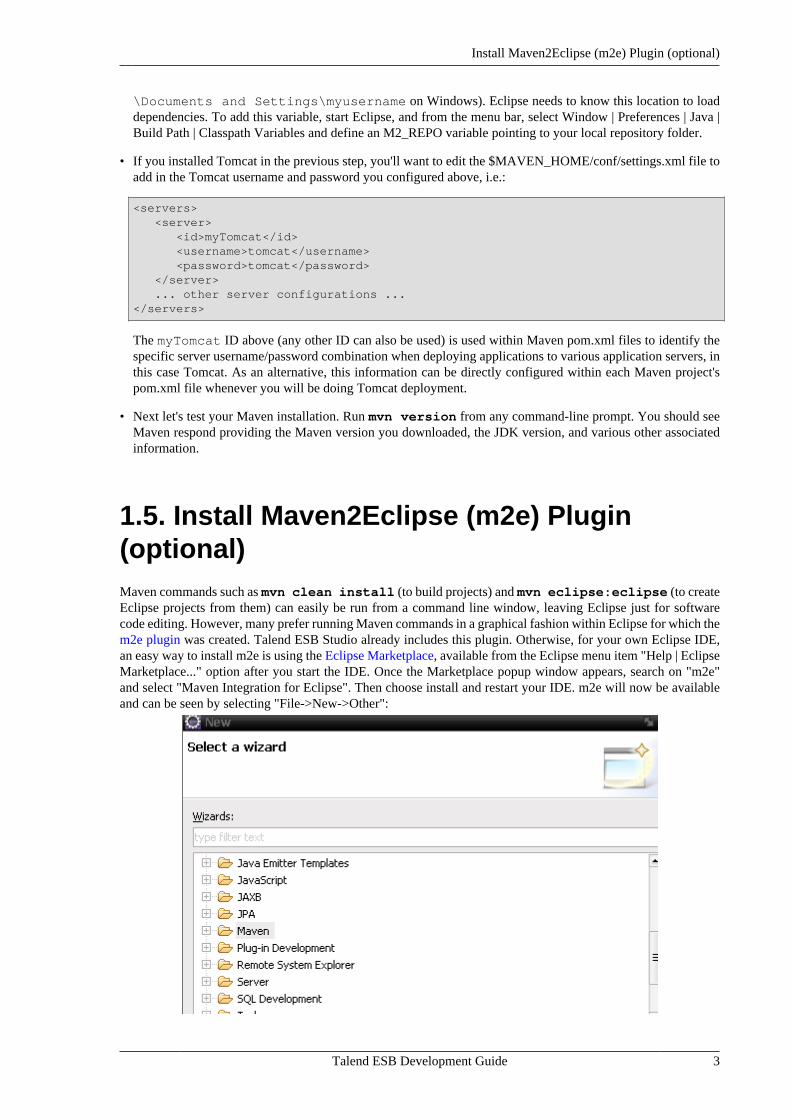
1.5. Install Maven2Eclipse (m2e) Plugin(optional)Maven commands such as mvn clean install (to build projects) and mvn eclipse:eclipse (to createEclipse projects from them) can easily be run from a command line window, leaving Eclipse just for softwarecode editing. However, many prefer running Maven commands in a graphical fashion within Eclipse for which them2e plugin was created. Talend ESB Studio already includes this plugin. Otherwise, for your own Eclipse IDE,an easy way to install m2e is using the Eclipse Marketplace, available from the Eclipse menu item "Help | EclipseMarketplace..." option after you start the IDE. Once the Marketplace popup window appears, search on "m2e"and select "Maven Integration for Eclipse". Then choose install and restart your IDE. m2e will now be availableand can be seen by selecting "File->New->Other":
Install soapUI Plugin (optional)
4 Talend ESB Development Guide
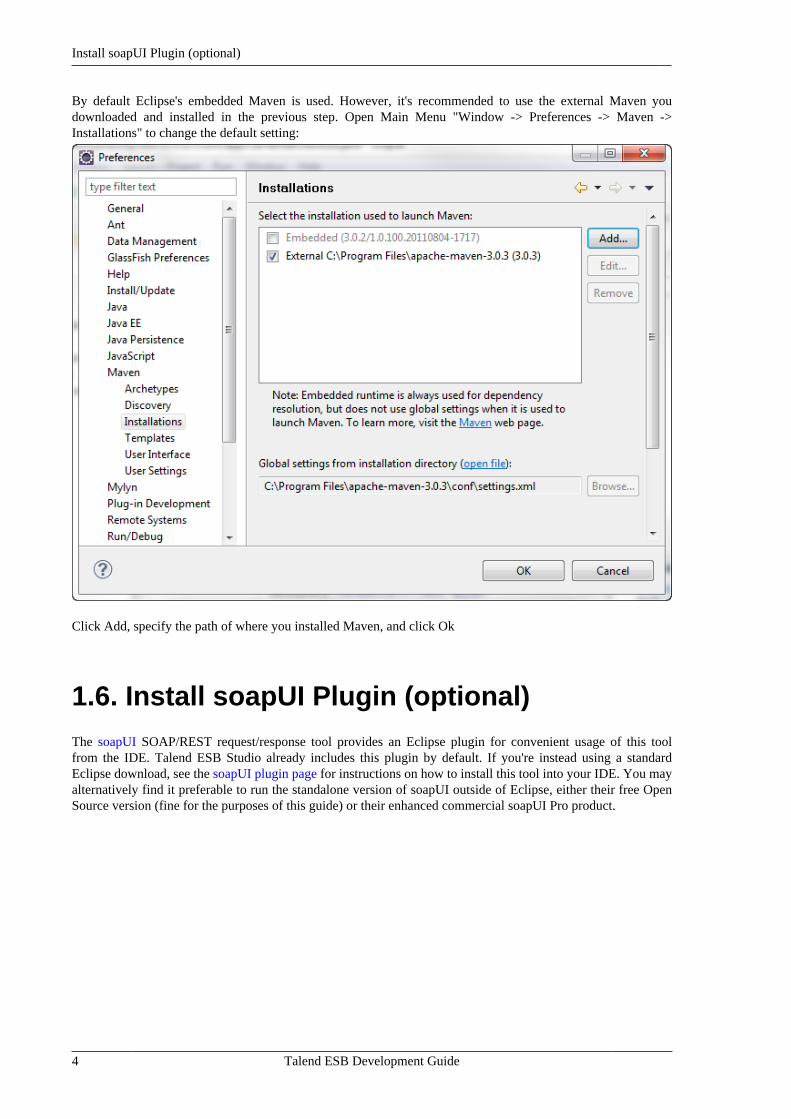
By default Eclipse's embedded Maven is used. However, it's recommended to use the external Maven youdownloaded and installed in the previous step. Open Main Menu "Window -> Preferences -> Maven ->Installations" to change the default setting:
Click Add, specify the path of where you installed Maven, and click Ok
1.6. Install soapUI Plugin (optional)The soapUI SOAP/REST request/response tool provides an Eclipse plugin for convenient usage of this toolfrom the IDE. Talend ESB Studio already includes this plugin by default. If you're instead using a standardEclipse download, see the soapUI plugin page for instructions on how to install this tool into your IDE. You mayalternatively find it preferable to run the standalone version of soapUI outside of Eclipse, either their free OpenSource version (fine for the purposes of this guide) or their enhanced commercial soapUI Pro product.
Talend ESB Development Guide
Chapter 2. Web ServicesTalend ESB helps you to create new web services or to service-enable your existing applications and interfaces foruse with the Web, using technologies based on Apache CXF. CXF supports all important web services standardsincluding the following specifications:
• the Java API for XML Web Services (JAX-WS)
• the Java API for RESTful Web Services (REST)
JAX-WS defines annotations that allow you to define how your standalone Java application should be representedin a web services context.
There are three main styles of web services development available with CXF:
1. Contract-first development:
Another JAX-WS option, this time a WSDL (Web Services Description Language) file is used to define theoperations and types a web service provides. This file is often referred to as the web services contract, and inorder to communicate with a web service, you must satisfy the contract. Contract-first development involvesstarting out by writing a WSDL file (either by hand or with the help of tooling), and then generating stub Javaclass implementations from the WSDL file by using tools such as those provided by CXF.
2. Code-first development:
Used in JAX-WS development, here we start out with a Java class and then let the web service frameworkhandle the job of generating a WSDL contract for you. This method is somewhat easier for newcomers to webservices, as it avoids the need to construct a WSDL, however as you start to add security policies to your webservices you'll probably find direct modification of an existing WSDL contract easier. Note you can also startwith code to generate a WSDL and then modify that WSDL using the contract-first approach, see this articlefor more details.
3. JAX-RS (REST) services:
REST is a more recent paradigm for simpler HTTP-based services which takes advantage of HTTP verbs (GET,POST, PUT, DELETE), an intuitively designed http URL string, and (in some cases) HTTP message body for
Contract-first development
6 Talend ESB Development Guide
responses and requests. It's paradigm is so simple that frequently usage of a web browser alone is sufficientto make and receive REST calls, however REST is not yet up to the level of providing the advanced WS-*support (security and reliability) available with JAX-WS.
We look at how to do development using these models in Section 2.1, “Contract-first development”, Section 2.2,“Code-first development” and Section 2.3, “REST Services”.
A general flowchart would be to:
1. Determine the type of web service you're interested in developing (SOAP or REST).
2. If SOAP, choose whether code-first or contract-first.
3. Determine the deployment environment (servlet container or OSGi).
Also note the Eclipse-based Talend ESB Studio provides additional graphical options, such as a RouteBuilder, ifless programmatic methods of service development are desired.
2.1. Contract-first developmentIn this section we'll work through the dev-guide-wsdl-first example available in the Talend ESBdownload, in the examples/cxf folder. This sample web service provides a simple SOAP operation called"DoubleIt", which takes an integer in the SOAP request and provides a doubled number in the response. BothTomcat and Talend ESB deployment options are shown below.
2.1.1. Project Structure
This sample is Maven-based and consists of three Maven submodules tied together with a parent pom.xml (Mavenconfiguration) file located in the base directory. (The next section will cover the POM files in detail.) The purposeof each of the submodules are as follows:
Submodule Description
service Provides the implementation for the web service provider (WSP) including its WSDL andOSGi deployment configuration (the latter ignored with Tomcat deployment.) Used bothby the war submodule for servlet (Tomcat) deployment and as an OSGi bundle for theTalend OSGi container. This submodule also generates a separate bundle holding the JAX-WS artifacts (WSP service interfaces and JAXB databinding classes) that will be used bythe SOAP client.
war Generates a deployable WAR containing the WSP that can be used with servlet containerssuch as Tomcat or Jetty. Consists mainly of the web.xml and servlet-specific WSPdeployment configuration files. The Talend OSGi container does not use this module.
client Provides a sample SOAP client for making calls against the WSP. After the WSP isdeployed (either via servlet or OSGi), this client can be activated simply by navigating tothis folder from a command-prompt window and running mvn exec:exec.
In this section, let's build the project and import it into the Eclipse IDE (the latter step optional, as source filescan be viewed and modified using any text editor):
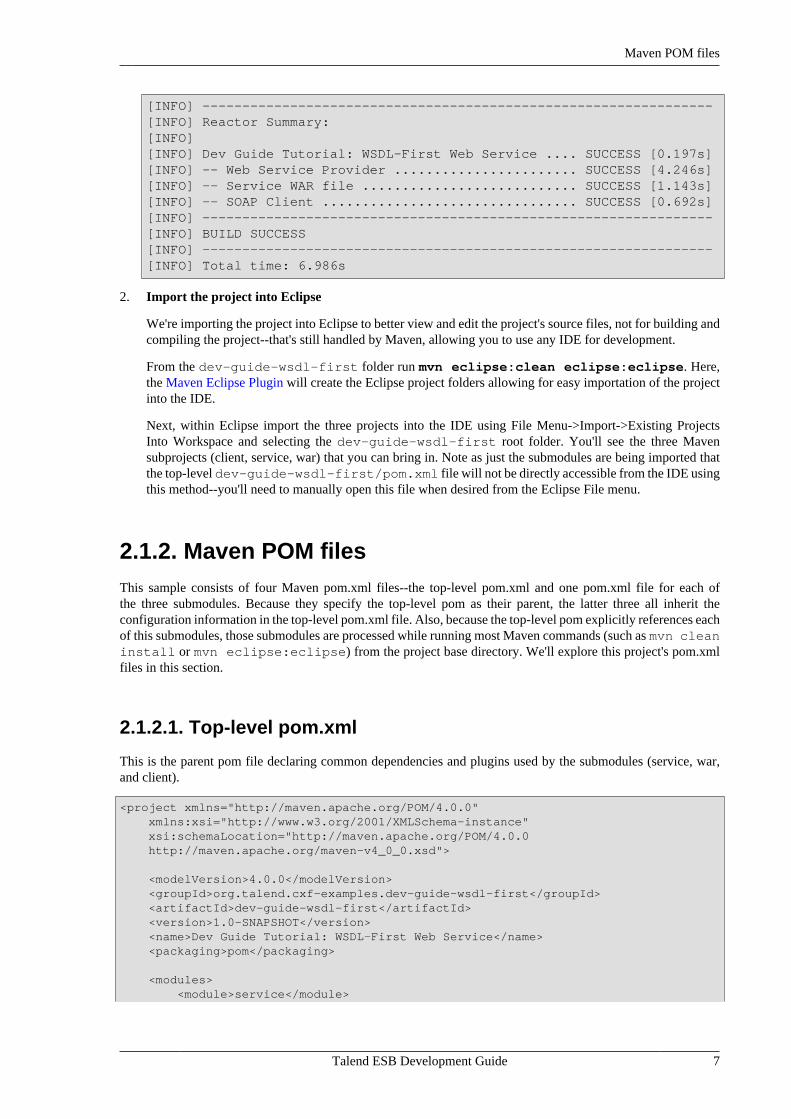
1. Build the project
From a command-prompt window, navigate to the examples/cxf/dev-guide-wsdl-first folderand run mvn clean install. You should see a success message similar to:
Maven POM files
Talend ESB Development Guide 7
[INFO] ----------------------------------------------------------------[INFO] Reactor Summary:[INFO] [INFO] Dev Guide Tutorial: WSDL-First Web Service .... SUCCESS [0.197s][INFO] -- Web Service Provider ....................... SUCCESS [4.246s][INFO] -- Service WAR file ........................... SUCCESS [1.143s][INFO] -- SOAP Client ................................ SUCCESS [0.692s][INFO] ----------------------------------------------------------------[INFO] BUILD SUCCESS[INFO] ----------------------------------------------------------------[INFO] Total time: 6.986s
2. Import the project into Eclipse
We're importing the project into Eclipse to better view and edit the project's source files, not for building andcompiling the project--that's still handled by Maven, allowing you to use any IDE for development.
From the dev-guide-wsdl-first folder run mvn eclipse:clean eclipse:eclipse. Here,the Maven Eclipse Plugin will create the Eclipse project folders allowing for easy importation of the projectinto the IDE.
Next, within Eclipse import the three projects into the IDE using File Menu->Import->Existing ProjectsInto Workspace and selecting the dev-guide-wsdl-first root folder. You'll see the three Mavensubprojects (client, service, war) that you can bring in. Note as just the submodules are being imported thatthe top-level dev-guide-wsdl-first/pom.xml file will not be directly accessible from the IDE usingthis method--you'll need to manually open this file when desired from the Eclipse File menu.
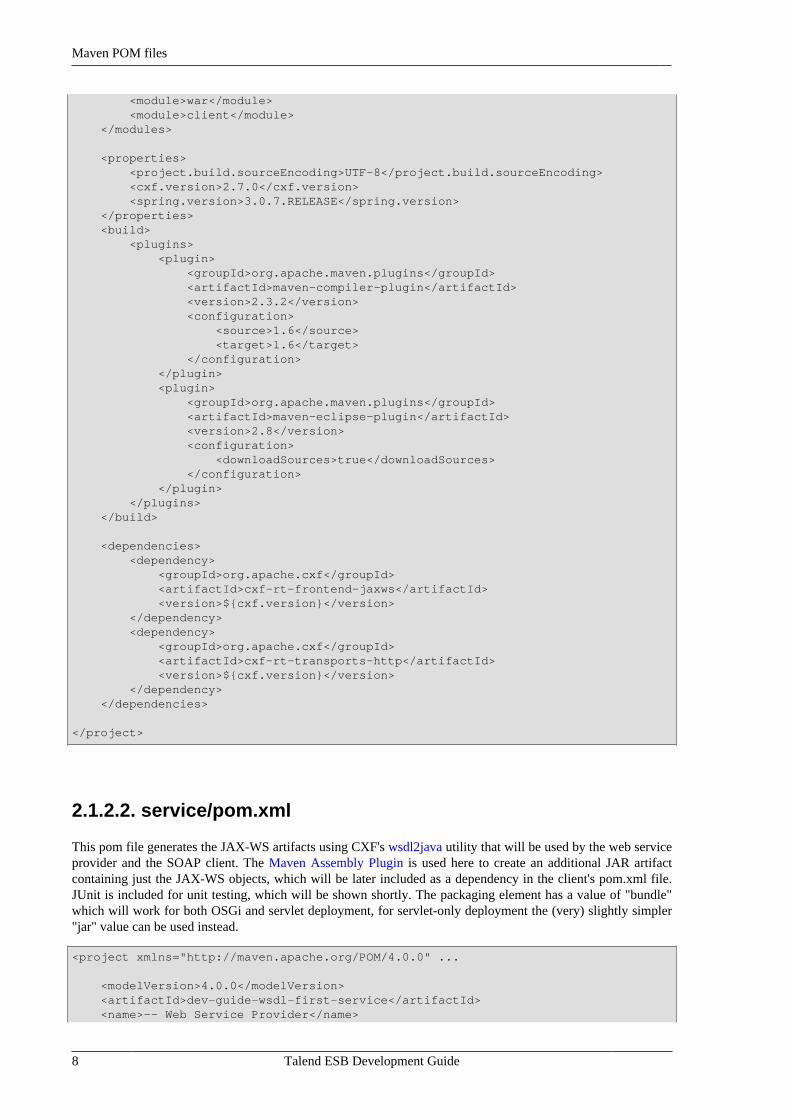
2.1.2. Maven POM filesThis sample consists of four Maven pom.xml files--the top-level pom.xml and one pom.xml file for each ofthe three submodules. Because they specify the top-level pom as their parent, the latter three all inherit theconfiguration information in the top-level pom.xml file. Also, because the top-level pom explicitly references eachof this submodules, those submodules are processed while running most Maven commands (such as mvn cleaninstall or mvn eclipse:eclipse) from the project base directory. We'll explore this project's pom.xmlfiles in this section.
2.1.2.1. Top-level pom.xml
This is the parent pom file declaring common dependencies and plugins used by the submodules (service, war,and client).
<project xmlns="http://maven.apache.org/POM/4.0.0" xmlns:xsi="http://www.w3.org/2001/XMLSchema-instance" xsi:schemaLocation="http://maven.apache.org/POM/4.0.0 http://maven.apache.org/maven-v4_0_0.xsd">
<modelVersion>4.0.0</modelVersion> <groupId>org.talend.cxf-examples.dev-guide-wsdl-first</groupId> <artifactId>dev-guide-wsdl-first</artifactId> <version>1.0-SNAPSHOT</version> <name>Dev Guide Tutorial: WSDL-First Web Service</name> <packaging>pom</packaging>
<modules> <module>service</module>
Maven POM files
8 Talend ESB Development Guide
<module>war</module> <module>client</module> </modules>
<properties> <project.build.sourceEncoding>UTF-8</project.build.sourceEncoding> <cxf.version>2.7.0</cxf.version> <spring.version>3.0.7.RELEASE</spring.version> </properties> <build> <plugins> <plugin> <groupId>org.apache.maven.plugins</groupId> <artifactId>maven-compiler-plugin</artifactId> <version>2.3.2</version> <configuration> <source>1.6</source> <target>1.6</target> </configuration> </plugin> <plugin> <groupId>org.apache.maven.plugins</groupId> <artifactId>maven-eclipse-plugin</artifactId> <version>2.8</version> <configuration> <downloadSources>true</downloadSources> </configuration> </plugin> </plugins> </build>
<dependencies> <dependency> <groupId>org.apache.cxf</groupId> <artifactId>cxf-rt-frontend-jaxws</artifactId> <version>${cxf.version}</version> </dependency> <dependency> <groupId>org.apache.cxf</groupId> <artifactId>cxf-rt-transports-http</artifactId> <version>${cxf.version}</version> </dependency> </dependencies>
</project>
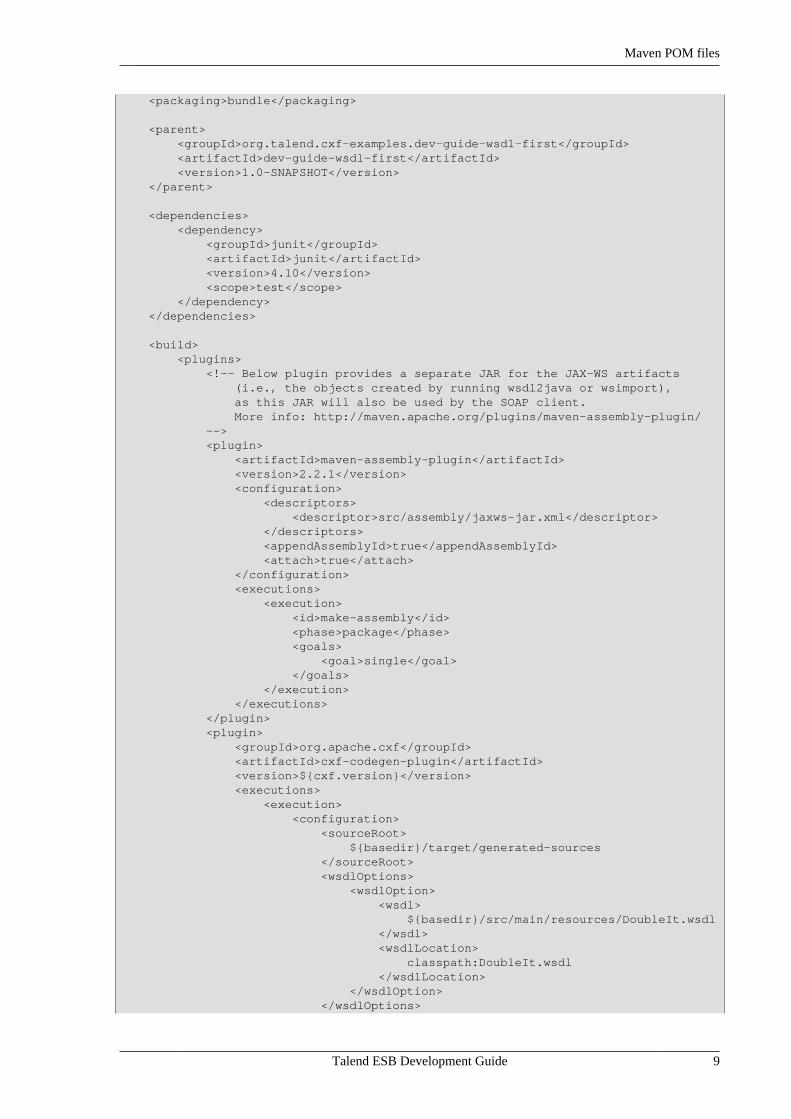
2.1.2.2. service/pom.xml
This pom file generates the JAX-WS artifacts using CXF's wsdl2java utility that will be used by the web serviceprovider and the SOAP client. The Maven Assembly Plugin is used here to create an additional JAR artifactcontaining just the JAX-WS objects, which will be later included as a dependency in the client's pom.xml file.JUnit is included for unit testing, which will be shown shortly. The packaging element has a value of "bundle"which will work for both OSGi and servlet deployment, for servlet-only deployment the (very) slightly simpler"jar" value can be used instead.
<project xmlns="http://maven.apache.org/POM/4.0.0" ...
<modelVersion>4.0.0</modelVersion> <artifactId>dev-guide-wsdl-first-service</artifactId> <name>-- Web Service Provider</name>
Maven POM files
Talend ESB Development Guide 9
<packaging>bundle</packaging>
<parent> <groupId>org.talend.cxf-examples.dev-guide-wsdl-first</groupId> <artifactId>dev-guide-wsdl-first</artifactId> <version>1.0-SNAPSHOT</version> </parent>
<dependencies> <dependency> <groupId>junit</groupId> <artifactId>junit</artifactId> <version>4.10</version> <scope>test</scope> </dependency> </dependencies>
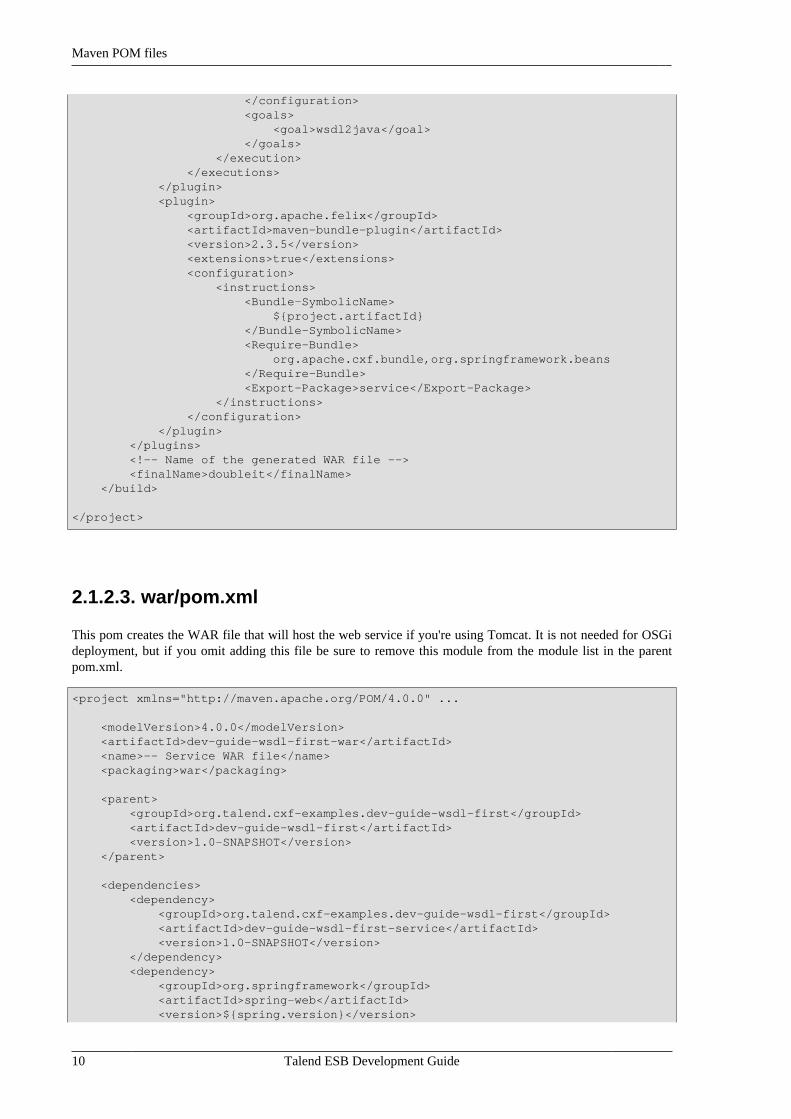
<build> <plugins> <!-- Below plugin provides a separate JAR for the JAX-WS artifacts (i.e., the objects created by running wsdl2java or wsimport), as this JAR will also be used by the SOAP client. More info: http://maven.apache.org/plugins/maven-assembly-plugin/ --> <plugin> <artifactId>maven-assembly-plugin</artifactId> <version>2.2.1</version> <configuration> <descriptors> <descriptor>src/assembly/jaxws-jar.xml</descriptor> </descriptors> <appendAssemblyId>true</appendAssemblyId> <attach>true</attach> </configuration> <executions> <execution> <id>make-assembly</id> <phase>package</phase> <goals> <goal>single</goal> </goals> </execution> </executions> </plugin> <plugin> <groupId>org.apache.cxf</groupId> <artifactId>cxf-codegen-plugin</artifactId> <version>${cxf.version}</version> <executions> <execution> <configuration> <sourceRoot> ${basedir}/target/generated-sources </sourceRoot> <wsdlOptions> <wsdlOption> <wsdl> ${basedir}/src/main/resources/DoubleIt.wsdl </wsdl> <wsdlLocation> classpath:DoubleIt.wsdl </wsdlLocation> </wsdlOption> </wsdlOptions>
Maven POM files
10 Talend ESB Development Guide
</configuration> <goals> <goal>wsdl2java</goal> </goals> </execution> </executions> </plugin> <plugin> <groupId>org.apache.felix</groupId> <artifactId>maven-bundle-plugin</artifactId> <version>2.3.5</version> <extensions>true</extensions> <configuration> <instructions> <Bundle-SymbolicName> ${project.artifactId} </Bundle-SymbolicName> <Require-Bundle> org.apache.cxf.bundle,org.springframework.beans </Require-Bundle> <Export-Package>service</Export-Package> </instructions> </configuration> </plugin> </plugins> <!-- Name of the generated WAR file --> <finalName>doubleit</finalName> </build>
</project>
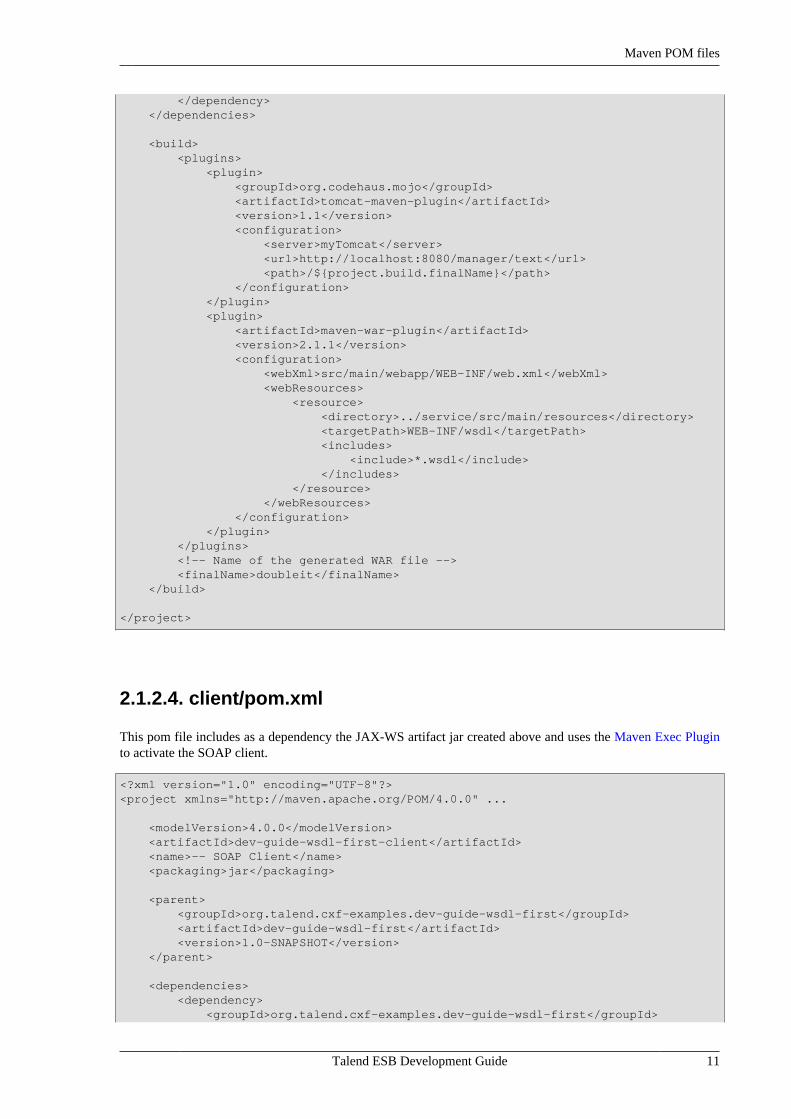
2.1.2.3. war/pom.xml
This pom creates the WAR file that will host the web service if you're using Tomcat. It is not needed for OSGideployment, but if you omit adding this file be sure to remove this module from the module list in the parentpom.xml.
<project xmlns="http://maven.apache.org/POM/4.0.0" ...
<modelVersion>4.0.0</modelVersion> <artifactId>dev-guide-wsdl-first-war</artifactId> <name>-- Service WAR file</name> <packaging>war</packaging>
<parent> <groupId>org.talend.cxf-examples.dev-guide-wsdl-first</groupId> <artifactId>dev-guide-wsdl-first</artifactId> <version>1.0-SNAPSHOT</version> </parent>
<dependencies> <dependency> <groupId>org.talend.cxf-examples.dev-guide-wsdl-first</groupId> <artifactId>dev-guide-wsdl-first-service</artifactId> <version>1.0-SNAPSHOT</version> </dependency> <dependency> <groupId>org.springframework</groupId> <artifactId>spring-web</artifactId> <version>${spring.version}</version>
Maven POM files
Talend ESB Development Guide 11
</dependency> </dependencies>
<build> <plugins> <plugin> <groupId>org.codehaus.mojo</groupId> <artifactId>tomcat-maven-plugin</artifactId> <version>1.1</version> <configuration> <server>myTomcat</server> <url>http://localhost:8080/manager/text</url> <path>/${project.build.finalName}</path> </configuration> </plugin> <plugin> <artifactId>maven-war-plugin</artifactId> <version>2.1.1</version> <configuration> <webXml>src/main/webapp/WEB-INF/web.xml</webXml> <webResources> <resource> <directory>../service/src/main/resources</directory> <targetPath>WEB-INF/wsdl</targetPath> <includes> <include>*.wsdl</include> </includes> </resource> </webResources> </configuration> </plugin> </plugins> <!-- Name of the generated WAR file --> <finalName>doubleit</finalName> </build>
</project>
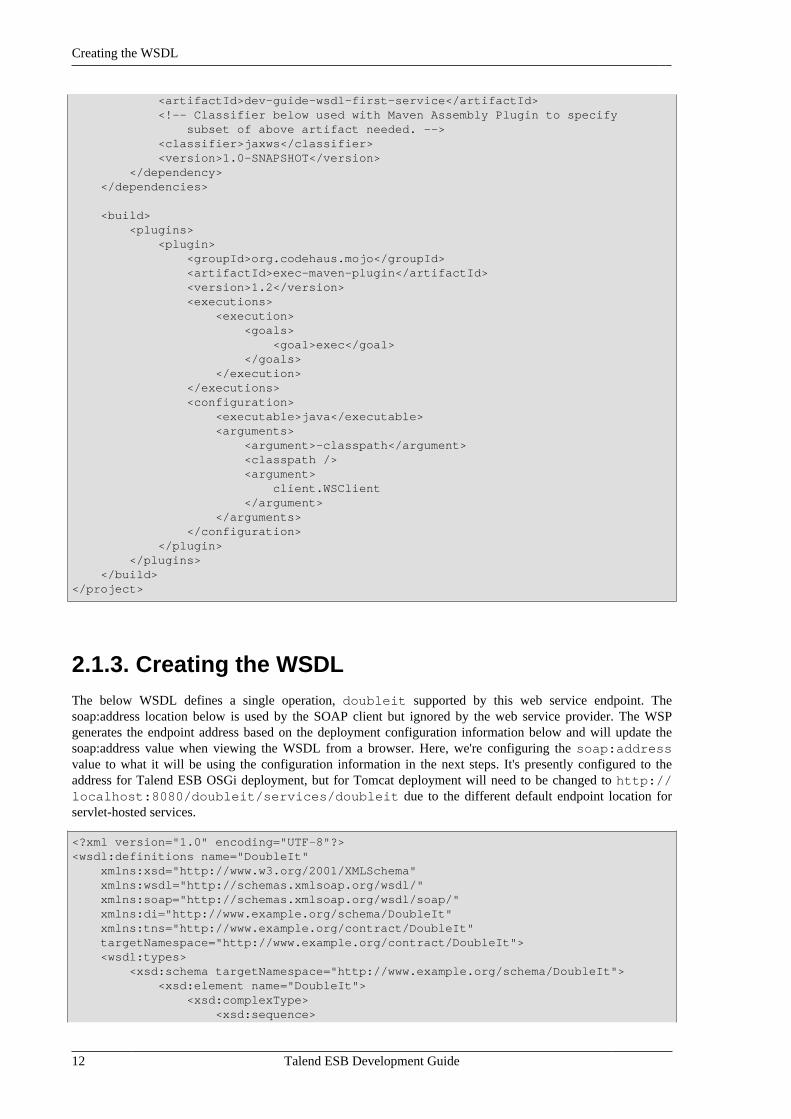
2.1.2.4. client/pom.xml
This pom file includes as a dependency the JAX-WS artifact jar created above and uses the Maven Exec Pluginto activate the SOAP client.
<?xml version="1.0" encoding="UTF-8"?><project xmlns="http://maven.apache.org/POM/4.0.0" ...
<modelVersion>4.0.0</modelVersion> <artifactId>dev-guide-wsdl-first-client</artifactId> <name>-- SOAP Client</name> <packaging>jar</packaging>
<parent> <groupId>org.talend.cxf-examples.dev-guide-wsdl-first</groupId> <artifactId>dev-guide-wsdl-first</artifactId> <version>1.0-SNAPSHOT</version> </parent>
<dependencies> <dependency> <groupId>org.talend.cxf-examples.dev-guide-wsdl-first</groupId>
Creating the WSDL
12 Talend ESB Development Guide
<artifactId>dev-guide-wsdl-first-service</artifactId> <!-- Classifier below used with Maven Assembly Plugin to specify subset of above artifact needed. --> <classifier>jaxws</classifier> <version>1.0-SNAPSHOT</version> </dependency> </dependencies>
<build> <plugins> <plugin> <groupId>org.codehaus.mojo</groupId> <artifactId>exec-maven-plugin</artifactId> <version>1.2</version> <executions> <execution> <goals> <goal>exec</goal> </goals> </execution> </executions> <configuration> <executable>java</executable> <arguments> <argument>-classpath</argument> <classpath /> <argument> client.WSClient </argument> </arguments> </configuration> </plugin> </plugins> </build></project>
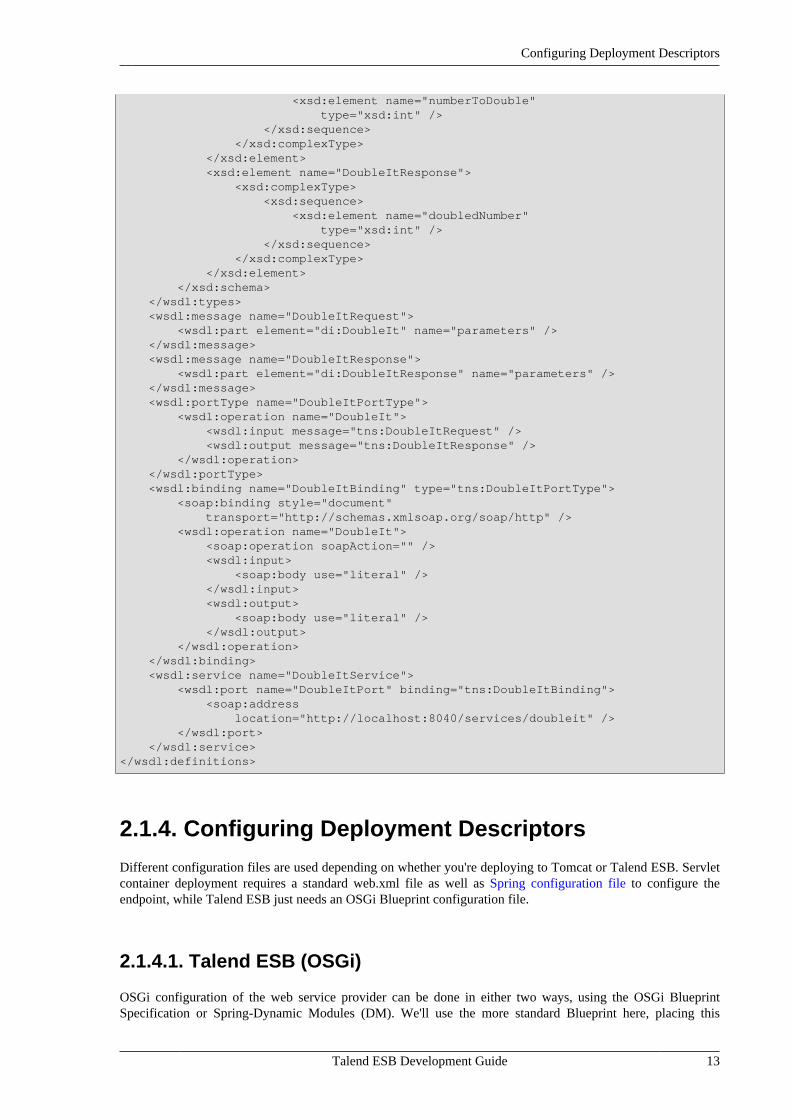
2.1.3. Creating the WSDLThe below WSDL defines a single operation, doubleit supported by this web service endpoint. Thesoap:address location below is used by the SOAP client but ignored by the web service provider. The WSPgenerates the endpoint address based on the deployment configuration information below and will update thesoap:address value when viewing the WSDL from a browser. Here, we're configuring the soap:addressvalue to what it will be using the configuration information in the next steps. It's presently configured to theaddress for Talend ESB OSGi deployment, but for Tomcat deployment will need to be changed to http://localhost:8080/doubleit/services/doubleit due to the different default endpoint location forservlet-hosted services.
<?xml version="1.0" encoding="UTF-8"?><wsdl:definitions name="DoubleIt" xmlns:xsd="http://www.w3.org/2001/XMLSchema" xmlns:wsdl="http://schemas.xmlsoap.org/wsdl/" xmlns:soap="http://schemas.xmlsoap.org/wsdl/soap/" xmlns:di="http://www.example.org/schema/DoubleIt" xmlns:tns="http://www.example.org/contract/DoubleIt" targetNamespace="http://www.example.org/contract/DoubleIt"> <wsdl:types> <xsd:schema targetNamespace="http://www.example.org/schema/DoubleIt"> <xsd:element name="DoubleIt"> <xsd:complexType> <xsd:sequence>
Configuring Deployment Descriptors
Talend ESB Development Guide 13
<xsd:element name="numberToDouble" type="xsd:int" /> </xsd:sequence> </xsd:complexType> </xsd:element> <xsd:element name="DoubleItResponse"> <xsd:complexType> <xsd:sequence> <xsd:element name="doubledNumber" type="xsd:int" /> </xsd:sequence> </xsd:complexType> </xsd:element> </xsd:schema> </wsdl:types> <wsdl:message name="DoubleItRequest"> <wsdl:part element="di:DoubleIt" name="parameters" /> </wsdl:message> <wsdl:message name="DoubleItResponse"> <wsdl:part element="di:DoubleItResponse" name="parameters" /> </wsdl:message> <wsdl:portType name="DoubleItPortType"> <wsdl:operation name="DoubleIt"> <wsdl:input message="tns:DoubleItRequest" /> <wsdl:output message="tns:DoubleItResponse" /> </wsdl:operation> </wsdl:portType> <wsdl:binding name="DoubleItBinding" type="tns:DoubleItPortType"> <soap:binding style="document" transport="http://schemas.xmlsoap.org/soap/http" /> <wsdl:operation name="DoubleIt"> <soap:operation soapAction="" /> <wsdl:input> <soap:body use="literal" /> </wsdl:input> <wsdl:output> <soap:body use="literal" /> </wsdl:output> </wsdl:operation> </wsdl:binding> <wsdl:service name="DoubleItService"> <wsdl:port name="DoubleItPort" binding="tns:DoubleItBinding"> <soap:address location="http://localhost:8040/services/doubleit" /> </wsdl:port> </wsdl:service></wsdl:definitions>
2.1.4. Configuring Deployment Descriptors
Different configuration files are used depending on whether you're deploying to Tomcat or Talend ESB. Servletcontainer deployment requires a standard web.xml file as well as Spring configuration file to configure theendpoint, while Talend ESB just needs an OSGi Blueprint configuration file.
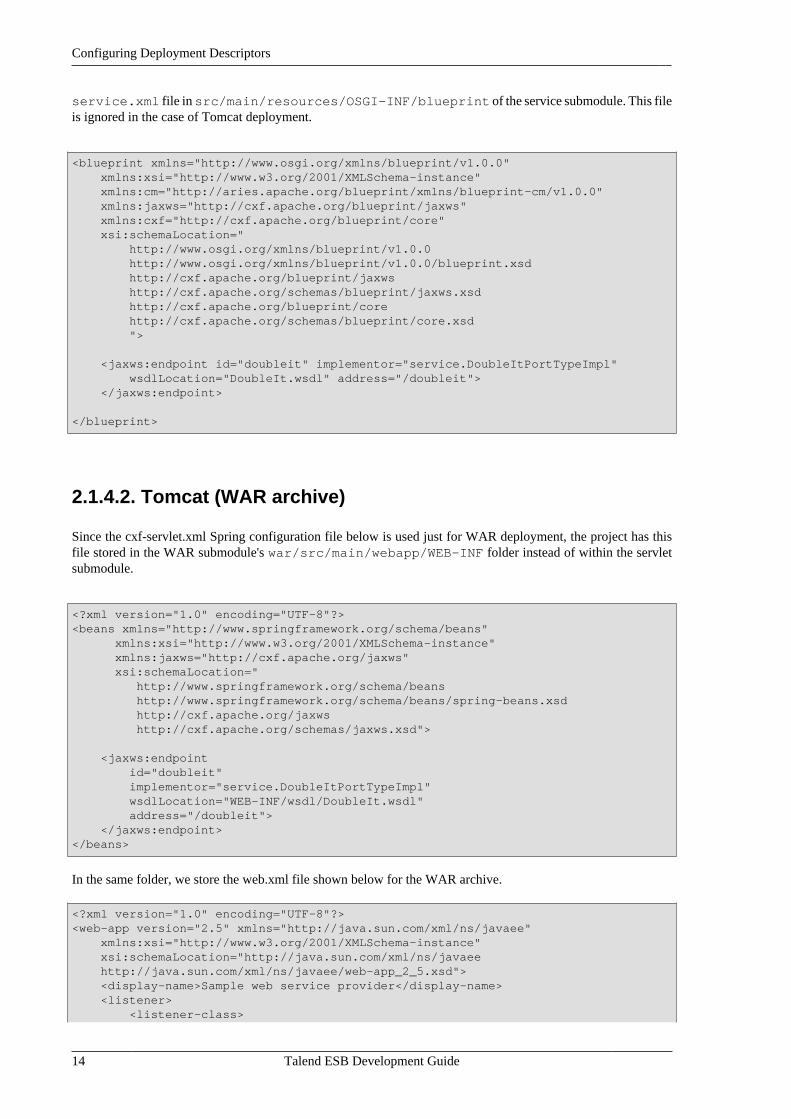
2.1.4.1. Talend ESB (OSGi)
OSGi configuration of the web service provider can be done in either two ways, using the OSGi BlueprintSpecification or Spring-Dynamic Modules (DM). We'll use the more standard Blueprint here, placing this
Configuring Deployment Descriptors
14 Talend ESB Development Guide
service.xml file in src/main/resources/OSGI-INF/blueprint of the service submodule. This fileis ignored in the case of Tomcat deployment.
<blueprint xmlns="http://www.osgi.org/xmlns/blueprint/v1.0.0" xmlns:xsi="http://www.w3.org/2001/XMLSchema-instance" xmlns:cm="http://aries.apache.org/blueprint/xmlns/blueprint-cm/v1.0.0" xmlns:jaxws="http://cxf.apache.org/blueprint/jaxws" xmlns:cxf="http://cxf.apache.org/blueprint/core" xsi:schemaLocation=" http://www.osgi.org/xmlns/blueprint/v1.0.0 http://www.osgi.org/xmlns/blueprint/v1.0.0/blueprint.xsd http://cxf.apache.org/blueprint/jaxws http://cxf.apache.org/schemas/blueprint/jaxws.xsd http://cxf.apache.org/blueprint/core http://cxf.apache.org/schemas/blueprint/core.xsd ">
<jaxws:endpoint id="doubleit" implementor="service.DoubleItPortTypeImpl" wsdlLocation="DoubleIt.wsdl" address="/doubleit"> </jaxws:endpoint>
</blueprint>
2.1.4.2. Tomcat (WAR archive)
Since the cxf-servlet.xml Spring configuration file below is used just for WAR deployment, the project has thisfile stored in the WAR submodule's war/src/main/webapp/WEB-INF folder instead of within the servletsubmodule.
<?xml version="1.0" encoding="UTF-8"?><beans xmlns="http://www.springframework.org/schema/beans" xmlns:xsi="http://www.w3.org/2001/XMLSchema-instance" xmlns:jaxws="http://cxf.apache.org/jaxws" xsi:schemaLocation=" http://www.springframework.org/schema/beans http://www.springframework.org/schema/beans/spring-beans.xsd http://cxf.apache.org/jaxws http://cxf.apache.org/schemas/jaxws.xsd">
<jaxws:endpoint id="doubleit" implementor="service.DoubleItPortTypeImpl" wsdlLocation="WEB-INF/wsdl/DoubleIt.wsdl" address="/doubleit"> </jaxws:endpoint></beans>
In the same folder, we store the web.xml file shown below for the WAR archive.
<?xml version="1.0" encoding="UTF-8"?><web-app version="2.5" xmlns="http://java.sun.com/xml/ns/javaee" xmlns:xsi="http://www.w3.org/2001/XMLSchema-instance" xsi:schemaLocation="http://java.sun.com/xml/ns/javaee http://java.sun.com/xml/ns/javaee/web-app_2_5.xsd"> <display-name>Sample web service provider</display-name> <listener> <listener-class>
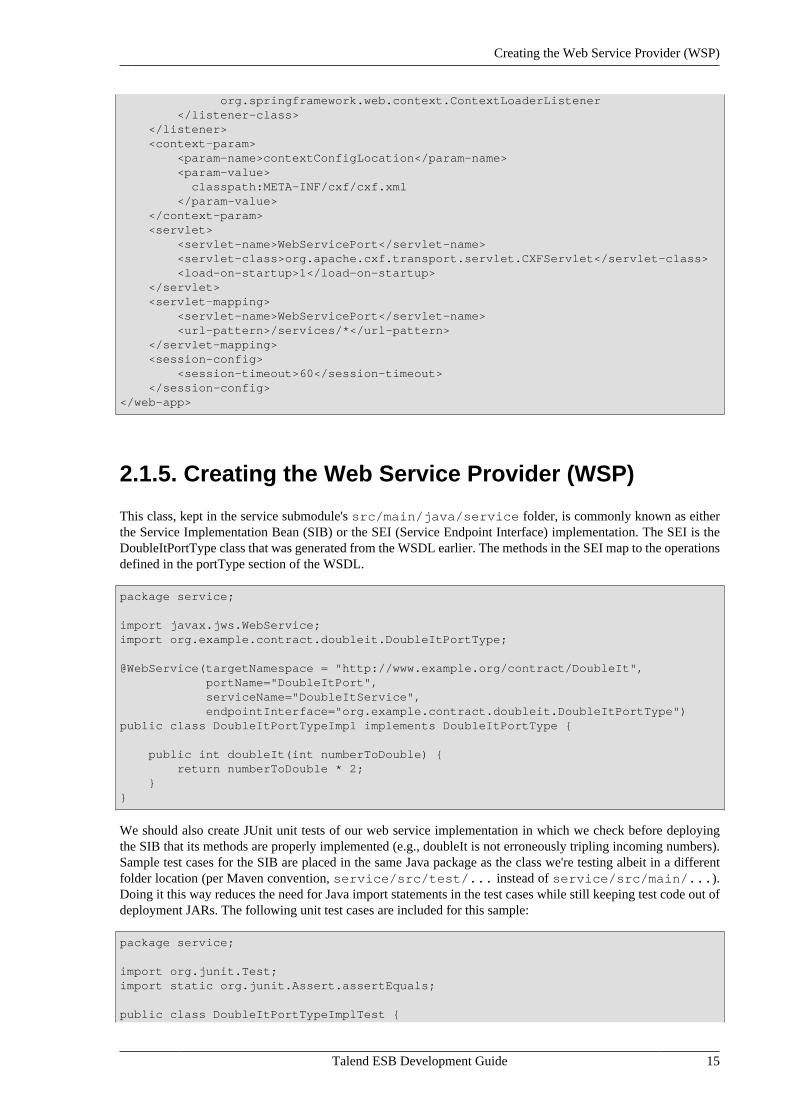
Creating the Web Service Provider (WSP)
Talend ESB Development Guide 15
org.springframework.web.context.ContextLoaderListener </listener-class> </listener> <context-param> <param-name>contextConfigLocation</param-name> <param-value> classpath:META-INF/cxf/cxf.xml </param-value> </context-param> <servlet> <servlet-name>WebServicePort</servlet-name> <servlet-class>org.apache.cxf.transport.servlet.CXFServlet</servlet-class> <load-on-startup>1</load-on-startup> </servlet> <servlet-mapping> <servlet-name>WebServicePort</servlet-name> <url-pattern>/services/*</url-pattern> </servlet-mapping> <session-config> <session-timeout>60</session-timeout> </session-config></web-app>
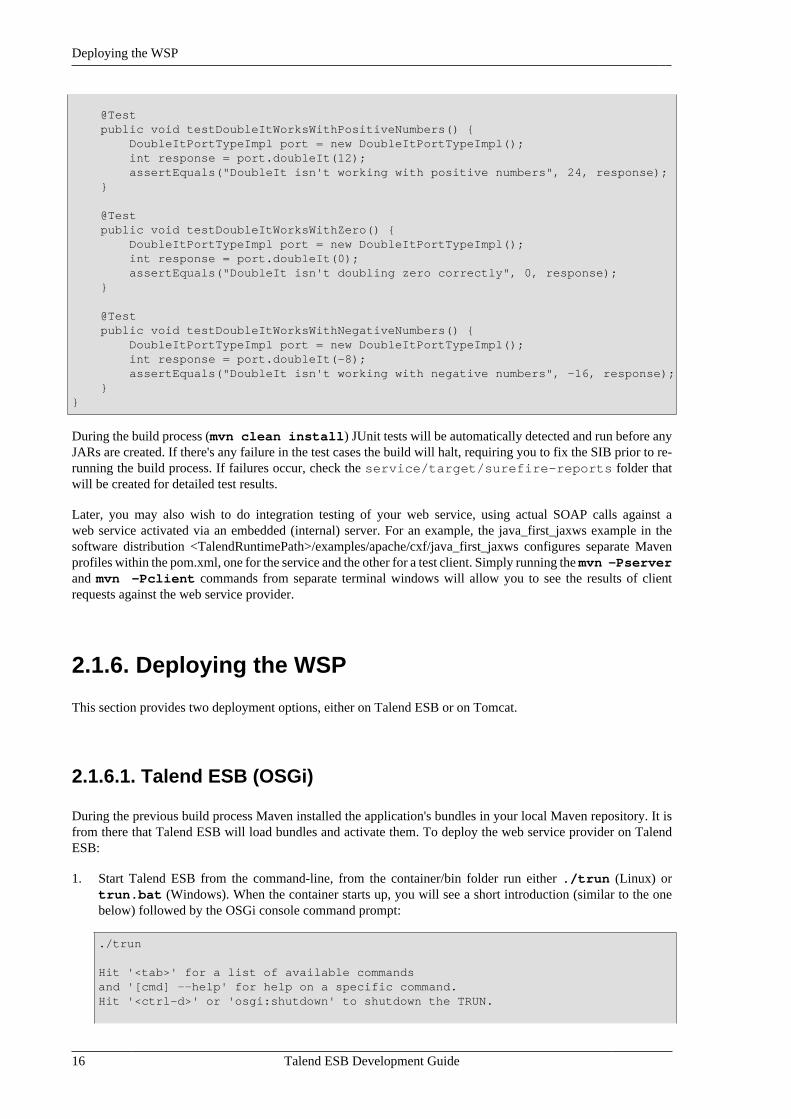
2.1.5. Creating the Web Service Provider (WSP)
This class, kept in the service submodule's src/main/java/service folder, is commonly known as eitherthe Service Implementation Bean (SIB) or the SEI (Service Endpoint Interface) implementation. The SEI is theDoubleItPortType class that was generated from the WSDL earlier. The methods in the SEI map to the operationsdefined in the portType section of the WSDL.
package service;
import javax.jws.WebService;import org.example.contract.doubleit.DoubleItPortType;
@WebService(targetNamespace = "http://www.example.org/contract/DoubleIt", portName="DoubleItPort", serviceName="DoubleItService", endpointInterface="org.example.contract.doubleit.DoubleItPortType")public class DoubleItPortTypeImpl implements DoubleItPortType {
public int doubleIt(int numberToDouble) { return numberToDouble * 2; }}
We should also create JUnit unit tests of our web service implementation in which we check before deployingthe SIB that its methods are properly implemented (e.g., doubleIt is not erroneously tripling incoming numbers).Sample test cases for the SIB are placed in the same Java package as the class we're testing albeit in a differentfolder location (per Maven convention, service/src/test/... instead of service/src/main/...).Doing it this way reduces the need for Java import statements in the test cases while still keeping test code out ofdeployment JARs. The following unit test cases are included for this sample:
package service;
import org.junit.Test;import static org.junit.Assert.assertEquals;
public class DoubleItPortTypeImplTest {
Deploying the WSP
16 Talend ESB Development Guide
@Test public void testDoubleItWorksWithPositiveNumbers() { DoubleItPortTypeImpl port = new DoubleItPortTypeImpl(); int response = port.doubleIt(12); assertEquals("DoubleIt isn't working with positive numbers", 24, response); } @Test public void testDoubleItWorksWithZero() { DoubleItPortTypeImpl port = new DoubleItPortTypeImpl(); int response = port.doubleIt(0); assertEquals("DoubleIt isn't doubling zero correctly", 0, response); }
@Test public void testDoubleItWorksWithNegativeNumbers() { DoubleItPortTypeImpl port = new DoubleItPortTypeImpl(); int response = port.doubleIt(-8); assertEquals("DoubleIt isn't working with negative numbers", -16, response); }}
During the build process (mvn clean install) JUnit tests will be automatically detected and run before anyJARs are created. If there's any failure in the test cases the build will halt, requiring you to fix the SIB prior to re-running the build process. If failures occur, check the service/target/surefire-reports folder thatwill be created for detailed test results.
Later, you may also wish to do integration testing of your web service, using actual SOAP calls against aweb service activated via an embedded (internal) server. For an example, the java_first_jaxws example in thesoftware distribution <TalendRuntimePath>/examples/apache/cxf/java_first_jaxws configures separate Mavenprofiles within the pom.xml, one for the service and the other for a test client. Simply running the mvn -Pserverand mvn -Pclient commands from separate terminal windows will allow you to see the results of clientrequests against the web service provider.
2.1.6. Deploying the WSP
This section provides two deployment options, either on Talend ESB or on Tomcat.
2.1.6.1. Talend ESB (OSGi)
During the previous build process Maven installed the application's bundles in your local Maven repository. It isfrom there that Talend ESB will load bundles and activate them. To deploy the web service provider on TalendESB:
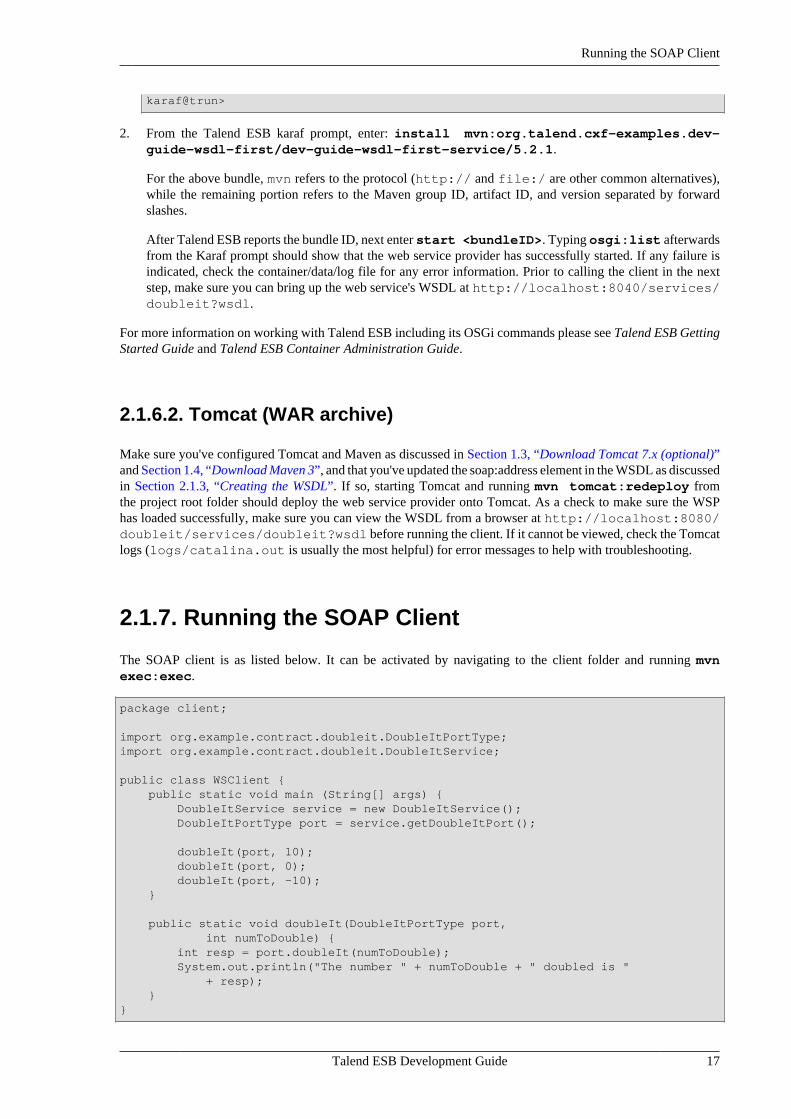
1. Start Talend ESB from the command-line, from the container/bin folder run either ./trun (Linux) ortrun.bat (Windows). When the container starts up, you will see a short introduction (similar to the onebelow) followed by the OSGi console command prompt:
./trun
Hit '<tab>' for a list of available commandsand '[cmd] --help' for help on a specific command.Hit '<ctrl-d>' or 'osgi:shutdown' to shutdown the TRUN.
Running the SOAP Client
Talend ESB Development Guide 17
karaf@trun>
2. From the Talend ESB karaf prompt, enter: install mvn:org.talend.cxf-examples.dev-guide-wsdl-first/dev-guide-wsdl-first-service/5.2.1.
For the above bundle, mvn refers to the protocol (http:// and file:/ are other common alternatives),while the remaining portion refers to the Maven group ID, artifact ID, and version separated by forwardslashes.
After Talend ESB reports the bundle ID, next enter start <bundleID>. Typing osgi:list afterwardsfrom the Karaf prompt should show that the web service provider has successfully started. If any failure isindicated, check the container/data/log file for any error information. Prior to calling the client in the nextstep, make sure you can bring up the web service's WSDL at http://localhost:8040/services/doubleit?wsdl.
For more information on working with Talend ESB including its OSGi commands please see Talend ESB GettingStarted Guide and Talend ESB Container Administration Guide.
2.1.6.2. Tomcat (WAR archive)
Make sure you've configured Tomcat and Maven as discussed in Section 1.3, “Download Tomcat 7.x (optional)”and Section 1.4, “Download Maven 3”, and that you've updated the soap:address element in the WSDL as discussedin Section 2.1.3, “Creating the WSDL”. If so, starting Tomcat and running mvn tomcat:redeploy fromthe project root folder should deploy the web service provider onto Tomcat. As a check to make sure the WSPhas loaded successfully, make sure you can view the WSDL from a browser at http://localhost:8080/doubleit/services/doubleit?wsdl before running the client. If it cannot be viewed, check the Tomcatlogs (logs/catalina.out is usually the most helpful) for error messages to help with troubleshooting.
2.1.7. Running the SOAP Client
The SOAP client is as listed below. It can be activated by navigating to the client folder and running mvnexec:exec.
package client;
import org.example.contract.doubleit.DoubleItPortType;import org.example.contract.doubleit.DoubleItService;
public class WSClient { public static void main (String[] args) { DoubleItService service = new DoubleItService(); DoubleItPortType port = service.getDoubleItPort();
doubleIt(port, 10); doubleIt(port, 0); doubleIt(port, -10); } public static void doubleIt(DoubleItPortType port, int numToDouble) { int resp = port.doubleIt(numToDouble); System.out.println("The number " + numToDouble + " doubled is " + resp); }}
Code-first development
18 Talend ESB Development Guide
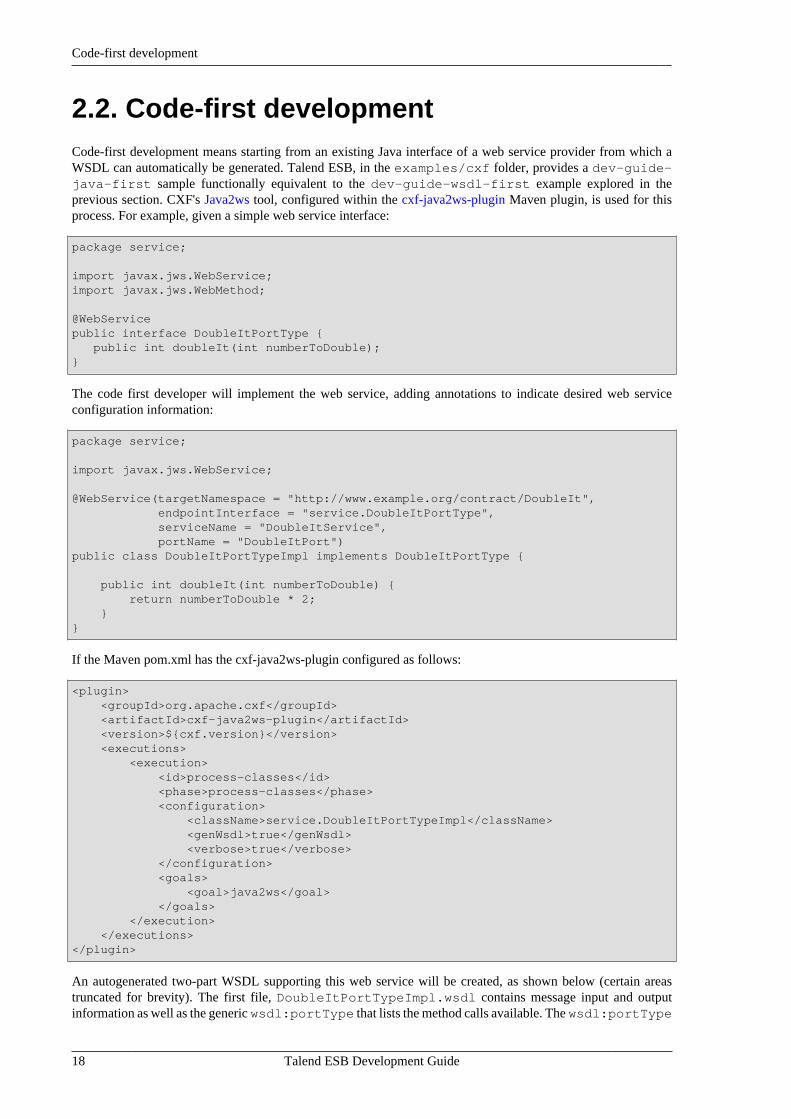
2.2. Code-first developmentCode-first development means starting from an existing Java interface of a web service provider from which aWSDL can automatically be generated. Talend ESB, in the examples/cxf folder, provides a dev-guide-java-first sample functionally equivalent to the dev-guide-wsdl-first example explored in theprevious section. CXF's Java2ws tool, configured within the cxf-java2ws-plugin Maven plugin, is used for thisprocess. For example, given a simple web service interface:
package service;
import javax.jws.WebService;import javax.jws.WebMethod;
@WebServicepublic interface DoubleItPortType { public int doubleIt(int numberToDouble);}
The code first developer will implement the web service, adding annotations to indicate desired web serviceconfiguration information:
package service;
import javax.jws.WebService;
@WebService(targetNamespace = "http://www.example.org/contract/DoubleIt", endpointInterface = "service.DoubleItPortType", serviceName = "DoubleItService", portName = "DoubleItPort")public class DoubleItPortTypeImpl implements DoubleItPortType {
public int doubleIt(int numberToDouble) { return numberToDouble * 2; }}
If the Maven pom.xml has the cxf-java2ws-plugin configured as follows:
<plugin> <groupId>org.apache.cxf</groupId> <artifactId>cxf-java2ws-plugin</artifactId> <version>${cxf.version}</version> <executions> <execution> <id>process-classes</id> <phase>process-classes</phase> <configuration> <className>service.DoubleItPortTypeImpl</className> <genWsdl>true</genWsdl> <verbose>true</verbose> </configuration> <goals> <goal>java2ws</goal> </goals> </execution> </executions></plugin>
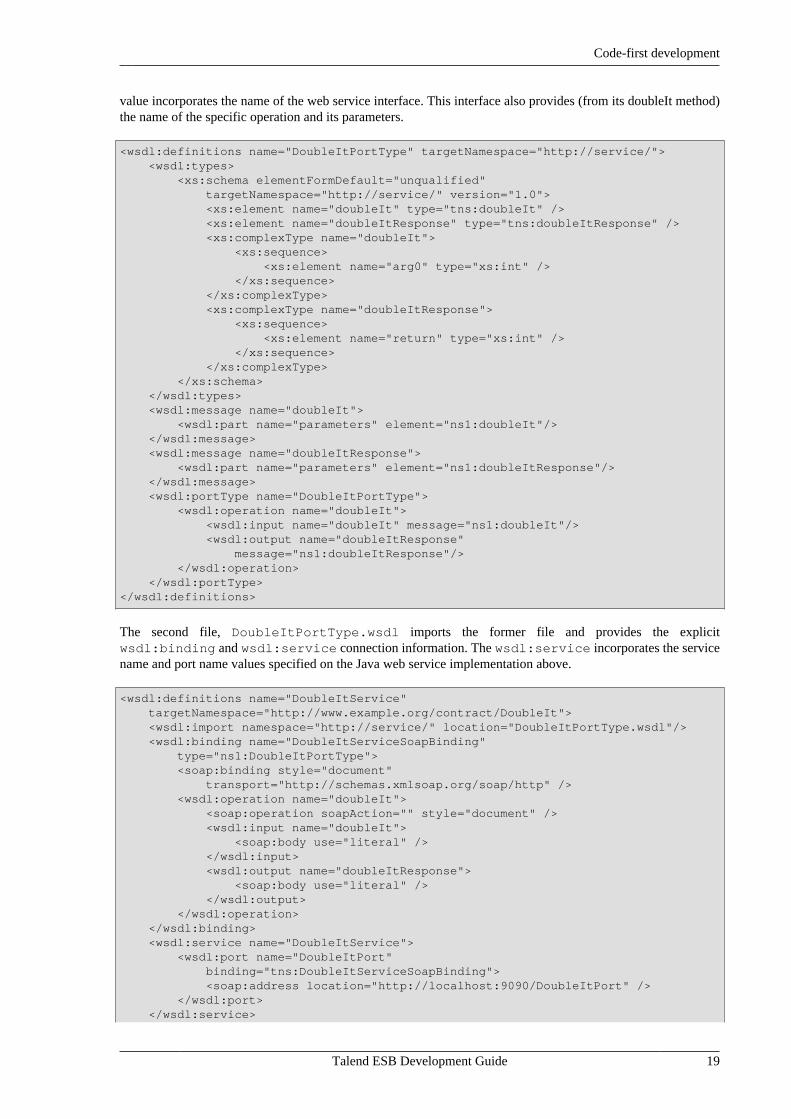
An autogenerated two-part WSDL supporting this web service will be created, as shown below (certain areastruncated for brevity). The first file, DoubleItPortTypeImpl.wsdl contains message input and outputinformation as well as the generic wsdl:portType that lists the method calls available. The wsdl:portType
Code-first development
Talend ESB Development Guide 19
value incorporates the name of the web service interface. This interface also provides (from its doubleIt method)the name of the specific operation and its parameters.
<wsdl:definitions name="DoubleItPortType" targetNamespace="http://service/"> <wsdl:types> <xs:schema elementFormDefault="unqualified" targetNamespace="http://service/" version="1.0"> <xs:element name="doubleIt" type="tns:doubleIt" /> <xs:element name="doubleItResponse" type="tns:doubleItResponse" /> <xs:complexType name="doubleIt"> <xs:sequence> <xs:element name="arg0" type="xs:int" /> </xs:sequence> </xs:complexType> <xs:complexType name="doubleItResponse"> <xs:sequence> <xs:element name="return" type="xs:int" /> </xs:sequence> </xs:complexType> </xs:schema> </wsdl:types> <wsdl:message name="doubleIt"> <wsdl:part name="parameters" element="ns1:doubleIt"/> </wsdl:message> <wsdl:message name="doubleItResponse"> <wsdl:part name="parameters" element="ns1:doubleItResponse"/> </wsdl:message> <wsdl:portType name="DoubleItPortType"> <wsdl:operation name="doubleIt"> <wsdl:input name="doubleIt" message="ns1:doubleIt"/> <wsdl:output name="doubleItResponse" message="ns1:doubleItResponse"/> </wsdl:operation> </wsdl:portType></wsdl:definitions>
The second file, DoubleItPortType.wsdl imports the former file and provides the explicitwsdl:binding and wsdl:service connection information. The wsdl:service incorporates the servicename and port name values specified on the Java web service implementation above.
<wsdl:definitions name="DoubleItService" targetNamespace="http://www.example.org/contract/DoubleIt"> <wsdl:import namespace="http://service/" location="DoubleItPortType.wsdl"/> <wsdl:binding name="DoubleItServiceSoapBinding" type="ns1:DoubleItPortType"> <soap:binding style="document" transport="http://schemas.xmlsoap.org/soap/http" /> <wsdl:operation name="doubleIt"> <soap:operation soapAction="" style="document" /> <wsdl:input name="doubleIt"> <soap:body use="literal" /> </wsdl:input> <wsdl:output name="doubleItResponse"> <soap:body use="literal" /> </wsdl:output> </wsdl:operation> </wsdl:binding> <wsdl:service name="DoubleItService"> <wsdl:port name="DoubleItPort" binding="tns:DoubleItServiceSoapBinding"> <soap:address location="http://localhost:9090/DoubleItPort" /> </wsdl:port> </wsdl:service>
CXF Maven Archetypes
20 Talend ESB Development Guide
</wsdl:definitions>
This sample can be compiled and deployed just as explained in the previous wsdl-first example--only difference,for Talend ESB OSGi deployment, to use install mvn:org.talend.cxf-examples.dev-guide-java-first/dev-guide-java-first-service/5.2.1 as the bundle install string.
In the next Java-first example we'll demonstrate other helpful tools for web services development, including them2eclipse plugin, Apache CXF's Maven archetypes for creating skeleton code and soapUI for making test SOAPcalls.
2.2.1. CXF Maven Archetypes
Apache CXF provides a Maven archetype for creating Java-first web services. In the this section we'll exploreusing it along with the Eclipse's m2eclipse plugin. Open Eclipse:
1. From Main Menu: File>New>Other, Select "Maven Project" under "Maven" category:
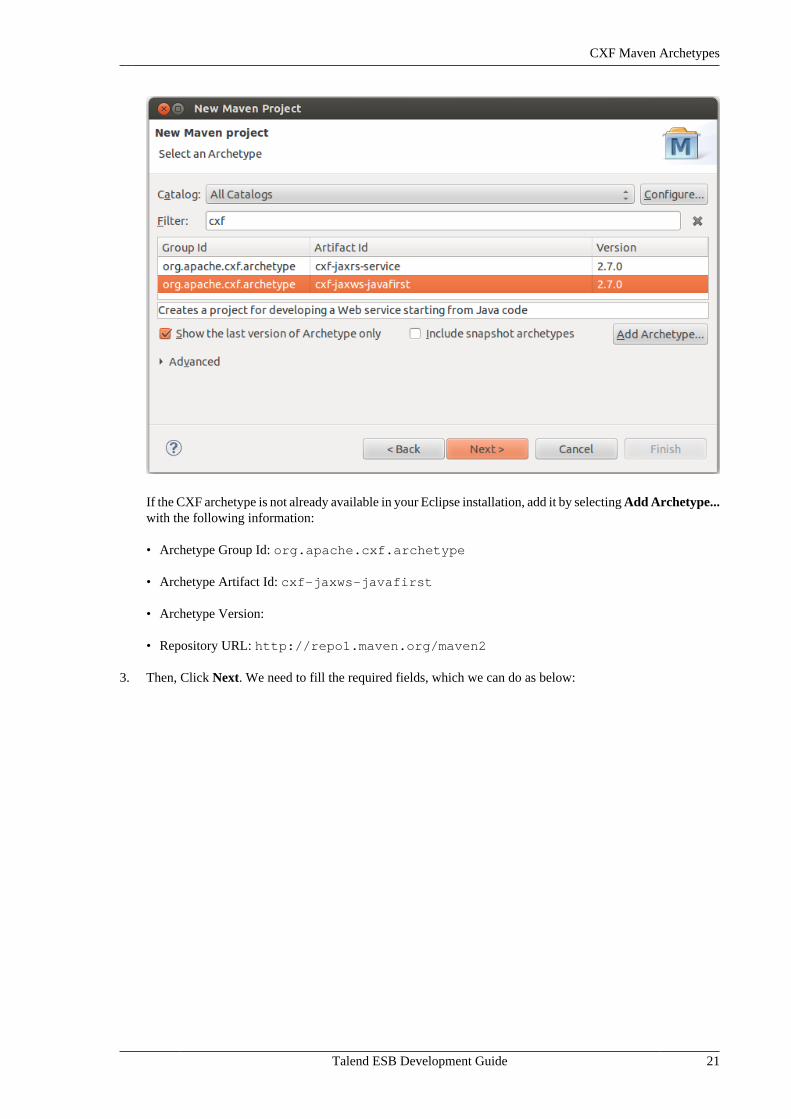
2. Click Next to get the "Select project name and location" screen, accept its defaults, and click Next again toget to the "Select an Archetype" dialog. On this page, enter "cxf" in the Filter box and select the item withgroup ID of org.apache.cxf.archetype and artifact ID of cxf-jaxws-javafirst:
CXF Maven Archetypes
Talend ESB Development Guide 21
If the CXF archetype is not already available in your Eclipse installation, add it by selecting Add Archetype...with the following information:
• Archetype Group Id: org.apache.cxf.archetype
• Archetype Artifact Id: cxf-jaxws-javafirst
• Archetype Version:
• Repository URL: http://repo1.maven.org/maven2
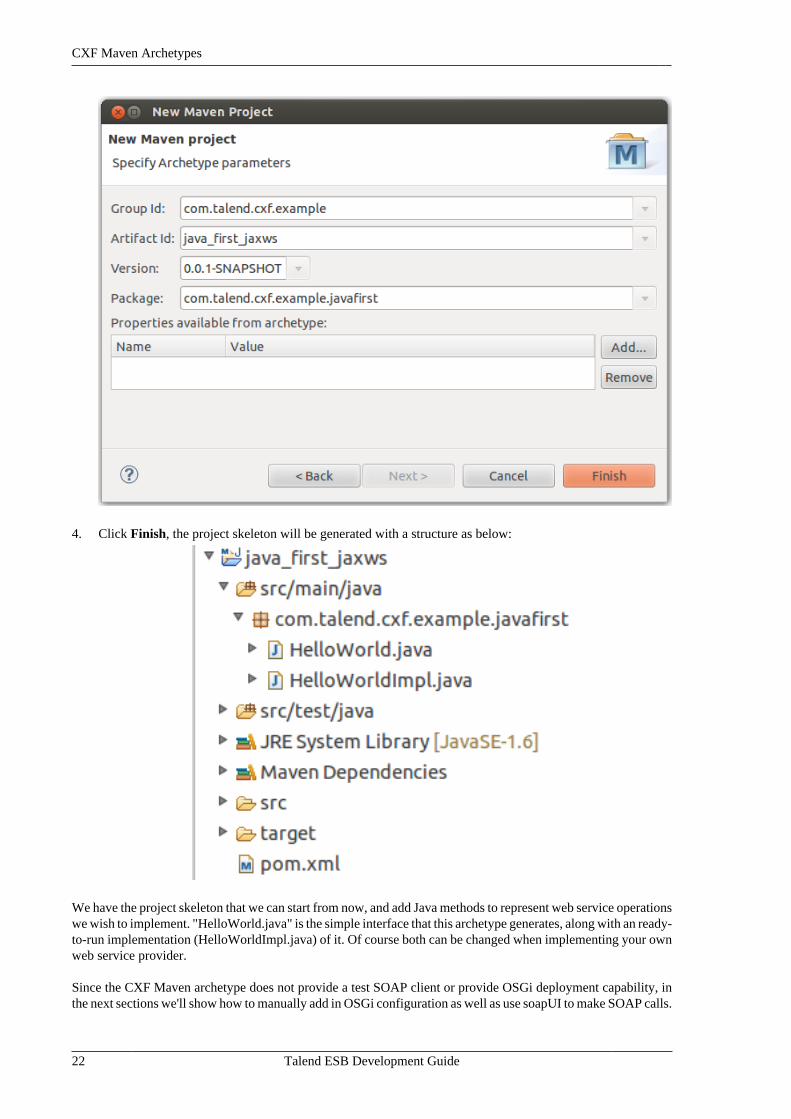
3. Then, Click Next. We need to fill the required fields, which we can do as below:
CXF Maven Archetypes
22 Talend ESB Development Guide
4. Click Finish, the project skeleton will be generated with a structure as below:
We have the project skeleton that we can start from now, and add Java methods to represent web service operationswe wish to implement. "HelloWorld.java" is the simple interface that this archetype generates, along with an ready-to-run implementation (HelloWorldImpl.java) of it. Of course both can be changed when implementing your ownweb service provider.
Since the CXF Maven archetype does not provide a test SOAP client or provide OSGi deployment capability, inthe next sections we'll show how to manually add in OSGi configuration as well as use soapUI to make SOAP calls.
Adding OSGi Capabilities to a Web Service
Talend ESB Development Guide 23
2.2.2. Adding OSGi Capabilities to a Web Service
This chapter shows how to configure a Mavenized web service as an OSGi bundle in Talend ESB, an OSGicontainer based on Apache Karaf. For more information about Talend ESB, Karaf, and OSGi, please see the TalendESB Container Administration Guide.
Let's package the java_first_jaxws web service created in the previous section as an OSGi bundle. We'll configurean Apache Felix plugin in Maven to for this. For more information about Felix, please visit http://felix.apache.org;for more information on using Felix with Maven, please refer to http://felix.apache.org/site/apache-felix-maven-bundle-plugin-bnd.html.
In order to package the application as a bundle, first we need to add the Felix Maven dependency to the pom.xmlcreated in the previous section:
<dependency> <groupId>org.apache.felix</groupId> <artifactId>org.osgi.core</artifactId> <version>1.4.0</version></dependency>
Also, we'll need to add the Felix plugin used for creating the bundle. Create a new plugins element under theproject's build element (not the build / pluginManagement / plugins element, that is usedfor configuration outside of Maven's default build process) and add:
<plugin> <groupId>org.apache.felix</groupId> <artifactId>maven-bundle-plugin</artifactId> <extensions>true</extensions> <version>2.3.7</version> <configuration> <instructions> <Bundle-SymbolicName> ${project.groupId}.${project.artifactId} </Bundle-SymbolicName> <Bundle-Name>${project.name}</Bundle-Name> <Bundle-Version>${project.version}</Bundle-Version> <Export-Package>com.talend.cxf.example.javafirst</Export-Package> <Bundle-Activator> com.talend.cxf.example.javafirst.Activator </Bundle-Activator> <Require-Bundle> org.apache.cxf.bundle,org.springframework.beans </Require-Bundle> </instructions> </configuration></plugin>
Since we want to package as an OSGi bundle, also change the packaging element at the top ofthe pom file from war to bundle. As shown above in Felix's maven-bundle-plugin configurationcom.talend.cxf.example.javafirst is exported as the bundle name and a CXF dependency is listed.In addition, the "Bundle-Activator" implementation is given. For bundle activation, we'll start and stop our servicein the Activator's start and stop services respectively. Place the following class within the java_first_jaxws project:
Activator.java:
package com.talend.cxf.example.javafirst;
import javax.xml.ws.Endpoint;import org.osgi.framework.BundleActivator; import org.osgi.framework.BundleContext;
Making SOAP calls with soapUI
24 Talend ESB Development Guide
public class Activator implements BundleActivator { private Endpoint endpoint;
public void start(BundleContext arg0) throws Exception { try { HelloWorldImpl implementor = new HelloWorldImpl(); String address = "http://localhost:9000/helloWorld"; endpoint = Endpoint.publish(address, implementor); System.out.println("Server is started..."); } catch (Exception e) { e.printStackTrace(); throw e; } }
public void stop(BundleContext arg0) throws Exception { try { endpoint.stop(); } catch (Exception e) { e.printStackTrace(); throw e; } }}
All changes needed have been made. Now let's have Maven create the package:
Select the "Run As> Maven Clean" and then "Run As> Maven Install" from the popup menu onpom.xml, or alternatively, mvn clean install from a command prompt located in the projecthome directory. The application will be packaged and installed into your Maven local repository,by default located in your hidden <user home>/.m2 directory or otherwise as configured by thelocalRepository field in your ${Maven_HOME}/conf/settings.xml file. You should find itunder ${MavenRepository}/ com/talend/cxf/example/ java_first_jaxws/0.0.1-SNAPSHOT/ java_first_jaxws-0.0.1-SNAPSHOT.jar.
We're now ready to deploy the bundle, which can be done as described in Section 2.1.6.1, “TalendESB (OSGi)” except with an install command of: install mvn:com.talend.cxf.example/java_first_jaxws/0.0.1-SNAPSHOT. Run the list command to make sure the bundle has started(check the logfiles in container/log folder for any errors if not) and ensure you can see the service WSDLat http://localhost:9000/helloWorld?wsdl. If so, we're ready to make SOAP calls to the serviceusing soapUI as shown in the next section.
2.2.3. Making SOAP calls with soapUI
In this section we'll use soapUI to make SOAP calls to the Talend ESB-hosted web service created in the previoussection. SoapUI's detailed tutorial is recommended for a full understanding of this tool's capabilities.
1. (Optional) From your browser, you may wish to save the service WSDL to a file, such ashelloWorld.wsdl, for subsequent usage by soapUI. However, soapUI can also easily read WSDLs fromHTTP URLs such as http://localhost:9000/helloWorld?wsdl.
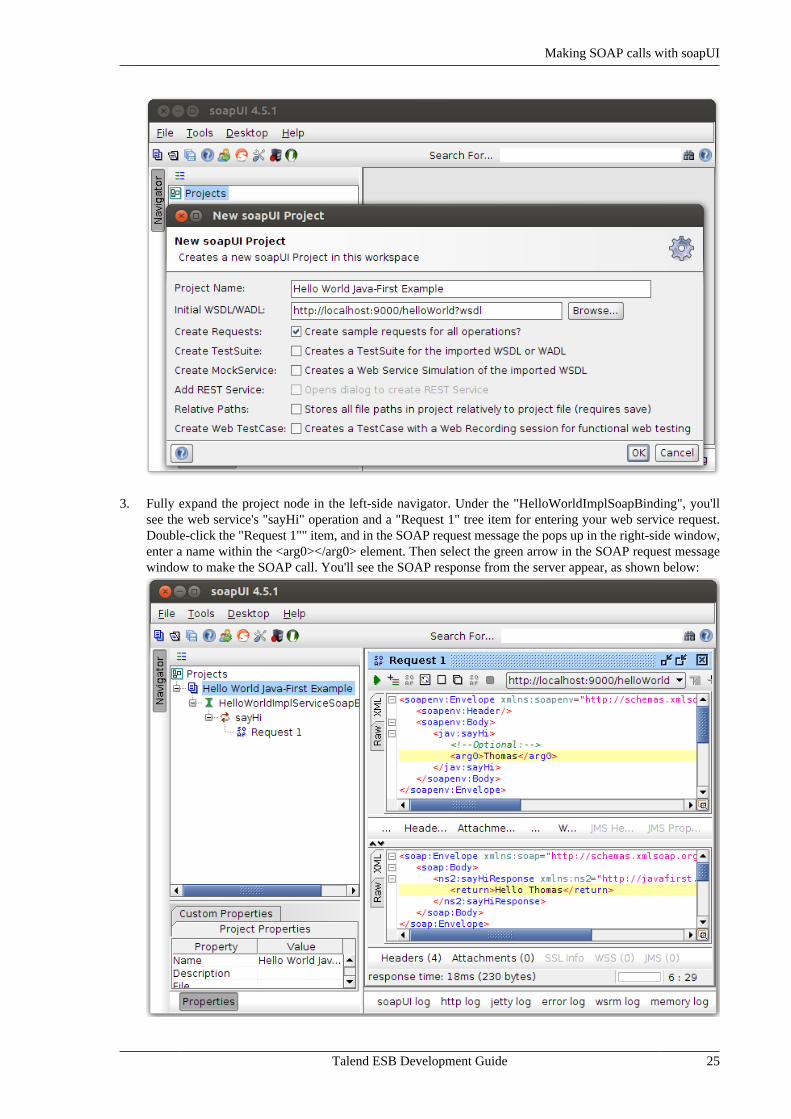
2. Start soapUI and select menu item File->New soapUI Project. Enter a name for the project and the webservice's URL either from a file or http location, the latter as shown below. Then click OK.
Making SOAP calls with soapUI
Talend ESB Development Guide 25
3. Fully expand the project node in the left-side navigator. Under the "HelloWorldImplSoapBinding", you'llsee the web service's "sayHi" operation and a "Request 1" tree item for entering your web service request.Double-click the "Request 1"" item, and in the SOAP request message the pops up in the right-side window,enter a name within the <arg0></arg0> element. Then select the green arrow in the SOAP request messagewindow to make the SOAP call. You'll see the SOAP response from the server appear, as shown below:

REST Services
26 Talend ESB Development Guide
You can make additional calls by editing the request window and pressing the green arrow.
2.3. REST ServicesThe JAX-RS Section on the Apache CXF website provides a solid background to implementing REST servicesand also provides the latest information on the newest RESTful features offered by CXF.
For an example of working with a RESTful application in Eclipse and deploying the service to either Tomcat orthe Talend OSGi container, let's look at the JAXRS-Intro sample provided in the examples/talend folderof the Talend ESB installation. The demo lists the Persons who are part of a generic membership, and allowsGETs to retrieve a single member or all members, POSTs to add members, and PUTs for updates to membershipinformation.
The JAX-RS Server provides one service via the registration of a root resource class, MembershipService whichrelies on within-memory data storage. MembershipService provides a list of its members, which are individualPerson objects containing name and age. New persons can be added to the MembershipService, and individualmembers can have their information updated. The RESTful client uses CXF JAX-RS WebClient to traverse allthe information about an individual Person and also add a new child.
This sample consists of four subfolders:
Folder Description
client This is a sample client application that uses the CXF JAX-RS API to create HTTP-centricand proxy clients and makes several calls with them.
common This directory contains the code that is common for both the client and the server. POJOsand the REST interface is kept here.
service This is the JAX-RS service holding the Membership root resources packaged as an OSGibundle.
war This module creates a WAR archive containing the code from common and servicemodules.
Working with a REST sample in Eclipse
1. From a command-line windows, navigate to the jax-rs folder and type mvn clean installeclipse:eclipse. This will create an Eclipse project out of this sample that we can import into Eclipse.
2. From Eclipse we can now import the project. From the Menu row, select File : Import..., and fromthe resulting Import popup, choose Existing Projects into Workspace (see illustration below). Select Next.
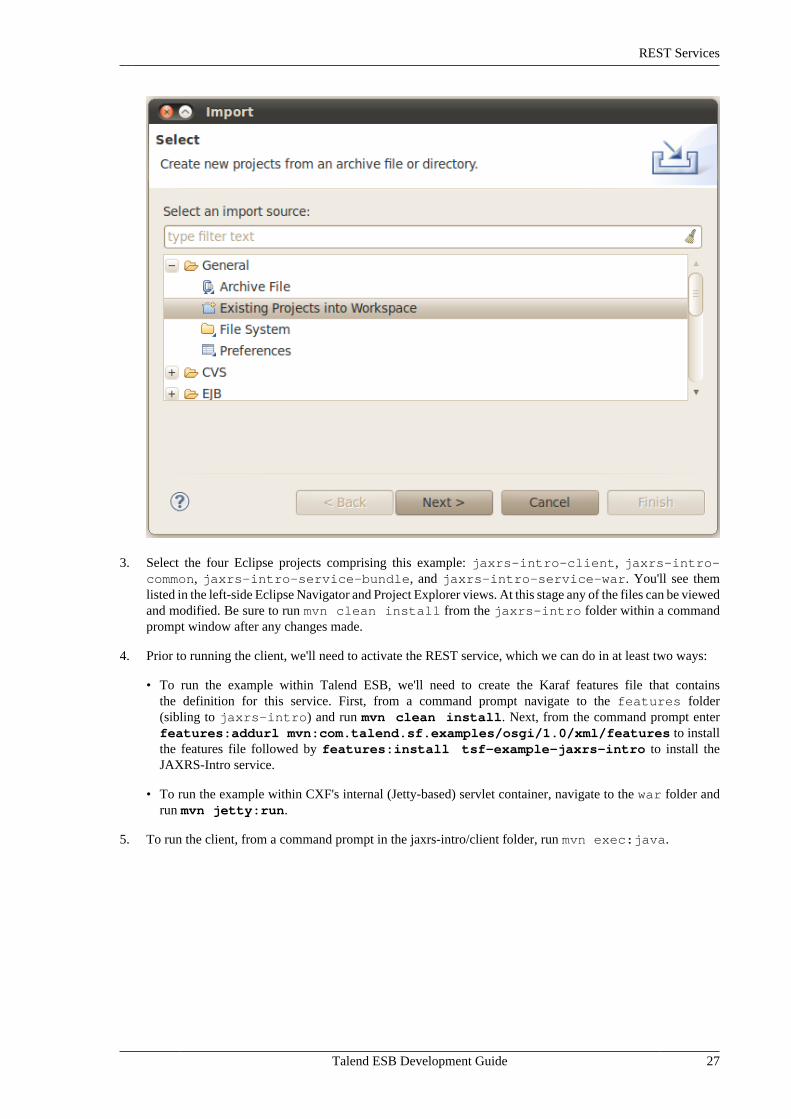
REST Services
Talend ESB Development Guide 27
3. Select the four Eclipse projects comprising this example: jaxrs-intro-client, jaxrs-intro-common, jaxrs-intro-service-bundle, and jaxrs-intro-service-war. You'll see themlisted in the left-side Eclipse Navigator and Project Explorer views. At this stage any of the files can be viewedand modified. Be sure to run mvn clean install from the jaxrs-intro folder within a commandprompt window after any changes made.
4. Prior to running the client, we'll need to activate the REST service, which we can do in at least two ways:
• To run the example within Talend ESB, we'll need to create the Karaf features file that containsthe definition for this service. First, from a command prompt navigate to the features folder(sibling to jaxrs-intro) and run mvn clean install. Next, from the command prompt enterfeatures:addurl mvn:com.talend.sf.examples/osgi/1.0/xml/features to installthe features file followed by features:install tsf-example-jaxrs-intro to install theJAXRS-Intro service.
• To run the example within CXF's internal (Jetty-based) servlet container, navigate to the war folder andrun mvn jetty:run.
5. To run the client, from a command prompt in the jaxrs-intro/client folder, run mvn exec:java.

Talend ESB Development Guide
Talend ESB Development Guide
Chapter 3. Camel Routes OverviewTo demonstrate the usage and deployment of a Camel route within Talend ESB using Eclipse, we'll use Camel'scamel-example-cxf-osgi example, located within the examples/apache/camel folder of the TalendESB distribution. Steps:
1. From a command-line windows, navigate to this folder and type mvn clean installeclipse:eclipse. This will create an Eclipse project out of this sample that we can import into Eclipse.
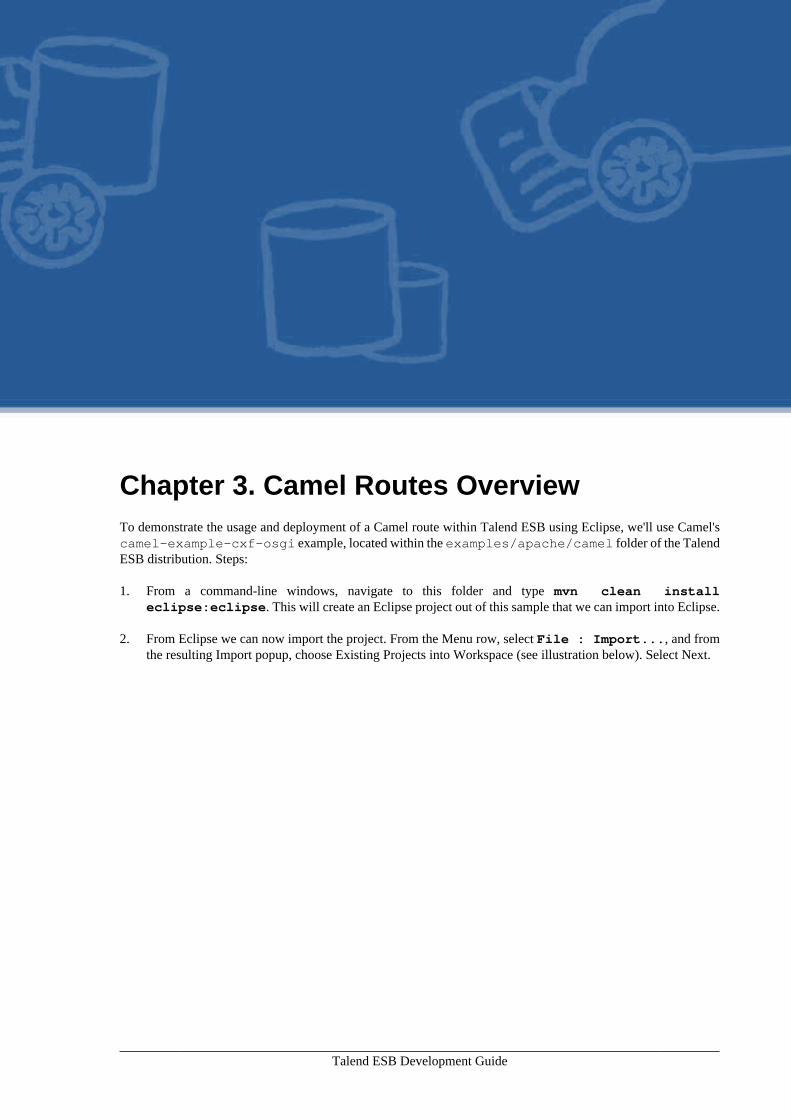
2. From Eclipse we can now import the project. From the Menu row, select File : Import..., and fromthe resulting Import popup, choose Existing Projects into Workspace (see illustration below). Select Next.
30 Talend ESB Development Guide
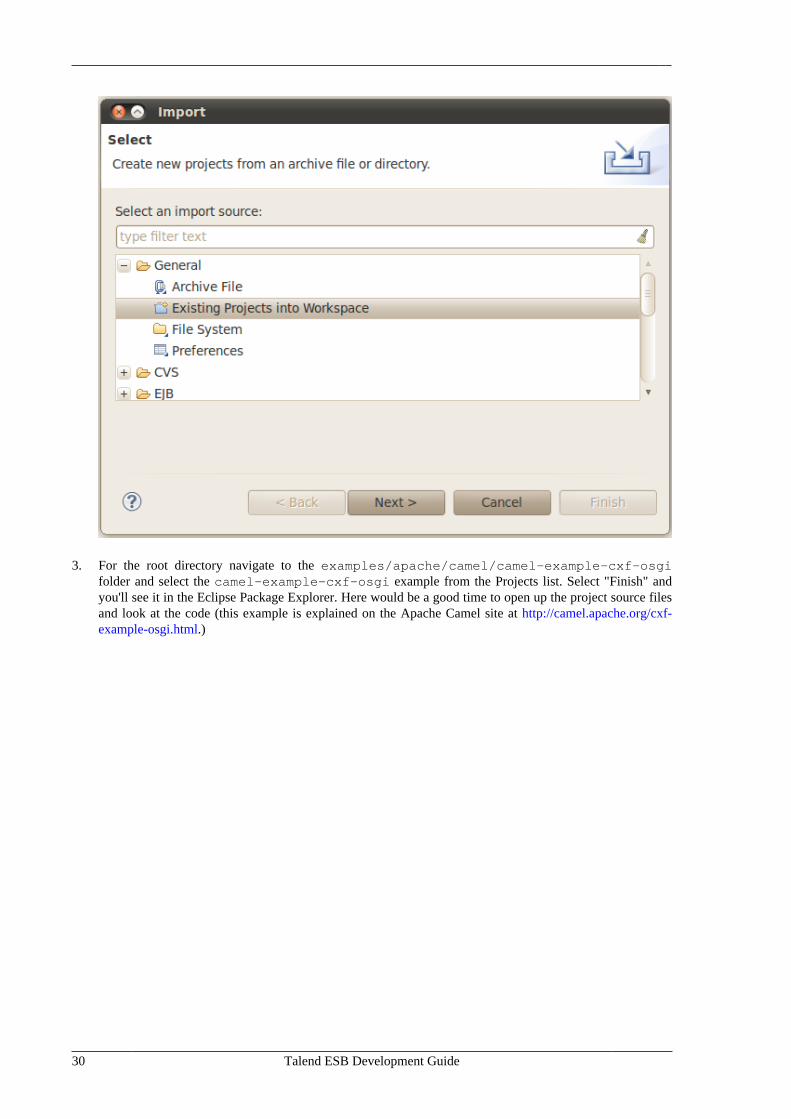
3. For the root directory navigate to the examples/apache/camel/camel-example-cxf-osgifolder and select the camel-example-cxf-osgi example from the Projects list. Select "Finish" andyou'll see it in the Eclipse Package Explorer. Here would be a good time to open up the project source filesand look at the code (this example is explained on the Apache Camel site at http://camel.apache.org/cxf-example-osgi.html.)

Talend ESB Development Guide 31
4. As this example runs in the Talend OSGi container, we'll need to start the container prior to running thisexample. Navigate to the <TalendRuntimePath>/container/bin folder and enter trun.bat or./trun. Enter the following commands at the resulting console to install the example:
features:addUrl mvn:org.apache.camel.karaf/apache-camel/2.10.2/xml/featuresfeatures:install warfeatures:install camel-springfeatures:install camel-jaxbfeatures:install camel-cxfosgi:install -s mvn:org.apache.camel/camel-example-cxf-osgi/2.10.2
5. Open a web browser and make sure you can view the above web service WSDL at http://localhost:8040/services/camel-example-cxf-osgi/webservices/incident?wsdl before continuing.
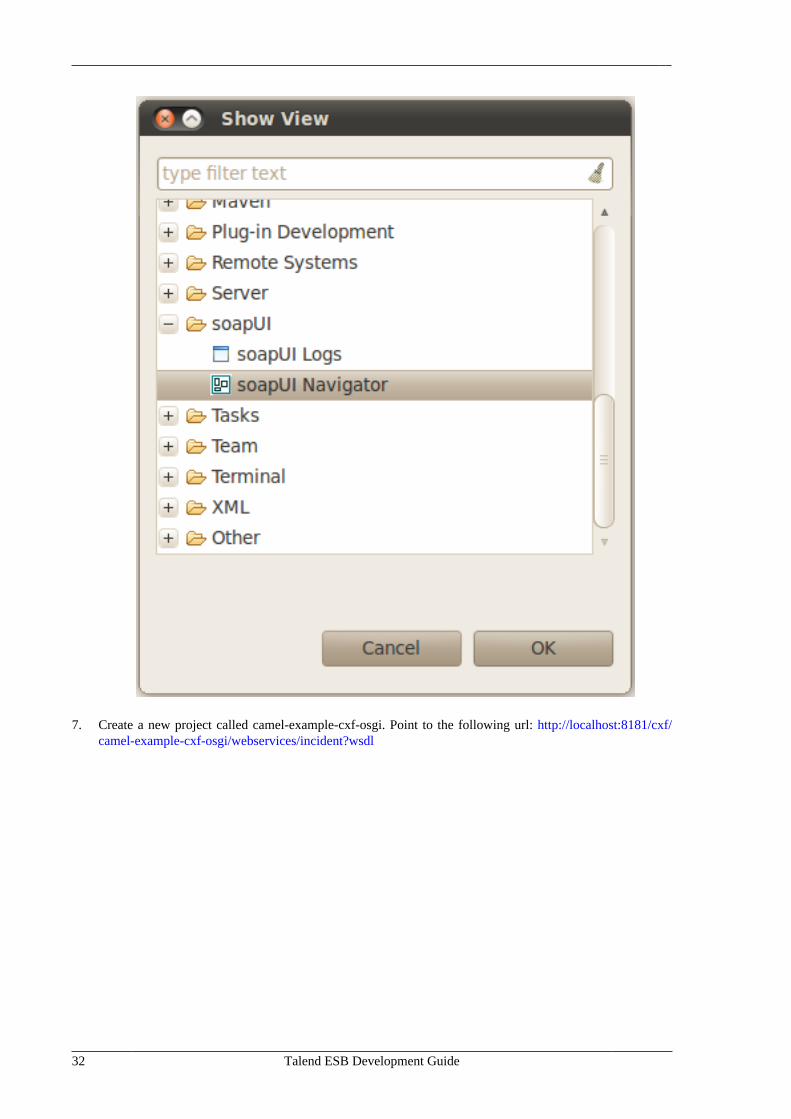
6. We'll make a SOAP call using soapUI in this step. Make sure you've already installed soapUI in Eclipseas discussed in Chapter 1, Development Environment Setup (standalone soapUI is also fine.) From Eclipse,select Menu Item Window | Show View | Other..., and select soapUI Navigator from the View list (seeillustration below.)
32 Talend ESB Development Guide
7. Create a new project called camel-example-cxf-osgi. Point to the following url: http://localhost:8181/cxf/camel-example-cxf-osgi/webservices/incident?wsdl
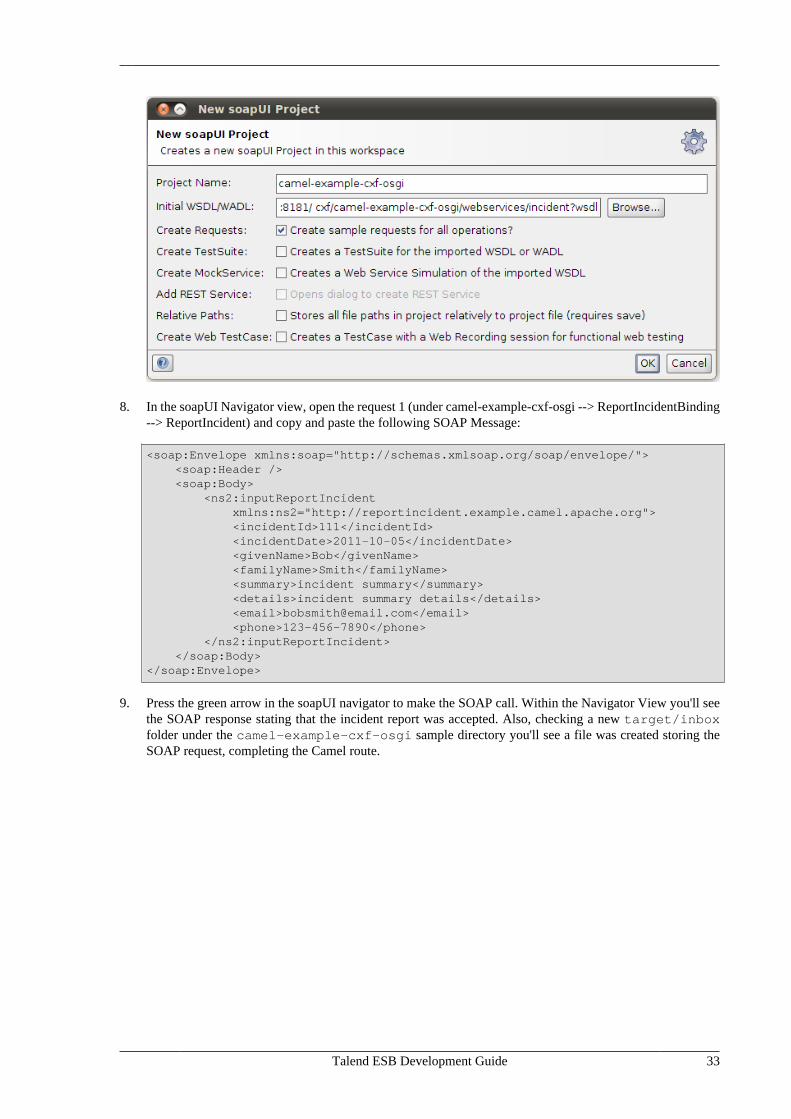
Talend ESB Development Guide 33
8. In the soapUI Navigator view, open the request 1 (under camel-example-cxf-osgi --> ReportIncidentBinding--> ReportIncident) and copy and paste the following SOAP Message:
<soap:Envelope xmlns:soap="http://schemas.xmlsoap.org/soap/envelope/"> <soap:Header /> <soap:Body> <ns2:inputReportIncident xmlns:ns2="http://reportincident.example.camel.apache.org"> <incidentId>111</incidentId> <incidentDate>2011-10-05</incidentDate> <givenName>Bob</givenName> <familyName>Smith</familyName> <summary>incident summary</summary> <details>incident summary details</details> <email>[email protected]</email> <phone>123-456-7890</phone> </ns2:inputReportIncident> </soap:Body></soap:Envelope>
9. Press the green arrow in the soapUI navigator to make the SOAP call. Within the Navigator View you'll seethe SOAP response stating that the incident report was accepted. Also, checking a new target/inboxfolder under the camel-example-cxf-osgi sample directory you'll see a file was created storing theSOAP request, completing the Camel route.

Talend ESB Development Guide
Talend ESB Development Guide
Chapter 4. Talend ESB Services OverviewThis section looks at accessing the Talend ESB services: Service Locator and Service Activity Monitoring (SAM)from an Eclipse development environment.
For more details on these services, please see Talend ESB Getting Started Guide and Talend ESB InfrastructureServices Configuration Guide.
4.1. Service LocatorThe Service Locator provides service consumers with a mechanism to register, and also discover serviceendpoints at runtime, thus isolating consumers from the knowledge about the physical location of the endpoint.Talend ESB uses Apache ZooKeeper as its service locator server, located within the Talend ESB distributionat "<TalendRuntimePath>/zookeeper". Please see http://zookeeper.apache.org/" for more information aboutZooKeeper. Also note the examples folder of the Talend ESB distribution provides a "locator" example you canlearn from.
We'll look at a simple greeting example to show you how to use the Service Locator.
4.1.1. Service interface
Within Eclipse:
1. Create a Maven project, following the same steps as Section 2.2.1, “CXF Maven Archetypes”, and call it"locator_common" for the purposes of this example.
2. Remove all default sources, as well as test source folder.
Service interface
36 Talend ESB Development Guide
3. Create a package named "demo.common", and create a interface Greeter.java.
package demo.common;
import javax.jws.WebService;
@WebService(targetNamespace = "http://talend.org/esb/examples/", name = "Greeter")public interface Greeter { String greetMe(String requestType);}
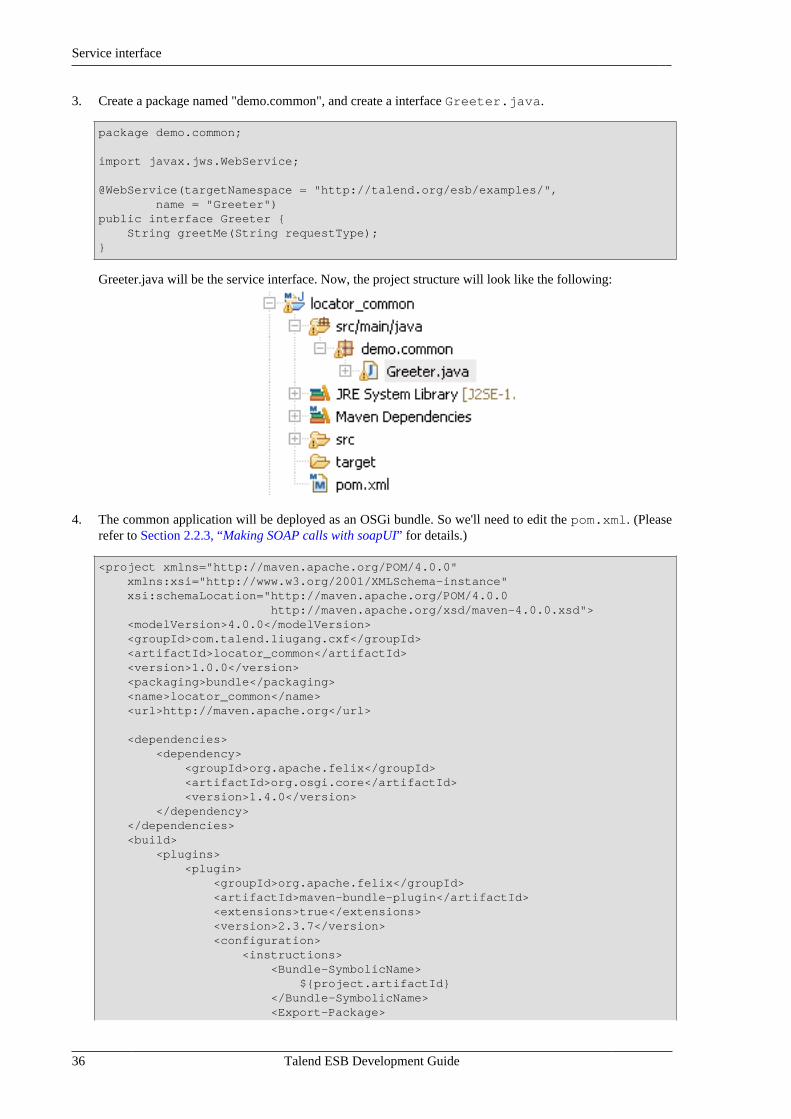
Greeter.java will be the service interface. Now, the project structure will look like the following:
4. The common application will be deployed as an OSGi bundle. So we'll need to edit the pom.xml. (Pleaserefer to Section 2.2.3, “Making SOAP calls with soapUI” for details.)
<project xmlns="http://maven.apache.org/POM/4.0.0" xmlns:xsi="http://www.w3.org/2001/XMLSchema-instance" xsi:schemaLocation="http://maven.apache.org/POM/4.0.0 http://maven.apache.org/xsd/maven-4.0.0.xsd"> <modelVersion>4.0.0</modelVersion> <groupId>com.talend.liugang.cxf</groupId> <artifactId>locator_common</artifactId> <version>1.0.0</version> <packaging>bundle</packaging> <name>locator_common</name> <url>http://maven.apache.org</url>
<dependencies> <dependency> <groupId>org.apache.felix</groupId> <artifactId>org.osgi.core</artifactId> <version>1.4.0</version> </dependency> </dependencies> <build> <plugins> <plugin> <groupId>org.apache.felix</groupId> <artifactId>maven-bundle-plugin</artifactId> <extensions>true</extensions> <version>2.3.7</version> <configuration> <instructions> <Bundle-SymbolicName> ${project.artifactId} </Bundle-SymbolicName> <Export-Package>
Service implementation
Talend ESB Development Guide 37
demo.common </Export-Package> </instructions> </configuration> </plugin> </plugins> </build></project>
Now we've finished the definition of the service. Select "Run As->Maven Install" from the M2Eclipse Popupmenu on the pom.xml to install the application into your Maven repository.
Next we'll look at the implementation of this service.
4.1.2. Service implementation
This time, we'll create a "locator_service" project first, following the steps as above. Then create aGreeterImpl.java which implements the Greeter interface defined above. The contents of GreeterImpl.javaare:
import javax.jws.WebService;
import demo.common.Greeter;@WebService(targetNamespace = "http://talend.org/esb/examples/", serviceName = "GreeterService")public class GreeterImpl implements Greeter {
public String greetMe(String me) { System.out.println("Executing operation greetMe"); System.out.println("Message received: " + me + "\n"); return "Hello " + me; }}
For each input, a statement "'Hello '+input" will be returned. Now it's time to bring the ServiceLocator in. As wesaid at the beginning of this section, the Service Locator is a mechanism to discover service endpoints at runtime.In order to make the Implementation discoverable, we need to register it first.
There are two ways to register a service: by Spring configuration or by code directly.
For Spring configuration:
<?xml version="1.0" encoding="UTF-8"?><beans xmlns="http://www.springframework.org/schema/beans" xmlns:xsi="http://www.w3.org/2001/XMLSchema-instance" xmlns:jaxws="http://cxf.apache.org/jaxws" xsi:schemaLocation=" http://www.springframework.org/schema/beans http://www.springframework.org/schema/beans/spring-beans.xsd http://cxf.apache.org/jaxws http://cxf.apache.org/schemas/jaxws.xsd"> <import resource="classpath:META-INF/cxf/cxf.xml" /> <import resource="classpath:META-INF/tesb/locator/beans-osgi.xml" />
<jaxws:endpoint xmlns:tns="http://talend.org/esb/examples/" id="greeter" implementor="demo.service.GreeterImpl" serviceName="tns:GreeterService" address="/GreeterService"> <jaxws:features>
Service implementation
38 Talend ESB Development Guide
<bean class="org.talend.esb.servicelocator.cxf.LocatorFeature"> </bean> </jaxws:features> </jaxws:endpoint></beans>
Note for the above Spring file the OSGi import line (classpath:META-INF/tesb/locator/beans-osgi.xml) is the only difference from a standard Spring configuration file.
Then load it by using "ClassPathXmlApplicationContext". It's important to include the configuration file inexported bundle and also add the necessary dependencies for Spring configuration.
Note the <jaxws:features></jaxws:features> lines, which add a feature"org.talend.esb.servicelocator.cxf.LocatorFeature", for using the Service Locator.
The alternative code version is:
LocatorFeature locatorFeature = new LocatorFeature();Greeter greeterService = new GreeterImpl();svrFactory = new JaxWsServerFactoryBean();// WSDL operations that service will implementsvrFactory.setServiceClass(Greeter.class); // endpoint service will listen onsvrFactory.setAddress("http://localhost:8082/services/Greeter"); // implementation of WSDL operationssvrFactory.setServiceBean(greeterService); // attach LocatorFeature to web service providersvrFactory.getFeatures().add(locatorFeature); svrFactory.create();
Similar to Section 4.1, “Service Locator”, we'll export "locator_service" as a bundle, so the BundleActivator isthe best place to register or remove this service:
import org.apache.cxf.jaxws.JaxWsServerFactoryBean;import org.osgi.framework.BundleActivator;import org.osgi.framework.BundleContext;import org.talend.esb.servicelocator.cxf.LocatorFeature;
import demo.common.Greeter;
public class Activator implements BundleActivator {
private JaxWsServerFactoryBean svrFactory;
public void start(BundleContext context) throws Exception { LocatorFeature locatorFeature = new LocatorFeature(); Greeter greeterService = new GreeterImpl(); svrFactory = new JaxWsServerFactoryBean(); svrFactory.setServiceClass(Greeter.class); svrFactory.setAddress("http://localhost:8082/services/Greeter"); svrFactory.setServiceBean(greeterService); svrFactory.getFeatures().add(locatorFeature); svrFactory.create(); }
public void stop(BundleContext context) throws Exception { svrFactory.destroy(); }}
There's all the code we need to provide. Next, we need to configure the pom.xml, add necessary dependencies,and configure the exported bundle information.
Service implementation
Talend ESB Development Guide 39
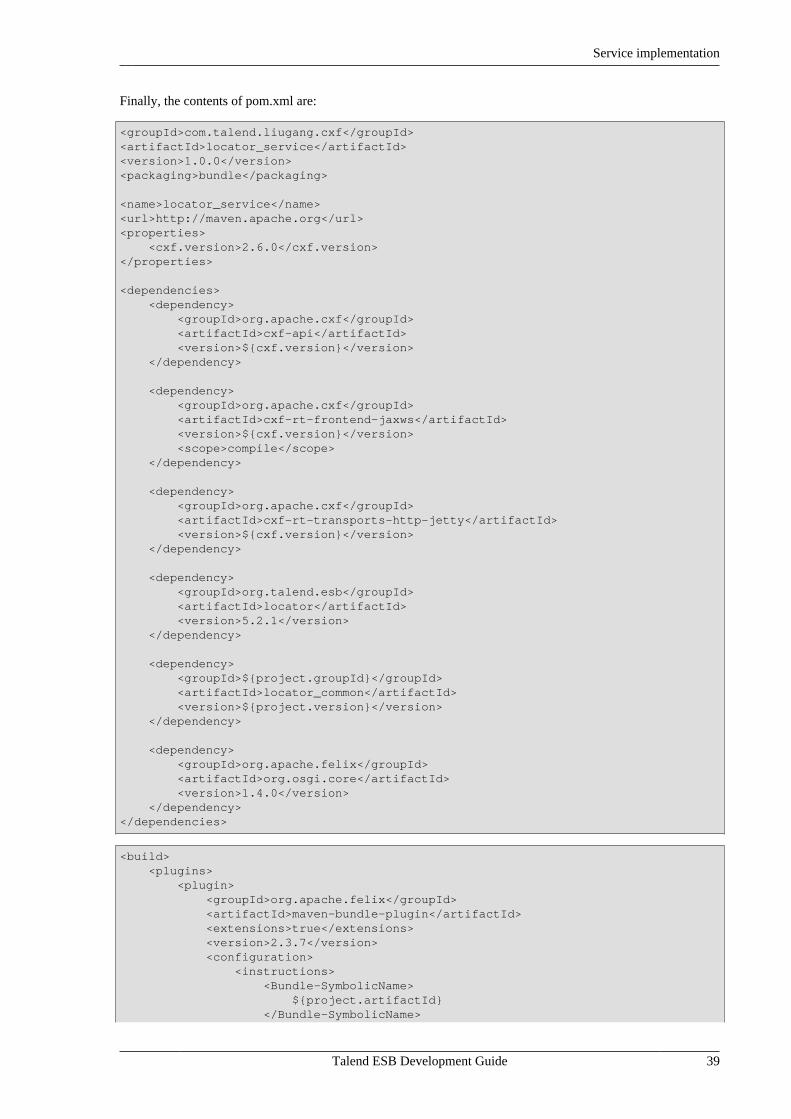
Finally, the contents of pom.xml are:
<groupId>com.talend.liugang.cxf</groupId><artifactId>locator_service</artifactId><version>1.0.0</version><packaging>bundle</packaging>
<name>locator_service</name><url>http://maven.apache.org</url><properties> <cxf.version>2.6.0</cxf.version></properties>
<dependencies> <dependency> <groupId>org.apache.cxf</groupId> <artifactId>cxf-api</artifactId> <version>${cxf.version}</version> </dependency> <dependency> <groupId>org.apache.cxf</groupId> <artifactId>cxf-rt-frontend-jaxws</artifactId> <version>${cxf.version}</version> <scope>compile</scope> </dependency> <dependency> <groupId>org.apache.cxf</groupId> <artifactId>cxf-rt-transports-http-jetty</artifactId> <version>${cxf.version}</version> </dependency> <dependency> <groupId>org.talend.esb</groupId> <artifactId>locator</artifactId> <version>5.2.1</version> </dependency> <dependency> <groupId>${project.groupId}</groupId> <artifactId>locator_common</artifactId> <version>${project.version}</version> </dependency> <dependency> <groupId>org.apache.felix</groupId> <artifactId>org.osgi.core</artifactId> <version>1.4.0</version> </dependency></dependencies>
<build> <plugins> <plugin> <groupId>org.apache.felix</groupId> <artifactId>maven-bundle-plugin</artifactId> <extensions>true</extensions> <version>2.3.7</version> <configuration> <instructions> <Bundle-SymbolicName> ${project.artifactId} </Bundle-SymbolicName>
Service Consumer
40 Talend ESB Development Guide
<Import-Package>demo.common,javax.jws, org.apache.cxf.endpoint,org.apache.cxf.jaxws, org.osgi.framework,org.talend.esb.locator </Import-Package> <Bundle-Activator>demo.service.Activator</Bundle-Activator> <Require-Bundle> org.apache.cxf.bundle;version="2.6.0" </Require-Bundle> </instructions> </configuration> </plugin> </plugins></build>
And also, we installed it into Maven by running "Maven Install".
So far, we have defined the Service interface, and given it an implementation. It's time to write a client whichwill consume the service.
4.1.3. Service Consumer
This time we will try to consume the service above by using Service Locator instead of referencing the implementordirectly.
Same as with service registration, you can use Spring configuration or code directly.
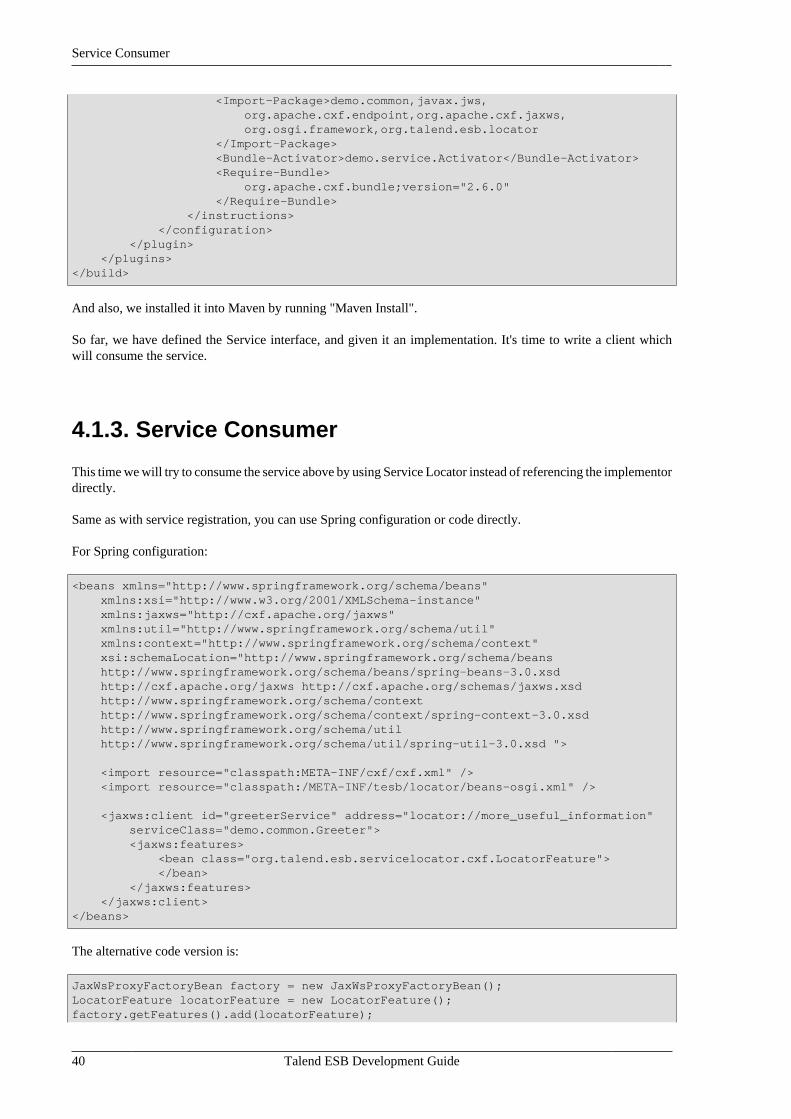
For Spring configuration:
<beans xmlns="http://www.springframework.org/schema/beans" xmlns:xsi="http://www.w3.org/2001/XMLSchema-instance" xmlns:jaxws="http://cxf.apache.org/jaxws" xmlns:util="http://www.springframework.org/schema/util" xmlns:context="http://www.springframework.org/schema/context" xsi:schemaLocation="http://www.springframework.org/schema/beans http://www.springframework.org/schema/beans/spring-beans-3.0.xsd http://cxf.apache.org/jaxws http://cxf.apache.org/schemas/jaxws.xsd http://www.springframework.org/schema/context http://www.springframework.org/schema/context/spring-context-3.0.xsd http://www.springframework.org/schema/util http://www.springframework.org/schema/util/spring-util-3.0.xsd ">
<import resource="classpath:META-INF/cxf/cxf.xml" /> <import resource="classpath:/META-INF/tesb/locator/beans-osgi.xml" />
<jaxws:client id="greeterService" address="locator://more_useful_information" serviceClass="demo.common.Greeter"> <jaxws:features> <bean class="org.talend.esb.servicelocator.cxf.LocatorFeature"> </bean> </jaxws:features> </jaxws:client></beans>
The alternative code version is:
JaxWsProxyFactoryBean factory = new JaxWsProxyFactoryBean();LocatorFeature locatorFeature = new LocatorFeature();factory.getFeatures().add(locatorFeature);
Service Consumer
Talend ESB Development Guide 41
factory.setServiceClass(Greeter.class);factory.setAddress("locator://more_useful_information");Greeter client = (Greeter) factory.create();String response = client.greetMe("MyName");
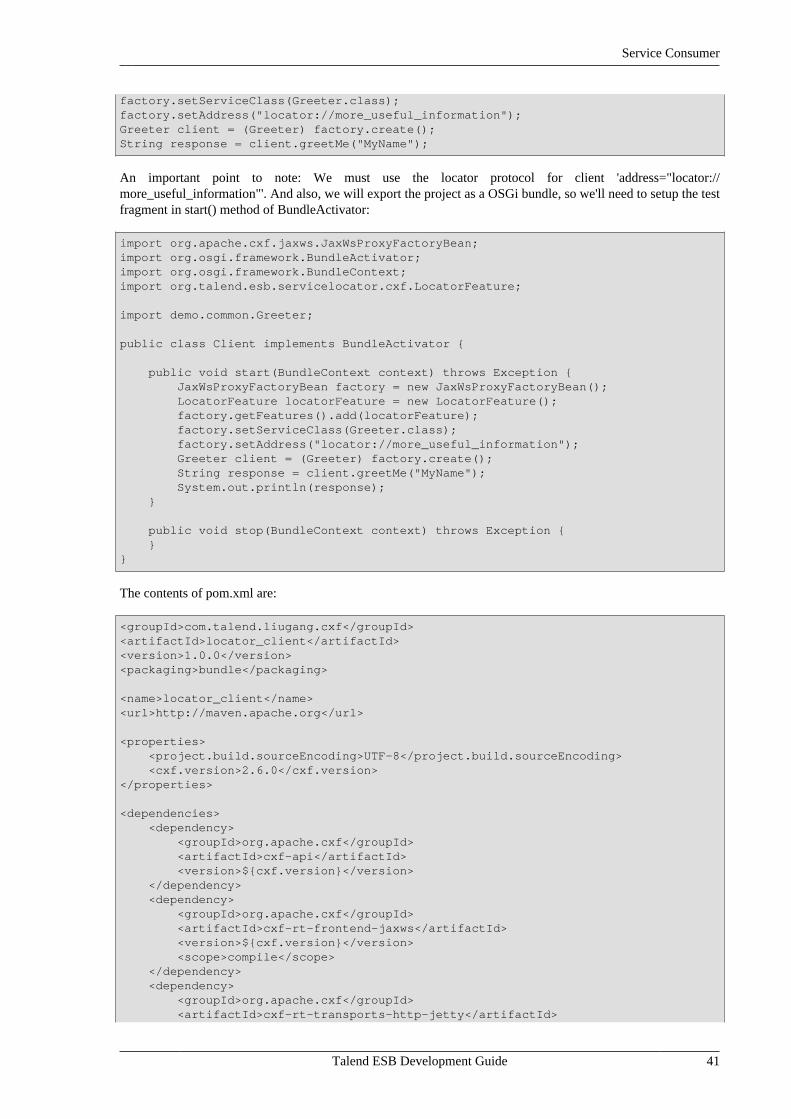
An important point to note: We must use the locator protocol for client 'address="locator://more_useful_information"'. And also, we will export the project as a OSGi bundle, so we'll need to setup the testfragment in start() method of BundleActivator:
import org.apache.cxf.jaxws.JaxWsProxyFactoryBean;import org.osgi.framework.BundleActivator;import org.osgi.framework.BundleContext;import org.talend.esb.servicelocator.cxf.LocatorFeature;
import demo.common.Greeter;
public class Client implements BundleActivator {
public void start(BundleContext context) throws Exception { JaxWsProxyFactoryBean factory = new JaxWsProxyFactoryBean(); LocatorFeature locatorFeature = new LocatorFeature(); factory.getFeatures().add(locatorFeature); factory.setServiceClass(Greeter.class); factory.setAddress("locator://more_useful_information"); Greeter client = (Greeter) factory.create(); String response = client.greetMe("MyName"); System.out.println(response); }
public void stop(BundleContext context) throws Exception { }}
The contents of pom.xml are:
<groupId>com.talend.liugang.cxf</groupId><artifactId>locator_client</artifactId><version>1.0.0</version><packaging>bundle</packaging>
<name>locator_client</name><url>http://maven.apache.org</url>
<properties> <project.build.sourceEncoding>UTF-8</project.build.sourceEncoding> <cxf.version>2.6.0</cxf.version></properties>
<dependencies> <dependency> <groupId>org.apache.cxf</groupId> <artifactId>cxf-api</artifactId> <version>${cxf.version}</version> </dependency> <dependency> <groupId>org.apache.cxf</groupId> <artifactId>cxf-rt-frontend-jaxws</artifactId> <version>${cxf.version}</version> <scope>compile</scope> </dependency> <dependency> <groupId>org.apache.cxf</groupId> <artifactId>cxf-rt-transports-http-jetty</artifactId>
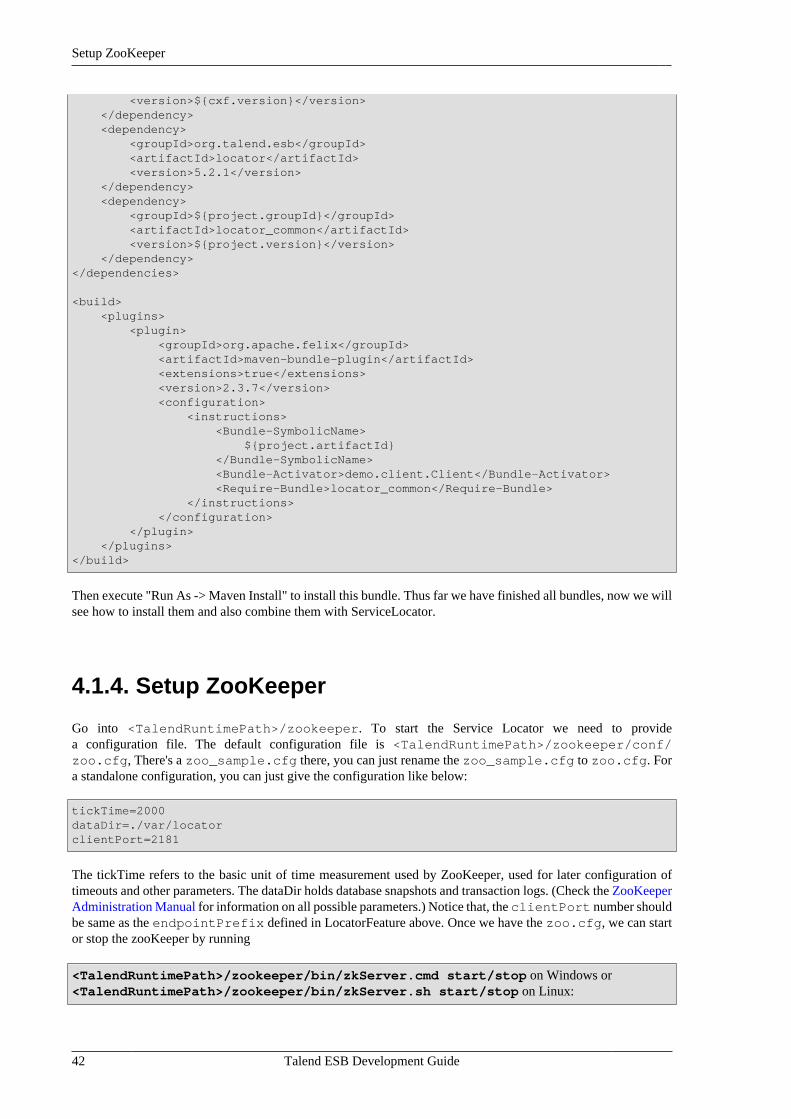
Setup ZooKeeper
42 Talend ESB Development Guide
<version>${cxf.version}</version> </dependency> <dependency> <groupId>org.talend.esb</groupId> <artifactId>locator</artifactId> <version>5.2.1</version> </dependency> <dependency> <groupId>${project.groupId}</groupId> <artifactId>locator_common</artifactId> <version>${project.version}</version> </dependency></dependencies>
<build> <plugins> <plugin> <groupId>org.apache.felix</groupId> <artifactId>maven-bundle-plugin</artifactId> <extensions>true</extensions> <version>2.3.7</version> <configuration> <instructions> <Bundle-SymbolicName> ${project.artifactId} </Bundle-SymbolicName> <Bundle-Activator>demo.client.Client</Bundle-Activator> <Require-Bundle>locator_common</Require-Bundle> </instructions> </configuration> </plugin> </plugins></build>
Then execute "Run As -> Maven Install" to install this bundle. Thus far we have finished all bundles, now we willsee how to install them and also combine them with ServiceLocator.
4.1.4. Setup ZooKeeper
Go into <TalendRuntimePath>/zookeeper. To start the Service Locator we need to providea configuration file. The default configuration file is <TalendRuntimePath>/zookeeper/conf/zoo.cfg, There's a zoo_sample.cfg there, you can just rename the zoo_sample.cfg to zoo.cfg. Fora standalone configuration, you can just give the configuration like below:
tickTime=2000 dataDir=./var/locator clientPort=2181
The tickTime refers to the basic unit of time measurement used by ZooKeeper, used for later configuration oftimeouts and other parameters. The dataDir holds database snapshots and transaction logs. (Check the ZooKeeperAdministration Manual for information on all possible parameters.) Notice that, the clientPort number shouldbe same as the endpointPrefix defined in LocatorFeature above. Once we have the zoo.cfg, we can startor stop the zooKeeper by running
<TalendRuntimePath>/zookeeper/bin/zkServer.cmd start/stop on Windows or<TalendRuntimePath>/zookeeper/bin/zkServer.sh start/stop on Linux:
Setup ZooKeeper
Talend ESB Development Guide 43
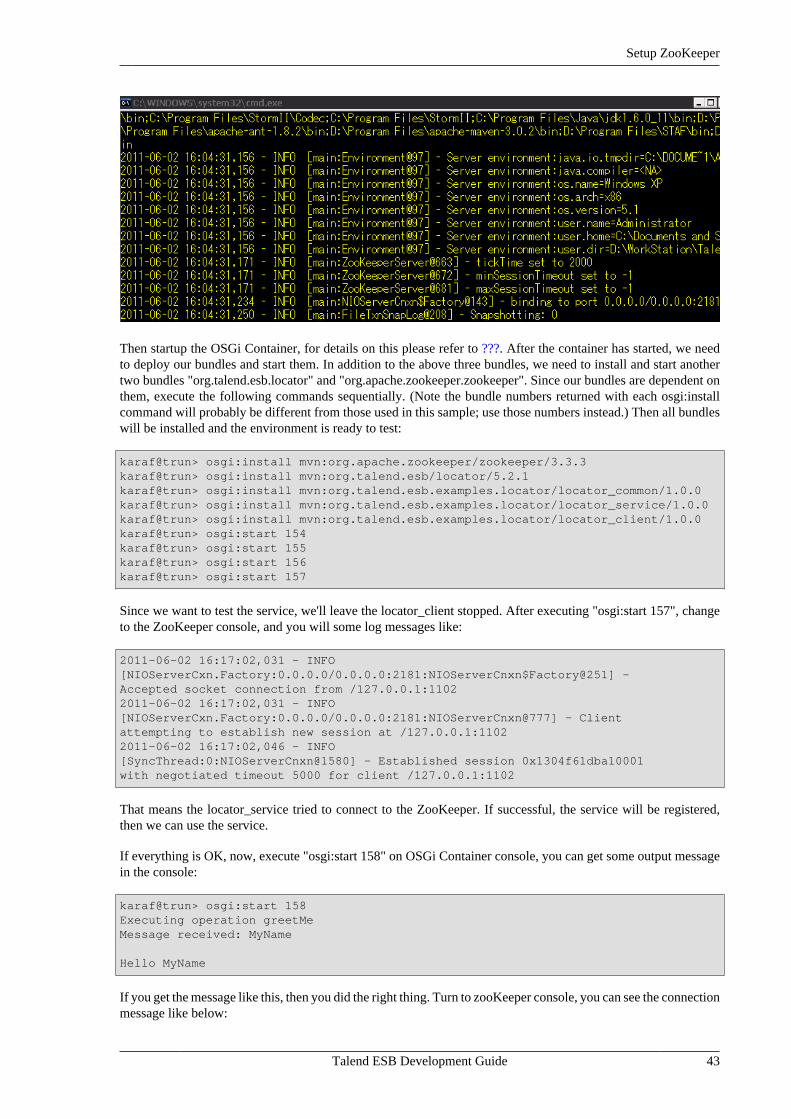
Then startup the OSGi Container, for details on this please refer to ???. After the container has started, we needto deploy our bundles and start them. In addition to the above three bundles, we need to install and start anothertwo bundles "org.talend.esb.locator" and "org.apache.zookeeper.zookeeper". Since our bundles are dependent onthem, execute the following commands sequentially. (Note the bundle numbers returned with each osgi:installcommand will probably be different from those used in this sample; use those numbers instead.) Then all bundleswill be installed and the environment is ready to test:
karaf@trun> osgi:install mvn:org.apache.zookeeper/zookeeper/3.3.3karaf@trun> osgi:install mvn:org.talend.esb/locator/5.2.1karaf@trun> osgi:install mvn:org.talend.esb.examples.locator/locator_common/1.0.0karaf@trun> osgi:install mvn:org.talend.esb.examples.locator/locator_service/1.0.0karaf@trun> osgi:install mvn:org.talend.esb.examples.locator/locator_client/1.0.0karaf@trun> osgi:start 154karaf@trun> osgi:start 155karaf@trun> osgi:start 156karaf@trun> osgi:start 157
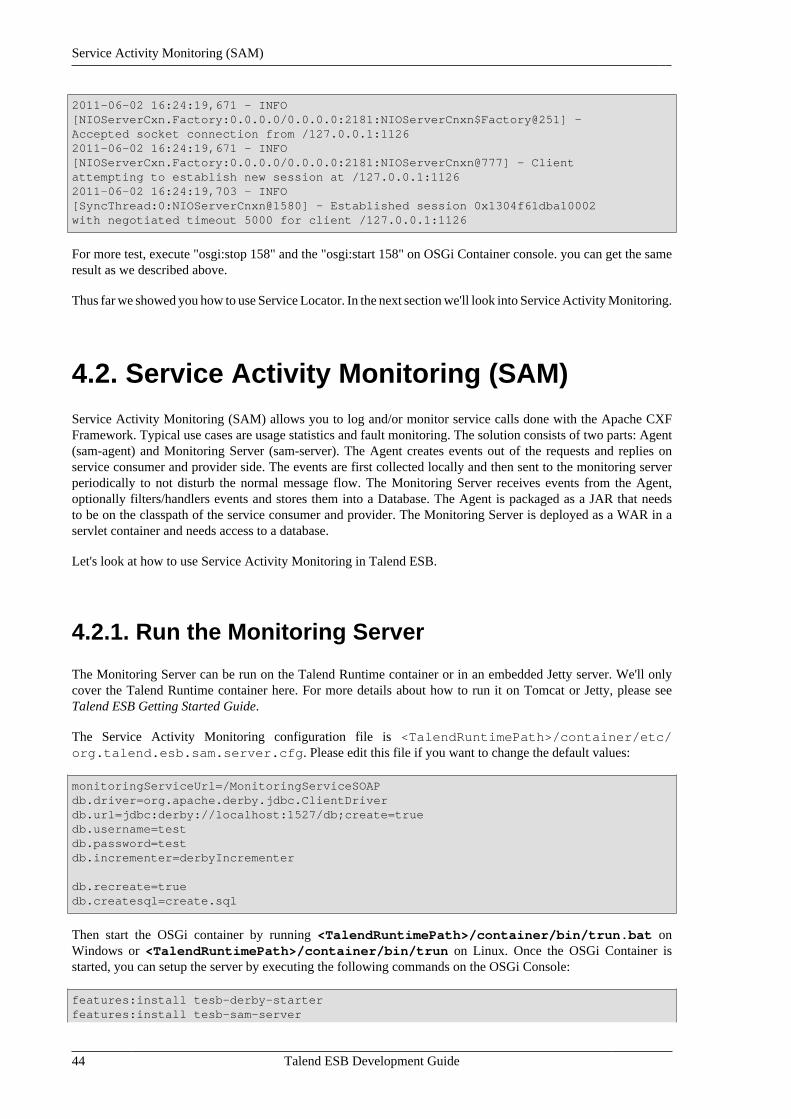
Since we want to test the service, we'll leave the locator_client stopped. After executing "osgi:start 157", changeto the ZooKeeper console, and you will some log messages like:
2011-06-02 16:17:02,031 - INFO [NIOServerCxn.Factory:0.0.0.0/0.0.0.0:2181:NIOServerCnxn$Factory@251] - Accepted socket connection from /127.0.0.1:11022011-06-02 16:17:02,031 - INFO [NIOServerCxn.Factory:0.0.0.0/0.0.0.0:2181:NIOServerCnxn@777] - Client attempting to establish new session at /127.0.0.1:11022011-06-02 16:17:02,046 - INFO [SyncThread:0:NIOServerCnxn@1580] - Established session 0x1304f61dba10001 with negotiated timeout 5000 for client /127.0.0.1:1102
That means the locator_service tried to connect to the ZooKeeper. If successful, the service will be registered,then we can use the service.
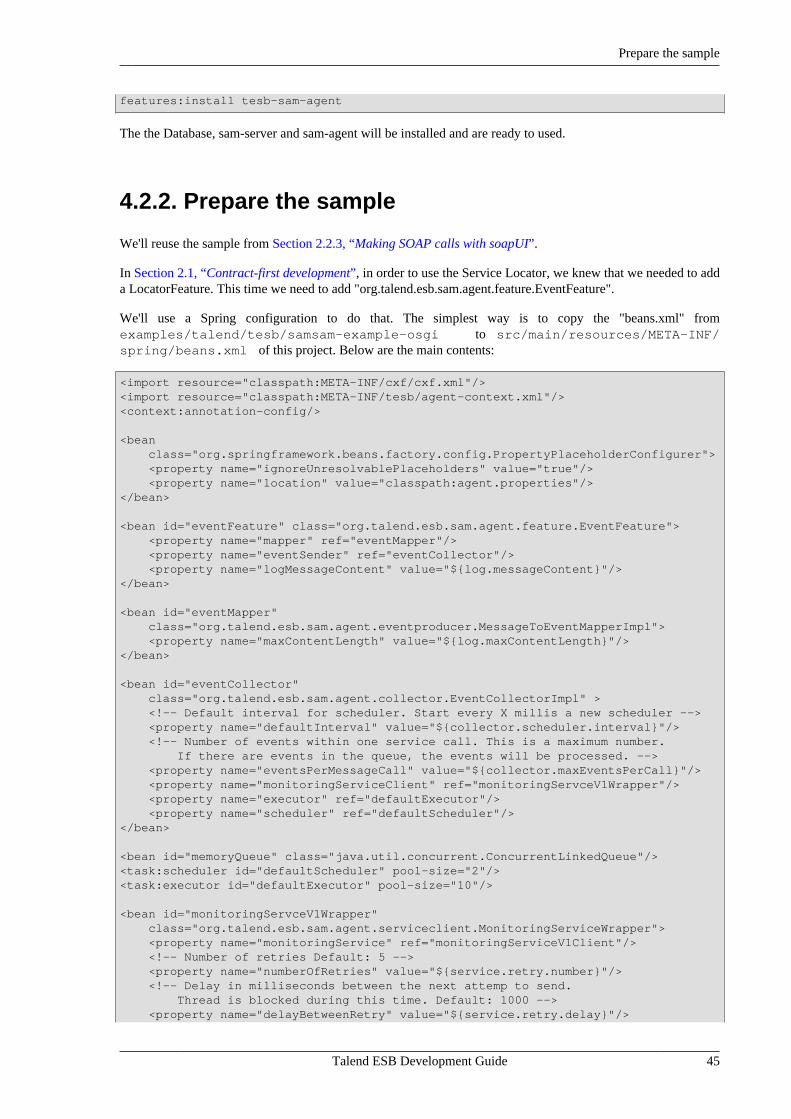
If everything is OK, now, execute "osgi:start 158" on OSGi Container console, you can get some output messagein the console:
karaf@trun> osgi:start 158Executing operation greetMeMessage received: MyName
Hello MyName
If you get the message like this, then you did the right thing. Turn to zooKeeper console, you can see the connectionmessage like below:
Service Activity Monitoring (SAM)
44 Talend ESB Development Guide
2011-06-02 16:24:19,671 - INFO [NIOServerCxn.Factory:0.0.0.0/0.0.0.0:2181:NIOServerCnxn$Factory@251] - Accepted socket connection from /127.0.0.1:11262011-06-02 16:24:19,671 - INFO [NIOServerCxn.Factory:0.0.0.0/0.0.0.0:2181:NIOServerCnxn@777] - Client attempting to establish new session at /127.0.0.1:11262011-06-02 16:24:19,703 - INFO [SyncThread:0:NIOServerCnxn@1580] - Established session 0x1304f61dba10002 with negotiated timeout 5000 for client /127.0.0.1:1126
For more test, execute "osgi:stop 158" and the "osgi:start 158" on OSGi Container console. you can get the sameresult as we described above.
Thus far we showed you how to use Service Locator. In the next section we'll look into Service Activity Monitoring.
4.2. Service Activity Monitoring (SAM)Service Activity Monitoring (SAM) allows you to log and/or monitor service calls done with the Apache CXFFramework. Typical use cases are usage statistics and fault monitoring. The solution consists of two parts: Agent(sam-agent) and Monitoring Server (sam-server). The Agent creates events out of the requests and replies onservice consumer and provider side. The events are first collected locally and then sent to the monitoring serverperiodically to not disturb the normal message flow. The Monitoring Server receives events from the Agent,optionally filters/handlers events and stores them into a Database. The Agent is packaged as a JAR that needsto be on the classpath of the service consumer and provider. The Monitoring Server is deployed as a WAR in aservlet container and needs access to a database.
Let's look at how to use Service Activity Monitoring in Talend ESB.
4.2.1. Run the Monitoring Server
The Monitoring Server can be run on the Talend Runtime container or in an embedded Jetty server. We'll onlycover the Talend Runtime container here. For more details about how to run it on Tomcat or Jetty, please seeTalend ESB Getting Started Guide.
The Service Activity Monitoring configuration file is <TalendRuntimePath>/container/etc/org.talend.esb.sam.server.cfg. Please edit this file if you want to change the default values:
monitoringServiceUrl=/MonitoringServiceSOAPdb.driver=org.apache.derby.jdbc.ClientDriverdb.url=jdbc:derby://localhost:1527/db;create=truedb.username=testdb.password=testdb.incrementer=derbyIncrementer
db.recreate=truedb.createsql=create.sql
Then start the OSGi container by running <TalendRuntimePath>/container/bin/trun.bat onWindows or <TalendRuntimePath>/container/bin/trun on Linux. Once the OSGi Container isstarted, you can setup the server by executing the following commands on the OSGi Console:
features:install tesb-derby-starterfeatures:install tesb-sam-server
Prepare the sample
Talend ESB Development Guide 45
features:install tesb-sam-agent
The the Database, sam-server and sam-agent will be installed and are ready to used.
4.2.2. Prepare the sample
We'll reuse the sample from Section 2.2.3, “Making SOAP calls with soapUI”.
In Section 2.1, “Contract-first development”, in order to use the Service Locator, we knew that we needed to adda LocatorFeature. This time we need to add "org.talend.esb.sam.agent.feature.EventFeature".
We'll use a Spring configuration to do that. The simplest way is to copy the "beans.xml" fromexamples/talend/tesb/samsam-example-osgi to src/main/resources/META-INF/spring/beans.xml of this project. Below are the main contents:
<import resource="classpath:META-INF/cxf/cxf.xml"/><import resource="classpath:META-INF/tesb/agent-context.xml"/><context:annotation-config/>
<bean class="org.springframework.beans.factory.config.PropertyPlaceholderConfigurer"> <property name="ignoreUnresolvablePlaceholders" value="true"/> <property name="location" value="classpath:agent.properties"/></bean>
<bean id="eventFeature" class="org.talend.esb.sam.agent.feature.EventFeature"> <property name="mapper" ref="eventMapper"/> <property name="eventSender" ref="eventCollector"/> <property name="logMessageContent" value="${log.messageContent}"/></bean>
<bean id="eventMapper" class="org.talend.esb.sam.agent.eventproducer.MessageToEventMapperImpl"> <property name="maxContentLength" value="${log.maxContentLength}"/></bean>
<bean id="eventCollector" class="org.talend.esb.sam.agent.collector.EventCollectorImpl" > <!-- Default interval for scheduler. Start every X millis a new scheduler --> <property name="defaultInterval" value="${collector.scheduler.interval}"/> <!-- Number of events within one service call. This is a maximum number. If there are events in the queue, the events will be processed. --> <property name="eventsPerMessageCall" value="${collector.maxEventsPerCall}"/> <property name="monitoringServiceClient" ref="monitoringServceV1Wrapper"/> <property name="executor" ref="defaultExecutor"/> <property name="scheduler" ref="defaultScheduler"/></bean>
<bean id="memoryQueue" class="java.util.concurrent.ConcurrentLinkedQueue"/><task:scheduler id="defaultScheduler" pool-size="2"/><task:executor id="defaultExecutor" pool-size="10"/>
<bean id="monitoringServceV1Wrapper" class="org.talend.esb.sam.agent.serviceclient.MonitoringServiceWrapper"> <property name="monitoringService" ref="monitoringServiceV1Client"/> <!-- Number of retries Default: 5 --> <property name="numberOfRetries" value="${service.retry.number}"/> <!-- Delay in milliseconds between the next attemp to send. Thread is blocked during this time. Default: 1000 --> <property name="delayBetweenRetry" value="${service.retry.delay}"/>
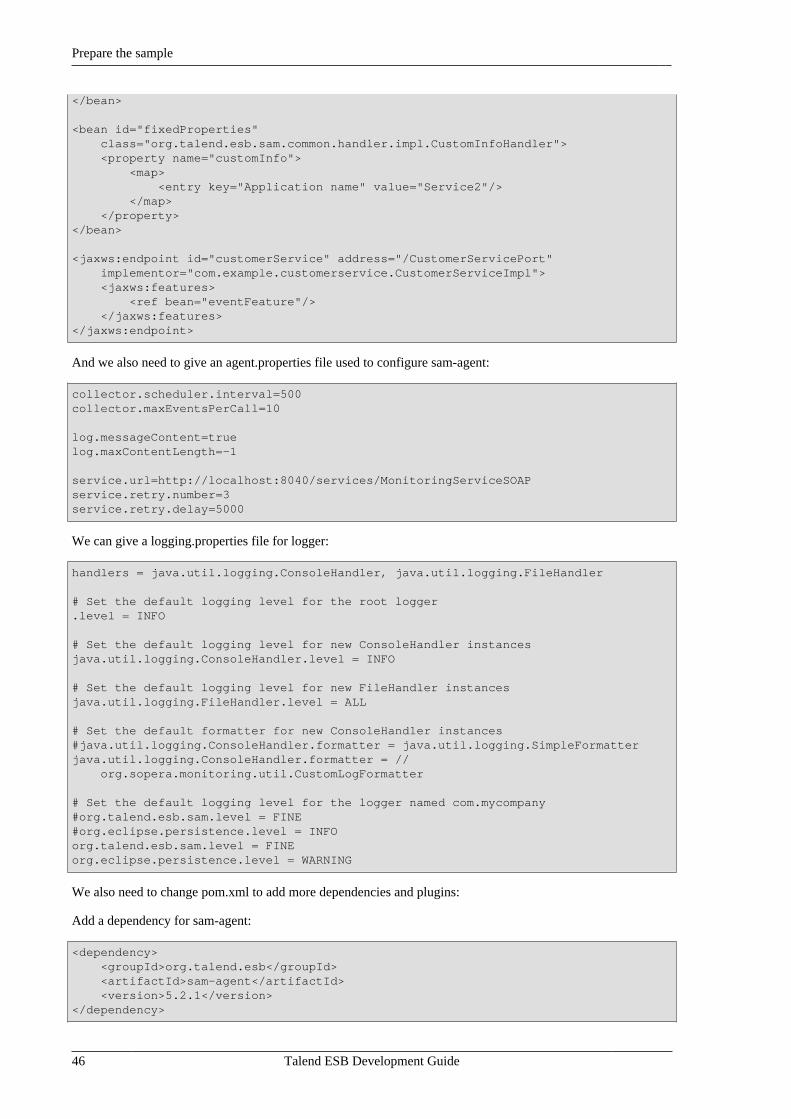
Prepare the sample
46 Talend ESB Development Guide
</bean>
<bean id="fixedProperties" class="org.talend.esb.sam.common.handler.impl.CustomInfoHandler"> <property name="customInfo"> <map> <entry key="Application name" value="Service2"/> </map> </property></bean>
<jaxws:endpoint id="customerService" address="/CustomerServicePort" implementor="com.example.customerservice.CustomerServiceImpl"> <jaxws:features> <ref bean="eventFeature"/> </jaxws:features></jaxws:endpoint>
And we also need to give an agent.properties file used to configure sam-agent:
collector.scheduler.interval=500collector.maxEventsPerCall=10
log.messageContent=truelog.maxContentLength=-1
service.url=http://localhost:8040/services/MonitoringServiceSOAPservice.retry.number=3service.retry.delay=5000
We can give a logging.properties file for logger:
handlers = java.util.logging.ConsoleHandler, java.util.logging.FileHandler
# Set the default logging level for the root logger .level = INFO
# Set the default logging level for new ConsoleHandler instances java.util.logging.ConsoleHandler.level = INFO
# Set the default logging level for new FileHandler instances java.util.logging.FileHandler.level = ALL
# Set the default formatter for new ConsoleHandler instances #java.util.logging.ConsoleHandler.formatter = java.util.logging.SimpleFormatter java.util.logging.ConsoleHandler.formatter = // org.sopera.monitoring.util.CustomLogFormatter
# Set the default logging level for the logger named com.mycompany #org.talend.esb.sam.level = FINE #org.eclipse.persistence.level = INFOorg.talend.esb.sam.level = FINE org.eclipse.persistence.level = WARNING
We also need to change pom.xml to add more dependencies and plugins:
Add a dependency for sam-agent:
<dependency> <groupId>org.talend.esb</groupId> <artifactId>sam-agent</artifactId> <version>5.2.1</version></dependency>
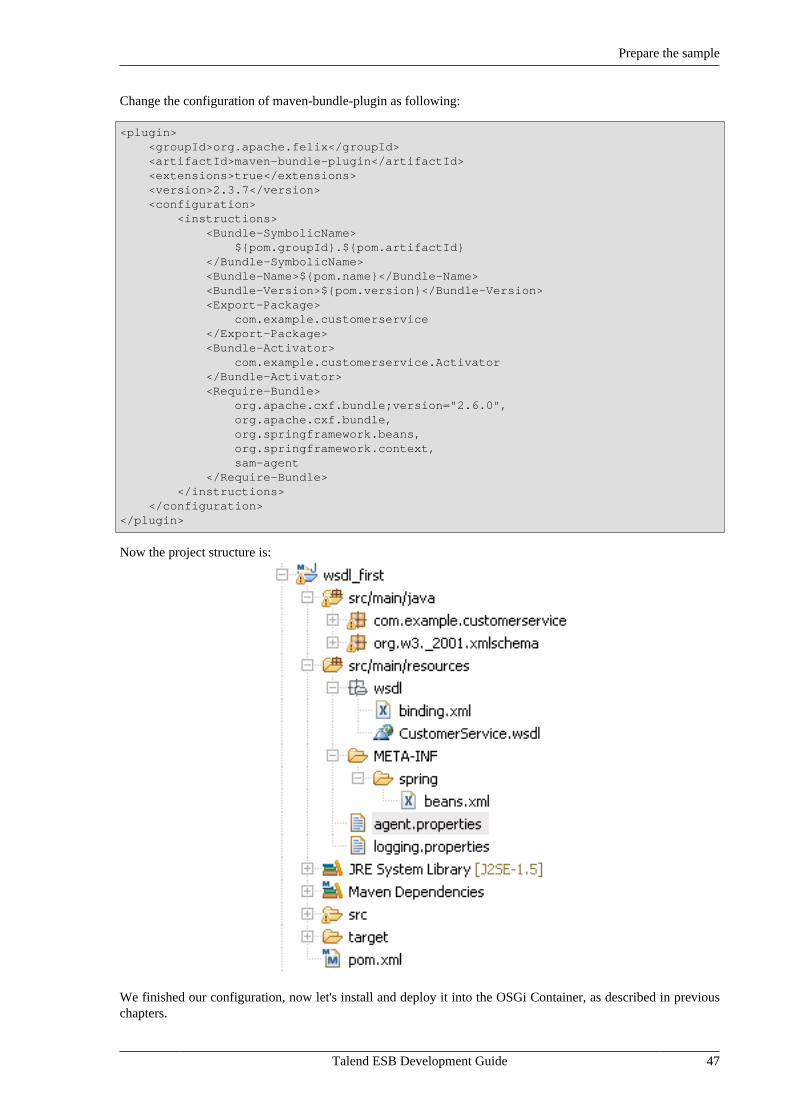
Prepare the sample
Talend ESB Development Guide 47
Change the configuration of maven-bundle-plugin as following:
<plugin> <groupId>org.apache.felix</groupId> <artifactId>maven-bundle-plugin</artifactId> <extensions>true</extensions> <version>2.3.7</version> <configuration> <instructions> <Bundle-SymbolicName> ${pom.groupId}.${pom.artifactId} </Bundle-SymbolicName> <Bundle-Name>${pom.name}</Bundle-Name> <Bundle-Version>${pom.version}</Bundle-Version> <Export-Package> com.example.customerservice </Export-Package> <Bundle-Activator> com.example.customerservice.Activator </Bundle-Activator> <Require-Bundle> org.apache.cxf.bundle;version="2.6.0", org.apache.cxf.bundle, org.springframework.beans, org.springframework.context, sam-agent </Require-Bundle> </instructions> </configuration></plugin>
Now the project structure is:
We finished our configuration, now let's install and deploy it into the OSGi Container, as described in previouschapters.
Test SAM Server
48 Talend ESB Development Guide
4.2.3. Test SAM Server
Thus far, we have deployed it, so it can now be tested.
For testing, we can use the sam-example-client in the Talend ESB examples.
The file agent.properties:
collector.scheduler.interval=500collector.maxEventsPerCall=10
log.messageContent=truelog.maxContentLength=-1
service.url=http://localhost:8040/services/MonitoringServiceSOAPservice.retry.number=3service.retry.delay=5000
Spring configuration file contents:
<import resource="classpath:META-INF/cxf/cxf.xml" /><import resource="classpath:META-INF/cxf/cxf-extension-soap.xml" /><import resource="classpath:META-INF/cxf/cxf-servlet.xml" />
<import resource="classpath:META-INF/tesb/agent-context.xml" />
<bean id="fixedProperties" class="org.talend.esb.sam.common.handler.impl.CustomInfoHandler"> <property name="customInfo"> <map> <entry key="Application name" value="Client" /> </map> </property></bean>
<bean class="org.talend.esb.sam.examples.client.CustomerServiceTester"> <property name="customerService" ref="customerService" /></bean>
<jaxws:client id="customerService" address="${serviceUrl}" serviceClass="com.example.customerservice.CustomerService"> <jaxws:features> <!-- <bean class="org.apache.cxf.feature.LoggingFeature" />--> <ref bean="eventFeature"/> </jaxws:features></jaxws:client>
Then provide the following code:
// read configurationSystem.setProperty("serviceUrl", "http://localhost:9090/CustomerServicePort/CustomerServiceService");ClassPathXmlApplicationContext context = new ClassPathXmlApplicationContext("/client.xml");CustomerServiceTester tester = context.getBean(CustomerServiceTester.class);tester.testCustomerService();
As you see we sent the value of "serviceUrl" with service URL, which will fill the contents of bean"customerService". Now we'll turn to the CustomerServiceTester to do a real test:
public void testCustomerService() throws NoSuchCustomerException {
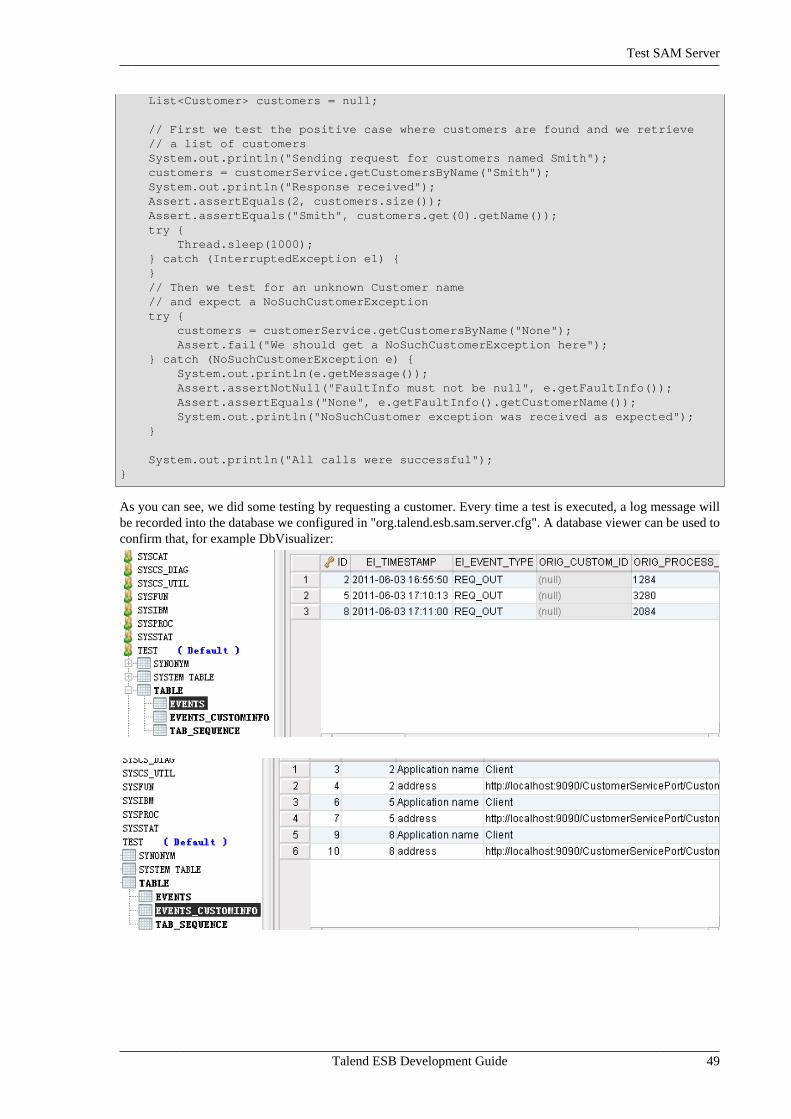
Test SAM Server
Talend ESB Development Guide 49
List<Customer> customers = null; // First we test the positive case where customers are found and we retrieve // a list of customers System.out.println("Sending request for customers named Smith"); customers = customerService.getCustomersByName("Smith"); System.out.println("Response received"); Assert.assertEquals(2, customers.size()); Assert.assertEquals("Smith", customers.get(0).getName()); try { Thread.sleep(1000); } catch (InterruptedException e1) { } // Then we test for an unknown Customer name // and expect a NoSuchCustomerException try { customers = customerService.getCustomersByName("None"); Assert.fail("We should get a NoSuchCustomerException here"); } catch (NoSuchCustomerException e) { System.out.println(e.getMessage()); Assert.assertNotNull("FaultInfo must not be null", e.getFaultInfo()); Assert.assertEquals("None", e.getFaultInfo().getCustomerName()); System.out.println("NoSuchCustomer exception was received as expected"); }
System.out.println("All calls were successful");}
As you can see, we did some testing by requesting a customer. Every time a test is executed, a log message willbe recorded into the database we configured in "org.talend.esb.sam.server.cfg". A database viewer can be used toconfirm that, for example DbVisualizer:

Talend ESB Development Guide