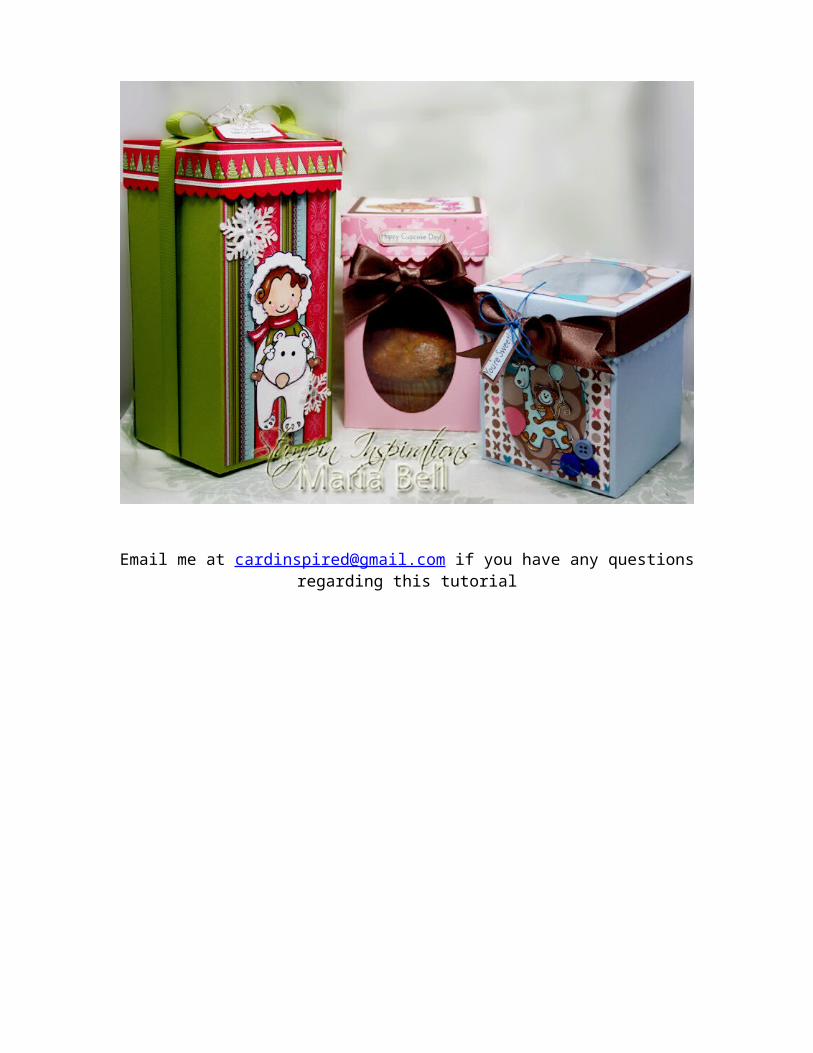
tall box, cupcake box, and keepsake box
DESCRIPTION
Step by step tutorial on how to create three different boxes: Tall box (3.75 x 7.75"), Cupcake Box, and Keepsake Box.Visit my blog for more card and project ideas:www.stampininspirations.blogspot.comTRANSCRIPT

Tall Box, Cupcake Box, and Keepsake Box Tutorial Created by Maria Bell
All photos are copyrighted and the property of Maria Bellwww.stampininspirations.blogspot.com
All of the boxes are similar except for the height of the box and the window placement of each box
Tall Box (3 ¾ x 7 ¾”)Materials
12 x 11 ¾” card stock6 7/8 x 6 7/8” card stock
3 ¾ x 7 ¾” card stock3 ½ x 7 ½” designer paper (optional)3 ½ x 3 ½ designer paper (optional)
Double stick tape or GlueScissorsScorer
Border Punch
Additional materials for Cupcake Box
Oval or Circle Template or Die (i.e., Nestabilites)Acetate or Projector film/sheet (plastic sheet)
3 ¾ x 6” designer paper3 ½ x 3 ½”designer paper
Additional materials for Keepsake Box
Circle Template or Die (i.e., Nestabilities)Acetate or Projector film/sheet (plastic sheet)
3 ½ x 3 ½” designer paperAdditional card stock (size will be determined by the box height)
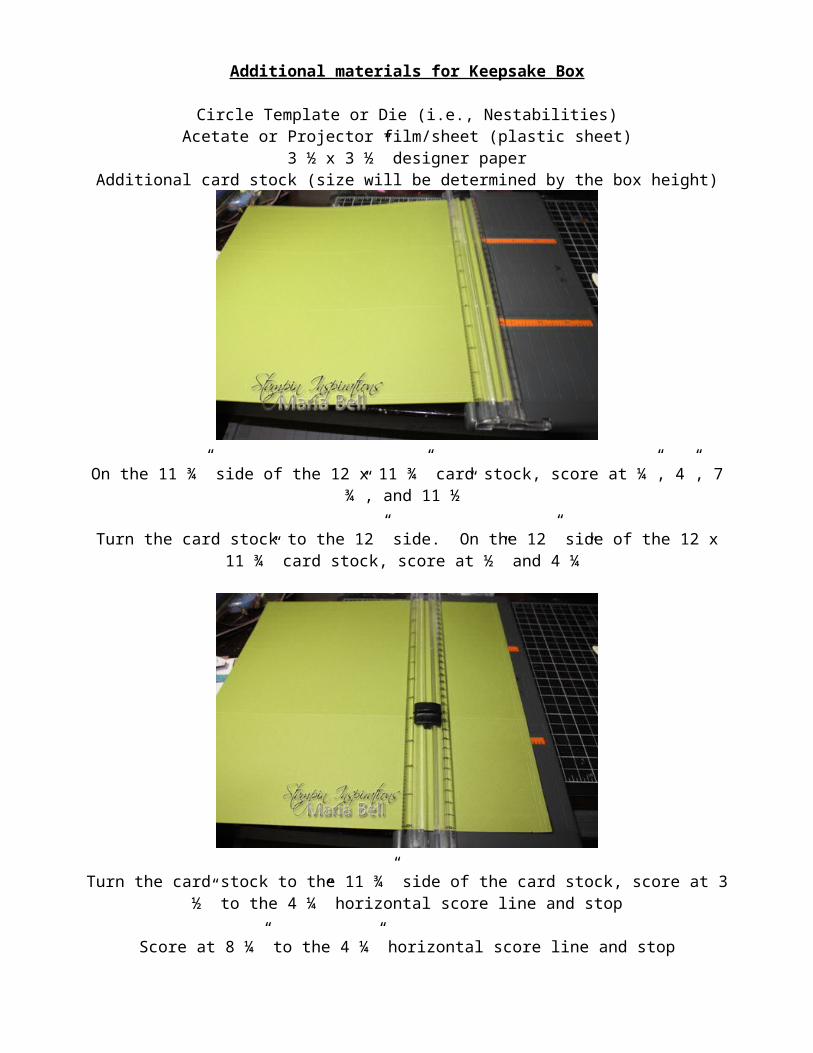
On the 11 ¾” side of the 12 x 11 ¾” card stock, score at ¼”, 4”, 7 ¾”, and 11 ½”
Turn the card stock to the 12” side. On the 12” side of the 12 x 11 ¾” card stock, score at ½” and 4 ¼”
Turn the card stock to the 11 ¾” side of the card stock, score at 3 ½” to the 4 ¼” horizontal score line and stop
Score at 8 ¼” to the 4 ¼” horizontal score line and stop

On the 11 ¾” side of the card stock, cut at the 3 ½” score line to the 4 ¼” horizontal score line and stop
Turn to the 12” side, cut at the 4 1/4” score line to the 4” horizontal score line. This step will cut off a piece of card stock
Repeat the steps to the other side (left and right side)
When completing the above steps, your card stock should appear as shown in the pictureAs you can see, you will be able to fold the ½” flaps
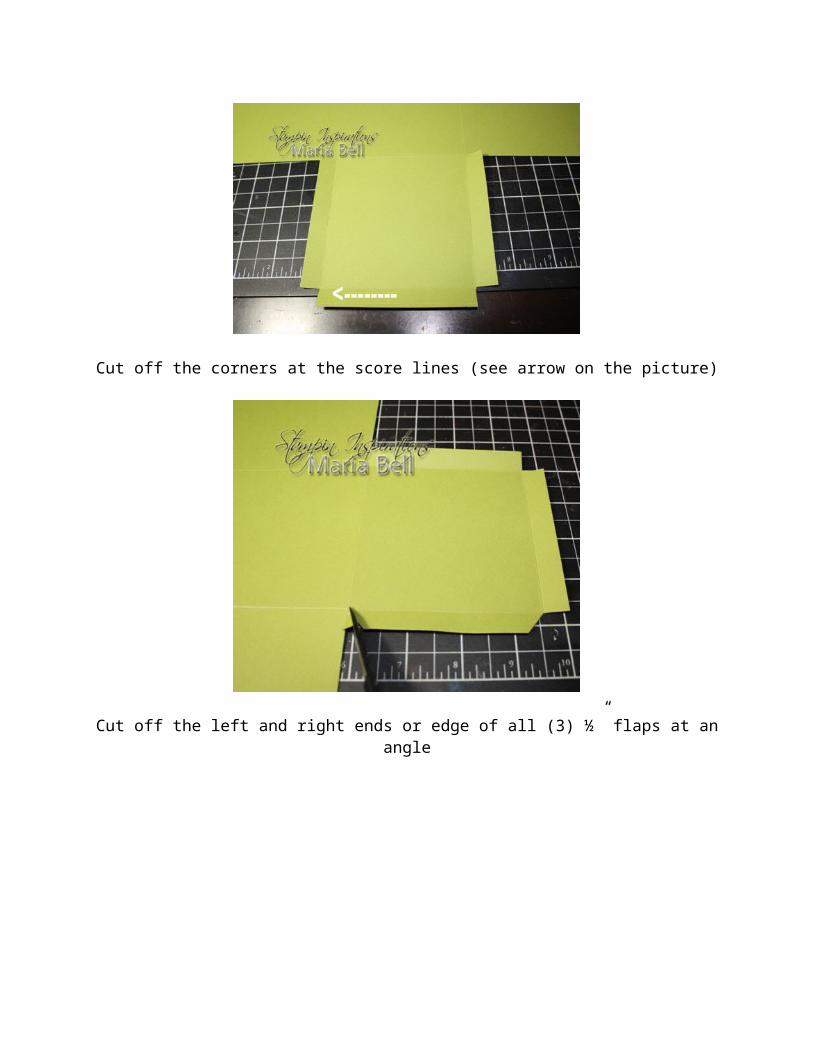
Cut off the corners at the score lines (see arrow on the picture)
Cut off the left and right ends or edge of all (3) ½” flaps at an angle
After cutting the ends of all 3 flaps at an angle, the ends of the flaps should appear as shown in the photo.

Fold at all the score line as shown in the photo
Apply double stick tape to all of the ½” and ¼” flaps

Assemble the box
Adhere the 3 ¾ x 7 ¾” card stock to the assembled box to complete the 4th side of the box

Box Cover
Score the 6 7/8 x 6 7/8” card stock at 1 ½” on all 4 sides of the card stock
Punch the card stock using a border punch to all 4 sides of the card stock
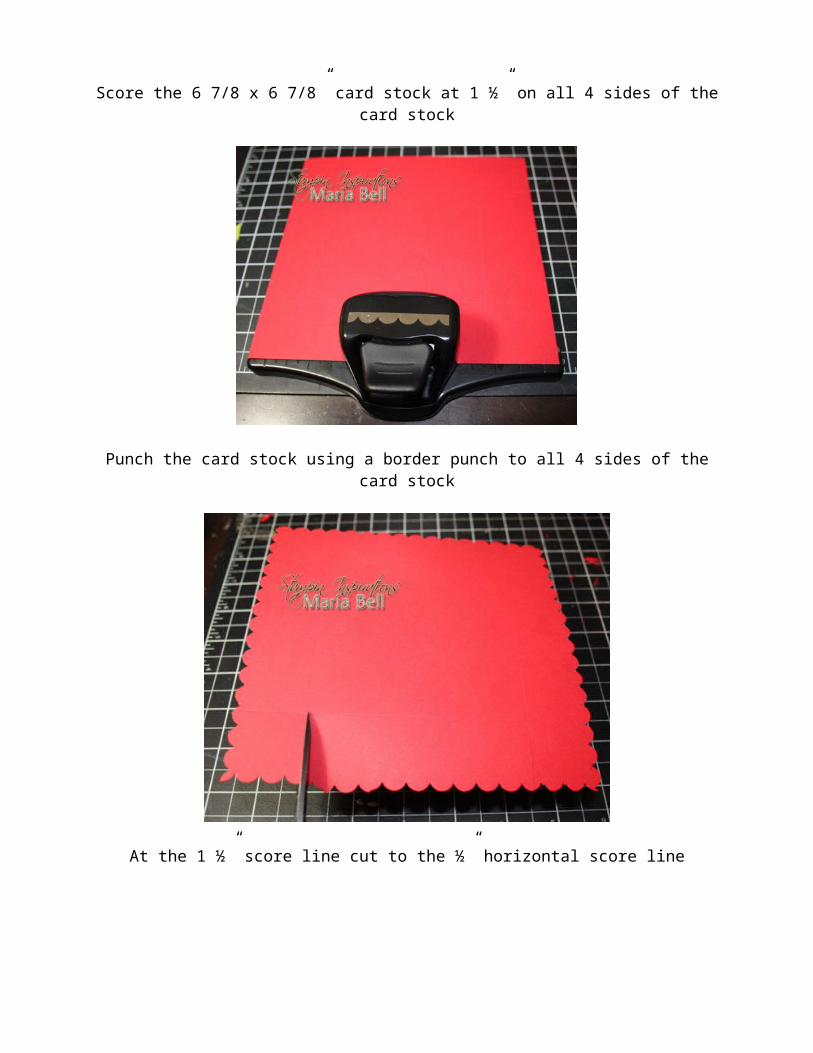
At the 1 ½” score line cut to the ½” horizontal score line
Repeat the previous step to all 4 corners as shown in the photo

At an angle, snip off the corners as shown in the photo
Apply double stick tape to the corners as shown in the photo

Assemble the box cover
(Optional) Adhere the 3 ½ x 7 ½” designer paper to one side of the box

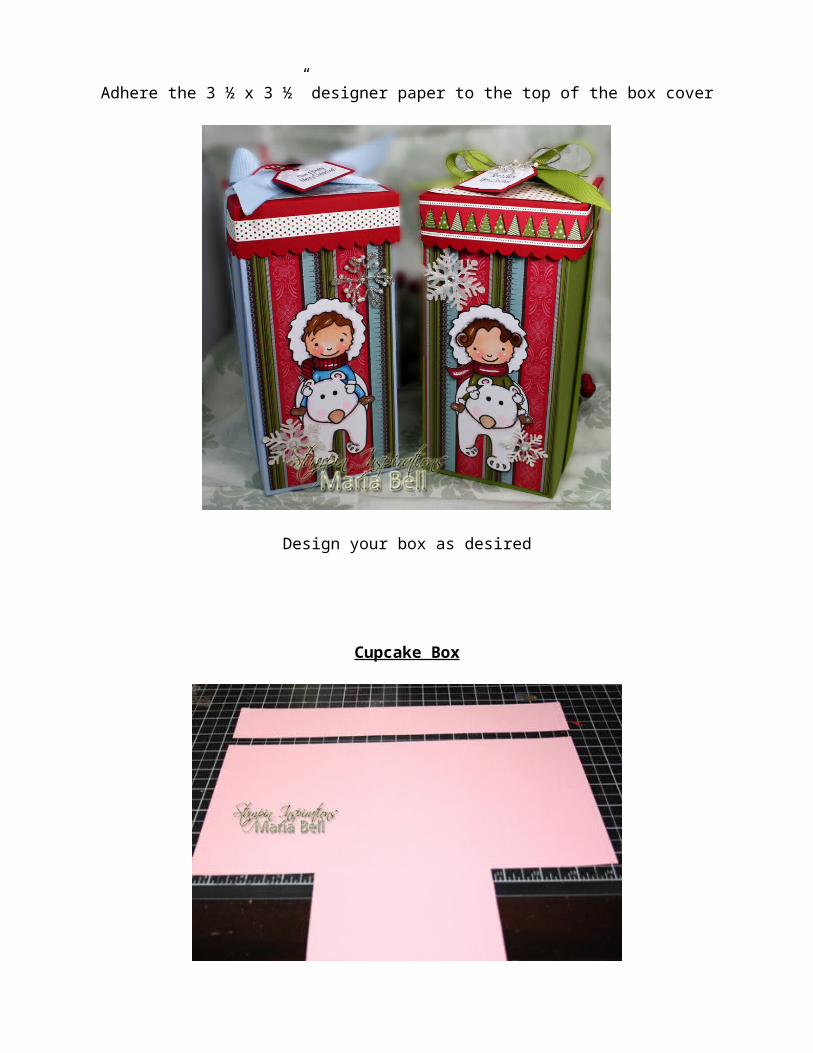
Adhere the 3 ½ x 3 ½” designer paper to the top of the box cover
Design your box as desired
Cupcake Box
Follow all of the steps of the tall box. Cut off 1 ¾” of the 7 ¾” height of the box. This will change the box height to 6”.
Using a scallop or circle template or die, cut a window to the center panel. When cutting the window, allow for space at the top for the box cover, approximately 2” from the top edge. If you
don’t allow for some space, the edge of the box cover will cover the top part of the circle/oval window
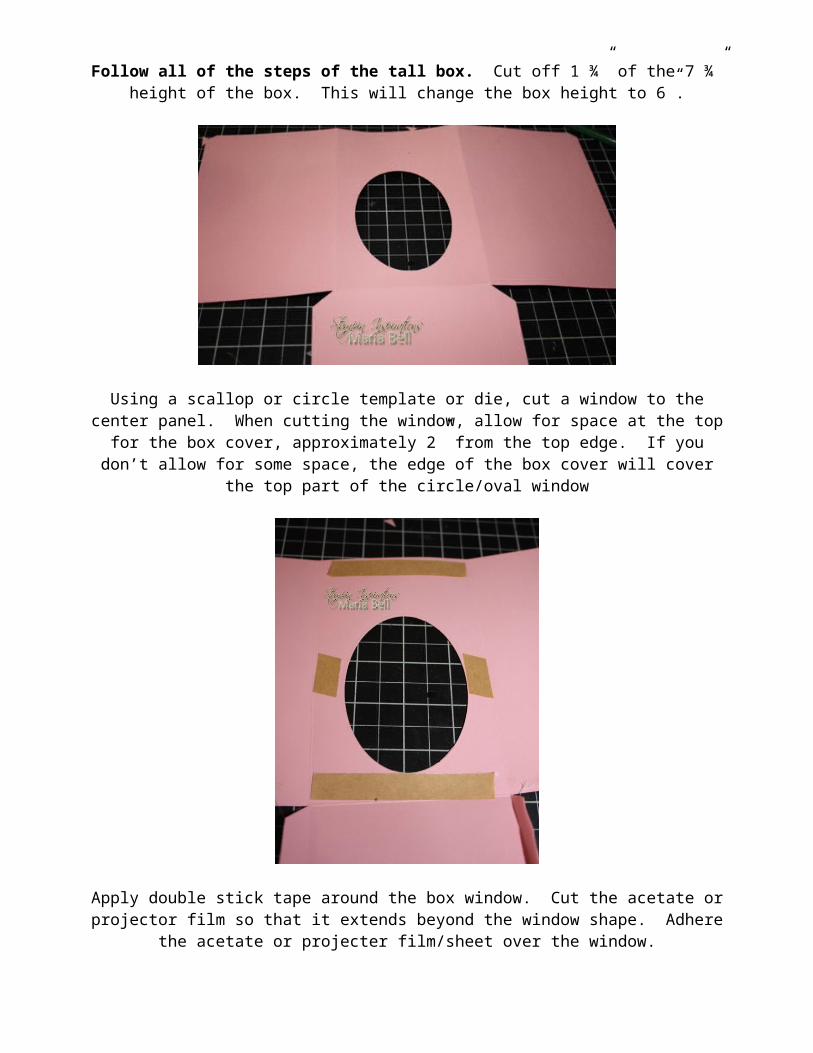
Apply double stick tape around the box window. Cut the acetate or projector film so that it extends beyond the window shape. Adhere the acetate or projecter film/sheet over the window.
Assemble the box as you did with the tall box by applying the 4th panel to complete the box Adhere the 3 ¾” x 6” designer paper to the inner back panel of the box. The designer paper will
show through the window.
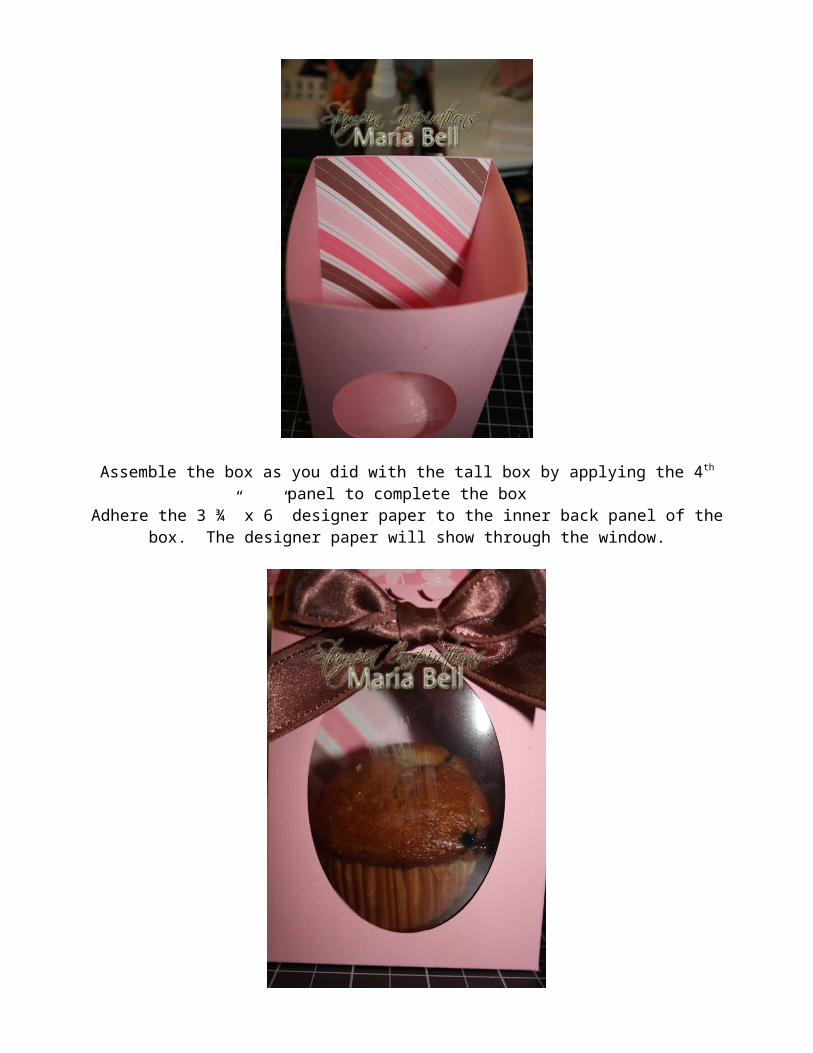
Insert the cupcake into the box
Design your cupcake box as desired

Keepsake Box
Follow all of the steps of the tall box. Cut the box height to a desired height following the 1st step of the cupcake box. The height of the box is determined by what you will be placing inside the box.
The height of the box can be as low as 3” by cutting off 4 ¾” of the box height.
Adhere the 3 ½” x 3 ½” designer paper to the center of the box cover
Cut a window at the center of the box cover using a circle template or die
Assemble the box cover and apply tape around the window as shown in the picture. Cut the acetate or projector film/sheet so it extends beyond the window size. Adhere the acetate or projector
film/sheet on the inner part of the box.

Design the front of your box as desired.
Email me at [email protected] if you have any questions regarding this tutorial