tape tracks
TRANSCRIPT

7/28/2019 Tape Tracks
http://slidepdf.com/reader/full/tape-tracks 1/8
- 1 -
Tape Tracks – Controlling Tape Recorders

7/28/2019 Tape Tracks
http://slidepdf.com/reader/full/tape-tracks 2/8
- 2 -
Operation Manual by Ernst Nathorst-Böös, Ludvig Carlson, Anders Nordmark, Roger Wiklander
Quality Cont rol: Katja Albrecht, Cristina Bachma nn, Sabine Pfeifer, Claudia Schomburg
The information in this document is subject to cha nge w ithout no tice a nd does not represent a commit-
ment on the part o f Steinberg Media Technologies AG. The softw are described by this document is subject
to a License Agreement a nd may no t be copied to o ther media except a s specifica lly allow ed in the License
Agreement. No part of this publication may be copied, reproduced or otherwise transmitted or recorded,
for any purpose, without prior writt en permission by Steinberg Media Technolog ies AG.
All product and company na mes a re ™ or ® tradema rks of their respect ive ow ners. Window s, Window s 95,
Windows 98 and Windows 2000 are trad ema rks of Microsoft Inc.
© Steinberg Media Technolog ies AG, 2000.
All rights reserved .
7/28/2019 Tape Tracks
http://slidepdf.com/reader/full/tape-tracks 3/8
- 3 -
Introduction
Cuba se VSTcan control tape recorders and similar devices via MIDI. This feature
makes MIDI and a nalog aud io recording an integ rated environment!
What Cubase VST Can Do with Tape Recorders
Basically, Cubase VSTallow s you to do two things w ith the tape recorders it supports:
• Cont rol the tape recorder’s transport cont rol from Cubase VST’s Transport Bar. That is, Cubase
VSTcan make the t ape recorder start, stop rewind etc.,
• Set tracks to record ready on the tape recorder and activate recording on these tracks. You can
even use a ll of Cubase VST’s recording features (punch in/out , Cycled recording etc), to control
the tape recorder!
About Sync and Tape Recorder Control
Controlling Tape recorders is a two w ay process:
• Cubase VSTsends out commands to the ta pe recorder, asking it to locate to certain positions
and activate recording etc.
• The ta pe recorder delivers synchronizat ion informat ion (in most cases in the form of MIDI Time-
code) to Cubase VST, which Cubase VSTsynchronizes to (see the Synchronizat ion cha pter of
the “Get ting into the Details” document for the complete picture).
Even though it appears as if Cubase VSTis controlling the tape recorder completely,it is important to remember that Cubase VSTis being synchronized to the tape re-
corders playback speed , not vice versa.
MIDI Machine Control
Cubase VSTuses a standard MIDI protocol for controlling tape transports, called MIDI
Machine Control. There are a number of tape recorders and hard disk recording sys-
tems on the market tha t support this protocol. Included with Cubase VSTis a driverfor using Cubase VSTwith MIDI Machine Control compa tible tape recorders.
Using MIDI Machine Control and ASIO Positioning Protocol
You may w ant to use MMC (MIDI Machine Control) to control the transport of the
sync master, even w hen using ASIO 2.0. This is no different from using MMC withregular synchronization. Just note the follow ing points:
• To enable MIDI Machine Control, select “ASIO 2.0/MMC” from the Timecode base pop-up in the Synchronization dialog.
• Select an MMC Output (on the Output pop-up menu in the Sync Source section of theSynchronization dialog) that corresponds to the device you want to control.This may be an external hardw are MMC converter. It may also b e a “virtua l MIDI device”, if
the device is cont rolled directly from your computer.
7/28/2019 Tape Tracks
http://slidepdf.com/reader/full/tape-tracks 4/8
- 4 -
Standard MIDI Machine Control
If you ha ve a tape t ransport that supports the MIDI Machine Control stand ard, pro-
ceed as follow s:
1. Connect the MIDI Out on the tape recorder to a MIDI In on your interface.
2. Connect the MIDI In on the tape recorder to a MIDI Out on your interface.
3. Make sure you have Timecode recorded on the tape recorder, and that it is set up totransmit this as MIDI Timecode via its MIDI out.
4. Also make sure the tape recorder is set to transmit and receive MIDI Machine Controlcommands.
5. Pull down the Options menu and select “Synchronization...”.
6. Pull down the “Timecode Base” Sync Source menu in this dialog box and select MMC.If you can’t find the correct option on the menu, the d river hasn’t been loaded for some reason.
7. Use the “From Input” pop-up menu below “Timecode Base” to select the correct MIDIInput.
8. Use the Output menu to select to which MIDI port Cubase VST should send its MIDI Ma-chine Control messages.
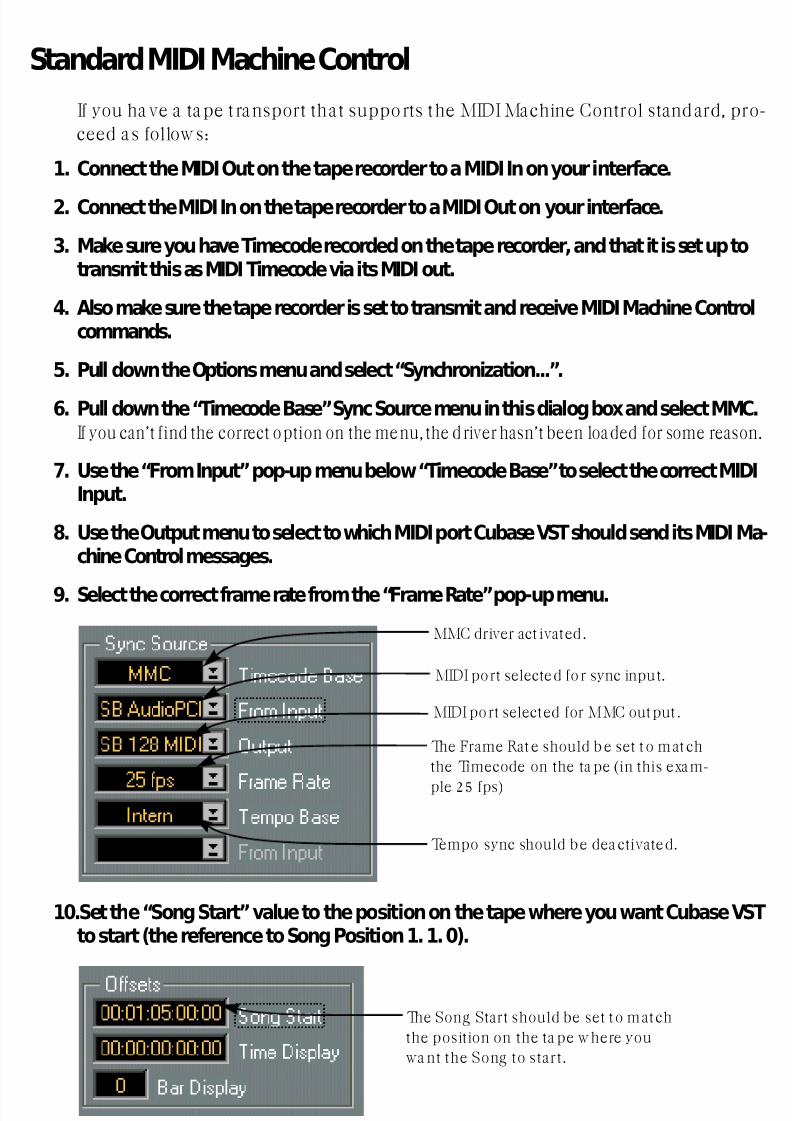
9. Select the correct frame rate from the “Frame Rate” pop-up menu.
10.Set the “Song Start” value to the position on the tape where you want Cubase VSTto start (the reference to Song Position 1. 1. 0).
11.Close the dialog box.
MMC driver act ivated.
MIDI port selected fo r sync input.
The Frame Rat e should b e set to mat ch
the Timecode on the ta pe (in this exam-
ple 25 fps)
Tempo sync should be dea ctivated.
MIDI port selected for MMC output .
The Song Start should be set to match
the position on the ta pe w here you
wa nt the Song to start.

7/28/2019 Tape Tracks
http://slidepdf.com/reader/full/tape-tracks 5/8
- 5 -
12.Open the MIDI Filtering dialog and make sure the MIDI Machine Control System Exclu-sive messages are not echoed back to the tape recorder.
13.Close the MIDI Filtering dialog.
14.Click on the Sync button on the transport bar (or press [X]).Cuba se VSTis now expecting sync to come from an external source, in this case the ta pe re-
corder.
15.Press PLAY on the tape recorder and let the tape roll for a few seconds, so Cubase VSTcan “learn” about the Timecode positions on the tape. Stop the tape recorder.
16.Now activate play from Cubase VST.The ta pe recorder should w ind the t ape to a position just before the Song Position
in Cubase VSTand go into Play. After a short w hile, Cubase VSTshould start, in sync.
Try to Stop, Fast Forward and Rew ind from Cubase VSTand activate Play from dif-
ferent positions in the Song . The tape recorder should follow . Record somethingsequenced from Cubase VSTonto an audio t rack and make sure tha t w hat you hear
“live” from Cubase VSTand taped on the tape recorder is in perfect sync from a llpositions.
Things to note before proceeding
• Make up a DEF.ALL Song or a DEF.SETsetup, with all sync set tings as t hey a re now . This will
make Cubase VSTcontrol the t ape recorder right after startup.
• When you record the next song on the tape, advance the “Song Start” value to a position that
corresponds to some position on the tape after this first song . By doing so you ha ve shifted
forward Cuba se VST’s Song Position 1. 1. 0 to that position. When you later save this second
Song, this “Song Start” value is saved with it so tha t the tape recorder always will wind to thecorrect position for this Song .
• Each time you start up your tape recorder, you may have to activate play from its front panel
for a couple of seconds. If you don’t, Cuba se VSThas no cha nce of “knowing” w here to w ind
the first t ime, since it doesn’t know what Timecode is recorded on the ta pe.
System Exclusive should
not be Thru-put.

7/28/2019 Tape Tracks
http://slidepdf.com/reader/full/tape-tracks 6/8
- 6 -
Using the Synchronization Setup
The tape t ransport o f your tape recorder can now be controlled from Cubase VST’s
Transport bar, no matter which window is up on the screen, as long as Sync is act i-
vated on the Transport bar.
Whenever you want to turn off the synchronizat ion betw een the tape recorder andCuba se VST, simply deactivate Sync on the Transport Bar.

7/28/2019 Tape Tracks
http://slidepdf.com/reader/full/tape-tracks 7/8
- 7 -
Using Tape Tracks
Tape Tracks allow you to activate recording on your tape recorder from the Arrang e
window . This is done ident ically, regardless of which of the supported tape record-
ers and a vailable drivers you use:
1. Create a new Track and set its class to Tape Track.
2. Use the Channel column in Cubase VST to select the tape recorder track you wish torecord on.For example, to record on t rack 3 on the tape recorder, set the Cuba se VSTTrack to Channel 3.
3. If you wish, make up tape Tracks for as many of your actual tape recorder tracks as youlike. You can move the Tracks and create new Tracks at will, it is only the channel settingthat decides which track on the tape recorder each Cubase VST Tape Track controls.
❐ We strongly recommend you not to make up a Cubase VST Tape Track for the tape re-corder track you have the Timecode (SMPTE) on, since recording over the Timecodecan be disastrous. Retrieving a lost sync track is very hard. To avoid confusion, do notset two Tape Tracks to the same channel.
Setting Tracks to Record Ready
One Track at a Time
• To activate Recording on one Track, simply select it.The corresponding tape recorder track is set to Record Ready mode.
Multiple Tracks
To activate recording on multiple Tracks, proceed as follow s:
1. Activate Multi Recording in Merge mode.See the Multi Track Recording chapter of the “Getting into the Deta ils” document for details.
2. Use the “R” column to set as many Tape Tracks as desired to record ready.
The corresponding tracks on the tape recorder are put into Record Ready mode.
A Track set to class
“Tape Track”.The Channel corresponds t o the
Track on the tape recorder.
Track 1, 3 and 4 set to record ready.

7/28/2019 Tape Tracks
http://slidepdf.com/reader/full/tape-tracks 8/8
Performing the recording
When you activate recording in Cubase VST, recording immediately sta rts on the
track(s) on the tape recorder.
You ca n use a ll of Cuba se VST’s manual and automatic punch in and out opt ions tocontrol recording on as many Tape Tracks as you like. You can a lso record in Cycle
mode, but you w ill have to wait some time for the tape recorder to rewind at theend of each “lap”.
About the Parts
When you record on a Tape Track, Parts appear between the positions you punch
in and out, just as with for example MIDI Tracks.
How ever, these Parts do not contain any da ta and can not be opened in any editor.
The Tape Track Parts are instead only used as visual guides to where on the Trackyou have actua lly recorded anything, on the tape. If you for example are doing back-
ground vocals for a number of choruses in a Song , the Tape Track Parts are g reatguides to which choruses you have recorded on yet, and which you have not .