teachers and students investigating plants in space pdf · pdf fileteachers and students...
TRANSCRIPT
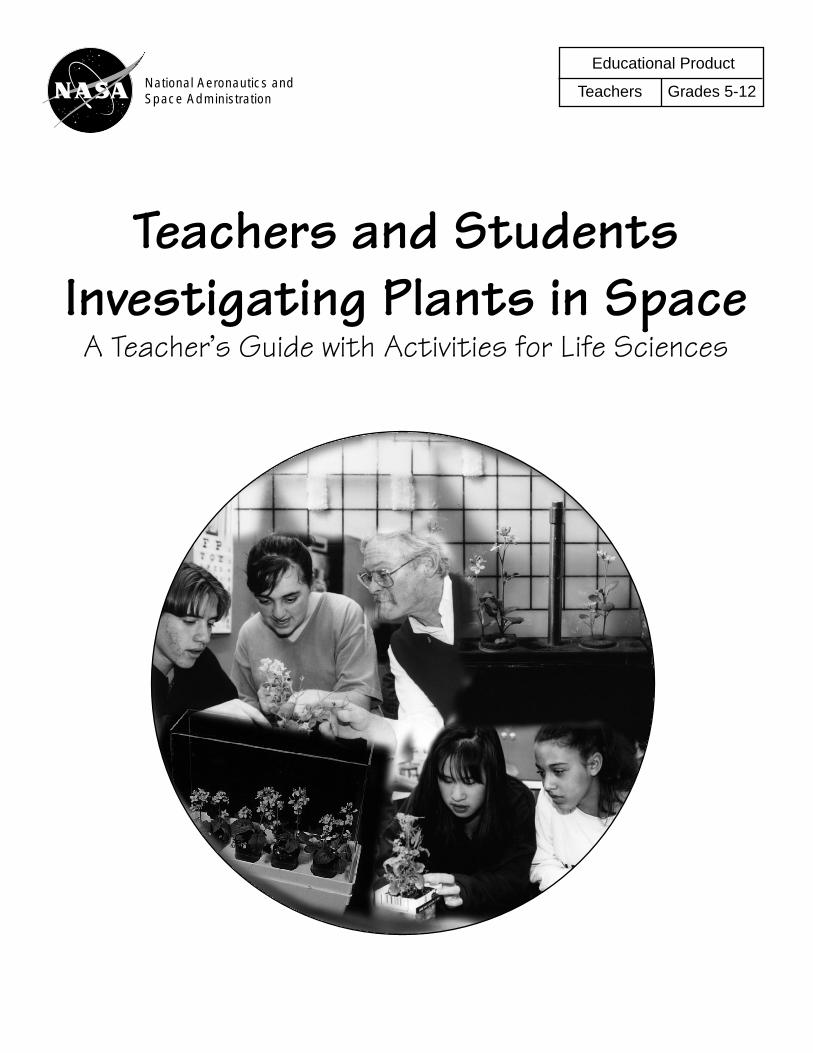
Teachers and StudentsInvestigating Plants in Space
A Teacher’s Guide with Activities for Life Sciences
Educational Product
Teachers Grades 5-12National Aeronautics andSpace Administration

Teachers and StudentsInvestigating Plants in Space
A Teacher’s Guide with Activities for Life Sciences
National Aeronautics and Space Administration
Office of Human Resources and EducationEducation Division
andOffice of Life and Microgravity Sciences and Applications
Life Sciences Division
Washington, DC
With the Wisconsin Fast Plants ProgramUniversity of Wisconsin—Madison
This publication is in the Public Domain and is not protected by copyright.Permission is not required for duplication.
EG-1997-02-113-HQ
Acknowledgments This publication was developed for the NationalAeronautics and Space Administration and the NationalSpace Agency of Ukraine with the input and support ofmany individuals.
Writer:Paul H. WilliamsDepartment of Plant PathologyUniversity of WisconsinMadison, WI
Editors:Paul H. WilliamsChristie M. RodenCoe M. WilliamsDaniel W. LaufferWisconsin Fast PlantsUniversity of WisconsinMadison, WI
Layout and Design:Christie M. Roden
Activity Development:Paul H. WilliamsMichelle A. GrahamDaniel W. LaufferCarey K. Wendell
The Wisconsin Fast Plants Program would like togratefully acknowledge Bonnie J. McClain and Tom K.Scott for their contribution of the text for "TheImportance of Plants in Space," and Greg L. Vogt for hiscontribution of the text for "Microgravity."
Special thanks to Bonnie J. McClain, Pamela L. Mountjoyand Rosalind A. Grymes for their guidance and advice.
Wisconsin Fast PlantsUniversity of Wisconsin-MadisonCollege of Agricultural and Life SciencesDepartment of Plant Pathology1630 Linden DriveMadison, WI 53706tel: 800-462-7417 or 608-263-2634email: [email protected]: http://fastplants.cals.wisc.edu

Table of Contents IntroductionOverview of CUE-TSIPS .................................................1
Road Map: How Do I Use This Guide? ..........................3
The Importance of Plants in Space ................................6
Microgravity ..................................................................8
The Life Cycle of AstroPlants .......................................10
Understanding the Environment .................................13
CUE-TSIPS Science and Technology ............................18
CUE-TSIPS ActivitiesCUE-TSIPS Mission Calendar......................................29
Getting Started ...........................................................32
Constructing the PGC, page 32
Planting AstroPlants in the PGC, page 35
Growth, Development and Flowering ...........................37
AstroPlants Growth Group Data Sheet, page 41
Pollination ..................................................................43
Floral Clock Student Data Sheet, page 51
Double Fertilization and Post-Fertilization Events .......53
Ovule and Embryo Student Data Sheet, page 65
Supplementary Activities:
Germination ................................................................. 66
Orientation and Guidance ............................................. 78
Additional CUE-TSIPS MaterialsMission Information ....................................................92
Sources of Supplies ....................................................94
Black Line Masters .....................................................99
Selected References .................................................. 101
NASA Educational MaterialsNASA Educational Resources .................................... 104
Evaluation Reply Card .............................................. 107

1
Overview of CUE-TSIPSThe Collaborative Ukrainian ExperimentIn May of 1995, the presidents of the United States and Ukraine issued a joint statement oncooperation in space, directing the National Aeronautics and Space Administration (NASA) and theNational Space Agency of Ukraine (NSAU) to cooperate on a joint Space Shuttle mission. The UnitedStates and Ukraine announced that a Ukrainian payload specialist would fly aboard this mission,STS-87, scheduled for October of 1997. The project was named the "Collaborative UkrainianExperiment," or "CUE."
The CUE Science QuestionsFrom plant science microgravity experiments on previousmissions of the Russian, Ukrainian and American spaceprograms, scientists have observed various abnormal growth anddevelopmental phenomena in plants. The CUE projects are designed toaddress specific questions raised in prior experiments.
American scientists and their teams of colleagues and students, with Ukrainianscientists and their research teams, will be running 12 separate experiments aspart of the science payload on STS-87. Several plant biology experiments will berun in an environmentally controlled Plant Growth Facility.
One experiment involves the controlled pollination and in-flight fixation ofpollinated flowers of a special dwarf stock of rapid-cycling Brassica rapa(Wisconsin Fast Plants) known as "AstroPlants." A Ukrainian payload specialistwill be performing these experimental procedures. The principal scientists and their question in thisCUE experiment are:
Project acronym: B-STICInvestigation of: microgravity effects on pollination and fertilizationScientists: Dr. Mary Musgrave, Louisiana State University, United States
Dr. Antonina Popova, National Academy of Science of UkraineQuestion: What developmental events during plant reproduction fail to function
normally in the microgravity environment?
This question is part of the more general question: how will plants grow and function in microgravityconsidering that they have evolved and existed in an environment of the Earth's gravity?
The CUE Education Project: TSIPSAs a part of the total CUE mission, an Education Project has been established with the Wisconsin FastPlants Program at the University of Wisconsin in Madison and the National Academy of Science ofUkraine, through the Ukrainian Junior Academy of Science in Kiev. The Education Project involvesteachers and students in both countries and is called "TSIPS" – Teachers and Students InvestigatingPlants in Space.
During the same time as the joint Space Shuttle flight, students throughout the United States andUkraine will be undertaking experiments to determine what is normal for biological events or stages inthe life cycle of AstroPlants under the Earth's gravity. Seedlings of other plants may also be used to

2
examine the effects of gravity and light on orientation and guidance in plants. The information thatstudents gather will provide them with the basis for understanding a number of biological phenomenaand principles, including phenotypic expression, variation, growth, orientation, reproduction andembryogeny. Students can compare their observations with those made in the microgravityenvironment by the CUE researchers.
The Central CUE-TSIPS ExperimentThe CUE-TSIPS activities have been designed to address mainly those questions raised in the B-STICinvestigation of Drs. Mary Musgrave and Antonina Popova, relating to the effects of microgravity onplant growth and reproduction.
The CUE-TSIPS activities center on the Science Exploration Flowchart (page 20). Students will growAstroPlants through a life cycle, and in the process will become well acquainted with germination,orientation, growth, flowering, pollination, fertilization, embryogenesis and seed development.
Students will gain insight into the life cycle of AstroPlants by making many careful observations,measuring and recording what they observe, and organizing and displaying data in a way that theycan make analyses. The data will provide both you and your students with a better understanding ofwhat is "normal" development in AstroPlants and will serve as the basis for comparison with datataken by the CUE investigators to help determine what developmental events during plantreproduction are affected by microgravity.
The Science-Technology PartnershipPerhaps more than any other endeavor, experiments in space illustrate the essential interdependencyof science and technology. Vast technological resources are marshalled in the execution of space-based science. Because of this interdependency of science and technology, the CUE-TSIPS project hasemphasized both by including the design and construction of the experimental equipment as part ofthe science activities (page 19). Throughout the activities teachers are provided with instruction onhow to engage students in this construction.
The CUE-TSIPS QuestionsAre there any basic life processes that will be affected by microgravity in a way that will result inaltered function? What are the significant growth processes that can be identified and observed underthe conditions of microgravity?
1. Impact of the environment on a model organism.Much of what the CUE flight and ground experiments will be about is coming to understand themany environmental variables that impact on the growth and development of the model organism,the AstroPlants. This stock was developed to grow rapidly under specified environmentalconditions, in an apparatus with limited volume and restricted energy inputs.
2. Microgravity.If microgravity affects one or more life processes in AstroPlants such that deviation from thenormal phenotype can be observed, then questions may be posed and research undertaken,leading to an understanding of how the processes are being affected.
3. What is "normal"?How would you define "normal"? In order to determine what the effects of microgravity are onAstroPlants, it is important to have an accurate understanding of how they grow under standardenvironmental conditions on Earth.
3
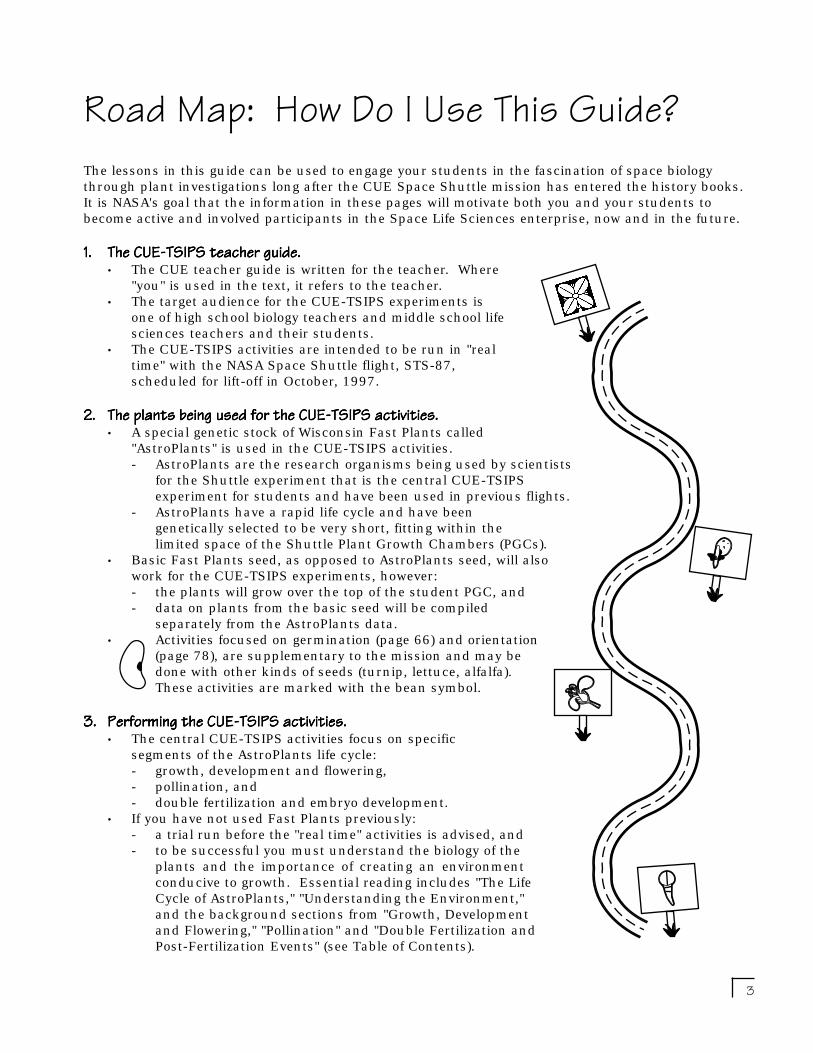
Road Map: How Do I Use This Guide?The lessons in this guide can be used to engage your students in the fascination of space biologythrough plant investigations long after the CUE Space Shuttle mission has entered the history books.It is NASA's goal that the information in these pages will motivate both you and your students tobecome active and involved participants in the Space Life Sciences enterprise, now and in the future.
1.1.1.1.1. The CUE-TSIPS teacher guide.The CUE-TSIPS teacher guide.The CUE-TSIPS teacher guide.The CUE-TSIPS teacher guide.The CUE-TSIPS teacher guide.• The CUE teacher guide is written for the teacher. Where
"you" is used in the text, it refers to the teacher.• The target audience for the CUE-TSIPS experiments is
one of high school biology teachers and middle school lifesciences teachers and their students.
• The CUE-TSIPS activities are intended to be run in "realtime" with the NASA Space Shuttle flight, STS-87,scheduled for lift-off in October, 1997.
2.2.2.2.2. The plants being used for the CUE-TSIPS activities.The plants being used for the CUE-TSIPS activities.The plants being used for the CUE-TSIPS activities.The plants being used for the CUE-TSIPS activities.The plants being used for the CUE-TSIPS activities.• A special genetic stock of Wisconsin Fast Plants called
"AstroPlants" is used in the CUE-TSIPS activities.- AstroPlants are the research organisms being used by scientists
for the Shuttle experiment that is the central CUE-TSIPSexperiment for students and have been used in previous flights.
- AstroPlants have a rapid life cycle and have beengenetically selected to be very short, fitting within thelimited space of the Shuttle Plant Growth Chambers (PGCs).
• Basic Fast Plants seed, as opposed to AstroPlants seed, will alsowork for the CUE-TSIPS experiments, however:- the plants will grow over the top of the student PGC, and- data on plants from the basic seed will be compiled
separately from the AstroPlants data.• Activities focused on germination (page 66) and orientation
(page 78), are supplementary to the mission and may bedone with other kinds of seeds (turnip, lettuce, alfalfa).These activities are marked with the bean symbol.
3.3.3.3.3. Performing the CUE-TSIPS activities.Performing the CUE-TSIPS activities.Performing the CUE-TSIPS activities.Performing the CUE-TSIPS activities.Performing the CUE-TSIPS activities.• The central CUE-TSIPS activities focus on specific
segments of the AstroPlants life cycle:- growth, development and flowering,- pollination, and- double fertilization and embryo development.
• If you have not used Fast Plants previously:- a trial run before the "real time" activities is advised, and- to be successful you must understand the biology of the
plants and the importance of creating an environmentconducive to growth. Essential reading includes "The LifeCycle of AstroPlants," "Understanding the Environment,"and the background sections from "Growth, Developmentand Flowering," "Pollination" and "Double Fertilization andPost-Fertilization Events" (see Table of Contents).

4
• For the "real time" activities you and your students will:- provide the proper growing environment (lighting, nutrient, temperature, etc.),- construct the Plant Growth Chamber (PGC) from low-cost, readily available materials to
simulate growing conditions on the Space Shuttle,- plant the AstroPlants in the PGC,- grow the AstroPlants through the entire life cycle, and- complete the AstroPlants Growth Data Sheets and Floral Clock Data Sheets.
• The "CUE-TSIPS Mission Calendar"(page 29) provides a clear day-to-dayguide and schedule for the activities.
• Teachers may wish to customize thedata keeping, depending on the ageand ability level of their students.
4.4.4.4.4. The supplementary activities.The supplementary activities.The supplementary activities.The supplementary activities.The supplementary activities.• For students to fully benefit from the
CUE-TSIPS experiments, thesupplementary activities (7 to 11) in the"Germination" and "Orientation andGuidance" sections should be carriedout prior to the experiments on reproduction.
• These activities are particularly rich in quantitative biology and mathematics.
5.5.5.5.5. Post-mission follow-up.Post-mission follow-up.Post-mission follow-up.Post-mission follow-up.Post-mission follow-up.• Class summary statistics from the AstroPlants Growth and Floral Clock Class Data Sheets can
be sent to the Wisconsin Fast Plants Program for compilation with data submissions from otherclassrooms in the United States and Ukraine (see page for the mailing address).- Data will be entered for compilation only if specified environmental growing conditions have
been met and recorded on the Class Data Sheets.- Parameters that must be reported with the data are:
▲ irradiance (number of fluorescent bulbs, wattage, distance of plants from bulbs),▲ temperature of the growing environment (average daily temperature),▲ nutrient solution used,▲ root medium (e.g., specific soil or soilless mixture),▲ seed type (AstroPlants or basic Fast Plants), and▲ plants grown in a student PGC or in another capillary wicking system.
- Data for compilation must be received by January 31, 1998.- Results will be posted on the Wisconsin Fast Plants World Wide Web site at the time of the
National Science Teachers Association National Convention in April, 1998.• Teachers complete evaluations by either:
- completing and mailing in the printed "Teacher Reply Card" at the end of this guide, or- using the NASA EDCATS on-line forms (the "Teacher Reply Form,"
http://ednet.gsfc.nasa.gov/edcats/teacher_guide and the "Plant ExperimentFollow-Up Form," http://ednet.gsfc.nasa.gov/edcats/fastplants_report.html).
Activity Matrix: Standards and SkillsActivity Matrix: Standards and SkillsActivity Matrix: Standards and SkillsActivity Matrix: Standards and SkillsActivity Matrix: Standards and SkillsUse the matrices on page 5 to align the CUE-TSIPS activities to the National ScienceStandards and Benchmarks. In each matrix, the teacher guide sections are listedalong the left edge. If the activities in a given section fulfill a listed standard orinclude the development of a listed skill, the activity is marked with the symbol " "in the appropriate column. The section entitled "CUE-TSIPS Science andTechnology" provides the foundations for experimentation and is aligned with manyaspects of the content standards.
For teachers:The most important guidanceitems in this book are:
• "Understanding theEnvironment" (page 13), and
• the "CUE-TSIPS Mission Calendar" (page 29).
i
✓

5
Phys
ical S
cienc
e
Scien
ce as
Inqu
iry
Unify
ing C
once
pts a
nd Pr
oces
ses
Scien
ce an
d Tec
hnolo
gy
- pos
ition a
nd m
otion
of ob
jects
- prop
erties
of ob
jects
and m
ateria
ls
- chang
e, co
nstan
cy an
d mea
surem
ent
- evid
ence
, mod
els an
d exp
lanati
on
- abil
ities o
f tec
hnolo
gical
desig
n
Scien
ce in
Pers
onal
and
Socia
l Per
spec
tives
- scie
nce a
nd te
chno
logy i
n
loc
al ch
allen
ges
Science StandardsScience StandardsScience StandardsScience StandardsScience Standards
- und
erstan
ding s
cienc
e and
tech
nolog
y
Growth andDevelopmentPollinationFertilization
Germination
Growth andDevelopmentPollinationFertilization
Obse
rving
Defin
ing O
pera
tiona
lly
Measu
ring
Commun
icatin
gCo
llecti
ng D
ataInf
erring
Pred
icting
Making
Mod
elsMak
ing G
raph
sHyp
othes
izing
Interp
reting
Data
Contr
olling
Varia
bles
Inves
tigati
ng
Numbe
r Rela
tions
hips
Trigo
nometr
y
Prob
lem So
lving
Commun
icatio
nRe
ason
ing
Conn
ectio
ns
Compu
tation
and E
stimati
onPa
ttern
s and
Func
tions
Stati
stics
Prob
abilit
y
Geom
etry
Measu
remen
t
Func
tions
Growth andDevelopmentPollination
FertilizationGermination
Mathematics StandardsMathematics StandardsMathematics StandardsMathematics StandardsMathematics Standards
Science Process SkillsScience Process SkillsScience Process SkillsScience Process SkillsScience Process Skills
Orientation ✓ ✓ ✓ ✓ ✓ ✓ ✓ ✓ ✓ ✓ ✓ ✓
✓ ✓ ✓ ✓ ✓ ✓ ✓ ✓ ✓ ✓ ✓ ✓
✓ ✓ ✓ ✓ ✓ ✓ ✓ ✓ ✓ ✓ ✓ ✓
✓ ✓ ✓ ✓ ✓ ✓ ✓ ✓ ✓ ✓ ✓
✓ ✓ ✓ ✓ ✓ ✓ ✓ ✓ ✓ ✓ ✓ ✓
✓ ✓ ✓ ✓ ✓ ✓
✓ ✓ ✓ ✓ ✓ ✓ ✓ ✓
✓ ✓ ✓ ✓ ✓ ✓ ✓
✓ ✓ ✓ ✓ ✓
✓ ✓ ✓ ✓ ✓ ✓
✓ ✓ ✓ ✓ ✓ ✓ ✓ ✓
✓ ✓ ✓ ✓ ✓ ✓ ✓ ✓
✓ ✓ ✓ ✓ ✓ ✓ ✓
✓ ✓ ✓ ✓ ✓
✓ ✓ ✓ ✓
GerminationOrientation
Orientation

6
The Importance of Plants in SpaceContributed by Bonnie J. McClain (Purdue University Grantee, Education Programs Coordinator, NASASpace Life Sciences) and Tom K. Scott (Senior Scientist, NASA Space Life Sciences).
The relationship between plants and humans has always been a close andinterdependent one. Research about basic plant processes helps inunderstanding and augmenting this interdependence. Ground-basedinvestigations yield information vital to this understanding; however, theknowledge gained from plant research in space is exciting and extends potentialfor new discoveries beneficial to humans.
There is abundant evidence that microgravity affects virtually every aspect ofplant growth. Space flight provides the only known environment in whichfundamental biological processes and mechanisms can be studied in theabsence of the sometimes overriding effects of gravity. Removal of the effects ofgravity for long periods of time allows new perspectives in the study of plants.
Answers to important questions about the basics of plant growth anddevelopment lie in understanding the role gravity has on plant processes andresponses to the environment. For example, gravitropism is the bendingresponse of plants to the force of gravity with the roots growing downward andthe shoots growing upward. Charles Darwin began experiments on plant gravitropism during thenineteenth century, yet the mechanisms of this process are still not clear. The more knowledgegenerated about how plants function, the more likely we can adapt that information into practical,useful new applications and products enhancing life on Earth and in space.
NASA’s research with plants in space is dedicated to systematic studies that explore the role gravityplays at all stages in the life of higher plants. Research focuses on the interaction of gravity and otherenvironmental factors with plant systems, and uses hypergravity, simulated hypogravity, andmicrogravity as tools to advance fundamental knowledge of plant biology. Results of the researchcontribute to NASA’s efforts to further human exploration of space and to improve the quality of life onEarth through applications in medicine, agriculture, biotechnology and environmental management.
NASA's plant science research questions focus on five objectives:
• to explain the basic mechanism whereby plants perceive, transduce, andrespond to gravitational force (example: comparisons of seedling vs. olderplant responses to gravity);
• to understand the role of gravity and microgravity in developmental andreproductive processes in plants (examples: flower development andwood formation);
• to learn how metabolic and transport processes are affected by gravityand microgravity (examples: photosynthesis and long and short distancesugar transport);
• to analyze interactions of microgravity with other important parametersof space (examples: cosmic radiation and electromagnetism); and
• to study the role of plants within recycling life support systems for spaceexploration (examples: carbon dioxide production and oxygenrevitalization).

7
Knowledge of physiology, cell biology, biochemistry and molecular biology of plants coupled withbiotechnology advances contributes to our fundamental knowledge of plants and provides impetus fora new era of plant investigations. The opportunity to experiment at a micro level of gravity provides anew dimension that enables interdisciplinary plant research to answer important questions about theplant’s reception of the gravity signal, the plant’s biochemical interpretation of that signal, and howthat interpretation causes a developmental reaction. It appears that this reaction system, in general,interacts with receptor systems that detect both internal and external signals. It is for this reasonthat understanding the role of mechanical signals, such as gravity, assumes such significance forplant science: these investigations could begin to reveal the precise control mechanisms involved indictating plant form, structure, and function.
Understanding how basic processes can be manipulated and put into use in new ways that developnew products and increase productivity is the basis for biotechnological applications in agriculture,horticulture, and forestry. For example, understanding the interaction between gravity and light couldbe the basis for genetic engineering of plants resulting in increased crop productivity while minimizingthe required growing space. Application to horticulture could include the ability to control plant form,and forestry could benefit from faster methods of regeneration of lost forest areas.
Before the first lunar outpost, theproposed Mars base, and other futuremissions from planet Earth can becomerealities, numerous scientific andtechnological problems remain to besolved. None of these problems is moreimportant than that of supporting humanlife in space. Extended duration humanexploration missions will require lifesupport capabilities beyond those nowavailable. A solution is to developtechnologies that integrate physical andchemical processes into a dynamic,recycling life support system.
Studying plants in space will provide the scientific information necessary for development of such alife support system. Plants will be a primary component of atmospheric regeneration: carbon dioxideexhaled by humans will be taken up by plants and used in photosynthesis, in the process returningoxygen and food to the crew. Plants are also important in water regeneration. The productivity ofplants relative to the input of energy (light) can be increased by using such techniques as carbondioxide enrichment and hydroponics. To achieve a controlled life support system, ground-basedresearch in growth chamber facilities will be conducted along with plant investigations in themicrogravity environment of space flight.
Why study plants in space? The discoveries made, lessons learned, and technologies developed fromthese investigations will benefit those of us on planet Earth as we unlock and utilize gravity’smysteries to enhance our journey into space.

8
MicrogravityContributed by Greg L. Vogt (Crew Educational Affairs Liaison, NASA Johnson Space Center).
Gravity is an attractive force that is a fundamental property of all matter. Whether an object is aplanet, a feather or a person, each exerts a gravitational force on all other objects around it.Physicists identify gravity as one of the four types of forces in the universe (the others are strong andweak nuclear forces and electromagnetic force).
The strength of the attraction between two objects is directly proportional to the product of the massesof those objects and inversely proportional to the square of the distance between the centers of mass ofthose objects: in other words, the larger the objects the stronger the attraction between them and thegreater the distance between the objects the weaker the attraction. When measured at the surface ofthe Earth, the acceleration of an object acted upon only by Earth's gravity is commonly referred to as"1 g" or "unit gravity." This acceleration is approximately 9.8 meters per second squared (m/s2).
On Earth, gravitational force is important in providing orientation and guidance to many forms of lifeincluding plants. For example, plants orient themselves with gravity so that shoots grow up and rootsgrow down and water and nutrients are transported through the plants against the pull of gravity.
Although gravity is a force that is always with us, its effects can be greatly reduced by the simple actof falling. NASA uses the term "microgravity" to refer to the condition that is produced by a "free fall."The diagram at the right illustrateshow a condition of microgravity iscreated. Imagine riding in an elevatorcar to the top floor of a very tallbuilding. At the top, the cablessupporting the car break, causing thecar and you to fall to the ground. (Inthis example we discount the effectsof air friction on the falling car.)
Since you and the elevator car arefalling together, you feel like you arefloating inside the car. In otherwords, you and the elevator car areaccelerating downward at the samerate. If a scale were present, yourweight would not register because thescale would be falling too. You wouldbe experiencing free fall or whatastronauts call "microgravity." The rideis lots of fun until you get to the bottom!
The term microgravity can be interpreted in a number of ways, depending upon context. The prefix"micro-" (µ) is derived from the original Greek "mikros," meaning "small." By this definition, amicrogravity environment is one that will impart to an object a net acceleration that is small comparedwith that produced by the Earth at its surface. Another common usage of micro- is found inquantitative measurement, such as the metric system, where micro- means one part in a million. Inpractice, net accelerations will range from about one percent of the Earth's gravitational acceleration(aboard aircraft in parabolic flight) to about one part in a million (aboard the Space Shuttle orbiter).
normalweight
heavierthan
normal
lighterthan
normal
nomeasured
weight
lighterthannormal
no measuredweight
heavierthannormal
normalweight

9
NASA uses airplanes, drop towersand small sounding rockets tocreate a microgravity environmentfor experimental purposes. Ineach facility, an experimentalpayload is put into free fall thatlasts from a few seconds to severalminutes. Eventually, free fall endsbecause the object will impact onthe Earth's surface.
When scientists want to conductexperiments in microgravity forlonger durations – days, weeks,months or even years – it isnecessary to travel into space andorbit Earth. Having more timeavailable for experiments meansthat slower processes and moresubtle effects can be investigated.Today, the Space Shuttle andspecial satellites are the spacefacilities that provide opportunitiesfor these microgravity experiments. The International Space Station will soon be an importantadditional means of accomplishing such investigations.
Microgravity ActivityYou can demonstrate a microgravity environment and the effects of freefall in the classroom. Collectan aluminum soft drink can, a nail, about 12 ounces of water and a waste basket.
Orbiter Orientation
To obtain the most consistent microgravity environment inspace, the Space Shuttle orbiter is oriented in a tail-downposition. This is called the "gravity gradient mode." The tail ofthe orbiter is closer to the Earth and feels a stronger pull ofgravity than does the more distant nose of the orbiter.
The difference in the strength ofthe attraction between the noseand tail has a stabilizing effect onthe attitude of the orbiter. Thismeans that the on-board crew isable to keep the orbiter stabilizedwith fewer corrective firings of thereaction control rockets (thrusters).Each firing produces an accelerationthat interferes with the microgravityenvironment of the Space Shuttle.
During the fall, no force is at work pulling the water out of the hole. The water and the can fall at thesame rate, just as in the falling elevator example. The water is in the condition of microgravity,experiencing free fall (Vogt and Wargo, Eds., 1992).
The Collaborative Ukrainian Experiment provides many unique opportunities for understanding theeffects of gravity and microgravity on plants.
Punch a small hole in the lower side of the can withthe nail, about 0.75 cm up from the bottom. Hold thecan with one end so that your thumb covers the hole.
Keeping your thumb tightly covering the nail hole, fillthe can with water and position the waste basketbelow. You may wish to stand on a chair to gain ahigher can altitude.
Slide your thumb off the hole so that a stream ofwater is visible to all. Then drop the can. The waterstream stops. Why?
In free fall, gravity's local effects are reduced.

10
The Life Cycle of AstroPlantsWhat are AstroPlants? AstroPlants are a special form of the species Brassica rapa (Wisconsin FastPlants), a member of the mustard or cabbage family Cruciferae. Crucifers are distinguished bycharacteristic flowers with four petals in the form of a cross or crucifix. Other forms of Brassica rapainclude turnips, Chinese cabbage, pak choi and canola. Some related crops in other Brassica speciesare cabbage, broccoli, collard, cauliflower and mustard.
Life Cycle Concepts and QuestionsLife Cycle Concepts and QuestionsLife Cycle Concepts and QuestionsLife Cycle Concepts and QuestionsLife Cycle Concepts and QuestionsBeginning the Life Cycle: Growth, Development and FloweringBeginning the Life Cycle: Growth, Development and FloweringBeginning the Life Cycle: Growth, Development and FloweringBeginning the Life Cycle: Growth, Development and FloweringBeginning the Life Cycle: Growth, Development and FloweringGermination is the awakening of a seed (embryo) from a resting state. It involves the harnessing ofenergy stored within the seed and is activated by components in the environment. Growth representsincrease in size, number and complexity of plant cells and organs. Environment and genetics playfundamental roles in regulating growth. The energy for growth comes from photosynthesis.
Flowering is the initiation of sexual reproduction. The generation of male and female gametes (spermand eggs) is one of the primary functions in flowering. The plant prepares for pollination by producingflowers. Each part of the flower has a specific role to play in sexual reproduction. The flower dictatesthe mating strategy of the species.
• What are the main components of the environment necessary for germination?• How does the seedling orient itself?• What enables the emerging plant to shift its dependency from stored energy to the energy from light?• What is the role of the environment in regulating plant growth?• How do plants grow?• How does a plant know when to produce leaves and when to produce flowers?• Why does a plant have flowers?
PollinationPollinationPollinationPollinationPollinationPollination is the process of mating in plants. In flowers, pollen is delivered to the stigma through awide range of mechanisms that insure an appropriate balance in the genetic makeup of the species.In brassicas, pollen is distributed by bees and other insects. The flower is the device by which theplant recruits the bee. Bees and brassicas have evolved an interdependent relationship.
• How do flower parts function to influence mating behavior?• How does the flower recruit the bee?• How does pollination occur?• How does the flower discriminate between self and nonself in the mix of pollen?
Double Fertilization and Post-Fertilization EventsDouble Fertilization and Post-Fertilization EventsDouble Fertilization and Post-Fertilization EventsDouble Fertilization and Post-Fertilization EventsDouble Fertilization and Post-Fertilization EventsFertilization is the final event in sexual reproduction. In higher plants, two sperm from the pollengrain are involved in fertilization. One fertilizes the egg to produce the zygote and begin the newgeneration. The other sperm combines with the fusion nucleus to produce the special tissue(endosperm) that nourishes the developing embryo. In some plants endosperm nourishes thegerminating seedling. Fertilization also stimulates the growth of the maternal tissue (seed pod or fruit)supporting the developing seed.
• What is unique about fertilization in flowering plants?• What is endosperm and what is its relationship to the embryo?• How does an embryo develop into a seed?• How does the maternal parent contribute to the developing embryo?

11
P =
par
ent
O =
offs
prin
g
P =
fem
ale
=m
ale
P =
mal
e &
fem
ale
A 01
B
23
C 47
D 911
E
13F
15
G
18
H
28-3
5
I
>35J
20 15 10 5 0
Sta
ge
Em
bryo
200X
100X
200X
100X
80X
40X
20X
10X
1X
Day
s af
ter
plan
ting
2+
glob
ular
hear
tto
rped
ow
alki
ngst
ick
mat
ure
Plant height in centimeters
A. q
uies
cenc
e (P
)
B. g
erm
inat
ion
(P)
C. g
row
th a
ndde
velo
pmen
t (P
)
D. g
amet
ogen
esis
(P)
+
&
E. f
low
erin
g an
dpo
llina
tion
(P)
F. g
amet
e m
atur
atio
n (P
)
3
,2
3
+en
dosp
erm
(P
)
+em
bryo
(O &
P)
G. d
oubl
e fe
rtili
zatio
n (P
)
H. f
ruiti
ng (
P)
H. e
mbr
yoge
nesi
s (O
)
Gro
wth
of R
apid
-cyc
ling
Bra
ssic
a ra
pa, R
br
I. s
enes
cenc
e (P
)I.
see
d rip
enin
g (O
& P
)
J. d
eath
(P
)J.
qui
esce
nce
(O)
A. qui
escenc
e (P)
B. ger
minati
on (P)
C. gro
wth an
ddev
elopm
ent (P
)
D. gam
etogen
esis (P
)
= fem
ale
= ma
le= f
emale
& male
P = pa
rent
O = off
spring
Growth
of As
troPla
nts
0000 05555 520202020 20 15151515 15 10101010 10
F. gam
ete ma
turati
on (P)
G. do
uble fe
rtiliza
tion
H. fru
iting (P
) and
embry
ogenes
is (O)
J. dea
th (P)
and
quiese
nce (O
)
200X
100X
200X
100X
80X
40X
20X
10X1X
torped
oglo
bular
walking
stick
full siz
ehea
rt
EMBR
YO
01
23
47
911
1315
1828
-35> 3
5
AAAA ABBBB B
CCCC CDDDD D
EEEE EFFFF F
GGGG GHHHH H
I I I I IJJJJ J
STAGE
Days
after S
owing
Plant Height (in centimeters)
&
(P)
I. sene
scence
(P) a
ndsee
d ripe
ning (O
)
E. flow
ering a
nd pol
linatio
n (P)
+
emb
ryo
(O & P
)
2 +
+
3 , 2
2 +
endosp
erm (P
)

12
Stages in the Life Cycle of AstroPlants: Concepts of DependencyStages in the Life Cycle of AstroPlants: Concepts of DependencyStages in the Life Cycle of AstroPlants: Concepts of DependencyStages in the Life Cycle of AstroPlants: Concepts of DependencyStages in the Life Cycle of AstroPlants: Concepts of Dependency
• independent of theparent and manycomponents of theenvironment
• dependent onenvironment andhealth of the individual
• dependent onenvironment
• dependent on healthyvegetative plant
• dependent on pollencarriers; bees andother insects
• dependent oncompatibility of pollenwith stigma and style
• dependent oncompatibility andhealthy plant
• interdependencyamong developingembryo, endosperm,developing pod andsupporting matureparental plant
• seed is becomingindependent of theparent
• seed (embryo) isindependent of parent,but is dependent onthe pod and theenvironment fordispersal
• suspended growth ofembryo
• awakening of growth
• roots, stems, leaves growrapidly, plant is sexuallyimmature
• gametogenesis —reproductive [male(pollen) and female (egg)]cell production
• pollination — attractingor capturing pollen
• gamete maturation• germination and growth of
pollen tube
• union of gametes• union of sperm (n) and
egg (n) to produce diploidzygote (2n)
• union of sperm (n) andfusion nucleus (2n) toproduce endosperm (3n)
• embryogenesis — growthand development ofendosperm and embryo
• growth of supportingparental tissue of thefruit (pod)
• withering of leaves ofparent plant
• yellowing pods, dryingembryo
• suspension of embryogrowth, development ofseed coat
• drying of all plant parts,dry pods will disperseseeds
StageStageStageStageStage StateStateStateStateState ConditionConditionConditionConditionCondition DependencyDependencyDependencyDependencyDependency• quiescence
(dormantembryo)
• germination
• growth anddevelopment
• flower buddevelopment
• flowering• mating
• pollen growth
• doublefertilization
• developingfruit
• developingendosperm
• developingembryo
• senescence ofparent
• maturationof fruit
• seeddevelopment
• death,desiccation
• seed quiescence
A.A.A.A.A. seed
B.B.B.B.B. germinatingseed
C.C.C.C.C. vegetativegrowth
D.D.D.D.D. immature plant
E.E.E.E.E. mature plant
F.F.F.F.F. mature plant
G.G.G.G.G. mature plant
H.H.H.H.H. mature parentplant plusembryo
I.I.I.I.I. aging parent plant plus maturing
embryo
J.J.J.J.J. dead parentplant plus seed
13
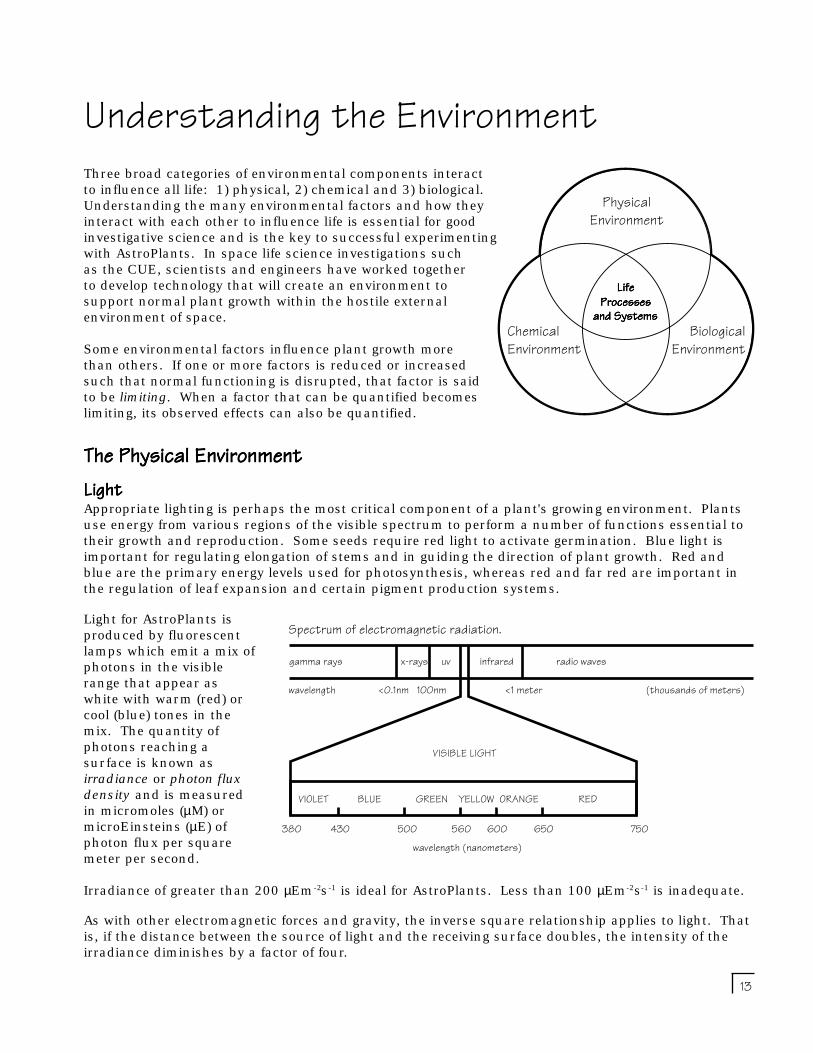
Understanding the EnvironmentThree broad categories of environmental components interactto influence all life: 1) physical, 2) chemical and 3) biological.Understanding the many environmental factors and how theyinteract with each other to influence life is essential for goodinvestigative science and is the key to successful experimentingwith AstroPlants. In space life science investigations suchas the CUE, scientists and engineers have worked togetherto develop technology that will create an environment tosupport normal plant growth within the hostile externalenvironment of space.
Some environmental factors influence plant growth morethan others. If one or more factors is reduced or increasedsuch that normal functioning is disrupted, that factor is saidto be limiting. When a factor that can be quantified becomeslimiting, its observed effects can also be quantified.
The Physical EnvironmentThe Physical EnvironmentThe Physical EnvironmentThe Physical EnvironmentThe Physical EnvironmentLightLightLightLightLightAppropriate lighting is perhaps the most critical component of a plant's growing environment. Plantsuse energy from various regions of the visible spectrum to perform a number of functions essential totheir growth and reproduction. Some seeds require red light to activate germination. Blue light isimportant for regulating elongation of stems and in guiding the direction of plant growth. Red andblue are the primary energy levels used for photosynthesis, whereas red and far red are important inthe regulation of leaf expansion and certain pigment production systems.
Light for AstroPlants isproduced by fluorescentlamps which emit a mix ofphotons in the visiblerange that appear aswhite with warm (red) orcool (blue) tones in themix. The quantity ofphotons reaching asurface is known asirradiance or photon fluxdensity and is measuredin micromoles (µM) ormicroEinsteins (µE) ofphoton flux per squaremeter per second.
Irradiance of greater than 200 µEm-2s-1 is ideal for AstroPlants. Less than 100 µEm-2s-1 is inadequate.
As with other electromagnetic forces and gravity, the inverse square relationship applies to light. Thatis, if the distance between the source of light and the receiving surface doubles, the intensity of theirradiance diminishes by a factor of four.
LifeProcesses
and Systems
Physical
BiologicalChemical
PhysicalEnvironment
ChemicalEnvironment
BiologicalEnvironment
LifeLifeLifeLifeLifeProcessesProcessesProcessesProcessesProcesses
and Systemsand Systemsand Systemsand Systemsand Systems
GREEN YELLOW ORANGE REDBLUEVIOLET
380 430 500 560 600 660 750
VISIBLE LIGHT
gamma rays
wavelength
x-rays
<0.1nm 100nm
uv infrared
<1 meter
radio waves
(thousands of meters)
wavelength (nanometers)
gamma rays x-rays uv infrared radio waves
VISIBLE LIGHT
VIOLET BLUE GREEN YELLOW ORANGE RED
380 430 500 560 600 650 750wavelength (nanometers)
wavelength <0.1nm 100nm <1 meter (thousands of meters)
Spectrum of electromagnetic radiation.

14
If you are using the standard four-foot Fast Plants light bank, you canuse either eight 40 watt cool white or six of the newer 32 watt highefficiency bulbs which will require different fixtures than the 40watt bulbs. Six 32 watt Sylvania Octron® 4100K FO32/741 bulbsspaced within two feet will produce ideal lighting for AstroPlants.
Fluorescent "circle" lamps can be suspended above and willadequately irradiate the plants growing within a circle of 30 cmdiameter (12 inches). The Wisconsin Fast Plants Program has hadthe most successful growth under 30 or 39 watt circular or "folded"circular bulbs.
Reflectors made from aluminum foil or reflective mylar (available from fabric or stationery stores)greatly increase the irradiance reaching the plants, particularly those around the edges of the lamps.Aluminum foil "curtains" (15 cm x 25 cm) taped on the lamp fixture to hang down to about the soillevel will contribute to uniform lighting across the plants.
Formula for growing successful AstroPlants — LIGHTING LIGHTING LIGHTING LIGHTING LIGHTING :
g
o
4
2
2
* red alert - male sterility inducedgetting warm - male and femalereproductive capability reduced
ideal - most plants will floweron timeplants develop more slowly
plants develop very slowly
* temperatures underlight banks
>30˚C / 86˚F*>30˚C / 86˚F*>30˚C / 86˚F*>30˚C / 86˚F*>30˚C / 86˚F*
22 / 7222 / 7222 / 7222 / 7222 / 7218 / 6418 / 6418 / 6418 / 6418 / 64
TemperatureTemperatureTemperatureTemperatureTemperatureThe temperature of the AstroPlants' growingenvironment will have an important influence on thegrowth of your plants. Temperatures that are too highor too low can affect the timing of developmental eventssuch as seedling emergence and flowering. Optimaltemperature is between 22˚C and 28˚C (72˚F to 82˚F).
Tip:- Temperatures can be monitored under each
bank using hi-low thermometers. Notefluctuations in the room temperature andvariation in temperature among light banks.
Tips:- Keeping the AstroPlants under constant 24 hour light will
produce the most satisfactory results. Be sure to makearrangements (with custodians, etc.) so light banks are notturned off at any time.
- Bulbs should be kept 2 cm to 3 cm above the top of theexperimental Plant Growth Chamber lid (page 32). Ideally thegrowing tips of the plants should be kept 5 cm to 10 cm fromthe lights. The height of the Plant Growth Chamber (PGC) lidwill keep your seedlings about 15 cm from the bulbs. This isadequate provided reflective curtains are used.
+ use reflectivefoil curtains
+ keep top of PGC lid2 to 3 cm from the lights
=eight 40 W bulbs or six32 W high efficiency bulbs,lighting 24 hours a day
HealthyHealthyHealthyHealthyHealthyAstroPlantsAstroPlantsAstroPlantsAstroPlantsAstroPlants
28 / 8228 / 8228 / 8228 / 8228 / 82
15
Gravity and MicrogravityGravity and MicrogravityGravity and MicrogravityGravity and MicrogravityGravity and MicrogravityOf the many environmental factors that impact on life, gravity is one that exists on Earth with thegreatest constancy (page 8). Gravity is an environmental factor that is difficult to vary experimentallywithout the support of space technology. Microgravity is what the CUE experiments are all about!
The Soilless Root MediumThe Soilless Root MediumThe Soilless Root MediumThe Soilless Root MediumThe Soilless Root MediumIn the CUE-TSIPS activities, a mixture of one part peat moss and one part vermiculite, known aspeatlite, serves as the root medium that anchors the plant roots, providing support for the stem andleaves. Physical characteristics of the root medium must be such as to provide adequate capillarywicking of water to the absorptive surfaces of the root hairs and epidermal cells, yet there must alsobe adequate channeling within the matrix of the root medium to enable air exchange for oxygendiffusion to the growing roots. Under conditions of unit gravity, peatlite provides ideal capillarity andair channeling for AstroPlants.
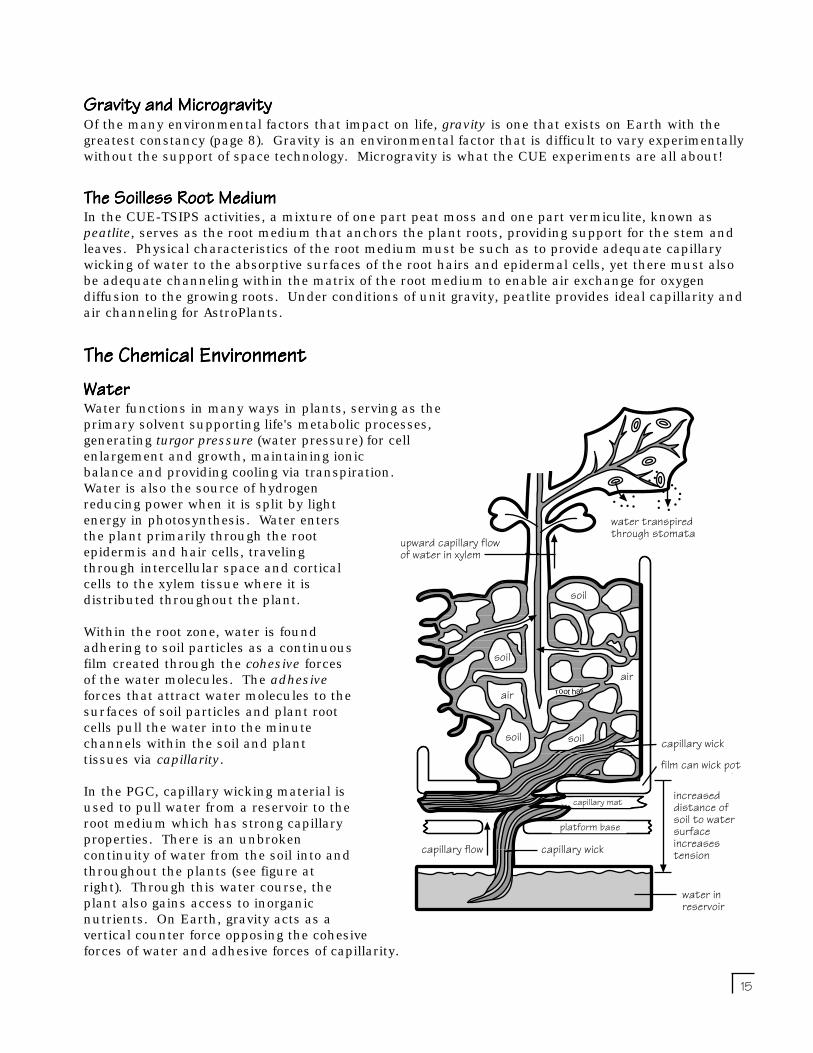
The Chemical EnvironmentThe Chemical EnvironmentThe Chemical EnvironmentThe Chemical EnvironmentThe Chemical EnvironmentWaterWaterWaterWaterWaterWater functions in many ways in plants, serving as theprimary solvent supporting life's metabolic processes,generating turgor pressure (water pressure) for cellenlargement and growth, maintaining ionicbalance and providing cooling via transpiration.Water is also the source of hydrogenreducing power when it is split by lightenergy in photosynthesis. Water entersthe plant primarily through the rootepidermis and hair cells, travelingthrough intercellular space and corticalcells to the xylem tissue where it isdistributed throughout the plant.
Within the root zone, water is foundadhering to soil particles as a continuousfilm created through the cohesive forcesof the water molecules. The adhesiveforces that attract water molecules to thesurfaces of soil particles and plant rootcells pull the water into the minutechannels within the soil and planttissues via capillarity.
In the PGC, capillary wicking material isused to pull water from a reservoir to theroot medium which has strong capillaryproperties. There is an unbrokencontinuity of water from the soil into andthroughout the plants (see figure atright). Through this water course, theplant also gains access to inorganicnutrients. On Earth, gravity acts as avertical counter force opposing the cohesiveforces of water and adhesive forces of capillarity.
soil
airroot hair
soil
soil soil
air
capillary mat
platform base
upwardmovementof water in xylem
transported watervapor throughstomata
capillary wick
film can wick pot
increaseddistance ofsoil to watersurfaceincreasestensioncapillary flow capillary wick
water transpiredthrough stomata
soil
soil soil
airair
increaseddistance ofsoil to watersurfaceincreasestension
capillary matplatform base
capillary wickcapillary flow
upward capillary flowof water in xylem
water inreservoir
soil
capillary wickfilm can wick pot
16
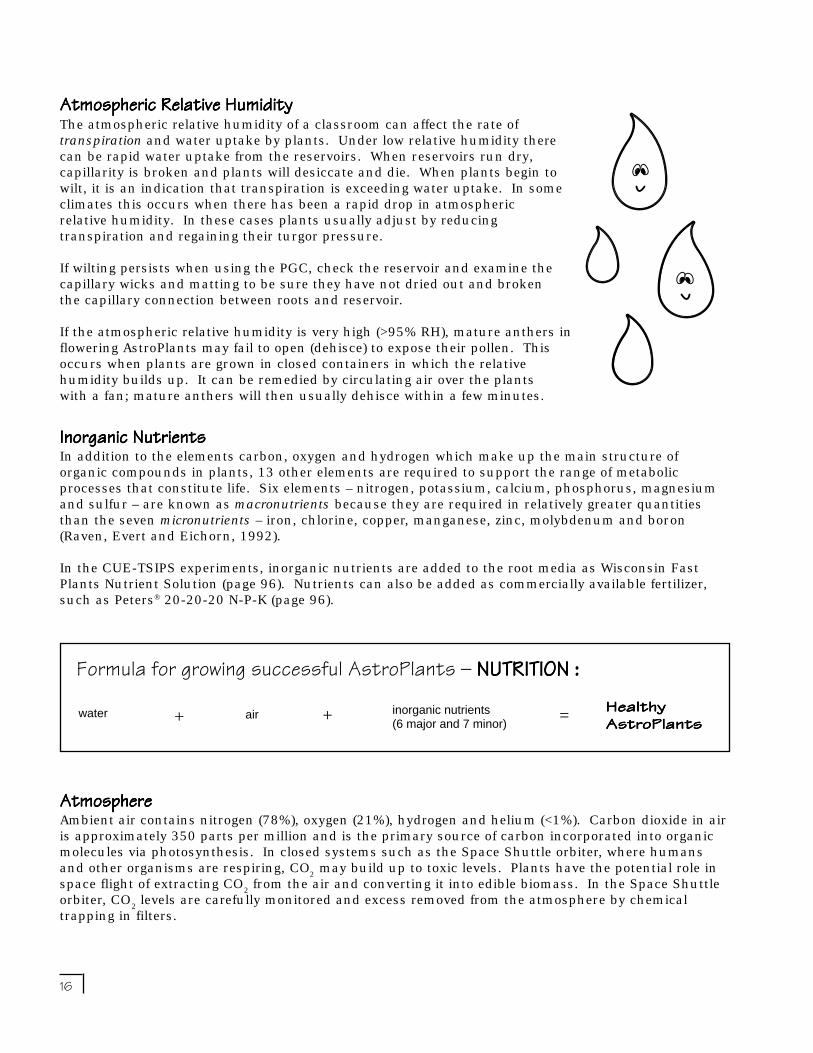
Atmospheric Relative HumidityAtmospheric Relative HumidityAtmospheric Relative HumidityAtmospheric Relative HumidityAtmospheric Relative HumidityThe atmospheric relative humidity of a classroom can affect the rate oftranspiration and water uptake by plants. Under low relative humidity therecan be rapid water uptake from the reservoirs. When reservoirs run dry,capillarity is broken and plants will desiccate and die. When plants begin towilt, it is an indication that transpiration is exceeding water uptake. In someclimates this occurs when there has been a rapid drop in atmosphericrelative humidity. In these cases plants usually adjust by reducingtranspiration and regaining their turgor pressure.
If wilting persists when using the PGC, check the reservoir and examine thecapillary wicks and matting to be sure they have not dried out and brokenthe capillary connection between roots and reservoir.
If the atmospheric relative humidity is very high (>95% RH), mature anthers inflowering AstroPlants may fail to open (dehisce) to expose their pollen. Thisoccurs when plants are grown in closed containers in which the relativehumidity builds up. It can be remedied by circulating air over the plantswith a fan; mature anthers will then usually dehisce within a few minutes.
Inorganic NutrientsInorganic NutrientsInorganic NutrientsInorganic NutrientsInorganic NutrientsIn addition to the elements carbon, oxygen and hydrogen which make up the main structure oforganic compounds in plants, 13 other elements are required to support the range of metabolicprocesses that constitute life. Six elements – nitrogen, potassium, calcium, phosphorus, magnesiumand sulfur – are known as macronutrients because they are required in relatively greater quantitiesthan the seven micronutrients – iron, chlorine, copper, manganese, zinc, molybdenum and boron(Raven, Evert and Eichorn, 1992).
In the CUE-TSIPS experiments, inorganic nutrients are added to the root media as Wisconsin FastPlants Nutrient Solution (page 96). Nutrients can also be added as commercially available fertilizer,such as Peters® 20-20-20 N-P-K (page 96).
AtmosphereAtmosphereAtmosphereAtmosphereAtmosphereAmbient air contains nitrogen (78%), oxygen (21%), hydrogen and helium (<1%). Carbon dioxide in airis approximately 350 parts per million and is the primary source of carbon incorporated into organicmolecules via photosynthesis. In closed systems such as the Space Shuttle orbiter, where humansand other organisms are respiring, CO
2 may build up to toxic levels. Plants have the potential role in
space flight of extracting CO2 from the air and converting it into edible biomass. In the Space Shuttle
orbiter, CO2 levels are carefully monitored and excess removed from the atmosphere by chemical
trapping in filters.
Formula for growing successful AstroPlants — NUTRITION :NUTRITION :NUTRITION :NUTRITION :NUTRITION :water =++ air
HealthyHealthyHealthyHealthyHealthyAstroPlantsAstroPlantsAstroPlantsAstroPlantsAstroPlantsinorganic nutrients
(6 major and 7 minor)
17
The Biological EnvironmentThe Biological EnvironmentThe Biological EnvironmentThe Biological EnvironmentThe Biological EnvironmentTypes of OrganismsTypes of OrganismsTypes of OrganismsTypes of OrganismsTypes of OrganismsThere can be many types of organisms associated with the plant's environment, from algae to insects.These organisms may reside together in various symbiotic relationships, from mutually beneficial toparasitic (one partner benefits) and even pathogenic (one partner harms the other). Some symbiosesmay be strictly neutral. Controlling undesirable organisms in the plants' environment requirescontinuous attention. Possible residents include:
• various soil microflora (bacteria, fungi) and microfauna(nematodes, worms, insect larvae) which may colonizethe root zone or rhizosphere;
• phytophagous (plant-eating) arthropods which may befound on stems, leaves and flowers (mites, thrips, aphids,leaf-eating beetles, moth and butterfly larvae);
• the larvae of fungus-eating (mycophagous) flies which may exist in large numbers, emergingfrom the root medium and water mat as small black gnats; and
• various algal populations which may live on the moist root media, capillary wicking materialand in the nutrient solution reservoirs. Most common are blue-green algae (cyanobacteria) onroot media and mat surfaces and green algae in reservoirs.
Controlling Undesirable OrganismsControlling Undesirable OrganismsControlling Undesirable OrganismsControlling Undesirable OrganismsControlling Undesirable OrganismsFungi and Bacteria: Fungi and bacteria rarely attack the above-ground parts of plants as long as therelative humidity is less than 95% and there is good air flow. The best control for fungi and bacteria issanitation. Be sure to use pathogen-free root media – most commercially available peatlite mixturesare sanitized and pathogen-free. Keep the root media well aerated and drained by not packing it in thegrowing containers. After growing, it is important to rinse, then soak all pots, reservoirs, capillarymats and wicks for at least 30 minutes in a 10% chlorine bleach solution. Do not reuse root media.
Insect Pests: The continuously illuminated plants can be attractiveto many insects, especially at night. Daily surveillance and removal ofinsects is good practice. Sticky yellow pest control cards work well totrap incoming insects and flies emerging from the soil. The stickystrips available from garden stores can be cut and stapled to bamboogrilling skewers and mounted in film cans filled with sand and placedamong the plants. These are very effective for white flies, aphids,fungus gnats and thrips.
If colonies of aphids, white flies or thrips appear or evidence of larvalfeeding is observed (holes chewed in leaves or flowers), plants may besprayed with insecticidal soap or another safe chemical control agent.Read labels carefully before applying chemicals. Surveillance andcareful removal by hand is the best control practice.
Algae: The most common residents with AstroPlants are algae. Mostdo not affect plant growth but can become unsightly and occasionallywill build up in reservoirs and wicking to consume nutrients andretard water flow. Algae growth can be suppressed by adding coppersulfate (CuSO4•5H2O) to the nutrient solution at a final concentration inthe reservoir of between 50 and 100 parts per million (milligrams/liter).
4 cm
10 cm
2ysas
bgs
ffs
4 cm
10 cm
bamboogrillingskewer
film canfilled withsand
stickystripstapledaroundskewer
18
CUE-TSIPS Science and TechnologyScience begins when a person of any age is curious about something and begins to question andexplore the relationships of a phenomenon to his or her understanding of the world. The scientificprocess begins with an observation and questions and proceeds through a process of inquiry involvingexploration, investigation, experimentation and analysis, and communication and persuasion. Thatprocess engages the creative energy of the individual and leads to deeper understanding, a sense ofpleasure and increased self-worth. Even young children quite naturally say: "Look what I found!"
Dr. Mary Musgrave and Dr. Antonina Popova are successful scientists who are curious about thegrowth of plants in space. Their interest is broad, but the questions they are asking in the CUE arevery specific. They are successful as scientists because they pay a great deal of attention to the detailsof the questions they ask and to the design and execution of the experiments they have run to testtheir questions. They are both analytical and critical in their approach to the science they do; beforethey accept an answer to their questions, they want rigorous proof that there are not more plausiblealternatives. Indeed, many scientists believe that they come closest to an understanding of what istrue through an exhaustive quest which seeks, yet fails, to disprove a hypothesis. This chapter dealswith many of the essentials that will lead you and your students through the discipline and pleasureof good science.
As the result of microgravity experiments run on previous missions from the former USSR, from theRussian, Ukrainian and U.S. space programs, in which the gravitational force was about one milliontimes less than on Earth, Drs. Musgrave and Popova have observed various abnormal growth anddevelopmental phenomena in plants. The CUE B-STIC experiments are designed to address aspects ofthe more specific question: what developmental events during pollination, fertilization and embryodevelopment fail to occur normally in the microgravity environment?
Science is All About QuestionsScience is All About QuestionsScience is All About QuestionsScience is All About QuestionsScience is All About QuestionsAs you and your students proceed with the CUE-TSIPS activities, you will be progressing through thestages illustrated in the Science Exploration Flowchart (page 20). The following questions aredesigned to assist you. Remember the power of writing as an assistance to learning. Have yourstudents pose questions and answers, document ideas and diagram relationships.
1. What do you observe?
2. What is your question about your observations? What is the questionyou are exploring?
3. How would you convert the question into an assertion, which is theidea you are experimentally testing (your hypothesis)?
- Can you also write this as a null hypothesis in which you may state thehypothesis having the opposite, or null, outcome?
4. What variable will you change in your tests? What is your treatment?What potential variables will remain constant?
5. What are your control treatments? How will each serve as a control?
6. How many observations for each result are enough? Is n = 1 enough to berepresentative? If not, what is enough? Why?

19
7. Is there any special experimental design of the treatments and/orreplicates needed in the experiment?
8. What equipment, tools, etc., will you need for your experiment?
- Draw your experimental set-up.
9. What form will your observations take? How will you describeor measure your observations?
- Use descriptors, comparators, scales and quantitative estimates.
Identifying a needIdentifying a needIdentifying a needIdentifying a needIdentifying a needYou have a problem
Defining the needDefining the needDefining the needDefining the needDefining the needDescribing the problem
Inventing a solution:Inventing a solution:Inventing a solution:Inventing a solution:Inventing a solution:Designing, describing, drawing
Can you think of a wayto solve the problem?
Constructing the invention:Constructing the invention:Constructing the invention:Constructing the invention:Constructing the invention:Making and describing, accessing and
assessing resources as neededCan you construct a tool,
equipment or methodto solve the problem?
Testing the invention:Testing the invention:Testing the invention:Testing the invention:Testing the invention:Effectiveness, efficiency,
accuracy, precisionWill your invention work?
Verifying the testVerifying the testVerifying the testVerifying the testVerifying the testof the invention:of the invention:of the invention:of the invention:of the invention:Effectiveness, reliabilityHow well did it work?
Communicating the resultsCommunicating the resultsCommunicating the resultsCommunicating the resultsCommunicating the results
Technology Innovation FlowchartTechnology Innovation FlowchartTechnology Innovation FlowchartTechnology Innovation FlowchartTechnology Innovation Flowchart
How will you tell othersof your invention?
10. How will you record or tabulateyour data?
11. How will you organize your data?How will you display your data?
- Use statistical summarization.
12. What is your conclusion relativeto your hypothesis? What furtherconclusions can you draw fromyour analysis of your experiment?
13. What other questions come toyour mind as the result of thisexperiment?
14. What is the next experiment thatyou plan to run? Why?
The Science-Technology PartnershipThe Science-Technology PartnershipThe Science-Technology PartnershipThe Science-Technology PartnershipThe Science-Technology PartnershipAs students design and execute experiments theneed for technological assistance from tools andequipment is ever-present, from the moment ofthe first observation to the time when newinsight is shared with someone across the oceanor across the classroom. Technologicalinnovation, like science, follows a logicalprogression, resulting in a successful inventionand its application to a need or problem.
20
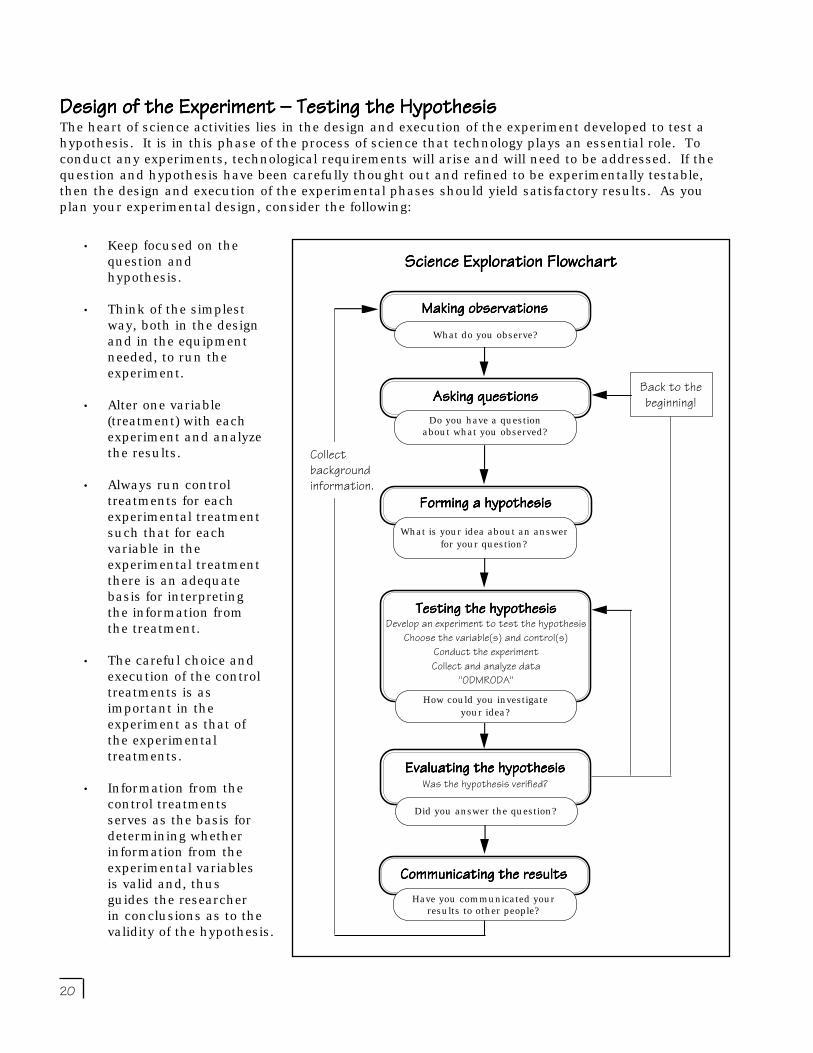
Design of the Experiment — Testing the HypothesisDesign of the Experiment — Testing the HypothesisDesign of the Experiment — Testing the HypothesisDesign of the Experiment — Testing the HypothesisDesign of the Experiment — Testing the HypothesisThe heart of science activities lies in the design and execution of the experiment developed to test ahypothesis. It is in this phase of the process of science that technology plays an essential role. Toconduct any experiments, technological requirements will arise and will need to be addressed. If thequestion and hypothesis have been carefully thought out and refined to be experimentally testable,then the design and execution of the experimental phases should yield satisfactory results. As youplan your experimental design, consider the following:
• Keep focused on thequestion andhypothesis.
• Think of the simplestway, both in the designand in the equipmentneeded, to run theexperiment.
• Alter one variable(treatment) with eachexperiment and analyzethe results.
• Always run controltreatments for eachexperimental treatmentsuch that for eachvariable in theexperimental treatmentthere is an adequatebasis for interpretingthe information fromthe treatment.
• The careful choice andexecution of the controltreatments is asimportant in theexperiment as that ofthe experimentaltreatments.
• Information from thecontrol treatmentsserves as the basis fordetermining whetherinformation from theexperimental variablesis valid and, thusguides the researcherin conclusions as to thevalidity of the hypothesis.
Testing the hypothesisTesting the hypothesisTesting the hypothesisTesting the hypothesisTesting the hypothesisDevelop an experiment to test the hypothesis
Choose the variable(s) and control(s)Conduct the experimentCollect and analyze data
"ODMRODA"
Forming a hypothesisForming a hypothesisForming a hypothesisForming a hypothesisForming a hypothesisWhat is your idea about an answer
for your question?
Do you have a questionabout what you observed?
Making observationsMaking observationsMaking observationsMaking observationsMaking observationsWhat do you observe?
Collectbackgroundinformation.
Back to thebeginning!
Science Exploration FlowchartScience Exploration FlowchartScience Exploration FlowchartScience Exploration FlowchartScience Exploration Flowchart
Asking questionsAsking questionsAsking questionsAsking questionsAsking questions
Evaluating the hypothesisEvaluating the hypothesisEvaluating the hypothesisEvaluating the hypothesisEvaluating the hypothesisWas the hypothesis verified?
Did you answer the question?
Communicating the resultsCommunicating the resultsCommunicating the resultsCommunicating the resultsCommunicating the results
How could you investigateyour idea?
Have you communicated yourresults to other people?

21
Execution of the Experimental InvestigationExecution of the Experimental InvestigationExecution of the Experimental InvestigationExecution of the Experimental InvestigationExecution of the Experimental InvestigationBelow are some of the activities involved in the experimental investigation of an hypothesis. For yourinvestigations, use :
MMRRD
OD
O
A
OOOOObserve and DDDDDescribe:Using your eyes and other tools to assist in observation (lenses,microscopes, etc.) together with insight from your brain, observevarious phenomena or characteristics associated with theexperiment and determine the way that you will describe them.
MMMMMeasure and RRRRRecord :Using tools and devices (eyes, brain, rulers, scales, comparatorsand experience), measure (quantify) and record numeric anddescriptive characteristics as data. Estimate, count or comparewhat you observe while adhering to an understanding of theprecepts of accuracy and precision.
OOOOOrganize and DDDDDisplay:Organize and display recorded data in various ways (tables, charts,graphs, diagrams, drawing, photographs, videos, audios,multimedia, etc.) that will provide insight into phenomenaassociated with the experiment.
AAAAAnalyze:Observe the data displays (tables, graphs, etc.) for comparisonsamong treatments, including controls. Apply statistical analysis tothe data that provides information from which to derive anddevelop inferential insight that will be useful in the evaluation ofthe hypothesis.
DO
A
OD"ODMRODA"
22
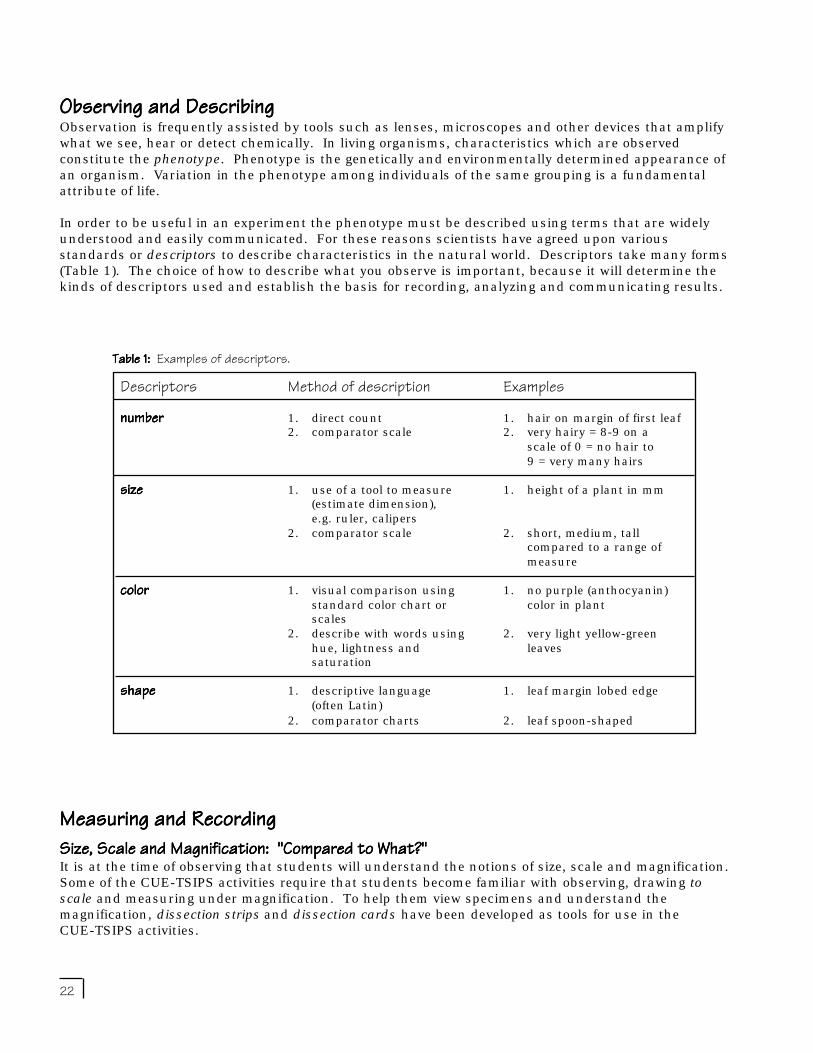
Observing and DescribingObserving and DescribingObserving and DescribingObserving and DescribingObserving and DescribingObservation is frequently assisted by tools such as lenses, microscopes and other devices that amplifywhat we see, hear or detect chemically. In living organisms, characteristics which are observedconstitute the phenotype. Phenotype is the genetically and environmentally determined appearance ofan organism. Variation in the phenotype among individuals of the same grouping is a fundamentalattribute of life.
In order to be useful in an experiment the phenotype must be described using terms that are widelyunderstood and easily communicated. For these reasons scientists have agreed upon variousstandards or descriptors to describe characteristics in the natural world. Descriptors take many forms(Table 1). The choice of how to describe what you observe is important, because it will determine thekinds of descriptors used and establish the basis for recording, analyzing and communicating results.
Descriptors Method of description Examplesnumbernumbernumbernumbernumber 1. direct count 1. hair on margin of first leaf
2. comparator scale 2. very hairy = 8-9 on ascale of 0 = no hair to9 = very many hairs
sizesizesizesizesize 1. use of a tool to measure 1. height of a plant in mm(estimate dimension),e.g. ruler, calipers
2. comparator scale 2. short, medium, tallcompared to a range ofmeasure
colorcolorcolorcolorcolor 1. visual comparison using 1. no purple (anthocyanin)standard color chart or color in plantscales
2. describe with words using 2. very light yellow-greenhue, lightness and leavessaturation
shapeshapeshapeshapeshape 1. descriptive language 1. leaf margin lobed edge(often Latin)
2. comparator charts 2. leaf spoon-shaped
Table 1: Table 1: Table 1: Table 1: Table 1: Examples of descriptors.
Measuring and RecordingMeasuring and RecordingMeasuring and RecordingMeasuring and RecordingMeasuring and RecordingSize, Scale and Magnification: "Compared to What?"Size, Scale and Magnification: "Compared to What?"Size, Scale and Magnification: "Compared to What?"Size, Scale and Magnification: "Compared to What?"Size, Scale and Magnification: "Compared to What?"It is at the time of observing that students will understand the notions of size, scale and magnification.Some of the CUE-TSIPS activities require that students become familiar with observing, drawing toscale and measuring under magnification. To help them view specimens and understand themagnification, dissection strips and dissection cards have been developed as tools for use in theCUE-TSIPS activities.
23
0 1 2 3 4 5 cm
012345 cm
0 1 2 3 4 5cm
012345cm
Much of the emphasis in the supplemental activity "Getting Acquainted with a Seed" (page 67) isdesigned to familiarize students with the use of lenses and scales. As they draw and measure whatthey observe under different magnifications, students will begin to understand size relationships.Drawing to scale requires practice and sharpens students' hand-eye coordination and sense ofperspective and scale. This understanding will be useful to them as they undertake more detaileddissection of AstroPlants embryos.
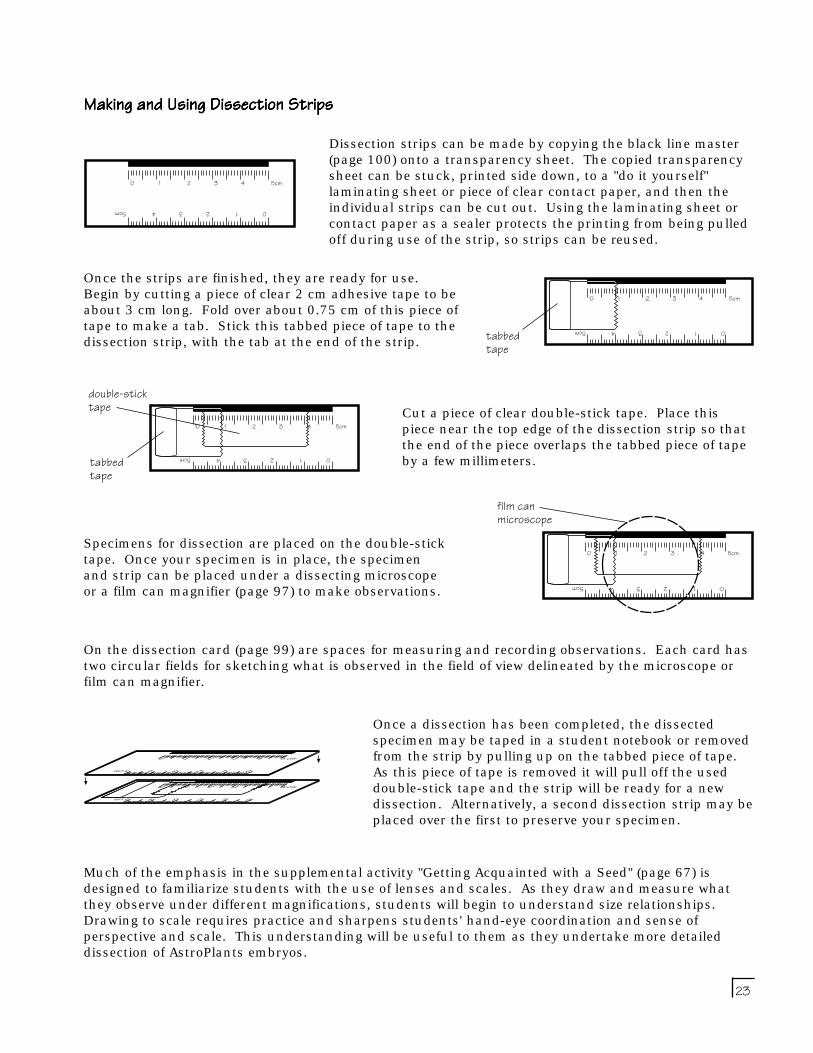
Making and Using Dissection StripsMaking and Using Dissection StripsMaking and Using Dissection StripsMaking and Using Dissection StripsMaking and Using Dissection Strips
0 1 2 3 4 5 cm
012345 cm
0 1 2 3 4 5cm
012345cm
Once the strips are finished, they are ready for use.Begin by cutting a piece of clear 2 cm adhesive tape to beabout 3 cm long. Fold over about 0.75 cm of this piece oftape to make a tab. Stick this tabbed piece of tape to thedissection strip, with the tab at the end of the strip.
0 1 2 3 4 5 cm
012345 cm
0 1 2 3 4 5cm
012345cm
Cut a piece of clear double-stick tape. Place thispiece near the top edge of the dissection strip so thatthe end of the piece overlaps the tabbed piece of tapeby a few millimeters.
Dissection strips can be made by copying the black line master(page 100) onto a transparency sheet. The copied transparencysheet can be stuck, printed side down, to a "do it yourself"laminating sheet or piece of clear contact paper, and then theindividual strips can be cut out. Using the laminating sheet orcontact paper as a sealer protects the printing from being pulledoff during use of the strip, so strips can be reused.
On the dissection card (page 99) are spaces for measuring and recording observations. Each card hastwo circular fields for sketching what is observed in the field of view delineated by the microscope orfilm can magnifier.
Specimens for dissection are placed on the double-sticktape. Once your specimen is in place, the specimenand strip can be placed under a dissecting microscopeor a film can magnifier (page 97) to make observations.
double-sticktape
tabbedtape
tabbedtape
film canmicroscope
0 1 2 3 4 5 cm
012345 cm
0 1 2 3 4 5cm
012345cm
Once a dissection has been completed, the dissectedspecimen may be taped in a student notebook or removedfrom the strip by pulling up on the tabbed piece of tape.As this piece of tape is removed it will pull off the useddouble-stick tape and the strip will be ready for a newdissection. Alternatively, a second dissection strip may beplaced over the first to preserve your specimen.
0 1 2 3 4 5 cm
012345 cm
0 1 2 3 4 5 cm
012345 cm
0 1 2 3 4 5 cm
012345 cm

24
Dealing with Variation: The Nature of NormalDealing with Variation: The Nature of NormalDealing with Variation: The Nature of NormalDealing with Variation: The Nature of NormalDealing with Variation: The Nature of NormalMeasurable differences will be found among individuals in a group or population. It is thereforeimportant to know how much variation in a particular phenotype (observable trait) might be expectedso that it can be determined whether the variation observed experimentally may be viewed as normalfor that population. Normal would be defined as that range of potential phenotypes that a populationwould exhibit in a specified range of environmental conditions.
The species Brassica rapa, of which AstroPlants are a specially bred stock, is inherently geneticallyvariable. Within a population of AstroPlants one can observe considerable phenotypic variation insome traits such as plant height or intensity of purple stem color. For this reason, it is important todetermine what is a normal range of phenotypes for AstroPlants.
Organizing and Displaying Data: Graphical RepresentationOrganizing and Displaying Data: Graphical RepresentationOrganizing and Displaying Data: Graphical RepresentationOrganizing and Displaying Data: Graphical RepresentationOrganizing and Displaying Data: Graphical RepresentationWhen, for example, the heights of apopulation of 48 AstroPlants aremeasured in millimeters at Day 10 andrecorded (Table 2), considerable variationcan be noted. Height is measured fromsoil level to shoot apex.
The "Stem and Leaf Table"The "Stem and Leaf Table"The "Stem and Leaf Table"The "Stem and Leaf Table"The "Stem and Leaf Table"Simply listed as a set of 48 numbers,relatively little information can be gainedfrom them other than to note that theyare variable. An easy way to begin toorganize the numbers is to put them intowhat is commonly known as a stem andleaf table (Table 3).
To do this, note that each number isbroken into "tens" and "digits." Examineeach number, breaking it into its tensand digits, e.g., 48 becomes 4 (tens) and8 (digits). Make a vertical column "stem"listing from zero to 9 that represents thetens. Then enter the digit from eachnumber in the horizontal row "leaf"corresponding to the appropriate ten orstem position; e.g., 48 is listed as an 8in row 4 in Table 3. Numbers in therange from 10 to 19 go in the "1" row,while numbers in the range from 20 to29 go in the "2" row, etc.
Considerable information about the population of 48 plants begins to become apparent from the stemand leaf table. For example, it can be observed that the most plant heights in this data set fit into the"4" stem. The numbers representing the plant heights in the population are a set of size 48 (n = 48).
digits, "leaf"tens, 0"stem" 1 8
2 7, 5, 13 3, 0, 2, 9, 7, 3, 9, 5, 2, 64 8, 3, 0, 7, 3, 9, 1, 4, 5, 5, 5, 1, 0, 85 0, 2, 3, 4, 9, 5, 7, 6, 1, 5, 2, 06 2, 0, 6, 87 2, 6, 38 49
Table 3:Table 3:Table 3:Table 3:Table 3: AstroPlant height data from Table 2 organized into astem and leaf table.
33 40 32 59 18 45 73 21
49 52 60 55 33 56 32 52
50 84 54 25 57 45 68 41
43 53 43 76 49 39 36 50
62 27 66 39 41 51 55 41
30 47 72 37 44 35 45 48
Table 2:Table 2:Table 2:Table 2:Table 2: Height, in mm, of 48 AstroPlants measuredat Day 10 (hypothetical data).
25
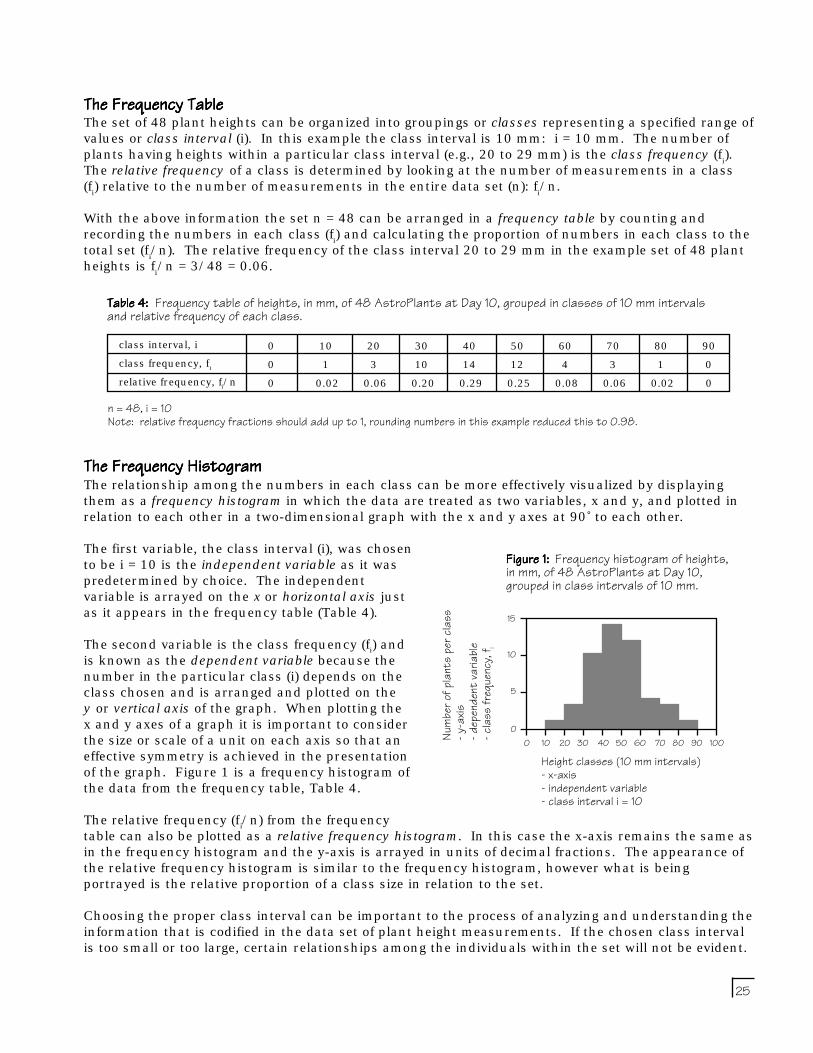
The Frequency TableThe Frequency TableThe Frequency TableThe Frequency TableThe Frequency TableThe set of 48 plant heights can be organized into groupings or classes representing a specified range ofvalues or class interval (i). In this example the class interval is 10 mm: i = 10 mm. The number ofplants having heights within a particular class interval (e.g., 20 to 29 mm) is the class frequency (f
i).
The relative frequency of a class is determined by looking at the number of measurements in a class(f
i) relative to the number of measurements in the entire data set (n): f
i/n.
With the above information the set n = 48 can be arranged in a frequency table by counting andrecording the numbers in each class (f
i) and calculating the proportion of numbers in each class to the
total set (fi/n). The relative frequency of the class interval 20 to 29 mm in the example set of 48 plant
heights is fi/n = 3/48 = 0.06.
The Frequency HistogramThe Frequency HistogramThe Frequency HistogramThe Frequency HistogramThe Frequency HistogramThe relationship among the numbers in each class can be more effectively visualized by displayingthem as a frequency histogram in which the data are treated as two variables, x and y, and plotted inrelation to each other in a two-dimensional graph with the x and y axes at 90˚ to each other.
The first variable, the class interval (i), was chosento be i = 10 is the independent variable as it waspredetermined by choice. The independentvariable is arrayed on the x or horizontal axis justas it appears in the frequency table (Table 4).
The second variable is the class frequency (fi) andis known as the dependent variable because thenumber in the particular class (i) depends on theclass chosen and is arranged and plotted on they or vertical axis of the graph. When plotting thex and y axes of a graph it is important to considerthe size or scale of a unit on each axis so that aneffective symmetry is achieved in the presentationof the graph. Figure 1 is a frequency histogram ofthe data from the frequency table, Table 4.
The relative frequency (fi/n) from the frequencytable can also be plotted as a relative frequency histogram. In this case the x-axis remains the same asin the frequency histogram and the y-axis is arrayed in units of decimal fractions. The appearance ofthe relative frequency histogram is similar to the frequency histogram, however what is beingportrayed is the relative proportion of a class size in relation to the set.
Choosing the proper class interval can be important to the process of analyzing and understanding theinformation that is codified in the data set of plant height measurements. If the chosen class intervalis too small or too large, certain relationships among the individuals within the set will not be evident.
0 10 20 30 40 50 60 70 80 90
0 1 3 10 14 12 4 3 1 0
0 0.02 0.06 0.20 0.29 0.25 0.08 0.06 0.02 0
class interval, i
class frequency, fi
relative frequency, fi/n
Table 4:Table 4:Table 4:Table 4:Table 4: Frequency table of heights, in mm, of 48 AstroPlants at Day 10, grouped in classes of 10 mm intervalsand relative frequency of each class.
n = 48, i = 10Note: relative frequency fractions should add up to 1, rounding numbers in this example reduced this to 0.98.
15
10
5
00 0 20 30 40 50 60 70 80 90
Height classes (10 mm intervals)- x-axis- independent variable- class interval i = 10
Figure 1:Figure 1:Figure 1:Figure 1:Figure 1: Frequency histogram of heights,in mm, of 48 AstroPlants at Day 10,grouped in class intervals of 10 mm.
10
15
5
0Number
of pla
nts pe
r class
- y-axi
s- d
epende
nt var
iable
- class
freque
ncy, f i
0 10 20 30 40 50 60 70 80 90 100

26
For example if a class interval of i = 25 rather than i = 10were chosen then the frequency histogram would appearas in Figure 2 or if a class interval of i = 2 were selectedthe frequency histogram would appear as in Figure 3.
The Normal CurveThe Normal CurveThe Normal CurveThe Normal CurveThe Normal CurveThe outline of a frequency histogram roughly depictsa curve known as a frequency curve. Frequencycurves can assume various different shapes.Interpretation of the shapes can give insight intounderlying phenomena conditioning the expressionof the phenotype's contribution to the curve. Forinstance, the data on plant height recorded in thedata chart (Table 2), organized in a frequency table(Table 4), and displayed in the frequency histogram(Figure 4) depicts what is referred to as the normaldistribution curve or the normal curve. A bell-shapednormal distribution is commonly observed for manyphenomena and is the basis for certain kinds ofstatistical summarization and interpretation.
Organizing and Displaying Data: Numerical RepresentationOrganizing and Displaying Data: Numerical RepresentationOrganizing and Displaying Data: Numerical RepresentationOrganizing and Displaying Data: Numerical RepresentationOrganizing and Displaying Data: Numerical Representation
rrrrrRangeRangeRangeRangeRangeThere are various ways of describing or summarizing the variation in heights of the 10day old AstroPlants recorded in Table 2 and displayed in Figure 4. One way is in termsof range (r). Range extends from the shortest plant to the tallest plant and is defined as:"r = the difference between the largest and smallest numbers in a set of data." Hereagain the stem and leaf diagram is useful in identifying the range, r = 84 - 18 = 66 mm.The range identifies the upper and lower limits of a data set and is helpful indetermining the limits of the x-axis on a graph. When measuring a population ofAstroPlants over several days of growth it is interesting to observe what happens to therange of plant heights. Does the range stay the same, decrease or increase? Why?
30
20
10
00 25 10050 750 25 50 75 100Height classes (25 mm intervals)
0
10
20
30
Number
or pla
nts pe
r class
Figure 2:Figure 2:Figure 2:Figure 2:Figure 2: Frequency histogram ofheights, in mm, of 48 AstroPlants at Day10, grouped in class intervals of 25 mm.
4
00 10 10020 30
3
2
1
40 50 60 70 80 90
43210Num
ber of
plants
per cl
ass
0 10 20 30 40 50 60 70 80 90 100Height classes (2 mm intervals)
Figure 3:Figure 3:Figure 3:Figure 3:Figure 3: Frequency histogram of heights, in mm, of 48AstroPlants at Day 10, grouped in class intervals of 2 mm.
15
10
5
00 0 20 30 40 50 60 70 80 90
15
10
5
00 10 20 30 40 50 60 70 80 90 100
Height classes (10 mm intervals)
Number
of pla
nts pe
r class
Figure 4:Figure 4:Figure 4:Figure 4:Figure 4: Frequency histogram of heights,in mm, of 48 AstroPlants at Day 10,grouped in class intervals of 10 mm.
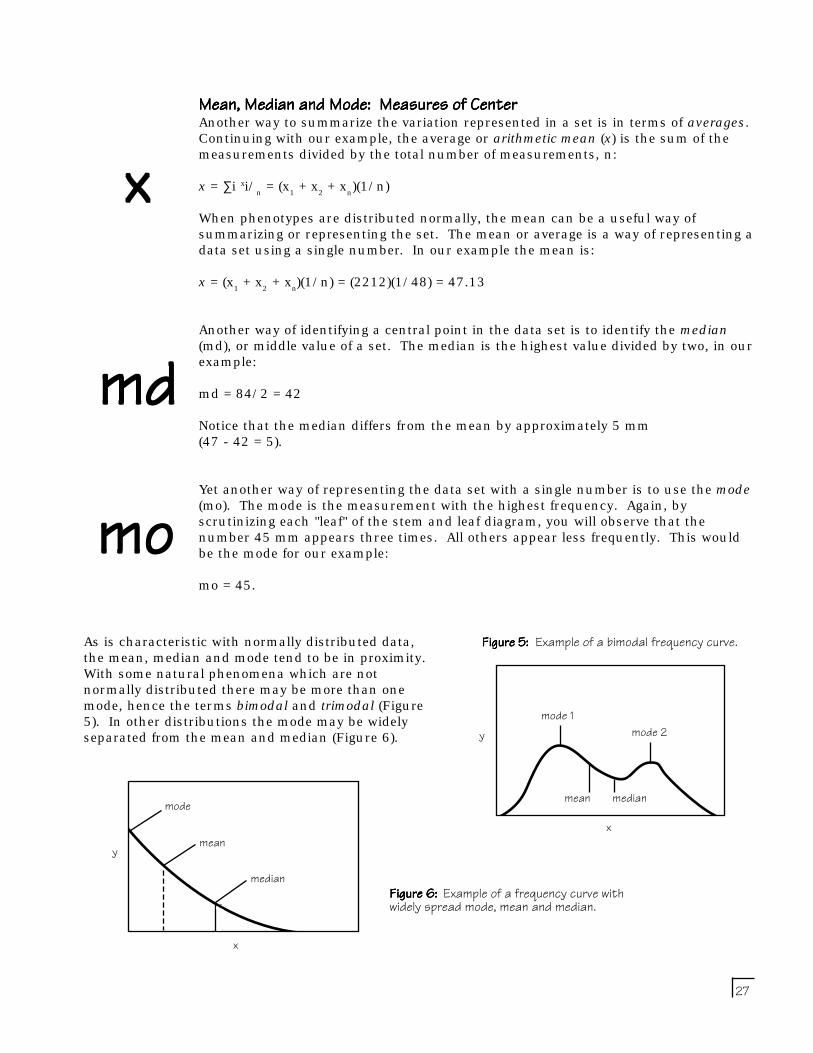
27
Mean, Median and Mode: Measures of CenterMean, Median and Mode: Measures of CenterMean, Median and Mode: Measures of CenterMean, Median and Mode: Measures of CenterMean, Median and Mode: Measures of CenterAnother way to summarize the variation represented in a set is in terms of averages.Continuing with our example, the average or arithmetic mean (x) is the sum of themeasurements divided by the total number of measurements, n:
x = ∑i xi/n = (x
1 + x
2 + x
n)(1/n)
When phenotypes are distributed normally, the mean can be a useful way ofsummarizing or representing the set. The mean or average is a way of representing adata set using a single number. In our example the mean is:
x = (x1 + x
2 + x
n)(1/n) = (2212)(1/48) = 47.13
Another way of identifying a central point in the data set is to identify the median(md), or middle value of a set. The median is the highest value divided by two, in ourexample:
md = 84/2 = 42
Notice that the median differs from the mean by approximately 5 mm(47 - 42 = 5).
Yet another way of representing the data set with a single number is to use the mode(mo). The mode is the measurement with the highest frequency. Again, byscrutinizing each "leaf" of the stem and leaf diagram, you will observe that thenumber 45 mm appears three times. All others appear less frequently. This wouldbe the mode for our example:
mo = 45.
xxxxx
mdmdmdmdmdmomomomomo
As is characteristic with normally distributed data,the mean, median and mode tend to be in proximity.With some natural phenomena which are notnormally distributed there may be more than onemode, hence the terms bimodal and trimodal (Figure5). In other distributions the mode may be widelyseparated from the mean and median (Figure 6).
mode
mean
median
x
y
mode
mean
x
y
Figure 6:Figure 6:Figure 6:Figure 6:Figure 6: Example of a frequency curve withwidely spread mode, mean and median.median
Figure 5:Figure 5:Figure 5:Figure 5:Figure 5: Example of a bimodal frequency curve.
median
x
mean
mode 1mode 2ymode 2
mode 1
x
y
mean median

28
number in set n = 48
range r = 66 mm
mean x = 47.13 mm
standard deviation s = 14.27 mm
Standard Deviation and VarianceStandard Deviation and VarianceStandard Deviation and VarianceStandard Deviation and VarianceStandard Deviation and VarianceAlthough the mean is probably the most useful value in representing a set of measurements, the meandoes not give an indication of the way in which the values of the set are distributed around the mean.In other words, how the shape of the bell in the normal frequency curve appears. The standarddeviation (s) is a statistical notation that provides an indication of whether the measures of phenotypeare widely distributed around the mean. When s is relatively high the normal curve is broad; when sis low the curve is relatively narrow, or tightly distributed around the mean (Figure 7).
Figure 7:Figure 7:Figure 7:Figure 7:Figure 7: Example of normally distributedfrequency curves depicting high A and low Bstandard deviations.
x
A, low s
B, high s
mean
y
x SB SA
A, low smean
x
y
Statistical SummariesStatistical SummariesStatistical SummariesStatistical SummariesStatistical SummariesFor our data set of 48 height measures of 10 day old AstroPlants, the summarized statistical data aregiven in Table 5.
From the statistical summaries and graphicaldisplays of the data sets you and your students willbe able to better understand the variation that willbecome evident in all aspects of the CUE-TSIPSinvestigations. Throughout, the activities ofmeasuring and recording, organizing and displayingare important. In order to communicate yourobservations, results and conclusions effectivelywith others, it is important that you compare thesame sorts of data in the same terms of reference. The CUE-TSIPS activities have been designed sothat your students will be able to share their data with others and generate discussion of their results.
Data Sheets and TablesData Sheets and TablesData Sheets and TablesData Sheets and TablesData Sheets and TablesData sheets or tables need to be organized so as to receive descriptive information in a logical andorderly manner that will minimize the likelihood of entry errors and that will aid in latersummarization and analysis. For each activity, examples of student and class data sheets have beenprovided. With most of the experiments, the data sheets also contain columns for data summationand statistical analyses. Calculators with graphical capabilities may be useful to students inanalyzing data.
Table 5:Table 5:Table 5:Table 5:Table 5: Statistical summary of height dataof 48 AstroPlants from Table 2.
sB sA
B, high s
The standard deviation is the square root of the variance (s2), which is the sum ofthe squared deviations of each value from the mean x divided by n-1, the set sizeminus one.
Though the standard deviation isa tedious calculation to makewith a pencil and paper, mosthand calculators with astatistical capability will havefunctions that automaticallyprovide the mean (x), variance(s2) and standard deviation (s).
s2 = ∑i (x1 - x)2
n-1sssss

29
Day das dap Subject Areas ActivityT minus – – - construct the life support4-2 weeks system (light bank)
T minus – – - prelude to planting - "Getting Acquainted with a Seed"10 days (page 67)
T minus – – - germination - Germination activity: "Launching7-5 days the Seed" (page 74)
T minus – – - constructing the PGC - students make and assemble the5-1 days Plant Growth Chambers (page 35)
CUE-TSIPS Mission CalendarThe CUE-TSIPS Mission Calendar is arranged to follow along with the timing of the experiments beingperformed on the CUE Space Shuttle mission in October, 1997. To establish the "real-time" schedule,count back from the day of launch, once scheduled and confirmed by NASA, to find the start date.
Teacher PreparationTeacher PreparationTeacher PreparationTeacher PreparationTeacher PreparationTime ActivityMay to August, 1997 - construct or order light bank (get supplies for light bank from
hardware store)
- purchase AstroPlants seeds (page 94)
- purchase peatlite root medium (page 94)
- purchase salts for Wisconsin Fast Plants Nutrient Solution orcommercial fertilizer (page 94)
August to September, 1997 - assemble materials for the student Plant Growth Chambers(page 32)
- purchase other recommended supplies, including a hi-lowthermometer (page 14) and pest control cards (page 17)
"Day" refers to the ordered timing of activities. In the "Day" column, "T" stands for "terminal," a termused by NASA to indicate time of launch. The abbreviation "das" stands for "days after sowing." Theabbreviation "dap" stands for "days after pollination."
Beginning with Day 14, each activity is given a span of days rather than a specific day. The timing ofthese activities depends on the rate of growth and development of your plants, depending specificallyon the day that your students pollinate. For these activities, follow the "dap" designation, performingeach at the appropriate number of days after pollination.
Countdown to LaunchCountdown to LaunchCountdown to LaunchCountdown to LaunchCountdown to Launch
Remember that the bean icon indicates that an activity can be completed with seeds fromplant types other than AstroPlants. These activities are part of the supplemental sectionsand do not need to be performed as part of the central CUE-TSIPS experiments.

30
Day das dap Subject Areas ActivityDay 0 0 – - planting - sow seed, place complete PGCs
under lights (page 35)
Day 1 1 – - orientation, tropism - tropism activity: "How do Plants Know Which Way to Grow" (page 79)
Day 2 2 – - orientation, tropism - tropism activity: "Do Plants Prefer the Blues?" (page 86)
Day das dap Subject Areas ActivityDay 3 3 – - growth, development - each student notes number of emerged
plants, records number on AstroPlantsGrowth Group Data Sheet (page 41)
- revisit gravitropism chamber
Day 5 5 – - orientation, tropism - revisit gravitropism chamber - revisit phototropism chamber
Day 7 7 – - growth, development - thin to two plants per film can wick pot- each student measures plant height,
records data on AstroPlants GrowthGroup Data Sheet
Day 11 11 – - growth, development - each student measures plant height,records data on AstroPlants GrowthGroup Data Sheet
Day 12 12 – - pollination - make beesticks (page 46)
Day 14 14 – - growth, development - each student measures plant height,records data on AstroPlants GrowthGroup Data Sheet
Launching the SeedLaunching the SeedLaunching the SeedLaunching the SeedLaunching the Seed
Life in OrbitLife in OrbitLife in OrbitLife in OrbitLife in Orbit
Reproduction in OrbitReproduction in OrbitReproduction in OrbitReproduction in OrbitReproduction in OrbitDay das dap Subject Areas ActivityDay 14-16 14-16 0 - growth, development - each student notes day of first open
- pollination flower, records day on AstroPlantsGrowth Group Data Sheet
- each student removes the most apical(top) flower on two plants, makes floralstrip, measures and records pistillength on Floral Clock Student DataSheet (page 51), numbers open flowers
- each student pollinates all openflowers, terminalize plants (pinch offall but open flowers 1-4)
- record stigma position in flowers 1-4on Floral Clock Student Data Sheet

31
Day 17-20 17-20 3 - growth, development - each student measures pistil length onflowers 1-4, records data on FloralClock Student Data Sheet
Day 21-22 21-22 6 - double fertilization, - each student measures pistil length onembryogenesis flowers 1-4, records data on Floral
Clock Student Data Sheet- AstroPlants embryo dissection, record
data on Ovule and Embryo StudentData Sheet (page 65)
Day 23-24 23-24 9 - double fertilization, - each student measures pistil length onembryogenesis flowers 1-4, records data on Floral
Clock Student Data Sheet- AstroPlants embryo dissection, record
data on Ovule and Embryo StudentData Sheet
Day 26-28 26-28 12 - double fertilization, - each student measures pistil length onembryogenesis flowers 1-4, records data on Floral
Clock Student Data Sheet- AstroPlants embryo dissection, record
data on Ovule and Embryo StudentData Sheet
Day 35-37 35-37 21 - double fertilization, - each student measures pistil length onembryogenesis flowers 1-4, records data on Floral
Clock Student Data Sheet- AstroPlants embryo dissection, record
data on Ovule and Embryo StudentData Sheet
- remove plants from water
Day 43-45 43-45 28 - harvest seeds- test seed for viability in bottle cap
seed germinator (page 75)
Day das dap Subject Areas ActivityReproduction in Orbit, continuedReproduction in Orbit, continuedReproduction in Orbit, continuedReproduction in Orbit, continuedReproduction in Orbit, continued
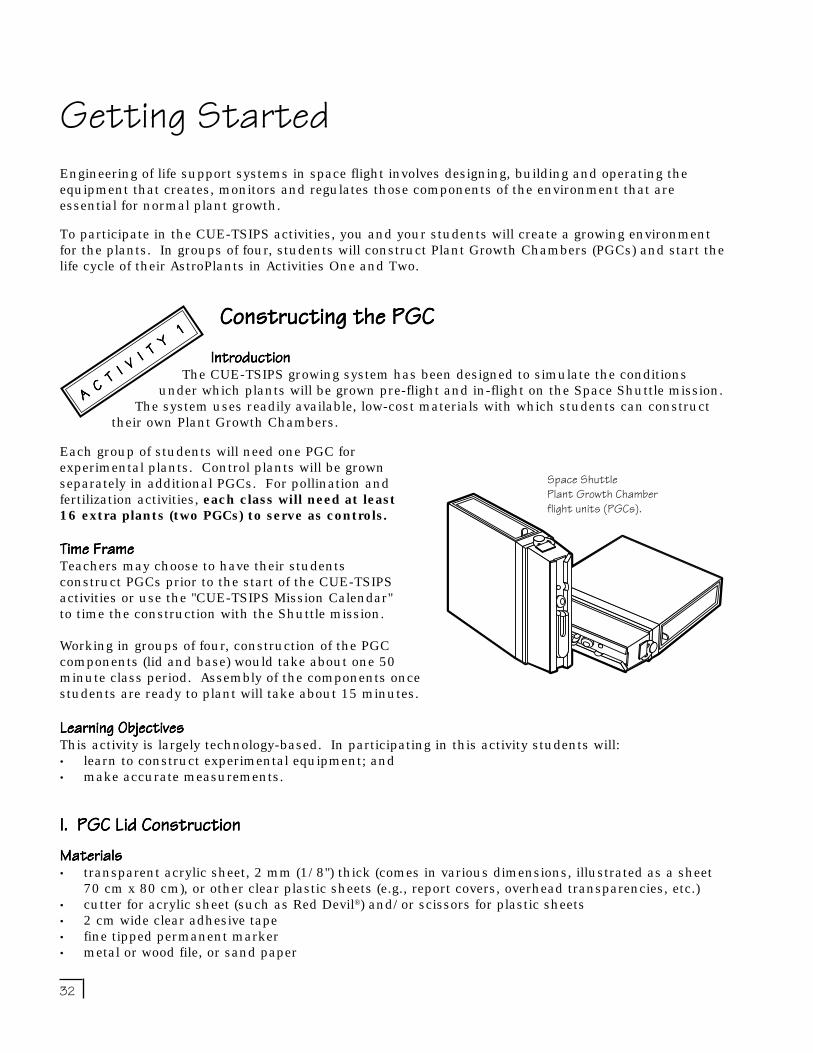
32
Getting StartedEngineering of life support systems in space flight involves designing, building and operating theequipment that creates, monitors and regulates those components of the environment that areessential for normal plant growth.
To participate in the CUE-TSIPS activities, you and your students will create a growing environmentfor the plants. In groups of four, students will construct Plant Growth Chambers (PGCs) and start thelife cycle of their AstroPlants in Activities One and Two.
Constructing the PGCConstructing the PGCConstructing the PGCConstructing the PGCConstructing the PGCIntroductionIntroductionIntroductionIntroductionIntroduction
The CUE-TSIPS growing system has been designed to simulate the conditionsunder which plants will be grown pre-flight and in-flight on the Space Shuttle mission.
The system uses readily available, low-cost materials with which students can constructtheir own Plant Growth Chambers.
Each group of students will need one PGC forexperimental plants. Control plants will be grownseparately in additional PGCs. For pollination andfertilization activities, each class will need at least16 extra plants (two PGCs) to serve as controls.
Time FrameTime FrameTime FrameTime FrameTime FrameTeachers may choose to have their studentsconstruct PGCs prior to the start of the CUE-TSIPSactivities or use the "CUE-TSIPS Mission Calendar"to time the construction with the Shuttle mission.
Working in groups of four, construction of the PGCcomponents (lid and base) would take about one 50minute class period. Assembly of the components oncestudents are ready to plant will take about 15 minutes.
Learning ObjectivesLearning ObjectivesLearning ObjectivesLearning ObjectivesLearning ObjectivesThis activity is largely technology-based. In participating in this activity students will:• learn to construct experimental equipment; and• make accurate measurements.
I. PGC Lid ConstructionI. PGC Lid ConstructionI. PGC Lid ConstructionI. PGC Lid ConstructionI. PGC Lid ConstructionMaterialsMaterialsMaterialsMaterialsMaterials• transparent acrylic sheet, 2 mm (1/8") thick (comes in various dimensions, illustrated as a sheet
70 cm x 80 cm), or other clear plastic sheets (e.g., report covers, overhead transparencies, etc.)• cutter for acrylic sheet (such as Red Devil®) and/or scissors for plastic sheets• 2 cm wide clear adhesive tape• fine tipped permanent marker• metal or wood file, or sand paper
PGC PGC
Space ShuttlePlant Growth Chamberflight units (PGCs).
A C T I V I T Y 1
A C T I V I T Y 1
A C T I V I T Y 1
A C T I V I T Y 1
A C T I V I T Y 1

33
ProcedureProcedureProcedureProcedureProcedure1. Use a marker to mark the cut lines on the
acrylic sheet as shown. For other types ofclear plastic make appropriate measuresand cuts.
Each PGC lid includes pieces in thefollowing dimensions:
- two pieces 20 cm x 21.5 cm (front andback panels), and
- two pieces 20 cm x 5.6 cm (side panels).
A 70 cm x 80 cm acrylic sheet can be cutas shown at right to yield pieces for fourPGC lids.
2. Cut the acrylic sheet with the cutter (orwith a circular table saw with a hardenedblade). Peel off the protective plastic film.
Caution: Acrylic sheet cutters and saws are very sharp and should be used with care.
Tips:- Smooth off sharp edges of the cut acrylic pieces using a file or sand paper.
- For thin plastic sheets, cut the front panel to be shorter to access plants.
3. Assemble the PGC lid as follows:
- Use two pieces of clear adhesive tape to attach the back panel to one of the side panels. Placeone piece of tape about 2 cm from the top and one about 4 cm above the bottom edge on eachside-back joint.
- Use two pieces of tape to attach a side panel to the other side of the back panel. Again, place onepiece about 2 cm from the top and the other about 4 cm above the bottom edge. Three of thefour panels should be taped together at this point.
20 cm 20 cm 20 cm 20 cm
80 cm (32")
(scrap)
21.5cm
21.5cm
5.6 cm
5.6 cm
70 cm(28")
(scrap) (scrap) (scrap)
80 cm (32")20 cm20 cm20 cm 20 cm
21.5cm
5.6 cm5.6 cm
- Tear off two additional pieces oftape. On each piece, fold overone end about 1 cm to make aflap. Place one of these twopieces of tape on each side of thefront panel, with the flap end onthe front panel. By peeling backthese pieces, the front panel canbe removed and replaced,allowing easy student access tothe plants inside the PGC.
- If using thin plastic sheets,support them by taping panels tobamboo grilling skewers at thecorners. The skewers can bepoked into the styrofoam film canwick pot holder (page 35).
21.5 cmopen forg and light
5.6 cm
20 cm
bottom is opento fit over plantsbottom is open tofit over plants
21.5 cmtop is open forcooling and light peel back
flap oftape toopen front
scotchtape
(scrap)(scrap)(scrap)(scrap)
21.5cm
5.6cm
20 cm
70 cm(28")

34
1 cm
3 cm
II. PGC Base ConstructionII. PGC Base ConstructionII. PGC Base ConstructionII. PGC Base ConstructionII. PGC Base ConstructionThe basic growing system utilizes peatlite (peat moss:vermiculite, 1:1) as the root medium, and acapillary wicking system to provide water and nutrients to the plants in film can wick pots. Althoughthe peatlite medium and film can wick pot system is not being used in the Space Shuttle Plant GrowthChambers, it is recommended as the most reliable system in which AstroPlants can be grown.
MaterialsMaterialsMaterialsMaterialsMaterials• two plastic drawer organizers (22 x 7.6 x 5.1 cm), the first to be a base which will hold the film can
wick pots and the second to act as a reservoir• four 35 mm black film cans for wick pots• capillary wicking material• styrofoam block (2.5 cm thick, 21 cm long x 5.5 cm wide), cut from builder's insulating foam
ProcedureProcedureProcedureProcedureProcedure1. Melt or drill an approximately 5 mm diameter hole in the center of the bottom of each film can.
Caution: Melting plastic produces noxious fumes; perform this step in a well-ventilated area. Wearsafety goggles if using a drill.
6. From 2.5 cm (1 inch) thick insulating styrofoam, measure and cut, with a fine blade saw (hacksawor utility saw), a rectangular block 21 cm long by 5.5 cm wide. Rough edges where the styrofoamis cut may be smoothed with sandpaper.
5. With a hot soldering iron or large hotnail melt two 2 cm slots in the bottomof one of the drawer organizers toaccommodate the capillary wick; thisorganizer will become the base for thegrowing system.
Caution: Melting plastic produces noxiousfumes; perform this step in a well-ventilated area.
(view from top)
"platform base"slot(2 cm long)
slot(2 cm long) "platform base"
5.5 cm
21 cm
capillary mat 5.5 cm
21 cm
4. From the capillary wicking material, cut acapillary mat to fit the bottom of one of thedrawer organizers (21 cm x 5.5 cm).
capillary mat
30 cm
ill i k ti k
30 cm
capillary wick strip
3. From the capillarywicking material,cut a wick strip tobe 30 cm long and1 cm wide, withtapered ends.
1 cm
diamondwick
2. From the capillary wicking material, cut four diamond wicks (3 cm x 1 cm),with tapered ends, for the film can wick pots.
(view from above)
3 cm

35
7. With a pen and a film can, trace four equally spaced circles on the top surface of the styrofoamblock (this block will hold the film can wick pots).
8. Using a 33 mm (1.25 inch) circular "keyhole" cutter in an electric drill, cut four holes equallyspaced in the styrofoam block. Alternatively the hot flamed rim of a Pyrex® test tube (18 to 22 mmdiameter) may be used to melt the four holes. Other forms of film can wick pot holders, such aswooden blocks, are satisfactory.
Caution: Melting styrofoam produces noxious fumes; perform this step in a well-ventilated area.Wear safety goggles if using a drill.
33mm
5.5 cm(viewfromtop)
33mm(viewfromabove)
5.5 cm21 cm
holes (33 mm diameter)
2.5 cm(viewfromside)
21 cm2.5 cm
(viewfromside)
holes (33 mm diameter)
A C T I V I T Y 2
A C T I V I T Y 2
A C T I V I T Y 2
A C T I V I T Y 2
A C T I V I T Y 2Planting AstroPlants in the PGCPlanting AstroPlants in the PGCPlanting AstroPlants in the PGCPlanting AstroPlants in the PGCPlanting AstroPlants in the PGCIntroductionIntroductionIntroductionIntroductionIntroduction
After constructing the PGC lid and base, students are ready to begin planting.Planting can be timed with the flight experiments by following the "CUE-TSIPS Mission
Calendar" (page 29). Once seeds have been planted, the AstroPlants life cycle is underway.
Time FrameTime FrameTime FrameTime FrameTime FrameWith an assembled PGC (lid and base), planting and placing the completed PGCs under lights will takeless than one 50 minute class period.
Learning ObjectivesLearning ObjectivesLearning ObjectivesLearning ObjectivesLearning ObjectivesIn participating in this activity students will:• understand the importance of capillarity in
providing a continuous supply of water andnutrients to the plants (see "Water," in"Understanding the Environment," page 15);
• learn the importance of the physicalcharacteristics of the peatlite root medium inproviding a suitable environment for normalroot growth and function; and
• understand the role of water in activating theprocess of seed germination.
MaterialsMaterialsMaterialsMaterialsMaterials• PGC lid and base, reservoir, film can wick pots and capillary wicks and mat (from Activity 1)• 16 AstroPlants seeds• forceps for handling seed• peatlite root medium and horticultural vermiculite• nutrient solution, such as Wisconsin Fast Plants Nutrient Solution or commercially available
fertilizer (page 96)• white lab tape
"Though I do not believethat a plant will spring upwhere no seed has been,I have great faith in a seed.Convince me that you have a seed there,and I am prepared to expect wonders."
- Henry David Thoreau,The Dispersion of Seeds, 1860

36
ProcedureProcedureProcedureProcedureProcedure1. Collect and assemble the components of the PGC lid and base along with the other materials
required for this activity. Each group of three to four students should plant in one PGC.Additional PGCs for control plants can be planted by volunteers or the teacher.
2. On Day 0, wet the four diamond wicks and insert one saturated diamond halfway through the holein the bottom of each film can. The emerging ends of the wicks will make contact with thecapillary mat.
3. Wet the long capillary wick and mat. Feed the wick through the slots in the base platform so thata length of 5 cm is emerging from each slot, hanging below the base. Place the wet capillary matover the wick in the bottom of the tray, make sure there are no air pockets trapped in the mat.
4. Fill each film can wick pot with slightly moistened peatlite, to the rim, tapping lightly to settle thepeatlite. Remove the excess peatlite above the pot rim. Do not press down on the peatlite.Carefully moisten the peatlite by watering from above until the wick drips. The peatlite will settleslightly to a few millimeters below the rim of the can.
5. Place four seeds in the form of a cross at the rim of the pot. Cover theseeds to the film can rim with horticultural vermiculite and gently wateragain from above.
6. On a piece of white lab tape placed just below the rim, label each filmcan with a student number (1 to 4). Carefully place each film can intoits hole in the styrofoam holder. Place the styrofoam and film cans intothe base platform drawer organizer, on top of the wet capillary mat.
seeds
(viewfrom top)
9. Carefully place the assembled lid of the PGC into the base platform, with the walls outside of thefoam. Label each PGC appropriately (date and time of sowing, seed stock, student names, studentgroup number, etc.).
10. Place the PGC with film can wick pots under lights.
Note: The time that the seeds are moistened begins the timing of the growth cycle. From this point ontime is taken as days after sowing or "das."
7. Add about 2 cm depth, approximately 200 ml, ofWisconsin Fast Plants Nutrient Solution to thesecond drawer organizer (without slots), to act asthe reservoir.
If a commercial liquid fertilizer is used (e.g., Peters®
20-20-20), fill the reservoir with a 2 cm depth ofwater. Add fertilizer solution at the soil surface atthe rate of 4 ml per film can wick pot on Days 3, 7,14, 21 and 28 (page 16). Do not put the fertilizersolution in the water reservoir.
8. Place the base platform drawer organizer into thesecond reservoir drawer organizer, with the wicksbeneath it. The water or nutrient solution will becarried via capillary action into the film can wickpots and to the plants.

37
Growth, Development and FloweringConceptsConceptsConceptsConceptsConceptsGrowth represents increase in size, number and complexity of plant cells and organs. Bothenvironment and genetics play fundamental roles in regulating growth. The energy for growth inplants comes from photosynthesis and respiration. Variation within a population is related tovariation in both the genetic constitution and the growth environment of the individuals.
QuestionsQuestionsQuestionsQuestionsQuestions• What is the role of the environment in regulating plant growth?• How do plants grow?• How does a plant know when to produce leaves and when to produce flowers?
BackgroundBackgroundBackgroundBackgroundBackgroundThe environment is created by the interaction of physical (light, temperature, gravity), chemical (water,air, minerals) and biological components (microbes, larger organisms). When environmentalconditions are favorable, plant growth occurs. Following the emergence of the germinating seedlingfrom the soil, growth of the plant continues through developmental stages in which new plant parts –leaves, stem and flowers – are produced from the growing point known as the shoot apical meristem.Further growth is observed as the increase in size of the new leaves, stems and flowers.
In AstroPlants, growth is most dramatic in the 10 to 12days between seedling emergence and the opening of thefirst flowers. During this period, students may exploreimportant concepts that will help them understandgrowth and development.
Each part of the plant performs important functions inthe life cycle. The roots anchor the plant in the soil sothat it doesn’t wash or blow away. The roots alsoprovide the means by which plants obtain water andminerals from the soil. The stem supports leaves andflowers and ensures that these parts are in the bestposition to perform their special tasks. The stem alsotransports water and minerals from the roots, and foodmanufactured in the leaves, to other plant parts.
The leaves are positioned to capture sunlight. In theprocess of photosynthesis, energy from sunlight istrapped by the green chlorophyll in leaves. This energyis used to manufacture food [carbohydrates (CHO)] bycombining the carbon (C) and oxygen (O) from carbondioxide (CO2) in the air with hydrogen (H) which istransported from the roots as water (H2O).
Flowers contain many specialized parts that are formedto ensure that the seed of the next generation of plantswill be produced and then dispersed to new locations forgrowth (Raven, Evert and Eichorn, 1992).
38
Tracking Variation within the Normal Growth andTracking Variation within the Normal Growth andTracking Variation within the Normal Growth andTracking Variation within the Normal Growth andTracking Variation within the Normal Growth andDevelopment of a Population of AstroPlantsDevelopment of a Population of AstroPlantsDevelopment of a Population of AstroPlantsDevelopment of a Population of AstroPlantsDevelopment of a Population of AstroPlants
IntroductionIntroductionIntroductionIntroductionIntroductionWith four students working as a team with one PGC, each student will be responsible for
two plants in a subpopulation of eight. Students will sow four seeds in each film can wick potand place them in an environment conducive to germination, growth and emergence. After plants
emerge students will select two of the four plants and track their growth and development bymeasuring plant height at specified days after sowing (das).
Data collected by students on their plants will become part of a class data set, which will be organized,summarized, analyzed, plotted and displayed so that students may gain a better understanding of thenormal variation within a population of AstroPlants as they grow and develop.
QuestionQuestionQuestionQuestionQuestion: How much variation is exhibited within and among subpopulations of AstroPlants grownunder standard environments in classrooms across the United States and Ukraine?
Sample HypothesisSample HypothesisSample HypothesisSample HypothesisSample Hypothesis: A normal amount of variation will exist.
DesignDesignDesignDesignDesign• Subpopulations of AstroPlants are grown in classroom PGCs, specified growth parameters (height,
etc.) are measured and summarized results compared with other subpopulations and withexperimental subpopulations grown in microgravity on the Space Shuttle orbiter.
• Students will record data on their AstroPlants Growth Group Data Sheet (page 41).• It is important for each class to have at least 2 sets of 4 film can wick pots in extra PGCs to serve
later as unpollinated control plants. Plant and maintain the extra PGCs in the same manner asthe experimental PGCs, being careful to avoid pollen transfer once the control plants are in flower.
Time FrameTime FrameTime FrameTime FrameTime FrameA period of 16 days from the sowing of seed is required for the growth of the AstroPlants and thecompletion of the activity. Class time required daily will vary depending on the developmental stage ofthe plants and the activity.
Learning ObjectivesLearning ObjectivesLearning ObjectivesLearning ObjectivesLearning ObjectivesIn participating in this activity students will:• learn about plant growth by observing the emergence of seedlings, observing and measuring
increases in plant size and in number, size and complexity of plant parts;• understand the role of environment in regulating plant growth;• observe, measure and analyze variation in growth and development among individuals in a
population of plants;• consider the use of statistical and graphical representation of growth and development within a
population; and• understand that growth in plants represents an ordered sequence of developmental events which
vary between individuals of a population within limits that are defined as "normal" (see page 26).
MaterialsMaterialsMaterialsMaterialsMaterials• white lab tape• metric ruler• black fine-tipped marking pen• PGC with seeded film can wick pots, three days after sowing (Day 3)
A C T I V I T Y 3
A C T I V I T Y 3
A C T I V I T Y 3
A C T I V I T Y 3
A C T I V I T Y 3
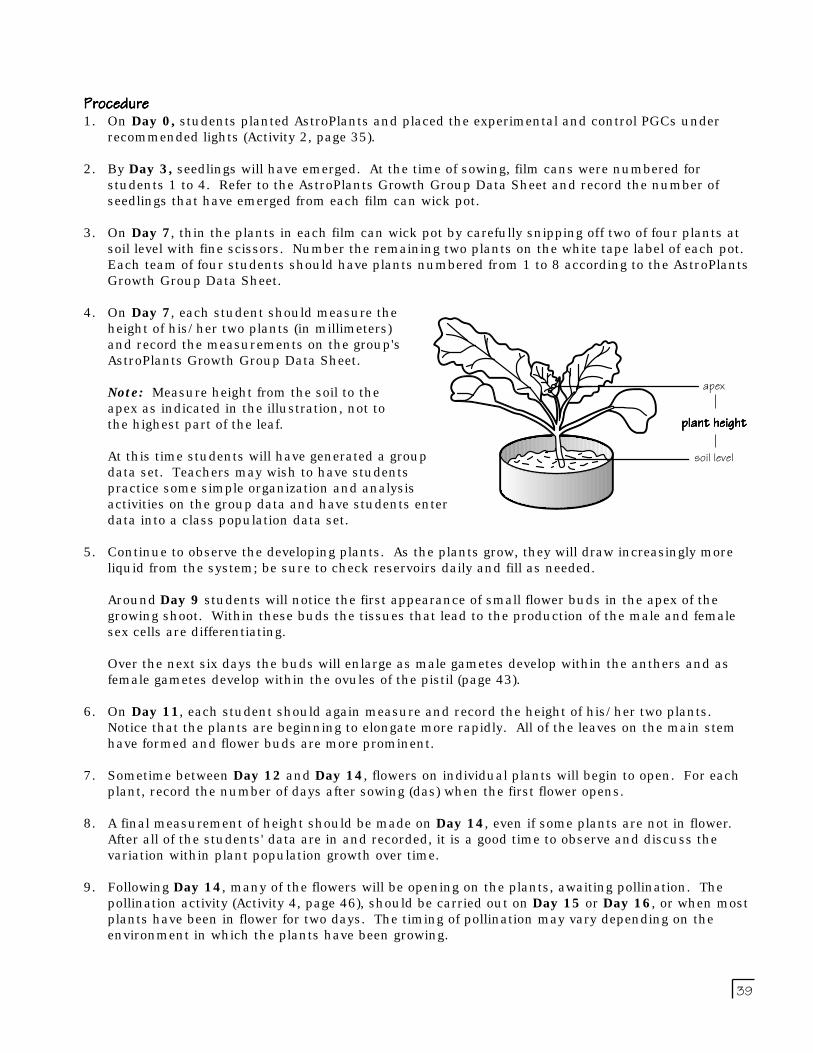
39
ProcedureProcedureProcedureProcedureProcedure1. On Day 0, students planted AstroPlants and placed the experimental and control PGCs under
recommended lights (Activity 2, page 35).
2. By Day 3, seedlings will have emerged. At the time of sowing, film cans were numbered forstudents 1 to 4. Refer to the AstroPlants Growth Group Data Sheet and record the number ofseedlings that have emerged from each film can wick pot.
3. On Day 7, thin the plants in each film can wick pot by carefully snipping off two of four plants atsoil level with fine scissors. Number the remaining two plants on the white tape label of each pot.Each team of four students should have plants numbered from 1 to 8 according to the AstroPlantsGrowth Group Data Sheet.
4. On Day 7, each student should measure theheight of his/her two plants (in millimeters)and record the measurements on the group'sAstroPlants Growth Group Data Sheet.
Note: Measure height from the soil to theapex as indicated in the illustration, not tothe highest part of the leaf.
At this time students will have generated a groupdata set. Teachers may wish to have studentspractice some simple organization and analysisactivities on the group data and have students enterdata into a class population data set.
5. Continue to observe the developing plants. As the plants grow, they will draw increasingly moreliquid from the system; be sure to check reservoirs daily and fill as needed.
Around Day 9 students will notice the first appearance of small flower buds in the apex of thegrowing shoot. Within these buds the tissues that lead to the production of the male and femalesex cells are differentiating.
Over the next six days the buds will enlarge as male gametes develop within the anthers and asfemale gametes develop within the ovules of the pistil (page 43).
6. On Day 11, each student should again measure and record the height of his/her two plants.Notice that the plants are beginning to elongate more rapidly. All of the leaves on the main stemhave formed and flower buds are more prominent.
7. Sometime between Day 12 and Day 14, flowers on individual plants will begin to open. For eachplant, record the number of days after sowing (das) when the first flower opens.
8. A final measurement of height should be made on Day 14, even if some plants are not in flower.After all of the students' data are in and recorded, it is a good time to observe and discuss thevariation within plant population growth over time.
9. Following Day 14, many of the flowers will be opening on the plants, awaiting pollination. Thepollination activity (Activity 4, page 46), should be carried out on Day 15 or Day 16, or when mostplants have been in flower for two days. The timing of pollination may vary depending on theenvironment in which the plants have been growing.
plan
so
plant heightplant heightplant heightplant heightplant height
apex
soil level
40
Concluding Activities and QuestionsConcluding Activities and QuestionsConcluding Activities and QuestionsConcluding Activities and QuestionsConcluding Activities and QuestionsCombine the group data into a class data summary using the AstroPlants Growth Class Data Sheet(page 42). See "CUE-TSIPS Science and Technology" for a review of data analysis (page 18).
If available, use data analysis software to create graphical and statistical summaries of class data.Notice how the various statistical notations (range, mean and standard deviation) change over timefrom sowing. Have students consider the following:
- From a class frequency histogram and statistical summary, does the measured plant character ofheight exhibit a normal distribution within the class population as hypothesized?
- Are their individual plants shorter than the average in the population? Or taller?
- Do their individual plant heights fall within one or two standard deviations of the class mean?Would they consider their plant heights to be normal? Why or why not?
- How many plants in the population fall within one or two standard deviations of the class mean?
- Are there any "abnormal" plants?
- There are many other ways that students could measure growth and development. Height is onlyone. Can they come up with others?
Classes can submit the AstroPlants Growth Class Data Sheet to the Wisconsin Fast Plants Programand then check the WFP World Wide Web site to see where their plant growth data fit into the data setfrom the larger population of plants grown for CUE-TSIPS in the United States and Ukraine (see pagefor addresses).
i

41
Date
DateDate
Date
Date
dasdasdasdas dasCha
racter
/Activi
tyCha
racter
/Activi
tyCha
racter
/Activi
tyCha
racter
/Activi
tyCha
racter
/Activi
tyPla
nt Me
asurem
ents
Plant
Measu
rement
sPla
nt Me
asurem
ents
Plant
Measu
rement
sPla
nt Me
asurem
ents
Statis
ticsSta
tistics
Statis
ticsSta
tistics
Statis
ticsStu
dents:
Studen
ts:Stu
dents:
Studen
ts:Stu
dents:
Studen
t 1Stu
dent 1
Studen
t 1Stu
dent 1
Studen
t 1Stu
dent 2
Studen
t 2Stu
dent 2
Studen
t 2Stu
dent 2
Studen
t 3Stu
dent 3
Studen
t 3Stu
dent 3
Studen
t 3Stu
dent 4
Studen
t 4Stu
dent 4
Studen
t 4Stu
dent 4
nnnn nrrrr r
xxxx xssss s
3in
dic
ate
nu
mber
of
seed
lin
gs e
mer
ged
7th
in t
o 2 p
lan
ts/film
can
,n
um
ber
pla
nts
Plant
Number
Plant
Number
Plant
Number
Plant
Number
Plant
Number
1111 12222 2
3333 34444 4
5555 56666 6
7777 78888 8
7pla
nt
hei
ght
(mm
)
11
pla
nt
hei
ght
(mm
)
14
pla
nt
hei
ght
(mm
)
day
to fir
st o
pen
flo
wer
(das)
Astro
Plants
Growt
h Grou
p Data
Sheet
Astro
Plants
Growt
h Grou
p Data
Sheet
Astro
Plants
Growt
h Grou
p Data
Sheet
Astro
Plants
Growt
h Grou
p Data
Sheet
Astro
Plants
Growt
h Grou
p Data
Sheet
Envir
onm
ent
Stu
den
t N
am
e 1
Irra
dia
nce
:n
o. o
f bu
lbs
dis
tan
ce o
f pla
nts
fro
m b
ulb
s
Stu
den
t N
am
e 2
watt
age
of
bu
lbs
or µ
Em
-2s-1
mea
sure
d u
nder
bu
lbs
Stu
den
t N
am
e 3
Ave
rage
da
ily t
emper
atu
re o
f gr
owin
g en
viro
nm
ent:
˚C
Stu
den
t N
am
e 4
Nu
trie
nt
use
d: W
FP n
utr
ien
t so
luti
on
S
pec
ify
oth
er:
Roo
t m
ediu
m u
sed
: P
eatl
ite
Spec
ify
oth
er:
Gro
up N
um
ber
See
d t
ype:
A
stro
Pla
nts
Spec
ify
oth
er:
Pla
nts
gro
wn
in
PG
C?
yes
/
no
das
= d
ays
aft
er s
owin
g, n
= n
um
ber
of
mea
sure
men
ts,
r = r
an
ge (m
axi
mu
m m
inu
s m
inim
um
), x
= m
ean
(ave
rage
), s
= s
tan
dard
dev
iati
on

42
Statis
ticsSta
tistics
Statis
ticsSta
tistics
Statis
ticsSta
tistics
Statis
ticsSta
tistics
Statis
ticsSta
tistics
Group
Group
Group
Group
Group
nnnn nrrrr r
xxxx xssss s
Group
Group
Group
Group
Group
nnnn nrrrr r
xxxx xssss s
Gro
up 1
Gro
up 7
Gro
up 2
Gro
up 8
Gro
up 3
Gro
up 9
Gro
up 4
Gro
up 1
0
Gro
up 5
Gro
up 1
1
Gro
up 6
Gro
up 1
2
Date
Envir
onm
ent
Tea
cher
Nam
eIr
rad
ian
ce:
no.
of
bu
lbs
dis
tan
ce o
f pla
nts
fro
m b
ulb
s
Sch
ool N
am
ew
att
age
of bu
lbs
or µ
Em
-2s-1
mea
sure
d u
nder
bu
lbs
Sch
ool A
ddre
ssA
vera
ge d
aily
tem
per
atu
re o
f gr
owin
g en
viro
nm
ent:
˚C
Nu
trie
nt
use
d: W
FP n
utr
ien
t so
luti
on
S
pec
ify
oth
er:
Sch
ool Ph
one
(
)
Roo
t m
ediu
m u
sed
: P
eatl
ite
Spec
ify
oth
er:
Em
ail A
ddre
ssS
eed
type
use
d:
Ast
roPla
nts
Spec
ify
oth
er:
Pla
nts
gro
wn
in
PG
C?
yes
/
no
Astro
Plants
Growt
h Clas
s Data
Sheet
Astro
Plants
Growt
h Clas
s Data
Sheet
Astro
Plants
Growt
h Clas
s Data
Sheet
Astro
Plants
Growt
h Clas
s Data
Sheet
Astro
Plants
Growt
h Clas
s Data
Sheet
How t
o use
this C
lass D
ata Sh
eet:
How t
o use
this C
lass D
ata Sh
eet:
How t
o use
this C
lass D
ata Sh
eet:
How t
o use
this C
lass D
ata Sh
eet:
How t
o use
this C
lass D
ata Sh
eet:
Th
is C
lass
Data
Sh
eet
can
be
use
d for
th
e te
ach
er o
r st
uden
ts t
o co
mpile
data
fro
m o
ne
mea
sure
d c
hara
cter
(e.
g.,
pla
nt
hei
ght,
Day
7)
taken
by
grou
ps
of s
tuden
ts w
ho
have
com
ple
ted t
he
Ast
roPla
nts
Gro
wth
Gro
up D
ata
Sh
eet.
Th
is C
lass
Data
Sh
eet
can
be
subm
itte
dto
th
e W
isco
nsi
n F
ast
Pla
nts
Pro
gram
to
be
incl
uded
in
a c
ompilati
on o
f st
ati
stic
s fr
om o
ther
cla
sses
.
Variab
le Meas
ured
Variab
le Meas
ured
Variab
le Meas
ured
Variab
le Meas
ured
Variab
le Meas
ured
Date
Measu
redDa
te Me
asured
Date
Measu
redDa
te Me
asured
Date
Measu
reddas
of Me
asurem
entdas
of Me
asurem
entdas
of Me
asurem
entdas
of Me
asurem
entdas
of Me
asurem
ent
*ta
ken
fro
m A
stro
Pla
nts
Gro
wth
Data
Sh
eets
das
= d
ays
aft
er s
owin
g, n
= n
um
ber
of
mea
sure
men
ts,
r = r
an
ge (m
axi
mu
m m
inu
s m
inim
um
), x
= m
ean
(ave
rage
), s
= s
tan
dard
dev
iati
on
Group
Data*
Group
Data*
Group
Data*
Group
Data*
Group
Data*
Statis
ticsSta
tistics
Statis
ticsSta
tistics
Statis
tics n n n n n
r r r r r xxxx x
s s s s s
Class
Data
Class
Data
Class
Data
Class
Data
Class
Data

43
PollinationConceptsConceptsConceptsConceptsConceptsPollination is the process of mating in plants; it is the precursor to double fertilization. In flowers,pollen is delivered to the stigma through a wide range of mechanisms that insure an appropriatebalance in the genetic makeup of the species. In brassicas, pollen is distributed by bees and otherinsects. The flower is the device by which the plant recruits the bee. Bees and brassicas have evolvedan interdependent relationship.
QuestionsQuestionsQuestionsQuestionsQuestions• What is the effect of microgravity on pollination?• What will be the pollen vector in space? Can a bee fly in microgravity?
BackgroundBackgroundBackgroundBackgroundBackgroundWhat is a flower? In human eyes it is something to enjoy, with color and fragrance. For many plants,flowers are vital organs of reproduction containing both male and female gametes. For bees and othernectar-feeding animals, flowers are a source of food.
Symbiosis is the close association of two or more dissimilar organisms. Such associations can bebeneficial to both organisms (mutualistic) or detrimental to one (parasitic). Symbiotic relationshipsamong species occur frequently in nature. When the two or more species in symbiosis evolve inresponse to each other, they are said to coevolve. Under close examination each symbioticrelationship stands out as an example of miraculous complexity which has emerged. The coevolutionof bees and brassicas, each dependent upon the other for survival, is such a relationship.
The FlowerThe FlowerThe FlowerThe FlowerThe FlowerMost flowers have the same basic parts,though they are often arranged in differentways. The five main parts of a flower are thesepals, petals, stamens, pistil and nectaries.The sepals are the green leaflike structuresat the base of the petals that protect thedeveloping flower. The petals are the coloredleaflike structures within the sepals.
The stamen has two parts, the anther andthe filament. The anther contains the pollengrains, which contain the male gametes.
The pistil usually has three parts, the stigma(which receives the pollen), the style (the neckbelow the stigma) and the carpel (or ovary).AstroPlants flowers have two fused carpels,separated by a thin membrane. The carpels housethe ovules, which contain the female gametes.
Sugar-rich nectar is secreted by the specialized nectary tissues strategically located in the flower toensure that nectar-gathering animals will receive pollen from anthers and transmit it to stigmas.
pedicel
sepal
petal
nectary
receptacal
ovule
anther
filament
stamen(male)
pistil(female)
stigmastylecarpel filament
stamen(male)
anther
ovules
receptaclenectary
pedicel
sepal
petal
style
pistil(female)
stigmacarpel

44
Investigations of a Gametic KindInvestigations of a Gametic KindInvestigations of a Gametic KindInvestigations of a Gametic KindInvestigations of a Gametic KindThe Developmental ClockThe Developmental ClockThe Developmental ClockThe Developmental ClockThe Developmental ClockAt about Day 7 in the AstroPlants life cycle, you may have lookeddown on your plants from the top view and noticed a tightlypacked whorl of buds, some of which were larger than others.Each successively smaller bud represented a time interval in thedevelopmental clock of AstroPlants, later marked by theappearance of new flower buds on the shoot.
As your AstroPlants begin to flower, normally the lowest flower onthe shoot opens first, followed by the next highest and so forth.By recording the time when the first flower opens and counting thenumber of successive flowers that open in the intervening 24 hours,you can calculate the average time between successive developmentalevents that initiate a flower on the shoot apical meristem.
• Can you calculate the number of hours between successiveflowers on your AstroPlants?
• How many flowers would you predict will open between the timeyour first flower opens and when you pollinate your plants?
When is a Flower Open?When is a Flower Open?When is a Flower Open?When is a Flower Open?When is a Flower Open?The answer to this question is not always as straightforward as it might appear. As you observe theprogression of flowers opening, you will notice that as the buds swell the sepals are pushed apart bythe enlarging anthers and emerging yellow petals. Eventually the petals (which are slightly rolled) foldoutward about halfway up their length, flattening and spreading to reveal their bright yellow color. Atthis time you might conclude that the flowers were open.
From the perspective of mating, a flower is openwhen it is capable of providing and receiving pollen.Thus, not until the anthers on the filaments of thestamens open up (dehisce) and release their pollenis a flower functionally open.
The shedding of pollen is known as anthesis. Whenyou observe a succession of flowers at the shootapex of your AstroPlants you will observe whetheranthesis has occurred by noting the release of thepowdery yellow pollen from the anthers. A handlens can be helpful in detecting anthesis.
Sometimes a flower is inhibited from male function by excessive heat or genetic male sterility. Asmentioned in "Understanding the Environment" (page 13) anthers may fail to dehisce at very highrelative humidities. This problem can usually be corrected in a few minutes by circulating air over theplant with a fan.
GametogenesisGametogenesisGametogenesisGametogenesisGametogenesisThe production of sperm and eggs involves a fundamental sequence of events that characterizes mosthigher plant and animal life. In plants, meiosis precedes gamete formation and establishes the initialevents of sexual reproduction by exchanging and sorting the genes on the chromosomes into thevehicles of genetic transmission and reception that we call gametes: the eggs and sperm.
erding pollen–esis
Anther NOTshedding po
anther NOTshedding pollen
anthershedding pollen —anthesis
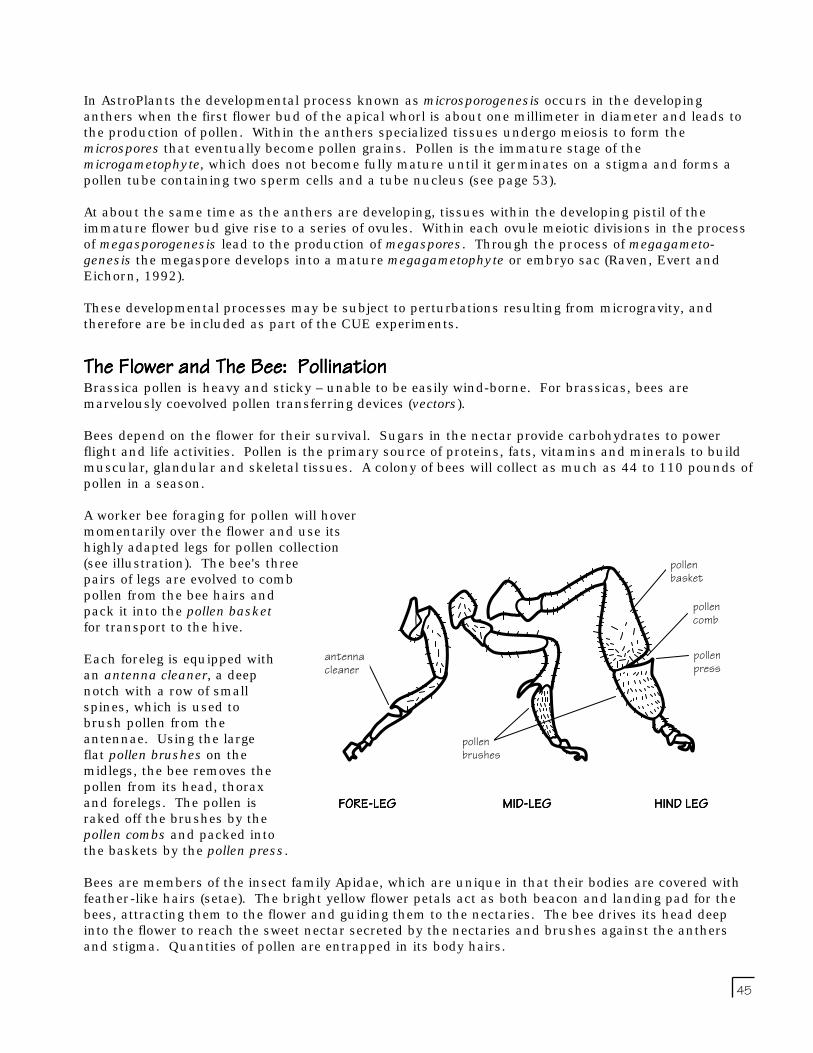
45
In AstroPlants the developmental process known as microsporogenesis occurs in the developinganthers when the first flower bud of the apical whorl is about one millimeter in diameter and leads tothe production of pollen. Within the anthers specialized tissues undergo meiosis to form themicrospores that eventually become pollen grains. Pollen is the immature stage of themicrogametophyte, which does not become fully mature until it germinates on a stigma and forms apollen tube containing two sperm cells and a tube nucleus (see page 53).
At about the same time as the anthers are developing, tissues within the developing pistil of theimmature flower bud give rise to a series of ovules. Within each ovule meiotic divisions in the processof megasporogenesis lead to the production of megaspores. Through the process of megagameto-genesis the megaspore develops into a mature megagametophyte or embryo sac (Raven, Evert andEichorn, 1992).
These developmental processes may be subject to perturbations resulting from microgravity, andtherefore are be included as part of the CUE experiments.
The Flower and The Bee: PollinationThe Flower and The Bee: PollinationThe Flower and The Bee: PollinationThe Flower and The Bee: PollinationThe Flower and The Bee: PollinationBrassica pollen is heavy and sticky – unable to be easily wind-borne. For brassicas, bees aremarvelously coevolved pollen transferring devices (vectors).
Bees depend on the flower for their survival. Sugars in the nectar provide carbohydrates to powerflight and life activities. Pollen is the primary source of proteins, fats, vitamins and minerals to buildmuscular, glandular and skeletal tissues. A colony of bees will collect as much as 44 to 110 pounds ofpollen in a season.
A worker bee foraging for pollen will hovermomentarily over the flower and use itshighly adapted legs for pollen collection(see illustration). The bee's threepairs of legs are evolved to combpollen from the bee hairs andpack it into the pollen basketfor transport to the hive.
Each foreleg is equipped withan antenna cleaner, a deepnotch with a row of smallspines, which is used tobrush pollen from theantennae. Using the largeflat pollen brushes on themidlegs, the bee removes thepollen from its head, thoraxand forelegs. The pollen israked off the brushes by thepollen combs and packed intothe baskets by the pollen press.
Bees are members of the insect family Apidae, which are unique in that their bodies are covered withfeather-like hairs (setae). The bright yellow flower petals act as both beacon and landing pad for thebees, attracting them to the flower and guiding them to the nectaries. The bee drives its head deepinto the flower to reach the sweet nectar secreted by the nectaries and brushes against the anthersand stigma. Quantities of pollen are entrapped in its body hairs.
pollenbasket
poco
popre
pollenbrushes
ntenaeaner
BEE LEGS pollenbasket
pollencomb
pollenpress
pollenbrushes
antennacleaner
FORE-LEG MID-LEGFORE-LEG MID-LEGFORE-LEG MID-LEGFORE-LEG MID-LEGFORE-LEG MID-LEG HIND LEG HIND LEG HIND LEG HIND LEG HIND LEG

46
As the bees work from plantto plant, pollen on the beesetae is carried from flowerto flower. The transfer ofpollen from the anther tothe stigma is known aspollination. When pollen istransferred from one plantto another, the process iscalled cross-pollination.
As the bee forages, cross-pollination occurs andgenetic information is widelytransferred. Some pollengrains are deposited on thesticky surface of each stigmaand each compatible pollen grainsends a tube through the style to theovule to complete fertilization. Within three daysof fertilization, petals drop and the pistil begins to elongate to form a pod as the seeds develop inside.
Are We Compatible?Are We Compatible?Are We Compatible?Are We Compatible?Are We Compatible?For AstroPlants and many other brassicas, the act of pollination does not insure fertilization and seedformation. Some brassicas contain recognition compounds called glycoproteins which are unique toeach plant. These compounds enable the plant to recognize "self," resulting in the abortion of theplant's own pollen. This genetically controlled prevention of fertilization with "self" pollen is called self-incompatibility. Only "non-self" pollen is able to germinate and effect fertilization.
In order for pollen germination and fertilization to occur, pollen must travel from one brassica plant tothe stigma of a different brassica plant in the process of cross-pollination. Bees take care of thisproblem naturally as they move from plant to plant in search of nectar and pollen. AstroPlants aretherefore cross-compatible and self-incompatible.
A C T I V I T Y 4
A C T I V I T Y 4
A C T I V I T Y 4
A C T I V I T Y 4
A C T I V I T Y 4Making Beesticks, Pollinating and Observing PollenMaking Beesticks, Pollinating and Observing PollenMaking Beesticks, Pollinating and Observing PollenMaking Beesticks, Pollinating and Observing PollenMaking Beesticks, Pollinating and Observing Pollen
IntroductionIntroductionIntroductionIntroductionIntroductionAs their plants come into flower, students need to be prepared to pollinate. The act
of pollination is the prelude to the beginning of a new generation that starts withdouble fertilization. In preparation for pollination of their plants, students will need to
understand the developmental biology leading to the production of male and female gametes(sperm and egg) and the concepts associated with the coevolutionary relationships between
flowers and their pollinators.
It is unknown whether natural pollen vectors on Earth, such as bees, flieshummingbirds and bats, are capable of flight or transit between and among flowersin conditions of microgravity. For this reason, in the B-STIC experiment, the CUEmission's Payload Specialist will be simulating the flight of a bee using an artificialpollination device to transfer pollen among the AstroPlants flowers.
Question:Question:Question:Question:Question: How is effective pollination carried out?
anther (shedding pollen)
nectaries bee proboscis
bee abdomen
bee thorax
bee abdomen
bee thoraxanther (shedding pollen)
nectaries bee proboscis
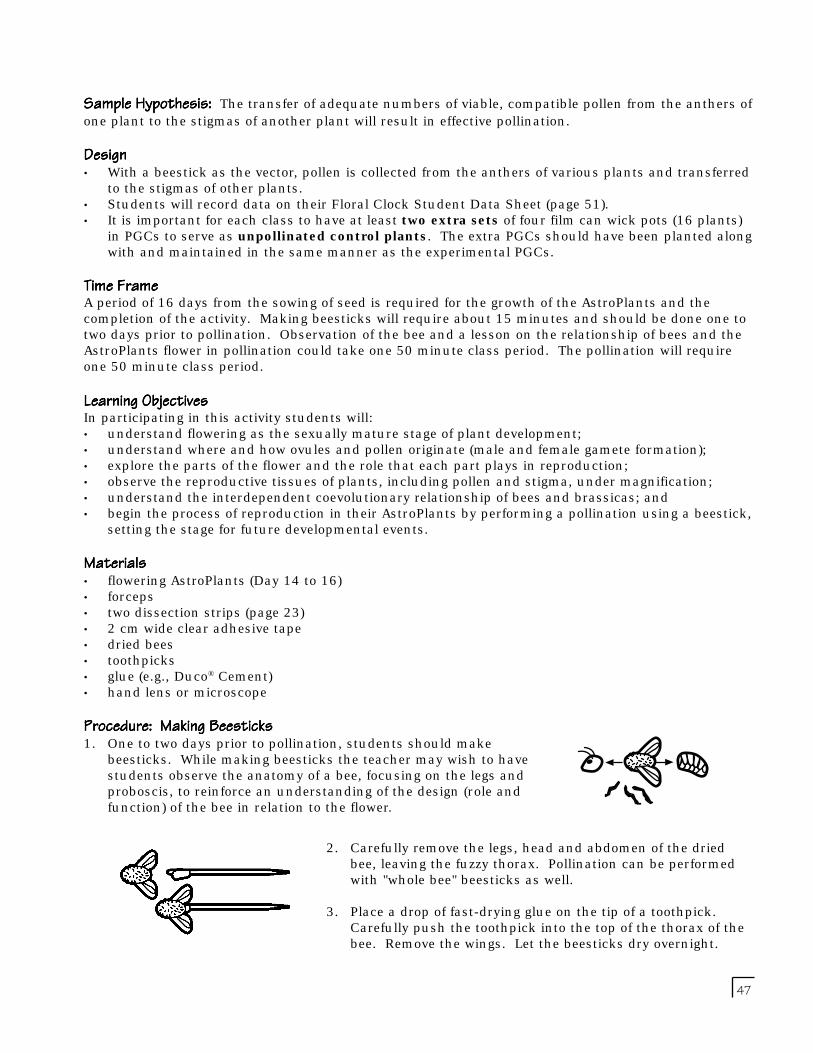
47
Sample Hypothesis:Sample Hypothesis:Sample Hypothesis:Sample Hypothesis:Sample Hypothesis: The transfer of adequate numbers of viable, compatible pollen from the anthers ofone plant to the stigmas of another plant will result in effective pollination.
DesignDesignDesignDesignDesign• With a beestick as the vector, pollen is collected from the anthers of various plants and transferred
to the stigmas of other plants.• Students will record data on their Floral Clock Student Data Sheet (page 51).• It is important for each class to have at least two extra sets of four film can wick pots (16 plants)
in PGCs to serve as unpollinated control plants. The extra PGCs should have been planted alongwith and maintained in the same manner as the experimental PGCs.
Time FrameTime FrameTime FrameTime FrameTime FrameA period of 16 days from the sowing of seed is required for the growth of the AstroPlants and thecompletion of the activity. Making beesticks will require about 15 minutes and should be done one totwo days prior to pollination. Observation of the bee and a lesson on the relationship of bees and theAstroPlants flower in pollination could take one 50 minute class period. The pollination will requireone 50 minute class period.
Learning ObjectivesLearning ObjectivesLearning ObjectivesLearning ObjectivesLearning ObjectivesIn participating in this activity students will:• understand flowering as the sexually mature stage of plant development;• understand where and how ovules and pollen originate (male and female gamete formation);• explore the parts of the flower and the role that each part plays in reproduction;• observe the reproductive tissues of plants, including pollen and stigma, under magnification;• understand the interdependent coevolutionary relationship of bees and brassicas; and• begin the process of reproduction in their AstroPlants by performing a pollination using a beestick,
setting the stage for future developmental events.
MaterialsMaterialsMaterialsMaterialsMaterials• flowering AstroPlants (Day 14 to 16)• forceps• two dissection strips (page 23)• 2 cm wide clear adhesive tape• dried bees• toothpicks• glue (e.g., Duco® Cement)• hand lens or microscope
Procedure: Making BeesticksProcedure: Making BeesticksProcedure: Making BeesticksProcedure: Making BeesticksProcedure: Making Beesticks1. One to two days prior to pollination, students should make
beesticks. While making beesticks the teacher may wish to havestudents observe the anatomy of a bee, focusing on the legs andproboscis, to reinforce an understanding of the design (role andfunction) of the bee in relation to the flower.
2. Carefully remove the legs, head and abdomen of the driedbee, leaving the fuzzy thorax. Pollination can be performedwith "whole bee" beesticks as well.
3. Place a drop of fast-drying glue on the tip of a toothpick.Carefully push the toothpick into the top of the thorax of thebee. Remove the wings. Let the beesticks dry overnight.

48
Procedure: Setting the Floral ClockProcedure: Setting the Floral ClockProcedure: Setting the Floral ClockProcedure: Setting the Floral ClockProcedure: Setting the Floral Clock1. At a time between Day 14 and Day 16 when five or more flowers are open on
each plant in the PGC, cross-pollinate all open flowers on each plant with abeestick by gently rolling the bee thorax back and forth over the anthers offlowers of several plants until yellow pollen can be observed on the hairs.
2. Take the top open flower of the first plant and carefully remove it with a forceps. Place it on thesticky tape of a dissection strip.
3. While observing with a hand lens or microscope, carefully remove the flower parts, noting theirrelative positions on the receptacle, making sure not to damage the pistil. Refer to theillustration on page 43 for help in identifying the floral parts. You and your students may want totest the nectaries for the presence of glucose (write to Wisconsin Fast Plants for the activity "TheHunt for Glucose - A Flower's Treasure").
4. Slip the ruler on a second dissection strip (without tape on it) under the first strip. Each studentshould measure the length of the pistil from the receptacle to the top of the stigma and record thepistil length on his/her Floral Clock Student Data Sheet (page 51).
5. Remove the top open flower of the second plant, measure the length of the pistil and record thedata on the Floral Clock Student Data Sheet in the column under the number of the second plant.
- With higher powered microscopes students couldobserve magnified views of pollen trapped on thestigmas of dissected flowers or on a beestick.
- While pollinating, students might also observe thepollen trapped on the tape of a dissection strip.
- Alternatively, look at the pollen on the stigmas oron the beestick with a hand lens.
- A beestick with pollen can be rolled over the stickytape on the dissection strip. Observation under amagnifier will reveal pollen attached to the bee setae.
6. Note that flowers on the plants are produced and open in a sequence spiraling up the flower stem.Starting with the next flower down from the one that you removed, number the remaining flowersas 4, 3, 2 and 1 as shown in the illustration on page 49, with number 1 being the oldest flower.
- With a sharp pair of fine scissors, carefully snip off all additional remaining flowers below flowernumber 1 (including side shoots), leaving only the four open flowers that have been numbered.
- Snip off the developing apical flower shoot and buds above the four remaining open flowers. Thisis known as terminalizing the plant.
Moving to other plants and repeating therolling motion over the anthers and thestigma of each pistil, students should makesure to deposit pollen collected on thebeestick on to the stigma of each flower.Students from one group may wish to "fly"their bees to flowers of other groups. Buzz!
magnifiedpollen grains onbee setae
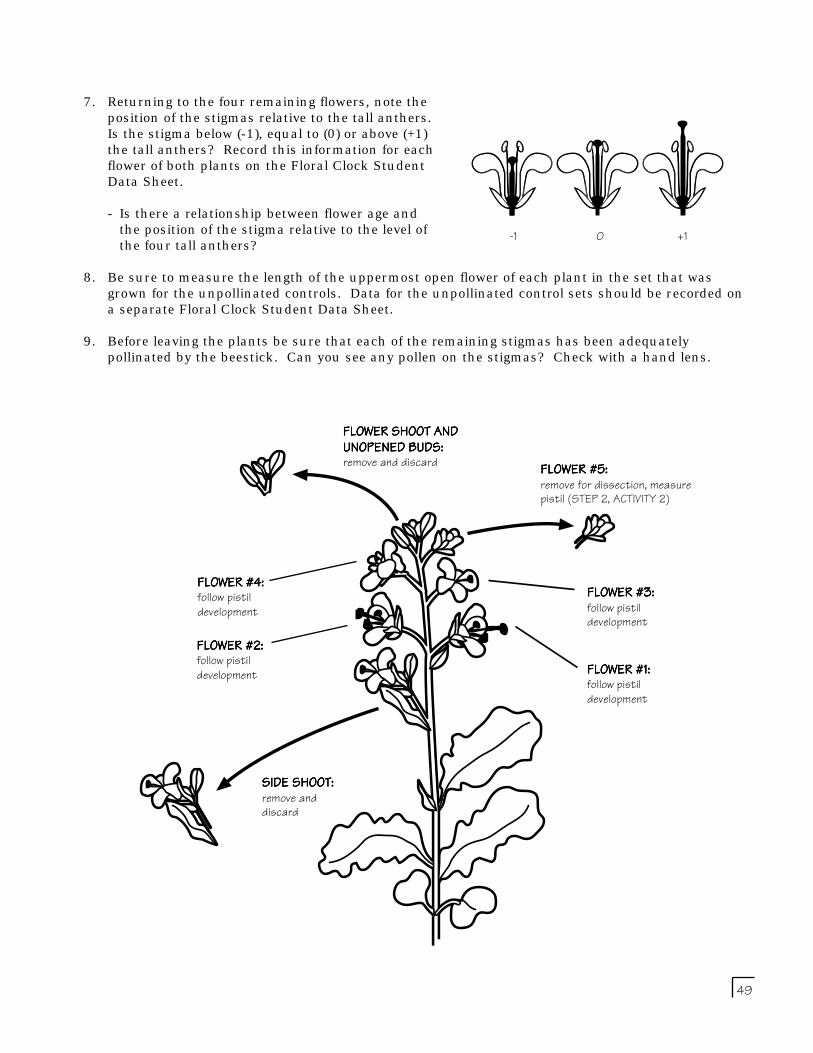
49
7. Returning to the four remaining flowers, note theposition of the stigmas relative to the tall anthers.Is the stigma below (-1), equal to (0) or above (+1)the tall anthers? Record this information for eachflower of both plants on the Floral Clock StudentData Sheet.
- Is there a relationship between flower age andthe position of the stigma relative to the level ofthe four tall anthers?
8. Be sure to measure the length of the uppermost open flower of each plant in the set that wasgrown for the unpollinated controls. Data for the unpollinated control sets should be recorded ona separate Floral Clock Student Data Sheet.
9. Before leaving the plants be sure that each of the remaining stigmas has been adequatelypollinated by the beestick. Can you see any pollen on the stigmas? Check with a hand lens.
-1 0 +1
FLOWER #1:FLOWER #1:FLOWER #1:FLOWER #1:FLOWER #1:follow pistildevelopment
SIDE SHOOT:SIDE SHOOT:SIDE SHOOT:SIDE SHOOT:SIDE SHOOT:remove anddiscard
FLOWER SHOOT ANDFLOWER SHOOT ANDFLOWER SHOOT ANDFLOWER SHOOT ANDFLOWER SHOOT ANDUNOPENED BUDS:UNOPENED BUDS:UNOPENED BUDS:UNOPENED BUDS:UNOPENED BUDS:remove and discard FLOWER #5:FLOWER #5:FLOWER #5:FLOWER #5:FLOWER #5:
remove for dissection, measurepistil (STEP 2, ACTIVITY 2)
FLOWER #2:FLOWER #2:FLOWER #2:FLOWER #2:FLOWER #2:follow pistildevelopment
FLOWER #4:FLOWER #4:FLOWER #4:FLOWER #4:FLOWER #4:follow pistildevelopment
FLOWER #3:FLOWER #3:FLOWER #3:FLOWER #3:FLOWER #3:follow pistildevelopment
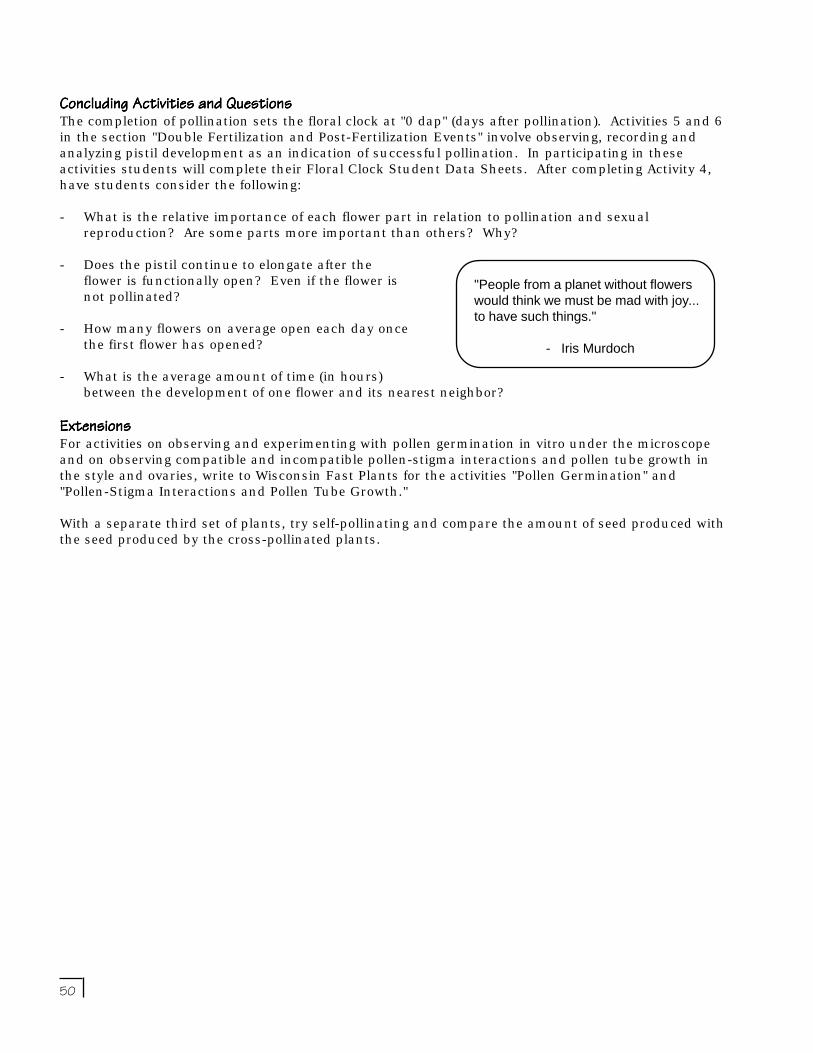
50
Concluding Activities and QuestionsConcluding Activities and QuestionsConcluding Activities and QuestionsConcluding Activities and QuestionsConcluding Activities and QuestionsThe completion of pollination sets the floral clock at "0 dap" (days after pollination). Activities 5 and 6in the section "Double Fertilization and Post-Fertilization Events" involve observing, recording andanalyzing pistil development as an indication of successful pollination. In participating in theseactivities students will complete their Floral Clock Student Data Sheets. After completing Activity 4,have students consider the following:
- What is the relative importance of each flower part in relation to pollination and sexualreproduction? Are some parts more important than others? Why?
- Does the pistil continue to elongate after theflower is functionally open? Even if the flower isnot pollinated?
- How many flowers on average open each day oncethe first flower has opened?
- What is the average amount of time (in hours)between the development of one flower and its nearest neighbor?
ExtensionsExtensionsExtensionsExtensionsExtensionsFor activities on observing and experimenting with pollen germination in vitro under the microscopeand on observing compatible and incompatible pollen-stigma interactions and pollen tube growth inthe style and ovaries, write to Wisconsin Fast Plants for the activities "Pollen Germination" and"Pollen-Stigma Interactions and Pollen Tube Growth."
With a separate third set of plants, try self-pollinating and compare the amount of seed produced withthe seed produced by the cross-pollinated plants.
"People from a planet without flowerswould think we must be mad with joy...to have such things."
- Iris Murdoch

51
Plant
No.Pla
nt No.
Plant
No.Pla
nt No.
Plant
No.Pla
nt No.
Plant
No.Pla
nt No.
Plant
No.Pla
nt No.
Date
DateDate
Date
Date
dapdapdapdap dapCha
racter
/Activi
tyCha
racter
/Activi
tyCha
racter
/Activi
tyCha
racter
/Activi
tyCha
racter
/Activi
tyMe
asurem
ents
Measu
rement
sMe
asurem
ents
Measu
rement
sMe
asurem
ents
Measu
rement
sMe
asurem
ents
Measu
rement
sMe
asurem
ents
Measu
rement
s0
pis
til le
ngt
h t
op f
low
er (m
m)
nu
mber
pol
lin
ate
d f
low
ers
Flower
/Pod N
umber
Flower
/Pod N
umber
Flower
/Pod N
umber
Flower
/Pod N
umber
Flower
/Pod N
umber
1111 12222 2
3333 34444 4
nnnn nrrrr r
xxxx xssss s
1111 12222 2
3333 34444 4
nnnn nrrrr r
xxxx xssss s
0n
ote
pos
itio
n o
f st
igm
aabov
e, a
t or
bel
ow a
nth
ers
(+1,
0,
-1)*
pis
til le
ngt
h (m
m)
pis
til le
ngt
h (m
m)
pis
til le
ngt
h (m
m)
est.
no.
dev
elop
ing
seed
s (#
)
pis
til le
ngt
h (m
m)
pis
til le
ngt
h (m
m)
harv
est
& c
oun
t se
eds/
pod
viabilit
y te
st (+ /
-)
Envir
onm
ent
Stu
den
t N
am
eIr
rad
ian
ce:
no.
of
bu
lbs
dis
tan
ce o
f pla
nts
fro
m b
ulb
s
Pla
nt
Typ
e: (c
ircl
e on
e)w
att
age
of
bu
lbs
or µ
Em
-2s-1
mea
sure
d u
nder
bu
lbs
p
ollin
ate
d
u
npol
lin
ate
dA
vera
ge d
aily
tem
per
atu
re o
f gr
owin
g en
viro
nm
ent:
˚C
Nu
trie
nt
use
d: W
FP n
utr
ien
t so
luti
on
S
pec
ify
oth
er:
Roo
t m
ediu
m u
sed
: P
eatl
ite
Spec
ify
oth
er:
Gro
up N
um
ber
See
d t
ype:
A
stro
Pla
nts
Spec
ify
oth
er:
Pla
nts
gro
wn
in
PG
C?
yes
/
no
Floral
Clock
Studen
t Data
Sheet
Floral
Clock
Studen
t Data
Sheet
Floral
Clock
Studen
t Data
Sheet
Floral
Clock
Studen
t Data
Sheet
Floral
Clock
Studen
t Data
Sheet
dap =
days
aft
er p
ollin
ati
on,
n =
nu
mber
of
mea
sure
men
ts,
r = r
an
ge (m
axi
mu
m m
inu
s m
inim
um
), x
= m
ean
(ave
rage
), s
= s
tan
dard
dev
iati
on
Th
e dap c
olu
mn
is
left
bla
nk o
n t
his
data
sh
eet
bec
au
se t
he
tim
ing
of a
ctiv
itie
s dep
ends
on t
he
rate
of
dev
elop
men
t in
each
stu
den
ts' p
lan
ts.
For
agu
ide
of a
ppro
xim
ate
dap,
see
the
"CU
E-T
SIP
S M
issi
on C
ale
ndar"
(page
29).
*w
hen
not
ing
stig
ma p
osit
ion
: +
1 =
abov
e an
ther
s, 0
= a
t le
vel of
an
ther
s, -
1 =
bel
ow t
he
leve
l of
an
ther
s
Statis
ticsSta
tistics
Statis
ticsSta
tistics
Statis
ticsSta
tistics
Statis
ticsSta
tistics
Statis
ticsSta
tistics

52
Statis
ticsSta
tistics
Statis
ticsSta
tistics
Statis
ticsSta
tistics
Statis
ticsSta
tistics
Statis
ticsSta
tistics
Group
Group
Group
Group
Group
nnnn nrrrr r
xxxx xssss s
Group
Group
Group
Group
Group
nnnn nrrrr r
xxxx xssss s
Gro
up 1
Gro
up 7
Gro
up 2
Gro
up 8
Gro
up 3
Gro
up 9
Gro
up 4
Gro
up 1
0
Gro
up 5
Gro
up 1
1
Gro
up 6
Gro
up 1
2
Floral
Clock
Class
Data
Sheet
Floral
Clock
Class
Data
Sheet
Floral
Clock
Class
Data
Sheet
Floral
Clock
Class
Data
Sheet
Floral
Clock
Class
Data
Sheet
Group
Data
Group
Data
Group
Data
Group
Data
Group
Data
Statis
ticsSta
tistics
Statis
ticsSta
tistics
Statis
tics n n n n n
r r r r r xxxx x
s s s s s
Class
Data
Class
Data
Class
Data
Class
Data
Class
Data
Variab
le Meas
ured
Variab
le Meas
ured
Variab
le Meas
ured
Variab
le Meas
ured
Variab
le Meas
ured
Date
Measu
redDa
te Me
asured
Date
Measu
redDa
te Me
asured
Date
Measu
reddap
of Me
asurem
entdap
of Me
asurem
entdap
of Me
asurem
entdap
of Me
asurem
entdap
of Me
asurem
ent
Date
Envir
onm
ent
Tea
cher
Nam
eIr
rad
ian
ce:
no.
of
bu
lbs
dis
tan
ce o
f pla
nts
fro
m b
ulb
s
Sch
ool N
am
ew
att
age
of bu
lbs
or µ
Em
-2s-1
mea
sure
d u
nder
bu
lbs
Sch
ool A
ddre
ssA
vera
ge d
aily
tem
per
atu
re o
f gr
owin
g en
viro
nm
ent:
˚C
Nu
trie
nt
use
d: W
FP n
utr
ien
t so
luti
on
S
pec
ify
oth
er:
Sch
ool Ph
one
(
)R
oot
med
ium
use
d: P
eatl
ite
S
pec
ify
oth
er:
Em
ail A
ddre
ssS
eed
type
use
d:
Ast
roPla
nts
S
pec
ify
oth
er:
Pla
nts
gro
wn
in
PG
C?
yes
/
no
How t
o use
this C
lass D
ata Sh
eet:
How t
o use
this C
lass D
ata Sh
eet:
How t
o use
this C
lass D
ata Sh
eet:
How t
o use
this C
lass D
ata Sh
eet:
How t
o use
this C
lass D
ata Sh
eet:
Th
is C
lass
Data
Sh
eet
can
be
use
d for
th
e te
ach
er o
r st
uden
ts t
o co
mpile
data
fro
m o
ne
mea
sure
d c
hara
cter
(e.
g.,
pis
til le
ngt
h,
14 d
ap)
taken
by
stu
den
ts w
ho
have
com
ple
ted t
he
Flo
ral C
lock
Stu
den
t D
ata
Sh
eet.
E
ach
gro
up o
f st
uden
ts s
hou
ld c
ompile
sum
mary
stati
stic
s fo
r th
e gr
oup's
eig
ht
pla
nts
. T
hes
e st
ati
stic
s sh
ould
th
en b
e en
tere
d in
th
e ch
art
bel
ow.
Fro
m t
he
Gro
up D
ata
ch
art
, th
ecl
ass
data
can
be
der
ived
. T
his
Cla
ss D
ata
Sh
eet
can
be
copie
d a
nd s
ubm
itte
d t
o th
e W
isco
nsi
n F
ast
Pla
nts
Pro
gram
to
be
incl
uded
in
a c
ompilati
on o
f st
ati
stic
s fr
om o
ther
cla
sses
.
dap =
days
aft
er p
ollin
ati
on,
n =
nu
mber
of m
easu
rem
ents
, r
= r
an
ge (m
axi
mu
m m
inu
s m
inim
um
), x
= m
ean
(ave
rage
), s
= s
tan
dard
dev
iati
on
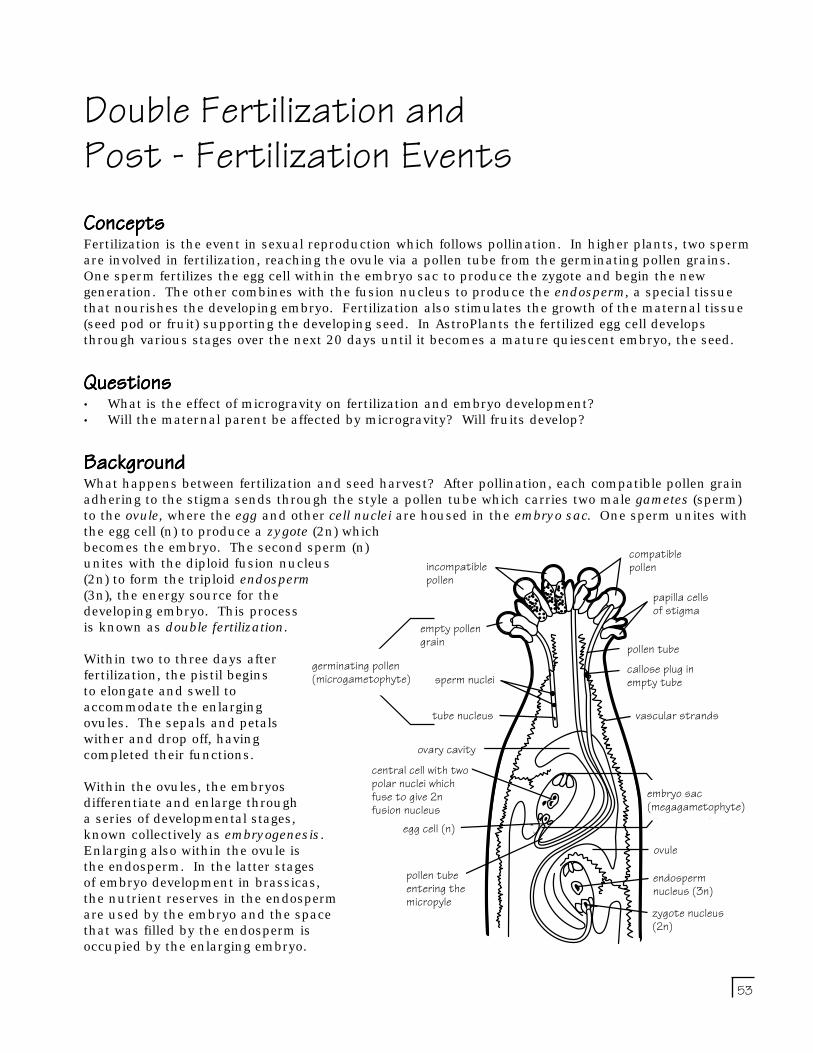
53
Double Fertilization andPost - Fertilization EventsConceptsConceptsConceptsConceptsConceptsFertilization is the event in sexual reproduction which follows pollination. In higher plants, two spermare involved in fertilization, reaching the ovule via a pollen tube from the germinating pollen grains.One sperm fertilizes the egg cell within the embryo sac to produce the zygote and begin the newgeneration. The other combines with the fusion nucleus to produce the endosperm, a special tissuethat nourishes the developing embryo. Fertilization also stimulates the growth of the maternal tissue(seed pod or fruit) supporting the developing seed. In AstroPlants the fertilized egg cell developsthrough various stages over the next 20 days until it becomes a mature quiescent embryo, the seed.
QuestionsQuestionsQuestionsQuestionsQuestions• What is the effect of microgravity on fertilization and embryo development?• Will the maternal parent be affected by microgravity? Will fruits develop?
BackgroundBackgroundBackgroundBackgroundBackgroundWhat happens between fertilization and seed harvest? After pollination, each compatible pollen grainadhering to the stigma sends through the style a pollen tube which carries two male gametes (sperm)to the ovule, where the egg and other cell nuclei are housed in the embryo sac. One sperm unites withthe egg cell (n) to produce a zygote (2n) whichbecomes the embryo. The second sperm (n)unites with the diploid fusion nucleus(2n) to form the triploid endosperm(3n), the energy source for thedeveloping embryo. This processis known as double fertilization.
Within two to three days afterfertilization, the pistil beginsto elongate and swell toaccommodate the enlargingovules. The sepals and petalswither and drop off, havingcompleted their functions.
Within the ovules, the embryosdifferentiate and enlarge througha series of developmental stages,known collectively as embryogenesis.Enlarging also within the ovule isthe endosperm. In the latter stagesof embryo development in brassicas,the nutrient reserves in the endospermare used by the embryo and the spacethat was filled by the endosperm isoccupied by the enlarging embryo.
compatablepollen
papilla cellsof stigma
pollen tube
callose plug inempty tube
embryo sac(femalegametophyte)
ovule
endospermnucleus (3n)
zygotenucleus (2n)
incompatablepollen
empty pollengrain
sperm nuclei
tube nucleus
ovary cavity
central cell with 2polar nuclei whichfuse to give 2nfusion nucleus
egg cell (n)
pollen tubeentering themicropyle
malegametophyte(germinatingpollen)
compatiblepollen
papilla cellsof stigma
pollen tubecallose plug inempty tube
ovuleendospermnucleus (3n)zygote nucleus(2n)
central cell with twopolar nuclei whichfuse to give 2nfusion nucleus
tube nucleus
sperm nuclei
empty pollengrain
germinating pollen(microgametophyte)
incompatiblepollen
ovary cavity
egg cell (n)
pollen tubeentering themicropyle
embryo sac(megagametophyte)
vascular strands

54
In cereal crops, such as wheat, rice and corn, endosperm is not used by the enlarging embryo andremains a major portion of the seed as a starchy energy source for the germinating seedling.
Through the development of the seed, the plant has solved the problem of packaging its newgeneration to survive until favorable conditions for growth return. As the seed matures, the walls ofeach ovule develop into a protective seed coat and the entire ovary becomes a fruit (seed pod). InAstroPlants, embryos mature into seeds in 20 days after successful pollination.
Measuring Time on the Floral ClockMeasuring Time on the Floral ClockMeasuring Time on the Floral ClockMeasuring Time on the Floral ClockMeasuring Time on the Floral ClockIntroductionIntroductionIntroductionIntroductionIntroduction
One of the primary aspects of the questions that Dr. Musgrave and Dr. Popova areasking relates to embryogenesis, the orchestrated sequence of developmental events
within the ovule and supporting maternal tissues that ultimately leads to the developmentof a viable seed (see "Mission Information," page 92). The failure to produce significant
quantities of viable seed in past missions raises the question as to whether normal embryogenesisis affected in microgravity. In order to ask this question, an understanding of normal embryogenicevents in AstroPlants is important.
Successful embryo and endosperm development is accompanied by rapid elongation and enlargementof the pistil which serves as supportive nourishing maternal tissue. There is a strong interdependencybetween the developing embryos, endosperm, ovule and maternal tissues of the pod: it is believed thathormones produced by the developing embryos and endosperm regulate the growth and expansion ofmaternal tissue (Stage G in the life cycle, page 12). When either embryo or endosperm fails in itsdevelopment, ovule development also ceases and pod enlargement may be slowed.
At the same time vigorous pod development supported by a healthy plant is necessary for thedeveloping embryo and endosperm in the ovule. Seed failure can result if the maternal plant comesunder excessive environmental stress, as from excessive heat, water stress or nutrient deprivation.
Fertilization in sexually reproducing organisms represents the onset of the next generation. Followingdouble fertilization in plants, the most visible event is the rapid wasting of all those flower parts whichare no longer needed by the plant. Sepals, petals and stamens wither and fall. Nectaries dry up. Atthe same time, within a few hours of fertilization, the pistil with its complement of fertilized ovulesbegins rapid development.
This activity provides students with an opportunity to follow the results of student pollination bymeasuring the increasing length of the pistil at regular intervals until mature seeds are formed andharvested. Upon harvest, viability of the seeds will also be tested. In Activity 6, students dissect podsat various stages of development in order to investigate the stages in embryogenesis.
Students will discover and document what constitutes normal embryo development in AstroPlantsthrough observation and drawing. An important part of this investigation is to determine whether thestudents results will correspond with the data from the B-STIC experiments.
Question:Question:Question:Question:Question: What are the indicators of normal fertilization and post-fertilization development that followsuccessful pollination?
Sample Hypothesis: Sample Hypothesis: Sample Hypothesis: Sample Hypothesis: Sample Hypothesis: Flower parts other than the pistil wither. The pistil enlarges to become a podcontaining developing seed. At maturity the pod and seeds dry. Viable seeds germinate.
A C T I V I T Y 5
A C T I V I T Y 5
A C T I V I T Y 5
A C T I V I T Y 5
A C T I V I T Y 5
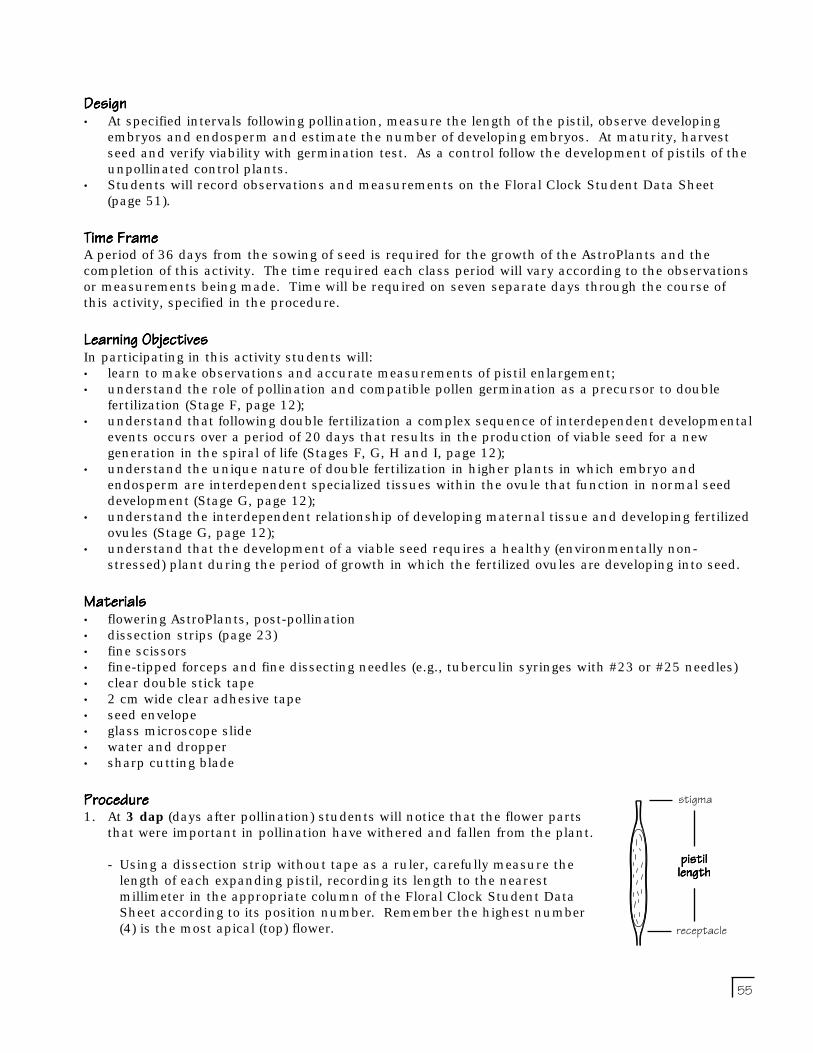
55
DesignDesignDesignDesignDesign• At specified intervals following pollination, measure the length of the pistil, observe developing
embryos and endosperm and estimate the number of developing embryos. At maturity, harvestseed and verify viability with germination test. As a control follow the development of pistils of theunpollinated control plants.
• Students will record observations and measurements on the Floral Clock Student Data Sheet(page 51).
Time FrameTime FrameTime FrameTime FrameTime FrameA period of 36 days from the sowing of seed is required for the growth of the AstroPlants and thecompletion of this activity. The time required each class period will vary according to the observationsor measurements being made. Time will be required on seven separate days through the course ofthis activity, specified in the procedure.
Learning ObjectivesLearning ObjectivesLearning ObjectivesLearning ObjectivesLearning ObjectivesIn participating in this activity students will:• learn to make observations and accurate measurements of pistil enlargement;• understand the role of pollination and compatible pollen germination as a precursor to double
fertilization (Stage F, page 12);• understand that following double fertilization a complex sequence of interdependent developmental
events occurs over a period of 20 days that results in the production of viable seed for a newgeneration in the spiral of life (Stages F, G, H and I, page 12);
• understand the unique nature of double fertilization in higher plants in which embryo andendosperm are interdependent specialized tissues within the ovule that function in normal seeddevelopment (Stage G, page 12);
• understand the interdependent relationship of developing maternal tissue and developing fertilizedovules (Stage G, page 12);
• understand that the development of a viable seed requires a healthy (environmentally non-stressed) plant during the period of growth in which the fertilized ovules are developing into seed.
MaterialsMaterialsMaterialsMaterialsMaterials• flowering AstroPlants, post-pollination• dissection strips (page 23)• fine scissors• fine-tipped forceps and fine dissecting needles (e.g., tuberculin syringes with #23 or #25 needles)• clear double stick tape• 2 cm wide clear adhesive tape• seed envelope• glass microscope slide• water and dropper• sharp cutting blade
ProcedureProcedureProcedureProcedureProcedure1. At 3 dap (days after pollination) students will notice that the flower parts
that were important in pollination have withered and fallen from the plant.
- Using a dissection strip without tape as a ruler, carefully measure thelength of each expanding pistil, recording its length to the nearestmillimeter in the appropriate column of the Floral Clock Student DataSheet according to its position number. Remember the highest number(4) is the most apical (top) flower.
stigma
receptacle
pistilpistilpistilpistilpistillengthlengthlengthlengthlength
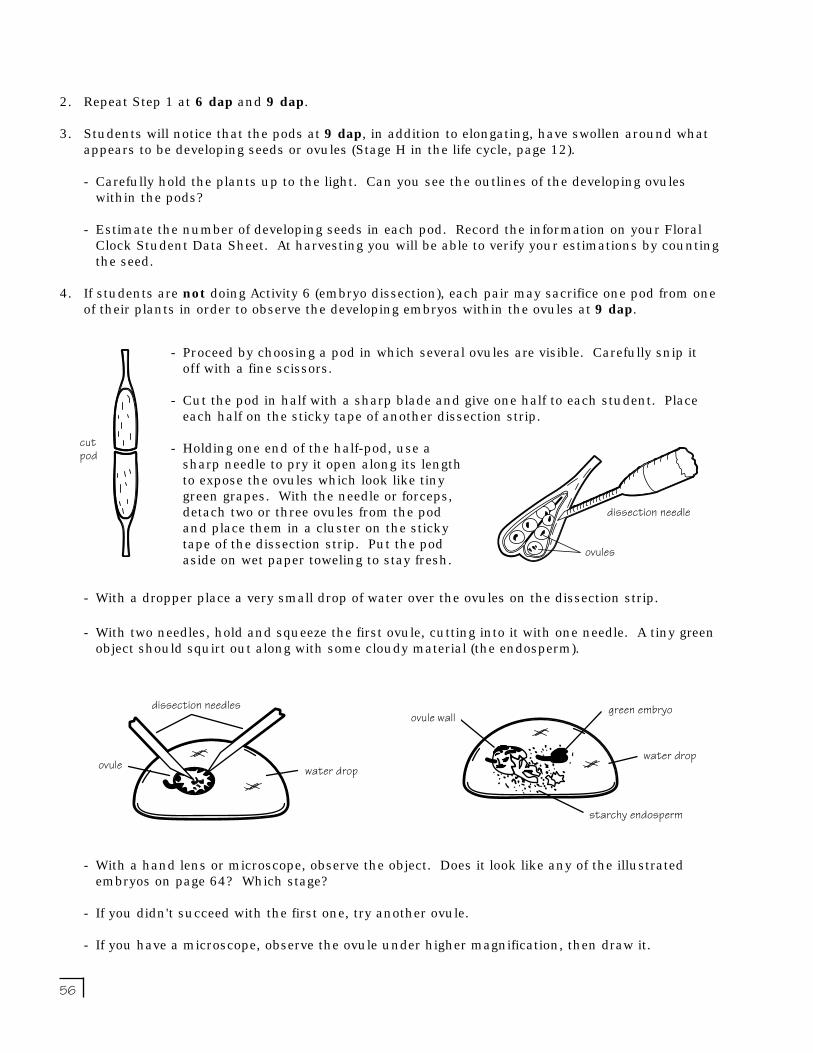
56
2. Repeat Step 1 at 6 dap and 9 dap.
3. Students will notice that the pods at 9 dap, in addition to elongating, have swollen around whatappears to be developing seeds or ovules (Stage H in the life cycle, page 12).
- Carefully hold the plants up to the light. Can you see the outlines of the developing ovuleswithin the pods?
- Estimate the number of developing seeds in each pod. Record the information on your FloralClock Student Data Sheet. At harvesting you will be able to verify your estimations by countingthe seed.
4. If students are not doing Activity 6 (embryo dissection), each pair may sacrifice one pod from oneof their plants in order to observe the developing embryos within the ovules at 9 dap.
- With two needles, hold and squeeze the first ovule, cutting into it with one needle. A tiny greenobject should squirt out along with some cloudy material (the endosperm).
- With a hand lens or microscope, observe the object. Does it look like any of the illustratedembryos on page 64? Which stage?
- If you didn't succeed with the first one, try another ovule.
- If you have a microscope, observe the ovule under higher magnification, then draw it.
- With a dropper place a very small drop of water over the ovules on the dissection strip.
- Proceed by choosing a pod in which several ovules are visible. Carefully snip itoff with a fine scissors.
- Cut the pod in half with a sharp blade and give one half to each student. Placeeach half on the sticky tape of another dissection strip.
- Holding one end of the half-pod, use asharp needle to pry it open along its lengthto expose the ovules which look like tinygreen grapes. With the needle or forceps,detach two or three ovules from the podand place them in a cluster on the stickytape of the dissection strip. Put the podaside on wet paper toweling to stay fresh.
dissection needledissection needles
water dropovule
cutpod
ovules
dissection needle
ovules
dissection needle
l
w
starchy en
green egreen embryo
water drop
starchy endosperm
ovule wall

57
5. At 12 dap, repeat Step 1 and record the data on the Floral Clock Student Data Sheet.
- By this time, the plant's lower leaves may be starting to turn yellow or even wither and dry. Thisis the normal succession in the life cycle of the plant, particularly if it is supporting a number ofpods with developing seeds.
- If a plant fails to develop any seeds, it will frequently remain green and continue to produceflowers from side shoots developing in the axils of leaves. This should be the case in theunpollinated control plants, if a plant has been severely stressed so that embryogeny has failedor if it is genetically or phenotypically sterile (incapable of producing offspring).
6. At 21 dap, plants are now approaching maturity. Normally AstroPlants embryos have fullydeveloped by 18 to 20 dap, at which time stem and pods of the aging parent plant begin to turnyellow along with the leaves and the seed coat begin to turn brown (Stage I in the life cycle,page 12). This is the time that water can be withheld from the plants to encourage seed ripening.
- At 21 dap, students should take a final pistil length measurement.
- Empty the water from the reservoir and remove the capillary mats. Keep the plants under thelightbank and let them dry.
7. In about a week, or when the pods are dry, harvest the seeds from each ofyour pods onto separate loops of sticky tape. Record the plant and podnumber on the tape.
- Count and record the number of seeds for each pod on the FloralClock Student Data Sheet.
- Did the number of seeds in each pod agree with the estimates youmade at 9 dap?
- As you harvest, notice any unusual seed. If these are of interestwith you, tape them to a card where they can be examined orgerminated later.
- Two days later, record the seed viability on the Floral ClockStudent Data Sheet. On the data sheet, "+" indicates a viable seedand "-" indicates a nonviable seed.
- Combine all the other seed in a bulk and store it in a seed or coinenvelope within a sealed container with indicator silica gel (dryingcompound, see page 94). Seed stored dry and cool in a refrigeratoror freezer will stay viable for many years.
8. Take a sample of two seeds from each pod and test their viability in a bottle cap seed germinatoraccording to the instructions on page 75.

58
Concluding Activities and QuestionsConcluding Activities and QuestionsConcluding Activities and QuestionsConcluding Activities and QuestionsConcluding Activities and QuestionsAfter setting the floral clock with the pollination activity (Activity 4), students have followed the courseof reproductive development by observing and measuring pistil enlargement and seed production andcompleting the Floral Clock Student Data Sheet. Combine the student data into group data, and theninto a class data summary using the Floral Clock Class Data Sheet (page 52). See "CUE-TSIPSScience and Technology" for a review of data analysis (page 18).
If available, use data analysis software to create graphical and statistical summaries of class data.Notice how the various statistical notations (range, mean and standard deviation) change over timefrom pollination. Have students consider the following:
- From a class frequency histogram and statistical summary, does the measured plant character ofpod length on a particular day exhibit a normal distribution within the class population?
- Do individual pod lengths for each day fall within one or two standard deviations of the classmean? Do students consider their post-fertilization events to be normal? Why or why not?
- Are there any "abnormal" seeds? They may be tested for viability.
- From a graph of the average rate of increase in pod length over time, is there a period in post-fertilization development in which the increase in pod length is fastest?
- Is there a relationship between the number of developing seed and pod length?
- How do graphs of pod length increase over time compare between the pollinated and unpollinatedsets of plants?
Classes can submit the Floral Clock Class Data Sheet for both experimental and unpollinated controlplants to the Wisconsin Fast Plants Program and then check the WFP World Wide Web site to seewhere their plant growth data fit into the data set from the larger population of plants grown for CUE-TSIPS in the United States and Ukraine (see page for addresses).
ExtensionExtensionExtensionExtensionExtensionFor an activity investigating the role of plant hormones in the regulation of pod enlargement, write toWisconsin Fast Plants for "Hormone-Induced Parthenocarpy in Rapid-Cycling Brassica rapa."
i

59
A C T I V I T Y 6
A C T I V I T Y 6
A C T I V I T Y 6
A C T I V I T Y 6
A C T I V I T Y 6
vascularstrandsnucellar tissue (region of
nutrient transfer frommaternal to endosperm)
cellularendosperm
ndospermns starch
at earlystick stage
days)
ntegumentsll layers)
integuments dry down toform the seed coat (testa)
inner integuments(several cell layers
aleuroof endconta
mic
sus
fun
aleurone(outer layer ofendosperm, oftencontains pigment)
Embryogenesis: Going for the GlobularEmbryogenesis: Going for the GlobularEmbryogenesis: Going for the GlobularEmbryogenesis: Going for the GlobularEmbryogenesis: Going for the Globular!!!!!IntroductionIntroductionIntroductionIntroductionIntroduction
Following double fertilization, four complex processes are triggered. The ovary walland related maternal structures rapidly grow to become the fruit tissue (the pod)
surrounding the developing seeds. Each ovule within the fruit enlarges to accommodatethe developing endosperm and embryo. The various outer cell layers of the ovule (integuments)
eventually become the seed coat. Within the embryo sac, the triploid endosperm nuclei dividesvery rapidly to form the nutrient-rich, starchy liquid endosperm. The liquid endosperm providesnutrients to the developing embryo.
Since fertilization, the zygote has undergone several mitotic divisions. The first few divisions produceda strand of eight cells known as the suspensor, which is attached to the embryo. The suspensororients the developing embryo within the ovule and is thought to serve as an “umbilical cord,” as itpasses nutrients from the endosperm to the embryo cells. The basal cell of the suspensor anchors thedeveloping embryo and orients the embryonic root tip near the micropyle, a hole in the integumentswhere the pollen tubeentered. At the tip of thesuspensor, repeated celldivisions give rise to thevery young globularembryo (page 64).
Immersed in the nutrient-rich endosperm, theembryo develops rapidly.By Day 7, the embryobecomes flattened andbilaterally symmetric withtwo lobes which willbecome the cotyledons.This is the heart stage.
As its developmentcontinues, the embryoelongates into the torpedostage. At this stage theembryo produceschlorophyll and becomesgreen. Elongation of theembryonic hypocotylseparates the root apicalmeristem from the shootapical meristem, which ishidden between theembryonic cotyledons.As the embryo enlarges it consumes space formerly occupied by the endosperm. To package theenlarging embryo, the cotyledons fold around the hypocotyl, now curved within the ovule; this is thewalking stick stage. By Day 20, the walls of the ovule (the integuments) harden and become the seedcoat (testa) and the embryo within desiccates to become a seed (Stages I and J, page 12). Asmaturation proceeds within the enlarged folded embryo, the starch reserves within the embryoniccotyledons are converted to lipids as the final form of energy storage.
outer integuments(4 to 5 cell layers)
nucellar tissue (region ofnutrient transfer frommaternal to endosperm)
vascularstrands
funiculusDeveloping Brassica Ovule
inner integuments(several cell layers)
micropylecellularendosperm
liquid endosperm(contains starchgrains)
embryo at earlywalking stick stage(Day 12 to 14)
integuments dry down toform the seed coat (testa)
suspensor
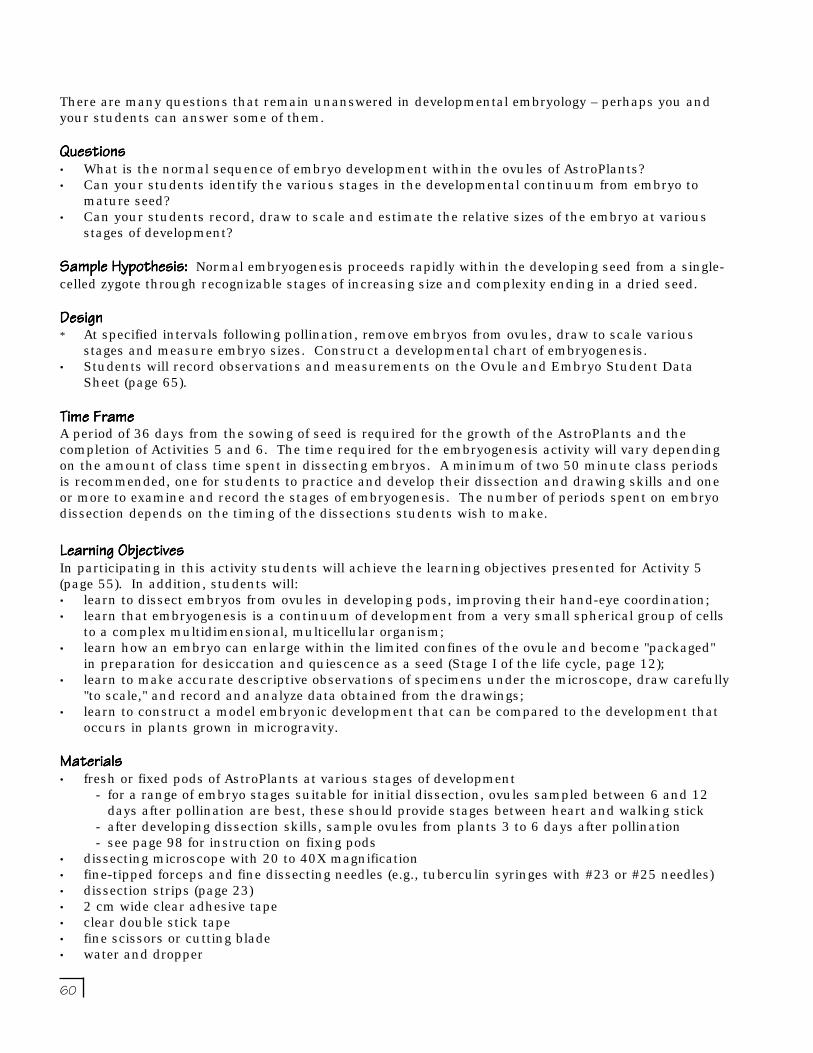
60
There are many questions that remain unanswered in developmental embryology – perhaps you andyour students can answer some of them.
QuestionsQuestionsQuestionsQuestionsQuestions• What is the normal sequence of embryo development within the ovules of AstroPlants?• Can your students identify the various stages in the developmental continuum from embryo to
mature seed?• Can your students record, draw to scale and estimate the relative sizes of the embryo at various
stages of development?
Sample Hypothesis:Sample Hypothesis:Sample Hypothesis:Sample Hypothesis:Sample Hypothesis: Normal embryogenesis proceeds rapidly within the developing seed from a single-celled zygote through recognizable stages of increasing size and complexity ending in a dried seed.
DesignDesignDesignDesignDesign* At specified intervals following pollination, remove embryos from ovules, draw to scale various
stages and measure embryo sizes. Construct a developmental chart of embryogenesis.• Students will record observations and measurements on the Ovule and Embryo Student Data
Sheet (page 65).
Time FrameTime FrameTime FrameTime FrameTime FrameA period of 36 days from the sowing of seed is required for the growth of the AstroPlants and thecompletion of Activities 5 and 6. The time required for the embryogenesis activity will vary dependingon the amount of class time spent in dissecting embryos. A minimum of two 50 minute class periodsis recommended, one for students to practice and develop their dissection and drawing skills and oneor more to examine and record the stages of embryogenesis. The number of periods spent on embryodissection depends on the timing of the dissections students wish to make.
Learning ObjectivesLearning ObjectivesLearning ObjectivesLearning ObjectivesLearning ObjectivesIn participating in this activity students will achieve the learning objectives presented for Activity 5(page 55). In addition, students will:• learn to dissect embryos from ovules in developing pods, improving their hand-eye coordination;• learn that embryogenesis is a continuum of development from a very small spherical group of cells
to a complex multidimensional, multicellular organism;• learn how an embryo can enlarge within the limited confines of the ovule and become "packaged"
in preparation for desiccation and quiescence as a seed (Stage I of the life cycle, page 12);• learn to make accurate descriptive observations of specimens under the microscope, draw carefully
"to scale," and record and analyze data obtained from the drawings;• learn to construct a model embryonic development that can be compared to the development that
occurs in plants grown in microgravity.
MaterialsMaterialsMaterialsMaterialsMaterials• fresh or fixed pods of AstroPlants at various stages of development
- for a range of embryo stages suitable for initial dissection, ovules sampled between 6 and 12days after pollination are best, these should provide stages between heart and walking stick
- after developing dissection skills, sample ovules from plants 3 to 6 days after pollination- see page 98 for instruction on fixing pods
• dissecting microscope with 20 to 40X magnification• fine-tipped forceps and fine dissecting needles (e.g., tuberculin syringes with #23 or #25 needles)• dissection strips (page 23)• 2 cm wide clear adhesive tape• clear double stick tape• fine scissors or cutting blade• water and dropper

61
ProcedureProcedureProcedureProcedureProcedure1. At the desired day after pollination (dap), students should use fine
scissors to remove one pod from one of their two plants. Place thepod on the sticky tape of the dissection strip aligning it longitudinallyon the scale.
2. Measure and make a drawing of the pod "to scale" in a lab notebook.
3. Using the dissection needles or a sharp blade, cut along one seam ofthe pod where the two carpels are fused. Pry open the pod to revealthe ovules aligned within the carpel; each ovule is attached to thevascular strands by its funiculus. You will also see a thin paper-likeseptum separating the ovules in each carpel.
4. Observe the opened pod with a hand lens or under a dissecting microscope. In a lab notebook,make a drawing "to scale" of what you observe.
5. Remove an ovule from the opened pod with fine forceps or dissecting needles, keeping a portion ofthe funiculus attached to the ovule. Then transfer the ovule onto the sticky tape on a dissectionstrip. Measure and record the length of the ovule next to the first circle on the Ovule and EmbryoStudent Data Sheet.
6. With a pipette, transfer a small drop of water to cover the ovule on the sticky tape of the dissectionstrip. Alternatively a drop of iodine potassium iodide (IKI) staining solution (page 98) can be usedin the dissection, in which case any cells or tissues containing starch will turn blue or purple.
7. Place the opened pod with remaining ovules on moist paper toweling in a covered petri dish. Thiswill keep it fresh for further sampling.
8. Place the dissection strip under a dissecting microscope and observe the ovule, noting thefuniculus attachment and the micropyle.
- If the ovule is illuminated from below, students may be able to see the indistinct embryo withinthe ovule. This will depend on the stage of embryo development.
ovulesovules
FI
fune
ovule
micropyle funiculus
ovule
- Make a second incision perpendicular to the first andusing dissection needles gently pull open the integuments.Embryos at 9 dap will generally be visible once the seedcoat is open.
niculus
ovule
9. With needles make an incision across the ovule at theend opposite the funiculus. As this cut is made, theembryo may float out into the water along with thecloudy starchy liquid endosperm.
ovule
funiculus
SECONDINCISION
FIRSTINCISION
62
INC
funic
em
ovule
en
integ
INCISION
embryofuniculusovule
endosperminteguments
INCISION
INCISION
- If the embryo is not visible, slowly and carefullyremove small pieces of the integuments,working toward the micropylar end.
Young embryos in the heart and globularstages are found surrounded by a funnelof aleurone and nucellar tissue from thetorn embryo sac. The young embryo isimmersed in cellular endosperm and isanchored by the suspensor in theinteguments at the base of the funnel.
- Continue to carefully tease out theembryo and, if possible, its attached suspensor.
10. Once the embryo has been removed, students may wish to increase the magnification under themicroscope for viewing and drawing.
- Under an appropriate magnification, slide a second dissection strip under the one holding theembryo in the water drop.
- Align the magnified image of the scale of the second dissection strip across the horizontaldiameter of the field of view of the microscope.
11. Draw in the magnified scale on the horizontal line of the first circle on the Ovule and EmbryoStudent Data Sheet. Be as accurate as possible in the spacing between the scale marks.
- Draw a scale bar at the top or bottom of the circle representing the distance of 1 mm or somefraction (0.5, 0.25, 0.1) of the magnified millimeter scaling. Indicate the distance representedby the bar on the drawing.
12. Observe the embryo and accurately draw it to scale within the same circle as the scale bar.
13. Identify and record the stage of embryo development (globular, heart, torpedo, etc.).
- Either from the drawing or directly, measure and record the length of the embryo, excludingthe suspensor. Record the magnification of your microscope.
14. Calculate the magnification of the drawing using the following method:
- Measure and record the actual distance in millimeters between the two ends of the scale bar inthe circle of the drawing of the embryo (e.g., 21 mm).
- Divide this measurement by the distance in millimeters represented by the scale bar in thecircle to give the magnification of the scale bar and drawing (e.g., 21 mm/0.5 mm = 42X).
15. Dissect ovules from pods of different dap making drawings and length measurements of thedifference stages of development, using the remaining circles on the Ovule and Embryo StudentData Sheet. If students have "spare" ovules at one developmental stage, they can share themwith other students or exchange them for ovules at different stages of development.
Suggested dissection times include 6, 9, 12 and 17 to 20 dap. If dissections are made in apotassium iodide staining solution, note the presence or absence of starch in the ovule atdifferent stages.

63
Concluding Activities and QuestionsConcluding Activities and QuestionsConcluding Activities and QuestionsConcluding Activities and QuestionsConcluding Activities and QuestionsIn completing Activity 6, students will have taken their AstroPlants through a complete life cycle, fromsowing the seed on Day 0 to harvesting the seed for the next generation. Analyze the data taken onthe Ovule and Embryo Student Data Sheets. Have students consider the following:
- Students as a group or as a class may construct a developmental graph or chart depicting the dapon the x-axis and the length of the embryo, size and stages on the y-axis, similar to what has beendone for the growth of AstroPlants on page 11.
- Students may use the embryo lengths of various developmental stages as a quantitative indicatorof development (page 64).
- How much does the embryo enlarge from the time it is a globular until it is mature?
- What are the relative sizes of the various stages in embryogenesis? With what will you comparethose sizes?
- In what stages of embryogenesis is the embryo enlarging most rapidly? What is your evidence?
- What becomes of the endosperm? Is there any stage in embryogenesis at which starch is notpresent in the ovule?
ExtensionExtensionExtensionExtensionExtensionThe embryo dissection activity can also be performed using pods that have been harvested and "fixed"in an acetic alcohol fixative on specified days after pollination. Fixed pods can be stored for futureuse. See page 98 for an acetic alcohol fixative recipe and safety information.
Practice makes perfect . . . embryos!Embryo dissection can be challenging for students, especially when the embryos are atthe early stages of development. Prior to beginning the dissection of your experimentalembryos, you and your students should practice dissecting embryos at different stages.
Have students plant several film can wick pots of AstroPlants, timed to be different ages theday or two before your class begins its experimental dissections. Pollinate these plants well:the more pods, the more practice!

64 *embryos not drawn to scale; sizes are samples, measured on embryos from wild type plants (AstroPlants embryos may be slightly smaller)
KEYBC = basal cell C = cotyledon EP = embryo proper RAM = root apical meristemSAM = shoot apical meristem S = suspensor TC = terminal cellZ= zygote P = pro-embryo G = globular H = heart T = torpedo W= walking stick FS = full size
ZYGOTE(Day 0)
2-CELL EMBRYO
T
B
FULL SIZEEMBRYO
(Day 10-11)
WALKINGSTICK(Day 9)
EP
S
EARLYPRO-EMBRYO
(Day 2)H
LATEPRO-EMBRYO
(Day 3)
S
PC
PD
H
EARLYGLOBULAR
(Day 4)
S
PC
PD
H
MIDGLOBULAR
(Day 4)
Day 4:0.03 mm
Day 5:0.047 mm
S
LATEGLOBULAR
(Day 5-6)
Day 2:~100 µm
Day 12:0.967 mm
Day 10:0.748 mm
Day 9:0.446 mm
Z
P
G
H
T
FS
W
Embryo Developmentin AstroPlants*
Day 8:0.377 mm
Day 7:0.1 mm
Day 7:0.073 mm
C
H
PD
PC
SS
EARLY HEART(Day 6-7)
EP
S
EP
S
HEART(Day 7)
EARLYTORPEDO(Day 7-8)
TORPEDO(Day 8)
RT
S
SAMPCRAM
S
EARLYWALKING STICK
(Day 8)
S
EP
TCBC
ZZZZZ
PPPPP
ZYGOTE(Day 0)
S
EARLYGLOBULAR
(Day 4)
S
Day 4:Day 4:Day 4:Day 4:Day 4:0.03 mmDay 2:Day 2:Day 2:Day 2:Day 2:
~ 100 µm
Embryo Developmentin AstroPlants*
EARLYPRO-EMBRYO
(Day 2)EPS
S
EP
LATEPRO-EMBRYO
(Day 3)
S
Day 5:Day 5:Day 5:Day 5:Day 5:0.047 mmGGGGG
MIDGLOBULAR
(Day 5)
LATEGLOBULAR(Day 5 to 6)
Day 6:Day 6:Day 6:Day 6:Day 6:0.073 mm
TTTTT
S
C
EARLY HEART(Day 6 to 7)
Day 7:Day 7:Day 7:Day 7:Day 7:0.1 mm
HHHHH
HEART(Day 7)
S
EP
S
EARLYTORPEDO
(Day 7 to 8)TORPEDO(Day 8)
S
EP
Day 8:Day 8:Day 8:Day 8:Day 8:0.377 mm
Day 9:Day 9:Day 9:Day 9:Day 9:0.446 mm
Day 12:Day 12:Day 12:Day 12:Day 12:0.967 mm
Day 10:Day 10:Day 10:Day 10:Day 10:0.748 mm
FSFSFSFSFS
WWWWW
WALKINGSTICK
(Day 9)
EARLYWALKING STICK
(Day 8)
SRAMSAM
TWO-CELL EMBRYO
FULL SIZEEMBRYO
(Day 10 to 11)
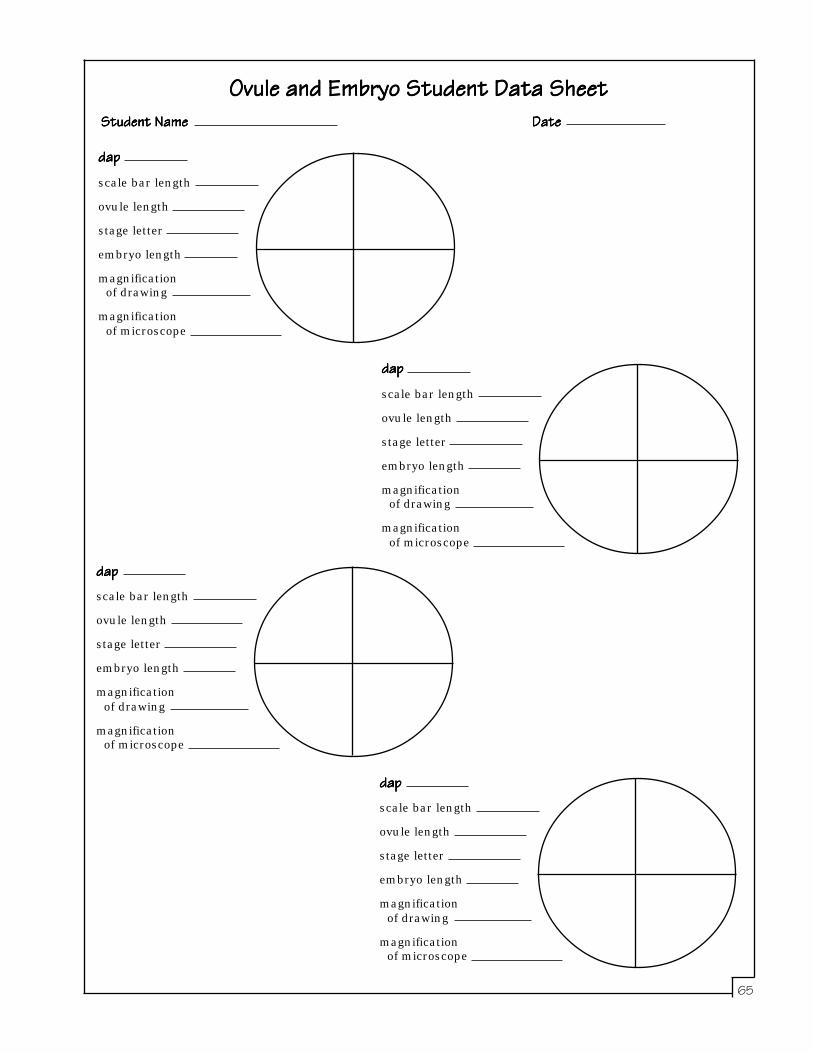
65
Ovule and Embryo Student Data SheetOvule and Embryo Student Data SheetOvule and Embryo Student Data SheetOvule and Embryo Student Data SheetOvule and Embryo Student Data SheetStudent NameStudent NameStudent NameStudent NameStudent Name DateDateDateDateDatedapdapdapdapdapscale bar length
ovule length
stage letter
embryo length
magnification of drawing
magnification of microscope
dapdapdapdapdapscale bar length
ovule length
stage letter
embryo length
magnification of drawing
magnification of microscope
dapdapdapdapdapscale bar length
ovule length
stage letter
embryo length
magnification of drawing
magnification of microscope
dapdapdapdapdapscale bar length
ovule length
stage letter
embryo length
magnification of drawing
magnification of microscope

66
GerminationConceptsConceptsConceptsConceptsConceptsGermination is the awakening of a seed (embryo) from a resting state. It involves the harnessing ofenergy stored within the seed and is activated by components in the environment.
In the metaphor of the mission, the seed is pointed in the correct position and ready for launch.Germination, like launch, involves the bringing together of essential chemicals, hydrogen and oxygen,to generate energy that will be directed toward expanding and propelling the two growing points of thegerminating seed outward (upward and downward if guided properly).
QuestionsQuestionsQuestionsQuestionsQuestions• What are the main components of the environment necessary for germination?• How does the germinating seed go about harnessing its stored energy and using the environment?• How does a germinating seed 'know' which way to grow?• What developmental events enable the emerging plant to shift its dependency from stored energy to
the energy from light?
BackgroundBackgroundBackgroundBackgroundBackgroundGermination is the beginning of growth of a plant from a previously dormant seed which contains theembryo. Germination begins when the seed takes up water (imbibition) and the seed coat cracks.
An embryonic root (radicle) emerges from the seed and develops root hairs that bring in water andnutrients. In AstroPlants, an embryonic stem (hypocotyl) elongates, pushing the seed leaves(cotyledons) upwards through the soil. As they emerge from the soil the cotyledons expand. Thecotyledons serve as an energy source until true leaves form. These events happen on Days 1, 2 and 3of the AstroPlants life cycle (see page 11). For germination to take place, water and oxygen are neededand the temperature must be suitable.
With germination water is the "on" switch. Water taken up by the dry seed hydrates the cytoplasm,activating enzymes, solubilizing substrates, loosening the structural fabric of walls and providingpressure that enlarges the cells, resulting in expansion and growth. Oxygen, another essentialingredient, combineswith hydrogen from thestored oil reserves in theembryonic seed leavesand fuels the metaboliccombustion that powerslife processes. Rapiddevelopment of the fineroot hair cells vastlyincreases the surfacearea of the root,facilitating the uptake ofwater that drives theelongation of thehypocotyl, which pushesthe seed leaves andshoot meristem upwardthrough the soil.
H2O, O2, 22˚C,– light
seedcoat
soil level
Germination in Brassica rapa
0 HOURS 0.5 - 6 6 - 12 12 - 24 24 - 36 36 - 48DRY SEED HOURS HOURS HOURS HOURS HOURS
seedcoat
light
soil level
H2O, O2, 22˚C
Germination in AstroPlants
67
On Earth, orientation during germination is provided by gravity. Roots respond positively to gravity bygrowing downward (positive gravitropism), while shoots respond negatively by growing upward(negative gravitropism). Prior to emerging from the soil into the light, the germinating brassicaseedling is dependent on the energy reserves stored in the seed leaves. Seeds of other plant speciesmay also store carbohydrates, starch (cereals) or protein (legumes, beans).
Upon emergence from the soil and triggered by the light, the cotyledons expand, casting off theprotective seed coat, turn green and become photosynthetically active. At this point the "plant"becomes independent of the stored reserves and dependent on the energy of light. Launch has beensuccessful! The solar panels (cotyledons) have been deployed. The future success of the missiondepends on keeping the panels oriented and operational to gather light energy which is convertedthrough photosynthesis to chemical energy for growth, flowering and reproduction.
The following activity will provide students with insight into the various stages of germination and givethem an introduction to the phenomena associated with orientation. Remember, one of the bigquestions about the microgravity environment is: how will plants know which way to grow?
Getting Acquainted with a SeedGetting Acquainted with a SeedGetting Acquainted with a SeedGetting Acquainted with a SeedGetting Acquainted with a SeedIntroductionIntroductionIntroductionIntroductionIntroduction
In this activity students become acquainted with the anatomy and biology of seeds.They will use lenses and scales and make drawings to scale. Students will measure
and calculate magnifications and they will begin to understand relationships among these.They will organize and summarize their data and, as they do so, they will be developing the
understanding and skills needed to undertake more detailed investigations on the reproduction ofAstroPlants in space.
QuestionsQuestionsQuestionsQuestionsQuestions• On a seed, which way is up?• Does a seed “know” which way to grow? If so, how does a seed “know” which way to grow?• When planting a seed, is there a best way to orient the seed?• In microgravity is there a best way to orient the seed?
Time FrameTime FrameTime FrameTime FrameTime FrameThis activity will take two or more 50 minute class periods. During the first period students will makea dissection strip and become familiar with its use in conjunction with magnifying lenses andmicroscopes for observing, measuring and recording data from seeds. The dissection, organization,analysis and discussion of student and class data could take another period. Further periods can bespent graphing and statistically analyzing data.
Learning ObjectivesLearning ObjectivesLearning ObjectivesLearning ObjectivesLearning ObjectivesThis activity is designed to strengthen students' observational and quantitative skills. In participatingin this activity students will:• learn to use magnifying lenses, microscopes and dissecting tools for detailed observation;• measure scales with rulers;• draw to scale, with accuracy and precision to understand scale and magnification;• learn features of the external anatomy of seeds that are associated with certain features of the
internal anatomy of seeds; and• estimate the amount of water required to be taken up by seeds in order to initiate germination.
A C T I V I T Y 7
A C T I V I T Y 7
A C T I V I T Y 7
A C T I V I T Y 7
A C T I V I T Y 7
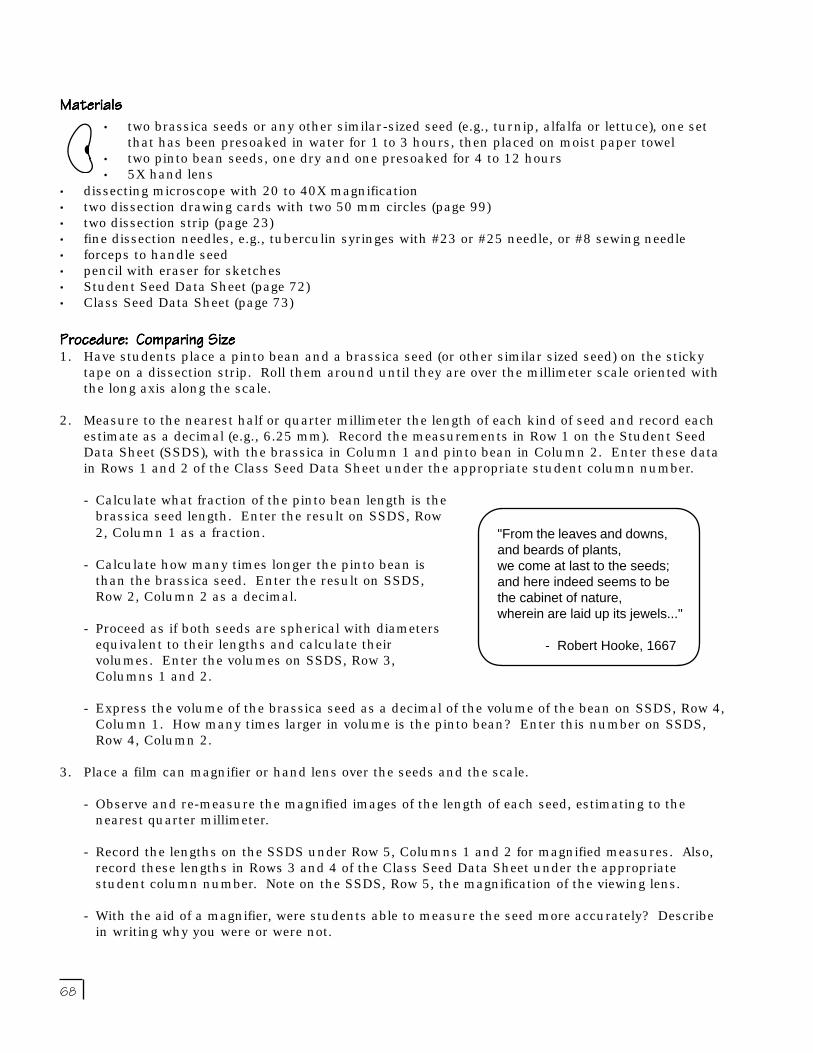
68
MaterialsMaterialsMaterialsMaterialsMaterials
• dissecting microscope with 20 to 40X magnification• two dissection drawing cards with two 50 mm circles (page 99)• two dissection strip (page 23)• fine dissection needles, e.g., tuberculin syringes with #23 or #25 needle, or #8 sewing needle• forceps to handle seed• pencil with eraser for sketches• Student Seed Data Sheet (page 72)• Class Seed Data Sheet (page 73)
Procedure: Comparing SizeProcedure: Comparing SizeProcedure: Comparing SizeProcedure: Comparing SizeProcedure: Comparing Size1. Have students place a pinto bean and a brassica seed (or other similar sized seed) on the sticky
tape on a dissection strip. Roll them around until they are over the millimeter scale oriented withthe long axis along the scale.
2. Measure to the nearest half or quarter millimeter the length of each kind of seed and record eachestimate as a decimal (e.g., 6.25 mm). Record the measurements in Row 1 on the Student SeedData Sheet (SSDS), with the brassica in Column 1 and pinto bean in Column 2. Enter these datain Rows 1 and 2 of the Class Seed Data Sheet under the appropriate student column number.
- Calculate what fraction of the pinto bean length is thebrassica seed length. Enter the result on SSDS, Row2, Column 1 as a fraction.
- Calculate how many times longer the pinto bean isthan the brassica seed. Enter the result on SSDS,Row 2, Column 2 as a decimal.
- Proceed as if both seeds are spherical with diametersequivalent to their lengths and calculate theirvolumes. Enter the volumes on SSDS, Row 3,Columns 1 and 2.
- Express the volume of the brassica seed as a decimal of the volume of the bean on SSDS, Row 4,Column 1. How many times larger in volume is the pinto bean? Enter this number on SSDS,Row 4, Column 2.
3. Place a film can magnifier or hand lens over the seeds and the scale.
- Observe and re-measure the magnified images of the length of each seed, estimating to thenearest quarter millimeter.
- Record the lengths on the SSDS under Row 5, Columns 1 and 2 for magnified measures. Also,record these lengths in Rows 3 and 4 of the Class Seed Data Sheet under the appropriatestudent column number. Note on the SSDS, Row 5, the magnification of the viewing lens.
- With the aid of a magnifier, were students able to measure the seed more accurately? Describein writing why you were or were not.
• two brassica seeds or any other similar-sized seed (e.g., turnip, alfalfa or lettuce), one setthat has been presoaked in water for 1 to 3 hours, then placed on moist paper towel
• two pinto bean seeds, one dry and one presoaked for 4 to 12 hours• 5X hand lens
"From the leaves and downs,and beards of plants,we come at last to the seeds;and here indeed seems to bethe cabinet of nature,wherein are laid up its jewels..."
- Robert Hooke, 1667

69
Procedure: Orientation of the Seed — Which Way is Up?Procedure: Orientation of the Seed — Which Way is Up?Procedure: Orientation of the Seed — Which Way is Up?Procedure: Orientation of the Seed — Which Way is Up?Procedure: Orientation of the Seed — Which Way is Up?1. While each seed is on the dissection strip, roll it around with a needle or pencil point and observe
its shape and features.
2. Can students determine which way is up on the seed?For this a point of view is needed.
- On Earth bottom is usually directed down or in thedirection of the gravitational force (toward the centerof the Earth). Up is opposite.
- Front can be arbitrarily determined as that viewwhich presents most visible detail. Can students findthe front of their seeds?
sidefrontbackside
bottom
top
side
Procedure: Drawing to Scale — Measuring and MagnificationProcedure: Drawing to Scale — Measuring and MagnificationProcedure: Drawing to Scale — Measuring and MagnificationProcedure: Drawing to Scale — Measuring and MagnificationProcedure: Drawing to Scale — Measuring and Magnification1. With the seeds still on the dissection strip and using a hand lens or film can magnifier on the
dissection strip, align the millimeter scale across the horizontal diameter of the circular field ofview of the lens.
- Encourage students to relax, have them keep both eyes open, but training their eye and brain toconcentrate on the scale and the seeds. This will take some practice.
2. Using the left circle on the first dissection card, with a sharp pencil lightly sketch in the magnifiedscale on the horizontal center line of the circle. Encourage students to be as accurate as possiblein drawing and spacing the millimeter scale marks (see page 74 for a sample dissection card).
- Now near the bottom of the circle draw a line or scale bar that is the length orsome fraction of the length between two magnified millimeter scale marks (e.g.,10 mm, 1 mm, 0.5 mm, etc.). Indicate on the scale bar and on the card thelength represented by the scale bar.
3. Students should make an accurate drawing to scale of the front view of the brassica seed,recording as much detail of the hilum and surrounding area as they can observe.
4. Now roll the brassica seed around on the tape. With the aid of amagnifier, a darker circular area with a small lighter area in itwill be seen. This is the remains of the funicular attachment.
5. Looking at the front view of the seeds, can you tell whichdirection is up and which is down?
- To answer this question students will need to observe andrecord details of their seeds under greater magnification usingthe dissection strip, a microscope and a dissection card fordrawing to scale, estimating object sizes and calculating themagnification of the drawing.
hilum orfunicular scar
brassicaseed
beanseed
3. On the pinto bean, a distinctive oval light area on the seed coat will be observed. This is the hilumand is the scar where the developing seed was attached through the funiculus (like an umbilicalcord) to the maternal tissue of the carpel or ovary. If the hilum is facing you, this is front.
hilum orfunicular scar
BRASSICABRASSICABRASSICABRASSICABRASSICASEEDSEEDSEEDSEEDSEED
top
frontbackside
bottom
1 mm
PINTOPINTOPINTOPINTOPINTOBEANBEANBEANBEANBEAN
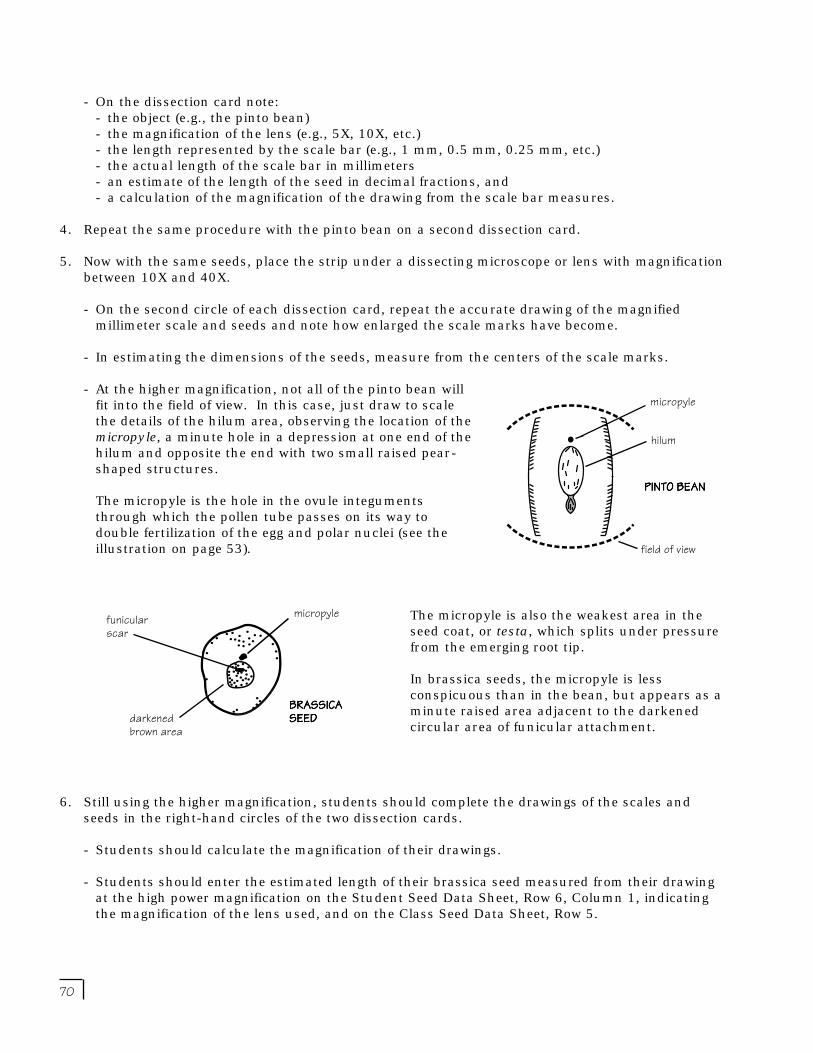
70
- On the dissection card note:- the object (e.g., the pinto bean)- the magnification of the lens (e.g., 5X, 10X, etc.)- the length represented by the scale bar (e.g., 1 mm, 0.5 mm, 0.25 mm, etc.)- the actual length of the scale bar in millimeters- an estimate of the length of the seed in decimal fractions, and- a calculation of the magnification of the drawing from the scale bar measures.
4. Repeat the same procedure with the pinto bean on a second dissection card.
5. Now with the same seeds, place the strip under a dissecting microscope or lens with magnificationbetween 10X and 40X.
- On the second circle of each dissection card, repeat the accurate drawing of the magnifiedmillimeter scale and seeds and note how enlarged the scale marks have become.
- In estimating the dimensions of the seeds, measure from the centers of the scale marks.
- At the higher magnification, not all of the pinto bean willfit into the field of view. In this case, just draw to scalethe details of the hilum area, observing the location of themicropyle, a minute hole in a depression at one end of thehilum and opposite the end with two small raised pear-shaped structures.
The micropyle is the hole in the ovule integumentsthrough which the pollen tube passes on its way todouble fertilization of the egg and polar nuclei (see theillustration on page 53).
6. Still using the higher magnification, students should complete the drawings of the scales andseeds in the right-hand circles of the two dissection cards.
- Students should calculate the magnification of their drawings.
- Students should enter the estimated length of their brassica seed measured from their drawingat the high power magnification on the Student Seed Data Sheet, Row 6, Column 1, indicatingthe magnification of the lens used, and on the Class Seed Data Sheet, Row 5.
be
kenedwn area
ular m
braBRASSICABRASSICABRASSICABRASSICABRASSICASEEDSEEDSEEDSEEDSEED
The micropyle is also the weakest area in theseed coat, or testa, which splits under pressurefrom the emerging root tip.
In brassica seeds, the micropyle is lessconspicuous than in the bean, but appears as aminute raised area adjacent to the darkenedcircular area of funicular attachment.
funicularscar
darkenedbrown area
micropyle
micropyle
hilum
field of view
PINTO BEANPINTO BEANPINTO BEANPINTO BEANPINTO BEAN
71
Procedure: On the Front View — Which Way is Up?Procedure: On the Front View — Which Way is Up?Procedure: On the Front View — Which Way is Up?Procedure: On the Front View — Which Way is Up?Procedure: On the Front View — Which Way is Up?1. Returning to the question of which way on the front view of the seed is up, take a pinto bean and a
brassica seed that have been soaking in water for one to four hours. Dry off the excess water andplace them on the dissection strip next to the dry seeds that have been measured.
2. Observe, measure and record the length of each soaked seed on the Student Seed Data Sheet, Row7, and on the Class Seed Data Sheet, Rows 6 and 7. Then, as with the dry seeds, calculate thevolumes and enter them in SSDS, Row 8, Columns 1 and 2.
3. Calculate the average volume increase of the brassica seed upon soaking. Enter this calculation inthe SSDS, Row 9, Column 1. Repeat for the pinto bean and enter the calculation in the SSDS,Row 9, Column 2.
- What causes the increase in seed volume? Is the increase in seed volume due entirely to wateruptake (imbibition)? How can this question be tested?
4. Under magnification examine the front views of the soaked seeds, comparing them with thedrawings of the dry seeds. Has anything changed? Can the hilum and micropyle still be seen?
5. Keep the location of the micropyle of the soaked pinto bean in view. With a sharp dissectionneedle cut through the testa around the hilum, peeling back the seed coat to expose the white orpale cream embryo. As this is done students will see the rounded tip of the embryonic rootpointing towards the micropyle. Make a front view drawing of the embryo in the orientation withroot tip pointing down.
Concluding Activities and QuestionsConcluding Activities and QuestionsConcluding Activities and QuestionsConcluding Activities and QuestionsConcluding Activities and QuestionsIn completing Activity 7, students will have made detailed observations of seeds which will providethem with further insight into plant biology and prepare them for further experimentation, includingActivity 8, "Launching the Seed." If available, use data analysis software or a calculator to creategraphical and statistical summaries of student and class data. Have students consider the following:
- How much variation was measured among the lengths of the pinto beans? Or of the brassicaseeds? Is the variation distributed normally?
- Does the measurement of data differ when gathered from the unaided eye, with the assistance of amagnifier or from a drawing? How do measurement data differ when gathered by each method?
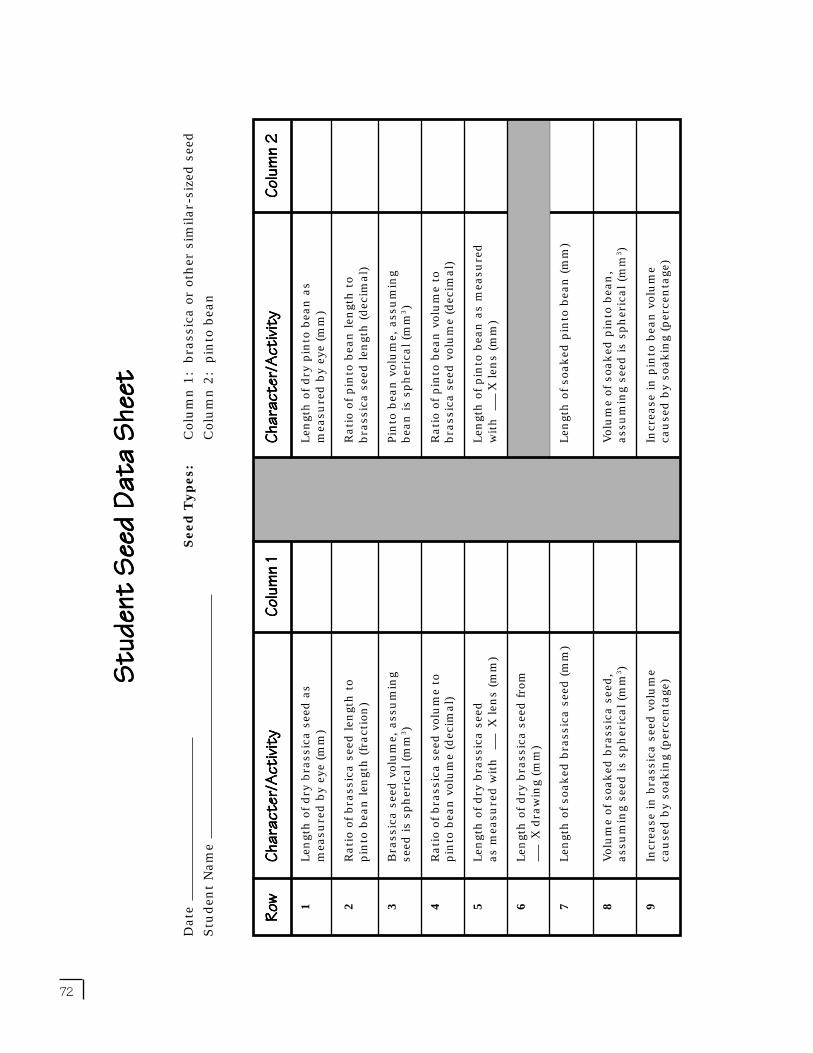
72
RowRowRowRow RowCha
racter
/Activi
tyCha
racter
/Activi
tyCha
racter
/Activi
tyCha
racter
/Activi
tyCha
racter
/Activi
tyCol
umn 1
Colum
n 1Col
umn 1
Colum
n 1Col
umn 1
Charac
ter/Ac
tivity
Charac
ter/Ac
tivity
Charac
ter/Ac
tivity
Charac
ter/Ac
tivity
Charac
ter/Ac
tivity
Colum
n 2Col
umn 2
Colum
n 2Col
umn 2
Colum
n 21
Len
gth
of
dry
bra
ssic
a s
eed a
sLen
gth
of
dry
pin
to b
ean
as
mea
sure
d b
y ey
e (m
m)
mea
sure
d b
y ey
e (m
m)
2R
ati
o of
bra
ssic
a s
eed len
gth
to
Rati
o of
pin
to b
ean
len
gth
to
pin
to b
ean
len
gth
(fr
act
ion
)bra
ssic
a s
eed len
gth
(dec
imal)
3B
rass
ica s
eed v
olu
me,
ass
um
ing
Pin
to b
ean
vol
um
e, a
ssu
min
gse
ed is
sph
eric
al (m
m3 )
bea
n is
sph
eric
al (m
m3)
4R
ati
o of
bra
ssic
a s
eed v
olu
me
toR
ati
o of
pin
to b
ean
vol
um
e to
pin
to b
ean
vol
um
e (d
ecim
al)
bra
ssic
a s
eed v
olu
me
(dec
imal)
5Len
gth
of
dry
bra
ssic
a s
eed
Len
gth
of
pin
to b
ean
as
mea
sure
das
mea
sure
d w
ith
X len
s (m
m)
wit
h
X len
s (m
m)
6Len
gth
of
dry
bra
ssic
a s
eed f
rom
X
dra
win
g (m
m)
7Len
gth
of
soaked
bra
ssic
a s
eed (m
m)
Len
gth
of
soaked
pin
to b
ean
(m
m)
8Vol
um
e of
soa
ked
bra
ssic
a s
eed,
Vol
um
e of
soa
ked
pin
to b
ean
,ass
um
ing
seed
is
sph
eric
al (m
m3 )
ass
um
ing
seed
is
sph
eric
al (m
m3 )
9In
crea
se in
bra
ssic
a s
eed v
olu
me
Incr
ease
in
pin
to b
ean
vol
um
eca
use
d b
y so
akin
g (p
erce
nta
ge)
cau
sed b
y so
akin
g (p
erce
nta
ge)
Date
See
d T
ypes
:C
olu
mn
1: b
rass
ica o
r ot
her
sim
ilar-
size
d s
eed
Stu
den
t N
am
eC
olu
mn
2: p
into
bea
n
Studen
t Seed
Data
Sheet
Studen
t Seed
Data
Sheet
Studen
t Seed
Data
Sheet
Studen
t Seed
Data
Sheet
Studen
t Seed
Data
Sheet
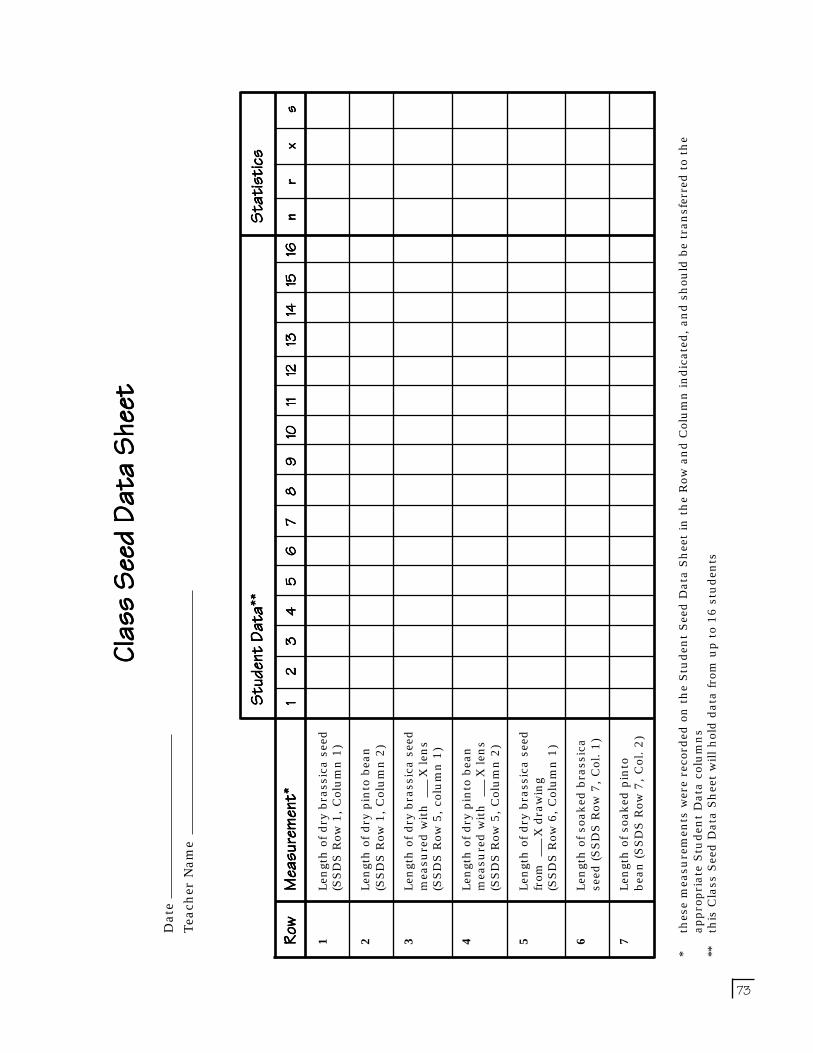
73
Date
Tea
cher
Nam
e
Class
Seed D
ata Sh
eetCla
ss See
d Data
Sheet
Class
Seed D
ata Sh
eetCla
ss See
d Data
Sheet
Class
Seed D
ata Sh
eet
Studen
t Data
**Stu
dent D
ata**
Studen
t Data
**Stu
dent D
ata**
Studen
t Data
**Sta
tistics
Statis
ticsSta
tistics
Statis
ticsSta
tistics
RowRowRowRow RowMe
asurem
ent*
Measu
rement
*Me
asurem
ent*
Measu
rement
*Me
asurem
ent*
1111 12222 2
3333 34444 4
5555 56666 6
7777 78888 8
9999 910101010 10
11111111 1112121212 12
13131313 1314141414 14
15151515 1516161616 16
nnnn nrrrr r
xxxx xssss s
1Len
gth
of
dry
bra
ssic
a s
eed
(SS
DS
Row
1,
Col
um
n 1
)
2Len
gth
of
dry
pin
to b
ean
(SS
DS
Row
1,
Col
um
n 2
)
3Len
gth
of
dry
bra
ssic
a s
eed
mea
sure
d w
ith
X
len
s(S
SD
S R
ow 5
, co
lum
n 1
)
4Len
gth
of
dry
pin
to b
ean
mea
sure
d w
ith
X
len
s(S
SD
S R
ow 5
, C
olu
mn
2)
5Len
gth
of
dry
bra
ssic
a s
eed
from
X
dra
win
g(S
SD
S R
ow 6
, C
olu
mn
1)
6Len
gth
of
soaked
bra
ssic
ase
ed (S
SD
S R
ow 7
, C
ol.
1)
7Len
gth
of
soaked
pin
tobea
n (S
SD
S R
ow 7
, C
ol.
2)
*th
ese
mea
sure
men
ts w
ere
reco
rded
on
th
e S
tuden
t S
eed D
ata
Sh
eet
in t
he
Row
an
d C
olu
mn
in
dic
ate
d,
an
d s
hou
ld b
e tr
an
sfer
red t
o th
eappro
pri
ate
Stu
den
t D
ata
col
um
ns
**th
is C
lass
See
d D
ata
Sh
eet
will h
old d
ata
fro
m u
p t
o 16 s
tuden
ts

74
Sample dissection card recording observations and measurements made on brassica seeds.
complete itemsbelow:magnificationof lens: X
length representedby scale bar: mm
actual length ofscale bar: mm
estimated lengthof object: mm
calculatedmagnification ofdrawing:== X
Dissection CardDissection CardDissection CardDissection CardDissection CardName Date
1. Draw a magnified scale on the horizontal axisof the field.
2. Accurately draw scale barindicating length.
3. Draw the object in viewto scale.
Object is:
1. Draw a magnified scale on the horizontal axisof the field.
2. Accurately draw scale barindicating length.
3. Draw the object in viewto scale.
complete itemsbelow:magnificationof lens: X
length representedby scale bar: mm
actual length ofscale bar: mm
estimated lengthof object: mm
calculatedmagnification ofdrawing:== X
Object is:
50 mm 50 mm
Willy Doit 8 - 6 - 96
brassica seed
5
10
14
1.5
14 / 101.4
brassica seeds
seed micropylescale marks
scale bar14 / 1
1.6
14
14
1
30
Launching the SeedLaunching the SeedLaunching the SeedLaunching the SeedLaunching the SeedIntroductionIntroductionIntroductionIntroductionIntroduction
From the activity "Getting Acquainted with a Seed," students found that on brassicaseeds the tip of the embryonic root points down toward the micropyle, near a darkened
circular area on the seed coat associated with the attachment of the seed to the maternalovary by way of the funiculus. Follow the steps below to begin to explore the interaction of
germination and orientation.
Question:Question:Question:Question:Question: For a brassica or other seed, which way is down? Or up?
Sample Hypothesis:Sample Hypothesis:Sample Hypothesis:Sample Hypothesis:Sample Hypothesis: The dark spot near the micropyle is down – brown is down.
Sample Null HypothesisSample Null HypothesisSample Null HypothesisSample Null HypothesisSample Null Hypothesis: Brown is up.
DesignDesignDesignDesignDesign:• Germinate seeds oriented in different directions. Observe and record initial and later direction of
root emergence from seed. Alter orientation of seedlings, predict, observe and record responses.• Observations are recorded on the "Launching the Seed Student Sketch Sheet," (page 77).
A C T I V I T Y 8
A C T I V I T Y 8
A C T I V I T Y 8
A C T I V I T Y 8
A C T I V I T Y 8
10 mmscale bar
seeds
1 mm

75
• Design Tip: You may want to begin this activity on a Monday, so that your germination will occurduring the week when students can make observations. Alternatively, students may set it up andobserve it at home.
Time FrameTime FrameTime FrameTime FrameTime FrameStudents will be able to construct their seed germinator and place their seeds within one 50 minuteclass period. This activity is designed for the student to observe their germinators over a two to threeday period. Data are collected as drawings and a written discussion. Time for observations should befive to ten minutes on each of three consecutive days.
Learning ObjectivesLearning ObjectivesLearning ObjectivesLearning ObjectivesLearning ObjectivesIn participating in this activity students will:• determine whether their understanding of seed anatomy from Activity 7 is correct and their
hypothesis regarding seed orientation is verified, namely that the micropyle is the down orientationin brassica seeds; and
• understand that plant roots reorient in the direction of their growth to conform with the directionof the gravitational force.
MaterialsMaterialsMaterialsMaterialsMaterials• two soda bottle caps (film can lids will also work)• kitchen plastic wrap• paper toweling• four brassica or other similar-sized seeds (lettuce, turnip, or alfalfa)• forceps for handling seed• hand lens• elastic band
ProcedureProcedureProcedureProcedureProcedure1. Cut two layers of paper towel into circles that will fit into the bottom of a soda bottle cap.
2. Place the towel in the cap and moisten it with water. Pour off any excess water.
3. Orient the four seeds in north-south-east-west positions on the moist towel surface,making sure that the brown micropyle area(spot) is pointing toward the center of the cap(Figure 1).
4. Make a mark on the bottle cap that indicatesthe direction of north, or up.
5. Cover the open cap with plastic wrap andsecure the wrap with an elastic band. Trimoff excess wrap with scissors.
6. Position the "bottle cap seed germinator" sothe seeds are in a vertical orientation bystanding it in a second bottle cap (Figure 2,page 76).
7. Make a drawing of the seeds in the bottle cap germinator, including the orientation of the brownmicropylar area toward the center of the circle. Use the "Circle 1" on the Launching the SeedStudent Sketch Sheet.
p
paperl
70˚,W
w
90˚,
360˚/0˚,N
soda bottlecap stand
seeds withmicropylespointed to center
mark for North
wet papertowel270˚, W 90˚, E
180˚, S
360˚/0˚, N
Figure 1: Figure 1: Figure 1: Figure 1: Figure 1: Front view of bottle cap seed germinator.
soda bottlecap

76
8. If students carry their bottle cap seed germinatorhome with them, they can observe it every fewhours. Be sure to keep it in the vertical positionwith the proper north-south-east-west orientation.
9. When the roots begin to emerge, record thedirection of the emerging root from each seed witha second drawing on the Sketch Sheet (Circle 2).You may wish to use a hand lens.
10. Continue to observe the germinating seeds beingsure that the paper towel is kept moist. Notethe appearance of the fine, fuzzy root hairs andthe extension of the hypocotyl.
11. After 24 to 48 hours, make a third drawing depicting the direction of the roots and hypocotyland illustrating the root hairs, cotyledons and seed coat (Circle 3).
12. Then reorient your bottle cap seed germinator in some way that will give you more informationon seed orientation. Make another drawing that predicts how the seedlings will look after 12 or24 hours in this new orientation (Circle 4). Observe them from time to time – do you noticeanything happening?
14. Twelve or 24 hours after reorientation, draw the seedlings on the Sketch Sheet (Circle 5).Has anything changed? Compare the outcome of the orientation with what you predicted in yourlast drawing.
15. Have students write about what they have learned on the Sketch Sheet.
Concluding Activities and QuestionsConcluding Activities and QuestionsConcluding Activities and QuestionsConcluding Activities and QuestionsConcluding Activities and QuestionsIn this activity students will have observed the effects of the Earth's gravity in reorienting the directionof roots in the direction of the gravitational force. They will also have observed that shoots orientagainst the direction of the gravitational force, bending and growing upward. This should raise adiscussion around the questions:
- In microgravity which direction will roots and shoots grow?
- Is there a guiding force for root growth in the absence of gravity? Could you generate a hypothesisand experiment to carry this question farther? Hint: What would happen if you ran thisexperiment on a centrifuge?
- What might be the possible influence(s) of light in this experiment?
see
wet
sodsoda bottle cap
soda bottlecap stand
seed
Figure 2: Figure 2: Figure 2: Figure 2: Figure 2: Side view of bottle cap seed germinator.
wet paper towel
elastic band
clearplasticwrap

77
Launching the Seed Student Sketch SheetLaunching the Seed Student Sketch SheetLaunching the Seed Student Sketch SheetLaunching the Seed Student Sketch SheetLaunching the Seed Student Sketch Sheet
Circle 1:Circle 1:Circle 1:Circle 1:Circle 1:Sketchandlabel yourbottle capseed germinatorat time of placement of seeds.
Circle 2:Circle 2:Circle 2:Circle 2:Circle 2:Sketchandlabel yourbottle capseed germinatoras the roots emerge from the seeds.
Circle 3:Circle 3:Circle 3:Circle 3:Circle 3:Sketchand labelyour bottlecap seedgerminator 24 to48 hours after placement of seed.
Circle 4:Circle 4:Circle 4:Circle 4:Circle 4:Sketchand labelyour bottlecap seedgerminator withyour prediction of the effects ofreorientation on your seedlings.
Circle 5:Circle 5:Circle 5:Circle 5:Circle 5:Sketchand labelyour bottlecap seedgerminator 12 or24 hours after reorientation tocompare with sketch in Circle 4.
Write about what you have learned about germination and orientation.

78
Orientation and GuidanceConceptsConceptsConceptsConceptsConceptsRooted in the ground, plants, unlike most animals, are unable to relocate themselves in theirenvironment from their fixed position. They are, however, capable of movement and of orientingthemselves so as to optimize their capacity to access the environmental components essential to theirlife. Plants orient themselves to light and gravity through tropism. Plants use guidance systems whichsense and respond to gravity (gravitropism) ensuring that roots anchor plants and access water andthat shoots emerge into the light. Plants then use light to activate energy-capturing photosynthesis.Light also guides the development of leaf expansion (photomorphogenesis), stem bending andelongation (phototropism), and pigment production (chlorophyll and anthocyanin).
QuestionsQuestionsQuestionsQuestionsQuestions• How does a seedling orient itself?• How does a plant grow up?• Why does the shoot grow up and the root down?
BackgroundBackgroundBackgroundBackgroundBackgroundPlants like many other organisms, including humans, use both gravity and light to provide them withorientation and guidance in their environments. Rooted in the ground, plants are unable to move, butthey are able to grow and bend toward or away from various stimuli in what is known as tropism.Roots exhibit positive gravitropism and shoots negative gravitropism. Whereas shoots are alsopositively phototropic (bend or grow toward a source of light), plants and humans rely heavily ongravity for orientation. We are especially aware of the verticality of our orientation as we lean forwardor lift a heavy object.
The perception of the horizontal is mostly afforded us by light through sight. Our awareness of ahorizon provides us with an essential sense of where we are in space. Just shut your eyes for a fewmoments and you come to realize how important 'horizontality' is to our orientation. The effects of thehorizon on your sensory stability can be best experienced in movies of stunt aircraft flights or on rollercoasters where the horizon is constantly changing. In the absence of sight, gravity and other sensorysystems (sound, smell, touch) provide compensation in our orientation.
In the absence of light, plants rely on gravity for orientation. This leads to an interesting question forplant biologists: in the environment of microgravity and in the absence of light, are there other waysthat a plant can become oriented? This and other questions will be under investigation in the CUE.
In the microgravity of the orbiting SpaceShuttle, humans and plants do not perceivethe force of Earth’s gravity. Astronauts andcosmonauts orient visually on the manystructures within the orbiter. In space,plants also must orient using light. Justhow plants orient themselves to the light isstill under intensive study by plantphysiologists. Perhaps the best place to dosuch studies on phototropism is in theSpace Shuttle and on the InternationalSpace Station, where the confounding influenceof gravity as a guiding force is minimized.
"...[in plants] we know that there is always movementin progress, and its amplitude, or direction, or both,have only to be modified for the good of the plant inrelation with internal or external stimuli."
- Charles Darwin,The Power of Movement in Plants, 1880
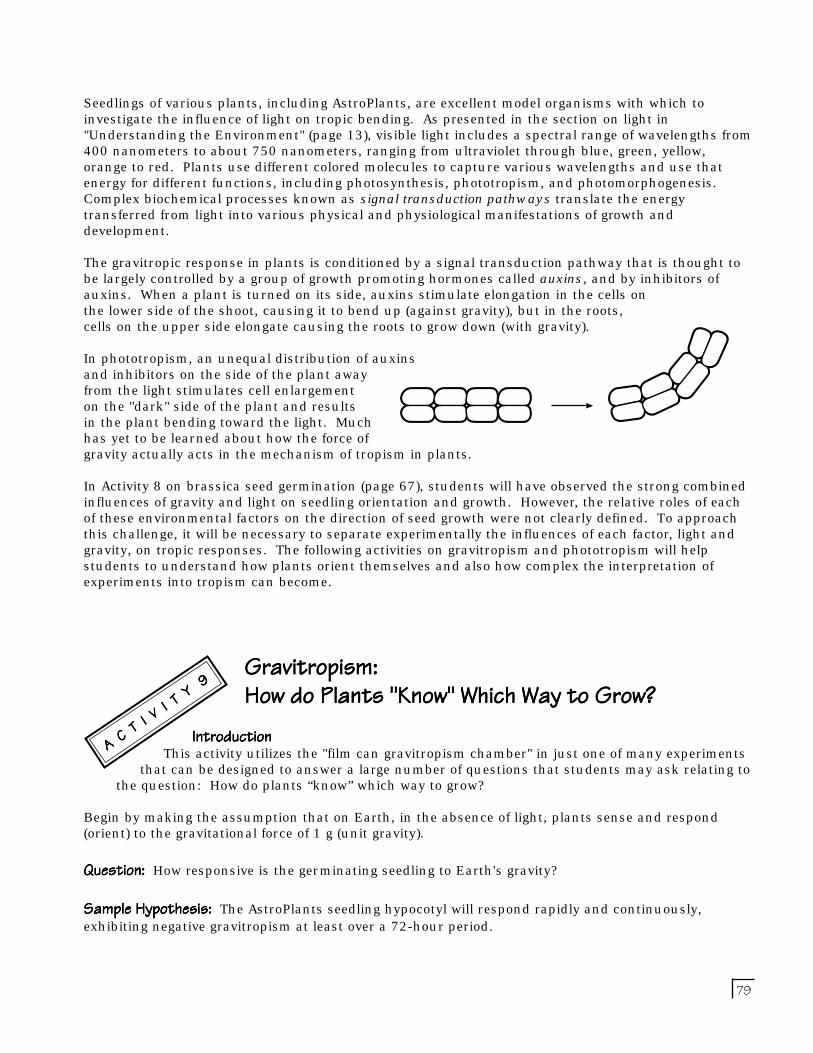
79
Seedlings of various plants, including AstroPlants, are excellent model organisms with which toinvestigate the influence of light on tropic bending. As presented in the section on light in"Understanding the Environment" (page 13), visible light includes a spectral range of wavelengths from400 nanometers to about 750 nanometers, ranging from ultraviolet through blue, green, yellow,orange to red. Plants use different colored molecules to capture various wavelengths and use thatenergy for different functions, including photosynthesis, phototropism, and photomorphogenesis.Complex biochemical processes known as signal transduction pathways translate the energytransferred from light into various physical and physiological manifestations of growth anddevelopment.
The gravitropic response in plants is conditioned by a signal transduction pathway that is thought tobe largely controlled by a group of growth promoting hormones called auxins, and by inhibitors ofauxins. When a plant is turned on its side, auxins stimulate elongation in the cells onthe lower side of the shoot, causing it to bend up (against gravity), but in the roots,cells on the upper side elongate causing the roots to grow down (with gravity).
In phototropism, an unequal distribution of auxinsand inhibitors on the side of the plant awayfrom the light stimulates cell enlargementon the "dark" side of the plant and resultsin the plant bending toward the light. Muchhas yet to be learned about how the force ofgravity actually acts in the mechanism of tropism in plants.
In Activity 8 on brassica seed germination (page 67), students will have observed the strong combinedinfluences of gravity and light on seedling orientation and growth. However, the relative roles of eachof these environmental factors on the direction of seed growth were not clearly defined. To approachthis challenge, it will be necessary to separate experimentally the influences of each factor, light andgravity, on tropic responses. The following activities on gravitropism and phototropism will helpstudents to understand how plants orient themselves and also how complex the interpretation ofexperiments into tropism can become.
Gravitropism:Gravitropism:Gravitropism:Gravitropism:Gravitropism:How do Plants "Know" Which Way to Grow?How do Plants "Know" Which Way to Grow?How do Plants "Know" Which Way to Grow?How do Plants "Know" Which Way to Grow?How do Plants "Know" Which Way to Grow?
IntroductionIntroductionIntroductionIntroductionIntroductionThis activity utilizes the "film can gravitropism chamber" in just one of many experiments
that can be designed to answer a large number of questions that students may ask relating tothe question: How do plants “know” which way to grow?
Begin by making the assumption that on Earth, in the absence of light, plants sense and respond(orient) to the gravitational force of 1 g (unit gravity).
Question:Question:Question:Question:Question: How responsive is the germinating seedling to Earth's gravity?
Sample Hypothesis:Sample Hypothesis:Sample Hypothesis:Sample Hypothesis:Sample Hypothesis: The AstroPlants seedling hypocotyl will respond rapidly and continuously,exhibiting negative gravitropism at least over a 72-hour period.
A C T I V I T Y 9
A C T I V I T Y 9
A C T I V I T Y 9
A C T I V I T Y 9
A C T I V I T Y 9

80
DesignDesignDesignDesignDesign• Seeds are germinated in the dark over several days and are observed and measured for their
directions of growth. At specified intervals of time, orientation is altered progressively by 90˚ ofrotation through 360˚ of rotation.
• At each orientation, growth response is recorded on the Gravitropism Data Sheet (page 85).• The experiment is designed so that it can be run either at home or in class.
Time FrameTime FrameTime FrameTime FrameTime FrameConstruction of and placing seed within the film can gravitropism chamber will require one 50 minuteclass period. Observation and data taking will require time on the day of chamber construction andthe two following days, approximately 15 minutes per day at specified intervals.
Learning ObjectivesLearning ObjectivesLearning ObjectivesLearning ObjectivesLearning ObjectivesIn participating in this activity students will:• learn that seedling hypocotyls (shoots) orient strongly in the direction opposite to the direction of
the force of gravity;• understand that the tropic response in seedlings is rapid and occurs in the absence of light;• construct a simple piece of experimental equipment from low-cost materials; and• develop spatial-temporal skills by predicting what seedling orientations will be in each of the four
positions of the film can gravitropism chamber at each reorientation.
Materials Materials Materials Materials Materials (per group of four students)• 35 mm black film can with lid• two extra film can lids• clear double stick tape or double stick mounting tape• white masking or lab tape, 2 cm wide• four grid strips, 0.5 cm x 4 cm pieces cut from millimeter square graph paper photocopied onto
overhead transparencies• four wick strips, 1 cm x 4.5 cm strips of soft paper toweling• one floral foam disc, 28 mm diameter, 2 to 4 mm thick• four brassica or other medium-sized seeds (turnip, lettuce or alfalfa)• water bottle• forceps to handle seed• ultrafine permanent black marker
PreparationPreparationPreparationPreparationPreparation• Making grid strips:
- Photocopy millimeter square graph paper onto an overhead transparency sheet.
- Cut the sheet along the lines to make strips with the dimensions 0.5 cm x 4 cm.
- Grid strips can be reused after rinsing, soaking for 20 minutes in a 20%bleach solution, then rinsing again and drying on paper toweling.
• Making wick strips:- Fold a square sheet of kitchen paper toweling to form an
eight layered rectangle.
- With scissors, trim end and folds to make a rectangle withthe dimensions 4.5 cm x 10 to 12 cm.
- Cut wick strips from the rectangle by cutting 1 cm strips.

81
• Making germination strips:- Hold a wick strip with a grid strip aligned on top of it. Moisten the wick strip.
- As the wick strip becomes moist through capillaryaction, the grid strip will adhere to it through theadhesive forces of the water. Together the wick andgrid strip make a germination strip.
- The wet germination strip will adhere to the inner wall of the film can gravitropism chamber.
• Making plastic seed forceps:- Cut a strip 1 cm x 10 cm from a piece of the flat side of a heavy plastic food or detergent bottle.
- Bend the strip in half and crimp the fold lightly between your thumb and forefinger.
- With scissors, trim edges to points of desired taper and precise alignment.
- Place a triangle of electrical tape on the inner surface of one of the forceps tips by taping on asquare and trimming of the excess tape with scissors. The tape will cushion the seeds andprevent them from slipping from the forceps.
blacelecblack vinylelectrical tape
• Making floral foam discs:- Prepare discs by cutting foam cylinders with a Fuji® brand "film can foam cylinder cutter" created
by cutting off the bottom of a Fuji® film can and beveling the outside edge with a knife.
cut outsidebevel withknife
cylindercuttercylindercutter
It is important to use clear Fuji® film cans forthis step because the foam cylinders andfoam discs will have a diameter of 28 mmrequired to fit inside the tropism chamber.
- Cut foam cylinders by carefully pressing the cylinder cuttercompletely through a dry floral foam block.
- With a flat knife slice discs of foam 2 to 4 mm thickfrom the cylinders.
cut outsidebevel with knife
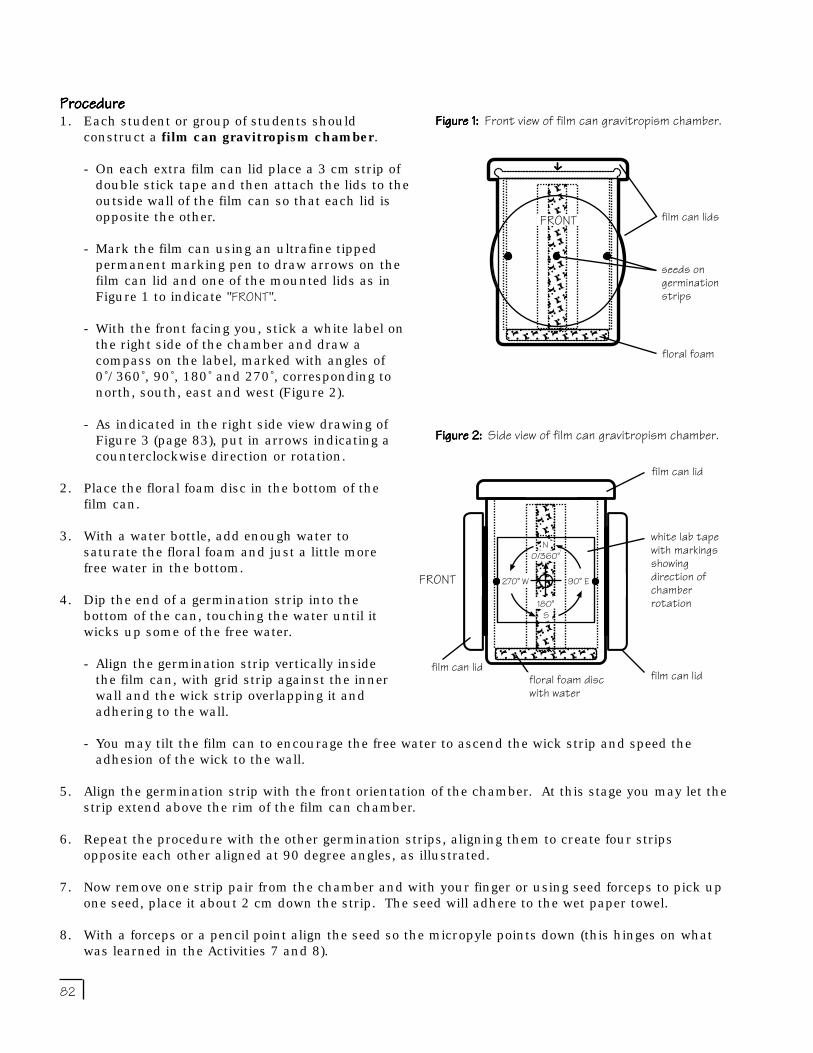
82
270˚ 90˚
0/360˚
W270˚ 90˚ENT
ilm cand f f
ProcedureProcedureProcedureProcedureProcedure1. Each student or group of students should
construct a film can gravitropism chamber.
- On each extra film can lid place a 3 cm strip ofdouble stick tape and then attach the lids to theoutside wall of the film can so that each lid isopposite the other.
- Mark the film can using an ultrafine tippedpermanent marking pen to draw arrows on thefilm can lid and one of the mounted lids as inFigure 1 to indicate "FRONT".
- With the front facing you, stick a white label onthe right side of the chamber and draw acompass on the label, marked with angles of0˚/360˚, 90˚, 180˚ and 270˚, corresponding tonorth, south, east and west (Figure 2).
- As indicated in the right side view drawing ofFigure 3 (page 83), put in arrows indicating acounterclockwise direction or rotation.
2. Place the floral foam disc in the bottom of thefilm can.
3. With a water bottle, add enough water tosaturate the floral foam and just a little morefree water in the bottom.
4. Dip the end of a germination strip into thebottom of the can, touching the water until itwicks up some of the free water.
- Align the germination strip vertically insidethe film can, with grid strip against the innerwall and the wick strip overlapping it andadhering to the wall.
- You may tilt the film can to encourage the free water to ascend the wick strip and speed theadhesion of the wick to the wall.
5. Align the germination strip with the front orientation of the chamber. At this stage you may let thestrip extend above the rim of the film can chamber.
6. Repeat the procedure with the other germination strips, aligning them to create four stripsopposite each other aligned at 90 degree angles, as illustrated.
7. Now remove one strip pair from the chamber and with your finger or using seed forceps to pick upone seed, place it about 2 cm down the strip. The seed will adhere to the wet paper towel.
8. With a forceps or a pencil point align the seed so the micropyle points down (this hinges on whatwas learned in the Activities 7 and 8).
FRONT
film can lid
FRONT
floral foam
Figure 1: Figure 1: Figure 1: Figure 1: Figure 1: Front view of film can gravitropism chamber.
film can lids
seeds ongerminationstrips
white lab tapewith markingsshowingdirection ofchamberrotation
film can lidfilm can lid
270˚ W 90˚ E
N0/360˚
180˚S
floral foam discwith water
Figure 2: Figure 2: Figure 2: Figure 2: Figure 2: Side view of film can gravitropism chamber.
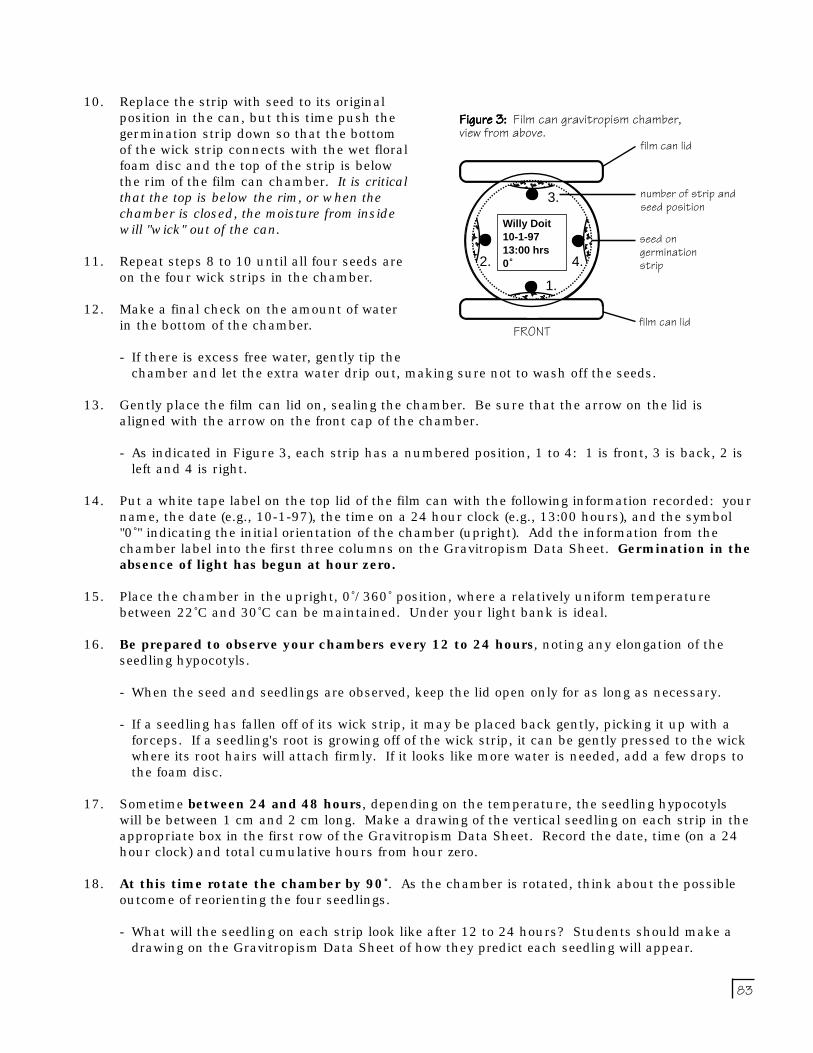
83
3.
2. 4.
1.
FRONT
10. Replace the strip with seed to its originalposition in the can, but this time push thegermination strip down so that the bottomof the wick strip connects with the wet floralfoam disc and the top of the strip is belowthe rim of the film can chamber. It is criticalthat the top is below the rim, or when thechamber is closed, the moisture from insidewill "wick" out of the can.
11. Repeat steps 8 to 10 until all four seeds areon the four wick strips in the chamber.
12. Make a final check on the amount of waterin the bottom of the chamber.
- If there is excess free water, gently tip thechamber and let the extra water drip out, making sure not to wash off the seeds.
13. Gently place the film can lid on, sealing the chamber. Be sure that the arrow on the lid isaligned with the arrow on the front cap of the chamber.
- As indicated in Figure 3, each strip has a numbered position, 1 to 4: 1 is front, 3 is back, 2 isleft and 4 is right.
14. Put a white tape label on the top lid of the film can with the following information recorded: yourname, the date (e.g., 10-1-97), the time on a 24 hour clock (e.g., 13:00 hours), and the symbol"0˚" indicating the initial orientation of the chamber (upright). Add the information from thechamber label into the first three columns on the Gravitropism Data Sheet. Germination in theabsence of light has begun at hour zero.
15. Place the chamber in the upright, 0˚/360˚ position, where a relatively uniform temperaturebetween 22˚C and 30˚C can be maintained. Under your light bank is ideal.
16. Be prepared to observe your chambers every 12 to 24 hours, noting any elongation of theseedling hypocotyls.
- When the seed and seedlings are observed, keep the lid open only for as long as necessary.
- If a seedling has fallen off of its wick strip, it may be placed back gently, picking it up with aforceps. If a seedling's root is growing off of the wick strip, it can be gently pressed to the wickwhere its root hairs will attach firmly. If it looks like more water is needed, add a few drops tothe foam disc.
17. Sometime between 24 and 48 hours, depending on the temperature, the seedling hypocotylswill be between 1 cm and 2 cm long. Make a drawing of the vertical seedling on each strip in theappropriate box in the first row of the Gravitropism Data Sheet. Record the date, time (on a 24hour clock) and total cumulative hours from hour zero.
18. At this time rotate the chamber by 90˚. As the chamber is rotated, think about the possibleoutcome of reorienting the four seedlings.
- What will the seedling on each strip look like after 12 to 24 hours? Students should make adrawing on the Gravitropism Data Sheet of how they predict each seedling will appear.
film can lid
seed ongerminationstrip
Figure 3: Figure 3: Figure 3: Figure 3: Figure 3: Film can gravitropism chamber,view from above.
FRONT film can lid
number of strip andseed position
Willy Doit10-1-9713:00 hrs0˚

84
19. Record the date, time and total cumulative hours of your first 90˚ rotation on the GravitropismData Sheet, and each rotation thereafter.
20. After 3 to 12 hours or 24 hours (3 to 6 is best), observe the chamber. Mark the time and dateon the Data Sheet and next to the predicted sketch, make a quick but accurate sketch of how theplant on each strip appears.
- The chamber should then be rotated another 90˚ to the 180˚ position. A predictive drawingshould be made on the Data Sheet and after 3 to 12 hours, repeat the cycle of observation,drawing and rotation. Be sure to record the date, time and total cumulative hours.
21. Continue rotating, observing and drawing until the chambers have completed 360˚ of rotation.Would students like to try to keep it going? Have them try it!
22. When the rotations have been finished carefully remove each strip with its seedling attached andmake a final drawing.
- Stretch out the seedling to straighten it, then accurately record the length of the hypocotylfrom the hypocotyl from the cotyledon to the root hypocotyl junction above where the root hairsfirst appear.
- On the Gravitropism Data Sheet, record the length of the hypocotyl in millimeters.
Concluding Activities and QuestionsConcluding Activities and QuestionsConcluding Activities and QuestionsConcluding Activities and QuestionsConcluding Activities and QuestionsIn this activity students will have observed the effects of gravity in orienting the growth of seedlings.Have students consider the following:
- Discuss the outcome of the experiment relative to the original hypothesis. Was the hypothesisverified? How strong is your evidence? Were you able to successfully predict how the seedlingswould respond to successive reorientation of the chamber?
- What is the average length of the hypocotyls in your chamber after X hours of germinating in thedark? You fill in the X!
- How long is it possible for a hypocotyl to grow in the dark?
- Is there a limit to how long it would grow? If there is, what is it?
- When it is elongating, how is the hypocotyl actually growing longer? By what mechanism?
- Is there a limit to how much bending a hypocotyl can undergo?
- What would the orientation behavior of the seedlings be like in microgravity?
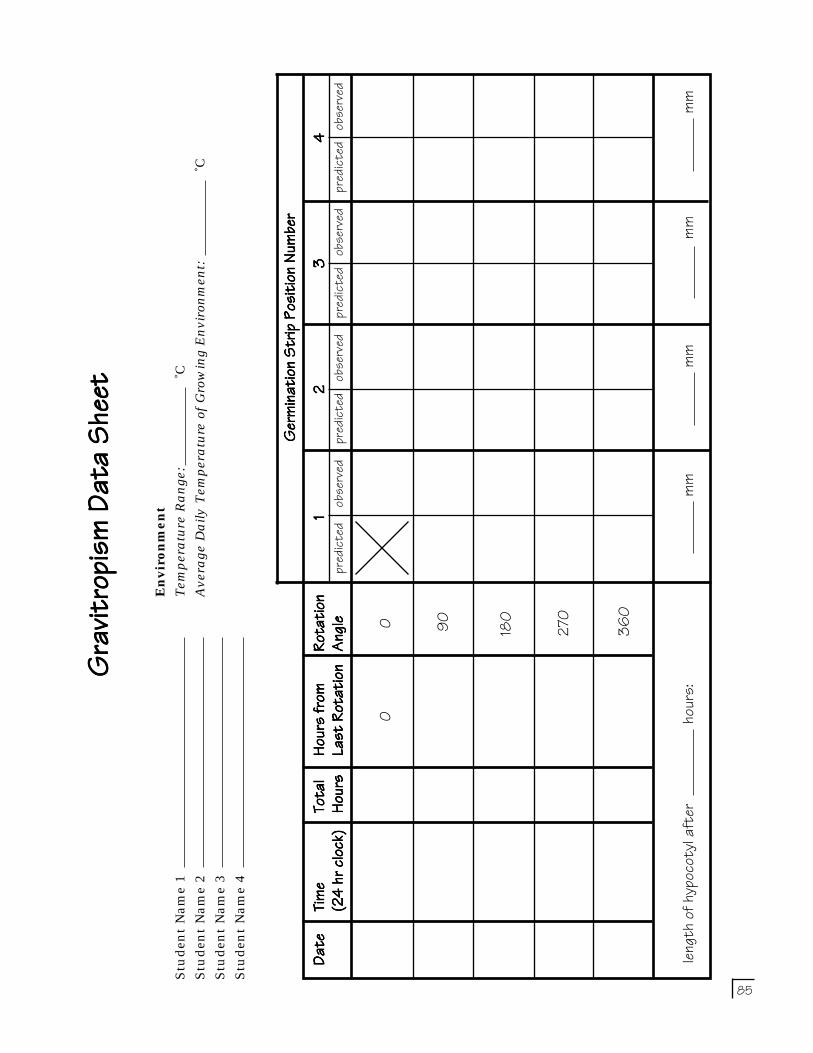
85
Envir
onm
ent
Stu
den
t N
am
e 1
Tem
per
atu
re R
an
ge:
˚C
Stu
den
t N
am
e 2
Ave
rage
Da
ily T
emper
atu
re o
f G
row
ing
En
viro
nm
ent:
˚C
Stu
den
t N
am
e 3
Stu
den
t N
am
e 4
Gravitr
opism
Data
Sheet
Gravitr
opism
Data
Sheet
Gravitr
opism
Data
Sheet
Gravitr
opism
Data
Sheet
Gravitr
opism
Data
Sheet
Germi
nation
Strip
Positio
n Num
berGe
rminat
ion St
rip Pos
ition N
umber
Germi
nation
Strip
Positio
n Num
berGe
rminat
ion St
rip Pos
ition N
umber
Germi
nation
Strip
Positio
n Num
berDa
teDa
teDate
Date
Date
Time
Time
Time
Time
Time
Total
Total
Total
Total
Total
Hours
from
Hours
from
Hours
from
Hours
from
Hours
from
Rotati
onRot
ation
Rotati
onRot
ation
Rotati
on1111 1
2222 23333 3
4444 4(24
hr clo
ck)(24
hr clo
ck)(24
hr clo
ck)(24
hr clo
ck)(24
hr clo
ck)Hou
rsHou
rsHou
rsHou
rsHou
rsLas
t Rota
tion
Last R
otatio
nLas
t Rota
tion
Last R
otatio
nLas
t Rota
tion
Angle
AngleAngle
Angle
Angle
predic
tedobs
erved
predic
tedobs
erved
predic
tedobs
erved
predic
tedobs
erved
length
of hyp
ocotyl
after
hours:
mmmm
mmmm
00 90
180
2
70
3
60
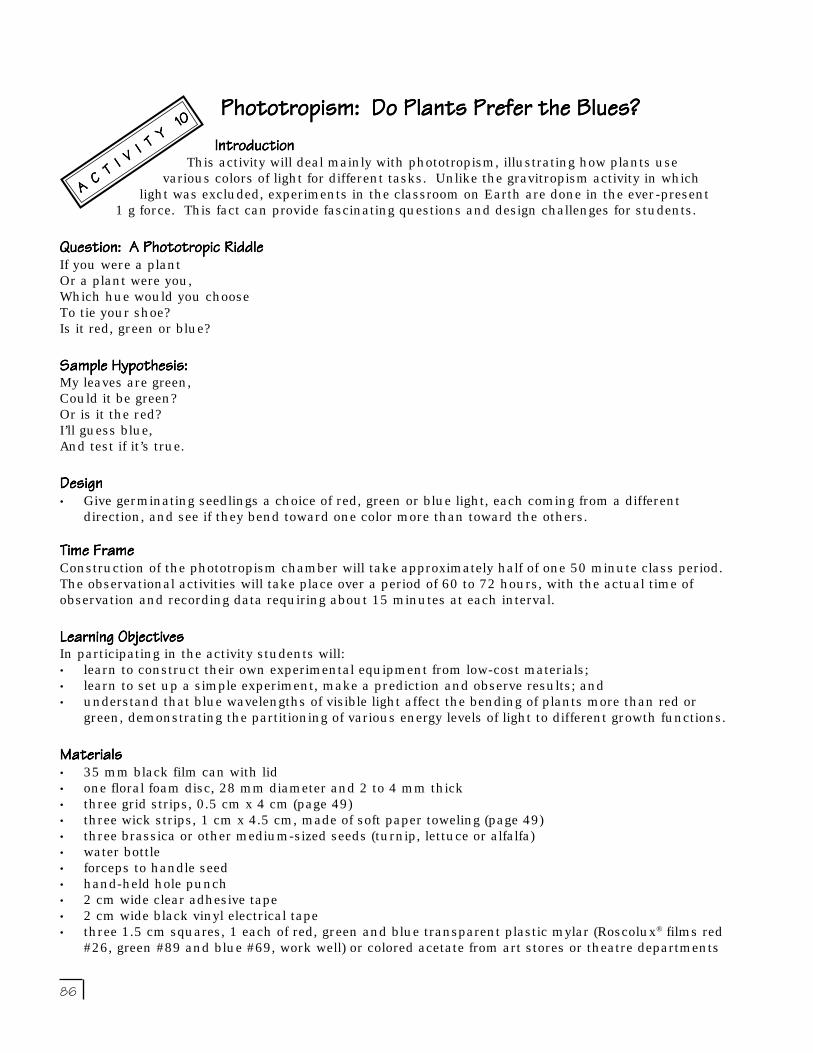
86
Phototropism: Do Plants Prefer the Blues?Phototropism: Do Plants Prefer the Blues?Phototropism: Do Plants Prefer the Blues?Phototropism: Do Plants Prefer the Blues?Phototropism: Do Plants Prefer the Blues?IntroductionIntroductionIntroductionIntroductionIntroduction
This activity will deal mainly with phototropism, illustrating how plants usevarious colors of light for different tasks. Unlike the gravitropism activity in which
light was excluded, experiments in the classroom on Earth are done in the ever-present1 g force. This fact can provide fascinating questions and design challenges for students.
Question: A Phototropic RiddleQuestion: A Phototropic RiddleQuestion: A Phototropic RiddleQuestion: A Phototropic RiddleQuestion: A Phototropic RiddleIf you were a plantOr a plant were you,Which hue would you chooseTo tie your shoe?Is it red, green or blue?
Sample Hypothesis:Sample Hypothesis:Sample Hypothesis:Sample Hypothesis:Sample Hypothesis:My leaves are green,Could it be green?Or is it the red?I’ll guess blue,And test if it’s true.
DesignDesignDesignDesignDesign• Give germinating seedlings a choice of red, green or blue light, each coming from a different
direction, and see if they bend toward one color more than toward the others.
Time FrameTime FrameTime FrameTime FrameTime FrameConstruction of the phototropism chamber will take approximately half of one 50 minute class period.The observational activities will take place over a period of 60 to 72 hours, with the actual time ofobservation and recording data requiring about 15 minutes at each interval.
Learning ObjectivesLearning ObjectivesLearning ObjectivesLearning ObjectivesLearning ObjectivesIn participating in the activity students will:• learn to construct their own experimental equipment from low-cost materials;• learn to set up a simple experiment, make a prediction and observe results; and• understand that blue wavelengths of visible light affect the bending of plants more than red or
green, demonstrating the partitioning of various energy levels of light to different growth functions.
MaterialsMaterialsMaterialsMaterialsMaterials• 35 mm black film can with lid• one floral foam disc, 28 mm diameter and 2 to 4 mm thick• three grid strips, 0.5 cm x 4 cm (page 49)• three wick strips, 1 cm x 4.5 cm, made of soft paper toweling (page 49)• three brassica or other medium-sized seeds (turnip, lettuce or alfalfa)• water bottle• forceps to handle seed• hand-held hole punch• 2 cm wide clear adhesive tape• 2 cm wide black vinyl electrical tape• three 1.5 cm squares, 1 each of red, green and blue transparent plastic mylar (Roscolux® films red
#26, green #89 and blue #69, work well) or colored acetate from art stores or theatre departments
A C T I V I T Y 10
A C T I V I T Y 10
A C T I V I T Y 10
A C T I V I T Y 10
A C T I V I T Y 10
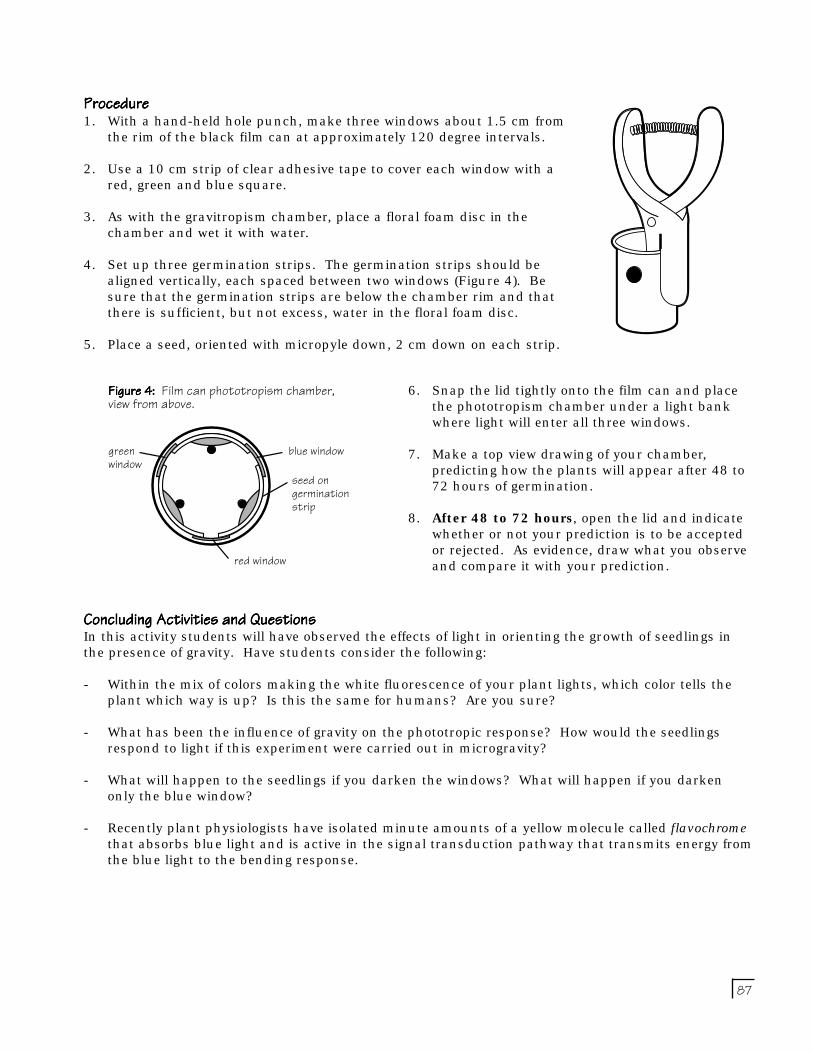
87
ProcedureProcedureProcedureProcedureProcedure1. With a hand-held hole punch, make three windows about 1.5 cm from
the rim of the black film can at approximately 120 degree intervals.
2. Use a 10 cm strip of clear adhesive tape to cover each window with ared, green and blue square.
3. As with the gravitropism chamber, place a floral foam disc in thechamber and wet it with water.
4. Set up three germination strips. The germination strips should bealigned vertically, each spaced between two windows (Figure 4). Besure that the germination strips are below the chamber rim and thatthere is sufficient, but not excess, water in the floral foam disc.
5. Place a seed, oriented with micropyle down, 2 cm down on each strip.
6. Snap the lid tightly onto the film can and placethe phototropism chamber under a light bankwhere light will enter all three windows.
7. Make a top view drawing of your chamber,predicting how the plants will appear after 48 to72 hours of germination.
8. After 48 to 72 hours, open the lid and indicatewhether or not your prediction is to be acceptedor rejected. As evidence, draw what you observeand compare it with your prediction.
Concluding Activities and QuestionsConcluding Activities and QuestionsConcluding Activities and QuestionsConcluding Activities and QuestionsConcluding Activities and QuestionsIn this activity students will have observed the effects of light in orienting the growth of seedlings inthe presence of gravity. Have students consider the following:
- Within the mix of colors making the white fluorescence of your plant lights, which color tells theplant which way is up? Is this the same for humans? Are you sure?
- What has been the influence of gravity on the phototropic response? How would the seedlingsrespond to light if this experiment were carried out in microgravity?
- What will happen to the seedlings if you darken the windows? What will happen if you darkenonly the blue window?
- Recently plant physiologists have isolated minute amounts of a yellow molecule called flavochromethat absorbs blue light and is active in the signal transduction pathway that transmits energy fromthe blue light to the bending response.
b
red window
blue windowseed ongerminationstrip
red window
greenwindow
Figure 4:Figure 4:Figure 4:Figure 4:Figure 4: Film can phototropism chamber,view from above.

88
Phototropism: How Little Light Will Bend a Seedling?Phototropism: How Little Light Will Bend a Seedling?Phototropism: How Little Light Will Bend a Seedling?Phototropism: How Little Light Will Bend a Seedling?Phototropism: How Little Light Will Bend a Seedling?IntroductionIntroductionIntroductionIntroductionIntroduction
On Earth gravity is present in the quantity of 1 g (unit gravity). The quantity oflight on the other hand can vary enormously from very large quantities of irradiance in
the order of 8000 µEm-2s-1 in sunlight at noon to vanishingly small amounts. With thechamber that you and your students constructed in the phototropism activity, it is easy to
investigate the effects of light quantity on bending of seedlings.
Question: Question: Question: Question: Question: How much light is needed to bend a seedling?
Hypothesis: Hypothesis: Hypothesis: Hypothesis: Hypothesis: You provide an amount. Then find out!
DesignDesignDesignDesignDesign• Groups of students will use a set of film can phototropism chambers to vary the quantity (intensity
and duration) of unidirectional light reaching seedlings and measure the responses over time. Thisexperiment can be run at home to facilitate observation and data collection.
• Students will record observations and measurements on the Phototropism Data Sheet (page 91).
Time FrameTime FrameTime FrameTime FrameTime FrameConstruction of the phototropism chamber will require approximately half of one 50 minute classperiod. The experiment will run 96 hours from the time seeds are placed in the chamber, withobservations and measurements made at specific intervals. The time required for the measurementswill be approximately 15 minutes at each interval.
Learning ObjectivesLearning ObjectivesLearning ObjectivesLearning ObjectivesLearning ObjectivesIn participating in this activity students will:• learn to construct their own experimental equipment from low-cost materials;• apply simple geometry to the determination of the experimental variables of light quantity
impacting a seedling; and• learn to interpret complex interactions involving three variables, including three-dimensional
graphing of data representing two independent variables (time and quantity of light) and oneindependent variable (angle of plant bending).
MaterialsMaterialsMaterialsMaterialsMaterials (per group of four students)• four 35 mm black film cans with lids• four floral foam discs, 28 mm diameter x 2 to 4 mm thick• four grid strips, 0.5 cm x 4 cm (page 43)• four wick strips, 1 cm x 4.5 cm, made of soft paper toweling (page 43)• four brassica or other similar-sized seeds (turnip, lettuce or alfalfa)• water bottle• forceps to handle seed• 2 cm wide clear adhesive tape• 2 cm wide black vinyl electrical tape• scissors• four 1.5 cm squares of aluminum foil• fine needles or pencil point for making holes in aluminum• dissection strips (page 23)• hand lens• hand-held hole punch• small plastic protractor or Tropism Response Measuring Card (page 90)
A C T I V I T Y 11
A C T I V I T Y 11
A C T I V I T Y 11
A C T I V I T Y 11
A C T I V I T Y 11

89
ProcedureProcedureProcedureProcedureProcedure1. On each of four black film cans, use a hand-held
hole punch to make a single hole of 6 mm diameter1.5 cm from the rim and cover it with a clear strip oftape to make a window.
2. Taking a 1.5 cm square of aluminum foil, puncturethe center of the foil with a very fine needle to make acircular hole (aperture of 1 mm diameter).
3. On a second square of foil, use the needle to puncturean aperture of about 2 mm diameter. On a thirdsquare puncture an aperture of 6 mm (Figure 5).
4. On a fourth foil square, make no aperture.
5. Measure the actual diameter of each aperture withthe aid of a hand lens and ruler, estimating to afraction of a millimeter, enter the diameter on thePhototropism Data Sheet. Calculate the area of eachwindow and enter it on the data sheet.
6. With clear tape, mount each foil square over the window on a different film can phototropismchamber, so that now there are four chambers each with a window of differing aperture diameter(0 aperture, 1 mm, 2 mm and 6 mm).
7. Cover each of the windows with a 3 cm strip of black vinyl tape that has a 5 mm length folded backon itself to produce a tab so the tape can be easily removed.
12. After removing the window covers, open the lid of each chamber and observe the orientation ofthe seedlings.
- Remove each germ strip with its seedling. Lay each down on a Tropism Response MeasuringCard as shown in Figure 7. Draw a line indicating the angle of bending from the vertical, 0.
- Carefully return the germination strip and the seedling to the original position in the chamberand replace the cap.
8. As in the gravitropism experiment, set up eachchamber with a wet floral foam disc in the bottombut this time with a single germination strip withone seed located 2 cm down the strip.
9. Place the germination strip and seed opposite thewindow (Figure 6).
10. Set the chambers under the light bank with thewindows in a position to receive light when theblack tape window covers are removed.
11. Let germination proceed in the dark for 36 to48 hours, then remove the window covers.
Figure 6:Figure 6:Figure 6:Figure 6:Figure 6: Film can photoropism chamber,view from above.
Figure 5:Figure 5:Figure 5:Figure 5:Figure 5: Side view of tropism chamber, andaluminum foil squares with varying apertures.
aper
seedgermstrip
floradisc
1 mm
apertureseed ongerminationstrip
2 mm
floral foamdisc
6 mm
black tape
windowfoil ape
seed ongerminationstrip
window with aluminumfoil aperture
black tape
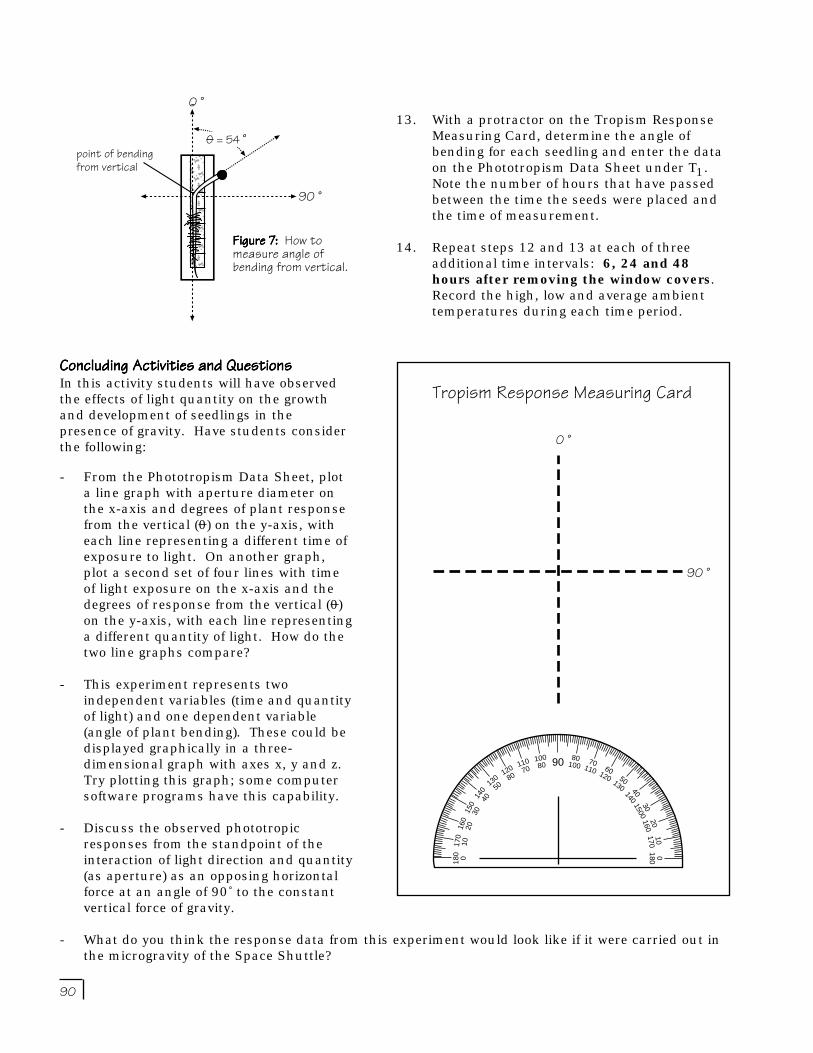
90
13. With a protractor on the Tropism ResponseMeasuring Card, determine the angle ofbending for each seedling and enter the dataon the Phototropism Data Sheet under T1.Note the number of hours that have passedbetween the time the seeds were placed andthe time of measurement.
14. Repeat steps 12 and 13 at each of threeadditional time intervals: 6, 24 and 48hours after removing the window covers.Record the high, low and average ambienttemperatures during each time period.
Tropism Response Measuring CardConcluding Activities and QuestionsConcluding Activities and QuestionsConcluding Activities and QuestionsConcluding Activities and QuestionsConcluding Activities and QuestionsIn this activity students will have observedthe effects of light quantity on the growthand development of seedlings in thepresence of gravity. Have students considerthe following:
- From the Phototropism Data Sheet, plota line graph with aperture diameter onthe x-axis and degrees of plant responsefrom the vertical (0) on the y-axis, witheach line representing a different time ofexposure to light. On another graph,plot a second set of four lines with timeof light exposure on the x-axis and thedegrees of response from the vertical (0)on the y-axis, with each line representinga different quantity of light. How do thetwo line graphs compare?
- This experiment represents twoindependent variables (time and quantityof light) and one dependent variable(angle of plant bending). These could bedisplayed graphically in a three-dimensional graph with axes x, y and z.Try plotting this graph; some computersoftware programs have this capability.
- Discuss the observed phototropicresponses from the standpoint of theinteraction of light direction and quantity(as aperture) as an opposing horizontalforce at an angle of 90˚ to the constantvertical force of gravity.
- What do you think the response data from this experiment would look like if it were carried out inthe microgravity of the Space Shuttle?
9
90 80100
70110 60120 50130 40140
30150020160
10170
0180
10080110
7012080
13050
140
40
150
30
160
20
170
1018
0 0
90 ˚
0 ˚
0
<θ˚=54ding
9
0 ˚
O = 54 ˚point of bendingfrom vertical
90 ˚
Figure 7:Figure 7:Figure 7:Figure 7:Figure 7: How tomeasure angle ofbending from vertical.

91
Photot
ropism
Data
Sheet
Photot
ropism
Data
Sheet
Photot
ropism
Data
Sheet
Photot
ropism
Data
Sheet
Photot
ropism
Data
Sheet
Angle
(An
gle (
Angle
(An
gle (
Angle
( OOOO O) a
t Hour
of Lig
ht Exp
osure
) at H
our of
Light
Exposu
re) a
t Hour
of Lig
ht Exp
osure
) at H
our of
Light
Exposu
re) a
t Hour
of Lig
ht Exp
osure
Chamb
erCha
mber
Chamb
erCha
mber
Chamb
erAp
erture
Apert
ureAp
erture
Apert
ureAp
erture
Area o
fAre
a of
Area o
fAre
a of
Area o
fTTTT T 1111 1
TTTT T 2222 2TTTT T 3333 3
TTTT T 4444 4Ap
erture
#Ap
erture
#Ap
erture
#Ap
erture
#Ap
erture
#Dia
meter
(mm)
Diame
ter (m
m)Dia
meter
(mm)
Diame
ter (m
m)Dia
meter
(mm)
Apert
ure (m
mAp
erture
(mm
Apert
ure (m
mAp
erture
(mm
Apert
ure (m
m2222 2 )))) )hrhrhrhr hr
hrhrhrhr hrhrhrhrhr hr
hrhrhrhr hr
hilo
avg
10
0
2 3 4
ambie
nt tem
peratu
re durin
g time
period
(˚C):
hilo
avghi
loavg
hilo
avg
Envir
onm
ent
Stu
den
t N
am
e 1
Tem
per
atu
re R
an
ge:
˚C
Stu
den
t N
am
e 2
Ave
rage
Da
ily T
emper
atu
re o
f G
row
ing
En
viro
nm
ent:
˚C
Stu
den
t N
am
e 3
Stu
den
t N
am
e 4
92
Mission Information*
Microgravity effects on pollination and fertilizationMicrogravity effects on pollination and fertilizationMicrogravity effects on pollination and fertilizationMicrogravity effects on pollination and fertilizationMicrogravity effects on pollination and fertilizationExperiment Acronym: B-STICPrincipal Investigators: Dr. Mary Musgrave (United States) and Dr. Antonina Popova (Ukraine)Hardware: PGF
A particularly sensitive time in the life cycle of a plant growing in microgravity seems to be thetransition from the vegetative to the reproductive phase. In previous spaceflight experiments, mostplants grown full term in space failed to produce any seed at all, and in one experiment in which seedswere produced, the seed quality was very poor. Dosimetry reading taken in flight have failed to explainthis ubiquitous sterility in terms of radiation load, thus some developmental failure during plantreproduction seems to be triggered by the microgravity environment itself. Reproductive events inangiosperms have a number of stages which could potentially be influenced directly by gravity.Microsporogenesis (the production of pollen), megasporogenesis (the production of egg cells),pollination and fertilization are all complex developmental events. Brassica rapa, a compact plant witha short life cycle, is ideal for such studies.
Close comparison of pollination and fertilization processes in microgravity with ground controls hasnot been possible before this experiment because we have not been able to control when pollinationoccurs. It is only through the availability of a trained participant for in-flight activities that controlledpollination and in-flight fixation of pollinated flowers will be possible. This will yield importantinformation on pollen germination and maturation in microgravity, pollen-stigma interactions, pollentube growth, fertilization and early embryo development.
Two plant populations are involved in this study. One population will be launched at the pre-floweringstage of growth. A second population will be seeds at time of launch. Using a pollination kit, thePayload Specialist will perform daily pollinations on the first population, and will mark the flowerspollinated with color-coded wire loops. The pollination wands will be stored with desiccant forsubsequent viability assays on pollen. Several pollinated flowers will be fixed in-flight for microtubulestudies, but the bulk of the flowers will be returned fresh for extensive processing on the ground.From the first population of plants which will be launched at the pre-flowering stage, siliques will beobtained. For high quality microscopy it will be necessary to dissect out the developing ovules prior toin-flight fixation. A small portion of the siliques will be placed in tissue culture for embryo rescuetechniques.
From the second population of plants which were seeds at time of launch, flower buds will beobtained. In vivo tests on these buds will include pollen viability (fluorescein diacetate staining),pollen germination, pollen tube growth through the stigma (aniline blue staining), and staining forstigma esterases. Flower buds will be scored for size prior to dissection and processing formicroscopy. In many ways, study of this single event in a plant life cycle integrates the manyoutstanding questions in gravitational biology.
* adapted from CUE Experiment Requirements Document (ERD), draft version (6/13/96)

93
Front Elevation of PGF:Front Elevation of PGF:Front Elevation of PGF:Front Elevation of PGF:Front Elevation of PGF:View of six Plant Growth Chambers(PGCs) and the Control Panel.
Plant Growth Chambers (PGCs):Plant Growth Chambers (PGCs):Plant Growth Chambers (PGCs):Plant Growth Chambers (PGCs):Plant Growth Chambers (PGCs):On STS-87, plant specimens will be contained in six
identical PGCs. The PGCs are designed for easyloading and unloading into the Plant Growth
Facility (PGF), and are designed to bedoubled or possibly tripled in width.
PGF and PGC SchematicsPGF and PGC SchematicsPGF and PGC SchematicsPGF and PGC SchematicsPGF and PGC Schematics

94
Sources of SuppliesAcrylic SheetsAcrylic SheetsAcrylic SheetsAcrylic SheetsAcrylic SheetsThe 2 mm thick, clear acrylic sheets of various size dimensions (e.g., 70 cm x 80 cm) are availablefrom hardware and building supply stores.
AstroPlants SeedAstroPlants SeedAstroPlants SeedAstroPlants SeedAstroPlants SeedSeed from the stock of Wisconsin Fast Plants known as "AstroPlants" can be purchased from CarolinaBiological Supply Company (2700 York Road, Burlington, NC 27215, tel: 800-334-5551).
BeesBeesBeesBeesBeesHoneybees can be obtained from local beekeepers, or commercially from Carolina Biological SupplyCompany (2700 York Road, Burlington, NC 27215, tel: 800-334-5551).
Capillary Wicking MaterialCapillary Wicking MaterialCapillary Wicking MaterialCapillary Wicking MaterialCapillary Wicking MaterialCapillary wicking material is used in the CUE-TSIPS peatlite growing system. Pellon is available fromfabric stores. WaterMat® is available local garden supply centers or from Florist Products (2242 N.Palmer Drive, Schaumburg, IL 60173, tel: 1-800-828-2242).
Chemical FixativesChemical FixativesChemical FixativesChemical FixativesChemical FixativesThe components for mixing chemical fixative solutions are available from chemical supply companies;these components can be ordered for preparing solutions to fix brassica pods, embryos and ovules. Arecipe for acetic alcohol fixative solution is included on page 98.
Drawer OrganizersDrawer OrganizersDrawer OrganizersDrawer OrganizersDrawer OrganizersDrawer organizers can be purchased at discount houseware stores.
Nutrient Solution ChemicalsNutrient Solution ChemicalsNutrient Solution ChemicalsNutrient Solution ChemicalsNutrient Solution ChemicalsThe components for the Wisconsin Fast Plants nutrient solution can be ordered from commercialchemical supply companies. This solution is a modified Hoagland's basal salt mixture with the macro-and micronutrients as described by Hoagland and Arnon (1950). Hoagland's mixture is availablepremixed in volumes of 1 liter and 10 liters from Sigma Chemical Company (P.O. Box 14508, St. Louis,MO 63178, tel: 800-835-3010). A recipe for Wisconsin Fast Plants Nutrient Solution is included onpage 96. Liquid fertilizers such as Peters® are available from garden supply stores.
Film CansFilm CansFilm CansFilm CansFilm CansBoth 35 mm black and clear film cans can be obtained in large quantities from film processing outletsor camera stores. The cans are usually discarded, so ask that they be saved.
Floral FoamFloral FoamFloral FoamFloral FoamFloral FoamFloral foam is available from florist supply stores.
Indicating Silica GelIndicating Silica GelIndicating Silica GelIndicating Silica GelIndicating Silica GelType III indicating silica gel changes color from blue to pink above 20% relative humidity. Silica gel isavailable in various quantities from Sigma Chemical Company (P.O. Box 14508, St. Louis, MO 63178,tel: 800-835-3010) and Aldrich Chemical Company (1001 West Saint Paul Avenue, Milwaukee, WI53233, tel: 800-558-9160).

95
Iodine Potassium Iodide Staining SolutionIodine Potassium Iodide Staining SolutionIodine Potassium Iodide Staining SolutionIodine Potassium Iodide Staining SolutionIodine Potassium Iodide Staining SolutionThe components for the nutrient solution can be ordered from commercial chemical supply companiessuch as Sigma Chemical Company (P.O. Box 14508, St. Louis, MO 63178, tel: 800-835-3010).Directions for mixing the solution and staining specimens is included on page 98.
LensesLensesLensesLensesLensesDouble convex lenses for film can magnifiers are available from various suppliers, including HamiltonBell (30 Craig Road, Montvale, NJ 07645, tel: 800-526-0864).
Light BanksLight BanksLight BanksLight BanksLight BanksMaterials for constructing light banks are available from hardware and building supply stores, or alight system can be ordered from Carolina Biological Supply Company (2700 York Road, Burlington,NC 27215, tel: 800-334-5551).
MicroscopesMicroscopesMicroscopesMicroscopesMicroscopesIlluminated hand-held microscopes are available in magnifications of 30X and 100X from local RadioShack stores.
MylarMylarMylarMylarMylarColored mylar filters (for the phototropism activity) are available from entertainment or theatre supplystores or directly from Roscolux.
PeatlitePeatlitePeatlitePeatlitePeatliteCommercially available as JiffyMix® or Terra-lite Redi-earth®, peatlite mixtures can be obtained fromgarden supply stores.
Styrofoam SheetsStyrofoam SheetsStyrofoam SheetsStyrofoam SheetsStyrofoam SheetsBuilder's insulating styrofoam can be purchased as large sheets from building supply stores.
* Note: The listing of proprietary names in this section is not an endorsement of the products.The brand names listed are suggestions only.
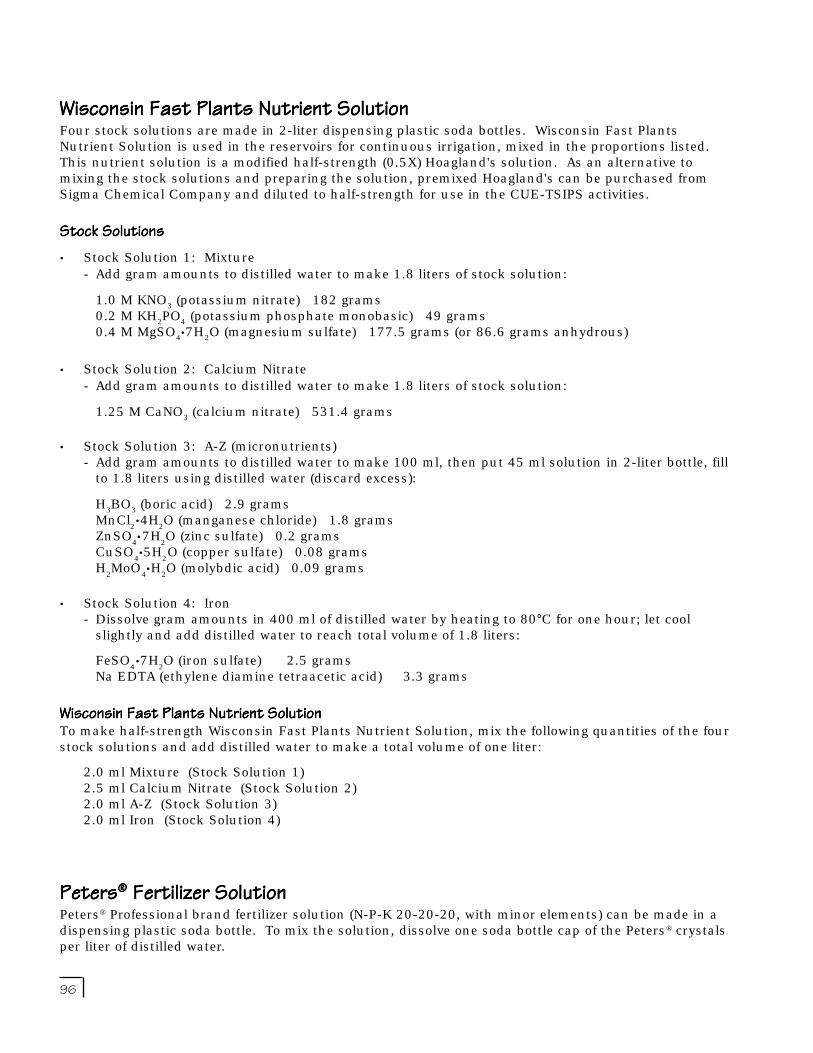
96
Wisconsin Fast Plants Nutrient SolutionWisconsin Fast Plants Nutrient SolutionWisconsin Fast Plants Nutrient SolutionWisconsin Fast Plants Nutrient SolutionWisconsin Fast Plants Nutrient SolutionFour stock solutions are made in 2-liter dispensing plastic soda bottles. Wisconsin Fast PlantsNutrient Solution is used in the reservoirs for continuous irrigation, mixed in the proportions listed.This nutrient solution is a modified half-strength (0.5X) Hoagland's solution. As an alternative tomixing the stock solutions and preparing the solution, premixed Hoagland's can be purchased fromSigma Chemical Company and diluted to half-strength for use in the CUE-TSIPS activities.
Stock SolutionsStock SolutionsStock SolutionsStock SolutionsStock Solutions• Stock Solution 1: Mixture
- Add gram amounts to distilled water to make 1.8 liters of stock solution:
1.0 M KNO3 (potassium nitrate) 182 grams0.2 M KH2PO4 (potassium phosphate monobasic) 49 grams0.4 M MgSO4•7H2O (magnesium sulfate) 177.5 grams (or 86.6 grams anhydrous)
• Stock Solution 2: Calcium Nitrate- Add gram amounts to distilled water to make 1.8 liters of stock solution:
1.25 M CaNO3 (calcium nitrate) 531.4 grams
• Stock Solution 3: A-Z (micronutrients)- Add gram amounts to distilled water to make 100 ml, then put 45 ml solution in 2-liter bottle, fill
to 1.8 liters using distilled water (discard excess):
H3BO3 (boric acid) 2.9 gramsMnCl
2•4H
2O (manganese chloride) 1.8 grams
ZnSO4•7H
2O (zinc sulfate) 0.2 grams
CuSO4•5H
2O (copper sulfate) 0.08 grams
H2MoO
4•H
2O (molybdic acid) 0.09 grams
• Stock Solution 4: Iron- Dissolve gram amounts in 400 ml of distilled water by heating to 80°C for one hour; let cool
slightly and add distilled water to reach total volume of 1.8 liters:
FeSO4•7H
2O (iron sulfate) 2.5 grams
Na EDTA (ethylene diamine tetraacetic acid) 3.3 grams
Wisconsin Fast Plants Nutrient SolutionWisconsin Fast Plants Nutrient SolutionWisconsin Fast Plants Nutrient SolutionWisconsin Fast Plants Nutrient SolutionWisconsin Fast Plants Nutrient SolutionTo make half-strength Wisconsin Fast Plants Nutrient Solution, mix the following quantities of the fourstock solutions and add distilled water to make a total volume of one liter:
2.0 ml Mixture (Stock Solution 1)2.5 ml Calcium Nitrate (Stock Solution 2)2.0 ml A-Z (Stock Solution 3)2.0 ml Iron (Stock Solution 4)
PetersPetersPetersPetersPeters®®®®® Fertilizer Solution Fertilizer Solution Fertilizer Solution Fertilizer Solution Fertilizer SolutionPeters® Professional brand fertilizer solution (N-P-K 20-20-20, with minor elements) can be made in adispensing plastic soda bottle. To mix the solution, dissolve one soda bottle cap of the Peters® crystalsper liter of distilled water.

97
Film Can MagnifierFilm Can MagnifierFilm Can MagnifierFilm Can MagnifierFilm Can MagnifierA simple hand lens can open the world of micro-exploration for a student. Through the use of aninexpensive lens, a film can and soda bottle cap, students can make their own magnifier.
MaterialsMaterialsMaterialsMaterialsMaterials• one clear film can (such as those made by Fuji®)• one plastic soda bottle cap• one double convex glass lens, 28 mm in diameter (Tip: Use a lens with a focal length of 59 mm;
you can use smaller lenses but drill correspondingly smaller holes in the film can.)• 17 to 20 mm diameter Pyrex test tube or wood bit with spurs• propane torch or Bunsen burner
ProcedureProcedureProcedureProcedureProcedure1. Drill or melt a 20 mm hole in a plastic soda bottle cap and in the bottom of a clear film can. To
melt the hole, heat the lip of a Pyrex test tube in a propane torch or Bunsen burner flame.Carefully push the heated end of the tube through the cap and can.
Caution: Melting plastic can give off noxious fumes, perform this step in a well-ventilated area orunder a hood.
2. Use scissors to trim off the small protruding rim of the cap so that it fits into the film can.
3. Drop the lens into the drilled film can. Push the drilled soda bottle cap into the can until it holdsthe lens snugly in place against the film can. The focal length of this lens will bring an object intofocus at the open edge of the film can.
Tips and SuggestionsTips and SuggestionsTips and SuggestionsTips and SuggestionsTips and Suggestions• A local film processing outlet or camera store is a good source for film cans. Ask that the cans be
saved for you, since they are usually discarded.
• You can thread a string through two small holes made inthe film can and wear the magnifier as a necklace.
• The hand lens can be used as a bug bottle by placinga bug in the can and replacing the lid.
For DissectionsFor DissectionsFor DissectionsFor DissectionsFor Dissections• You can melt two larger holes in the side of
the can to be used as access ports.

98
Chemical FixativeChemical FixativeChemical FixativeChemical FixativeChemical FixativeTo mix a fixative solution, combine 75 ml 95% ethanol and 25 ml glacial acetic acid for a total volumeof 100 milliliters
Store the fixative solution in an airtight container. Use caution when mixing chemicals.
At the desired developmental stages, remove pods from AstroPlants. Place the pods in an airtightcontainer. Add a depth of the chemical fixative to cover the pods. Seal and label the container withthe date and the age of the pods. Pods can be stored for many years at room temperature in aceticalcohol fixative.
Use forceps to remove pods from the fixative and transfer them into a container of at least 100 ml ofwater for at least three minutes. Pods can then be safely handled with fingers or forceps. Wash handsthoroughly after working with the fixed pods.
Acetic alcohol fixative solution can be poured down a sink and followed with water for disposal. Checkwith lab supervisors for any special instructions.
Iodine Potassium Iodide (IKI) Staining SolutionIodine Potassium Iodide (IKI) Staining SolutionIodine Potassium Iodide (IKI) Staining SolutionIodine Potassium Iodide (IKI) Staining SolutionIodine Potassium Iodide (IKI) Staining SolutionTo mix an iodine potassium iodide (IKI) staining solution, dissolve 2 g of KI in 100 ml distilled water.Then dissolve 0.2 g of iodine in the KI solution. Store the solution in an airtight container.
Starch will appear blue to black within a few minutes of staining. Newly formed starch may appearred to purple.
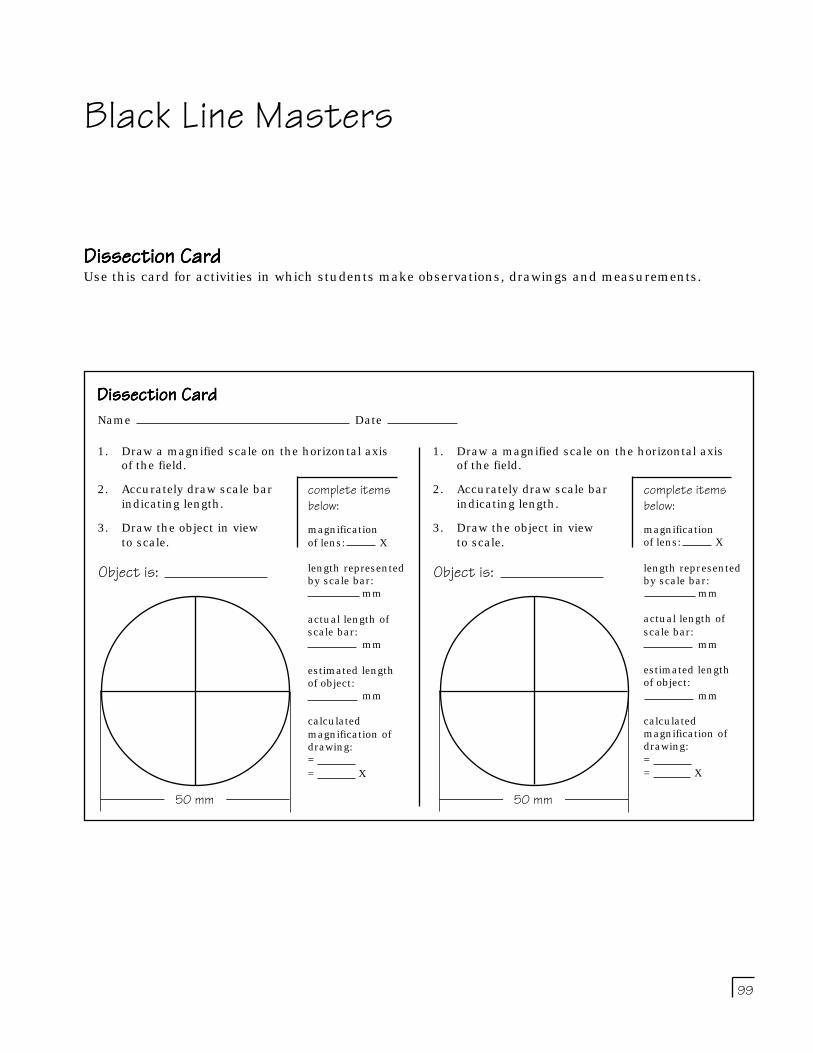
99
Black Line Masters
complete itemsbelow:magnificationof lens: X
length representedby scale bar: mm
actual length ofscale bar: mm
estimated lengthof object: mm
calculatedmagnification ofdrawing:== X
Dissection CardDissection CardDissection CardDissection CardDissection CardName Date
1. Draw a magnified scale on the horizontal axisof the field.
2. Accurately draw scale barindicating length.
3. Draw the object in viewto scale.
Object is:
1. Draw a magnified scale on the horizontal axisof the field.
2. Accurately draw scale barindicating length.
3. Draw the object in viewto scale.
complete itemsbelow:magnificationof lens: X
length representedby scale bar: mm
actual length ofscale bar: mm
estimated lengthof object: mm
calculatedmagnification ofdrawing:== X
Object is:
50 mm 50 mm
Dissection CardDissection CardDissection CardDissection CardDissection CardUse this card for activities in which students make observations, drawings and measurements.

100
Dissection StripsDissection StripsDissection StripsDissection StripsDissection StripsPhotocopy this page onto an overhead transparency sheet. Stick the transparency sheet to a "do ityourself" laminating sheet or piece of clear contact paper, printed side down (this will protect theprinting from being pulled of during use of the strip). Cut out the dissection strips. Use the strips forthe activities in the pollination and fertilization sections.
0 1 2 3 4 5 cm
012345 cm
00000 11111 2 2 2 2 2 33333 44444 5 cm5 cm5 cm5 cm5 cm
0000011111 2 2 2 2 233333444445 cm 5 cm 5 cm 5 cm 5 cm
0 1 2 3 4 5 cm
012345 cm
00000 11111 2 2 2 2 2 33333 44444 5 cm5 cm5 cm5 cm5 cm
0000011111 2 2 2 2 233333444445 cm 5 cm 5 cm 5 cm 5 cm
0 1 2 3 4 5 cm
012345 cm00000 11111 2 2 2 2 2 33333 44444 5 cm5 cm5 cm5 cm5 cm
0000011111 2 2 2 2 233333444445 cm 5 cm 5 cm 5 cm 5 cm
0 1 2 3 4 5 cm
012345 cm
00000 11111 2 2 2 2 2 33333 44444 5 cm5 cm5 cm5 cm5 cm
0000011111 2 2 2 2 233333444445 cm 5 cm 5 cm 5 cm 5 cm
0 1 2 3 4 5 cm
012345 cm
00000 11111 2 2 2 2 2 33333 44444 5 cm5 cm5 cm5 cm5 cm
0000011111 2 2 2 2 233333444445 cm 5 cm 5 cm 5 cm 5 cm
0 1 2 3 4 5 cm
012345 cm
00000 11111 2 2 2 2 2 33333 44444 5 cm5 cm5 cm5 cm5 cm
0000011111 2 2 2 2 233333444445 cm 5 cm 5 cm 5 cm 5 cm
0 1 2 3 4 5 cm
012345 cm
00000 11111 2 2 2 2 2 33333 44444 5 cm5 cm5 cm5 cm5 cm
0000011111 2 2 2 2 233333444445 cm 5 cm 5 cm 5 cm 5 cm
0 1 2 3 4 5 cm
012345 cm
00000 11111 2 2 2 2 2 33333 44444 5 cm5 cm5 cm5 cm5 cm
0000011111 2 2 2 2 233333444445 cm 5 cm 5 cm 5 cm 5 cm0 1 2 3 4 5 cm
012345 cm
00000 11111 2 2 2 2 2 33333 44444 5 cm5 cm5 cm5 cm5 cm
0000011111 2 2 2 2 233333444445 cm 5 cm 5 cm 5 cm 5 cm
0 1 2 3 4 5 cm
012345 cm00000 11111 2 2 2 2 2 33333 44444 5 cm5 cm5 cm5 cm5 cm
0000011111 2 2 2 2 233333444445 cm 5 cm 5 cm 5 cm 5 cm
0 1 2 3 4 5 cm
012345 cm
00000 11111 2 2 2 2 2 33333 44444 5 cm5 cm5 cm5 cm5 cm
0000011111 2 2 2 2 233333444445 cm 5 cm 5 cm 5 cm 5 cm0 1 2 3 4 5 cm
012345 cm
00000 11111 2 2 2 2 2 33333 44444 5 cm5 cm5 cm5 cm5 cm
0000011111 2 2 2 2 233333444445 cm 5 cm 5 cm 5 cm 5 cm
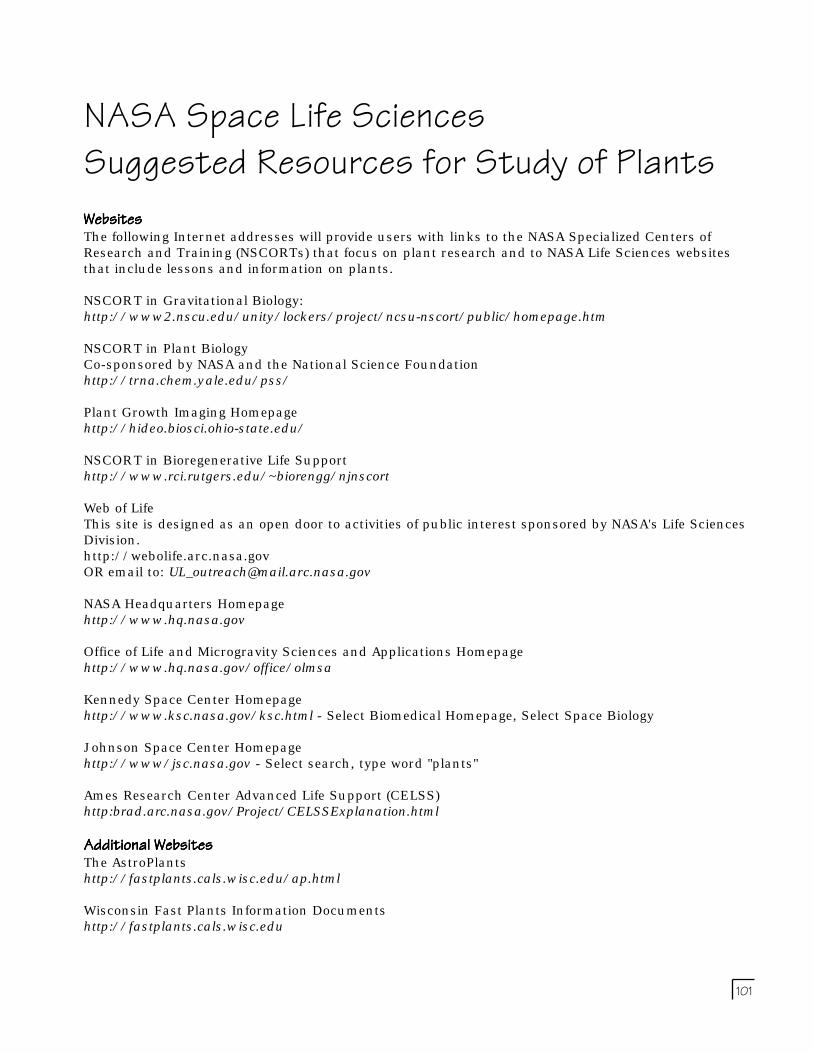
101
NASA Space Life SciencesSuggested Resources for Study of PlantsWebsitesWebsitesWebsitesWebsitesWebsitesThe following Internet addresses will provide users with links to the NASA Specialized Centers ofResearch and Training (NSCORTs) that focus on plant research and to NASA Life Sciences websitesthat include lessons and information on plants.
NSCORT in Gravitational Biology:http://www2.nscu.edu/unity/lockers/project/ncsu-nscort/public/homepage.htm
NSCORT in Plant BiologyCo-sponsored by NASA and the National Science Foundationhttp://trna.chem.yale.edu/pss/
Plant Growth Imaging Homepagehttp://hideo.biosci.ohio-state.edu/
NSCORT in Bioregenerative Life Supporthttp://www.rci.rutgers.edu/~biorengg/njnscort
Web of LifeThis site is designed as an open door to activities of public interest sponsored by NASA's Life SciencesDivision.http://webolife.arc.nasa.govOR email to: [email protected]
NASA Headquarters Homepagehttp://www.hq.nasa.gov
Office of Life and Microgravity Sciences and Applications Homepagehttp://www.hq.nasa.gov/office/olmsa
Kennedy Space Center Homepagehttp://www.ksc.nasa.gov/ksc.html - Select Biomedical Homepage, Select Space Biology
Johnson Space Center Homepagehttp://www/jsc.nasa.gov - Select search, type word "plants"
Ames Research Center Advanced Life Support (CELSS)http:brad.arc.nasa.gov/Project/CELSSExplanation.html
Additional WebsitesAdditional WebsitesAdditional WebsitesAdditional WebsitesAdditional WebsitesThe AstroPlantshttp://fastplants.cals.wisc.edu/ap.html
Wisconsin Fast Plants Information Documentshttp://fastplants.cals.wisc.edu

102
BooksBooksBooksBooksBooksBowman, J., Ed. 1994. Arabidopsis, An Atlas of Morphology and Development. Springer-Verlag, Inc.(New York).
Buchmann, S.L. and G.P. Nabhan. 1996. The Forgotten Pollinators. Island Press (Covelo, CA).
Darwin, C. 1880. The Power of Movement in Plants. J. Murray Publishing (London).
Hart, J.W. 1990. Plant Tropisms and Other Growth Movements. Unwin Hyman Publishing (London).
Kearns, C.A. and D.W. Inouye. 1993. Techniques for Pollination Biologists. Colorado University Press(Niewot, CO).
National Council for Agricultural Education. 1994. Using Fast Plants and Bottle Biology in theClassroom. National Association of Biology Teachers (Reston, VA).
Proctor, M., P. Yeo and A. Lack. 1996. The Natural History of Pollination. Harper Collins (London).
Suge, Hiroshi. (editor) 1996. Plants in Space Biology. Institute of Genetic Ecology, Tohoku University.
Ragnavan, V. 1986. Embryogenesis in Angiosperms: A Developmental and Experimental Study.Cambridge University Press (New York).
Raven, P.H., R.F. Evert and S.E. Eichorn. 1992. Biology of Plants. Worth Publishers (New York).
Vogt, G.L. and J.J. Wargo, Eds. 1992. Microgravity. National Aeronautics and Space Administration(Washington, D.C.).
Journal ArticlesJournal ArticlesJournal ArticlesJournal ArticlesJournal ArticlesEvans, M.L., Moore, R., Hasenstein, K.H., 1986 How roots respond to gravity. Scientific American254: 112–119.
Reiser, L. and R. Fischer. 1993. The ovule and embryo sac. The Plant Cell 5:1291–1301.
Russel, S. 1993. The egg cell: development and role in fertilization and early embryogenesis. ThePlant Cell 5:1349–1359.
Salisbury, F.B. 1993. Gravitropism: Changing Ideas. In Offprints from Horticultural Reviews, Volume15, pp. 233–278.
Salisbury, F.B. and B.G. Bugbee. 1988. Space farming in the 21st Century. 21st Century Scienceand Technology 1:32–41.
West, M. and J. Harada. 1993. Embryogenesis in higher plants: an overview. The Plant Cell5:1361–1369.
Williams, P.H. 1986. Rapid-cycling populations of Brassica. Science 232:1385–1389.
Yeung, E. and D. Meinke. 1993. Embryogenesis in angiosperms: development of the suspensor. ThePlant Cell 5:1371–1381.

103
Wisconsin Fast Plants Information DocumentsWisconsin Fast Plants Information DocumentsWisconsin Fast Plants Information DocumentsWisconsin Fast Plants Information DocumentsWisconsin Fast Plants Information Documents(Documents available from the Wisconsin Fast Plants office or at http://fastplants.cals.wisc.edu.)Wisconsin Fast Plants. 1987. "Around the World with Brassicas" Wisconsin Fast Plants (Madison, WI).
Wisconsin Fast Plants. 1994. "Hormone-Induced Parthenocarpy in Rapid-Cycling Brassica Rapa."Wisconsin Fast Plants (Madison, WI).
Wisconsin Fast Plants. 1996a. "The Hunt for Glucose—A Flower's Treasure." Wisconsin Fast Plants(Madison, WI).
Wisconsin Fast Plants. 1990. "Pollen Germination." Wisconsin Fast Plants (Madison, WI).
Wisconsin Fast Plants. 1996b. "Pollen-Stigma Interactions and Pollen Tube Growth." Wisconsin FastPlants (Madison, WI).

104
NASA Educational ResourcesNASA On-line Resources for EducatorsNASA On-line Resources for EducatorsNASA On-line Resources for EducatorsNASA On-line Resources for EducatorsNASA On-line Resources for Educators provide current educational information and instructionalresource materials to teachers, faculty, and students. A wide range of information is available,including science, mathematics, engineering, and technology education lesson plans, historicalinformation related to the aeronautics and space program, current status reports on NASAprojects, news releases, information on NASA educational programs, useful software and graphicsfiles. Educators and students can also use NASA resources as learning tools to explore theInternet, accessing information about educational grants, interacting with other schools whichare already on-line, and participating in on-line interactive projects, communicating with NASAscientists, engineers, and other team members to experience the excitement of real NASA projects.
Go to these resources through the NASA Education Home Page:http://www.hq.nasa.gov/office/codef/education
or, for more information, E-mail:[email protected]
NASA Television (NTV) NASA Television (NTV) NASA Television (NTV) NASA Television (NTV) NASA Television (NTV) is the Agency's distribution system for live and taped programs. It offers thepublic a front-row seat for launches and missions, as well as informational and educationalprogramming, historical documentaries, and updates on the latest developments in aeronautics andspace science. NTV is transmitted on Spacenet 2 (a C-band satellite) on transponder 5, channel 9, 69degrees west with horizontal polarization, frequency 3880 megahertz, audio on 6.8 megahertz; orthrough collaborating distance learning networks and local cable providers.
Apart from live mission coverage, regular NASA Television programming includes a News Video Filefrom noon to 1:00 pm, a NASA History File from 1:00 to 2:00 pm, and an Education File from 2:00 to3:00 pm (all times Eastern). This sequence is repeated at 3:00 pm, 6:00 pm, and 9:00 pm, Mondaythrough Friday. The NTV Education File features programming for teachers and students on science,mathematics, and technology, including the NASA. . .On the Cutting Edge Education SatelliteVideoconference Series. The videoconferences include NASA scientists, astronauts, and educationspecialists presenting aeronautics and Earth & space science topics of interest to teachers and studentsof grades 5-12. The series is free to registered educational institutions. The videoconferences and allNASA Television programming may be videotaped for later use.
For more information on NASA Television, contact:NASA Headquarters, Code P-2, NASA TV, Washington, DC 20546-0001Phone: (202) 358-3572Home Page: http://www.hq.nasa.gov/office/pao/ntv.html
For more information about the Education Satellite Videoconference Series, contact: VideoconferenceProducer, NASA Teaching From Space Program, 308 CITD, Room A, Oklahoma State University,Stillwater, OK 74078-8089E-mail: [email protected] Page: http://www.okstate.edu/aesp/VC.html

105
IF YOU LIVE IN: Precollege Officer Educator Resource Center
Alaska Nevada Mr. Garth A. Hull NASA Educator Resource CenterArizona Oregon Chief, Educational Programs Branch Mail Stop 253-2California Utah Mail Stop 204-12 NASA Ames Research CenterHawaii Washington NASA Ames Research Center Moffett Field, CA 94035-1000Idaho Wyoming Moffett Field, CA 94035-1000 Phone: (415) 604-3574Montana Phone: (415) 604-5543
Connecticut New Hampshire Dr. Robert Gabrys NASA Educator Resource LaboratoryDelaware New Jersey Chief, Education Office Mail Code 130.3District of Columbia New York Mail Code 130.3 NASA Goddard Space Flight CenterMaine Pennsylvania NASA Goddard Space Flight Center Greenbelt, MD 20771-0001Maryland Rhode Island Greenbelt, MD 20771-0001 Phone: (301) 286-8570Massachusetts Vermont Phone: (301) 286-7206
Colorado North Dakota Ms. Billie A. Deason NASA Educator Resource RoomKansas Oklahoma Education Team Lead Mail Code AP 2Nebraska South Dakota Education & Information Services Branch - AP 2 NASA Johnson Space CenterNew Mexico Texas NASA Johnson Space Center 2101 NASA Road 1
2101 NASA Road 1 Houston, TX 77058-3696Houston, TX 77058-3696 Phone: (281) 483-8696Phone: (281) 483-2462
○ ○ ○ ○ ○ ○ ○ ○ ○ ○ ○ ○ ○ ○ ○ ○ ○ ○ ○ ○ ○ ○ ○ ○ ○ ○ ○ ○ ○ ○ ○ ○ ○ ○ ○ ○ ○ ○ ○ ○ ○ ○ ○ ○ ○ ○ ○ ○ ○ ○ ○ ○ ○ ○ ○ ○ ○ ○ ○ ○
NASA Educator Resource Center NetworkTo make additional information available to the education community, the NASA EducationDivision has created the NASA Educator Resource Center (ERC) network. ERCs contain a wealthof information for educators: publications, reference books, slide sets, audio cassettes, videotapes,telelecture programs, computer programs, lesson plans, and teacher guides with activities. Be-cause each NASA field center has its own areas of expertise, no two ERCs are exactly alike. Phonecalls are welcome if you are unable to visit the ERC that serves your geographic area. A list of thecenters and the geographic regions they serve starts at the bottom of this page.
Regional Educator Resource Centers (RERCs)Regional Educator Resource Centers (RERCs)Regional Educator Resource Centers (RERCs)Regional Educator Resource Centers (RERCs)Regional Educator Resource Centers (RERCs) offer more educators access to NASA educational materi-als. NASA has formed partnerships with universities, museums, and other educational institutions toserve as RERCs in many states. Educators may preview, copy, or receive NASA materials at thesesites. A complete list of RERCs is available through CORE.
NASA Central Operation of Resources for Educators (CORE)NASA Central Operation of Resources for Educators (CORE)NASA Central Operation of Resources for Educators (CORE)NASA Central Operation of Resources for Educators (CORE)NASA Central Operation of Resources for Educators (CORE) was established for the national andinternational distribution of NASA-produced educational materials in audiovisual format. Educa-tors can obtain a catalogue and an order form by one of the following methods:
• NASA CORELorain County Joint Vocational School15181 Route 58 SouthOberlin, OH 44074
• Phone (216) 774-1051, Ext. 249 or 293• Fax (216) 774-2144• E-mail: [email protected]• Home Page: http://spacelink.msfc.nasa.gov/CORE

106
IF YOU LIVE IN: Precollege Officer Educator Resource Center
Florida Dr. Steve Dutczak NASA Educator Resource LaboratoryGeorgia Chief, Education and Services Branch Mail Code ERLPuerto Rico Mail Code PA-ESB NASA Kennedy Space CenterVirgin Islands NASA Kennedy Space Center Kennedy Space Center, FL 32899-0001
Kennedy Space Center, FL 32899-0001 Phone: (407) 867-4090Phone: (407) 867-4444
Kentucky Dr. Marchelle Canright NASA Educator Resource CenterNorth Carolina Precollege Officer for Langley Research CenterSouth Carolina Mail Stop 400 Virginia Air and Space CenterVirginia NASA Langley Research Center 600 Settler's Landing RoadWest Virginia 17 Langley Boulevard Hampton, VA 23669-4033
Hampton, VA 23681-0001 Phone: (757) 727-0900 x 757Phone: (757) 864-3313
Illinois Minnesota Ms. Jo Ann Charleston NASA Educator Resource CenterIndiana Ohio Acting Chief, Office of Educational Programs Mail Stop 8-1Michigan Wisconsin Mail Stop 7-4 NASA Lewis Research Center
NASA Lewis Research Center 21000 Brookpark Road21000 Brookpark Road Cleveland, OH 44135-3191Cleveland, OH 44135-3191 Phone: (216) 433-2017Phone: (216) 433-2957
Alabama Louisiana Mr. William Anderson NASA Educator Resource CenterArkansas Missouri Director, Education Programs Office for Marshall Space Flight CenterIowa Tennessee Mail Code CL01 U.S. Space and Rocket Center
NASA Marshall Space Flight Center P.O. Box 070015Huntsville, AL 35812-0001 Huntsville, AL 35807-7015Phone: (205) 544-8811 Phone: (205) 544-5812
Mississippi Dr. David Powe NASA Educator Resource CenterManager, Educational Programs Building 1200NASA John C. Stennis Space Center NASA John C. Stennis Space CenterP.O. Box 508 Stennis Space Center, MS 39529-6000Iuka, MS 38852-0508 Phone: (601) 688-3338Phone: (601) 423-7452
Mr. David Seidel NASA Educator Resource CenterPrecollege Officer Mail Stop CS-530Mail Stop CS-530 NASA Jet Propulsion LaboratoryNASA Jet Propulsion Laboratory 4800 Oak Grove Drive4800 Oak Grove Drive Pasadena, CA 91109-8099Pasadena, CA 91109-8099 Phone: (818) 354-6916Phone: (818) 354-6916
California (mainly cities near Dr. Marianne McCarthy NASA Educator Resource Center forDryden Flight Research Facility) Education Specialist NASA Dryden Flight Research Facility
P.O. Box 273, MS D4839A 45108 N. 3rd. Street EastNASA Dryden Flight Research Facility Lancaster, CA 93535Edwards, CA 93523-0273 Phone: (805) 948-7347Phone: (805) 258-2281
Virginia and Maryland's Mr. Keith Koehler NASA Goddard Space Flight CenterEastern Shores Public Affairs Specialist Wallops Flight Facility
Wallops Flight Facility Education Complex/Visitor Center Bldg. J-17Wallops Island, VA 23337 Wallops Island, VA 23337-5099Phone: (804) 824-1597 Phone: (804) 824-2297 / 2298

107
EG
-199
7-02
-113
-HQ
4. H
ow d
id y
ou u
se th
is te
ache
r's g
uide
?
Bac
kgro
und
Info
rmat
ion
Crit
ical
Thi
nkin
g T
asks
Dem
onst
rate
NA
SA
Mat
eria
lsD
emon
stra
tion
Gro
up D
iscu
ssio
nsH
ands
-On
Act
iviti
es
Inte
grat
ion
Into
Exi
stin
g C
urric
ula
Inte
rdis
cipl
inar
y A
ctiv
ity
Lect
ure
Sci
ence
and
Mat
hem
atic
s
Tea
m A
ctiv
ities
Sta
ndar
ds In
tegr
atio
n
Oth
er: P
leas
e sp
ecify
:
____
____
____
____
____
____
____
____
____
____
____
____
____
____
___
5. W
hat f
eatu
res
of th
is g
uide
did
you
find
par
ticul
arly
hel
pful
?
____
____
____
____
____
____
____
____
____
____
____
____
____
____
____
____
____
____
____
____
____
____
____
____
____
____
____
____
____
____
____
____
____
____
____
____
____
____
____
____
____
____
____
____
____
____
____
____
____
____
____
____
____
____
____
____
____
____
____
____
____
____
____
____
____
____
____
____
____
____
____
____
6. H
ow c
an w
e m
ake
this
gui
de m
ore
effe
ctiv
e fo
r yo
u?
____
____
____
____
____
____
____
____
____
____
____
____
____
____
____
____
____
____
____
____
____
____
____
____
____
____
____
____
____
____
____
____
____
____
____
____
____
____
____
____
____
____
____
____
____
____
____
____
____
____
____
____
____
____
____
____
____
____
____
____
____
____
____
____
____
____
____
____
____
____
____
____
7. A
dditi
onal
com
men
ts:
____
____
____
____
____
____
____
____
____
____
____
____
____
____
____
____
____
____
____
____
____
____
____
____
____
____
____
____
____
____
____
____
____
____
____
____
____
____
____
____
____
____
____
____
____
____
____
____
____
____
____
____
____
____
TE
AC
HE
R R
EP
LY C
AR
DT
each
ers
and
Stu
dent
s In
vest
igat
ing
Pla
nts
in S
pace
:A
Tea
cher
's G
uide
with
Act
iviti
es fo
r Li
fe S
cien
ces
To
achi
eve
Am
eric
a's
goal
s in
Edu
catio
nal E
xcel
lenc
e, it
is N
AS
A's
mis
sion
to d
evel
opsu
pple
men
tary
inst
ruct
iona
l mat
eria
ls a
nd c
urric
ula
in s
cien
ce, m
athe
mat
ics,
and
tech
nolo
gy.
NA
SA
see
ks to
invo
lve
the
educ
atio
nal c
omm
unity
in th
e de
velo
pmen
t and
impr
ovem
ent o
fth
ese
mat
eria
ls.
You
r ev
alua
tion
and
sugg
estio
ns a
re v
ital t
o co
ntin
ually
impr
ovin
g N
AS
Aed
ucat
iona
l mat
eria
ls.
Ple
ase
take
a m
omen
t to
res
pond
to th
e st
atem
ents
and
que
stio
ns b
elow
. Y
ou c
an s
ubm
ityo
ur r
espo
nse
thro
ugh
the
Inte
rnet
or
by m
ail.
Sen
d yo
ur r
eply
to th
e fo
llow
ing
Inte
rnet
addr
ess:
http
://ed
net.g
sfc.
nasa
.gov
/edc
ats/
teac
her_
guid
e
You
will
then
be
aske
d to
ent
er th
e pu
blic
atio
n nu
mbe
r, y
ou w
ill s
ee th
is fo
rm g
ener
ated
elec
tron
ical
ly o
n yo
ur s
cree
n. E
nter
you
r da
ta a
t the
app
ropr
iate
pro
mpt
.
Oth
erw
ise,
fold
the
mai
ler
in h
alf,
tape
it s
hut,
affix
pro
per
post
age,
and
ret
urn
the
repl
y ca
rd b
ym
ail.
Tha
nk y
ou.
1. W
ith w
hat g
rade
s di
d yo
u us
e th
e te
ache
r gu
ide
and
activ
ities
?N
umbe
r of
Tea
cher
s/F
acul
ty:
____
_ K
-4 _
____
5-8
___
__9-
12
____
_Com
mun
ity C
olle
ge
Col
lege
/Uni
vers
ity__
___G
radu
ate
____
_Und
ergr
adua
teN
umbe
r of
Stu
dent
s:__
___
K-4
___
__5-
8 _
____
9-12
__
___C
omm
unity
Col
lege
C
olle
ge/U
nive
rsity
____
_Gra
duat
e__
___U
nder
grad
uate
Num
ber
of O
ther
s:__
___
Adm
inis
trat
ors/
Sta
ff _
____
Par
ents
__
___
Pro
fess
iona
l Gro
ups
___
__ C
ivic
Gro
ups
____
_ G
ener
al P
ublic
Oth
er__
____
____
____
____
____
____
____
__
____
____
____
____
____
____
____
____
2. W
hat i
s yo
ur 9
-dig
it zi
p co
de?
__ _
_ __
__
__ —
__
__ _
_ __
3. H
ow w
as th
e qu
ality
of t
his
teac
her's
gui
de?
Exc
elle
ntG
ood
Ave
rage
Poo
rV
ery
Poo
r

108
NATIONAL AERONAUTICS AND SPACE ADMINISTRATIONEDUCATION DIVISIONMAIL CODE FEWASHINGTON DC 20546-0001
PLEASE PLACESTAMP HERE
POST OFFICE WILLNOT DELIVER
WITHOUT PROPERPOSTAGE
Fold along line, and tape closed.
!2054600012!