teachers’ guide - omsi teachers guide.pdf · teachers’ guide 4 design zone 2010, omsi goals...
TRANSCRIPT

2,000 sq. ft. version
Teachers’ Guide
Teachers’ Guide 1 Design Zone
2010, OMSI
Teachers’ Guide
Table of Contents
HOW TO USE THIS GUIDE ................................................................ 2
EXHIBITION OVERVIEW ................................................................... 3
GOALS ................................................................................. 4
EXHIBIT COMPONENTS ............................................................ 5
CORRELATION TO EDUCATIONAL STANDARDS ........................................ 8
TOPICS BY COMPONENT ......................................................... 11
ACTIVE LEARNING LOG .................................................................. 12
FACILITATION STRATEGIES .................................................................... 17
CLASSROOM ACTIVITIES ........................................................................ 22

Teachers’ Guide 2 Design Zone
2010, OMSI
How to Use This Teachers’ Guide
These materials have been developed as a supplementary resource for educators bringing their students to the Design Zone exhibit. Included are
background information, connections to standards, strategies for working with students in the exhibit, classroom activities that tie to the exhibit, and the Active Learning Log—an open-ended worksheet for students to fill out
while exploring the exhibit. The various materials can be used independently, combined to ensure a rich experience for classes visiting Design Zone, or
adapted to meet your classroom goals.

Teachers’ Guide 3 Design Zone
2010, OMSI
Exhibition Overview
What does it take to create a video game, line up rhythms like the best DJs, or design a roller coaster that produces the biggest thrills? In Design Zone,
students can go behind the scenes and see how video game developers, music producers, roller coaster designers, and other creative problem solvers use math to do the amazing things they do.
Design Zone explores mathematical concepts like patterns, variables, scale, slope, and ratios used by artists, architects, engineers, musicians, and other
innovators.
Design Zone is:
A nontraditional, experiential approach to math, focusing on math
concepts as a tool to create and invent everything from hip-hop to
skate parks.
A means to promote innovation and build math literacy—essential for
careers in the twenty-first century—by directly connecting
mathematical concepts to real-life experiences.
Design Zone is organized into three highly interactive thematic areas,
highlighting the relationship between mathematical thinking and the creative process in art, music, and engineering. Each thematic area draws students into compelling scenes of music production, videogame development, and
extreme sports that directly and experientially relate mathematical concepts to environments and activities attractive to youth. Students can design their
own experience and, in some cases, e-mail their creations to family and friends. They’ll solve real-world challenges and discover that math isn’t just a subject in school but a fundamental, creative tool that can be used to design
and invent!

Teachers’ Guide 4 Design Zone
2010, OMSI
Goals
Design Zone exhibits are about functions, patterns, and predicting; when one quantity changes, another changes in a predictable way. The exhibit and
complementary materials were developed with the following goals for student experience:
Students will have enjoyable and social experiences with
algebra/math. Groups of students will feel comfortable engaging in algebra/math
activities together. Students will use algebraic thinking skills and engage in
mathematical exploration.
The exhibition’s primary educational goal is for students to use algebraic thinking, a form of mathematical exploration, as they engage in creative
problem solving. Like scientific inquiry, mathematical exploration is a powerful tool for understanding the world around us. Design Zone offers students an engaging and stimulating experience where they solve
challenges, use creative thinking and problem-solving strategies, and consider problems from different perspectives. Students will use algebraic
thinking in the exhibit by:
Finding and exploring mathematical patterns and relationships between quantities.
Representing mathematical relationships in a variety of ways, including images, words, models, graphs, and symbols.
Using mathematical relationships to describe, analyze, predict, and create.
Mathematical exploration is a process similar to scientific inquiry that:
Identifies variables
Identifies patterns and relationships between those variables
Asks questions like:
o What is changing?
o How is it changing?
o Can I measure it?
o How does a change in one variable affect another?

Teachers’ Guide 5 Design Zone
2010, OMSI
Exhibit Components
Design Zone’s three thematic areas and exhibit components are described in depth below.
ART—See It! Creative inspiration may come
from anywhere, but whether it’s digital design, architecture, or video games, visual designers
use mathematical thinking to turn ideas into reality. In this area,
students design their own 2-D and 3-D art and explore the math
behind visual creativity. Math concepts include: visual patterns, scale and proportional reasoning,
coordinate grids, equality, rate of change, and slope.
Exhibit clusters: Architecture Studio, Video Game Design Lab
Architecture Studio Use math to design and build in three dimensions
Balancing Art Mobiles balance because of a relationship between the weights on each side
of the balancing rod and their distance from the center of the fulcrum of the rod. Students discover the math behind mobiles as they create their own
balancing art from colorful pieces.
Build a Tower Students test their abilities to continue a pattern in three dimensions as they
try building a tower from custom printed architectural blocks.
Videogame Design Lab Discover the algebra designers use to model virtual worlds and create on-
screen action
Marble Maze Video game designers use algebra to create games with the right feel and
level of challenge. Students start with a simple marble maze game controlled by a giant tilt table. The goal of the game is to navigate the maze, avoid the
black holes, and roll over stars to collect points. A simple equation relates the size of the holes, the bounciness of the marble, and the number of points per star. Students can adjust the variables and design a game that gives them
the highest score.
Teachers’ Guide 6 Design Zone
2010, OMSI
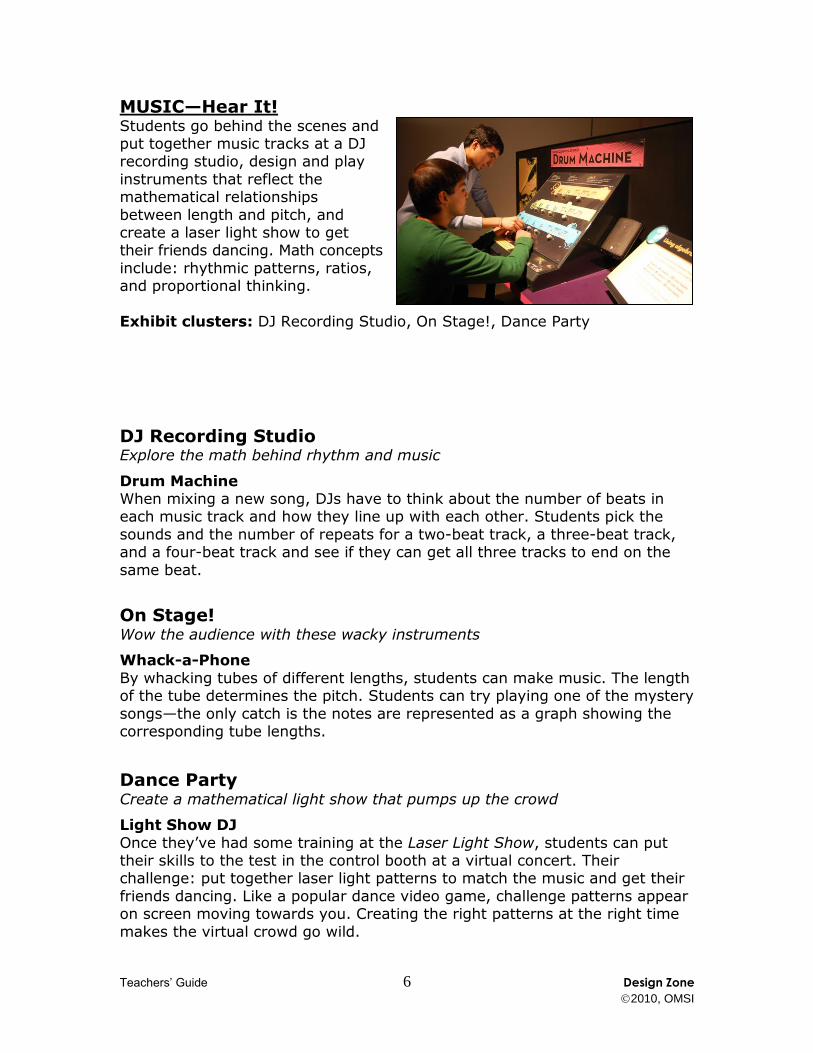
MUSIC—Hear It! Students go behind the scenes and put together music tracks at a DJ recording studio, design and play
instruments that reflect the mathematical relationships
between length and pitch, and create a laser light show to get their friends dancing. Math concepts
include: rhythmic patterns, ratios, and proportional thinking.
Exhibit clusters: DJ Recording Studio, On Stage!, Dance Party
DJ Recording Studio Explore the math behind rhythm and music
Drum Machine When mixing a new song, DJs have to think about the number of beats in each music track and how they line up with each other. Students pick the
sounds and the number of repeats for a two-beat track, a three-beat track, and a four-beat track and see if they can get all three tracks to end on the
same beat.
On Stage! Wow the audience with these wacky instruments
Whack-a-Phone
By whacking tubes of different lengths, students can make music. The length of the tube determines the pitch. Students can try playing one of the mystery
songs—the only catch is the notes are represented as a graph showing the corresponding tube lengths.
Dance Party Create a mathematical light show that pumps up the crowd
Light Show DJ
Once they’ve had some training at the Laser Light Show, students can put their skills to the test in the control booth at a virtual concert. Their challenge: put together laser light patterns to match the music and get their
friends dancing. Like a popular dance video game, challenge patterns appear on screen moving towards you. Creating the right patterns at the right time
makes the virtual crowd go wild.
Teachers’ Guide 7 Design Zone
2010, OMSI
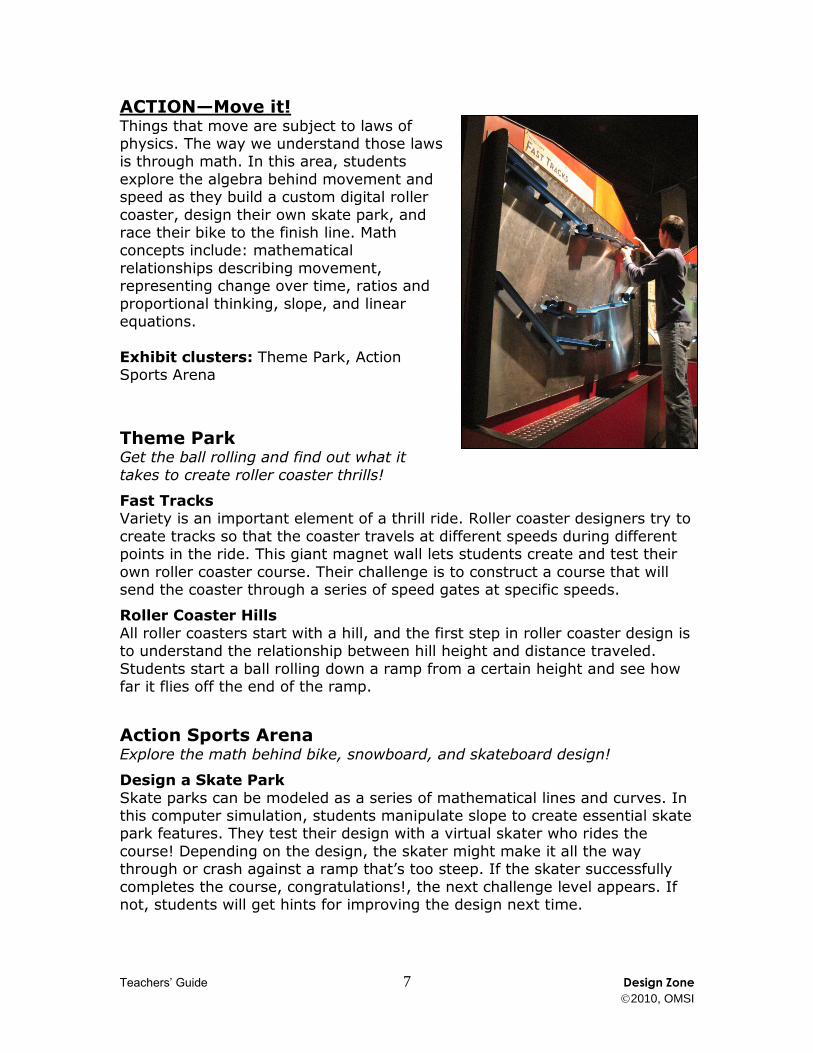
ACTION—Move it! Things that move are subject to laws of physics. The way we understand those laws is through math. In this area, students
explore the algebra behind movement and speed as they build a custom digital roller
coaster, design their own skate park, and race their bike to the finish line. Math concepts include: mathematical
relationships describing movement, representing change over time, ratios and
proportional thinking, slope, and linear equations.
Exhibit clusters: Theme Park, Action Sports Arena
Theme Park Get the ball rolling and find out what it
takes to create roller coaster thrills!
Fast Tracks Variety is an important element of a thrill ride. Roller coaster designers try to
create tracks so that the coaster travels at different speeds during different points in the ride. This giant magnet wall lets students create and test their
own roller coaster course. Their challenge is to construct a course that will send the coaster through a series of speed gates at specific speeds.
Roller Coaster Hills
All roller coasters start with a hill, and the first step in roller coaster design is to understand the relationship between hill height and distance traveled.
Students start a ball rolling down a ramp from a certain height and see how far it flies off the end of the ramp.
Action Sports Arena Explore the math behind bike, snowboard, and skateboard design!
Design a Skate Park
Skate parks can be modeled as a series of mathematical lines and curves. In this computer simulation, students manipulate slope to create essential skate park features. They test their design with a virtual skater who rides the
course! Depending on the design, the skater might make it all the way through or crash against a ramp that’s too steep. If the skater successfully
completes the course, congratulations!, the next challenge level appears. If not, students will get hints for improving the design next time.
Teachers’ Guide 8 Design Zone
2010, OMSI
Correlation to Educational Standards Design Zone is intended to provide strong connections to mathematics
content, focusing on algebra. Design Zone exhibits are about functions, patterns, and predicting; when one quantity changes, another changes in a predictable way. Throughout the exhibition, students engage in mathematical
exploration through creative problem solving. In addition, by looking at math as a tool in the creative processes of art, music, and engineering, the exhibit
provides further connections to science and fine arts educational standards.
Each Design Zone exhibit is presented with a series of progressively difficult challenges to promote engagement and learning. All of these challenges build
problem-solving skills, demand creativity, build on prior knowledge, and encourage lateral thinking.
MATHEMATICS
Design Zone activities support the following standards from the National Council of Teachers of Mathematics’ (NCTM) Principles and Standards for
School Mathematics (2000). Those in italic are particularly emphasized in the exhibition.
Numbers and Operations Understand numbers, ways of representing numbers, relationships
among numbers, and number systems
Understand meanings of operations and how they relate to one another
Compute fluently and make reasonable estimates
Algebra
Understand patterns, relations, and functions Represent and analyze mathematical situations and structures using
algebraic symbols
Use mathematical models to represent and understand quantitative relationships
Analyze change in various contexts
Geometry Analyze characteristics and properties of two- and three-dimensional
geometric shapes and develop mathematical arguments about geometric relationships
Specify locations and describe spatial relationships using coordinate geometry and other representational systems
Apply transformations and use symmetry to analyze mathematical
situations Use visualization, spatial reasoning, and geometric modeling to solve
problems
Measurement Understand measurable attributes of objects and the units, systems,
and processes of measurement

Teachers’ Guide 9 Design Zone
2010, OMSI
Apply appropriate techniques, tools, and formulas to determine measurements
Data Analysis and Probability Formulate questions that can be addressed with data and collect,
organize, and display relevant data to answer them Develop and evaluate inferences and predictions that are based on
data
Problem Solving Build new mathematical knowledge through problem solving
Solve problems that arise in mathematics and in other contexts Apply and adapt a variety of appropriate strategies to solve problems
Reasoning and Proof
Make and investigate mathematical conjectures
Communication
Organize and consolidate their mathematical thinking through communication
Communicate their mathematical thinking coherently and clearly to
peers, teachers, and others Analyze and evaluate the mathematical thinking and strategies of
others Use the language of math to express mathematical ideas precisely
Connections Recognize and use connections among mathematical ideas Recognize and apply mathematics in contexts outside of mathematics
Representation Create and use representations to organize, record, and communicate
mathematical ideas Select, apply, and translate among mathematical representations to
solve problems
Use representations to model and interpret physical, social, and mathematical phenomena
SCIENCE
Design Zone activities support the following content standards from the National Research Council’s (NRC) National Science Education Standards
(1996). Design Zone also supports Program Standard C—coordination of science and mathematics programs.
Unifying concepts and processes in science Evidence, models, and explanation Change, constancy, and measurement
Science as inquiry Abilities necessary to do scientific inquiry
Understanding about scientific inquiry

Teachers’ Guide 10 Design Zone
2010, OMSI
Physical Science Properties of objects and materials
Motions and forces Transfer of energy
Science and technology Abilities of technological design Understanding about science and technology
Science in personal and social perspectives Science and technology in society
History and nature of science Science as a human endeavor Nature of science
FINE ART
Design Zone activities support the following content standards from the Consortium of National Arts Education Associations’ (CNAEA) National Standards for Arts Education (1994).
Visual Arts Understanding and applying media, techniques, and processes
Using knowledge of structures and functions Making connections between visual arts and other disciplines
Music Performing on instruments, alone and with others, a varied repertoire
of music
Improvising melodies, variations, and accompaniments Listening to, analyzing, and describing music
Understanding relationships between music, the other arts, and disciplines outside the arts
Teachers’ Guide 11 Design Zone
2010, OMSI
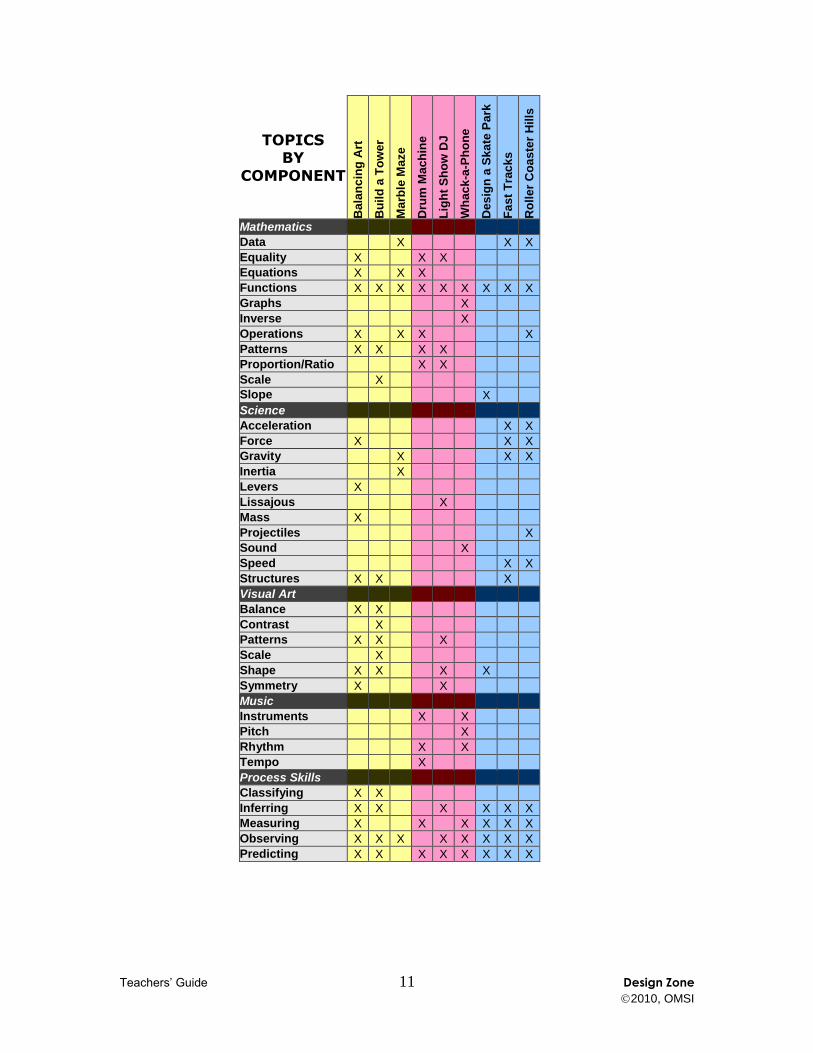
TOPICS BY
COMPONENT
Ba
lan
cin
g A
rt
Bu
ild
a T
ow
er
Ma
rble
Maze
Dru
m M
ach
ine
Lig
ht
Sh
ow
DJ
Wh
ac
k-a
-Ph
on
e
De
sig
n a
Sk
ate
Pa
rk
Fa
st
Tra
ck
s
Ro
lle
r C
oa
ste
r H
ills
Mathematics
Data X X X
Equality X X X
Equations X X X
Functions X X X X X X X X X
Graphs X
Inverse X
Operations X X X X
Patterns X X X X
Proportion/Ratio X X
Scale X
Slope
X
Science
Acceleration X X
Force X X X
Gravity X X X
Inertia X
Levers X
Lissajous X
Mass X
Projectiles X
Sound X
Speed X X
Structures X X X
Visual Art
Balance X X
Contrast X
Patterns X X X
Scale X
Shape X X X X
Symmetry X X
Music
Instruments X X
Pitch X
Rhythm X X
Tempo X
Process Skills
Classifying X X
Inferring X X X X X X
Measuring X X X X X X
Observing X X X X X X X X
Predicting X X X X X X X X

Teachers’ Guide 12 Design Zone
2010, OMSI
Active Learning Log The active learning log on the following pages is a tool designed to help
students get engaged during a field trip. It features inquiry based questions about the exhibits students will experience in Design Zone.
An answer key is provided for teacher use, though many questions are open
ended. Exhibit descriptions and likely answers are provided when questions do not have a single correct answer.

Active Learning Log 13 Design Zone
2010, OMSI
Active Learning Log
Name____________________
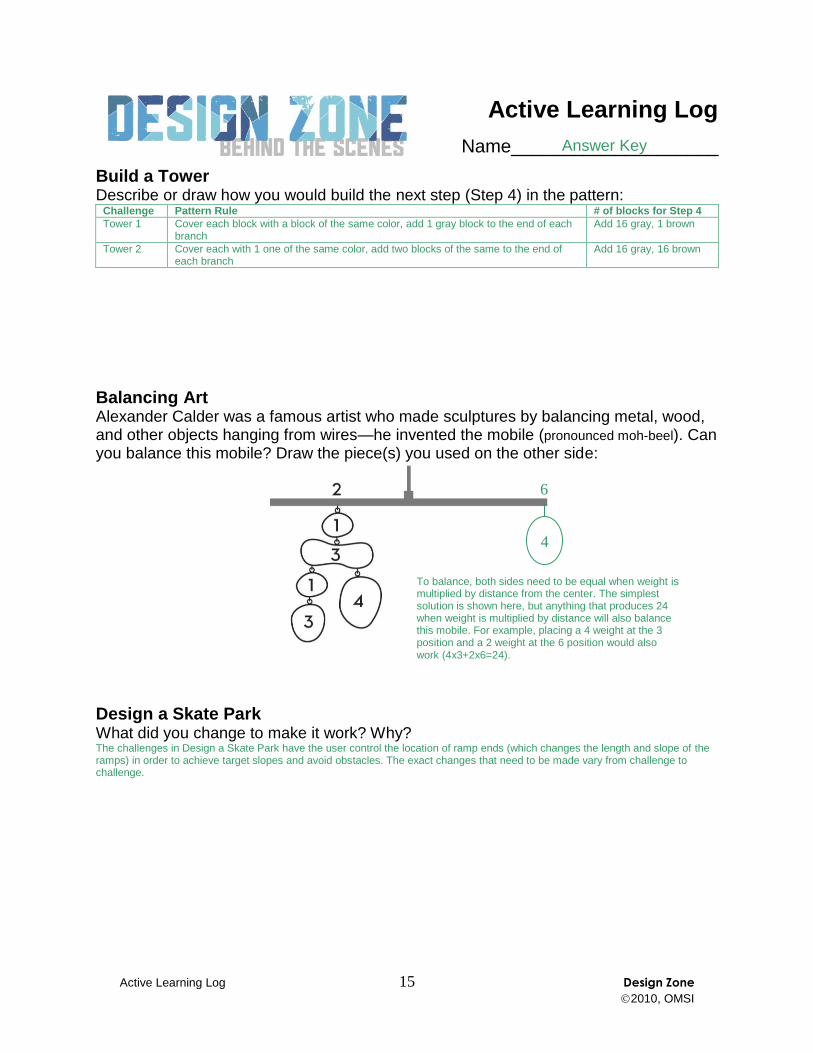
Build a Tower Describe or draw how you would build the next step (Step 4) in the pattern:
Balancing Art Alexander Calder was a famous artist who made sculptures by balancing metal, wood, and other objects hanging from wires—he invented the mobile (pronounced moh-beel). Can you balance this mobile? Draw the piece(s) you used on the other side:
Design a Skate Park What did you change to make it work? Why?

Active Learning Log 14 Design Zone
2010, OMSI
Light Show DJ Find two sets of mirror speeds that produce this Lissajous (pronounced liss-uh-jew) pattern:
_____ : _____
Mirror 1 Speed Mirror 2 Speed
_____ : _____
Mirror 1 Speed Mirror 2 Speed
Bonus: How are the two sets of speeds alike?
Whack-a-Phone Some people say that you use the same part of your brain for both music and math. Try playing the Whack-a-Phone. How are musical notes related to math?
Additional Questions What are two jobs featured in Design Zone that use math?
1. ____________________ 2. ____________________
Which exhibit was your favorite? What did you like about it?
Write a trivia question about a Design Zone exhibit that will stump your classmates: Question: Answer:
Active Learning Log 15 Design Zone
2010, OMSI
Active Learning Log
Name____________________
Build a Tower Describe or draw how you would build the next step (Step 4) in the pattern:
Challenge Pattern Rule # of blocks for Step 4
Tower 1 Cover each block with a block of the same color, add 1 gray block to the end of each branch
Add 16 gray, 1 brown
Tower 2 Cover each with 1 one of the same color, add two blocks of the same to the end of each branch
Add 16 gray, 16 brown
Balancing Art Alexander Calder was a famous artist who made sculptures by balancing metal, wood, and other objects hanging from wires—he invented the mobile (pronounced moh-beel). Can you balance this mobile? Draw the piece(s) you used on the other side:
Design a Skate Park What did you change to make it work? Why? The challenges in Design a Skate Park have the user control the location of ramp ends (which changes the length and slope of the ramps) in order to achieve target slopes and avoid obstacles. The exact changes that need to be made vary from challenge to challenge.
Answer Key
6
4
To balance, both sides need to be equal when weight is multiplied by distance from the center. The simplest solution is shown here, but anything that produces 24 when weight is multiplied by distance will also balance this mobile. For example, placing a 4 weight at the 3 position and a 2 weight at the 6 position would also work (4x3+2x6=24).

Active Learning Log 16 Design Zone
2010, OMSI
Light Show DJ Find two sets of mirror speeds that produce this Lissajous (pronounced liss-uh-jew) pattern:
_____ : _____
Mirror 1 Speed Mirror 2 Speed
_____ : _____
Mirror 1 Speed Mirror 2 Speed
Bonus: How are the two sets of speeds alike?
Whack-a-Phone Some people say that you use the same part of your brain for both music and math. Try playing the Whack-a-Phone. How are musical notes related to math? Whack-a-Phone demonstrates the relationship between length and pitch: the longer the tube, the lower the note. A tube that is double the length of another produces a note that is an octave lower. Whack-a-Phone also uses graphs of tube length as a unique form of musical notation. Whack-a-Phone is labeled with numeric lengths rather than note names (e.g., A-B-Bflat, Do-Re-Mi).
Additional Questions What are two jobs featured in Design Zone that use math? Design Zone features architects, digital designers, videogame designers, musicians, DJs, laser engineers, roller coaster engineers, bike engineers, and skate park engineers.
Which exhibit was your favorite? What did you like about it? Descriptions of all Design Zone exhibits can be found in the Teachers Guide.
Write a trivia question about a Design Zone exhibit that will stump your classmates: Question: Descriptions of all Design Zone exhibits can be found in the Teachers Guide.
Answer:
They are equivalent ratios. Any 1:3 ratio will produce this pattern (i.e., Mirror 2 Speed needs to be 3x Mirror 1 Speed). Values of 10 through 60 are available.

Teachers’ Guide 17 Design Zone
2010, OMSI
Facilitation Strategies During the exhibit’s development, several components of Design Zone
underwent extensive testing to develop strategies for museum education staff supporting visitors in the exhibit. Many of these strategies can also be used by classroom teachers to support students as they engage with the
exhibit and mathematical exploration. Strategies are intended to aid educators in:
Orienting students to the exhibit’s activity by showing students how to use the exhibit, highlighting the primary goal of the activity, or pointing out important features (often the variables or quantities
important to the math).
Supporting Student Interactions by recognizing that students are
often effective at facilitating their own learning and supporting rather than superseding any facilitation that is already going on within student groups.
Promoting Mathematical Exploration by carefully encouraging discussion through the posing of questions and challenges.
General strategies that have proven successful for many Design Zone components are outlined below. The “facilitation sheet” on the following pages describes the Balancing Art component in greater depth. This includes
the educational goals, a summary of the students’ experience, exhibit layout, suggested facilitation strategies, and important vocabulary.
Challenges to pose Challenges that highlight the goal of the activity or simply restate the
initial challenges from copy panels Challenges that simplify the activity for groups who are struggling Encourage and support students who create their own challenges
Things to say Describe the activity using every day, non-technical, mathematical
language (e.g., faster, smaller, double) that students can borrow. Explicitly prompt student facilitation (e.g., suggesting that a student
explain the activity to a newly arrived group member)
Ask open ended questions (e.g., “Tell me about your wheel.”) Ask past tense questions that prompt students to explain their thinking
when successful (e.g., “What did you do, I didn’t get to see?”) Explicitly encourage communication among students Ask questions that prompt students to make predictions
Things to do Give students time to explore independently
Model/highlight mathematical vocabulary and features Connect to students’ prior knowledge and experience Watch for student cues and opportunities to ask questions, such as
when students seem surprised by a result

Balancing Art 18 Design Zone
Facilitation 2010, OMSI
Balancing Art
Facilitation
DESCRIPTION: Students construct a large mobile using whimsical colored shapes and a balance bar
marked with numbers.
LEARNING OBJECTIVES: Students will explore equality, weighing as a means of measuring and comparing, and the relationship between weight
and distance in a mobile.
Equality Force Observing K–12 Equations Levers Classifying Functions Mass Inferring Operations Structures Measuring Patterns Predicting
Students choose weighted pieces, labeled numerically, from a bin and suspend them from points along a fixed hanging rod, also numbered numerically to make a mobile.
Pieces can also be suspended from other pieces, creating more complex mobiles.
Pieces are weighted in units of 1, 2, 3, and 4 (i.e., 2 is twice as heavy as 1) and pieces of the same weight are all one color, but may be different abstract shapes.
Students can build freely or try posted challenges, with the goal being to have their mobile balance.
Balance is indicated by a colored scale.
MATH SCIENCE PROCESS GRADE
TOPICS TOPICS SKILLS LEVEL
EXHIBIT
DESCRIPTION
Balancing Art 19 Design Zone
Facilitation 2010, OMSI
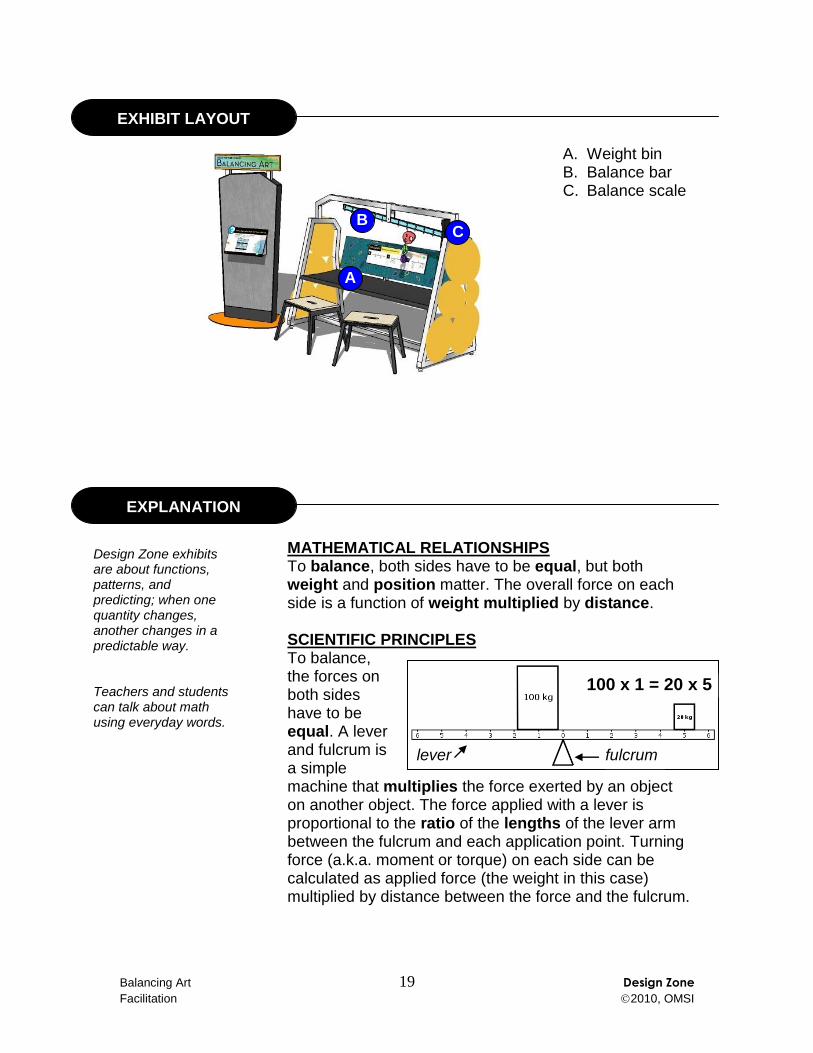
A. Weight bin B. Balance bar C. Balance scale
MATHEMATICAL RELATIONSHIPS To balance, both sides have to be equal, but both weight and position matter. The overall force on each side is a function of weight multiplied by distance. SCIENTIFIC PRINCIPLES To balance, the forces on both sides have to be equal. A lever and fulcrum is a simple machine that multiplies the force exerted by an object on another object. The force applied with a lever is proportional to the ratio of the lengths of the lever arm between the fulcrum and each application point. Turning force (a.k.a. moment or torque) on each side can be calculated as applied force (the weight in this case) multiplied by distance between the force and the fulcrum.
EXHIBIT LAYOUT
EXPLANATION
A
B C
100 x 1 = 20 x 5
Design Zone exhibits are about functions, patterns, and predicting; when one quantity changes, another changes in a predictable way. Teachers and students can talk about math using everyday words.
lever fulcrum

Balancing Art 20 Design Zone
Facilitation 2010, OMSI
CHALLENGES TO POSE
Start by making it balance with 1s on each side, then get more complex.
Balance symmetrically (e.g., both sides 3 on 4) or inversely (e.g., 3 on 4, 4 on 3).
Isolate a section when a student is frustrated, e.g., “You have 25 here, how can you get the same over there?”
Encourage students to challenge each other by building one side and seeing how many ways to balance on the other side.
THINGS TO SAY
“There are lots of ways to balance this bar using different blocks—try it out!”
“Let’s look at why this one worked before we start another challenge.”
“If you have 2 and 3 here, you can do a 3 and 2 there—reverse the numbers.”
“I’m going to let go now—what do you think will happen?”
“6 on the 5 is the same as 5 on the 6” and other “on the” language.
THINGS TO DO
Encourage groups to work together toward the common goal of a balanced bar.
Raise awareness that “position matters.”
Help students focus on each side of the equation, e.g., “what do you have on this side?”
Give everyone a role to ensure their involvement. Example: have someone hold the bar until ready to test.
FACILITATION STRATEGIES
Facilitation strategies are intended to help teachers orient students to the exhibit activity, support students’ interactions with one another, and promote mathematical exploration.
Strategies which are
particularly useful for helping a student get started at the exhibit are marked with an asterisk.

Balancing Art 21 Design Zone
Facilitation 2010, OMSI
Force: An influence that causes an object to change speed,
direction, or shape. A push or a pull. Fulcrum: The support about which a lever pivots. Equation: A mathematical expression stating that two opposite sides
are equal. Torque: A specific kind of force, also known as moment. A force
that rotates an object around an axis, fulcrum, or pivot point. Where a force can be thought of as a push or pull, a torque can be thought of as a twist.
Important Everyday Words Balance Weight
Distance Multiply
Even Uneven
Equal
http://www.nga.gov/exhibitions/calder/realsp/roomenter-foyer.htm A virtual tour of the National Gallery of Art’s Alexander Calder exhibition. Calder is considered the inventor of the mobile. http://www.nga.gov/kids/zone/mobile.htm An Adobe Shockwave application from the National Gallery of Art that allows you to create your own virtual mobile. http://nlvm.usu.edu/en/nav/frames_asid_201_g_3_t_2.html Algebraic equations represented using a virtual balance beam from Utah State University’s National Library of Virtual Manipulatives (Java).
RESOURCES
GLOSSARY

Teachers’ Guide 22 Design Zone
2010, OMSI
Classroom Activities The activities outlined on the following pages can be used to connect
classroom curriculum to a Design Zone field trip, pre- or post-visit, or can be used independently.

Drawing With Math 23 Design Zone
2010, OMSI
Drawing with Math
DESCRIPTION: Students work together to draw different shapes using an Etch A Sketch.
LEARNING OBJECTIVES: Students will use movement to
explore graphical representations of slope and position on a coordinate grid.
Functions Mapping Observing Grades 5–9 Graphs Communicating Slope Inferring Measuring Predicting
Advance Preparation Set Up Activity Clean Up
20 minutes 5 minutes 45 minutes 5 minutes
Item Amount Needed
Etch A Sketch toys 1 per student pair*
Challenge overlays (Master A) 1 set per table group
Blank grid overlays (Master B) 1 per student pair*
Challenge ideas (Master C) 1 per student pair*
Clear tape 1 roll per table group
Dry erase markers 1 per student pair*
Graph paper A few sheets per table group
Permanent marker 1
*Pairs are ideal, but if students take turns they could work in larger groups.
TIME REQUIRED
SUPPLIES
MATH SCIENCE PROCESS GRADE
TOPICS TOPICS SKILLS LEVEL
Drawing With Math 24 Design Zone
2010, OMSI
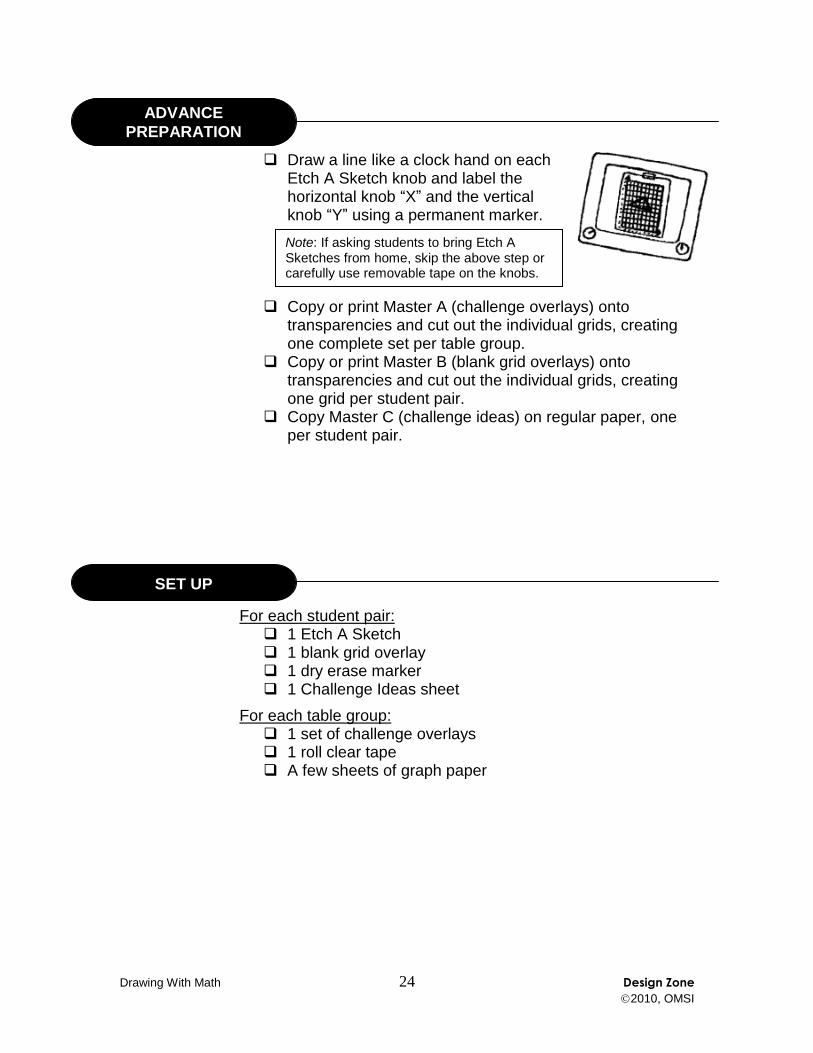
Draw a line like a clock hand on each Etch A Sketch knob and label the horizontal knob “X” and the vertical knob “Y” using a permanent marker.
Copy or print Master A (challenge overlays) onto transparencies and cut out the individual grids, creating one complete set per table group.
Copy or print Master B (blank grid overlays) onto transparencies and cut out the individual grids, creating one grid per student pair.
Copy Master C (challenge ideas) on regular paper, one per student pair.
For each student pair:
1 Etch A Sketch 1 blank grid overlay 1 dry erase marker 1 Challenge Ideas sheet
For each table group: 1 set of challenge overlays 1 roll clear tape A few sheets of graph paper
ADVANCE
PREPARATION
SET UP
Note: If asking students to bring Etch A Sketches from home, skip the above step or carefully use removable tape on the knobs.

Drawing With Math 25 Design Zone
2010, OMSI
Ask students if they’ve ever played with an Etch A Sketch and wondered how it works. Explain that students will be working together to draw pictures and “slope” will help them draw (older students who are studying algebra are likely to be more familiar with mathematical representations and equations, which can be emphasized throughout this activity).
What is slope?
In every day terms, slopes can be “downhill” or “uphill,” “gentle” or “steep.” Slope is a way of thinking about how far up and how far over something goes. Slopes are always lines in mathematics, but they may be bumpier in real life!
How do we describe slopes?
Slopes can go up faster or slower—we often say they are more or less steep. To describe a slope mathematically, you figure out how high the slope goes and how far over it goes. The higher it goes in relation to how far over it goes, the steeper it is. Sometimes, we call this “rise over run.”
But what’s rise and what’s run?
Rise is distance along the Y-axis and run is distance along the X-axis. You can think of rise as “how far up” and run as “how far over.”
If you wanted to draw a line with a slope of 3, what would you do?
Make one dot, then go up three and over one and make another. Then draw a line to connect the dots.
INTRODUCING THE ACTIVITY
Let students speculate before offering answers to any questions. The answers at the right are provided primarily for the teacher’s benefit.
Choose questions that are appropriate for your classroom.

Drawing With Math 26 Design Zone
2010, OMSI
First, encourage students to experiment with their Etch A Sketch.
One partner should control each knob.
Allow them some time to try doodling on their own to get a feel for the knobs.
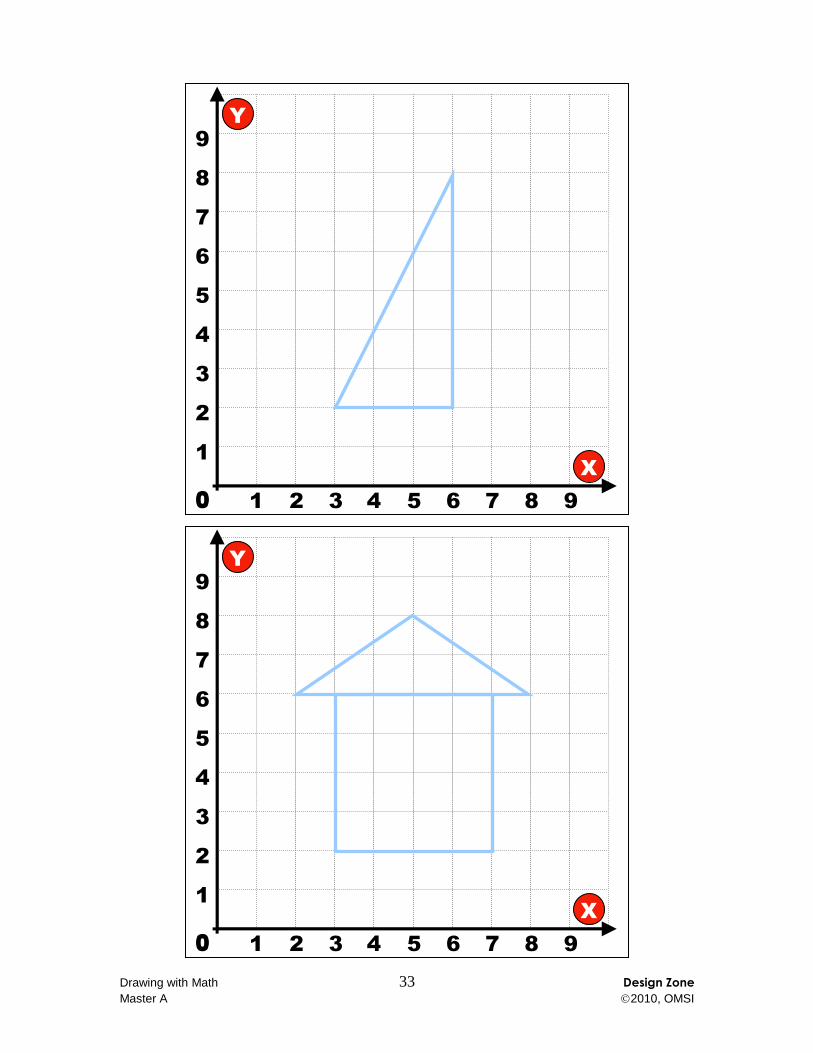
Ask the students to choose a challenge overlay and place it on the Etch A Sketch screen.
A square or rectangle will be easiest to start.
They can use a small piece of clear tape to hold the overlay in place if needed.
Encourage students to work together to draw their shape.
If they want to start with a clean screen they should move to a point on the shape before inverting the Etch A Sketch and shaking it to erase.
Call students attention to the “clock hand” lines on the knobs—these will help them track how far they are turning their knob.
Ask students to think about which partner needs to move their knob for which parts of the picture. When does the X student move? When does the Y student move? When do they both move?
Remind students to communicate with their partner. Counting out loud as they move can help them keep pace with each other.
Encourage students to try additional challenges.
As they try the more difficult ones (triangles with slopes greater than or less than 1), ask them to think about the speed they are moving their knob relative to their partner. Who is moving faster? How much faster?
Finally, encourage students to create their own challenges.
Use the blank grid overlay and a dry erase marker.
They can use the Challenge Ideas sheet for inspiration or create their own.
They may want to sketch on graph paper before drawing on the overlay.
Pairs of students can challenge other pairs by trading.
CLASSROOM
ACTIVITY
When prompting students, choose language and a level of detail that are appropriate for your classroom. The base activity is suitable for a range of grade levels.
Drawing With Math 27 Design Zone
2010, OMSI
Discuss the challenges and how students accomplished them. How did you need to work together to finish the shapes? What strategies did you use? You need both knobs to control the position of the pen in an Etch A Sketch. The X student is controlling its horizontal (left or right) position and the Y student is controlling its vertical (up or down) position. It’s important for the two to communicate—counting out loud can be particularly helpful. Did you move at the same speed or different speeds? When did one person have to move faster? Speed depends on the slope, or steepness, of the line. For horizontal lines, only the X student moves. For vertical lines, only the Y student moves. For lines with a slope of 1 or -1, both move at the same speed. For steeper lines the Y student moves faster, and for less steep lines the X student moves faster. Which shapes were easiest? Which were hardest? Typically, shapes where only one student moves at a time, like squares and rectangles, are easiest. Slopes of 1 or -1 are fairly easy, but require communication so that both students move at the same speed. Other slopes are more difficult as they require the two students to move at different speeds. Communication is the key! Curved lines are usually extremely difficult. How do you think the Etch A Sketch works? An Etch A Sketch uses a simple two-axis system of pulleys to control its stylus “pen,” which scrapes aluminum powder off of the screen. Shaking the Etch A Sketch allows the powder to recoat the screen—small beads help to smooth it.
CLASS
DISCUSSION
Ask for student observations and explanations. Let the students guide the discussion and present their hypotheses before discussing explanations. Choose questions that are appropriate for your classroom.
Drawing With Math 28 Design Zone
2010, OMSI
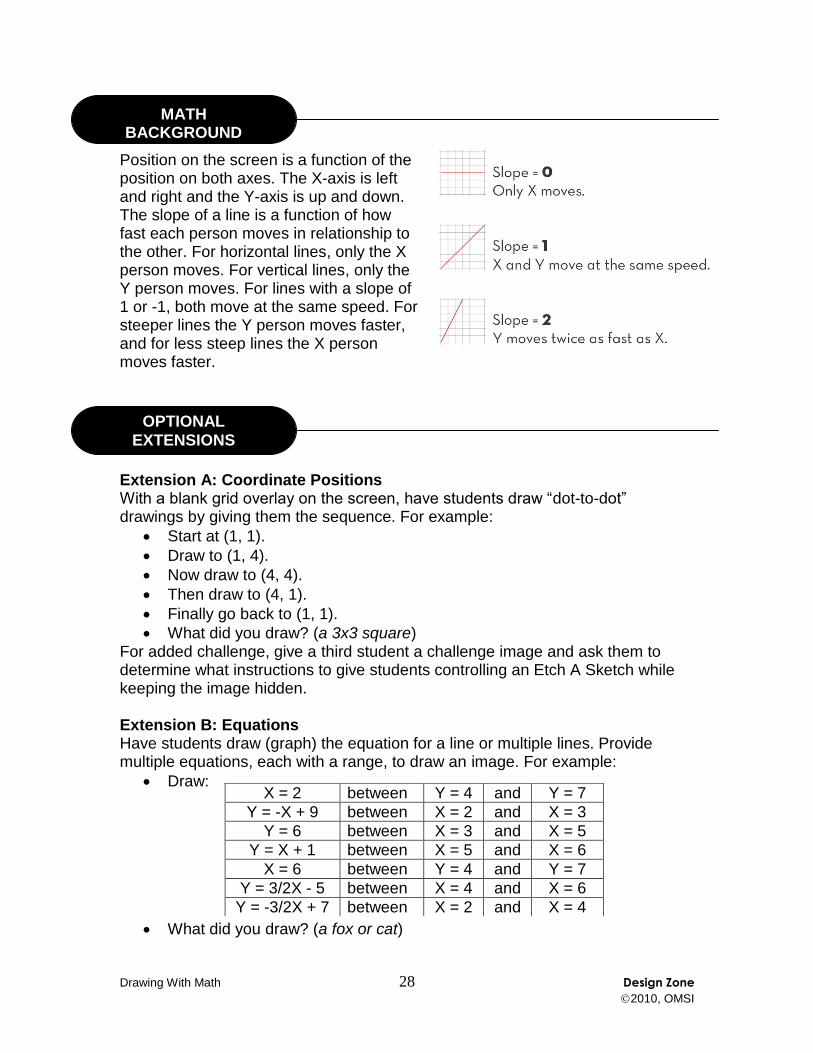
Position on the screen is a function of the position on both axes. The X-axis is left and right and the Y-axis is up and down. The slope of a line is a function of how fast each person moves in relationship to the other. For horizontal lines, only the X person moves. For vertical lines, only the Y person moves. For lines with a slope of 1 or -1, both move at the same speed. For steeper lines the Y person moves faster, and for less steep lines the X person moves faster.
Extension A: Coordinate Positions With a blank grid overlay on the screen, have students draw “dot-to-dot” drawings by giving them the sequence. For example:
Start at (1, 1).
Draw to (1, 4).
Now draw to (4, 4).
Then draw to (4, 1).
Finally go back to (1, 1).
What did you draw? (a 3x3 square) For added challenge, give a third student a challenge image and ask them to determine what instructions to give students controlling an Etch A Sketch while keeping the image hidden. Extension B: Equations Have students draw (graph) the equation for a line or multiple lines. Provide multiple equations, each with a range, to draw an image. For example:
Draw:
What did you draw? (a fox or cat)
X = 2 between Y = 4 and Y = 7
Y = -X + 9 between X = 2 and X = 3
Y = 6 between X = 3 and X = 5
Y = X + 1 between X = 5 and X = 6
X = 6 between Y = 4 and Y = 7
Y = 3/2X - 5 between X = 4 and X = 6
Y = -3/2X + 7 between X = 2 and X = 4
MATH BACKGROUND
OPTIONAL
EXTENSIONS

Drawing With Math 29 Design Zone
2010, OMSI
Master A—Challenge Overlays Master B—Blank Grid Overlays Master C—Challenge Ideas
MASTERS

Drawing with Math 30 Design Zone
Master A 2010, OMSI
X
Y
0 1 0
1
2
2
3
3
4
4
5 6 7 8 9
6
5
7
8
9
X
Y
0 1 0
1
2
2
3
3
4
4
5 6 7 8 9
6
5
7
8
9

Drawing with Math 31 Design Zone
Master A 2010, OMSI
X
Y
0 1 0
1
2
2
3
3
4
4
5 6 7 8 9
6
5
7
8
9
X
Y
0 1 0
1
2
2
3
3
4
4
5 6 7 8 9
6
5
7
8
9

Drawing with Math 32 Design Zone
Master A 2010, OMSI
X
Y
0 1 0
1
2
2
3
3
4
4
5 6 7 8 9
6
5
7
8
9
X
Y
0 1 0
1
2
2
3
3
4
4
5 6 7 8 9
6
5
7
8
9
Drawing with Math 33 Design Zone
Master A 2010, OMSI
X
Y
0 1 0
1
2
2
3
3
4
4
5 6 7 8 9
6
5
7
8
9
X
Y
0 1 0
1
2
2
3
3
4
4
5 6 7 8 9
6
5
7
8
9

Drawing with Math 34 Design Zone
Master B 2010, OMSI
X
Y
0 1 0
1
2
2
3
3
4
4
5 6 7 8 9
6
5
7
8
9
X
Y
0 1 0
1
2
2
3
3
4
4
5 6 7 8 9
6
5
7
8
9

Drawing with Math 35 Design Zone
Master C 2010, OMSI
Challenge Ideas Try drawing these shapes and patterns with a partner.

Mirror Multiplier 36 Design Zone
2010, OMSI
Mirror Multiplier
DESCRIPTION: Students use colored tiles and folding mirrors placed at different angles to create patterns.
LEARNING OBJECTIVES: Students will discover a
mathematical relationship between two variables.
Data Symmetry Observing Grades 5–9 Functions Predicting Inverse Inferring Patterns Tables
Advance Preparation Set Up Activity Clean Up
20 minutes 5 minutes 20 minutes 5 minutes
Item Amount Needed
Mirrors (4” x 5” or larger) 2 per group*
Duct tape 1 roll
Pattern blocks or other geometric tiles Several assorted per group*
Angle cards (Master A) 1 per group*
Challenge cards (Master B) 1 set per group*
*Groups of 2–4 are ideal
TIME REQUIRED
SUPPLIES
MATH SCIENCE PROCESS GRADE
TOPICS TOPICS SKILLS LEVEL

Mirror Multiplier 37 Design Zone
2010, OMSI
Create a “Mirror Multiplier” for each group by taping two mirrors together at one edge so that they open like a book with the reflective surface on the inside.
Copy Master A (angle card), one per group Copy Master B (challenge cards), one per group, and cut
into individual cards
For each group 1 mirror multiplier 1 angle card 1 set of challenge cards Assorted pattern blocks
Explain that students can change the angle of the Mirror Multiplier. The angle card will help them adjust it to a particular angle. You may wish to remind students of various methods for measuring angles. This activity uses fractions, where ½ means half of a circle. What is another way to measure angles? Degrees
How many degrees is a whole circle? 360 degrees Half of a circle? 180 degrees ¼ of a circle? 90 degrees ⅓ of a circle? 120 degrees
ADVANCE
PREPARATION
SET UP
INTRODUCING THE ACTIVITY
SAFETY NOTE: Cover any sharp edges on mirrors with tape.
Let students speculate before offering answers to any questions. The answers at the right are provided primarily for the teacher’s benefit.
Choose questions that are appropriate for your classroom.
Mirror Multiplier 38 Design Zone
2010, OMSI
First, encourage students to experiment.
Have students set up the Mirror Multiplier so it is standing up, open like a book, with the reflective sides facing them.
Blocks can be placed in the space between the two mirrors.
Allow students time to make their own patterns using just the Mirror Multiplier and the blocks.
Ask students to try setting the mirrors at different angles, using the angle card, and make observations.
Students should compare what they see at different angles using the same seed pattern of blocks.
Ask students to write down their observations.
Encourage students to consider the angle of the mirror and the number of images.
Ask students if they can predict what the image will look like at different angles.
Suggest that students construct a data table and record the mirror angle and number of images.
Ask students to draw a diagram of the patterns at different mirror angles.
Finally, ask students to recreate the challenge card images.
Have students write down the pieces they used and the angle of the mirrors.
Encourage students to use as few pieces as possible to make each challenge card image.
CLASSROOM
ACTIVITY
SAFETY NOTE: Remind students to handle the mirrors carefully.
When prompting students, choose language and a level of detail that are appropriate for your classroom. The base activity is suitable for a range of grade levels.

Mirror Multiplier 39 Design Zone
2010, OMSI
Discuss the patterns in the reflections and how they are related to the mirror angles.
What happens when you change the angle of the mirrors? (If needed, prompt: Does the reflection look the same?) Moving the mirrors changes the image that you see.
Does the reflection change in a predictable way? Decreasing the mirror angle increases the number of images. For instance, with the mirror set at ⅓ of a circle, you get 3 images (1 original, 2 reflections). At ¼ of a circle, you get 4.
What type of relationship is this? An inverse relationship—when one variable decreases, the other increases.
Encourage students to think about the exact angle the mirrors are set to and the number of reflections seen.
Could you predict the exact number of reflections you would get at any angle? The number of images is the reciprocal of the angle fraction. At ½ of a circle you get 2 images, at ⅓ of a circle you get 3 images, etc.
How many images would you get if the mirrors were set to 1/16 of a circle? At 1/16 of a circle you would have 16 images!
There’s a predictable relationship between the mirror angle and the number of images. Decreasing the mirror angle increases the number of images. For instance, when the mirror is set at ⅓ of a circle, you get three images—one original and two reflections. When the mirror is set at ¼ of a circle, you get four images. This is an inverse relationship—when one variable increases, the other decreases—and a particularly unique one. The number of images seen is actually the reciprocal of the angle fraction.
CLASS
DISCUSSION
Ask for student observations and explanations. Let the students guide the discussion and present their hypotheses before discussing explanations. Choose questions that are appropriate for your classroom.
MATH
BACKGROUND

Mirror Multiplier 40 Design Zone
2010, OMSI
Extension A: Collecting and Analyzing Data Have the students create a data table similar to the one in Math Background and plot a graph of the data. Encourage students to suggest reasons for the results, formulate testable questions, and conduct and share results of their own inquiries. Ask students to extrapolate: How many images would you get if the mirrors were set to 1/16 of a circle?
Extra Supplies: graph paper
Extension B: New Challenges Have students create their own challenge cards and challenge other groups. To make a challenge card, have students:
choose which tiles to use and arrange them into a seed pattern draw a picture of the pattern copy the picture the desired number of times and arrange in a circle check the image with a Mirror Multiplier before challenging others
Note: It is easiest to use seed patterns with reflectional symmetry. For non-symmetrical patterns, every other reflection is flipped in the circle.
Extra Supplies: paper or blank index cards colored pencils or crayons
Extension C: Symmetry Use the Mirror Multipliers to explore and discuss different types of symmetry with your students:
Reflectional Symmetry—when one half of a pattern is a mirror image of the other half of the pattern, also called mirror symmetry. Do all of the Mirror Multiplier designs have reflectional symmetry? (Yes, but some have only one axis of symmetry, others have multiple axes. This depends on whether there is an even or odd number of repetitions.)
Rotational Symmetry—when an object looks the same after a certain degree of rotation. Some of the images have rotational symmetry, some do not. Why? (When the original pattern has reflectional symmetry, the Mirror Multiplier design will have rotational symmetry. A design without reflectional symmetry in the original pattern will only have rotational symmetry if reflected an even number of times!)
Master A—Angle Card Master B—Challenge Cards
OPTIONAL
EXTENSIONS
MASTERS

Mirror Multiplier 41 Design Zone
Master A 2010, OMSI

Mirror Multiplier 42 Design Zone
Master B 2010, OMSI
Challenge 1
Challenge 2
Challenge 3
Challenge 4

Teachers’ Guide 43 Design Zone
2010, OMSI
This material is based upon work supported by the National Science
Foundation under Grant No. 0714634.
Any opinions, findings, and conclusions or recommendations expressed
in this material are those of the author(s) and do not necessarily
reflect the views of the National Science Foundation.