teaching big data skills with amazon emr
TRANSCRIPT

Page 1
Teaching Big Data Skills with Amazon EMR Technical Guide
July 2020

2
Notices
Customers are responsible for making their own independent assessment of the
information in this document. This document: (a) is for informational purposes only, (b)
represents current AWS product offerings and practices, which are subject to change
without notice, and (c) does not create any commitments or assurances from AWS and
its affiliates, suppliers or licensors. AWS products or services are provided “as is”
without warranties, representations, or conditions of any kind, whether express or
implied. The responsibilities and liabilities of AWS to its customers are controlled by
AWS agreements, and this document is not part of, nor does it modify, any agreement
between AWS and its customers.
© 2020 Amazon Web Services, Inc. or its affiliates. All rights reserved.

3
Contents
About this Guide .................................................................................................................. 4
Overview .............................................................................................................................. 1
Common EMR Applications ............................................................................................. 1
Deployment Options ......................................................................................................... 2
AWS Educate ................................................................................................................... 5
Amazon EC2 Option ........................................................................................................ 5
One AWS Account Hosting One EMR Cluster Per Student ............................................... 5
Users and Authentication ................................................................................................. 7
Implementation ................................................................................................................. 7
Individual Student AWS Accounts Hosting One EMR Cluster Per Student .................... 22
Users and Authentication ............................................................................................... 23
Implementation ............................................................................................................... 23
One AWS Account Hosting One EMR Cluster for All Students ....................................... 23
Users and Authentication ............................................................................................... 24
Implementation ............................................................................................................... 24
Conclusion ......................................................................................................................... 34
Contributors ....................................................................................................................... 35
Document Revisions.......................................................................................................... 35

4
About this Guide
In today's competitive data analysis space, Apache Hadoop workloads have become
more relevant to organizations of all sizes and purposes. As such, the skillsets
associated with managing these workloads are in high demand. To keep up with this
demand, universities have begun to offer classes that teach these concepts to the next
generation of business and IT professionals. The IT staff supporting these organizations
are often tasked with enabling students with an advanced, modern infrastructure to
support a demanding curriculum. Due to short-term semesters, it is cost prohibitive for
universities to invest in dedicated infrastructure for these classes, which can become
quickly outdated.
This document discusses multiple deployment options available to higher-education
organizations, enabling them to provide a modern AWS infrastructure to support a big
data class offering using Amazon EMR. Although not limited in scope to higher
education, this content was designed with the higher-education instructional use-case in
mind. If you are part of an academic institution that is a member of AWS Educate,
program benefits may be available. Contact your AWS Account Manager for more
information on AWS Educate.

Amazon Web Services Teaching Big Data Skills with Amazon EMR
1
Overview
Amazon EMR provides a managed Apache Hadoop service that makes it easy to
deploy Hadoop open source applications quickly, such as Apache Spark and Apache
Hive, enabling the processing of large amounts of data in a cost-effective way.
The EMR service extracts the complexities associated with managing and scaling a
Hadoop infrastructure by providing all infrastructure, configuration, and workload
automation tasks for the customer. Amazon EMR helps simplify the setup of the
infrastructure components such as cluster setup, auto-scaling data nodes and
permissions, making it easier to focus on teaching rather than infrastructure support.
Common EMR Applications
Amazon EMR makes it simple to provision Hadoop infrastructure, but also simplifies the
deployment of popular distributed applications such as Apache Spark, Apache Pig, and
Apache Zeppelin. This document details three deployment strategies to provision EMR
clusters that support these applications. For a full list of supported applications, see
Amazon EMR 5.x Release Versions.
This document focuses on a few key applications that are relevant to teaching an
introduction to big data with EMR.
Apache Spark
Apache Spark is a unified analytics engine used in large-scale data processing. In
simple terms, Spark allows users to run SQL queries and create data frames for
analysis using various common languages, mainly Java, Python and Scala. Spark is a
native component of EMR that is available to be automatically provisioned when
deploying an Amazon EMR cluster.
Apache Pig
Apache Pig is an open-source Apache library that runs on top of Hadoop. It provides a
scripting language used to modify large data sets with a high-level scripting language.
Apache Pig enables the user to take commands that are similar to SQL (written in Pig
Latin), and convert them to Tez jobs for execution in the Hadoop environment. Apache
Pig works with structured and unstructured data in a variety of formats.

Amazon Web Services Teaching Big Data Skills with Amazon EMR
2
Apache Zeppelin with Shiro
Apache Zeppelin is an open-source, multi-language, web-based notebook that allows
users to use various data processing back-ends provided by Amazon EMR. Zeppelin is
flexible enough to provide functionality for data ingestion, discovery, analytics, and
visualization. Zeppelin is included in Amazon EMR 5.0 and later, and provides built-in
integration for Apache Spark. Configuration for how to set up Zeppelin is provided in the
Setting Up Access to Zeppelin Using Linux Credentials section.
For multi-tenant deployments of Zeppelin, Apache Shiro is recommended as the
authentication method. Shiro is a Java security framework that performs authentication,
authorization, cryptography, and session management for Zeppelin notebooks.
Deployment Options
To support a big data course offering, you are tasked with providing a solution that
offers simplified access to common big data software offerings, a scalable up-to-date
infrastructure, and mechanisms that restrict access to other student's data. You must
keep in mind that in most deployments:
• Students submit their assignments to a protected location with access
permissions allocated to one student and access denied to any other students.
• All students can access any shared data as provided by the teacher such as for
data sets.
• Teaching assistants should be able to access student profiles to provide any
needed support.
• Tools and products such as Zeppelin, Hue, Hive, and Spark must scale as
needed.
When deploying an EMR cluster for deployment in an educational setting, there are a
few options to consider in achieving these goals. Depending on your organizational
requirements, you may choose to deploy EMR in one of the following ways:
• One AWS Account Hosting One EMR Cluster Per Student
• Individual Student AWS Accounts Hosting One EMR Cluster Per Student
• One AWS Account Hosting One EMR Cluster for All Students
In each option, we assume that the IT staff requires unrestricted access to the cluster
infrastructure, the instructor and support staff have access to all course data, and
students are only provided access to instructional data source(s) and their own data

Amazon Web Services Teaching Big Data Skills with Amazon EMR
3
repository. The following table summarizes some of the operational tradeoffs of these
options:
Table 1: Operational tradeoffs of different deployment options
One AWS Account
Hosting One EMR
Cluster Per Student
Individual
Student AWS
Accounts
Hosting One
EMR Cluster Per
Student
One AWS Account
Hosting One EMR
Cluster for All
Students
Setup and
Configuration
Institution provisions
and configures EMR
cluster for each student
and provides each
student with an Amazon
EC2 key pair and IAM
user to access the EMR
cluster and AWS
Management Console.
Student has full
control over the
AWS account and
provisions and
configures the
EMR cluster.
Institution provisions
and configures one
EMR cluster as a multi-
tenant cluster and
provides each student
with SSH keys to
access the EMR
cluster.
Security* IAM access keys, SSH
access, IAM roles and
policies, security groups
are managed by the
institution for each EMR
cluster to ensure each
student has access to
their own environment
and storage.
Student manages
all security
configuration (or
organizational
policy).
IAM access keys, SSH
access, IAM roles and
policies are managed
by the institution for
one shared EMR
cluster to ensure each
student has access to
their own environment
and storage
Billing Link to institution Payer
Account (if consolidated
billing is used)
Account
provisioned via the
AWS Educate
program or
individual
responsibility
Link to institution Payer
Account (if
consolidated billing is
used)
Billing Alerts Billing Alerts can be set up to monitor charges.

Amazon Web Services Teaching Big Data Skills with Amazon EMR
4
One AWS Account
Hosting One EMR
Cluster Per Student
Individual
Student AWS
Accounts
Hosting One
EMR Cluster Per
Student
One AWS Account
Hosting One EMR
Cluster for All
Students
Maintenance
and
Administration
Medium (updates and
setup need to be
propagated to all EMR
clusters to ensure each
student is using the
latest updated cluster)
High (student
knowledge
necessary to
control the EMR
cluster and data
permissions
Low (updates and
setup only need to be
managed on one EMR
cluster)
Students Can
Provision
Additional
Resources
No (IAM policies limiting
access)
Yes (student owns
the account)
No (IAM policies
limiting access)
Cost Cost will vary substantially based on your chosen consumption model
(On Demand, Spot, Reserved Instances) and usage. We recommend
having a detailed discussion with your AWS or Partner Solutions
Architect to explore the most optimal cost model for your specific
deployment
* When considering AWS Identity and Access Management (IAM) role permissions,
consider using EMR File System (EMRFS) to control access to Amazon Simple Storage
Service (Amazon S3) resources:
Beginning with Amazon EMR release version 5.10.0, you can use a security
configuration to specify IAM roles for EMRFS. This option allows you to customize
permissions for EMRFS requests to Amazon S3 for clusters that have multiple users.
You can specify different IAM roles for different users and groups, and for different
Amazon S3 bucket locations based on the prefix in Amazon S3. When EMRFS makes a
request to Amazon S3 that matches users, groups, or the locations that you specify, the
cluster uses the corresponding role that you specify instead of the EMR role for Amazon
Elastic Compute Cloud (Amazon EC2). For more information, see Configure IAM Roles
for EMRFS Requests to Amazon S3.

Amazon Web Services Teaching Big Data Skills with Amazon EMR
5
AWS Educate
As students design innovative solutions to solve a variety of data analysis needs and
use cases, they need access to technology resources to make their ideas come to life.
AWS Educate is a great way to get students started with AWS. AWS Educate is
Amazon's global program to provide students and educators with the resources needed
to accelerate cloud learning. For students aged 14 and older, the program offers a self-
paced, no-cost curriculum, with materials designed to accelerate cloud-related learning
endeavors. It also provides a job board for employment opportunities for students 18
and over. Upon enrollment as a student, students will receive $100 in AWS Promotional
Credits to use in the AWS Management Console or the AWS Educate Starter Account.
For educators, AWS Educate offers a robust portal filled with tools and content that
enables teachers to better integrate cloud technology into their curriculum.
To learn more or to sign-up, visit AWS Educate or contact your AWS Account Manager.
Amazon EC2 Option
Although this document focuses on teaching big-data concepts using Amazon EMR,
another deployment option is to deploy Hadoop workloads on Amazon Elastic Compute
Cloud (Amazon EC2) instances. In fact, the underlying compute platform that EMR runs
on is EC2. However, the value of using the EMR managed service is the simplification
of management of these nodes, and the deployment of the EMR software packages
necessary to run these workloads in a single AWS point of management. In addition,
the EMR service takes care of automatic scaling based on Hadoop workload metrics as
well as mapping Unix user permissions to Amazon S3 access policies via EMR File
System (EMRFS). Although technically possible to provision the same workloads on
EC2 instances, EC2 provisioning is outside the scope of this post. We recommend that
you consider EMR to simplify managing your environment and free up more time to
develop Hadoop coursework.
One AWS Account Hosting One EMR Cluster
Per Student This approach is our recommended deployment model, because it allows for central IT
administration of all course resources while also exposing students to the AWS
environment, providing a better understanding of how the infrastructure is configured.
This option can also be the foundation to implement a packaged offering that leverages

Amazon Web Services Teaching Big Data Skills with Amazon EMR
6
AWS Service Catalog to provide an end-to-end self-service deployment option for EMR
clusters. A Service Catalog approach to deploying course infrastructure can further
simplify the control and administration of your EMR clusters, providing students with a
dashboard with only basic deploy and tear-down options.
Figure 1: One AWS account hosting one EMR cluster per student
In this deployment option, an institution's IT department provisions a single AWS
account to provide access to a separate EMR cluster for each student by using AWS
Identity and Access Management (IAM). Each student maps to a unique IAM user and
SSH keypair to be provided with least-privilege access to their own EMR cluster and
data sources. With this deployment option, billing of the EMR resources can be tied
back to a central, university-owned payer account using Consolidated Billing for AWS
Organizations to simplify deployment. Customized billing alerts can also be created to
alert IT administrators to resource usage that rises above a certain cost threshold.
In terms of administrative overhead, this deployment option can consume a large
amount of resources without automation to tear down resources when not in use.
Standardization of configuration can easily be achieved by using AWS CloudFormation.
With CloudFormation, a new stack can be deployed for each student only when
resources are needed.
In terms of cost, each student runs a small-sized EMR cluster for a short period for each
assignment. Computing costs are based off a per second usage of resources with a
minimum of 60 seconds, only for the resources that are used. It is the responsibility of
the course administrator and students to terminate clusters that are not in use. This can
be automated with an AWS Lambda function or by establishing a Time to Live (TTL)

Amazon Web Services Teaching Big Data Skills with Amazon EMR
7
value on each AWS CloudFormation template. With this type of deployment, students
are exposed directly to the AWS Management Console or API to provision their own
clusters. This approach requires students to properly terminate resources when
workloads are completed, or have administrators automate the de-provisioning of
student EMR clusters with an automated script. See Scheduling automatic deletion of
AWS CloudFormation stacks on the AWS Infrastructure & Automation Blog.
Users and Authentication
In this deployment, user authentication and restricting access to data is easily controlled
using IAM and S3 bucket policies. Each student is provided with a unique IAM login to
the university AWS Management Console that is minimally scoped to authorize EMR
cluster operations and permissions to read and upload to selected S3 buckets. If your
university has an existing identity provider, you can integrate existing student logins with
the AWS Management Console, eliminating the need for users to use a new IAM user.
For more information, see Identity Federation in AWS.
EMR releases 5.10.0 and later also support Kerberos authentication. For more
information on using Kerberos authentication with an EMR cluster, see Use Kerberos
Authentication.
Students can then be provided with an AWS CloudFormation template that
automatically provisions an EMR cluster for their use. These CloudFormation templates
can be customized to reflect specific coursework per lesson, or provisioned once per
semester, depending upon what the course syllabus requires.
Implementation
A simple way to implement this deployment is to use CloudFormation templates. Since
all course resources are deployed from within the university AWS account, IT
administrators have full control over all permissions and user creation. You can create a
CloudFormation template to establish the baseline infrastructure, such as the common
VPC and all IAM users, groups, and policies. Once this baseline has been established,
students can be provided with a separate CloudFormation template within their private
folder to run only when EMR resources are required.
Outside the scope of this document, consider providing students with a custom AWS
Service Catalog offering that can simplify the deployment process. For more information
on AWS Service Catalog integration with EMR, see AWS Service Catalog EMR
Reference architecture.

Amazon Web Services Teaching Big Data Skills with Amazon EMR
8
The deployment steps below are split into two CloudFormation templates:
• Baseline Course Infrastructure
• Individual Student EMR Resources
The Baseline Course Infrastructure deployment steps provision all of the AWS
resources that are needed for the entire duration of the class (e.g., source and student
S3 buckets, IAM users for students, IAM users for course administrators, associated
groups for these users and the permissions necessary for each). The deployment also
provisions the Amazon VPC infrastructure necessary to support these clusters, keeping
any subnet size restrictions in mind based on class size. Finally, the deployment steps
create a custom reusable security group to allow desired network access to the master-
node web services required as part of the course syllabus. These resources are
automatically created for you in the provided emr-course-infrastructure.yaml file
located at the following link:
https://s3.amazonaws.com/aws-bigdata-blog/artifacts/teaching-big-data/emr-course-infrastructure.yaml.
With minor modification of this CloudFormation template, many policies and settings
can be customized and deployed as needed.
Note: Depending on your design constraints, you may have some of these resources already provisioned. You should carefully evaluate the example IAM permissions to ensure that the access provided meets your security posture standards. Any access provided should conform to AWS Security Best Practices, particularly those of least privilege. For more information on these best practices, see the AWS Security Best Practices whitepaper.
Deploying the Baseline Course Infrastructure
1. Click to launch the course infrastructure stack.
The CloudFormation page launches in the AWS Management Console. The
Amazon S3 URL is pre-filled with the CloudFormation template URL.

Amazon Web Services Teaching Big Data Skills with Amazon EMR
9
Figure 2: Create stack page
2. Choose Next.
3. On the Stack details page, type an easily identified Stack name. For example,
emr-course-infrastructure.

Amazon Web Services Teaching Big Data Skills with Amazon EMR
10
Figure 3: Stack details page
4. Review the Parameters and change as needed. These values are used to
create a new VPC, subnets, route tables, NAT gateway, Internet Gateway, S3
buckets, and IAM users, groups and policies.

Amazon Web Services Teaching Big Data Skills with Amazon EMR
11
Note: When specifying a S3 bucket name, make sure the bucket name is unique globally.
Along with the infrastructure setup, this step also creates three student IAM
users and one course admin IAM user.
5. Click Next.
6. On the Configure stack options page, accept the default values or change as
needed.
7. Choose Next.
8. On the Review page, review the selections and scroll to the Capabilities
section. Select the check box I acknowledge that AWS CloudFormation
might create IAM resources with custom names.
Figure 4: Review page - acknowledgement
9. Choose Create stack and wait for the cluster to deploy. A
CREATE_IN_PROGRESS status message appears (Figure 5).

Amazon Web Services Teaching Big Data Skills with Amazon EMR
12
Figure 5: Cluster creation in progress
Once baseline infrastructure is created, a CREATE_COMPLETE status message
appears (Figure 6).
Figure 6: Cluster creation complete
10. Select the emr-course-infrastructure stack name, and in the right pane,
choose the Outputs tab.
11. Make note of the following key|value.
o PublicSubnet1
o WebAccessSecurityGroup

Amazon Web Services Teaching Big Data Skills with Amazon EMR
13
Figure 7: Outputs
Update Security Group
Once your baseline infrastructure is set up, update your security group {emr-web-
access-sg} with a few inbound rules. These rules allow you to access the EMR cluster
and its resources.
To update the security group:
1. Sign in to the AWS Management Console and choose Services, then VPC.
2. In the left navigation pane, choose Security Groups.
3. In the list of security groups, select emr-web-access-sg. Choose the
Inbound rules tab, then choose Edit Inbound rules.
Note: Use caution when you edit security group rules. Be sure to add rules that only allow traffic from trusted clients for the protocols and ports that are required. We do not recommend any inbound rules that allow public access, that is, traffic from sources specified as IPv4 0.0.0.0/0
or IPv6 ::/0.

Amazon Web Services Teaching Big Data Skills with Amazon EMR
14
Figure 8: Edit inbound rules
4. Add the following inbound rules:
Type Protocol Port Source IP Description
Custom TCP TCP 22 {IP address or CIDR block}
For connecting to the Amazon EMR master node using SSH to run interactive queries, examine log files, submit Linux commands, and more.
Custom TCP TCP 80 {IP address or CIDR block}
For accessing Ganglia
http://master-public-dns-name/ganglia/
Custom TCP TCP 8088 {IP address or CIDR block}
For accessing YARN Resource manager
http://master-public-dns-name:8088/
Custom TCP TCP 8890 {IP address or CIDR block}
For accessing Zeppelin
http://master-public-dns-name:8890/
Custom TCP TCP 8888 {IP address or CIDR block}
For access to Hue
http://master-public-dns-name:8888/
Amazon Web Services Teaching Big Data Skills with Amazon EMR
15
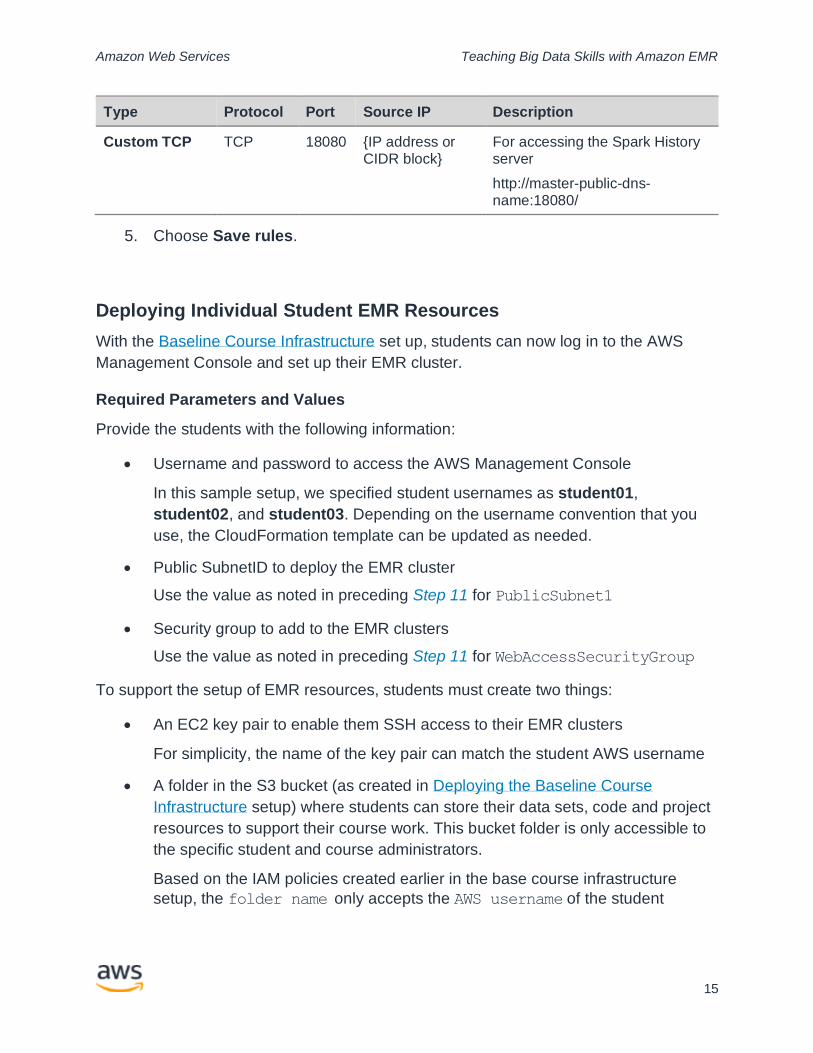
Type Protocol Port Source IP Description
Custom TCP TCP 18080 {IP address or CIDR block}
For accessing the Spark History server
http://master-public-dns-name:18080/
5. Choose Save rules.
Deploying Individual Student EMR Resources
With the Baseline Course Infrastructure set up, students can now log in to the AWS
Management Console and set up their EMR cluster.
Required Parameters and Values
Provide the students with the following information:
• Username and password to access the AWS Management Console
In this sample setup, we specified student usernames as student01,
student02, and student03. Depending on the username convention that you
use, the CloudFormation template can be updated as needed.
• Public SubnetID to deploy the EMR cluster
Use the value as noted in preceding Step 11 for PublicSubnet1
• Security group to add to the EMR clusters
Use the value as noted in preceding Step 11 for WebAccessSecurityGroup
To support the setup of EMR resources, students must create two things:
• An EC2 key pair to enable them SSH access to their EMR clusters
For simplicity, the name of the key pair can match the student AWS username
• A folder in the S3 bucket (as created in Deploying the Baseline Course
Infrastructure setup) where students can store their data sets, code and project
resources to support their course work. This bucket folder is only accessible to
the specific student and course administrators.
Based on the IAM policies created earlier in the base course infrastructure
setup, the folder name only accepts the AWS username of the student

Amazon Web Services Teaching Big Data Skills with Amazon EMR
16
Download PEM File for EMR Cluster Access
This file allows you to access your EMR clusters for each assignment.
6. Sign in to the AWS Management Console.
7. Choose the AWS Region drop-down box and select a Region where you want
to set up Amazon EMR. (This exercise uses US East (N. Virginia).)
Figure 9: AWS Region selection
8. In the services list, under Compute choose EC2.
9. In the left navigation pane, under Network & Security, choose Key Pairs.
10. Choose Create Key Pair and name your key pair your AWS Management
Console username (e.g. student01).
11. Choose Create. A PEM file is downloaded in your browser.
12. Save this PEM file to a safe location that you can access for the entire
semester.
A sample template is provided in emr-student-cluster.yaml file that you can
access here:
https://s3.amazonaws.com/aws-bigdata-blog/artifacts/teaching-big-data/emr-student-cluster.yaml
With minor modification of this CloudFormation template, many policies and settings
can be customized and deployed to many students. This template can be pre-populated

Amazon Web Services Teaching Big Data Skills with Amazon EMR
17
into each student's private data repository or updated as the semester progresses. Your
required configurations, instance sizes, and policies associated to various EMR
functions will vary depending upon the course setup needs.
Note: The IAM permissions established for student users restricts S3 access only to the StudentDataBucket created from the course infrastructure CloudFormation template. Upload the emr-student-
cluster.yaml file to this bucket to allow students to self-provision their
own clusters. The following Launch Stack link only works for an admin user that has S3 permissions to all principles.
To learn more about the CloudFormation customizations available when deploying an
EMR cluster, see: AWS::EMR::Cluster. You may also want to consider other
management choices that are discussed in the Amazon EMR Management Guide. For
details, see Plan and Configure Clusters
Deploy Student Cluster
1. Click to launch the student cluster stack:
The CloudFormation page launches in the AWS Management Console. The
Amazon S3 URL is pre-filled with the CloudFormation template URL.

Amazon Web Services Teaching Big Data Skills with Amazon EMR
18
Figure 10: Create stack
2. Choose Next and name the stack your AWS Management Console userID,
making sure this name also matches the key name. For example, student01.
3. For StudentDataBucketName, SubnetID and WebAccessSecurityGroup,
use the values provided by your administrator.
4. Choose Next.

Amazon Web Services Teaching Big Data Skills with Amazon EMR
19
Figure 11: Stack details
Note: A Failed to list topics error message may appear. This
error occurs because the student IAM users are restricted to least privileges. For this example setup, you can ignore the error message. If students require additional permissions, you can modify the baseline course infrastructure CloudFormation template as needed.

Amazon Web Services Teaching Big Data Skills with Amazon EMR
20
Figure 12: Failed to list topics error
5. On the Configure stack options page, accept the default values or change as
needed.
6. Choose Next.
7. On the Review page, review the selections and scroll to the Capabilities
section. Select the check box I acknowledge that AWS CloudFormation
might create IAM resources with custom names.
8. Choose Create stack and wait for the cluster to deploy. A
CREATE_IN_PROGRESS message displays.
Once cluster is created, a CREATE_COMPLETE message displays.
Connect to EMR Master Node
1. In the AWS Management Console, search for and choose EMR.
2. In the EMR dashboard, choose Clusters.
Figure 13: List of EMR clusters
3. Choose the EMR cluster corresponding to your student login (e.g. student01).
4. On the Summary tab, next to Master public DNS, choose SSH.

Amazon Web Services Teaching Big Data Skills with Amazon EMR
21
Figure 14: Cluster summary
5. Choose the appropriate tab for your operating system and follow the
instructions to connect to the master node.
Figure 15: SSH instructions for Mac/Linux
Once you have successfully connected to the EMR master node, EMR appears
on the console screen.
The example student EMR cluster is now deployed. Students can now use these
resources for their coursework.
Amazon Web Services Teaching Big Data Skills with Amazon EMR
22
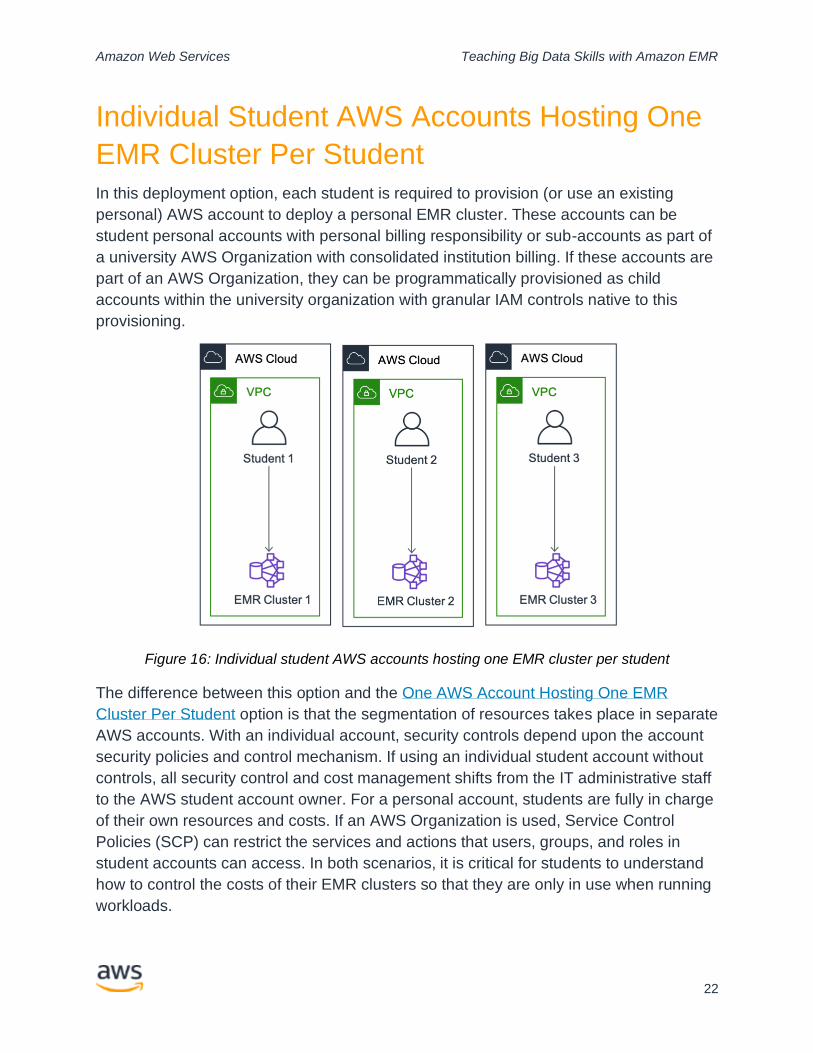
Individual Student AWS Accounts Hosting One
EMR Cluster Per Student
In this deployment option, each student is required to provision (or use an existing
personal) AWS account to deploy a personal EMR cluster. These accounts can be
student personal accounts with personal billing responsibility or sub-accounts as part of
a university AWS Organization with consolidated institution billing. If these accounts are
part of an AWS Organization, they can be programmatically provisioned as child
accounts within the university organization with granular IAM controls native to this
provisioning.
Figure 16: Individual student AWS accounts hosting one EMR cluster per student
The difference between this option and the One AWS Account Hosting One EMR
Cluster Per Student option is that the segmentation of resources takes place in separate
AWS accounts. With an individual account, security controls depend upon the account
security policies and control mechanism. If using an individual student account without
controls, all security control and cost management shifts from the IT administrative staff
to the AWS student account owner. For a personal account, students are fully in charge
of their own resources and costs. If an AWS Organization is used, Service Control
Policies (SCP) can restrict the services and actions that users, groups, and roles in
student accounts can access. In both scenarios, it is critical for students to understand
how to control the costs of their EMR clusters so that they are only in use when running
workloads.

Amazon Web Services Teaching Big Data Skills with Amazon EMR
23
Users and Authentication
In this deployment model, students control IAM permissions within their own accounts,
and all access rights to the data contained within them (pending any organizational
control policies if the account is a part of AWS Organizations). As an account owner,
each student may have full administrative (or root) access. If resources are deployed in
a personal account, students are financially responsible for these resources as well. In a
personal account, configuring IAM permissions to limit functions outside of the EMR
service is not required. However, for students to submit their coursework to be graded
by course administrators, you must determine where student data will reside and who
maintains ownership of it. You may elect to provide a student-data bucket owned by
your institution, or have data reside in student accounts. If student data resides in an
institution account, you must configure bucket policies to restrict access. These policies
require that you obtain account information from each student-owned account to
determine who will have access to the student objects/buckets. If data resides in a
student account, similar policies to allow course administrators to read student
submissions are required, but in the opposite direction. For students that are not very
familiar with AWS, this approach may add additional administrative challenge if personal
accounts are used.
For more information on how to manage access permissions for S3 resources, see
Amazon Simple Storage Service Developer Guide.
Implementation
To deploy this scenario, use the previous CloudFormation templates to establish a
course infrastructure and an individual cluster in each student account.
One AWS Account Hosting One EMR Cluster
for All Students
In this deployment option, an institution's IT department deploys a single EMR cluster
on an IT administrative account. Security, billing, and cluster configuration are all
controlled by the university IT administrative staff. Provisioned resources are only
accessible via SSH or web-interfaces as no AWS Management Console access would
be provided to students. This option is the most centralized administrative model that
affords IT administrative staff with the most control over access and cost. The main
tradeoff is the need to manage permissions within this account by creating individual

Amazon Web Services Teaching Big Data Skills with Amazon EMR
24
IAM roles to correspond to the granular access rights required by each cluster user
(student, instructor and support staff). EMR cluster resources must also be maintained
to remain on for the entire duration of the course, or an established time window when
students may access course resources.
Figure 17: One AWS Account hosting one EMR cluster for all students
Users and Authentication
In this deployment option, a new Linux user is created for each unique user of the EMR
cluster. Since users only have SSH access to the master node of the EMR cluster, you
must authenticate users on this node using traditional Linux authentication methods.
One suggested way of doing this is by generating SSH key pairs and configuring them
as the means of user authentication upon cluster creation. These credentials can be
generated natively from the Linux shell of the EMR cluster master node or can be
created with EC2 key pairs. This process can also be automated.
Implementation
To set up an EMR cluster to be multi-tenant, the EMR Master node must have SSH
keys and users created so that each user has their own profile on the EMR cluster. To
do this, create a Linux user for each user and set up each user with their own SSH
keys. For more information on how to connect to the EMR cluster, see Use an Amazon
EC2 Key Pair for SSH Credentials.

Amazon Web Services Teaching Big Data Skills with Amazon EMR
25
Once the EMR cluster is ready and available to use, login to the EMR cluster using the
Hadoop username using the associated SSH key-pair of the EMR cluster. After
successfully logging in to the EMR cluster, use the following steps to create the users
and enable each user with SSH keys. Two forms of usernames are referenced as
examples in code and command samples:
• Hadoop: the master management user to access the EMR cluster for
administration.
• student01: the test user created.
Table 2: Sample command flow to show user creation and SSH key association:
Step Command Description
1 sudo adduser student01 Creates new user student01.
2 sudo su - student01 Switch to newly created user student01.
3 mkdir .ssh Create new directory to store SSH key.
4 chmod 700 .ssh Update read/write/execute permissions
for the directory.
5 touch .ssh/authorized_keys Create a new file called
authorized_keys.
7 chmod 600 .ssh/authorized_keys Update read/write/execute permissions
on the authorized_keys file.
8 cat >> .ssh/authorized_keys Copy and paste the SSH key that you
would like to use and save the file
(Ctrl+D).
Set Up Access to S3 Using Linux Credentials
If EMR needs access to S3 buckets (such as if the instructor created data sets to be
accessed by all students or student specific buckets/folders), instead of needing to
create IAM AccessID/Secret Keys for students to access S3 and having to distribute
and keep rotating those keys, IAM roles and policies can be used and mapped to the
local Linux users created in the Master node. This is available by enabling EMRFS

Amazon Web Services Teaching Big Data Skills with Amazon EMR
26
authorization for S3 access. For more details, see Configure IAM Roles for EMRFS
Requests to Amazon S3.
Note: This option can only be configured on cluster creation and cannot be updated. By default, the EMR role for EC2 determines the permissions for accessing EMRFS data in Amazon S3. The IAM policies that are attached to this role apply regardless of the user or group making the request through EMRFS, which is important to consider if users have SSH access to cluster noted. The default is EMR_EC2_DefaultRole. For more information, see Service Role for Cluster EC2 Instances (EC2 Instance Profile).
Set up HDFS Permissions using Linux Credentials
For the Linux users created above to have access to their own Hadoop Distributed File
System (HDFS) directories, the user specific HDFS directories must be created using
the hdfs commands. For command details, see HDFS Permissions Guide.
1. Create Home directory for each user.
hdfs dfs -mkdir /user/INSERT_USER_NAME
2. Apply ownership for the newly created home directory to the user
hdfs dfs -chown INSERT_USER_NAME:INSERT_USER_NAME
/user/INSERT_USER_NAME
Example:
hdfs dfs -mkdir /user/student01
hdfs dfs -chown student01:student01 /user/student01
For HDFS, there is a completely separate permission silo. As such, you want to
provision separate group ownership to each user and then have separate entries for
each group in each student’s facl. Depending on the current state of permissions or if
you want to automate new cluster creation, you might want to overwrite a full facl, for
example:
HDFS command syntax to set ACL permissions:

Amazon Web Services Teaching Big Data Skills with Amazon EMR
27
hdfs dfs -setfacl [-R] [-b |-k -m |-x <acl_spec> <path>] |[—set
<acl_spec> <path>]
Example (student01 access rights):
hdfs dfs -chown student01:student01 /user/student01
hdfs dfs -setfacl -R –set
user:student01:rwx,group:instructors:rwx,group:administrators:rwx
,group:teachingassistants:rwx,group:students:---,other::---
/user/student01
Additionally, apply similar ACL permissions to lock down the superuser and any
administrator accounts or directories that you create.
Note: The /tmp hdfs directory can store information (such as queries and
keys) that is readable in plain text. Make sure to lock this directory down so that only class administrators/instructors have access to this directory. You can do this by limiting read access only to the needed users/groups.
For example, to lock down access to only the instructors, you can use permissions such as:
hdfs dfs -setfacl –set user::rwx,group:instructors:rwx,other::-wx
/tmp
Set up Access to Zeppelin Using Linux Credentials
Zeppelin supports multi-tenant by using a component called Shiro. Apache Shiro is a
security framework that provides support for authentication, authorization, cryptography
and session management. You can use Shiro to set up authentication for Zeppelin.
There are three steps to this setup:
Step 1 — Enabling formed auth security
1. Navigate to the ZEPPELIN_CONF_DIR path on the EMR master node. The
ZEPPELIN_CONF_DIR path will be set to /usr/lib/zeppelin directory.
2. Go to the conf directory by typing cd conf and open the shiro.ini file for
editing (vi or nano editor) by typing the command such as sudo vi shiro.ini

Amazon Web Services Teaching Big Data Skills with Amazon EMR
28
3. In shiro.ini, comment and un-comment the below settings in the [urls]
section. This tells Zeppelin to allow access only to users who authenticate to
Zeppelin and not allow any anonymous user access.
Zeppelin is enabled with anonymous access by default. To disable anonymous
access, comment out the below configuration setting by adding a # before the
setting.
#/* = anon
Then, un-comment the below configuration setting by removing the # from the
setting:
/* = authc
Additionally, in the same shiro.ini file, a few settings must be updated to ensure
these configuration options are only available to users who are part of admin
roles.
/api/interpreter/* = authc, roles[admin]
/api/configurations/* = authc, roles[admin]
/api/credential/* = authc, roles[admin]
Note: These settings already exist in the shiro.ini file (located at the
end of the file). After these updates, the shiro.ini file appear like the following:
[urls]
# authentication method and access control filters
#/api/version = anon
/api/interpreter/* = authc, roles[admin]
/api/configurations/* = authc, roles[admin]
/api/credential/* = authc, roles[admin]
#/* = anon
/* = authc
4. Open shiro.ini file and add users in the [users] section of the file. For example:
Amazon Web Services Teaching Big Data Skills with Amazon EMR
29
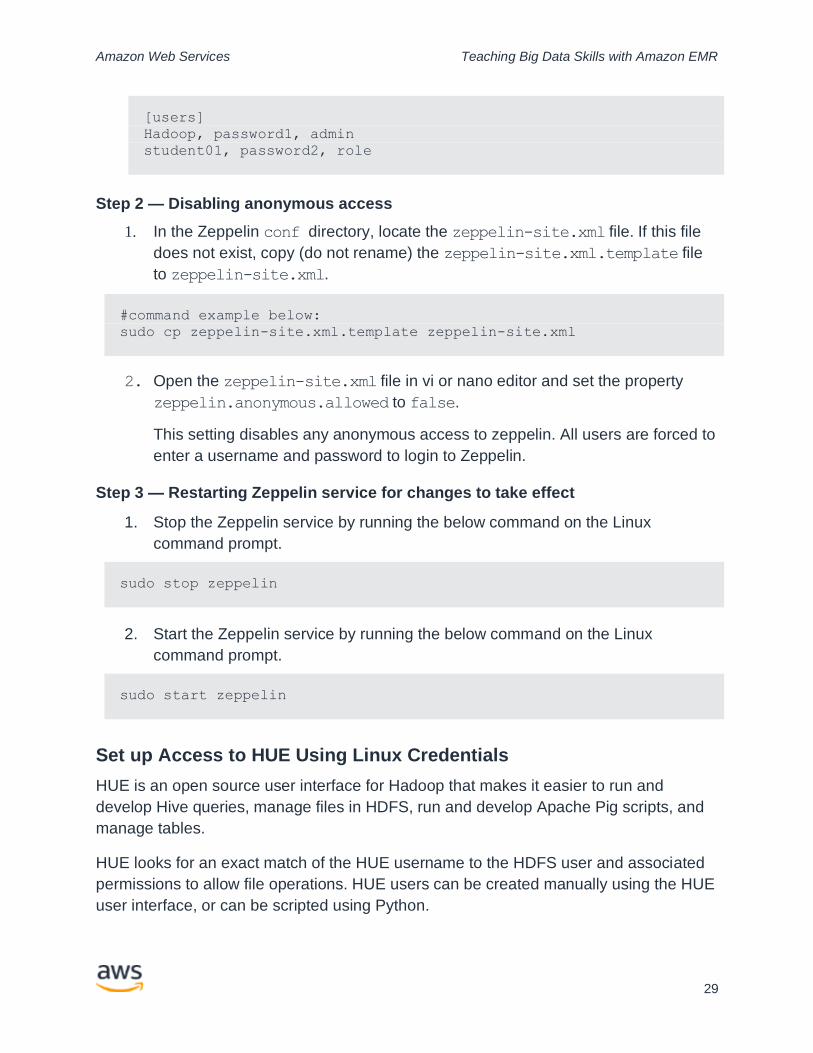
[users]
Hadoop, password1, admin
student01, password2, role
Step 2 — Disabling anonymous access
1. In the Zeppelin conf directory, locate the zeppelin-site.xml file. If this file
does not exist, copy (do not rename) the zeppelin-site.xml.template file
to zeppelin-site.xml.
#command example below:
sudo cp zeppelin-site.xml.template zeppelin-site.xml
2. Open the zeppelin-site.xml file in vi or nano editor and set the property
zeppelin.anonymous.allowed to false.
This setting disables any anonymous access to zeppelin. All users are forced to
enter a username and password to login to Zeppelin.
Step 3 — Restarting Zeppelin service for changes to take effect
1. Stop the Zeppelin service by running the below command on the Linux
command prompt.
sudo stop zeppelin
2. Start the Zeppelin service by running the below command on the Linux
command prompt.
sudo start zeppelin
Set up Access to HUE Using Linux Credentials
HUE is an open source user interface for Hadoop that makes it easier to run and
develop Hive queries, manage files in HDFS, run and develop Apache Pig scripts, and
manage tables.
HUE looks for an exact match of the HUE username to the HDFS user and associated
permissions to allow file operations. HUE users can be created manually using the HUE
user interface, or can be scripted using Python.

Amazon Web Services Teaching Big Data Skills with Amazon EMR
30
Note: Superuser must be created by first login to HUE console.
The following commands can be used to script the HUE user creation process using
Python:
1. Open the HUE shell by running the following command on the Linux prompt
sudo /usr/lib/hue/build/env/bin/hue shell
2. Import django libraries for USER and GROUP
from django.contrib.auth.models import User
from django.contrib.auth.models import Group
3. Create HUE user and store the user in an object.
objUser = User.objects.create_user (username='INSERT_USER_NAME',
password='INSERT_USER_PASSWORD', first_name='INSERT_FIRST_NAME',
last_name='INSERT_LAST_NAME')
4. Get HUE group in an object – this example uses students as the group name.
objGroup = Group.objects.get (name='students')
5. Attach the newly created HUE user to HUE group.
objGroup.user_set.add (objUser)
6. Apply the settings.
objUser.save()
7. Quit the HUE shell.
quit()

Amazon Web Services Teaching Big Data Skills with Amazon EMR
31
Set up Interpreters in Zeppelin as Multi-Tenant Setup
Zeppelin Interpreter is a plug-in that enables Zeppelin users to use a specific language
and data-processing-backend. For example, you can use Apache Spark or JDBC in
Zeppelin for any data processing.
Apache Spark Interpreter
Apache Spark is a unified analytics engine used in large-scale data processing. In
simple terms, Spark allows users to run SQL queries and create data frames for
analysis using various common languages, mainly Java, Python and Scala. Spark is a
native component of EMR that is available to be automatically provisioned when
deploying an AWS EMR cluster.
Here are the steps to set up Spark in Zeppelin:
1. Open the /usr/lib/zeppelin/conf/zeppelin-env.sh file and add the below lines to
the environment file:
ZEPPELIN_IMPERSONATE_SPARK_PROXY_USER=false
2. Create/update the SPARK interpreter in Zeppelin.
Use the configuration settings as available in the Spark Interpreter for Apache
Zeppelin documentation.
a. For the master property, set the value to yarn-client instead of
local[*].
b. Set up User Impersonate for the Interpreter by selecting isolated user
process in the interpreter option
c. Restart the Spark interpreter using the Zeppelin UI.
d. Stop and start Zeppelin.
sudo stop zeppelin
sudo start zeppelin
JDBC Interpreter
Zeppelin can be used to communicate with databases. For example, you can configure
Zeppelin to use a JDBC interpreter to access Hive. For more information, see Using the
jdbc Interpreter to Access Hive.

Amazon Web Services Teaching Big Data Skills with Amazon EMR
32
1. Install JDBC interpreter using the following command.
sudo cp /usr/lib/hive/jdbc/hive-jdbc-2.3.2-amzn-1-standalone.jar
/usr/lib/zeppelin/interpreter/jdbc/
For additional information on configuring the JDBC interpreter, see Hive
Interpreter for Apache Zeppelin.
2. Configure Zeppelin impersonation for Hive:
a. In the Zeppelin UI, navigate to the {jdbc} section of the Interpreter page.
b. Click Edit, then add a hive.proxy.user.property property and set its
value to hive.server2.proxy.user.
c. Click Save, then click Restart to restart the JDBC interpreter.
Connectivity to database
A connection to a database may need a connection-string having username/password.
In our case, we need to use the Linux user/password to enable such connection. This is
enabled by setting up Credentials in Zeppelin. This will be set up per user to use their
Linux user/password and will be used as impersonation to enable access to their
own HDFS via JDBC. For more information, see this documentation:
• Data Source Authorization in Apache Zeppelin
• Configuring User Impersonation for Access to Hive
Create the /usr/lib/zeppelin/conf/credentials.json file as part of the EMR cluster
setup – so all the users are configured on cluster setup. The data in this json file will
look like the following code sample (showing with sample Linux user names for
reference).
{
"credentialsMap": {
"Hadoop": {
"userCredentials": {
"jdbc.jdbc": {
"username": "Hadoop",
"password": "password1"
}
}
},
"student01": {
"userCredentials": {

Amazon Web Services Teaching Big Data Skills with Amazon EMR
33
"jdbc.jdbc": {
"username": "student02",
"password": "password2"
}
}
}
}
}
Ensure all settings are in place by restarting the JDBC interpreter and then restarting
Zeppelin.
Run JDBC commands in Zeppelin
Since we are using Hive properties for the JDBC interpreter, the notebook command will
always start with %jdbc (hive).
Creating databases and tables – these can be stored in /user/hive/warehouse or in a
specified directory such as /user/student02/ (using the location parameter) — as
long the logged in user has access to those directories. Default is always
/user/hive/warehouse. In both location cases, the user that created the
databases/tables is the one that will have access as the user is the owner of those files
(per HDFS ACLs).
Sample example jdbc notebook note below. This creates a database testdb01 and then
creates a table table01 in database testdb01. Additionally, stores the database + table
into the /user/student02 location in HDFS.
%jdbc (hive)
create database testdb01 location '/user/student02/';
CREATE TABLE testdb01.table01 (
person_id string, gender string,
birthdate string,
uuid string,
fullname string,
given_name string,
middle_name string, family_name string,
family_name2 string,
family_name_suffix string
);
To load data to this table from a file, you can use the below command:

Amazon Web Services Teaching Big Data Skills with Amazon EMR
34
%jdbc (hive)
LOAD DATA INPATH '/user/student02/file_sample.csv' OVERWRITE INTO
TABLE testdb01.table01;
Back up Zeppelin Notebook Notes
Backing up notebooks is always a good idea, especially when EMR workloads are
moved to different clusters, or migrated to a cluster with augmented capacity. See the
following steps to make a backup of Zeppelin notebook notes to S3.
When a user creates a notebook, the notebook gets stored in the
ZEPPELIN_NOTEBOOK_DIR (path specified in the /usr/lib/zeppelin/zeppelin-env.sh file).
For example: export ZEPPELIN_NOTEBOOK_DIR = /var/lib/zeppelin/notebook
Additionally, since the notebooks are saved as private (not public), Zeppelin manages
the access permissions in an authorization file. This notebook authorization file
(notebook-authorization.json) is located in the /usr/lib/zeppelin/conf directory.
To backup these files/directories and copy them to a new EMR cluster:
1. Copy these files/directories to a S3 bucket (using the AWS S3 CLI Copy [cp]
parameter ).
2. Once the new EMR cluster is ready, SSH into the cluster and copy the files and
directories from S3 to the Zeppelin directories on the cluster (using the AWS S3
CLI).
3. Use the following commands to stop and start Zeppelin for the notebook
authorization to take effect (after the copy operation):
o sudo stop zeppelin
o sudo start zeppelin
Conclusion
In this document, we explored design considerations and associated deployment
models that can be used to teach big data skills in a university setting using Amazon
EMR. There are various tradeoffs to analyze in terms of resource control and protecting
student data in exchange for administrative overhead. In any of the discussed
scenarios, the Amazon EMR service provides a simplified way to manage the

Amazon Web Services Teaching Big Data Skills with Amazon EMR
35
underlying compute infrastructure such that resources are only billed as they are used.
These deployment models combined with proper preparation and course design, can
enable your organization to quickly deploy EMR clusters in an educational setting to
enable hands-on access with a pay-as-you-go-model.
Contributors
Contributors to this document include:
• Jonathan Cornell - Partner Solutions Architect - Amazon Web Services
• Raj Chary - Senior Solutions Architect - Amazon Web Services
Document Revisions
Date Description
July 2020 Added Update Security Group section.
January 2020 First publication.