team3task1
DESCRIPTION
team3task1 projectTRANSCRIPT

Rough Version
Bleeds
11
When it comes to designing the layout of your document there are many factors of design you must take into consideration. Such factors are where should the type be placed, how many pictures will I be using, and where are they going to be located, will my design have a border or will there be a complete fill in of the document with some sort of color, graphic, or pattern?
Though all of these questions may seem very different they do all have at least one thing in common, bleeds. Basically, if any element on your document ends up overlapping or just makes direct contact with the edge of your document, you the designer will have to set up a proper bleed. Some examples of such documents that use bleeds are postcards, brochures, letterheads, business cards, and billboards. The trick is to place the element so that it goes over the border where the document will be cropped after printing.
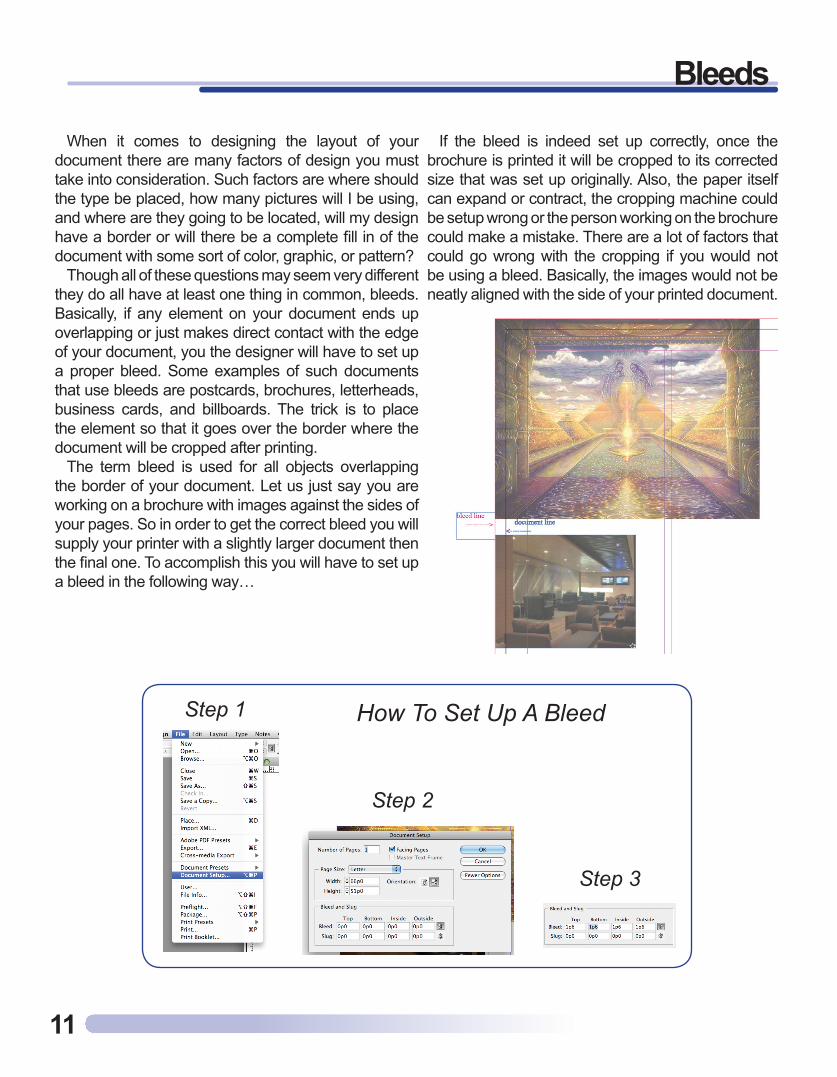
The term bleed is used for all objects overlapping the border of your document. Let us just say you are working on a brochure with images against the sides of your pages. So in order to get the correct bleed you will supply your printer with a slightly larger document then the final one. To accomplish this you will have to set up a bleed in the following way…
If the bleed is indeed set up correctly, once the brochure is printed it will be cropped to its corrected size that was set up originally. Also, the paper itself can expand or contract, the cropping machine could be setup wrong or the person working on the brochure could make a mistake. There are a lot of factors that could go wrong with the cropping if you would not be using a bleed. Basically, the images would not be neatly aligned with the side of your printed document.
Step 1
Step 2
Step 3
How To Set Up A Bleed

Bleeds
12
Registration marks are probably the most important marks because they allow the printers to know if they are printing the document’s colors correctly. For example, if your having a four color process job being printed and your colors are not correctly registered you will not have crisp fine lines, you will have paper being shown, and your color will be off in certain ares and the color will not be fluent in others. The fourth set of marks is called a color bar. All a color bar is a bar on the side of the print sheet, before the sheet gets cut, that allows one to verify all of the ink on your job is the correct shade/density. The final set of marks is the page information. The page information just allows the printer to know the name of the document and what each color the separation is in that was just printed. To set up the printer’s marks in Adobe InDesign, just head to your print dialog box and choose the marks and bleed tab and click on the all printer’s marks box.
Printer’s Marks Dialog Box
Color Separations Dialog Box
Note: The dialog boxes shown to the right are from the printing dialog box form the page layout program Adobe InDesign CS3, thus these dialog boxes may vary depending on what page layout program you are using.
Trapping
13
Some prepress systems provide automatic trapping of artwork as a process in file preparation for platesetting. This method of trapping is by far the best because the trap elements, their color, and their values are determined by sophisticated software algorithms. If trapping is available from your prepress provider, take advantage of that service. One needs to know color and design to be successful. A publication designed with several interacting spot colors requires I t The ideal time to consider trapping is before and during the design stage. This does not always happen however. The next best thing is to review trapping necessities with the printer. This, too, does not always happen. Some printers are proactive and tell their customer when image trapping will be a benefit or not. The next steps are determining which elements to trap and which could be selected to overprint; determining the trap settings, and then trapping the digital files using appropriate software. rapping because the colors don’t share a common ink. A publication with several process colors without common colors may also require trapping.
Be aware that not all printing require trapping. Designs that contain isolated areas of solid color don’t need to be trapped because there are no adjacent colors that could show gaps if register errors occur. Designs consisting of process colors where adjacent areas share copious percentages of component inks don’t require trapping, because misregister would reveal the common inks instead of leaving a gap. Photographs do not need to be trapped because the colors on the picture are random enough to prevent areas of a single color from showing up next to a big area of a different color.
An effective trap should compensate for misregister without distorting the shapes of the objects on the page. If trapping results invisible distortion, it maybe better to protect against register error by overprinting all of the object or a part of it. Overprinting black lines and black text can help to avoid the problem, even when these objects appear on a colored background. Trapping is a way to compensate for misregistration on press, and it
Guidelines
Exceptions
Introduction
Misregistraion
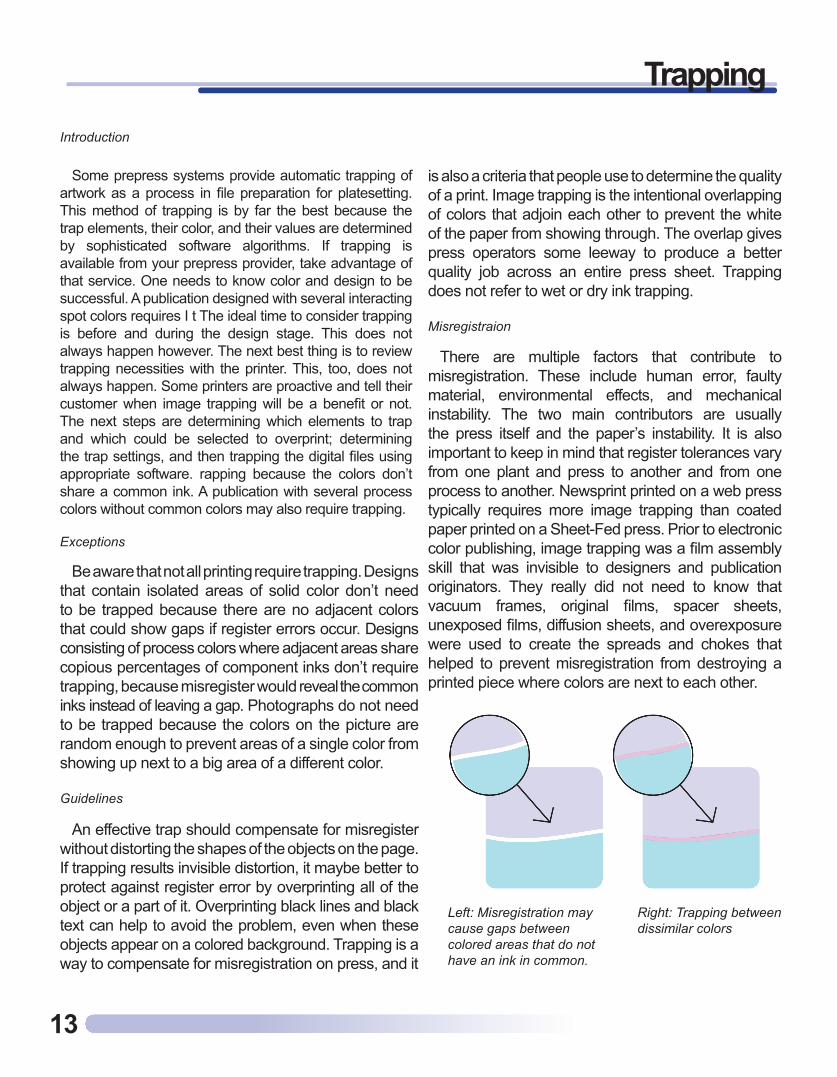
Left: Misregistration may cause gaps between colored areas that do not have an ink in common.
Right: Trapping between dissimilar colors
There are multiple factors that contribute to misregistration. These include human error, faulty material, environmental effects, and mechanical instability. The two main contributors are usually the press itself and the paper’s instability. It is also important to keep in mind that register tolerances vary from one plant and press to another and from one process to another. Newsprint printed on a web press typically requires more image trapping than coated paper printed on a Sheet-Fed press. Prior to electronic color publishing, image trapping was a film assembly skill that was invisible to designers and publication originators. They really did not need to know that vacuum frames, original films, spacer sheets, unexposed films, diffusion sheets, and overexposure were used to create the spreads and chokes that helped to prevent misregistration from destroying a printed piece where colors are next to each other.
is also a criteria that people use to determine the quality of a print. Image trapping is the intentional overlapping of colors that adjoin each other to prevent the white of the paper from showing through. The overlap gives press operators some leeway to produce a better quality job across an entire press sheet. Trapping does not refer to wet or dry ink trapping.

Trapping
14
Image Trapping Basics Image Trapping Rules/Suggestions
Page Deisgned to avoid trapping
Page RequiringTrapping
The ideal time to consider trapping is before and during the design stage. This does not always happen however. The next best thing is to review trapping necessities with the printer. This, too, does not always happen. If the printer is unknown, image trapping can be applied according to general recommendations or left to the printer. Some printers are proactive and tell their customer when image trapping will be a benefit or not. The next steps are determining which elements to trap and which could be selected to overprint; determining the trap settings, and then trapping the digital files using appropriate software.
It is important to know that page layout programs cannot apply trapping to elements created in other programs. Elements need to be trapped correctly in their native applications or the image trapping must be handled in a dedicated trapping program. One way to bypass the limitations of these programs is to place the same color background in the illustration file and in the page layout file where the graphic is being placed. This, however, can be time-consuming, especially for a page layout file that contains many imported graphics. If you intend to reduce the size of a file once it is imported into a page layout program, be aware that the trap amounts are also reduced. Make sure you inform your printer if you have selected this or any trapping option. Unexpected results may occur if a trapping software filter is run on a file that already has trapping applied to it.
Consult with your printer (most have software programs to apply trapping).
• Trap lighter colors into darker colors. • Avoid over trapping. • Use tinted traps to tone down the appearance of a third color at the border of objects. • If colors of nearly equal densities are being trapped, choke the background color into the foreground color. • Trap backgrounds into photographic images. • Don’t trap white knockouts, except in super black situations. • Don’t trap type in small point sizes or with thin serifs, and avoid knocking out this kind of type from multi-color and four-color images. These typefaces, however, are good candidates for overprinting. • Overprint hairline rules. • Watch out for opaque Inks. Ink lay down sequence for opaque inks will determine whether an overprint or trap is required. • Use common colors among touching objects. • Watch out for nested files with inconsistent or incorrect trapping. • To trap an object filled with a gradient into a solid object, try to find a color that is present at every level of the gradient and create a trap with that color. • Trapping is unnecessary on objects that don’t touch. • There are occasions when the rules don’t work.
Overprinting
15
Overprint to Cover Register Error
Ask these questions to evaluate the situation at hand:
Photographs
In some situations, overprinting text an objects is a more superior way to hide register error. The reason behind this is that small text and thin lines are thickened by trapping. It is up to the person’s discretion whether a misregistration will be more noticeable than a variation in color or text. The goal should be to have the least distraction between text and background.
• If gaps appear due to register error, will they be noticed? • Will the text change to an unwanted color if it’s overprinted to the background? • Will trapping distort the text? • It is common to print black trapping lines to prevent register error from showing. This technique has proved very effective and has been used greatly in comic books.
Photographs and transparencies usually contain more color information than can be printed. Often, designers will send a photograph to a prepress service to have the image scanned and color corrected. The prepress service then returns a low-resolution file for page layout. When the high-resolution file is incorporated into the final page and a proof is generated, however, the designer may discover subtle color changes in the image. Those color changes may not be the fault of the scanner operator. It may be that the original image contained more colors and density than process inks could print. The proof, however, should simulate the color gamut of the printed sheet.
File Formatting
16
File formatting is one of the easiest thing that Photoshop has to offer but it can also be tricky if you don’t know what the correct files are. Though the internet have only been around for a few years, files have been shifting their formats in matters of months, leaving us with well over 100 formats in its wake. Below are a couple of formats that you should be aware of, whether you’re working in Photoshop or even Indesign, these files are going to make its way to you one way or another.
The .AI file extension is generated by Adobe Illustrator: a drawing program released by Adobe Systems. AI files can also be opened using Acrobat as well as Photoshop will, however the image will be converted from vector image format to bitmap format in the process.
The .bmp file format BMP is a file extension associated with Image Bitmap.
GIFs are common format for Web graphics, epecially small images and images that contain text, such as navigation buttons; however, GIF images can also be animated and saved as “animated GIFs,” which are often used to display basic animations on websites; they may also include transparent pixels, which allow them to blend with different color backgrounds
Commonly used for storing digital photos since the format supports up to 24-bit color; also a common format for publishing Web graphics. Jpeg compresses using lossy compression, which may noticeably reduce the image quality if a high amount of compression is used
PNG images may also include an 8-bit transparency channel, which allows the colors in the image to fade from opaque to transparent; GIF images only support fully opaque or fully transparent pixels.
The most commonly used professional image editing program; can include image layers, adjustment layers, layer masks, annotation notes, file information, keywords, and other Photoshop-specific elements.
High-quality graphics format that supports color depths from 1 to 24-bit; designed to be a standard image format for storing high-quality color images on multiple computer platforms; may contain multiple layers and pages.
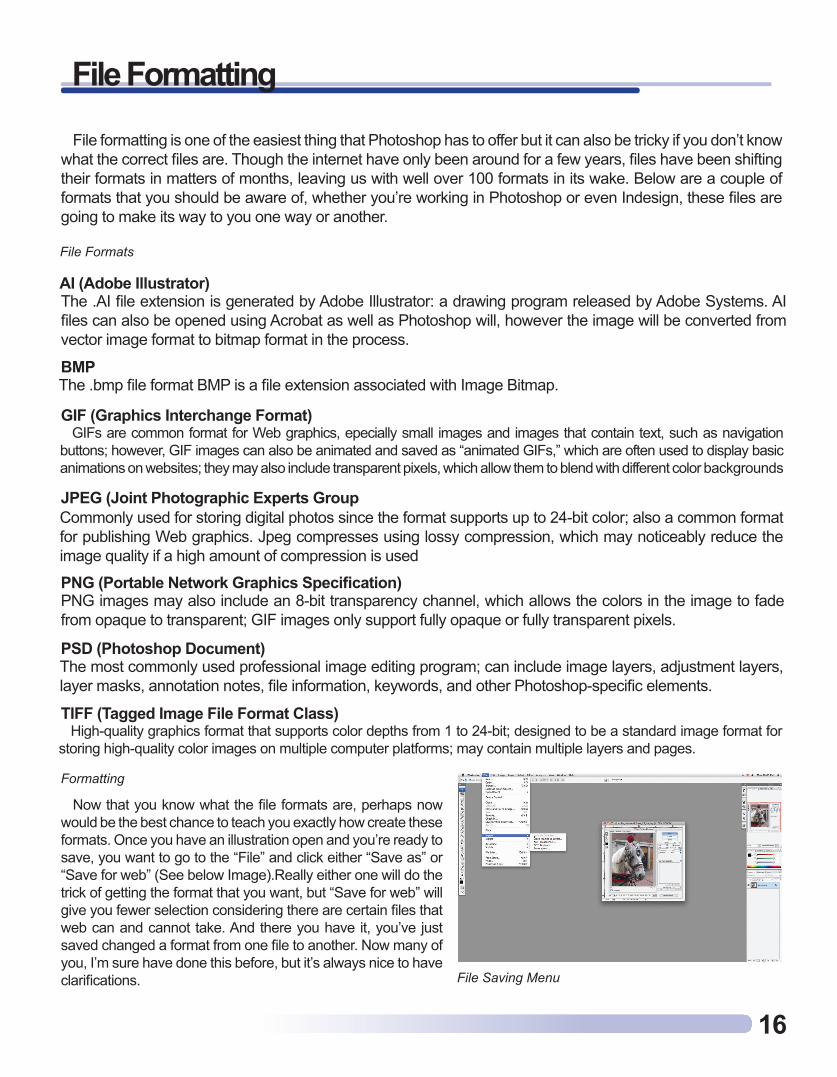
Now that you know what the file formats are, perhaps now would be the best chance to teach you exactly how create these formats. Once you have an illustration open and you’re ready to save, you want to go to the “File” and click either “Save as” or “Save for web” (See below Image).Really either one will do the trick of getting the format that you want, but “Save for web” will give you fewer selection considering there are certain files that web can and cannot take. And there you have it, you’ve just saved changed a format from one file to another. Now many of you, I’m sure have done this before, but it’s always nice to have clarifications.
File Formats
AI (Adobe Illustrator)
BMP
GIF (Graphics Interchange Format)
JPEG (Joint Photographic Experts Group
PNG (Portable Network Graphics Specification)
PSD (Photoshop Document)
TIFF (Tagged Image File Format Class)
Formatting
File Saving Menu

Scanning Files
17
Scanning is one of many ways to get your photos onto your computer whether you have the pictures on your cameras or even a hardcopy of your illustration. While it seems easy, and don’t get me wrong it is-when you know what you’re doing, there’s a bit more stepping stones you have to climb before fully getting a grasp on how to scan in perfect formats.
GIF’S, JPEGs, BMPs,PSDs,PICTs, etc are great for screen displays and for use on the Internet. However, they are not what’s necessary for printing on the press. If you are preparing a color file, then you should convert these graphics to flattened CMYK rather than RGB. Why? You ask. The reason being is that color there are certain colors that RGB has, which is mainly designated for the screen, that CYMK can not achieve in printing systems. Remember to keep this in mind while scanning if you’re planning on printing a hard copy of your subject.
There may come a time when you have to scan a series of lines (I.E. Logos, Illustration) into a layout for a client, but you can’t just scan into any format. Scanning at the highest resolution is possible but usually cannot be scanned above 1200 DPI or below 600 DPI (see formula below to determine dpi size). Scanning above 1200 is rarely any quality advantage over any others while scanning at 600 DPI can cause distorting and poor resolution to the image.
Scanning photographs can be a little different than scanning line arts. There are colors to factor in as well as resolution, and unlike line art, scanning at the highest resolution is not the best solution. Often, when scanning at the highest resolution, files often to become larger than needed (scanners usually apply their own base on color), and then become unprintable on standard paper.
Example: Say for example you are going to scan a colored photograph and you want to enlarge it to 135% from the original size. Following the formula above you times 2 by 100 (the resolution for color prints) by 1.35. Remember to change the desired size into decimal format. Multiplying the three numbers together, you get 270 DPI as your resolution to scan, which can be rounded to 300 DPI.
Scanning Line Art
Scanning Photographs
Note: Ever find yourself scratchingyour head to figure out whatresolution you need to scan in orderto get the correct resolution?Below is the formula you mightwant to consider:Formula 85 for black and whitehalftone 100 for color print 2x linescreen x sizing factor = DPI of scan
Photoshop CS3 Scanning Dialog Box
Pagination
18
Most of the documents you create will probably have a one or two-page spread. Adding or Removing pages before a spread will cause the document to automatically shuffle. However, you may want to keep certain pages in a spread together. For example, you can create gate fold or “Z” foldouts by creating a multiple-page spread (also called an island spread) and adding pages to it. By not allowing pages to shuffle, you can ensure that pages are kept in the same spread
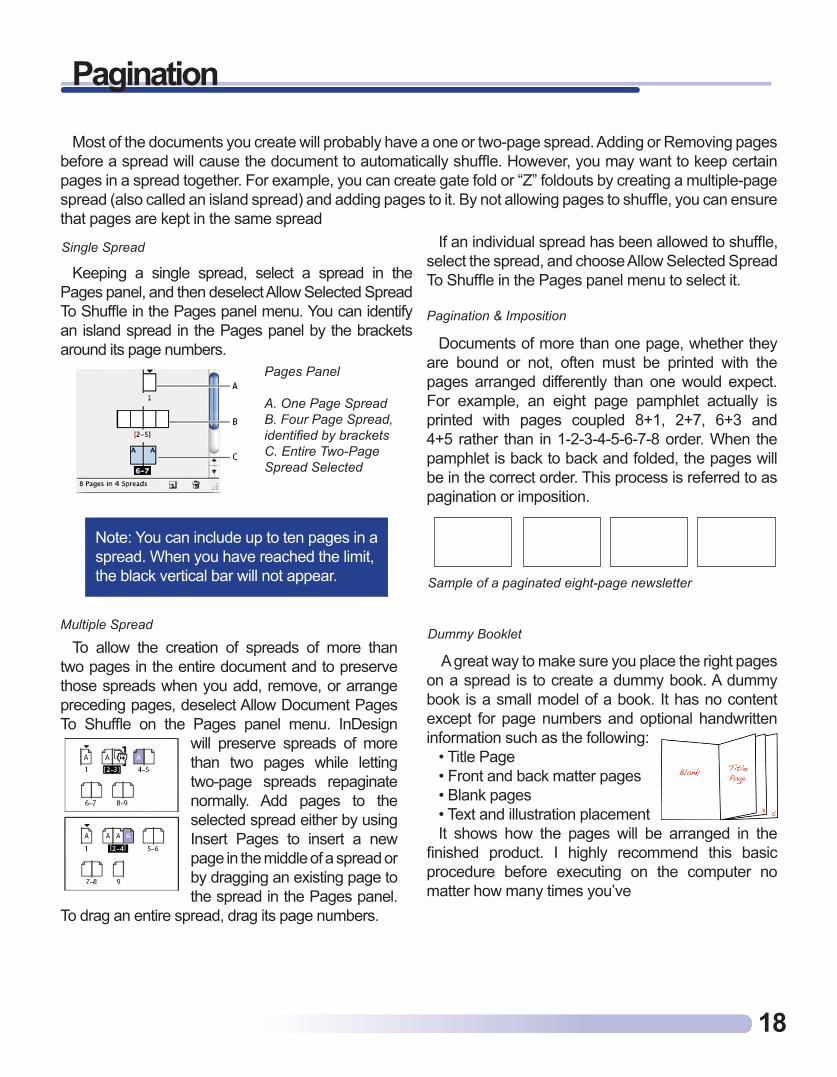
Keeping a single spread, select a spread in the Pages panel, and then deselect Allow Selected Spread To Shuffle in the Pages panel menu. You can identify an island spread in the Pages panel by the brackets around its page numbers.
To allow the creation of spreads of more than two pages in the entire document and to preserve those spreads when you add, remove, or arrange preceding pages, deselect Allow Document Pages To Shuffle on the Pages panel menu. InDesign
will preserve spreads of more than two pages while letting two-page spreads repaginate normally. Add pages to the selected spread either by using Insert Pages to insert a new page in the middle of a spread or by dragging an existing page to the spread in the Pages panel.
To drag an entire spread, drag its page numbers.
Single Spread If an individual spread has been allowed to shuffle, select the spread, and choose Allow Selected Spread To Shuffle in the Pages panel menu to select it.
Documents of more than one page, whether they are bound or not, often must be printed with the pages arranged differently than one would expect. For example, an eight page pamphlet actually is printed with pages coupled 8+1, 2+7, 6+3 and 4+5 rather than in 1-2-3-4-5-6-7-8 order. When the pamphlet is back to back and folded, the pages will be in the correct order. This process is referred to as pagination or imposition.
Pagination & Imposition
Sample of a paginated eight-page newsletter
Dummy Booklet
A great way to make sure you place the right pages on a spread is to create a dummy book. A dummy book is a small model of a book. It has no content except for page numbers and optional handwritten information such as the following:
• Title Page • Front and back matter pages • Blank pages • Text and illustration placement It shows how the pages will be arranged in the
finished product. I highly recommend this basic procedure before executing on the computer no matter how many times you’ve
Multiple Spread
Pages Panel
A. One Page Spread B. Four Page Spread, identified by brackets C. Entire Two-Page Spread Selected
Note: You can include up to ten pages in aspread. When you have reached the limit,the black vertical bar will not appear.
Unlinked Graphics
19
Linked artwork is connected to the document, making it a smaller document. You can modify linked artwork using transformation tools and effects; however, you cannot select and edit individual components in the artwork. You can use the linked graphic many times without significantly increasing the size of the document; you can also update all links at once. When you export or print, the original graphic is retrieved, creating the final output from the full resolution of the originals.
Linked artwork is connected to the document, making it a smaller document. You can modify linked artwork using transformation tools and effects; however, you cannot select and edit individual components in the artwork. You can use the linked graphic many times without significantly increasing the size of the document; you can also update all links at once. When you export or print, the original graphic is retrieved, creating the final output from the full resolution of the originals.
Embedded artwork is copied into the document at full resolution, resulting in a larger document. You can control versions and update the file whenever you like; as long as the artwork is embedded, your document is self-sufficient.
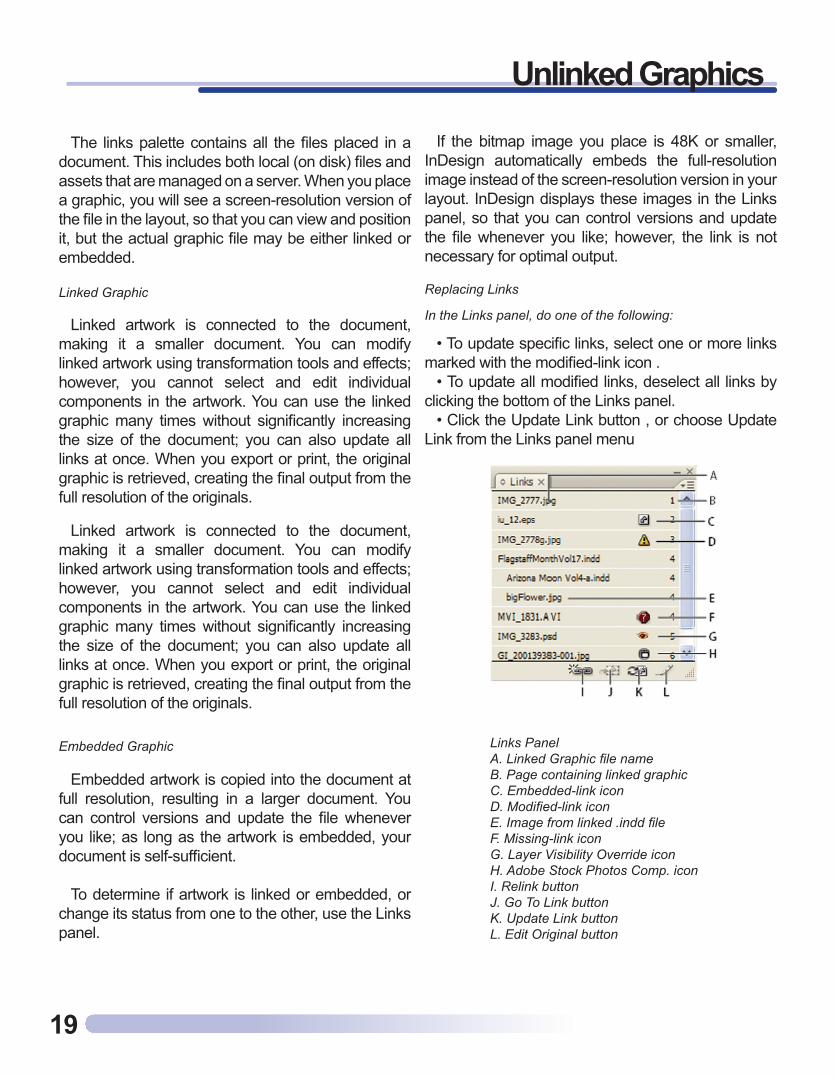
To determine if artwork is linked or embedded, or change its status from one to the other, use the Links panel.
If the bitmap image you place is 48K or smaller, InDesign automatically embeds the full-resolution image instead of the screen-resolution version in your layout. InDesign displays these images in the Links panel, so that you can control versions and update the file whenever you like; however, the link is not necessary for optimal output.
• To update specific links, select one or more links marked with the modified-link icon .
• To update all modified links, deselect all links by clicking the bottom of the Links panel.
• Click the Update Link button , or choose Update Link from the Links panel menu
The links palette contains all the files placed in a document. This includes both local (on disk) files and assets that are managed on a server. When you place a graphic, you will see a screen-resolution version of the file in the layout, so that you can view and position it, but the actual graphic file may be either linked or embedded.
Replacing LinksLinked Graphic
Embedded Graphic Links Panel A. Linked Graphic file name B. Page containing linked graphic C. Embedded-link icon D. Modified-link icon E. Image from linked .indd file F. Missing-link icon G. Layer Visibility Override icon H. Adobe Stock Photos Comp. icon I. Relink button J. Go To Link button K. Update Link button L. Edit Original button
In the Links panel, do one of the following:
Missing Fonts
20
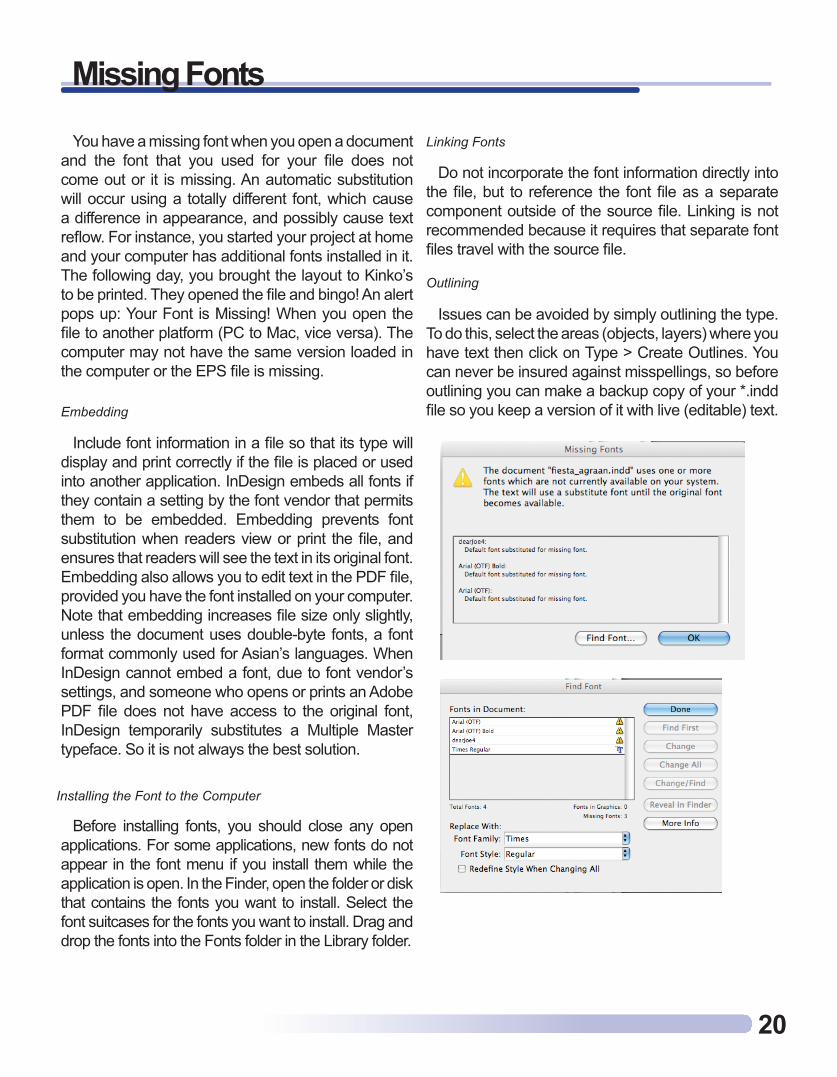
You have a missing font when you open a document and the font that you used for your file does not come out or it is missing. An automatic substitution will occur using a totally different font, which cause a difference in appearance, and possibly cause text reflow. For instance, you started your project at home and your computer has additional fonts installed in it. The following day, you brought the layout to Kinko’s to be printed. They opened the file and bingo! An alert pops up: Your Font is Missing! When you open the file to another platform (PC to Mac, vice versa). The computer may not have the same version loaded in the computer or the EPS file is missing.
Include font information in a file so that its type will display and print correctly if the file is placed or used into another application. InDesign embeds all fonts if they contain a setting by the font vendor that permits them to be embedded. Embedding prevents font substitution when readers view or print the file, and ensures that readers will see the text in its original font. Embedding also allows you to edit text in the PDF file, provided you have the font installed on your computer. Note that embedding increases file size only slightly, unless the document uses double-byte fonts, a font format commonly used for Asian’s languages. When InDesign cannot embed a font, due to font vendor’s settings, and someone who opens or prints an Adobe PDF file does not have access to the original font, InDesign temporarily substitutes a Multiple Master typeface. So it is not always the best solution.
Before installing fonts, you should close any open applications. For some applications, new fonts do not appear in the font menu if you install them while the application is open. In the Finder, open the folder or disk that contains the fonts you want to install. Select the font suitcases for the fonts you want to install. Drag and drop the fonts into the Fonts folder in the Library folder.
Do not incorporate the font information directly into the file, but to reference the font file as a separate component outside of the source file. Linking is not recommended because it requires that separate font files travel with the source file.
Issues can be avoided by simply outlining the type. To do this, select the areas (objects, layers) where you have text then click on Type > Create Outlines. You can never be insured against misspellings, so before outlining you can make a backup copy of your *.indd file so you keep a version of it with live (editable) text.
Linking Fonts
Outlining
Embedding
Installing the Font to the Computer
