technical manual gear hub systems - sram · 1 contents gear hub systems technical manual 2003 gear...
TRANSCRIPT

ENGLISH
2003
TECHNICAL MANUAL
GEAR HUB SYSTEMS

© Copyright SRAM Corporation 2002Publ. No. 8034 EInformation may be enhanced without prior notice.
Released August 2002SRAM Technical Documentation, Schweinfurt/Germany
EXA-Drive is a trademark of Campagnolo S.R.L., Italia.Grilon is a trademark of EMS-Chemie AG, Switzerland.MAGURA is a trademark of MAGURA GmbH & Co., GermanyHAYES is a trademark of der HAYES BRAKE Inc., U.S.A.Dacromet is a tradename of Metal Coatings International, U.S.A.Shimano, HG, IG is a trademark of Shimano Inc., Japan.
This Technical Manual isintended for bicycle factoriesand qualified bicycles dealersonly!

1
CONTENTSGEAR HUB SYSTEMS
Technical Manual 2003
G E A R H U B S A N D S H I F T E R S
DualDrive 3
Spectro S7 13
Spectro P5 21
Spectro P5 Cargo 29
Spectro T3 37
Sparc 45
S P E C T R O S Y S T E M C O M P O N E N T S
Front Hubs with Drum Brake 53
Two-Axis Brake Levers 56
SmartBar 59
Power Chain 70
S U P P O R T
Distributors 78
Who to call / Warranty / Spare Parts 80!
CARGOCARGO

Technical Manual 20032

3
DUALDRIVETECHNICAL DATA /ASSEMBLY REQUIREMENTS
Technical Manual 2003
6718
44.567.5
Chainline
135182.6
4.6
33
• Expanded gear range• Efficient design• Stand-still shifting (mode selector)• Single chainring design• Sealed system• Easy wheel removal• ESP 1:1 actuation ratio technology• Improved material use• Outward facing limit screws• Low system weight
Caution: Not suitable for tandems, trademen’s delivery bicycles and similar.
Cycle frame:The strength must be such that with a maxi-mum braking torque of 250 Nm (2200 in.lbs.)on the rear wheel no residual deformationcan occur on the rear structure.
HUBS
DualDrive 27/24 · without brake DualDrive 27/24 · disc brake compatible
Part No. — " — — " —
Brake None Interface for Disc brakes
Over Locknut Dim. 135 mm 135 mm
Length 182.6 mm 182,6 mm
Ends Diameter FG 10.5 FG 10.5
Holes 36 " 32 36 " 32
Hole Diameter 2.6 mm 2.6 mm
Hole Ref. ø 67 mm 67 mm
Flange Dist. to 1/2 OLD 33 mm / 18 mm 33 mm / 18 mm
Totally 576 % (27spd) / 542 % (24spd)
Totally hub 186 %
Speed 1 73 %
Speed 2 100 %
Speed 3 136 %
Chainline 45 mm 45 mm
Crankset 33 / 38 Teeth
Cogset 9 / 8 Speed, 11-34/32 Teeth
Cogset Compatib. DualDrive 27 / DualDrive 24
Shifter Compatib. DualDrive 27 / DualDrive 24
Sealing Extra sealed
Tandem compatib. — —
Disc compatib. — SRAM / Magura / Hayes / Shimano
Weight 970 g 970 g
Hub Shell Aluminum Aluminum
Shifting device Composite Composite
#
#
#
#
#
#
#
#
#
#
Axle
Spok
eRa
tioFi
nish

4
DUALDRIVETECHNICAL DATA /ASSEMBLY REQUIREMENTS
Technical Manual 2003
DualDrive 27 DualDrive 24
Part No. — " — " — " — " — — " — " — " — " —
Clickbox Cable 1400 mm " 1500 mm " 1600 mm " 1700 mm " 2100 mm 1400 mm " 1500 mm " 1600 mm " 1700 mm " 2100 mm
Shifter Type SRS Twistring-Thumbshifter-Combo (2in1) SRS Twistring-Thumbshifter-Combo (2in1)
Arrangement Handlebar, right Handlebar, right
Gear Hub DualDrive DualDrive
Derailleur DualDrive 9spd DualDrive 8spd
Gear Indication Der. Window Printed
Riding Mode Indic. Printed Printed
Barrel Adj. Gear Hub None None
Barrel Adj. Derailleur Indexing Indexing
Clamping Diameter 22.3 mm 22.3 mm
Handlebar, Straight Area Minimum length for shifter = 150mm Minimum length for shifter = 150mm
Cable Routing, Gear Hub Continuous housing (preassembled) Continuous housing (preassembled)
Cable Routing, Der. Open or continuous Open or continuous
Weight N/A N/A
Cables Stainless steel Stainless steel
Housing Glass filled PA – Silver painted Glass filled PA – Silver painted
Grip Cover Thermoplastic elastomer, Overmolded Thermoplastic elastomer, Overmolded
Clamping Collar Aluminum Aluminum
Clickbox Composite Composite
Desi
gnCo
m-
pat.S
HIFTERS
CASS.
DualDrive 27 DualDrive 24
Part No. — —
Largest Cog 34 Teeth 32 Teeth
Speeds 9 8
Cogs 11/12/14/16/18/21/24/28/34 11/12/14/16/18/21/26/32
Spacers Blue Black
Chain compatib. 9spd, HG/IG/PG II comp. 8spd, HG/IG/PG II comp.
Weight 320 g 270 g
Cogs SAPH 440 steel
Screws Steel / Zinc Coat
Finish Matte Nickel Plated Chrome#
#
Desi
gn
DERAILLEURS
DualDrive 27 DualDrive 24
Speeds 9 8
Shifter Compatibility DualDrive 27 DualDrive 24
Cage Length Short, 75 mm Short, 75 mm
Sprocket, max. 34 Teeth 32 Teeth
Sprocket, min. 11 Teeth 11 Teeth
Pulleys Exchangeable / Bushing Exchangeable / Bushing
Direct Mount $ $
Weight 260 g 220 g
Upper Knuckle Aluminum Grilon Composite silver
Lower Knuckle Grilon Composite silver Grilon Composite silver
Outer Link Aluminum Grilon Composite silver
Inner Link Steel / Zinc coat Steel / Zinc coat
Outer Cage Forged Aluminum Grilon Composite black
Inner Cage Grilon Composite black Grilon Composite black
Hanger Bolt Aluminum Steel
Desi
gn
NEWNEWNEW

5
DUALDRIVETECHNICAL DATA /ASSEMBLY REQUIREMENTS
Technical Manual 2003
3
1
2
4
C A B L E H O U S I N G • Use only new high quality cable and
com-pressionless cable housing withend caps.
• When choosing cable housing lengths,be sure to allow enough housing for anextreme turn of the handlebars in both directions.
• Note also, that different stem lengthsand cable stop positions effects cablehousing length.
D R O P O U TOnly flat and no off-set versions.Dropout thickness: 7 – 8 mm.Vertical or horizontal dropout slot.Dropouts must be parallel.
Dropout dimensions: see Fig. 2 and 3.
C R A N K S E TBicycle without chain case:Use a chain guard disc (at the outer surface of chainring, material no resin)Use only standard chainring version (non-shifting teeth).
Chainline = 45 mm.
Length X min. 90 mm.Cable stop below or beside chainstay.
Recommended cranks:Cyclone:• DualDrive crank for chainguard, 33 T, Part
No. CPI-104 (chain guide fork necessary).• DualDrive crank for Trekking, 33 T,
Part No. CY-100W.• DualDrive crank for MTB, 33 T,
Part No. CF-100W.Truvativ:• CR-02-XF-SS or CR-02-XF-SSA
DualDrive crank supplier:Cyclone Precision Inc. P.O. Box 3-41 · Nantou 540 · TaiwanTel.: +886-49-257-829 · Fax: +886-49-257-832eMail: [email protected]://www.cpi-cw.comor Truvativ · http://www.truvativ.com
C H A I N G U I D E F O R KIt prevents chain from jumping off frontchainring, is bolted inside the chain case (1, Fig. 4).
H A N D L E B A RDiameter: 22.3 mm.Minimum length of straight area for shifter:150 mm.Check the compatibility of intended handlebars and brake levers.
1
dA max. 220 mm
R2
A XR1
L
90˚
L
2830
X
6–107.5 –10
A
25˚–30˚25˚–30˚
R1
8.5 max8.5 max
R2
11.5 –13.511.5 –13.5
1
2
3
45
X (mm)90 100 110 120 130
L (m
m)
200
180
160
140
120
100X
C A B L E H O U S I N G F O R D E R A I L L E U R
Rear cable stop position Rear housing length (only DualDrive 27)
Example: Distance X = 100 mm cable housing length L = 140 – 165 mm.
#
32
60
2545
15
14
13
Cable routingDualDrive 27 DualDrive 24
Hub cable Along chainstay only Along chainstay only
Derailleur cable Along chainstay only Along chainstay only
Cable attachement see Fig. 1 Cable housing Attachement points Cable stops
Hub Continuous 1 / 2 / 3 / 4 (see Fig. 1) —
Derailleur Continuous 1 / 2 / 3 / 4 / 5 (see Fig. 1) —
Open — 1 /5 (Fig. 1)

6
DUALDRIVEASSEMBLY
Technical Manual 2003
A S S E M B L Y H U B• Lace the wheel as normal.• Place spoke protector disc (1, Fig. 1) on
shoulder of hub, fit cassette (2) onto driver profile. Screw lock nut (3) withcassette tool (Park Tool FR-5 or SRAMPart No. 4624 411 010), tightening torque:40 Nm (350 in.lbs.).
• Screw shifting rod (1, Fig. 2) into the hubaxle and tighten it with 0.2 Nm (1.8 in.lbs.).
• Fit wheel in dropouts. • Place retaining washers (Fig. 2) on both
sides of the axle – the serrations mustbear against the dropout.– Version for horizontal dropouts (2): the
lug must engage in the dropout slot.– Version for vertical dropouts (3):
without lug. • Tighten up axle nuts. Tightening
torque 30 – 40 Nm (266 – 350 in.lbs.).
A S S E M B L Y D E R A I L L E U RAdvice: Check the rear derailleur hangeralignment. A bent rear derailleur hangerwill result in inaccurate index shifting. • Attach the rear derailleur to the frame’s
rear derailleur hanger using a 5 mm hexhead wrench (Fig. 3).
• Check that the b-adjust washer tab (b-adjust screw at DualDrive 24) is clearof the rear derailleur dropout tab (Fig. 4).
• Tighten the 5 mm hex hanger bolt to8 – 10 Nm (70 – 85 in.lbs.).
C H A I N L E N G T H• Bypassing the rear derailleur, run the
chain around the largest cog/chainringcombination (Fig. 5).– For rear suspension frames, position
the rear suspension for the greatestchain length required.
• Add 4 LINKS or 3 links + Power Link to this length for proper chain length.
A S S E M B L Y S H I F T E R• Slide the shifter (1, Fig. 6) onto the
handlebar.• Rotate the shifter until the barrel
adjuster (4) is beneath (but out of theway of) the brake lever.
• Tighten the 3 mm hex clamp bolt (2) to 1.9 Nm (17 in.lbs.).
• Slide the handlebar grip (3) onto thehandlebar.
Caution:• Never use lubricants or solvents to
install handlebar grips.Handlebar grips provide an axial safety function. For this reason, they should bemounted in such a way as to make surethey do not slip off handlebar.
• Check that the shifter and brake leverfunction properly and are unobstructed(realign if necessary).
• Never ride without the handlebar gripsthis can result in severe injury or death.
I N S T A L L I N G C L I C K B O X• Fit the cable and avoid small radius.• Cable attachment points see Page 5 /
Fig. 1.Cable housing must be movable insideattachment.
• Place shift lever in uphill riding mode /gear position “1“ (Fig. 7).
• Push Clickbox button down (Fig. 7).• Push on Clickbox to the stop on the hub
axle.• Press button up.• Place thumb shift lever in standard
riding mode / gear position “2“ (Fig. 8).• Match up the marks in the Clickbox
viewing window by twisting the barrel adjuster (Fig. 8).
1
4
3
2
321
5
6
5 mm8 – 10 Nm70 – 85 in.lbs.
(4 Links)
DualDrive 24
DualDrive 27
2
4
1 3
10,2 Nm1,8 in.lbs.
2
3

7
DUALDRIVEASSEMBLY
Technical Manual 2003
D E R A I L L E U R A D J U S T M E N TLimit screw adjustment:• View the rear derailleur and pulleys from
behind the rear of the bicycle (Fig. 9).• Using a small screwdriver, turn the limit
screw marked ’H’ on the outer link of thederailleur to align the upper guide pulleycenter with the outboard edge of thesmallest cog – clockwise moves the guide pulley inboard towards the wheel.
• While turning the crank, push the rearderailleur towards the larger cogs by hand.
• Align the upper guide pulley under thelargest cog, center to center, by turningthe limit screw marked ’L’ on the outerlink – clockwise moves the guide pulleyoutboard away from the spokes.
Chain gap adjustment:Chain gap is the distance between the upperguide pulley and the cog the chain is ridingon. Optimal chain gap is small enough toallow quick, efficient shifts to and from anycog, but large enough to allow smoothshifts to and from the largest cog.
• Shift chain to the small chain ring.• While turning the crank, push the rear
derailleur inboard by hand to the largestcog.
• Hold the derailleur in this position whilemaking the following adjustment.
• Use a 3 mm hex wrench, turn the b-adjustscrew until the chain gap equals approximately 6 mm (1/4”) from tip of thecog to tip of upper guide pulley (Fig. 10).– Turn the b-adjust screw clockwise to
increase the chain gap.– Turn the b-adjust screw counterclock-
wise to decrease the chain gap.
Advice: Do not use the b-adjust screw to adjustthe rear derailleur to act as a chain-tensioning device or to prevent chainsuck. This increases the chain gap causing poor shifting performance.
Index shifting adjustment:• Check that the chain and the rear
derailleur are in the smallest cog position.• Measure and cut the rear piece of
cable housing. Make sure that it is nottoo short or long (DualDrive 27: seepage 5 for figure and chart).
• Rotate the twist shifter until the largestnumber and gear indication tab/dashline up.
• Turn the twist shifter barrel adjuster (4,Fig. 6) clockwise fully into the shifter,then turn counterclockwise 1 full turn.
• Feed the shifter cable through the rearderailleur cable housing, stops and cable guides.
• Feed the rear derailleur cable throughthe rear derailleur-housing stop andthrough the cable guide on the fin.
• Pull the cable tight and position it under the cable anchor washer (Fig. 11).
• Tighten the 5 mm hex cable anchor boltto 4 – 5 Nm (35–45 in.lbs.).
• Rapidly shift the chain and derailleur upand down the cassette several times. If thecable slips repeat the two former steps.
• Shift the chain to the smallest cog.• While pedaling, move the shifter up one
detent.– If the chain hesitates or does not shift
to the second cog, increase the cabletension by turning the shifter barreladjuster counterclockwise.
– If the chain shifts beyond the second cog,decrease the cable tension by turning the shifter barrel adjuster clockwise.
• Repeat the two former steps until shifting and cable tension is accurate.
• While turning the crank, shift the chainup and down the cassette and chainrings several times to ensure that yourderailleur is indexing smoothly.
5 mm4 – 5 Nm35 – 45 in.lbs.
7
1110
9
8
3 mm
6 mm(1/4")

8
DUALDRIVEMAINTENANCE
Technical Manual 2003
R E A S S E M B L Y H U Bsee Fig. 1
Lubrication see “LUBRICATION GEAR HUB“.• Clamp axle with the two axle flats
(longer axle thread).• Fit shift sleeve (12), bushing (13) with small
diameter first, compression spring (15),coupling gear clutch (14), and driver (17).
• Mount cone (18) and lock nut (19). Tightening torque 15 – 20 Nm (133 – 177 in.lbs.).
• Clamp other axle end (driver side facingdownwards).
• Mount ball retainer (16), pawl carrier(10) and washer (9).
• Press pawls against spring force andmount gear ring (8) with smaller diameter first.Rotate gear ring counterclockwise untilpawls engage inside the gear ring.
• Fit planetary gear carrier (7) and washer (6).
• Press and rotate planetary gear carrieruntil axle groove is visible.
• Mount retaining washer (5).• Mount hub shell (4), obligatory with a
slight counterclockwise turn.• Mount adjusting cone (3).• Screw on counternut (2), adjust bearings
to be free of play and tighten with a torque of 15 – 20 Nm (133 – 177 in.lbs.).
• Mount cap (1).• Unclamp hub and mount shifing rod (20)
with a torque of 0,2 Nm (1.8 in.lbs.). Mount spoke protector disc and cassette.
R E M O V E W H E E L• Rotate the twist shifter to the highest
gear position (speed “8/9“). • Place shift lever in uphill riding mode /
gear position “1“ (Fig. 2).• Push Clickbox button down (Fig. 2).• Pull Clickbox off the axle.• Screw out shifting rod (20, Fig. 1).• Dismantle wheel.
D I S M A N T L I N G H U Bsee Figure 1
• Dismantle cassette lock nut with cassette tool (Park Tool FR-5 or SRAM Part No. 4624 411 010).
• Remove cassette and spoke protectordisc.
• Clamp hub with the two axle flats (driverside facing downwards).
• Remove cap (1), unscrew lock nut (2),screwed adjusting cone (3) and hubshell (4).
• Dismantle retaining washer (5), removewasher (6), planetary gear carrier (7)and gear ring (8).
• Squeeze down pawls and remove pawlcarrier (10) with washer (9) and ball re-tainer (16).
• Clamp other axle end (longer axlethread).
• Dismantle lock nut (19) and cone (18).• Remove driver (17), compression spring
(15), coupling gear clutch (14) and shiftsleeve (12) with bushing (13).
1
2
1
23
4
56
7
8
910
11
12
1314
1516
17
18
19
20
3Lubricate the shifting joints regularly
When disassembled –use a waterproof grease

9
DUALDRIVEMAINTENANCE
Technical Manual 2003
L U B R I C A T I O N G E A R H U BHubs are provided with permanent lubrication and maintenance-free undernormal conditions.
Cleaning of parts:• All parts – except the planetary gear
carrier and the driver – can be degreasedin a cleaning bath.
• Planetary gear carrier and driver onlyneed to be cleaned on the outside with a brush so as not to degrease the bearings.
Lubrication of parts:Use only SRAM grease (Part No. 0369 135 201)and standard bicycle oil.• To lubricate the bearing points on
the planetary gear sets, position the planetary gear carrier pawls upside andapply 2 – 3 drops of oil to the bearingbolts – at the same time turning the planetary gears so that the bearingpoints are completely wet. Oil axle slot, apply a thin coating of grease to the outside.
• Grease the teeth of the axle (fill thegaps).
• Apply grease to gear ring teeth but justoil the pawls and pawl teeth.
• Oil pawl carrier pawls and pawl bearings.
• Oil cartridge bearing.• Regrease ball retainers, line ball
bearing running tracks with grease.
Caution:Do not use high-pressure water whencleaning the gear hub (e.g. strong waterjets, high-pressure cleaners etc.) – if water penetrates it could lead to functional problems.
L U B R I C A T I O N R E A R D E R A I L L E U R• Do not use solvants or corrosive
materials to clean the components.• Lubricate the shifting joints regularly
(Fig. 3).• Grease any cable guides (e.g. beneath
the bottom bracket).
C A B L E C H A N G EAdvice:Use only new high quality cable and compressionless cable housing with end caps.
Twist shifter (rear derailleur):• Detach the cable from the derailleur.• Cut cable off 15 cm (6") from shifter
barrel adjuster. Discard old cable andcable housing.
• Remove screw (1, Fig. 4) and pull openthe cable change sleeve (2).
• Rotate the shifter fully in the cable release direction (gear position “8/9“).
• Look for cable head entry (3, Fig. 5).• Push cable up/out of the shifter and
discard.• Feed the new cable through the cable
entry and out the barrel adjuster (4).• Pull cable snug.• Install cable change sleeve (2, Fig. 4).• Feed the cable through the new cable
housing and frame stops.• Attach cable to the derailleur.• Adjust indexing per derailleur instruction.
Thumb shift lever (gear hub):• Place thumb shift lever (5, Fig. 6) in
uphill riding mode / gear position “1“.• Snap open Clickbox-cover (8, Fig. 7)
(no need to move Clickbox from the axle end).
• Unscrew clamping bolt (9).• Remove the shifter escape hatch (6, Fig. 6).• Remove and discard the old cable.• Feed the new cable through the cable
entry (7, Fig. 6), the new calbe housingand pull the cable snug.
• Attach the escape hatch.• Pull the cable tight and position it under
the cable anchor washer (10, Fig. 7).• Tighten the 4 mm hex cable anchor bolt
to 4 – 5 Nm (35 – 45 in.lbs.).• Cut off cable end to 1 – 3 mm.• Snap in Clickbox-cover (8).• Place thumb shift lever in standard
riding mode / gear position “2“.• Match up the marks in the Clickbox
viewing window (11, Fig. 7) by turningthe barrel adjuster (12).
4
6
7
5
2
1
11 12
89
10
3
4
6
5
7
4 mm4 – 5 Nm35 – 45 in.lbs.

10
DUALDRIVEMAINTENANCE
Technical Manual 2003
ProblemHub:Shifting difficulties
Pedals are carried forward when freewheeling
Derailleur:Chain jumps from smallest sprocket to frame dropout.
Difficult or impossible to shift chain onto smallest sprocket.Chain jumps over largest sprocket and falls between the spokes and largest sprocket or inner cage plate scrapes on spokes.Delayed shifting.
Rough shifting behavior.
Chain jumps two gears on small sprocketDelayed shifting onto larger sprocketDelayed shifting onto smaller sprocket
Cause
Incorrect gear setting
Bearings set too tightLoose lock nuts
Rear frame dropouts nonparallel
High gear limit screw is notadjusted properly.
High gear limit screw is notadjusted properly.
Low gear limit screw is notadjusted properly.
Rear derailleur or derailleurhanger is bent.Clearance between guidepulley / sprocket is too large.Clearance between guidepulley / sprocket is too small.Shift cable insufficiently tensioned.Shift cable insufficiently tensioned.Shift cable is too tight.
Excessive cable friction, pinched or poorly routed cable.
Remedy
Adjust shifting system, oilcontrol cable, check that cablestop is fastened correctly.Re-adjust bearingTighten lock nuts (15 – 20 Nm,133 – 177 in.lbs.)Bend / reorient dropouts
Turn in screw H until the guide pulley is aligned withthe smallest sprocket.Unscrew screw H until theguide pulley is aligned withthe smallest sprocket.Turn in screw L until the guide pulley is aligned withthe largest sprocket.Straighten or replace.
Adjust b-adjust screw by rotating counterclockwise.Adjust b-adjust screw by rotating clockwise.Turn barrel adjuster on theshifter counterclockwise.Turn barrel adjuster on theshifter counterclockwise.Turn barrel adjuster on theshifter clockwise.Lubricate or replace cableand housing. Check for excessive bending of cablehousing.
T R O U B L E S H O O T I N G

11
DUALDRIVEMAINTENANCE
Technical Manual 2003

Technical Manual 200312

Technical Manual 2003 13
SPECTRO S7TECHNICAL DATA /ASSEMBLY REQUIREMENTS
Spectro S7 with coaster brake Spectro S7 with drum brake Spectro S7 without brake
Type MH 7215 MH 7225 MH 7205
Brake Coaster Drum „D“ " „NL“ None
Over Locknut Dim., OLD 130 mm 135 mm 130 mm
Length, L 183.4 mm 188.5 mm 183.4 mm
Ends Diameter, T FG 10.5 FG 10.5 FG 10.5
Dropout Width Dim. A1 max. = 12.5 mm / A2 max. = 12 mm A1 max. = 12.5 mm / A2 max. = 12.2 mm A1 max. = 12.5 mm / A2 max. = 10 mm
Holes 36 36 36
Hole Diameter, DS 3.0 mm 2.9 mm 3.0 mm
Hole Ref. ø, HR 75 mm 89 mm 75 mm
Flange Dist. to 1/2 OLD F1 = 33 mm / F2 = 34 mm F1 = 34.8 mm / F2 = 35.7 mm F1 = 33 mm / F2 = 34 mm
Totally 303 %
Speed 1 57 %
Speed 2 68 %
Speed 3 81 %
Speed 4 100 %
Speed 5 124 %
Speed 6 148 %
Speed 7 174 %
Usable Dimensions 1/2" x 1/8" or 1/2" x 3/32" 1/2" x 1/8" or 1/2" x 3/32" 1/2" x 1/8" or 1/2" x 3/32"
Line, C/D/E 54 / 51 / 48 mm 55.5 / 52.5 / 49.5 mm 54 / 51 / 48 mm
Ratio 24", 26", 28"= 1.83 – 1.90 / 20"= 1.83 – 2.00
Shifter Compatib. Spectro Grip 7
Clickbox Compatib. Clickbox S7
Tandem Compatib. — — —
Weight 1714 g 1737 g 1556 g
Hub Shell Material Steel Aluminum Steel
Finish Matt Chrome Plated Clear Coat Matt Chrome Plated
##
##
##
##
##
##
##
##
##
##
##
Axle
Spok
eGe
ar H
ub R
atio
Chai
nFi
nish
HUBS
• Comfort Action Shifting• Improved Ergonomics• Optimal Gear Ratio• Spectro Design• Matte Chrome Finish• Reliable Brake Performance• Most Efficient Hub In Its Class
Caution: • Spectro S7 hubs are not suitable for
tandems, trademen’s delivery bicyclesand similar.
• Use always 2 retaining washers. Alternatively assemble both retainingwashers on the left axle end (Fig. 5).
Cycle frame:• Dropouts must be parallel.• Slot width at rear dropout max. 10,5 mm.• The strength must be such that with a maxi-
mum braking torque of 250 Nm (2200 in.lbs.)on the rear wheel no residual deformationcan occur on the rear structure. R 100Ø 7.3
HR
DS
A1 maxA2 max
F2 F1
TL
1/2 OLD
OLD
C
7min. 13.5
DE
Version with Coaster Brake

14
SPECTRO S7TECHNICAL DATA /ASSEMBLY REQUIREMENTS
Technical Manual 2003
SPECTRO S7ASSEMBLY
Spoke lengths are approximate values. They must be checked through lacing attemptsand adjusted accordingly.
Tire Size Cross Length MH 7215/7205 Length MH 722547–406 20" x 1.75 x 2 3 x 181 mm 179 mm37–490 22" x 1 3/8 3 x 225 mm 222 mm47–507 24" x 1.75 x 2 3 x 232 mm 229 mm37–540 24" x 1 3/8 3 x 251 mm 248 mm47–559 26" x 1.75 x 2 3 x 259 mm 256 mm37–590 26" x 1 3/8 3 x 275 mm 272 mm47–622 28" x 1.75 3 x 289 mm 286 mm37–622 28" x 1 3/8 x 1 5/8 3 x 289 mm 286 mm28–622 28" x 1 1/8 3 x 289 mm 286 mm32–622 28" x 1 5/8 x 1 1/4 3 x 289 mm 286 mm28–630 27" x 1 1/4 fifty 3 x 294 mm 291 mm32–630 27" x 1 1/4 3 x 294 mm 291 mm
Spoke length table:
Spectro Grip 7
Part No. — " — " — " — " — " — " — " —
Shifter Type Twist Shifter
Cable 1450 mm " 1550 mm " 1650 mm " 1750 mm " 1850 mm " 1950 mm " 2050 mm " 2150 mm
Gear Indication Window
Clamping Diameter 22.3 mm
Handlebar, Straight Area Minimum length for shifter = 150mm
Weight 89g
Housing Glass filled PA
Grip PP
Grip Cover Thermoplastic elastomer, Overmolded
Clamping Collar Aluminum
Desi
gn
SHIFTERS
A S S E M B L Y H U B• Lace the wheel as normal. See spoke
length table.• Place the dust cap (1, Fig. 1) and
sprocket (2) on the driver.• Push sprocket circlip (3, Fig. 2) onto the
cone of tool sleeve (4). Place tool sleevewith large diameter on the driver.
• Push the spring end of sliding sleeve (5)of the tool over the tool sleeve. Thrustsliding sleeve in direction (6), this forcescirclip into the recess of the driver.
• Remove tool and check that the circlip isseated correctly.
• Turn dust cap (7, Fig. 3) until the threelugs (8) are between the three beads (9)on the sprocket (10).
• Position dust cap and push towardssprocket until it is felt to lock into place.
• Placing the wheel in the rear frame.• Mount the chain.
• Fit retaining washers (1, Fig. 4) on bothaxle ends. The serrations must bearagainst the dropout and the lug must engage in the dropout slot.In case of exceeding the dimension A1max. = 12.5 mm (see Page 13), e.g. by thickdropouts, both retaining washers shouldbe assembled on the left axle end (Fig. 5).
• On the sprocket side fit the protectivebracket (1, Fig. 6) directly below the fixing nut. Tightening torque on acorn orhex nuts 30 – 40 Nm (266 – 350 in.lbs.).
• Mount the brake lever using a suitableframe clamp (2, Fig. 4 resp. Fig. 10).Caution:Mount the brake lever between the twostraps of the frame clamp.The clamp must be seated on the framewithout play.Use a self-locking nut! Tightening torque: 2 – 3 Nm (18 – 27 in.lbs.).3
1
2
4 5
10
9
8 7
1 2
12
4 5
6
3
Mounting ToolPart No. 0582 104 000

15
SPECTRO S7ASSEMBLY
Technical Manual 2003
Advice:• If a different protective bracket (1, Fig. 6)
is used the thickness of the attachmentplate must be max. 3 mm.
• Do not use additional washers. • At least the beginning of the axle thread
must be visible in front of the axle nut.
A S S E M B L Y S H I F T E R SAdvice:• Contrary to the old shifter version the
shifter cable of the new version runsabove the brake lever. Maybe you need50 mm more cable length.
• When choosing cable housing lengths,be sure to allow enough housing for anextreme turn of the handlebars in both directions.
• Note also, that different stem lengthsand handlebar positions effects cablehousing length.
• Slide shifter (1, Fig. 7) onto handlebar.• Mount fixed grip (2) onto end of handlebar.• Slide shifter against fixed grip, adjust
shifter on handlebar and tighten withbolt (3) with a torque of 1.5 Nm (13 in.lbs.).
Caution:• Never use lubricants or solvents to
install fixed grips.Fixed grips provide an axial safety function. For this reason, they should bemounted in such a way as to make surethey do not slip off handlebar.
• Check that the shifter and brake leverfunction properly and are unobstructed(realign if necessary).
• Never ride without the fixed grips. Theturning grip may loosen from housingand slip off handlebar – this can resultin severe injury or death.
• When fitting the cable avoid small radius.Attach the cable 3 times to the downtube (1, Fig. 8).
• Last attachment point is on the lowerrear wheel fork (2, Fig. 8) immediately behind the chain wheel.Cable housing must be movable insideattachment.
I N S T A L L I N G C L I C K B O X• Insert shift rod (1, Fig. 9) in shift tube (2)
(oil parts lightly) and then push into axlebore as far as the stop. Turn slot (6) inshift tube to a position where it is easilyvisible.
• Push locating sleeve (3) with guiding rib(4) to the front onto the hub axle – makingsure that the internal lug (5) is guided inthe slot (6) of the shift tube until it can befelt – and heard – to engage.
• Turn locating sleeve on the axle until theguiding rib (4) is facing roughly upwards.
• Place shifter in gear position “1“.• Push on Clickbox (2, Fig. 6) to the stop on
the hub axle. The guiding rib (4, Fig. 9) ofthe locating sleeve thereby engages inthe slot on the housing. In the end positiontighten up the knurled bolt (3, Fig. 6) byhand (0,3 Nm / 2,7 in.lbs.).
A D J U S T M E N T• Be sure to reset rotational shifter from
5th. to 4th gear.• Match up the marks in the Clickbox
viewing window (4, Fig. 7) by turning the adjusting screw (5).
C O N N E C T I N G D R U M B R A K ECaution:Only use brake levers with a cable moving distance of at least 15 mm and aminimum leverage of 3.8. • Fit cable stop (1, Fig. 10) with adjusting
bolt (2) and nut (3) and insert into the sloton the brake anchor plate.
• Turn adjusting bolt down by approx. 2/3and route the brake cable from thebrake handle.
• Push lower brake cable end throughadjusting bolt (2) and insert lower cablehousing end into adjusting bolt.
• Thread brake cable end (4) intofork unit (5).
• Tighten screw (6) slightly.• Attach fork unit to brake lever (7).• Pull brake cable end taut with pliers
so that fork unit can still be attached andremoved (important for changing wheel).
• Tighten screw (6).
Caution:For NL version drum brake hub with special lever (8), only use original NL brake cable (fork unit (5) is not suitable).
A D J U S T M E N T D R U M B R A K E• Unscrew adjusting screw (2, Fig. 10)
until the brake pads drag lightly.• Actuate the hand brake lever forcefully
several times and then, if necessary,turn the adjusting screw further in justuntil the wheel starts spinning freely.
• Lock hex nut (3).
7
64
5
21
3
8
6
7
9
10
12
7
8
1
4
5
6
23
3 21
1
4
5
23

16
SPECTRO S7MAINTENANCE
Technical Manual 2003
R E M O V E W H E E L• Place shifter in gear position “1“.• Loosen the knurled screw and pull the
Clickbox off the axle.• Disengage the location sleeve and pull it off.
Remove shift rod/tube out of the axle bore.• Remove wheel.
D I S M A N T L I N G H U Bsee Fig. 1
• Remove circlip (38), sprocket (37) anddust cap (36) as normal.
• Withdraw locating sleeve (42) (latched)• Take out shift rod/tube (40/41).• Clamp hub by the axle between aluminum
jaws with sprocket side facing downwards.• Unscrew both locknuts (1).• Remove lever cone (2) ball retainer (3)
and brake shell (4).• Withdraw hub sleeve (5) upwards.• Unscrew brake cone (6) from flat thread.• Take out retaining washer (7) and thrust
washer (8).• Remove planetary gear carrier (9),
washer (10) compression spring (11) andthe three sun gears (12, 13, 14).
• Clamp other axle end.• Unscrew fixed cone (35).• Remove driver (34), compression spring
(32) with cover (31), large compressionspring (30), ball retainer (33), gear ring (29)and coupling gear (28).
• Compress spring (25) and remove thrustblock (27).
• Remove cover (26), spring (25) and cover (24).
• Dismantle retaining washer (23).• Remove thrust washer (22) and plastic
profile washer (21).• Unscrew grub screw (16) (Caution: It is
subject to spring pressure) – and dis-mantle the long compression spring (17)guide pin (18), thrust block (19) and theshort compression spring (20).
R E A S S E M B L Y H U Bsee Fig. 1
Lubrication see “MAINTENANCE/LUBRICATION“.• Insert into the axle (on the side with the
internal thread):• Short compression spring (20).• Thrust block (19) – it is the same both sides.• Guide rod (18) – it is the same both sides.• Long compression spring (17).• Compress spring and fit grub screw (16).• Clamp axle, end for clickbox facing
upwards.• Fit plastic profile washer (21) with its
large diameter upwards.• Fit thrust washer (22) and retaining
washer (23).• Locate cover (24), compression spring (25)
with 7 turns, cover (26, insides to thespring).
• Compress spring and position thrustblock (27) – it is the same both sides –centrally in the axle.
1
2
SACHS
1
2
3
4
5
6
78
16
17
18
2122
2324
2526
15
1213
14
1011
3031
32
42
40
41
39
38
373635
34
33
27
28
29
9
1920
3
X
Spectro S7 mounting aidPart No. 65 0324 103 000

17
SPECTRO S7MAINTENANCE
Technical Manual 2003
• Clamp other axle end.• Fit large sun gear (14), with deflector
bevels upwards.• Position medium sun gear (13), with
deflector bevels upwards.• Fit small sun gear (12) – with recesses in
front, thrust block engages in the slots.• Position smallest compression spring (11).• Fit 1 mm thick washer (10).• Fit planetary gear carrier (9).• Place the mounting aid(Fig. 2) on the
planetary gear carrier such that the markings (X) on the 3 small planet gearsand the mounting aid match up.
• Turn planetary gear carrier and at thesame time push it downwards over thesun gears.
• Fit thrust washer (8) and retaining washer (7) in the undercut.Only now remove the mounting aid.
Advice:If the gears are not accurately assembledthe hub may feel tight in use. This maylead to gear wheel damage during travel.
• Reclamp axle (Clickbox end facing upwards)
• Fit coupling gear (28) with carrier platedownwards
• Push ring gear (29) over the coupling gear.• Locate large spring (30).• Fit largest ball retainer (33) with balls
underneath.• Fit cover (31, inside to the spring).• Assemble the compression spring (32)
with 12 turns.• Position driver (34) – push it down – and
screw on fixed cone (35) to the stop,tightening torque 20 Nm (177 in.lbs.).
• Clamp other axle end.• Screw brake cone (6) onto the flat thread.• Assemble hub shell – with a slight
counter-clockwise movement.In case the hub shell jams, position theplastic ring (Fig. 3) correctly.
• Insert brake shell (4, Fig. 1) – retaininglugs upwards, thereby the friction springon the brake cone must engage in theslot on the brake shell.
• Locate ball retainer (3) (balls underneath),position lever cone (2), thereby turn itclockwise until the retaining lugs engage.
• Screw on locknuts (1), adjust bearing so that there is no play and lock nuts together with 15 – 20 Nm (133 – 177in.lbs.).
Advice:Dismantling and reassembly of hub typesMH 7205 / MH 7225 should be carried outin the same way. Differences: Instead ofbrake shell/cone a click-and-pawl carrieris installed on the planetary gear carrierhere. Without flat thread – fixed with a re-taining washer.
C A B L E C H A N G EDismantling shifter cable:• Place shifter in gear position “1“.• Do not remove the Clickbox from the axle
end.• Unscrew the adjusting screw (1, Fig. 4)
completely. Unscrew the cover screw (2),brush aside the adjusting screw (1) andremove the cover (3).
• Withdraw shifter cable and clampingbolt (1, Fig. 5) upwards, loosen clampand pull clamping piece from the cable.
• Slightly lift the grip cover (Fig. 6), pushthe cable out and discard.
Assembly shifter cable:• Route new cable through shifter housing
and pull cable to seat cable head completely into cable recess. Feed the cable through the new cablehousing and adjusting screw.
• Position clamping bolt (1, Fig. 7) at a distance of 90 mm, tighten up with 1.5 Nm (13 in.lbs.) and cut off cable ends to 2 – 3 mm. For positioning the clampingbolt use adjust gauge (Fig. 8). (Part. No.65 0324 107 000)
• Locate clamping bolt (1, Fig. 5) and placeshifter cable around the carrier cylinder(counter-clockwise winding).
• Position the cover (3, Fig. 4) and tightenup with the cover screw (2). Torque 0.35 – 0.45 Nm (3.1 – 4.0 in.lbs.).Screw in the adjusting screw (1) completely.
Advice:• If you want to remove the Clickbox from
the axle end for changing the cable, doas follows:– Place shifter in gear position “1“.– Loosen the knurled screw and pull the
Clickbox off the axle.– Now it’s essential to push the end (1,
Fig. 8) of the adjust gauge completeyinto the Clickbox and tighten up theknurled bolt (so that you maintain theinitial tension of the spring inside theClickbox).
– Change cable as per description above.• If you remove the Clickbox from the
axle and change the cable withoutusing the end of the adjust gauge, thenyou will lose the initial tension of thespring inside the Clickbox. In this caseyou must assemble the cable by placingit around the carrier cylinder with anadditional winding (Fig. 5).
6
4
5
7
8
2
1
2 +1 mm 90±0,5 mm
2 31
1
1

18
SPECTRO S7MAINTENANCE
Technical Manual 2003
E X C H A N G E A B I L I T YS H I F T E R / C L I C K B O XProduced till 1998 (Fig. 9):Dont’t combine with newer versions!
Produced till end 2002 and as of 2003 (Fig. 10):Combine shifter and Clickbox only accor-ding to Fig. 10.
Distance of the clamping bolt:Each Clickbox version needs its specificdistance of the clamping bolt:• Till 1998: Distance 68,5 mm• Till end 2002: Distance 89 mm• As of 2003: Distance 90 mm
R E P L A C E M E N T B Y AN E W C L I C K B O X ( A S O F2 0 0 3 )• Place shifter in gear position “1“.• Loosen the knurled screw and pull the
Clickbox off the axle.• Unscrew the adjusting screw (1, Fig. 12)
completely. Unscrew the cover screw (2),brush aside the adjusting screw (1) andremove the cover (3).
• Push the end (1, Fig. 11) of the adjustgauge (Part. No. 65 0324 107 000) com-pletely into the Clickbox and tighten upthe knurled bolt (so you maintain the initial tension of the spring inside theClickbox).
• Withdraw shifter cable and clampingbolt (1, Fig. 5) upwards.
• Locate clamping bolt (1, Fig. 5) in thenew Clickboxh and place shifter cablearound the carrier cylinder (counter-clockwise winding).Advice:If you remove the Clickbox from theaxle and change the cable withoutusing the end of the adjust gauge, thenyou will lose the initial tension of thespring inside the Clickbox. In this caseyou must assemble the cable by placingit around the carrier cylinder with anadditional winding (Fig. 5).
• Position the cover (3, Fig. 12) and tightenup with the cover screw (2). Torque 0.35 – 0.45 Nm (3.1 – 4.0 in.lbs.).Screw in the adjusting screw (1) completely.
• Loosen the knurled screw on the Click-box and pull the adjust gauge off.
• Push on Clickbox on the hub axle. Tighten up the knurled bolt by hand.
A D J U S T M E N T• Be sure to reset rotational shifter from
5th. to 4th gear.• Match up the marks in the Clickbox
viewing window (Fig. 12) by turning the adjusting screw (1).
9
Don’t combine with newer versions!
TIL
L 1
99
8
10
11
12
1
2 31
TIL
L E
ND
20
02
AS
OF
20
03
combine only that w
ay!

19
SPECTRO S7MAINTENANCE
Technical Manual 2003
D R U M B R A K EInstall brake anchor plate (or exchange it):• Place thrust washer (8, Fig. 13) over the
axle on the adjusting cone and fit complete brake anchor plate. Positionwasher (9) distance sleeve (10) and screw on locknut (11).
• Push brake lever (7) to the stop and holdit there to center the brake jaws in thebrake drum – tighten up locknut with atorque of 15 – 20 Nm (133 – 177 in.lbs.).
A D J U S T M E N T D R U M B R A K E• Unscrew adjusting screw (2, Fig. 13)
until the brake pads drag lightly.• Actuate the hand brake lever forcefully
several times and then, if necessary,turn the adjusting screw further in justuntil the wheel starts spinning freely.
• Lock hex nut (3).
Caution:Check that all the brake system components are functioning properly!
M A I N T E N A N C E /L U B R I C A T I O NCaution:The Spectro hubs are provided with permanent lubrication and under normalconditions is maintenance-free. If the coaster brake is loaded excessively itseffect can be too strong, the hub may lock.In such a case the brake shell should belubricated with a special grease (Part No.0369 135 201). Renew brake shell, whenrhombic pattern is worn out.
Cleaning of parts:• All parts – except for the planetary gear
carrier – can be degreased in a cleaningbath.
• The planetary gear carrier only needs tobe cleaned on the outside with a brushso as not to degrease the planetary gearbearing.
Caution:Do not use high-pressure water whencleaning the gear hub (e.g. strong waterjets, high-pressure cleaners etc.) – if water penetrates it could lead to functional problems.
Lubrication of parts:• To lubricate the bearing points on
the planetary gear sets, position the planetary gear carrier on its crown andapply 2 – 3 drops of oil to the bearingbolts – at the same time turning the planetary gears so that the bearingpoints are completely wet. Oil axlethrough the axle bore and axle slot, apply a thin coating of grease to the outside.
• Oil the inside of the sun gears, greasethe outside teeth (fill the gaps in theteeth).
• Oil outside teeth and carrier plate onthe coupling gear and lightly grease theborehole from right and left.
• Do not apply grease to ring gear but justoil the pawl pockets.
• Grease the brake cone in the boreholeand the friction spring.
• Spread grease on the inside and outsideof the brake shell.
• Fill lever cone with grease reserves forbrakes
• Regrease ball retainer, line ball bearingrunning tracks with grease.
ProblemShifting difficulties
Pedals arecarried forward when free-wheeling
Hub lockswhenbraking (coaster brake)
CauseDamagedcontrol cableIncorrectgear settingTo much ad-ditional axle attachmentsbetween huband axle nutBearings set too tightLoose lock nuts
Chain is over-tensionedBrake shellhas run dry
RemedyReplace control cableAdjust shift.systemBeginning ofaxle threadmust be visi-ble in front ofthe axle nutRe-adjustbearingsTighten lock nuts (15 – 20 Nm)Reducechain tensionWash outhub sleeve,repolish andrelubricatebrake cylin-der, renewbrake shell
T R O U B L E S H O O T I N G
7
1
4
5
6
2
11 10
9
3
13
8

Technical Manual 200320

Technical Manual 2003 21
SPECTRO P5TECHNICAL DATA /ASSEMBLY REQUIREMENTS
• Comfort Action Shifting• Improved Ergonomics• Optimal Gear Ratio• Spectro Design• Matte Chrome Finish• Reliable Brake Performance• Most Efficient Hub In Its Class
Version Spectro P5 Cargo:see page 29.
Caution: • Spectro P5 hubs are not suitable for
tandems, trademen’s delivery bicyclesand similar.
• Use always 2 retaining washers. Alternatively assemble both retainingwashers on the left axle end (Fig. 5).
Cycle frame:• Dropouts must be parallel.• Slot width at rear dropout max. 10,5 mm.• The strength must be such that with a maxi-
mum braking torque of 250 Nm (2200 in.lbs.)on the rear wheel no residual deformationcan occur on the rear structure.
HUBS
Spectro P5 with coaster brake Spectro P5 with drum brake Spectro P5 without brake
Type MH 5215 MH 5225 MH 5205
Brake Coaster Drum „D“ " „NL“ " „NL“ None
Over Locknut Dim., OLD 122 mm 126 mm 122 mm
Length, L 175 mm 179 mm 175 mm
Ends Diameter, T FG 10.5 " FG 10.5 toothed cone FG 10.5 FG 10.5
Dropout Width Dim. A1 max. = 12.5 mm / A2 max. = 11.5 mm A1 max. = 12.5 mm / A2 max. = 12.5 mm A1 max. = 12.5 mm / A2 max. = 10.5 mm
Holes 36 36 36
Hole Diameter, DS 3.0 mm 2.9 mm 3.0 mm
Hole Ref. ø, HR 75 mm 89 mm 75 mm
Flange Dist. to 1/2 OLD F1 = 28.5 mm / F2 = 29.5 mm F1 = 30.5 mm / F2 = 29.5 mm F1 = 29 mm / F2 = 29 mm
Totally 251 %
Speed 1 63 %
Speed 2 78 %
Speed 3 100 %
Speed 4 128 %
Speed 5 158 %
Usable Dimensions 1/2" x 1/8" or 1/2" x 3/32" 1/2" x 1/8" or 1/2" x 3/32" 1/2" x 1/8" or 1/2" x 3/32"
Line, C/D/E 49 / 45.5 / 43 mm 51.5 / 48.5 / 45.5 mm 49 / 45.5 / 43 mm
Ratio 24", 26", 28"= 1.8 – 1.9 / 20"= 1.8 – 2.0
Shifter Compatib. Spectro Grip 5
Clickbox Compatib. Clickbox P5
Tandem Compatib. — — —
Weight 1495 g 1536 g 1330 g
Hub Shell Material Steel Aluminum Steel
Finish Matt Chrome Plated Clear Coat " Clear Coat " Black Painted Matt Chrome Plated
##
##
##
##
##
##
##
##
##
Axle
Spok
eGe
ar H
ub R
atio
Chai
nFi
nish
T
L
OLD
1/2 OLD
A2 max.
F2 F1
EDC
7min. 13.5
A1 max.R 100Ø 7.3
TK
DS
Version with coaster brake

Technical Manual 200322
SPECTRO P5TECHNICAL DATA /ASSEMBLY REQUIREMENTS
SPECTRO P5ASSEMBLY
Spoke lengths are approximate values. They must be checked through lacing attemptsand adjusted accordingly.
Tire Size Cross Length MH 5215/5205 Length MH 522547–406 20" x 1.75 x 2 3 x 181 mm 179 mm37–490 22" x 1 3/8 3 x 225 mm 222 mm47–507 24" x 1.75 x 2 3 x 232 mm 229 mm37–540 24" x 1 3/8 3 x 251 mm 248 mm47–559 26" x 1.75 x 2 3 x 259 mm 256 mm37–590 26" x 1 3/8 3 x 275 mm 272 mm47–622 28" x 1.75 3 x 289 mm 286 mm37–622 28" x 1 3/8 x 1 5/8 3 x 289 mm 286 mm28–622 28" x 1 1/8 3 x 289 mm 286 mm32–622 28" x 1 5/8 x 1 1/4 3 x 289 mm 286 mm28–630 27" x 1 1/4 fifty 3 x 294 mm 291 mm32–630 27" x 1 1/4 3 x 294 mm 291 mm
Spoke length table:
SHIFTERS
A S S E M B L Y H U B• Lace the wheel as normal. See spoke
length table.• Place the dust cap (1, Fig. 1) and
sprocket (2) on the driver.• Push sprocket circlip (3, Fig. 2) onto the
cone of tool sleeve (4). Place tool sleevewith large diameter on the driver.
• Push the spring end of sliding sleeve (5)of the tool over the tool sleeve. Thrustsliding sleeve in direction (6), this forcescirclip into the recess of the driver.
• Remove tool and check that the circlip isseated correctly.
• Turn dust cap (7, Fig. 3) until the threelugs (8) are between the three beads (9)on the sprocket (10).
• Position dust cap and push towardssprocket until it is felt to lock into place.
• Placing the wheel in the rear frame.• Mount the chain.
• Fit retaining washers (1, Fig. 4) on bothaxle ends. The serrations must bearagainst the dropout and the lug must engage in the dropout slot.In case of exceeding the dimension A1max. = 12.5 mm (see Page 21), e.g. by thickdropouts, both retaining washers shouldbe assembled on the left axle end (Fig. 5).
• On the sprocket side fit the protectivebracket (1, Fig. 6) directly below the fixing nut. Tightening torque on acorn orhex nuts 30 – 40 Nm (266 – 350 in.lbs.).
• Mount the brake lever using a suitableframe clamp (2, Fig. 4 resp. Fig. 10).Caution:Mount the brake lever between the twostraps of the frame clamp.The clamp must be seated on the framewithout play.Use a self-locking nut! Tightening torque: 2 – 3 Nm (18 – 27 in.lbs.).
Spectro Grip 5
Part No. — " — " — " — " — " — " — " —
Shifter Type Twist Shifter
Cable 1450 mm " 1550 mm " 1650 mm " 1750 mm " 1850 mm " 1950 mm " 2150 mm " 2350 mm
Gear Indication Window
Clamping Diameter 22.3 mm
Handlebar, Straight Area Minimum length for shifter = 150mm
Weight 89g
Housing Glass filled PA
Grip PP
Grip Cover Thermoplastic elastomer, Overmolded
Clamping Collar Aluminum
Desi
gn
3
1
2
10
9
8 7
1 2
4 5
6
3
Mounting ToolPart No. 0582 104 000
4 5
12

Technical Manual 2003 23
SPECTRO P5ASSEMBLY
Advice:• If a different protective bracket (1, Fig. 6)
is used the thickness of the attachmentplate must be max. 3 mm.
• Do not use additional washers. • At least the beginning of the axle thread
must be visible in front of the axle nut.
A S S E M B L Y S H I F T E R SAdvice:• Contrary to the old shifter version the
shifter cable of the new version runsabove the brake lever. Maybe you need50 mm more cable length.
• When choosing cable housing lengths,be sure to allow enough housing for anextreme turn of the handlebars in both directions.
• Note also, that different stem lengthsand handlebar positions effects cablehousing length.
• Slide shifter (1, Fig. 7) onto handlebar.• Mount fixed grip (2) onto end of handlebar.• Slide shifter against fixed grip, adjust
shifter on handlebar and tighten withbolt (3) with a torque of 1.5 Nm (13 in.lbs.).
Caution:• Never use lubricants or solvents to
install fixed grips.Fixed grips provide an axial safety function. For this reason, they should bemounted in such a way as to make surethey do not slip off handlebar.
• Check that the shifter and brake leverfunction properly and are unobstructed(realign if necessary).
• Never ride without the fixed grips. Theturning grip may loosen from housingand slip off handlebar – this can resultin severe injury or death.
• When fitting the cable avoid small radius.Attach the cable 3 times to the downtube (1, Fig. 8).
• Last attachment point is on the lowerrear wheel fork (2, Fig. 8) immediately behind the chain wheel.Cable housing must be movable insideattachment.
I N S T A L L I N G C L I C K B O X• Insert shift rod (1, Fig. 9) in shift tube (2)
(oil parts lightly) and then push into axlebore as far as the stop. If the shifting rodis sticking up out of the axle end: applyslight pressure on the shift rod with itsthreaded section and screw inwards in a clockwise direction until it can againbe moved axially (valid for older hub versions). Turn slot (6) in shift tube to aposition where it is easily visible.
• Push locating sleeve (3) with guiding rib(4) to the front onto the hub axle – makingsure that the internal lug (5) is guided inthe slot (6) of the shift tube until it can befelt – and heard – to engage.
• Turn locating sleeve on the axle until theguiding rib (4) is facing roughly upwards.
• Place shifter in gear position “2“.• Push on Clickbox (2, Fig. 6) to the stop on
the hub axle. The guiding rib (4, Fig. 9) ofthe locating sleeve thereby engages inthe slot on the housing. In the end positiontighten up the knurled bolt (3, Fig. 6) byhand (0,3 Nm / 2,7 in.lbs.).
A D J U S T M E N T• Be sure to reset rotational shifter from
4th. to 3th gear.• Match up the marks in the Clickbox
viewing window (4, Fig. 7) by turning the adjusting screw (5).
C O N N E C T I N G D R U M B R A K ECaution:Only use brake levers with a cable moving distance of at least 15 mm and aminimum leverage of 3.8. • Fit cable stop (1, Fig. 10) with adjusting
bolt (2) and nut (3) and insert into the sloton the brake anchor plate.
• Turn adjusting bolt down by approx. 2/3and route the brake cable from thebrake handle.
• Push lower brake cable end throughadjusting bolt (2) and insert lower cablehousing end into adjusting bolt.
• Thread brake cable end (4) intofork unit (5).
• Tighten screw (6) slightly.• Attach fork unit to brake lever (7).• Pull brake cable end taut with pliers
so that fork unit can still be attached andremoved (important for changing wheel).
• Tighten screw (6).
Caution:For NL version drum brake hub with special lever (8), only use original NL brake cable (fork unit (5) is not suitable).
A D J U S T M E N T D R U M B R A K E• Unscrew adjusting screw (2, Fig. 10)
until the brake pads drag lightly.• Actuate the hand brake lever forcefully
several times and then, if necessary,turn the adjusting screw further in justuntil the wheel starts spinning freely.
• Lock hex nut (3).
7
64
5
21
3
8
6
7
9
10
12
7
8
1
4
5
6
23
3 21
1
4
5
23

24
SPECTRO P5MAINTENANCE
Technical Manual 2003
R E M O V E W H E E L• Place shifter in gear position “2“.• Loosen the knurled screw and pull the
Clickbox off the axle.• Disengage the location sleeve and pull it
off. Remove shift rod/tube, if necessarypull shift rod outwards and unscrew in acounter-clockwise direction.
• Remove wheel.
D I S M A N T L I N G H U Bsee Fig. 1
• Remove circlip (35), sprocket (34) anddust cap (33).
• Clamp hub with sprocket side facingdownwards with the two axle flats.
• Unscrew the two locknuts (1).• Remove lever cone (2), ball retainer (3)
and brake shell (4).• Withdraw hub sleeve (5) upwards.• Unscrew brake cone (6) from flat thread.• Remove retaining washer (7), thrust
washer (8).• Remove planetary gear carrier (9) and
thrust washer (10).• Clamp other axle end.• Unscrew fixed cone (32).• Remove driver (31), compression spring
(29), large compression spring (27) and ballretainer (30). – Withdraw gear ring (26)and coupling gear (25) and then removecover (28) from the coupling gear.
• Take out thrust block (24), (to do thiscompress the spring). Remove spring(22) and the two covers (23/21).
• Dismantle retaining washer (20), washer(19), conical compression spring (18),and the large sun gear (12). Clamp otheraxle end (thrust block visible).
• Unscrew grub screw (14) – Dismantlespring (15), guide bolt (16) and thrustblock (17).
• Remove small sun sun gear (11).
R E A S S E M B L Y H U Bsee Fig. 1
Lubrication see “MAINTENANCE/LUBRICATION“.• Clamp axle with internal thread up-
wards.• Position small sun gear (11) with crown
gears to the front.• Position thrust block (17) in the slotted
hole (is laterally guided when the sungear is screwed in).
• Locate bolt (16), then spring (15) in theaxle and screw in grub screw (14) untilit is flush with the axle.
• Reclamp axle. Fit large sun gear (12) (itis the same both sides). Position conicalcompression spring (18), with the largediameter first. Press spring together andfit washer (19) and retaining washer (20).
1
2
1
2
3
4
5
6
78
9
1011
12
13
1415
1617
1819
2021
2223
24 2526
27
28
29
3031
32 33
34
3536
37
38
39
40
41
X
Spectro P5 mounting aidPart No. 5024 300 000
3

25
SPECTRO P5MAINTENANCE
Technical Manual 2003
• Assemble cover (21), compressionspring with 7 turns (22) and the secondcover (23, insides to the spring).
• Compress spring and position thrustblock (24) (it is the same both sides) inthe center of the slotted hole.
• Position coupling gear (25) with carrierplate facing downwards.
• Fit cover (28, inside to the spring) forcompression spring.
• Position gear ring (26) over the teeth ofthe coupling gear.
• Place ball retainer (30), with balls belowon the gear ring.
• Position large compression spring (27)on gear ring.
• Mount compression spring with 13 turns(29) on the axle. (Is supported in thecoupling wheel by the cover).
• Locate driver (31), press it down and screw on fixed cone (32) as far as thestop. Tightening torque 20 Nm. (Thenreclamp hub.)
• Push on thrust washer (10) and fitplanetary gear carrier (9). In doing this:Position mounting aid (Fig. 2) on theplanetary gear carrier so that the (X)markings on the threeplanetary gearsmatch with the mounting aid.
• Insert planetary gear carrier, placethrust washer (8) on it and mount retaining washer (7) in recess.Only now remove the mounting aid.
Advice:If the gears are not accurately installedthe hub may be tight to move. This could lead to damage to the gear-wheels in operation.
• Screw brake cone (6) onto flat threads.• Mount hub sleeve (5), with a slight
counter-clockwise turn.In case the hub shell jams, position theplastic ring (Fig. 3) correctly.
• Locate brake shell (4, Fig. 1) – with retai-ning lugs uppermost –, then the frictionspring on the brake cone must engagewith the slot on the brake shell.
• Insert ball retainer (3) – with balls below.• Position lever cone (2) – in doing this
turn it clockwise until the retaininglugs engage.
• Screw on counternuts (1), adjust bearingsto be free of play and tighten lock nuts.Tightening torque 15 – 20 Nm (133 – 177in.lbs.).
Advice:The dismantly and reassembly of the hub types MH 5205 / MH 5225 should be carried out in the same way. Differences:Instead of brake shell/cone a click-and-pawl carrier is installed on the planetarygear carrier here. Without flat thread – fixed with a retaining washer.
C A B L E C H A N G EDismantling shifter cable:• Place shifter in gear position “2“.• Do not remove the Clickbox from the axle
end.• Unscrew the adjusting screw (1, Fig. 4)
completely. Unscrew the cover screw (2),brush aside the adjusting screw (1) andremove the cover (3).
• Withdraw shifter cable and clampingbolt (1, Fig. 5) upwards, loosen clampand pull clamping piece from the cable.
• Slightly lift the grip cover (Fig. 6), pushthe cable out and discard.
Assembly shifter cable:• Route new cable through shifter housing
and pull cable to seat cable head completely into cable recess. Feed the cable through the new cablehousing and adjusting screw.
• Position clamping bolt (1, Fig. 7) at a distance of 80 mm, tighten up with 1.5 Nm (13 in.lbs.) and cut off cable ends to 2 – 3 mm. For positioning the clampingbolt use adjust gauge (Fig. 8). (Part. No.65 0324 107 000)
• Locate clamping bolt (1, Fig. 5) and placeshifter cable around the carrier cylinder(counter-clockwise winding).
• Position the cover (3, Fig. 4) and tightenup with the cover screw (2). Torque 0.35 – 0.45 Nm (3.1 – 4.0 in.lbs.).Screw in the adjusting screw (1) completely.
Advice:• If you want to remove the Clickbox from
the axle end for changing the cable, doas follows:– Place shifter in gear position “2“.– Loosen the knurled screw and pull the
Clickbox off the axle.– Now it’s essential to push the end (1,
Fig. 8) of the adjust gauge completeyinto the Clickbox and tighten up theknurled bolt (so that you maintain theinitial tension of the spring inside theClickbox).
– Change cable as per description above.• If you remove the Clickbox from the
axle and change the cable withoutusing the end of the adjust gauge, thenyou will lose the initial tension of thespring inside the Clickbox. In this caseyou must assemble the cable by placingit around the carrier cylinder with anadditional winding (Fig. 5).
6
4
5
7
8
2
1
1
2 +1 mm 80 ±0,5 mm
2 31
1

26
SPECTRO P5MAINTENANCE
Technical Manual 2003
E X C H A N G E A B I L I T YS H I F T E R / C L I C K B O XProduced till 1998 (Fig. 9):Dont’t combine with newer versions!
Produced till end 2002 and as of 2003 (Fig. 10):Combine shifter and Clickbox only accor-ding to Fig. 10.
Distance of the clamping bolt:Each Clickbox version needs its specificdistance of the clamping bolt:• Till 1998: Distance 68,5 mm• Till end 2002: Distance 83 mm• As of 2003: Distance 80 mm
R E P L A C E M E N T B Y AN E W C L I C K B O X ( A S O F2 0 0 3 )• Place shifter in gear position “2“.• Loosen the knurled screw and pull the
Clickbox off the axle.• Unscrew the adjusting screw (1, Fig. 12)
completely. Unscrew the cover screw (2),brush aside the adjusting screw (1) andremove the cover (3).
• Push the end (1, Fig. 11) of the adjustgauge (Part. No. 65 0324 107 000) com-pletely into the Clickbox and tighten upthe knurled bolt (so you maintain the initial tension of the spring inside theClickbox).
• Withdraw shifter cable and clampingbolt (1, Fig. 5) upwards.
• Locate clamping bolt (1, Fig. 5) in thenew Clickboxh and place shifter cablearound the carrier cylinder (counter-clockwise winding).Advice:If you remove the Clickbox from theaxle and change the cable withoutusing the end of the adjust gauge, thenyou will lose the initial tension of thespring inside the Clickbox. In this caseyou must assemble the cable by placingit around the carrier cylinder with anadditional winding (Fig. 5).
• Position the cover (3, Fig. 12) and tightenup with the cover screw (2). Torque 0.35 – 0.45 Nm (3.1 – 4.0 in.lbs.).Screw in the adjusting screw (1) completely.
• Loosen the knurled screw on the Click-box and pull the adjust gauge off.
• Push on Clickbox on the hub axle. Tighten up the knurled bolt by hand.
9
Don’t combine with newer versions!
TIL
L 1
99
8
10
11
12
1
2 31
TIL
L E
ND
20
02
AS
OF
20
03
combine only that w
ay!
A D J U S T M E N T• Be sure to reset rotational shifter from
4th. to 3th gear.• Match up the marks in the Clickbox
viewing window (Fig. 12) by turning the adjusting screw (1).

27
SPECTRO P5MAINTENANCE
Technical Manual 2003
Lubrication of parts:• To lubricate the bearing points on
the planetary gear sets, position the planetary gear carrier on its crown andapply 2 – 3 drops of oil to the bearingbolts – at the same time turning the planetary gears so that the bearingpoints are completely wet. Oil axlethrough the axle bore and axle slot, apply a thin coating of grease to the outside.
• Oil the inside of the sun gears, greasethe outside teeth (fill the gaps in theteeth).
• Oil outside teeth and carrier plate onthe coupling gear and lightly grease theborehole from right and left.
• Do not apply grease to ring gear but justoil the pawl pockets.
• Grease the brake cone in the boreholeand the friction spring.
• Spread grease on the inside and outsideof the brake shell.
• Fill lever cone with grease reserves forbrakes.
• Regrease ball retainer, line ball bearingrunning tracks with grease.
Advice:The Spectro P5 hubs complete with shifting component have been modified insuch a way that the shifting forces areconsiderably lower than was previouslythe case.The new shifting component (shifter /Clickbox) is shown in Fig. 7, Page 23.Indentification of the new hubs: red grubscrew (14, Fig. 1, Page 24) in the left axleend and new spring (15) in the axle.In order to achieve the maximum reduction in shifting forces with a combination of new shifting component /old hub, the new spring (15) and the redgrub screw (14) should be installed in thehub axle (see describtion “DISMANTLING/REASSEMBLY HUB“).
7
1
4
5
6
2
11 10
9
3
13
8
ProblemShifting difficulties
Pedals arecarried forward when free-wheeling
Hub lockswhenbraking (coaster brake)
CauseDamagedcontrol cableIncorrectgear settingTo much ad-ditional axle attachmentsbetween huband axle nutBearings set too tightLoose lock nuts
Chain is over-tensionedBrake shellhas run dry
RemedyReplace control cableAdjust shift.systemBeginning ofaxle threadmust be visi-ble in front ofthe axle nutRe-adjustbearingsTighten lock nuts (15 – 20 Nm)Reducechain tensionWash outhub sleeve,repolish andrelubricatebrake cylin-der, renewbrake shell
T R O U B L E S H O O T I N G
D R U M B R A K EInstall brake anchor plate (or exchange it):• Place thrust washer (8, Fig. 13) over the
axle on the adjusting cone and fit complete brake anchor plate. Positionwasher (9) distance sleeve (10) and screw on locknut (11).
• Push brake lever (7) to the stop and holdit there to center the brake jaws in thebrake drum – tighten up locknut with atorque of 15 – 20 Nm (133 – 177 in.lbs.).
A D J U S T M E N T D R U M B R A K E• Unscrew adjusting screw (2, Fig. 13)
until the brake pads drag lightly.• Actuate the hand brake lever forcefully
several times and then, if necessary,turn the adjusting screw further in justuntil the wheel starts spinning freely.
• Lock hex nut (3).
Caution:Check that all the brake system components are functioning properly!
M A I N T E N A N C E /L U B R I C A T I O NCaution:The Spectro hubs are provided with permanent lubrication and under normalconditions is maintenance-free. If the coaster brake is loaded excessively itseffect can be too strong, the hub may lock.In such a case the brake shell should belubricated with a special grease (Part No.0369 135 201). Renew brake shell, whenrhombic pattern is worn out.
Cleaning of parts:• All parts – except for the planetary gear
carrier – can be degreased in a cleaningbath.
• The planetary gear carrier only needs tobe cleaned on the outside with a brushso as not to degrease the planetary gearbearing.
Caution:Do not use high-pressure water whencleaning the gear hub (e.g. strong waterjets, high-pressure cleaners etc.) – if water penetrates it could lead to functional problems.

Technical Manual 200328

29
SPECTRO P5 CARGOTECHNICAL DATA /ASSEMBLY REQUIREMENTS
Technical Manual 2003
Caution: The Spectro P5 Cargo is suitable for tandems, trademen’s delivery bicyclesand similar. An additional external rearbrake is necessary due to the high load.
Tolerable stress:Axle load: max. 120 kilogramsTorque/driver body: max. 85 Nm (750 in.lbs.),no continuous stress.
Identification Spectro P5 Cargo:Yellow grub screw inside the axle end.
Version Spectro P5 for normal bikes:see page 21.
Caution: Use always 2 retaining washers. Alternatively assemble both retainingwashers on the left axle end (Fig. 5).
HUBS
Spectro P5 Cargo with coaster brake Spectro P5 with drum brake
Typ MH 5215 Cargo MH 5225 Cargo
Brake Coaster Drum „D“
Over Locknut Dim., OLD 122 mm 126 mm
Length, L 175 mm 179 mm
Ends Diameter, T FG 10.5 toothed cone FG 10.5
Dropout Width Dim. A1 max. = 12.5 mm / A2 max. = 11.5 mm A1 max. = 12.5 mm / A2 max. = 12.5 mm
Holes 36 36
Hole Diameter, DS 3.0 mm 2.9 mm
Hole Ref. ø, HR 75 mm 89 mm
Flange Dist. to 1/2 OLD F1 = 28.5 mm / F2 = 29.5 mm F1 = 30.5 mm / F2 = 29.5 mm
Totally 224 %
Speed 1 67 %
Speed 2 78 %
Speed 3 100 %
Speed 4 128 %
Speed 5 150 %
Usable Dimensions 1/2" x 1/8" or 1/2" x 3/32" 1/2" x 1/8" or 1/2" x 3/32"
Line, C/D/E 49 / 45.5 / 43 mm 51.5 / 48.5 / 45.5 mm
Ratio 24", 26", 28"= 1.8 – 1.9 / 20"= 1.8 – 2.0
Shifter Compatib. Spectro Grip 5
Clickbox Compatib. Clickbox P5
Tandem Compatib. Yes Yes
Weight 1495 g 1536 g
Hub Shell Material Steel Aluminum
Finish Matt Chrome Plated Clear Coat
#
#
#
#
#
#
#
#
#
Axle
Spok
eGe
ar H
ub R
atio
Chai
nFi
nish
CARGOCARGO
Cycle frame:• Dropouts must be parallel.• Slot width at rear dropout max. 10,5 mm.• The strength must be such that with a maximum braking torque of 250 Nm (2200 in.lbs.) on the rear wheel no
residual deformation can occur on the rear structure.
T
L
OLD
1/2 OLD
A2 max.
F2 F1
EDC
7min. 13.5
A1 max.R 100Ø 7.3
HR
DS
Version with Coaster Brake

30
SPECTRO P5 CARGOTECHNICAL DATA /ASSEMBLY REQUIREMENTS
Technical Manual 2003
SPECTRO P5 CARGOASSEMBLY
Spoke lengths are approximate values. They must be checked through lacing attemptsand adjusted accordingly.
Tire Size Cross Length MH 5215 Length MH 522547–406 20" x 1.75 x 2 3 x 181 mm 179 mm37–490 22" x 1 3/8 3 x 225 mm 222 mm47–507 24" x 1.75 x 2 3 x 232 mm 229 mm37–540 24" x 1 3/8 3 x 251 mm 248 mm47–559 26" x 1.75 x 2 3 x 259 mm 256 mm37–590 26" x 1 3/8 3 x 275 mm 272 mm47–622 28" x 1.75 3 x 289 mm 286 mm37–622 28" x 1 3/8 x 1 5/8 3 x 289 mm 286 mm28–622 28" x 1 1/8 3 x 289 mm 286 mm32–622 28" x 1 5/8 x 1 1/4 3 x 289 mm 286 mm28–630 27" x 1 1/4 fifty 3 x 294 mm 291 mm32–630 27" x 1 1/4 3 x 294 mm 291 mm
Spoke length table:
SHIFTERS
A S S E M B L Y H U B• Lace the wheel as normal. See spoke
length table.• Place the dust cap (1, Fig. 1) and
sprocket (2) on the driver.• Push sprocket circlip (3, Fig. 2) onto the
cone of tool sleeve (4). Place tool sleevewith large diameter on the driver.
• Push the spring end of sliding sleeve (5)of the tool over the tool sleeve. Thrustsliding sleeve in direction (6), this forcescirclip into the recess of the driver.
• Remove tool and check that the circlip isseated correctly.
• Turn dust cap (7, Fig. 3) until the threelugs (8) are between the three beads (9)on the sprocket (10).
• Position dust cap and push towardssprocket until it is felt to lock into place.
• Placing the wheel in the rear frame.• Mount the chain.
• Fit retaining washers (1, Fig. 4) on bothaxle ends. The serrations must bearagainst the dropout and the lug must engage in the dropout slot.In case of exceeding the dimension A1max. = 12.5 mm (see Page 29), e.g. by thickdropouts, both retaining washers shouldbe assembled on the left axle end (Fig. 5).
• On the sprocket side fit the protectivebracket (1, Fig. 6) directly below the fixing nut. Tightening torque on acorn orhex nuts 30 – 40 Nm (266 – 350 in.lbs.).
• Mount the brake lever using a suitableframe clamp (2, Fig. 4 resp. Fig. 10).Caution:Mount the brake lever between the twostraps of the frame clamp.The clamp must be seated on the framewithout play.Use a self-locking nut! Tightening torque: 2 – 3 Nm (18 – 27 in.lbs.).
Spectro Grip 5
Part No. — " — " — " — " — " — " — " —
Shifter Type Twist Shifter
Cable 1450 mm " 1550 mm " 1650 mm " 1750 mm " 1850 mm " 1950 mm " 2150 mm " 2350 mm
Gear Indication Window
Clamping Diameter 22.3 mm
Handlebar, Straight Area Minimum length for shifter = 150mm
Weight 89g
Housing Glass filled PA
Grip PP
Grip Cover Thermoplastic elastomer, Overmolded
Clamping Collar Aluminum
Desi
gn
3
1
2
1 2
4 5
6
3
Mounting ToolPart No. 0582 104 000
10
9
8 7
4 5
12
31
SPECTRO P5 CARGOASSEMBLY
Technical Manual 2003
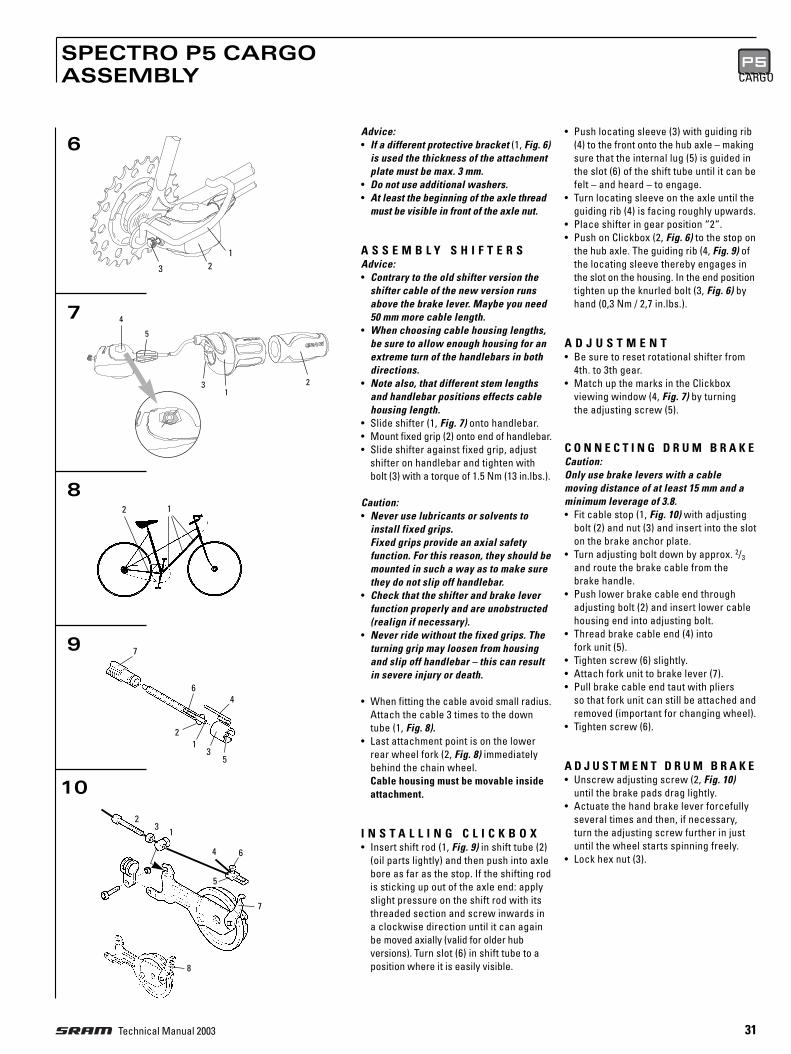
Advice:• If a different protective bracket (1, Fig. 6)
is used the thickness of the attachmentplate must be max. 3 mm.
• Do not use additional washers. • At least the beginning of the axle thread
must be visible in front of the axle nut.
A S S E M B L Y S H I F T E R SAdvice:• Contrary to the old shifter version the
shifter cable of the new version runsabove the brake lever. Maybe you need50 mm more cable length.
• When choosing cable housing lengths,be sure to allow enough housing for anextreme turn of the handlebars in both directions.
• Note also, that different stem lengthsand handlebar positions effects cablehousing length.
• Slide shifter (1, Fig. 7) onto handlebar.• Mount fixed grip (2) onto end of handlebar.• Slide shifter against fixed grip, adjust
shifter on handlebar and tighten withbolt (3) with a torque of 1.5 Nm (13 in.lbs.).
Caution:• Never use lubricants or solvents to
install fixed grips.Fixed grips provide an axial safety function. For this reason, they should bemounted in such a way as to make surethey do not slip off handlebar.
• Check that the shifter and brake leverfunction properly and are unobstructed(realign if necessary).
• Never ride without the fixed grips. Theturning grip may loosen from housingand slip off handlebar – this can resultin severe injury or death.
• When fitting the cable avoid small radius.Attach the cable 3 times to the downtube (1, Fig. 8).
• Last attachment point is on the lowerrear wheel fork (2, Fig. 8) immediately behind the chain wheel.Cable housing must be movable insideattachment.
I N S T A L L I N G C L I C K B O X• Insert shift rod (1, Fig. 9) in shift tube (2)
(oil parts lightly) and then push into axlebore as far as the stop. If the shifting rodis sticking up out of the axle end: applyslight pressure on the shift rod with itsthreaded section and screw inwards in a clockwise direction until it can againbe moved axially (valid for older hub versions). Turn slot (6) in shift tube to aposition where it is easily visible.
• Push locating sleeve (3) with guiding rib(4) to the front onto the hub axle – makingsure that the internal lug (5) is guided inthe slot (6) of the shift tube until it can befelt – and heard – to engage.
• Turn locating sleeve on the axle until theguiding rib (4) is facing roughly upwards.
• Place shifter in gear position “2“.• Push on Clickbox (2, Fig. 6) to the stop on
the hub axle. The guiding rib (4, Fig. 9) ofthe locating sleeve thereby engages inthe slot on the housing. In the end positiontighten up the knurled bolt (3, Fig. 6) byhand (0,3 Nm / 2,7 in.lbs.).
A D J U S T M E N T• Be sure to reset rotational shifter from
4th. to 3th gear.• Match up the marks in the Clickbox
viewing window (4, Fig. 7) by turning the adjusting screw (5).
C O N N E C T I N G D R U M B R A K ECaution:Only use brake levers with a cable moving distance of at least 15 mm and aminimum leverage of 3.8. • Fit cable stop (1, Fig. 10) with adjusting
bolt (2) and nut (3) and insert into the sloton the brake anchor plate.
• Turn adjusting bolt down by approx. 2/3and route the brake cable from thebrake handle.
• Push lower brake cable end throughadjusting bolt (2) and insert lower cablehousing end into adjusting bolt.
• Thread brake cable end (4) intofork unit (5).
• Tighten screw (6) slightly.• Attach fork unit to brake lever (7).• Pull brake cable end taut with pliers
so that fork unit can still be attached andremoved (important for changing wheel).
• Tighten screw (6).
A D J U S T M E N T D R U M B R A K E• Unscrew adjusting screw (2, Fig. 10)
until the brake pads drag lightly.• Actuate the hand brake lever forcefully
several times and then, if necessary,turn the adjusting screw further in justuntil the wheel starts spinning freely.
• Lock hex nut (3).
CARGOCARGO
7
64
5
21
3
8
6
7
9
10
12
7
8
1
4
5
6
23
3 21
1
4
5
23

32
SPECTRO P5 CARGOMAINTENANCE
Technical Manual 2003
R E M O V E W H E E L• Place shifter in gear position “2“.• Loosen the knurled screw and pull the
Clickbox off the axle.• Disengage the location sleeve and pull it
off. Remove shift rod/tube, if necessarypull shift rod outwards and unscrew in acounter-clockwise direction.
• Remove wheel.
D I S M A N T L I N G H U Bsee Fig. 1
• Remove circlip (35), sprocket (34) anddust cap (33).
• Clamp hub with sprocket side facingdownwards with the two axle flats.
• Unscrew the two locknuts (1).• Remove lever cone (2), ball retainer (3)
and brake shell (4).• Withdraw hub sleeve (5) upwards.• Unscrew brake cone (6) from flat thread.• Remove retaining washer (7), thrust
washer (8).• Remove planetary gear carrier (9) and
thrust washer (10).• Clamp other axle end.• Unscrew fixed cone (32).• Remove driver (31), compression spring
(29), large compression spring (27) and ballretainer (30). – Withdraw gear ring (26)and coupling gear (25) and then removecover (28) from the coupling gear.
• Take out thrust block (24), (to do thiscompress the spring). Remove spring(22) and the two covers (23/21).
• Dismantle retaining washer (20), washer(19), conical compression spring (18),and the large sun gear (12). Clamp otheraxle end (thrust block visible).
• Unscrew grub screw (14) – Dismantlespring (15), guide bolt (16) and thrustblock (17).
• Remove small sun sun gear (11).
R E A S S E M B L Y H U Bsee Fig. 1
Lubrication see “MAINTENANCE/LUBRICATION“.• Clamp axle with internal thread up-
wards.• Position small sun gear (11) with crown
gears to the front.• Position thrust block (17) in the slotted
hole (is laterally guided when the sungear is screwed in).
• Locate bolt (16), then spring (15) in theaxle and screw in grub screw (14) untilit is flush with the axle.
• Reclamp axle. Fit large sun gear (12) (itis the same both sides). Position conicalcompression spring (18), with the largediameter first. Press spring together andfit washer (19) and retaining washer (20).
1
2
X
Spectro P5 mounting aidPart No. 5024 300 000
1
2
3
4
5
6
78
9
1011
12
13
1415
1617
1819
2021
2223
24 2526
27
28
29
3031
32 33
34
3536
37
38
39
40
41

33
SPECTRO P5 CARGOMAINTENANCE
Technical Manual 2003
• Assemble cover (21), compressionspring with 7 turns (22) and the secondcover (23, insides to the spring).
• Compress spring and position thrustblock (24) (it is the same both sides) inthe center of the slotted hole.
• Position coupling gear (25) with carrierplate facing downwards.
• Fit cover (28, inside to the spring) forcompression spring.
• Position gear ring (26) over the teeth ofthe coupling gear.
• Place ball retainer (30), with balls belowon the gear ring.
• Position large compression spring (27)on gear ring.
• Mount compression spring with 13 turns(29) on the axle. (Is supported in thecoupling wheel by the cover).
• Locate driver (31), press it down and screw on fixed cone (32) as far as thestop. Tightening torque 20 Nm. (Thenreclamp hub.)
• Push on thrust washer (10) and fitplanetary gear carrier (9). In doing this:Position mounting aid (Fig. 2) on theplanetary gear carrier so that the (X)markings on the threeplanetary gearsmatch with the mounting aid.
• Insert planetary gear carrier, placethrust washer (8) on it and mount retaining washer (7) in recess.Only now remove the mounting aid.
Advice:If the gears are not accurately installedthe hub may be tight to move. This could lead to damage to the gear-wheels in operation.
• Screw brake cone (6) onto flat threads.• Mount hub sleeve (5), with a slight
counter-clockwise turn.• Locate brake shell (4, Fig. 1) – with
retaining lugs uppermost –, then the friction spring on the brake cone mustengage with the slot on the brake shell.
• Insert ball retainer (3) – with balls below.• Position lever cone (2) – in doing this
turn it clockwise until the retaininglugs engage.
• Screw on counternuts (1), adjust bearingsto be free of play and tighten lock nuts.Tightening torque 15 – 20 Nm (133 – 177in.lbs.).
Advice:The dismantly and reassembly of the hub type MH 5225 should be carried out in thesame way. Differences: Instead of brakeshell/cone a click-and-pawl carrier is installed on the planetary gear carrierhere. Without flat thread – fixed with a retaining washer.
C A B L E C H A N G EDismantling shifter cable:• Place shifter in gear position “2“.• Do not remove the Clickbox from the axle
end.• Unscrew the adjusting screw (1, Fig. 4)
completely. Unscrew the cover screw (2),brush aside the adjusting screw (1) andremove the cover (3).
• Withdraw shifter cable and clampingbolt (1, Fig. 5) upwards, loosen clampand pull clamping piece from the cable.
• Slightly lift the grip cover (Fig. 6), pushthe cable out and discard.
Assembly shifter cable:• Route new cable through shifter housing
and pull cable to seat cable head completely into cable recess. Feed the cable through the new cablehousing and adjusting screw.
• Position clamping bolt (1, Fig. 7) at a distance of 80 mm, tighten up with 1.5 Nm (13 in.lbs.) and cut off cable ends to 2 – 3 mm. For positioning the clampingbolt use adjust gauge (Fig. 8). (Part. No.65 0324 107 000)
• Locate clamping bolt (1, Fig. 5) and placeshifter cable around the carrier cylinder(counter-clockwise winding).
• Position the cover (3, Fig. 4) and tightenup with the cover screw (2). Torque 0.35 – 0.45 Nm (3.1 – 4.0 in.lbs.).Screw in the adjusting screw (1) completely.
Advice:• If you want to remove the Clickbox from
the axle end for changing the cable, doas follows:– Place shifter in gear position “2“.– Loosen the knurled screw and pull the
Clickbox off the axle.– Now it’s essential to push the end (1,
Fig. 8) of the adjust gauge completeyinto the Clickbox and tighten up theknurled bolt (so that you maintain theinitial tension of the spring inside theClickbox).
– Change cable as per description above.• If you remove the Clickbox from the
axle and change the cable withoutusing the end of the adjust gauge, thenyou will lose the initial tension of thespring inside the Clickbox. In this caseyou must assemble the cable by placingit around the carrier cylinder with anadditional winding (Fig. 5).
CARGOCARGO
6
4
5
7
8
2
1
1
2 +1 mm 80 ±0,5 mm
2 31
1

34
SPECTRO P5 CARGOMAINTENANCE
Technical Manual 2003
9
Don’t combine with newer versions!
TIL
L 1
99
8
10
11
12
1
2 31
TIL
L E
ND
20
02
AS
OF
20
03
combine only that w
ay!
E X C H A N G E A B I L I T YS H I F T E R / C L I C K B O XProduced till 1998 (Fig. 9):Dont’t combine with newer versions!
Produced till end 2002 and as of 2003 (Fig. 10):Combine shifter and Clickbox only accor-ding to Fig. 10.
Distance of the clamping bolt:Each Clickbox version needs its specificdistance of the clamping bolt:• Till 1998: Distance 68,5 mm• Till end 2002: Distance 83 mm• As of 2003: Distance 80 mm
R E P L A C E M E N T B Y AN E W C L I C K B O X ( A S O F2 0 0 3 )• Place shifter in gear position “2“.• Loosen the knurled screw and pull the
Clickbox off the axle.• Unscrew the adjusting screw (1, Fig. 12)
completely. Unscrew the cover screw (2),brush aside the adjusting screw (1) andremove the cover (3).
• Push the end (1, Fig. 11) of the adjustgauge (Part. No. 65 0324 107 000) com-pletely into the Clickbox and tighten upthe knurled bolt (so you maintain the initial tension of the spring inside theClickbox).
• Withdraw shifter cable and clampingbolt (1, Fig. 5) upwards.
• Locate clamping bolt (1, Fig. 5) in thenew Clickboxh and place shifter cablearound the carrier cylinder (counter-clockwise winding).Advice:If you remove the Clickbox from theaxle and change the cable withoutusing the end of the adjust gauge, thenyou will lose the initial tension of thespring inside the Clickbox. In this caseyou must assemble the cable by placingit around the carrier cylinder with anadditional winding (Fig. 5).
• Position the cover (3, Fig. 12) and tightenup with the cover screw (2). Torque 0.35 – 0.45 Nm (3.1 – 4.0 in.lbs.).Screw in the adjusting screw (1) completely.
• Loosen the knurled screw on the Click-box and pull the adjust gauge off.
• Push on Clickbox on the hub axle. Tighten up the knurled bolt by hand.
A D J U S T M E N T• Be sure to reset rotational shifter from
4th. to 3th gear.• Match up the marks in the Clickbox
viewing window (Fig. 12) by turning the adjusting screw (1).

35
SPECTRO P5 CARGOMAINTENANCE
Technical Manual 2003
7
1
4
5
6
2
11 10
9
3
13
8
ProblemShifting difficulties
Pedals arecarried forward when free-wheeling
Hub lockswhenbraking (coaster brake)
CauseDamagedcontrol cableIncorrectgear settingTo much ad-ditional axle attachmentsbetween huband axle nutBearings set too tightLoose lock nuts
Chain is over-tensionedBrake shellhas run dry
RemedyReplace control cableAdjust shift.systemBeginning ofaxle threadmust be visi-ble in front ofthe axle nutRe-adjustbearingsTighten lock nuts (15 – 20 Nm)Reducechain tensionWash outhub sleeve,repolish andrelubricatebrake cylin-der, renewbrake shell
T R O U B L E S H O O T I N G
D R U M B R A K EInstall brake anchor plate (or exchange it):• Place thrust washer (8, Fig. 13) over the
axle on the adjusting cone and fit complete brake anchor plate. Positionwasher (9) distance sleeve (10) and screw on locknut (11).
• Push brake lever (7) to the stop and holdit there to center the brake jaws in thebrake drum – tighten up locknut with atorque of 15 – 20 Nm (133 – 177 in.lbs.).
A D J U S T M E N T D R U M B R A K E• Unscrew adjusting screw (2, Fig. 13)
until the brake pads drag lightly.• Actuate the hand brake lever forcefully
several times and then, if necessary,turn the adjusting screw further in justuntil the wheel starts spinning freely.
• Lock hex nut (3).
Caution:Check that all the brake system components are functioning properly!
M A I N T E N A N C E /L U B R I C A T I O NCaution:The Spectro hubs are provided with permanent lubrication and under normalconditions is maintenance-free. If the coaster brake is loaded excessively itseffect can be too strong, the hub may lock.In such a case the brake shell should belubricated with a special grease (Part No.0369 135 201). Renew brake shell, whenrhombic pattern is worn out.
Cleaning of parts:• All parts – except for the planetary gear
carrier – can be degreased in a cleaningbath.
• The planetary gear carrier only needs tobe cleaned on the outside with a brushso as not to degrease the planetary gearbearing.
Caution:Do not use high-pressure water whencleaning the gear hub (e.g. strong waterjets, high-pressure cleaners etc.) – if water penetrates it could lead to functional problems.
Lubrication of parts:• To lubricate the bearing points on
the planetary gear sets, position the planetary gear carrier on its crown andapply 2 – 3 drops of oil to the bearingbolts – at the same time turning the planetary gears so that the bearingpoints are completely wet. Oil axlethrough the axle bore and axle slot, apply a thin coating of grease to the outside.
• Oil the inside of the sun gears, greasethe outside teeth (fill the gaps in theteeth).
• Oil outside teeth and carrier plate onthe coupling gear and lightly grease theborehole from right and left.
• Do not apply grease to ring gear but justoil the pawl pockets.
• Grease the brake cone in the boreholeand the friction spring.
• Spread grease on the inside and outsideof the brake shell.
• Fill lever cone with grease reserves forbrakes.
• Regrease ball retainer, line ball bearingrunning tracks with grease.
CARGOCARGO

Technical Manual 200336

37
SPECTRO T3TECHNICAL DATA /ASSEMBLY REQUIREMENTS
Technical Manual 2003
• Easy Adjust• Superior Quality• Matte Chrome Finish• Most Efficient Hub In Its Class
Caution: Spectro T3 hubs are not suitable for tandems, trademen’s delivery bicyclesand similar.
Cycle frame:• Dropouts must be parallel.• Slot width at rear dropout max. 10,5 mm.• The strength must be such that with a maxi-
mum braking torque of 250 Nm (2200 in.lbs.)on the rear wheel no residual deformationcan occur on the rear structure.
HUBS
T
L HR
F2 F1
Ø 7.3
C DSD
OLD
1/2 OLDE
R 100
Spectro T3 with coaster brake Spectro T3 with drum brake Spectro T3 without brake
Type MH 3115 MH 3125 MH 3105
Brake Coaster Drum „D“ " „NL“ None
Over Locknut Dim., OLD 118 mm 118 mm 117 mm
Length, L 152 / 164 mm 164 mm 152 mm " 164 mm
Ends Diameter, T FG 10.5 FG 10.5 FG 10.5
Holes 36 " 28 36 36
Hole Diameter, DS 3.0 mm 2.8 mm 3.0 mm
Hole Ref. ø, HR 58 mm 89 mm 58 mm
Flange Dist. to 1/2 OLD F1 = 24.5 mm / F2 = 25.5 mm F1 = 25.5 mm / F2 = 32.5 mm F1 = 24.5 mm / F2 = 25.5 mm
Totally 186 %
Speed 1 73 %
Speed 2 100 %
Speed 3 136 %
Line, C/D/E 44.5 / 41.5 / 38.5 mm 44.5 / 41.5 / 38.5 mm 44 / 41 / 38 mm
Ratio 24", 26", 28"= 2.0 – 2.4 / 20"= 2.0 – 2.5
Shifter Compatib. Spectro Grip 3 / Spectro Bandix 3
Tandem Compatib. — — —
Weight 1182 g 1270 g 911 g
Hub Shell Material Steel Aluminum Steel
Finish Matt Chrome Plated Silver Painted Matt Chrome Plated
#
##
##
##
##
##
Axle
Spok
eGe
ar H
ub R
atio
Chai
nFi
nish
SHIFTERS
Spectro Grip 3 (for adults) Spectro Bandix 3 (for kids)
Part No. — " — —
Shifter Type Twist Shifter Twist Shifter
Cable ø 1.2 mm 2174 mm " 2500 mm ø 1.2 mm 2174 mm
Comp. Cable Housing Capped, Compressionless with Resin Liner inside
Gear Indication Printed Printed
Barrel Adjuster Indexing Indexing
Clamping Diameter 22.3 mm 22.3 mm
Handlebar, Straight Area Minimum length for shifter = 145mm Minimum length for shifter = 125mm
Weight 58 g 58 g
Housing PA PA
Grip PA PA
Grip Cover Thermoplastic elastomer Thermoplastic elastomer
Clamping Collar Aluminum Aluminum
Desi
gn
Version with Coaster Brake
NEWNEWNEW

Technical Manual 200338
SPECTRO T3ASSEMBLY
Advice:The Spectro T3 hubs have been modifiedfor the series launch of the new deflection pulley.Identification: yellow counter nut on the driving end of the axle and modifiedcompression spring (22 resp. 14, Fig. 1 /Page 40)In order to prevent malfunctions, thesemodified hubs may no longer be combinedwith the chain guide nut.The deflection pulley can also be used forthe previous hub version (silver-colouredcounter nut on the axle). In order to achieve the maximum reduction in shifting forces with this combination, the new, modified compres-sion spring should be installed (descripti-on see „REASSEMBLY HUB“).
Caution:• Only install additional axle attachments
(e.g. struts) between nut and retainingwasher.
• Cable stop bracket: dimensions see Fig. 9.
• Axle end must protrude by min. 1 mm to max. 4 mm beyond the nut (1, Fig. 5).
• Mount the brake lever using a suitableframe clamp (2, Fig. 4 resp. Fig 10).Caution:Mount the brake lever between the twostraps of the frame clamp.The clamp must be seated on the framewithout play.Use a self-locking nut! Tightening torque: 2 – 3 Nm (18 – 27 in.lbs.).
3
1
2
4
5
6
Spoke lengths are approximate values. They must be checked through lacing attemptsand adjusted accordingly.
Tire Size Cross Length MH 3115/3105 Length MH 312528 / 36 Holes 28 / 36 Holes 36 Holes
47–406 20" x 1.75 x 2 2 x / 3 x 182 mm / 184 mm —37–490 22" x 1 3/8 — / 3 x — / 228 mm —47–507 24" x 1.75 x 2 2 x / 3 x 234 mm / 235 mm —37–540 24" x 1 3/8 — / 3 x — / 254 mm —47–559 26" x 1.75 x 2 2 x / 3 x 258 mm / 262 mm 253 mm37–590 26" x 1 3/8 — / 3 x — / 254 mm 273 mm47–622 28" x 1.75 2 x / 3 x 289 mm / 292 mm 285 mm28–622 28" x 1 1/8 — / 3 x — / 292 mm 285 mm32–622 28" x 1 5/8 x 1 1/4 — / 3 x — / 292 mm 285 mm37–622 28" x 1 3/8 x 1 5/8 — / 3 x — / 292 mm 285 mm28–630 27" x 1 1/4 fifty — / 3 x — / 297 mm 287 mm32–630 27" x 1 1/4 — / 3 x — / 297 mm 287 mm
Spoke length table:
A S S E M B L Y H U B• Lace the wheel as normal. See spoke
length table.• Place the dust cap (1, Fig. 1) and
sprocket (2) on the driver.• Push sprocket circlip (3, Fig. 2) onto the
cone of tool sleeve (4). Place tool sleevewith large diameter on the driver.
• Push the spring end of sliding sleeve (5)of the tool over the tool sleeve. Thrustsliding sleeve in direction (6), this forcescirclip into the recess of the driver.
• Remove tool and check that the circlip isseated correctly.
• Turn dust cap (7, Fig. 3) until the threelugs (8) are between the three beads (9)on the sprocket (10).
• Position dust cap and push towardssprocket until it is felt to lock into place.
• Screw tension chain (2, Fig. 5) into theaxle end.
• Placing the wheel in the rear frame.• Mount the chain.• After positioning the wheel in the rear
fork fit non-turn washer (1, Fig. 4) to theoutside of the dropout (hub side oppositethe sprocket). The serrations must bearagainst the dropout and the lug must engage in the dropout slot.
• Tighten up special type axle nut (1, Fig. 5)and axle nut at other axle end. Tighteningtorque 30 – 40 Nm (266 – 350 in.lbs.).
• Guide tension chain (2) trough deflection pulley (3).
• Position deflection pulley at axle nut andpush until it is felt to lock into place. Turn deflection pulley until the yellowarea is at the top (4, Fig. 6).
10
9
8 7
1 2
1
2
1
2
3
4
4 5
6
3
Mounting ToolPart No. 0582 104 000

Technical Manual 2003 39
SPECTRO T3ASSEMBLY
A S S E M B L Y S H I F T E R S• Slide shifter (1, Fig. 7) onto handlebar.• Add thrust washer (2).• Mount fixed grip (3) onto end
of handlebar.• Without applying pressure, slide shifter
against fixed grip, adjust shifter onhandlebar and tighten with bolt (4). Allenkey 2.5 Nm, torque 1,7 Nm (15 in.lbs.)
• Not recommended for use on thin walledaluminum handlebars such as Hyperlite©
type handlebars.
Caution:• Never use lubricants or solvents to
install fixed grips.Fixed grips provide an axial safety function. For this reason, they should bemounted in such a way as to make surethey do not slip off handlebar.
• Check that the shifter and brake leverfunction properly and are unobstructed(realign if necessary).
• Never ride without the fixed grips. Theturning grip may loosen from housingand slip off handlebar – this can resultin severe injury or death.
I N S T A L L I N G C A B L E• When fitting the cable avoid small radius.
Use only compressionless cable housingswith resin liner inside and capped.
• Screw the cable stop clamp and cablepully clamp on the down tube or seat tube.
• Secure the lubricated shift cable atequidistant intervals on the frame (in case of continuous cable housing).
• Feed the shifter cable into the locatingsleeve (5, Fig. 8), fix at the appropriatelength (cable stop bracket: see Fig. 9)using the clamping bolt (1). Allan key 2.5 mm, tightening torque 1.5 Nm (13 in.lbs.). Shorten any cablewhich is sticking out.
• Connect to the hub: push locating sleeve(2, Fig. 8) loosely onto small pull rod (3).
A D J U S T M E N T• Place the shifter in gear position "3".
Move the crank to check that the gearis engaged.
• To make the adjustment, the cable mustbe taut in third gear to be able to transfera shift movement directly to the hub.
• Push locating sleeve (2, Fig. 8) onto thesmall pull rod (3) until the control cableis taut. Make sure that you don’t pull theindicator chain out of the deflection pulley (4).
Check:• Place shifter in gear position "1" while
moving the crank.• Setting too loose: In gear position "1" the
tension chain can be pulled out of the deflection pulley by hand.
• Setting too tight: It is difficult to placethe shift lever in gear position "1".
• If required, readjust the shift mechanism(in third gear).
C O N N E C T I N G D R U M B R A K ECaution:Only use brake levers with a cable moving distance of at least 15 mm and aminimum leverage of 3.8. • Fit cable stop (1, Fig. 10) with adjusting
bolt (2) and nut (3) and insert into the sloton the brake anchor plate.
• Turn adjusting bolt down by approx. 2/3and route the brake cable from thebrake handle.
• Push lower brake cable end throughadjusting bolt (2) and insert lower cablehousing end into adjusting bolt.
• Thread brake cable end (4) intofork unit (5).
• Tighten screw (6) slightly.• Attach fork unit to brake lever (7).• Pull brake cable end taut with pliers
so that fork unit can still be attached andremoved (important for changing wheel).
• Tighten screw (6).
Caution:For NL version drum brake hub with special lever (8), only use original NL brake cable (fork unit (5) is not suitable).
A D J U S T M E N T D R U M B R A K E• Unscrew adjusting screw (2, Fig. 10)
until the brake pads drag lightly.• Actuate the hand brake lever forcefully
several times and then, if necessary,turn the adjusting screw further in justuntil the wheel starts spinning freely.
• Lock hex nut (3).
10
7
8
9
21
3
min.13 mm
min. 90 mm
1
3
2
4
4
5
min. 12 mm
max. 30°
7
8
1
4
5
6
23
2.5 mm1.7 Nm15 in.lbs.
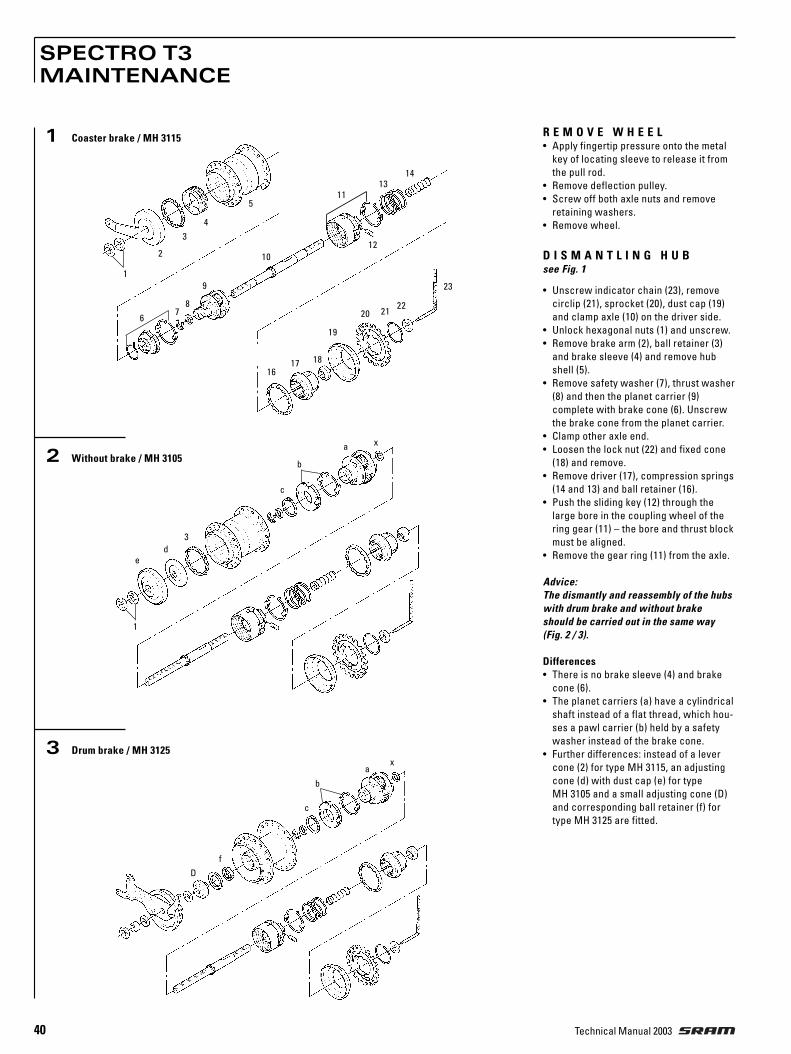
40
SPECTRO T3MAINTENANCE
Technical Manual 2003
3
1 R E M O V E W H E E L• Apply fingertip pressure onto the metal
key of locating sleeve to release it fromthe pull rod.
• Remove deflection pulley.• Screw off both axle nuts and remove
retaining washers.• Remove wheel.
D I S M A N T L I N G H U Bsee Fig. 1
• Unscrew indicator chain (23), removecirclip (21), sprocket (20), dust cap (19)and clamp axle (10) on the driver side.
• Unlock hexagonal nuts (1) and unscrew.• Remove brake arm (2), ball retainer (3)
and brake sleeve (4) and remove hubshell (5).
• Remove safety washer (7), thrust washer(8) and then the planet carrier (9) complete with brake cone (6). Unscrewthe brake cone from the planet carrier.
• Clamp other axle end.• Loosen the lock nut (22) and fixed cone
(18) and remove.• Remove driver (17), compression springs
(14 and 13) and ball retainer (16).• Push the sliding key (12) through the
large bore in the coupling wheel of thering gear (11) – the bore and thrust blockmust be aligned.
• Remove the gear ring (11) from the axle.
Advice:The dismantly and reassembly of the hubswith drum brake and without brakeshould be carried out in the same way(Fig. 2 / 3).
Differences• There is no brake sleeve (4) and brake
cone (6).• The planet carriers (a) have a cylindrical
shaft instead of a flat thread, which hou-ses a pawl carrier (b) held by a safetywasher instead of the brake cone.
• Further differences: instead of a levercone (2) for type MH 3115, an adjustingcone (d) with dust cap (e) for type MH 3105 and a small adjusting cone (D)and corresponding ball retainer (f) fortype MH 3125 are fitted.
2x
1
ed
3
c
b
a
b
fD
c
xa
1
6
9
78
10
1113
14
12
16
222120
19
1817
23
5
43
2
Coaster brake / MH 3115
Without brake / MH 3105
Drum brake / MH 3125

41
SPECTRO T3MAINTENANCE
Technical Manual 2003
R E A S S E M B L Y H U Bsee Fig. 1 / 2 / 3
Lubrication see “MAINTENANCE/LUBRICATION“.• Clamp the hub axle (10) with the slot for
thrust block upwards), fit ring gear (11)and align the large bore in the couplingwheel with the slot. Position the radiusof the sliding key (12) facing downwardsand turn the coupling wheel slightly.
• Fit the compression springs (13 and 14).• Place ball retainer with balls in (16) on
ring gear (11), mount driver (17), fit fixedcone and lock with hexagonal nut (22),tightening torque 15 – 20 Nm (133 – 177 in.lbs).
• Turn hub over and slide on planet carrier(9) – thrust washer (X) must first be fittedfor types MH 3105/3125. (For type MH3115, this washer is already integrated inthe planet carrier). Mount thrust washer(8) and place safety washer (7) in the recess of the axle.
• Screw brake cone (6, type MH 3111) ontothe flat thread – for types MH 3105/3125 mount pawl carrier (b) and secure in place using safety washer (c).
• Fit hub shell (5) – turning it counter-clockwise slightly to get past the stopnotches – until the shell runs cleanlyonto the ball retainer.
• For type MH 3115, insert the brake slee-ve (4) so that the spring end of the fric-tion spring on the brake cone (6) sits inone of the two slots on the brake sleeve.Insert the ball retainer and fit the levercone – move the lever cone lightly untilthe lugs on the brake lever catch in thegrooves on the adjusting cone.
• Adjust the hub clearance by screwing onhexagonal nut (1) until the hub shell runsfree of play but not under tension. Lockwith a second nut to a tightening torqueof 15 – 20 Nm (133 – 177 in.lbs.).
• For type MH 3105 insert ball retainer (3),mount adjusting cone (d) with dust cap(e) and hexagonal nuts (1). Adjust thehub clearance as for type MH 3115.
• For type MH 3125, the ball retainer (f)and dust cap (pressed in) normally remain in the hub shell. The hub clearance is set with adjusting cone (D)as for type MH 3115.
C A B L E C H A N G EDismantling shifter cable:• Use only new cable and compression-
less cable housing• Detach the cable from the internal hub.• Remove the cable housing. Cut the cable
off 15 cm (6") from the shifter barrel adjuster. Discard the old cable and cablehousing.
• Line up the ‘3’ gear number mark withthe indicator mark.
• From the edge, pull open the cable change hatch (Fig. 6).
• Remove and discard the rest of the oldcable.
Assembly shifter cable:• Feed the new cable through the shifter.• Feed the cable through the new cable
housing and stops.• Feed the shifter cable into the locating
sleeve (5, Fig. 7), fix at the appropriatelength using the clamping bolt (1). Allankey 2.5 mm, tightening torque 1.5 Nm (13 in.lbs.). Shorten any cable which issticking out.
• Connect to the hub: push locating sleeve(2, Fig. 7) loosely onto small pull rod (3).
A D J U S T M E N T• Place the shifter in gear position "3".
Move the crank to check that the gearis engaged.
• To make the adjustment, the cable mustbe taut in third gear to be able to transfera shift movement directly to the hub.
• Push locating sleeve (2, Fig. 7) onto thesmall pull rod (3) until the control cableis taut. Make sure that you don’t pull theindicator chain out of the deflection pulley (4).
Check:• Place shifter in gear position "1" while
moving the crank.• Setting too loose: In gear position "1" the
tension chain can be pulled out of the deflection pulley by hand.
• Setting too tight: It is difficult to placethe shift lever in gear position "1".
• If required, readjust the shift mechanism(in third gear).
Ø 1,1 mm
Ø 1,4 mm
6
4
5
7
21
3
4
5

42
SPECTRO T3MAINTENANCE
Technical Manual 2003
D R U M B R A K EInstal brake anchor plate (or exchange it):• Place thrust washer (8, Fig. 8) over the
axle on the adjusting cone and fit complete brake anchor plate. Positionwasher (9) distance sleeve (10) and screw on locknut (11).
• Push brake lever (7) to the stop and holdit there to center the brake jaws in thebrake drum – tighten up locknut with atorque of 15 – 20 Nm (133 – 177 in.lbs.).
A D J U S T M E N T D R U M B R A K E• Unscrew adjusting screw (2, Fig. 8) until
the brake pads drag lightly.• Actuate the hand brake lever forcefully
several times and then, if necessary,turn the adjusting screw further in justuntil the wheel starts spinning freely.
• Lock hex nut (3).
Caution:Check that all the brake system components are functioning properly!
M A I N T E N A N C E /L U B R I C A T I O NCoaster Brake:Improved braking in third gear after production date CW 38/96 • In case of repair, older hub models (Fig. 4)
can be converted with a repair set (Fig. 5).It is important that all three parts are
replaced at the same time – new,reinforced compression springs, planetcarrier with 4 lugs and ring gear with 4 lugs on the driving plate.
A change at the new or converted hubs: • When braking in third gear, the indicator
chain moves out of the deflection pulleyby approx. one chain link – after braking,the tension chain returns immediately toits normal position.
Caution:The Spectro hubs are provided withpermanent lubrication and are maintenance-free under normal conditions. For typeMH 3115, however, particularly high loading of the coaster brake can cause to overcompensate. In this case, applyspecial grease (Part No. 0369 135 201) tothe brake sleeve or replace it. Renew brake shell, when rhombic patternis worn out.
Cleaning of parts:• All parts – except for the planetary gear
carrier – can be degreased in a cleaningbath.
• The planetary gear carrier only needs tobe cleaned on the outside with a brushso as not to degrease the planetary gearbearing.
Lubrication of parts:• To lubricate the bearing points on
the planetary gear sets, position the planetary gear carrier on its crown andapply 2 – 3 drops of oil to the bearingbolts – at the same time turning the planetary gears so that the bearingpoints are completely wet. Oil axlethrough the axle bore and axle slot, apply a thin coating of grease to the outside.
• Oil the inside of the sun gears, greasethe outside teeth (fill the gaps in theteeth).
• Oil outside teeth and carrier plate onthe coupling gear and lightly grease theborehole from right and left.
• Do not apply grease to ring gear but justoil the pawl pockets.
• Grease the brake cone in the boreholeand the friction spring.
• Spread grease on the inside and outsideof the brake shell.
• Fill lever cone with grease reserves forbrakes.
• Regrease ball retainer, line ball bearingrunning tracks with grease.
Caution:Do not use high-pressure water whencleaning the gear hub (e.g. strong waterjets, high-pressure cleaners etc.) – if water penetrates it could lead to functional problems.
8
7
1
4
5
6
2
11 10
9
3
8

43
SPECTRO T3MAINTENANCE
Technical Manual 2003
ProblemShifting difficulties
Pedals are carried forward when freewheeling
Ccoaster brake:Hub locks when braking
Pedals yield slowly duringbraking (does not impair safety).
CauseIncorrect gear setting
Bearings set too tightLoose lock nutsChain is overtensioned
Brake shell has run dry
Brake cone / brake sleeve
RemedyAdjust shifting system, oilcontrol cable, check that cablestop is fastened correctly.Re-adjust bearingTighten lock nuts (15 – 20 Nm)Reduce chain tension
Wash out hub sleeve, re-polish and relubricate brakecylinder, renew brake shellReplace brake cone and brakesleeve
T R O U B L E S H O O T I N G

Technical Manual 200344

45
SPARCTECHNICAL DATA /ASSEMBLY REQUIREMENTS
Technical Manual 2003
Caution: Not suitable for tandems, tradesmen’s delivery bicycles and similar.
SHIFTER
REM.CON.
Sparc Remote Control Unit
Part. No. — " — " — " — " —Cable 1500 mm " 1600 mm " 1700 mm " 1800 mm " 2200 mm
Mode Selector Off / Econ / Speed
Mode Indication Printed
Clamping Diameter 22.3 mm
Cable Connection 3.5 mm stereo jack
Weight 45 g
BA.BOX
Sparc Battery Box
Part No. — — — — —
Cable 650 mm 750 mm 850 mm 1400 mm 1950 mm
Battery 12V / 7Ah lead battery
Charger 12V / 1.5A 12V / 2.0A
Charging time 4 hours 45 minutes 3 hours 30 minutes
Luggage carrier comp. Struts: ø 8 mm / dist. 68 mm center to center / parallel
Weight 3000 g
Sparc Shifter
Part. No. — " — " —Shifter Type Twist Shifter
Cable 1500 mm " 1600 mm " 1700 mm
Gear Indication Window
Clamping Diameter 22.3 mm
Handlebar, Straight Area Minimum length = 150 mm
Weight 70 g
190135 33.5
205194
40 40
16 258.6
49.567.512.5
55
185
2.7 30°
HUB
Sparc hub
Version Europe 28" Europe 20" USA 26"
Econ Mode 18 km/h 18 km/h 14 mph
Speed Mode 24 km/h 24 km/h 18 mph
Engine Type 2 x 12V DC engines
Power 2 x 100 W max.
Assist Type Pedal controlled
Assist Ratio Econ / Speed
Brake None
Over Locknut Dim. 135 mm
Length 190 mm
Ends Diameter FG 10.5
Holes 36
Hole Diameter 2.9 mm
Hole Reference ø 194 mm
Totally 249 %
Speed 1 63 %
Speed 2 78 %
Speed 3 100 %
Speed 4 128 %
Speed 5 158 %
Usable Dimension 1/2" x 1/8" or 1/2" x 3/32"
Line 49.5 mm (only off-set sprockets)
Ratio 1.7 – 1.9 2.3 – 2.6 1.8 – 2.6
Shifter Compatib. Sparc Shifter
Frame Compatib. Dropouts max. 7 mm / OLD 135 mm
Weight 2500 g
Axle
V m
ax.
Elec
tric
Driv
eSp
oke
Gear
Hub
Rat
ioCh
ain
NEWNEWNEW

46
SPARCASSEMBLY
Technical Manual 2003
61
5
6
2 34
3
1
2
4
5
L A C I N G T H E W H E E LVersion Europe 28" / USA 26":1-cross only.All spoke heads must be positioned at theoutside of the spoke flange. Spoke tension about 1000 N recommended.
Version Europa 20":• 1-cross:
Use only rim „Rigida 20x406 59 (L 01 12 E)“(or contact SRAM). All spoke heads must be positioned at theoutside of the spoke flange. Spoke tension about 1000 N recommended.
• Radial lacing:No restrictions.Spoke tension about 1000 N recommended.
A S S E M B L Y H U B• Place the dust cap (1, Fig. 1) and
sprocket (2) on the driver. Toothing closeto the hub (only sprocket version off-set).
• Push sprocket circlip (3, Fig. 2) onto thecone of tool sleeve (4). Place tool sleevewith large diameter on the driver.
• Push the spring end of sliding sleeve (5)of the tool over the tool sleeve. Thrustsliding sleeve in direction (6), this forcescirclip into the recess of the driver.
• Remove tool and check that the circlip isseated correctly.
• Turn dust cap (7, Fig. 3) until the threelugs (8) are between the three beads (9)on the sprocket (10).
• Position dust cap and push towardssprocket until it is felt to lock into place.
• Placing the wheel in the rear frame.Advice:Dropouts must be parallel.
• Mount the chain.• Fit non-turn washer (1, Fig. 4) to the
outside of the dropouts. The serrationsmust bear against the dropout and thelug must engage in the dropout slot.
• On the sprocket side fit the protectivebracket (1, Fig. 5) directly below the axle nut. Tightening torque on acorn orhex nuts 30 – 40 Nm (266 – 350 in.lbs.).
Advice:• If a different protective bracket is used
the thickness of the attachment platemust be max. 3 mm.
• Do not use additional washers. • At least the beginning of the axle thread
must be visible in front of the axle nut.
A S S E M B L Y S H I F T E R• Slide shifter (1, Fig. 6) onto handlebar.• Add 2 thrust washers (2).• Mount fixed grip (3) onto end of handlebar.• Without applying pressure, slide shifter
against fixed grip.• Adjust shifter on handlebar and
tighten with bolt (4) with a torque of 1.5 Nm (13 in.lbs.).
Caution:• Never use lubricants or solvents to
install fixed grips.Fixed grips provide an axial safety function. For this reason, they should bemounted in such a way as to make surethey do not slip off handlebar.
• Check that the shifter and brake leverfunction properly and are unobstructed(realign if necessary).
• Never ride without the fixed grips. Theturning grip may loosen from housingand slip off handlebar – this can resultin severe injury or death.
• When fitting the cable (1, Fig. 7) avoidsmall radius.
• Last attachment point is on the lowerrear wheel fork (2, Fig. 7) immediately behind the chain wheel.Cable housing must be movable insideattachment.
I N S T A L L I N G C L I C K B O X• Insert shift rod (1, Fig. 8) in shift tube (2)
(oil parts lightly) and then push into axlebore as far as the stop. Turn slot (6) inshift tube to a position where it is easilyvisible.
• Push locating sleeve (3) with guiding rib(4) to the front onto the hub axle – makingsure that the internal lug (5) is guided inthe slot (6) of the shift tube until it can befelt – and heard – to engage.
• Turn locating sleeve on the axle (7) until theguiding rib (4) is facing roughly upwards.
• Place shifter in gear position “2“.• Push on clickbox (2, Fig. 5) to the stop on
the axle. The guiding rib (4, Fig. 8) of thelocating sleeve thereby engages in theslot on the housing. In the end positiontighten up the knurled bolt (3, Fig. 5) byhand (0,3 Nm / 2,7 in.lbs.).
A D J U S T M E N T H U B• Be sure to reset rotational shifter from
4th. to 3rd gear.• Match up the arrow marks in the
Clickbox viewing window (5, Fig. 6)by turning the adjusting screw (6).
10
9
8 7
4
1 2
5
6
3
1
Mounting ToolPart No. 0582 104 000
32
1

47
SPARCASSEMBLY
Technical Manual 2003
A S S E M B L Y B A T T E R Y B O X• Pull both quick releases outward and
turn them to the „open“ position (Fig. 9).• Position battery box onto luggage
carrier struts (3, Fig. 7).• Push quick releases inwards and turn
them to the „closed“ position.• Slide plug of battery cable in the slot of
the battery box until it snaps in.• Attach cable along the frame or luggage
carrier strut.Advice:Last attachment point of the cable at therear fork: approx. 8 cm away from theaxle end.Do not jam the cable between frameand rear hub and keep it away from therotating hub shell.
• Slide plug in the slot on the hub until itsnaps in.
Advice:Closed elements such as brazed-on eyebolts are not suitable because plug willnot pass through.
S T O R I N G T H E B A T T E R YIf you intend to not use your bicycle for awhile, e.g. during the winter, the battery boxshould be stored fully charged in a dry andcool place. We recommend to recharge the batteryonce a month. Recharge the battery at least every 6 months.
A S S E M B L Y R E M O T EC O N T R O L U N I T• Slide remote control unit (1, Fig. 10) onto
handlebar. • Mount brake lever (2) and fixed grip (3).• Adjust remote control unit on handlebar
and tighten the bolt (4) with a torque of1.5 Nm (13 in.lbs.).
• Slide plug of remote control cable in theslot (5) of the remote control unit until itsnaps in.
• Attach cable along the frame.Advice:Last attachment point of the cable at therear fork: approx. 8 cm away from theaxle end.Do not jam the cable between frameand rear hub.Make a cable loop between plug andcable attachment point to avoid tensileload.
• Slide the plug straightly in the slot on thehub until it snaps in.Angular installation may damage theslot.
Check:Switch remote control to „Speed“ positionand rotate the rear wheel.At least 2 green and 1 red LED must gleam.If not, assemble plugs again completely. If not, assemble plugs again completely /right.
7
8
9
10
12 3
7
21
35
46
openclosed
4
5
1
2
1
3

48
SPARCMAINTENANCE
Technical Manual 2003
X
1
2R E M O V E W H E E L• Pull the remote control cable plug off
the hub.• Apply fingertip pressure onto the tap and
pull battery cable plug off the hub.• Loosen the knurled screw (40, Fig. 1) and
pull the Clickbox off the axle.• Disengage the locating sleeve and pull it
off. Remove shift rod/tube (37/36), pullshift rod out of the axle bore.
• Remove wheel.
E L E C T R I C D R I V ERemove:• Unscrew resin nut (3, Fig. 1).• Remove electric drive (4).
Caution:Do not disassemble and do not lubricatethe electric drive.
Reassembly:• Position electric drive onto hub. • While rotating the electric drive push it
inside until the two small inside pins engage in corresponding small holes (41).Check: The thread must be visible atleast 8 mm.
• Screw on resin nut (3) with a torque of 3 – 5 Nm (27 – 44 in.lbs.).
D I S M A N T L I N G G E A R H U Bsee Fig. 1
• Remove circlip (35), sprocket (34) anddust cap (33).
• Clamp hub with the two axle flatssprocket side facing downwards.
• Remove electric drive (4). • Unscrew the locknuts (1+2).• Remove plate (6) with washer (5). • Remove hub shell (7).• Remove circlip (8) and washer (9).• Remove planetary gear carrier (10) and
circlip (11).• Clamp other axle end.• Unscrew fixed cone (32).• Remove driver (31), compression spring
(29), large compression spring (27) andball retainer (30). – Withdraw gear ring(26) and coupling gear (25) and removecover (28) from the coupling gear.
• Take out thrust block (24), (to do thiscompress the spring). Remove spring (22)and the two covers (23/21).
• Dismantle retaining washer (20), washer(19), conical compression spring (18),and the large sun gear (13).
• Clamp other axle end.• Unscrew grey grub screw (14) – dis-
mantle spring (15), guide bolt (16) andthrust block (17).
• Remove small sun gear (12).
12
3
4
5
641
7
89
10
1112
13
14
15
1617 18
1920
2122
2324
25
26
2728
29
30
31 32
33
34 35
36
37
38
40
39
Sparc mounting aidPart No. 3024 001 000

49
SPARCMAINTENANCE
Technical Manual 2003
5
3
4
6
1
2
15 mm
2 +1 mm 83 ±0,5 mm
1
2
34
1
5
24
R E A S S E M B L Y H U Bsee Fig. 1
Lubrication see “LUBRICATION GEAR HUB“,next page.• Clamp axle with small internal thread
upwards.• Position small sun gear (12) with crown
gears to the front.• Position thrust block (17) in the slotted
hole (is laterally guided when the sungear is mounted).
• Locate bolt (16), then spring (15) in theaxle and screw in grey grub screw (14)until it is flush with the axle end.
• Clamp other axle end. Fit large sun gear(13). Position conical compressionspring (18), with the large diameter first.Compress spring and fit washer (19) andretaining washer (20).
• Assemble cover (21), compressionspring with 7 turns (22) and the secondcover (23, insides to the spring).
• Compress spring and position thrustblock (24) (it is the same both sides) inthe center of the slotted hole.
• Position coupling gear (25) with carrierplate facing downwards.
• Fit cover (28, inside to the spring) forcompression spring.
• Position gear ring (26) over the teeth ofthe coupling gear.
• Place ball retainer (30), with balls belowon the gear ring.
• Position large compression spring (27)on gear ring.
• Mount compression spring with 13 turns(29) on the axle. (Is supported in thecoupling wheel by the cover.)
• Locate driver (31), press it down and screw on fixed cone (32). Tightening torque 20 Nm.
• Clamp other axle end.• Push on thrust washer (11) and fit
planetary gear carrier (10). In doing this:Position mounting aid (Fig. 2) on theplanetary gear carrier so that the (X)markings on the three planetary gearsmatch with the mounting aid.
• Insert planetary gear carrier, placethrust washer (9) and mount circlip (8) inrecess.Remove the mounting aid.
Advice:If the gears are not accurately installedthe hub may be tight to move. This could lead to damage to the gear-wheels in operation.
• Mount hub shell (7), with a slightcounterclockwise turn.
• Fit plate (6) and washer (5).• Screw on counternuts (2+1), tightening
torque 15 – 20 Nm (133 – 177 in.lbs.).• Reassemble electric drive.
C A B L E C H A N G EDismantling shifter cable:• Place shifter in gear position “2“.• Loosen clamping bolt (1, Fig. 3) on the
shifter and slide the complete shifter inwards towards the middle of handle-bar 20 mm or more. (It may be necessaryto loosen and move the brake lever.)
• Separate housing (2) from turning grip (3).• Unscrew bolt (1, Fig. 4), remove cap (2).• Withdraw shifter cable and clamping
bolt (1, Fig. 6) upwards, loosen clampand pull clamping piece from the cable.
• Remove the old cable (4, Fig. 3).
Assembly shifter cable:• Route new cable through shifter housing
and pull cable to seat cable head completely into cable recess.
• Reassemble shifter by aligning four tabs on shifter housing with matchingrecesses on turning grip and snap together (Fig. 3).
• Feed the cable through the new cablehousing and adjusting screw.
• Position clamping bolt (1, Fig. 5) at a distance of 83 mm, tighten up with 1.5 Nm (13 in.lbs.) and cut off cable ends to 2 – 3 mm.
• Locate clamping bolt (1, Fig. 6) (srewhead not visible) and place shifter cablearound the carrier cylinder (counter-clockwise winding).
• Insert the square nut of the adjustingbolt (2) in the housing and completelyscrew in the knurled bolt.
• Position cap (2, Fig.4) and tighten upwith bolt.
Advice:To set the clamping bolt / adjusting screw distance a setting piece can beused (Part No. 65 0324 105 001).
A D J U S T M E N T• Be sure to reset rotational shifter from
4th. to 3rd gear.• Match up the arrow marks in the
Click Box viewing window (4, Fig. 4)by turning the adjusting screw (5).

50
SPARCMAINTENANCE
Technical Manual 2003
7L U B R I C A T I O N G E A R H U BCleaning of parts:• All parts – except for the planetary gear
carrier – can be degreased in a cleaningbath.
• The planetary gear carrier only needs tobe cleaned on the outside with a brushso as not to degrease the planetary gearbearing.
Lubrication of parts:Use only SRAM grease (Ref. No. 0369 135 201)and standard bicycle oil.• To lubricate the bearing points on
the planetary gear sets, position the planetary gear carrier on its crown andapply 2 – 3 drops of oil to the bearingbolts – at the same time turning the planetary gears so that the bearingpoints are completely wet.
• Oil axle through the axle bore and axleslot, apply a thin coating of grease to the outside.
• Oil the inside of the sun gears, greasethe outside teeth (fill the gaps in theteeth).
• Oil outside teeth and carrier plate onthe coupling gear and lightly grease theborehole from right and left.
• Do not apply grease to ring gear but justoil the pawl pockets.
• Regrease ball retainer, line ball bearingrunning tracks with grease.
Advice:Do not use high-pressure water whencleaning (e.g. strong water jets, high-pressure cleaners etc.) – if water penetrates it could lead to functional problems.
B A T T E R Y C H A N G EDisassembly:• Apply fingertip pressure onto the tap and
pull battery cable plug off the batterybox.
• Turn quick releases to the „open“ position (Fig. 7) and pull them outward.
• Take off battery box from luggage carrier.
• Unscrew the 4 bottom screws (slottedscrewdriver / Torx T10) and take off battery box cover.
• Hang out stirrup (3, Fig. 8).• Take out battery and pull off plugs (1+2).
Advice:Do not pull off any plug from card modul.
Reassembly:• Connect plugs to new battery:
– black cable: Negative Pole (1, Fig. 8)– red cable: Positive Pole (2)and put battery inside.
• Assemble stirrup (3) (bulge downward).• Mount battery box cover by the 4 screws.• Pull both Quick Releases outward and
turn them to the „open“ position (Fig. 7).• Position battery box onto luggage
carrier struts.• Push Quick Releases inwards and turn
them to the „closed“ position.• Slide plug of battery cable in the slot of
the battery box until it snaps in.
Advice:Use only batteries as specified.
openclosed
8
4
12
3

51
SPARCMAINTENANCE
Technical Manual 2003
• The battery must never be burned. Riskof explosion!
• The battery must be disposed of accor-ding to the waste disposal regulations.
• Only ever use the Sparc charging unitwith the Sparc battery.
• In the USA only use the ”USA chargingunit”.
S T O R I N G T H E B A T T E R YIf you intend to not use your bicycle for awhile, e.g. during the winter, the battery boxshould be stored fully charged in a dry andcool place. We recommend to recharge the batteryonce a month. Recharge the battery at least every 6 months.
R E M O T E C O N T R O L U N I TDo not disassemble the remote controlunit.
• Do not use in rooms (garages) with anexplosion risk.
• Do not dismantle the charging unit andbattery box yourself.Incorrect assembly can lead to electric shock or fire.
• The charging unit should not get intothe hands of children.
• Charging should only be carried out insufficiently well ventilated areas.
• When not in use always withdraw themains plug for the charging unit fromthe socket (do not pull on the chargingunit’s cable).
• Regularly check the cable and protect itfrom sharp edges. If it is damaged haveit renewed immediately by a specialistworkshop.
• Protect the unit from oil, grease, aggressive cleaning agents and paintthinners since they can destroy the housing.
• If it falls, from a bench for example, theunit must immediately be given a safetycheck by a specialist workshop. This isalso necessary if contact pins becomeloose.
C H A R G I N G T H E B A T T E R Y• Insert the plug of the charger into the
socket of the battery box.• Insert the charger into an electric mains
socket.
The LED will glow red during charging,changing to green when the battery is fullyrecharged.A trickle charge prevents self-discharge ofthe battery.Therefore, the charger can be permanent-ly connected to the battery.
Advice:• We recommend to recharge the battery
once a month.• The battery should only be operated or
charged in a temperature range of +5°Cto +40°C.
Caution:• Only charge the battery in the operating
position.• Recharge the battery at least every 6
months.• Only use in dry internal areas.
ProblemGear hub:Shifting difficulties
Pedals are carried forward when freewheeling
Electric system:Electric drive does not work
Electric drive emits unusual noise
Cause
Damaged control cableIncorrect gear settingTo much additional axleattachments between huband axle nutBearings set too tightLoose lock nuts
Chain is overtensioned
Remote control in position OFFRemote control defectPlugs not engaged
Cable defect Battery dischargedBattery inside not connectedBattery defectFuse blasted
Electric drive defectForeign body in electric driveElectric drive defect
Remedy
Replace control cableAdjust shifting systemBeginning of axle thread must be visible in front of the axle nutReadjust bearingsTighten lock nuts (15 – 20 Nm)Reduce chain tension
Switch to ECON or SPEEDReplace remote controlSlide all plugs completely in slotsReplace defect cablesCharch batteryConnect battery insideReplace batteryReplace fuse (4, Fig. 8) in battery box (25 A) Replace electric driveTake out foreign body
Replace electric drive
T R O U B L E S H O O T I N G

Technical Manual 200352

53
SPECTRO VT 5000 / VT 3000TECHNICAL DATA /ASSEMBLY REQUIREMENTS
Technical Manual 2003
• Reliable Brake Performance In All Weather Conditions• Practically Maintenance Free• Sealed Cartridge Bearing
DRUM
BRAKE
Typ VT 5000
Version D
Version NL
100
M9x
1
136
158
21,5
9,5
14
VT 5000 VT 3000
Part No. — — — " — — " —Brake anchor plate Version D Version NL Version D Version NL
Over Locknut Dim. 100 mm 100 mm 100 mm 100 mm
Length 135 mm 135mm 135 mm 135 mm
Type Solid Solid Solid Solid
Material Steel Steel Steel Steel
Ends Diameter M9x1 M9x1 M9x1 M9x1
Holes 36 36 36 36
Hole Diameter 2.9 mm 2.9 mm 3 / 3.3 mm 3 / 3.3 mm
Hole Reference ø 89 mm 89 mm 86 mm 86 mm
Bearing Cartridge Cartridge Cartridge Cartridge
Sealing Lip Seal Lip Seal Lip Seal Lip Seal
Weight 750 g 750 g 770 g 770 g
Hub Shell Material Aluminum Aluminum / galvananized Steel
Finish Clear Coat Aluminum/Silver " Silver Silver " Black
Axle
Spok
eFi
nish #
#
Front fork:The strength must be such that with a maximum torque of 300 Nm (2700 in.lbs.) on the wheel no residual deformation canoccur on the front fork.
Warning:• There is a risk of accident if unsuitable
forks are used!• Not suitable for tandem use.• Wheel size: only 24"/26"/28" wheels are
suitable for use.

54
SPECTRO VT 5000 / VT 3000ASSEMBLY
Technical Manual 2003
A D J U S T M E N T D R U M B R A K E• Unscrew adjusting screw (8, Fig. 1) until
the brake pads drag lightly.• Actuate the hand brake lever forcefully
several times and then, if necessary,turn the adjusting screw further so thatthe brake once again brushes the wheelas it turns.
• Lock hex nut (9)
Caution:Check that all the brake system components are functioning properly!
O P E R A T I O NTo get used to the new brake, operate thebrake lever carefully to acquire a feel forthe drum brake’s deceleration.
Caution: • If the bicycle is left standing for long
periods, surface rust in the brake drummay increase braking effect. For thisreason, start by braking gently a few times the next time the bicycle is usedto remove the surface rust. This willprevent the brake from aggressive braking.
• On long, steep downhill stretches, alsouse the second brake (rear wheel) alternately to prevent the brakes fromheating up excessively.
• Do not touch hub after cycling – risk ofburning!
1
2
F I T T I N G W H E E L I NF R O N T F O R K• Lace the wheel as normal. • Placing the wheel in front fork. The
brake lever (1, Fig. 1) goes on the leftside viewed from behind the rear of thebicycle. Guide the top end of brake anchor plate (2) into the brazing part ofthe fork if fitted. If there is no brazingpart, use VT pipe clamp (3).
• Slide washers or snap rings onto axleends.
• Fit axle nuts (4) with wrench 15 mm, torque 30 – 40 Nm (266 – 350 in.lbs.).
• Tighten screw connections on VT pipeclamp (5/6), torque approx. 3 Nm (27 in.lbs.).Caution:The clamp must be seated on the forkwith no play.
C O N N E C T I N G D R U M B R A K ECaution:Only use brake levers with a cable moving distance of at least 15 mm and aminimum leverage of 3.8.• Fit cable stop (7, Fig. 1) with adjusting
bolt (8) and nut (9) and insert into the sloton the brake anchor plate (10).
• Turn adjusting bolt down by approx. 2/3and route the brake cable from thebrake handle.
• Push lower brake cable end throughadjusting bolt.
• Insert lower cable housing end intoadjusting bolt.
• Thread brake cable end (11) into forkunit (12).
• Tighten screw (13) slightly.• Attach fork unit to brake lever (1).• Pull brake cable end taut with pliers
so that fork unit can still be attached andremoved (important for changing wheel).
• Tighten screw (13).• For NL version drum brake hub with
special lever (1, Fig. 2), only use originalNL brake cable (fork unit (12, Fig. 1) isnot suitable)
2
10
14
5
3
6
1
7
11
12
13
89

55
SPECTRO VT 5000 / VT 3000MAINTENANCE
Technical Manual 2003
Advice:• Do not use high-pressure water when
cleaning the hub (e.g. strong water jets,high-pressure cleaners etc.) – if waterpenetrates the unit it could lead to functional problems.
• Do not rinse hub with benzine, petroleumetc. as this could produce impurities inthe brake pads.
M A I N T E N A N C E• Bearings is sufficiently lubricated and
essentially maintenance-free.• Cable housing without inner tube:
lubricate regularly.
Caution:The brake anchor plate must be replacedif oil or other substances containing grease get into the brake pads. Oily brakepads reduce braking effect and cause thebrake to fail completely. This may resultin accidents with extremely serious injuries.

Technical Manual 200356
TWO-AXIS BRAKE LEVERTECHNICAL DATA / ASSEMBLY REQUIREMENTS
Two-Axis
Part No. — —
Brake Lever Left Right
Lever Size 4 Finger
Brake Compatibility i-Brake / Linear Pull
Leverage Adjust Single Position
Cable Pull 28 mm
Pivot Bushing I-Glide
Reach Adjust Yes Yes
Barrel Adjuster Ergonomic Indexing Ergonomic Indexing
Clamping Diameter 22.3 mm 22.3 mm
Weight 155 g 155 g
Housing Grilon Composite
Lever Forged Aluminum #
#
#
#
#
#
#
Desi
gn
TWO-AXIS
Caution:SRAM Brake Levers are designed for usewith linear-pull brakes. Do not use SRAMBrake Levers with conventional cantileverbrakes (those with arms measuring lessthan 76 mm and utilizing a non-linearstraddle cable). Use of SRAM Brake Levers with conventional cantilever brakesets, drum brakes or roller brakeswill result in faulty braking performance.
Do not use conventionalcantilever brakes.
Designed for use withlinear-pull brakes.
76–
108
mm
C A B L E H O U S I N G • Use only new brake cable and cable
housing.• When choosing cable housing lengths,
be sure to allow enough housing for anextreme turn of the handlebars in both directions.
• Note also, that different stem lengthsand cable stop positions effects cablehousing length.

Technical Manual 2003 57
TWO-AXIS BRAKE LEVERASSEMBLY / MAINTENANCE
B R A K E L E V E R A N A T O M Y
reach adjustmentscrew
clamp
barrel adjuster
lever
2
1
3
I N S T A L L A T I O N• When sliding the brake lever onto the
handlebar, allow enough room for theshifter, the handlebar grip, and the bar end.
• Using a 3 mm hex wrench, tighten theclamp bolt to 3.4 Nm (30 in.lbs.) (Fig. 1).Be careful not to over tighten!
• Line up the barrel adjuster and the brakelever housing cable slots.
• Pull on the lever and push the brake cable head through the opening in thebrake lever housing (Fig. 2).
• Install the brake cable head into the cable socket in the lever.
• Set up the brakes and brake pads perbrake instructions.
• Actuate each brake lever 5 – 10 times.
Caution:Check that all the brake system components are functioning properly!
R E A C H A D J U S T M E N TUsing a 2 mm hex wrench (Fig. 3):• Turn the reach adjustment screw clock-
wise to bring the lever closer to thehandlebars.
• Turn the screw counterclockwise tomove the lever further away.
Caution:After any adjustment to the reach alwayscheck the brake cable tension to ensureproper brake system performance. Readjust the cable tension if necessary.
clamp bolt
3 mm3.4 Nm30 in.lbs.
2 mm

Technical Manual 200258

59Technical Manual 2002
SMARTBARTECHNICAL DATA / ASSEMBLY REQUIREMENTS
• New Style• ErgoFit – allows for height, reach, and
rise adjustment• ErgoFunction – improved control,
enhanced ergonomics and safety• Upgradeable – full suite of integrated
accessories
SmartBar Quill Stem
Part No. — — — — — — — —
Stem diameter 1“ $ $ $ $
Stem diameter 1 1/8“ $ $ $ $
Brake Compatibility 2:1 (linear pull) leverage only
Rear, 9spd ESP $ $ $ $
Rear, 8spd ESP $ $ $ $
Front, Micro Adjust $ $ $ $
Front, Index $ $ $ $
######
Shift
er
QUILL
SmartBar Clamp-On Stem
Part No. — — — — — — — —
Stem diameter 1“ $ $ $ $
Stem diameter 1 1/8“ $ $ $ $
Brake Compatibility 2:1 (linear pull) leverage only
Rear, 9spd ESP $ $ $ $
Rear, 8spd ESP $ $ $ $
Front, Micro Adjust $ $ $ $
Front, Index $ $ $ $
######
Shift
er
CLAMP

Technical Manual 200260
SMARTBARASSEMBLY ERGOFIT STEM (QUILL STEM)
Caution:The SmartBar requires a knowledgeableand trained bicycle mechanic for properinstallation and adjustment. To ensure rider safety, all stem adjust-ments should be made by a trained mechanic using a calibrated torquewrench to verify required tightening torque.
• Lightly grease the outside of the stemquill tube below the MINIMUM INSERTION mark before assembly.
• Slide the stem into the steerer tube of thefront fork making sure that it is insertedpast the ”MINIMUM INSERTION” markon the stem quill (Fig. 1).
• Align the SmartBar assembly so that the stem centerline is in line with thecenterline of the front wheel (Fig. 2).
• Rotate the elastomer quill cover upwardto allow access to the 6 mm hex wedgebolt (Fig. 3).
• Tighten the 6 mm hex wedge bolt to 20 – 30 Nm (177 – 270 in.lbs).
Caution:• Always check that the stem cannot slip
up/down or rotate in/on the steerer tubewhen the handlebars are turned.
• If the handlebars can be turned so that the stem does not line up withthe front wheel, check and re-tightenthe hex wedge bolt.
• Re-tighten and check again for properattachment and operation!
6 mm20 – 30 Nm177 – 270 in.lbs.
3
1
2
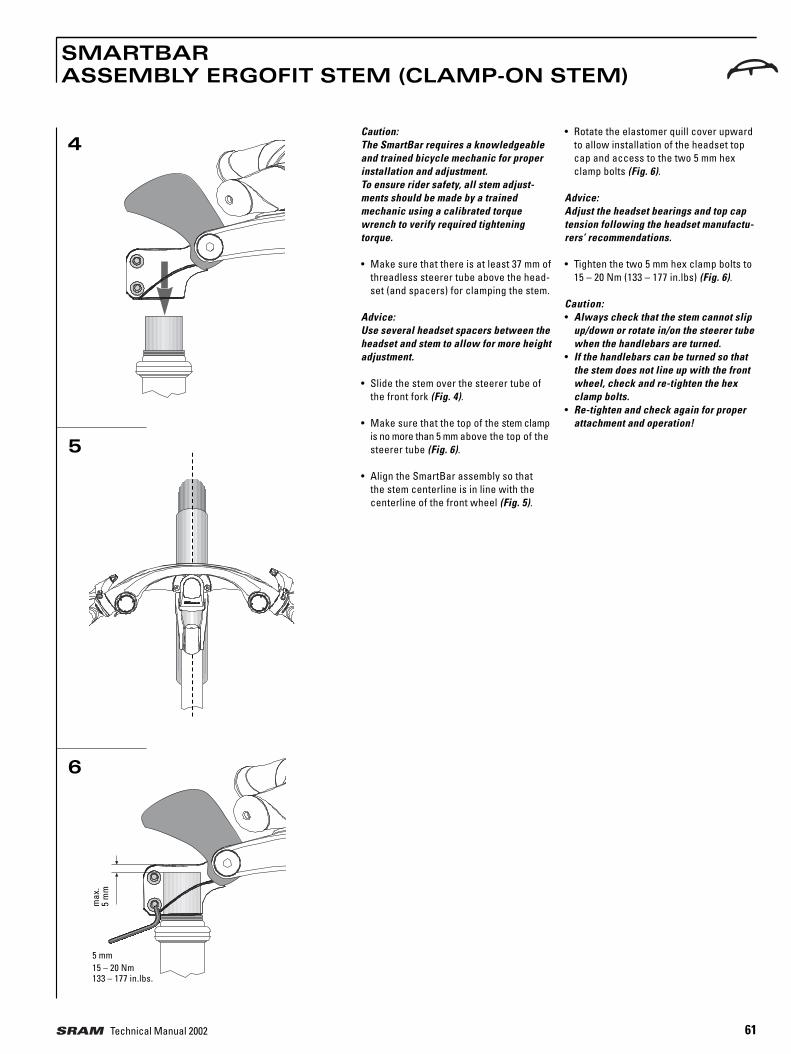
61Technical Manual 2002
SMARTBARASSEMBLY ERGOFIT STEM (CLAMP-ON STEM)
6
4
5
Caution:The SmartBar requires a knowledgeableand trained bicycle mechanic for properinstallation and adjustment. To ensure rider safety, all stem adjust-ments should be made by a trained mechanic using a calibrated torquewrench to verify required tightening torque.
• Make sure that there is at least 37 mm ofthreadless steerer tube above the head-set (and spacers) for clamping the stem.
Advice:Use several headset spacers between theheadset and stem to allow for more heightadjustment.
• Slide the stem over the steerer tube ofthe front fork (Fig. 4).
• Make sure that the top of the stem clampis no more than 5 mm above the top of thesteerer tube (Fig. 6).
• Align the SmartBar assembly so that the stem centerline is in line with thecenterline of the front wheel (Fig. 5).
• Rotate the elastomer quill cover upwardto allow installation of the headset topcap and access to the two 5 mm hexclamp bolts (Fig. 6).
Advice:Adjust the headset bearings and top captension following the headset manufactu-rers’ recommendations.
• Tighten the two 5 mm hex clamp bolts to15 – 20 Nm (133 – 177 in.lbs) (Fig. 6).
Caution:• Always check that the stem cannot slip
up/down or rotate in/on the steerer tubewhen the handlebars are turned.
• If the handlebars can be turned so thatthe stem does not line up with the frontwheel, check and re-tighten the hexclamp bolts.
• Re-tighten and check again for properattachment and operation!
max
.5
mm
5 mm15 – 20 Nm133 – 177 in.lbs.

Technical Manual 200262
SMARTBARADJUSTMENT ERGOFIT STEM (REACH ADJUSTMENT)
The ErgoFit stem has two rotating adjust-ment bolts and a ”Flip-Flop” design that allow for a very wide range of adjust-ments.
F O R E - A F T P O S I T I O N• To fine-tune the fore-aft
position of the handgrips adjust the Ergo-Fit rotation adjustments (Fig. 7).
• Loosen the two 6 mm hex adjustmentbolts just enough that the links can berotated freely.
• Rotate the main structure and links forward and down or backward and upuntil the desired fore-aft position isachieved. Choose any one of the locking positions that are evenly spaced in 15-degree increments (Fig. 8).
• Tighten the 6 mm hex rear adjustmentbolt just enough to hold the desired position.
• Rotate the main structure and grips sothat lower flat section of the main structure is nearly level with the groundand the gear indicators are clearly visible from the riding position. Locking positions are evenly spaced in 15-degree increments (Fig. 9).
• Tighten the 6 mm hex front adjustment bolt to 35 – 40 Nm (310 – 350in.lbs) (Fig. 7).
• Tighten the 6 mm hex rear adjustment bolt to 35 – 40 Nm (310 – 350 in.lbs).
Caution:• Always check that the stem rotation
adjustments cannot be rotated up ordown after tightening.
• If the handlebars can be moved up ordown or rotated forward or backwardafter tightening the adjustment bolts,check and re-tighten both the adjust-ment bolts making sure that they are inone of the locking positions.
• Re-tighten and check again for properattachment and operation!6 mm
35 – 40 Nm310 – 350 in.lbs.
6 mm35 – 40 Nm310 – 350 in.lbs.
9
7
8
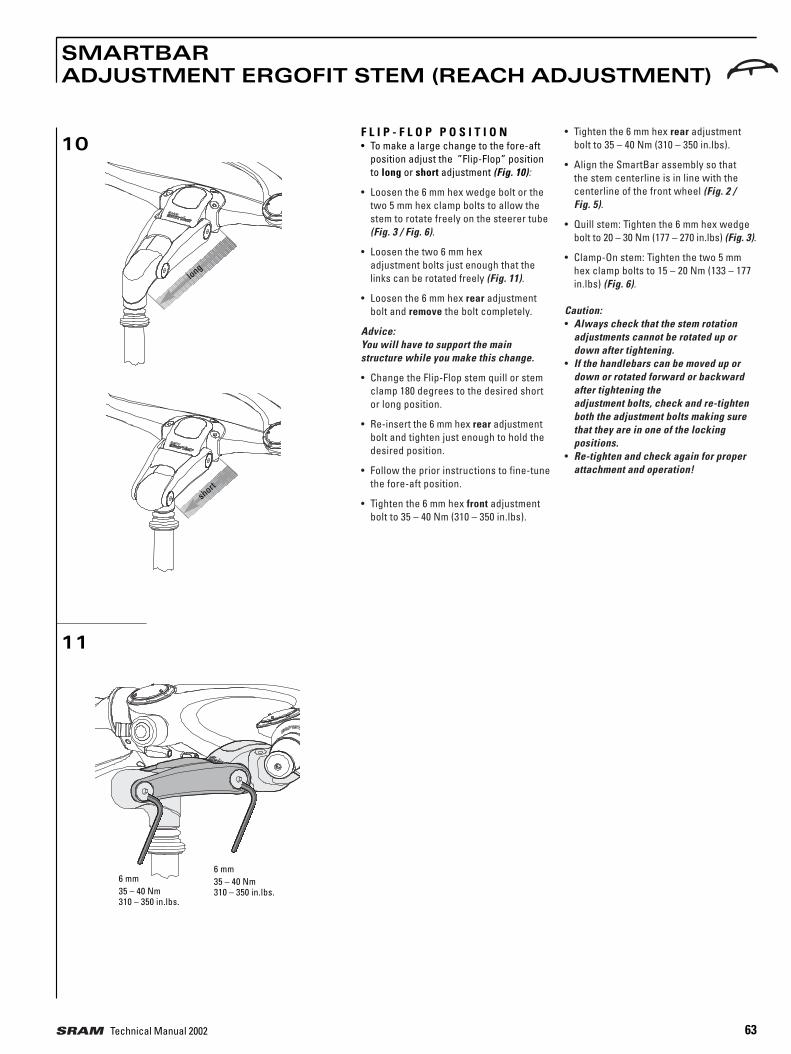
63Technical Manual 2002
SMARTBARADJUSTMENT ERGOFIT STEM (REACH ADJUSTMENT)
10
11
6 mm35 – 40 Nm310 – 350 in.lbs.
6 mm35 – 40 Nm310 – 350 in.lbs.
short
long
F L I P - F L O P P O S I T I O N• To make a large change to the fore-aft
position adjust the ”Flip-Flop” positionto long or short adjustment (Fig. 10):
• Loosen the 6 mm hex wedge bolt or thetwo 5 mm hex clamp bolts to allow thestem to rotate freely on the steerer tube(Fig. 3 / Fig. 6).
• Loosen the two 6 mm hex adjustment bolts just enough that thelinks can be rotated freely (Fig. 11).
• Loosen the 6 mm hex rear adjustmentbolt and remove the bolt completely.
Advice:You will have to support the main structure while you make this change.
• Change the Flip-Flop stem quill or stemclamp 180 degrees to the desired shortor long position.
• Re-insert the 6 mm hex rear adjustmentbolt and tighten just enough to hold thedesired position.
• Follow the prior instructions to fine-tunethe fore-aft position.
• Tighten the 6 mm hex front adjustmentbolt to 35 – 40 Nm (310 – 350 in.lbs).
• Tighten the 6 mm hex rear adjustmentbolt to 35 – 40 Nm (310 – 350 in.lbs).
• Align the SmartBar assembly so that the stem centerline is in line with thecenterline of the front wheel (Fig. 2 / Fig. 5).
• Quill stem: Tighten the 6 mm hex wedgebolt to 20 – 30 Nm (177 – 270 in.lbs) (Fig. 3).
• Clamp-On stem: Tighten the two 5 mmhex clamp bolts to 15 – 20 Nm (133 – 177in.lbs) (Fig. 6).
Caution:• Always check that the stem rotation
adjustments cannot be rotated up ordown after tightening.
• If the handlebars can be moved up ordown or rotated forward or backwardafter tightening the adjustment bolts, check and re-tightenboth the adjustment bolts making surethat they are in one of the locking positions.
• Re-tighten and check again for properattachment and operation!

Technical Manual 200264
SMARTBARADJUSTMENT ERGOFIT STEM (HEIGHT ADJUSTMENT)
6 mm20 – 30 Nm177 – 270 in.lbs.
To fine tune the up-down position of thehandgrips of a quillstem SmartBar adjustthe stem up or down on the steerer tube.
• Loosen the 6 mm hex wedge bolt (Fig. 12).
• Move the stem to the desired position upor down making sure that it is insertedpast the ”MINIMUM INSERTION” markon the stem quill (Fig. 13).
• Align the SmartBar assembly so that the stem centerline is in line with thecenterline of the front wheel (Fig. 14).
• Tighten the 6 mm hex wedge bolt to 20 – 30 Nm (177 – 270 in.lbs) (Fig. 12).
Caution:• Always check that the stem cannot slip
up/ down or rotate in/on the steerertube when the handlebars are turned.
• If the handlebars can be turned so thatthe stem does not line up with the frontwheel, check and re-tighten the hexwedge bolt or hex clamp bolts.
• Re-tighten and check again for properattachment and operation!
14
12
13

65Technical Manual 2002
SMARTBARADJUSTMENT CONTROL POD
17
15
16
5 mm6 Nm53 in.lbs.
Verify that the rotational position of thebrake levers is desired as assembled.
If no position change is required:• Insert a 5 mm hex wrench into the hole
in the end of the handgrip. Tighten the 5 mm hex bolt to 6 Nm (53 in.lbs) (Fig. 15).
If a different position is desired:• Insert a 5 mm hex wrench into the hole
in the end of the handgrip (Fig. 15). Loosen the bolt five complete turns. Thisis enough to allow the control pod to bepulled a few millimeters away from themain structure without disassembly of thecontrol pod unit.
Caution:Do NOT disassemble the control pod! The gear indication cables are set at thefactory, and improper disassembly will damage the gear indication cables andfunction.
• Pull the control pod slightly away (3 – 5 mm) from the main structure androtate to the desired position (Fig. 16).
Caution:• Do NOT rotate the control pod assembly
outside of the allowed adjustment rangeof 20 – 60 degrees down from horizontal(Fig. 17)!
• Rotating the pods beyond their allowedadjustment range will damage the gearindication cables and function.
• The pods can be adjusted in incrementsof 10 degrees within the range of 20 – 60 degrees down from horizontal.
• Once desired position is determinedtighten the 5 mm hex bolt to 6 Nm (53 in.lbs) (Fig. 15).
max. 3 – 5 mm
20°
20–60°

Technical Manual 200266
SMARTBARASSEMBLY BRAKE CABLE / BRAKE COMPATIBILITY
• Line up the barrel adjuster with the slotin the underside of the control pod housing.
• Pull on the brake lever and push the cable head through the opening in thebrake lever housing (Fig. 18).Use only new cable and housing.
• Install the cable head into the cablesocket in the brake lever (Fig. 19).
• Set up the brakes and brake pads perbrake instructions.
• Actuate each brake lever 5 – 10 timesand ensure proper operation.
Caution:All SmartBars are equipped to actuatetwo brakes with 2:1 (linear pull) leverageonly.
Using a 2 mm hex wrench. • Turn the reach adjustment screw clock-
wise to bring the lever closer to thehandgrip (Fig. 20).
• Turn the screw counterclockwise tomove the lever further away.
• Actuate each brake lever 5 – 10 timesand ensure proper operation.
Caution:• Do NOT force the screw past its normal
stop!• After any adjustment to the reach
always check the brake cable tensionto ensure proper brake system performance.
• Readjust the cable tension if necessary.
18
19
SMARTBARBRAKE LEVER REACH ADJUSTMENT
20

67Technical Manual 2002
SMARTBARASSEMBLY SHIFTER CABLE INSTALLATION
24spd and 27spd ESP systems
• Feed the cable through the cable housing and stops.
• Attach the cable to the derailleur.Use only new cable and housing.
• Adjust indexing per derailleur instructions.
7 Speed Spectro Gearhubsystems
• The cable, housing and Clickbox are pre-assembled at the factory.
Advice:When fitting the cable avoid small radius.
• See figure for cable attachment points (1, Fig. 21).
• Last attachment point is on the lower rear wheel fork (2, Fig. 21)immediately behind the chain wheel.
Advice:Cable housing must be movable inside attachment.
• CLICKBOX INSTALLATION AND ADJUSTMENT per Technical Manual /Spectro S7.
12
21
SMARTBARADJUSTMENT GEAR INDICATION
Caution: Do NOT disassemble the gear indicationdisplay!
The gear indicators and cables are set atthe factory and improper disassembly willdamage the gear indication and its function. In the event of external damageor adjustment problems not solved by thefollowing procedures, please call technicalservice for detailed repair instructions.
• Check all gears are shifting well, shiftthe derailleur or internal gear hub intothe middle gear:
Gear 4 = middle gear for 7spd internal hub
Gear 4 = 4th largest sprocket on 8spd cassette
Gear 5 = 5th largest sprocket on 9spd cassette
Gear 2 = middle chainring for front derailleurs with triple chainrings (left side gear indication).
• While holding the lockring stationaryturn the clear gear indication dome untilthe middle gear number is exactly linedup with the gear indicator needle.
• Use the three protruding tabs on the clear gear indication dome to turn thedome and the gear display beneath itwhile holding the lockring stationary(Fig. 22).
Protruding tabs Lockring
22

Technical Manual 200268
SMARTBARGRIP REPLACEMENT
5 mm6 Nm53 in.lbs.
S T A T I O N A R Y G R I P :Removal• Rotate the shifter fully in the cable
release direction. (Gear “1” on the frontshifter, gear “1” on the Spectro 7spdshifter, gear “8” on the 8spd shifter, andgear “9” on the 9spd shifter).
Caution:Do NOT disassemble the control pod!
• The gear indication cables are set at thefactory, and improper disassembly willdamage the gear indication cables andfunction.
• Insert a 5 mm hex wrench into the holein the end of the handgrip (Fig. 23).
• While pressing the twist grip toward thecenter of the handlebar, unscrew thebolt completely until the stationary gripcan be pulled straight off (Fig. 24).
Replacement• Align the flat keyed feature on the new
stationary grip assembly with the flatkeyed feature on the end of the Smart-Bar and push the grip assembly onto theSmartBar until it makes contact with thespacer tube (Fig. 24).
• Tighten the 5 mm hex bolt to 6 Nm (53 in.lbs) (Fig. 23).
T W I S T G R I P :Removal• Remove stationary grip, see left.
• Pull the spacer tube straight off theSmartBar (Fig. 24).
• Next, while pressing the control podhousing toward the center of the handlebar, slowly pull the twist gripstraight off, taking care to keep the coilspring from falling out.
Replacement• Slide new twist grip over SmartBar.
• Slide the spacer tube back onto theSmartBar and part way through the newgrip, making sure that the flange is onthe outboard side toward the stationarygrip (Fig. 24).
• Replace rear end of coil spring ontospring tab of new grip (Fig. 25).
• While sliding the grip towards the housing, align the free end of the springinto the spring cavity in the spool (already in the housing).
• Push the spacer tube all the way into thegrip assembly.
• Rotate grip forward slightly compressingthe coil spring and push the grip towardsthe housing until there is no gap between the housing and grip.
• Align the flat keyed feature on the stationary grip assembly with the flatkeyed feature on the end of the Smart-Bar and push the grip assembly onto theSmartBar until it makes contact with thespacer tube (Fig. 24).
• Tighten the 5 mm hex bolt to 6 Nm (53 in.lbs) (Fig. 23).
Stationary grip
Twistgrip
Spacer tube
Flat keyed feature
25
23
24

69Technical Manual 2002
SMARTBARCABLE CHANGE / CLEANING
28
26
27
29
2 4 S P D & 2 7 S P D E S P S Y S T E M S
Removal• Detach the cable from the derailleur.
• Cut cable off 15 cm (6”) from shifter arrel adjuster. Discard old cable andhousing.
• From the top edge pull open the cablechange hatch (1, Fig. 26).
• Rotate the shifter fully in the cable release direction. (Gear “1” on the frontshifter, gear “8” on the 8spd shifter, andgear “9” on the 9spd shifter.)
• Look for cable head and push cable up /out of the shifter and discard (Fig. 26).
Replacement• Feed the new cable through the cable
entry and out the barrel adjuster. Besure to thread the cable through thesmall hole in the spool.
• Pull the cable snug to seat the cablehead in the shifter.
• Replace the cable change hatch.
• Feed the cable through the new cablehousing and frame stops.
• Attach the cable to the derailleur.
• Adjust indexing per derailleur instructions.
7 S P E E D S P E C T R O G E A R H U B S Y S T E M S
Removal• Rotate the shifter fully in the cable
release direction. Gear position “1”.
• Do not remove the Clickbox from the axleend.
• Unscrew the barrel adjuster (2, Fig. 27)completely.
• Unscrew bolt (3, Fig. 27), remove cap (4).
• Withdraw shifter cable and clampingbolt (5, Fig. 28) upwards, loosen clampand pull clamping piece from the cable.
• From the top edge pull open the cablechange hatch (1, Fig. 26)
• Look for cable head and push cable up /out of the shifter and discard.
Replacement• Feed the new cable through the cable
entry and out the barrel adjuster.
• Pull the cable snug to seat cable head inthe shifter.
• Replace the cable change hatch.
• Feed the cable through the new cablehousing and adjusting barrel.
• Position clamping bolt at a distance of 90 mm, tighten to 1.5 Nm (13 in.lbs.) andcut off cable end to 2 – 3 mm (Fig. 29).
• Locate clamping bolt (5, Fig. 28) (screwhead not visible) and place shifter cablearound carrier cylinder (counter-clock-wise winding).
• Position cap (4, Fig. 27) and tighten with bolt (3), torque 0.35 – 0.45 Nm (3.1– 4.0 in.lbs.).
• Screw the barrel adjuster (2) completelyonto the clickbox.
• CLICKBOX INSTALLATION AND ADJUSTMENT per Technical ManualGear Hub Systems / Spectro S7.
1
C L E A N I N G• Clean all parts with soapy water only.• It is recommended that you clean the
bike in a upright position, this allows thewater to drain out correctly.
• After cleaning, if moisture does impairthe clarity of the gear indication lenscap it is not recommended to remove thelens, instead leave your bike in a warmdry room, until the moisture disappearsfrom the lens.
2 +1 mm 90 ±0,5 mm
3 42
5

Technical Manual 200370
POWER CHAINSTECHNICAL DATA /ASSEMBLY REQUIREMENTS
POWER
CHAINS
PC 99 Holow Pin1 PC 89R Holow Pin1 PC 69 PC 59 PC 49
Part No. — — — — — —
Application MTB Road MTB MTB MTB
Compatibility Front HG / EXA-Drive HG / EXA-Drive HG / EXA-Drive HG / EXA-Drive HG / EXA-Drive
Compatibility Rear HG / EXA-Drive HG / EXA-Drive HG / EXA-Drive HG / EXA-Drive HG / EXA-Drive
Max. No. of sprockets 9 only 9 only 9 only 9 only 9 only
Dimension 1/2" x 11/128" 1/2" x 11/128" 1/2" x 11/128" 1/2" x 11/128" 1/2" x 11/128"
Length 6.8 mm 6.35 mm 6.8 mm 6.15 mm 6.8 mm 6.8 mm 6.8 mm
Riveting Cross Step Cylindrical Step Cylindrical Step Step Step
Chrome Hardened Yes Yes Yes Yes Yes
Push Power 2000 N / 450 lbs. 1500 N / 340 lbs. 1500 N / 340 lbs. 1500 N / 340 lbs. 1500 N / 340 lbs.
Min. Tensile Strength 9000 N / 2023 lbs. 9000 N / 2023 lbs. 9000 N / 2023 lbs. 9000 N / 2023 lbs. 9000 N / 2023 lbs.
Weight (114 links) 297 g 284 g 290 g 271 g 297 g 297 g 297 g
External Pin Plate Silver / Nickel Plated Silver / Nickel Plated Silver / Nickel Plated Silver / Nickel Plated Grey / Polished
Internal Pin Plate Silver / Nickel Plated Silver / Nickel Plated Silver / Nickel Plated Grey / Polished Grey / Polished
Weight Reduced Yes Yes Yes
Connecting Method Power Link Gold Power Link Gold or Pin1 Power Link Gold or Pin Power Link Gold or Pin Power Link Gold or Pin
Desi
gnPi
n
POWER
CHAINS
PC 10 Saltshaker PC 10 PC 7X PC 1 Saltshaker PC 1 Ni PC 1
Part No. — — — — — —
Application MTB MTB BMX / Track Gear Hubs Gear Hubs
Compatibility Front HG HG Single Single Single Single
Compatibility Rear HG HG Single Single Single Single
Max. No. of sprockets max. 7 max. 7 1 1 1 1
Dimension 1/2" x 3/32" 1/2" x 3/32" 1/2" x 1/8" 1/2" x 1/8" 1/2" x 1/8" 1/2" x 1/8"
Length 6.9 mm 6.9 mm 8.1 mm 7.8 mm 7.8 mm 7.8 mm
Riveting Step Step Step Step Step Step
Push Power 1000 N / 225 lbs. 1000 N / 225 lbs. 1500 N / 340 lbs. 800 N / 180 lbs. 800 N / 180 lbs.
Min. Tensile Strength 9000 N / 2023 lbs. 9000 N / 2023 lbs. 11000 N / 2500 lbs. 9000 N / 2023 lbs. 9000 N / 2023 lbs.
Weight (114 links) 300 g 300 g 345 g 330 g 330 g 330 g
External Pin Plate Grey / Dacromet Brown / Annealed Gold / Gold Plated Grey / Dacromet Silver / Brown /
Internal Pin Plate Grey / Dacromet Brown / Annealed Grey / Polished Grey / Dacromet Nickel Plated Annealed
Connecting Method Power Link Grey or Pin Power Link Grey or Pin 3 pcs. Connecting Link Snap Lock or Pin Snap Lock, 3pcs Link or Pin
Desi
gnPi
n
POWER
CHAINS
PC 68 PC 58 PC 48 PC 38 Saltshaker PC 38
Part No. — — — — —
Application MTB MTB MTB MTB MTB
Compatibility Front HG / IG / PG / EXA-Drive HG / IG / PG / EXA-Drive HG / IG / PG / EXA-Drive HG / IG / EXA-Drive HG / IG / EXA-Drive
Compatibility Rear HG/HG-I/IG/PG/EXA-Drive HG/HG-I/IG/PG/EXA-Drive HG/HG-I/IG/PG/EXA-Drive HG/HG-I/IG/PG/EXA-Drive HG/HG-I/IG/PG/EXA-Drive
Max. No. of sprockets max. 8 max. 8 max. 8 max. 8 max. 8
Dimension 1/2" x 3/32" 1/2" x 3/32" 1/2" x 3/32" 1/2" x 3/32" 1/2" x 3/32"
Length 7.1 mm 7.1 mm 7.1 mm 6.9 mm 6.9 mm
Riveting Cross Step Step Step Step Step
Chrome Hardened Yes Yes Yes
Push Power 2000 N / 450 lbs. 1500 N / 340 lbs. 1500 N / 340 lbs. 1100 N / 350 lbs. 1100 N / 350 lbs.
Min. Tensile Strength 9000 N / 2023 lbs. 9000 N / 2023 lbs. 9000 N / 2023 lbs. 9000 N / 2023 lbs. 9000 N / 2023 lbs.
Weight (114 links) 307 g 307 g 307 g 300 g 300 g
External Pin Plate Silver / Nickel Plated Silver / Nickel Plated Grey / Polished Grey / Dacromet Grey / Polished
Internal Pin Plate Silver / Nickel Plated Grey / Polished Grey / Polished Grey / Dacromet Brown / Annealed
Connecting Method Power Link Silver Power Link Silver or Pin Power Link Silver or Pin Power Link Grey or Pin Power Link Grey or Pin
Desi
gnPi
n
1 Caution: Holow Pin chain connecting method: with Power Link Gold only

Technical Manual 2003 71
POWER CHAINSASSEMBLY / MAINTENANCE
P C 1 1/2 " x 1/8 "( S I N G L E A N D M U L T I -S P E E D H U B S )
Closing chain with Snap Lock: • Fit the shortened chain, bring the ends
together and connect with the Snap Lock.Place the outer plate on one pin (Fig. 6).
• Gently flex the chain until the outsideconnector plate snaps into position overthe second pin (Fig. 7).
Caution:• Make sure plate is fully seated in the
pin channel and plates are parallel toeach other.
• If movement of the connector plate isnoticed a new Snap Lock must be used.
• Always use a new Snap Lock when fitting a new chain. Failure to shortenthe chain properly or to lock it exactlyinto place may cause damage to thechain and eventually total chain failure,material damage or the rider to fall offhis bicycle resulting in injury.
P C 7 X 1/2 " x 1/8 "( B M X / T R A C K )
Closing chain: • Fit the shortened chain, bring the two
ends together and connect with thechain lock. The chain lock consists of anouter plate with pins (1, Fig. 8), an outerplate (2) and a retaining spring (3).
• Insert outer plate with pins (1) into thechain ends, attach outer plate (2) andpress chain lock together (1+2).
• Attach retaining spring (3) with the closed end of the retaining ring pointingin the direction of chain travel (Fig. 9).
• Slide retaining spring in the direction of arrow (4, Fig. 9) to engage it in thegrooves in the pins.
M A I N T E N A N C E• Regular lubrication will extend the
chain's service life.• Apply oil to the chain rollers and allow
to work in.• Clean dirty chains before oiling. Do not
use any grease-dissolving or acidicagents. Cleaning agent must be rinsedoff after a few minutes with water. Apply oil after chain is completely dried.
1 /2 " x 3/32" A N D 1/2 " x 11/128"( D E R A I L L E U R S / S I N G L EA N D M U L T I - S P E E D H U B S )
Chain length:• Shorten chain to the length specified by
the derailleur manufacturer.SRAM derailleurs: • Place chain over largest front chain-
wheel and largest rear sprocket and add2 links or 1 link + Power Link (Fig. 1).
• For rear suspension frame, position therear suspension for the greatest chainlength required.
Closing standard version with clamping pin:• Fit chain, bring the two ends together
and press pin (Fig. 2) through with assembly tool. The pin must extend bythe same amount at both outer plates. Itmust be possible to move the connectinglink slightly.
• The use of the SRAM assembly plier(Part No. 00 2799 980 001) is recommen-ded for PC 68, PC 58 and PC 48.
Power Link connecting links:Caution:• Use only as specified, to avoid material
damage or the rider to fall off his bicycleresulting in injury.
• Use only Power Link Gold for closingHolow Pin chain versions (no pin).
Closing: • Fit chain, bring the ends together and
insert both halves of the Power Link intothe chain ends. (Fig. 3)
• Press both halves of the Power Link together (Fig. 4) and lock in place bypulling the chain apart. (Fig. 5)
Opening:• Press both plates of the Power Link
together (Fig. 4) while sliding the chainends together (unlock). Remove the twohalves of the link from the chain ends.
Caution: Always use a new Power Link when fitting a new chain. Failure to shorten thechain properly or to lock it exactly intoplace may cause damage to the chain andeventually total chain failure, materialdamage or the rider to fall off his bicycleresulting in injury.
1
2
3
4
5
6
7
8
9
Power Link Grey grey colouredfor PC 38, PC 10
Power Link Silver silver colouredfor PC 68, PC 58, PC 48
Power Link Gold gold colouredfor PC 99, PC 89R, PC 69, PC 59, PC 49
+(2 Links)
4
1
2 3

72
NOTICES
Technical Manual 2003

73
NOTICES
Technical Manual 2003

74
NOTICES
Technical Manual 2003

75
NOTICES
Technical Manual 2003

76
NOTICES
Technical Manual 2003

77
NOTICES
Technical Manual 2003

78
SUPPORTDISTRIBUTORS
Technical Manual 2003
USA EUROPE
Action Bicycle USA217 Washington Ave - ACarlstadt, NJ 07072Ph: 1.800.284.2453Ph: 201.804.9090www.actionbicycleusa.com
Bicycle Tech International3201B Richards LaneSante Fe, NM 87505Ph: 1.800.558.8324Ph: 505.473.0011www.bti-usa.com
DownEast Bicycle SpecialistsPorter RoadFryeburg, ME 04037Ph: 1.800.242.1043Ph: 207.935.4242www.debike.com
Giant Bicycle, Inc.3287 Old Conejo RdNew Bury Park ,CA 91320Ph: 1.800 US GIANTPh: 805.267.4600www.giant-bicycle.com
G. Joannou151 Ludlow AveNorthvale, NJ 07647Ph: 201.768.9050www.jamisbikes.com
Hans Johnsen Company8901 Chancellor RowDallas, TX 75248Ph: 1.800.879.1515Ph: 214.879.1550www.hjc.com
The Hawley CompanyOne Hawley DriveLexington, SC 29074Ph: 1.800.822.1980Ph: 803.359.3492www.hawleyusa.com
J&B Importers, Inc.11925 S W 128th StMiami, FL 33116Ph: 1.800.666.5000Ph: 305.238.1866www.jbimporters.com
KHS Inc.2840 East HarcourtRancho Dominguez, CA 90221Ph: 1.800.347.7854Ph: 310.632.7173www.bicyclesusa.com
Lexco2738 W BelmontChicago, IL 60618Ph: 1.800.626.6556Ph: 773.588.8890
The Merry Sales Company1415 San Mateo AveSan Francisco, CA 94080Ph: 1.800.245.9959Ph: 650.871.8870www.merrysales.com
Olympic Cycle Supply5711 W Douglas AveMilwaukee, WI 53218Ph: 1.800.236.8380Ph: 414.461.8380www.olympicsupplycompany.com
Quality Bicycle Products6400 West 105th StBloomington, MN 55438Ph: 1.800.346.0004Ph: 952.941.9391www.qbp.com
Raleigh Bicycle Co., USA22710 72nd Ave SKent, WA 98032Ph: 1.800.222.5527Ph: 253.395.1100www.raleighusa.com
Seattle Bike Supply7620 South 192ndKent, WA 98032Ph: 1.800.955.2453Ph: 425.251.1516www.redlinebicycles.com
Security Bicycle32 Intersection StHempstead, NY 11550Ph: 1.800.645.2990Ph: 516.485.6100
Sinclair Imports2775 Highway 40Verdi, NV 89439Ph: 1.800.654.8052Ph: 702.345.0600www.sinclairimports.com
Trek Bicycle Corporation801 W Madison StWaterloo, WI 53594Ph: 1.800.369.8735Ph: 920.478.2191www.trekbikes.com
United Bicycle Parts691 Washington StAshland, OR 97520Ph: 1.800.482.1984Ph: 541.488.1984www.ubike.com
Wilson Bicycle Sales31157 Wiegman RdHayward, CA 94544Ph: 1.800.877.0077Ph: 510.471.7520www.wilsonbike.com
A U S T R I AKTM Fahrrad GmbHHarlochnerstrasse 135230 MattighofenPh: +43 7742 4091 0FX: +43 7742 4091 72e-mail: [email protected]
B E L G I U MTransmission S.A.Boulevard du Centenaire 41325 Dion-ValmontPh: +32 10 24 46 46FX: +32 10 24 47 77
C Z E C H R E P U B L I CVokolek ImportSezimova 12146 00 Praha 10Ph: +420 2 41 74 07 12Fx: +420 2 41 74 23 93e-mail: [email protected]
ZitnyCeskobratrske Nam. 13329301 Mlada BoleslavPh: +420 326 722214Fx: +420 326722214
D E N M A R KDan Agentur ApSStationsvej 775792 ÅrslevPh: +45 65 99 24 11Fx: +45 65 99 28 42e-mail: [email protected]
E S T O N I ABalti Autoosade ASMustamäe tee 18A10617 TallinnPh: +372 6 200 600Fx: +372 6 200 699
F I N L A N DJ. Syväranta OyNervanderinkatu5E 47 / PL 64F-00101 HelsinkiPh: +358 9 434 2030Fx: +358 9 493 890
F R A N C ESAVOYE SARue de I’industrie01470 Serrières de BriordPh: 33 474 36 13 77Fx: 33 474 36 15 14e-mail: [email protected]
G E R M A N YEpple Zweirad GmbHMittereschweg 187700 MemmingenPh: +49 8331 751411Fx: +49 8331 751450e-mail: [email protected]
Hermann Hartje KGDeichstrasse 120-12227318 Hoya/WeserPh: +49 4251 811 240Fx: +49 4251 811 249e-mail: [email protected] Hotline: 0180-3772633
G R E E C EGatsoulis Imports8 Thessalonikis Street14342 New Filadelfia-AthensPh: +30 1 251 2779Fx: +30 1 253 3960
H U N G A R YBiker Kft.Gyepsor u.11211 BudapestPh: +36 1 278 10 20Fx: +36 1 278 10 23e-mail: [email protected]
I C E L A N DÖrninn Hjól HFCeskobratrske Nam. 133IS-108 ReykjavikPh: +354 5889890Fx: +354 5889896e-mail: [email protected]
I T A LYA.M.G. s.r.l.Via Piave 1023871 Lomagna (Como)Ph: +39 039 5301167Fx: +39 039 9220270
L A T V I AVeloserviss Ltd111 Brivbas Str1005 RigaPh: +371 750 1292Fx: +371 750 1298e-mail: [email protected]
N E T H E R L A N D SKoch Kleeberg B.V.Dukdalfweg 251332 BJ AlmerePh: +31 36 5320504Fx: +31 36 5322548e-mail: [email protected]

79
SUPPORTDISTRIBUTORS
Technical Manual 2003
!
CANADA
Kempter Marketing (KMI)1271 St. LouisSt. Lazare, PQ J7T1Z9Ph: 450.424.4600Fx: 450.424.5828www.kmi.ca
Norco Products Limited1465 Kebet WayPort Coquitlam, BC V3C6L3Ph: 1.800.521.9088Ph: 604.552.2930Fx: 604.552.2931www.norco.com
JAPAN
Kawashima Cycle Supply Corp.No. 4-2-4 Kushiya-Cho Nigashi,Sakai, Osaka 590-0944Ph: +81 722 38 6126Fx: +81 722 21 4379
KOREA
Highland Sports, Ltd.1006, Deechi-3 Dong, Kangnem-KuSeoulPh: +822 553 2667Fx: +822 553 2669
SOUTH AFRICA
Cape Cycle Systems (PTY) LTD.10/12 Argo Road, Wetton7780 Cape TownPh: +27 21 761 3528Fx: +27 21 761 5914
AUSTRALIA
Groupe Sportif Pty. Ltd.20 Harker StreetBurwoodVictoria 3125Ph: +03 9888 9882FX: +03 9888 9902
BRAZIL
Pedal Power BrazilR. Gomes de Carvalho S41Sao Paulo SP04547 002Ph: +5511 38467720FX: +5511 38456377
CARRIBEAN
X-Trimulti Sports530 Ponce De Leon AvenueSan JuanPuerto Rico 00901-2304Ph: +787 289 8122Fx: +787 289 8773
SINGAPORE
Boon Bike Supply488 Changi RoadSingapore 419898Ph: +65 242 8488Fx: +65 242 8488
NEW ZEALAND
Cycle Supplies17A Brockworth Pl RicartonChristchurch, 0000Ph: +64 3 332 3622Fx: +64 3 332 3243
PHILLIPINES
VeloCity-DaDa2195 Leverizza St. Unit #iCartimar, Pasay CityPh: +632 832 2352Fx: +632 820 2626e-mail: [email protected]
Vertex Cycle Systems BVDelfweg 122211 VM NoordwijkerhoutPh: +31 252 340611Fx: +31 252 345030www.vertexcs.nl
N O R W A YStians Sport A.S.Disenåveien 262100 SkarnesPh: +47 6296 6020Fx: +47 6296 6021e-mail: [email protected] Hotline: +47 62 96 70 20
P O L A N DHARFA-HARRYSON Henryk CharuckiUl. Ks. Witolda 4850-203 Wroclaw,Ph: +48 713721570Fx: +48 713278092e-mail: [email protected]
P O R T U G A LCiclo CoimbresParca Manuel Da Silva Reis 1224400 Vila Nova de GaiaPh: +351 23 79 4461Fx: +351 23 06 163
R U S S I ATRIATLON ‘Velomir’Lusinovskaya Ul 53/12113096 MoscowPh: +7 095 237-8463Fx: +7 095237-8463
S L O V A K I AEXCELIA s.r.o.Trencianska 764/409018 51 Nova DubnicaPh: +421 827 430034Fx: +421 827 430034
S L O V E N I AProloco Trade d.o.o.Britof 96A4000 KranjPh: +386 4 280 2000Fx: +386 4 280 2022e-mail: [email protected]
S P A I NCasa Masferrer, s.a.Pol. Ind. Congost. AvenidaSan Julian s/nE-08400 Granollers (Barcelona)Ph: +34 9 3846 6051Fx: +34 9 3846 5356e-mail: [email protected]
S W E D E NVartex ABBatterivägen 1443232 VarbergPh: +46 340 64 60 00Fx: +46 340 61 11 90e-mail: [email protected]
S W I T Z E R L A N DAmsler & CO AGLindenstraße 168245 FeuerthalenPh: +41 52 647 36 36Fx: +41 52 647 36 66e-mail: [email protected] Hotline: +41 52 647 36 36
U N I T E D K I N G D O MFisher Outdoor Leisure PlcUnit 8/9 Brick Knoll ParkAshley Road Industrial EstateAshley RoadSt. Albans, HertfordshireAL1 5UGFx: +44 1727 798345Fx: +44 8009 807129

80
SUPPORTWHO TO CALL / SRAM WARRANTY / SPARE PARTS
Technical Manual 2003
!
WARRANTY
1. SRAM settles warranty claims accor-ding to the legal EU regulations effectiveas of 01.01.2002, alternatively accordingto the legal regulations of the respectivecountry.
2. Any other warranty claims not includedin this statement are void. This especially includes any disassembly orassembly costs (for instance by the dealer), which shall not be covered bySRAM.
3. Warranty claims are only valid upon presentation of a proper proof ofpurchase.
4. Parts subject to normal wear and tear(for example brake sleeves, brake pads,chains, sprockets, shifter cables, handlebar grips etc.) and damage whichis caused by improper use, specificallycaused by disregard for our assemblyand operating instructions, shall not be covered by this warranty. Furthermore,
this warranty shall not cover damagescaused by the use of parts of different manufacturers or otherwise which arenot compatible or suitable resp. not authorized by SRAM for use with SRAMcomponents.
5. If a defect is discovered, please contactthe dealer where the bicycle or theSRAM component in question waspurchased.
WHO TO CALL
In warranty cases or need of technical support help, please contact the appropriate locations.
NORTH AMERICA
Dealer Helpdesk Number:
( 8 0 0 ) - 3 4 6 - 2 9 2 8
EUROPE
Please contact your local distributor.
SPARE PARTS SRAM ORIGINAL PARTS
You can find an extensive spare partsprogram in SRAM’s Spare Parts List Model Year 2003 · Publ. Number 8503.
Caution: Installation of parts and accessories not originally intendedcould result in less than optimal performance and/or injury.


WORLD HEADQUARTERSChicago, Illinois U.S.A.SRAM Corporation1333 North Kingsbury, 4th floorChicago, Illinois 60622phone: +1-312-664-8800fax: +1-312-664-8826
EUROPEAN HEADQUARTERSAmersfoort, The NetherlandsSRAM EuropeBasicweg 12-D3821 BR AmersfoortThe Netherlandsphone: +31-33-450-6060fax: +31-33-457-0200
ASIAN HEADQUARTERSTaichung, TaiwanSRAM TaiwanNo. 1598-8 Chung Shan RoadShen Kang Hsiang, TaichungCounty 429Taiwan R.O.C.phone: +886-4-2561-3678fax: +886-4-2561-3686
www.sram.com