technics sp-15 (manual) - the library of...
TRANSCRIPT
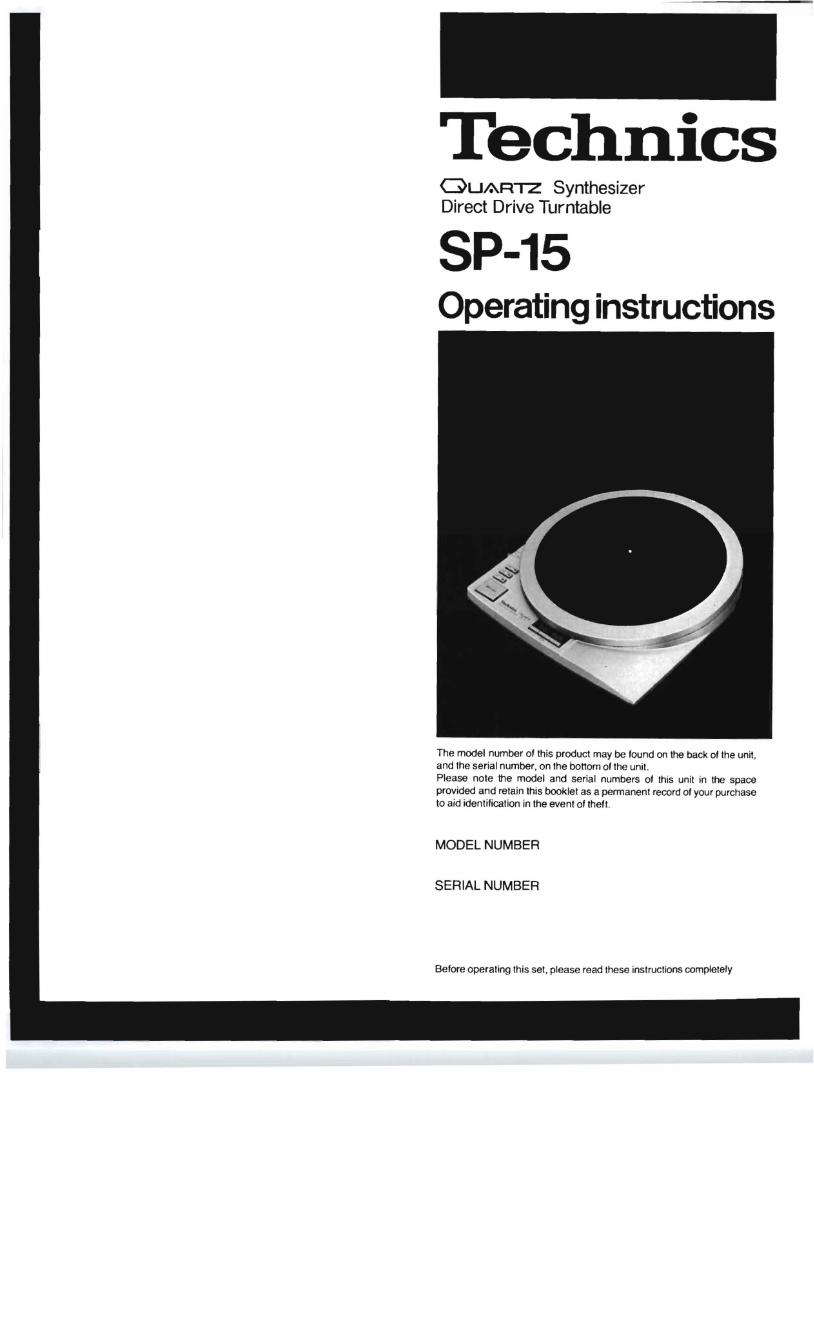
Technics OUAR"TZ Synthesizer Direct Drive Turntable
SP-15 Operating instructions
The model number of this product may be found on the back of the unit, and the serial number, on the boHom of the unit. Please note the model and serial numbers of this unit in the space provided and retain this booklet as a permanent record of your purchase to aid identification in the event of theft .
MODEL NUMBER
SERIAL NUMBER
Before operating this set, please read these instructions completely
We want to thank you for selecting the SP-1S. For optimum performance, we recommend that you read these instructions carefully.
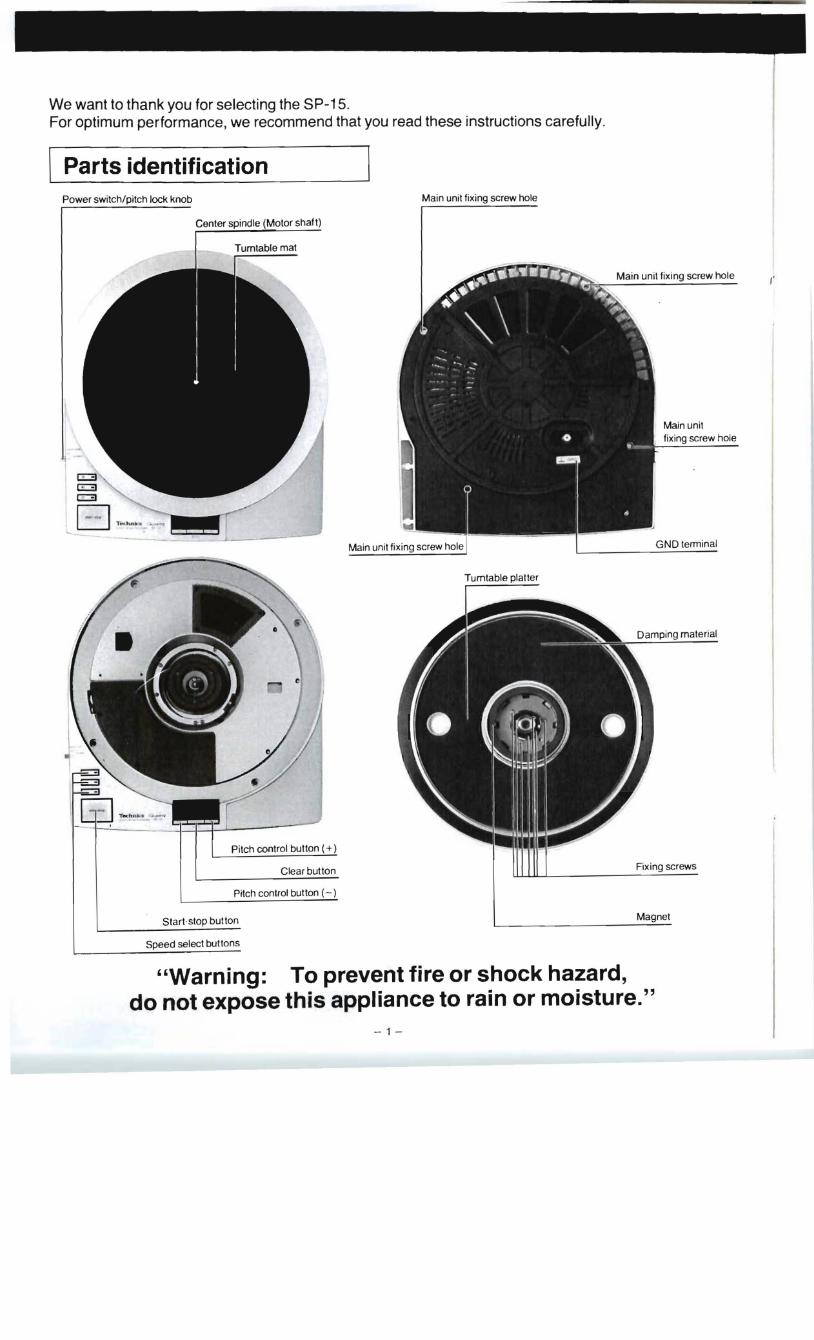
Parts identification Power switch/pitch lock knob Main unit fixing screw hole
,.
c:::::3 c:::::3 c::3
B ~~~~_
Damping material
Fixing screws
Magnet
"Warning: To prevent fire or shock hazard, do not expose this appliance to rain or moisture."
- 1
Main unit fixing screw hole
GND terminal
Turntable plaller
~-L--~
Pitch control button
Clear button
Pitch control button (- )
Start button
Speed select buttons
[L-_B_e_fo-r-e-u-s-e--------'I
Caution: .Never connect the AC power plug before assembly has been
completed . • Attach the dust cover last, so that assembly and adjustments can
be made most conveniently .
• Checklist of parts Turntable unit. Turntable platter .... . ... .
r Turntable mat 45-rpm adaptor ..... .. . . . . Main unit fixing screw . . . . .. , .. . 4 Ground wire (GNO) ... . . . . .. . . .. . . . .. . ... . .. . . . . ... .. . .... 1 Installation diagram . . . . . . . . . . . . . . . . . . . . 1
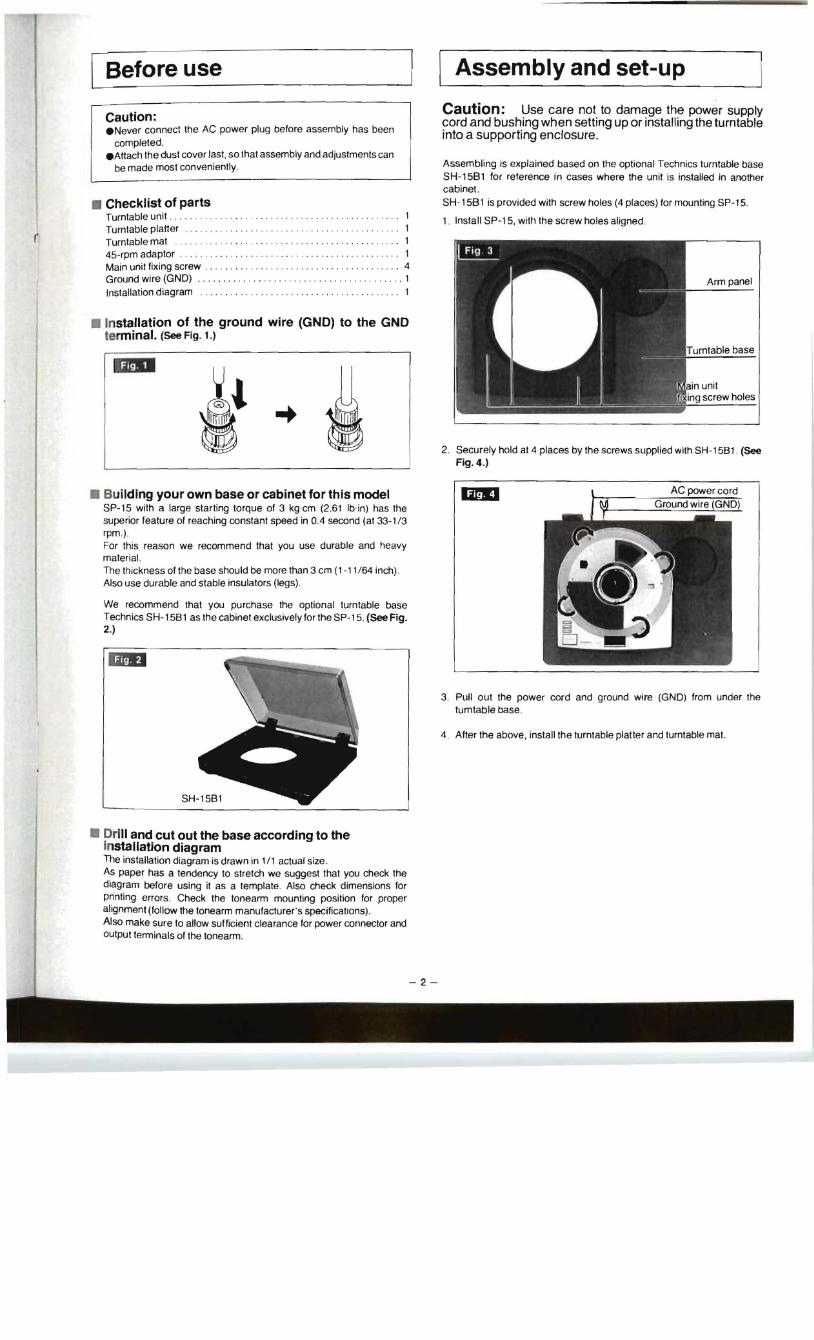
• Installation of the ground wire (GND) to the GND terminal. (See Fig. 1.)
Gil
• Building your own base or cabinet for this model SP-15 with a large starting torque of 3 kg·cm (2.61 Ib·in) has the superior feature of reaching constant speed in 0.4 second (at 33-1 /3 rpm .). For this reason we recommend that you use durable and heavy material. The thickness of the base should be more than 3 cm (1-11 /64 inch). Also use durable and stable insulators (legs).
We recommend that you purchase the optional turntable base Technics SH-15B 1 as the cabinet exclusively for the SP-15. (See Fig. 2.)
• Drill and cut out the base according to the Installation diagram The installation diagram is drawn in 1/1 actual size. As paper has a tendency to stretch we suggest that you check the diagram before using it as a template. Also check dimensions for printing errors. Check the tonearm mounting position for proper alignment (follow the tonearm manufacturer's specifications). Also make sure to allow sufficient clearance for power connector and output terminals of the tonearm.
I Assembly and set-up
Caution: Use care not to damage the power supply cord and bushing when setting up or installing the turntable into a supporting enclosure.
Assembling is explained based on the optional Technics turntable base SH-1581 for reference in cases where the unit is installed in another cabinet. SH-1581 is provided with screw holes (4 places) for mounting SP-15.
1. Install SP-15, with the screw holes aligned.
2. Securely hold at 4 places by the screws supplied with SH-15Bl . (See Fig. 4.)
3. Pull out the power cord and ground wire (GNO) from under the tumtable base.
4. After the above, install the turntable platter and turntable mat.
'--C_o_n_n_e_c_ti_o_n_s_____----ll • Connect the AC power plug
Connect the AC power plug to an AC wall socket , Connect the ground wire (GND) to "GND" of the amplifier or receiver,
• Connect the output terminals Note: Be sure to connect the ground terminal firmly to the amplifier or receiver. If this connection is not made or is loose, a power source "HUM" will result .
I Placement • Place the unit in a stable and horizontal position, where there is
little or no vibration.
• Locate the unit as far away from the speakers as possible and isolate the unit from sound radiation from them.
• Do not place the unit where it is exposed to direct sun, dust, moisture or heat.
• Keep it in a well ventilated place.
• When a radio is placed too close to the turntable and is played While the turntable is in operation, Interference with AM reception may result.
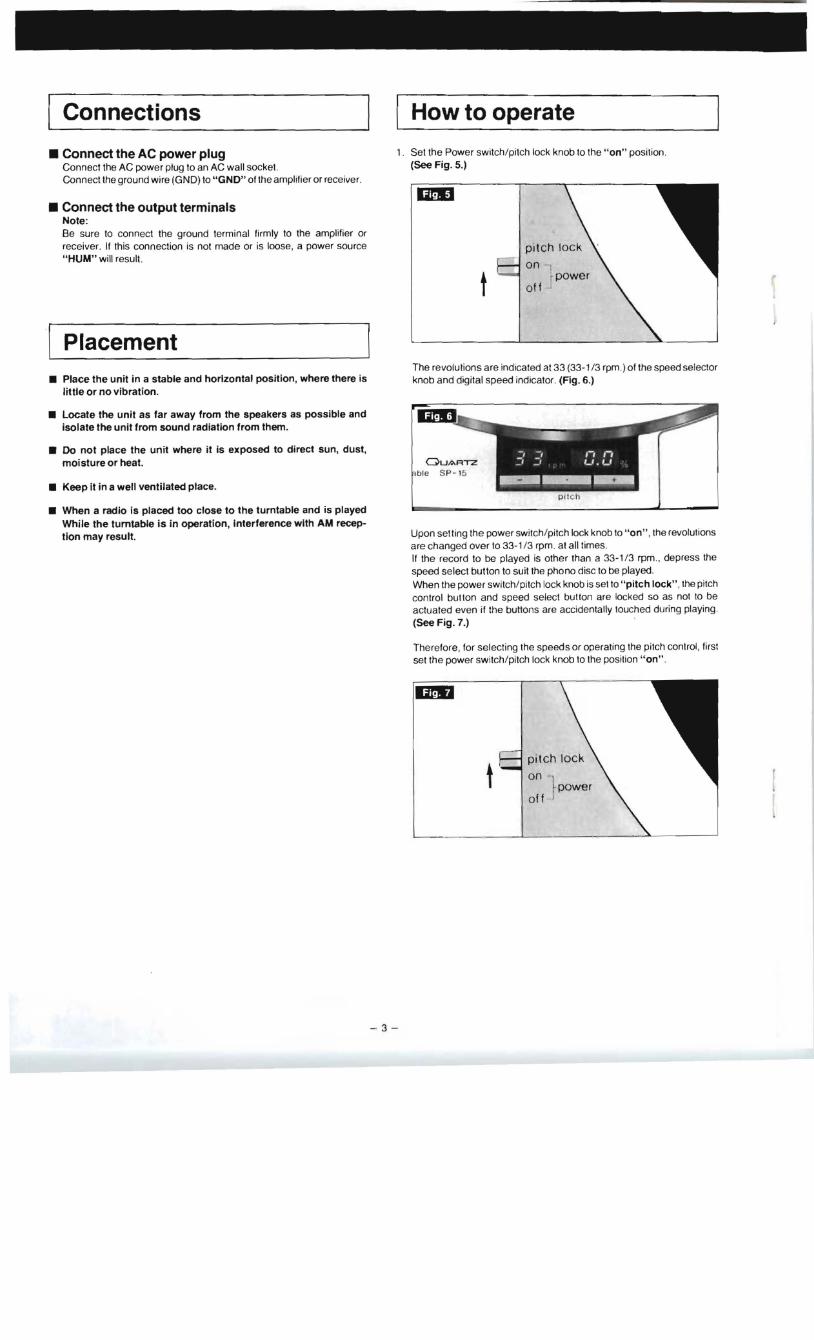
I How to operate 1. Set the Power switch/pitch lock knob to the "on" position ,
(See Fig. 5.)
t pitch lock
on .... ~ power
oft
The revolutions are indicated at33 (33-1 /3 rpm.) of the speed selector knob and digital speed indicator. (Fig. 6.)
r
Upon setting the power switch/pitch lock knob to " on" , the revolutions are changed over to 33-1 / 3 rpm. at all times. If the record to be played is other than a 33-1 / 3 rpm" depress the speed select button to suit the phono disc to be played. When the power switch/pitch lock knob is set to "pitch lock", the pitch control button and speed select button are locked so as not to be actuated even if the buttons are accidentally touched during playing , (See Fig. 7.)
Therefore, for selecting the speeds or operating the pitch control, first set the power switch/pitch lock knob to the position "on" ,
pitch lock
on -1 f- pOwert
off .]
- 3
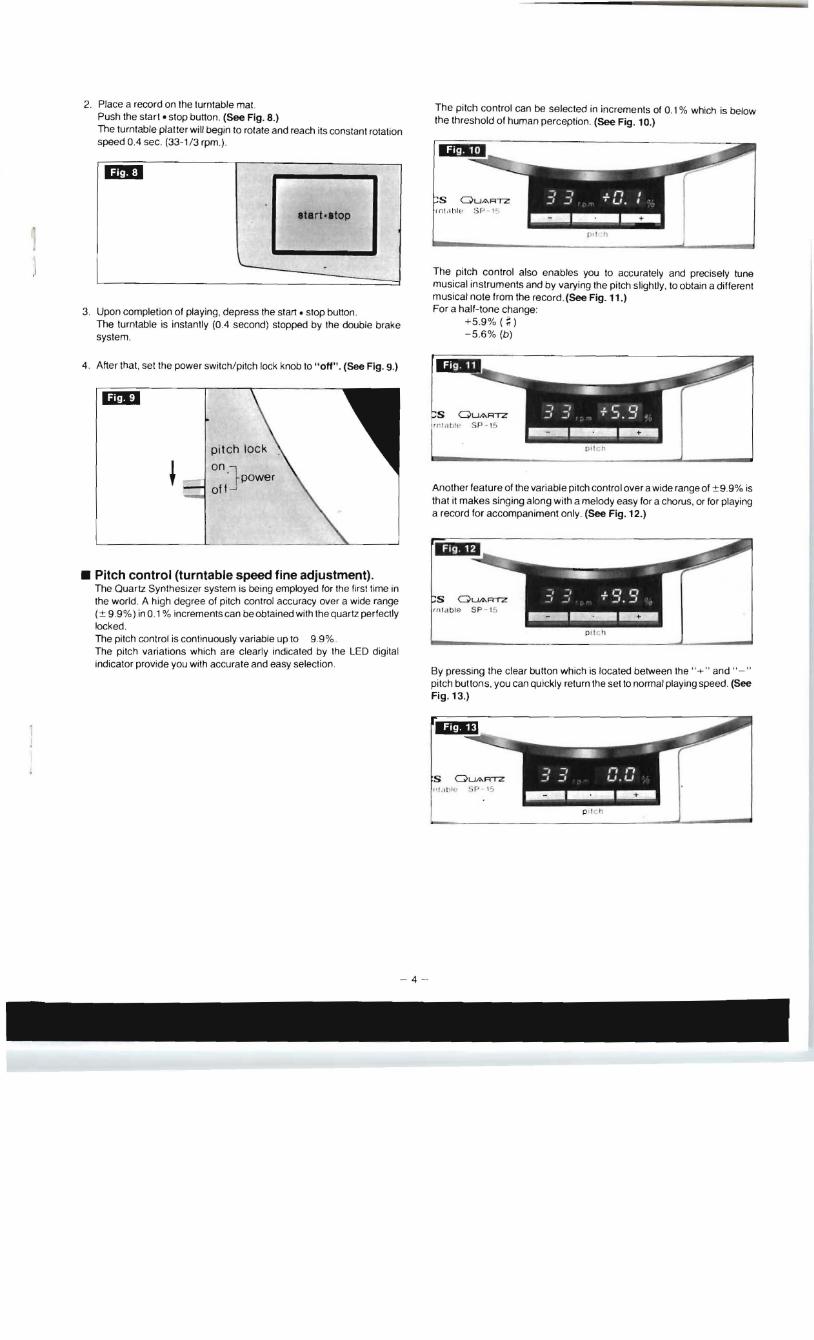
2. Place a record on the turntable mat. The pitch control can be selected in increments of 0.1 % which is below Push the start· stop butlon. (See Fig. 8.) the threshold of human perception. (See Fig. 10.) The turntable platter will begin to rotate and reach its constant rotation speed 0.4 sec. (33-1/3 rpm.).
start·atop
The pitch control also enables you to accurately and precisely tune musical instruments and by varying the pitch slightly , to obtain a different musical note from the record .(See Fig. 11.) For a half-tone change:
+5.9% (;) 3 . Upon completion of playing , depress the start. stop button .
The turntable is instantly (0.4 second) stopped by the double brake system. -5.6% (b)
4 . After that, set the power switch/pitch lock knob to "off". (See Fig. 9.)
on l . , power
off ~
• Pitch control (turntable speed fine adjustment). The Quartz Synthesizer system is being employed for the first time in the world . A high degree of pitch control accuracy over a wide range (± 9 .9 % ) in 0.1 % increments can be obtained with the quartz perfectly locked. The pitch control is continuously variable up to 9.9 % . The pitch variations which are clearly indicated by the LED digital indicator provide you with accurate and easy selection .
Another feature of the variable pitch control over a wide range of ±9.9% is that it makes singing along with a melody easy for a chorus, or for playing a record for accompaniment only . (See Fig. 12.)
By pressing the clear butlon which is located between the"+ " and" -" pitch buttons. you can quickly return the set to normal playing speed. (See Fig. 13.)
OU/.\RTZ , p - 15 Ill" I}I I '
-4
Notes and maintenance
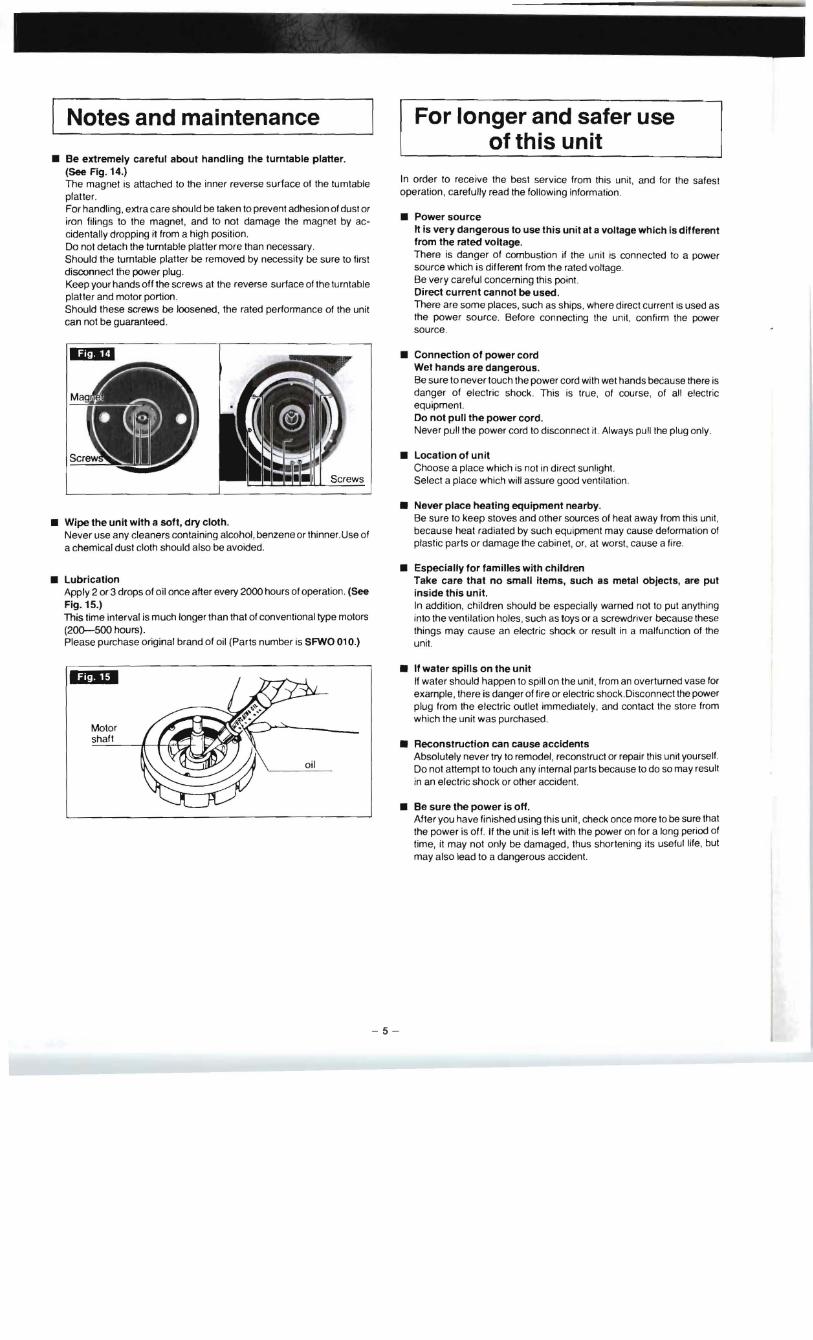
• Be extremely careful about handling the turntable platter. (See Fig. 14.) The magnet is attached to the inner reverse surface of the tumtable platter. For handling, extra care should be taken to prevent adhesion of dust or iron filings to the magnet, and to not damage the magnet by accidentally dropping it from a high position. Do not detach the turntable platter more than necessary. Should the tumtable platter be removed by necessity be sure to first disconnect the power plug. Keep your hands off the screws at the reverse surface olthe tu rntable platter and motor portion . Should these screws be loosened, the rated performance of the unit can not be guaranteed.
• Wipe the unit with a soft, dry cloth. Never use any cleaners containing alcohol, benzene or thinner. Use of a chemical dust cloth should also be avoided.
• Lubrication Apply 2 or 3 drops of oil once after every 2000 hours of operation . (See Fig. 15.) This time interval is much longer than that of conventional type motors (200--500 hours). Please purchase original brand of oil (Parts number is SFWO 01 0.)
Uif,
Motor shaft
For longer and safer use of this unit
In order to receive the best service from this unit, and for the safest operation, carefully read the following information.
• Power source It is very dangerous to use this unit at a voltage which is different from the rated voltage. There is danger of combustion if the unit is connected to a power source which is different from the rated voltage. Be very careful concerning this point. Direct current cannot be used. There are some places, such as ships, where direct current is used as the power source. Before connecting the unit, confirm the power source.
• Connection of power cord Wet hands are dangerous. Be sure to never touch the power cord with wet hands because there is danger of electric shock . This is true, of course, of all electric equipment. Do not pull the power cord. Never pull the power cord to disconnect it. Always pull the plug only.
• Location of unit Choose a place which is not in direct sunlight. Select a place which will assure good ventilation.
• Never place heating eqUipment nearby. Be sure to keep stoves and other sources of heat away from this unit, because heat radiated by such equipment may cause deformation of plastic parts or damage the cabinet, or, at worst, cause a fire.
• Especially for families with children Take care that no small items, such as metal objects, are put inside this unit. In addition, children should be especially warned not to put anything into the ventilation holes, such as toys or a screwdriver because these things may cause an electric shock or result in a malfunction of the unit.
• If water spills on the unit If water should happen to spill on the unit, from an overturned vase for example, there is danger of fire or electric shock .Disconnect the power plug from the electric outlet immediately, and contact the store from which the unit was purchased .
• Reconstruction can cause accidents Absolutely never try to remodel, reconstruct or repair this unit yourself. Do not attempt to touch any internal parts because to do so may result in an electric shock or other accident.
• Be sure the power is off. After you have finished using this unit, check once more to be sure that the power is off. If the unit is left with the power on for a long period of time, it may not only be damaged, thus shortening its useful life, but may also lead to a dangerous accident.
-5
Features
• Quartz synthesizer system that for the first time in the world has made it possible to achieve a digital pitch control of ± 9.9% in 0.1 % increments In conventional quartz players the quartz reference was in effect only within strictly limited ranges: whenever vernier speed change was required, the quartz circuit had to be switched off . In the Technics SP-15, we took the lead by locking the quartz, thus making it possibte to effect a high degree of pitch control accuracy over a range as wide as ± 9.9% in 0.1 % increments, which is below the threshold of human perception. Moreover, the pitch control , coupled with the clear digital indicator, enables you to accurately and preCisely tune with musical instruments, vary pitch slighlly for obtaining a musical note from a record or aller tones by a half-note .
• Oversized turntable that cuts off and absorbs external vibrations. Based on analyses of the turntable vibration modes and vibrations in the sound range, a special viscoelastic material is applied to the reverse surface of the turntable plaller for deadening. The deadening material is applied to the undersurface and outer periphery of the turntable plaller, with the rubber turntable mat on the surface sellied into the turntable plaller. This design is superior in acoustic characteristics even at high sound levels through elimination of turntable resonance and absorption of external vibration . Moreover, the oversized aluminum die-casl turntable plaller , 339 cm (13-11/32") in diameter, is heavy with 2.7 kg (5.9Ib.)of its own weight , with a moment of inertia of 380 kgcm2 (130 lb· in' ) for large heavy weight class design.
• Vibration damping structure by the preCision aluminum die-cast cabinet and TNRC. The acoustical characteristics of the player system are inevitably affected by the turntable plaller and cabinet employed. The SP-15 adopts an aluminum die-cast cabinet superior in strength , with high processing accuracy, and the new acoustic material TNRC excellent in acoustical properties . Through culling-off and absorption of external vibrations, the unit is designed for improved acoustic characteristics , with susceptibility to feedback minimized.
• Electronic circuits of more than 3,000 discrete elements concentrated into 41Cs The 4 kindsof IC , i.e. , Synthesizer pitch control CMOS LSI (MN 6042), Frequency dividing IC employing 12L, ECL (DN 8OO), phase speed control IC (AN 660) and Driving IC (AN 640) into which high density electronic circuits of more than 3,000 discrete elements have been compressed have made it possible to produce this high precision quartz turntable.
• Quartz Controlled Rotation Accuracy The SP-15 utilizes the oscillation of a quartz crystal as a reference signal or source. This oscillation is not affected by temperature change or power fluctuations. By synchronizing the rotation of the turntable plaller accurately to the reference signal, speed drift of the unit is held within ± 0.002% .
• Technics' unique motor construction in which the rotor of the motor is integrally formed with the turntable
• High torque motor of 3 kg. cm with starting time of 0.4 second is capable of instant speed change-over (at 33-1/3 rpm.).
• With the double braking system of the electronic brake and mechanical brake, the turntable stops instantly (0.4 second) upon depression of the start· stop button (at 33-1/3 rpm.)
• High performance with wow and flutter of only 0.025% (JIS C5521) and rumble of -78 dB (IEC 98A Weighted).
• Pitch I.ock mect:'anism capable of locking the speed selection and pitch control operation Malfunction caused by accidental touching of the operating portion during playing, can be prevented.
• Highly efficient pulse power supply circuit is employed for the DC power source Since DC voltage is obtained by oscillating high frequency (20 kHz) through direct rectification of AC power supply for voltage conversion althe pulse transformer, there is no leakage of the commercial power source frequency.
• Stable and positive mechanism that can stand frequent use for business use, etc. and a switch section with point contacts. Revolutions at3 speeds of 33-1/3, 45 and 78.26 rpm. are employed, taking into account business use.
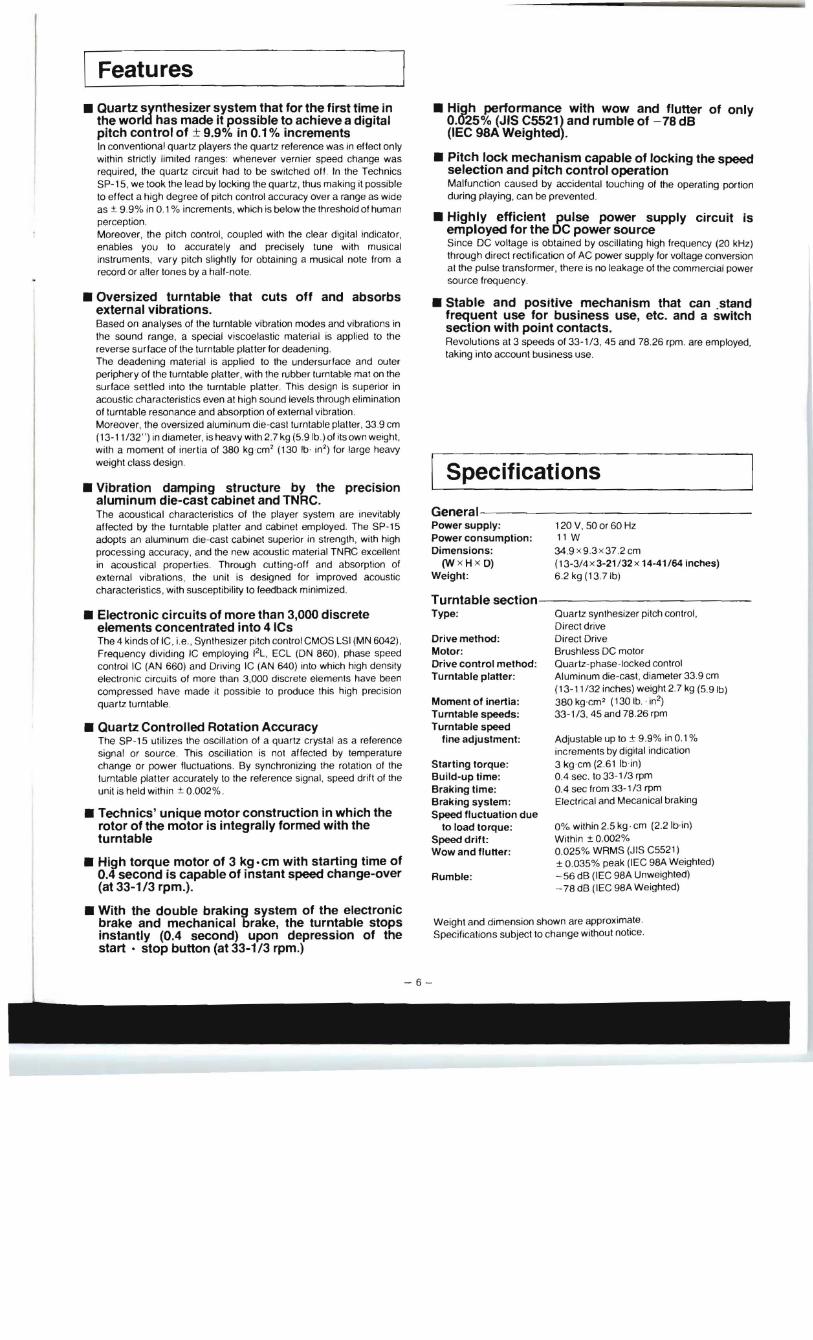
Specifications
General----------------------------------Power supply: 120 V, 50 or 60 Hz Power consumption: I1W Dimensions: 34 .9 x 9.3 x 37 .2cm
(W x H x D) (13-3/4 X 3-21 /32 x 14-41/64 inches) Weight: 6.2 kg (13. 71b)
Turntable section-------------------------Type: Quartz synthesizer pitch control,
Direct drive Drive method: Direct Drive Motor: Brushless DC motor Drive control method: Quartz-phase-Iocked control Turntable platter: Aluminum die-cast, diameter 33.9 cm
(13-11/32 inches) weight 2.7 kg (5.9Ib) Moment of inertia: 380 kgcm' (130 lb . . in2) Turntable speeds: 33-1/3. 45 and 76.26 rpm Turntable speed
fine adjustment: Adjustable up to ± 9.9% in 0.1 % increments by digital indication
Starting torque: 3 kgcm (2.61 Ib·in) Build-up time: 0.4 sec. to 33-1/3 rpm Braking time: 0.4 sec from 33-1/3 rpm Braking system: Electrical and Mecanical braking Speed fluctuation due
to load torque: 0% within 2.5 kg . cm (2.2 lb· in)
Speed drift: Within ± 0.002% Wow and flutter: 0.025% WRMS (JIS C5521)
± 0.035% peak (IEC 98A Weighted)
Rumble: - 56 dB (IEC 98A Unweighted) - 78 dB (IEC 98A Weighted)
Weight and dimension shown are approximate . Specifications subject to change without notice.
-6