tennessee immunization information system (tenniis) health ... · tennessee immunization...
TRANSCRIPT

Tennessee Immunization Information System (TennIIS) Health Department User Quick Reference Guide
Please contact [email protected] or 844-206-3327 with questions about this quick reference guide. Version: IWeb v5.30.4 Page 1 of 20
Description of this guide: This guide describes basic TennIIS functionality for HEALTH DEPARTMENT USERS. This guide does not include medical office, pharmacy, or school/childcare facility users (see separate quick reference guides for alternate user types).
Included in this guide:
• Searching for a Patient • Adding a Patient • Editing Demographic Information • Viewing a Patient’s Vaccinations • Adding Historical Vaccinations • Editing Vaccination Information • Deleting Vaccinations • Generating the official TN Certificate of Immunization • Adding Vaccinator Name as Default • Adding Route and Site as Default • Adding Vaccination Volume as Default

Tennessee Immunization Information System (TennIIS) Health Department User Quick Reference Guide
Please contact [email protected] or 844-206-3327 with questions about this quick reference guide.
Version: IWeb v5.30.4 Page 2 of 20
Searching for a Patient 1) Using the Navigation Menu, click on the “Patient”
menu heading.
2) Click “Search/Add”.
3) Enter search criteria using these three searchtips:
• Enter patient’s first name and last nameOR• Enter patient’s first name or last name andbirth dateOR•Enter “%” (wildcard) in the first and last namefields to replace multiple characters

Tennessee Immunization Information System (TennIIS) Health Department User Quick Reference Guide
Please contact [email protected] or 844-206-3327 with questions about this quick reference guide.
Version: IWeb v5.30.4 Page 3 of 20
4) Click “Search”.
5) TennIIS will take you directly to the PatientDemographic Master View if an exact match isfound.
If multiple results display, select the correctpatient to view the Patient Demographic MasterView.
Sort Patient Search Results by clicking on theblack arrow located at the top of each column.
6) Patient Demographic Master View will display.
Tennessee Immunization Information System (TennIIS) Health Department User Quick Reference Guide
Please contact [email protected] or 844-206-3327 with questions about this quick reference guide.
Version: IWeb v5.30.4 Page 4 of 20
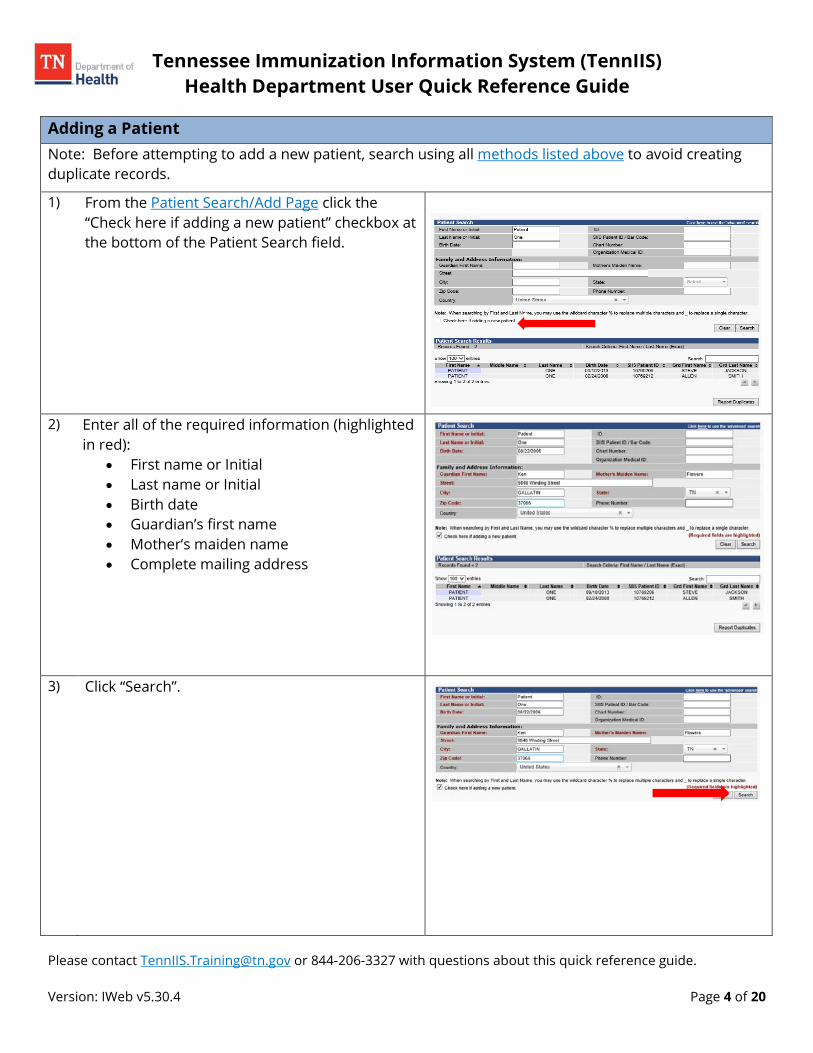
Adding a Patient Note: Before attempting to add a new patient, search using all methods listed above to avoid creating duplicate records.
1) From the Patient Search/Add Page click the“Check here if adding a new patient” checkbox atthe bottom of the Patient Search field.
2) Enter all of the required information (highlightedin red):
• First name or Initial• Last name or Initial• Birth date• Guardian’s first name• Mother’s maiden name• Complete mailing address
3) Click “Search”.

Tennessee Immunization Information System (TennIIS) Health Department User Quick Reference Guide
Please contact [email protected] or 844-206-3327 with questions about this quick reference guide.
Version: IWeb v5.30.4 Page 5 of 20
4) A dialog box will appear with one of thefollowing messages:
• “Before adding, check to make sure thepatient you want to add is not listed inthe Patient Search Results.”OR
• “This record already exists in thedatabase. An exact match has beenfound.”
Click “OK” to close the dialog box.
Note: If a positive match is found, select the patient from the search results. If TennIIS finds an exact match of the record, you will not be able to add a new patient.
5) If no match is found or the patient you aresearching for is not listed in the search results,click “Add Patient”.
6) TennIIS will then automatically go to the PatientDemographics Edit.
Enter patient information into the appropriatefields then click “Save” to complete adding newpatient.

Tennessee Immunization Information System (TennIIS) Health Department User Quick Reference Guide
Please contact [email protected] or 844-206-3327 with questions about this quick reference guide.
Version: IWeb v5.30.4 Page 6 of 20
Editing Demographic Information 1) Search for the patient and select the correct
patient from the list.
2) From the Patient Demographics Master View,click “Edit”.
3) Edit the desired fields and click “Save”.
Note: The “Phone Number” section contains an “Add” button to enter new phone numbers. Once entered, user will additionally have “Edit” and “Remove” keys to use respectively for the “Phone Number” section only.

Tennessee Immunization Information System (TennIIS) Health Department User Quick Reference Guide
Please contact [email protected] or 844-206-3327 with questions about this quick reference guide.
Version: IWeb v5.30.4 Page 7 of 20
4) Editing optional patient demographics:Patient Demographic Edit:
• Language – select language.• Birth Order – if the patient is a twin,
triplet, etc., enter the birth order in thefirst dropdown.
• Inactivate Patient – use the inactivedropdown menu to select theappropriate status.
• VFC Status – select the patient’s VFCstatus from the dropdown box.
Address section – enter the following fields to update or enter the patient’s address:
• Address 1 – street or PO Box number• Address 2 – apartment number• Enter the zip code and the correct city,
state, and county will automaticallypopulate for you.
Alias section • Enter a nickname, maiden or second last
name into these fields to allow users tosearch by the alias name.

Tennessee Immunization Information System (TennIIS) Health Department User Quick Reference Guide
Please contact [email protected] or 844-206-3327 with questions about this quick reference guide.
Version: IWeb v5.30.4 Page 8 of 20
Viewing a Patient’s Vaccinations 1) Search for the patient and select the correct
patient from the list.
2) Using the Navigation Menu, click on the“Vaccinations” menu heading.
3) Click “View/Add”.
4) The Vaccination View/Add screen will appearwhere users can see the patient’s full vaccinationhistory.
This screen has three sections:• Patient• Vaccination Forecast:
o Vaccine Family name displays if series notcomplete
o Recommended Date is routine ACIPschedule
o Minimum Valid Date is earliest vaccinecould be given to be valid dose
o Status is as of today and will be eitherPast Due, Due Now, or Not Yet Due

Tennessee Immunization Information System (TennIIS) Health Department User Quick Reference Guide
Please contact [email protected] or 844-206-3327 with questions about this quick reference guide.
Version: IWeb v5.30.4 Page 9 of 20
• Vaccination Viewo * after date = historical vaccinationo No * after date = administered
vaccination o X in front of date = invalid vaccination
5) Click on vaccine date to display the VaccinationDetails Screen.
Note: Organization and/or Facility fields showfacility that entered either administered orhistorical vaccinations into TennIIS.

Tennessee Immunization Information System (TennIIS) Health Department User Quick Reference Guide
Please contact [email protected] or 844-206-3327 with questions about this quick reference guide.
Version: IWeb v5.30.4 Page 10 of 20
Adding Historical Vaccinations
Note: Historical vaccinations are shots that were administered by providers outside of your facility. Historical vaccinations include those given out of state and country. 1) From the Vaccination View/Add Screen :
Type the date in the field next to the appropriatevaccine name to enter the date the vaccine wasgiven (see red box).
Helpful tip: to enter vaccination dates quickly,double click in the date field to automaticallyenter today’s date as the default. To change thedefault date, enter the date you’d like as thedefault in the Default Date box on top of theVaccination Date grid (see red arrow).
Note the drop-down menu located at thebottom of the vaccination list which will containadditional vaccine selections. Once a vaccine isselected from the drop-down, a new line willappear for that vaccine in which the user canadd dates.
2) Click “Add Historicals” after all of the historicaldates have been entered.
TennIIS will add the historical data and take youback to the Vaccination View/Add Screen.

Tennessee Immunization Information System (TennIIS) Health Department User Quick Reference Guide
Please contact [email protected] or 844-206-3327 with questions about this quick reference guide.
Version: IWeb v5.30.4 Page 11 of 20
Editing Vaccination Information 1) From the Vaccination View/Add Screen :
Click on the date of the vaccination you want toedit. You will be taken to the Vaccination Detailpage.
Note: Administered vaccinations may only bemodified or deleted by staff within theadministering facility.
2) Click “Edit Record”.
3) Make the appropriate changes in the fields andclick “Submit Changes.”

Tennessee Immunization Information System (TennIIS) Health Department User Quick Reference Guide
Please contact [email protected] or 844-206-3327 with questions about this quick reference guide.
Version: IWeb v5.30.4 Page 12 of 20
Deleting Vaccinations 1) From the Vaccination View/Add Screen :
Click on the date of the vaccination you want todelete.
Note: Dates must be individually deleted.
2) Click “Delete Record” on the Vaccination Detailpage.
3) Click “Delete Record” on the confirmation page.
Note: administered vaccinations can only bedeleted by users in the administering facility.

Tennessee Immunization Information System (TennIIS) Health Department User Quick Reference Guide
Please contact [email protected] or 844-206-3327 with questions about this quick reference guide.
Version: IWeb v5.30.4 Page 13 of 20
Generating the official TN Certificate of Immunization Note: The Tennessee Immunization Certificate is required for children in child care or pre-school, and when they enroll for the first time in a school located in Tennessee. In addition, all currently enrolled students entering 7th grade must provide a certificate showing they have had the vaccines required for 7th grade entry. 1) Search for the patient and select the correct
patient from the list.
2) Using the Navigation Menu, click on the“Reports” menu heading.
3) Click “State Reports”.
4) Click “IMMCert” (this link is only available forpatients less than 20 years old).
5) Click the appropriate “radio button” forcertificate needed (options change dependingupon patient/student age):
Click “View Certificate”.
Note: Pre-Populated and Blank Certificate maybe selected from this screen. Both Pre-Populated Immunization Certificate withoutValidation Assessment and Blank Certificaterequire the signature of a qualified providerto be valid.

Tennessee Immunization Information System (TennIIS) Health Department User Quick Reference Guide
Please contact [email protected] or 844-206-3327 with questions about this quick reference guide.
Version: IWeb v5.30.4 Page 14 of 20
6) If immunization record in TennIIS MEETSrequirements for certificate type, ValidationResult screen displays links for validated OfficialCertificate and Validation Report.
Click link to produce a validated OfficialCertificate or a Validation Report for desiredcertificate type.
7) Validated Official Certificate will have:
• Certificate type box checked in Section 3.Provider Assessment• No signature is required; “Validated bythe TN State Immunization Information System”• Invalid doses do not display

Tennessee Immunization Information System (TennIIS) Health Department User Quick Reference Guide
Please contact [email protected] or 844-206-3327 with questions about this quick reference guide.
Version: IWeb v5.30.4 Page 15 of 20
8) PASS Validation Report:
• Displays pass status for certificate type• Displays vaccine requirements with passstatus• If invalid dose in record, displays invalidvaccine dose and reason dose is invalid
9) If Immunization record in TennIIS does notmeet requirements for certificate type andpatient/student is not as up-to-date aspossible for required vaccines, ValidationResults screen displays links for OfficialCertificate that has not been validated andValidation Report.
Click link to produce Official Certificate that hasnot been validated or Validation Report fordesired certificate type.
10) FAIL Validation Report:
• Displays fail status for certificate type• Displays vaccine requirements with passor fail status• If invalid dose in record, displays invalidvaccine dose and reason dose is invalid
11) If Immunization record in TennIIS does notmeet requirements for certificate type, butstudent is as up-to-date as possible forrequired vaccines, Validation Results screendisplays links for Temporary Official Certificateand Validation Report.
Click link to produce Temporary OfficialCertificate or Validation Report for desiredcertificate type.

Tennessee Immunization Information System (TennIIS) Health Department User Quick Reference Guide
Please contact [email protected] or 844-206-3327 with questions about this quick reference guide.
Version: IWeb v5.30.4 Page 16 of 20
12) Temporary Official Certificate:
• Temporary certificate box checked inSection 3. Provider Assessment with expirationdate.
• No signature is required; “Validated bythe TN State Immunization Information System”.
• Invalid doses do not display.

Tennessee Immunization Information System (TennIIS) Health Department User Quick Reference Guide
Please contact [email protected] or 844-206-3327 with questions about this quick reference guide.
Version: IWeb v5.30.4 Page 17 of 20
Adding Vaccinator Name as Default
Note: Adding vaccinator name as default will expedite data entry by automatically populating the vaccinator name when adding an administered vaccine to a patient’s record. 1) Using the Navigation Menu, click on the
“Settings” menu heading.
2) Click “Personal.”
3) Next to “Vaccination Defaults”, click the “+” toopen the tab.

Tennessee Immunization Information System (TennIIS) Health Department User Quick Reference Guide
Please contact [email protected] or 844-206-3327 with questions about this quick reference guide.
Version: IWeb v5.30.4 Page 18 of 20
4) Click “Update”.
5) Choose the vaccinator’s name and facility fromthe dropdown list and click “Save”.
Note: You can always override any default whenadding an administered vaccine. Personalsettings follow each user account. Each usermust set up his/her unique personal settings.
Organization points of contact are responsiblefor setting up physician/vaccinators in TennIIS.

Tennessee Immunization Information System (TennIIS) Health Department User Quick Reference Guide
Please contact [email protected] or 844-206-3327 with questions about this quick reference guide.
Version: IWeb v5.30.4 Page 19 of 20
Adding Route and Site as Default
Note: When adding an administered vaccine to a patient’s record, you can set up Anatomical Injection Site Default for each vaccine you normally give in the same anatomical site. You can even specify the site by the patient’s age. 1) Open “Personal Settings” (see steps in Adding
Vaccinator Name as Default section).
2) Next to “Anatomical Injection Site Defaults”, clickthe “+” to open the tab.
3) Choose the Vaccine Description, AnatomicalRoute, and Anatomical Injection Site from thedropdown menus.
Note: If you would like to set the default by agerange, type the age range. Otherwise select the“All Ages” radio button. If you create the defaultby a specific age range you must repeat theabove step for each possible age range.
Once you have made your selection, click the“Add” button to save your changes. Repeat thesesteps for each vaccine type.
Note: You can always override any default whenadding an administered vaccine. Personalsettings follow each user account. Each usermust set up his/her unique personal settings.

Tennessee Immunization Information System (TennIIS) Health Department User Quick Reference Guide
Please contact [email protected] or 844-206-3327 with questions about this quick reference guide.
Version: IWeb v5.30.4 Page 20 of 20
Adding Vaccination Volume as Default
1) Open “Personal Settings” (see steps in AddingVaccinator Name as Default section).
2) Next to “Vaccine Default Volume”, click the “+” toopen the tab.
3) Select the appropriate “Vaccine” from thedropdown list.
Type in the “Dosage Default” in the space provided.Only type a number – TennIIS will automaticallyadd the mL/cc unit.
4) Once you have made your selection, click the“Add” button to save your changes. Repeat thesesteps for each vaccine type.
Note: You can always override any default whenadding an administered vaccine. Personalsettings follow each user account. Each usermust set up his/her unique personal settings.