test taker photo and voice sample procedures and tips and voice sample proced… · enabled by ets...
TRANSCRIPT

September 12, 2017 1 Copyright © 2017 by Educational Testing Service. All rights reserved. ETS, the ETS logo and MEASURING THE POWER OF LEARNING are registered trademarks of Educational Testing Service (ETS) in the United States and other countries. All other trademarks are property of their respective owners.
Test Taker Photo and Voice Sample Procedures and Tips
Important: The following procedures are only for TOEFL iBT® and GRE® tests at test centers
enabled by ETS to capture voice samples in addition to photos of TOEFL iBT®
and GRE® test takers.
You will be prompted to collect an image capture photo and a voice sample from each test taker during the check-in process. The software will perform quality checks on the photo and the voice sample and let you know immediately whether they are acceptable or need to be retaken.
This document describes how to prepare and practice in advance, and how to capture test takers’ photos and voice samples on test day. The last two pages are a test day tip sheet for you to print and bring to the administrative station for reference.
Main Features
Administrative station menu options:
Two menu options – Check Microphone and Check Camera – will appear when you start the administrative station for a round trip, a readiness check or a test administration.
They are available to help you prepare, practice and troubleshoot. They are not to be used with test takers.
Test taker check-in procedures:
Image Capture: When you capture each test taker’s image with the web camera, the system will analyze the image and provide feedback on what needs to be corrected if the image does not meet the established criteria.
Voice Capture: A 30-second voice sample will be recorded for each test taker. If the recording does not meet the established criteria, feedback messages on the screen will provide guidance on what needs to be corrected.
How to Prepare before Test Day
Prepare the webcam microphone at the administration station for capturing voice samples:
Ensure that your webcam is one of the following webcams models supplied/approved by ETS: Logitech® C170, C270, C210, and Microsoft VX800.
Verify that the sound is not muted.
Select the correct recording device in the Sound panel.
If you encounter an issue, check that the sound level is set appropriately (usually the level is set automatically).
If you need more information, consult your site technician and/or Appendix 2 of this document.
Important: You will need to repeat the microphone setup steps on test day if your settings have become changed because the administrative station computer was used for other purposes.
Practice the new procedures:
Use the Check Camera and Check Microphone options to practice before your first test date with the new photo and voice requirements. See Appendix 3 of this document for procedures.
If you are within four days of a test administration, use the readiness check as your opportunity to practice.
If you do not have an upcoming test administration, you can schedule a round trip administration via the self-service scheduling tool.
Print copies of the test taker voice capture script (one per test taker); see Appendix 4.

September 12, 2017 2 Copyright © 2017 by Educational Testing Service. All rights reserved. ETS, the ETS logo and MEASURING THE POWER OF LEARNING
are registered trademarks of Educational Testing Service (ETS) in the United States and other countries. All other trademarks are property of their respective owners.
Test Day Procedures
Before starting the administrative station application:
Ensure that the web camera is connected to the administrative station computer.
Check that the microphone properties are set appropriately (see “How to Prepare before Test Day” on page 1).
Ensure that you have printed sufficient copies of the test taker voice capture script (one per test taker); see Appendix 4.
Note: During the Test Setup process at the administrative station, the system will require you to take a test photo and record a test voice sample.
Tips for Good Quality Photos that Pass Quality Checks:
Image size – Only the top of the head to the chin should be in the frame. Hold the webcam no more than 12–18 inches (30–45 centimeters) from the test taker’s face to meet the resolution/size requirement. Note: The camera has to be closer to the test taker than you may expect. The quality check will fail if the face appears too small. (This is the most common cause of photo quality failures.)
Hand hold the webcam – Move the camera as needed to adjust the distance and framing to meet the requirements.
Background – The background behind the test taker must be plain, light-colored and free of patterns, textures, objects, furniture and people.
Lighting – Even lighting is important to minimize shadows and bright spots that can cause quality failures. Do not position the test taker in front of a window or other bright light. If the light in your check-in area comes primarily from one direction (e.g., ceiling lights), you may find it helpful to add desk lamps or other light sources at eye level.
Eyes – The test taker must be facing the camera with both eyes open and visible (not obscured by shadows or eyeglasses). Eyeglasses should be removed for the photo.
Centering – Center the test taker’s head in the image area.
Facial Expression – Just before taking the photo, ask the test taker to face the camera, look directly at it, and display a neutral, business-like expression (eyes open, lips closed, no smile or frown).
Head coverings claimed to worn for religious or medical purposes do not need to be removed. However, clothing that obscures the face must be moved aside so that the face is visible (uncovered and clear) in the photo.
If the image quality fails, read the information in the feedback and recommendations box, make the necessary adjustments, and try again.
Important: If the first two attempts fail, try taking a third image. Submit the third attempt even if it fails the quality check.
Practice makes perfect – When you are new to the process, practice before test day and adjust your lighting, background, distance, posing and technique until you can consistently take photos that pass the quality checks.
Tips for Successful Voice Recordings
Have the test taker hold the microphone/webcam. Tell him/her to hold it steady, with the microphone facing his/her mouth, and about 2–8 inches (5–20 cm) away. Note: Having the microphone close enough to the test taker’s mouth helps avoid background noise failures.
Minimize background noise in the check-in area. Excessive background noise will cause a quality check failure.
Encourage the test taker to speak in a normal volume (as if having a conversation) and speak continuously (without any significant breaks) during the entire recording time.

September 12, 2017 3 Copyright © 2017 by Educational Testing Service. All rights reserved. ETS, the ETS logo and MEASURING THE POWER OF LEARNING
are registered trademarks of Educational Testing Service (ETS) in the United States and other countries. All other trademarks are property of their respective owners.
Make sure the test taker has a printed copy of the script, and say the following instructions:
“The next step is to record a voice sample. You will need to speak the printed statement in your normal tone and volume. There is no need to hurry.
At the beginning of the statement, there are two blank lines where you will say your name and today’s date.
I will motion with my hand to let you know when to begin speaking.”
Click the Record button. A countdown from three to zero will be displayed (just above the buttons). When the countdown reaches zero, cue the test taker to begin speaking.
Important: If you cue the test taker too soon (before the countdown reaches zero), he/she may begin speaking before the recording begins, and his/her name may not be recorded.
If the recording passes the quality check, click Submit, and continue with the check-in.
If the quality check fails, read the information in the feedback and recommendations box, make the necessary adjustments, and try again.
Important: If the first two recordings fail, try making a third recording. Submit the third recording even if it fails the quality check. A message will pop up asking you to confirm that you want to submit the recording. Click Yes.
You do not need to start over just because a test taker was unable to finish reading the entire script during the 30-second recording period. The important thing for passing the voice quality checks is that the test taker must speak continuously without any lengthy pauses throughout the entire recording time.

September 12, 2017 4 Copyright © 2017 by Educational Testing Service. All rights reserved. ETS, the ETS logo and MEASURING THE POWER OF LEARNING
are registered trademarks of Educational Testing Service (ETS) in the United States and other countries. All other trademarks are property of their respective owners.
Appendix 1: Photo and Voice Quality Feedback Messages
Photo Quality
Requirement Feedback Message
Uniform lighting Lighting is uneven. Adjust the lighting so the full face is evenly lighted. Eliminate shadows and side lighting.
Natural color The skin color does not look natural. Ensure the background is plain and light colored. Adjust the lighting. Verify an ETS approved camera is being used.
No overexposed spots The image shows overexposed areas. Remove bright light from face. Ask the person to adjust or remove reflective objects (e.g., eyeglasses, jewelry).
Eyes facing the camera Eyes are not facing the camera. Have the person face forward and look directly at the camera.
Face covers 60–90% of the image height
Face is either too close or too far away. Adjust the distance between the camera and person. The recommended distance is 12-18 inches (30-45 cm).
Good resolution of the face The face is too far from the camera. The recommended distance is 12–18 inches (30–45 cm). Move the camera closer to the face, or ask the person to move closer. Verify an ETS approved camera is being used.
Only one face visible More than one face detected. Make sure only one person is in front of the camera and no other objects or people can be seen in the background.
Both eyes open Closed eye(s) detected. Retake photo with both eyes opened.
No red eye The image shows red eye(s). Make sure the person’s eyes are not exposed to flashes. Verify no reflection of light is found in the eyes.
No tinted glasses or large frames that obscure the eyes or face
Glasses detected. Make sure no colored or large frame glasses are worn.
Face is centered vertically Adjust the framing so the face and neck are centered and fill the photo area.
Face is centered horizontally Face is too far left or too far right. Make sure the person is centered in front of the camera.
Head covers 50–75% of the image width
Head appears either too large or too small. Adjust the framing so that the head occupies 50% to 75% of the photo width.
Image is not flattened or stretched Face size and/or width is not recognized. Verify the photo is not stretched or distorted.
Good exposure Poor camera exposure. Verify the photo is not too dark or too bright. Adjust lighting, if needed.
Person is facing the camera Person is not facing the camera. Make sure they are facing the camera and looking directly at the lens.
Gray scale intensity resolution level is correct
The image has an unnatural color tint. Use a plain, light-colored background. Adjust lighting so it is not too bright or dim. Verify an ETS approved camera is being used. Try using the backup camera.
Image is in focus The image is not clear. Hold the camera steady to avoid shaking. Adjust focus and sharpness settings of the camera, if available.
Voice Quality
Requirement Feedback Message
Low background noise Background noise too high. Make sure to reduce background noise during recording. Make sure the person is talking close to the microphone and is using an ETS approved microphone.
No echo Echo is detected. Make sure the person is speaking in a normal voice (without shouting). Reduce background noise in the room.
Speech time is at least 22 seconds, and sentences are not repeated
The total detected speech is too short. Record again for a longer time, at least 22 seconds. Verify no repeating of sentences.

September 12, 2017 5 Copyright © 2017 by Educational Testing Service. All rights reserved. ETS, the ETS logo and MEASURING THE POWER OF LEARNING
are registered trademarks of Educational Testing Service (ETS) in the United States and other countries. All other trademarks are property of their respective owners.
Appendix 2: Webcam Microphone Setup Procedures Use the following steps to set up the webcam microphone to capture test taker voice samples.
1. Plug in an ETS-supplied/approved webcam, but DO NOT start the Unify Administrative Station application yet.
2. Go to Windows Control Panel.
For Windows 10: In the search box on the taskbar, type control panel, and then select Control Panel.
For Windows 8.1: Point to the upper-right corner of the screen, move the mouse pointer down, and then click Search,
enter Control Panel in the search box, and then tap or click Control Panel.
For Windows 7: Click the Start button, and then click Control Panel.
3. Select the Sound panel, and click the Recording tab.
4. Look for the device with “webcam” in its name.
Speak into the microphone and watch the signal level bars on the Recording tab. If your webcam microphone is working, you will see the number of bars changing.
If the microphone is not working, adjust the settings until you get it to work.
5. Disable all other recording devices (except the webcam microphone) as follows:
Select the device you want to disable and display its Microphone Properties screen.
In the Device Usage dropdown, select “Don’t use this device (disable)”.
Then click Apply and OK.
6. Click Apply/OK to save your settings, and close Control Panel.
7. Start the Unify Administrative Station application from the desktop shortcut.
September 12, 2017 6 Copyright © 2017 by Educational Testing Service. All rights reserved. ETS, the ETS logo and MEASURING THE POWER OF LEARNING
are registered trademarks of Educational Testing Service (ETS) in the United States and other countries. All other trademarks are property of their respective owners.
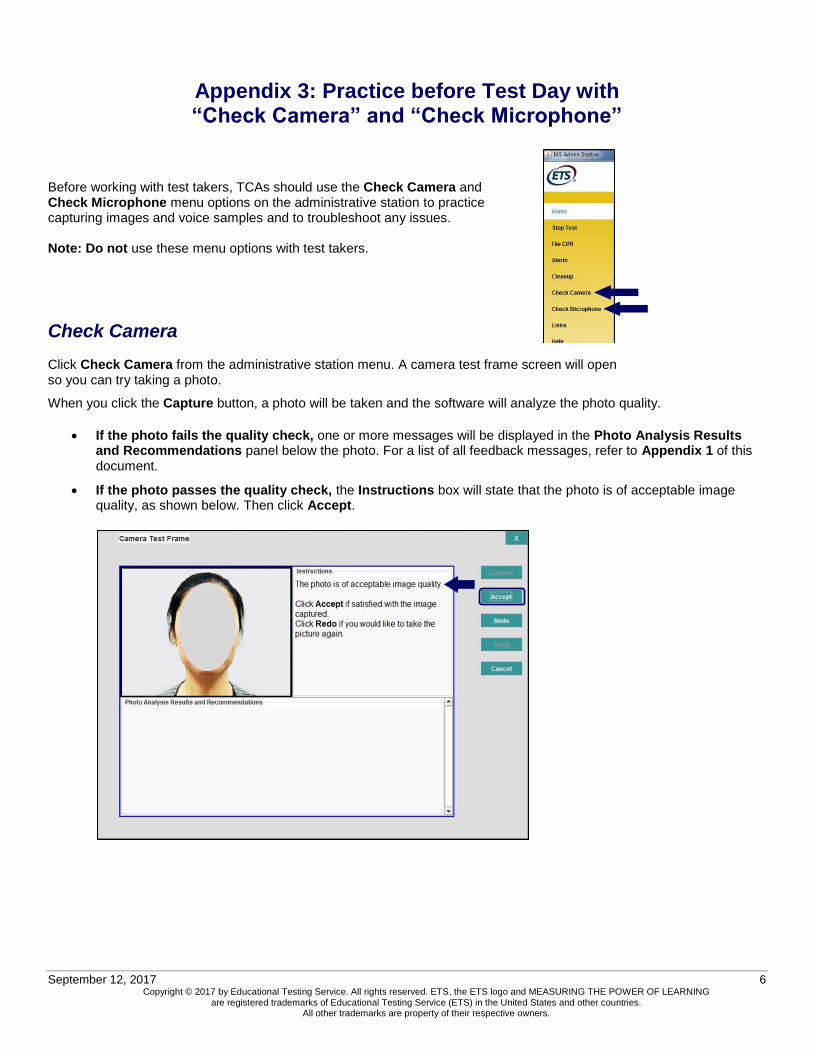
Appendix 3: Practice before Test Day with “Check Camera” and “Check Microphone”
Before working with test takers, TCAs should use the Check Camera and Check Microphone menu options on the administrative station to practice capturing images and voice samples and to troubleshoot any issues. Note: Do not use these menu options with test takers.
Check Camera Click Check Camera from the administrative station menu. A camera test frame screen will open so you can try taking a photo.
When you click the Capture button, a photo will be taken and the software will analyze the photo quality.
If the photo fails the quality check, one or more messages will be displayed in the Photo Analysis Results and Recommendations panel below the photo. For a list of all feedback messages, refer to Appendix 1 of this document.
If the photo passes the quality check, the Instructions box will state that the photo is of acceptable image quality, as shown below. Then click Accept.

September 12, 2017 7 Copyright © 2017 by Educational Testing Service. All rights reserved. ETS, the ETS logo and MEASURING THE POWER OF LEARNING
are registered trademarks of Educational Testing Service (ETS) in the United States and other countries. All other trademarks are property of their respective owners.
Check Microphone The individual who will be speaking should:
Hold the microphone/webcam during the recording, with the microphone facing his/her mouth.
Hold it steady and about 2–8 inches (5–20 cm) away from his/her mouth.
Speak in a normal tone of voice (as if having a conversation).
Speak continuously (without breaks) during the recording time. Click Check Microphone from the administrative station menu.
Then click the Launch Voice Recorder button to display the Voice Recording Instructions screen:
Click Record, and read the script shown on the screen (it begins with “My name is ___....”).

September 12, 2017 8 Copyright © 2017 by Educational Testing Service. All rights reserved. ETS, the ETS logo and MEASURING THE POWER OF LEARNING
are registered trademarks of Educational Testing Service (ETS) in the United States and other countries. All other trademarks are property of their respective owners.
If the quality check fails, read the information in the feedback and recommendations box, make the necessary adjustments, and try again. For a list of all feedback messages, refer to Appendix 1 of this document.
Click Play to play back the recording to help with troubleshooting.
When the quality check is successful, you will receive the message Recording Complete - Quality Check Successful. Then click Submit:

September 12, 2017 9 Copyright © 2017 by Educational Testing Service. All rights reserved. ETS, the ETS logo and MEASURING THE POWER OF LEARNING
are registered trademarks of Educational Testing Service (ETS) in the United States and other countries. All other trademarks are property of their respective owners.
Appendix 4: Printing the “Test Taker Voice Capture Script”
Print copies of the voice capture script prior to test day.
From your administrative station:
Click Check Microphone from the administrative station menu. Then click the Launch Voice Recorder button to display the Voice Recording Instructions screen. Click the Print Statement button on the screen.
For convenience, the script is also available on STN EasyServe:
Log in to STN EasyServe and go to the Operational Documents page. Scroll down and click the Voice Capture Script link to open the PDF. Print from the PDF.
On test day, provide one copy of the script to each test taker at the same time you provide the confidentiality statement form. This will allow test takers to become familiar with the script before they arrive at the check-in station.
After the test session:
Keep the printed scripts for future use, or discard them if they have been damaged or written on.
Do not send the scripts to ETS (but do send the completed Confidentiality Statements at the end of each month.)

September 12, 2017 10 Copyright © 2017 by Educational Testing Service. All rights reserved. ETS, the ETS logo and MEASURING THE POWER OF LEARNING are registered trademarks of Educational Testing Service (ETS) in the United States and other countries. All other trademarks are property of their respective owners.
Test Day Tips – Photos and Voice Samples
For Good Quality Photos:
Image Size The top of the head to the chin should almost fill photo frame. This means you must hold the webcam no more than 12–18 inches (30–45 centimeters) from the face.
Hand hold the webcam Move it closer until the face almost fills the frame.
Background Plain and light-colored. No patterns, textures, objects, furniture, or people.
Lighting Must be even to minimize shadows and bright spots. Add a desk lamp or other light source at eye level, if needed. Do not position test taker in front of a window or other bright light.
Eyes Facing the camera, open and visible. Eyeglasses should be removed for the photo.
Centering Center the head in the image.
Facial Expression Test taker should look directly at the camera. Display a neutral, business-like expression (eyes open, lips closed, no smile or frown).
To Avoid Image Quality Failure Messages:
Do’s Don’ts
Hand hold the webcam
Approximate distance required is 12–18 in. (30–45 cm.) from the face
Eyes should be looking directly into the lens
Include top of head to chin only. Face should almost fill the frame:
Don’t attach the webcam to the monitor
Don’t hold the webcam too far away from the subject
Don’t include the body in the photo:
TOO FAR AWAY
Correct distance is 12–18 inches (30–45 cm)

September 12, 2017 11 Copyright © 2017 by Educational Testing Service. All rights reserved. ETS, the ETS logo and MEASURING THE POWER OF LEARNING
are registered trademarks of Educational Testing Service (ETS) in the United States and other countries. All other trademarks are property of their respective owners.
For Successful Voice Recordings:
Webcam Position The test taker should hold the microphone/webcam.
Tell him/her to hold it steady, with the microphone facing his/her mouth, and about 2–8 inches (5–20 cm) away.
Note: Having the microphone close enough to the test taker’s mouth helps avoid background noise failures.
Give the test taker a printed script, and say
these instructions
“The next step is to record a voice sample. You will need to speak the printed statement in your normal tone and volume. There is no need to hurry.
At the beginning of the statement, there are two blank lines where you will say your name and today’s date.
I will motion with my hand to let you know when to begin speaking.”
Click “Record” Wait for the countdown to get to zero. Then cue the test taker to start speaking.
(Starting too early risks that the test taker’s name may not be recorded.)
Note: Cue the start with a hand signal so your voice will not become part of the recording.
If the quality check fails Read the feedback/recommendations box.
Make adjustments as needed.
Try again.
After two failed attempts Try a third recording.
Submit the third try even if it fails.
To Avoid Voice Quality Failure Messages:
Do’s Don’ts
Have the test taker hold the microphone
Don’t attach the microphone to the monitor. (That would position it too far away from the test taker.)
Encourage the test taker to speak in a normal volume (as if having a conversation); avoid whispering
Test taker should speak continuously (without lengthy pauses) during the entire recording period
Minimize background noise in the check-in area
DO NOT attach webcam
to monitor