tetrix getting started guide · pdf filetetrix® getting started guide extensions. 103 tips...
TRANSCRIPT

102
Arm and Gripper Building Guide
Tips
•Makesurealltheinternalscrewsareverysecure,astheywillbehardtoretightenlater.•The7/64",5/64"and3/32"hexkeyswillbeneededtobuildthismodel.•Usethe7/64"hexkeyforthesescrewsthroughoutthemodel.•Ensurethattheteethofthenutfacetheheadofthescrew.
Parts NeededStep 1
1x96mmChannel 1x160mmChannel 3x1/2"SHCS 3xKepNut
ExtensionsTETRIX®GettingStartedGuide

103
Tips
Arm and Gripper Building Guide
•Ensurethatallscrewsaretightlysecuredatthispoint,astheywillnotbeeasilyaccessiblelater.•Reminder:Ensurethattheteethofthenutfacetheheadofthescrew.
Parts NeededStep 2
1xSingle-ServoMotorBracket
1xGearHubSpacer
3xKepNut 3x1.5"SHCS
TETRIX®GettingStartedGuideExtensions

104
Tip
Arm and Gripper Building Guide
•Ensurethattheteethofthenutsarefacingthegear.
Parts NeededStep 3
1x40-ToothGear
1xServoHorn 4x1/2"SHCS 4xKepNut
ExtensionsTETRIX®GettingStartedGuide

105
Tips
Arm and Gripper Building Guide
•UsethePhillipsheadonthe4-in-1screwdrivertotightentheservoscrew.Thiswillkeeptheservohornattachedtotheservomotor.
•Usethe5/64"hexkeyfortheBHCS.
Parts NeededStep 4
1x180°ServoMotor 4x3/8"BHCS 4xKepNut 1xServoScrew
TETRIX®GettingStartedGuideExtensions

106
Tip
Arm and Gripper Building Guide
•The3/32"hexkeyisusedontheaxlehubs.
Parts NeededStep 5
1x80-ToothGear
1x100mmAxle 2xAxleHub 6x1/2"SHCS3xBronzeBushing
2x1/8”AxleSpacer
ExtensionsTETRIX®GettingStartedGuide

107
Tip
Arm and Gripper Building Guide
•Reminder:Ensurethattheteethofthenutfacetheheadofthescrew.
Parts NeededStep 6
2x1"Stand-OffPost2xFlatBracket 1xLBracket 5x5/16"SHCS 1xKepNut
TETRIX®GettingStartedGuideExtensions

108
Tip
Arm and Gripper Building Guide
•Reminder:Ensurethattheteethofthenutfacetheheadofthescrew.
Parts NeededStep 7
2x1/2"SHCS 2xKepNut
ExtensionsTETRIX®GettingStartedGuide
109
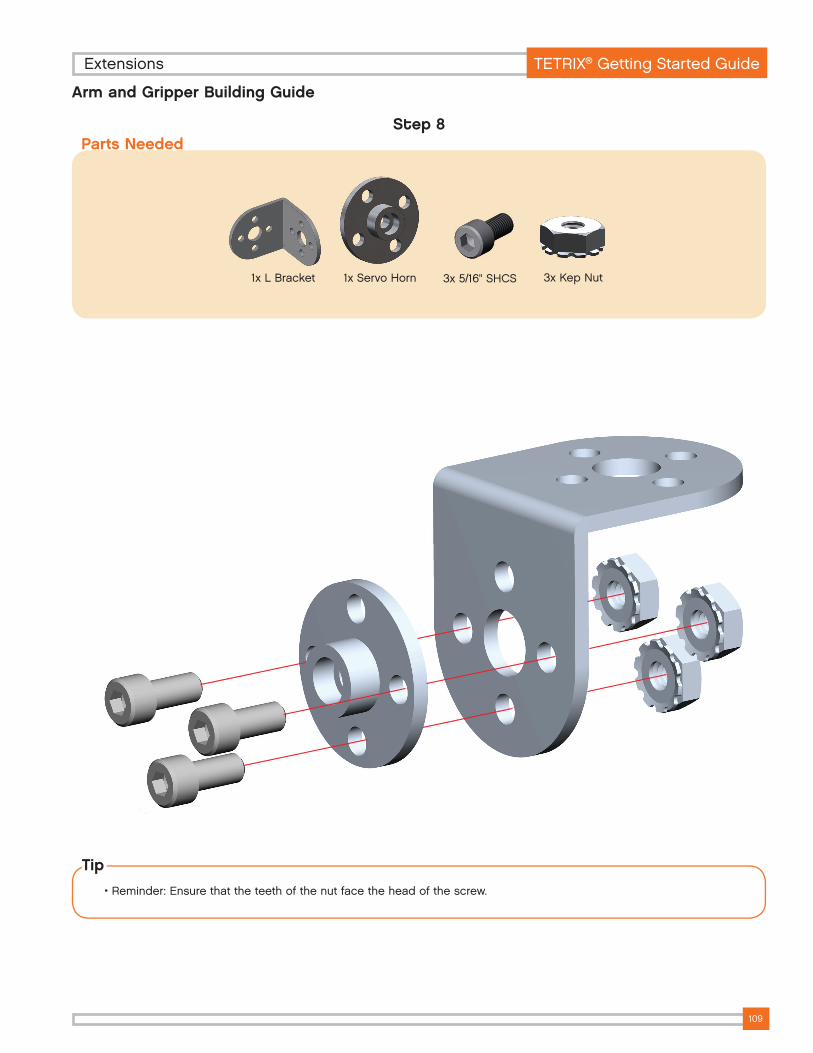
Arm and Gripper Building Guide
Parts NeededStep 8
1xLBracket 1xServoHorn 3x5/16"SHCS 3xKepNut
Tip
•Reminder:Ensurethattheteethofthenutfacetheheadofthescrew.
TETRIX®GettingStartedGuideExtensions

110
Arm and Gripper Building Guide
Parts NeededStep 9
2x1"Stand-OffPost 2x5/16"SHCS
ExtensionsTETRIX®GettingStartedGuide

111
Arm and Gripper Building Guide
Parts NeededStep 10
1xFlatBracket1xSingle-ServoMotorBracket
1x2"Stand-OffPost 4x5/16"SHCS 3xKepNut
Tip
•Reminder:Ensurethattheteethofthenutfacetheheadofthescrew.
TETRIX®GettingStartedGuideExtensions

112
Arm and Gripper Building Guide
Parts NeededStep 11
Tip
•UsethePhillipsheadonthe4-in-1screwdrivertotightentheservoscrew.Thiswillkeeptheservohornattachedtotheservomotor.
4x3/8"BHCS 4xKepNut 1xServoScrew1x180°ServoMotor
ExtensionsTETRIX®GettingStartedGuide

113
Arm and Gripper Building Guide
Parts NeededStep 12
2x5/16"SHCS
Tip
•Tokeepthearmorientedproperly,tightenthescrewsbitbybit,alternatingbetweenthem.
TETRIX®GettingStartedGuideExtensions

114
Arm and Gripper Building Guide
Parts NeededStep 13
1xTETRIX®HardPointConnector
1x7-ModuleBeam
4x3-ModuleConnectorPegwithFriction
ExtensionsTETRIX®GettingStartedGuide

115
Arm and Gripper Building Guide
Parts NeededStep 14
2x5-ModuleBeam2x3-ModuleConnectorPegwithFriction
1xNXTTouchSensor
1x20-ToothGear
1x2-ModuleAxle
TETRIX®GettingStartedGuideExtensions

116
Tip
Arm and Gripper Building Guide
•TurnthescrewsonlyuntilthehardpointconnectorissecurelyattachedtotheTETRIX®channel.
Parts NeededStep 15
2x5/16"SHCS 2xKepNut
ExtensionsTETRIX®GettingStartedGuide

117
Arm and Gripper Building Guide
Parts NeededStep 16
2xKepNut2x1/2"SHCS
TETRIX®GettingStartedGuideExtensions

118
Arm and Gripper Building Guide
Final View
ExtensionsTETRIX®GettingStartedGuide

119
Arm and Gripper Building Guide
Servo Horn AdjustmentNote: Wheneveraservomotorisusedtoattachanextension,caremustbetakentoproperlyadjusttheservomotorpositionso
thatthedesiredrangeofmotionisachieved.Thebestwaytoadjusttheservopositionistounscrewtheservohornanduseit,andtheextensionthathasbeenbuiltontoit,likeawrench.
Step 1 Starting Point:
Attachtheservohorntoadjusttheservoposition.
Step 2 Rotate:
Rotatetheservosothatithasbeenpositionedattheendofitsrangeofmotion.
Step 3 Final Positioning:
Reattachtheservohornwiththeextensionpieceintheappropriatepositionforthatservolocation.
TETRIX®GettingStartedGuideExtensions

120
Arm and Gripper Building Guide
Wiring Diagram
Tips
•TightenthescrewsontheHiTechniccontrollerafterthewireshavebeeninserted.Completeallwiringbeforeattachingthebattery.
ExtensionsTETRIX®GettingStartedGuide