texas 4-h photography projecttexas4-h.tamu.edu/wp-content/uploads/explore_photography.pdf · texas...
TRANSCRIPT

Texas 4-H Photography ProjectExplore Photography
The members of Texas A&M AgriLife will provide equal opportunities in programs and activities, education, and employment to all persons regardless of race, color, sex, religion, national origin, age, disability, genetic information, veteran status, sexual orientation or gender identity and will strive to achieve full and equal employment opportunity throughout Texas A&M AgriLife.
texas4-h.tamu.edu
Texas 4-H Youth Development | texas4-h.tamu.edu
TEXAS 4-H PHOTOGRAPHY PROJECT
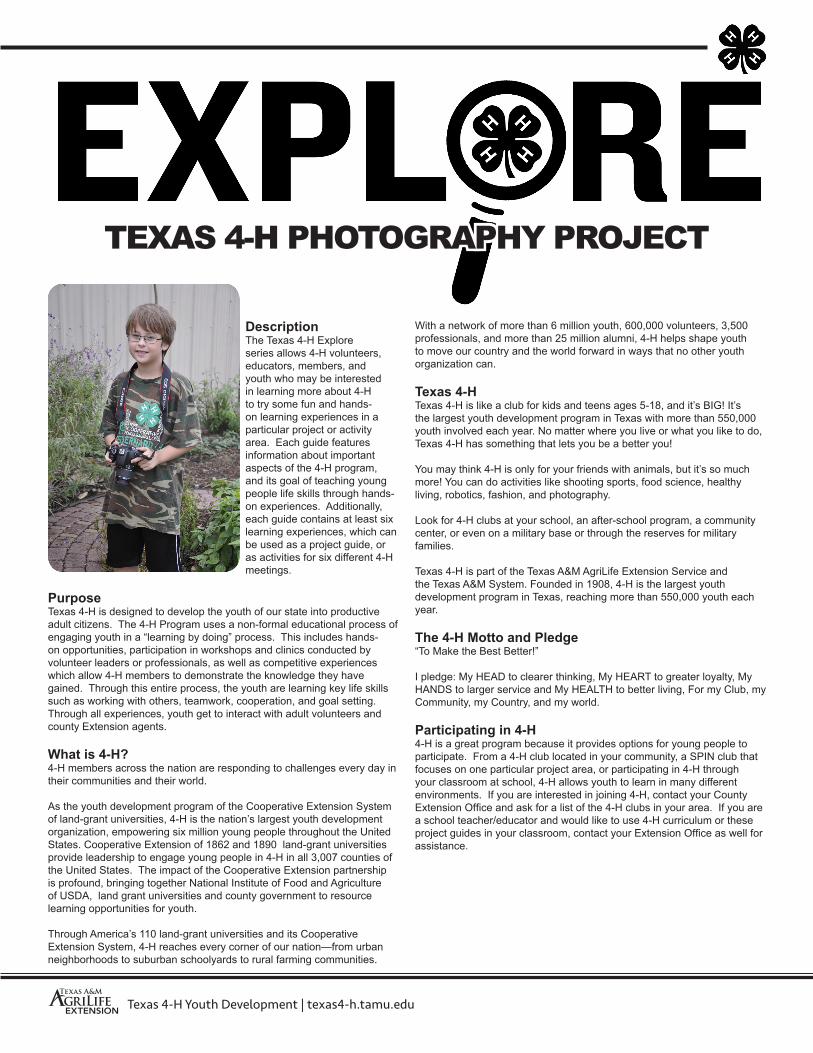
DescriptionThe Texas 4-H Explore series allows 4-H volunteers, educators, members, and youth who may be interested in learning more about 4-H to try some fun and hands-on learning experiences in a particular project or activity area. Each guide features information about important aspects of the 4-H program, and its goal of teaching young people life skills through hands-on experiences. Additionally, each guide contains at least six learning experiences, which can be used as a project guide, or as activities for six different 4-H meetings.
PurposeTexas 4-H is designed to develop the youth of our state into productive adult citizens. The 4-H Program uses a non-formal educational process of engaging youth in a “learning by doing” process. This includes hands-on opportunities, participation in workshops and clinics conducted by volunteer leaders or professionals, as well as competitive experiences which allow 4-H members to demonstrate the knowledge they have gained. Through this entire process, the youth are learning key life skills such as working with others, teamwork, cooperation, and goal setting. Through all experiences, youth get to interact with adult volunteers and county Extension agents.
What is 4-H?4-H members across the nation are responding to challenges every day in their communities and their world.
As the youth development program of the Cooperative Extension System of land-grant universities, 4-H is the nation’s largest youth development organization, empowering six million young people throughout the United States. Cooperative Extension of 1862 and 1890 land-grant universities provide leadership to engage young people in 4-H in all 3,007 counties of the United States. The impact of the Cooperative Extension partnership is profound, bringing together National Institute of Food and Agriculture of USDA, land grant universities and county government to resource learning opportunities for youth.
Through America’s 110 land-grant universities and its Cooperative Extension System, 4-H reaches every corner of our nation—from urban neighborhoods to suburban schoolyards to rural farming communities.
With a network of more than 6 million youth, 600,000 volunteers, 3,500 professionals, and more than 25 million alumni, 4-H helps shape youth to move our country and the world forward in ways that no other youth organization can.
Texas 4-HTexas 4-H is like a club for kids and teens ages 5-18, and it’s BIG! It’s the largest youth development program in Texas with more than 550,000 youth involved each year. No matter where you live or what you like to do, Texas 4-H has something that lets you be a better you!
You may think 4-H is only for your friends with animals, but it’s so much more! You can do activities like shooting sports, food science, healthy living, robotics, fashion, and photography.
Look for 4-H clubs at your school, an after-school program, a community center, or even on a military base or through the reserves for military families.
Texas 4-H is part of the Texas A&M AgriLife Extension Service and the Texas A&M System. Founded in 1908, 4-H is the largest youth development program in Texas, reaching more than 550,000 youth each year.
The 4-H Motto and Pledge“To Make the Best Better!” I pledge: My HEAD to clearer thinking, My HEART to greater loyalty, My HANDS to larger service and My HEALTH to better living, For my Club, my Community, my Country, and my world.
Participating in 4-H4-H is a great program because it provides options for young people to participate. From a 4-H club located in your community, a SPIN club that focuses on one particular project area, or participating in 4-H through your classroom at school, 4-H allows youth to learn in many different environments. If you are interested in joining 4-H, contact your County Extension Office and ask for a list of the 4-H clubs in your area. If you are a school teacher/educator and would like to use 4-H curriculum or these project guides in your classroom, contact your Extension Office as well for assistance.
Texas 4-H Youth Development | texas4-h.tamu.edu
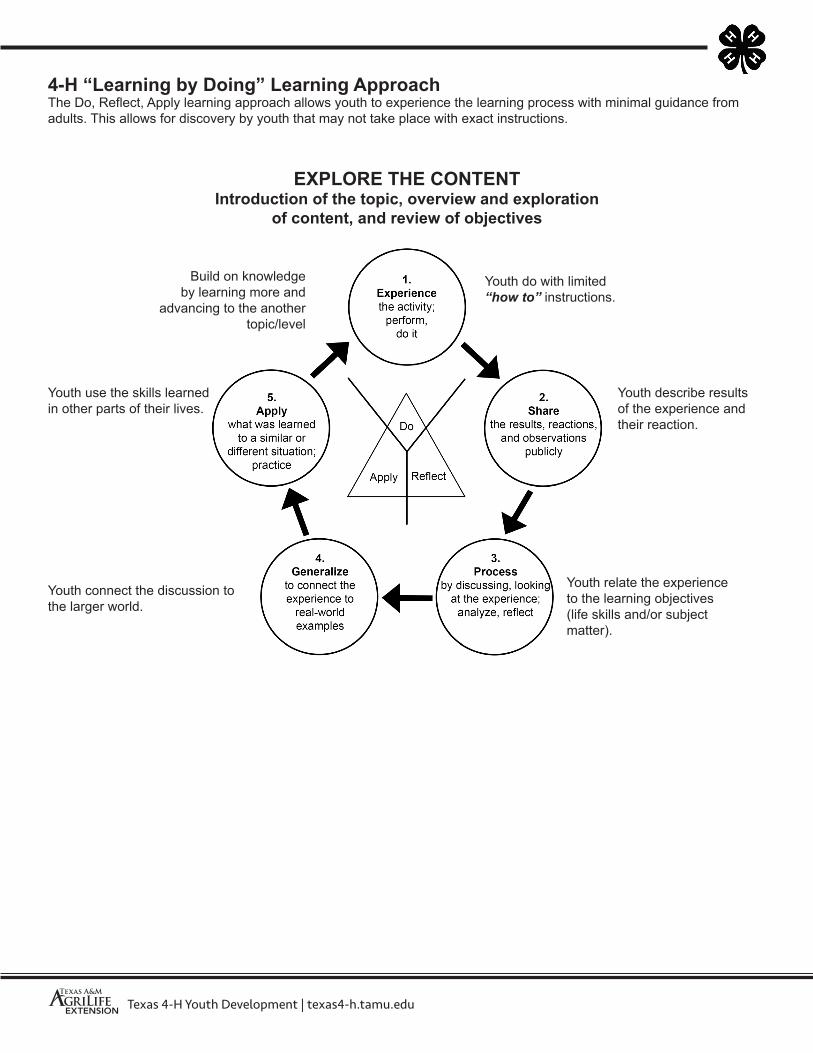
4-H “Learning by Doing” Learning ApproachThe Do, Reflect, Apply learning approach allows youth to experience the learning process with minimal guidance from adults. This allows for discovery by youth that may not take place with exact instructions.
Youth do with limited “how to” instructions.
Youth describe results of the experience and their reaction.
Youth relate the experience to the learning objectives (life skills and/or subject matter).
Youth connect the discussion to the larger world.
Youth use the skills learned in other parts of their lives.
EXPLORE THE CONTENTIntroduction of the topic, overview and exploration
of content, and review of objectives
Build on knowledge by learning more and
advancing to the another topic/level
Texas 4-H Youth Development | texas4-h.tamu.edu
Photography Project
4-H PHOTOGRAPHY PROJECTLessons
Lesson 1The Camera . . . . . . . . . . . . . . . . . . . . . . . . . . . . . . . . . . . . . 2
Lesson 2Selecting a Subject . . . . . . . . . . . . . . . . . . . . . . . . . 7
Lesson 3Composition . . . . . . . . . . . . . . . . . . . . . . . . . . . . . . . . . . . . 9
Lesson 4Lighting. . . . . . . . . . . . . . . . . . . . . . . . . . . . . . . . . . . . . . . . 15
Lesson 5Managing Your Photos . . . . . . . . . . . . . . . . . . . . . . . . . . . 16
Lesson 6Printing and Displaying Your Photos . . . . . . . . . . . . . . .20
Developed by:Michael ApodacaJohn FergusonKimberly Guillen
Fred HallToby LepleyMiquela SmithPreston Sturdivant
Nathan TuckerCindy VanDevenderJoyce WhiteJulie York
Glossary of Terms . . . . . . . . . . . . . . . . . . . . . . . . . . . . . . . 22

Texas 4-H Youth Development | texas4-h.tamu.edu Page 2
4-H PHOTOGRAPHY PROJECTLessons
The Camera
TIME:45 to 60 minutes
MATERIALS NEEDED:• 1 camera per child (DSLR or compacts)• Exercise 1 can be done individually or as a
team – numbers of copies may vary• 1 internet capable computer/smart device
OBJECTIVES: The 4-H member will:• Learn basic camera settings• Be able to label the basic parts of a camera• Understand the different types of cameras
used in everyday photography• Know criteria for selecting a camera
EXPLORE THE CONTENT: Explore the Types of Cameras. Common cameras are typically classified into two different classes: compacts and DSLRs. Compacts are commonly referred to as the “point and shoot” and for most photographers, the first type of camera you will start out with. They are very convenient, small in size, and take very little knowledge to use. While they have a low profile making it easy to carry and handle, they may compromise on quality. Compacts tend to be weaker in the areas of light capabilities, depth of field, and shutter lag. Compacts are good for learning the basics of a camera and photography, so when you are ready to move to a larger camera, you have a good idea of the type you want.
DSLR or Digital Single Lens Reflex are becoming the camera of choice from family photo taking to professional photographers due to options that they have, such as being able to have interchangeable lens, and allowing the user to adjust the camera settings based on subjects, lighting, and depth of field. The DSLR camera has a larger housing unit as well as heavier lenses, but the quality outweighs the negatives.”
There are a number of elements that should be taken into account when purchasing a camera. First, the price you are willing to spend on a camera. DSLR cameras are considerably more money that a point and shoot camera. With the increased expense, the quality of picture is usually better with a DSLR. With faster shutter speed, better depth of field, larger ISO range, and optic viewfinders, the DSLR will hold its value for a longer period of time. Point and shoot cameras are generally lighter, and easy to carry around while traveling or being active. They are usually less complicated to use, and quieter. This could be helpful if you are taking pictures at an event that requires silence. Additionally, point and shoot cameras are ideal for younger youth who may not need an expensive camera. Aside from both of these options, most cellular devices (such as iPhone, iPad, Android, Android Tablet) are equipped with a decent camera that has some basic settings for taking pictures indoors, outdoors, and recording video.
Parts of a CameraA camera has many parts it needs to take a photograph. Beyond what you can see on the outside of the camera, the internal parts of play an extremely important role in making the camera work. This lesson will focus on the basics of the outside of the camera and the parts you can see. Following is a list of basic camera parts found on a DSLR camera and their purpose.

Texas 4-H Youth Development | texas4-h.tamu.edu Page 3
PHOTOGRAPHY PROJECT
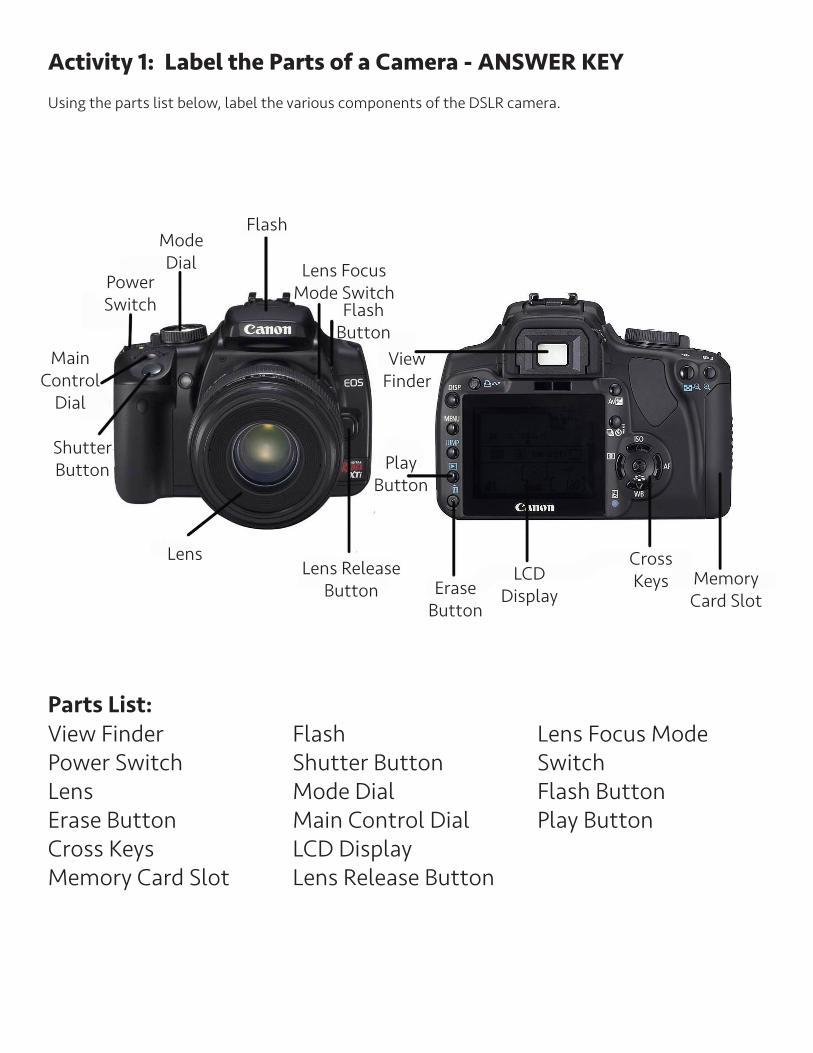
Cross Keys (SET Button) The Multi-controller keys can be used to move between the menu items or to move the magnified display to a different point during image playback, while the SET button is used to confirm a selection (see photo to right)Erase Button Removes photographs you do not wish to keepFlash Provides additional light to your sceneFlash Button Allows for the manual opening of the flash in case you want to add a fill flash for a portrait in the shadows or to freeze actionLCD Display The camera’s displayLens Light enters through the lens, and this is where the photo process begins.Lens Release Button Press this button when you want to detach the lens (DSLR cameras).Lens Focus Mode Switch Use this button to set the focus position (the AF point) during AF shooting.Main Control Dial Turn this dial to select a shooting mode according to the scene you want to capture.Memory Card Slot Accepts digital memory cards.Mode Dial Change among different scene modes, adjust exposure choices, and so on.Play Button This is the button for playing back images you have captured. Power Switch Turn the camera on or off.Shutter Button Press this button all the way to take a picture.Viewfinder Look through the eyepiece to view the image you want to capture
Camera SettingsWhat do all those setting on a camera do? For many of us we just want to know the basic, how to take a good photo. The cool thing about photography is, as your confidence grows, so does the opportunity to explore and experiment with the settings of your camera. Below is a summary of basic settings found on your camera, or terms you will hear in the area of photography.
Mode SettingsAutomatic Utilizes the camera’s best judgment for pictureLandscape Large depth of field for landscape shotsMacro Used for very close-up picturesManual Allows photographer to make all adjustments to setting based on personal preferenceMovie Allows a recording of videoNight Shooting in low-light situationsPortrait Keeps the background out of focus, focusing on a close subject Program (P) Used to set personal favorite settingsSemi-Automatic(A/AV) Used when controlling the depth of field in a shotShutter Priority (S/TV) Used to control the shutter speedSports Used for quick-moving subjects
Photo SettingsAperture Looking at the lens, change your aperture setting and you will see the opening in the lens get larger or smaller. The smaller the opening means less light, the larger the opening means more light.ISO The digital equivalent (or approximation) of film speed.Shutter Speed When you press the button to take a photo, the amount of time it takes for the aperture blades and shutter curtain to close.
Texas 4-H Youth Development | texas4-h.tamu.edu Page 4
PHOTOGRAPHY PROJECT
DO:Activity 1: Label the Camera PartsLabel the parts of a camera by using the Activity 1 page featuring the outline of the digital camera and parts list. To add excitement if in a group, put the youth in teams and make it a relay race as to who can complete the diagram first.
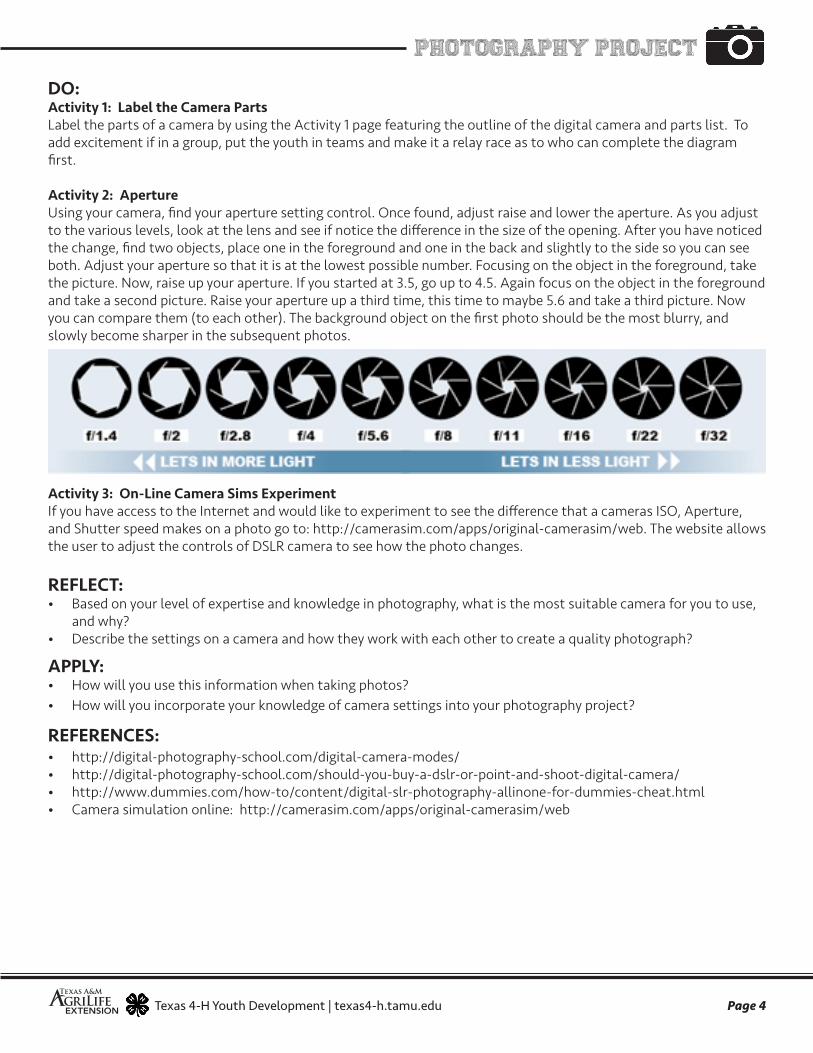
Activity 2: Aperture Using your camera, find your aperture setting control. Once found, adjust raise and lower the aperture. As you adjust to the various levels, look at the lens and see if notice the difference in the size of the opening. After you have noticed the change, find two objects, place one in the foreground and one in the back and slightly to the side so you can see both. Adjust your aperture so that it is at the lowest possible number. Focusing on the object in the foreground, take the picture. Now, raise up your aperture. If you started at 3.5, go up to 4.5. Again focus on the object in the foreground and take a second picture. Raise your aperture up a third time, this time to maybe 5.6 and take a third picture. Now you can compare them (to each other). The background object on the first photo should be the most blurry, and slowly become sharper in the subsequent photos.
Activity 3: On-Line Camera Sims ExperimentIf you have access to the Internet and would like to experiment to see the difference that a cameras ISO, Aperture, and Shutter speed makes on a photo go to: http://camerasim.com/apps/original-camerasim/web. The website allows the user to adjust the controls of DSLR camera to see how the photo changes.
REFLECT:• Based on your level of expertise and knowledge in photography, what is the most suitable camera for you to use,
and why?• Describe the settings on a camera and how they work with each other to create a quality photograph?
APPLY:• How will you use this information when taking photos?• How will you incorporate your knowledge of camera settings into your photography project?
REFERENCES: • http://digital-photography-school.com/digital-camera-modes/• http://digital-photography-school.com/should-you-buy-a-dslr-or-point-and-shoot-digital-camera/• http://www.dummies.com/how-to/content/digital-slr-photography-allinone-for-dummies-cheat.html• Camera simulation online: http://camerasim.com/apps/original-camerasim/web

Activity 1: Label the Parts of a CameraUsing the parts list below, label the various components of the DSLR camera.
View FinderPower SwitchLens Erase ButtonCross Keys Memory Card Slot
Flash Shutter ButtonMode Dial Main Control Dial LCD Display Lens Release Button
Lens Focus Mode SwitchFlash Button Play Button
Parts List:
View FinderPower SwitchLens Erase ButtonCross Keys Memory Card Slot
Flash Shutter ButtonMode Dial Main Control Dial LCD Display Lens Release Button
Lens Focus Mode SwitchFlash Button Play Button
Parts List:
Flash
Lens Release Button
Lens
EraseButton
LCDDisplay
CrossKeys Memory
Card Slot
PlayButton
ViewFinder
ShutterButton
Main Control
Dial
PowerSwitch
ModeDial Lens Focus
Mode SwitchFlash
Button
Activity 1: Label the Parts of a Camera - ANSWER KEYUsing the parts list below, label the various components of the DSLR camera.

Texas 4-H Youth Development | texas4-h.tamu.edu Page 7
4-H PHOTOGRAPHY PROJECTLessons
Selecting a Subject
TIME:45 minutes
MATERIALS NEEDED:• Camera
OBJECTIVES: To improve the quality of your images and to tell a story through your photos.The 4-H member will:• Make a plan before they take a photo-
graph.• Ask themselves what they are wanting to
“say” with their image.• Learn to tell a story or “sell” an idea with
their image(s).
EXPLORE THE CONTENT: Exceptional photographs don’t just happen. Most of the time, a successful photograph takes planning. Now that you have the basics of how to work your camera you are ready to start taking some of those exceptional photos. The next step requires a bit of thinking and questions to ask yourself. These questions will help you in the process of selecting a subject, which is simply choosing something you want to photograph.
Your Goal:• What would I like to photograph? What interests me? What
do I want to capture that will demonstrate my new skills and allow me to express myself?
• What is my purpose with this photograph? Am I taking the photo just for fun? Will it be a gift? Am I documenting something? Am I entering a competition? What story do I want my photo or photos to tell?
• What is the message that I am trying to tell others? Look at photographs you have taken previously. If you do not know why you took the photo, then others won’t understand either.
Your Subject:Once you know what your goal is for your photo, think about what subject. • If it is just for fun, you probably have lots of choices all around
you that you can use for practice: siblings, friends, family, landscapes, flowers, insects, pets, the possibilities are endless. Go out and explore with your camera!
• If your purpose is to give the photo as a gift, who is it for? A parent? Grandparent? Teacher? Friend? Find something that interests them: flowers, your little brother or sister, a beautiful landscape.
• Are you documenting something? A trip? A game? Time spent with your 4-H project either as memories or for your 4-H record book? Whatever your reason for taking these photos, make sure you have a story to tell so your photo inspires the viewer’s imagination or emotions. You as the Photographer, have the power to tell any story you want through your photographs. You have the ability to “talk” to your viewers even if you never actually meet them.
Ready, Set, Go!You have asked yourself the questions, made a plan, and selected your subject. You have a goal and a story you want to tell. You are ready to begin shooting. Now, there are 3 basic tips to remember when taking your photo:
Texas 4-H Youth Development | texas4-h.tamu.edu Page 8
PHOTOGRAPHY PROJECT
1. Find isolated subjects and simple backgrounds. Make your subject the focus of your photo. Too much background noise will take the drama away from your photo. Keep it simple, but look carefully at your surroundings to see if there is something that adds to our story.
2. The story you are telling doesn’t have to be true, allow your imagination and the viewers imagination to run freely. Focus on your subject and what you are trying to communicate.
3. Having a plan for your photos does not mean you can’t take candid moments. Watch for those. Oftentimes a candid or surprise emotion or subject is a better story than a staged scene.
If your purpose with your photograph is to enter a competition, be sure to study the categories and know which one you want to enter. The typical categories are: People, Flora (plants), Fauna (animals), Landscape/scenic, Architectural Elements. Sometimes a contest has a theme category and the image should fit that theme. Different contests offer many other categories to enter, some more broad and some more specific. Studying the categories and submitting a photo that fits the requirements of that category will help you take that first step to being successful with your entry.
And Finally….. practice, practice, practice!
As with all things, practice makes perfect, and the more photographs you take, the better you will become. Once you have mastered all the settings and know how to make changes quickly, you will become more confident in your photography and this will in turn help you to take better photos to help you tell your story.
DO:Beginner: Assignment 1. Tell a story through your photography. Your story can be one image or up to five images. It can be any topic you would like. Perhaps you want to tell the story of special day, or your summer vacation, or a fun 4-H project or event. Write 1 to 3 sentences about what your story is telling. Then present your “photo story” to three different people (a friend, sibling, parent, 4-H leader, etc.) and write down their thoughts or feelings of your “story”. Their comments do not have to be long; a couple of sentences or bullets will work. Next, compare their comments to your notes. Are they similar? Did they understand the story you were trying to tell? Did they feel anything significant? Did you want them to feel anything? Share the results with them and enjoy reflecting on this experience. Then go out and find another story to tell!!
Advanced: Assignment 2. Think of a word. Then think how you can apply that to a photograph. The challenge is to take a photograph that someone else will look at and think about the word you are trying to portray. For instance, if your word was “baseball;” you could take a photo of a baseball, people playing baseball, a ballpark or anything else that represents baseball. How can you, in only one photo, get your viewer to “see” your word? Show your photo to three different people and ask them to say the first word that comes to mind. If they say your word, you were successful! If they don’t, then reflect on their answers and see if you need to narrow or expand your subject selection.
REFLECT:• As you review the photos that you took, do you feel something differently than expected? • Do you wonder why you took that photograph?• How would you review your surroundings with an idea of the purpose of your photograph?
APPLY:• How will you use this information in your 4-H project?• How will you apply this information when you take holiday photos or vacation photos?• How will you share this information with others interested in photography?
Texas 4-H Youth Development | texas4-h.tamu.edu Page 9
4-H PHOTOGRAPHY PROJECTLessons
Composition
TIME:One 1-hour lesson, plus six 15-30 minute activity sections
MATERIALS NEEDED:• Camera• tripod (optional)
OBJECTIVES: The 4-H member will learn about photographic composition through the following topics:• Focal Point• Balance and Symmetry• Rule of Thirds• Rule of Odds• Leading Lines
EXPLORE THE CONTENT: What is Composition?In the visual arts, particularly painting, graphic design, photography, and sculpture, composition refers to the placement or arrangement of visual elements in a work of art. The way you arrange the elements in your photo is crucial to the visual appeal of the photo and the story that you are trying to tell. Composition is a way of guiding the viewer’s eye towards the most important part of your photo in order to help them understand the story. There is no universal formula for taking a great photograph, but there are general guidelines that can help improve your photos.
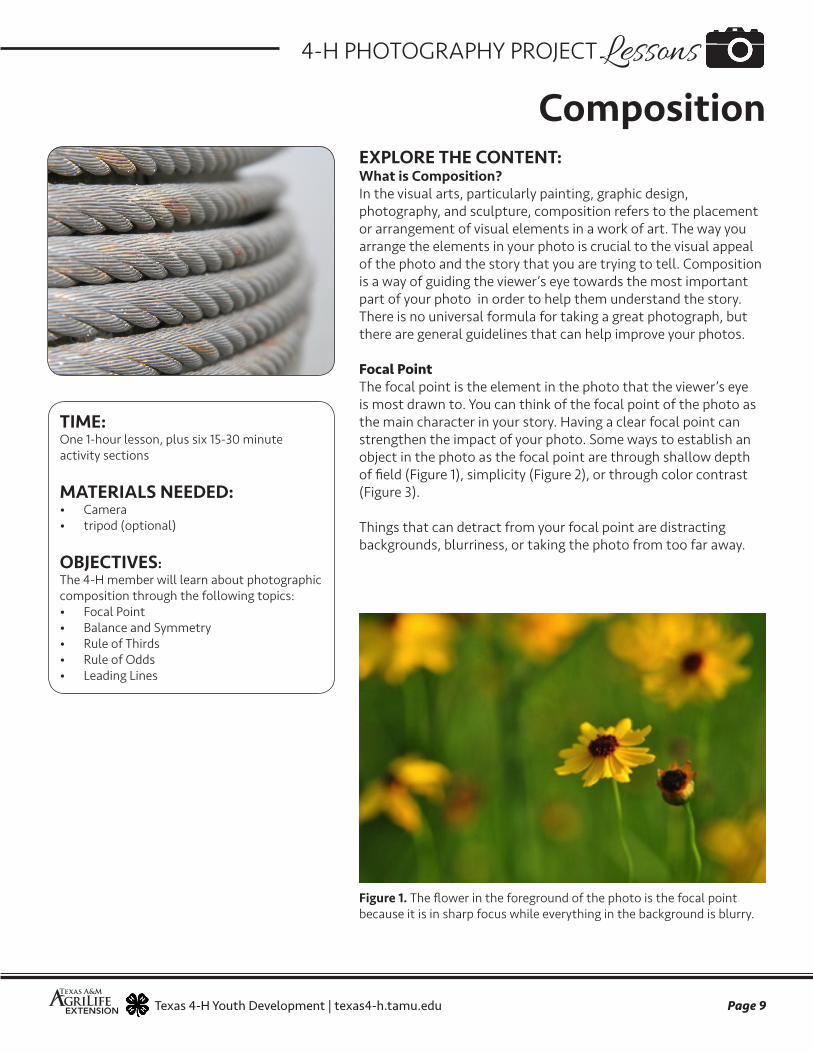
Focal PointThe focal point is the element in the photo that the viewer’s eye is most drawn to. You can think of the focal point of the photo as the main character in your story. Having a clear focal point can strengthen the impact of your photo. Some ways to establish an object in the photo as the focal point are through shallow depth of field (Figure 1), simplicity (Figure 2), or through color contrast (Figure 3).
Things that can detract from your focal point are distracting backgrounds, blurriness, or taking the photo from too far away.
Figure 1. The flower in the foreground of the photo is the focal point because it is in sharp focus while everything in the background is blurry.

Texas 4-H Youth Development | texas4-h.tamu.edu Page 10
PHOTOGRAPHY PROJECT
Figure 2. This simple photo has a large amount of negative space that allows the viewer to focus on the clean outlines of the people without being distracted.
Figure 3. Many of the rocks are similar in size, shape, and color and it would be difficult to deter-mine the focal point. The red rock provides strong contrast and establishes a clear focal point.
Balance and SymmetryVisual balance in your photo helps the image appear stable and complete. If you think of the elements of a photo as having “weight,” you don’t want all of the weight to be on one side of the photo because it will appear imbalanced. Symmetry in the photo is one way to achieve balance but it can also be achieved through asymmetry if the weights of different objects in the photo complement each other.
Symmetrical balance of objects Asymmetrical balance of objects

Texas 4-H Youth Development | texas4-h.tamu.edu Page 11
PHOTOGRAPHY PROJECT
The Rule of ThirdsThe rule of thirds has been used through the centuries and is probably the most recognized rule. The rule of thirds directs that the frame can be divided into three vertical sections and three horizontal sections. Wherever the separating lines connect is an ideal spot for a subject or point of interest. By positioning your main subject at any of the four intersection points, you are giving your subject more emphasis than if it is right in the middle of the photo. The intersection points can also work if there is more than one main subject in a photo. Most famous photographs and paintings have the rule of thirds applied to them in some way or another.
DO:Take a piece of paper and draw two horizontal lines dividing the paper into thirds. Draw two vertical lines again dividing the paper into thirds.
Figure 6. This diagram displays the rule of thirds and the red circles where the lines intersect are where you should try to place your subject.
Figure 4. This photo of the Taj Mahal is an example of symmetrical balance.
Figure 5. This photo of a doorway and window is an example of asymmetrical balance.
Try to placesubject at one ofthese four circles.

Texas 4-H Youth Development | texas4-h.tamu.edu Page 12
PHOTOGRAPHY PROJECT
Leading LinesA leading line paves an easy path for the eye to follow through different elements of a photo. Usually they start at the bottom of the frame and guide the eye upwards and inwards, from the foreground of the image to the background, typically leading toward the main subject.
Leading lines are all around us in cities and in nature. Our job as photographers is to find them and arrange them in our photographs so that they lead toward something, even if that something is infinity!
Figure 8. After application of the Rule of Odds, the photo on the right is more visually interesting than the photo on the left.
Now, go take a picture of anything - placing the main subject at one of those four positions one third of the way from the top or bottom and one third of the way from the side. In fact, try placing the same subject at all four intersection positions. Compare the pictures for the effects of balance
Rule of OddsThe rule of odds suggests that an image may have more visual appeal with an odd number of subjects.
Figure 7. After application of the Rule of Thirds, the photo on the right is more visually interesting than the photo on the left.
Examples of leading lines in everyday life:• roads• fences• boardwalks• bridges• bricks• anything in a row such as lamp posts• buildings• doorways• window panes
Examples of leading lines in nature: • rivers• shorelines• waves• sand dunes• trees• tall grass• cliffs• rocks• sun rays

Texas 4-H Youth Development | texas4-h.tamu.edu Page 13
PHOTOGRAPHY PROJECT
Figure 9. The leading lines of the road converge to create a sense of infinity.
Figure 10. The soft leading line of the river’s edge creates depth in the image.
DO:A to Z Alphabet Scavenger HuntFor this activity, you will apply the principles you learned in this section to photos you take. For each letter in the alphabet, take a photo that represents that letter. It can be a literal interpretation, like in the photo below depicting the letter ‘S’, seen in the chain of a porch swing or it could be something more abstract like a picture of a Quiet pond to represent the letter ‘Q.’
Since we covered multiple principles in this section, you can divvy the letters up like we did below (or divvy it up in another way that you like). You can also choose to only do one group of letters per session.

Texas 4-H Youth Development | texas4-h.tamu.edu Page 14
PHOTOGRAPHY PROJECT
A
Use a shallow depth of field, simplicity, or color contrast to establish a clear focal point
B
C
D
E
S
Apply the Rule of Thirds for photos with these letters
T
U
V
J
Use both symmetry and asymmetry to create balance in a photo for these letters
K
L
M
N
WIntentionally break the rules for these letters and then compare to some of your other photos
X
Y
Z
F
Apply the Rule of Odds for photos with these letters
G
H
I
OUse leading lines to create an interesting photo for these letters
P
Q
R
REFLECT:1. Which of the composition styles do you prefer and why?2. Discuss the composition style or styles that would be more appealing to the following persons (an architect,
developer, or someone seeking directions).3. Which composition style or styles would you associate with tranquility vs. chaos (random)?
APPLY:1. How could you use any of these composition styles to give directions to someone who is lost?2. Select an object or a scenery and practice taking photos to represent at least one of the above composition styles.3. Which of the composition styles would be best suited in a landscape garden design?
REFERENCES:• Figure 1- http://www.steves-digicams.com/knowledge-center/working-with-shallow-depth-of-field.html• Figure 2- http://iphonephotographyschool.com/negative-space/• Figure 3- http://www.mikedhani.com/?p=72• Figure 4- http://adventure.howstuffworks.com/taj-mahal-landmark.htm• Figure 5- http://incolors.club/collectionadwn-asymmetrical-balance-in-photography.htm• Figure 7 & 8- S. Creighton, 2010 from Michael Apodaca handout • Figures 9 & 10- http://digital-photography-school.com/how-to-use-leading-lines-for-better-compositions/• Rule of Thirds. http://bestphotolessons.com/lessons/lesson-7-rule-of-thirds/#ixzz47tyJrGjN

Texas 4-H Youth Development | texas4-h.tamu.edu Page 15
4-H PHOTOGRAPHY PROJECTLessons
Lighting
TIME:30 minutes
MATERIALS NEEDED:• Samples of photography with enhanced
lighting features – either printed or on PowerPoint
• A variety of cameras to show different ways to change lighting options
• Different Types of light
OBJECTIVES: The 4-H member will:• Increase their self-expression abilities
through the use of lighting techniques• Develop skills in composition, light, story
line, posing, and awareness• Learn how to manipulate their subjects or
camera angle to achieve the best quality lighting
EXPLORE THE CONTENT: How can the use of lighting affect the quality of a photograph?• Natural- Most flattering light, for most situations. Light we
are most use to seeing in an outdoor setting. Direct sunlight can cause lines, shadows and squinting subjects.
• Reflected light- bounced natural light to subject.• Natural plus fill flash- fills heavy shadows, by bouncing the
flash off the ceiling or wall.• Flash/Speedlights- tends to washout colors and puts heavy
shadows behind subjects. Slave flash units can put light where shadow was.
How do we measure light?• Incident meters- measure the amount of light falling on a
subject; hold in front of subject• Reflected meters- measure the light that is being reflected off
a subject. Built-in meters on cameras are generally reflected meters
DO:• Workshop Prep: Select a “subject” you can carry around and
place in different settings. For example: A vase or even an old pair of shoes
• Workshop Schedule: Either morning or late in the day. Place the subject into different light situations using the different light sources.
REFLECT: • How does changing the use of lighting of the same subject
affect the way the photo makes you feel?• How can you use shadows to bring out lighting contrasts in
the photograph?• What is the best way to illuminate your subjects?
APPLY:• How will you use this information when taking photographs
on your own?• Challenge yourself to take the same photo in different lighting
to see what effect it has.• How will you incorporate this lesson material for the rest of
your life when taking pictures? ie. Considering lighting when taking family pictures to lessen face shadows)
REFERENCES: • 2015-2016 Texas 4-H Photography Contest Rules and
Guidelines

Texas 4-H Youth Development | texas4-h.tamu.edu Page 16
4-H PHOTOGRAPHY PROJECTLessons
Managing Your Photos
TIME:45-60 minutes
MATERIALS NEEDED:• Various samples of photo storing options• Computer to show how to use technology
to organize and store images
OBJECTIVES: The 4-H member will:• Learn about options and strategies for
organizing photos and storing • Determine the best personal method for
organizing and storing photos• Create a system for organizing and storing
photos
EXPLORE THE CONTENT: Now that you’ve learned how to take great photos, you need to turn your attention to storing and organizing them. Photos are a great way to save memories and document lives, but we need to be sure we can access these photos years from now. Wouldn’t it be great to be able to share our memories with our children and grandchildren? With the widespread availability of technology such as computers and “the cloud” we are able to store more photos than ever before. However, it’s important to consider that today’s cutting-edge technology will be outdated in the future. We may not be able to access these photos due to future technological limitations, so printing and displaying photos still remains a relevant topic.
Equipment for Saving/StoringHere are some of the various types of equipment you can use for storing your photos:
Film: The original storage method for photos. Most cameras no longer use film, but until recently, almost all photos were taken on film and then developed. However, some people still prefer to use film. The negatives can be saved and used to develop the film again in the future. It is recommended that you store negatives in a cool, dark place and be sure to have a method to label and organize them. For peace of mind, it may be worth storing negatives in another location such as a safe deposit box so they will be preserved in case of emergency or disaster.
SD Card: This has become the industry standard for photo storage on digital cameras. The SD card slot is typically located next to the removable battery of your digital camera. SD cards are relatively inexpensive and available in a variety of sizes, from 2 GB to over 128 GB, at the time of this writing. Storage size is sure to increase in the future. Many computers have SD card readers, but it is often easier to download photos to the computer using the USB cable rather than removing the SD card from the camera to insert it into the reader. Experts recommend removing the SD card from the camera as infrequently as possible as the cards are very small and can be easily lost.
Hard drive: Data in your computer is stored on the hard drive. Computers may have more than one hard drive as well. Hard drive size has been steadily increasing since their invention, and current hard drive sizes range from 80 gigabytes at the low end to 5 terabytes at the high end. That’s enough room to store a lot of photos! However, one thing to realize is that while hard

Texas 4-H Youth Development | texas4-h.tamu.edu Page 17
PHOTOGRAPHY PROJECT
drives have a lot of storage space, there is always the possibility that they can fail. In this case, some of the data may be recoverable, but there is also the risk that some or all of the data may be lost. The section in this activity on “Organizing and Storing” has more information about the importance of backing up photos.
Portable hard drive: Similar to a hard drive, except they are built to be portable. They are also called external hard drives. They can easily be connected to any computer via USB cables. Sizes currently available range from 32 gigabytes to up to 8 terabytes, but like hard drives, storage size is sure to increase in the coming years.
Flash drive: Flash drives are similar to portable hard drives except they are smaller. They are small enough to fit in your pocket. Like portable hard drives, they can be connected to just about any computer via USB port. The disadvantage is that the storage space is also smaller than a portable hard drive. Current sizes range from 128 megabytes to 1 terabyte.
Compact Disc (CD-R or CD-RW): This is becoming an increasingly less popular storage format due to the rise of streaming and online cloud storage. However, during the late 90s and 2000s, CD-Rs (writable CDs) and CD-RW (rewritable CDs) were a common method of storage for computer files, including photos. CD-Rs can only be written or burned with data one time, while CD-RWs can be written or burned multiple times. Most CD-Rs and CD-RWs hold about 650 MB to 700 MB of data which is enough to hold around 300 photos, depending on the size of the photos. One disadvantage of this storage method is that CD-Rs and CD-RWs tend to degrade over time, especially if they are not properly stored.
Cloud Storage: This increasingly popular method of data storage involves storing data online on the cloud provider’s servers. An advantage of this method is that it allows you to access data on different computers and devices without having to copy it over to each device individually. If you store photos on the cloud, you can access these photos on your home computer, work or school computer, and even your smart phone. With the increased prevalence of computers, smart phones, and tablets in our lives, this is an important concern. Potential disadvantages of cloud computing include the cost and the need for internet access. Cloud computing sites will generally let you upload a certain amount of data for free, and after that you will have to pay to upload additional data. Generally the amount of data available without paying will be filled up very quickly, especially if you are storing photos, which take up a lot of memory. Lack of internet access or downed servers can also cause problems, as you need internet access to use the cloud. You might want to consider using a combination of cloud storage and physical storage methods for backing up your photos (see section on Organizing and Storing for more details). Some of the more popular cloud storage sites include Google Drive, Microsoft OneDrive, Amazon Cloud Drive, Apple iCloud, and Dropbox.
DownloadingDownloading photos from your camera to a computer is an important step in the photography process. If you don’t download photos, you will eventually run out of storage space on your camera. The process of downloading photos will vary depending on the brand of camera that you have but the basic concepts are the same. The first step in the process is to install the software necessary for downloading photos from the camera. Most cameras purchase packages include a compact disc with the software on it. It may also be possible to download the software from the company’s website.
After the software is installed, the next step is to connect the camera to the computer using the USB cable. This is also usually included with the camera. Different makes of camera use different size USB cables so it is important to not lose this cable. Once the USB cable is connected to the computer and the camera, you will need to turn the camera on. Depending on the make of camera, you may need to then select the appropriate option on the camera’s LCD screen in order to download photos (for example, select “Computer” if the camera is being connected to a computer).
Texas 4-H Youth Development | texas4-h.tamu.edu Page 18
PHOTOGRAPHY PROJECT
The next step may vary, depending upon the type of camera and software you are using, but you will probably have the option of tagging your photos. Tagging can be an excellent tool to help organize your photos. For example, a photography teacher, may tag the photos with the student’s name. However, you may also consider tagging photos based on the subject of the photos, the location of the photos, or the date the photos were taken. You may also be given the option to delete the photos from the camera after they are downloaded. This may be a good idea as it will ensure that you have plenty of free space next time you are using the camera.
Once the photos have been successfully downloaded, you can close out of the software if necessary, unplug the USB cable from the camera and the computer, and turn off your camera. Be sure to store the USB cable in a safe place so you won’t lose it!
Keep in mind the download process may vary from this depending on the type of camera you are using. For example, some cameras allow you to download the photos directly to cloud storage on the internet.
Organizing and StoringNow that your photos downloaded on the computer, you will need to consider ways to keep your photos organized. With today’s digital technology, it has become increasingly easy to take a large number of photos, which is great. But, if you do not have a method to organize your photos, you may find yourself overwhelmed with the sheer number of photos in your “Pictures” folder!
Various ways you can organize your photos include:• By photographer:
A photography teacher shares the following strategy: “As a photography teacher, I am dealing with a large number of photos from different students. Each class period that I teach, I can be dealing with anywhere from two to sixteen different photographers. If I didn’t organize these photos, it would be almost impossible to be an effective teacher. Therefore, when I am downloading student’s photos from the camera to the computer, I will create a different folder for each student and copy their photos from that day into their folder. I also instruct students to either take a “selfie” or better yet take a photo of their name written on a piece of paper or whiteboard in order to make it easier to identify who took what photo. That way, we can avoid arguments over whose photo it is when it comes time to submit photos to the County Contest.”
• By date: One of the simplest and most effective methods to organize photos is by date. Files automatically have the date information and can be sorted by date. It may also be helpful to create folders based on the date.
• By subject: Another method for organizing photos is by subject. You could create a single folder for a trip, for example, “Summer Vacation 2016.” The subject could also be the subject of the photos themselves, for example, the family pet or the new baby in the household.
The safest way to ensure that you do not lose valuable photos is to back them up in multiple locations, including at least one physical media backup.
Storing TipsOn the other hand, you don’t want to have too many photos on our hard drive. The ease of digital photography makes it possible to have more photos than one knows what to do with. Photos take up a lot of hard drive space, and videos even more so. It’s a good idea to delete subpar photos as they will take up space that can be better used to store good photos. So, go ahead and delete all those photos that are blurry, have the subject cut out of the frame or with the subject’s eyes closed. There is no sense in keeping a mediocre photo of a subject when you also have a much better one of the same subject. It’s a good idea to do this “pruning” process as you download your photos so you don’t become overwhelmed later.

Texas 4-H Youth Development | texas4-h.tamu.edu Page 19
PHOTOGRAPHY PROJECT
DO:Using what you have learned in this activity, create a strategy for organizing and storing your photos to include the following:• Saving/Storing Options • Download Steps• Digital Image Organization Plan• Printed Photo Organization Plan• Printing/Display Options
REFLECT: • What did you consider in deciding how you would save, organize and store your photos?• How does your strategy work for the present and the future?• How difficult was this process and what do you consider to be the benefits of making these decisions?
APPLY:• How might what you have learned about storage and organization in the photography project affect other
aspects of your life?• How and why is saving, storage and organizing data important in today’s world?
REFERENCES: • Information about photo storage: http://www.pdnonline.com/gear/8-Great-Photo-Storag-10345.shtml• Best practices for backing up digital photos: http://www.seagate.com/do-more/photographers-share-best-
practices-part-2-master-dm/• A blog post discussing storage of digital photos: http://teamwhitaker.org/2013/11/hdydi-filestore-digital-photos/• Information about CD-Rs and CD-RWs: http://www.cdrfaq.org/• Article about cloud computing: http://www.pcmag.com/article2/0,2817,2372163,00.asp• Article comparing different cloud storage sites: http://www.pcmag.com/article2/0,2817,2413556,00.asp• Why your digital photos might die before your grandkids see them: http://www.today.com/money/why-your-
digital-photos-might-die-your-grandkids-see-them-1D80395921

Texas 4-H Youth Development | texas4-h.tamu.edu Page 20
4-H PHOTOGRAPHY PROJECTLessons
Printing and Displaying Your Photos
TIME:60 minutes
MATERIALS NEEDED:• Computer with photo editing software• Various high resolution photographs
OBJECTIVES: The 4-H member will:• Learn the difference in file types and how it
effects quality.• Learn the various types of median
photographs can be printed on and how printing changes appearance.
• Determine the best file type and median to print and display photographs.
EXPLORE THE CONTENT:Although almost all photography is now digital, there are still situations where you will want to have a physical copy of your photo, so printing and displaying photos remains relevant. There is the chance of losing photos stored on a hard drive over long periods especially when exposed to magnets and heat, or a liquid spill. In the case of cloud technology, you may also lose photos when unreliable internet companies failed, and take their memory with them. According to Greg Scoblete, (2013) the editor of Your Digital Life - if stored properly, photos may last over 200 years. So, now that you have stored and organized your photos, below are some reasons you may need to print and display your photos:
• Entering a photography/visual arts contest• Presenting your photos as your 4-H project display• Including your photos in your 4-H record book• Producing photos for an art gallery or museum • Room decorations• Scrapbooks or yearbooks
Depending on the requirements and the guidelines for which you need to print or display your photos, you need to pay attention to the file types or format (lossy or lossless) such as:• JPEG (JPG, JPE) - stands for Joint Photographic Experts
Group. Once compressed in JPEG format you cannot regain the original quality (lossy format). This is why the original photo (your digital negative) should be taken with as little compression as possible.
• TIF/ TIFF - TIFF stands for Tag Image File Format (lossless format). TIF files are very large, much larger in computer file size than their JPEG equivalents. As a lossless format TIF can contain more photo information than a JPEG image.
• CRW/ CR2 – These are two main forms of the RAW image format, which are also called electronic negatives. CRW is file format of Canon digital camera, while CR2 is the extended file name of Canon camera. They contain minimally processed data from the image sensor of a digital camera.
• RAW - this format allows the greatest post-processing flexibility, and should be converted to TIFs for archival storage because it is not a good long term archival standard. RAW is the direct unprocessed image as seen by the camera’s sensor.
• GIF, PNG, BMP, PDF, PSD, etc. are other types of file format normally used for specific graphics purposes (animation, transparency, text, and layering) and not generally used for digital photos.

Texas 4-H Youth Development | texas4-h.tamu.edu Page 21
PHOTOGRAPHY PROJECT
DO:Activity: File Type and SizeUsing a photo editing software program, load a photo and then using the "save" as command, save the photograph in various types such as gif, jpg, tif, and eps. After you have saved the photo in the different file formats, find the files on your computer and look at the file size for each of the photos.• Did you see any significant difference in the size of each of the files?
• Do you see any difference in quality of the photograph?
Activity: Printing Photos on Various MediansTake a photograph that has a high resoultion and using an online photograph printing service have the photograph printed on different papers, such as matte, gloss, etc. After receiving your photographs view the photograph in vari-
ous light settings.
REFLECT:• Do you see any difference in file size of the photograph based on the format you saved it as?• Does quality differ from file type to file type?• Does the print media make a difference in different settings or environments
APPLY:• Based on how a photograph is saved, can you identify the best file format when entering a photography contest.
• Based on various print medias can you determine how best to print a photograph to be displayed.
REFERENCES:• Your Digital Life - How to print long-lasting photos at home: http://www.your-digital-life.com/how-to-print-
long-lasting-photos-at-home/ • All about digital photos - Common Digital Photo File Formats: http://www.rideau-info.com/photos/filetypes.
html
Texas 4-H Youth Development | texas4-h.tamu.edu Page 22
4-H PHOTOGRAPHY PROJECTLessons
Glossary of TermsAmbient Lighting: The natural light in a scene
Aperture: The circular opening inside the lens that can change in diameter to control the amount of light reaching a camera's sensor or film. The diameter is expressed in numbers called f/stops; the lower the number, the larger the aperture opening.
Angle of view / Picture Angle: Refers to the amount of a scene that will be in the photo. It is determined by the focal length of the lens and the format of the camera and is usually measured across the diagonal of the frame. Also called angle of view.
Autofocus: A system of sensors and motors that allow lenses to obtain focus automatically; in some cameras, the system also allows the lens to maintain focus on a moving subject.
Background: General term for anything behind the main subject in a photograph.
Backlighting: Lighting that illuminates the subject from [behind the subject]
Bounce Light: Refers to a flash unit aimed at a reflecting surface, such as a wall or ceiling, to illuminate the subject with reflected light.
Camera Controls: Camera adjustments that allow control over specific subjects and/or types of photography. Camera controls will vary from camera to camera. (Apodaca)
Catchlight: The reflection of a light source in a subject's eyes.
Close-Up: The general term for pictures taken at relatively close distances to achieve from 1/10 life-size (1:10) to life-size (1:1) images.
Composition: The arrangement of elements in a photograph.
Computer Connection Port: A port that allows the digital camera to connect to computer for image download, control, and/or charging. (Apodaca)
Contrast: A measure of the rate of an image's change of brightness. High contrast implies dark black and bright white content; medium contrast, a good spread from black to white; low contrast, a small spread of values from black to white.
Cropping: Trimming unwanted parts of an image.
Definition: The clarity of detail within a photograph.Depth of Field: The zone of acceptable sharpness in front of and behind the sub- ject on which the lens is focused. Depth of field varies according to focal length of the lens, chosen aperture and shooting distance.
Diffuser: Any device or substance placed between the central light source and the subject that softens or spreads the light.

Texas 4-H Youth Development | texas4-h.tamu.edu Page 23
4-H PHOTOGRAPHY PROJECTLessonsDigital Card: A camera’s removable card that stores images. Common types include: SD - Secure Data, CF - Compact Flash, MicroSD. (Apodaca)
Digital Photography: Photography that utilizes a digital camera to produce the image.
Download: A file or other information transferred from a camera, media card, CD, DVD, hard drive or the Internet to a computer or from one piece of computer equip- ment to another.
Exposure: The total amount of light falling on the film or image sensor. Most often measured in the amount of time the light is allowed to reach the sensor, as in "a one-second exposure."
Flash: An electronic unit that provides a relatively brief burst of light.
Focal Point: A point on the optical axis where light rays converge to form a sharp image of an object.
Foreground: The area in a scene that is closer to the photographer than the main subject.
Formatting: Preparing a memory card for use. It is recommended that before each shooting session, digital camera users format their memory card, in the camera, which completely wipes the data that had been on the card. It is recommended that this be done, instead of simply deleting all files.Frame: A single image; also, the scene viewed through the camera's finder.
Four Corners: Refers to the four corners of your scene through the view finder. A good composition rule to follow is to always check the four corners for distracting elements that affect the visual impact of the image. (Apodaca)
F/Stop or F/Number: The numerical expression of the relative aperture of a lens. Each f/number is 1.4 times larger than the preceding one, and each number indi- cates a halving or doubling of the amount of light allowed to pass through the lens.
Golden Hour: In photography, the golden hour (sometimes known as magic hour, especially in cinematography) is a period shortly after sunrise or before sunset during which daylight is redder and softer compared to when the Sun is higher in the sky. (Wikipedia.org)
Highlight: The bright- and light-tone areas of a subject or scene.
Hot Shoe: A mounting device, usually built onto the top of a camera, that enables a flash unit or select accessories to be mounted on the camera.
Image Size: The dimensions of an image in pixels. Sometimes stated using abbre- viations such as “L” (large), “M” (medium), or “S” (small).
ISO: Acronym for International Organization for Standardization. Refers to the international standard for representing the sensitivity to light of an imaging sensor or film by a numerical value.
Lens: An optical device that transmits light to film or a sensor.
Macro: Refers to close-up photography, particularly photography that results in the subject appearing close to life-size [or larger] in the image.
Megapixel: Equal to one million pixels.

Texas 4-H Youth Development | texas4-h.tamu.edu Page 24
4-H PHOTOGRAPHY PROJECTLessonsOverexposure: The result of the film or image sensor receiving too much light.
Panorama: A wide or ultra wide-angle image, often, but not restricted to, a landscape.
Perspective: The relative size, distance and depth of a three-dimensional subject or scene within a two-dimensional flat picture.
Rule of Odds: The [composition] rule of odds states that images are more visually appealing when there is an odd number of subjects. (http://digital-photography- school.com/four-rules-of-photographic-composition/)
Rule of Space: The [composition] rule of space says that in order to portray move- ment, context and the idea that the photo is bigger than just the part that you’re seeing, you need to leave clutter free ‘white’ spaces. (http://digital-photography- school.com/four-rules-of-photographic-composition/)
Rule of Thirds: More a composition guideline than a rule, the Rule of Thirds says that the optimal placement of your main subject should be in one of the four areas where the lines intersect. It does not matter whether you are composing horizontally or vertically, because as you view the scene, you can always break it up into thirds.
Saturation: Technically, the degree to which a color is undiluted by white light. On an everyday basis, the degree of color intensity.
SD Card: Secure Digital, a type of card used in digital cameras to store images. Available in a range of storage capacities, the cards can be erased (when the images have been transferred or are no longer needed) and reused many times.
Shadow: The dark area—as opposed to the highlight—of a subject or scene.
Sharpness: The quality of an image appearing to be in focus; commonly, the clarity of detail in a photo.
Shutter: A device that opens and closes in a camera to allow light to pass through the camera body to the imaging sensor or film.
Shutter Speed: The measurement of how long a camera's shutter remains open as the picture is taken.
Soft focus: An effect resulting from diffusing light around a sharply focused image.
Special Effects Mode: The Special Effects mode incorporates a variety of different effects that can be added to images or videos.
Stitching: "Stitching" is the term used to electronically join a series of images together to make one large image using software. Stop Motion: Stop Motion is an animation technique whereby you take individual frames of an object, making it appear to be moving of its own accord, and using software, turn it into a movie. Stop Motion should not be confused with time lapse.
Time Exposure: An exposure longer than the camera's fixed shutter speeds will allow.
Tripod: An adjustable three-legged stand used to steady a camera.

Texas 4-H Youth Development | texas4-h.tamu.edu Page 25
4-H PHOTOGRAPHY PROJECTLessonsUnderexposure: The result of the film or imaging sensor receiving too little light.
View Finder: The device through which you look to select the subject and com- pose the image.
View Point / Point of View: The most basic of composition rules. And it’s as simple as clicking the shutter. You are your viewer. Your camera is their eye. If you photograph a dog at eye level, your viewer will be viewing the dog at eye level (which gives the idea/feeling of equality). If you photograph a dog from below, your viewer will be seeing the dog from below (a low shot gives the notion of domi- nance). If you photograph a dog from above, you are projecting a feeling of your viewer’s superiority in relation to the dog. (http://digital-photography- school.com/four-rules-of-photographic-composition/)
White Balance: A function on the camera to compensate for the different colors of light being emitted by different light sources.
Wide Angle Lens: A lens of short focal length that provides a wider angle of view than human vision and standard lenses (in the 50mm focal length range). Wide- angle lenses in 35mm and D-SLR photography generally include focal lengths from 21mm to 35mm.
Zoom: Adjust focal length to pull subject in closer. (Apodaca)

1. Please read the statement in the left column of the table below. Bubble in the circles that describe yourlevel of understanding BEFORE attending this program. In the section on the far right, bubble in the circlesthat describe your level of understanding AFTER attending this program. You will have two bubbles per row.
AFTER
BEFORE
I understand the basic type of cameras and which best fits with myphotography goals.I understand the basic operation of a camera and how to adjust settingsbased on needs.
I understand composition and how it can affect the impact of a photograph.
I understand the importance of lighting i photography and how it affects aphotograph.
I understand the various ways of saving and protecting my photos for storage.
4-H ExploreProject Book Evaluation - Photography
LEVEL OF UNDERSTANDING: 1 = Poor, 2 = Average, 3 = Good, 4 = Excellent
INTENTIONS TO ADOPT:
2. For each statement below, fill in the bubble that best describes you.
I can make the necessary setting adjustments to my camera based on thedesired shot.
I will explore various photography techniques when taking photographs such ascomposition and lighting.I plan to use the techniques I have learned to enter at least one photographin the 4-H Photography Contest as a Senior or another photography contest.
Yes No Unsure
Please continue on the back.
MARKING INSTRUCTIONS
As a result of participating in the Photography project lessons and activities… 1 2 3 4 1 2 3 4
As a result of participating in the Photography Project lessons and activities…
BEHAVIOR CHANGES:
3. For each statement below, fill in the bubble that best describes your level of agreement with the followingstatements.
I am more comfortable working in a team.
I am more willing to listen to others.
I am more comfortable speaking with others.
I am more confident in my abilities as a leader.
StronglyDisagree Disagree Strongly
AgreeAs a result of participating in the Photography Project lessons and activities…Agree
I understand the various photograph file formats.
I am more comfortable talking to someone about photography.
1578
4. What is the most significant thing you learned in the Photography project?
Thank you!
Gender:
Most of the time, you live . . .
Female Male
Farm or ranchTown less than 10,000City between 10,000 - 50,000
Suburb of city between 50,000Central city/urban center with more than 50,000
Please tell us about yourself.
African AmericanAsian AmericanNative American
WhiteOther
I consider myself to be:
MARKING INSTRUCTIONS
Grade: 3rd
4th
5th
6th
7th
8th
9th
10th
11th
12th
I consider myself to be: Hispanic Non-Hispanic
Please provide any additional comments below.
1578