thank you for choosing electronic payment authorization ... · thank you for choosing electronic...
TRANSCRIPT


Thank you for choosing Electronic Payment Authorization (EPA) through ACH Direct.
By implementing the EPA service, you have taken an important step towards guarding your account against unauthorized ACH debit fraud.
The purpose of this quick start guide is to cover the main features of the EPA service through ACH Direct and help you begin decisioning items immediately.
For complete information on ACH Direct, its components and their uses, please see the ACH Direct User Guide.
Once again, thank you for choosing Key Bank.
Version 1.0 08/08
EPA Quick Start Guide 2

Overview of EPA Electronic Payment Authorization provided via ACH Direct is comprised of two components:
1. Notifications (alerts of events) are sent to each of your designated associates.
2. A web-based portal, accessible through Key Total Treasury, allows authorized individuals to decision pending items, input authorizations, and search authorization records.
By default, clients are setup so that all ACH debits attempting to post to the account are blocked. If there are trading partners whom you wish to allow to debit your account, you can submit an authorization online through ACH Direct allowing their debits to successfully withdraw funds from your account.
Entering ACH Direct 1. From the Corporate Banking page of www.key.com, login to Key Total Treasury
2. In the Services Login box select, ACH Direct
3. Select, Enter ACH Direct
EPA Quick Start Guide 3

Entering EPA 1. Type your User ID, Password and Organization, click Send
2. At the Corporate Customer Main Menu, click Transactions
3. The EPA Main Menu contains the following functions:
• EPA Add – Used to add authorizations to your service. These are partners you are authorizing to debit your account.
• EPA Authorization Search – Used to search for authorizations already on the system.
• Reject Decisioning – Used to decision items, i.e. pay or reject items.
EPA Add (Adding an Authorization) Note: The account number selected will be displayed at the top of the page for informational purposes only.
1. Select EPA Add
2. If you have more than one account setup with EPA, select the account that you would like to add the authorization to.
EPA Quick Start Guide 4

3. Enter the required data (descriptions follow)
How many transactions should be accepted with this Authorization (Please note: if this field is left blank, the default is unlimited!)
• Single Use – To authorize only a single transaction, this value should be set to 001.
• Specific Number of Transactions – Enter the specific number of Transactions that should be authorized. For example, if the user wants to authorize ten transactions, this value should be set to 010.
• Unlimited – To indicate that an unlimited number of transactions should be authorized, this value should be left blank.
Authorization Date Range
• Begin Date: The date the authorization will become active. • Expiration Date: The date the authorization record will expire or will be considered inactive.
Please Note: If there is no expiration, type in 12/31/2099. Maximum Amount: The maximum amount of the transaction(s) that can be authorized using this authorization record.
Specific Amount: The specific amount of the transaction(s) that can be authorized using this authorization record.
Transaction Type: Debit.
Company ID: The company ID of the entity originating the payment.
Company Name: The name of the company originating the payment.
Reference Number: Optional reference number to be contained within the individual ID field of the incoming transaction detail record.
EPA Quick Start Guide 5
4. Click Submit.
5. You will receive a confirmation screen. Please review the information to ensure that it is accurate.
6. If another authorization is required click Add Another at the bottom of the ACH Direct EPA Add Result Screen and repeat steps 2 - 4.
EPA Search Please Note: If you are an existing Electronic Payment Authorization client, be sure to verify the accuracy of previously submitted authorizations.
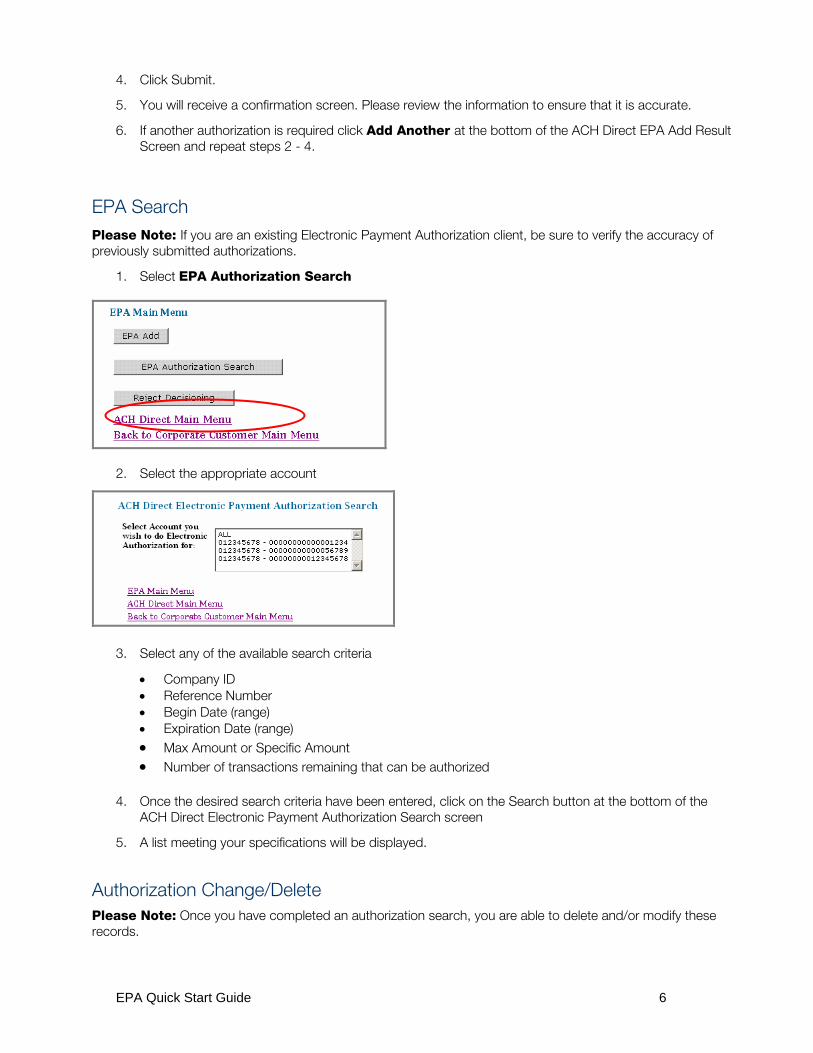
1. Select EPA Authorization Search
2. Select the appropriate account
3. Select any of the available search criteria
• Company ID • Reference Number • Begin Date (range) • Expiration Date (range) • Max Amount or Specific Amount • Number of transactions remaining that can be authorized
4. Once the desired search criteria have been entered, click on the Search button at the bottom of the ACH Direct Electronic Payment Authorization Search screen
5. A list meeting your specifications will be displayed.
Authorization Change/Delete Please Note: Once you have completed an authorization search, you are able to delete and/or modify these records.
EPA Quick Start Guide 6

1. Based on the search results displayed, authorizations can be changed, deleted, or the inquire function can be used to obtain more details on an authorization by checking the desired selection and selecting the appropriate function.
2. If Inquire Selected is chosen, the current authorization detail is shown. From this screen there is also an option to change or delete the authorization.
EPA Quick Start Guide 7

3. If Change Selected or Request Change was selected (from either the Search screen or the Inquiry Detail screen respectively) input desired changes and select Submit Changes.
4. If Delete Selected or Request Delete (from either the Search screen or the Inquiry Detail screen respectively) was selected, validate the information and hit Submit Delete.
EPA Quick Start Guide 8

Reject Decisioning Once you have received an email notification regarding a pending entry, you can log into ACH Direct and make a decision to allow the item to post to your account or refuse the item. You have three options:
• Accept—allows entry to post to account • Refuse—item will be returned • Pending—decision is not known at this time. You have until 4:00 P.M (ET) on the return date listed
on the email notification to make a decision regarding the item, if no decision is made by that time, the item will be returned.
Some important tips regarding decisioning
• It is important to note that any changes or additions to authorization records made during the acceptance session will only impact future transactions.
• Decisioning can only be performed until the item has been recollected, i.e. the return date.
• When selecting “Accept”, you are indicating the item should be allowed to post and will not look for or use any existing authorization records.
• During the acceptance process, you will be given the option to view (and potentially change) an existing authorization record (if one was present) to determine why the item rejected and make any appropriate modifications to allow future transactions to post.
• If the detail item rejected because no authorization record was located, you will be given the option to add an authorization record so that future transactions will not reject.
• If you determine the entry should be returned, select the REFUSE option and the item will be recollected and returned on its effective date (or on the following day if collected on the Effective Date).
1. From the main menu select “Reject Decisioning”
2. On the next screen select the account that you will be decisioning items for.
EPA Quick Start Guide 9

3. Once the account is selected enter the desired search criteria and select Search.
4. Select the items that you wish to make a decision on. 5. Click Pending Selected; Refuse Selected, or Accept Selected to apply the decision to the
specified items.
EPA Quick Start Guide 10
6. You will receive a confirmation screen displaying the action taken.

