thanks for your purchase. any questions please don't
TRANSCRIPT

Thanks for your purchase. Any questions please don't hesitate to contact us, We will handle
all your problem ASAP. Your feedback is vital to us! And we will always try to do better.For more details, please contact us by email via [email protected] (Write your seller's
Order # on the subject of the email, so that we can find your order and better assist your issue)

INTRODUCTION
IMPORTANT SAFETY INSTRUCTION ............................................................................
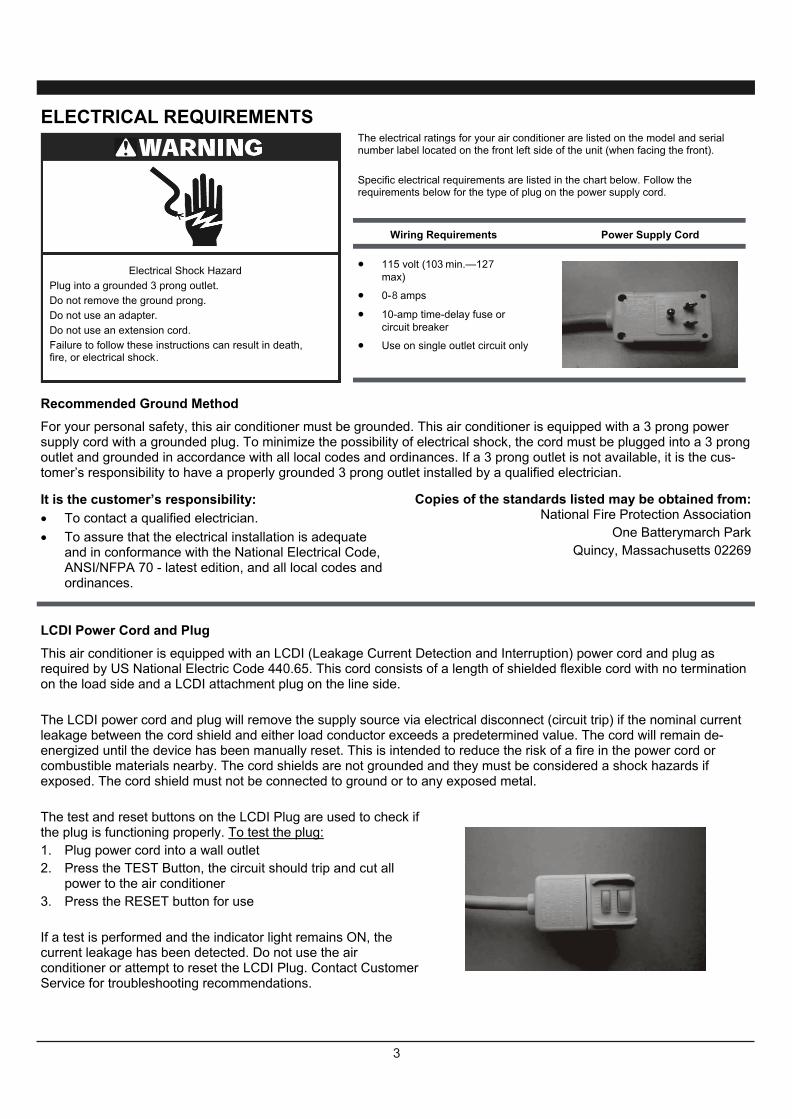
ELECTRICAL REQUIREMENTS ....................................................................................
PACKING LIST .............................................................................................................
INSTALLATION & ASSEMBLY INSTRUCTIONS ...............................................................
USING YOUR AIR CONDITIONER ..................................................................................
CARE AND CLEANING ................................................................................................ .
TROUBLESHOOTING ...................................................................................................
1
3
4
5
10
13
14
1
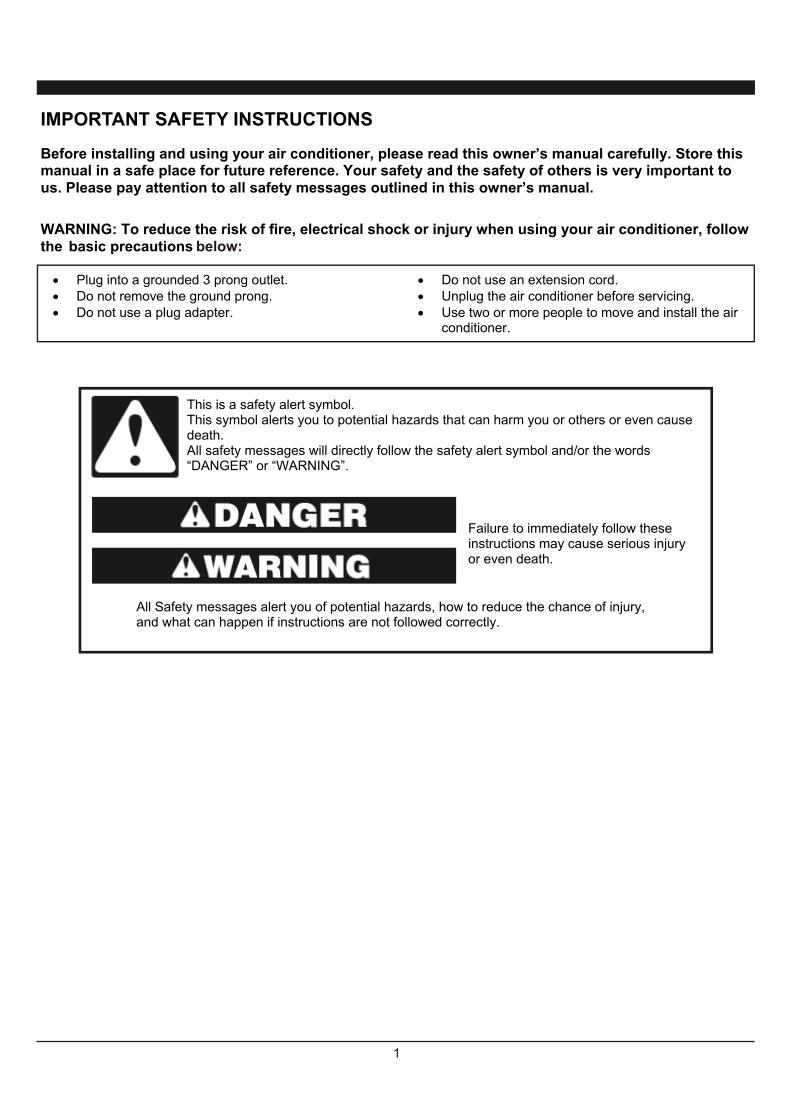
below:
2
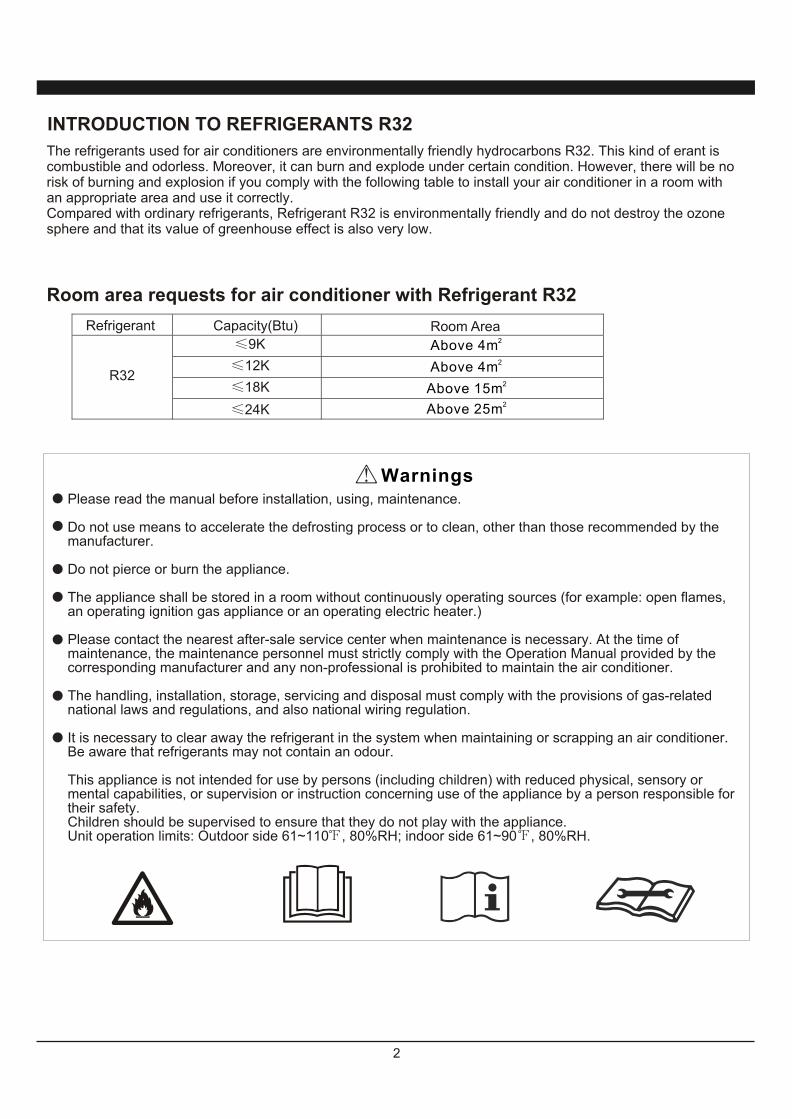
INTRODUCTION TO REFRIGERANTS R32
9K
12K
18K
24K
The refrigerants used for air conditioners are environmentally friendly hydrocarbons R32. This kind of erant is combustible and odorless. Moreover, it can burn and explode under certain condition. However, there will be no risk of burning and explosion if you comply with the following table to install your air conditioner in a room with an appropriate area and use it correctly. Compared with ordinary refrigerants, Refrigerant R32 is environmentally friendly and do not destroy the ozone sphere and that its value of greenhouse effect is also very low.
Room area requests for air conditioner with Refrigerant R32
WarningsPlease read the manual before installation, using, maintenance.
Do not use means to accelerate the defrosting process or to clean, other than those recommended by the manufacturer.
Do not pierce or burn the appliance.
The appliance shall be stored in a room without continuously operating sources (for example: open flames, an operating ignition gas appliance or an operating electric heater.)
Please contact the nearest after-sale service center when maintenance is necessary. At the time of maintenance, the maintenance personnel must strictly comply with the Operation Manual provided by the corresponding manufacturer and any non-professional is prohibited to maintain the air conditioner.
The handling, installation, storage, servicing and disposal must comply with the provisions of gas-related national laws and regulations, and also national wiring regulation.
It is necessary to clear away the refrigerant in the system when maintaining or scrapping an air conditioner. Be aware that refrigerants may not contain an odour.
This appliance is not intended for use by persons (including children) with reduced physical, sensory or mental capabilities, or supervision or instruction concerning use of the appliance by a person responsible for their safety. Children should be supervised to ensure that they do not play with the appliance.Unit operation limits: Outdoor side 61~110 , 80%RH; indoor side 61~90 , 80%RH.
R32
Refrigerant Capacity(Btu) Room Area2Above 4m2Above 4m
2Above 15m2Above 25m
3
7
8

4
Battery
5
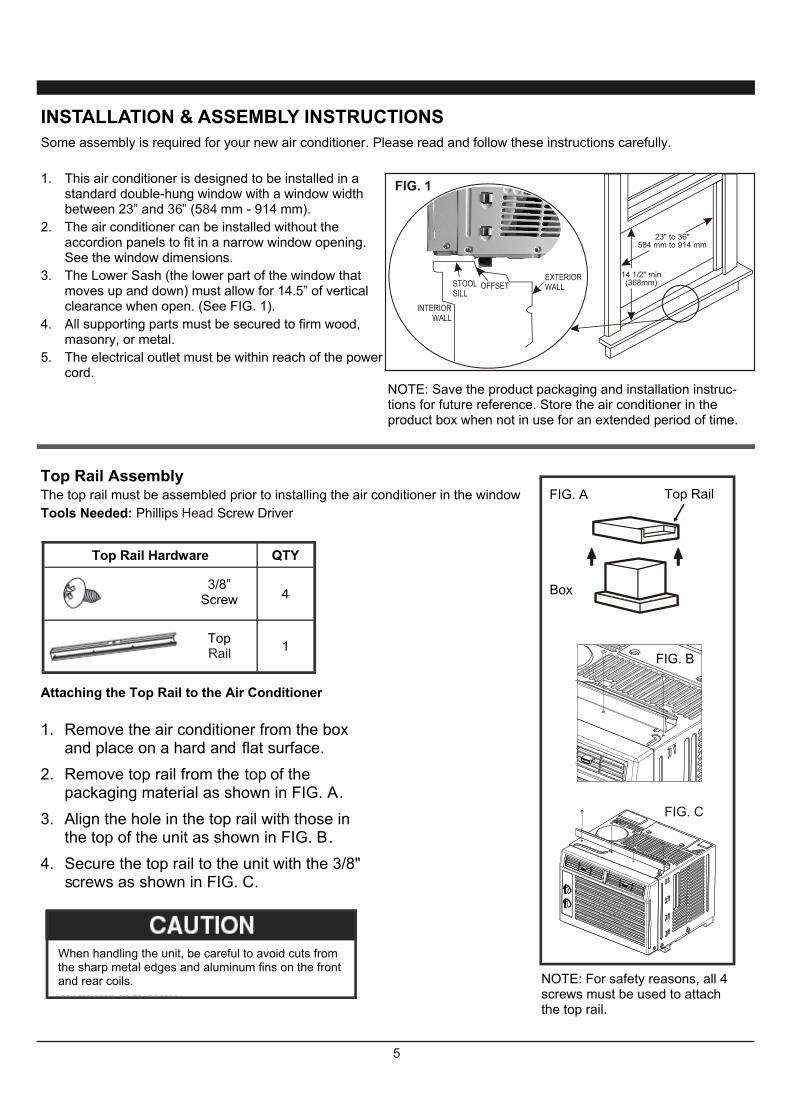
23" to 36"584 mm to 914 mm
14 1/2" min(368mm)OFFSETSTOOL
SILL
INTERIORWALL
EXTERIORWALL
FIG. 1
6 84
Head
6
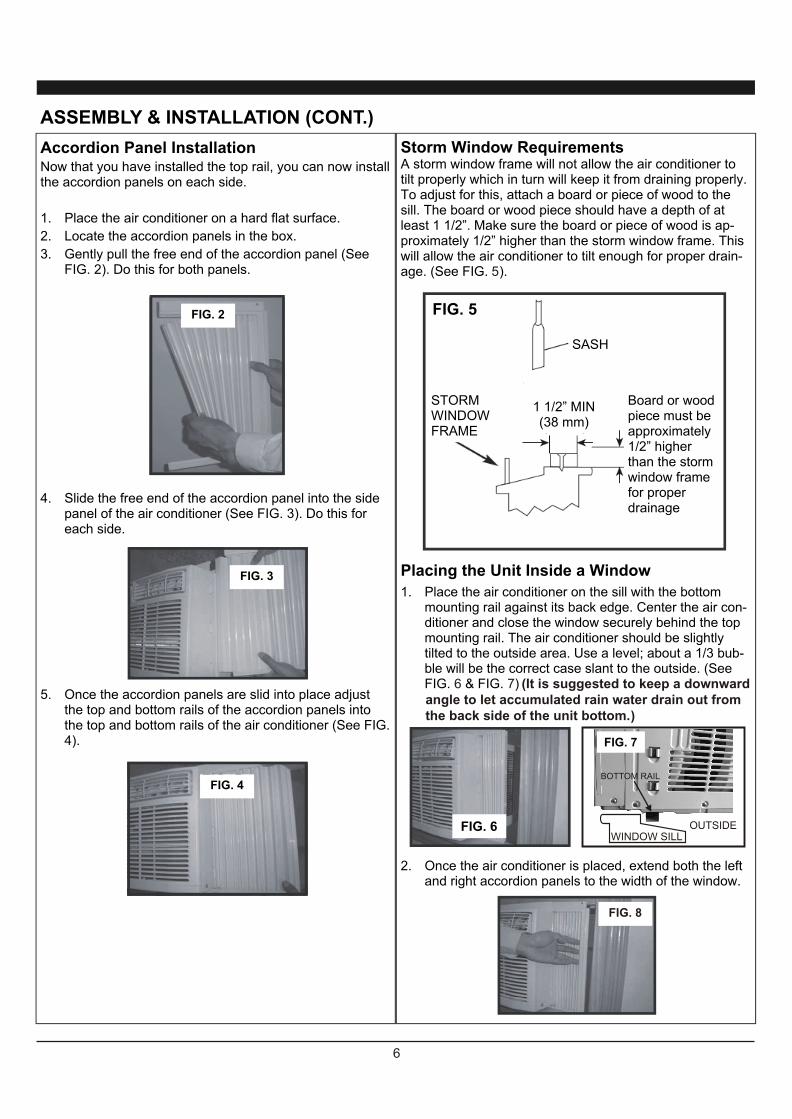
(It is suggested to keep a downward angle to let accumulated rain water drain out from the back side of the unit bottom. (
8
5
76

7
Head
unplug
FIG. 9
9
10
FIG. 10
FIG. 11 FIG. 12
FIG. 13
FIG. 14
4

8
INSTALLATION & ASSEMBLY INSTRUCTIONSIntroduction to Refrigerants R32
The maximum charge and the required minimum floor area 3 3 3m = (4 m ) x LFL , m = (26 m )) x LFL, m = (130 m )x LFL1 2 3
3 3Where LFL is the lower flammable limit in kg/ m , R32 LFL is 0.306 kg/ m .For the appliances with a charge amount m < M m :1 2
(5/4) 1/2The maximum charge in a room shall be in accordance with the following:m = 2.5 x (LFL) x h x (A)max 0
The required minimum floor area Amin to install an appliance with refrigerant charge M (kg)(5/4) 2shall be in accordance with following: A = (M/ (2.5 x (LFL) x h )) min 0
Where:m is the allowable maximum charge in a room, in kg;max
M is the refrigerant charge amount in appliance, in kg;Amin is the required minimum room area, in m2;
2A is the room area, in m ;3LFL is the lower flammable limit, in kg/m ;
h is the installation height of the appliance, in meters for calculating m or A , 1.8 m for wall mounted;0 max min
Table GG.1 Maximum charge (kg)
CategoryLFL
3 (kg/m )h0
(m)
2Floor area(m )
CategoryLFL
3 (kg/m )h0
(m)
Charge amount (M) ( kg)
2Minimum room area(m )
2Table GG.2 Minimum room area (m )
Before installing the appliance, you must read the manual carefully to get the safety information and notes.When filling the combustible refrigerant, any of your rude operations may cause serious injury or injuries to human body or bodies and object or objects.A leak test must be done after the installation is completed.It is a must to do the safety inspection before maintaining or repairing an air conditioner using combustible refrigerant in order to ensure that the fire risk is reduced to minimum.It is necessary to operate the machine under a controlled procedure in order to ensure that any risk arising from the combustible gas or vapor during the operation is reduced to minimum.Requirements for the total weight of filled refrigerant and the area of a room to be equipped with an air conditioner (are shown as in the following Tables GG.1 and GG.2)

9
INSTALLATION & ASSEMBLY INSTRUCTIONS
Introduction to Refrigerants R321. Site Safety
2. Operation Safety
Open Flames Prohibited Ventilation Necessary
Open Flames Prohibited
Mind Static Electricity Must Wear Protective Clothing and anti-static gloves Don't use mobile phone
3. Installation Safety
Refrigerant Leak Detector
Appropriate Installation Location
The left picture is the schematic diagram of a refrigerant leak detector.
Please note that:
1. The installation site should be in a well-ventilated condition.
2. The sites for installing and maintaining an air conditioner using Refrigerant R32 should be free from open fire or welding, smoking, drying oven or any other heat source higher than 548 which easily produces open fire.
3. When installing an air conditioner, it is necessary to take appropriate anti-static measures such as wear anti- static clothing and/or gloves.
4. It is necessary to choose the site convenient for installation or maintenance wherein the air inlets and outlets of the indoor and outdoor units should be not surrounded by obstacles or close to any heat source or combustible and/or explosive environment.
5. If the indoor unit suffers refrigerant leak during the installation, all the personnel should go out till the refrigerant leaks completely for 15 minutes. If the product is damaged, it is a must to carry such damaged product back to the maintenance station and it is prohibited to weld the refrigerant pipe or conduct other operations on the user's site.
6. It is necessary to choose the place where the inlet and outlet air of the indoor unit is even.
7. It is necessary to avoid the places where there are other electrical products, power switch plugs and sockets, kitchen cabinet, bed, sofa and other valuables right under the lines on two sides of the indoor unit, and also prevent mechanical damage from occurring.
10
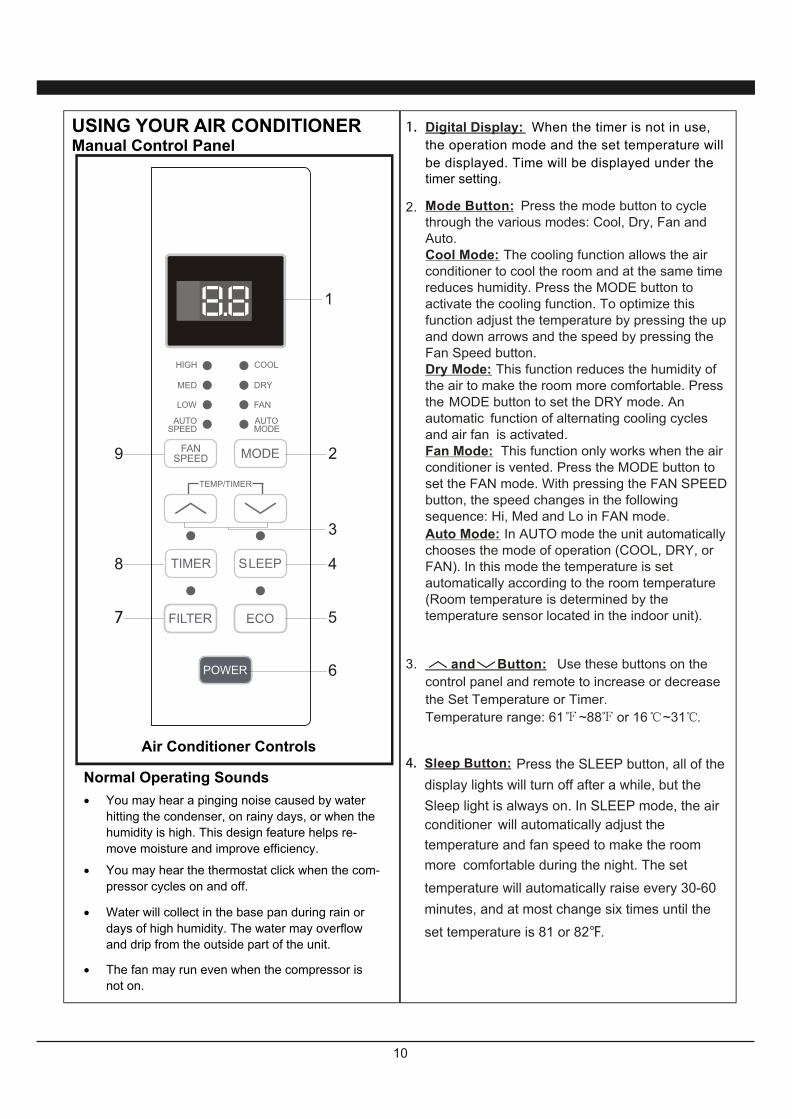
and Button:3. Use these buttons on the control panel and remote to increase or decrease the Set Temperature or Timer. Temperature range: 61 ~88 or 16 ~31 .
Press the mode button to cycle through the various modes: Cool, Dry, Fan and Auto.Cool Mode: The cooling function allows the air conditioner to cool the room and at the same time reduces humidity. Press the MODE button to activate the cooling function. To optimize this function adjust the temperature by pressing the up and down arrows and the speed by pressing the Fan Speed button.Dry Mode: This function reduces the humidity of the air to make the room more comfortable. Press the MODE button to set the DRY mode. An automatic function of alternating cooling cycles and air fan is activated. Fan Mode:
Auto Mode: In AUTO mode the unit automatically chooses the mode of operation (COOL, DRY, or FAN). In this mode the temperature is set automatically according to the room temperature (Room temperature is determined by the
conditioner is vented. Press the MODE button to set the FAN mode. With pressing the FAN SPEEDbutton, the speed changes in the following sequence: Hi, Med and Lo in FAN mode.
temperature sensor located in the indoor unit).7
This function only works when the air
Press the SLEEP button, all of the display lights will turn off after a while, but the Sleep light is always on. In SLEEP mode, the air conditioner will automatically adjust the temperature and fan speed to make the room more comfortable during the night. The set temperature will automatically raise every 30-60 minutes, and at most change six times until the set temperature is 81 or 82 .
1. When the timer is not in use, the operation mode and the set temperature will be displayed. Time will be displayed under thetimer setting.
Digital Display:
2. Mode Button:
4. Sleep Button:
3
6
1
2
4
5
9
8

11
6. Turn the air conditioner on and
off.
Power Button:
Press the FAN SPEED button
to select the fan speed. In COOL MODE you can
choose the following settings: HI, MED, LO, or
AUTO. In FAN MODE you can choose from HI,
MED, and LO.
9. Fan Speed Button: When the unit is in ECO mode, the
light will turn on. In ECO mode, the unit willturn off once the room is cooled to the user-set temperature. The unit will turn back on when the room
temperature rises above the user-set temperature.Before the compressor starts, the fan motor willrun for a while, then it will stop for a while, and will repeat to provide a much more comfortable feeling
and save energy.
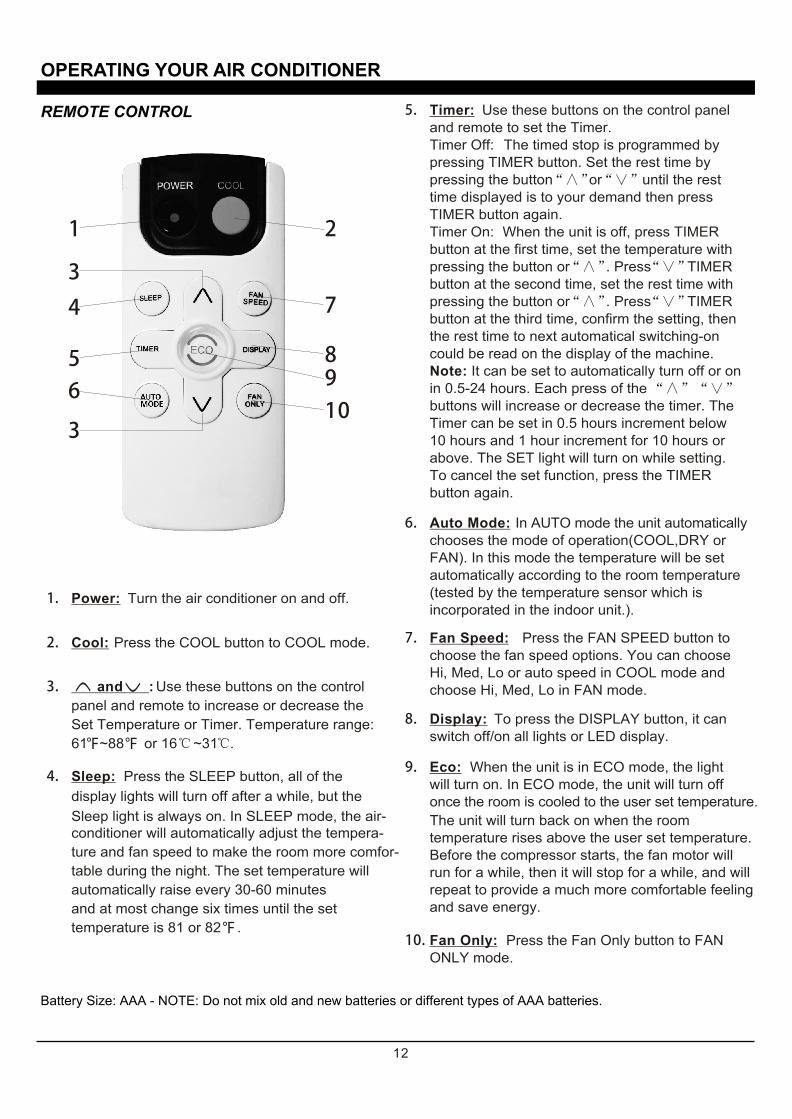
5. Eco Button:
10. Use the horizontal wheels
to control horizontal airflow and the air deflectors
to control vertical airflow.
Directional Louvers:
horizontal wheelair deflector air deflector When the Filter Check light is off,
it is not necessary to press the Filter Check button.
When the Filter Check light is on, you can turn off
the light by pressing the Filter Check button. After
the fan motor works for 500 total hours, the Filter
Check light will turn on to remind the user to clean
the filter.
Filter Button:7.
Use these buttons on the control panel and remote to set the Timer. Timer Off: The timed stop is programmed by pressing TIMER button. Set the rest time by pressing the button or until the rest time displayed is to your demand then press TIMER button again.Timer On: When the unit is off, press TIMER button at the first time, set the temperature with pressing the button or . Press TIMER button at the second time, set the rest time with pressing the button or . Press TIMER button at the third time, confirm the setting,
Note: It can be set to automatically turn off or on in 0.5-24 hours. Each press of the buttons will increase or decrease the timer. The Timer can be set in 0.5 hours increment below 10 hours and 1 hour increment for 10 hours or above. The SET light will turn on while setting. To cancel the set function, press the TIMER button again.
then it will show on the display.
8. Timer Button:
12
Fan Only:
Press the FAN SPEED button to choose the fan speed options. You can choose Hi, Med, Lo or auto speed in COOL mode and choose Hi, Med, Lo in FAN mode.
7. Fan Speed:
To press the DISPLAY button, it can switch off/on all lights or LED display.
8. Display:
Use these buttons on the control panel and remote to set the Timer. Timer Off: The timed stop is programmed by pressing TIMER button. Set the rest time by pressing the button or until the rest time displayed is to your demand then press TIMER button again.Timer On: When the unit is off, press TIMER button at the first time, set the temperature with pressing the button or . Press TIMER button at the second time, set the rest time with pressing the button or . Press TIMER button at the third time, confirm the setting, then the rest time to next automatical switching-on could be read on the display of the machine. Note: It can be set to automatically turn off or on in 0.5-24 hours. Each press of thebuttons will increase or decrease the timer. The Timer can be set in 0.5 hours increment below 10 hours and 1 hour increment for 10 hours or above. The SET light will turn on while setting. To cancel the set function, press the TIMER button again.
5. Timer:
In AUTO mode the unit automatically chooses the mode of operation(COOL,DRY or FAN). In this mode the temperature will be set automatically according to the room temperature (tested by the temperature sensor which is incorporated in the indoor unit.).
6. Auto Mode:
1. Turn the air conditioner on and off.Power:
2. Press the COOL button to COOL mode.Cool:
and :3. Use these buttons on the control panel and remote to increase or decrease the Set Temperature or Timer. Temperature range: 61 ~88 or 16 ~31 .
1
4
56
3
3
7
8
109
2
When the unit is in ECO mode, the light will turn on. In ECO mode, the unit will turn off once the room is cooled to the user set temperature. The unit will turn back on when the room temperature rises above the user set temperature. Before the compressor starts, the fan motor will run for a while, then it will stop for a while, and will repeat to provide a much more comfortable feeling and save energy.
Press the Fan Only button to FAN ONLY mode.
9.
10.
Eco: Press the SLEEP button, all of the display lights will turn off after a while, but the Sleep light is always on. In SLEEP mode, the air-conditioner will automatically adjust the tempera-ture and fan speed to make the room more comfor-table during the night. The set temperature will automatically raise every 30-60 minutes and at most change six times until the set temperature is 81 or 82 .
4. Sleep:
13
15
FIG. 15

14

15


