the abc’s of overcurrent coordination
DESCRIPTION
El libro que estabas esperando...TRANSCRIPT

AAnnaallyyzzeerr Published for electrical engineers by EPOWERENGINEERING and available at www.epowerengineering.com
The ABC’s of Overcurrent Coordination
Thomas P. Smith, P.E.
January 2006
ABOUT THE AUTHOR
THOMAS P. SMITH, P.E. received his B.S. in Electrical Engineering in 1982, and his B.S. in Education in 1981 from the University of Nebraska. Mr. Smith has over 20 years of electric power systems design, analysis and training experience. He began his career in 1983 at the U.S. Army Corps of Engineers – Omaha District as a design engineer. In 1988 Mr. Smith joined Gilbert/Commonwealth where he performed a wide variety of power system studies for industrial and utility clients. In 1995 he began work as a private consultant. He has designed electrical distribution systems for air separation plants built throughout the world for Air Products and Chemicals. He annually prepares and teaches several seminars in power systems design and analysis. Mr. Smith is a Registered Professional Engineer in the states of Nebraska and Pennsylvania. He is a member of the IEEE.
The material in this guide was initially developed by Mr. Smith for his power system seminars. His design experiences were used as a foundation. He has been fortunate to work with, and is grateful to, the many fine engineers that have shared their knowledge and experiences with him over the years. Much of this material is not original, it can be found in old engineering references no longer in print, rules of thumb passed down from one engineer to another, or in various standards.
DISCLAIMER
EPOWERENGINEERING has attempted to provide accurate and current information for interpretation and use by a registered professional engineer. EPOWERENGINEERING disclaims any responsibility or liability resulting from the interpretation or use of this information.
© 2006 EPOWERENGINEERING
The ABC’s of Overcurrent Coordination
Table of Contents
Section 1 INTRODUCTION 1
Section 2 LIFE SAFETY REQUIREMENTS 2
Section 3 EQUIPMENT PROTECTION REQUIREMENTS 3
Feeders 3
Capacitors 11
Transformers 15
Motors 23
Generators 31
LV Equipment 36
MV Equipment 40
Section 4 SELECTIVITY REQUIREMENTS 44
Section 5 SETTING GUIDELINES 54
MV Motor Switchgear Feeder Unit 54
MV Motor Fused Starter Feeder Unit 56
LV Motor Power Circuit Breaker Feeder Unit 58
LV Motor MCP Starter Feeder Unit 60
LV Motor Fused Starter Feeder Unit 62
MV Generator Switchgear Feeder Unit with Voltage Controlled 51V 64
MV Generator Switchgear Feeder Unit with Voltage Restrained 51V 66
LV Generator Molded-Case Circuit Breaker or Power Circuit Breaker Feeder Unit 68
MV Transformer Switchgear Feeder Unit 70
MV Transformer Fused Switch Feeder Unit 72
MV Capacitor Switchgear Feeder Unit 74
MV Main Service Switchgear Feeder Unit 76
LV Main Service Power Circuit Breaker Feeder Unit 78
LV Main Service Molded-Case Circuit Breaker Feeder Unit 80
MV Resistor Grounded Systems 82
LV Solidly Grounded Systems 84
Section 6 STUDY PROCEDURES 86
Section 7 REFERENCES 88
© 2006 EPOWERENGINEERING
i


The ABC’s of Overcurrent Coordination
_________________________________________________________________________________________________________ SECTION 1 INTRODUCTON_________________________________________________________________________________________________________
The proper selection and coordination of protective devices is mandated in article 110.10 of the National Electrical Code.
“The overcurrent protective devices, the total impedance, the component short-circuit current ratings, and other characteristics of the circuit to be protected shall be selected and coordinated to permit the circuit-protective devices used to clear a fault to do so without extensive damage to the electrical components of the circuit. This fault shall be assumed to be either between two or more of the circuit conductors or between any circuit conductor and the grounding conductor or enclosing metal raceway. Listed products applied in accordance with their listing shall be considered to meet the requirements of this section.”
To fulfill this mandate an overcurrent coordination study is required. The electrical engineer is always responsible for this analysis. It is an unfortunate fact of life that many times the engineer who specified and purchased the equipment will not set the protective devices. Therefore, compromises are inevitable.
There are three fundamental aspects to overcurrent coordination that engineers should keep in mind while selecting and setting protective devices.
• Life Safety Requirements
Life safety requirements are met if protective device pickup settings are within distribution equipment continuous current ratings and rated short circuit test duration times. Life safety requirements are never compromised.
• Equipment Protection Requirements
Equipment protection goals are met if overcurrent devices are set above load operating levels and below equipment damage curves. Conductor, cable, transformer and distribution equipment damage information is defined in applicable equipment standards. Capacitor, motor and generator damage information is component specific, and is normally provided by the manufacturer. Based on system operating and equipment sizing practices equipment protection is not always possible.
• Selectivity Requirements
Selectivity goals are met if in response to a system fault or overload, the minimum area of the distribution system is removed from service. Again, based on system operating and equipment selection practices selectivity is not always possible.
Performing overcurrent coordination studies is a skill required of every electric power system engineer. This document is intended as a basic guide to overcurrent coordination. There is no substitute for experience.
It is strongly recommended that the design engineer objectively review the results of the overcurrent coordination study. If life safety, equipment protection, or selectivity goals have not been met, determine what could have been done differently. For instance, using switchgear equipped with power circuit breakers instead of switchboards equipped with molded case circuit breakers. Keep in mind there are inherent advantages and disadvantages between distribution systems and equipment. Engineers must know and understand these differences before equipment is purchased.
© 2006 EPOWERENGINEERING
1

The ABC’s of Overcurrent Coordination
_________________________________________________________________________________________________________ SECTION 2 LIFE SAFETY REQUIREMENTS _________________________________________________________________________________________________________
The results of the load flow study are used to confirm minimum equipment continuous current ratings. The results of the short circuit study are used to confirm minimum equipment interrupting and withstand ratings. To meet life safety requirements, the results of the overcurrent coordination study must confirm that protective device pickups are within equipment continuous current ratings, and that protective device clearing times are within distribution equipment rated short circuit duration times, Table 1.
Table 1 – SC Duration Limits
Distribution Equipment
Industry Standard
Short Circuit Test Duration Time
Panelboard UL67 3 cycles MCC UL 845 3 cycles
Switchboard UL 891 3 cycles LV Switchgear ANSI C37.50 30 cycles MV Switchgear ANSI C37.010 2 seconds
Consider the distribution system shown in Fig. 1. It is common in industry to find a MV main circuit breaker relay pickup set above the continuous current rating of the breaker, or to find a fuse sized above the switch amp rating. This practice is commonly done for selectivity reasons. However, this practice is misguided. It introduces a life safety problem in situations where the continuous load current is below the protective device trip setting, but above the equipment amp rating. Even though the equipment short circuit interrupting and withstand ratings are above fault duties, the distribution equipment is not rated to safely operate under these conditions.
ALTERNATESOURCE
Fig. 1 – MV One Line Diagram
A second example of a life safety problem occurs when a main lug only panelboard, motor control center or switchboard is fed from a power circuit breaker, Fig. 2. In these situations it is common practice in industry to remove the instantaneous function from the power circuit breaker, again for selectivity reasons. In these situations, the downstream distribution equipment is required to endure a fault for much longer than the equipment rated short circuit duration time of 3 cycles.
LV SWG
LV MCC LV SWBD LV PANEL
Fig. 2 – LV One Line Diagram
© 2006 EPOWERENGINEERING
2

The ABC’s of Overcurrent Coordination
_________________________________________________________________________________________________________ SECTION 3 EQUIPMENT PROTECTION REQUIREMENTS _________________________________________________________________________________________________________
A background in equipment damage characteristics is required to understand the basic principles of equipment protection. Time-current curve (TCC) landmarks and protection philosophies will be explored for feeders, capacitors, transformers, motors, generators, panelboards, motor control centers, LV switchgear and MV switchgear.
FEEDERS INCLUDING CABLES, CONDUCTORS & BUS DUCT
FEEDER TCC LANDMARKS
Feeder Ampacity (> 1-6 hours)
The ampacity is the rated continuous current carrying capacity of a conductor at a referenced ambient temperature and allowable temperature rise.
If a cable is loaded continuously above its rated ampacity the insulation temperature design limits will be exceeded. This will lead to loss of life not instantaneous failure. Table 2 summarizes cable temperature limits under short circuit, intermediate (emergency) overload, and normal operating conditions.
Table 2 – Operating Temperature Limits
Short Circuit Emergency Overload Normal Type Voltage 0.01 < t < 10 sec. 10 sec. < t < 1-6 hrs t > 1-6 hrs
TW 600V 150ºC 85ºC 60ºC THWN 600V 150ºC 90ºC 75ºC THHN 600V 150ºC 105ºC 90ºC XLP 5-15kV 250ºC 130ºC 90ºC EPR 5-15kV 250ºC 130ºC 90ºC
If a bare aerial conductor is loaded continuously above its rated ampacity the mechanical strength of the conductor is reduced. This will lead to loss of mechanical life and may result in instantaneous failure.
The ampacity landmark is located in the top decade of a TCC at 1000 seconds.
© 2006 EPOWERENGINEERING
3

The ABC’s of Overcurrent Coordination
Feeder Intermediate Overload Limit Curve (from 10 seconds to 1-6 hours)
Conductor overcurrent (emergency) operating limit that if exceeded will damage the insulation of an insulated power conductor. This will lead to loss of life not instantaneous failure. Limit curves are based on the thermal inertia of the conductor, insulation and surrounding material, Tables 3 and 4. As a result, it can take from 1 to 6 hours for the temperature of a cable to stabilize after a change in load current, therefore, currents much greater than the rated ampacity of the cable can be supported for these time frames, see IEEE 242-2001 for more information.
Table 3 – Conductor K Factors
K Factors Air Cable Size
No Conduit ConduitUG Duct Direct Buried
< #2 AWG 0.33 0.67 1.00 1.25 #2 - 4/0 AWG 1.00 1.50 2.50 3.00
> 4/0 AWG 1.50 2.50 4.00 6.00
Table 4 – Emergency Overload Current at 40∞C Ambient
Time Percent Overload Seconds K=0.5 K=1 K=1.5 K=2.5 K=4 K=6
EPR-XLP TN = 90°C TE = 130°C 10 1136 1602 1963 2533 3200 3916100 374 518 629 807 1018 1244
1000 160 195 226 277 339 40710000 126 128 132 140 152 16818000 126 127 128 131 137 147
THH TN = 90°C TE = 105°C 10 725 1020 1248 1610 2033 2487100 250 338 407 518 651 794
1000 127 146 163 192 229 27010000 111 112 114 118 124 13118000 111 111 112 113 116 121
THW TN = 75°C TE = 95°C 10 987 1390 1703 2197 2275 3396100 329 452 548 702 884 1080
1000 148 117 202 245 298 35710000 121 123 125 132 142 15418000 121 121 122 125 130 137
© 2006 EPOWERENGINEERING
4

The ABC’s of Overcurrent Coordination
Feeder SC Damage Curve (0.01 to 10 seconds)
Ampere limit that if exceeded will damage the bare aerial conductor or the insulation of an insulated power conductor. Damage curves are plotted in the lower 3 decades of a TCC.
Bare Aerial Conductors
ACSR with an upper temperature limit of 645∞C
t = (0.862 * A / I)2 (1)
where,
A = conductor area - cmils I = short circuit current - RMS amps t = time of short circuit – 0.01 to 20 seconds
Cables
Equations for cables consider all heat absorbed in the conductor metal with no heat transmitted from the conductor to the insulation. The temperature rise is a function of the size of the conductor, the magnitude of fault current and the duration of the fault.
Copper Cables
t = 0.0297 log10[(T2+234)/(T1+234)] (A/I)2 (2)
Aluminum Cables
t = 0.0125 log10[(T2+228)/(T1+228)] (A/I)2 (3)
where,
A = conductor area – cmils I = short circuit current – RMS amps t = time of short circuit – 0.01 to 10 seconds T1 = operating temperature, THWN-75∞C T2 = maximum short circuit temperature, THWN-150∞C
© 2006 EPOWERENGINEERING
5

The ABC’s of Overcurrent Coordination
Feeder Damage Points
Segregated and Non-segregated Phase Bus Duct
Short circuit limit points for metal-enclosed non-segregated phase bus duct are defined at 10 cycles and 2 seconds, Table 5. The 10 cycle limit is expressed in RMS asymmetrical amperes. The 2 second limit is expressed in RMS symmetrical amperes, see ANSI C37.23.
Feeder & Plug-In Bus Duct
Short circuit limit points for feeder and plug-in duct are defined at 3 cycles, Table 6. The 3 cycle limit is expressed in RMS asymmetrical amperes, see UL 857.
Table 5 – Segregated and Non-segregated Phase Bus Duct Ratings
Voltage (kV)
2 Second Rating (kA – RMS Sym)
10 Cycle Rating (kA – RMS Asym)
0 Cycle Rating (kA – Peak)
22 28 51 42 53 97 65 81 150
0.625
85 106 196 36 56 94 4.76 49 76 128
8.25 41 64 107 23 36 60 15 36 56 94 16 25 42 27 25 39 65 16 25 42 25 39 65
31.5 49 83 38
40 62 104
Table 6 – Feeder & Plug-In Bus Duct Ratings
Voltage (V)
3 Cycle Rating (kA – RMS Sym)
3 Cycle Rating (kA – Peak)
5 8.5 7.5 13 10 17 14 28 22 48 25 55 30 66 35 76 42 92 50 110 65 142 75 160 85 180 100 220 125 270
600
150 330
© 2006 EPOWERENGINEERING
6

The ABC’s of Overcurrent Coordination
FEEDER PROTECTION PHILOSOPHY
Step 1 – Identify TCC Landmarks
• Ampacity – located in the upper decade
• Intermediate Overload Curve – located in the upper 2 decades (typically not shown)
• Short Circuit Damage Curve – located in the bottom 3 decades
Step 2 – Identify TCC Areas
• Equipment Operating Area – located to the left and below the ampacity
• Equipment Damage Area – located to the right and above the intermediate overload and short circuit damage curves
Step 3 – Size and Set the Protective Device
• Set the protection device pickup at or below the ampacity
• Set the protection device characteristic curve below the intermediate overload and short circuit damage curves
Additional Comments
• If the maximum thru fault current penetrates the limits of the cable short circuit damage curve, insulation damage will occur.
• If the maximum thru fault current penetrates the limits of the conductor short circuit damage curve, conductor damage will occur.
• The thru fault current is defined as the maximum current that can flow for a short circuit located on or beyond the load-side feeder terminals.
© 2006 EPOWERENGINEERING
7

The ABC’s of Overcurrent Coordination
Feeder Sample Problem
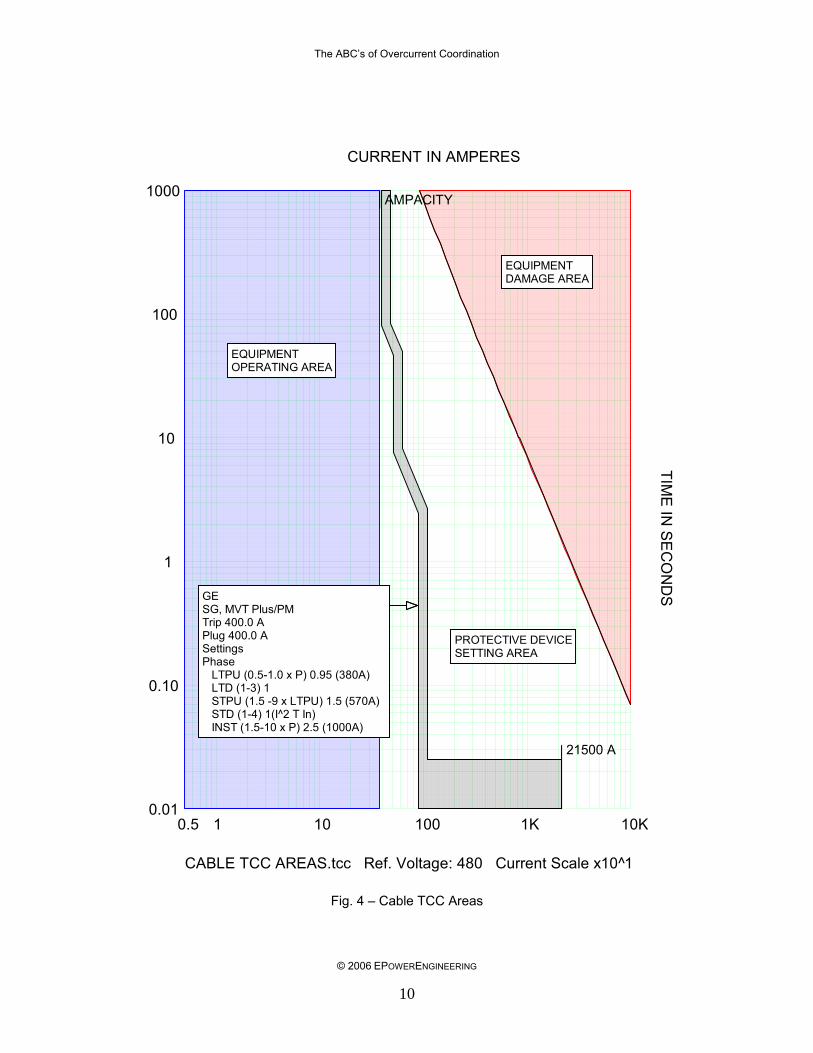
Calculate and plot the TCC landmarks for 3-1/C, 500MCM, THWN copper conductors installed in 2-1/2” conduit on a 480V distribution system. Then set a LV MCCB to protect the cable. The feeder breaker is a GE SG Spectra Series MCCB with a MVT Plus trip unit equipped with LSI adjustable functions. The maximum available through fault current is 21.5kA.
Solution
Step 1 – Identify TCC Landmarks
Ampacity – from NEC table 310.16 the ampacity = 380 A
Intermediate Overload Curve – from Tables 3 and 4
Time (sec.) Current (%) Current (A)10 2197 380 x 21.71 = 8,348 100 702 380 x 7.02 = 2,667 1,000 245 380 x 2.45 = 931 10,000 132 380 x 1.32 = 501 18,000 125 380 x 1.25 = 475
Short Circuit Damage Curve - Damage points calculated from equation (2)
where,
A = 500,000 cmils I = short circuit current – RMS amps t = time of short circuit – 0.01 to 10 seconds T1 = 75∞C (Table 2) T2 = 150∞C (Table 2)
Time (sec.) Current (A)10.00 8,371 1.00 26,471 0.10 83,709 0.01 264,711
The cable TCC landmarks are plotted in Fig. 3.
Step 2 – Identify TCC Areas
The Equipment Operating Area is located to the left and below the ampacity as shown in Fig. 4.
The Equipment Damage Area is located to the right and above the intermediate overload and short circuit damage curves as shown in Fig. 4.
Step 3 – Size and Set the Protective Device
Set the breaker trip at or below the ampacity.
Set the breaker characteristic curve below the intermediate overload and short circuit damage curves as shown in Fig. 4.
© 2006 EPOWERENGINEERING
8

The ABC’s of Overcurrent Coordination
AMPACITY
0.5 1 10 100 1K 10K0.01
0.10
1
10
100
1000
CURRENT IN AMPERES
CABLE.tcc Ref. Voltage: 480 Current Scale x10^1
TIME
IN S
EC
ON
DSCABLE SHORT CIRCUIT
DAMAGE CURVE0.01 - 10 SECONDS
CABLE THERMALOVERLOAD CURVE10 - 20,000 SECONDS(TYPICALLY NOT SHOWN)
CABLE SHORT CIRCUITDAMAGE CURVE0.01 - 10 SECONDS
CABLE THERMALOVERLOAD CURVE10 - 20,000 SECONDS(TYPICALLY NOT SHOWN)
Fig. 3 – Cable TCC Landmarks
© 2006 EPOWERENGINEERING
9
The ABC’s of Overcurrent Coordination
AMPACITY
21500 A
0.5 1 10 100 1K 10K0.01
0.10
1
10
100
1000
CURRENT IN AMPERES
CABLE TCC AREAS.tcc Ref. Voltage: 480 Current Scale x10^1
TIME
IN S
EC
ON
DS
Isc Thru FaultGE SG, MVT Plus/PM Trip 400.0 APlug 400.0 ASettings Phase LTPU (0.5-1.0 x P) 0.95 (380A) LTD (1-3) 1 STPU (1.5 -9 x LTPU) 1.5 (570A) STD (1-4) 1(I^2 T In) INST (1.5-10 x P) 2.5 (1000A)
Isc Thru FaultGE SG, MVT Plus/PM Trip 400.0 APlug 400.0 ASettings Phase LTPU (0.5-1.0 x P) 0.95 (380A) LTD (1-3) 1 STPU (1.5 -9 x LTPU) 1.5 (570A) STD (1-4) 1(I^2 T In) INST (1.5-10 x P) 2.5 (1000A)
EQUIPMENTDAMAGE AREA
EQUIPMENTOPERATING AREA
PROTECTIVE DEVICESETTING AREA
EQUIPMENTDAMAGE AREA
EQUIPMENTOPERATING AREA
PROTECTIVE DEVICESETTING AREA
Fig. 4 – Cable TCC Areas
© 2006 EPOWERENGINEERING
10

The ABC’s of Overcurrent Coordination
CAPACITORS
CAPACITOR TCC LANDMARKS
Capacitor Rated Current
The capacitor rated current represents the continuous current draw of the capacitor bank at rated power and voltage. The rated current landmark is located in the top decade of the TCC at 1000 seconds.
Capacitor Case Rupture Curve
The capacitor case rupture curve is a representation of the gas pressure limit from an internal arcing fault. If this limit is exceeded the enclosure will rupture. Protecting against case rupture will not save the capacitor bank from damage. The capacitor will need to be replaced. The purpose of protecting against a case rupture is to prevent spillage of insulating liquid and damage to adjacent equipment. Case rupture curves are plotted in all 5 decades of the TCC
CAPACITOR PROTECTION PHILOSOPHY
Step 1 – Identify TCC Landmarks
• Rated Current – located in the upper decade
• Case Rupture Curve – located in all 5 decades
Step 2 – Identify TCC Areas
• Equipment Operating Area – located to the left and below the full load amps
• Equipment Damage Area – located to the right and above the case rupture curve
Step 3 – Size and Set the Protective Device
• Size the protection above the rated current
• Set the protective device characteristic curve below the case rupture curve
Additional Comments
• If current from an internal arcing fault is allowed to penetrate the limits of the case rupture curve the capacitor enclosure will be damaged.
© 2006 EPOWERENGINEERING
11

The ABC’s of Overcurrent Coordination
Capacitor Sample Problem
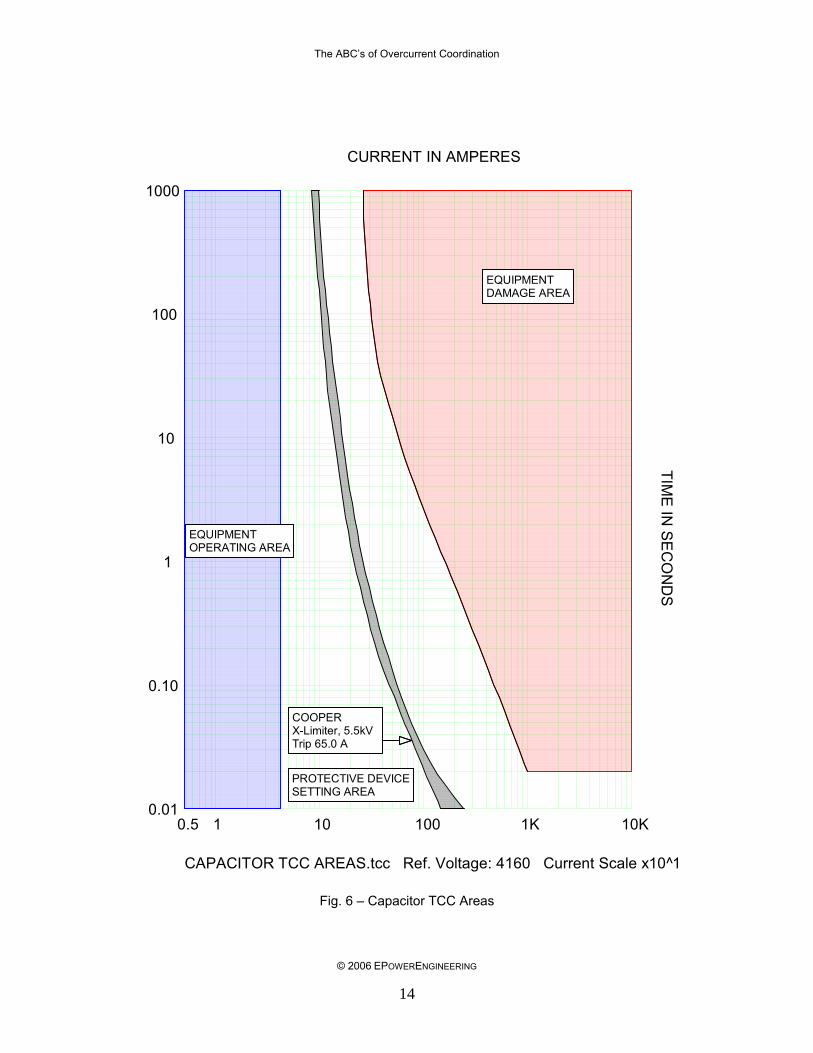
Plot the TCC landmarks for a 300kVAR, 4160V, 3-Ø capacitor bank. Then set a fuse to protect the capacitor.
Solution
Step 1 – Identify TCC Landmarks
Rated Current = 300kVAR / (√ 3 x 4.16kV) = 41.6A
Case Rupture Curve data points provided by the manufacturer.
Time (sec.) Current (A)2000 250 150 300 50 350 9 600 0.4 2,500 0.2 3,500 0.02 10,000
The capacitor TCC landmarks are plotted in Fig. 5.
Step 2 – Identify TCC Areas
The Equipment Operating Area is located to the left and below the full load amps as shown in Fig. 6.
The Equipment Damage Area is located to the right and above the rupture curve as shown in Fig. 6.
Step 3 – Size and Set the Protective Device
Size the fuse above the rated current.
The characteristic curve of the fuse must be below the rupture curve as shown in Fig. 6.
© 2006 EPOWERENGINEERING
12

The ABC’s of Overcurrent Coordination
0.5 1 10 100 1K 10K0.01
0.10
1
10
100
1000
CURRENT IN AMPERES
CAPACITOR.tcc Ref. Voltage: 4160 Current Scale x10^1
TIME
IN S
EC
ON
DS
Rated Current
CAPACITORCASE RUPTURE CURVE
Rated Current
CAPACITORCASE RUPTURE CURVE
Fig. 5 – Capacitor TCC Landmarks
© 2006 EPOWERENGINEERING
13
The ABC’s of Overcurrent Coordination
0.5 1 10 100 1K 10K0.01
0.10
1
10
100
1000
CURRENT IN AMPERES
CAPACITOR TCC AREAS.tcc Ref. Voltage: 4160 Current Scale x10^1
TIME
IN S
EC
ON
DS
FUSE
COOPER X-Limiter, 5.5kV Trip 65.0 AFUSE
COOPER X-Limiter, 5.5kV Trip 65.0 A
EQUIPMENT DAMAGE AREA
EQUIPMENTOPERATING AREA
PROTECTIVE DEVICESETTING AREA
EQUIPMENT DAMAGE AREA
EQUIPMENTOPERATING AREA
PROTECTIVE DEVICESETTING AREA
Fig. 6 – Capacitor TCC Areas
© 2006 EPOWERENGINEERING
14

The ABC’s of Overcurrent Coordination
TRANSFORMERS
TRANSFORMER TCC LANDMARKS
Transformer Full Load Amps (FLA)
The FLA is the rated continuous current carrying capacity of a transformer at a referenced ambient temperature and allowable temperature rise, Table 7. Insulating materials are listed in Table 8 for information.
Table 7 – Transformer Temperature Ratings
Cooling Method
Ave/Max Amb. Temp.
Hot Spot Temp.
Temp. Rise
Total Temp. Rise
Insul. Temp.
Max. Winding SC Temp.
15∞C 75∞C 120∞C/130∞C 130∞C 300∞C 20∞C 90∞C 140∞C/150∞C 150∞C 350∞C 25∞C 115∞C 170∞C/180∞C 180∞C 400∞C 30∞C 130∞C 190∞C/200∞C 200∞C 425∞C
AA 30∞C/40∞C
30∞C 150∞C 210∞C/220∞C 220∞C 450∞C 10∞C 55∞C 95∞C/105∞C OA 30∞C/40∞C 15∞C 65∞C 110∞C/120∞C
105∞C 200∞C-AL 250∞C-CU
Note, the total temperature rise of an OA 65∞C transformer, at a maximum ambient temperature of 40∞C, is 120∞C. This does exceed the transformer insulation rating of 105∞C, and is allowed by ANSI.
The FLA label is located on the TCC in top decade at 1000 seconds. The FLA label is shown on the base (lowest kVA) rating of the transformer.
Table 8 – Insulating Materials
Insulation Class
Maximum Temperature Insulating Materials
Y 90∞C Cotton, silk, paper, wood, cellulose, fibre without impregnation or oil-immersion
A 105∞C Class Y impregnated with natural resins,
cellulose esters, insulating oils, etc., also laminated wood, varnished paper
Hybrid A 110∞C Insuldur® Insulation, Kraft paper with epoxy binders activated under pressure
E 120∞C Synthetic-resin enamels, cotton and paper Laminates with formaldehyde bonding
B 130∞C Mica, glass fibre, asbestos, etc., with suitable
bonding substance; built-up mica, glass-fibre and asbestos laminates
F 155∞C The materials of Class B with more thermally-resistant bonding materials
H 180∞C Glass-fibre and asbestos materials, and built-up mica, with appropriate Silicone resins
C >180∞C Mica, ceramics, glass, quartz, and asbestos
without binders or with silicone resins of superior thermal stability
Hybrid H 220∞C NOMEX® insulation, varnish dipped and vacuum pressure impregnated (VPI)
© 2006 EPOWERENGINEERING
15

The ABC’s of Overcurrent Coordination
Transformer Through-Fault Damage Curve
Liquid-Immersed Transformers
IEEE C57.109-1993 defines thermal and mechanical through-fault damage curves for liquid-immersed transformers, Tables 9-12. The standard states,
“if fault current penetrates the limits of the thermal damage curve transformer insulation may be damaged. If fault current penetrates the limits of the mechanical damage curve cumulative mechanical damage may occur. The validity of these damage limit curves cannot be demonstrated by test, since the effects are progressive over the transformer lifetime. They are based principally on informed engineering judgment and favorable, historical field experience.”
Through-fault damage curves are plotted in the top 3 decades of a TCC from 2 to 1000 seconds.
Table 9 – Category I Transformers 5 to 500 kVA single-phase
15 to 500 three-phase
Frequent or Infrequent Faults Time (sec.) Current (A p.u.) I2T
1800 2 7200 300 3 2700 60 4.75 1354 30 6.3 1192 10 11.3 1277 2 25 1250
1.02 35 (1, 2) 1250 0.78 40 (2) 1250 1. Applies only to 37.5-100 kVA 1Ø and
112.5-300 kVA 3Ø transformers. 2. Applies only to 37.5-100 kVA 1Ø and
112.5-300 kVA 3Ø transformers.
Table 10 – Category II Transformers
501 to 1667 kVA single-phase 501 to 5000 three-phase
Frequent or Infrequent Faults Time (sec.) Current (A p.u.) I2T
1800 2 7200 300 3 2700 60 4.75 1354 30 6.3 1192 10 11.3 1277 2 25 1250
Points for Frequent Fault Curve (Dog leg) 2551 Z(p.u.)2 0.7 / Z(p.u.) 1250
4.08 0.7 / Z(p.u.) 2 / Z(p.u.)2
2 1 / Z(p.u.) 2 / Z(p.u.)2
© 2006 EPOWERENGINEERING
16

The ABC’s of Overcurrent Coordination
Table 11 – Category III Transformers 1668 to 10 000 kVA single-phase
5001to 30 000 three-phase
Frequent or Infrequent Faults Time (sec.) Current (A p.u.) I2T
1800 2 7200 300 3 2700 60 4.75 1354 30 6.3 1192 10 11.3 1277 2 25 1250
Points for Frequent Fault Curve (Dog leg) 5000 Z(p.u.)2 0.5 / Z(p.u.) 1250
8 0.5 / Z(p.u.) 2 / Z(p.u.)2
2 1 / Z(p.u.) 2 / Z(p.u.)2
Table 12 – Category IV Transformers Above 10 000 kVA single-phase
Above 30 000 three-phase
Frequent or Infrequent Faults Time (sec.) Current (A p.u.) I2T
1800 2 7200 300 3 2700 60 4.75 1354 30 6.3 1192 10 11.3 1277 2 25 1250
Frequent or Infrequent Fault Curve (Dog leg) 5000 Z(p.u.)2 0.5 / Z(p.u.) 1250
8 0.5 / Z(p.u.) 2 / Z(p.u.)2
2 1 / Z(p.u.) 2 / Z(p.u.)2
© 2006 EPOWERENGINEERING
17

The ABC’s of Overcurrent Coordination
Dry-Type Transformers
IEEE C57.12.59-2001 defines thermal and mechanical through-fault damage curves for dry-type transformers, Tables 13 and 14.
Table 13 – Category I Transformers 1 to 500 kVA single-phase
15 to 500 three-phase
Frequent or Infrequent Faults Time (sec.) Current (A p.u.) I2T
100 3.5 1250 10 11.2 1250 2 25 1250
Table 14 – Category II Transformers
501 to 1667 kVA single-phase 501 to 5000 three-phase
Frequent or Infrequent Faults Time (sec.) Current (A p.u.) I2T
100 3.5 1250 10 11.2 1250 2 25 1250
Points for Frequent Fault Curve (Dog leg) 2551 Z(p.u.)2 0.7 / Z(p.u.) 1250
4.08 0.7 / Z(p.u.) 2 / Z(p.u.)2
2 1 / Z(p.u.) 2 / Z(p.u.)2
Magnetizing Inrush Current Point(s)
One or more inrush current points may be plotted on a TCC. Inrush currents are expressed in peak amperes. The most common point is 12 times rated FLA at 0.1 seconds.
Another less common point is 25 times rated FLA at 0.01 seconds. This point is commonly used when applying fuses.
© 2006 EPOWERENGINEERING
18

The ABC’s of Overcurrent Coordination
TRANSFORMER PROTECTION PHILOSOPHY
Step 1 – Identify TCC Landmarks (all based on the nominal kVA rating)
• Full Load Amps – located in the upper decade
• Thermal Damage Curve – located in the upper 3 decades
• Mechanical Damage Curve – located in the middle decade
• Inrush point defined @ 12 x FLA and 0.1 seconds
• Inrush point defined @ 25 x FLA and 0.01 seconds (Fuse applications only)
Step 2 – Identify TCC Areas
• Equipment Operating Area – located to the left and below the full load amps and inrush points
• Equipment Damage Area – located to the right and above the through-fault damage curves
Step 3 – Size and Set Protective Device
• Set the protection above the full load amps and inrush point(s)
• Set protection below the through-fault damage curves
Additional Comments
• If current penetrates the limits of the thermal damage curve, insulation damage may occur.
• If current penetrates the limits of the mechanical damage curve, cumulative mechanical damage may occur.
© 2006 EPOWERENGINEERING
19

The ABC’s of Overcurrent Coordination
Transformer Sample Problem
Plot the TCC landmarks for a 1000kVA, OA, 4160-480V, ∆-YG, 5% impedance, substation type transformer. Then set a relay to protect the transformer.
Solution
Step 1 – Identify the TCC Landmarks
FLA = 1000kVA / (√ 3 4.16kV) = 139A
Through-fault damage curve data points calculated from Table 10. These points apply to the low-voltage, wye-connected winding.
Time (sec.) Current (A p.u.) Current (A)1800 2 278 300 3 417 60 4.75 660 30 6.3 876 10 11.3 1571 2 25 3475
Points for Frequent Fault Curve (Dog leg) 6.4 14 1946 4.08 14 1946 2 20 2780
A second set of data points is required because a fuse or relay on the delta-side of a ∆-YG connected transformer, will only detect 58% of a line-to-ground fault located on the wye-side. To account for this the current data points calculated above are adjusted by 0.58 for the delta winding.
Time (sec.) Current (A p.u.) Current (A)1800 2 x 0.58 = 1.16 278 x 0.58 = 161 300 3 x 0.58 = 1.74 417 x 0.58 = 242 60 4.75 x 0.58 = 2.755 660 x 0.58 = 383 30 6.3 x 0.58 = 3.654 876 x 0.58 = 508 10 11.3 x 0.58 = 6.554 1571 x 0.58 = 911 2 25 x 0.58 = 14.5 3475 x 0.58 = 2016
Points for Frequent Fault Curve (Dog leg) 6.4 14 x 0.58 = 8.12 1946 x 0.58 = 1129 4.08 14 x 0.58 = 8.12 1946 x 0.58 = 1129 2 20 x 0.58 = 11.6 2780 x 0.58 = 1612
Magnetizing Inrush Current Points
12 x FLA = 12 x 139A = 1668A @ 0.1 seconds
25 x FLA = 25 x 139A = 3475A @ 0.1 seconds
The TCC landmarks are plotted in Fig. 7.
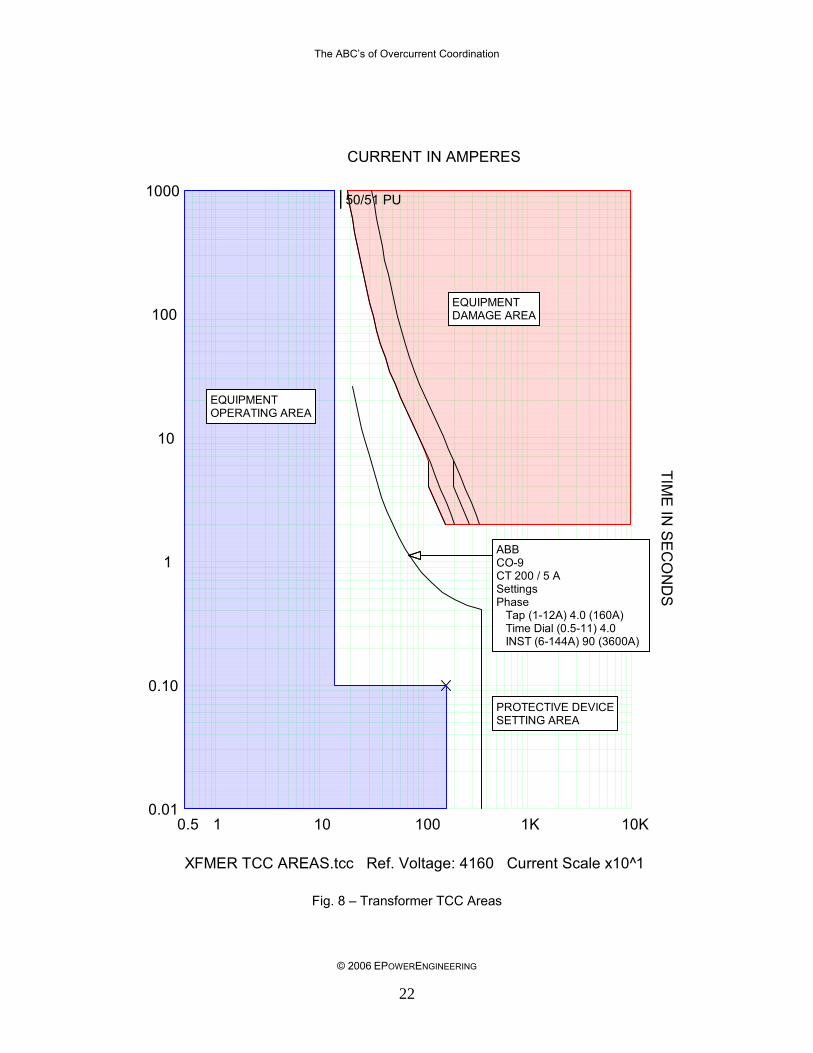
Step 2 – Identify TCC Areas
The Equipment Operating Area is located to the left and below the FLA and inrush points, Fig. 8.
The Equipment Damage Area is located to the right and above the through-fault damage curves, Fig. 8.
Step 3 – Size and Set the Protective Device
Set the relay pickup above the FLA.
Set the relay characteristic curve above the inrush points and below the through-fault damage curves as shown in Fig. 8.
© 2006 EPOWERENGINEERING
20

The ABC’s of Overcurrent Coordination
0.5 1 10 100 1K 10K0.01
0.10
1
10
100
1000
CURRENT IN AMPERES
TRANSFORMER.tcc Ref. Voltage: 4160 Current Scale x10^1
TIME
IN S
EC
ON
DS
WYE WINDINGMECHANICAL DAMAGE CURVE(TYPICALLY NOT SHOWN)
DELTA WINDINGTHERMAL LIMIT CURVE
FULL LOADAMPS
DELTA WINDINGMECHANICAL DAMAGE CURVE
INRUSH12 x FLA @ 0.1 SECONDS
WYE WINDINGTHERMAL LIMIT CURVE
INRUSH25 x FLA @ 0.01 SECONDS(APPLICABLE WITH FUSES)
NOTES:1. ALL LANDMARKS ARE BASED ON THE NOMINAL KVA RATING.2. DELTA WINDING SHIFTED BY 0.58 RELATIVE TO WYE WINDING.
Fig. 7 – Transformer TCC Landmarks
© 2006 EPOWERENGINEERING
21
The ABC’s of Overcurrent Coordination
50/51 PU
0.5 1 10 100 1K 10K0.01
0.10
1
10
100
1000
CURRENT IN AMPERES
XFMER TCC AREAS.tcc Ref. Voltage: 4160 Current Scale x10^1
TIME
IN S
EC
ON
DS
50/51 PUABB CO-9 CT 200 / 5 ASettings Phase Tap (1-12A) 4.0 (160A) Time Dial (0.5-11) 4.0 INST (6-144A) 90 (3600A)
50/51 PUABB CO-9 CT 200 / 5 ASettings Phase Tap (1-12A) 4.0 (160A) Time Dial (0.5-11) 4.0 INST (6-144A) 90 (3600A)
EQUIPMENTDAMAGE AREA
EQUIPMENTOPERATING AREA
PROTECTIVE DEVICESETTING AREA
EQUIPMENTDAMAGE AREA
EQUIPMENTOPERATING AREA
PROTECTIVE DEVICESETTING AREA
Fig. 8 – Transformer TCC Areas
© 2006 EPOWERENGINEERING
22

The ABC’s of Overcurrent Coordination
MOTORS
MOTOR TCC LANDMARKS
Motor FLA
The motor FLA is the rated continuous current carrying capacity of a motor at a referenced ambient temperature and allowable temperature rise, Table 15.
Table 15 – Motor Temperature Ratings
Max Amb. Temp.
Hot Spot Temp.
Temp. Rise
Temp. Rise
Total Temp. Rise
Insul. System
Insul. Temp. Rating
40∞C 5∞C Class A 60∞C 105∞C Class A 105∞C 40∞C 10∞C Class B 80∞C 130∞C Class B 130∞C 40∞C 10∞C Class B 80∞C 130∞C Class F 155∞C (1) 40∞C 10∞C Class F 105∞C 155∞C Class F 155∞C 40∞C 15∞C Class F 105∞C 160∞C Class H 180∞C (2) 40∞C 15∞C Class H 125∞C 180∞C Class H 180∞C
1. Many existing machines are built with Class F insulation systems with nameplates based on Class B temperature rises.
2. Newer machines are trending towards Class H insulation systems with nameplates based on Class F temperature rises.
Motor Starting Curve
The motor starting curve represents the machine accelerating characteristic for a specific starting condition defined by the motor, driven equipment, starter and power source characteristics.
Motor Running Overload Thermal Limit Curve (Typical of MV Motors)
The running overload curve represents the stator thermal capability from rated full load current back to the current drawn at breakdown torque while the motor is running. This curve should never be used to approximate the continuous overload capability of a motor. Operation up to and beyond the limits of this overload curve will reduce insulation life.
Motor Accelerating Thermal Limit Curve (Typical of MV Motors)
The accelerating thermal limit curve represents the rotor thermal capability during acceleration from locked rotor up to the breakdown torque for a specified terminal voltage. These curves are typically not provided since they reside above the locked rotor thermal limit curve.
Motor Safe Stall Point (Typical of LV Motors)
The safe stall point represents the maximum time a motor can sustain a locked rotor condition without damage at a specified terminal voltage. NEMA MG-1 requires safe stall times not less than 12 seconds for motors less than 500HP and 1000V.
Motor Locked Rotor Thermal Limit Curve (Typical of MV Motors)
The locked rotor thermal limit curve represents the maximum time a motor can sustain a locked rotor condition without damage for a given set of terminal voltages.
© 2006 EPOWERENGINEERING
23

The ABC’s of Overcurrent Coordination
MOTOR PROTECTION PHILOSOPHY
Step 1 – Identify TCC Landmarks
• Full Load Amps – located in the upper decade
• Motor Starting Curve – located in all 5 decades
• Rotor Safe Stall Point – located in the upper middle decades (Typical of LV motors)
• Stator Damage Curve – located in the upper decade (Typical of MV motors)
• Rotor Damage Curve – located in the middle decades (Typical of MV motors)
Step 2 – Identify TCC Areas
• Equipment Operating Area – located to the left and below the motor starting curve
• Equipment Damage Area – located to the right and above the safe stall point for LV motors, or the running overload and locked rotor thermal limit curves for MV motors
Step 3 – Size and Set Protective Devices
• Set protection above the full load amps and motor starting curve
• Set protection below the hot stall point for LV motors, or the running overload and locked rotor thermal limit curve for MV motors
Additional Comments
• If a motor operates above the limits of the running overload thermal limit curve, stator insulation life is reduced.
• If a LV motor is allowed to operate at locked rotor for a time above the hot stall point, rotor damage will occur.
• If a MV motor is allowed to operate at locked rotor for a time above the locked rotor thermal limit curve, rotor damage will occur.
© 2006 EPOWERENGINEERING
24

The ABC’s of Overcurrent Coordination
LV Motor Sample Problem
Plot the TCC landmarks for a NEMA 100HP, 460V, 124A, 1800rpm, 1.15 SF induction motor with a safe stall time of 32 seconds. Then set an overload-MCP FVNR combination starter unit to protect the motor. The maximum available fault duty at the motor terminal box is 25kA.
Solution
Step 1 – Identify the TCC Landmarks
FLA = 124A
Motor starting curve was assumed. The starting time was set to 6 seconds and the LRA to 6 x FLA.
The safe stall time is 32 seconds.
The TCC landmarks are plotted in Fig. 9.
Step 2 – Identify TCC Areas
The Equipment Operating Area is located to the left and below the motor starting curve, Fig. 10.
The Equipment Damage Area is located to the right and above the safe stall point, Fig. 10.
Step 3 – Size and Set the Protective Device
Size the overload pickup above the motor FLA and below the rotor safe stall point.
Set the MCP characteristic curve above the motor starting curve, Fig. 10.
© 2006 EPOWERENGINEERING
25

The ABC’s of Overcurrent Coordination
0.5 1 10 100 1K 10K0.01
0.10
1
10
100
1000
CURRENT IN AMPERES
LV MOTOR.tcc Ref. Voltage: 480 Current Scale x10^1
TIME
IN S
EC
ON
DS
MOTORSTARTING CURVE
ROTORSAFE STALL POINT
FLA
STARTING TIME
LRA
MOTORSTARTING CURVE
ROTORSAFE STALL POINT
FLA
STARTING TIME
LRA
Fig. 9 – LV Motor TCC Landmarks
© 2006 EPOWERENGINEERING
26

The ABC’s of Overcurrent Coordination
25000 A
0.5 1 10 100 1K 10K0.01
0.10
1
10
100
1000
CURRENT IN AMPERES
LV MOTOR TCC AREAS.tcc Ref. Voltage: 480 Current Scale x10^1
TIME
IN S
EC
ON
DS
LV MCP
CUTLER-HAMMER HMCP Settings Phase INST (450-1500A) H (1500A)
OLMOL Class 20 Settings Phase Class 20
LV MCP
CUTLER-HAMMER HMCP Settings Phase INST (450-1500A) H (1500A)
OLMOL Class 20 Settings Phase Class 20
EQUIPMENTDAMAGE AREA
EQUIPMENTOPERATING AREA
PROTECTIVE DEVICESETTING AREA
EQUIPMENTDAMAGE AREA
EQUIPMENTOPERATING AREA
PROTECTIVE DEVICESETTING AREA
Fig. 10 – LV Motor TCC Areas
© 2006 EPOWERENGINEERING
27

The ABC’s of Overcurrent Coordination
MV Motor Sample Problem
Plot the TCC landmarks for a NEMA 1500HP, 4000V, 187A, 1800rpm, 1.0 SF induction motor. Then set a relay to protect the motor. The maximum available fault duty at the motor terminal box is 18kA.
Solution
Step 1 – Identify the TCC Landmarks
FLA = 187A
The motor starting curve was determined from a motor starting study. The results are listed below.
Current (A p.u.) Time (sec.)3.0 11.7 4.1 11.3 4.5 7.6 4.6 4.6 4.7 2.2 4.8 0.0
The running overload thermal limit curve was provided by the manufacturer.
Current (A p.u.) Time (sec.)1.4 510.0 2.0 180.0 3.3 53.0
The locked rotor thermal limit curve was also provided by the manufacturer.
Current (A p.u.) Time (sec.)4.4 16.0 5.0 12.5 5.6 10.0
The TCC landmarks are plotted in Fig. 11.
Step 2 – Identify TCC Areas
The Equipment Operating Area is located to the left and below the motor starting curve, Fig. 12.
The Equipment Damage Area is located to the right and above the running overload and locked rotor thermal limit curves, Fig. 12.
Step 3 – Size and Set the Protective Device
Set the relay pickup above the motor FLA.
Set the relay characteristic curve above the motor starting curve and below the running overload and locked rotor thermal limit curves, Fig. 12.
© 2006 EPOWERENGINEERING
28

The ABC’s of Overcurrent Coordination
0.5 1 10 100 1K 10K0.01
0.10
1
10
100
1000
CURRENT IN AMPERES
MV MOTOR.tcc Ref. Voltage: 4160 Current Scale x10^1
TIME
IN S
EC
ON
DS
MOTORSTARTING CURVE
LOCKED ROTORTHERMAL LIMIT CURVE
FLA
STARTING TIME
LRA
RUNNING OVERLOAD (STATOR)THERMAL LIMIT CURVE
MOTORSTARTING CURVE
LOCKED ROTORTHERMAL LIMIT CURVE
FLA
STARTING TIME
LRA
RUNNING OVERLOAD (STATOR)THERMAL LIMIT CURVE
Fig. 11 – MV Motor TCC Landmarks
© 2006 EPOWERENGINEERING
29

The ABC’s of Overcurrent Coordination
50/51 PU
18000 A
0.5 1 10 100 1K 10K0.01
0.10
1
10
100
1000
CURRENT IN AMPERES
MV MOTOR TCC AREAS.tcc Ref. Voltage: 4160 Current Scale x10^1
TIME
IN S
EC
ON
DS
50/51 PUMULTILIN SR469 Motor Relay CT 200 / 5 ASettings Phase O/L PU 1.15 (215.1A) O/L Curves 3 S/C Trip 10 (2000A)
50/51 PUMULTILIN SR469 Motor Relay CT 200 / 5 ASettings Phase O/L PU 1.15 (215.1A) O/L Curves 3 S/C Trip 10 (2000A)
EQUIPMENTDAMAGE AREA
EQUIPMENTOPERATING AREA
PROTECTIVE DEVICESETTING AREA
EQUIPMENTDAMAGE AREA
EQUIPMENTOPERATING AREA
PROTECTIVE DEVICESETTING AREA
Fig. 12 – MV Motor TCC Areas
© 2006 EPOWERENGINEERING
30

The ABC’s of Overcurrent Coordination
GENERATORS
GENERATOR TCC LANDMARKS
Generator FLA
The FLA is the rated continuous current carrying capacity of a generator at a referenced ambient temperature and allowable temperature rise, Table 16.
Table 16 – Generator Temperature Ratings
Max Amb. Temp.
Hot Spot Temp.
Temp. Rise
Temp. Rise
Total Temp. Rise
Insul. Temp.
Insul. Temp.
40∞C 5∞C Class A 60∞C 105∞C Class A 105∞C 40∞C 10∞C Class B 80∞C 130∞C Class B 130∞C 40∞C 10∞C Class B 80∞C 130∞C Class F 155∞C 40∞C 10∞C Class F 105∞C 155∞C Class F 155∞C 40∞C 15∞C Class F 105∞C 160∞C Class H 180∞C 40∞C 15∞C Class H 125∞C 180∞C Class H 180∞C
Generator Overload Curve
The overload curve is the rated continuous output capability of a generator at a specified frequency, voltage, power factor and cooling basis temperature, i.e., hydrogen-cooled machine rating based on a referenced hydrogen pressure, or a combustion-turbine machine rating based on a referenced inlet air temperature.
Under emergency conditions it is permissible to exceed the continuous rating of a generator. The overload capability of the armature winding of cylindrical-rotor, synchronous generator as defined in ANSI C50.13-1989 is listed in Table 17.
Table 17 – Generator Overload Capability
% Current Time (sec.) 116 120 130 60 154 30 226 10
Generator Decrement Curve
The current response of a generator with a fault at its terminals is described using equations (4) through (9).
iac = (id” – id’) e-t/Td” + (id’ – id) e-t/Td’ + id (4)
idc = √ 2 id” e-t/TA” (5)
itotal = (iac2 + idc
2 )0.5 (6)
assuming the machine is at no load:
id” = et / Xd” (7)
id’ = et / Xd’ (8)
id = et / Xd (If / Ifg) (9)
© 2006 EPOWERENGINEERING
31

The ABC’s of Overcurrent Coordination
Generator Short Circuit Capability
ANSI C50.13-1989 states a generator shall be capable of withstanding any type of fault at its terminals without damage for times not exceeding the short-time limits when operated at rated KVA and power factor and at 5 percent overvoltage. Provided that the maximum phase current is limited by external means to a value that does not exceed the maximum phase current of a three-phase fault.
ANSI C50.12-1982 states a generator shall be capable of withstanding a three-phase terminal fault without damage for 30-seconds when operated at rated KVA and power factor and at 5 percent overvoltage, with fixed excitation. Again, provided that the maximum phase current is limited by external means to a value that does not exceed the maximum phase current of a three-phase fault, and provided that the I22t limit < 40.
LV GENERATOR PROTECTION PHILOSOPHY
Step 1 – Identify TCC Landmarks
• Full Load Amps – located in the upper decade
• Overload Curve – located in the upper 1 or 2 decades
• Decrement Curve – located in the bottom 3 decades
Step 2 – Identify TCC Areas
• Equipment Operating Area – located to the left and below the full load amps and to the left and below the decrement curve in the instantaneous region
• Equipment Damage Area – located to the right and above the overload curve
Step 3 – Size and Set Protection Devices
• Set protection above the full load amps and above the decrement curve in the lowest decade.
• Set protection below the overload curve.
• Set protection to intersect with the decrement curve in the second lowest decade.
Additional Comments
• If current penetrates the limits of the overload curve, stator insulation life is reduced.
• If protection is set above the decrement curve, the device will never trip.
© 2006 EPOWERENGINEERING
32

The ABC’s of Overcurrent Coordination
LV Generator Sample Problem
Plot the TCC landmarks for a 750kVA, 480V, 902A, 0.8 pf lag diesel engine-generator with Xd” = 0.107, Xd’ = 0.154, Xd = 1.54, Td” = 0.015, Td’ = 0.417 and TA = 0.189. The generator is capable of sustaining a three-phase short circuit at 3 times rated current for 5 seconds. Then set a circuit breaker to protect the generator.
Solution
Step 1 – Identify the TCC Landmarks
FLA = 902A
The overload curve was provided by the manufacturer.
Time (sec.) Current (A p.u.)1000 1.4 600 1.5 420 1.6 180 2.0
The decrement curve was calculated using equation (4).
t (sec.) idc (A p.u.) iac (A p.u.) itotal (A p.u.)0.01 13.5 7.5 15.4 0.02 12.8 6.6 14.4 0.03 12.2 6.2 13.7 0.04 11.6 6.0 13.0 0.05 11.0 5.9 12.5 0.10 8.6 5.5 10.2 0.30 3.2 4.5 5.5 0.50 1.2 3.9 4.1 0.70 0.4 3.6 3.6 0.90 0.2 3.3 3.3 1.00 0.1 3.3 3.3 1.50 0.0 3.1 3.1 2.00 0.0 3.0 3.0 2.50 0.0 3.0 3.0 3.00 0.0 3.0 3.0 3.50 0.0 3.0 3.0 4.00 0.0 3.0 3.0 4.50 0.0 3.0 3.0 5.00 0.0 3.0 3.0
The TCC landmarks are plotted in Fig. 13.
Step 2 – Identify TCC Areas
The Equipment Operating Area is located to the left and below the FLA and the decrement curve in the lowest decade, Fig. 14.
The Equipment Damage Area is located to the right and above the overload curve, Fig. 14.
Step 3 – Size and Set the Protective Device
Set the overload pickup above the generator FLA.
Set the breaker characteristic curve below the overload curve and above the decrement curve in the lowest decade, Fig. 14.
© 2006 EPOWERENGINEERING
33

The ABC’s of Overcurrent Coordination
0.5 1 10 100 1K 10K0.01
0.10
1
10
100
1000
CURRENT IN AMPERES
LV GENERATOR.tcc Ref. Voltage: 480 Current Scale x10^1
TIME
IN S
EC
ON
DS
GENERATOR DECREMENT CURVEAC + DC CURRENTWITH 3 PU FIELD FORCING
FLA
GENERATORFIELD FORCING LIMIT
GENERATOR DECREMENT CURVEAC CURRENT ONLYWITH 3 PU FIELD FORCING
GENERATOROVERLOAD CURVE
GENERATOR DECREMENT CURVEAC + DC CURRENTWITH 3 PU FIELD FORCING
FLA
GENERATORFIELD FORCING LIMIT
GENERATOR DECREMENT CURVEAC CURRENT ONLYWITH 3 PU FIELD FORCING
GENERATOROVERLOAD CURVE
Fig. 13 – LV Generator TCC Landmarks
© 2006 EPOWERENGINEERING
34

The ABC’s of Overcurrent Coordination
0.5 1 10 100 1K 10K0.01
0.10
1
10
100
1000
CURRENT IN AMPERES
LV GENERATOR PROTECTION.tcc Ref. Voltage: 480 Current Scale x10
TIME
IN S
EC
ON
DS
LV GEN CB MINGE AKR, MVT Plus/PM (RMS-9C) Trip 1600.0 APlug 1200.0 ASettings Phase LTPU (0.5-1.1 x P) 0.9 (1080A) LTD (1-4) 1 STPU (1.5-9 x LTPU) 1.5 (1620A) STD (Min-Max) Min(I^2 T Out) INST (1.5-15 x P) 15 (18000A)
LV GEN CB MINGE AKR, MVT Plus/PM (RMS-9C) Trip 1600.0 APlug 1200.0 ASettings Phase LTPU (0.5-1.1 x P) 0.9 (1080A) LTD (1-4) 1 STPU (1.5-9 x LTPU) 1.5 (1620A) STD (Min-Max) Min(I^2 T Out) INST (1.5-15 x P) 15 (18000A)
LV GENERATORDAMAGE AREA
LV GENERATOROPERATING AREA
PROTECTIVE DEVICESETTING AREA
LV GENERATORDAMAGE AREA
LV GENERATOROPERATING AREA
PROTECTIVE DEVICESETTING AREA
Fig. 14 – LV Generator TCC Areas
© 2006 EPOWERENGINEERING
35

The ABC’s of Overcurrent Coordination
LV EQUIPMENT INCLUDING PANELBOARDS, MCCS, SWITCHBOARDS & SWITCHGEAR
LV EQUIPMENT TCC LANDMARKS
Ampacity
The ampacity is the rated continuous current carrying capacity of the equipment at a referenced ambient temperature.
Short Circuit Withstand Capability
Panelboards, MCCs and switchboards are tested to withstand their short circuit current rating for 3 cycles per UL 67, UL 845 and UL 891.
However UL 489, the LV molded-case circuit breaker standard, does not require breakers installed in this type of equipment to clear faults within 3 cycles! This represents a hole in the UL standards. Therefore, it is the specifying engineer’s responsibility to confirm that breakers protecting panelboards, MCCs or switchboards have maximum instantaneous clearing times of 3 cycles or less.
LV switchgear and power circuit breakers are tested to withstand their short circuit current rating for 30 cycles.
LV EQUIPMENT PROTECTION PHILOSOPHY
Step 1 – Identify TCC Landmarks
• Ampacity – located in the upper decade
• SC Withstand Point – located in the bottom two decades
Step 2 – Identify TCC Areas
• Equipment Operating Area – located to the left and below the ampacity
• Equipment Damage Area – located to the right and above the withstand point
Step 3 – Size and Set Protection Devices
• Set protection at or below the ampacity.
• Set protection below the short circuit withstand point.
Additional Comments
• If current penetrates the limits of the short circuit withstand point the mechanical integrity of the equipment may be compromised.
© 2006 EPOWERENGINEERING
36

The ABC’s of Overcurrent Coordination
LV Equipment Sample Problem
Plot the TCC landmarks for a 400A, 208V, 3-Ø panelboard rated 30kA. Then set a circuit breaker to protect the panelboard. 25kA is available at the panelboard.
Solution
Step 1 – Identify the TCC Landmarks
Ampacity = 400A
SC Withstand Point = 30kA @ 3 cycles
The TCC landmarks are plotted in Fig. 15.
Step 2 – Identify TCC Areas
The Equipment Operating Area is located to the left and below the ampacity, Fig. 16.
The Equipment Damage Area is located to the right and above the SC withstand point, Fig. 16.
Step 3 – Size and Set the Protective Device
Set the breaker pickup at or below the ampacity.
Set the breaker characteristic curve below the SC withstand point, Fig. 16.
© 2006 EPOWERENGINEERING
37

The ABC’s of Overcurrent Coordination
0.5 1 10 100 1K 10K0.01
0.10
1
10
100
1000
CURRENT IN AMPERES
LV EQUIPMENT.tcc Ref. Voltage: 208 Current Scale x10^1
TIME
IN S
EC
ON
DS
SC WITHSTANDPOINT
AMPACITY
SC WITHSTANDPOINT
AMPACITY
Fig. 15 – LV Equipment TCC Landmarks
© 2006 EPOWERENGINEERING
38

The ABC’s of Overcurrent Coordination
25000 A
0.5 1 10 100 1K 10K0.01
0.10
1
10
100
1000
CURRENT IN AMPERES
LV EQUIPMENT TCC AREAS.tcc Ref. Voltage: 208 Current Scale x10^1
TIME
IN S
EC
ON
DS
LV MCCB
GE SG, MVT Plus/PM Trip 400.0 APlug 400.0 ASettings Phase LTPU (0.5-1.0 x P) 1 (400A) LTD (1-3) 1 STPU (1.5 -9 x LTPU) 1.5 (600A) STD (1-4) 1(I^2 T Out) INST (1.5-10 x P) 10 (4000A)
LV MCCB
GE SG, MVT Plus/PM Trip 400.0 APlug 400.0 ASettings Phase LTPU (0.5-1.0 x P) 1 (400A) LTD (1-3) 1 STPU (1.5 -9 x LTPU) 1.5 (600A) STD (1-4) 1(I^2 T Out) INST (1.5-10 x P) 10 (4000A)
EQUIPMENTOPERATING AREA
EQUIPMENTDAMAGE AREA
PROTECTIVE DEVICESETTING AREA
EQUIPMENTOPERATING AREA
EQUIPMENTDAMAGE AREA
PROTECTIVE DEVICESETTING AREA
Fig. 16 – LV Equipment TCC Areas
© 2006 EPOWERENGINEERING
39

The ABC’s of Overcurrent Coordination
MV EQUIPMENT INCLUDING SWITCHGEAR & CIRCUIT BREAKERS
MV EQUIPMENT TCC LANDMARKS
Ampacity
The ampacity is the rated continuous current carrying capacity of the equipment at a referenced ambient temperature.
Short Circuit Current Thermal Limit Curve
MV switchgear and circuit breaker short circuit thermal limit. The energy limit is defined by the symmetrical short circuit rating at 2 seconds per ANSI C37.010. The thermal limit curve is calculated using equation (10).
t2 = t1 (I1 / I2)2 (10)
MV EQUIPMENT PROTECTION PHILOSOPHY
Step 1 – Identify TCC Landmarks
• Ampacity – located in the upper decade
• Shot Circuit Thermal Limit Curve – located in the top three decades
Step 2 – Identify TCC Areas
• Equipment Operating Area – located to the left and below the ampacity
• Equipment Damage Area – located to the right and above the short circuit thermal limit curve
Step 3 – Size and Set Protection Devices
• Set protection at or below the ampacity.
• Set protection below the short circuit thermal limit point.
Additional Comments
• If current penetrates the limits of the short circuit thermal limit curve the mechanical integrity of the equipment may be compromised.
© 2006 EPOWERENGINEERING
40

The ABC’s of Overcurrent Coordination
MV Equipment Sample Problem
Plot the TCC landmarks for a 1200A, 4160V, 3-Ø circuit breaker rated 31.5kA. Then set a relay to protect the MV circuit breaker and switchgear. 25kA is available at the switchgear.
Solution
Step 1 – Identify the TCC Landmarks
Ampacity = 1200A
Rated short circuit current = 31.5kA
Rated permissible tripping delay time = 2 seconds
Short circuit thermal limit curve is calculated using equation (10).
Time (sec.) Current (kA)2 31.50 20 9.96 200 3.15 1378 1.2
The TCC landmarks are plotted in Fig. 17.
Step 2 – Identify TCC Areas
The Equipment Operating Area is located to the left and below the ampacity, Fig. 18.
The Equipment Damage Area is located to the right and above the SC thermal limit curve, Fig. 18.
Step 3 – Size and Set the Protective Device
Set the relay pickup at or below the ampacity.
Set the relay characteristic curve below the SC thermal limit curve, Fig. 18.
© 2006 EPOWERENGINEERING
41

The ABC’s of Overcurrent Coordination
0.5 1 10 100 1K 10K0.01
0.10
1
10
100
1000
CURRENT IN AMPERES
MV EQUIPMENT.tcc Ref. Voltage: 4160 Current Scale x10^1
TIME
IN S
EC
ON
DS
AMPACITY
MV CIRCUIT BREAKERSC THERMAL LIMIT CURVE
MV CIRCUIT BREAKERPERMISSIBLE TRIPPINGDELAY
AMPACITY
MV CIRCUIT BREAKERSC THERMAL LIMIT CURVE
MV CIRCUIT BREAKERPERMISSIBLE TRIPPINGDELAY
Fig. 17 – MV Circuit Breaker TCC Landmarks
© 2006 EPOWERENGINEERING
42

The ABC’s of Overcurrent Coordination
1200 A
25000 A
0.5 1 10 100 1K 10K0.01
0.10
1
10
100
1000
CURRENT IN AMPERES
MV EQUIPMENT TCC AREAS.tcc Ref. Voltage: 4160 Current Scale x10^
TIME
IN S
EC
ON
DS
MV Relay
ABB CO-9 CT 1200 / 5 ASettings Phase Tap (1-12A) 5.0 (1200A) Time Dial (0.5-11) 2.5 INST (6-144A) 50 (12000A)
MV Relay
ABB CO-9 CT 1200 / 5 ASettings Phase Tap (1-12A) 5.0 (1200A) Time Dial (0.5-11) 2.5 INST (6-144A) 50 (12000A)
EQUIPMENTDAMAGE AREA
EQUIPMENTOPERATING AREA
PROTECTIVE DEVICESETTING AREA
EQUIPMENTDAMAGE AREA
EQUIPMENTOPERATING AREA
PROTECTIVE DEVICESETTING AREA
Fig. 18 – MV Circuit Breaker TCC Areas
© 2006 EPOWERENGINEERING
43

The ABC’s of Overcurrent Coordination
_________________________________________________________________________________________________________ SECTION 4 SELECTIVITY REQUIREMENTS_________________________________________________________________________________________________________
Selectivity between series protective devices is difficult to achieve unless the engineer responsible for specifying and purchasing the distribution equipment is familiar with available equipment features and functions. The engineer must also have a clear understanding of how sections of the distribution system should be removed from service during an overload or fault condition. Table 18 lists overcurrent relay curve types with associated applications, which are typically used in industry. Table 19 lists LV power circuit breaker trip functions with associated applications, which are again typically used in industry.
Table 18 – Relay Curve Selection Chart
Application Functions Relay Curve Main Service 51 Extremely Inverse
Generator 51V Very Inverse Transformer 50/51 Very Inverse
Motor 50/51 Long Time Capacitor 50/51 Short Time
Residual Neutral 51 Inverse Neutral Ground 51 Inverse
Ground 50 Instantaneous
Table 19 – LV Power Circuit Breaker Trip Function Chart
Application Long Time Short Time Instantaneous Ground Fault Main Y Y N Y Tie Y Y N Y
Motor Feeder Y N Y Y Transformer Feeder Y Y Y Y Generator Feeder Y Y Y Y
MCC Feeder Y Y N Y Switchboard Feeder Y Y N Y Panelboard Feeder Y Y N Y
When evaluating the tripping characteristics for series protective devices on a TCC, coordinating time intervals must be maintained based on the equipment under consideration. Table 20 lists coordinating time intervals that have been successfully used throughout industry.
The primary reason for coordinating time intervals is that MV relays and breakers are provided as separate, discrete components. Characteristic curves are provided by the relay vendor, and rated interrupting times are provided by the breaker manufacturer. It is the responsibility of the engineer performing the coordination study to be aware of the overall relay-breaker TCC characteristics for the application under consideration.
There are two special cases concerning coordinating time intervals that warrant further discussion. The first considers series fuses. The proper approach recommended in the standards and by fuse vendors is to maintain fuse ratios, not time margins on the TCC, Table 21. For instance, consider the case of a 1600A Class L main fuse serving a 1000A Class L feeder fuse. When plotted on a TCC, the two curves will not touch. However, according to Table 21, a 2:1 ratio must be maintained. In this case, the ratio is 1.6:1, therefore selectivity is not achieved.
The second case considers series LV power or molded-case circuit breakers. No coordinating time interval between series devices is required. Breaker characteristic curves incorporate breaker sensing and operating times. The purpose of the breaker total clear curve is to indicate that all poles in the circuit have been cleared. Therefore, if the curves do not touch, selectivity is achieved.
© 2006 EPOWERENGINEERING
44

The ABC’s of Overcurrent Coordination
Table 20 – Series Device Coordinating Time Intervals
Upstream Device
Downstream Device
Relay Disk Over-travel
Relay Tolerance
Operating Time (sec.)
(note 4)
Total Time (sec.)
Typical Time (sec.)
0.05 0.22 0.08 0.25
0.07 (note2)
0.13 0.30 0.05 0.32 0.08 0.35
51 Relay 51 Relay 0.1 0.17
(note 3) 0.13 0.40
0.4
0.05 0.12 0.08 0.15 0.07
(note 2) 0.13 0.20 0.05 0.22 0.08 0.25
51 Relay 50 Relay N/A 0.17
(note 3) 0.13 0.30
0.2
0.05 0.12 0.08 0.15 0.07
(note 2) 0.13 0.20 0.05 0.22 0.08 0.25
Static Relay Static Relay N/A 0.17
(note 3) 0.13 0.30
0.2
0.07 (2) 0.07 51 Relay LV CB N/A 0.17 (3)
N/A 0.17
0.2
0.07 (2) 0.07 51 Relay Fuse N/A 0.17 (3)
N/A 0.17
0.2
0.05 0.12 0.08 0.15 0.07
(note 2) 0.13 0.20 0.05 0.22 0.08 0.25
Fuse 50 Relay N/A 0.17
(note 3) 0.13 0.30
0.2
Fuse Fuse N/A N/A N/A (note 5) (note 5) LV CB (6) LV CB (6) N/A N/A N/A (note 7) (note 7)
Notes: 1. Total time at maximum current seen by both devices. 2. Recently tested and calibrated relay. 3. Not recently tested and calibrated relay. 4. Downstream breaker operating time, 3-cycle (0.05 sec.), 5-cycle (0.08 sec.) and 8-cycle (0.13 sec.). 5. Coordinating time interval is not applicable. Maintain published fuse ratios. 6. Low voltage molded case or power circuit breaker. 7. Coordinating time interval is not applicable. Published time-current curves should not overlap.
Table 21 – Typical Fuse Ratios
LOAD-SIDE FUSE
LINE-SIDE FUSE Class L 601-6000A
Class K1 0-600A
Class J 0-600A
Class K5 Time Delay
0-600A
Class J Time Delay
(0-600A)
Class L (601-6000A) 2:1 2:1 2:1 6:1 2:1
Class K1 (0-600A) - 2:1 3:1 8:1 4:1
Class J (0-600A) - 3:1 3:1 8:1 4:1
Class K5 Time Delay ( 0-600A) - 1.5:1 1.5:1 2:1 1.5:1
Class J Time Delay (0-600A) - 1.5:1 1.5:1 8:1 2:1
Note: For illustration only. Refer to manufacturer for specific data.
© 2006 EPOWERENGINEERING
45
The ABC’s of Overcurrent Coordination
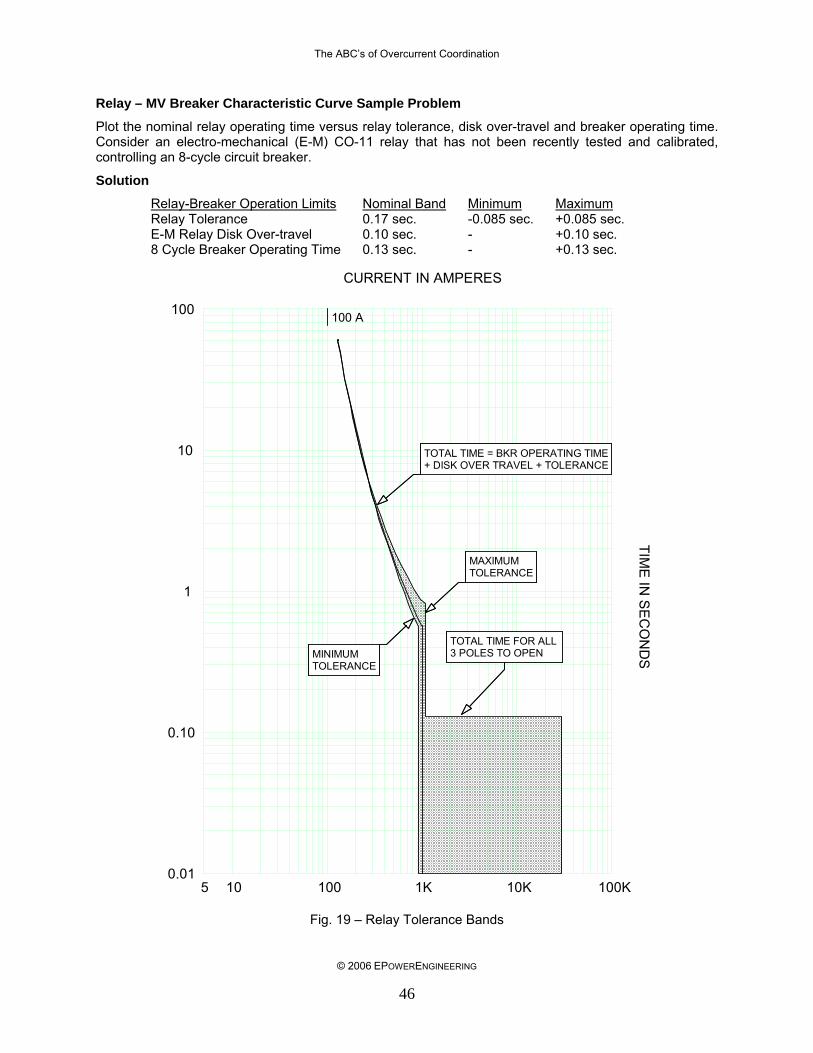
Relay – MV Breaker Characteristic Curve Sample Problem
Plot the nominal relay operating time versus relay tolerance, disk over-travel and breaker operating time. Consider an electro-mechanical (E-M) CO-11 relay that has not been recently tested and calibrated, controlling an 8-cycle circuit breaker.
Solution
Relay-Breaker Operation Limits Nominal Band Minimum MaximumRelay Tolerance 0.17 sec. -0.085 sec. +0.085 sec. E-M Relay Disk Over-travel 0.10 sec. - +0.10 sec. 8 Cycle Breaker Operating Time 0.13 sec. - +0.13 sec.
100 A
5 10 100 1K 10K 100K0.01
0.10
1
10
100
CURRENT IN AMPERES
TIME
IN S
EC
ON
DS
TOTAL TIME = BKR OPERATING TIME+ DISK OVER TRAVEL + TOLERANCE
MINIMUMTOLERANCE
MAXIMUMTOLERANCE
TOTAL TIME FOR ALL 3 POLES TO OPEN
TOTAL TIME = BKR OPERATING TIME+ DISK OVER TRAVEL + TOLERANCE
MINIMUMTOLERANCE
MAXIMUMTOLERANCE
TOTAL TIME FOR ALL 3 POLES TO OPEN
Fig. 19 – Relay Tolerance Bands
© 2006 EPOWERENGINEERING
46

The ABC’s of Overcurrent Coordination
Selectivity Problem 1
Applicable combinations include: Device ANSI No. Protection DeviceUpstream 51 E-M Relay Downstream 51 E-M Relay, Static Relay
2
151
52
51
52
Isc
Isc
0.40
0 s
0.5 1 10 1000.01
0.10
1
10
100
CURRENT IN AMPERES
TIME
IN S
EC
ON
DS
1
2
0.40
0 s
1
2
Fig. 20 – 51 Relay Upstream with 51 Relay Downstream
© 2006 EPOWERENGINEERING
47

The ABC’s of Overcurrent Coordination
Selectivity Problem 2
Applicable combinations include: Device ANSI No. Protection DeviceUpstream 51 Static Relay Downstream 51 E-M Relay, Static Relay
2
151
52
51
52
Isc
Isc
0.20
0 s
0.5 1 10 1000.01
0.10
1
10
100
CURRENT IN AMPERES
TIME
IN S
EC
ON
DS
1
2 0.20
0 s
1
2
Fig. 21 – 51 Relay Upstream with 51 Relay Downstream
© 2006 EPOWERENGINEERING
48

The ABC’s of Overcurrent Coordination
Selectivity Problem 3
Applicable combinations include: Device ANSI No. Protection DeviceUpstream 51 E-M Relay Downstream 50/51 E-M Relay, Static Relay
1
2
51
52
5051
52
Isc
Isc
0.40
0 s
0.20
0 s
0.5 1 10 1000.01
0.10
1
10
100
CURRENT IN AMPERES
TIME
IN S
EC
ON
DS
1
2
0.40
0 s
0.20
0 s
1
2
Fig. 22 – 51 Relay Upstream with 50/51 Relay Downstream
© 2006 EPOWERENGINEERING
49

The ABC’s of Overcurrent Coordination
Selectivity Problem 4
Applicable combinations include: Device ANSI No. Protection DeviceUpstream 50/51 E-M Relay, Static Relay Downstream - MCCB, ICCB, PCB
1
2
5051
52
Isc
Isc
0.20
0 s
0.5 1 10 1000.01
0.10
1
10
100
CURRENT IN AMPERES
TIME
IN S
EC
ON
DS
1
2
0.20
0 s
1
2
Fig. 23 – 50/51 Relay Upstream with LV CB Downstream
© 2006 EPOWERENGINEERING
50

The ABC’s of Overcurrent Coordination
Selectivity Problem 5
Applicable combinations include: Device ANSI No. Protection DeviceUpstream 50/51 E-M Relay, Static Relay Downstream - Fuse
1
2
52
5 1
Isc
Isc
0.20
0 s
0.5 1 10 1000.01
0.10
1
10
100
CURRENT IN AMPERES
TIME
IN S
EC
ON
DS
1
2
0.20
0 s
1
2
Fig. 24 – 51 Relay Upstream with Fuse Downstream
© 2006 EPOWERENGINEERING
51

The ABC’s of Overcurrent Coordination
Selectivity Problem 6
Applicable combinations include: Device Protection DeviceUpstream LV PCB or MCCB Downstream LV PCB or MCCB
For selectivity between LV circuit breakers, no margins are required. As long as devices do not intersect, selectivity is achieved.
1
2
Isc
Isc
0.5 1 10 1000.01
0.10
1
10
100
1000
CURRENT IN AMPERES
TIME
IN SE
CO
ND
S
1
2
1
2
Fig. 25 – LV CB Upstream with LV CB Downstream
© 2006 EPOWERENGINEERING
52

The ABC’s of Overcurrent Coordination
To coordinate fuses, maintain manufacturer published fuse ratios listed in selectivity tables. All fuse selectivity tables are manufacturer specific. To achieve fuse selectivity between different manufacturers, the clearing I2T of the downstream fuse must be less than the minimum I2T of the upstream fuse.
The minimum melt and total clear curves take into account fuses tolerances. However, to take into account ambient temperature, preloading and pre-damage, down stream devices should not come within 75% of the minimum melt curve. At a minimum, to avoid the effects of pre-damage, down stream devices should not come within 90% of the minimum melt curve, Fig. 26.
0.5 1 10 1000.01
0.10
1
10
100
CURRENT IN AMPERES
TIME
IN S
EC
ON
DS
75%
90%
75%
90%
Fig. 26 – Fuse Boundary Limits
© 2006 EPOWERENGINEERING
53

The ABC’s of Overcurrent Coordination
_________________________________________________________________________________________________________
SECTION 5 SETTING GUIDELINES_________________________________________________________________________________________________________
MV Motor Switchgear Feeder Unit
Industry standard overcurrent protection schemes for MV induction and synchronous motors fed from switchgear circuit breakers include an instantaneous overcurrent relay (device 50/51). The 50/51 relay characteristics are plotted on a phase TCC along with the motor starting and damage curves, and the feeder damage curve.
The purpose of the 50/51 relay is to allow the motor to start and run, and to protect the motor and cable from overloads and faults. To accomplish this, the relay characteristics must be above and to the right of the motor starting curve, and to the left and below the rotor, stator and cable damage curves, and the amp rating of the cable.
Suggested margins are listed below that have historically allowed for safe operation of the motor and cable while reducing instances of nuisance trips.
Device Function Recommendations Comments
CT Size 125-150% of FLA
51 Pickup 115-125% of FLA Set below motor stator damage curve.
Set at or below cable ampacity.
51 Time Dial 2-10 seconds above knee of motor curve
Set below motor rotor damage curve.
Set below cable damage curve.
50 Pickup 200% of LRA Set below cable damage curve.
Cable damage curve must be above the maximum fault current at 0.1 seconds.
CT
52
50/51
Fig. 27 – MV Motor Switchgear Feeder Unit
© 2006 EPOWERENGINEERING
54

The ABC’s of Overcurrent Coordination
50/51 Relay
20000 A
Feeder
0.5 1 10 100 1K 10K0.01
0.10
1
10
100
1000
CURRENT IN AMPERES
MVMSFU.tcc Ref. Voltage: 4160 Current Scale x10^1
TIME
IN S
EC
ON
DS
STATORDAMAGE CURVE
ROTORDAMAGE CURVE
MOTORSTARTING CURVE
50/51 RELAY
FEEDERDAMAGE CURVE
STATORDAMAGE CURVE
ROTORDAMAGE CURVE
MOTORSTARTING CURVE
50/51 RELAY
FEEDERDAMAGE CURVE
Fig. 28 – MV Motor Switchgear Feeder Unit
© 2006 EPOWERENGINEERING
55

The ABC’s of Overcurrent Coordination
MV Motor Fused Starter Feeder Unit
Industry standard overcurrent protection schemes for MV induction and synchronous motors fed from fused starters include an overcurrent relay (device 51), and a set of R-rated fuses (device 50). R rated fuses melt at 100 times the R rating and 20 seconds. Both the fuse and relay characteristics are plotted on a phase TCC along with the motor starting and damage curves, and the feeder damage curve.
The purpose of the fuse-relay combination is to allow the motor to start and run, and to protect the motor and cable from overloads and faults. To accomplish this, the fuse-relay characteristics must be above and to the right of the motor starting curve, and to the left and below the rotor, stator and cable damage curves, and the amp rating of the cable.
Suggested margins are listed below that have historically allowed for safe operation of the motor and cable while reducing instances of nuisance trips.
Device Function Recommendations Comments
CT Size 125-150% of FLA
51 Pickup 115-125% of FLA Set below motor stator damage curve.
Set at or below cable ampacity.
51 Time Dial 2-10 seconds above knee of motor curve
Set below motor rotor damage curve.
Set below cable damage curve.
50 Fuse Size RRating > 1.1*LRA/100 Set below cable damage curve.
AMPRating > FLA Cable damage curve must be above the maximum fault current at 0.01 seconds.
CT51
Fig. 29 – MV Motor Fused Starter Feeder Unit
© 2006 EPOWERENGINEERING
56

The ABC’s of Overcurrent Coordination
51 RelayFeeder
20000 A
0.5 1 10 100 1K 10K0.01
0.10
1
10
100
1000
CURRENT IN AMPERES
MVMFSFU.tcc Ref. Voltage: 4160 Current Scale x10^1
TIME
IN S
EC
ON
DS
STATORDAMAGE CURVE
ROTORDAMAGE CURVE
MOTORSTARTING CURVE
51 RELAY
FEEDERDAMAGE CURVE
FUSE
STATORDAMAGE CURVE
ROTORDAMAGE CURVE
MOTORSTARTING CURVE
51 RELAY
FEEDERDAMAGE CURVE
FUSE
Fig. 30 – MV Motor Fused Starter Feeder Unit
© 2006 EPOWERENGINEERING
57

The ABC’s of Overcurrent Coordination
LV Motor Power Circuit Breaker Feeder Unit
Industry standard phase overcurrent functions purchased with power circuit breakers (PCB) serving LV motors include long time pickup, long time delay and instantaneous pickup. Short time pickup and short time delay are not used. The PCB characteristics are plotted on a phase TCC along with the motor starting curve and safe stall point, and the feeder damage curve.
The purpose of the PCB is to allow the motor to start and run, and to protect the motor and cable from overloads and faults. To accomplish this, the PCB characteristics should be above and to the right of the motor starting curve, and to the left and below the motor safe stall point, cable damage curve and amp rating. Note it is not always possible to be below the cable amp rating due to breaker tolerances.
Suggested margins are listed below that have historically allowed for safe operation of the motor and cable while reducing instances of nuisance trips.
Device Function Recommendations Comments
PCB LTPU 125% of FLA Set at or below cable ampacity.
PCB Time Dial 2-10 seconds above knee of motor curve
Set below motor safe stall point.
PCB INST 200% of LRA Set below cable damage curve.
Cable damage curve must be above the point defined by the maximum fault current and the PCB instantaneous clear curve.
Fig. 31 – LV Motor Power Circuit Breaker Feeder Unit
© 2006 EPOWERENGINEERING
58

The ABC’s of Overcurrent Coordination
40000 A
Feeder
0.5 1 10 100 1K 10K0.01
0.10
1
10
100
1000
CURRENT IN AMPERES
LVPCBFU.tcc Ref. Voltage: 480 Current Scale x10^1
TIME
IN S
EC
ON
DS
FEEDERDAMAGE CURVE
MOTOR STARTINGCURVE
PCB
FEEDERDAMAGE CURVE
MOTOR STARTINGCURVE
PCB
Fig. 32 – LV Motor Power Circuit Breaker Feeder Unit
© 2006 EPOWERENGINEERING
59

The ABC’s of Overcurrent Coordination
LV Motor MCP Starter Feeder Unit
Industry standard phase overcurrent protection is provided in MCP starter units by two discrete components, an overload relay and an MCP. The MCP is a circuit breaker with the thermal element removed. The overload and MCP characteristics are plotted on a phase TCC along with the motor starting curve and safe stall point, and the feeder damage curve.
The purpose of the overload-MCP combination is to allow the motor to start and run, and to protect the motor and cable from overloads and faults. To accomplish this, the overload-MCP characteristics should be above and to the right of the motor starting curve, and to the left and below the motor safe stall point, the cable damage curve and amp rating. Note it is not always possible to be below the cable amp rating due to overload tolerances.
Suggested margins are listed below that have historically allowed for safe operation of the motor and cable while reducing instances of nuisance trips.
Device Function Recommendations Comments
OL Pickup 125% of FLA if SF > 1.15
115% of FLA if SF = 1.00
Set at or below cable ampacity.
OL Time Dial Fixed assume Class 20 Set below motor safe stall point.
MCP Size 125-160% of FLA Defer to recommended size by manufacturer.
MCP Pickup 200% of LRA Set below cable damage curve.
Cable damage curve must be above the point defined by the maximum fault current and the MCP instantaneous clear curve.
Fig. 33 – LV Motor MCP Starter Feeder Unit
© 2006 EPOWERENGINEERING
60

The ABC’s of Overcurrent Coordination
40000 A
Feeder
0.5 1 10 100 1K 10K0.01
0.10
1
10
100
1000
CURRENT IN AMPERES
LVMMCPSFU.tcc Ref. Voltage: 480 Current Scale x10^1
TIME
IN S
EC
ON
DS
FEEDERDAMAGE CURVE
MCP
OL RELAY
MOTORSTARTING CURVE
FEEDERDAMAGE CURVE
MCP
OL RELAY
MOTORSTARTING CURVE
Fig. 34 – LV Motor MCP Starter Feeder Unit
© 2006 EPOWERENGINEERING
61

The ABC’s of Overcurrent Coordination
LV Motor Fused Starter Feeder Unit
Industry standard phase overcurrent protection is provided in fused starter units by two discrete components, an overload relay and a fuse. Both the overload and fuse characteristics are plotted on a phase TCC along with the motor starting curve and safe stall point, and the feeder damage curve.
The purpose of the overload-fuse combination is to allow the motor to start and run, and to protect the motor and cable from overloads and faults. To accomplish this, the overload-fuse characteristics should be above and to the right of the motor starting curve, and to the left and below the motor safe stall point, the cable damage curve and amp rating. Note it is not always possible to be below the cable amp rating due to overload tolerances.
Suggested margins are listed below that have historically allowed for safe operation of the motor and cable while reducing instances of nuisance trips.
Device Function Recommendations Comments
OL Pickup 125% of FLA if SF > 1.15
115% of FLA if SF = 1.00
Set at or below cable ampacity.
OL Time Dial Fixed assume Class 20 Set below motor safe stall point.
Fuse Size 175% of FLA Set below cable damage curve.
Cable damage curve must be above the point defined by the maximum fault current and 0.01 seconds
Fig. 35 – LV Motor Fused Starter Feeder Unit
© 2006 EPOWERENGINEERING
62

The ABC’s of Overcurrent Coordination
40000 A
Feeder
0.5 1 10 100 1K 10K0.01
0.10
1
10
100
1000
CURRENT IN AMPERES
LVMFSFU.tcc Ref. Voltage: 480 Current Scale x10^1
TIME
IN S
EC
ON
DS
FEEDERDAMAGE CURVE
MOTOR STARTING CURVE
FUSE
OL RELAY
FEEDERDAMAGE CURVE
MOTOR STARTING CURVE
FUSE
OL RELAY
Fig. 36 – LV Motor Fused Starter Feeder Unit
© 2006 EPOWERENGINEERING
63

The ABC’s of Overcurrent Coordination
MV Generator Switchgear Feeder Unit with Voltage Controlled 51V
Industry standard backup overcurrent protection schemes for MV generators fed from switchgear circuit breakers include either a voltage controlled or voltage restrained overcurrent relay (device 51V). The voltage controlled overcurrent relay will be covered in this section. The 51V relay characteristics are plotted on a phase TCC along with the generator decrement curve and damage point, and the feeder damage curve.
The purpose of the relay is to allow the generator to operate, and to provide backup fault protection for the generator and cable. To accomplish this, the relay pickup must be to the left of the generator armature steady state current. Also, the relay time delay characteristics must be above and to the right of the generator decrement curve with constant excitation, and to the left and below the generator damage point, cable damage curve and the amp rating of the cable. The time delay must also be set to be selective with downstream feeder relays.
Suggested margins are listed below that have historically allowed for safe operation of the generator and cable while reducing instances of nuisance trips.
Device Function Recommendations Comments
CT Size 125-150% of FLA
51V Pickup 80-90% of Id = 1/Xd Assume Xd = 1.5 Í p.u. if Xd unknown.
51 Time Dial Above knee of generator decrement curve with constant excitation
Set above downstream feeder relays.
Set below cable damage curve.
CT51V
52
Fig. 37 – MV Generator Switchgear Feeder Unit w/VC 51V
© 2006 EPOWERENGINEERING
64

The ABC’s of Overcurrent Coordination
51V Relay
20000 A
Feeder
0.5 1 10 100 1K 10K0.01
0.10
1
10
100
1000
CURRENT IN AMPERES
MVGSFUVC.tcc Ref. Voltage: 12470 Current Scale x10^1
TIME
IN S
EC
ON
DS
WITH VOLTAGE CONTROL THE CURRENTAND VOLTAGE FUNCTIONS ARE IN SERIES.CURRENTS ABOVETHE TIME CURVE WILLNOT TRIP THE RELAY FOR VOLTAGES ABOVE THE SETPOINT
51V RELAY
CONSTANT EXCITATIONDECREMENT CURVEIf=1.0 P.U.
FEEDERDAMAGE CURVE
GENERATOROVERLOAD CURVE
WITH VOLTAGE CONTROL THE CURRENTAND VOLTAGE FUNCTIONS ARE IN SERIES.CURRENTS ABOVETHE TIME CURVE WILLNOT TRIP THE RELAY FOR VOLTAGES ABOVE THE SETPOINT
51V RELAY
CONSTANT EXCITATIONDECREMENT CURVEIf=1.0 P.U.
FEEDERDAMAGE CURVE
GENERATOROVERLOAD CURVE
Fig. 38 – MV Generator Switchgear Feeder Unit w/VC 51V
© 2006 EPOWERENGINEERING
65

The ABC’s of Overcurrent Coordination
MV Generator Switchgear Feeder Unit with Voltage Restrained 51V
Industry standard backup overcurrent protection schemes for MV generators fed from switchgear circuit breakers include either a voltage controlled or voltage restrained overcurrent relay (device 51V). The voltage restrained overcurrent relay will be covered in this section. The 51V relay characteristics are plotted on a phase TCC along with the generator decrement curve and damage point, and the feeder damage curve.
The purpose of the relay is to allow the generator to operate, and to provide backup fault protection for the generator and cable. To accomplish this, the relay pickup at 0% restraint must be to the left of the generator armature steady state current, and at 100% restraint must be to the right of the generator full load amps. Also, the relay time delay characteristics must be above and to the right of the generator decrement curve with constant excitation, and to the left and below the generator damage point, cable damage curve and the cable amp rating. The time delay must also be set to be selective with downstream feeder relays.
Suggested margins are listed below that have historically allowed for safe operation of the generator and cable while reducing instances of nuisance trips.
Device Function Recommendations Comments
CT Size 125-150% of FLA
51V Pickup 125-150% of FLA @ 100% Voltage Restraint
Set below Overload Curve
51 Time Dial Above knee of generator decrement curve with constant excitation
Set above downstream feeder relays.
Set below cable damage curve.
CT51V
52
Fig. 39 – MV Generator Switchgear Feeder Unit w/VR 51V
© 2006 EPOWERENGINEERING
66

The ABC’s of Overcurrent Coordination
51V (0% VR)
51V (100% VR)
20000 A
Feeder
0.5 1 10 100 1K 10K0.01
0.10
1
10
100
1000
CURRENT IN AMPERES
MVGSFUVR.tcc Ref. Voltage: 12470 Current Scale x10^1
TIME
IN S
EC
ON
DS
WITH VOLTAGE RESTRAINT CURRENTS ABOVE THE TIMECURVE WILL TRIP THE RELAYFOR VOLTAGE ABAOVE THE SETPOINT.
FEEDERDAMAGE CURVE
51V RELAYw/100% VR
51V RELAYw/0% VR
CONSTANT EXCITATIONDECREMENT CURVEIf = 1. P.U.
GENERATOROVERLOAD CURVE
WITH VOLTAGE RESTRAINT CURRENTS ABOVE THE TIMECURVE WILL TRIP THE RELAYFOR VOLTAGE ABAOVE THE SETPOINT.
FEEDERDAMAGE CURVE
51V RELAYw/100% VR
51V RELAYw/0% VR
CONSTANT EXCITATIONDECREMENT CURVEIf = 1. P.U.
GENERATOROVERLOAD CURVE
Fig. 40 – MV Generator Switchgear Feeder Unit w/VR 51V
© 2006 EPOWERENGINEERING
67

The ABC’s of Overcurrent Coordination
LV Generator Molded-Case Circuit Breaker or Power Circuit Breaker Feeder Unit
Industry standard phase overcurrent functions purchased with molded case or power circuit breakers serving LV generators include long time, short time and instantaneous functions. The circuit breaker (CB) characteristics are plotted on a phase TCC along with the generator characteristics, and the feeder damage curve.
The purpose of the CB is to allow the generator to operate, and to protect the generator and cable from overloads and faults. To accomplish this, the CB characteristics should be above the generator FLA, intersect the generator decrement curve in the short time region, fall to the left and below the generator damage point, the cable damage curve and amp rating, and be above the generator decrement curve in the instantaneous region.
Suggested margins are listed below that have historically allowed for safe operation of the generator and cable while reducing instances of nuisance trips.
Device Function Recommendations Comments
CB LTPU 115-125% of FLA Set at or below cable ampacity.
CB LTD, STPU & STD Minimum Set to intersect with generator decrement curve.
CB I2T Out If I2T in the breaker may never trip.
CB INST Above total decrement curve
Set below cable damage curve.
Cable damage curve must be above the point defined by the maximum fault current and the CB instantaneous clear curve.
Fig. 41 – LV Generator Molded Case or Power Circuit Breaker Feeder Unit
© 2006 EPOWERENGINEERING
68

The ABC’s of Overcurrent Coordination
GeneratorFeeder
40000 A
0.5 1 10 100 1K 10K0.01
0.10
1
10
100
1000
CURRENT IN AMPERES
LVGTMPCBFU.tcc Ref. Voltage: 480 Current Scale x10^1
TIME
IN S
EC
ON
DS
FEEDERDAMAGE CURVE
MCCB or PCB
GENERATORDECREMENT CURVE
GENERATOROVERLOAD CURVE
FEEDERDAMAGE CURVE
MCCB or PCB
GENERATORDECREMENT CURVE
GENERATOROVERLOAD CURVE
Fig. 42 – LV Generator Molded-Case or Power Circuit Breaker Feeder Unit
© 2006 EPOWERENGINEERING
69

The ABC’s of Overcurrent Coordination
MV Transformer Switchgear Feeder Unit
Industry standard overcurrent protection schemes for MV transformers fed from switchgear circuit breakers include an instantaneous overcurrent relay (device 50/51). The 50/51 relay characteristics are plotted on a phase TCC along with the transformer and feeder damage curves.
The purpose of the phase overcurrent relay is to allow for full use of the transformer, and to protect the transformer and cable from overloads and faults. To accomplish this, the relay characteristic should be to the right of the transformer FLA rating and inrush point, and to the left of the transformer and cable damage curves and the cable amp rating.
Suggested margins are listed below that have historically allowed for safe operation of the transformer and cable while reducing instances of nuisance trips.
Device Function Recommendations Comments
CT Size 200% of FLA FLA on base rating.
51 Pickup 110-140% of FLA Set below the transformer damage curve.
Set at or below cable ampacity.
51 Time Dial let-thru current @ 1.0 second
Set below the transformer damage curve.
Set at or above low voltage main device.
50 Pickup 200% of let-thru current or inrush
Set below cable damage curve.
Set above transformer inrush point.
Cable damage curve must be above the maximum fault current at 0.1 seconds.
CT
52
50/51
Fig. 43 – MV Transformer Switchgear Feeder Unit
© 2006 EPOWERENGINEERING
70

The ABC’s of Overcurrent Coordination
Feeder
TX Inrush
Transformer50/51 Relay
20000 A
0.5 1 10 100 1K 10K0.01
0.10
1
10
100
1000
CURRENT IN AMPERES
MVTSFU.tcc Ref. Voltage: 4160 Current Scale x10^1
TIME
IN S
EC
ON
DS
TRANSFORMERDAMAGE CURVE
50/51 RELAY
FEEDER DAMAGE CURVE
TRANSFORMERDAMAGE CURVE
50/51 RELAY
FEEDER DAMAGE CURVE
Fig. 44 – MV Transformer Switchgear Feeder Unit
© 2006 EPOWERENGINEERING
71

The ABC’s of Overcurrent Coordination
MV Transformer Fused Switch Feeder Unit
E-rated power fuses are typically used in fused switches serving MV transformers. Fuses rated 100E or less must trip in 300 seconds at currents between 200 and 240% of their E ratings. Fuses above 100E must trip in 600 seconds at currents between 220 and 264% of their E ratings. The fuse characteristics are plotted on a phase TCC along with the transformer and feeder damage curves.
The purpose of the fuse is to allow for full use of the transformer, and to protect the transformer and cable from faults. To accomplish this, the fuse characteristic should be to the right of the transformer inrush point and to the left of the cable damage curve. The fuse will always cross the transformer damage curve. The LV main device provides overcurrent protection for the circuit.
Suggested margins are listed below that have historically allowed for safe operation of the transformer and cable while reducing instances of nuisance trips.
Device Function Recommendations Comments
50 Fuse Size E-rating > FLA
FLA at top rating.
Set at or below cable ampacity.
Set above transformer inrush 12 x 0.1 seconds.
Set above transformer inrush 25 x 0.01 seconds.
Cable damage curve must be above the maximum fault current at 0.01 seconds.
Fig. 45 – MV Transformer Fused Switch Feeder Unit
© 2006 EPOWERENGINEERING
72

The ABC’s of Overcurrent Coordination
TX Inrush
Transformer
20000 A
Feeder
0.5 1 10 100 1K 10K0.01
0.10
1
10
100
1000
CURRENT IN AMPERES
MVTFSFU.tcc Ref. Voltage: 12470 Current Scale x10^1
TIME
IN S
EC
ON
DS
TRANSFORMERDAMAGE CURVE
FUSE
FEEDERDAMAGE CURVE
TRANSFORMERDAMAGE CURVE
FUSE
FEEDERDAMAGE CURVE
Fig. 46 – MV Transformer Fused Switch Feeder Unit
© 2006 EPOWERENGINEERING
73

The ABC’s of Overcurrent Coordination
MV Capacitor Switchgear Feeder Unit
Industry standard overcurrent protection schemes for MV fused capacitor banks fed from switchgear circuit breakers include an instantaneous overcurrent relay (device 50/51). The 50/51 relay characteristics are plotted on a phase TCC along with the feeder damage curve.
The purpose of the phase overcurrent relay is to allow for full use of the capacitor, and to protect the capacitor and cable from overloads, and the cable from faults. The purpose of the fuse is to prevent a case rupture due to a fault within the capacitor tank. To accomplish this, the relay and fuse characteristics should be to the right of the capacitor amp rating, and to the left of the capacitor case rupture curve, cable damage curve and cable amp rating. Note, the phase relay is not fast enough to protect the capacitor bank from damage.
Suggested margins are listed below that have historically allowed for safe operation of the transformer and cable while reducing instances of nuisance trips.
Device Function Recommendations Comments
CT Size 150% of ICapacitor
51 Pickup 130-155% of ICapacitor Set at or below cable ampacity.
51 Time Dial Time Dial 1 for E-M relay
50 Pickup 200-450% of ICapacitor Set below cable damage curve.
Cable damage curve must be above the maximum fault current at 0.1 seconds.
Fuse Fuse Size 200% of ICapacitor Defer to manufacturer recommendations.
Set below capacitor case rupture curve.
CT50/51
52
Fig. 47 – MV Capacitor Switchgear Feeder Unit
© 2006 EPOWERENGINEERING
74

The ABC’s of Overcurrent Coordination
50/51 Relay
5000 A
Feeder
0.5 1 10 100 1K 10K0.01
0.10
1
10
100
1000
CURRENT IN AMPERES
MVCSFU.tcc Ref. Voltage: 4160 Current Scale x10^1
TIME
IN S
EC
ON
DS
FEEDERDAMAGE CURVE
FUSE
50/51 RELAY
CAPACITOR
CAPACITORCASE RUPTURE CURVE
FEEDERDAMAGE CURVE
FUSE
50/51 RELAY
CAPACITOR
CAPACITORCASE RUPTURE CURVE
Fig. 48 – MV Capacitor Switchgear Feeder Unit
© 2006 EPOWERENGINEERING
75

The ABC’s of Overcurrent Coordination
MV Main Service Switchgear Feeder Unit
Industry standard overcurrent protection schemes for switchgear main circuit breakers include an overcurrent relay (device 51). However, there are those who believe in adding an instantaneous function (device 50). The problem with adding this function is that the main and feeder instantaneous functions will never be selective. Those who do this, accept the risk of nuisance tripping in order to reduce tripping times for a fault on the main bus. The relay characteristics are plotted on a phase TCC along with upstream and downstream protective device characteristics.
The purpose of the 51 relay is to provide overcurrent protection for the main service bus and feeder. The 51 relay must be selective with downstream feeder relays.
Suggested margins are listed below that have historically allowed for safe operation of the main bus and cable while reducing instances of nuisance trips.
Device Function Recommendations Comments
CT Size > 100% Bus Rating
51 Pickup < 100% Bus Rating Do not set pickup according to load.
Set above the transformer FLA.
Set below the transformer damage curve.
Set at or below feeder ampacity.
Set below the feeder damage curve.
Do not set above main bus ampacity
51 Time Dial No Specific Rule Set above feeder relays.
Set below transformer primary relay if possible. Not necessary to coordinate since devices are in series.
CT
52
5 1
Fig. 49 – MV Main Service Switchgear Feeder Unit
© 2006 EPOWERENGINEERING
76

The ABC’s of Overcurrent Coordination
51 Relay
20000 A
50/51 Relay
Feeder
0.5 1 10 100 1K 10K0.01
0.10
1
10
100
1000
CURRENT IN AMPERES
MVMSSFU.tcc Ref. Voltage: 4160 Current Scale x10^1 ONE LINE.drw
TIME
IN S
EC
ON
DS
FEEDERDAMAGE CURVE
51 RELAY
50/51 RELAY (TYP)
FEEDER 50/51 RELAY NOT SHOWN IN FIG. 41
FEEDERDAMAGE CURVE
51 RELAY
50/51 RELAY (TYP)
FEEDER 50/51 RELAY NOT SHOWN IN FIG. 41
Fig. 50 – MV Main Service Switchgear Feeder Unit
© 2006 EPOWERENGINEERING
77

The ABC’s of Overcurrent Coordination
LV Main Service Power Circuit Breaker Feeder Unit
Industry standard phase overcurrent functions purchased with main service PCB include long time and short time functions. Do not purchase main PCBs with an instantaneous function. Main PCBs purchased with instantaneous functions will not be selective with feeder PCBs and defeat one of the purposes of purchasing switchgear over switchboard. The PCB characteristics are plotted on a phase TCC along with the upstream and downstream protective devices, and the primary feeder damage curve.
The purpose of the main PCB is to provide overcurrent protection for the main service bus. The main PCB must be selective with downstream feeder devices. Note it is not always possible to be below the cable amp rating due to beaker trip unit tolerances and feeder sizing practices.
Suggested margins are listed below that have historically allowed for safe operation of the main bus and cable while reducing instances of nuisance trips.
Device Function Recommendations Comments
PCB LTPU 100% of Bus Rating Set at or below cable ampacity.
PCB LTD, STPU & STD Minimum Selective with downstream devices.
Cable damage curve must be above the point defined by the maximum fault current and the STD clear curve.
PCB I2T In or Out Selective with downstream devices.
PCB INST Out Do not purchase instantaneous function.
Fig. 51 – LV Main Service Power Circuit Breaker Feeder Unit
© 2006 EPOWERENGINEERING
78

The ABC’s of Overcurrent Coordination
50000 A
Feeder
0.5 1 10 100 1K 10K0.01
0.10
1
10
100
1000
CURRENT IN AMPERES
LVMPCBFU.tcc Ref. Voltage: 480 Current Scale x10^2
TIME
IN S
EC
ON
DS
FEEDERDAMAGE CURVE
PCB
FCB (TYP)
FEEDER BREAKERNOT SHOWN IN FIG. 43
FEEDERDAMAGE CURVE
PCB
FCB (TYP)
FEEDER BREAKERNOT SHOWN IN FIG. 43
Fig. 52 – LV Main Service Power Circuit Breaker Feeder Unit
© 2006 EPOWERENGINEERING
79

The ABC’s of Overcurrent Coordination
LV Main Service Molded-Case Circuit Breaker Feeder Unit
Industry standard phase overcurrent functions purchased with main service molded case CBs include long time, short time and instantaneous functions. Main CBs with instantaneous functions will not be selective with downstream feeder CBs. This is an unfortunate fact of life with molded case breakers. The CB characteristics are plotted on a phase TCC along with the upstream and downstream protective devices, and the primary feeder damage curve.
The purpose of the CB is to provide overcurrent protection for the main service bus and feeder. The CB must be selective with downstream feeder devices in the long time and short time regions. Note it is not always possible to be below the cable amp rating due to overload tolerances and feeder sizing practices.
Suggested margins are listed below that have historically allowed for safe operation of the main bus and cable while reducing instances of nuisance trips.
Device Function Recommendations Comments
CB LTPU 100% of Bus Rating Set at or below cable ampacity.
CB LTD, STPU & STD Minimum Selective with downstream devices.
CB I2T In or Out Selective with downstream devices.
CB INST Maximum Cable damage curve must be above the point defined by the maximum fault current and the CB instantaneous clear curve.
Fig. 53 – LV Main Service Molded-Case Circuit Breaker Feeder Unit
© 2006 EPOWERENGINEERING
80

The ABC’s of Overcurrent Coordination
50000 A
Feeder
0.5 1 10 100 1K 10K0.01
0.10
1
10
100
1000
CURRENT IN AMPERES
LVMSMCCBFU.tcc Ref. Voltage: 480 Current Scale x10^2
TIME
IN S
EC
ON
DS
MCB
FCB (TYP)
FEEDERDAMAGE CURVE
BREAKERS ARE NOT SELECTIVEFOR FAULT CURRENTS ABOVETHE MCB INSTANTANEOUS SETTING
FEEDER CIRCUIT BREAKERNOT SHOWN IN FIGURE 45
MCB
FCB (TYP)
FEEDERDAMAGE CURVE
BREAKERS ARE NOT SELECTIVEFOR FAULT CURRENTS ABOVETHE MCB INSTANTANEOUS SETTING
FEEDER CIRCUIT BREAKERNOT SHOWN IN FIGURE 45
Fig. 54 – LV Main Service Molded-Case Circuit Breaker Feeder Unit
© 2006 EPOWERENGINEERING
81

The ABC’s of Overcurrent Coordination
MV Resistor Grounded Systems
Industry standard ground overcurrent protection schemes for switchgear or fused starter distribution equipment include; residual neutral overcurrent relays (device 51N) on main breakers, instantaneous ground relays (device 50G) on feeders, and transformer neutral overcurrent relays (device 51G) monitoring ground resistors. All relay characteristics are plotted on a ground TCC along with the resistor damage point.
The 50G feeder ground relays are the first level of ground fault protection. The second level is the 51N relay on the main breaker. The 51G relay is the last level of ground fault protection. The 51N and 51G relays would trip the main switchgear breaker. The 51G relay would also trip the transformer HV feeder breaker.
Suggested margins are listed below that have historically allowed for safe operation of equipment while reducing instances of nuisance trips.
Device Function Recommendations Comments
CT Size 50% of NGRAmp Rating Typical NGR amp ratings are 200, 400, 1000 and 1200 amperes
51G Pickup 25% of NGRAmp Rating Set below NRG amp rating
51G Time Dial Time Dial 2 for E-M relay Set above 51N
51N Pickup 25% of NGRAmp Rating Set at or below 51G
51N Time Dial Time Dial 1 for E-M relay Set above feeder relays.
BYZ CT Size 50/5 Typical all feeders.
50G Pickup 5 amps primary Typical all feeders.
CT
CT
BYZ CT
CT
Typical Feeder
50/51
50/51
50G
51N
52
52
51G
Fig. 55 – MV Resistor Grounded Systems
© 2006 EPOWERENGINEERING
82

The ABC’s of Overcurrent Coordination
51N51G
400 A
50G
0.5 1 10 100 1K 10K0.01
0.10
1
10
100
1000
CURRENT IN AMPERES
MVSNG.tcc Ref. Voltage: 4160 Current Scale x10^0
TIME
IN S
EC
ON
DS
X NGR Amp Rating @ 10 Seconds
50G (TYP ALL FDRS)
51N RELAY
51G RELAY
X NGR Amp Rating @ 10 Seconds
50G (TYP ALL FDRS)
51N RELAY
51G RELAY
Fig. 56 – MV Resistor Grounded Systems
© 2006 EPOWERENGINEERING
83

The ABC’s of Overcurrent Coordination
LV Solidly Grounded Systems
Ground fault protection is required on LV main services rated 1000 amps or more per the National Electrical Code. The main CB ground characteristics are plotted on a ground TCC along with feeder breaker and fuse characteristics.
Feeder breakers with integral or shunt trip ground fault protection are first level ground fault devices. These devices are never a problem to coordinate with. Other feeder breakers and fuses are also first level ground fault devices. These devices are a problem to coordinate with. Fuses greater than 100A, and thermal magnetic circuit breakers greater than 50A, will not be selective with main ground fault devices set at maximum pickup (1200 amps) and maximum time delay (0.5 seconds)!
This problem is compounded by the fact that, on many manufacturer’s breakers, the ground fault pickup is a function of sensor rating with a setting range of 0.2 – 0.6. Therefore, a minimum sensor rating of 2000 amps is required to derive a maximum ground fault pickup setting of 1200 amps. Sensors less than 2000 amps have maximum ground fault pickups less than 1200 amps. Sensors greater than 2000 amps will have maximum ground fault pickup settings limited to 1200 amps.
Device Function Recommendations Comments
51G GFPU < 1200 amps Selective with downstream devices.
51G I2T In or Out “In” if coordinating with fuses.
51G GFD Minimum Selective with downstream devices.
MainMCCB w/Integral GF
FeederTMCB
FeederFuse
FeederMCCB w/Integral GF orShunt Trip GF
Fig. 57 – LV Solidly Grounded Systems
© 2006 EPOWERENGINEERING
84

The ABC’s of Overcurrent Coordination
60000 A
0.5 1 10 100 1K 10K0.01
0.10
1
10
100
1000
CURRENT IN AMPERES
LVSGS.tcc Ref. Voltage: 480 Current Scale x10^1
TIME
IN S
EC
ON
DS
MAIN MCCB w/INTEGRAL GF
FEEDER FUSE
FEEDER TMCB
FEEDER MCCB w/SHUNT TRIP GF
MAIN MCCB w/INTEGRAL GF
FEEDER FUSE
FEEDER TMCB
FEEDER MCCB w/SHUNT TRIP GF
Fig. 58 – LV Solidly Grounded Systems
© 2006 EPOWERENGINEERING
85

The ABC’s of Overcurrent Coordination
_________________________________________________________________________________________________________ SECTION 6 STUDY PROCEDURE_________________________________________________________________________________________________________
The overcurrent coordination study procedure consists of six steps, Table 22.
Table 22 – Study Procedure
Step Description Zone Type 1 Break the Power System into Zones of Protection - 2 Set the Protective Devices Serving All Directly Connected Loads 1 3 Set the Lowest Level Bus Main and Tie Protective Devices 2 4 Set the Bus Feeder Protective Device 3 5 Repeat Steps 3 and 4 Until Finished - 6 Develop Protective Device Setting Summary Tables -
The first step is to break the power system into zones of protection as shown in Fig. 59. The boundary for each zone is established by a protective device. Each protective device is included in two zones.
ZONE TYPE 1ZONE TYPE 1ZONE TYPE 1
P
S
5 2
5 2
5 2 5 2 5 2
Clo sed
ZONE TYPE 1 ZONE TYPE 1
ZONE TYPE 1 ZONE TYPE 1
ZONE TYPE 1
ZONE TYPE 2
ZONE TYPE 2
ZONE TYPE 3
ZONE TYPE 3
ZONE TYPE 2
ZONE TYPE 3
Fig. 59 – Zones of Protection
© 2006 EPOWERENGINEERING
86

The ABC’s of Overcurrent Coordination
The second step is to set all the protective devices in Zone Type 1. Zone Type 1 includes all directly connected loads at each voltage level in the distribution system. This includes lighting panelboards, receptacle panelboards, motor starters, capacitors, heaters and generators. The third step is to set the main protective device at the lowest distribution board. The distribution board can be a panelboard, motor control center, switchboard or switchgear. The fourth step is to set the feeder protective device serving the distribution board in step 3. The distribution board service could be from a different voltage level through a step-down transformer, or at the same voltage level through a cable. The fifth step is to repeat steps 3 and 4 until the coordination is finished. The sixth and final step is to summarize protective device settings in summary tables.
This guide covered overcurrent coordination. However, when engineers are performing comprehensive protective device coordination studies other devices such as timers, metering interfaces, DCS interfaces and other protective devices need settings specified. An improper timer setting like an improper relay setting can have catastrophic consequences. Finally, when composing study reports, always categorize the results and recommendations in terms of life safety, equipment protection and selectivity.
© 2006 EPOWERENGINEERING
87

The ABC’s of Overcurrent Coordination
_________________________________________________________________________________________________________
SECTION 7 REFERENCES_________________________________________________________________________________________________________
Recommended as Basic Engineering References
1. IEEE Std 242-2001, IEEE Recommended Practice for Protection and Coordination of Industrial and Commercial Power Systems (IEEE Buff Book)
2. IEEE Std 399-1997, IEEE Recommended Practice for Industrial and Commercial Power Systems Analysis (IEEE Brown Book)
3. IEEE Std 1015-1993, IEEE Recommended Practice for Applying Low-Voltage Circuit Breakers Used in Industrial and Commercial Power Systems (IEEE Blue Book)
4. NFPA 70, National Electrical Code, National Fire Protection Association, Quincy, Massachusetts, 2005
Recommended for Coordination Studies
5. IEEE Std C37.91-2000, IEEE Guide for Protective Relay Applications to Power Transformers
6. IEEE Std C37.95-2002, IEEE Guide for Protective Relaying of Utility-Customer Interconnections
7. IEEE Std C37.96-2000, IEEE Guide for AC Motor Protection
8. IEEE Std C37.91-2000, IEEE Guide for Protective Relay Applications to Power System Buses
9. IEEE Std C37.99-2000, IEEE Guide for the Protection of Shunt Capacitor Banks
10. IEEE Std C37.101-1983, IEEE Guide for Generator Ground Protection
11. IEEE Std C37.102-1995, IEEE Guide for AC Generator Protection
12. IEEE Std C37.108-2002, IEEE Guide for the Protection of Network Transformers
13. IEEE Std C37.109-1988, IEEE Guide for the Protection of Shunt Reactors
14. IEEE Std C37.110-1996, IEEE Guide for the Application of Current Transformers Used for Protective Relaying Purposes
15. IEEE Std C37.112-1996, IEEE Standard Inverse-Time Characteristic Equations for Overcurrent Relays
16. IEEE Std C37.113-1999, IEEE Guide for Protective Relay Applications to Transmission Lines
Recommended for Equipment Damage Curves
17. IEEE Std C57.12.59-2001, IEEE Guide for Dry-Type Transformer Through-Fault Current Duration
18. IEEE Std C57.109-1993, IEEE Guide for Liquid-Immersed Transformer Through-Fault Current Duration
19. IEEE Std 620-1996, IEEE Guide for the Presentation of Thermal Limit Curves for Squirrel Cage Induction Machines
Recommended for Equipment Selection
20. IEEE Std C37.010-1999, IEEE Application Guide for AC High-Voltage Circuit Breakers Rated on a Symmetrical Current Basis
21. UL 67 – January 12, 2000, Panelboards
22. UL 489 – March 22, 2000, Molded-Case Circuit Breakers, Molded-Case Switches, and Circuit Breaker Enclosures
© 2006 EPOWERENGINEERING
88

The ABC’s of Overcurrent Coordination
23. UL 845 – May 17, 2000, Motor Control Centers
24. UL 891 – December 23, 1998, Dead-Front Switchboards
25. UL 1066 – May 30, 1997, Low-Voltage AC and DC Power Circuit Breakers used in Enclosures
26. UL 1558 – February 25, 1999, Metal-Enclosed Low-Voltage Power Circuit Breaker Switchgear
© 2006 EPOWERENGINEERING
89


AAnnaallyyzzeerr
Published by EPOWERENGINEERING
Available at www.epowerengineering.com
The ABC’s of Overcurrent Coordination
January 2006