the action at magnuson’s drift...1 the action at magnuson’s drift a solo wargamer leads an...
TRANSCRIPT

1
The Action at Magnuson’s Drift A solo wargamer leads an Imperial column into Zulu territory
By Chris Hahn
Inspired by the content of the February 2012 issue of WARGAMES ILLUSTRATED
(specifically the piece titled “Let’s Have a Fight at Jim’s Place!”) and interested in testing out
some rule revisions found on the Warlord Games Forum, in early February of 2012, I set about
drawing up plans for my second experiment using Mr. Priestley’s popular Black Powder rules.
The Scenario
Not being an especially original fellow, I decided to stage a rather simple, straightforward
engagement. A column of Imperial infantry, accompanied by a number of ox-drawn wagons,
and supported by an artillery section, as well as Gatling gun, assisted by a few packets of
cavalry, and joined by a rather large native contingent, would be tasked with traversing the
length of the tabletop in order to reach and secure an abandoned mission/farmhouse situated near
a river crossing. Taking exception to this invasion of their territory, a large number of Zulus
would appear and contest the advance of the colonial formations.
The Terrain
Map 1 shows how my six-by-four-foot table was set up for this fictional encounter. A river
(perhaps the White Umfolozi?) runs down the right edge of the playing surface. Magnuson’s
Drift is indicated by the two pale brown hexagons. The three small abandoned buildings
representing the mission and or farmhouse complex are indicated by the gray square, located in
the center of a gentle hill (large green hexagon), to the left and a bit lower than the natural
crossing point. Numerous hills and areas of rough ground (elephant grass, crops, and patches of
scrub, brush, rocks, etc.) were scattered across an otherwise featureless expanse of ground.
The Forces
As this was not intended as a reconstruction of an actual engagement, I exercised some historical
license in putting together the opposing forces. For the British, I studied the battle report in
Black Powder (pages 152-161) as well as the Rorke’s Drift adaptation in the February issue of
WARGAMES ILLUSTRATED (pages 84-95). I also dug out my copy of THE ZULU WAR: A
Pictorial History, by Michael Barthorp. After some enjoyable hours spent drafting and tweaking
the Imperial order of battle, I decided that the core of the force or column would be six
companies of regulars. Five of these units were from the 99th Regiment; there was a single
company from the 1st Battalion of the 13th Light Infantry. Each of these “small” companies
contained 18 “figures” arranged on three trays. A company of Naval Brigade infantry (slightly
larger at 24 “figures,” completed the foot complement of the redcoats. As to support, well, I
attached a section of 7 pdr. cannon (1 “model” representing two pieces) and a half-section of
Gatling guns (1 “model” representing one piece) to the Naval Brigade detachment. The cavalry
of the force was a mixed bag. I gave Colonel Reynolds -- the imaginary commander of No. 6

2
Column -- some Light Frontier Horse (12 “figures”), a group of Native Cavalry (12 “figures,”
and a small but powerful troop of lancers (9 “figures.”) The largest brigade of the column
contained four battalions of Natal Natives. One of these units numbered 24 “figures” while the
majority counted 36 in their ranks. The largest concern of the column were the nine heavy
wagons, each one drawn by four oxen.
Appreciating the ideas of one “jazbo” (see the Warlord Games Forum, BP for the Zulu War,
December 12, 2011; and thanks to a Mr. Alex Elstone for directing me to this “gold mine”), I
listed the British regulars as “smallish” units, with an HTH factor of 4, a Shooting factor of 3, a
Morale Save of 4+, and a Stamina of just 2. The Naval Brigade detachment was given an HTH
of 5 and a Stamina of 3. I gave the Imperial infantry the specials of Steady and Stubborn.
Borrowing an additional excellent idea from “jazbo,” these six companies could deploy into
Extended Order and, if not Shaken from losses, they could use Volley Fire. The Volley Fire rule
added two more six-sided dice to the roll, but it had to be conducted while in close order (line)
formation, and was limited to a range of 15 centimeters.
Stat lines for the cavalry varied, as might be expected. The light horse and native cavalry were
listed as Marauders and Skirmishers. The lancers (of the 17th Regiment, of course!) were given
Ferocious Charge in addition to the infantry’s Stubborn quality. The HTH value of the Natal
Native Contingent battalions was 5, and their Shooting factor was 2. Their Morale Save was a
5+, and the Stamina of these “standard” units was 3. These troops were armed with rifle-
muskets (not many) along with the traditional spears and shields. The ox-drawn wagons were
categorized as unable to engage in combat. If contacted by an enemy stand, these vehicles were
considered captured or worse, destroyed.
As for the Zulu army, I used the same resources, but spent more time reviewing Chapter 2
(“Opposing Forces”) and Appendix B (Zulu Corps and Regiments in 1879) in Barthorp’s book.
Thinking that “Redcoats versus Black Shields” had a period-specific ring to it, I decided to field
a large number of unmarried and untried Zulu regiments. These would be supported by a smaller
number of experienced formations. Taking additional historical license, I decided to give
command of the Zulus to Prince Mpande, the warlike son of the former king. He would have a
staff rating of 9, and have high ratings in Aggression and Decisiveness, but normal in the
category of Independence. The subordinate commanders of the unmarried regiments would have
staff ratings of 8, and have high ratings in only the Aggression category. They would be normal
in the other two classes. The leaders of the three married or veteran regiments were also given
staff ratings of 8. They were classed as normal or medium across all command qualities.
Brigades 1 through 6: “Black Shields”
Each consisting of 4 Regiments of Zulus, numbering either 36, 48, or even 60 “figures.” Spear
and shield HTH of 6, Shooting of 1*, Morale of 5+, Stamina of 3, 4, or 5 Shooting asterisk for
thrown spears. These units will not have muskets or rifles. Range is 6 centimeters. Ferocious
Charge on first charge ONLY (HTH, Shooting, and Stamina will increase for the “large” units).

3
Brigades 7 and 8: “Red Shields”
Each consisting of 3 Regiments of Zulus, either 36 or 48 “figures.” Spear and shield; rifled-
musket HTH of 7, Shooting of 1, Morale of 4+, Stamina of 3 or 4, Superbly Drilled, Tough
Fighters.
Brigade 9: “White Shields”
2 Regiments of Zulus, each regiment numbering 36 “figures.” Spear and shield; rifled-musket
HTH of 8, Shooting of 1, Morale of 4+, Stamina of 3, Elite, Superbly Drilled, Tough Fighters
Having settled on the composition of the opposing armies (odds of five to one against the
Europeans, at least in terms of trained infantry units, seemed appropriately historical), I turned
my attention to creating a simple procedure for solo play.

4
Solo Guidelines
Map 1 shows the five entry zones reserved for the Zulu regiments. At the start of their phase of
each game turn, a 1d6 was rolled for each brigade. If the result of the roll matched the turn of
the game, then that brigade of Zulus would run onto the field. Their arrival point or zone was
determined by rolling a 20-sided die. The Zulus could opt to take a free move, or they could
chance it by rolling for orders. Once on table, the primary objective of the Zulu regiments was to
engage and inflict maximum damage upon the colonial invaders.
And the Winner is . . .
As established above, the objective of No. 6 Column was to reach Magnuson’s Drift. For each
heavy wagon within 12 cm of the river crossing by the end of game turn 10 (the determined
length of this second experiment), the British would receive 60 points. If a wagon was between
12 and 24 cm of the crossing point, then 30 points would be awarded. For each Zulu regiment in
disorder at the end of the battle, the British would earn 5 points. If a regiment was shaken, the
award went up to 20 points. If an enemy unit was broken or otherwise forced off the tabletop, 50
points would be deposited in the Imperial “bank.”
The Zulus would earn points by capturing/destroying wagons, and by destroying British units.
Each wagon, brigade commander, and unit of Regulars was worth 50 points to the Zulus. If a
unit was shaken at the conclusion of game turn 10, then the Zulus would receive 25 points. The
battalions of the Natal Native Contingent were worth just 15 points if broken by the Zulus.
Swamped by a Wave of Warriors: A Summary of the Contest
Embracing the role of the fictional Colonel Reynolds, I organized my command for its march to
Magnuson’s Drift. Diagram A shows how I arranged my infantry companies, cavalry
detachments, native contingent, and wagons. Unfortunately, I misjudged the amount of space my
units (especially the wagons) would occupy, so it took two turns before I was able to get my
entire column on the field. Fortunately, the Zulus appeared to be concentrated -- or concentrating
in one particular arrival zone, and so, created something of a traffic jam that interfered with their
present and future progress.
A mass of Zulus was sighted at the beginning of the third turn, and the alarm was raised. Oddly
enough, the units of the NNC proved more reactive to issued orders than the well-trained and
experienced Imperial troops. Two units formed a battle line on the front right of the column,
while the left hand unit wheeled in that direction so as to guard the flank and rear of the NNC.
Colonel Reynolds rode up through the halted wagons to get a better picture of what was going
on, and in a premature move, ordered the Gatling gun to be set up. A couple of weak volleys
were delivered by the NNC battalions, but these proved sufficient to knock down some Zulus
and disorder one of the regiments which was positioning itself to charge. Closing fire was issued
at the subsequently charging mass, but proved unable to stop them completely. In a savage
melee, both combatants were reduced to shaken status, but an awful break test for the NNC unit
resulted in it being fragmented and swept aside.

5
To be sure, the sudden appearance of another force of Zulus on the left of the British formation --
in proximity to the Native Cavalry -- did not bode well. Luckily, both riders and mounts were
able to escape the very real threat of being overwhelmed by four regiments of bloodthirsty Zulu
warriors. (Map 2 presents a snapshot of the state of the tabletop at the conclusion of Turn 4.)

6

7
Over the next six turns (well, five and a half), the British commander completely ignored the
attached wagons, and focused all of his attention on getting his regulars into line so that their
breech-loading rifles could be used to proper effect. When this plan worked (meaning when
orders were carried out), things went fairly well. But when units failed to respond -- especially
the Naval Brigade troops -- things got a little desperate. Fortunately, for Colonel Reynolds, the
warriors commanding the various Zulu “brigades” seemed to be having similar problems.
On the right and left of the column, the
companies of the 1st and 2nd Brigades
were pushed into close-order lines so
volley fire could be used against the
masses of warriors. The fighting grew
in intensity as more Zulus attempted to
rush and break through the “thin red
lines,” but effective volleys and
stubborn resistance with the bayonet
held them in check.
These local victories did not come
without a cost, however. Two
companies of regulars suffered pretty
severe casualties in throwing back
repeated charges. Indeed, for a few
turns on the right of the British
formation, one Zulu regiment proved
particularly resilient (or just plain stubborn -- or just very lucky) when it engaged a company of
redcoats for several turns of close combat. The British would win the melee every time, but the
Zulu warriors would always roll splendid dice for the required break test.

8
In the center of the field, or of the stalled British advance, the NNC continued to put up a
surprisingly good fight against larger numbers. Eventually, however, their morale failed, and the
survivors began to withdraw back toward the stalled Naval Brigade and the non-moving wagons.
The detachment from the 17th Lancers had been moved forward just for this reason, and in
addition to being able to provide support along the front face of the pseudo-square, were able to
deliver a charge in the last phase of the engagement that pushed back a too-close-for-comfort
regiment of Zulus.

9
Back over on the right of the column, the men of the 1st Brigade stood their ground against all
attacks. These two companies were supported only by a unit of irregular cavalry. The third
company of the brigade could not seem to find its way closer to the fighting. And the Gatling
gun proved completely useless in the local contest. Given new orders to move into a better
position and support the defensive line, the crew held on for dear life as the horses spooked and
took the gun and caisson deep into enemy lines. (The order roll for this piece of “artillery” was
blundered, and subsequent rolls dictated a charge move of three moves or 54 cm into an area
swarming with Zulus! I thought it improbable that a limbered Gatling gun would “charge” an
enemy formation, but believed it completely possible for horses to bolt. The resulting move put
the crew very near newly arriving Zulus. These regiments caught the horses and crew in their
phase of the turn and overwhelmed them.)
Despite this unusual occurrence, the Zulus were not able to mass sufficiently and then launch
irresistible attacks against selected British targets. In fact, the majority of warriors seemed
uninterested in getting “stuck in.” As the sun began to set on the miniature field, the British
column was still rather far away from its planned stopping point (Magnuson’s Drift), but it was
still intact. Granted, the NNC had been broken by Zulu attacks, but the column was still standing
and most importantly, the wagons were safe! Scores of Zulus littered the ground on the left and
right of the British position. While there was some fighting in the center, it never approached the
desperate level of the struggle on the flanks of the column.
Unable to break the British companies with fierce charges, and unable to organize his various
regiments into a more potent striking force, Prince Mpande issued orders for a general
withdrawal. The regulars of No. 6 Column did not stand down for two more hours, however.
The unit of Frontier Light Cavalry was sent out to scout, to make sure that the Zulus had
departed. A makeshift camp was set up around the wagons. Since they took no real part in the
fighting, the Naval Brigade was tasked with guarding the perimeter. Colonel Reynolds was
frustrated that his men had not reached the Drift, but he was relieved that a majority of them
would wake up tomorrow. Prince Mpande was as frustrated, if not more so. His warriors had
prevented the British from making any real progress, but a steep price had been paid.
10
Evaluation
As related in the abbreviated narrative (12 pages of notes totaling some 3,800 words were
produced while this wargame was played over six days), the British did not reach their stated
objective. A strong case could be made, therefore, for a Zulu win. Because no British wagons
made it anywhere near Magnuson’s Drift, the Zulus should receive those points. As a counter to
that position, there is the fact that not a single wagon came under direct threat from any Zulu
regiment. Furthermore, based on points earned during the 10-turn fight (technically, just nine
and a half turns; the Zulu phase of the last turn was not initiated), the British have a complete
advantage: 525 points to just 130. Nine Zulu regiments were broken, two regiments were
shaken, and one leader of a “brigade” was KIA. The British, in contrast, did not lose a single
leader. They lost two units of NNC, a Gatling gun (though I still question if I played that
blunder right), and two companies of their regular infantry were shaken as a result of prolonged
combat.
Then again, perhaps points should be taken away from the British? Since not a single wagon
was dragged within 24 cm of Magnuson’s Drift, maybe I should penalize them 270 points? Even
if I accept this, Colonel Reynolds still winds up with double the points of Prince Mpande. I
think, then, that the victory has to go to the soldiers of Queen Victoria.
Setting aside the calculations, what else can be said about the action at Magnuson’s Drift? Did I
have fun gaming the battle? Was it realistic? In my subjective opinion, what worked and what
did not?
To be candid, I did not have a great deal of fun working my way through this second experiment.
This is not to say that sitting down to the table was on par with getting a cavity fixed without
novocaine, or being forced to watch a marathon of “Life with the Kardashians,” but to remark
that, like the opposing fictional commanders, I found myself a bit frustrated as well as a little
disappointed.
Why? Well, for starters, a sizable portion of the prepared Zulu regiments never made it on to the
tabletop. For those that did, a large number of these units never managed to move themselves
into combat with the enemy. The finger points at poor dice rolling, but I wonder to what extent
poor scenario design and or solo mechanics can also be blamed.
As to realism, well, the following comments have to be prefaced by this author’s admission of
not being a recognized and highly respected expert on the Anglo-Zulu War. The adoption and
use of the volley fire rules (again, I strongly recommend interested readers check out the posts
made by “jazbo”) seemed to work very well. Zulu aggression was blunted by the cool
performance of Imperial troops commanded by NCOs and line officers. I also thought the
performance of the NNC troops was fairly representative of the historical record. To a lesser
extent, I thought the inability of the Naval Brigade detachment to follow orders detracted from
the historical “flavor” of the miniature engagement. Then again, as Colonel Reynolds, my
attention was focused in more than several different directions as Zulu regiments appeared at
several points across the front of my route of advance.

11
Indeed, though I moved my command stand forward at the start of the battle, and issued orders to
the Gatling gun crew as well as to the captain leading the lancers, I became engrossed with the
action on the left and right. I do not think I moved Colonel Reynolds and his subordinates again
after Game Turn 4.
On the other side of this “coin,” I questioned the realism of the runaway Gatling gun and crew. I
also wondered about the one regiment of veteran Zulu warriors, who -- though a safe distance
from the British -- suddenly decided to “turn around” and march the other way. The protracted
combat on the right of the British formation also gave me pause. While I understand that Zulus
are brave and fierce warriors, I was puzzled if not also a little impressed by the ability of one
regiment to stand toe-to-boot with a company of British regulars. Accepting that melees in this
period involved shooting at very close range as well as crossing spears with bayonets, it seemed
unlikely that Zulus would “stand around” and take the punishment that they did in this local
episode.
To a degree, I have already addressed -- or at least started to address -- the question about what I
think worked and what I think needs improvement. At the risk of promoting my admittedly
eccentric approach, I will say that both troops and terrain were prepared with a minimum
investment of time and funds.
Though my miniatures were/are atypical, I could easily identify which units were regulars, NNC,
or Zulus. Though my battlefield terrain was lacking in substance, I could easily tell what was a
hill, a patch of rough ground, and where the river ran.
The scenario was simple enough, and
certainly resulted in action. There was not,
despite the previously completed
manipulation of victory points, the perception
of a clear-cut winner. Perhaps I should have
continued the battle for five or seven more
turns? Given the evident inability of the
Zulus to coalesce and given the justifiable
reluctance of the British to move their
wagons while under attack, would these
additional turns have produced a more
definitive result? As the tabletop was cleared
in the middle of Game Turn 10, an absolute
answer will never by known. My hunch is
that it would have been more of the same. In
this sense, I guess there was an underlying
realism to the engagement. Shields, spears,
and naked flesh do not fare very well when
pitted against uniforms, drilled troops,
cartridge boxes, and breech-loading rifles.

12
I thought the solo mechanics sufficient for their purpose. I was not prepared, however, for the
repetition of die rolls that put four “brigades” of Zulus into one arrival zone. Perhaps I should
have re-rolled the dice, or simply moved the additional regiments to the left or right of the
indicated arrival zone? Perhaps I should have simplified the victory conditions? After all,
keeping things simple seems to be one of the foundations of the Black Powder rules.
If I were to offer a final grade for this second experiment, it would be a C-plus. Though I have
no exact rubric, I think the reasons for this slightly better than average evaluation have been
provided and supported. It is perfectly understandable that a student with a new set of rules
would be prone to errors, and even second-guess himself with this or that interpretation of a
particular situation. While I may have made a few mistakes in this recently completed battle, I
don’t think any were severe enough to affect the outcome. What is not so understandable is why
an experienced solo gamer would have so much trouble -- evidently -- with developing a decent
scenario and establishing reasonable victory conditions.
In my further experiments, I hope to increase my fluency with BP as well as address my
shortcomings in scenario design, while hoping to raise my solo wargaming grade point average.
Photos of the action
PHOTO 1: The prepared battlefield. This view is from the British table edge. Magnuson’s Drift can be
seen in the distance. The nature of the terrain (hills and rough ground) surrounding the route of march is
obvious.
13
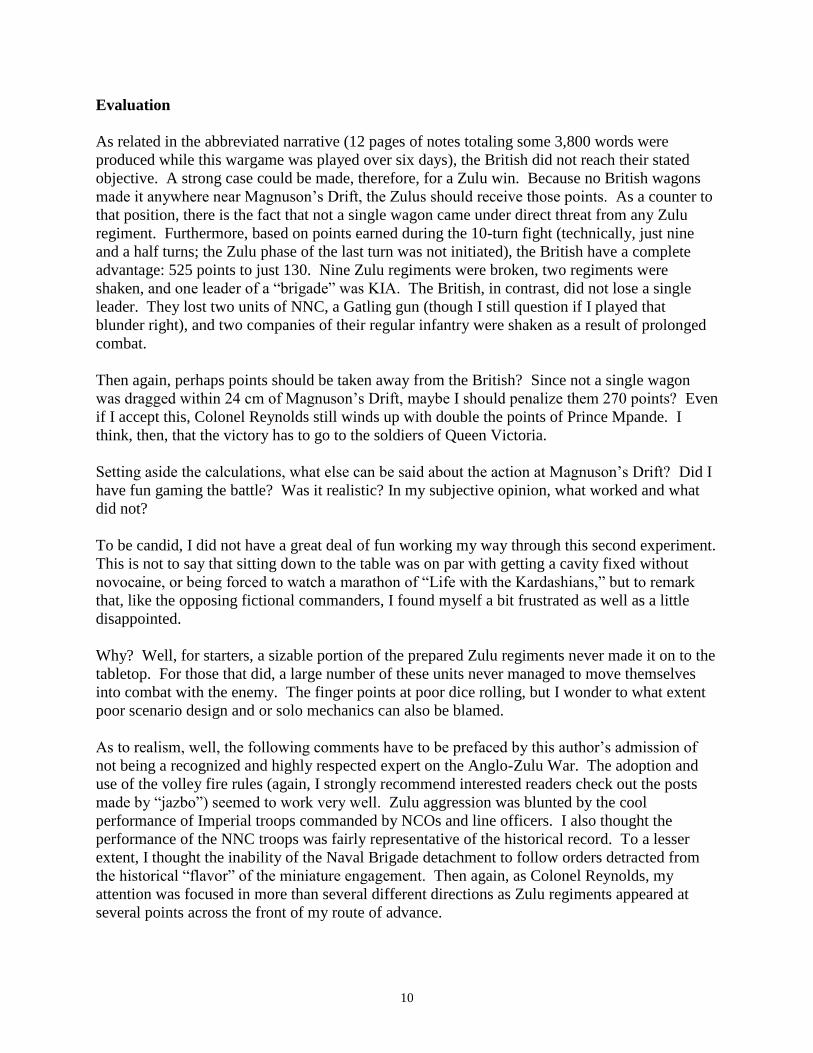
PHOTO 2: The initial set up of No. 6 Column. As depicted in Diagram A, a loose square
formation was adopted. As indicated in the text of the article, the allotted space was too small to
hold all of the wagons accompanying the column. Here, the NNC and cavalry can be seen across
the top of the square. The Naval Brigade has artillery and a Gatling gun as “bookends.” Five of
the nine wagons are on the table. Brigade stats are located on the left and right of the formation
for ease of reference and to speed play.

14
PHOTO 3: The first “brigade” of Zulus has run onto the field. Another brigade is preparing to
enter as well. The NNC (top of picture) is shifting its line in order to meet the expected advance.
The leading company of the 1st Brigade (left of photo) has deployed into line, and can just see
the mass of Zulus moving across the hill to their front. (Picture taken at the close of Turn 3.)

15
PHOTO 4: A view of the developing action, taken from the Zulu table edge. Additional
regiments have appeared on the left of the British column, forcing Colonel Reynolds to split his
attention. In the foreground, Prince Mpande and two regiments of veteran warriors have jogged
onto the field. At this point, one unit of NNC has been broken, and a second unit has been forced
back to the base of a three-tier hill on the right.

16
PHOTO 5: An aerial close-up (sorry about the lack of focus!) showing the attempt of one Zulu
“brigade” to overwhelm the “thin red line” of the 2nd Brigade. The red dots on the leading Zulu
formation indicate the number of casualties; the yellow marker indicates that the unit is
disordered.

17
PHOTO 6: Taken late in the battle, this picture shows the detachment of lancers (all mounted on
black horses) moving forward to fill the gap left by the retreating NNC. The Naval Brigade still
has not moved, but its artillery section has withdrawn to relative safety. (Oddly enough, the
cannons would never unlimber during the battle.) The two units of NNC are working their way
back through the lancers and native horse. Colonel Reynolds and his adjutant are in the lower left
of the frame.