the are and feeding of altimeters for nar ompetition – an wolf
TRANSCRIPT

The Care and Feeding of Altimeters for NAR Competition – Dan Wolf
Note: This article originally appeared in the January/February 2019 issue of Sport Rocketry magazine.
Introduction Counting NARAM-61, altimeters have been used for altitude events at six NARAMs. They are now an integral part
of the NAR US Model Rocket Sporting Code. One of the benefits of using altimeters is that altitude events can be
easily flown. That allows competitors the chance to practice and fly the NRC altitude events as much as they want.
This is in contrast to the “olden” years when optical tracking was used. Small clubs would only host meets without
altitude events because of the time and resources required for optical tracking. It was not uncommon for many
competitors to show up at NARAM having not flown an altitude event all year! So, the ability to practice and make
NRC flights in altitude events any time prior to NARAM should be a tremendous help to competitors. However, at
NARAM-60 it was clear that the competition community is not yet completely comfortable using altimeters in NAR
contests. There is even the occasional grumbling that altimeters be abandoned and the NAR revert back to optical
tracking only for altitude events in spite of the ease of use and utility of altitude with altimeters.
This purpose of this article is to provide information that will be helpful to increasing the comfort level of using
altimeters for NAR competition. To do that, first the science and theory behind altimeters will be presented.
Second, some general suggestions and tips for using altimeters in contest rockets will be suggested. Third,
information and tips on using the three most popular altimeters will be offered.
Altimeter Theory Altimeters approved for NAR competition use barometric pressure sensors to determine altitude. A barometric
sensor is a device that measures air pressure. Air pressure decreases the higher the elevation. Airplane pilots have
used barometric sensor based altimeters to determine their flight altitude for several decades. While commercial
aircraft may now use other methods, many small private aircraft still use barometric sensor based altimeters.
In 1952, the International Civil Aviation Organization (ICAO) published the ICOA Standard Atmosphere. Versions of
this standard evolved with the United States 1962 and 1976 versions of the Standard Atmosphere and the
International Standard Atmosphere. The purpose of these “standard atmospheres” was to develop a model (set of
equations) that describes the air pressure versus altitude relationship from sea level to miles above. Most of the
changes in the newer versions of these models describe the temperature - air pressure relationship more
accurately at high elevations as NASA and others realized the older models were not accurate at those higher
elevations. However, at altitudes below 2000 Km (where most NAR contest models are
flown) the pressure-altitude model has not changed much since that original 1952
publication.
If those atmospheric models have existed for so long, why haven’t we been using
altimeters since NARAM 1? The reason is that the technology to build an altimeter that
fits inside a model rocket did not exist until the 1980s. Bulky aneroid barometers were
the common type used in the 50s, 60s, and 70s. See figure 1. Besides the size, they are
also costly. The one in the figure retails for $500.
Figure 1 - A mechanical aneroid barometer.
Fortunately, small electronic pressure sensors became available starting in the 1980s and due to smartphones,
tablets, and the “Internet of Things”, air pressure sensors have now involved into highly precise instruments that
are as small as 2mm x 2mm at a cost of less than $5. Early electronic sensors and hobby altimeters had analog
outputs and required calibration. Today’s sensors are factory calibrated and have precise digital outputs. All
altimeters approved for NAR Competition today use factory calibrated digital sensors. Coupled with powerful, tiny,
low power and inexpensive microcontrollers with built in USB interfaces and today’s altimeters are the perfect
instrument for flying altitude events.
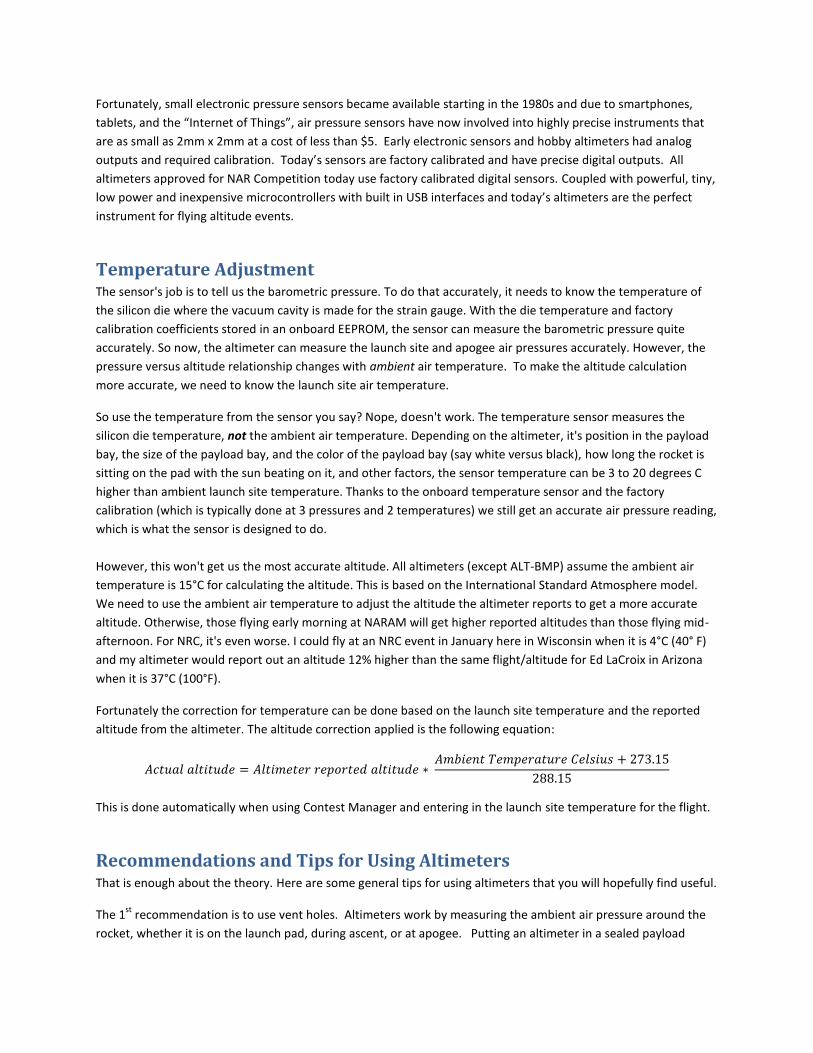
Temperature Adjustment The sensor's job is to tell us the barometric pressure. To do that accurately, it needs to know the temperature of
the silicon die where the vacuum cavity is made for the strain gauge. With the die temperature and factory
calibration coefficients stored in an onboard EEPROM, the sensor can measure the barometric pressure quite
accurately. So now, the altimeter can measure the launch site and apogee air pressures accurately. However, the
pressure versus altitude relationship changes with ambient air temperature. To make the altitude calculation
more accurate, we need to know the launch site air temperature.
So use the temperature from the sensor you say? Nope, doesn't work. The temperature sensor measures the
silicon die temperature, not the ambient air temperature. Depending on the altimeter, it's position in the payload
bay, the size of the payload bay, and the color of the payload bay (say white versus black), how long the rocket is
sitting on the pad with the sun beating on it, and other factors, the sensor temperature can be 3 to 20 degrees C
higher than ambient launch site temperature. Thanks to the onboard temperature sensor and the factory
calibration (which is typically done at 3 pressures and 2 temperatures) we still get an accurate air pressure reading,
which is what the sensor is designed to do.
However, this won't get us the most accurate altitude. All altimeters (except ALT-BMP) assume the ambient air
temperature is 15°C for calculating the altitude. This is based on the International Standard Atmosphere model.
We need to use the ambient air temperature to adjust the altitude the altimeter reports to get a more accurate
altitude. Otherwise, those flying early morning at NARAM will get higher reported altitudes than those flying mid-
afternoon. For NRC, it's even worse. I could fly at an NRC event in January here in Wisconsin when it is 4°C (40° F)
and my altimeter would report out an altitude 12% higher than the same flight/altitude for Ed LaCroix in Arizona
when it is 37°C (100°F).
Fortunately the correction for temperature can be done based on the launch site temperature and the reported
altitude from the altimeter. The altitude correction applied is the following equation:
𝐴𝑐𝑡𝑢𝑎𝑙 𝑎𝑙𝑡𝑖𝑡𝑢𝑑𝑒 = 𝐴𝑙𝑡𝑖𝑚𝑒𝑡𝑒𝑟 𝑟𝑒𝑝𝑜𝑟𝑡𝑒𝑑 𝑎𝑙𝑡𝑖𝑡𝑢𝑑𝑒 ∗ 𝐴𝑚𝑏𝑖𝑒𝑛𝑡 𝑇𝑒𝑚𝑝𝑒𝑟𝑎𝑡𝑢𝑟𝑒 𝐶𝑒𝑙𝑠𝑖𝑢𝑠 + 273.15
288.15
This is done automatically when using Contest Manager and entering in the launch site temperature for the flight.
Recommendations and Tips for Using Altimeters That is enough about the theory. Here are some general tips for using altimeters that you will hopefully find useful.
The 1st
recommendation is to use vent holes. Altimeters work by measuring the ambient air pressure around the
rocket, whether it is on the launch pad, during ascent, or at apogee. Putting an altimeter in a sealed payload

compartment will not work, because the
air pressure in the compartment will not
change if the compartment is perfectly
sealed. In reality, a model rocket
payload compartment is not perfectly
sealed. Air will leak out on the rocket’s
ascent. However, it may take it too long
to do so, and so the air pressure in the
compartment may never reach
equilibrium to the air pressure at apogee
since the rocket is not at apogee for very
long. Figure 2 is a graph of altitude for a
rocket that had two altimeters on board.
One was in a compartment with vent
holes. The other was in a non-vented
compartment. Notice how the altitude
versus time for the non-vented altimeter
lags the one with vent holes. Also notice how the peak altitude is lower for the non-vented altimeter. The rocket
was not at apogee long enough for the pressure in the non-vented compartment to equalize to the outside air
pressure. Thanks to Bernard Cawley for running this experiment and sharing the results.
The second recommendation is to keep the altimeter out of ambient light as much as possible. Some barometric
sensors are highly sensitive to light. The lid of the sensor has small vent holes so the sensor can measure the air
pressure. But those holes allow light to hit the surface of the silicon chip inside. Light hitting the chip will cause
the sensor to output “garbage data”. The best way to avoid this is to place the altimeter in the altimeter
compartment immediately after turning the altimeter on. Altimeters have a wait or “quiet” period after power up
before the sensor is sampled, just for this reason. The idea is to get the altimeter “in the dark” before it goes into
sampling mode to measure the launch site altitude.
A couple of other related notes: First, some competitors will tie the altimeter to the shock cord and place it in the
main rocket airframe with the recovery system. This works well with altimeters like the Jolly Logic Altimeter One
that have the sensor covered in the plastic housing. For other altimeters, at ejection, the altimeter will be directly
exposed to sunlight. The altimeter will get highly inaccurate readings from the sensor that will confuse the
altimeter software and result in an incorrect altitude or no altitude reported. When using this method of attaching
an altimeter, I take a small piece of index card stock and fold it over the altimeter and tape it in place. It is still
loose enough to not block the vent hole from air pressure changes, but it will keep sunlight from entering the vent
hole. Second, place the vent holes in the altimeter compartment so they do align horizontally with the sensor’s
vent holes. Third, the sensors are somewhat sensitive to shock (abrupt acceleration). This is often what causes the
“ejection spike” (Fig 4) that you may see in an altimeter data plot. You can also observe this effect by looking at the
data plot from a flight where the altimeter section is “swinging around” and sensing acceleration during
descent(Fig 3).
Figure 2 - Altitude plot from 2 identical altimeters mounted in the same rocket. Green plot is for the altimeter in a vented compartment. Red plot is for the altimeter mounted in a non-vented compartment. The air pressure in the non-vented compartm (no air holes) takes longer to equalize to ambient air pressure. It does not equalize before the rocket starts to descend, thus causing the altimeter to under report the altitude.

I have seen rockets “manhandled” by TARC teams have the altimeters false trigger during prep or when the rocket
is placed on the rail. For audio beeping altimeters such as the Perfectflite Pnut, this can be heard and the altimeter
can be reset prior to launch. Not so for the blinking LED type that is most commonly used for NAR competition. My
recommendation is to not arm the altimeter until you are at the launch pad. I usually have everything else prepped
(piston, recovery system, etc.) and then put the altimeter in the rocket at the pad. I then finish my rocket prep and
have it launch ready before the altimeter completes its quiet period. That way, the sensor is not “read” by the
onboard microcontroller until the rocket is in flight ready position.
Specific Altimeter Recommendations Here are some recommendations and usage comments for the altimeters typically used in NAR competition based
on my experiences and observations.
Altus Metrum MicroPeak Type: Recording Altimeter
Weight : 1.9 g
Size: (18mm x 14mm x 6mm)
Quiet Time: 60 seconds
Read out mode: Blinks out in decameters (tenths of a meter)
The majority of flights made at NARAM-60 used either the MicroPeak or the Perfectflite Firefly due to size, weight,
availability, and ease of use. They both use sensors from TE Connectivity (formerly Measurement Specialties). The
key difference however is that Perfectflite has a piece of black foam covering the sensor vent hole to keep ambient
light from affecting it. Altus Metrum is considering doing something similar in the future. The main thing to do
when flying the MicroPeak is take all of the precautions outlined in the general tips section above with regards to
light sensitivity. If those precautions are followed, the MicroPeak is fairly reliable. I have had a 100% success rate
using them at the past 4 NARAMs and at all of my NRC launches last year.
Figure 5 - Altus Metrum MicroPeak Altimeter
Figure 4 - The sudden shock at ejection causes the altimeter to give a false reading due to the sensitivity of the sensor to acceleration.
Figure 3 - Oscillations observed in the altimeter readings on descent are usually caused by the altimeter compartment swinging around the rocket on its shock cord.

There were a number of “no data” flights at NARAM-60 with MicroPeaks, more than with other altimeters. The
most common failure was that the altimeter was blinking rapidly when returned. Per the MicroPeak manual, this
indicates the altimeter did not sense landing. The MicroPeak software waits until it determines that the rocket has
landed before blinking out the altitude. If it does not sense that the rocket has landed, it will not blink out the
altitude but instead the LED will blink rapidly. The likely cause is that the sensor was exposed to sunlight at some
point during prep or flight. Again, if care is taken in prepping the model and the altimeter, the MicroPeak works
well. The main reason for using the MicroPeak over the Firefly is that the MicroPeak is a recording altimeter so it
can be used to set records. The Firefly cannot as it is not a recording altimeter.
One other caution for using the MicroPeak is when using the download software, make sure you are using version
1.8.6 (or later). There was a bug in prior versions that could cause the flight altitude blinked out to sometimes be
different than the altitude reported by the software. That bug was fixed in version 1.8.6.
Perfectflite Firefly Type: Apogee Only Altimeter
Weight : 3.4 g
Size: (28mm x 17mm x 8mm)
Quiet Time: 60 seconds
Readout mode: Blinks out in feet
The Firefly is the other altimeter that was widely used at NARAM-60. The reasons are small size, low cost, and the
Perfectflite reputation for quality. The Firefly has clear, heat shrink tubing wrapped around it. The tubing helps
hold in position the black foam that covers the sensor vent hole. This keeps ambient light from affecting the
altimeter while still allowing the sensor to sample the air pressure properly.
There are no specific things to be aware of when using the Firefly. I have never had an issue with any Perfectflite
altimeter. I have observed several TARC team flights using the Perfectflite Pnut. The only failures I observed from
TARC flying were false triggering prior to launch on a couple of occasions as mentioned previously. At NARAM-60,
there was one Firefly that had an issue. At the return desk, it indicated an altitude of 99,999 feet and it behaved
erratically. It may have been due to a worn out battery. The flight was considered a “No Data” flight and the
contestant was awarded a re-flight. All other Fireflys worked properly at NARAM 60 to my knowledge.
Adrel ALT-BMP Type: Recording Altimeter
Weight : 0.6 g
Size: 19.3mm x 7.9mm x 4.9mm (not inc. battery)
Quiet Time: 3 minutes default
Readout mode: Only as a download to computer, displays meters
Foam covering sensor vent hole.
The tiny
ALT-BMP
Single cell
3.7V LiPo
Battery
Figure 6 - Perfectflite Firefly Altimeter
These two
pins are
shorted
together to
reset the ALT-
BMP.
Figure 7 - The Adrel ALT-BMP alitmeter.

The ALT-BMP is a small altimeter from Poland designed and made by Adrel. It is distributed in the United States by
North Coast Rocketry. It uses a sensor from Bosch Sensortech, specifically the BMP180. Bosch sensors are made
using the proprietary Bosch process for MEMs sensors that has made them the market leader for barometric
sensors. While the ALT-BMP does not have an ambient light shield over the sensor vent hole, I have not heard of
any such issues with the ALT-BMP. However, the datasheet for the BMP180 does have this item in its mounting
and assembly recommendations section: “During operation the sensor is sensitive to light, which can influence the
accuracy of the measurement (photo current of silicon)”.
The ALT-BMP has a few differences that make it unique as compared to
the MicroPeak and Firefly. First, the MicroPeak uses an external (to the
altimeter) rechargeable Lithium Polymer (LiPo) battery. Second, the size
of the battery and the altimeter allow the ALT-BMP to fit inside a 13mm
body tube which is a huge advantage for events like 1/4A to A Altitude.
Third, the ALT-BMP does not “blink out” its altitude. Although it has an
onboard LED, it is only used for beeping out the state the ALT-BMP is in.
To get the altitude, you must download the data to a computer using the
Adrel USB adapter or “dongle”.
When the data from the ALT-BMP is downloaded, it will report out both an altitude and a temperature. That is
NOT the actual ambient temperature, but the sensor die temperature and as such, the altitude reported is not
correct. There are 2 ways to obtain the correct altitude from the downloaded data. The most straightforward way
is to enter 15°C as the temperature in the provided field. The ALT-BMP’s reported altitude will now be the same as
any other altimeter reports. Then, the temperature correction can be applied as mentioned in the theory section
above. The other way is to enter in the launch site temperature in the ALT-BMP software as the temperature. The
Adrel software will apply the temperature correction itself based on the entered temperature and no further
correction is. In summary, DO NOT use the altitude as downloaded with the temperature downloaded from the
ALT-BMP. Use one of the 2 procedures above.
Another unique thing about the ALT-BMP is how it is armed for flight. There is a five pin connector on the end of
the ALT-BMP with 3 pins on one side and 2 pins on the other. The 3 pin side connects to the battery. To arm the
ALT-BMP, you must short the 2 pins on the opposite side together (touching them at the same time with an X-acto
knife blade works).
The ALT-BMP software has a setup menu for the altimeter. The software allows certain parameters to be set. One
is the launch detect height. The default setting is 30 meters. Another is the number of samples taken per second.
The default is 15 samples per second. The USMRSC requires a minimum of 10 samples per second. A 3rd
setting is
for allowing manual reset. If the manual rest value is set to No, the altimeter can only be reset by the software
while connected to a computer. If set to Yes, then shorting the two contacts as mentioned earlier will also cause
the altimeter to be reset. The No setting is primarily used for FAI competitions. There is a setting for temperature
that should not be used and there are also additional settings used for FAI competitions. In general, the altimeter
defaults are correct for NAR competition and should not need to be changed.
One other important factor is when using the ALT-BMP is filtering. The USMRSC requires altimeters to have a filter
to reduce or eliminate noise and especially ejection spikes. All of the other altimeters discussed apply filtering to
the reported altitude automatically. The ALT-BMP does not. The filter button on the ALT-BMP app must be
Figure 8 - The ALT-BMP USB dongle. Connect with a USB cable to a computer to download the altimeter data and also to charge the LiPo battery.

pressed to do this. The specific sequence to follow is to enter the 15 as the temperature first, then click the filter
button.
The ALT-BMP takes a little more work to use than other altimeters but has an advantage in size that is of value for
some contest events. The ALT-BMP has been used exclusively in FAI competition for the last 3 World
Spacemodeling Championships. It has performed well in those events with no major issues. It is the only altimeter
that has been tested to the FAI requirements and it met all of the FAI performance specifications. It should be part
of your altimeter arsenal.
In closing, I want to mention that the Jolly Logic Altimeters were not discussed because they are not typically used
in NAR competition due to size and weight. However, I have done extensive testing and flying with the Altimeter
One and my experience is that it and other Jolly Logic altimeters are solid devices. They are the 4th
altimeter
supplier whose products are approved for NAR Contest use. I have no tips or tricks to using the Jolly Logic
Altimeters except to make sure the altimeter has been reset prior to flight.
I recommend that NAR competitors buy and try as many of the above mentioned altimeters as their time and
money allows. As always, experience is the best teacher. One fun way to do that is schedule a Record Trials and
fly a variety of altimeter events. There are a number of NAR records that are not set yet with altimeters. Over
time, I hope you enjoy and appreciate altimeters for NAR competition. Hopefully this article will help. If you have
any questions or issues with any of the altimeters mentioned, please feel free to contact me. I can be reached at