the best practices book - programmer books · the symfony framework best practices the symfony...
TRANSCRIPT
The Best Practices BookVersion: 3.3
generated on February 19, 2018
The Best Practices Book (3.3)
This work is licensed under the “Attribution-Share Alike 3.0 Unported” license (http://creativecommons.org/licenses/by-sa/3.0/).
You are free to share (to copy, distribute and transmit the work), and to remix (to adapt the work) under thefollowing conditions:
• Attribution: You must attribute the work in the manner specified by the author or licensor (but not inany way that suggests that they endorse you or your use of the work).
• Share Alike: If you alter, transform, or build upon this work, you may distribute the resulting work onlyunder the same, similar or a compatible license. For any reuse or distribution, you must make clear toothers the license terms of this work.
The information in this book is distributed on an “as is” basis, without warranty. Although every precautionhas been taken in the preparation of this work, neither the author(s) nor SensioLabs shall have any liability toany person or entity with respect to any loss or damage caused or alleged to be caused directly or indirectly bythe information contained in this work.
If you find typos or errors, feel free to report them by creating a ticket on the Symfony ticketing system(http://github.com/symfony/symfony-docs/issues). Based on tickets and users feedback, this book iscontinuously updated.
Contents at a Glance
The Symfony Framework Best Practices...............................................................................................4Creating the Project ............................................................................................................................6Configuration .....................................................................................................................................9Organizing Your Business Logic ........................................................................................................13Controllers .......................................................................................................................................19Templates.........................................................................................................................................23Forms...............................................................................................................................................26Internationalization...........................................................................................................................30Security ............................................................................................................................................32Web Assets .......................................................................................................................................38Tests.................................................................................................................................................40
PDF brought to you by
generated on February 19, 2018
Contents at a Glance | iii
Chapter 1
The Symfony Framework Best Practices
The Symfony Framework is well-known for being really flexible and is used to build micro-sites,enterprise applications that handle billions of connections and even as the basis for other frameworks.Since its release in July 2011, the community has learned a lot about what's possible and how to do thingsbest.
These community resources - like blog posts or presentations - have created an unofficial set ofrecommendations for developing Symfony applications. Unfortunately, a lot of these recommendationsare unneeded for web applications. Much of the time, they unnecessarily overcomplicate things and don'tfollow the original pragmatic philosophy of Symfony.
What is this Guide About?This guide aims to fix that by describing the best practices for developing web apps with the Symfonyfull-stack Framework. These are best practices that fit the philosophy of the framework as envisionedby its original creator Fabien Potencier1.
Best practice is a noun that means "a well defined procedure that is known to produce near-optimumresults". And that's exactly what this guide aims to provide. Even if you don't agree with everyrecommendation, we believe these will help you build great applications with less complexity.
This guide is specially suited for:
• Websites and web applications developed with the full-stack Symfony Framework.
For other situations, this guide might be a good starting point that you can then extend and fit to yourspecific needs:
• Bundles shared publicly to the Symfony community;• Advanced developers or teams who have created their own standards;• Some complex applications that have highly customized requirements;• Bundles that may be shared internally within a company.
1. https://connect.sensiolabs.com/profile/fabpot
PDF brought to you by
generated on February 19, 2018
Chapter 1: The Symfony Framework Best Practices | 4
Listing 1-1
We know that old habits die hard and some of you will be shocked by some of these best practices. Butby following these, you'll be able to develop apps faster, with less complexity and with the same or evenhigher quality. It's also a moving target that will continue to improve.
Keep in mind that these are optional recommendations that you and your team may or may notfollow to develop Symfony applications. If you want to continue using your own best practices andmethodologies, you can of course do it. Symfony is flexible enough to adapt to your needs. That willnever change.
Who this Book Is for (Hint: It's not a Tutorial)Any Symfony developer, whether you are an expert or a newcomer, can read this guide. But since thisisn't a tutorial, you'll need some basic knowledge of Symfony to follow everything. If you are totally newto Symfony, welcome! Start with The Quick Tour tutorial first.
We've deliberately kept this guide short. We won't repeat explanations that you can find in the vastSymfony documentation, like discussions about Dependency Injection or front controllers. We'll solelyfocus on explaining how to do what you already know.
The ApplicationIn addition to this guide, a sample application has been developed with all these best practices in mind.This project, called the Symfony Demo application, can be obtained through the Symfony Installer. First,download and install2 the installer and then execute this command to download the demo application:
1 $ symfony demo
The demo application is a simple blog engine, because that will allow us to focus on the Symfonyconcepts and features without getting buried in difficult implementation details. Instead of developingthe application step by step in this guide, you'll find selected snippets of code through the chapters.
Don't Update Your Existing ApplicationsAfter reading this handbook, some of you may be considering refactoring your existing Symfonyapplications. Our recommendation is sound and clear: you should not refactor your existingapplications to comply with these best practices. The reasons for not doing it are various:
• Your existing applications are not wrong, they just follow another set of guidelines;• A full codebase refactorization is prone to introduce errors in your applications;• The amount of work spent on this could be better dedicated to improving your tests or adding
features that provide real value to the end users.
Next: Creating the Project
2. https://symfony.com/download
PDF brought to you by
generated on February 19, 2018
Chapter 1: The Symfony Framework Best Practices | 5
Listing 2-1
Chapter 2
Creating the Project
Installing Symfony
In the past, Symfony projects were created with Composer1, the dependency manager for PHPapplications. However, the current recommendation is to use the Symfony Installer, which has to beinstalled before creating your first project.
Use the Symfony Installer to create new Symfony-based projects.
Read the Installing & Setting up the Symfony Framework article learn how to install and use the SymfonyInstaller.
Creating the Blog ApplicationNow that everything is correctly set up, you can create a new project based on Symfony. In yourcommand console, browse to a directory where you have permission to create files and execute thefollowing commands:
123456
$ cd projects/$ symfony new blog
# Windowsc:\> cd projects/c:\projects\> php symfony new blog
If the installer doesn't work for you or doesn't output anything, make sure that the Phar extension2 isinstalled and enabled on your computer.
1. https://getcomposer.org/
2. http://php.net/manual/en/intro.phar.php
PDF brought to you by
generated on February 19, 2018
Chapter 2: Creating the Project | 6
Listing 2-2
This command creates a new directory called blog that contains a fresh new project based on themost recent stable Symfony version available. In addition, the installer checks if your system meets thetechnical requirements to execute Symfony applications. If not, you'll see the list of changes needed tomeet those requirements.
Symfony releases are digitally signed for security reasons. If you want to verify the integrity of yourSymfony installation, take a look at the public checksums repository3 and follow these steps4 to verifythe signatures.
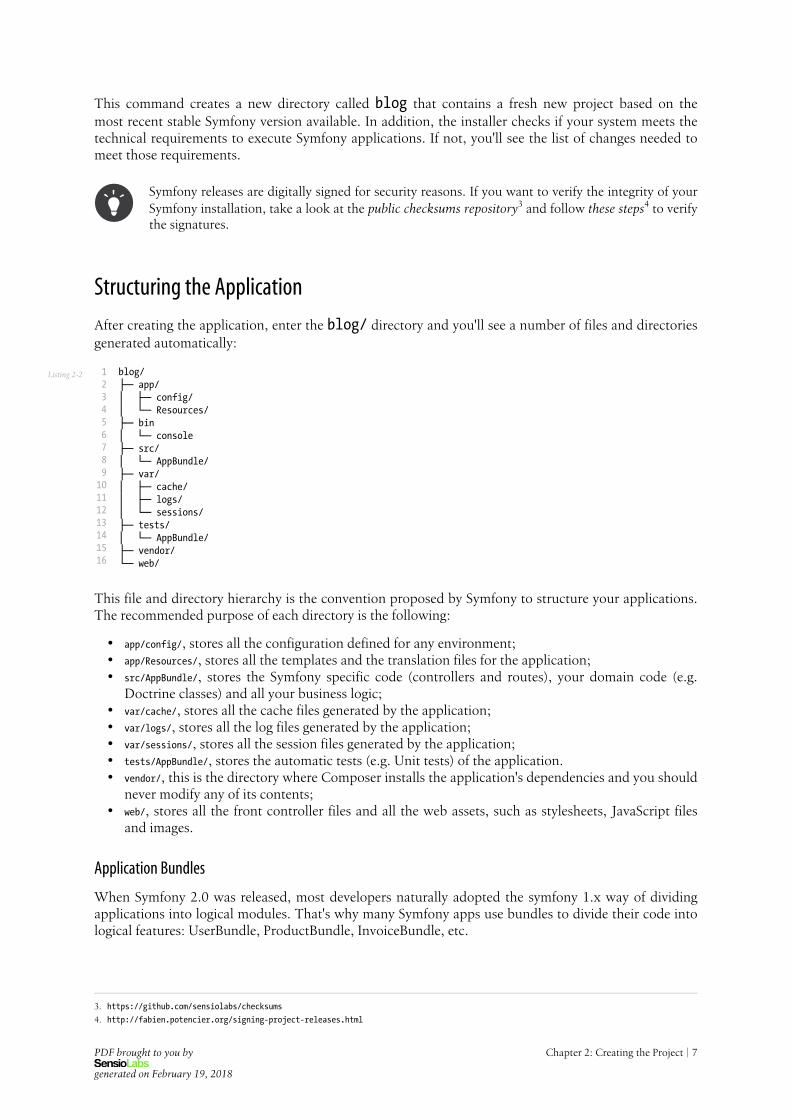
Structuring the Application
After creating the application, enter the blog/ directory and you'll see a number of files and directoriesgenerated automatically:
12345678910111213141516
blog/├─ app/│ ├─ config/│ └─ Resources/├─ bin│ └─ console├─ src/│ └─ AppBundle/├─ var/│ ├─ cache/│ ├─ logs/│ └─ sessions/├─ tests/│ └─ AppBundle/├─ vendor/└─ web/
This file and directory hierarchy is the convention proposed by Symfony to structure your applications.The recommended purpose of each directory is the following:
• app/config/, stores all the configuration defined for any environment;• app/Resources/, stores all the templates and the translation files for the application;• src/AppBundle/, stores the Symfony specific code (controllers and routes), your domain code (e.g.
Doctrine classes) and all your business logic;• var/cache/, stores all the cache files generated by the application;• var/logs/, stores all the log files generated by the application;• var/sessions/, stores all the session files generated by the application;• tests/AppBundle/, stores the automatic tests (e.g. Unit tests) of the application.• vendor/, this is the directory where Composer installs the application's dependencies and you should
never modify any of its contents;• web/, stores all the front controller files and all the web assets, such as stylesheets, JavaScript files
and images.
Application Bundles
When Symfony 2.0 was released, most developers naturally adopted the symfony 1.x way of dividingapplications into logical modules. That's why many Symfony apps use bundles to divide their code intological features: UserBundle, ProductBundle, InvoiceBundle, etc.
3. https://github.com/sensiolabs/checksums
4. http://fabien.potencier.org/signing-project-releases.html
PDF brought to you by
generated on February 19, 2018
Chapter 2: Creating the Project | 7
Listing 2-3
Listing 2-4
But a bundle is meant to be something that can be reused as a stand-alone piece of software. IfUserBundle cannot be used "as is" in other Symfony apps, then it shouldn't be its own bundle. Moreover,if InvoiceBundle depends on ProductBundle, then there's no advantage to having two separate bundles.
Create only one bundle called AppBundle for your application logic.
Implementing a single AppBundle bundle in your projects will make your code more concise and easierto understand.
There is no need to prefix the AppBundle with your own vendor (e.g. AcmeAppBundle), becausethis application bundle is never going to be shared.
Another reason to create a new bundle is when you're overriding something in a vendor's bundle(e.g. a controller). See How to Use Bundle Inheritance to Override Parts of a Bundle.
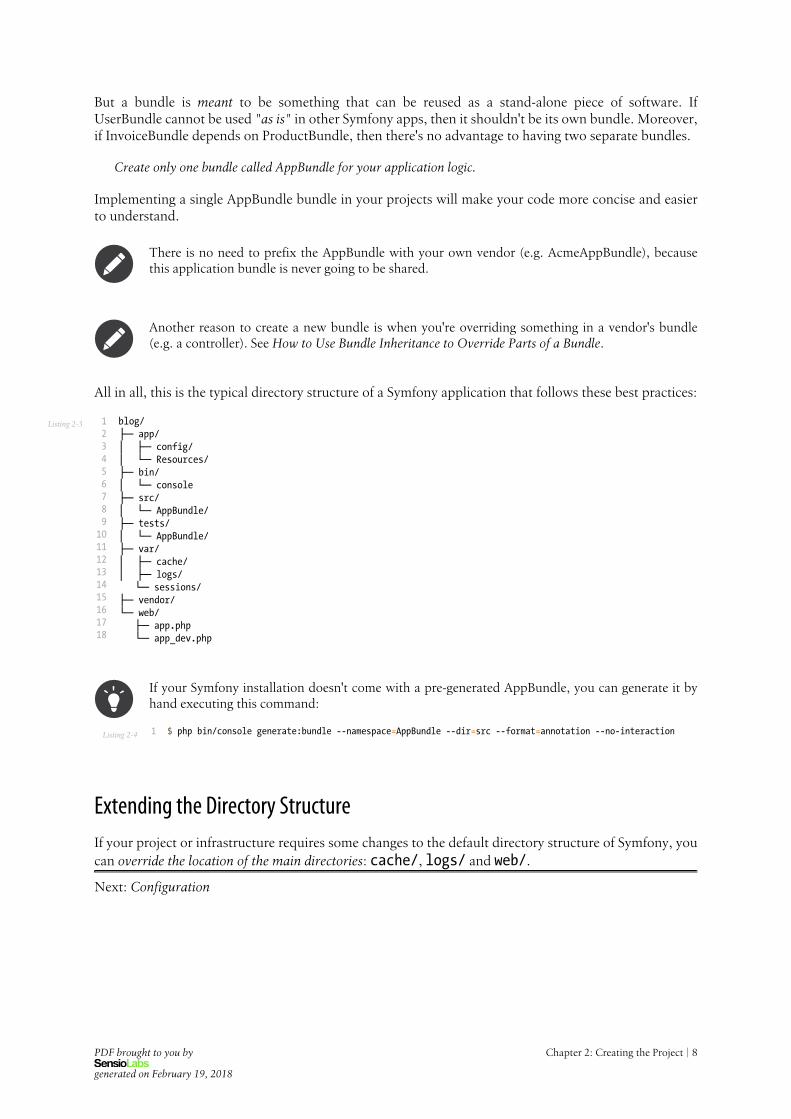
All in all, this is the typical directory structure of a Symfony application that follows these best practices:
123456789101112131415161718
blog/├─ app/│ ├─ config/│ └─ Resources/├─ bin/│ └─ console├─ src/│ └─ AppBundle/├─ tests/│ └─ AppBundle/├─ var/│ ├─ cache/│ ├─ logs/└─ sessions/
├─ vendor/└─ web/├─ app.php└─ app_dev.php
If your Symfony installation doesn't come with a pre-generated AppBundle, you can generate it byhand executing this command:
1 $ php bin/console generate:bundle --namespace=AppBundle --dir=src --format=annotation --no-interaction
Extending the Directory StructureIf your project or infrastructure requires some changes to the default directory structure of Symfony, youcan override the location of the main directories: cache/, logs/ and web/.
Next: Configuration
PDF brought to you by
generated on February 19, 2018
Chapter 2: Creating the Project | 8

Listing 3-1
Chapter 3
Configuration
Configuration usually involves different application parts (such as infrastructure and security credentials)and different environments (development, production). That's why Symfony recommends that you splitthe application configuration into three parts.
Infrastructure-Related Configuration
Define the infrastructure-related configuration options in the app/config/parameters.yml file.
The default parameters.yml file follows this recommendation and defines the options related to thedatabase and mail server infrastructure:
123456789101112131415
# app/config/parameters.ymlparameters:
database_driver: pdo_mysqldatabase_host: 127.0.0.1database_port: ~database_name: symfonydatabase_user: rootdatabase_password: ~
mailer_transport: smtpmailer_host: 127.0.0.1mailer_user: ~mailer_password: ~
# ...
These options aren't defined inside the app/config/config.yml file because they have nothing to dowith the application's behavior. In other words, your application doesn't care about the location of yourdatabase or the credentials to access to it, as long as the database is correctly configured.
Canonical Parameters
PDF brought to you by
generated on February 19, 2018
Chapter 3: Configuration | 9
Listing 3-2
Listing 3-3
Define all your application's parameters in the app/config/parameters.yml.dist file.
Symfony includes a configuration file called parameters.yml.dist, which stores the canonical list ofconfiguration parameters for the application.
Whenever a new configuration parameter is defined for the application, you should also add it to thisfile and submit the changes to your version control system. Then, whenever a developer updates theproject or deploys it to a server, Symfony will check if there is any difference between the canonicalparameters.yml.dist file and your local parameters.yml file. If there is a difference, Symfonywill ask you to provide a value for the new parameter and it will add it to your local parameters.ymlfile.
Application-Related Configuration
Define the application behavior related configuration options in the app/config/config.yml file.
The config.yml file contains the options used by the application to modify its behavior, such as thesender of email notifications, or the enabled feature toggles1. Defining these values in parameters.ymlfile would add an extra layer of configuration that's not needed because you don't need or want theseconfiguration values to change on each server.
The configuration options defined in the config.yml file usually vary from one environment to another.That's why Symfony already includes app/config/config_dev.yml and app/config/config_prod.yml files so that you can override specific values for each environment.
Constants vs Configuration Options
One of the most common errors when defining application configuration is to create new options forvalues that never change, such as the number of items for paginated results.
Use constants to define configuration options that rarely change.
The traditional approach for defining configuration options has caused many Symfony apps to includean option like the following, which would be used to control the number of posts to display on the bloghomepage:
123
# app/config/config.ymlparameters:
homepage.num_items: 10
If you've done something like this in the past, it's likely that you've in fact never actually needed to changethat value. Creating a configuration option for a value that you are never going to configure just isn'tnecessary. Our recommendation is to define these values as constants in your application. You could, forexample, define a NUM_ITEMS constant in the Post entity:
1234567
// src/AppBundle/Entity/Post.phpnamespace AppBundle\Entity;
class Post{
const NUM_ITEMS = 10;
1. https://en.wikipedia.org/wiki/Feature_toggle
PDF brought to you by
generated on February 19, 2018
Chapter 3: Configuration | 10
Listing 3-4
Listing 3-5
Listing 3-6
89
// ...}
The main advantage of defining constants is that you can use their values everywhere in your application.When using parameters, they are only available from places with access to the Symfony container.
Constants can be used for example in your Twig templates thanks to the constant() function2:
123
<p>Displaying the {{ constant('NUM_ITEMS', post) }} most recent results.
</p>
And Doctrine entities and repositories can now easily access these values, whereas they cannot access thecontainer parameters:
123456789101112
namespace AppBundle\Repository;
use Doctrine\ORM\EntityRepository;use AppBundle\Entity\Post;
class PostRepository extends EntityRepository{
public function findLatest($limit = Post::NUM_ITEMS){
// ...}
}
The only notable disadvantage of using constants for this kind of configuration values is that you cannotredefine them easily in your tests.
Parameter Naming
The name of your configuration parameters should be as short as possible and should include a common prefixfor the entire application.
Using app. as the prefix of your parameters is a common practice to avoid collisions with Symfony andthird-party bundles/libraries parameters. Then, use just one or two words to describe the purpose of theparameter:
12345678910
# app/config/config.ymlparameters:
# don't do this: 'dir' is too generic and it doesn't convey any meaningapp.dir: '...'# do this: short but easy to understand namesapp.contents_dir: '...'# it's OK to use dots, underscores, dashes or nothing, but always# be consistent and use the same format for all the parametersapp.dir.contents: '...'app.contents-dir: '...'
Semantic Configuration: Don't Do It
Don't define a semantic dependency injection configuration for your bundles.
2. http://twig.sensiolabs.org/doc/functions/constant.html
PDF brought to you by
generated on February 19, 2018
Chapter 3: Configuration | 11
Listing 3-7
As explained in How to Load Service Configuration inside a Bundle article, Symfony bundles have twochoices on how to handle configuration: normal service configuration through the services.yml fileand semantic configuration through a special *Extension class.
Although semantic configuration is much more powerful and provides nice features such as configurationvalidation, the amount of work needed to define that configuration isn't worth it for bundles that aren'tmeant to be shared as third-party bundles.
Moving Sensitive Options Outside of Symfony EntirelyWhen dealing with sensitive options, like database credentials, we also recommend that you store themoutside the Symfony project and make them available through environment variables:
12345
# app/config/config.ymldoctrine:
dbal:# ...password: "%env(DB_PASSWORD)%"
New in version 3.2: Support for runtime environment variables via the %env(...)% syntax was added inSymfony 3.2. Prior to version 3.2, you needed to use the special SYMFONY__ variables.
Next: Organizing Your Business Logic
PDF brought to you by
generated on February 19, 2018
Chapter 3: Configuration | 12
Listing 4-1
Listing 4-2
Chapter 4
Organizing Your Business Logic
In computer software, business logic or domain logic is "the part of the program that encodes the real-world business rules that determine how data can be created, displayed, stored, and changed" (read fulldefinition1).
In Symfony applications, business logic is all the custom code you write for your app that's not specific tothe framework (e.g. routing and controllers). Domain classes, Doctrine entities and regular PHP classesthat are used as services are good examples of business logic.
For most projects, you should store everything inside the AppBundle. Inside here, you can createwhatever directories you want to organize things:
12345678910
symfony-project/├─ app/├─ src/│ └─ AppBundle/│ └─ Utils/│ └─ MyClass.php├─ tests/├─ var/├─ vendor/└─ web/
Storing Classes Outside of the Bundle?But there's no technical reason for putting business logic inside of a bundle. If you like, you can createyour own namespace inside the src/ directory and put things there:
12345678
symfony-project/├─ app/├─ src/│ ├─ Acme/│ │ └─ Utils/│ │ └─ MyClass.php│ └─ AppBundle/├─ tests/
1. https://en.wikipedia.org/wiki/Business_logic
PDF brought to you by
generated on February 19, 2018
Chapter 4: Organizing Your Business Logic | 13

Listing 4-3
Listing 4-4
Listing 4-5
91011
├─ var/├─ vendor/└─ web/
The recommended approach of using the AppBundle/ directory is for simplicity. If you're advancedenough to know what needs to live in a bundle and what can live outside of one, then feel free to dothat.
Services: Naming and FormatThe blog application needs a utility that can transform a post title (e.g. "Hello World") into a slug (e.g."hello-world"). The slug will be used as part of the post URL.
Let's create a new Slugger class inside src/AppBundle/Utils/ and add the following slugify()method:
123456789101112
// src/AppBundle/Utils/Slugger.phpnamespace AppBundle\Utils;
class Slugger{
public function slugify($string){
return preg_replace('/[^a-z0-9]/', '-', strtolower(trim(strip_tags($string)))
);}
}
Next, define a new service for that class.
1234567
# app/config/services.ymlservices:
# ...
# use the fully-qualified class name as the service idAppBundle\Utils\Slugger:
public: false
If you're using the default services.yml configuration, the class is auto-registered as a service.
Traditionally, the naming convention for a service was a short, but unique snake case key - e.g.app.utils.slugger. But for most services, you should now use the class name.
The id of your application's services should be equal to their class name, except when you have multipleservices configured for the same class (in that case, use a snake case id).
Now you can use the custom slugger in any controller class, such as the AdminController:
123456
use AppBundle\Utils\Slugger;
public function createAction(Request $request, Slugger $slugger){
// ...
PDF brought to you by
generated on February 19, 2018
Chapter 4: Organizing Your Business Logic | 14
Listing 4-6
7891011121314151617
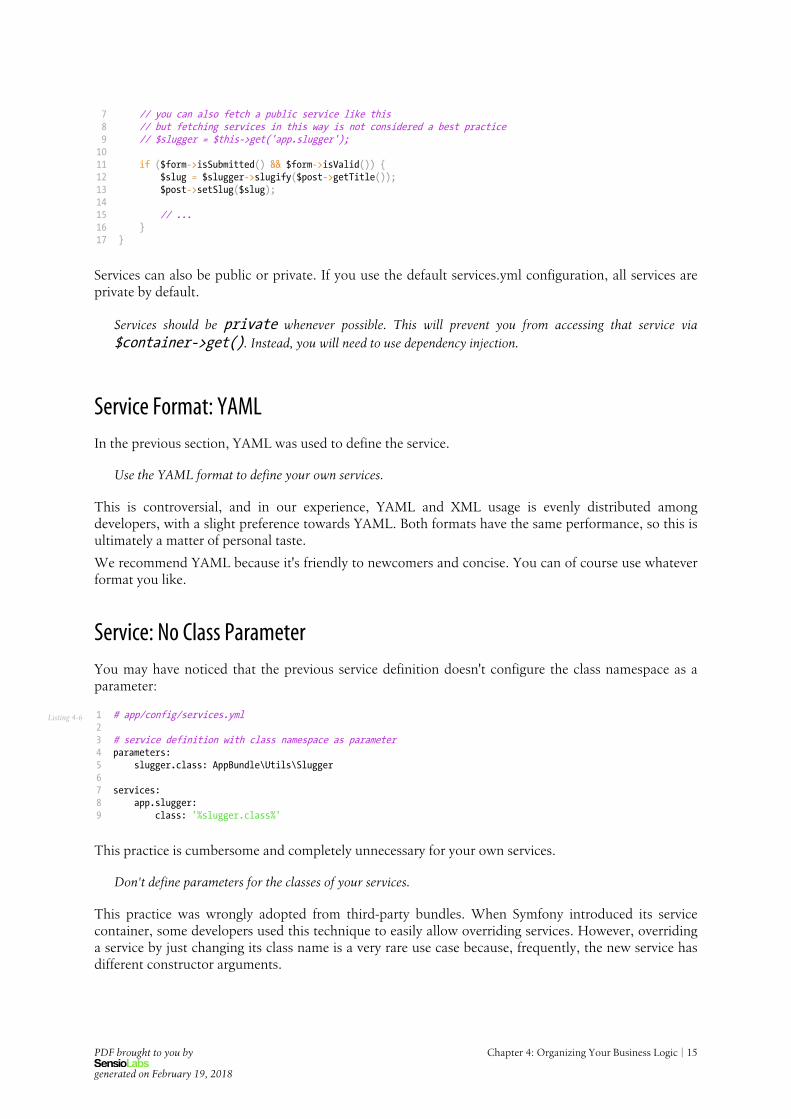
// you can also fetch a public service like this// but fetching services in this way is not considered a best practice// $slugger = $this->get('app.slugger');
if ($form->isSubmitted() && $form->isValid()) {$slug = $slugger->slugify($post->getTitle());$post->setSlug($slug);
// ...}
}
Services can also be public or private. If you use the default services.yml configuration, all services areprivate by default.
Services should be private whenever possible. This will prevent you from accessing that service via$container->get(). Instead, you will need to use dependency injection.
Service Format: YAMLIn the previous section, YAML was used to define the service.
Use the YAML format to define your own services.
This is controversial, and in our experience, YAML and XML usage is evenly distributed amongdevelopers, with a slight preference towards YAML. Both formats have the same performance, so this isultimately a matter of personal taste.
We recommend YAML because it's friendly to newcomers and concise. You can of course use whateverformat you like.
Service: No Class ParameterYou may have noticed that the previous service definition doesn't configure the class namespace as aparameter:
123456789
# app/config/services.yml
# service definition with class namespace as parameterparameters:
slugger.class: AppBundle\Utils\Slugger
services:app.slugger:
class: '%slugger.class%'
This practice is cumbersome and completely unnecessary for your own services.
Don't define parameters for the classes of your services.
This practice was wrongly adopted from third-party bundles. When Symfony introduced its servicecontainer, some developers used this technique to easily allow overriding services. However, overridinga service by just changing its class name is a very rare use case because, frequently, the new service hasdifferent constructor arguments.
PDF brought to you by
generated on February 19, 2018
Chapter 4: Organizing Your Business Logic | 15
Listing 4-7
Listing 4-8
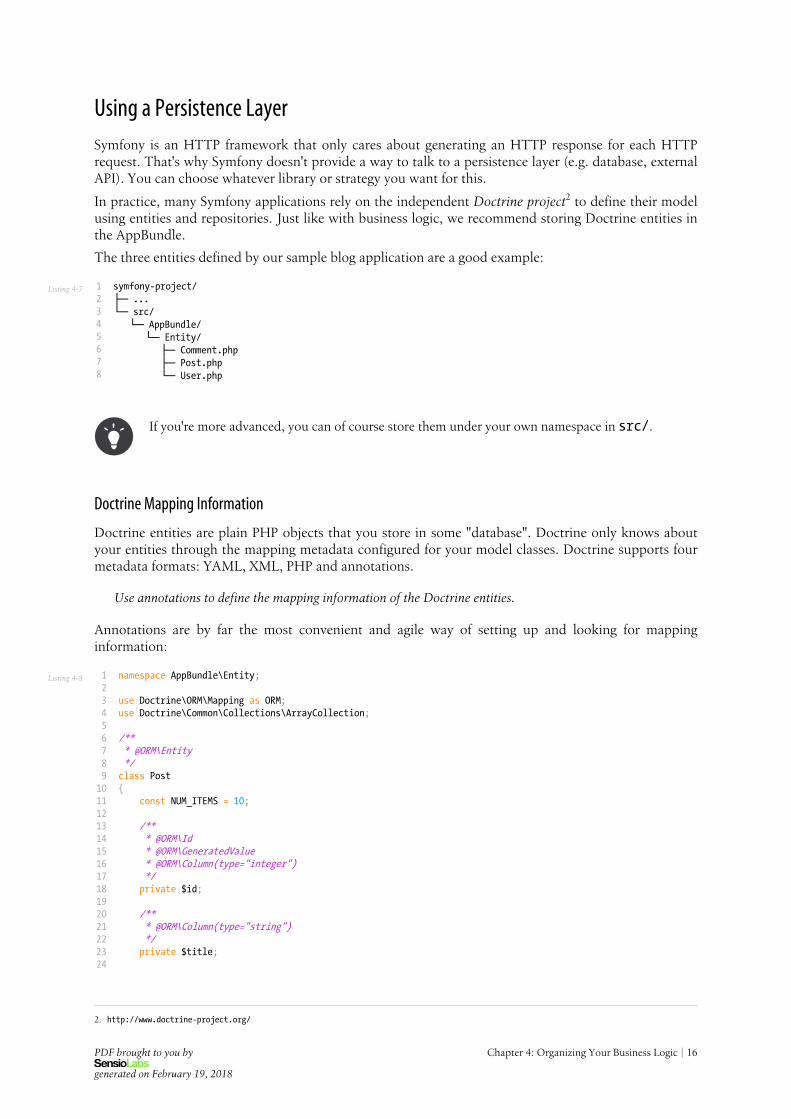
Using a Persistence LayerSymfony is an HTTP framework that only cares about generating an HTTP response for each HTTPrequest. That's why Symfony doesn't provide a way to talk to a persistence layer (e.g. database, externalAPI). You can choose whatever library or strategy you want for this.
In practice, many Symfony applications rely on the independent Doctrine project2 to define their modelusing entities and repositories. Just like with business logic, we recommend storing Doctrine entities inthe AppBundle.
The three entities defined by our sample blog application are a good example:
12345678
symfony-project/├─ ...└─ src/└─ AppBundle/└─ Entity/├─ Comment.php├─ Post.php└─ User.php
If you're more advanced, you can of course store them under your own namespace in src/.
Doctrine Mapping Information
Doctrine entities are plain PHP objects that you store in some "database". Doctrine only knows aboutyour entities through the mapping metadata configured for your model classes. Doctrine supports fourmetadata formats: YAML, XML, PHP and annotations.
Use annotations to define the mapping information of the Doctrine entities.
Annotations are by far the most convenient and agile way of setting up and looking for mappinginformation:
123456789101112131415161718192021222324
namespace AppBundle\Entity;
use Doctrine\ORM\Mapping as ORM;use Doctrine\Common\Collections\ArrayCollection;
/*** @ORM\Entity*/class Post{
const NUM_ITEMS = 10;
/*** @ORM\Id* @ORM\GeneratedValue* @ORM\Column(type="integer")*/private $id;
/*** @ORM\Column(type="string")*/private $title;
2. http://www.doctrine-project.org/
PDF brought to you by
generated on February 19, 2018
Chapter 4: Organizing Your Business Logic | 16
Listing 4-9
Listing 4-10
2526272829303132333435363738394041424344454647484950515253545556575859606162
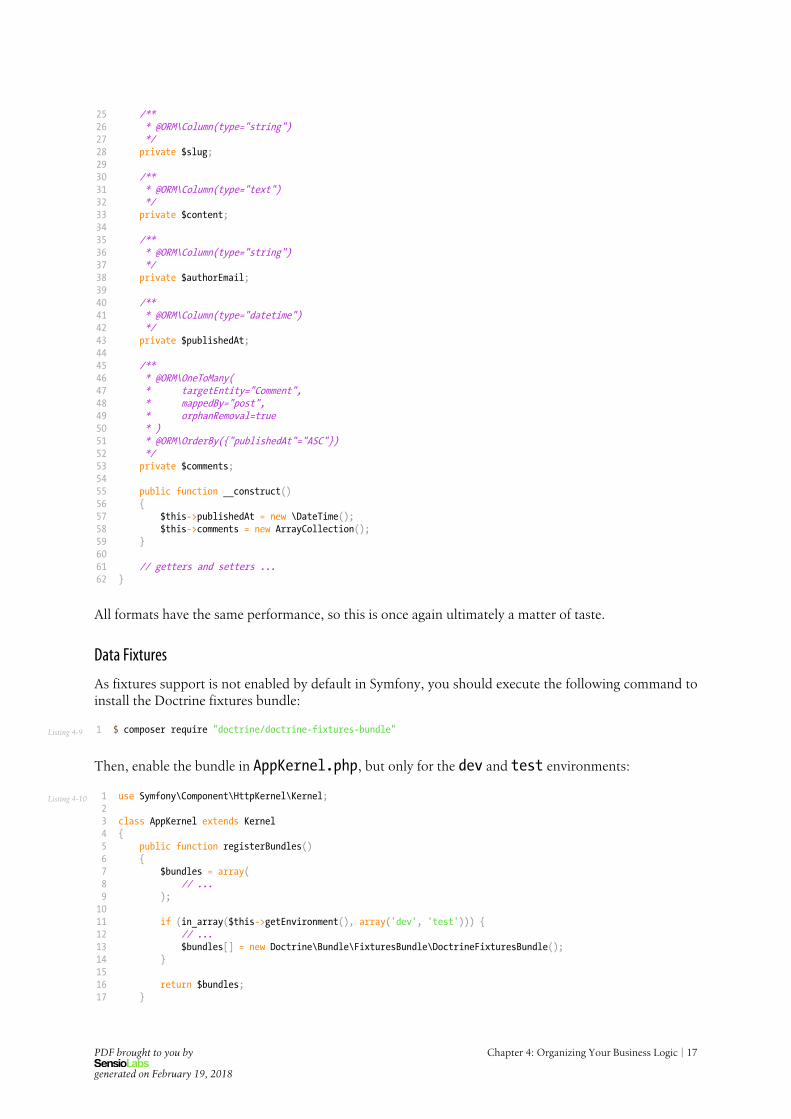
/*** @ORM\Column(type="string")*/private $slug;
/*** @ORM\Column(type="text")*/private $content;
/*** @ORM\Column(type="string")*/private $authorEmail;
/*** @ORM\Column(type="datetime")*/private $publishedAt;
/*** @ORM\OneToMany(* targetEntity="Comment",* mappedBy="post",* orphanRemoval=true* )* @ORM\OrderBy({"publishedAt"="ASC"})*/private $comments;
public function __construct(){
$this->publishedAt = new \DateTime();$this->comments = new ArrayCollection();
}
// getters and setters ...}
All formats have the same performance, so this is once again ultimately a matter of taste.
Data Fixtures
As fixtures support is not enabled by default in Symfony, you should execute the following command toinstall the Doctrine fixtures bundle:
1 $ composer require "doctrine/doctrine-fixtures-bundle"
Then, enable the bundle in AppKernel.php, but only for the dev and test environments:
1234567891011121314151617
use Symfony\Component\HttpKernel\Kernel;
class AppKernel extends Kernel{
public function registerBundles(){
$bundles = array(// ...
);
if (in_array($this->getEnvironment(), array('dev', 'test'))) {// ...$bundles[] = new Doctrine\Bundle\FixturesBundle\DoctrineFixturesBundle();
}
return $bundles;}
PDF brought to you by
generated on February 19, 2018
Chapter 4: Organizing Your Business Logic | 17
Listing 4-11
181920
// ...}
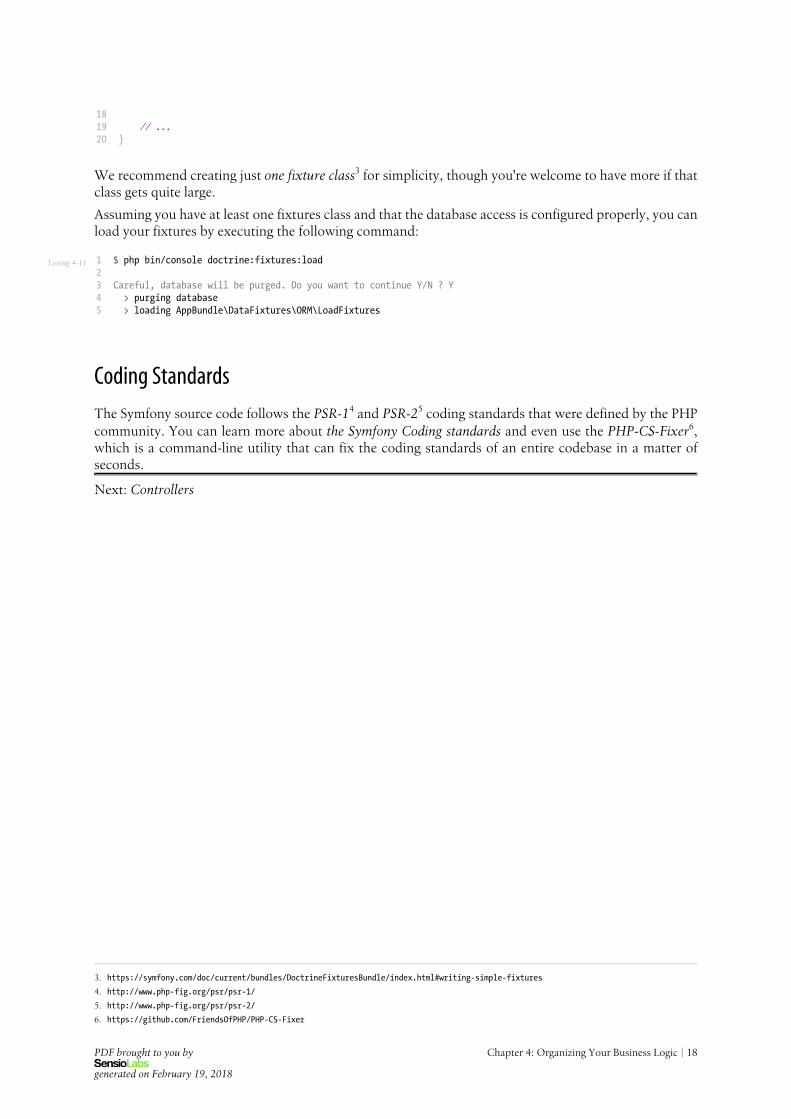
We recommend creating just one fixture class3 for simplicity, though you're welcome to have more if thatclass gets quite large.
Assuming you have at least one fixtures class and that the database access is configured properly, you canload your fixtures by executing the following command:
12345
$ php bin/console doctrine:fixtures:load
Careful, database will be purged. Do you want to continue Y/N ? Y> purging database> loading AppBundle\DataFixtures\ORM\LoadFixtures
Coding Standards
The Symfony source code follows the PSR-14 and PSR-25 coding standards that were defined by the PHPcommunity. You can learn more about the Symfony Coding standards and even use the PHP-CS-Fixer6,which is a command-line utility that can fix the coding standards of an entire codebase in a matter ofseconds.
Next: Controllers
3. https://symfony.com/doc/current/bundles/DoctrineFixturesBundle/index.html#writing-simple-fixtures
4. http://www.php-fig.org/psr/psr-1/
5. http://www.php-fig.org/psr/psr-2/
6. https://github.com/FriendsOfPHP/PHP-CS-Fixer
PDF brought to you by
generated on February 19, 2018
Chapter 4: Organizing Your Business Logic | 18

Listing 5-1
Chapter 5
Controllers
Symfony follows the philosophy of "thin controllers and fat models". This means that controllers shouldhold just the thin layer of glue-code needed to coordinate the different parts of the application.
As a rule of thumb, you should follow the 5-10-20 rule, where controllers should only define 5 variablesor less, contain 10 actions or less and include 20 lines of code or less in each action. This isn't an exactscience, but it should help you realize when code should be refactored out of the controller and into aservice.
Make your controller extend the FrameworkBundle base controller and use annotations to configure routing,caching and security whenever possible.
Coupling the controllers to the underlying framework allows you to leverage all of its features andincreases your productivity.
And since your controllers should be thin and contain nothing more than a few lines of glue-code,spending hours trying to decouple them from your framework doesn't benefit you in the long run. Theamount of time wasted isn't worth the benefit.
In addition, using annotations for routing, caching and security simplifies configuration. You don't needto browse tens of files created with different formats (YAML, XML, PHP): all the configuration is justwhere you need it and it only uses one format.
Overall, this means you should aggressively decouple your business logic from the framework while, atthe same time, aggressively coupling your controllers and routing to the framework in order to get themost out of it.
Routing ConfigurationTo load routes defined as annotations in your controllers, add the following configuration to the mainrouting configuration file:
1234
# app/config/routing.ymlapp:
resource: '@AppBundle/Controller/'type: annotation
PDF brought to you by
generated on February 19, 2018
Chapter 5: Controllers | 19
Listing 5-2
Listing 5-3
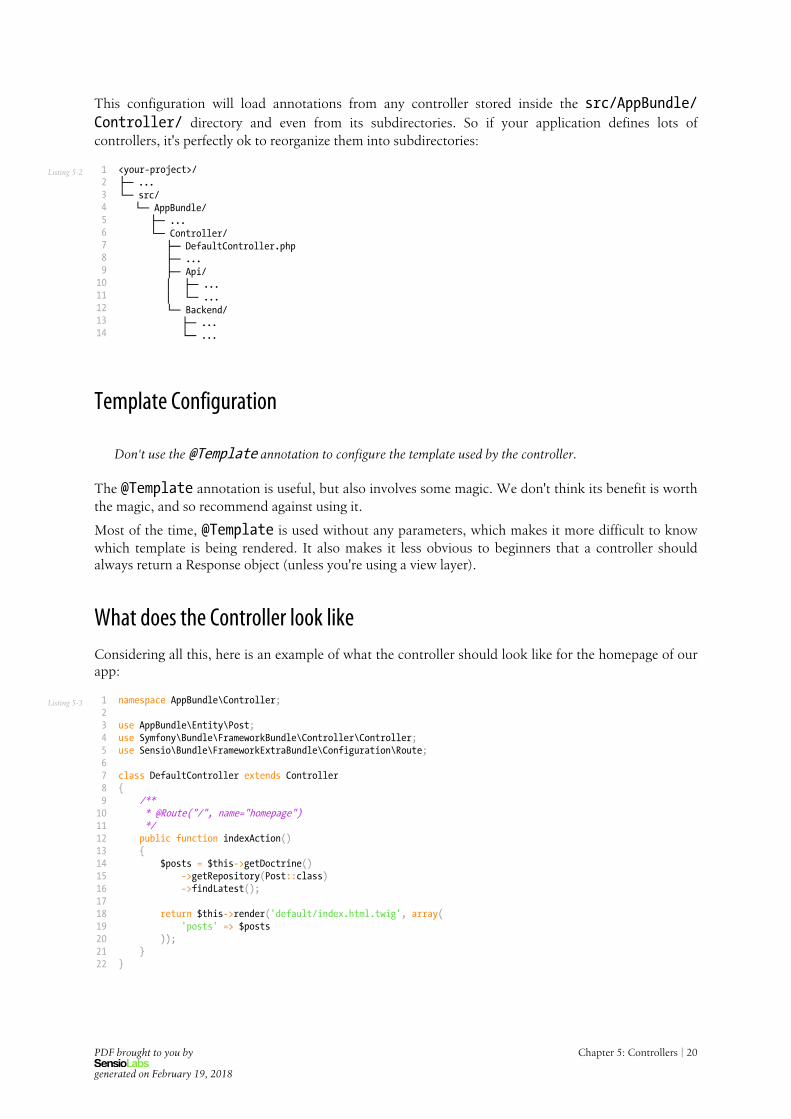
This configuration will load annotations from any controller stored inside the src/AppBundle/Controller/ directory and even from its subdirectories. So if your application defines lots ofcontrollers, it's perfectly ok to reorganize them into subdirectories:
1234567891011121314
<your-project>/├─ ...└─ src/└─ AppBundle/├─ ...└─ Controller/├─ DefaultController.php├─ ...├─ Api/│ ├─ ...│ └─ ...└─ Backend/├─ ...└─ ...
Template Configuration
Don't use the @Template annotation to configure the template used by the controller.
The @Template annotation is useful, but also involves some magic. We don't think its benefit is worththe magic, and so recommend against using it.
Most of the time, @Template is used without any parameters, which makes it more difficult to knowwhich template is being rendered. It also makes it less obvious to beginners that a controller shouldalways return a Response object (unless you're using a view layer).
What does the Controller look likeConsidering all this, here is an example of what the controller should look like for the homepage of ourapp:
12345678910111213141516171819202122
namespace AppBundle\Controller;
use AppBundle\Entity\Post;use Symfony\Bundle\FrameworkBundle\Controller\Controller;use Sensio\Bundle\FrameworkExtraBundle\Configuration\Route;
class DefaultController extends Controller{
/*** @Route("/", name="homepage")*/public function indexAction(){
$posts = $this->getDoctrine()->getRepository(Post::class)->findLatest();
return $this->render('default/index.html.twig', array('posts' => $posts
));}
}
PDF brought to you by
generated on February 19, 2018
Chapter 5: Controllers | 20
Listing 5-4
Listing 5-5
Fetching Services
If you extend the base Controller class, you can access services directly from the container via $this->container->get() or $this->get(). But instead, you should use dependency injection to fetchservices: most easily done by type-hinting action method arguments:
Don't use $this->get() or $this->container->get() to fetch services from the container. Instead,use dependency injection.
By not fetching services directly from the container, you can make your services private, which has severaladvantages.
Using the ParamConverter
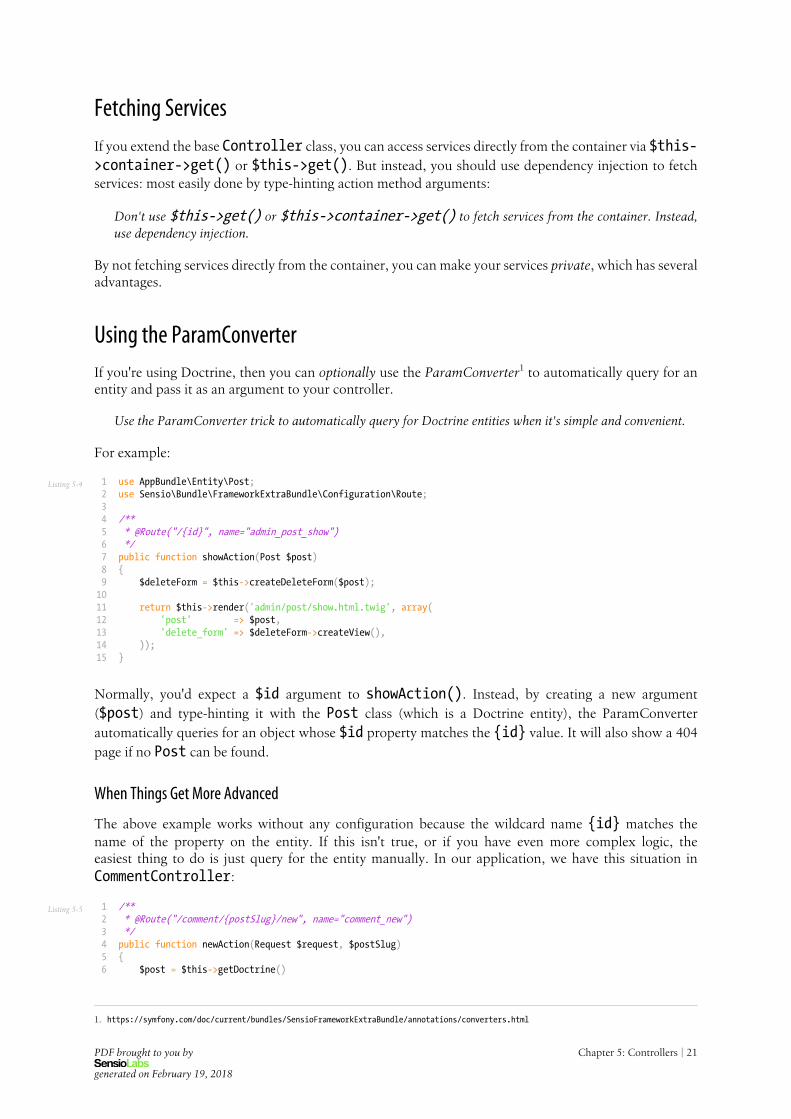
If you're using Doctrine, then you can optionally use the ParamConverter1 to automatically query for anentity and pass it as an argument to your controller.
Use the ParamConverter trick to automatically query for Doctrine entities when it's simple and convenient.
For example:
123456789101112131415
use AppBundle\Entity\Post;use Sensio\Bundle\FrameworkExtraBundle\Configuration\Route;
/*** @Route("/{id}", name="admin_post_show")*/public function showAction(Post $post){
$deleteForm = $this->createDeleteForm($post);
return $this->render('admin/post/show.html.twig', array('post' => $post,'delete_form' => $deleteForm->createView(),
));}
Normally, you'd expect a $id argument to showAction(). Instead, by creating a new argument($post) and type-hinting it with the Post class (which is a Doctrine entity), the ParamConverterautomatically queries for an object whose $id property matches the {id} value. It will also show a 404page if no Post can be found.
When Things Get More Advanced
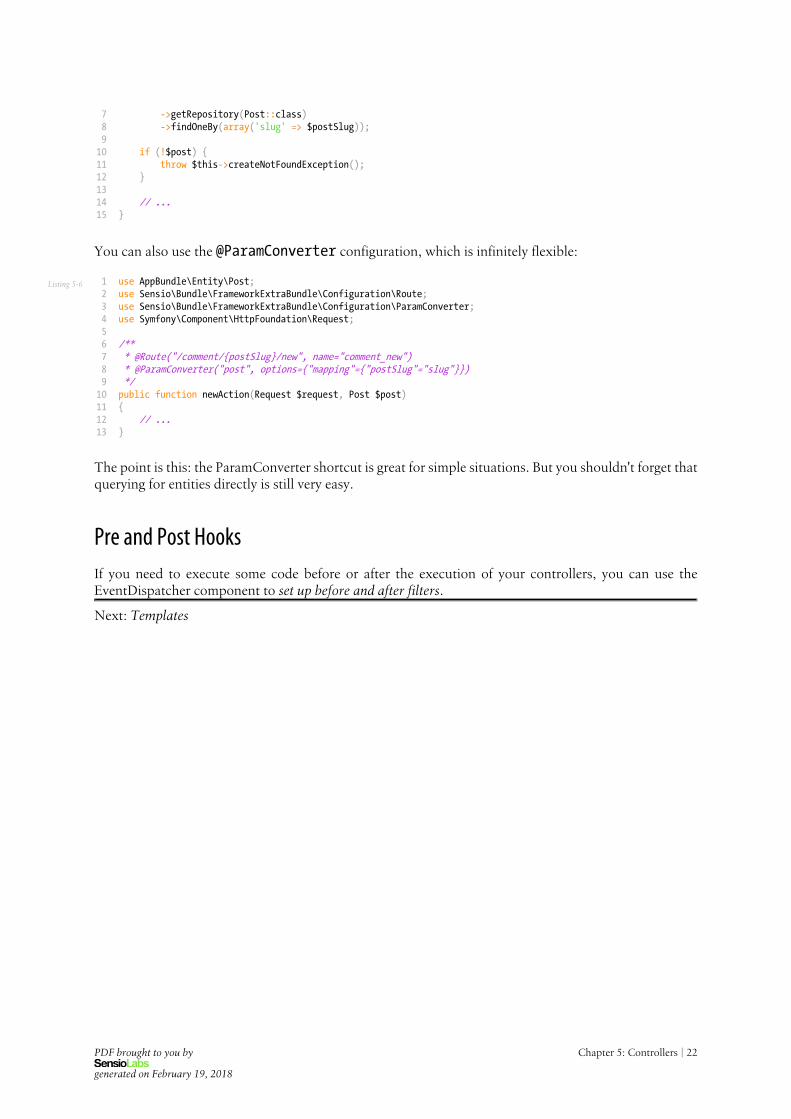
The above example works without any configuration because the wildcard name {id} matches thename of the property on the entity. If this isn't true, or if you have even more complex logic, theeasiest thing to do is just query for the entity manually. In our application, we have this situation inCommentController:
123456
/*** @Route("/comment/{postSlug}/new", name="comment_new")*/public function newAction(Request $request, $postSlug){
$post = $this->getDoctrine()
1. https://symfony.com/doc/current/bundles/SensioFrameworkExtraBundle/annotations/converters.html
PDF brought to you by
generated on February 19, 2018
Chapter 5: Controllers | 21
Listing 5-6
789101112131415
->getRepository(Post::class)->findOneBy(array('slug' => $postSlug));
if (!$post) {throw $this->createNotFoundException();
}
// ...}
You can also use the @ParamConverter configuration, which is infinitely flexible:
12345678910111213
use AppBundle\Entity\Post;use Sensio\Bundle\FrameworkExtraBundle\Configuration\Route;use Sensio\Bundle\FrameworkExtraBundle\Configuration\ParamConverter;use Symfony\Component\HttpFoundation\Request;
/*** @Route("/comment/{postSlug}/new", name="comment_new")* @ParamConverter("post", options={"mapping"={"postSlug"="slug"}})*/public function newAction(Request $request, Post $post){
// ...}
The point is this: the ParamConverter shortcut is great for simple situations. But you shouldn't forget thatquerying for entities directly is still very easy.
Pre and Post HooksIf you need to execute some code before or after the execution of your controllers, you can use theEventDispatcher component to set up before and after filters.
Next: Templates
PDF brought to you by
generated on February 19, 2018
Chapter 5: Controllers | 22
Chapter 6
Templates
When PHP was created 20 years ago, developers loved its simplicity and how well it blended HTMLand dynamic code. But as time passed, other template languages - like Twig1 - were created to maketemplating even better.
Use Twig templating format for your templates.
Generally speaking, PHP templates are much more verbose than Twig templates because they lack nativesupport for lots of modern features needed by templates, like inheritance, automatic escaping and namedarguments for filters and functions.
Twig is the default templating format in Symfony and has the largest community support of all non-PHPtemplate engines (it's used in high profile projects such as Drupal 8).
In addition, Twig is the only template format with guaranteed support in Symfony 3.0. As a matter offact, PHP may be removed from the officially supported template engines.
Template Locations
Store all your application's templates in app/Resources/views/ directory.
Traditionally, Symfony developers stored the application templates in the Resources/views/directory of each bundle. Then they used the Twig namespaced path to refer to them (e.g. @AcmeDemo/Default/index.html.twig).
But for the templates used in your application, it's much more convenient to store them in the app/Resources/views/ directory. For starters, this drastically simplifies their logical names:
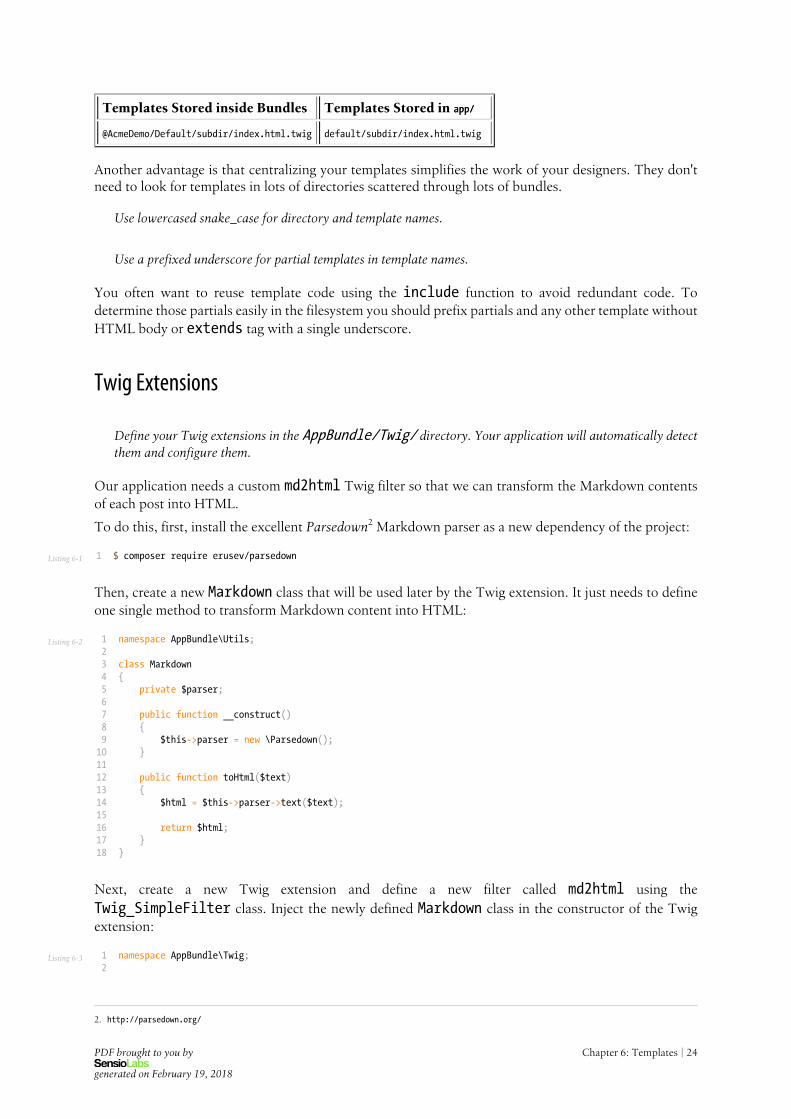
Templates Stored inside Bundles Templates Stored in app/app/
@AcmeDemo/index.html.twig index.html.twig
@AcmeDemo/Default/index.html.twig default/index.html.twig
1. http://twig.sensiolabs.org/
PDF brought to you by
generated on February 19, 2018
Chapter 6: Templates | 23
Listing 6-1
Listing 6-2
Listing 6-3
Templates Stored inside Bundles Templates Stored in app/app/
@AcmeDemo/Default/subdir/index.html.twig default/subdir/index.html.twig
Another advantage is that centralizing your templates simplifies the work of your designers. They don'tneed to look for templates in lots of directories scattered through lots of bundles.
Use lowercased snake_case for directory and template names.
Use a prefixed underscore for partial templates in template names.
You often want to reuse template code using the include function to avoid redundant code. Todetermine those partials easily in the filesystem you should prefix partials and any other template withoutHTML body or extends tag with a single underscore.
Twig Extensions
Define your Twig extensions in the AppBundle/Twig/ directory. Your application will automatically detectthem and configure them.
Our application needs a custom md2html Twig filter so that we can transform the Markdown contentsof each post into HTML.
To do this, first, install the excellent Parsedown2 Markdown parser as a new dependency of the project:
1 $ composer require erusev/parsedown
Then, create a new Markdown class that will be used later by the Twig extension. It just needs to defineone single method to transform Markdown content into HTML:
123456789101112131415161718
namespace AppBundle\Utils;
class Markdown{
private $parser;
public function __construct(){
$this->parser = new \Parsedown();}
public function toHtml($text){
$html = $this->parser->text($text);
return $html;}
}
Next, create a new Twig extension and define a new filter called md2html using theTwig_SimpleFilter class. Inject the newly defined Markdown class in the constructor of the Twigextension:
12
namespace AppBundle\Twig;
2. http://parsedown.org/
PDF brought to you by
generated on February 19, 2018
Chapter 6: Templates | 24
345678910111213141516171819202122232425262728293031323334
use AppBundle\Utils\Markdown;
class AppExtension extends \Twig_Extension{
private $parser;
public function __construct(Markdown $parser){
$this->parser = $parser;}
public function getFilters(){
return array(new \Twig_SimpleFilter(
'md2html',array($this, 'markdownToHtml'),array('is_safe' => array('html'), 'pre_escape' => 'html')
),);
}
public function markdownToHtml($content){
return $this->parser->toHtml($content);}
public function getName(){
return 'app_extension';}
}
And that's it!
If you're using the default services.yml configuration, you're done! Symfony will automatically knowabout your new service and tag it to be used as a Twig extension.
Next: Forms
PDF brought to you by
generated on February 19, 2018
Chapter 6: Templates | 25
Listing 7-1
Chapter 7
Forms
Forms are one of the most misused Symfony components due to its vast scope and endless list of features.In this chapter we'll show you some of the best practices so you can leverage forms but get work donequickly.
Building Forms
Define your forms as PHP classes.
The Form component allows you to build forms right inside your controller code. This is perfectly fineif you don't need to reuse the form somewhere else. But for organization and reuse, we recommend thatyou define each form in its own PHP class:
12345678910111213141516171819202122232425
namespace AppBundle\Form;
use AppBundle\Entity\Post;use Symfony\Component\Form\AbstractType;use Symfony\Component\Form\FormBuilderInterface;use Symfony\Component\OptionsResolver\OptionsResolver;use Symfony\Component\Form\Extension\Core\Type\TextareaType;use Symfony\Component\Form\Extension\Core\Type\EmailType;use Symfony\Component\Form\Extension\Core\Type\DateTimeType;
class PostType extends AbstractType{
public function buildForm(FormBuilderInterface $builder, array $options){
$builder->add('title')->add('summary', TextareaType::class)->add('content', TextareaType::class)->add('authorEmail', EmailType::class)->add('publishedAt', DateTimeType::class)
;}
public function configureOptions(OptionsResolver $resolver){
PDF brought to you by
generated on February 19, 2018
Chapter 7: Forms | 26
Listing 7-2
Listing 7-3
Listing 7-4
2627282930
$resolver->setDefaults(array('data_class' => Post::class,
));}
}
Put the form type classes in the AppBundle\Form namespace, unless you use other custom form classes likedata transformers.
To use the class, use createForm() and pass the fully qualified class name:
1234567891011
// ...use AppBundle\Form\PostType;
// ...public function newAction(Request $request){
$post = new Post();$form = $this->createForm(PostType::class, $post);
// ...}
Registering Forms as Services
You can also register your form type as a service. This is only needed if your form type requires somedependencies to be injected by the container, otherwise it is unnecessary overhead and therefore notrecommended to do this for all form type classes.
Form Button ConfigurationForm classes should try to be agnostic to where they will be used. This makes them easier to re-use later.
Add buttons in the templates, not in the form classes or the controllers.
The Symfony Form component allows you to add buttons as fields on your form. This is a nice way tosimplify the template that renders your form. But if you add the buttons directly in your form class, thiswould effectively limit the scope of that form:
123456789101112
class PostType extends AbstractType{
public function buildForm(FormBuilderInterface $builder, array $options){
$builder// ...->add('save', SubmitType::class, array('label' => 'Create Post'))
;}
// ...}
This form may have been designed for creating posts, but if you wanted to reuse it for editing posts, thebutton label would be wrong. Instead, some developers configure form buttons in the controller:
123
namespace AppBundle\Controller\Admin;
use Symfony\Component\HttpFoundation\Request;
PDF brought to you by
generated on February 19, 2018
Chapter 7: Forms | 27
Listing 7-5
Listing 7-6
Listing 7-7
456789101112131415161718192021222324
use Symfony\Bundle\FrameworkBundle\Controller\Controller;use Symfony\Component\Form\Extension\Core\Type\SubmitType;use AppBundle\Entity\Post;use AppBundle\Form\PostType;
class PostController extends Controller{
// ...
public function newAction(Request $request){
$post = new Post();$form = $this->createForm(PostType::class, $post);$form->add('submit', SubmitType::class, array(
'label' => 'Create','attr' => array('class' => 'btn btn-default pull-right')
));
// ...}
}
This is also an important error, because you are mixing presentation markup (labels, CSS classes, etc.)with pure PHP code. Separation of concerns is always a good practice to follow, so put all the view-relatedthings in the view layer:
123456
{{ form_start(form) }}{{ form_widget(form) }}
<input type="submit" value="Create"class="btn btn-default pull-right" />
{{ form_end(form) }}
Rendering the FormThere are a lot of ways to render your form, ranging from rendering the entire thing in one line torendering each part of each field independently. The best way depends on how much customization youneed.
One of the simplest ways - which is especially useful during development - is to render the form tags anduse the form_widget() function to render all of the fields:
123
{{ form_start(form, {'attr': {'class': 'my-form-class'} }) }}{{ form_widget(form) }}
{{ form_end(form) }}
If you need more control over how your fields are rendered, then you should remove theform_widget(form) function and render your fields individually. See How to Customize FormRendering for more information on this and how you can control how the form renders at a global levelusing form theming.
Handling Form SubmitsHandling a form submit usually follows a similar template:
1234
public function newAction(Request $request){
// build the form ...
PDF brought to you by
generated on February 19, 2018
Chapter 7: Forms | 28
5678910111213141516171819
$form->handleRequest($request);
if ($form->isSubmitted() && $form->isValid()) {$em = $this->getDoctrine()->getManager();$em->persist($post);$em->flush();
return $this->redirect($this->generateUrl('admin_post_show',array('id' => $post->getId())
));}
// render the template}
There are really only two notable things here. First, we recommend that you use a single action for bothrendering the form and handling the form submit. For example, you could have a newAction() thatonly renders the form and a createAction() that only processes the form submit. Both those actionswill be almost identical. So it's much simpler to let newAction() handle everything.
Second, is it required to call $form->isSubmitted() in the if statement before calling isValid().Calling isValid() with an unsubmitted form is deprecated since version 3.2 and will throw anexception in 4.0.
Next: Internationalization
PDF brought to you by
generated on February 19, 2018
Chapter 7: Forms | 29
Listing 8-1
Chapter 8
Internationalization
Internationalization and localization adapt the applications and their contents to the specific region orlanguage of the users. In Symfony this is an opt-in feature that needs to be enabled before using it. To dothis, uncomment the following translator configuration option and set your application locale:
123456789
# app/config/config.ymlframework:
# ...translator: { fallbacks: ['%locale%'] }
# app/config/parameters.ymlparameters:
# ...locale: en
Translation Source File Format
The Symfony Translation component supports lots of different translation formats: PHP, Qt, .po, .mo,JSON, CSV, INI, etc.
Use the XLIFF format for your translation files.
Of all the available translation formats, only XLIFF and gettext have broad support in the tools used byprofessional translators. And since it's based on XML, you can validate XLIFF file contents as you writethem.
Symfony supports notes in XLIFF files, making them more user-friendly for translators. At the end, goodtranslations are all about context, and these XLIFF notes allow you to define that context.
The Apache-licensed JMSTranslationBundle1 offers you a web interface for viewing and editing thesetranslation files. It also has advanced extractors that can read your project and automatically updatethe XLIFF files.
1. https://github.com/schmittjoh/JMSTranslationBundle
PDF brought to you by
generated on February 19, 2018
Chapter 8: Internationalization | 30
Listing 8-2
Translation Source File Location
Store the translation files in the app/Resources/translations/ directory.
Traditionally, Symfony developers have created these files in the Resources/translations/directory of each bundle. But since the app/Resources/ directory is considered the global location forthe application's resources, storing translations in app/Resources/translations/ centralizes themand gives them priority over any other translation file. This let's you override translations defined in third-party bundles.
Translation Keys
Always use keys for translations instead of content strings.
Using keys simplifies the management of the translation files because you can change the originalcontents without having to update all of the translation files.
Keys should always describe their purpose and not their location. For example, if a form has a fieldwith the label "Username", then a nice key would be label.username, notedit_form.label.username.
Example Translation FileApplying all the previous best practices, the sample translation file for English in the application wouldbe:
123456789101112
<!-- app/Resources/translations/messages.en.xlf --><?xml version="1.0"?><xliff version="1.2" xmlns="urn:oasis:names:tc:xliff:document:1.2">
<file source-language="en" target-language="en" datatype="plaintext" original="file.ext"><body>
<trans-unit id="title_post_list"><source>title.post_list</source><target>Post List</target>
</trans-unit></body>
</file></xliff>
Next: Security
PDF brought to you by
generated on February 19, 2018
Chapter 8: Internationalization | 31
Listing 9-1
Chapter 9
Security
Authentication and Firewalls (i.e. Getting the User's Credentials)You can configure Symfony to authenticate your users using any method you want and to load userinformation from any source. This is a complex topic, but the Security guide has a lot of informationabout this.
Regardless of your needs, authentication is configured in security.yml, primarily under thefirewalls key.
Unless you have two legitimately different authentication systems and users (e.g. form login for the main siteand a token system for your API only), we recommend having only one firewall entry with the anonymouskey enabled.
Most applications only have one authentication system and one set of users. For this reason, you onlyneed one firewall entry. There are exceptions of course, especially if you have separated web and APIsections on your site. But the point is to keep things simple.
Additionally, you should use the anonymous key under your firewall. If you need to require users tobe logged in for different sections of your site (or maybe nearly all sections), use the access_controlarea.
Use the bcrypt encoder for encoding your users' passwords.
If your users have a password, then we recommend encoding it using the bcrypt encoder, instead of thetraditional SHA-512 hashing encoder. The main advantages of bcrypt are the inclusion of a salt value toprotect against rainbow table attacks, and its adaptive nature, which allows to make it slower to remainresistant to brute-force search attacks.
With this in mind, here is the authentication setup from our application, which uses a login form to loadusers from the database:
12
# app/config/security.ymlsecurity:
PDF brought to you by
generated on February 19, 2018
Chapter 9: Security | 32
Listing 9-2
345678910111213141516171819202122
encoders:AppBundle\Entity\User: bcrypt
providers:database_users:
entity: { class: AppBundle:User, property: username }
firewalls:secured_area:
pattern: ^/anonymous: trueform_login:
check_path: loginlogin_path: login
logout:path: security_logouttarget: homepage
# ... access_control exists, but is not shown here
The source code for our project contains comments that explain each part.
Authorization (i.e. Denying Access)
Symfony gives you several ways to enforce authorization, including the access_control configurationin security.yml, the @Security annotation and using isGranted on thesecurity.authorization_checker service directly.
• For protecting broad URL patterns, use access_control;• Whenever possible, use the @Security annotation;• Check security directly on the security.authorization_checker service whenever you have a more complex
situation.
There are also different ways to centralize your authorization logic, like with a custom security voter orwith ACL.
• For fine-grained restrictions, define a custom security voter;• For restricting access to any object by any user via an admin interface, use the Symfony ACL.
The @Security Annotation
For controlling access on a controller-by-controller basis, use the @Security annotation wheneverpossible. It's easy to read and is placed consistently above each action.
In our application, you need the ROLE_ADMIN in order to create a new post. Using @Security, thislooks like:
123
use Sensio\Bundle\FrameworkExtraBundle\Configuration\Route;use Sensio\Bundle\FrameworkExtraBundle\Configuration\Security;// ...
PDF brought to you by
generated on February 19, 2018
Chapter 9: Security | 33
Listing 9-3
Listing 9-4
Listing 9-5
4567891011121314
/*** Displays a form to create a new Post entity.** @Route("/new", name="admin_post_new")* @Security("has_role('ROLE_ADMIN')")*/public function newAction(){
// ...}
Using Expressions for Complex Security Restrictions
If your security logic is a little bit more complex, you can use an expression inside @Security. In thefollowing example, a user can only access the controller if their email matches the value returned by thegetAuthorEmail() method on the Post object:
123456789101112
use AppBundle\Entity\Post;use Sensio\Bundle\FrameworkExtraBundle\Configuration\Route;use Sensio\Bundle\FrameworkExtraBundle\Configuration\Security;
/*** @Route("/{id}/edit", name="admin_post_edit")* @Security("user.getEmail() == post.getAuthorEmail()")*/public function editAction(Post $post){
// ...}
Notice that this requires the use of the ParamConverter1, which automatically queries for the Post objectand puts it on the $post argument. This is what makes it possible to use the post variable in theexpression.
This has one major drawback: an expression in an annotation cannot easily be reused in other parts ofthe application. Imagine that you want to add a link in a template that will only be seen by authors. Rightnow you'll need to repeat the expression code using Twig syntax:
123
{% if app.user and app.user.email == post.authorEmail %}<a href=""> ... </a>
{% endif %}
The easiest solution - if your logic is simple enough - is to add a new method to the Post entity thatchecks if a given user is its author:
123456789101112131415
// src/AppBundle/Entity/Post.php// ...
class Post{
// ...
/*** Is the given User the author of this Post?** @return bool*/public function isAuthor(User $user = null){
return $user && $user->getEmail() == $this->getAuthorEmail();
1. https://symfony.com/doc/current/bundles/SensioFrameworkExtraBundle/annotations/converters.html
PDF brought to you by
generated on February 19, 2018
Chapter 9: Security | 34
Listing 9-6
Listing 9-7
Listing 9-8
1617
}}
Now you can reuse this method both in the template and in the security expression:
1234567891011
use AppBundle\Entity\Post;use Sensio\Bundle\FrameworkExtraBundle\Configuration\Security;
/*** @Route("/{id}/edit", name="admin_post_edit")* @Security("post.isAuthor(user)")*/public function editAction(Post $post){
// ...}
123
{% if post.isAuthor(app.user) %}<a href=""> ... </a>
{% endif %}
Checking Permissions without @Security
The above example with @Security only works because we're using the ParamConverter, which givesthe expression access to the post variable. If you don't use this, or have some other more advanced use-case, you can always do the same security check in PHP:
123456789101112131415161718192021222324252627
/*** @Route("/{id}/edit", name="admin_post_edit")*/public function editAction($id){
$post = $this->getDoctrine()->getRepository(Post::class)->find($id);
if (!$post) {throw $this->createNotFoundException();
}
if (!$post->isAuthor($this->getUser())) {$this->denyAccessUnlessGranted('edit', $post);
}// equivalent code without using the "denyAccessUnlessGranted()" shortcut://// use Symfony\Component\Security\Core\Exception\AccessDeniedException;// ...//// if (!$this->get('security.authorization_checker')->isGranted('edit', $post)) {// throw $this->createAccessDeniedException();// }
// ...}
PDF brought to you by
generated on February 19, 2018
Chapter 9: Security | 35

Listing 9-9
Security Voters
If your security logic is complex and can't be centralized into a method like isAuthor(), you shouldleverage custom voters. These are an order of magnitude easier than ACLs and will give you the flexibilityyou need in almost all cases.
First, create a voter class. The following example shows a voter that implements the samegetAuthorEmail() logic you used above:
123456789101112131415161718192021222324252627282930313233343536373839404142434445464748495051525354555657585960
namespace AppBundle\Security;
use Symfony\Component\Security\Core\Authentication\Token\TokenInterface;use Symfony\Component\Security\Core\Authorization\AccessDecisionManagerInterface;use Symfony\Component\Security\Core\Authorization\Voter\Voter;use Symfony\Component\Security\Core\User\UserInterface;use AppBundle\Entity\Post;
class PostVoter extends Voter{
const CREATE = 'create';const EDIT = 'edit';
/*** @var AccessDecisionManagerInterface*/private $decisionManager;
public function __construct(AccessDecisionManagerInterface $decisionManager){
$this->decisionManager = $decisionManager;}
protected function supports($attribute, $subject){
if (!in_array($attribute, array(self::CREATE, self::EDIT))) {return false;
}
if (!$subject instanceof Post) {return false;
}
return true;}
protected function voteOnAttribute($attribute, $subject, TokenInterface $token){
$user = $token->getUser();/** @var Post */$post = $subject; // $subject must be a Post instance, thanks to the supports method
if (!$user instanceof UserInterface) {return false;
}
switch ($attribute) {case self::CREATE:
// if the user is an admin, allow them to create new postsif ($this->decisionManager->decide($token, array('ROLE_ADMIN'))) {
return true;}
break;case self::EDIT:
// if the user is the author of the post, allow them to edit the postsif ($user->getEmail() === $post->getAuthorEmail()) {
return true;}
PDF brought to you by
generated on February 19, 2018
Chapter 9: Security | 36
Listing 9-10
Listing 9-11
616263646566
break;}
return false;}
}
If you're using the default services.yml configuration, your application will autoconfigure your securityvoter and inject an AccessDecisionManagerInterface instance into it thanks to autowiring.
Now, you can use the voter with the @Security annotation:
12345678
/*** @Route("/{id}/edit", name="admin_post_edit")* @Security("is_granted('edit', post)")*/public function editAction(Post $post){
// ...}
You can also use this directly with the security.authorization_checker service or via the eveneasier shortcut in a controller:
123456789101112131415161718
/*** @Route("/{id}/edit", name="admin_post_edit")*/public function editAction($id){
$post = ...; // query for the post
$this->denyAccessUnlessGranted('edit', $post);
// or without the shortcut://// use Symfony\Component\Security\Core\Exception\AccessDeniedException;// ...//// if (!$this->get('security.authorization_checker')->isGranted('edit', $post)) {// throw $this->createAccessDeniedException();// }
}
Learn More
The FOSUserBundle2, developed by the Symfony community, adds support for a database-backed usersystem in Symfony. It also handles common tasks like user registration and forgotten passwordfunctionality.
Enable the Remember Me feature to allow your users to stay logged in for a long period of time.
When providing customer support, sometimes it's necessary to access the application as some other userso that you can reproduce the problem. Symfony provides the ability to impersonate users.
If your company uses a user login method not supported by Symfony, you can develop your own userprovider and your own authentication provider.
Next: Web Assets
2. https://github.com/FriendsOfSymfony/FOSUserBundle
PDF brought to you by
generated on February 19, 2018
Chapter 9: Security | 37
Listing 10-1
Chapter 10
Web Assets
Web assets are things like CSS, JavaScript and image files that make the frontend of your site lookand work great. Symfony developers have traditionally stored these assets in the Resources/public/directory of each bundle.
Store your assets in the web/ directory.
Scattering your web assets across tens of different bundles makes it more difficult to manage them. Yourdesigners' lives will be much easier if all the application assets are in one location.
Templates also benefit from centralizing your assets, because the links are much more concise:
1234567
<link rel="stylesheet" href="{{ asset('css/bootstrap.min.css') }}" /><link rel="stylesheet" href="{{ asset('css/main.css') }}" />
{# ... #}
<script src="{{ asset('js/jquery.min.js') }}"></script><script src="{{ asset('js/bootstrap.min.js') }}"></script>
Keep in mind that web/ is a public directory and that anything stored here will be publiclyaccessible, including all the original asset files (e.g. Sass, LESS and CoffeeScript files).
Using Assetic
Starting from Symfony 2.8, Assetic is no longer included by default in the Symfony Standard Edition.Refer to this article to learn how to install and enable Assetic in your Symfony application.
These days, you probably can't simply create static CSS and JavaScript files and include them in yourtemplate. Instead, you'll probably want to combine and minify these to improve client-side performance.You may also want to use LESS or Sass (for example), which means you'll need some way to process theseinto CSS files.
PDF brought to you by
generated on February 19, 2018
Chapter 10: Web Assets | 38
Listing 10-2
A lot of tools exist to solve these problems, including pure-frontend (non-PHP) tools like GruntJS.
Use Assetic to compile, combine and minimize web assets, unless you're comfortable with frontend tools likeGruntJS.
Assetic is an asset manager capable of compiling assets developed with a lot of different frontendtechnologies like LESS, Sass and CoffeeScript. Combining all your assets with Assetic is a matter ofwrapping all the assets with a single Twig tag:
123456789101112131415
{% stylesheets'css/bootstrap.min.css''css/main.css'filter='cssrewrite' output='css/compiled/app.css' %}<link rel="stylesheet" href="{{ asset_url }}" />
{% endstylesheets %}
{# ... #}
{% javascripts'js/jquery.min.js''js/bootstrap.min.js'output='js/compiled/app.js' %}<script src="{{ asset_url }}"></script>
{% endjavascripts %}
Frontend-Based ApplicationsRecently, frontend technologies like AngularJS have become pretty popular for developing frontend webapplications that talk to an API.
If you are developing an application like this, you should use the tools that are recommended by thetechnology, such as Bower and GruntJS. You should develop your frontend application separately fromyour Symfony backend (even separating the repositories if you want).
Learn More about AsseticAssetic can also minimize CSS and JavaScript assets using UglifyCSS/UglifyJS to speed up your websites.You can even compress images with Assetic to reduce their size before serving them to the user. Checkout the official Assetic documentation1 to learn more about all the available features.
Next: Tests
1. https://github.com/kriswallsmith/assetic
PDF brought to you by
generated on February 19, 2018
Chapter 10: Web Assets | 39
Listing 11-1
Chapter 11
Tests
Roughly speaking, there are two types of test. Unit testing allows you to test the input and output ofspecific functions. Functional testing allows you to command a "browser" where you browse to pages onyour site, click links, fill out forms and assert that you see certain things on the page.
Unit TestsUnit tests are used to test your "business logic", which should live in classes that are independent ofSymfony. For that reason, Symfony doesn't really have an opinion on what tools you use for unit testing.However, the most popular tools are PhpUnit1 and PhpSpec2.
Functional TestsCreating really good functional tests can be tough so some developers skip these completely. Don't skipthe functional tests! By defining some simple functional tests, you can quickly spot any big errors beforeyou deploy them:
Define a functional test that at least checks if your application pages are successfully loading.
A functional test can be as easy as this:
1234567891011
// tests/AppBundle/ApplicationAvailabilityFunctionalTest.phpnamespace Tests\AppBundle;
use Symfony\Bundle\FrameworkBundle\Test\WebTestCase;
class ApplicationAvailabilityFunctionalTest extends WebTestCase{
/*** @dataProvider urlProvider*/public function testPageIsSuccessful($url)
1. https://phpunit.de/
2. http://www.phpspec.net/
PDF brought to you by
generated on February 19, 2018
Chapter 11: Tests | 40
Listing 11-2
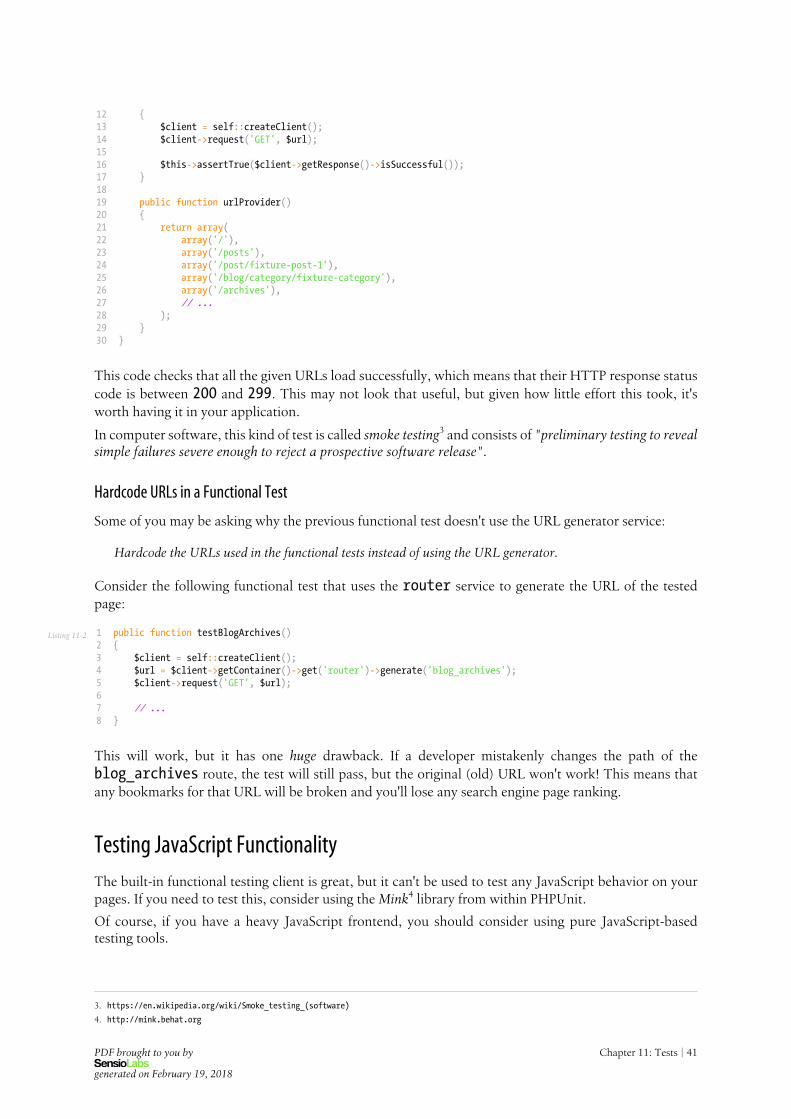
12131415161718192021222324252627282930
{$client = self::createClient();$client->request('GET', $url);
$this->assertTrue($client->getResponse()->isSuccessful());}
public function urlProvider(){
return array(array('/'),array('/posts'),array('/post/fixture-post-1'),array('/blog/category/fixture-category'),array('/archives'),// ...
);}
}
This code checks that all the given URLs load successfully, which means that their HTTP response statuscode is between 200 and 299. This may not look that useful, but given how little effort this took, it'sworth having it in your application.
In computer software, this kind of test is called smoke testing3 and consists of "preliminary testing to revealsimple failures severe enough to reject a prospective software release".
Hardcode URLs in a Functional Test
Some of you may be asking why the previous functional test doesn't use the URL generator service:
Hardcode the URLs used in the functional tests instead of using the URL generator.
Consider the following functional test that uses the router service to generate the URL of the testedpage:
12345678
public function testBlogArchives(){
$client = self::createClient();$url = $client->getContainer()->get('router')->generate('blog_archives');$client->request('GET', $url);
// ...}
This will work, but it has one huge drawback. If a developer mistakenly changes the path of theblog_archives route, the test will still pass, but the original (old) URL won't work! This means thatany bookmarks for that URL will be broken and you'll lose any search engine page ranking.
Testing JavaScript FunctionalityThe built-in functional testing client is great, but it can't be used to test any JavaScript behavior on yourpages. If you need to test this, consider using the Mink4 library from within PHPUnit.
Of course, if you have a heavy JavaScript frontend, you should consider using pure JavaScript-basedtesting tools.
3. https://en.wikipedia.org/wiki/Smoke_testing_(software)
4. http://mink.behat.org
PDF brought to you by
generated on February 19, 2018
Chapter 11: Tests | 41
Learn More about Functional Tests
Consider using the HautelookAliceBundle5 to generate real-looking data for your test fixtures using Faker6
and Alice7.
5. https://github.com/hautelook/AliceBundle
6. https://github.com/fzaninotto/Faker
7. https://github.com/nelmio/alice
PDF brought to you by
generated on February 19, 2018
Chapter 11: Tests | 42

